

Page 1

Wonderful Communication,
Mobile Life.
User Guide
Page 2

2
Page 3

Contents
Introduction
About This Guide . . . . . . . . . P1
Frequency Band . . . . . . . . . . P1
Packing List . . . . . . . . . . . . . . P1
SIM Card and Memory Card . P2
Charging the Battery . . . . . . . P3
Appearance of Your Phone . . P5
Home Screen . . . . . . . . . . . . P7
Using the Touch Screen . . . . P8
Calibrating the Touch Screen P9
Dragging and Flicking . . . . . . P9
Accessing the Widget Bar . . P10
Security Settings . . . . . . . . . P10
Text Input
On-screen Keyboard Mode . P12
?
Input Method . . . . . . . . . P13
T9
Traditional Input Method . . . P13
Customized Settings
Profiles . . . . . . . . . . . . . . . . P14
Phone Settings . . . . . . . . . . P14
Display Settings . . . . . . . . . P15
Network Settings . . . . . . . . . P15
Call Service
Contacts . . . . . . . . . . . . . . . P16
Making a Call . . . . . . . . . . . P17
Answering or Rejecting a
Call . . . . . . . . . . . . . . . . . . . P19
Call Settings . . . . . . . . . . . . P19
Messaging
Sending a Message . . . . . . P21
Viewing a Message . . . . . . . P21
Message Settings . . . . . . . . P22
Sending an Email . . . . . . . . P22
Viewing an Email . . . . . . . . . P23
Email Settings . . . . . . . . . . P23
Entertainment
Playing Music or Video . . . . P24
Using Camera or Video
Camera . . . . . . . . . . . . . . . . P24
Games & Applications . . . . . P25
Business
Viewing the Calendar . . . . . P26
Creating a Reminder . . . . . . P26
Creating a Note . . . . . . . . . . P27
Managing files . . . . . . . . . . . P27
Creating an Alarm . . . . . . . . P27
Synchronizing Data . . . . . . . P28
Using Other Tools . . . . . . . . P29
Connectivity
Installing PC Suite . . . . . . . . P30
Connecting via USB . . . . . . P31
Connecting via Bluetooth . . P33
Using Bluetooth Headset . . P34
Accessing the Internet . . . . . P34
Page 4

Warnings and Precautions
Electronic Device . . . . . . . . P36
Medical Device . . . . . . . . . . P36
Potentially Explosive Atmosphere
P37
Traffic Security . . . . . . . . . . P37
Operating Environment . . . . P38
Prevention of Hearing Damage . .
P39
Safety of Children . . . . . . . . P39
Accessories . . . . . . . . . . . . . P39
Battery and Charger . . . . . . P40
Cleaning and Maintenance . P41
Emergency Call . . . . . . . . . . P42
Certification Information (SAR) . .
P42
FCC Statement . . . . . . . . . . P43
Disposal and Recycling
Information . . . . . . . . . . . . . P44
Reduction of Hazardous
Substances . . . . . . . . . . . . . P44
EU Regulatory Conformance P45
Page 5

Page 6

Notice
Copyright © Huawei Technologies Co., Ltd. 2009. All rights reserved.
No part of this document may be reproduced or transmitted in any form or by any means without prior written consent of Huawei Technologies Co., Ltd.
The product described in this manual may include copyrighted software of
Huawei Technologies Co., Ltd and possible licensors. Customers shall not
in any manner reproduce, distribute, modify, decompile, disassemble,
decrypt, extract, reverse engineer, lease, assign, or sublicense the said
software, unless such restrictions are prohibited by applicable laws or such
actions are approved by respective copyright holders under licenses.
Trademarks and Permissions
, HUAWEI and are trademarks or registered trademarks of Huawei
Technologies Co., Ltd.
Other trademarks, product, service and company names mentioned are the property of their respective owners.
Notice
Some features of the product and its accessories described herein rely on
the software installed, capacities and settings of local network, and may
not be activated or may be limited by local network operators or network
service providers. Thus the descriptions herein may not exactly match the
product or its accessories you purchase.
Huawei Technologies Co., Ltd reserves the right to change or modify any information or specifications contained in this manual without prior notice or obligation.
Page 7

NO WARRANTY
THE CONTENTS OF THIS MANUAL ARE PROVIDED “AS IS”. EXCEPT
AS REQUIRED BY APPLICABLE LAWS, NO WARRANTIES OF ANY
KIND, EITHER EXPRESS OR IMPLIED, INCLUDING BUT NOT LIMITED
TO, THE IMPLIED WARRANTIES OF MERCHANTABILITY AND
FITNESS FOR A PARTICULAR PURPOSE, ARE MADE IN RELATION
TO THE ACCURACY, RELIABILITY OR CONTENTS OF THIS MANUAL.
TO THE MAXIMUM EXTENT PERMITTED BY APPLICABLE LAW, IN NO
CASE SHALL HUAWEI TECHNOLOGIES CO., LTD BE LIABLE FOR
ANY SPECIAL, INCIDENTAL, INDIRECT, OR CONSEQUENTIAL
DAMAGES, OR LOST PROFITS, BUSINESS, REVENUE, DATA, GOODWILL OR ANTICIPATED SAVINGS.
Import and Export Regulations
Customers shall comply with all applicable export or import laws and regulations and will obtain all necessary governmental permits and licenses in
order to export, re-export or import the product mentioned in this manual
including the software and technical data therein.
Page 8
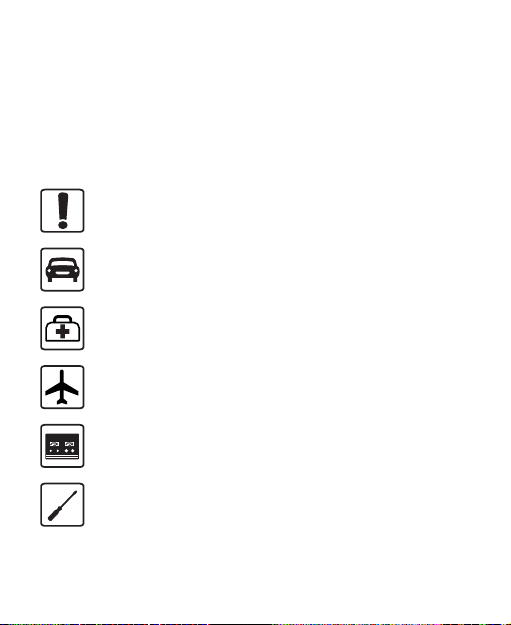
Safety Precautions
Please read the safety precautions carefully to ensure the correct and safe use of your wireless device. For detailed information, refer to the section “Warnings and Precautions”.
Do not switch on your phone when it is prohibited to use mobile phones or when the phone may cause interference or danger.
Do not use your phone while driving.
Follow any rules or regulations in hospitals and health care facilities. Switch off your phone near medical apparatus.
Switch off your phone in aircraft. The phone may cause interference to control signals of the aircraft.
Switch off your phone near high-precision electronic devices. The phone may affect the performance of these devices.
Do not attempt to disassemble your phone or its accessories. Only qualified personnel are allowed to service or repair the phone.
Page 9
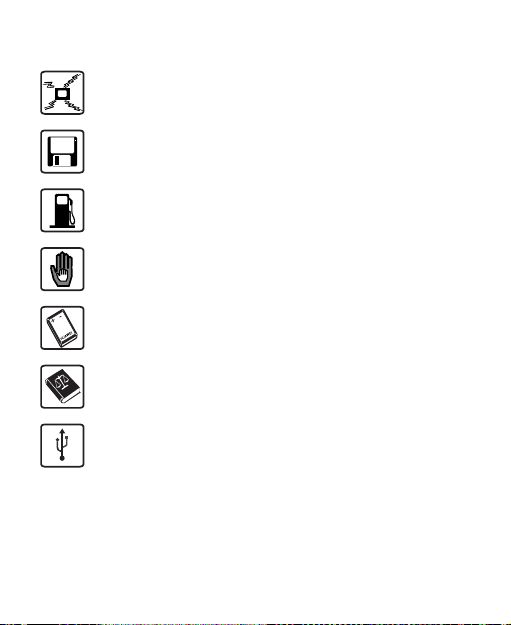
Do not place your phone or its accessories in containers with strong electromagnetic field.
Do not place magnetic storage media near your phone. Radiation from the phone may erase the information stored on them.
Do not put your phone in a high- temperature place or use it in a place with flammable gas such as a gas station.
Keep your phone and its accessories away from children. Do not allow children to use your phone without guidance.
Use only approved batteries and chargers to avoid the risk of explosions.
Observe any laws or regulations on the use of wireless device. Respect others’ privacy and legal rights when using your wireless device.
Strictly follow the relevant instructions in this manual while using the USB cable. Otherwise your phone or PC may be damaged.
Page 10

Introduction
1 Introduction
About This Guide
This guide describes how to use your phone and customize the menus.
All the images in this guide are provided only for your reference. The actual appearance and display depands on the phone that has been delivered.
Frequency Band
Your phone can operate in virtually all countries, automatically switching between WCDMA/HSDPA 2100 and GSM/GPRS 900/1800/1900 networks.
Packing List
Your phone package box contains the following:
• One mobile phone
• One Li-ion battery
• One travel charger
• One USB data cable
• One User Guide
• One Headset (Optional)
1
Page 11

Introduction
SIM Card and Memory Card
Insert your SIM card before using your phone. Remove the SIM card and
the battery only after powering off your phone. To use the SIM card properly, please read the following instructions carefully.
NOTE:
• Keep the SIM card out of the reach of children.
• The SIM card and its metal contacts can be easily damaged by
scratching or bending. Be careful when you carry , insert or remove
the SIM card.
• Always disconnect the charger from the phone before loading or
removing the SIM card.
Your phone supports a memory card (microSD) with a capacity of up to 8 GB.
To load or remove the memory card, remove the battery cover.
2
Page 12
Introduction
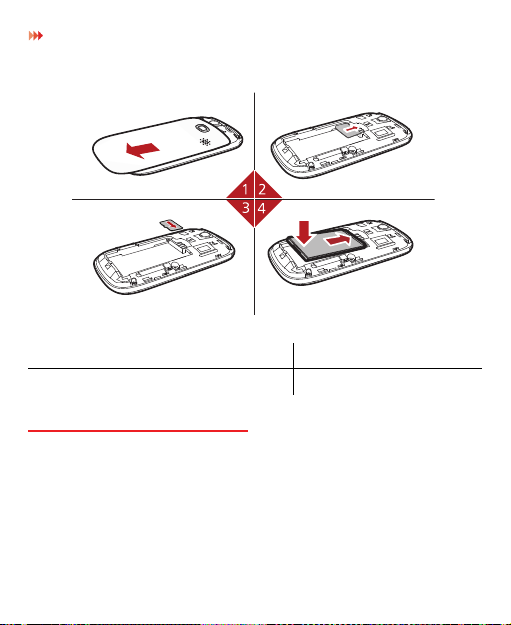
The following figures show the installation of the SIM card and memory card.
1 Remove the battery cover. 2 Inert the SIM card.
3 (Optional) Insert the memory card. 4 Insert the battery.
Charging the Battery
NOTE:
• The battery discharges even when not being used. If you have not
used it for a long time, please recharge it first.
3
Page 13

Introduction
• The battery can be recharged but eventually wears out. If the battery
lasts for a shorter time period than usual after being charged normally,
replace it with a battery of the same type.
• The charging time depends on the environmental temperature and the
age of the battery.
• When the battery is very low, the phone plays an alert sounds and
displays a prompt. When the battery power level is too low, the phone
will power off automatically.
Before charging the battery, ensure that the battery has been properly loaded into your phone.
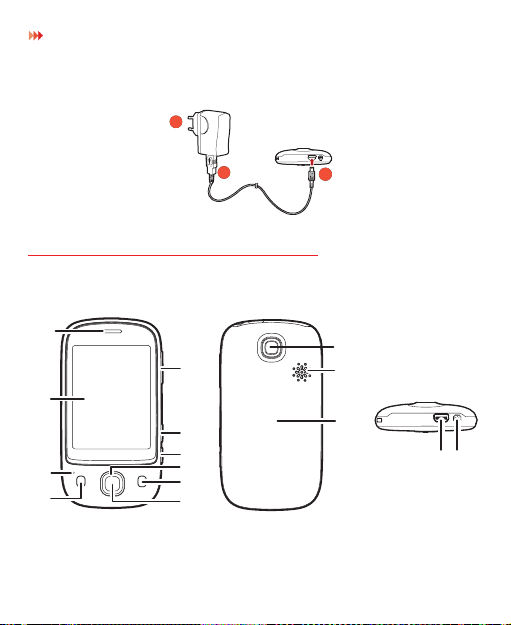
1. Connect the USB interface of the USB cable to the travel charger.
2. Plug in the travel charger to a power socket.
3. Connect the mini USB interface of the USB cable to the charger connector of your phone. When the battery is being charged, the charging indicator blinks continuously.
4. When the charging indicator stops blinking, it indicates that the battery is full.Disconnect the charger connector from the power socket.
4
Page 14
Introduction
1
2
3
4
5
6
7
11
12
13
14
15
8
9
10
5. Disconnect the USB cable from the phone.
2
1
Appearance of Your Phone
3
5
Page 15
Introduction
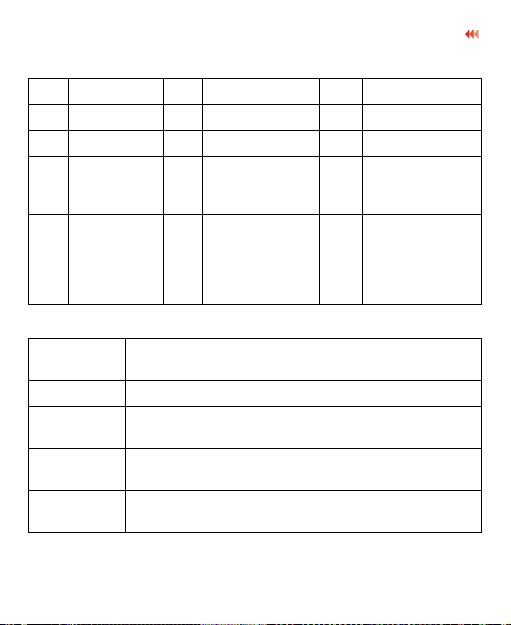
1 Earpiece 2 Touch screen 3 Microphone
4 Send key 5 OK key 6 End key
7 Scroll key 8 Camera key 9 Shortcut key
10 Volume
Up/Down
Key
13 Main
camera
11 Battery cover 12 Speaker
14 Charger
connector /
Cable
connector /
Headset jack
15 Power Key
Send Key
OK Key Confirm a selection.
End Key
Camera Key
Shortcut key
• Make or answer a call.
• Access the Calls screen in standby mode.
• End an ongoing call or reject an incoming call.
• Return to the standby mode.
Activate the camera in standby mode when the screen is unlocked.
Activate the corresponding application in standby mode when the screen is unlocked.
6
Page 16
Introduction
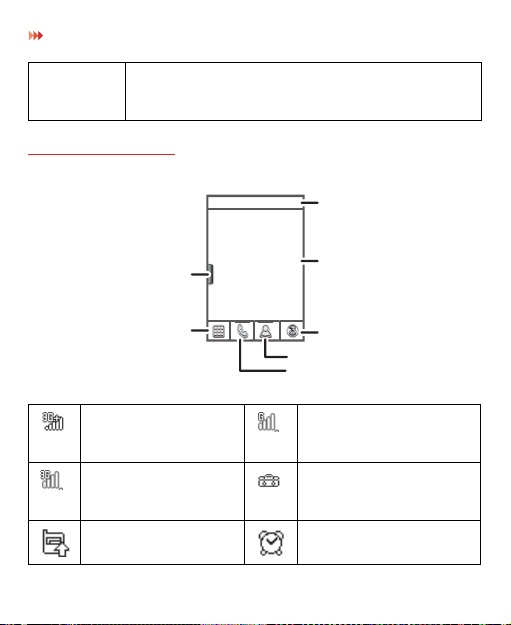
Icon bar
Tap it to access Widget Bar
Tap it to access the browser
Desktop
Tap it to access Contacts
Tap it to access the dialer
Tap it to access main menu
Power Key
• Press and hold it to power on or power off the
• Press it to lock or unlock the touch screen.
Home Screen
The phone is currently in the HSDPA network.
The phone is currently in the WCDMA network.
Call in progress. Alarm clock is enabled.
phone.
The phone is currently in the GSM network.
You are using the Roaming Service.
7
Page 17
Introduction
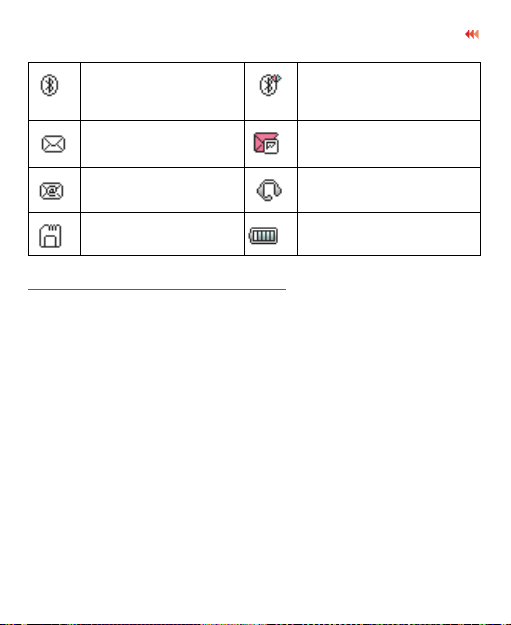
Bluetooth is enabled. Bluetooth connection is
You have new text messages.
You have new Emails. The headset is
Memory card is inserted.
being set up with another
device.
You have new multimedia messages.
connected.
Indicates power level of the battery.
Using the Touch Screen
You can select an item or enter text by using the stylus or tapping the touch screen.
NOTE:
• Tap the icon accurately to select an item.
• Tap gently to protect your touch screen.
• When the screen is locked, press the power key to unlock the touch screen.
• When the screen is locked, press the send key, the OK key or the end key to light the screen, and then unlock the screen by pressing and holding the icon according to the instructions on screen.
8
Page 18

Introduction
Calibrating the Touch Screen
When operating the phone with the stylus, if the phone cannot respond to your operation correctly, calibrate the screen as follows.
1. Select Settings> Touch settings> Calibrate to access the screen for calibration.
2. Calibrate the screen by tapping the center of calibration frame displayed on the screen according to the instructions.
NOTE: During the calibration, tap the center of calibration frame accu-
rately to ensure that the phone can respond to your tapping and text entry
correctly after the calibration.
Dragging and Flicking
On the following screens, you can perform certain operations conveniently through dragging on the touch screen.
• On the standby screen, tap and drag the profile to change the position of the selected item.
• On the standby screen, tap and drag the widgets to change the position of the selected item.
• In the menu list, drag up or down to scroll. Then tap a submenu to select it.
• When viewing pictures, flick right or left to switch a picture to the next or previous one.
9
Page 19

Introduction
Accessing the Widget Bar
The widget bar provides quick access to the most frequently used items.
1. Tap the widget bar tab located on the left side of the screen to open the widget bar.
2. Tap the item on the widget bar to use it.
3. Tap the widget bar tab again to close the widget bar.
NOTE: You can drag a widget to the desktop or drag it back to the widget
bar.
Security Settings
Select Settings> Security> Phone and SIM card> Desired item.
• Enter the password of your phone to restore factory defaults. The initial password is 0000.
• If the phone lock or PIN lock is enabled, you need to enter the corresponding password when you switch on your phone.
• Change the password of your phone, PIN code, or PIN2 code.
10
Page 20

Introduction
• Set the fixed dialer number list to define the numbers that your phone can dial. This function needs to be supported by the SIM card.
NOTE:
• For certain SIM cards, you need to enter the PIN2 code to use certain special functions.
• If you enter a wrong PIN code or wrong PIN2 code thrice consecutive attempts, the SIM card is locked. To unlock the SIM card, enter the PIN Unblocking Key (PUK) code or PUK2 code.
• If you enter a wrong PUK code or a wrong PUK2 code for ten consecutive attempts, the SIM card will get invalidated permanently, and only
emergency calls will be permitted. Consult your service provider to
unlock the SIM card.
• The PIN code, PIN2 code, PUK code, or PUK2 code is provided with the SIM card. For details, consult your service provider.
11
Page 21
2 Text Input
On-screen Keyboard Mode
Text Input
1
2
3
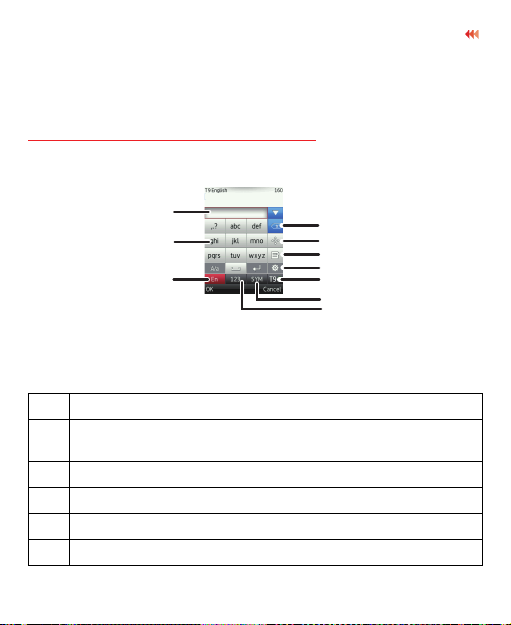
You can tap the keys on the on-screen keyboard to enter letters, numbers, or symbols.
1 Candidate character area
2 On-screen keyboard: Tap the keys on the keyboard to enter
alphabets, numbers, or symbols.
3 Display the current input language.
4 Tap here to switch to the numeric input mode.
5 Tap here to switch to the symbols input mode.
6 Tap here to enable or disable the T9 input method.
10
9
8
7
6
5
4
12
Page 22
Text Input
7
Tap here to set the input language.
8 Tap here to insert a common phrase, a contact, or an email
message.
9
Tap here, and then you can move the cursor by tapping the arrow on the screen.
10 Tap here to delete the letter before the cursor.
T9® Input Method
With the T9 input method, you can easily and quickly enter words. T9 is a predictive text entry mode. Press the relevant key that corresponds to the required letter and T9 will offer you candidate words.
Press each key carrying the desired letter once, and then the predictive text scheme will present the candidate words composed by the letters you have entered.
Traditional Input Method
When T9 input method is off, you can use the traditional input method for entering alphabets. On portrait keyboard, repeatedly tap the key that carries the letter to be entered till it appears on the screen.
13
Page 23

Customized Settings
3 Customized Settings
Profiles
You can set different profiles according to different scenarios.
• On the standby screen, tap the profile to edit it.
•Select Settings > Profiles > Desired item. Select a profile. Then, tap it or press the OK key to enable the profile or select Edit to modify the profile.
Phone Settings
Settings > Phone settings > Desired item. You can set the following:
• System time of your phone.
• Language of your phone.
• Sound options of your phone.
• Keypad tones.
• Enabling of automatic keypad lock.
• Enabling and time of automatic switching on or off.
14
Page 24

Customized Settings
Display Settings
Settings > Display settings > Desired item, you can set the following:
• Wallpaper in standby mode
• Brightness of the screen
• Enabling of keypad backlight
• Backlight on duration
• User name
• Greeting message
Network Settings
Settings > Network > Desired item. You can set the following:
• Network mode
• Manual or automatic network selection
• Enabling of the cell information
• Preferred operators
15
Page 25

Call Service
4 Call Service
Contacts
You can save or manage the information about contacts inContacts. You can also set a contact number as a speed dialing number.
Adding a Contact
1. Select Contacts > New Contact.
2. Enter the information about the contact.
3. Select Save to save the contact.
Searching for a Contact
1. Select Contacts.
2. Tap the search bar to enter the contact name you are searching for.
3. The contacts with the information you enter is listed.
You can also use quick search in the contacts list screen. You can find a
contact by entering the initials of the first name or the last name of the
contact. For example, to find a contact named "Alice Green", enter the
initials "a" or "g". This contact is displayed in the candidate list.
16
Page 26
Call Service
Making a Call
Making a Call from Keyboard
1. In standby mode, tap to open the dialer.
2. Enter the phone number on the dialer. If you enter a wrong number, tap to erase the number.
3. To make a call, perform either of the following operations:
• Tap to make a voice call.
• Tap to make a video call.
4. Press the end key to terminate a call.
NOTE:
• In the 3G network, you can make video calls, provided that the called party has a device supporting the video call function.
• During a call, you can select Options to perform operations in the option list.
Making a Call from Contacts
1. Access Contacts.
17
Page 27

Call Service
2. Select the desired contact.
3. To make a call, perform either of the following operations:
• Tap to make a voice call.
• Press the send key to make a voice call.
• Select Options > Call > Call/Video call to make a call.
Making a Call from Call History
You can view all the missed calls, received calls, or dialed numbers in call history, and select a specific history as follows.
1. Access Calls.
2. Select the desired call history.
3. To make a call, perform either of the following operations:
• Press the send key to make a voice call.
• Select Options > Call/Video call to make a call.
18
Page 28

Call Service
Answering or Rejecting a Call
When there is an incoming call, press the send key to answer the call, or press the end key to reject the call. You can set the any key answer mode or auto answer mode.
1. Select Settings > Call settings > General > Answer mode to set the answer mode.
2. You can answer a call according to the settings that you have customized.
Call Settings
To enable call forwarding, call waiting and call barring, consult your service provider.
By selecting Settings > Call settings, you can enable or disable the preceding functions.
By selecting Settings > Call settings > General > Desired item, you can set the following:
• Prompt of saving unknown numbers.
• Automatic redialing after a call fails.
• Answering mode of incoming calls.
• Automatic answering mode.
19
Page 29

Call Service
• Display of your number to the called party.
If you set it to automatic, the displaying is subject to your network.
• Calling line of your mobile phone.
• Set My number.
You can create, edit or delete your records.
20
Page 30

Messaging
5 Messaging
Sending a Message
1. Select Messaging > Create message to create a message.
2. When you edit a message, you can tap the icons at the bottom of the screen to insert pictures or other files.
3. After the message is completed, tap or press the OK key, and then select Add from contacts or Enter number to add a recipient.
4. Select Send to send the message.
Viewing a Message
Your phone provides four mailboxes for messages. Received messages are stored in Inbox . Messages are created and unsent messages saved in Drafts. Messages that are failed to be delivered are stored in Outbox. Messages that are successfully delivered are stored in Sent.
1. Select a mailbox from Messaging. Then switch between four mailboxes and templates through the scroll key.
2. Select a message, and then select Options to perform the operations provided in the option list.
21
Page 31

Messaging
NOTE: If your phone is enabled with the broadcast function, select
Messaging > Broadcast inbox to view broadcast messages.
Message Settings
1. Select Messaging > Settings > SMS&MMS or Settings > Applica- tions > Message settings > SMS&MMS.
2. Set the parameters related to messages.
NOTE: Select Messaging > Settings. You can also modify the settings
of Push message, Broadcast or Common phrases.
Sending an Email
1. Select Email > Create Email to create an email.
2. Select To. Select Add from contacts or Enter recipient to select an email address.
3. Select Subject to edit the content.
4. Select Text message to edit the content.
5. In the email editing screen, select Options to perform the operations in the option list.
6. In the email editing screen, select Options > Send to send the email.
22
Page 32

Messaging
Viewing an Email
Your phone provides five mailboxes for emails. Inbox stores received emails. Drafts stores created and saved emails. Outbox stores the emails failed to be sent. Sent stores sent emails. Blocked stores screened emails.
1. Select a mailbox from Email, and then switch among five mail-boxes through the scroll key.
2. Select an email, and then select Options to perform the operations of the option list.
Email Settings
Settings > Applications > Email settings > Desired item, or Email > Email Wizard > Desired item. Then, you can set the email account. Select
an account, and then choose Options.
• You can edit an account and set general, incoming, or outgoing attributes.
• You can add a new account.
• You can set an account to the default account.
23
Page 33

Entertainment
6 Entertainment
Playing Music or Video
1. Select music files, video files, or playlists.
2. Press the OK key to play music or video.
3. During the playing of a file, you can perform the following operations:
• Press the OK key to pause or resume the playing.
• Tap the icons on the player screen to control the player.
• Select Options to perform the operations of the option list.
• Select Exit to exit from the player.
Using Camera or Video Camera
1. Press the camera key or select Camera to launch the camera.
2. In the viewfinder screen, you can tap the icons to perform the desired operations.
3. In the viewfinder screen, press the camera key or OK key to take a picture or record a video clip.
24
Page 34

Entertainment
• When recording a video clip, you can pause or continue
recording.
• When recording a video clip, press the camera key or OK key to
stop recording and save the video.
4. After taking a picture or recording a video clip, you can tap the icons on screen to perform the desired operations.
Games & Applications
You can install and run Java applications on your phone. For details, please refer to the help of the applications.
25
Page 35

Business
7 Business
Viewing the Calendar
1. Select Calendar, and then select the desired date.
2. You can perform the following operations:
• Press the OK key or tap the selected date to view the reminder.
• Select Options to create a reminder, set the view mode, jump to
a date, synchronize data, view undone reminders, and search the
calendar.
Creating a Reminder
1. Select My Reminders.
2. Click the tab on the top of the screen to change categories.
3. Select Options > Desired item, to create reminders, view categories, or search reminders.
26
Page 36

Business
Creating a Note
Select Memo > New memo to create a new note.
1. Select Memo and select a note.
2. Click Options to edit, send or delete the note.
Managing files
1. Select My Files > Desired item to manage pictures, music files, video clips, documents, ringtones, and other files.
2. Select a file folder, and then select Options > Desired item to perform operations in the option list.
When your phone finds the memory card, the memory card tab is automatically lighted on the folder screen. Select the required files in the memory
card and perform operations as required. In addition, you can also format
the memory card.
Creating an Alarm
1. Select Alarms > New alarm to set an alarm.
2. You can select an alarm from the alarm list, and then select the corresponding option to activate, deactivate, or delete the alarm.
27
Page 37

Business
3. When it is time for an alarm clock to ring, the selected alarm tone is played and a prompt is displayed. You can stop the ringing or snooze the alarm.
NOTE: If your phone is powered off, the alarm clock will still ring. When
the alarm rings, you can choose to power on the phone.
Synchronizing Data
You can synchronize information between your phone and the server
through the wireless network. The information that can be synchronized
includes the contacts, calendar, and to-do list. This service requires
network support. For details, consult your service provider.
1. Select Synchronize.
2. Tap the arrows on the upper part of the screen to switch among Synchronize, Settings, and Log.
• Synchronize: You can synchronize Contacts, Event & Anni-
versary, and Task.
• Settings: You can connect to the server or set the synchroniza-
tion direction.
• Log: You can view logs.
28
Page 38

Business
Using Other Tools
Your phone also provides Calculator, Converter, World Time, Stop- watch, and Timer.
29
Page 39

Connectivity
8 Connectivity
Installing PC Suite
The PC Suite software supplied with your phone runs automatically after you connect your phone to the PC with the USB cable. To install a PC Suite software, perform the following operations:
1. Connect your phone and PC with the USB cable.
2. Wait for the dialog box to appear.
3. Select the desired button to install the software.
4. Follow the wizard to complete the installation.
5. When the installation is complete, wait for the modem driver to be displayed in the modem list on your PC.
6. Restart your PC for the installation to take effect.
30
Page 40

Connectivity
Connecting via USB
USB-based Synchronization
You can synchronize data between your phone and PC. With a USB cable and the PC assistant, your phone can communicate with a PC. To perform the USB-based synchronization with your phone, do as follows.
1. Connect your phone and PC with the USB cable.
2. Run the PC Suite on the PC.
3. Now you can perform the USB-based synchronization. For details, refer to the Help of the PC Assistant.
USB-based Internet Access
Connecting your phone to the PC with the USB cable enables the PC to use the phone as a modem. This helps to set up a dial-up connection to the Internet.
Only Windows 2000, Windows XP and Windows Vista are supported.
1. Connect your phone and PC with the USB cable.
2. Ensure that the USB device is displayed in Device Manager/Port of your PC.
3. Select one of the following methods to set up the dial-up connection.
• Run the Dial-up Internet on the PC to create the dial-up connection.
31
Page 41

Connectivity
• Create Internet access through the built-in Internet wizard of the Windows operating system.
• Install and run the dial-up internet wizard application supplied on your phone. For details, refer to the Help of the application.
microSD Card Reader
You can read the files saved in the microSD card by using a USB cable.
NOTE:
• The function of the microSD card reader is not compatible with the other functions that are performed using the USB cable. If you enable the microSD card reader, other functions using the USB cable cannot be performed.
• Your phone can switch to the microSD card reader mode only in standby mode.
1. Insert the microSD card into your phone.
2. Connect your phone to the PC with the USB cable.
3. The PC Options software supplied on your phone runs automatically.Then select File Transfer.
4. Found New Hardware is displayed on your PC, and an icon for the mobile memory drive is displayed. Then you can read the files stored in the microSD card directly.
32
Page 42

Connectivity
Connecting via Bluetooth
Bluetooth-based Synchronization
To perform the Bluetooth synchronization with your phone, your PC needs to support the Bluetooth function.
1. Select Bluetooth to enable the Bluetooth function, and then select Discoverable > Yes.
2. Run the driver software for Bluetooth on the PC, and pair the phone.
After the PC detects the phone serial port service, activate the Bluetooth serial port service on the phone.
3. You can now perform the synchronization. For details, refer to the Help of the PC Assistant.
Bluetooth-based Internet Access
Connecting your phone to a PC through the Bluetooth function enables the PC to use the phone as a modem. This helps to set up a dial-up connection to the Internet.
To access the Internet through Bluetooth, make sure that your PC supports the Bluetooth function and your SIM card supports the Internet access service.
You can create Bluetooth-based Internet access through the built-in
Internet wizard of the Windows operating system, or the Internet wizard
supplied with the Bluetooth drive suite of the PC.
NOTE: Windows 2000, Windows XP and Windows Vista are supported.
33
Page 43

Connectivity
Bluetooth-based Data Transfer
You can exchange data between your Bluetooth phone and other Bluetooth devices. If you want to exchange data between your phone and
another device, that device must support Bluetooth and the Bluetooth function must be enabled.
1. Select Bluetooth to enable the Bluetooth function.
2. Select Search devices to search a Bluetooth device. When a Bluetooth device is found for the first time, authentication is required.
3. After the authentication, you can exchange data between your phone and the other Bluetooth device.
Using Bluetooth Headset
You can talk by using the Bluetooth headset or Bluetooth loudspeaker. For more information, refer to the user manuals of the relevant devices.
1. Open the Bluetooth headset and keep it in the discoverable state.
2. Select Bluetooth to enable the Bluetooth function.
3. Select Search devices to search for a Bluetooth device. When a Bluetooth device is found for the first time, authentication is required.
Accessing the Internet
1. Select Browser to access the internet.
34
Page 44

Connectivity
2. You can perform the following when browsing:
• Opening the homepage
• Entering a website to access and connect to it
• Saving or editing frequently visited websites
• Browsing saved web pages offline
• Browsing history web pages
• Connecting to the website accessed recently
• Setting the Browser
35
Page 45

Warnings and Precautions
9 Warnings and Precautions
This section contains important information pertaining to the operating instructions of your device. It also contains information about how to use the device safely. Read this information carefully before using your device.
Electronic Device
Power off your device if using the device is prohibited. Do not use the
device when using the device causes danger or interference with electronic devices.
Medical Device
• Follow rules and regulations set forth by hospitals and health care facilities. Do not use your device when using the device is prohibited.
• Pacemaker manufacturers recommend that a minimum distance of 15
cm be maintained between a device and a pacemaker to prevent
potential interference with the pacemaker. If you are using a pacemaker, use the device on the opposite side of the pacemaker and do
not carry the device in your front pocket.
• Some wireless devices may affect the performance of hearing aids. For any such problems, consult your service provider.
36
Page 46

Warnings and Precautions
Potentially Explosive Atmosphere
Power off your device in any area with a potentially explosive atmosphere,
and comply with all signs and instructions. Areas that may have potentially
explosive atmospheres include the areas where you would normally be
advised to turn off your vehicle engine. Triggering of sparks in such areas
could cause an explosion or a fire, resulting in bodily injuries or even
deaths. Do not power on your device at refueling points such as service
stations. Comply with restrictions on the use of radio equipment in fuel
depots, storage, and distribution areas, and chemical plants. In addition,
adhere to restrictions in areas where blasting operations are in progress.
Before using the device, watch out for areas that have potentially explosive
atmospheres that are often, but not always, clearly marked. Such locations
include areas below the deck on boats, chemical transfer or storage facilities, and areas where the air contains chemicals or particles such as grain,
dust, or metal powders. Ask the manufacturers of vehicles using liquefied
petroleum gas (such as propane or butane) whether this device can be
safely used in their vicinity.
Traffic Security
Observe local laws and regulations while using the device. In addition, if
using the device while driving a vehicle, comply with the following guidelines:
• Concentrate on driving. Your first responsibility is to drive safely.
• Do not talk on the device while driving. Use hands-free accessories.
• When you have to make or answer a call, park the vehicle at the road side before using your device.
37
Page 47

Warnings and Precautions
• RF signals may affect electronic systems of motor vehicles. For more information, consult the vehicle manufacturer.
• In a motor vehicle, do not place the device over the air bag or in the air bag deployment area. Otherwise, the device may hurt you owing to the strong force when the air bag inflates.
• Do not use your device while flying in an aircraft. Power off your
device before boarding an aircraft. Using wireless devices in an
aircraft may cause danger to the operation of the aircraft and disrupt
the wireless telephone network. It may also be considered illegal.
Operating Environment
• Do not use or charge the device in dusty, damp, and dirty places or places with magnetic fields. Otherwise, it may result in a malfunction of the circuit.
• The device complies with the RF specifications when the device is
used near your ear or at a distance of 1.5 cm from your body. Ensure
that the device accessories such as a device case and a device
holster are not composed of metal components. Keep your device 1.5
cm away from your body to meet the requirement earlier mentioned.
• On a stormy day with thunder, do not use your device when it is being charged, to prevent any danger caused by lightning.
• When you are on a call, do not touch the antenna. Touching the antenna affects the call quality and results in increase in power consumption. As a result, the talk time and the standby time are reduced.
38
Page 48

Warnings and Precautions
• While using the device, observe the local laws and regulations, and respect others' privacy and legal rights.
• Keep the ambient temperature between –10 ℃ and 45 ℃ while the
device is being charged. Keep the ambient temperature between –10
℃ to 55 ℃ for using the device powered by a battery.
Prevention of Hearing Damage
Using a headset at high volume can damage your hearing. To reduce the
risk of damage to hearing, lower the headset volume to a safe and comfortable level.
Safety of Children
Comply with all precautions with regard to children's safety. Letting the
child play with your device or its accessories, which may include parts that
can be detached from the device, may be dangerous, as it may present a
choking hazard. Ensure that small children are kept away from the device
and accessories.
Accessories
Use the accessories delivered only by the manufacturer. Using accessories of other manufacturers or vendors with this device model may invalidate any approval or warranty applicable to the device, result in the
non-operation of the device, and cause danger.
39
Page 49

Warnings and Precautions
Battery and Charger
• Unplug the charger from the electrical plug and the device when not in use.
• The battery can be charged and discharged hundreds of times before it eventually wears out. When the standby time and the talk time are shorter than the normal time, replace the battery.
• Use the AC power supply defined in the specifications of the charger. An improper power voltage may cause a fire or a malfunction of the charger.
• Do not connect two poles of the battery with conductors, such as metal materials, keys, or jewelries. Otherwise, the battery may be short-circuited and may cause injuries and burns on your body.
• Do not disassemble the battery or solder the battery poles. Otherwise, it may lead to electrolyte leakage, overheating, fire, or explosion.
• If battery electrolyte leaks out, ensure that the electrolyte does not touch your skin and eyes. When the electrolyte touches your skin or splashes into your eyes, wash your eyes with clean water immediately and consult a doctor.
• If there is a case of battery deformation, color change, or abnormal heating while you charge or store the battery, remove the battery immediately and stop using it. Otherwise, it may lead to battery leakage, overheating, explosion, or fire.
• If the power cable is damaged (for example, the cord is exposed or broken), or the plug loosens, stop using the cable at once. Otherwise, it may lead to an electric shock, a short circuit of the charger, or a fire.
40
Page 50

Warnings and Precautions
• Do not dispose of batteries in fire as they may explode. Batteries may also explode if damaged.
Cleaning and Maintenance
• The device, battery, and charger are not water-resistant. Keep them
dry. Protect the device, battery, and charger from water or vapor. Do
not touch the device or the charger with a wet hand. Otherwise, it may
lead to a short circuit, a malfunction of the device, and an electric
shock to the user.
• Do not place your device, battery, and charger in places where they can get damaged because of collision. Otherwise, it may lead to battery leakage, device malfunction, overheating, fire, or explosion.
• Do not place magnetic storage media such as magnetic cards and floppy disks near the device. Radiation from the device may erase the information stored on them.
• Do not leave your device, battery, and charger in a place with an
extreme high or low temperature. Otherwise, they may not function
properly and may lead to a fire or an explosion. When the temperature
is lower than 0°C, performance of the battery is affected.
• Do not place sharp metal objects such as pins near the earpiece. The earpiece may attract these objects and hurt you when you are using the device.
• Before you clean or maintain the device, power off the device and disconnect it from the charger.
• Do not use any chemical detergent, powder, or other chemical agents
(such as alcohol and benzene) to clean the device and the charger.
41
Page 51

Warnings and Precautions
Otherwise, parts of the device may be damaged or a fire can be
caused. You can clean the device and the charger with a piece of
damp and soft antistatic cloth.
• Do not dismantle the device or accessories. Otherwise, the warranty on the device and accessories is invalid and the manufacturer is not liable to pay for the damage.
Emergency Call
You can use your device for emergency calls in the service area. The connection, however, cannot be guaranteed in all conditions. You should not rely solely on the device for essential communications.
Certification Information (SAR)
This mobile device meets guidelines for exposure to radio waves.
Your device is a low-power radio transmitter and receiver. As recommended by international guidelines, the mobile device is designed not to
exceed the limits for exposure to radio waves. These guidelines were
developed by the independent scientific organization International
Commission on Non-Ionizing Radiation Protection (ICNIRP) and include
safety measures designed to ensure safety for all users, regardless of age
and health.
The Specific Absorption Rate (SAR) is the unit of measurement for the
amount of radio frequency energy absorbed by the body when using a
device. The SAR value is determined at the highest certified power level in
laboratory conditions, but the actual SAR level of the device when being
42
Page 52

Warnings and Precautions
operated can be well below the value. This is because the device is
designed to use the minimum power required to reach the network.
The SAR limit adopted by the USA and Canada is 1.6 watts/kilogram
(W/kg) averaged over one gram of tissue. The highest SAR value reported
to the FCC and IC for this device type when tested for use at the ear is
0.564 W/kg, and when properly worn on the body is 0.541 W/kg.
The SAR limit also adopted by Europe is 2.0 W/kg averaged over 10 grams of tissue. The highest SAR value for this device type when tested at the ear is 0.666 W/kg, and when properly worn on the body is 0.670 W/kg.
FCC Statement
This device has been tested and found to comply with the limits for a Class B digital device, pursuant to Part 15 of the Federal Communications Commission (FCC) rules.
This device complies with Part 15 of the FCC Rules. Operation is subject to the following two conditions:
1. This device may not cause harmful interference.
2. This device must accept any interference received, including interference that may cause undesired operation.
Warning: Changes or modifications made to this device not expressly
approved by Huawei Technologies Co., Ltd. may void the FCC authorization to operate this device.
43
Page 53
Warnings and Precautions
Disposal and Recycling Information
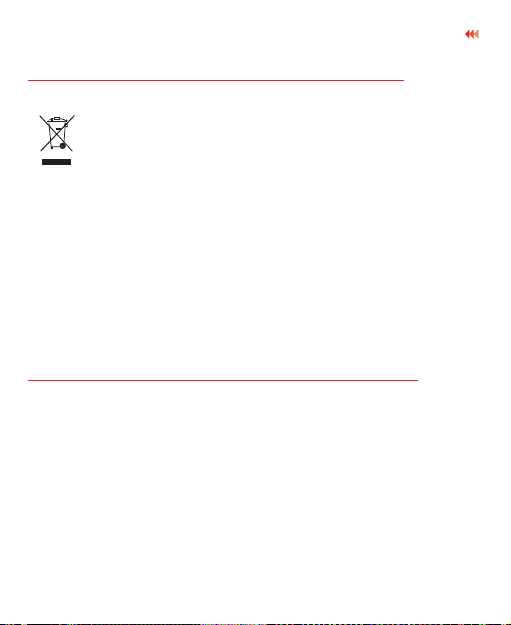
This symbol on the device (and any included batteries) indicates that they should not be disposed of as normal household
garbage. Do not dispose of your device or batteries as
unsorted municipal waste. The device (and any batteries)
cling or proper disposal at the end of their life.
For more detailed information about the recycling of the device or batteries, contact your local city office, the household waste disposal service, or the retail store where you purchased this device.
The disposal of this device is subject to the Waste from Electrical and Electronic Equipment (WEEE) directive of the European Union. The reason for
separating WEEE and batteries from other waste is to minimize the potential environmental impacts on human health of any hazardous substances
that may be present.
should be handed over to a certified collection point for recy-
Reduction of Hazardous Substances
This device is compliant with the EU Registration, Evaluation, Authorisation and Restriction of Chemicals (REACH) Regulation (Regulation No
1907/2006/EC of the European Parliament and of the Council) and the EU
Restriction of Hazardous Substances (RoHS) Directive (Directive
2002/95/EC of the European Parliament and of the Council). For more
information about the REACH compliance of the device, visit the Web site
www.huaweidevice.com/certification. You are recommended to visit the
Web site regularly for up-to-date information.
V100R001_01 31010AHL
44
Page 54
Warnings and Precautions
EU Regulatory Conformance
Hereby, Huawei Technologies Co., Ltd.
declares that this device is in compliance
0682
Web site www.huaweidevice.com/certification.
Notice: Observe the national local regulations in the location where the device is to be used. This device may be restricted for use in some or all countries of European Union.
with the essential requirements and other
relevant provisions of Directive
1999/5/EC.
For the declaration of conformity, visit the
45
 Loading...