

Huawei Quidway S6500, Release 3000 Operation Manual

HUAWEI
1. Getting Started
2. Port
3. VLAN
4. Network Protocol
5. Routing Protocol
6. Multicast Protocol
7. QoS/ACL
8. STP
9. Security
10. Reliability
11. System Management
12. PoE
13. Appendix
Quidway S6500 Series Ethernet Switches
Operation Manual
Release 3000 Series
Huawei Technologies Proprietary

Quidway S6500 Series Ethernet Switches
Operation Manual
Manual Version
Product Version
BOM
Huawei Technologies Co., Ltd. provides customers with comprehensive technical support
and service. If you purchase the products from the sales agent of Huawei Technologies Co.,
Ltd., please contact our sales agent. If you purchase the products from Huawei
Technologies Co., Ltd. directly, Please feel free to contact our local office, customer care
center or company headquarters.
Huawei Technologies Co., Ltd.
Address: Administration Building, Huawei Technologies Co., Ltd.,
T2-081638-20051118-C-2.01
Release 3000 Series
3116A038
Bantian, Longgang District, Shenzhen, P. R. China
Postal Code: 518129
Website:
http://www.huawei.com
Huawei Technologies Proprietary

Copyright © 2005 Huawei Technologies Co., Ltd.
All Rights Reserved
No part of this manual may be reproduced or transmitted in any form or by any
means without prior written consent of Huawei Technologies Co., Ltd.
Trademarks
, HUAWEI, C&C08, EAST8000, HONET, , ViewPoint, INtess, ETS, DMC,
TELLIN, InfoLink, Netkey, Quidway, SYNLOCK, Radium,
M900/M1800,
TELESIGHT, Quidview, Musa, Airbridge, Tellwin, Inmedia, VRP, DOPRA,
iTELLIN, HUAWEI OptiX, C&C08
iNET, NETENGINE, OptiX, iSite, U-SYS, iMUSE,
OpenEye, Lansway, SmartAX, infoX, and TopEng are trademarks of Huawei
Technologies Co., Ltd.
All other trademarks and trade names mentioned in this manual a re the property of
their respective holders.
Notice
The information in this manual is subject to change without notice. Every effort has
been made in the preparation of this manual to ensure accuracy of the contents,
but all statements, information, and recommendations in this manual do not
constitute the warranty of any kind, express or implied.
Huawei Technologies Proprietary
About This Manual
Release Notes
The product version that corresponds to the manual is Release 3000 Series.
Related Manuals
The following manuals provide more information about the Quidway S6500 Series
Ethernet Switches.
Manual Content
Organization
Quidway S6500 Series Ethernet Switches Operation Manual consists of the following
parts:
z Getting Started
z Port
z VLAN
Quidway S6500 Series Ethernet
Switches Installation Manual
Quidway S6502 Ethernet Switch
Installation Manual
Quidway S6500 Series Ethernet
Switches Command Manual
It provides information for the system
installation.
It provides information for the S6502
installation.
It is used for assisting the users in using
various commands.
Introduces how to access the Ethernet Switch.
Introduces Ethernet port and link aggregation configuration.
Introduces VLAN and Voice VLAN related configuration.
z Network Protocol
Introduces network protocol configuration, includin g IP address, ARP, DHCP, and
IP performance configuration.
z Routing Protocol
Introduces routing protocol configuration, including static route, RIP, OSPF, IS-IS,
BGP, and routing policy configuration.
Huawei Technologies Proprietary

z Multicast Protocol
Introduces GMRP, IGMP Snooping, IGMP, PIM-DM and PIM-SM configuration.
z QoS/ACL
Introduces QoS/ACL configuration.
z STP
Introduces STP configuration.
z Security
Introduces 802.1X, AAA & RADIUS configuration.
z Reliability
Introduces VRRP configuration.
z System Management
Introduces system management and maintenance of Ethernet Switch, including
file system management, system maintenance and network management
configuration.
z PoE
Introduces power over Ethernet (PoE) configuration.
z Appendix
Is the index for all commands in this command manual.
Intended Audience
The manual is intended for the following readers:
z Network engineers
z Network administrators
z Customers who are familiar with network fundamentals
Conventions
The manual uses the following conventions:
I. General conventions
Convention Description
Arial Normal paragraphs are in Arial.
Boldface
Courier New
Headings are in Boldface.
Terminal Display is in Courier New.
Huawei Technologies Proprietary
II. Command conventions
Convention Description
Boldface
italic
[ ]
{ x | y | ... }
[ x | y | ... ]
{ x | y | ... } *
[ x | y | ... ] *
# A line starting with the # sign is comments.
III. GUI conventions
The keywords of a command line are in Boldface.
Command arguments are in italic.
Items (keywords or arguments) in square brackets [ ] are
optional.
Alternative items are grouped in braces and separated by
vertical bars. One is selected.
Optional alternative items are grouped in square brackets
and separated by vertical bars. One or none is selected.
Alternative items are grouped in braces and separated by
vertical bars. A minimum of one or a maximum of all can be
selected.
Optional alternative items are grouped in square brackets
and separated by vertical bars. Many or none can be
selected.
Convention Description
< >
[ ]
/
IV. Keyboard operation
Format Description
<Key>
<Key1+Key2>
<Key1, Key2>
Button names are inside angle brackets. For example, click
the <OK> button.
Window names, menu items, data table and field names
are inside square brackets. For example, pop up the [New
User] window.
Multi-level menus are separated by forward slashes. For
example, [File/Create/Folder].
Press the key with the key name inside angle brackets. For
example, <Enter>, <Tab>, <Backspace>, or <A >.
Press the keys concurrently. For example, <Ctrl+Alt+A>
means the three keys should be pressed concurrently.
Press the keys in turn. For example, <Alt, A> means the
two keys should be pressed in turn.
Huawei Technologies Proprietary

V. Mouse operation
Action Description
Select
Click
Double-Click
Drag
Press and hold the primary mouse button (left mouse
button by default).
Select and release the primary mouse button without
moving the pointer.
Press the primary mouse button twice continuously and
quickly without moving the pointer.
Press and hold the primary mouse button and move the
pointer to a certain position.
VI. Symbols
Eye-catching symbols are also used in the manual to highlight the points worthy of
special attention during the operation. They are defined as follows:
Caution, Warning, Danger: Means reader be extremely careful during the
operation.
Note, Comment, Tip, Knowhow, Thought: Means a complementary
description.
Huawei Technologies Proprietary

HUAWEI
Quidway S6500 Series Ethernet Switches
Operation Manual
Getting Started
Huawei Technologies Proprietary

Operation Manual - Getting Started
Quidway S6500 Series Ethernet Switches Table of Contents
Table of Contents
Chapter 1 Product Overview........................................................................................................ 1-1
1.1 Product Overview............................................................................................................... 1-1
1.2 Function Features.............................................................................................................. 1-2
Chapter 2 Logging in Switch........................................................................................................ 2-1
2.1 Setting up Configuration Environment via the Console Port ............................................. 2-1
2.2 Setting up Configuration Environment through Telnet....................................................... 2-2
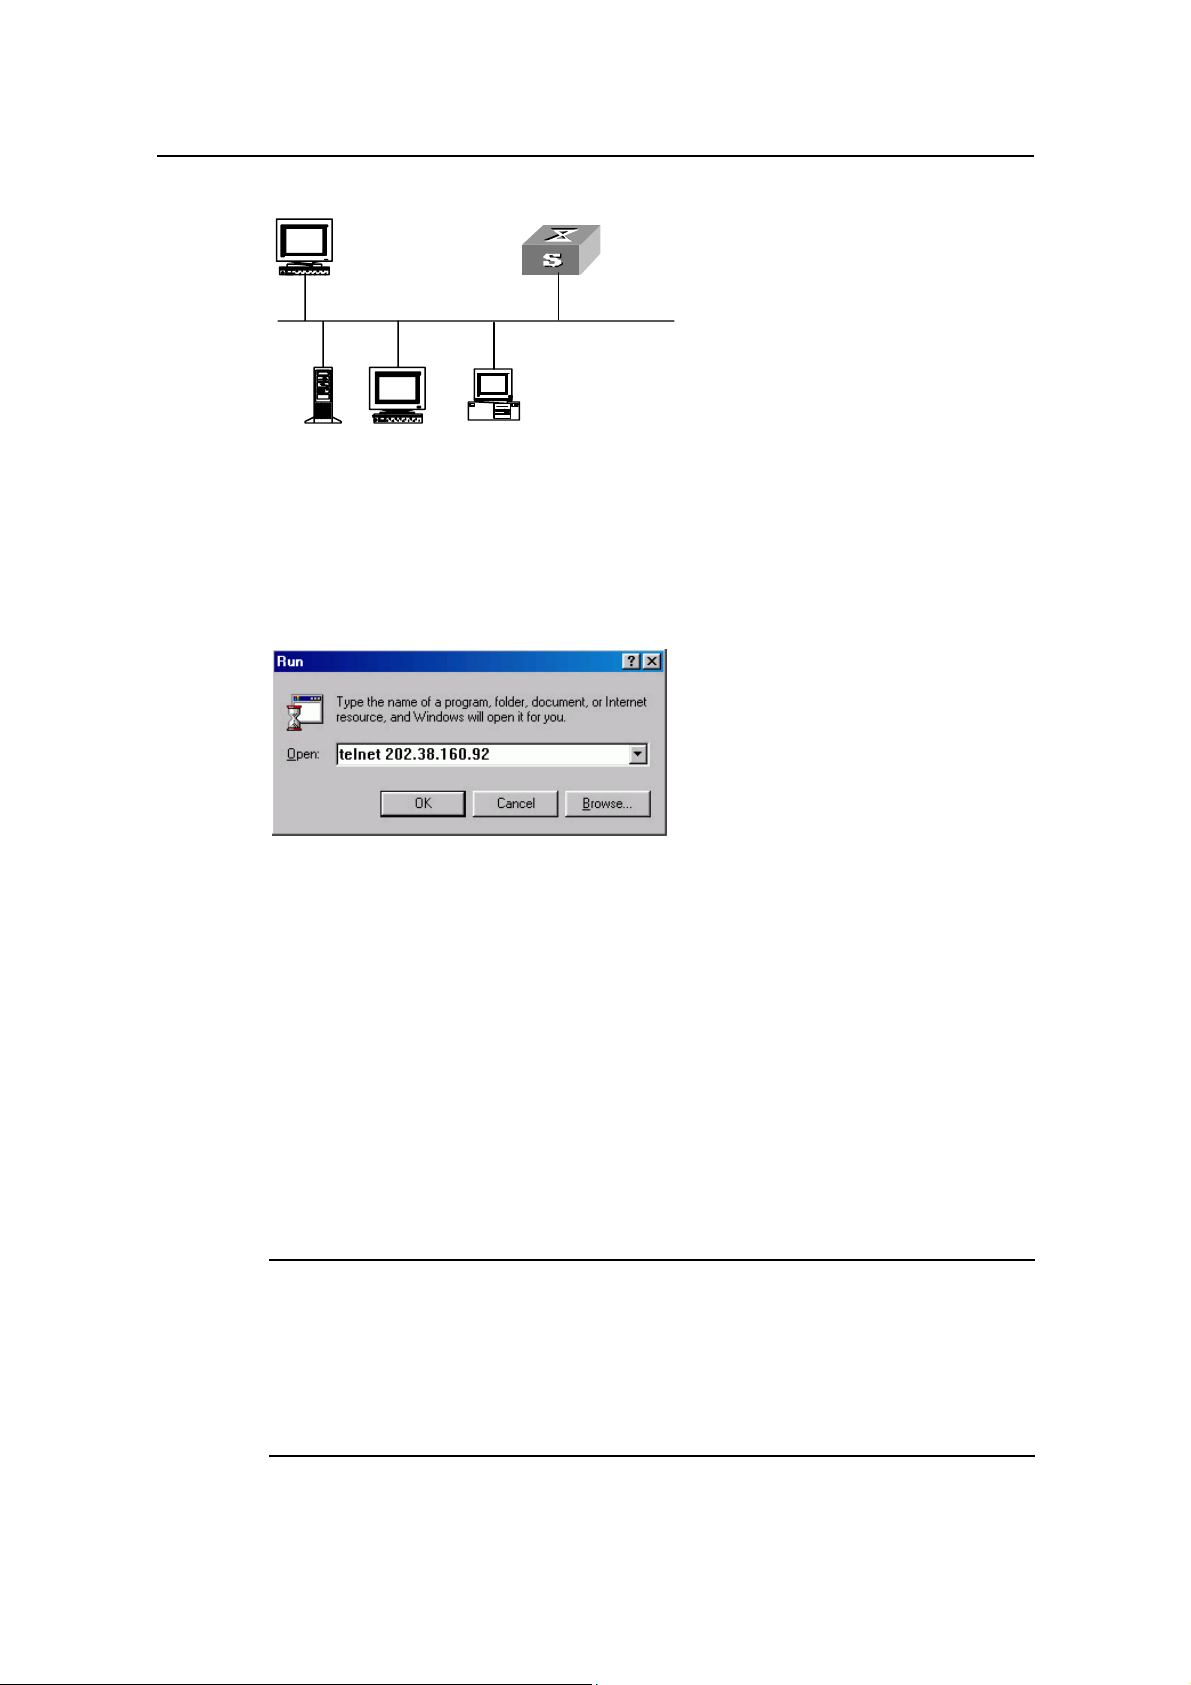
2.2.1 Connecting a PC to the Switch through Telnet ....................................................... 2-2
2.2.2 Telneting a Switch through another Switch............................................................. 2-5
2.3 Setting up Configuration Environment through a Dial-up the Modem............................... 2-6
Chapter 3 Command Line Interface............................................................................................. 3-1
3.1 Command Line Interface ................................................................................................... 3-1
3.2 Command Line View.......................................................................................................... 3-1
3.3 Features and Functions of Command Line ....................................................................... 3-6
3.3.1 Online Help of Command Line................................................................................ 3-6
3.3.2 Displaying Characteristics of Command Line ......................................................... 3-7
3.3.3 History Command of Command Line...................................................................... 3-7
3.3.4 Common Command Line Error Messages.............................................................. 3-8
3.3.5 Editing Characteristics of Command Line............................................................... 3-9
Chapter 4 User Interface Configuration...................................................................................... 4-1
4.1 User Interface Overview .................................................................................................... 4-1
4.2 User Interface Configuration.............................................................................................. 4-2
4.2.1 Entering User Interface View .................................................................................. 4-2
4.2.2 Configuring the User Interface-Supported Protocol ................................................ 4-2
4.2.3 Configuring the Attributes of AUX (Console) Port................................................... 4-3
4.2.4 Configuring the Terminal Attributes......................................................................... 4-4
4.2.5 Managing Users ...................................................................................................... 4-6
4.2.6 Configuring Modem Attributes............................................................................... 4-10
4.2.7 Configuring Redirection......................................................................................... 4-10
4.3 Displaying and Debugging User Interface ....................................................................... 4-11
Huawei Technologies Proprietary
i

Operation Manual - Getting Started
Quidway S6500 Series Ethernet Switches Chapter 1 Product Overview
Chapter 1 Product Overview
1.1 Product Overview
Quidway S6500 Series Ethernet Switches is a series of large capacity, modularized
wire speed L2/L3 Ethernet switches. They are mainly designed for IP MAN, large-sized
enterprise network and campus network users. The series include the following main
types of switches:
z S6506 Ethernet Switch
z S6503 Ethernet Switch
z S6506R Ethernet Switch
z S6502 Ethernet Switch
Quidway S6500 Series Switches have an integrated chassis structure. The chassis
contains card area, fan area, power supply area, and power distribution area.
For S6506, in the card area, there are seven slots. Slot 0 is prepared specially for
SRPU (Salience I, Salience II or Salience III Series). The other six are LPU slots.
For S6503, in the card area, there are four slots. Slot 0 is prepared specially for SRPU
(iSalience I or Salience III Series). The other three are LPU slots.
For S6506R, in the card area, there are eight slots. Slot 0 and slot 1 are prepared
specially for SRPU (Salience II or Salience III Series) and they operate redundantly.
The other six are LPU slots.
For S6502, in the card area, there are two slots. Slot 0 is prepared specially for SRPU
(supporting LS81P12TE and LS81T12PE), and slot 1 is LPU slot.
User can select required LPUs for different networks.
Quidway S6500 Series Ethernet Switches support the following services:
z Internet broadband access
z MAN, enterprise/campus networking
z Providing multicast service and multicast routing and supporting multicast audio
and video services.
Hereinafter Quidway S6500 Series Ethernet Switches are referred to as S6500 Series
Ethernet Switches.
Huawei Technologies Proprietary
1-1

Operation Manual - Getting Started
Quidway S6500 Series Ethernet Switches Chapter 1 Product Overview
1.2 Function Features
Table 1-1 Function features
Features Description
Supports VLAN compliant with IEEE 802.1Q Standard
Supports port-based VLAN
VLAN
STP protocol
Supports protocol-based VLAN
Supports GARP VLAN Registration Protocol (GVRP)
Supports Super VLAN
Supports Spanning Tree Protocol (STP) / Rapid Spanning Tree
Protocol (RSTP) / Multiple Spanning Tree Protocol (MSTP),
compliant with IEEE 802.1D/IEEE 802.1s Standard
Flow control
Broadcast
Suppression
Multicast
IP routing
Supports IEEE 802.3x flow control (full-duplex)
Supports back-pressure based flow control (half-duplex)
Supports Broadcast Suppression
Supports GARP Multicast Registration Protocol (GMRP)
Supports Internet Group Management Protocol (IGMP)
Snooping
Supports Internet Group Management Protocol (IGMP)
Supports Protocol-Independent Multicast-Dense Mode
(PIM-DM)
Supports Protocol-Independent Multicast-Sparse Mode
(PIM-SM)
Supports the static route
Supports Routing Information Protocol (RIP) V1/v2
Supports Open Shortest Path First (OSPF)
Supports Border Gateway Protocol (BGP)
Supports Intermediate System-to-Intermediate System
intra-domain routing information exchange protocol (IS-IS)
Supports IP routing policy
DHCP Relay Supports Dynamic Host Configuration Protocol (DHCP) Relay
Supports Power Over Ethernet (PoE) (Only the switches with
PoE
the software versions of Release 3000 series support this
feature)
Supports link aggregation through manual configuration
Link aggregation
Supports dynamic LACP (Link Aggregation Control Protocol)
aggregation (IEEE802.3ad standard)
Supports static LACP aggregation (IEEE802.3ad standard)
Mirror Supports the port-based mirror
Huawei Technologies Proprietary
1-2

Operation Manual - Getting Started
Quidway S6500 Series Ethernet Switches Chapter 1 Product Overview
Features Description
Supports Multi-level user management and password protect
Security features
Supports 802.1X authentication
Supports Packet filtering
Supports AAA & RADIUS/HWTACACS authentication
Reliability Supports Virtual Redundancy Routing Protocol (VRRP)
Supports traffic classification
Supports bandwidth control
Quality of Service
(QoS)
Supports priority control
Supports queues of different priority on the port
Queue scheduling: supports Strict Priority Queuing (SP)
Supports command line interface configuration
Supports configuration via Console port
Supports remote configuration via Telnet or SSH
Supports configuration through dialing the Modem
Supports SNMP management
Management and
Maintenance
Supports Quidview NMS
Supports RMON MIB Group 1, 2, 3 and 9
Supports system log
Supports level alarms
Supports output of the debugging information
Supports PING and Tracert
Supports the remote maintenance via Telnet, Modem and SSH
Loading and
update
Supports to load and upgrade software via XModem protocol
Supports to load and upgrade software via File Transfer
Protocol (FTP) and Trivial File Transfer Protocol (TFTP)
Huawei Technologies Proprietary
1-3
Operation Manual - Getting Started
Quidway S6500 Series Ethernet Switches Chapter 2 Logging in Switch
Chapter 2 Logging in Switch
2.1 Setting up Configuration Environment via the Console
Port
Step 1: As shown in the figure below, to set up the local configuration environment,
connect the serial port of a PC (or a terminal) to the Console port of the switch with the
Console cable.
RS-232 Serial port
Console port
Console cable
Figure 2-1 Setting up the local configuration environment via the Console port
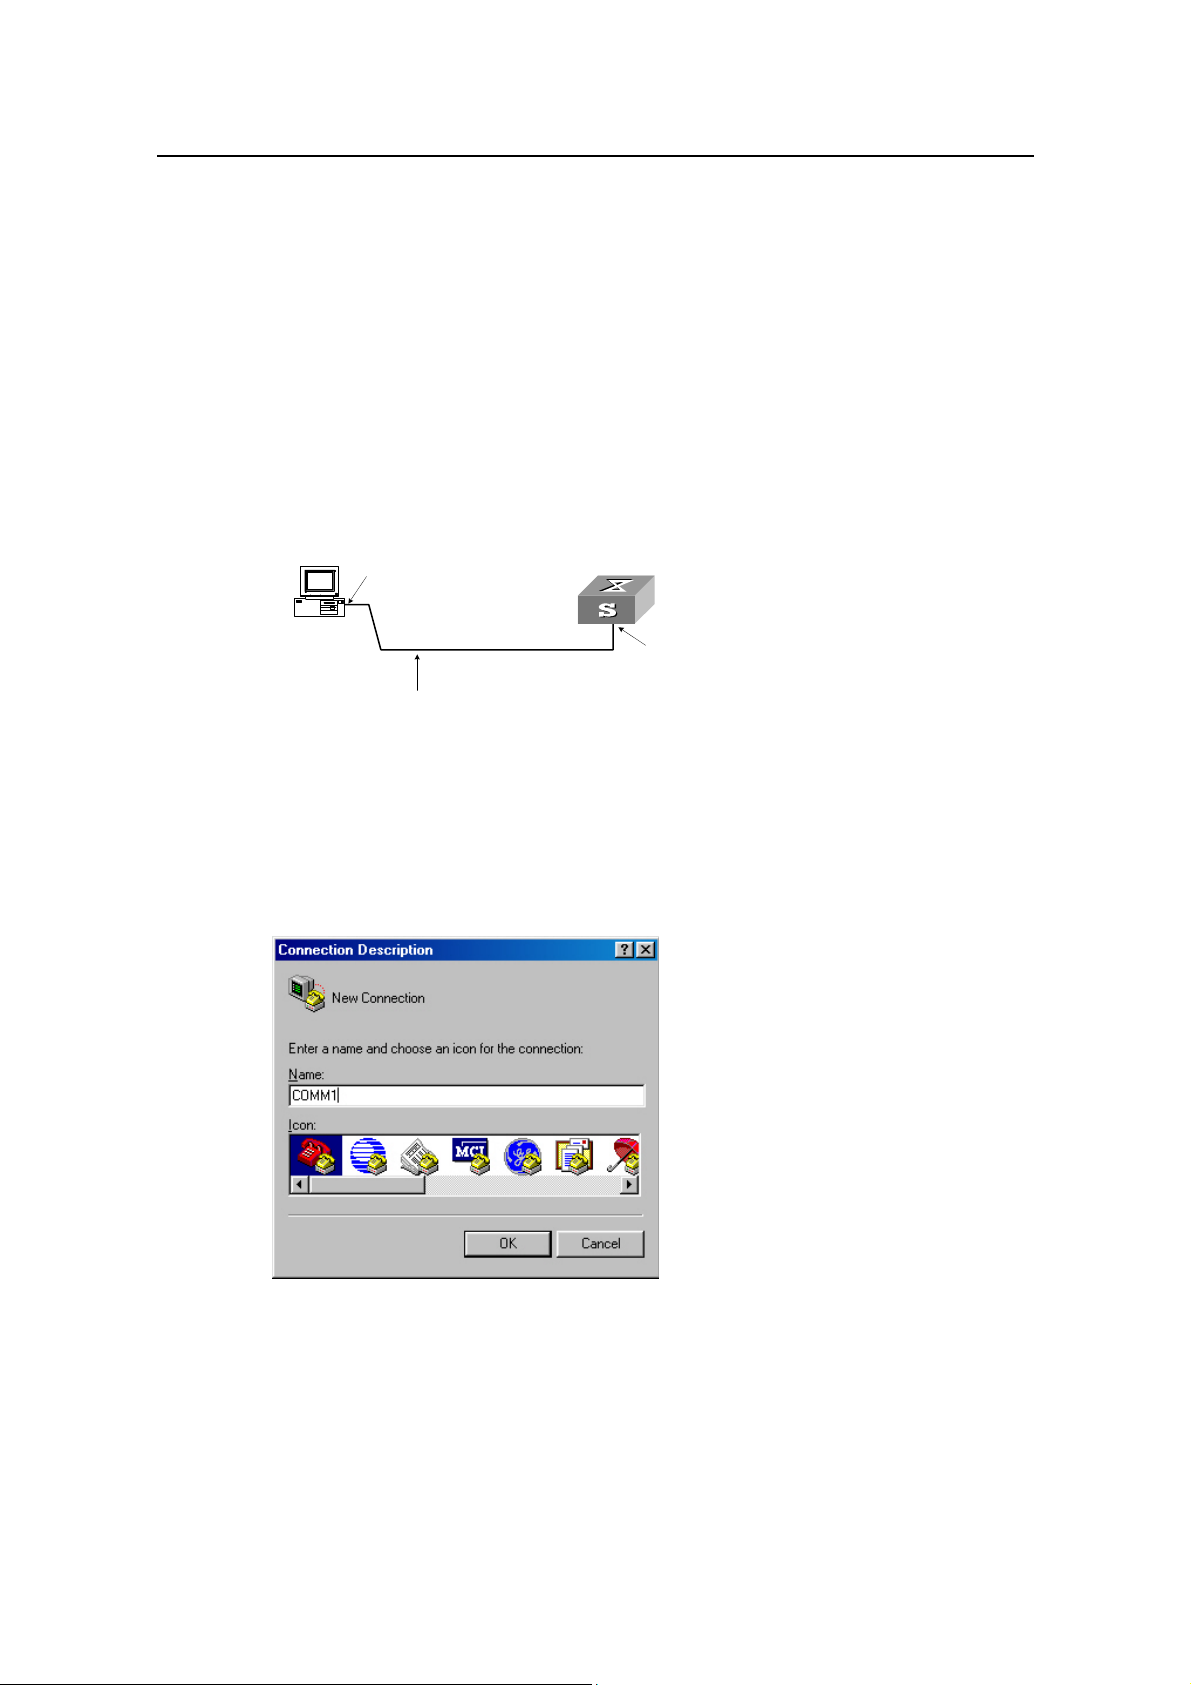
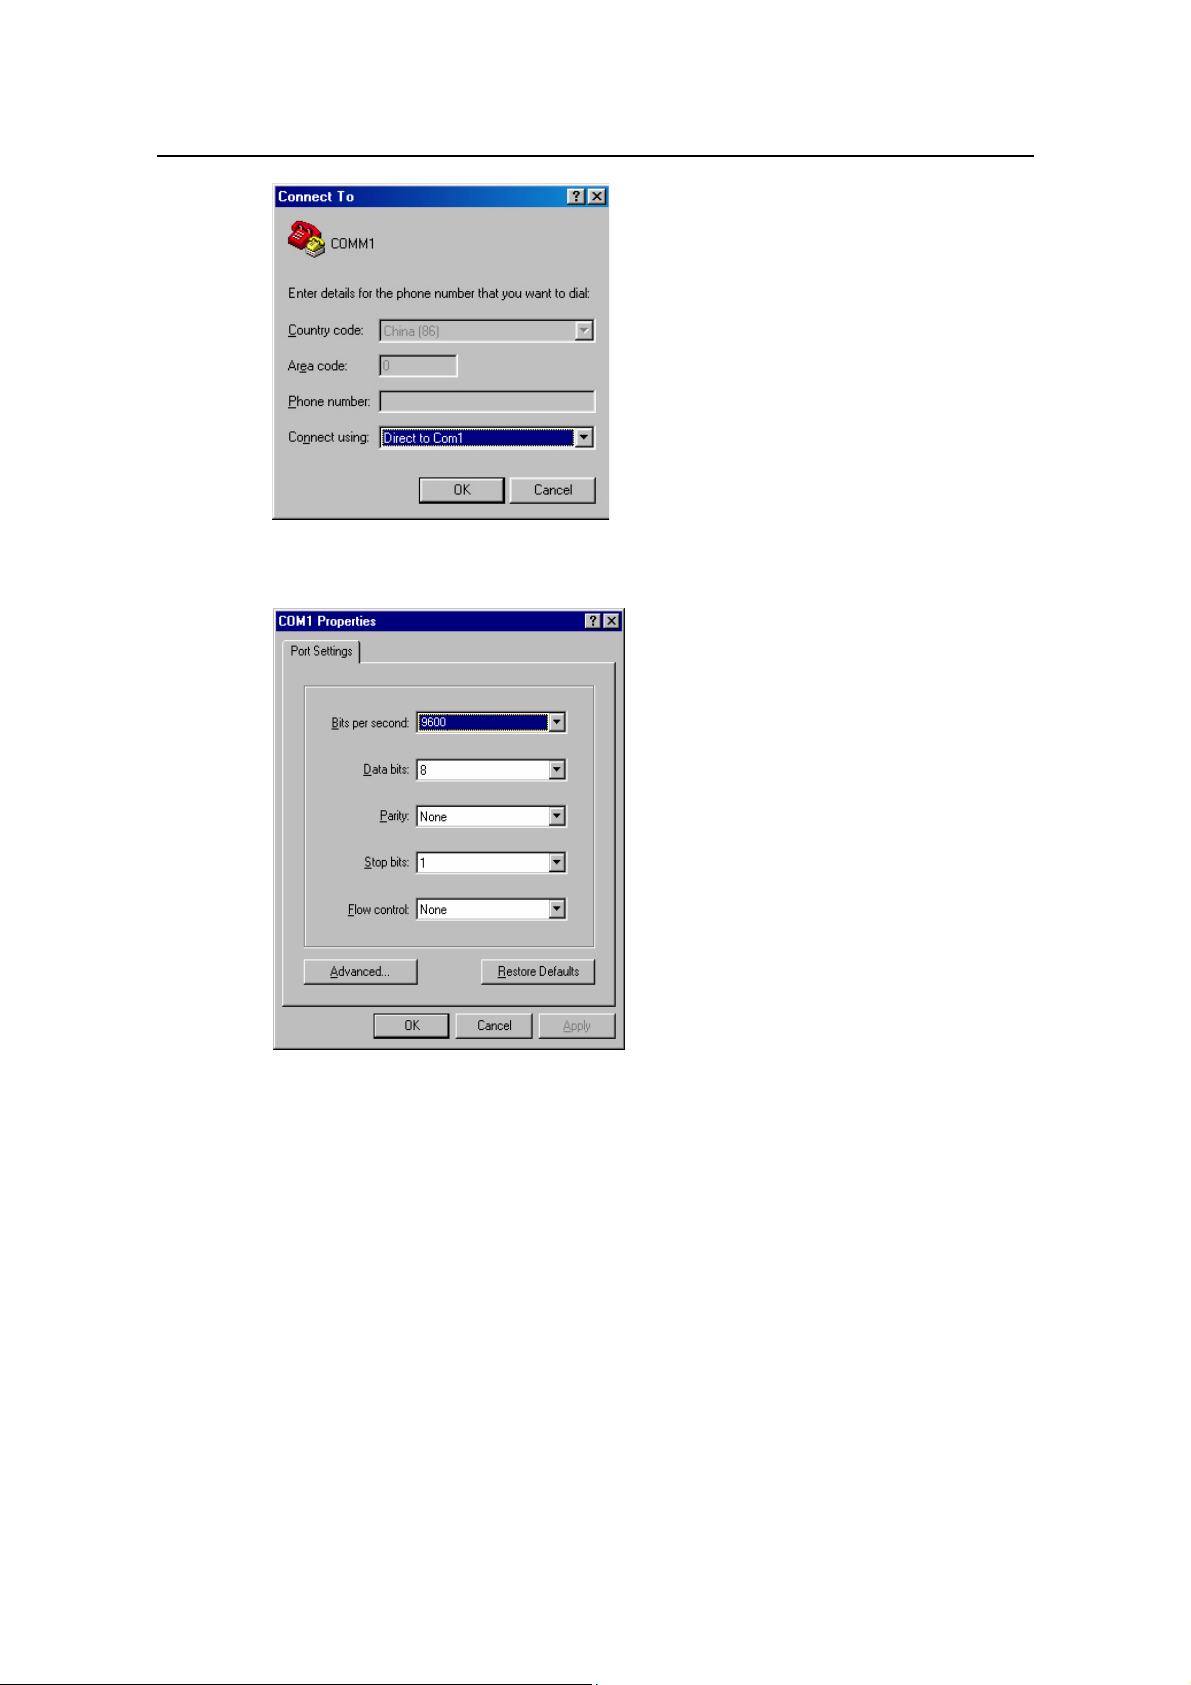
Step 2: Run terminal emulator (such as Terminal on Windows 3X or the Hyper Terminal
on Windows 9X) on the PC. Set the terminal communication parameters as follows: Set
the baud rate to 9600, databit to 8, parity check to none, stopbit to 1, flow control to
none and select the terminal type as VT100.
Figure 2-2 Set up new connection
Huawei Technologies Proprietary
2-1
Operation Manual - Getting Started
Quidway S6500 Series Ethernet Switches Chapter 2 Logging in Switch
Figure 2-3 Configuring the port for connection
Figure 2-4 Setting communication parameters
Step 3: The switch is powered on. Display self-test information of the Ethernet switch
and prompt you to press Enter to show the command line prompt such as <Quidway>.
Step 4: Input a command to configure the Ethernet switch or view the operation state.
Input a “?” for an immediate help. For details of specific commands, refer to the
following chapters.
2.2 Setting up Configuration Environment through Telnet
2.2.1 Connecting a PC to the Switch through Telnet
To connect a PC to the Switch through Telnet, you must configure to meet the following
requirements:
Huawei Technologies Proprietary
2-2

Operation Manual - Getting Started
Quidway S6500 Series Ethernet Switches Chapter 2 Logging in Switch
1) Log in through the Ethernet port
z Correctly configure the IP address of a VLAN interface on a Switch (using the ip
address command in VLAN interface view).
z Add the port (that connects to a terminal) to this VLAN (using port command in
VLAN view).
z If the terminal and the interface through which the terminal connects to the Switch
locate in the same LAN, configure the IP address in the same segment as that of
the terminal, otherwise, the terminal and the Switch must be reachable between
each other.
2) Log in through the management Ethernet interface
z Correctly configure the IP address of the management Ethernet interface on the
Switch (using the ip address command in M-ethernet0/0/0 interface view).
z If the terminal and the management Ethernet interface of the Switch locate in the
same LAN, configure the IP address in the same segment as that of the terminal,
otherwise, the terminal and the Switch must be reachable between each other.
Log in to the Switch through Telnet and perform the following configuration.
Step 1: Authenticate the Telnet user via the Console port before the user logs in by
Telnet.
Note:
By default, the password is required for authenticating the Telnet user to log in the
switch. If a user logs in via the Telnet without password, he will see the prompt “Login
password has not been set !”.
<Quidway> system-view
[Quidway] user-interface vty 0
[Quidway-ui-vty0] set authentication password simple xxxx (xxxx is the preset login
password of Telnet user)
Step 2: To set up the configuration environment, connect the Ethernet port of the PC to
that of the switch via the LAN.
Huawei Technologies Proprietary
2-3
Operation Manual - Getting Started
Quidway S6500 Series Ethernet Switches Chapter 2 Logging in Switch
Workstation
Workstation
Ethernet port
Ethernet port
Ethernet
Ethernet
Server
Server
Workstation
Workstation
PC ( for co n fi g u r ing th e sw i tch
PC ( for co n fi g u r ing th e sw i tch
via Te l net )
via Te l net )
Figure 2-5 Setting up configuration environment through telnet
Step 3: Run Telnet on the PC and input the IP address of the VLAN connected to the PC
port.
Figure 2-6 Running Telnet
Step 4: The terminal displays “Login authentication” and prompts the user to input the
logon password. After you input the correct password, it displays the command line
prompt (such as <Quidway>). If the prompt “All user interfaces are used, please try
later!” appears, it indicates that too many users are connected to the Ethernet through
the Telnet at this moment. In this case, please reconnect later. At most 5 Telnet users
are allowed to log on to the Quidway series Switches simultaneously.
Step 5: Use the corresponding commands to configure the Ethernet switch or to
monitor the running state. Enter “?” to get the immediate help. For details of specific
commands, refer to the following chapters.
Note:
z When configuring the switch via Telnet, do not modify the IP address of it unless
necessary, for the modification might cut the Telnet connection.
z By default, when a Telnet user passes the password authentication to log on to the
switch, he can access the commands at Level 0.
Huawei Technologies Proprietary
2-4

Operation Manual - Getting Started
Quidway S6500 Series Ethernet Switches Chapter 2 Logging in Switch
2.2.2 Telneting a Switch through another Switch
After a user has logged into a switch, he or she can configure another switch through
the switch via Telnet. The local switch serves as Telnet client and the peer switch
serves as Telnet server. If the ports connecting these two switches are in a same local
network, their IP addresses must be configured in the same network segment.
Otherwise, the two switches must establish a route that can reach each other.
As shown in the figure below, after you telnet to a switch, you can run telnet command
to log in and configure another switch.
PC
Telnet Client
Telnet Server
Figure 2-7 Providing Telnet Client service
Step 1: Authenticate the Telnet user via the Console port on the Telnet Server (switch)
before login.
Note:
By default, the password is required for authenticating the Telnet user to log in the
switch. If a user logs in via the Telnet without password, he will see the prompt “Login
password has not been set !”.
<Quidway> system-view
[Quidway] user-interface vty 0
[Quidway-ui-vty0] set authentication password simple xxxx (xxxx is the preset login
password of Telnet user)
Step 2: The user logs in the Telnet Client (switch). For the login process, refer to the
section describing “Connecting a PC to the Switch through Telnet”.
Step 3: Perform the following operations on the Telnet Client:
<Quidway> telnet xxxx (xxxx can be the hostname or IP address of the Telnet Server. If
it is the hostname, you need to use the ip host command to specify.)
Step 4: Enter the preset login password and you will see the prompt such <Quidway>. If
the prompt “All user interfaces are used, please try later!” appears, it indicates that too
many users are connected to the switch through the Telnet at this moment. In this case,
please connect later.
Huawei Technologies Proprietary
2-5
Operation Manual - Getting Started
Quidway S6500 Series Ethernet Switches Chapter 2 Logging in Switch
Step 5: Use the corresponding commands to configure the switch or view it running
state. Enter “?” to get the immediate help. For details of specific commands, refer to the
following chapters.
2.3 Setting up Configuration Environment through a Dial-up
the Modem
Step 1: Authenticate the Modem user via the Console port of the switch before he logs
in the switch through a dial-up Modem.
Note:
By default, the password is required for authenticating the Modem user to log in the
switch. If a user logs in via the Modem without password, he will see an error prompt .
<Quidway> system-view
[Quidway] user-interface aux 0
[Quidway-ui-aux0] set authentication password simple xxxx (xxxx is the preset login
password of the Modem user.)
Step 2: Using modem command, you can configure Console port as in Modem mode.
[Quidway-ui-aux0] modem
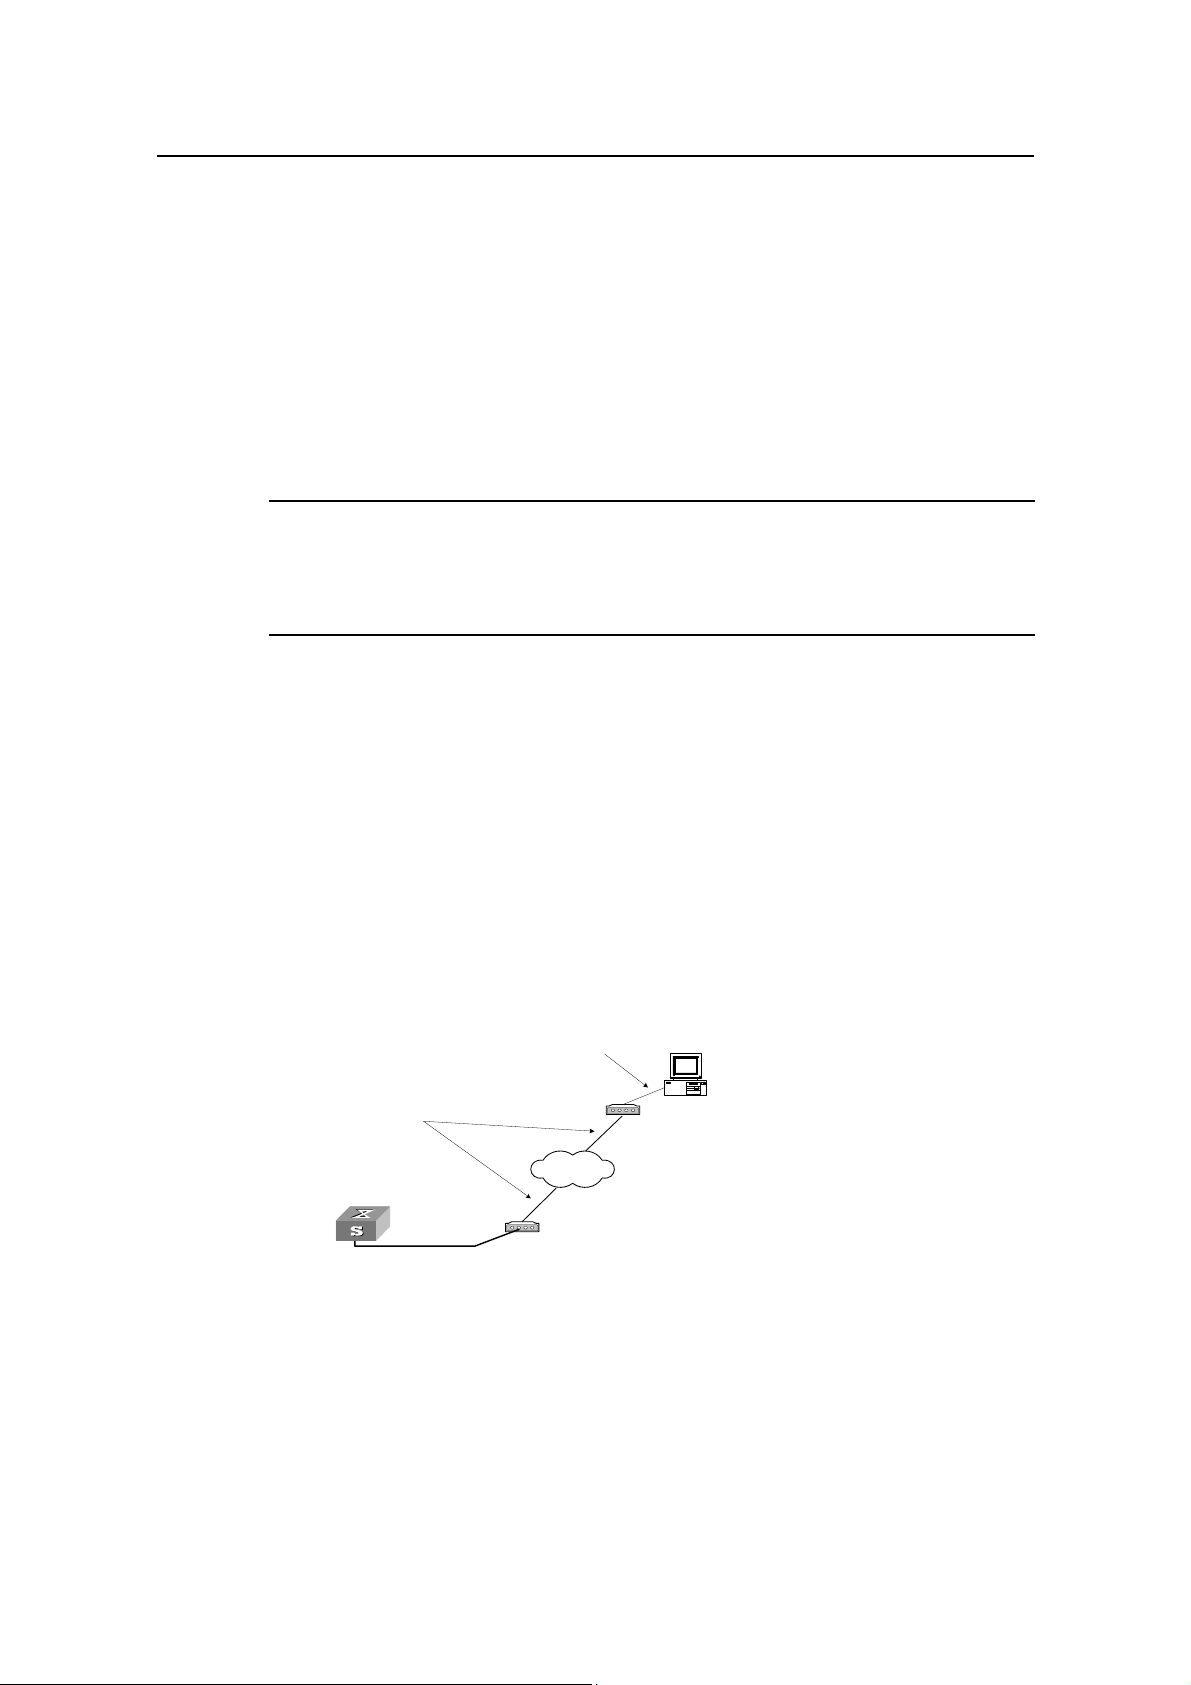
Step 3: As shown in the figure below, to set up the remote configuration environment,
connect the Modems to a PC (or a terminal) serial port and the switch Console port
respectively.
Modem serial port line
Telephone line
Console port
Remote tel:
82882285
Modem
PSTN
Modem
Figure 2-8 Setting up remote configuration environment
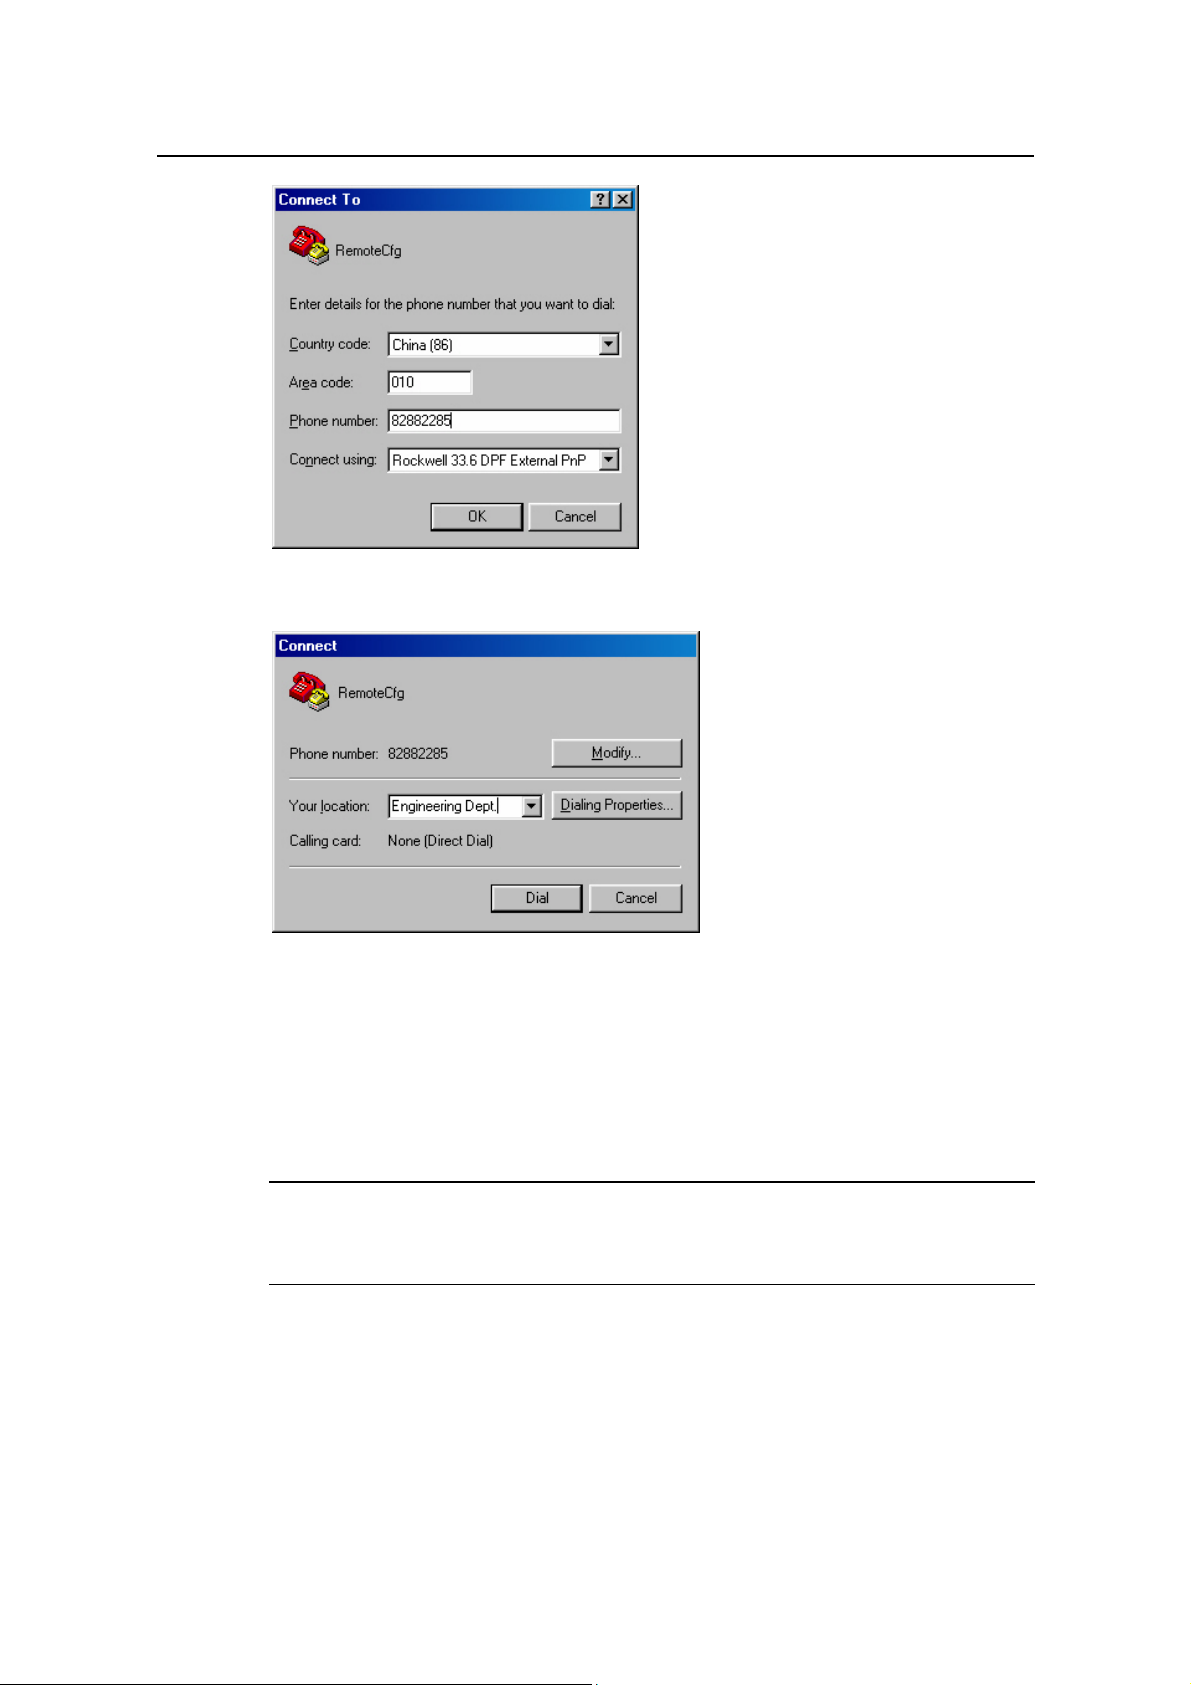
Step 4: Dial for connection to the switch, using the terminal emulator and Modem on the
remote end. The number dialed shall be the telephone number of the Modem
connected to the switch. See the two figures below.
Huawei Technologies Proprietary
2-6
Operation Manual - Getting Started
Quidway S6500 Series Ethernet Switches Chapter 2 Logging in Switch
Figure 2-9 Setting the dialed number
Figure 2-10 Dialing on the remote PC
Step 5: Enter the preset login password on the remote terminal emulator and wait for
the prompt such as <Quidway>. Then you can configure and manage the switch. Enter
“?” to get the immediate help. For details of specific commands, refer to the following
chapters.
Note:
By default, when a Modem user logs in, he can access the commands at Level 0.
Huawei Technologies Proprietary
2-7

Operation Manual - Getting Started
Quidway S6500 Series Ethernet Switches Chapter 3 Command Line Interface
Chapter 3 Command Line Interface
3.1 Command Line Interface
Quidway series Switches provide a series of configuration commands and command
line interfaces for configuring and managing the switch. The command line interface
has the following characteristics:
z Local configuration via the Console port.
z Local or remote configuration via Telnet or SSH.
z Remote configuration through a dial-up Modem to log in the switch.
z Hierarchy command protection to avoid the unauthorized users accessing switch.
z Enter a “?” to get immediate online help.
z Provide network testing commands, such as Tracert and Ping, to fast troubleshoot
the network.
z Provide various detailed debugging information to help with network
troubleshooting.
z Log in and manage other switch directly, using the Telnet command.
z Provide FTP service for the users to upload and download files.
z Provide the function similar to Doskey to execute a history command.
z The command line interpreter searches for target not fully matching the keywords.
It is ok for you to key in the whole keyword or part of it, as long as it is unique and
not ambiguous.
3.2 Command Line View
Quidway series Switches provide hierarchy protection for the command lines to avoid
unauthorized user accessing illegally.
Commands are classified into four levels, namely visit level, monitoring level, system
level and management level. They are introduced as follows:
z Visit level: Commands of this level involve command of network diagnosis tool
(such as ping and tracert), command of switch between different language
environments of user interface (language-mode) and telnet command etc. The
operation of saving configuration file is not allowed on this level of commands.
z Monitoring level: Commands of this level, including the display command and the
debugging command, are used to system maintenance, service fault diagnosis,
etc. The operation of saving configuration file is not allowed on this level of
commands.
z System level: Service configuration commands, including routing command and
commands on each network layer, are used to provide direct network service to
the user.
Huawei Technologies Proprietary
3-1

Operation Manual - Getting Started
Quidway S6500 Series Ethernet Switches Chapter 3 Command Line Interface
z Management level: They are commands that influence basis operation of the
system and system support module, which plays a support role on service.
Commands of this level involve file system commands, FTP commands, TFTP
commands, user management commands, and level setting commands.
At the same time, login users are classified into four levels that correspond to the four
command levels respectively. After users of different levels log in, they can only use
commands at the levels that are equal to or lower than its own level.
In order to prevent unauthorized users from illegal login, user will be identified when
switching from a lower level to a higher level with super [ level ] command. User ID
authentication is performed when users at lower level switch to users at higher level. In
other words, user password of the higher level is needed (Suppose the user has set the
super password [ level level ] { simple | cipher } password.) For the sake of
confidentiality, on the screen the user cannot see the password that he entered. Only
when correct password is input for three times, can the user switch to the higher level.
Otherwise, the original user level will remain unchanged.
Different command views are implemented according to different requirements. They
are related to one another. For example, after logging in the switch, you will enter user
view, in which you can only use some basic functions such as displaying the running
state and statistics information. In user view, key in system-view to enter system view,
in which you can key in different configuration commands and enter the corresponding
views.
The command line provides the following views:
z User view
z System view
z Ethernet Port view
z VLAN view
z VLAN interface view
z LoopBack interface view
z Local-user view
z User interface view
z FTP Client view
z SFTP Client view
z MST region view
z RSA public key view
z RSA key code view
z PIM view
z RIP view
z OSPF view
z OSPF area view
z BGP view
z IS-IS view
Huawei Technologies Proprietary
3-2

Operation Manual - Getting Started
Quidway S6500 Series Ethernet Switches Chapter 3 Command Line Interface
z Route policy view
z Basic ACL view
z Advanced ACL view
z Layer-2 ACL view
z User-defined ACL view
z QoS view
z RADIUS scheme view
z ISP domain view
The following table describes the function features of different views and the ways to
enter or quit.
Table 3-1 Function feature of command view
Command
view
User view
System
view
Ethernet
Port view
VLAN view
Function Prompt
Show the basic
information
about operation
<Quidway>
and statistics
Configure
system
[Quidway]
parameters
[Quidway-Ethernet
3/0/1]
Configure
Ethernet port
parameters
[Quidway-GigabitE
thernet4/0/1]
Configure
VLAN
[Quidway-vlan1]
parameters
Command to
enter
Enter right after
connecting the
switch
Key in
system-view in
user view
100M Ethernet
port view
Key in interface
ethernet 3/0/1 in
system view
GigabitEthernet/
10GE port view
Key in interface
gigabitethernet
4/0/1 in system
view
Key in vlan 1 in
system view
Command to
exit
quit
disconnects to
the switch
quit or return
returns to user
view
quit returns to
system view
return returns
to user view
quit returns to
system view
return returns
to user view
Huawei Technologies Proprietary
3-3

Operation Manual - Getting Started
Quidway S6500 Series Ethernet Switches Chapter 3 Command Line Interface
Command
view
Function Prompt
Command to
enter
Command to
exit
VLAN
interface
view
LoopBack
interface
view
Local-user
view
User
interface
view
FTP Client
view
SFTP
Client view
Configure IP
interface
parameters for
a VLAN
Configure
LoopBack
interface
parameters
Configure local
user
parameters
Configure user
interface
parameters
Configure FTP
Client
parameters
Configure
SFTP Client
parameters
[Quidway-Vlan-inte
rface1]
[Quidway-LoopBac
k0]
[Quidway-luser-us
er1]
[Quidway-ui0]
[ftp]
sftp-client>
Key in interface
vlan-interface 1
in system view
Key in interface
loopback 0 in
system view
Key in
local-user user1
in system view
Key in
user-interface 0
in system view
Key in ftp in user
view
Key in sftp
10.1.1.1
quit returns to
system view
return returns
to user view
quit returns to
system view
return returns
to user view
quit returns to
system view
return returns
to user view
quit returns to
system view
return returns
to user view
quit returns to
user view
quit returns to
user view
MST
region view
RSA public
key view
RSA key
code view
PIM view
RIP view
Configure MST
region
parameters
Configure RSA
public key of
SSH user
Edit RSA public
key of SSH
user
Configure PIM
parameters
Configure RIP
parameters
[Quidway-mst-regi
on]
[Quidway-rsa-publi
c-key]
[Quidway-rsa-keycode]
[Quidway-pim]
[Quidway-rip]
Key in stp
region-configur
ation in system
view
Key in rsa
peer-public-key
quidway003 in
system view
Key in
public-key-cod
e begin in RSA
public key view
Key in pim in
system view
Key in rip in
system view
quit returns to
user view
return returns
to user view
peer-public-ke
y end returns
to system view
public-key-co
de end returns
to RSA public
key view
quit returns to
system view
return returns
to user view
quit returns to
system view
return returns
to user view
Huawei Technologies Proprietary
3-4

Operation Manual - Getting Started
Quidway S6500 Series Ethernet Switches Chapter 3 Command Line Interface
Command
view
Function Prompt
Command to
enter
Command to
exit
OSPF view
OSPF area
view
BGP view
IS-IS view
Route
policy view
Configure
OSPF
parameters
Configure
OSPF area
parameters
Configure BGP
parameters
Configure IS-IS
parameters
Configure route
policy
parameters
[Quidway-ospf-1]
[Quidway-ospf-1-ar
ea-0.0.0.1]
[Quidway-bgp]
[Quidway-isis]
[Quidway-route-pol
icy]
Key in ospf in
system view
Key in area 1 in
OSPF view
Key in bgp 100
in system view
Key in isis in
system view
Key in
route-policy
policy1 permit
node 10 in
system view
quit returns to
system view
return returns
to user view
quit returns to
OSPF view
return returns
to user view
quit returns to
system view
return returns
to user view
quit returns to
system view
return returns
to user view
quit returns to
system view
return returns
to user view
Basic ACL
view
Advanced
ACL view
Layer-2
ACL view
User-defin
ed ACL
view
QoS view
Define the rule
of basic ACL
Define the rule
of advanced
ACL
Define the rule
of layer-2 ACL
Define the rule
of user-defined
ACL
Configure the
parameters
related to Qos
[Quidway-aclbasic-2000]
[Quidway-acl-adv3000]
[Quidway-acl-link-4
000]
[Quidway-acl-user5000]
[Quidway-qoss-Gig
abitEthernet4/0/1]
or
[Quidway-qosb-Gi
gabitEthernet4/0/1]
Key in acl
number 2000 in
system view
Key in acl
number 3000 in
system view
Key in acl
number 4000 in
system view
Key in acl
number 5000 in
system view
Key in qos in
Ethernet
interface view
quit returns to
system view
return returns
to user view
quit returns to
system view
return returns
to user view
quit returns to
system view
return returns
to user view
quit returns to
system view
return returns
to user view
quit returns to
system view
return returns
to user view
Huawei Technologies Proprietary
3-5

Operation Manual - Getting Started
Quidway S6500 Series Ethernet Switches Chapter 3 Command Line Interface
Command
view
Function Prompt
Command to
enter
Command to
exit
RADIUS
scheme
view
ISP
domain
view
Configure
RADIUS
parameters
Configure ISP
domain
parameters
[Quidway-radius-1]
[Quidway-isp-huaw
ei163.net]
Key in radius
scheme 1 in
system view
Key in domain
huawei163.net in
system view
3.3 Features and Functions of Command Line
3.3.1 Online Help of Command Line
The command line interface provides the following online help modes.
z Full help
z Partial help
You can get the help information through these online help commands, which are
described as follows.
quit returns to
system view
return returns
to user view
quit returns to
system view
return returns
to user view
1) Input “?” in any view to get all the commands in it and corresponding descriptions.
<Quidway> ?
User view commands:
boot Set boot option
cd Change current directory
clock Specify the system clock
copy Copy from one file to another
debugging Enable system debugging functions
delete Delete a file
dir List files on a file system
display Display current system information
2) Input a command with a “?” separated by a space. If this position is for keywords,
all the keywords and the corresponding brief descriptions will be listed.
<Quidway> language-mode ?
chinese Chinese environment
english English environment
3) Input a command with a “?” separated by a space. If this position is for parameters,
all the parameters and their brief descriptions will be listed.
[Quidway] interface vlan ?
<1-4094> VLAN interface number
Huawei Technologies Proprietary
3-6
Operation Manual - Getting Started
Quidway S6500 Series Ethernet Switches Chapter 3 Command Line Interface
[Quidway] interface vlan 1 ?
<cr>
<cr> indicates no parameter in this position. The next command line repeats the
command, you can press <Enter> to execute it directly.
4) Input a character string with a “?”, then all the commands with this character string
as their initials will be listed.
<Quidway>pi?
ping
5) Input a command with a character string and “?”, then all the key words with this
character string as their initials in the command will be listed.
<Quidway> display ver?
version
6) Input the first letters of a keyword of a command and press <Tab> key. If no other
keywords are headed by this letters, then this unique keyword will be displayed
automatically. If other keywords headed by this letter exist, press <Tab> key
repeatedly to display these keywords
7) To switch to the Chinese display for the above information, perform the
language-mode command.
3.3.2 Displaying Characteristics of Command Line
Command line interface provides the following display characteristics:
z For users’ convenience, the instruction and help information can be displayed in
both English and Chinese.
z For the information to be displayed exceeding one screen, pausing function is
provided. In this case, users can have three choices, as shown in the table below.
Table 3-2 Functions of displaying
Key or Command Function
Press <Ctrl+C> when the display
pauses
Enter a space when the display
pauses
Press <Enter> when the display
pauses
Stop displaying and executing command.
Continue to display the next screen of
information.
Continue to display the next line of
information.
3.3.3 History Command of Command Line
Command line interface provides the function similar to that of DosKey. The commands
entered by users can be automatically saved by the command line interface and you
Huawei Technologies Proprietary
3-7
Operation Manual - Getting Started
Quidway S6500 Series Ethernet Switches Chapter 3 Command Line Interface
can invoke and execute them at any time later. History command buffer is defaulted as
10. That is, the command line interface can store 10 history commands for each user.
The operations are shown in the table below.
Table 3-3 Retrieve history command
Operation Key Result
Display history
command
Retrieve the
previous history
command
Retrieve the next
history command
display
history-command
Up cursor key <↑> or
<Ctrl+P>
Down cursor key <↓>
or <Ctrl+N>
Note:
Cursor keys can be used to retrieve the history commands in Windows 3.X Terminal
and Telnet. However, in Windows 9X HyperTerminal, the cursor keys ↑ and ↓ do not
work, because Windows 9X HyperTerminal defines the two keys differently. In this
case, use the combination keys <Ctrl+P> and <Ctrl+N> instead for the same purpose.
3.3.4 Common Command Line Error Messages
All the input commands by users can be correctly executed, if they have passed the
grammar check. Otherwise, error messages will be reported to users. The common
error messages are listed in the following table.
Display history command by user
inputting
Retrieve the previous history
command, if there is any.
Retrieve the next history
command, if there is any.
Table 3-4 Common command line error messages
Error messages Causes
Cannot find the command.
Cannot find the keyword.
Unrecognized command
Wrong parameter type.
The value of the parameter exceeds the range.
Incomplete command The input command is incomplete.
Too many parameters Enter too many parameters.
Ambiguous command The parameters entered are not specific.
Huawei Technologies Proprietary
3-8

Operation Manual - Getting Started
Quidway S6500 Series Ethernet Switches Chapter 3 Command Line Interface
3.3.5 Editing Characteristics of Command Line
Command line interface provides the basic command editing function and supports to
edit multiple lines. A command cannot longer than 256 characters. See the table below.
Table 3-5 Editing functions
Key Function
Common keys
Backspace
Leftwards cursor key
<←> or <Ctrl+B>
Rightwards cursor key
<→> or <Ctrl+F>
Up cursor key <↑> or
<Ctrl+P>
Down cursor key <↓>
or <Ctrl+N>
<Tab>
Insert from the cursor position and the cursor moves to the
right, if the edition buffer still has free space.
Delete the character preceding the cursor and the cursor
moves backward.
Move the cursor a character backward
Move the cursor a character forward
Retrieve the history command.
Press <Tab> after typing the incomplete key word and the
system will execute the partial help: If the key word
matching the typed one is unique, the system will replace
the typed one with the complete key word and display it in
a new line; if there is not a matched key word or the
matched key word is not unique, the system will do no
modification but display the originally typed word in a new
line.
Huawei Technologies Proprietary
3-9

Operation Manual - Getting Started
Quidway S6500 Series Ethernet Switches Chapter 4 User Interface Configuration
Chapter 4 User Interface Configuration
4.1 User Interface Overview
User interface configuration is another way provided by the switch to configure and
manage the port data.
S6500 Series Switches support the following configuration methods:
z Local configuration via the Console port
z Local and remote configuration through Telnet or SSH on Ethernet port
z Remote configuration through dial with modem via the Console port.
According to the above-mentioned configuration methods, there are two types of user
interfaces:
z AUX user interface
AUX user interface is used to log in the switch via the Console port. A switch can only
have one AUX user interface.
z VTY user interface
VTY user interface is used to telnet the switch. A switch can have up to five VTY user
interface.
Note:
For Quidway series Switches, AUX port and Console port are the same one. There is
only the type of AUX user interface.
User interface is numbered in the following two ways: absolute number and relative
number.
1) Absolute number, following the rules below.
z AUX user interface is numbered as the first interface designated as user interface
0.
z VTY is numbered after AUX user interface. The absolute number of the first VTY is
incremented by 1 than the AUX user interface number.
2) Relative number, represented by “+ number” assigned to each type of user
interface. It follows the rules below:
z Number of AUX user interface: AUX 0.
z Number of VTY: The first VTY interface is designated as VTY 0, the second one is
designated as VTY 1, and so on.
Huawei Technologies Proprietary
4-1

Operation Manual - Getting Started
Quidway S6500 Series Ethernet Switches Chapter 4 User Interface Configuration
4.2 User Interface Configuration
User interface configuration includes:
z Entering user interface view
z Configuring the user interface-supported protocol
z Configuring the attributes of AUX (Console) port
z Configuring the terminal attributes
z Managing users
z Configuring Modem attributes
z Configuring redirection
4.2.1 Entering User Interface View
The following command is used for entering a user interface view. You can enter a
single user interface view or multi user interface view to configure one or more user
interfaces respectively.
Perform the following configuration in system view.
Table 4-1 Entering user interface view
Operation Command
Enter a single user interface view or
multi user interface views
user-interface [ type ] first-number
[ last-number ]
4.2.2 Configuring the User Interface-Supported Protocol
The following command is used for setting the supported protocol by the current user
interface. You can log in switch only through the supported protocol. The configuration
becomes effective when you log in again.
Perform the following configurations in user interface (VTY user interface only) view.
Table 4-2 Configuring the user interface-supported protocol
Operation Command
Configure the user interface-supported
protocol
protocol inbound { all | ssh | telnet }
By default, the user interface supports Telnet and SSH protocols.
Huawei Technologies Proprietary
4-2
 Loading...