

Page 1
Basic Operation
For detailed operations, refer to "Basic Manual".
Power button
Power ON
Touch and hold for 2 seconds or longer.
Sleep mode
While screen backlight is turned on, press the Power
button to turn off the screen and put the product into
sleep mode. In sleep mode, press the Power button to
cancel sleep mode.
Displaying the Home screen from the lock screen
The lock screen is displayed when turning the power
on or sleep mode is canceled. The Home screen is
displayed when sliding on the lock screen.
Navigation bar
: Return to the previous screen.
: Indicate the current position of home screens.
:
Display a list of recently-used applications or functions.
Display (Touch panel)
Touch directly with your finger to operate.
《Home screen (Main home screen)》
■ Character entry
Use the software keyboard for entering characters.
Tap the entry field in the character entry screen when registering a contact, creating mail, etc. to display the software keyboard.
Software keyboard
With "iWnn IME" for Japanese input, you can change keyboard from "QWERTY keyboard", "10-key keyboard", and "50-key keyboard".
・Tap "
" to change input mode (Katakana/alphabet/numeric).
《QWERTY keyboard》《10-key keyboard》《50-key keyboard》
Flick input
Touch and hold a key to display input candidates for flick input as shown below. Flick to the direction of the character to enter.
《Flick input screen》
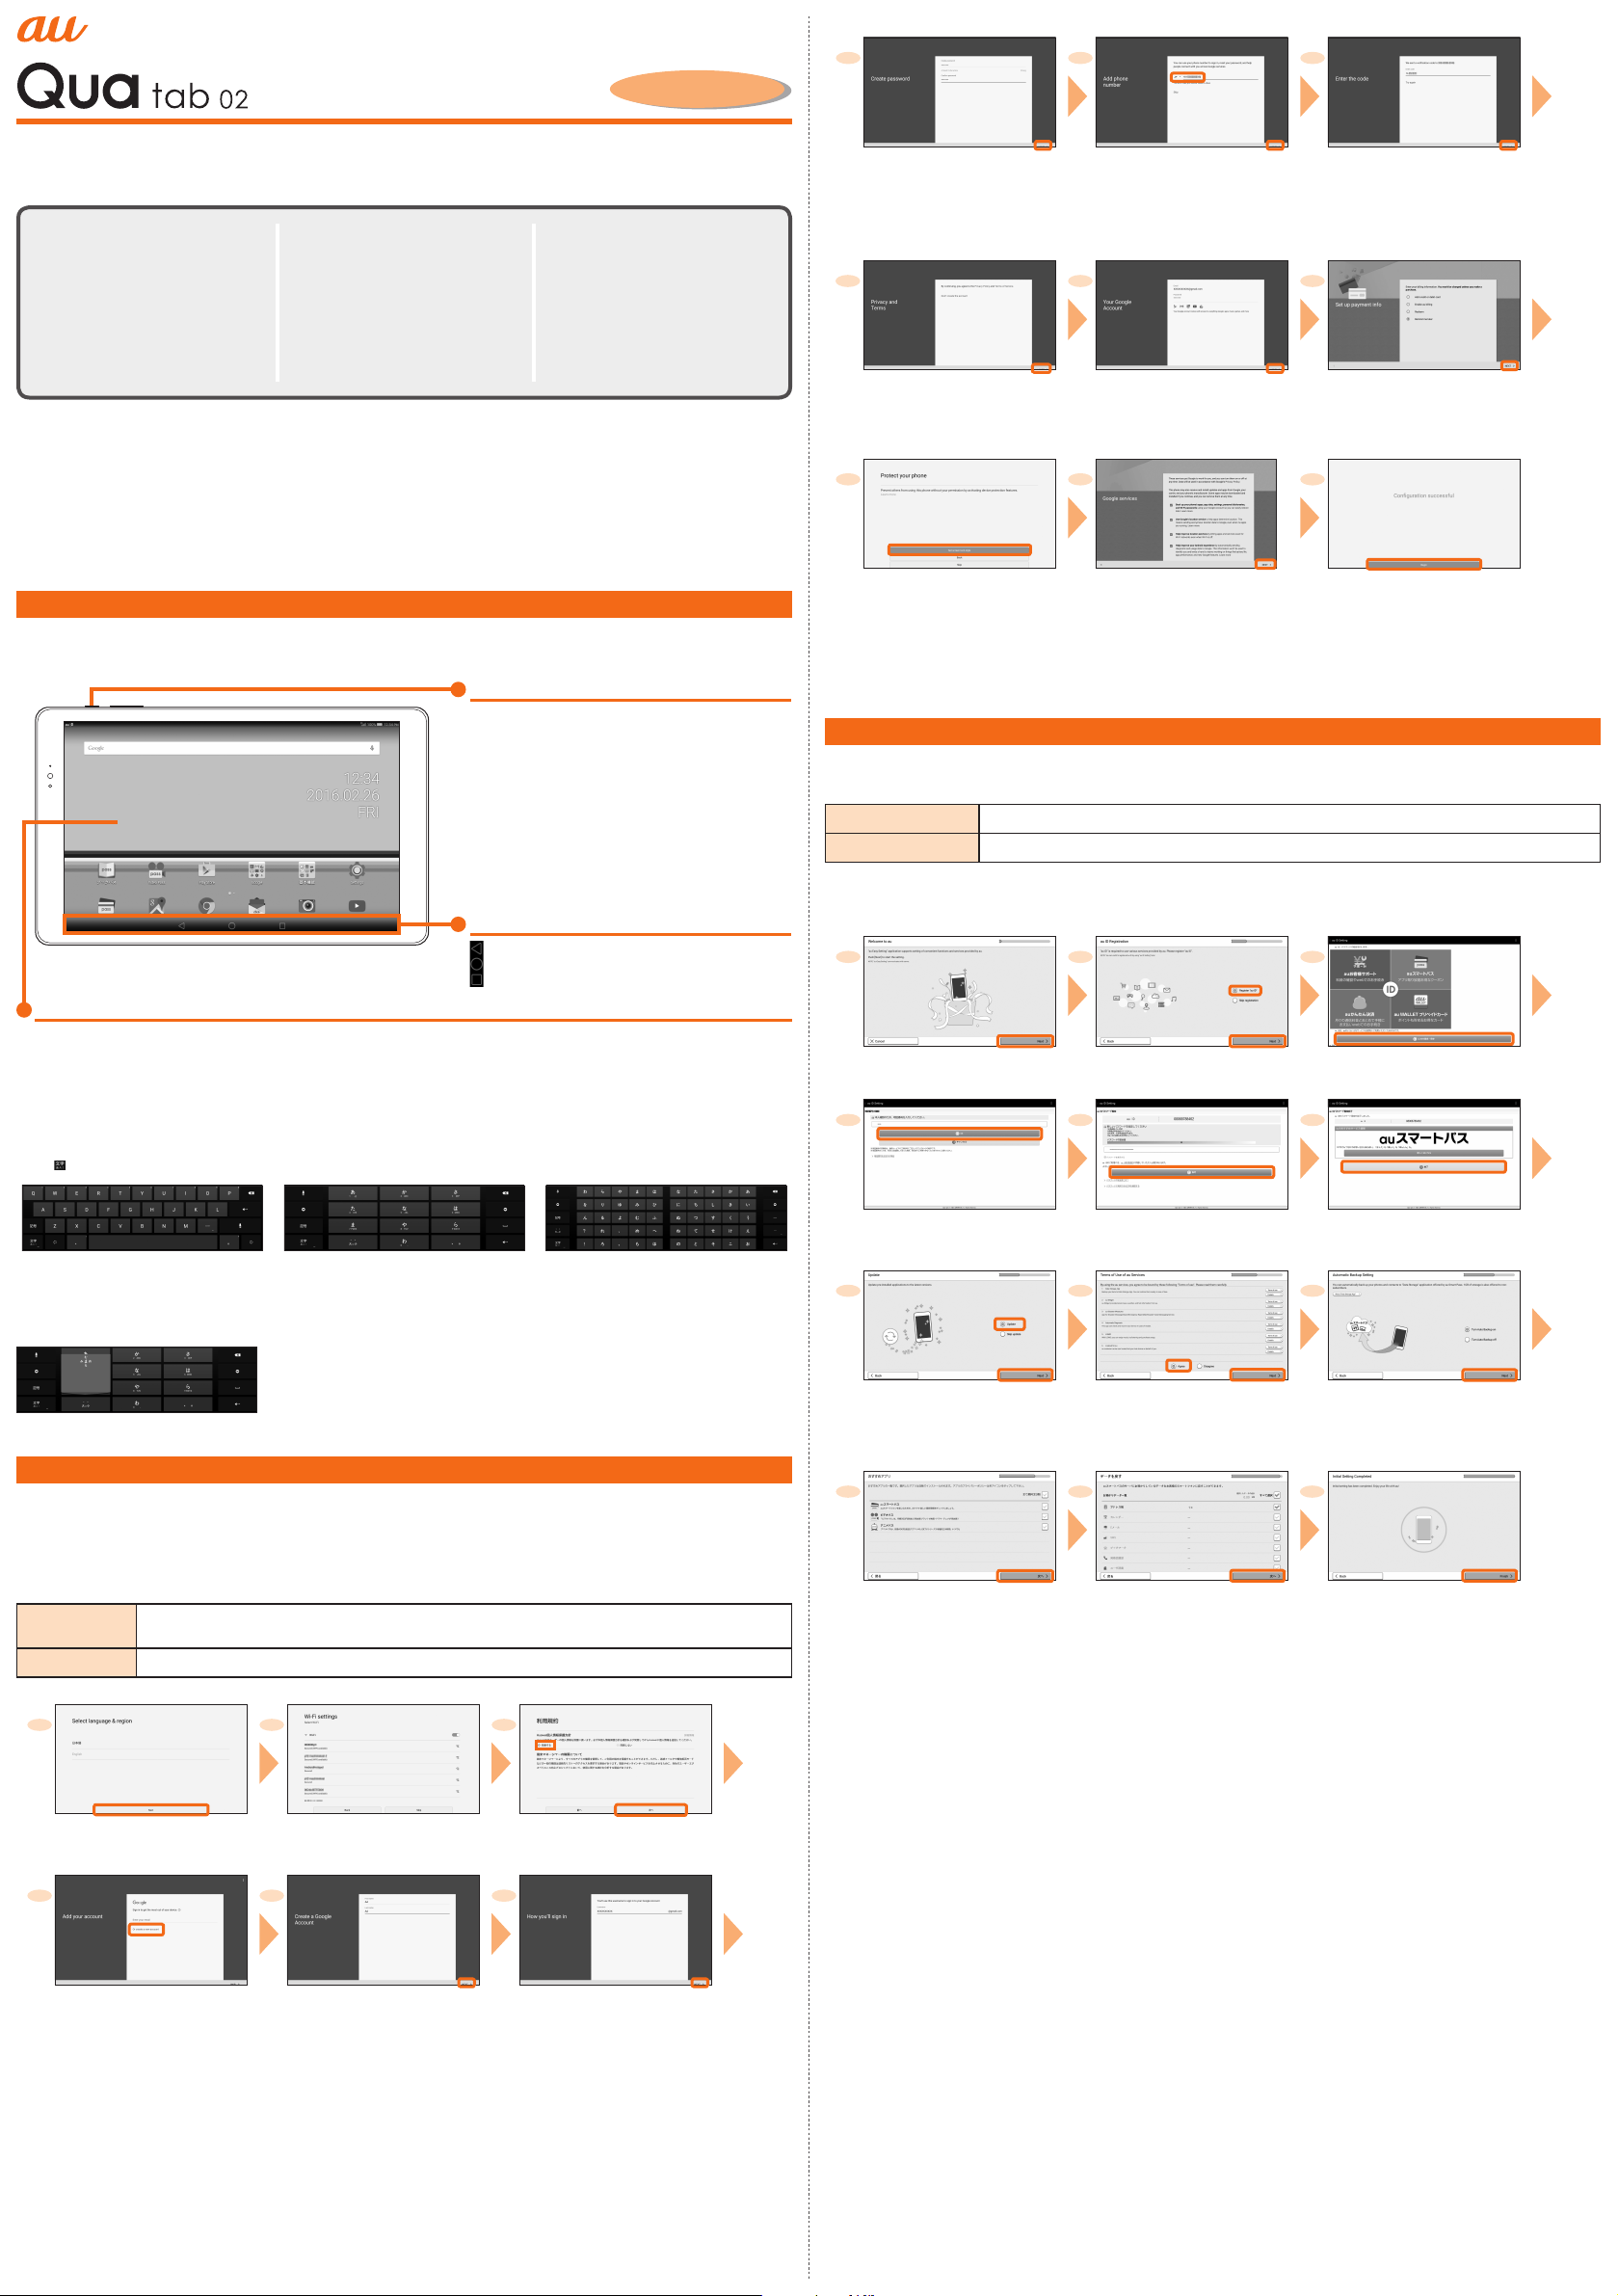
Initial Settings
When you turn on the product for the first time after purchasing the product, follow the onscreen instructions to set language, functions,
services, etc.
■ Setting up Google account
Set up Google account to use Google applications such as "Gmail", "Play Store", "Hangouts".
Main setting items are as follows. You need to register "Last name" and "First name" to create an account.
User name
Register your Google account (user ID) and a character string for mail address. You can register a desired name,
but a name already registered by another user cannot be set.
Password Register password for the Google account.
1 2 3
Select language, [NEXT] Set up the Wi-Fi® network to
connect as required
*1
Check detailed information,
[ 同意する (Agree)] → [ 次へ (NEXT)]
4
5
6
[Or create a new account]
*2
Enter "Last" name and "First"
name → [NEXT]
Enter a username → [NEXT]
7 8 9
Enter a password, and reenter the
password for confirmation
→ [NEXT]
Confirm/check country name, enter
phone number →
[NEXT] *1 → [VERIFY]
A text message with a Google verification
code is sent to the specified phone
number.
Enter the Google verification code
→ [NEXT]
When you set the phone number of
this product in step 8, the Google
verification code you sent is set
automatically. Go to step 10.
10
11 12
Check the contents,
then [I AGREE]
Check the contents, then [NEXT] Select whether to set payment
information → [NEXT]
Here, select "Remind me later" and go to
next step.
13
14 15
[Set screen lock style]*1→
Follow the onscreen instructions
Check the contents, then [NEXT] [Begin]
*1 If you do not set up, tap "Skip".
*2 If you have a Google account, enter the mail address.
au Easy Setting
By setting au ID, you can use various services provided by au such as "au Kantan Kessai" which allows you to purchase applications from
the au スマートパス (au Smart Pass) or Google Play. Main setting items are as follows.
au ID
*
Register your au phone number or a character string for au ID (user ID).
au ID password Register password for using au ID.
* "au ID" which is already used by another user cannot be set.
• If you skip the operation of "au Easy Setting" when you purchased the product, you can set au ID later. In that case, operate from the
Home screen → [Settings] → [au menu] → [au Easy Setting], or from the Home screen → [auフォルダー ] → [au ID Setting].
1 2 3
Welcome to au screen → [Next] [Register "au ID"] → [Next] [au IDの設定・保存
(Set and save au ID)]
4 5 6
Enter the security code*1 → [OK] Enter a security password →
[ 設定 (Settings)]
[ 終了 (End)]
7 8 9
[Update] → [Next] Check the terms and conditions
(reading requires),
[Agree] → [Next] → [Agree]
*2
Check the contents,
[Turn Auto Backup on]/
[Turn Auto Backup off]3→
[Next]
10 11
12
Select apps to install →
[ 次へ (Next)]
*4
Select type of data to return*5→
[ 次へ (Next)]
[Finish]
※ 6
*1 Default value is a four-digit number written at subscription.
*2 Configurations for Lookout for au is completed when you tap "Agree".
*3 To back up photos and contacts to au Smart Pass automatically using "Data Storage App", tap "Turn Auto Backup on".
*4 If there are apps to be restored, the restoration of apps screen appears. Follow the onscreen instructions.
*5 If there is no application on au Smart Pass, a restore screen is not displayed.
*6 When the confirmation screen appears, confirm the content and tap "OK".
Thank you for buying the "Qua tab 02" (simply called the "product" from here on). In this guide, settings and precautions for using the
product are described.
For explanations of basic functions, refer to "Basic Manual".
■ Basic Operation
Describes the basic operations.
■ Initial settings
Make initial settings when you turn the
power on for the first time.
■ au Easy Setting
Set au ID.
■ E-mail
Make initial settings for E-mail
(@ezweb.ne.jp) etc.
■ Wi-Fi® Setting
Describes how to connect Wi-Fi®
network.
■ Transferring data from au
Settings Menu
Return or store data from your
previously used au phone to this
product using a microSD card or the au
Smart Pass server.
■ Saving battery power
Describes how to save battery
consumption by switching ON/OFF of
functions in the shortcut items list.
Company names and product names referred to in this manual are trademarks or registered trademarks of respective companies.
The TM, ® marks may be omitted in this manual.
Screen illustrations shown in this manual may look different from the actual screens.
In some cases, minor details or a part of a screen may be omitted.
In this manual, screenshots for body color "Powder White" are provided as examples.
December2015,1stEdition
Soldby:KDDICORPORATION
OKINAWACELLULARTELEPHONECOMPANY
Importedby:HUAWEITECHNOLOGIESJAPANK.K.
Manufacturedby:HUAWEITECHNOLOGIESCO.,LTD.
Setting Guide
Introduction
Page 2
E-mail
To use E-mail (@ezweb.ne.jp), subscription to LTE NET is required.
If you did not subscribe it when you purchased the product, contact an au shop or Customer Service Center.
Your E-mail address is determined automatically after initial setting. You can change the E-mail address later.
■ Initial settings
1 2 3
When the overview of send
information of "About use of
customer information" appears, tap
[Accept].
When the description screen for
E-mail function appears, confirm
the content and tap [Close].
Home screen → [ ] →
Check the contents,
then [接続する (Connect)]
Check your Email address →
[閉じる (Close)] → Check the contents,
then [Agree]/[Disagree]→ [Done]
■ Changing your e-mail address
1 2 3
Home screen → [ ] →
[ ] → [E-mail settings]
[Other settings ] → Check
the contents, then [ 接続する
(Connect)]
[E メールアドレスの変更へ
(To Change E-mail address)]
4 5
Enter the security code →
[ 送信 (Send)] →
Check the contents,
then [ 承諾する (I accept)]
Enter E-mail address →
[ 送信 (Send)] → [OK] →
[ 閉じる (Close)]
■ Backing up E-mail
You can back up E-mail data on the internal storage (/storage/emulated/0/private/au/email/BU/).
• Home screen → [Settings] → [Storage] → When [Default location] is set to [SD card], data is backed up on the microSD memory card (/
storage/sdcard1/private/au/email/BU/).
* When you connect the product to a PC and check the back up data location, the folder name may be displayed differently.
1 2 3
Home screen → [ ] →
[ ] → [E-mail settings]
[Backup/Restore] [Mail Backup] →
Confirm the notes and [OK]
4
Select a character code to make backup data →
[OK] → Select a folder to back up → [OK]
Mail Settings Other Than E-mail
You can use mail addresses other than E-mail (@ezweb.ne.jp).
Use of other mail addresses requires accounts to be set. When using another mail address for the first time, set the address as
follows.
Example: When you use Gmail
Home screen → [Google] → [Gmail] → Follow the onscreen instructions and enter mail information.
Wi-Fi® Setting
Use your home Wireless LAN (Wi-Fi®) or public wireless LAN to connect to the Internet.
Main settings are as follows.
Select Wi-Fi® network
to connect
Search for and connect to an available Wi-Fi® network.
WPS system Use for registration of access point compatible with Wi-Fi
®
Protected Setup™ with WPS mark.
* If you turn on wireless LAN (Wi-Fi®) function, battery consumption increases. It is recommended that you turn wireless LAN (Wi-Fi®) function to OFF
when not using wireless LAN (Wi-Fi
®
) function.
1 2
Available Wi-Fi® networks are listed. Select
a Wi-Fi
®
network to connect → Enter a
password as required → [Connect] to
connect the Wi-Fi
®
network.
If an access point you want to connect
cannot be detected, tap [Add network...]
and connect the Wi-Fi
®
network manually.
Home screen → [Settings] → [Wi-Fi]
Tap [
] to turn ON
■ Using WPS system access point
3 4
For using WPS button, tap [WPS connection] and then press and hold the WPS button
of the access point to set to WPS mode. The access point is automatically detected and
registration starts.
For entering WPS PIN, tap [WPS PIN connection] and enter displayed PIN code on the
access point, then registration starts.
[ ] → [Advanced settings] →
[WPS connection]/
[WPS PIN connection]
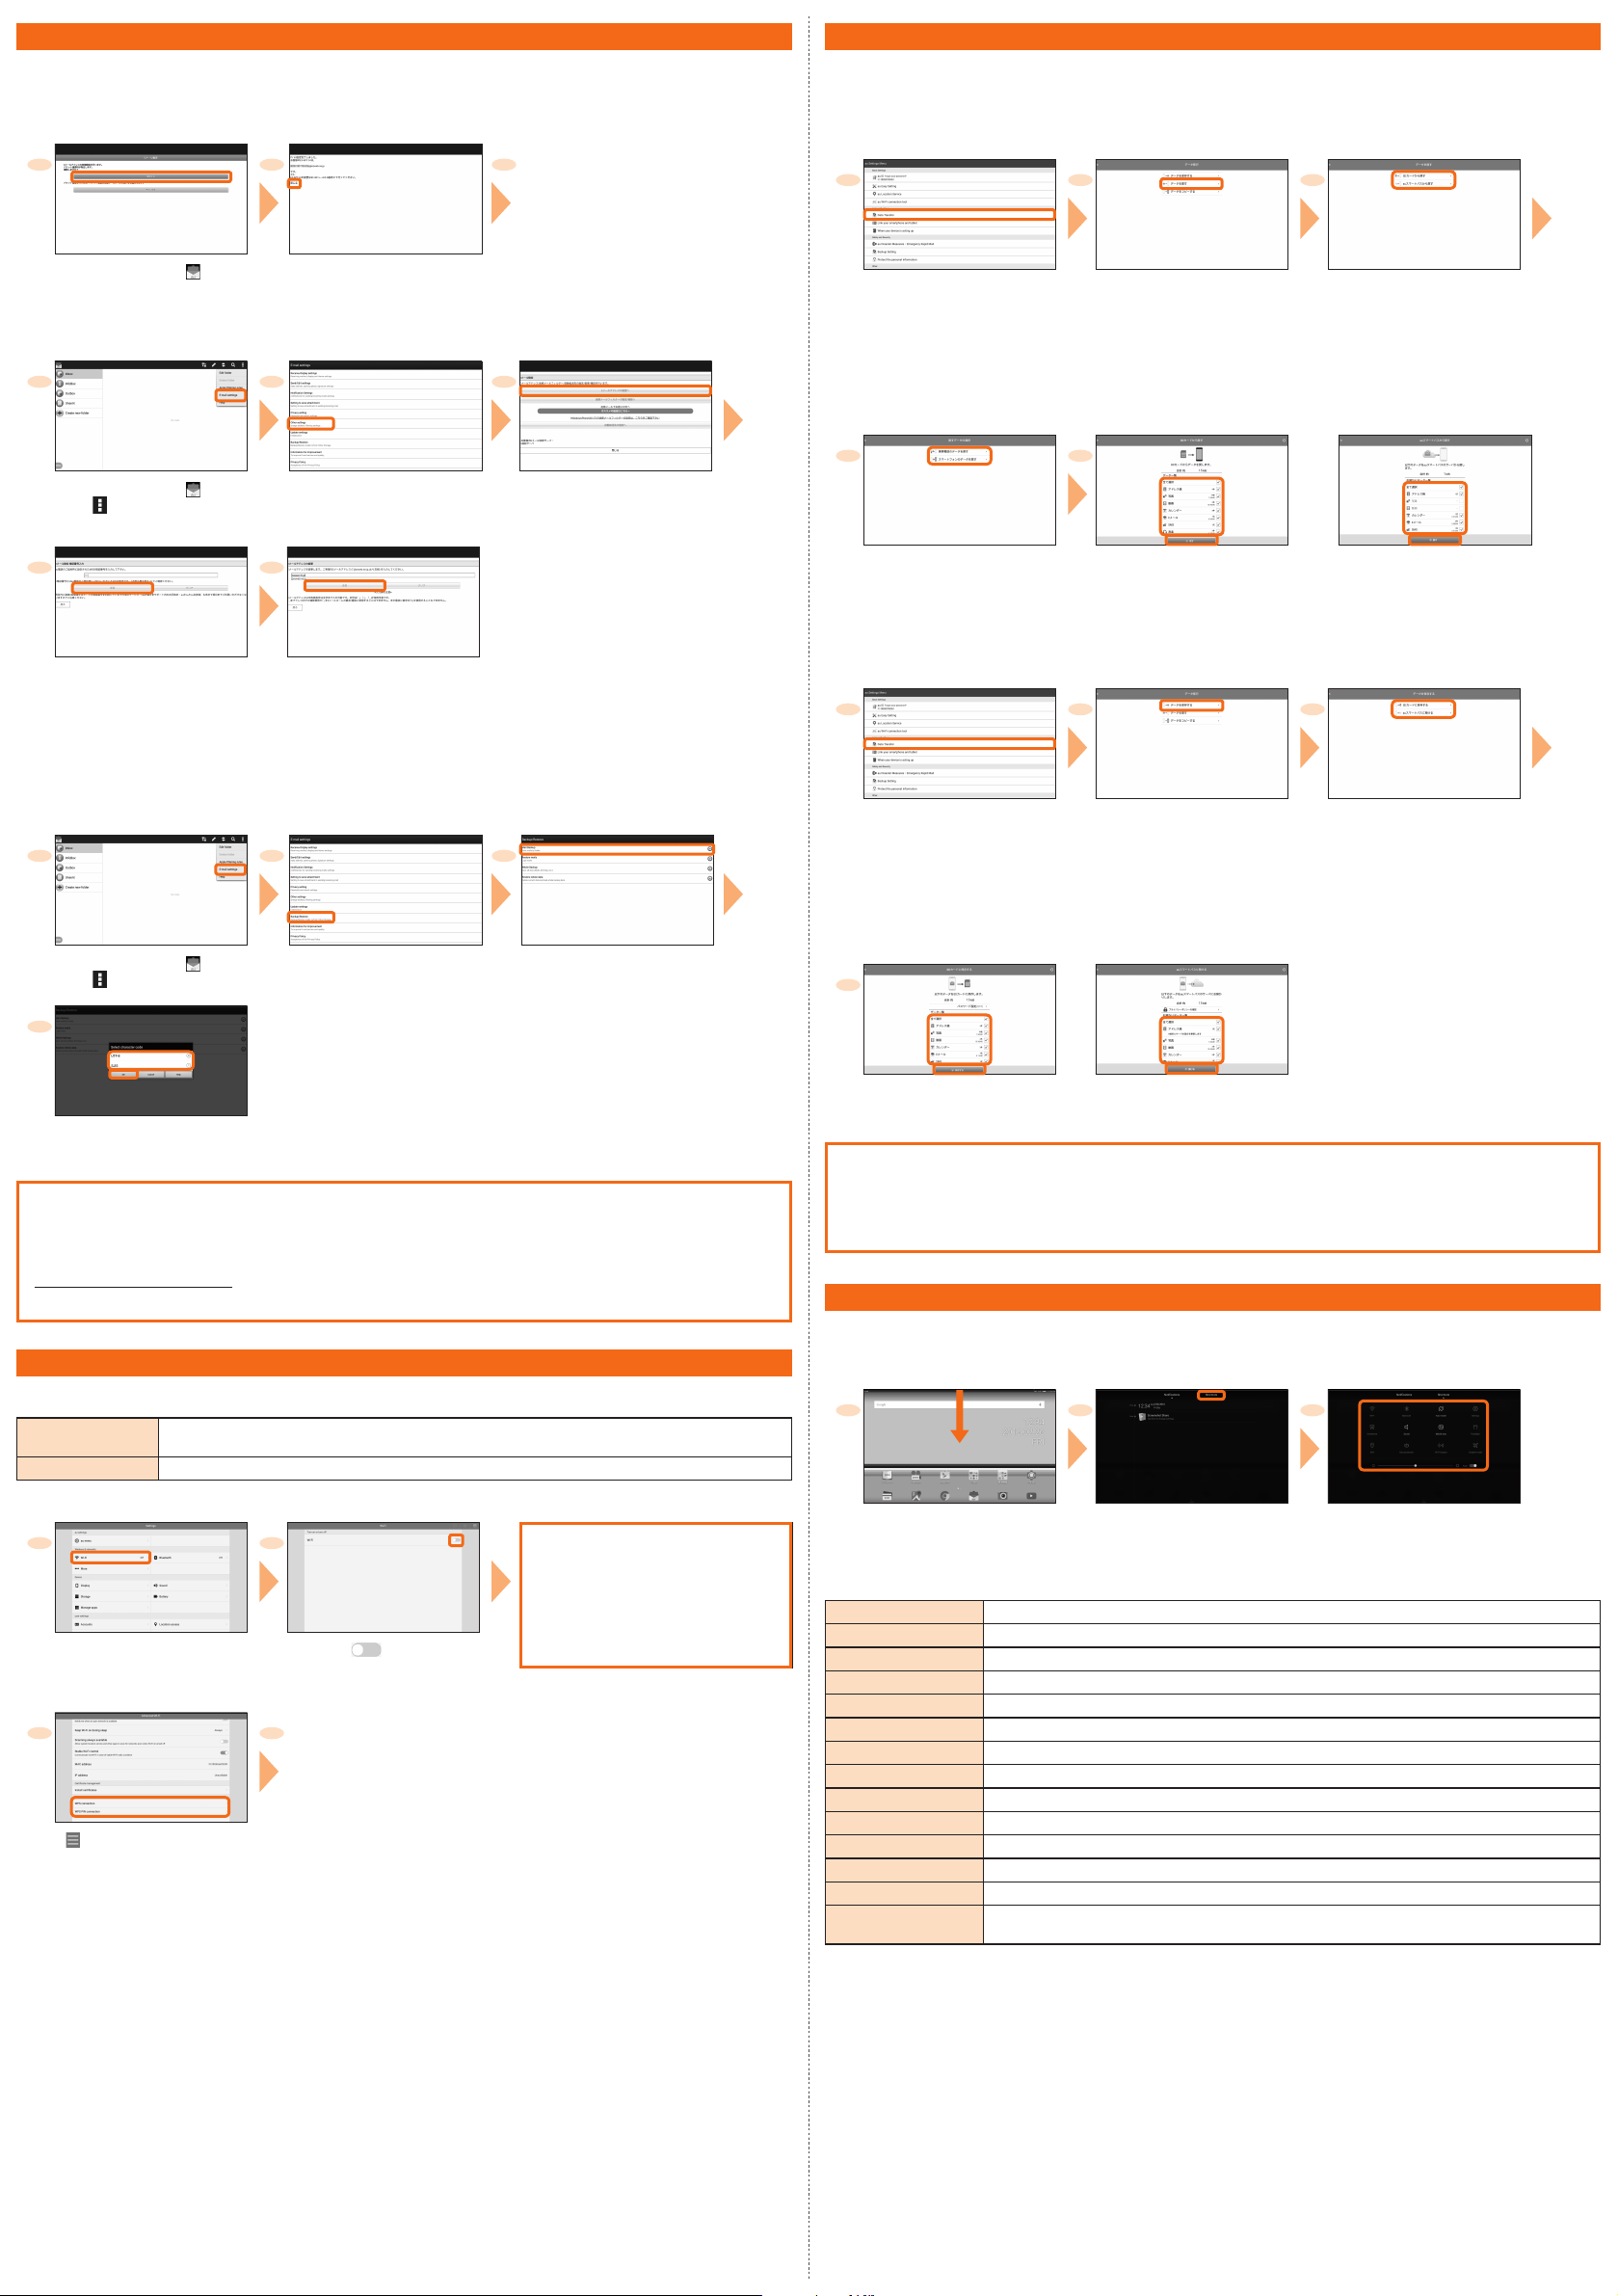
Transferring Data from au Settings Menu
Return or store data from your previously used au phone to this product using a microSD card or the au Smart Pass server.
• Setting au ID is required for returning/storing data using the au Smart Pass server.
• For returning data using a microSD memory card, save the data to the microSD memory card using your previously used au phone in
advance.
■ Returning data from au Settings Menu
1 2 3
Home screen → [Settings] →
[au menu] → [Data Transfer]
In the data transfer screen,
[ データを戻す (Return data)]
Select a method for returning data
*Toreturndatafrom"au スマー
トパスから戻す(Returnfromau
SmartPass)"(datastoredon
theauSmartPassserver),you
mustsetanauID.
When "SDカードから戻す
(Return from SD card)"
is selected
When "auスマートパスから
戻す (Return from au Smart
Pass)" is selected
4 5
When you select "SDカードから戻す
(Return from SD card)", select the type of
your previously used au cell phone
*Thismenudoesnotappearwhen"au
スマートパスから戻す(Returnfromau
SmartPass)"isselectedinstep3.
Select data to return →
[ 戻す (Return)] → [ 完了 (Done)]
*Thisscreenappearswhen
" スマートフォンのデータを戻す
(Returnsmartphonedata)"is
selected.
Select data to return →
[ 戻す (Return)] → [ 完了 (Done)]
■ Saving data from au Settings Menu
1 2 3
Home screen → [Settings] →
[au menu] → [Data Transfer]
In the data transfer screen,
[ データを保存する
(Save data)]
Select a saving location
*Tosavedatafrom"au スマート
パスに預ける(StoretoauSmart
Pass)"(Storedatatotheau
SmartPassserver),youmust
setanauID.
When "SDカードに保存する
(Saving to SD card)"
is selected
When "auスマートパスに預け
る (Store to au Smart Pass)"
is selected
4
Select data to save →
[ 保存する (Save)] → [ 完了 (Done)]
Select data to store →
[ 預ける (Store)] → [ 完了 (Done)]
Using "Data Storage" app
To use "Data Storage" app to back up photos and contacts to the au Smart Pass server automatically, set as follows.
Home screen → [Settings] → [au menu] → [Backup Setting] → Turn on "定期的に自動で預ける (Back up
periodically)"
Saving Battery Power
From the shortcut items list, you can configure the setting such as Wi-Fi® function, Bluetooth® function, and screen brightness adjustment.
You can save battery consumption by switching the communication function to OFF or adjusting brightness of the display.
■ Opening the shortcut items list
1 2 3
Slide down the status bar "Shortcuts" tab Set each item
*Toshowhiddenitems,slideup
ordown.
■ Shortcut items list
Wi-Fi ON/OFF of the Wi-Fi® function
Bluetooth ON/OFF of the Bluetooth® function
Auto-rotate ON/OFF of the auto-rotate screen
Settings Open the settings menu
Screenshot Capture the screen
Sound/Silent ON/OFF of Manner mode
Mobile data ON/OFF of the mobile data communication
Flashlight ON/OFF of flash/photo light
GPS ON/OFF of the location information function
Eyes protection ON/OFF of the eyesight protection
Wi-Fi hotspot ON/OFF of the Wi-Fi® tethering function
Airplane mode ON/OFF of the airplane mode
Auto-sync ON/OFF of the account auto synchronize function
(Adjusting screen
brightness)
Adjust the screen brightness
* When you tap "Auto" to ON, the screen brightness is automatically adjusted according to your condition.
 Loading...