

Page 1

U2800A
UMTS Mobile Phone
Quick User Guide
Page 2
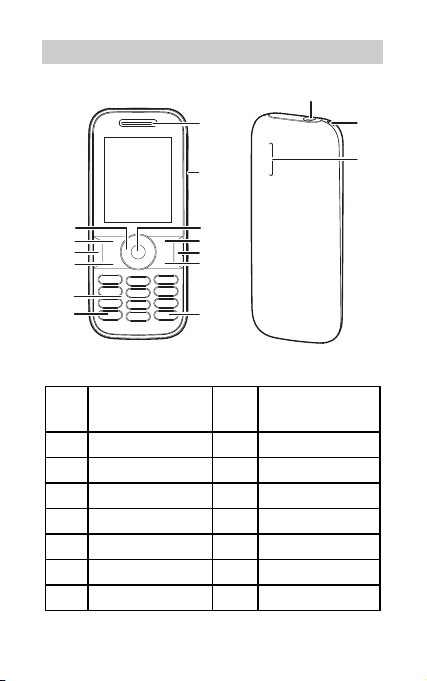
Your Phone at a Glance
1
14
15
2
13
12
11
10
9
8
3
4
5
6
7
1 Earpiece 2 Charger/Data
cable connector
3 Confirm Key 4 Right Soft Key
5 Clear Key 6 End Key
7 # Key 8 * Key
9 Numeric Keys 10 Call Key
11 Speaker Key 12 Left Soft Key
13 Navigation Keys 14 Headset jack
15 Strap Hole 16 Speaker
1
16
Page 3
Keys and Functions
Call Key
End Key
Left Soft Key Select the option displayed in the
Right Soft Key Select the option displayed in the
Clear Key Delete a character in editing mode or
Speaker Key Press and hold to switch between
* Key Press and hold to switch between
# Key Switch between text input methods
Make or answer a call.
Access recent calls in standby
mode.
Press and hold to power the phone
on or off.
End or reject a call.
Return to standby mode.
Turn backlight on or off.
lower left corner of the screen.
lower right corner of the screen.
delete a selected item in an
application.
speaker and headset modes.
current mode and Meeting mode.
when editing text.
2
Page 4

Keys 0–9
Enter numbers, letters, and
symbols.
Access voicemail in standby mode
by pressing and holding the 1 key.
Press and hold a number 2-9 to
speed-dial the phone number
assigned to that key.
Confirm Key Confirm a selection.
Navigation
Keys
During a call, increase the volume
(press the Right navigation key) and
decrease the volume (press the Left
navigation key).
In standby mode, highlight a
shortcut icon if the Standby
screen is set to Shortcut (press the
Left navigation key or the Right
navigation key).
In standby mode, access the self-
defined shortcut menu if the
Standby screen is set to Go to.
Up: Address Book;
Down: Messaging;
Left: Calendar;
Right: Alarm.
3
Page 5

Inserting the SIM Card and the Battery
12
34
Charging the Battery
Before charging the battery with the travel charger, ensure
that the battery is installed in your phone. Do not use a
damaged battery or charger.
1. Connect the charger to a power outlet.
2. Connect the charger to the connector of the phone. The
phone begins charging. When the battery icon changes to
, it indicates that your phone is fully charged.
3. When the phone is fully charged, disconnect the charger
from the phone and then from the power outlet.
4
Page 6

Status Icons
Signal strength
Roaming
2G network available
The phone is receiving and sending data
through 2G network
3G network available
The phone is receiving and sending data
through 3G network
Call in progress
New text message received
The memory for text messages is full
Alarm clock enabled
Battery level
Battery charging
Ringing mode activated
Ringing and Vibration mode activated
Silence mode activated
Vibration mode activated
Headset connected
5
Page 7

Text E n try
Entering English
Select Menu > Settings > Phone > Text Input Settings >
Predictive Input to turn on or off the smart English input
mode.
Smart English Input Method
1. Begin spelling a word by pressing the key labeled with the
desired letter once. Then the phone predicts the
commonly used words according to the numeric sequence
of key presses.
2. Select the desired word, and press Confirm Key or 0 Key
to enter the word.
3. Press 1 Key to enter a period or other commonly used
punctuation. Press * Key to display the symbol list. Then
you can select and enter a symbol.
The indicator of the current input method is displayed in the upper
left corner of the screen. You can press # Key to change the input
method.
Traditional English Input Method
The traditional text input method allows you to enter
uppercase or lowercase English letters. You can press the key
labeled with the desired letter once to enter the first letter on
the key, twice to enter the second letter on the key, and so
on.
Press 1 Key to enter a period or another commonly used
punctuation.
6
Page 8

Press 0 Key once to enter a space, twice to enter a
carriage return, and three times to enter 0.
Entering Spanish
You can enter Spanish words using Spanish text input
methods.
The traditional Spanish input method and the smart Spanish
input method are similar to the traditional English input
method and the smart English input method. For details, see
"Entering English".
Entering a Number
In "123" input mode, press the key labeled with your
desired digit.
In "Abc" input mode, press a number key consecutively
until the digit appears.
In "En" input mode, press a number key and then press
Navigation Keys to scroll to the digit and press Confirm
Key to enter it.
In any text input mode, except the "123" input mode,
press and hold a number key to enter the digit.
Making and answering calls
1. In standby mode, enter the phone number.
2. Press Call Key to dial the number.
3. Press End Key or Select End to end the call.
When there is an incoming call, you can press Call Key to
answer it, press End Key to reject it.
7
Page 9

Adding a Contact
1. Select Menu > Contacts > Create Contact.
2. On the Edit screen, enter the information about the
contact. (For each contact, at least one number needs to
be entered.)
3. Select Save to save the contact.
Creating and Sending a Text Message
1. Select Menu > Messaging > Create Message.
2. Enter one or more recipient’s numbers directly, or press
Confirm Key to access the contact list and then select
one or multiple recipients.
3. Enter text contents in the text box.
4. Select Options > Send to send the message
Phone Lock
The Phone Lock protects your phone from unauthorized use.
By default, the function is disabled. To enable or disable
Phone Lock, select Menu > Settings > Security > Phone
Lock. Once it is enabled, you must enter a passcode each
time you power on the phone.
The preset passcode is 000000. You can select Menu >
Settings > Security > Change Phone Lock Code to
change your passcode to any numeric string of four to eight
digits.
Please do not forget your passcode. Should you forget it,
contact your local device retailer.
8
Page 10

PIN and PUK
The personal identification number (PIN) protects your phone
from unauthorized use. By default, the function is disabled.
To enable or disable PIN Verification, select Menu >
Settings > Security > PIN Verification.
You can select Menu > Settings > Security > Change PIN
to change your PIN.
The PIN unblocking key (PUK) can unlock a blocked PIN. Both
PIN and PUK are delivered with the SIM card. For details,
contact your service provider.
If you enter wrong PINs for a specified number of times
consecutively, the phone asks you to enter the PUK.
If you enter wrong PUKs for a specified number of times
consecutively, the SIM card is invalidated permanently.
Contact your service provider for a new one.
Body worn operation
The device complies with RF specifications when used
near your ear or at a distance of 1.5 cm from your body.
Ensure that the device accessories, such as a device case
and device holster, are not composed of metal
components. Keep the device away from your body to
meet the distance requirement.
Ideal operating temperatures are 0°C to 35°C. Ideal
storage temperatures are 0°C to 40°C. Extreme heat or
cold may damage your device or accessories.
Certification Information (SAR)
This device is also designed to meet the requirements for
9
Page 11

exposure to radio waves established by the Federal
Communications Commission (USA).
The SAR limit adopted by the USA is 1.6 W/kg averaged over
one gram of tissue. The highest SAR value reported to the
FCC for this device type complies with this limit.
The highest SAR value reported to the FCC for this device
type when using at the ear is 1.330 W/kg, and when
properly worn on the body is 0.956 W/kg.
For more help
Want to obtain the user guide?
Search for and download the User Guide from
www.huaweidevice.com/us.
Disclaimer
Your device may not work if you alter its original software.
This device will only operate with firmware versions that have
been approved for use by MetroPCS and the device
manufacturer. If unauthorized firmware is placed on the
device it may not function.
Please visit
www.huaweidevice.com/worldwide/support/hotline for
recently updated hotline and email address in your country or
region.
All the pictures in this guide are for your reference only. Your
phone's actual display features may be different to those
described here, depending on its software version.
10
 Loading...