

Page 1

User Guide
Page 2

Contents
Essentials
Basic Gestures
Lock and Unlock Your Screen
Get Familiar with the Home Screen
Notication and Status Icons
Control Panel
Screenshots & Screen Recording
multi-window
Smart Features
AI Voice
AI Lens
AI Touch
Huawei Print
Multi-Device Collaboration
Audio Control Panel
Camera and Gallery
1
4
5
6
7
10
13
17
20
20
21
21
22
Apps
Settings
Take Photos
Shoot in Portrait, Night, and Wide Aperture Modes
AI Photography
Pro Mode
Record Videos
Time-Lapse Photography
Adjust Camera Settings
Manage Gallery
Notepad
Display & Brightness
Biometrics & Password
About Phone
24
25
26
27
29
30
30
32
37
40
40
42
i
Page 3
Essentials
Basic Gestures
Basic Gestures and Shortcuts
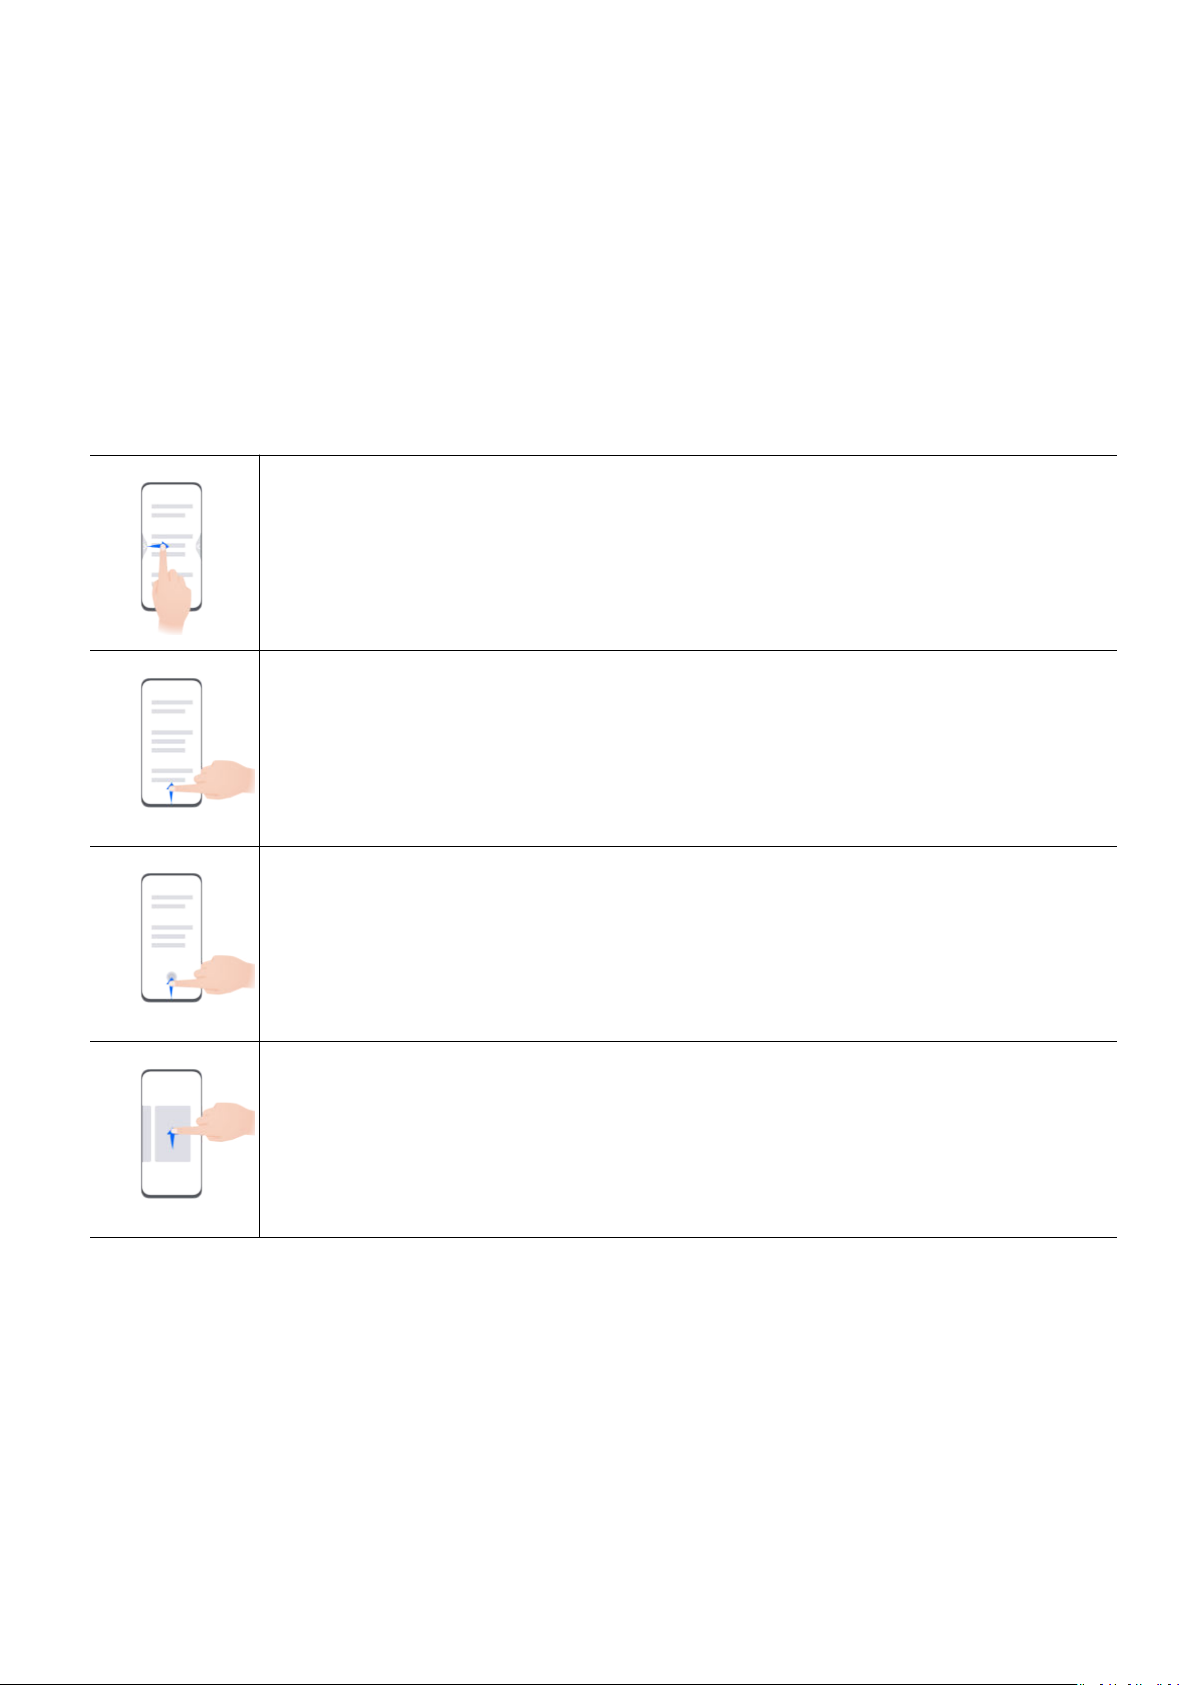
System Navigation Gestures
Go to Settings > System & updates > System navigation and make sure that Gestures is
selected.
Return to the previous screen
Swipe in from the left or right edges to return to the previous screen.
Back to home screen
Swipe up from the bottom to go to the home screen.
Recent tasks
Swipe up from the bottom of the screen and hold to view recent tasks.
Close an app
When viewing recent tasks, swipe up on an app preview to close the app.
1
Page 4
Essentials
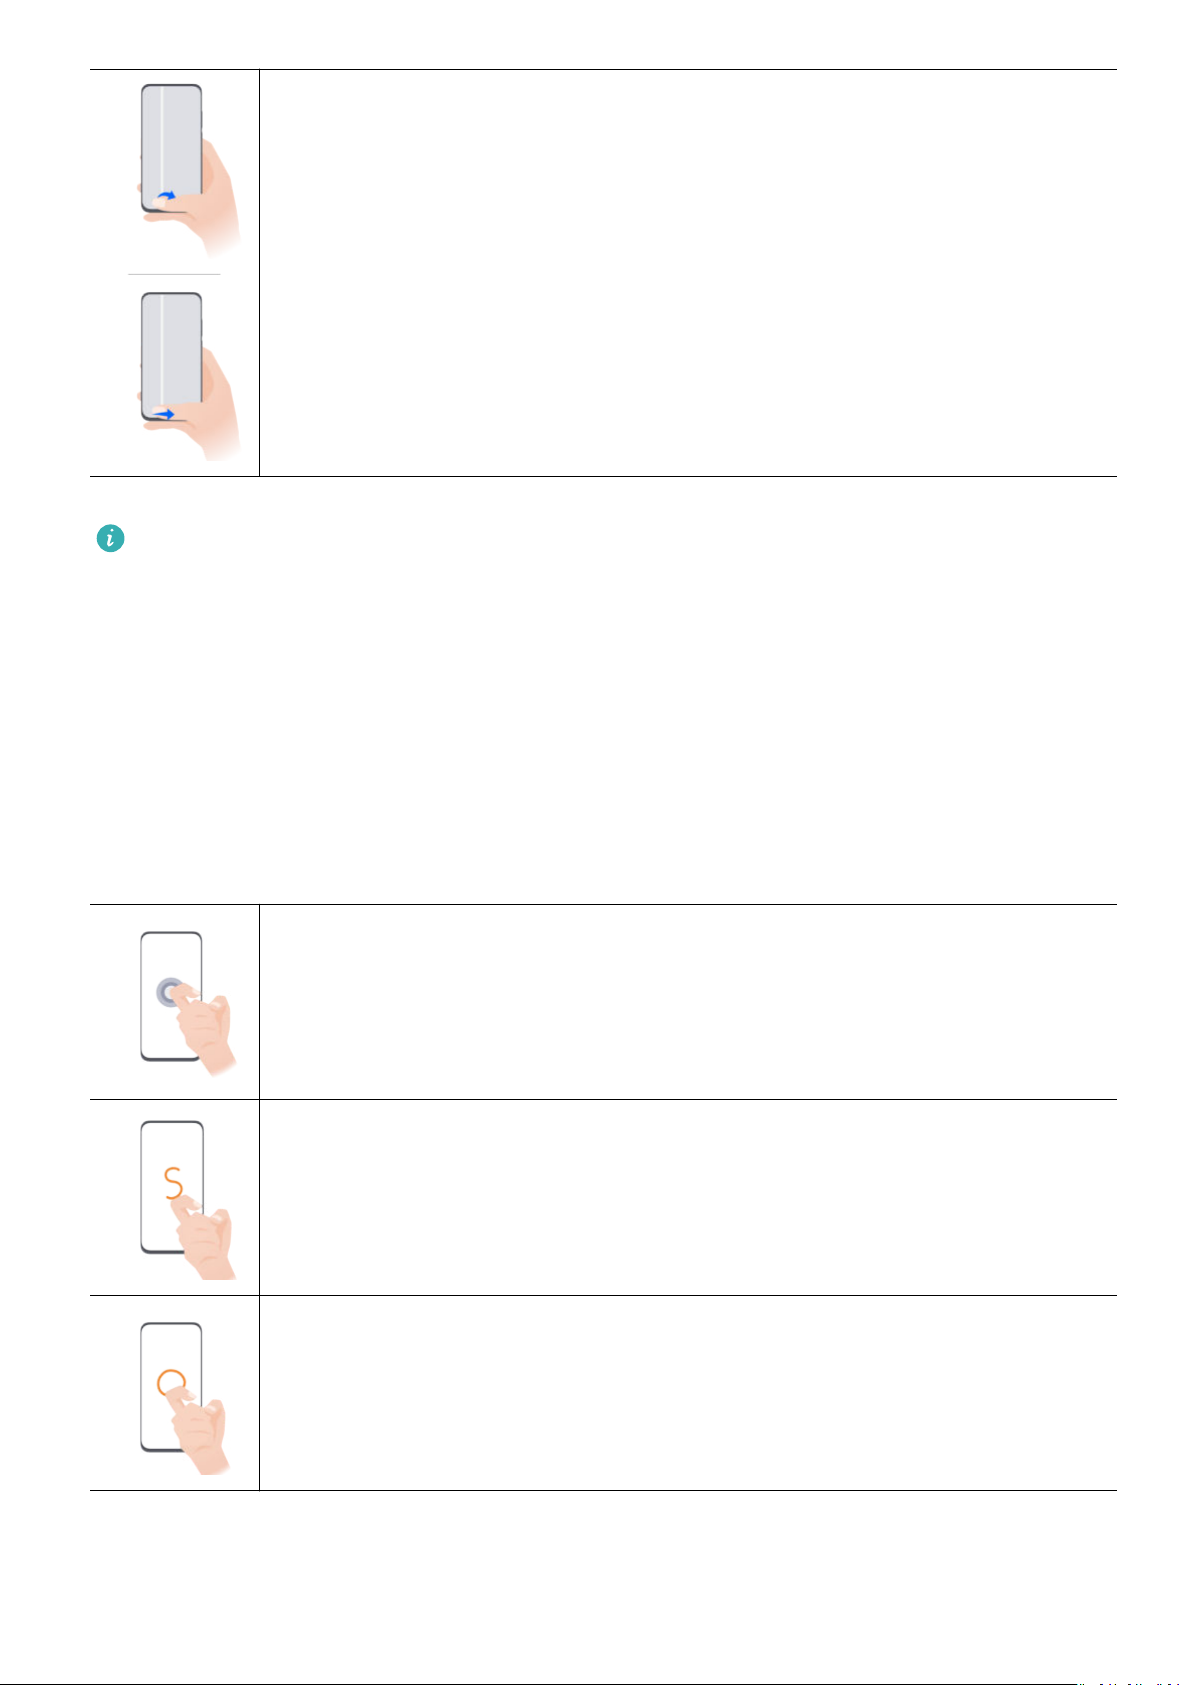
Switch between apps
• Slide across the bottom edge of the screen to switch between apps.
Before using this gesture, touch Settings on the System navigation
screen, and ensure that Slide across bottom to switch apps is enabled.
• Swipe across the bottom of the screen in an arc to switch between apps.
If your device does not have the Slide across bottom to switch apps switch, it indicates
that the corresponding feature is not supported.
Knuckle Gestures
Before using knuckle gestures, use either of the following methods to make sure that all
necessary features are enabled (depending on your device model):
Go to Settings > Accessibility features > Shortcuts & gestures, and enable Take
screenshot and Record screen.
Go to Settings > Accessibility features > Motion control > Take screenshot, and enable
Smart screenshot.
Take a screenshot
Knock twice on the screen with a knuckle to take a screenshot.
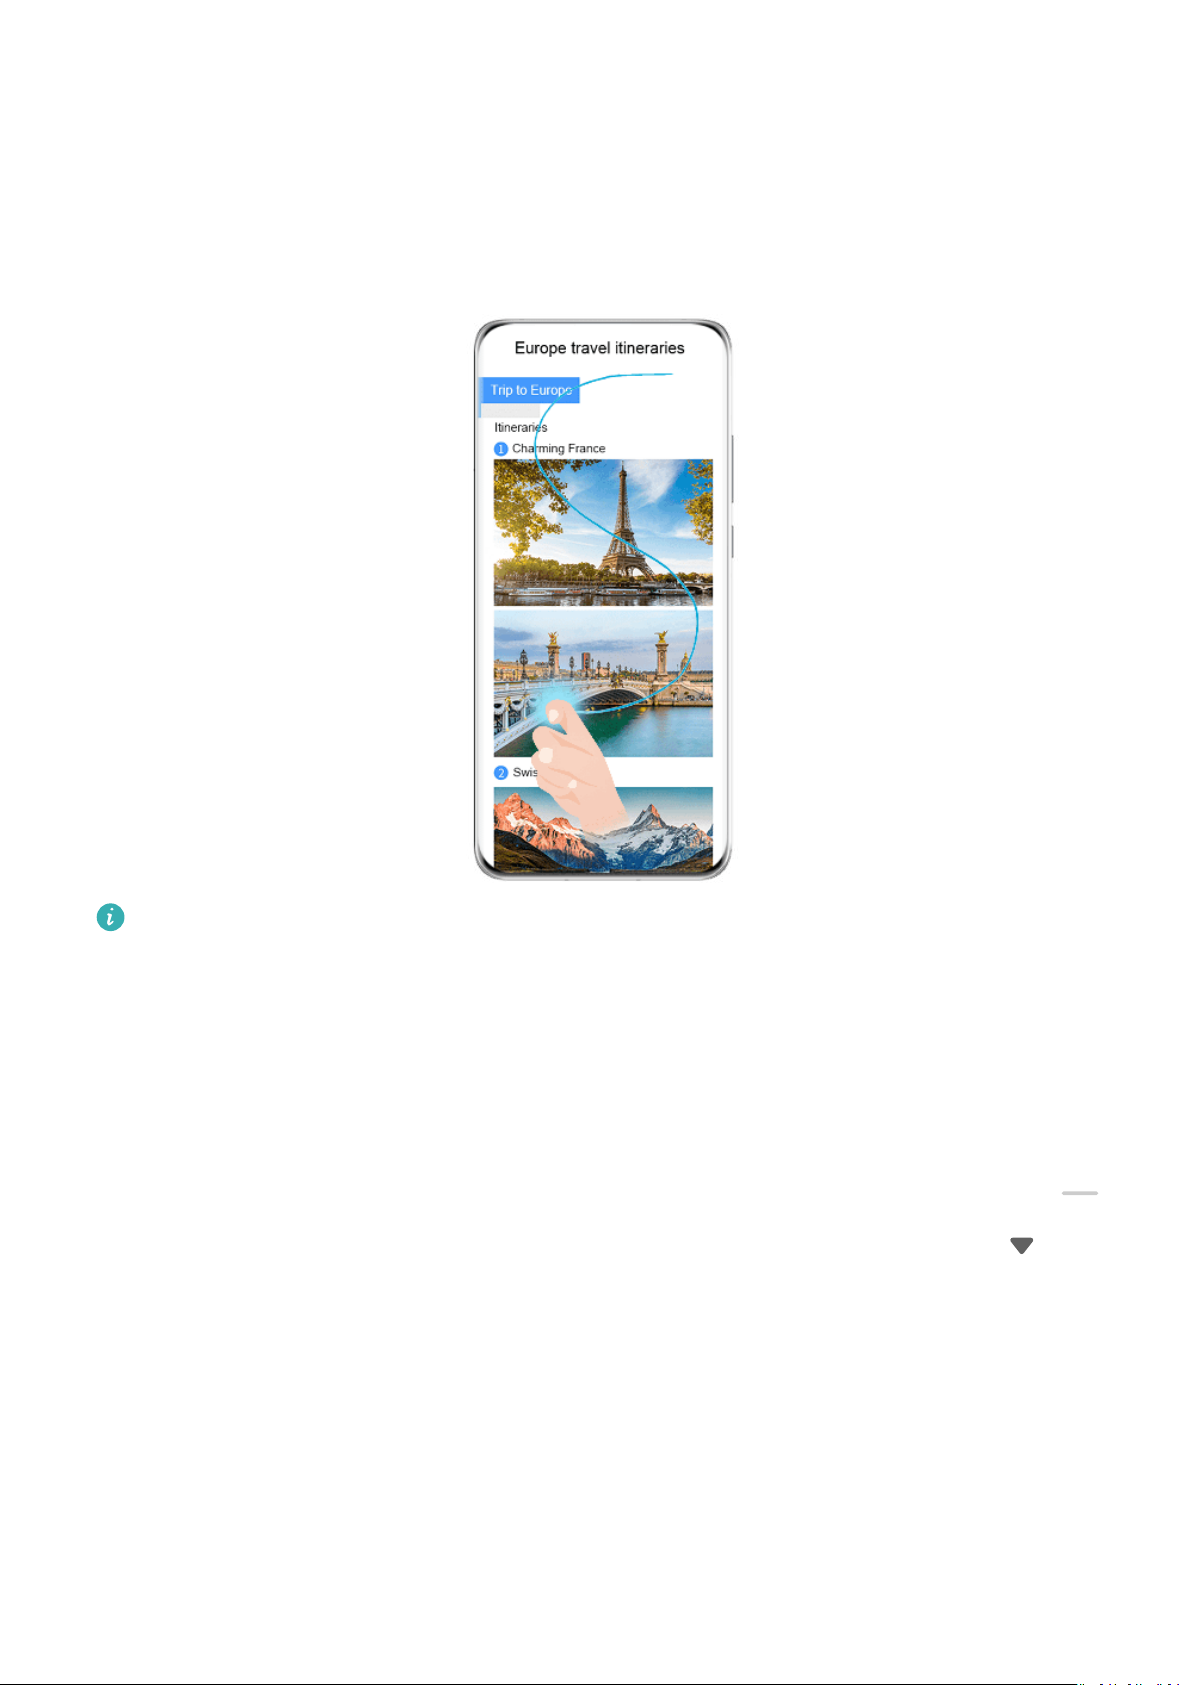
Take a scrollshot
Knock on the screen with a knuckle and draw an "S" to take a scrolling
screenshot.
Capture part of the screen
Knock and draw an enclosed area with a knuckle to capture part of the
screen.
2
Page 5
More Gestures
Essentials
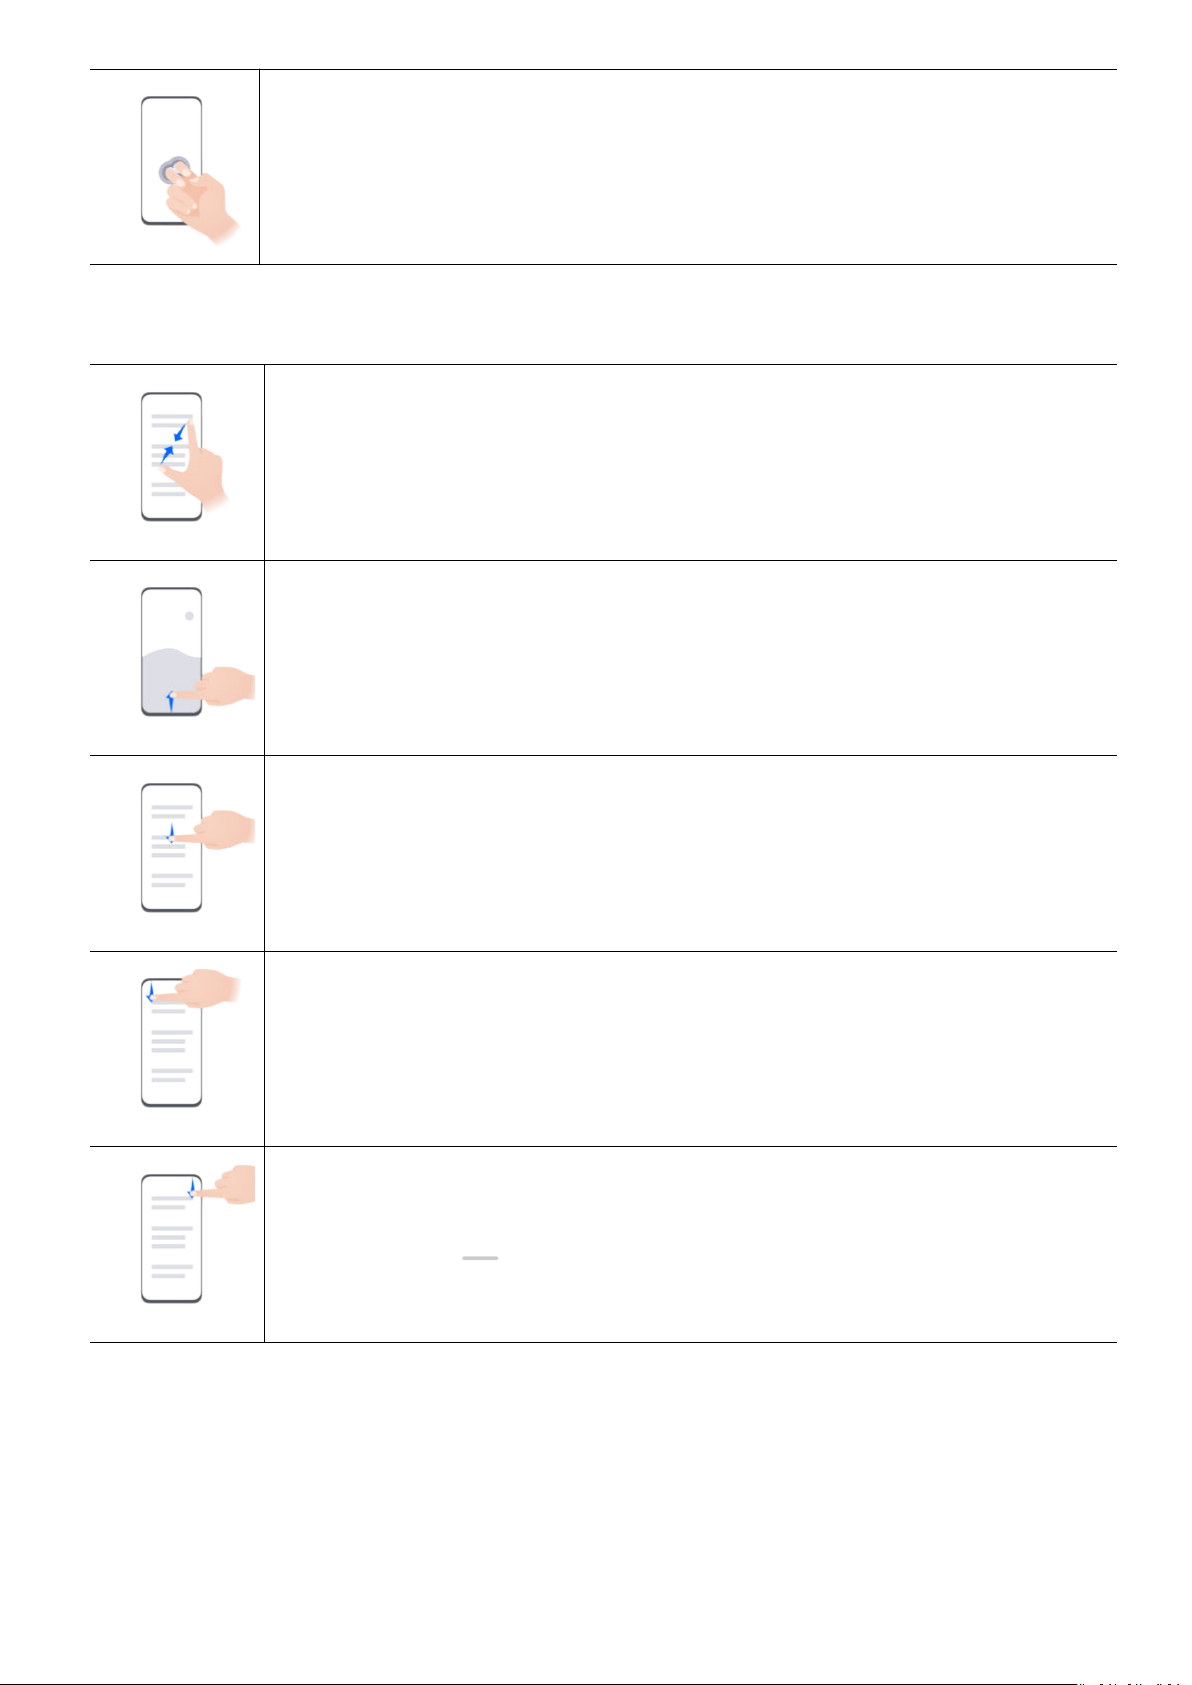
Record screen
Knock twice on the screen with two knuckles to start or end a screen
recording.
Access Home screen editing mode
Pinch two ngers together on the home screen.
Display the shortcut panel on the lock screen
Turn on the screen and swipe up from the bottom of the lock screen.
Display the search bar
Swipe down from the middle of the home screen.
Display the notication panel
Swipe down from the upper left edge of the screen.
Turn on a shortcut switch
Swipe down from the upper right edge of the screen to display Control
Panel and touch
to expand the shortcut switches panel (depending on
your device model).
3
Page 6
Button Shortcuts
Essentials
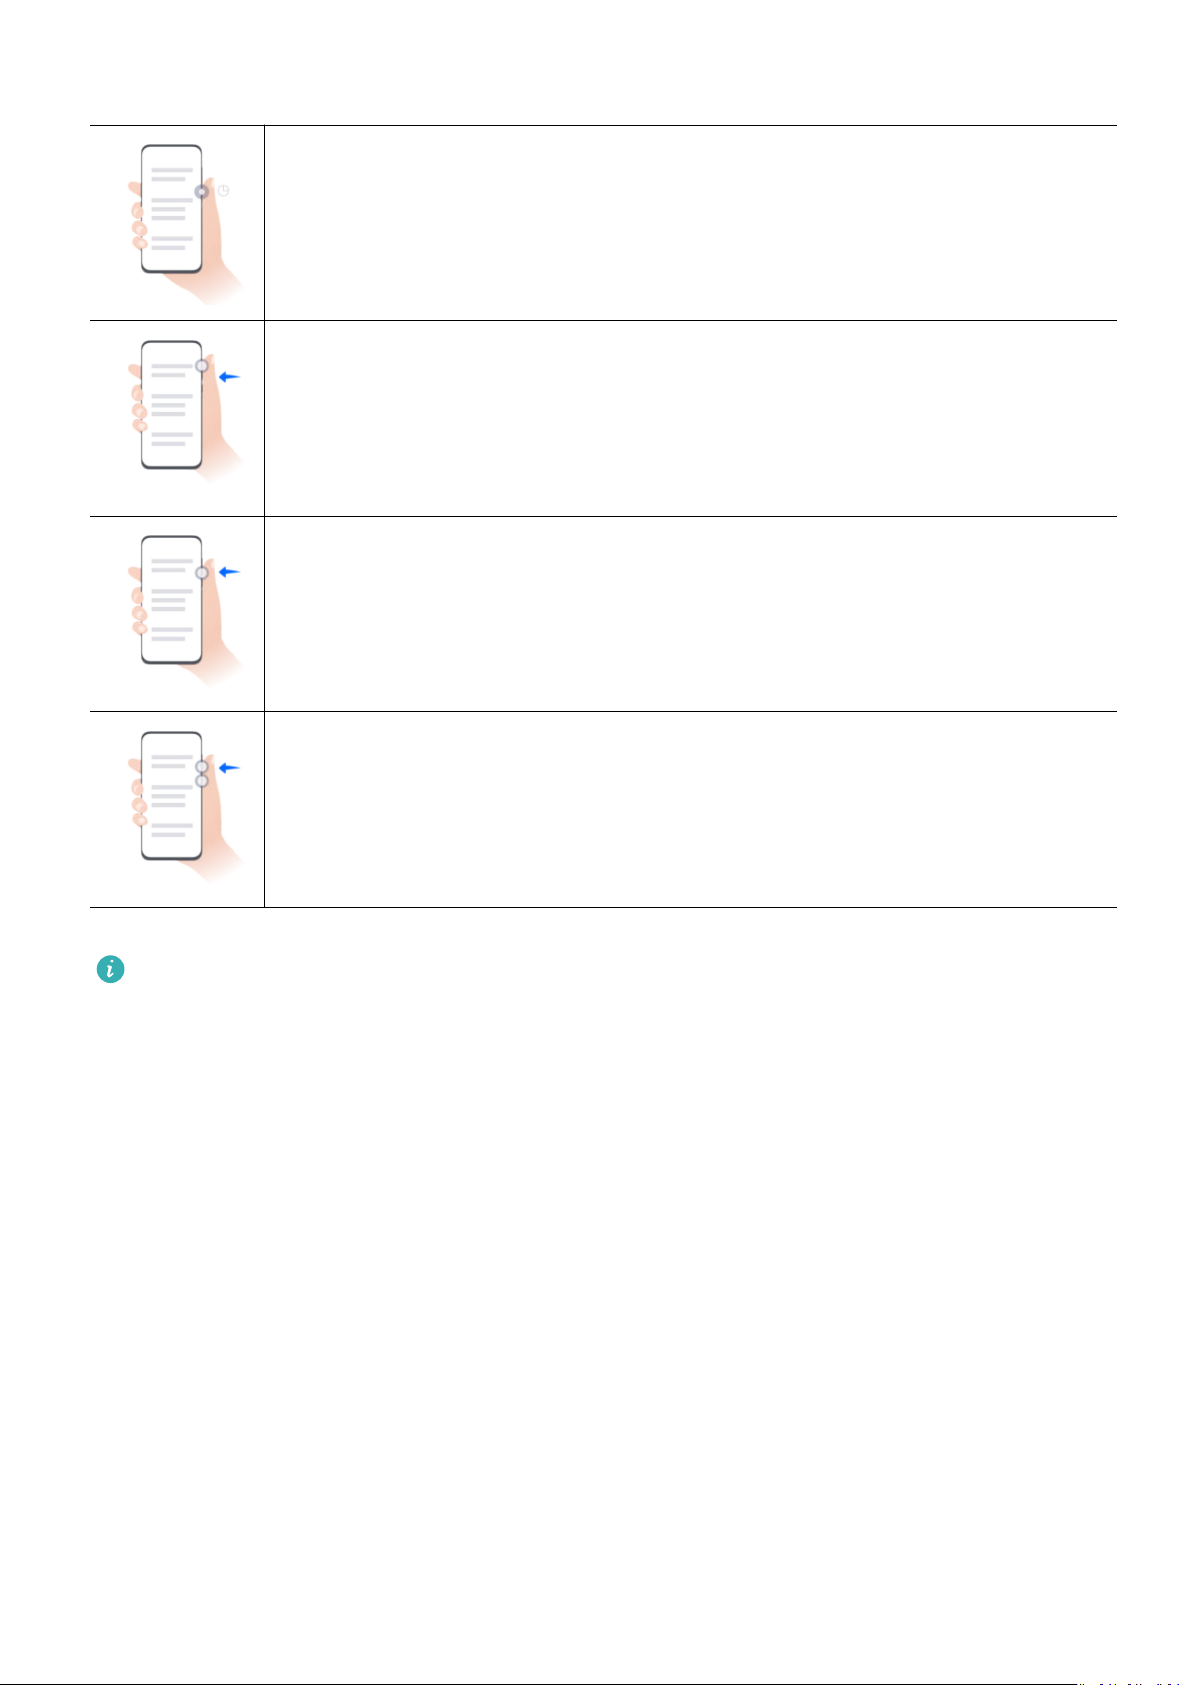
Power o and restart
Press and hold the Power button until your phone displays the Power o
and Restart menu.
Turn up volume
Press the Volume up button.
Turn down volume
Press the Volume down button.
Take a screenshot
Press the Volume down and Power buttons simultaneously.
Some products do not have volume buttons.
Lock and Unlock Your Screen
Lock and Unlock Your Screen
Lock Your Screen
Auto-lock:
Your phone will automatically turn o when you haven't used it for a certain period of time.
You can go to Settings > Display & brightness > Sleep, and set the screen timeout duration.
Manually lock the screen:
To lock the screen, use either of the following methods:
• Press the Power button.
• On the home screen, pinch two ngers together to enter editing mode. Touch Widgets, and
drag the Screen Lock icon to the home screen. Then touch the Screen Lock icon to lock the
screen.
4
Page 7

Essentials
Turn On the Screen
You can turn on the screen in any of the following ways:
• Press the Power button.
• Go to Settings > Accessibility features > Shortcuts & gestures > Wake screen, and
enable Raise to wake, Double-tap to wake, and/or Show palm to wake. Then use the
corresponding feature to turn on the screen.
If your phone does not have this option, it indicates that this feature is not supported.
Unlock Your Screen
Password unlock: Once the screen is turned on, swipe up from the middle of the screen to
display a panel where you can enter your lock screen password.
Face unlock: Once the screen is turned on, bring your face in front of the screen. Your phone
will unlock automatically after recognizing your face.
Fingerprint unlock: Touch the ngerprint sensor zone with a nger that you have enrolled.
Be sure to rst wake the screen, if your device has an in-screen ngerprint sensor.
Get Familiar with the Home Screen
Create and Use Large Folders
You can group similar apps in a large folder and name the folder for better management.
You can also turn a standard folder into a large one (both the folder and the app icons in it
will be enlarged) to access apps more easily.
Create a Large Folder
1 Touch and hold an app icon and drag it over another icon to create a new folder.
2 Touch and hold a folder to switch between display modes. For example, you can touch
and hold a new folder and select Enlarge from the displayed menu to create a large
folder.
3 You can touch the lower right corner of the large folder to open it and then touch the
folder name to rename it.
You can also rename the folder by touching and holding it and selecting Rename.
Operations in a Large Folder
You can perform the following operations in large folders:
• Open apps: In a large folder, touch an icon to access the app directly.
• Enter and exit folders: Touch the lower right corner of a large folder to enter it. Touch a
blank area in the folder to exit it.
5
Page 8
Essentials
When there are more than nine apps within a large folder, a stacked icon will appear in the
lower right corner of the folder. You can touch the stacked icon to view more apps within
the folder.
• Add or remove apps: Open a large folder, touch
If you deselect all apps within the folder, the folder will be deleted.
• Switch between display modes: Touch and hold a folder to switch between a standard
and large display. For example, you can touch and hold a standard folder and select
Enlarge from the displayed menu to create a large folder.
, and add or remove apps as required.
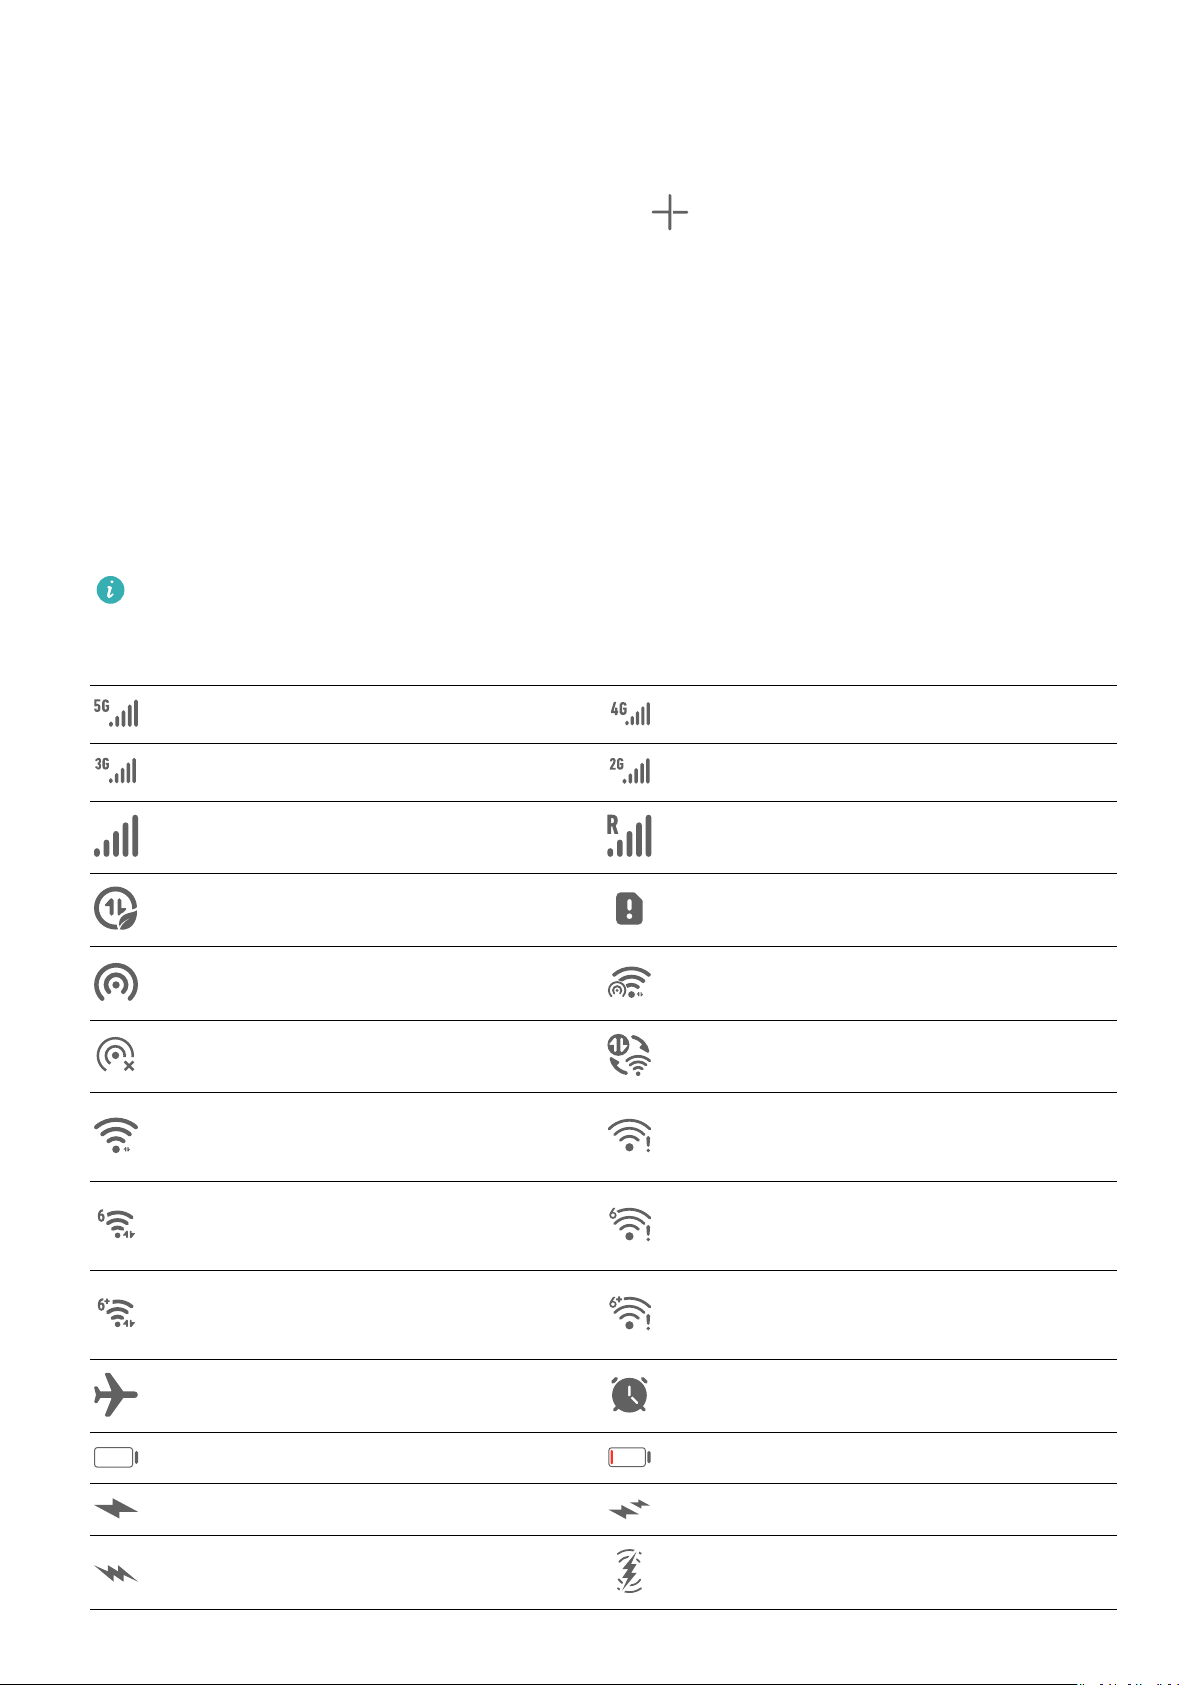
Notication and Status Icons
Notication and Status Icons
Network status icons may vary depending on your region or network service provider.
Supported functions vary depending on the device model. Some of the following icons
may not be applicable to your phone.
5G network connected 4G network connected
3G network connected 2G network connected
Full signal strength Roaming
Data saver enabled. No SIM card inserted
Hotspot enabled Hotspot connected
Hotspot disconnected Switching network via Wi-Fi+
Wi-Fi connected
Wi-Fi 6 connected
Wi-Fi 6+ connected
Airplane mode is ON Alarm set
Wi-Fi network is faulty, unable to
connect to the Internet
Wi-Fi 6 network is faulty, unable
to connect to the Internet
Wi-Fi 6+ network is faulty, unable
to connect to the Internet
Battery empty Low battery power
Charging Quick charging
Super charging Wireless super charging
6
Page 9
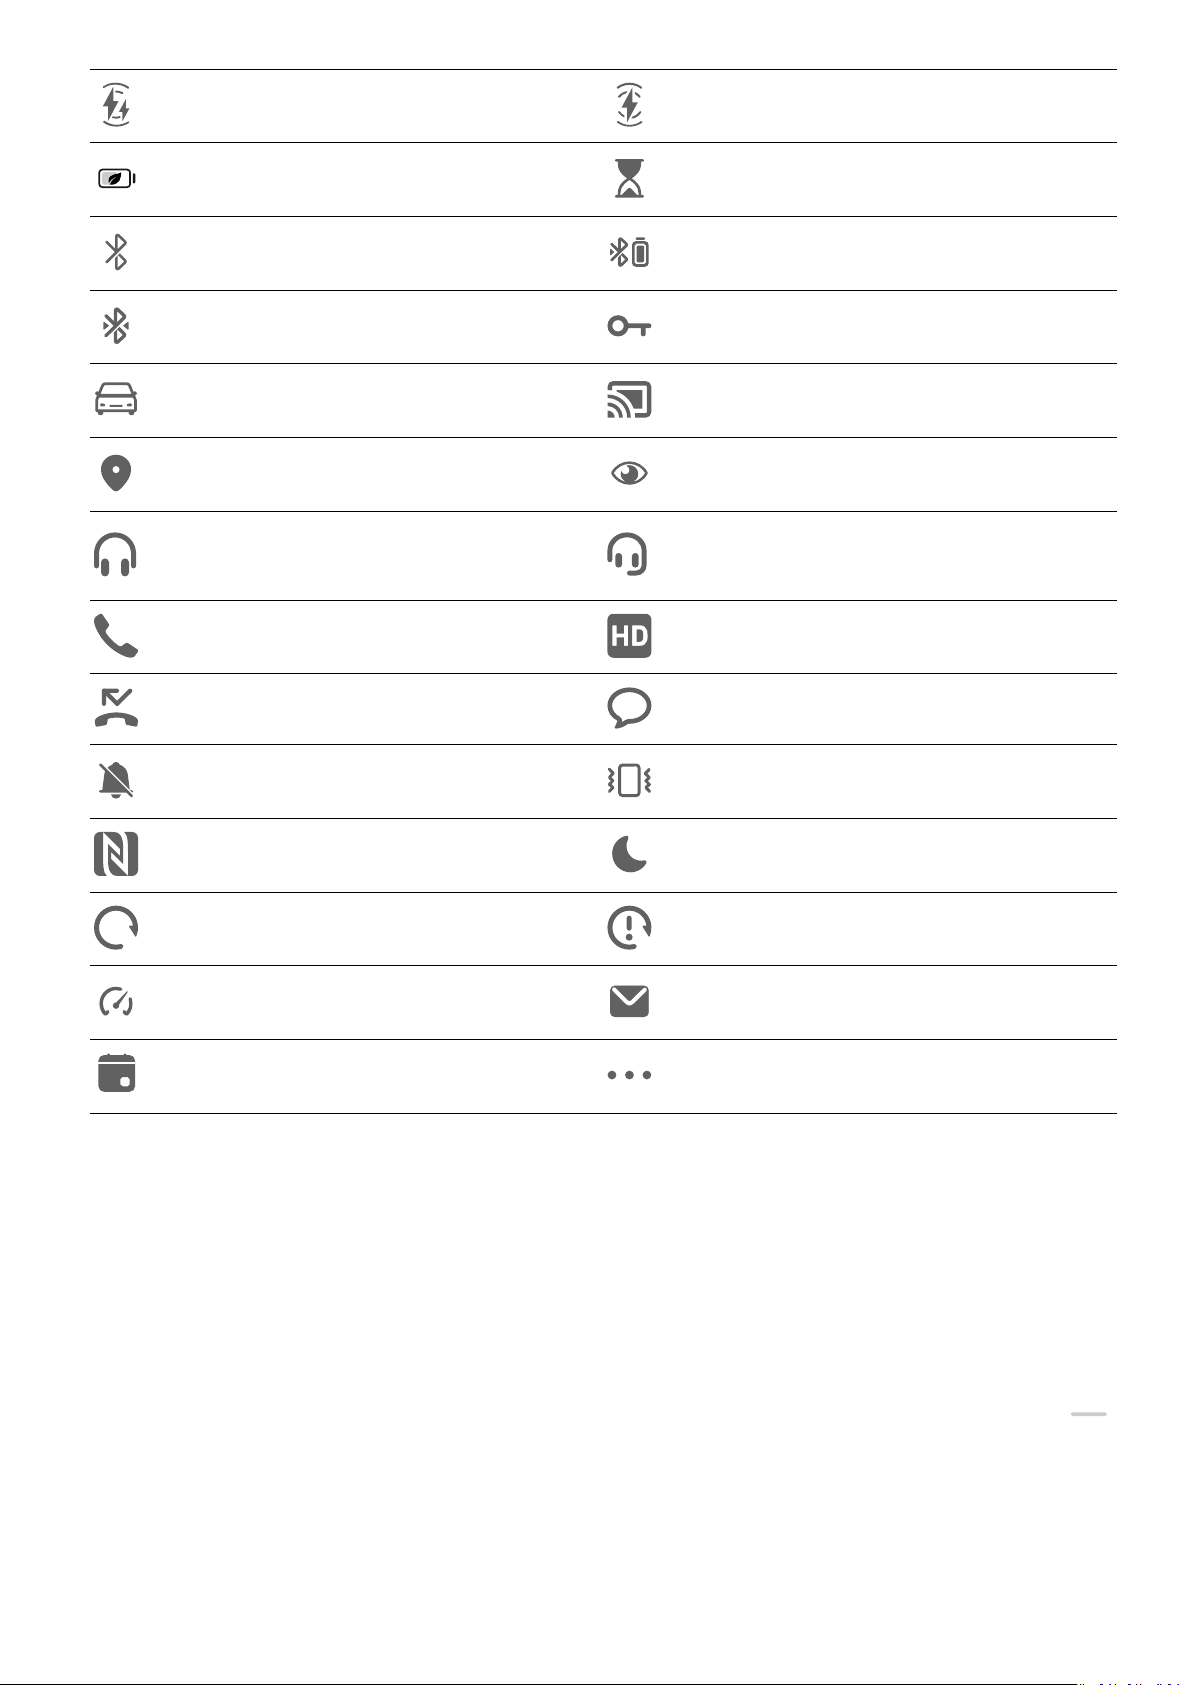
Wireless fast charging Regular wireless charging
Power Saving mode on Digital Balance enabled
Bluetooth enabled Bluetooth device battery
Bluetooth device connected VPN connected
Driving mode Projection device connected
Location service enabled Eye Comfort enabled
Essentials
Headset connected
In call VoLTE enabled
Missed call There are unread messages.
Silent mode Vibration
NFC enabled Do Not Disturb mode enabled
Syncing… Syncing failed
Performance mode enabled New email
Event reminder More notications
Headset with a microphone
connected
Control Panel
Use Shortcut Switches
Turn on a Shortcut Switch
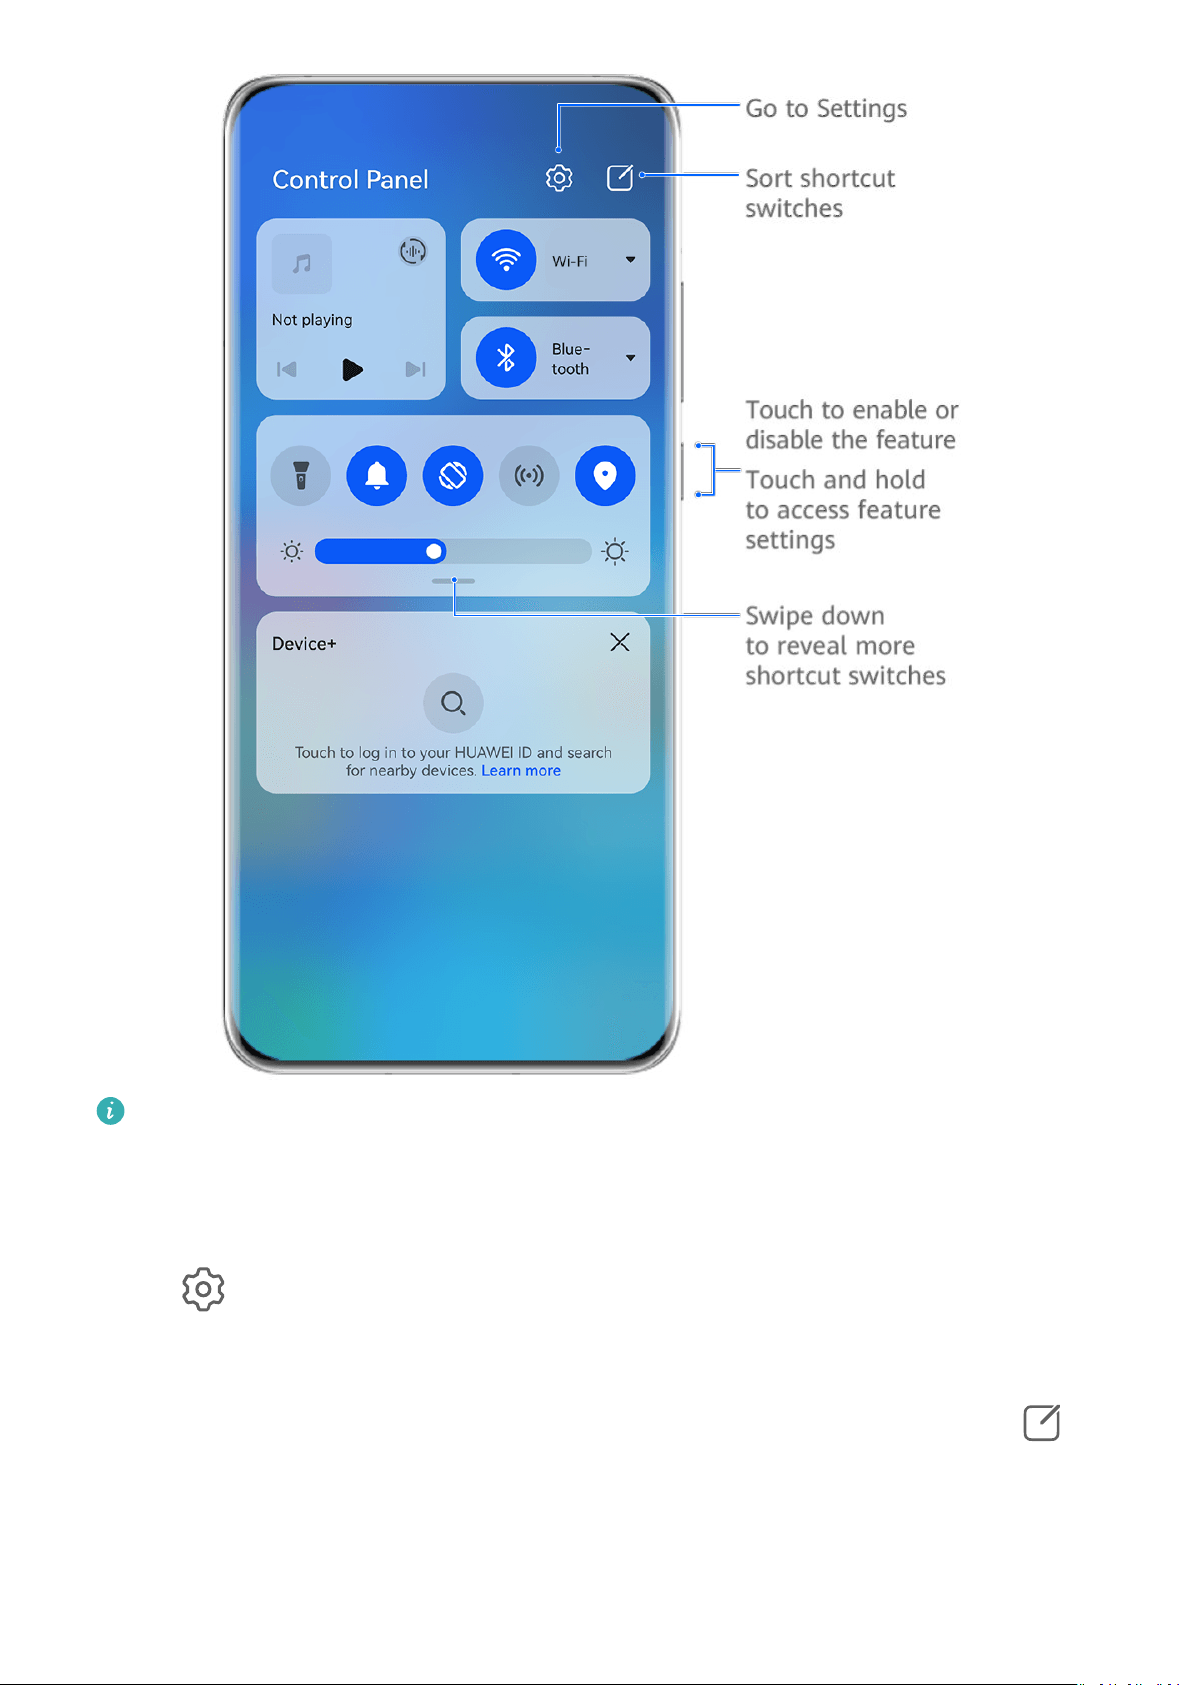
Swipe down from the upper right edge of the screen to display Control Panel and touch
to expand the shortcut switches panel (depending on your device model).
7
Page 10
Essentials
The gures are for reference only.
• Touch a shortcut switch to enable or disable the corresponding feature.
• Touch and hold a shortcut switch to access the settings screen of the corresponding feature
(supported by some features).
• Touch
to access the system settings screen.
Customize Shortcuts
Swipe down from the upper right edge of the screen to display Control Panel, go to
>
Edit switches, then touch and hold a shortcut switch to drag it to your preferred position,
and touch Done.
Audio Control Panel
8
Page 11

Essentials
Manage Audio Playback in Audio Control Panel
When multiple audio apps (such as Music) are opened, you can manage music playback and
switch between these apps in Audio Control Panel with ease.
1 After opening multiple audio apps, swipe down from the upper right edge of the phone to
display Control Panel, then touch the audio playback card at the top of Control Panel.
2 The currently and recently used audio apps will be displayed in Audio Control Panel where
you can manage playback (such as playing, pausing, and switching to the previous or next
song) in the app in use, or touch another audio app to quickly switch playback.
• Some apps need to be updated to the latest version before using this feature.
• Not all apps support Audio Control Panel.
Quickly Switch Audio Playback Device
When your phone is connected to an audio device (such as a headset, Bluetooth speaker, or
Vision product), you can quickly switch the playback device in the audio control section in
Control Panel (such as for transferring the current music playback from your phone to a
Bluetooth speaker).
1 Connect your phone to an audio device via Bluetooth or other methods.
After a Vision product is connected to your phone via Bluetooth, you can also connect it to
the same Wi-Fi network and log in to the same HUAWEI ID as your phone to perform
more operations.
2 Swipe down from the upper right edge of your phone to display Control Panel, touch
or the device icon (such as ) in the top right corner of the audio control section at the
top, then select the audio device from the connected device list to transfer the current
audio playback on your phone to the device.
Work Seamlessly Across Devices with Device+
Device+ allows for collaboration between dierent devices, making your phone the hub of
your nearby Vision and other supported devices for them to be controlled conveniently. You
can also seamlessly transfer ongoing tasks on your phone, from MeeTime calls to audio and
video content being streamed, to your Vision with just a tap.
Please make sure your device has been updated to the latest system version.
Set Device+
Currently, Device+ supports linking phones with the following types of devices. To use this
feature, make sure that devices to be connected support Device+. Before you get started,
enable Bluetooth and Wi-Fi and log in to your HUAWEI ID on your phone. For other devices,
perform the following settings:
• Vision: Ensure that it is connected to the same LAN and logged in to the same HUAWEI ID
as your phone.
9
Page 12

Essentials
• Bluetooth device: Some Bluetooth devices (such as Bluetooth headsets) can be linked with
your phone via Device+ after establishing a Bluetooth connection.
• Device+ does not support collaboration between phones.
• If Device+ is hidden, access Control Panel and go to
> Show Device+.
Transfer MeeTime Calls and Audio or Video Being Streamed to Other Devices
When you are making MeeTime calls on your phone, watching videos (such as in HUAWEI
Video, Youku, or other video streaming apps), or listening to music, you can transfer any of
these ongoing tasks to another device via Device+ and pick up from where you left o on
the new device. For instance, you can transfer a MeeTime call to your Vision.
MeeTime: This feature is only available in some countries and regions.
You can select dierent devices to transfer the following tasks:
• Videos: Can be transferred to Visions.
• MeeTime calls: Can be transferred to Visions.
• Music: Can be transferred to Bluetooth earphones and Visions (either when the screen is on
or o).
1 Swipe down from the upper right edge of your phone to display Control Panel. Available
devices will be displayed in the Device+ section. You can also touch
to search for
nearby devices manually.
2 Touch a device that you want to transfer the ongoing tasks to.
Screenshots & Screen Recording
Take a Screenshot
Use Your Knuckle to Take a Screenshot
1 Before using knuckle gestures, use either of the following methods to make sure that all
necessary features are enabled (depending on your device model):
• Go to Settings > Accessibility features > Shortcuts & gestures > Take screenshot
and enable Knuckle screenshots.
• Go to Settings > Accessibility features > Motion control > Take screenshot and
enable Smart screenshot.
2 Knock twice in quick succession with one knuckle to take a screenshot.
Take a Screenshot with a Key Shortcut
Press and hold down on the Power and Volume down buttons at the same time to take a
screenshot.
10
Page 13

Take a Screenshot with a Shortcut Switch
Essentials
Swipe down from the upper right edge of the screen to display Control Panel, touch
expand the shortcut switches panel (depending on your device model), and touch
Screenshot to take a screenshot.
Share or Edit a Screenshot
After you take a screenshot, a thumbnail will appear in the lower left corner of the screen.
Feel free to:
• Swipe up on the thumbnail to select a method for sharing the screenshot with others.
• Swipe down on the thumbnail to take a scrolling screenshot.
• Tap on the thumbnail to edit, delete, or do more with the screenshot.
Screenshots are saved to Gallery by default.
Swipe Down with Three Fingers to Take a Screenshot
1 Go to Settings > Accessibility features > Shortcuts & gestures > Take screenshot or
Settings > Accessibility features > Motion control > Three-nger screenshot
(depending on your device model) and make sure that Three-nger screenshot is
enabled.
to
2 Swipe down from the middle of the screen with three ngers to take the screenshot.
Take a Partial Screenshot
Use Partial screenshot to take a screenshot of a part of the screen. You can choose your
preferred screenshot shape (such as a rectangle, oval, or heart).
Take Partial Screenshots with Knuckle Gestures
11
Page 14
Essentials
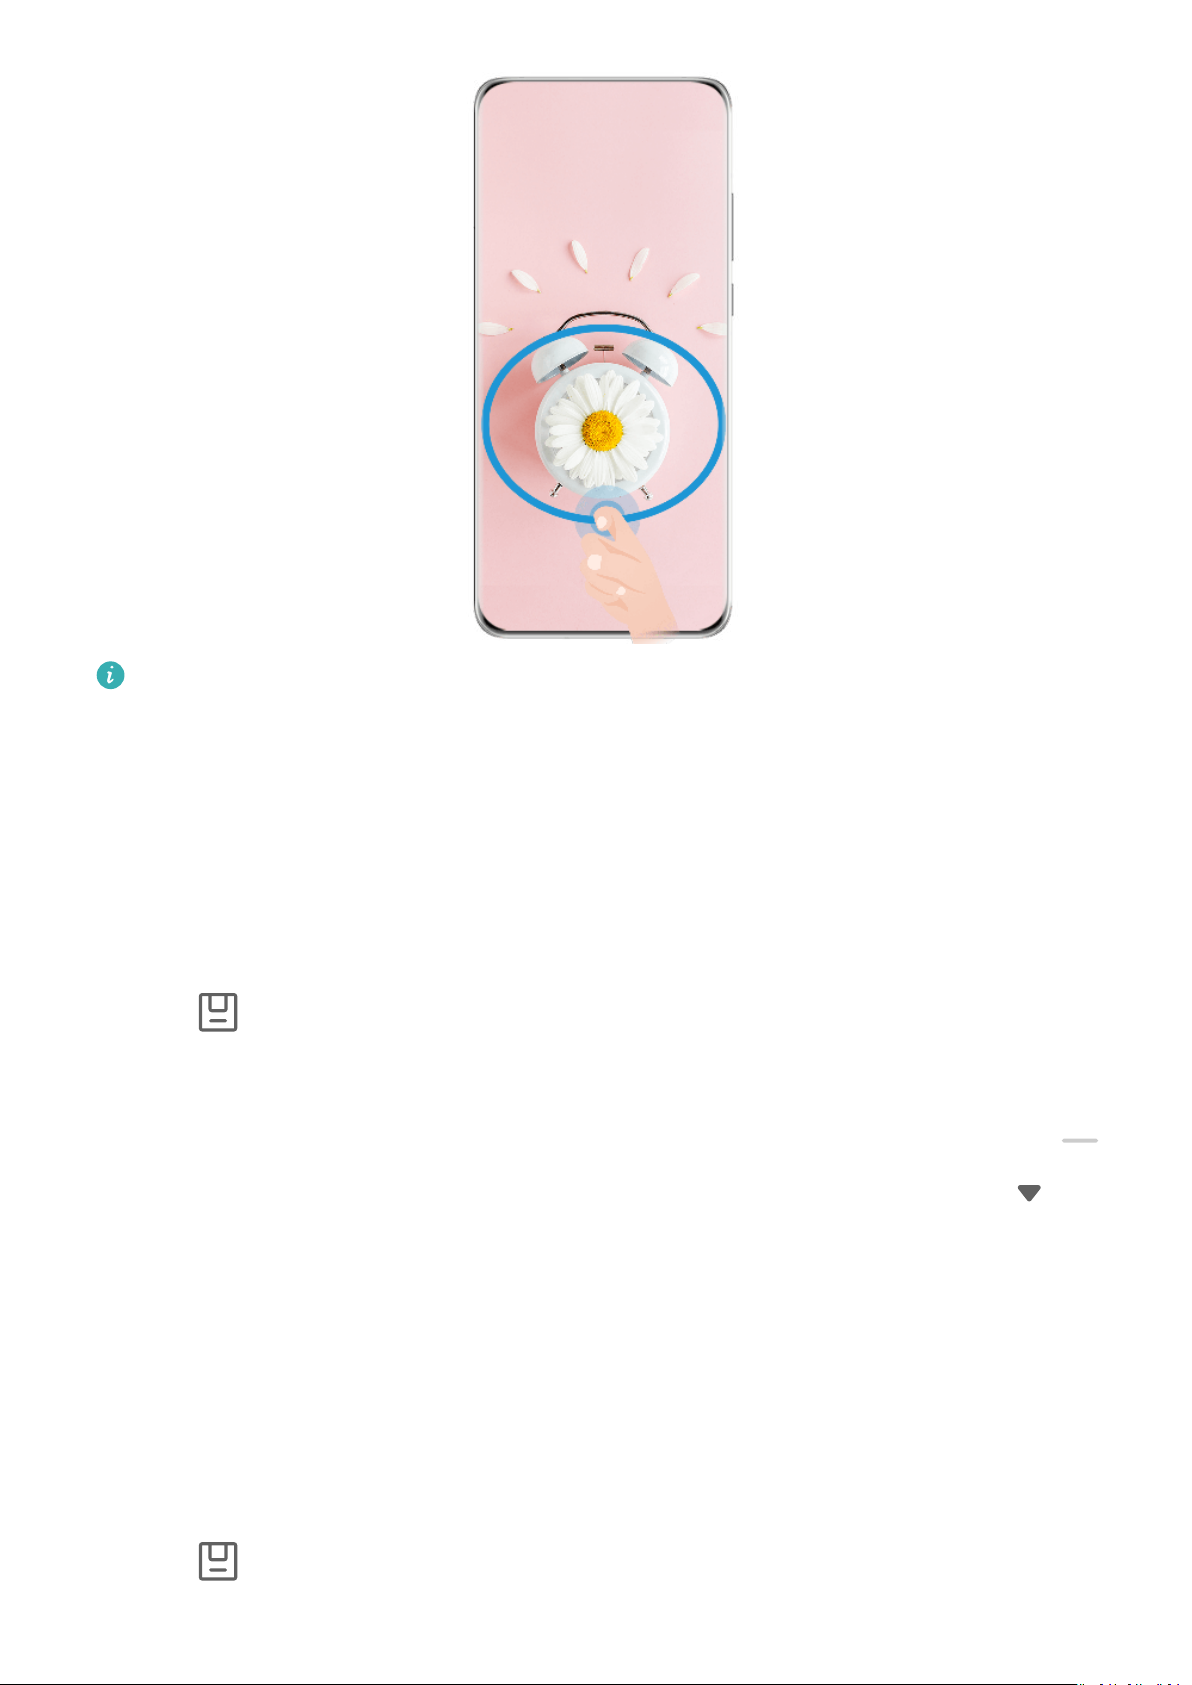
The gures are for reference only.
1 Knock on the screen with a single knuckle and hold to draw an outline around the part of
the screen that you wish to capture. Make sure that your knuckle does not leave the
screen.
2 The screen will display your knuckle movements. You can then:
• Drag the frame to the desired position or resize it.
• Touch any of the shape options at the bottom of the screen to change the shape of the
captured area. You can also keep the original shape that you drew.
3 Touch
Use a Shortcut to Take a Partial Screenshot
to save the screenshot.
1 Swipe down from the upper right edge of the screen to display Control Panel, touch
to expand the shortcut switches panel (depending on your device model), touch next
to Screenshot, and touch Partial screenshot in the displayed dialog box.
2 Follow the onscreen instructions to draw an outline with your nger around the part of
the screen that you want to capture.
3 The screen will display the movement trajectory of your nger and take a screenshot of
the selected area. You can then:
• Drag the frame to the desired position or resize it.
• Touch any of the shape options at the bottom of the screen to change the shape of the
captured area. You can also keep the shape that you drew.
4 Touch
to save the screenshot.
12
Page 15
Essentials
Take a Scrolling Screenshot
Use Scrollshot to capture a memorable chat, article, or essential work document that can't
display in full on the screen, and share with others.
Use a Knuckle to Take a Scrolling Screenshot
The gures are for reference only.
1 Tap a single knuckle against the screen and hold to draw an "S". Your device will
automatically scroll to the bottom of the page to capture all of the content in a single
screenshot.
2 You can touch the screen at any time to stop the scrolling.
Use a Shortcut to Take a Scrolling Screenshot
1 Swipe down from the upper right edge of the screen to display Control Panel, touch
to expand the shortcut switches panel(depending on your device model), touch next
to Screenshot, and touch Scrollshot in the displayed dialog box.
2 You can touch the screen at any time to stop the scrolling.
multi-window
Split the Screen, to Multi-Task Away
Multi-Window allows you to open apps in split screen mode, for seamless multi-tasking at all
times.
13
Page 16

Essentials
Split-screen mode is only supported in certain apps.
To check whether an app supports Multi-Window:
1 Swipe inward from the left or right edge of your phone screen and hold, to bring up the
Multi-Window dock.
2 Touch
Splitting the screen:
to nd the list of apps that support Multi-Window in the More apps section.
1 After opening an app, swipe inward from the left or right edge of your phone screen and
hold, to bring up the Multi-Window dock.
2 Hold down on an app in the dock, drag it to the screen, and then release.
If an app does not support Multi-Window, a prompt will appear onscreen.
Switching split-screen panes:
Touch and hold down on
then drag it to the other side of the screen to switch panes.
Exiting split-screen mode:
Touch and hold down on
you see either pane disappear.
Drag and Drop Between Apps with Multi-Window
at the top of a split-screen pane until you see the pane shrink,
or in the middle of the split screen line, and drag it until
Use the Multi-Window feature to easily drag and drop images, text, and documents between
apps.
• Drag and drop an image: When taking notes with Notepad, open Files, select the photo
you want to add, and drag it into the Notepad editor.
• Drag and drop text: When sending an SMS message, open Notepad, touch and hold the
text you want to send, and drag it into the message text input box.
• Drag and drop a document: When writing an email, open Files, select the document you
want to attach, and drag it into the email editor.
Not all apps fully support drag-and-drop with Multi-Window.
Multi-Window View for a Single App
You can create two task windows for the same app (such as Email and Notepad), and drag
images, text, or documents between them.
This feature is unavailable in some apps.
Enter the split-screen view within an app.
1 Open the Email app.
2 Swipe inward from the left or right edge of your phone and hold to bring up the Multi-
Window dock.
14
Page 17

Essentials
3 Touch and hold the Email icon, and drag it to the screen to enter split-screen view.
Drag images, text, or documents between the split-screen windows.
• Drag an image: Select an image from one split-screen window and drag it to the other
window.
• Drag text: Touch and hold the text and select the desired part from one split-screen
window, then touch and hold the text again and drag it to the other window.
• Drag a document: Select a document from one split-screen window and drag it to the
other window.
Use the Floating Window
Open a oating window while gaming, and you can chat with a friend without missing a
second of the action.
Display the oating window:
1 Swipe inward from the left or right edge and hold to bring up the Multi-Window dock.
2 Touch an app icon in the Multi-Window dock to open the app in a oating window.
Relocate the oating window:
Drag the bar at the top of the oating window to move the window to the desired position.
Resize the oating window:
Drag the bottom edge, two sides, or bottom corners of the oating window to resize it.
Display in full screen:
Touch
Minimize the oating window:
Touch
Close the oating window:
Touch
Find and Switch Between Floating Windows for Apps
at the top of the oating window to display it in full screen.
at the top of the oating window to minimize and shrink it into a oating bubble.
at the top of the oating window to close it.
You can quickly nd and switch between oating windows for apps using the oating
window management function.
1 Make sure that you have opened oating windows for multiple apps and minimized them
into the oating ball.
2 Touch the oating ball to display all oating window previews:
• Browse through the oating window previews: Swipe up or down to nd the
oating window preview of the app you are looking for.
• Display the oating window for an app: Touch the oating window preview of the
app to display it in a oating window.
15
Page 18

Essentials
• Close the oating window for an app: Touch on the oating window preview to
close it.
Open an Attachment in a Floating Window
You can open a link or attachment within specic apps (such as Email and Notepad) in a
oating window.
This feature is unavailable in some apps.
1 Open the Email app.
2 Touch a link or attachment in the Email app to open it in the oating window.
• Open a link: Touch a link in the Email app to display it in a oating window.
• Open an attachment: Touch an attachment (such as a document, image, or video) in
the Email app to display it in a oating window.
16
Page 19

Smart Features
AI Voice
AI Voice
AI Voice allows you to communicate verbally with your phone.
To operate hands-free on your phone, wake up AI Voice and give a voice command.
• This feature is only available in some countries and regions.
• Please make sure your device has been updated to the latest system version.
Wake up AI Voice
You can wake up AI Voice in multiple ways:
Press and hold the Power button for 1 second to wake up AI Voice
1 Go to Settings > HUAWEI Assistant > AI Voice > Wake with Power button, and enable
Wake with Power button.
2 Press and hold the Power button for 1 second to wake up AI Voice.
Say the wakeup phrase to wake up AI Voice
1 Go to Settings > HUAWEI Assistant > AI Voice > Voice wakeup, enable Voice wakeup,
and follow the onscreen instructions to record your wakeup phrase.
2 When you need to wake up AI Voice, say the wakeup phrase.
• The settings items vary by device. If your phone does not provide a specic item, it
indicates that the corresponding feature is not supported.
• You cannot wake up AI Voice with the wakeup phrase when your phone is in a call.
• You cannot wake up AI Voice with the wakeup phrase either if you are making an
audio or screen recording (with microphone enabled). In this case, you can press and
hold the Power button to wake up AI Voice.
• This feature is only available in some countries and regions.
AI Voice Skills
AI Voice allows you to navigate on your phone with simple voice commands. You can use AI
Voice to:
• Make phone calls
• Send SMS messages
• Launch apps
• Add calendar events and reminders
• Check the weather and more
17
Page 20

Smart Features
• Enable AI Lens, and identify content onscreen
To use the voice assistant, wake up AI Voice and say your command, such as "Call Zichen",
"Set an alarm for 8 AM", and "Open Camera".
View AI Voice Skills
You can view the skills incorporated into the AI Voice feature in either of the following ways:
• Wake up AI Voice and ask: "What can you do?". AI Voice will display the Skill center, where
its skills are listed.
• This feature is only available in some countries and regions.
• Please make sure your device has been updated to the latest system version.
Play Music or Videos with Voice Commands
If you want to listen to music or watch videos, wake up AI Voice and give the voice
commands directly.
Play Music with Voice Commands
You can request your device to play a song for you with AI Voice.
Wake up AI Voice and give voice commands such as "Play music", "Play previous song", or
"Play next song".
This feature is only available in some countries and regions.
Play Videos with Voice Commands
Wake up AI Voice and give voice commands such as "Play video", "Play Friends in HUAWEI
Video", "Show me a funny video", or "Play a Coldplay video".
This feature is only available in some countries and regions.
Speech Translation
AI Voice allows you to translate your voice or text input so you can communicate with
foreign friends easily.
• This feature is only available in some countries and regions.
• Please make sure your device has been updated to the latest system version.
Speech Translation
You can use AI Voice to translate your voice or text input into the target language you have
set.
1 Wake up AI Voice and give the voice command "Translate".
2 Say or type in what you want to be translated.
3 AI Voice will display the translated result and broadcast it for you.
18
Page 21

Smart Features
Communicate Easily with Face-to-Face Translation
Face-to-face translation allows you to overcome language barriers when you are traveling
abroad or in an international conference.
1 Wake up AI Voice and give the voice command "Face-to-face translation" to enter the
translation screen.
2 Touch
sections can be read from each side of the device.
or (depending on your device model), so the text on each of the two
3 Press the button on your side of the section, say what you want to be translated, and
release the button for AI Voice to display the translated result in real time and broadcast
it.
Enable AI Lens with AI Voice
You can use AI Voice to wake up AI Lens.
Wake up AI Voice and give a voice command such as "AI Lens".
• This feature is only available in some countries and regions.
• Please make sure your device has been updated to the latest system version.
Scan and Shop with AI Voice
1 Wake up AI Voice and give voice commands such as "Look at how much is the
refrigerator", or "Help me look at the same style of this juice machine".
2 Position the object within the viewnder and wait for it to be identied.
3 You will be provided with purchase links to dierent shopping platforms once the object
has been recognized.
Scan and Translate with AI Voice
1 Wake up AI Voice and ask questions or give voice commands such as "Please scan this
menu and translate it" or "Scan this street sign and translate it".
2 Select the source and target languages from the language list.
3 Position the text you want to translate within the viewnder and wait for it to be
translated.
Scan to Learn More with AI Voice
1 Wake up AI Voice and ask questions or give voice commands such as "Help me see what
this ower is" or "Please have a look what is this building".
2 Position the object within the viewnder and wait for it to be identied.
3 Touch the information card to obtain additional information.
Scan and Count Calories with AI Voice
1 Wake up AI Voice and ask questions or give voice commands such as "Have a look how
much heat this steak has", or "How much heat I can gain by eating this egg tart".
19
Page 22

Smart Features
2 Position the food within the viewnder and wait for the calorie and nutrient information
to be displayed.
Scan Codes with AI Voice
1 Wake up AI Voice and give voice commands such as "Scan this QR code" or "Scan the
barcode".
2 Position the QR code or barcode within the scan frame and wait for it to be recognized.
AI Lens
Scan to Translate
AI Lens allows you to scan and translate text in a foreign language, so you can easily read
road signs, menus, or descriptions on cosmetics bottles when you are traveling or shopping
abroad.
Scan to Translate Using Camera
1 Go to Camera > Photo, touch
model).
, and then touch or (depending on your device
2 Select the source and target languages from the language list.
3 Position the text you want to translate within the viewnder, and wait for it to be
translated.
AI Touch
Enable AI Touch
When you see any content that you are interested in on your phone, touch and hold the
screen with two ngers to bring up AI Touch to learn more.
Go to Settings > HUAWEI Assistant > AI Touch and enable AI Touch.
Shop with AI Touch
When you see an item you wish to buy on your phone, you can use AI Touch to quickly
search for the item and compare prices across multiple shopping platforms before making
the purchase.
Touch to Get it Right Away!
1 Go to Settings > HUAWEI Assistant > AI Touch and enable AI Touch.
2 When you see an item that you wish to buy, touch and hold down on the screen with two
ngers.
20
Page 23

Smart Features
3 Adjust the size and position of the identication box so that it covers the item you wish to
identify.
4 Once the item has been identied, you will see a set of purchase links from dierent
shopping platforms.
Huawei Print
Print Files, with Huawei Print
Your phone makes it easy to print images and documents on it, by detecting nearby printers
that support Huawei Print. Then just touch to print!
1 Power on the target printer and make sure that it is connected to the same Wi-Fi network
as your phone, or that Wi-Fi Direct is enabled.
2 To print les stored in dierent locations on your phone:
• Gallery: Open an image or select multiple images in Gallery, and go to Share >
• Notepad: Open a note in Notepad, and go to More > Print.
• Files: Select one or more les in Files, and go to Share > Print.
.
3 After granting the necessary permissions, touch Select to detect nearby printers and select
the desired printer. You can then set the number of copies, color, paper size, and other
options on the preview screen, and touch PRINT.
If no printer is detected, download and install the required printer plug-in as prompted on
the Select printer screen.
Multi-Device Collaboration
Work Seamlessly Across Devices with Device+
Device+ allows for collaboration between dierent devices, making your phone the hub of
your nearby Vision and other supported devices for them to be controlled conveniently. You
can also seamlessly transfer ongoing tasks on your phone, from MeeTime calls to audio and
video content being streamed, to your Vision with just a tap.
Please make sure your device has been updated to the latest system version.
Set Device+
Currently, Device+ supports linking phones with the following types of devices. To use this
feature, make sure that devices to be connected support Device+. Before you get started,
enable Bluetooth and Wi-Fi and log in to your HUAWEI ID on your phone. For other devices,
perform the following settings:
• Vision: Ensure that it is connected to the same LAN and logged in to the same HUAWEI ID
as your phone.
21
Page 24

Smart Features
• Bluetooth device: Some Bluetooth devices (such as Bluetooth headsets) can be linked with
your phone via Device+ after establishing a Bluetooth connection.
• Device+ does not support collaboration between phones.
• If Device+ is hidden, access Control Panel and go to
> Show Device+.
Transfer MeeTime Calls and Audio or Video Being Streamed to Other Devices
When you are making MeeTime calls on your phone, watching videos (such as in HUAWEI
Video, Youku, or other video streaming apps), or listening to music, you can transfer any of
these ongoing tasks to another device via Device+ and pick up from where you left o on
the new device. For instance, you can transfer a MeeTime call to your Vision.
MeeTime: This feature is only available in some countries and regions.
You can select dierent devices to transfer the following tasks:
• Videos: Can be transferred to Visions.
• MeeTime calls: Can be transferred to Visions.
• Music: Can be transferred to Bluetooth earphones and Visions (either when the screen is on
or o).
1 Swipe down from the upper right edge of your phone to display Control Panel. Available
devices will be displayed in the Device+ section. You can also touch
to search for
nearby devices manually.
2 Touch a device that you want to transfer the ongoing tasks to.
Audio Control Panel
Audio Control Panel
Manage Audio Playback in Audio Control Panel
When multiple audio apps (such as Music) are opened, you can manage music playback and
switch between these apps in Audio Control Panel with ease.
1 After opening multiple audio apps, swipe down from the upper right edge of the phone to
display Control Panel, then touch the audio playback card at the top of Control Panel.
2 The currently and recently used audio apps will be displayed in Audio Control Panel where
you can manage playback (such as playing, pausing, and switching to the previous or next
song) in the app in use, or touch another audio app to quickly switch playback.
• Some apps need to be updated to the latest version before using this feature.
• Not all apps support Audio Control Panel.
22
Page 25

Smart Features
Quickly Switch Audio Playback Device
When your phone is connected to an audio device (such as a headset, Bluetooth speaker, or
Vision product), you can quickly switch the playback device in the audio control section in
Control Panel (such as for transferring the current music playback from your phone to a
Bluetooth speaker).
1 Connect your phone to an audio device via Bluetooth or other methods.
After a Vision product is connected to your phone via Bluetooth, you can also connect it to
the same Wi-Fi network and log in to the same HUAWEI ID as your phone to perform
more operations.
2 Swipe down from the upper right edge of your phone to display Control Panel, touch
or the device icon (such as ) in the top right corner of the audio control section at the
top, then select the audio device from the connected device list to transfer the current
audio playback on your phone to the device.
23
Page 26
Camera and Gallery
Take Photos
Take Photos
1 Open Camera.
2 You can then:
• Focus: Touch the location you want to focus on.
To adjust focus and metering separately, touch and hold the viewnder and drag the
respective frame or ring to the desired location.
• Adjust brightness: Touch the viewnder. When the
focus frame, drag it up or down.
• Zoom in or out: On the viewnder, pinch in or out, or drag the zoom slider.
• Select a camera mode: Swipe up, down, left, or right across the camera mode options.
• Turn the ash on or o: Touch
(Always on).
If you select
environment, a ash icon will appear in the viewnder and the ash will be
automatically turned on when you take a photo.
These features may not be available in some camera modes.
(Auto) and the camera detects that you are in a dimly lit
and select (Auto), (On), (O), or
symbol appears next to the
3 Touch the shutter button to take a photo.
Use Gestures to Take Photos
1 Open Camera and touch
2 Touch
and enable Gesture control.
to switch to the front camera.
3 Return to the viewnder and hold your palm about 20 cm (8 in.) in front of the screen.
4 When the front camera detects your palm, your phone will take a photo after a brief
countdown.
Use the Floating Shutter to Take Photos
You can enable the oating shutter to display it in the camera viewnder, and drag it
anywhere you like to take photos quickly.
1 Go to Camera >
and enable Floating shutter.
24
Page 27

Camera and Gallery
2 The oating shutter will then be displayed in the viewnder. You can drag it anywhere you
like.
3 Touch the oating shutter to take a photo.
Take Timed Photos
The camera timer allows you to set a countdown so you can get into position after you have
touched the shutter button.
1 Go to Camera >
> Timer and select a countdown.
2 Return to the viewnder and touch the shutter button. Your phone will take a photo when
the countdown ends.
Use Audio Control to Take Photos
You can use your voice to take photos without having to touch the shutter button.
1 Go to Camera >
> Audio control, and select an option.
2 Go back to the viewnder, then say your command to take a photo.
Shoot in Portrait, Night, and Wide Aperture Modes
Use Portrait Mode to Shoot Portraits
Portrait mode lets you apply beauty and lighting eects to your photos to shoot stunning
portraits.
1 Open Camera and select Portrait mode.
2 Frame your subject within the viewnder.
To take a sele, touch
.
3 You can then:
• Enable beauty eects: Touch
To disable the beauty eects, drag the setting to its lowest value, or touch
• Set lighting eects: Touch
• Light compensation: When you switch to the front camera and the ambient light is
dim, touch the ash icon to enable light compensation.
Touch the ash icon and select
Not all devices support these features.
and adjust the beauty settings.
and select your preferred eect.
(Auto) or (Always on).
4 Touch the shutter button to shoot a photo.
.
25
Page 28

Camera and Gallery
Take Night Shots
Night mode gives your photos sharper details and brighter colors even when shooting in low
light or at night.
1 Open Camera or go to Camera > More (depending on your device model), and select
Night mode.
2 When shooting with the rear camera, some phones allow you to adjust the ISO sensitivity
and shutter speed by touching
or in the viewnder.
3 Steady your phone and touch the shutter button.
4 Your phone will adjust the exposure time based on the ambient brightness. Keep your
phone steady until the countdown nishes.
You can also touch the shutter button to take a photo before the countdown nishes.
Some phones do not support ending a countdown before it is due to nish.
Take Photos, with Aperture Mode
Take Wide Aperture Photos
Wide aperture mode allows you to shoot photos and videos with a blurred background while
your subject remains in sharp focus.
1 Open Camera or go to Camera > More(depending on your device model) and select
Aperture mode.
2 Touch where you want to focus. For best results, your phone needs to be within 2 m
(about 7 ft.) of your subject.
3 Touch
aperture value will create a more blurred background.
in the viewnder and drag the slider to adjust aperture settings. A smaller
4 Touch the shutter button to shoot a photo.
AI Photography
Take Professional-Looking Photos
Master AI is a pre-installed camera feature that helps you take better photos by intelligently
identifying objects and scenes (such as food, beaches, blue skies, and greenery, as well as
text) and optimizing the color and brightness settings accordingly.
Master AI is displayed as AI photography or AI camera on some devices.
1 Open Camera and select Photo mode.
2 Touch to turn on
3 Frame the subject within the viewnder. Once the camera identies what you are
shooting, it will automatically recommend a mode (such as portrait, greenery, or text).
.
26
Page 29
Camera and Gallery
4 To disable the recommended mode, touch next to the mode text or turn o .
Pro Mode
Use Pro Mode to Shoot Like a Pro
Pro mode lets you ne-tune photos and videos and gives you full control over ISO sensitivity,
focus mode, and more when taking photos or recording videos.
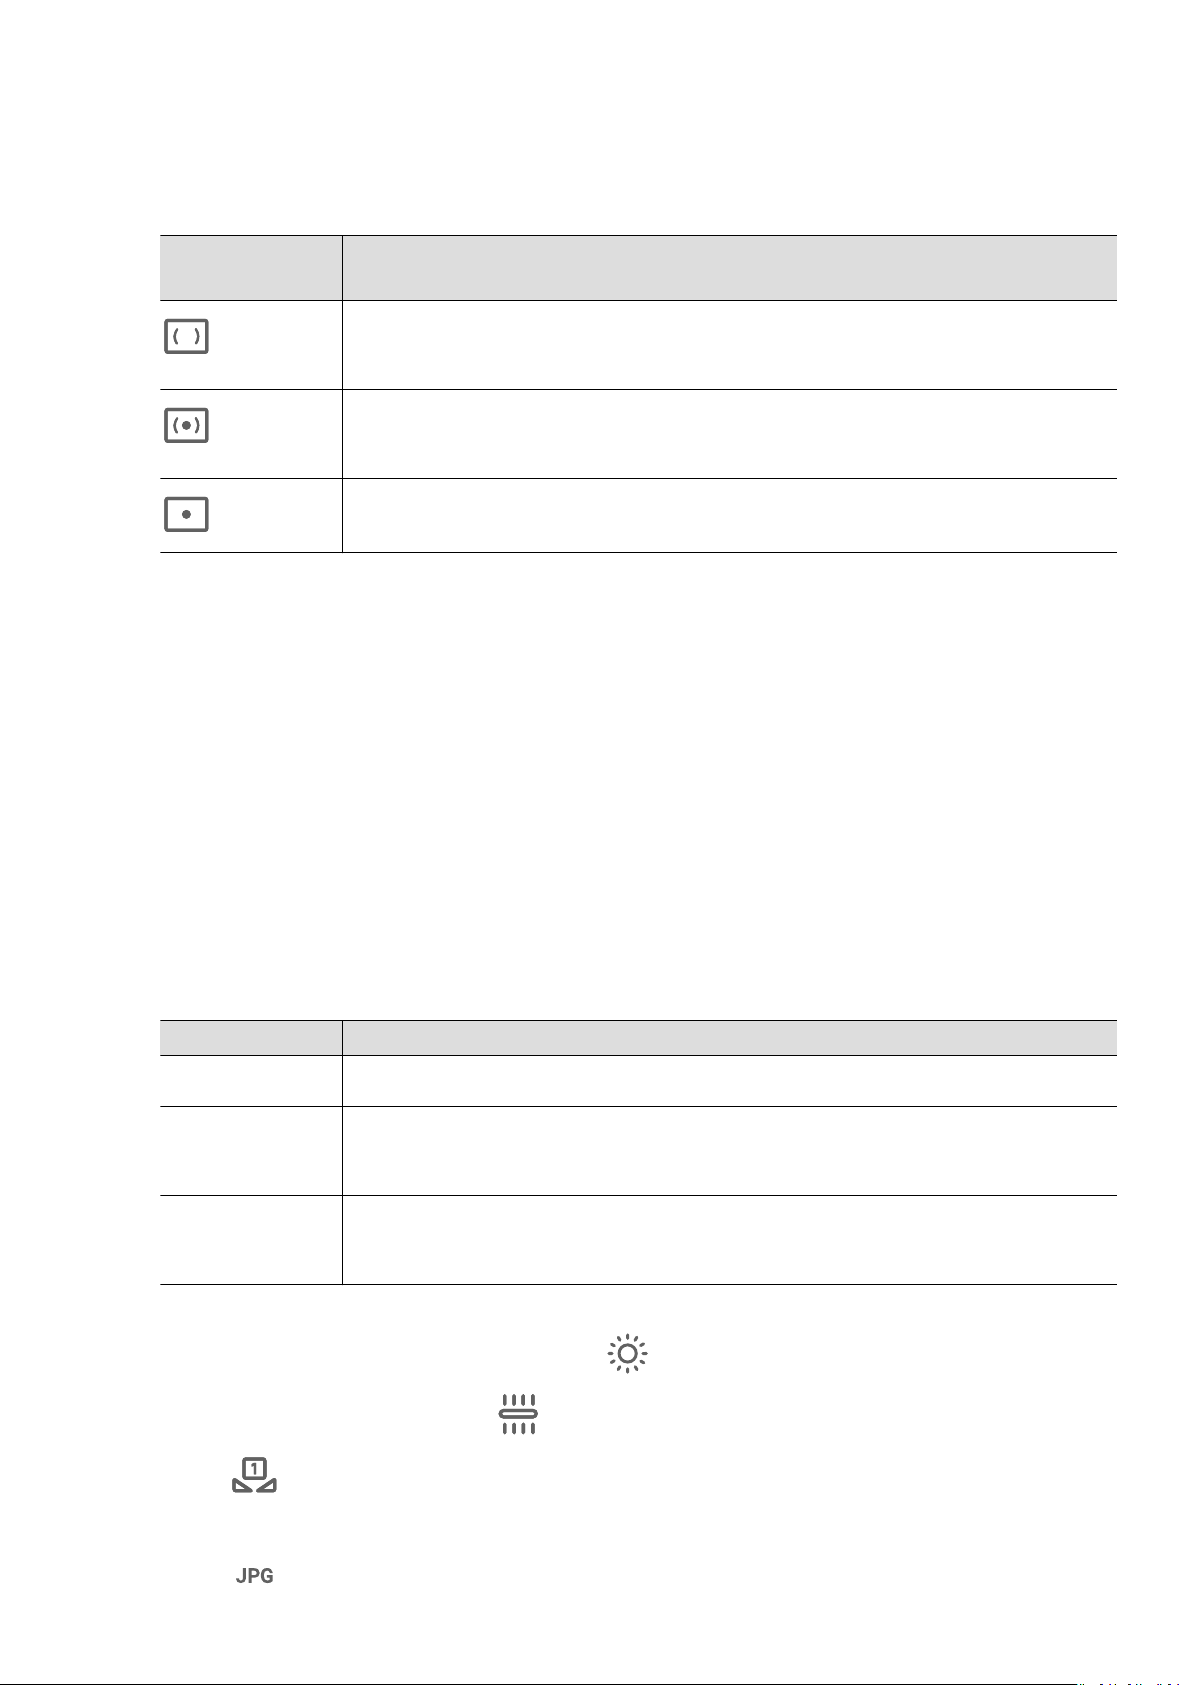
Shoot to Stun, with Pro Mode
The gures are for reference only.
27
Page 30
Camera and Gallery
1 Open Camera or go to Camera > More (depending on your device model), and select Pro
mode.
2 From there, you can:
• Adjust the metering mode: Touch M and select a metering mode.
Metering
Overview
mode
Measures light across the entire frame; ideal for shooting natural
Matrix
landscapes.
Focuses on light near the center of the screen; ideal for shooting
Center
portraits.
Focuses on light from a specic region, such as a subject's eyes.
Spot
• Adjust the ISO sensitivity: Touch ISO and drag the slider.
In low-light settings, you'll generally want to increase the ISO sensitivity. In well-lit
settings, you'll want to reduce it to avoid image noise.
• Adjust the shutter speed: Touch S and drag the slider.
The shutter speed determines the amount of light that is able to enter the camera
lens. When shooting stationary scenes or portraits, it's recommended that you use a
slower shutter speed. Likewise, when shooting fast-moving scenes or objects, you'll
want to increase the shutter speed.
• Adjust EV exposure compensation: Touch EV· and drag the slider.
It's recommended that you increase the EV value in low-light environments, and
decrease it in well-lit environments.
• Adjust the focus: Touch AF· and select a focus mode.
Focus Mode Usage scenarios
AF-S (single) Stationary subjects
AF-C
Moving subjects
(continuous)
MF (manual) Touch the subject of interest to focus in on them, such as the
subject's face.
• Adjust the color cast: Touch WB· and select a mode.
When shooting in bright daylight, select
. When shooting in overcast conditions or
low-light environments, select
Touch
• Select the storage format: Pro mode allows you to save the photo in dierent formats.
to adjust the color temperature.
.
Touch in the viewnder to select your preferred format.
28
Page 31
Camera and Gallery
3 Touch the shutter button to take a photo.
• These features are only supported on certain device models.
• Changing a specic setting will sometimes cause other settings to change as well.
Adjust them according to your actual requirements.
Record Videos
Capture Video
1 Open Camera and select Video mode.
2 Adjust the following settings:
• Zoom in or out: Pinch in or out on the viewnder, or drag the zoom slider.
• Focus: Touch the location you want to focus on. Touch and hold the viewnder to lock
the exposure and focus.
• Turn the ash on or o: Touch and select (steady on) or (o).
When using the front camera to record videos in low-light conditions, you can set the
ash to
• Adjust beauty eects: Touch
• Adjust the video resolution and frame rate: Go to
(steady on). The camera will provide light compensation.
and drag to adjust the eects.
> Video resolution and select
the desired resolution. A higher resolution will result in a higher quality video with a
larger le size.
You can touch Frame rate to select your desired frame rate.
• Select a space-saving video format: Touch
and toggle on the Ecient video
format switch.
When this feature is enabled, your phone will use a video format that takes up less
storage space. However, videos in this format may not play on other devices. Please
exercise caution when selecting this option.
• Not all devices support these features.
• Changing a specic setting will sometimes cause other settings to change as well.
Adjust them according to your actual requirements.
3 Touch
to shoot.
When recording videos with the rear camera, you can touch and hold
in or out.
Touch
to take a shot of the current frame.
or to zoom
29
Page 32

Camera and Gallery
4 Touch to pause and touch to stop shooting.
Time-Lapse Photography
Use Time-Lapse to Create a Short Video
You can use Time-lapse to capture images slowly over several minutes or even hours, then
condense them into a short video. This allows you to capture the beauty of change –
blooming owers, drifting clouds, and more.
1 Go to Camera > More and select Time-lapse mode.
2 Place your phone in position. To reduce camera shake, use a tripod to steady your phone.
3 Touch
The recorded video is automatically saved to Gallery.
to start recording, then touch to end the recording.
Adjust Camera Settings
Adjust Camera Settings
You can adjust the camera settings to take photos and videos more quickly.
The following features may not be available in some camera modes.
Adjust the Aspect Ratio
Go to Camera >
This feature is not available in some modes.
Enable Location Tags
> Aspect ratio and select an aspect ratio.
To enable Location tag, enable Location Services for your phone rst, then go to Camera >
. Your photos and videos will then be tagged with location information.
You can touch and swipe up on a photo or video in Gallery to view its shooting location.
To enable Location Services on your phone:
• Swipe down from the upper right edge of the phone to display Control Panel, touch
expand the shortcut switches panel (depending on your device model), and enable
Location.
• Go to Settings > Location and enable Access my location.
Use the Assistive Grid to Compose Your Photos
Use the assistive grid to help you line up the perfect shot.
to
30
Page 33

Camera and Gallery
1 Enable Assistive grid. Grid lines will then appear in the viewnder.
2 Place the subject of your photo at one of the intersecting points, then touch the shutter
button.
Use Mirror Reection
When using the front camera, touch
When Mirror reection is enabled, the image will appear as you see yourself in the
viewnder, instead of ipped.
When Mirror reection is disabled, the image will be ipped, so it's the opposite of what
you see in the viewnder.
Mute the Shutter Sound
Enable Mute to mute the camera shutter sound.
This feature is only available in some countries and regions.
Capture Smiles
Enable Capture smiles. The camera will take a photo automatically when it detects a smile
in the viewnder.
Use the Horizontal Level for Better Compositions
Enable Horizontal level to display a horizontal guiding line on the viewnder.
, then enable or disable Mirror reection.
When the dotted line overlaps with the solid line, it indicates that the camera is parallel with
the horizontal level.
Customize Camera Mode Layout
You can customize the layout of the Camera mode screen based on your preferences by
moving the frequently used modes to the camera home screen, or change the order of
modes.
Photo, Portrait, and Video modes cannot be moved to More.
1 Go to Camera > More, and touch
to enter the mode editing screen.
2 Touch and hold a mode and drag it to the desired position. You can move a mode on the
More screen to the camera home screen, move the mode on the camera home screen to
More, or adjust the layout of the mode screen based on how often you use certain modes.
Modes with a
3 Touch
to save the layout.
icon can be deleted by simply touching this icon.
To restore a deleted mode, go to Camera > More, touch
, and then touch ADD.
31
Page 34

Camera and Gallery
Manage Gallery
Make Quick Searches in Gallery
Quickly Search for Images in Gallery
Quickly locate an image by searching with keywords, such as a date, food, or category, in
Gallery.
1 Go to Gallery, touch the search bar at the top of the screen, then type in a keyword (such
as "food" or "scenery") or touch a suggested word to start searching.
2 Thumbnails of images related to that keyword will be displayed, and more keywords will
be suggested. Touch a suggested keyword or enter more keywords for more precise
results.
Quickly Search for Videos in Gallery
Your phone automatically analyzes and categorizes videos in Gallery when charging and with
the screen o. Suggested keywords will be displayed in the search bar for quick results on
related topics.
1 Go to Gallery, touch the search bar at the top of the screen, then type in a keyword (such
as "food" or "scenery") or touch a suggested word to start searching.
2 Thumbnails of videos related to that keyword will be displayed, and more keywords will
be suggested. Touch a suggested keyword or enter more keywords for more precise
results.
Key moments of videos in the search results will automatically be played in sequence for
you to see a preview.
Screenshots will not be analyzed.
Edit Images
Gallery oers a wide range of editing features for images.
Basic Editing
1 Open Gallery, touch the image you want to edit, and then touch
• Crop and rotate: Touch Crop, select a frame, then drag the grid or its corners to select
which part you want to keep. You can drag the image in the frame, or use two ngers
to zoom in or out to adjust the displayed part of the image.
To rotate the image, touch Crop and drag the angle wheel to the desired orientation.
To rotate the image by a certain degree or mirror ip the image, touch
• Add a lter eect: Touch Filter to select a lter.
• Adjust image eects: Touch Adjust to adjust the brightness, contrast, saturation, and
other aspects of the image.
. You can then:
or .
32
Page 35
Camera and Gallery
• Other: Touch More to edit the image in other ways, such as by adding a color splash,
blur, doodle, or text element.
When using the Adjust or Filter feature, you can touch Compare to compare the image
before and after editing. Comparison is not supported in some editing modes.
2 Touch
Add Stickers to Images
1 In Gallery, touch an image, then go to
or to save the edits.
> More > Stickers.
2 Select a sticker and drag it anywhere you like. Touch and hold the dot on the corner of the
sticker and drag it to resize the sticker. Touch
You can also edit the text in some types of stickers. Touch the editable area which is
typically encircled with dash lines to enter the new text.
3 Touch
Pixelate Images
1 In Gallery, touch an image, then go to
to save your edits and touch to save the image.
> More > Mosaic.
to delete the sticker.
2 Select a mosaic style and size to cover parts of the image.
3 To remove the mosaic, touch Eraser and wipe it o the image.
4 Touch
Rename Images
to save your edits and touch to save the image.
1 In Gallery, touch the image thumbnail you want to rename.
2 Go to
> Rename and enter a new name.
3 Touch OK.
Collage
You can use the collage feature in Gallery to quickly combine multiple images into one for
easier sharing.
1 You can access the collage feature in the following ways (depending on your device
model):
• On the Discover tab, touch Create collage, select some images, then touch Create.
• On the Photos or Albums tab, touch and hold to select some images, then go to
> Collage.
2 Select a template. You can then:
• Relocate an image: Touch and hold the image and drag it to a dierent position.
33
Page 36

Camera and Gallery
• Adjust the displayed portion of an image: Slide on the image, or pinch in or out on it
so that only the part you want to see is displayed in the grid.
• Rotate an image: Touch the image, then touch
• Add or remove borders: By default, borders are displayed between images and along
the grid edges. To remove them, touch Frame.
3 Touch
To view the saved collage, go to Albums > Collages.
to save the collage.
to rotate it or to ip it.
Share Images and Videos
Open Gallery and share an image or video in the following ways:
• Share a single image or video: Touch the image or video, then touch
• Share multiple images or videos: In an album or on the Photos tab, touch and hold to
select multiple images and videos, then touch
Share Your Photos Securely
Before sending a photo, you can choose to delete sensitive information like the location,
.
.
time, and camera specs.
1 Open Gallery.
2 Select one or more photos and touch
.
3 Touch the privacy switch in the upper left corner of the screen. In the displayed Privacy
options dialog box, turn on the Remove photo info and Remove location info switches,
then touch OK.
If Location tag was disabled when a photo was taken, the Remove location info switch
will not be displayed in the Privacy options dialog box when you share the photo.
Organize Albums
Organize images and videos into albums to easily sift through them.
Add Albums
1 Go to Gallery > Albums.
2 Touch
, name the album, then touch OK.
3 Select the images or videos you want to add, and then move or copy them to the album.
Sort Albums
1 Go to Gallery > Albums >
and touch Sort albums.
2 Hold and drag next to the albums to adjust the order.
34
Page 37

Touch Reset or go to > Reset to restore the default order.
Adjust the Album Display Style
Camera and Gallery
Go to Gallery > Albums >
Move Images and Videos
, touch Switch view, and select an album display style.
1 Open an album, then touch and hold to select the images and videos you want to move.
2 Touch
> Move to album to select the desired album.
3 Once the items are moved, they will no longer be in their original album.
The All photos and Videos albums show all images and videos stored on your device.
Moving items across albums will not remove them from these albums.
Delete Images and Videos
Touch and hold to select images, videos, or albums and go to Delete > Delete.
Some preset albums cannot be deleted, including All photos, My favorites, Videos, and
Camera.
Deleted images and videos will be temporarily moved to the Recently deleted album for a
period of time, after which they will be permanently deleted.
To permanently delete images and videos before the retention period expires, touch and hold
to select images or videos in the Recently deleted album and go to Delete > Delete.
Recover Deleted Images and Videos
In the Recently deleted album, touch and hold to select the items you want to recover, then
touch
If the original album has been deleted, a new one will be created.
Add Images and Videos to Favorites
Open an image or video, then touch
The item will appear in both its original album and the My favorites album.
Hide Images and Videos
Keep images and videos in Gallery under wraps and out of view.
Go to Gallery > Albums. From there, you can:
to restore them to their original albums.
.
• Hide images and videos: Tap to open an album, touch and hold down to select the images
and videos you wish to hide, and then go to
• View hidden images and videos: In the Albums tab, go to > Hidden items.
> Hide > OK.
35
Page 38

Camera and Gallery
You can touch in the Hidden items screen to switch to album view, to quickly locate
the desired items.
• Unhide items: In Hidden items, touch and hold down to select the images or videos you
wish to unhide, then touch Unhide.
These images and videos will then be restored to their original albums.
36
Page 39
Apps
Notepad
Create a Note
To help you quickly keep a track of your thoughts and inspirations, you can create notes
using the Handwrite (to write or draw the content) and Scan document modes, or in
conjunction with Multi-Screen Collaboration.
Add Content to a Note
1 Go to Notepad > Notes and touch
.
2 Enter the title and content of the note. You can then perform the following:
• Touch
• Touch
• Touch
position in the note.
• To organize your notes for easier access and viewing, categorize a note after nishing
it.
3 Touch
Add a Handwritten Note
You can add a handwritten note to write down thoughts and inspirations that would be
dicult to convey through text.
to add a checklist.
to change the text style, paragraph alignment, and background.
to insert a picture. Touch and hold the picture, then drag it to the desired
to save the note.
1 Go to Notepad > Notes and touch
2 Touch
3 Touch
to write or draw the content you want to note down in the selected color.
to save the note.
.
Create To-dos
You can create to-dos to keep a track of day-to-day essentials, such as daily shopping lists,
tasks at work, and household chores.
Add a To-do Item and Set a Reminder
You can add a to-do item and set a time reminder for it.
37
Page 40
If you have marked the to-do item as important, you will be prompted with a full-screen
reminder when the screen is locked.
Apps
1 Go to Notepad > To-dos and touch
.
2 Enter your to-do item.
3 Touch
4 Touch
, set a reminder time, then touch OK.
to mark the to-do item as important.
5 Then touch Save.
Set Repeated Reminders for a To-do Item
If you specify a time for a to-do item, you can select a repeat mode for it (for example,
Never, Every day, Every week, Every month, or Every year), and your phone will repeatedly
prompt you to complete the to-do item at the specied time.
Manage Your Notepad
You can sort your Notepad items by category and put them into dierent folders, delete
unwanted items, and share items with other people.
When viewing a list of items or an individual item in Notepad, touch the status bar at the top
of the screen to quickly return to the rst item or the beginning of the item you are viewing.
Use App Lock for Notepad or Lock a Note
You can apply App Lock to Notepad or set a password for a note to protect your privacy.
Enable the app lock for Notepad: Go to Settings > Security > App Lock, enter the lock
screen password or customize the app lock password as prompted, and then turn on the
switch next to Notepad.
Lock a note: Open the note you need to lock in Notepad, go to
the onscreen instructions. To unlock your note, go to
If your device supports ngerprint or face unlock, you can use fast authentication by
performing the following: Go to Notepad >
with Fingerprint ID and Unlock with Face Recognition.
> Settings > Note lock, then enable Unlock
> Remove lock.
> Add lock, and follow
Sort Notepad Items by Category
You can sort the Notepad items into dierent folders by category and add labels in dierent
colors.
Sort Notepad items using the following methods:
• On the All notes screen, swipe left on a note, select
top, or add a star icon to it.
or to move this note to the
38
Page 41

• On the All notes or All to-dos screen, swipe left on an item, touch , and select a
category for it.
• Touch and hold a note or to-do item, select the ones you want to classify under the same
Apps
category, then touch
to move them to the target category.
Items in an Exchange account cannot be moved.
Share Notepad Items
You can share Notepad items in the following ways:
• To share a single note or to-do item, open the one you want to share from the All notes or
All to-dos screen, then touch
and share it as prompted.
Notes can be shared by touching As image, As text, Export as document, or To another
device.
Handwritten notes do not support Export as document, and other types of notes can
be exported into TXT or HTML les when using Export as document. You can view
saved notes as follows: Open Files, search for and touch Documents, then touch
Notepad.
• To share multiple notes, access the All notes screen, touch and hold a note, select the ones
you want to share, then touch
and share them as prompted.
Print Notepad Items
1 On the All notes screen, open the item you want to print.
2 Go to
Delete Notepad Items
You can delete Notepad items using either of the following methods:
• On the All notes or All to-dos screen, swipe left on an item, and touch
• Touch and hold a note or to-do item you want to delete, select or drag over the check
boxes of any other notes or to-do items you want to delete as well, then touch
To restore a deleted Notepad item, touch All notes or All to-dos, select the item you want to
restore in Recently deleted, then touch
> Print, then select a printer and congure printing settings as prompted.
to delete it.
.
.
39
Page 42

Settings
Display & Brightness
Use Eye Comfort Mode
Eye comfort mode can eectively reduce harmful blue light and adjust the screen to display
warmer colors, relieving eye fatigue and protecting your eyesight.
Enable or Disable Eye Comfort Mode
• Swipe down from the upper right edge of the screen to display Control Panel and touch
to expand the shortcut switches panel (depending on your device model). Enable or
disable Eye Comfort. Touch and hold Eye Comfort to access the settings screen.
• Go to Settings > Display & brightness > Eye Comfort and enable or disable Enable all
day.
Once Eye Comfort mode is enabled,
will take on a yellow tint since less blue light is being emitted.
Set a Schedule for Eye Comfort Mode
Go to Settings > Display & brightness > Eye Comfort, enable Scheduled, then set Start and
End according to your preferences.
Adjust the Blue Light Filter in Eye Comfort Mode
Go to Settings > Display & brightness > Eye Comfort, enable Enable all day or set up
Scheduled, and adjust the slider under Filter level to customize how much blue light you
would like to be ltered.
will be displayed in the status bar, and the screen
Biometrics & Password
Set Fingerprints
You can enroll a ngerprint and then use it to unlock the screen and access your Safe, App
Lock, and more.
Add Fingerprints
1 Go to Settings > Biometrics & password > Fingerprint ID or Settings > Biometrics &
password > Fingerprint ID > Fingerprint management (depending on your device
model), and follow the onscreen instructions to set or enter the lock screen password.
2 Touch New ngerprint or New rear ngerprint (depending on your device model) to
begin enrolling your ngerprint.
40
Page 43

Settings
3 Place your ngertip on the ngerprint sensor. When you feel a vibration, lift your nger
and then press down again. Move your nger around until the entire ngerprint is
captured.
4 Once enrollment is complete, touch OK.
You can now place your nger on the ngerprint sensor to unlock the screen.
Rename or Delete a Fingerprint
1 Go to Settings > Biometrics & password > Fingerprint ID or Settings > Biometrics &
password > Fingerprint ID > Fingerprint management(depending on your device
model) and enter your lock screen password.
2 In the Fingerprint list section, touch an enrolled ngerprint to rename or delete it.
Fingerprint Identication
Fingerprint identication allows you to match your ngers with the enrolled ngerprints.
1 Go to Settings > Biometrics & password > Fingerprint ID or Settings > Biometrics &
password > Fingerprint ID > Fingerprint management(depending on your device
model) and enter the lock screen password.
2 In the Fingerprint list section, touch Identify ngerprint.
3 Touch the ngerprint sensor with your nger. The recognized ngerprint will be
highlighted.
Use Your Fingerprint to Access Your Safe
1 Go to Settings > Biometrics & password > Fingerprint ID or Settings > Biometrics &
password > Fingerprint ID > Fingerprint management(depending on your device
model) and enter your lock screen password.
2 Turn on the switch for Access Safe and follow the onscreen instructions to link your
ngerprint with the Safe.
Now you can go to Files > Me, touch Safe, then use your ngerprint to access it.
Please make sure your device has been updated to the latest system version.
Use Your Fingerprint to Access a Locked App
1 Go to Settings > Biometrics & password > Fingerprint ID or Settings > Biometrics &
password > Fingerprint ID > Fingerprint management(depending on your device
model) and enter the lock screen password.
2 Turn on the Access App Lock switch and follow the onscreen instructions to link your
ngerprint with App Lock.
You can then touch a locked app on your home screen and use your ngerprint to access it.
Enable and Use Fingerprint Payment
You can use your ngerprint to verify your payments in a payment app.
Go to the payment app and follow the onscreen instructions to enable this feature.
41
Page 44

Settings
Face Recognition
Face Recognition allows you to unlock your phone or access locked apps with your facial
data.
Set up Face Recognition
1 Go to Settings > Biometrics & password > Face Recognition and enter your lock screen
password.
2 Select Enable raise to wake.
The settings items vary by device. If your phone does not provide a specic item, it
indicates that the corresponding feature is not supported.
3 Touch Get started and follow the onscreen instructions to enroll your facial data.
Set Face Unlock
On the Face Recognition screen, touch Unlock device and select an unlock method.
If you have enabled PrivateSpace or added multiple users to your phone, you can use
Face unlock only in MainSpace or with the Owner account.
Access App Lock with Face Recognition
On the Face Recognition screen, enable Access App Lock, and follow the onscreen
instructions to add your facial data to App Lock.
You can then touch a locked app on your home screen and use face recognition to access the
app.
Disable or Delete Facial Data
On the Face Recognition screen, you can do the following:
• Disable facial data for certain features: Disable Unlock device, or Access App Lock as
required. This will not delete your facial data.
• Delete facial data: Touch Delete facial data and follow the onscreen instructions to delete
your facial data.
About Phone
Legal Notice
Copyright © Huawei 2022. All rights reserved.
42
Page 45

This guide is for reference only. The actual product, including but not limited
to the color, size, and screen layout, may vary. All statements, information,
and recommendations in this guide do not constitute a warranty of any kind,
express or implied.
Please visit https://consumer.huawei.com/en/support/hotline for recently
updated hotline and email address in your country or region.
Model:
EMUI12.0_01
MGA-LX3
MGA-LX9
MGA-LX9N
 Loading...