

Page 1

User Guide
Page 2

Contents
Exciting New Features
Unboxing your Phone
Transferring Data
Scrolling screenshots 1
Pro camera mode 2
Screen recorder 3
Getting to know your phone 5
Inserting a SIM card and microSD card 5
Charging your phone 6
Turning your phone on and off 7
Using the Backup application to transfer data 8
Transferring data between your phone and a computer 10
Copying contacts from an old phone to a new phone 10
First Use and Initial Setup
Initial setup 11
Dual SIM settings 11
Connecting to the Internet 12
Configuring your fingerprint ID 14
Installing Applications
Sharing applications using a microSD card 15
Uninstalling an application 15
Getting Started
Locking and unlocking the screen 16
Touchscreen gestures 17
Status and notification icons 18
Home screen 20
Taking a screenshot 25
Notifications 27
Using fingerprint recognition 30
Accessing applications 31
Personalizing your phone 34
Entering text 37
Tips and Tricks
Searching for settings 39
Quickly returning a call 39
Using your knuckle 39
Adding contact details quickly 41
i
Page 3

Sharing your QR card 41
Calling contacts when the screen is off 41
Pocket mode 42
Taking snapshots when the screen is off 42
Perfect selfie 43
Using time-lapse mode to fast forward the action 43
Taking photos while recording a video 44
Finding applications quickly 44
Connecting to the Wi-Fi network with the strongest signal 45
Using your phone while wearing gloves 46
Adjusting the system volume rapidly 46
Using the floating dock 47
Aligning home screen applications automatically 47
Touch-disable mode 47
Calls and Contacts
Contents
Making calls 49
Answering or rejecting a call 51
Functions available during a call 52
Answering a third-party call 53
Making a conference call 54
Viewing the call log 54
Turning on pocket mode 55
Call settings 55
Creating a contact 57
Adding contact details quickly 57
Importing or exporting contacts 58
Managing contacts 60
Finding a contact 60
Viewing contacts from different accounts 61
Adding a contact to your favorites 61
Contact groups 61
Messaging and Email
Sending a message 63
Replying to a message 63
Searching for messages 64
Deleting threads 64
Managing messages 64
Blocking spam messages 65
Managing common phrases 65
Adding a message signature 65
Adding an email account 65
Sending an email 66
ii
Page 4

Checking your emails 67
Managing VIP contacts 68
Account settings 68
Camera and Gallery
Accessing the viewfinder 69
Taking a photo 69
Capture modes 69
Beauty mode 70
Perfect Selfie mode 70
Ultra Snapshot 71
Burst shooting 72
Voice activated shooting 73
Launching the camera from Gallery 73
Object tracking 74
Audio notes 75
Contents
HDR mode 75
Super Night mode 75
Pro camera mode 76
Light Painting mode 78
Panoramic shots 81
Adding watermarks to photos 82
Shooting a video 83
Time-lapse mode 83
Slow motion recording 84
Document correction 84
Video settings 85
Camera settings 85
Viewing photos and videos 86
Adding photos or videos to a new album 88
Moving photos or videos to other albums 88
Deleting images or videos 88
Sharing images or videos 88
Managing albums 88
Adding notes to an image 89
Editing an image 89
Using Camera or Gallery to scan a QR code 90
Music and Video
Adding songs to your phone 91
Searching for local music 91
Listening to music 91
Controlling playback using a smart headset 92
Creating a playlist 93
iii
Page 5

Playing a playlist 93
Setting a song as the ringtone 94
Playing a video 94
Accessing the Internet
Connecting to the Internet using mobile data 95
Connecting to the Internet using Wi-Fi 95
Sharing your mobile Internet with other devices 96
Transferring data using Bluetooth 98
Transferring data using Wi-Fi Direct 99
Contents
Transferring data between your phone and a USB storage
device
Streaming multimedia content to your TV 100
NFC and payment 101
Backup and Restore
Using the Backup application to back up and restore data 103
Restoring factory settings 104
Updating your phone 104
OTA updates 105
File Management
Viewing files 106
Sharing files 106
Creating folders 107
Renaming files 107
Copying, moving, or deleting files 107
100
Creating or extracting archives 107
Excluding small images 108
Storing private files in a safe 108
Power Management
Viewing battery usage statistics 109
Reducing power consumption 109
Enabling the Ultra power plan 109
Closing background applications when the screen is locked 110
Preventing background applications from accessing the Internet 110
Configuring display and sound settings 110
Phone Manager
Optimizing your system 111
Managing data usage 111
Harassment filter 111
Battery management 112
iv
Page 6

Tools
Settings
Contents
Calendar 113
Clock 114
Weather 116
Notepad 118
Calculator 119
Sound recorder 119
Opening two apps on one screen 120
Enabling location access 122
Increasing indoor positioning accuracy 122
Configuring the display settings 123
Sound settings 123
Changing the screen unlock method 124
Gestures and navigation settings 125
Airplane mode 126
Using the floating dock 127
Setting your SIM card PIN 127
Setting up an account 128
Setting the date and time 129
Changing the system language 129
Viewing your phone's specifications 129
Viewing the available storage space 129
Encrypting a microSD card 129
Formatting the microSD card 130
Accessibility Features
About your phone's accessibility features 131
TalkBack 131
Magnification gestures 133
Using the power button to end a call 134
Appendix
Adjusting the screen response time 134
Color correction 135
Obtaining help 136
Personal Information and Data Security 136
List of safety features 137
Legal Notice 138
v
Page 7
Exciting New Features
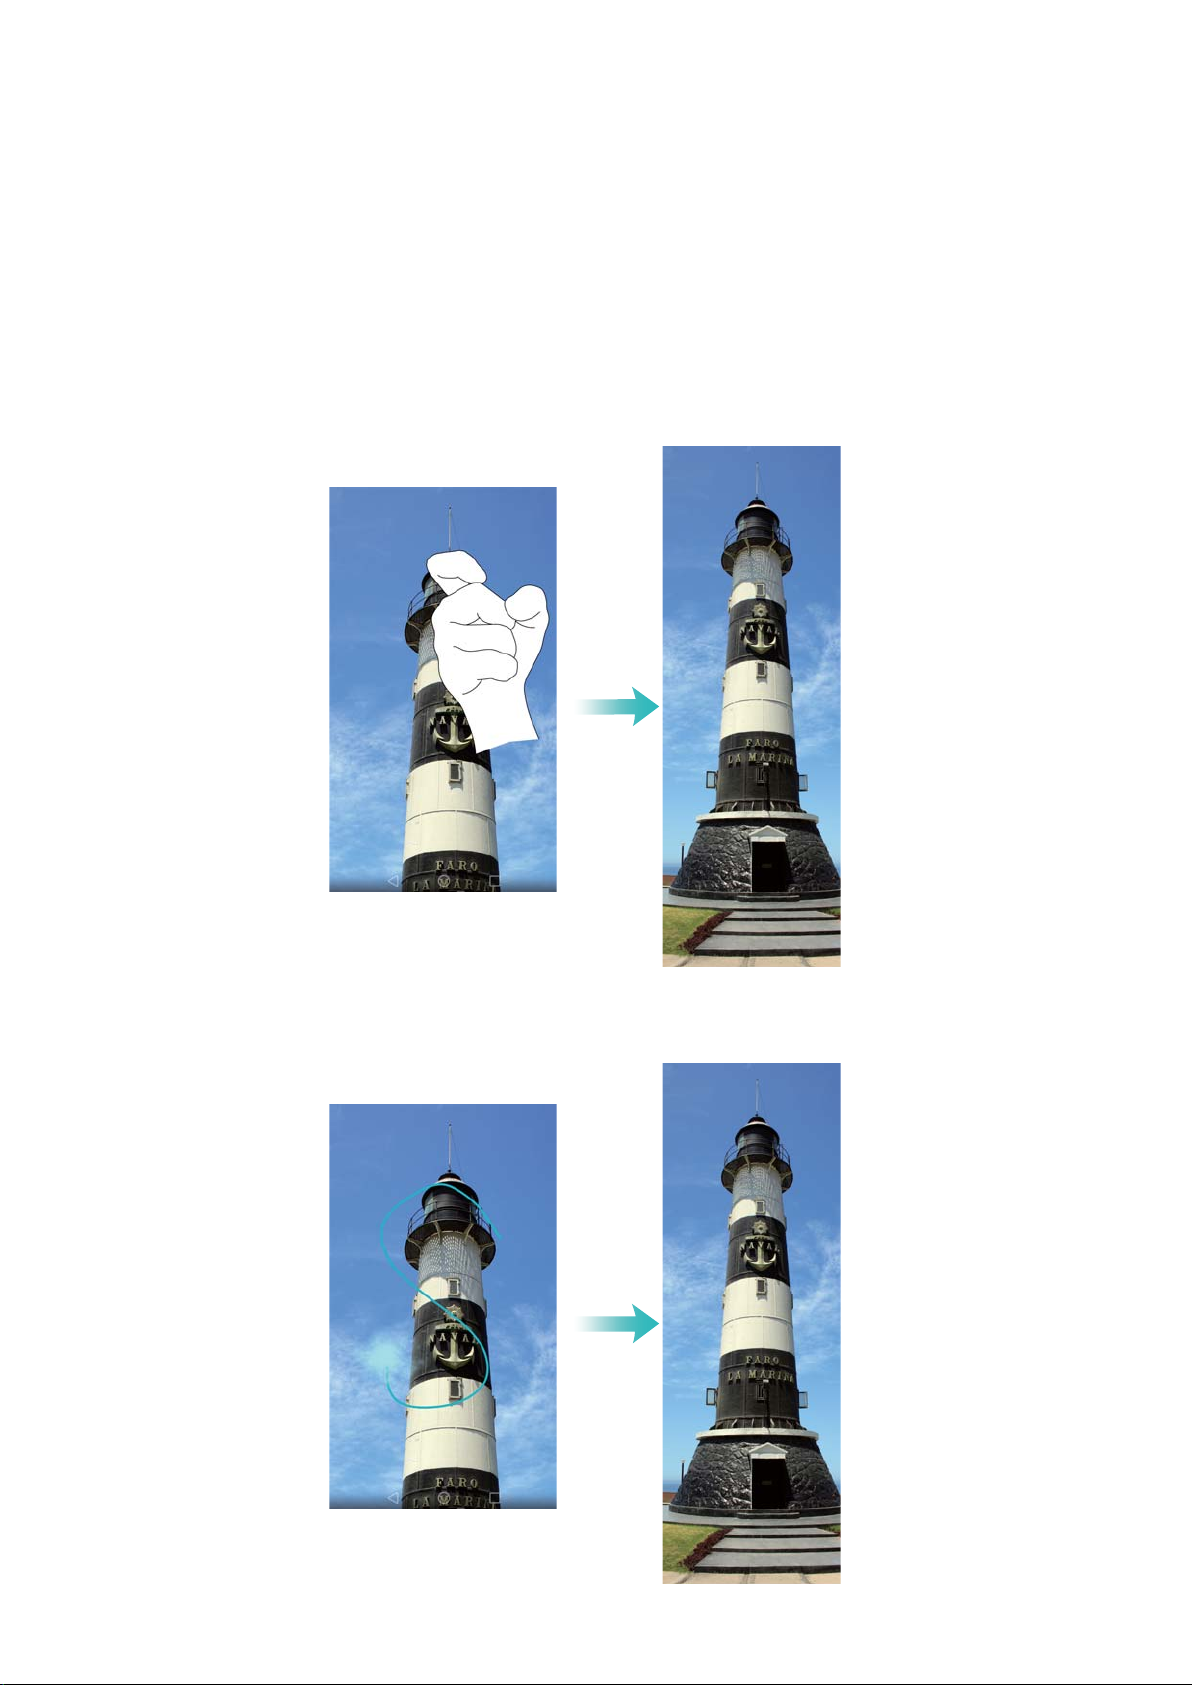
Scrolling screenshots
Scrolling screenshots enables you to take screenshots longer than one screen. For example,
you can capture long messaging threads in one screenshot.
l To take a scrolling screenshot, knock the screen twice using your knuckle, and then touch
Scrollshot in the bottom right of the screen. The screen will scroll down automatically.
l Alternatively, draw an "S" on the screen using your knuckle.
1
Page 8
Exciting New Features
Touch the screen with your finger at any time to stop scrolling and take a screenshot of the
previous content.
Pro camera mode
Photography is all about light and composition. When combined effectively, these two elements
can produce stunning, soul-stirring images. Pro camera mode lets you fine-tune photos and
gives you full control over composition, exposure, and shutter speed.
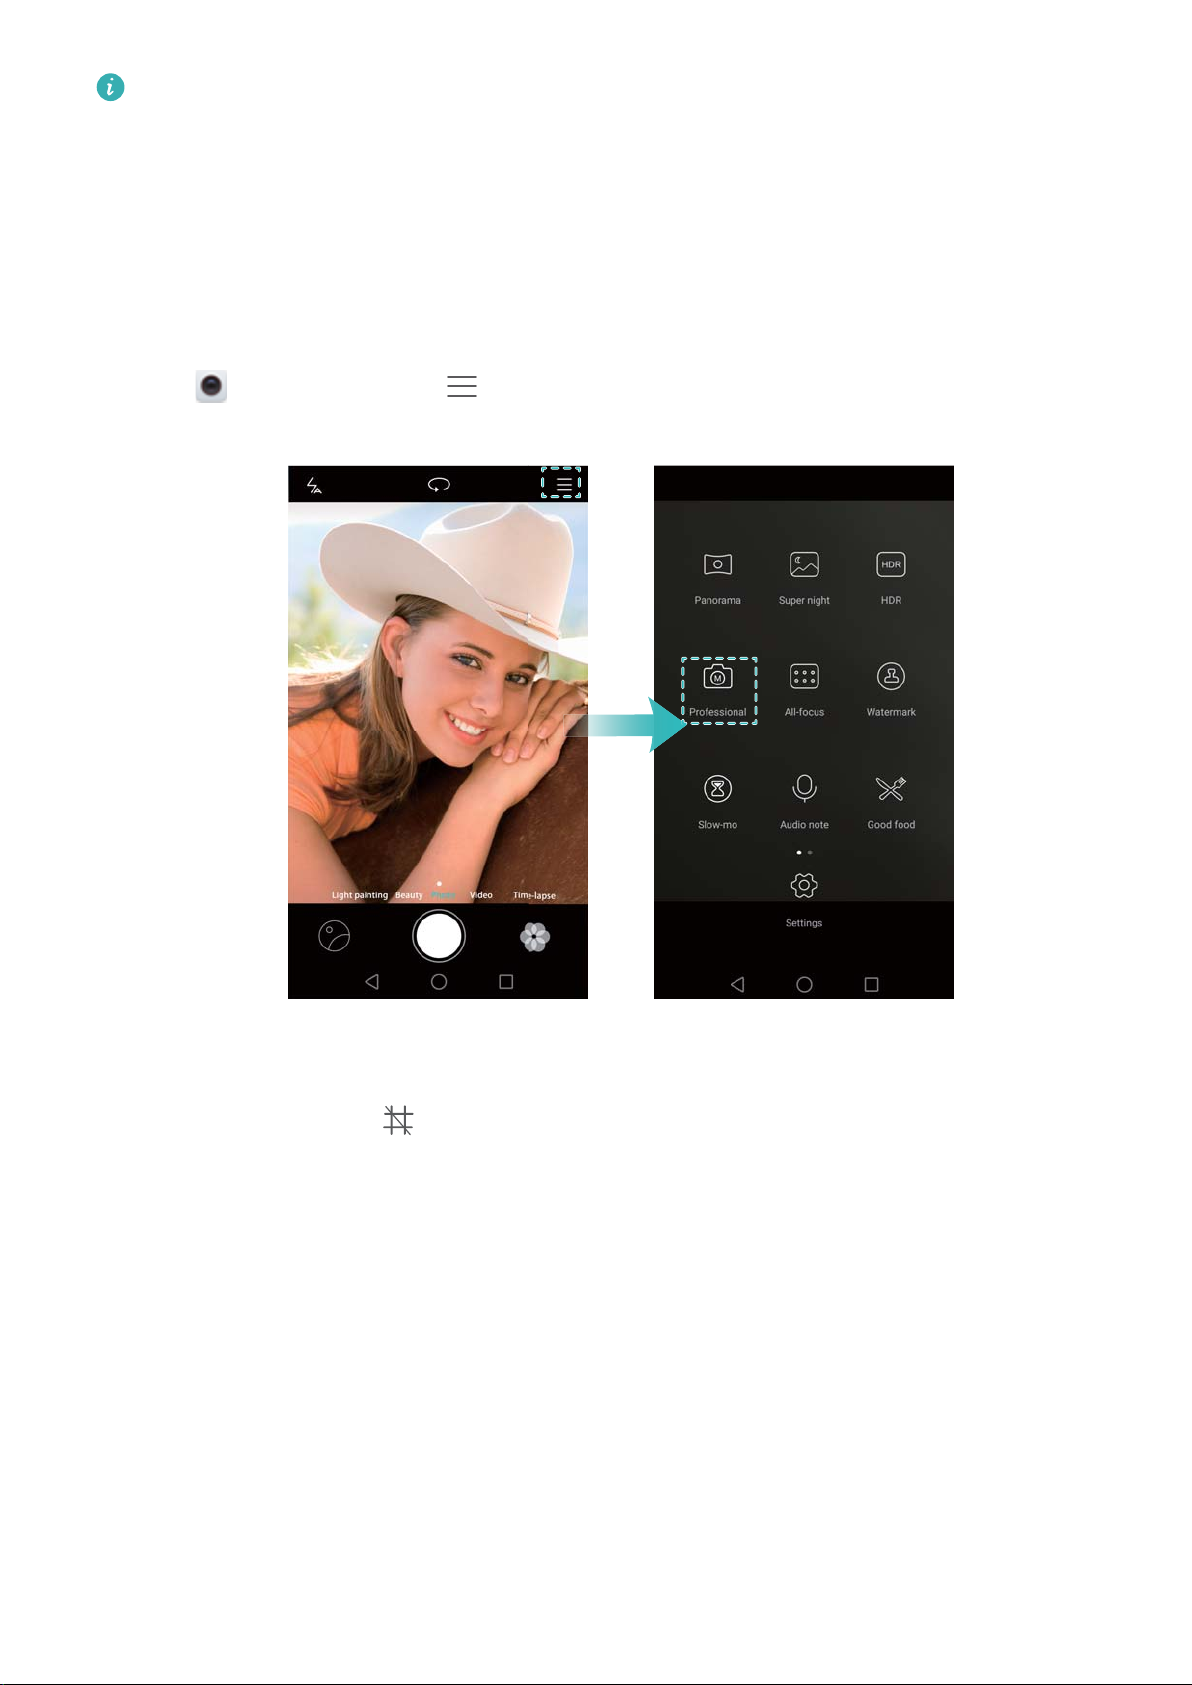
1 Open Camera and touch > Professional.
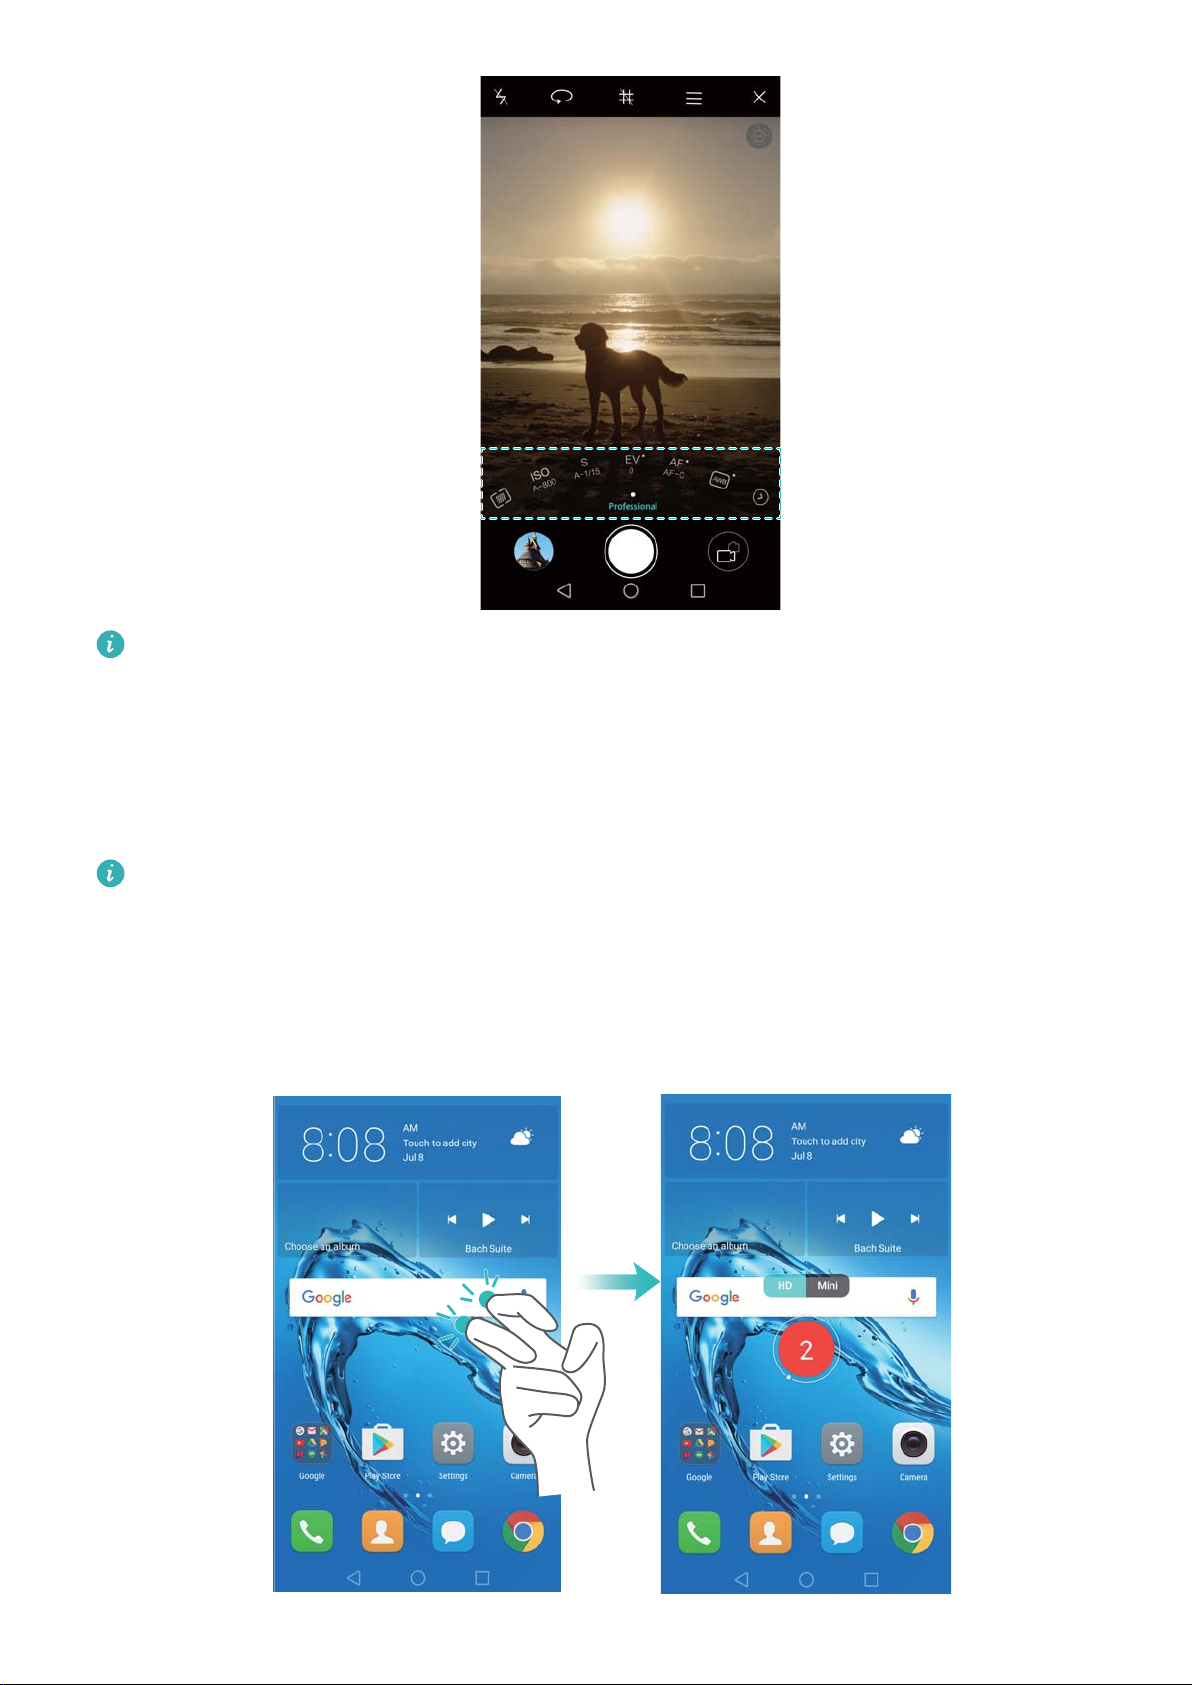
2 On the Pro camera settings screen, you can enable grid lines, or configure parameters such
as lighting, exposure, and shutter speed. For more information, refer to Pro camera settings.
l Grid lines: Touch the icon at the top of the screen. You can choose from a 3 x 3 grid,
phi grid, or a spiral-shaped overlay. These overlays have been designed by professionals to
help you compose interesting, professional-looking shots.
l Shutter speed and exposure control: Adjust the parameters at the bottom of the screen
to produce a perfectly-exposed shot. You can set the ISO, shutter speed, white balance,
exposure compensation, focus mode, and metering mode.
2
Page 9
Exciting New Features
For more information, refer to Pro camera mode.
Screen recorder
Use the screen recorder feature to record video game footage or teach friends and family how to
use phone features.
To protect your privacy, unlock your phone before recording your screen.
Starting the recording
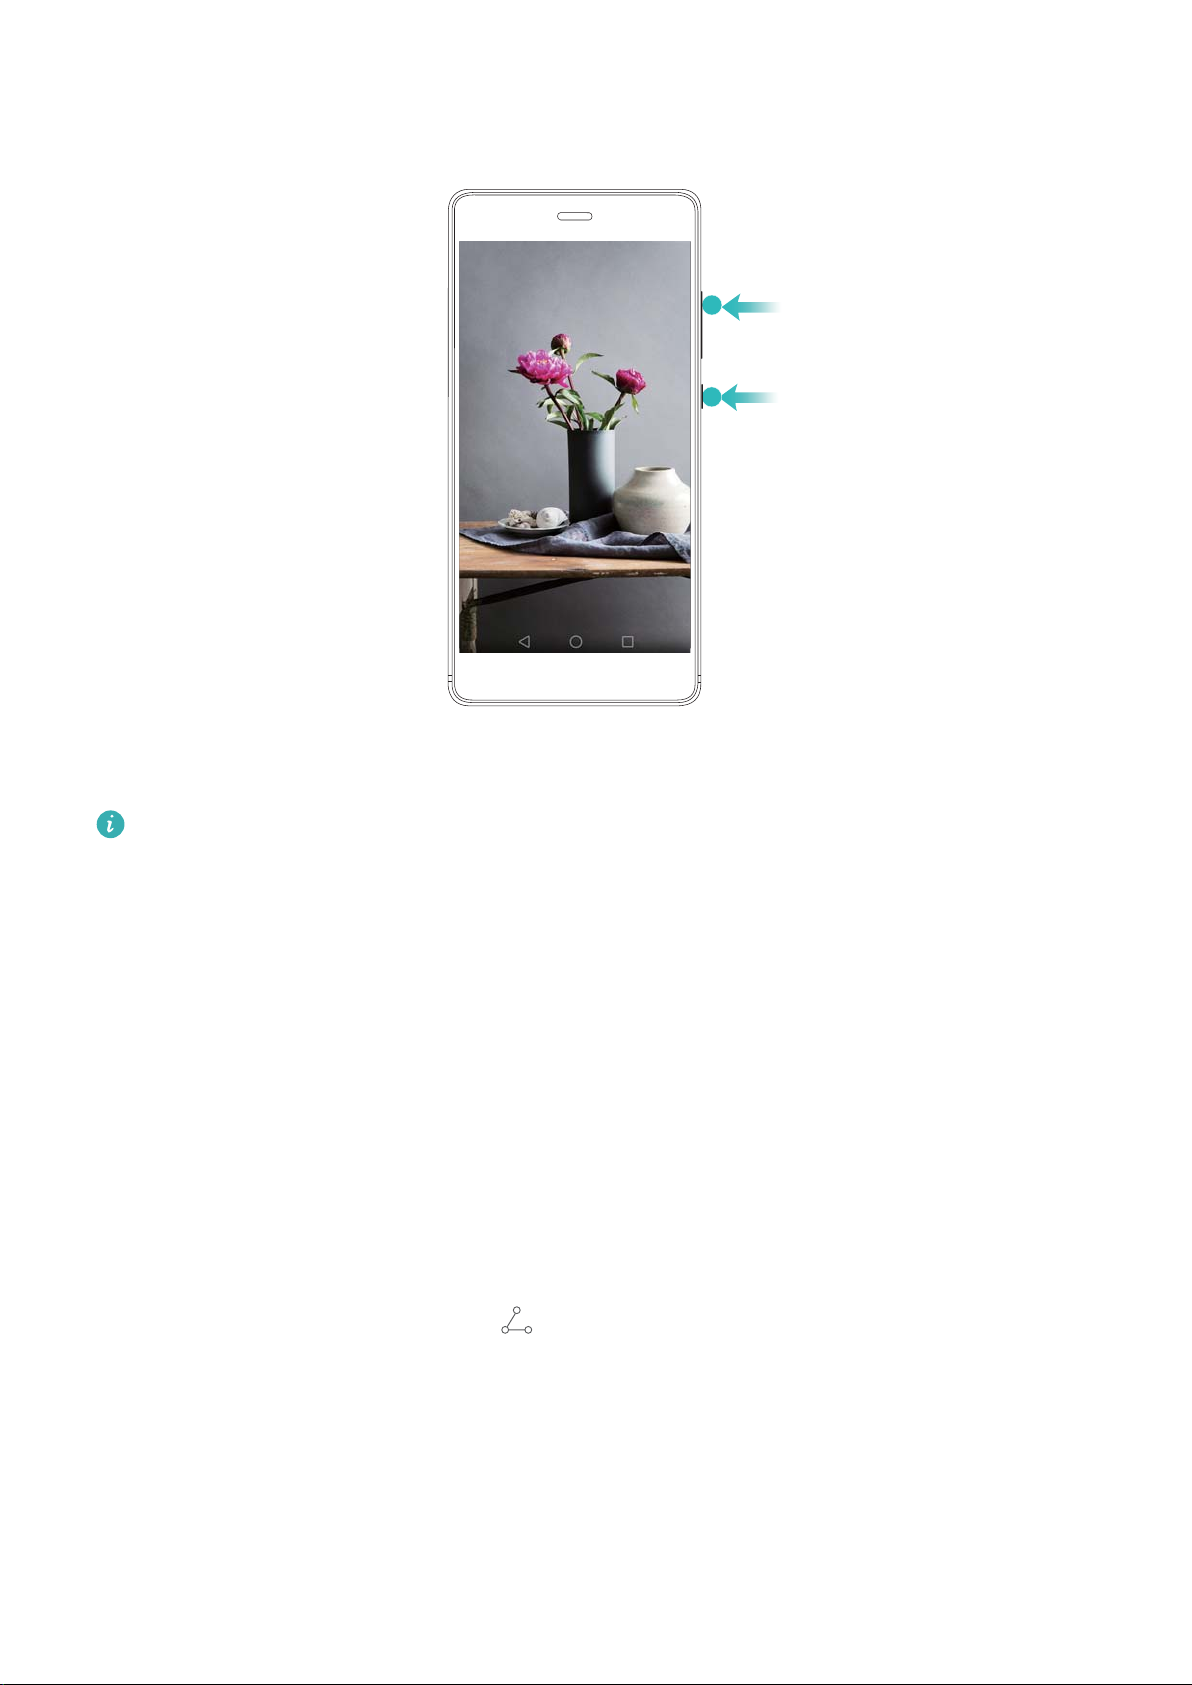
Start recording the screen using one of the following methods:
l Knock the screen twice using two knuckles and select the desired recording mode.
3
Page 10
Exciting New Features
l Press the volume up and power buttons simultaneously and select the desired recording
mode.
You can choose from HD mode or Mini mode. Mini mode records in a lower resolution, resulting
in smaller file sizes and faster upload speeds.
l Audio will also be recorded, therefore make sure that you are in a quiet environment.
l Recording will stop automatically when you make or receive a call.
l When making a screen recording, you will not be able to use the recording feature in other
applications.
l Longer recordings will take up more space on your phone's internal storage, so ensure
there is enough space before recording.
Stopping the recording
Stop recording the screen using one of the following methods:
l Knock the screen twice using two knuckles.
l Press the volume up and power buttons simultaneously.
l Touch the screen recording icon in the upper left corner of the status bar.
Open the notification panel and touch
to share your screen recording.
By default, screen recordings are stored in Gallery, within the Screen recordings folder.
4
Page 11
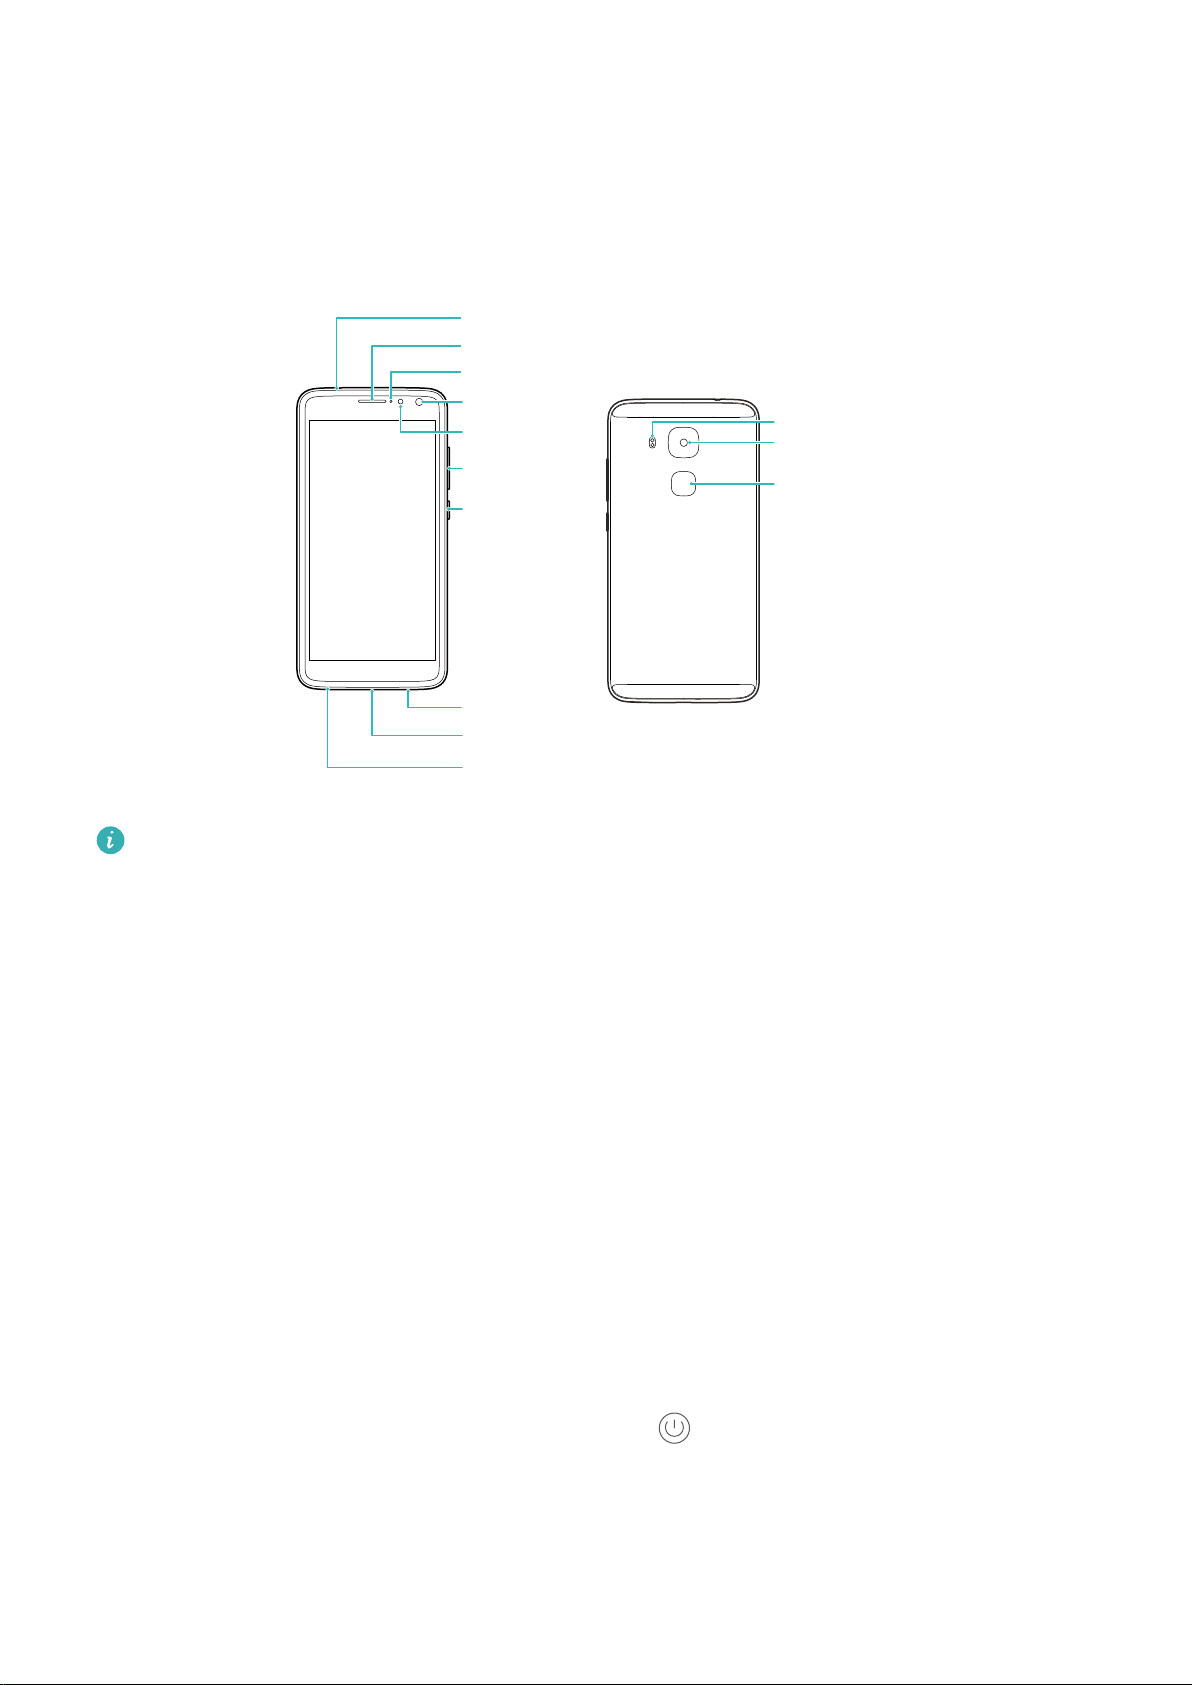
Unboxing your Phone
Dual-tone flash
Fingerprint scanner
Camera
Headset jack
Front camera
Power button
Volume button
USB-C port
Speaker
Microphone
Earpiece
Light sensor
Status indicator
Getting to know your phone
Do not cover the light sensor, as this will affect some of the phone's functions. Ensure that
you use a screen protector that has a purpose-built hole for the light sensor.
Inserting a SIM card and microSD card
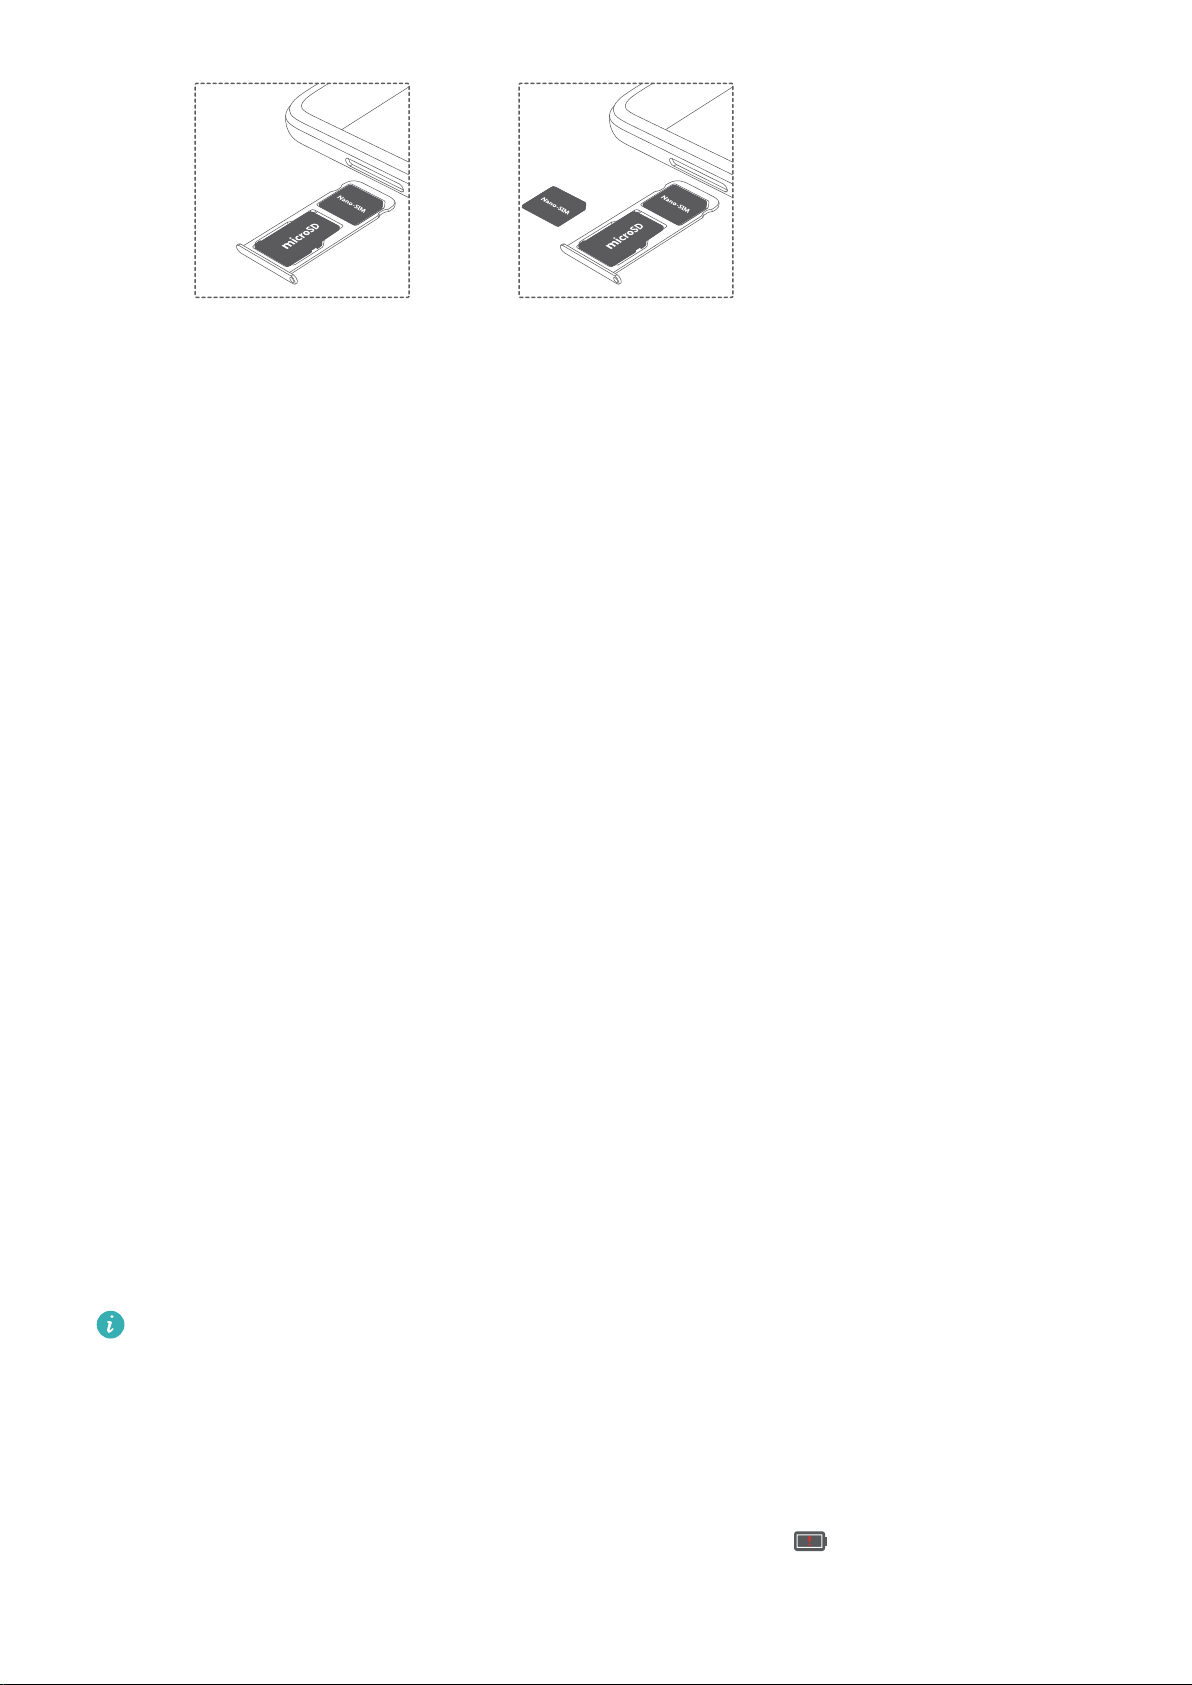
Your phone's 2-in-1 card slot is located on the upper left side of the phone. You can insert 2
nano-SIM cards, or 1 nano-SIM card and 1 microSD card.
Tips:
l Your phone only supports nano-SIM cards. Contact your carrier for a new or replacement
nano-SIM card.
l Only use standard nano-SIM cards to avoid damaging the SIM card tray.
l Ensure that the card is in the correct position and keep the card tray level when inserting it into
your phone.
l Be careful not to hurt yourself or damage your phone when using the SIM eject pin.
l Store the SIM eject pin out of the reach of children to prevent accidental swallowing or injury.
1 Press and hold the power button, and then select to turn off your phone.
2 To remove the card tray, insert the SIM eject PIN included with your phone into the small hole
next to the card tray.
5
Page 12
MLA-L01
MLA-L02
MLA-L03
MLA-L11
MLA-L12
MLA-L13
Unboxing your Phone
3 Insert a SIM card or microSD card into the card tray.
4 Insert the card tray back into your phone in the correct orientation.
Charging your phone
Your phone comes with a long-lasting battery and efficient power-saving technology. This section
outlines how to care for your battery in order to maximize its lifespan.
Using your battery
l You can recharge your battery many times, but all batteries have a limited lifespan. If you
notice a significant deterioration in your phone's battery life, contact an authorized Huawei
service center for a replacement battery. The battery is built into the phone and is not
removable. Do not attempt to remove the battery yourself.
l Your phone may become warm after prolonged use or when exposed to high ambient
temperatures. This is entirely normal. If your phone becomes hot to the touch, stop charging it
and disable unnecessary features. Place your phone in a cool location and allow it to cool
down to room temperature. Avoid prolonged contact with the surface of your phone if it
becomes hot.
l When charging your phone, only use genuine Huawei batteries, chargers, and USB cables.
Third-party accessories are a potential safety hazard and may impair your phone's
performance. Avoid using your phone when it is charging. Do not cover your phone or the
power adapter.
l Charging times may vary depending on the ambient temperature and the remaining battery
level.
l A low battery warning will be displayed when the battery level is low.
l Your phone will switch off automatically when the battery is nearly empty.
Visit the official Huawei website and download the user guide for your device for information
on how to care for your battery.
Battery status indicator
The battery status is indicated by your phone's indicator light and the battery icon in the status
bar.
l If the status indicator blinks red and the battery icon changes to the battery level is below
4%.
6
Page 13

Unboxing your Phone
l The status indicator and the battery icon indicate the battery status during charging. A red
status indicator and a battery icon indicate that the battery level is below 10%. A yellow
status indicator and a battery icon indicate that the battery level is between 10% and 90%.
A green status indicator and a battery icon indicate that the battery level is between 90%
and 100%. A green status indicator and a battery icon indicate that the battery is fully
charged and you can unplug the charging cable from your phone.
If your phone does not respond when you press the power button, this indicates that the
battery is empty. Charge your battery for at least 10 minutes using a genuine Huawei
charger, and then turn on your phone.
Turning your phone on and off
l To turn on your phone, press and hold the power button until your phone vibrates and the
screen turns on.
l To turn off your phone, press and hold the power button, and then touch
.
If your phone does not respond after holding down the power button for 20 seconds, the
battery may be empty. If so, connect your phone to a charger to charge the battery.
7
Page 14
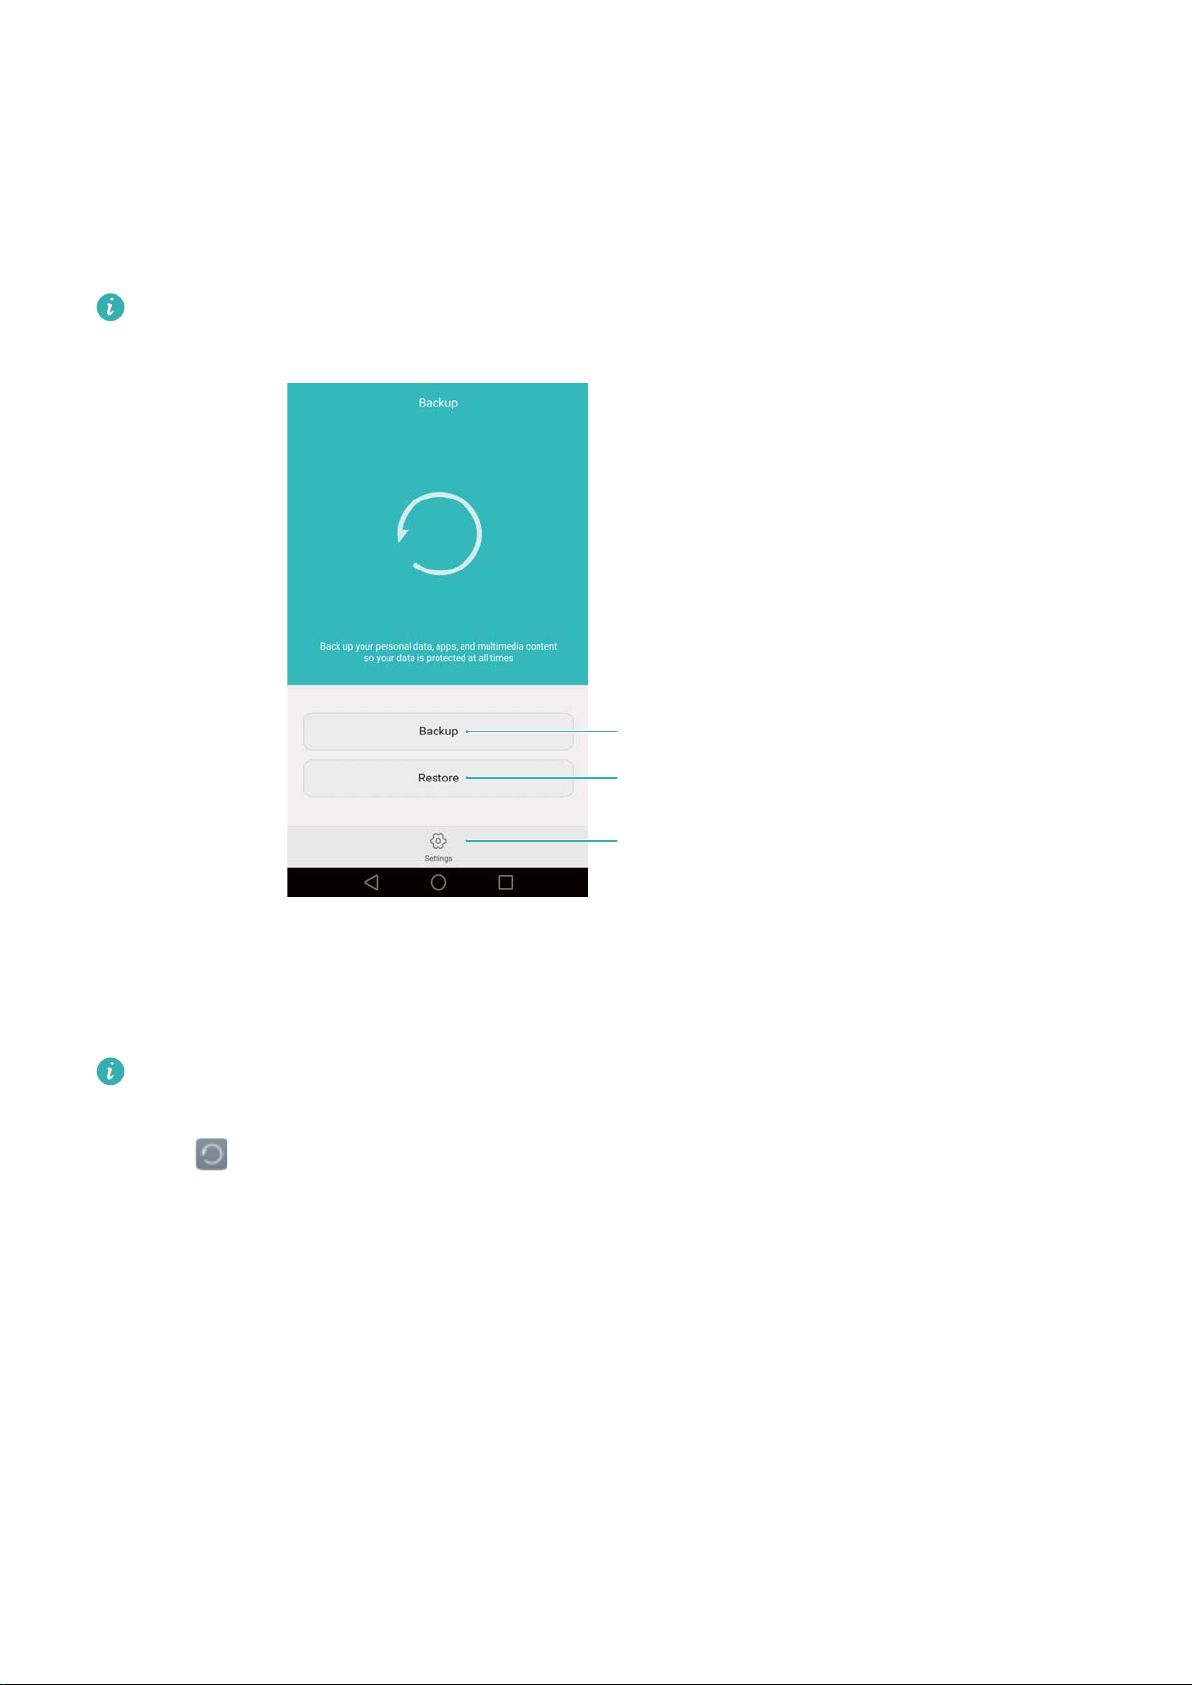
Transferring Data
More settings
Restore previously backed up data
Back up new data
Using the Backup application to transfer data
Use the Backup application to transfer data from your old phone to your new phone.
Features may vary depending on your carrier.
Backing up data to a microSD card
You can back up data on your old phone to a microSD card. For more information on inserting or
removing a microSD card, see Inserting a SIM card and microSD card.
Data that can be backed up: contacts, messages, call log, photos, audio, videos, files, and
applications.
1 Open Backup.
2 Touch Backup > SD card > Next.
3 Select the data you want to back up. No backup password is required if you back up photos,
audio, videos, and documents. To back up other types of data, follow the onscreen
instructions to set a backup password.
4 Touch Back up.
8
Page 15
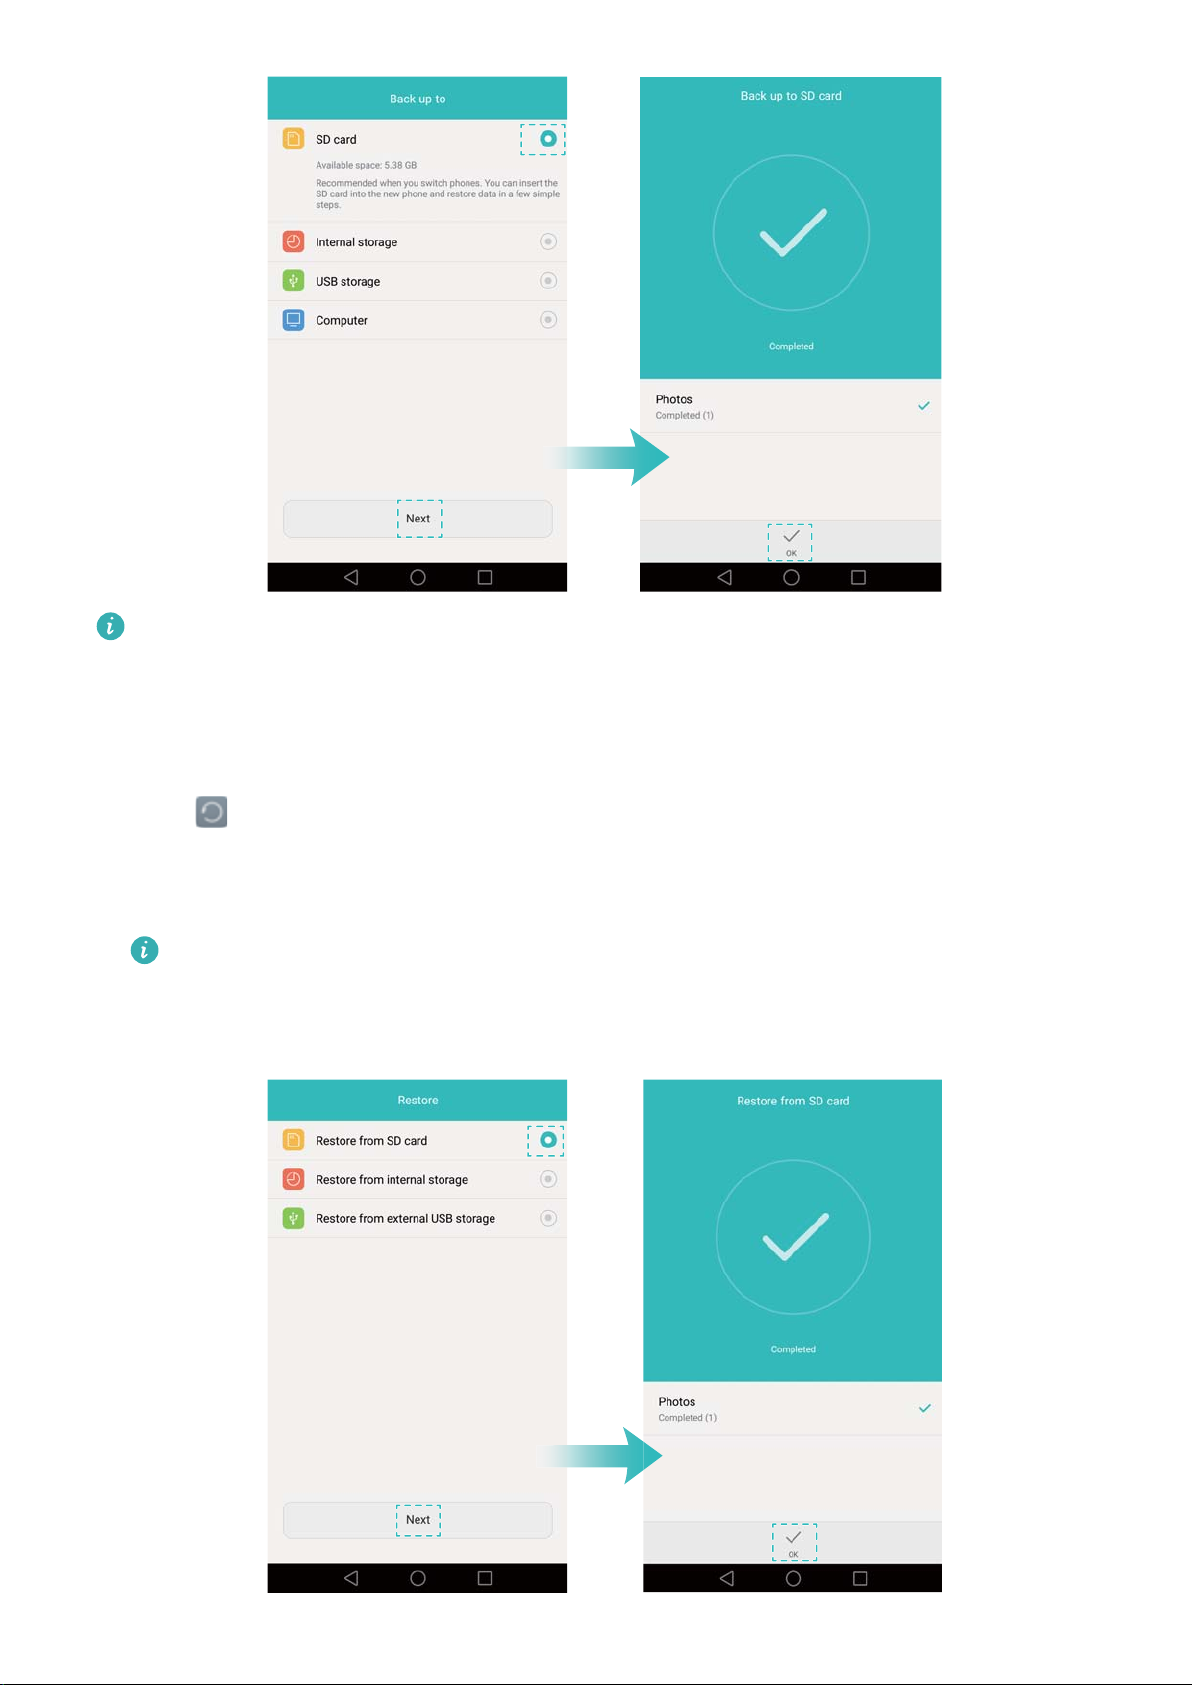
By default, backup data is saved to the HuaweiBackup folder in Files.
Transferring Data
Restoring data from a microSD card
1 Insert the microSD card containing the backup files into your new phone. For more
information on inserting microSD cards, see Inserting a SIM card and microSD card.
2 Open Backup.
3 Touch Restore > Restore from SD card > Next.
4 Select the backup you want to restore.
If the backup data is encrypted, enter the encryption password when prompted.
5 Select the data you want to restore, and then touch Start restoration.
9
Page 16

Transferring Data
Transferring data between your phone and a
computer
Transfer the data on your old phone to your computer, and then transfer it to your new phone.
Connect your phone to a computer using a USB cable. Select Photos or Files. Your computer
will automatically install any necessary drivers. Once installed, double-click on the new disk drive
to manage files. The drive name should be your phone's model number.
l Photos: View photos that are stored on your phone.
l Files: Transfer files between your phone and a computer.
l If no connection type is specified, your phone will remain in charging mode.
Copying contacts from an old phone to a new phone
Use any of the following methods to copy contacts from your old phone to your new phone.
SIM card
Storage device
Bluetooth
Backup
Computer
Other methods
Use the SIM import feature to copy SIM card contacts to your new phone. For
more information, see Importing contacts from a SIM card.
If both phones have a microSD slot, export your contacts to a microSD card in
vCard format on the old phone, and then copy the contacts to the new phone.
For more information, see Importing contacts from a storage device.
Enable Bluetooth on both your old and new phones, and import your contacts
using Bluetooth. For more information, see Importing contacts using Bluetooth.
If your old phone supports Backup, back up your contacts, and restore them to
your new phone. For more information, see Using the Backup application to
back up and restore data.
Sync contacts on your old phone to a computer, and then sync these to a new
phone using a phone management application (such as HiSuite).
l Install social networking applications and synchronize your contacts.
l Log in to your Exchange account and synchronize your contacts.
10
Page 17

First Use and Initial Setup
Initial setup
Ensure that the SIM card is inserted correctly before using your phone for the first time. Read
the Quick Start Guide for more information on how to set up your phone.
Press and hold the power button to turn on your phone, and then follow the onscreen
instructions to complete the initial setup.
1 Select your language and region, and then touch Next.
2 Proceed to the Wi-Fi settings screen. Your phone will automatically list available Wi-Fi
networks. Select the network you want to connect to, and then enter the password to access
the Internet.
3 Proceed to the Terms and Conditions screen. Read the content carefully, accept the user
terms and Huawei Privacy Policy, and then touch Next.
4 Follow the onscreen instructions to enable Wi-Fi+.
5 Your phone has a fingerprint sensor. Follow the onscreen instructions to add your fingerprint.
You also need to set a PIN or password in order to unlock the screen when your phone fails
to recognize your fingerprint.
6 On the Configuration successful screen, touch Begin to complete the settings. Wait for a
moment and the EMUI interface should launch. You can now start using your phone.
Dual SIM settings
When two SIM cards are inserted, only one SIM card can be set as the 4G/3G/2G SIM. The
other SIM card slot only supports 2G networks. You can also configure the default card for
mobile data and phone calls according to your monthly plan.
This feature is only available on dual SIM phones.
Open Settings and touch Dual card management. You can configure both SIM cards as
desired.
11
Page 18
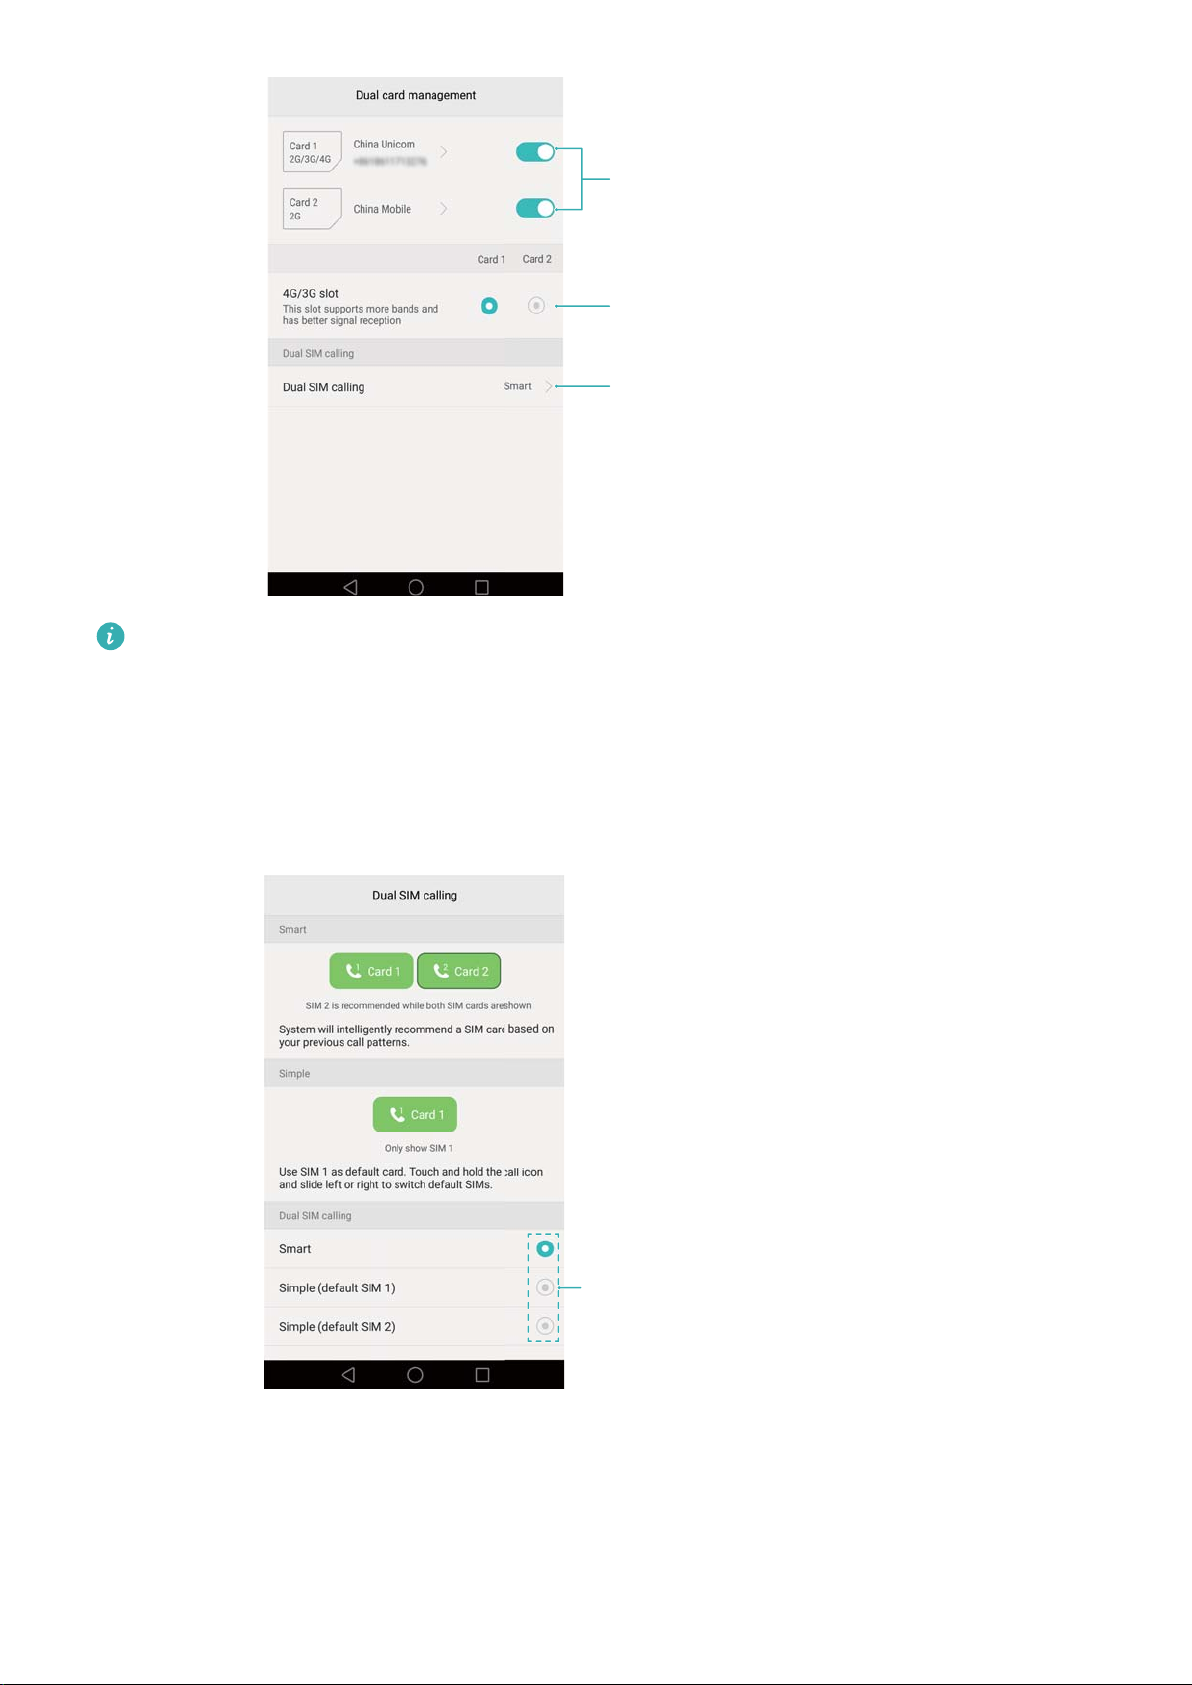
Enable or disable a SIM card
Select 4G/3G SIM
Configure SIM settings for phone calls
Select SIM display mode for phone calls
First Use and Initial Setup
l If you disable a SIM card, you will be unable to use it to make calls, send messages, or
access the Internet.
l Select Dual SIM calling. You can configure whether you want to select a SIM card
manually or use the default SIM card each time you make a call. If you choose to use the
default SIM card, your phone will use that SIM card for all outgoing calls.
Connecting to the Internet
Connect to the Internet using Wi-Fi or mobile data to surf the web, play games, and use instant
messaging applications.
12
Page 19
First Use and Initial Setup
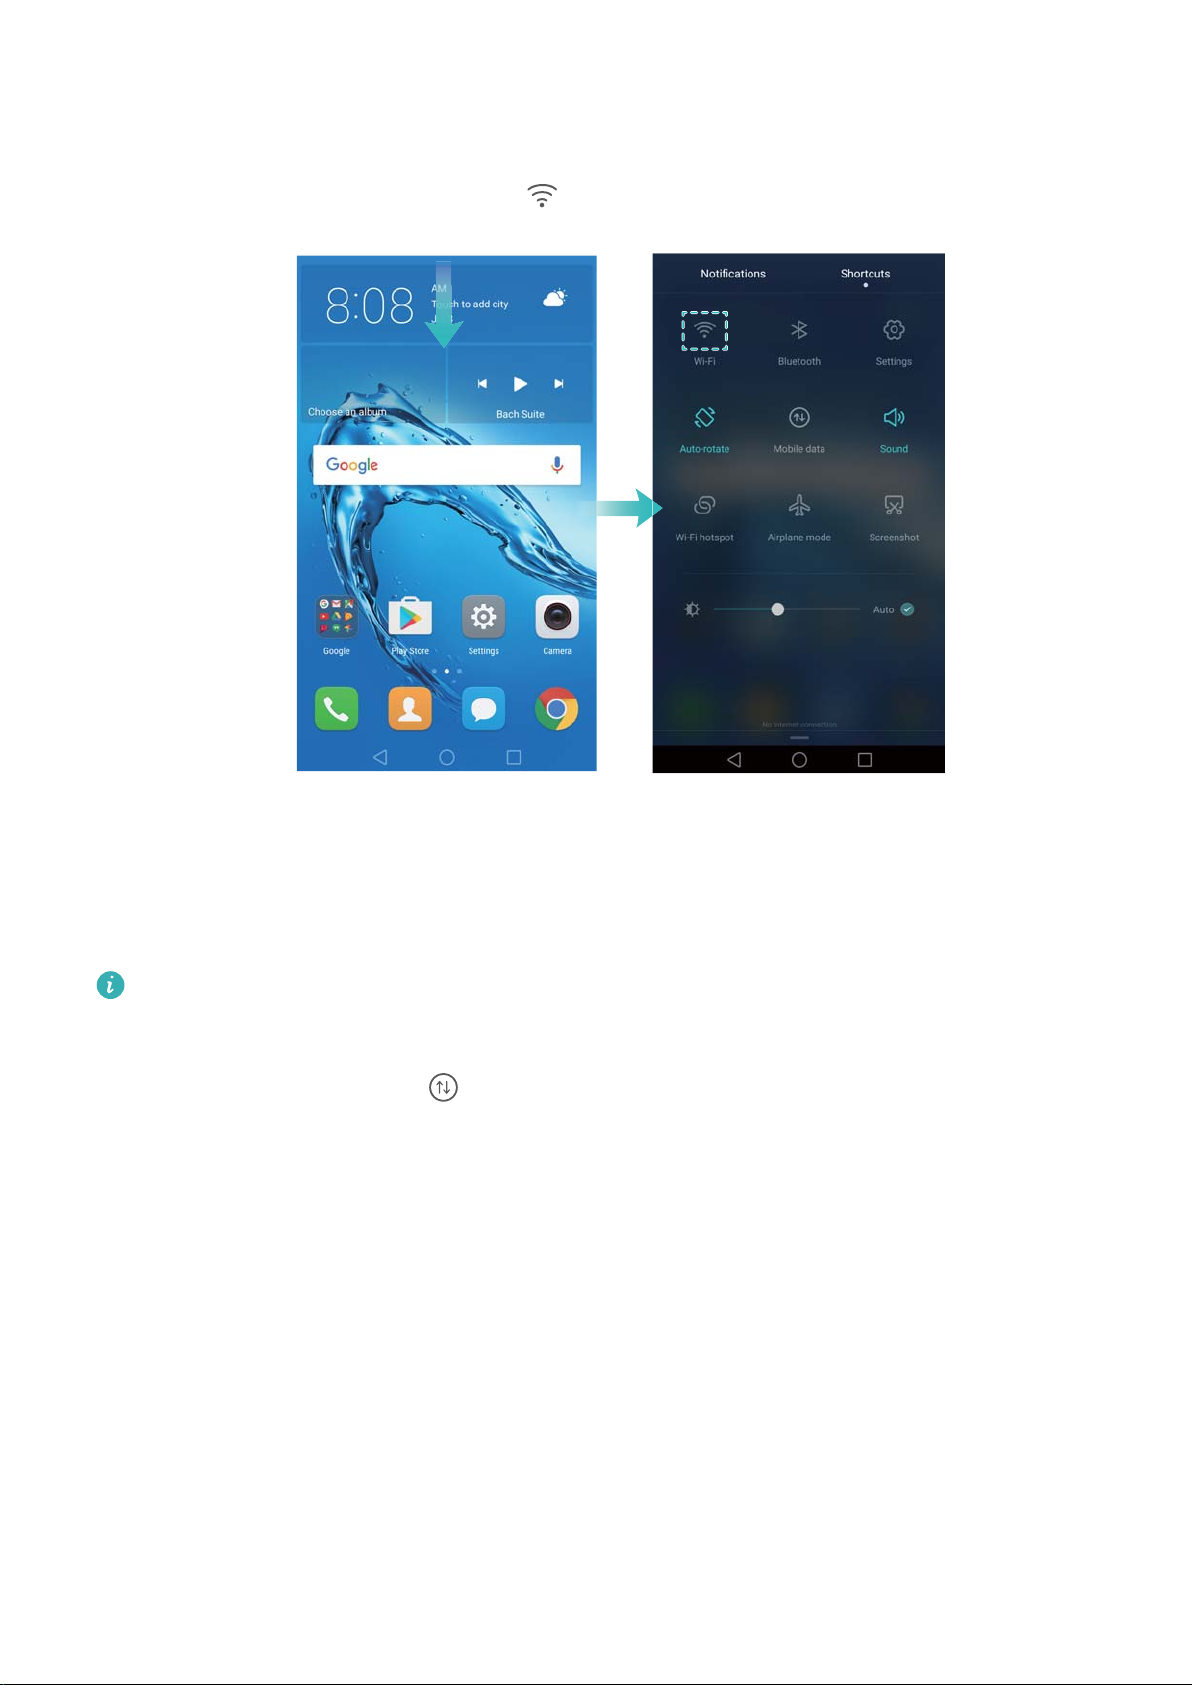
Connecting to a Wi-Fi network
1 Swipe down from the status bar to open the notification panel.
2 In the Shortcuts tab, touch and hold to open the Wi-Fi settings screen.
3 Turn on the Wi-Fi switch. Your phone will list available Wi-Fi networks.
4 Select the Wi-Fi network you want to connect to. If the Wi-Fi network is encrypted, enter the
password when prompted.
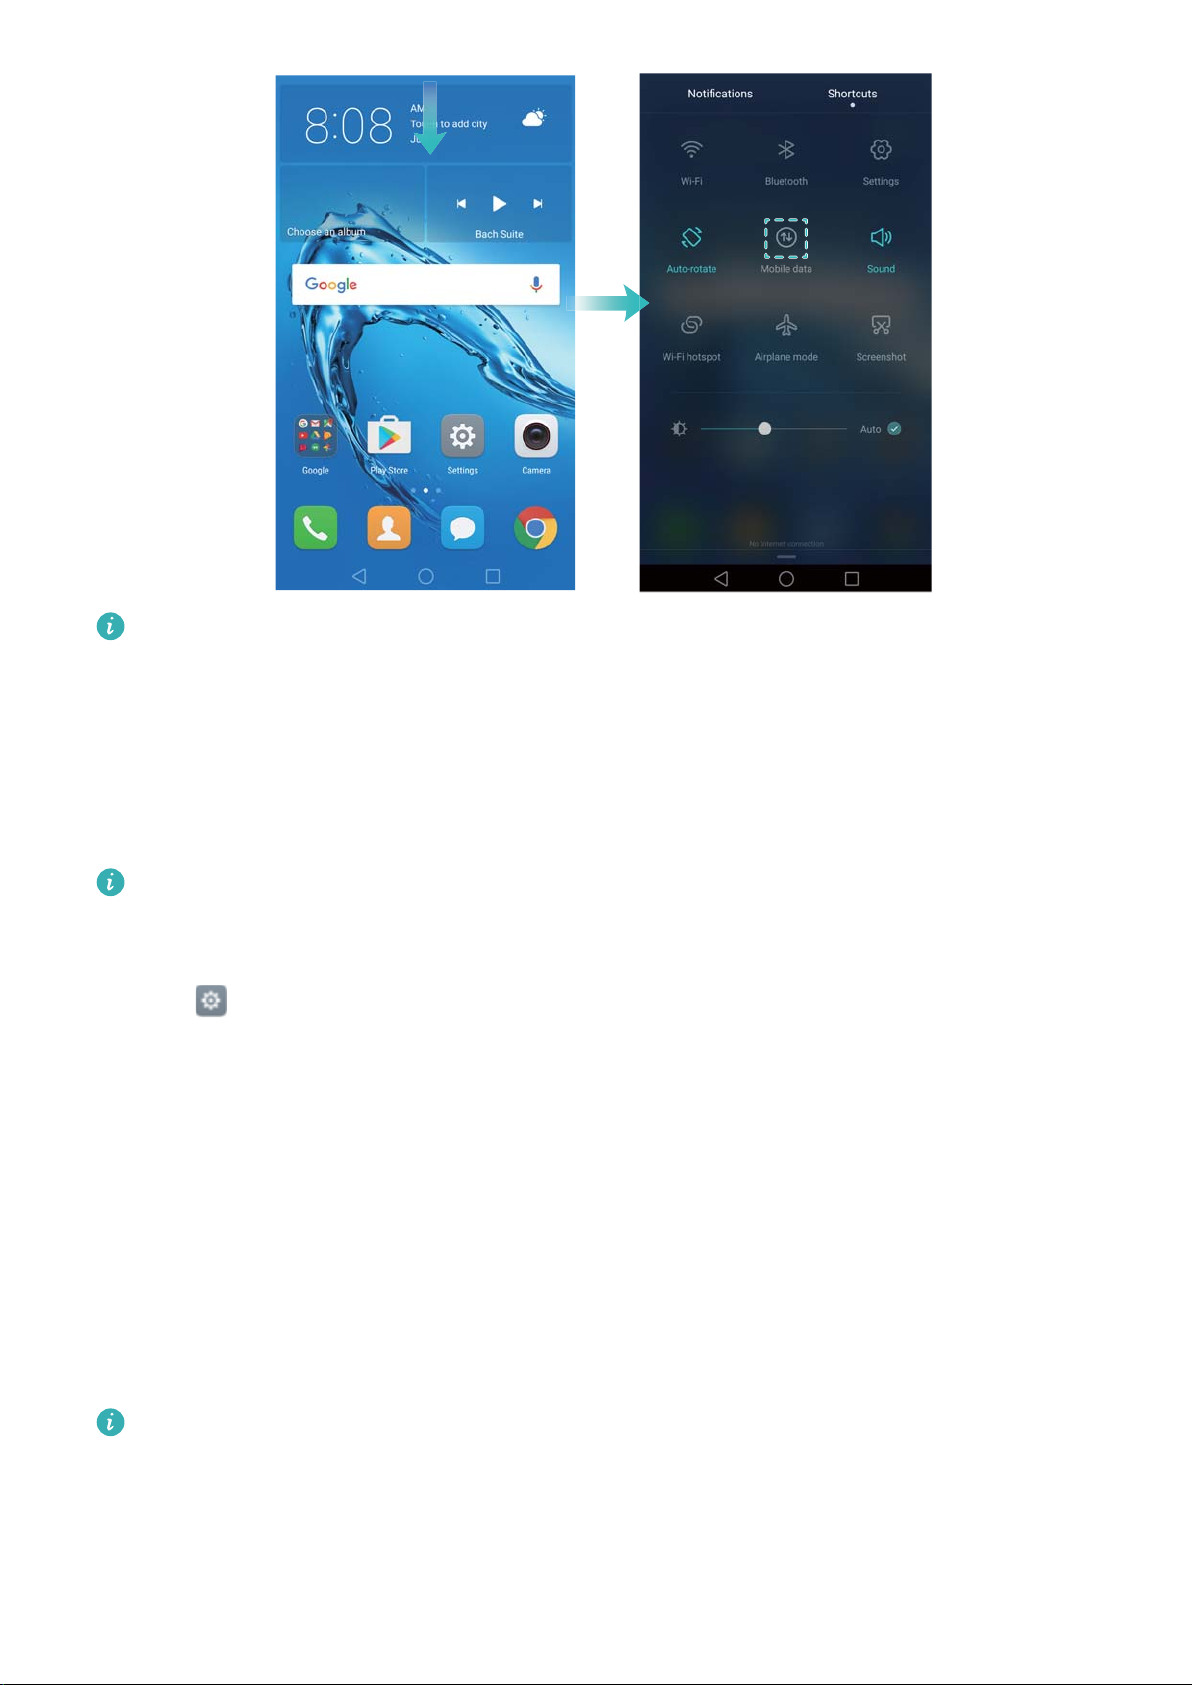
Using mobile data
Before using mobile data, ensure that you have a data plan with your carrier.
1 Swipe down from the status bar to open the notification panel.
2 In the Shortcuts tab, touch to enable mobile data.
13
Page 20
First Use and Initial Setup
Disable mobile data when not required in order to save battery power and reduce data
usage.
Configuring your fingerprint ID
Use the fingerprint sensor to unlock the screen, access the Safe and App Lock, and authorize
payments in third-party applications.
For added security and to ensure that you can still access your data if your phone fails to
recognize your fingerprint, you will need to set a backup password when configuring
fingerprint unlock.
1 Open Settings and touch Fingerprint ID > Fingerprint management.
2 Select PIN or Password, and then follow the onscreen instructions to set a screen lock
password.
3 Once you have configured the password, touch New fingerprint to add your fingerprint.
4 Place your fingertip on the fingerprint sensor. Press down lightly on the sensor until your
phone vibrates. Repeat this step using different parts of your fingertip until your phone has
successfully added your fingerprint.
5 Once you have added your fingerprint, touch OK.
On the Fingerprint management screen, turn off the Unlock screen switch to disable
fingerprint unlock.
To delete a fingerprint, select the desired fingerprint on the Fingerprint management
screen, touch Delete, and then follow the onscreen instructions.
14
Page 21

Installing Applications
Sharing applications using a microSD card
Save installation packages to a microSD card to share them with other phones.
Installation packages from third-party sources may contain viruses or malicious software and
should be installed with caution. Only install applications from trusted sources.
1 Insert the microSD card containing the installation package into your phone.
2 Open Files, locate the installation package on the microSD card, and then touch to
install.
A warning message may be displayed during the installation process. Always read these
messages carefully. If you wish to proceed with the installation, touch Settings and then turn
on the Unknown sources switch to allow your phone to install third-party applications. After
you have finished installing the application, touch Settings > Advanced settings > Security
and turn off the Unknown sources switch to prevent your phone from installing applications
downloaded from unofficial sources.
After installation, the application will be visible on your home screen.
Uninstalling an application
Free up space on your phone and boost performance by removing unused applications.
Some pre-installed system applications cannot be removed.
l On the home screen, touch and hold the application you want to uninstall and drag it to the
icon.
l Touch Settings > Apps, select the application you want to uninstall, and then touch Uninstall.
15
Page 22
Getting Started
Locking and unlocking the screen
Locking the screen
l Press the power button to manually lock the screen.
l The screen will lock automatically and enter sleep mode after it has been idle for a certain
period to reduce power consumption and prevent unintended operations.
To change the screen sleep time, open Settings, touch Display > Sleep, and then
select a time.
Your phone will continue to receive messages, notifications, and incoming calls when the screen
is locked. The status indicator will flash green when you receive new notifications. When you
receive an incoming call, the screen will turn on and display the caller information.
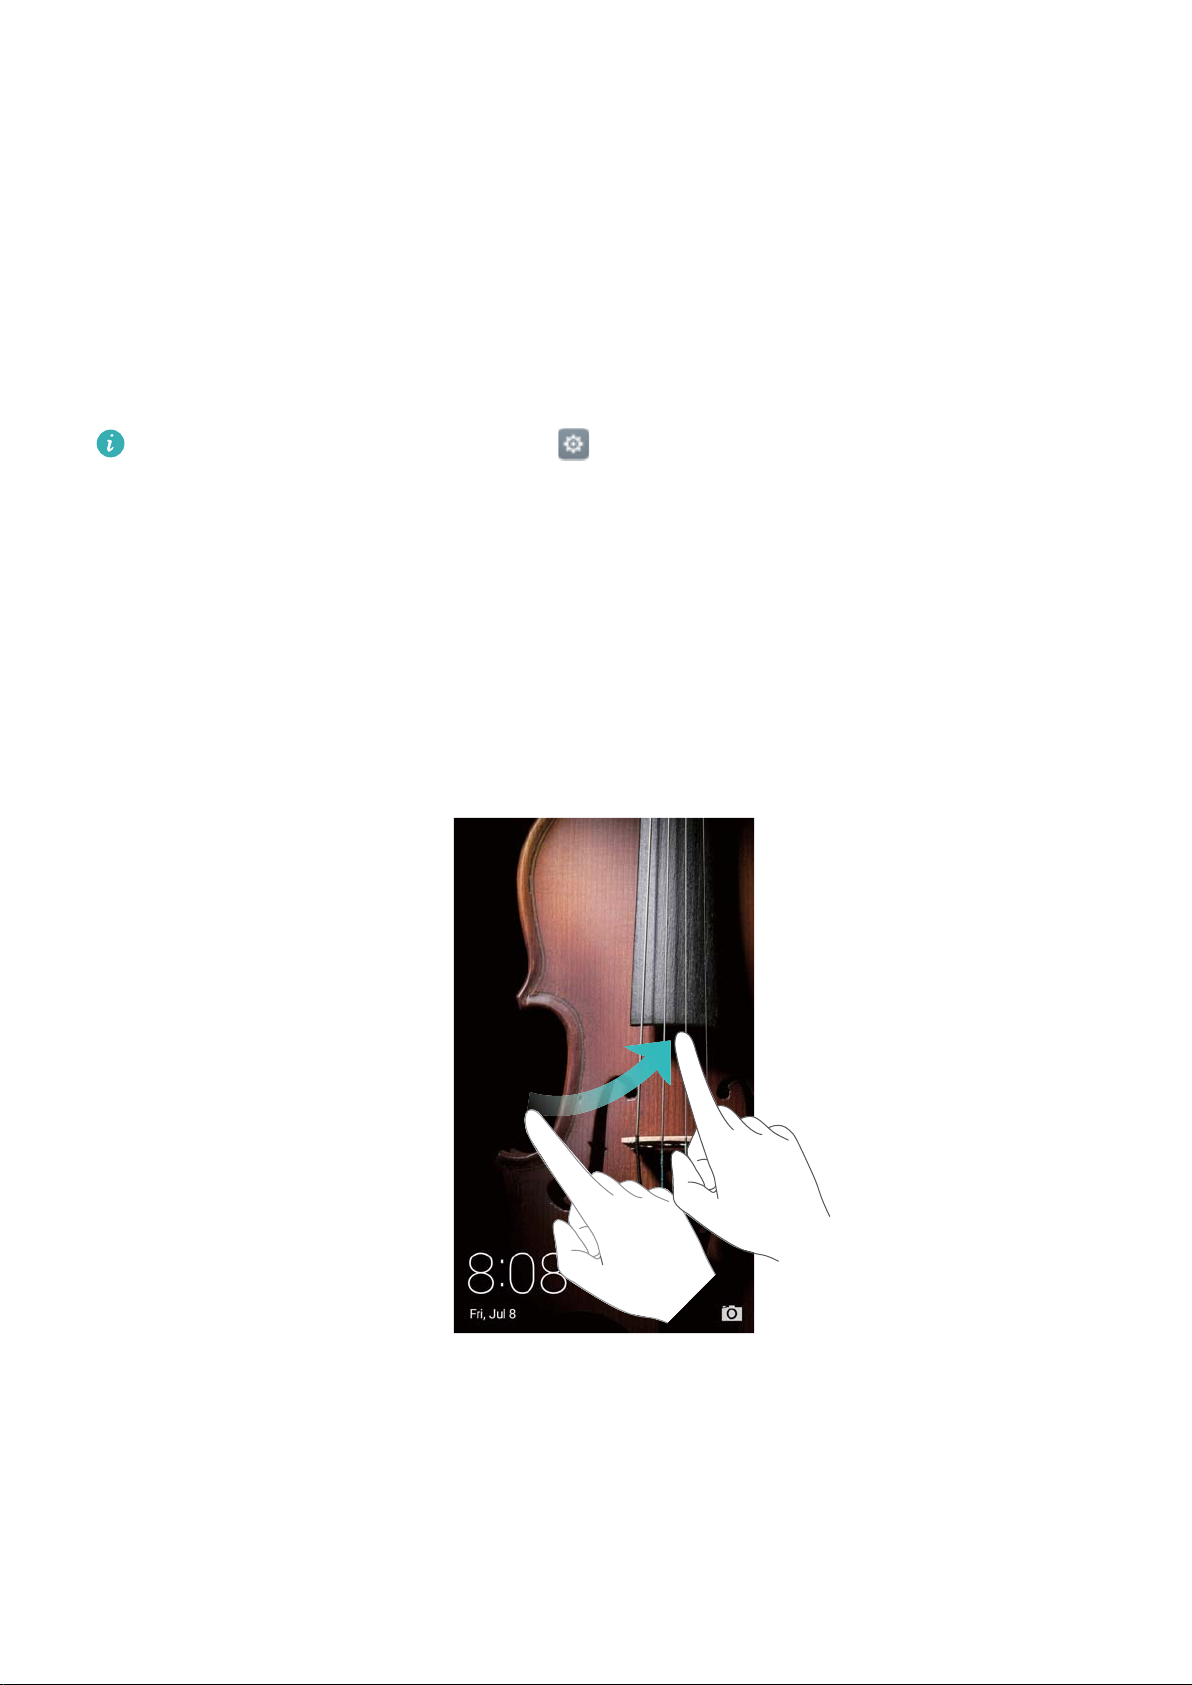
Unlocking the screen
When the screen is off, press the power button to wake the screen. Slide your finger in any
direction to unlock the screen.
Magazine Unlock
Use Magazine Unlock to create your own selection of lock screen images and bring your lock
screen to life.
Swipe up from the bottom of the lock screen to display the Magazine Unlock options.
16
Page 23
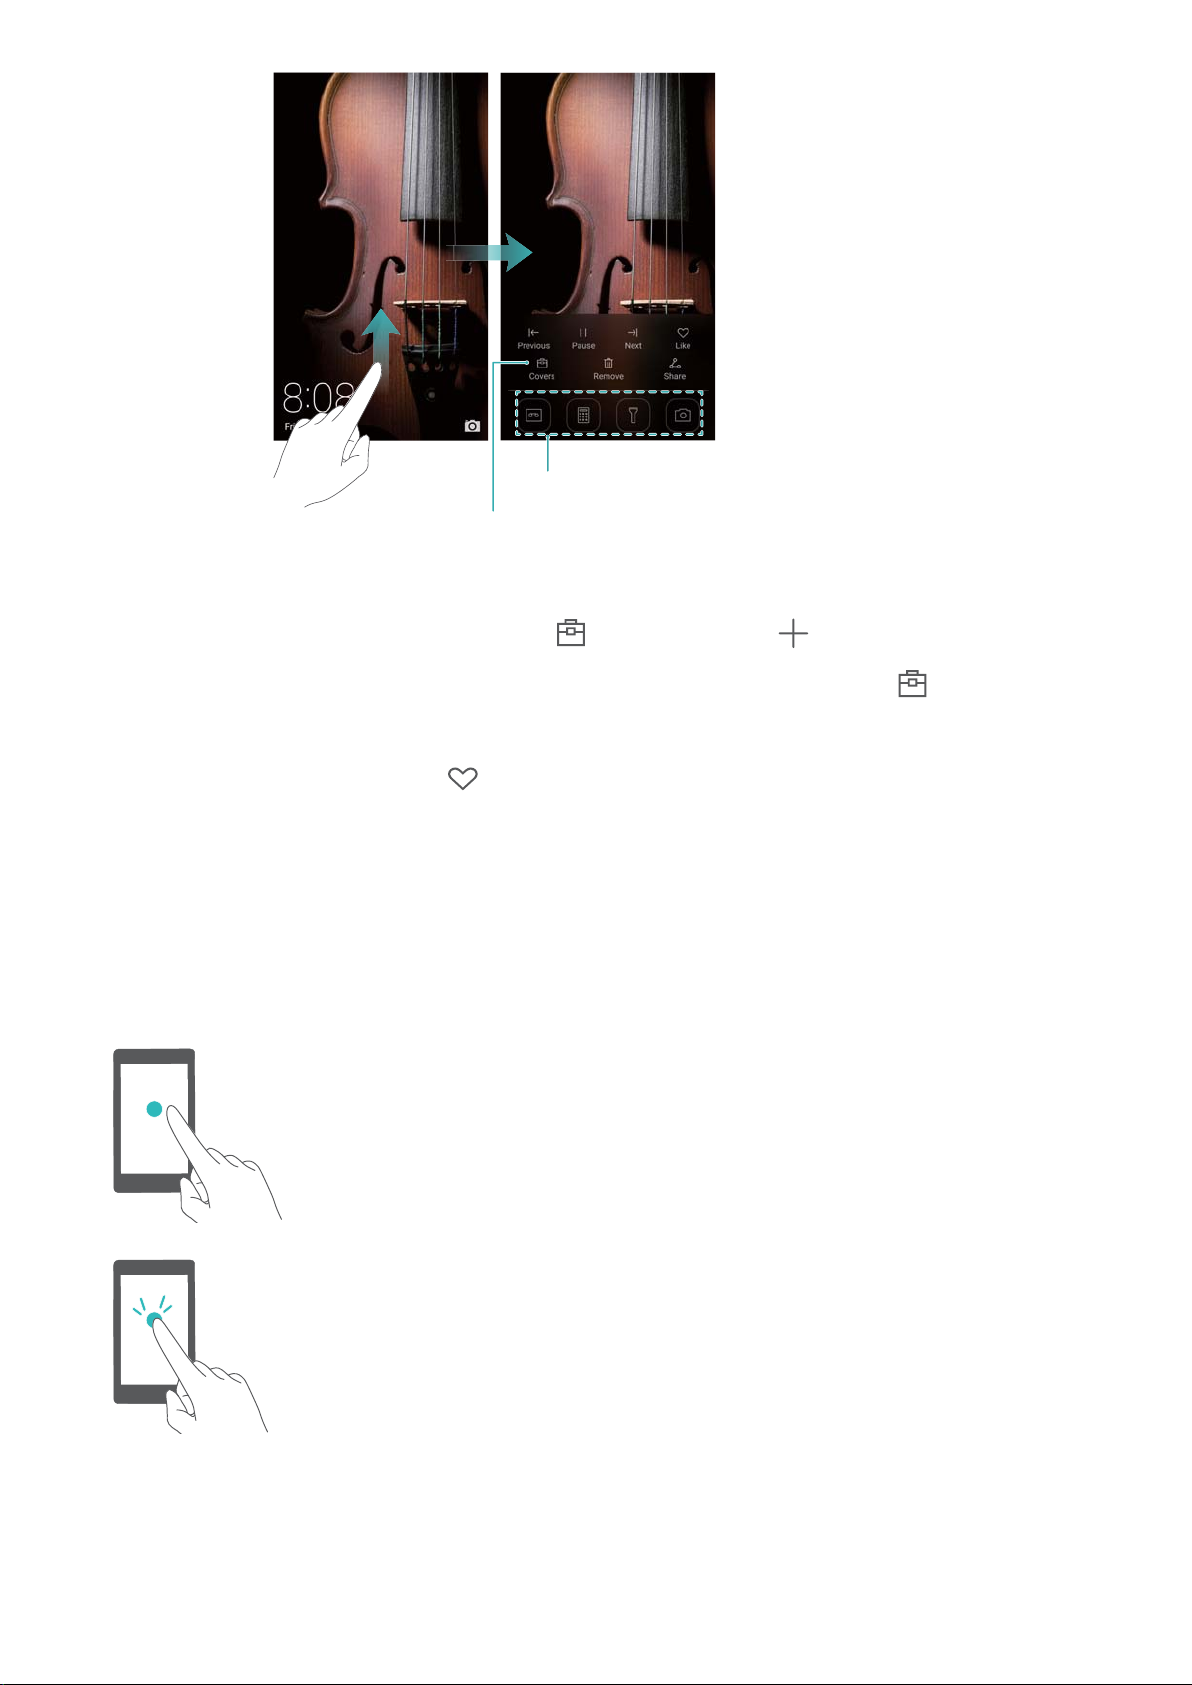
View, add, or delete images from your Magazine
Unlock covers
App shortcuts
Getting Started
Manage Magazine Unlock covers: Touch , and then touch . Select the desired images
to add them to the viewing list. To delete covers from the viewing list, touch , and then touch
and hold the desired image and select Remove.
Add covers to favorites: Touch to add the current cover to your favorites. Images that
have been added to your favorites will not be deleted from the viewing list after an online update.
Touchscreen gestures
Use simple touchscreen gestures to perform a variety of tasks, such as open applications, scroll
through lists, and zoom images.
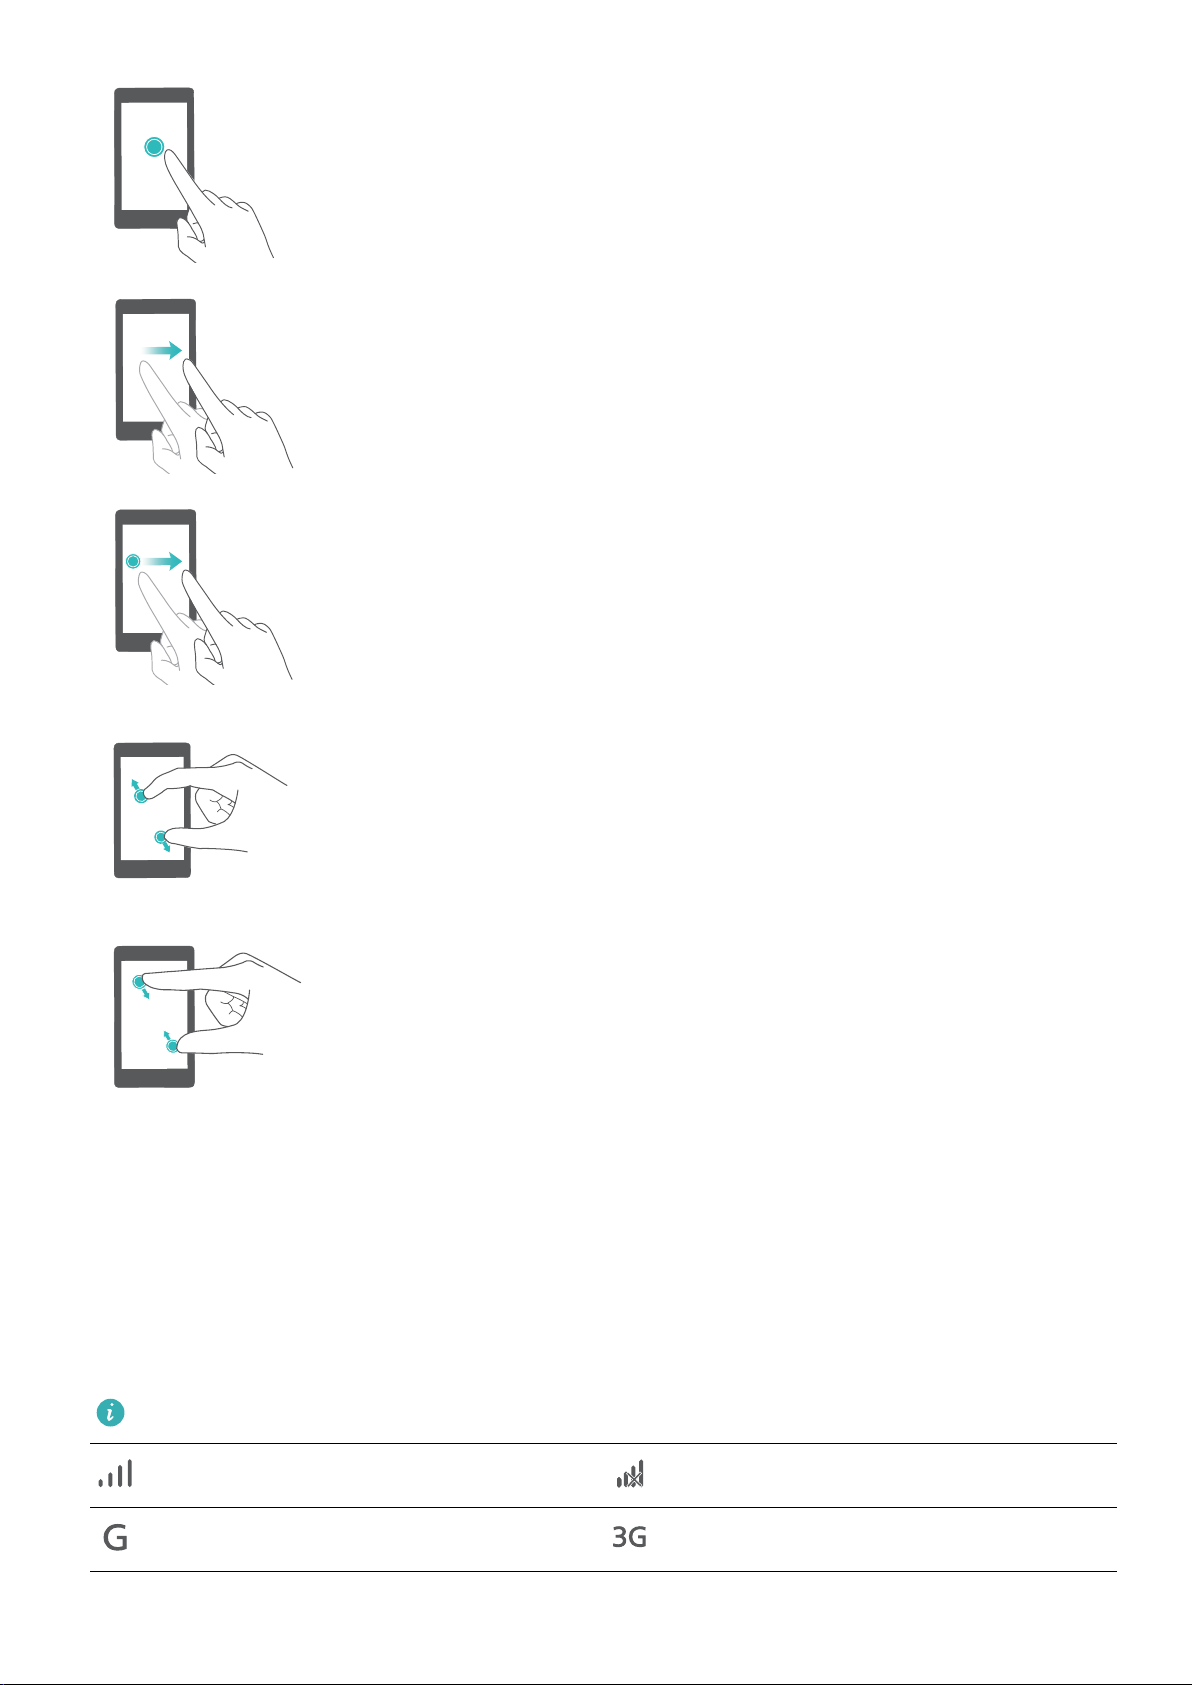
Touch: Touch an item once. For example, touch to select
an option or open an application.
Double touch: Touch the target area of the screen twice
in quick succession. For example, double touch an
image in full screen mode to zoom in or out.
17
Page 24
Getting Started
Touch and hold: Touch and hold the target area of the
screen for at least 2 seconds. For example, touch and
hold a blank area on the home screen to access the
home screen editor.
Swipe: Swipe your fingers on the screen. For example,
in the Notifications tab, swipe left or right on a
notification to dismiss it. Swipe vertically or horizontally
to go to other home screens, scroll through a document,
and more.
Drag: Touch and hold an item, and then move it to
another position. For example, use this gesture to
rearrange applications and widgets on the home screen.
Spread fingers apart: Spread two fingers apart on the
screen. For example, spread two fingers apart to zoom in
on a picture or web page.
Pinch fingers together: Pinch two fingers together on
the screen. For example, pinch two fingers together to
zoom out on an image.
Status and notification icons
Status icons
Status icons are displayed on the right-hand side of the status bar. Status icons display
information about your phone's status, such as network connection information, signal strength,
battery level, and time.
Status icons may vary according to your region or carrier.
Signal strength No signal
Connected over GPRS Connected over 3G
18
Page 25
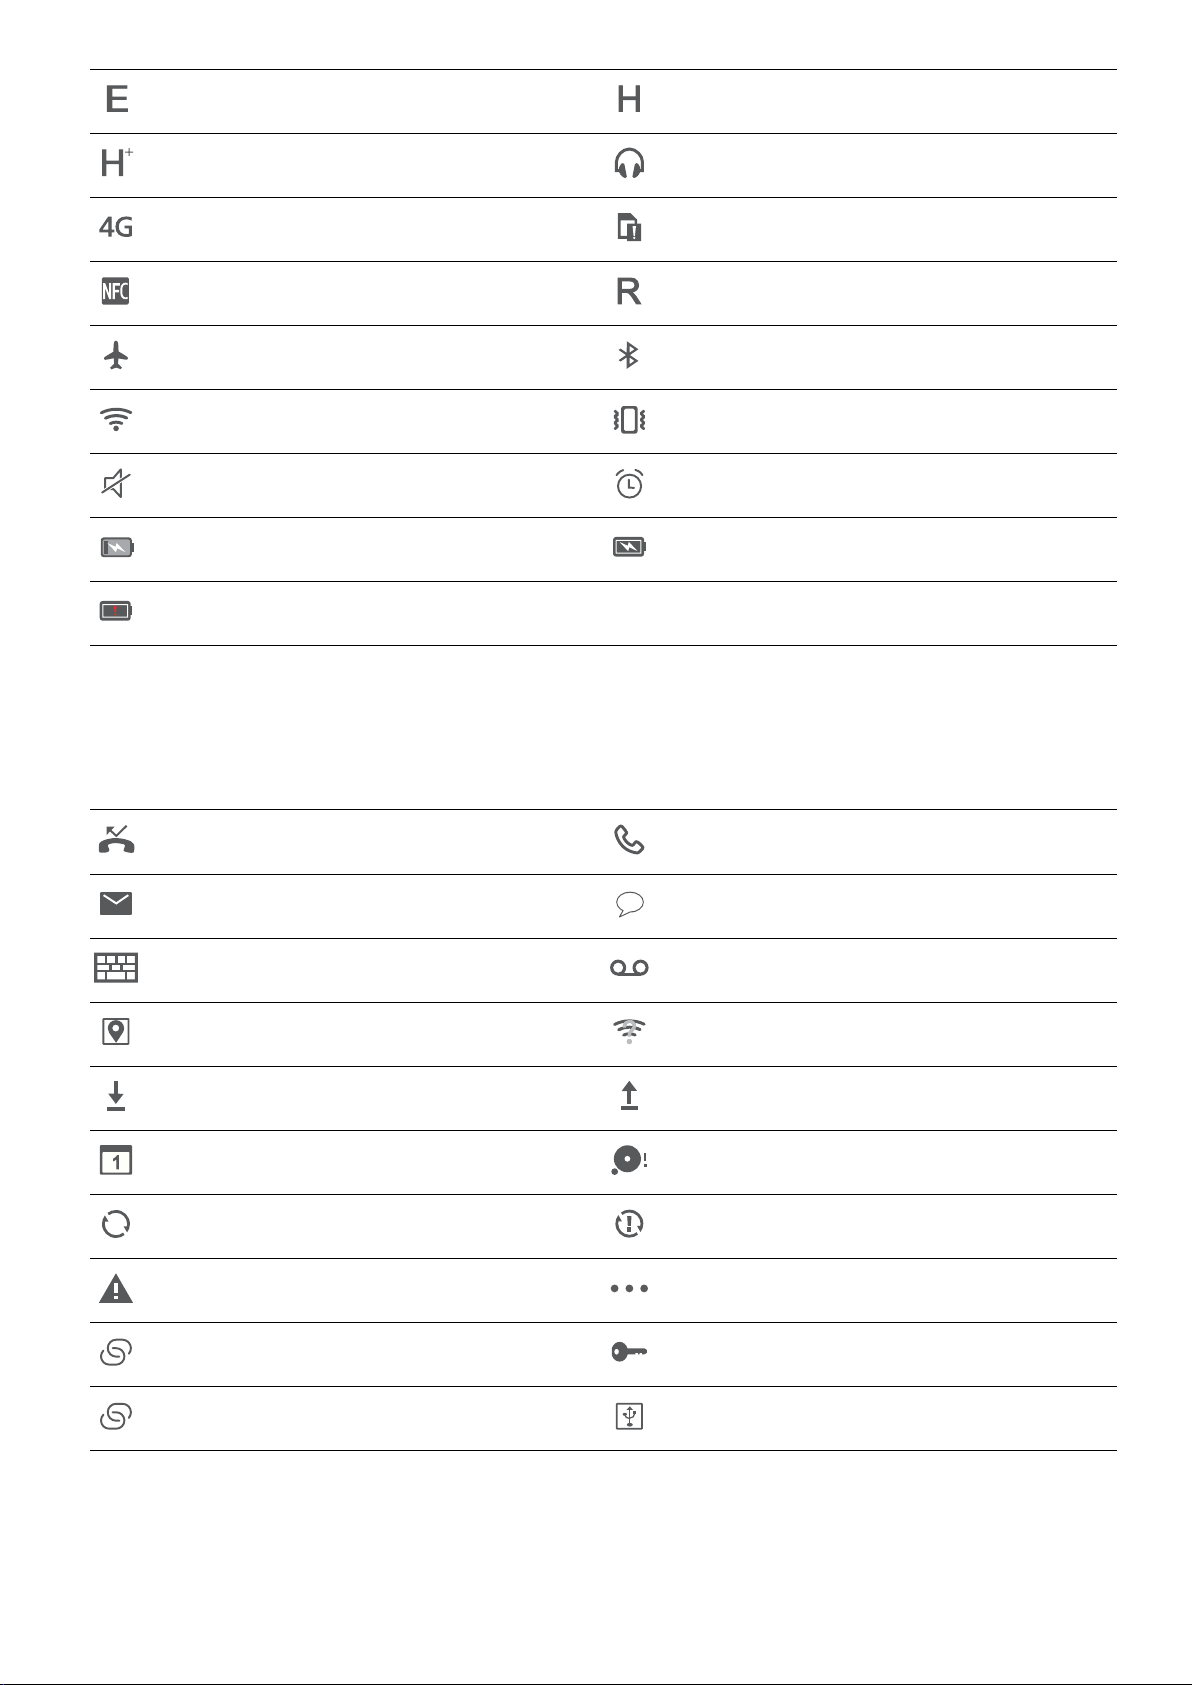
Connected over EDGE Connected over HSPA
Connected over HSPA+ Headset inserted
Connected over LTE No SIM card found
NFC enabled Roaming
Airplane mode enabled Bluetooth enabled
Connected over Wi-Fi Vibration mode enabled
Silent mode enabled Alarm enabled
Charging Battery full
Battery low
Getting Started
Notification icons
Notification icons are displayed on the left-hand side of the status bar when you receive a new
message, notification, or reminder.
Missed calls Call in progress
New emails New messages
Select an input method New voicemail
Receiving location data from GPS Wi-Fi network available
Downloading data Uploading data
Upcoming events Phone memory full
Synchronizing data Synchronization failed
Login or synchronization problem More notifications
Portable Wi-Fi hotspot enabled Connected to a VPN
USB tethering enabled USB debugging enabled
19
Page 26
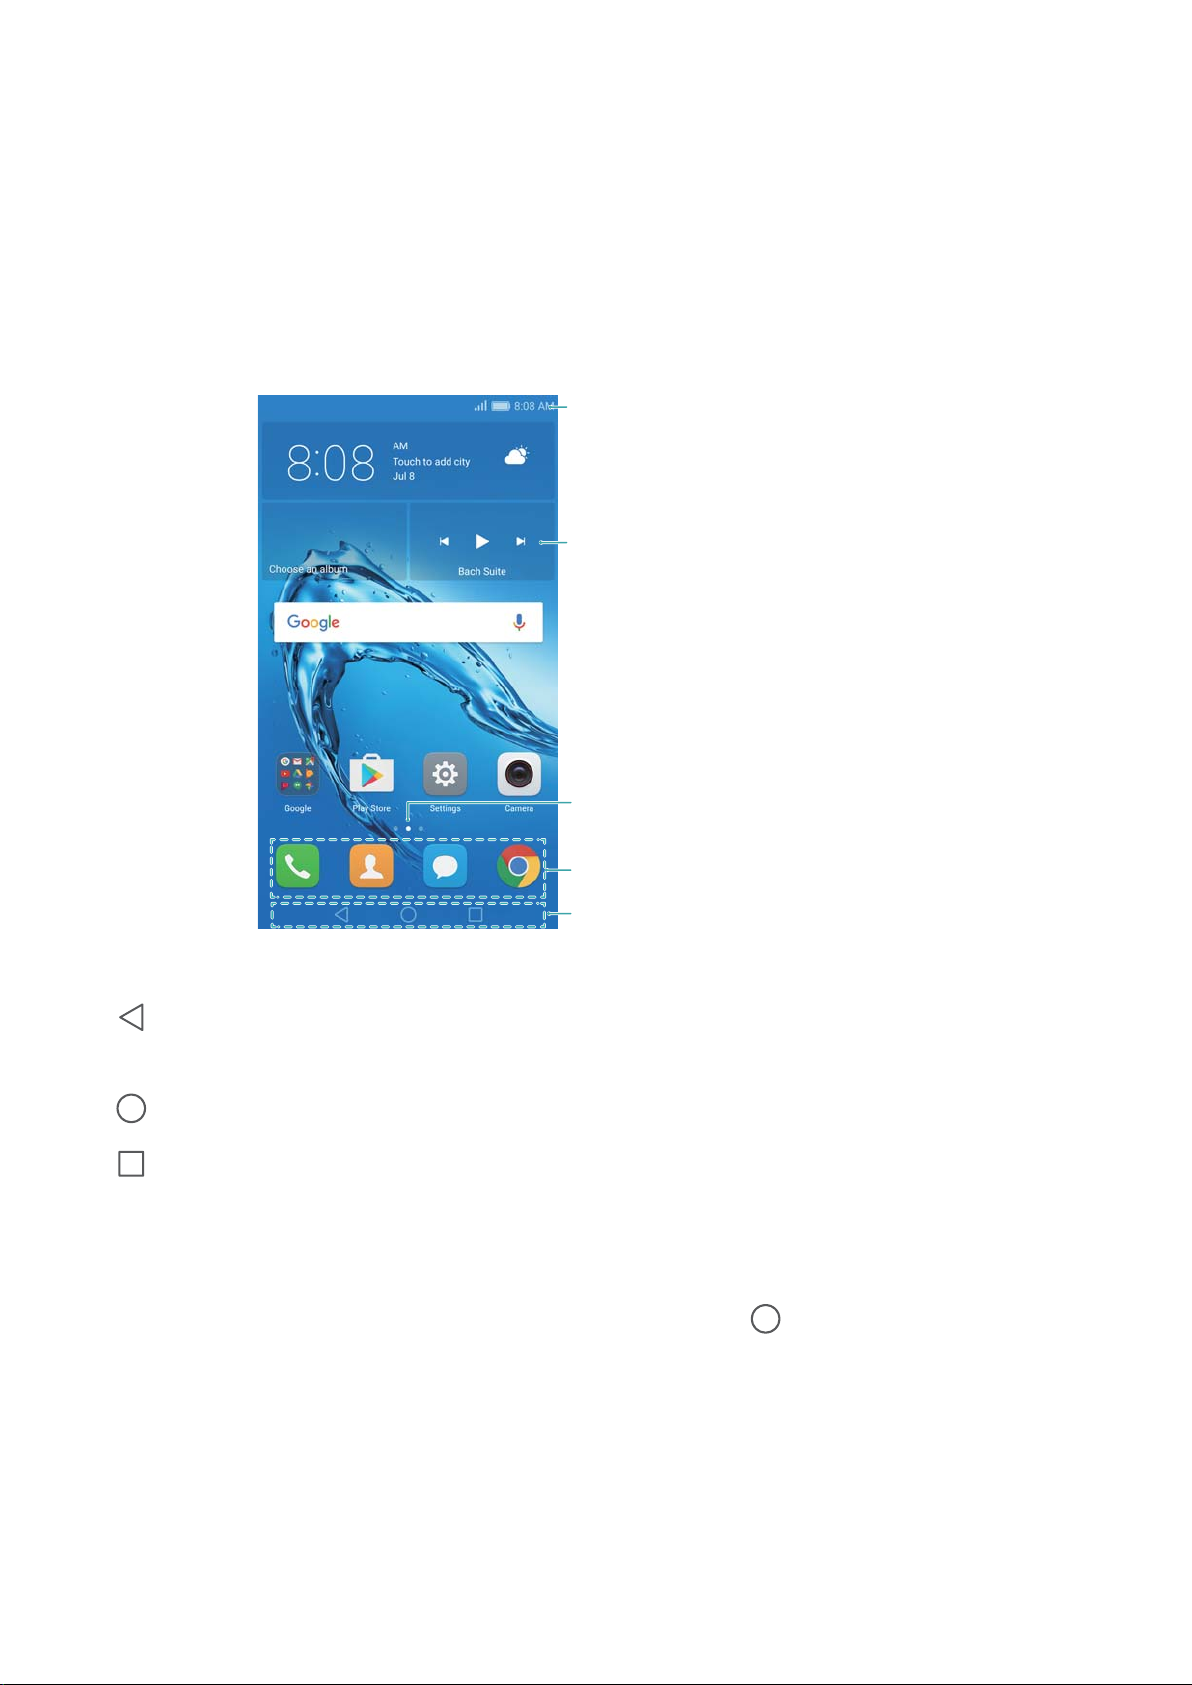
Status bar: Displays notifications and status
icons
Main screen: Displays application icons,
desktop folders, and widgets
Screen position indicator: Indicates
which home screen is displayed
Dock: Displays frequently used applications
Navigation bar: Displays virtual navigation
keys
Getting Started
Home screen
Getting to know your home screen
Your home screens are where you can find your favorite widgets and all your applications. The
application list has been removed to give you a more convenient and direct path to your
applications.
Virtual navigation bar keys:
l Back: Touch to return to the previous screen or close an application. When entering text,
touch to close the onscreen keyboard.
l Home: Touch to return to the home screen.
l Recent: Touch to access the list of recently used applications, or touch and hold to enable
dual windows mode.
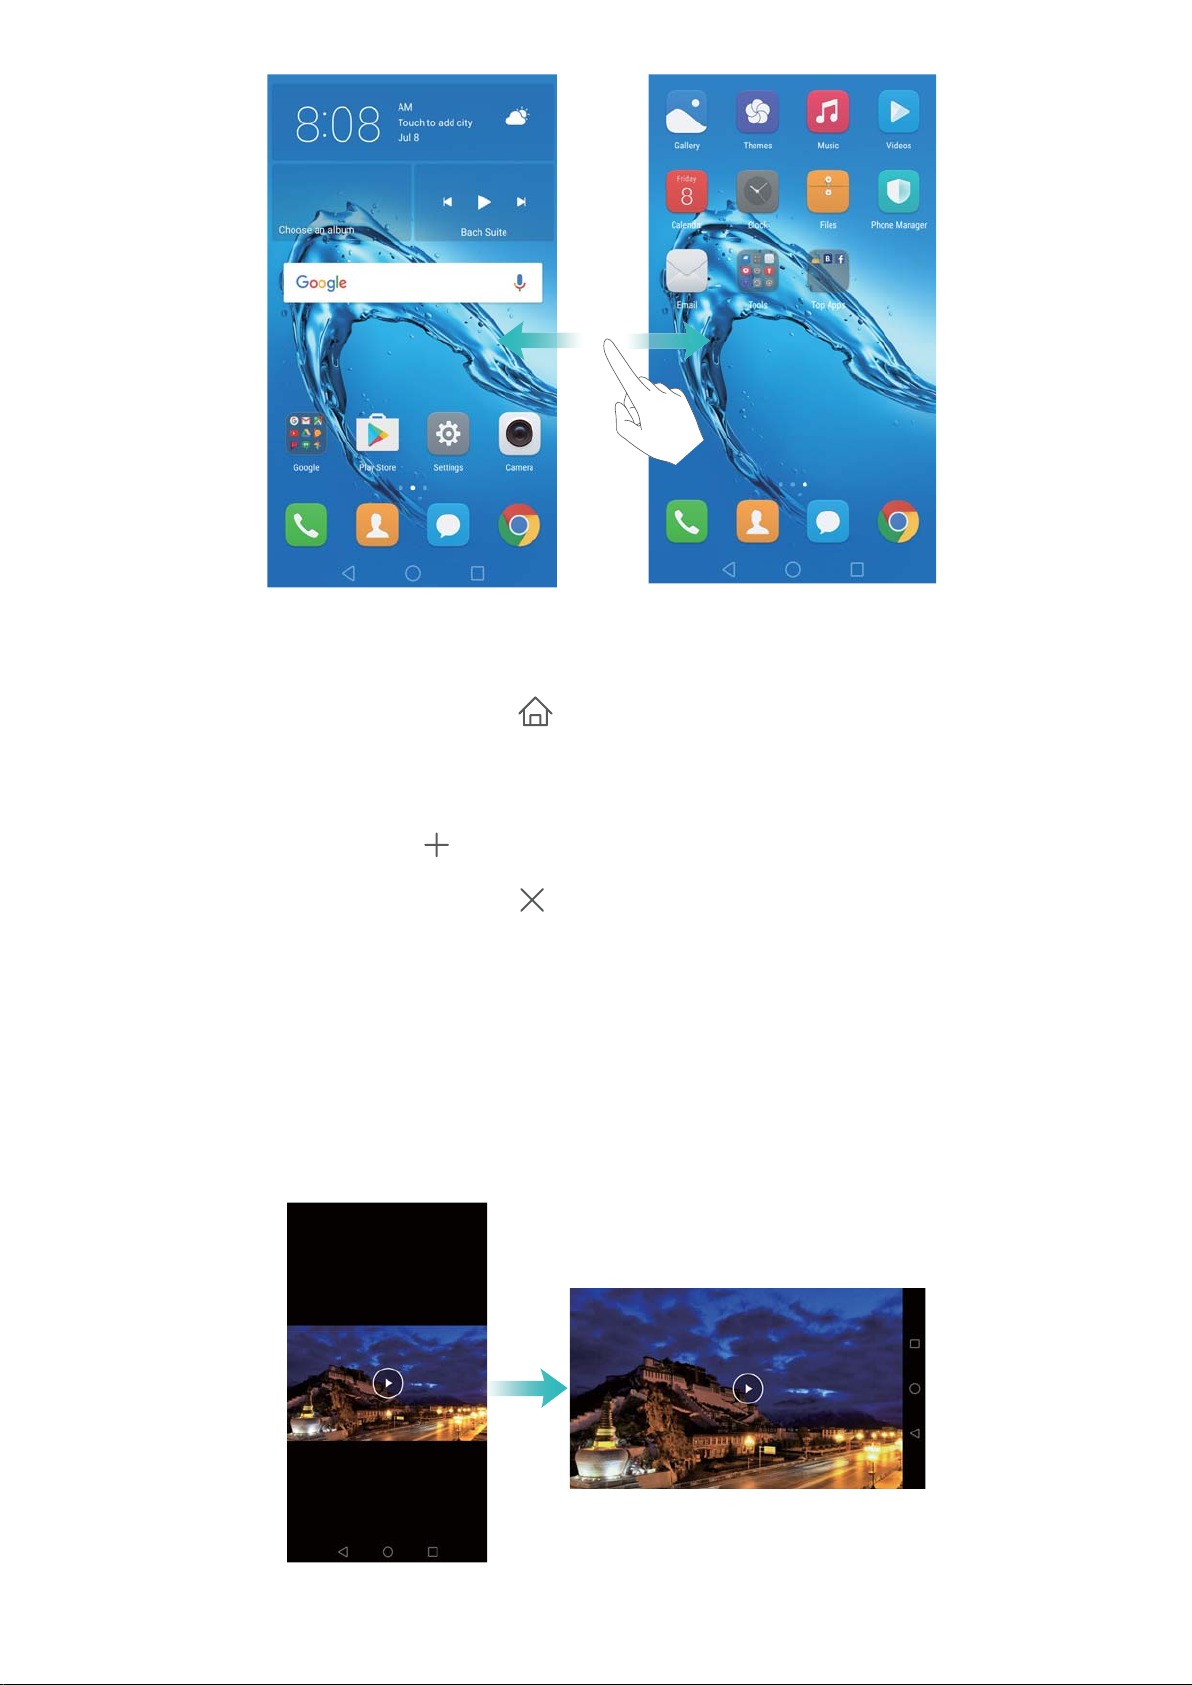
Switching between home screens
Swipe left or right to view the extended home screens. Touch Home to return to the default
home screen.
20
Page 27
Getting Started
On the home screen, pinch two fingers together or touch and hold a blank area on the screen to
access the home screen editor. You can:
l Set the default home screen: Touch at the top of the home screen to set the chosen
home screen as the default home screen.
l Move a home screen: Drag the home screen to the desired location.
l Add a home screen: Touch on the home screen furthest to the left or right.
l Delete a blank home screen: Touch at the bottom of a blank screen.
Automatic screen rotation
When you rotate your phone, some applications will automatically adjust the screen orientation
to make them easier to use. This feature also lets you use tilt-controlled applications.
Swipe down from the status bar to open the notification panel, and then touch Auto-rotate in the
Shortcuts tab to enable or disable automatic screen rotation.
21
Page 28
Getting Started
Organizing applications and widgets on the home screen
Adding a widget to the home screen
Add frequently used widgets to the home screen for quick access.
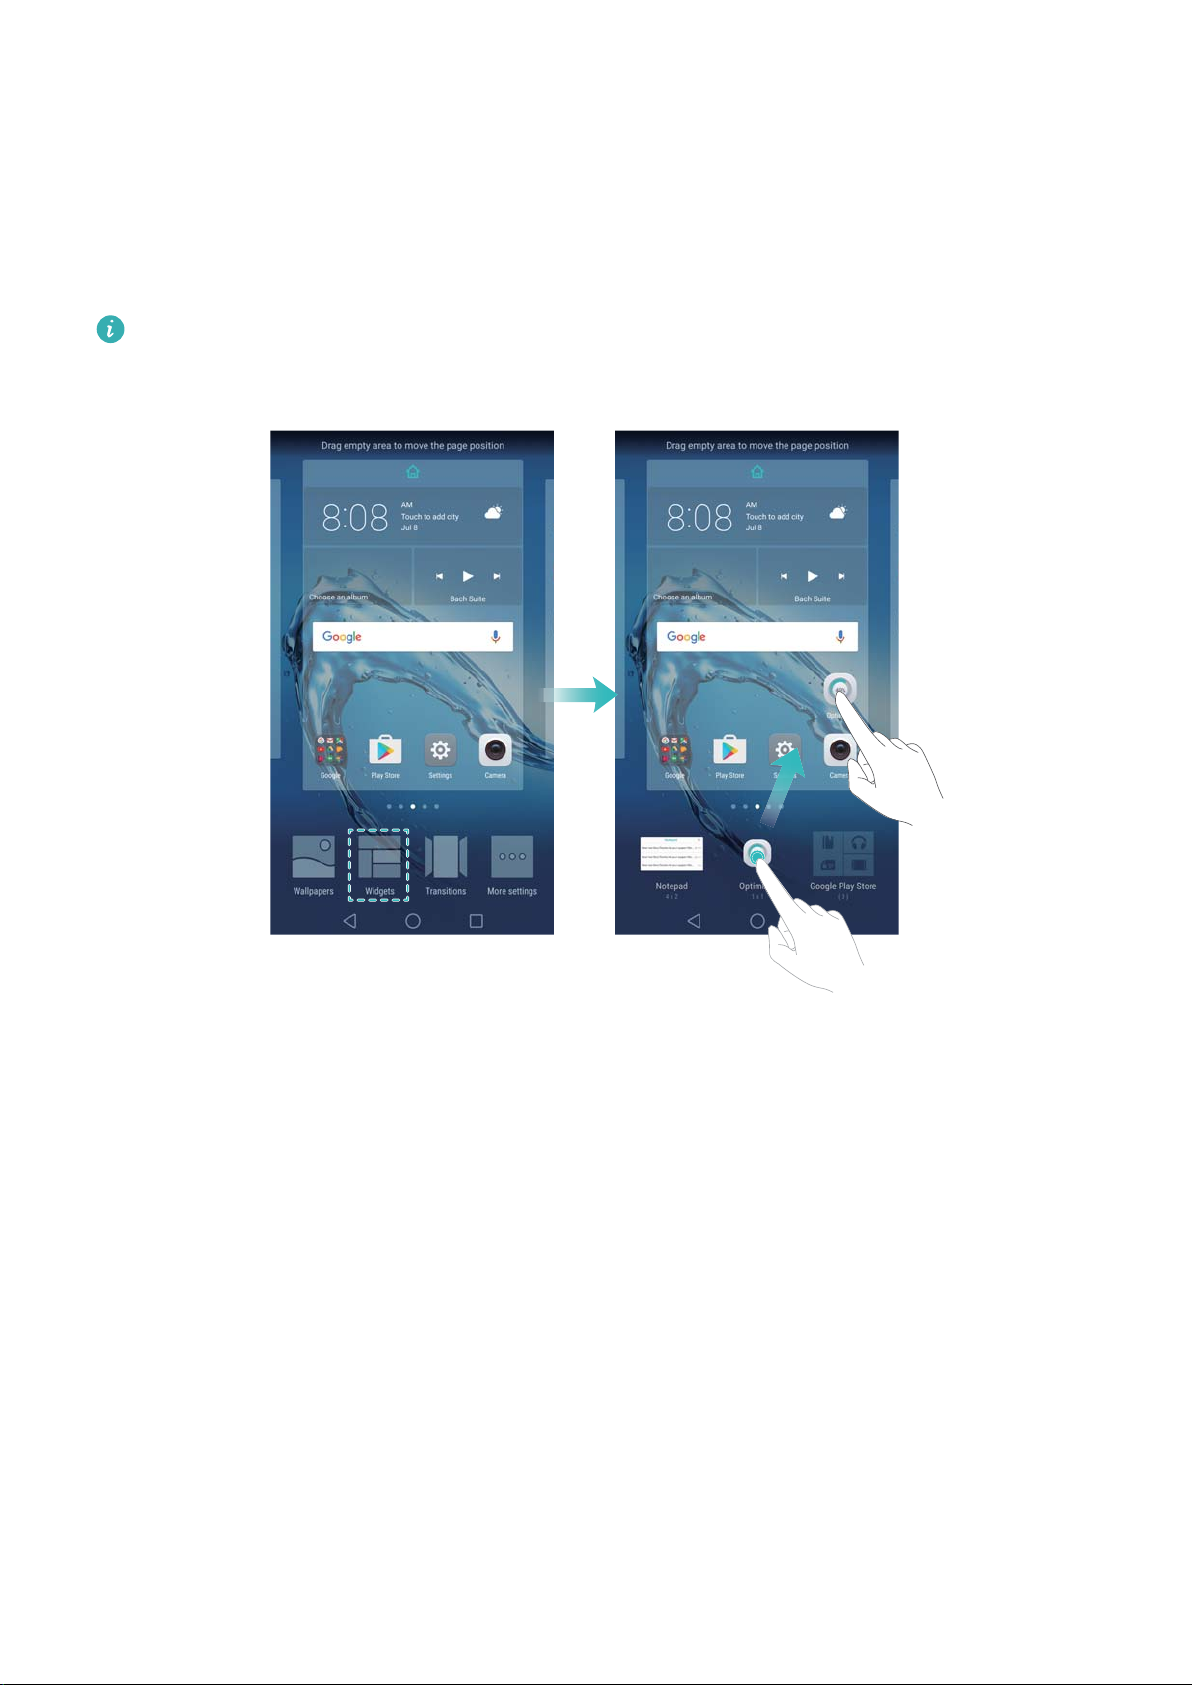
On the home screen, pinch two fingers together to open the home screen editor. Touch Widgets
and select a widget. Touch and hold the widget and drag it to a blank area on the home screen.
You must have enough space on the home screen to add widgets. If there is not enough
space, add another home screen or free up some space.
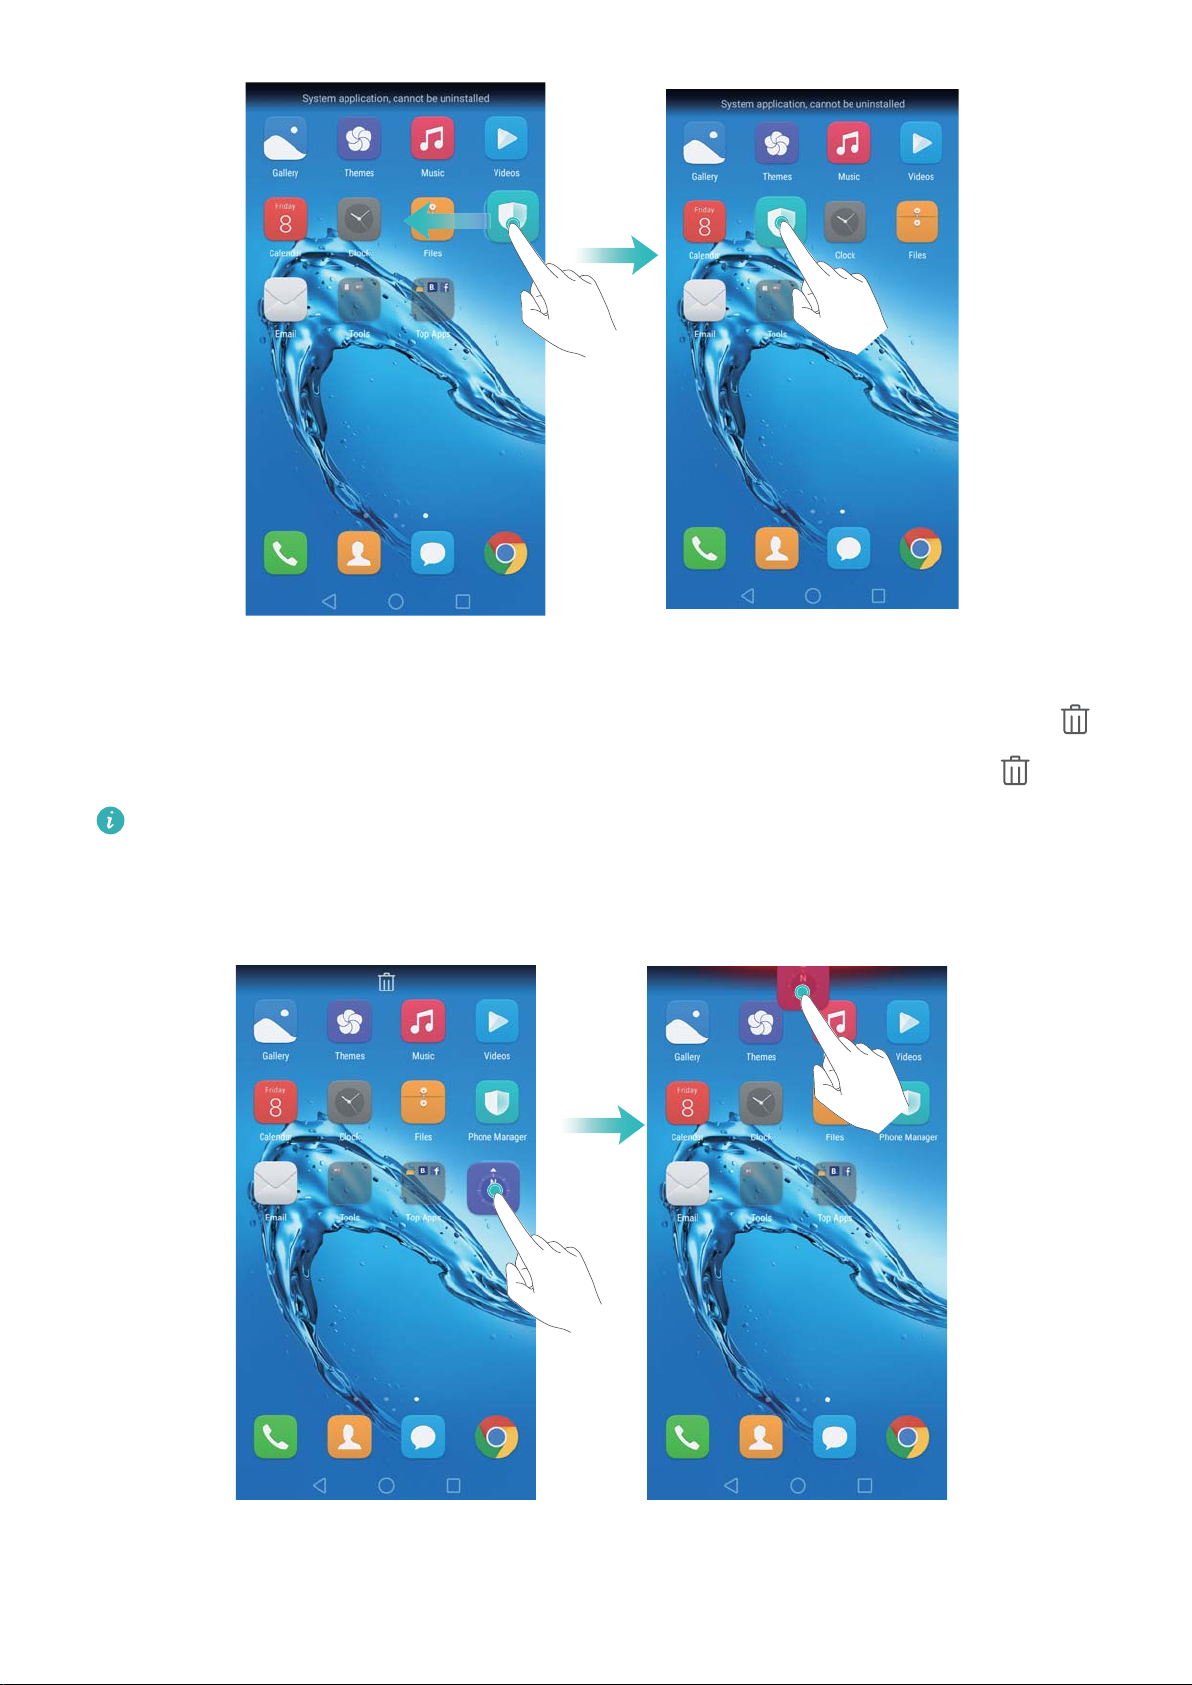
Moving a widget or icon
On the home screen, touch and hold an application icon or widget until your phone vibrates. You
can then drag the application icon or widget to the desired location.
22
Page 29
Getting Started
Deleting a widget or icon
On the home screen, touch and hold the application icon or widget you want to delete until
is displayed at the top of the screen. Drag the unwanted application icon or widget to .
After you have moved/deleted an application icon, a blank space will appear on the home
screen. You can sort application icons automatically; for more information, see Aligning
home screen applications automatically.
23
Page 30
Getting Started
Creating a folder
Create home screen folders to organize your applications by type. For example, you can create
a Games folder that contains all of your game applications.
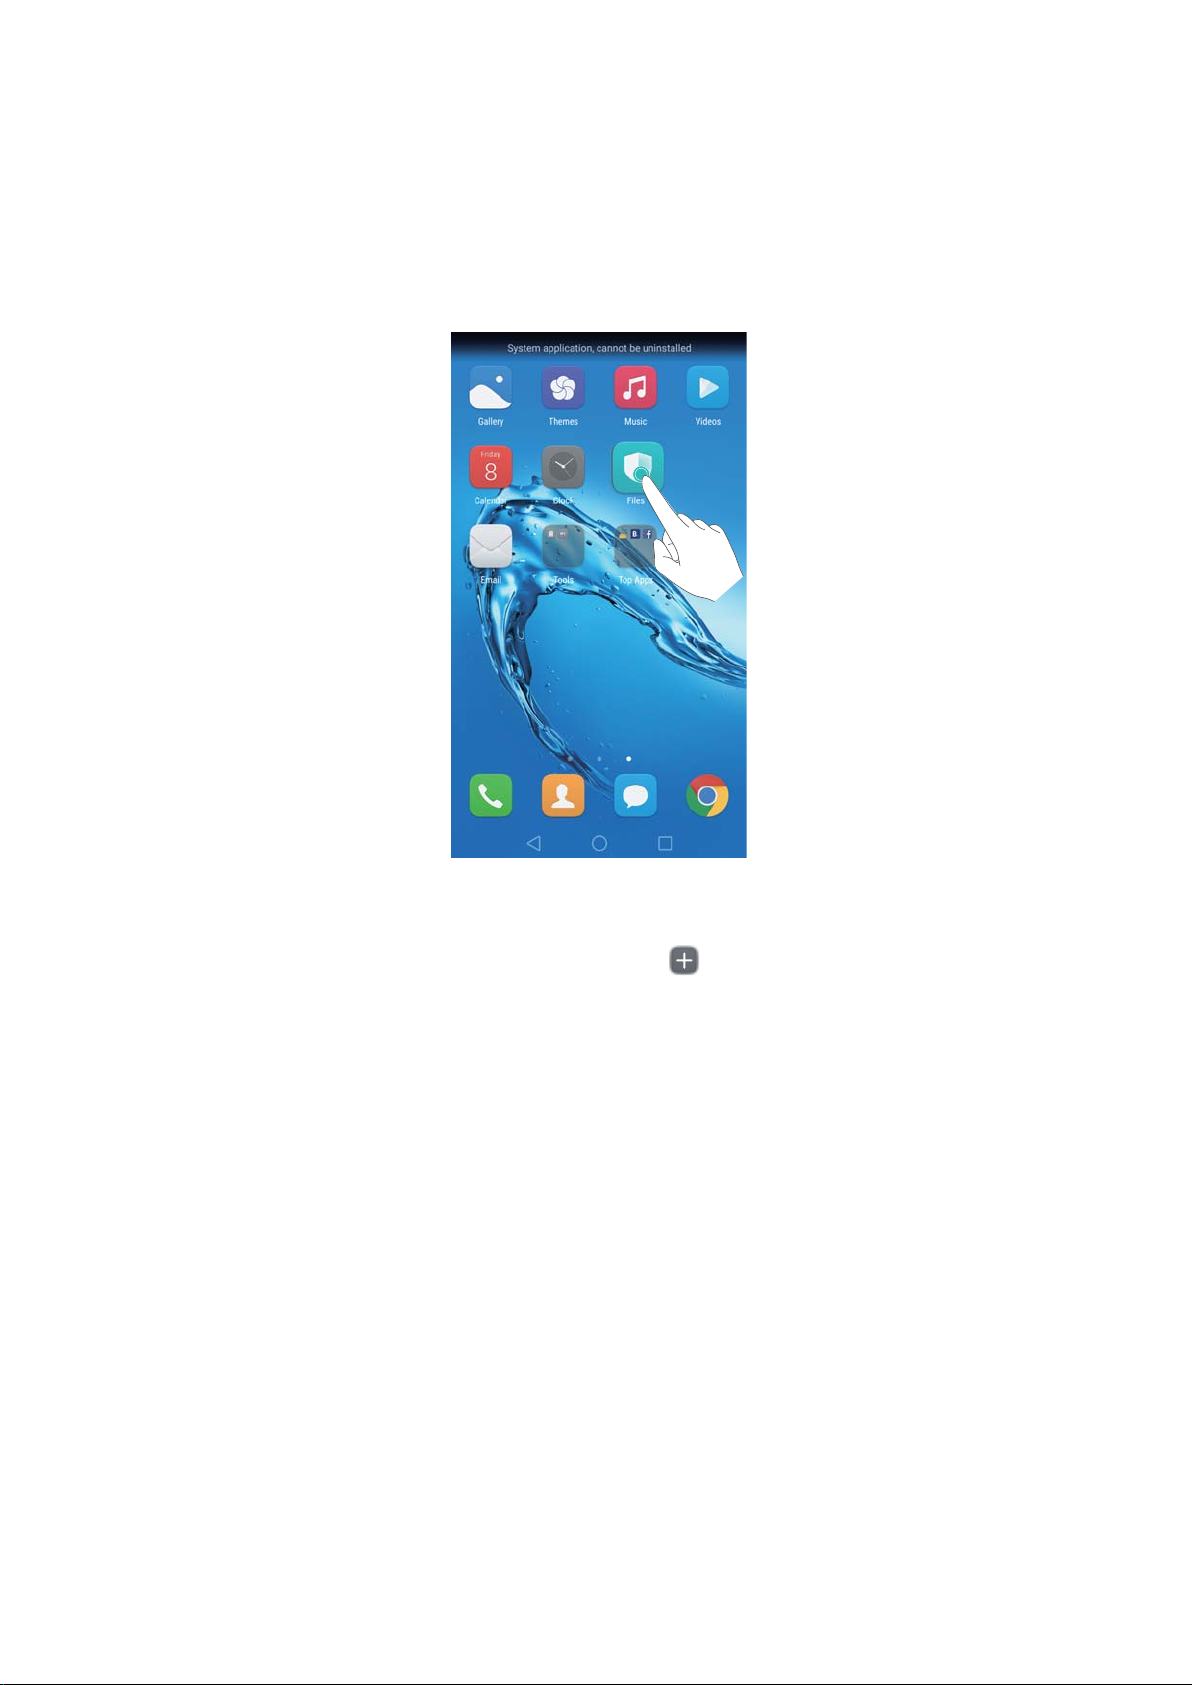
On the home screen, drag an icon on top of another icon to create a folder containing both
applications. To rename the folder, open the folder, and then touch the folder name.
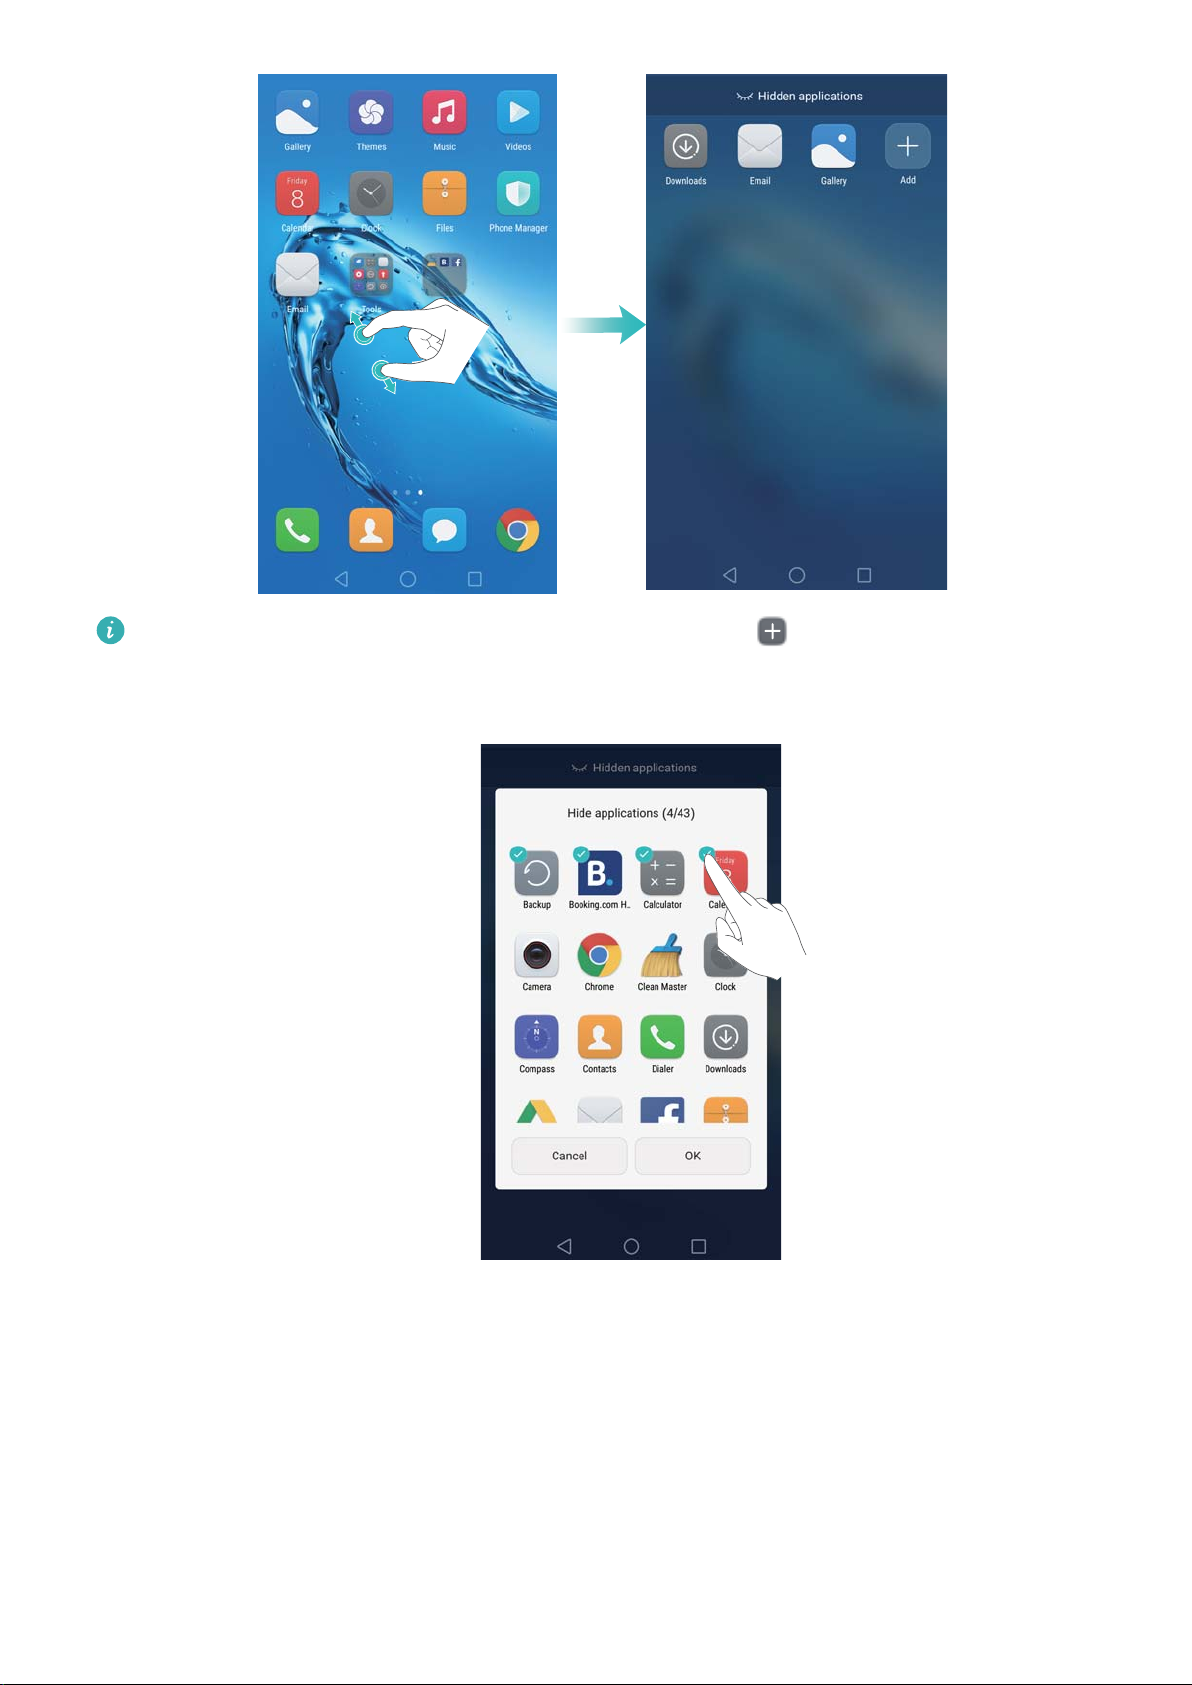
Hiding applications
On the home screen, spread two fingers apart. Touch Add, select the applications you want
to hide, and then touch OK. Applications will not appear on the home screen after they have
been hidden.
24
Page 31
Getting Started
To restore a hidden application to the home screen, touch Add on the hidden
applications screen, deselect the desired application, and then touch OK.
Taking a screenshot
Your phone comes with a range of screenshot options. Capture the entire screen or draw a
shape on the screen to take a partial screenshot.
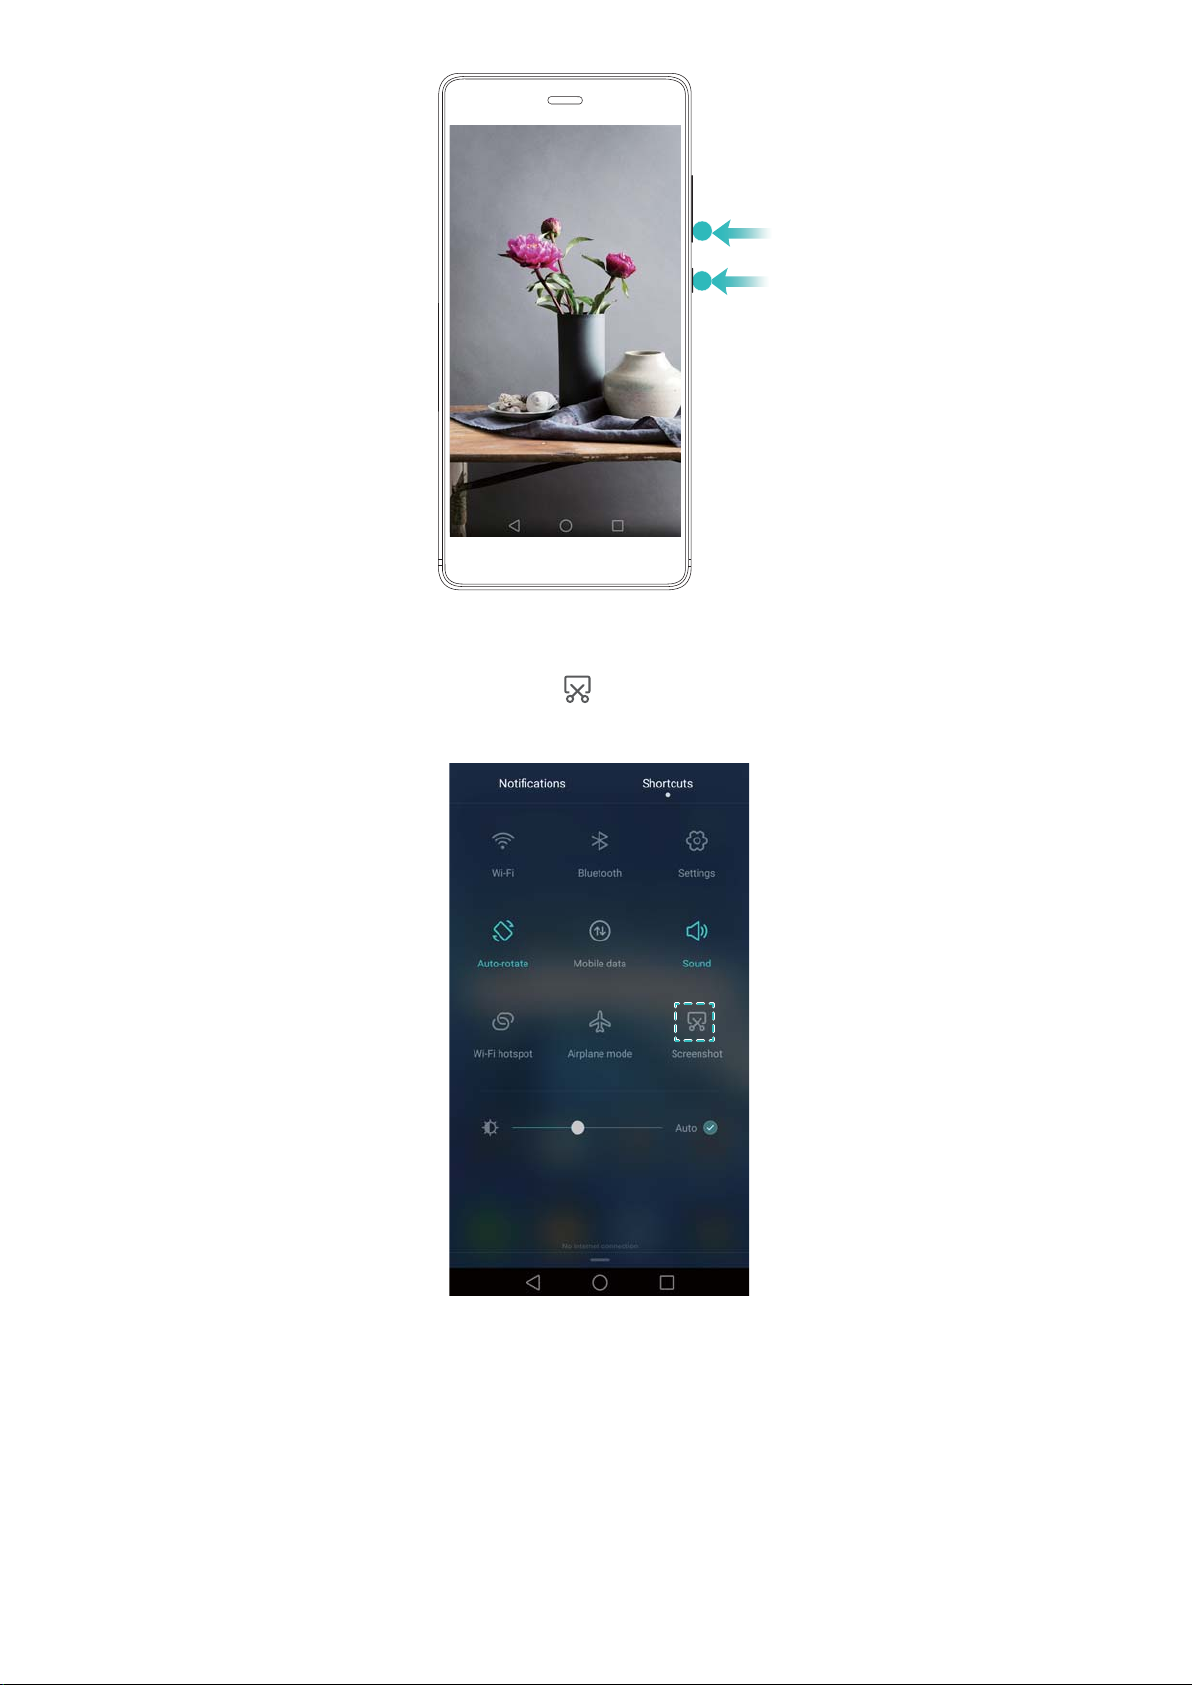
Using the power and volume down buttons
Press the power and volume down buttons at the same time to take a full screenshot.
25
Page 32
Getting Started
Using the screenshot shortcut switch
Open the notification panel, and then touch in the Shortcuts tab to take a full screenshot.
Using your knuckle
Use your knuckle to take a screenshot of the whole screen or draw a shape on the screen to
capture a specific area. For more information, see Using your knuckle.
By default, screenshots are saved to the Screenshots folder in Gallery.
26
Page 33

Getting Started
Notifications
Status indicator
The status indicator changes color and flashes to indicate the following:
l Steady red (not charging): The battery level is critically low and the phone will turn off
automatically.
l Steady red (when charging): The battery level is critically low.
l Steady yellow (when charging): The battery level is medium.
l Steady green (when charging): The battery is almost full or already full. Unplug the charger
when the battery level reaches 100%.
l Flashing green (not charging): You have unread messages, notifications, or missed calls.
Notification badges
Notification badges appear in the top right corner of application icons.
The badge number indicates the number of new notifications. Open the corresponding
application to view more details about the notifications.
To disable notification badges for an application, pinch two fingers together on the home
screen to open the home screen editor, and then touch More settings > Badge app icons
and turn off the switch next to the corresponding application.
Notification panel
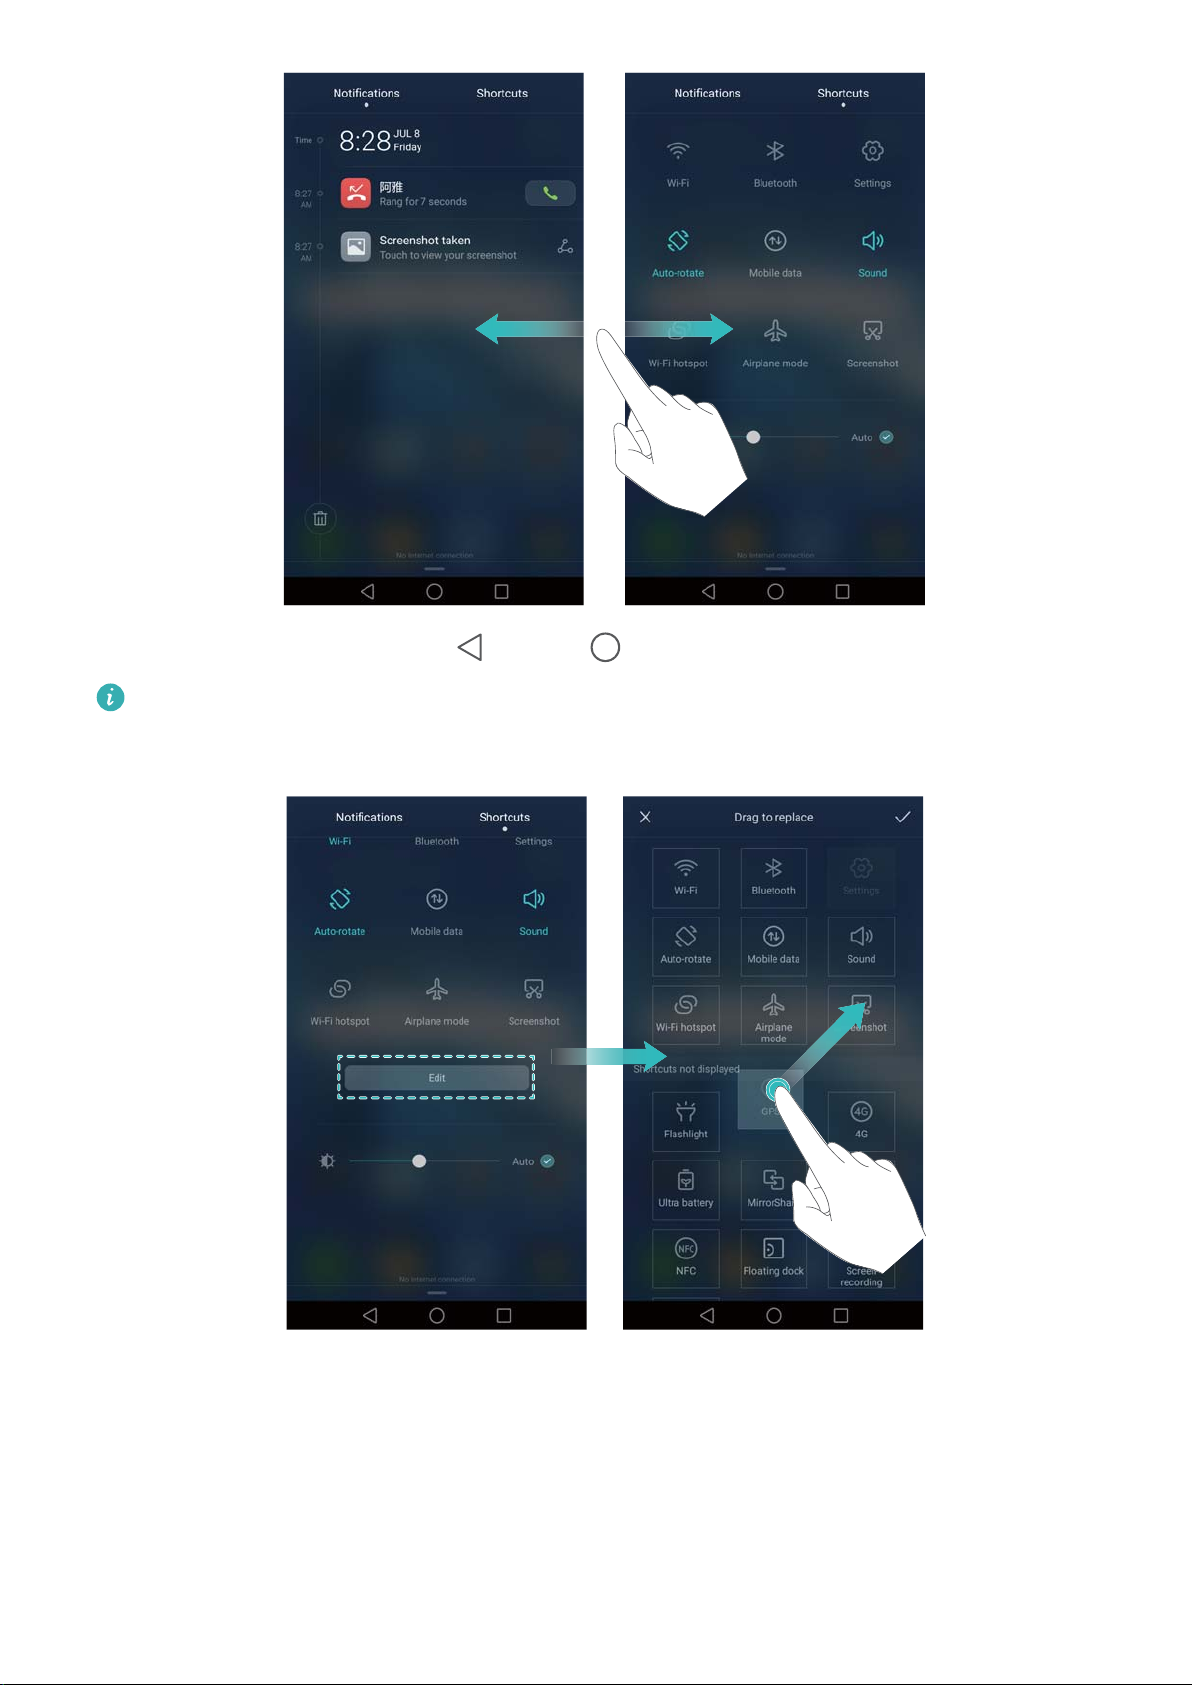
Swipe down from the status bar and open the notification panel to view notifications.
Swipe left on the notification panel to go to the shortcuts tab.
27
Page 34
Getting Started
Swipe up on the screen, or touch Back or Home to close the notification panel.
Customize shortcut switches: Swipe up on the shortcuts tab, and then touch Edit. Drag
the shortcut switch to the desired location for easier access.
Viewing notifications on the lock screen
New notifications (such as missed calls and messages) are displayed on the lock screen.
28
Page 35
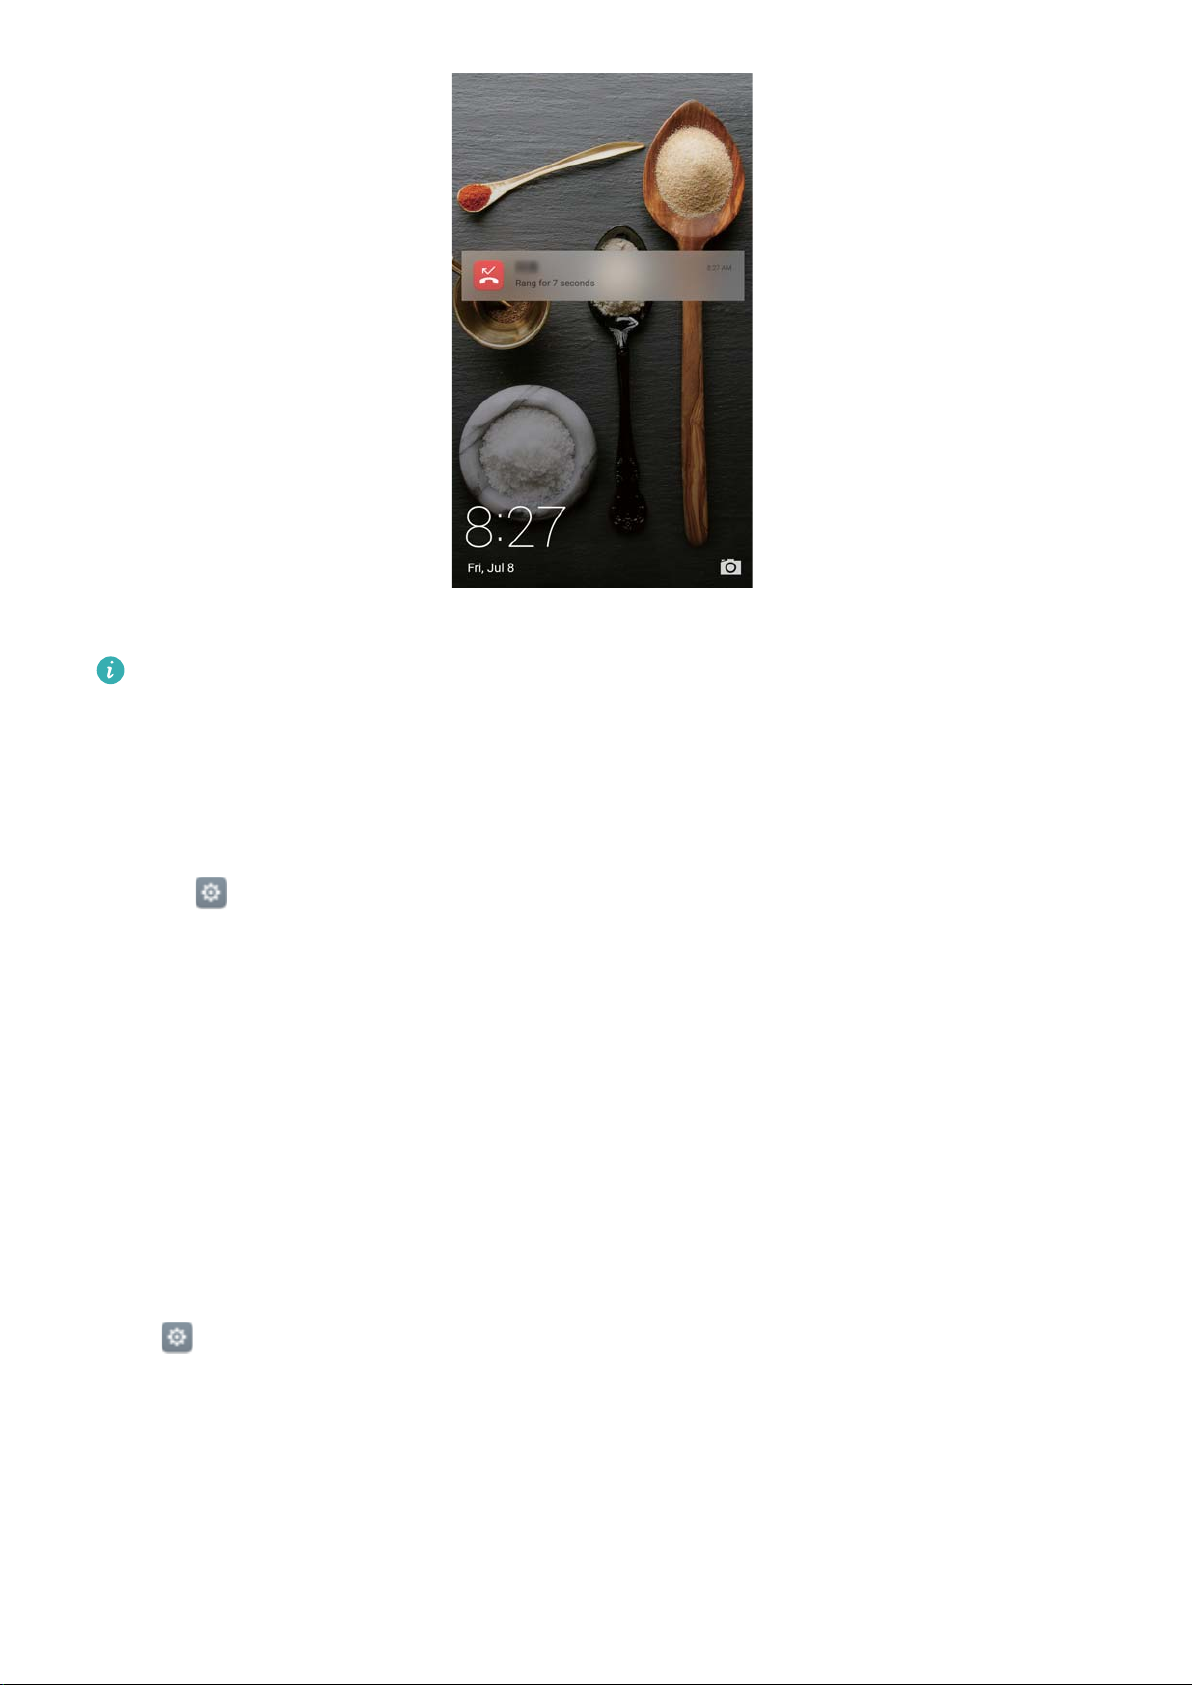
Swipe right on a lock screen notification to view its details.
Getting Started
By default, your phone will only display lock screen notifications for certain applications. If
you want to enable lock screen notifications for more applications, see Managing notification
permissions.
Managing notification permissions
Disable notifications for an application to prevent unnecessary disturbances.
1 Open Settings.
2 Touch Notification panel & status bar > Notification center, and then select the desired
application.
3 Enable or disable notification settings as desired.
Display notifications in do not disturb mode: Select the desired application in Notification
center, and then turn on the Priority display switch. Notifications will still be displayed when
Define priority interruptions is enabled in do not disturb mode.
Notification and status bar settings
Change the notification and status bar settings to customize how notifications and status
reminders are displayed.
Open
and display settings for the notification and status bar.
Configuring the drop-down settings for the notification bar
l Touch Drag actions > Smart selection. When you open the notification panel, your phone will
go to the notifications tab if you have new notifications, otherwise it will go to the shortcuts tab.
Settings, and then touch Notification panel & status bar to configure the drop-down
29
Page 36

Getting Started
l Touch Drag actions > Determine from drag position. Swipe down from the left of the status
bar to open to the notifications tab, or swipe down from the right of the status bar to open the
shortcuts tab.
Configuring the display content for the notification and status bar
Turn the Display carrier name, Display network speed, and Remaining battery percentage
switches on or off to configure the content that is displayed in the status bar.
Turn off the Show notification icons switch to hide notification icons in the status bar.
Using fingerprint recognition
In addition to waking and unlocking the screen, the fingerprint sensor can also be used to take a
photo, answer an incoming call, and disable an alarm.
Adding a fingerprint for the first time
See Configuring your fingerprint ID for more information on configuring fingerprint unlock.
Adding, deleting, or renaming a fingerprint
Add multiple fingerprints to make it easier to unlock your phone. You can also delete or rename
fingerprints.
1 Open Settings.
2 Touch Fingerprint ID > Fingerprint management.
3 Enter the screen lock password, and then touch Done.
4 In the Fingerprint list section, you can:
l Touch New fingerprint to add a fingerprint. You can add up to five in total.
l Touch a previously added fingerprint to rename or delete it.
Accessing Safe with your fingerprint
Use your fingerprint to access your Safe without entering the password.
1 Open
Settings.
2 Touch Fingerprint ID > Fingerprint management.
3 Enter the screen lock password, and then touch Next.
4 Touch Access safe, and then follow the onscreen instructions to enter your Safe password
and enable fingerprint recognition.
Once you have completed the settings, touch Files > Safe. You can now use your fingerprint to
access your Safe.
Accessing App Lock with your fingerprint
Use your fingerprint to access locked applications.
1 Open Settings.
30
Page 37

Getting Started
2 Touch Fingerprint ID > Fingerprint management.
3 Enter the screen lock password, and then touch Next.
4 Touch Access app lock, and then follow the onscreen instructions to enter your App Lock
password and enable fingerprint recognition.
Touch Phone Manager > App lock once you have completed the settings, and then use your
fingerprint to view the App Lock status. You can also use your fingerprint to access locked
applications on the home screen.
Fingerprint sensor touch gestures
Touch or swipe the sensor with any finger to perform common tasks.
1 Open
Settings.
2 Touch Fingerprint ID.
3 In the Touch and hold gesture section, turn on switches for features you want to enable.
l Take photo/video: When using the camera viewfinder, touch and hold the fingerprint
sensor to take a picture.
l Answer call: When you have an incoming call, touch and hold the fingerprint sensor to
answer it.
l Stop alarm: When your alarm goes off, touch and hold the fingerprint sensor to disable it.
4 In the Slide gesture section, turn on switches for features you want to enable.
l Show notification panel: Swipe down on the fingerprint sensor using any finger to open
the notification panel. Tap the sensor twice to clear all notifications, and swipe up on the
sensor to close the notification panel.
l Browse photos: When viewing photos in full screen mode, swipe left or right on the sensor
to switch between photos.
Accessing applications
Opening and switching between applications
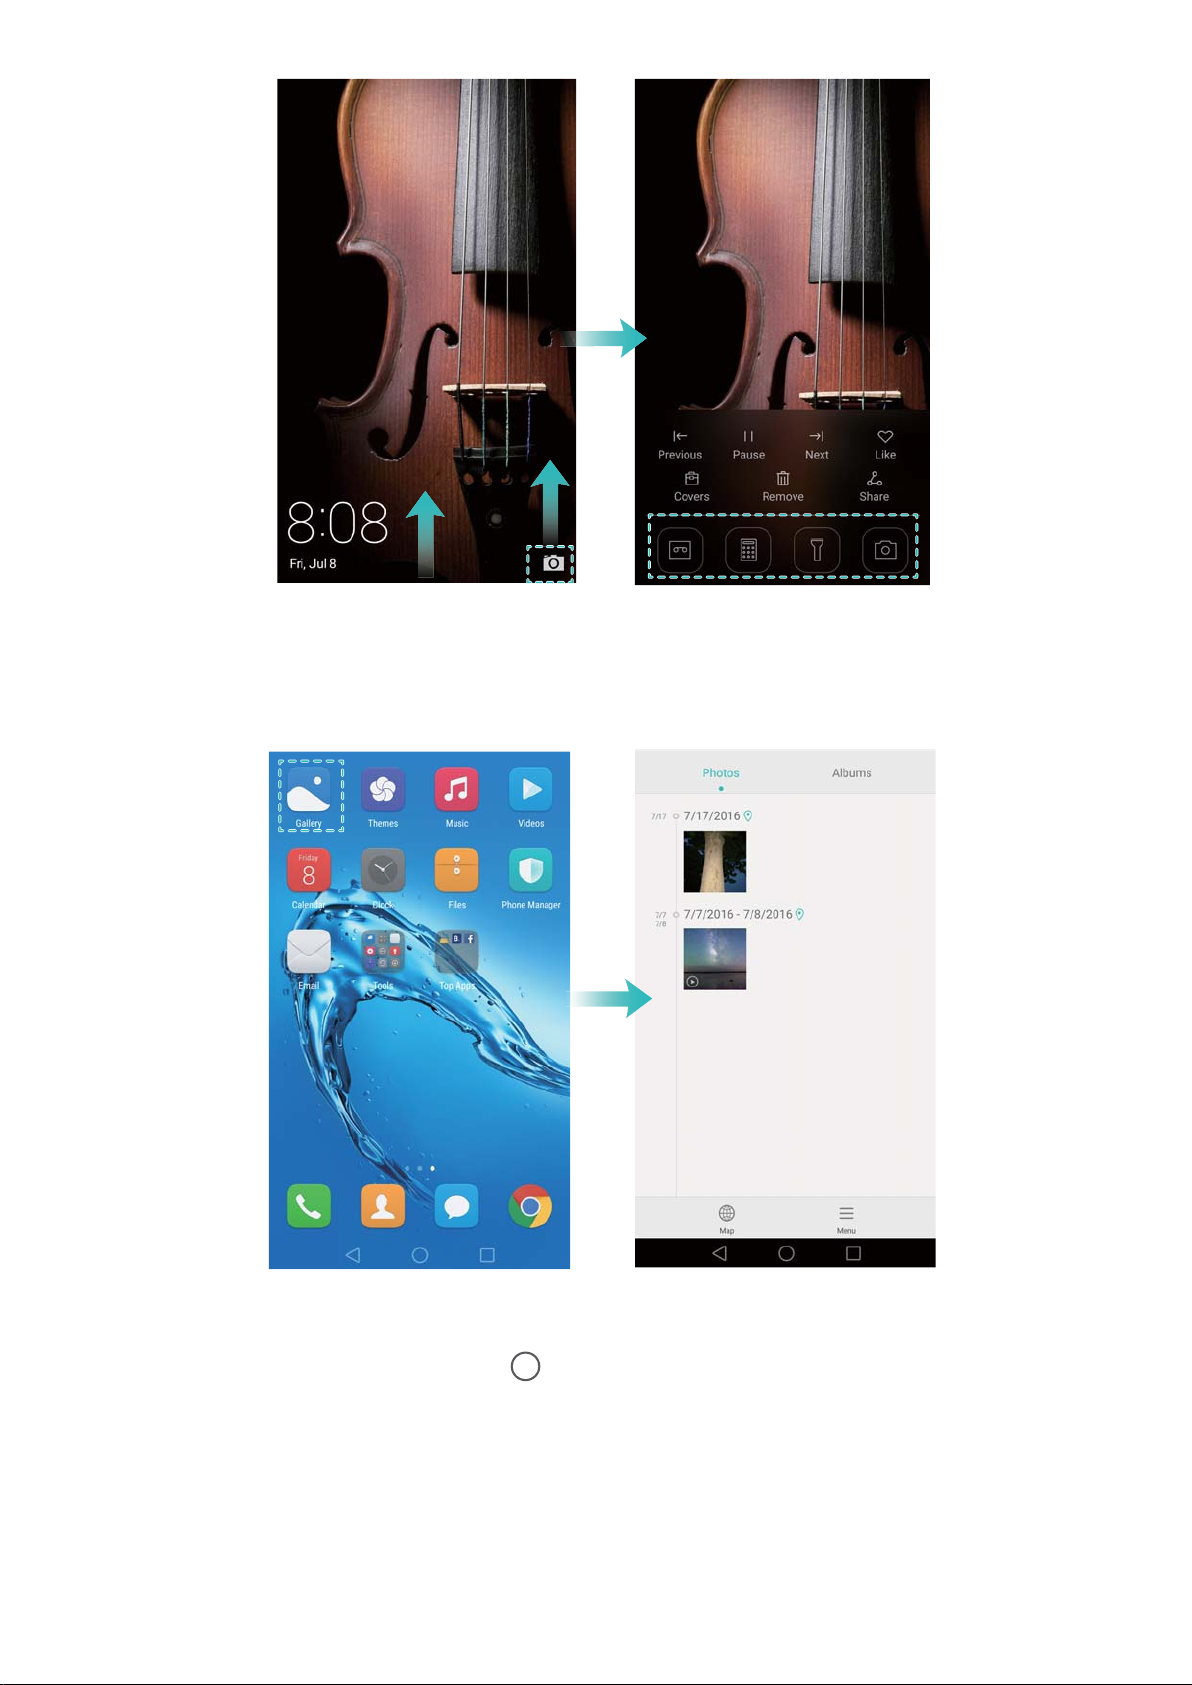
Opening applications from the lock screen
Swipe up on the lock screen and touch to launch the camera application. You can also
swipe up from the bottom of the screen and touch a shortcut icon to quickly launch the
corresponding application.
31
Page 38
Getting Started
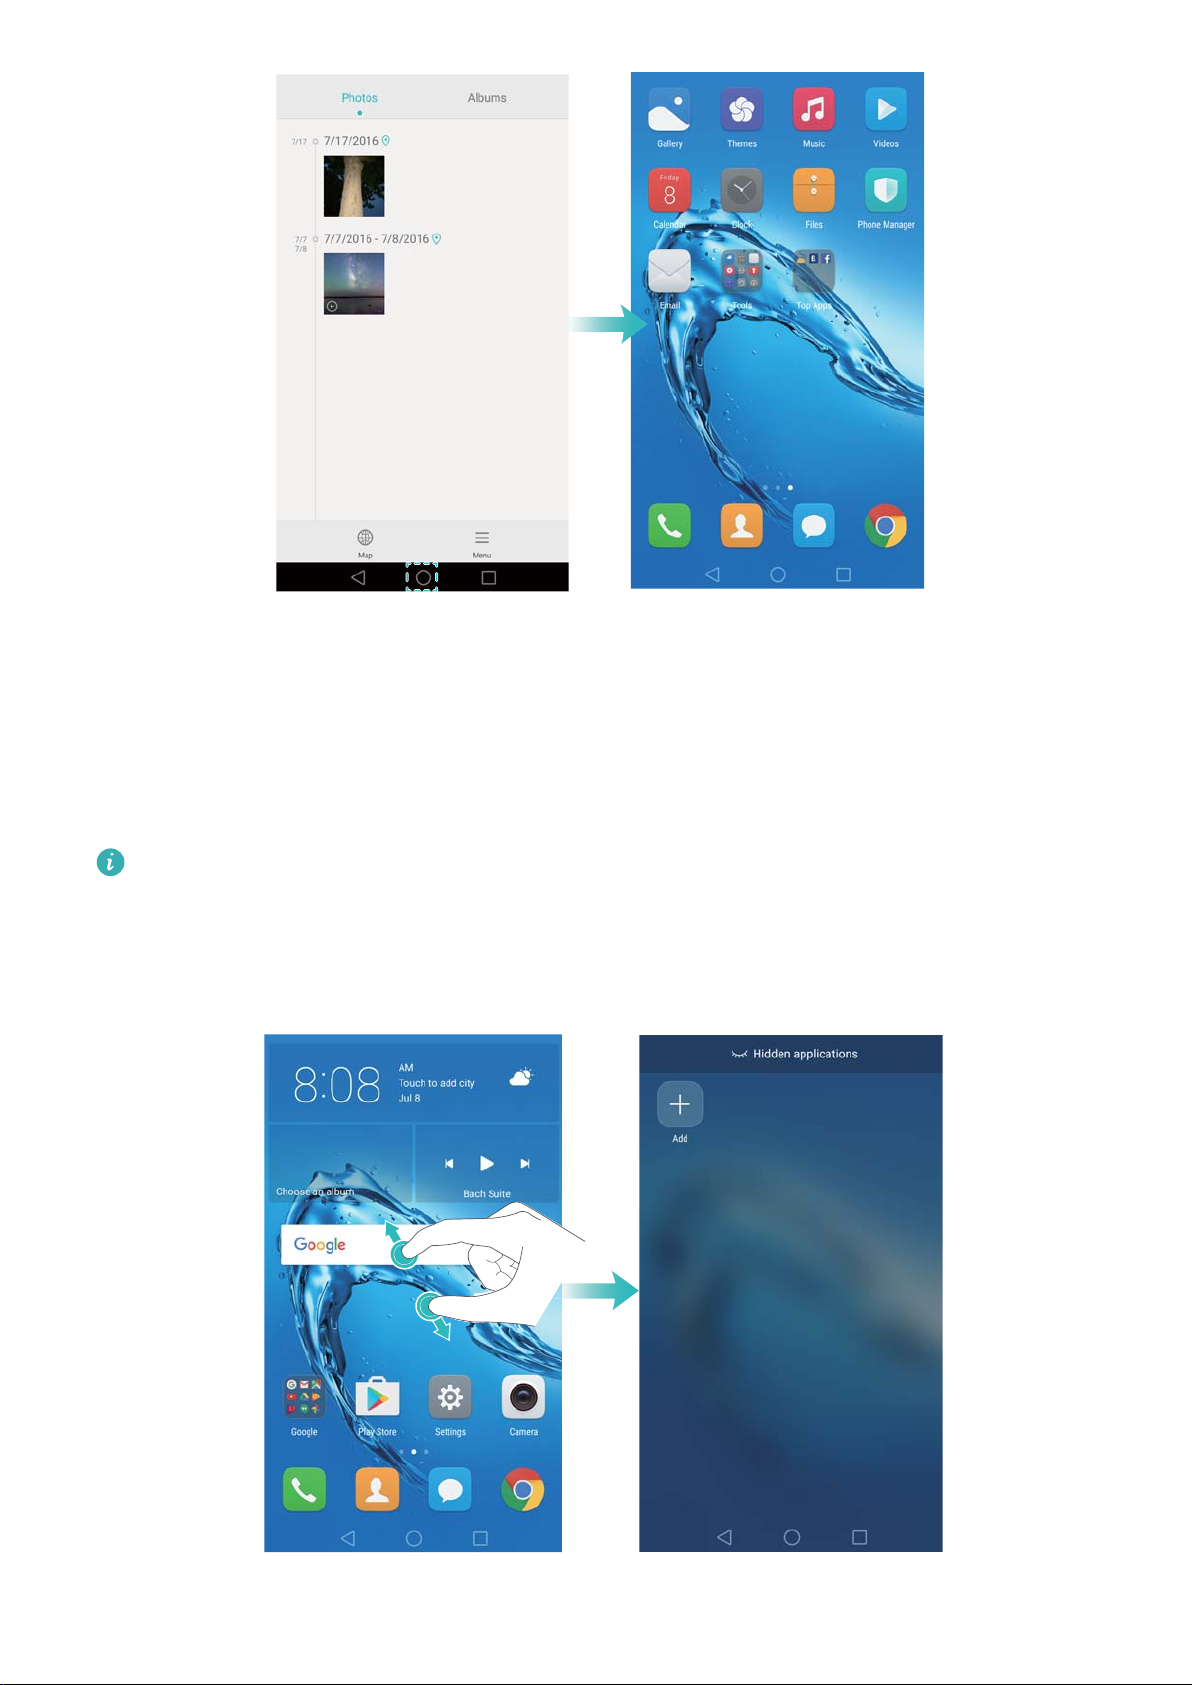
Opening an application from the home screen
On the home screen, touch an icon to open the corresponding application.
Switching between applications
To switch to another application, touch Home to return to the home screen, and then touch
the icon of the application you want to open.
32
Page 39
Getting Started
Searching for applications
Finding applications
Swipe down from the middle of the screen to access the search bar, and then enter the name of
an application. The search results will be displayed underneath the search bar. For more
information, see Finding applications quickly.
Hidden applications are not listed in the search results.
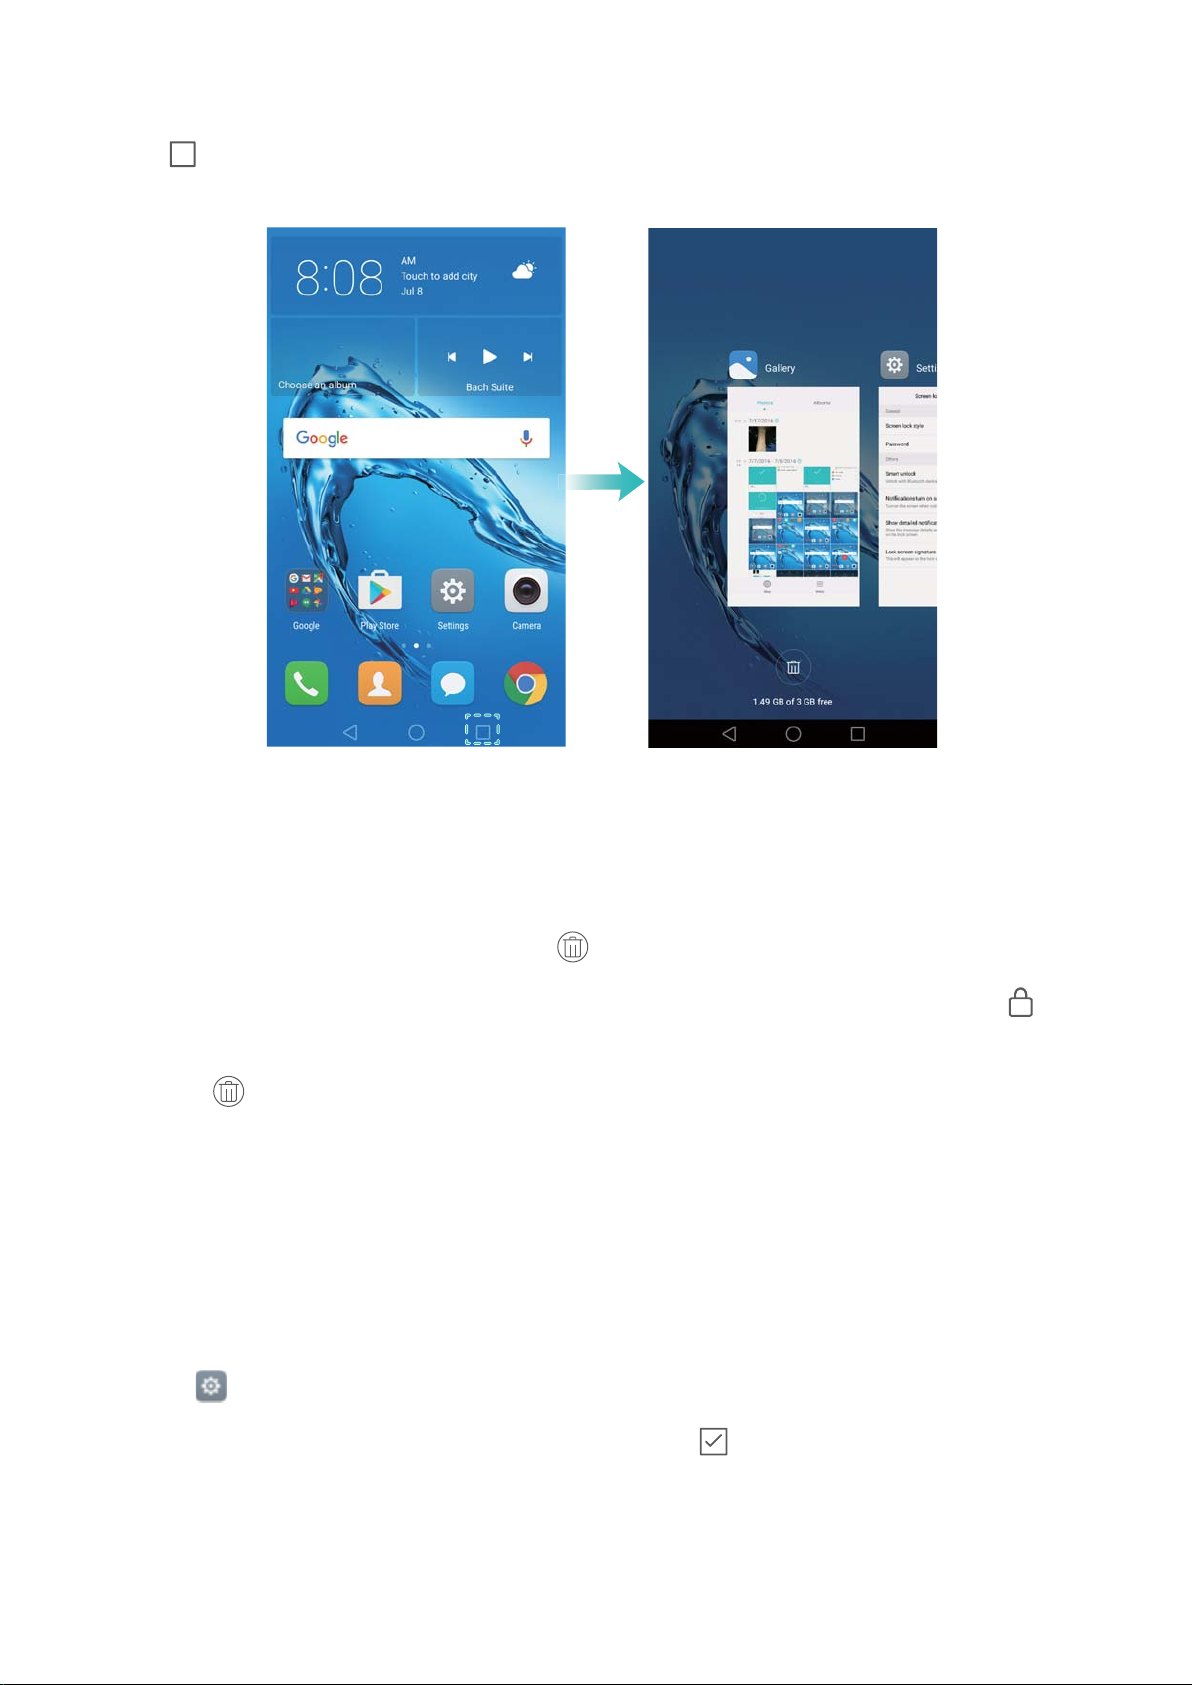
Finding hidden applications
On the home screen, spread two fingers apart to view your hidden applications.
33
Page 40
Viewing recently used applications
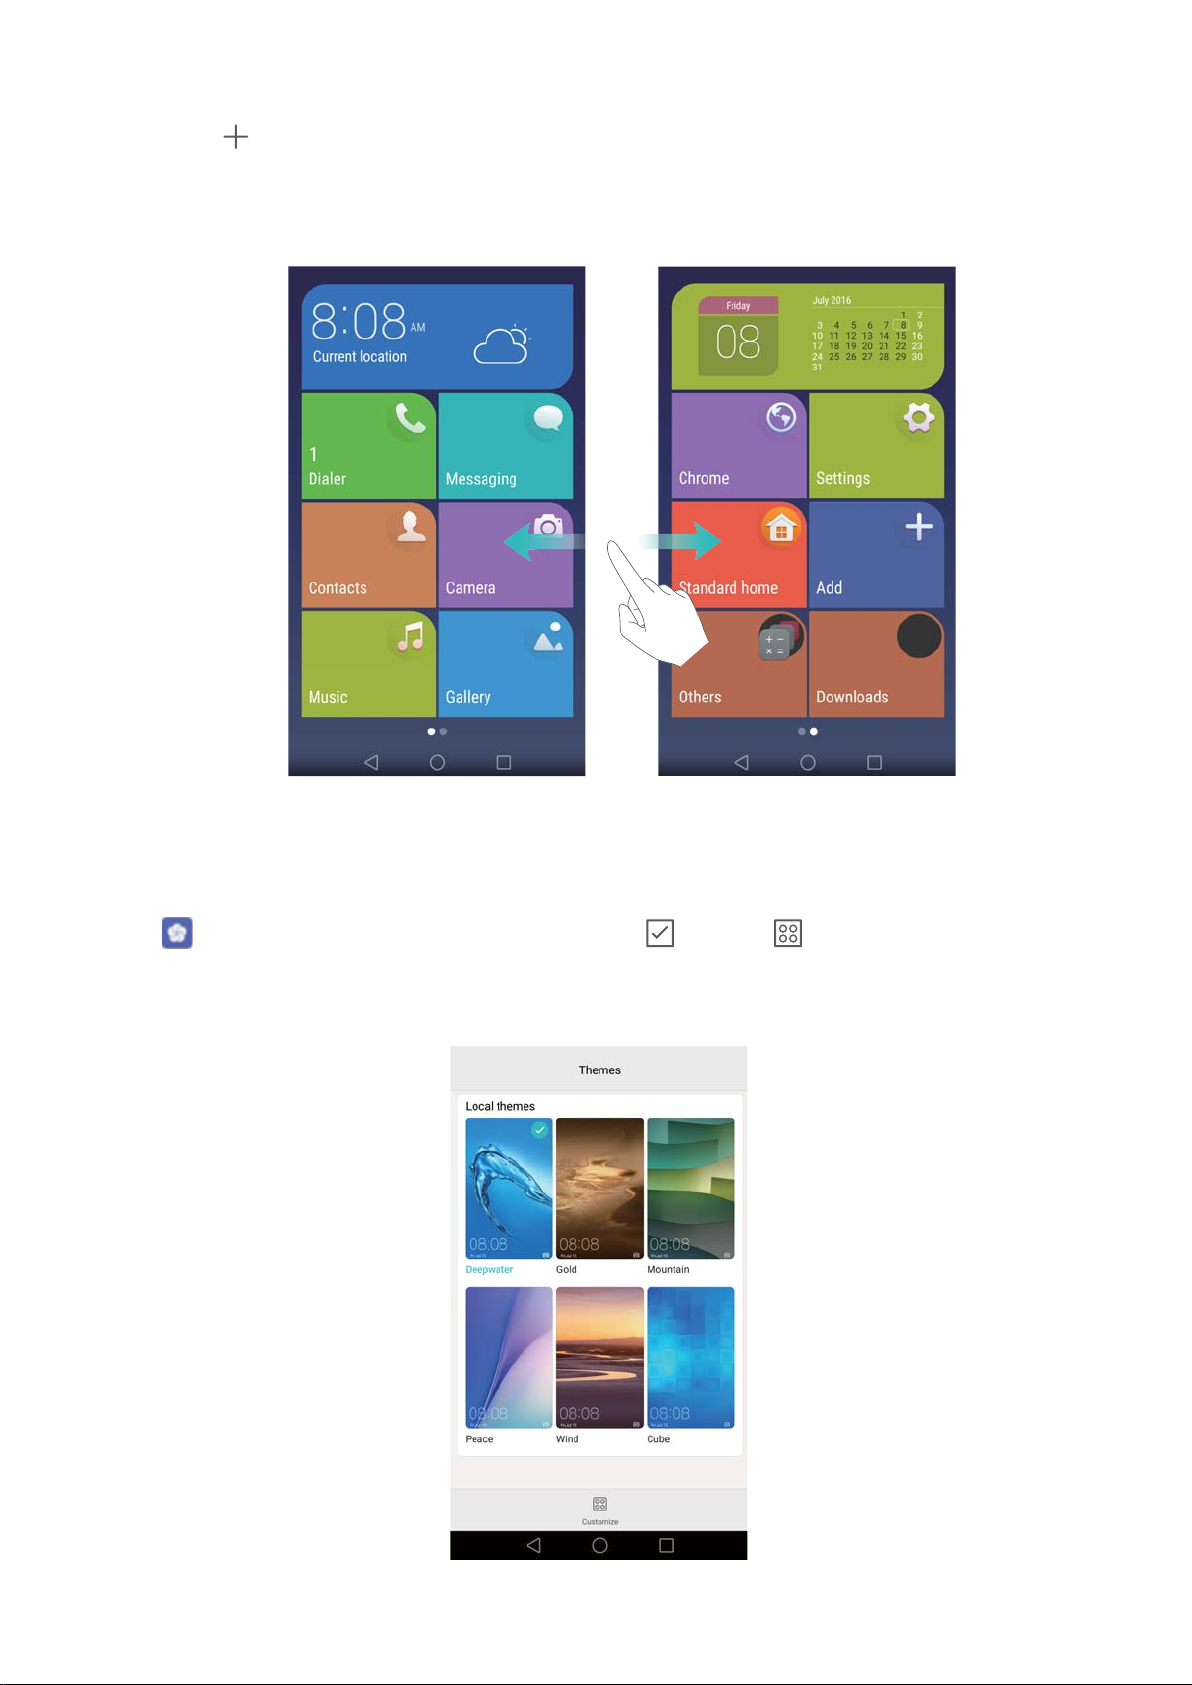
Touch Recent to display the list of recently used applications.
Getting Started
l View more applications: Swipe left or right on the screen to view more recently used
applications.
l Open an application: Touch a thumbnail to open the corresponding application.
l Close an application: Swipe up on a thumbnail to close the corresponding application.
l Close all unlocked applications: Touch to close all unlocked applications.
l Lock or unlock an application: Swipe down on a thumbnail to lock an application. will
appear above an application once it has been locked. Locked applications cannot be closed by
touching . Swipe down again on the thumbnail to unlock the application.
Personalizing your phone
Simple home screen
The simple home screen mode uses large icons and fonts to display content in a more easy-to-
read layout.
1 Open Settings.
2 Touch Home screen style > Simple, and then touch to enable the simple home screen.
3 On the simple home screen, you can:
l Touch application icons or widgets to open them.
l Touch and hold an icon to open the home screen editor and add or delete application icons.
34
Page 41
l Touch Others to open the application list and view or open applications.
l Touch to add contacts or applications to the home screen.
l Touch Standard home to exit the simple home screen.
Getting Started
Changing the theme
Personalize your phone's home screen using a wide range of themes and wallpapers.
Open Themes, select a theme, and then touch . Touch to mix and match lock
screen methods, wallpapers, application icons, and more.
35
Page 42
Getting Started
Changing the wallpaper
Set your favorite images or photos as your phone's wallpaper.
1 Open Settings and select Display.
2 Touch Wallpaper, and then touch Lock screen wallpaper or Home screen wallpaper.
3 In the Wallpapers or Live wallpaper tab, select an image, and then follow the onscreen
instructions to set it as the wallpaper.
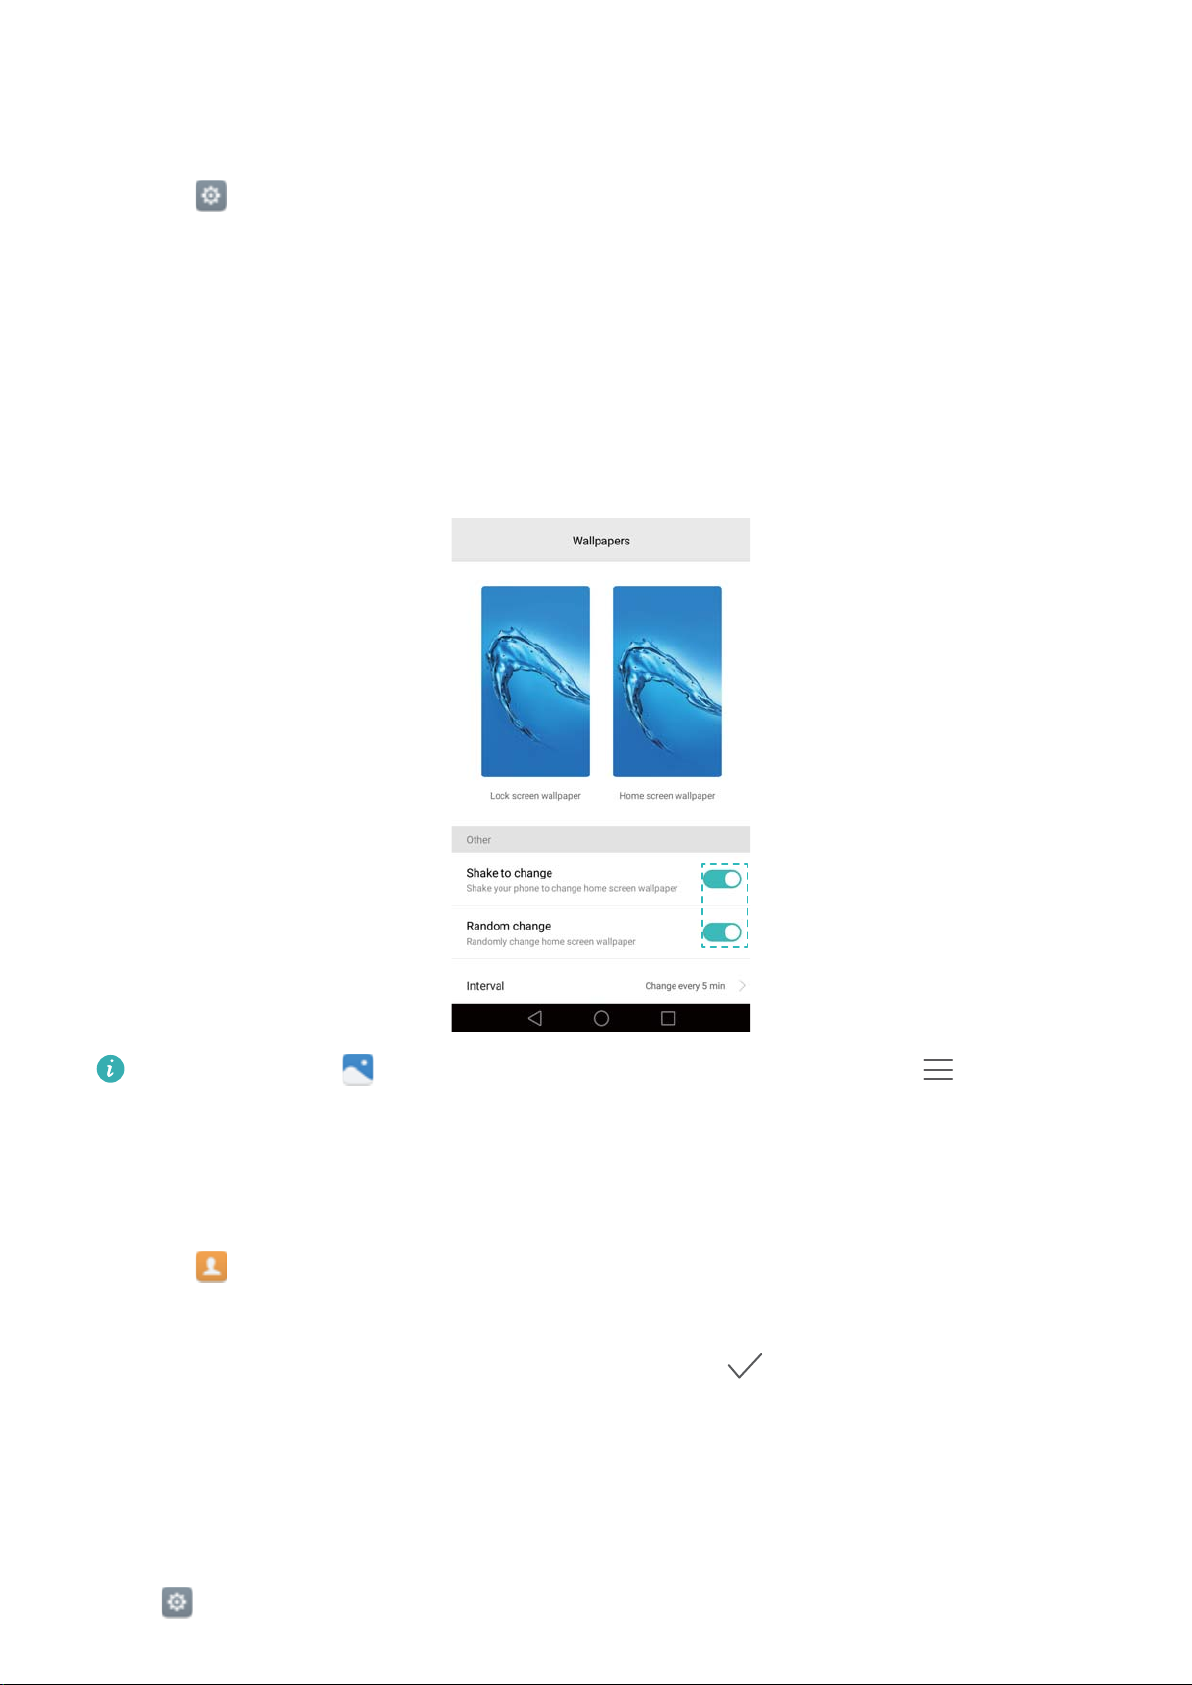
Turn on the Shake to change switch. The wallpaper will change every time you shake your
phone. Turn on the Random change switch. Configure Interval or Album to display. Your
phone will automatically change the wallpaper at the specified time interval.
You can also open Gallery, touch and hold an image, and then touch > Set as >
Wallpaper. Follow the onscreen instructions to set the image as the wallpaper.
Assigning a ringtone to a contact
Assign a unique ringtone to each contact so that you can easily tell who is contacting you.
1 Open
Contacts.
2 Select the desired contact, and then touch Phone ringtone.
3 Select the desired ringtone or music file, and then touch .
For more information on how to configure call and message ringtones and vibration settings, see
Sound settings.
Changing the font size
The phone's font size can be increased to make words easier to read.
Open Settings, and then touch Display > Font size to set the system font size.
36
Page 43
Backspace
Enter a space
Enter numbers and symbols
Input method settings
Swipe letters to input words
Toggle between upper and lower case
Getting Started
The Extra huge font size will only be displayed in messages, contacts, and the dialer
application.
Entering text
Switching text input methods
Switch between text input methods as desired.
1 On the text input screen, swipe down from the status bar to open the notification panel.
2 Touch Select input method in the Notifications tab, and then select the desired input
method.
If there are no input methods to choose from, go to Settings, touch Advanced settings
> Language & input > Default keyboard > Configure input methods, and then turn on
the switch next to the corresponding input method.
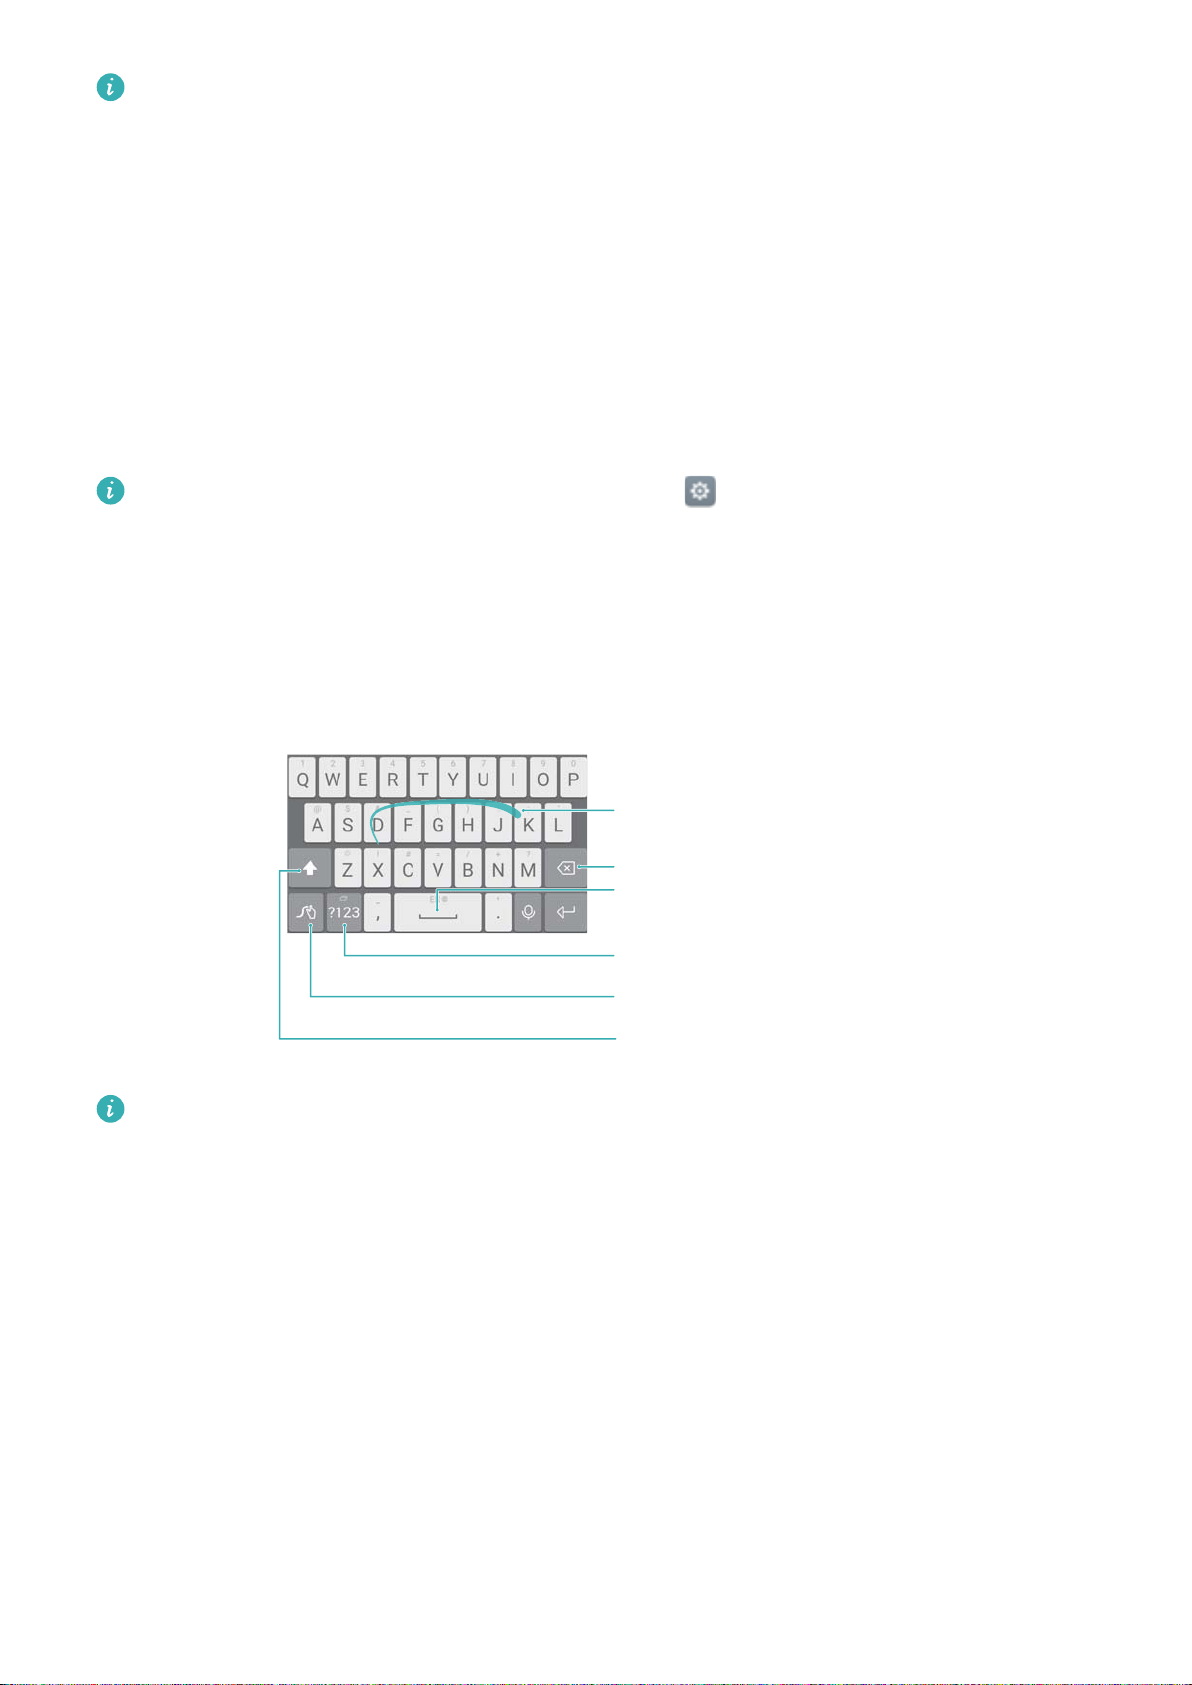
Huawei Swype input method
Quickly enter words by swiping on the keyboard.
Huawei Swype input supports a wide range of languages.
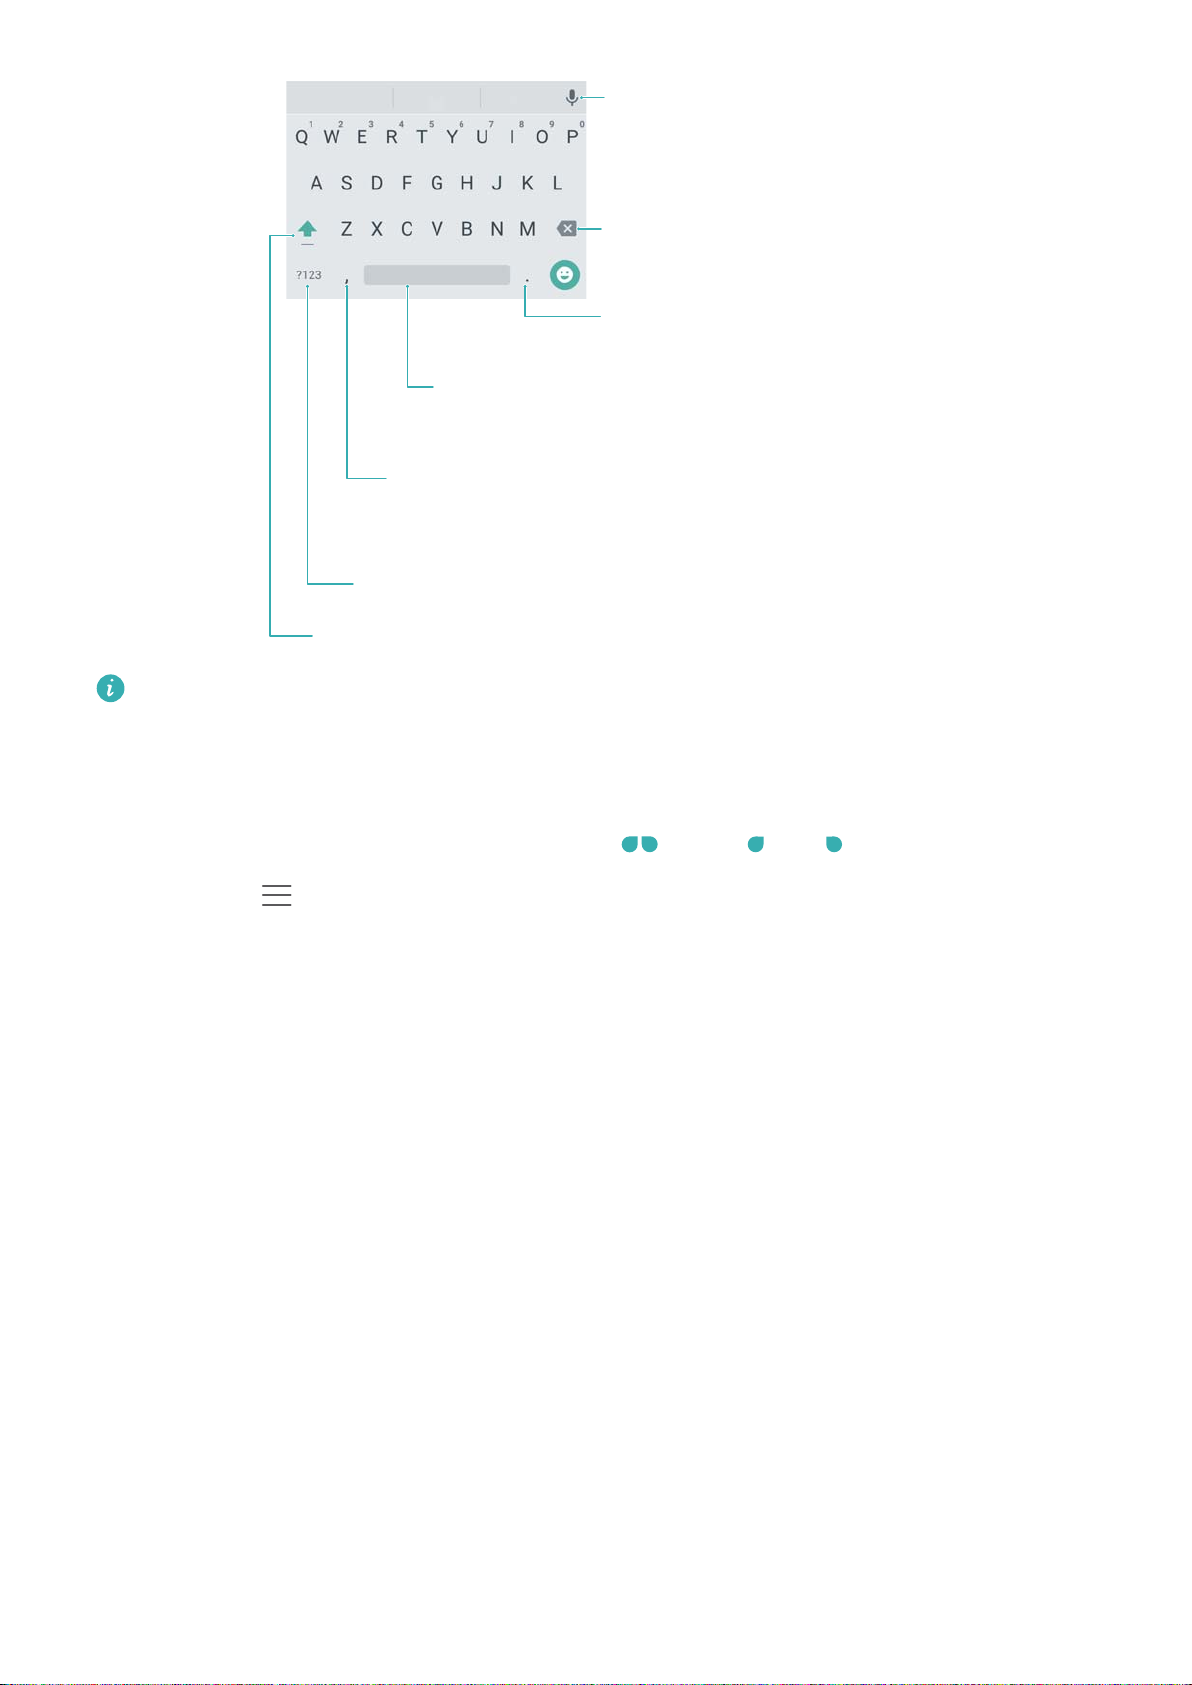
Android input method
37
Page 44
Enter numbers and symbols
Enter a comma
Touch and hold to open the input options menu
Enter a space
Touch and hold to choose another input method
Backspace
Switch to voice input
Toggle between upper and lower case
Enter a period
Touch and hold to enter symbols
Getting Started
The Android input method supports a wide range of languages.
Editing text
You can select, cut, copy, and paste text on your phone.
l Select text: Touch and hold the text to bring up . Drag or to select more or less
text, or touch > Select all to select all text.
l Copy text: Select text and touch Copy.
l Cut text: Select text and touch Cut.
l Paste text: Touch and hold where you want to insert the text, and then touch Paste.
l Share text: Select text, and then touch Share to select a sharing method.
38
Page 45
Tips and Tricks
Searching for settings
Use the search feature in Settings to search for menu options.
Open
term (such as Sound). Your phone will display the search results; touch an option to access the
corresponding setting.
Settings, and then touch the search box at the top of the screen and enter a search
Quickly returning a call
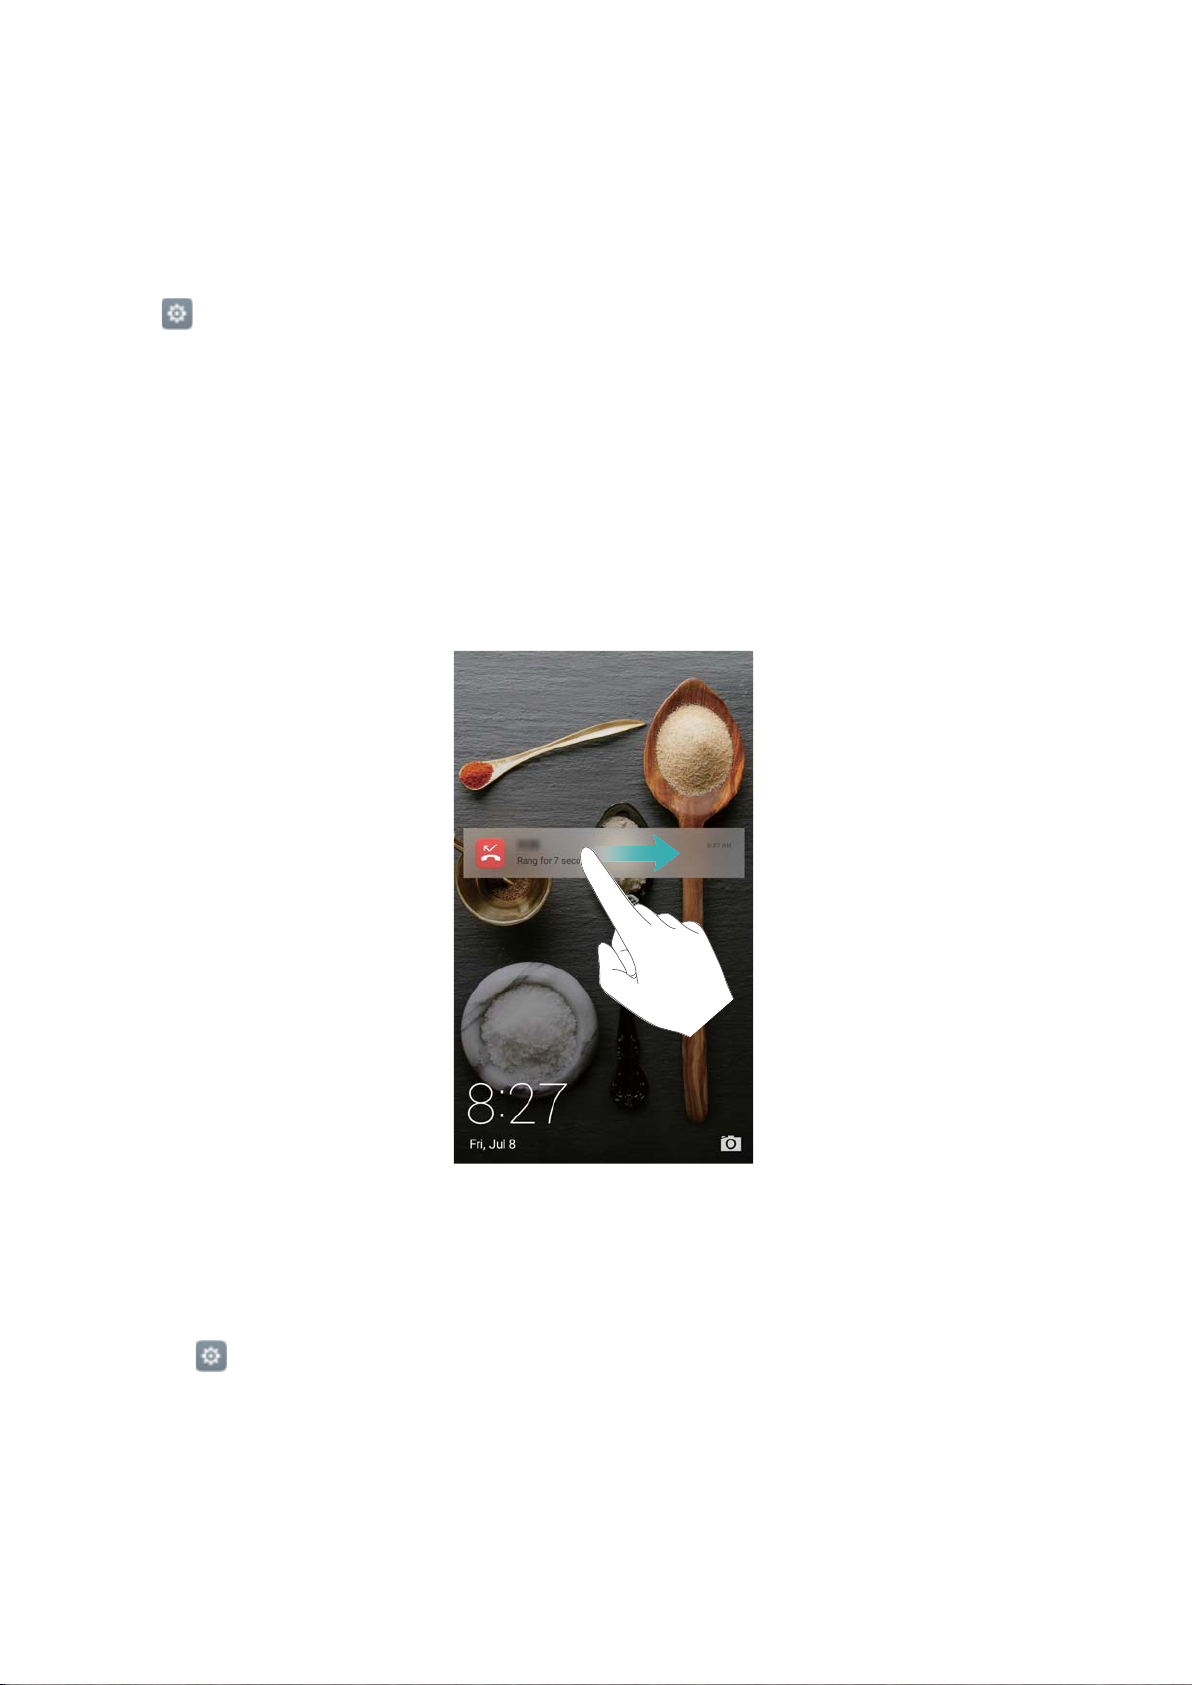
On the lock screen, swipe right on a missed call notification and unlock the screen. The dialer
screen will be displayed; touch the corresponding number to return the call.
Using your knuckle
Use a knuckle to take a screenshot of the whole screen, or part of it.
1 Open Settings, and then select Smart assistance.
2 Touch Motion control > Smart screenshot and turn on the Smart screenshot switch.
Taking a full screenshot
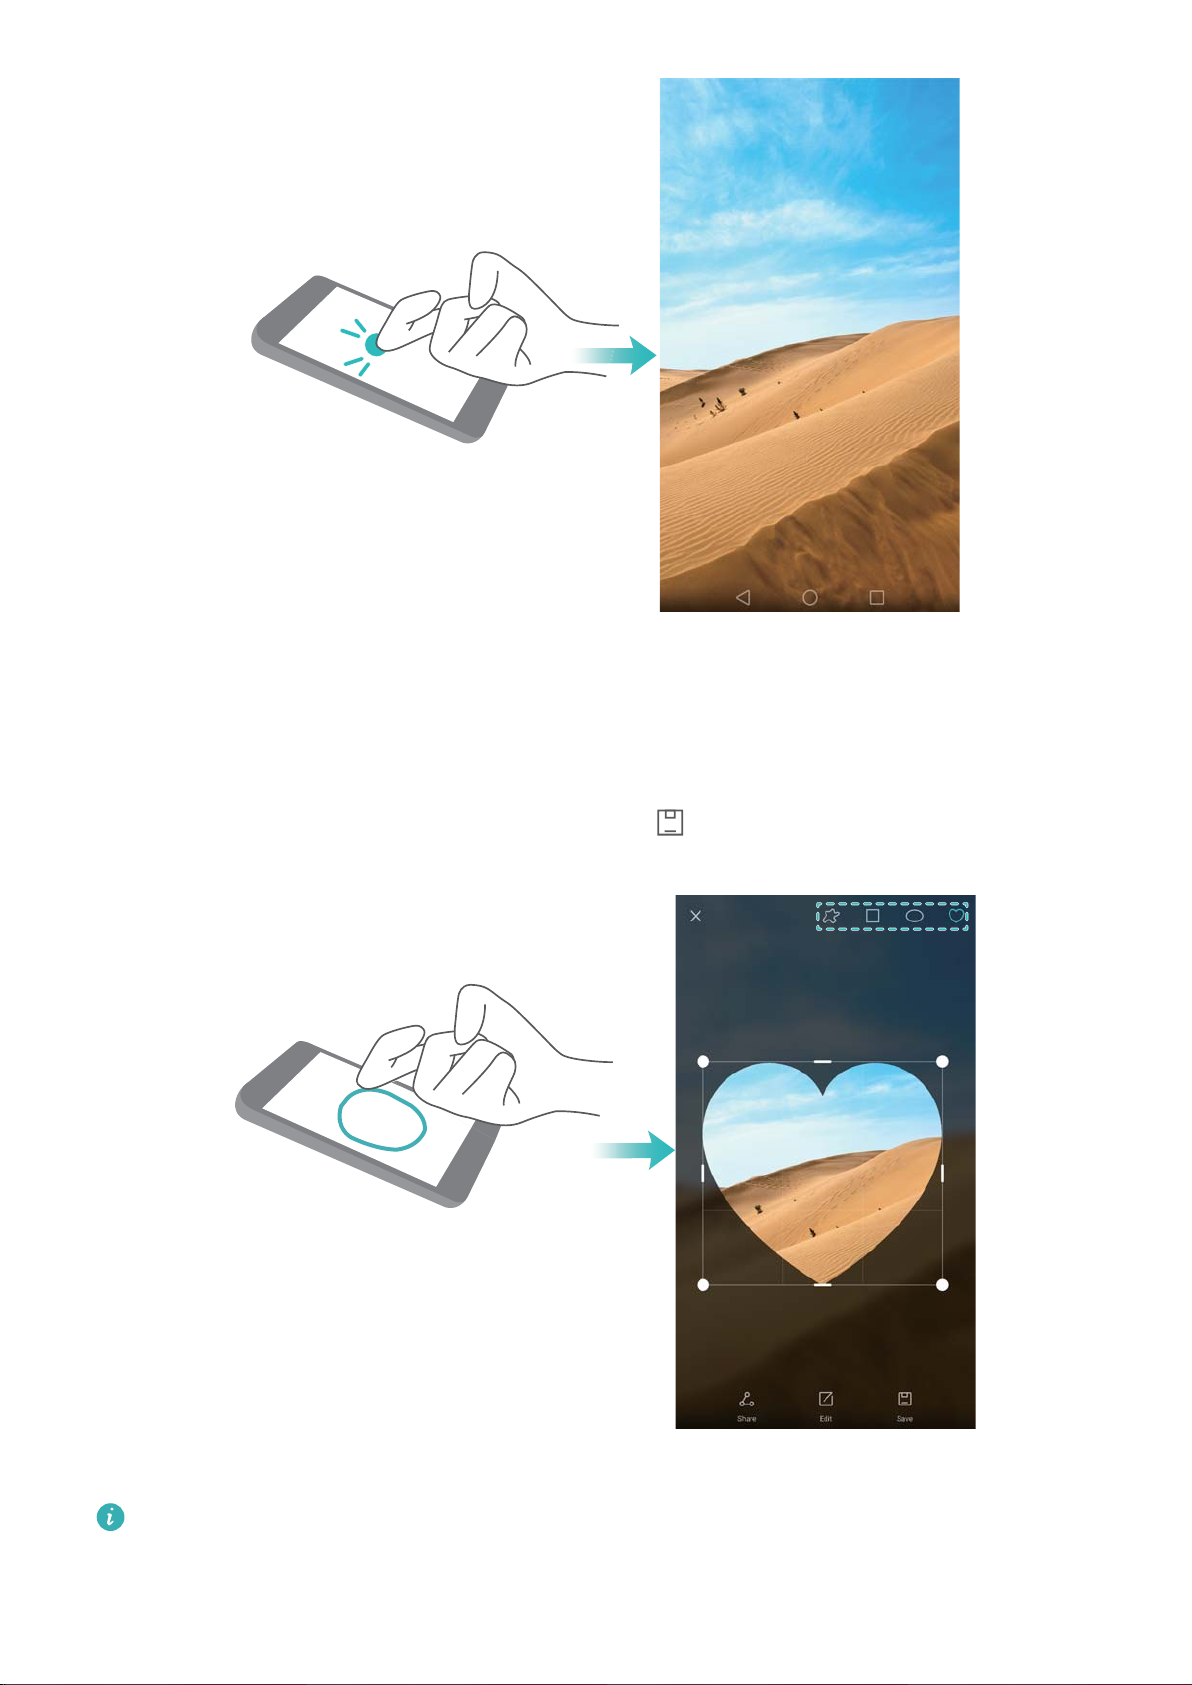
Knock the screen twice with your knuckle to take a screenshot of the whole screen.
39
Page 46
Tips and Tricks
Taking a partial screenshot
Knock the screen with your knuckle. Keep your knuckle on the screen, drag it around the area
you want to capture, and then return to the starting point. Your selection is displayed on screen;
the area inside the blue line will be captured. You can also select the screenshot box at the top
of the screen for different screenshot shapes. Touch to save a screenshot.
By default, screenshots are stored in Gallery, within the Screenshots folder.
After creating a screenshot, touch Share to share it with friends. For more information about
sharing, see Sharing images or videos.
40
Page 47
Tips and Tricks
Adding contact details quickly
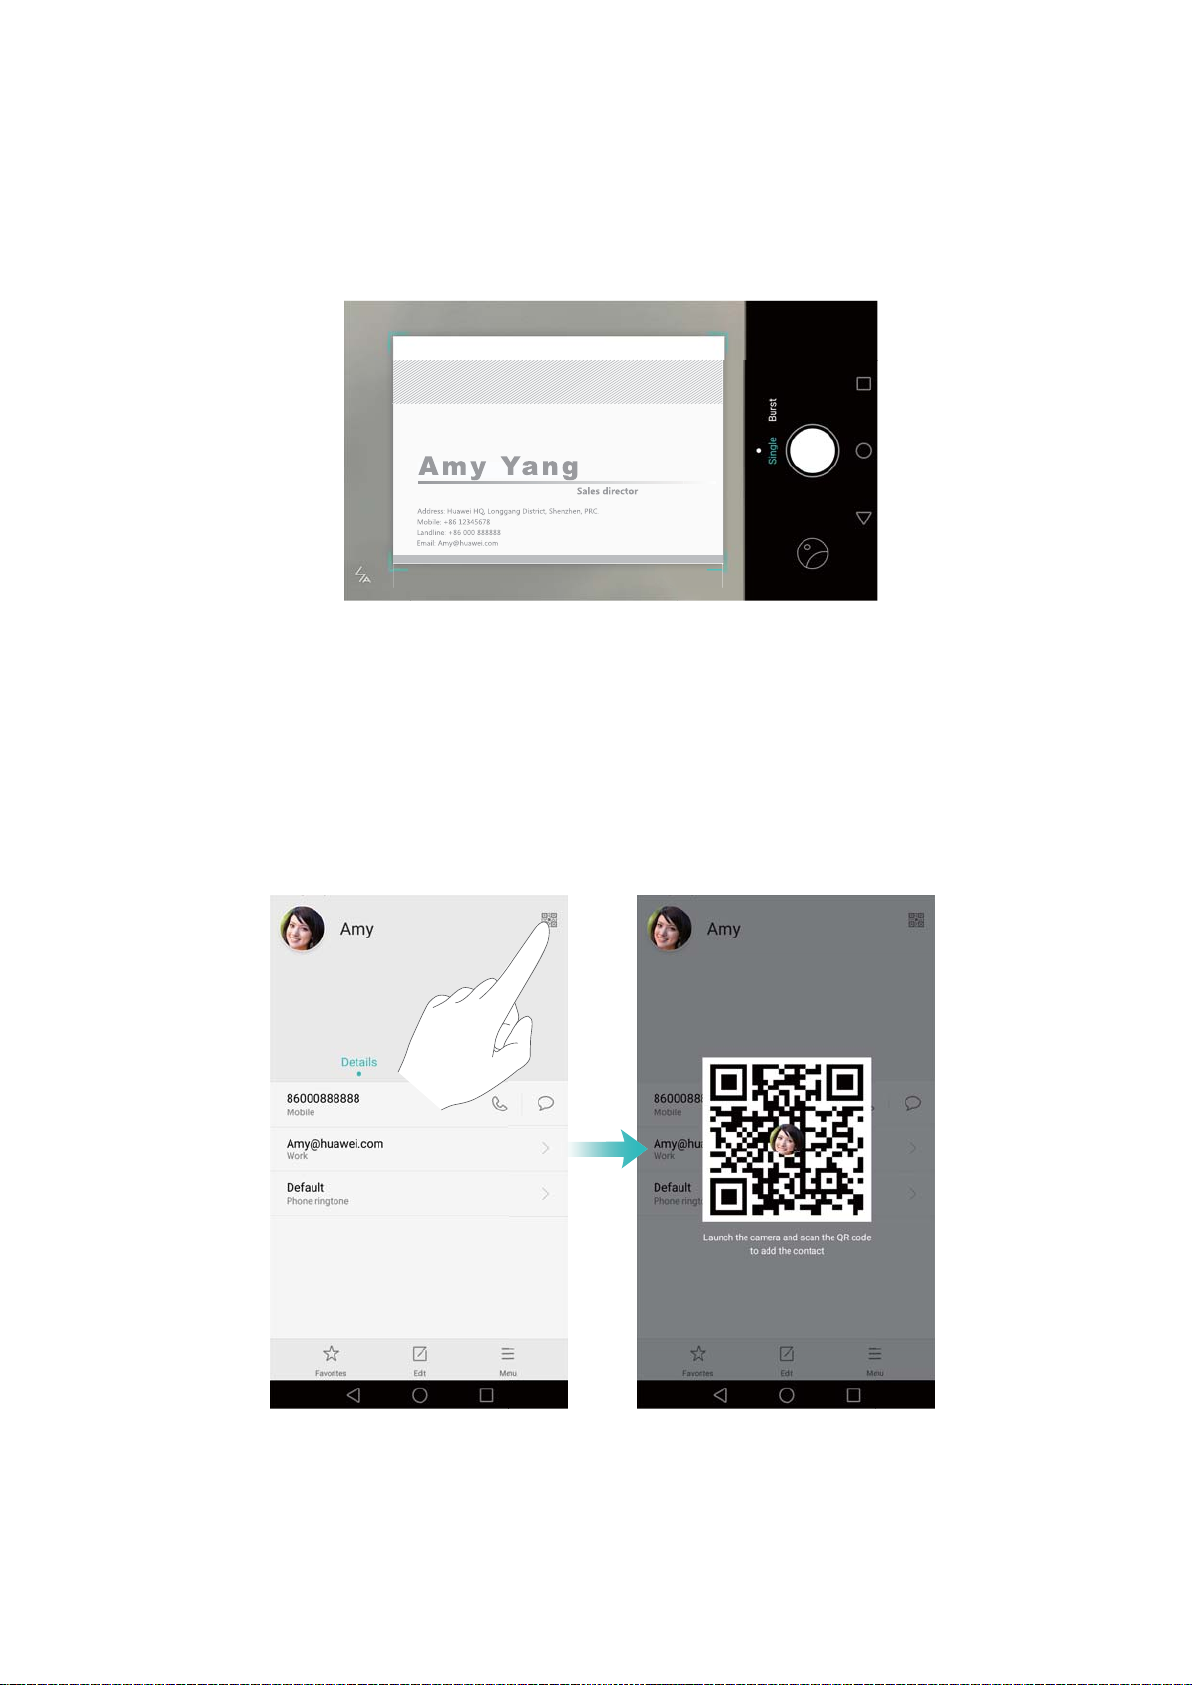
Use the camera to take a photo of a business card. Your phone will recognize the contact details
and add them automatically. In Contacts, touch Business cards > Scan.
Sharing your QR card
Share your QR card with your friends so that they can add you to their contacts quickly. On the
contact details screen, touch the QR code at the top of the screen to display your personal QR
code.
Calling contacts when the screen is off
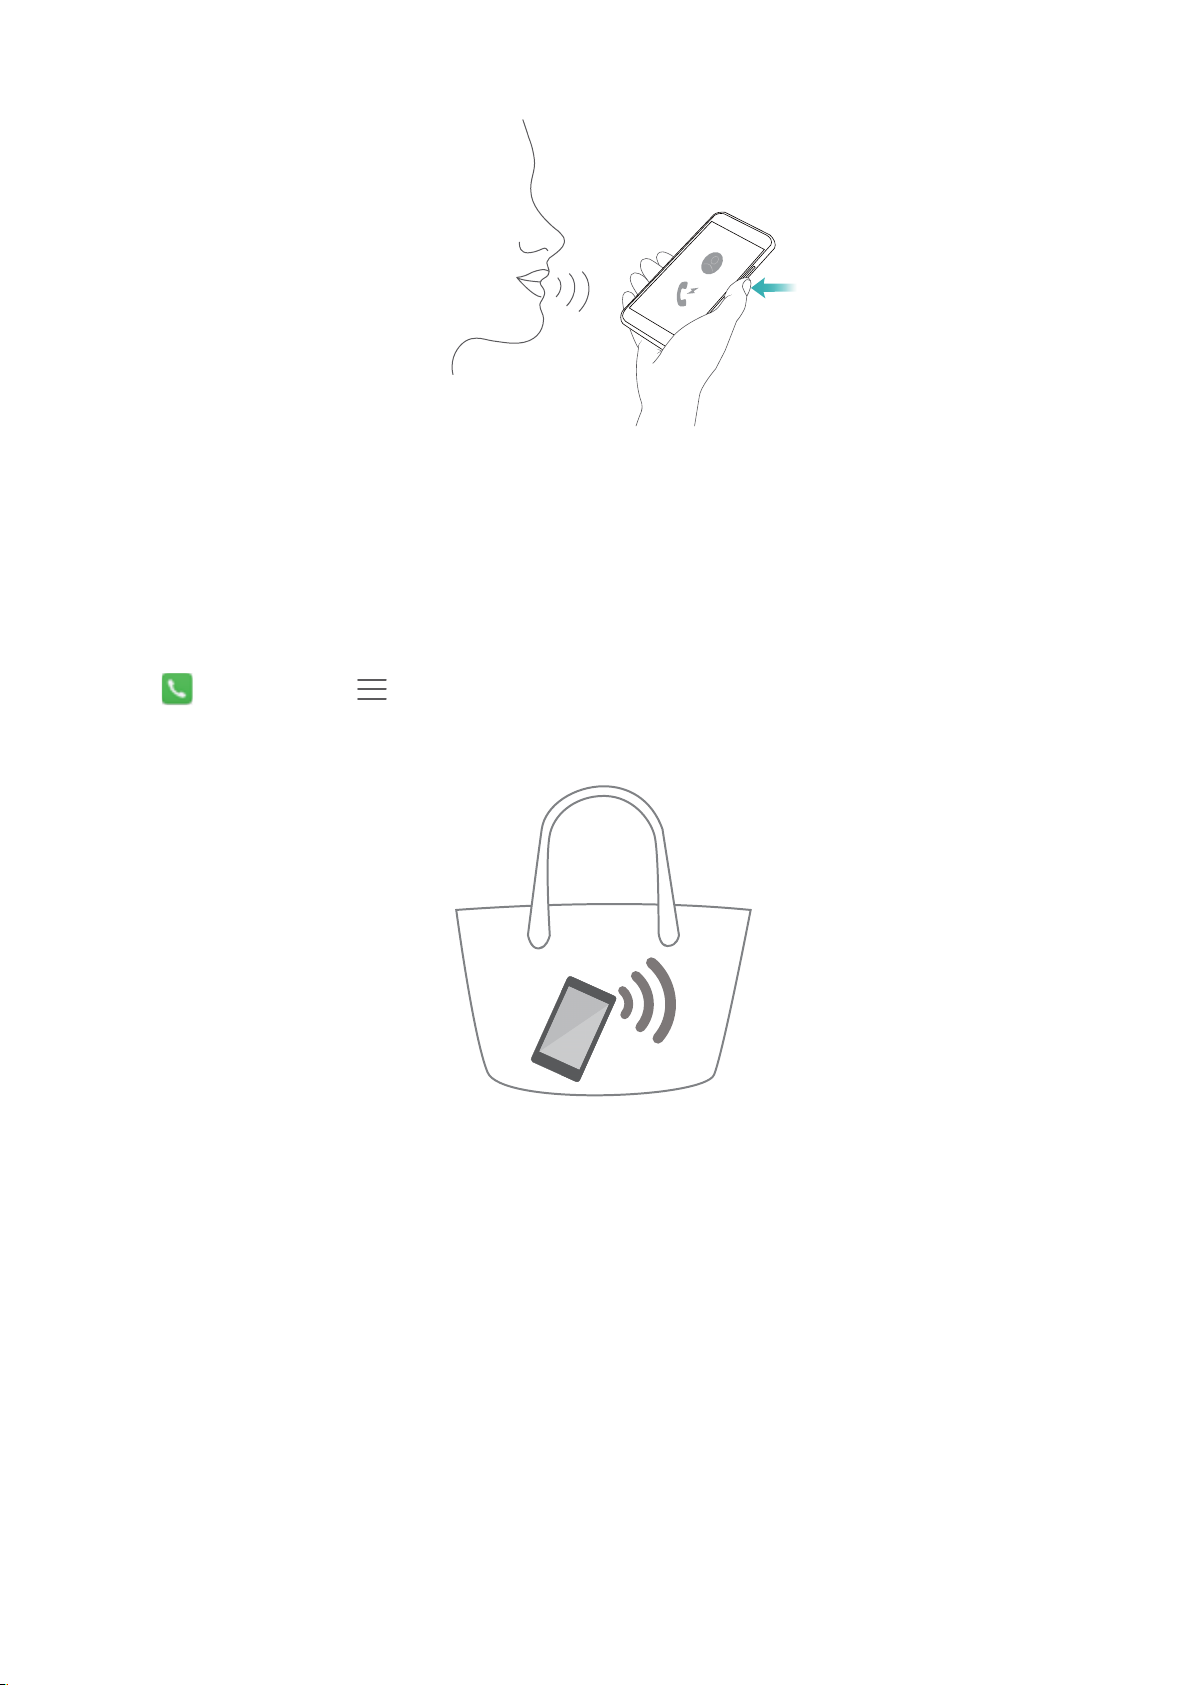
When the screen is off, press and hold the volume down button. When you hear the alert sound,
say the name of the contact you want to call. Your phone will automatically call the contact.
41
Page 48
Tips and Tricks
Pocket mode
Enable Pocket mode to prevent you from missing important calls when your phone is in your
pocket. The call ringtone and vibration intensity will gradually increase when you receive an
incoming call.
Open Dialer. Touch > Settings in the Dialer tab and turn on the Pocket mode switch.
Taking snapshots when the screen is off
You can take rapid snapshots with your phone, even when the screen is off.
When the screen is off, point your phone at a subject and press the volume down button twice.
Your phone will take a photo and display how fast it was captured.
42
Page 49
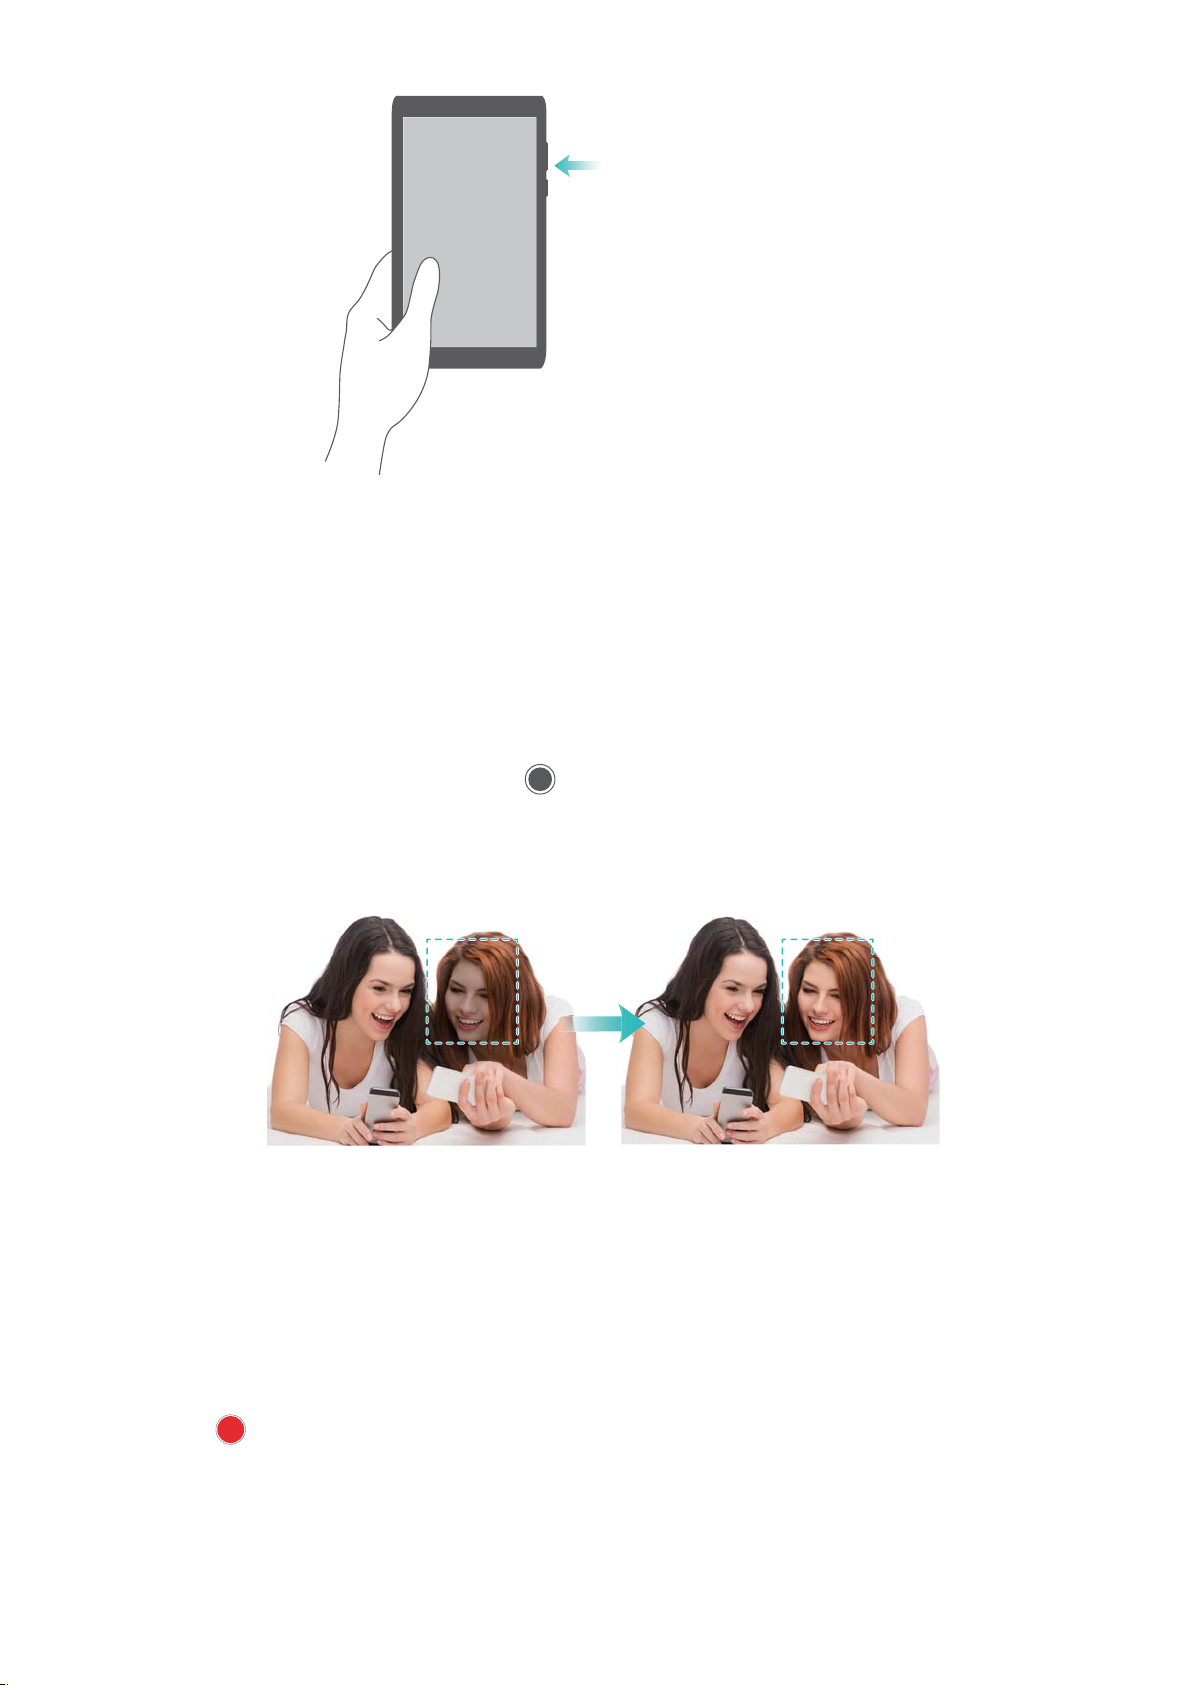
Press the volume down button
twice in quick succession
Tips and Tricks
Perfect selfie
Enable perfect selfie mode and customize the beauty settings to make sure you shine in group
photos.
In the camera application, go to Beauty mode, and then touch Perfect selfie. Turn on the
Perfect selfie switch, and then configure your custom beauty settings.
Next, switch to Beauty mode and touch to take a photo. Your phone will detect your face
and apply your custom beauty settings to make you stand out in a group shot.
Using time-lapse mode to fast forward the action
Time-lapse mode lets you capture and accelerate subtle changes in scenery, such as a sunrise,
sunset, or the movement of clouds.
On the camera screen, swipe left or right to switch to Time-lapse. Hold the phone steady, and
then touch to start capturing video.
43
Page 50
For more information, refer to Time-lapse mode.
Taking photos while recording a video
Ever wanted to take a photo while capturing a video?
Tips and Tricks
On the camera screen, swipe left or right to switch to Video. While recording a video, touch
to take photos.
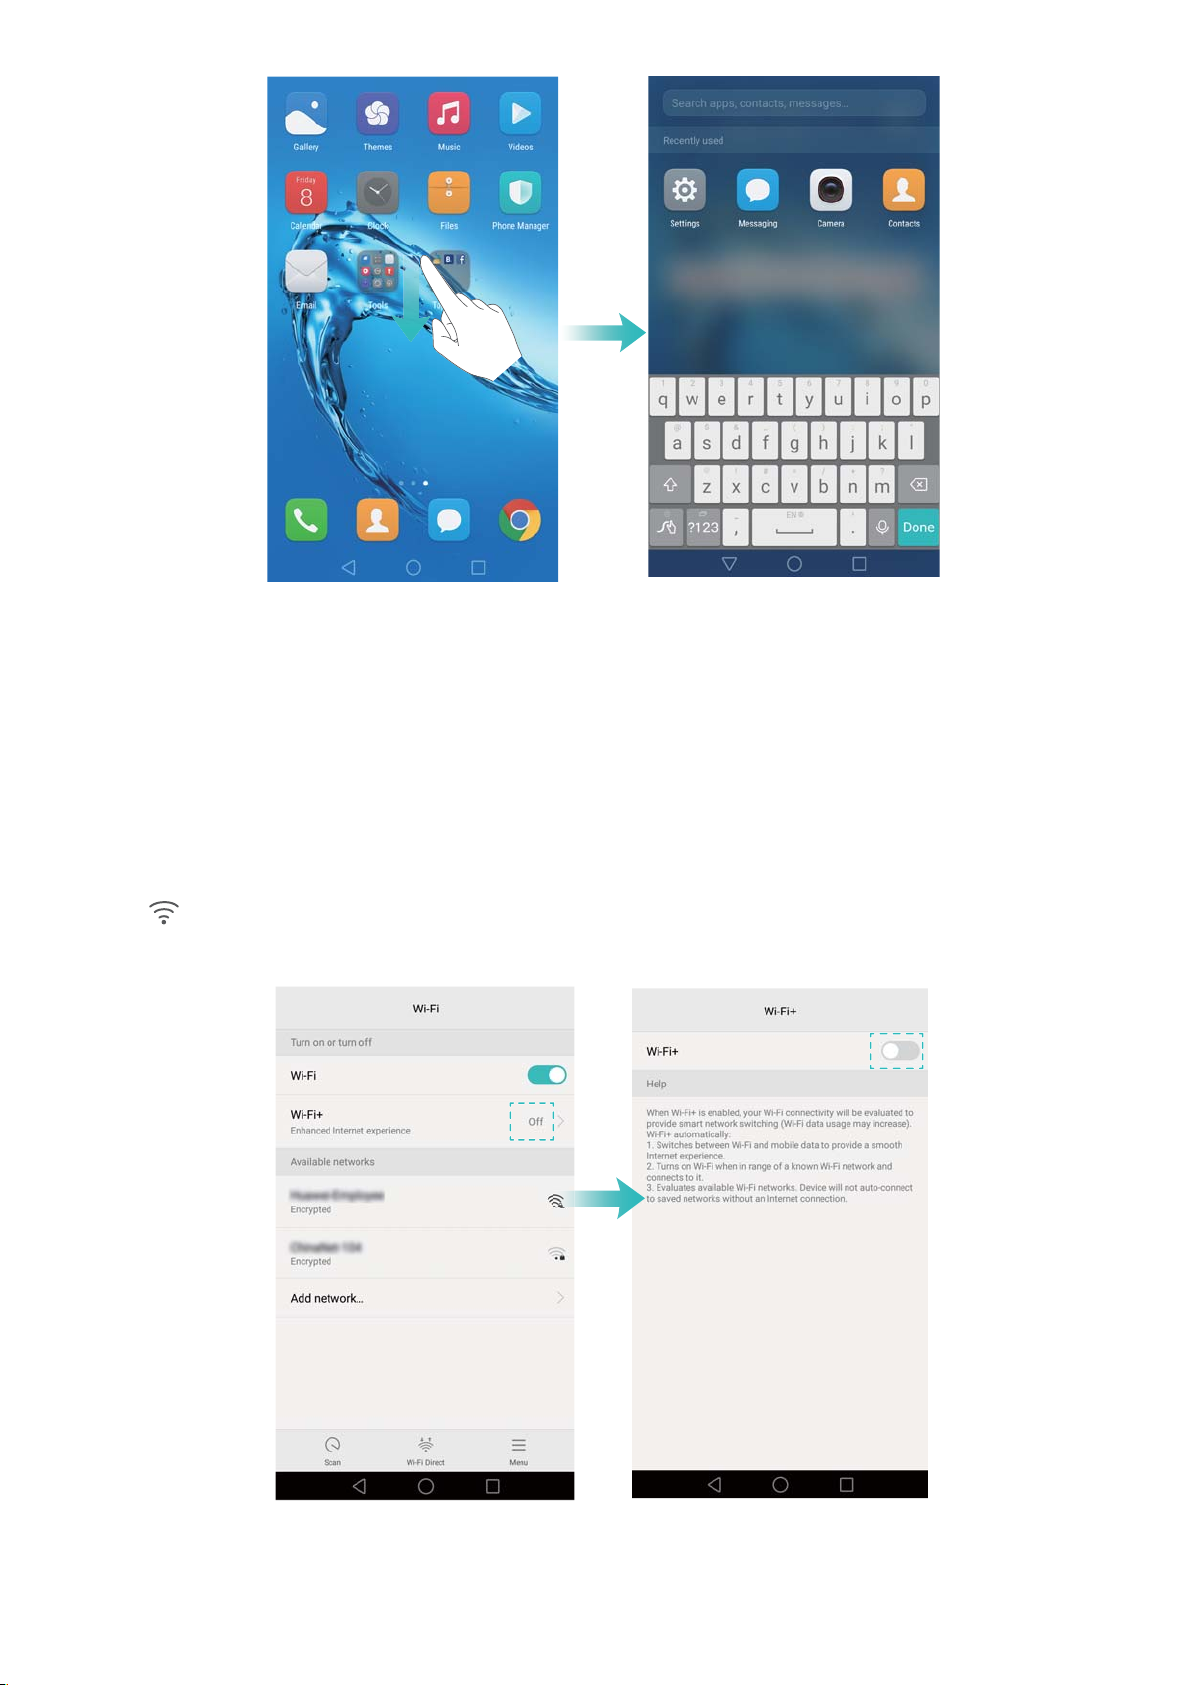
Finding applications quickly
Use the search feature to quickly find an application.
Swipe down from the middle of the screen to access the search bar, and then enter the name of
the application that you are looking for. The search results will be displayed underneath the
search bar.
44
Page 51
Tips and Tricks
Connecting to the Wi-Fi network with the strongest
signal
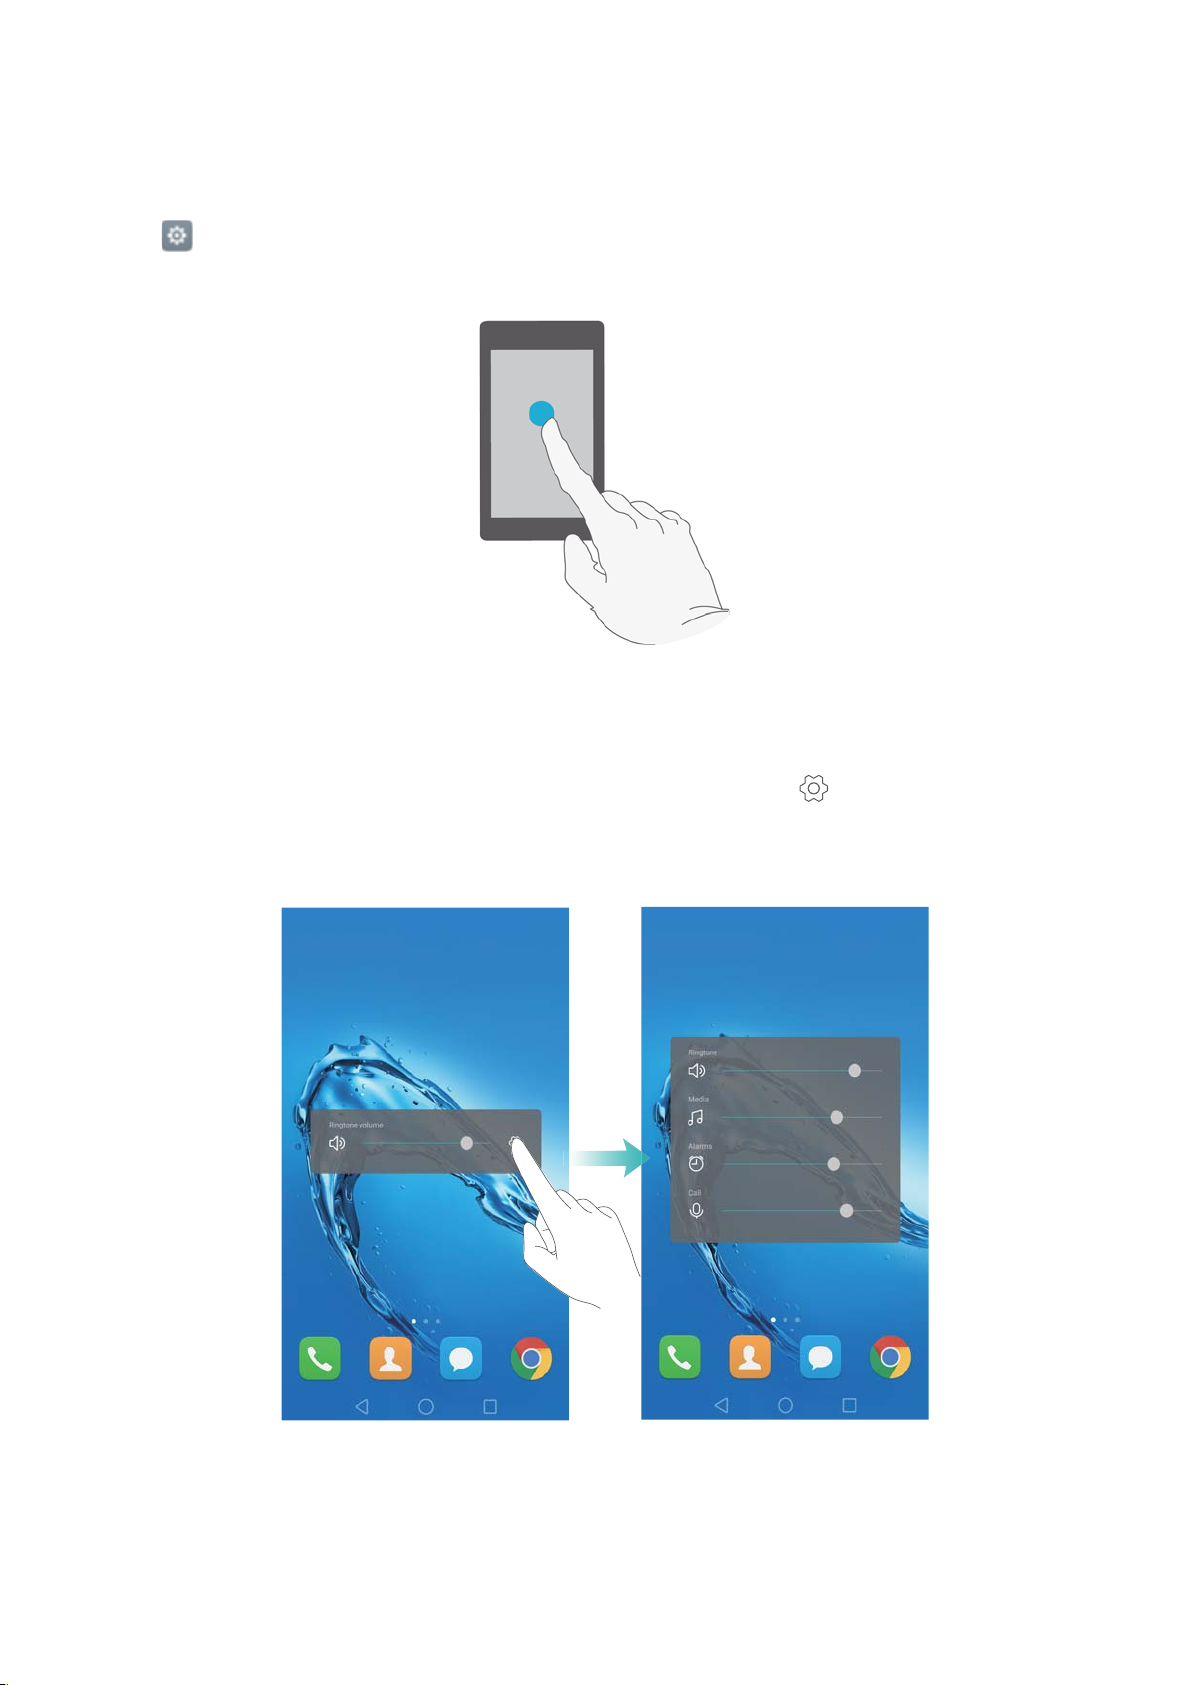
After enabling Wi-Fi+, your phone will monitor Wi-Fi networks and mobile data and select the
connection with the best signal and fastest data transfer speeds.
Swipe down from the status bar to open the notification panel. In the Shortcuts tab, touch and
hold and select Wi-Fi+. Turn on the Wi-Fi+ switch to enable this feature.
45
Page 52
Tips and Tricks
Using your phone while wearing gloves
Enable gloves mode so that you can continue to use your phone when wearing gloves.
Open Settings, and then touch Smart assistance > Gloves mode.
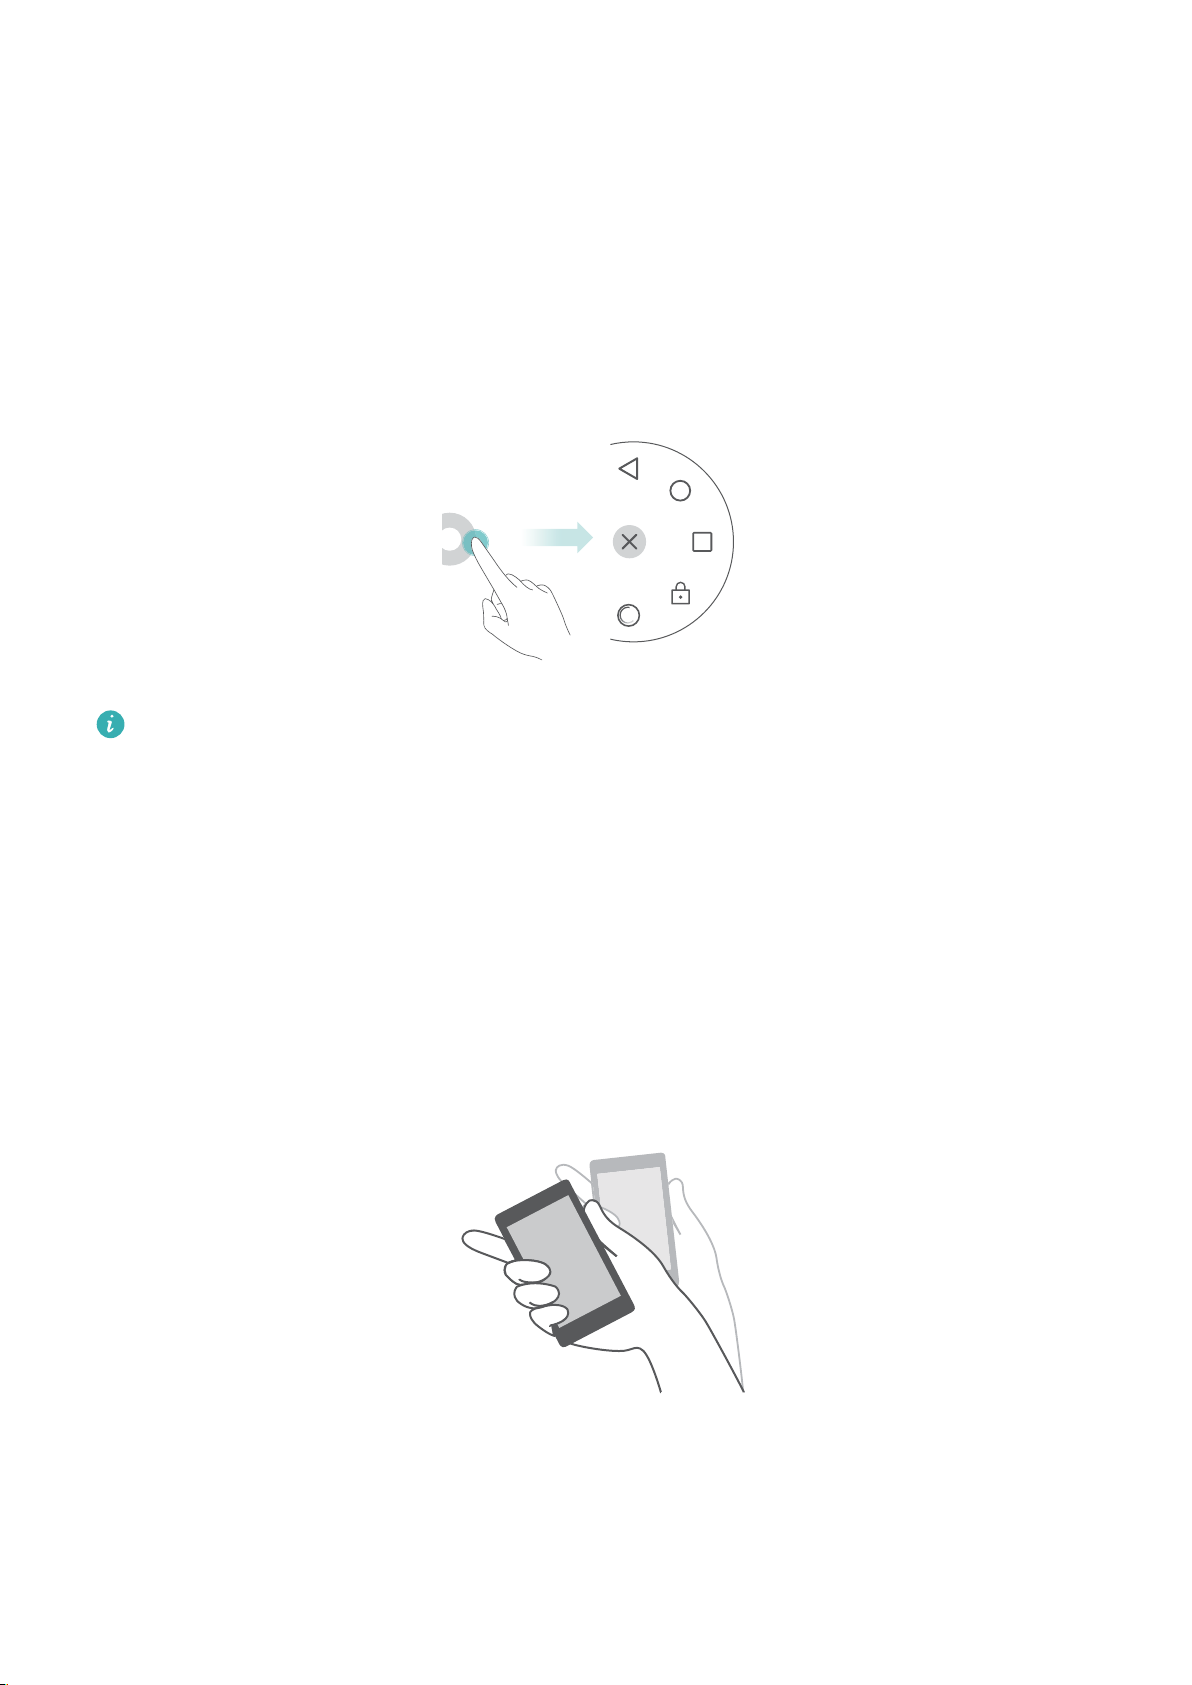
Adjusting the system volume rapidly
Press the volume button on the side of the phone, and then touch to adjust the ringtone,
multimedia, alarm, and call volume.
46
Page 53
Tips and Tricks
Using the floating dock
The floating dock gives you access to a number of frequently-used options and features, such as
the back key, home key, and one-touch optimization. You can move the floating dock around the
screen for easy one-hand use.
Under Settings, select Smart assistance > Floating dock, and then turn on the Floating dock
switch.
The floating dock is displayed on most screens. Drag the dock to the desired location to
adjust its position.
Aligning home screen applications automatically
Gaps may appear on the home screen after you uninstall applications or move them into folders.
Use the automatic align feature to arrange applications neatly on the home screen.
Pinch two fingers together to open the home screen editor. Touch More settings, and then turn
on the Shake switch. Touch and hold the home screen to open the home screen editor. Shake
your phone to realign application icons and fill any gaps.
Touch-disable mode
Enable touch-disable mode to prevent unintended operations when your phone is in your pocket.
47
Page 54

Tips and Tricks
Open Settings, touch Smart assistance, and then turn on the Touch-disable mode switch.
Screen gestures will not work in touch-disable mode, even when the screen is on. Uncover the
top of the screen, or press the power and volume up buttons simultaneously to turn off touch-
disable mode.
48
Page 55
Calls and Contacts
1
2
1
2
Making calls
Smart dialing
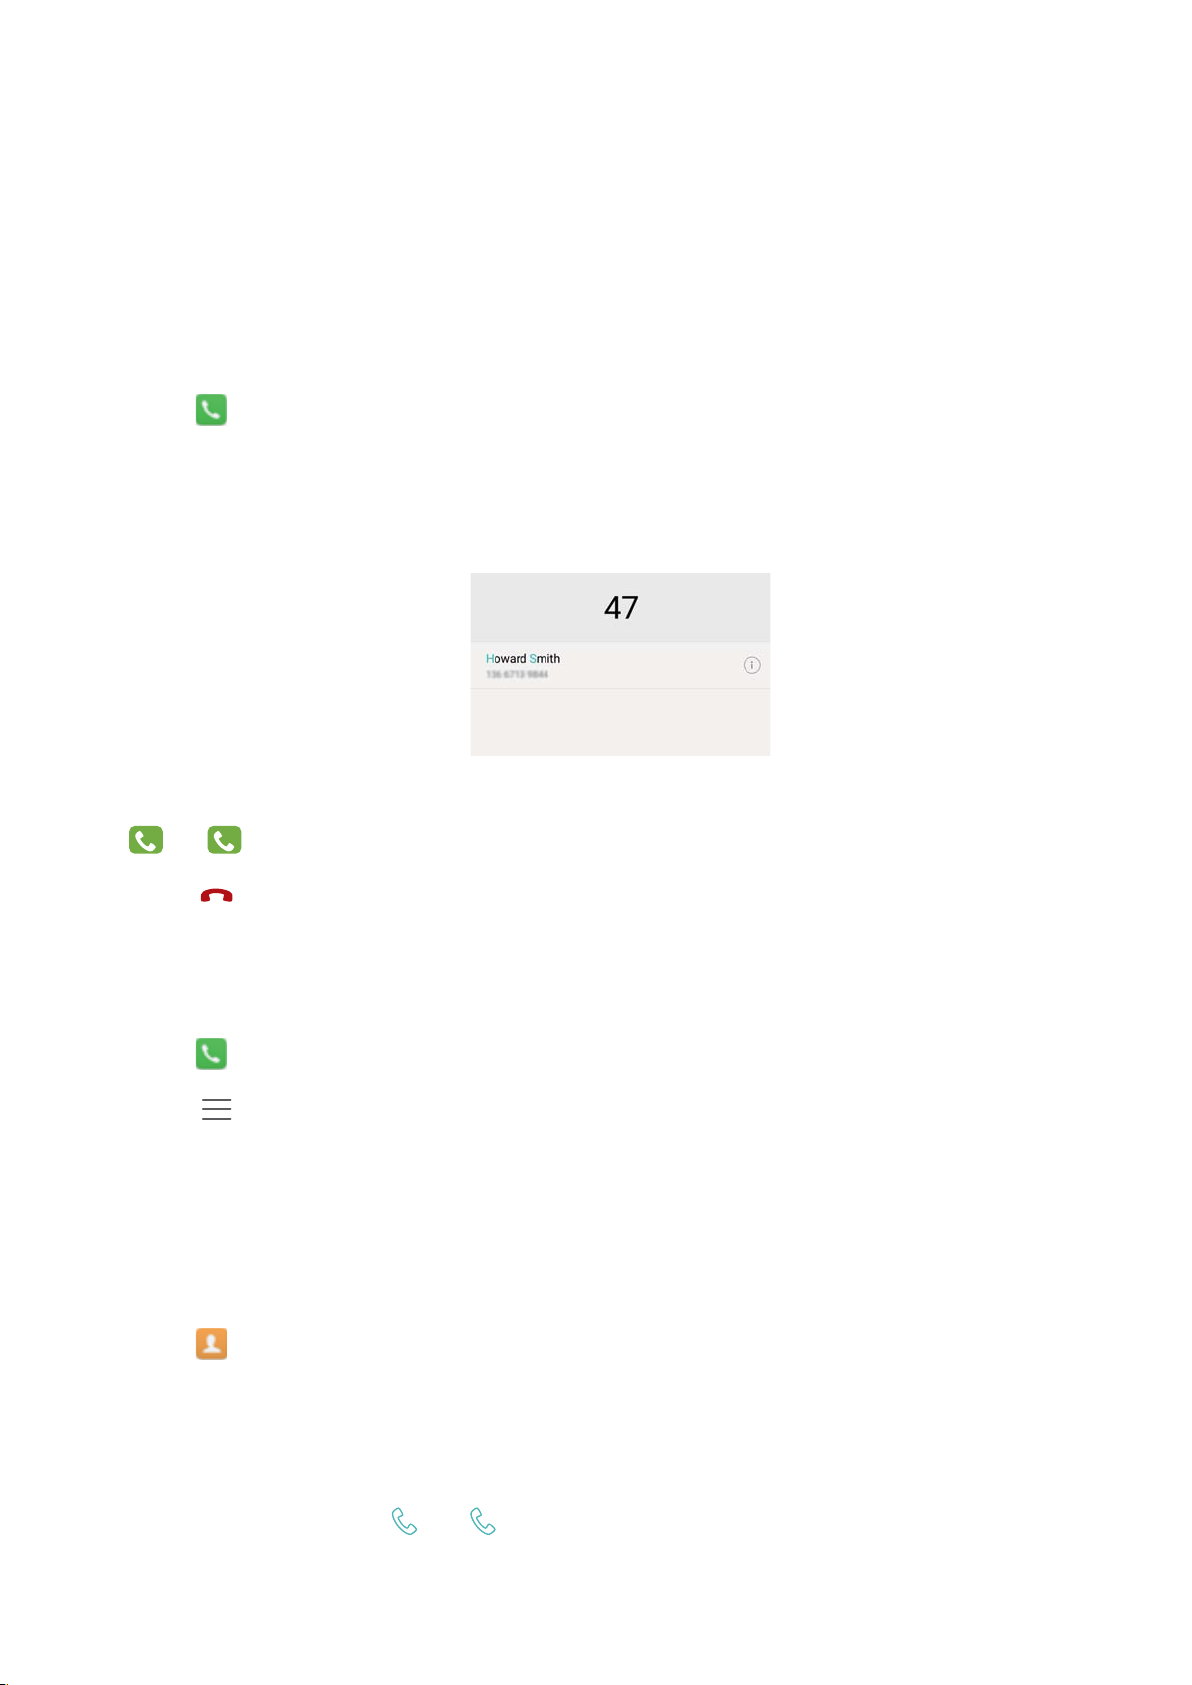
Enter the name, initials, or number of a contact in the dialer. Your phone will display matching
contacts.
1 Open
Dialer.
2 Enter the name or initials of a contact in the dialer (for example, Howard Smith or HS). Your
phone will search your contacts and call log and list the results above the dialer.
3 From the list, select the contact you want to call. If your phone has dual SIM support, touch
or
to make a call.
4 Touch to end the call.
Enabling quick calling
Call people quickly even when the screen is switched off.
1 Open Dialer.
2 Touch > Settings > Quick calling and then turn on the Quick calling switch.
Press and hold the volume down button for one second when the screen is off. When you hear
the alert sound, release the volume down button and say the name of the contact you want to
call. The phone will dial their number.
Making a call from Contacts
1 Open Contacts.
2 Touch the search bar and enter the name or initials of the person you want to call. For more
information on searching for contacts, see Finding a contact.
3 Touch the contact number. If your phone has dual SIM support, touch the contact's phone
number, and then touch
or
to initiate the call.
49
Page 56
1
2
1
2
Calls and Contacts
Making a call from the call log
View incoming and outgoing calls in the call log and dial the corresponding numbers.
1 Open Dialer.
2 Slide the list up and down to view all calls. Touch the name or number of the person that you
want to call. If your phone has dual SIM support, touch
or
to make a call.
Making an emergency call
In the event of an emergency, you can make emergency calls from your phone, even without a
SIM card. However, you must be in an area with cellular coverage.
1 Open Dialer.
2 Enter the emergency number for your location in the dialer, and then touch
You can dial an emergency number even when the screen is locked. On the lock screen,
touch Emergency call, enter your local emergency number, and then touch .
The ability to make emergency calls can depend on local regulations and carriers in your
area. Poor network reception or environmental interference may prevent your call from being
connected. Never rely solely on your phone for essential communication during
emergencies.
Speed dialing
.
Configure speed dialing for people you call frequently. Simply touch and hold a number key to
dial their number.
1 is the default key for voicemail. It cannot be used as a speed-dial number.
1 Open Dialer.
2 Touch and hold a number key to associate it with a contact.
3 Return to the dialer and touch and hold a number key to call the associated contact. If you
are using a dual SIM phone, touch and hold a number key, and then select
the associated contact.
To delete a key association, open the dialer and touch > Settings > Speed dial. Select
the contact association you want to remove, and then touch Clear assigned number.
or
Making an international call
Before making a long-distance call, contact your carrier to activate an international calling or
roaming service.
to call
1 Open Dialer.
2 On the dialer screen, touch and hold the 0 key to enter a + symbol, and then enter the
country code, area code, and phone number.
50
Page 57
1
2
Calls and Contacts
3 Touch . If your phone has dual SIM support, touch
or
.
Auto redial
Use auto redial to keep redialing a contact's number until your call is connected.
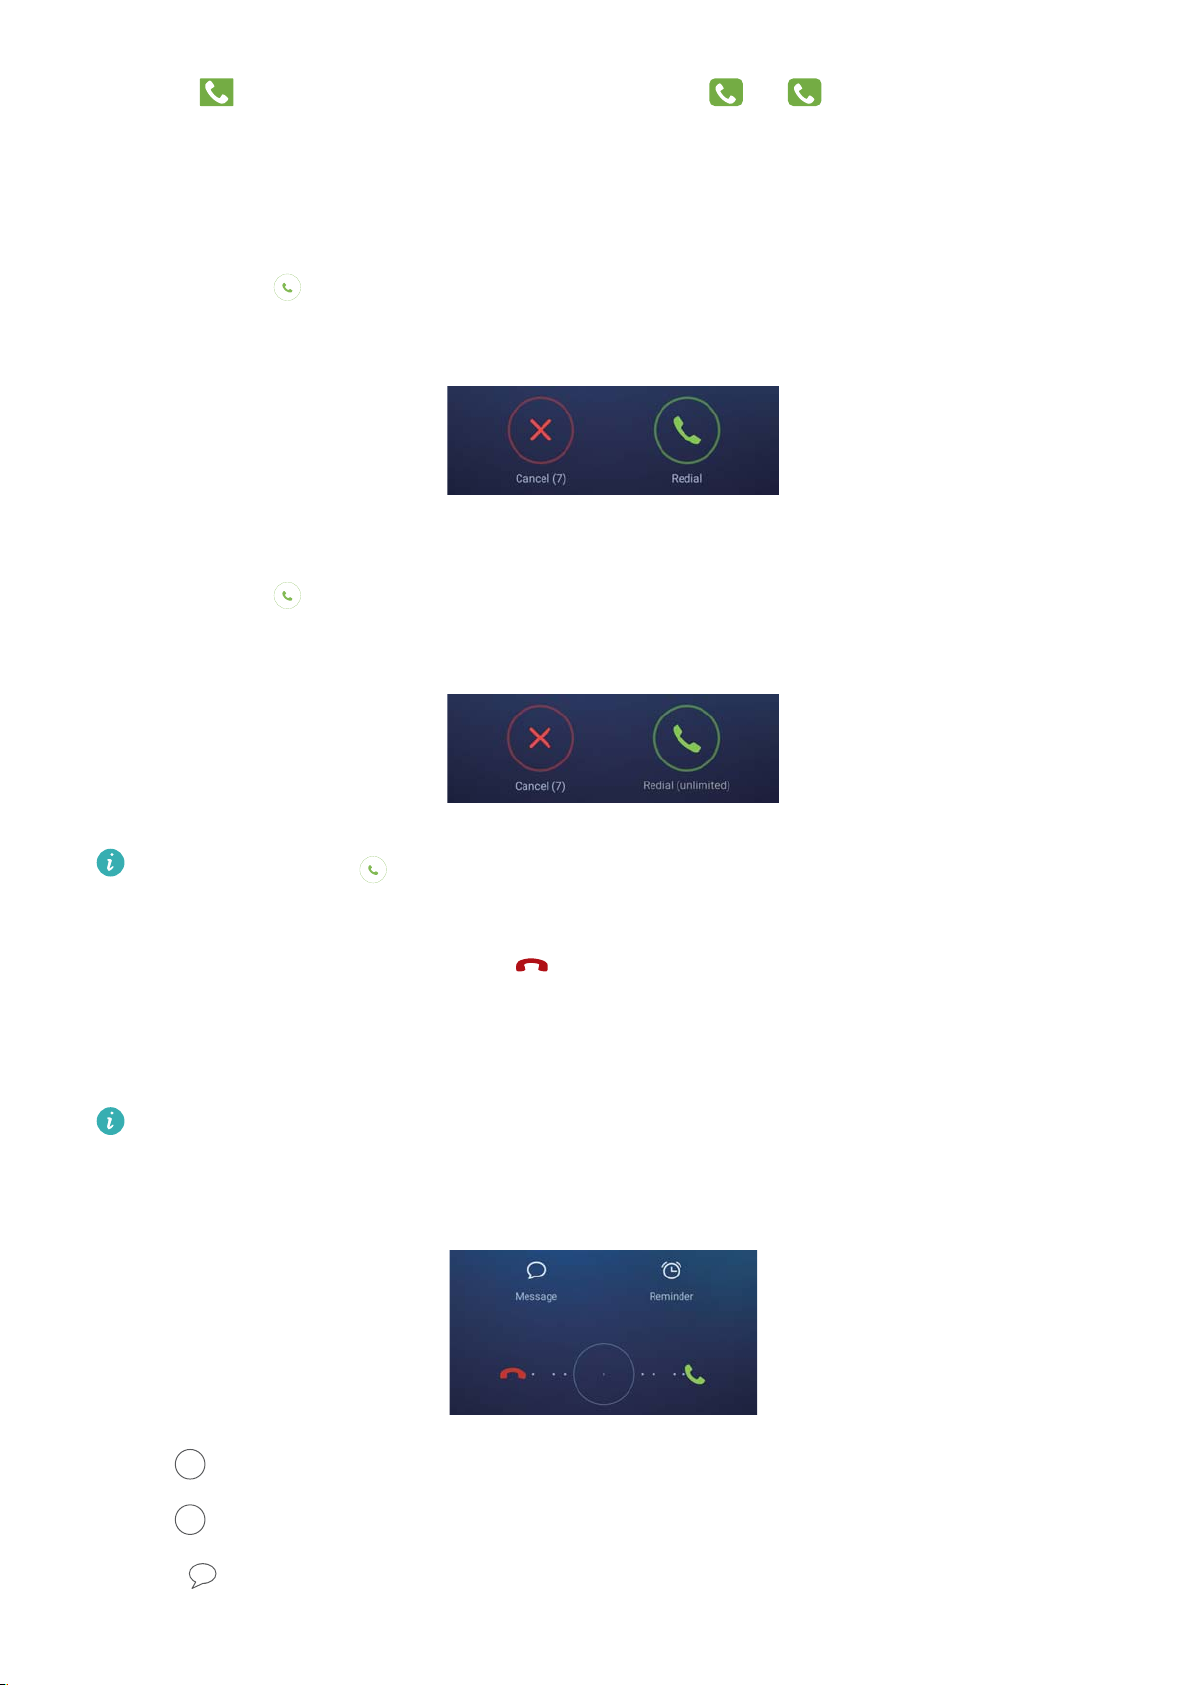
l The first time a call does not connect or is interrupted, your phone will display the single redial
screen. Touch to redial the number once.
l If a call does not connect after the first redial attempt, your phone will display the infinite redial
screen. Touch to redial the number until the call connects.
l Ensure you touch promptly. The redial screen will close if you don't redial within 10
seconds.
l To cancel a redial attempt, touch .
Answering or rejecting a call
When a call comes in, you can press the volume button to mute the ringtone.
While the screen is locked:
l Drag right to answer the call.
l Drag left to reject the call.
l Touch to reject the call and send an SMS.
51
Page 58
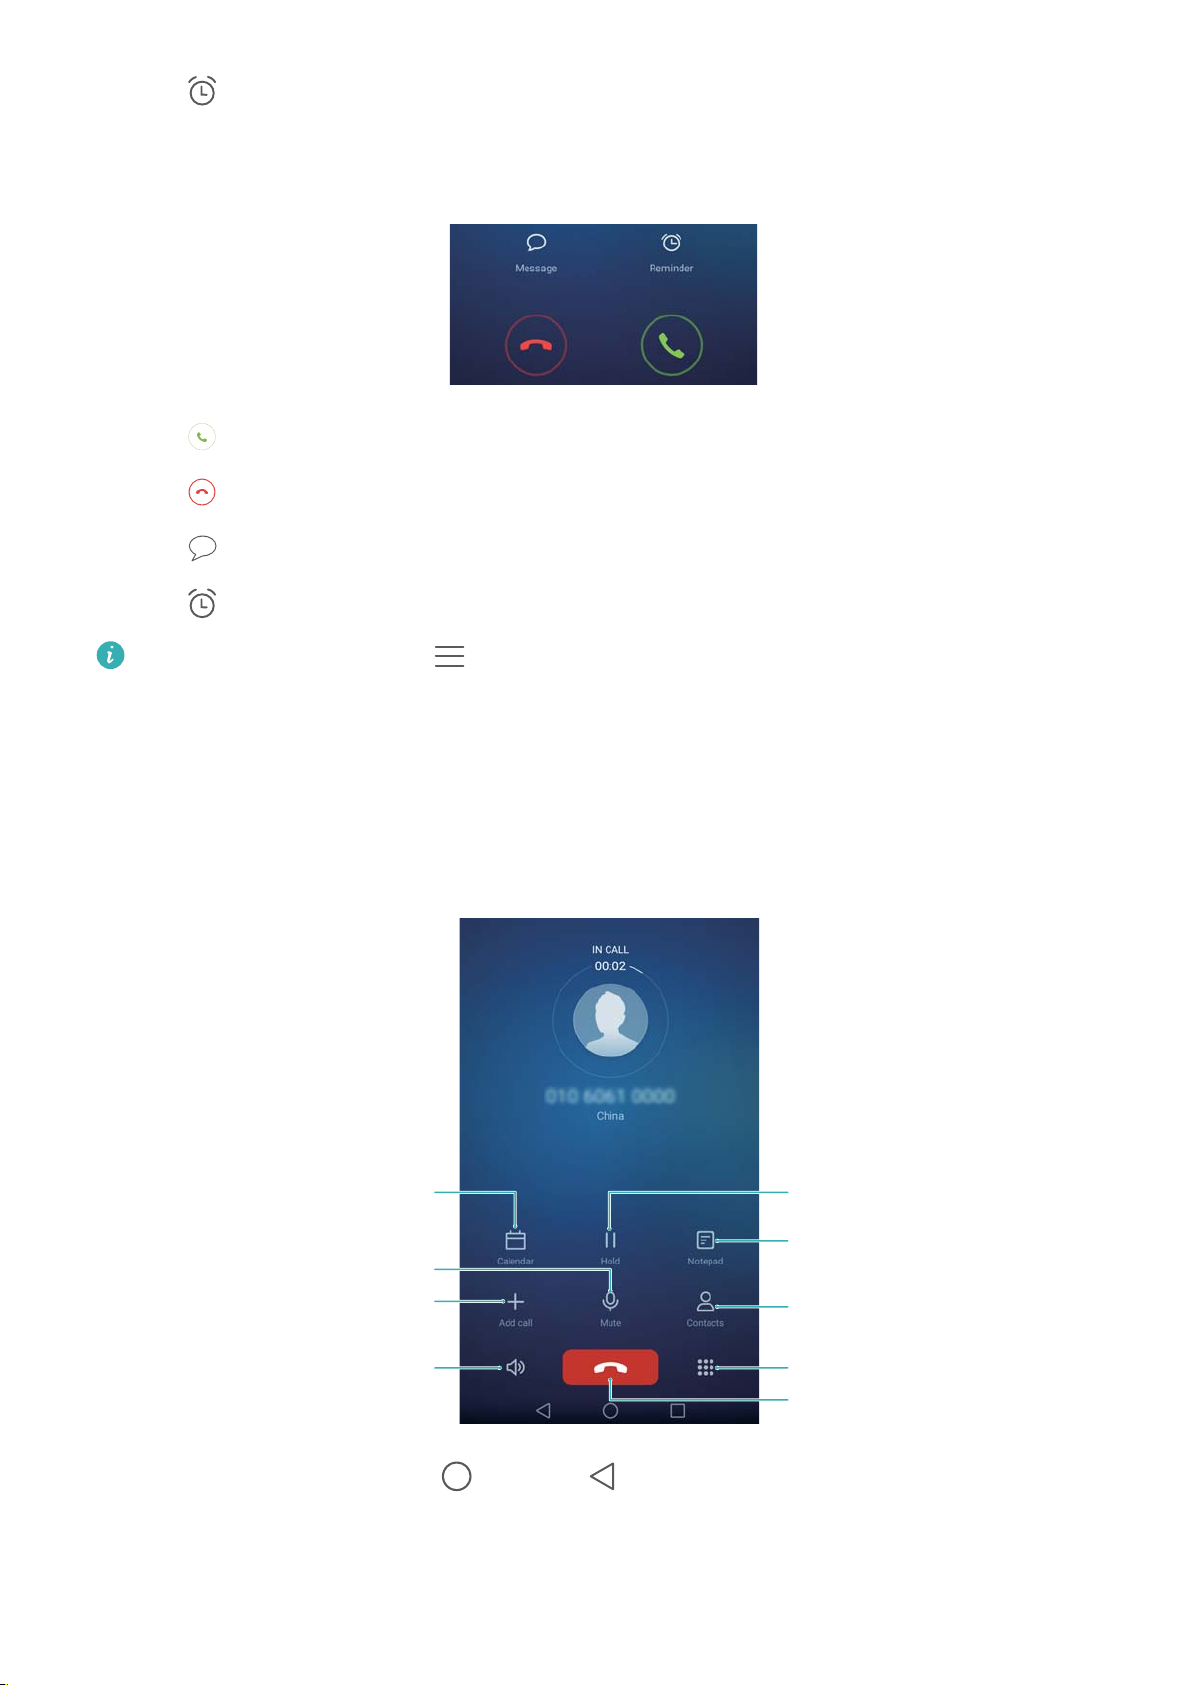
l Touch to configure a callback reminder.
Mute the call
Start a three-way
call
Enable hands-free
mode
Open the dialer
End call
Display your
contacts
View your notes
Place the current
call on hold
Open Calendar
While the screen is unlocked:
l Touch to answer the call.
l Touch to reject the call.
l Touch to reject the call and send an SMS.
l Touch to configure a callback reminder.
Calls and Contacts
On the dialer screen, touch > Settings > Reject calls with SMS to edit the predefined
text messages.
Functions available during a call
During a call, your phone will display an in-call menu.
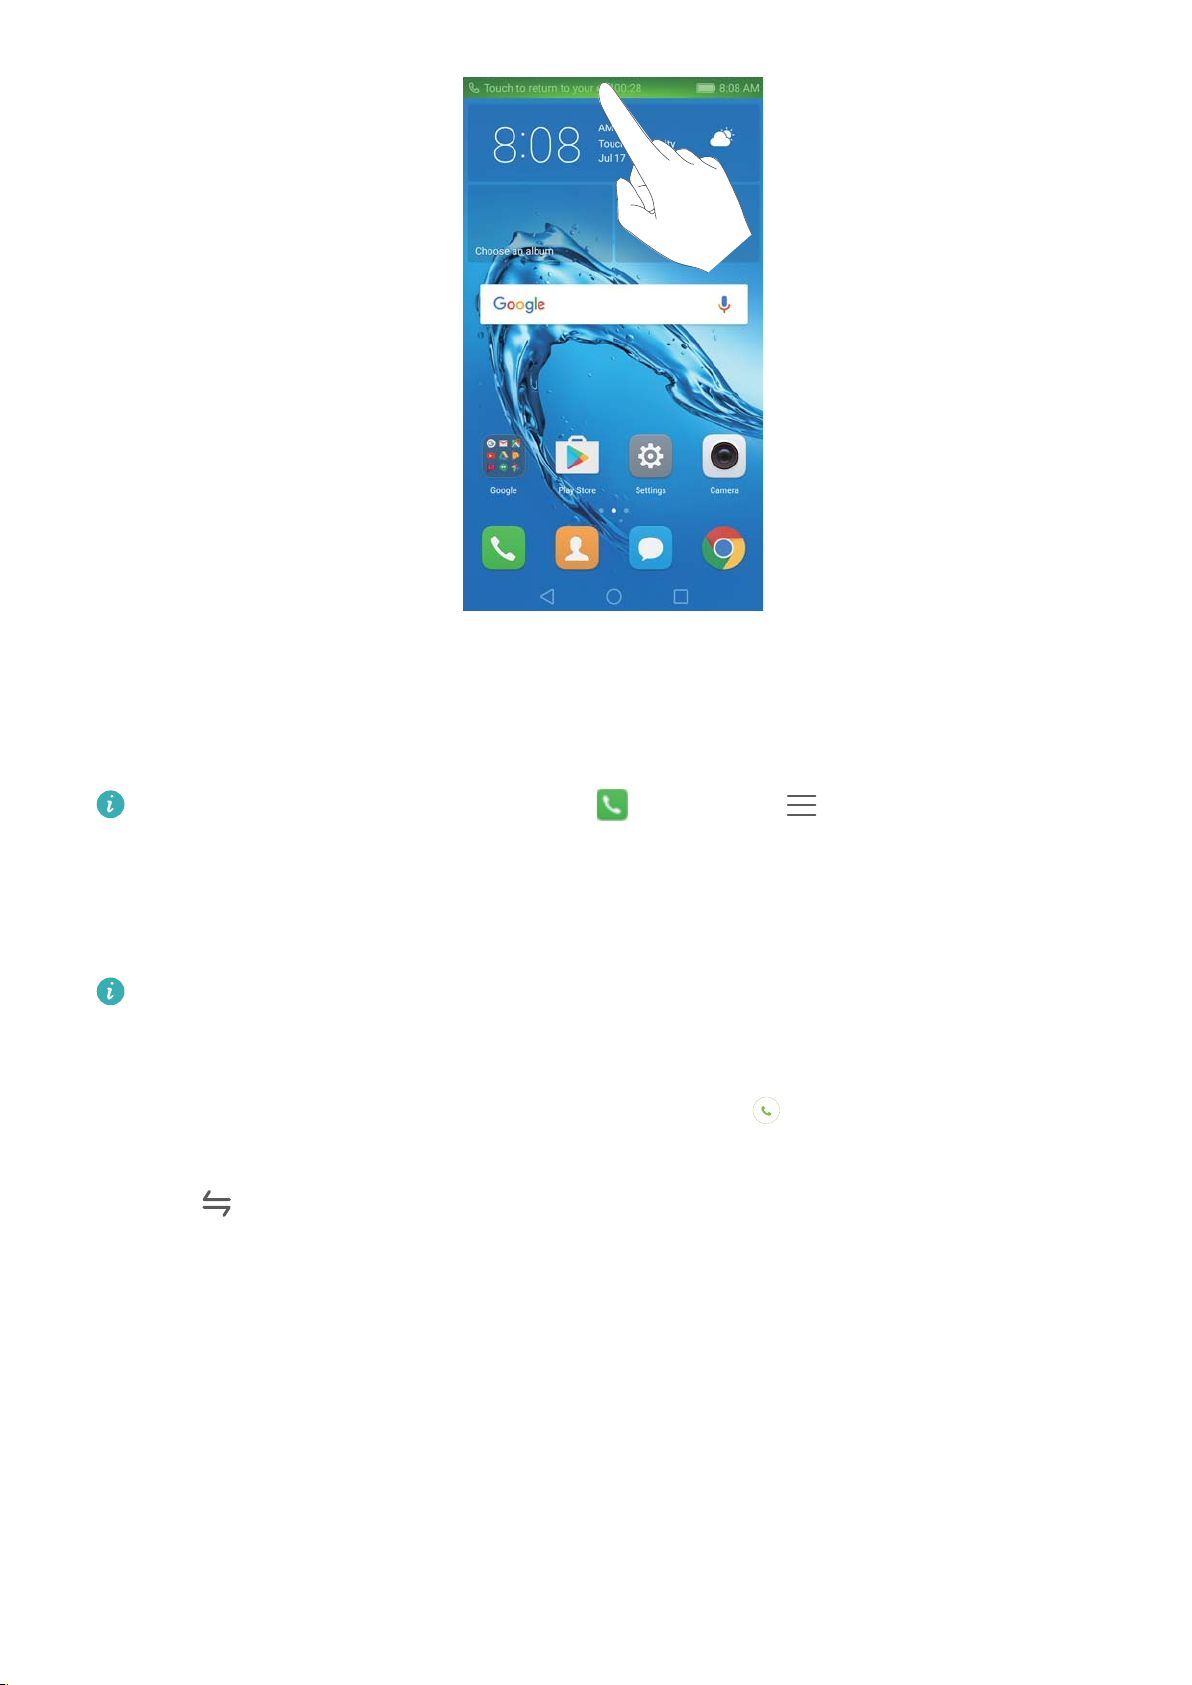
l Hide the in-call menu: Touch Home or Return. To return to the in-call menu, touch
the green status bar at the top of the screen.
52
Page 59
Calls and Contacts
l Start a three-way call: Please contact your carrier to find out how to use this feature. For
more information, see Making a conference call.
l Adjust the volume: Press the volume up button to increase the volume, or the volume down
button to decrease the volume.
To end a call using the power button, go to Dialer, touch > Settings and then turn
on the Power button ends call switch.
Answering a third-party call
Before using this feature, check that you have subscribed to a call hold service and enabled
call waiting on your phone. For more information on enabling call waiting, see Enabling call
waiting. For details, contact your carrier.
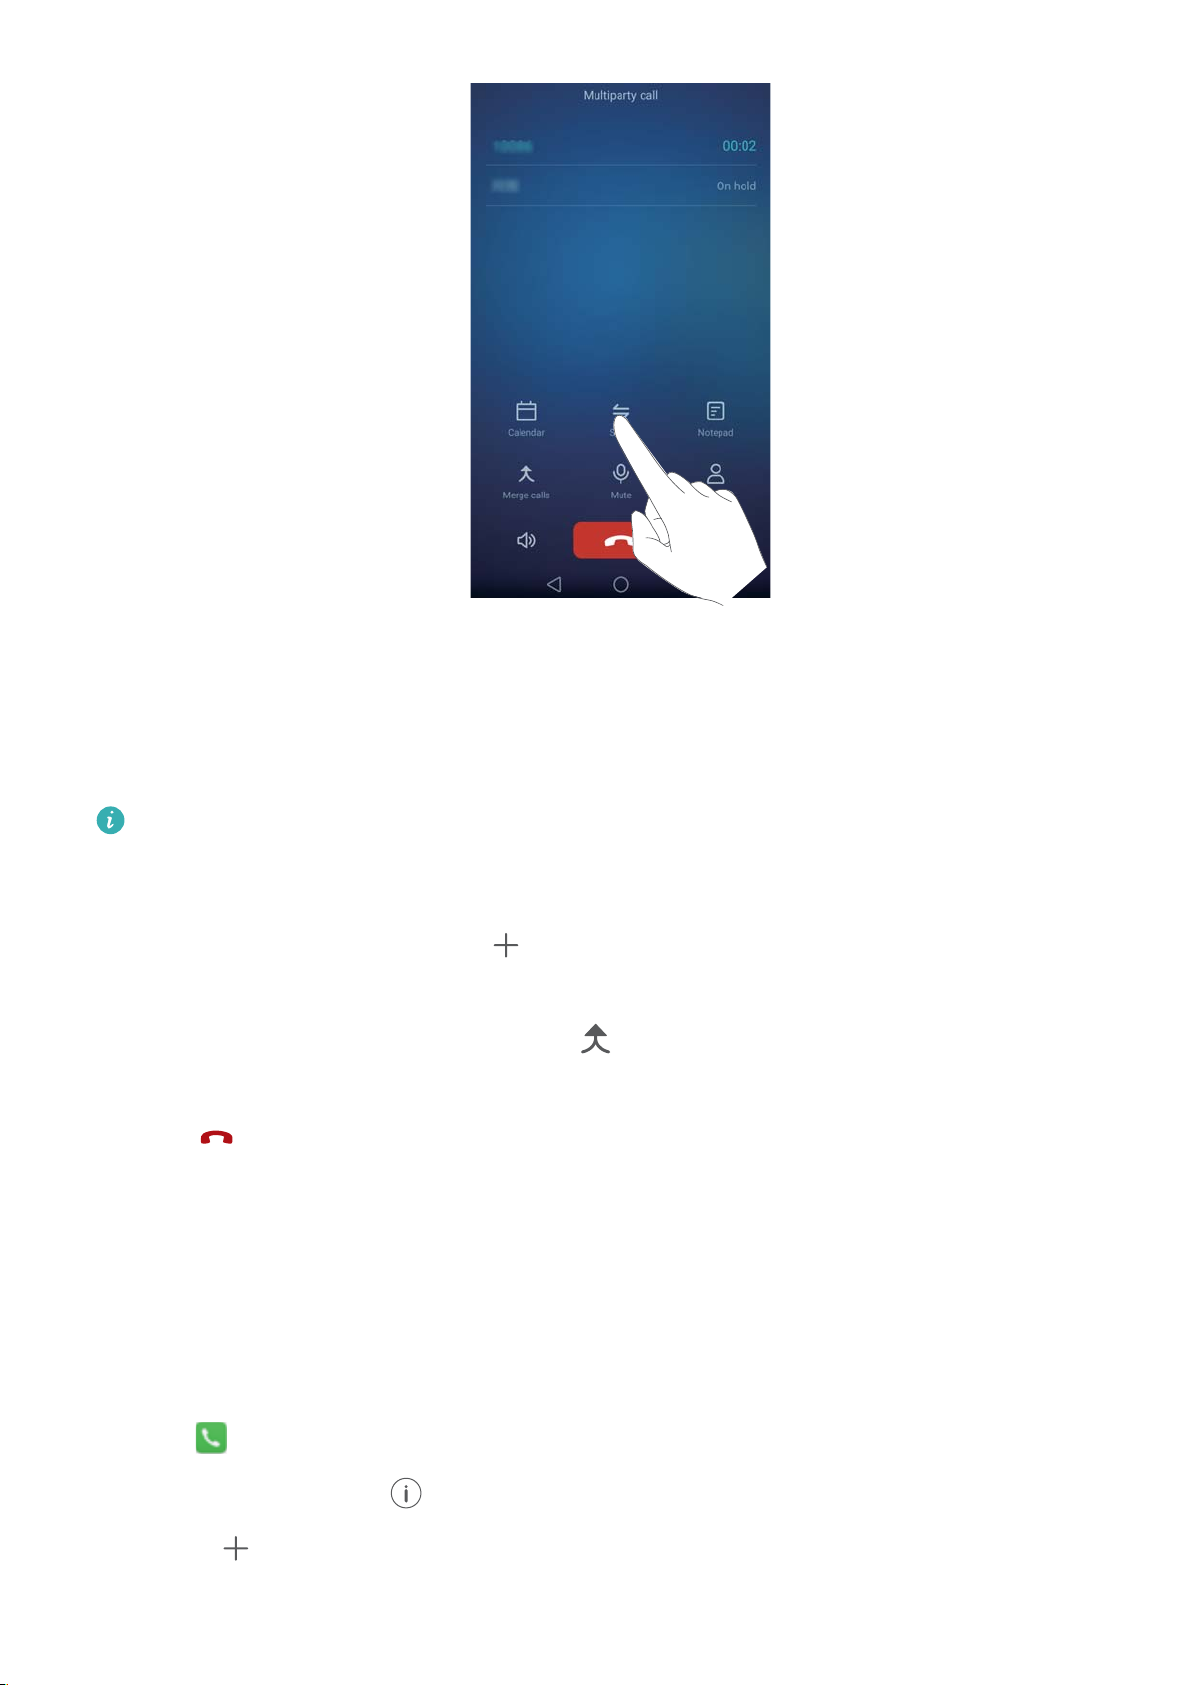
1 If you receive an incoming call when in another call, touch . You can then answer the
incoming call and hold the other line.
2 Touch to switch between the two calls.
53
Page 60
Calls and Contacts
Making a conference call
You can set up a conference call using the multi-party call feature on your phone. Call one
number (or receive a call), and then call another number to add it to the conference call.
Conference calling requires network support. Please ensure you have activated this service.
For details, contact your carrier.
1 Call the first participant.
2 Once the call is connected, touch and then dial the second participant's number. The
first participant will be placed on hold.
3 When the second call is connected, touch to start a conference call.
4 To add more people to the call, repeat steps 2 and 3.
5 Touch
to end the call.
Viewing the call log
The call log is displayed above the dialer. Missed calls are displayed in red.
Adding a number from the call log
Select a number from the call log and save it to your contacts.
1 Open Dialer.
2 In the call log, touch the icon next to the number you want to add and do the following:
l Touch to create a new contact. For more information, see Creating a contact.
54
Page 61
Calls and Contacts
l Touch to add the number to an existing contact.
Clearing the call log
Open Dialer. You can:
l Delete one entry: Touch and hold a log entry, and then touch Delete entry.
l Delete multiple entries: Touch > Delete call log and select the entries you want to
delete. Touch > Delete.
Turning on pocket mode
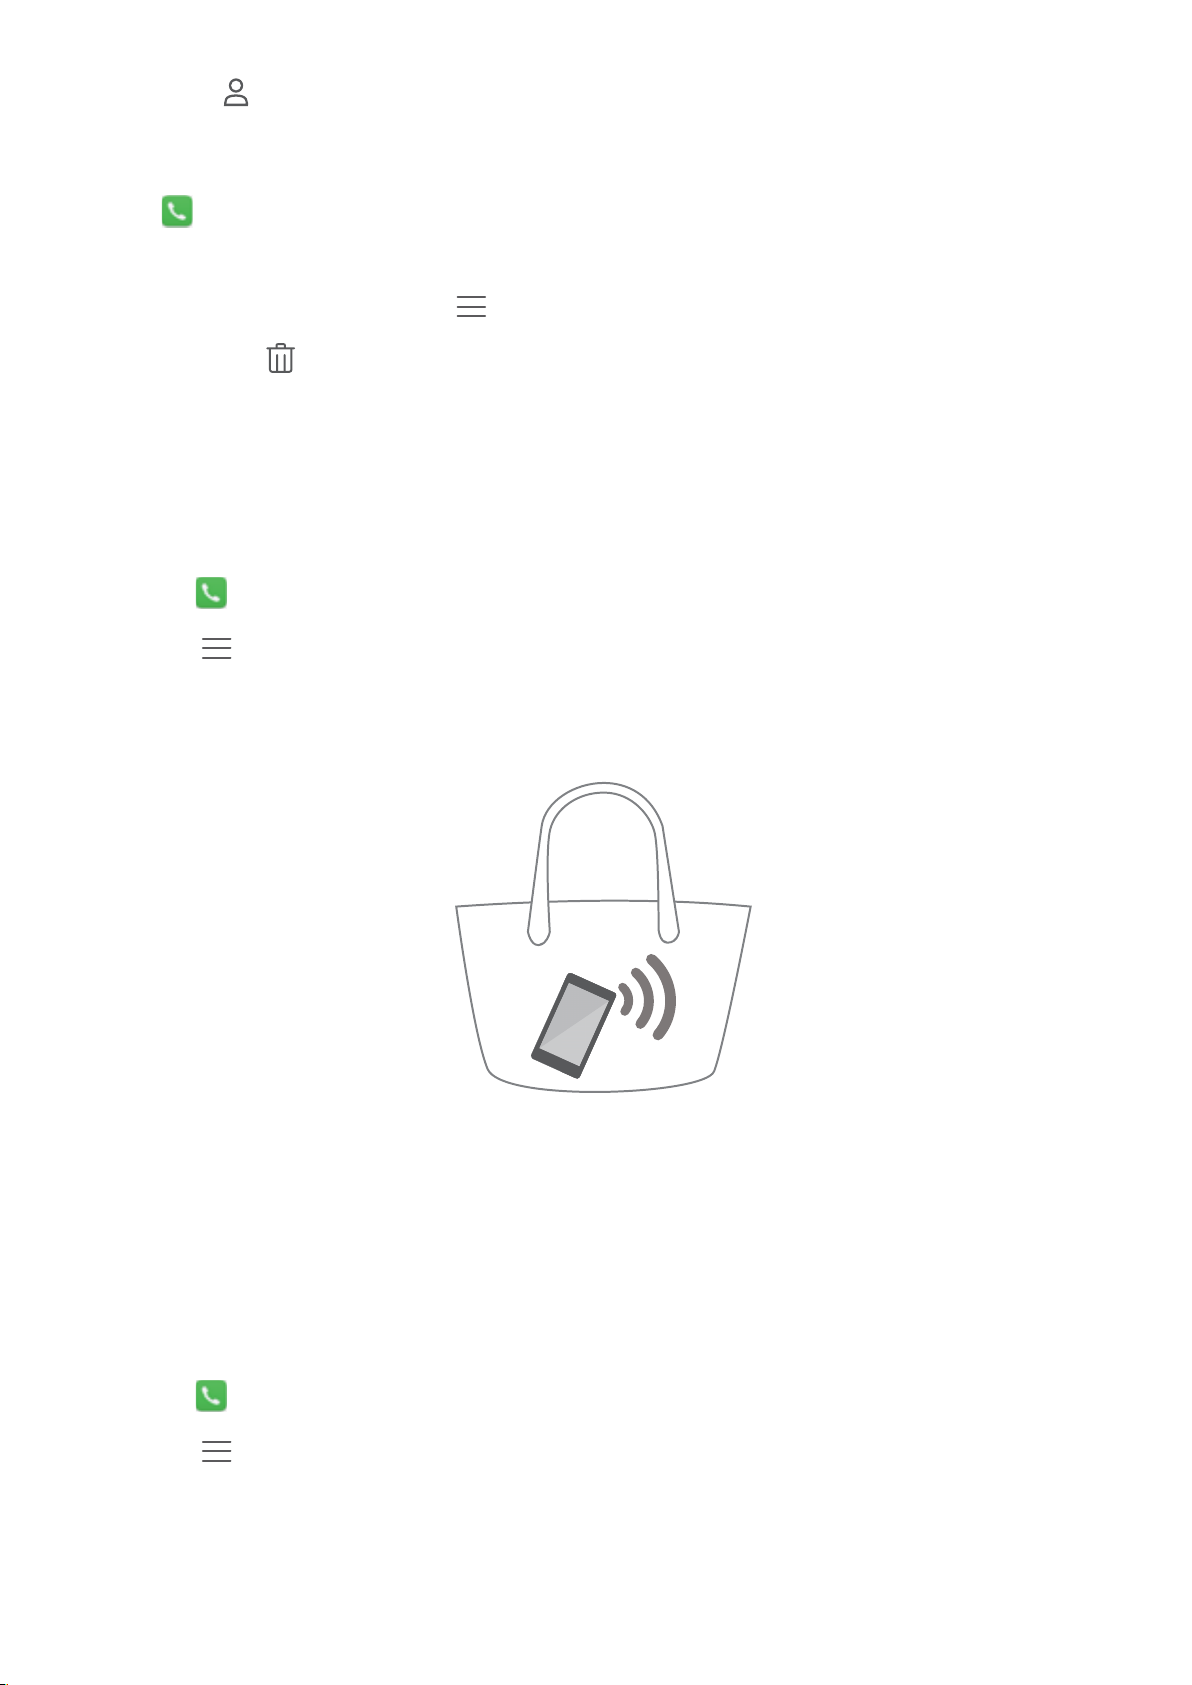
Enable pocket mode to make sure you don't miss calls when your phone is in your pocket. The
ringtone volume and vibration intensity will gradually increase when you receive a call.
1 Open Dialer.
2 Touch > Settings.
3 Turn on the Pocket mode switch.
Call settings
Enabling call forwarding
If you are unavailable to take a call, you can configure your phone to forward calls to another
number.
1 Open Dialer.
2 Touch > Settings.
3 Touch Call forwarding. If your phone has dual SIM support, touch Call forwarding under
Card 1 or Card 2.
4 Select a forwarding method, enter the destination number, and then touch Enable.
55
Page 62

Calls and Contacts
When call forwarding is enabled, your phone will forward certain calls (such as unanswered
calls) to the number you specified.
Enabling call waiting
Call waiting allows you to take an incoming call when you are already in a call and switch
between the two conversations.
1 Open Dialer.
2 Touch > Settings.
3 Touch Additional settings and turn on the Call waiting switch. If your phone has dual SIM
support, touch Additional settings under Card 1 or Card 2, and then turn on the Call
waiting switch.
When you receive an incoming call while already in a call, touch to answer the new call, and
to switch between the two calls.
Enabling do not disturb mode
Do not disturb mode allows you to work or relax in peace and quiet. Your phone will only notify
you about important calls or messages.
1 Open Settings.
2 Touch Do not disturb and turn on the Do not disturb switch.
3 Touch Define priority interruptions > Whitelist for calls and messages > to add
contacts to the whitelist.
When do not disturb mode is enabled, your phone will only ring or vibrate when chosen contacts
call or message you. Your phone will mute ringtones or vibrations for any other calls or
messages. Notifications for these can be viewed in the notification panel.
Configuring the harassment filter
The harassment filter automatically blocks calls and messages from unknown or blacklisted
sources. The blacklist is constantly updated, ensuring that you are never disturbed.
Open Phone Manager, then touch Harassment filter to configure filter rules and the
blacklist or whitelist. For more information, see Harassment filter.
You can also open Dialer and then touch > Harassment filter to configure the
harassment filter.
Configuring voicemail
Divert calls to your voicemail when your phone is switched off or unavailable. Callers can leave a
voice message which you can listen to later.
Voicemail must be supported by your carrier. Please ensure that you have subscribed to this
service. Contact your carrier for information about their voicemail service.
56
Page 63
Calls and Contacts
1 Open Dialer.
2 Touch > Settings
3 Touch Additional settings. If your phone has dual SIM support, touch Additional settings
under Card 1 or Card 2.
4 Touch Voicemail > Voicemail number and then enter your voicemail number.
When you receive a voicemail message, the
voicemail number to retrieve the message.
icon is displayed in the status bar. Dial the
Creating a contact
The number of contacts you can store on your phone depends on the size of your phone's
internal storage. The maximum number of SIM card contacts may vary depending on your
SIM card's storage capacity.
1 Open Contacts.
2 Touch . Touch Create a new contact if you are creating a contact for the first time.
3 Select a location to save the contact from the options menu.
4 Enter the contact's name, phone number and other information, and then touch .
If you want to save a number from your call log, touch the icon next to the number you want
to save, and then select
or . You can also save phone numbers or email addresses in
Messaging or Email to your contacts.
Adding contact details quickly
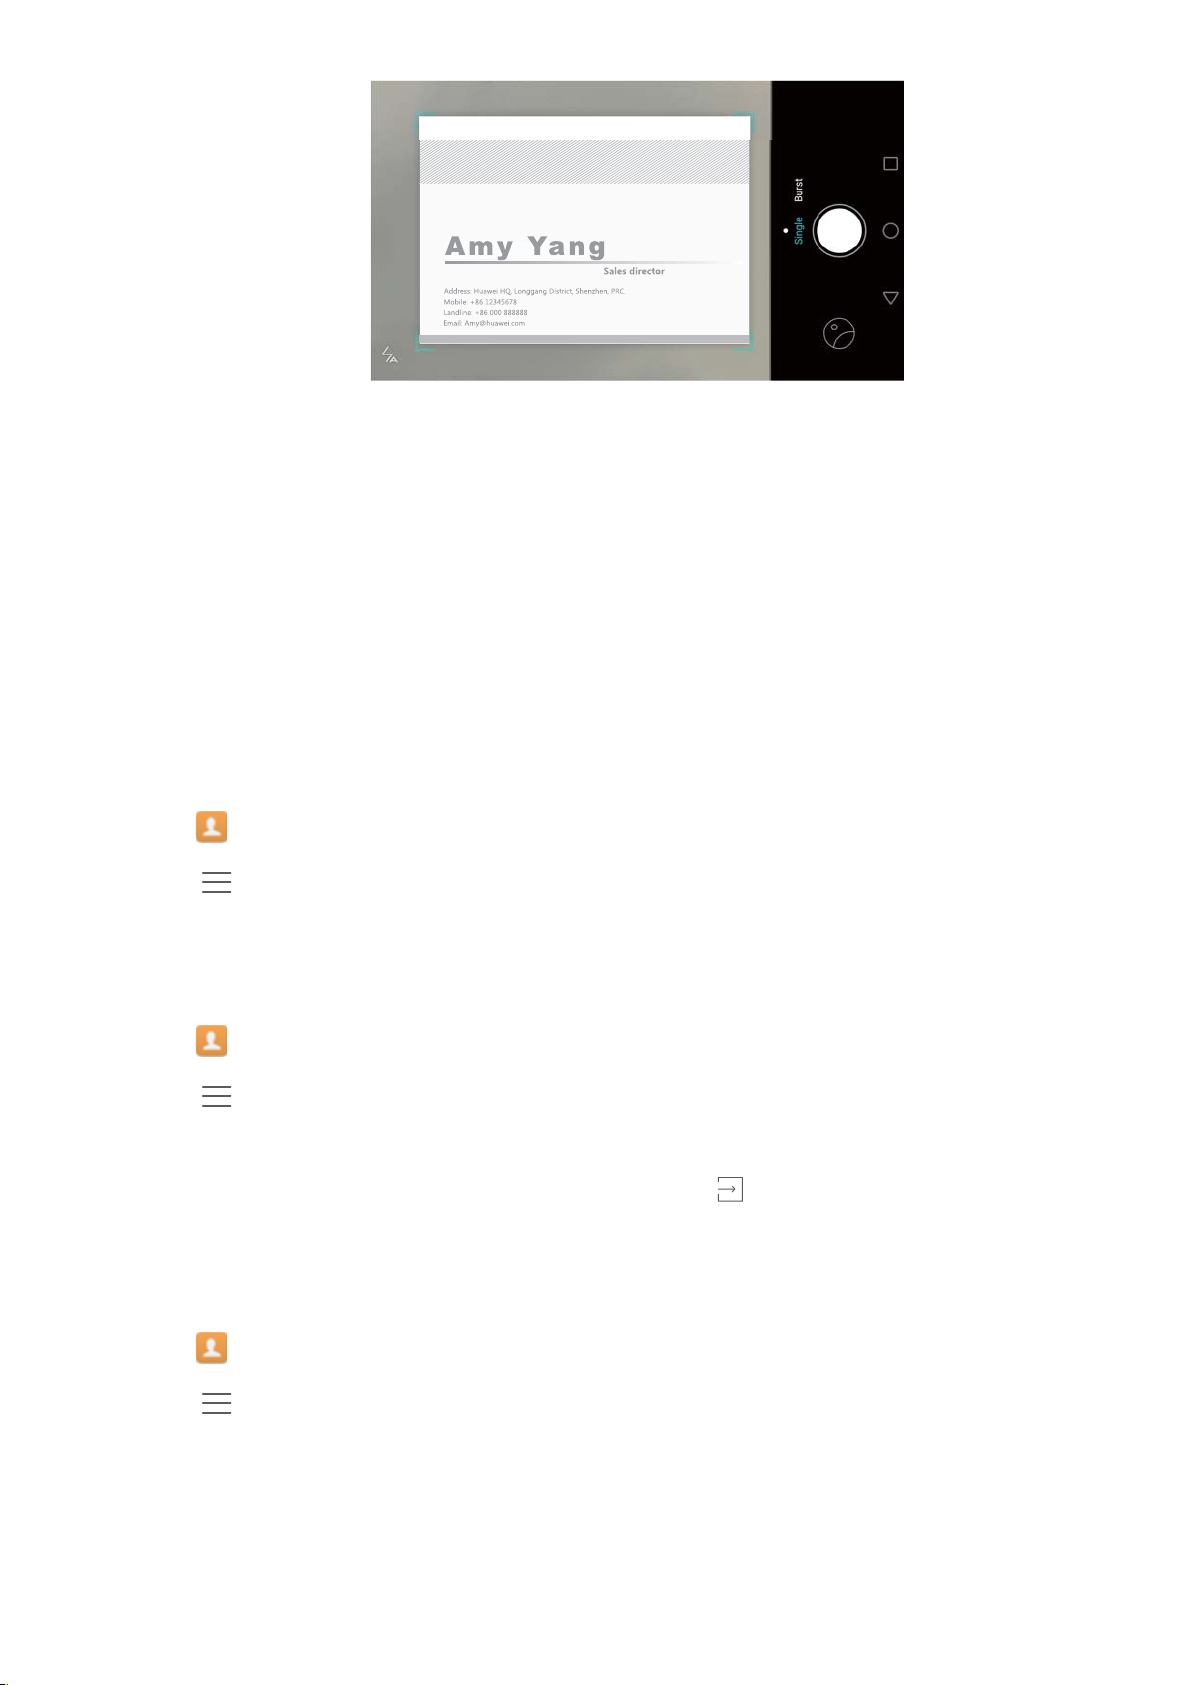
Enter contact information on your phone more rapidly. Simply scan or take pictures of business
cards to automatically add names, phone numbers, and other information to your contacts.
1 Open Contacts.
2 Touch Business cards > Scan.
3 You can then:
l Take a photo of one card: Place the business card on a flat surface and hold the phone in
a landscape orientation. Adjust the viewfinder frame so that the card fits the guidelines, and
then touch .
57
Page 64
Calls and Contacts
l Take photos of multiple cards: Switch to Burst mode and follow the onscreen
instructions to photograph multiple cards.
After you have finished scanning or taking photos, contact information will automatically be
saved to Business cards.
Importing or exporting contacts
Your phone supports .vcf contact files. VCF is a standard file format for storing contact
information, including names, addresses, and phone numbers.
Importing contacts from a storage device
1 Open Contacts.
2 Touch > Import/Export > Import from storage.
3 Select one or more .vcf files, and then touch OK.
Importing contacts from a SIM card
1 Open Contacts.
2 Touch > Import/Export > Import from SIM card. If your phone has dual SIM support,
you can choose whether to import from SIM 1 or SIM 2.
3 Select the contacts you want to import, and then touch .
4 Choose the location to import contacts to. Your phone will automatically import the contacts.
Importing contacts using Bluetooth
1 Open
Contacts.
2 Touch > Import/Export > Import from another phone.
3 Select Supports Bluetooth and then touch Next.
4 Enable Bluetooth on the device from which you want to import contacts and set the device to
be visible to other Bluetooth devices.
5 Touch Next. Your phone will automatically turn on Bluetooth and search for nearby devices.
58
Page 65

Calls and Contacts
6 Touch the Bluetooth device from which you want to import contacts. Once connected, your
phone will automatically import contacts from the other Bluetooth device.
Importing contacts using Wi-Fi Direct
1 Open Contacts.
2 Touch > Import/Export > Import from another phone.
3 Select Import via Wi-Fi Direct and then touch Next. Your phone then prompts you to enable
Wi-Fi and scans for Wi-Fi Direct devices.
4 Select the Wi-Fi Direct device you want to connect to. Once connected, your phone will
automatically import contacts from the other device.
Exporting contacts to a storage device
1 Open
Contacts.
2 Touch > Import/Export > Export to storage.
3 Touch Export.
4 Choose where you want to export the contacts from and touch OK.
The exported .vcf file is saved to the root directory of your phone's internal storage by default.
Open Files to view the exported file.
Exporting contacts to a SIM card
1 Open
Contacts.
2 Touch > Import/Export > Export to SIM card. If your phone has dual SIM support, you
can choose whether to export to SIM 1 or SIM 2.
3 Select the contacts you want to export, and then touch .
4 Touch Continue.
Sharing contacts
1 Open Contacts.
2 Touch > Import/Export > Share contact.
3 Select the contacts you want to share, and then touch .
4 Choose your sharing method, and then follow the onscreen instructions.
59
Page 66

Calls and Contacts
Managing contacts
Merging duplicate contacts
When you add contacts to your phone from different sources, you may end up with duplicate
entries. These duplicate entries can be merged into one to help keep your contacts organized.
1 Open Contacts.
2 Touch > Organize contacts > Merge duplicate contacts.
3 Select the contacts you want to merge, and then touch .
Deleting contacts
1 Open Contacts.
2 Touch > Organize contacts > Delete contacts by batch.
3 Select the contacts you want to delete, and then touch
.
4 Touch Delete.
You can also touch and hold a contact you want to delete. From the popup options menu,
select Delete to delete that contact.
Finding a contact
Search contacts stored on the phone, SIM card, or linked to an online account.
1 Open Contacts.
For more complete search results, ensure that Contacts is configured to display all of
your contacts. On the contacts screen, touch > Display preferences and then select
All contacts.
2 On the contact list, use one of the following methods to find a contact:
l Swipe the contact list up or down.
l Slide your finger up or down the index on the right-hand side of the screen to scroll through
your contacts.
l Enter the contact's name, initials, phone number, email address, or other contact
information in the search bar at the top of the contact list. Search results will be displayed
underneath.
3 Select a contact. You can then choose to call them, send them a text message, or edit their
contact information.
If an error message is displayed or you are unable to search for a contact, touch >
Organize contacts and then select Rebuild index data.
60
Page 67

Calls and Contacts
Viewing contacts from different accounts
You can select which contacts to display on your phone.
1 Open Contacts.
2 Touch > Display preferences.
3 Select the account you want to display or customize the accounts to display.
Hide contact photos, company information and job title: Touch > Display preferences
on the contacts screen, and then turn on the Simple layout switch.
Adding a contact to your favorites
You can add frequently-contacted people to your favorites to make them easier to find.
1 Open
Contacts.
2 Touch and hold the contact you want to add to your favorites, and then touch Add to
favorites to add the contact to Favorites.
When viewing contact details, touch to add the contact to your favorites.
Remove contacts from your favorites: Touch Favorites > on the contacts screen. Select
the contacts that you wish to remove from your favorites, and then touch .
Contact groups
Organize friends and family into different groups. You can send text messages or emails to
everyone in a group. Contacts now also features Smart groups. Your phone can automatically
sort contacts according to their company or the date you last contacted them, making it easier to
manage contacts and groups.
Creating a group
1 Open Contacts.
2 Touch Groups and then .
3 Enter the group name (for example Family or Friends) and then touch OK.
4 Touch
Editing a group
Add or remove people from a group or change the group name.
. Select the contacts you want to add to the group, and then touch .
1 Open Contacts.
2 Touch Groups and select the group you want to edit.
61
Page 68

Calls and Contacts
3 Touch and add new members to the group.
4 Touch . You can then:
l Touch Remove members to remove members from the group.
l Touch Delete group to delete the group.
l Touch Rename to edit the group name.
Sending messages or emails to a group
1 Open Contacts.
2 Touch Groups and select which group you want to send a message or email to.
3 Touch to send a message or to send an email.
Deleting a group
1 Open Contacts.
2 Touch Groups.
3 Touch and hold the group you want to delete, and then touch Delete.
4 Touch Delete.
Deleting a group will not remove the contacts in the group.
62
Page 69
Messaging and Email
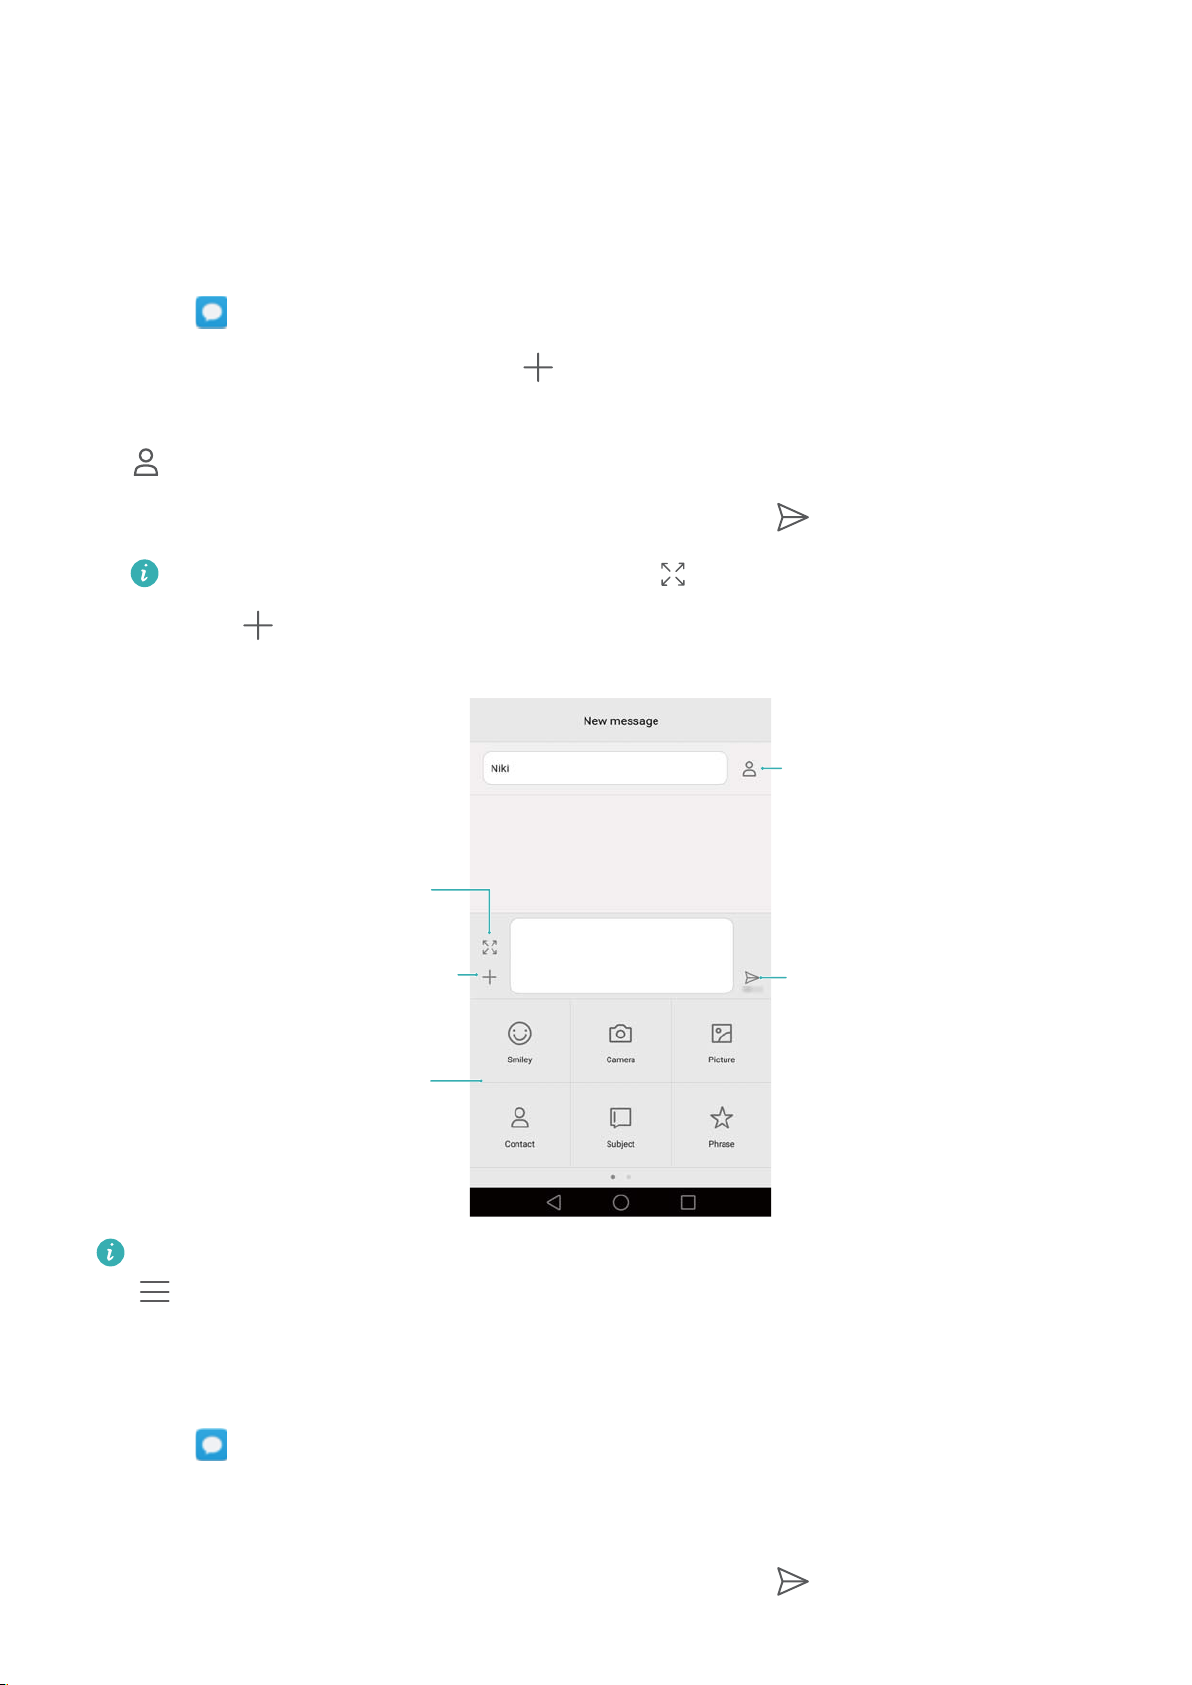
Swipe left or
right to select
attachment
type
Switch to full
screen text
entry
Send
Choose recipients
Add attachment
************************************
************************************
**************************
Sending a message
Spice up your messages by adding emoticons, images, videos, music, recordings, and more.
1 Open
Messaging.
2 In the list of message threads, touch .
3 Select the recipient box and enter the contact name or phone number. You can also touch
to open your contact list and choose a contact or contact group.
4 Select the text field and enter your message, and then touch
If you enter more than two lines of text, touch to switch to full screen text entry.
Touch to add an attachment to your message.
.
Cancel a message: You can cancel a message up to four seconds after it was sent. Touch
Replying to a message
1 Open Messaging.
2 In the list of message threads, touch a contact name or phone number to view your
conversations.
3 Select the text field and enter your message, and then touch
> Settings, then turn on the Cancel send switch.
.
63
Page 70

Messaging and Email
Reply to a message from the notification bar: New messages will be displayed in the
notification bar. Touch the button to compose a reply.
Searching for messages
Use the message search feature to find messages quickly.
1 Open Messaging.
2 Swipe down on the screen in the list of message threads to bring up the search bar.
3 Enter one or more keywords. The search results will be displayed underneath the search bar.
Deleting threads
Delete unwanted or old threads to tidy up your message list.
Deleted threads cannot be retrieved, so please proceed with caution.
1 Open Messaging.
2 In the list of message threads, touch and hold a thread.
3 Select the threads you want to delete, and then touch > Delete.
Managing messages
Delete unwanted messages, forward messages to other contacts, copy and paste message
content, and lock messages or add them to your favorites to prevent them from being deleted by
accident.
1 Open Messaging.
2 In the list of message threads, touch a contact name or phone number to view your
conversations.
3 Touch and hold a message. You can:
l Forward the message: Touch
to forward the message to another contact.
l Delete the message: Touch > Delete to delete the message. Deleted messages
cannot be retrieved.
l Copy the message: Touch to copy the message to the clipboard and paste it
elsewhere. When viewing a message, touch the message twice to enter full screen text
selection view.
l Add the message to your favorites: Touch > Copy to Favorites to add the message
to your favorites. When you delete messages, messages in your favorites will not be
affected. In the list of message threads, touch > Favorites to view your favorite
messages.
64
Page 71

Messaging and Email
l Lock the message: Touch > Lock to lock the message. When you delete messages,
locked messages will not be affected.
Blocking spam messages
1 Open Messaging.
2 In the list of message threads, touch > Harassment filter to view blocked messages.
3 Touch to configure the spam rules and keywords. Blocked messages are not shown in
the list of message threads.
Managing common phrases
Create common phrases to save you time when you're composing a message.
1 Open Messaging.
2 In the list of message threads, touch
can:
l Touch a common phrase to edit it.
l Touch to create a common phrase.
Use a common phrase in a message: When composing a message, touch . Select
Phrase, then select a common phrase to add it to your message.
> Settings > Advanced > Common phrases. You
Adding a message signature
Add a message signature to save you time when sending messages.
1 Open Messaging.
2 Touch > Settings > Advanced > Signature in the list of message threads, and then turn
on the Attach signature switch.
3 Touch Edit signature, enter your signature, and then touch OK.
Adding an email account
Adding a personal email account
When adding an account, consult your email service provider if you are unsure about the
account settings.
1 Open Email.
2 Choose an email service provider or touch Others.
65
Page 72
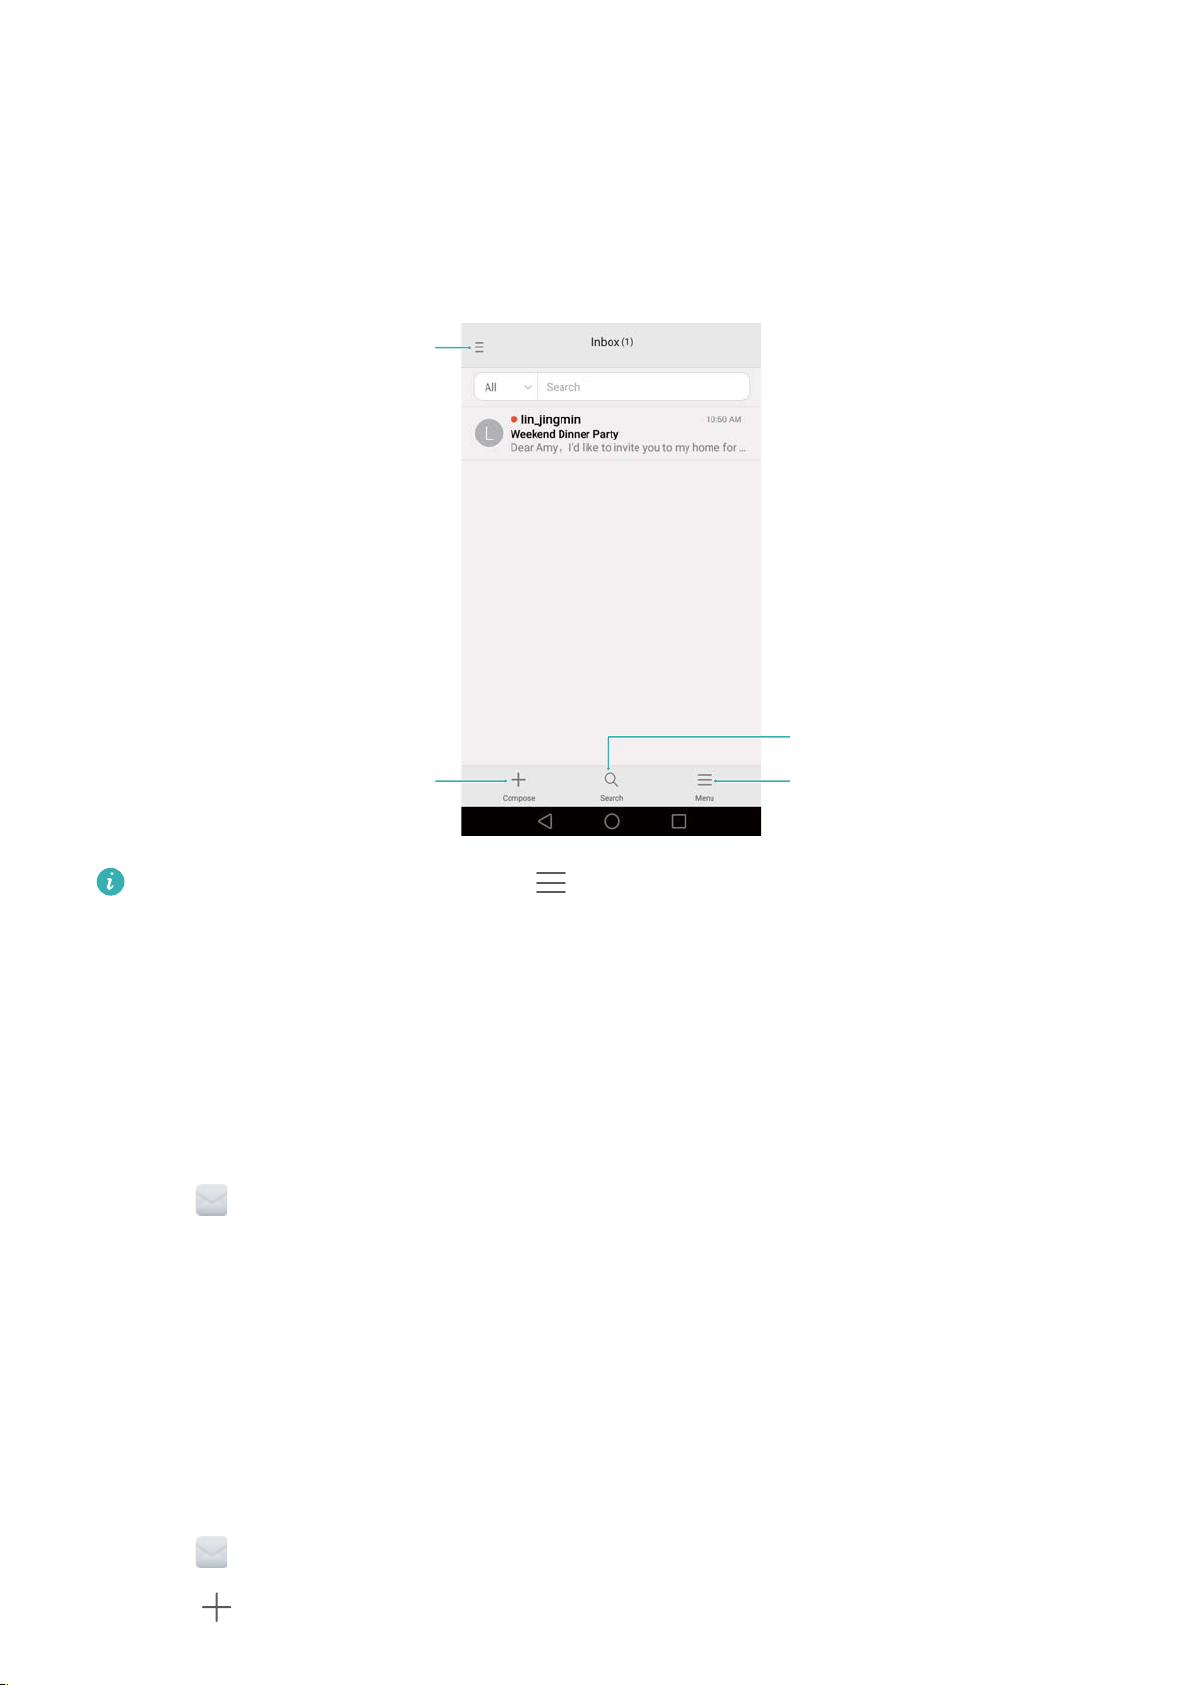
Messaging and Email
3 Enter your email address and password, and then touch Next. Touch Manual setup to
configure an email account manually.
4 Follow the onscreen instructions to configure your account. The system will automatically
connect to the server and check the server settings.
Once the account has been set up, your Inbox will be displayed.
After adding an email account, touch > Settings > Add account in your Inbox to
continue adding other accounts.
Adding an Exchange account
Exchange is an email system developed by Microsoft for businesses. Some email service
providers also provide Exchange accounts for individuals and families.
When adding an account, consult your email service provider if you are unsure about the
account settings.
1 Open
2 Touch Exchange.
3 Enter your email address, user name, and password. Touch Next.
4 Follow the onscreen instructions to configure your account. The system will automatically
connect to the server and check the server settings.
Once the account has been set up, your Inbox will be displayed.
Email.
Sending an email
1 Open Email.
2 Touch
.
66
Page 73
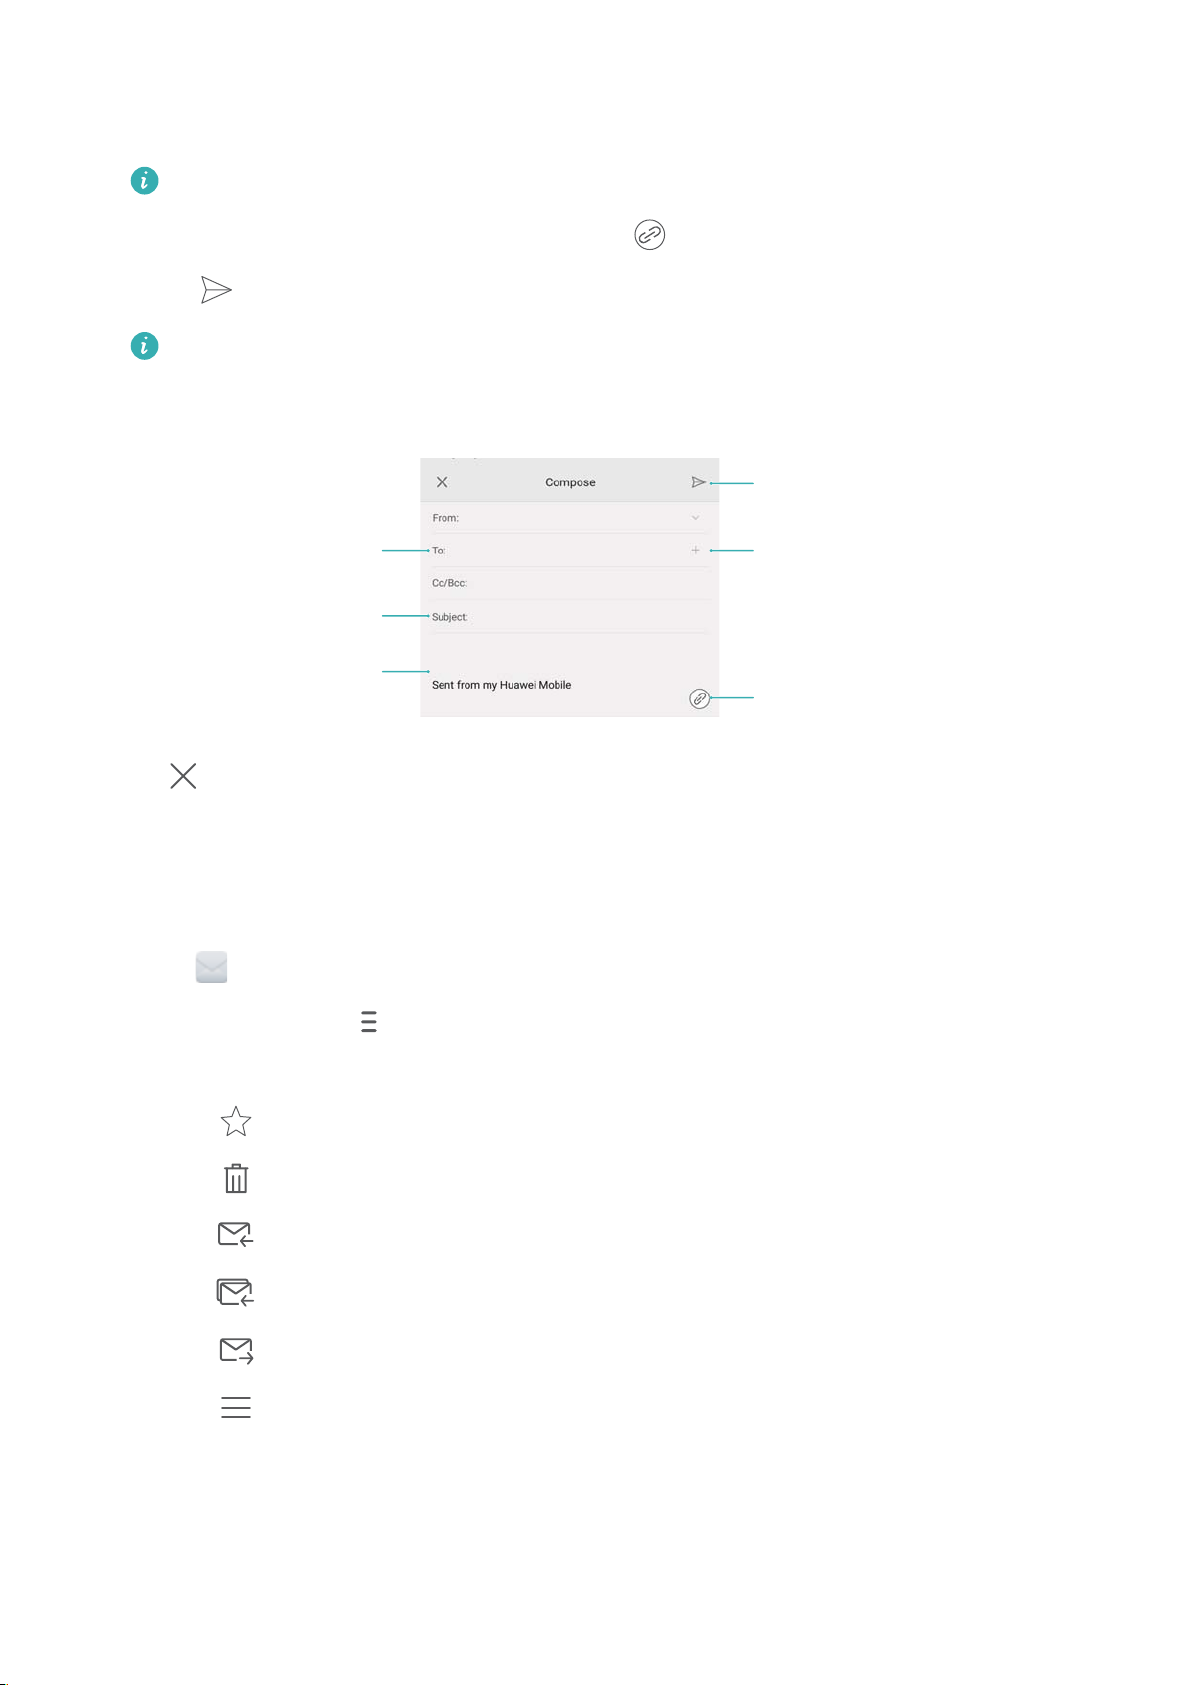
3 Touch From: and then select the email account you want to use.
Recipient
Email body
Add attachment
Send
Subject
Select recipient from
contact list
4 Enter one or more recipients.
To Cc or Bcc the email to multiple recipients, touch Cc/Bcc:.
5 Enter your email subject and main body. Touch to add an attachment.
6 Touch .
Your email service provider may place a limit on the size of email attachments. If your
attachments exceed the limit, send the attachments in separate emails.
Messaging and Email
Touch > Save to save your email as a draft.
Checking your emails
Open Email and then swipe down in your Inbox to refresh the list of emails.
1 Open Email.
2 In your Inbox, touch in the upper left corner to select an account.
3 Touch the email you want to read. You can:
l Touch
l Touch to delete.
l Touch to reply.
l Touch to reply to all.
l Touch to forward.
to star for future reference.
l Touch , and then select Mark unread to mark an email as unread.
l Swipe left or right to read the next or previous email.
67
Page 74

Messaging and Email
Managing VIP contacts
Add important contacts to your VIP list. Emails from your VIP contacts will appear in a separate
inbox.
1 Open Email.
2 In your Inbox, open the email that you want to read.
3 Touch the contact's photo, and then select Add to VIP list in the popup menu.
To change the notification settings and ringtones for your VIP contacts, touch >
Settings > VIP notifications in your Inbox.
Account settings
Changing email accounts
If you have added multiple email accounts on your phone, ensure you switch to the right account
before viewing or sending emails.
1 Open Email.
2 In your Inbox, touch in the upper left corner to open the account list.
3 Select the desired email account.
Removing an email account
1 Open Email.
2 In your Inbox, touch > Settings.
3 Select the account you want to remove.
4 Touch Remove account > OK.
After you remove an email account, you will no longer be able to send or receive emails using
that account.
Personalizing your email account
Display contact pictures, choose what to display after deleting an email, change your signature,
set inbox update frequency, and change email notification tones.
1 Open
Email.
2 In your Inbox, touch > Settings and then choose the desired settings.
68
Page 75
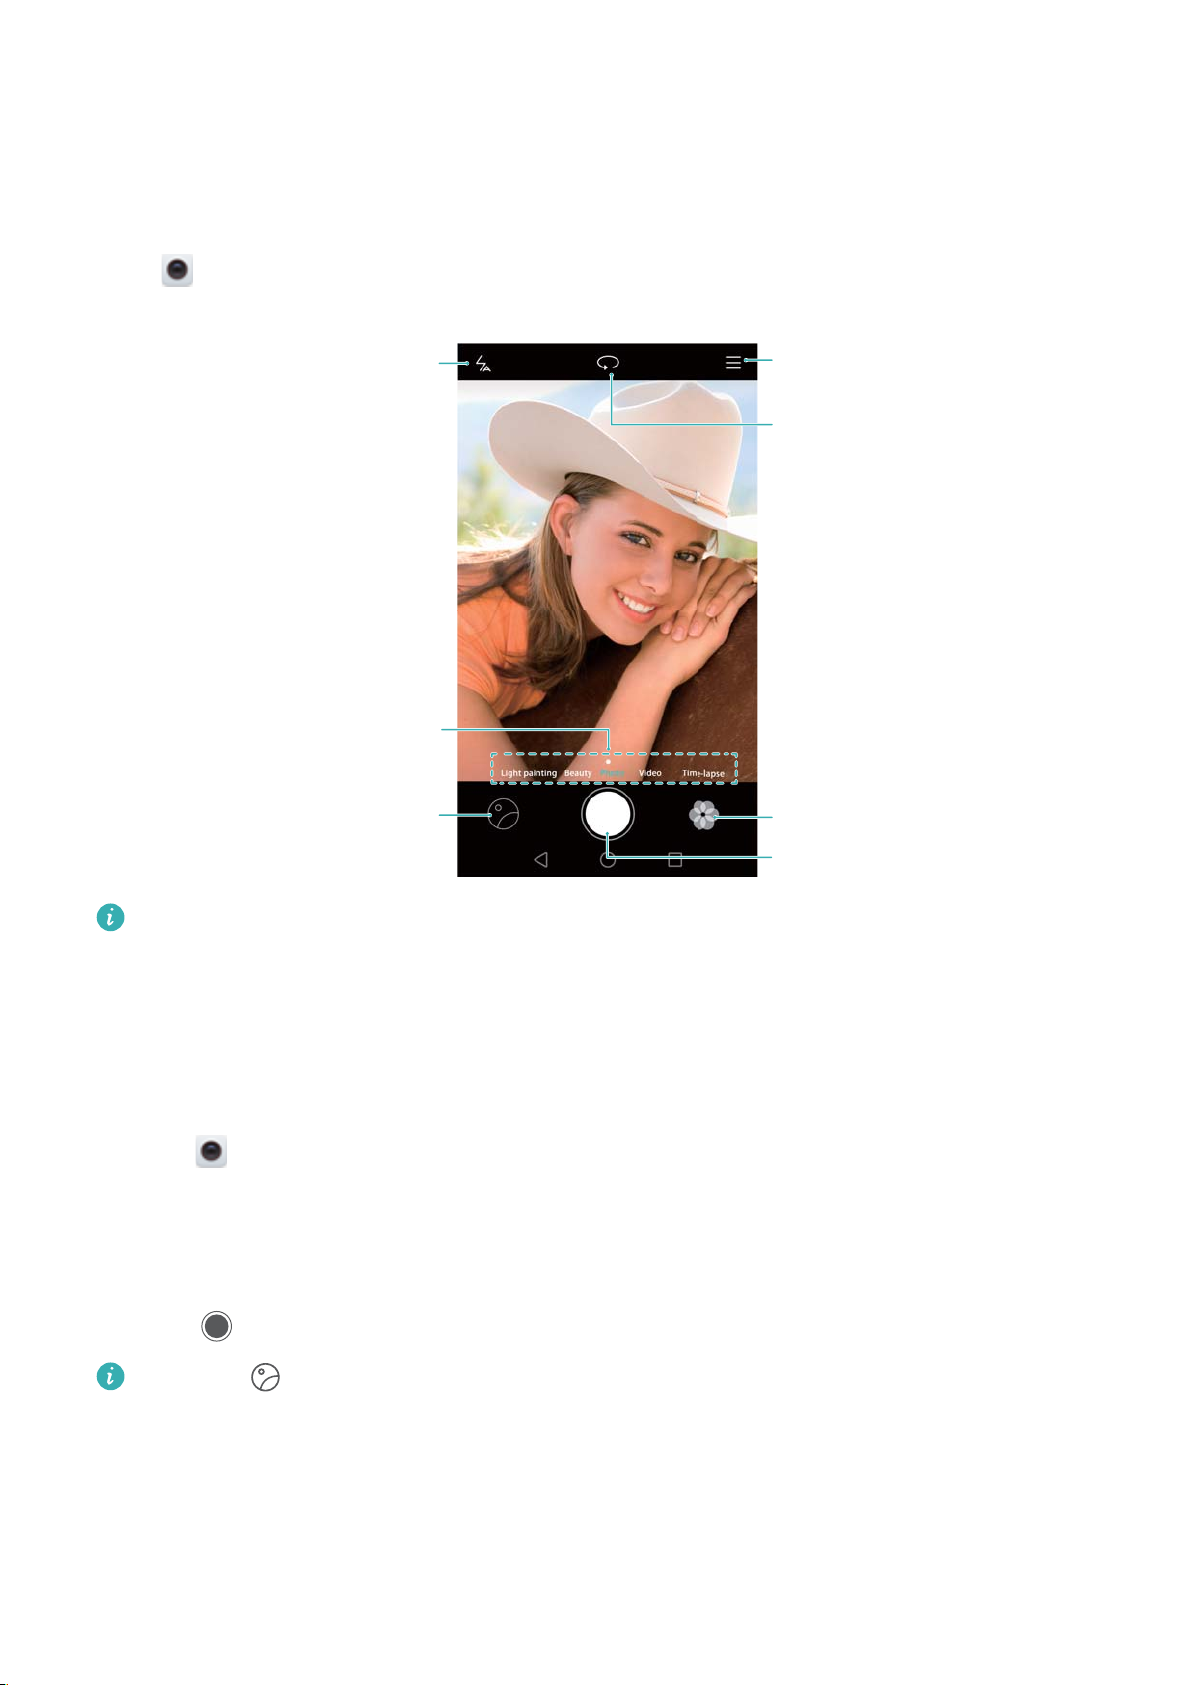
Camera and Gallery
Switch flash modes
View images
or videos
Swipe left or right to
change capture
mode
Apply filter effects
Take a photo
Switch between
rear and front
cameras
More options
Accessing the viewfinder
Open
Camera to access the viewfinder.
For more information on the camera settings, see Camera settings.
Taking a photo
Your phone comes with a feature-packed camera that you can use to capture life's unforgettable
moments.
1 Open Camera.
2 Frame the scene you want to capture, the camera will focus automatically. Touch any part of
the viewfinder to focus on the corresponding area. To adjust the focal length, pinch two
fingers together or spread them apart on the viewfinder.
3 Touch
Touch the thumbnail to view a photo and share it with friends. For more information, see
Sharing images or videos.
.
Capture modes
The camera comes with a range of capture modes so that you can take stunning photos in a
variety of different shooting scenarios.
69
Page 76

Camera and Gallery
Your phone may not support all of these capture modes.
To change the capture mode, swipe left or right on the viewfinder, or touch .
l Beauty: Drag the slider to adjust the beauty level and apply facial enhancement effects.
l Panorama: Use this mode to take wide-angle shots. For more information, refer to Taking a
panoramic photo.
l Panorama: Use this mode to take panoramic self portraits. For more information, refer to
Taking panoramic self-portraits.
l Super night: Use this mode to take nighttime shots. The camera will automatically adjust the
exposure based on the ambient light conditions. For more information, refer to Super Night
mode.
l HDR: Enhance a photo taken under insufficient or excessive light conditions.
l All-focus: Use this mode to reselect the focal point after taking a photo.
l Professional: Use this mode for stunning, DSLR-quality images. For more information, refer to
Pro camera mode.
l Document readjustment: Automatically straighten out images taken from an angle to make
them easier to read. For more information, refer to Document correction.
l Light painting: Capture trails of light by using slow shutter speeds. For more information, refer
to Light Painting mode.
l Watermark: Add a selection of watermarks to your photos.
l Audio note: Use this mode to record a few seconds of audio when taking a photo.
Beauty mode
Use beauty mode for stunning selfies and younger, smoother-looking skin.
1 Open Camera.
2 Swipe left or right and select Beauty.
3 Drag the slider to adjust the beauty level.
4 Frame the scene you want to capture, and then touch . The camera will automatically
detect each face in the photo and apply the beauty settings.
Perfect Selfie mode
With Perfect Selfie mode, your phone will automatically detect your face in a group shot and
apply preset facial enhancement settings to make you stand out from the crowd.
1 Open Camera.
2 Touch > > Perfect selfie, and then turn on the Perfect selfie switch.
3 Touch Perfect selfie to configure the facial enhancement settings.
70
Page 77
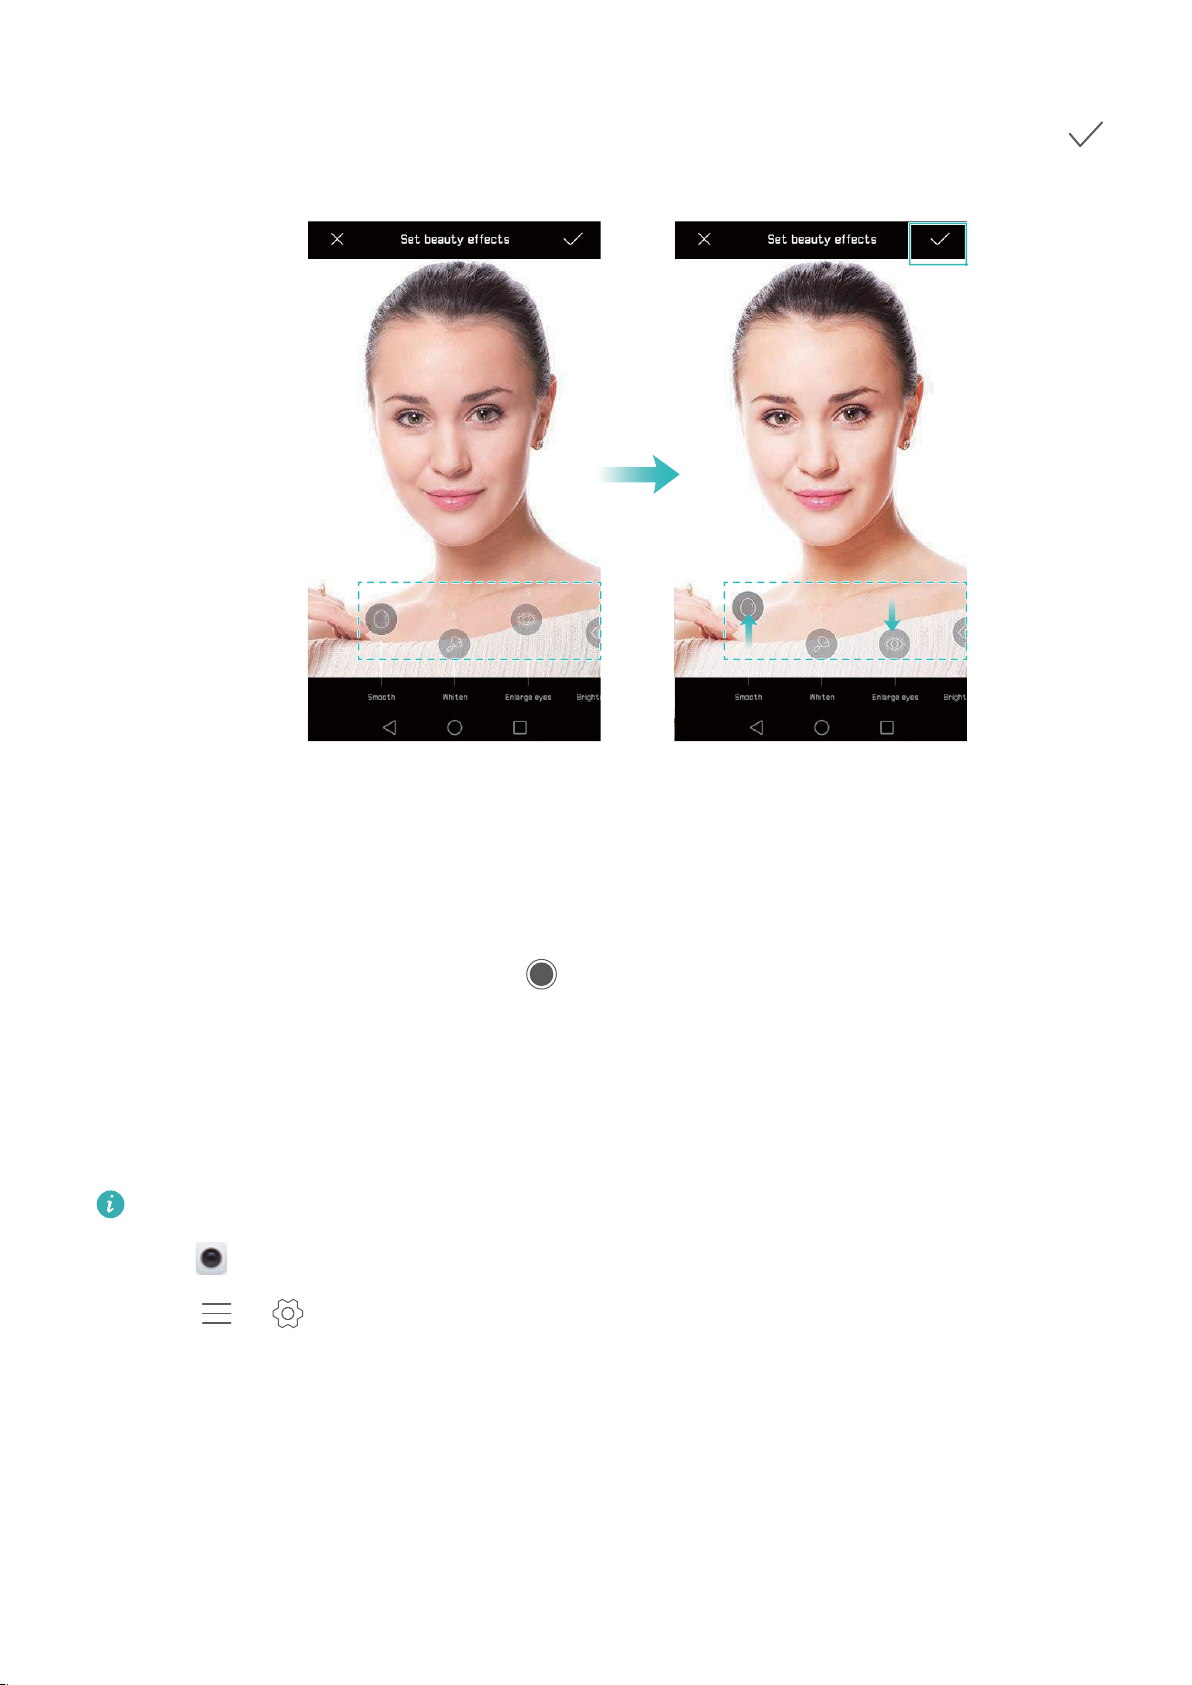
Camera and Gallery
1 Take three photos of your face from the front, side, and with your head lowered.
2 Adjust the settings for your eyes, pupils, skin tone, and face shape as desired. Touch
to confirm.
l Change your calibration photos: On the camera settings screen, select Perfect selfie >
Edit personal info to update your calibration photos.
l Change the facial enhancement settings: On the camera settings screen, touch Perfect
selfie > Set beauty effects to adjust the beauty settings, such as skin tone and face
shape.
Switch to Beauty mode, and then touch to take a photo. The camera will automatically
detect your face and apply the preset facial enhancement settings.
Ultra Snapshot
Press the volume down button twice to take a photo, even when the screen is off.
This feature is not available during music playback.
1 Open Camera.
2 Touch > > Ultra snapshot, and then select Open camera and take quick
snapshot. Select Off to disable this feature.
3 Point the camera at the desired object, and then press the volume down button twice in quick
succession. The camera will automatically take a photo and display the capture time.
71
Page 78
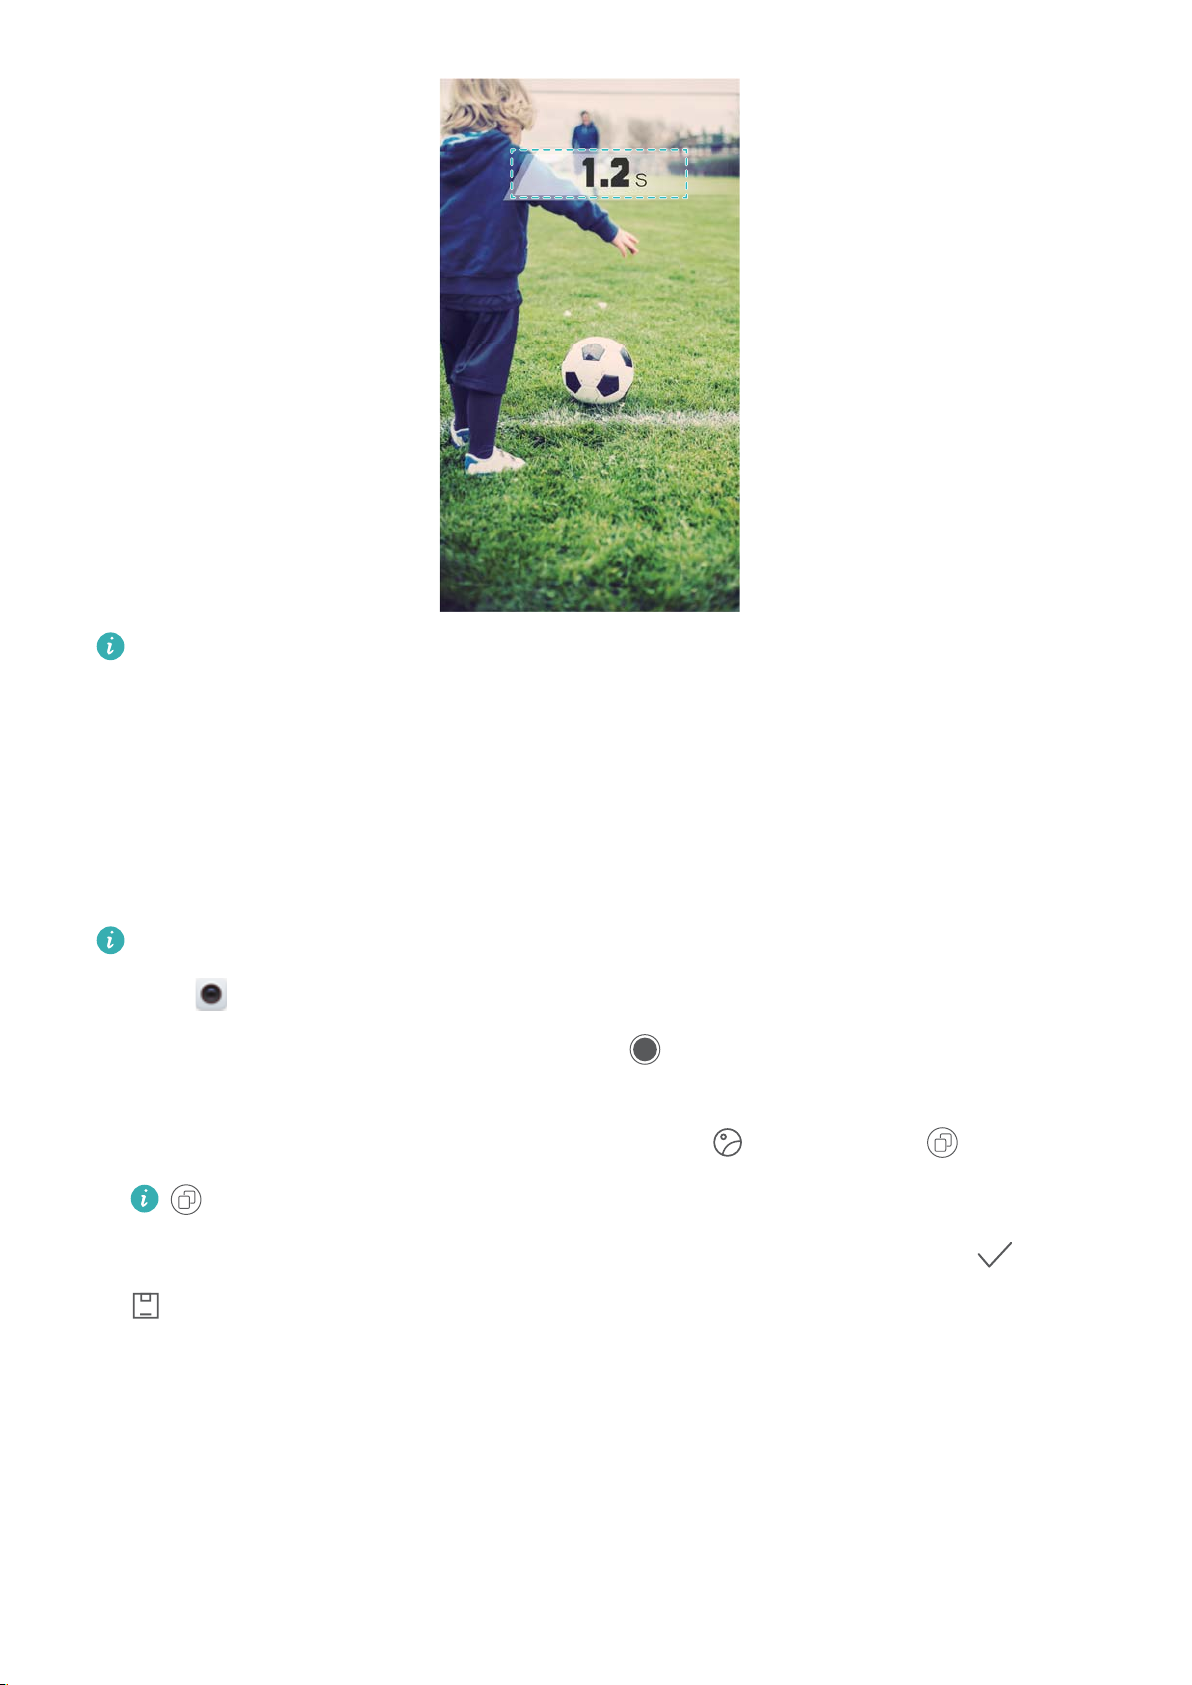
Camera and Gallery
Due to the rapid capture time, image quality may decrease for nighttime or close-up shots.
Choose a location with ample light and shoot from a suitable distance.
Burst shooting
Use burst shooting when you want to take a photo of a moving subject, such as during a football
match. The camera will capture several images in quick succession so that you don't miss out on
the action.
Not all camera modes support this feature.
1 Open Camera.
2 Focus on the subject, and then press and hold to start the burst sequence. Release your
finger to stop shooting.
3 To view and select images, touch the image thumbnail and then touch .
indicates photos that were taken in burst mode.
4 Your phone will automatically select the best shot. To select other photos, touch . Touch
and then follow the onscreen instructions to save the image.
72
Page 79
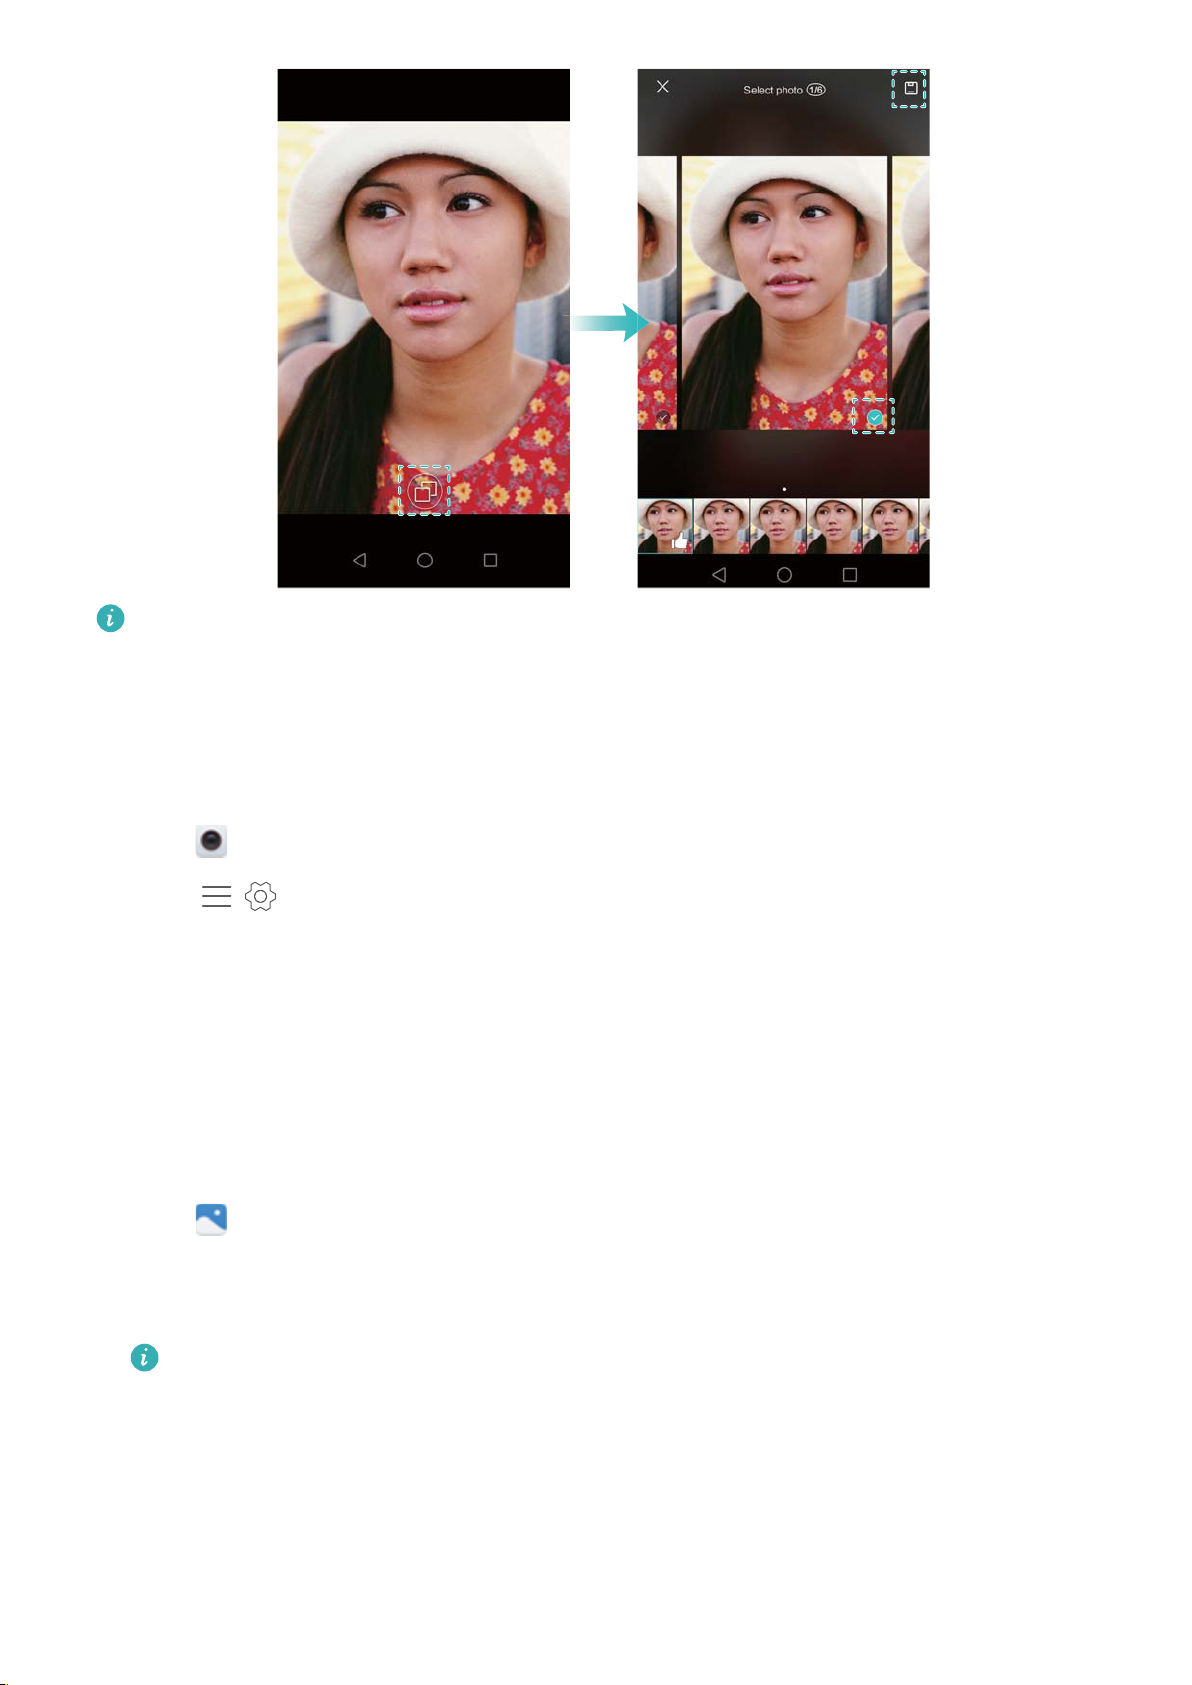
Camera and Gallery
If you cannot access Burst shooting mode, touch Touch & hold shutter button on the
camera settings screen and check that Burst shoot is selected.
Voice activated shooting
Use voice activated shooting to control the shutter when taking a group shot.
1 Open Camera.
2 Touch > Audio control and turn on the Audio control switch. You can then:
l Say "cheese" to take a photo.
l Set the camera to take a photo when the ambient noise reaches a certain decibel level.
3 Frame the scene you want to capture. The camera will take a photo automatically when you
issue a voice command or the camera detects a loud sound.
Launching the camera from Gallery
1 Open Gallery.
2 Go to the Photos tab and swipe down to display the viewfinder in half screen mode. Swipe
down again to launch the camera.
Not all camera features are available in half screen mode.
73
Page 80
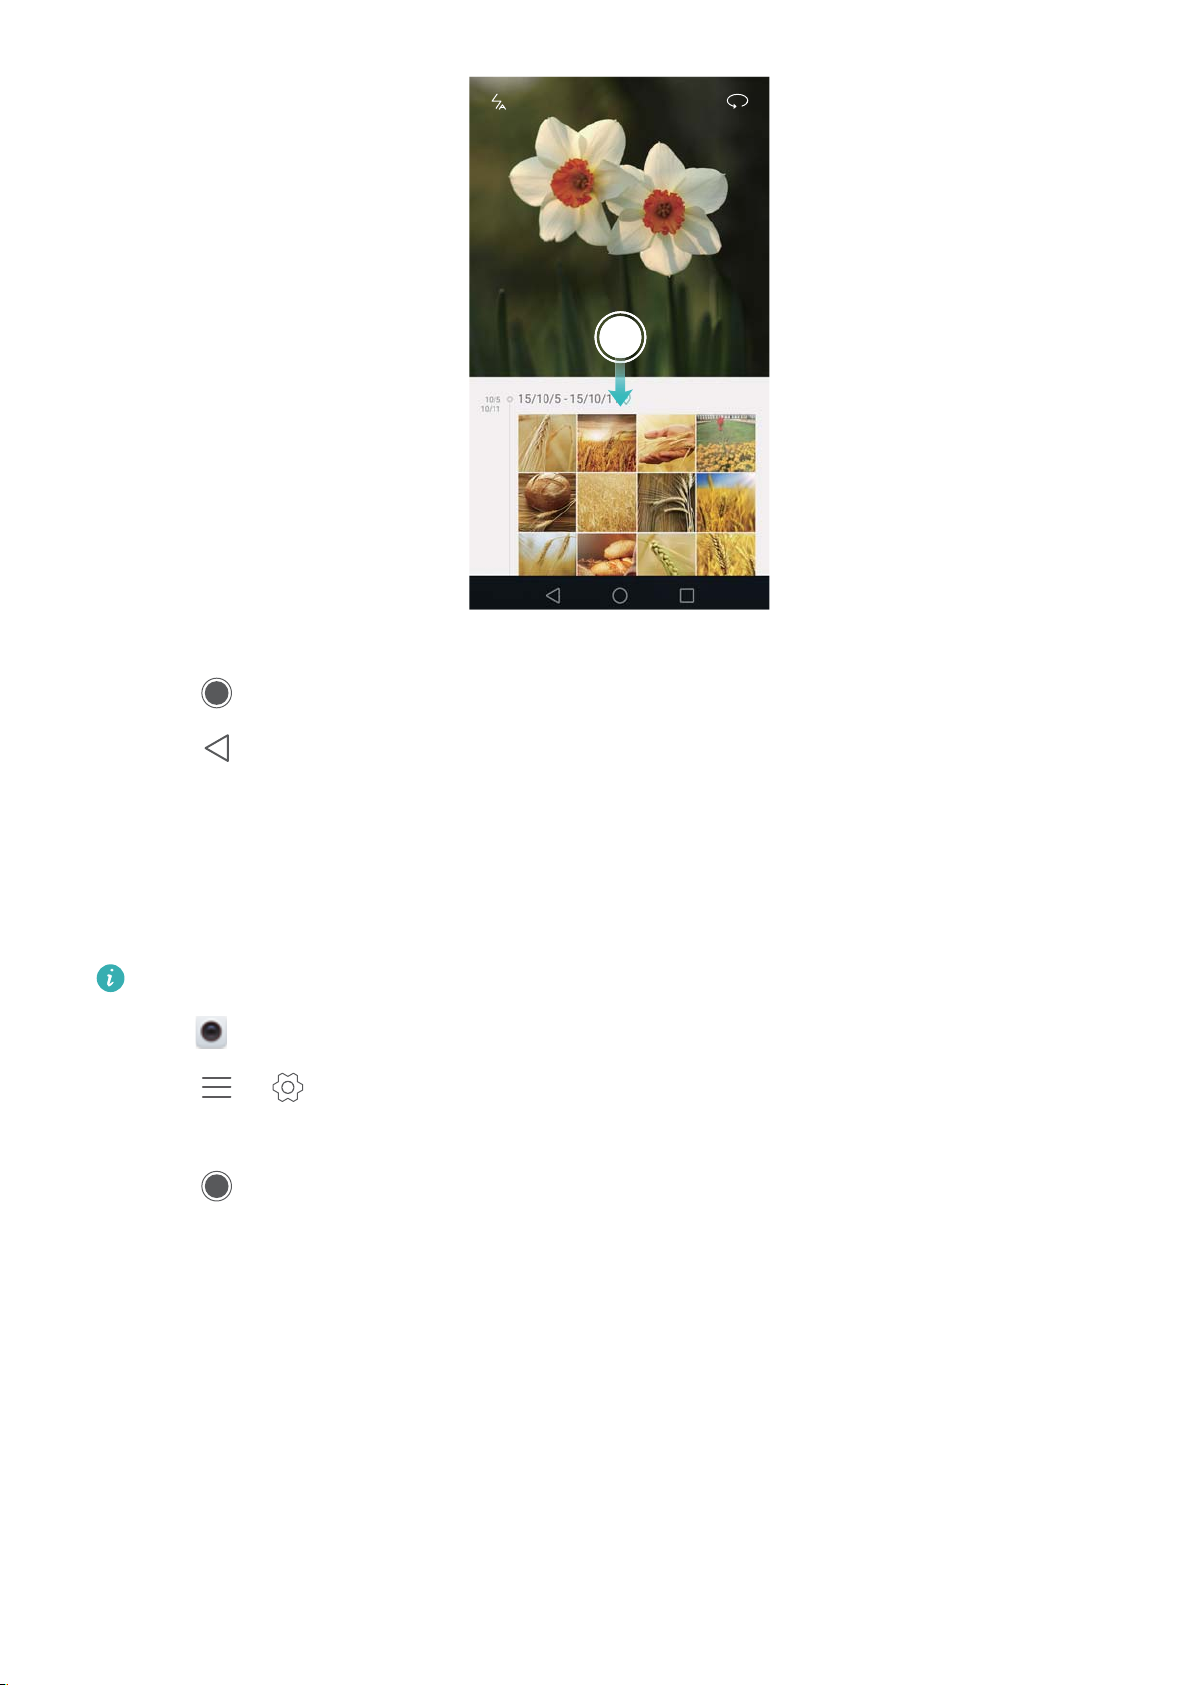
Camera and Gallery
3 Select the desired shooting mode. For more information, see Capture modes.
4 Touch to take a photo.
5 Touch Return to return to Gallery.
Object tracking
Use object tracking when taking photos of moving subjects, such as people or animals. The
camera will automatically focus on the moving subject to ensure that your image stays in focus.
Object tracking mode and smile capture cannot be used at the same time.
1 Open Camera.
2 Touch > , and then turn on the Object tracking switch.
3 Touch your subject on the screen. Your camera will remain focused on the subject.
4 Touch to take a photo.
74
Page 81
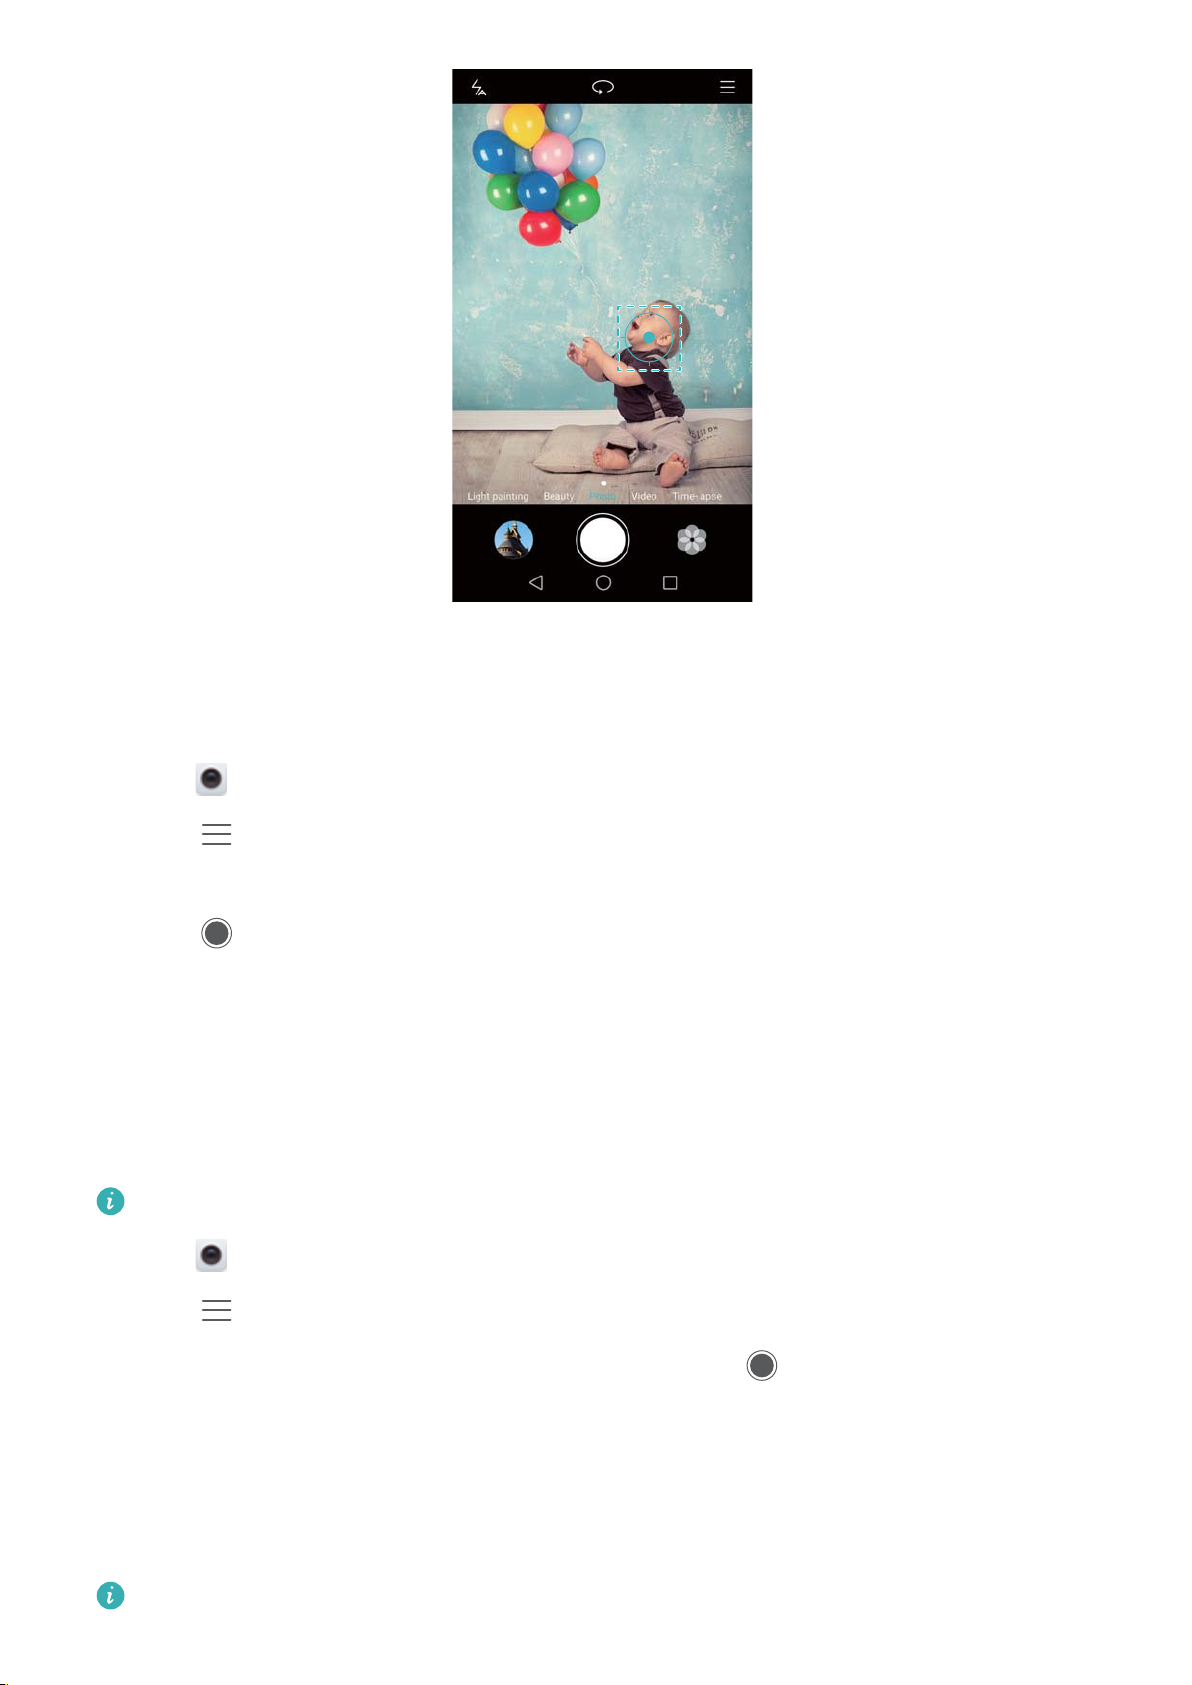
Camera and Gallery
Audio notes
Add audio notes to bring your photos to life.
1 Open Camera.
2 Touch > Audio note.
3 Frame the scene you want to capture.
4 Touch
add to your photo.
to take a photo with an audio note. The camera will record a short audio clip to
HDR mode
Use HDR mode for scenes with a large contrast to prevent under- or overexposure and ensure
clarity in every shot.
HDR mode is not available for the front camera.
1 Open Camera.
2 Touch > HDR.
3 Hold your phone steady, frame the scene, and then touch .
Super Night mode
Super Night mode improves the quality of images taken at night and in low-light conditions by
accentuating the detail of darker areas to produce brighter, more colorful images.
Use a tripod to minimize camera shake.
75
Page 82
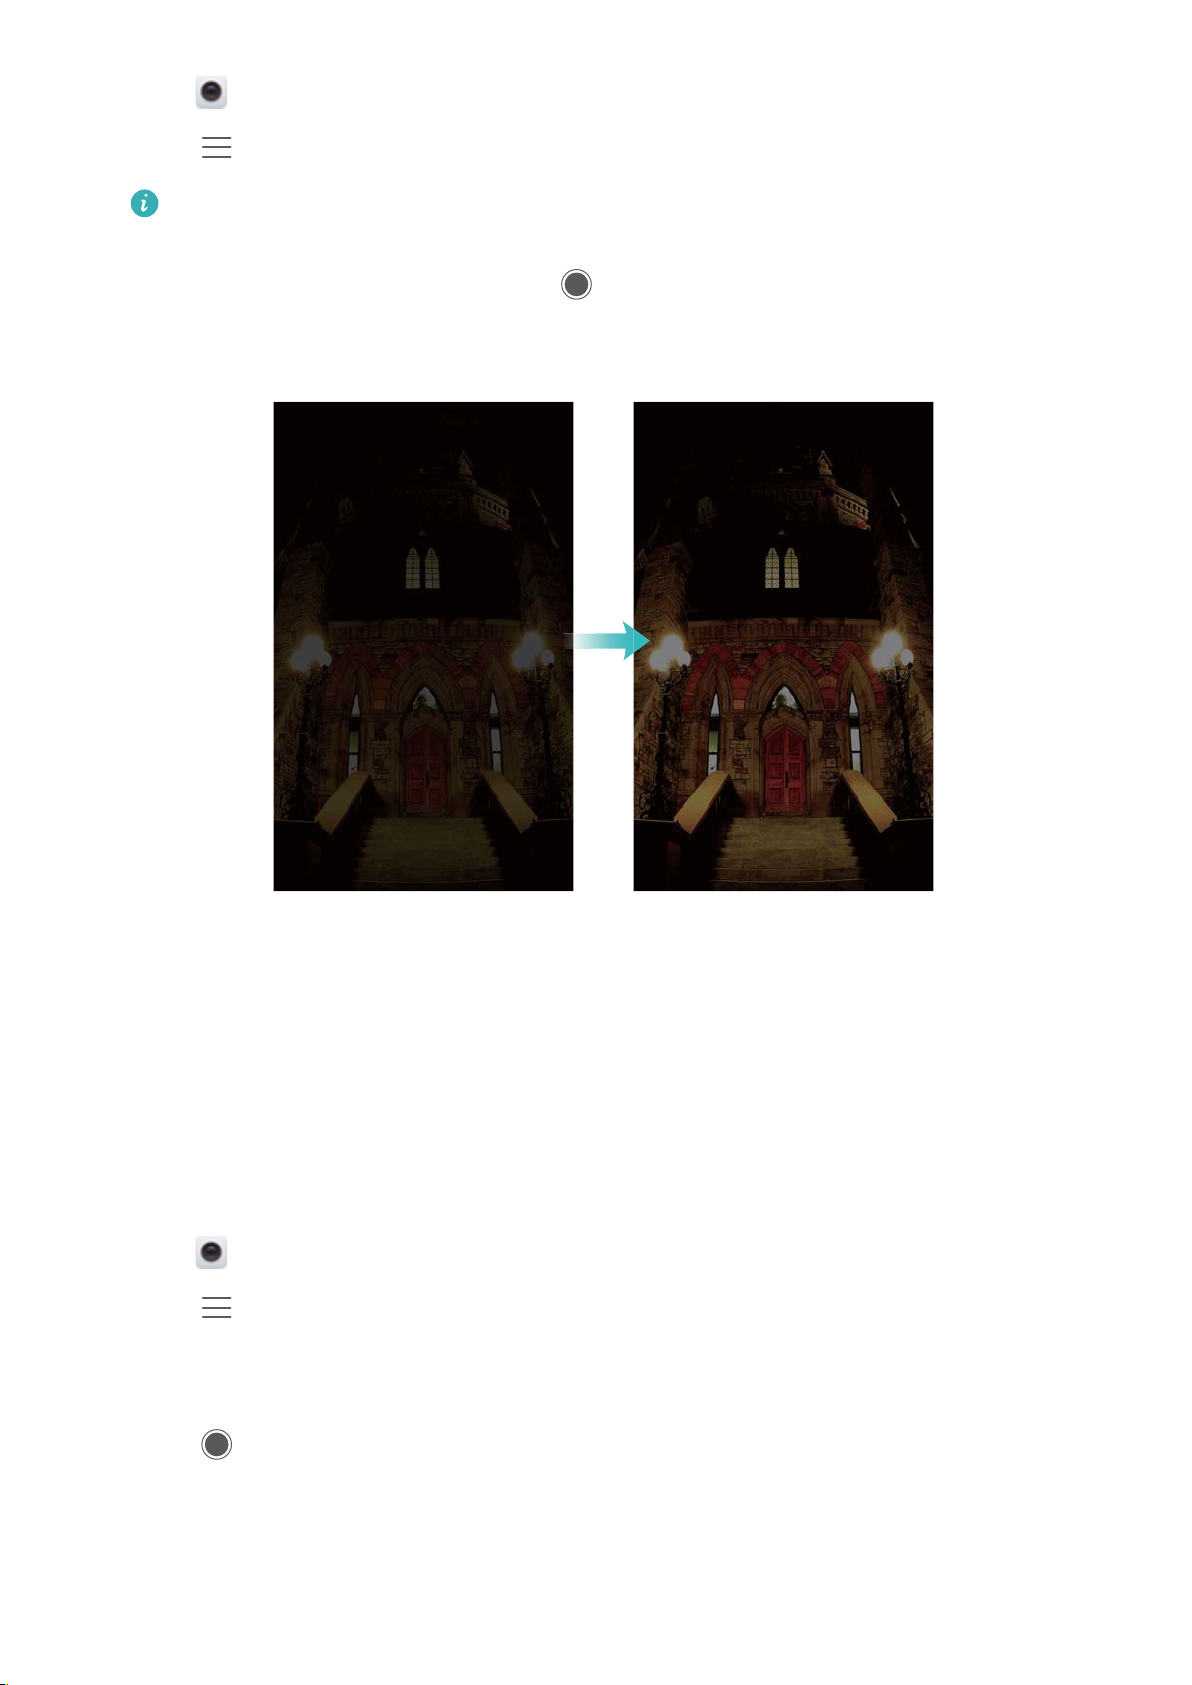
Camera and Gallery
1 Open Camera.
2 Touch > Super night.
Touch Auto and follow the onscreen instructions to manually adjust the ISO and other
exposure settings.
3 Hold your phone steady, and then touch to take a photo. Your phone will take several
shots and automatically combine them into one image.
Pro camera mode
Pro camera mode gives you full control over the camera settings so that you can take
professional-looking shots in challenging shooting scenarios.
Using Pro camera mode
Your phone comes with Pro camera mode, which gives you manual control over the camera
settings for professional quality shots.
1 Open
2 Touch
3 You can add a grid or spiral overlay, and manually configure camera settings. For more
information, refer to Pro camera settings.
4 Touch to take a photo.
Camera.
> Professional.
76
Page 83
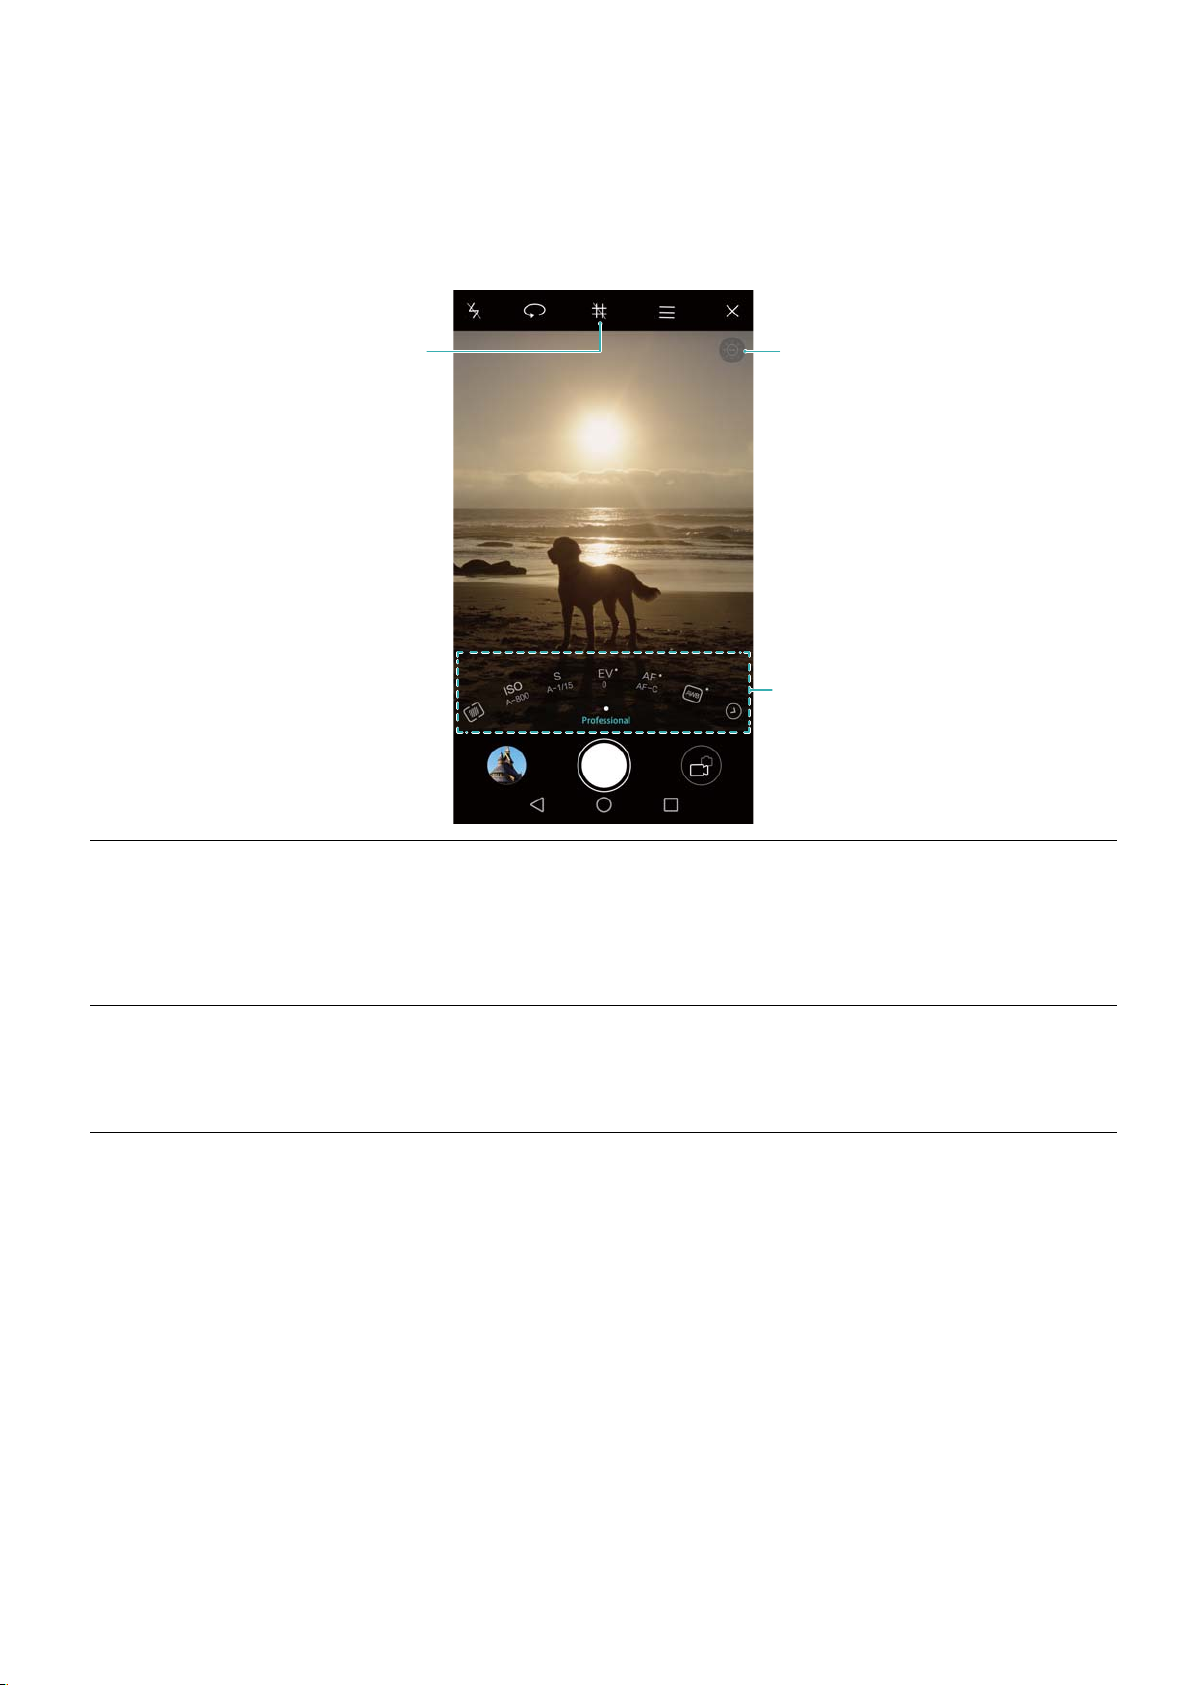
Enable grid lines
Underexposure
warning
Manual settings
Camera and Gallery
Pro camera settings
When you switch to Pro camera mode, you can adjust a whole range of camera settings in the
viewfinder to produce professional-looking shots. For example, you can just the ISO, exposure
compensation, white balance, shutter speed, and more.
Grid overlay
icon
Low
exposure
icon
Touch the grid overlay icon to enable the overlay. You can select a 3 x 3 grid, phi
grid, or a spiral overlay. Use the 3 x 3 grid for general shooting scenarios. The phi
grid is similar to the 3 x 3 grid, but uses the golden ratio to divide the viewfinder
into distinct sections. Use the spiral grid for indoor photography or portrait shots.
Touch this icon to restore the default exposure settings. This icon will only appear
when the exposure is too low.
77
Page 84

Camera and Gallery
l : Touch to configure the metering mode (the method used to determine the
exposure). You can select matrix metering, center-weighted metering, or spot
metering. Matrix metering is set by default.
l ISO: Touch to adjust the camera's sensitivity to light. Increasing the ISO will
create a brighter picture, but there will be a noticeable increase in noise. You
can configure the camera to adjust the ISO automatically, or you can adjust it
manually.
l S: Touch to set the shutter speed. You can configure the camera to adjust the
shutter speed automatically, or you can adjust it manually.
Manual
settings
l EV: Touch to set the exposure compensation. Select an exposure setting to
increase/decrease the brightness. Touch and hold the icon to lock the current
exposure setting.
l AF: Touch to set the focus mode. You can select touch to focus, continuous
autofocus, or manual focus. Continuous autofocus is set by default. When
continuous autofocus is selected, touch and hold the icon to enable the focus
lock.
l : Touch to select a white balance according to the ambient light conditions.
You can choose from daylight, tungsten bulb, fluorescent lamp, and more. You
can also adjust the color temperature. Touch and hold the icon to lock the
white balance.
Light Painting mode
Light Painting mode enables you to take stunning shots of light trails without the need to
manually adjust the aperture or shutter speed. Four different settings are available for different
shooting scenarios.
l Tail light trails: Capture trails of light made by cars at night.
l Light graffiti: Capture trails of light in a dark environment.
l Silky water: Capture silky smooth images of flowing water.
l Star track: Capture stunning images of star trails in the night sky.
Tail light trails
In Light Painting mode, select Tail light trails to capture the trails of light made by cars at night.
Use a tripod to minimize camera shake.
1 Select a suitable location and hold your phone steady.
Shoot from a distance for the best results. Avoid pointing the camera at street lamps to
prevent parts of the image from becoming overexposed.
2 Open Camera.
78
Page 85

Camera and Gallery
3 Touch Light painting > Tail light trails.
4 Touch to start the exposure. The exposure time is displayed at the bottom of the screen.
5 A preview of the image is displayed in the viewfinder. When the desired exposure time has
elapsed, touch
to end the exposure.
Light graffiti
In Light Painting mode, select Light graffiti to create patterns or text by moving a light source in
front of the camera.
l Choose a light source with a suitable color and brightness, such as a torch or glow stick.
l Use a tripod to minimize camera shake.
1 Select a suitable location and hold your phone steady.
Choose a location away from other sources of light to ensure that the person holding the
light source does not appear in the image.
2 Open Camera.
3 Touch Light painting > Light graffiti.
4 Touch to start the exposure. The exposure time is displayed at the bottom of the screen.
5 A preview of the image is displayed in the viewfinder. Touch to end the exposure.
79
Page 86

Camera and Gallery
Silky water
In Light Painting mode, select Silky water to capture silkily smooth images of waterfalls and
rivers.
Use a tripod to minimize camera shake.
1 Select a suitable location and hold your phone steady.
2 Open Camera.
3 Touch Light painting > Silky water.
4 Touch
to start the exposure. The exposure time is displayed at the bottom of the screen.
5 A preview of the image is displayed in the viewfinder. When the desired exposure time has
elapsed, touch to end the exposure.
80
Page 87

Camera and Gallery
Star track
You can use your camera to capture the movement of stars in the night sky.
l Use a tripod to minimize camera shake.
l Choose a location away from light pollution with a good view of the night sky. Clear skies
will produce the best results.
1 Use a tripod to hold your phone steady.
When shooting the image, stay away from sources of light and avoid excessive exposure
times to prevent parts of the image from becoming overexposed.
2 Open Camera.
3 Touch Light painting > Star track.
4 Touch to start the exposure. The exposure time is displayed at the bottom of the screen.
5 A preview of the image is displayed in the viewfinder. When the desired exposure time has
elapsed, touch
to end the exposure.
Panoramic shots
Taking a panoramic photo
You can select Panorama mode to take wide-angle shots.
1 Select a suitable location and hold your phone steady.
l Shoot the image in a wide, open space and avoid monochromatic backgrounds.
l Shoot the image from a distance.
2 Open Camera.
3 Touch > Panorama.
4 Touch to start shooting.
81
Page 88

Camera and Gallery
5 Follow the onscreen instructions to take the photo. Slowly move your camera from left to
right, ensuring that the arrow stays level with the center line.
6 Touch to stop shooting. The camera automatically stitches the photos together to create
one panoramic photograph.
Taking panoramic self-portraits
You can also take wide-angle shots in self-portrait mode. This is ideal when you want to capture
beautiful surroundings.
You cannot take panoramic self-portraits in landscape mode.
1 Open Camera.
2 Touch to select the front-facing camera.
3 Touch > Panorama.
4 Hold your phone steady, and then touch to take the first photo.
l Make sure that subjects don't move between each photo.
l Hold your phone steady and move slowly while you turn.
5 Turn your phone to the left while following the onscreen instructions. Your phone will take the
second photo automatically when the blue box lines up with box on the left-hand side.
6 Turn your phone to the right while following the onscreen instructions. Your phone will take
the final photo when the blue box lines up with the box on the right-hand side. The camera
automatically stitches the photos together to create a panorama.
Adding watermarks to photos
Add watermarks to personalize your photos and help you remember where they were taken.
1 Open Camera.
2 Touch > Watermark.
3 Touch the
4 Drag the watermark to reposition, and then touch to take a photo.
or navigation icon or touch More and then select the desired watermark.
82
Page 89
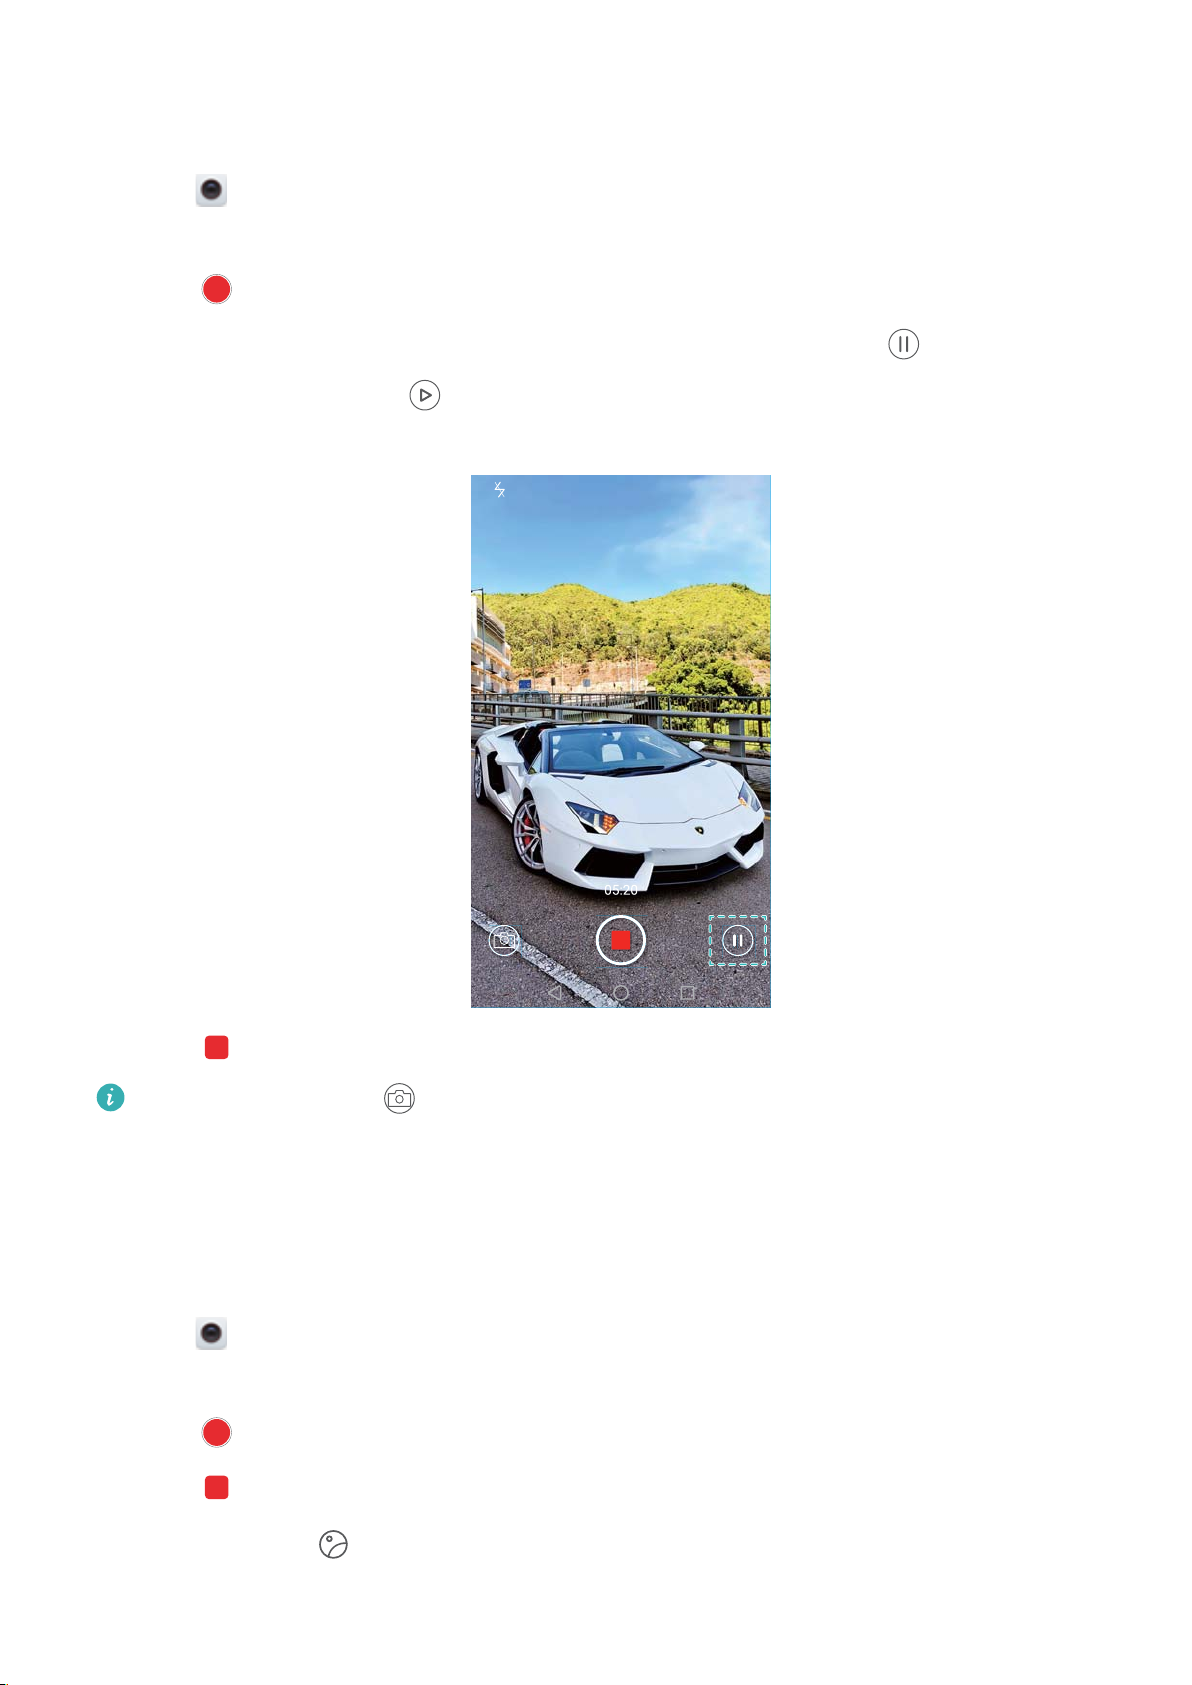
Camera and Gallery
Shooting a video
1 Open Camera.
2 Swipe left or right and select Video.
3 Touch to start a video recording.
4 Touch the screen to focus on an object or area during recording. Touch to pause
recording, and then touch
to resume.
5 Touch to end the recording.
While recording, touch to save the current scene as a photo.
Time-lapse mode
Time-lapse mode allows you to capture and speed up subtle changes in the natural world. For
example, you can record the opening of a flower or the movement of clouds.
1 Open Camera.
2 Swipe left or right and select Time-lapse.
3 Touch to start a video recording.
4 Touch
Touch the thumbnail to play the recording. The video will be played back at a higher frame
rate.
to stop recording.
83
Page 90
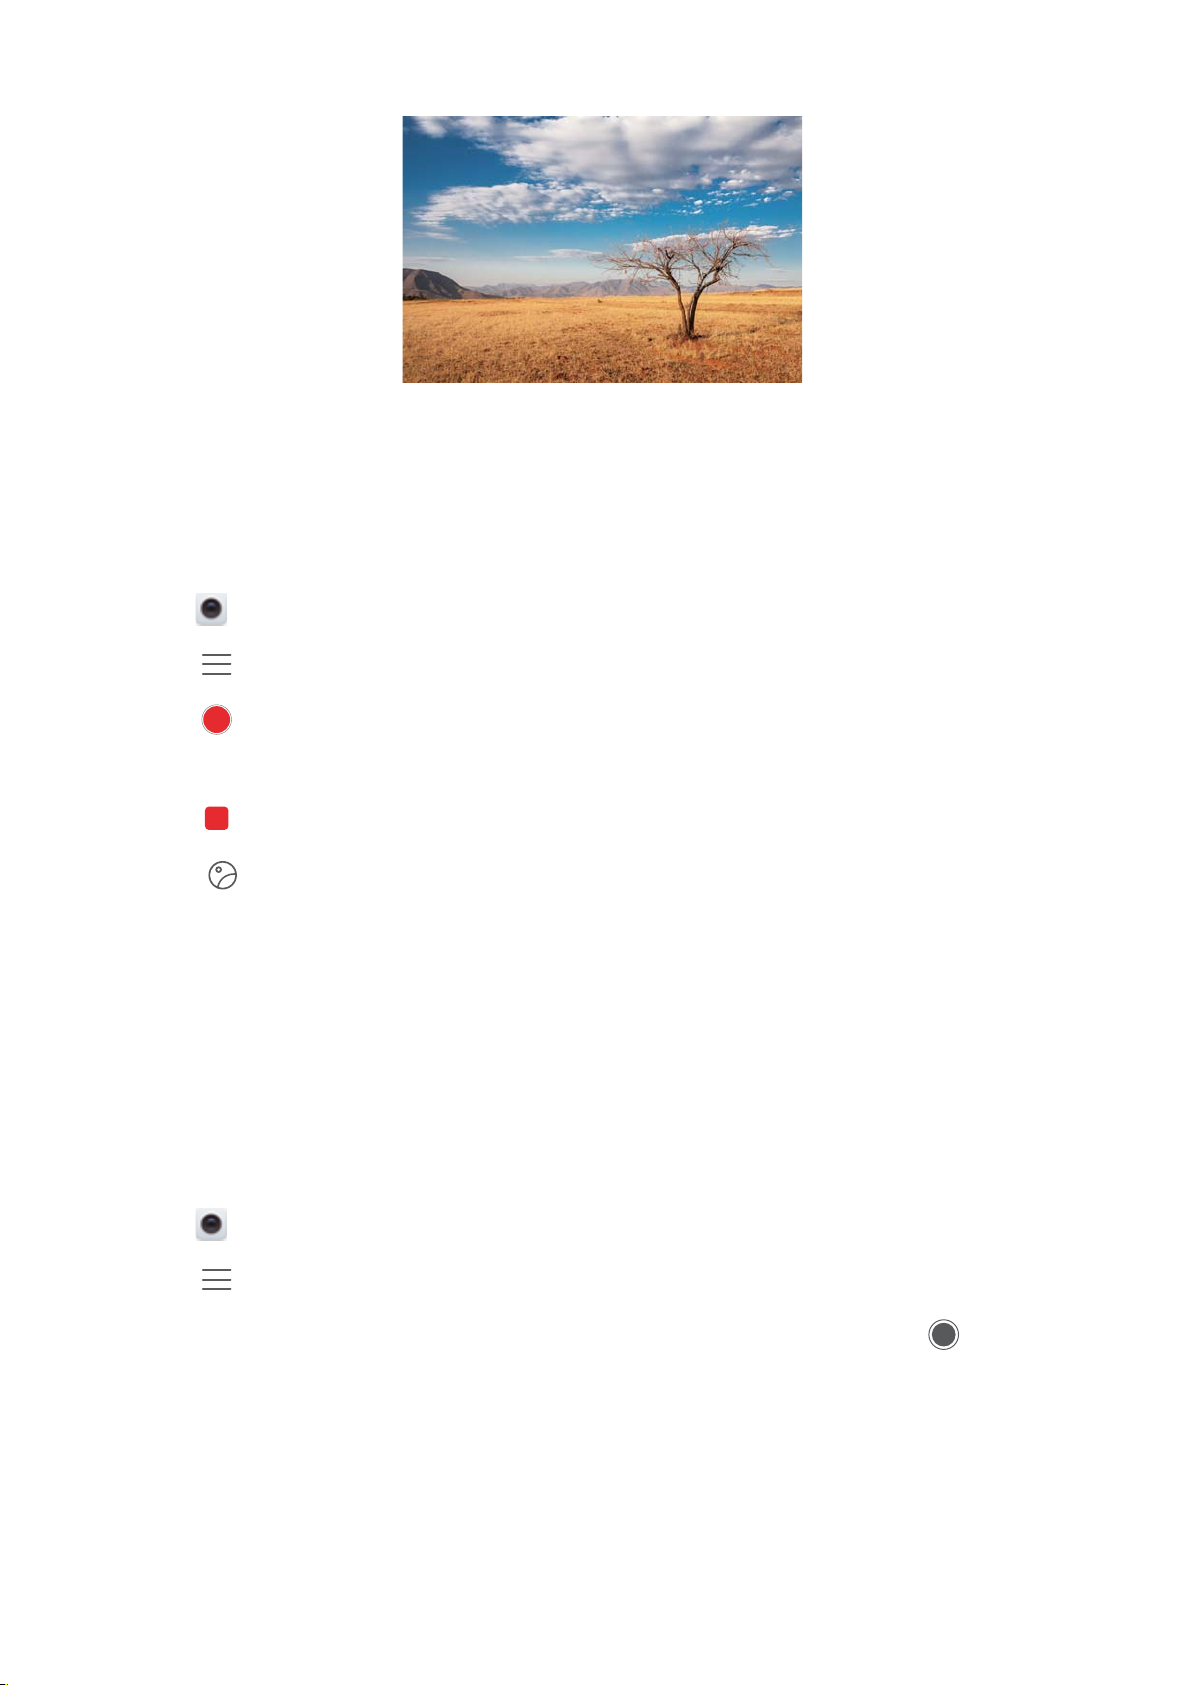
Camera and Gallery
Slow motion recording
You can record videos in slow motion to enjoy fast moving scenes in detail, such as falling water
droplets or dance moves.
1 Open Camera.
2 Touch > Slow-mo.
3 Touch to start a video recording.
4 Touch the screen to focus on an object or area during recording.
5 Touch
Touch the thumbnail to play the recording back in slow motion. You can also select a clip
from the video and play it in slow motion.
to end the recording.
Document correction
You can use document correction mode to automatically adjust the orientation of a document in
a photo. For example, if you're sitting at the edge of a meeting room, you can take a photo of a
PPT and then use document readjustment to crop and straighten the image so that it fits
perfectly on your screen.
1 Open Camera.
2 Touch > Document readjustment.
3 Focus on the subject (for example, PPT, poster, or screen), and then touch to take a
photo. Your phone will automatically extract the part of the image containing text and adjust
its orientation so that it is easier to read.
84
Page 91
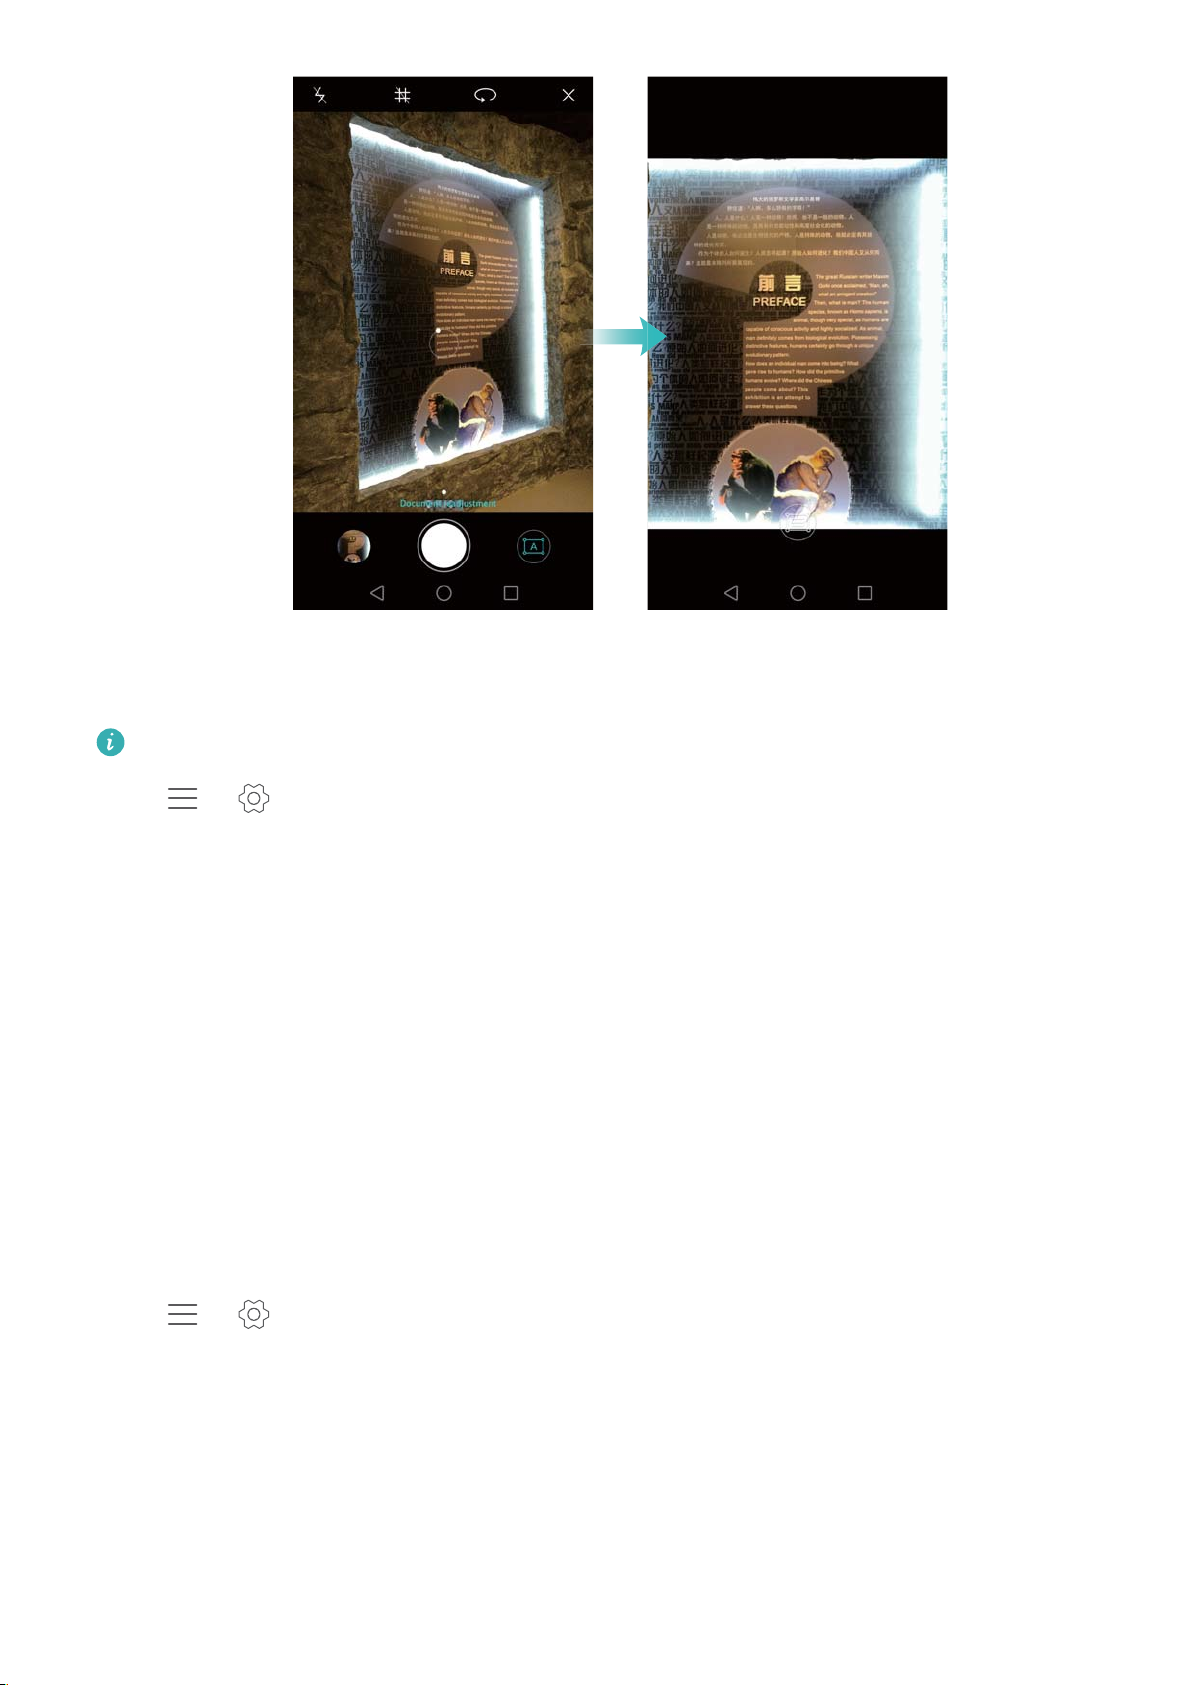
Camera and Gallery
Video settings
Beauty mode and Stabilizer cannot be enabled at the same time.
Touch > in video recording mode to configure the following settings:
l Resolution: Configure the video resolution.
l GPS tag: Display the location where the video was recorded.
l Preferred save location: Set the default storage location for your videos. You can select the
phone's internal storage, or the microSD card.
l Beauty mode: Automatic facial enhancement during recording. Beauty mode is not supported
for some video resolutions.
l Object tracking: Touch an object on the screen. The camera will focus on the selected object
when capturing the video.
l Stabilizer: Minimizes camera shake during recording.
Camera settings
Touch > in the camera app to configure the following settings:
l Resolution: Set the camera resolution.
l GPS tag: Display the location where the photo was taken.
l Preferred save location: Set the default storage location for your photos. You can select the
phone's internal storage, or the microSD card.
l Perfect selfie: Enable or disable this function in Beauty mode for automatic facial recognition
and customized portrait enhancement. For more information, refer to Perfect Selfie mode.
85
Page 92

Camera and Gallery
l Touch & hold shutter button: Configure the shutter's touch and hold settings. You can select
Burst shoot or Focus.
l Audio control: Take a photo using voice commands.
l Volume button function: Configure the volume button settings. You can select Shutter,
Zoom, or Focus.
l Mute: Enable this feature to mute the camera. Due to legal constraints, this feature is not
available in all countries and regions.
l Timer: Enable this feature to set a self-timer.
l Touch to capture: Touch the viewfinder to take a photo.
l Capture smiles: The camera will automatically take a photo when it detects a smile.
l Object tracking: Touch the object you want to focus on. The camera will track and focus on
the selected object. For more information, refer to Object tracking.
l Ultra snapshot: Touch the volume down button twice to take a photo when the screen is
locked. For more information, refer to Ultra Snapshot.
Viewing photos and videos
You can view the following photos and videos in Gallery:
l Photos and videos shot with the camera.
l Photos and videos that your friends shared with you.
l Photos and videos synced from your computer.
l Photos and videos saved from messages, emails, or websites, as well as screenshots.
Open
location they were shot. Go to the Albums tab to sort photos and videos by album.
Viewing photos in chronological order
Go to the Photos tab. Photos are automatically displayed in chronological order. Touch >
Settings, and then turn on the Show time switch to display the time that the shot was taken
when viewing an image.
Viewing photos by location
Gallery and go to the Photos tab to sort photos and videos according to the time and
Go to the Photos tab and touch . Photos with location information will be displayed on a
map. Touch > Settings, and then turn on the Show location switch to display the location
where the shot was taken when viewing an image.
Viewing photos by album
Go to the Albums tab. Photos and videos are automatically added to the default folders. For
example, videos that you shot using the camera are automatically added to the Camera videos
folder, and screenshots are added to the Screenshots folder.
86
Page 93
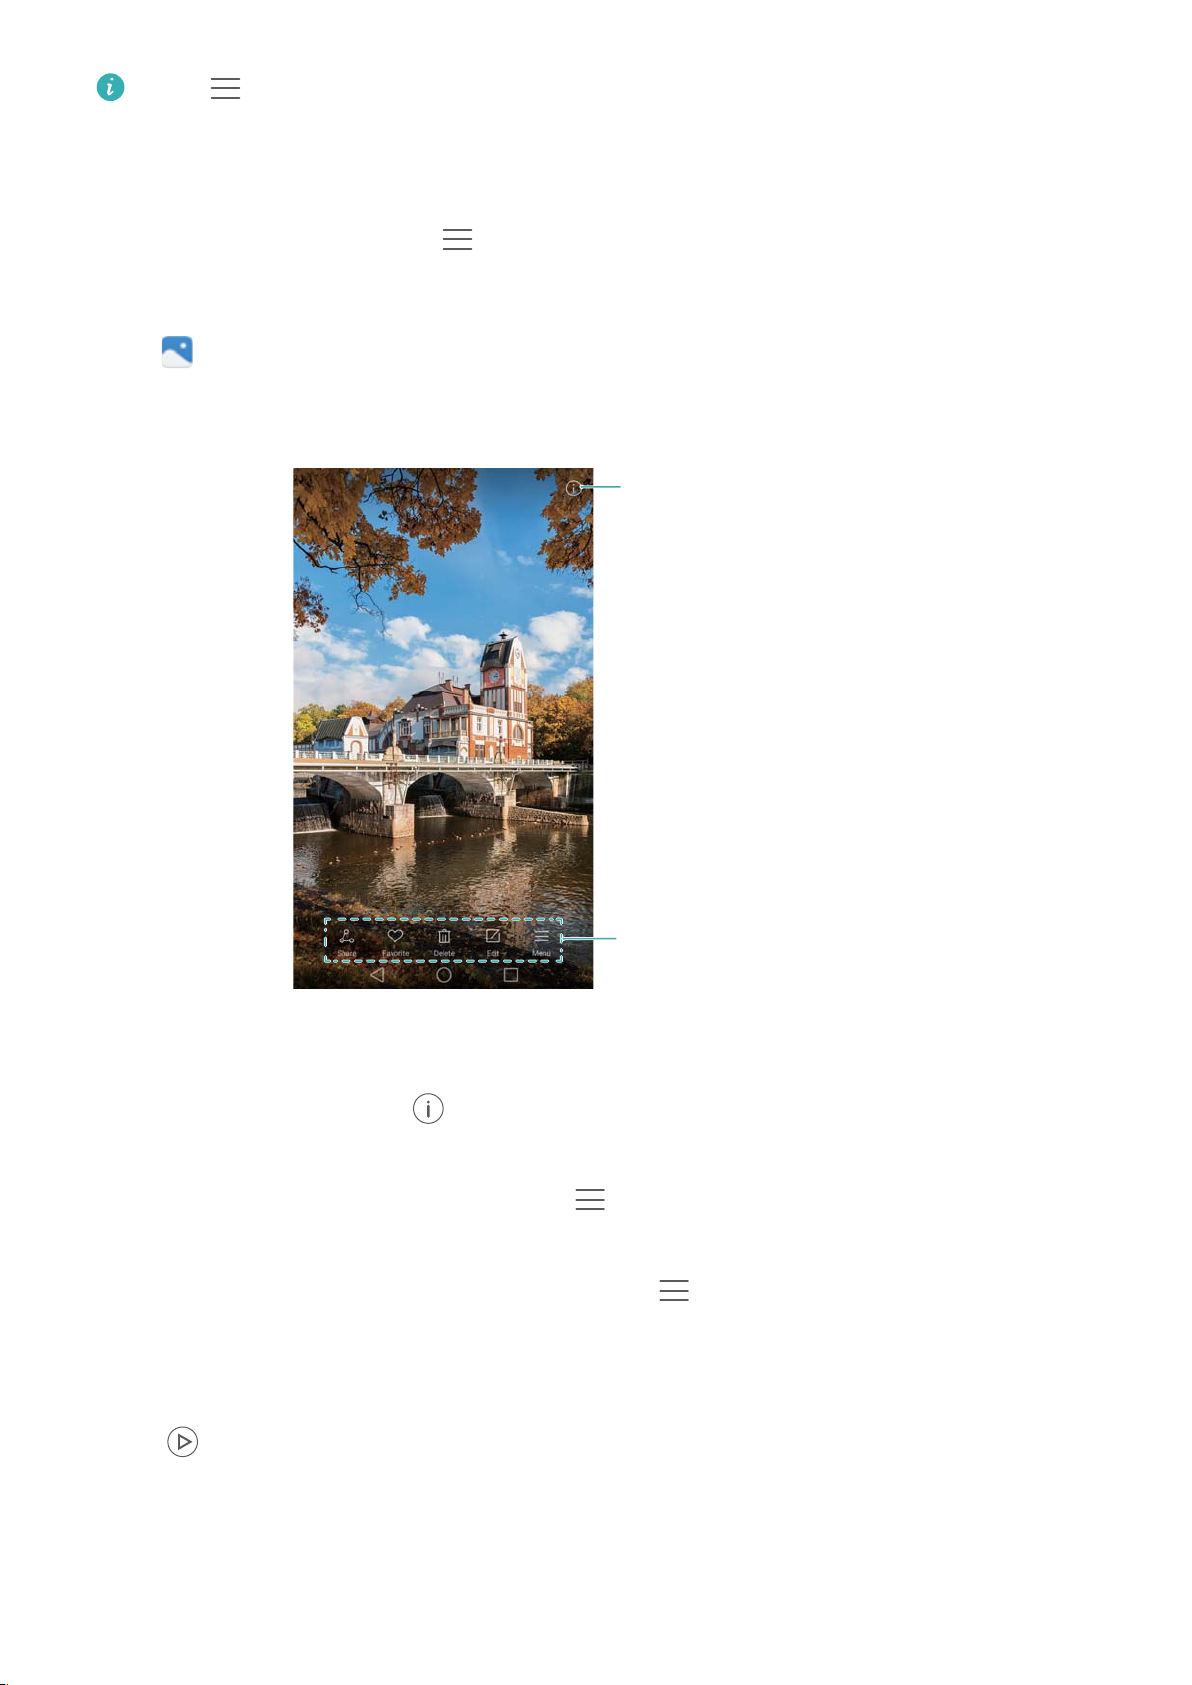
View photo details
Overlay menu
Camera and Gallery
Touch > Hide albums and turn on the switch next to albums that you wish to hide.
These albums will not appear in the album list.
Viewing photos as a slideshow
Go to the Photos tab and touch > Slideshow. Touch the screen to stop the slideshow.
Viewing photos in full-screen mode
Open Gallery and then touch an image to view it in full-screen mode. Touch the screen to
display or hide the screen menu.
l Zoom or in out: Spread two fingers apart to zoom in or pinch two fingers together to zoom
out.
l View image details: Touch to view the image details, such as the ISO, exposure
compensation, and resolution.
l Rename photo: To rename a photo, touch
> Rename, enter the new name, and then
select OK.
l Set photo as the home screen wallpaper: Touch > Set as > Wallpaper to set a photo
as the home screen wallpaper.
Playing a video
Touch to play a video. Touch the screen when the video is playing to display or hide the
control bar. For more information, see Playing a video.
87
Page 94

Camera and Gallery
Adding photos or videos to a new album
1 Open Gallery.
2 Go to the Albums tab. Touch and then enter the album name.
3 Select the images or videos that you want to add to the new album, and then touch .
4 Copy or move the photos or videos to the new album.
Moving photos or videos to other albums
1 Open
Gallery.
2 Touch and hold an image or video thumbnail, and then select the files that you want to move.
3 Touch , then select the destination album, or touch to create a new album and select
it as the destination album.
Deleting images or videos
If you're running out of storage space, delete unwanted photos and videos from Gallery.
1 Open Gallery.
2 Touch and hold an image or video thumbnail, and then select the files that you want to delete.
3 Touch > Delete to delete the selected files.
Sharing images or videos
1 Open
Gallery.
2 Touch and hold an image or video thumbnail, and then select the files that you want to share.
3 Touch , choose a sharing method, and follow the onscreen instructions to share your
files.
Managing albums
1 Open Gallery.
2 Go to the Albums tab, and then touch and hold an album to access the menu. You can:
l Rename an album: Touch > Rename, enter the new album name, and then select
OK.
l Delete an album: Select the album you want to delete, and then touch > Delete.
88
Page 95
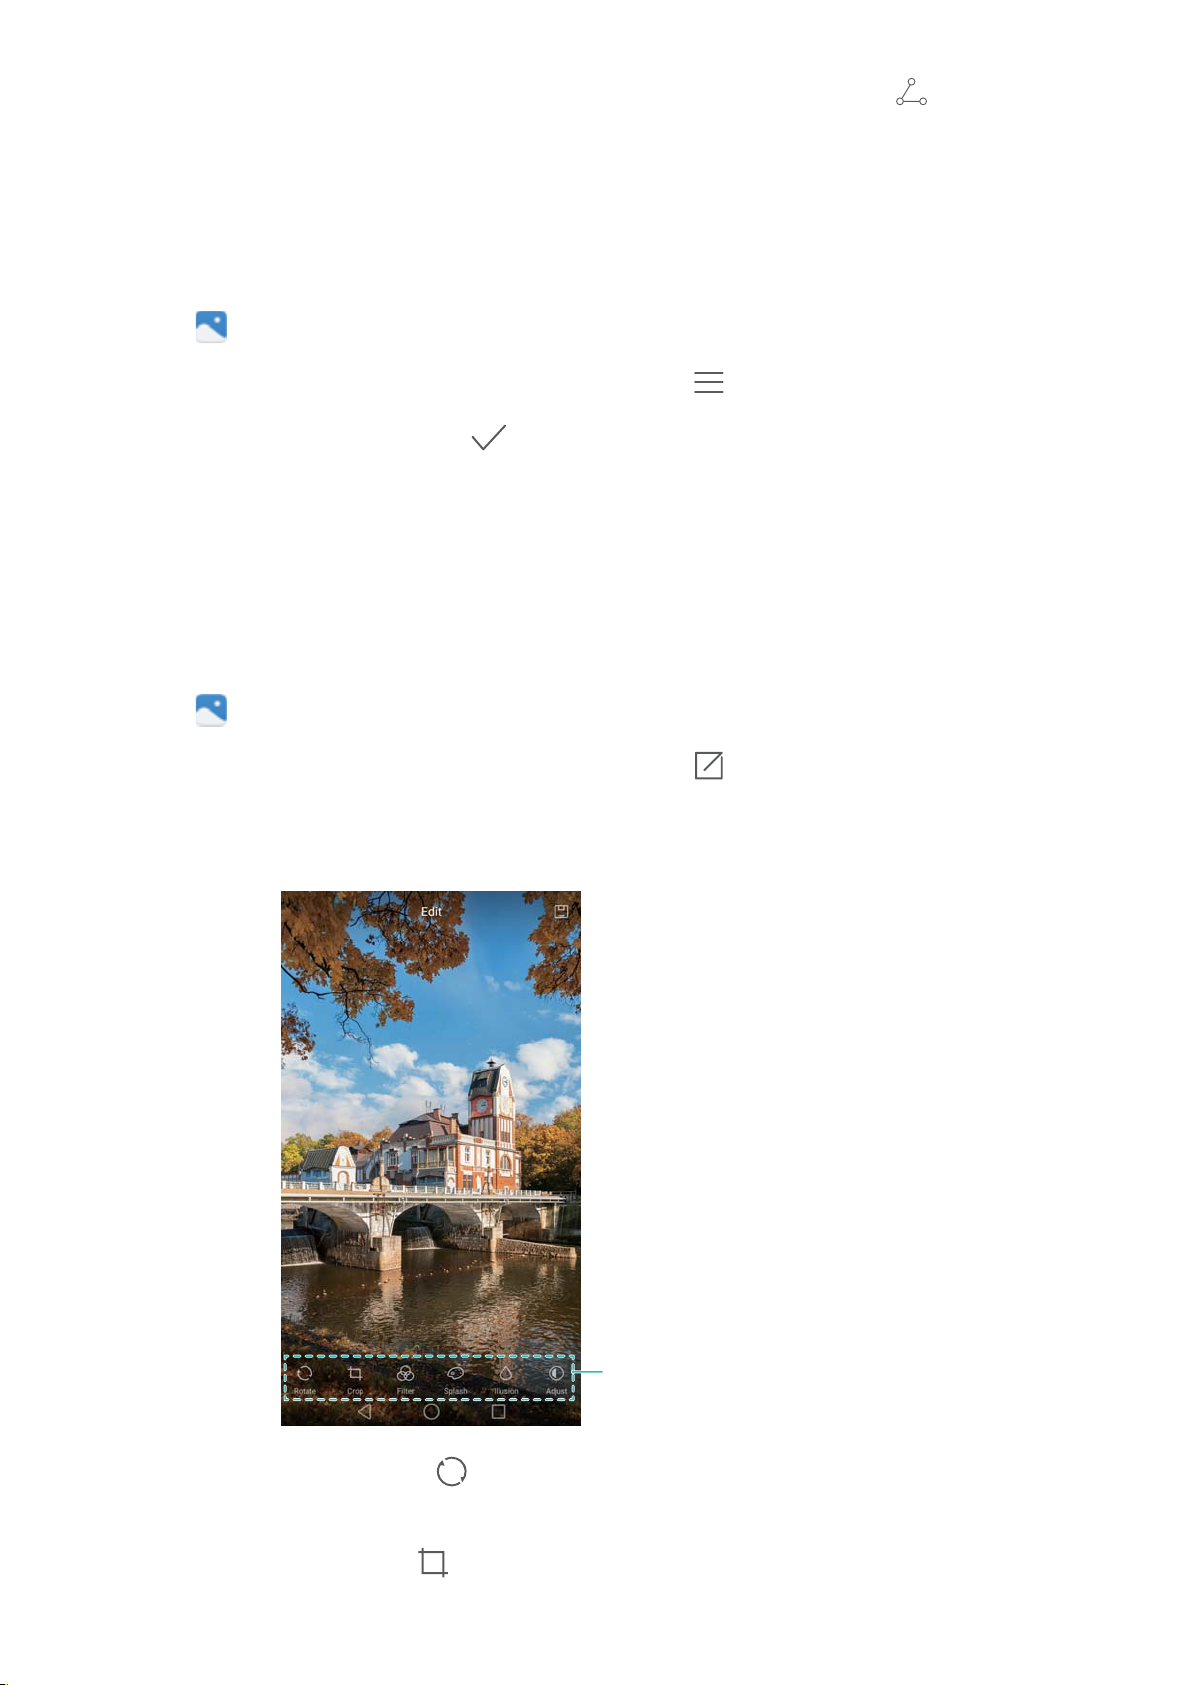
Swipe left to view more editing tools
Camera and Gallery
l Share an album: Select the album you want to share, and then touch . Select a
sharing method and follow the onscreen instructions to share the album files.
Adding notes to an image
Use Gallery to add notes to your images.
1 Open Gallery.
2 Touch an image to view it in full-screen mode. Touch > Add memo.
3 Enter your note, and then touch . Add the image to your Magazine Unlock covers so that
it will be displayed on the lock screen.
Editing an image
The Gallery application comes with powerful image editing tools that you can use to bring your
photos to life. For example, you can draw graffiti, add watermarks, or apply a variety of filters.
1 Open Gallery.
2 Touch an image to view it in full-screen mode. Touch
to edit the image.
3 Select an image editing tool. You can:
l Rotate an image: Touch and swipe the screen to adjust the angle of rotation. Touch
Mirror to create a mirror image of the photo.
l Crop an image: Touch to select the crop ratio (for example, 16:9). Drag the dotted
edges to crop the image to the desired size.
89
Page 96

Camera and Gallery
l Add a filter: Touch and select the desired filter.
l Accentuate colors: Touch and select the colors that you wish to accentuate.
l Blur an image: Touch . Drag the slider to adjust the amount of blur. Drag the circle to
the part of the image that you do not want to blur.
l Adjust image parameters: Touch . You can adjust the brightness, contrast,
saturation, and more to make your image look more vivid.
l Apply facial enhancement effects: Touch to apply facial enhancement effects to
people in an image. You can choose from various skin and eye enhancement effects.
l Apply mosaic effects: Touch and then select the desired mosaic effect.
l Draw graffiti: Touch to select the brush and color.
l Add a watermark: Touch to add a watermark and personalize your photo. You can
choose from time, location, weather, exercise type, and more.
l Add a label: Touch and then select the desired label type and font. You can use
labels to record your mood or thoughts.
Using Camera or Gallery to scan a QR code
QR codes are a quick and convenient way to receive information. For example, you can scan a
QR code to view discount information or add contacts. You can scan a QR code using the
camera, or use Gallery to scan a QR code contained in an image stored on your device.
Scanning a QR code using Gallery
1 Open
2 Select the image containing the QR code that you want to scan to view it in full-screen mode.
3 Touch the screen. Gallery will automatically scan the QR code.
4 Touch View details to view the QR code details.
Gallery.
Scanning a QR code using Camera
1 Open Camera.
2 Frame the QR code in the viewfinder. The camera will automatically scan the QR code.
3 Touch View details to view the QR code details.
90
Page 97
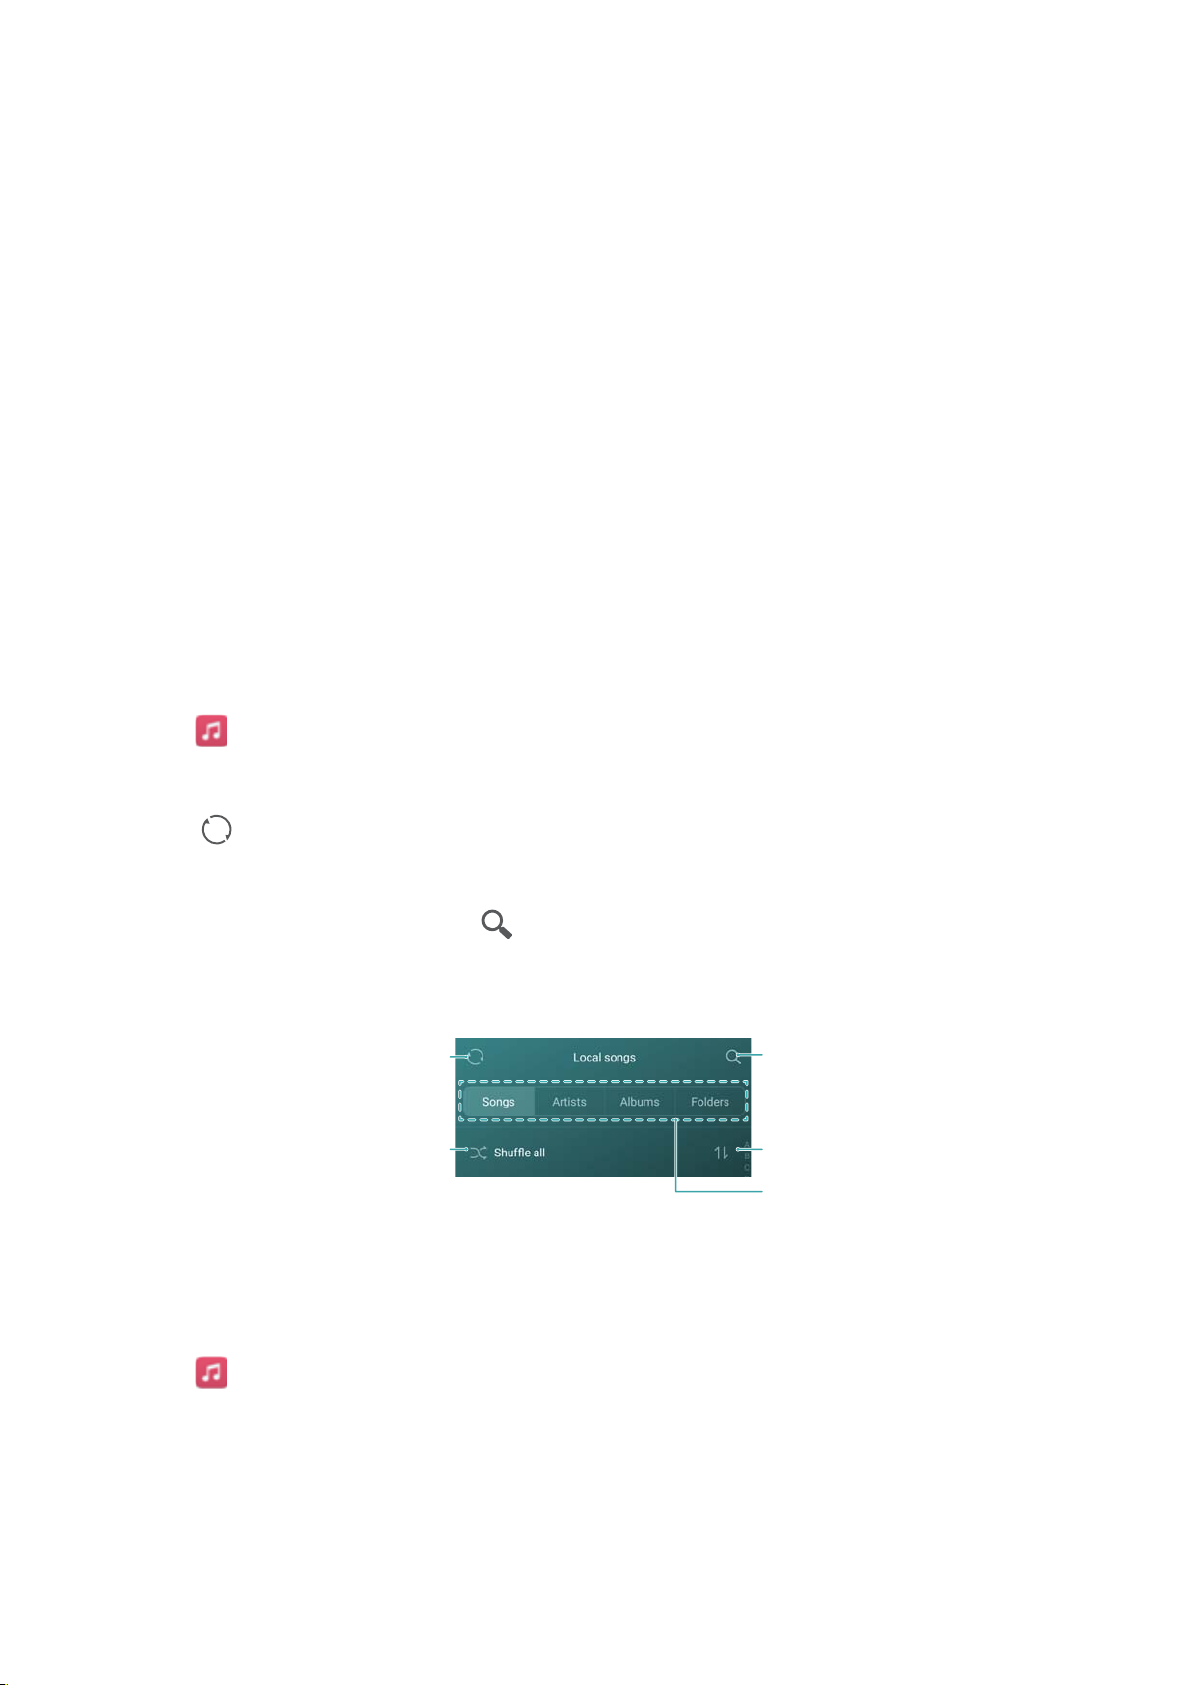
Music and Video
Scan for local music
Shuffle
Browse music by
category
Search local music
Sort songs
Adding songs to your phone
Before you can listen to your music, you need to copy your songs onto your phone.
To add songs to your phone:
l Copy songs from your computer using the USB cable.
l Download songs from the Internet.
l Copy songs with Bluetooth. For more information, see Sending and receiving files using
Bluetooth.
l Copy songs with Wi-Fi Direct. For more information, see Using Wi-Fi Direct to send and
receive files.
Searching for local music
Sort your music by category or search with a keyword to find your music files quickly.
1 Open
Music.
2 Touch Local songs.
3 Touch to search for and view your local music.
4 You can choose to organize your music by song name, artist, album name, or folder. To
search for a specific song, touch and then enter the song name, artist, or album in the
search bar.
Listening to music
1 Open Music.
2 Touch Local songs.
3 Touch the song you want to play.
Using your phone during music playback
91
Page 98
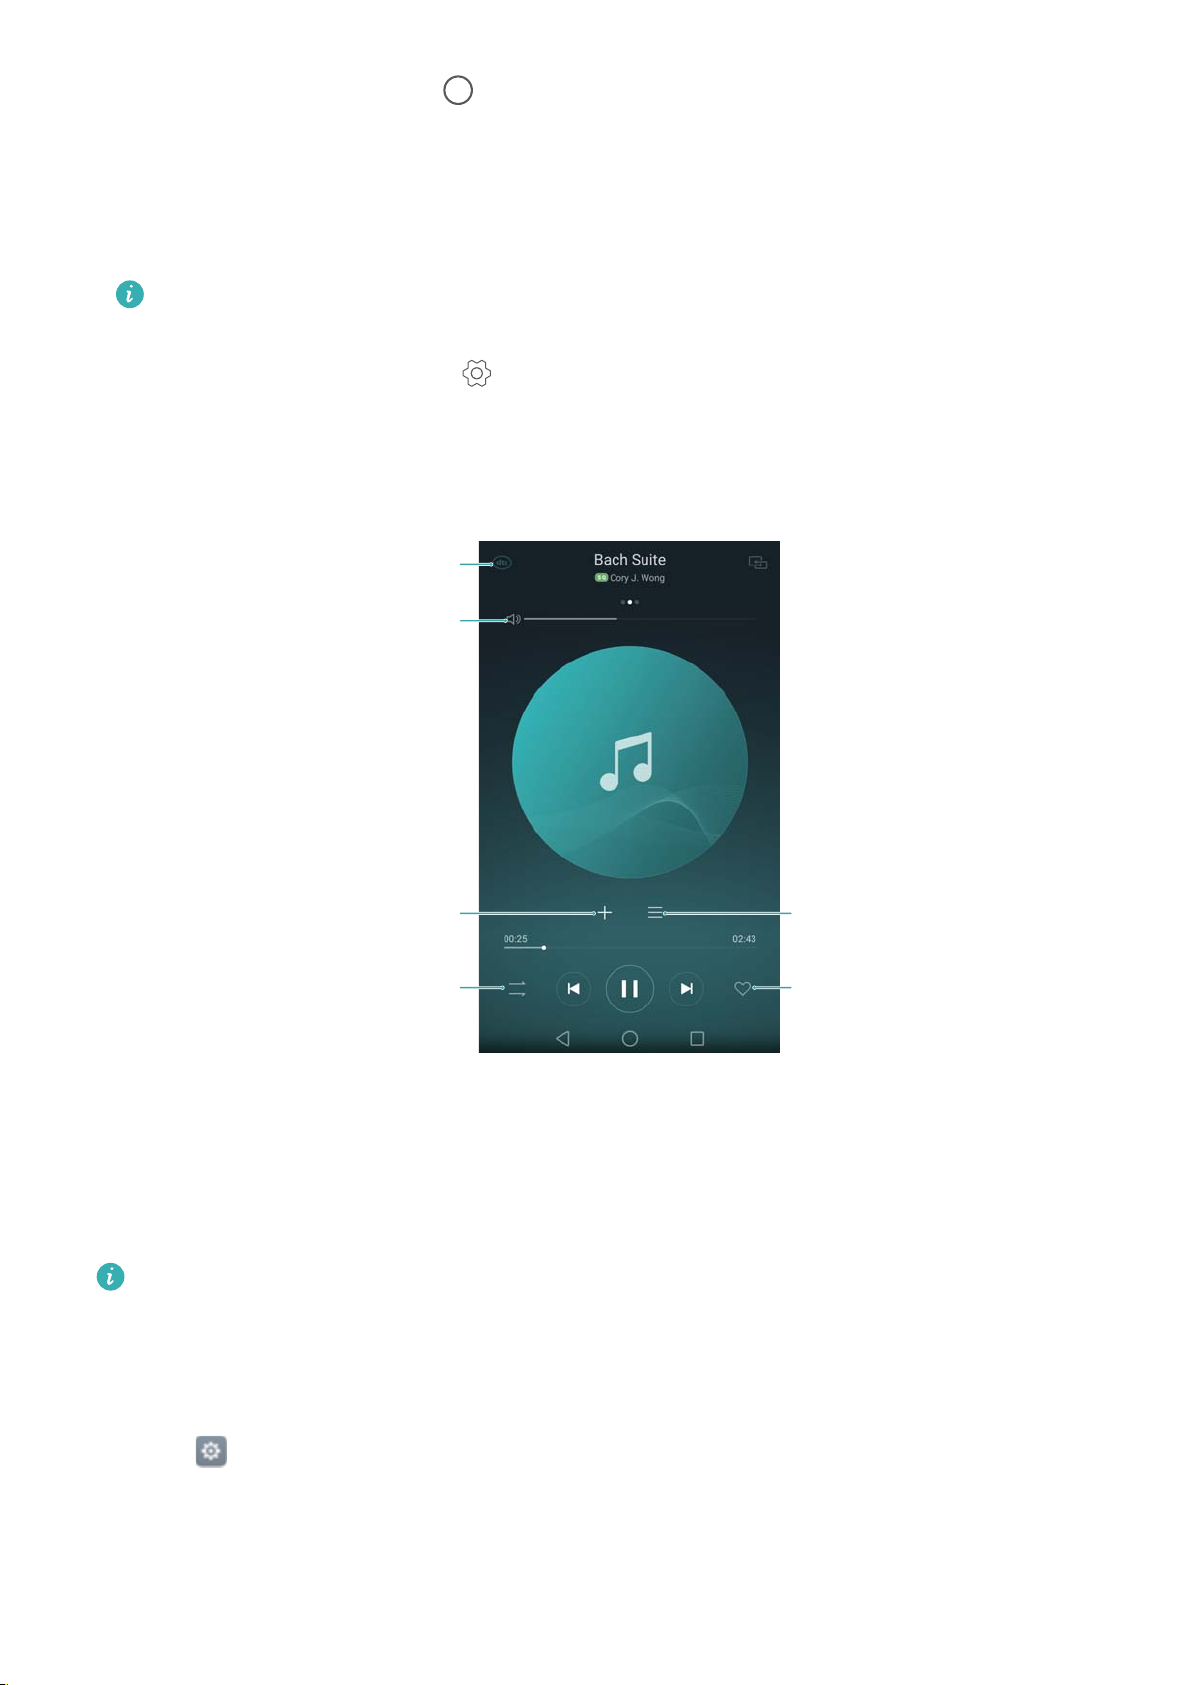
Enable DTS effects
for headset
Adjust playback
volume
Add song to playlist
Change playback
mode
Add song
to favorites
Menu
Music and Video
l When a song is playing, touch Home to exit the music playback screen without stopping
the song. To return to the music playback screen, open the notification panel and touch the
song that is playing.
l Touch the song that is playing to return to the playback screen. Swipe left or right to view the
song list, album cover, and lyrics.
Lyrics files must be downloaded separately and saved in .lrc format. The name and file
path must be the same as the music file.
l On the My music screen, touch > Close to close the music player.
Using the playback screen
Touch the playback screen to display or hide the menu icons.
Controlling playback using a smart headset
When smart headset control is enabled, you can use the buttons on a headset to control
playback without turning on the screen.
l Not all headsets are compatible with your phone. You are advised to purchase an official
Huawei headset.
l You can also use a headset to control video playback (this feature is not supported by all
video players).
1 Open Settings.
2 Touch Smart assistance > Smart headset control.
3 Turn on the Smart headset control switch.
Use the following buttons to control playback:
92
Page 99
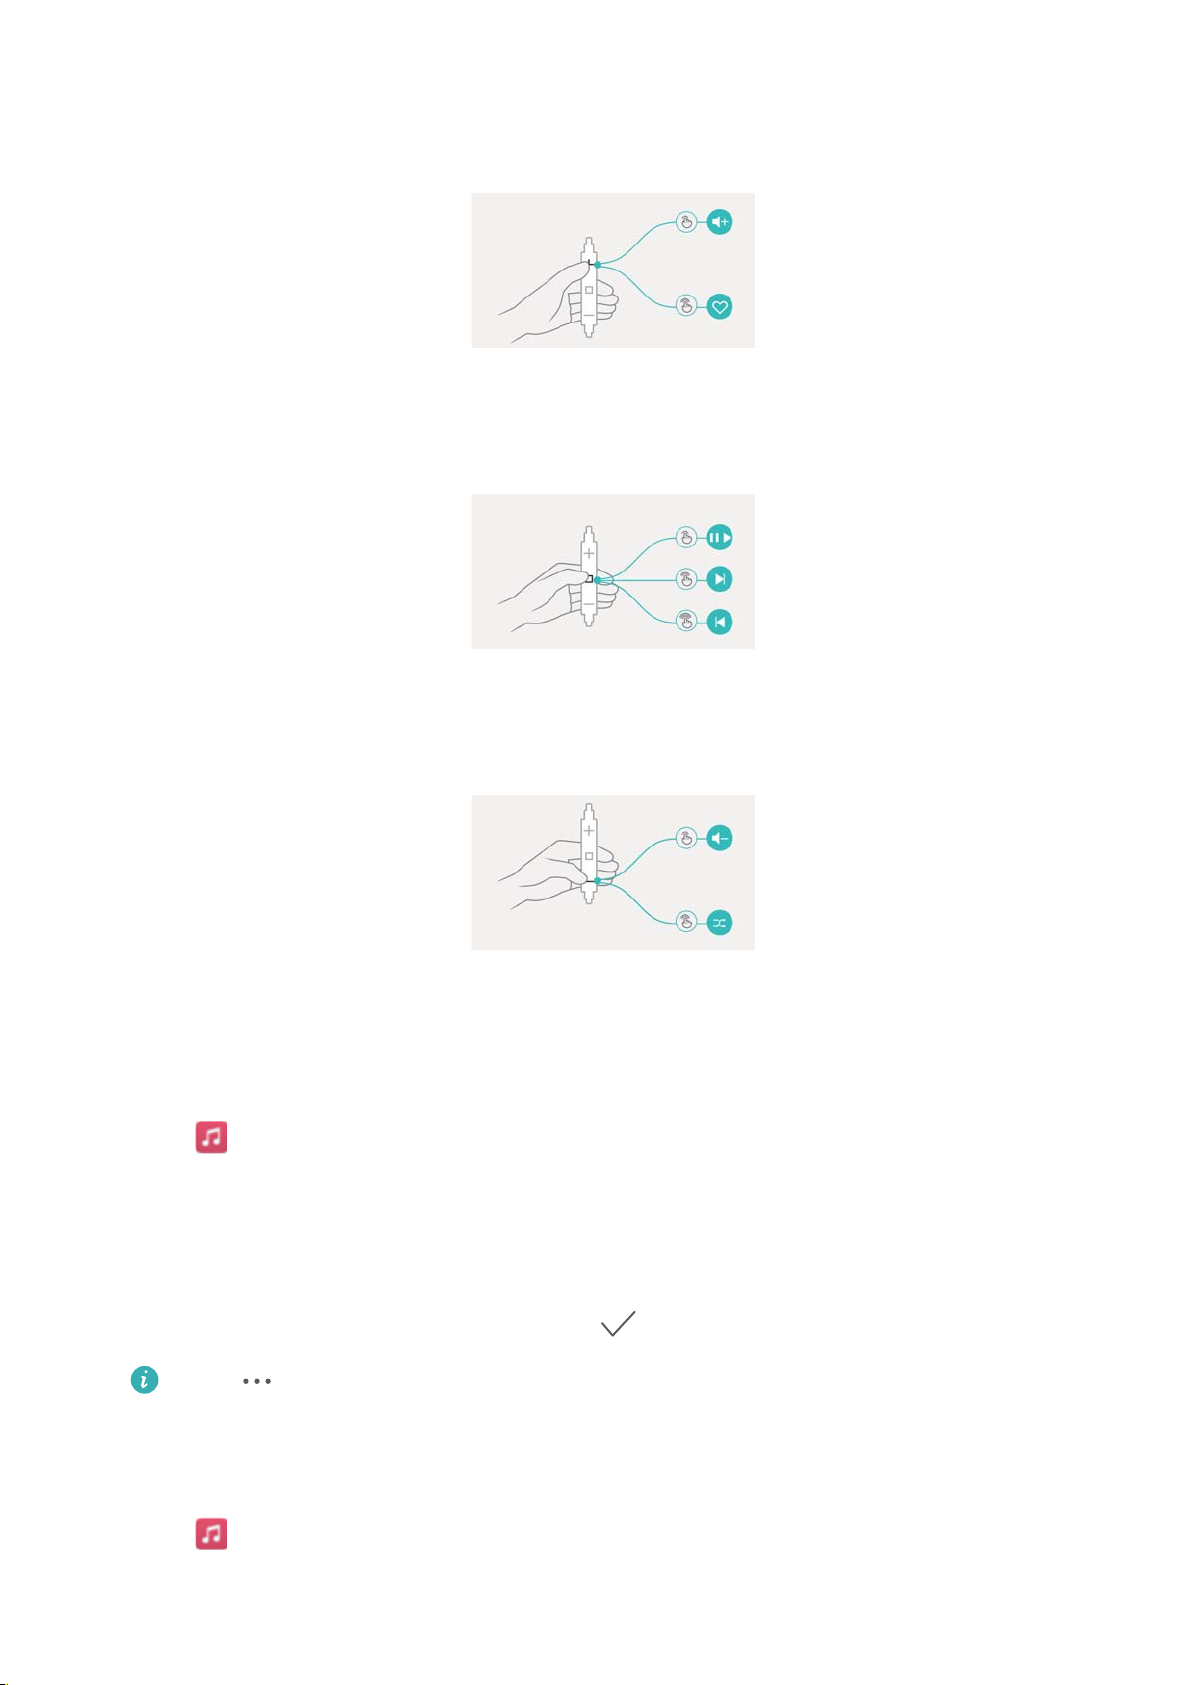
Music and Video
l Volume up button: Press once to increase the volume, or twice to add the current song to
your favorites.
l Pause button: Press once to pause or resume playback, twice to skip to the next song, or
three times to go to the previous song.
l Volume down button: Press once to decrease the volume, or twice to change the playback
mode.
Creating a playlist
Organize your music by creating customized playlists that contain your favorite songs.
1 Open Music.
2 Touch Playlists > Create new playlist.
3 Name the playlist and touch Save.
4 Touch Add in the dialog box.
5 Select the songs you want to add and touch
Touch next to the playlist to Rename or Delete the playlist.
Playing a playlist
1 Open
2 Touch Playlists .
Music.
.
93
Page 100
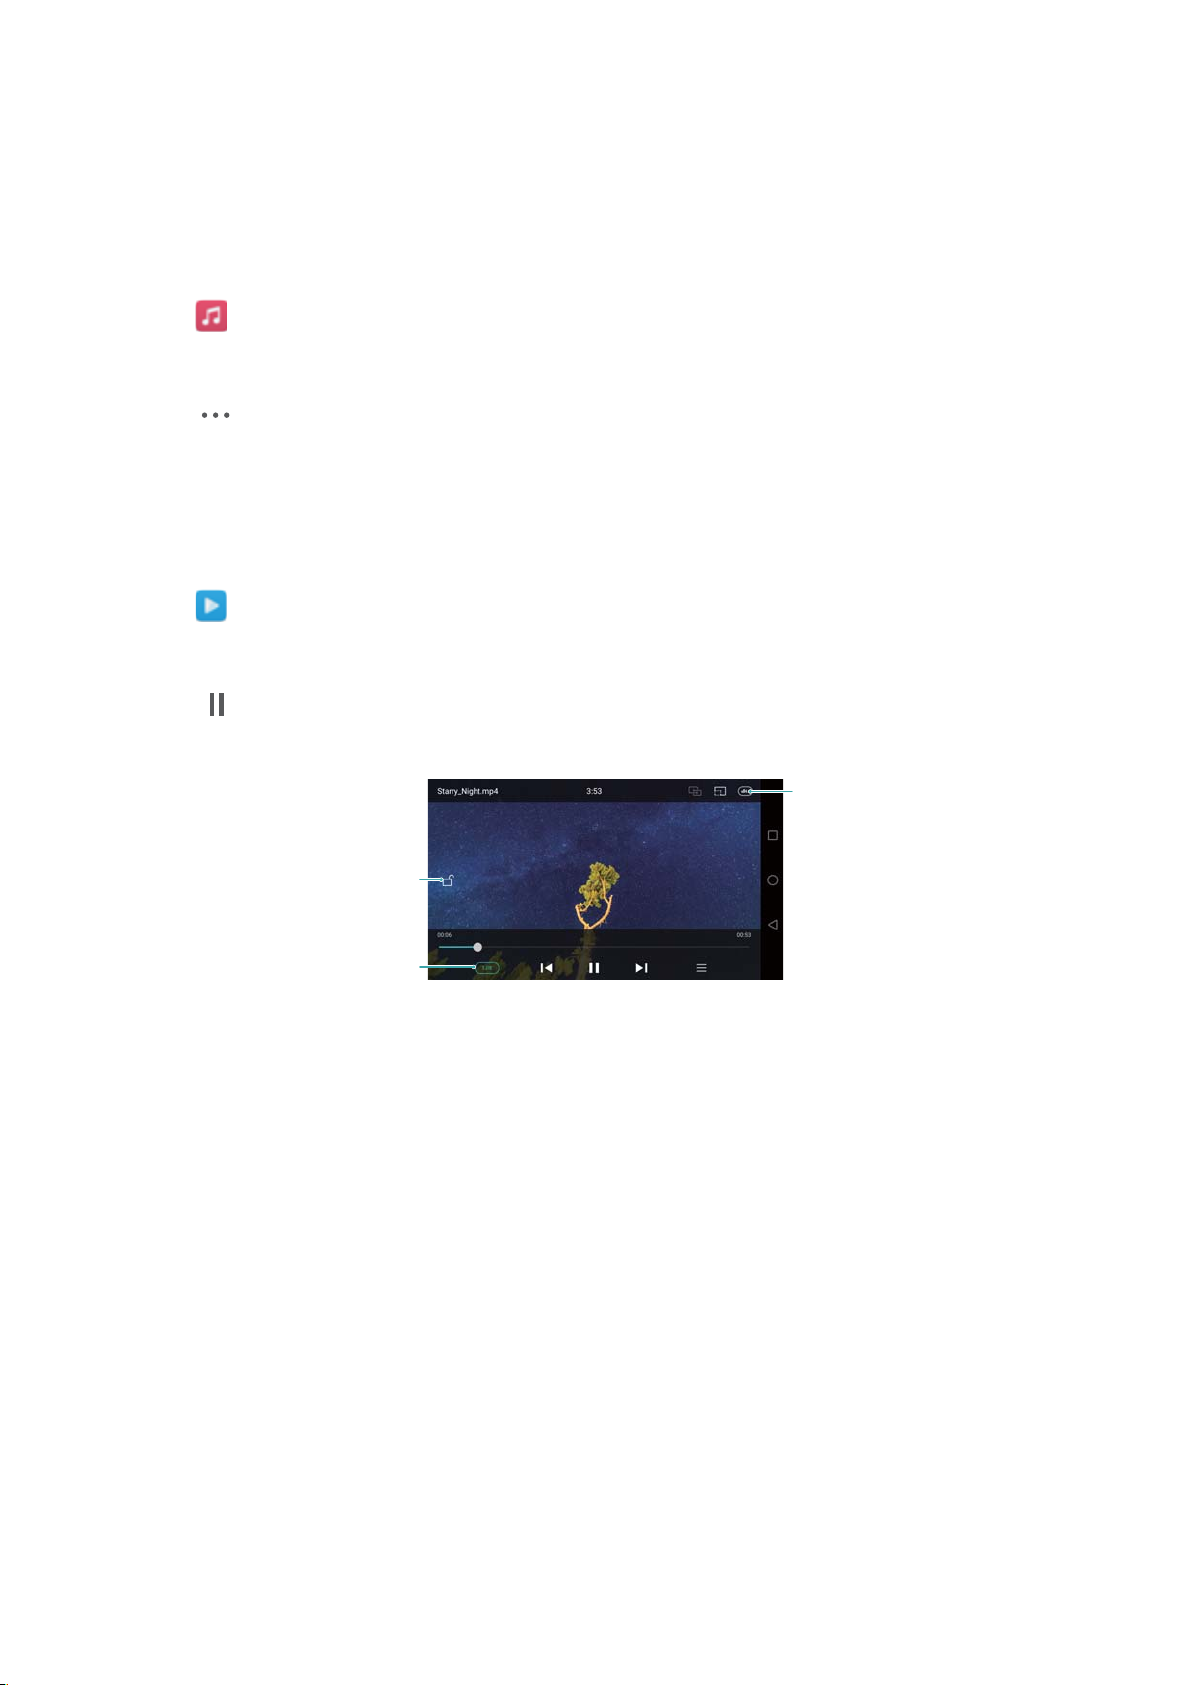
Enable DTS
effects for
headset
Lock the screen
Adjust playback
speed
Music and Video
3 Select the desired playlist, and then touch a song to start playback, or touch Shuffle all to
shuffle all songs.
Setting a song as the ringtone
Set your favorite song as the call, notification, or alarm ringtone.
1 Open Music.
2 Touch Local songs.
3 Touch
call, notification, or alarm ringtone.
> Set as ringtone next to the song name. You can choose to set the song as the
Playing a video
1 Open Videos.
2 Touch the video you want to play.
3 Touch to pause the video playback.
Using your phone during video playback
l Swipe left or right to rewind or fast-forward the video.
l Swipe up or down on the left side of the screen to adjust the screen brightness.
l Swipe up or down on the right side of the screen to adjust the volume.
94
 Loading...