

Page 1
User Guide
Page 2

Contents
Essentials
Basic Gestures
System Navigation
Phone Clone
Lock and Unlock Your Screen
Get Familiar with the Home Screen
Notication and Status Icons
Control Panel
Quickly Access Frequently Used App Features
Home Screen Widgets
Set Your Wallpaper
Screenshots & Screen Recording
View and Clear Notications
Adjust Sound Settings
multi-window
Show Date and Time When the Screen Is O
Power On and O or Restart Your Device
Charging
1
4
5
6
7
8
9
14
15
15
16
20
21
23
25
27
27
Smart Features
AI Voice
AI Lens
Easy Projection
Multi-screen Collaboration
Multi-screen Collaboration Between Your Tablet and Phone
Huawei Share
Huawei Print
Multi-Device Collaboration
Audio Control Panel
Camera and Gallery
Launch Camera
Take Photos
Shoot in Portrait, Night, and Wide Aperture Modes
Master AI
Macro
Take Panoramic Photos
Moving Pictures
Add Stickers to Photos
Documents Mode
High-Res Mode
30
35
37
39
46
48
51
52
54
56
56
59
61
62
62
63
63
64
64
i
Page 3

Apps
Pro Mode
Record Videos
Slow-Mo Recording
Time-Lapse Photography
Dual-View Mode
Filters
Adjust Camera Settings
Manage Gallery
Smart Photo Categorization
People Album Videos
Highlights
Contents
65
69
70
71
72
72
72
74
80
81
81
Apps
Contacts
Phone
Messaging
MeeTime
Calendar
Clock
Notepad
Recorder
Email
Calculator
Flashlight
Compass
App Twin
Optimizer
Phone Clone
83
84
87
93
96
97
98
100
103
104
109
109
110
110
111
114
Settings
Search for Items in Settings
Wi-Fi
Mobile Network
More Connections
Home Screen & Wallpaper
Display & Brightness
Sounds & Vibration
Notications
Biometrics & Password
Apps
Battery
Storage
Security
116
116
117
121
128
129
132
135
136
139
140
142
142
ii
Page 4

Privacy
Accessibility Features
Users & Accounts
System & Updates
About Phone
Contents
145
148
150
151
157
iii
Page 5
Essentials
Basic Gestures
Basic Gestures and Shortcuts
System Navigation Gestures
Go to Settings > System & updates > System navigation and make sure that Gestures is
selected.
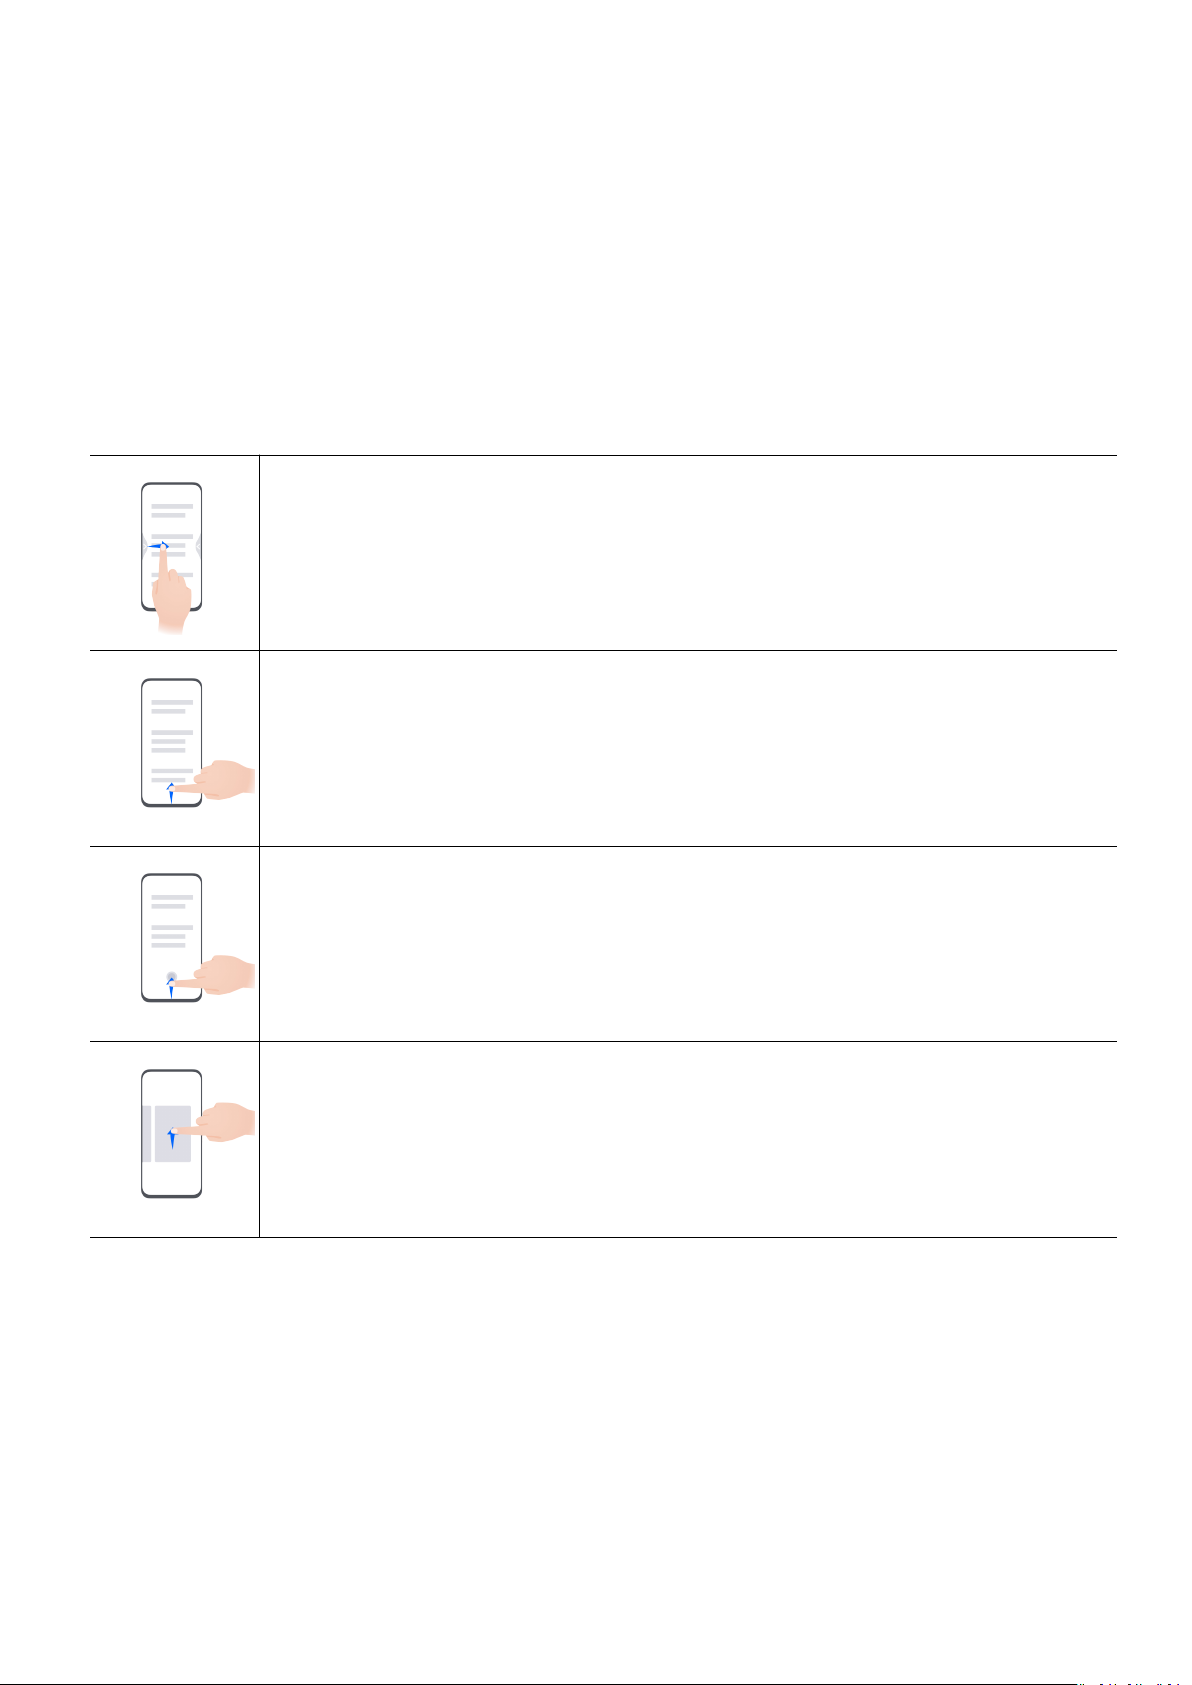
Return to the previous screen
Swipe in from the left or right edges to return to the previous screen.
Back to home screen
Swipe up from the bottom to go to the home screen.
Recent tasks
Swipe up from the bottom of the screen and hold to view recent tasks.
Close an app
When viewing recent tasks, swipe up on an app preview to close the app.
1
Page 6
Essentials
Switch between apps
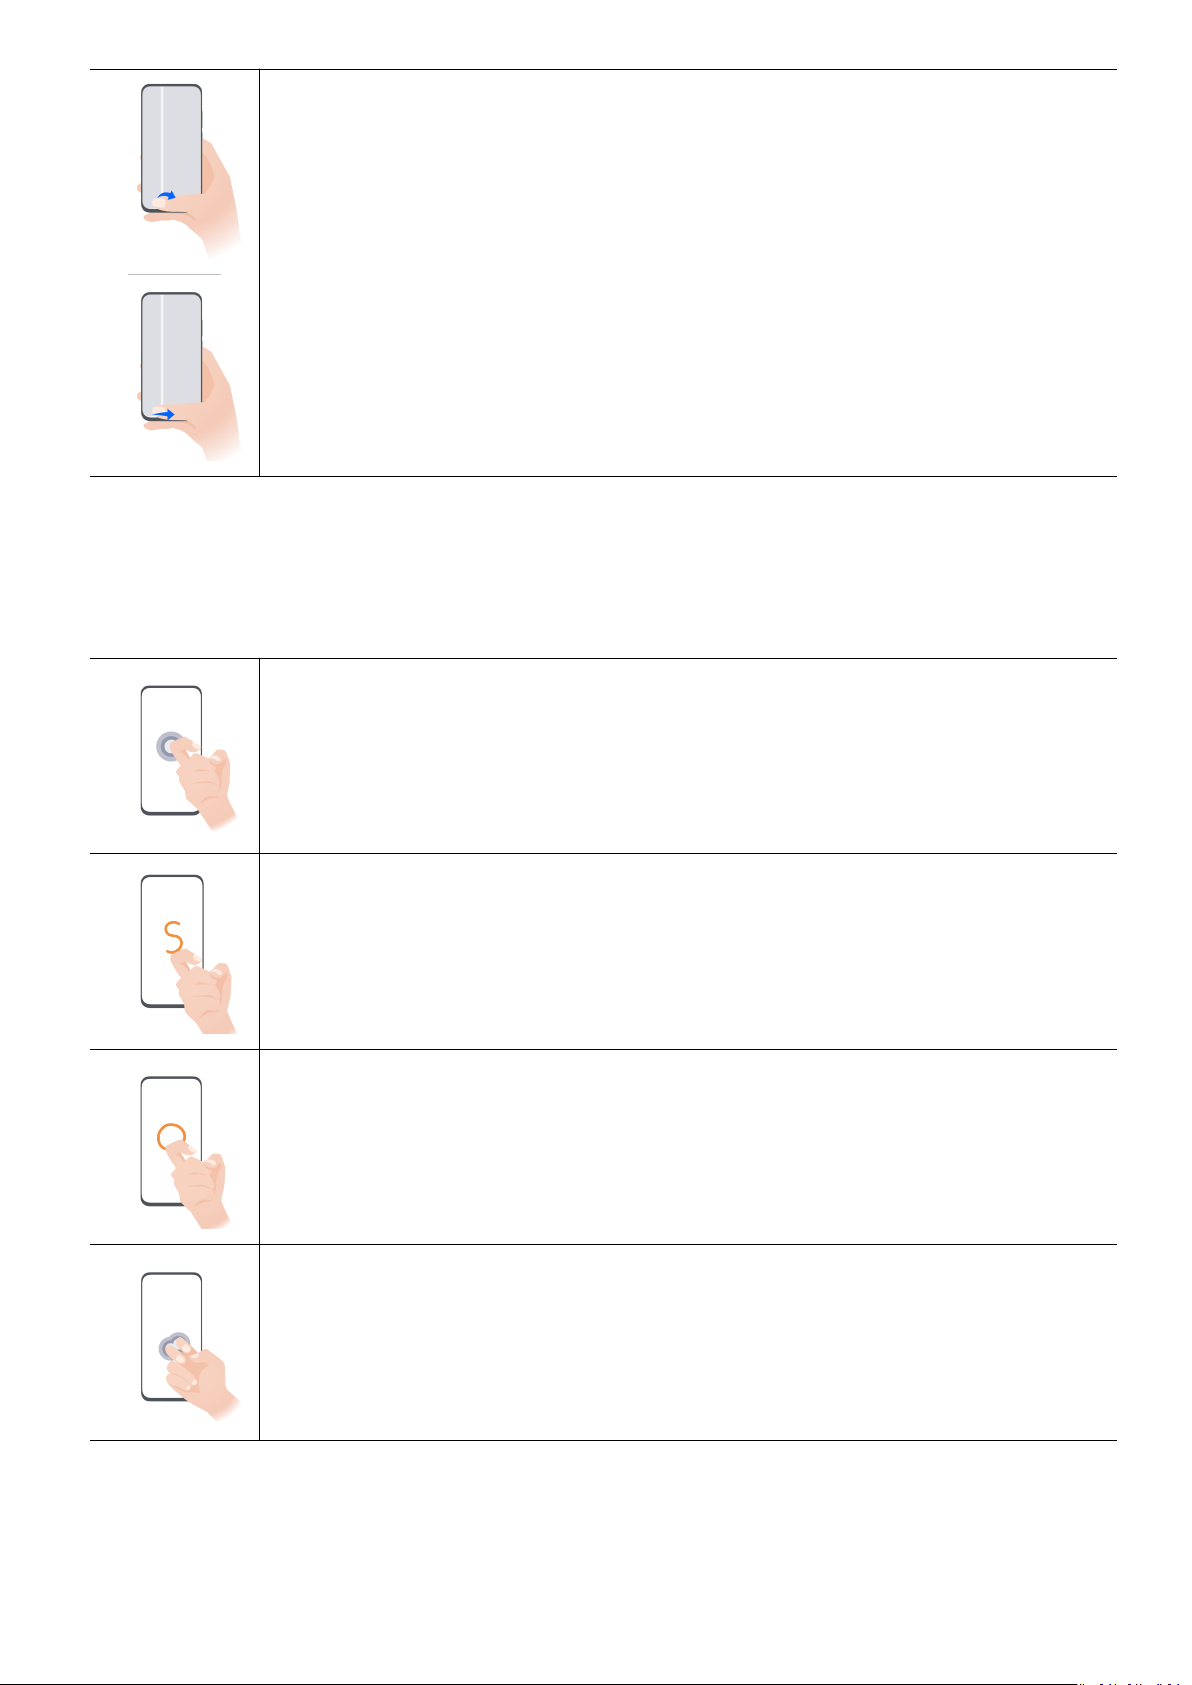
• Slide across the bottom edge of the screen to switch between apps.
Before using this gesture, touch Settings on the System navigation
screen, and ensure that Slide across bottom to switch apps is enabled.
• Swipe across the bottom of the screen in an arc to switch between apps.
Knuckle Gestures
Go to Settings > Accessibility features > Shortcuts & gestures to enable Take screenshot,
Record screen.
Take a screenshot
Knock twice on the screen with a knuckle to take a screenshot.
Take a scrollshot
Knock on the screen with a knuckle and draw an "S" to take a scrolling
screenshot.
Capture part of the screen
Knock and draw an enclosed area with a knuckle to capture part of the
screen.
Record screen
Knock twice on the screen with two knuckles to start or end a screen
recording.
2
Page 7
More Gestures
Essentials
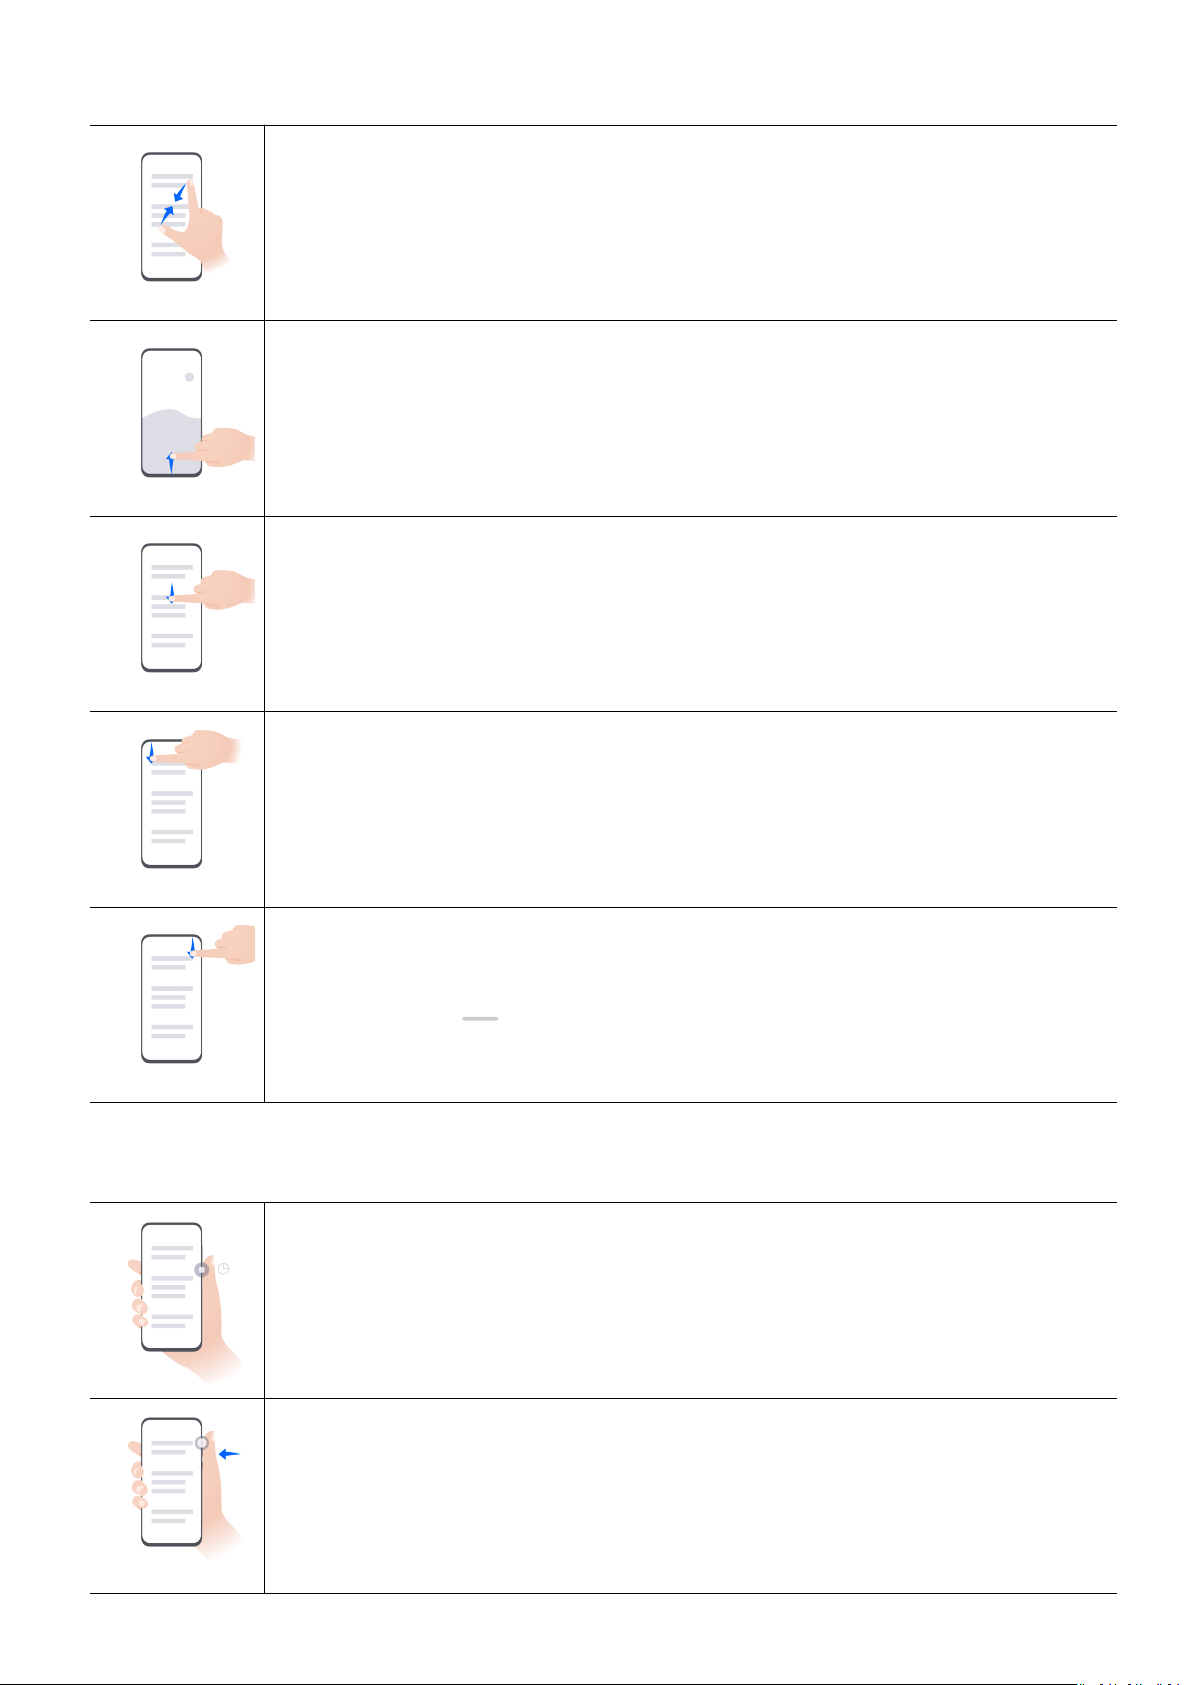
Access Home screen editing mode
Pinch two ngers together on the home screen.
Display the shortcut panel on the lock screen
Turn on the screen and swipe up from the bottom of the lock screen.
Display the search bar
Swipe down from the middle of the home screen.
Button Shortcuts
Display the notication panel
Swipe down from the upper left edge of the screen.
Turn on a shortcut switch
Swipe down from the upper right edge of the screen to display Control
Panel and touch to expand the shortcut switches panel (depending on
your device model).
Power o and restart
Press and hold the Power button until your phone displays the Power o
and Restart menu.
Turn up volume
Press the Volume up button.
3
Page 8
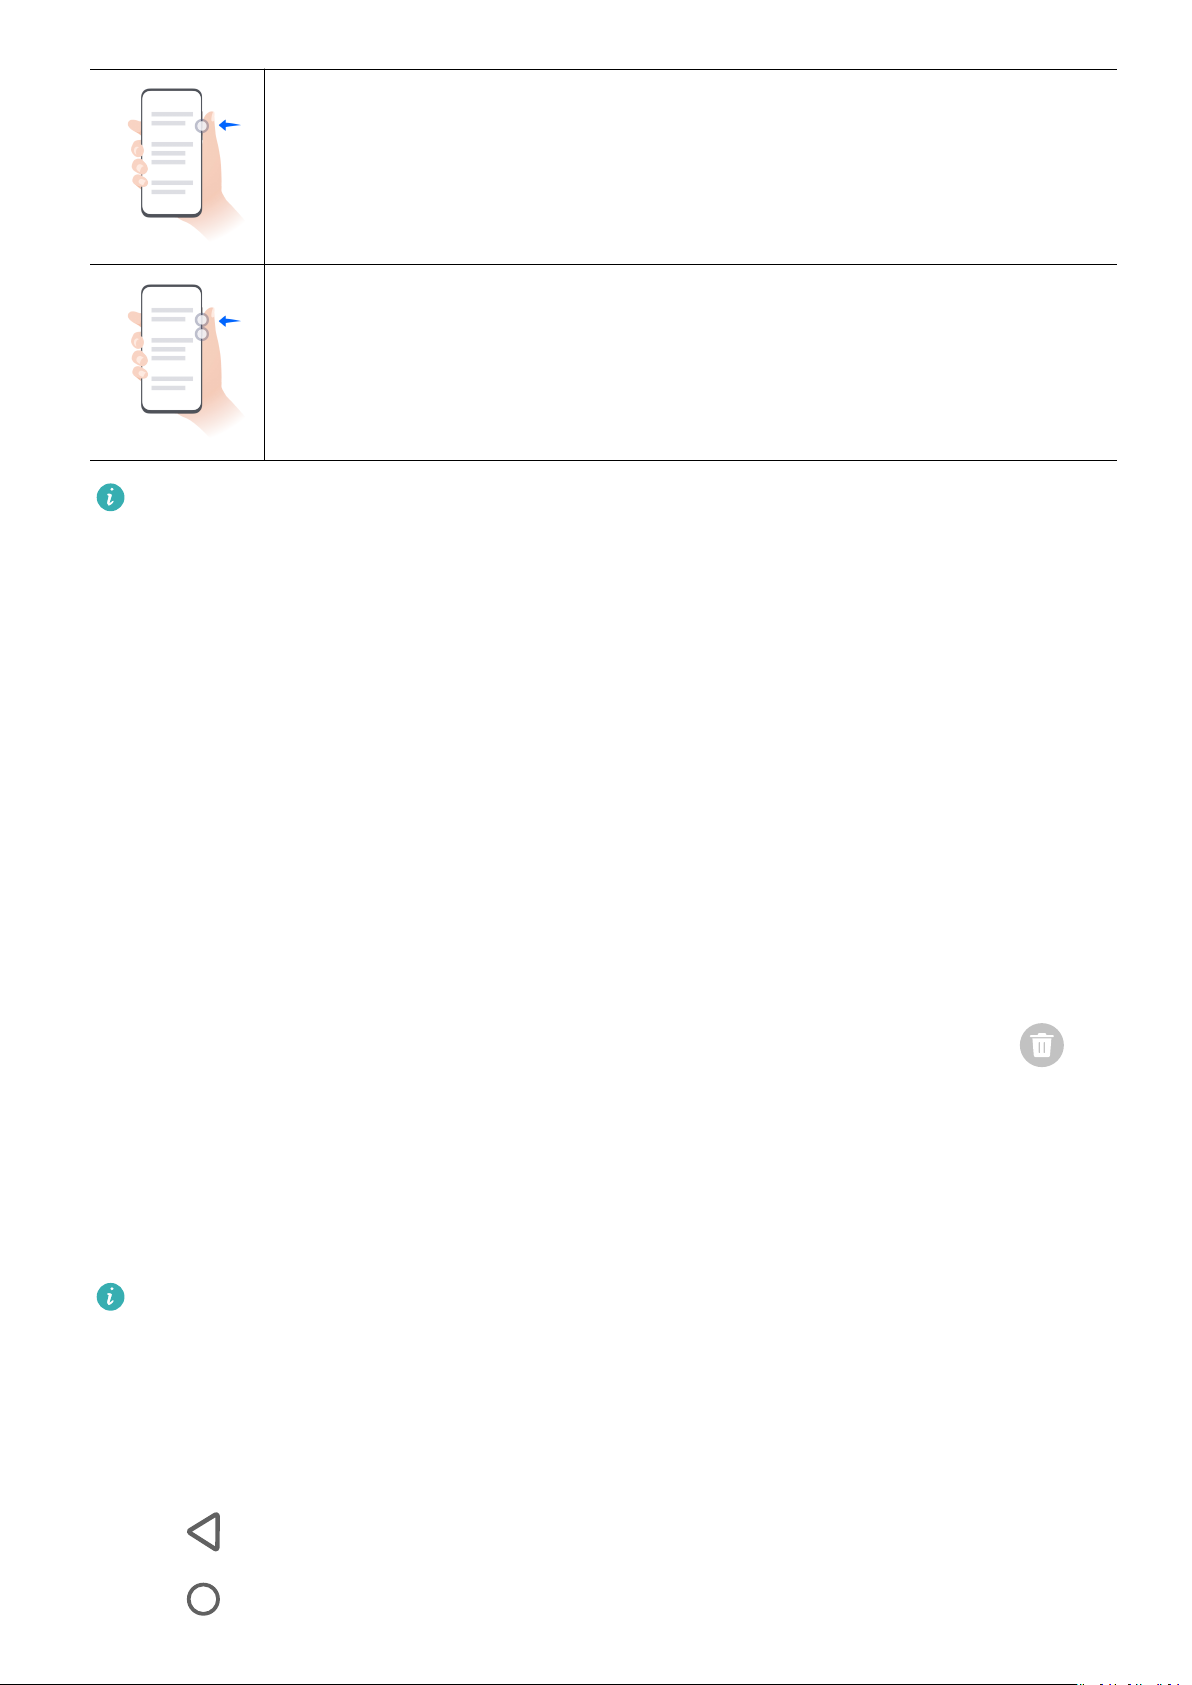
Turn down volume
Press the Volume down button.
Take a screenshot
Press the Volume down and Power buttons simultaneously.
Some products do not have volume buttons.
System Navigation
Essentials
Change the System Navigation Mode
Navigate with Gestures
Go to Settings > System & updates > System navigation and select Gestures.
You can then:
• Go back to the previous screen: Swipe inward from the left or right edge.
• Return to the home screen: Swipe up from the bottom of the screen.
• Access the Recent tasks screen: Swipe up from the bottom of the screen and hold.
• Close an app: Swipe up on an app preview from the Recent tasks screen. Swiping down on
an app preview can lock the app. A locked app will not be cleared when you touch on
the Recent tasks screen.
• Switch apps: Swipe across the bottom of the screen in an arc. Alternatively, when Slide
across bottom to switch apps is enabled, swipe across the bottom edge of the screen.
You can enable Show navigation bar to display the navigation bar to assist your gesture
operations.
Slide across bottom to switch apps or Show navigation bar is not supported on certain
products.
Use Three-Key Navigation
Go to Settings > System & updates > System navigation and select Three-key navigation.
You can then:
• Touch
• Touch
to return to the previous menu or exit the current app.
to return to the home screen.
4
Page 9

Essentials
• Touch to access the recent tasks screen.
You can touch Settings to congure more settings.
• Select a navigation key combination.
• Enable Hide navigation keys to allow you to hide the navigation bar when not in use.
• Touch
(if available in the selected navigation key combination) to open the notication
panel.
Use Navigation Dock to Control Your Phone
Go to Settings > System & updates > System navigation > More or Settings > System &
updates > System navigation > Navigation dock(depending on your device model) and
enable Navigation dock.
After the Navigation dock appears, you can:
• Drag the dock to your preferred position.
• Touch the dock to go back.
• Touch and hold the dock, then release it to return to the home screen.
• Touch and hold the dock, then swipe left or right to view recent tasks.
Phone Clone
Use Phone Clone to Move Data to Your New Device
Phone Clone lets you quickly and seamlessly move all the basic data (including contacts,
calendar, images, and videos) from your old phone to your new phone.
Migrate Data from a Huawei or Other Android Device
1 On your new phone, open the Phone Clone app, or go to Settings > System & updates >
Phone Clone, touch This is the new device, and select Huawei or Other Android.
2 On your old device, follow the onscreen instructions to download and install Phone Clone.
3 On the old device, open the Phone Clone app, touch This is the old device, and follow
the onscreen instructions to connect the old device with your new device by scanning a
code or connecting manually.
4 On your old device, select the data you want to clone, then touch Transfer to start
cloning.
You can search for Android versions that support Phone Clone in AppGallery and view
more information on the app details screen.
Migrate Data from an iPhone or iPad
1 On the new phone, open the Phone Clone app, or go to Settings > System & updates >
Phone Clone, touch This is the new device, and select iPhone/iPad.
5
Page 10

Essentials
2 Follow the onscreen instructions to download and install Phone Clone on your old device.
3 On the old device, open the Phone Clone app, touch This is the old device, and follow
the onscreen instructions to connect the old device with your new device by scanning a
code or connecting manually.
4 On your old device, select the data you want to clone, then follow the onscreen
instructions to complete the data cloning.
You can search for iOS versions that support Phone Clone in App Store and view more
information on the app details screen.
Lock and Unlock Your Screen
Lock and Unlock Your Screen
Lock the Screen
If your phone remains inactive for a period of time, it will automatically lock the screen and
enter sleep mode to save power.
Alternative, you can manually lock the screen in either of the following ways:
• Press the Power button.
• On the home screen, pinch two ngers together to enter screen editing mode. Touch
Widgets, then drag the Screen Lock icon to the home screen. You can now touch the
Screen Lock icon to lock the screen.
Set the Screen Timeout Period
Go to Settings > Display & brightness > Sleep and select a screen timeout period.
Turn On the Screen
You can turn on the screen in any of the following ways:
• Press the Power button.
• Go to Settings > Accessibility features > Shortcuts & gestures > Wake screen, and
enable Raise to wake, Double-tap to wake, and/or Show palm to wake. Then use the
corresponding feature to turn on the screen.
If your phone does not have this option, it indicates that this feature is not supported.
Unlock the Screen with Password
Once the screen is turned on, swipe up from the middle of the screen to display the password
input panel. Then, enter your lock screen password.
Use Face Unlock
Turn on the screen and align it with your face. Your phone will unlock once your face is
recognized.
6
Page 11

Essentials
Use Fingerprint Unlock
Once the screen is turned on, the ngerprint icon will display on the screen. Touch the icon
with an enrolled nger to unlock the screen.
Change the Lock Screen Display
When using an ocial theme, you can set to display your step count and signature on the
lock screen.
Display Your Signature on the Lock Screen
Go to Settings > Home screen & wallpaper, touch Lock screen signature, then type text to
display on the lock screen.
To remove the signature, touch Lock screen signature and delete the text.
Access Apps from the Lock Screen
You can access commonly used apps, such as Camera, Recorder, and Calculator, from the lock
screen.
• Turn on the screen, and swipe up on the Camera icon in the lower right corner to open
Camera.
• Turn on the screen, and swipe up from the bottom of the lock screen to open the shortcut
panel. Then touch the app you wish to access from the available shortcuts, such as
Flashlight, Calculator, or Timer.
Get Familiar with the Home Screen
Create and Use Large Folders
You can group similar apps in a large folder and name the folder for better management.
You can also turn a standard folder into a large one (both the folder and the app icons in it
will be enlarged) to access apps more easily.
Create a Large Folder
1 Touch and hold an app icon and drag it over another icon to create a new folder.
Your phone will automatically name the folder based on the type of apps within it and
will also suggest apps of the same type for you to add into the folder.
2 Touch and hold the folder and select Enlarge from the displayed menu.
3 You can touch the lower right corner of the large folder to open it and then touch the
folder name to rename it.
You can also rename the folder by touching and holding it and selecting Rename.
Operations in a Large Folder
You can perform the following operations in large folders:
7
Page 12
Essentials
• Open apps: In a large folder, touch an icon to access the app directly.
• Enter and exit folders: Touch the lower right corner of a large folder to enter it. Touch a
blank area in the folder to exit it.
When there are more than nine apps within a large folder, a stacked icon will appear in the
lower right corner of the folder. You can touch the stacked icon to view more apps within
the folder.
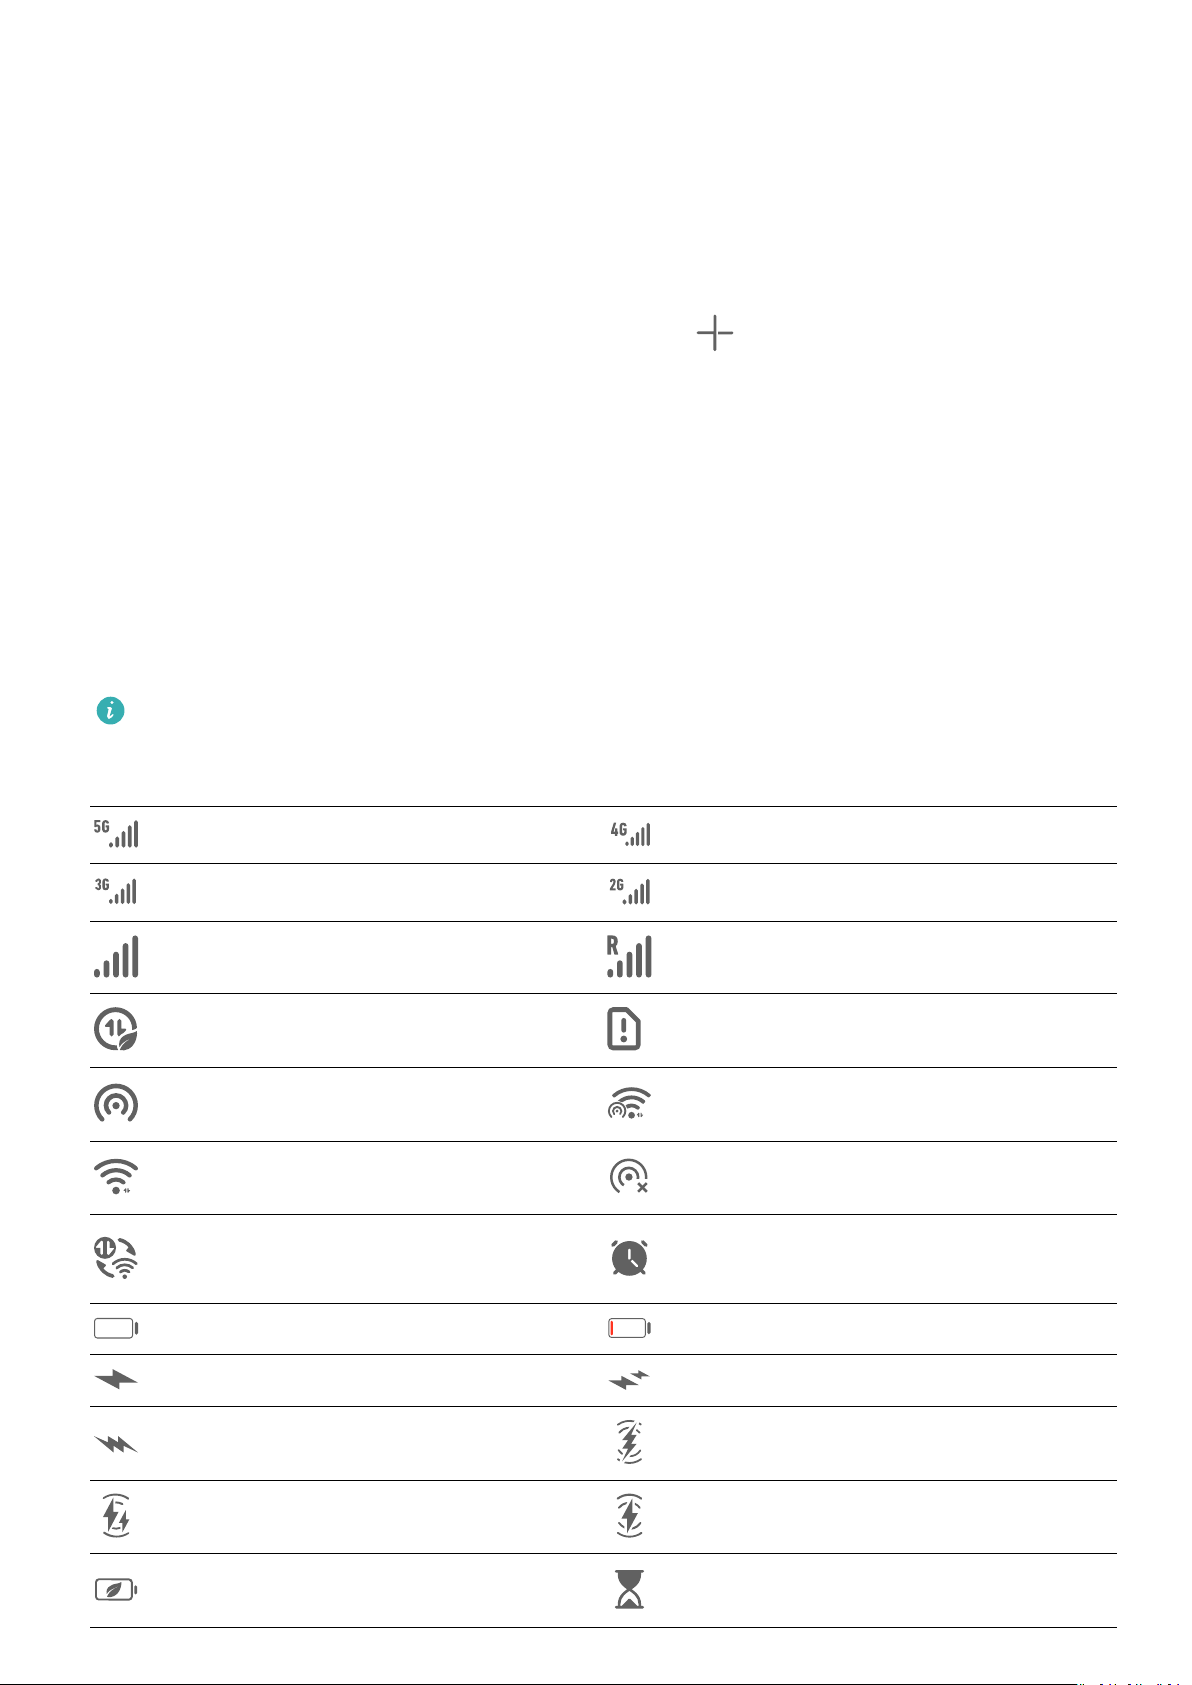
• Add or remove apps: Open a large folder and touch . Your phone will suggest apps for
you to add into the folder based on the type of apps that are already within the folder.
• Switch between display modes: Touch and hold a folder to switch between a standard
and large display. For example, you can touch and hold a standard folder and select
Enlarge from the displayed menu to create a large folder.
Notication and Status Icons
Notication and Status Icons
Network status icons may vary depending on your region or network service provider.
Supported functions vary depending on the device model. Some of the following icons
may not be applicable to your phone.
5G network connected 4G network connected
3G network connected 2G network connected
Full signal strength Roaming
Data saver enabled No SIM card detected
Hotspot enabled Hotspot connected
Wi-Fi connected Hotspot disconnected
Switching network through Wi-
Fi+
Alarm set
Battery empty Low battery
Charging Quick charging
Super charging Super wireless charging
Quick wireless charging Regular wireless charging
Power Saving mode enabled Digital Balance enabled
8
Page 13
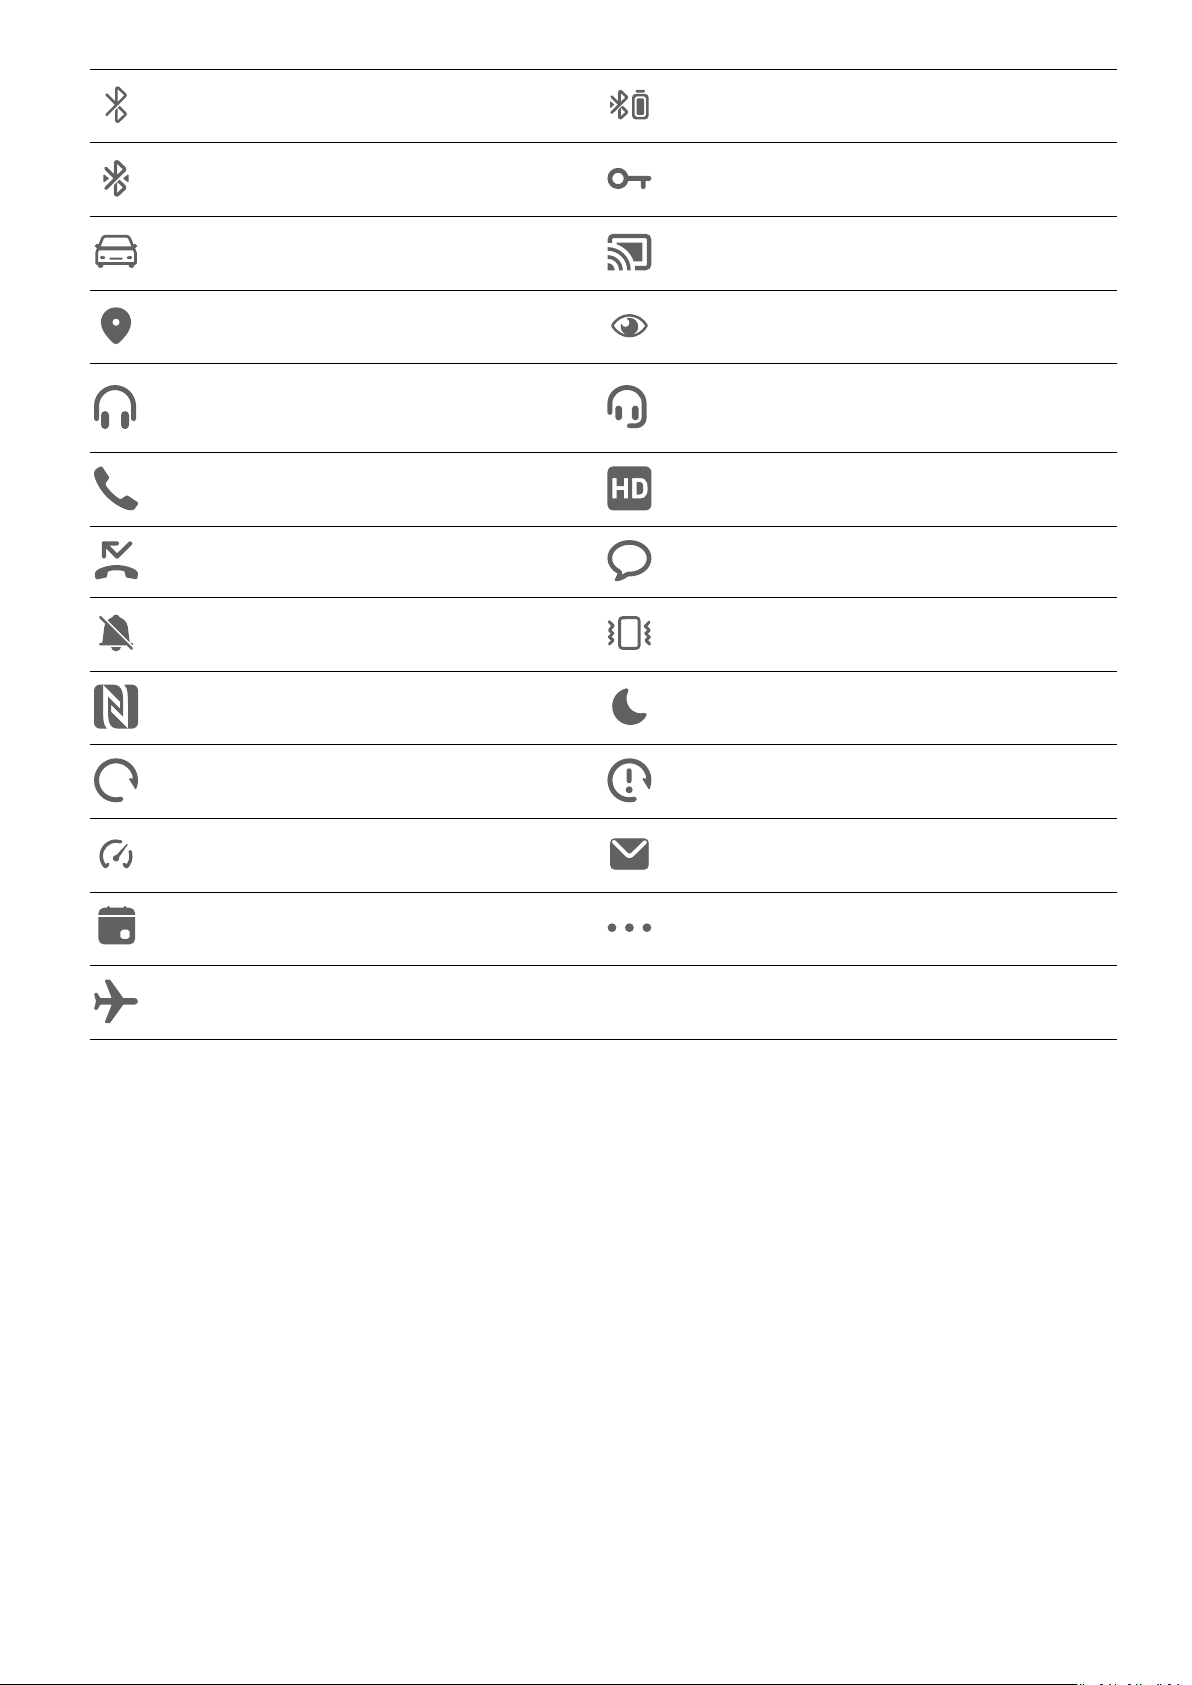
Bluetooth enabled Bluetooth device battery
Bluetooth device connected VPN connected
Driving mode Projection device connected
Location service enabled Eye Comfort mode enabled
Essentials
Headset connected
Call in progress VoLTE enabled
Missed call Unread SMS
Silence Vibration
NFC enabled Do Not Disturb mode enabled
Data syncing Data sync failed
Performance mode enabled New email
Event reminder More notications
Headset with a microphone
connected
Airplane mode enabled
Control Panel
Introduction to Control Panel
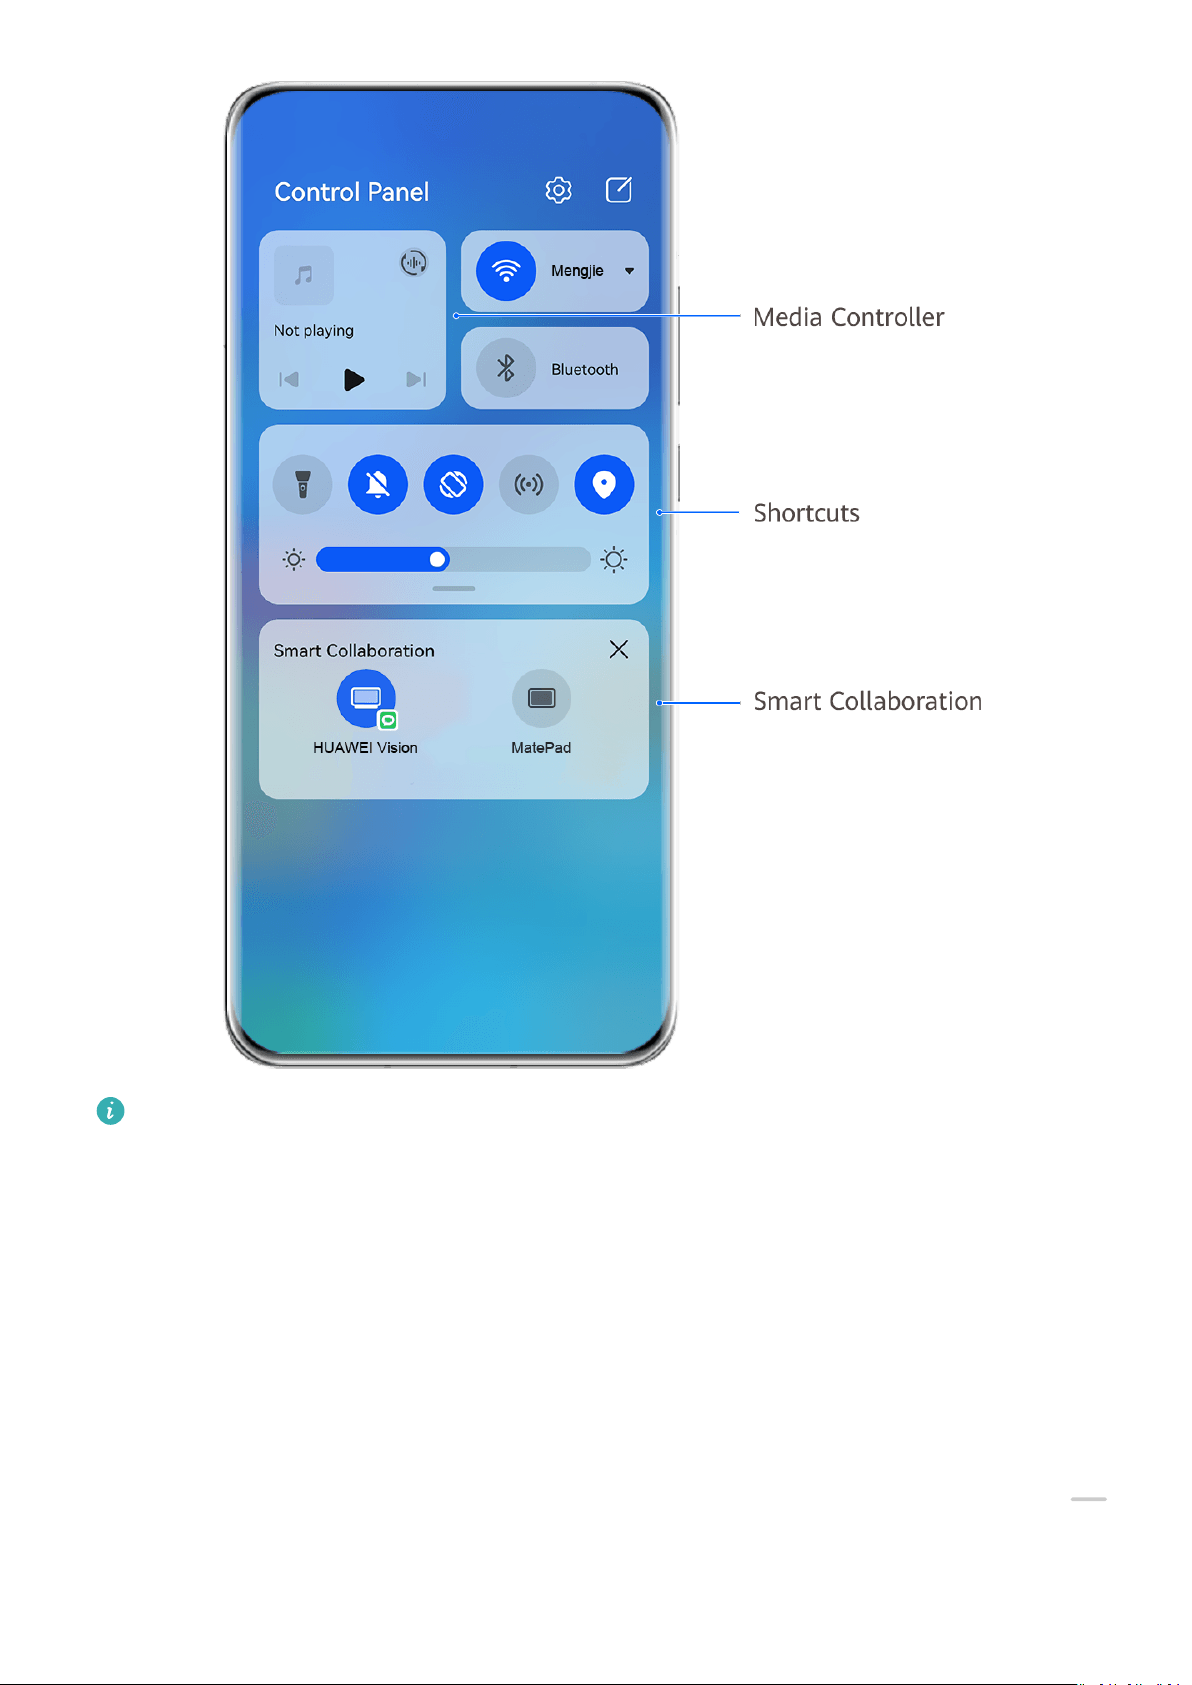
You can easily manage and control media playback, shortcuts, and Smart Collaboration in
the Control Panel.
Swipe down from the upper right edge of the screen to display Control Panel where you can
access the following features with ease:
9
Page 14
Essentials
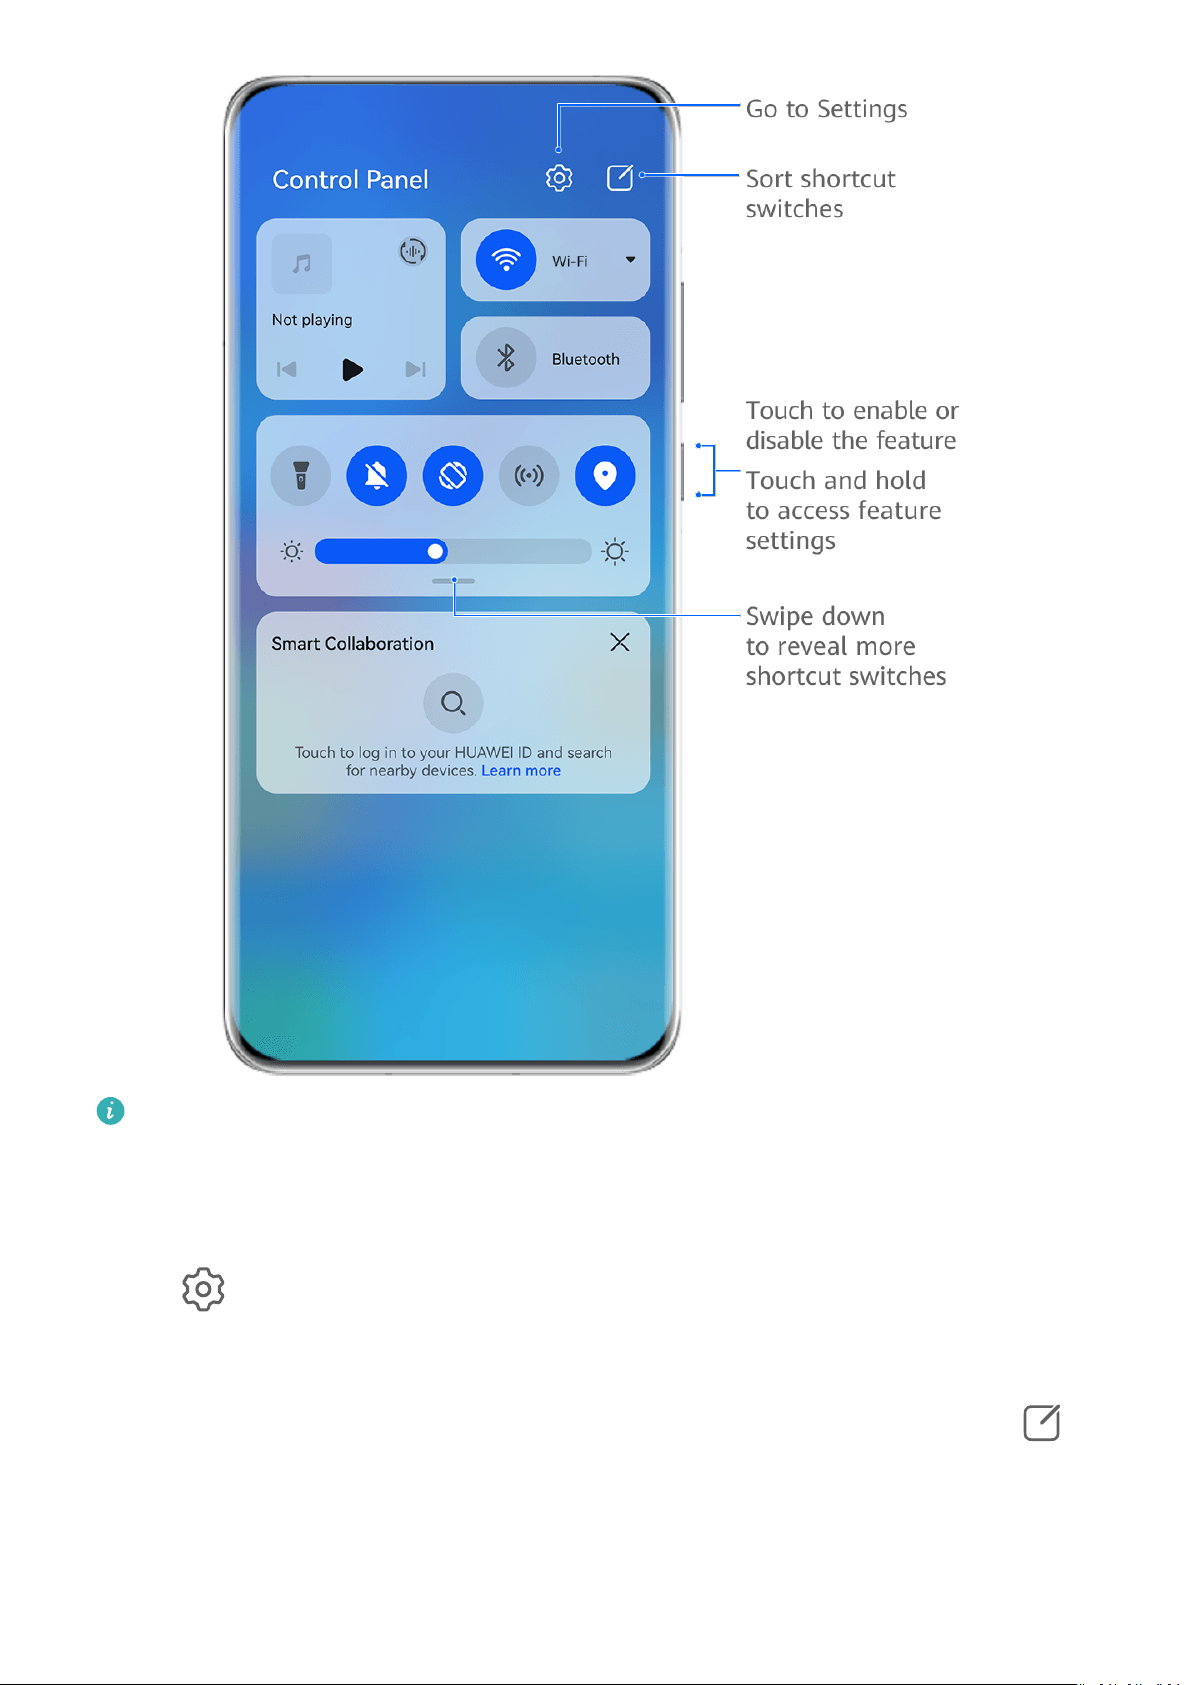
The gures are for reference only.
• Media controls: To control media playback and switch between recently used media apps
and media devices (such as Visions and Bluetooth headsets).
• Shortcut controls: To enable, disable, or set frequently used features.
• Smart Collaboration: Automatically discovers nearby devices logged in to the same
HUAWEI ID and allows you to link them so they work together as one.
Use Shortcut Switches
Turn on a Shortcut Switch
Swipe down from the upper right edge of the screen to display Control Panel and touch
to expand the shortcut switches panel (depending on your device model).
10
Page 15
Essentials
The gures are for reference only.
• Touch a shortcut switch to enable or disable the corresponding feature.
• Touch and hold a shortcut switch to access the settings screen of the corresponding feature
(supported by some features).
• Touch
to access the system settings screen.
Customize Shortcuts
Swipe down from the upper right edge of the screen to display Control Panel, go to >
Edit switches, then touch and hold a shortcut switch to drag it to your preferred position,
and touch Done.
Audio Control Panel
11
Page 16

Essentials
Manage Audio Playback in Audio Control Panel
When multiple audio apps (such as HUAWEI Music) are opened, you can manage music
playback and switch between these apps in Audio Control Panel with ease.
1 After opening multiple audio apps, swipe down from the upper right edge of the phone to
display Control Panel, then touch the audio playback card at the top of Control Panel.
2 The currently and recently used audio apps will be displayed in Audio Control Panel where
you can manage playback (such as playing, pausing, and switching to the previous or next
song) in the app in use, or touch another audio app to quickly switch playback.
• Some apps need to be updated to the latest version before using this feature.
• Not all apps support Audio Control Panel.
Quickly Switch Audio Playback Device
When your phone is connected to an audio device (such as a headset, Bluetooth speaker, or
Vision), you can quickly switch the playback device in Audio Control Panel (such as for
switching music playback from your phone to a Bluetooth speaker) .
1 Connect your phone to an audio device via Bluetooth or other methods.
After a Vision is connected to your phone via Bluetooth, it can also be connected to the
same Wi-Fi network and logged in to the same HUAWEI ID as your phone.
2 Swipe down from the upper right edge of your phone to display Control Panel, touch
on the audio playback card in the Audio Control Panel section at the top to display the
connected devices, then touch a device to transfer audio playback from your phone.
Work Seamlessly Across Devices with Smart Collaboration
Smart Collaboration allows for collaboration between dierent devices, making your phone
the hub of your nearby tablets, computers, Visions, and other supported devices for them to
be controlled conveniently. You can also seamlessly transfer ongoing tasks on your phone,
from MeeTime calls to audio and video content being streamed, to your Vision with just a
tap, and you can easily view the phone screen projected to your computer, or edit les on
your phone using your computer.
Please make sure your device has been updated to the latest system version.
Set Smart Collaboration
Currently, Smart Collaboration only supports linking phones with the following four types of
devices. Before you get started, enable Bluetooth and Wi-Fi and log in to your HUAWEI ID on
your phone. For other devices, perform the following settings:
• Tablet: Enable Bluetooth and Wi-Fi, and ensure that it is logged in to the same HUAWEI ID
as your phone.
• Computer: Enable Bluetooth and Wi-Fi, and ensure that it is logged in to the same
HUAWEI ID as your phone and can access the Internet.
12
Page 17

Essentials
• Vision: Ensure that it is connected to the same LAN and logged in to the same HUAWEI ID
as your phone.
• Bluetooth device: Some Bluetooth devices (such as Bluetooth headsets) can be linked with
your phone via Smart Collaboration after establishing a Bluetooth connection.
• Certain device models do not support collaborating with smart speakers.
Transfer MeeTime Calls and Audio or Video Being Streamed to Other Devices
When you are making MeeTime calls on your phone, watching videos (such as in HUAWEI
Video, Youku, or other video streaming apps), or listening to music, you can transfer any of
these ongoing tasks to another device via Smart Collaboration and pick up from where you
left o on the new device. For instance, you can transfer a MeeTime call to your Vision and a
video being streamed to your tablet.
You can select dierent devices to transfer the following tasks:
• Videos: Can be transferred to tablets and Visions.
• MeeTime calls: Can be transferred to Visions.
• Music: Can be transferred to Bluetooth earphones and Visions (either when the screen is on
o).
or
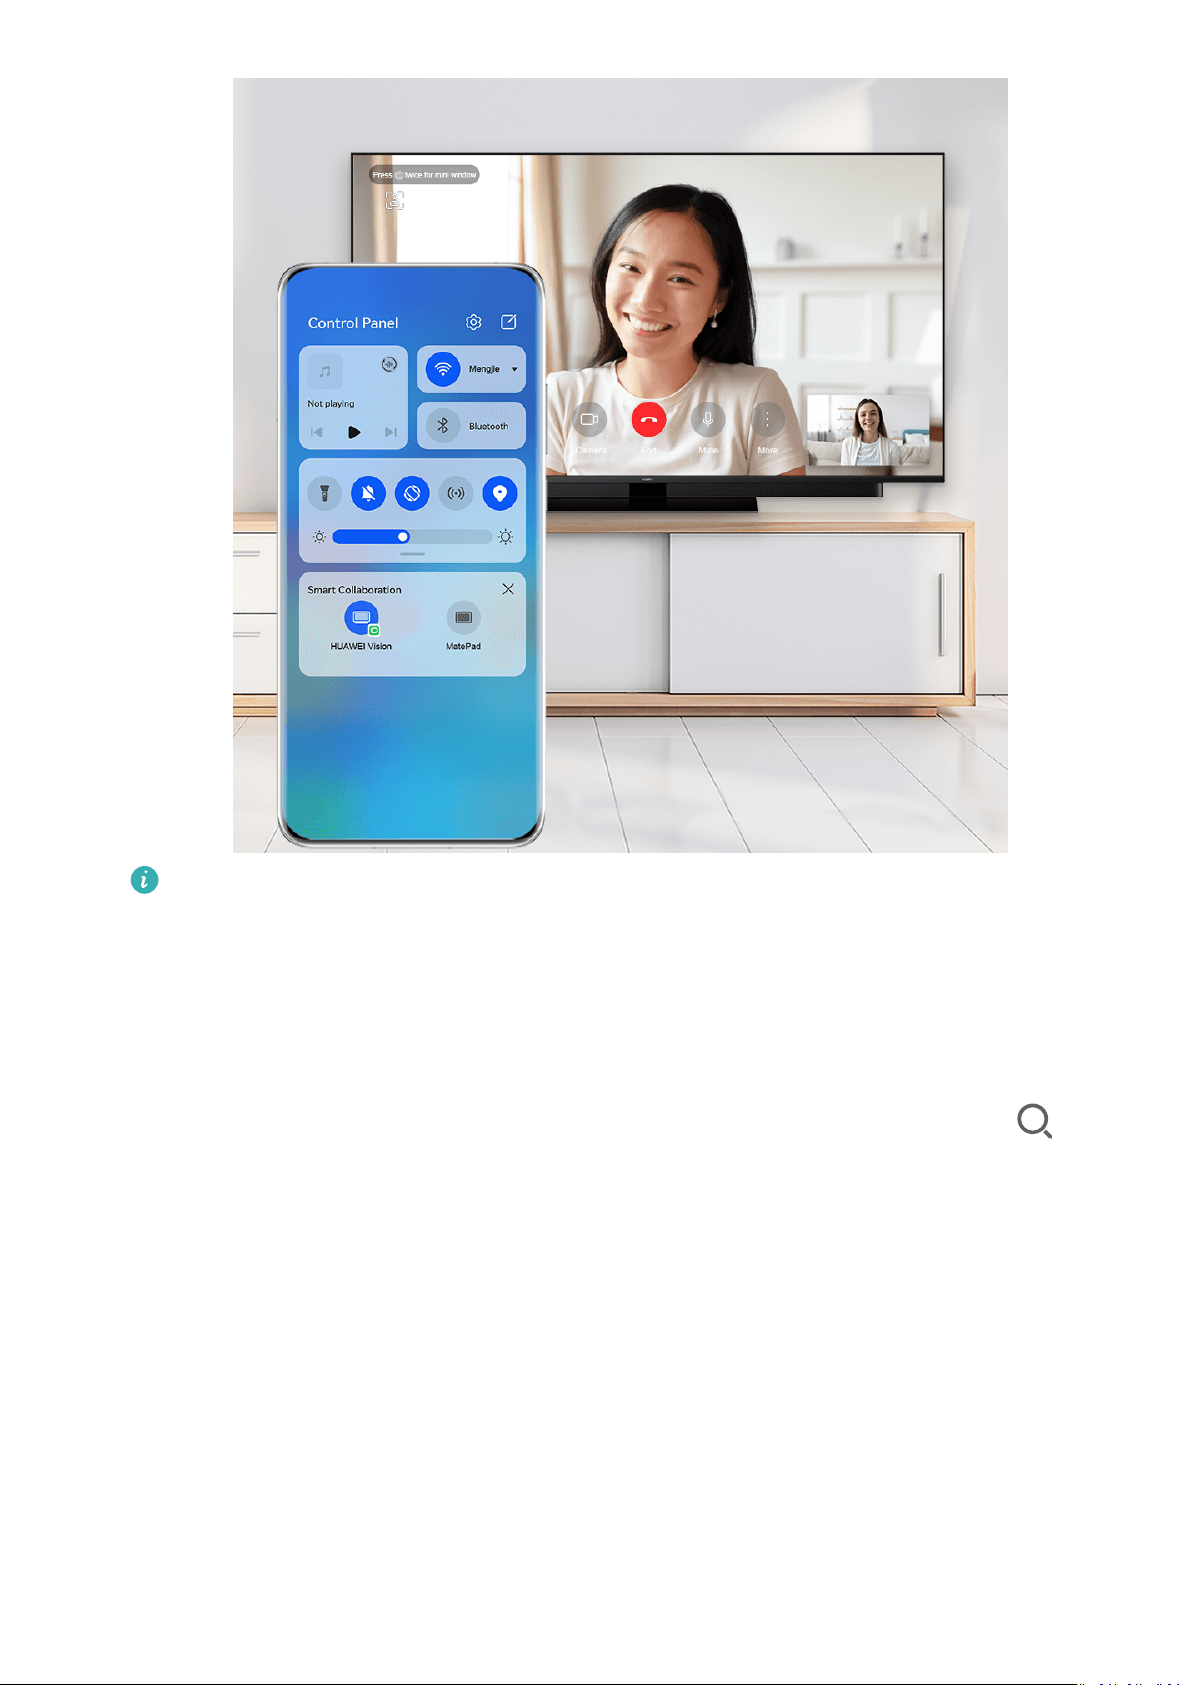
1 Swipe down from the upper right edge of your phone to display Control Panel. Available
devices will be displayed in the Smart Collaboration section. You can also touch to
search for nearby devices manually.
2 Touch a device that you want to transfer the ongoing tasks to.
13
Page 18
Essentials
The gures are for reference only.
Use Multi-Screen Collaboration on a Computer or Tablet
You can view or edit les on your phone using your computer or tablet, drag les across
devices, and even use phone apps on your computer or tablet.
1 Swipe down from the upper right edge of your phone to display Control Panel. Available
devices will be displayed in the Smart Collaboration section. You can also touch to
search for nearby devices manually.
2 Select a device that you want to connect to, and your phone screen will then be displayed
on that device.
To stop Multi-Screen Collaboration, touch the corresponding device again in the Smart
Collaboration section.
Quickly Access Frequently Used App Features
Access Frequently Used App Features from the Home Screen
You can access frequently used features of certain apps from app icons on the home screen,
and even add shortcuts for these features to the home screen.
14
Page 19

Essentials
Quickly Access Frequently Used App Features
Touch and hold an app icon until a pop-up menu is displayed, then touch a frequently used
feature to access it.
For example, touch and hold the Camera icon, then touch a shooting mode, such as Sele or
Video, from the pop-up menu to access it.
If no pop-up menu is displayed after you touch and hold an app icon, it indicates that the
app does not support this feature.
Add Frequently Used App Features to the Home Screen
Touch and hold an app icon on your home screen to bring up the pop-up menu. Touch and
hold the desired feature and drag it to your home screen to create a shortcut.
Home Screen Widgets
Add, Move, or Delete Home Screen Widgets
You can add, move, or delete home screen widgets, such as Screen lock, Weather, Notepad,
Clock, Contacts, Petal Search and Calendar, according to your personal requirements.
Add Weather, Clock, and Other Widgets to the Home Screen
1 Pinch two
ngers on the home screen to access Home screen settings mode.
2 Touch Widgets, then swipe left to view all widgets.
3 Some widgets, such as Weather, come in various formats. Touch the widget to show all
formats, and swipe right to collapse.
4 Touch a widget to add it to the home screen. If there is no room on the current screen,
touch and hold it, then drag it to a dierent screen.
To congure the Weather app, open it, and touch to set the congurations as
prompted.
For example, to switch between Celsius and Fahrenheit, go to > Temperature unit,
and select the unit of temperature you want.
Move or Delete a Widget
On the home screen of your device, you can touch and hold a widget to drag it to anywhere
on the screen, or touch Remove to delete it.
Set Your Wallpaper
Set Your Wallpaper
15
Page 20

Use a Preset Wallpaper
1 Go to Settings > Home screen & wallpaper > Wallpaper.
2 Touch an image you want to set as the wallpaper.
Essentials
3 Apply
eects on the image as prompted, such as Blur.
4 Touch APPLY and choose whether to set it as Lock screen, Home screen, or Both.
Set an Image from Gallery as Your Wallpaper
1 Open Gallery, and open the image you want to set as your wallpaper.
2 Go to > Set as > Wallpapers, then follow the onscreen instructions.
Screenshots & Screen Recording
Take a Screenshot
Use Your Knuckle to Take a Screenshot
1 Go to Settings > Accessibility features > Shortcuts & gestures > Take screenshot, and
ensure that Knuckle screenshots is enabled.
2 Knock the screen twice in quick succession with one knuckle to take a screenshot.
Use a Key Combination to Take a Screenshot
Press and hold the Power and Volume down buttons simultaneously to take a screenshot.
Use a Shortcut to Take a Screenshot
Swipe down from the upper right edge of the screen to display Control Panel, touch
expand the shortcut switches panel (depending on your device model), and touch
Screenshot to take a screenshot.
Share and Edit a Screenshot or Switch to Scrollshot
to
16
Page 21
Essentials
The gures are for reference only.
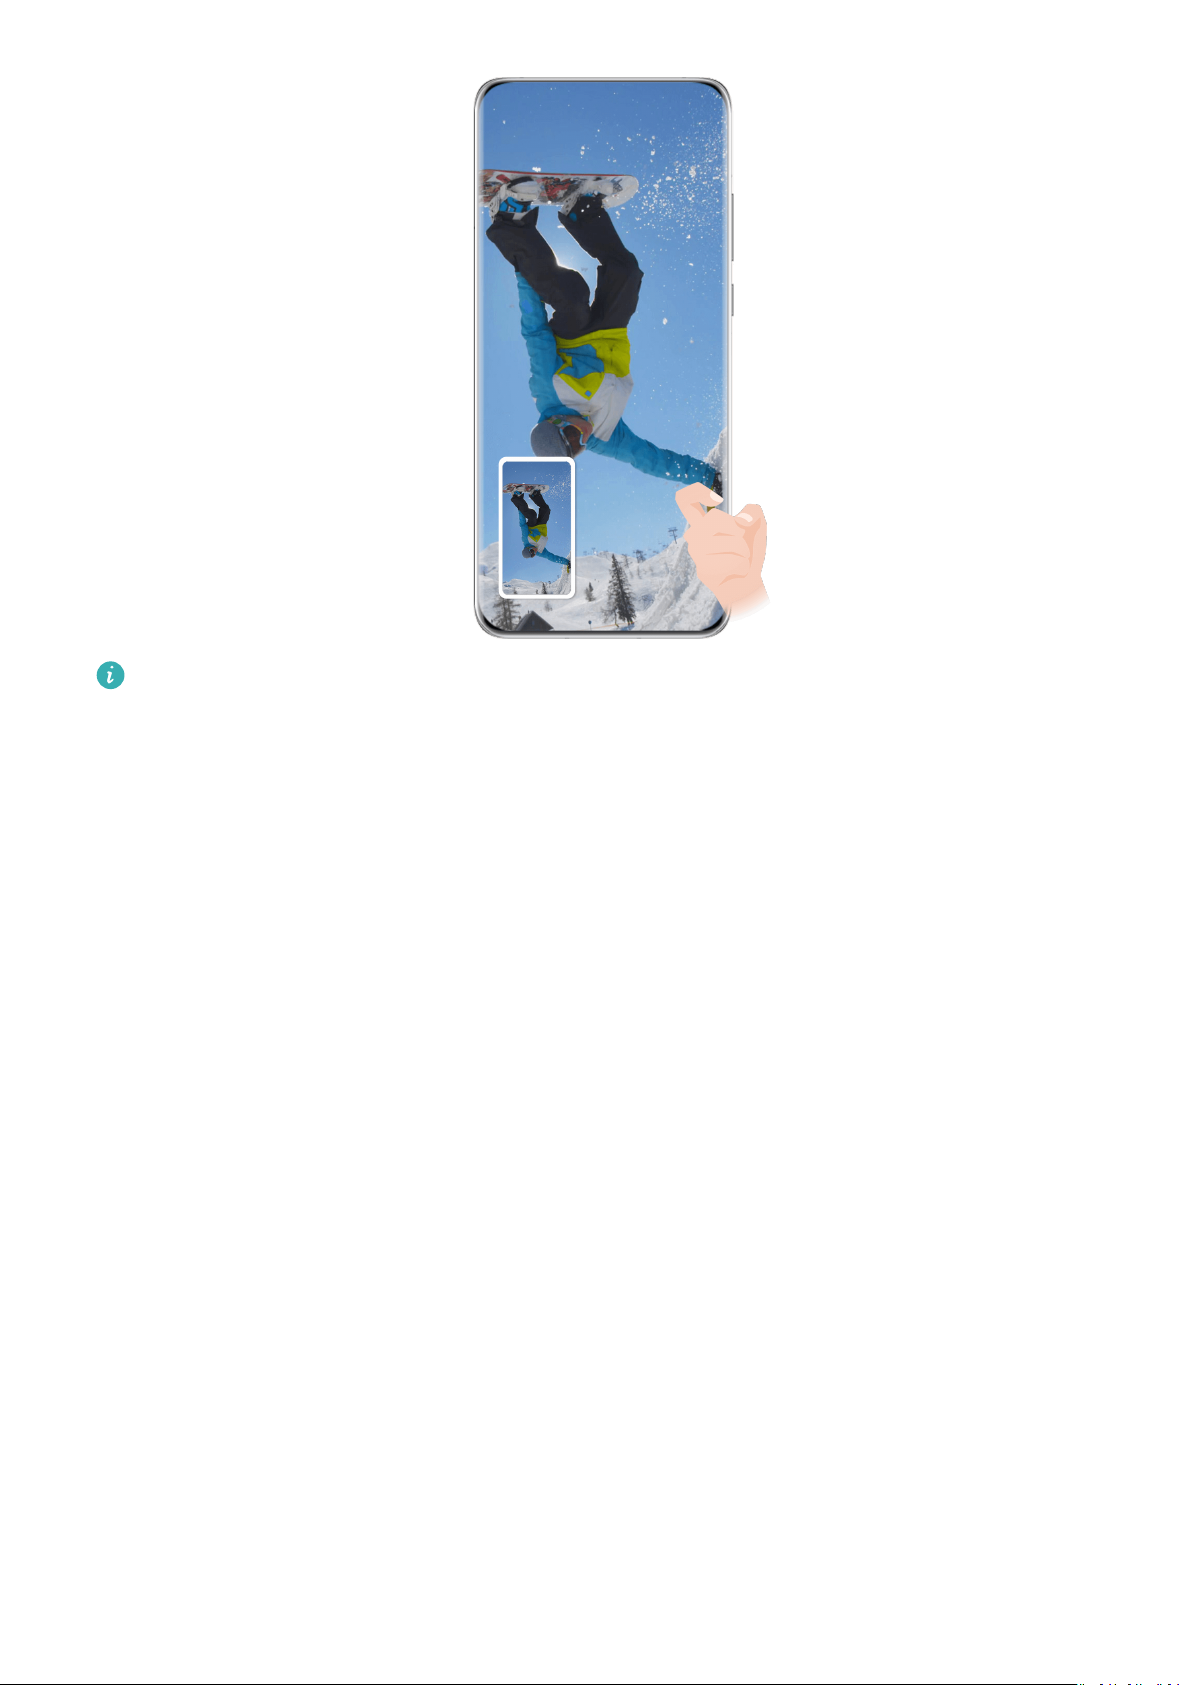
After you take a screenshot, a thumbnail will be displayed in the lower left corner of the
screen. You can then:
• Swipe down on the thumbnail to take a scrolling screenshot.
• Swipe up on the thumbnail to select a way to share the screenshot with your friends.
• Touch the thumbnail to edit or delete it. You can also touch Scrollshot to take a scrolling
screenshot.
Screenshots are saved to Gallery by default.
Swipe Down Using Three Fingers to Take a Screenshot
1 Go to Settings > Accessibility features > Shortcuts & gestures > Take screenshot or
Settings > Accessibility features > Motion control >
(depending on your device model) and make sure that Three-nger screenshot is
enabled.
Three-nger screenshot
2 Swipe down from the middle of the screen with three ngers to take a screenshot.
Take a Partial Screenshot
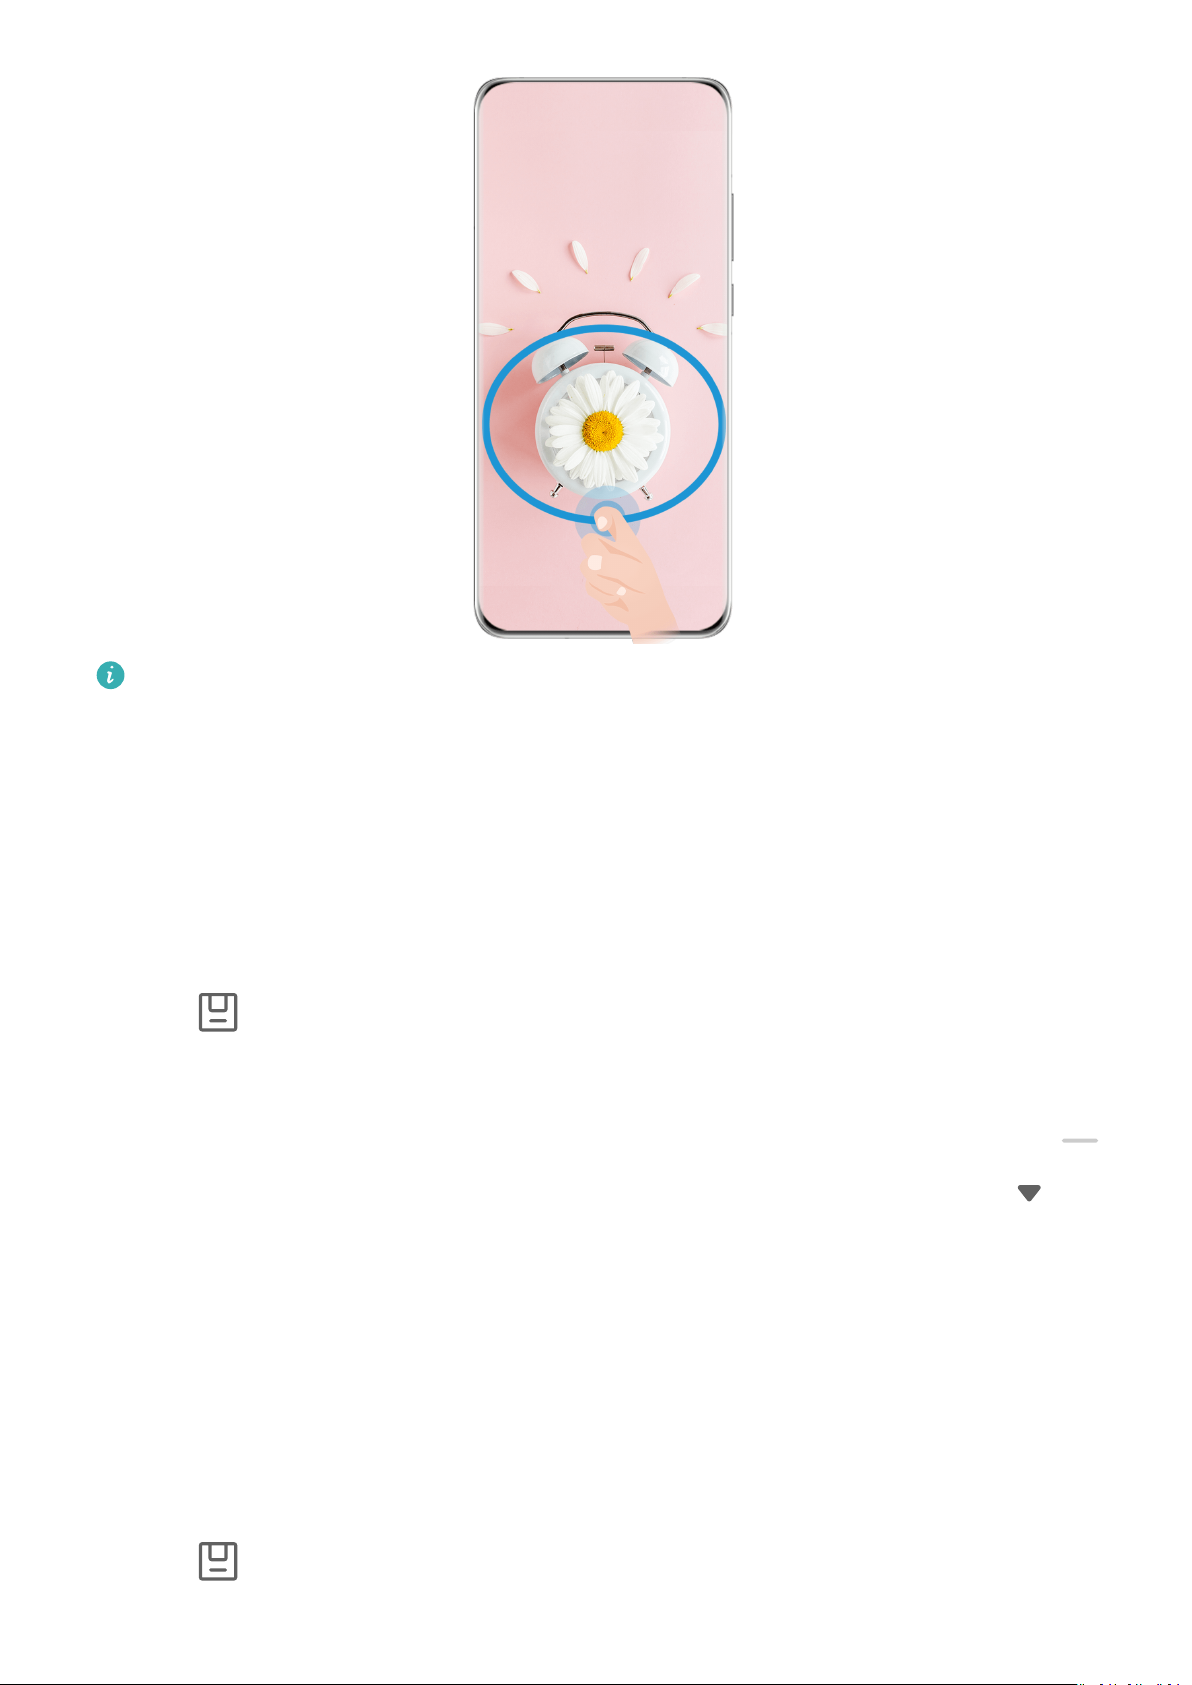
Use Partial screenshot to take a screenshot of a part of the screen. You can choose your
preferred screenshot shape (such as a rectangle, oval, or heart).
Use Knuckle Gestures to Take a Partial Screenshot
17
Page 22
Essentials
The gures are for reference only.
1 Knock on the screen with a knuckle and hold to draw an outline around the part of the
screen that you want to capture. Make sure that your knuckle does not leave the screen.
2 The screen will display the movement trajectory of your knuckle and take a screenshot of
the selected area. You can then:
• Drag the frame to the desired position or resize it.
• Touch any of the shape options at the bottom of the screen to change the shape of the
captured area. You can also keep the shape that you drew.
3 Touch
Use a Shortcut to Take a Partial Screenshot
to save the screenshot.
1 Swipe down from the upper right edge of the screen to display Control Panel, touch
to expand the shortcut switches panel (depending on your device model), touch next
to Screenshot, and touch Partial screenshot in the displayed dialog box.
2 Follow the onscreen instructions to draw an outline with your nger around the part of
the screen that you want to capture.
3 The screen will display the movement trajectory of your nger and take a screenshot of
the selected area. You can then:
• Drag the frame to the desired position or resize it.
• Touch any of the shape options at the bottom of the screen to change the shape of the
captured area. You can also keep the shape that you drew.
4 Touch
to save the screenshot.
18
Page 23
Essentials
Take a Scrolling Screenshot
You can use Scrollshot to capture a memorable chat, article, or essential work document
that cannot be displayed in full on the screen.
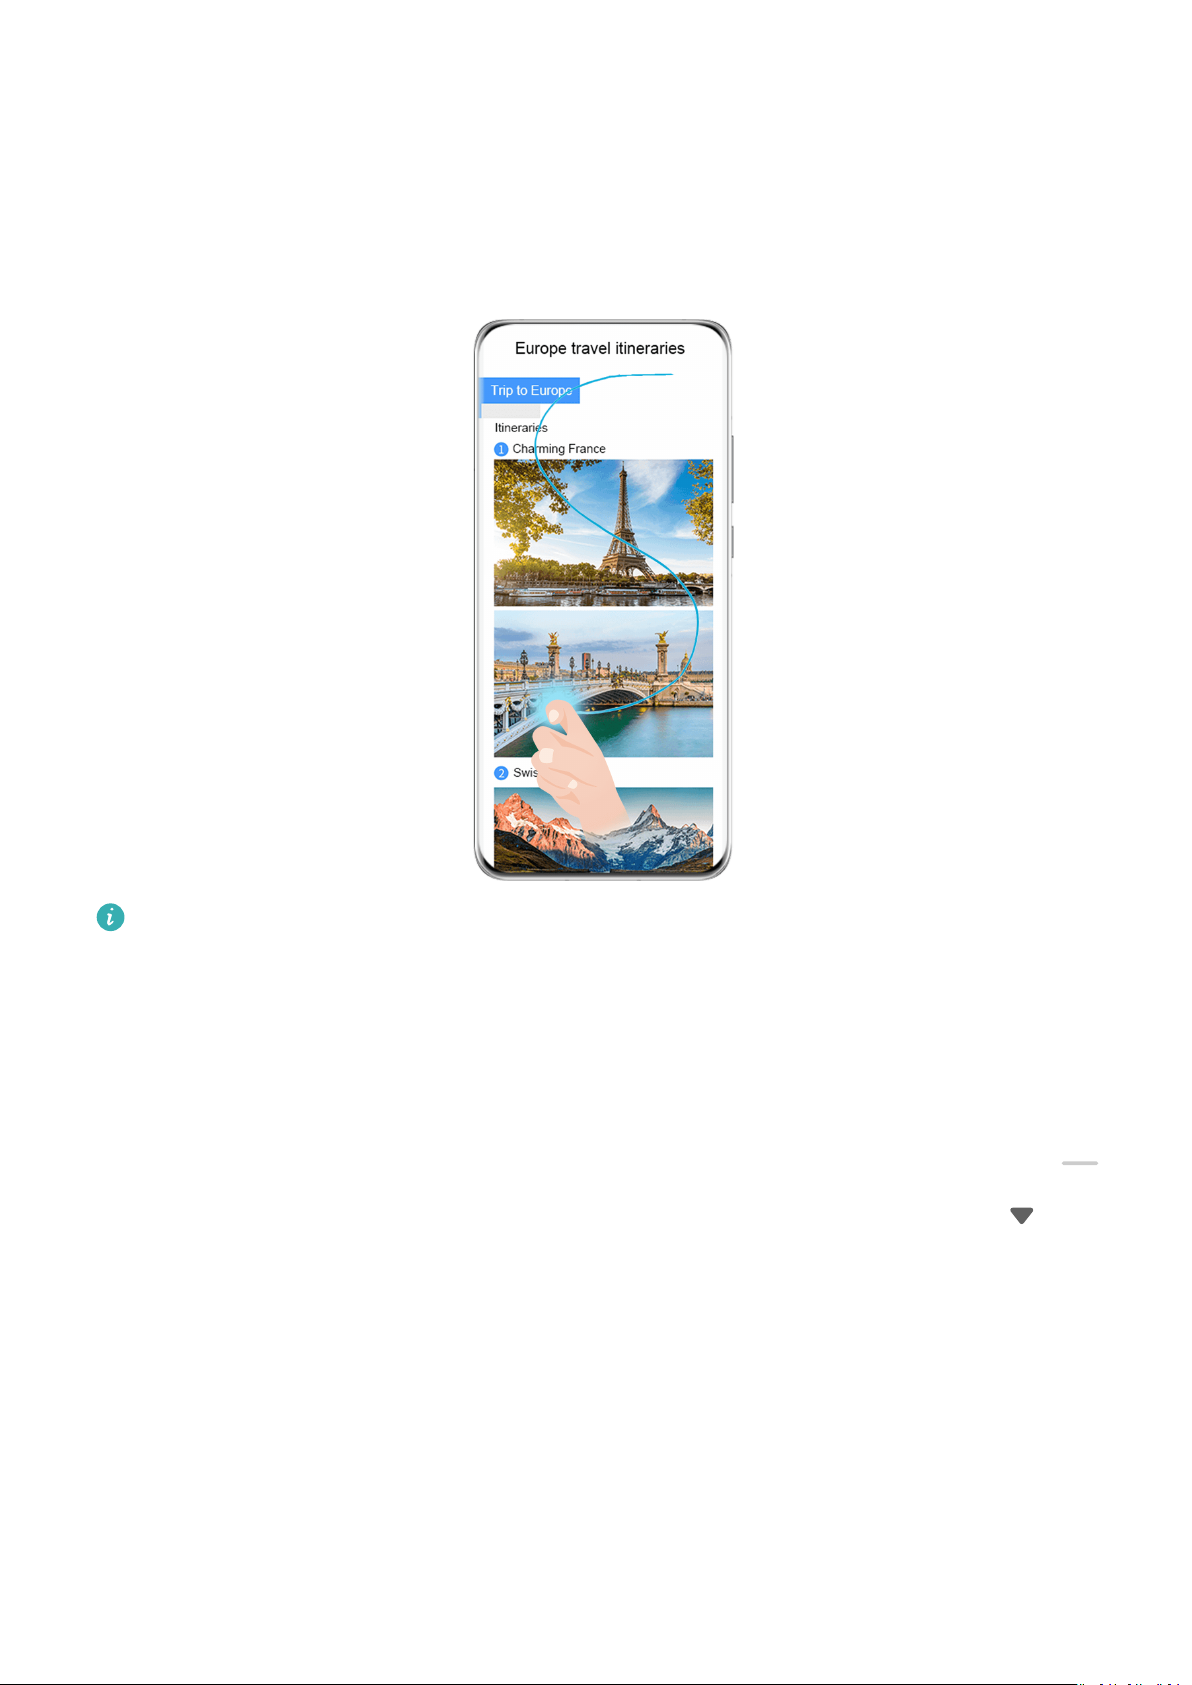
Use Your Knuckle to Take a Scrolling Screenshot
The gures are for reference only.
1 Tap a knuckle against the screen and hold to draw an "S". Your device will automatically
scroll to the bottom of the page to capture all of the content in a single screenshot.
2 You can touch the screen at any time to stop the scrolling.
Use a Shortcut to Take a Scrolling Screenshot
1 Swipe down from the upper right edge of the screen to display Control Panel, touch
to expand the shortcut switches panel(depending on your device model), touch next
to Screenshot, and touch Scrollshot in the displayed dialog box.
2 You can touch the screen at any time to stop the scrolling.
Precautions for Using Knuckle Screenshots
• Please double knock the screen consecutively at the same place and at an appropriate
speed.
• Keep your knuckle vertical to the screen.
• If you want to take more than one screenshot, wait 2 seconds before knocking on the
screen again.
19
Page 24

Essentials
• If there is a screen protector on the screen, knock the screen harder or remove the screen
protector and try again.
Record the Screen
Record your screen activities in sharable videos to compose a tutorial, show o your
awesome gaming skills, and a lot more.
Use a Key Combination to Start Screen Recording
Press and hold the Power and Volume up buttons simultaneously to start screen recording. To
stop recording, press and hold both buttons again.
Use a Shortcut to Start Screen Recording
1 Swipe down from the upper right edge of the screen to display Control Panel, touch
to expand the shortcut switches panel (depending on your device model), and touch
Screen Recorder to start screen recording.
2 To stop the recording, touch the timer at the top of the screen.
3 The recording will be saved in Gallery.
Use Two Knuckles to Start Screen Recording
1 Go to Settings > Accessibility features > Shortcuts & gestures > Record screen, and
ensure that Record screen is enabled.
2 Knock the screen twice in quick succession with two knuckles to start screen recording. To
stop recording, knock twice again.
Record Your Voice During Screen Recording
You can enable the microphone to record your voice while recording the screen.
After starting a screen recording, touch the microphone icon and ensure that it is displayed as
. You can now record your voice.
If the microphone is disabled (if it is displayed as ), you will only be able to record
system sounds, such as music. If you don't want any system sounds in your screen
recording, mute your phone and turn o any music or other media sounds before
starting the screen recording.
View and Clear Notications
View and Clear Notications
View Notications
After receiving a notication, unlock the screen and swipe down from the upper left edge of
the screen to open the notication panel where all new messages are displayed.
20
Page 25

Clear Notications
• You can remove a notication by swiping right on it.
Essentials
• You can touch
Some system notications and notications from apps running in the foreground cannot
be cleared.
Do Not Disturb Settings for Notications
If you wish not to be disturbed by a notication, swipe left on it, touch , and choose from
options including Disable notications, Use gentle notications, and DELAY.
Some system notications and notications from apps running in the foreground cannot
be disabled or delayed.
at the bottom of the notication panel to clear all notications.
Adjust Sound Settings
Adjust Sound Settings
Press a Volume Button to Adjust the Volume
Press the Volume up or down button to adjust the volume.
Press the Power Button to Mute Your Device When It Rings
When your phone rings for an incoming call or alarm, you can press the Power button to
mute it.
Flip to Mute
When there is an incoming call, you can
To use this feature, go to Settings > Accessibility features > Shortcuts & gestures > Mute
ringtone/Reduce volume or Settings > Accessibility features > Shortcuts & gestures >
Mute ringtone (depending on your device model) and make sure that Flip to mute
ringtone is enabled.
Change the Sounds and Vibration Settings
You can set the messaging tone, notication tone, and call ringtone depending on your
preferences, as well as set the vibration pattern.
ip your phone to mute it.
1 Go to Settings > Sounds & vibration and touch Phone ringtone, Messaging tone, or
Notication tone.
2 You can then:
• Set a tone.
Select a preset tone, or touch Music on device to select a locally saved song.
If two SIM cards are being used, you can set the tones for them individually.
21
Page 26

Essentials
• Set a vibration pattern.
Touch Vibration and select a vibration pattern as you prefer.
When Synchronized (default) is selected, your phone will vibrate according to the
rhythm of the tone.
For other options, the vibration pattern of your phone is xed.
Use a Shortcut to Switch Between Sound, Vibration, and Silent Modes
1 Swipe down from the upper right edge of the screen to display Control Panel and touch
to expand the shortcut switches panel (depending on your device model).
2 Touch Sound, Silent, or Vibration to switch between dierent modes.
In Sound mode, your phone plays all sounds as normal.
In Silent mode, your phone only mutes the ringtones for incoming calls, messages,
notications, and some third-party app notications. Other sounds, including alarms, voice
calls, music, videos, and games, will not be muted.
In Vibration mode, your phone is muted and vibrates to provide discreet alerts for calls or
messages.
You can also go to Settings > Sounds & vibration to switch between Sound, Vibration, and
Silent modes.
System Haptics
The system uses haptics to provide feedback when certain operations are completed, such as
when you touch and hold text, a contact, or some other elements on the screen.
Go to Settings > Sounds & vibration > More settings and enable or disable System haptics
according to your preferences.
Set the Default Volume
Go to Settings > Sounds & vibration and you can then set the default volume for the
following items:
• Ringer, Messages, Notications
• Alarms
• Music, Videos, Games
• Calls
Set More settings
On the Sounds & vibration screen, touch More settings, and set more
notication methods
according to your preferences. For example, you can set Screen lock and Screen touch.
Raise to Reduce the Ringtone Volume
When there is an incoming call, you can raise your phone up to reduce the ringtone volume.
22
Page 27

Essentials
Use either of the following methods to enable this feature (depending on your device
model):
• Go to Settings > Accessibility features > Shortcuts & gestures > Mute ringtone/Reduce
volume and make sure that Raise to reduce volume is enabled.
• Go to Settings > Accessibility features > Motion control > Raise and ensure that Reduce
call ringing volume and Reduce timer and alarm volume are enabled.
multi-window
Edit the Multi-Window Dock
Swipe inward from the left or right edge of your phone and hold to bring up the Multi-
Window dock.
• Add apps: Go to
> on the Multi-Window dock, select your desired apps in the
More apps section, then touch .
• Move apps: Go to
> , touch and hold an app icon on the Multi-Window dock, drag
it up and down to your desired position on the dock, then touch .
• Remove apps: Go to > , touch at the top right corner of an app icon, then
touch .
The Multi-Window dock is enabled by default. To disable it, go to Settings > Accessibility
features > Multi-Window, and turn o the Multi-Window dock switch.
Enable Split-screen Mode
Multi-Window allows you to open apps in split screen for multitasking.
Enable split-screen mode:
1 Open an app and swipe inward from the left or right edge and hold to bring up the Multi-
Window dock.
2 Drag an app icon out of the Multi-Window dock.
Switch the split-screen panes:
Touch and hold at the top of a split-screen pane until the pane shrinks, then drag it to
the other side of the screen to switch panes.
Exit split-screen mode:
Touch and hold
disappears.
Support for split-screen mode varies by app.
or in the middle of the split screen line and drag it until either pane
23
Page 28

Essentials
Drag and Drop Between Apps with Multi-Window
Use the Multi-Window feature to easily drag and drop images, text, and documents between
apps.
• Drag and drop an image: When taking notes with Notepad, open Files, select the photo
you want to add, and drag it into the Notepad editor.
• Drag and drop text: When sending an SMS message, open Notepad, touch and hold the
text you want to send, and drag it into the message text input box.
• Drag and drop a document: When writing an email, open Files, select the document you
want to attach, and drag it into the email editor.
Not all apps fully support drag-and-drop with Multi-Window.
Multi-Window View for a Single App
You can create two task windows for the same app (such as Email and Notepad), and drag
images, text, or documents between them.
This feature is unavailable in some apps.
Enter the split-screen view within an app.
1 Open the Email app.
2 Swipe inward from the left or right edge of your phone and hold to bring up the Multi-
Window dock.
3 Touch and hold the Email icon, and drag it to the screen to enter split-screen view.
Drag images, text, or documents between the split-screen windows.
• Drag an image: Select an image from one split-screen window and drag it to the other
window.
• Drag text: Touch and hold the text and select the desired part from one split-screen
window, then touch and hold the text again and drag it to the other window.
• Drag a document: Select a document from one split-screen window and drag it to the
other window.
Use the Floating Window
Open a oating window while gaming, and you can chat with a friend without missing a
second of the action.
Display the oating window:
1 Swipe inward from the left or right edge and hold to bring up the Multi-Window dock.
2 Touch an app icon in the Multi-Window dock to open the app in a oating window.
Relocate the oating window:
Drag the bar at the top of the oating window to move the window to the desired position.
Resize the oating window:
24
Page 29

Essentials
Drag the bottom edge, two sides, or bottom corners of the oating window to resize it.
Display in full screen:
Touch at the top of the oating window to display it in full screen.
Minimize the oating window:
Touch at the top of the oating window to minimize and shrink it into a oating bubble.
Close the oating window:
Touch
Find and Switch Between Floating Windows for Apps
You can quickly nd and switch between oating windows for apps using the oating
window management function.
1 Make sure that you have opened
into the oating ball.
at the top of the oating window to close it.
oating windows for multiple apps and minimized them
2 Touch the oating ball to display all oating window previews:
• Browse through the oating window previews: Swipe up or down to nd the
oating window preview of the app you are looking for.
• Display the oating window for an app: Touch the oating window preview of the
app to display it in a oating window.
• Close the oating window for an app: Touch on the oating window preview to
close it.
Open an Attachment in a Floating Window
You can open a link or attachment within specic apps (such as Email and Notepad) in a
oating window.
This feature is unavailable in some apps.
1 Open the Email app.
2 Touch a link or attachment in the Email app to open it in the oating window.
• Open a link: Touch a link in the Email app to display it in a oating window.
• Open an attachment: Touch an attachment (such as a document, image, or video) in
the Email app to display it in a
Show Date and Time When the Screen Is
oating window.
O
25
Page 30

Essentials
Always On Display
With Always On Display enabled, the lock screen will show the date, time, and more when
the screen is o.
Enable Always On Display
1 Go to Settings > Home screen & wallpaper > Always On Display, and enable Always
On Display.
2 Set Display mode as prompted.
Set the Style for Always On Display
You can customize the display style for Always On Display (AOD) on your phone according to
your preferences.
Select a GIF Image or Moving Picture
You can select a local image (such as a GIF image or moving picture) for Always On Display
to make your display stand out.
1 From under Images on the Always On Display screen, go to > Select image > .
If you have selected a local image, touch this image and go to Change image > .
After selecting a GIF image or moving picture, you can touch Edit to edit it.
2 Set other options available on the screen as needed, and touch Apply.
Add Grati
You can personalize Always On Display by specifying text to be displayed, selecting your
preferred color scheme, and adding stickers.
1 From under Grati on the Always On Display screen, touch the style you would like to
use.
2 Enter text in the input box and set the style options, such as Color or Text size.
You can also add Stickers and drag the sticker border to adjust its position and size, and
touch or to change its direction or delete it.
3 Touch Apply.
Create an Artistic Image for Always On Display
You can choose from multiple modern art styles (such as the Mondrian style). You can also
specify the color scheme for the artistic image, by taking a photo or choosing from your
favorite photos. The colors in the photo will form a color palette for the artistic image.
1 From under Artistic on the Always On Display screen, touch the style you would like to
use.
2 Set the related options for the Artistic style, such as Layout.
When setting Color, your phone can parse the colors in your
the abstracted color palette to the artistic image.
specied photo and apply
26
Page 31

Essentials
Touch , take a photo or select a photo from Gallery, and then go to > Extract
colors.
3 Touch Apply.
Clock Styles
You can select an Analog or Digital clock style for Always On Display.
1 From under Analog or Digital on the Always On Display screen, swipe left or right to
browse the clock styles and select your preferred clock style.
2 Set the related options for the selected clock style, such as Show date.
3 Touch Apply.
Get More Styles for Always On Display
On the Always On Display screen, touch My AODs or More.
Power On and
O or Restart Your Device
Power On and O or Restart Your Device
Power Your Device On and O
To power o your device, press and hold the Power button for a few seconds, touch Power
o and Touch to power o.
To power on your device, press and hold the Power button for a few seconds until your device
vibrates and displays the logo.
Restart Your Device
Restart your device on a regular basis to clear the cache and keep the device in an optimal
state. A restart can sometimes resolve the issue when your device encounters a problem.
Just press and hold the Power button for a few seconds, then touch Restart and Touch to
restart.
Force Restart Your Phone
You can force restart your phone if it isn't working or won't turn o normally. To do this, just
press and hold the Power and Volume down buttons simultaneously for 10 seconds or longer.
Charging
Charge Your Phone
Your phone will alert you when it is running out of power. Please make sure to charge your
phone in time to prevent it from turning
o automatically when the power runs out.
27
Page 32
Essentials
Precautions for Charging
• Charge your device using the standard charger and USB cable that came with your device.
Using other chargers may result in a re, explosion, or other hazard.
• Do not use the charger in damp areas, such as in a bathroom. Do not handle the charger
with wet hands.
• Do not charge your device when there is moisture in the device.
• After you connect your device to a charger or other devices using a USB cable, your device
will automatically inspect the USB port. If moisture is detected in the USB port, your device
will automatically activate safety measures and stop charging. Disconnect your device from
the USB port and wait until the USB port is dry.
• Do not cover your device or charger during charging.
• If your device does not power on after you press and hold the Power button, the battery
may have run out. Charge for 10 minutes and then power it on.
• Disconnect the charger from this device and unplug the charger from the power socket
once this device is fully charged or is not charging.
• When the battery life becomes noticeably shorter, go to an authorized Huawei Customer
Service Center to replace the battery.
• It is recommended that you avoid using your device while charging.
Charging with a Charger
To ensure charging safety, use the charger and USB cable that came with your device.
1 Use a USB cable to connect the charger to your phone.
2 Plug the charger into a power socket.
When a beeping sound is heard, your phone will start charging, and the charging mode icon
and current battery level will be displayed on the charging animation screen.
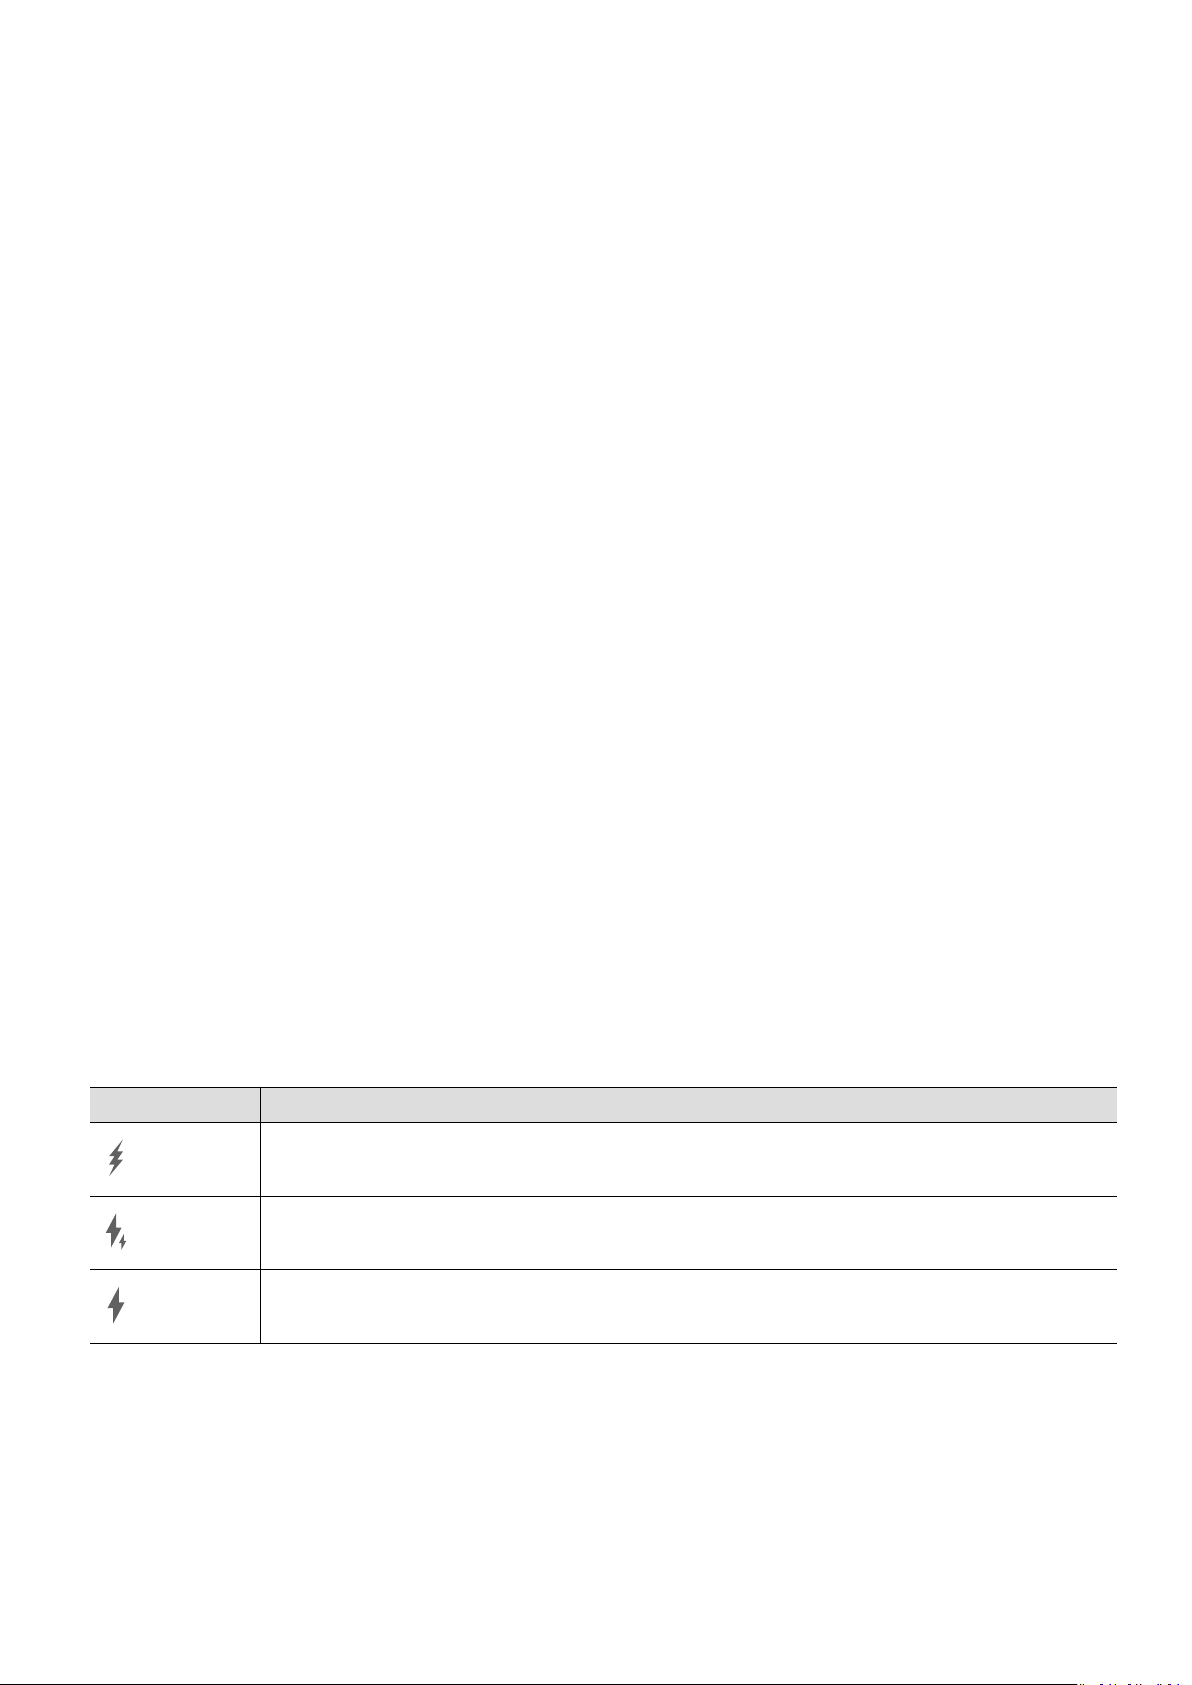
Icon Charge Mode
SuperCharge
Fast charging
Standard charging
Charging Your Phone with a PC
1 Connect your phone to a PC or other device using a USB cable.
2 When the Use USB to dialog box is displayed on your phone, touch Charge only.
If another option has been set previously, the dialog box will not pop up. Swipe down
from the upper left edge of the screen to display the notication center, touch Settings,
then select Charge only.
28
Page 33
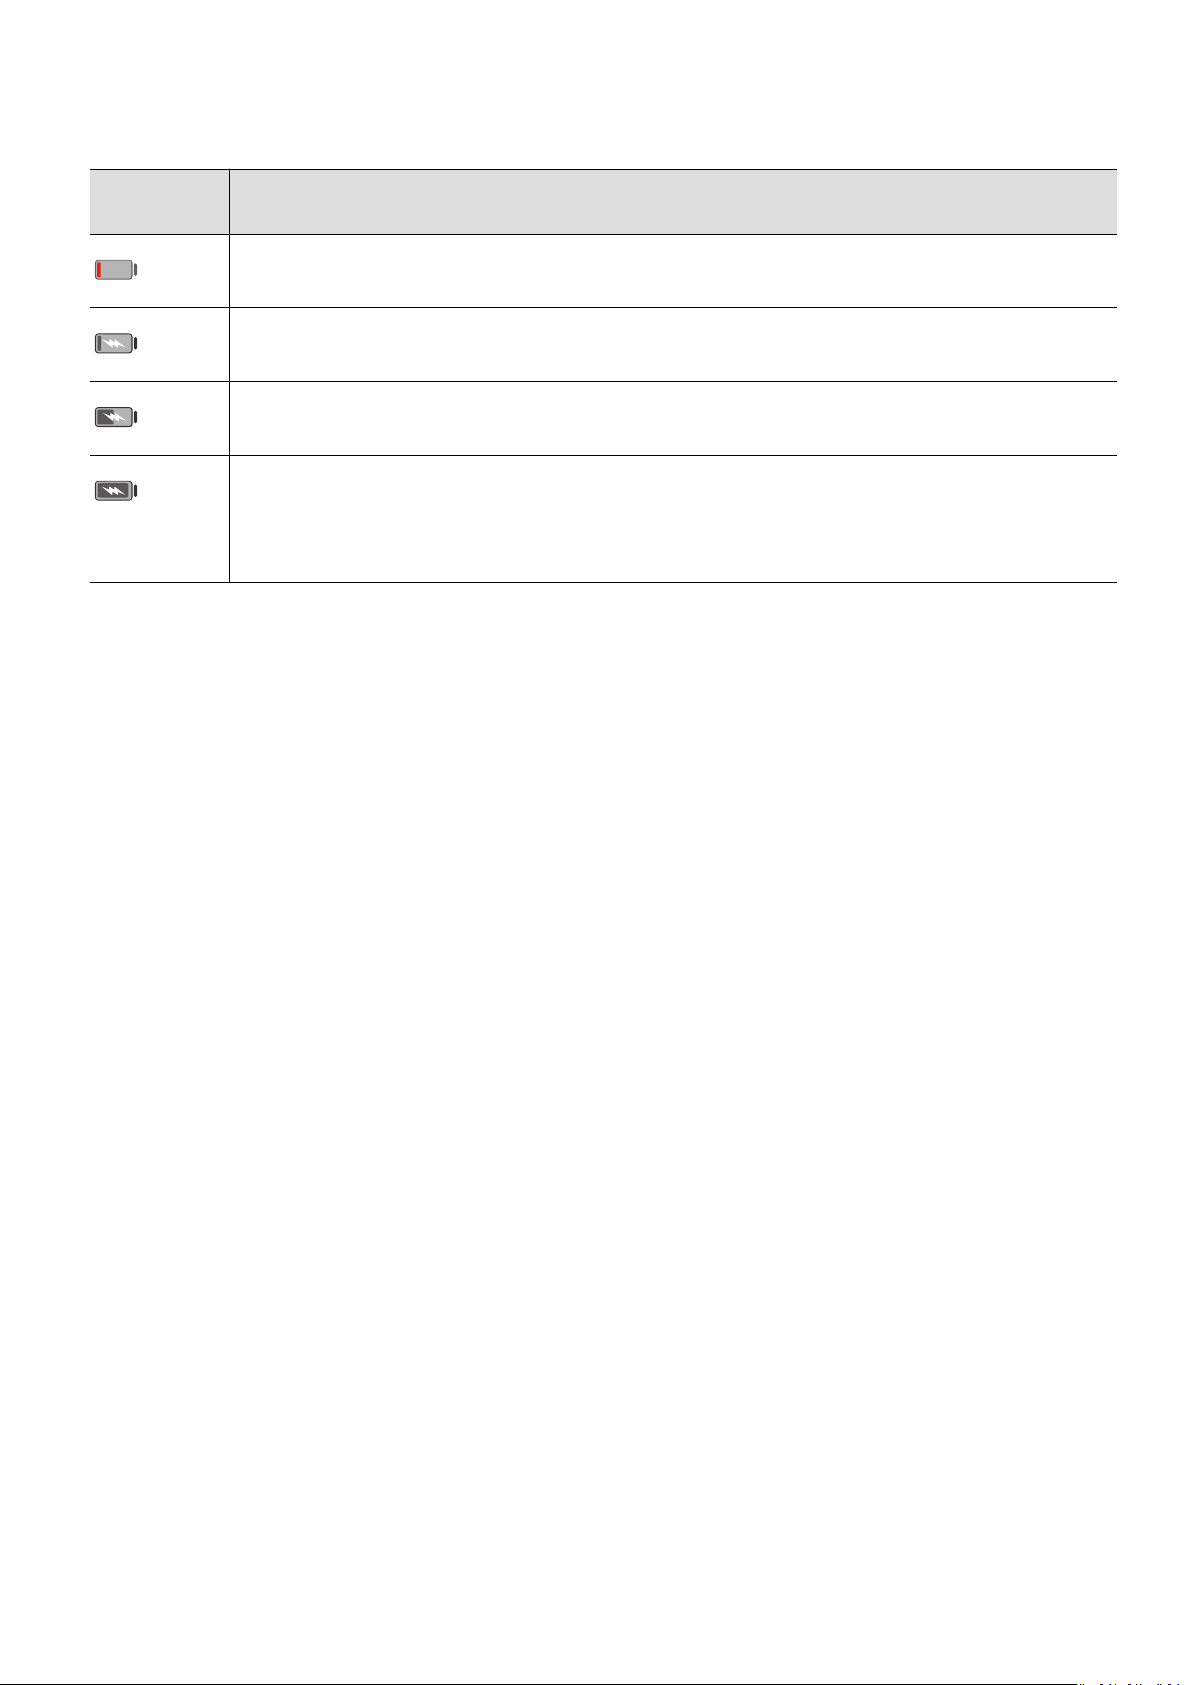
Overview of Battery Icons
You can check the battery level from the battery icon on the phone screen.
Essentials
Battery
Icon
Battery Level
Less than 4% battery remaining.
Charging, less than 10% battery remaining.
Charging, 10% to 90% battery remaining.
Charging, at least 90% battery remaining.
If 100% is displayed next to the battery icon, or a charging complete message is
displayed on the lock screen, the battery is fully charged.
29
Page 34

Smart Features
AI Voice
AI Voice
AI Voice allows you to communicate verbally with your phone.
To operate hands-free on your phone, wake up AI Voice and give a voice command.
• This feature is only available in some countries and regions.
• Please make sure your device has been updated to the latest system version.
Countries and Regions that Support AI Voice
AI Voice is only supported in certain countries and regions. You can set your location to one
of these countries and regions on your phone to use AI Voice.
AI Voice can be used in countries/regions such as the UK, France, Spain, Chile, Mexico,
Colombia, Italy, Germany, Saudi Arabia, UAE, Kuwait, Jordan, Iraq, Egypt, Turkey,
Thailand, the Philippines, Czech Republic, Romania, Serbia, Ukraine, Pakistan, Singapore,
Poland, and Malaysia. You need to select a language supported by AI Voice during use.
1 Go to Settings > System & updates > Language & input > Language and region and
touch Region to select a country/region from the above list.
2 Go to Settings > HUAWEI Assistant > AI Voice, touch Conversation language, select a
language, and follow the onscreen instructions to set it up.
Wake up AI Voice
You can wake up AI Voice in multiple ways:
Press and hold the Power button for 1 second to wake up AI Voice
1 Go to Settings > HUAWEI Assistant > AI Voice > Wake with Power button, and enable
Wake with Power button.
2 Press and hold the Power button for 1 second to wake up AI Voice.
Say the wakeup phrase to wake up AI Voice
1 Go to Settings > HUAWEI Assistant > AI Voice > Voice wakeup, enable Voice wakeup,
and follow the onscreen instructions to record your wakeup phrase.
2 When you need to wake up AI Voice, say the wakeup phrase.
30
Page 35

Smart Features
• The settings items vary by device. If your phone does not provide a specic item, it
indicates that the corresponding feature is not supported.
• You cannot wake up AI Voice with the wakeup phrase when your phone is in a call.
• You cannot wake up AI Voice with the wakeup phrase either if you are making an
audio or screen recording (with microphone enabled). In this case, you can press and
hold the Power button to wake up AI Voice.
• This feature is only available in some countries and regions.
Communicate with AI Voice
AI Voice can be in one of the following three modes: Idle, Listening, and Thinking. You can
talk to AI Voice when it is in the Listening mode.
• Idle mode: AI Voice doesn't pick up any sound in this mode.
• Listening mode: You can talk to AI Voice as it can listen to you in this mode.
• Thinking mode: AI Voice can start to execute your voice commands.
This feature is only available in some countries and regions.
View AI Voice Skill
View Built-in AI Voice Skills
You can view the built-in AI Voice skills in either of the following ways:
• Wake up AI Voice and ask: "What can you do?". AI Voice will then display the Skill center
where the built-in skills are listed.
• Wake up AI Voice and follow the onscreen instructions to swipe up to enter full-screen
mode. Then go to > Skill centre to check the built-in AI Voice skills.
• This feature is only available in some countries and regions.
• Please make sure your device has been updated to the latest system version.
Make Calls and Send SMS Messages with AI Voice
AI Voice allows you to make calls or send messages hands-free.
• This feature is only available in some countries and regions.
• Please make sure your device has been updated to the latest system version.
Make Calls with Voice Commands
You can make a call on your phone with AI Voice.
Wake up AI Voice and give voice command, such as "Call Mom", "Call back", "Check call
records", or "Redial".
When you make calls with voice commands, hands-free mode is automatically enabled.
31
Page 36

Smart Features
Send SMS Messages with Voice Commands
You can send SMS messages with AI Voice.
Wake up AI Voice and give voice commands such as "Send a message", "Check messages", or
"Send Dad a message saying the party is tomorrow".
Set Alarms with Voice Commands
You can create, disable, and query alarms with AI Voice.
Wake up AI Voice and give voice commands such as "Wake me up at 8 AM tomorrow", "Set
an alarm for 8 PM", "Set a Wednesday alarm for 7 AM", or "Show my alarms".
• This feature is only available in some countries and regions.
• Please make sure your device has been updated to the latest system version.
Play Music or Videos with Voice Commands
If you want to listen to music or watch videos, wake up AI Voice and give the voice
commands directly.
Play Music with Voice Commands
You can request your device to play a song for you with AI Voice.
Wake up AI Voice and give voice commands such as "Play music", "Play previous song", or
"Play next song".
This feature is only available in some countries and regions.
Play Videos with Voice Commands
Wake up AI Voice and give voice commands such as "Play video", "Play Friends in HUAWEI
Video", "Show me a funny video", or "Play a Coldplay video".
This feature is only available in some countries and regions.
Open Apps with Voice Commands
You can quickly open an app with AI Voice, such as for opening the camera and taking a
photo in a
• This feature is only available in some countries and regions.
• Please make sure your device has been updated to the latest system version.
specic mode.
Access Camera with Voice Commands
Wake up AI Voice and give voice commands such as "I want to take a photo" or "Take a
photo".
This feature is only available in some countries and regions.
32
Page 37

Smart Features
Open an App with Voice Commands
Wake up AI Voice and give voice commands such as "Open the Camera", "Open YouTube",
"Open PayPal", or "Open HUAWEI Music".
• This feature is only available in some countries and regions.
• Not all apps support voice control.
Query the Weather with Voice Commands
Query the Weather with Voice Commands
To query the weather, wake up AI Voice and give voice commands such as "What's the
weather like today?", "What's the weather forecast for tomorrow?", "Will it be windy today?",
"Is it going to rain tomorrow?", or "What's the temperature today?".
• This feature is only available in some countries and regions.
• Please make sure your device has been updated to the latest system version.
Speech Translation
You can use AI Voice to translate your voice or text input into the target language you have
set.
1 Wake up AI Voice and give the voice command "Translate".
2 Say or type in what you want to be translated.
3 AI Voice will display the translated result and broadcast it for you.
Communicate Easily with Face-to-Face Translation
Face-to-face translation allows you to overcome language barriers when you are traveling
abroad or in an international conference.
1 Wake up AI Voice and give the voice command "Face-to-face translation" to enter the
translation screen.
2 Touch so the text on each of the two sections can be read from each side of the
device.
3 Press the button on your side of the section, say what you want to be translated, and
release the button for AI Voice to display the translated result in real time and broadcast
it.
Set Calendar Events and Reminders with Voice Commands
AI Voice allows you to create and check your Calendar events and add reminders for these
events.
Wake up AI Voice and give voice commands such as "Schedule a meeting for 9 tomorrow
morning", "Set a meeting for 2 o'clock tomorrow afternoon", "What's my schedule for
tomorrow morning?", or "Do I have any appointments on Monday?".
33
Page 38

Smart Features
• This feature is only available in some countries and regions.
• Please make sure your device has been updated to the latest system version.
Voice Search
To make searches in a browser with voice commands, wake up AI Voice and give voice
commands such as "Search for new Huawei products", "Use website search for polar bear",
or "Search for nance websites on browser".
• This feature is only available in some countries and regions.
• Please make sure your device has been updated to the latest system version.
Enable AI Lens with AI Voice
You can use AI Voice to wake up AI Lens.
Wake up AI Voice and give a voice command such as "AI Lens".
• This feature is only available in some countries and regions.
• Please make sure your device has been updated to the latest system version.
Scan and Shop with AI Voice
1 Wake up AI Voice and give voice commands such as "Look at how much is the
refrigerator", or "Help me look at the same style of this juice machine".
2 Position the object within the
viewnder and wait for it to be identied.
3 You will be provided with purchase links to dierent shopping platforms once the object
has been recognized.
Scan and Translate with AI Voice
1 Wake up AI Voice and ask questions or give voice commands such as "Please scan this
menu and translate it" or "Scan this street sign and translate it".
2 Select the source and target languages from the language list.
3 Position the text you want to translate within the
translated.
viewnder and wait for it to be
Scan to Learn More with AI Voice
1 Wake up AI Voice and ask questions or give voice commands such as "Help me see what
this ower is" or "Please have a look what is this building".
2 Position the object within the viewnder and wait for it to be identied.
3 Touch the information card to obtain additional information.
Scan and Count Calories with AI Voice
1 Wake up AI Voice and ask questions or give voice commands such as "Have a look how
much heat this steak has", or "How much heat I can gain by eating this egg tart".
34
Page 39

Smart Features
2 Position the food within the viewnder and wait for the calorie and nutrient information
to be displayed.
Scan Codes with AI Voice
1 Wake up AI Voice and give voice commands such as "Scan this QR code" or "Scan the
barcode".
2 Position the QR code or barcode within the scan frame and wait for it to be recognized.
Enable AI Touch with AI Voice
When you see content you are interested in on the screen, wake up AI Touch with AI Voice
to identify onscreen objects and obtain more relevant information.
Go to Settings > HUAWEI Assistant > AI Touch and enable AI Touch.
• This feature is only available in some countries and regions.
• Please make sure your device has been updated to the latest system version.
Shop with AI Voice
1 Go to Settings > HUAWEI Assistant > AI Touch and enable AI Touch.
2 When you see an item you wish to buy on your phone, wake up AI Voice and ask
questions or give commands such as "How much is the cosmetics in the screen", "I want
to buy the electric fan in the screen", or "Help me nd the same style skirt on the screen".
3 When several items are displayed on the screen, adjust the size and position of the
identication box to t around the item you wish to identify.
4 After the item has been identied, links to purchase it on dierent shopping platforms will
be displayed.
AI Lens
Enable AI Lens
There are several methods for you to access AI Lens.
From Camera
Open Camera, select Photo mode, and touch
From the Search Bar
When the screen is unlocked, swipe down from the center of the screen to open the search
box and touch
From the Lock Screen
When the screen is locked, turn it on, swipe up from the bottom to open the shortcuts panel,
and touch to unlock the screen and access AI Lens.
next to the search bar to access AI Lens.
to access AI Lens.
35
Page 40

Smart Features
Scan to Shop
When you see an item you wish to buy in a magazine or when you are strolling on the street,
you can use AI Lens to quickly search for the item and compare prices across multiple
shopping platforms before making a purchase.
Scan to Shop Using Camera
1 Go to Camera > Photo, touch , and then touch .
2 Position the item you want to buy within the viewnder, and wait for it to be identied.
3 After the item has been identied by AI Lens, links to purchase it on dierent shopping
platforms will be displayed.
Scan to Translate
AI Lens allows you to scan and translate text in a foreign language, so you can easily read
road signs, menus, or descriptions on cosmetics bottles when you are traveling or shopping
abroad.
Scan to Translate Using Camera
1 Go to Camera > Photo, touch , and then touch .
2 Select the source and target languages from the language list.
3 Position the text you want to translate within the viewnder, and wait for it to be
translated.
Scan to Learn More
AI Lens allows you to learn more about artworks or landmarks you see by scanning the
objects with your camera.
Scan to Learn More Using Camera
1 Go to Camera > Photo, touch
, and then touch .
2 Position the object within the viewnder and wait for it to be identied.
3 Touch the information card to obtain additional information.
Scan and Count Calories
AI Lens allows you to count the calories and nutrients in an item of food by scanning it with
your camera.
Scan and Count Calories with Camera
1 Go to Camera > Photo, touch
, and then touch .
36
Page 41

Smart Features
2 Position the food within the viewnder and wait for information about the calories and
nutrients per 100 g to be displayed.
The information is for reference only.
Scan Codes for Services and Information
You can scan dierent types of QR codes and bar codes with AI Lens, and then touch the
identied result to be redirected to other pages for more services and information.
Scan Codes Using Camera
1 Go to Camera > Photo, touch , and then touch .
2 Position the QR code or barcode within the scan frame and wait for it to be recognized.
Easy Projection
Project Your Phone Screen Wirelessly
Project your phone wirelessly to stream movies and work on a bigger screen (such as a TV).
Dierent display devices support dierent projection protocols. Therefore, the projection
method may vary. Choose a suitable method based on the protocol supported by your device.
For details about the supported projection protocols, refer to the product manual or
contact the product manufacturer.
Display devices that support DVKit, Cast+, or Miracast:
1 Ensure that the DVKit/Cast+/Miracast switch or the projection switch is enabled on the
display device. For details about how to turn on the switch, refer to the product manual or
contact the product manufacturer.
2 Swipe down from the upper right edge of your phone to display Control Panel and touch
.
3 In Control Panel, touch to expand the shortcut switches panel (depending on your
device model), then touch Wireless Projection. Your phone will then start searching for
available external displays.
You can also go to Settings > More connections > Easy Projection or Settings > More
connections to enable Wireless projection(depending on your device model).
4 Touch the device that you want to project your phone to from the detected devices.
By default, after the connection is successful, banner notications for incoming calls,
messages, and alarms, and Multi-Window are only displayed on your phone instead of the
external display. To show notications on the external display, touch and turn o the
switch for Hide notications.
To exit wireless projection, go to
> Disconnect.
37
Page 42

Smart Features
Display devices that support DLNA:
1 Before you get started, connect your phone and the display device to the same Wi-Fi
network.
2 Ensure that the DLNA switch or the projection switch is enabled on the display device. For
details about how to turn on the switch, refer to the product manual or contact the
product manufacturer.
3 Open a media app, such as Gallery, Music, or HUAWEI Video, on your phone, open the
content that you want to project, then select the option to project it to the external
display.
For instance, open Gallery on your phone, open the photo or video that you want to
project to the external display, then go to
want to project the content to from the detected devices.
The DLNA projection protocol only supports projecting content from HUAWEI Video,
Music, Gallery, and certain third-party apps to external displays.
> Project. Then touch the device that you
Use Desktop Mode
After your phone screen is projected, go to > Projection mode on your phone, and touch
Desktop mode.
In Desktop mode, your phone and the large display work independently and can show
dierent content. The content projected on the large display is in a layout similar to that on
a computer desktop.
Therefore, you can edit a document on the large display while chatting on your phone. You
don't need to worry about missing out on notications, calls, or messages, as a red dot will
appear on the notication panel on the external display to let you know.
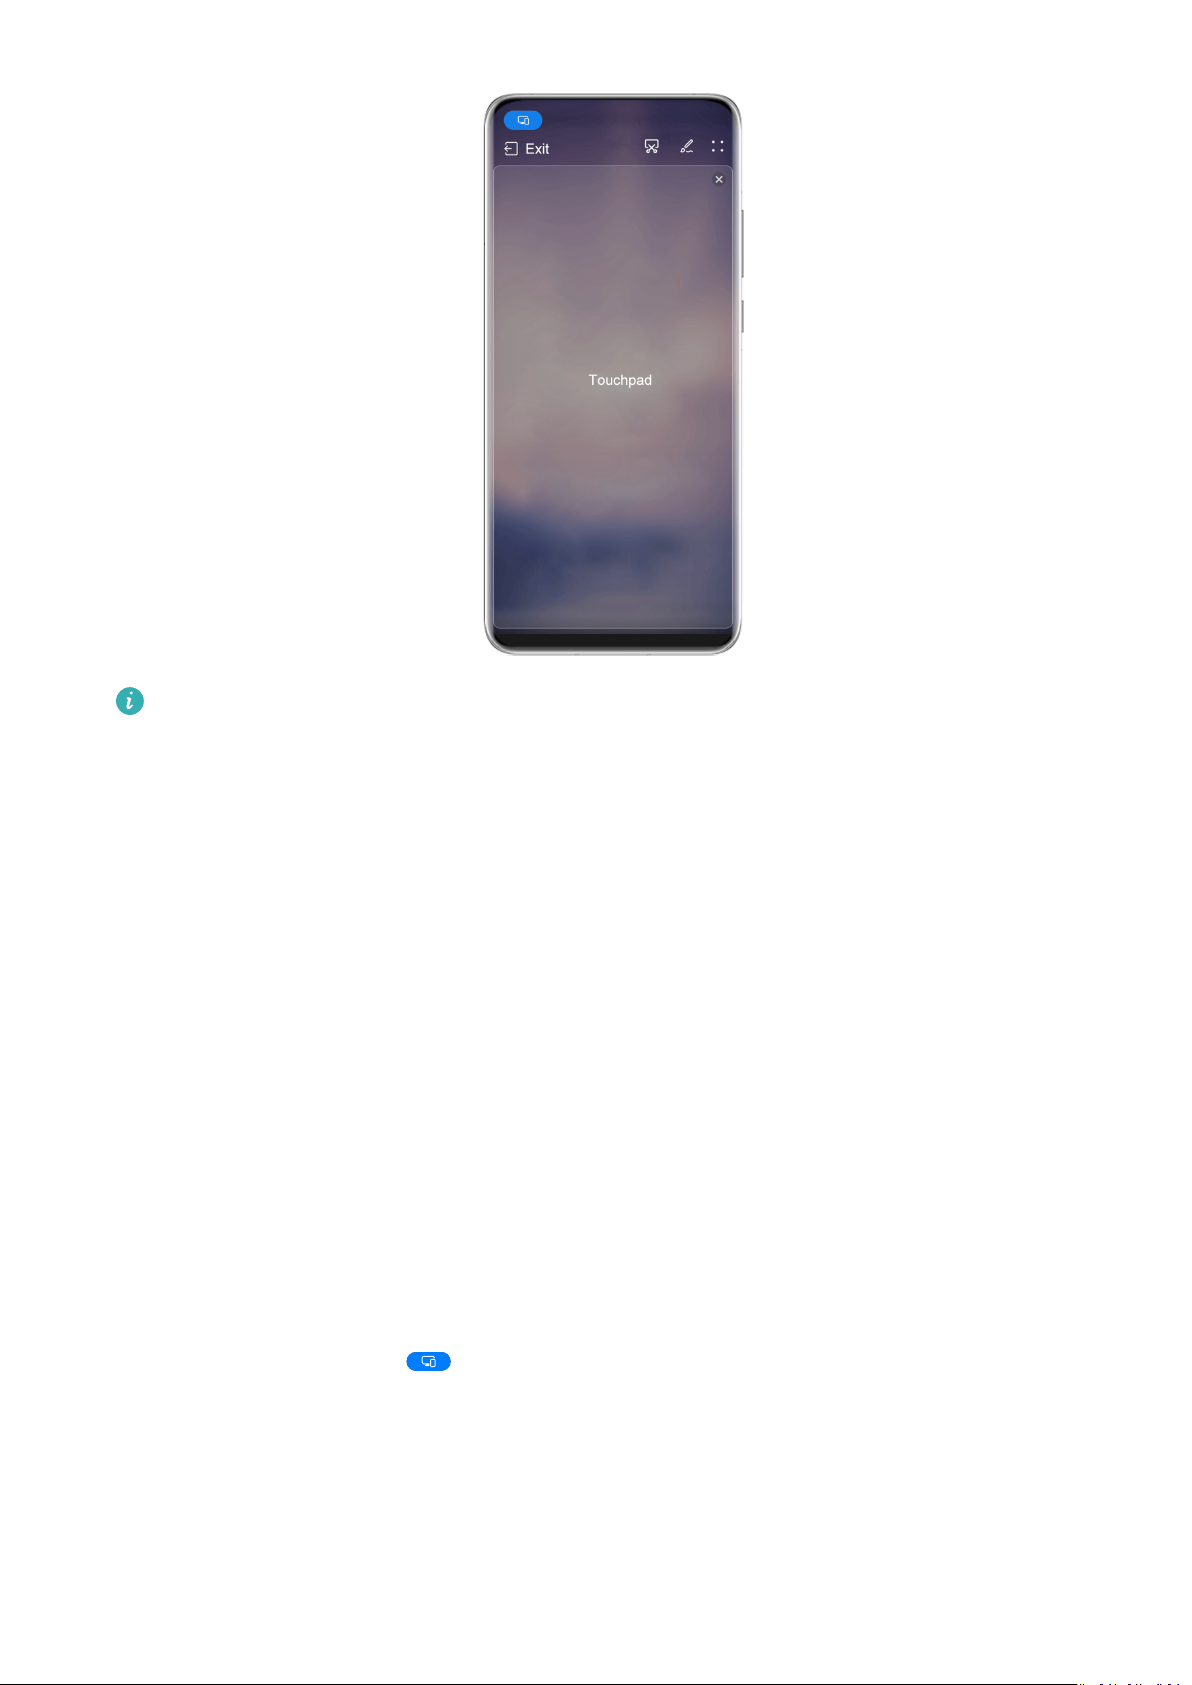
Use Your Phone as a Touchpad
After projecting your phone on the large display in Desktop mode, if no keyboard is
available, your phone can work as a touchpad to complete input operations of a mouse and
keyboard.
Go to
• Use gestures as instructed to simulate mouse commands.
> Touchpad. You can:
38
Page 43
Smart Features
The gures are for reference only.
• When no external keyboard is connected, touch the text input box on the external display
to display the onscreen keyboard to input text.
If an external keyboard is connected, the onscreen keyboard will not be available. In this
case, you need to use the external keyboard to input text.
Use Screen Projection to Make Work Easier
In Desktop mode, you can use the following features:
• Multi-window display: Open multiple windows at a time to multitask.
• File management: Save
les to the desktop, create les or folders, and rename or delete
les.
• Quick search: Search for documents, multimedia les, and apps using the start menu
search box.
• Quick app projection: Touch and hold an app icon on your phone to view the projection
options. You can then project and open the app on the large display.
Exit Desktop Mode
To exit Desktop mode, go to > Projection mode and select Phone.
Multi-screen Collaboration
39
Page 44
Smart Features
Multi-Screen Collaboration Between Your Phone and Laptop
Connect your phone to a Huawei/Honor laptop and use your keyboard and mouse to unlock
and control your phone, or share les across systems, making your work more productive and
ecient.
The operations may vary between PC Manager versions.
Connect Your Phone to Your Computer Through OneHop
1 Ensure that your computer has a Huawei Share sensor or an area labeled with a or
icon.
2 On your computer, enable Wi-Fi, Bluetooth, and PC Manager, and agree to the user
agreement.
3 Swipe down from the upper right of your phone screen to display the Control Panel,
touch
turn on NFC, Wi-Fi, and Bluetooth.
to expand the shortcut switches panel (depending on your device model), then
4 Place the NFC area (near the rear camera) on the back of your phone against the Huawei
Share sensor or the area with a or icon until your phone vibrates or plays a tone.
5 Follow the onscreen instructions to connect your phone to your computer.
Connect Your Phone to Your Laptop Using Bluetooth
1 Swipe down from the upper right edge of your phone screen to display the Control Panel
and enable Bluetooth.
2 Open PC Manager (version 10.0 or later) on the laptop and go to My devices > Phone >
Connect. Place your phone above the keyboard and your laptop will start searching for
your phone.
To check the version of PC Manager, go to > About. To update PC Manager, go to
> Check for updates.
3 Follow the onscreen instructions to connect your phone to your laptop.
Connect Your Phone to the PC by Scanning the QR Code
1 Open PC Manager (version 10.0 or later) on your PC, go to My devices > Phone >
Connect, and select the QR code option in the upper left corner.
To check the version of PC Manager, go to > About. To update PC Manager, go to
> Check for updates.
2 Ensure that your phone is connected to the Internet and use it to scan the QR code
displayed on the PC.
3 Follow the onscreen instructions to connect your phone and PC.
40
Page 45

Smart Features
Connect Your Phone to the PC with a USB Cable
1 Use a USB cable to connect your phone and PC.
2 On the PC, open PC Manager (version 10.1 or later).
To check the version of PC Manager, go to > About. To update PC Manager, go to
> Check for updates.
3 Conrm to connect to the PC on your phone.
If you cancel the connection on your phone, you can establish a wired connection
again. To do so, open PC Manager and go to My devices > Phone > Connect > Other
ways to connect > USB.
Disconnect Your Phone from Your Computer
After you have nished using Multi-screen Collaboration, you can disconnect your devices
using the following methods:
• Open PC Manager on your computer and go to My devices > Phone > Disconnect.
• Swipe down from the upper left edge of your phone to display the notication panel, and
touch DISCONNECT.
• If your phone and computer are connected via a USB cable, remove the cable to disconnect
them.
Drag to Transfer Files Between Your Phone and Laptop
After connecting your phone to a laptop, you can transfer les between them to make work
easier.
Drag and Drop Files
After Multi-Screen Collaboration is established between your device and PC, you can drag
and drop les such as pictures and videos between them to make your work easier.
Transfer les from your device to the PC.
• In the device window on the PC, open Gallery or Files, click and hold a picture or video,
click and hold any of the selected les until a dragging icon is displayed, then drag the les
to a folder on your PC.
• In the device window on the PC, drag the selected pictures or text and drop them in an
opened document on your PC.
For example, drag a photo or text from Notepad in the device window and drop it to an
Oce document opened on your PC, then continue editing on your PC.
Transfer les from your PC to your device:
• Go to Gallery > Albums in the device window, and drag a picture or video from your PC to
the device window.
• Open Files in the device window, and drag a document from your PC to the device window.
41
Page 46
Smart Features
The le will be saved in the folder that is open in Files, or in the Huawei Share folder
by default.
• Open a le in the device window on the PC, then drag a picture or text from Notepad to
the device window.
For example, drag a picture on your PC to a Notepad item opened in the device window,
then continue editing on your device.
Use Huawei Share OneHop to Transfer Files
After Multi-Screen Collaboration is enabled between your device and PC, you can transfer
les between them using Huawei Share OneHop, without needing a data cable or any
software.
Share pictures and videos
• Transfer pictures and videos from your device to your PC:
1 On your device, select one or more pictures and videos in Gallery.
2 Place the NFC area (near the rear camera) on the back of your device against the
or label on the PC until your device vibrates or plays a tone. The selected pictures or
videos will be quickly transferred to your PC.
You can click
in the picture browser to extract text from an image, and copy or save it
into a new le.
• Transfer pictures from your PC to your device:
1 Right-click a picture on your PC and use Huawei Image viewer to open it.
2 On your device, exit Gallery or go to the home screen, and place your device against
your PC (in the same way as above) to transfer the picture from your PC to your device.
Ensure that PC Manager is running version 9.0 or later.
Record the PC screen:
Shake your device and place it against your PC to project and record the PC screen on your
device.
1 Shake your device and immediately place the NFC area (near the rear camera) on the
back of the device against the
or label on your PC until your device vibrates or
plays a tone. Your PC screen will then be projected and recorded on your device.
2 Touch
on your device to stop the screen recording, which will be saved to Gallery on
your device.
• This feature is currently supported on Intel laptops only.
• Ensure that PC Manager is running version 9.1 or later.
Share documents
• Transfer documents from your device to your PC:
42
Page 47

Smart Features
1 On your device, use Microsoft Oce to open the document you want to transfer.
2 Place the NFC area (near the rear camera) on the back of your device against the
or label on the PC until your device vibrates or plays a tone. The selected
documents will be quickly transferred to your PC.
• Transfer documents from your PC to your device:
1 On your PC, use Microsoft Oce to open the document you want to transfer.
2 On your device, exit Microsoft Oce or return to the home screen, then place the device
against your PC (in the same way as above). The le opened on your PC will then be
transferred to your device.
Ensure that PC Manager is running version 9.1 or later.
Access Phone Apps and Files on Your Computer
After Multi-screen Collaboration is enabled between your phone and Huawei or Honor
laptops, you can use a mouse and keyboard on your laptop to access your phone apps and
les.
Control Your Phone Using Your Computer
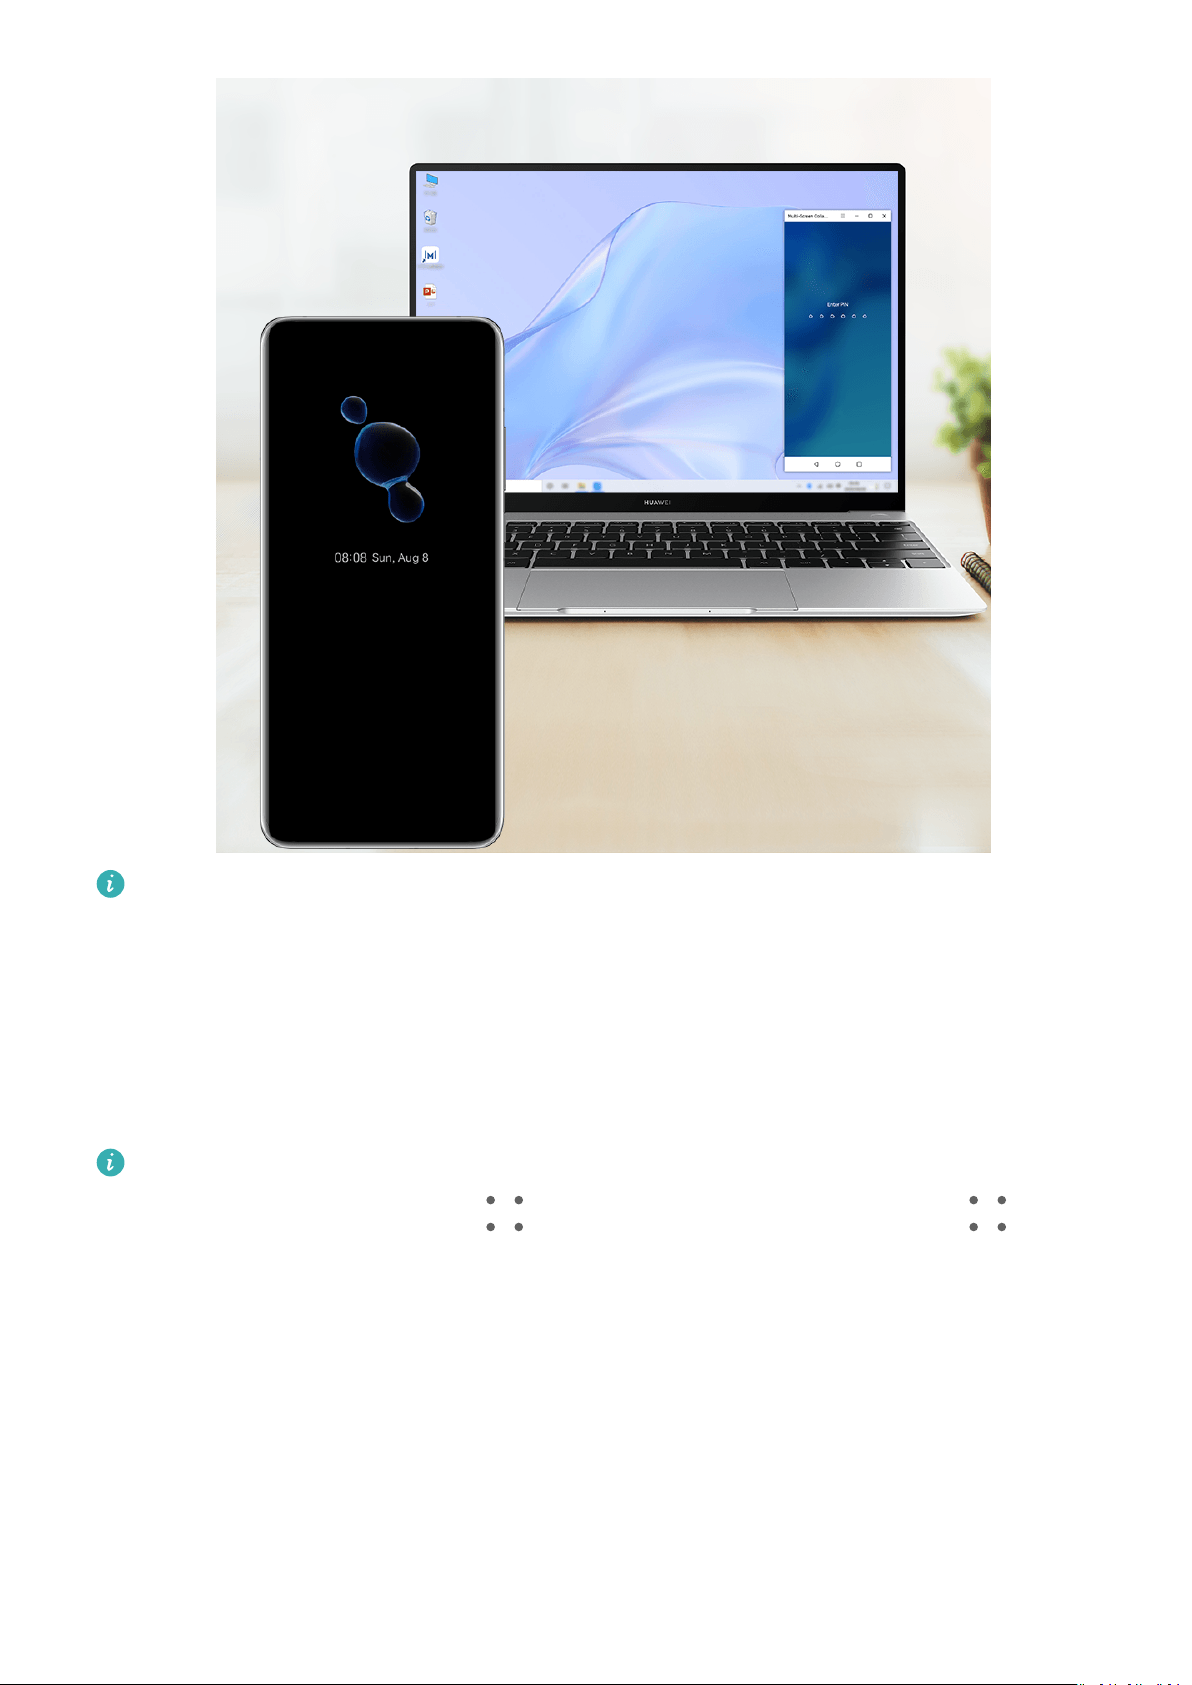
When using Multi-Screen Collaboration, the distributed authentication function allows you to
unlock your phone screen or apps on your computer, ensuring security and making the
identity authentication easier and more ecient.
43
Page 48
Smart Features
The gures are for reference only.
• Access the lock screen in the virtual window of your phone on your computer, and unlock
the screen with a preset PIN, pattern, or password using the keyboard or touchpad of your
computer.
• To access a locked app on your phone, touch the app in the virtual window of your phone
on your computer, and unlock the app with a preset PIN, pattern, or password using the
keyboard or touchpad of your computer.
• Ensure that your computer is running PC Manager 11.1 or a later version. To check the
version of PC Manager, go to > About. To update PC Manager, go to > Check
for updates.
• The operations may vary between PC Manager versions.
Operate Phone Apps on Your PC
Use a mouse to perform operations quickly
• Open an app: Click an app in the phone window on your PC to open it.
• Browse a page: Use the mouse scroll wheel to browse web pages in the phone window or
scroll between desktop tabs.
Use a keyboard to perform operations quickly
44
Page 49

Smart Features
• Input text: Use the input method on your PC to enter text in the phone window.
• Copy and paste text: Press Ctrl+C on the PC keyboard to copy text and press Ctrl+V to
paste it in the phone window.
To view information about the text you have copied recently, click the Notication
Center icon on the PC, then select the Clipboard tab.
• Send messages quickly: Press Ctrl+Enter on the keyboard to send a message in the phone
window.
• Exit an app: Press the ESC key on the keyboard to exit an app in the phone window.
Always display the phone window on the top
In the phone window on your PC, click
> to pin the phone window so that it will be
always displayed on the top, and click this icon again to unpin the phone window.
Answer a Voice or Video Call on Your Laptop
After Multi-Screen Collaboration is enabled between your phone and laptop, you can use the
laptop to answer voice and video calls (such as those in WeChat, QQ, and MeeTime) from
your phone. During a call, the audio and video can be played through your laptop and its
accessories such as the speaker and camera.
Swipe down from upper left edge of your phone to display the notication panel, and touch
Play audio/video on phone/Play audio/video on PC to switch the audio output device.
Please ensure that your laptop is running PC Manager 10.1 or a later version.
Open and Edit Files on Your Phone Using Apps on the PC
After connecting your phone to your laptop, you can open and edit various les on your
phone from your laptop.
• Documents: Use Microsoft Oce on your laptop to open a document.
• Pictures: Use Photoshop on your laptop to open or edit a picture.
• Audio and video
• Web pages: Use IE browser on your laptop to open a web page.
• Compressed les: Use WinRAR on your laptop to extract and open compressed les.
les: Use Windows Media Player to open an audio or video le.
Please ensure that your laptop is running PC Manager 10.1 or a later version.
Cross-Device Distributed File Management
After your phone is connected to your laptop, you can view and access les on the phone by
category on the laptop, and save the les being edited on the laptop to the phone.
45
Page 50

Smart Features
• Make sure that your laptop is running PC Manager 11.1 or a later version. In addition,
go to > Settings > Connections in PC Manager to ensure that Multi-Device Files
is enabled.
• To check the PC Manager version, go to > About. To update PC Manager, go to
> Check for updates.
View les on your phone from the laptop: Use the following methods:
• Open PC Manager, click Home, then go to Connect your phone > Access phone les for
your phone.
• Open PC Manager and go to My devices > Phone > Access phone les.
• On the desktop of your laptop, double-click This PC and open the drive named after your
phone.
Access les on your phone from your laptop: When viewing les on your phone by
category from your laptop, you can directly drag photos, text, and other les to an open
document or a folder on your laptop. For example, you can drag a photo from your phone to
a note that you are editing on your laptop, or to an email you are writing on your laptop to
send it as an email attachment.
Save les from your laptop to your phone: You can save a le being edited or an email
attachment on your laptop to the corresponding folder of your phone that is connected to
your laptop.
Share Your Phone's Mobile Data Network with Your Laptop
After Multi-Screen Collaboration is enabled between your phone and laptop, you can share
your phone's hotspot with your laptop in PC Manager.
1 Ensure that your phone is connected to the Internet using mobile data.
2 Open PC Manager and go to My devices > Phone > Instant Hotspot.
After Instant Hotspot is enabled, your laptop will use your phone's mobile data to access the
Internet.
• Please ensure that your laptop is running PC Manager 11.0 or a later version.
• The operations may vary between PC Manager versions.
Multi-screen Collaboration Between Your Tablet and
Phone
46
Page 51

Smart Features
Multi-screen Collaboration Between Your Phone and Tablet
Connect your phone and tablet to use Multi-screen Collaboration for cross-device operations,
such as to display your phone screen on the tablet, use your phone apps on the tablet, drag
les across the two devices, and edit a le from your phone on the tablet.
Connect Your Phone and Tablet
Only certain Huawei and Honor tablets support this feature.
Connect your phone and tablet and enable Multi-Screen Collaboration using one of the
following methods (depending on your device model):
Connect over Bluetooth:
1 Swipe down from the upper right edge of the tablet screen to display Control Panel,
touch to expand the shortcut switches panel (depending on your device model), and
enable Multi-Screen Collaboration.
2 Swipe down from the upper right edge of the phone screen to display Control Panel and
enable Bluetooth.
3 Hold your phone close to your tablet and follow the onscreen instructions to establish a
connection.
Scan a QR code to connect:
1 Open Multi-Screen Collaboration on your tablet and touch Scan to connect on the
Multi-Screen Collaboration screen.
2 Ensure that your phone is connected to the Internet and connect your phone and tablet as
prompted.
Connect by tapping against an NFC-capable keyboard:
You can place your phone against the standard NFC-capable keyboard that comes with your
tablet to enable Multi-screen Collaboration.
1 Make sure that your tablet has been paired with the keyboard.
2 Swipe down from the upper right edge of the phone screen to display Control Panel,
touch
enable NFC.
to expand the shortcut switches panel (depending on your device model), and
3 Tap the NFC area at the back of your phone (near the rear cameras) against the NFC area
of the keyboard until your phone vibrates or plays a tone.
4 Connect your phone and tablet as prompted.
Access Phone Apps and Files from Your Tablet
After connecting your phone with your tablet, you can operate your phone from your tablet,
such as to use phone apps and
make or answer phone calls.
les, view phone notications (such as SMS messages), and
47
Page 52

Smart Features
When your phone screen is unlocked, you can perform the following operations in the phone
window on your tablet:
• Open Phone to make a call by dialing a number.
• Open Messaging to view and reply to SMS messages.
• Open Gallery or Files to view photos, videos, and
les, as well as to play video or audio
les from your phone.
• Swipe down from the upper left edge of your phone or tablet screen to display the
notication panel and touch Play audio/video on phone or Play audio/video on tablet to
switch between playback devices.
• If your tablet is connected to an external keyboard or a stylus, you can use it to input text
and control the phone window on your tablet.
Drag to Transfer Files Between Your Phone and Tablet
1 Open Gallery or Files, and touch and hold a picture, video, or document.
2 Select more
an icon for dragging les appears.
For example, you can:
• Drag to transfer les in Gallery or Files between your phone and tablet.
• Drag to transfer
les if needed, touch and hold any of the selected les, then drag them when
les in Files between your phone and tablet.
• Drag a picture, text, or le from your phone to an open document on your tablet, such as a
Microsoft Oce document, memo, or email.
Disconnect Your Phone from Your Tablet
After you have nished using your phone and tablet, you can disconnect them using the
following methods:
• On the phone window displayed on the tablet, touch
• Swipe down from the upper left edge of your phone or tablet screen to display the
to disconnect.
notication panel and touch DISCONNECT.
Huawei Share
Share Files Between Phones with Huawei Share
You can use Huawei Share to easily share
les wirelessly between Huawei phones.
Share Local Files Between Phones
You can use Huawei Share to quickly share les between Huawei phones. The recipient can
preview the les before agreeing to accept them and view the full content of the les after
receiving them. For example, the recipient can view received pictures and videos in Gallery.
48
Page 53
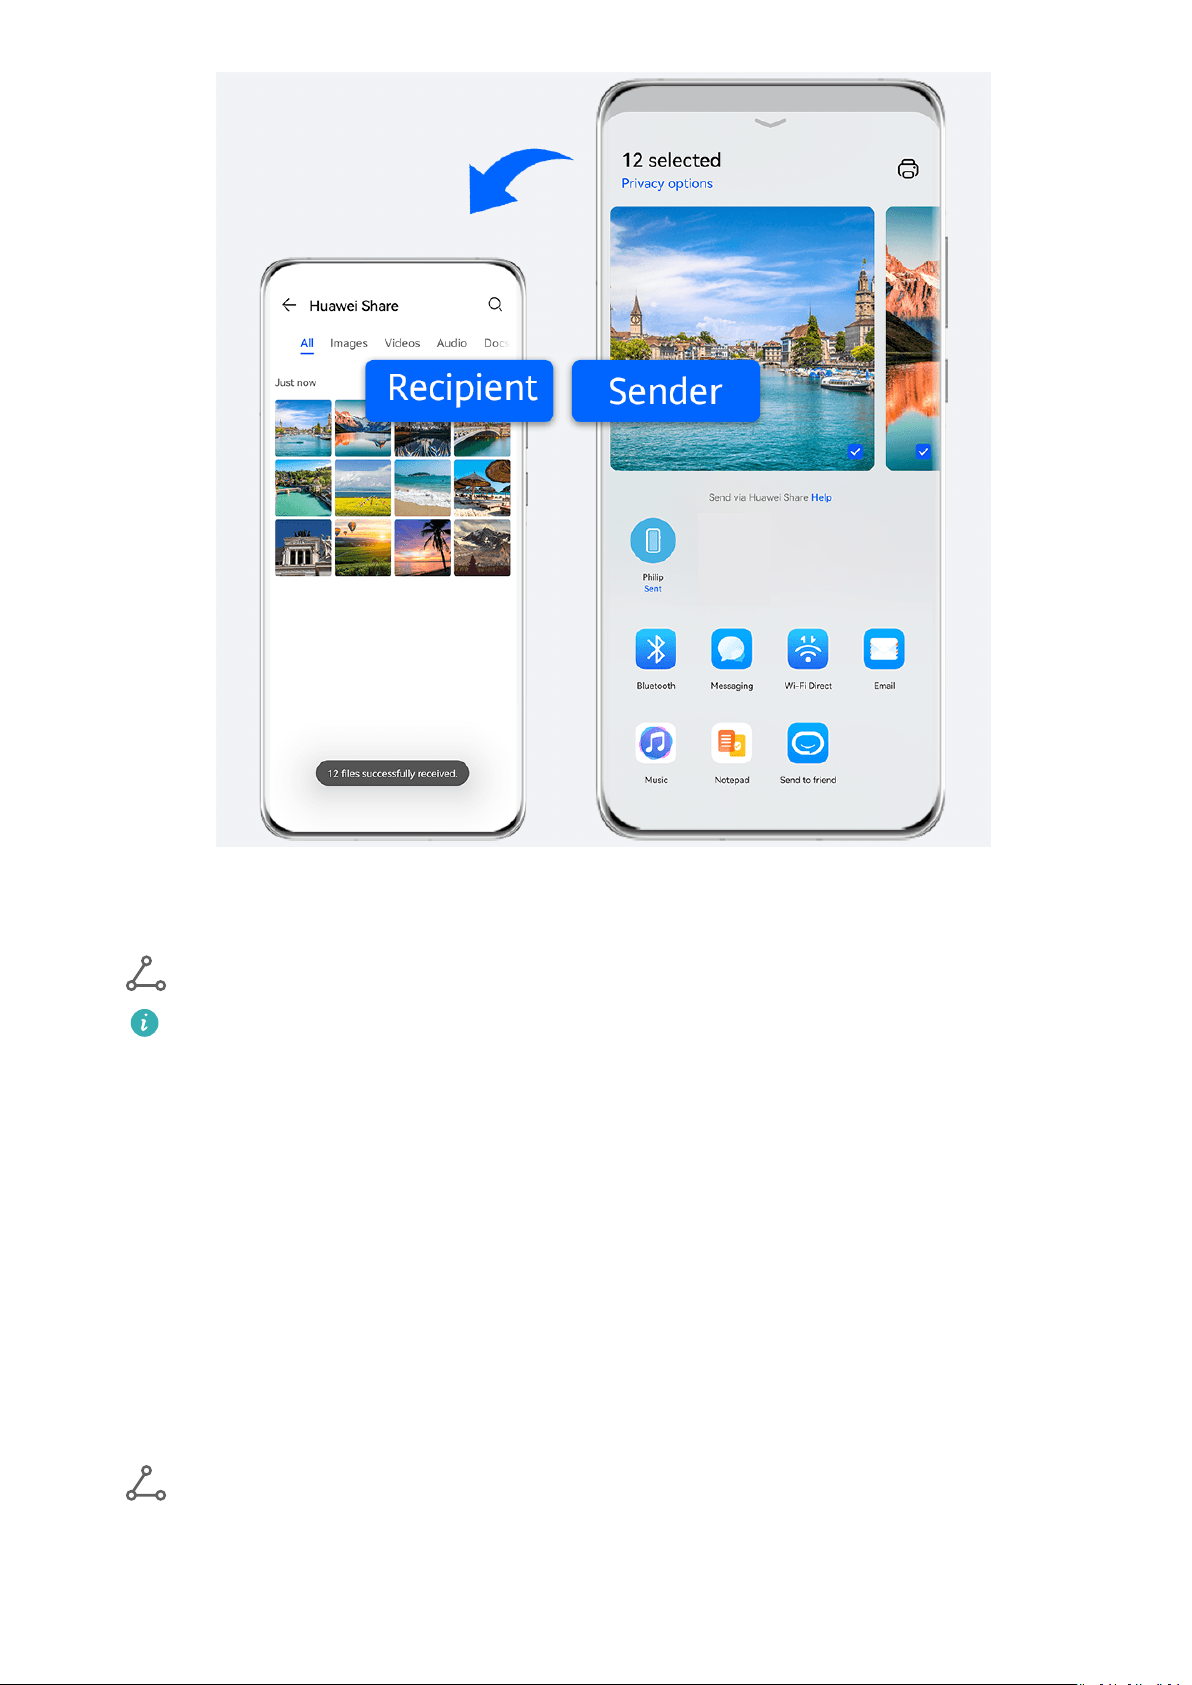
Smart Features
1 On the receiving device, enable Huawei Share.
2 On the sending device, touch and hold to select the les you want to share, then touch
. Touch Huawei Share, then touch the icon of the receiving device to send the le.
These steps may be dierent if you are sharing les directly from an app.
3 On the receiving device, touch ACCEPT to accept the transfer.
Then open Files to view the received le.
You can also view the received images or videos by going to Gallery > Albums.
Share Online Files Between Phones
Share videos, websites, and other content in apps (such as HUAWEI Video, HUAWEI Browser,
and Dianping) as links via Huawei Share. The content will be displayed directly on the
receiving device once received.
1 On the receiving device, enable Huawei Share.
2 On the sending device, open the app or website you want to share the content from, go to
> More, touch Huawei Share, wait for the system to scan for available devices, and
touch the name of the device you want to send the content to.
3 On the receiving device, touch ACCEPT to accept the transfer. The content will be opened
upon completion of the transfer.
49
Page 54
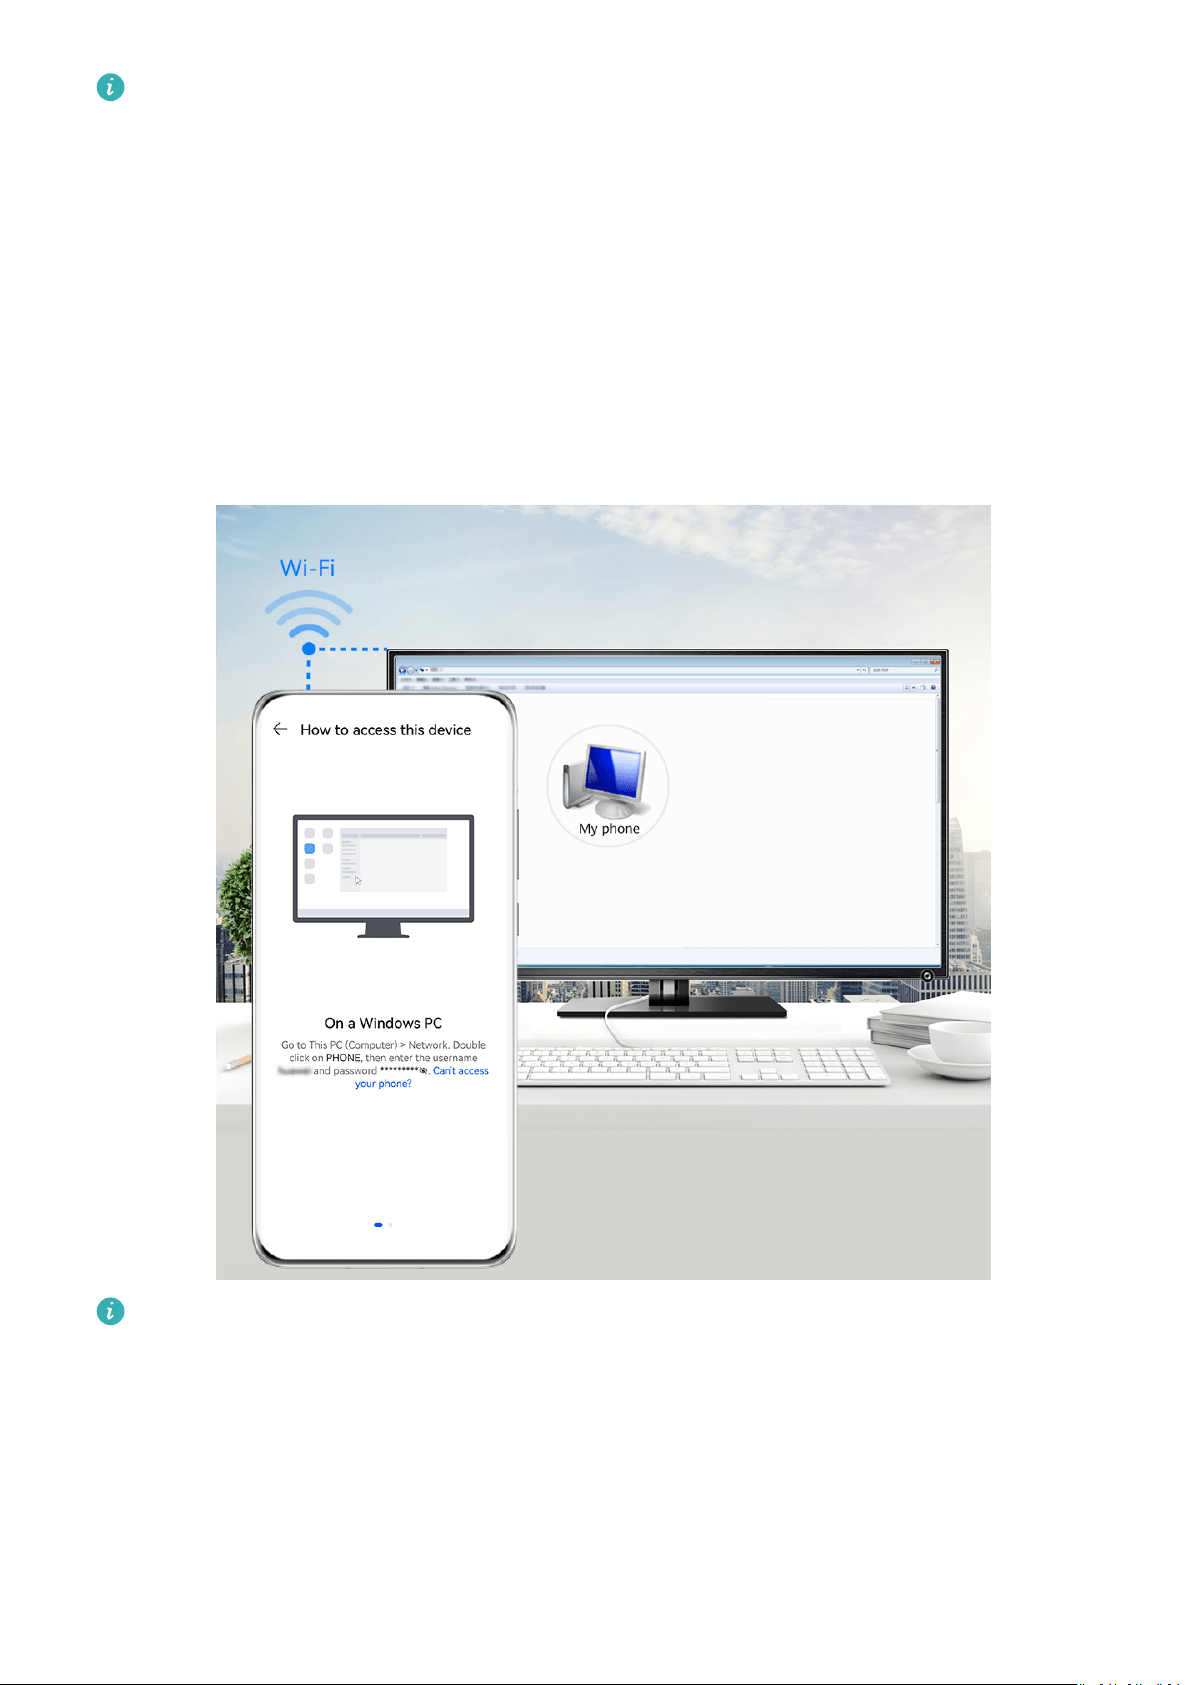
Smart Features
• The operations may vary depending on the app you share from.
• Please make sure both devices have been updated to the latest system version.
Share Files Between Your Phone and Computer with Huawei Share
You can use Huawei Share to easily share les wirelessly between your phone and a
computer (Windows or macOS).
Share Files from Your Phone to Your Computer
Share les from your phone to your computer using Huawei Share. You can then easily access
the shared folders on your phone from your computer.
The gures are for reference only.
1 Make sure your phone and computer are connected to the same Wi-Fi network.
2 On your phone, access the Huawei Share settings, then enable Huawei Share and
Computer share.
3 Make a note of the name displayed next to Name shown on computers as well as the
user name and password under Verication.
4 Perform the following operations on a Windows-based computer (desktop or laptop) or a
macOS-based computer (laptop):
50
Page 55

Smart Features
• Windows: Go to This PC (Computer) > Network.
• macOS: Go to Finder > Go to > Network.
Currently, this feature is only available on Macs running macOS 10.8 to 10.14.
5 On your computer, double-click the name of your phone and enter the user name and
password that you made a note of.
6 Open a shared folder, such as the Internal storage or Album folder, to view, edit, or copy
les from your phone to your computer or vice versa.
Changes made to les in the shared folders on your computer will be automatically
synced to your phone and vice versa.
Share Files Between Your Phone and Computer
You can use Huawei Share to share les between your phone and computer.
1 Swipe down from the upper right edge of your phone to display Control Panel, touch
to expand the shortcut switches panel (depending on your device model), then enable
Huawei Share.
2 Open PC Manager on your computer and enable Huawei Share.
You can transfer les in the following ways:
From your phone to your computer:
1 On your phone, touch and hold to select les to be transferred, then touch Share.
2 From the device list, select the name of the target computer.
3 In the displayed dialog box on your computer, click Accept.
4 After the transfer is successful, the folder where the transferred les are saved will be
automatically opened on your computer for your easy access.
From your computer to your phone:
• Transfer by sharing
1 On the computer, right-click the
les to be transferred and select Huawei Share.
2 From the device list that pops up, select your phone.
3 In the displayed dialog box on your phone, touch Accept.
• Transfer by dragging
1 Select the le to be transferred and drag it to the corresponding phone on the Huawei
Share screen.
2 In the displayed dialog box on your phone, touch Accept.
Ensure that PC Manager is running version 11.1 or later.
Huawei Print
51
Page 56

Smart Features
Print Files Using Huawei Print
Your phone can easily detect nearby printers that support Huawei Print and allows you to
print photos and documents stored on your phone with just a touch.
1 Power on the target printer and ensure that it is connected to the same Wi-Fi network as
your phone or that Wi-Fi Direct is enabled.
2 You can print
• Gallery: Open one or select multiple photos in Gallery and go to Share > .
• Files: Select one or more
• Third-party apps: Open the document you want to print in a third-party app, such as
les stored in dierent locations on your phone:
les in Files and go to Share > Print.
WPS, and go to Share > Share as attachment > Huawei Print.
The operations may vary depending on the app you use.
3 Touch Select to detect nearby printers and select the one you need. You can then set the
number of copies, color, paper size, and other options on the preview screen, then touch
PRINT.
If no printer is detected, download and install the printer plug-in as prompted on the
Select screen.
Multi-Device Collaboration
Work Seamlessly Across Devices with Smart Collaboration
Smart Collaboration allows for collaboration between
dierent devices, making your phone
the hub of your nearby tablets, computers, Visions, and other supported devices for them to
be controlled conveniently. You can also seamlessly transfer ongoing tasks on your phone,
from MeeTime calls to audio and video content being streamed, to your Vision with just a
tap, and you can easily view the phone screen projected to your computer, or edit les on
your phone using your computer.
Please make sure your device has been updated to the latest system version.
Set Smart Collaboration
Currently, Smart Collaboration only supports linking phones with the following four types of
devices. Before you get started, enable Bluetooth and Wi-Fi and log in to your HUAWEI ID on
your phone. For other devices, perform the following settings:
• Tablet: Enable Bluetooth and Wi-Fi, and ensure that it is logged in to the same HUAWEI ID
as your phone.
• Computer: Enable Bluetooth and Wi-Fi, and ensure that it is logged in to the same
HUAWEI ID as your phone and can access the Internet.
• Vision: Ensure that it is connected to the same LAN and logged in to the same HUAWEI ID
as your phone.
52
Page 57

Smart Features
• Bluetooth device: Some Bluetooth devices (such as Bluetooth headsets) can be linked with
your phone via Smart Collaboration after establishing a Bluetooth connection.
• Certain device models do not support collaborating with smart speakers.
Transfer MeeTime Calls and Audio or Video Being Streamed to Other Devices
When you are making MeeTime calls on your phone, watching videos (such as in HUAWEI
Video, Youku, or other video streaming apps), or listening to music, you can transfer any of
these ongoing tasks to another device via Smart Collaboration and pick up from where you
left o on the new device. For instance, you can transfer a MeeTime call to your Vision and a
video being streamed to your tablet.
You can select dierent devices to transfer the following tasks:
• Videos: Can be transferred to tablets and Visions.
• MeeTime calls: Can be transferred to Visions.
• Music: Can be transferred to Bluetooth earphones and Visions (either when the screen is on
o).
or
1 Swipe down from the upper right edge of your phone to display Control Panel. Available
devices will be displayed in the Smart Collaboration section. You can also touch to
search for nearby devices manually.
2 Touch a device that you want to transfer the ongoing tasks to.
53
Page 58
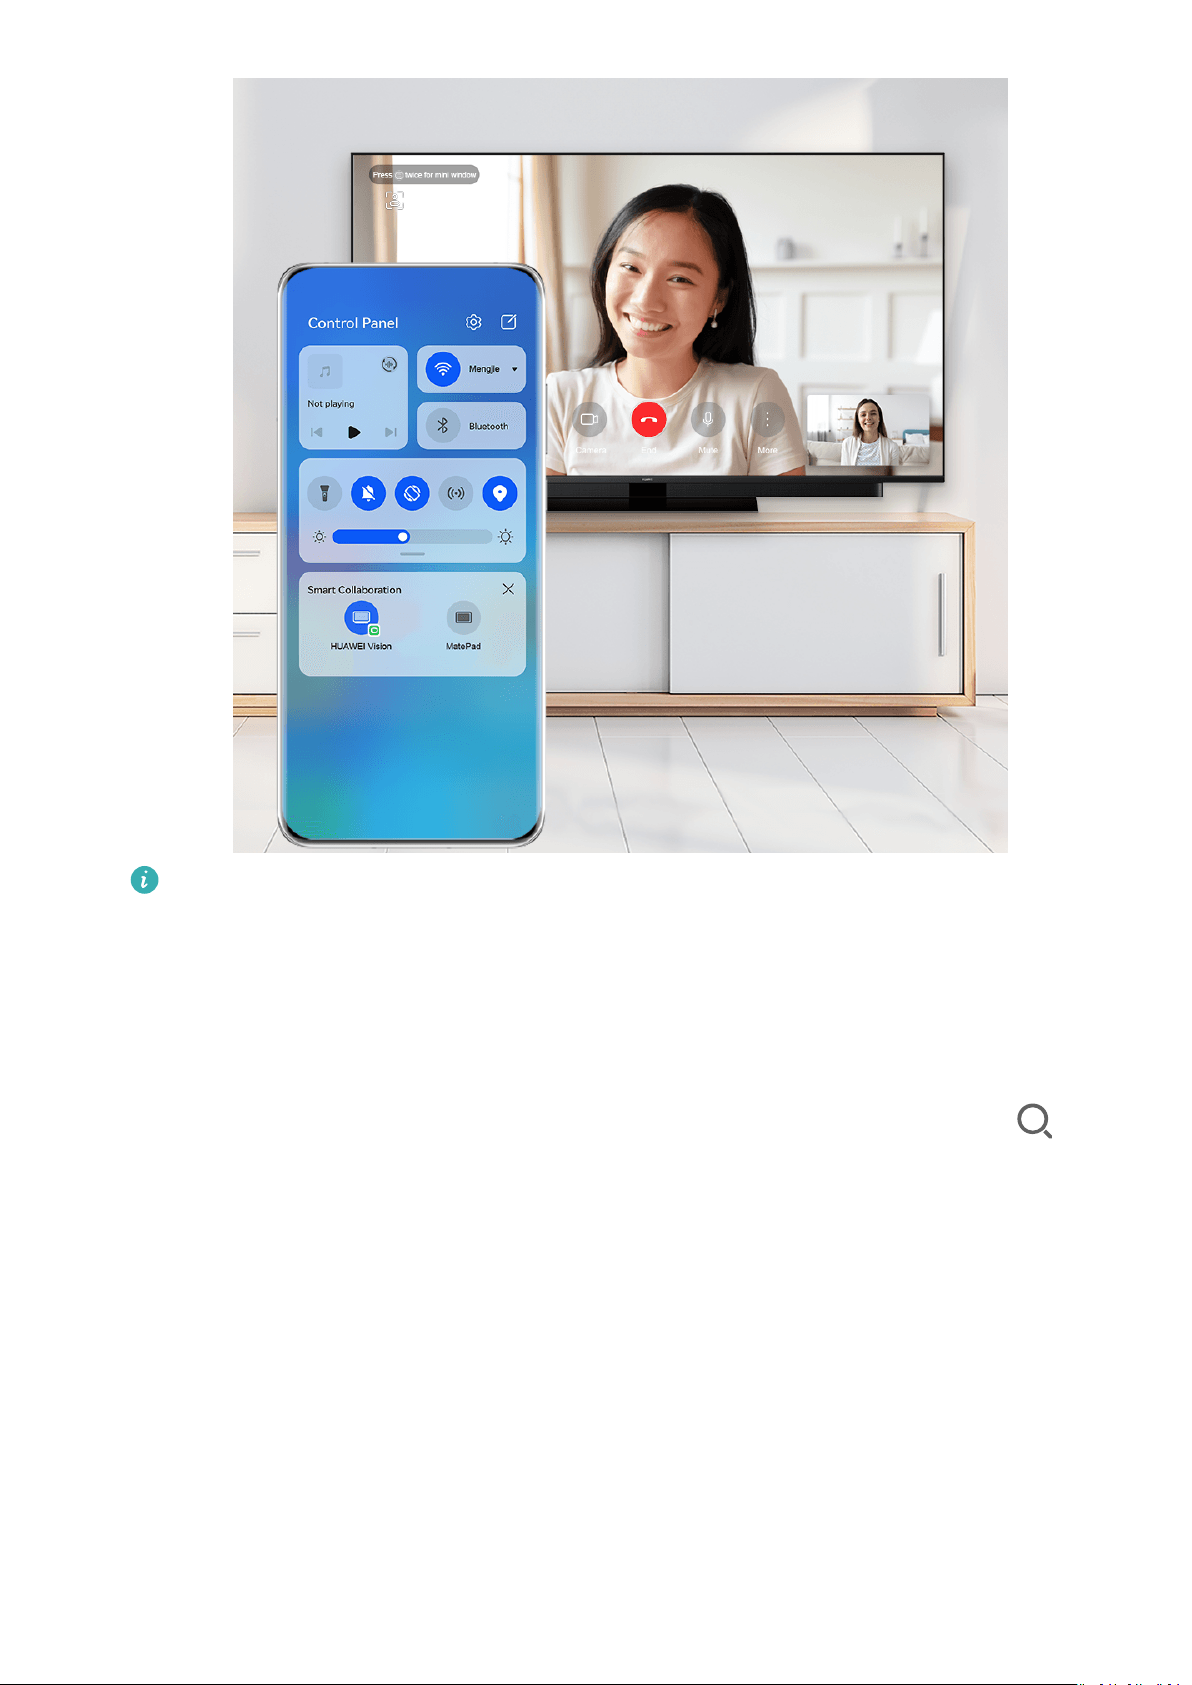
Smart Features
The gures are for reference only.
Use Multi-Screen Collaboration on a Computer or Tablet
You can view or edit les on your phone using your computer or tablet, drag les across
devices, and even use phone apps on your computer or tablet.
1 Swipe down from the upper right edge of your phone to display Control Panel. Available
devices will be displayed in the Smart Collaboration section. You can also touch to
search for nearby devices manually.
2 Select a device that you want to connect to, and your phone screen will then be displayed
on that device.
To stop Multi-Screen Collaboration, touch the corresponding device again in the Smart
Collaboration section.
Audio Control Panel
Audio Control Panel
54
Page 59

Smart Features
Manage Audio Playback in Audio Control Panel
When multiple audio apps (such as HUAWEI Music) are opened, you can manage music
playback and switch between these apps in Audio Control Panel with ease.
1 After opening multiple audio apps, swipe down from the upper right edge of the phone to
display Control Panel, then touch the audio playback card at the top of Control Panel.
2 The currently and recently used audio apps will be displayed in Audio Control Panel where
you can manage playback (such as playing, pausing, and switching to the previous or next
song) in the app in use, or touch another audio app to quickly switch playback.
• Some apps need to be updated to the latest version before using this feature.
• Not all apps support Audio Control Panel.
Quickly Switch Audio Playback Device
When your phone is connected to an audio device (such as a headset, Bluetooth speaker, or
Vision), you can quickly switch the playback device in Audio Control Panel (such as for
switching music playback from your phone to a Bluetooth speaker) .
1 Connect your phone to an audio device via Bluetooth or other methods.
After a Vision is connected to your phone via Bluetooth, it can also be connected to the
same Wi-Fi network and logged in to the same HUAWEI ID as your phone.
2 Swipe down from the upper right edge of your phone to display Control Panel, touch
on the audio playback card in the Audio Control Panel section at the top to display the
connected devices, then touch a device to transfer audio playback from your phone.
55
Page 60

Camera and Gallery
Launch Camera
Launch Camera
There are multiple ways to open the Camera app.
From the Home Screen
From the home screen, open Camera.
From the Lock Screen
When the screen is locked, turn on the screen, then swipe up on the camera icon in the lower
right corner to open the camera.
Using Ultra Snapshot
When this feature is enabled, you can open the camera or take a snapshot when the screen is
o or locked.
1 Go to Camera > > Ultra snapshot and select Open camera or Take a snapshot.
2 You can now double-press the Volume down button to open the camera or take a
snapshot without unlocking or turning on your screen.
Take Photos
Take Photos
56
Page 61
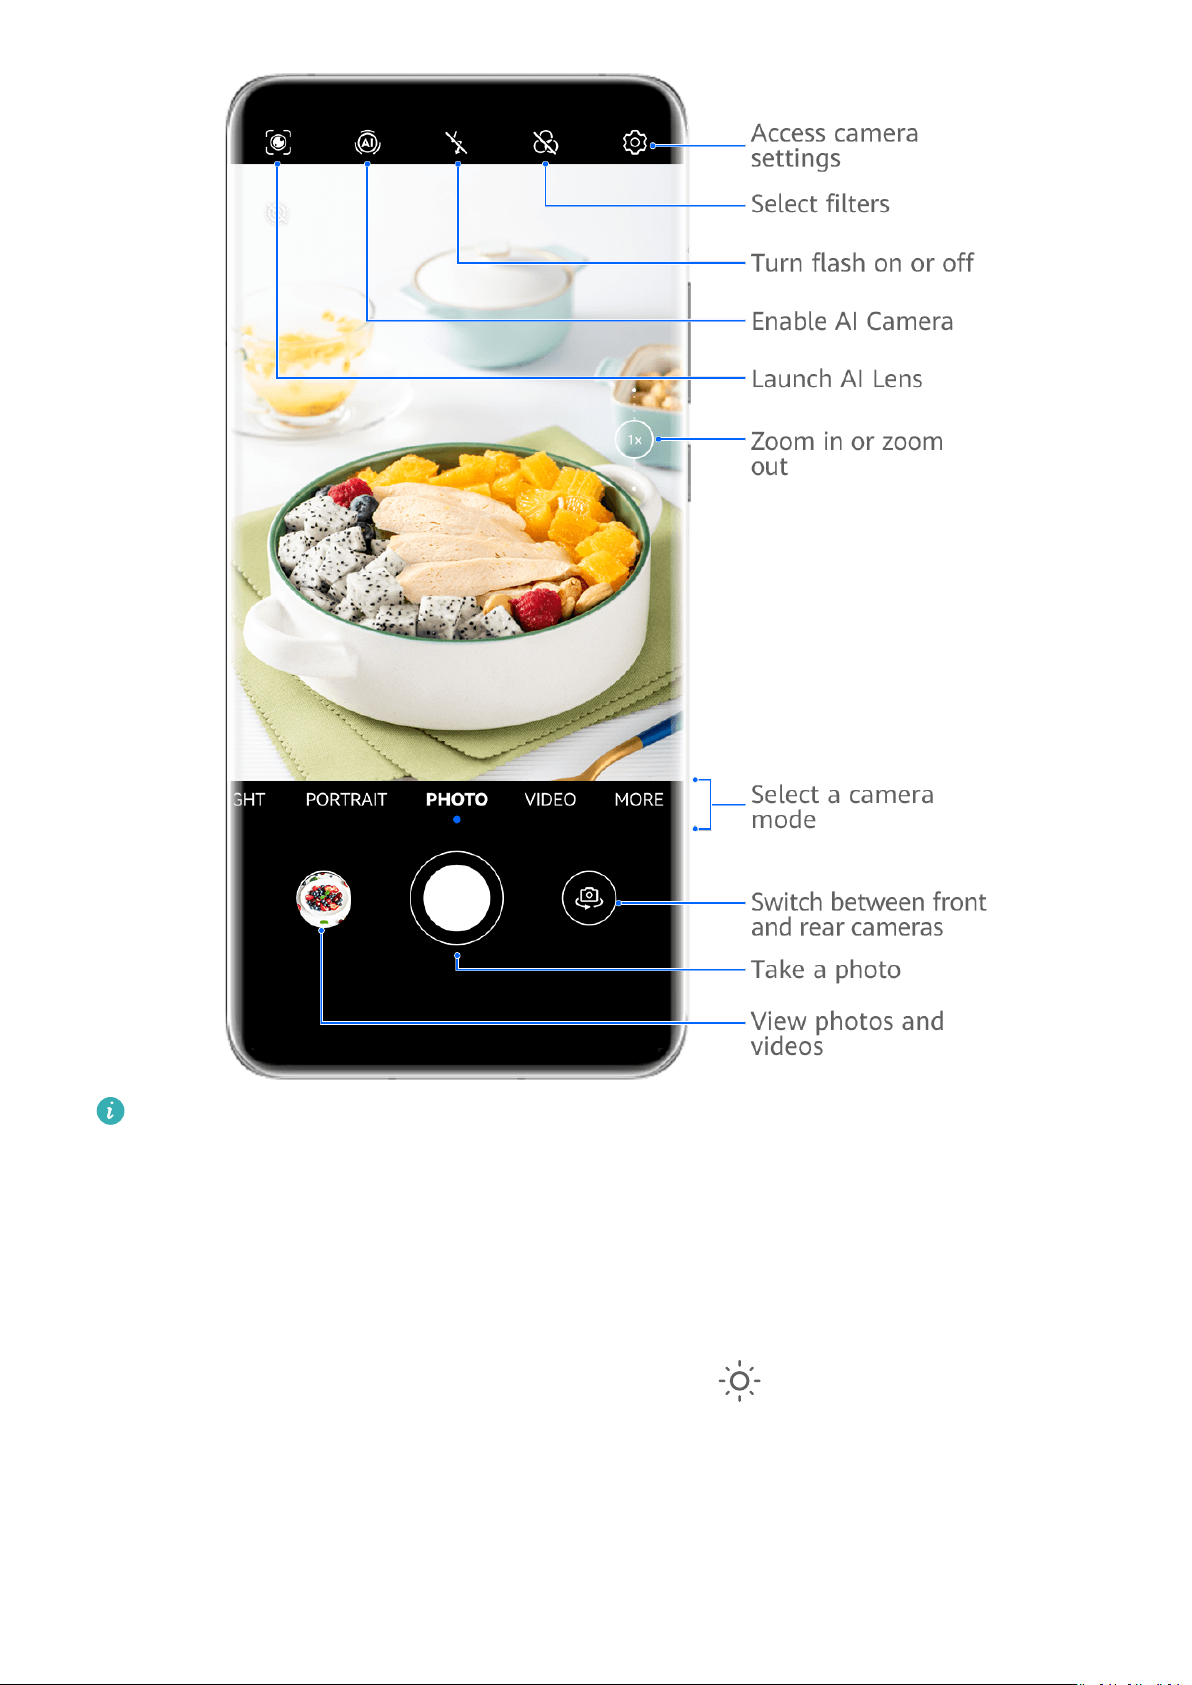
Camera and Gallery
The gures are for reference only.
1 Open Camera.
2 You can then:
• Focus: Touch the location you want to focus on.
To adjust focus and metering separately, touch and hold the viewnder and drag the
respective frame or ring to the desired location.
• Adjust brightness: Touch the viewnder. When the symbol appears next to the
focus frame, drag it up or down.
• Zoom in or out: On the viewnder, pinch in or out, or drag the zoom slider.
• Select a camera mode: Swipe up, down, left, or right across the camera mode options.
57
Page 62

Camera and Gallery
• Turn the ash on or o: Touch and select (Auto), (On), (O), or
(Always on).
If you select
environment, a ash icon will appear in the viewnder and the ash will be
automatically turned on when you take a photo.
These features may not be available in some camera modes.
(Auto) and the camera detects that you are in a dimly lit
3 Touch the shutter button to take a photo.
Use Gestures to Take Photos
1 Open Camera and touch to switch to the front camera.
2 Touch and enable Gesture control.
3 Return to the viewnder and hold your palm about 20 cm (8 in.) in front of the screen.
4 When the front camera detects your palm, your phone will take a photo after a brief
countdown.
Use the Floating Shutter to Take Photos
You can enable the oating shutter to display it in the camera viewnder, and drag it
anywhere you like to take photos quickly.
1 Go to Camera > and enable Floating shutter.
2 The oating shutter will then be displayed in the viewnder. You can drag it anywhere you
like.
3 Touch the oating shutter to take a photo.
Take Burst Photos
Use Burst mode to take a sequence of photos in quick succession so you can choose the best
one.
1 Open Camera, select Photo mode, and make sure the rear camera is in use.
2 Press and hold the shutter button or one of the Volume buttons to take burst photos.
When shooting, you'll see a number, which indicates how many photos you've taken so
far.
3 Release your
nger to stop shooting.
Select the Burst Photos You Want to Keep
1 Open Gallery. Touch a burst photo (which is tagged with
), then touch .
58
Page 63

Camera and Gallery
2 Swipe through the burst photos, select the ones you want to keep, then touch and
follow the onscreen instructions.
To delete the whole burst photo, touch and hold to select the photo, then touch .
Take Timed Photos
The camera timer allows you to set a countdown so you can get into position after you have
touched the shutter button.
1 Go to Camera >
> Timer and select a countdown.
2 Return to the viewnder and touch the shutter button. Your phone will take a photo when
the countdown ends.
Use Audio Control to Take Photos
You can use your voice to take photos without having to touch the shutter button.
1 Go to Camera > > Audio control, and select an option.
2 Go back to the viewnder, then say your command to take a photo.
Shoot in Portrait, Night, and Wide Aperture Modes
Use Portrait Mode to Shoot Portraits
Portrait mode lets you apply beauty and lighting
portraits.
eects to your photos to shoot stunning
1 Open Camera and select Portrait mode.
2 Frame your subject within the viewnder.
To take a sele, touch .
3 You can then:
• Enable beauty eects: Touch and adjust the beauty settings.
To disable the beauty eects, drag the setting to its lowest value, or touch .
• Set lighting
• Light compensation: When you switch to the front camera and the ambient light is
dim, touch the ash icon at the top of the screen to enable light compensation.
Touch the ash icon and select (Auto) or (Always on).
Not all devices support these features.
eects: Touch and select your preferred eect.
4 Touch the shutter button to shoot a photo.
59
Page 64

Camera and Gallery
Take Night Shots
Night mode gives your photos sharper details and brighter colors even when shooting in low
light or at night.
1 Open Camera or go to Camera > More (depending on your device model), and select
Night mode.
2 When shooting with the rear camera, some phones allow you to adjust the ISO sensitivity
and shutter speed by touching
or in the viewnder.
3 Steady your phone and touch the shutter button.
4 Your phone will adjust the exposure time based on the ambient brightness. Keep your
phone steady until the countdown nishes.
You can also touch the shutter button to take a photo before the countdown nishes.
Some phones do not support ending a countdown before it is due to nish.
Use the Front Camera to Take Night Portraits
To take a sele at night or when there is not sucient light around you, you can use the
front camera in Night mode.
In a dim environment, you can turn on the ash to get an illuminated photo of your face.
1 Go to Camera or go to Camera > More (depending on your device model), and select
Night mode.
2 Touch to switch to the front camera and:
• Touch the
to enable the ash. This allows you to capture an illuminated photo of your face when
there is not sucient light around you.
• Touch to adjust the beauty eect.
If the icon cannot be found in the viewnder of your phone, it means that
beauty mode is not supported.
ash icon at the top of the screen and select (auto) or (steady on)
3 Steady your phone and touch the shutter button.
Aperture
Take Wide Aperture Photos
Wide aperture mode allows you to shoot photos and videos with a blurred background while
your subject remains in sharp focus.
1 Open Camera or go to Camera > More(depending on your device model) and select
Aperture mode.
2 Touch where you want to focus. For best results, your phone needs to be within 2 m
(about 7 ft.) of your subject.
60
Page 65

Camera and Gallery
3 Touch in the viewnder and drag the slider to adjust aperture settings. A smaller
aperture value will create a more blurred background.
4 Touch the shutter button to shoot a photo.
Edit Background Blur in Wide Aperture Photos
You can adjust the focus and background blur after you've taken a wide aperture photo.
1 Go to Gallery > Albums > Camera.
2 Touch a photo tagged with
, then touch at the top of the photo.
3 Touch the photo to adjust the focus. Drag the slider at the bottom to adjust the aperture.
4 Touch to save the settings.
5 Touch
background blur editing.
Shoot Wide Aperture Videos
Wide aperture mode allows you to shoot photos and videos with a blurred background while
your subject remains in sharp focus.
to save the edited photo as a new photo. The new photo does not allow
1 Open Camera or go to Camera > More(depending on your device model) and select
Aperture mode.
2 Touch to switch to Video mode.
3 Touch where you want to focus. Touch in the viewnder and drag the slider to adjust
aperture settings. A smaller aperture value will create a more blurred background.
4 Touch the shutter button to start recording. When recording, touch the viewnder to
adjust the focus.
Master AI
Take Professional-Looking Photos
Master AI is a pre-installed camera feature that helps you take better photos by intelligently
identifying objects and scenes (such as food, beaches, blue skies, and greenery, as well as
text) and optimizing the color and brightness settings accordingly.
Master AI is displayed as AI photography or AI camera on some devices.
1 Open Camera and select Photo mode.
2 Touch to turn on
3 Frame the subject within the viewnder. Once the camera identies what you are
shooting, it will automatically recommend a mode (such as portrait, greenery, or text).
.
61
Page 66

Camera and Gallery
4 To disable the recommended mode, touch next to the mode text or turn o .
Macro
Use Super Macro to Shoot Close-ups
With Super macro mode, you can take photos of small objects such as dewdrops and leaves
to explore and record the details of the world around you.
1 Go to Camera > More and select Super macro mode.
2 Touch
to take a photo.
Take Panoramic Photos
Take Panoramic Photos
Add some width to your landscape or group photos with the Panorama feature. The camera
takes multiple photos of objects within your
single panoramic photo.
Use the Rear Camera to Take Panoramic Photos
Panorama mode combines multiple shots into a seamless panoramic photo. Simply move the
camera as you shoot and the camera will take care of the rest.
1 Go to Camera > More and select Panorama mode.
2 Touch
and set the pan direction.
eld of view and stitches them together into a
3 Point the camera at your starting point, then touch to start shooting. Move the
camera in the direction of the arrow displayed on the screen. Keep the arrow on the
center line when you are taking the photo.
4 Touch when you are nished.
Use the Front Camera to Take Panoramic Seles
1 In Panorama mode, touch to switch to the front camera.
Touch and drag the slider to adjust the beauty eect. A larger value will produce a
more pronounced beauty eect.
2 Point the camera at the center of your shot, then touch to take the rst photo.
3 Turn the camera to the left and right slowly as instructed. When the two frames on the
viewnder overlap, the camera will automatically take the second and last photos.
62
Page 67

Camera and Gallery
After the three photos are taken, the camera will automatically combine them into a
panoramic photo.
Moving Pictures
Take Moving Pictures to Bring Photos to Life
When you want to capture a photo-worthy moment, but do not feel sure about when to
touch the shutter button, you can use the Moving picture feature.
Take Moving Pictures
1 Go to Camera > Photo and touch
and select Moving picture (depending on your device model).
to enable Moving picture, or go to Camera > More
2 Touch to shoot.
Play Moving Pictures
Moving pictures are saved in JPG format in Gallery.
Go to Gallery > Albums > Camera, touch a moving picture, then touch
picture to view it.
The moving picture will automatically stop after a complete playback. You can also touch the
screen to stop the playback.
Save a Moving Picture as a GIF File or Video
To save a moving picture as a GIF le or video, touch the moving picture in the album, touch
, then select Save as video or Save as GIF.
at the top of the
Share Moving Pictures
You can share moving pictures with Huawei or Honor devices using various methods, such as
Wi-Fi Direct, Bluetooth, or Huawei Share.
Go to Gallery > Albums > Camera, touch and hold to select the moving pictures you want to
share, then touch to share them.
If you share moving pictures to third-party apps or incompatible devices, moving pictures will
be displayed as static images.
Add Stickers to Photos
Add Stickers to Photos
Add a sticker, such as a time, weather, mood, or food sticker, to spice up your photos.
63
Page 68

1 Go to Camera > More and select Stickers mode.
Camera and Gallery
If the Stickers option is not present in More, touch
2 Select a sticker, which will then be displayed in the
Drag the sticker to change its position. Touch and hold the dot on the corner of the sticker
and drag it to resize the sticker. Touch
You can also edit the text in some types of stickers. Touch the editable area which is
typically encircled with dash lines to enter the new text.
to delete the sticker.
, then download Stickers.
viewnder.
3 Touch the shutter button to shoot a photo.
Documents Mode
Use Documents Mode to Straighten Photos
Images shot at an angle always
take a perfectly straight photo of a document, use Documents mode.
The camera will automatically adjust skewed images shot in Documents mode and remove
shadows from them.
suer from the problem of perspective. If you aren't able to
Shoot Photos in Documents Mode
1 Go to Camera > More and select Documents mode.
If the Documents option is not present in More, touch , then download Documents.
2 Frame the document (such as a presentation slide or a poster) you want to shoot within
the
viewnder, and touch the shutter button to take a photo.
3 The camera will automatically identify the text area within the viewnder, unskew the
image, and remove any shadows.
Some devices do not support the removal of document shadows.
Adjust the Text Area
If you are not satised with the skew correction of a photo, you can also manually adjust the
text area.
1 Go to Gallery > Albums > Camera.
2 Touch a document photo marked with and then touch at the top of the photo.
3 Drag the four corners to customize the correction area. Then touch
reshape the photo as a at, rectangular image.
High-Res Mode
. Your phone will
64
Page 69

Camera and Gallery
Take High-Resolution Photos
Take high-resolution photos if you would like to print them or display them on a large screen.
1 Go to Camera > More and select High-res mode.
2 Frame your subject within the
In High-res mode, you won't be able to zoom in or out, or adjust the aspect ratio.
viewnder, then touch where you want to focus.
3 Touch the shutter button to shoot a photo.
Pro Mode
Use Pro Mode to Shoot Like a Pro
Pro mode lets you
focus mode, and more when taking photos or recording videos.
Use Pro Mode to Shoot Like a Pro
ne-tune photos and videos and gives you full control over ISO sensitivity,
65
Page 70
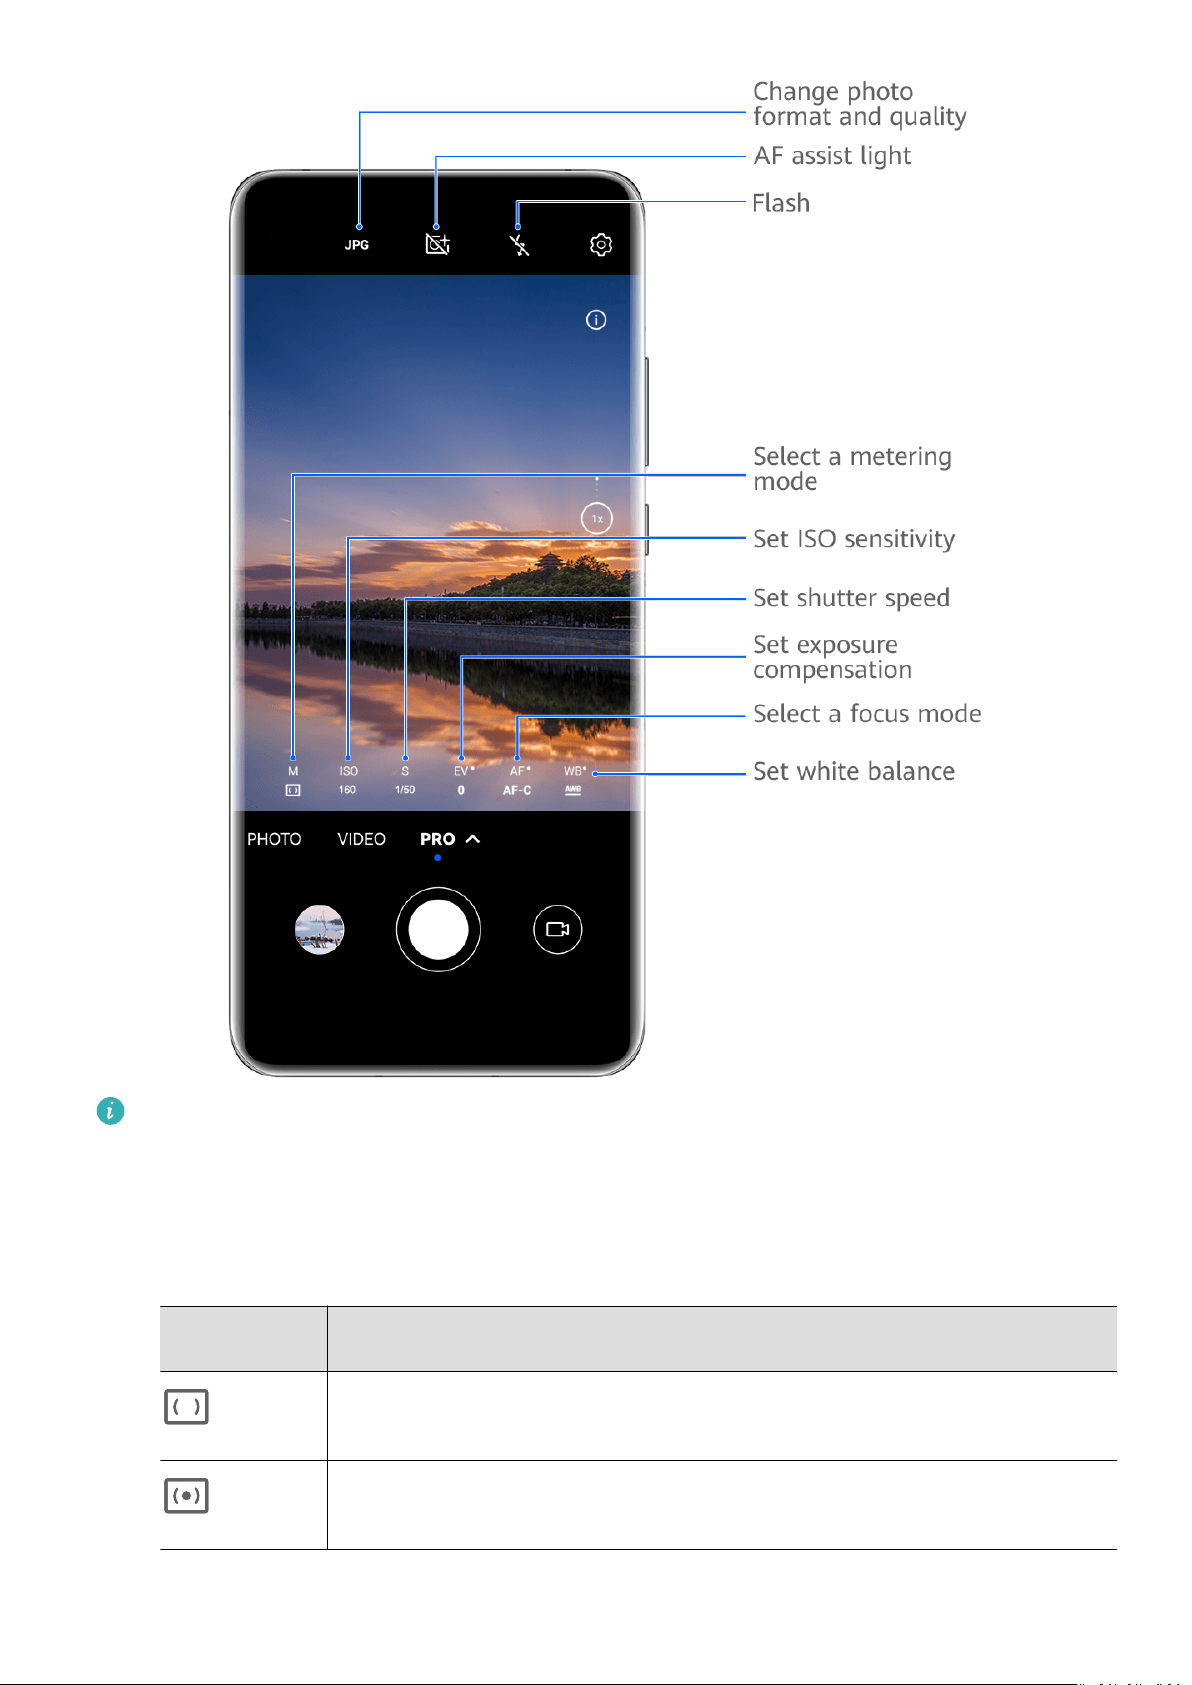
Camera and Gallery
The gures are for reference only.
1 Open Camera or go to Camera > More(depending on your device model), and select Pro
mode.
2 You can then:
• Adjust the metering mode: Touch M and select a metering mode.
Metering
Mode
Matrix
Center
Description
Measures the light in the whole frame. Applicable when shooting
natural landscapes.
Concentrates on the light at the center of the screen. Applicable when
shooting portraits.
66
Page 71
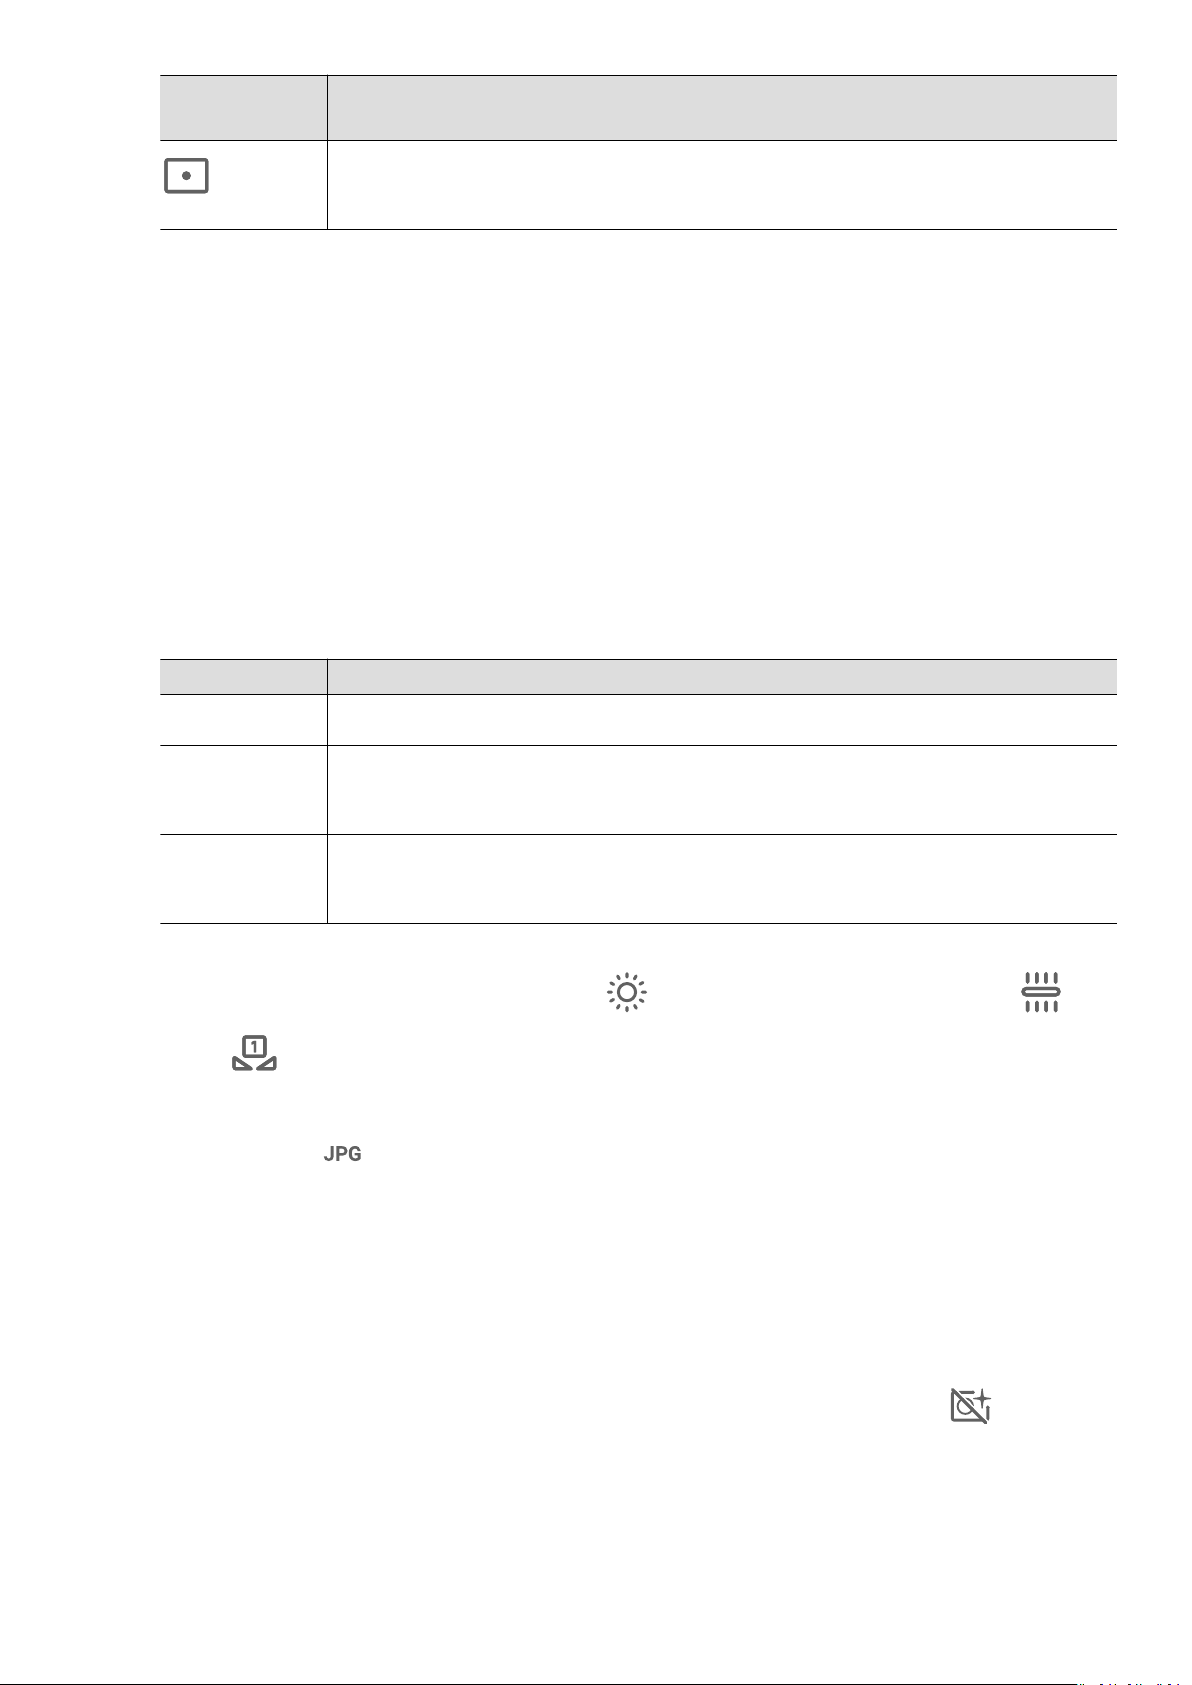
Camera and Gallery
Metering
Description
Mode
Concentrates on the light in a small area of the screen, such as the
Spot
• Adjust the ISO sensitivity: Touch ISO and drag the slider.
subject's eyes.
In low-light conditions, increase the ISO sensitivity. In well-lit environments, decrease
the ISO sensitivity to avoid image noise.
• Adjust the shutter speed: Touch S and drag the slider.
The shutter speed aects the amount of light allowed to enter the camera lens. When
you are shooting stationary scenes or portraits, decrease the shutter speed. When you
are shooting moving scenes or objects, increase the shutter speed.
• Adjust EV exposure compensation: Touch EV and drag the slider.
Increase the EV value in low-light conditions and decrease the EV value in well-lit
environments.
• Adjust the focus: Touch AF and select a focus mode.
Focus Mode Description
AF-S (single) Applicable to stationary subjects
AF-C
Applicable to moving subjects
(continuous)
MF (manual) Touch the subject on which you want to focus, such as the subject's
face.
• Adjust the color cast: Touch WB and select a mode.
When shooting in bright sunlight, select . In dimly-lit environments, select .
Touch to adjust the color temperature.
• Select the storage format: Pro mode allows you to save the photo in JPG or RAW
format. Touch
at the top of the viewnder to select a storage format.
The RAW format keeps more image details for further processing, but may occupy
more storage space. JPG format occupies a smaller amount of storage space. You can
choose a format based on your preferences.
If you select RAW format, photos that you take will be saved in RAW and standard
formats. The RAW format photos will be saved to the RAW photo album in Gallery.
• Enable AF assist light: For better focus in low-light environments, touch to enable
AF assist light.
3 Touch the shutter button to shoot a photo.
67
Page 72
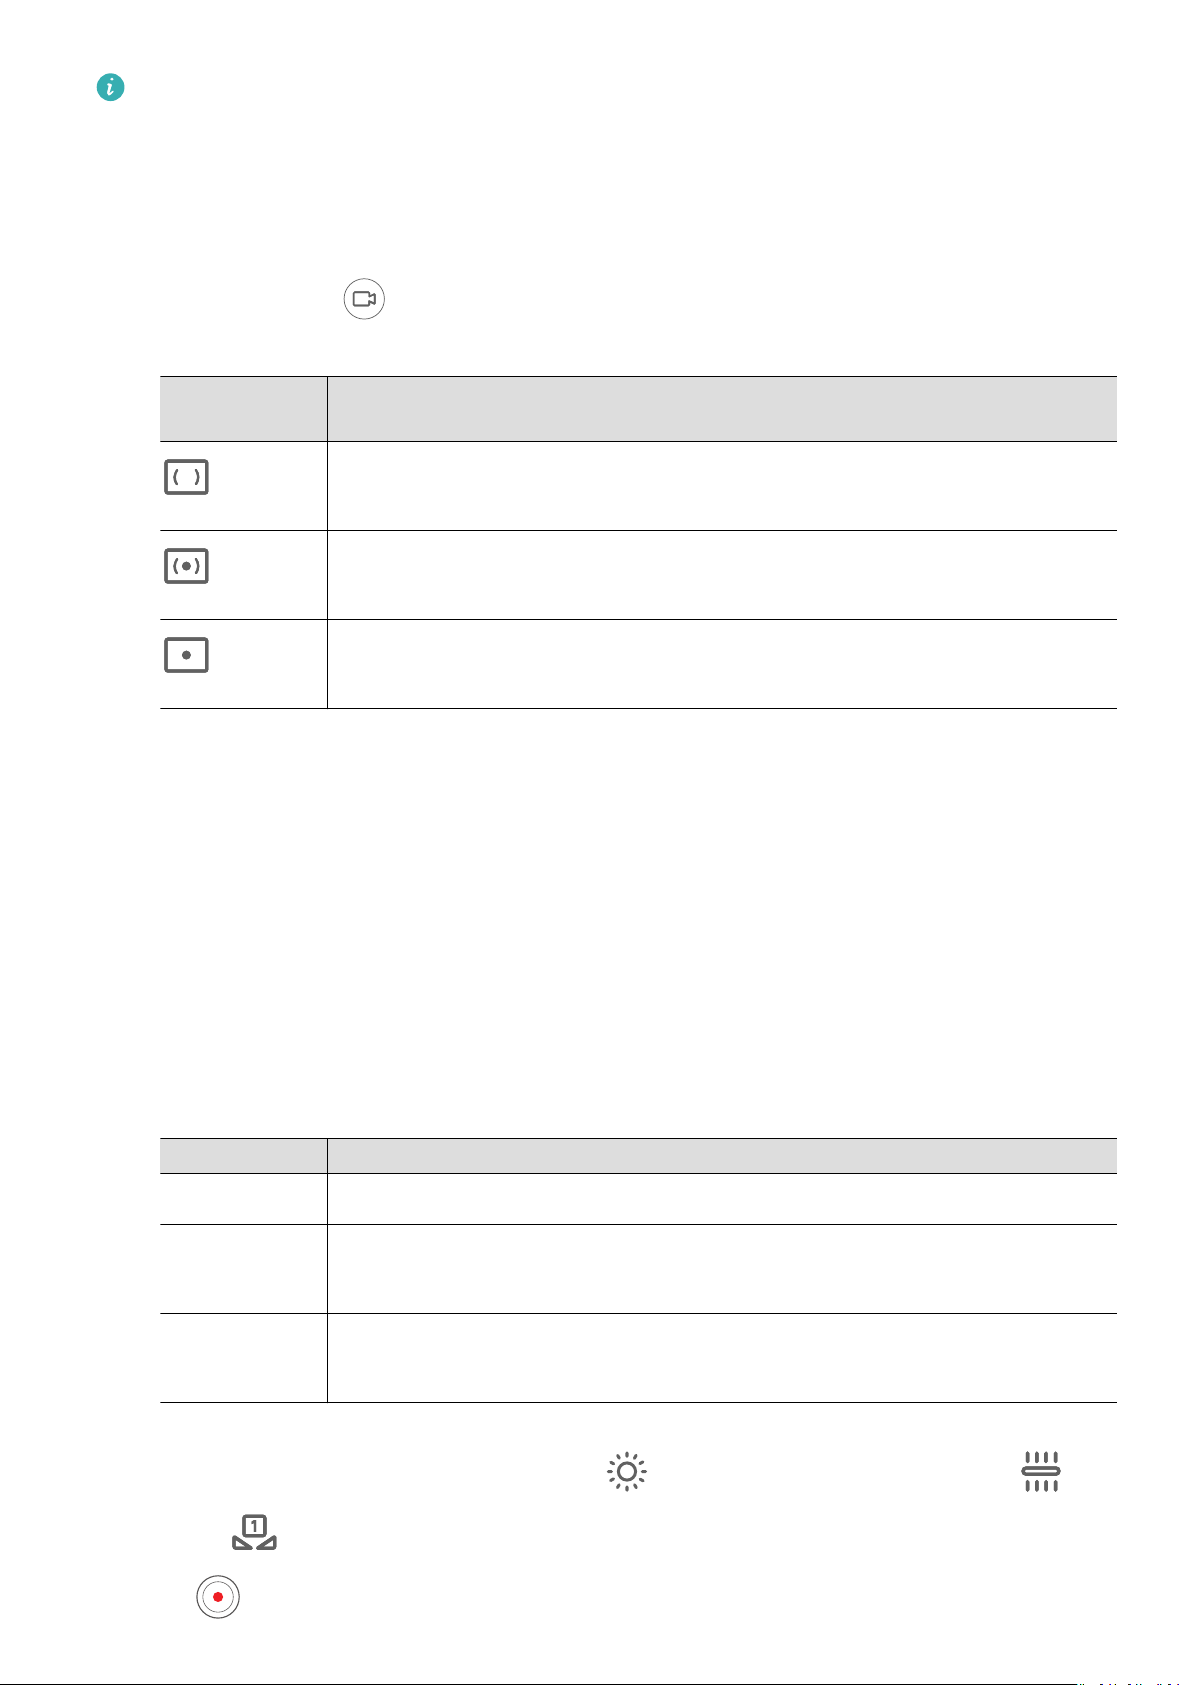
Camera and Gallery
• Not all devices support these features.
• Changing a specic setting will sometimes cause other settings to change as well.
Adjust them according to your actual requirements.
Use Pro Mode to Record Videos
1 In Pro mode, touch to switch to Video mode. You can then:
• Adjust the metering mode: Touch M and select a metering mode.
Metering
Description
Mode
Measures the light in the whole frame. Applicable when shooting
Matrix
natural landscapes.
Concentrates on the light at the center of the screen. Applicable when
Center
shooting portraits.
Concentrates on the light in a small area of the screen, such as the
Spot
• Adjust the ISO sensitivity: Touch ISO and drag the slider.
subject's eyes.
In low-light conditions, increase the ISO sensitivity. In well-lit environments, decrease
the ISO sensitivity to avoid image noise.
• Adjust the shutter speed: Touch S and drag the slider.
The shutter speed aects the amount of light allowed to enter the camera lens. When
you are shooting stationary scenes or portraits, decrease the shutter speed. When you
are shooting moving scenes or objects, increase the shutter speed.
• Adjust EV exposure compensation: Touch EV and drag the slider.
Increase the EV value in low-light conditions and decrease the EV value in well-lit
environments.
• Adjust the focus: Touch AF and select a focus mode.
Focus Mode Description
AF-S (single) Applicable to stationary subjects
AF-C
Applicable to moving subjects
(continuous)
MF (manual) Touch the subject on which you want to focus, such as the subject's
face.
• Adjust the color cast: Touch WB and select a mode.
When shooting in bright sunlight, select
. In dimly-lit environments, select .
Touch to adjust the color temperature.
2 Touch to start recording.
68
Page 73

Camera and Gallery
• Not all devices support these features.
• Changing a specic setting will sometimes cause other settings to change as well.
Adjust them according to your actual requirements.
Record Videos
Record Videos
1 Open Camera and select Video mode.
2 Adjust the following settings:
• Zoom in or out: Pinch in or out on the viewnder, or drag the zoom slider.
• Focus: Touch the area you want to focus on. Touch and hold the viewnder to lock the
exposure and focus.
• Turn the
ash on or o: Touch , then select (Always on) or (O).
When using the front camera to record videos, you can set the ash to (Always
on) in dim light. The camera will provide light compensation.
• Adjust the beauty eect: Touch and drag the slider to adjust beauty settings.
• Adjust the video resolution and frame rate: Go to > Video resolution and select
the desired resolution. A higher resolution will result in a higher quality video with a
larger le size.
Touch Frame rate to select a frame rate.
• Select a video format that saves on storage space: Touch and enable Ecient
video format.
When this feature is enabled, your phone will use a video format that takes up less
storage space. However, this may result in other devices being unable to play the video.
Please exercise caution when selecting this option.
Not all devices support these features.
3 Touch to start shooting.
While recording, touch and hold or to smoothly zoom in or out.
Touch to take a photo while recording.
4 Touch
Record Audio with a Bluetooth Headset During Video Recording
Currently, this feature is only available on selected Huawei headsets.
to pause and touch to end the recording.
69
Page 74

Camera and Gallery
1 Pair your phone with a Bluetooth headset.
2 After pairing is successful, you will see Switch audio when swiping down on the
notication panel on your phone. Touch . From the displayed audio device list, select
the Bluetooth headset.
3 Open Camera and select Video mode.
4 Frame your subject in the
During recording, only the sound collected by the Bluetooth headset is recorded.
viewnder, then touch to start recording.
5 Touch to end the recording.
Shoot 4K UHD Videos
Your phone supports 4K Ultra HD (UHD) video recording, allowing you to record in even
greater clarity.
1 Open Camera and select Video mode.
2 Go to > Video resolution and select the 4K resolution.
Beauty mode, lters, and special eects are not supported at 4K, and will be
automatically disabled when you select the 4K resolution.
3 Return to the Video screen and touch to start recording.
A higher resolution will result in a higher quality video, but will also take up more
storage space.
Slow-Mo Recording
Shoot Slow-Mo Videos
Use Slow-mo mode to capture
based on how slow you want your footage to appear. With a higher speed you'll get slower
playback.
The available slow motion speeds vary by device.
• 256x: suitable for recording shooting, explosion, or other extreme fast-paced action scenes.
• 128x or 64x: suitable for recording balls being hit and racing.
• 32x or 16x: suitable for recording bubbles popping and water splashing.
• 8x or 4x: suitable for recording breakdowns of fast movements, such as diving into water
and a football being kicked. You can customize the overall shooting length and the length
of the slow-mo portion.
For best results, shoot the slow-mo videos in bright and natural lighting.
eeting moments in detail. Adjust the slow motion speed
70
Page 75

Shoot Slow-Mo Videos
1 Go to Camera > More and select Slow-mo mode.
Camera and Gallery
2 Touch
and select a slow motion speed.
3 Frame your subject within the viewnder, then touch to start recording.
Shoot Slow-Mo Videos with the Front Camera
You can use the front camera to take slow-mo sele videos such as of your hair blowing in
the wind.
1 Go to Camera > More, select Slow-mo mode, then touch to switch to the front
camera.
2 If your phone allows, touch and select a slow motion speed.
3 Touch to start recording.
4 Touch to end the recording.
Adjust the Slow-Mo Part in Slow-Mo Videos
For a slow-mo video, you can change which part of it you want to play in slow motion.
This feature is only available for slow-mo videos recorded at 4x or 8x. The 8x option is
not available on certain devices.
1 Go to Gallery > Albums > Camera and select a slow-mo video.
2 Touch
to play the video. During playback, touch the video to display the editing area.
3 Drag the sliders to adjust the part you want to be played in slow motion.
Other parts of the video will be played at a normal speed.
4 Go to
For the best results when sharing, share the slow-mo videos in which your edits have
been saved.
> Save slow-mo le to save your edits.
Time-Lapse Photography
Use Time-Lapse to Create a Short Video
You can use Time-lapse to capture images slowly over several minutes or even hours, then
condense them into a short video. This allows you to capture the beauty of change –
blooming
owers, drifting clouds, and more.
1 Go to Camera > More and select Time-lapse mode.
2 Place your phone in position. To reduce camera shake, use a tripod to steady your phone.
71
Page 76

Camera and Gallery
3 Touch to start recording, then touch to end the recording.
The recorded video is automatically saved to Gallery.
Dual-View Mode
Record Dual-View Videos
The Dual-view feature splits the recording screen into two views, allowing you to watch the
regular view side by side with a zoomed-in view.
1 Go to Camera > More and select Dual-view.
2 Frame your subject in the
The regular view and the zoomed-in view are displayed side by side on the screen, with
the zoomed-in area being the center of the regular view. You can adjust the zoom level by
pinching in or out on the viewnder.
viewnder, then touch to start recording.
3 Touch to stop recording.
Filters
Apply a Filter to Photos or Videos
1 Open Camera and select Photo or Video mode.
2 Touch
Some phones do not have the icon.
3 Touch the shutter button to take a photo or start recording a video.
or to select a lter and preview the eect.
Adjust Camera Settings
Adjust Camera Settings
You can adjust the camera settings to take photos and videos more quickly.
The following features may not be available in some camera modes.
Adjust the Aspect Ratio
Go to Camera > > Aspect ratio and select an aspect ratio.
This feature is not available in some modes.
72
Page 77

Camera and Gallery
Enable Location Tags
To enable Location tag, enable Location Services for your phone rst, then go to Camera >
. Your photos and videos will then be tagged with location information.
You can touch and swipe up on a photo or video in Gallery to view its shooting location.
To enable Location Services on your phone:
• Swipe down from the upper right edge of the phone to display Control Panel, touch to
expand the shortcut switches panel (depending on your device model), and enable
Location.
• Go to Settings > Location and enable Access my location.
Add Device Watermarks
Enable Add watermark. Photos and videos shot with the rear camera will have a device
watermark added.
Adding a device watermark to videos is not supported on certain phones.
Use the Assistive Grid to Compose Your Photos
Use the assistive grid to help you line up the perfect shot.
1 Enable Assistive grid. Grid lines will then appear in the viewnder.
2 Place the subject of your photo at one of the intersecting points, then touch the shutter
button.
Use Mirror Reection
When using the front camera, touch , then enable or disable Mirror reection.
When Mirror reection is enabled, the image will appear as you see yourself in the
viewnder, instead of ipped.
When Mirror reection is disabled, the image will be ipped, so it's the opposite of what
you see in the viewnder.
Mute the Shutter Sound
Enable Mute to mute the camera shutter sound.
This feature is only available in some countries and regions.
Capture Smiles
Enable Capture smiles. The camera will take a photo automatically when it detects a smile
in the viewnder.
Use the Horizontal Level for Better Compositions
Enable Horizontal level to display a horizontal guiding line on the viewnder.
73
Page 78

Camera and Gallery
When the dotted line overlaps with the solid line, it indicates that the camera is parallel with
the horizontal level.
Customize Camera Mode Layout
You can customize the layout of the Camera mode screen based on your preferences by
moving the frequently used modes to the camera home screen, or change the order of
modes.
Photo, Portrait, and Video modes cannot be moved to More.
1 Go to Camera > More, and touch to enter the mode editing screen.
2 Touch and hold a mode and drag it to the desired position. You can move a mode on the
More screen to the camera home screen, move the mode on the camera home screen to
More, or adjust the layout of the mode screen based on how often you use certain modes.
Modes with a
icon can be deleted by simply touching this icon.
3 Touch to save the layout.
To restore a deleted mode, go to Camera > More, touch
, and then touch ADD.
Manage Gallery
View Images and Videos
In Gallery, you can view, edit, and share your images and videos, as well as browse the clips
automatically generated from them.
74
Page 79
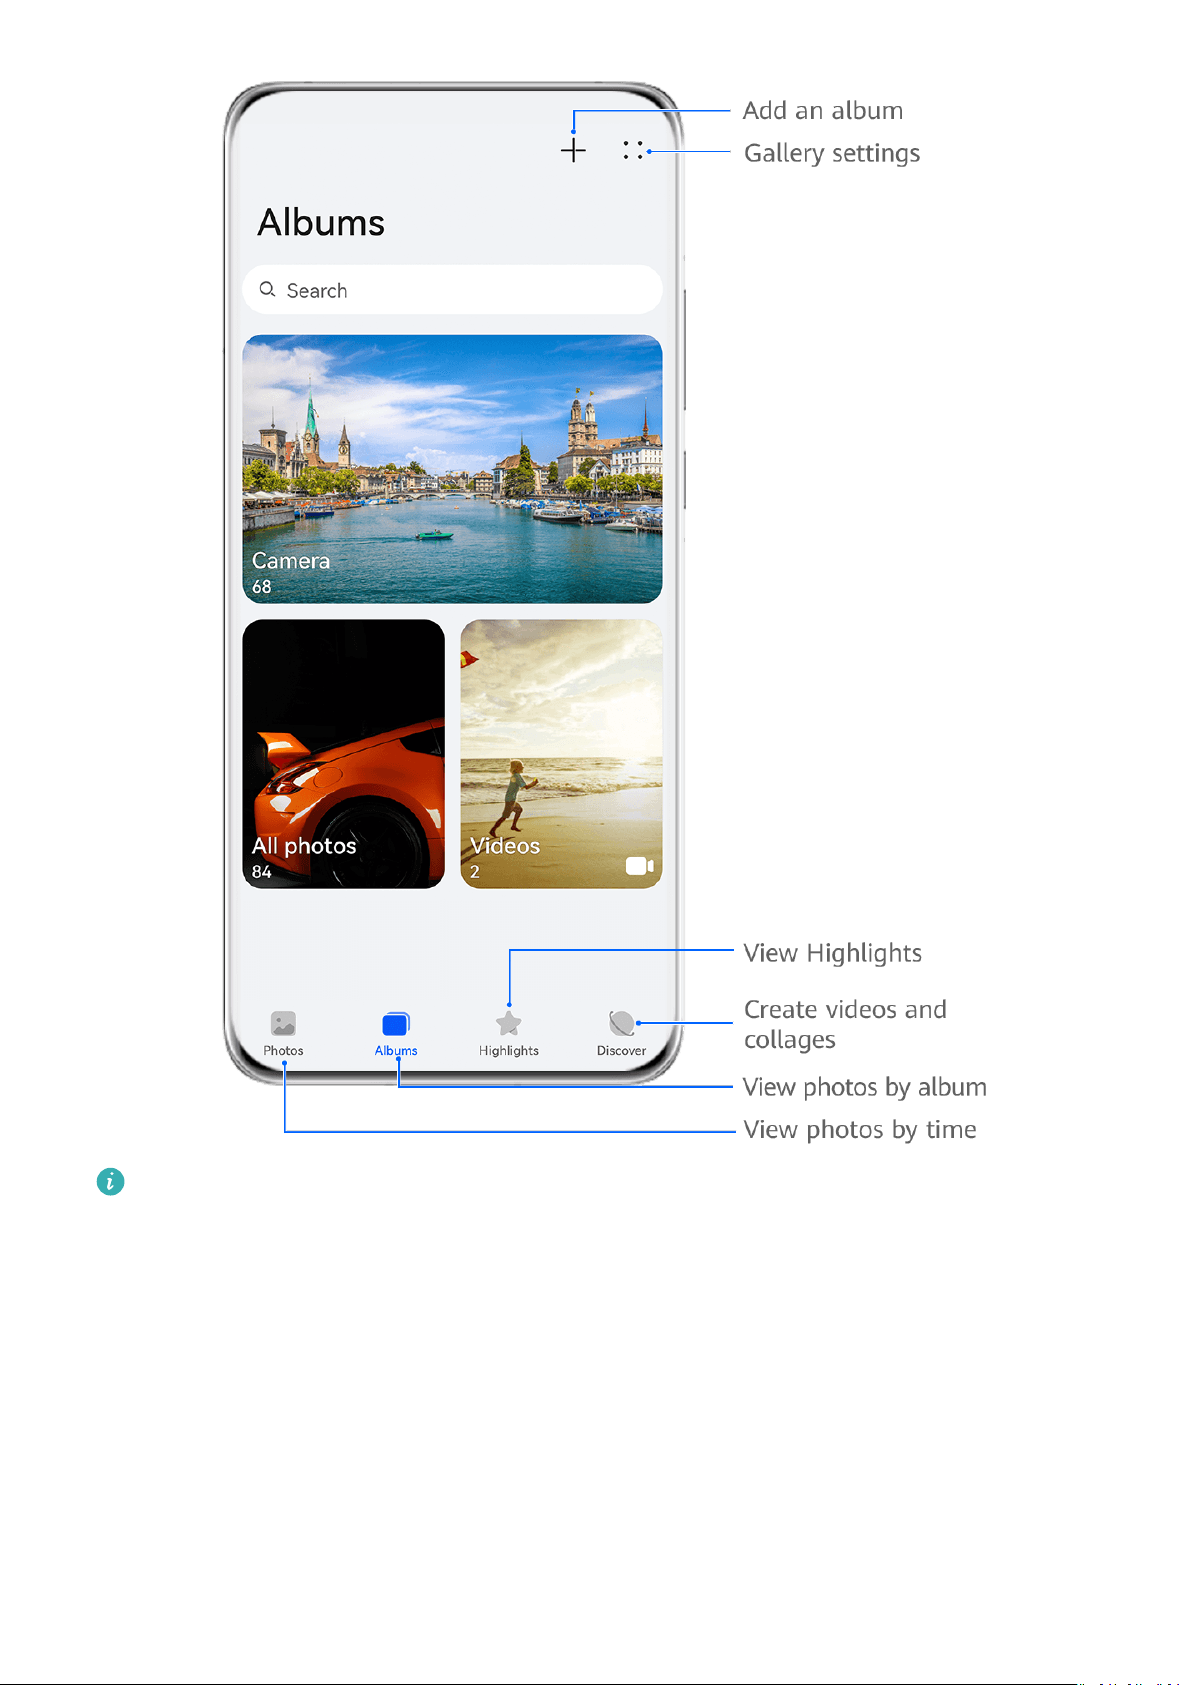
Camera and Gallery
The gures are for reference only.
View by Shooting Time
Open Gallery. On the Photos tab, pinch in on the screen to switch to the monthly view and
pinch out to switch to the daily view.
You can also drag the track ball on the edge to view the time.
View by Album
You can view images and videos by album on the Albums tab.
Some images and videos are stored in default albums. For example, videos recorded with the
camera are saved in the Camera album. Screenshots and screen recordings are saved in the
Screenshots album.
75
Page 80

Camera and Gallery
View by Category
Gallery intelligently sorts images into categories, allowing you to quickly sift through large
albums by category.
Touch a category album on the Discover tab (such as food, portrait, or scenery) to view
images in that album.
View Details About Images and Videos
1 In Gallery, touch an image or video to view it in Full screen mode. Touch the screen again
to hide the menu.
2 When in Full screen mode, touch to view details about the image or video, such as
the storage path, resolution, and size.
Make Quick Searches in Gallery
Quickly Search for Images in Gallery
Quickly locate an image by searching with keywords, such as a date, food, or category, in
Gallery.
1 Go to Gallery, touch the search bar at the top of the screen, then type in a keyword (such
as "food" or "scenery") or touch a suggested word to start searching.
2 Thumbnails of images related to that keyword will be displayed, and more keywords will
be suggested. Touch a suggested keyword or enter more keywords for more precise
results.
Quickly Search for Videos in Gallery
Your phone automatically analyzes and categorizes videos in Gallery when charging and with
the screen
related topics.
o. Suggested keywords will be displayed in the search bar for quick results on
1 Go to Gallery, touch the search bar at the top of the screen, then type in a keyword (such
as "food" or "scenery") or touch a suggested word to start searching.
2 Thumbnails of videos related to that keyword will be displayed, and more keywords will
be suggested. Touch a suggested keyword or enter more keywords for more precise
results.
Key moments of videos in the search results will automatically be played in sequence for
you to see a preview.
Screenshots will not be analyzed.
Edit Images
Gallery oers a wide range of editing features for images.
Basic Editing
1 Open Gallery, touch the image you want to edit, and then touch . You can then:
76
Page 81
Camera and Gallery
• Crop and rotate: Touch Crop, select a frame, then drag the grid or its corners to select
which part you want to keep. You can drag the image in the frame, or use two ngers
to zoom in or out to adjust the displayed part of the image.
To rotate the image, touch Crop and drag the angle wheel to the desired orientation.
To rotate the image by a certain degree or mirror ip the image, touch or .
• Add a lter eect: Touch Filter to select a lter.
• Adjust image eects: Touch Adjust to adjust the brightness, contrast, saturation, and
other aspects of the image.
• Other: Touch More to edit the image in other ways, such as by adding a color splash,
blur, doodle, or text element.
When using the Adjust or Filter feature, you can touch Compare to compare the image
before and after editing. Comparison is not supported in some editing modes.
2 Touch
Add Stickers to Images
or to save the edits.
1 In Gallery, touch an image, then go to > More > Stickers.
2 Select a sticker and drag it anywhere you like. Touch and hold the dot on the corner of the
sticker and drag it to resize the sticker. Touch
You can also edit the text in some types of stickers. Touch the editable area which is
typically encircled with dash lines to enter the new text.
to delete the sticker.
3 Touch to save your edits and touch to save the image.
Pixelate Images
1 In Gallery, touch an image, then go to
> More > Mosaic.
2 Select a mosaic style and size to cover parts of the image.
3 To remove the mosaic, touch Eraser and wipe it o the image.
4 Touch
Rename Images
to save your edits and touch to save the image.
1 In Gallery, touch the image thumbnail you want to rename.
2 Go to > Rename and enter a new name.
3 Touch OK.
Collage
You can use the collage feature in Gallery to quickly combine multiple images into one for
easier sharing.
77
Page 82

Camera and Gallery
1 You can access the collage feature in the following ways (depending on your device
model):
• On the Discover tab, touch Create collage, select some images, then touch Create.
• On the Photos or Albums tab, touch and hold to select some images, then go to
> Collage.
2 Select a template. You can then:
• Relocate an image: Touch and hold the image and drag it to a dierent position.
• Adjust the displayed portion of an image: Slide on the image, or pinch in or out on it
so that only the part you want to see is displayed in the grid.
• Rotate an image: Touch the image, then touch
• Add or remove borders: By default, borders are displayed between images and along
to rotate it or to ip it.
the grid edges. To remove them, touch Frame.
3 Touch to save the collage.
To view the saved collage, go to Albums > Collages.
Share Images and Videos
Open Gallery and share an image or video in the following ways:
• Share a single image or video: Touch the image or video, then touch
• Share multiple images or videos: In an album or on the Photos tab, touch and hold to
select multiple images and videos, then touch .
Share Your Photos Securely
Before sending a photo, you can choose to delete sensitive information like the location,
.
time, and camera specs.
1 Open Gallery.
2 Select one or more photos and touch .
3 Touch the privacy switch in the upper left corner of the screen. In the displayed Privacy
options dialog box, turn on the Remove photo info and Remove location info switches,
then touch OK.
If Location tag was disabled when a photo was taken, the Remove location info switch
will not be displayed in the Privacy options dialog box when you share the photo.
Organize Albums
Organize images and videos into albums to easily sift through them.
78
Page 83

Add Albums
1 Go to Gallery > Albums.
Camera and Gallery
2 Touch
, name the album, then touch OK.
3 Select the images or videos you want to add, and then move or copy them to the album.
Sort Albums
1 Go to Gallery > Albums >
and touch Sort albums.
2 Drag next to an album to the desired position. Touch Reset to reset the albums to
the default order.
Adjust the Album Display Style
Go to Gallery > Albums > , touch Switch view, and select an album display style.
Move Images and Videos
1 Open an album, then touch and hold to select the images and videos you want to move.
2 Touch
> Move to select the desired album.
3 Once the items are moved, they will no longer be in their original album.
The All photos and Videos albums show all images and videos stored on your device.
Moving items across albums will not remove them from these albums.
Delete Images and Videos
Touch and hold to select images, videos, or albums and go to Delete > Delete.
Some preset albums cannot be deleted, including All photos, My favorites, Videos, and
Camera.
Deleted images and videos will be temporarily moved to the Recently deleted album for a
period of time, after which they will be permanently deleted.
To permanently delete images and videos before the retention period expires, touch and hold
to select images or videos in the Recently deleted album and go to Delete > Delete.
Recover Deleted Images and Videos
In the Recently deleted album, touch and hold to select the items you want to recover, then
touch to restore them to their original albums.
If the original album has been deleted, a new one will be created.
Add Images and Videos to Favorites
Open an image or video, then touch
.
79
Page 84
The item will appear in both its original album and the My favorites album.
Block Albums
Block third-party app albums to prevent them from being displayed in Gallery.
1 In the Others list, touch the album you want to block.
Camera and Gallery
2 If
Block.
Blocked albums can only be viewed in Files.
is displayed at the top, it indicates that the album can be blocked. Go to >
3 To unblock an album, open the Others list, touch View blocked albums, then touch
Unblock next to the album.
Only some albums in Others can be blocked.
Hide Albums
You can hide images and videos in Gallery to keep them private.
On the Albums tab, touch an album, touch and hold to select the images and videos you
want to hide, then go to > Hide > OK.
The selected images and videos will then be hidden. You can then:
• On the Albums tab, go to
• In Hidden items, touch and hold to select images and videos, then touch Unhide.
> Hidden items to view the hidden images and videos.
These images and videos will then be restored to their original albums.
Smart Photo Categorization
Smart Image Categorization
Gallery automatically sorts your images into categories such as portraits, food, and scenery,
so you can quickly
Go to Gallery > Discover to view your images organized into categories.
To remove an image from an album, touch and hold to select the image, then touch (or
for portraits).
Not all images can be removed from the category albums.
View and Set People Albums
Once you have a sucient number of images with faces, Gallery will automatically create
nd what you're looking for.
People albums of individuals or groups by identifying faces in your images. This will happen
when your phone is charging and the screen is o.
80
Page 85

Camera and Gallery
You can name your People albums and set the relationship of individuals with you to search
for images more easily.
1 Go to Gallery > Discover to view People albums.
2 Touch an album, go to
individuals with you (such as Baby and Mom).
> Edit and name the album or set the relationship of the
3 Touch to save your settings.
Once you have
Group photo albums require a specic number of group photos with faces that have
already been named in People albums.
nished, you can nd a People album by entering the name in the search bar.
People Album Videos
People Album Videos
Gallery automatically creates People albums by identifying faces in images.
View People Album Videos
1 Go to Gallery > Discover and touch a People album.
2 Touch
on the album cover.
Highlights
Introduction to Highlights
Gallery automatically creates Highlights albums from your best photos and videos based on
time, location, and theme information, and even generates a short video clip so you can walk
down memory lane and instantly relive the good times.
• To start using Highlights, go to Camera >
• Highlights albums are created automatically when your phone is charging and connected
to a Wi-Fi network, the screen is turned
take a while for the albums to be created.
Highlights albums will not be automatically generated if there are not enough relevant
photos.
o, and the battery has sucient power. It may
and enable Location tag.
View Highlights Videos
1 Go to Gallery > Highlights and touch an album.
2 Touch
to play the video.
81
Page 86

Change the Highlights Album Cover
1 On the Highlights tab, touch an album.
Camera and Gallery
2 Go to
Share Highlights
You can share Highlights as videos or images with friends.
Share Highlights videos as videos
> Change cover, select a photo, then touch .
1 If you have edited and exported a Highlights video, the exported video can be found in
Gallery > Albums > Video Editor.
2 You can touch and hold to select the video in Video Editor and touch to share it.
Share Highlights videos as images
Touch the Highlights video you want to share, then go to
automatically generate an image for the video and you can follow the onscreen instructions
to share it with others.
You can also share the photo under Gallery > Albums > Collages, where the images created
for Highlights videos are saved by default.
> Share. Your phone will
Add or Remove Photos and Videos from a Highlights Album
1 On the Highlights tab, select a Highlights album.
2 You can then:
• Add photos or videos: Touch , follow the onscreen instructions to select the photos
or videos you want to add, and then touch .
• Remove photos or videos: Touch and hold to select the photos or videos you want to
remove, touch , and then touch Remove.
Rename Highlights Albums
1 On the Highlights tab, touch an album.
2 Go to > Rename and enter a new name.
Delete Highlights Albums
1 On the Highlights tab, select a Highlights album.
2 Go to
After you delete a Highlights album, it cannot be restored, and the photos and videos in
the Highlights album will remain in Gallery.
> Delete and then touch Delete.
82
Page 87

Apps
Apps
App Basics
Locate an Installed App
Swipe down from the middle of the home screen to show the search bar, and enter the app
name. When the app is found, touch
next to its name.
Uninstall an App
You can uninstall an app using any of the following methods:
• When using the Standard style home screen, touch and hold the app icon on the home
screen, then touch Uninstall and follow the instructions.
• When using the Drawer style home screen, touch and hold the app icon in the drawer, then
touch Uninstall and follow the instructions.
• Go to Settings > Apps > Apps, touch the app, then touch Uninstall.
Some pre-installed system apps can't be uninstalled, as uninstalling them may cause
system errors.
Manage Background Apps
1 Access the recent tasks screen using either of the following methods, depending on the
navigation method you are using:
• Gestures: Swipe up from the bottom of the screen and hold.
• Three-key navigation: Touch .
2 On the recent tasks screen, you can:
• Swipe across to view app previews.
• Touch an app preview to access an app.
• Swipe up on an app preview to close an app.
• Swipe down on an app preview to lock it.
preview. Touching will not close this app.
• Swipe down again to unlock it. will disappear.
• Touch to close all apps (except for those you have locked).
will appear at the top of the app
83
Page 88
Apps
Clear the Cache of an App
Delete app cache les to free up storage space.
Go to Settings > Apps > Apps, select the app that you want to clear the cache of, then go to
Storage > Clear cache.
Contacts
Create and Edit Contact Information
You can create contacts in multiple ways, as well as view and manage your contacts list.
Create Contacts
1 Open Phone, touch the Contacts tab, and touch
If you are creating a contact for the rst time, touch Create new contact to start adding
a contact.
.
2 Set a prole picture for the contact, enter information such as the name, organization,
and phone number of the contact, then touch .
Import Contacts
1 On the Contacts screen, go to > Settings > Import/Export.
2 You could follow the onscreen instructions to import contacts. Such as Import via
Bluetooth, Import via Wi-Fi Direct, Import from storage, and so on.
Scan Business Cards to Add Contacts
1 On the Contacts screen, go to
> Scan or Business cards > Scan.
2 Place the business card on a tabletop, hold your phone so that the card appears fully in
the viewnder, select Single or Multiple, then touch .
3 After capturing the image, your phone will automatically identify information on the card.
Touch to save the contact.
You can view the scanned business cards in Business cards.
Scan a QR Code to Add a Contact
If a QR code contains contact information, you can scan the QR code to quickly add a
contact.
1 On the Contacts screen, go to > Scan or go to Business cards > Scan.
2 Take a photo of a QR code or select a photo of a QR code from Gallery, and contact
information contained in the QR code can be identied and added.
84
Page 89

Merge Duplicate Contacts
1 On the Contacts screen, go to > Settings > Organize contacts > Merge duplicate
contacts.
2 Select duplicate contacts you want to merge and touch Merge.
Search for Contacts
1 Open Contacts, go to > Settings > Display preferences, and touch All contacts to
display all your contacts. Ensure that the corresponding icon at the bottom is enabled.
2 Search for contacts using either of the following methods:
• Swipe down from the middle of the home screen and enter a keyword for the contact
you want to nd in the search box (such as their name, initials, or email address).
You can also enter multiple keywords, such as "John London", to quickly nd matching
contacts.
Apps
• On the top of the Contacts screen, enter keywords for the contact you want to nd in
the search box.
Share Contacts
1 On the Contacts screen:
• Touch and hold the contact you want to share, then touch Share contact.
• Touch the contact you want to share, then go to
> Share contact.
2 Select a sharing method, then follow the onscreen instructions to share the contact.
Export Contacts
1 On the Contacts screen, go to
> Settings > Import/Export.
2 Touch Export to storage and follow the onscreen instructions to export contacts.
The contacts will be exported into .vcf les. You can search for and view these .vcf les in
Files.
Delete Contacts
Delete contacts using the following methods:
• Touch and hold the contact you want to delete, then touch Delete.
• Touch the contact you want to delete, then go to > Delete contact.
• On the Contacts screen, go to > Settings > Organize contacts > Delete multiple
contacts, select the contacts you want to delete, then touch .
85
Page 90

To restore a contact, go to > Settings > Organize contacts > Recently deleted on the
Contacts screen, touch and hold to select the contact you want to restore, then touch .
Manage Contact Groups
You can conveniently send emails or messages to multiple contacts by creating and
managing contact groups. Your phone automatically groups contacts by company, city, and
last contact time, but you can also create new groups based on your preferences.
New Group
1 Open Phone, touch the Contacts tab, and touch Groups.
2 Touch , enter the group name, such as "Family" or "Friends", then touch OK.
Apps
3 In a chat group, touch
then touch .
Edit a Contact Group
1 On the Groups screen, select the group you want to edit and touch
contact.
, follow the onscreen instructions to add contacts to the group,
to add a new
2 Touch for Remove members, Group ringtone, Delete group, or Rename.
Send Group Messages or Emails
On the Groups screen, open a group. You can then:
• Touch
• Touch
Delete Contact Groups
to send a group message.
to send a group email.
On the Groups screen, do either of the following to delete a contact group from your phone:
• Touch and hold the group and select Delete.
• Touch
, select the groups you want to delete, and touch .
Create Personal Business Cards and Emergency Information
You can create a business card containing your personal information to share with others.
You can also add personal emergency information so you can call for help quickly in an
emergency.
86
Page 91

Create a Personal Business Card
1 Open Phone, touch the Contacts tab, and touch My card.
Apps
2 Set your
and phone number.
3 Touch
You can share your business card using the QR code.
Add Emergency Information
prole picture and enter personal information, such as your name, work address,
to automatically create a QR code business card.
1 From the Contacts screen, go to My card > Emergency information.
2 Touch ADD and set your personal, medical, and emergency contact information.
3 To modify the information, touch
Once you have added emergency contacts and you nd yourself in an emergency, access the
lock screen for inputting your password, go to Emergency > Emergency information >
Emergency contacts, and select an emergency contact to make a call.
Erase Contact Traces
on the Emergency information screen.
1 Open Phone, touch the Contacts tab, then touch a contact to erase your contact traces.
2 Go to
> Erase history > Erase to delete all call and message records for that contact.
Phone
Make a Call
Dial a Number or Select a Contact to Make a Call
Use either of the following methods to make a call:
• Open Phone, enter part of a phone number, the
contact's initials to nd a contact, then touch to make a call.
• Open Phone, touch the Contacts tab, then search for a contact or select a contact in the
contact list to make a call.
Touch to end the call.
Use Speed Dial
rst letter of a contact's name, or a
Once you've set up speed dialing for a contact, you can quickly call that contact with the
assigned number key.
1 Go to Phone > > Settings > Speed dial, select a number key, then set a contact for
this speed dial number.
87
Page 92
2 Then you can press and hold this speed dial number to call this contact directly.
Press the Power Button to End a Call
During a call, press the Power button to end the call.
Apps
Go to Phone >
Set a Call Background
To set a wallpaper as the call background, do the following:
> Settings > More, and enable Power button ends call.
1 Go to Settings > Home screen & wallpaper > Wallpaper.
2 Select a picture and set it as the wallpaper.
You can also set a prole picture for a contact to be shown on the call background.
1 Open Phone, touch the Contacts tab, then select a contact.
2 Touch
Make an International Call
and then to set a prole picture for the selected contact.
1 Contact your mobile carrier to activate and inquire about the international calling service.
2 Open Phone, touch the Contacts tab, then select a contact to make a call.
3 For numbers that are not in the contacts list, open the dialer and hold the 0 number key
until the + icon is displayed. Enter the country code and phone number, then touch
make an international call.
Manage Call Logs
You can merge the call logs of the same contact or number for a tidier and more concise
interface, or delete call logs as required.
Merge Call Logs
1 Go to Phone > > Settings > Merge call log.
2 Select By contact and your phone will automatically merge the call logs of the same
number or contact.
View Missed Calls
1 To display all missed calls, open Phone, swipe down on the call log list, then touch the
Missed tab.
All missed calls are displayed in red in the call log list for you to quickly identify them. You
can also nd them on the All screen.
to
2 Touch next to a call log entry to call back or send a message.
88
Page 93

Delete Call Logs
Delete call logs using any of the following methods:
• On the Phone screen, touch and hold an entry, then touch Delete entry.
Apps
• On the Phone screen, go to
then touch Delete.
• On the Phone screen, swipe left on the entry you want to delete, then touch
> Delete entries, select the entries you want to delete,
.
Set a Ringtone
You can set a personalized ringtone for incoming calls depending on your preferences.
If you are carrying your phone in your pocket, the ringtone volume will gradually increase to
prevent you from missing important calls.
If your phone has two SIM cards installed, congure the settings for SIM 1 and SIM 2
respectively.
Set a Music Ringtone
1 Go to Phone > > Settings > Ringtone.
Or go to Settings > Sounds & vibration > Phone ringtone.
2 Select a system ringtone, or touch Music on device to set a local song as the ringtone.
3 If you select a system ringtone, touch Vibration on the same screen, and select
Synchronized (default). When there is an incoming call, your phone will vibrate with
rhythm while the system ringtone is playing.
Not all products support a synchronized vibration and ringtone.
Set a Video Ringtone
Set a video as the ringtone for incoming calls on your phone.
1 Go to Phone >
Or go to Settings > Sounds & vibration > Phone ringtone.
> Settings > Ringtone.
2 Touch Video ringtones and select a video. You can then preview what it looks like for
incoming calls.
3 Touch SET to set the video as the ringtone.
Set a Ringtone for a Contact
Set a
is calling you.
dierent ringtone for a particular contact to distinguish more easily when that contact
1 Open Phone, touch the Contacts tab, then select the contact you want to set a ringtone
for.
2 On the contact details screen, touch Ringtone and select a ringtone.
89
Page 94

Use VoLTE to Make HD Video Calls
VoLTE (Voice over LTE) is an IP-based data transmission technology. After enabling VoLTE, it
can provide you with fast call connection times and high-quality voice and video calls.
Enable VoLTE
1 Contact your carrier to activate the VoLTE service for your SIM card. If both the primary
and secondary SIM card trays of a dual-SIM phone support VoLTE, it can be enabled for
both SIM cards.
2 Go to Settings > Mobile network > Mobile data and enable VoLTE calls for SIM 1 or 2.
5G services are only available in some countries and regions.
Make a Video Call
Video calls are only possible when both parties are using VoLTE-activated devices.
1 Open Phone, touch the Contacts tab at the bottom of the screen, then select the contact
you want to call.
Apps
2 Touch to make a video call.
During a voice call, you can touch
Manage Incoming Calls
You can use the call waiting feature to answer incoming calls when you are already engaged
in a previous call.
If you cannot answer a call because your phone is faulty or the network signal is poor, you
can also set call forwarding to forward calls to another number or device.
Answer or Reject an Incoming Call
If you receive a call when the screen is locked:
• Drag
• Drag
right to answer the call.
left to reject the call.
to switch to a video call.
• Touch to reject the call and reply with a message.
• Touch to set a reminder for calling back.
If you receive a call when the screen is unlocked:
• Touch
• Touch
to answer the call.
to reject the call.
90
Page 95
• Touch to reject the call and reply with a message.
• Touch to set a reminder for calling back.
Enable Call Waiting
The Call waiting feature lets you answer an incoming call when a call is already in progress
by placing the rst call on hold. This feature requires the support of your carrier. For details,
contact your carrier.
Go to Phone > > Settings and then go to More > Call waiting.
If your phone has two SIM cards installed, congure the settings for SIM 1 and SIM 2
respectively.
This feature may vary depending on your carrier.
Answer a New Incoming Call During a Call
Apps
1 When you receive an incoming call when you are already engaged in a previous call,
touch to answer it.
2 Touch
Enable Call Forwarding
After the Call forwarding feature is enabled, calls that meet your pre-set conditions will be
automatically forwarded to a specied phone number. This feature requires the support of
your carrier. For details, contact your carrier.
, or touch a held call in the call list to switch between the two calls.
1 Open Phone, go to > Settings, and touch Call forwarding.
2 Select and enable a forwarding method, then enter and conrm the target number.
You can cancel call forwarding in the same path.
If your phone has two SIM cards installed, congure the settings for SIM 1 and SIM 2
respectively.
This feature may vary depending on your carrier.
Filter and Block Spam Calls
Set
dierent block rules to block sales, fraud, and other kinds of spam calls.
Filter Spam Calls
1 Go to Phone >
Alternatively, go to Optimizer > Blocked > .
> Blocked > .
2 Touch Call block rules and toggle on the switches of corresponding block rules.
91
Page 96

Block Incoming Calls from Specic Numbers
You can block incoming calls from specic numbers using either of the following methods:
• Go to Phone > > Blocked > > Blocklist, touch , then add the phone numbers
you want to block.
• Open Phone, touch the Contacts tab, touch the contact you want to block, then choose
> Block contact.
Set Whether to Receive Notications for Blocked Calls
Apps
Go to Phone >
> Blocked > > Receive notications and set whether to receive
notications when calls are blocked.
Manage Blocked Calls
On the Blocked screen, you can manage blocked calls, such as by calling back numbers,
deleting records, or submitting appeals if a number has been incorrectly marked.
Go to Phone > > Blocked. You can then:
• Touch a record and select Call to call back numbers, select Add to trustlist or Add contact,
or touch Delete to delete call records.
• Touch Clear to delete blocked calls in batches.
• Touch Block rules to change the block rules.
Emergency SOS and Calls
Use Emergency SOS
If you are in an emergency situation, you can quickly and secretly send an SOS message or
make an SOS call to your emergency contacts.
1 Go to Settings > Security > Emergency SOS, and touch Emergency contacts to add an
emergency contact.
2 Enable Also send SOS message and Auto-SOS call, and set related permissions as
prompted.
Once you have enabled the Emergency SOS feature and you are in an emergency situation,
press the Power button
a message with your current location to your emergency contacts. It will also automatically
call your emergency contacts one by one and play a pre-recorded SOS message, then end the
call automatically.
If Auto-SOS call is disabled, after the message is sent, your phone will bring up the
emergency call screen, from which you can quickly call an emergency service or one of your
emergency contacts.
ve times in quick succession and your phone will automatically send
92
Page 97
Apps
Make Emergency Calls
In the event of an emergency, you can make emergency calls directly from the lock screen of
your phone even if there is no signal.
The emergency call feature is subject to local regulations and individual mobile carriers.
Network issues or other types of interference may lead to emergency calls not working.
1 From the lock screen, access the screen for entering your password, and touch
Emergency. If you are in an area with a good signal and your phone has an Internet
connection, it will automatically obtain your location and display it on the screen.
2 Enter your local emergency number and touch
touch Emergency information and select an emergency contact to call.
to call the number. Alternatively,
Perform In-call Operations
During a call, an in-call menu will be displayed.
• Touch to switch the audio channel to the speaker.
• Touch to start another call. This feature requires the support of your carrier. For details,
contact your carrier.
• Touch to use the dialer.
• During a call, you can hide the call screen and access other apps by returning to the
previous screen or home screen using the current navigation mode on your phone.
To return to the call screen, touch the green icon in the status bar.
• Touch
to end a call.
Messaging
Send and Manage Messages
You can send and receive messages that include text, emojis, pictures, audio
You can also manage your messages in the message list.
Send Messages
1 Open Messaging and touch .
2 On the New message screen, enter your message content. Touch to add other types
of content such as pictures and audio les.
3 In the recipient box, touch , select contacts or contact groups, then touch .
To send a group message to those not included in your contacts list, touch anywhere
blank in the recipient box and enter the recipients' phone number. Touch the return key in
the keyboard when you nish entering each of the phone numbers.
les, and more.
93
Page 98
4 After nishing editing, touch to send the message.
Save a Draft Message
Apps
From the New message screen, touch
(depending on your device model) or go back to
the previous screen while editing a message to save a draft.
Cancel Sending a Message
On the Messaging screen, go to > Settings > Advanced, and enable Recall messages.
Within six seconds after a message is sent, you can double-tap the message to cancel
sending it.
View and Reply to Messages
1 On the Messaging screen, select a contact to view your conversations.
2 To reply to a message, enter your message content in the text box, then touch
Notications for new messages will be displayed as banners in the notication panel, and
you can touch them to reply to messages.
Mark Messages as Read
.
You can use any of the following methods to mark messages as read:
• New messages will be displayed in the notication panel in the form of a banner and you
can mark them as read there.
• On the Messaging screen, swipe left on the message that you want to mark as read, then
touch
• On the Messaging screen, go to > Mark all as read.
.
Favorite Important Messages
You can favorite an important message for future use.
Touch and hold a message, select messages to be favorited in a message thread, and go to
More > Favorite.
To view the messages you have favorited, open Messaging and go to
> Favorites.
Delete a Message
Delete messages using either of the following methods:
• On the Messaging screen, swipe left the message to be deleted, then touch .
94
Page 99

Apps
• Touch and hold a message, select multiple messages you wish to delete, then touch .
Deleted messages cannot be recovered.
Filter and Block Spam Messages
Set dierent block rules, such as your blocklist, to block sales, fraud, and other kinds of spam
messages.
Block Spam Messages
1 Go to Messaging > > Blocked > .
Alternatively, go to Optimizer > Blocked >
.
2 Touch Message block rules and enable Block unknown numbers. Your phone will then
block all messages from unknown numbers.
Block Messages from
1 Go to Messaging >
2 Touch
these numbers will all be blocked.
Block Messages Containing Specic Keywords
and add the numbers you want to block. SMS and MMS messages sent by
Specic Numbers
> Blocked > > Blocklist.
1 Go to Messaging > > Blocked > > Keyword blocklist.
2 Touch and add the keywords to be ltered. All messages containing these keywords
will be blocked.
To unblock messages that contain a specic keyword, touch and hold the keyword in the
Keyword blocklist and touch Remove.
Set Whether to Receive Notications for Blocked Messages
Go to Messaging > > Blocked > > Receive notications and set whether to receive
notications when messages are blocked.
Manage Blocked Messages
On the Blocked screen, you can manage blocked message, such as by deleting records,
restoring messages, or submitting appeals if a number has been incorrectly marked.
Go to Messaging >
• Touch a record and select Restore to messages to restore this message to the Messaging
app. Touch Add to trustlist to add the number corresponding to this message to the
trustlist. Touch Delete to delete the message record.
• Touch Clear to delete blocked messages in batches.
> Blocked. You can then:
95
Page 100

• Touch Block rules to change the block rules.
MeeTime
Use MeeTime to Make Calls
Use MeeTime to make high-quality video or voice calls with contacts who have Huawei
devices (such as phones and tablets), and share your screen during calls.
Thanks to the GPU Turbo technology, the video call resolution will be optimized
automatically when the network signal is weak. With intelligent algorithms, the other party
can see your face clearly even when making a video call at night or in dark environments.
During the video call, you can adjust the beauty level.
• Please make sure your device has been updated to the latest system version.
• This feature is only available in some countries and regions.
Apps
• If your phone is not pre-installed with the MeeTime app, download it from
AppGallery.
Charges for MeeTime
• MeeTime only uses Wi-Fi or mobile data and will not be charged as calls by your carrier. It
is recommended that you use this feature over a Wi-Fi network.
• If you need to make a video call using mobile data, you can perform the following to save
on the amount of mobile data you use: On the MeeTime screen, touch your prole picture
in the upper right corner to access the Settings screen, then turn on the Data saver switch.
Make a High-quality Video or Voice Call
Use MeeTime to make smooth and high-quality calls between Huawei devices such as
phones and tablets. You can enjoy clear video calls even in dark environments and adjust the
beauty level during video calls.
1 Open MeeTime and follow the onscreen instructions to activate and enable it.
2 In the MeeTime app, go to Contacts > MeeTime, and touch or next to a contact
who has enabled MeeTime on their devices to make a high-quality video or voice call.
3 During a video call, touch the screen and then touch to access the Soften function.
Drag the slider left or right to adjust the beauty level.
• For optimal use, keep your phone within 1 meter (3.3 feet) of you and ensure that you
are in a bright environment.
• The beauty level adjustment feature is only supported by some products.
4 You can touch More and then perform the following:
• Touch
to mute MeeTime.
96
 Loading...