

Page 1
User Guide
EMUI 4.1
Page 2

Contents
About this document
Getting Started
Contacts and Email
Locking and unlocking the screen 2
Touchscreen gestures 3
Status and notification icons 4
Home screen 5
Taking a screenshot 10
Notifications 11
Accessing applications 13
Personalizing your tablet 16
Entering text 18
Creating a contact 19
Importing or exporting contacts 19
Finding a contact 20
Viewing contacts from different accounts 20
Adding a contact to your favorites 20
Adding an email account 21
Sending an email 22
Checking your emails 22
Camera and Gallery
Taking a photo 24
Deleting images or videos 24
Sharing images or videos 24
Editing an image 24
Accessing the Internet
Connecting to the Internet using Wi-Fi 26
Transferring data using Bluetooth 26
Transferring data using Wi-Fi Direct 27
File Management
Viewing files 29
Sharing files 29
Creating folders 30
Renaming files 30
Copying, moving, or deleting files 30
Creating or extracting archives 30
Excluding small images 31
i
Page 3

Storing private files in a safe 31
Backup and Restore
Using the Backup application to back up and restore data 32
Restoring factory settings 33
Updating your tablet 33
OTA updates 33
Settings
Airplane mode 35
Configuring the display settings 35
Sound settings 36
Changing the screen unlock method 36
Setting the date and time 37
Changing the system language 37
Viewing the available storage space 37
Contents
Appendix
Enabling location access 37
Personal Information and Data Security 39
Legal Notice 39
ENERGY STAR® model information
41
ii
Page 4

About this document
Thank you for choosing the HUAWEI MediaPad T3 7.
This document is intended for HUAWEI MediaPad T3 7 that runs EMUI 4.1.
Figures in this document are screenshots taken under the Glaze theme. Switch to the Glaze
theme to better understand this guide. For details, see Changing the theme.
Certain functions may vary with models and regions.
1
Page 5

Getting Started
Locking and unlocking the screen
Locking the screen
l Press the power button to manually lock the screen.
l The screen will lock automatically and enter sleep mode after it has been idle for a certain
period to reduce power consumption and prevent unintended operations.
To change the screen sleep time, open Settings, touch Display > Sleep, and then
select a time.
Your tablet will continue to receive notifications, when the screen is locked. The status indicator
will flash green when you receive new notifications.
Unlocking the screen
When the screen is off, press the power button to wake the screen. Slide your finger in any
direction to unlock the screen.
Magazine Unlock
Use Magazine Unlock to create your own selection of lock screen images and bring your lock
screen to life.
Swipe up from the bottom of the lock screen to display the Magazine Unlock options.
2
Page 6
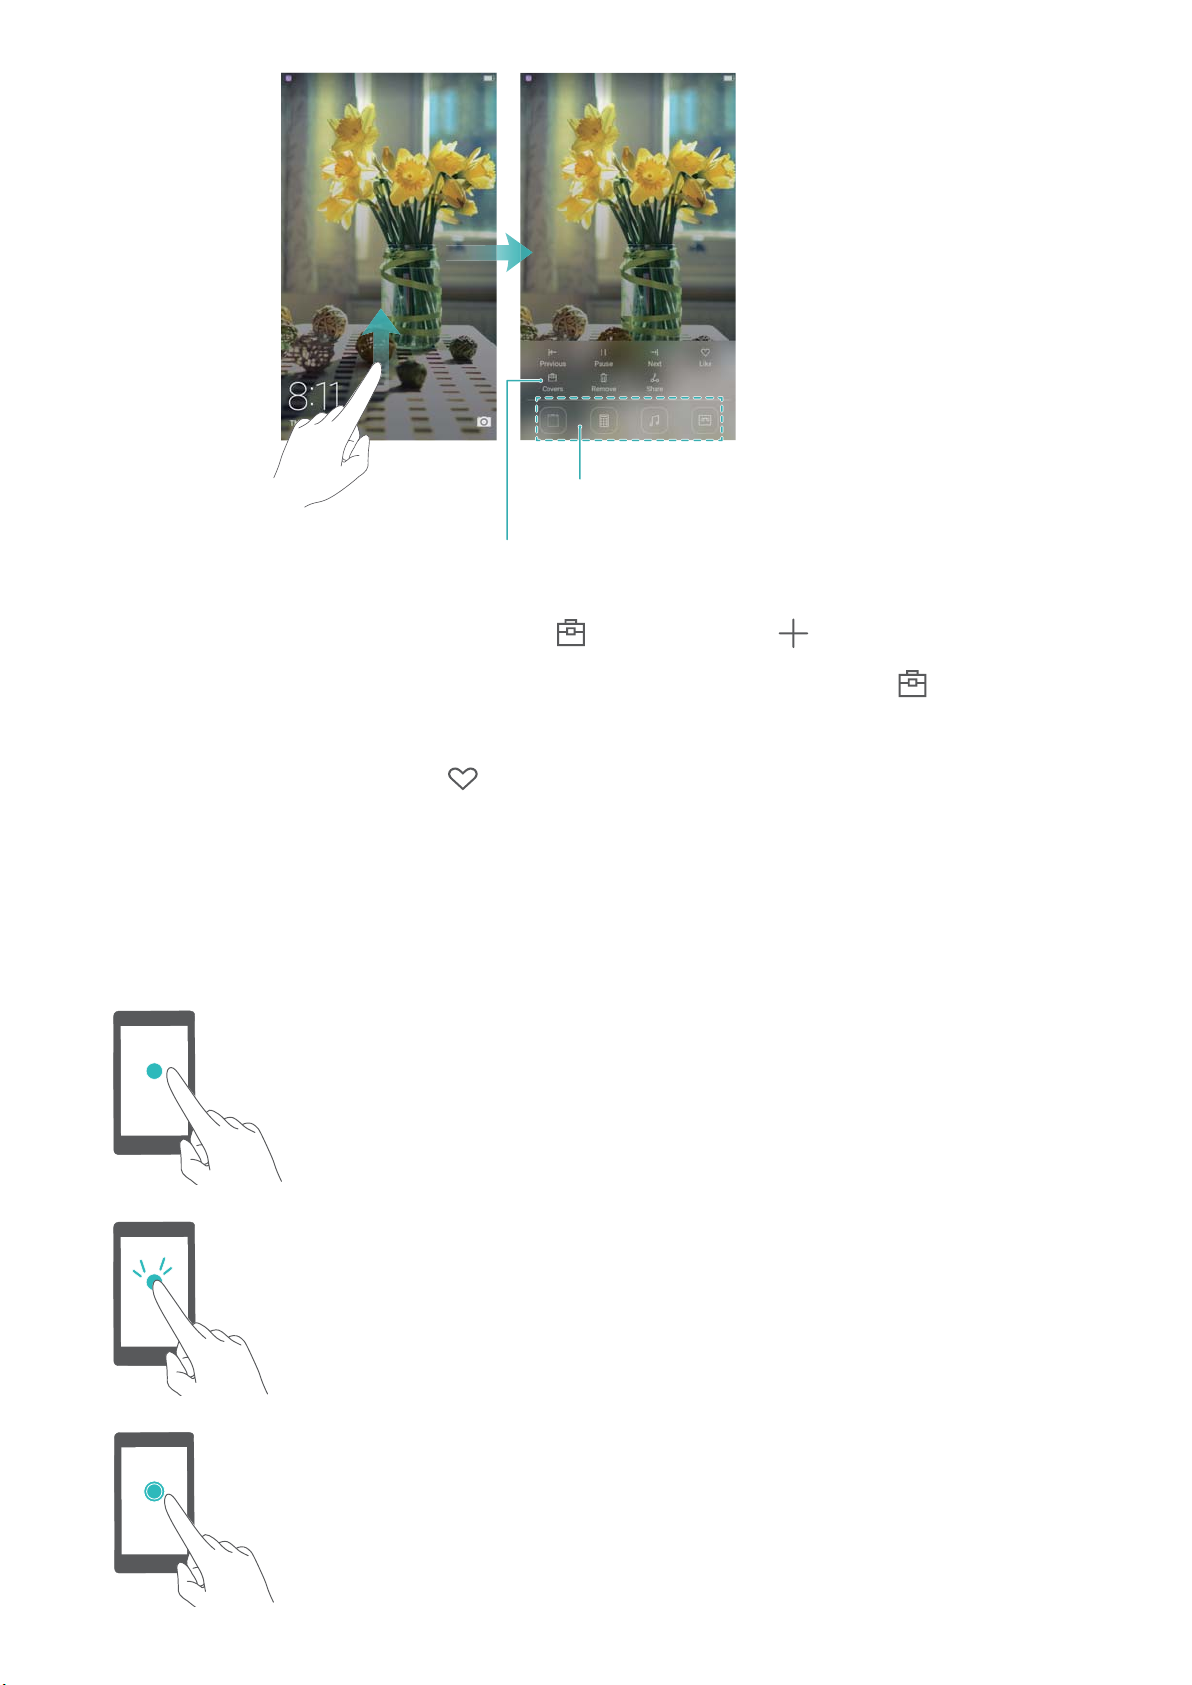
View, add, or delete images from your Magazine
Unlock covers
App shortcuts
Getting Started
Manage Magazine Unlock covers: Touch , and then touch . Select the desired images
to add them to the viewing list. To delete covers from the viewing list, touch , and then touch
and hold the desired image and select Remove.
Add covers to favorites: Touch to add the current cover to your favorites.
Touchscreen gestures
Use simple touchscreen gestures to perform a variety of tasks, such as open applications, scroll
through lists, and zoom images.
Touch: Touch an item once. For example, touch to select
an option or open an application.
Double touch: Touch the target area of the screen twice
in quick succession. For example, double touch an
image in full screen mode to zoom in or out.
Touch and hold: Touch and hold the target area of the
screen for at least 2 seconds. For example, touch and
hold a blank area on the home screen to access the
home screen editor.
3
Page 7
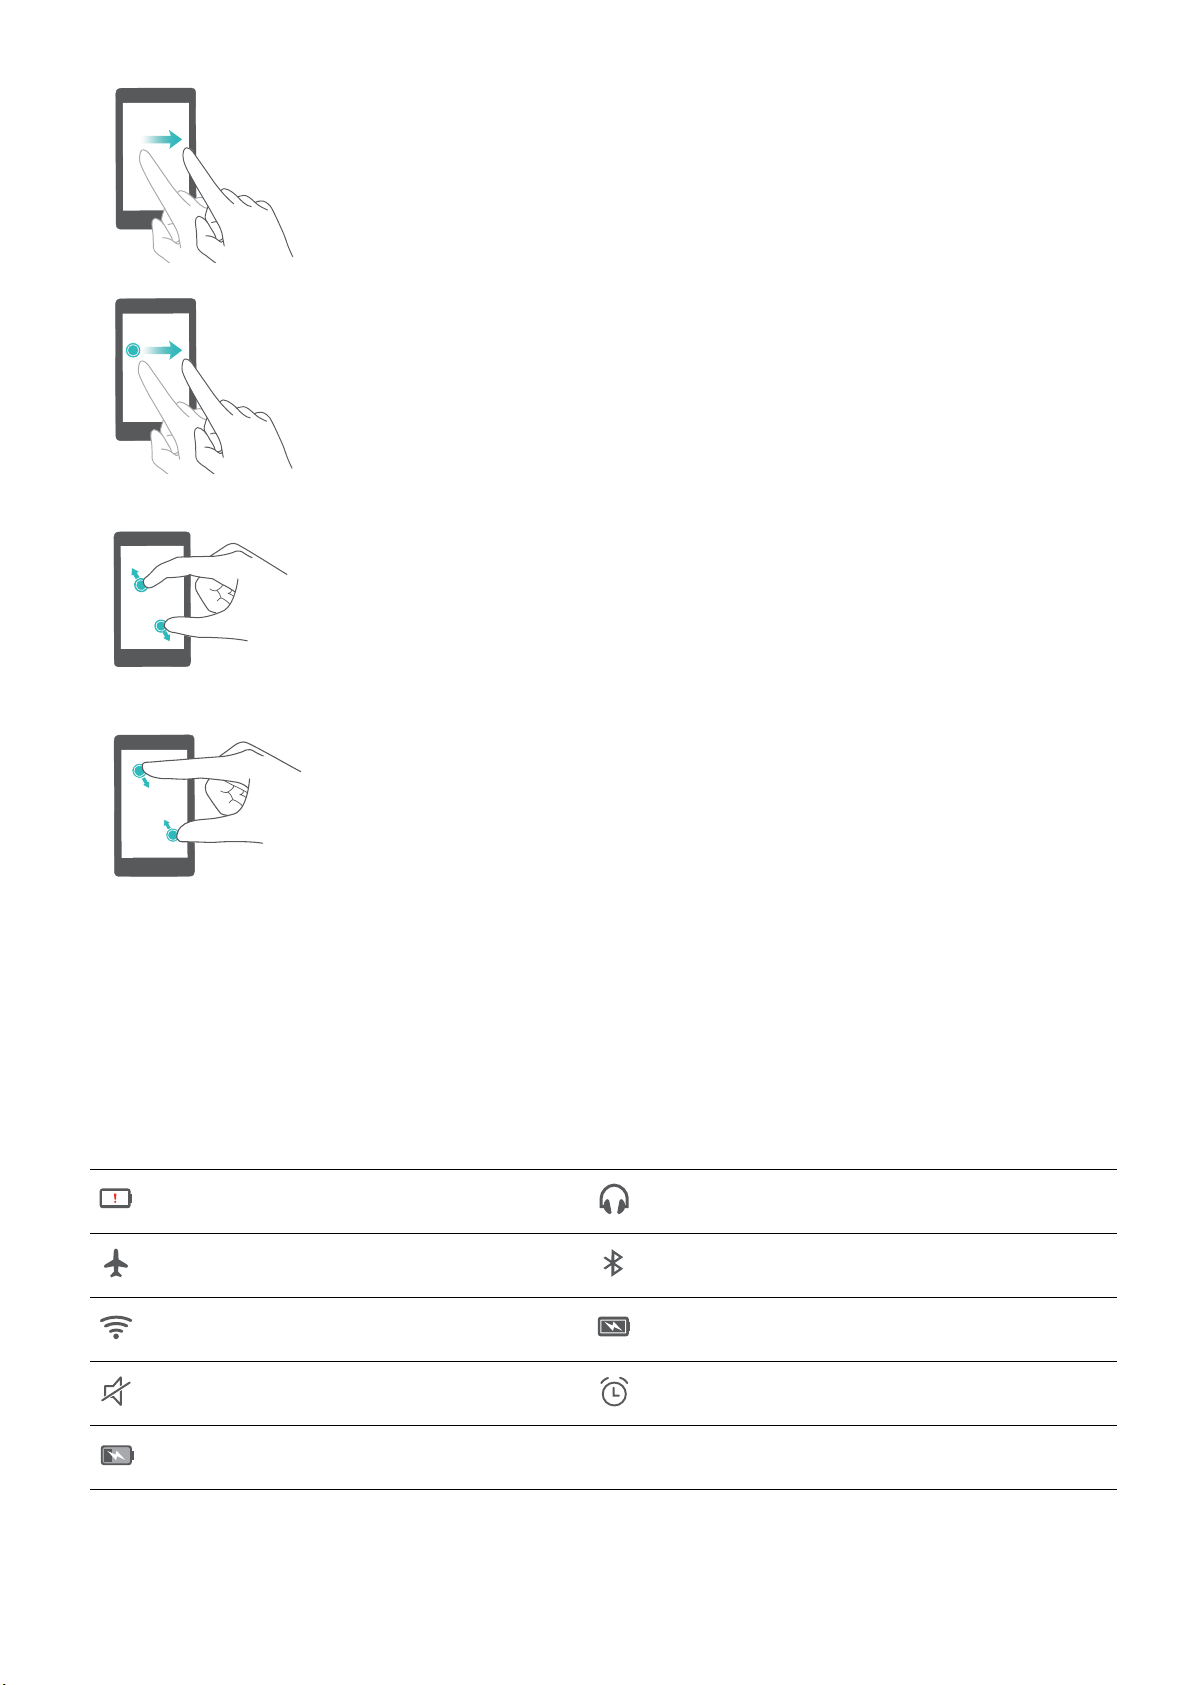
Getting Started
Swipe: Swipe your fingers on the screen. For example,
in the Notifications tab, swipe left or right on a
notification to dismiss it. Swipe vertically or horizontally
to go to other home screens, scroll through a document,
and more.
Drag: Touch and hold an item, and then move it to
another position. For example, use this gesture to
rearrange applications and widgets on the home screen.
Spread fingers apart: Spread two fingers apart on the
screen. For example, spread two fingers apart to zoom in
on a picture or web page.
Pinch fingers together: Pinch two fingers together on
the screen. For example, pinch two fingers together to
zoom out on an image.
Status and notification icons
Status icons
Status icons are displayed on the right-hand side of the status bar. Status icons display
information about your tablet's status, such as network connection information, signal strength,
battery level, and time.
Battery low Headset inserted
Airplane mode enabled Bluetooth enabled
Connected over Wi-Fi Battery full
Silent mode enabled Alarm enabled
Charging
Notification icons
Notification icons are displayed on the left-hand side of the status bar when you receive a new
message, notification, or reminder.
4
Page 8
Status bar: Displays notications and status
icons
Main screen: Displays application icons,
desktop folders, and widgets
Screen position indicator: Indicates
which home screen is displayed
Dock: Displays frequently used applications
Navigation bar: Displays virtual navigation
keys
Getting Started
New emails Select an input method
Receiving location data
from GPS
Downloading data Uploading data
Upcoming events Tablet memory full
Synchronizing data Synchronization failed
Login or synchronization
problem
USB debugging available Connected to a VPN
Home screen
Getting to know your home screen
Wi-Fi network available
More notifications
Your home screens are where you can find your favorite widgets and all your applications. The
application list has been removed to give you a more convenient and direct path to your
applications.
Virtual navigation bar keys:
l Back: Touch to return to the previous screen or close an application. When entering text,
touch to close the onscreen keyboard.
l Home: Touch to return to the home screen.
5
Page 9
Getting Started
l Recent: Touch to access the list of recently used applications, or touch and hold to enable
dual windows mode.
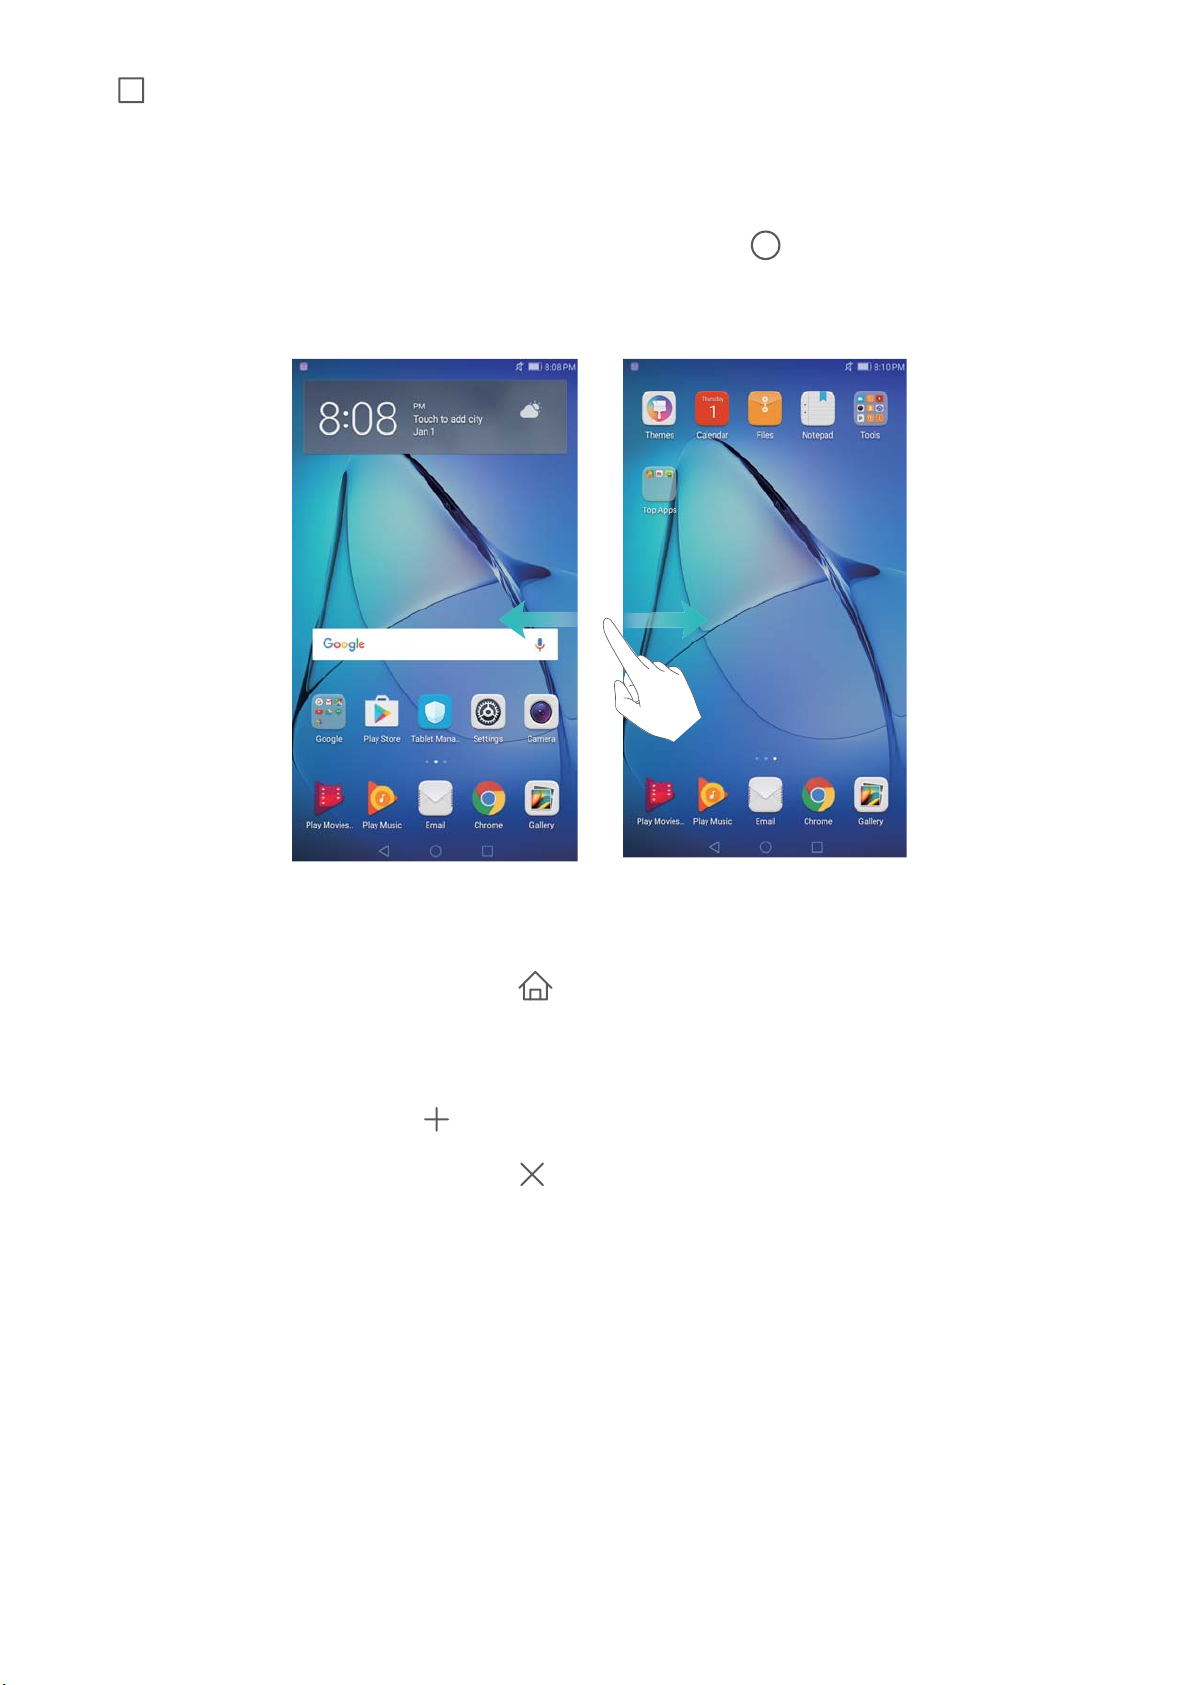
Switching between home screens
Swipe left or right to view the extended home screens. Touch Home to return to the default
home screen.
On the home screen, pinch two fingers together or touch and hold a blank area on the screen to
access the home screen editor. You can:
l Set the default home screen: Touch at the top of the home screen to set the chosen
home screen as the default home screen.
l Move a home screen: Drag the home screen to the desired location.
l Add a home screen: Touch on the home screen furthest to the left or right.
l Delete a blank home screen: Touch at the bottom of a blank screen.
Automatic screen rotation
When you rotate your tablet, some applications will automatically adjust the screen orientation to
make them easier to use. This feature also lets you use tilt-controlled applications.
Swipe down from the status bar to open the notification panel, and then touch Auto-rotate in the
Shortcuts tab to enable or disable automatic screen rotation.
6
Page 10
Organizing applications and widgets on the home screen
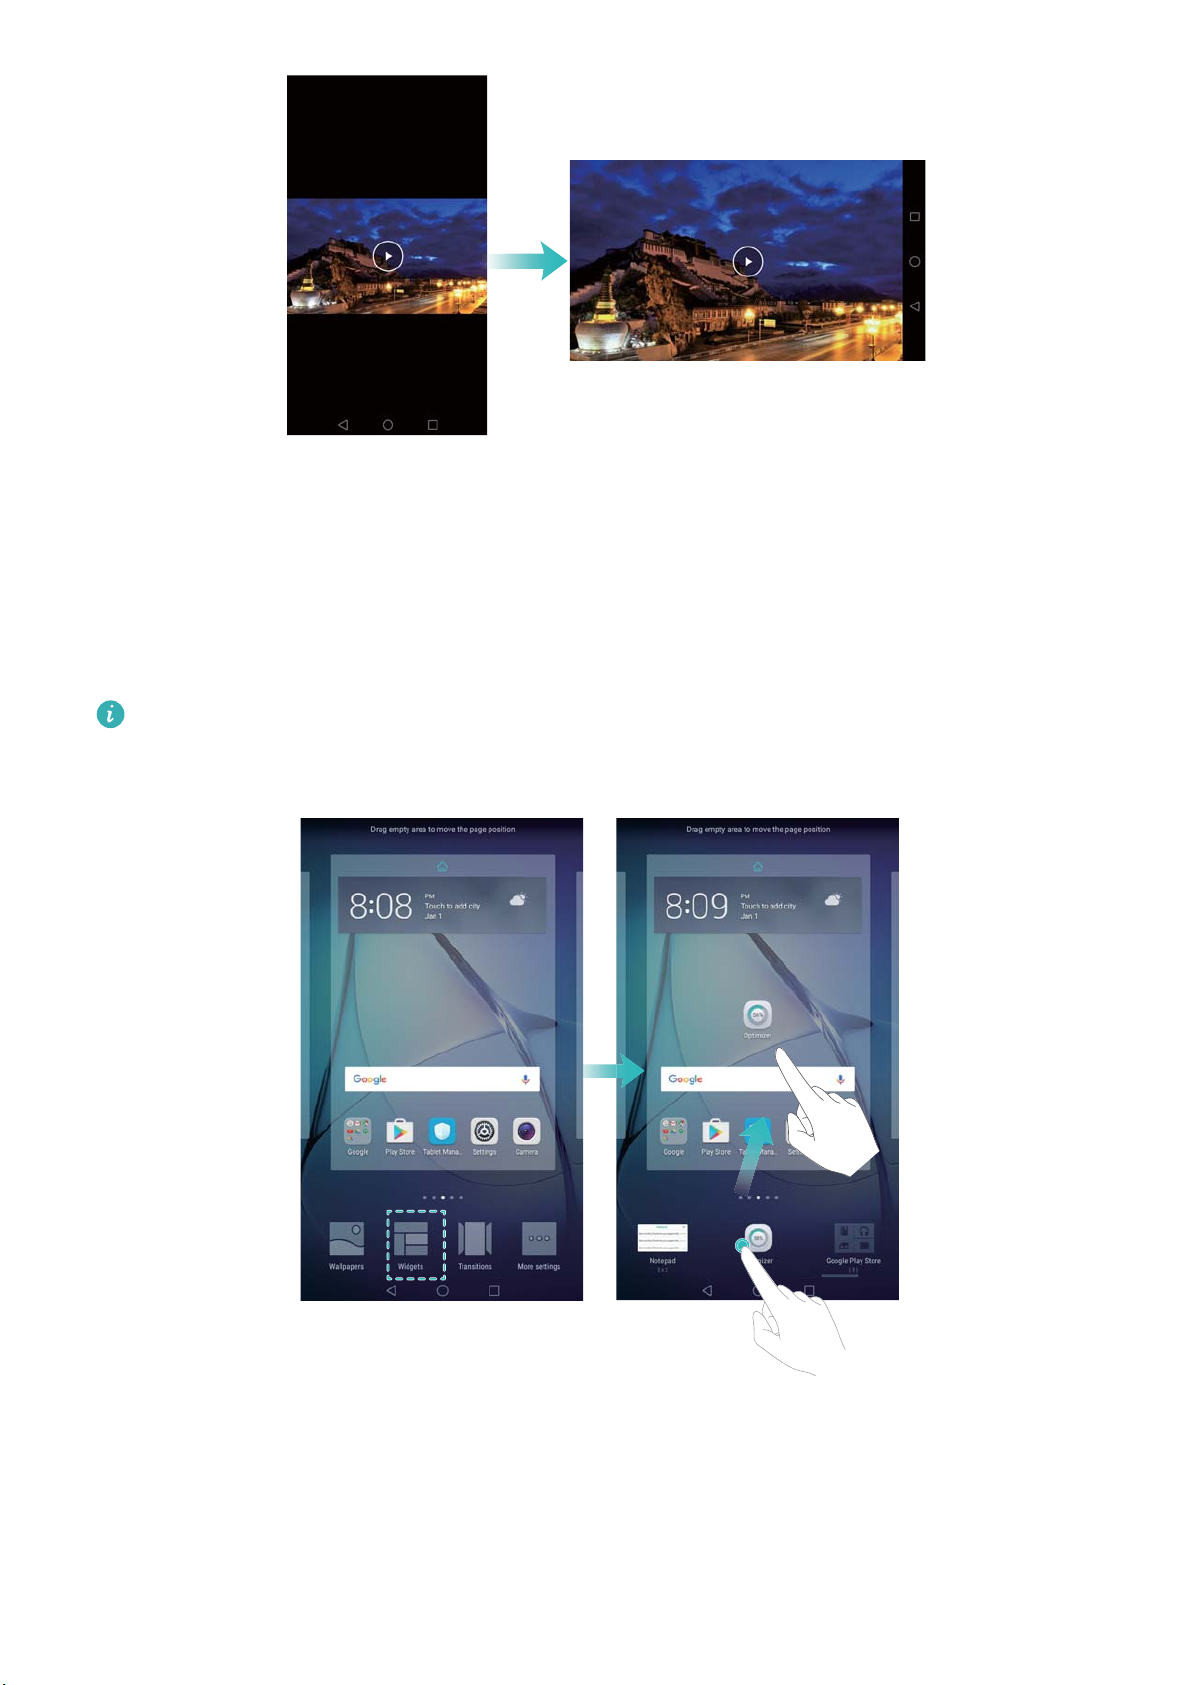
Adding a widget to the home screen
Add frequently used widgets to the home screen for quick access.
Getting Started
On the home screen, pinch two fingers together to open the home screen editor. Touch Widgets
and select a widget. Touch and hold the widget and drag it to a blank area on the home screen.
You must have enough space on the home screen to add widgets. If there is not enough
space, add another home screen or free up some space.
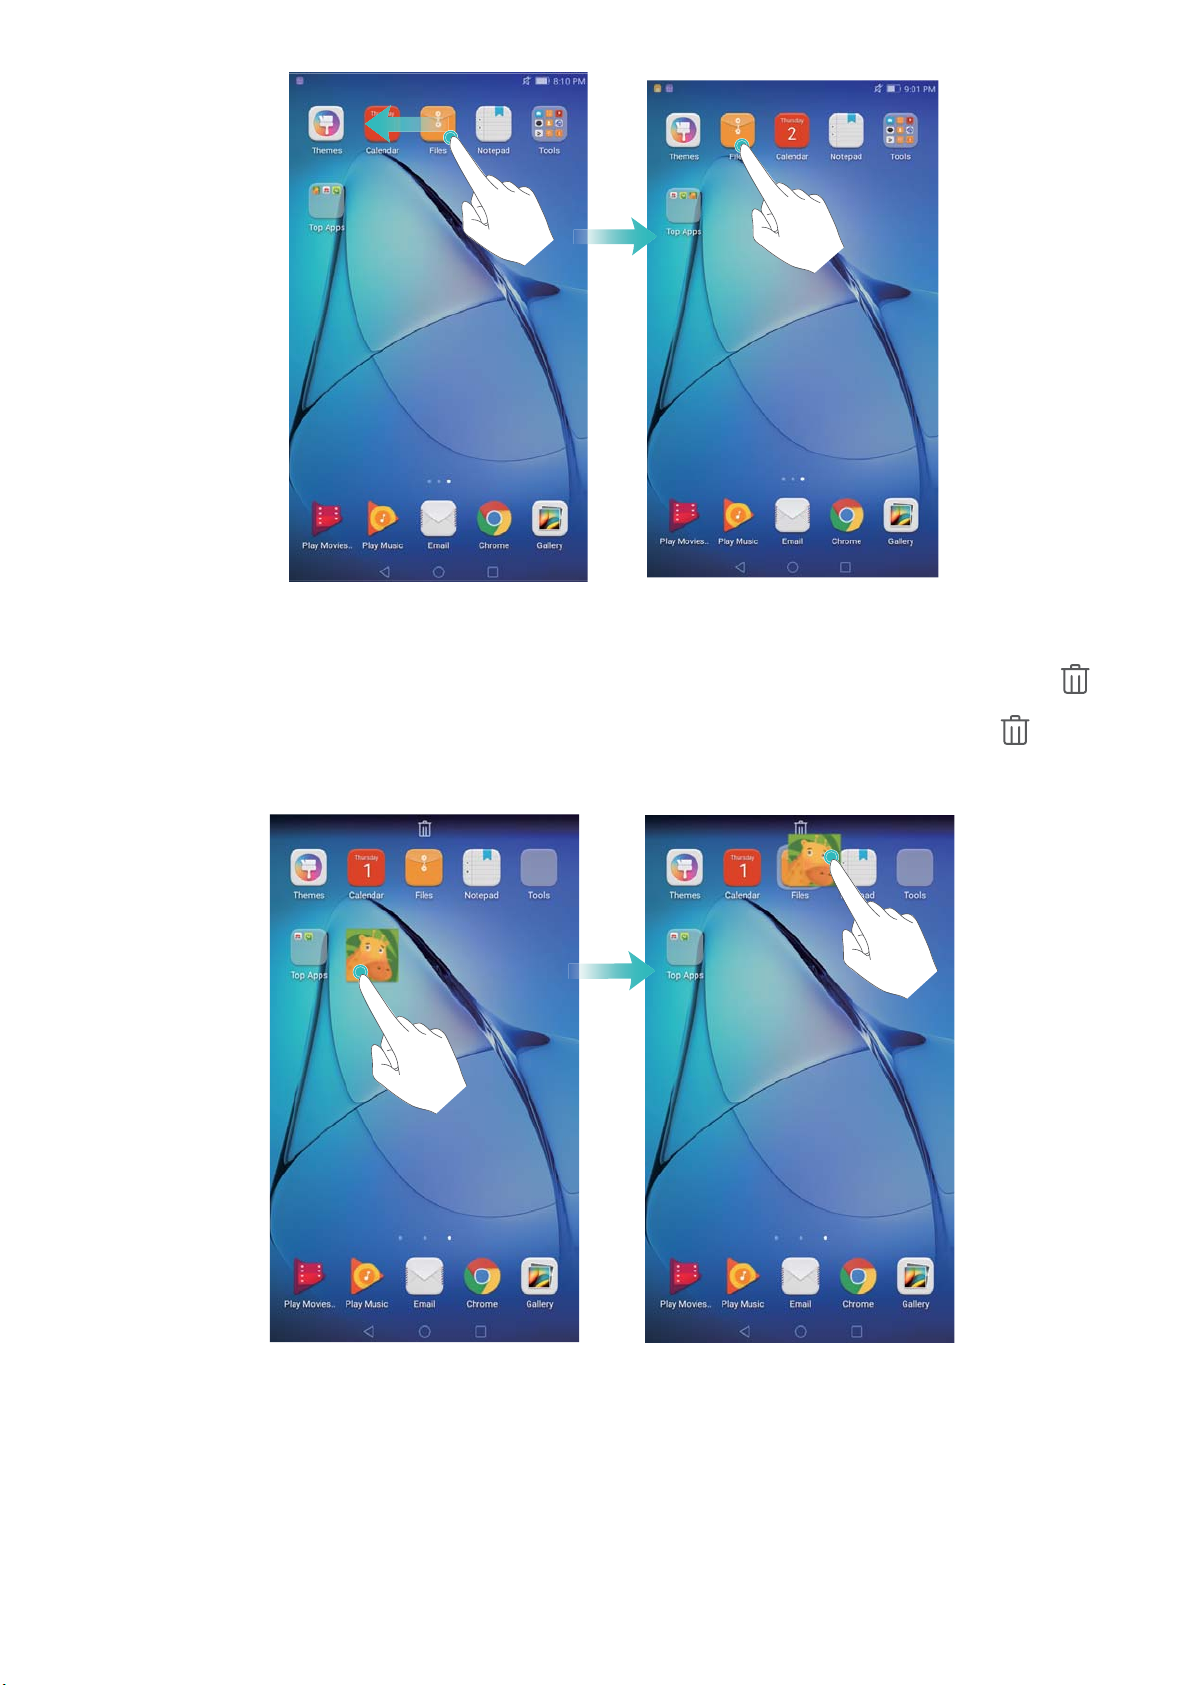
Moving a widget or icon
On the home screen, touch and hold an application icon or widget until your tablet vibrates. You
can then drag the application icon or widget to the desired location.
7
Page 11
Getting Started
Deleting a widget or icon
On the home screen, touch and hold the application icon or widget you want to delete until
is displayed at the top of the screen. Drag the unwanted application icon or widget to .
Creating a folder
Create home screen folders to organize your applications by type. For example, you can create
a Games folder that contains all of your game applications.
On the home screen, drag an icon on top of another icon to create a folder containing both
applications. To rename the folder, open the folder, and then touch the folder name.
8
Page 12
Getting Started
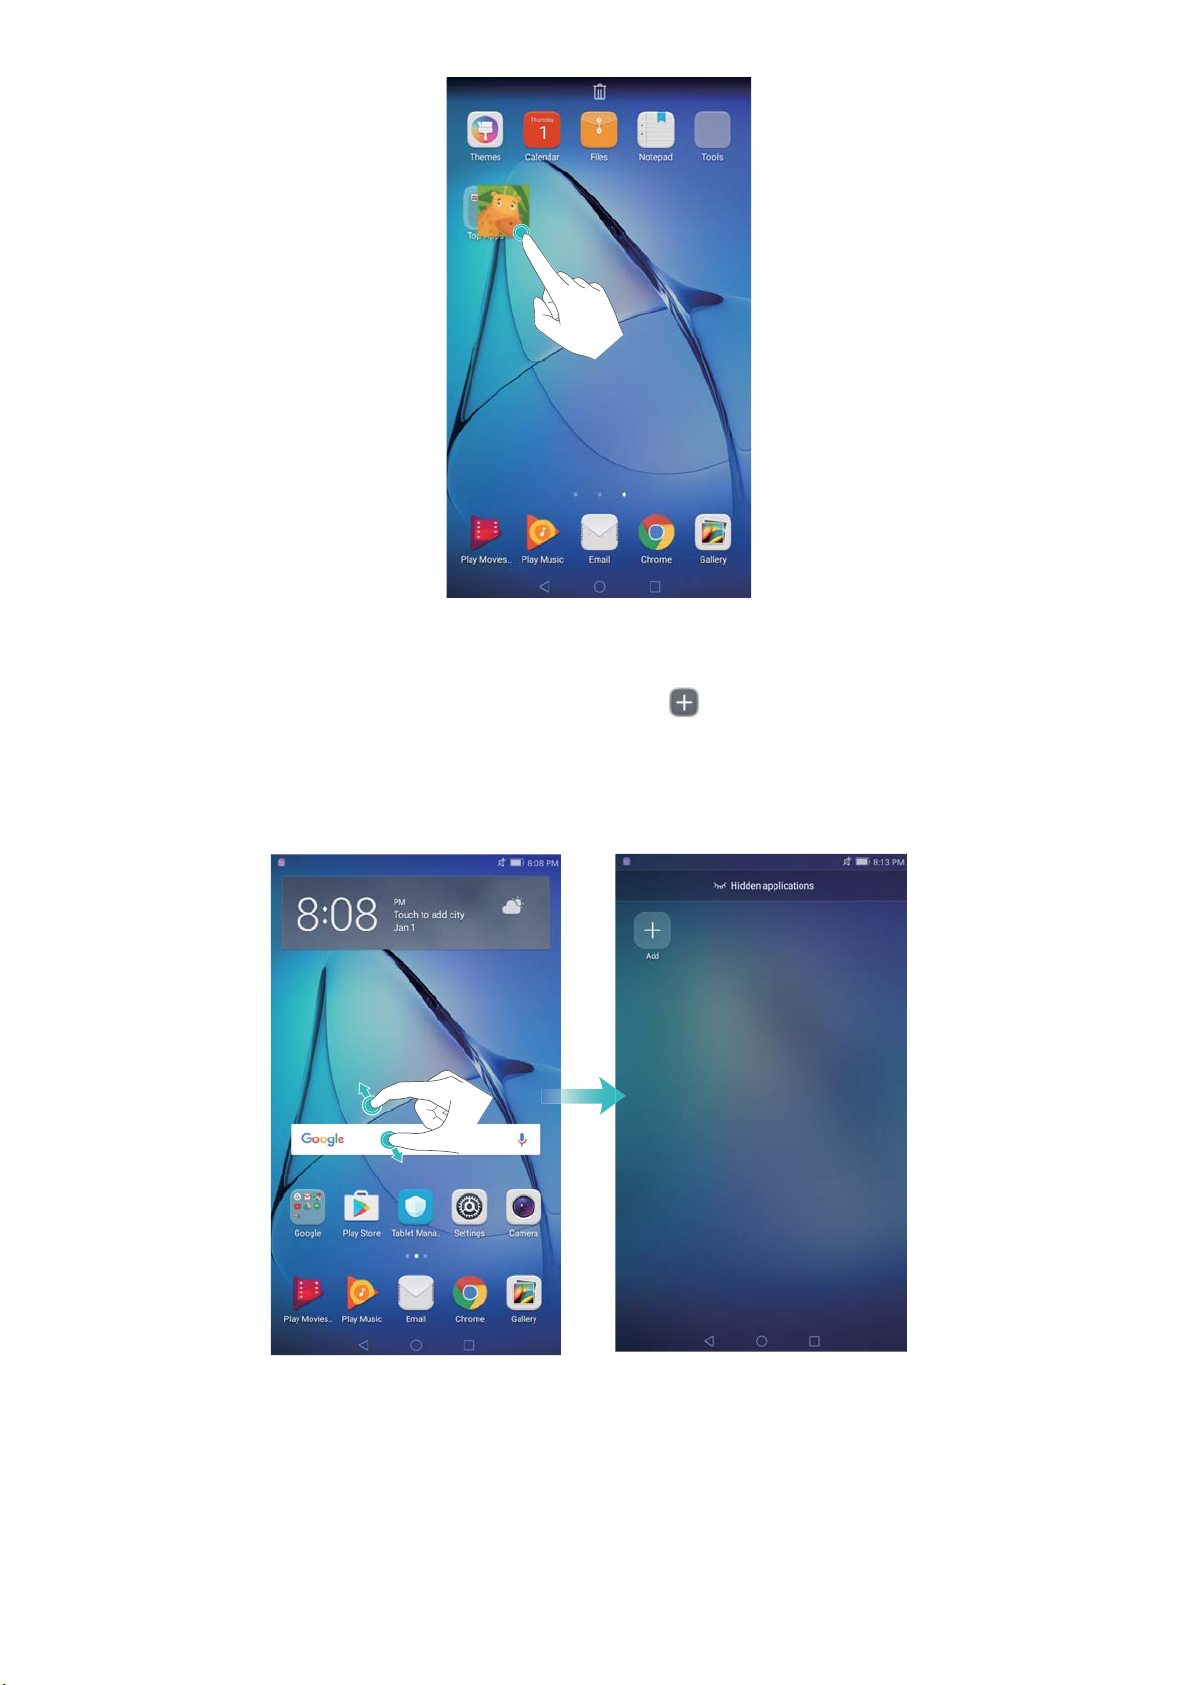
Hiding applications
On the home screen, spread two fingers apart. Touch Add, select the applications you want
to hide, and then touch OK. Applications will not appear on the home screen after they have
been hidden.
9
Page 13
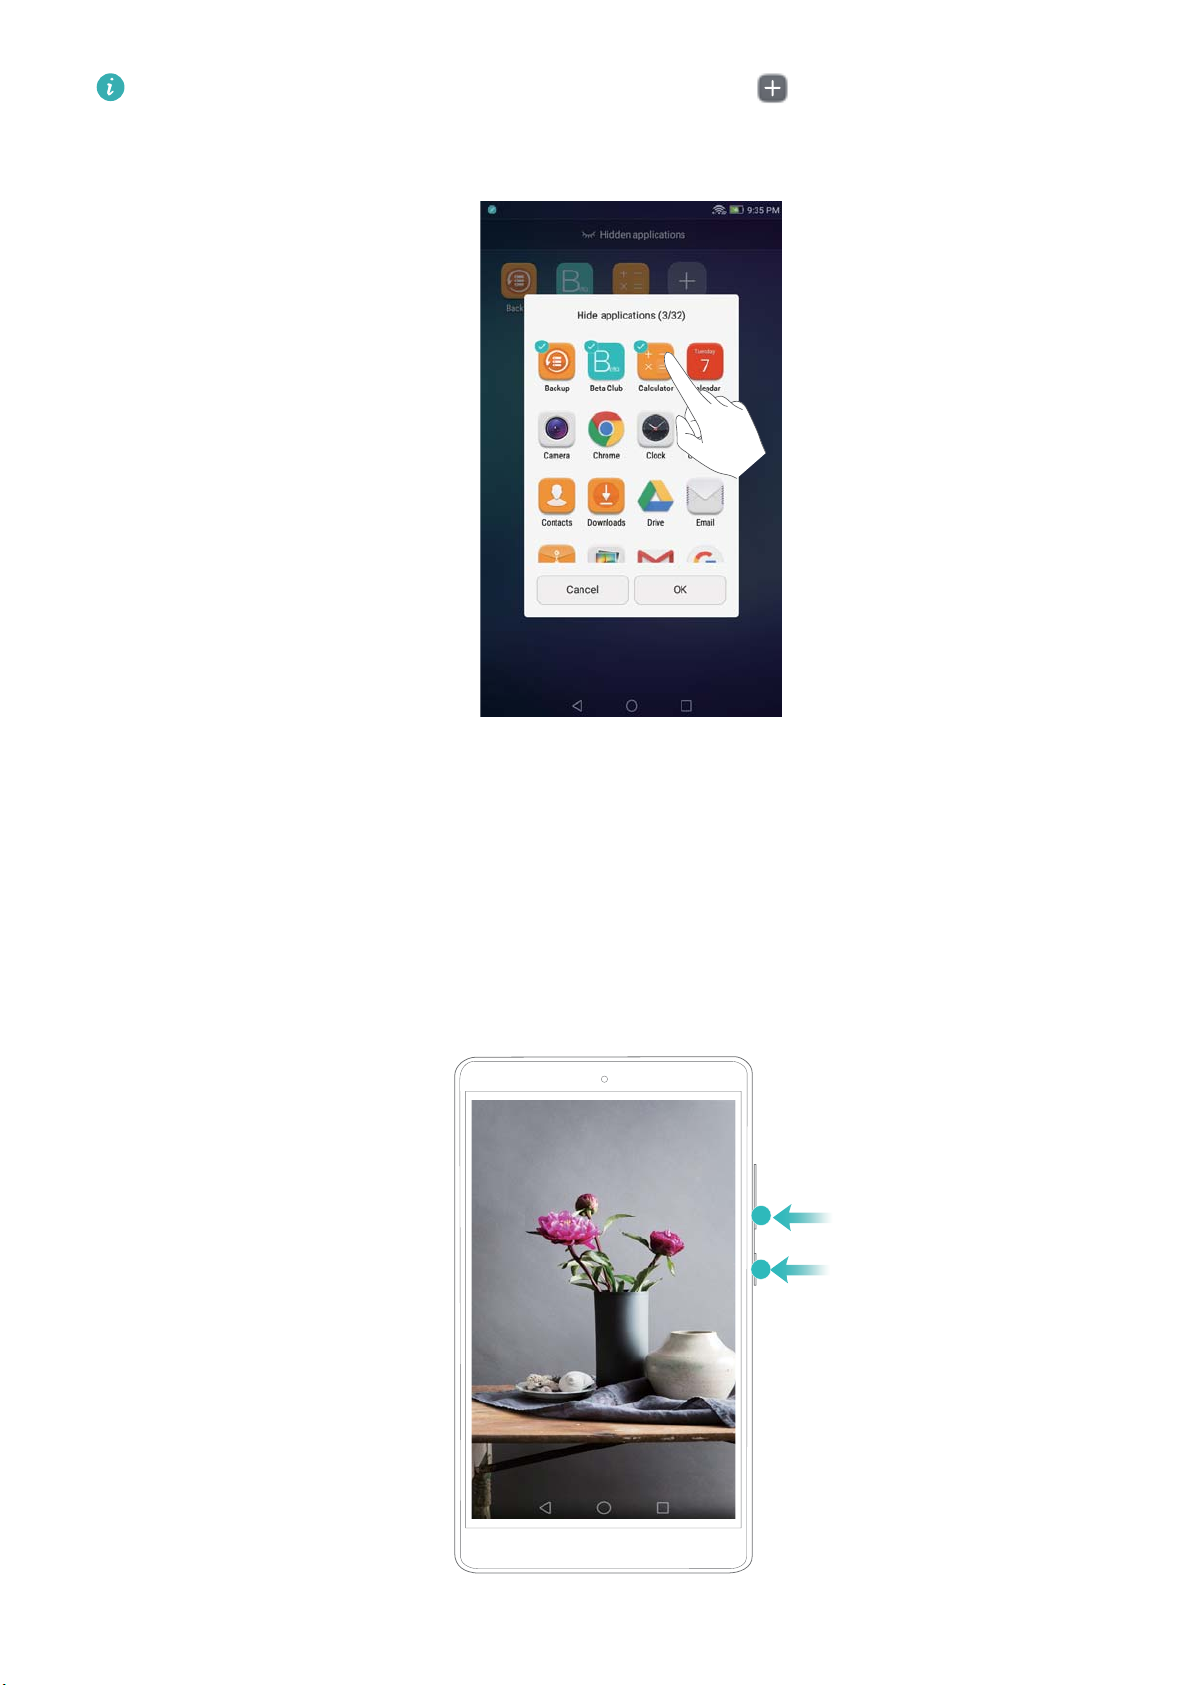
To restore a hidden application to the home screen, touch Add on the hidden
applications screen, deselect the desired application, and then touch OK.
Getting Started
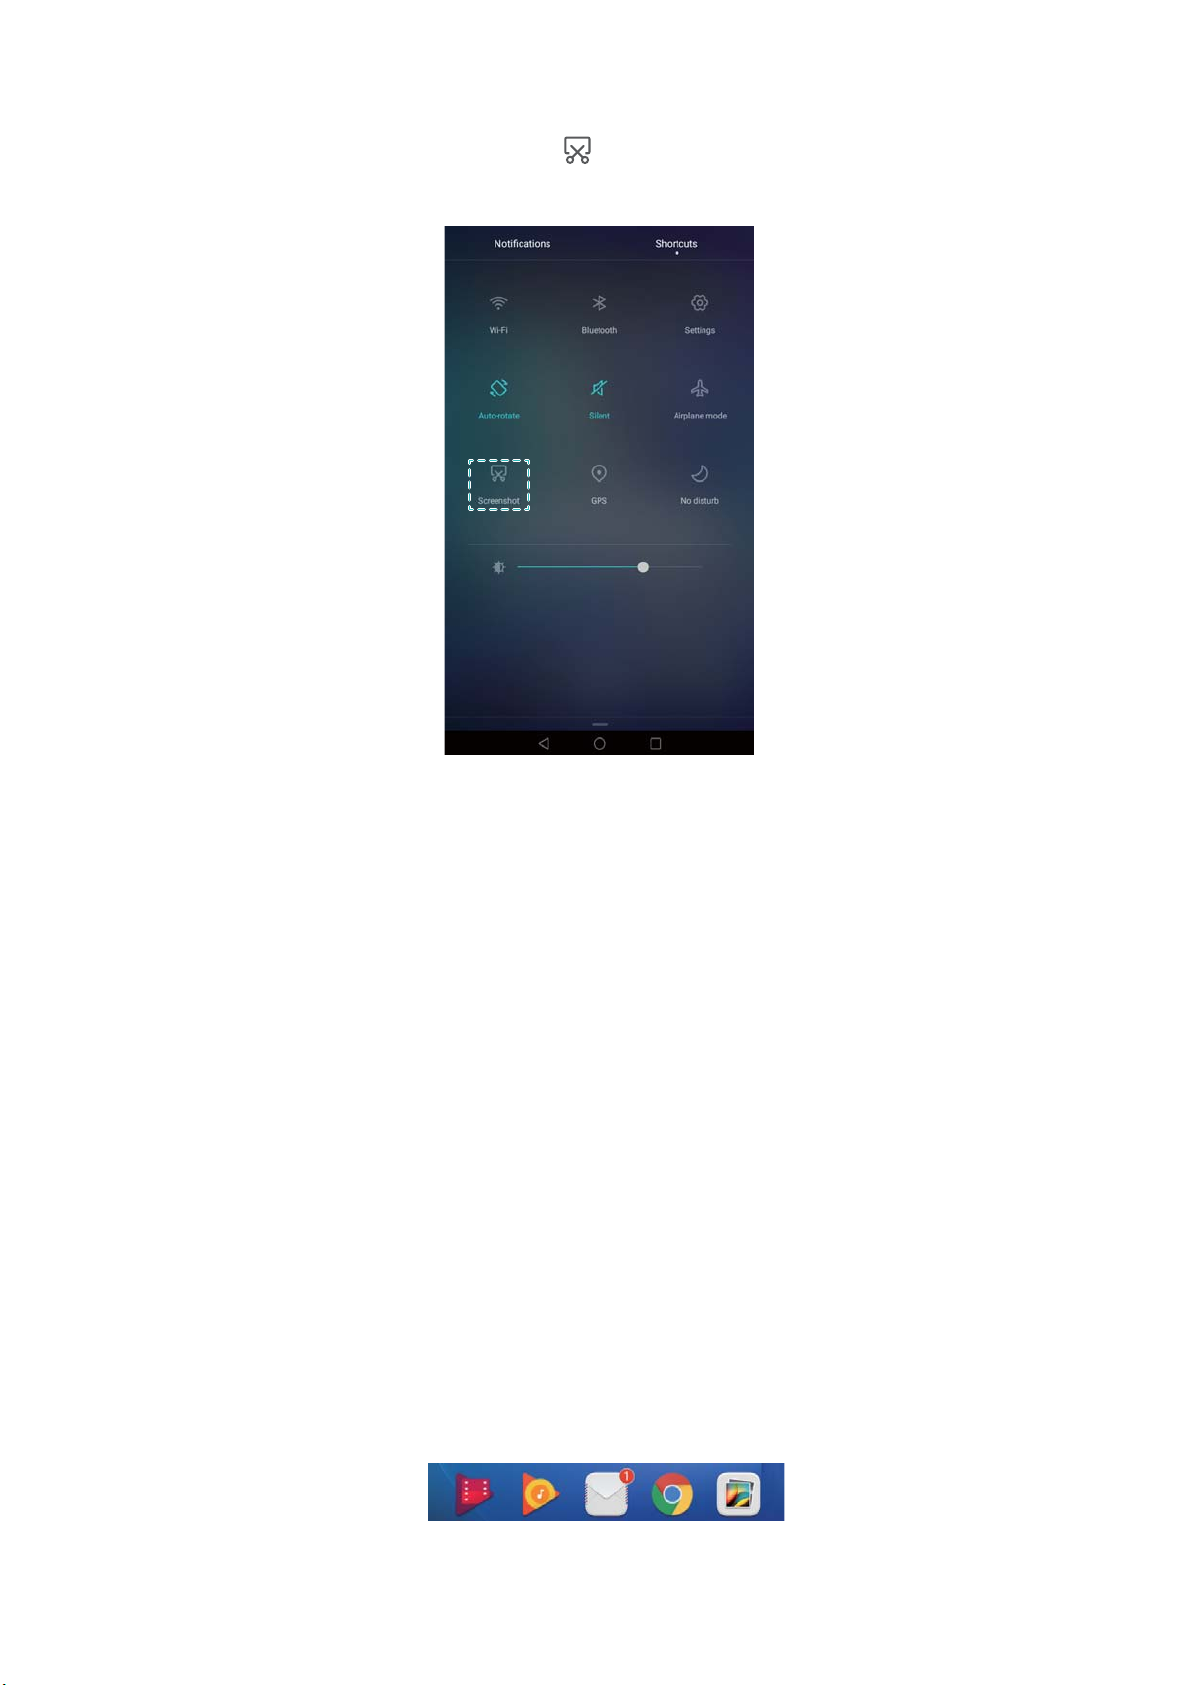
Taking a screenshot
Your tablet comes with a range of screenshot options. Capture the entire screen or draw a shape
on the screen to take a partial screenshot.
Using the power and volume down buttons
Press the power and volume down buttons at the same time to take a full screenshot.
10
Page 14
Getting Started
Using the screenshot shortcut switch
Open the notification panel, and then touch in the Shortcuts tab to take a full screenshot.
By default, screenshots are saved to the Screenshots folder in Gallery.
Notifications
Status indicator
The status indicator changes color and flashes to indicate the following:
l Flashing red (not charging): The battery level is critically low and the tablet will turn off
automatically.
l Steady red (when charging): The battery level is critically low.
l Steady yellow (when charging): The battery level is medium.
l Steady green (when charging): The battery is almost full or already full. Unplug the charger
when the battery level reaches 100%.
l Flashing green (not charging): You have unread notifications.
Notification badges
Notification badges appear in the top right corner of application icons.
The badge number indicates the number of new notifications. Open the corresponding
application to view more details about the notifications.
11
Page 15

Getting Started
To disable notification badges for an application, pinch two fingers together on the home
screen to open the home screen editor, and then touch More settings > Badge app icons
and turn off the switch next to the corresponding application.
Notification panel
Swipe down from the status bar and open the notification panel to view notifications.
Swipe left on the notification panel to go to the shortcuts tab.
Swipe up on the screen, or touch Back or Home to close the notification panel.
Customize shortcut switches: Swipe up on the shortcuts tab, and then touch Edit. Drag
the shortcut switch to the desired location for easier access.
12
Page 16

Getting Started
Notification and status bar settings
Change the notification and status bar settings to customize how notifications and status
reminders are displayed.
Open Settings, and then touch Notification panel & status bar to configure the drop-down
and display settings for the notification and status bar.
Configuring the drop-down settings for the notification bar
l Touch Drag actions > Smart selection. When you open the notification panel, your tablet will
go to the notifications tab if you have new notifications, otherwise it will go to the shortcuts tab.
l Touch Drag actions > Determine from drag position. Swipe down from the left of the status
bar to open to the notifications tab, or swipe down from the right of the status bar to open the
shortcuts tab.
l Turn on the Notification panel switch to access the notification panel when the screen is
locked.
You cannot access the notification panel from the lock screen if you have set a screen lock
password.
Configuring the display content for the notification and status bar
Turn the Display network speed and Remaining battery percentage switches on or off to
configure the content that is displayed in the status bar.
Turn off the Show notification icons switch to hide notification icons in the status bar.
Accessing applications
Opening and switching between applications
Opening applications from the lock screen
Swipe up on the lock screen and touch to launch the camera application. You can also
swipe up from the bottom of the screen and touch a shortcut icon to quickly launch the
corresponding application.
13
Page 17

Opening an application from the home screen
Getting Started
On the home screen, touch an icon to open the corresponding application.
Switching between applications
To switch to another application, touch Home to return to the home screen, and then touch
the icon of the application you want to open.
14
Page 18

Getting Started
Searching for applications
Finding applications
Swipe down from the middle of the screen to access the search bar, and then enter the name of
an application. The search results will be displayed underneath the search bar.
Hidden applications are not listed in the search results.
Finding hidden applications
On the home screen, spread two fingers apart to view your hidden applications.
Viewing recently used applications
Touch Recent to display the list of recently used applications.
15
Page 19

Getting Started
l View more applications: Swipe left or right on the screen to view more recently used
applications.
l Open an application: Touch a thumbnail to open the corresponding application.
l Close an application: Swipe up on a thumbnail to close the corresponding application.
l Close all unlocked applications: Touch to close all unlocked applications.
l Lock or unlock an application: Swipe down on a thumbnail to lock an application. will
appear above an application once it has been locked. Locked applications cannot be closed by
touching . Swipe down again on the thumbnail to unlock the application.
Personalizing your tablet
Changing the theme
Personalize your tablet's home screen using a wide range of themes and wallpapers.
Open Themes, select a theme, and then touch . Touch to mix and match lock
screen methods, wallpapers, application icons, and more.
16
Page 20

Getting Started
Changing the wallpaper
Set your favorite images or photos as your tablet's wallpaper.
1 Open Settings and select Display.
2 Touch Wallpaper, and then touch Lock screen wallpaper or Home screen wallpaper.
3 Follow the onscreen instructions to set the wallpaper.
Turn on the Random change switch. Configure Interval or Album to display. Your tablet will
automatically change the wallpaper at the specified time interval.
You can also open Gallery, touch and hold an image, and then touch > Set as >
Wallpaper. Follow the onscreen instructions to set the image as the wallpaper.
17
Page 21

Getting Started
Changing the font size
The tablet's font size can be increased to make words easier to read.
Open Settings, and then touch Display > Font size to set the system font size.
Entering text
Switching text input methods
Switch between text input methods as desired.
1 On the text input screen, swipe down from the status bar to open the notification panel.
2 Touch Select input method in the Notifications tab, and then select the desired input
method.
If there are no input methods to choose from, go to Settings, touch Advanced settings
> Language & input > Default keyboard > Configure input methods, and then turn on
the switch next to the corresponding input method.
Editing text
You can select, cut, copy, and paste text on your tablet.
l Select text: Touch and hold the text to bring up
text, or touch Select all to select all text.
l Copy text: Select text and touch Copy.
l Cut text: Select text and touch Cut.
l Paste text: Touch and hold where you want to insert the text, and then touch Paste.
l Share text: Select text, and then touch Share to select a sharing method.
. Drag or to select more or less
18
Page 22

Contacts and Email
Creating a contact
1 Open
Contacts.
2 Touch . Touch Create a new contact if you are creating a contact for the first time.
3 Select a location to save the contact from the options menu.
4 Enter the contact's name, phone number and other information, and then touch .
Importing or exporting contacts
Your tablet supports .vcf contact files. VCF is a standard file format for storing contact
information, including names, addresses, and phone numbers.
Importing contacts from a storage device
1 Open
2 Touch > Import/Export > Import from storage.
3 Select one or more .vcf files, and then touch OK.
Contacts.
Importing contacts using Bluetooth
1 Open Contacts.
2 Touch > Import/Export > Import from another device.
3 Select Supports Bluetooth and then touch Next.
4 Enable Bluetooth on the device from which you want to import contacts and set the device to
be visible to other Bluetooth devices.
5 Touch Next. Your tablet will automatically turn on Bluetooth and search for nearby devices.
6 Touch the Bluetooth device from which you want to import contacts. Once connected, your
tablet will automatically import contacts from the other Bluetooth device.
Importing contacts using Wi-Fi Direct
1 Open
Contacts.
2 Touch > Import/Export > Import from another device.
3 Select Import via Wi-Fi Direct and then touch Next. Your tablet then prompts you to enable
Wi-Fi and scans for Wi-Fi Direct devices.
4 Select the Wi-Fi Direct device you want to connect to. Once connected, your tablet will
automatically import contacts from the other device.
19
Page 23

Sharing contacts
1 Open Contacts.
2 Touch > Import/Export > Share contact.
3 Select the contacts you want to share, and then touch .
4 Choose your sharing method, and then follow the onscreen instructions.
Finding a contact
Contacts and Email
1 Open
For more complete search results, ensure that Contacts is configured to display all of
your contacts. On the contacts screen, touch > Display preferences and then select
All contacts.
Contacts.
2 On the contact list, use one of the following methods to find a contact:
l Swipe the contact list up or down.
l Slide your finger up or down the index on the right-hand side of the screen to scroll through
your contacts.
l Enter the contact's name, initials, phone number, email address, or other contact
information in the search bar at the top of the contact list. Search results will be displayed
underneath.
If an error message is displayed or you are unable to search for a contact, touch >
Organize contacts and then select Rebuild index data.
Viewing contacts from different accounts
You can select which contacts to display on your tablet.
1 Open Contacts.
2 Touch > Display preferences.
3 Select the account you want to display or customize the accounts to display.
Hide contact photos, company information and job title: Touch
on the contacts screen, and then turn on the Simple layout switch.
> Display preferences
Adding a contact to your favorites
You can add frequently-contacted people to your favorites to make them easier to find.
1 Open Contacts.
20
Page 24

Amy@huawei.com
Change account
or folder
Compose email
Search
Change email
settings
Contacts and Email
2 Touch and hold the contact you want to add to your favorites, and then touch Add to
favorites to add the contact to Favorites.
When viewing contact details, touch to add the contact to your favorites.
Remove contacts from your favorites: Touch Favorites > on the contacts screen. Select
the contacts that you wish to remove from your favorites, and then touch .
Adding an email account
Adding a personal email account
When adding an account, consult your email service provider if you are unsure about the
account settings.
1 Open
Email.
2 Choose an email service provider or touch Others.
3 Enter your email address and password, and then touch Next. Touch Manual setup to
configure an email account manually.
4 Follow the onscreen instructions to configure your account. The system will automatically
connect to the server and check the server settings.
Once the account has been set up, your Inbox will be displayed.
After adding an email account, touch > Settings > Add account in your Inbox to
continue adding other accounts.
21
Page 25

Amy@huawei.com
Recipient
Email body
Add attachment
Send
Subject
Select recipient from
contact list
Contacts and Email
Adding an Exchange account
Exchange is an email system developed by Microsoft for businesses. Some email service
providers also provide Exchange accounts for individuals and families.
When adding an account, consult your email service provider if you are unsure about the
account settings.
1 Open Email.
2 Touch Exchange.
3 Enter your email address, user name, and password. Touch Next.
4 Follow the onscreen instructions to configure your account. The system will automatically
connect to the server and check the server settings.
Once the account has been set up, your Inbox will be displayed.
Sending an email
1 Open
Email.
2 Touch .
3 Touch From: and then select the email account you want to use.
4 Enter one or more recipients.
To Cc or Bcc the email to multiple recipients, touch Cc/Bcc:.
5 Enter your email subject and main body. Touch to add an attachment.
6 Touch .
Your email service provider may place a limit on the size of email attachments. If your
attachments exceed the limit, send the attachments in separate emails.
Touch > Save to save your email as a draft.
Checking your emails
Open Email and then swipe down in your Inbox to refresh the list of emails.
22
Page 26

1 Open Email.
2 In your Inbox, touch in the upper left corner to select an account.
3 Touch the email you want to read. You can:
l Touch to star for future reference.
l Touch Reply… and enter text to compose a quick reply.
l Swipe left or right to read the next or previous email.
Contacts and Email
23
Page 27

Camera and Gallery
Taking a photo
Your tablet comes with a feature-packed camera that you can use to capture life's unforgettable
moments.
1 Open
Camera.
2 Frame the scene you want to capture, Touch .
Touch the thumbnail to view a photo and share it with friends. For more information, see
Sharing images or videos.
Deleting images or videos
If you're running out of storage space, delete unwanted photos and videos from Gallery.
1 Open Gallery.
2 Touch and hold an image or video thumbnail, and then select the files that you want to delete.
3 Touch
> Delete to delete the selected files.
Sharing images or videos
1 Open Gallery.
2 Touch and hold an image or video thumbnail, and then select the files that you want to share.
3 Touch , choose a sharing method, and follow the onscreen instructions to share your
files.
Editing an image
The Gallery application comes with powerful image editing tools that you can use to bring your
photos to life. For example, you can draw graffiti, add watermarks, or apply a variety of filters.
1 Open Gallery.
2 Touch an image to view it in full-screen mode. Touch to edit the image.
3 Select an image editing tool. You can:
24
Page 28

Swipe left to view more editing tools
Camera and Gallery
l Rotate an image: Touch and swipe the screen to adjust the angle of rotation. Touch
Mirror to create a mirror image of the photo.
l Crop an image: Touch to select the crop ratio (for example, 16:9). Drag the dotted
edges to crop the image to the desired size.
l Add a filter: Touch and select the desired filter.
l Adjust image parameters: Touch . You can adjust the brightness, contrast,
saturation, and more to make your image look more vivid.
l Apply mosaic effects: Touch and then select the desired mosaic effect.
l Draw graffiti: Touch to select the brush and color.
l Add a watermark: Touch to add a watermark and personalize your photo. You can
choose from time, location, weather, exercise type, and more.
l Add a label: Touch
and then select the desired label type and font. You can use
labels to record your mood or thoughts.
25
Page 29

Accessing the Internet
Connecting to the Internet using Wi-Fi
You can connect to the Internet using a Wi-Fi access point or hotspot.
Your personal data and financial information may be at risk if you connect to insecure public
Wi-Fi networks.
Connecting to a Wi-Fi network
1 Open Settings.
2 Touch Wi-Fi and then turn on the Wi-Fi switch. Your tablet will list available Wi-Fi networks.
l Search manually for Wi-Fi networks: Touch Scan. Your tablet will scan again for
available Wi-Fi networks.
l Add a Wi-Fi network that is not shown in the list: Touch Add network…. Follow the
onscreen instructions to configure the Wi-Fi settings and password.
3 Select the Wi-Fi network you want to connect to:
l If the Wi-Fi network does not require a password, your tablet will connect automatically.
l If the network is protected, enter the password when prompted, and then touch Connect.
Once your tablet is connected to a Wi-Fi network, it will display the icon in the status bar.
Your tablet will remember Wi-Fi networks that you have used before and reconnect to them
automatically.
Connecting to a Wi-Fi network using WPS
Connect your tablet to a WPS-enabled router without having to enter the network key.
1 Open Settings.
2 Touch Wi-Fi and then turn on the Wi-Fi switch.
3 Touch
l Touch WPS connection and then press the Wi-Fi router's WPS button.
l Touch WPS PIN connection to generate a PIN, and then enter this PIN on the Wi-Fi router.
> Advanced settings, and then choose one of the following methods:
Once your tablet is connected to a Wi-Fi network, it will display the icon in the status bar.
Your tablet will remember Wi-Fi networks that you have used before and reconnect to them
automatically.
Transferring data using Bluetooth
Enabling Bluetooth and pairing your tablet with another device
1 Open Settings and touch Bluetooth.
26
Page 30

Accessing the Internet
2 Turn on the Turn on Bluetooth switch and ensure that Visibility is enabled. Your tablet will
automatically list available devices. If the device you want to pair with is not displayed, check
that the device is discoverable.
3 Select the device you want to pair with and follow the onscreen instructions.
Sending and receiving files using Bluetooth
Check that both devices are paired before attempting to transfer files.
l Send files: Touch and hold the file you want to send and touch Share > Bluetooth. Your
device will automatically search for nearby devices. Select the receiving device.
l Receive files: When another device tries to send you files using Bluetooth, select Accept from
the dialog box that appears. Open the notification panel to view file transfer progress.
By default, received files are saved to the bluetooth folder on your device's internal storage.
Unpairing Bluetooth devices
1 Open Settings and touch Bluetooth.
2 Turn on the Turn on Bluetooth switch.
3 Touch the
Renaming your tablet
By default, your tablet's model number is used as the device name when you enable Bluetooth.
You can change the name to something more recognizable.
icon next to the name of the paired device, and then touch Unpair.
1 Open Settings and touch Bluetooth > Device name.
2 Rename the tablet and touch OK.
Transferring data using Wi-Fi Direct
Use Wi-Fi Direct to transfer photos and files between two devices without connecting to a Wi-Fi
network. Wi-Fi Direct is similar to Bluetooth but is faster, making it suitable for the transfer of
larger files such as videos.
Wi-Fi Direct can only be used to transfer data between two Huawei devices. Check that both
devices support Wi-Fi Direct.
27
Page 31

Accessing the Internet
Connecting two devices using Wi-Fi Direct
Establish a Wi-Fi Direct connection to transfer data wirelessly between two devices.
1 Open Settings, select Wi-Fi and then turn on the Wi-Fi switch. Touch Wi-Fi Direct.
2 Repeat the above steps on the other device and keep the Wi-Fi Direct search screen open on
both devices.
3 When your tablet detects the other device, select it. Follow the onscreen instructions to
establish a Wi-Fi Direct connection between the two devices.
To terminate the Wi-Fi Direct connection, select
device you want to disconnect from and touch OK to disconnect.
to open the Wi-Fi Direct screen. Select the
Using Wi-Fi Direct to send and receive files
Share files between two devices by establishing a Wi-Fi Direct connection.
This feature requires a Wi-Fi connection. Ensure that Wi-Fi is enabled on both devices.
1 Open Gallery and select the picture you want to send.
2 Touch Share > Wi-Fi Direct. Wait until the receiving device is detected, and then select it.
If the receiving device is not detected, check that Wi-Fi is enabled.
3 A prompt will be displayed on the receiving device. Touch Accept to accept the file transfer
request.
Open the notification panel and touch Notifications to monitor the file transfer progress.
By default, received files are saved to the Wi-Fi Direct folder on your tablet's internal
storage.
28
Page 32

File Management
Viewing files
Viewing files by category
Open the Categories tab in Files. Your files are automatically sorted into different categories.
Finding files quickly
Use the search feature to quickly find what you are looking for.
1 Open
Files.
2 In the Local tab, touch Internal storage or SD card.
3 Touch and then enter the file name or keywords. Search results will be displayed below
the search bar.
Sorting your files
Use the sort feature to arrange your files by type, name, size, or date.
1 Open Files.
2 In the Local tab, touch Internal storage or SD card.
3 Touch
Creating file shortcuts on the home screen
Create a shortcut to frequently-used files on the home screen for easy access.
and then sort files by type, name, size, or date as desired.
1 Open Files.
2 In the Local tab, touch Internal storage or SD card.
3 Touch and hold the file you want to create a shortcut for, and then touch > Create
desktop shortcut.
Sharing files
Use Files to share photos or videos on social media, or with friends.
1 Open Files.
2 In the Local tab, touch Internal storage or SD card.
3 Select the files you want to share, and then touch
4 Choose a sharing method and follow the onscreen instructions to share your files.
> Share.
29
Page 33

Creating folders
Create folders and place files inside them to keep your tablet organized.
1 Open Files.
2 In the Local tab, touch Internal storage or SD card.
3 Touch , enter the name of the new folder, and then touch Save.
Renaming files
Give your files distinctive names so that you can find them more quickly.
1 Open Files.
2 In the Local tab, touch Internal storage or SD card.
File Management
3 Touch and hold the file or folder you want to rename, and then touch
> Rename.
4 Enter a new name, and then touch OK.
Copying, moving, or deleting files
1 Open Files.
2 In the Local tab, touch Internal storage or SD card.
3 Select the files you want to copy, move, or delete. You can:
l Copy files to a destination folder: Touch
.
l Move files to a destination folder: Touch , select a destination folder, and then touch
.
l Delete files: Touch > Delete
, select a destination folder, and then touch
Creating or extracting archives
Combine multiple files into a single zip archive to free up storage space and make your files
easier to share.
1 Open Files.
2 In the Local tab, touch Internal storage or SD card.
3 Select the files or folders you want to add to the archive, and then touch
4 Choose the archive destination. The selected files will be compressed into a zip archive,
which will be named automatically.
> Compress.
30
Page 34

File Management
To extract an archive, touch and hold the archive file, and then touch > Extract to.
Select where the archive should be extracted to.
Excluding small images
When viewing images, you may find that Files also displays cached images and thumbnails
from web pages you have visited. Exclude these images for a clutter-free viewing experience.
1 Open Files.
2 Touch > Settings and then turn on the Filter small pictures switch to prevent files
smaller than 30 KB from being shown.
Storing private files in a safe
To ensure the privacy of your files, enable Safe, set a password, and move files into a safe to
encrypt them. You can always remove them from the safe at a later date.
1 Open Files.
2 In the Categories or Local tab, touch Safe.
3 Touch Enable and set the safe storage location.
4 Follow the onscreen instructions to set a password and security question, and then touch
Done to open Safe.
5 Touch
to the safe.
l Remove files from a safe: In Safe, open the folder which contains the files you want to
remove. Touch and hold any file, select the files you want to move, and then touch .
l Destroy a safe: In Safe, touch Settings > Destroy safe. Follow the onscreen instructions to
remove files from the safe and destroy it.
l Change the safe password: In Safe, touch Settings > Change password. Follow the
onscreen instructions to change the password.
. Follow the onscreen instructions to select files, and then touch to add them
31
Page 35

Backup and Restore
More settings
Restore previously backed up data
Back up new data
Using the Backup application to back up and restore
data
Backups help ensure that you never lose your data. You can use a local backup to copy data to
your tablet's internal storage or a microSD card.
Backing up data to local storage
You can back up your contacts, messages, call log, photos, music, videos, files, and
applications.
1 Open Backup.
2 Touch Backup > Internal storage > Next.
3 Select the data you want to back up. No backup password is required if you back up photos,
audio, videos, and documents. To back up other types of data, follow the onscreen
instructions to set a backup password.
4 Touch Back up.
By default, backup data is saved to the HuaweiBackup folder in Files.
Restoring data from local storage
1 Open Backup.
2 Touch Restore > Restore from internal storage > Next.
3 Select the backup you want to restore.
32
Page 36

Backup and Restore
If the backup data is encrypted, enter the encryption password when prompted.
4 Select the data you want to restore, and then touch Restore.
Restoring factory settings
Restore your tablet to its factory settings if it crashes or is slow to respond.
Back up important data on your tablet before restoring factory settings. For more
information, see Using the Backup application to back up and restore data.
Restoring factory settings will erase all personal data from your tablet, including account
information, downloaded applications, and application settings.
1 Open Settings.
2 Touch Advanced settings > Backup & reset > Factory data reset.
3 Choose whether to format your internal storage, and then touch Reset tablet.
Selecting Erase internal storage will delete all files on your internal storage, such as
music and images. Proceed with caution.
4 Touch Reset tablet to restore your tablet to its factory settings. Your tablet will restart
automatically when the process is complete.
Updating your tablet
Update your tablet's system to the latest version to enhance performance.
l Using unauthorized third-party software to update your tablet may render your tablet
unusable or put your personal information at risk. Always update through your tablet's
online update feature or send your tablet to a nearby authorized Huawei service center for
assistance.
l Your personal data may be erased during a system update. Ensure that you back up
important data before updating your tablet.
l When updating, ensure that your tablet has at least 20% battery power remaining.
l After updating, you may find that some third-party applications are incompatible with your
system, such as Internet banking applications and games. This is because it takes a while
for third-party application developers to release updates for new Android releases. Please
wait until a new version of the application is released.
Touch Settings > About tablet > Build number to view your tablet's version number.
OTA updates
When a new system update is released, you will be prompted to download and install the latest
version. Select OTA update for quick and secure updates.
33
Page 37

Backup and Restore
Ensure that your tablet is connected to the Internet before updating. Connect to a Wi-Fi
network before updating to avoid incurring data charges. In addition, ensure that your tablet
has sufficient battery power remaining.
1 Open Settings.
2 Touch Updater. Your tablet will automatically check for updates.
3 Select the latest version to download the update package.
4 Once the download is complete, touch Restart and update. The update process may take a
while to complete. Do not use your tablet before it has finished updating. Your tablet will
restart automatically when it has finished updating.
34
Page 38

Settings
Airplane mode
Wireless devices may interfere with an airplane's flight system. Power off your tablet or switch to
airplane mode when you are on a flight.
After you enable airplane mode, all of your tablet's network features will be disabled. You will not
be able to use Bluetooth or Wi-Fi. However, you will still be able to play music, watch videos,
and use applications that do not require an Internet connection.
Use one of the following methods to enable or disable airplane mode:
l Swipe down from the status bar to open the notification panel. In the Shortcuts tab, turn on
the Airplane mode switch.
l Press and hold the power button, and then touch Airplane mode.
l Open Settings, and then turn on the Airplane mode switch.
When airplane mode is on, is displayed in the status bar.
Configuring the display settings
Configure the display settings to personalize your tablet. For example, you can change the
wallpaper, font size, and screen-off time.
Go to Settings and then touch Display. You can configure the following settings:
l Wallpaper: Set the lock screen and home screen wallpapers. For more information, see
Changing the wallpaper.
35
Page 39

Settings
l Font size: Set the font size.
l Daydream: When this feature is enabled and you have configured Picture source and
Duration, your tablet will automatically display images when it's being charged and the screen
is locked.
l Indicator light: The status indicator will blink when you receive notifications.
l Sleep: The screen will lock automatically after a period of inactivity to reduce power
consumption. Select Sleep to adjust the screen-off time or disable the automatic screen lock
feature.
l Auto-rotate screen: If this option is enabled, your screen's orientation will switch automatically
depending on how you hold your tablet when performing certain operations, such as browsing
a web page, or viewing a picture.
The above options may not be available on all tablet models.
Sound settings
Go to Settings and then touch Sound. You can configure the following settings:
l Volume: Adjust the Notifications, media, alarm, and call volume.
l Default notification tone: Choose a preset ringtone or a local music file as the notification
tone for emails, and other notifications.
l Touch the switches under System to enable or disable touch sounds, screen lock sounds,
screenshot tones.
The above options may not be available on all tablet models.
Changing the screen unlock method
Set a screen lock password to prevent unauthorized access to your tablet.
Setting a screen unlock pattern
1 Open Settings.
2 Touch Screen lock & passwords > Password > Pattern.
3 Connect at least four dots to create a screen unlock pattern, and then release your finger.
Draw your screen unlock pattern again to confirm.
4 Enter a backup PIN containing at least four digits. If you forget your screen unlock pattern,
you can enter the backup PIN to unlock the screen.
Unlocking the screen with a password
1 Open
Settings.
2 Touch Screen lock & passwords > Password.
3 You can choose to set a PIN or password:
36
Page 40

l Touch PIN, and then enter a PIN containing at least four digits and select Done.
l Touch Password, and then enter a password containing at least four characters and select
Done.
Removing the screen lock password
1 Open Settings.
2 Touch Screen lock & passwords > Password.
3 Enter your screen lock password or unlock pattern, and then touch None.
Setting the date and time
Open Settings. Touch Advanced settings > Date & time to configure the settings.
Changing the system language
Settings
1 Open
Settings.
2 Touch Advanced settings > Language & input.
3 Touch Language & region, and then select the desired language.
Viewing the available storage space
Check that there is enough space on your tablet's internal storage or microSD card before
downloading update packages or large files.
Open Settings and touch Advanced settings > Memory & storage to view storage
information.
Touch Default location to set the default storage location to Internal storage or SD card.
Enabling location access
Enable location-based services to ensure that map, navigation, and weather applications can
access your location information.
1 Open Settings.
2 Touch Advanced settings > Location access and then turn on the Access my location
switch.
3 Three options are available under Location mode:
l Use GPS and Wi-Fi: Uses GPS and your tablet's Internet connection. Enable this option for
highly accurate positioning.
l Use Wi-Fi: Only uses your tablet's Internet connection. Enable this option for reduced
power consumption and longer standby times.
37
Page 41

l Use GPS only: Does not require an Internet connection. Enable this option to reduce
Enable location service
Select positioning method
mobile data usage.
Settings
38
Page 42

Appendix
Personal Information and Data Security
The use of some functions or third-party applications on your device could result in your
personal information and data being lost or becoming accessible to others. Several measures
are recommended to help you protect personal and confidential information.
l Place your device in a safe area to prevent it from unauthorized use.
l Set your device screen to lock and create a password or unlock pattern to open it.
l Periodically back up personal information kept on your memory card, or stored in your device
memory. If you change to a different device, be sure to move or delete any personal
information on your old device.
l If you are worried about viruses when you receive messages or emails from a stranger, you
can delete them without opening them.
l If you use your device to browse the Internet, avoid websites that might pose a security risk to
avoid theft of your personal information.
l Install or upgrade device security software and regularly scan for viruses.
l Be sure to obtain third-party applications from a legitimate source. Downloaded third-party
applications should be scanned for viruses.
l Install security software or patches released by Huawei or third-party application providers.
l Some applications require and transmit location information. As a result, a third-party may be
able to share your location information.
l Your device may provide detection and diagnostic information to third-party application
providers. Third party vendors use this information to improve their products and services.
Legal Notice
Copyright © Huawei Technologies Co., Ltd. 2017. All rights reserved.
No part of this manual may be reproduced or transmitted in any form or by any means without
prior written consent of Huawei Technologies Co., Ltd. and its affiliates ("Huawei").
The product described in this manual may include copyrighted software of Huawei and possible
licensors. Customers shall not in any manner reproduce, distribute, modify, decompile,
disassemble, decrypt, extract, reverse engineer, lease, assign, or sublicense the said software,
unless such restrictions are prohibited by applicable laws or such actions are approved by
respective copyright holders.
Trademarks and Permissions
, , and are trademarks or registered trademarks of Huawei Technologies Co., Ltd.
39
Page 43

Appendix
Android™ is a trademark of Google Inc.
The Bluetooth® word mark and logos are registered trademarks owned by Bluetooth SIG, Inc.
and any use of such marks by Huawei Technologies Co., Ltd. is under license.
Other trademarks, product, service and company names mentioned may be the property of their
respective owners.
Notice
Some features of the product and its accessories described herein rely on the software installed,
capacities and settings of local network, and therefore may not be activated or may be limited by
local network operators or network service providers.
Thus, the descriptions herein may not exactly match the product or its accessories which you
purchase.
Huawei reserves the right to change or modify any information or specifications contained in this
manual without prior notice and without any liability.
Third-Party Software Statement
Huawei does not own the intellectual property of the third-party software and applications that
are delivered with this product. Therefore, Huawei will not provide any warranty of any kind for
third party software and applications. Neither will Huawei provide support to customers who use
third-party software and applications, nor be responsible or liable for the functions or
performance of third-party software and applications.
Third-party software and applications services may be interrupted or terminated at any time, and
Huawei does not guarantee the availability of any content or service. Third-party service
providers provide content and services through network or transmission tools outside of the
control of Huawei. To the greatest extent permitted by applicable law, it is explicitly stated that
Huawei shall not compensate or be liable for services provided by third-party service providers,
or the interruption or termination of third-party contents or services.
Huawei shall not be responsible for the legality, quality, or any other aspects of any software
installed on this product, or for any uploaded or downloaded third-party works in any form,
including but not limited to texts, images, videos, or software etc. Customers shall bear the risk
for any and all effects, including incompatibility between the software and this product, which
result from installing software or uploading or downloading the third-party works.
This product is based on the open-source Android™ platform. Huawei has made necessary
changes to the platform. Therefore, this product may not support all the functions that are
supported by the standard Android platform or may be incompatible with third-party software.
Huawei does not provide any warranty or representation in connect with any such compatibility
and expressly excludes all liability in connection with such matters.
DISCLAIMER
ALL CONTENTS OF THIS MANUAL ARE PROVIDED "AS IS". EXCEPT AS REQUIRED BY
APPLICABLE LAWS, NO WARRANTIES OF ANY KIND, EITHER EXPRESS OR IMPLIED,
40
Page 44

Appendix
INCLUDING BUT NOT LIMITED TO, THE IMPLIED WARRANTIES OF MERCHANTABILITY
AND FITNESS FOR A PARTICULAR PURPOSE, ARE MADE IN RELATION TO THE
ACCURACY, RELIABILITY OR CONTENTS OF THIS MANUAL.
TO THE MAXIMUM EXTENT PERMITTED BY APPLICABLE LAW, IN NO EVENT SHALL
HUAWEI BE LIABLE FOR ANY SPECIAL, INCIDENTAL, INDIRECT, OR CONSEQUENTIAL
DAMAGES, OR LOSS OF PROFITS, BUSINESS, REVENUE, DATA, GOODWILL SAVINGS OR
ANTICIPATED SAVINGS REGARDLESS OF WHETHER SUCH LOSSES ARE FORSEEABLE
OR NOT.
THE MAXIMUM LIABILITY (THIS LIMITATION SHALL NOT APPLY TO LIABILITY FOR
PERSONAL INJURY TO THE EXTENT APPLICABLE LAW PROHIBITS SUCH A LIMITATION)
OF HUAWEI ARISING FROM THE USE OF THE PRODUCT DESCRIBED IN THIS MANUAL
SHALL BE LIMITED TO THE AMOUNT PAID BY CUSTOMERS FOR THE PURCHASE OF
THIS PRODUCT.
Import and Export Regulations
Customers shall comply with all applicable export or import laws and regulations and be
responsible to obtain all necessary governmental permits and licenses in order to export, re-
export or import the product mentioned in this manual including the software and technical data
therein.
Privacy Policy
To better understand how we protect your personal information, please see the privacy policy at
http://consumer.huawei.com/privacy-policy.
ENERGY STAR® model information
ENERGY STAR is a U.S. Environmental Protection Agency voluntary program that
helps businesses and individuals save money and protect our climate through superior energy
efficiency. For information related to ENERGY STAR, please visit the website
www.energystar.gov.
The following machine types have been designed and tested to conform to the ENERGY STAR
program requirement for computers at the time of manufacture.
Model: BG2-W09
Huawei has preset the following power-management features to take effect when your device
has been inactive for a specified duration:
List of power management settings
Go to Settings > Display
41
Page 45

Sleep: After 30 seconds of inactivity
To awaken your device from sleep mode, press the power button.
Appendix
42
Page 46

This guide is for reference only. The actual product, including but not limited
to the color, size, and screen layout, may vary. All statements, information,
and recommendations in this guide do not constitute a warranty of any kind,
express or implied.
903631_02
 Loading...