

Page 1
MatePad T
User Guide
s10
Page 2

Contents
Essent
ials
Basic Gestures
System Navigation
Phone Clone
Lock and Unlock Your Screen
Get Familiar with the Home Screen
Notication and Status Icons
Shortcut Switches
Home Screen Widgets
Set Your Wallpaper
Screenshots & Screen Recording
View and Clear Notications
Adjust Sound Settings
Enter Text
Split-screen Mode & Floating Window
Power On and O or Restart Your Device
Charging
1
3
4
4
5
5
7
7
8
8
9
9
9
10
11
11
Smart Features
Huawei Share
Camera and Gallery
Launch Camera
Take Photos
Zoom to Take Photos
Take Panoramic Photos
Take HDR Photos
Record Videos
Adjust Camera Settings
Manage Gallery
Apps
Apps
Contacts
Phone
Messaging
Calendar
Clock
Notepad
Recorder
Email
14
16
16
17
17
17
18
18
19
23
24
26
31
33
35
36
37
38
i
Page 3

Settings
Calculator
Radio
App Twin
Quickly Access Frequently Used App Features
Tablet Manager
Phone Clone
HiSuite
Tips
Contents
42
42
43
43
43
45
45
46
Search for Items in Settings
Wi-Fi
Bluetooth
Mobile Data
More Connections
Home Screen & Wallpaper
Display & Brightness
Sounds & Vibration
Notications
Biometrics & Password
Apps
Battery
Storage
Security
Privacy
Accessibility Features
System & Updates
About Tablet
48
48
49
50
52
54
55
58
60
61
62
62
64
64
65
66
67
71
ii
Page 4
Essentials
Basic Gestur
es
Basic Gestures
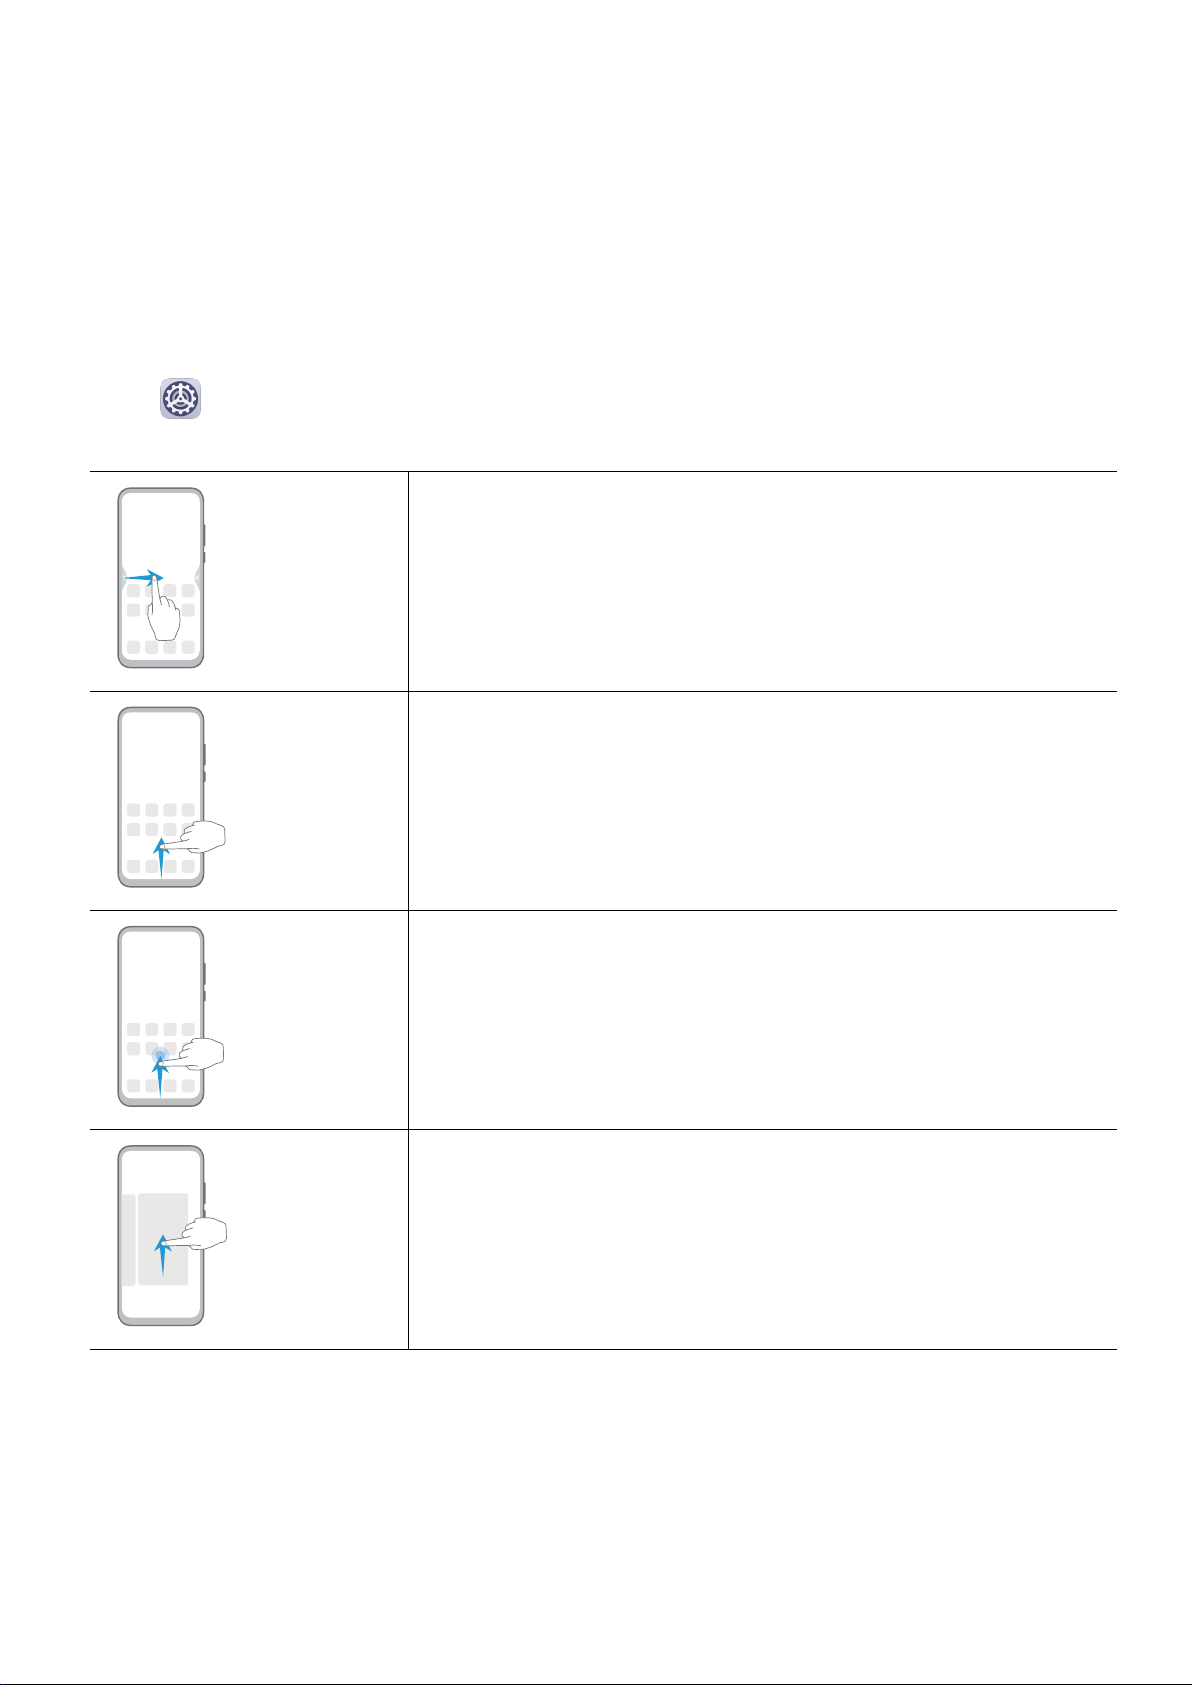
System Navigation Gestures
Go to
selected.
Settings > S
ystem & updates > System navigation and ensure that Gestures is
Back
wipe inward from the left or right edge to return to the
S
previous screen.
Back to the home screen
wipe up from the bottom to go to the home screen.
S
View recent tasks
S
wipe up from the bottom of the screen and hold to view
recent tasks.
Close an app
On the r
close the app.
ecent tasks screen, swipe up on an app preview to
1
Page 5
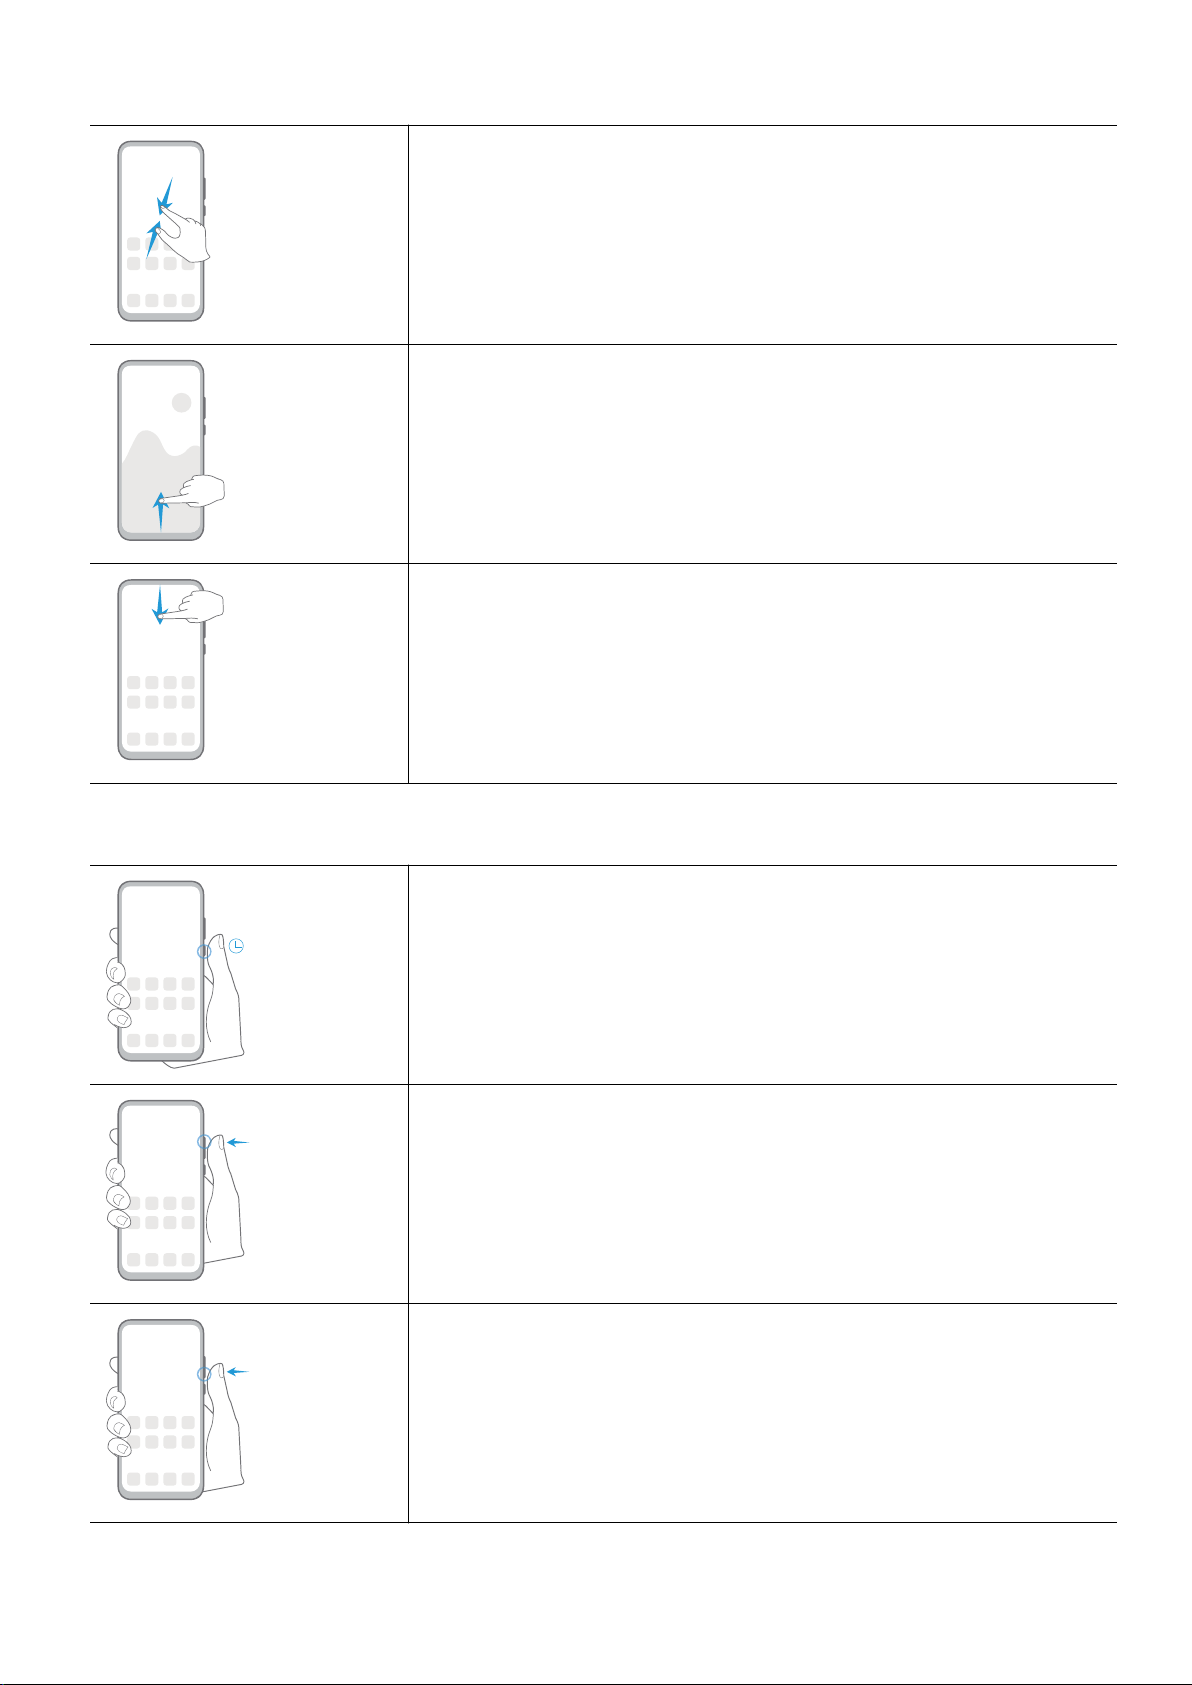
More Gestures
Essentials
Access Home screen editing mode
Pinch t
wo ngers together on the home screen.
Display the shortcut panel on the lock screen
wipe up from the bottom of the lock screen.
S
Open the
notication panel
Swipe down from the status bar.
Button Shortcuts
Power o and restart
Pr
ess and hold the Power button until the Power o and
Restart options appear.
Increase the volume
Pr
ess the Volume up button.
Decrease the volume
Press the Volume down button.
2
Page 6
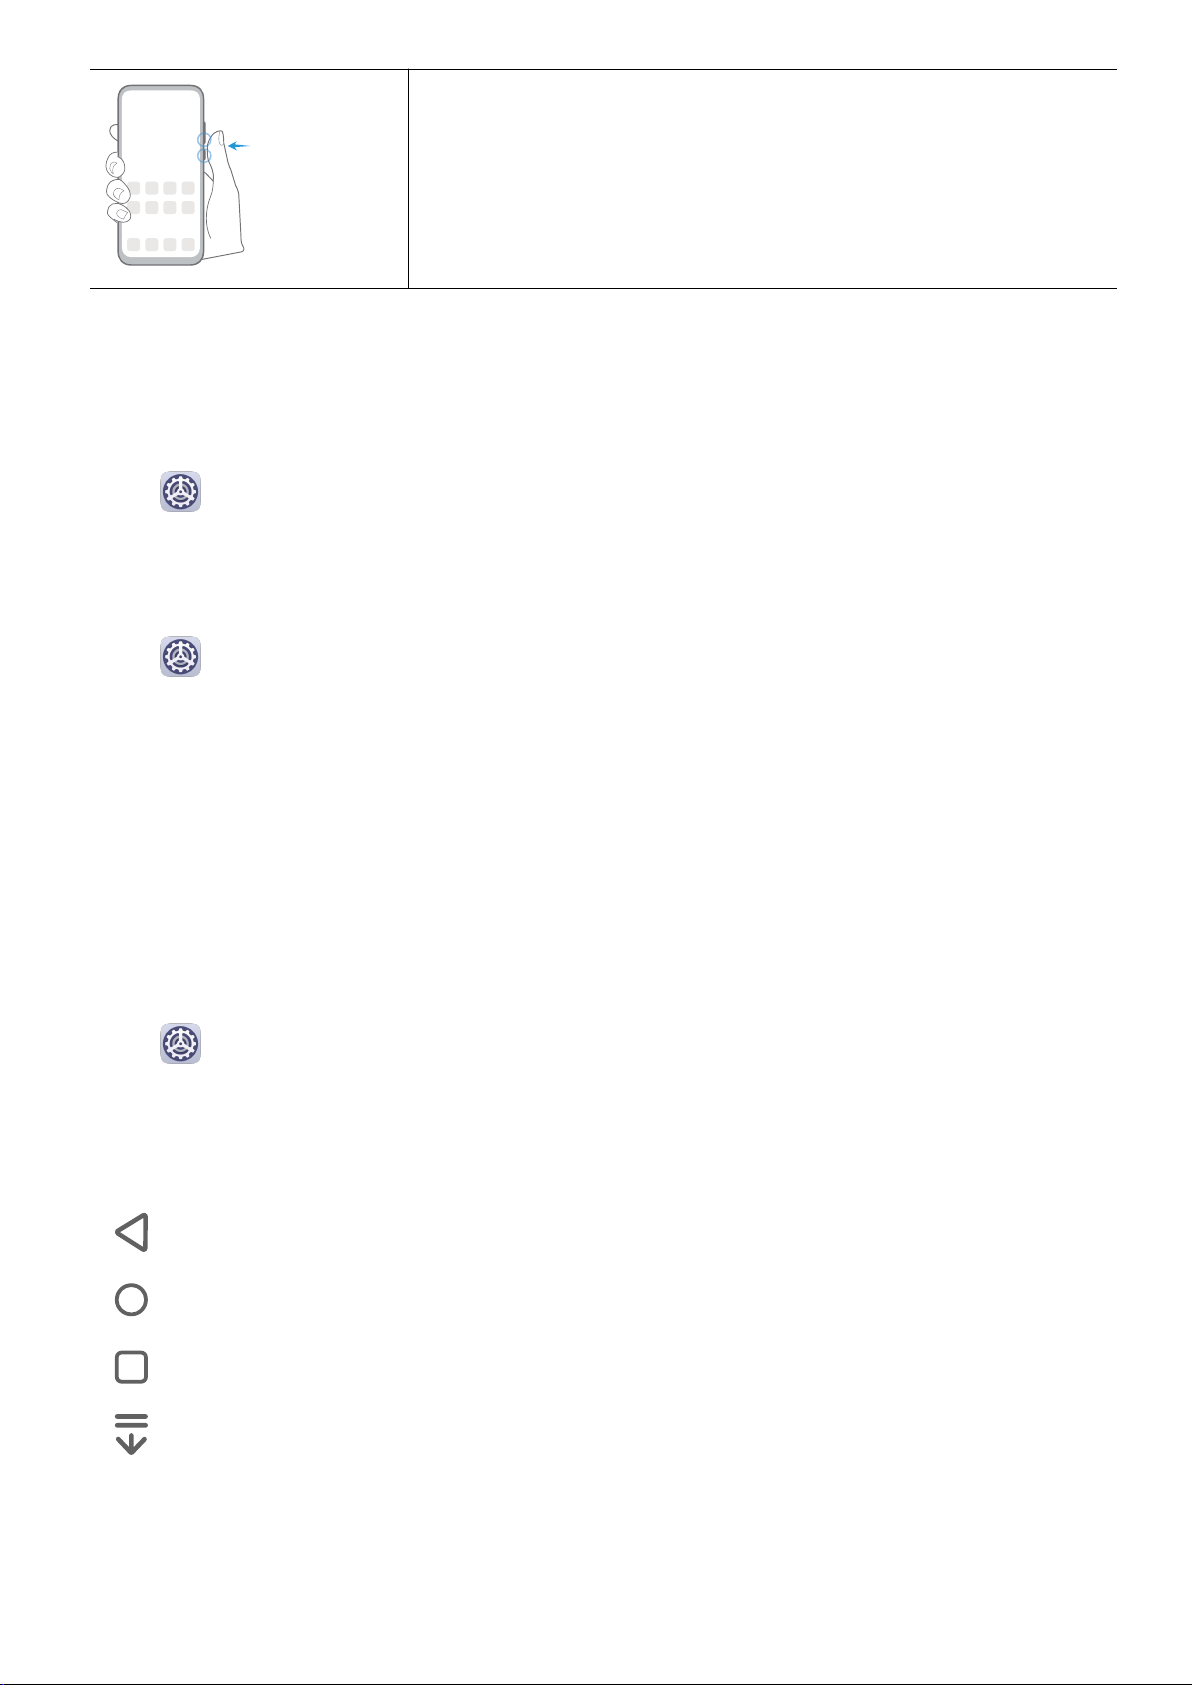
Take a screenshot
ess the Volume down and Power buttons simultaneously.
Pr
System Navigation
Change the Navigation Mode
Essentials
Go to
Settings > S
ystem & updates > System navigation to select a navigation mode
according to your preferences.
Navigate with Gestures
Go to
Settings > S
Gestures.
After enabling Gestures, you can:
• Go back to the previous screen: Swipe inward from the left or right edge.
• Return to the home screen: Swipe up from the bottom of the screen.
• Access the recent tasks screen: Swipe up from the bottom of the screen and hold.
• Close an app from the recent tasks screen: Swipe up on an app preview.
ystem & updates > System navigation and enable or disable
Three-Key Navigation
Go to
Settings > System & updates > System navigation, and select Three-key
navigation.
Touch Settings to select the navigation key combination you prefer.
The icons on the navigation bar are as follows:
• : Back key to return to the previous screen, exit an app, or close the onscreen keyboard.
• : Home key to return to the home screen.
•
• :
: Recents key to display the recent tasks screen.
Notication key to open the notication panel.
Customize the Navigation Key Combination
Go to Three-key navigation > Settings. You can:
• Select a navigation key combination.
3
Page 7

Essentials
• Enable Hide navigat
ion keys to allow you to hide the navigation bar when not in use.
Phone Clone
Phone Clone
Phone Clone lets you quickly and seamlessly move all the basic data (including contacts,
calendar, images, and videos) from your old tablet to your new tablet.
Clone Data from an Android Device
1 On your new tablet, open
updates > Phone Clone, touch This is the new phone, then touch Huawei or Other
Android.
2 Follow the onscreen instructions to download and install Phone Clone on your old device.
3 On your old device, open
onscreen instructions to connect your old device with your new tablet by scanning a code
or connecting manually.
Phone Clone. Alternat
Phone Clone and touch This is the old phone. Follow the
ively, go to
Settings > S
ystem &
4 On your old device, select the data you want to clone, then touch Transfer to start
cloning.
Phone Clone is only available on tablets running Android 4.4 or later.
Clone Data from an iPhone or iPad
1 On y
our new tablet, open
updates > Phone Clone, touch This is the new phone, then touch iPhone/iPad.
Phone Clone. Alternatively, go to Settings > System &
2 Follow the onscreen instructions to download and install Phone Clone on your old device.
3 On your old device, open Phone Clone and touch This is the old phone. F
onscreen instructions to connect your old device with your new tablet by scanning a code
or connecting manually.
ollow the
4 On your old device, select the data you want to clone, then follow the onscreen
instructions to complete the data cloning.
Phone Clone is only available on tablets running iOS 8.0 or later.
Lock and Unlock Your Screen
Lock and Unlock Y
Lock the Screen
If your tablet remains inactive for a period of time, it will automatically lock the screen and
enter sleep mode to save power.
Alternative, you can manually lock the screen in either of the following ways:
our Screen
4
Page 8

ess the Power button.
• Pr
• On the home screen, pinch two ngers together to enter screen editing mode. Touch
Essentials
Widgets, then dr
ag the Screen Lock icon to the home screen. You can now touch the
Screen Lock icon to lock the screen.
Set the Screen Timeout Period
Go to
Settings > D
isplay & brightness > Sleep and select a screen timeout period.
Unlock the Screen with Password
Once the screen is turned on, swipe up from the middle of the screen to display the password
input panel. Then, enter your lock screen password.
Change the Lock Screen Display
Go to
text to display on the lock screen.
To remove the signature, touch Lock screen signature and delete the text.
Settings > Home screen & wallpaper, touch Lock screen signature, then type
Access Apps from the Lock Screen
You can access commonly used apps such as Camera, Recorder, and Calculator from the lock
screen.
• Turn on the screen, touch and hold , then swipe up to open Camer
• Turn on the screen, then swipe up from the bottom of the lock screen to open the shortcut
a.
panel. Shortcuts for Recorder, Calculator and Timer will be available.
Get Familiar with the Home Screen
Get Familiar with the Home Screen
From the home screen, you can:
• Check the status of your tablet and notications from the status bar at the top of the
scr
een.
• Swipe left or right to view apps and widgets displayed on the home screen.
Notication and Status Icons
Notication and Status Icons
Network status icons may vary according to your region or network service provider.
Supported funct
not be applicable to your tablet.
ions vary according to the device model. Some of the following icons may
5
Page 9
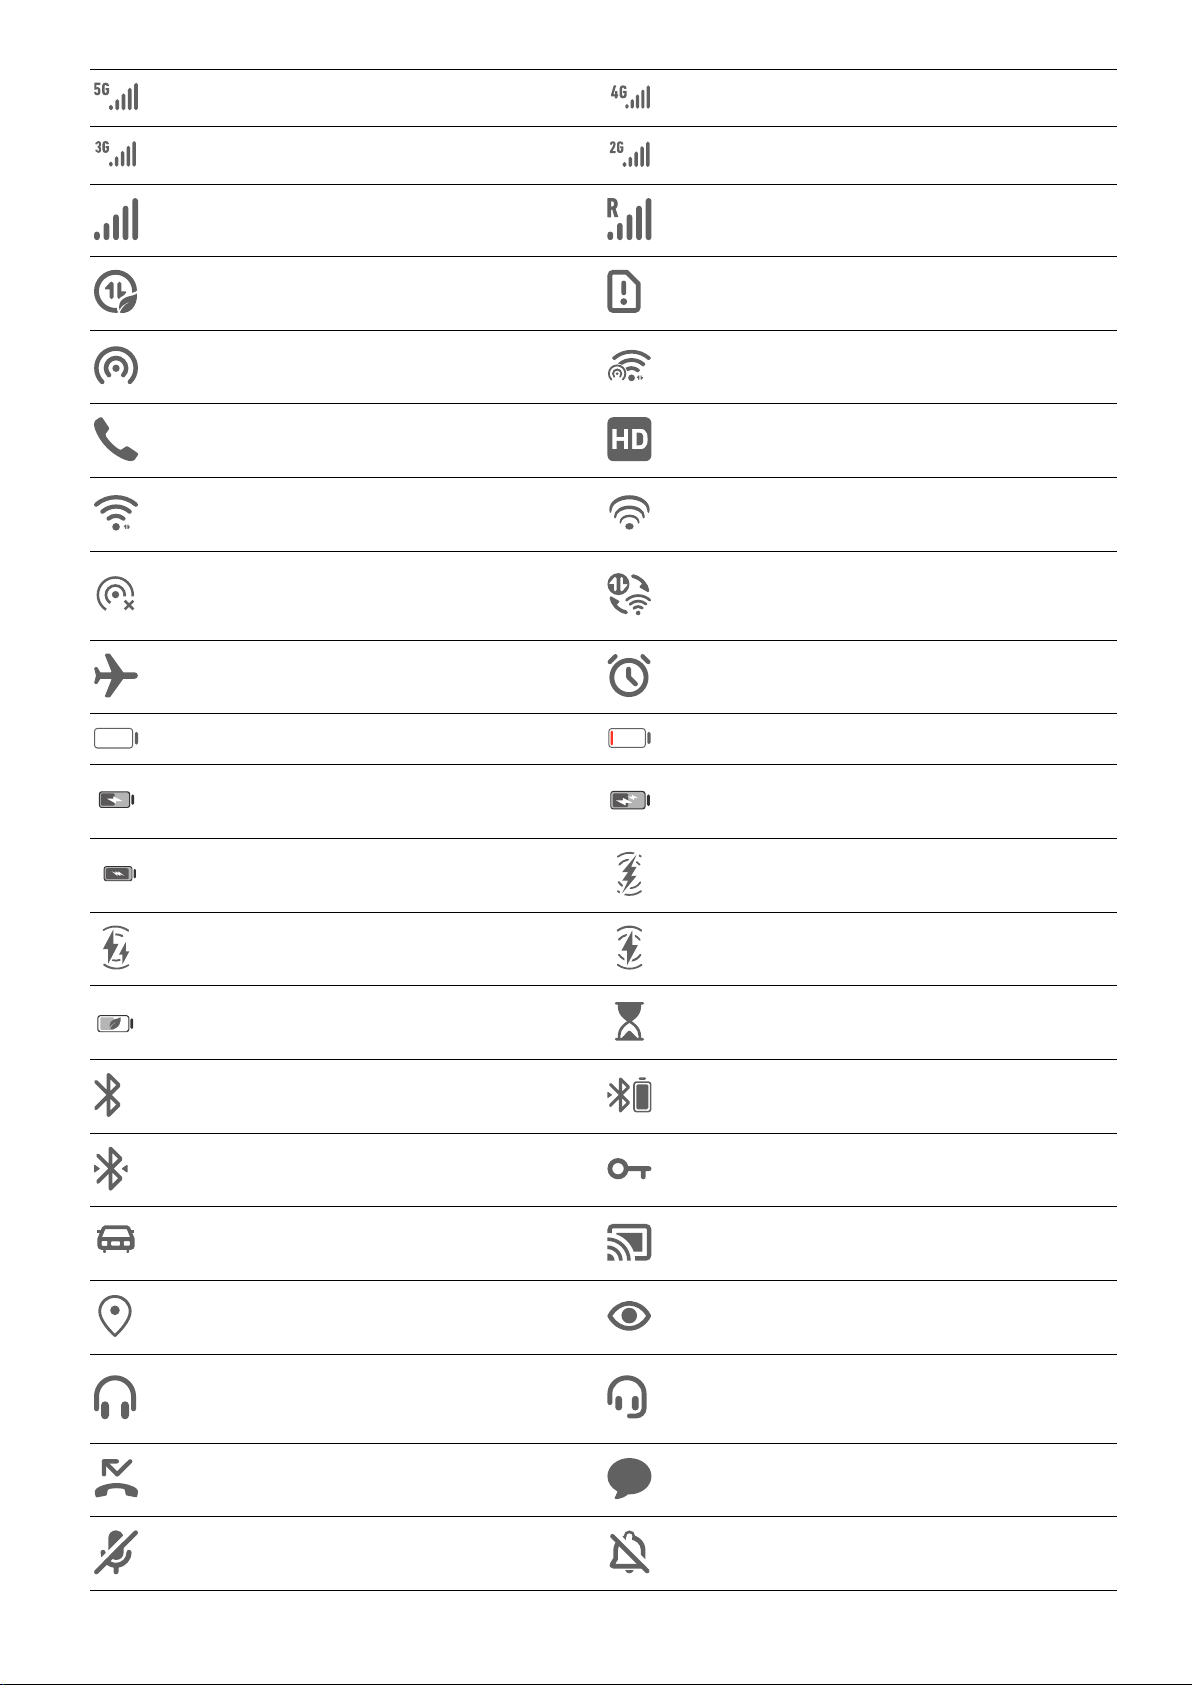
5G network connected 4G network connected
3G network connected 2G network connected
Full signal strength Roaming
Data saver enabled SIM card not found
Hotspot enabled Hotspot connected
Calling VoLTE enabled
Wi-Fi network connected SkyTone in use
Essentials
Hotspot disconnected
Network being switched by Wi-Fi
+
Airplane mode enabled Alarm set
Battery empty Battery low
Charging Quick charging
Super charging Super wireless charging
Quick wireless charging Regular wireless charging
Power saving mode enabled Digital balance enabled
Bluetooth enabled Bluetooth device battery
Bluetooth device connected VPN connected
Driving mode Projection device connected
Location service enabled Eye Comfort mode enabled
Headset with a microphone
Headset connected
c
onnected
Missed call Unread SMS
Microphone disabled Muted
6
Page 10
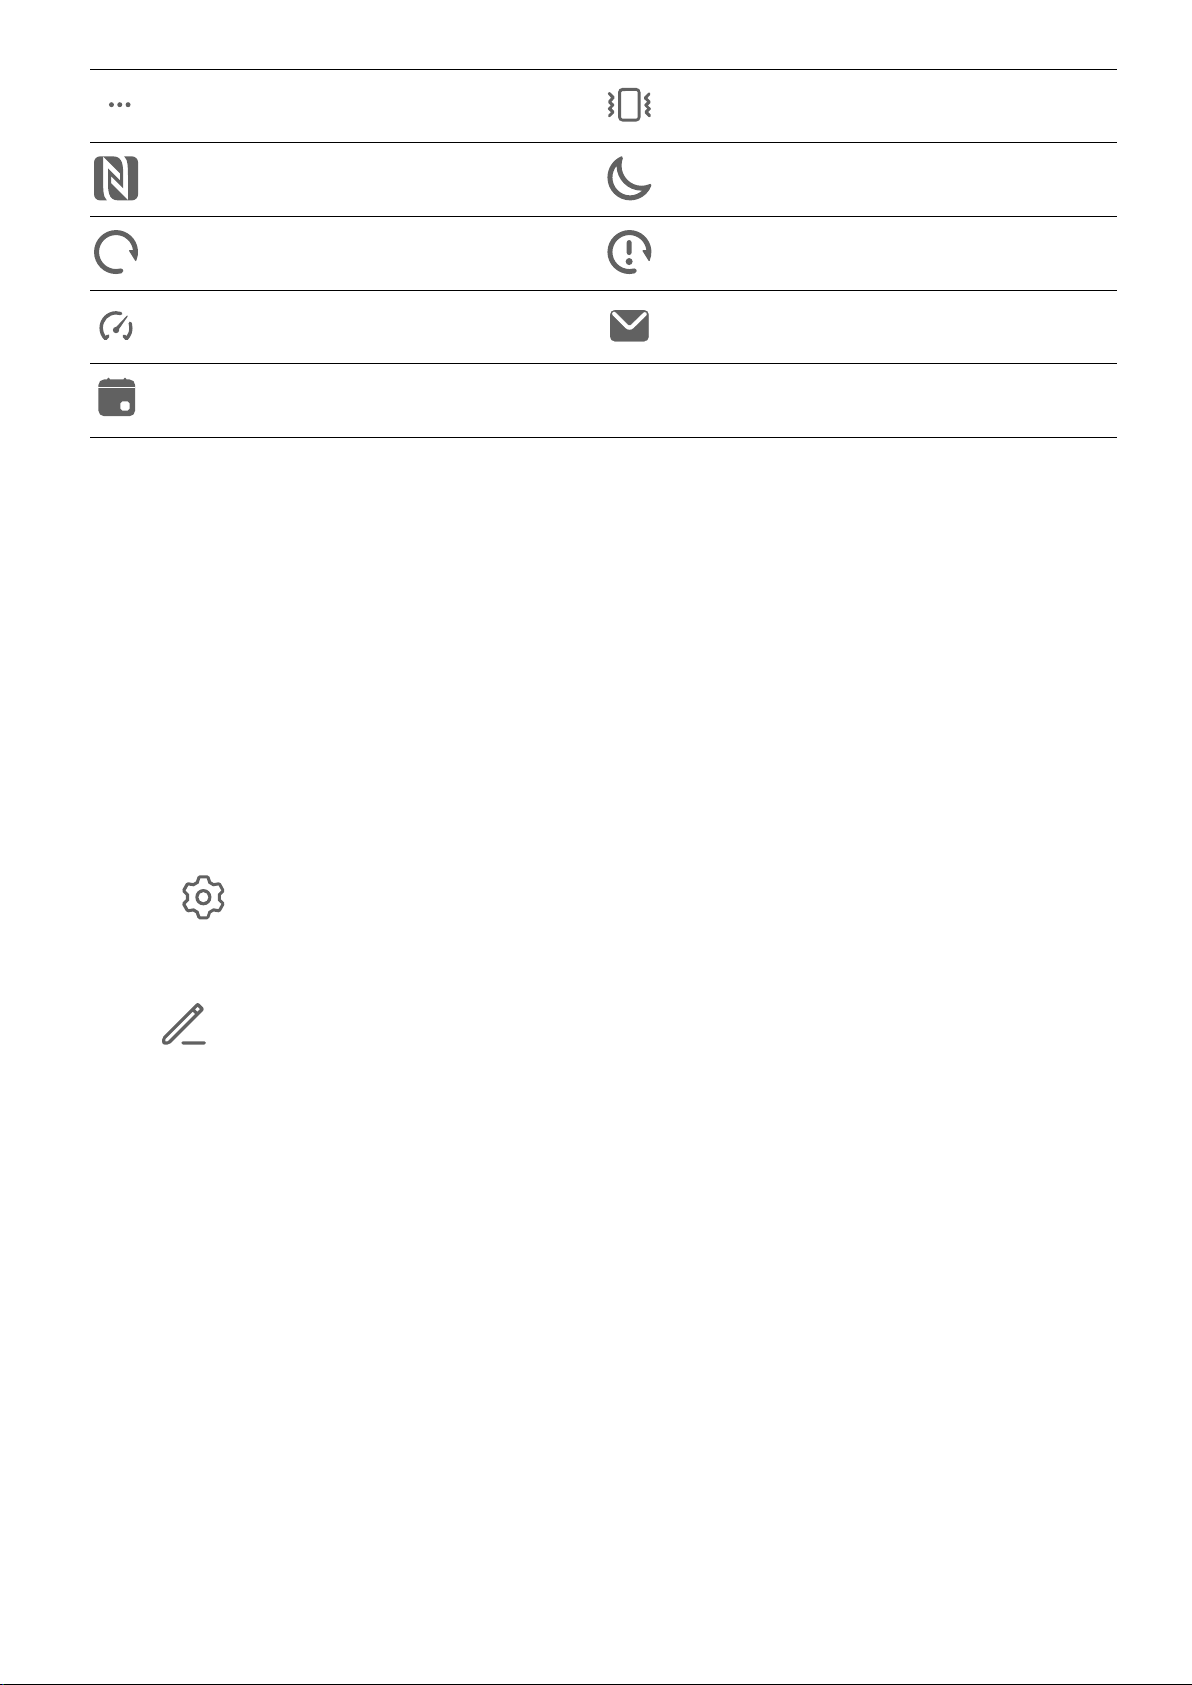
Essentials
More
NFC enabled Do Not Disturb mode enabled
Data syncing Data sync failed
Performance mode enabled New email
Event reminders
notications
Shortcut Switches
Shortcut S
Turn on a Shortcut Switch
witches
Vibrate only
Swipe down from the status bar to open the notication panel, then swipe down further to
sho
w all shortcut switches.
• Touch a shortcut switch to enable or disable the corresponding feature.
• Touch and hold a shortcut switch to enter the settings screen for that feature. (Only
available for some features)
• Touch
Customiz
Touch
Home Scr
to open Settings.
e Shortcut Switches
, touch and hold an icon, then drag it to the desired position.
een Widgets
Home Screen Widgets
You can add, move, or delete home screen widgets, such as Screen lock, Weather, Notepad,
Clock, Contacts, and Calendar, according to your personal requirements.
Add a Widget to the Home Screen
1 Pinch two ngers together on the home screen to access the Home screen editor.
2 T
ouch Widgets, then swipe left to view all widgets.
3 Some widgets, like Weather, come in various formats. Touch the widget to view all
formats, then swipe right to return.
4 Touch a widget to add it to the home screen. If there is no room on the current screen
page, touch and hold it, then drag it to a dierent screen page.
7
Page 11
Set Your Wallpaper
Essentials
Set Y
Use a Preset Wallpaper
1 Go to
our Wallpaper
Settings > Home scr
een & wallpaper > Wallpaper.
2 Touch an image you want to set as the wallpaper.
3 Set the following according to your preferences:
• Blur: applies a blur eect, which can be adjusted by dragging the slider.
• Scrollable: enables the wallpaper to be scrollable on the home screen.
4 Touch
scr
een, Home screen, or Both.
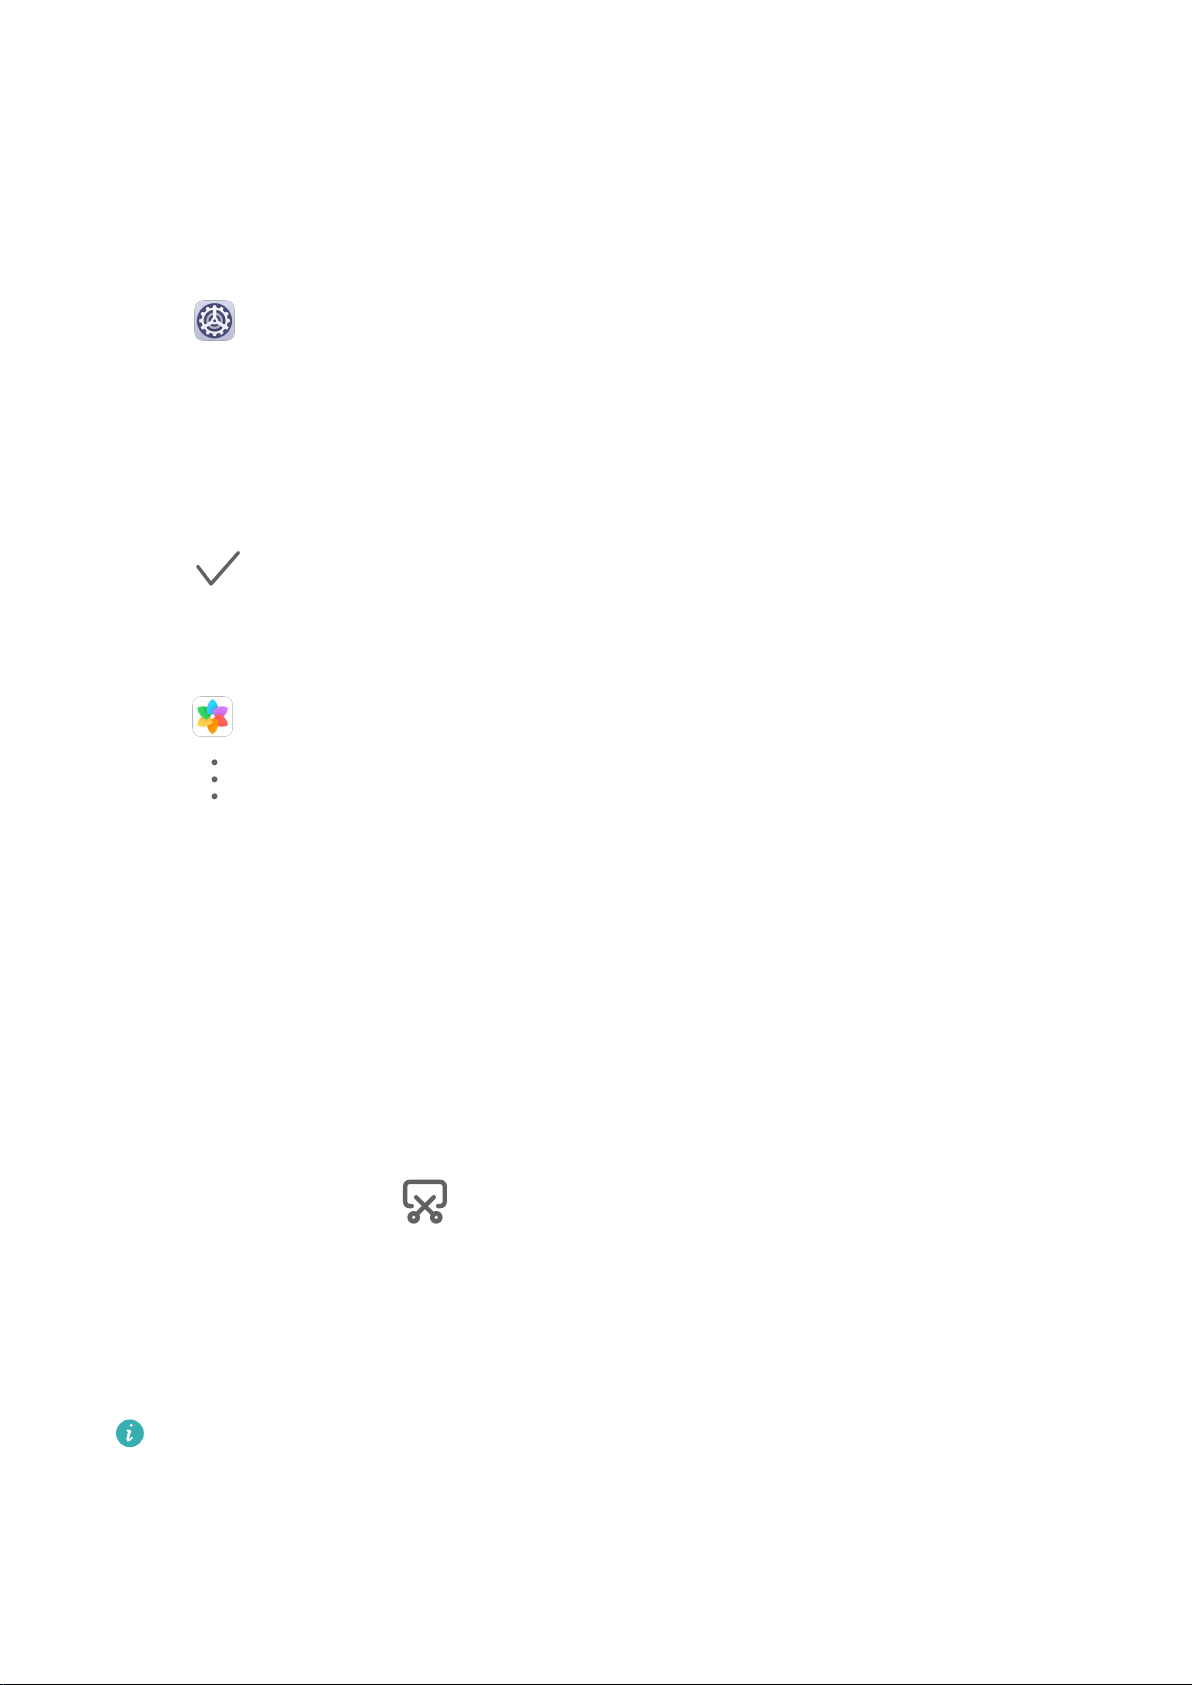
Set an Image from Gallery as Your Wallpaper
1 Open
, then determine whether you'd like to set it as the wallpaper for the Lock
Gallery, and open the image y
ou want to set as your wallpaper.
2 Go to
> Set as > W
allpaper, then follow the onscreen instructions.
Screenshots & Screen Recording
Take a Screenshot
Use a Key Combination to Take a Screenshot
Press and hold the Power and Volume down buttons simultaneously to take a screenshot.
Use a Shortcut to Take a Screenshot
Swipe down from the status bar to open the notication panel, then swipe down on it again
to sho
Shar
After you take a screenshot, a thumbnail will display in the lower left corner of the screen.
Then you can:
w all shortcuts. Touch
e and Edit a Screenshot, or Switch to Scrollshot
to take a screenshot.
• Swipe down on the thumbnail to take a scrolling screenshot.
This function is not supported in landscape view.
• S
wipe up on the thumbnail to select a sharing mode and share the screenshot with your
friends.
• Touch the thumbnail to edit or delete it.
Screenshots are saved to Gallery by default.
8
Page 12

Essentials
View and Clear
View and Clear
View Notications
When there is a notication reminder, you can turn on the screen and swipe down from the
status bar to open the notication panel and view the notication.
Clear
• Swipe right on a notication reminder to clear the notication.
• T
Block, Silence, or Delay Notications
Swipe left on a notication, then touch to block, silence, or delay notications from that
sour
Notications
ouch
ce.
Some system notications can't be blocked, cleared, or delayed.
at the bottom of the notication panel to clear all notications.
Notications
Notications
Adjust Sound Settings
Adjust Sound Set
Press a Volume Button to Adjust the Volume
Press the Volume up or down button to adjust the volume.
Press the Power Button to Mute Your Device When It Rings
When your tablet rings for an incoming call or alarm, you can press the Power button to
mute it.
Use a Shortcut to Switch Between Ring or Mute Mode
1 Swipe down from the status bar to open the notication panel, then swipe down on it
again to sho
2 Touch the
tings
w all shortcuts.
Sound, Silent ic
on to switch between dierent modes.
Enter Text
Edit Text
You can select text displayed on your screen, copy or cut it to the clipboard, then paste it
somewhere else. You can also share it in multiple ways.
9
Page 13
ouch and hold the text until
1 T
In some apps, what happens af
you touch and hold a sent or received message, an option menu will be displayed, and
will appear only after you touch Select text.
appears.
ter you touch and hold the text may dier. For example, if
Essentials
2 Dr
ag
and to select the text you need, or touch Select all to select all text
.
3 Touch Copy or Cut as needed.
4 Touch and hold the space where you want to paste the text until Paste appears, then
touch Paste.
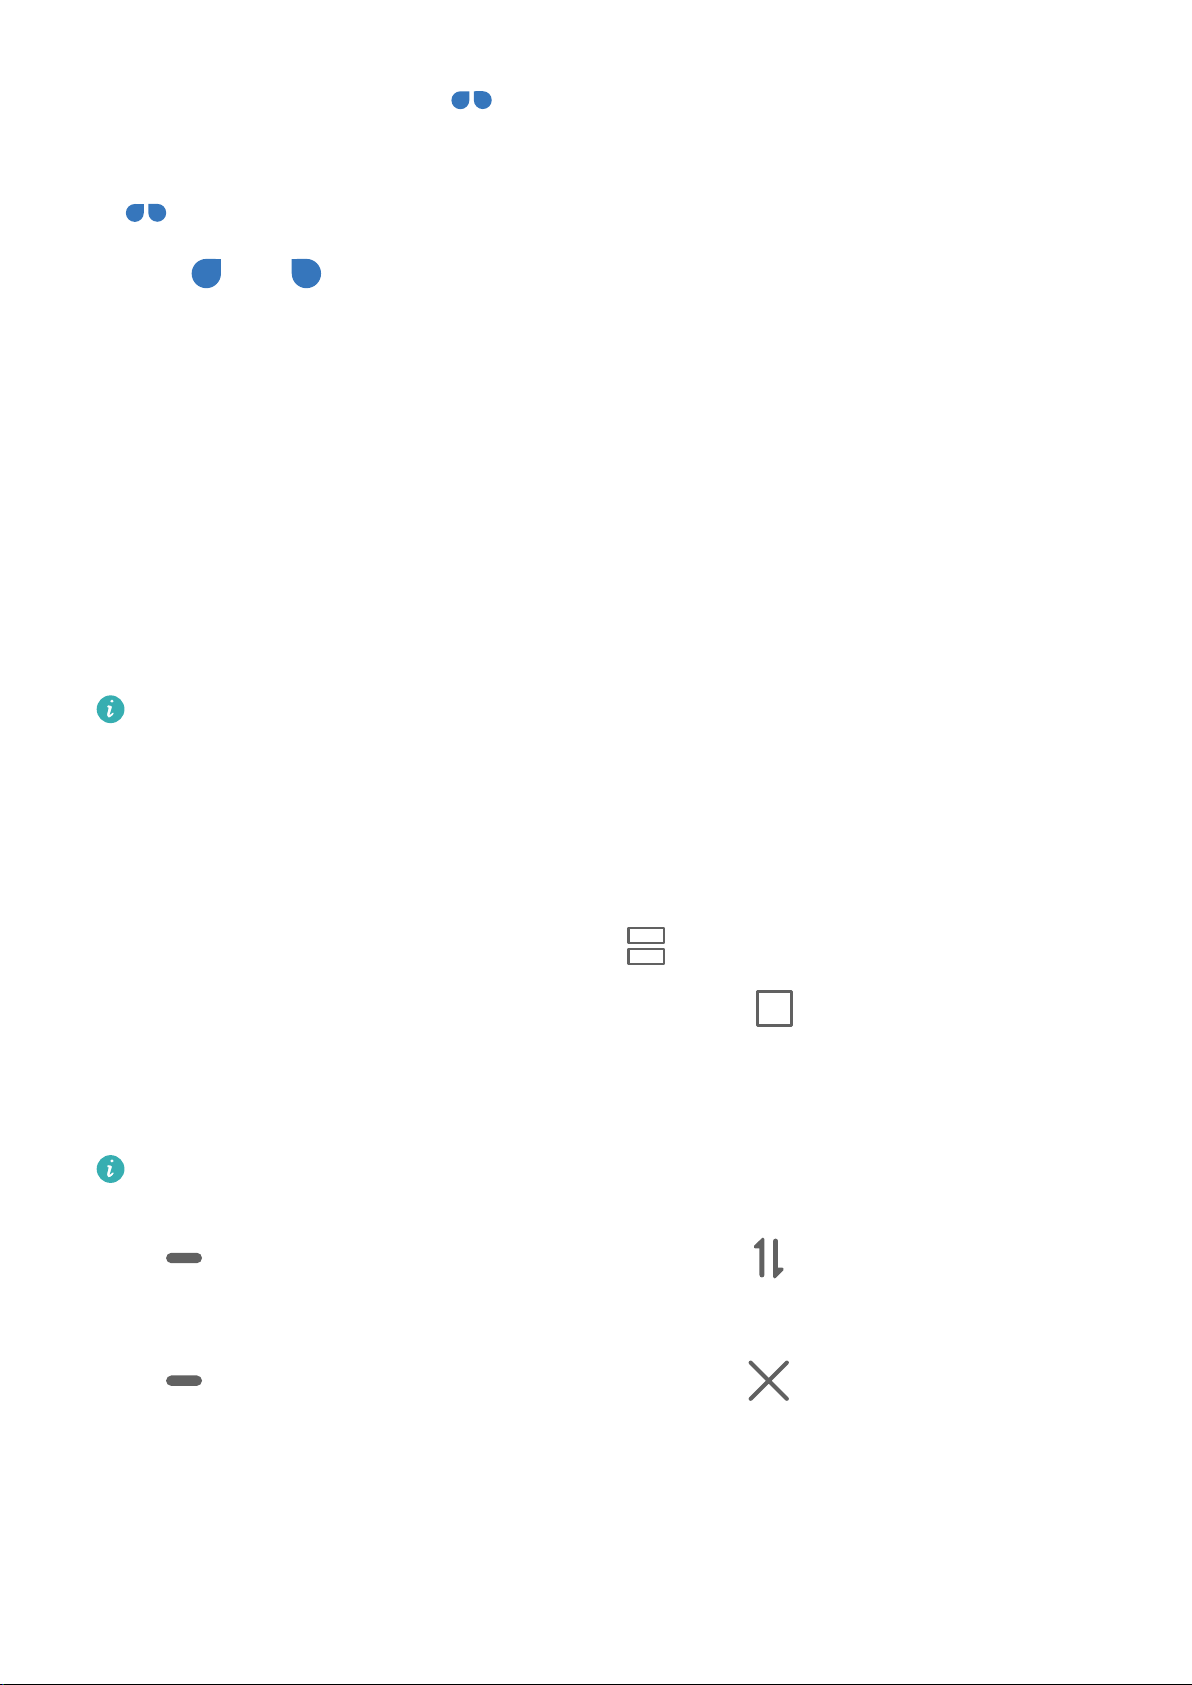
Split-screen Mode & Floating Window
Split-screen Mode
You can split the screen of your tablet to use two apps simultaneously.
Enable Split-screen Mode
Certain apps do not support Split-screen mode.
1 O
pen an app.
2 Enable split-screen mode using any of the following methods:
• Swipe up from the middle of the screen with three ngers.
• When using gestur
enter the Recent tasks screen. Then touch .
• When using thr
pen the other app to start multitasking.
3 O
Switch the Split-screen Panes
If the home screen is displayed in either of the split-screen panes, you won't be able to
switch the panes.
Touch in the middle of the split screen line, then touch .
Disable Split-screen Mode
Touch in the middle of the split screen line, then touch .
APP Mult
iplier
e navigation, swipe up from the bottom of the screen and hold to
ee-key navigation, touch and hold the
key.
App Multiplier displays an app's home and content screens in dual windows for easier
multitasking when your tablet is in landscape orientation.
10
Page 14

Essentials
1 Go to Settings > Apps > App Mult
want to use this feature with.
iplier, and turn on the switch for apps that you
2 Open an app that has App Multiplier enabled. The app's home screen will then be
displayed in the center of the screen.
3 Touch an entry on the app's home screen. The home screen will then be relocated to the
left to make space for the new screen.
Power On and O or Restart Your Device
P
ower On and O or Restart Your Device
P
ower Your Device On and O
To power
o and Touch to power o.
To power on your device, press and hold the Power button for a few seconds until your device
displays the logo.
o your device, press and hold the Power button for a few seconds, touch Power
Restart Your Device
Restart your device on a regular basis to clear the cache and keep the device in an optimal
state. A restart can sometimes resolve the issue when your device encounters a problem.
Just press and hold the Power button for a few seconds, then touch Restart and Touch to
restart.
Force Restart Your Device
If your device isn't working or won't turn o normally, you can force restart it.
Just press and hold the Power button for 10 seconds or longer.
Charging
Charge Your Tablet
Your tablet will alert you when it is running out of power. Please make sure to charge your
tablet in time to prevent it from turning o automatically when the power runs out.
Pr
ecautions for Charging
• Charge your tablet using the standard adapter and USB cable that came with your device.
Using other chargers or USB cables may cause repeated restarts, slow charging,
overheating, or other undesirable eects.
• Your tablet will automatically run a safety check when a charger or other device is
connected to the USB port. If moisture is detected in the USB port, your tablet will
automatically activate safety measures and stop charging. Disconnect your tablet from the
USB port and wait until the USB port is dry.
11
Page 15
Essentials
• The t
ime required to fully charge the battery depends on the ambient temperature and age
of the battery.
• Batteries have a limited number of charge cycles. When the battery life becomes noticeably
shorter, go to an authorized Huawei Customer Service Center to replace the battery.
• Do not cover your tablet or charger during charging.
• Your tablet may heat up when you have been using it for an extended period of time,
especially in high temperatures. In this case, stop charging, disable some features, and
move your tablet to a cool place.
• Please do not use your tablet while it is charging.
• If your tablet does not respond after you press and hold the Power button, the battery may
have run out. Charge for 10 minutes and then power it on.
Using the Charger that Came with Your Device
1 Use the USB cable that came with your tablet to connect your tablet and the adapter.
2 Plug the adapter into a power socket.
Charging Your Tablet with a PC
1 Connect your tablet to a PC or other device using a USB cable.
2 When the Use USB to dialog box is displayed on your tablet, touch Charge only.
If another option has been set previously, the dialog box will not pop up. Swipe down
from the status bar to open the notication panel, touch Set
only.
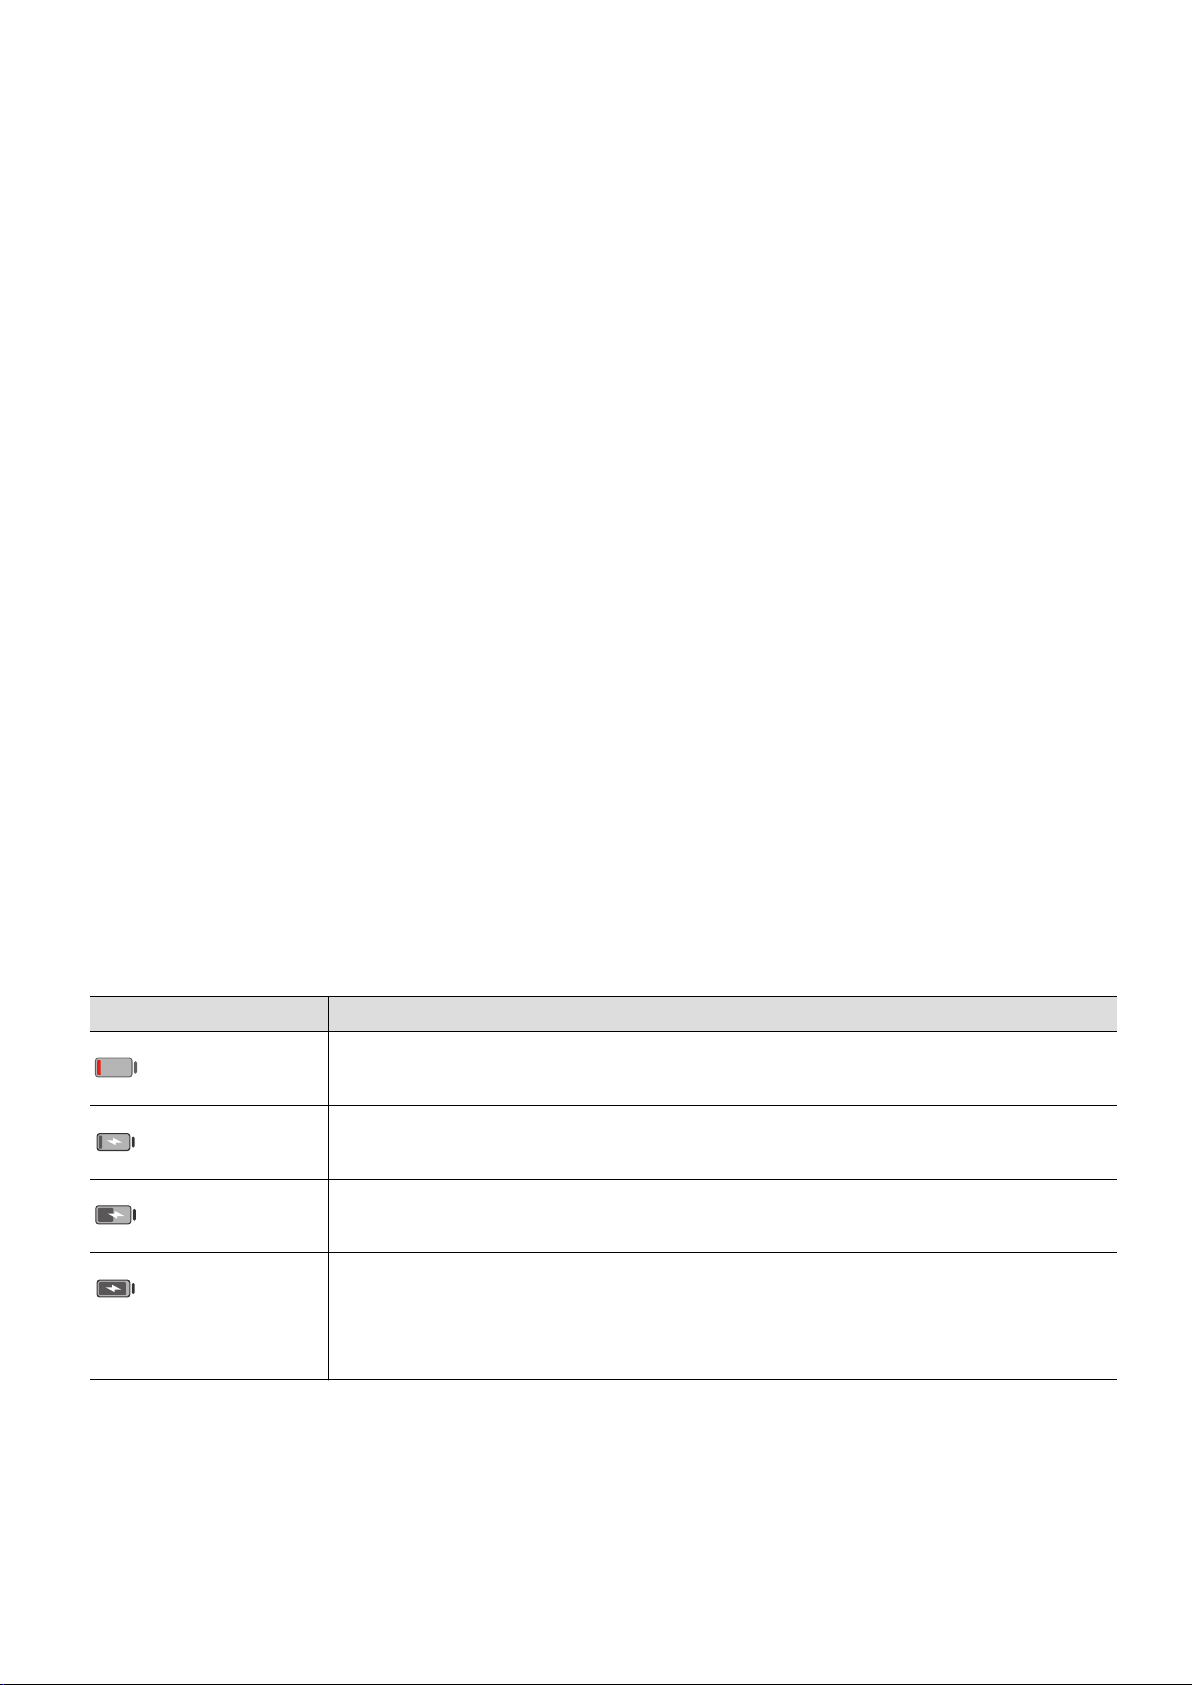
Overview of Battery Icons
You can check the battery level from the battery icon on the tablet screen.
Battery Icon Battery Level
Less than 4% battery remaining.
Charging, less than 10% battery remaining.
Charging, 10% to 90% battery remaining.
tings, then select Charge
Charging, at least 90% battery remaining.
If 100% is display
ed next to the battery icon, or a charging complete
message is displayed on the lock screen, the battery is fully charged.
Reverse Charging with an OTG Cable
On-
The-Go (OTG) is a USB transmitting technology that allows a tablet to directly access les
on a USB ash drive or digital camera, or connect to an external device such as a keyboard or
mouse, with the help of an O
You can use your tablet to charge other devices using an OTG cable.
TG cable.
12
Page 16

Essentials
1 Connect y
our tablet with the device to be charged using an OTG cable.
2 Swipe down from the status bar to open the notication panel, touch Settings > Touch
for more options, and then select Reverse charge.
3 Follow the onscreen instructions on the device to be charged to start charging.
13
Page 17

Smart Features
Huaw
ei Share
Huawei Share
Huawei Share is a wireless sharing technology that allows you to quickly transfer images,
videos, documents, and other types of les between devices. This technology uses Bluetooth
to disc
without using mobile data.
Enable or Disable Huawei Share
You can enable or disable Huawei Share in either of the following ways:
• Swipe down from the status bar to open the notication panel, then touch
• Go to
over nearby devices that supports Huawei Share and Wi-Fi Direct to transfer les
or disable Huaw
screen.
Settings > Mor
Share.
ei Share. Touch and hold the toggle to enter the Huawei Share settings
e connections > Huawei Share, and enable or disable Huawei
to enable
Enabling Huawei Share automatically turns on Wi-Fi and Bluetooth.
Quickly Share Files Between Your Tablets with Huawei Share
You can use Huawei Share to quickly share les between Huawei tablets. The recipient can
preview the les before they are sent, then view the full content of the les once they have
been received. For example, the recipient can view received pictures or videos in Gallery.
1 On the receiving device, enable Huawei Share.
2 On the sending device, touch and hold to select the les you want to share, then touch
. Touch Huaw
These steps may be dierent if you are sharing les directly from an app.
3 On the r
To view the received les, go to Files, then go to Internal stor
Categories tab.
Received pictures or videos can also be found in
eceiving device, touch Accept to accept the transfer.
ei Share, then touch the icon of the receiving device to send the les.
age > Huawei Share on the
Gallery > Albums > Huaw
ei Share.
Share Files Between Your Tablet and Computer with Huawei Share
You can use Huawei Share to quickly and easily share les wirelessly between your tablet and
a computer (Windows or macOS).
1 Make sure your tablet and computer are connected to the same Wi-Fi network.
14
Page 18

Smart Features
2 On y
our tablet, go to the Huawei Share settings screen and enable Huawei Share and
Computer Share.
3 Make a note of the name displayed next to Name shown on computers and the user
name and password under Verication.
4 On the c
• Windows: This PC (Computer) > Network.
• macOS: Finder > Go to > Network.
5 On y
password noted down previously.
omputer, go to:
Currently, this feature is only available on Macs running macOS 10.8 to 10.14.
our computer, double-click the name of your tablet and enter the user name and
6 Open a shared folder on your tablet, such as the Internal storage or Album folder to view,
edit, or copy les from your tablet to your computer or vice versa.
Changes made to les in the shared folders on your computer will be automatically
sync
ed to your tablet and vice versa.
One-Touch Printing with Huawei Share
When a printer that supports Huawei Share is nearby, you can use Huawei Share to nd the
printer and print out pictures or PDF les stored on your tablet.
1 Depending on the type of printer, ensure the following:
• Wi-Fi capable printers: The printer must be powered on and connected to the same
network as your tablet.
• Wi-Fi Direct capable printers: The printer must be powered on and have Wi-Fi Direct
enabled.
• Bluetooth capable printers: The printer must be powered on and discoverable via
Bluetooth.
2 On your tablet, preview the le to be printed, then go to Shar
e > Huawei Share.
3 Once the printer has been discovered, touch its name on your tablet, and adjust the
settings on the preview screen. Then, touch PRINT to print.
If you are connecting a Bluetooth printer to your tablet for the rst time, nd the printer
on your tablet, touch the printer name, then press and hold the Power button on the
printer for about 1 second to conrm the connection.
For a list of supported printers, touch Help on the Huaw
Printers, then touch What printers are supported?.
ei Share sharing screen, select
15
Page 19

Camera and Gallery
Launch Camer
a
Launch Camera
There are multiple ways to open the Camera app.
From the Home Screen
From the home screen, open
om the Lock Screen
Fr
When the screen is locked, turn on the screen, then swipe up on the camera icon in the lower
right corner to open the camera.
Camera.
Take Photos
Take Photos
1 Open
ou can then:
2 Y
• Focus: Touch where you want to focus.
To adjust focus and metering separately, touch and hold the viewnder and drag the
individual frame or ring to the desired location.
• Adjust brightness: Touch the viewnder. When the
f
ocus frame, drag it up or down.
• Zoom in or out: On the viewnder, pinch in or out, or drag the zoom slider.
• Select a camera mode: Swipe left or right across the camera mode options.
Some features are only available when using the rear camera.
3 Touch
T
ake Timed Photos
The camera timer allows you to set a time delay so you can get into position after you have
Camera.
symbol appears next to the
to take a photo.
touched the shutter button.
1 Open
2 Go to
Camera.
> Timer and select a delay opt
ion.
16
Page 20

Camera and Gallery
3 Return to the viewnder and touch the shutter button. Your tablet will take a photo when
the c
ountdown ends.
Use Voice Commands to Take Photos
You can use your voice to take photos without having to touch the shutter button.
1 Open
2 Go to > Audio c
Camera.
ontrol, enable Audio control, and select an audio control option.
3 Go back to the viewnder, then say your command to take a photo.
Zoom to Take Photos
Take Photos with Various Zoom Settings
1 Open
2 Aim the camer
or pinch in or out to adjust the zoom level.
Camera and select Photo mode.
a at the distant object you want to take a photo of. Drag the zoom slider,
3 In the viewnder, touch where you want to focus. When the camera is in focus, touch
Take Panoramic Photos
.
Take Panoramic Photos
Add breadth to your landscape or group photos with the Panorama feature. The camera
takes multiple photos of objects within your eld of view and stitches them together into a
single panor
Use the Rear Camera to Take Panoramic Photos
1 Go to
2 Touch
3 P
oint the camera at your starting point, then touch
4 Slo
wly move the camera in the direction of the arrow displayed on the screen. Keep your
tablet steady and the arrow on the center line the entire time.
5 Touch
amic photo.
Camera > Mor
at the bottom of the viewnder to set the pan direction.
when you are nished.
e and select Panorama mode.
to start shooting.
Take HDR Photos
17
Page 21
Take HDR Photos
Camera and Gallery
When shoot
mode can help you improve light and shadow eects in your photos, giving your photos
sharper details.
Use HDR with the Rear Camer
1 Go to
ing photos with backlighting or a high light contrast, High Dynamic Range (HDR)
a
Camera > Mor
e and select HDR.
2 Steady your tablet, with the help of a tripod if necessary.
3 Touch
Rec
Record Videos
ord Videos
1 Open
to take a photo.
Camera and select Video mode.
2 T
3 T
ouch
While r
T
ouch
ouch
to start recording.
ecording, touch and hold
to take a photo while recording.
to pause and to end the recording.
or to smoothly zoom in or out.
Adjust Camera Settings
Adjust Camera Settings
You can adjust the camera settings to take photos and videos more quickly.
The following features may not be available in some camera modes.
Adjust the Aspect Ratio
1 O
pen
Camera and touch to access the Set
tings screen.
2 Touch Aspect ratio to select an aspect ratio (for example, 1:1 or 4:3).
This feature is not available in some modes.
Enable Location Tag
Enable Locat
Use the Assistive Grid to Compose Your Photos
Use the assistive grid to help you line up the perfect shot.
ion tag to tag your location in photos and videos.
18
Page 22
1 Go to Camera > .
Camera and Gallery
2 Enable Assist
ive grid.
3 Grid lines will appear in the viewnder. Place the subject of your photo at one of the
intersecting points, then touch the shutter button.
Enable Mirror Reection
When using the front camera, touch
Mute the Shutter Sound
Enable Mute to mute the camera shutter sound.
Use the Horizontal Level for Better Compositions
1 Touch
to access the Set
tings screen.
to enable or disable Mirr
or reection.
2 Enable Horizontal level to display a horizontal guiding line on the viewnder.
When the dotted line overlaps with the solid line, it indicates that the camera is parallel
with the horizontal level.
Manage Gallery
View Photos and Videos
You can view photos and videos by album on the Albums tab.
Some photos and videos are stored in default albums. For example, videos recorded with the
camera are saved in the Camera album. Screenshots and screen recordings are saved in the
Screenshots album.
View Details About Photos and Videos
1 Touch a photo or video to view it in Full screen mode. Touch the screen again to hide the
menu.
2 When in Full screen mode, touch
the stor
Edit Photos
age path, resolution, and size.
to view details about the photo or video, such as
1 Open
access the editing features.
• Crop and rotate: Touch
which part y
To rotate the photo, touch
Gallery, touch the thumbnail of the photo y
ou want to keep.
ou want to edit, then touch Edit to
, select a frame, then drag the grid or its corners to select
and drag the angle wheel to the desired orientation.
19
Page 23

Camera and Gallery
To rotate the photo by 90 degrees, touch . To mirror the photo, touch .
• Add a
• Adjust photo eects: Touch to adjust the brightness, contrast, saturation, and
other qualit
2 Touch
Pix
elate Photos
lter eect: Touch
ies of the photo.
to save your edits, or touch to save the photo.
1 Touch a photo, then go to Edit >
2 Select a mosaic st
yle and size to cover parts of the photo.
to select a lter.
> Mosaic.
3 To remove the mosaic, touch Eraser and wipe it o the photo.
4 Touch
Rename Photos
1 In Galler
to save your edits and touch to save the photo.
y, touch the photo thumbnail you want to rename.
2 Go to
> Rename and enter a new name.
3 Touch OK.
Collage
You can use the collage feature to quickly combine multiple photos into one for easier
sharing.
1 On the Photos or Albums tab, touch and hold to select desired photos, then go to >
Collage.
2 Select a template. Y
• Relocate a photo: Touch and hold the photo and drag it to a dierent position.
• Adjust the display
that only the desired part is displayed in the grid.
• Rotate a photo: Touch the photo, then touch
• Add bor
ders: Touch Frame to add borders to the collaged photos.
ou can then:
ed portion of a photo: Slide on the photo, or pinch in or out on it so
to rotate it or to ip it.
3 Touch
o view the saved collage, go to Albums > Collage.
T
to save the collage.
Share Photos and Videos
There are several ways to share photos and videos from Gallery.
20
Page 24
1 O
pen
Camera and Gallery
Gallery.
2 Use either of the f
• Share a single photo or video: Touch the photo or video, then touch
• Shar
Manage Galler
Organize photos and videos into albums to easily sift through them.
Add Albums
1 Open
ouch Add album, then name the album.
2 T
e multiple photos or videos: In an album, touch and hold to select multiple photos
and videos, then touch
Gallery, then touch Albums.
ollowing methods:
.
y
3 Touch OK.
4 Select the photos or videos you want to add.
.
Move Photos and Videos
1 Open an album, then touch and hold to select the photos and videos you want to move.
2 Touch
> Mo
ve to select the desired album.
3 Once the items are moved, they will no longer be in their original album.
The All photos and Videos albums show all photos and videos stored on your device.
Moving items across albums will not remove them from these albums.
Delete Photos and Videos
Touch and hold to select the items you want to delete, then go to > Delete.
The All photos, My f
To permanently delete a photo or video manually, touch and hold its thumbnail in the
ently deleted album, then go to
Rec
over Deleted Photos and Videos
Rec
avorites, Videos, and Camera albums cannot be deleted.
> Delete.
In the Recently deleted album, touch and hold to select the items you want to recover, then
touch
If the original album has been deleted, a new one will be cr
Add Photos and Videos to Favorites
Open a photo or video, then touch
to restore them to their original albums.
eated.
.
21
Page 25

Camera and Gallery
The item will appear in both its original album and the My f
avorites album.
Hide Albums
System albums such as Camer
a, Videos, My favorites, and Screenshots cannot be
hidden.
From the Albums tab
, go to
> Hide albums and toggle the switches on f
or albums that
you want to hide.
Hidden albums and the photos and videos in them are hidden from view in Gallery.
22
Page 26

Apps
Apps
Apps
Uninstall an App
Y
ou can uninstall an app using either of the following methods:
• Touch and hold the app icon you want to uninstall, touch Uninstall, then follow the
onscreen instructions to uninstall the app.
• Go to
Settings > Apps > Apps, touch the app y
ou want to uninstall, then touch
Uninstall.
Some pre-installed system apps can't be uninstalled, as uninstalling them may cause
stem errors.
sy
Manage Background Apps
1 Access the recent tasks screen using either of the following methods, depending on the
navigation method you are using:
• Gestures: Swipe up from the bottom of the screen and hold.
• Three-key navigation: Touch
2 On the r
• Swipe across to view app previews.
• Touch an app preview to access an app.
• Swipe up on an app preview to close an app.
ecent tasks screen, you can:
.
• Swipe down on an app preview to lock it.
pr
eview. Touching
• Swipe down again to unlock it. will disappear.
ouch
• T
to close all apps (except for those you have locked).
will not close this app.
Clear the Cache of an App
Delete app cache les to free up storage space.
Go to
Settings > Apps > Apps, select the app that y
go to Storage > Clear cache.
will appear at the top of the app
ou want to clear the cache of, then
23
Page 27

Contacts
Cr
eate and Edit Contact Information
You can create contacts in multiple ways, as well as view and manage your contacts list.
Create Contacts
Apps
1 Open
ou are creating a contact for the rst time, touch Create new contact to start adding
If y
a contact.
For Wi-Fi only tablets, open Contacts in the T
2 T
ouch the camera image to set a prole picture for the contact, enter information such as
the name, organization, and phone number of the contact, then touch
Import Contacts
1 On the Contacts scr
Phone, select the Contacts tab at the bot
een, go to
> Set
tings > Import/Export.
tom of the screen, then touch
ools folder.
.
2 Select Import via Bluetooth, Import via Wi-Fi Direct, or Import from storage, then
follow the onscreen instructions to import contacts.
Search for Contacts
1 From the Contacts screen, go to
contacts to display all your contacts.
> Set
tings > Display preferences and touch All
.
2 Search for contacts using either of the following methods:
• Enter keywords for the contact you want to nd in the search box above the contacts
list
. Matching results will be displayed below the search box.
Share Contacts
1 On the Contacts screen, select the contact you want to share, then go to
contact.
> Shar
2 Select a sharing method, then follow the onscreen instructions to share the contact.
Export Contacts
1 On the Contacts screen, go to
> Set
tings > Import/Export.
2 Touch Export to storage and follow the onscreen instructions to export contacts.
The exported .vcf
default. You can open Files to view the exported les in the internal storage.
les are saved in the root directory of your device's internal storage by
e
Delete Contacts
Delete contacts using either of the following methods:
24
Page 28
ouch and hold the entry you want to delete, then touch Delete.
• T
Apps
• On the Contacts screen, go to
contacts, select the entries you want to delete, then touch
To restore deleted contacts, go to > Set
touch and hold a contact you want to restore, select the check boxes of any others you also
want to restore, then touch
ge Duplicate Contacts
Mer
1 Open
tings > Organize contacts > Merge duplicate contacts.
Set
For Wi-Fi only tablets, open Contacts in the T
2 Select duplicate c
Phone, touch the Contacts tab at the bot
ontacts to be merged and touch Merge.
> Set
.
tings > Organize contacts > Delete multiple
.
tings > Organize contacts > Recently deleted,
tom of the screen, then go to
ools folder.
>
Manage Contact Groups
You can conveniently send emails or messages to multiple contacts by creating and
managing contact groups. Your tablet automatically groups contacts by company, city, and
last contact time, but you can also create new groups based on your preferences.
Create a Contact Group
1 Open
For Wi-Fi only tablets, open Contacts in the T
ouch , enter the group name, such as "Family" or "Friends", then touch OK.
2 T
Phone, select the Contacts tab
, then touch Groups.
ools folder.
3 Follow the onscreen instructions to add contacts to the group, then touch .
Edit a Contact Gr
1 On the Groups screen, select the group you want to edit and touch
c
ontact.
2 Touch
oup
for Remo
to add a new
ve members, Group ringtone, Delete group, or Rename.
Send Group Messages or Emails
SMS messaging services are not supported on Wi-Fi only tablets.
On the Gr
send an email.
oups screen, open a group, then touch
to send a message or touch to
25
Page 29

Delete Contact Groups
Apps
On the Gr
oups screen, touch and hold the group to be deleted, then touch Delete.
Create Personal Information
You can create a business card containing your personal information to share with others.
You can also add personal emergency information so you can call for help quickly in an
emergency.
Create a Personal Business Card
1 Open
card.
For Wi-Fi only tablets, open Contacts in the T
2 Set y
phone number.
3 Touch
ou can share your business card using the QR code.
Y
Phone, select the Contacts tab at the bot
our prole picture, enter personal information such as your name, work address, and
to automatically create a QR code business card.
tom of the screen, then touch My
ools folder.
Add Emergency Information
Voice calls are not supported on Wi-Fi only tablets.
om the Contacts screen, go to My card > Emergency information.
1 Fr
2 Touch ADD and set your personal, medical, and emergency contact information.
Once you have added emergency contacts and you nd yourself in an emergency, access the
lock scr
Emergency contacts, and select an emergency contact to make a call.
Erase Contact Traces
1 Open
2 Go to
een for inputting your password, go to Emergency > Emergency information >
Phone, touch the Contacts tab at the bot
contact for whom you wish to erase contact traces.
> Er
ase history > Erase to delete all call and message records for that contact.
This feature is not supported on Wi-Fi only tablets.
tom of the screen, then touch the
Phone
V
oice calls are not supported on Wi-Fi only tablets.
Make a Call
Voice calls are not supported on Wi-Fi only tablets.
26
Page 30

Dial a Number or Select a Contact to Call
Apps
Use either of the f
• Open
contact's initials to nd a contact.
• On the Phone screen, touch the Contacts tab at the bottom, then select a contact to make
a call.
Touch
Use Speed D
Once you've set up speed dialing for a contact, you can quickly call that contact with the
assigned number key.
Go to
this speed dial number.
Press the Power Button to End a Call
Phone, enter part of a phone number
to end a call.
Phone > > Set
ollowing methods to make a call:
, the rst letter of a contact's name, or the
ial
tings > Speed dial, select a number key, then set a contact for
During a call, press the Power button to end the call.
Go to
Set a Call Background
You can set a wallpaper as the call background.
1 Go to
Phone > > Set
Settings > Home scr
tings and enable Power button ends call.
een & wallpaper > Wallpaper.
2 Select a picture and set it as the wallpaper.
You can also set a prole picture for a contact to be shown on the call background.
1 On the Phone scr
want to set a prole picture for.
2 T
ouch
Make an International Call
and then touch to set a prole picture for the contact.
een, touch the Contacts tab at the bottom, then select the contact you
1 Contact your mobile carrier to activate and inquire about the international calling service.
2 Open Phone, touch the Contacts tab at the bot
call.
For numbers that are not in the contacts list, on the Phone screen, touch and hold the 0
number key to display +, enter the country code and phone number, then touch
mak
e an international call.
tom, then select a contact to make a
Manage Call Logs
Voice calls are not supported on Wi-Fi only tablets.
to
27
Page 31
You can merge the call logs of the same contact or number for a tidier and more concise
ace, or delete call logs as required.
interf
Merge Call Logs
Apps
1 Go to
Phone > > Set
tings > Merge call log.
2 Select By contact and your tablet will automatically merge the call logs of the same
number or contact.
View Missed Calls
1 To display all missed calls, open
Missed tab.
All missed calls are displayed in red in the call log list for you to quickly identify them on
the All screen.
2 Touch
Delete Call Logs
Delete call logs using any of the f
• On the Phone screen, touch and hold an entry, then touch Delete entry.
• On the Phone screen, go to
next to a call log to call back or send a message.
ollowing methods:
Phone, swipe do
> Delete entries, select the entries y
wn on the call log list, then touch the
ou want to delete,
then touch
• On the Phone scr
Set a Ringtone f
Voice calls are not supported on Wi-Fi only tablets.
You can set your favorite music or a video as the ringtone for incoming calls.
Set a Music Ringtone
1 Go to
Tablet ringtone.
.
een, swipe left on the entry you want to delete, then touch
or Incoming Calls
Phone > > Set
tings > Ringtone or
Settings
.
> Sounds & vibration >
2 Select a system ringtone, or touch Music on device to select a local song as the ringtone.
Set a Ringtone for a Contact
1 Open
contact you want to set a ringtone for.
Phone, touch the Contacts tab at the bot
tom of the screen, then select the
2 On the contact details screen, touch Ringtone and select a ringtone.
Manage Incoming Calls
Voice calls are not supported on Wi-Fi only tablets.
28
Page 32

Apps
You can use the call waiting feature to answer incoming calls when you are already engaged
in a pr
evious call.
If you cannot answer a call because your tablet is faulty or the network signal is poor, you
can also set call forwarding to forward calls to another number or device.
Answer or Reject an Incoming Call
If you receive a call when the screen is locked:
• Drag
ag
• Dr
• Touch to reject the call and reply with an SMS message.
• T
ouch
ou receive a call when the screen is unlocked:
If y
• Touch
right to answer the call.
left to reject the call.
to set a callback reminder.
to answer the call.
ouch
• T
• T
ouch
ouch
• T
Enable Call W
to reject the call.
to reject the call and reply with an SMS message.
to set a callback reminder.
aiting
The Call waiting feature lets you answer incoming calls when a call is already in progress by
placing the rst call on hold.
This feature requires the support of your mobile carrier. For details, contact your carrier.
Go to Phone > > Settings. Under the SIM card you wish to enable call waiting on,
click More > Call waiting.
This feature may vary depending on your carrier.
Answer a New Incoming Call During a Call
1 When y
touch
ou receive an incoming call when you are already engaged in a previous call,
to answer it.
2 Touch , or touch a held call in the call list to switch between the two calls.
Enable Call F
After the Call forwarding feature is enabled, calls that meet set conditions will be
automatically transferred to a specied phone number.
orwarding
29
Page 33
This feature requires the support of your mobile carrier. For details, contact your carrier.
Apps
1 On the Phone
screen, go to
> Set
tings, and touch Call forwarding.
2 Select and enable a forwarding method, then enter and conrm the target number.
This feature may vary depending on your carrier.
Disable Call Forwarding
1 On the Phone scr
card you wish to disable call forwarding on.
een, go to
> Settings, and touch Call forwarding under the SIM
2 Select the forwarding mode that you wish to disable and disable it.
This feature may vary depending on your carrier.
Filter and Block Spam Calls
Voice calls are not supported on Wi-Fi only tablets.
Set dierent block rules to block sales, fraud, and other kinds of spam calls.
Filter and Block Spam Calls
1 Go to Phone > > Block
Alternat
2 T
ouch Call block rules and toggle on the switches of corresponding block rules.
Block Incoming Calls from Specic Numbers
You can block incoming calls from specic numbers using either of the following methods:
• Go to
numbers y
• On the Phone screen, touch the Contacts tab at the bottom, touch the contact you want to
block, then go to
Set Whether to Receive Notications for Blocked Calls
Go to
notications for blocked calls.
ively, go to
Phone > > Block
ou want to block.
Phone > > Block
Tablet Manager > Block
> Block c
ed >
ed >
ontact.
ed >
and set the block rules.
ed >
> Blocklist, touch , then add the phone
> Rec
eive notications and set whether to receive
to set the block rules.
Emergency SOS and Calls
This feature is not supported on Wi-Fi only tablets.
Use Emergency SOS
ou encounter an emergency, you can quickly and secretly send an SOS message to your
If y
emergency contacts.
30
Page 34
Apps
1 Enable GPS and allo
2 Go to
set your emergency contacts.
Once you have enabled the Emergency SOS feature, if you encounter an emergency, press
the Power button ve times in quick succession and your tablet will automatically send a
message with your current location to your emergency contacts.
Once the message is sent, your tablet will bring up the emergency call screen, from which
you can quickly call an emergency service or one of your emergency contacts.
Make Emergency Calls
In the event of an emergency, you can make emergency calls directly from the lock screen of
your tablet even if there is no signal.
The emergency call feature is subject to local regulations and individual mobile carriers.
work issues or other types of interference may lead to emergency calls not working.
Net
1 Fr
om the lock screen, access the screen for inputting your password, and touch
Emergency. If you are in an area with a good signal and your tablet has an Internet
connection, it will automatically obtain your location and display it on the screen.
Settings > Securit
w the Emergency SOS feature to access your location.
y > Emergency SOS, enable Also send SOS message, then
2 Enter your local emergency number and touch
touch Emer
gency information and select an emergency contact to call.
to call the number. Alternatively,
Make Operations During a Call
Voice calls are not supported on Wi-Fi only tablets.
During a call, an in-call menu will be displayed.
ouch
• T
This f
• Touch
• During a call, y
previous screen or home screen using the current navigation mode.
To return to the call screen, touch the green bar on the status bar.
• Touch
to start another call (only available once three-way calling has been activated).
eature requires the support of your mobile carrier. For details, contact your carrier.
to use the dialer.
ou can hide the call screen and access other apps by returning to the
to end the call.
Messaging
Send and Manage Messages
SMS messaging services are not supported on Wi-Fi only tablets.
You can send and receive messages that include text, emojis, pictures, audio les, and more.
You can also manage your messages in the message list.
31
Page 35
Send and Manage Messages
SMS messaging services are not supported on Wi-Fi only tablets.
You can send and receive messages that include text, emojis, pictures, audio les, and more.
ou can also manage your messages in the message list.
Y
Send Messages
Apps
1 Open
2 On the New message scr
of c
ontent such as pictures and audio les.
3 In the r
To send a group message to those not included in your contacts list, touch anywhere
blank in the recipient box and enter the recipients' phone number. Touch the return key in
the keyboard when you nish entering each of the phone numbers.
Messaging and touch .
een, enter your message content. Touch
ecipient box, touch , select contacts or contact groups, then touch .
to add other types
4 After nishing editing, touch to send the message.
e a Draft Message
Sav
From the New message screen, touch
Canc
el Sending a Message
On the Messaging screen, go to
> Set
to save a draft message.
tings > Advanced and enable Recall messages.
Within six seconds after the message is sent, you can double-touch the message to cancel
sending it.
View and Reply to Messages
1 On the Messaging screen, select a contact to view your conversation with them.
2 To reply to a message, enter your message content in the text box, then touch
New messages will be display
touch them ther
Mark Messages as Read
You can use any of the following methods to mark messages as read:
• New messages will be displayed in the notication panel in the form of a banner and you
can mark them as read there.
• On the Messaging screen, swipe left on the message that you want to mark as read, then
touch
e to reply.
.
ed in the notication panel in the form of banners and you can
.
• On the Messaging
screen, go to
> Mark all as r
ead.
32
Page 36
Delete a Message
Apps
Delete messages using either of the f
• On the Messaging screen, swipe left the message to be deleted, then touch
ouch and hold a message, select multiple messages you wish to delete, then touch
• T
Deleted messages cannot be recovered.
ollowing methods:
.
.
Filter and Block Spam Messages
This feature is not supported on Wi-Fi only tablets.
Set dierent block rules, such as your blocklist, to block sales, fraud, and other kinds of spam
messages.
Block Spam Messages
Go to Messaging > > Block
ou can also go to
Y
Tablet Manager > Block
ed >
and set block rules.
ed >
to set block rules.
Block Messages fr
1 Go to
2 T
ouch
these numbers will all be blocked.
Block Messages Containing Specic Keywords
1 Go to Messaging > > Block
2 Touch
will be blocked.
Set Whether to Receive Notications for Blocked Messages
Go to
receive notications when messages are blocked.
Messaging > > Block
om Specic Numbers
Messaging > > Block
and add the numbers you want to block. SMS and MMS messages sent by
and add the keywords to be
ed >
ed >
ltered. All messages containing these keywords
ed >
> Blocklist.
eyword blocklist.
> K
> Rec
eive notications and set whether to
Calendar
Add and Manage E
Events help you plan and manage activities in your daily life and work, such as attending
company meetings, arranging social get-togethers, and making credit card repayments. You
can add events and set reminders to help you arrange your schedule in advance.
vents
33
Page 37
Create an Event
pen
1 O
Calendar and touch .
Apps
2 Enter the details of the ev
ent, such as the title, location, and start and end times.
3 Touch Add reminder to set the reminder time for the event.
4 Touch
Import Meet
1 Go to
to save the event.
ing Reminders
Calendar > > Manage ac
counts.
2 Touch Add account, then follow the onscreen instructions to add your work emails (from
your Exchange account) to the calendar to see meeting reminders.
Search for Events
1 On the Calendar screen, touch
2 Enter k
Share an Event
eywords of your event in the search box, such as the title and location.
.
1 On the Calendar screen, touch an event on the calendar or under the schedule.
2 Touch
method y
Delete Events
You can delete events using the following methods:
• On the Calendar screen, then touch the event to be deleted and touch
• On the Schedule scr
then touch
and follow the onscreen instructions to share the event using whichever
ou prefer.
.
een, touch and hold an event, select the events you want to delete,
.
Set a Calendar Notication
Set the calendar notication type according to your requirements. You can set status bar
notications, banner notications, sound notications, and more.
Y
ou can also change the default reminder time to control when your tablet will send you a
reminder.
1 Go to
Calendar > > Set
tings.
2 In the reminder settings, set Default reminder time and Reminder time for all-day
events.
3 Touch Notications and enable Allo
instructions to set a notication type.
w notications. Then follow the onscreen
34
Page 38
Customize the Calendar View
Apps
Set the start day of the w
calendar view settings.
1 Go to
Calendar > > Set
eek, whether or not to show week numbers, and more in the
tings.
2 Set the start day of the week, whether or not to show week numbers, and so on.
Set Alternate Calendars
Set the Calendar to display other calendars as well, such as the Chinese lunar calendar or the
Islamic calendar.
Go to
Calendar > > Set
tings > Alternate calendars and select another calendar.
View National/Regional Holidays
View national/regional holidays in the calendar to help plan your travel.
1 Go to
Calendar > > Set
tings > National/Regional holidays.
2 Turn on the switch of a country/region, and your tablet will automatically download
holiday information for that country/region and display it in the Calendar.
Clock
Alarm
1 Go to
2 Select a sound for the alarm. The sound will play when you select it. You can press the
Volume buttons to adjust its volume.
3 Set the following options according to your preferences:
• Repeat
• Ring duration
• Snooze duration
• Label
4 When you are nished, touch
Modif
y or Delete an Alarm
Clock > Alarm, touch , and set a time.
.
Touch an existing alarm to modify or delete it.
Snooze an Alarm
If you don't want to get up when an alarm rings, simply touch the snooze button or press the
Power button.
35
Page 39
The snooze length is set when creating the alarm.
urn O an Alarm
T
When an alarm rings, swipe left or right on the button that appears at the bottom of the
screen to turn it o.
Timer and Stopwatch
ou can use the timer to count down from a specied time. You can also use the stopwatch
Y
Apps
to measur
Timer
Go to
, touch
it
Stop
Go to
View the Time in Cit
Use Clock to see the local time in dierent time zones around the world.
Go to
the list of cit
e the duration of an event.
Clock > Timer, set the dur
.
watch
Clock > Stop
Clock > W
ies.
watch, and touch
orld clock, touch
ation of time, and touch
ies Worldwide
to start the timer. To stop
to start the stopwatch. To stop it, touch .
, and enter the name of a city or select one from
Notepad
Manage Your Notepad
You can sort your Notepad items by category and put them into dierent folders, delete
unw
anted items, and share items with other people.
When viewing a list of items or an individual item in Notepad, touch the status bar at the top
of the screen to quickly return to the rst item or the beginning of the item you are viewing.
Create Notes
You can create notes to record your thoughts and inspirations.
1 Go to
2 Enter the t
3 Touch
ag it to the desired position in the note.
dr
Notepad > Notes, then touch .
itle and content of the note.
to insert a picture into the note as needed. Touch and hold the picture, then
4 If you want to organize your notes for easier access and viewing, touch
our note after nishing it.
to y
to add a tag
36
Page 40
ouch
5 T
eate To-Dos
Cr
You can create to-dos with a set time to remind you to complete them.
If you set a time, your tablet will send you a reminder notication at the specied time.
to save the note.
Apps
1 Go to
2 Enter y
3 Touch
ouch Save.
4 T
Sort Notepad Items by Category
Categorize notepad items to make them easier to nd. Notes in dierent categories are
display
You can sort notepad items using either of the following methods:
• On the All notes or All to-dos screen, swipe left on an item, touch
• Touch and hold a note or to-do, select the ones you want to classify under the same
ed in dierent colors.
categor
category, then touch
Notepad > T
our to-do.
, set a reminder time, then touch OK.
y.
o-dos, then touch
to select a category.
.
, then select a
Shar
e Notepad Items
You can share your Notepad items as text les or images.
On the All notes or All to-dos screen, touch the item to be shared, touch
the onscr
Delete Notepad Items
You can delete notepad items using either of the following methods:
• On the All notes or All to-dos screen, swipe left on a note or to-do, then touch
delete it.
• Touch and hold a note or to-do you want to delete, select or drag over the check boxes of
any other notes or to-dos you want to delete as well, then touch .
o restore a deleted Notepad item, touch All notes or All to-dos, select the item you want to
T
restore in Recently deleted, then touch
een instructions to share it.
.
, then follow
to
Rec
order
37
Page 41
Recorder
Apps
1 In the T
2 During a r
3 When y
ou can also touch and hold a recording, then share, rename, or delete it.
4 Y
Recordings are saved under Files > Categories > Internal storage > Sounds.
Play a Recording
Recording les are listed on the
On the recording playback screen, you can:
• Touch
• T
ouch
ouch
• T
ools folder, open
ecording, you can touch
ou are nished, touch
to skip the muted parts.
to adjust the playback speed.
to add a tag.
Recorder, and touch to start a recording.
to stop recording.
Recorder home scr
to add a tag.
een. Touch a recording to play it.
ouch a tag to rename it.
• T
Edit a Recording
1 On the
2 Touch
3 Dr
ag the start and end bars to adjust the clip length. Pinch your ngers on the waveform
to zoom in or out to adjust the clip length more precisely.
4 Touch
Share Recordings
1 On the
2 Go to
Recorder home scr
to display the waveform of the recording.
and select K
Recorder home scr
> Shar
e.
eep selected part or Delete selected part.
een, touch a recording.
een, touch the recording you want to share to play it.
3 Select your preferred sharing method and follow the onscreen instructions to share the
recording.
38
Page 42

Add Email Accounts
Apps
Add y
any time.
Add a Personal Email Account
1 Open
our email account in Email and you can use your tablet for convenient email access at
Email on y
Other.
our tablet and select from the available mailbox providers or touch
2 Enter the email address and password, touch Sign in, and follow the onscreen instructions
to congure the server settings. The system will automatically connect to the server and
check the ser
Add an Exchange Account
Microsoft Exchange enables digital messaging within a company. If your company mailbox
uses the Exchange server, you can log in to your company email account on your tablet.
ver settings.
1 Contact the company email server administrator to obtain the domain name, server
address, port number, and security type.
2 Open
Email, and select E
xchange.
3 Enter the email address, username, and password.
4 Touch Manual setup. On the Account setup screen, set parameters such as the email
domain name, server address, port number, and security type.
5 Touch Next, then follow the onscreen instructions to complete the conguration. The
sy
stem will automatically connect to the server and check the server settings.
Send Emails
Select an email account and write emails to send them to the recipients' email addresses.
Send an Email
1 Open
2 Enter the r
.
3 Add the addr
more than one email account, you will also need to select the email address you wish to
send the email from.
Email, then touch .
ecipient's email address, or touch
esses of any recipients to whom you wish to CC or BCC the email. If you have
to select a contact or group, then touch
4 Write the email and enter the subject, then touch
e an Email as a Draft
Sav
On the Compose screen, enter the recipient's email address, subject, or email content, and
touch
to save the email as a draft.
.
39
Page 43

Apps
Go to Inbo
Reply to an Email
x > Show all folders > Drafts to view draft emails.
1 On the Inbox screen, open the email you wish to reply to.
2 Touch
ead.
thr
3 After writing your reply, touch
Set Automat
1 Go to
to reply to just the email sender, or touch to reply to everyone on the
.
ic Replies for an Exchange Account
Email > > Set
tings.
2 Select the Exchange account you want to set automatic replies for, touch Automatic
replies, and turn on the Automatic replies switch.
3 Set the time or content of the auto reply, then touch Done.
Set Email Notications
Set a notication mode for your emails based on your needs.
1 Go to
notications.
2 Select the email account you want to set notications for, turn on the Allo
switch, then select a notication mode.
Email > > Settings > General > Notications and enable Allow
w notications
View and Manage Emails
Receive, view and manage your emails in the inbox.
View an Email
1 Open
If you have multiple email accounts, touch Inbox and select the email account you want
to view.
Email, then swipe do
wn on the Inbox screen to refresh the email list.
2 Open an email, then view, reply to, forward, or delete the email.
If you are
import the ev
notied about an important event in an email, touch
ent into your calendar.
> Add to calendar to
3 Swipe left or right to view the next or previous email.
Organize Emails by Subject
On the Inbox screen, go to
Sync Emails
After automatic email syncing is enabled, the emails on your tablet will be automatically
synced with those on the email server.
> Set
tings > General, then enable Organize by subject.
40
Page 44

Apps
1 On the Inbo
x screen, go to
> Set
tings.
2 Touch the account you wish to sync emails for, then turn on the Sync email switch.
3 Touch Sync frequency to set the automatic syncing period.
Search for an Email
On the Inbox screen, touch the search box, then enter keywords such as the subject or
content of the email.
Delete Emails
On the Inbox screen, touch and hold the email to be deleted, drag over the check boxes of
any other emails you want to delete, then touch
Manage Email Ac
You can add multiple email accounts so you can manage them at the same time.
Add Email Accounts
counts
.
1 Go to
Email > > Set
tings > Add account.
2 Select an existing email service provider or touch Other, then follow the onscreen
instructions to add an email account. Repeat for each of the accounts you wish to add.
Switch Between Email Accounts
On the Inbox screen, touch Inbox and select the email account you wish to use.
Change Account Name and Signature
On the Inbox screen, go to
the Account name, Signature, and Default account.
Log Out of an Email Account
On the Inbox screen, go to > Set
Manage VIP Contacts
Important email contacts can be added as VIP contacts. Emails from VIP contacts will be
> Settings and select an account. You can then set or change
tings, select an account, and touch Remove account.
automatically stored in the VIP inbox.
Add a VIP Contact
You can add VIP contacts using either of the following methods:
• Go to
Create or touch Add from contacts, then follow the onscreen instructions.
• Open an email, touch the account name of the sender or receiver, then touch Add to VIP
list.
Email > > Set
tings > VIP contacts. On the VIP list screen, go to Add >
41
Page 45
Delete a VIP Contact
Apps
1 Go to Email > > Set
2 On the VIP list screen, touch
3 Select the VIP c
ontact to be deleted, then touch
tings > VIP contacts.
.
.
Calculator
Calculator
Use the calculator on y
calculating exponential, logarithmic, and trigonometric functions.
Use the Basic Calculator
You can open the calculator using either of the following methods:
• Find Calculator in the Tools folder.
• Swipe up from the bottom of the lock screen to display the shortcut panel, then touch
our tablet to perform basic mathematical calculations and for
to open the calculator.
Use the Scientic Calculator
pen the calculator and rotate your tablet to landscape orientation.
O
Copy, Delete, or Clear Numbers
• Copy a calculation result: Touch and hold the calculation result, touch Copy, then paste the
result somewhere else, such as in a note or message.
• Delete the last digit: Touch
• Clear the display
to complete the calculation.
: Touch
.
. You can also touch to clear the display after touching
Radio
Radio
1 T
o use the radio feature of your tablet, insert a wired headset to use as the radio antenna.
2 Go to the Tools folder, touch
3 T
4 Dr
ouch
ag
or to switch to another channel.
to manually select a frequency.
FM Radio, then touch to turn on the radio.
42
Page 46

App Twin
Apps
App T
App Twin enables you to log in to two WeChat accounts simultaneously without the hassle of
having to constantly switch between them, allowing you to keep your work and private lives
separate.
1 Go to
win
App Twin will onl
Settings > Apps > App T
create a twin of.
y work with certain apps.
win, and turn on the switch for the app you want to
2 Two icons for the same app will display on the home screen for you to log in to your
separate accounts simultaneously.
3 To disable App twin, touch and hold the twinned version of the app, then touch Delete.
All the data of the twin app will be deleted.
Quickly Access Frequently Used App Features
Quickly Access Frequently Used App Features
You can access frequently used features of certain apps from app icons on the home screen,
and even add shortcuts for these features to the home screen.
Quickly Access Frequently Used App Features
Touch and hold an app icon until a pop-up menu is displayed. Then touch a frequently used
feature to access it.
For example, touch and hold the
menu to access it.
If no pop-up menu is displayed after you touch and hold an app icon, the app does not
support this feature.
Add Frequently Used App Features to the Home Screen
Touch and hold an app icon on your home screen to bring up the pop-up menu. Touch and
hold the desired feature and drag it to your home screen to create a shortcut.
icon, then touch a shooting mode from the pop-up
Tablet Manager
Cleanup
You can use Cleanup in Tablet Manager to scan for redundant or large les, such as app
r
esidue, unwanted installation packages, WeChat data, and more. Once detected, you can
choose whether or not to delete les as suggested.
43
Page 47

1 O
pen
Apps
Tablet Manager, then touch Cleanup.
2 When the scan is c
need.
Clean Up Duplicate Files
Tablet Manager can identify duplicate les on your tablet.
On the Cleanup screen, touch Duplicate les , then select unwanted les to delete them.
omplete, touch Clean up after each item and delete any les you don't
Manage Data Usage
This feature is not supported on Wi-Fi only tablets.
Open
access.
View and Manage High Data Consumption Apps
Tablet Manager, then touch Data usage to view data usage and manage net
work
1 You can nd out how much data your apps are using in comparison to each other by
going to Data usage this month on the Data usage scr
een.
2 Touch a high data consumption app to set mobile data, roaming data, or background data
usage limits for it.
View and Set the Network Access Permission of an App
On the Data usage screen, touch Network access, then change the settings for apps that
consume a large amount of data (such as video streaming apps) so they can only be used
when you are connected to a Wi-Fi network.
Enable or Disable Smart Data Saver
Enable Smart Data Saver to prevent apps from using mobile data in the background.
1 On the Data usage screen, touch Smart Data Saver, then enable it. The
then display in the status bar
.
icon will
2 If you want to allow unrestricted access to data for some apps even when they are
running in the background, toggle on the switches for these apps.
Add Mobile Data Usage Reminders
Add data plans for your SIM cards and usage reminders in Optimizer to keep you informed of
your data consumption.
1 On the Data usage screen, go to More data settings > Monthly data limit and follow
the onscreen instructions to add a data plan.
2 On the More data settings screen, touch Usage reminders. From there, you can set
whether a notication will be sent or if mobile data will be disabled once the monthly
data limit or r
oaming data limit has been topped.
3 On the More data settings screen, you can set whether to show data used when the
screen is locked.
44
Page 48

One-Touch Optimization
Apps
Use the OPTIMIZE f
1 Open
Tablet Manager and touch OPTIMIZE.
2 Results and r
eature of Tablet Manager to keep your tablet in an optimal state.
ecommendations will be displayed once the optimization is complete.
Phone Clone
HiSuite
Introduction to HiSuite
Huawei HiSuite is a PC-based tool used for managing Huawei smart Android devices
(including phones and tablets).
After you have installed HiSuite on your computer, you can manage data such as your
contacts, messages, pictures, videos, and apps, back up data from and restore data to your
tablet, and update your tablet to the latest version.
1 Visit the ocial Huawei website on your computer, search for HiSuite, then do
install the latest version of HiSuite.
wnload and
2 Use a USB cable to connect your tablet to the computer. When a dialog box entitled Use
USB to appears on your tablet, select Transfer les.
3 On the c
establish a connection between your tablet and computer.
omputer, open HiSuite and select USB. Then follow the onscreen instructions to
Back Up and Restore Data Using HiSuite
After installing HiSuite on your computer and connecting your computer with your tablet,
you can use HiSuite to back up data (such as contacts, messages, call logs, photos, videos,
audio les, and documents) from your tablet to your computer. You can also restore data to
y
our tablet from your computer.
Back Up Data to a Computer
1 On the HiSuite home page, click Back Up.
2 Select the items you want to back up.
3 Click Back Up, follow the onscreen instructions to set the password and password hint,
and conrm the settings.
Backup data w
on't be able to restore if you forget the password.
4 HiSuite will then back up the data you selected. Keep the USB cable connected when the
data is being backed up.
5 Click Done when all data has been backed up.
45
Page 49

Apps
Backup data is saved under C
computer by default. To change the backup directory on the computer, go to
> Backup.
Restore Data
:\Users\
User name
\Documents\Hisuite\backup on the
> Set
tings
1 On the HiSuite home page, click Restore.
2 Click Backup Files, select the items you want to restore to your tablet, then click Restore.
3 Enter the password for the backup data and click OK.
4 HiSuite will then restore the items you have selected. Keep the USB cable connected
when the data is being restored.
5 Click Done when all data has been restored successfully.
Update or Restore the System Using HiSuite
After installing HiSuite on your computer and connecting your computer with your tablet,
you can use HiSuite to update the system of your tablet.
Update the System Using HiSuite
our personal data may be erased during a system update. It is recommended that you
• Y
back up your data before updating your tablet.
• Ensure that your tablet is at least 20% charged and keep the USB cable connected
throughout the update process. Do not power o or restart your tablet, or remove or
insert a memory card.
• Some third-party apps, such as online banking and game apps, may not be compatible
with the latest system version. It might take some time for the app developers to
launch a compatible app version.
On the HiSuite home page, click Update. If a new version is detected, the version number
will be displayed and you can click the version number to start updating the system.
Once the update is completed, your tablet will automatically restart.
Tips
Tips
Tips pr
yourself with your tablet and make the best use of it. In Tips, you can also nd a full set of
user guides for more detailed instructions.
• Vividly depicted cards: Browse through the easy-to-read cards with a short clip or image to
quickly get to grips with all the most useful features on your tablet. The cards are
categorized so you can jump directly to a category you are interested in.
• User guides: Find detailed instructions in the comprehensive user guides.
ovides you with an abundance of information so you can quickly familiarize
46
Page 50

ry out features: A TRY NOW button is available in certain cards for you to try out the
• T
feature immediately.
Apps
47
Page 51

Settings
Sear
ch for Items in Settings
Search for Items in Settings
Tired of trudging through layers of settings? Just search for them using the search box.
• Swipe down from the middle of the screen to display the search box. Enter the name of a
setting to obtain search results.
• Open
screen, to obtain search results.
Settings, and enter the name of a set
ting in the search box at the top of the
Wi-Fi
Connect to a Wi-Fi Network
Connecting to the Internet over Wi-Fi is an eective way to save mobile data. You can also
enable
Wi-Fi security monitoring to avoid risky hotspots and ensure safe Internet access.
Connect to a Wi-Fi Network
Be extra careful when connecting to a free public Wi-Fi hotspot to avoid security risks
nancial losses resulting from the leakage of your personal data.
and
1 Go to
2 Connect to a
• Select a Wi-Fi network to connect to under Available networks. A password is
required for encrypted networks.
• To manually add a Wi-Fi network, scroll down to the bottom of the screen, touch Add
network, and enter the SSID and password as prompted to complete the connection.
The
Wi-Fi D
You can use Wi-Fi Direct to transfer data between Huawei devices. Wi-Fi Direct can transfer
bigger les more quickly than Bluetooth, without having to pair the devices.
Settings > Wi-Fi, and enable Wi-Fi.
Wi-Fi network on the Wi-Fi screen using either of the following methods:
icon displayed in the status bar indicates that the tablet is connected to Wi-Fi.
irect
1 On the receiving device, go to
2 Go to Mor
Direct enabled.
e settings > Wi-Fi Direct to start searching for nearby devices that have Wi-Fi
Settings > Wi-Fi and enable Wi-Fi.
3 On the sending device, touch and hold to select the les you want to share, touch
and select Wi-Fi D
irect.
,
48
Page 52

These steps may be dierent if you are sharing les directly from an app.
ouch the icon of the receiving device to establish a connection, then share the les.
4 T
5 On the receiving device, accept the Wi-Fi Direct transfer request.
Settings
To view the received les, open Files, then go to Internal stor
Categories tab.
age > Wi-Fi Direct on the
Wi-Fi+
When Wi-Fi+ is enabled, if your tablet detects a Wi-Fi network that it has previously
connected to or is free, it will automatically enable Wi-Fi and connect to the network. Your
tablet will also evaluate the quality of the current Wi-Fi network and switch to mobile data if
the Wi-Fi signal is poor.
1 Go to
ouch More settings and enable or disable Wi-Fi+.
2 T
Settings > Wi-Fi.
Bluetooth
Bluetooth Basics
You can connect your tablet to Bluetooth headsets, speakers, and car kits. You can also use
Bluetooth to share data between your tablet and other devices.
Make sure your tablet is within 10 m (about 33 ft.) of other Bluetooth devices.
Enable or Disable Bluetooth
You can enable or disable Bluetooth in either of the following ways:
• Swipe down from the status bar to open the notication panel, then touch
or disable Bluetooth. T
• Go to
Set a Bluetooth Name
Set a Bluetooth name for your tablet to easily identify it during connection.
Settings > Bluetooth, then enable or disable Bluetooth.
ouch and hold the switch to enter the Bluetooth settings screen.
1 On the Bluetooth settings screen, toggle the Bluetooth switch on.
2 Touch Device name, enter a name, then touch OK.
Pair with a Bluetooth Device
to enable
1 Enable Bluetooth on the target device and set it to discoverable. For detailed instructions,
refer to the device's user guide.
2 From your tablet, access the Bluetooth settings screen, and enable Bluetooth to have
your tablet automatically search for nearby Bluetooth devices.
49
Page 53

3 Fr
om the list of Available devices, select the one you want to pair your tablet with, and
follow the onscreen instructions to complete pairing.
Settings
On the Bluetooth settings screen, touch
es.
devic
Transfer Files via Bluetooth
You can use Bluetooth to transfer videos, pictures, contacts, and more to another device
provided that both devices are within the eective Bluetooth range.
to view tips for connecting various Bluetooth
1 Pair the sending and recipient devices via Bluetooth.
2 On the sending device, touch and hold a le, select the les you want to share, touch
and select Bluetooth.
Operations may vary if you are sharing les from apps directly.
3 Touch the Bluetooth name of the recipient device to start sharing.
4 On the recipient device, accept the Bluetooth transfer request.
Unpair a Bluetooth Device
1 On the Bluetooth settings screen, enable the Bluetooth switch.
,
2 In the list of Paired devices, touch next to the name of the device you wish to unpair,
then touch Unpair.
Mobile Data
Connect to Mobile Data
1 Mak
2 Connect to mobile data using either of the following methods:
To conserve battery power and reduce data usage, disable the mobile data service when you
don't need it.
e sure that mobile data is available on your SIM card. Wi-Fi only tablets do not
support mobile data.
• Swipe down from the status bar to open the notication panel, then swipe down
further to sho
• Go to Settings > Mobile net
w all shortcut switches. Touch
work > Mobile data and enable Mobile data.
to enable Mobile data.
Personal Hotspot
Data services are not supported on Wi-Fi only tablets.
Once P
network your tablet is currently connected to with other devices.
ersonal hotspot has been enabled, you can share your mobile data or the Wi-Fi
50
Page 54

Share Your Network Connection via Personal Hotspot
The following listed items are only available in some countries and regions. If your tablet
Settings
does not pr
supported.
1 Go to
ovide a specic item, it indicates that the corresponding feature is not
Settings > Mobile net
work > Personal hotspot.
2 Set Device name and Password.
3 In the case of a Wi-Fi network, you can set the AP frequency band of the Wi-Fi hotspot.
Go to More > AP band and touch 2.4 GHz or 5 GHz.
4 In the case of mobile data, you can set a mobile data limit for a single session. Go to
More > Data limit and set the limit.
When this limit has been reached, your tablet will automatically disable the hotspot.
5 Enable Personal hotspot and your tablet will share your mobile data or the Wi-Fi
network you are currently connected to with other devices.
Share Your Network Connection via Bluetooth
1 Go to
onscreen instructions to complete pairing.
Settings > Bluetooth, enable Bluetooth, select a devic
e, then follow the
2 Go to
tethering.
Settings > Mobile network > Personal hotspot > More, and enable Bluetooth
3 On the Bluetooth settings screen of the paired device, touch next to your device
name, then enable Internet ac
network connection.
Share Your Network Connection via USB
cess to establish an Internet connection and share your
1 Use a USB cable to connect your tablet to a computer.
2 On your tablet, go to
enable USB tethering to share your mobile data or Wi-Fi network.
Settings > Mobile net
Enable Data Roaming
Data services are not supported on Wi-Fi only tablets.
Once you have activated the international roaming service, you can enable this feature to use
mobile data when tr
• This f
eature requires the support of your mobile carrier. For details, contact your carrier.
aveling in a dierent country or region.
work > Personal hotspot > More and
• Charges may apply when using the international roaming service. For details about
how data roaming fees are charged, contact your carrier.
Go to
wish to enable the data roaming feature, enable Data roaming.
Settings > Mobile net
work > Mobile data. Under the SIM card for which you
51
Page 55

More Connections
Airplane Mode
When taking a ight, you can enable Airplane mode if required to do so by the airline. In
Settings
Airplane mode, y
use mobile data, but all other functions will be available.
You can enable or disable Airplane mode using either of the following methods:
• Swipe down from the status bar to open the notication panel, then swipe down again to
display all shortcuts. Touch
• Go to Settings > Mobile net
When Airplane mode is enabled, Wi-Fi and Bluetooth will automatically be disabled. You can
re-enable them if allowed to do so by the airline.
our tablet will not be able to make calls, send or receive SMS messages, or
to enable or disable Airplane mode.
work, and enable or disable Airplane mode.
Connect to a Laptop Using a USB Cable
1 Connect your tablet to a computer with a USB cable. After the driver is automatically
installed on the computer, a drive letter corresponding to your tablet will be displayed.
2 On your tablet, swipe down from the status bar to open the notication panel, go to
Set
tings > Touch for more options, and select one of the following modes:
• Transfer photos: Uses the Picture Transfer Protocol (PTP) to transfer photos between
your tablet and computer. In the new drive on the computer, you can view photos
stored on your tablet, or copy and paste photos between the two devices.
• Transfer les: Uses the Media Transfer Protocol (MTP) to transfer media les between
your tablet and computer. In the new drive on the computer, you can view les stored
on your tablet, or copy and paste les between the two devices.
Install Windows Media Player 11 or later on your computer to view media les on
our tablet.
y
• Input MIDI: Uses the Musical Instrument Digital Interface (MIDI) to use your tablet as
an audio input device to play music on your computer.
Printing
Connect your tablet to a Mopria-certied printer via Wi-Fi, and then you will be able to print
images and documents from your tablet.
Connect Your Tablet to a Printer
1 Check the printer manual or consult with its manufacturer to verify that it is Mopria-
certied.
If it is not, consult with its manufacturer to install the corresponding app or plug-in for it
on y
our tablet.
52
Page 56

Settings
2 Connect y
our tablet and the printer to the same Wi-Fi network using any of the following
methods:
• Connect to a Wi-Fi router: Enable Wi-Fi on the printer and connect it to the Wi-Fi
router. On your tablet, go to
Settings > Wi-Fi, enable Wi-Fi, touch the same
router, and follow the onscreen instructions to complete the settings.
• Connect with Wi-Fi Direct: If your printer supports Wi-Fi Direct, follow the instructions
in the printer manual to enable this feature. On your tablet, go to
Fi, enable Wi-Fi, go to Mor
e settings > Wi-Fi Direct, then touch the printer to
Settings > Wi-
establish the connection.
• Connect to your printer's hotspot: If your printer can double as a wireless hotspot,
follow the instructions in the printer manual to enable the hotspot and set a password.
On your tablet, go to
Settings > Wi-Fi, enable Wi-Fi, touch the printer's hotspot
then follow the onscreen instructions to complete the settings.
Wi-Fi
,
3 Go to
Settings > Mor
e connections > Printing > Default Print Service, and enable
Default Print Service.
4 Select the printer from the search results and follow the onscreen instructions to add the
printer.
Print Files
To print les in Galler
• Print an image: Open
or export to PDF, select the printer, then follow the onscreen instructions to complete the
printing.
• Print a note: Open
the onscreen instructions to complete the printing.
Connect to a VPN Network
A virtual private network (VPN) is a temporary connection that extends a private network
y and Notepad, do the following:
Gallery. O
Notepad. O
pen the image you want to print, go to More > Print
pen the note you want to print, touch Print, then follow
across a public network, encrypting data transmission to provide security.
When working outside the oce, you can use a VPN to securely access your company's
Intranet.
The following types of servers are supported:
• PPTP: Point-to-Point Tunneling Protocol, oering MPPE encryption.
• L2TP: Layer 2 (Data Link Layer) Tunneling Protocol, oering IPSec PSK and IPSec RSA
encr
yption.
• IPSec Xauth: Oering PSK, RSA, and Hybrid RSA encryption.
53
Page 57

Connect to a PPTP Server
Settings
1 Obtain the VPN ser
2 Go to
name, set the server type to PPTP, then enter the server address.
Settings > Mor
ver name and address from your VPN server administrator.
e connections > VPN > Add VPN network, enter the VPN
3 If the VPN server does not have a DNS address, touch Show advanced options, then
enter the DNS domain, DNS server address, and forwarding route.
4 Touch Save.
5 Touch the VPN you have just set up, enter your VPN username and password, then touch
Connect.
Connect to a L2TP/IPSec PSK Server
1 Obtain the VPN server name, address, L2TP key (optional), IPSec identier (optional), and
IPSec pr
2 Go to
server name, set the server type to L2TP/IPSec PSK, then enter the server address, L2TP
key, IPsec identier, and IPsec pre-shared key.
e-shared key from your VPN server administrator.
Settings > Mor
e connections > VPN > Add VPN network, enter the VPN
3 If the VPN server does not have a DNS address, touch Show advanced options and enter
the DNS domain, DNS server address, and forwarding route.
4 Touch Save.
5 Touch the VPN you have just set up, enter your VPN username and password, then touch
Connect.
Home Screen & Wallpaper
Manage the Home Screen
You can customize the home screen layout to suit your tablet usage habits.
Keep Home Screen Icons Aligned
Pinch two ngers together on the home screen to access Home scr
enable Auto-align. With this feature enabled, empty spaces will automatically be lled when
apps are removed.
een settings mode, then
Lock Home Screen Icon Positions
Pinch two ngers together on the home screen to access Home screen settings mode, then
enable Lock layout.
Select the Home Screen Layout Pattern
Pinch two ngers together on the home screen, go to Home screen settings > Layout, then
select a layout pattern you prefer.
54
Page 58

Add App Icons to a Folder or Remove Them
pen a folder and touch
O
. Then you can:
Settings
• Select one or mor
• Deselect one or more apps, and touch OK to remove them from the folder. If you deselect
e apps, and touch OK to add them to the folder.
all apps, the folder will be deleted.
App Drawer
You can put your apps in a drawer and display only frequently used apps on your home
screen to streamline your home screen.
Enable App Drawer
Go to
Once enabled, you can swipe up on the home screen to access all of your apps in the drawer.
Disable the App Drawer
To disable the App Drawer, set Home screen style to Standard.
Settings > Home screen & wallpaper > Home screen style, and select Drawer.
Display & Brightness
Use eBook Mode
Use eBook mode to prevent eye fatigue if you read for an extended period of time on your
tablet. When eBook mode is enabled, the screen of your tablet will turn black and white to
make it easier for your eyes and help you enjoy a comfortable reading experience.
You can enable or disable eBook mode using either of the following methods:
• Swipe down from the status bar to open the notication panel, then swipe down on it
again to sho
If the switch is not available, touch
een for it to display in the notication panel.
scr
• Go to
• If eBook mode is enabled together with Eye comfort mode, eBook mode will take
w all shortcuts. Touch to enable or disable eB
and nd and drag the switch towards the top of the
Settings > D
isplay & brightness, and enable or disable eBook mode.
eect to turn the screen of your tablet black and white.
ook mode.
• If eBook mode is enabled together with Dark mode, the background of the screen will
be black and text will be white.
Brightness and Color Temperature
ou can set the screen brightness, color mode, and color temperature according to your
Y
preferences.
55
Page 59

Manually Adjust the Screen Brightness
ou can manually adjust the screen brightness using either of the following methods:
Y
Settings
• Swipe down from the status bar to open the notication panel. In the
slider to adjust the scr
• Go to
een brightness.
scr
Settings > D
een brightness.
isplay & brightness. In the
section, drag the slider to adjust the
section, drag the
Adjust the Color Temperature
Go to
Settings > D
isplay & brightness > Color temperature, and select the color
temperature that you prefer. Default and Warm will be easier on your eyes and are therefore
recommended.
• Default: a natural tint
• Warm: a yellowish tint
• Cool: a whitish tint
• You can touch anywhere on the color circle or drag the spot to adjust the color
temperature.
Eye Comfort mode
Eye comfort mode can eectively reduce blue light and adjust the screen to show warmer
c
olors, relieving eye fatigue and protecting your eyesight.
ter every half hour of screen time, rest your eyes for at least 10 minutes.
• Af
• Look into the distance to adjust the focusing muscles of your eyes and to avoid eye
fatigue.
• Cultivating good eye care habits will protect your vision and prevent near-sightedness.
Enable or Disable Eye Comfort Mode
• S
wipe down from the status bar to open the notication panel, then swipe down on it
again to show all shortcuts. Touch
to access the E
• Go to
Settings > D
ye Comfort settings screen.
isplay & brightness > Eye Comfort, and enable or disable Enable
to enable or disable E
ye Comfort. Touch and hold
all day.
Once Eye Comfort is enabled,
tak
e on a yellow tint as a result of emitting less blue light.
will be displayed in the status bar, and the screen will
56
Page 60

Set a Schedule for Eye Comfort Mode
Settings
Go to Settings > D
and End according to your preferences.
Customize Eye Comfort Mode
Go to
Scheduled, and adjust the slider under Filter level to customize how much blue light you
would like to be ltered.
Settings > D
isplay & brightness > Eye Comfort, enable Scheduled, then set Start
isplay & brightness > Eye Comfort, enable Enable all day or set up
Dark Mode
w light conditions or at night, you can enable Dark mode to apply a darker color
In lo
scheme, which helps prevent excessive screen light from irritating your eyes.
Go to
Settings > D
isplay & brightness, and enable or disable Dark mode.
Adjust Text Style Settings
You can adjust the system text size and app display size, as well as the text style.
Enlarge or Reduce Text Size
Go to
Text size.
Enlarge or Reduce Display Size
Display size determines the size of content (including text and images) displayed within
apps.
Go to
Display size.
Settings > D
Settings > D
isplay & brightness > Text and display size, and drag the slider for
isplay & brightness > Text and display size, and drag the slider for
Screen Resolution
Use Smart Screen Resolution
Go to
automatically adjust the screen resolution according to the current running status.
Settings > Display & brightness, and enable Smart Resolution. Your tablet will
Display Carrier Name and Network Speed in the Status Bar
You can check the carrier name and network speed with a single glance at the status bar.
Go to Settings > D
Display carrier name and Display network speed according to your preferences.
This feature is not supported on Wi-Fi only tablets.
isplay & brightness > More display settings, and enable or disable
57
Page 61

Switch Between Portrait and Landscape Orientation
Settings
The built
horizontal and landscape orientations when you rotate the screen.
Swipe down from the status bar to open the notication panel, then swipe down on it again
to sho
GPU T
GPU Turbo represents a radical redesign of the graphics processing framework of the tablet
at its most basic level, integrating hardware and software to achieve accelerated graphics
processing. It improves the device's graphics processing eciency, image quality, and
performance, whilst simultaneously reducing system power consumption.
The end result is a great improvement in user experience when playing graphically intense
games.
-in gravity sensor of your tablet allows you to automatically switch between
w all shortcuts. Touch
to enable or disable this feature.
urbo
Sounds & Vibration
Do Not Disturb
Do Not Disturb helps you prevent interruptions when you need to focus. When this mode is
enabled, calls and messages will be muted and banner notications will not be displayed.
Enable or D
You can enable or disable Do not disturb using either of the following methods:
• Swipe down from the status bar to open the notication panel, then swipe down again to
display all shortcuts. Touch
hold
This feature is not supported on Wi-Fi only tablets.
• Go to Settings > Sounds & vibr
Disturb.
When Do not disturb is enabled,
isable Do Not Disturb
to enable or disable Do Not D
to access the Do Not D
isturb. You can touch and
isturb settings screen.
ation > Do Not Disturb, and enable or disable Do Not
will be displayed in the status bar. You can check for
notications on the lock screen or by swiping down from the status bar to open the
notication panel. Swipe left on a notication and touch to delay the notication.
When you receive calls, notications, or messages, they will be muted, the screen will not
light up
, and banner notications will not be displayed.
58
Page 62

Set a Schedule for Do Not Disturb
Settings
1 Go to Settings > Sounds & vibr
ation > Do Not Disturb, and disable Do Not Disturb.
2 Enable Scheduled. Your tablet will enter Do not disturb mode at the specied time on
Saturdays and Sundays by default.
3 Touch Scheduled to set the time frame and repeat cycle.
4 You can also touch Add to set multiple start times.
Make Exceptions in Do Not Disturb Mode
While in Do Not Disturb mode, you can enable your tablet to ring for calls and messages
from certain sources so you don't miss anything important.
Go to
Scheduled. Then you can:
• Touch Calls or Messages and select one of the options. If you set an exception, your tablet
will ring for calls or messages from the selected source.
• Once Repeated calls is enabled, a second call from the same number within 15 minutes
will not be silenced.
Settings > Sounds & vibr
ation > Do Not Disturb, and enable Do Not Disturb or
Voice calls are not supported on Wi-Fi only tablets.
Set the SMS Notication Tone
1 Go to
Settings > Sounds & vibr
ation, then touch Messaging tone.
2 Select a preset tone, or touch Music on device to select a local song as the SMS
notication tone.
This feature is not supported on Wi-Fi only tablets.
Set the Notication Tone
You can set a global notication tone or set tones for specic apps, such as Notepad or
Calendar
Set the Default Notication Tone
1 Go to
.
Settings > Sounds & vibration, and touch Notication sound.
2 Select a preset tone, or touch Music on device to select a local song as the notication
tone.
Set the Notication Tone for a Specic App
You can set the notication tone for certain apps by doing the following:
1 Go to Settings > Apps > Apps.
2 Select an app (f
or example, Notepad).
59
Page 63

3 Go to Notications > Notepad > Sound.
Settings
4 Select a pr
tone.
eset tone, or touch Music on device to select a local song as the notication
Huawei Histen Sound Eects
Huawei Histen sound eects, with 3D surround sound support, deliver vibrant and crisp
sound to create an immersive audio experience.
Huawei Histen sound eects are only available when a headset is plugged in.
Go to Settings > Sounds & vibr
option:
• Auto: Automatically identies what you are playing and intelligently applies sound eects
to optimize your experience.
• 3D audio: Delivers 3D spatial sounds.
• Natural: Faithfully reproduces the original sounds.
• Standard: Requires less power for audio playback. You can also customize equalizer
settings yourself to achieve the exact sound you are looking for.
ation > Huawei Histen sound eects and select an
Auto, 3D audio, and Standard modes allow you to select a headset type so you can match
the sound eects to your headset.
Notications
App Badges
When new notications arrive for an app, a numbered badge will appear on the app icon.
Y
ou can also set a dot as the badge, or hide the badge for some or all apps.
Turn O App Badges
1 Go to
Settings > Notications, and touch App ic
2 Turn o the switch for some or all apps.
Change the Badge Display Mode
On the App icon badges screen, touch Badge display mode, and select Numbers or Dots
on badges.
according to your preference.
Disable or Change the App Notications
Disable App Notications
You can choose not to receive notications from apps in any of the following ways:
ter you receive a notication from an app, nd it on the notication panel, swipe left on
• Af
the notication, go to
> Mor
e settings, and disable Allow notications.
60
Page 64

Settings
• Go to Settings > Notications,
notications, then disable Allow notications.
• Go to
Notications, and disable Allow notications.
Change the Way How App Notications Are Sent
1 Go to
Settings > Apps > Apps, touch the ic
Settings > Notications, select an app, and enable Allo
nd the app for which you want to disable
on of the app you want to set, touch
w notications.
2 Follow the onscreen instructions to set up how notications are sent:
• Mute notications
• Select the notication style (including Lock screen notications and Banners).
• Select a notication sound.
• Enable or disable the funct
D
isturb is enabled.
Notication methods supported by an app may vary.
ion that allow notications from the app even when Do Not
Lock Screen Notications
Go to
content will no longer be displayed on the lock screen of your tablet. When Hide
notication content is disabled, the c
lock screen.
More
Go to
Your tablet will automatically turn on the screen when it receives a notication.
Settings > Notications and enable Hide notication content. Notication
ontents of new notications will be displayed on the
Notication Settings
Settings > Notications > Mor
e notication settings and enable Wake screen.
Biometrics & Password
Lock Scr
You can set a numeric, pattern, or hybrid password as your lock screen password.
een Password
Set the Lock Screen Password
You can set a numeric, pattern, or hybrid password.
1 Go to
Settings > Biometrics & passw
ord and touch Lock screen password.
2 Enter a password containing 6 digits.
3 Alternatively, touch Change unlock method and select a password type, then follow the
onscreen instructions to input a new password.
61
Page 65

Change the Lock Screen Password
Settings
1 On the Biometrics & passw
ord screen, go to Change lock screen password.
2 Enter the original lock screen password.
3 Enter a new password, or touch Change unlock method to select a password type, then
follow the onscreen instructions to input a new password.
Disable Lock Screen Password
On the Biometrics & password screen, go to Disable lock screen password.
Apps
View or Change App Settings
Go to
the app cache, view and change app permissions, set notication modes, and more.
Some apps cannot be uninstalled.
Settings > Apps > Apps, and touch an app
. You can force stop it, uninstall it, clear
Battery
Check P
Go to
ouch Battery usage to view power-intensive apps. Touch a power-intensive app to enable
• T
or disable power consumption alerts.
• Touch Power consumption details to learn more about the software and hardware power
consumption.
Power Management
On the Battery screen, you can check the estimated battery time remaining, and enable a
power saving mode to extend the battery life of your tablet.
Optimize Tablet Power Settings
Go to
ower Consumption
Settings > Bat
Settings > Bat
tery (or
tery (or
Tablet Manager > ). You can:
Tablet Manager > ) and touch O
ptimize battery
usage. Your tablet will automatically analyze the current power consumption issues, optimize
certain settings, and recommend other setting optimizations.
Enable Power Saving Mode
Tablet Manager provides two power saving modes:
• Power Saving mode reduces power consumption by limiting background app activity,
visual eects, and sounds.
62
Page 66
Settings
• Ultr
a Power Saving mode strictly controls background apps to ensure that your tablet can
stay on for as long as possible. In this mode, you will only be able to use selected apps, and
all system switches, except for Wi-Fi and mobile data, will be turned o.
On the Battery screen, select a power saving mode:
• When the battery level is extremely low, enable Ultra Power Saving mode. Your tablet will
then display a black home screen.
To add apps you wish to use in Ultra Power Saving mode, touch
om the list. You can touch
fr
to exit Ultr
• When the battery level is not extremely low, but you would still like to save power, enable
a Power Saving mode.
Power Saving mode. The
Ultra Power Saving mode is not av
to remove the apps or touch in the upper right corner
icon will then be displayed in the status bar.
ailable on some devices. If this option is not
and select the apps
displayed, it indicates that your device does not support the feature.
Enable Performance Mode
erformance mode adjusts power settings to deliver maximum performance. This will cause
P
the battery to drain more quickly, especially when graphic-intensive apps are used.
When the battery level is sucient, go to
) and enable P
The
icon will then be displayed in the status bar.
Performance mode is not av
erformance mode.
ailable on some devices. If this option is not displayed in
Settings > Bat
tery (or
Tablet Manager >
Tablet Manager, it indicates that your device does not support the feature.
Battery Settings
ou can also set whether to display the battery percentage in the status bar, and whether to
Y
maintain a network connection when the tablet screen is turned o.
Display Battery Percentage in the Status Bar
Go to
Settings > Bat
tery (or
Tablet Manager > ), touch Bat
tery percentage,
and choose to display the battery percentage, either inside or outside of the battery icon in
the status bar.
Stay Connected While Your Device is Sleeping
If you would like your tablet to continue to receive messages or download data while it is in
sleep mode, set your tablet to stay connected when it sleeps. Please note that this may
increase power consumption.
63
Page 67

Settings
On the Bat
while asleep as required.
tery screen, touch More battery settings, then enable or disable Stay connected
Storage
Check Storage Usage
Go to
necessary.
Settings > Stor
Security
App Lock
Go to
the apps to lock.
Settings > Securit
age to check storage usage and optimize it when you feel
y > App Lock > Enable, set the App Lock password and select
Change the App Lock Password or Security Questions
> P
Enter the App Lock settings screen, go to
password or Custom PIN as the App Lock password.
If you select Custom PIN, you can go on to set a new password and security questions.
Cancel or Disable App Lock
On the App Lock settings screen, do the following:
• Cancel App Lock: On the list of locked apps, toggle o the switches beside the apps for
which you want to cancel App Lock.
> D
• Reset App Lock: Go to
clear all App Lock settings.
isable App Lock > DISABLE. This will cancel all locks, and
assword type, and select Lock screen
Smart Unlock
Smart Unlock enables you to unlock your tablet with a Bluetooth device, such as a smart
band. When a compatible Bluetooth device is detected, you can unlock your tablet without
the need to verify your identity using a password, for example.
1 Set a lock screen password for your tablet.
2 Go to
3 Touch
cessful, the Bluetooth device name will be displayed in the Paired devices list on the
suc
Smart Unlock settings screen.
Settings > Biometrics & passw
to pair with a Bluetooth device, such as a smart band. After the pairing is
ord > Smart Unlock, and enable Smart Unlock.
64
Page 68

4 T
ouch the Bluetooth device name in the Paired devices list, touch Ok, and follow the
onscreen instructions to set this device as the Unlocking device.
Afterwards, your tablet will automatically unlock when the Bluetooth device is in close
proximity to it.
Settings
To learn more about Smart Unlock, touch
on the Smart Unlock set
tings screen.
Pin a Screen
You can pin the screen of an app so you can stay focused on it. Try this feature when playing
games, watching videos, and more.
Go to
pinning.
• When using gesture navigation, swipe up from the bottom of the screen and hold to access
the recent tasks screen, then touch
the bot
• When using three-key navigation, touch
Settings > Securit
tom of the screen.
on an app preview. To unpin, touch and hold .
y > More settings > Screen pinning, and enable Screen
on an app preview. To unpin, swipe up twice from
to access the recent tasks screen, and touch
Priv
acy
Permission Management
Apps may require certain permissions, such as the Location permission, in order to provide
you with corresponding services.
However, some apps may obtain too many unnecessary permissions, posing potential risks to
your privacy and information security. You can monitor the permissions granted to each app
and deny those you deem unnecessary.
Manage the Location Permission
With the Location permission, apps can obtain your location to provide location-based
services. For example, if a map app obtains the Location permission, it can provide you with
location and navigation services. You can disable the permission if you do not need these
services.
1 Go to
Settings > Apps > P
ermission manager.
2 On the Permission manager screen, enter Location, touch the app you want to manage,
and select an option.
65
Page 69

Settings
Manage Permissions to Access Other Private Data
ou can also manage permissions to access your personal data, such as Contacts, Messaging,
Y
Call logs, Body sensors, Calendar, and Camera, to enjoy better services and protect your
privacy.
On the Permission manager screen, touch the permission you want to manage, and toggle
the switch for each app on or o as required.
Accessibility Features
Accessibility
Screen reader apps are designed to assist visually impaired users to use a tablet.
Enable Color Correction to Customize the Screen Color
Color correction helps people with poor eyesight see the screen content more easily.
1 Go to
Color correction.
Settings > Ac
cessibility features > Accessibility > Color correction and enable
2 Touch Correction mode to select a color correction mode.
Use Magnication Gestures
Use magnication gestures to zoom in on the screen.
On the Accessibility > Magnication screen, touch Magnication, then enable it.
Zoom in or out by touching the screen three times in a row.
• While zoomed in, spread two or more ngers to further zoom in, then pinch two or more
ngers together to zoom back out.
• Drag the screen with two or more ngers to view other parts of the screen.
Enable Color Inversion
Color inversion allows you to invert the color of the text and the background. When Color
inversion is enabled, your tablet will display text in white and the background in black.
On the Accessibility screen, enable Color inversion.
Use a Shortcut to Activate an Accessibility Feature
You can use Volume buttons to quickly activate an accessibility feature.
1 On the Accessibility screen, touch Accessibility shortcut.
2 Touch Select feature to select the feature you want to activate with the shortcut.
3 Enable Accessibility shortcut. You can now press and hold the Volume up and down
buttons simultaneously for 3 seconds to activate the feature.
66
Page 70

Settings
Adjust the Touch and Hold Delay
ouch & hold delay allows you to adjust the time the screen takes to respond when you
T
touch and hold something.
On the Accessibility screen, touch Touch & hold delay, then select a delay option according
to your preferences.
Scheduled Power On/O
Use the Scheduled power on/o feature to power your tablet on and o at set times, to
save power and prevent interruptions while resting.
1 Go to
Scheduled power on/o.
Settings > Ac
cessibility features > Scheduled power on/o, and enable
2 Set the power on and o times, as well as the repeat cycle. Your tablet will power on and
o automatically at the specied times.
T
o stop using this feature, disable Scheduled power on/o.
System & Updates
Language and Region
1 Go to
then select the language you want to use.
Settings > S
2 If the language is not listed, touch Add language, then locate and touch it to add it to
the list.
3 Touch Region to select a country/region, so the display content will adapt to the local
culture and habits of the country/region you have selected.
ystem & updates > Language & input > Language and region,
Input Method
You can download a third-party input method and set it as the default input method.
1 Download the input method from an ocial app market.
2 F
ollow the onscreen instructions to set it as the default input method, or go to
Settings > S
input method.
Date and Time
Your tablet is able to sync to the local date, time, and time zone over a mobile network. You
can also manually set the date, time, and time zone for your tablet.
Go to
your requirements.
ystem & updates > Language & input > Default keyboard and select the
Settings > S
ystem & updates > Date & time, then set the options according to
67
Page 71

Set the Date and Time Automatically or Manually
Settings
• Enable Set automat
ically, and your tablet will sync to the local date and time over a
mobile network.
• To manually set the date and time, disable Set automatically.
Change the Time Zone
This feature is not supported on Wi-Fi only tablets.
• Enable Set automat
ically, and your tablet will sync to the local time zone over a mobile
network.
• To manually set the time zone, disable Set automatically.
Change the Time Format
• Enable 24-hour time and your tablet will display time in the 24-hour format.
• Disable 24-hour time and your tablet will display time in the 12-hour format.
Back Up with an External Storage Device
Back Up with a Memory Card
Insert a memory card in your tablet so you can conveniently back up your data to keep it
safe.
1 Go to
Settings > S
ystem & updates > Backup & restore > Data backup > External
storage and touch Memory card.
2 Touch BACK UP, select the data you want to back up, then touch Back up.
3 Follow the onscreen instructions to set the password and password hint. The data will be
encrypted and backed up. The password will be required if you want to restore your data
backup.
To reset the password, go to the Memory card backup screen, then
passw
ord.
The new password is only valid for backups created thereafter.
4 Af
ter the backup is complete, you can nd your data backup in the Huawei folder in Files
> Categories > Memory card.
You can go to the Memory card backup screen and enable Auto-backup. Your tablet will
then automatically back up your data every seven days when it is being charged, the screen
> Reset
is turned o, and the battery level is at least 75%.
Restore Your Backup from a Memory Card
1 Go to
Settings > S
ystem & updates > Backup & restore > Data backup > External
storage and touch Memory card.
2 Select the backup you want to restore from the RESTORE FROM BACKUP list.
3 Select the data you want to restore, touch Restore, and enter the password as prompted.
68
Page 72

Settings
Back Up with a USB Storage Device
In case of insucient storage space on your tablet, you can back up large les and any data
on a U
SB storage device, such as a USB ash drive or card reader.
1 Connect your tablet to a USB storage device via a USB OTG cable.
2 On the External storage screen of your tablet, touch USB storage.
3 Touch BACK UP, select the data you want to back up, then touch Back up.
4 Follow the onscreen instructions to set the password and password hint. The data will be
encrypted and backed up. The password will be required if you want to restore your data
backup.
To reset the password, go to the USB storage backup screen, then
The new password is only valid for backups created thereafter.
Restore Your Data from a USB Storage Device
1 Connect y
our tablet to a USB storage device via a USB OTG cable.
> Reset passw
ord.
2 On the External storage screen of your tablet, touch USB storage.
3 Select the backup you want to restore from the RESTORE FROM BACKUP list.
4 Select the data you want to restore, touch Restore, and enter the password as prompted.
Back Up with a NAS Device
You can back up your important data on a network-attached storage (NAS) device, also
known as a private cloud storage server. The NAS device provides shared folders for data
backup.
1 On the External storage screen of your tablet, touch Shared folder.
2 On your tablet, scan for available NAS devices using your Wi-Fi network, then touch an
applicable one to access and add its shared folders.
3 Touch BACK UP, select the data you want to back up, then touch Back up.
4 Follow the onscreen instructions to set the password and password hint. The data will be
encrypted and backed up. The password will be required if you want to restore your data
backup.
To reset the password, go to the Shared folder backup screen, then
passw
ord.
The new password is only valid for backups created thereafter.
> Reset
Restore Your Data from an NAS Device
1 On the E
xternal storage screen of your tablet, touch Shared folder.
2 On your tablet, scan for available NAS devices using your Wi-Fi network, then touch an
applicable one to access and add its shared folders.
3 Select the backup you want to restore from the RESTORE FROM BACKUP list.
69
Page 73

Settings
4 Select the data y
ou want to restore, touch Restore, and enter the password as prompted.
Reset Your Tablet
Reset Network Settings
This operation will reset your Wi-Fi, mobile data network, and Bluetooth settings. It will not
change any other settings on your tablet or delete any data.
Go to
Settings > S
the onscreen instructions to reset network settings.
Restore All Settings
This operation will reset all network settings and your lock screen password. If your tablet
supports ngerprint or facial recognition, the enrolled ngerprints and facial data will be
deleted as well. Other data or les will not be deleted from your tablet.
Go to
Settings > S
ystem & updates > Reset, touch Reset network settings, then follow
ystem & updates > Reset, touch Reset all settings, and follow the
onscreen instructions to reset all settings.
Restore Factory Settings
This operation will erase data on your tablet, including your accounts, app data and system
settings, installed apps, music, images, all les in the internal storage, security chip contents,
and locally-stored system, app, and personal data related to HUAWEI IDs. Make sure to back
up your data before restoring your tablet to its factory settings.
Go to
Settings > S
ystem & updates > Reset > Reset tablet, touch Reset tablet, and
follow the onscreen instructions to restore factory settings.
Update the System Online
When an update is available, your tablet will prompt you to download and install the update
package.
• B
efore updating, make sure your tablet is running an ocial system version. Otherwise,
the update may fail and your tablet may experience unknown issues.
• Back up your user data before the update.
• After an update, third-party apps that aren't compatible with the new system version
may become unavailable. In some cases, it may take some time for a compatible app
version to be released.
• During the update, do not power o or restart your tablet, remove the memory card,
or insert a memor
1 Go to
Settings > S
y card.
ystem & updates, and touch Software update.
70
Page 74

Settings
2 When an update is av
package, or update your tablet automatically overnight.
• Download and install the update package: Go to New version > DOWNLOAD AND
INSTALL. To avoid data usage, connect your tablet to a Wi-Fi network when
downloading the update package.
Your tablet will automatically restart once the update is complete.
• Update overnight: Touch
overnight.
Your tablet will automatically update and restart between 02:00 – 04:00.
To ensure a successful overnight update, make sure that your tablet is powered on, the
screen is locked, there are no alarms set for this period of time, and the battery level
remains higher than 35%. Connect your tablet to a charger if necessary.
To disable automatic updates, touch
download over Wi-Fi.
ailable, you can either manually download and install the update
, and enable Auto-
on the Sof
download over Wi-Fi and Update
tware update screen, then disable Auto-
About Tablet
Legal Disclaimer
Copyright © Huawei 2020. All rights reserved.
71
Page 75

This guide is for reference only. The actual product, including but not limited
to the color, size, and screen layout, may vary. All statements, information,
and recommendations in this guide do not constitute a warranty of any kind,
express or implied.
Please visit https://consumer.huawei.com/en/support/hotline for recent updated
hotline and email address in your country or region.
Model: AGS3-L09
AGS3-W09
AGS3-L03
EMUI 10.1_02
 Loading...