

Page 1

G7
User Guide
Page 2

Contents
New features
1 Read before use
1Safe
2 All focus mode
2 Taking photos from the timeline album screen
4 Scanning a QR code
4 Protecting your privacy
Getting started
6 Basic screen features
9 Personalizing your phone
10 Basic operations
11 Calling, contacts and messaging
13 Email
14 Internet connection
14 Browser
Entertainment
15 Camera
17 Gallery
18 Music
18 Playing a video
Contents
Transferring data
19 Bluetooth
19 Wi-Fi Direct
20 Multi-screen display
20 Huawei Beam
20 Connecting your phone to a computer
21 Connecting your phone to a USB storage device
Managing your phone
22 Managing applications
23 File Manager
25 Phone Manager
26 Backup, restoration, and update
Tools
28 Weather
28 Alarms
29 Mirror
Legal Notice
i
Page 3

New features
New features
Read before use
This guide only applies to phones that run EMUI 3.0.
Features in this guide are for your reference only. Some features may not be
supported by all phones.
Safe
Encrypt important and private files to prevent others from viewing them.
Enabling the Safe
1.
Open
Files
.
2.
Touch
Safe
.
3.
If your phone supports and has a microSD card inserted, you can choose to
SD card
or
create the Safe in
Internal
.
4.
Enable
Safe
and follow the onscreen instructions to set a password and
security question answer.
Adding files to the Safe
1.
Open
Files
.
2.
Touch
Safe
and enter your password.
3.
Touch . Then add some files to
You can then view the encrypted files in
Safe
.
Safe
.
1
Page 4
All focus mode
All focus mode lets you change the focus point on a photo after it's been
taken.
This function may not be supported by all models.
1.
Open
Camera
2.
Touch >
3.
Touch to take a photo.
4.
Touch to find the photo you've just taken, and touch to adjust the
focus point.
.
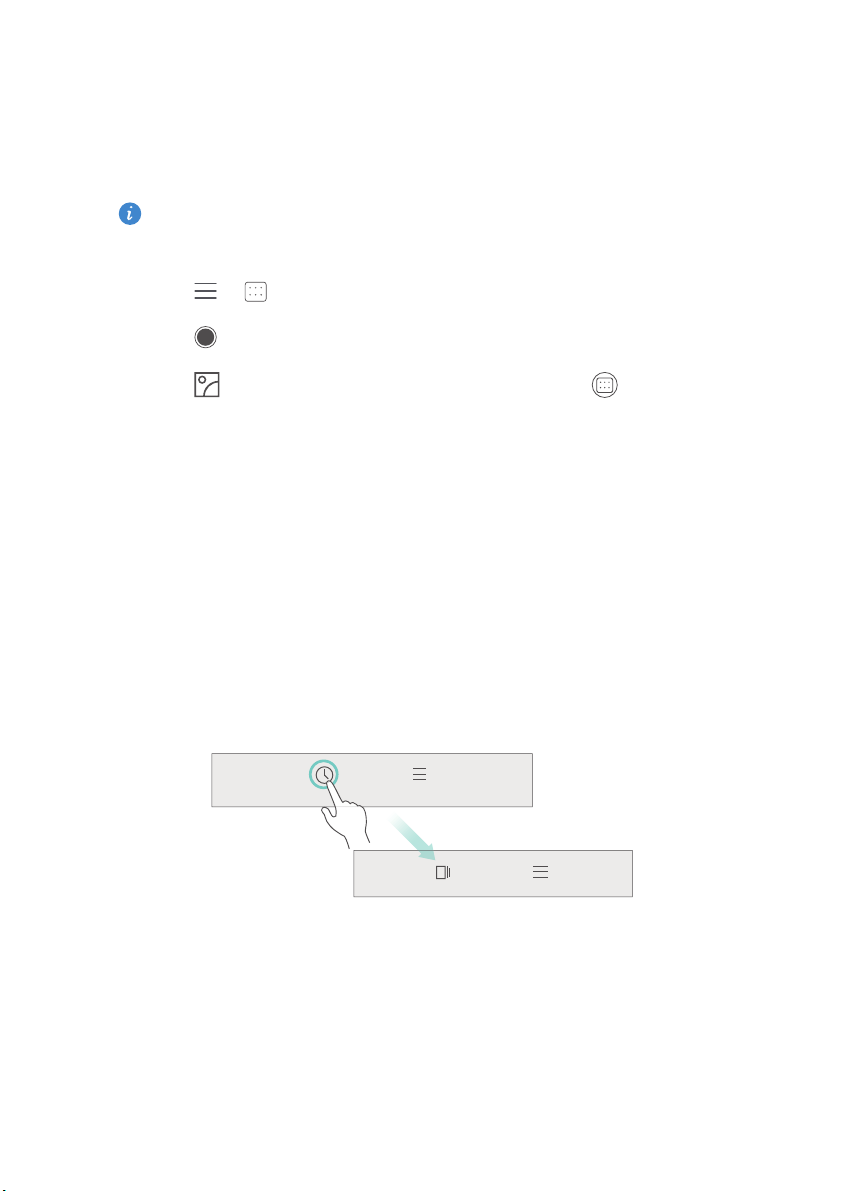
Taking photos from the timeline album
screen
You can take photos directly from
1.
Open
Gallery
.
2.
Touch the view switching button at the bottom of the screen to switch to
the timeline album view.
Gallery
.
2
Page 5
New features
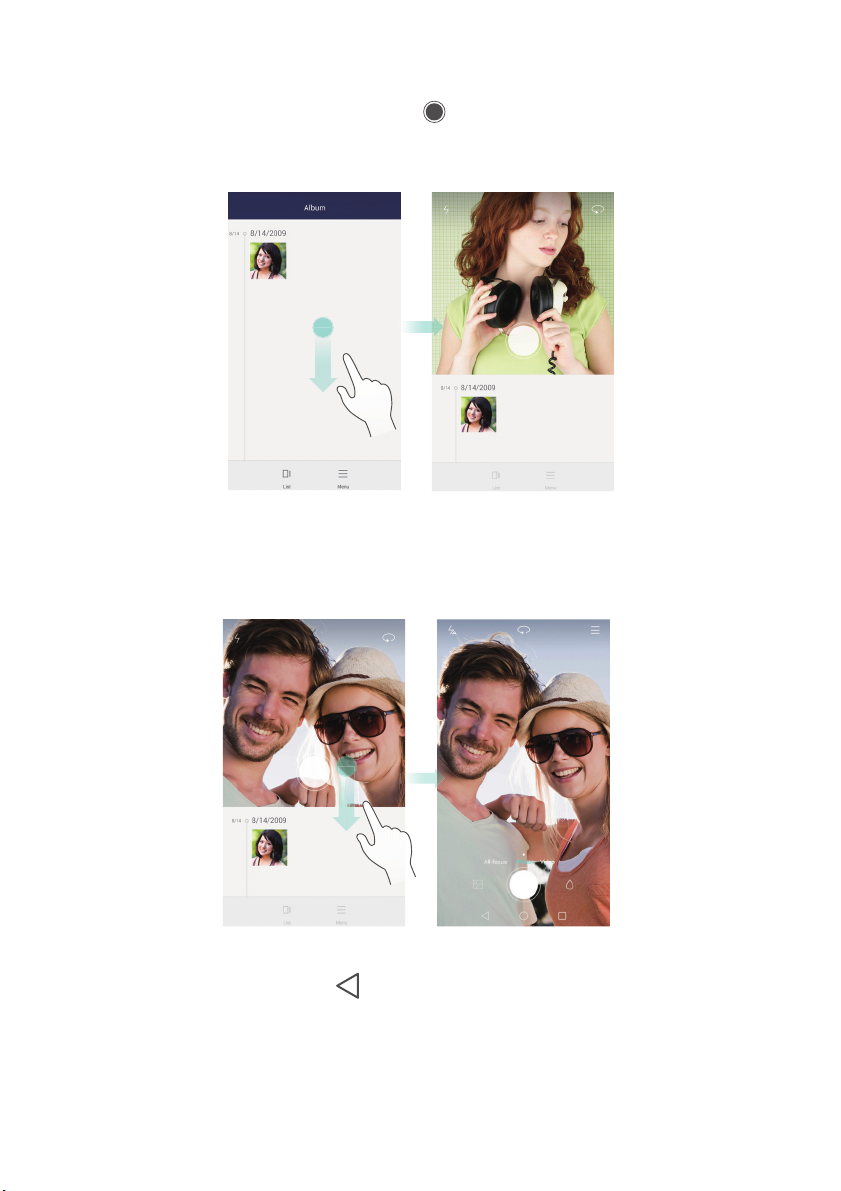
3.
On the timeline album screen, drag down on a blank area to launch the
camera in half-screen mode. Touch
4.
Drag the viewfinder further down to enter full-screen capture mode.
to take photos.
When you are done, touch to return to the timeline album screen.
3
Page 6

Scanning a QR code
Scanning a QR code using Gallery
1.
Open
Gallery
.
2.
Choose a QR code photo.
3.
Touch
View details
Scanning a QR code using Camera
1.
Open
Camera
2.
Frame the QR code with the camera.
code.
3.
Touch
.
View details
Gallery
will automatically scan the QR code.
to view the QR code details.
to view the QR code details.
Protecting your privacy
Camera
will automatically scan the QR
New features
What's Privacy protection?
If you have content on your phone that you want to keep private, you can set
two different unlock passwords, one for yourself, and the other for visitors. If
your phone is unlocked using the visitor password, all your private content
will be hidden.
Your contacts, albums, and applications are all able to be set as private.
Setting a privacy protection password
1.
Open
Settings
2.
Touch
3.
Choose a password style, and set your owner password and the visitor
password.
If you have set a screen unlock password, the password will be used as
the owner password by default.
Security
.
>
Privacy protection
>
Let's start
.
4
Page 7

Setting private information
1.
Open
Settings
2.
Touch
3.
Enter your owner password to access the
4.
Select the contacts, albums, or applications you want to set as private.
Security
.
>
Privacy protection
.
Privacy protection
screen.
New features
5
Page 8
Getting started
1
2
Getting started
Basic screen features
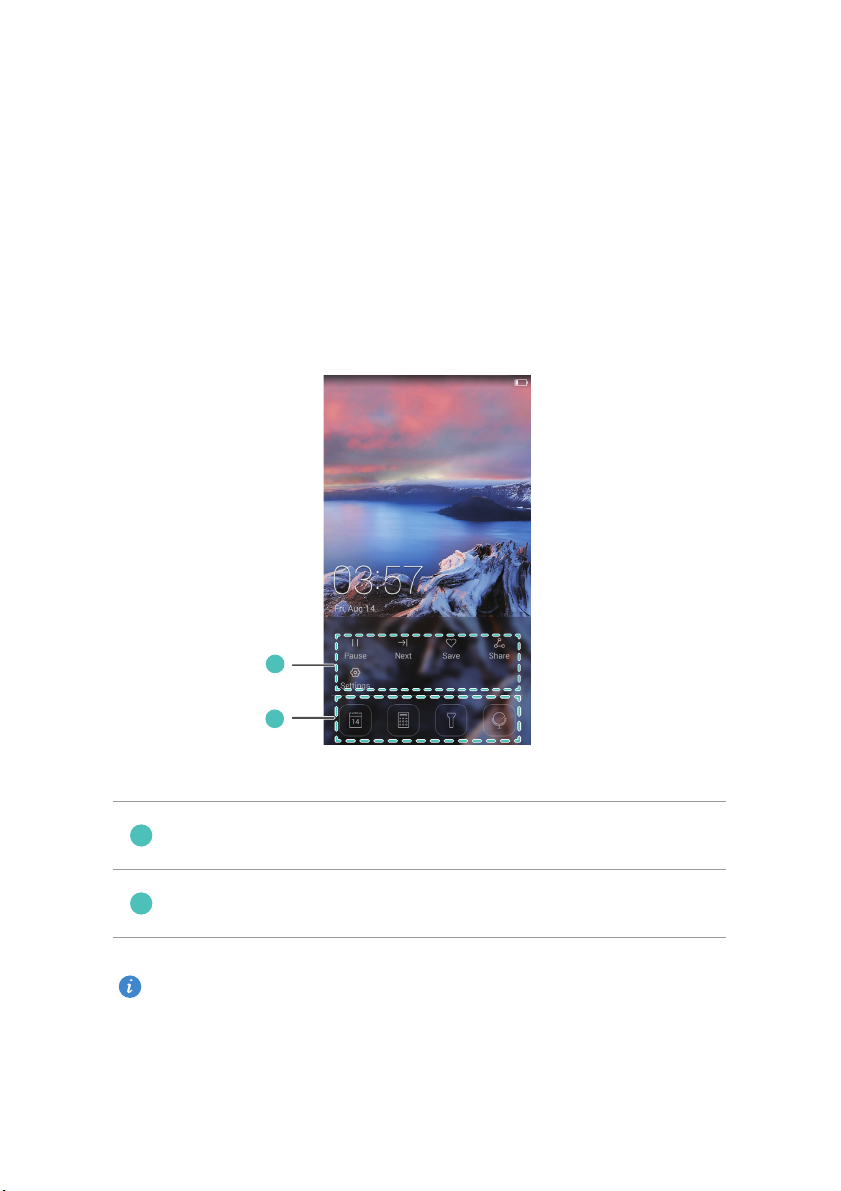
Magazine screen unlock
Flick up from the bottom of the screen to display the magazine unlock control
panel.
Magazine control area: Stop shuffling magazine covers, go to
the next page, add the current cover to favorites, and more.
Shortcut buttons: Access common tools, such as Calendar,
Calculator, and Flashlight.
This function may not be supported by all models.
6
Page 9
Getting started
Managing the home screen
Adding a widget
1.
Touch and hold a blank area on the home screen.
2.
Touch
Widgets
3.
Choose a widget and drag it to the home screen.
Creating a folder
On the home screen, drag one application on top of another to create a folder
containing both of them.
Adding or removing a home screen
Pinch three fingers together on the home screen to display the home screen
thumbnails. Touch to add a home screen or touch on the upper right
corner of a blank home screen to remove it.
.
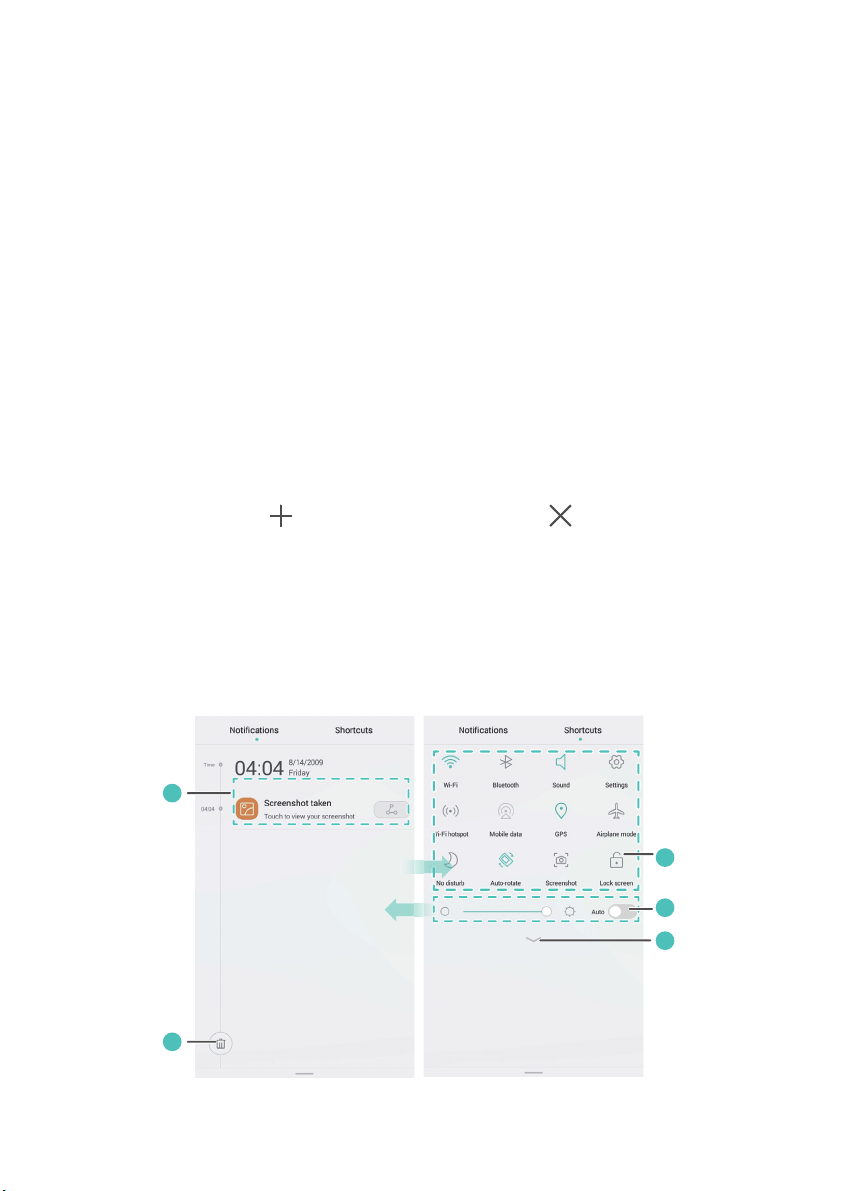
Notification panel
Flick down from the status bar to open the notification panel. Flick left or
right to switch between the
Notifications
and
Shortcuts
tabs.
7
Page 10
View detailed information about push notifications. Flick left or
1
2
3
4
5
right across a notification to dismiss it.
Clear all push notifications.
Expand or collapse the shortcut switches. (This feature may not
be supported by all models.)
Adjust the screen brightness.
Turn on or turn off common functions. Touch to customize
the shortcut switch list.
Auto-rotate screen
Getting started
Open the notification panel, go to the
or turn off auto-rotate.
Shortcuts
tab, and touch to turn on
Taking a screenshot
Press the power and volume down buttons simultaneously to take a
Gallery
screenshot. To view your screenshots, open
and touch
Screenshots
.
, switch to the list view,
Suspend button
Open
Settings
enable
be displayed on most screens. You can move it around by dragging it.
. Under
Suspend button
Smart assistance
. When this feature is enabled, the suspend button will
, touch
More
>
Suspend button
to
8
Page 11

Getting started
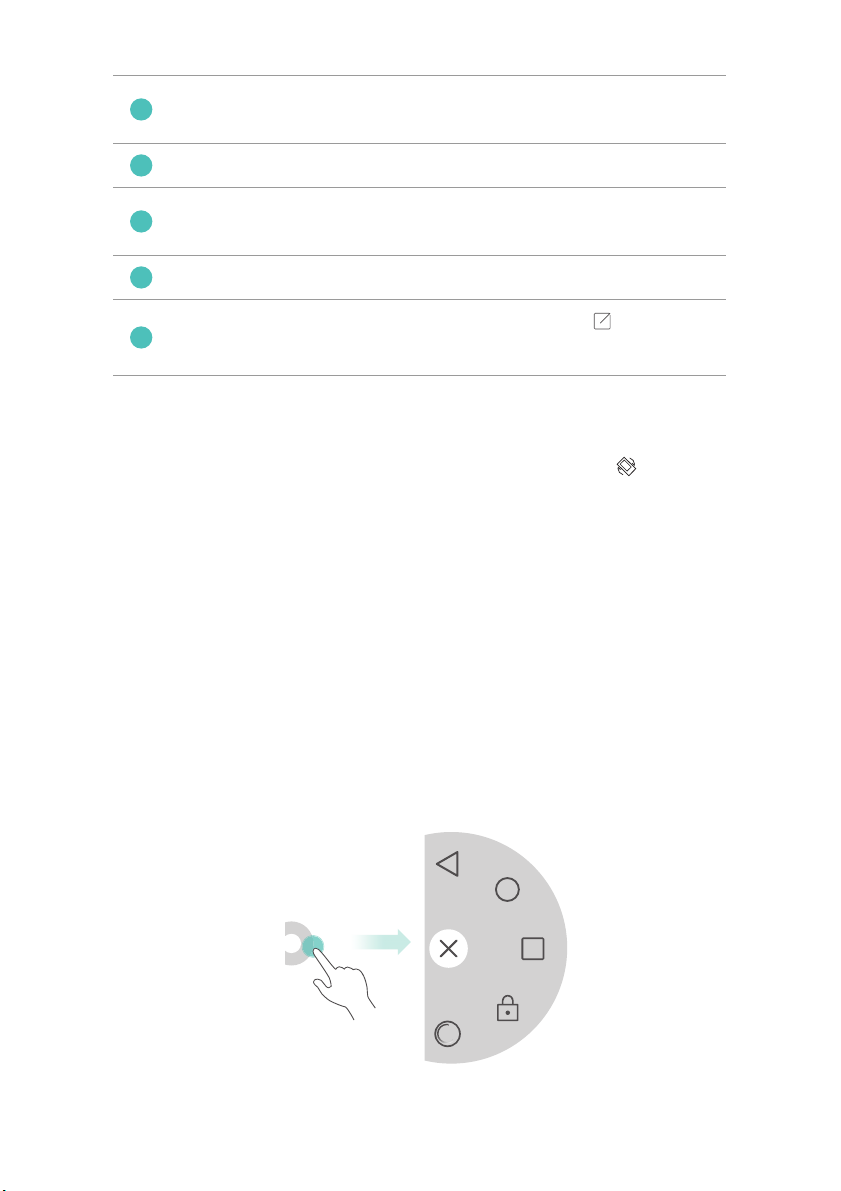
Touch the suspend button to expand the suspend button menu for the
following actions:
•
Touch to return to the previous screen.
•
Touch to go to the home screen.
•
Touch to view the list of recently used applications.
•
Touch to lock the screen.
•
Touch to optimize the system.
Personalizing your phone
Changing the wallpaper
1.
Touch and hold a blank area on the home screen.
2.
Touch
Wallpapers
3.
Set the wallpapers displayed on the phone lock screen and home screen.
You can also choose whether to have the home screen wallpaper change
randomly at timed intervals.
.
Using the simple home screen
1.
Open
Settings
2.
Touch
3.
Select
To switch back to the standard home screen, touch
screen style
.
Home screen style
Simple
.
>
Standard
.
on the simple home screen.
Settings
>
Home
9
Page 12

Getting started
Changing the theme
Touch
Themes
customize the themes.
to browse through and apply different themes. You can also
Setting notification tones
1.
Open the notification panel and go to the
2.
Touch and hold from the shortcut switches to enter the tone settings
screen.
3.
Set your notification tones, such as the ringtone.
Shortcuts
tab.
Changing the font size
1.
Open
2.
3.
Settings
Touch
Touch
Display
Font size
.
.
to select a font size.
Basic operations
Displaying or hiding the onscreen keyboard
•
Touch a text box to display the onscreen keyboard.
•
To hide the onscreen keyboard, touch .
Selecting an input method
Open the notification panel, switch to the
Choose input method
to select an input method.
Notifications
tab, and touch
10
Page 13

Getting started
Editing text
•
Touch and hold the text to display . Then, drag and to select
more or less text.
•
Touch where you want to insert the text and drag to move the insertion
point. You can then paste the text you copied or cut.
Calling, contacts and messaging
Placing a call
Placing a call
Open
Dialer
.
•
Enter the initials or first few letters of a contact's name, or part of the
contact's phone number. Then, select the contact you want to call from
the search results.
•
Touch
Contacts
•
Touch the contact you want to call from the call log.
, and select the contact you want to call from the contacts list.
11
Page 14

Getting started
Answering a call
•
Drag right to answer the call.
•
Drag left to reject the call.
•
Drag up to reject the call and send the caller a message. To edit the
message that will be sent, touch >
When there is an incoming call, you can press the volume button to mute
the ringtone.
Call settings
>
Reject calls with SMS
Turning on pocket mode
1.
Open
Dialer
.
2.
Touch >
3.
Turn on
Call settings
Pocket mode
.
.
Creating a contact
1.
Open
Contacts
2.
Touch .
3.
Choose the save location for the contact.
4.
Enter the contact name, phone number, and other details. Then, save the
contact.
.
.
12
Page 15

Getting started
Importing or exporting contacts
1.
Open
Contacts
2.
In the contacts list, touch >
•
Choose a method to import contacts.
•
Export contacts to a storage device or SIM card.
•
Share your contacts.
.
Import/Export
. You can then:
Messaging
1.
Open
Messaging
2.
On the message thread screen, touch .
3.
Touch to choose a contact.
4.
Write a message, touch to add attachments, and send the message.
.
Adding a POP3 or IMAP email account
1.
Open
Email
.
2.
Choose an email account type.
3.
Enter your email address and password, and touch
4.
Follow the onscreen instructions to set up the email account.
Next
Sending an email
1.
Open
Email
.
2.
On the inbox screen, touch to create an email.
•
Touch
From:
to choose an email account.
•
Enter the recipient and subject, and compose your email.
•
Touch to upload attachments.
3.
When you are done, touch to send the email.
.
13
Page 16

Getting started
Internet connection
Turning on the mobile network
To quickly turn on or turn off your mobile network, open the notification
panel, go to the
When you don't need to access the Internet, turn off the mobile network
to save battery power and reduce mobile data usage.
Shortcuts
tab, and touch .
Connecting to a Wi-Fi network
1.
Open the notification panel and go to the
2.
Touch and hold from the shortcut switches to enter the Wi-Fi settings
screen.
3.
Turn on Wi-Fi. Your phone then scans for available Wi-Fi networks and
displays them.
4.
Touch a Wi-Fi network to connect to.
•
If the network is open, you will directly connect to it.
•
If the network is encrypted, enter the password when prompted.
Shortcuts
tab.
Browser
With
Browser
, you can:
•
Browse web pages: Enter a web address in the address box.
•
Edit bookmarks: To add a bookmark, touch next to the address bar. To
view or delete a bookmark, touch >
•
Clear the browsing history: Touch >
history
.
Bookmarks & history
Settings
>
Privacy & security
.
>
Clear
14
Page 17

Entertainment
1
2
3
4
5
6
7
Camera
Capture screen
Entertainment
Turn on the flash.
Flick left or right to switch between common capture modes.
View photos and videos in
Take a photo or shoot a video.
Apply a special effect.
Switch between the rear and front cameras.
Choose a capture mode and set the camera parameters.
Gallery
.
15
Page 18

Entertainment
Taking a photo
1.
Open
Camera
2.
Frame the scene you want to capture. Let your camera focus automatically
or touch the screen to focus the camera.
3.
Touch to take a single photo, or touch and hold to take several
photos in rapid succession.
.
Capture mode
Not all models support the following capture modes:
•
Beauty
: Your phone automatically beautifies your skin and gives your
portraits a more professional touch-up. For some device models, you can
flick left or right on the capture screen to switch to beauty mode.
•
Panorama
into one stunning panoramic shot.
•
HDR
when ambient light is unbalanced.
•
Audio note
•
Best photo
automatically picks the best.
•
Watermark
photo as watermarks.
: Your phone takes several photos as you pan and stitches them
: High dynamic range imaging (HDR) helps improve the photo quality
: Your phone records a brief audio clip after you take a photo.
: Your phone takes several photos in rapid succession and
: Add the time, location, weather, and other information to a
Shooting a video
1.
Open
Camera
2.
Flick left or right to switch to video mode.
.
16
Page 19

Entertainment
3.
Frame the scene you want to record.
4.
Touch to start recording.
Setting the preferred save location for photos and videos
This section only applies to phones that support microSD cards.
After a microSD card is properly inserted into your phone, you can change the
preferred save location for photos and videos.
1.
Open
Camera
2.
Touch >
3.
Set the preferred save location for your photos and videos.
.
Settings
>
Preferred save location
.
Gallery
Playing a slideshow
1.
Open
Gallery
.
2.
On the timeline album screen, touch >
of the photos in the album.
3.
Touch the screen to stop the slideshow.
Slideshow
to play a slideshow
Applying a special effect
1.
Open
Gallery
.
2.
Touch the photo you want to edit, and touch .
3.
Follow the onscreen instructions to apply beauty mode, crop the photo,
rotate the photo, or perform other operations.
Sharing a photo or video
1.
Open
Gallery
.
2.
Touch the photo or video you want to share.
17
Page 20

Entertainment
3.
Flick up on the photo or video, and touch
phone then automatically enables Bluetooth and searches for nearby
Bluetooth devices.
Make sure Bluetooth is enabled on the receiving device and the device
is set to discoverable.
4.
From the search results, touch the receiving device's name.
After the two devices are paired for the first time, flick up on a photo or video
to quickly share it.
START
to turn on
Transfer
. Your
Music
Creating a playlist
1.
Open
Music
.
2.
Touch
Playlists
3.
Name and save the playlist.
>
Create new playlist
.
4.
Follow the onscreen instructions to add songs to the playlist.
Playing a playlist
1.
Open
Music
.
2.
Touch
Playlists
3.
Touch the playlist you want to play.
.
Playing a video
1.
Open
Videos
.
2.
Touch the video you want to play.
3.
Touch the onscreen control buttons to fast forward, rewind, stop, or
perform other operations.
18
Page 21

Transferring data
Transferring data
Bluetooth
Turning on Bluetooth
1.
Open the notification panel and go to the
2.
Touch and hold to enter the Bluetooth settings screen.
3.
Touch
Turn on Bluetooth
4.
From the search results, choose a Bluetooth device, and follow the
onscreen instructions to pair your phone with it.
To unpair the two devices, touch next to the other device, and touch
Unpair
.
If you can't set up a Bluetooth connection with another device, the
device may not be compatible with your phone.
.
Shortcuts
tab.
Sharing a file using Bluetooth
To exchange data with another Bluetooth device, enable Bluetooth on both
devices and make sure they are both discoverable.
Share
>
Touch and hold the file you want to send, and touch
Bluetooth
.
Wi-Fi Direct
Connecting two devices using Wi-Fi Direct
1.
Open the notification panel and go to the
2.
Touch and hold from the shortcut switches to enter the Wi-Fi settings
screen.
3.
Turn on
4.
Touch
5.
Choose a device.
Wi-Fi
.
Wi-Fi direct
to scan for available devices.
Shortcuts
tab.
19
Page 22

Transferring data
Sending a file using Wi-Fi Direct
1.
Open
Files
.
2.
Touch and hold the file you want to send, and touch
Share
>
Wi-Fi Direct
Multi-screen display
Connect your phone to other phones and tablets, smart household
appliances, and in-car devices for remote control and content sharing
through a wireless connection or accessory.
.
Open the notification panel, go to the
by touching . You can then push photos or videos from your phone to a
large screen, such as a TV or projector. To do so requires that your TV support
DLNA. If it does not, you can purchase an Android TV box or a similar wireless
transmission device.
Shortcuts
tab, and turn on
Multi-screen
Huawei Beam
This feature may not be supported by all models.
Huawei Beam lets you quickly share data between two Near Field
Communication (NFC) enabled phones. To beam a web page or contact to
another phone, place the two phones back to back and touch the content.
1.
Open
2.
3.
Settings
Under
Touch
.
Wireless & networks
NFC
, and turn on
NFC
, touch
and
More
.
Huawei Beam
.
Connecting your phone to a computer
MTP mode
MTP mode lets you transfer media files, such as photos, songs, and videos,
between your phone and a computer. Windows Media Player 11 or later is
required.
20
Page 23

Transferring data
HiSuite mode
HiSuite is a file transfer application developed by Huawei. It lets you back up,
synchronize, and transfer data between your phone and computer.
USB flash drive mode
This section applies to phones that support microSD cards only.
If a microSD card is inserted properly into your phone, you can use your phone
as a USB flash drive and transfer data between your phone and a computer.
Connecting your phone to a USB storage
device
This feature may not be supported by all models.
You can directly connect your phone to a USB storage device using a USB OTG
cable to transfer data. Compatible USB storage devices include USB flash
drives, card readers, and phones that work as USB flash drives.
21
Page 24

Managing your phone
Managing applications
Viewing recently used applications
Managing your phone
Touch
phone has a physical menu button, press and hold
•
Touch an application to open it.
•
Flick up on an application to close it.
•
Drag an application down until is displayed to lock the application.
Drag the application down again to unlock it.
•
Drag up from the bottom of the screen until is displayed to dismiss all
applications. Locked applications will not be dismissed.
Downloading applications
•
Download applications from application centers.
•
Download applications from web pages using the browser on your phone.
•
Download applications using a computer, and copy the applications to your
phone.
•
Connect the phone to a computer, and download applications using
HiSuite or other third-party applications.
Recent
to view the list of recently used applications. (If your
Menu
). You can then:
Installing an application
1.
Open
Files
.
2.
Under
Categories
3.
In the application list, touch the application you want to install, and follow
the onscreen instructions to install it.
, touch
Apps
.
22
Page 25

Managing your phone
During the installation, an
Install blocked
message may be displayed.
Read the message carefully. If you want to continue with the installation,
follow the onscreen instructions to allow the installation of third-party
applications.
Uninstalling an application
On the home screen, touch and hold the application you want to uninstall
until is displayed at the top of the screen. Drag the application to ,
and follow the onscreen instructions to uninstall it.
Some pre-installed applications can't be uninstalled.
File Manager
Creating a folder
1.
Open
Files
.
2.
Touch the
Local
tab.
3.
Under
Internal
>
New folder
4.
Name and save the folder.
or
SD card
.
(if available), switch to the list view, and touch
Searching for a file
1.
Open
Files
.
2.
Touch the
3.
Under
4.
Enter part or all of the file name. Search results are displayed as you type.
Internal
>
Search
Local
.
tab.
or
SD card
(if available), switch to the list view, and touch
23
Page 26

Copying, cutting, and pasting a file
1.
Open
Files
.
2.
Touch the
3.
Under
Local
Internal
tab.
or
SD card
(if available), switch to the list view, and touch
or .
4.
Choose a file, touch
Copy
or
Cut
, and choose where you want to paste the
file.
Compressing or decompressing a file
1.
Open
Files
.
2.
Touch the
3.
Under
hold the file you want to compress, and touch
4.
Choose the save path of the compressed file and name the file.
To decompress a file, touch and hold it, and touch
Local
Internal
tab.
or
SD card
(if available), switch to the list view, touch and
Compress
Extract
Managing your phone
.
.
Creating a shortcut for a file or folder
1.
Open
Files
.
2.
Touch the
3.
Under
hold the file or folder for which you want to create a shortcut, and touch
Desktop shortcuts
Local
Internal
tab.
or
SD card
(if available), switch to the list view, touch and
.
24
Page 27

Managing your phone
Phone Manager
Optimizing the system
With
Phone Manager
following features:
•
Scan
: Quickly check the system operating status, clear trash files, optimize
your phone system, and more.
•
Phone accelerator
you no longer need, and application installation packages.
Power saving
Open
Phone Manager
phone's power consumption and maximize the standby time. You can switch
to different power saving modes as required.
Harassment filter
Open
Phone Manager
calls, and notifications:
, you can optimize your phone system using the
: Scan for and clear the cache, trash files, applications
, and use
, and use the following features to block messages,
Power saving
to comprehensively check your
•
Harassment filter
•
Notification manager
•
Do not disturb
receive calls from specified contacts. Other calls will be rejected, and the
message tone and other notification tones will be muted.
: Set a blacklist to block unwanted messages and calls.
: Block unwanted push notifications.
: In do not disturb mode, your phone will ring only when you
Protecting your privacy
Open
Phone Manager
features:
App lock
access locked applications.
: When this feature is enabled, you have to enter the password to
. You can protect your private data using the following
25
Page 28

Managing your phone
Backup, restoration, and update
Backing up data
1.
Open
Tools
, and touch
2.
Choose where you want to back up the data. By default, data is backed up
to the internal storage. If your phone supports Cloud Drive or OTG data
backup, touch to back up data to Cloud Drive or a USB storage device.
3.
Choose whether to encrypt the backup file, and touch
some models, backup files are all auto-encrypted. In that case, you do not
need to choose whether to encrypt the backup file. You will need to enter
the encryption password to read the encrypted backup file.
4.
Select the data you want to back up, and follow the onscreen instructions
to back it up.
Restoring data
1.
Open
Tools
, and touch
Backup
Backup
.
New backup
.
.On
2.
Choose a data source. The default data source is the internal storage. If
your phone supports Cloud Drive or OTG data restoration, touch
select data from Cloud Drive or a USB storage device.
3.
Select the backup file you want to restore. If the backup file has been
encrypted, enter the password when prompted.
4.
Select the data you want to restore and follow the onscreen instructions to
restore it.
Restoring factory settings
Restoring your phone to the factory settings erases all your personal
data from the phone storage. Back up important data on your phone
before you restore factory settings.
1.
Open
Settings
.
to
26
Page 29

Managing your phone
2.
Touch
Backup & reset
3.
Follow the onscreen instructions to restore your phone to its factory
>
Factory data reset
.
settings.
Online update
•
Using unauthorized third-party software to update your phone may
damage your phone or put your personal information at risk. It is
recommended that you update your phone using the phone's online
update feature or through Huawei's official software update
packages.
•
All your data may be erased during a system update. It is
recommended that you back up important data before updating your
phone.
Open
Updater
to update your phone.
, touch
Check for updates
, and follow the onscreen instructions
27
Page 30

Tools
Weather
With
Weather
•
Check the weather information: Touch to check the air quality,
humidity, wind force, and more.
•
Add a city: Touch > , enter a city name, and touch the city you
want to add.
•
Update the weather: Drag down on the weather screen to update the
, you can:
Tools
weather, or touch
interval.
> , turn on
Auto update
, and set the update
Alarms
Open
Clock
. Under
•
Add an alarm: Touch , and set the alarm time, tone, how often it
repeats, and more. Then touch .
•
Turn on or turn off an alarm: Touch the switch button to the right of an
alarm to turn it on or off.
•
Configure alarm settings: Touch , and set the snooze duration,
whether the alarm rings in silent mode, and what the volume buttons do
when pressed.
•
Delete an alarm: Touch and hold the alarm list, and touch next to an
alarm to delete it.
Alarm
, you can:
28
Page 31

Mirror
On the
Mirror
screen, you can:
•
Adjust the brightness: Touch or at the top of the screen.
•
Zoom in or out: Drag along the bottom of the screen. Touch and hold
an area on the screen to zoom in, and release your finger to zoom out and
restore the image.
•
Freeze the screen: Touch the screen to freeze the screen, and touch to
save the image. Touch the screen again to unfreeze it.
Tools
29
Page 32

Legal Notice
Legal Notice
Copyright © Huawei Technologies Co., Ltd. 2015. All rights reserved.
No part of this manual may be reproduced or transmitted in any form or by
any means without prior written consent of Huawei Technologies Co., Ltd.
and its affiliates ("Huawei").
The product described in this manual may include copyrighted software of
Huawei and possible licensors. Customers shall not in any manner reproduce,
distribute, modify, decompile, disassemble, decrypt, extract, reverse
engineer, lease, assign, or sublicense the said software, unless such
restrictions are prohibited by applicable laws or such actions are approved by
respective copyright holders.
Trademarks and Permissions
, , and are trademarks or registered trademarks of Huawei
Technologies Co., Ltd.
Android™ is a trademark of Google Inc.
LTE is a trade mark of ETSI.
Bluetooth® word mark and logos are registered trademarks owned by
The
Bluetooth SIG, Inc.
Ltd. is under license.
Other trademarks, product, service and company names mentioned may be
the property of their respective owners.
Notice
Some features of the product and its accessories described herein rely on the
software installed, capacities and settings of local network, and therefore
may not be activated or may be limited by local network operators or network
service providers.
and any use of such marks by Huawei Technologies Co.,
30
Page 33

Legal Notice
Thus, the descriptions herein may not exactly match the product or its
accessories which you purchase.
Huawei reserves the right to change or modify any information or
specifications contained in this manual without prior notice and without any
liability.
Third-Party Software Statement
Huawei does not own the intellectual property of the third-party software and
applications that are delivered with this product. Therefore, Huawei will not
provide any warranty of any kind for third party software and applications.
Neither will Huawei provide support to customers who use third-party
software and applications, nor be responsible or liable for the functions or
performance of third-party software and applications.
Third-party software and applications services may be interrupted or
terminated at any time, and Huawei does not guarantee the availability of any
content or service. Third-party service providers provide content and services
through network or transmission tools outside of the control of Huawei. To
the greatest extent permitted by applicable law, it is explicitly stated that
Huawei shall not compensate or be liable for services provided by third-party
service providers, or the interruption or termination of third-party contents or
services.
Huawei shall not be responsible for the legality, quality, or any other aspects
of any software installed on this product, or for any uploaded or downloaded
third-party works in any form, including but not limited to texts, images,
videos, or software etc. Customers shall bear the risk for any and all effects,
including incompatibility between the software and this product, which result
from installing software or uploading or downloading the third-party works.
This product is based on the open-source Android™ platform. Huawei has
made necessary changes to the platform. Therefore, this product may not
support all the functions that are supported by the standard Android platform
or may be incompatible with third-party software. Huawei does not provide
any warranty or representation in connect with any such compatibility and
expressly excludes all liability in connection with such matters.
31
Page 34

Legal Notice
DISCLAIMER
ALL CONTENTS OF THIS MANUAL ARE PROVIDED "AS IS". EXCEPT AS
REQUIRED BY APPLICABLE LAWS, NO WARRANTIES OF ANY KIND, EITHER
EXPRESS OR IMPLIED, INCLUDING BUT NOT LIMITED TO, THE IMPLIED
WARRANTIES OF MERCHANTABILITY AND FITNESS FOR A PARTICULAR
PURPOSE, ARE MADE IN RELATION TO THE ACCURACY, RELIABILITY OR
CONTENTS OF THIS MANUAL.
TO THE MAXIMUM EXTENT PERMITTED BY APPLICABLE LAW, IN NO EVENT
SHALL HUAWEI BE LIABLE FOR ANY SPECIAL, INCIDENTAL, INDIRECT, OR
CONSEQUENTIAL DAMAGES, OR LOSS OF PROFITS, BUSINESS, REVENUE,
DATA, GOODWILL SAVINGS OR ANTICIPATED SAVINGS REGARDLESS OF
WHETHER SUCH LOSSES ARE FORSEEABLE OR NOT.
THE MAXIMUM LIABILITY (THIS LIMITATION SHALL NOT APPLY TO LIABILITY
FOR PERSONAL INJURY TO THE EXTENT APPLICABLE LAW PROHIBITS SUCH A
LIMITATION) OF HUAWEI ARISING FROM THE USE OF THE PRODUCT
DESCRIBED IN THIS MANUAL SHALL BE LIMITED TO THE AMOUNT PAID BY
CUSTOMERS FOR THE PURCHASE OF THIS PRODUCT.
Import and Export Regulations
Customers shall comply with all applicable export or import laws and
regulations and be responsible to obtain all necessary governmental permits
and licenses in order to export, re-export or import the product mentioned in
this manual including the software and technical data therein.
Privacy Policy
To better understand how we protect your personal information, please see
the privacy policy at http://consumer.huawei.com/privacy-policy.
32
Page 35

This guide is for reference only. The actual product, including but not limited to
the color, size, and screen layout, may vary. All statements, information, and
recommendations in this guide do not constitute a warranty of any kind, express
or implied.
Please visit http://consumer.huawei.com/en/support/hotline for recent updated
hotline and email address in your country or region.
Model: HUAWEI G7-L01
V100R001_01
 Loading...