


Copyright © Huawei Technologies Co., Ltd. 2011.
All rights reserved.
Trademarks and Permissions
, , and are trademarks or
registered trademarks of Huawei Technologies Co., Ltd.
Other trademarks, product, service and company names
mentioned are the property of their respective owners.
NO WARRANTY
THE CONTENTS OF THIS MANUAL ARE PROVIDED "AS
IS". EXCEPT AS REQUIRED BY APPLICABLE LAWS, NO
WARRANTIES OF ANY KIND, EITHER EXPRESS OR
IMPLIED, INCLUDING BUT NOT LIMITED TO, THE
IMPLIED WARRANTIES OF MERCHANTABILITY AND
FITNESS FOR A PARTICULAR PURPOSE, ARE MADE IN
RELATION TO THE ACCURACY, RELIABILITY OR
CONTENTS OF THIS MANUAL.
TO THE MAXIMUM EXTENT PERMITTED BY APPLICABLE
LAW, IN NO CASE SHALL HUAWEI TECHNOLOGIES CO.,
LTD BE LIABLE FOR ANY SPECIAL, INCIDENTAL,
INDIRECT, OR CONSEQUENTIAL DAMAGES, OR LOST
PROFITS, BUSINESS, REVENUE, DATA, GOODWILL OR
ANTICIPATED SAVINGS.

Contents
1 Getting to Know Your Phone ........................... 2
Your Phone .................................................. 2
Keys and Functions ....................................... 3
Main Screen Icons ......................................... 4
2 Getting Started .............................................. 5
Installing the SIM Card and the Battery ............ 5
Removing the Battery and the SIM Card ........... 6
Installing a microSD Card ............................... 6
Charging the Battery ..................................... 7
Customizing the Home Screen ........................ 7
Working with the Main Menu ........................... 8
Accessing a Shortcut Menu ............................. 9
Phone Lock .................................................. 9
Mass Storage ............................................. 10
PIN and PUK .............................................. 10
Locking the Keypad ..................................... 11
3 Voice Services .............................................. 12
Making a Call ............................................. 12
Handling Incoming Calls ............................... 13
4 Text Input .................................................... 13
Changing the Text Input Mode ...................... 13
Multi-Tap Input Mode ................................... 14
Predictive Input Mode .................................. 15
Entering Digits ........................................... 15
i

Entering Symbols ........................................ 16
5 Messaging .................................................... 16
Writing and Sending a Text Message .............. 16
Writing and Sending a Multimedia Message ..... 17
6 Email (Optional) ........................................... 19
Creating an Email Account ............................ 19
Activating an Email Account .......................... 20
Writing and Sending an Email ....................... 20
7 Voice Mail .................................................... 21
Adding or Changing a Voicemail Number ........ 21
8 Phonebook ................................................... 22
Creating a Contact ...................................... 22
Searching for a Contact ............................... 22
Setting the Preferred Storage ....................... 23
Copying Contacts ........................................ 23
Contact Group ............................................ 24
9 Multimedia ................................................... 25
Camera ..................................................... 25
Video Recorder ........................................... 25
Media Player .............................................. 26
Image Viewer ............................................. 27
FM Radio ................................................... 27
Sound Recorder .......................................... 28
TV (for G7205) ........................................... 28
TV (for G7206) ........................................... 29
10 WAP Browser ............................................. 30
Configuring Network Settings ....................... 30
ii

Accessing a Website .................................... 31
11 Bluetooth ................................................... 31
Synchronizing Data ..................................... 32
Connecting a Bluetooth Headset to Your Phone 32
Transferring Data ........................................ 33
12 Chat Functions ........................................... 33
Facebook (Link) .......................................... 34
Facebook (Client) ........................................ 34
13 File Manager .............................................. 34
14 Tools .......................................................... 35
Alarm........................................................ 35
Calendar ................................................... 35
Tasks ........................................................ 35
Ebook ....................................................... 35
Calculator .................................................. 36
Unit Converter ............................................ 36
Currency Exchanger .................................... 36
15 App Store ................................................... 36
Installing a Java Application.......................... 37
Running a Java Application ........................... 37
Removing a Java Application ......................... 38
16 Opera (Optional) ........................................ 38
Configuring Network Settings ....................... 38
Accessing a Website .................................... 39
17 Nimbuzz (Optional) .................................... 40
Configuring Network Settings ....................... 40
Accessing Nimbuzz ...................................... 40
iii

18 FAQs .......................................................... 41
19 Warnings and Precautions .......................... 44
iv

Features marked as "optional" may vary
according to service providers. For details,
contact your service provider.
Features marked with "for G7205" are only
provided on G7205. Features marked with "for
G7206" are only provided on G7206.
1
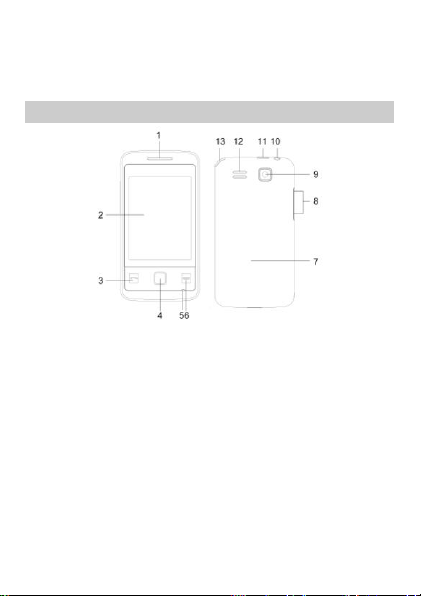
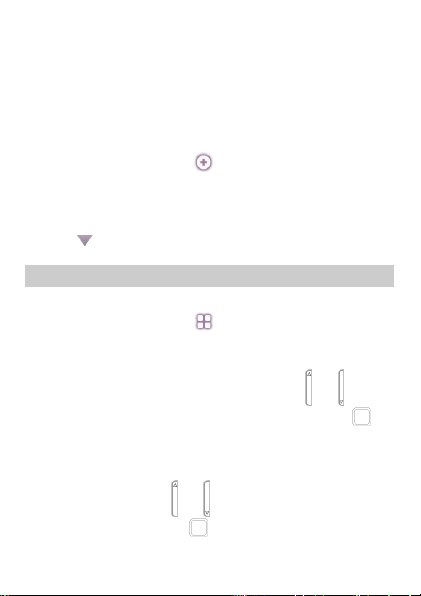
1 Getting to Know Your Phone
1
Earpiece
8
Volume key
2
Screen
9
Camera
3
Call/Answer key
10
Headset jack
4
OK/Confirm key
11
Charger jack/Universal
serial bus (USB) port
5
Microphone
12
Speaker
6
End/Power key
13
TV antenna (for
G7205)
TV & FM radio antenna
(for G7206)
7
Back cover
Your Phone
2

The figure above shows the appearance of your
phone and is provided only for your reference.
Press…
To…
Make a call.
Answer a call.
View all call history in standby mode.
Power the phone on or off (press and hold
for about 3 seconds).
End or reject a call.
Return to the standby mode.
Confirm a selection.
Increase the volume ( ) or decrease the
volume ( ) during a call.
Scroll to the desired menu (press or ).
Keys and Functions
3
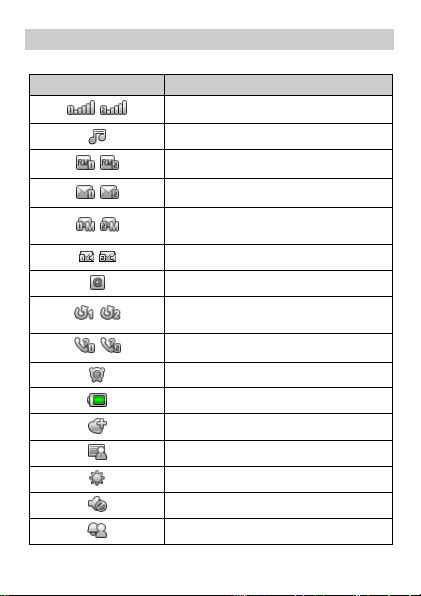
Main Screen Icons
Icon
Indicates…
/
Signal strength (SIM1/SIM2).
Media player enabled.
/
Roaming (SIM1/SIM2).
/
New text messages (SIM1/SIM2).
/
New multimedia messages
(SIM1/SIM2).
/
New voice mails (SIM1/SIM2).
New emails.
/
Call forwarding enabled
(SIM1/SIM2).
/
Missed calls (SIM1/SIM2).
Alarm enabled.
Battery level.
General profile activated.
Meeting profile activated.
Outdoor profile activated.
Silent profile activated.
My profile activated.
4
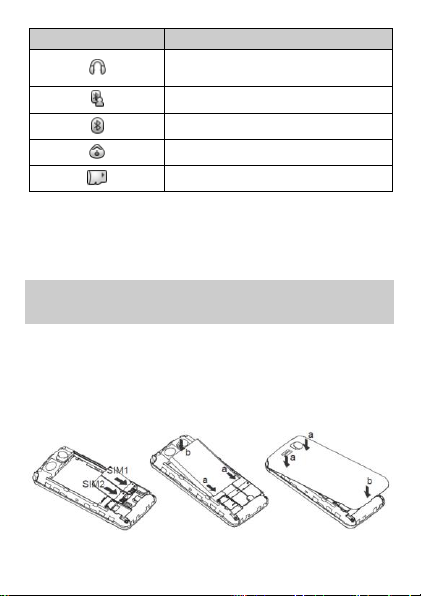
Icon
Indicates…
Headset connected to the phone
and Headset profile activated.
Bluetooth profile activated.
Bluetooth activated.
Stopwatch enabled.
microSD card installed.
2 Getting Started
Installing the SIM Card and the
Battery
When installing a SIM card, ensure that the golden
contact area on the SIM card is facing downward and
that the beveled edge of the SIM card is properly aligned
with that of the SIM card slot.
The left slot is for SIM card 2 and the right slot is for SIM
card 1.
5
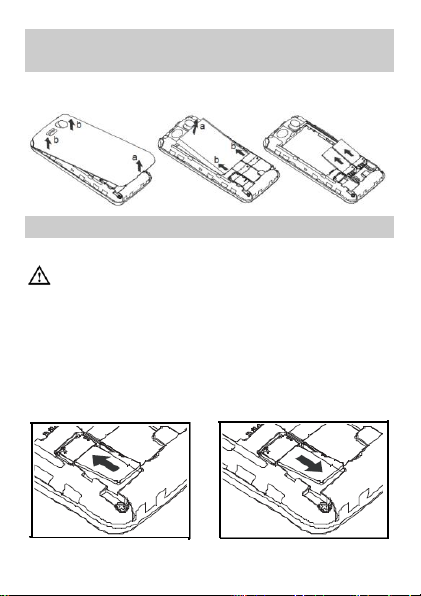
Removing the Battery and the SIM
Before installing or removing a microSD card,
power off the phone. After the phone is powered
on, it will indicate whether the microSD card has
been installed properly.
Card
Before removing the battery and the SIM card, ensure
that your phone is powered off.
Installing a microSD Card
You can install a microSD card to expand the memory
capacity of your phone. When inserting the microSD
card, ensure that the golden contact area on the
microSD card is facing downward.
6

Charging the Battery
To charge the battery, do the following:
1. Connect the smaller end of the USB cable to the
charger jack on the phone and the larger end to the
charger.
2. Connect the charger to a power socket.
3. Wait until the battery is fully charged.
During charging, an animated charging icon is
displayed. When the charging icon is static, the
battery is fully charged.
4. Disconnect the charger from the power socket, and
then from the phone.
Customizing the Home Screen
Your phone has three home screens. After adding
widgets to the home screens, you can access these
widgets in standby mode.
To switch between home screens, do the following:
In standby mode, slide your finger horizontally across
the screen to go to the left or right screen.
To add widgets to the home screen, do the following:
1. In standby mode, tap to open the widget menu.
2. Touch and hold the desired widget, and drag it to the
home screen.
3. Tap to close the widget menu.
7
To reposition widgets on the home screen, do the
following:
Touch and hold the icon of the widget you want to
reposition, and drag it to the desired position on the
screen.
To remove a widget from the home screen, do the
following:
1. In standby mode, tap to open the widget menu.
2. On the home screen, touch and hold the icon of the
widget you want to remove, and drag it to the widget
menu.
3. Tap to close the widget menu.
Working with the Main Menu
To work with the main menu, do the following:
1. In standby mode, tap to access the main menu.
2. Slide your finger horizontally across the screen to go
to the next or previous screen, and then tap the
desired submenu to access it; or press or to
scroll to the desired submenu, and then press to
access the submenu.
3. Slide your finger vertically across the screen to scroll
through options, and then tap the desired option to
access it; or press or to scroll to an option, and
then tap OK or press to access the option.
8
4. Tap Back to return to the previous menu.
To return to the standby mode, press .
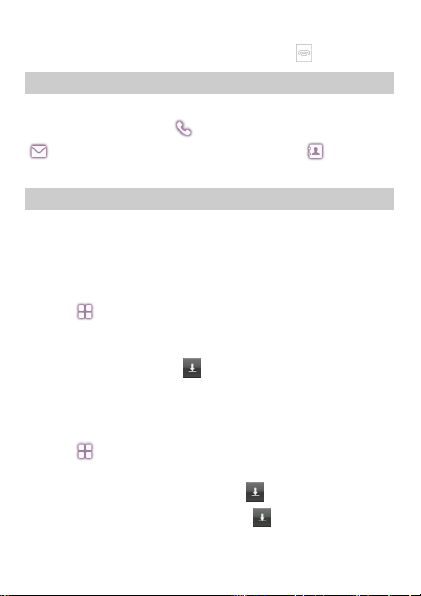
Accessing a Shortcut Menu
To access a shortcut menu, do the following:
In standby mode, tap to open the onscreen keypad,
to access the Messaging screen, and to access
the Phonebook screen.
Phone Lock
The phone lock protects your phone from unauthorized
use. By default, the phone lock is disabled. After the
phone lock is enabled, the phone requests the phone
code each time it is powered on.
To enable the phone lock, do the following:
1. Tap > Settings > Security settings > Phone
lock.
2. Tap the text box to open the onscreen keypad, enter
the phone code, tap and then OK.
You can change the default phone code (1234) to any
numeric string of four to eight digits.
To change the phone code, do the following:
1. Tap > Settings > Security settings > Change
password > Phone password.
2. Enter the old phone code, tap and then OK.
3. Enter the new phone code, tap and then OK.
4. Enter the new phone code again to confirm it.
9

If you forget the phone code, contact your service
Ensure that you connect and disconnect the USB
cable properly.
Do not run the formatting command on the PC
to format the phone memory; doing so may
damage the phone memory permanently.
You can transfer data and charge the battery by
connecting the phone to the PC through the USB
cable.
provider.
Mass Storage
When the phone is connected to a PC through a USB
cable, the option Mass storage is displayed on the
phone screen.
If you select Mass storage, you can manage the files
stored in the phone memory and on the microSD card.
The microSD card and the phone memory are displayed
as removable disks on the PC. You can perform the
following operations:
Double-click a disk to open it.
Copy, paste, or delete files on the disk.
Disconnect the phone from the PC.
PIN and PUK
The personal identification number (PIN) protects your
SIM card from unauthorized use. The PIN unblocking
key (PUK) unlocks the blocked PIN. Both the PIN and the
PUK are provided with the SIM card. For details, contact
your service provider.
10

To enable the PIN lock, do the following:
When the keypad is locked, you can press to
answer a call or make an emergency call.
1. Tap > Settings > Security settings > SIM1
security settings/SIM2 security settings > SIM1
lock/SIM2 lock.
2. Enter the PIN, tap and then OK.
If you enter incorrect PINs for a specified number of
times consecutively, the phone prompts you to enter the
PUK.
If you enter incorrect PUKs for a specified number of
times consecutively, the SIM card becomes permanently
invalid. In this case, contact your service provider for a
new SIM card.
Locking the Keypad
To lock the keypad, press in standby mode. To
unlock the keypad, press any key to turn on the
backlight, and then slide to the right.
If the auto keypad lock function is enabled and the
phone is in standby mode for a preset period, the phone
locks the keypad automatically.
To enable the auto keypad lock function, tap >
Settings > Security settings > Auto keypad lock,
and then select the desired preset duration.
11
3 Voice Services
You can also make calls from the call history,
phonebook, and messages.
During a call, you can press or to adjust the
in-call volume.
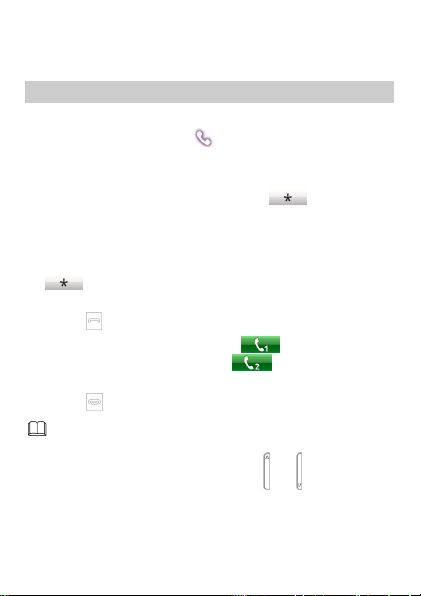
Making a Call
To make a call, do the following:
1. In standby mode, tap to open the onscreen
keypad.
2. Enter the phone number.
To make an international call, tap key twice to
enter the plus sign (+), and then enter the country or
region code, area code, and phone number in
sequence.
To call an extension, enter the phone number, tap
three times to enter P, or four times to enter
W, and then enter the extension number.
3. Press to dial the number.
In the dual-SIM card mode, tap to use the SIM1
network to make a call, or tap to use the SIM2
network to make a call.
4. Press to end the call.
12
Handling Incoming Calls
Indicator
Text Input Mode
S ABC and S abc
Predictive input mode
ABC and abc
Multi-tap input mode
123
Number input mode
When there is an incoming call, do the following:
Press or tap Answer to answer the call.
Tap Option and select Answer to answer the call.
Press or tap Reject to reject the call.
Tap Silent to mute the speaker.
If the any key answer function is enabled, you can press
any key except , , and to answer a call.
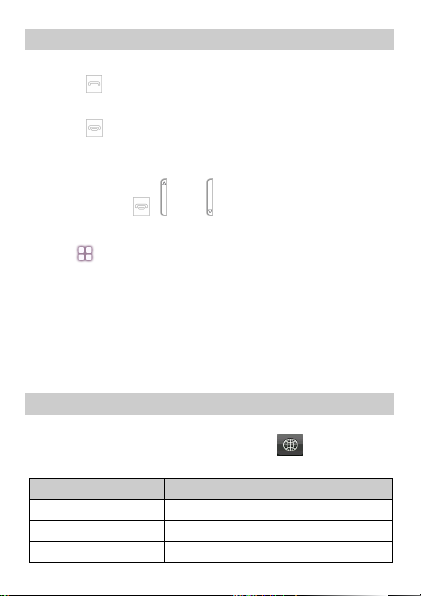
To enable the any key function, do the following:
1. Tap > User profiles.
2. Select the desired profile except Silent.
3. Tap Options > Customize > Answer mode.
4. Tap On and then Done.
4 Text Input
Changing the Text Input Mode
The indicator of the current text input mode is displayed
on the top of the screen. You can tap on the
onscreen keyboard to select the text input mode.
13
 Loading...