


Notice
Copyright © Huawei Technologies Co., Ltd.
2009. All rights reserved.
1 No part of this document may be reproduced or
transmitted in any form or by any means without
prior written consent of Huawei Technologies
Co., Ltd.
2 The product described in this manual may
include copyrighted software of Huawei Technologies Co., Ltd and possible licensors. Customers
shall not in any manner reproduce, distribute,
modify, decompile, disassemble, decrypt,
extract, reverse engineer, lease, assign, or sublicense the said software, unless such restrictions
are prohibited by applicable laws or such actions
are approved by respective copyright holders
under licenses.
3
Trademarks and Permissions
4 HUAWEI, and are trademarks or
registered trademarks of Huawei Technologies
Co., Ltd.
5 Other trademarks, product, service and
company names mentioned are the property of
their respective owners.
6
Notice
7 Some features of the product and its accessories
described herein rely on the software instal led,
capacities and settings of local network, and
may not be activated or may be limited by local
network operators or network service providers,
thus the descriptions herein may not exactly
match the product or its accessories you purchase.
8 Huawei Technologies Co., Ltd reserves the right
to change or modify any information or specifications contained in this manual without prior
notice or obligation.
9
NO WARRANTY
10 THE CONTENTS OF THIS MANUAL ARE PRO-
VIDED “AS IS”. EXCEPT AS REQUIRED BY
APPLICABLE LAWS, NO WARRANTIES OF
ANY KIND, EITHER EXPRESS OR IMPLIED,

INCLUDING BUT NOT LIMITED TO, THE
IMPLIED WARRANTIES OF MERCHANTABILITY AND FITNESS FOR A PARTICULAR PURPOSE, ARE MADE IN RELATION TO THE
ACCURACY, RELIABILITY OR CONTENTS OF
THIS MANUAL.
11 TO THE MAXIMUM EXTENT PERMITTED BY
APPLICABLE LAW, IN NO CASE SHALL HUAWEI TECHNOLOGIES CO., LTD BE LIABLE
FOR ANY SPECIAL, INCIDENTAL, INDIRECT,
OR CONSEQUENTIAL DAMAGES, OR LOST
PROFITS, BUSINESS, REVENUE, DATA,
GOODWILL OR ANTICIP ATED SAVINGS.
Import and Export Regulations
12 Customers shall comply with all applicable
export or import laws and regulations and will
obtain all necessary governmental permits and
licenses in order to export, re-export or import
the product mentioned in this manual including
the software and technical data therein.

1Table of Contents
Table of Contents 1
Introduction 1
Packing List........ ... .. ... ................................1
Front View ..................................................1
Rear View...................................................2
Installation 3
Installing the Battery...................................3
Installing the SIM/USIM Card .....................3
Installing the Power Adapter ......................4
Installing the Antenna............................... ..4
Connecting the Terminal............................4
Viewing the Signal Strength.......................5
Mounting the FWT................... ... ................6
General Functions 7
Booting the FWT ........... .............................7
Making or Answering Calls.........................7
Adjusting the Voice Volume .... ...................7
Advanced Functions 9
Supplementary Services . ...........................9
Wireless Data Service ................................9
Security ....................................................10
Troubleshooting 11
Warnings and Precautions 12

1Introduction
Packing List
Item
FWT (Fixed Wireless Terminal) host 1
Power adapter 1
Phone cable 1
Battery (Rechargeable) 1
Certificate of Quality 1
User Guide 1
Antenna(Optional) 1
To access the Internet, you need to purchase
Note
the required data suite. For more information,
please consult your local
sales agent.
Front View
The figures are only for your reference, please
Note
refer color and shape to produc
Quantity
t.
The main ports on the host are described as follows:
NO. Item
FWT switch
1
2 Telephone port 1
Telephone port 2
3
4 Data port
DC input
5
Antenna port
6
The LEDs on the host are described as follows:
1
Rear View
NO. Item
7
8
9
10 Power indicator
11
2
Signal strength indicator: L2
Signal strength indicator: L1
Battery indicator
Steady on and in red: The battery is fu lly
electricity or fully charged.
Fast blinking in red: The battery needs
to be recharged.
Slow blinking in red: The battery is being
charged.
Steady on and in blue: The FWT is connected with the power adapter.
Network mode
Double blinking in blue: searching the
network.
Blinking in blue: registering with the 2G
network.
Steady on and in blue: registering with
the 3G network.
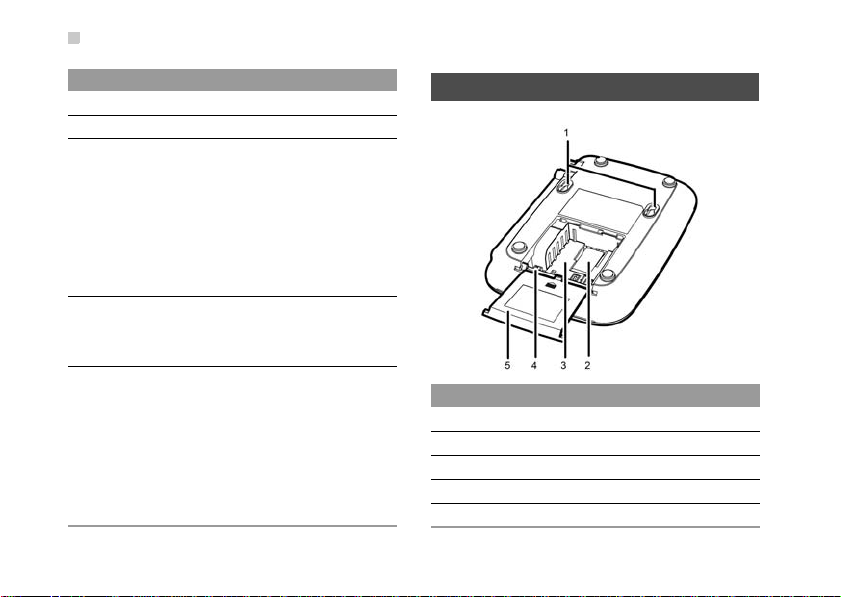
Rear View
No. Item
Wall-mounting brackets
1
2 SIM/USIM card slot
Battery container
3
Battery port
4
Battery container cover
5
2Installation
Before installing or removing the battery,
Note
antenna, or SIM/USIM card, you need to swich
off the FWT
power adapter
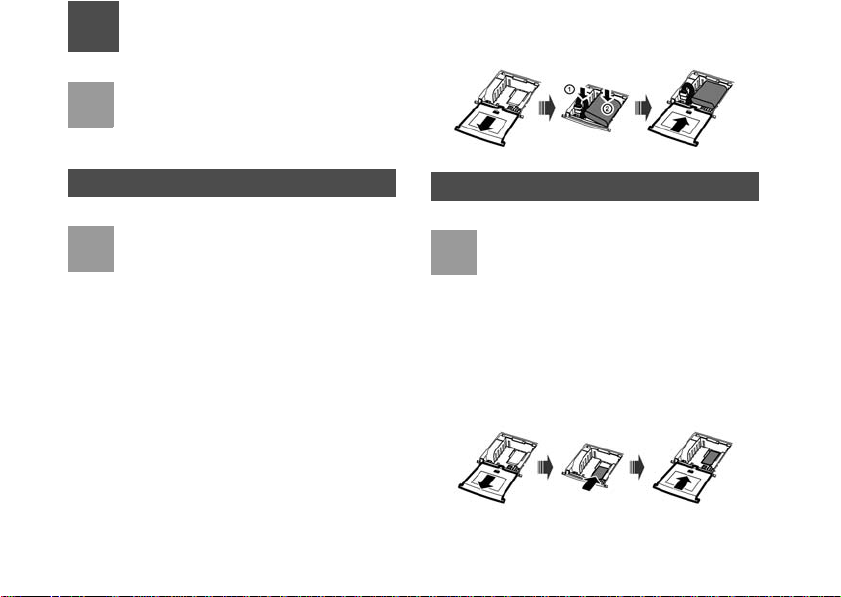
Installing the Battery
• When the ambient temperature exceeds the
Note
• When the power adapter is in use, the FWT
• Remove the battery if the FWT is left unused
• Make sure that the battery has been charged
Insert the connection cable of the battery into the bat tery port (make sure the battery is correctly inserted),
and then seat the battery in the battery container.
and disconnect the FWT from the
.
temparature allowed for charging, the system
will stop charging the battery.
will automatically ch
charging when the battery is fully charged.
for a long period.
for more than 8 hours before it supplies
power for the FWT at the first time. The
charging time depends on the environmental
temperature and battery life.
arge the battery and stop
Installing the SIM/USIM Card
• Consult the local agent to determine whether
Note
Insert the card into the card slot. Put the side with a
corner cutting backwards and the side with a golden
contact downwards
inserted into the slot.
to install the
•The SIM/USIM card and contact point are vulnerable to damage such as scarring or bending, so you need to insert or remove it with
care.
SIM/USIM card or not.
. Make sure the card is completely
3
 Loading...