

Page 1

eBIMS
V100R002C00
Product Installation Guide
Issue
Date 2015-01-09
HUAWEI TECHNOLOGIES CO., LTD.
02
Page 2

Copyright © Huawei Technologies Co., Ltd. 2015. All rights reserved.
No part of this document may be reproduced or transmitted in any form or by any means without prior written
consent of Huawei Technologies Co., Ltd.
Trademarks and Permissions
and other Huawei trademarks are trademarks of Huawei Technologies Co., Ltd.
All other trademarks and trade names mentioned in this document are the property of their respective holders.
Notice
The purchased products, services and features are stipulated by the contract made between Huawei and the
customer. All or part of the products, services and features described in this document may not be within the
purchase scope or the usage scope. Unless otherwise specified in the contract, all statements, information,
and recommendations in this document are provided "AS IS" without warranties, guarantees or representations
of any kind, either express or implied.
The information in this document is subject to change without notice. Every effort has been made in the
preparation of this document to ensure accuracy of the contents, but all statements, information, and
recommendations in this document do not constitute a warranty of any kind, express or implied.
Huawei Technologies Co., Ltd.
Address: Huawei Industrial Base
Bantian, Longgang
Shenzhen 518129
People's Republic of China
Website: http://www.huawei.com
Email: support@huawei.com
Issue 02 (2015-01-09) Huawei Proprietary and Confidential
Copyright © Huawei Technologies Co., Ltd.
i
Page 3

eBIMS
Product Installation Guide
Contents
Contents
1 Overview.........................................................................................................................................1
1.1 Networking.....................................................................................................................................................................2
1.2 Safety Precautions..........................................................................................................................................................2
1.2.1 General Safety Precautions..........................................................................................................................................2
1.2.2 Battery.........................................................................................................................................................................4
1.3 Unpacking and Acceptance............................................................................................................................................5
1.4 Installation Scenario.......................................................................................................................................................6
1.5 Installation Process.........................................................................................................................................................9
2 Installation Preparations............................................................................................................11
2.1 Preparing Tools.............................................................................................................................................................12
2.2 Preparing Documents...................................................................................................................................................13
3 Hardware Installation.................................................................................................................15
3.1 Installing an eBat..........................................................................................................................................................16
3.2 Installing an eMeter......................................................................................................................................................19
3.3 Installing an eBox.........................................................................................................................................................21
3.3.1 Inside an Outdoor Cabinet.........................................................................................................................................22
3.3.2 Inside an Indoor Equipment Room............................................................................................................................24
3.3.3 Connecting Cables.....................................................................................................................................................27
3.4 Setting eBox Parameters...............................................................................................................................................30
3.4.1 Setting eBox Parameters Using eConfig...................................................................................................................31
3.4.1.1 Setting eBox FE Interface Parameters....................................................................................................................32
3.4.1.2 Setting eBox GPRS Interface Parameters..............................................................................................................35
3.4.1.3 Setting eBox RS485 Interface Parameters..............................................................................................................38
3.4.2 Setting eBox Parameters Manually...........................................................................................................................41
3.4.2.1 Setting eBox Parameters in FE Port-based.............................................................................................................41
3.4.2.2 Setting eBox Parameters in GPRS-Based..............................................................................................................45
3.5 Field Networking..........................................................................................................................................................48
3.6 Setting Number of Battery Strings...............................................................................................................................51
3.7 Querying Battery Information......................................................................................................................................53
3.8 Setting current transducer information of eMeter........................................................................................................54
3.9 Verifying the Hardware Installation.............................................................................................................................55
Issue 02 (2015-01-09) Huawei Proprietary and Confidential
Copyright © Huawei Technologies Co., Ltd.
ii
Page 4

eBIMS
Product Installation Guide Contents
4 Software Installation...................................................................................................................57
4.1 Hardware Requirements...............................................................................................................................................58
4.2 Installing the eBIMS.....................................................................................................................................................58
4.3 Verifying the Software Installation..............................................................................................................................63
4.4 Registering the eBIMS.................................................................................................................................................70
4.4.1 Loading a New License File Before the Initial License Expires...............................................................................70
4.4.2 Loading a New License File After the Initial License Expires.................................................................................72
4.5 Uninstalling the eBIMS................................................................................................................................................74
5 FAQ................................................................................................................................................75
5.1 How Can I Modify the Database eBIMS IP Address?.................................................................................................77
5.2 How Can I Connect the eBox to a Laptop?..................................................................................................................77
5.3 How Can I Do If an Access Failure Message Is Displayed?........................................................................................80
5.4 How Can I Enable Automatic prompting for file downloads of the Internet Explorer?..............................................81
5.5 How Do I Set a Database User Name and Password?..................................................................................................81
5.6 How Do I Change the Initial Login Password?............................................................................................................82
5.7 How Do I Change the Initial Login Password of maintenance tool?...........................................................................82
5.8 How Do I Reinstall the eBIMS System?......................................................................................................................83
5.9 How Can I Handle the Problem that Forward and Backward Buttons Are Unavailable When Accessing the eBIMS
Using the Internet Explorer?...............................................................................................................................................83
5.10 How Can I Handle the Problem that Web Page Cannot Be Displayed Normally When Using the Internet Explorer on
Windows 2008 OS?............................................................................................................................................................83
5.11 How Can I Handle the Problem that Security Warnings Are Displayed When Logging in to the eBIMS?..............84
5.12 How Can I Handle the Problem of Internet Explorer Closing When Logging In to the eBIMS?..............................84
5.13 How Can I Handle the Problem of Failure in Logging In to the eBIMS When Cookies Are Disabled?...................85
5.14 How Can I Handle the Problem of Layout Disorder When Logging In to the eBIMS?............................................85
5.15 How Can I Handle the Problem that Exporting eBIMS Data Fails Using the Internet Explorer?.............................85
5.16 How Can I Handle the Problem that Login to the eBIMS Fails and the Account Is Locked?...................................86
5.17 How to change eBox command line password...........................................................................................................86
5.18 How to import CA Certificate?..................................................................................................................................87
5.19 How to create self-signed certificate?.........................................................................................................................88
Issue 02 (2015-01-09) Huawei Proprietary and Confidential
Copyright © Huawei Technologies Co., Ltd.
iii
Page 5

eBIMS
Product Installation Guide
Figure 1-1 eBIMS networking.................................................................................................................................2
Figure 1-2 Deployment inside an outdoor cabinet..................................................................................................7
Figure 1-3 Deployment inside a data center battery room.......................................................................................8
Figure 1-4 Deployment inside a site equipment room.............................................................................................9
Figure 1-5 eBIMS installation flowchart...............................................................................................................10
Figure 3-1 eBats installed on batteries...................................................................................................................16
Figure 3-2 Removing insulation covers from a battery.........................................................................................17
Figure 3-3 Remove screws....................................................................................................................................17
Figure 3-4 Installing blade terminals.....................................................................................................................17
Figure 3-5 Installing cables...................................................................................................................................18
Figure 3-6 Inserting cable connectors....................................................................................................................18
Figure 3-7 Removing the adhesive tape from the eBat bottom.............................................................................19
Figure 3-8 eBat installed on a battery....................................................................................................................19
Figure 3-9 eBat installed on the side of a battery..................................................................................................19
Figure 3-10 Installation of current transducer.......................................................................................................20
Figure 3-11 Connect eMeter with current transducer............................................................................................20
Figure 3-12 The connection of eMeter and battery string.....................................................................................21
Figure 3-13 Antenna..............................................................................................................................................22
Figure 3-14 Removing the adhesive tape from the bottom of the eBox rear panel...............................................22
Figure 3-15 Attaching the rear panel to the installation position..........................................................................23
Figure 3-16 Installing the antenna.........................................................................................................................23
Figure 3-17 eBox installed inside an outdoor cabinet...........................................................................................24
Figure 3-18 eBox installation position requirements.............................................................................................24
Figure 3-19 Drilling a hole in the installation position..........................................................................................25
Figure 3-20 Installing a plastic expansion anchor.................................................................................................25
Figure 3-21 Installing a tapping screw..................................................................................................................26
Figure 3-22 Installation effect drawing 1..............................................................................................................26
Figure 3-23 Installation effect drawing 2..............................................................................................................26
Figure 3-24 RS485 pins.........................................................................................................................................27
Figure 3-25 eBox powered by the 48 V power supply system..............................................................................28
Figure 3-26 eBox powered by the 220 V power supply system............................................................................28
Figure 3-27 Cable connections in FE communication mode.................................................................................29
Figures
Figures
Issue 02 (2015-01-09) Huawei Proprietary and Confidential
Copyright © Huawei Technologies Co., Ltd.
iv
Page 6

eBIMS
Product Installation Guide
Figure 3-28 Cable connections in GPRS communication mode...........................................................................29
Figure 3-29 Cable connections in RS485 communication mode..........................................................................29
Figure 3-30 Cable connections in FE port-based communication mode...............................................................30
Figure 3-31 Cable connections in GPRS-based communication mode.................................................................31
Figure 3-32 Cable connections in RS485 port-based communication mode.........................................................31
Figure 3-33 eConfig dialog box.............................................................................................................................32
Figure 3-34 Setting eBox-F parameters.................................................................................................................33
Figure 3-35 Message indicating successful setting of eBox-F parameters............................................................33
Figure 3-36 Viewing eBox-F parameter settings...................................................................................................34
Figure 3-37 Setting the channel ID and PAN ID...................................................................................................35
Figure 3-38 eConfig dialog box.............................................................................................................................36
Figure 3-39 Setting eBox-G parameters................................................................................................................36
Figure 3-40 Message indicating successful setting of eBox-G parameters...........................................................37
Figure 3-41 Viewing eBox-G parameter settings..................................................................................................37
Figure 3-42 Setting the channel ID and PAN ID...................................................................................................38
Figure 3-43 eConfig dialog box.............................................................................................................................39
Figure 3-44 Setting eBox-S parameters.................................................................................................................39
Figure 3-45 Message indicating successful setting of eBox-S parameters............................................................40
Figure 3-46 Setting the channel ID and PAN ID...................................................................................................41
Figure 3-47 Setting the eBox address....................................................................................................................42
Figure 3-48 IP address configuration information.................................................................................................42
Figure 3-49 Setting the trap IP address and port parameters.................................................................................43
Figure 3-50 Trap configuration information..........................................................................................................43
Figure 3-51 Setting the channel.............................................................................................................................44
Figure 3-52 Querying channel information...........................................................................................................44
Figure 3-53 Setting the PAN ID............................................................................................................................44
Figure 3-54 Querying eBox setting information...................................................................................................45
Figure 3-55 Setting APN parameters.....................................................................................................................46
Figure 3-56 Querying APN parameters.................................................................................................................46
Figure 3-57 Setting SIMPIN parameters...............................................................................................................46
Figure 3-58 Querying SIMPIN parameters...........................................................................................................47
Figure 3-59 Setting the trap IP address and port parameters.................................................................................47
Figure 3-60 Querying trap configuration information...........................................................................................47
Figure 3-61 Binding button and indicator on the eBat..........................................................................................48
Figure 3-62 Binding button and indicator on the eBox.........................................................................................48
Figure 3-63 Grouping batteries..............................................................................................................................52
Figure 3-64 Setting string number for a single eBat..............................................................................................53
Figure 3-65 Querying single eBat string information............................................................................................53
Figure 3-66 Setting string number for multiple eBats...........................................................................................53
Figure 3-67 Querying multiple eBat string information........................................................................................53
Figure 3-68 Querying eBat information................................................................................................................54
Figures
Issue 02 (2015-01-09) Huawei Proprietary and Confidential
Copyright © Huawei Technologies Co., Ltd.
v
Page 7

eBIMS
Product Installation Guide Figures
Figure 3-69 Querying eBat information using the eConfig function.....................................................................54
Figure 3-70 Configuration of current transducer...................................................................................................55
Figure 4-1 Copyright Notice..................................................................................................................................59
Figure 4-2 Setting server parameters.....................................................................................................................60
Figure 4-3 Setting database parameters.................................................................................................................61
Figure 4-4 Components Select...............................................................................................................................62
Figure 4-5 Summary..............................................................................................................................................62
Figure 4-6 Installation process...............................................................................................................................63
Figure 4-7 Message indicating an incorrect certificate..........................................................................................64
Figure 4-8 Message indicating an untrusted certificate.........................................................................................65
Figure 4-9 Certificate information.........................................................................................................................66
Figure 4-10 Certification importing wizard...........................................................................................................67
Figure 4-11 Certificate Import Wizard..................................................................................................................68
Figure 4-12 Select Certificate Store......................................................................................................................68
Figure 4-13 Certificate Import Wizard..................................................................................................................69
Figure 4-14 Completing the Certificate Import Wizard........................................................................................70
Figure 4-15 Obtain ESN........................................................................................................................................71
Figure 4-16 Import License...................................................................................................................................72
Figure 4-17 eBIMS login page..............................................................................................................................72
Figure 4-18 ESN entry dialog box.........................................................................................................................73
Figure 4-19 Obtain ESN........................................................................................................................................73
Figure 5-1 New COM port....................................................................................................................................78
Figure 5-2 Setting COM port number...................................................................................................................79
Figure 5-3 Setting COM port parameters..............................................................................................................79
Figure 5-4 Configuring eBox CLI.........................................................................................................................80
Issue 02 (2015-01-09) Huawei Proprietary and Confidential
Copyright © Huawei Technologies Co., Ltd.
vi
Page 8

eBIMS
Product Installation Guide Tables
Tables
Table 2-1 Tools......................................................................................................................................................12
Table 2-2 Construction technical documents.........................................................................................................13
Table 2-3 Software list...........................................................................................................................................14
Table 3-1 Functions of RS485 pins.......................................................................................................................27
Table 3-2 Description of eBat indicator status......................................................................................................49
Table 3-3 Desciption of eMeter indicator status....................................................................................................49
Table 3-4 Description of eBox indicator status.....................................................................................................50
Table 3-5 Hardware installation checklist.............................................................................................................56
Table 4-1 eBIMS hardware configuration requirements.......................................................................................58
Table 5-1 Self-Signed Certificate and CA Certificate...........................................................................................87
Table 5-2 Self-Signed Certificate and CA Certificate...........................................................................................88
Issue 02 (2015-01-09) Huawei Proprietary and Confidential
Copyright © Huawei Technologies Co., Ltd.
vii
Page 9

eBIMS
Product Installation Guide 1 Overview
1 Overview
About This Chapter
About This Chapter
This chapter describes the battery intelligent management system (eBIMS) in terms of its
installation networking, safety precautions, installation scenarios, and installation process.
1.1 Networking
1.2 Safety Precautions
1.3 Unpacking and Acceptance
1.4 Installation Scenario
1.5 Installation Process
Issue 02 (2015-01-09) Huawei Proprietary and Confidential
Copyright © Huawei Technologies Co., Ltd.
1
Page 10
eBIMS
Product Installation Guide
1.1 Networking
This section describes the eBIMS networking.
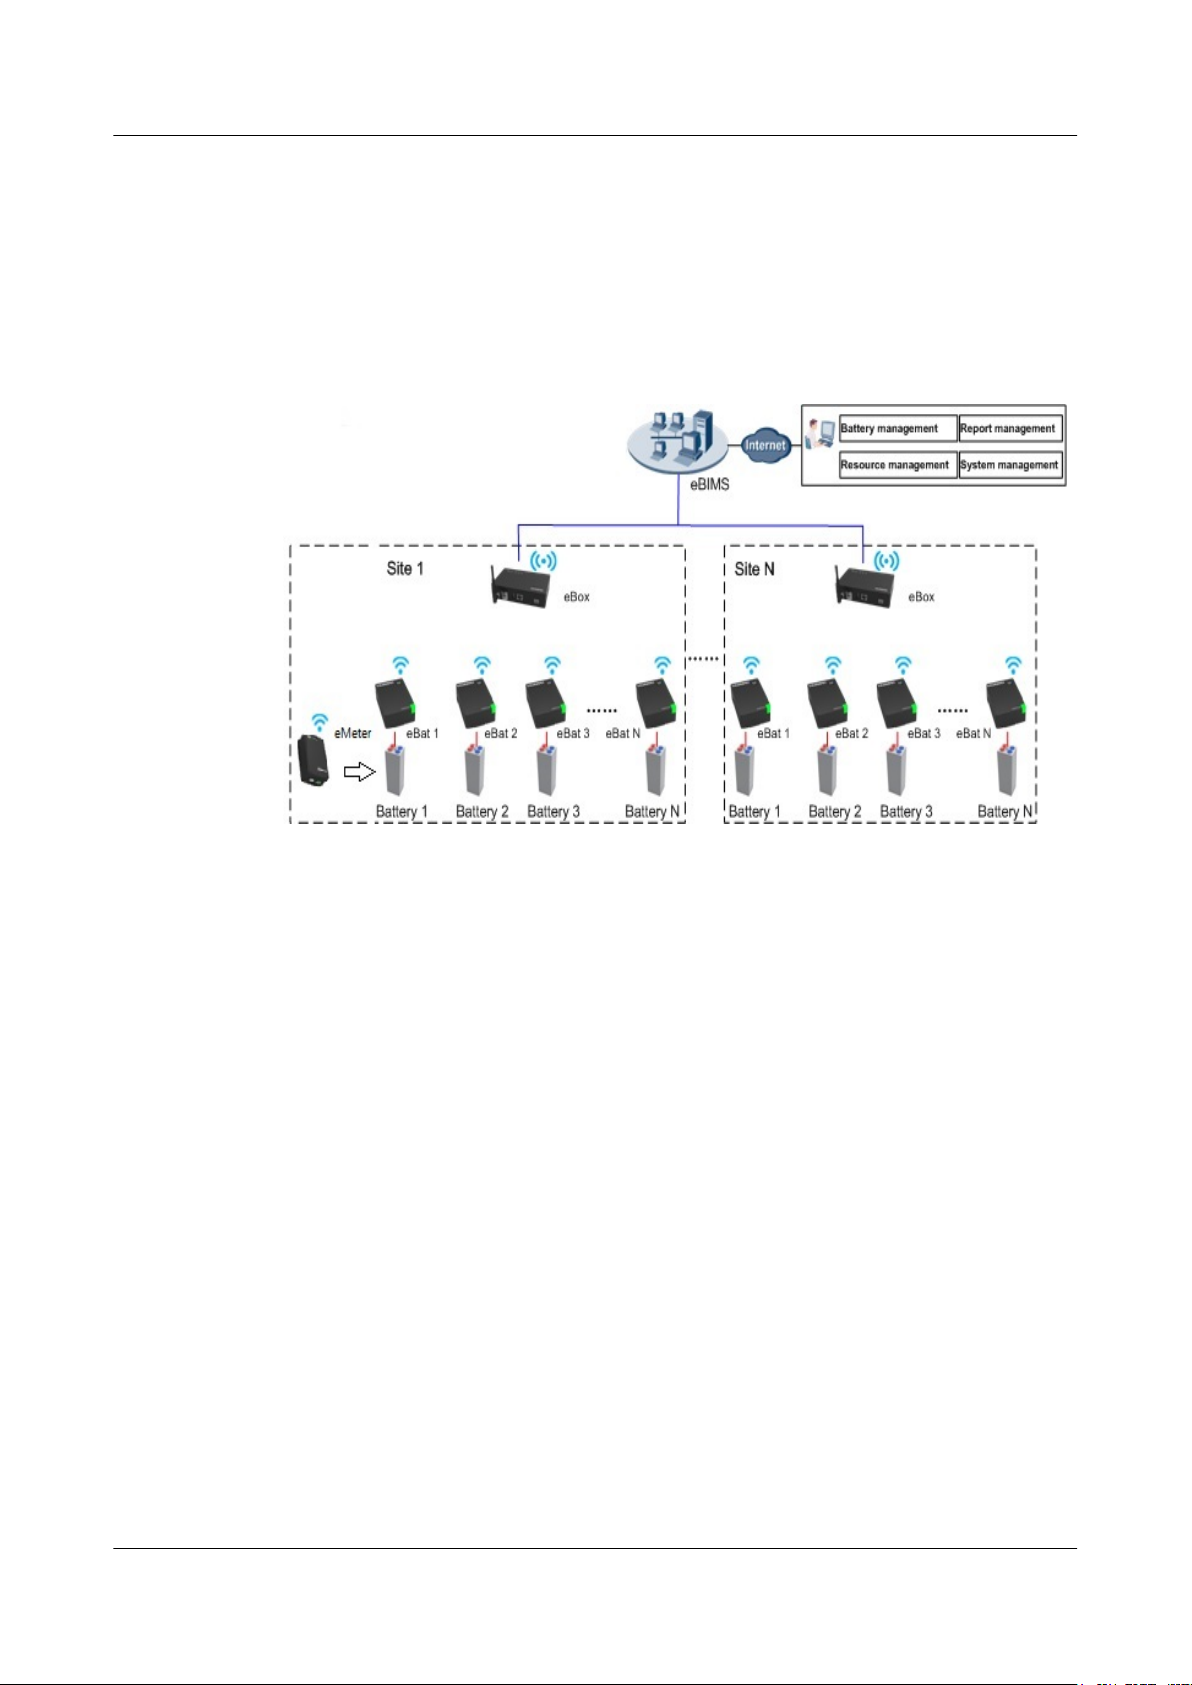
Figure 1-1 shows the eBIMS networking.
Figure 1-1 eBIMS networking
1 Overview
Networking description:
l The eBIMS consists of monitoring software, its auxiliary facilities, and information
collection hardware. The monitoring software refers to the eBIMS software installed on
the server. The information collection hardware includes eBoxes, eBats and eMeters.
l One eBox can manage a maximum of 250 wireless sensors simultaneously. An eBox
collects information, such as battery temperature, voltage, and resistance, that monitored
by eBats by means of wireless connection, and sends the information to the eBIMS
software.
l One battery connects to one eBat.
l One battery string connects to one eMeter.
l You can log in to the server from a client to manage batteries, resources, the system, and
reports.
1.2 Safety Precautions
This section describes the safety precautions to be taken when you install, operate, and maintain
Huawei equipment.
1.2.1 General Safety Precautions
This section describes general safety precautions to be taken when you install and maintain the
eBIMS.
Issue 02 (2015-01-09) Huawei Proprietary and Confidential
Copyright © Huawei Technologies Co., Ltd.
2
Page 11

eBIMS
Product Installation Guide
Overview
To ensure safety of humans and the equipment, pay attention to the safety symbols on the
equipment and all the safety instructions in this document. The CAUTION, WARNING, and
DANGER marks in this document do not represent all the safety instructions. They are only
supplements to the safety instructions.
Local Safety Regulations
When operating Huawei equipment, you must follow the local laws and regulations. The safety
instructions in this document are only supplements to the local laws and regulations.
Personal Requirements
Only trained and qualified personnel are allowed to perform operations.
1 Overview
l Only trained and qualified personnel are allowed to install, operate, and maintain the
l Only trained and qualified personnel are allowed to remove safety facilities and inspect the
l Only personnel certified or authorized by Huawei are allowed to replace or change the
l Installation personnel must report faults or errors that might cause serious security issues
Human Safety
l Never operate the equipment or touch the cables in the case of a thunderstorm.
l To avoid electric shock, do not connect safety extra-low voltage (SELV) circuits to
l Before operating a device, wear electrostatic discharge (ESD) clothes, ESD gloves, and an
l In the case of fire, immediately leave the building or the equipment room, and turn on the
Equipment Safety
equipment.
equipment.
equipment or components (including software).
to related owners.
telecommunication network voltage (TNV) circuits.
ESD wrist strap. Do not wear jewelry or watches when you operate the device.
fire alarm bell or make an emergency call. Never enter the building on fire in any case.
l Before operation, ensure that the equipment is firmly anchored to the floor or other solid
objects, such as a wall or an installation rack.
l Never block the air vent when the system is running.
l When installing a panel, use tools to tighten the screws.
l After the installation, remove the packing materials from the equipment area.
Moving Heavy Objects
l Wear protective gloves when moving heavy objects.
Issue 02 (2015-01-09) Huawei Proprietary and Confidential
Copyright © Huawei Technologies Co., Ltd.
3
Page 12

eBIMS
Product Installation Guide
l Be careful to prevent injury when moving heavy objects.
l At least two persons are required to move a battery. When lifting it, keep your back straight
1.2.2 Battery
This section describes the precautions to be taken when you operate batteries.
Before operating batteries, carefully read the safety precautions for battery handling and
connection.
l Incorrect handling of batteries causes hazards. When operating batteries, avoid battery short
l Electrolyte overflow may damage the device. It will corrode metal parts and circuit boards,
1 Overview
and move smoothly to avoid injury.
DANGER
circuits and electrolyte overflow or leakage.
and ultimately damage the device and cause short circuit of circuit boards.
l Because storage batteries have high power, short circuits caused by incorrect operations
may cause serious injuries.
Preventative Measures
When installing and maintaining batteries, pay attention to the following points:
l Use special insulating tools.
l Take care to protect your eyes when operating batteries.
l Wear rubber gloves and a protective coat in case of electrolyte overflow.
l When handling a battery, ensure that its electrodes are upward. Leaning or reversing the
battery is prohibited.
l Switch off the power supply during installation and maintenance.
l Open the circuit breaker contacts of the battery group before installing the eBat.
l Close the circuit breaker contacts of the battery group after the eBat is successfully installed.
Short Circuit
DANGER
Battery short circuit may cause human injuries. Although the voltage of ordinary batteries is
low, the instantaneous high current caused by the short circuit releases a great deal of energy.
Prevent battery short circuits that are caused by metal objects. If metal objects must be used,
first disconnect the batteries in use before performing any other operations.
Issue 02 (2015-01-09) Huawei Proprietary and Confidential
Copyright © Huawei Technologies Co., Ltd.
4
Page 13

eBIMS
Product Installation Guide
Harmful Gas
Do not use unsealed lead-acid batteries. Place and secure lead-acid batteries horizontally to
prevent inflammation or device corrosion due to flammable gas emitted from batteries.
The lead-acid batteries in use may emit flammable gas. Therefore, store the batteries in a place
with good ventilation, and take precautions against fire.
Battery temperature
High temperature may result in battery distortion, damage, and electrolyte overflow.
When the temperature of the battery is higher than 60°C, check the battery for electrolyte
overflow. If the electrolyte overflows, absorb and counteract the electrolyte immediately.
1 Overview
Acid leakage
In the case of electrolyte leaks, counteract and absorb the leaking electrolyte immediately.
When moving or handling a storage battery whose electrolyte leaks, note that the leaking
electrolyte may hurt human bodies. When you find the electrolyte leaks, use the following
substances to counteract and absorb the leaking electrolyte:
l Sodium bicarbonate (baking soda): NaHCO
l Sodium carbonate (soda): Na2CO
When using substances to counteract and absorb electrolytes, strictly follow the guidelines
provided by the battery supplier.
If your body meets the acid, wash the part that has met the acid with clean water immediately,
or immediately call a doctor if the situation is serious.
1.3 Unpacking and Acceptance
3
3
After devices are delivered to the installation site, lay the packing cases neatly, and check the
devices on the presence of both the project supervisor and customer.
Operation Scenario
After the devices are delivered to the installation site, check that all the items are intact and
comply with the packing list on the presence of both the project supervisor and customer.
Issue 02 (2015-01-09) Huawei Proprietary and Confidential
Copyright © Huawei Technologies Co., Ltd.
5
Page 14

eBIMS
Product Installation Guide
Procedure
1. Check that the number of accepted items is the same as the number of items described in
2. Check that the packing case is intact.
3. Use a knife to cut the tape along the seams of the carton cover, and check the number and
1 Overview
NOTE
l When transporting and moving the devices, components, or parts, protect them against collision with
doors, walls, or shelves.
l Never touch the uncoated surface of parts or components with sweat-soaked or dirty gloves.
l To protect the devices and help cause identification, store the unpacked devices and packing materials
indoors. Take photos of the storage site, rusty or corroded devices, packing boxes, and packing
materials, and keep the photos for future use.
the Packing List and that the destination address is the address of the installation site.
l If the outer surface of a packing case is damaged or soaked, or the devices inside are
soaked or rusty, stop unpacking the devices and find the reasons. Provide the feedback
to the local office of Huawei.
l If the devices are in good condition, unpack and accept the devices.
types of devices in the packing box against the packing list.
4. Unpack the carton labeled "Contain Packing List" and take out the Packing List.
5. Check all devices against the packing list.
l If shortage or miscarriage occurs, fill in the Cargo Shortage and Miscarriage Report.
l If cargo damage occurs, fill in the Cargo Replacement Application Form.
6. Sign on the Packing List with the customer after verifying that all required items are
delivered.
7. Store the devices properly.
1.4 Installation Scenario
The eBIMS can be deployed inside an outdoor cabinet or indoor equipment room. An equipment
room can be a data center power battery room or a site equipment room.
Deployment Inside an Outdoor Cabinet
l Battery: deployed in battery cabinets.
l eBat: deployed in battery cabinets. Install one eBat for one Battery.
l eBox: deployed in battery cabinets. Install one eBox for one battery cabinet.
l eMeter: deployed in battery cabinets. Install one eMeber for one battery string.
l eBIMS: installed on the server.
Figure 1-2 shows the eBIMS deployed inside an outdoor cabinet.
Issue 02 (2015-01-09) Huawei Proprietary and Confidential
Copyright © Huawei Technologies Co., Ltd.
6
Page 15

eBIMS
Product Installation Guide 1 Overview
Figure 1-2 Deployment inside an outdoor cabinet
Deployment Inside a Data Center Battery Room
l Battery: deployed in the indoor equipment room.
l eBat: deployed on batteries. Install one eBat for one battery.
l eMeter: deployed for each one of battery strings.
l eBox: deployed in the indoor equipment room. One eBox can manage a maximum of 250
wireless sensors.
l eBIMS: installed on the server.
Figure 1-3 shows the eBIMS installed inside a data center battery room.
Issue 02 (2015-01-09) Huawei Proprietary and Confidential
Copyright © Huawei Technologies Co., Ltd.
7
Page 16

eBIMS
Product Installation Guide 1 Overview
Figure 1-3 Deployment inside a data center battery room
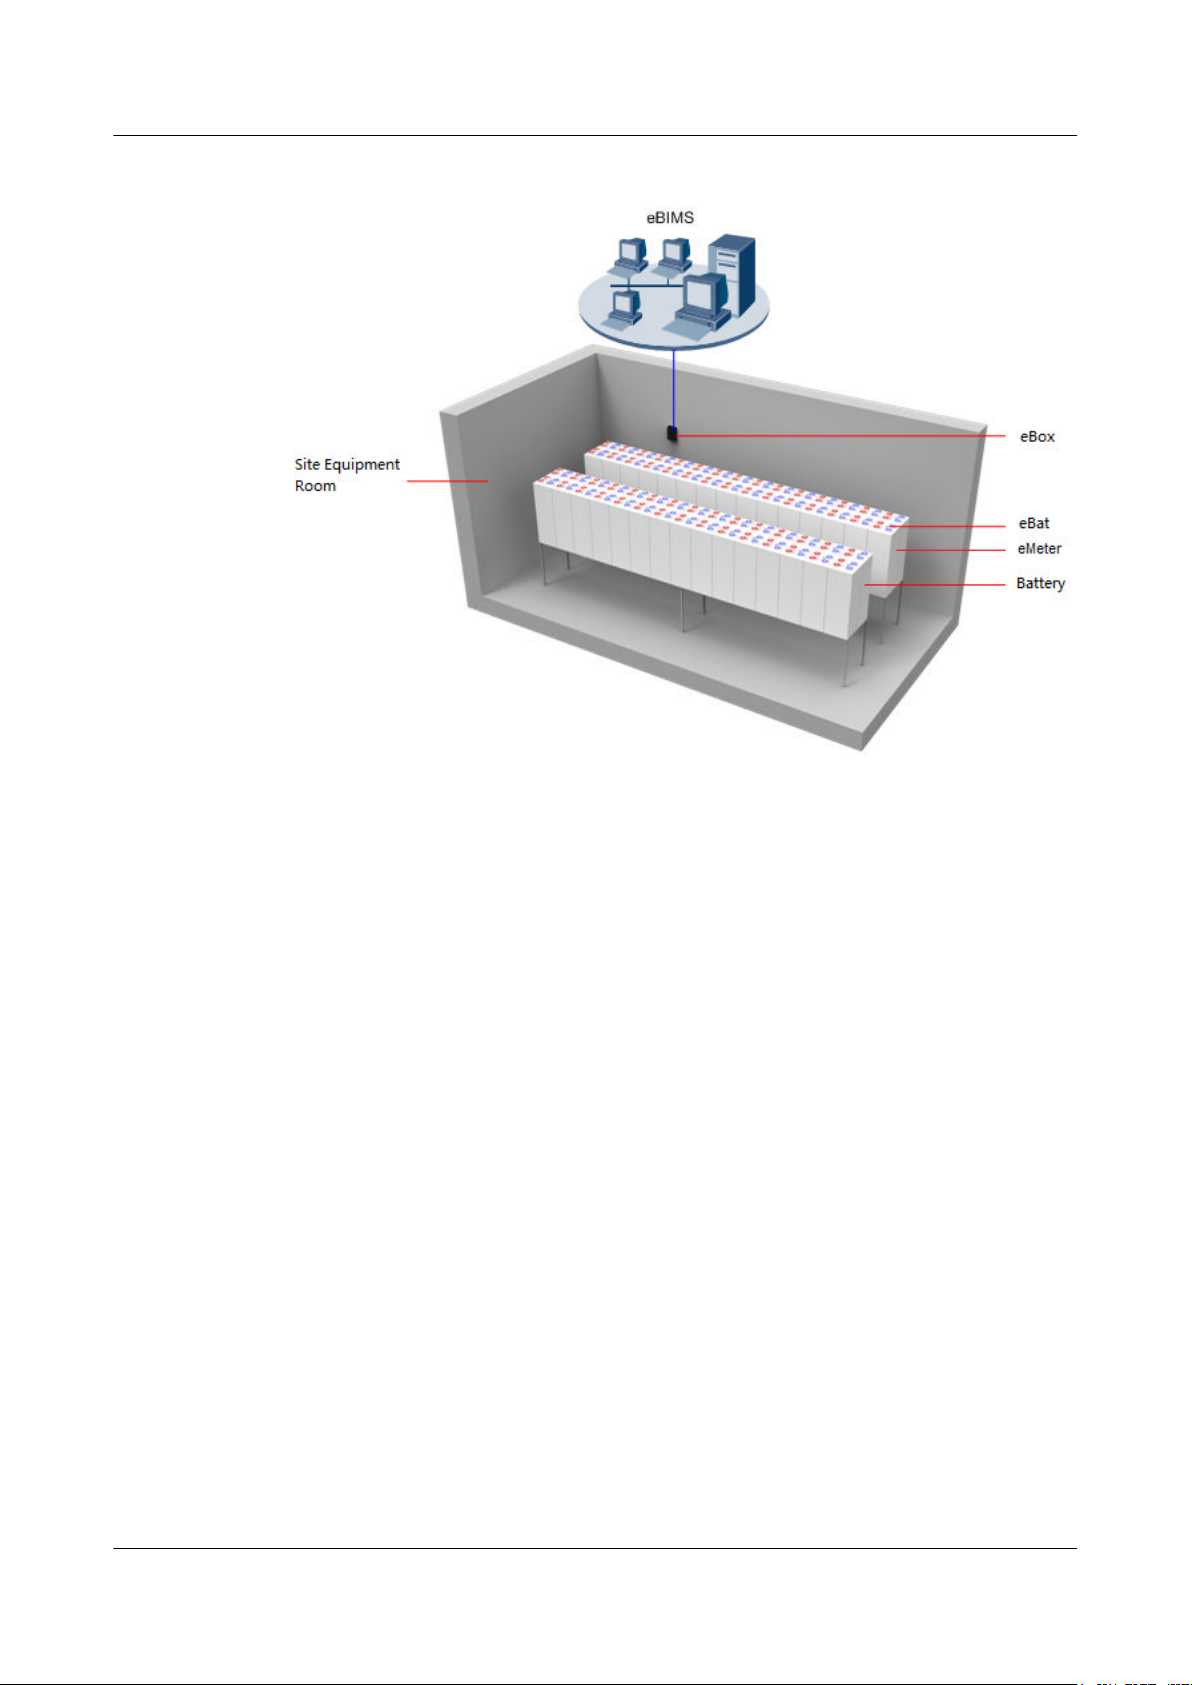
Deployment Inside a Site Equipment Room
l Battery: deployed in the site equipment room.
l eBat: deployed on batteries. Install one eBat for one battery.
l eMeter: deployed for each one of battery strings.
l eBox: deployed in the site equipment room. One eBox is deployed and can manage a
maximum of 250 wireless sensors.
l eBIMS: installed on the server.
Figure 1-4 shows the eBIMS installed inside a site equipment room.
Issue 02 (2015-01-09) Huawei Proprietary and Confidential
Copyright © Huawei Technologies Co., Ltd.
8
Page 17
eBIMS
Product Installation Guide 1 Overview
Figure 1-4 Deployment inside a site equipment room
1.5 Installation Process
This section describes the eBIMS installation process.
The eBIMS hardware includes eBats, eBoxes and eMeters, and the software is the eBIMS
management system. Figure 1-5 shows the installation flowchart.
Issue 02 (2015-01-09) Huawei Proprietary and Confidential
Copyright © Huawei Technologies Co., Ltd.
9
Page 18

eBIMS
Product Installation Guide 1 Overview
Figure 1-5 eBIMS installation flowchart
NOTE
Field networking: Binding eBats or eMeters with eBox to establish wireless communications.
Issue 02 (2015-01-09) Huawei Proprietary and Confidential
Copyright © Huawei Technologies Co., Ltd.
10
Page 19

eBIMS
Product Installation Guide 2 Installation Preparations
2 Installation Preparations
About This Chapter
About This Chapter
Prepare installation tools and reference documents before the installation.
2.1 Preparing Tools
2.2 Preparing Documents
Issue 02 (2015-01-09) Huawei Proprietary and Confidential
Copyright © Huawei Technologies Co., Ltd.
11
Page 20
eBIMS
Product Installation Guide 2 Installation Preparations
2.1 Preparing Tools
To facilitate installation, choose tools as required.
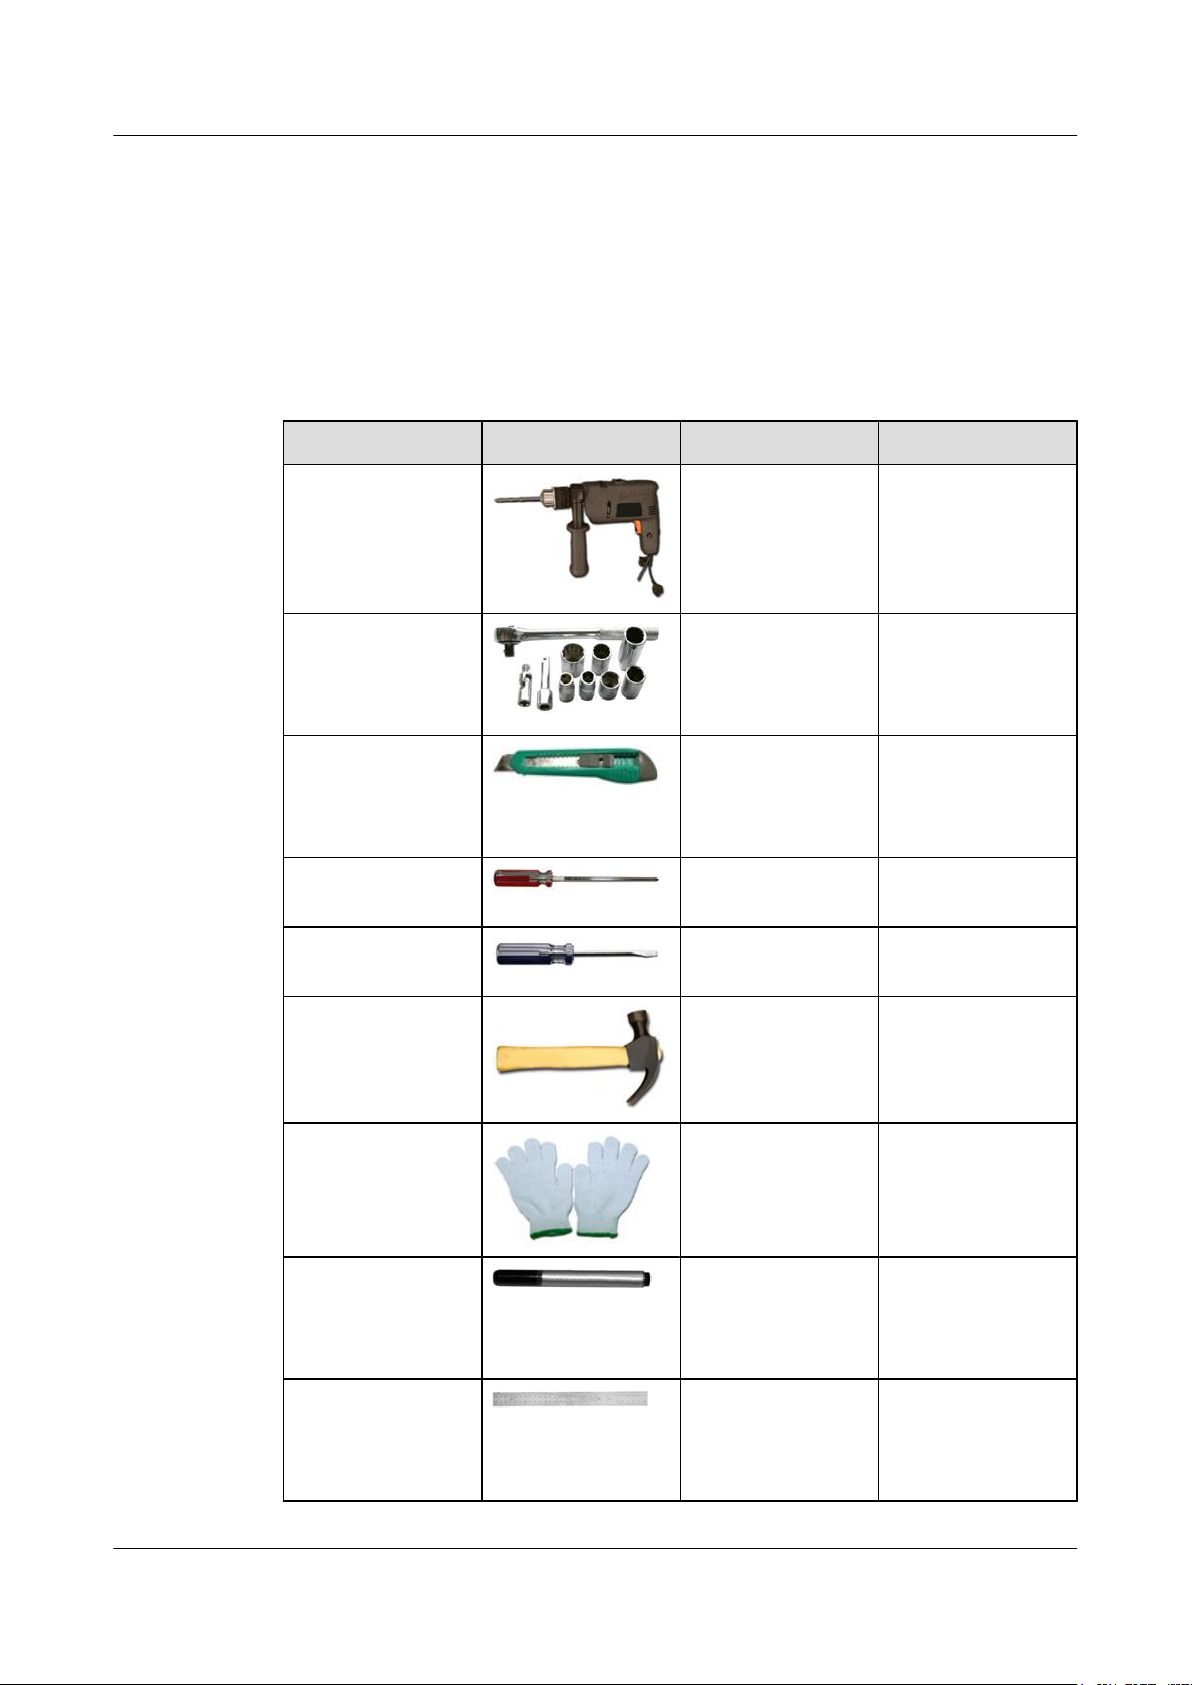
Table 2-1 describes the essential tools used in installation.
Table 2-1 Tools
Name Outline Description Specifications
Hammer drill Used to drill holes for
mounting eBoxes.
Socket wrench Used to secure
battery binding posts
of various
specifications.
Segmented blade
utility knife
Phillips screwdriver Used to tighten
Flat-head
screwdriver
Claw hammer Used to secure
Used to open packing
cases during
unpacking and
acceptance.
Phillips screws.
Used to tighten flathead screws.
plastic expansion
anchors.
With a drill bit of Φ6
With specifications
of M6, M8, and M10
General
General
General
With the hammer
weight of 0.5 kg or
above
Protective gloves Used to protect the
hands and the device
which you operate.
Marker Used to mark the
installation position
for a wall-mounted
eBox.
Ruler Used to determine
the installation
position for a wallmounted eBox.
Issue 02 (2015-01-09) Huawei Proprietary and Confidential
Copyright © Huawei Technologies Co., Ltd.
General
General
With a length 50 cm
or above
12
Page 21

eBIMS
Product Installation Guide
Name Outline Description Specifications
2 Installation Preparations
ESD gloves Used for protection
Hex key Used to tighten SIM
2.2 Preparing Documents
Prepare documents related to hardware and software installation before installation.
Hardware Installation
Table 2-2 describes the construction technical documents related to project installation.
when operating
boards or staticsensitive equipment.
card screws on the
eBox.
Meeting at least 3 kV
pressure resistance
requirement
ST2.9
Table 2-2 Construction technical documents
Document Name Description Obtaining Method
eBIMS V100R002C00
Installation Guide 01
Project design document - Delivered with equipment.
Site survey report Indicates the environment
Packing list Contains equipment delivery
Used to guide onsite
installation.
survey report on the
equipment installation site,
including information such
as cable connection modes
and battery positions.
information used for
checking equipment during
unpacking and acceptance.
Obtain it from http://
support.huawei.com.
(paper copy)
Obtain it from the
engineering design
administrant system
(EDAS).
Obtain it from the EDAS.
Software Installation
Prepare for the eBIMS installation documentation.
Issue 02 (2015-01-09) Huawei Proprietary and Confidential
Copyright © Huawei Technologies Co., Ltd.
13
Page 22

eBIMS
Product Installation Guide 2 Installation Preparations
NOTE
Before installing the eBIMS, ensure that Windows Server 2008 R2 with a standard 64-bit OS has been
installed.
Table 2-3 Software list
Software Description How to Obtain...
eeBIMS V100R002C00 Used for Installing the
eBIMS system.
eConfig_PC Used for configuring eBox
parameters.
From http://
support.huawei.com.
From http://
support.huawei.com.
Issue 02 (2015-01-09) Huawei Proprietary and Confidential
Copyright © Huawei Technologies Co., Ltd.
14
Page 23

eBIMS
Product Installation Guide 3 Hardware Installation
3 Hardware Installation
About This Chapter
About This Chapter
Hard installation includes installing eBats, eMeters and eBoxes, connecting cables, and checking
hardware installation.
3.1 Installing an eBat
3.2 Installing an eMeter
3.3 Installing an eBox
3.4 Setting eBox Parameters
3.5 Field Networking
3.6 Setting Number of Battery Strings
3.7 Querying Battery Information
3.8 Setting current transducer information of eMeter
3.9 Verifying the Hardware Installation
Issue 02 (2015-01-09) Huawei Proprietary and Confidential
Copyright © Huawei Technologies Co., Ltd.
15
Page 24
eBIMS
Product Installation Guide
3.1 Installing an eBat
eBat installation includes securing and connecting cables to the eBat.
Prerequisites
NOTICE
l Before intallation of eBat, the switch of battery stirng should be turned off.
l eBat cable must be installed firstly before eBat was installed.
l After all eBats were installed, the switch of battery string could be turned on.
l For uninstallation of eBat, eBat should be unplugged out firstly, then remove the eBat cable
from battery terminal.
3 Hardware Installation
Context
l eBat can be sticked on the surface of battery. The position can be determined according to
the shape of the battery.
l The installation method of eBat in site room is totally same as in outdoor cabinet.
l eBat can be installed on 2V and 12V lead-acid battery, installation was shown as Figure
3-1.
Figure 3-1 eBats installed on batteries
l Positive and negative terminals are in red and blue, respectively.
l The following uses installation of eBats on 12 V batteries as an example.
Procedure
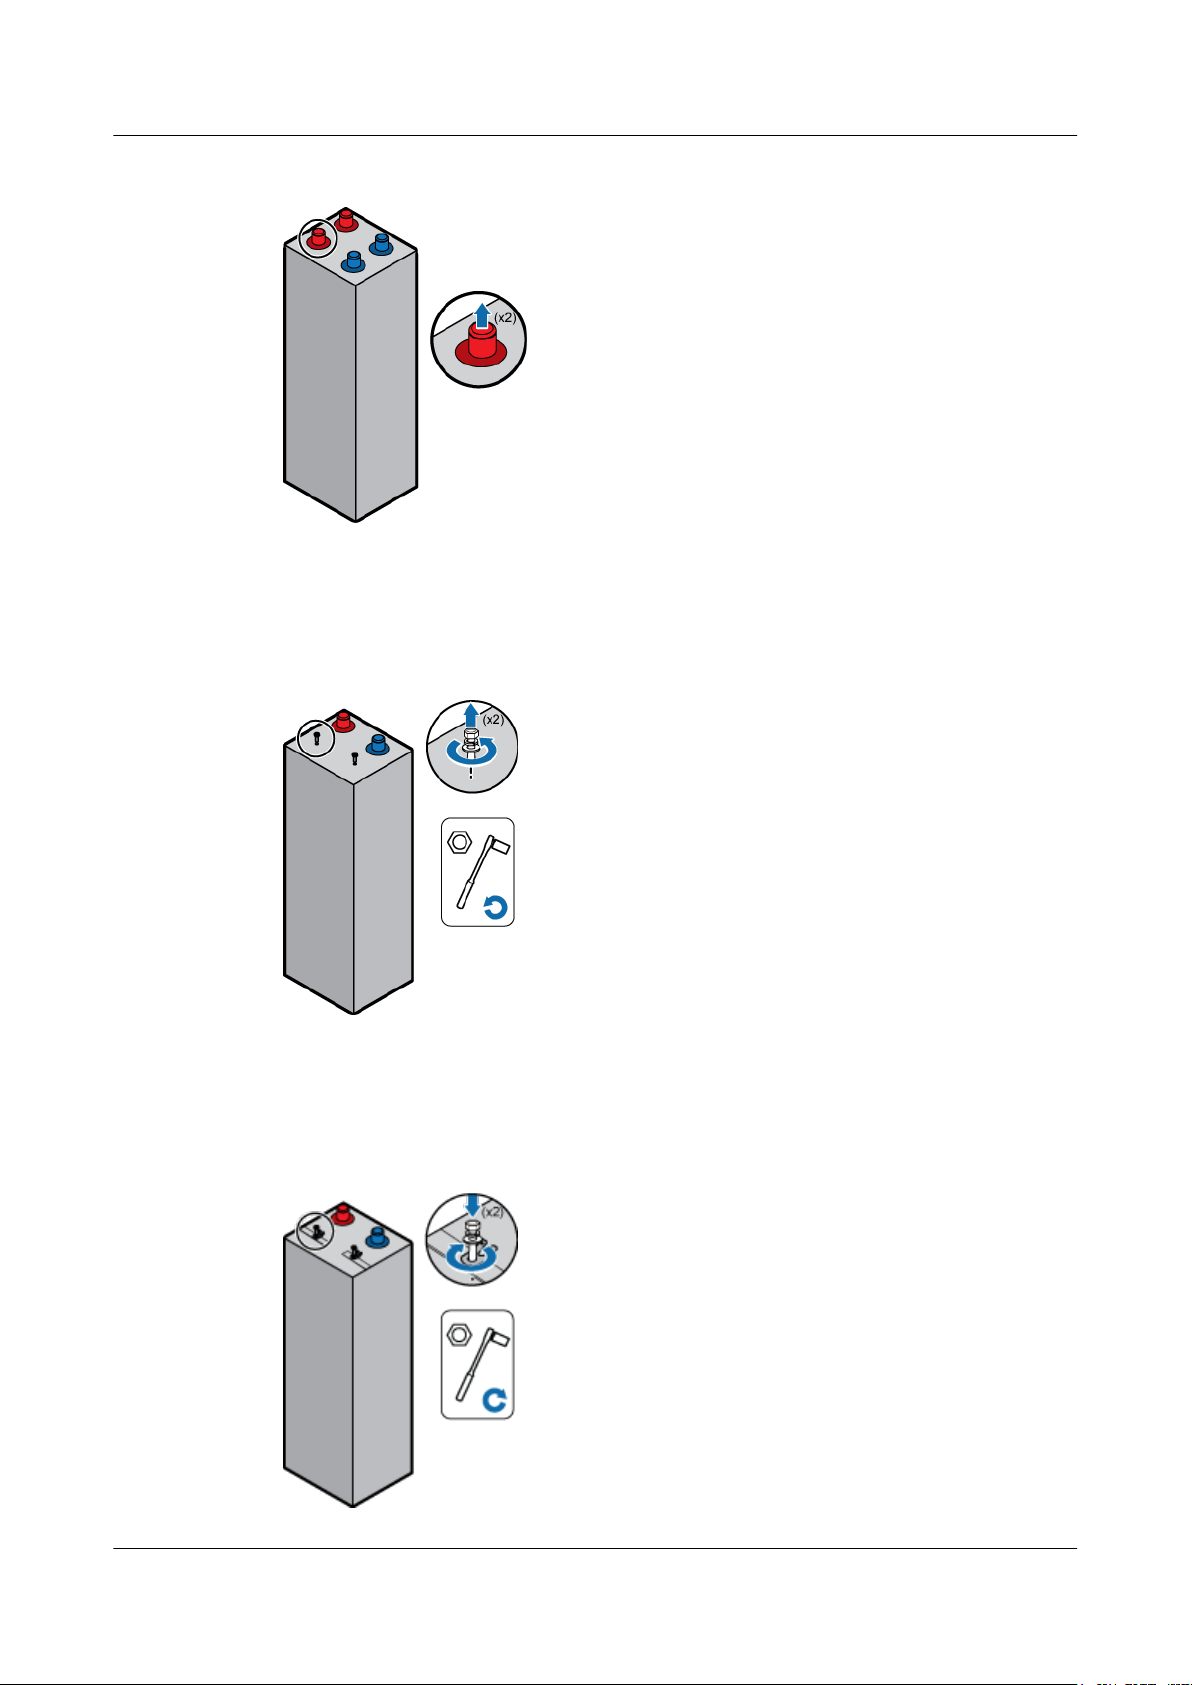
Step 1 Remove insulation covers from battery positive and negative polar columns used to install the
eBat, as shown in Figure 3-2.
Issue 02 (2015-01-09) Huawei Proprietary and Confidential
Copyright © Huawei Technologies Co., Ltd.
16
Page 25
eBIMS
Product Installation Guide 3 Hardware Installation
Figure 3-2 Removing insulation covers from a battery
Step 2 Unscrew terminals on the battery positive and negative polar columns using a socket wrench,
as shown in Figure 3-3.
Figure 3-3 Remove screws
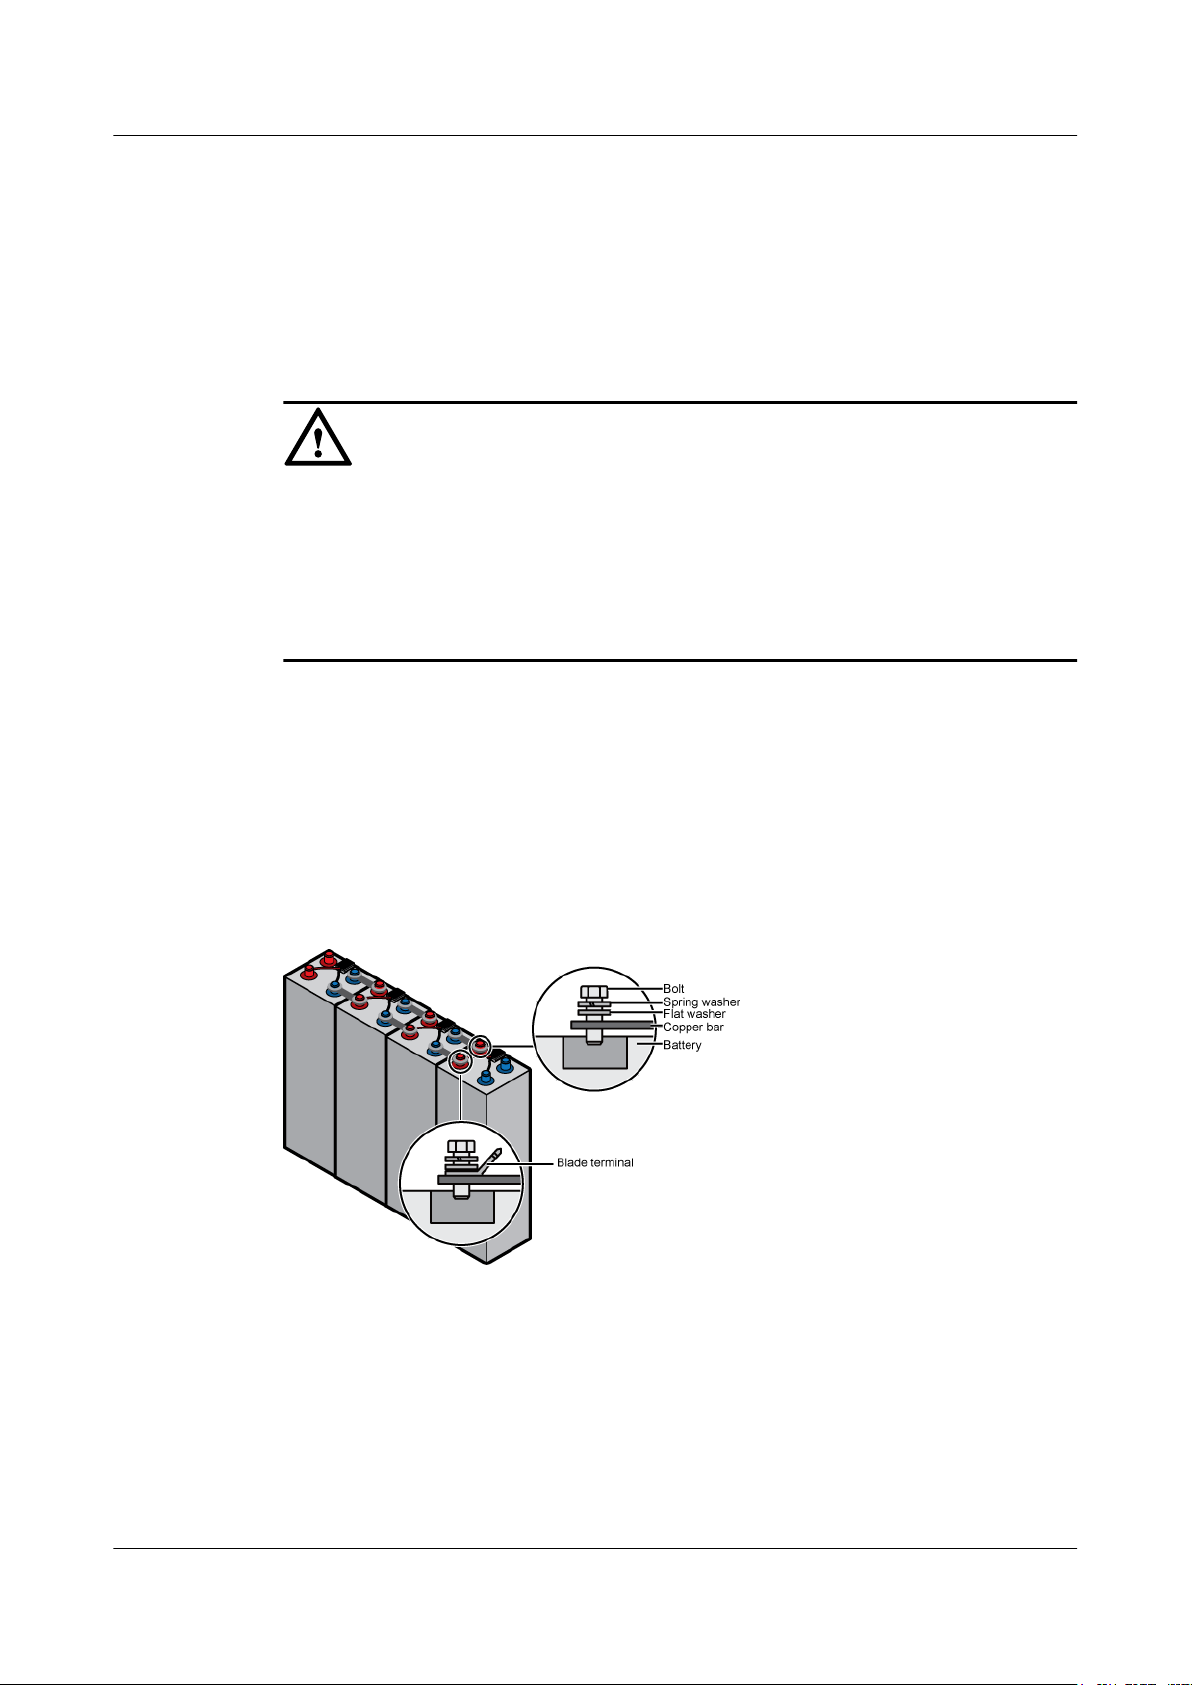
Step 3 Secure springs washers, flat washers, blade terminals, and copper bar on the battery positive and
negative polar columns as shown in Figure 3-4.
Figure 3-4 Installing blade terminals
Issue 02 (2015-01-09) Huawei Proprietary and Confidential
Copyright © Huawei Technologies Co., Ltd.
17
Page 26
eBIMS
Product Installation Guide
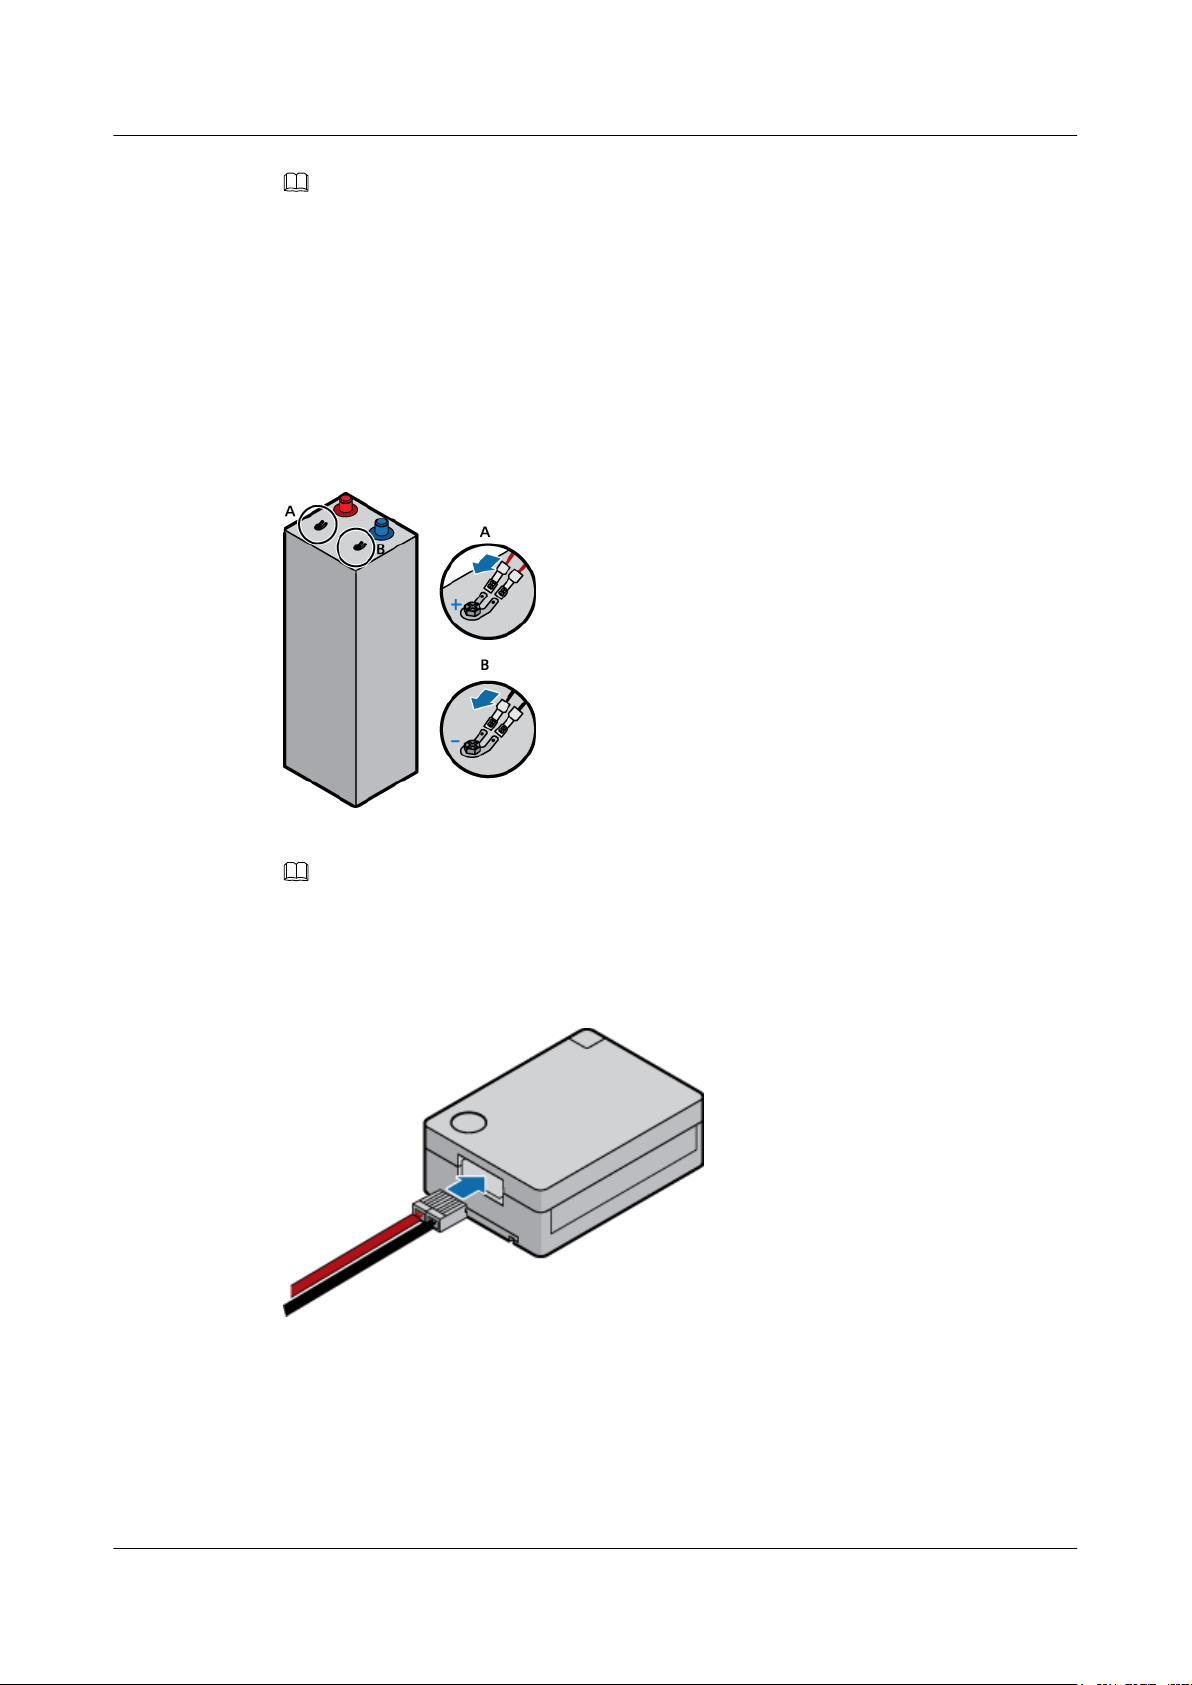
Step 4 Connect the red and black cables respectively to the positive and negative blade terminals, as
shown in Figure 3-5.
Figure 3-5 Installing cables
3 Hardware Installation
NOTE
Blade terminals match M6, M8, and M10 screws. Select proper blade terminals based on the type of screws
on your Battery polar columns. The following shows the torque supported by the screws:
l M6: 4-6 N.m
l M8: 13-15 N.m
l M10: 15-20 N.m
NOTE
Connect the red and black cables respectively to the positive and negative polarities.
Step 5 Insert cable connectors to eBat cable ports, as shown in Figure 3-6.
Figure 3-6 Inserting cable connectors
Step 6 Determine the optimal position for attaching the eBat. Ensure that the installation position is
clean without dust.
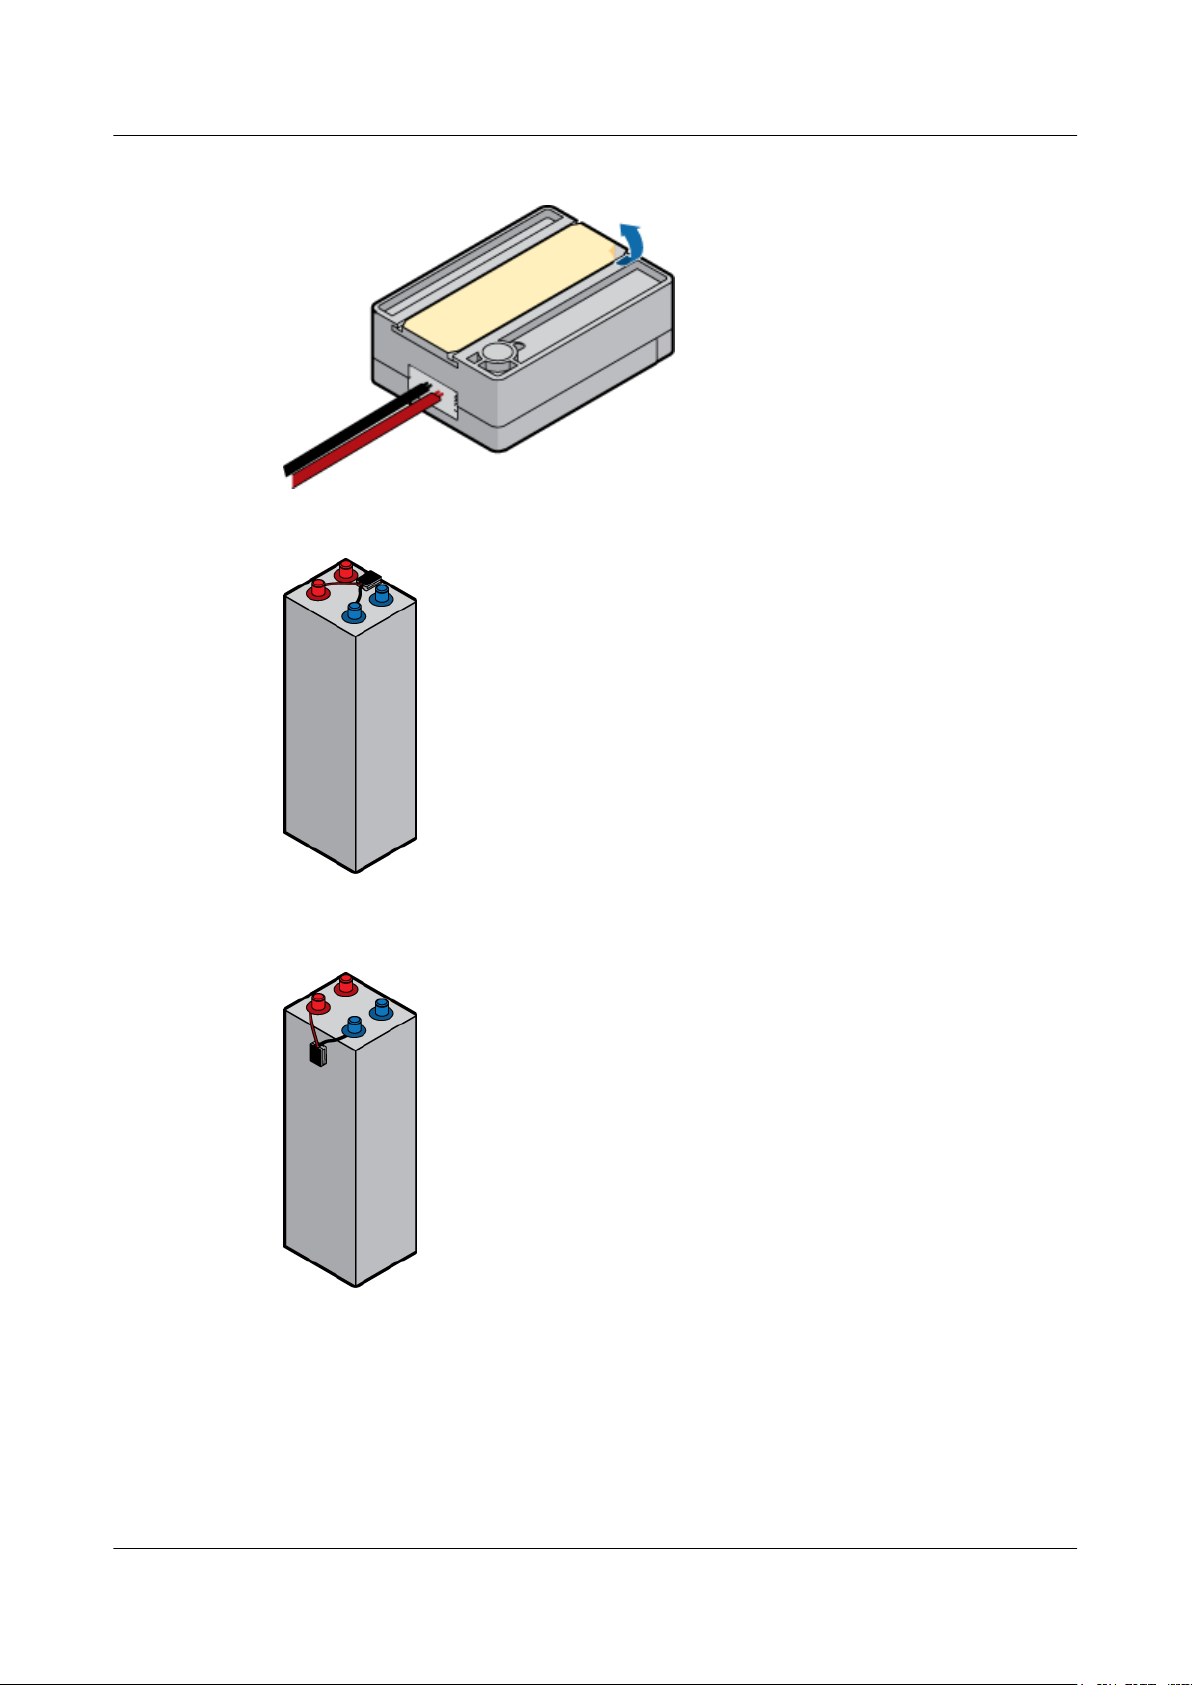
Step 7 Remove the adhesive tape from the eBat bottom, as shown in Figure 3-7, attach the eBat to the
surface of the battery, and press the eBat using a force of 1 N to 2 N for 5 to 10 seconds.Figure
3-8andFigure 3-9 show an eBat installed on a battery.
Issue 02 (2015-01-09) Huawei Proprietary and Confidential
Copyright © Huawei Technologies Co., Ltd.
18
Page 27
eBIMS
Product Installation Guide
Figure 3-7 Removing the adhesive tape from the eBat bottom
Figure 3-8 eBat installed on a battery
3 Hardware Installation
Figure 3-9 eBat installed on the side of a battery
----End
3.2 Installing an eMeter
eMeter installation includes securing and connecting cables to the eMeter and connection with
current transducer.
Issue 02 (2015-01-09) Huawei Proprietary and Confidential
Copyright © Huawei Technologies Co., Ltd.
19
Page 28
eBIMS
Product Installation Guide
Prerequisites
l The switch between battery string and power supply is turned off.
Procedure
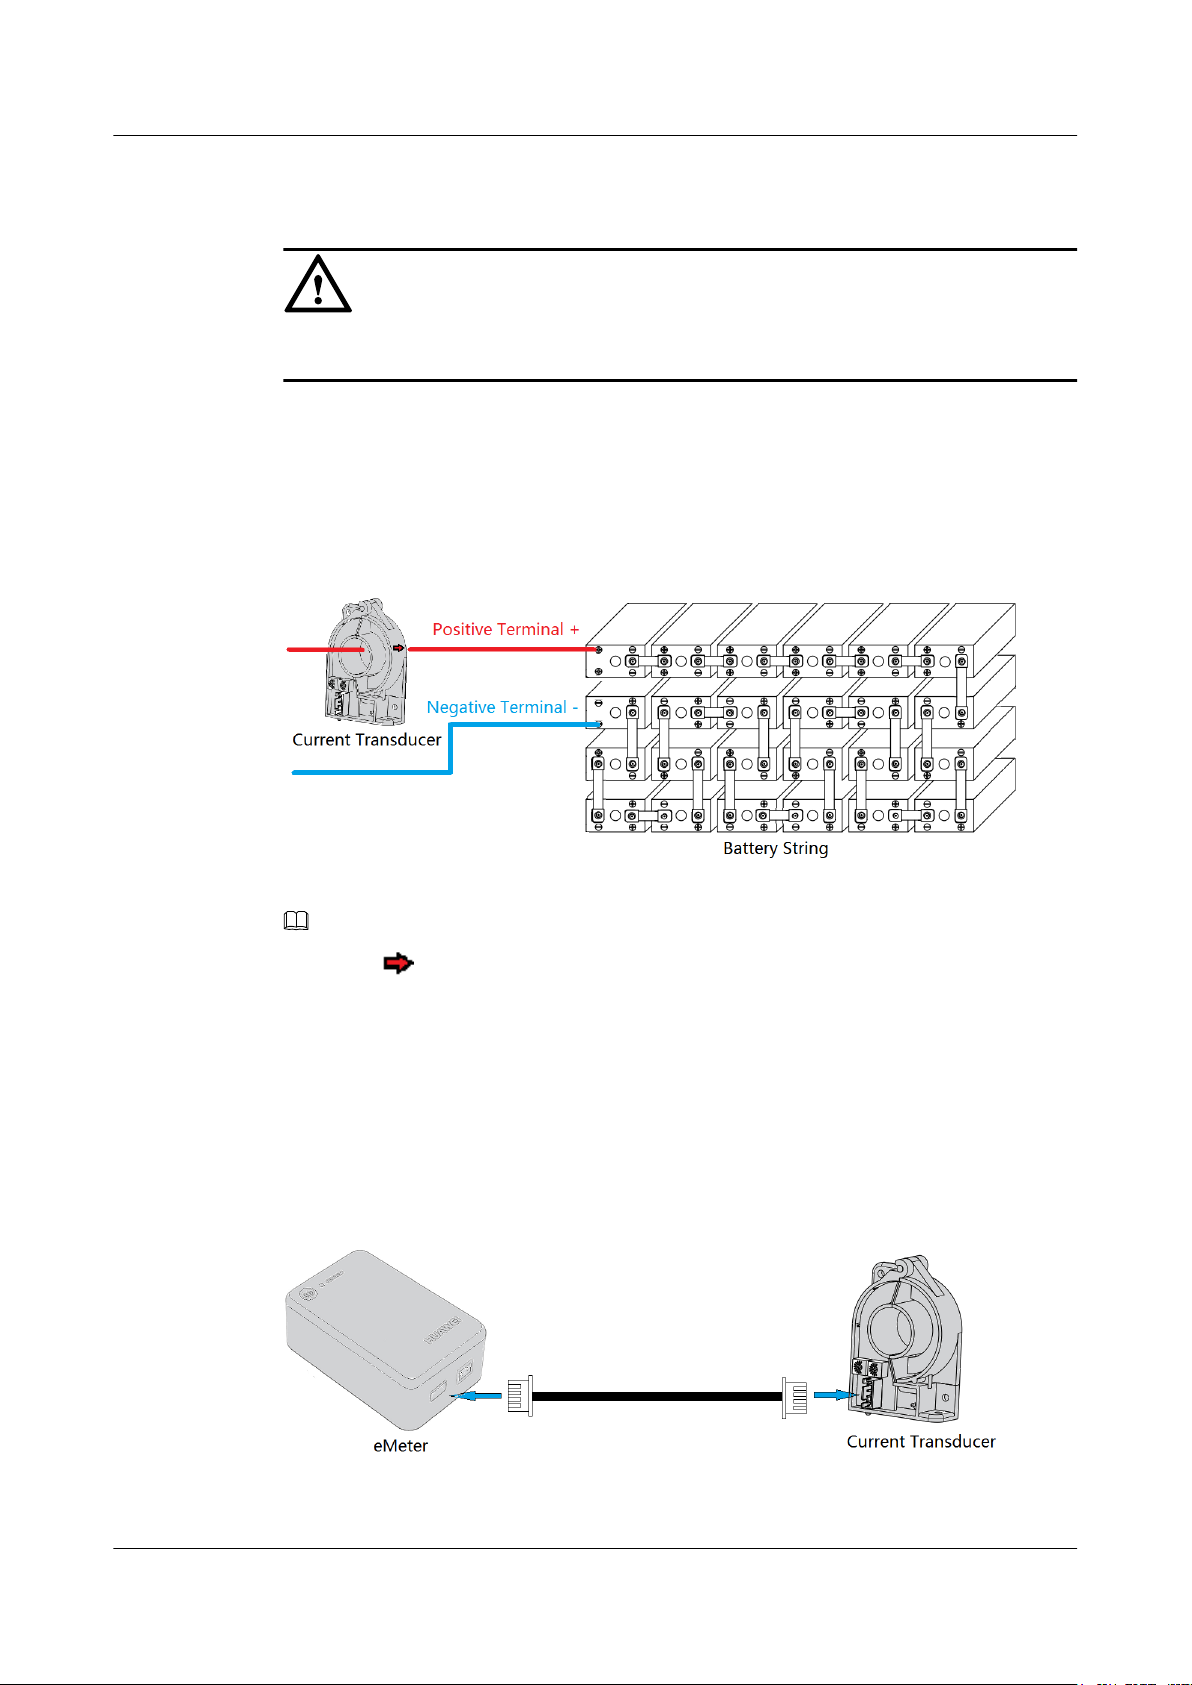
Step 1 Make the power cable to the positive terminal of battery string go through the current transducer,
as shown in Figure 3-10.
Figure 3-10 Installation of current transducer
3 Hardware Installation
NOTICE
NOTE
l The symbol on the current transducer must be pointed to the positive terminal.
l The current transducer should not be installed on the connecting strap between batteies.
l The current transducer should not be installed on the connecting wire between battery string and load.
Step 2 Determine the optimal position for attaching or fixing the eMeter. Ensure that the installation
position is clean without dust.
Step 3 Connect eMeter and current transducer with cable, as shown in Figure 3-11.
Figure 3-11 Connect eMeter with current transducer
Issue 02 (2015-01-09) Huawei Proprietary and Confidential
Copyright © Huawei Technologies Co., Ltd.
20
Page 29
eBIMS
Product Installation Guide
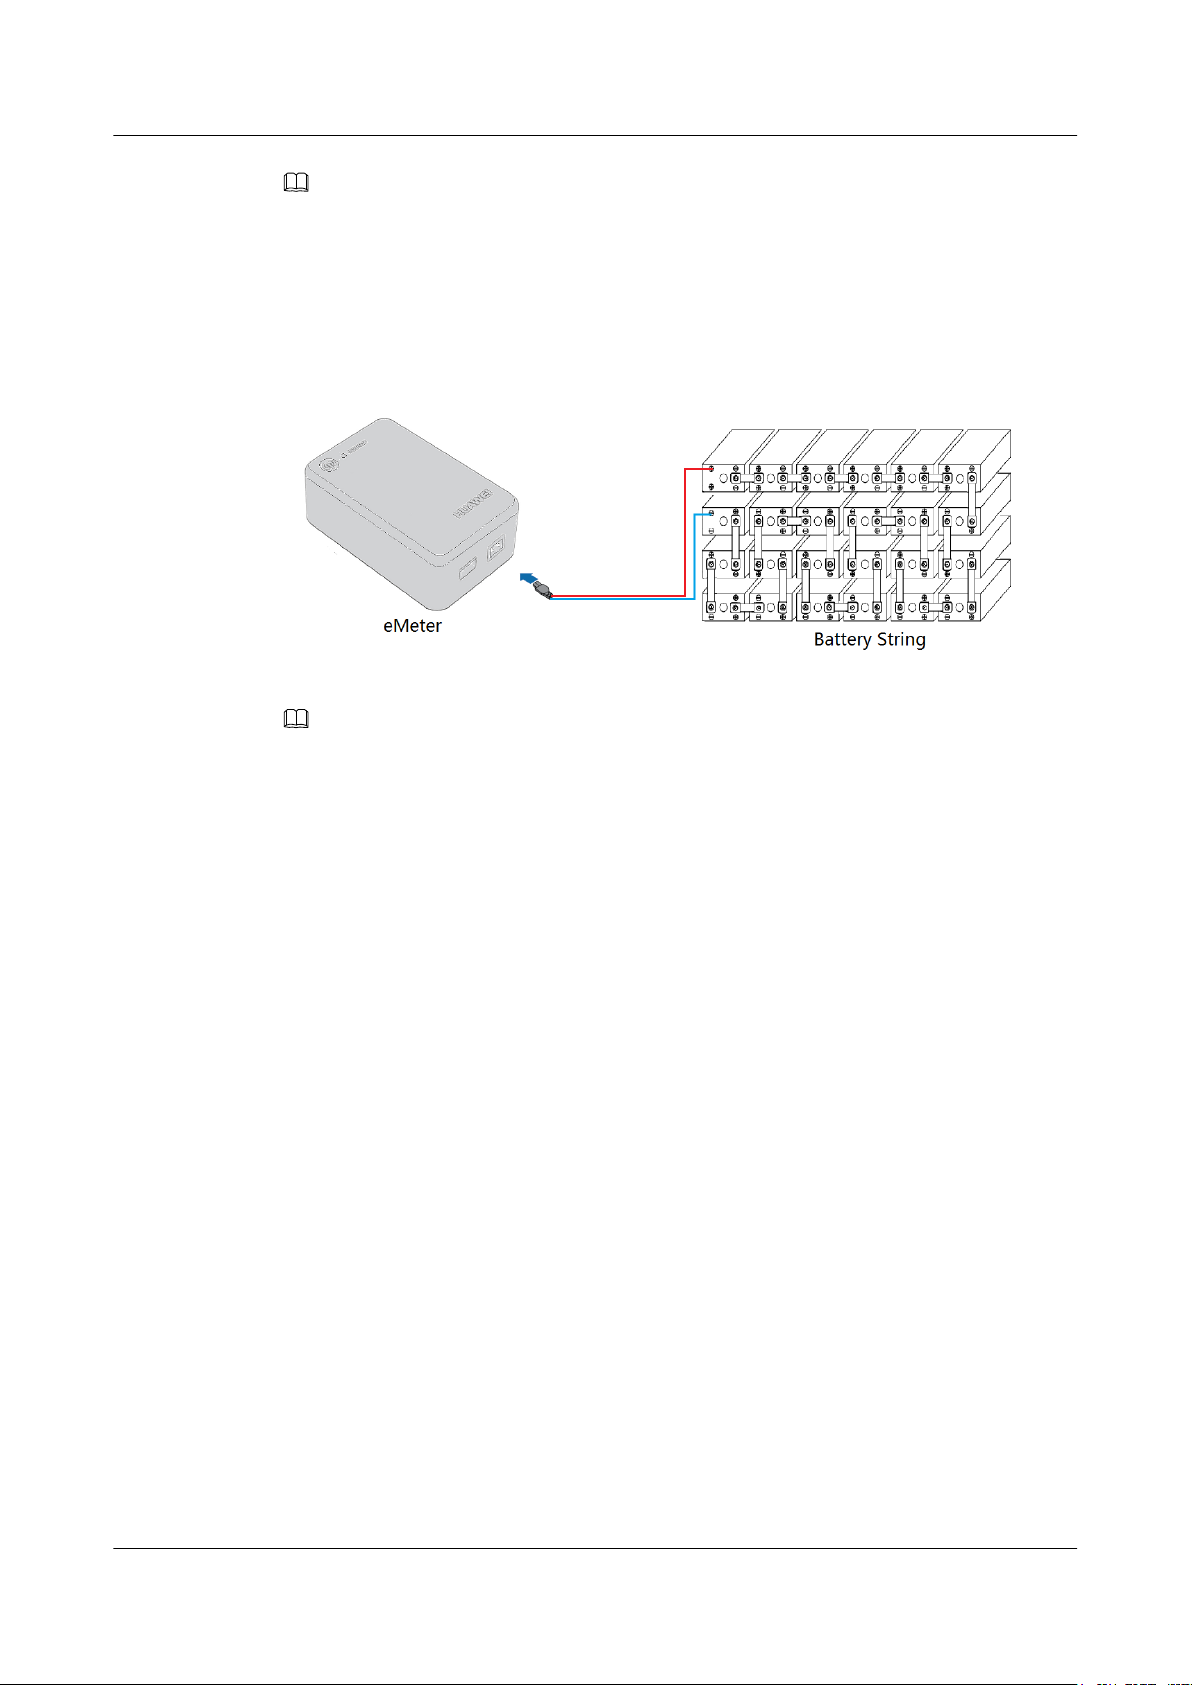
Step 4 Provide power supply for eMeter, as shown in Figure 3-12.
Figure 3-12 The connection of eMeter and battery string
3 Hardware Installation
NOTE
l The wire between eMeter and current transducer should not be coiled or folded.
NOTE
The power port of eMeter was used not only for power supply to eMeter, but also for detection the battery
string voltage. Currently for the detection of battery string, only 48V battery string could be used.
----End
3.3 Installing an eBox
eBox installation includes securing the eBox, drilling holes, and connecting cables to the eBox.
Context
The eBox deployment mode is different inside an outdoor cabinet and an indoor equipment
room:
l Inside an outdoor cabinet: Attach the eBox rear panel to the inside of the battery cabinet,
and mount the eBox on the rear panel.
l Inside an indoor equipment room: Mount the eBox on the wall.
An eBox communicates with the upstream using any of the following modes:
l GPRS: Fast Ethernet (FE) network cables are not required in this mode.
l FE network cables: A GPRS antenna and a SIM card are not required in this mode.
l RS485 cables: A GPRS antenna and a SIM card are not required in this mode.
Installation location of eBox:
l The location of eBox should be close to the battery string.
l There should be no obstacles between eBox and eMeter or eBat.
Issue 02 (2015-01-09) Huawei Proprietary and Confidential
Copyright © Huawei Technologies Co., Ltd.
21
Page 30
eBIMS
Product Installation Guide
3.3.1 Inside an Outdoor Cabinet
eBox hardware installation includes positioning and securing the eBox.
Context
To secure an eBox to a battery cabinet, attach the eBox rear panel to the inside of the battery
cabinet, and mount the eBox on the rear panel. Configure one eBox for one battery cabinet.
This section describes how to install an eBox in GPRS communication mode.
eBox antennas are placed outside the cabinet, as shown in Figure 3-13.
Figure 3-13 Antenna
3 Hardware Installation
Procedure
Step 1 Determine the installation position of the eBox inside the cabinet.
Step 2 Loosen the SIM cover using an inner hexagon screwdriver, insert the SIM card, and tighten the
cover.
Step 3 Remove the adhesive tape from the bottom of the eBox rear panel, as shown in Figure 3-14.
Figure 3-14 Removing the adhesive tape from the bottom of the eBox rear panel
Issue 02 (2015-01-09) Huawei Proprietary and Confidential
Copyright © Huawei Technologies Co., Ltd.
22
Page 31

eBIMS
Product Installation Guide
Step 4 Attach the rear panel to the eBox installation position inside the cabinet, as shown in Figure
3-15.
Figure 3-15 Attaching the rear panel to the installation position
3 Hardware Installation
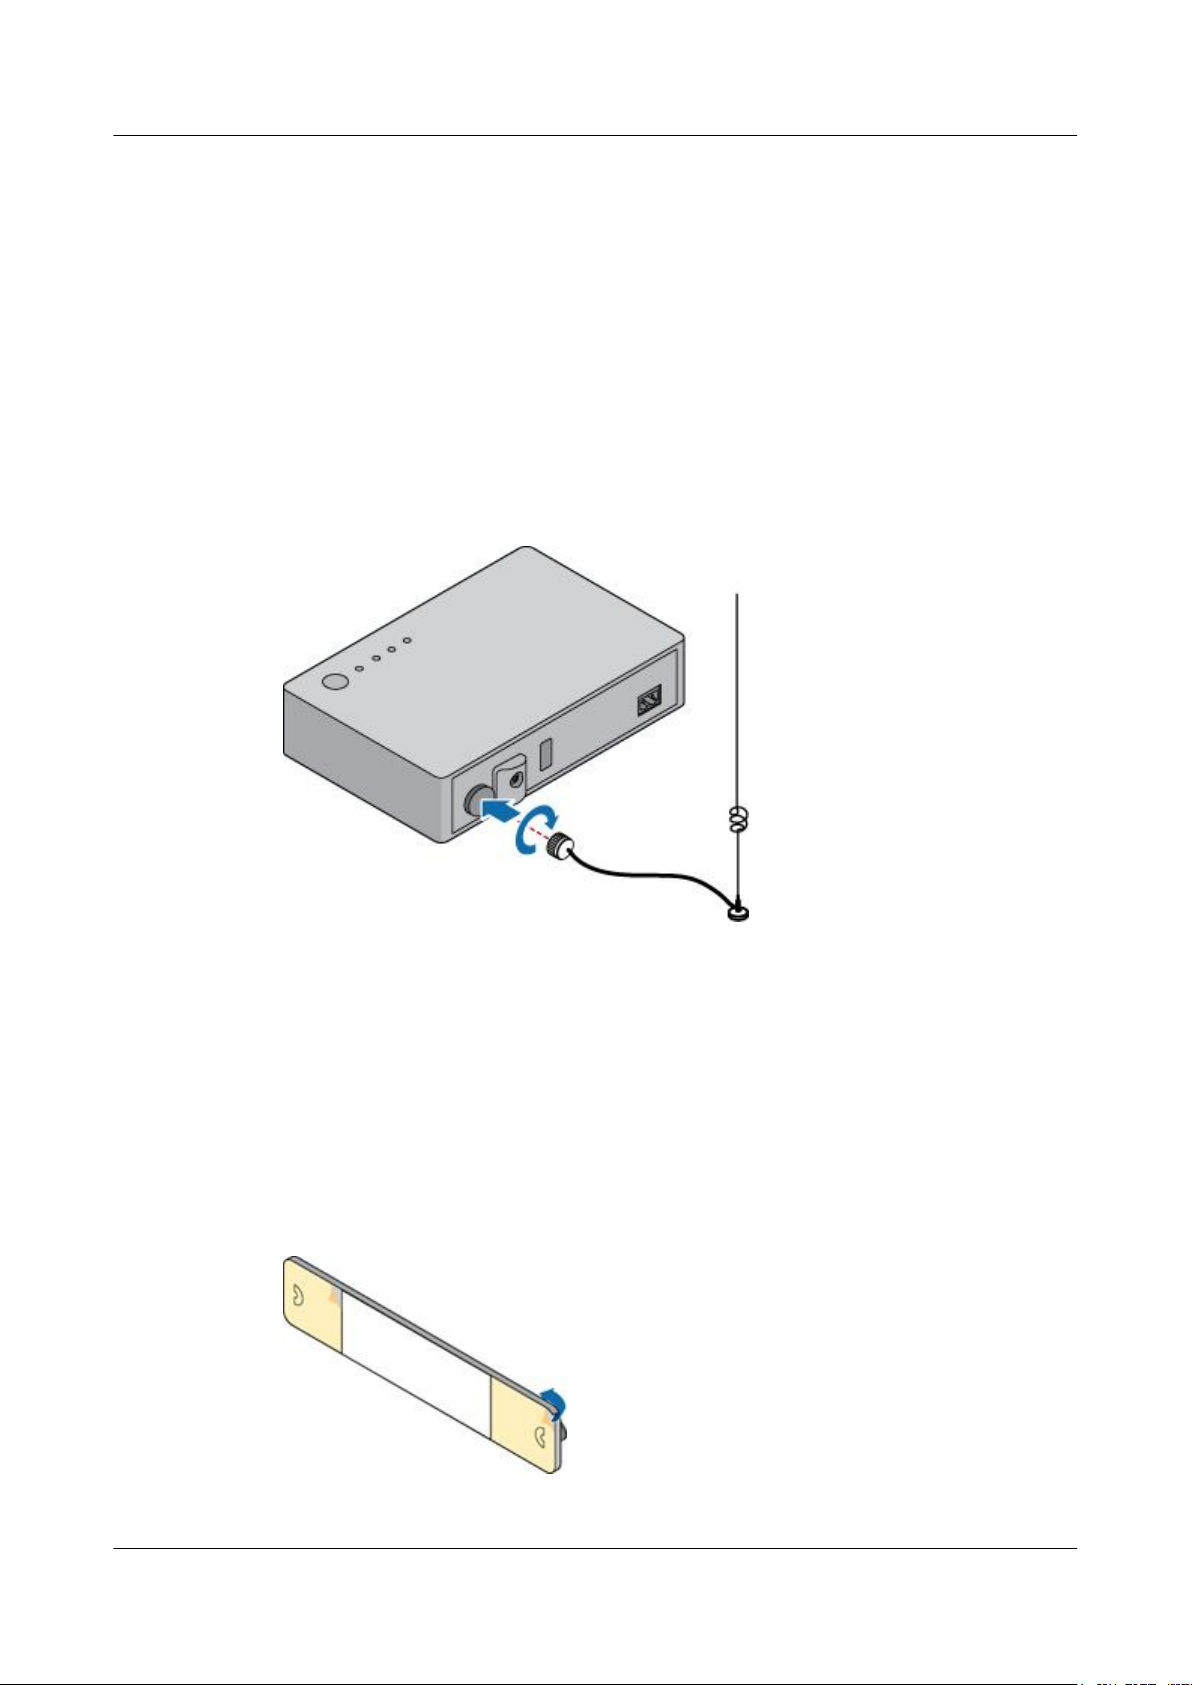
Step 5 Route the GPRS antenna through the cable hole and secure one end of the antenna to the eBox,
as shown in Figure 3-16.
Figure 3-16 Installing the antenna
Step 6 Mount the eBox on the rear panel, and secure the antenna outside the cabinet. Figure 3-17 shows
an eBox installed inside an outdoor cabinet.
Issue 02 (2015-01-09) Huawei Proprietary and Confidential
Copyright © Huawei Technologies Co., Ltd.
23
Page 32

eBIMS
Product Installation Guide 3 Hardware Installation
Figure 3-17 eBox installed inside an outdoor cabinet
----End
3.3.2 Inside an Indoor Equipment Room
eBox hardware installation includes positioning and drilling holes.
Context
To secure an eBox to an indoor equipment room, mount the eBox on the wall inside the
equipment room.
The eBox communicates with uplink devices using FE network cables or antennas.
This section describes how to install an eBox in FE network cable communication mode.
Figure 3-18 shows the installation position requirements.
Figure 3-18 eBox installation position requirements
Issue 02 (2015-01-09) Huawei Proprietary and Confidential
Copyright © Huawei Technologies Co., Ltd.
24
Page 33

eBIMS
Product Installation Guide
Procedure
Step 1 Determine the eBox installation position inside the equipment room using a ruler, and mark the
position using a marker.
Step 2 Drill a hole in the marked position using a hammer drill, as shown in Figure 3-19.
Figure 3-19 Drilling a hole in the installation position
3 Hardware Installation
Step 3 Knock a plastic expansion anchor into the mounting hole using a claw hammer, as shown in
Figure 3-20.
Figure 3-20 Installing a plastic expansion anchor
Step 4 Insert a tapping screw into the plastic expansion anchor using a Phillips screwdriver, as shown
in Figure 3-21.
Issue 02 (2015-01-09) Huawei Proprietary and Confidential
Copyright © Huawei Technologies Co., Ltd.
25
Page 34

eBIMS
Product Installation Guide 3 Hardware Installation
Figure 3-21 Installing a tapping screw
Step 5 Mount the eBox on the screw. Figure 3-22 and Figure 3-23 show an eBox installed inside an
indoor equipment room.
Figure 3-22 Installation effect drawing 1
Figure 3-23 Installation effect drawing 2
Issue 02 (2015-01-09) Huawei Proprietary and Confidential
Copyright © Huawei Technologies Co., Ltd.
26
Page 35

eBIMS
Product Installation Guide
NOTE
You can mount an eBox in either of the ways shown in Figure 3-22 and Figure 3-23 based on your actual
situation.
----End
3.3.3 Connecting Cables
Connect cables to the eBox after installation.
Context
An eBox communicates with the upstream in any of the following modes:
l GPRS communication: You only need to connect the power cable.
l FE network cable: You need to connect the FE network cable and power cable.
l RS485 cable: You need to connect the RS485 cable and power cable.
Figure 3-24 shows the RS485 pins. Table 3-1 shows the function of each RS485 pin.
3 Hardware Installation
Figure 3-24 RS485 pins
Table 3-1 Functions of RS485 pins
Pin Function
Pin 1 TX+
Pin 2 TX-
Pin 3 ---
Pin 4 RX+
Pin 5 RX-
Pin 6 ---
Pin 7 ---
Pin 8 GND
The eBox can be powered by using the following two methods:
Issue 02 (2015-01-09) Huawei Proprietary and Confidential
Copyright © Huawei Technologies Co., Ltd.
27
Page 36

eBIMS
Product Installation Guide
1. The eBox is powered by the 48 V power supply system in the power cabinet, as shown in
3 Hardware Installation
Figure 3-25.
Figure 3-25 eBox powered by the 48 V power supply system
2. The eBox is powered by the 220 V power supply system using an adapter, as shown in
Figure 3-26.
Figure 3-26 eBox powered by the 220 V power supply system
Procedure
Step 1 Connect the power cable to the eBox, as shown by 1 in Figure 3-27.
Step 2 Connect the FE network cable to the eBox, as shown by 2 in Figure 3-27.
Step 3 Connect the RS485 cable to the eBox, as shown by 3 in Figure 3-29.
Issue 02 (2015-01-09) Huawei Proprietary and Confidential
Copyright © Huawei Technologies Co., Ltd.
28
Page 37

eBIMS
Product Installation Guide
Figure 3-27 Cable connections in FE communication mode
Figure 3-28 Cable connections in GPRS communication mode
3 Hardware Installation
Figure 3-29 Cable connections in RS485 communication mode
----End
Issue 02 (2015-01-09) Huawei Proprietary and Confidential
Copyright © Huawei Technologies Co., Ltd.
29
Page 38

eBIMS
Product Installation Guide 3 Hardware Installation
3.4 Setting eBox Parameters
eBox parameters include the IP address, mask, gateway, ports, etc.
Prerequisites
l The eBox has been connected to a laptop and the USB serial driver has been installed.
l HyperTerminal has been installed on the laptop running Windows OS and ports have been
correctly configured. For details, see 5.2 How Can I Connect the eBox to a Laptop?.
NOTE
You can also use the eConfig tool of the eBox to obtain the COM port information from the laptop.
l The latest release of the eBox configuration tool package has been downloaded to the laptop
from http://support.huawei.com.
NOTE
This document describes commands used for networking deployment and maintenance.
The following types of commands are beyond the scope of this document:
1. Commands that are used during production, assembly, and return for repair.
2. Commands used for engineering and fault diagnosis are beyond the scope of this document. If
these commands are not used properly, equipment may become abnormal or services may be
interrupted. If you do need to use these commands, please contact the local Huawei office to
know the process of getting permission for these documents and the special requirements.
Context
Set eBox parameters using either of the following methods:
1. Use the eConfig function of the eBox.
2. Enter command lines on the laptop.
The eBox uses the following three communication modes:
l FE ports: FE cables and power cables are required. Figure 3-30 shows the cable
connections.
Figure 3-30 Cable connections in FE port-based communication mode
Issue 02 (2015-01-09) Huawei Proprietary and Confidential
Copyright © Huawei Technologies Co., Ltd.
30
Page 39

eBIMS
Product Installation Guide
l GPRS: Install an antenna, insert the SIM card, and connect cables. Figure 3-31 shows the
Figure 3-31 Cable connections in GPRS-based communication mode
l RS485 port: cables fitted with the RS485 connectors and power cables. Figure 3-32 shows
3 Hardware Installation
cable connections.
the cable connections.
Figure 3-32 Cable connections in RS485 port-based communication mode
3.4.1 Setting eBox Parameters Using eConfig
You can set eBox parameters using the eConfig function.
Prerequisites
The IP address, subnet mask, and gateway IP address have been provided by the customer.
Context
The default IP address of the eBox is 192.168.0.33.
Correct Trap IP address and port settings are crucial to successful report of system events and
alarms.
Issue 02 (2015-01-09) Huawei Proprietary and Confidential
Copyright © Huawei Technologies Co., Ltd.
31
Page 40

eBIMS
Product Installation Guide 3 Hardware Installation
3.4.1.1 Setting eBox FE Interface Parameters
If the eBox is connected to upstream devices through the FE ports, you must specify the IP
address, Trap IP address, channel, and PAN ID.
Procedure
Step 1 Double-click eConfig_PC.exe in the eBox configuration tool kit to start the eConfig tool.
NOTE
If the eConfig tool is being used for the first time, double-click eConfig_reg.bat to import registry
information first.
Step 2 Choose the COM port and click Open.
Step 3 Click Login to log in to the eBox, as shown in Figure 3-33.
Figure 3-33 eConfig dialog box
Step 4 Choose the eBox-F tab. Enter the eBox local IP address, gateway IP address, subnet mask, port
number, and server parameters, as shown in Figure 3-34.
Issue 02 (2015-01-09) Huawei Proprietary and Confidential
Copyright © Huawei Technologies Co., Ltd.
32
Page 41

eBIMS
Product Installation Guide
Figure 3-34 Setting eBox-F parameters
3 Hardware Installation
Step 5 Click Send. In the Reset eBox dialog box displayed, click Yes to reset the eBox. Figure 3-35
is displayed indicating successful setting of eBox-F parameters.
Figure 3-35 Message indicating successful setting of eBox-F parameters
Step 6 Click netparams to view the eBox-F parameter settings, as shown in Figure 3-36.
Issue 02 (2015-01-09) Huawei Proprietary and Confidential
Copyright © Huawei Technologies Co., Ltd.
33
Page 42

eBIMS
Product Installation Guide 3 Hardware Installation
Figure 3-36 Viewing eBox-F parameter settings
Step 7 Optional: Choose the Advanced tab and specify PAN ID and Channel ID, as shown in Figure
3-37.
NOTE
l If more than four eBoxes are used for the same scenario, set radio frequency parameters to ensure the
reliability of communication between the eBox and eBat.
l A total of 16 channels can be used, ranging from channel 11 to channel 26.
l Each channel supports up to 4 eBoxes. Each eBox is identified by PAN ID.
l Different channel can share the same PAN ID.
Issue 02 (2015-01-09) Huawei Proprietary and Confidential
Copyright © Huawei Technologies Co., Ltd.
34
Page 43

eBIMS
Product Installation Guide 3 Hardware Installation
Figure 3-37 Setting the channel ID and PAN ID
----End
3.4.1.2 Setting eBox GPRS Interface Parameters
If the eBox is connected to upstream devices through the GPRS, you must specify the APN,
SIMPIN, Trap IP address, channel, and PAN ID.
Procedure
Step 1 Double-click eConfig_PC.exe in the eBox configuration tool kit to start the eConfig tool.
NOTE
If the eConfig tool is being used for the first time, double-click eConfig_reg.bat to import registry
information first.
Step 2 Choose the COM port and click Open.
Step 3 Click Loginto log in to the eBox, as shown inFigure 3-38.
Issue 02 (2015-01-09) Huawei Proprietary and Confidential
Copyright © Huawei Technologies Co., Ltd.
35
Page 44

eBIMS
Product Installation Guide
Figure 3-38 eConfig dialog box
3 Hardware Installation
Step 4 Choose the eBox-Gtab and enter the eBIMS server IP address, port number, SIM APN, and SIM
PIN information, as shown inFigure 3-39.
Figure 3-39 Setting eBox-G parameters
Step 5 Click Send. In theReset eBoxdialog box displayed, clickYESto reset the eBox.Figure 3-40 is
displayed indicating successful setting of eBox-G parameters.
Issue 02 (2015-01-09) Huawei Proprietary and Confidential
Copyright © Huawei Technologies Co., Ltd.
36
Page 45

eBIMS
Product Installation Guide
Figure 3-40 Message indicating successful setting of eBox-G parameters
3 Hardware Installation
Step 6 Click GPRSparamsto view the eBox-G parameter settings, as shown inFigure 3-41.
Figure 3-41 Viewing eBox-G parameter settings
Step 7 Optional: Choose theAdvancedtab and specifyPAN IDandChannel ID, as shown inFigure
3-42.
Issue 02 (2015-01-09) Huawei Proprietary and Confidential
Copyright © Huawei Technologies Co., Ltd.
37
Page 46

eBIMS
Product Installation Guide
Figure 3-42 Setting the channel ID and PAN ID
3 Hardware Installation
NOTE
l If more than four eBoxes are used for the same scenario, set radio frequency parameters to ensure the
reliability of communication between the eBox and eBat.
l A total of 16 channels can be used, ranging from channel 11 to channel 26.
l Each channel supports up to 4 eBoxes. Each eBox is identified by PAN ID.
l Different channel can share the same PAN ID.
----End
3.4.1.3 Setting eBox RS485 Interface Parameters
If the eBox is connected to upstream devices through the RS485 port, you must specify the baud
rate and device address.
Procedure
Step 1 Double-click eConfig_PC.exe in the eBox configuration tool kit to start the eConfig tool.
NOTE
If the eConfig tool is being used for the first time, double-click eConfig_reg.bat to import registry
information first.
Step 2 Choose the COM port and click Open.
Step 3 Click Login to log in to the eBox, as shown in Figure 3-43.
Issue 02 (2015-01-09) Huawei Proprietary and Confidential
Copyright © Huawei Technologies Co., Ltd.
38
Page 47

eBIMS
Product Installation Guide
Figure 3-43 eConfig dialog box
3 Hardware Installation
Step 4 Choose the eBox-S tab and specify the baud rate and device address, as shown in Figure 3-44.
Figure 3-44 Setting eBox-S parameters
Step 5 Click Send. In the Reset eBox dialog box displayed, click YES to reset the eBox. Figure
3-45 is displayed indicating successful setting of eBox-S parameters.
Issue 02 (2015-01-09) Huawei Proprietary and Confidential
Copyright © Huawei Technologies Co., Ltd.
39
Page 48

eBIMS
Product Installation Guide 3 Hardware Installation
Figure 3-45 Message indicating successful setting of eBox-S parameters
Step 6 Click RS485params to view the eBox-S parameter settings.
Step 7 Optional: Choose the Advanced tab and specify PAN ID and Channel ID, as shown in Figure
3-46.
NOTE
l If more than four eBoxes are used for the same scenario, set radio frequency parameters to ensure the
reliability of communication between the eBox and eBat.
l A total of 16 channels can be used, ranging from channel 11 to channel 26.
l Each channel supports up to 4 eBoxes. Each eBox is identified by PAN ID.
l Different channel can share the same PAN ID.
Issue 02 (2015-01-09) Huawei Proprietary and Confidential
Copyright © Huawei Technologies Co., Ltd.
40
Page 49

eBIMS
Product Installation Guide
Figure 3-46 Setting the channel ID and PAN ID
3 Hardware Installation
----End
3.4.2 Setting eBox Parameters Manually
You can manually set eBox parameters with any PC serial port terminal tool.
Prerequisites
The IP address, subnet mask, and gateway IP address have been provided by the customer.
Context
The default IP address of the eBox is 192.168.0.33.
Correct Trap IP address and port settings are crucial to successful report of system events and
alarms.
3.4.2.1 Setting eBox Parameters in FE Port-based
Communication Mode
For an eBox that uses the FE port to communicate with the eBIMS, set the eBox local IP address,
trap address, channels, and PAN ID.
Configuring Address Parameters
Configure the eBox local IP address and trap address.
Issue 02 (2015-01-09) Huawei Proprietary and Confidential
Copyright © Huawei Technologies Co., Ltd.
41
Page 50

eBIMS
Product Installation Guide
Prerequisites
The IP address, subnet mask, and gateway IP address allocated to the eBox have been provided
by the customer.
Context
The default eBox IP address is 192.168.0.33.
System events and alarms can be properly reported only when the trap address and ports are
correctly configured.
Procedure
Step 1 In the eBox serial port CLI of the client, enter setnetcfg 1 IP NetMask GateWay and press
Enter to set the eBox IPv4 address, subnet mask, and gateway address.
Step 2 Enter reset and press Enter to reset the board.
Step 3 Enter getnetcfg 1 to query whether the setting is successful.
3 Hardware Installation
Example
Step 4 Enter setnetcfg 8 Trap destination IP Trap destination port and press Enter.
Step 5 Enter reset and press Enter to reset the board.
Step 6 Enter getnetcfg 8 to query whether trap parameters are successfully set.
----End
1. In the eBox serial port CLI of the client, enter setnetcfg 1 192.168.1.66 255.255.255.0
192.168.1.1 and press Enter, as shown in Figure 3-47.
Figure 3-47 Setting the eBox address
NOTE
If the Write para success! message is displayed after you press Enter, the setting is successful.
2. Enter reset and press Enter.
3. Enter getnetcfg 1. Figure 3-48 shows the address configuration information.
Figure 3-48 IP address configuration information
Issue 02 (2015-01-09) Huawei Proprietary and Confidential
Copyright © Huawei Technologies Co., Ltd.
42
Page 51

eBIMS
Product Installation Guide
4. Enter setnetcfg 8 192.168.1.42 162 and press Enter to configure the trap IP address and
5. Enter reset and press Enter.
6. Enter getnetcfg 8. Figure 3-50 shows the trap configuration information.
3 Hardware Installation
port parameters, as shown in Figure 3-49.
Figure 3-49 Setting the trap IP address and port parameters
NOTE
If the Write para success! message is displayed after you press Enter, the setting is successful.
Figure 3-50 Trap configuration information
Configuring the Channel and PAN ID
If more than four eBoxes are deployed in the same scenario, configure eBox RF communication
parameters to ensure the reliability of data communications between the eBoxes and eBats.
Prerequisites
More than four eBoxes have been deployed at the same time.
Context
l The number of available channels ranges from 11 to 26, totally 16 channels.
l Each channel supports a maximum of four eBoxes that have different PAN IDs.
l PAN IDs of eBoxes in different channels can be the same.
Procedure
Step 1 In the eBox serial port CLI of the client, enter setchanid 14 and press Enter.
NOTE
If the set channel id ok. message is displayed after you press Enter, the setting is successful.
Step 2 Enter reset and press Enter to reset the eBox.
Step 3 Enter showebox to query whether the setting is successful.
Step 4 Enter setpanid 1 and press Enter to set the PAN ID.
Issue 02 (2015-01-09) Huawei Proprietary and Confidential
Copyright © Huawei Technologies Co., Ltd.
43
Page 52

eBIMS
Product Installation Guide
Step 5 Enter reset and press Enter to reset the eBox.
Step 6 Enter showebox to query whether the setting is successful.
----End
Example
1. In the eBox serial port CLI, enter setchanid 14 and press Enter, as shown in Figure
3 Hardware Installation
3-51.
Figure 3-51 Setting the channel
NOTE
If the set channel id ok. message is displayed after you press Enter, the setting is successful.
2. Enter reset and press Enter to reset the eBox.
3. Enter showebox to query whether the setting is successful, as shown in Figure 3-52.
Figure 3-52 Querying channel information
4. Enter setpanid 1 and press Enter to set the PAN ID, as shown in Figure 3-53.
Figure 3-53 Setting the PAN ID
Issue 02 (2015-01-09) Huawei Proprietary and Confidential
Copyright © Huawei Technologies Co., Ltd.
44
Page 53

eBIMS
Product Installation Guide
5. Enter reset and press Enter to reset the eBox.
6. Enter showebox to query whether the setting is successful, as shown in Figure 3-54.
3 Hardware Installation
NOTE
If the set pan id ok. message is displayed after you press Enter, the setting is successful.
Figure 3-54 Querying eBox setting information
3.4.2.2 Setting eBox Parameters in GPRS-Based
Communication Mode
For an eBox that uses GPRS-based communication mode, set the eBox APN, SIMPIN, trap
address, channels, and PAN ID.
Configuring Address Parameters
Configure the eBox APN, SIMPIN, and trap address.
Prerequisites
l The eBox uses GPRS to communicate with the eBIMS.
l The subnet mask and gateway IP address allocated to the eBox have been provided by the
customer.
Context
System events and alarms can be reported properly only when the TRAP address and ports are
configured correctly.
Procedure
Step 1 In the eBox serial port CLI of the client, enter setapn apn parameter and press Enter to set
APN parameters.
Step 2 Enter reset and press Enter to reset the eBox.
Issue 02 (2015-01-09) Huawei Proprietary and Confidential
Copyright © Huawei Technologies Co., Ltd.
45
Page 54

eBIMS
Product Installation Guide
Step 3 Enter getapn to check whether the setting is successful.
Step 4 Enter setsimpin pincode repeat pincode and press Enter to set SIMPIN parameters.
Step 5 Enter reset and press Enter to reset the eBox.
Step 6 Enter getsimpin to query whether the setting is successful.
Step 7 Enter setnetcfg 8 Trap destination IP Trap destination port and press Enter to set trap
parameters.
Step 8 Enter reset and press Enter to reset the eBox.
Step 9 Enter getnetcfg 8 to query whether trap parameters are successfully set.
----End
Example
3 Hardware Installation
NOTE
setsimpin is set to be blank by default. If the SIM card does not require pincode, retain the setting. If the
SIM card requires pincode, ensure that pincode you set is the same as pincode of the SIM card. Otherwise,
the SIM card will be locked after three attempts fail.
1. In the eBox serial port CLI of the client, enter setapn apn parameter and press Enter to
set APN parameters, as shown in Figure 3-55.
Figure 3-55 Setting APN parameters
2. Enter reset and press Enter to reset the eBox.
3. Enter getapn to query whether the setting is successful, as shown in Figure 3-56.
Figure 3-56 Querying APN parameters
4. Enter setsimpin pincode repeat pincode and press Enter to set SIMPIN parameters, as
shown in Figure 3-57.
Figure 3-57 Setting SIMPIN parameters
5. Enter reset and press Enter to reset the eBox.
6. Enter getsimpin to query whether the SIMPIN setting is successful, as shown in Figure
3-58.
Issue 02 (2015-01-09) Huawei Proprietary and Confidential
Copyright © Huawei Technologies Co., Ltd.
46
Page 55

eBIMS
Product Installation Guide
7. Enter setnetcfg 8 192.168.1.42 162 and press Enter to configure the trap IP address and
8. Enter reset and press Enter to reset the eBox.
3 Hardware Installation
Figure 3-58 Querying SIMPIN parameters
port parameters, as shown in Figure 3-59.
Figure 3-59 Setting the trap IP address and port parameters
NOTE
If the Write para success! message is displayed after you press Enter, the setting is successful.
9. Enter getnetcfg 8. Figure 3-60 shows the trap configuration information.
Figure 3-60 Querying trap configuration information
Configuring the Channel and PAN ID
If more than four eBoxes are deployed in the same scenario, configure eBox RF communication
parameters to ensure the reliability of data communications between the eBoxes and eBats.
Prerequisites
More than four eBoxes have been deployed in the same scenario.
Context
l The number of available channels ranges from 11 to 26, totally 16 channels.
l Each channel supports a maximum of four eBoxes that have different PAN IDs.
l PAN IDs of eBoxes in different channels can be the same.
Procedure
Step 1 For details, see Configuring the Channel and PAN ID.
----End
Issue 02 (2015-01-09) Huawei Proprietary and Confidential
Copyright © Huawei Technologies Co., Ltd.
47
Page 56

eBIMS
Product Installation Guide
3.5 Field Networking
An eBat or eMeter communicates with an eBox by means of wireless connection. Bind eBox
and eBat before the wireless connection.
Prerequisites
l The eBat has been installed.
l The eBat and eBox parameters have been configured.
l The linear distance between the eBat and the eBox is no greater than 100 m.
Context
Figure 3-61 shows the binding button and indicator on the eBat.
Figure 3-61 Binding button and indicator on the eBat
3 Hardware Installation
Figure 3-62 shows the binding button and indicator on the eBox.
Figure 3-62 Binding button and indicator on the eBox
Table 3-2,Table 3-3andTable 3-4, respectively describe the meanings of different indicator
status on the eBat eMeter and eBox.
Issue 02 (2015-01-09) Huawei Proprietary and Confidential
Copyright © Huawei Technologies Co., Ltd.
48
Page 57

eBIMS
Product Installation Guide 3 Hardware Installation
Table 3-2 Description of eBat indicator status
Indicator
Indicator Status Description
Name
RUN/ALARM Off The eBat is powered off or in sleep
mode.
Steady green The eBat is powered on but not
connected to the network.
Fast blinking in green (4 Hz) The eBat is searching for the
network.
Slow blinking in green (0.5 Hz) The eBat communication is ready.
Steady red The eBat communication is normal.
A critical battery internal resistance
alarm has happened, which means
the battery should be changed.
Fast blinking in red (4 Hz) A hardware failure has happened;
The communication of ebat is also
NOT normal.
Slow blinking in red (0.5 Hz) A hardware failure has happened;
The communication of ebat is
normal.
Steady orange The eBat communication is normal,
but there is a minor high battery
internal resistance alarm.
Fast blinking in orange (4 Hz) The eBat LED was turned on
manually by remote work station
like eBIMS.
Table 3-3 Desciption of eMeter indicator status
Indicator
Indicator Status Description
Name
RUN/ALARM Off The eMeter is powered off or in
sleep mode.
Steady green The eMeter is powered on but not
connected to the network.
Fast blinking in green (4 Hz) The eMeter is searching for the
network.
Slow blinking in green (0.5 Hz) The eMeter communication is
ready.
Issue 02 (2015-01-09) Huawei Proprietary and Confidential
Copyright © Huawei Technologies Co., Ltd.
49
Page 58

eBIMS
Product Installation Guide 3 Hardware Installation
Indicator
Indicator Status Description
Name
Fast blinking in red (4 Hz) A hardware failure has happened;
The communication of eMeter is
NOT normal.
Slow blinking in red (0.5 Hz) A hardware failure has happened;
The communication of eMeter is
normal.
Fast blinking in orange (4 Hz) The eMeter LED was turned on
manually by remote work station
like eBIMS
Table 3-4 Description of eBox indicator status
Indicator
Indicator Status Description
Name
SETUP Off The eBox is powered off or there is
no data transmission.
Steady green System initialization (Binding for
ebox and ebat is not allowed).
Fast blinking in green (8 Hz) Data transmission.
Slow blinking in green (0.5 Hz) Binding for eBox and eBat is
allowed. Auto disabled after 10
minutes.
RUN Off The eBox is powered off or
hardware failure.
Steady Green The eBox is powered on and there
is hardware failure.
Blinking(0.5 Hz) The eBox in running normally.
ALM Off The eBox is powered off, and there
is no fault alarm.
Steady Red The hardware failure, the eBox
should be replaced.
LINK Off The eBox is powered off or there is
no data transmission.
Issue 02 (2015-01-09) Huawei Proprietary and Confidential
Copyright © Huawei Technologies Co., Ltd.
50
Page 59

eBIMS
Product Installation Guide
3 Hardware Installation
Procedure
Step 1 Click the binding button on the eBox within 1 seconds. The SETUP indicator is blinking slowly
Step 2 Press the binding button on the eBat longer than 1 seconds. The RUN/ALARM indicator is
Step 3 Optional: RepeatStep 2 for other eBats in the same group.
Indicator
Name
in green at a frequency of 0.5 Hz, indicating that the eBox and eBat networking is enabled.
blinking slowly in green at a frequency of 0.5 Hz, indicating that the eBox and eBat networking
is successful.
Indicator Status Description
Blinking
l eBox-F: data transmission.
l eBox-G:
- 1Hz: Searching GPRS
networking.
- 1/3Hz: Network registered.
- 8Hz: data transmission.
Step 4 Click the binding button on the eBox within 1 seconds to turn off the binding procedure.
----End
3.6 Setting Number of Battery Strings
To facilitate the eBIMS to analyze and display battery data, you need to set string numbers for
the batteries connected to the eBIMS.
Prerequisites
l eBats are connected to batteries.
l eBats and eBoxes are networked after code matching.
Context
l You can group batteries using the eBox configuration tool. To use the eBox configuration
tool to group batteries, start from Step 5.
l You can set a string number for a single eBat or for multiple eBats.
l One eBat is used for each battery. Therefore, the string number of eBats is that of batteries.
l A eBox contains a maximum of eight eBat strings.
Procedure
Step 1 In the eBox serial port CLI of the client, enter setstrno 2 1and pressEnterto set the string number
to2 for No.1 eBat.
Issue 02 (2015-01-09) Huawei Proprietary and Confidential
Copyright © Huawei Technologies Co., Ltd.
51
Page 60

eBIMS
Product Installation Guide
l 2: indicates the string number.
l 1: indicates the eBat number.
Step 2 Enter showebat to query single eBat string information.
Step 3 In the eBox serial CLI, enter setstrno 2 1 3and pressEnterto set the string number to2 for No.
1 to No.3 eBats.
l 2: indicates the string number.
l 1: indicates the eBat start number.
l 3: indicates the eBat end number.
Step 4 Enter showebat to query multiple eBat string information.
Step 5 Optional: Use the eBox configuration tool to group batteries by specify the group number and
battery number range, as shown inFigure 3-63.
3 Hardware Installation
NOTE
If the system displays Set string number success., the setting is successful.
NOTE
If the system displays Set string number success., the setting is successful.
Figure 3-63 Grouping batteries
----End
Example
1. In the eBox serial port CLI of the client, enter setstrno 2 1and pressEnterto set the string
number to2for No.1 eBat, shown asFigure 3-64.
Issue 02 (2015-01-09) Huawei Proprietary and Confidential
Copyright © Huawei Technologies Co., Ltd.
52
Page 61

eBIMS
Product Installation Guide
2. Enter showebatto query single eBat string information, as shown inFigure 3-65.
3. In the eBox serial CLI, enter setstrno 2 1 3and pressEnterto set the string number to2for
3 Hardware Installation
Figure 3-64 Setting string number for a single eBat
Figure 3-65 Querying single eBat string information
No.1 to No.3 eBats, as shown inFigure 3-66.
Figure 3-66 Setting string number for multiple eBats
4. Enter showebatto query eBat string information, as shown inFigure 3-67.
Figure 3-67 Querying multiple eBat string information
3.7 Querying Battery Information
Query information about eBats managed by the eBox for onsite commissioning and fault
locating.
Prerequisites
l eBats and eBoxes are networked.
l The eBats have been grouped.
Context
You can also query the battery information using the eConfig function of the eBox. For details,
see Step 2.
Issue 02 (2015-01-09) Huawei Proprietary and Confidential
Copyright © Huawei Technologies Co., Ltd.
53
Page 62

eBIMS
Product Installation Guide
Procedure
Step 1 In the eBox CLI, enter the showebatcommand to query the number of the eBats and determine
whether the onsite connection configuration is correct.Figure 3-68 shows the eBat information
query page.
Figure 3-68 Querying eBat information
Step 2 Optional: In the eConfig dialog box, clickshowebatto check the storage battery information,
as shown inFigure 3-69.
Figure 3-69 Querying eBat information using the eConfig function
3 Hardware Installation
----End
3.8 Setting current transducer information of eMeter
Prerequisites
l eMeter has been connected with battery string.
l eMeter has been connected with current transducer.
Issue 02 (2015-01-09) Huawei Proprietary and Confidential
Copyright © Huawei Technologies Co., Ltd.
54
Page 63

eBIMS
Product Installation Guide
l eMeter and eBox are networked.
Context
l You can configure the current transducer by means of eConfig.
l One eMeter works for only one battery string.
l One eBox can manage max 8 eMeters.
Procedure
Step 1 To confiugre the current transducer by eConfig. Figure 3-70 shows how to use eConfig to setup
the current transducer information.
l Charge Current Limit: Current value when battery string state changes from equalize state
l Transducer Type: The transducer type to be used.
l Working Mode: String voltage and current mode; Current only mode.
----End
3 Hardware Installation
to float state.
Figure 3-70 Configuration of current transducer
3.9 Verifying the Hardware Installation
After the hardware installation, verify the installation.
Table 3-5 describes the check items and check methods for the hardware installation.
Issue 02 (2015-01-09) Huawei Proprietary and Confidential
Copyright © Huawei Technologies Co., Ltd.
55
Page 64

eBIMS
Product Installation Guide 3 Hardware Installation
Table 3-5 Hardware installation checklist
No. Check Item Check Method
1 Cables between eBats and
Batteries are connected
correctly and securely.
2 eBats are secured on
Batteries.
3 The wireless communication
signal indicator for eBats
works properly.
4 eBoxes are securely mounted
to the wall.
5 The wireless communication
signal indicator for eBoxes
works properly.
6 All battery screws are
secured.
Visually check that the red
and black cables correctly
and securely connect to the
Batteries.
Visually check that eBats are
secured.
Consecutively press the code
matching button on the eBat.
Visually check that the signal
indicator blinks in green at a
frequency of 0.5 Hz.
Manually check that the
eBoxes are properly mounted
to the wall without drop risks.
Visually check that the
SETUP indicator is off.
Perform operations by
referring to 3.7 Querying
Storage Battery
Information. If the number
of eBats are correct, battery
screws are properly secured.
Otherwise, check and secure
screws.
Issue 02 (2015-01-09) Huawei Proprietary and Confidential
Copyright © Huawei Technologies Co., Ltd.
56
Page 65

eBIMS
Product Installation Guide 4 Software Installation
4 Software Installation
About This Chapter
About This Chapter
Installing the eBIMS includes installing software and loading license files.
4.1 Hardware Requirements
4.2 Installing the eBIMS
4.3 Verifying the Software Installation
4.4 Registering the eBIMS
4.5 Uninstalling the eBIMS
Issue 02 (2015-01-09) Huawei Proprietary and Confidential
Copyright © Huawei Technologies Co., Ltd.
57
Page 66

eBIMS
Product Installation Guide
4.1 Hardware Requirements
To install the eBIMS, the software and hardware must meet installation requirements.
Table 4-1 shows the eBIMS requirements for software and hardware configurations.
Table 4-1 eBIMS hardware configuration requirements
4 Software Installation
Server
Configuration
CPU: 2 x 4-core, 2.4
GHz or above
Memory: 32 GB or
above
Disk: 2.0 TB or
above
NOTE
Recommended server: Tecal RH2288 V2-HS1M000SRS01-eBIMS Server Standard (Xeon
E5-2609-4Core-2.4GHz-64bit, Mem 32G,2*1000G)
Operating System Database Client
Windows Server
2008 R2 Standard
64-bit
4.2 Installing the eBIMS
This section describes how to install the eBIMS. Comply with the requirements during the
installation.
The system is
equipped with a
database, so you do
not need to install
one.
Internet Explorer 8.0
or later versions
Prerequisites
l Windows Server 2008 is installed.
l Hardware facilities meet configuration requirements.
l The directory for storing installation files can contain only characters, digits, -, and _.
Otherwise, the eBIMS cannot be installed.
Context
To ensure secure and stable running of the eBIMS, harden the operating system and antivirus
software by referring to the following guides:
l eBIMS V100R002C00 Windows Server 2008 R2 Security Hardening User Guide
l eBIMS V100R002C00 Windows Server 2008 R2 Antivirus Solution User Guide
The guides are available on http://support.huawei.com.
Issue 02 (2015-01-09) Huawei Proprietary and Confidential
Copyright © Huawei Technologies Co., Ltd.
58
Page 67

eBIMS
Product Installation Guide
Procedure
Step 1 Log in to Windows Server 2008 using an account with the operation right.
Step 2 Double-click setup.bat to start the eBIMS installation.
Step 3 In the Choose a Language dialog Box, select a language and click OK. The eBIMS installation
dialog Box is displayed.
Step 4 Click Next. The Copyright Notice dialog Box is displayed, as shown in Figure 4-1.
Figure 4-1 Copyright Notice
4 Software Installation
NOTE
The eBIMS cannot be installed in a remotely shared directory.
NOTE
The system automatically checks whether the current environment meets the requirements for installing
the eBIMS. If the current environment does not meet the requirements, the system will display a message.
Step 5 Click I agree and click Next. The Server Parameters dialog Box is displayed, as shown in
Figure 4-2.
Issue 02 (2015-01-09) Huawei Proprietary and Confidential
Copyright © Huawei Technologies Co., Ltd.
59
Page 68

eBIMS
Product Installation Guide 4 Software Installation
Figure 4-2 Setting server parameters
NOTE
l Server IP Address: indicates the default IP address of the eBIMS server. If the server has multiple IP
addresses, select a public IP address from the drop-down list.
l Server Port: The default port number is 8080.
l The eBIMS is installed in drive D by default. You can change the installation directory. The directory
should not contain Chinese characters, special characters, or spaces and its name length should be no
longer than 60 characters.
l To ensure successful eBIMS installation, verify that the eBIMS installation directory is empty before
the installation.
Step 6 Click Next. In the Database Parameters dialog Box, set parameters and click Next, as shown
in Figure 4-3.
Issue 02 (2015-01-09) Huawei Proprietary and Confidential
Copyright © Huawei Technologies Co., Ltd.
60
Page 69

eBIMS
Product Installation Guide 4 Software Installation
Figure 4-3 Setting database parameters
NOTE
l Database Type: The default database is MySQL.
l Super User Name: The default database administrator user name is ebimssys.
l Super User Password: The default database administrator password is Changeme1234. It is
recommended that you set a password by yourself.
l User Name: The default database common user name is commonuser.
l User Password: The default database common user password is Changeme123. It is recommended
that you set a password by yourself.
l Database Port: The default database port number is 33306.
l Data file directory: The default database directory is MySQL under the eBIMS installation directory.
Step 7 Click Next. The Components Select dialog Box is displayed, as shown in Figure 4-4.
Issue 02 (2015-01-09) Huawei Proprietary and Confidential
Copyright © Huawei Technologies Co., Ltd.
61
Page 70

eBIMS
Product Installation Guide 4 Software Installation
Figure 4-4 Components Select
NOTE
All components are selected by default.
Step 8 Click Next. The Summary dialog box is displayed, as shown in Figure 4-5.
Figure 4-5 Summary
Issue 02 (2015-01-09) Huawei Proprietary and Confidential
Copyright © Huawei Technologies Co., Ltd.
62
Page 71

eBIMS
Product Installation Guide
Step 9 After confirming the installation information, click Next. The system starts to install the eBIMS,
as shown in Figure 4-6.
Figure 4-6 Installation process
4 Software Installation
NOTE
If the installation information is incorrect, click Previous to reset the installation information.
Step 10 Wait about 3 to 5 minutes, the Installation Completed dialog Box is displayed. Then click
Finish.
NOTE
l The default user name is admin and the default password is Changeme123. You can change them the
first time you log in to the eBIMS.
l Please change the admin user's password periodically.
----End
4.3 Verifying the Software Installation
This section describes how to verify the software installation.
Procedure
Step 1 Verify that the eBIMS Console shortcut icon is displayed on the desktop.
Step 2 Start the eBIMS service. If the message starting eBIMS system succeeded. is displayed, the
eBIMS service has been started.
Start the eBIMS service using either of the following two methods:
Issue 02 (2015-01-09) Huawei Proprietary and Confidential
Copyright © Huawei Technologies Co., Ltd.
63
Page 72

eBIMS
Product Installation Guide 4 Software Installation
l Double-click the eBIMS Console shortcut icon on the desktop. In the displayed eBIMS
Console dialog box, click Start.
l Choose Start > All Programs > eBIMS > eBIMS Console. In the displayed eBIMS
Console dialog box, click Start.
Step 3 Log in to the eBIMS server from the client by using the Internet Explorer 8.0.
1. Open Internet Explorer.
2. Choose Tools > Internet Options from the main menu. In the Internet Options dialog
Box, click the Security tab, and click Custom Level.
3. In the Security Settings dialog Box, click Enable under Downloads > Automatic
prompting for file downloads, and click OK.
4. Enter http://Server IP address:Port ID in the address bar and press Enter.
NOTE
l Server IP address indicates the server IP address configured when installing the eBIMS.
l Port ID is 8080 by default.
5. Install a security certificate when logging in to the eBIMS server for the first time. Click
Continue to this website (not recommended), as shown in Figure 4-7.
Figure 4-7 Message indicating an incorrect certificate
6. Click Certificate Error on the right of the address bar.
7. In the Untrusted Certificate dialog Box, click View certificates, as shown in Figure
4-8.
Issue 02 (2015-01-09) Huawei Proprietary and Confidential
Copyright © Huawei Technologies Co., Ltd.
64
Page 73

eBIMS
Product Installation Guide 4 Software Installation
Figure 4-8 Message indicating an untrusted certificate
8. In the Certificate dialog Box, click Install Certificate on the General tab page, as shown
in Figure 4-9.
Issue 02 (2015-01-09) Huawei Proprietary and Confidential
Copyright © Huawei Technologies Co., Ltd.
65
Page 74

eBIMS
Product Installation Guide 4 Software Installation
Figure 4-9 Certificate information
9. In the Certificate Import Wizard dialog Box, retain the default settings and click Next
until the installation is completed. Then, click Finish, as shown in Figure 4-10.
Issue 02 (2015-01-09) Huawei Proprietary and Confidential
Copyright © Huawei Technologies Co., Ltd.
66
Page 75

eBIMS
Product Installation Guide 4 Software Installation
Figure 4-10 Certification importing wizard
10. In the displayed Certificate Import Wizard dialog box, select Place all certificate in the
following store and click Browse, as shown in Figure 4-11.
Issue 02 (2015-01-09) Huawei Proprietary and Confidential
Copyright © Huawei Technologies Co., Ltd.
67
Page 76

eBIMS
Product Installation Guide
4 Software Installation
Figure 4-11 Certificate Import Wizard
11. In the displayed Select Certificate Store dialog box, select Trusted Root Certification
Authorities and click OK, as shown in Figure 4-12.
Figure 4-12 Select Certificate Store
12. In the displayed Certificate Import Wizard dialog box, click Next, as shown in Figure
4-13.
Issue 02 (2015-01-09) Huawei Proprietary and Confidential
Copyright © Huawei Technologies Co., Ltd.
68
Page 77

eBIMS
Product Installation Guide 4 Software Installation
Figure 4-13 Certificate Import Wizard
13. In the displayed Certificate Import Wizard dialog box, click Finish.
14. In the displayed Security Warning dialog box, click Yes, as shown in Figure 4-14.
Issue 02 (2015-01-09) Huawei Proprietary and Confidential
Copyright © Huawei Technologies Co., Ltd.
69
Page 78

eBIMS
Product Installation Guide
4 Software Installation
Figure 4-14 Completing the Certificate Import Wizard
15. Click Finish.
16. Open the Internet Explorer again, enter http://server IP address:port number in the address
bar, and click Enter.
17. Enter the user name admin and the default password Changeme123, and click Login.
----End
4.4 Registering the eBIMS
When the initial license of the eBIMS expires, load a new license file and register the eBIMS
to ensure that the eBIMS works properly.
The eBIMS provides a license with a validity period when the eBIMS is installed the first time.
When the license expires, a new license file must be loaded to ensure proper running of the
eBIMS.
A license file can be reloaded in the following two scenarios:
1. Loading the license file before the initial license expiration
2. Loading the license file after initial license expiration
4.4.1 Loading a New License File Before the Initial License Expires
Apply for a new license and load the license file before the initial license expires.
Issue 02 (2015-01-09) Huawei Proprietary and Confidential
Copyright © Huawei Technologies Co., Ltd.
70
Page 79

eBIMS
Product Installation Guide
Procedure
Step 1 Specify User name and Password to log in to the eBIMS.
Step 2 Choose System > License Management and click Obtain ESN.
Step 3 In the displayed Obtain ESN dialog box, select Select network adapters and click Generate
ESN, as shown in Figure 4-15.
Figure 4-15 Obtain ESN
4 Software Installation
NOTE
An ESN (Equipment Serial Number) is a string that uniquely identifies a device. It ensures that the license
is granted to the specified device. If the server is equipped with multiple network adapters, record the ESNs
for all the network adapters.
Select the network adapter whose IP address is the one defined for the eBIMS.
Step 4 Log in to http://support.huawei.com/support/, fill the license application information, and
click Submit.
NOTE
After the application is granted, a license is sent to you by email.
Step 5 Choose System > License Management and click Import License.
Step 6 In the displayed Import License dialog box, select a license file and click Import, as shown in
Figure 4-16.
Issue 02 (2015-01-09) Huawei Proprietary and Confidential
Copyright © Huawei Technologies Co., Ltd.
71
Page 80

eBIMS
Product Installation Guide
Figure 4-16 Import License
Step 7 Click Apply.
4 Software Installation
----End
4.4.2 Loading a New License File After the Initial License Expires
After the initial license expires, apply for a new license and load the license file again to ensure
that the eBIMS works normally.
Procedure
Step 1 Click here on the eBIMS login page, as shown in Figure 4-17.
Figure 4-17 eBIMS login page
Step 2 In the displayed dialog box, click here, as shown in Figure 4-18.
Issue 02 (2015-01-09) Huawei Proprietary and Confidential
Copyright © Huawei Technologies Co., Ltd.
72
Page 81

eBIMS
Product Installation Guide
Figure 4-18 ESN entry dialog box
4 Software Installation
Step 3 In the displayed Obtain ESN dialog box, select Select network adapters and click Generate
ESN, as shown in Figure 4-19.
Figure 4-19 Obtain ESN
NOTE
An ESN (Equipment Serial Number) is a string that uniquely identifies a device. It ensures that the license
is granted to the specified device. If the server is equipped with multiple network adapters, record the ESNs
for all the network adapters.
Step 4 Log in to http://support.huawei.com/support/, fill the license application information, and
click Submit.
NOTE
After the application is granted, a license is sent to you by email.
Issue 02 (2015-01-09) Huawei Proprietary and Confidential
Copyright © Huawei Technologies Co., Ltd.
73
Page 82

eBIMS
Product Installation Guide 4 Software Installation
Step 5 Repeat Step 1 and Step 2, enter the administrator's password, select the license, and click
Import.
NOTE
After the license is loaded successfully, the eBIMS login page is displayed.
----End
4.5 Uninstalling the eBIMS
This section describes how to uninstall the eBIMS.
Procedure
Step 1 Choose Start>All Programs>eBIMS>eBIMS Console. In the displayed eBIMS Console
dialog box, click Stop.
Step 2 Choose Start>All Programs>eBIMS>uninstall eBIMS.
NOTE
After the uninstallation, eBIMS data is deleted. If you need to save eBIMS data, back up the data as
prompted.
Step 3 In the Confirm uninstallation dialog box, click Next.
Step 4 In the Confirm dialog box, click Yes.
Step 5 In the Uninstallation Completed dialog box, click Finish.
----End
Follow-up Procedure
1. Verify that the shortcut icons are deleted from the desktop.
2. Verify that the eBIMS installation directory is deleted.
Issue 02 (2015-01-09) Huawei Proprietary and Confidential
Copyright © Huawei Technologies Co., Ltd.
74
Page 83

eBIMS
Product Installation Guide
About This Chapter
5 FAQ
5 FAQ
About This Chapter
Frequently asked questions about the installation of eBIMS
5.1 How Can I Modify the Database eBIMS IP Address?
5.2 How Can I Connect the eBox to a Laptop?
5.3 How Can I Do If an Access Failure Message Is Displayed?
5.4 How Can I Enable Automatic prompting for file downloads of the Internet Explorer?
5.5 How Do I Set a Database User Name and Password?
5.6 How Do I Change the Initial Login Password?
5.7 How Do I Change the Initial Login Password of maintenance tool?
5.8 How Do I Reinstall the eBIMS System?
5.9 How Can I Handle the Problem that Forward and Backward Buttons Are Unavailable When
Accessing the eBIMS Using the Internet Explorer?
5.10 How Can I Handle the Problem that Web Page Cannot Be Displayed Normally When Using
the Internet Explorer on Windows 2008 OS?
5.11 How Can I Handle the Problem that Security Warnings Are Displayed When Logging in
to the eBIMS?
5.12 How Can I Handle the Problem of Internet Explorer Closing When Logging In to the
eBIMS?
5.13 How Can I Handle the Problem of Failure in Logging In to the eBIMS When Cookies Are
Disabled?
5.14 How Can I Handle the Problem of Layout Disorder When Logging In to the eBIMS?
5.15 How Can I Handle the Problem that Exporting eBIMS Data Fails Using the Internet
Explorer?
Issue 02 (2015-01-09) Huawei Proprietary and Confidential
Copyright © Huawei Technologies Co., Ltd.
75
Page 84

eBIMS
Product Installation Guide 5 FAQ
5.16 How Can I Handle the Problem that Login to the eBIMS Fails and the Account Is Locked?
5.17 How to change eBox command line password
5.18 How to import CA Certificate?
5.19 How to create self-signed certificate?
Issue 02 (2015-01-09) Huawei Proprietary and Confidential
Copyright © Huawei Technologies Co., Ltd.
76
Page 85

eBIMS
Product Installation Guide
5.1 How Can I Modify the Database eBIMS IP Address?
Question
After the server IP address is changed, how do I modify the database eBIMS IP address?
Answer
Step 1 Choose Start > All Programs > eBIMS > eBIMS Console. In the eBIMS Console dialog box,
click Stop.
Step 2 Modify the database eBIMS IP address using an IP address modification tool.
1. Choose Start > All Programs > eBIMS Console> Tools > IP Change Tool to start the
IP address modification tool.
2. In the IP Change Tool dialog box, choose the desired server IP address and click
Modify.
5 FAQ
3. Click Yes when the system prompts you to continue.
4. In the displayed window, click Confirm.
Step 3 Start the eBIMS service.
l On the Windows OS, choose Start > All Programs > eBIMS > eBIMS Console. In the
displayed eBIMS Console dialog box, click Start.
----End
5.2 How Can I Connect the eBox to a Laptop?
Question
How can I connect the eBox to a laptop?
Answer
Step 1 Connect the eBox to a laptop using a USB cable.
Step 2 Install the USB serial driver on the laptop. After the installation is successful, a new COM port
is displayed in the Device Manager window, as shown in Figure 5-1.
Issue 02 (2015-01-09) Huawei Proprietary and Confidential
Copyright © Huawei Technologies Co., Ltd.
77
Page 86

eBIMS
Product Installation Guide 5 FAQ
Figure 5-1 New COM port
NOTE
Obtain the USB serial driver at http://support.huawei.com.
Step 3 Choose Start > All Programs > Accessories > hypertrm to open HyperTerminal.
NOTE
You can also use the eBox parameter configuration tool to obtain the COM port information from the
laptop.
Step 4 Select the number of the COM port configured in Step 2, as shown in Figure 5-2.
Issue 02 (2015-01-09) Huawei Proprietary and Confidential
Copyright © Huawei Technologies Co., Ltd.
78
Page 87

eBIMS
Product Installation Guide
Figure 5-2 Setting COM port number
5 FAQ
Step 5 Set COM port parameters, as shown in Figure 5-3.
Figure 5-3 Setting COM port parameters
Step 6 Enter the password of the eBox CLI to configure and commission the eBox, as shown in Figure
5-4.
Issue 02 (2015-01-09) Huawei Proprietary and Confidential
Copyright © Huawei Technologies Co., Ltd.
79
Page 88

eBIMS
Product Installation Guide
Figure 5-4 Configuring eBox CLI
5 FAQ
NOTE
The initial password of the eBox CLI is Huawei_eBox.
----End
5.3 How Can I Do If an Access Failure Message Is Displayed?
Question
After the eBIMS server starts, logging in to the eBIMS server by using a browser fails and an
access failure message is displayed. How can I rectify this failure?
Answer
Step 1 Choose Start>Control Panel.
Step 2 Double-click Administrative Tools and double-click Services.
Step 3 In the Services dialog Box, double-click Security Center.
Step 4 In the Security Center Properties dialog Box, select Disabled as Startup type and click
Stop under Service status.
Step 5 Click OK.
Step 6 Log in to the eBIMS server by using the browser.
----End
Issue 02 (2015-01-09) Huawei Proprietary and Confidential
Copyright © Huawei Technologies Co., Ltd.
80
Page 89

eBIMS
Product Installation Guide
5.4 How Can I Enable Automatic prompting for file downloads of the Internet Explorer?
Question
Files fail to be downloaded from the eBIMS. How can I enable automatic prompting for file
downloads of the Internet Explorer?
Answer
Step 1 Open Internet Explorer.
Step 2 Choose Tools>Internet Options from the main menu. In the Internet Options dialog Box,
click the Security tab, and click Custom Level.
Step 3 In the Security Settings dialog box, click Enable under Download>Automatic prompting for
file downloads.
5 FAQ
Step 4 Click OK.
----End
5.5 How Do I Set a Database User Name and Password?
Question
How do I set a database user name and password?
Answer
Step 1 The databases are installed automatically when you install the eBIMS. The system asks you to
enter a user name and password.
Step 2 The super administrator user name of the database is root, which cannot be changed. You can
set a password for the user name.
Step 3 The default database eBIMS user name is commonuser, which can be changed. You can set a
password for the user name.
NOTE
The password must contain at least an upper-case letter (A to Z), a lower-case letter (a to z), and a digit (0
to 9).
You can also define the database user name and password for the maintenance system.
----End
Issue 02 (2015-01-09) Huawei Proprietary and Confidential
Copyright © Huawei Technologies Co., Ltd.
81
Page 90

eBIMS
Product Installation Guide
5.6 How Do I Change the Initial Login Password?
Question
How do I change the user password after logging into the eBIMS the first time?
Answer
Step 1 After the eBIMS is installed, the initial user name is admin, and the initial user password is
Changeme123.
Step 2 After you log in to the eBIMS the first time, the system forcibly asks you to change the password.
For details about the password rules, see the password modification page.
Step 3 After changing the password successfully, use the new password when you log in to the eBIMS
the next time.
----End
5 FAQ
NOTE
Please change admin user's password periodically.
5.7 How Do I Change the Initial Login Password of maintenance tool?
Question
How do I change the user password after logging into the eBIMS maintenance web page for the
first time?
Answer
Step 1 After the eBIMS is installed, the initial user name for maintenance tool is sys, and the initial
user password is Changeme123.
Step 2 After you log in to the eBIMS maintenance tool for the first time, the system forcibly asks you
to change the password. For details about the password rules, see the password modification
page.
Step 3 After changing the password successfully, use the new password when you log in to the eBIMS
the next time.
----End
NOTE
l Web link for maintenance tool: http://ebimsIP:8088
l Please change sys user's password periodically.
Issue 02 (2015-01-09) Huawei Proprietary and Confidential
Copyright © Huawei Technologies Co., Ltd.
82
Page 91

eBIMS
Product Installation Guide
5.8 How Do I Reinstall the eBIMS System?
Question
After uninstalling the eBIMS, how do I reinstall it?
Answer
Step 1 Restart the eBIMS system after uninstalling the eBIMS.
Step 2 Delete the original installation directory, and install the eBIMS system again.
----End
5.9 How Can I Handle the Problem that Forward and
5 FAQ
Backward Buttons Are Unavailable When Accessing the
eBIMS Using the Internet Explorer?
Question
How can I handle the problem that forward and backward buttons are unavailable when accessing the eBIMS using the Internet Explorer?
Answer
Step 1 Install the Internet Explorer 9 with other versions or perform page switch from the eBIMS menu.
Do not use Forward or Backward provided by the browser.
----End
5.10 How Can I Handle the Problem that Web Page Cannot Be Displayed Normally When Using the Internet Explorer on Windows 2008 OS?
Question
How can I handle the problem that web page cannot be displayed normally when using the
Internet Explorer on Windows 2008 OS?
Answer
Step 1 Open the Internet Explorer and choose Tools>Internet Options. In the Internet Options dialog
box, click the Security tab page and click Trusted sites. Add the eBIMS website (https://eBIMS
Issue 02 (2015-01-09) Huawei Proprietary and Confidential
Copyright © Huawei Technologies Co., Ltd.
83
Page 92

eBIMS
Product Installation Guide
server IP address:eBIMS server port number/) to the trusted site list and set the security level
to Low.
----End
5 FAQ
5.11 How Can I Handle the Problem that Security Warnings Are Displayed When Logging in to the eBIMS?
Question
How can I handle the problem that security warnings are displayed when logging in to the
eBIMS?
Answer
Step 1 In the Security Warning dialog box, click Add.
Step 2 In the Internet Options dialog box of the Internet Explorer, click the Security tab page and
select Trusted sites.
Step 3 Click Sites. In the Trusted sites dialog box, enter the eBIMS website in the Add this website
to the zone: text box and click Add.
Step 4 Click Close.
Step 5 Restart the Internet Explorer to log in to the eBIMS.
----End
5.12 How Can I Handle the Problem of Internet Explorer Closing When Logging In to the eBIMS?
Question
How can I handle the problem of Internet Explorer closing when logging in to the eBIMS?
Answer
Step 1 In the Internet Options dialog box of the Internet Explorer, click the Privacy tab page and
deselect Block pop-ups.
Step 2 Click OK.
Step 3 Restart the Internet Explorer to log in to the eBIMS.
----End
Issue 02 (2015-01-09) Huawei Proprietary and Confidential
Copyright © Huawei Technologies Co., Ltd.
84
Page 93

eBIMS
Product Installation Guide
5 FAQ
5.13 How Can I Handle the Problem of Failure in Logging In to the eBIMS When Cookies Are Disabled?
Question
How can I handle the problem of failure in logging in to the eBIMS when cookies are disabled?
Answer
Step 1 Open the Internet Explorer and choose Tools>RoboForm Toolbar.
Step 2 On the RoboForm Toolbar page, click Cache and deselect Disable Cookies.
Step 3 Restart the Internet Explorer.
----End
5.14 How Can I Handle the Problem of Layout Disorder When Logging In to the eBIMS?
Question
How can I handle the problem of layout disorder when logging in to the eBIMS?
Answer
Step 1 Open the Internet Explorer and choose Tools>Compatibility View.
Step 2 In the Compatibility View dialog box, deselect Include updated website lists from
Microsoft, Display intranet sites in Compatibility View, and Display all websites in
Compatibility View.
Step 3 Click Close.
----End
5.15 How Can I Handle the Problem that Exporting eBIMS Data Fails Using the Internet Explorer?
Question
How can I handle the problem that exporting eBIMS data fails using the Internet Explorer?
Issue 02 (2015-01-09) Huawei Proprietary and Confidential
Copyright © Huawei Technologies Co., Ltd.
85
Page 94

eBIMS
Product Installation Guide
5 FAQ
Answer
Step 1 Choose Tool>Internet Options from the main menu. In the Internet Options dialog box, click
the Security tab, and click Custom Level.
Step 2 In the Security Settings dialog box, click Enable under Download>Automatic prompting for
file downloads.
Step 3 Click OK.
Step 4 Restart the Internet Explorer to log in to the eBIMS.
----End
5.16 How Can I Handle the Problem that Login to the eBIMS Fails and the Account Is Locked?
Question
How can I handle the problem that login to the eBIMS fails and the account is locked?
Answer
Step 1 Log in to the eBIMS again after 30 minutes.
NOTE
User admin can use other computers to log in to the eBIMS.
----End
5.17 How to change eBox command line password
Question
How to change eBox command line password, after logged in?
NOTE
It is recommended to change the default password to avoid the security risk.
Answer
Step 1 Doulbe click eConfig_PC.exe to start the config tool.
NOTE
For the first time to use eConfig tool, please double click eConfig_reg.bat firstly to register eConfig to your
PC.
Step 2 Select the correct COM port, then input default password: Huawei_eBox, and click Open.
Step 3 Input chgpwd [old pwd] [new pwd] [new pwd] at the right bottom input box, and then click
send.
Issue 02 (2015-01-09) Huawei Proprietary and Confidential
Copyright © Huawei Technologies Co., Ltd.
86
Page 95

eBIMS
Product Installation Guide
NOTE
l For example, the old password is Huawei_eBox, and new password is Huawei_eBoxV1, please input
chgpwd Huawei_eBox Huawei_eBoxV1 Huawei_eBoxV1, then click send at the right bottom input
box. For successful operation, there should be a Set CLI password success! in the display area on the
right part of eConfig window.
l Please change the eBox command line password periodically.
----End
5.18 How to import CA Certificate?
Question
How to import CA Certificate?
Answer
5 FAQ
CA Certificate is a kind of Digital Certificate, which was used to establish a secure
communication channel between client browser and Web server. Communication data was
encrypted by encryption algorithm.
Table 5-1 Self-Signed Certificate and CA Certificate
Certificate Type Comments How to get
Self-Signed Certificate Temporary certificates
installed by eBIMS, which
was used go enable the the
secure communication of
eBIMS after installation.
eBIMS support
Import CA Certificate or
Create Self-signed
Certificate are supported
after installation to replace
the temporary certificates
installed by eBIMS.
SHA1withRSA and
SHA256withRSA, default is
SHA256withRSA. SHA is
Secure Hash Algorithm,
which was used for
generation of digital
signature. SHA1 is Secure
Hash Algorithm 1. SHA256's
hash value length is 256.
RSA is the most popular
encryption algorithm, which
was used to make digital
signature.
CA Certificate Signed by certificate
authority.
Issue 02 (2015-01-09) Huawei Proprietary and Confidential
Copyright © Huawei Technologies Co., Ltd.
Apply for CA certificate to
official certificate authority.
87
Page 96

eBIMS
Product Installation Guide 5 FAQ
Step 1 Double click eBIMS Console on desktop, or Start > All programs > eBIMS > eBIMS
Console. eBIMS Console dialog should be displayed.
Step 2 Select Tools > Certificate Tool. Certificate Tool dialog should be displayed.
Step 3 Select Import CA Certificate, then Next.
Step 4 Select a CA certificate and input the correct password, then click Apply. New certificate should
be enabled after restart of eBIMS.
----End
NOTE
l Please import or change the certificate with different password periodically.
l Certificate Tool menu is enabled after eBIMS service was stopped.
5.19 How to create self-signed certificate?
Question
Answer
How to create self-signed certificate?
CA Certificate is a kind of Digital Certificate, which was used to establish a secure
communication channel between client browser and Web server. Communication data was
encrypted by encryption algorithm.
Table 5-2 Self-Signed Certificate and CA Certificate
Certificate Type Comments How to get
Self-Signed Certificate Temporary certificates
installed by eBIMS, which
was used go enable the the
secure communication of
eBIMS after installation.
eBIMS support
SHA1withRSA and
SHA256withRSA, default is
SHA256withRSA. SHA is
Secure Hash Algorithm,
which was used for
generation of digital
signature. SHA1 is Secure
Hash Algorithm 1. SHA256's
hash value length is 256.
RSA is the most popular
encryption algorithm, which
was used to make digital
signature.
Import CA Certificate or
Create Self-signed
Certificate are supported
after installation to replace
the temporary certificates
installed by eBIMS.
Issue 02 (2015-01-09) Huawei Proprietary and Confidential
Copyright © Huawei Technologies Co., Ltd.
88
Page 97

eBIMS
Product Installation Guide 5 FAQ
Certificate Type Comments How to get
CA Certificate Signed by certificate
authority.
Apply for CA certificate to
official certificate authority.
Step 1 Double click eBIMS Console on desktop, or Start > All programs > eBIMS > eBIMS
Console. eBIMS Console dialog should be displayed.
Step 2 Select Tools > Certificate Tool. Certificate Tool dialog should be displayed.
Step 3 Select Create Self-signed Certificate, then click Next.
Step 4 Select your wanted encryption algorithm, then click Apply. New certificate should be enabled
after restart of eBIMS.
----End
NOTE
l Please import or change the certificate with different password periodically.
l Certificate Tool menu is enabled after eBIMS service was stopped.
Issue 02 (2015-01-09) Huawei Proprietary and Confidential
Copyright © Huawei Technologies Co., Ltd.
89
 Loading...