

Appendix A. CRU instructions
To replace the hard disk drive, do the following:
1
Turn off the computer; then disconnect the AC adapter and all cables
from the computer.
2
Close the computer display, and then turn the computer over.
3
Remove the battery pack.
4
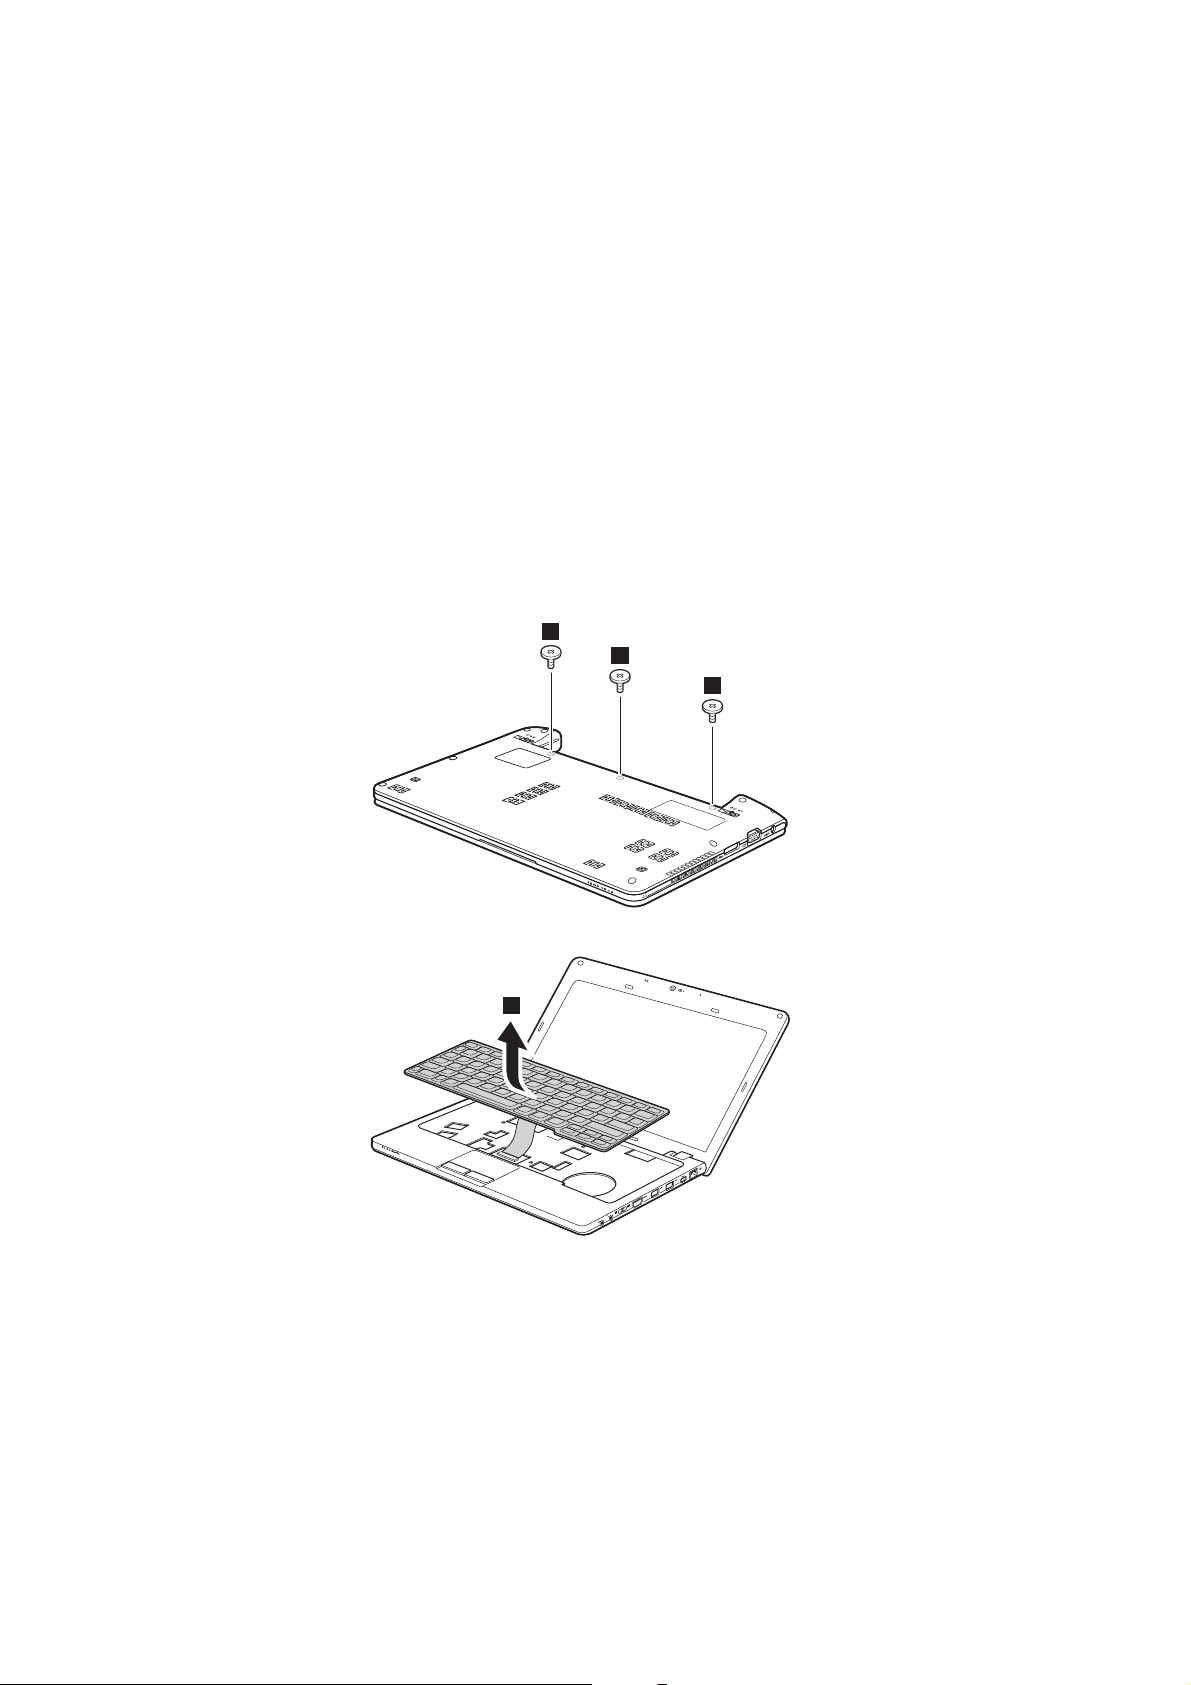
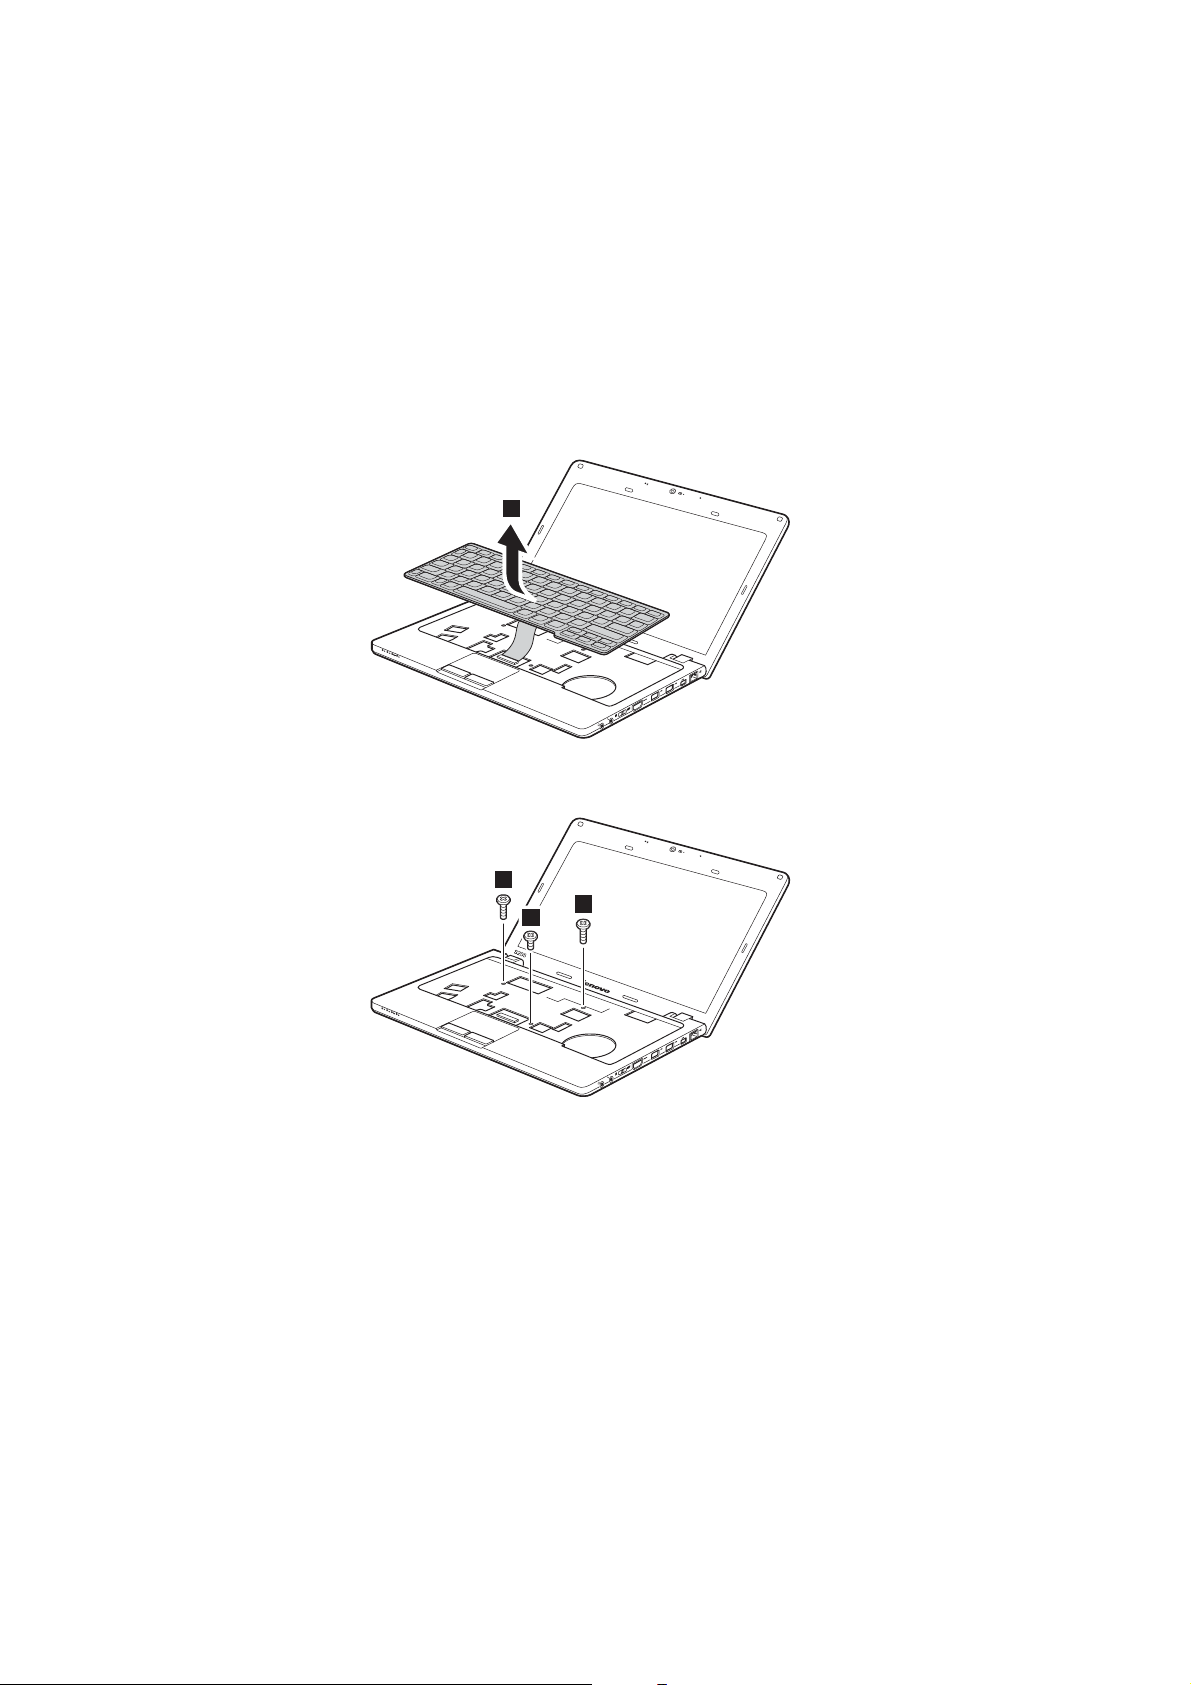
Remove the keyboard.
a.Remove the screws under the battery pack that secure the keyboard .
1
1
1
b.Remove the keyboard .
b
2
a
32
5
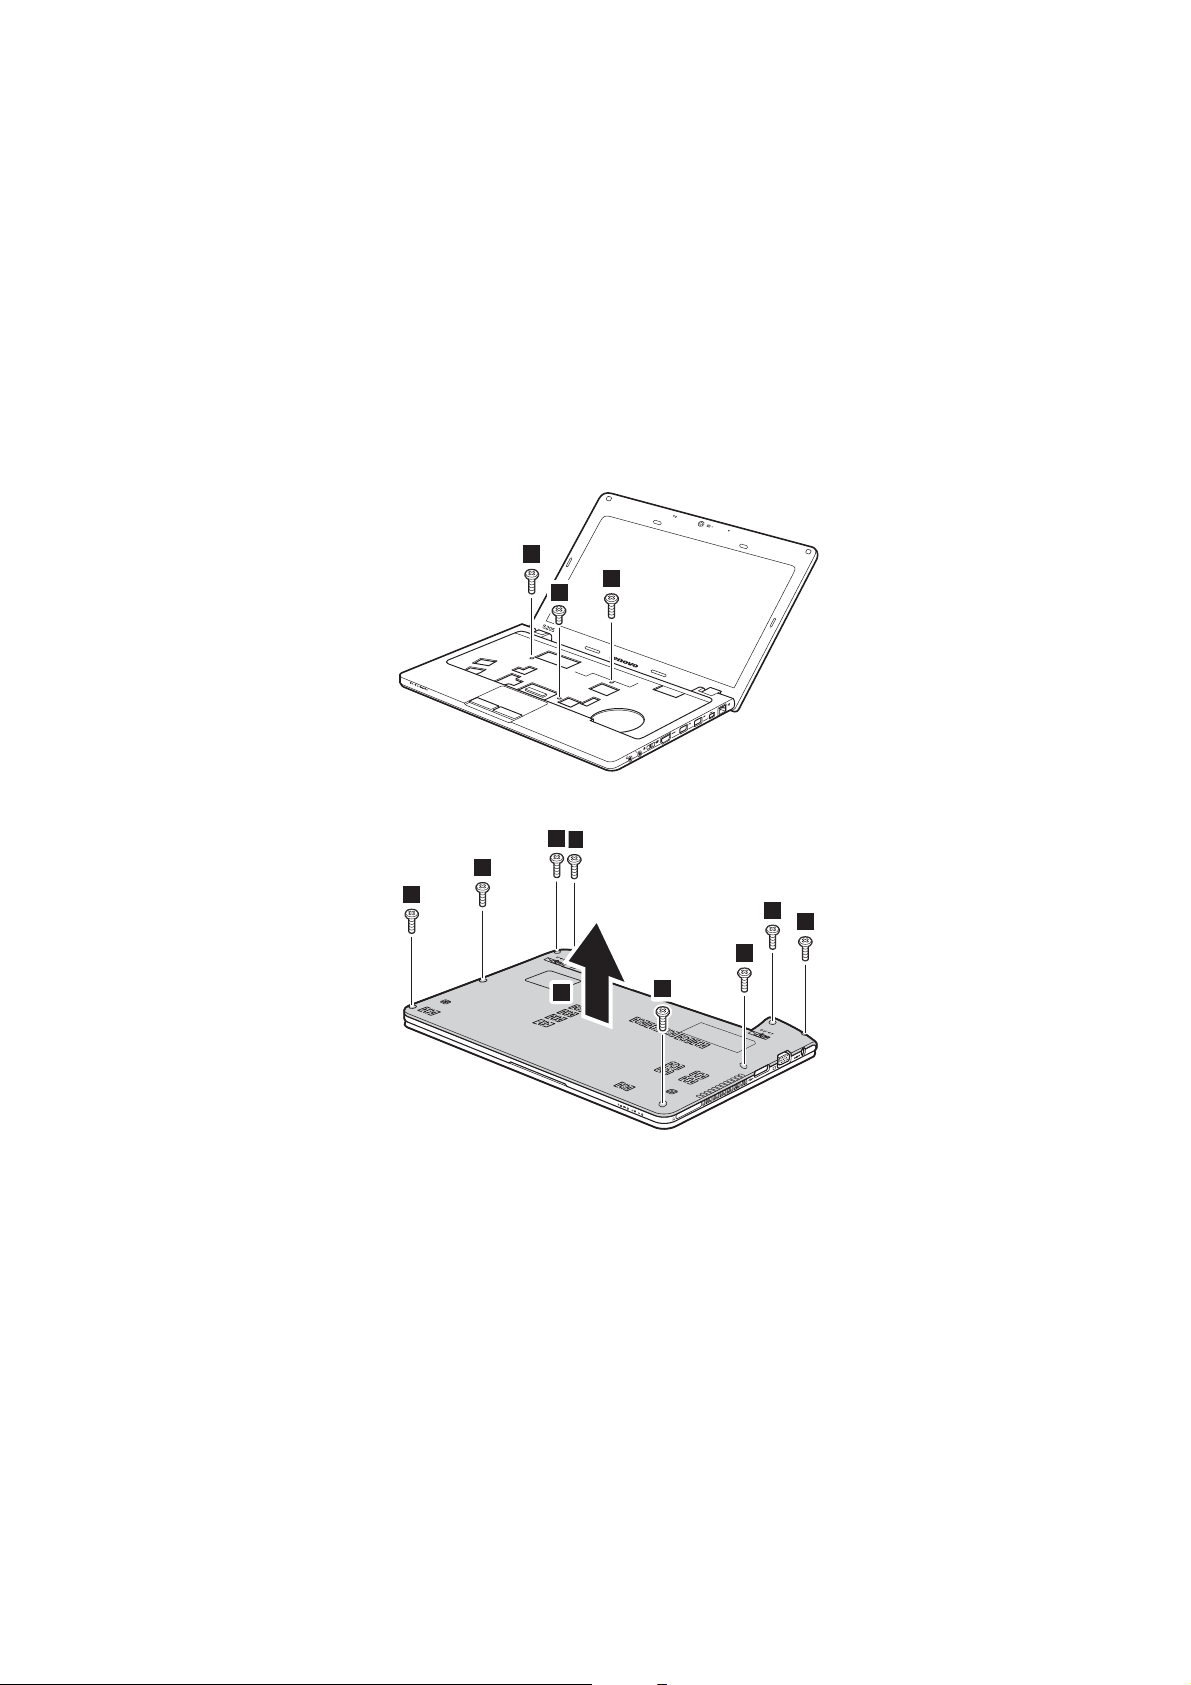
Remove the base cover.
Appendix A. CRU instructions
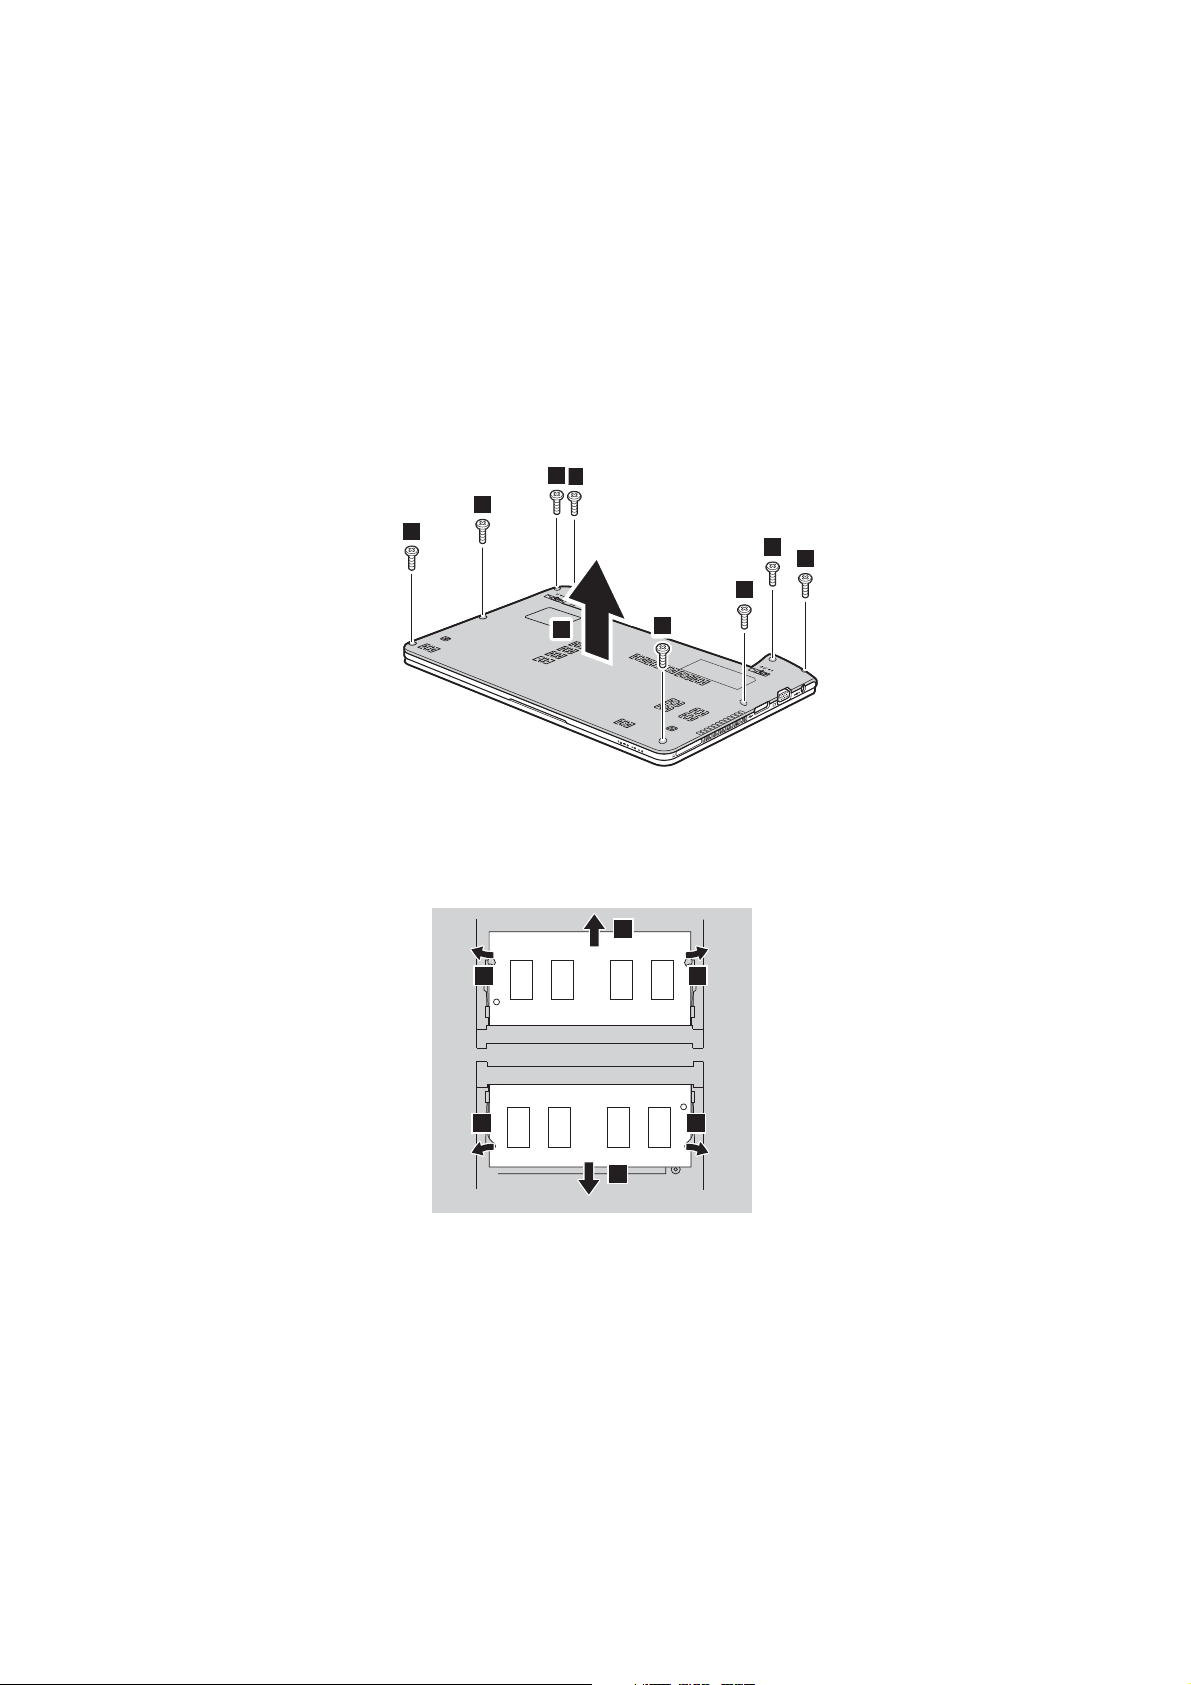
a.Remove the screws that secure the base cover .
3
3
3
b.Remove the base cover .
3
3
d
3
3
4
3
c
3
3
3
33
Appendix A. CRU instructions
6
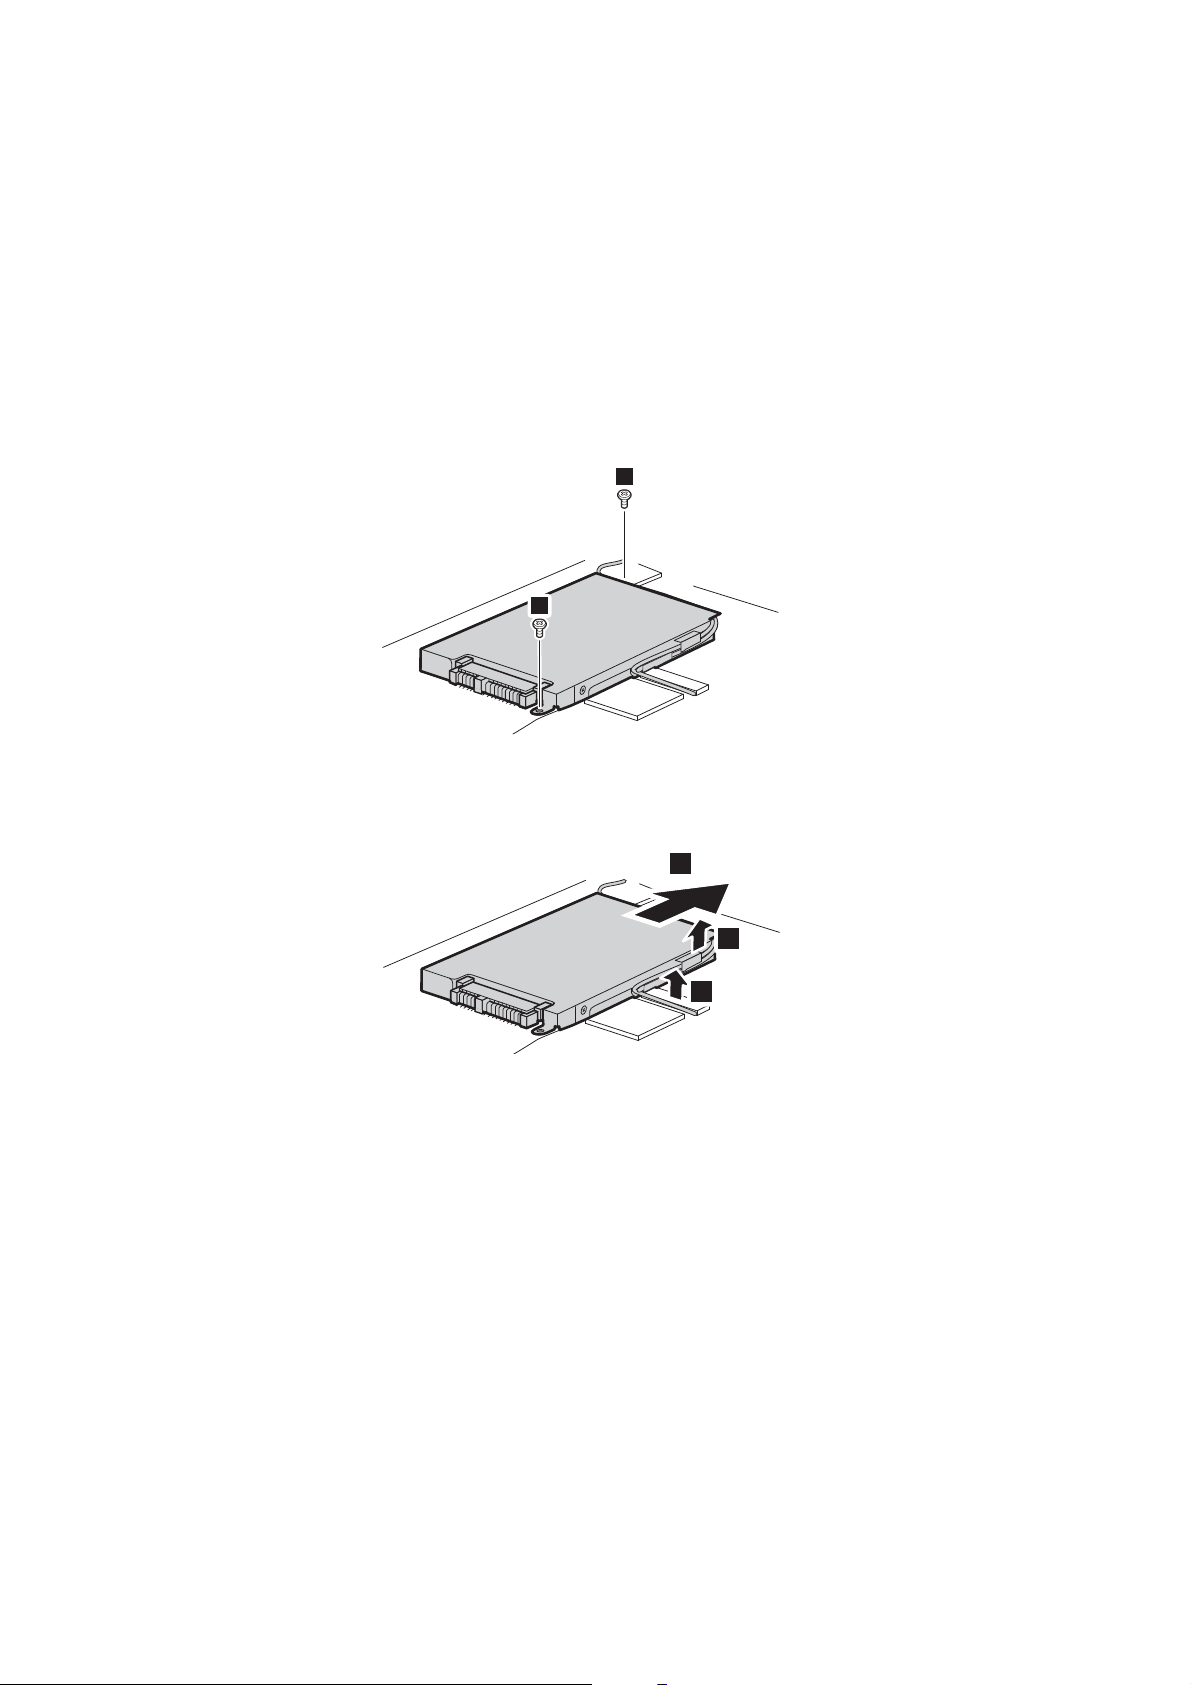
Remove the frame fixing screws.
7
Release the cables from the cable guides of the hard disk drive frame and
pull the tab in the direction shown by arrow .
5
5
g
7
34
6
6
8
Take out the hard disk drive secured in the hard disk drive bay.
9
Remove the screws and detach the metal frame from the hard disk drive.
0
Attach the metal frame to a new hard disk drive; then tighten the screws.
A
Put the hard disk drive gently into the hard disk drive bay with the tab
facing upwards and the connectors facing each other; then push it firmly
into space.
B
Reinstall the frame fixing screws.
C
Reinstall the base cover and the keyboard.
D
Reinstall the battery pack.
E
Turn the computer over again. Connect the AC adapter and the cables to
the computer again.
Appendix A. CRU instructions
Replacing memory - - - - - - - - - - - - - - - - - - - - - - - - - - - - - - - - - - - - - - - - - - - - - - - - - - - - - - - - - - - - - - - - - - - - - - - - - -
You can increase the amount of memory in your computer by installing a
double-data-rate three synchronous dynamic random access memory (DDR3
SDRAM)-available as an option-in the memory slot of your computer. DDR3
SDRAMs are available in various capacities.
Note: Use only the memory types supported by your computer. If you incorrectly install
optional memory, or install an unsupported memory type, a warning beep will sound
when you try to start the computer.
To install a DDR3 SDRAM, do the following:
1
Touch a metal table or a grounded metal object to reduce any static electricity in your body, which could damage the DDR3 SDRAM. Do not
touch the contact edge of the DDR3 SDRAM.
2
Turn off the computer. Disconnect the AC adapter and all cables from the
computer.
3
Close the computer display, and turn the computer over.
4
Remove the battery again.
5
Remove the keyboard.
a.Remove the screws under the battery pack that secure the keyboard .
1
1
1
a
35
Appendix A. CRU instructions
b
b.Remove the keyboard .
6
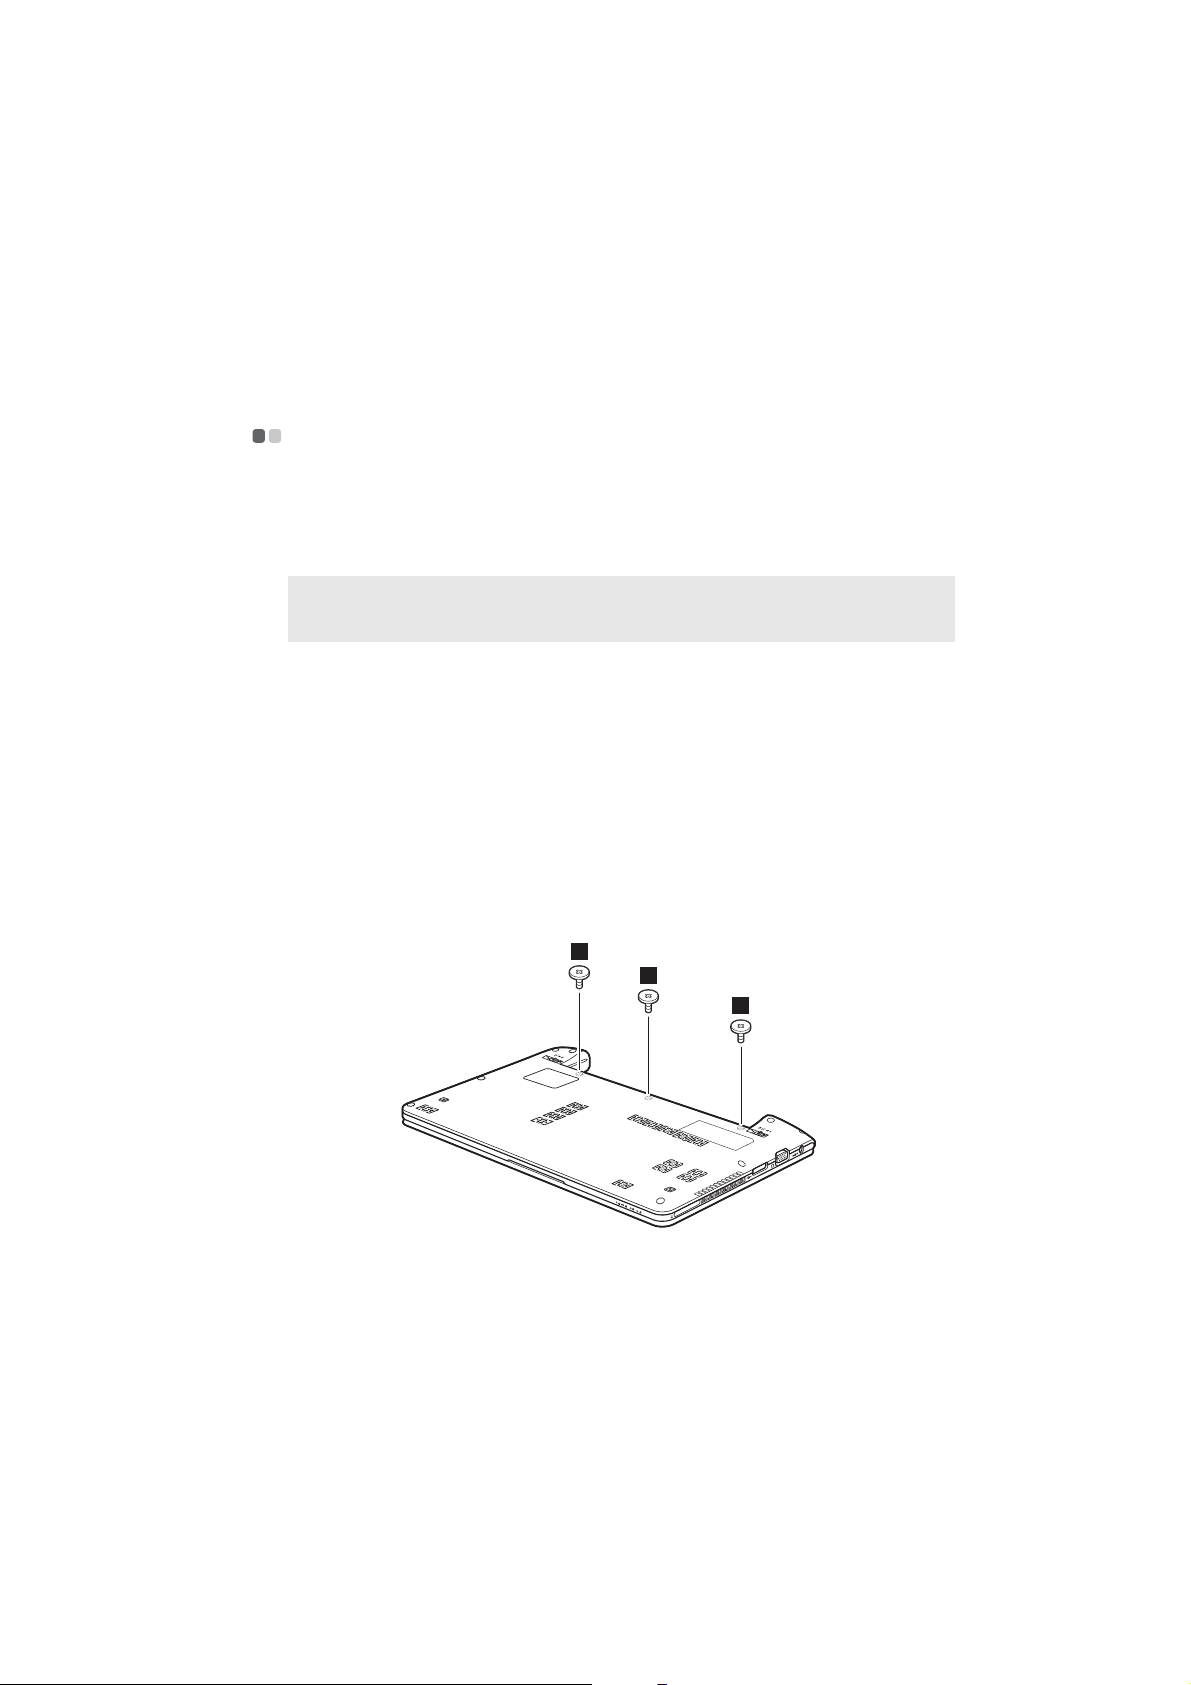
Remove the base cover.
2
a.Remove the screws that secure the base cover .
3
3
3
c
36
Appendix A. CRU instructions
b.Remove the base cover .
3
3
7
If two SO-DIMMs are already installed in the memory slot, remove one of
d
3
3
3
3
3
4
3
them to make room for the new one by pressing out on the latches on both
edges of the socket at the same time. Be sure to save the old SO-DIMM for
future use.
2
1
1
11
2
37

Appendix A. CRU instructions
8
Insert the notched end of the DIMM into the socket.
Press the DIMM firmly, and pivot it until it snaps into place. Make sure
that it is firmly fixed in the slot and does not move easily.
9
Reinstall the base cover and the keyboard.
0
Reinstall the battery.
A
Turn the computer over, and reconnect the AC adapter and the cables to
the computer.
To make sure that the SO-DIMM is installed correctly, do as follows:
1
Turn the computer on.
2
Hold F2 during startup. The
Memory
item shows the total amount of memory installed in your computer.
BIOS Setup Utility
screen opens. The
To t a l
38

Appendix A. CRU instructions
The following table provides a list of CRUs (Customer Replaceable Units) for
your computer, and informs you of where to find replacement instructions.
Setup Poster User Guide
AC adapter O
Power cord for AC adapter O
Battery O O
Bottom access doors O
Hard disk drive O
Memory O
Optical drive O
39

Index
A
AC adapter
Using........................................................... 9
B
Battery
Charging.................................................... 9
Bluetooth
Connecting..............................................16
C
Camera
.....................................................1, 13
E
ExpressCard/34 slot
...........................15
F
Function key combinations
K
Keyboard
Using.........................................................12
............12
O
OneKey Rescue System button
P
Password
Using ........................................................20
S
Security
SIM card
......................................................... 19
.......................................................26
T
Touchpad
....................................................11
U
USB port
.................................................. 3, 15
V
VeriFace
Using ........................................................19
.....28
M
Meomory card reader
Microphone
Built-in ....................................................... 1
40
........................14


©Lenovo China 2010
User Guide V1.0
New World. New Thinking.
www.lenovo.com
TM
 Loading...