

Huawei EC5072 Owner's Manual

©2011 Sprint. SPRINT and the logo are trademarks of Sprint.
Other marks are the property of their respective owners.
9/20/11
User Guide
Express Mobile Hotspot from Sprint
www.sprint.com
Introduction
This User Guide introduces you to Sprint® service and
the features of your device. It’s divided into six sections:
⽧ Section 1: Getting Started
⽧ Section 2: Your Device
⽧ Section 3: Quick Start Guide
⽧ Section 4: Settings
⽧ Section 5: Resources
⽧ Section 6: Safety and Warranty Information
Note: This user guide may not be the latest one for your
device due to the software update. Visit
and sign on to
version of the user guide.
My Sprint to access the most recent
www.sprint.com
WARNING: Please refer to the Important Safety Information
Sprint UG_032511
section on page 50 to learn information that will
help you safely use your device. Failure to read
and follow the Important Safety Information in this
user guide may result in serious bodily injury or
property damage.

Section 1
Getting Started
⽧ Setting Up Your Device (page 2)
1A. Setting Up Service
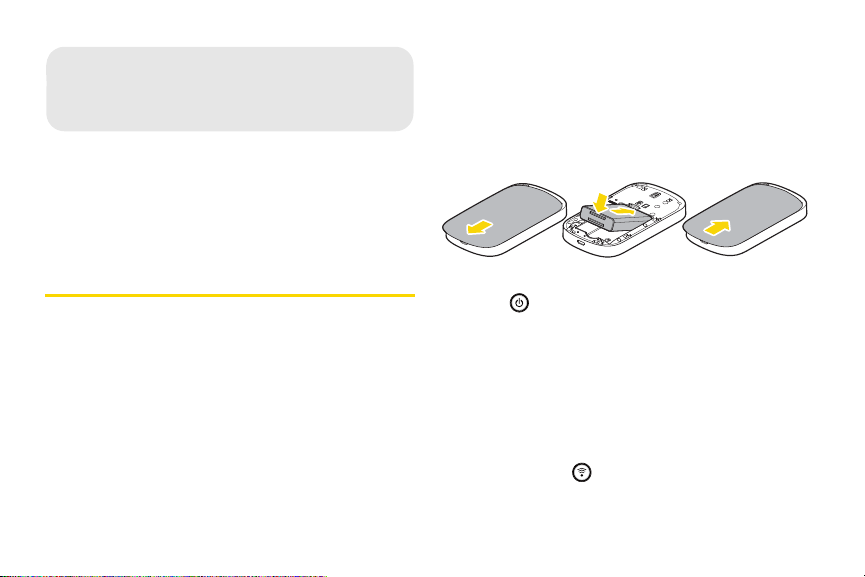
Figure A Figure B
Figure C
⽧ Activating Your Device (page 3)
⽧ Sprint Account Password (page 3)
⽧ Getting Help (page 4)
Setting Up Your Device
1. Remove the back cover.
䡲 Simply slide the cover down (in the direction of
the arrow in Figure A). You may hear a click
sound.
2. Install the battery.
䡲 Remove the battery from its packaging.
䡲 As shown in Figure B, insert the battery into the
opening at the back of the device, making sure
2 1A. Setting Up Service
the connectors align, and gently press down to
secure the battery.
3. Install the back cover onto your device.
䡲 Place the back cover at the back of the device,
and then slide up (in the direction of the arrow in
Figure C). You may hear a pop sound.
4. Press on the right of the device for about three
seconds to turn the device on.
䡲 If your device is activated, it will turn on, search for
Sprint service, and then be ready for Internet
connection.
䡲 If your device is not yet activated, see “Activating
Your Device” on page 3 for more information.
5. Set the wireless connection.
䡲 Double press on the right of the device, the
SSID (Wi-Fi network name) and the network
security key display on the screen for about fifteen
seconds. Record the SSID and the network key.
䡲 A wireless client (for example, a computer with a
wireless network adapter installed) searches for
available wireless networks. Select your device's
SSID in the list of availabe networks.
䡲 Enter the device's network security key to connect
to the network.
Activating Your Device
䢇 If you purchased your device at a Sprint Store, it is
probably activated and ready to use.
䢇 If you received your device in the mail and it is for a new
Sprint account or a new line of service, it is designed to
activate automatically.
䢇 If you received your device in the mail and you are
activating a new device for an existing number on your
account, you will need to go online to activate your
new device.
䡲 From your computer’s Web browser, go to
www.sprint.com/activate and complete the
onscreen instructions to activate your device.
When you have finished, set a wireless connection
with a wireless client to confirm your activation. If your
device is still not activated or you do not have access
to the Internet, contact Sprint Customer Service at
888- 211-4727 for assistance.
Tip: Do not press while the device is being activated.
Note: If you are have difficulty with activation, contact Sprint
Customer Service by dialing
assistance.
1-888-211-4727 for
1-
Sprint Account Password
As a Sprint customer, you enjoy unlimited access to
your personal account information and your data
services account. To ensure that no one else has
access to your information, you will need to create a
password to protect your privacy.
Account Username and Password
If you are the account owner, you will create an account
when you sign on to
and then click
the account owner (if someone else receives the bill for
www.sprint.com. (Click My Sprint
Sign up now! to get started.) If you are not
1A. Setting Up Service 3
Setting Up Service

your Sprint service), you can get a sub-account
password at
www.sprint.com.
Data Service Password
With your Sprint device, you may select to set up an
optional data services password to control access and
authorize premium service purchases.
For more information, or to change your passwords,
sign on to
Service at
www.sprint.com or call Sprint Customer
1-888 -211-4727.
Getting Help
Managing Your Account
Online: www.sprint.com
䢇 Access your account information.
䢇 Check your minutes used (depending on your Sprint
service plan).
䢇 View and pay your bill.
䢇 Enroll in Sprint online billing and automatic payment.
䢇 Purchase accessories.
4 1A. Setting Up Service
䢇 Shop for the latest Sprint phones.
䢇 View available Sprint service plans and options.
䢇 Learn more data services and other products.
From A Phone
䢇 Sprint Customer Service: 1-888-211-4727.
䢇 Business Customer Service: 1-888-788-4727.
For more information or to see the latest information on
products and services, visit us online at
www.sprint.com.

Section 2
Your Device
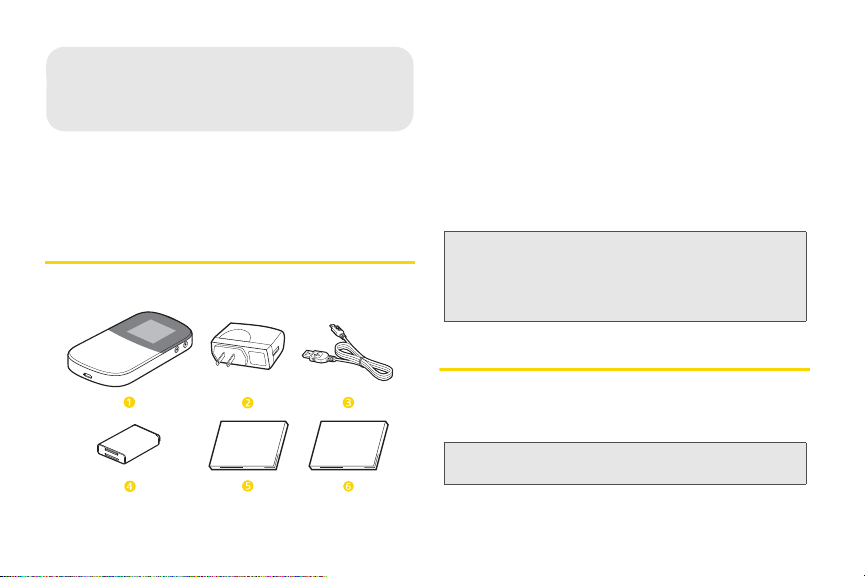
⽧ Package Contents (page 6)
2A. Device Basics
⽧ Your Device (page 6)
⽧ Key Functions (page 8)
1 Express Mobile Hotspot
2 AC Adapter
3 USB Cable
4 Battery
5 Getting Started Poster
6 Important Information Booklet
Package Contents
Check the following items in the product package:
6 2A. Device Basics
Note: Please contact the Sprint store where you purchased
your device if any items are missing or damaged when
you first open the package. And notes that the figures in
this guide are provided only for reference, see the
actual product for details.
Your Device
Your Express Mobile Hotspot lets you wirelessly
connect multiple Wi-Fi capable devices to the Internet
using the Sprint 3G and Sprint 4G networks.
Note: Generally, the Express Mobile Hotspot will be referred to
as "the device" in this guide.
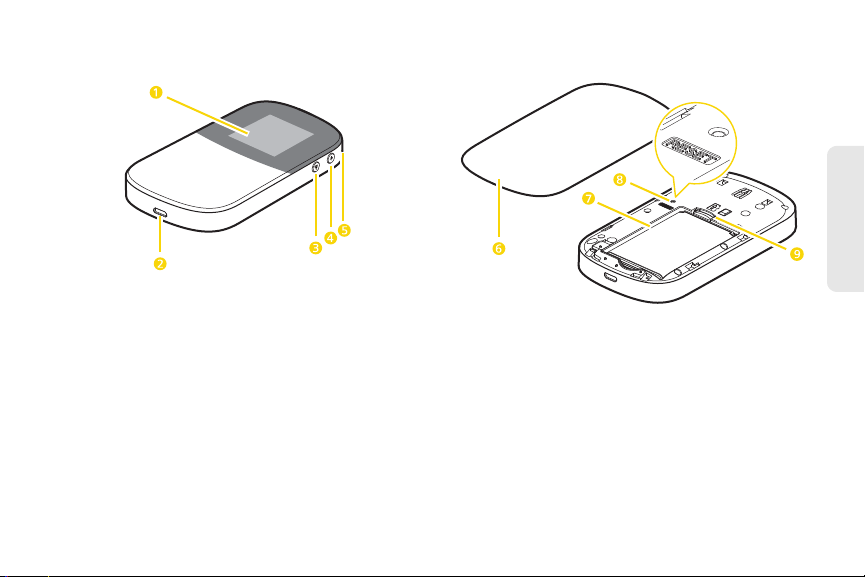
Front Overview Rear Overview
1 Display screen
2 Micro USB port
3 WLAN (Wi-Fi) button
4 Power button
5 Strap hole
6 Back cover
7 Battery slot
8 Reset button
9 microSD card slot
Device Basics
2A. Device Basics 7

Key Functions
1. Display screen provides information about your
device status.
Tip: If the display screen is off while the device is on, you can
press any button to turn it on.
2. Micro USB port lets you use the supplied USB
cable to connect the device to the supplied AC
adapter for charging. You can also connect the
device to a compatible PC for a direct data
connection.
WARNING: Inserting an incorrect accessory into the port may
3. WLAN (Wi-Fi) button
8 2A. Device Basics
damage the device.
When the device is on:
● Double press the button to display the SSID
(Wi-Fi network name) and the network
security key of the wireless network on the
display screen.
● Press and hold the button for two to five
seconds to disable or enable the Wi-Fi
(WLAN) feature.
● Press and hold the button for more than five
seconds to start a WPS (Wi-Fi Protected
Setup) negotiation.
4. Power button
● When the device is off, press and hold the
button for about three seconds to turn it on.
● When the device is on, press and hold the
button for about three seconds to turn it off.
5. Strap hole allows you to thread to attach an
optional carrying strap.
6. Back cover protects the battery and the interior of
the device.
7. Battery slot holds the device battery in place for
safe operation.
8. Reset button
● Press and hold the button for two to five
seconds to restore the default Wi-Fi settings.
● Press and hold the button for about five
seconds or more to restore the default settings
of the device.

9. microSD
card slot allows you to install an optional
microSD card for additional memory storage.
WARNING: Inserting an incorrect accessory into the slot may
damage the device.
Device Basics
2A. Device Basics 9
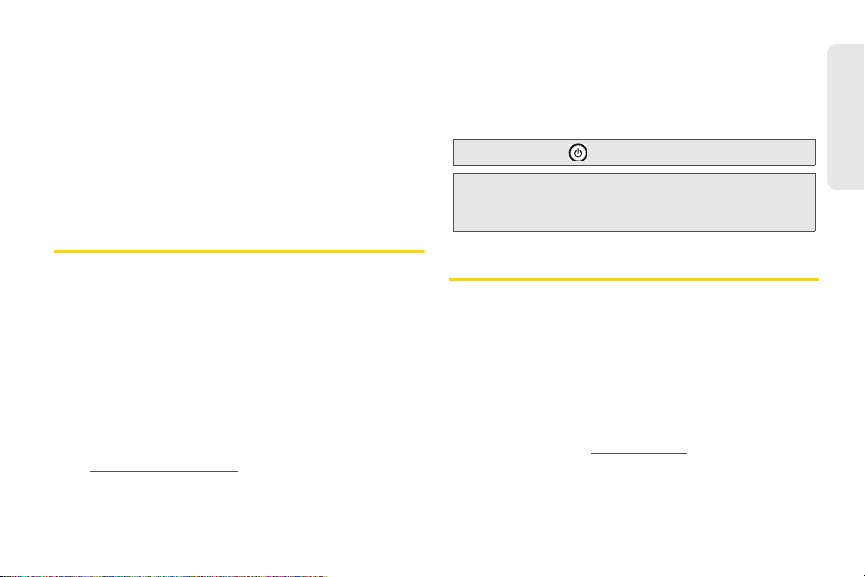
⽧ Installing or Removing the Battery (page 10)
2B. Installation and Startup
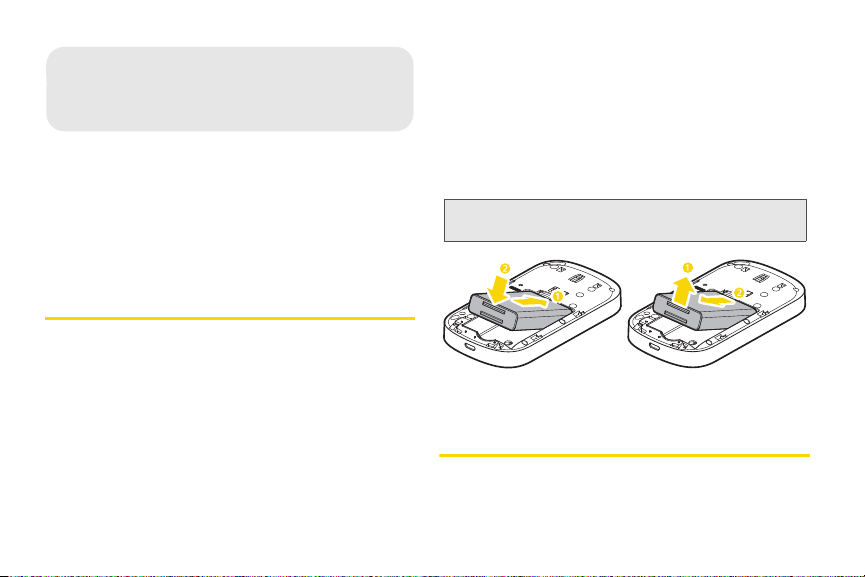
Diagram A Diagram B
⽧ Installing or Removing a Card (page 10)
⽧ Charging the Battery (page 11)
⽧ Turning Your Device On or Off (page 12)
⽧ Checking the Device Status (page 14)
Installing or Removing the Battery
To install the battery:
1. Remove the back cover. Slide the back cover
down in the direction of the triangle to remove it.
2. Insert the battery into the battery slot, making sure
the connectors align (see Diagram A). Gently press
down to secure the battery.
3. Replace the back cover. Place it over the back of
the device and slide up until it pops into place.
10 2B. Installation and Startup
To r emove th e batte r y :
1. Turn the device off to avoid any data loss. Press
and hold the Power button for about 3 seconds.
2. Remove the back cover. Slide the back cover
down in the direction of the triangle to remove it.
3. Lift the battery out from the bottom (see Diagram
B).
WARNING: Do not handle a damaged or leaking Li-Ion
battery as you may be burned.
Installing or Removing a Card
Your device supports up to a 32 GB microSD card
(sold separately) for file sharing and transferring or

storage. When connected to a computer through the
USB cable, the microSD card is recognized as a
removable storage device.
WARNING: Before installing or removing a microSD card,
power off the device to protect the device and the
SD card from being damaged.
To install a microSD card:
1. Power off the device and remove the back cover
and battery. See “Installing or Removing the
Battery” on page 10.
2. Insert the microSD card into the microSD card slot.
Push it in until it clicks into place.
3. Replace the battery and the back cover, and the
power the device back on.
To remove a microSD card:
1. Power off the device and remove the back cover
and battery. See “Installing or Removing the
Battery” on page 10.
2. Push in on the microSD card to release it from the
slot, and then carefully remove it from the device.
3. Replace the battery and the back cover, and the
power the device back on.
WARNING: Using microSD cards larger than 32 GB may
cause data loss and damage your device.
Charging the Battery
WARNING: Use only Sprint-approved or manufacturer-
Sprint-approved or manufacturer-approved batteries
and accessories can be found at Sprint Stores, or call
1-866-866-7509 to order. They’re also available at
www.sprint.com.
Battery Capacity
Your device is equipped with a Lithium Ion (Li-Ion)
battery. It allows you to recharge your battery before it is
fully drained.
approved batteries and chargers for your device.
The failure to use a Sprint-approved or
manufacturer-approved battery and charger may
increase the risk that your device will overheat,
catch fire, or explode, resulting in serious bodily
injury or property damage.
2B. Installation and Startup 11
Installation and Startup
When the battery is low, the battery icon blinks. The
device turns off after a few minutes.
Note: Long backlight settings, searching for service and other
variables may reduce the battery’s data-transferring
and standby time.
Tip: Watch your device battery level indicator and charge the
battery before it runs out of power.
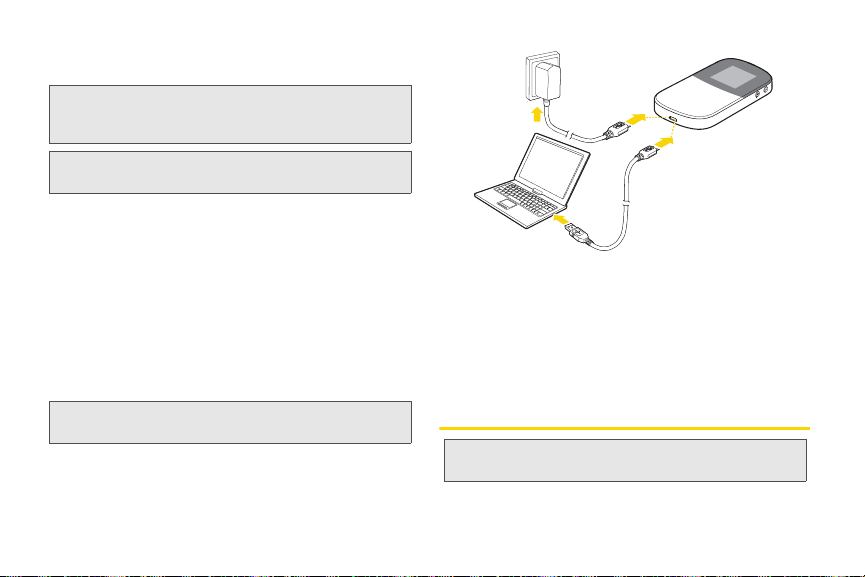
Charging the Battery
Keeping track of your battery’s charge is important. If
your battery level becomes too low, your device
automatically turns off, and you will lose any
information you were just working on.
䊳 To charge the battery, plug the smaller end of the
USB cable into the device’s micro USB port, and
the other end into the AC adapter or an available
USB port of a compatible powered-on PC as
shown in the following diagram.
Note: The computer is usually slower than the battery charger
for charging the battery.
12 2B. Installation and Startup
䡲 Charging the battery while the device is on, the
battery icon is animated when charging.
Charging the battery while the device is off, the
battery icon is animated until charging is over.
With the Sprint-approved Li-Ion battery, you can
recharge the battery before it is completely run down.
Turning Your Device On or Off
Note: Before turning on the device, make sure the battery is
installed and charged (or charging)..
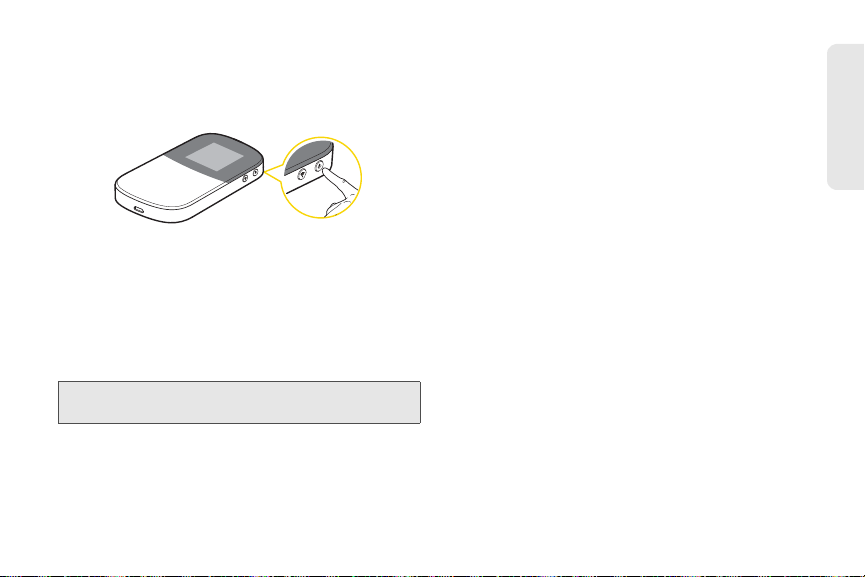
䊳 To turn the device on or off, press and hold the
power button for about three seconds until you see
the powering-on or powering-off animation on the
display screen.
Once your device is on, it searches for the network.
When the device finds a signal, you have established
the network connetion.
If your device is power-supplied by the battery and can
not search for a signal, a power saving feature is
automatically activated. In power saving mode, it can
search for a signal automatically and periodically.
Tip: The power saving feature conserves your battery power
when you are in an area where there is no signal.
Installation and Startup
2B. Installation and Startup 13
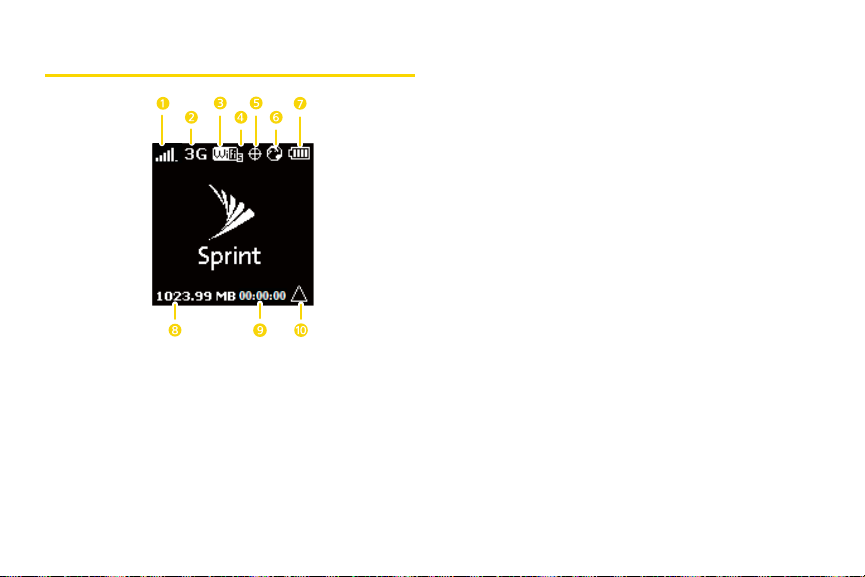
Checking the Device Status
1 Signal Strength – The current signal strength of the
network. (More bars = stronger signal.)
3G or 4G status – The current network is in 3G mode
2
or in 4G mode.
3 Wi-Fi On – The device's wireless feature is on.
14 2B. Installation and Startup
4 Clients – The number of currently connected client
Wi-Fi devices (1 - 5).
5 Location On – The device's location feature is on
and available for location-based services such as
GPS Navigation.
6 Internet – Internet connection is set up.
7 Battery Status – The current battery charge level.
When charging, the icon is animated.
8 Throughput – The amount of the data transferred
during the current session.
9 Duration – How long the device has been active in
its current session.
10 Roaming – The device is “roaming” off the
Nationwide Sprint Network.

Section 3
Quick Start Guide
⽧ Requirements for the PC (page 16)
3A. Quick Start
⽧ Accessing the Internet via Wi-Fi (page 16)
⽧ Accessing the Internet via USB (page 18)
⽧ Logging in to the Web Management Page (page 18)
⽧ Using a Card (page 19)
Requirement Description
Operating system •Windows XP (32bit-only)
•Windows Vista
•Windows 7
•MAC 10.5, 10.6, 10.7
Screen resolution 1024 x 768 pixels or higher
Internet browser Internet Explorer 6.0 or higher
Safari
Accessing the Internet via Wi-Fi
Requirements for the PC
Your PC must meet the following requirements to
configure and use the device. Otherwise, the operation
performance may be degraded.
Requirement Description
CPU Pentium 500 MHz or higher
Memory 128 MB RAM or higher
Hard disk memory Available space of 50 MB
16 3A. Quick Start
You can connect up to 5 computers or other Wi-Fi
capable devices to the hotspot via Wi-Fi. You can also
create a small wireless local network for data sharing.
Note: By default, the management parameters are preset on
the device according to Sprint's requirements.
To connect a computer to the device via Wi-Fi for the
first time, refer to the following steps. The operation may
be different according to your operating system.
1. Press and hold the power button for 3 seconds to
turn on the device.
 Loading...