

Page 1

Wonderful Communication, Mobile Life.
Thank you for choosing HUAWEI E220 HSDPA USB Modem.
HUAWEI E220 HSDPA USB Modem
User Manual
Page 2

Copyright © 2008 Huawei Technologies Co., Ltd.
All Rights Reserved
No part of this manual may be reproduced or transmitted in any form or by any
means without prior written consent of Huawei Technologies Co., Ltd.
Trademarks
and HUAWEI are trademarks of Huawei Technologies Co., Ltd. All other
trademarks mentioned in this manual are the property of their respective holders.
Notice
The information in this manual is subject to change without notice. Every effort
has been made in the preparation of this manual to ensure accuracy of the contents,
but all statements, information, and recommendations in this manual do not
constitute the warranty of any kind, expressed or implied.
Page 3

Safety Precautions
Before using the wireless device, please read the safety precautions carefully and
let your children know these, so that you can use your wireless device correctly
and safely. For details, see the section “Warnings and Precautions”.
Do not switch on your wireless device when it is prohibited to use
wireless device or when the wireless device may cause interference or
danger.
Do not use your wireless device while driving.
Follow any rules or regulations in hospitals and health care facilities.
Switch off your wireless device near medical apparatus.
Switch off your wireless device in aircraft. The wireless device may
cause interference to control signals of the aircraft.
Switch off your wireless device near high-precision electronic
devices. The wireless device may affect the performance of these
devices.
Do not attempt to disassemble your wireless device or its accessories.
Only the qualified personnel are allowed to service or repair the
wireless device.
Do not place your wireless device and its accessories in containers
with strong electromagnetic field.
Do not place magnetic storage media near your wireless device.
Radiation from the wireless device may erase the information stored
on them.
Do not put your wireless device in a high-temperature place or use it
in a place with flammable gas such as a gas station.
Keep your wireless device and its accessories away from children. Do
not allow children to use your wireless device without guidance.
Observe any laws or regulations on the use of wireless device.
Respect others’ privacy and legal rights when using your wireless
device.
Page 4

Table of Contents
1 Getting to Know Your E220..................................................................................................1
Overview........................................................................................................................1
Indicator.........................................................................................................................2
2 Getting Started.......................................................................................................................3
Computer Configuration Requirements ........................................................................3
Preparing E220 ..............................................................................................................3
3 Installation.............................................................................................................................4
Connecting E220 to the PC ...........................................................................................4
Installing the Tele2 Mobile Connect .............................................................................6
Disconnecting E220 from the PC ..................................................................................6
Uninstalling Tele2 Mobile Connect ..............................................................................6
4 Introduction to Tele2 Mobile Connect..................................................................................7
Launching Tele2 Mobile Connect .................................................................................7
Introduction to the Home Screen...................................................................................7
5 Menu....................................................................................................................................10
6 Internet Service ...................................................................................................................12
Network Connection Settings......................................................................................12
Accessing the Internet .................................................................................................13
Volume Statistic...........................................................................................................13
7 SMS .....................................................................................................................................14
Creating a Message......................................................................................................14
Inbox ............................................................................................................................15
Outbox .........................................................................................................................18
Draft .............................................................................................................................20
Trash ............................................................................................................................21
Reports.........................................................................................................................22
Message Import Management .....................................................................................22
SMS Settings ...............................................................................................................23
8 Contacts...............................................................................................................................24
i
Page 5

Managing Contacts ......................................................................................................24
Importing/Exporting Contacts.....................................................................................26
9 Settings and Information Query ..........................................................................................28
Selecting the Network .................................................................................................28
Selecting the Connection Type....................................................................................28
Selecting the Band .......................................................................................................28
Managing the PIN Code ..............................................................................................28
System Settings............................................................................................................29
Diagnostic....................................................................................................................31
10 Specifications ....................................................................................................................32
11 FAQ ...................................................................................................................................34
12 Warnings and Precautions .................................................................................................35
13 Acronyms and Abbreviations ............................................................................................39
ii
Page 6

1 Getting to Know Your E220
Overview
Welcome to HUAWEI E220 HSDPA USB Modem (hereinafter referred to as E220). With
E220, you can easily:
y Access the Internet
y Send or receive text messages
y Manage contacts
The following figure shows E220.
USB interface
USIM/SIM card slot
Note:
The figure is for your reference only.
Indicator
1
Page 7

Indicator
This indicator indicates the status of E220.
Indicator Status Description
Off E220 is powered off.
Blinking twice every 2.7
seconds (green)
Blinking once every 2.9
seconds (green)
Blinking once every 2.9
seconds (blue)
On (green) The GPRS data service is established.
On (cyan) The HSDPA data service is established.
On (blue) The WCDMA data service is established.
E220 is searching for a network or no network is
available.
The GSM network is normal.
The WCDMA network is normal.
2
Page 8

2 Getting Started
Computer Configuration Requirements
To use E220, your PC is required to have:
y CPU: Pentium 4, 1 GHz or above
y Memory: 128 MB RAM or above
y Hard disk: 50 MB or above
y Operating system: Windows XP, Windows 2000 or Windows Vista
y USB modem interface: USB 2.0 full speed
y Display resolution: 800 % 600 or above; 1024 % 768 is recommended
Note:
Make sure that the configuration of your PC meets the requirements. Otherwise,
improper configuration may degrade the performance of your PC.
Preparing E220
1. Take out E220 from the protective cover.
2. Take out the USIM/SIM card slot from E220. Then insert the USIM/SIM card into the
USIM/SIM card slot. Make sure that the USIM/SIM card is fully inserted.
3. Insert the USIM/SIM card slot into E220.
3
Page 9

3 Installation
The installation procedures vary with the operating system. The following installation
procedures are for your reference only.
Take the Windows XP operating system as an example.
Note:
y For Windows XP, it is recommended to install patches such as Service Pack 2
or above.
y For Windows 2000, it is recommended to install patches such as Service Pack 4
or above.
y Before connecting E220 to the PC, power on the PC. Otherwise, the installation
may be affected.
Connecting E220 to the PC
Use the dedicated USB cable to connect E220 to the PC.
The following figure shows the USB cable.
Auxiliary USB
data cable
Main USB
data cable
4
Mini-USB
connector
Page 10
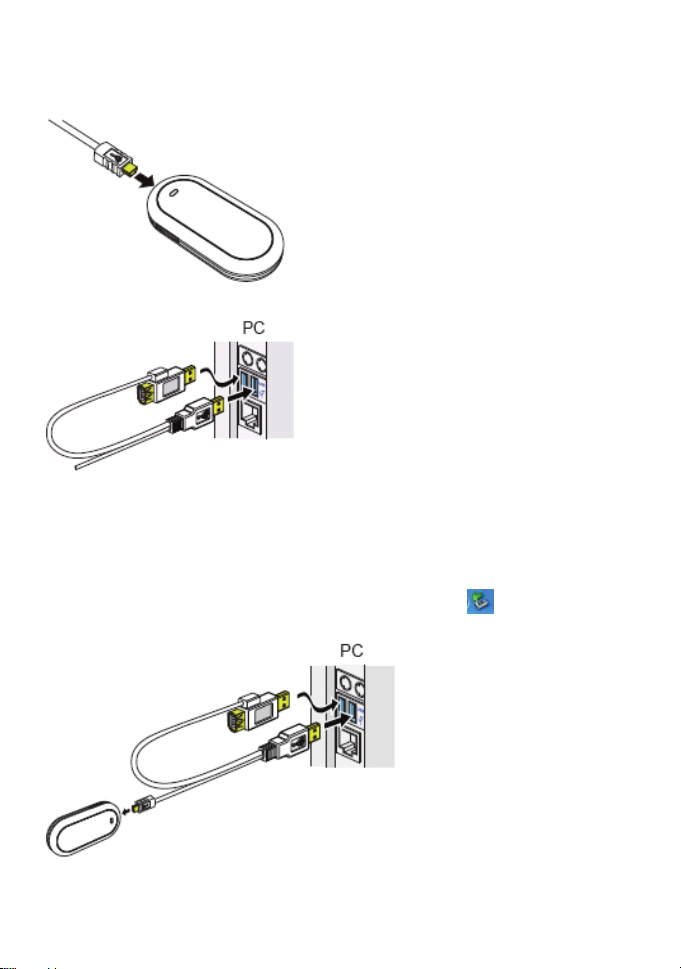
Do the following to connect E220 to the PC:
1. Connect the Mini-USB plug of the USB cable to the USB interface of E220.
2. Insert the main plug and auxiliary plug to the USB interfaces of the PC.
Note:
The PC can supply power for E220 through the auxiliary USB data cable. Make
sure that it is connected to the USB interface of the PC.
3. Windows XP auto detects and recognizes E220 and displays
corner, indicating that E220 is connected successfully.
5
on the lower right
Page 11
Installing the Tele2 Mobile Connect
1. Connect E220 to the PC.
2. The setup program auto runs. Then the E220 installation interface appears.
Note:
If the auto-run program does not start, double-click the AutoRun.exe file in the
drive path to run it.
3. Select the language in the Choose Language dialog box and click Next.
4. Follow the remaining instructions.
5. Click Finish to complete the installation.
Note:
Do not disconnect E220 during the installation.
6. When the installation completes, the shortcut icon
Connect management program (hereinafter referred to as Tele2 Mobile Connect)
appears on the desktop.
of the Tele2 Mobile
Disconnecting E220 from the PC
Before disconnecting E220, stop it through the hardware removing function of Windows.
Do the following:
1. Double-click
Hardware dialog box is displayed.
2. Select Huawei Mass Storage USB Device to stop E220.
3. After the system prompts you that it is safe to remove the device, disconnect E220.
on the lower right corner of the PC screen and the Safely Remove
Uninstalling Tele2 Mobile Connect
Uninstall Tele2 Mobile Connect through the Add or Remove Programs function of
Windows.
6
Page 12
4 Introduction to Tele2 Mobile
Connect
Launching Tele2 Mobile Connect
1. Connect E220 to the computer and Tele2 Mobile Connect is auto launched.
2. If you are required to enter the Personal Identification Number (PIN) code, enter the
correct one and click OK.
If you enter wrong PIN codes three times consecutively, your USIM/SIM card is
blocked. In this case, use the PIN Unblocking Key (PUK) code to unblock it.
If you enter wrong PUK codes ten times consecutively, your USIM/SIM card is
disabled. In this case, contact your service provider.
Note:
The service provider provides the PIN code and the PUK code. For details about
how to modify, enable or disable the PIN code, refer to "Managing the PIN Code".
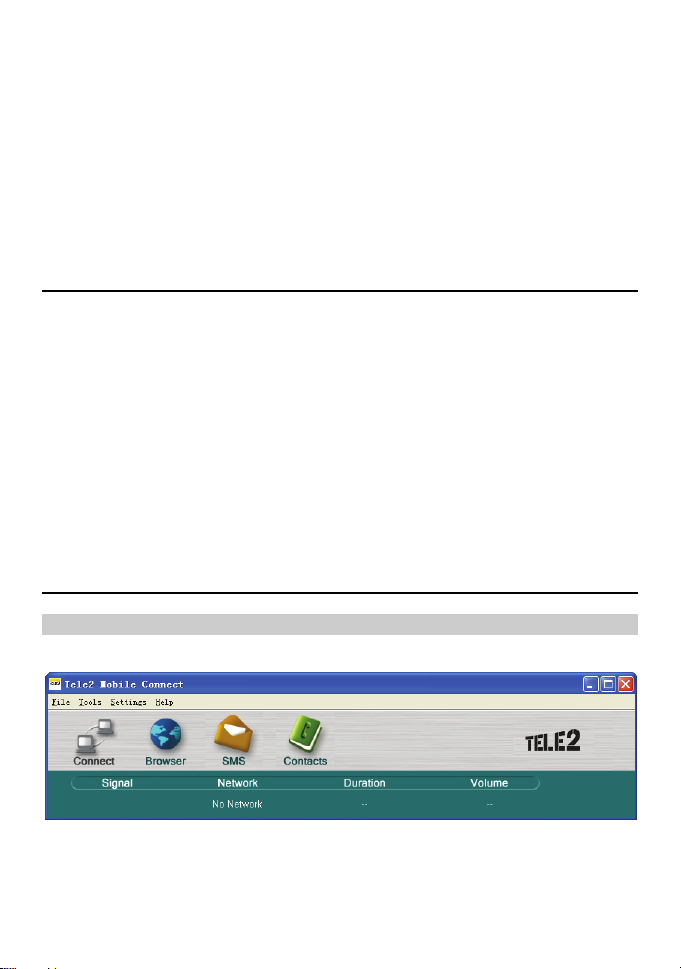
Introduction to the Home Screen
Overview of the Home Screen
After Tele2 Mobile Connect is launched, the home screen is displayed as follows:
7
Page 13
You can maximize the screen.
Icons and Shortcut Keys
The following table lists the icons and corresponding shortcut keys of Tele2 Mobile
Connect.
Icon/Shortcut Key Description
/ /F2
/F3
/F5
/F6
Connect to/Disconnect from the network.
Launch the IE.
Display the SMS interface.
Display the Contacts interface.
8
Page 14
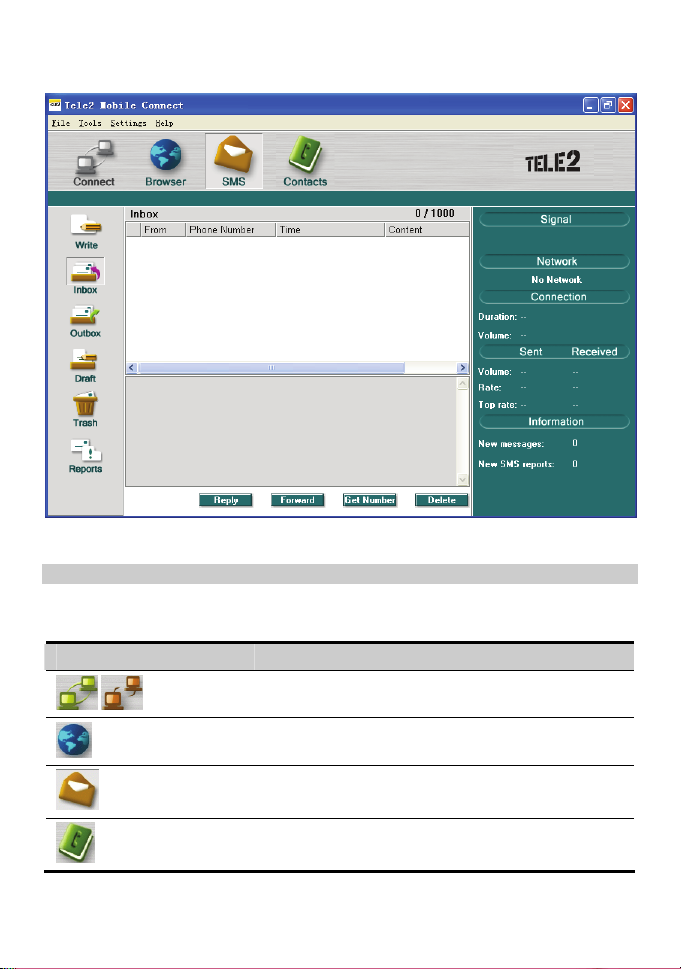
Status Information
The status information shown on the right panel varies with the ongoing service. The
following two tables list the status information and description.
When the screen is in the minimized status:
Status Information Description
Signal The network type and signal strength. The more the bars
Network Service provider information.
Duration The duration of the current data connection.
Volume The volume of the current data connection.
are, the stronger the signal strength is.
When the screen is in the maximized status:
Status Information Description
Signal The network type and the signal strength.
Network Service provider information.
Connection The current connection information:
y Duration
y Vo l u m e
Sent Received y Sent volume, rate, and the top rate
y Received volume, rate, and the top rate
Information y New messages: The number of new messages. If there
is a new message, the number blinks.
y New SMS reports: The number of new message
reports. If there is a new message report, the number
blinks.
9
Page 15

1 File
1.1 Connect/Disconnect
1.2 Import Contacts
1.2.1 From File
1.2.2 From USIM/SIM Card
1.3 Export Contacts
1.3.1 To File
1.3.2 To USIM/SIM Card
1.4 Import Message from USIM/SIM Card
1.5 Exit
2 Tools
2.1 Open Browser
2.2 SMS
2.3 Contacts
2.4 Volume Statistic
2.5 Diagnostics
3 Settings
3.1 Choose Network
3.1.1 Auto
3.1.2 Manual
3.2 Choose Connection Type
3.2.1 GPRS Preferred
3.2.2 3G Preferred
10
5 Menu
Page 16

3.2.3 GPRS Only
3.2.4 3G Only
3.3 Band Selection
3.3.1 All Band
3.3.2 GSM900/1800/WCDMA2100
3.3.3 GSM1900
3.4 Modify PIN Code
3.5 PIN Code Protection
3.5.1 Validate
3.5.2 Enable
3.5.3 Disable
3.6 Options
3.7 SMS Settings
3.8 Network Connection Settings
4 Help
4.1 HUAWEI Online Support
4.2 About
11
Page 17

6 Internet Service
Network Connection Settings
Creating a Profile
Select Settings > Network Connection Settings…. Then do the following:
Step Procedure
1 Click New.
2 Enter the profile name.
3 Enter the APN, IP, authentification, DNS, WINS, and authentication protocol.
4 Click Save.
Note:
For details of network connection settings, consult your service provider.
Deleting a Profile
Select Settings > Network Connection Settings…. Then, do the following:
Step Procedure
1 In the Choose Profile Name field, select the profile.
2 Click Remove > OK.
Modifying a Profile
Select Settings > Network Connection Settings…. Then, do the following:
Step Procedure
1 In the Choose Profile Name field, select the profile.
2 Click Modify.
3 Modify the profile.
4 Click Save.
12
Page 18

Accessing the Internet
You can access the Internet through a 3G or GPRS connection. Select Settings > Network
Connection Settings…. Then do the following:
Step Procedure
1 In the Choose Profile Name field, select the profile and click OK.
2
Click
3 After a prompt is displayed indicating that the connection is established, click
Internet.
4
Click
When the connection is established, details of the network connection are displayed as
follows:
y The current connection duration
y The data volume of the current connection
y The volume, rate and the top rate of the sent and received data
to establish the 3G connection or the GPRS connection.
or launch the browser of the operating system. Then you can access the
to disconnect the connection.
Volume Statistic
You can view the details of the volume statistic.
Select Tools > Vo lu me Stat istic… to view:
y Last Volume Statistic: the volume of the last connection, including the sent volume, the
received volume, and the duration
y Total Volume Statistic: the volume of all connections, including the sent volume, the
received volume, and the duration
y Last Reset Time: the last reset time
y Reset: Click it to reset
Note:
y The volume statistic is for your reference only.
y If you do not perform the reset operation, the last reset time is null.
13
Page 19

7 SMS
Tele2 Mobile Connect supports SMS services. You can save up to 1000 messages.
You can create, edit, send, reply, forward, and delete messages. You can import or export
messages. You can also set the SMS functions.
Creating a Message
Click or select Tools > SMS, the SMS interface is displayed.
Step Procedure
1 Click Write and the Write interface is displayed.
2 Enter the phone number by one of the following ways:
y Enter the phone number: In the Contacts field, enter the phone number and
use the semicolon to separate phone numbers.
y Select the contact: Click Contacts. Select one or more contacts and click
OK. In the pop-up dialog box, select the phone numbers and click OK.
Note:
y To select several contacts, press and hold the Shift key or the Ctrl
key.
y To select several contacts, select the Apply to all items check box to
simplify the procedures.
3 Write the message.
Note:
On the upper right corner of the interface, the number of remaining
characters and the number of the message is split are displayed.
4 y Click Send to send the message. After the message is sent, it is auto saved to
the Outbox. If the sending fails, a prompt is displayed asking whether to
send it again. If you cancel the sending, the message is auto saved to the
Outbox.
y Click Save to save the message to the Draft.
y Click Clear to clear the phone number and the message.
14
Page 20

Note:
y Tele2 Mobile Connect supports the group sending function. You can send a
message to up to 20 phone numbers.
y Each message can contain 160 English letters. If a message contains more than
160 English letters, it is split into several messages and sent one by one.
y You can follow the above-mentioned two ways to enter the phone number as the
message recipient.
Inbox
The Inbox stores received messages. It can store up to 1,000 messages.
If the Inbox is full and there is a new message, the oldest message is auto moved to the
Trash. If there is an unread message, the number is displayed on the right panel of the home
screen.
On the SMS interface, click Inbox to access the Inbox.
There are two types of icons in the Inbox:
: Unread messages
y
y
: Read messages
Viewing a Message
You can view a message in the Inbox.
Step Procedure
1
Click
2 Click Inbox to access the inbox. Double-click the message to view details.
You can view a message upon its arrival.
1. With the alert tone function enabled:
If there is a new message, you can hear the alert tone.
or select Tools > SMS. The SMS interface is displayed.
Step Procedure
1
Click
2 Click Inbox to access the Inbox. Double-click the message to view details.
or select Tools > SMS. The SMS interface is displayed.
15
Page 21

2. With the alert window function enabled:
If there is a new message, you can see the alert window.
Click To…
View
Close
View details of the message.
Close the alert window.
Replying to a Message
You can reply to a message in the Inbox.
Step Procedure
1 Select or double-click the message to view details. Then click Reply.
2 The phone number of the sender is displayed in the Contacts field. You can
edit the phone number.
3 Write the message.
4 Click Send.
Forwarding a Message
You can forward a received message.
Step Procedure
1 Select or double-click the message to view details. Then click Forward.
2 Enter the phone number of the recipient, or click Contacts to select the contact.
3 Details of the message are displayed in the text box. You can edit it.
4 Click Send.
Deleting a Message
You can delete a received message.
Step Procedure
1 y Select one or more messages.
y Double-click the message to view details.
2 Click Delete. The message is moved to the Trash.
16
Page 22

Saving a Phone Number
You can save the phone number of a received message as a contact.
Step Procedure
1 Select or double-click the message to view details and click Get Number.
2 The New interface is displayed and the phone number of the message is
displayed in the Mobile Number field.
3 Enter the information of the phone number.
4 Click Save.
Exporting a Message
You can export received messages to a file. The file must be .txt or .csv files.
Step Operation
1 Select one or more messages.
2 Right-click the window and select Export to file.
3 Select the path and enter the file name.
4 Click Save.
Locking/Unlocking a Message
To avoid unintentional deletion, you can lock or unlock a message in the Inbox.
Step Operation
1 Select one or more messages.
2 Right-click the window and select Lock or Unlock.
Note:
A locked message is marked by
.
17
Page 23

Outbox
The Outbox stores sent messages. The Outbox can store up to 1,000 messages. If the
Outbox is full and there is a new message, the oldest message is auto moved to the Trash.
On the SMS interface, click Outbox to access the Outbox.
Viewing a Message
You can view a message in the Outbox.
Step Procedure
1 You can view all the messages in the Outbox.
2 Double-click the message to view details.
Sending a Message
In the Outbox, you can send a message.
Step Procedure
1 y Select or double-click the message to view details. Then click Send.
y You can send a message to several recipients each time. Select several
messages and click Send.
2 The phone number of the recipient is displayed in the Contacts field. You can
edit the phone number.
3 Write the message.
4 Click Send.
Forwarding a Message
In the Outbox, you can forward a sent message.
Step Procedure
1 Select or double-click the message to view details. Then click Forward.
2 Enter the phone number of the recipient in the Contacts field, or click
Contacts to select the contact.
3 Details of the message are displayed. You can edit the message.
4 Click Send.
18
Page 24

Deleting a Message
You can delete a message.
Step Procedure
1 y Select one or more messages and click Delete.
y Double-click the message to view details and click Delete.
2 The message is moved to the Trash.
Saving a Phone Number
You can save the phone number of a sent message as a contact.
Step Procedure
1 Select or double-click the message to view details and click Get Number.
2 The New interface is displayed and the phone number of the message is
displayed in the Mobile Number field.
3 Enter the information of the phone number.
4 Click Save.
Exporting a Message
You can export sent messages to a file. The file must be .txt or .csv files.
Step Operation
1 Select one or more messages.
2 Right-click the window and select Export to file.
3 Select the path and enter the file name.
4 Click Save.
19
Page 25

Locking/Unlocking a Message
To avoid unintentional deletion, you can lock a message in the Outbox. In addition, you can
unlock a message.
Step Procedure
1 Select one or more messages.
2 Right-click the window and select Lock or Unlock.
Note:
A locked message is marked by
.
Draft
You can save a message as a draft. The Draft can store up to 1,000 messages.
If you save a message as a draft, only the content of the message is saved.
On the SMS interface, click Draft.
Editing a Message
You can edit a draft.
Step Procedure
1 y Select the draft and click Edit.
y Double-click the draft.
2 On the Write interface, edit the draft and click Send, Save, or Clear.
Deleting a Message
You can delete a draft.
Step Procedure
1 Select one or more drafts and click Delete.
2 The draft is moved to the Trash.
3 Click Save.
20
Page 26

Trash
The Trash stores messages removed from the Inbox, Outbox, and Draft. The Trash can store
up to 1,000 messages.
If the Trash is full and there is a new message, the oldest message is auto deleted.
On the SMS interface, click Tr ash .
Restoring a Message
You can restore a message.
Step Procedure
1 Select one or more messages and click Restore.
2 The message is restored.
Deleting a Message
If you delete a message from the Trash, it is permanently deleted.
Step Procedure
1 Select one or more messages and click Delete.
2 Click OK.
Exporting a Message
You can export messages to a file. The file must be .txt and .csv files.
Step Procedure
1 Select one or more messages.
2 Right-click the window and select Export to file.
3 Select the path and enter the file name.
4 Click Save.
21
Page 27

Reports
The Reports can store up to 1,000 delivery reports.
If the Reports is full and there is a new report, the oldest report is auto deleted.
On the SMS interface, click Reports.
Deleting a Report
You can delete reports as follows.
Step Procedure
1 Select one or more reports and click Delete.
2 Click OK.
Exporting a Report
You can export reports to a file. The file must be .txt or .csv files.
Step Procedure
1 Select one or more reports.
2 Right-click the window and select Export to file.
3 Select the path and enter the file name.
4 Click Save.
Message Import Management
You can import messages to Tele2 Mobile Connect from the USIM/SIM card.
Step Procedure
1 Select File > Import Message from USIM/SIM Card….
2 Messages are imported to the Inbox, Outbox, or Draft of Tele2 Mobile
Connect respectively.
22
Page 28

SMS Settings
Select Settings > SMS Settings and the SMS settings interface is displayed.
Option Description
Reports You can enable or disable this function.
With the function enabled, if you send a message successfully, you
can receive a delivery report.
Use same SMS
centre for reply
SMS Bearer
Domain
Validity Set the validity period for a message saved in the SMS center.
SMC Number The SMS center number is supplied with the USIM/SIM card. After
Note:
If there is no capacity for delivery reports in the USIM/SIM card, the request status
report function is invalid, contact your service provider for details.
Set the recipient to use the same SMS center number to reply the
message.
Set the bearer domain of sending a message.
y Circuit Switched (CS): messages are sent through the CS domain.
y Packet Switched (PS): messages are sent through the PS domain.
you insert the USIM/SIM card, the field is auto filled.
If the field is null or you delete the number unconsciously, contact
your service provider to retrieve the number.
23
Page 29

8 Contacts
Tele2 Mobile Connect can save up to 1,000 contacts. You can create, modify, or delete
contacts. You can send a message or make a call to the contact. You can also import or
export contacts.
Managing Contacts
Click or select Tools > Contacts. The Contacts interface is displayed.
Creating a Contact
Do the following:
Step Procedure
1 Click New.
2 Enter the content in the Name, Mobile Number, Home Number, Office
Number, E-mail, and/or Comments fields.
3 Click Save.
Modifying a Contact
Do the following:
Step Procedure
1 Select or double-click the contact and click Edit.
2 Modify the contact.
3 Click Save.
24
Page 30

Deleting a Contact
Do the following:
Step Procedure
1 Select one or more contacts. Then click Delete.
2 Click OK.
Sending a Message
You can send a message to a contact. Do the following:
Step Procedure
1 Select one or more contacts.
2 Click Send. Tele2 Mobile Connect retrieves the phone number and the Write
interface is displayed.
3 The phone number is displayed in the Contacts field. Write the message and
click Send.
Searching for a Contact
You can search for a contact. Do the following:
Step Procedure
1 Click Search.
2 y Select a field item such as Name, Mobile, Family, Office or E-mail from
3 Click Search Now to start searching.
4 Click Stop Search to stop searching.
the dropdown list in the Condition area.
y Enter the content in the Va l ue text box.
y Select Match Whole Word Only and/or Match Case in the Matching
Typ e field.
25
Page 31

Importing/Exporting Contacts
Importing a Contact
You can import contacts to Tele2 Mobile Connect from the USIM/SIM card or a file.
Importing a Contact from a File
You can import contacts to Tele2 Mobile Connect from a file. The file must be .csv files.
Step Procedure
1 Select File > Import Contacts > From File.
2 In the Open dialog box, select the file.
3 Click Open to import the file to Tele2 Mobile Connect.
Importing a Contact from the USIM/SIM Card
You can import contacts to Tele2 Mobile Connect from the USIM/SIM card.
Step Procedure
1 Select File > Import Contacts > From USIM/SIM Card.
2 y You can select:
y Move Import: Contacts in the USIM/SIM card are deleted.
y Copy Import: Contacts in the USIM/SIM card are retained.
3 Click OK. Then select Mobile, Home or Office and set whether to apply the
operations to all items. Then click OK.
4 After the importing completes, a prompt is displayed to indicate the result.
Exporting a Contact
You can export contacts from Tele2 Mobile Connect to the USIM/SIM card or a file.
Exporting a Contact to a File
Do the following:
Step Procedure
1 Select File > Export Contacts > To File. Click OK in the pop-up dialog box.
2 In the Save as dialog box, enter the file name with .csv as its extension.
3 Click Save.
26
Page 32

Exporting a Contact to the USIM/SIM Card
Do the following:
Step Procedure
1 Select one or more contacts.
2 Select File > Export Contacts > To USIM/SIM Card.
3 Click OK.
4 After the exporting completes, a prompt is displayed to indicate the result.
Note:
y If you do not select a contact, the function is unavailable.
y The number of contacts that can be saved is determined by the capacity of the
USIM/SIM card.
y If the contacts you are exporting exceed the USIM/SIM card capacity, Tele2
Mobile Connect auto stops the operation.
27
Page 33

9 Settings and Information Query
Selecting the Network
E220 supports manual or auto search of the network. To set the search mode, select
Settings > Choose Network and select either of the following options:
y Auto: E220 auto searches for a network and registers to the network.
y Manual: You can manually search for networks and select a network for E220 to
register.
Selecting the Connection Type
Select Settings > Choose Connection Type to set the connect type.
Option Description
GPRS Preferred If possible, E220 selects the GPRS network.
3G Preferred If possible, E220 selects the 3G network.
GPRS Only E220 selects the GPRS network only.
3G Only E220 selects the 3G network only.
Selecting the Band
You can set the working band for E220. After setting, E220 can work only in the preset
working band.
Select Settings > Band Selection. Then you can select All Band, GSM900/1800/
WCDMA2100 or GSM1900.
Managing the PIN Code
The PIN code can protect the USIM/SIM card from unauthorized use. The PIN code is
supplied with the USIM/SIM card. You can change your PIN code .Also you can set
whether to enter the PIN code when E220 starts up.
28
Page 34

Modifying the PIN Code
You can modify the PIN code. Do the following:
Step Procedure
1 Select Settings > Modify PIN Code.
2 Enter the current PIN code and the new PIN code, and then enter the new code
again to confirm it.
3 Click OK.
Validating the PIN Code
After launching Tele2 Mobile Connect, you can still use the PIN code validation function.
Do the following:
Step Procedure
1 Select Settings > PIN Code Protection.
2 Select Validate to enable the PIN code validation function. For details, refer to
the descriptions on page 7.
PIN Code Protection
You can enable or disable the PIN code when the E220 starts up.
Step Procedure
1 Select Settings > PIN Code Protection.
2 Select Enable or Disable. Enter the PIN code.
y Enable: You need to enter the PIN code when E220 starts up.
y Disable: You do not need to enter the PIN code when E220 starts up.
System Settings
The system settings include the startup mode of Tele2 Mobile Connect, the alert mode for
messages, and the standby/hibernate mode of the PC and so on.
Select Settings > Options.
29
Page 35

Setting Startup
.Click the Startu p tab to set the following items
Option Description
Launch application on Windows
start up
Start main window minimized The Tele2 Mobile Connect window is minimized
Check the unread message(s)
while starting
Enable roaming prompt Select this option to enable the roaming function.
Note:
Click Default to restore the settings to the default values, namely, only the Check
the unread message(s) while starting check box is selected.
Tele2 Mobile Connect is launched along with the
Windows.
on startup.
On launching, Tele2 Mobile Connect checks the
unread messages in the USIM/SIM card and E220.
Setting SMS Alerts Function
Select the SMS Alerts tab to set the following items.
Option Description
Alert window Select the Alert window check box. If there is a new message,
Alert tone y After you select a sound file, if there is a new message, the
Note:
y The SMS sound files must be *.wav or *.mid files.
y If you click Default, all the items in the Prompts tab are restored to the default
values. That is, both the Alert window check box and the Alert tone check box
are selected.
the alert window is displayed. You can:
y Click View to view details.
y Click Close to close the alert window.
sound file is played.
y Click Browse to select the sound file.
y Click Play to pre-listen to the sound file.
30
Page 36

Setting the Standby/Hibernate Mode
Click the Standby/Hibernate tab to set the following items.
Option Description
Prevent Standby/Hibernate Prevent the PC from turning to the standby or
Allow Standby/Hibernate Allow the computer to turn to the standby or
Note:
If you click Default, the standby/hibernate status recovers to its default value, that
is, allow standby or hibernate.
hibernate mode.
hibernate mode.
Diagnostic
You can inquire E220 and the USIM/SIM card.
Select Tools > Diagnostics:
y Messages in USIM/SIM Card: The format is "XX/YY". XX indicates the number of
messages, and YY indicates the capacity of the USIM/SIM card.
y Contacts in USIM/SIM Card: The format is "XX/YY". XX indicates the number of
contacts, and YY indicates the capacity of the USIM/SIM card.
y IMEI Number: the IMEI number of E220.
y API Version: the API version.
y Firmware Version: the board software version of E220.
y Hardware Version: the hardware version of E220.
31
Page 37

10 Specifications
Item Description
Technical standard 3GPP R5
USB interface standard USB2.0 full speed standard
Radio system y GSM/GPRS/EDGE: 900 MHz/1800 MHz/1900 MHz
y HSDPA /WCDMA: 2100 MHz
Radio frequency band GSM/GPRS/EDGE 900 MHz
y UL: 880 MHz–915 MHz
y DL: 925 MHz–960 MHz
GSM/GPRS/EDGE 1800 MHz
y UL: 1710 MHz–1785 MHz
y DL: 1805 MHz–1880 MHz
GSM/GPRS/EDGE 1900 MHz
y UL: 1850 MHz–1910 MHz
y DL: 1930 MHz–1990 MHz
HSDPA/WCDMA 2100 MHz
y UL: 1920 MHz–1980 MHz
y DL: 2110 MHz–2170 MHz
Radio power output y HSDPA/WCDMA 2100 MHz: Power Class 3, +24
dBm+1/-3
y GSM/GPRS 900 MHz: Power Class 4, +33 dBm±2
y GSM/GPRS 1800 MHz: Power Class 1, +30 dBm±2
y GSM/GPRS 1900 MHz: Power Class 1, +30 dBm±2
y EDGE 900 MHz: Power Class E2, +27 dBm±3
y EDGE 1800 MHz: Power Class E2, +26 dBm±3
y EDGE 1900 MHz: Power Class E2, +26 dBm±3
32
Page 38

Item Description
Services Data service:
y GSM CS: UL 9.6 kbit/s/DL 9.6 kbit/s
y GPRS: UL 26.8 kbit/s/DL 53.6 kbit/s
y EDGE: UL 118.4 kbit/s/DL 236.8 kbit/s
y WCDMA CS: UL 64 kbit/s/DL 64 kbit/s
y WCDMA PS: UL 384 kbit/s/DL 384 kbit/s
y UL WCDMA/DL HSDPA: UL 384 kbit/s/DL 3.6 Mbit/s
SMS service:
GSM, GPRS, WCDMA, HSDPA, EDGE
Dimensions
(D % W % H)
Weight About 50 g
Power supply method Through two USB interfaces
Operating temperature -10℃ to +55℃
Storage temperature -40℃ to +70℃
89.37 mm % 42.61 mm % 14.50 mm
33
Page 39

11 FAQ
How to judge whether E220 is correctly connected to the PC?
After you connect E220 to the PC, two device icons are displayed in the device manager,
namely, “HUAWEI Mobile Connect-3G Modem” and “HUAWEI Mobile Connect-3G PC
UI Interface”.
If a yellow exclamatory mark or other signs are displayed in front of the icons, it indicates
that E220 is not correctly connected. You need to connect E220 again.
What to do if E220 fails to connect to the Internet?
1. Make sure that E220 is in the service area and the network signal is normal.
2. Make sure you have subscribed to the wireless access service. For details, consult your
service provider.
3. If you have subscribed to the wireless access service, refer to "Internet Service" to
configure the network settings.
Only part of the message is displayed after I use the “Paste” function
to edit it. Why?
A text message can contain up to 1,000 characters. If the size of the pasted part exceeds the
limit, the exceeding part is auto deleted.
When there is a new message, no alert window is displayed. Why?
Make sure that you have enabled the alert window function.
Select Settings > Options. Then select the Prompt tab and select the Display alerts when
a message is received check box in Message Alerts Settings.
After Tele2 Mobile Connect is launched, the system prompts “There
are some unread messages in USIM/SIM card. Do you want to import
them to the computer?” After I select “No”, what if I want to import
the message?
Select File > Import Message from USIM/SIM Card to import messages to Tele2 Mobile
Connect from the USIM/SIM card.
I cannot paste the phone number. Why?
Only “0123456789#*+” is valid. Make sure that all digits of the phone number are valid.
34
Page 40

12 Warnings and Precautions
Electronic Device
y Switch off your wireless device near high-precision electronic devices. The wireless
device may affect the performance of these devices.
y Such devices include hearing aids, pacemakers, fire alarm systems, automatic gates, and
other automatic-control devices. If you are using an electronic medical device, consult
the device manufacturer and confirm whether the radio wave affects the operation of this
electronic device.
Hospital
Pay attention to the following points in hospitals or health care facilities:
y Do not take your wireless device into the operating room (OR), intensive care unit (ICU),
or coronary care unit (CCU).
y Do not use your wireless device at places for medical treatment where it is prohibited to
use wireless devices.
Area with flammables and Explosives
y In the area with inflammables and explosives, disconnect your wireless device from your
PC and turn off the PC to avoid explosion and fire. The area with inflammables and
explosives include:
y Gas station
y Area for storing fuels (such as the bunk under the deck of a ship)
y Device/Vehicle for transporting and storing fuels or chemical products
y Area with chemical substances and particles (such as: granule, dust, metal powder) in the
air
y Area with the sign of Explosives
y Area with the sign of Turn off bi-direction wireless equipment
y Area where it is generally suggested to stop the engine or a vehicle
Traffic Safety
y Please observe the relevant regulation of the area or country where you are. Do not use
your wireless device while driving to avoid traffic accident.
35
Page 41

y Secure the wireless device on its holder. Do not place the wireless device on the seat or
other places where it can get loose in a sudden stop or collision. Use the wireless device
after the vehicle stops at a safety place.
y Do not place the wireless device over the air bag or in the air bag outspread area.
Otherwise, the wireless device may hurt you owing to the strong force when the air bag
inflates.
y Observe the rules and regulations of airline companies. On or nearby a plane, disconnect
the wireless device from your PC and turn off the PC. In areas where it is prohibited to
use wireless device, do not use the wireless device. Otherwise, the wireless signal of the
wireless device can disturb the plane control signals. Disconnect the wireless device
from your PC and turn off the PC before boarding an aircraft.
Storage Environment
y Do not place magnetic storage media such as magnetic cards and floppy disks near the
wireless device. Radiation from the wireless device may erase the information stored on
them.
y Do not put your wireless device in containers with strong magnetic field, such as an
induction cooker and a microwave oven. Otherwise, circuit failure, fire, or explosion can
be caused.
y Do not leave your wireless device in a very hot or cold place. Otherwise, malfunction of
the products, fire, or explosion can be caused.
y Do not put your wireless device in the pocket on the back side of trousers or a skirt to
avoid wireless device damage while seating.
Children Safety
y Put your wireless device in places beyond the reach of children. Do not allow children to
use the wireless device without guidance.
y Do not allow children to touch the small fittings. Otherwise, suffocation or gullet jam
can be caused if children swallow the small fittings.
Operating Environment
y The wireless device is not water-resistant. Keep it dry. Protect the wireless device from
water or vapor. Do not touch the wireless device with a wet hand. Otherwise,
short-circuit and malfunction of the product or electric shock can be caused.
y Do not use the wireless device in dusty, damp and dirty places or places with magnetic
field. Otherwise, malfunction of the circuit can be caused.
y When you carry or use the wireless device, keep it at least one inch (2.5 centimeters)
away from your body, to avoid negative impact on your health caused by radio frequency
leakage.
y On a thunder stormy day, do not use your wireless device outdoors.
y Do not touch the wireless device when it is running. This may affect call quality and
cause the wireless device to operate with more power.
36
Page 42

y The wireless device may interfere nearby TV sets and radios.
y In accordance with the international standards for radio frequency and radiation, use
wireless device accessories approved by Huawei only.
Cleaning and Maintenance
y Before you clean or maintain the wireless device, disconnect your wireless device from
your PC and turn off the PC. Otherwise, electric shock or short-circuit may be caused.
y Do not use any chemical detergent, powder, or other chemical agent (such as alcohol and
benzene) to clean the wireless device. Otherwise, part damage or a fire can be caused.
You can clean the wireless device with a piece of soft antistatic cloth that is a little wet.
y Do not scratch the shell of the wireless device. Otherwise, the shed coating may cause
skin allergy. Once it happens, stop using the wireless device at once and go to see a
doctor.
y If the wireless device or any of its fittings does not work, turn to the local authorize
service center for help.
Environmental Care
Please observe the local regulations regarding the disposal of your packaging materials, old
wireless device and please promote their recycling. Do not dispose of old wireless device in
a dustbin or fire. Otherwise, explosion can be caused
Certification Information (SAR)
THIS DEVICE MEETS THE GOVERNMENT'S REQUIREMENTS FOR EXPOSURE
TO RADIO FREQUENCY ELECTROMAGNETIC FIELD.
Your wireless device is a low-power radio transmitter and receiver. When it is running, it
emits low levels of radio frequency energy (also known as radio waves or radio frequency
fields).
Governments around the world have adopted comprehensive international safety guidelines,
developed by scientific organizations, e.g. ICNIRP (International Commission on
Non-Ionizing Radiation Protection) and IEEE (Institute of Electrical and Electronics
Engineers Inc.), through periodic and thorough evaluation of scientific studies. These
guidelines establish permitted levels of radio wave exposure for the public. The levels
include a safety margin designed to assure the safety of all persons, regardless of age and
health, and to account for any variations in measurements.
Specific Absorption Rate (SAR) is the unit of measurement for the amount of radio
frequency energy absorbed by the body when using a wireless device. The SAR value is
determined at the highest certified power level in laboratory conditions, but the actual SAR
level of the wireless device while operating can be well below the value. This is because the
wireless device is designed to use the minimum power required to reach the network.
All models of Huawei’s wireless device are designed to meet radio frequency exposure
guidelines such as European Council Recommendation and Federal Communications
37
Page 43

Commission Notice (United States).
European Council Recommendation: Before a wireless device model is available for sale
to the public, it must be tested according to the technical standard-EN 50361 and does not
exceed the limit established by the European Council Recommendation: 1999/519/EC for
safe exposure. l.
The SAR limit adopted by the 1999/519/EC is 2.0 watts/kilogram (W/kg) averaged over ten
gram of tissue. The highest SAR value for this device type when tested is 1.20 W/kg.
Federal Communications Commission Notice (United States): Before a wireless device
model is available for sale to the public, it must be tested and certified to the FCC that it
does not exceed the limit established by the government-adopted requirement for safe
exposure.
The SAR limit adopted by the USA and Canada is 1.6 watts/kilogram (W/kg) averaged
over one gram of tissue. The highest SAR value reported to the FCC and IC for this device
type when tested for use is 0.59 W/kg.
FCC Statement
This equipment has been tested and found to comply with the limits for a Class B digital
device, pursuant to Part 15 of the FCC Rules. These limits are designed to provide
reasonable protection against harmful interference in a residential installation. This
equipment generates, uses and can radiate radio frequency energy and, if not installed and
used in accordance with the instructions, may cause harmful interference to radio
communications. However, there is no guarantee that interference will not occur in a
particular installation. If this equipment does cause harmful interference to radio or
television reception, which can be determined by turning the equipment off and on, the user
is encouraged to try to correct the interference by one or more of the following measures:
y Reorient or relocate the receiving antenna.
y Increase the separation between the equipment and receiver.
y Connect the equipment into an outlet on a circuit different from that to which the
receiver is connected.
y Consult the dealer or an experienced radio/TV technician for help.
This device complies with Part 15 of the FCC Rules and with RSS-210 of Industry Canada.
Operation is subject to the following two conditions: (1) this device may not cause harmful
interference, and (2) this device must accept any interference received, including
interference that may cause undesired operation.
Warning:
Changes or modifications made to this equipment not expressly approved by
HUAWEI may void the FCC authorization to operate this equipment.
38
Page 44

13 Acronyms and Abbreviations
A
APN Access Point Name
C
CPU Central Processing Unit
CS Circuit Switched
D
DL Downlink
DNS Domain Name Server
E
EDGE Enhanced Data rates for Global Evolution
G
GPRS General Packet Radio Service
GSM Global System for Mobile communications
H
HSDPA High Speed Downlink Packet Access
P
PS Packet Switched
PIN Personal Identification Number
PUK PIN Unblocking Key
39
Page 45

S
SIM Subscriber Identity Module
U
UL Uplink
USB Universal Serial Bus
USIM UMTS Service Identity Module
W
WCDMA Wideband Code Division Multiple Access
WINS Windows Internet Name Service
Version: V100R001_06
40
 Loading...