

Page 1

User Guide
HUAWEI Ascend Q
Welcome to HUAWEI
Page 2

Contents
1 Reading Before Proceeding...................................................1
1.1 Safety Precautions.......... ............................................................. 1
1.2 Personal Information and Data Security ...................................... 2
1.3 Legal Notice ............................................................ ..................... 3
2 Getting Started.......................................................................6
2.1 Appearance.................................................................................6
2.2 Setting Up Your Mobile Phone .................................. .................. 7
2.3 Power On or Off Your Mobile Phone ........................................... 9
2.4 Using the Touchscreen.............................................................. 10
2.5 Locking and Unlocking the Screen............................................10
2.6 Home Screen.. ................................ ........................................... 11
2.7 Application Screen.......................... ........................................... 16
2.8 Using a microSD Card ............................................................... 17
3 Calling..................................................................................18
3.1 Making a Call............................................................................. 18
3.2 Answering or Rejecting a Call................................. ................... 19
3.3 Other Operations During a Call ................................................. 20
3.4 Using the Call log....................................................................... 21
3.5 Using Airplane Mode ................................................................. 21
3.6 TTY Operation .... ...................................................................... 21
4 Contacts...............................................................................22
4.1 Opening the Contacts Application ............................................. 22
4.2 Adding a Contact ....................................................................... 23
4.3 Adding a Contact to Your Favorites........................................... 23
4.4 Indexing Contacts......................................................................23
4.5 Searching for a Contact............................................................. 23
4.6 Editing a Contact .................................................................. ..... 24
4.7 Communicating with Your Contacts........................................... 24
i
Page 3

4.8 Deleting a Contact ..................................................................... 25
4.9 Streams ........................................................................ ............. 25
4.10 Managing Groups .................................................................... 26
4.11 Joining and Separating Contacts............................................. 27
4.12 Sending Contacts .................................................................... 28
5 Using the Onscreen Keyboard.............................................28
5.1 Displaying the Keyboard............................................................ 28
5.2 Customizing Keyboard Settings. ................................................ 30
6 Messaging...........................................................................31
6.1 SMS and MMS........................................................ ................... 31
6.2 Email. .............................................................. ........................... 33
7 Getting Connected...............................................................36
7.1 Mobile Networks ........................................................................ 36
7.2 Wi-Fi ....................................................................... ................... 36
7.3 WPS........................................................................................... 38
7.4 Browser................ ...................................................................... 39
7.5 Bluetooth............ ................................ ........................................ 40
8 Entertainment......................................................................42
8.1 Taking Photos and Recording Videos.......................................42
8.2 Using the Gallery ....................................................................... 44
8.3 DTS Envelo™................. ........................................................... 45
9 Google Services..................................................................46
9.1 Creating a Google Account.......................................... ..... .. . ... .. .46
9.2 Gmail .................................................................................... ..... 47
9.3 Talk...................... ... ................................................................... 48
9.4 Maps.......................................................................................... 49
9.5 YouTube .... ................................................................................ 50
9.6 Play Store .. ................................ ................................................ 51
10 Synchronizing Information.................................................51
ii
Page 4

10.1 Managing Your Accounts......................................................... 52
10.2 Customizing Your Account Synchronization............................ 53
11 Using Other Applications ...................................................54
11.1 Traffic Manager........................................................................54
11.2 All Backup................................................................................ 55
11.3 Calendar .................................................................................. 55
11.4 File Manager............................................................................ 57
11.5 Clock........................................................................................ 59
11.6 Calculator................................................................................. 60
11.7 Notepad................................................................................ ...61
12 Managing Your Mobile Phone ...........................................61
12.1 Setting the Date and Time.......................................................61
12.2 Setting the Display................................................................... 62
12.3 Setting Ringers ........................................................................ 62
12.4 Setting Phone Services...........................................................63
12.5 Configuring Text-to-Speech.....................................................64
12.6 Protecting Your Mobile Phone................................................. 64
12.7 Managing Applications............................................................. 65
12.8 Resetting Your Mobile Phone .................................................. 66
12.9 Setting Power saving mode ..................................................... 67
12.10 Online Update........................................................................ 67
13 Appendix............................................................................68
13.1 FAQ ......................................................................................... 68
iii
Page 5
1 Reading Before Proceeding
1.1 Safety Precautions
Please read the safety precautions carefully to ensure the correct use of your mobile
phone.
Do not crash, throw, or puncture your mobile phone. Avoid the
falling, squeezing, and bending of your mobile phone.
Do not use your mobile phone in a moist environment, such as the
bathroom. Prevent your mobile phone from being soaked or washed
in liquid.
Do not switch on your mobile phone when it is prohibited to use
phones or when the phone may cause interference or danger.
Do not use your mobile phone while driving.
Follow any rules or regulations in hosp itals and health c are facilities.
Switch off your mobile phone near medical apparatus.
Switch off your mobile phone in aircraft. The phone may cause
interference to control equipment of the aircraft.
Switch off your mobile phone near high-precision electronic devices.
The phone may affect the performance of these de vices.
Do not attempt to disassemble your mobile phone or its accessories.
Only qualified personnel are allowed to service or repair the phone.
1
Page 6
Do not place your mobile phone or its accessories in cont ainers with
a strong electromagnetic field.
Do not place magnetic storage media near your mobile phon e.
Radiation from the phone may erase the information stored on them.
Do not put your mobile phone in a high-tempe rature place or use it in
a place with flammable gas such as a gas station.
Keep your mobile phone and its accessorie s away from children. Do
not allow children to use your mobile phon e without guidance .
Use only approved batteries and chargers to avoid the risk of
explosions.
Observe any laws or regulations on the use of wireless devices.
Respect others’ privacy and legal rights when using your wireless
device.
Strictly follow the relevant instructions of this manual w hile using the
USB cable. Otherwise your mobile ph one or PC ma y be damaged.
1.2 Personal Information and Data Security
The use of some functions or third-party applications on your device co uld result in
your personal information and data being lost or becoming accessible to others.
Several measures are recommended to help you protect persona l and confidential
information.
• Place your device in a safe area to prevent it from unauthoriz ed use.
• Set your device screen to lock and create a pass word or unlock pattern to open it.
2
Page 7

• Periodically back up personal information kept on your memo ry card, or stored in
your device memory. If you change to a different device, be sure to mov e or delete
any personal information on your old device.
• If you are worried about viruses when you receive mess ages or emails from a
stranger, you can delete them without opening them.
• If you use your device to browse the Internet, avoid websites that might pose a
security risk to avoid theft of your personal informatio n.
• If you use services such as Wi-Fi tether or Bluetoot h, set passwords for these
services to prevent unauthorized access . When these services are not in use, turn
them off.
• Install or upgrade device security software and regularly scan for viruses.
• Be sure to obtain third-party applications from a legitimate source. Downloaded
third-party applications should be scanned for viruses .
• Install security software or patches released by Huawe i or third-party application
providers.
• Some applications require and transmit location information. As a result, a thirdparty may be able to share your location information.
• Your device may provide detection and diagnostic infor mation to third-party
application providers. Third party vendors use this informat ion to improve their
products and services.
• If you have concerns about the security of your pers onal information and data,
please contact mobile@huawei.com .
1.3 Legal Notice
Copyright © Huawei Technologies Co., Ltd. 2012. All rights reserved.
No part of this document may be reproduced or transmitted in any form or by any
means without prior written consent of Huawei Technologies Co., Lt d.
The product described in this manual may include copyrighted softw are of Huawei
Technologies Co., Ltd. and possible licensors. Customers sha ll not in any manner
reproduce, distribute, modify, deco mpile, disassemble, d ecrypt, extract, reverse
engineer, lease, assign, or sublicense the said software, unless such restrictions are
prohibited by applicable laws or such actions are approved by re spective copyright
holders.
3
Page 8

Trademarks and Permissions
, , and are trademarks or registered trademarks of Huawei
Technologies Co., Ltd.
Android is a trademark of Google Inc.
Other trademarks, product, service and company names mentioned are the property
of their respective owners.
Notice
Some features of the product and its accessories described herein re ly on the
software installed, capacities and settings of local network , and therefore may not be
activated or may be limited by local network operators or networ k service providers.
Thus the descriptions herein may not match exac tly the product or its accessories you
purchase.
Huawei Technologies Co., Ltd. reserves the right to change or modify any information
or specifications contained in this manual without prior notice and without any liability.
Third-Party Software Statement
Huawei Technologies Co., Ltd. does not own the intellectual property of the third-pa rty
software and applications that are delivered with this product. Therefore, Huaw ei
Technologies Co., Ltd. will not provide any warranty of any kind for these third-party
software and applications. Neither will Huawei Technologies Co., Ltd. provide support
to customers who use these third-party software and applications, nor be res ponsible
or liable for the functions of these third-party software and applicat ions.
Third-party software and applications services may be interrupted or terminated at
any time. Huawei Technologies Co., Ltd. does not guarantee that any content or
service would be maintained for any period during its availability. Third-party service
providers provide content and services through network or transmiss ion tools outside
of the control of Huawei Technologies Co., Ltd. To the greatest extent permitted by
applicable law, it is explicitly stated that Huawei Technologies Co., Ltd. shall not
compensate or be liable for services provided by third-party service providers, or the
interruption or termination of third-party contents or ser vices.
Huawei Technologies Co., Ltd. shall not be responsible for the legality , q uality, or any
other aspects of any software installed on this product, or for any uploaded or
downloaded third-party works, such as texts, images, videos, or softw are. Customers
shall bear the risk for any and all effects, including incompatibility between the
software and this product, which result from installing software or uploading or
downloading the third-party works.
4
Page 9

This product uses the open-source Android™ platform. Huawei Techno logies Co.,
Ltd. has made necessary changes to the platform. Therefore, this pr oduct may not
support all the functions that are supported by the standard And roid platform or may
be incompatible with third-party software. Huawei Tech nologies Co., Ltd. shall not be
liable for any of such situation.
DISCLAIMER OF WARRANTIES
THE CONTENTS OF THIS MANUAL ARE PROVIDED “AS IS”. EXCEPT AS
REQUIRED BY APPLICABLE LAWS, NO WARRANTIES OF ANY KIND, EITHER
EXPRESS OR IMPLIED, INCLUDING BUT NOT LIMITED TO, THE IMPLIED
WARRANTIES OF MERCHANTABILITY AND FITNESS FOR A PARTICULAR
PURPOSE, ARE MADE IN RELATION TO THE ACCURACY, RELIABILITY OR
CONTENTS OF THIS MANUAL.
LIMITATIONS OF LIABILITY
TO THE MAXIMUM EXTENT PERMITTED BY APPLICABLE LAW, IN NO EVENT
SHALL HUAWEI TECHNOLOGI ES CO., LTD. BE LIAB LE FOR ANY SPEC IAL,
INCIDENTAL, INDIRECT, OR CONS EQUENTIAL DAMAGES , OR LOST
PROFITS, BUSINESS, RE VENUE, DATA, GOODWILL OR ANTI CIPATED
SAVINGS.
THE MAXIMUM LIABILITY (THIS LIMITATION SHALL NOT APPLY TO LIABILITY
FOR PERSONAL INJURY TO THE EXTENT APPLICABLE LAW PROHIBITS
SUCH A LIMITATION) OF HUAWEI TECHNOLOGIES CO., LTD. ARISING FROM
THE USE OF THE PRODUCT DESCRIBED IN THIS DOCUMENT SHALL BE
LIMITED TO THE AMOUNT PAID BY CUSTOMERS FOR THE PURCHASE OF
THIS PRODUCT.
Import and Export Regulations
Customers shall comply with all applicable export or import laws and regulations and
be responsible to obtain all necessary governmenta l permits and licenses in order to
export, re-export or import the product mentioned in this manual including the
software and technical data therein.
5
Page 10
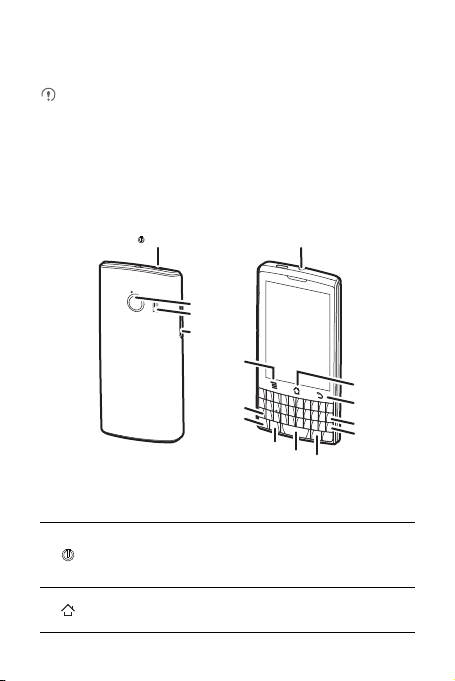
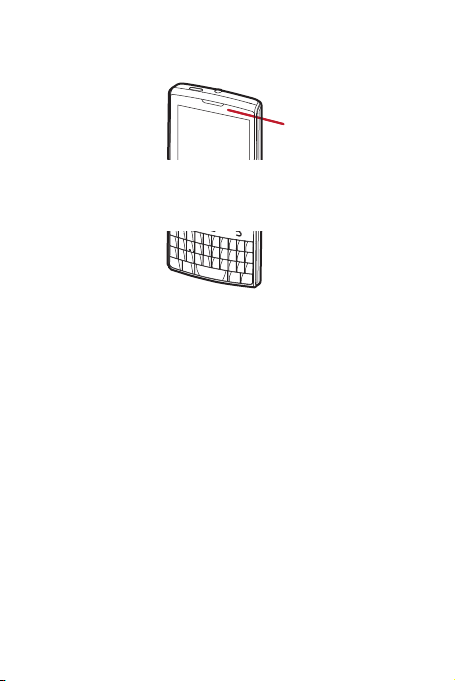
2 Getting Started
Power key
Back camera
Speaker
Volume keys
Headset jack
Home
Menu
Back
Delete
Enter
Alt
Cap
Smiley
Space
Symbol
All the pictures in this guide are for your reference only. Your phone’s actu al
display features may be different to those described here, depend ing on its
software version.
2.1 Appearance
2.1.1 Phone at a Glance
2.1.2 Key Functio ns at Your Fi ngerti ps
• Press and hold to power on your mobile phone.
• Press and hold to open the
• Press to lock the screen when your mobile phone is active.
• Touch to return to the Home screen.
• Touch and hold to open
6
Phone options
Recent
.
menu.
Page 11
Touch to open the menu on an acti ve screen.
• Touch to return to the previous screen.
• Touch to exit any application you are running.
• Touch to hide the keyboard.
2.2 Setting Up Your Mobile Phone
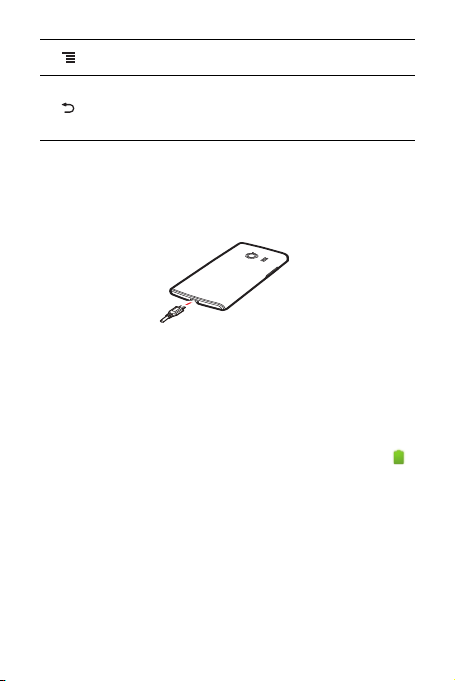
2.2.1 Charging the Battery
Before charging the battery, ensure that it has been pro perly installed on your phone.
1. Connect the USB cable that came with your mobile phone to the charger.
2. Connect the other end of the USB cable to your mobile phone. Then, to start
charging, plug the charger into an electrical outlet.
If you charge your mobile phone while it is powered on, the battery icon o n the
notification bar indicates the charging status. When the battery icon ch anges to ,
your mobile phone is fully charged.
7
Page 12
Status Indicator
The color of the status indicator tells you the status of your mobile phone ’s battery.
Status Indicator
Green: Fully charged (when connected to charger).
Orange: Charging in progress (when connected to charger).
Red: Battery low.
2.2.2 Important Informat ion About t he Battery
• If the battery has not been used for a long time, you may not be able to power on
your mobile phone immediately after you begin charging the battery. Allow th e
battery to charge for a few minutes with the phone powered off before attempting
to power the phone on.
• As it ages, the battery’s performance will degrade, in particular it will not hold charge
as it did when it was new. When the battery life becomes noticeably shorter tha n
usual after being charged properly, replace the battery with a new o ne of the same
type.
• Using data services increases the power consumption of t he phone and will
therefore reduce the length of time that the phone can be used between bat tery
charges.
• The time required to fully charge the battery depends on the ambient temperature
and the age of the battery.
• When the battery power is low, the phone will alert you and display a message.
When the battery power is almost exhausted, your phone will power off
automatically.
8
Page 13

2.2.3 Power Saving Tips
The longevity of battery power depends on the network to wh ich you connect, and
how you use your mobile phone.
Try the following to conserve battery power:
• When your mobile phone is not in use, turn o ff the screen ba cklight.
• Reduce the time it takes for your screen backlight to turn off when your phone is
idle.
• Lower the screen brightness.
• Turn off Bluetooth when you are not using it. Only make your phone visible to other
Bluetooth devices when you need to establish a Bluetooth con nection.
• Turn off Wi-Fi when you are not using it.
• Turn off your phone’s GPS receiver when you are not using it.
• Lower the volume.
• Close power-draining programs, when you do not need them.
• Turn off the data service.
2.3 Power On or Off Your Mobile Phone
2.3.1 Powering On Your Mobile Phone
Press . The first time you power on your phone, you will be asked to sign in to
your account and set up your mobile phone.
2.3.2 Setting Up Your Mobile Phone
The first time you power on your mobile phon e, the phone displays a setup wizard to
help you set up the phone.
The setup wizard helps you:
• Create or sign in to your account
• Make some initial decisions about how you want to use your mobile phone
2.3.3 Turning On Fast boot
1. Touch >
2. Select the
Settings
Fast boot
>
Applications
check box.
.
9
Page 14

Do not turn on
Fast boot
while on an airplane.
2.3.4 Powering Off Your Mobile Phone
1. Press and hold to open the
2. Touch
Power off
If
is disabled, touch OK to shut down the phone.
.
Fast boot
is enabled, the phone will enter the deep sleep mode. If
Phone options
menu.
Fast boot
2.4 Using the Touchscreen
2.4.1 Touchscreen Actions
•
Touch
: Tap the screen with your finger to select an item, confirm a selection, or
start an application.
•
Touch and hold
mobile phone responds. For example, to open the options menu for the active
screen, touch and hold the screen until the menu appears.
•
Flick
•
Drag
item to any part of the screen. You can drag an icon to mov e or delete it.
: Touch an item with your finger and do not release it until the
: Move your finger either vertically or horizontally across the s creen.
: Touch and hold the desired item with your finger. T o move an item, drag the
2.4.2 Rotating Your Mobile Phone Screen
The orientation of most screens will change to landscape or portrait view when you
rotate your phone sideways.
On the Home screen, touch >
to disable this function.
Settings
>
Display
>
Auto-rotate screen
2.5 Locking and Unlocking the Screen
2.5.1 Locking the Screen
• When your phone is on, press to lock the screen. When the screen is locked,
you can still receive messages and calls.
10
Page 15
• If your phone is idle for a while, the screen will lock automatically.
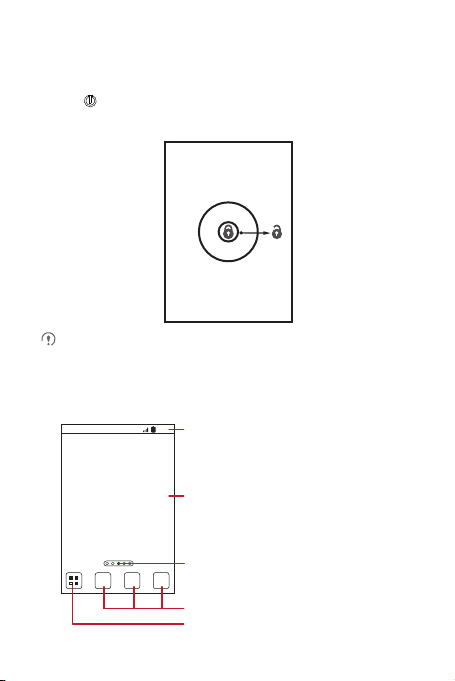
2.5.2 Unlocking the Screen
1. Press to wake up the screen .
2. Drag the lock icon from left to right to unlock the screen.
If you have set up a screen unlock pattern, you will be prompted to draw the
pattern on the screen to unlock it.
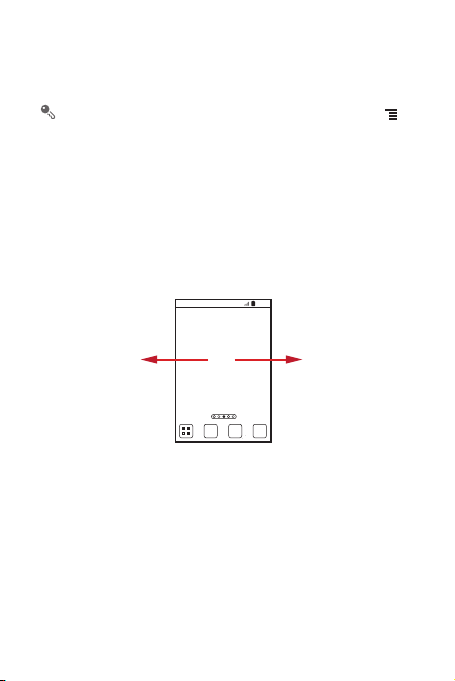
2.6 Home Screen
10:23
Notifications bar:
Displays the reminders and status icons of
your phone. Flick down to open the
notifications panel.
Display area:
Shows the operation and display areas of
your phone.
Indicates the current screen.
Shortcuts
Touch to view all your applications.
11
Page 16
Touch and hold a shortcut until the mobile phone vibrates, you can then drag it
to your desired location or move it to the trash. You can also drag a n icon from
another area of the screen to the shortcut position.
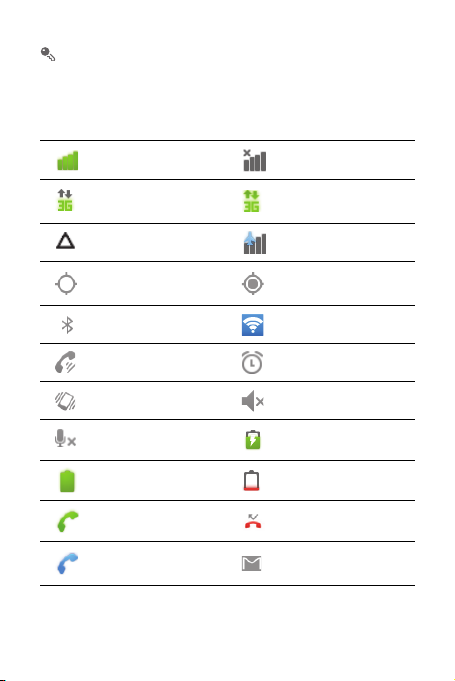
2.6.1 Notifi cation and S tatus Ico ns
Signal strength No signal
Connected to 3G mobile
network
Roaming Airplane mode
GPS on
Bluetooth on Portable Wi-Fi hotspot on
Speakerphone on Alarm enabled
Vibration mode Ringe r silenced
Call muted Charging battery
Battery full Battery exetremely low
Call in progress Missed call
3G in use
Receiving locati on data
from GPS
Call in progress with a
Bluetooth headset used
New mail from Gmail
12
Page 17
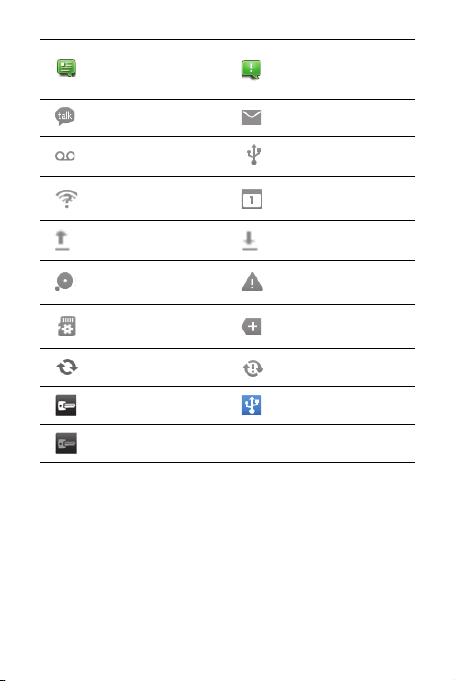
New text or multimedia
message
New chat message New email
New voicemail Connected to a PC
Problem with text or
multimedia message
delivery
Open Wi-Fi network
available
Uploading Downloading
Memory full
Preparing the mircoSD
card
Synchronizing data Synchronization failed
Connected to a VPN USB tethering on
Disconnected from a VPN
Upcoming event
Sign-in or synchronization
problem
More undisplayed
notifications
2.6.2 Notifi cation Pane l
Your mobile phone will notify you when you receive a new message or there is an
upcoming event. The notification panel also informs you of alarms and settings, for
example, you will be notified when
panel to see your network operator or to view a message, re minder, or event
notification.
Call forwarding
is activated. Open the notification
13
Page 18
Opening the Notification Panel
1. When a new notification icon appears on the notification bar, place your finger on
the notification bar and flick down to open the notification pa nel.
You can also open the notification panel from the Home screen: Touch >
Notifications
to open the panel.
2. On the panel, you can:
• Touch a notification to open the r elated application.
• Touch
Clear
to clear all notifications.
Closing the Notification Panel
Touch and hold the bottom of the panel. Then flick up to close it.
2.6.3 Viewing Other Parts of the Home Screen
10:23
Flick your finger left or
right across the Home
screen.
14
Page 19
2.6.4 Customizing the Home Screen
Adding a New Home Screen Item
1. Touch and hold a blank area on the Home screen until the
menu is displayed.
You can also touch >
home screen
menu.
Add
on the Home screen to display the
Add to home screen
Add to
2. Select an item to add it to the Home screen.
Moving a Home Screen Item
1. Touch and hold an item on the Home screen until the item expands in size and the
mobile phone vibrates.
2. Without lifting your finger, drag the item to the desired position on the screen, and
then release it.
Removing a Home Screen Item
1. Touch and hold an item on the Home screen until the item expands and the mobile
phone vibrates.
2. Without lifting your finger, drag the item to the trash can. When the item and the
trash can turn red, the item is ready to be removed.
3. Release the item to remove it from the Home screen.
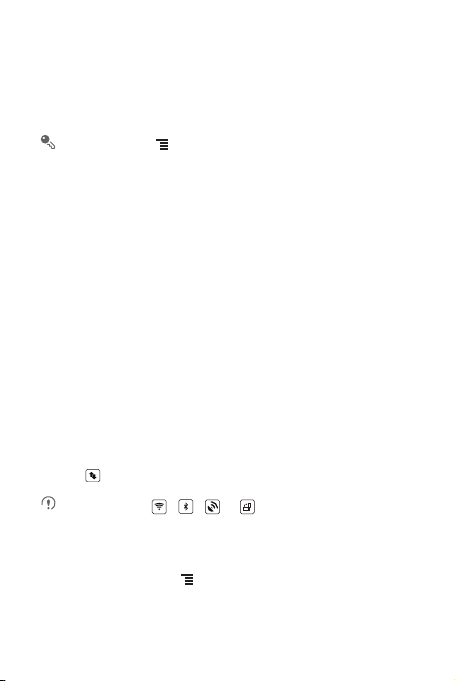
2.6.5 Service Sho rtcut s
1. Open the notification bar.
2. Touch at the top of the screen to switch data services on or off.
You can also touch , , or turn the correspond ing services on
or off.
2.6.6 Setting a Home Screen Animation
1. On the Home screen, touch >
2. Select an animation, and then touch
Home settings
Save
.
>
Animation
.
15
Page 20

2.6.7 Changing the Wallpaper
1. On the Home screen, touch >
2. Touch the following menu items to select a picture and set it as the wallpaper:
•
Gallery
•
Live wallpapers
•
Wallpapers
Wallpaper
.
2.6.8 Changing the Theme
1. On the Home screen, touch >
2. Do any of the following:
• Touch
Theme
• Touch
3. Touch
to select a theme.
Application icons
Save
.
Home settings
to select a series of application icons.
.
2.7 Application Screen
The Application screen holds icons for all of the applications on your phone. You can
touch on the Home screen to open the application screen.
2.7.1 Moving Icons on the Appli cation S creen
1. On the application screen, touch .
2. Touch and hold the icon you want to move on the application screen.
3. Without lifting your finger, drag the icon to the desired location, and then release it.
To move more icons, repeat steps 2 and 3.
4. Touch or to save.
16
Page 21
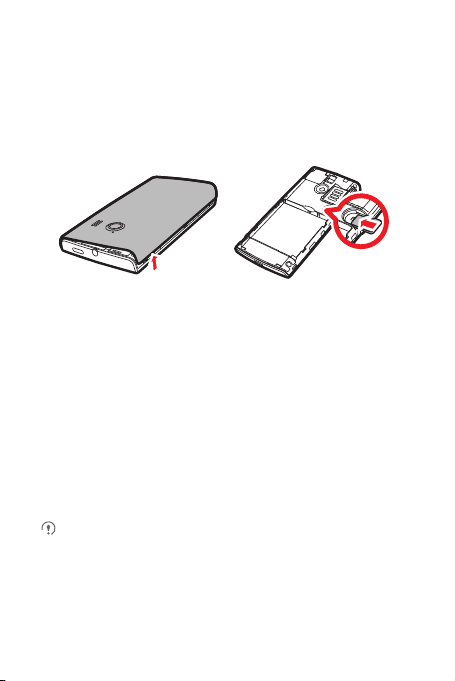
2.8 Using a microSD Card
2.8.1 (Optional) Install ing the micr oSD Card
Your mobile phone is already equipped with a large-volume built-in embedded
MultiMediaCard (eMMC). If you want to expand your phone memory, you ca n also
insert a microSD card
1. Remove the battery cover.
2. Insert the microSD card into the card slot as shown in the diagram.
2.8.2 Using the microSD Card as a USB Mass Storage
To transfer all your favorite music and pictures from your PC to your mob ile phone’s
microSD card, set the microSD card as a USB mass storage.
1. Connect your mobile phone to your PC with the USB cable provided. Your PC will
detect the microSD card as a removable storage device.
2. Open the notification bar, and then touch
3. Touch
Turn on USB storage
to transfer files.
You can now transfer files from your PC to your mobile phone’s micr oSD card.
When your microSD card acts as a USB mass storage, your mobile phone will
not use this memory space. Ensure that you follow the correct procedures to
disconnect the USB mass storage device (your mobile phone) from the PC
when you have finished transferring files.
USB connected
in the dialog box that opens to confirm that you want
.
17
Page 22

2.8.3 Removing the microSD Card
1. On the Home screen, touch >
2. Scroll down the screen, and then touch
3. Carefully remove the microSD card.
Settings
Storage
.
>
Unmount SD card
.
3 Calling
To make a phone call, you can dial a number using the keypad or touch a number
saved in your contact list, on a webpage, or in a document. When you are in a call,
you can answer other incoming calls or re direct them to your voicem ail. You can also
set up conference calls with several participants.
3.1 Making a Call
To make a call, you can use the
or
Call log
.
When you are in a call, you can touch to use other functions. To return to the call
screen, flick the notification bar down and touch
Be careful not to block the microphone at the bottom of your phone if you want
your voice heard by the other parties in a call.
3.1.1 Making a Call wi th the Dial er Applic ation
1. On the Home screen, touch >
If you are already working with
2. Touch the appropriate number keys to enter the phone number.
Your mobile phone supports the SmartDial function, that is, when you to uch
numbers on the dialer, the phone automatically searc hes among your contacts
and lists the matching results ordered a ccording to the accuracy of the match. If
no contacts match the information entered, the phone will n ot display any result.
3. Touch to initiate the call.
During a call, touch
Dialer
application, or select a number from
Current call
Dialer
to display the dialer.
Contacts
or
Call log
Dialpad
to enter other numbers on the dia lpad.
.
, touch the
Dialer
Contacts
tab.
18
Page 23

3.1.2 Making a Call f rom Contact s
1. On the Home screen, touch >
If you are already working with
2. In the list, touch the contact you want to call.
3. Touch to dial the phone number.
Contacts
Dialer
or
Call log
to display the contact list.
, touch the
Contacts
3.1.3 Making a Call f rom Call l og
1. If you are already working with
2. Touch to the right of the log entry to d ial.
If you touch and hold a log entry, the options menu will open.
Contacts
or
Dialer
, touch the
Call log
tab.
3.2 Answering or Rejecting a Call
3.2.1 Answering an Incoming Call
When you receive a phone call, the incoming call screen opens. If you have
previously saved the caller’s number in
displayed. If the caller’s number is not saved in
displayed.
Drag to the right to answer the call.
3.2.2 Ending a Call
During a call, touch
End
to hang up.
Contacts
, the caller's name and number are
Contacts
the caller’s number is
tab.
19
Page 24
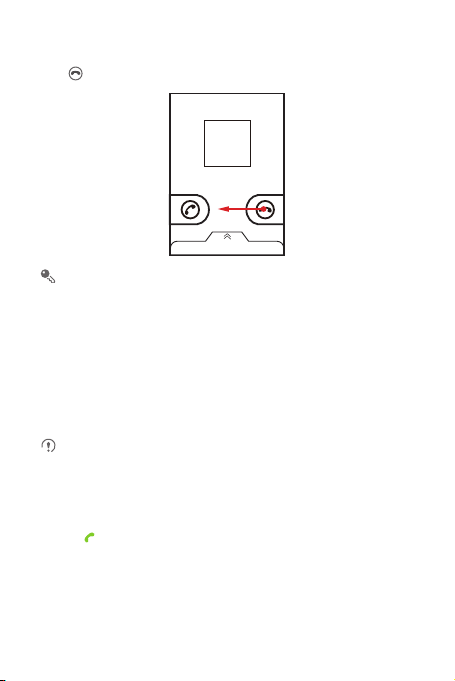
3.2.3 Rejecting an Incoming Call
Drag to the left to rej ect the call.
You can also drag up the bar at the bottom of the scre en to reject a call and send
the caller a message.
3.3 Other Operations During a Call
3.3.1 Making a Conference Call
If you receive a new call while you are already on a call, you can connec t the second
call to the call you are on. This feature is known as conference calling. You can also
set up a conference call with multiple callers.
Contact your network operator to lear n if conferen ce calls are s upported and, if
yes, how many can participate.
1. To initiate a conference call, dial the number of the first participant. After you have
connected to the first participant, keep the connect ion open, touch
2. Enter the phone number of the next person you want to join the conversation and
touch , or select someone from your
is automatically placed on hold while you do this.
3. Once you have connected to the second person, touch
conference call.
4. To end the conference call and disconnect everyone, touch
Call log
or
Contacts
. The first participant
Merge calls
End
.
Add call
to begin the
.
20
Page 25

3.3.2 Switchin g Between Calls
If you receive a new call while you are already in a call, you can switch between the
two calls.
1. While you are in the first call and the second c all comes in, answer the incoming
call, and then touch
2. The current call is placed on hold and you are connected to the first call.
Manage calls
.
3.4 Using the Call log
The
Call log
contains a list of calls that you have dialed, received, and missed. You
can use the call log to find a recently called number quickly or a dd a number from the
call log to your contact list.
3.4.1 Adding an Entry to Contacts
1. If you are already working with
2. Touch and hold the entry you want to add to your
3. Touch
Add to contact
4. Touch
Create contact
contact name.
Dialer
or
Contacts
, touch the
Call log
in the options menu.
Contacts
or scroll through the contact list and touch an existing
tab.
.
3.5 Using Airplane Mode
Some locations may require you to turn off your pho ne’s wireless connections. Rather
than powering off your phone, you can place it in
1. Press and hold .
2. Touch
Airplane mode
in the options menu.
Airplane mode
.
3.6 TTY Operation
3.6.1 Using the TTY Device
The Teletypewriter (TTY) is a typewriting device. By connecting the phone t o the TTY
device, you can use the TTY functions to send/receive messages. Wh en you use the
TTY function, do as fol lows:
21
Page 26

1. Connect the TTY device to the headset jack of the phone and set the phone to the
TTY mode.
2. Make or answer calls as normal.
3. When the call is put through, use the TTY device to send or receive the letters.
4. Press the
End
to end the call.
3.6.2 Setting t he TTY Mode
1. Touch >
2. Select one TTY mode.
Settings
>
Call settings
•
TTY Off
: The standard voice speaking mode and the listening mode.
•
TTY Full
: Transmit and receive the TTY characters .
•
TTY HCO
: Transmit TTY characters but receive by listening to the earpiece.
•
TTY VCO
: Receive TTY characters but transmit by speaking into the
microphone.
>
TTY mode
.
4 Contacts
The
Contacts
phone numbers and addresses of your contacts. After you sav e contact information
on your mobile phone, you have easy access to the people with whom you want to
communicate.
4.1 Opening the Contacts Application
If you have not yet added any contacts to your mobile phone,
message with hints on how to start addin g contacts information. On the Home scre en,
touch
On the Home screen, touch >
All of your contacts are displayed alphabetically in a list that you can scroll through.
application enables you to save and manage information such as
Contacts
to open the
Contacts
application.
Contacts
to open the
Contacts
Contacts
application.
displays a
22
Page 27

4.2 Adding a Contact
1. In the contact list, touch >
2. If you have more than one account with contacts, touch the account to which you
want to add the contact.
3. Enter the contact's name, and then add detailed information such as phone
number and address.
4. When you are finished, touch
Create contact
Save
.
to save the contact information.
4.3 Adding a Contact to Your Favorites
• Touch and hold the contact you want to add to
Favorites
.
• Touch a contact, and then touch the star to the right of the contact’ s name. The star
turns gold.
Favorites
. Then touch
Add to
4.4 Indexing Contacts
You can index your
1. On the Home screen, touch >
2. Touch or move any letter in the alphabet to list all contacts starting with the letter.
Contacts
to quickly find your desired contact.
Contacts
.
4.5 Searching for a Contact
1. In the contact list, touch >
2. Enter the name of the contact you wish to search for. As you type, contacts with
matching names appear below the search box.
On the contact list screen, you can touch a letter on the right to display contac ts
starting with the touched letter.
Search
.
23
Page 28

4.6 Editing a Contact
You can make changes to the information you have stored for a co ntact at any time.
1. In the contacts list, touch and hold the contact whose details you want to edit, and
then touch
Edit contact
2. Touch the category of contact information you wish to change: name, phone
number, email address, or any other information you recorded ea rlier.
3. Make the desired changes to the contact information, and then touch
cancel all of your changes, touch
in the options menu.
Cancel
.
Save
. To
4.7 Communicating with Your Contacts
From the
Contacts
or
Favorites
multimedia (MMS) message to a contact’s default phone number. You can also open
details to view a list of all the ways you can communicate with that contact. This
section describes how to communicate with a contact when you view your contacts
list.
4.7.1 Using Quick Contact for Androi d
1. Touch the contact's picture or picture frame (if you have not assigned a picture to
the contact) to open Quick Contact for Android.
2. Touch the icon for the way you want to communicate with the contact.
The icons available depend on the information you have entered for the contact,
the applications installed on your phone, and the accounts you have.
4.7.2 Communicating with a Contact
1. In the contacts list, touch the contact that you want to communicate with.
2. On the contact’s details screen, touch the icon to the right of the number to call or
send messages.
tab, you can quickly call or send a text (SMS) or
24
Page 29

4.8 Deleting a Contact
1. In the contacts list, touch and hold the contact that you want to delete, and then
touch
Delete contact
2. Touch OK to confirm that you want to de lete the contact.
in the options menu.
4.9 Streams
Streams is a client that integrates social networking ser vice (SNS) functions of
Facebook and Twitter. Using Streams, your SNS accounts can be closely linked wit h
Contacts.
To access the Streams screen, touch >
Contacts
, and then flick left to switch to the Streams screen.
4.9.1 Logging in to an Account
1. The first time you access Streams, touch
2. Select the type of account that you want to log in to. Then follow the on-screen
setup instructions to complete login.
You can log in to different types of accounts at the same time. To add an account of
another type, touch >
Accounts
4.9.2 Importing Friends
After login, the phone asks you whether to import all friends. If you choose to import
friends, Streams will import the SNS accounts of all your friends to your phone. If not,
you can import your friends' accounts in Set tings later.
After friends are imported, the group of imported accounts is auto matically added to
the groups of
Contacts
.
4.9.3 Preferenc e Setting s
You can configure account settings, such as refresh mode, refr esh frequency, and
notifications.
1. On the Streams screen, touch >
configured.
Streams
Login to Social Network
>
Add account
Accounts
.
. Then touch the account to be
. You can also touch
.
25
Page 30

2. On the account screen, touch
settings.
Social Preference Settings
to configure the
4.9.4 Adding the Streams Widget to the Home Screen
Touch and hold the blank area of the Home screen. In the displayed menu, touch
Add widget
>
Streams
Using the widget, you can quick ly access Streams, or directly br owse the latest events
and update the status of your friends on the Home screen.
to add Streams to the Home screen.
4.10 Managing Groups
4.10.1 Creating a Group
1. On the Home screen, touch >
touch
Groups
.
2. In the groups list, touch , and then touch
3. Enter the name and picture you want to assign to the group, and then set a
ringtone for it.
4. Touch >
5. Select the contacts to be added to the group, and then touch OK.
6. When you are finished, touch
Add Members
4.10.2 Editing a Group
You can always make changes to the information you have sav ed for a group.
1. In the groups list, touch and hold the group whose details you want to edit, and then
touch
Edit group
2. Make the desired changes to the group information, and then touch
cancel all changes you made to the group information, touch
in the options menu.
4.10.3 Adding a Contact to Your Groups
To add a contact to your groups, you can do any of the following:
• Touch and hold the contact you want to add to
groups
.
Contacts
. Then flick the tab bar to the left and
Create group
to add members to the group.
Save
to save the group information.
Groups
. Then touch
.
Cancel
Save
.
Add to
. To
26
Page 31

• When editing a group, touch , and then touch
contacts you want to add to group.
Add Members
to select the
4.11 Joining and Separating Contacts
You may have duplicate contacts if you import contacts by:
• Adding an account, such as a Gmail account.
• Using the social networking services such as Face book or Twitter. (If your phone
has the Streams function, you can use it to access Facebo ok or Twitter.)
• Using other methods, such as exchanging emails.
To avoid duplication, join two or more contacts together to form a single contact.
Availability of Facebook or Twitter may vary depending on your country or
carrier. Please use them according to local laws and regulations.
4.11.1 Joining Contacts
1. On the Home screen, touch >
2. Touch a duplicated contact.
3. Touch
Joined Contacts
4. Select the contact to be joined to combine two duplicate contacts.
Two contacts will be joined together and displayed as one co ntact. Touch the contact
to view the joined information. You can see that the contact is joined together by two
contacts. You can also combine more than two contacts.
4.11.2 Separat ing Conta cts
If contact information from different sources was joined together in error, you can
separate the contacts.
1. On the Home screen, touch >
2. Touch the joint contact to be separated.
3. Touch the option for separating a contact.
4. Select the contact to be separated from the joint contact.
The joint contact is then separated into two contacts displayed separa tely in
Contacts
.
Contacts
, and then touch
Contacts
.
Add contact
.
.
27
Page 32

4.12 Sending Contacts
You can send contacts as a .vcf file via Bluetooth or Email.
1. In the contacts list, touch .
2. Select contacts that you want to send.
3. Touch
Send
4. Select the way you prefer to send the contacts you have selected, for example
.
Bluetooth or Email.
You can send one contact by another way. Touch and hold a contact, touch
Send contact
, and then select the way you prefer to send.
5 Using the Onscreen Keyboard
5.1 Displaying the Keyboard
To enter text, use the onscreen keyboard. Some applications open the keyboard
automatically. In others, touch a text field to open the keyboard.
Touch to hide the keyboard.
Touch and hold a text field to open the
5.1.1 Choosing an Input Method
1. Touch and hold a text field until the
2. Touch
Select Input method
3. Select the input method.
The keyboard panel will be displayed automatically.
Edit text
menu.
Edit text
.
menu is displayed.
28
Page 33

5.1.2 Using the Android Key board
q w e r t y u i o p
a s d f g h j k
z x c v b n m
.
?123
l
Touch once to capitalize the next letter you type.
Touch twice to capitalize all letters to be entered.
Touch to change from the text mode to the symbol/number mode.
Touch to enter text by voice.
Touch to insert a space.
Touch to delete a character
to the left of the cursor.
Touch and hold to delete all
characters to the left of the
cursor.
......
:-)
...
On the Home screen, touch >
Android keyboard
>
Voice input
Settings
>
Language & keyboard
to turn on or turn off voice input.
5.1.3 Using the Landscape Keyboard
If you find the keyboard inconvenient or difficult to use, turn your mobile phone
sideways. The screen will display the keyboard in landscape orientation, providing
you with a wider keyboard layout.
>
29
Page 34

5.1.4 Using the Landscape Keyboard
Cursor:
Cursor:
Cursor:
Cursor:
To enter an upper character of on e key,
press first and then the desired key.
To enter only upper characters, press
twice before typing. Press again to
switch back to lower-case letters.
To enter one upper-case letter, press
first and then a key.
To enter only upper-case letters, press
twice before typing. Press again to input
lower-case letters.
Press to display all expressions.
Press to display all symbols.
5.2 Customizing Keyboard Settings
1. On the Home screen, touch >
2. In
Keyboard settings
30
Settings
>
, select an input method to customize the keyboard settings.
Language & keyboard
aA
.
Page 35

6 Messaging
The
Messaging
multimedia messages (MMS) with anyone using an SMS-or-MMS-capable phone.
With the
6.1 SMS and MMS
6.1.1 Opening Messaging
Touch >
6.1.2 Creati ng and Se nding a T ext Messag e
1. Touch >
2. Enter a phone number or a contact's name in the To field, or touch to select a
contact from
3. Touch the composition text box to start entering your message.
4. When you are ready to send the message, touch .
Sent and received messages will be displayed in a message thread, grou ping
together the messages in a conversation.
application allows you to exchange text messages (SMS) and
Email
application you can read and send emails.
Messaging
.
Messaging
>
New message
Contacts
or
As you enter the phone number or the contact's name, the phone displays
possible matches from your contacts. Select a contact from the list of poss ible
matches or continue entering.
After you select a contact or finish entering a numb er, add a comma and you can
enter another recipient. You can also touch a previously entered c ontact again
to edit or delete it.
While writing a message, you can touch >
information.
Groups
.
.
Add
>
Contact
to insert contact
31
Page 36

6.1.3 Creati ng and Se nding a Mu ltimed ia Message
1. Touch >
2. Enter a phone number in the To field, or touch to select a contact from
Contacts
3. Touch the composition text box to start entering your message.
4. Touch to display the options pa nel.Touch
subject. Your mobile phone is now in multimedia message mode.
5. When the message is ready to be sent, touch .
Adding a Slideshow
If you want to attach more than one file to your message, use the
1. On the message editing screen, touch to display the options panel.
2. Touch
3. Touch and then touch
4. Touch
message screen.
5. To alter your multimedia message, touch the slideshow on the multimedia
message screen. When the message is ready to be sent, touch .
Messaging
>
New message
or
Groups
.
On the message editing screen, you can also t ouch , and then selec t your
desired files to add.
You can direct select a multimedia file (audios, videos, or pictures) and send it
via MMS: Touch
and then select
File Manager
Share
>
Messaging
.
Add subject
to add the message
, touch and hold the multimedia file to be s ent,
.
Slideshow
Add
>
Slideshow
, and then select a slide to start editing it.
More
>
Add slide
Done
to finish composing your message and return to the multimedia
to add more slides.
6.1.4 Opening and Viewing a Multimedia Message
1. In the message list, touch the message thread you wish to view.
2. Touch the multimedia message to view the message.
option.
32
Page 37

6.1.5 Replying t o a Message
1. In the message list, touch a text or multimedia message thread to open it.
2. Touch the text box to compose your message. Once finished, touch .
You can also do the following to reply to a message: Touch >
select one or more message threads, and touch
Reply
Multiselect
.
6.1.6 Copying a Text Message to Notepad or Calendar
1. In the message list, touch a text message thread to open it.
2. Touch and hold one of the messages, and then touch
3. Touch
Notepad
or
Calendar
For information about how to use
this guide.
to save it as a note or an event.
Notepad
or
Copy message to
Calendar
, see the relevant sections of
.
6.1.7 Customizing Message Settings
In the message list, touch , and then touch
settings.
Settings
to customize the message
6.2 Email
Your mobile phone also puts email at your fingertips. With your phone’s
application, you can use your email account with Yahoo!, A OL, or other popular email
services on your phone.
6.2.1 Adding an Email Account
When using the
account. The Email setup wizard helps you to configure your account . A number of
popular email systems are supported. You can work with the same email ser vice that
you use on your PC or you can select another email s ervice.
1. On the Home screen, touch >
2. To customize your email settings, follow the onscreen instructions, and then touch
Next
Email
application for the first time, you must configure an email
Email
.
.
Email
,
33
Page 38

3. Enter the account name and the name you want other people to see when they
receive an email from you.
4. Touch
Done
.
Adding Other Email Accounts
1. After creating your initial email account, touch on the
touch
More
>
Accounts
to access the accounts screen.
2. Touch on the accounts screen , and then touch
another email account.
When adding an additional email account, you have the option to use the new
account to send all outgoing messages.
Inbox
Add account
screen, and then
to create
6.2.2 Viewing an Email Message
1. On the accounts screen, touch the email account you want to use.
2. Access a folder, and then touch the message that you want to view.
6.2.3 Saving an Emai l Attachme nt
1. On the accounts screen, touch the email account you want to use.
2. Touch the email message you want to view.
3. Touch
Save
4. Select a path for saving the attachment and touch
next to the attachment in the email.
Save
.
6.2.4 Creating an d Sending an E mail Message
1. On the accounts screen, touch the email account you want to use.
2. On the
Inbox
3. In the To field, enter the recipients’ name or email address.
4. Enter the subject of your message and compose the message.
5. When you are finished, touch
screen, touch , and then touch
To send an attachment with the message, touch , and then touch
attachment
.
If you are not ready to send the me ssage, touch
save the message as a draft.
Send
.
34
Compose
Save as draft
in the options panel.
Add
or touch to
Page 39

6.2.5 Replying t o an Email Mes sage
1. On the accounts screen, touch the email account you want to use.
2. Touch the email message to which you want to reply.
3. Touch
Reply
or
Reply all
to reply to the email message.
6.2.6 Deleting an Email Acc ount
1. On the accounts screen, touch and hold the email account you want to delete.
2. Touch
Remove account
3. Touch OK.
.
6.2.7 Changing Email Account Settings
You can change a number of account settings, including how o ften you check for
emails, how you are notified of a new mail, and det ails about the servers the ac count
uses to send and receive mails.
Your account’s incoming and outgoing settings depend on the kind of email
service you are using. You can enter the necessary details manually , although
you may need to contact your email service provider to obtain the correc t
information.
1. Touch >
2. On the accounts screen, touch and hold the email account you want to change.
3. Touch
4. Change
Email
.
Account settings
General settings, Notification settings
.
, or
Server settings
.
35
Page 40

7 Getting Connected
7.1 Mobile Networks
Your mobile phone will be automatically configured to use your network operator’s
2G/3G service (if available) when you turn on t he phone for the first time. Note th at the
SIM/UIM card must be inserted (some CDMA m obile phones have an integrated UIM
card and do not need a separate UIM card)
7.1.1 Checking the Network Connection
1. Touch >
2. Touch
3. Touch
connection.
7.1.2 Turning on the Data Service
1. Touch >
2. Touch
3. Select the
7.2 Wi-Fi
Wi-Fi gives you wireless access to broadband Internet. To use W i-Fi on your mobile
phone, you must have an access to wireless a ccess points (hotspots). Obstacles tha t
block the Wi-Fi signal will reduce its strength.
7.2.1 Turning On Wi-Fi
1. Touch >
2. Touch
Settings
Settings
Data enabled
Settings
.
>
Mobile networks
.
>
Mobile networks
check box to turn on the data connection.
.
, and then select the
.
to check the network
.
Wi-Fi
check box to turn on Wi-Fi.
Wireless & networks
Network Settings > Access Point Names
Your mobile phone will automatically read the access point settings from the
SIM/UIM card (if any). For this re ason, do not change the acc ess point
parameters; otherwise, you might not be able to access network resources .
Wireless & networks
Wireless & networks
36
Page 41

7.2.2 Connecting to a Wireless Network
1. After turning on Wi-Fi, touch >
2. Touch
Wireless & networks
networks in the
Wi-Fi networks
3. Touch a Wi-Fi network to connect to it.
• If you select an open network, you will be automatically connected to the
network.
• If you select a network that is secured with Wired Equivalent Privacy (WEP)
and connect to it for the first time, enter the password as pro mpted, and then
touch
Connect
already used, you will not be prompted to enter the password again unless you
have reset your mobile phone to its default settings.
On the
network.
. If you connect to a secured wireless network that you have
Wi-Fi settings
Settings
>
Wi-Fi settings
section.
screen, touch
.
. You will see a list of detected Wi-Fi
Add Wi-Fi network
to add a new Wi-Fi
7.2.3 Sharing Your Phone’s Data Connection as a Portable Wi-Fi Hotspot
1. Touch
2. Touch
3. Select the
> Settings
.
Wireless & networks > Tethering & portable hotspot
Portable Wi-Fi h otspot
When
Portable Wi-Fi hotspot
hotspot settings
to change its network name or secure it.
check box to share your data connection.
is selected, you can touch
.
Portable Wi- Fi
7.2.4 Sharing Your Phone’s Data Connection via USB
To use USB tethering in different operating systems, you may need t o prepare your
computer to establish a network connection via USB.
You cannot share your mobile phone’s data connection and ac cess its microSD
card via USB at the same time.
1. Touch
2. Touch
3. Select the
> Settings
.
Wireless & networks > Tethering & portable hotspot
USB tethering
check box to share your data connection.
.
37
Page 42

7.3 WPS
The Wi-Fi Protected Setup (WPS) function simplifies the operations to set up Wi- Fi
networks and configure network security settings.
When connecting to a Wi-Fi network via WPS, ensure that the Wi-Fi access
point to be connected supports the WPS function.
7.3.1 Connecting to a Wireless Network via the WPS Button
1. Turn on Wi-Fi, and then access the
2. Touch
WPS button connection
3. Press the WPS button of the Wi-Fi access point. When your phone connects to the
network, it displays a message.
7.3.2 Connecting to a Wireless Network via the WPS PIN
1. Turn on Wi-Fi, and then access the
2. In the
Wi-Fi networks
Then select
WPS PIN connection
PIN of the selected Wi-Fi access point.
3. Enter the PIN on the Wi-Fi access point. When your phone connects to the
network, it displays a message.
To add a new Wi-Fi network, touch
enter the Service Set Identifier (SSID) of the network.
Wi-Fi settings
.
Wi-Fi settings
section, press and hold the Wi-Fi network to be connected .
in the options menu. Your phone displays the
screen.
screen.
Add Wi-Fi network
on the screen, and then
38
Page 43

7.4 Browser
Your mobile phone comes with an Internet browser pre-installed.
7.4.1 Opening the Browser
Touch >
Touch to open the browser options menu and perform one of the following
operations:
•
•
•
•
•
•
7.4.2 Opening a Webpage
1. In a browser window, touch the URL field at the top of the screen.
2. Use the keyboard to enter a webpage address. You can touch to enter th e
3. As you enter the address, matching webpage addresses will appear on the screen.
Browser
to open the home page.
When known or open Wi-Fi networks and mobile data netw orks are available at
the same time, your phone will preferably select a Wi-Fi network for Internet
access.
New window
Bookmarks
Windows
another browser window or open a new one on this s creen.
Refresh
Forward
More
selecting text, downloading, or setting options.
web page address by voice.
If you see the address you want, touch it and go directly to that webpa ge or
complete entering your desired webpage.
: Touch to open a new window.
: Touch to display bookmarks.
: Touch to view thumbnails of open browser windows. You can switch to
: Touch to refresh the current webpage.
: Touch to browse the next web page.
: Touch to open other menus and perform operations such as searching,
39
Page 44

7.4.3 Setting a Home Page
1. In a browser window, touch .
2. Touch
More
>
Settings
>
3. Enter the address of the desired home page, and then touch OK.
Set home page
.
7.4.4 Managing Bookmarks
You can store as many bookmarks as you want on your mobile phone.
Adding a Bookmark
1. In a browser window, go to the webpage you want to save as a bookmark.
2. Touch , and then touch
3. Edit the bookmark name and then touch OK.
Opening a Bookmark
1. In a browser window, touch , and then touch
On the
Bookmarks
visited, or touch the
frequently.
2. Touch the bookmark of the website you want to open.
Bookmarks
>
Add
.
Bookmarks
screen, touch the
Most visited
History
tab to view the pages you have visited most
tab to view the pages you have
.
7.4.5 Customizing Browser Settings
Customize the browser to suit your browsing sty le. Use
privacy, and security preferences. In the browser w indow, touch , and then touch
More
>
Settings
.
Browser
to set page content,
7.5 Bluetooth
Your mobile phone has Bluetooth, which allows you to create a wirele ss connection
with other Bluetooth devices so you can share files with your friends, talk hands-free
with a Bluetooth headset, or even transfer photos from your phone to your PC.
If you are using Bluetooth, remember to stay within 10 meters (33 feet) of the other
Bluetooth devices to which you want to connect. Be aware that obstacles like walls or
other electronic equipment may interfere with your Bluetooth connec tion.
40
Page 45

7.5.1 Turning On Bluetooth
1. Touch >
2. Touch
Bluetooth. When Bluetooth is turned on, the Bluetooth ico n appears in the
notification bar.
3. Touch
mobile phone visible to other Bluetooth devices.
Settings
Wireless & networks
Bluetooth settings
.
, and then select the
, and then select the
Bluetooth
Discoverable
check box to turn on
to make your
7.5.2 Pairing wit h and Connecti ng to a Bluet ooth Device
Your mobile Bluetooth lets you do the following:
• Hands Free Profile (HFP): allows you to use a hand s-free Bluetooth device.
• Headset Profile (HSP): allows you to use a mono Bluetoot h headset.
• Object Push Profile (OPP): allows you to transfe r files over a Bluetooth connection.
• Advanced Audio Distribution Profile (A2DP): allows yo u to use a stereo Bluetooth
headset.
• A/V Remote Control Profile (AVRCP): allows you to control aud io playing using a
Bluetooth headset remotely.
Before you use Bluetooth, pair your mobile phone with another Bluet ooth device as
follows:
1. Ensure that the Bluetooth function on your mobile phone is enabled.
2. On the Home screen, touch >
settings
. Your mobile phone will then scan for Bluetooth devices in range.
3. Touch the device you want to pair your mobile phone with.
4. If required, enter the pairing password to complete the connection.
Settings
>
Wireless & networks
>
Bluetooth
41
Page 46

7.5.3 Sending Files via Bluetooth
With Bluetooth, you can share pictures, videos, or music files with your f amily and
friends. To send files via Bluetooth:
1. Touch and hold the file to be sent in your mobile phone or SD card. The active
options menu is displayed.
2. Touch
Share
, then
Bluetooth
to select a paired device.
7.5.4 Disconnecting from or Unpairing with a Bluetooth Device
1. Touch >
2. Navigate to the
which you are connected.
3. Touch
Settings
>
Wireless & networks
Bluetooth devices
Unpair
to disconnect from the device.
>
section, and then touch and hold the device to
Bluetooth settings
.
8 Entertainment
In addition to being a communication device and personal assistant, your mobile
phone also provides you with a multitude of entertainment possibilities. You can tak e
photos, create videos and audio clips, and download and listen to music.
8.1 Taking Photos and Recording V ideos
The camera is a combination of camera and ca mcorder that you can use to shoot a nd
share pictures and videos.
8.1.1 Opening Your Camera
• Touch >
mode, ready to take a picture or record a video.
• Touch to close the camera.
Camera
to open the camera. The camera opens in landscape
42
Page 47

Capture Screen
Touch to customize the camera settings.
Thumbnail of the
last photo. Touch
to preview the
photos or videos.
Slide up to record
videos; slide down
to take photos.
Touch to take a
photo.
3
5
On the capture screen, touch to show the capture panel.
8.1.2 Taking a Photo
1. Open your camera application and switch it to camera mode.
2. If necessary, change the camera settings. The preview changes as you change
the settings.
3. Frame your photo within the photo capture screen.
4. Touch and hold .
5. Release to take your photo.
Photos taken are displayed for a moment. You ca n take another photo or review your
photos.
8.1.3 Viewing Your Phot os
1. After taking a photo, a thumbnail of the photo you have just taken is shown in the
upper right corner of the capture screen. Touch the thumbna il to view it.
2. Touch the onscreen button to do any of the following:
• Touch
Share
• Touch
• Touch
to send the photo in a message or post it online.
Delete
to delete the photo.
More
>
Set as
to set the photo as a contact icon or the wallpaper.
43
Page 48

8.1.4 Recording a Video
1. Open the camera application, and then switch it to camcorder mode.
2. If necessary, change the camcorder settings.
3. Frame the scene with which you want to start your video.
4. Touch to start recording a video.
5. Touch to stop recording.
8.1.5 Viewing Your Vid eos
1. After recording a video, a thumbnail of the video you have just recorde d is shown in
the upper right corner of the capture screen. Touch the th umbnail to view it.
2. Touch the onscreen buttons to do any of the following:
• Touch
Share
• Touch
On the video playback screen, touch the co ntrols to fast-forwa rd or rewind or to
play or pause the video.
3. If you want to view more videos, flick your finger left or right across the screen.
to send the video in a message or post it online.
Delete
to delete the video.
8.2 Using the Gallery
Your
Gallery
application can automatically search for pictures and videos on your
mobile phone and microSD card. Use
view and edit pictures, watch videos, and set a picture as wallpaper or as a photo for
a contact.
8.2.1 Opening the Gallery
On the Home screen, touch >
The
Gallery
application categorizes your pictures and videos by storage locati on and
displays these files in folders. Touch a folder to view the pictures or vide os inside.
8.2.2 Viewing a Pict ure
1. In
Gallery
, touch the folder that contains the pictures you want to view.
2. Touch the picture to view it in full-screen mode.
Gallery
to sort photos and videos into folders,
Gallery
.
44
Page 49

3. Touch the screen. Then the zoom panel appears. You can zoom in or zoom out on
the picture.
The picture viewer supports the automat ic rotation fun ction. When you rotate
your mobile phone, the picture adjusts it self to the r otation.
8.2.3 Rotating a Picture
1. When viewing a picture, touch to display the operations panel.
2. Touch
More
orientation.
.
Rotate Left
or
Rotate Right
. The picture is saved with the new
3. Select either
8.2.4 Cropping a Picture
1. When viewing a picture, touch to display the operation panel, and then touch
More
>
Crop
2. Use the cropping tool to select the portion of the picture to crop.
3. Touch
.
• Drag from the inside of the cropping tool to move it.
• Drag an edge of the cropping tool t o resize the image.
• Drag a corner of the cropping tool to resize the image without changing its
length to width ratio.
Save
to save the cropped picture. Touch
Discard
to discard the changes.
8.3 DTS Envelo™
DTS Envelo is a virtual surround soun d solution for c onsumer electronics. It can
create virtual surround sound from any input source: mono, stereo, or 5.1 multichannel.
8.3.1 Using DTS Envel o
DTS can be used only with a headset and when music or movies are played
through music .
1. Touch
2. Touch
Sound
> Settings
>
DTS mode
.
.
45
Page 50

9 Google Services
Availability of Google applications, services, and features may vary according to
your country or carrier. Please follow local laws and regulations to use them .
When you turn on your mobile phone for the first time, tou ch a Google services such
as
Talk, Gmail
, or
Play Store
account.
Ensure that your mobile phone has an active data connection (3G) bef ore you
sign in to your Google account.
If you already have a Google account, touch
password.
9.1 Creating a Google Account
If you do not have a Google acc ount, you can cr eate one:
1. After reading the setup information, touch
2. Touch
Create
3. Enter the first name, last name, and user name for your Google account, and then
touch
username is available. If the username you entered is already in use, you will be
prompted to choose another one or select one from a list.
4. Enter and confirm your Google account password.
5. Select a security question from the drop-down menu, and then enter the answer.
6. Touch
7. When the
8. Enter the characters that appear on the screen, and then touch
.
Next
. The mobile phone will connect to a Google server to check wh ether the
Create
.
Google Terms of Service
To use another Google account, go to the
and touch
Add account
, and you will be prompted to sign in to your G oogle
Sign in
and enter your username and
Next
.
screen appears, touch
to select which type of accounts you want to add.
Accounts & sync settings
I agree, Next
Next
.
.
screen,
46
Page 51

9.2 Gmail
Gmail
is Google’s web-based email service. When you first set up your pho ne, you
may have configured it to use an existing
The first time you open the
the messages from your
Gmail
Gmail
9.2.1 Opening Gmail
On the Home screen, touch >
you decide to keep on your mobile phone will go to your
9.2.2 Switchin g Between Accounts
1. In the mail list, touch , and then touch
2. Touch the account that contains the email you want to read.
9.2.3 Creating and Sending a n Email
1. In the mail list, touch , and then touch
2. Enter the message recipient’s email address in the To field. If you are sending the
email to several recipients, separate the email addresses with commas. You can
add as many message recipients as you want.
If you want to send a copy (Cc) or a blind copy (Bcc) of the email to other
recipients, touch , and then touch
3. Enter the email subject and write your email.
If you want to add a picture attach ment, touch , and then touch
select the picture you want to attach.
4. After writing your email, touch .
9.2.4 Replyi ng to or Forwar ding an E mail
1. In the mail list, touch the email that you want to reply to or forward.
2. Touch to reply. You can also touch , and then touch
Forward
.
3. Do one of the following:
Gmail
application on your phone, your
web account.
account or create a new account.
Gmail
. The
Inbox
mail list appears. Any emails
Accounts
.
Compose
.
Add Cc/Bcc
Inbox
.
Inbox
will contain
folder.
Attach
Reply, Reply all
to
, or
47
Page 52

• If you selected
• If you selected
additional text you want to include in the forwarded message.
4. Touch to send, or touch to save as a draft.
Reply
or
Reply all
Forward
, enter your message.
, specify the message recipients and add any
9.2.5 Customizing Your Gmail Settings
In the mail list, touch , and then touch
Gmail
.
More
>
Settings
to customizing your
9.3 Talk
Talk
is Google’s instant messaging service. You can use it to communicate in real
time with other people using
9.3.1 Opening Talk
On the Home screen, touch >
Your
Talk
phone.
9.3.2 Adding a Friend
1. In the friends list, touch , and then touch
2. Enter the
Talk
3. Touch
Send invitation
9.3.3 Accepting an Invitation
1. If you have invited anyone to chat or if someone else has invited you to chat, this
information will appear in the friends list.
2. Touch a pending invitation, and then touch
9.3.4 Starting a Chat
1. In the friends list, touch a friend's name in the friends list.
2. Use the onscreen keyboard to enter text and chat with your friend.
Talk
on a phone or on the web.
Talk
to open the application.
account is based on the Google account you set up with your mobile
Add friend
Accept
.
.
instant messaging ID or Gmail address of the friend yo u want to add.
.
48
Page 53

3. After entering your message, touch
Send
.
9.3.5 Setting Notifications for New Instant Messages
Whenever you receive an instant message, your mobile phone can play a sound,
vibrate, or display an icon. To set up one of these handy notifications, start in the
friends list, and then touch . Then touch
following:
Settings
. Now choose from one of the
Notifications
Ringtone
Vibrate
Select the check box to receive a notification on the
notification bar when you receive an instant message.
Touch to choose the ringtone used for a new instant
message. You will hear a short sample of the ringtone when
you select it. To turn the ringtone off, select
Select the check box to make your mobile phone vibrate
when you receive a new instant message.
Silent
.
9.3.6 Signing out of Talk
On the friends list screen, touch , and then touch
Sign out
to quit
Talk
.
9.4 Maps
Maps
lets you find your current location, view real-time traffic conditions (dep ending
on availability in your locale), and get detailed directions to various destinations. You
can view satellite images, traffic maps, or other ki nds of maps of your current or other
locations.
9.4.1 Enabling the Location Service
Before you open
enable the location service.
1. On the Home screen, touch >
2. Touch
Maps
to find your location or searc h for places of in terest, you must
Location & security
Settings
.
.
49
Page 54

3. In the
My Location
GPS satellites
section, select the
check box, or both.
Use wireless networks
check box, the
Use
9.4.2 Opening Maps
On the Home screen, touch >
Maps
to open the application.
9.4.3 Searching for Places of Inter est
1. On the map, touch , and then touch
2. Enter the place you want to search for in the search box, and then touch the Search
icon.
3. Your search results will then be displayed. Touch a place you are interested in and
the application will show where it is on the map.
Search
.
9.4.4 Getting Directions
1. While viewing a map, touch , and then touch
2. Enter the starting point in the first text box, and then enter your destination in the
second text box.
3. Touch the icon for car, public transit, or walking directions.
4. Touch
Get directions
5. Touch a direction item on the list to show it on the map.
6. When you finish viewing or following the directions, touch , and then touch
Clear Map
. Your directions will appear in a list.
to reset the map.
Directions
.
9.5 YouTube
YouTube
is Google’s free online video streaming service for watching, searching for,
and uploading videos.
9.5.1 Opening YouTube
On the Home screen, touch >
9.5.2 Searching for a Video
1. On the
YouTube
screen, touch , and then touch
50
YouTube
. You will then see the YouTube screen.
Search
.
Page 55

2. Enter a search keyword, and then touch the Search icon.
3. You will see a number of search results displayed below the notification bar. Scroll
through the results and touch a video to watch it.
9.5.3 Sharing a Video
From the video list on the
Share
.
YouTube
screen, select a video clip and touch
More
>
9.6 Play Store
Android Market provides direct access to applications and games which you can
download and install on your phone.
9.6.1 Opening Pl ay Store
1. On the Home screen, touch >
2. When you open
window will appear. Touch
Play Store
Play Store
for the first time, the
Accept
to continue.
.
Google Play Terms of Service
9.6.2 Searching for Applications
There are a few different ways to find applications on the
including:
• Featured applications
• List of games
• Search function
• My apps
Play Store
home screen,
10 Synchronizing Information
Some applications on your mobile phone giv e you access t o the same personal
information that you can add, view, and edit on your computer. If you add , change, or
delete your information in any of these applications on the web, the updated
information also appears on your mobile phone.
This is made possible through over-the-air data synchr onization. The process occurs
in the background and does not interfere with use of your mobile phone. When your
51
Page 56

phone is synchronizing, a data synchronization icon will be shown in the notification
bar.
10.1 Managing Your Accounts
You can synchronize contacts, email, and other information on your mobile phone
with multiple Google accounts or other kinds of accounts, depending on the
applications installed on your mobile phone.
For example, you can start by adding your personal Google account , so your
personal email, contacts, and calendar are always available. You could then add a
work account, so your work-related emails and work contacts are ha ndy. If you like,
you may add multiple Google accounts or other accounts.
10.1.1 Adding an Account
When you add an account, the
newly synchronized account with contacts from your ex isting mobile phone accounts
and attempts to merge duplicates into a single entry in
as a single contact entry, the contact data itself is not merged.
1. Touch >
synchronization settings and a list o f your current acco unts.
2. Touch
3. Touch the kind of account to add.
4. Follow the onscreen steps to enter the required and optional information about the
account. Most accounts require a username a nd password, but the details depen d
on the kind of account and the configuration of the service to which y ou are
connecting.
5. Configure the account. Depending on the kind of account, you may be asked to
configure what kind of data you want to synchronize to the mobile phone, to name
the account, and for other details. When you are finished, the ac count is added to
the list on the
Settings
In some cases, you may need to obtain account details from IT support. For
example, you may need to know the account’s domain or server address.
Add account
Accounts & sync settings
Contacts
>
Accounts & sync
.
application compares contacts from the
Contacts
. While it is presented
. The screen displays your current
screen.
52
Page 57

10.1.2 Adding an Exchange Account
1. On the Home screen, touch >
2. Touch
Add account
3. Follow the instructions and enter the required information about the exchange
account you want to add. For details, contact the se rver administrator.
4. Touch
Next
synchronization settings for this account.
5. Touch
Next
synchronized properly, contact the server ad ministrator.
>
to display the
to finish configuring the account settings. If emails are not
Corporate
.
Account options
Settings
>
screen. Configure the
Accounts & sync
.
10.1.3 Removing an Account
You can remove an account, deleting it and all infor mation associated with it from your
mobile phone, including email, contacts, settings, and so on. You cannot, however ,
remove some accounts, such as the first account you signed into on the mobile
phone. If you attempt to remove certain accounts, all personal information associated
with it will be deleted.
You can only remove the first Google Account by resetting the phone to facto ry
defaults.
1. On the
Accounts & sync settings
2. Touch
Sign Out
3. Confirm that you want to remove the account.
.
screen, touch the account to be deleted.
10.2 Customizing Your Account Synchronization
You can configure background data use and synchronization opt ions for all the
applications on your phone. Yo u can also configure what k ind of data you synchroniz e
for each account.
For some accounts, synchronization is bi-directional; change s that you make to the
information on your mobile phone are made to the copy of that information on the
web. Some accounts support only one- way synchronization ; the information on your
mobile phone is read-only.
53
Page 58

10.2.1 Configuring General Synchronization Settings
On the
Accounts & sync settings
• Select or clear the
and services can transmit data when you are not working with them directly (that is,
when they are running in the background).
If you clear this optio n,
synchronizing events, and so on, until you touch the
email.
• Select or clear the
information on the phone or on the web are automatically synchron ized with each
other.
For example, when this option is selected, changes that you make in
on the phone are automatically made in Go ogle Contacts o n the web.
Background data
Auto-sync
screen, do the following:
check box to control whether applications
Gmail
stops receiving new mail,
check box to control whether cha nges you make to
Calendar
Refresh
stops
option or send an
Contacts
10.2.2 Changing an Account’s Synchronization Settings
1. On the
Accounts & sync settings
synchronization settings you want to change. The data and synchron ization screen
opens, displaying a list of the kinds of information the account can synchr onize.
2. Selected items are configured to synchronize to your mobile phone.
3. Select or clear the check box of information you want to synchronize with the
mobile phone.
screen, touch the account whose
11 Using Other Applications
11.1 Traffic Manager
Traffic Manager
monthly package and set traffic notification thresholds. When your traf fic usage
reaches these thresholds, you will be notified.
11.1.1 Using Traffic Manager
When
monthly traffic limit and notification thresholds.
54
allows you to enter the total amount of traffic included in your 2G/3G
Traffic Manager
is opened for the first time, it will request you to enter the
Page 59

1. On the Home screen, touch >
2. Enter the monthly traffic limit in the
3. Touch
Next
4. Enter the notification thresholds in the
5. Touch
6. You can now view your data traffic in
.
traffic reminder
You can modify the monthly traffic limit and not ification thresholds in
Finish
fields.
.
Traffic Manager
Monthly package
Set daily traffic reminder
Traffic statistics
.
field.
and
Set monthly
.
Settings
11.2 All Backup
You can back up data using
Backup to SD, Restore from SD, Quick Backup, Schedule Backup
Applications
.
11.2.1 Backing Up data by using Backup to SD
1. On the Home screen, touch >
2. Touch
Backup to SD
3. Enter a file name in the
4. In the
Backup contents:
5. Touch
Backup
To cancel the backup, touch
All Backup
, which provides the following options:
.
to back up the selected data.
All Backup
Filename:
field.
field, select the contents you want to back up.
Cancel
.
and
.
11.3 Calendar
Use
Calendar
Depending on your synchronization settings, the ca lendar on your phone can be
synchronized with the internet-base d calendar you use.
to create and manage events, meetings, and appointments.
.
55
Page 60

11.3.1 Opening Calendar
Touch >
Calendar
to open the application.
When you add a Google Account that includes a calendar servi ce to your phone,
you can access Google calendar: Touch , and then touch
Calendars
.
More
>
11.3.2 Creating an Event
1. In any calendar view, touch , and then touch
details
screen.
If you have more than one calendar, select the calenda r where you want to save
the event.
2. Enter the event name.
• If there is a time frame for the event, touch
and end times of the event.
• If the event is a special occasion such as a birthday or a day-long activit y, set
the date for
From
and To, and then select the
3. Enter the location of the event and a description.
4. Set the time of your event reminder in
whether the event recurs and, if it does, how frequently.
5. Touch
Done
.
To quickly create an event in the
empty time slot, and then touch
Day, Week
New event
appear with the selected time slot and date in the
New event
From
and To to set the beginning
All day
check box.
Reminders
, and then specify in
, or
Month
view, touch and hold an
. A new event details screen will
From
and To fields.
to open the
Event
Repetition
11.3.3 Setting an Event Reminder
1. In any calendar view, touch an event to view its details or an event summary.
2. Touch the
Add reminder
button to delete an existing reminder.
3. Touch the reminder time, and then, from the list displayed, touch the length of time
before the event when you want to be reminded. When the time comes, you will
receive a notification about the event.
56
button to add a reminder, or touch the reminder’s “-”
Page 61

11.3.4 Setting Synchronization and Display
1. In any calendar view, touch . Then touch
The Calendars screen displays all the calendars you have added or subscribed
to for each account that is configured to synchronize events to your phone,
organized by account. (Calendars for accounts yo u have configured not to
synchronize Calendar events are not included in the list.)
2. Touch the icon next to a calendar to change whether it is synchronize and whe ther
it is displayed.
You remain subscribed to Calendars t hat you configur e not to stor e on the
phone and you can still work with them with Google Calendar on the web.
3. Touch OK.
More
>
Calendars
.
11.3.5 Customizing Calendar Settings
In any calendar view, touch . Then touch
following:
•
Hide declined events
invitations.
•
Set alerts & notifications
a notification, or to turn off event notifications on your mobile phone.
•
Select ringtone
reminder.
•
Vibrate
: Select to vibrate the mobile phone when you receive an event no tification.
•
Default reminder time
reminders to occur.
: Select to hide events for which you have declined
: Touch to set event reminders to alert you, to send you
: Touch to select the ringtone to sound when you receive an event
: Touch to select the default time before an event for event
More
>
Settings
and choose from the
11.4 File Manager
File Manager
organize, edit, and delete files and folders.
11.4.1 Opening File Manager
On the Home screen, touch >
is like having a pocket-sized p ersonal assistant (PA), letting yo u
File Manager
to open the application.
57
Page 62

11.4.2 Creating a Folder
1. On the
File Manager
new folder.
2. Touch to open the options panel, and then touch
3. Enter the name of the new folder in the text box.
4. Touch
Save
screen, access the directory in which you want to cre ate a
New folder
.
.
11.4.3 Moving or Copying a File
1. On the
File Manager
touch
Multiselect
2. Touch the file or folder you want to move or copy. When a file or a folder is selected,
a check mark will appear.
To select all files, touch
to cancel the selection).
3. Touch
Cut
4. Select the path where you want the file to be copied or moved. Press to open
the options panel, and then touch
path.
screen, press to show the options panel, and then
.
Select all
to select all files in a folder (touch
or
Copy
to cut or copy the file.
Paste
to move or copy the file to the selected
Unselect all
11.4.4 Searching for a File
1. On the
File Manager
you want is located.
2. Press to open the options panel, and then to uch
3. Write a key word of the name of your file in the search box.
4. Touch . Your mobile phone will start the search.
5. A list of search results will be displayed. Touch a file in the list to open it.
6. Touch
New search
manager screen.
screen, touch a folder to access the directory where the file
Search
.
for a new search or press the back key to return t o the file
11.4.5 Compressing or Extracting Files
Your phone supports compressing and extracting files.
58
Page 63

You can only compress files and fold ers into .zip f iles, but can e xtract both .zip
and .rar files.
Compressing Files
1. On the
File Manager
2. Select the files or folders you want to compress. When a file is selected, a check
mark will appear.
To select all files and folders, touch
selection.
3. Touch
Compress
4. Edit the save path and the name of the target file, and then touch OK to start
compressing the files and folders.
Extracting a File
1. Touch and hold a compressed file.
2. Touch
Extract
3. Edit the save path for the extracted files.
4. Touch OK to start extracting.
screen, Touch , and then touch
Select all
.
.
or
Unselect all
Multiselect
to cancel the
.
11.4.6 Viewing Your Memory Status
On the
File Manager
Memory Status
allows you to view the memory status and available memory on your mobile phone
and microSD card.
screen, press to open the options panel, and then touch
. The memory management screen will be displaye d. This screen
11.5 Clock
In addition to displaying the date and time, the
about the weather and your phone. You can also use
phone into an alarm clock.
11.5.1 Opening the Clock
On the Home screen, touch >
Clock
Clock
to open the application.
application displays information
Clock
to turn your mobile
59
Page 64

Clock
opens with the date and time displayed on your Home screen wa llpaper, along
with your local weather and other useful information.
11.5.2 Opening the Alarms
On the
Clock
screen, touch to open the
Adding an Alarm
1. On the alarm list screen, touch
2. Set the alarm, and then touch
Setting an Alarm
1. On the alarm list screen, touch one of the alarms on the screen.
2. Touch
Time
3. Touch
4. Touch
5. Select the
6. Touch
7. Touch
Customizing Alarm Settings
On the alarm list screen, touch , and then touch
to set the time of the alarm.
Repeat
to set the days when you want the alarm to sound.
Ringtone
to select a ringtone for the alarm.
Vibrate
the ringtone.
The alarm clock still works when the phone is powered off.
check box to enable the phone to vibrate, in addition to playing
Label
to enter a name for the alarm.
Done
.
Add alarm
Done
.
Alarms
.
.
Settings
.
11.6 Calculator
Use
Calculator
solve more complex equations.
11.6.1 Opening Calculator
On the Home screen, touch >
to solve simple arithmetic problems or use its advanced operators to
Calculator
to open the application.
60
Page 65

11.6.2 Switching Between Basic and Advanced panel
On the
Calculator
Advanced panel
screen, flick the screen to the right or left to switch between
and
Basic panel
.
11.7 Notepad
Notepad
features a simple text processor. In the note list, you can add, edit, and
delete notes.
1. On the Home screen, touch >
2. Touch , and then touch
3. Touch to save the note.
Add note
Notepad
to open the application.
to create a note.
12 Managing Your Mobile Phone
To configure your mobile phone, touch >
12.1 Setting the Date and Time
By default, your mobile phone automatically uses the date, time, and time zone
provided by the network.
When your mobile phone is using the date and time settings provided
automatically by the network, you cannot manually set the date, time, an d time
zone.
1. On the
Settings
2. Clear the
3. Touch
month, and year, and then touch
4. Touch
the list to view more time zones.
5. Touch
minute. Touch
screen, touch
Automatic
check box.
Set date
. On the set date screen, touch or to adjust the date,
Select time zone
Set time
, and then select the desired time zone from the list. Scroll
. On the set time screen, touch or to adjust the hour and
Set
when the configuration is complete.
Settings
.
Date & time
.
Set
when the configuration is complete.
61
Page 66

6. Select or clear the
12-hour formats.
7. Touch
mobile phone.
Use 24-hour format
Select date format
check box to switch between 24-hour and
to select how you want the date to display on your
12.2 Setting the Display
12.2.1 Adjusting the Screen Brightness
1. On the
Settings
2. Drag the slider left to make the screen darker, or right to make it brighter.
screen, touch
3. Touch OK to save the adjustment.
Display
>
Brightness
.
12.2.2 Adjusting the Time Before the Screen Turns Off
If your mobile phone is idle for several minutes, it will turn off the screen to save battery
power. To set a longer or shorter idle time:
1. On the
Settings
2. Select the duration you want the screen to be illuminated.
screen, touch
Display
>
Screen timeout
.
12.3 Setting Ringers
12.3.1 Turning On Silent Mode
1. On the
Settings
2. Select the
and video media.
screen, touch
Silent mode
12.3.2 Adjusting the Volume
You can adjust the volume from the H ome screen or any application screen ( except
during a call or when playing music or videos). Press the Volume keys to adjust
volume to the level you desire.
You can also adjust the volume from the settings scre en.
1. On the
Settings
2. Drag the slider left to make the volume lower, or right to make it higher.
screen, touch
Sound
Sound
.
>
Volume
.
check box to silence all sounds except alarms, and music
62
Page 67

3. Touch OK to save the adjustment.
12.3.3 Changing the Phone Ringtone
1. On the
Settings
2. Touch the ringtone you want to use, and then touch OK. The ringtone plays when
screen, touch
selected.
Sound
>
Phone ringtone
.
12.3.4 Changing the Message Ringtone
1. On the Home screen, touch >
2. In the message list, touch >
3. Touch the ringtone you want to use, and then touch OK. The ringtone plays when
selected.
Messaging
Settings
.
>
Select ringtone
.
12.4 Setting Phone Services
12.4.1 Customizing Call Settings
Mobile phone service providers offer different services such as call forwardin g, call
waiting, fixed dialing numbers, and voicemail. You can customize many of these
services if they are part of your calling plan.
On the
Settings
screen, touch
12.4.2 Turning on Data Roaming
1. On the
Settings
2. Select the
Data roaming
Accessing data services while roaming may incur additional charges . Ask your
wireless service provider about data roaming fees.
12.4.3 Switching off the Data Service
1. On the
Settings
2. Clear the
Data enabled
screen, touch
check box.
screen, touch
check box.
Call settings
to customize your call functions.
Wireless & networks
Wireless & networks
>
Mobile networks
>
Mobile networks
.
.
63
Page 68

12.5 Configuring Text-to-Speech
Use the Text-to-Speech settings to configure the Andr oid text-to-speech synthesizer,
for applications that can take advantage of this feat ure.
12.5.1 Installing Voice Data
1. On the
Settings
>
Install voice data
2. If your mobile phone does not have speech synthesizer data installed, connect to
Android Market and let it guide you through the process of downloading an d
installing the data.
3. Follow the instructions to install the voice data.
screen, touch
.
Voice input & output
>
Text-to-speech settings
12.5.2 Adjusting the Speech Rate
1. On the
Settings
>
Speech rate
2. Select a speed at which the text is to be spoken.
screen, touch
.
Voice input & output
>
Text-to-speech settings
12.6 Protecting Your Mobile Phone
12.6.1 Protecting Your Mobile Phone with a Screen Lock
To keep your data more secure, lock the screen and/or req uire a screen unlock
pattern every time your mobile phone is turned on or wakes up from sleep mod e.
1. On the
Settings
.
screen, touch
Pattern
2. Flick your finger vertically, horizontally or diagonally, connect at least four dots in
any order you choose. Lift your finger from the screen when you are finished.
You must drag your finger between the d ots on the screen to cre ate the pattern,
not simply touch individual dots.
3. Your mobile phone will record the pattern. Touch
4. When prompted, draw the screen unlock pattern again, and then touch
To change your unlock screen pattern, touch
lock
.
64
Location & security
Location & security
>
Set up screen lock
Continue
.
>
Confirm
>
Change screen
.
Page 69

12.6.2 Protecting Your Mobile Phone with a Numeric PIN
You can set up a numeric PIN to lock your phone.
1. On the
Settings
Continue
screen, touch
.
2. Enter at least four characters.
3. Touch
4. Enter the same characters again and touch OK.
To change your PIN, touch
Location & security
Location & security
>
Set up screen lock
>
Change screen lock
>
PIN
.
12.6.3 Unlocking Your Mobile Phone If You Forge t the Screen
Lock Pattern
If you have already created a Google account, you can unlock your mobile phone
using the following methods.
• After you have entered the wrong sequence five times , a
will appear. Touch this button to enter the Goog le account interface. After you have
entered your Google account password, you will be able to reset the unlock pattern.
• After you have entered the wrong pattern twenty times, you will be taken directly to
the Google account interface. After you have e ntered your G oogle account
password, you will be able to reset the unlock pattern.
Forgot pattern?
button
12.7 Managing Applications
12.7.1 Viewing an Installed Application
1. On the
Settings
2. In the applications list, do either of the following:
• Touch , and then touch
• Touch an application directly to view it s details.
screen, touch
details.
12.7.2 Uninstalling an Application
You cannot uninstall the applications that are pre-installed o n the system.
1. On the
Settings
screen, touch
Applications
Sort by size
Applications
>
Manage applications
. Then touch an application to view its
>
Manage applications
.
.
.
65
Page 70

2. Touch an application, and then touch
Uninstall
.
12.7.3 Moving an Application to the microSD Card
Some applications are designed to be stored on your phone’s USB s torage or
microSD card (depending on the model of your phone), rather than in its int ernal
storage. Others are designed so you can change where th ey are stored. You may find
it helpful to move large applications off your internal storage, to make more room for
other applications that do not offer the option.
1. On the
Settings
2. Touch an application in the list. Then touch
the application from the phone’s int ernal storage.
The
memory used by the application. If the application can be moved, the
SD card
Touch
storage.
screen, touch
Storage
section of the application’s details sc reen shows details abo ut the
button is active.
Move to phone
Applications
to move the application back to the phone’s internal
>
Manage applications
Move to SD card
.
to move the bulk of
Move to
12.7.4 Ways to Free Up Your Mobile Phone Memory
• Move files and email attachments to the microSD card.
• In
Browser
, clear all temporary Internet files and Browser history inf ormation.
• Move applications to the microSD card.
• Uninstall any downloaded programs that you no longer use.
• Reset your mobile phone.
12.8 Resetting Your Mobile Phone
12.8.1 Backing Up My Data
You can use your Google account to b ack up your mobile phone’s se ttings to Google
servers. If you replace your mobile phone, the settings you have backed up will be
transferred to the new mobile phone the first time you sign in to your Google acco unt.
1. On the
Settings
2. Select the
screen, touch
Back up my data
Privacy
check box.
.
66
Page 71

12.8.2 Restoring Factory Data
If you reset your phone to the settings that were configured at the fac tory, all of your
personal data stored on the phone, including information about your Google Account,
any other accounts, your system and application settings, an d any applications you
have downloaded will be erased. Resetting the phone does not erase any system
software updates you have downloaded or any files on your micro SD card, such as
music clips or photos.
1. On the
Settings
2. When prompted, touch
mobile phone resets the settings to the original factory settings, and then r estarts.
screen, touch
Privacy
Reset phone
>
Factory data reset
, and then touch
.
Erase everything
. The
12.9 Setting Power saving mode
1. On the Home screen, touch >
2. Select the
Power saving mode
Settings
check box.
>
Power saving mode
.
12.10 Online Update
Your mobile phone has pre-installed the online update function. When ther e is new
software available, the version information appears and prompts you to update. Y ou
can also touch
new software is available.
When updating:
1.
2.
3.
Settings
>
About phone
Back up your personal information. All personal information will be
removed after the update.
Make sure that your microSD card has sufficient space to store the new
software version.
Perform the online update following the onscreen instruct ions.
>
Online upgrade
to check whether the
67
Page 72

13 Appendix
13.1 FAQ
How Can I Use a microSD Card to Import Contacts to My Phone from a Different Mobile Phone?
Your mobile phone only supports contact files in the
1.
Save the contacts you want to import to y our mobile phone to a microS D
card as a
.vcf
2.
Insert the microSD card into your mobile phone and find t he
using the
3.
Touch the
want to import the contacts.
4.
Touch OK to import the contacts.
Compatibility problems may occur with
phones and certain contact information may be lost after contacts are imp orted.
You can also use Bluetooth to share and import contacts.
How do I prevent automatic switching of orientation when rotating phone?
On the Home screen, touch >
disable the function.
How do I set the unlock pattern?
On the Home screen, touch >
lock
>
How can I change the input method?
Touch and hold the area where you write text and then select the input method you
prefer.
How do I stop the song playing in the background?
Touch the notification bar, flick downwards to open the notificatio ns panel, touch the
music playing notification to go to the music playing screen, and then stop playing the
song.
file.
File Manager
Pattern
.
.vcf
file. The phone displays a prompt asking whether you
Settings
.
Settings
.vcf
format.
.vcf
files created by different mobile
>
Display
>
Auto-rotate screen
>
Location & security
>
.vcf
file
to
Set up screen
68
Page 73

How do I return to the calling screen?
While on a call, if you’re on another screen, you can touch the notification bar, and
drag downwards to open the notifications panel. Then touch the curren t call
notification to return to the calling screen.
How do I create an application shortcut on the Home screen?
Touch and hold an application icon on the applicat ion screen until the Home screen is
displayed. Then drag the icon where you want it to go and release yo ur finger.
How do I hide the keyboard?
Touch to hide the keyboard.
69
Page 74

HUAWEI M660
Manufactured under license from DTS Licensing
Limited. DTS, the Symbol, & DTS and the Symbol
together are registered trademarks & DTS Envelo |
Headphone is a trademark of DTS, Inc. Product
includes software. © DTS, Inc. All Rights Reserved.
All the pictures in this guide are for your reference only. The actual
appearance and display features depend on the mobile phone you
purchase.
Android is a trademark of Google Inc. Use of this trademark is
subject to Google Permissions.
© Huawei Technologies Co., Ltd. 2012. All rights reserved.
V100R001_01
Page 75

Guía del usuario
HUAWEI Ascend Q
Bienvenido a HUAWEI
Page 76

Contenido
1 Lectura previa a las operaciones...........................................1
1.1 Precauciones de seguridad.........................................................1
1.2 Seguridad de datos e información personal................................2
1.3 Aviso legal...................................................................................4
2 Introducción...........................................................................7
2.1 Aspecto... ..................................................................................... 7
2.2 Configuración del teléfono móvil.................................................. 8
2.3 Encendido o apagado del teléfono móvil................... ................ 10
2.4 Uso de la pantalla táctil.............................................................. 11
2.5 Bloqueo y desbloqueo de la pantalla.........................................12
2.6 Pantalla principal ....................................... ................................ 13
2.7 Pantalla de aplicaciones............................................................ 18
2.8 Uso de la tarjeta microSD.......................................................... 18
3 Cómo realizar llamadas.......................................................19
3.1 Cómo realizar llamadas.................................................. ........... 20
3.2 Cómo responder o rechazar llamadas....................................... 21
3.3 Otras operaciones que se pueden realizar durante una
llamada...................................................................................... 22
3.4 Utilización de la Registro de llamadas.................... ... ................ 23
3.5 Uso del modo avión ................................................................... 24
3.6 Operación TTY .............................................. ... ........................ 24
4 Contactos.............................................................................25
4.1 Cómo acceder a Contactos ....................................................... 25
4.2 Cómo agregar contactos ........................................................... 25
4.3 Cómo agregar contactos a favoritos.......................................... 25
4.4 Índice de contactos.................... ................................................ 26
4.5 Búsqueda de contactos ............................................................. 26
4.6 Edición de contactos.................................................................. 26
i
Page 77

4.7 Cómo comunicarse con los contactos....................................... 27
4.8 Eliminación de contactos ........................................................... 27
4.9 Redes sociales ..................................................................... ..... 2 8
4.10 Administración de Grupos .......................................................29
4.11 Asociación y separación de contactos..................................... 30
4.12 Envío de contactos .................................................................. 31
5 Uso del teclado en pantalla.................................................31
5.1 Visualización del teclado ........................................................... 31
5.2 Personalización de las configuraciones del teclado.................. 33
6 Mensajería...........................................................................34
6.1 SMS y MMS............................................................................... 34
6.2 Correo electrónico .................................. ................................... 3 6
7 Cómo establecer una conexión...........................................39
7.1 Redes móviles ..... .................................................................... .. 39
7.2 Wi-Fi ....................................................................... ................... 40
7.3 WPS........................................................................................... 41
7.4 Navegador.................................................................................42
7.5 Bluetooth............ ................................ ........................................ 44
8 Entretenimiento....................................................................46
8.1 Cómo tomar fotografías y grabar videos ...................... ............. 46
8.2 Utilización de la Galería............................................. ................ 48
8.3 DTS Envelo™................. ........................................................... 49
9 Servicios de Google.............................................................50
9.1 Creación de una cuenta de Google......................................... .. 50
9.2 Gmail .................................................................................... ..... 51
9.3 Talk...................... ... ................................................................... 52
9.4 Maps.......................................................................................... 54
9.5 YouTube .... ................................................................................ 55
9.6 Play Store .. ................................ ................................................ 56
ii
Page 78

10 Sincronización de información...........................................56
10.1 Administración de las cuentas ................................................. 57
10.2 Personalización de la sincronización de cuentas....................58
11 Uso de otras aplicaciones..................................................60
11.1 Gestor de tráfico ...................................................................... 60
11.2 Cop seg de tod los arch........................................................... 60
11.3 Calendario ............................................................................... 61
11.4 Gestor de archivos................................................................... 63
11.5 Reloj......................................................................................... 65
11.6 Calculadora..................................................... .. . ......................66
11.7 Bloc de notas........................................................................... 67
12 Administración del teléfono móvil......................................67
12.1 Configuración de fecha y hora................................................. 67
12.2 Configuración de la pantalla....................................................68
12.3 Configuración del timbre.......................................................... 68
12.4 Configuración de servicios telefónicos .................................... 69
12.5 Configuración de la función texto a voz................................... 70
12.6 Protección del teléfono móvil................................................... 71
12.7 Administración de aplicaciones ............................................... 72
12.8 Restablecimiento de las configuraciones de fábrica del
teléfono móvil ............................................................................ 74
12.9 Configuración del Modo aho de energ.....................................74
12.10 Actualización en línea............................................................ 75
13 Apéndice............................................................................75
13.1 Preguntas frecuentes........................................ . .... . .. . .... . .. . ...... 75
iii
Page 79

1 Lectura previa a las operaciones
1.1 Precauciones de seguridad
Lea las precauciones de seguridad cuidadosamente para garantiza r el uso correcto
del teléfono móvil.
No lo golpee, no lo deje caer ni lo perfore. Evite que el teléfono móvil
se caiga, no lo doble ni ejerza presión sobre éste.
No utilice el teléfono móvil en ambientes húmedos, por ejemplo, en
un cuarto de baño. Evite mojar o lavar el teléfono móvil con líquidos.
No encienda el dispositivo en los lugares donde se prohiba el uso de
teléfonos móviles, o en aquellas zonas donde pueda causar
interferencias u ocasionar situaciones de riesgo.
No utilice el teléfono mientras conduce.
Obedezca las normas y regulaciones vigentes en los hospitales y
centros de salud. Apague el teléfono cuando se encuentre c erca de
dispositivos de uso médico.
Apague el teléfono cuando se encuentre dentro de una aeronave.
El teléfono podría causar interferencias con los equipos de control
de esta última.
Apague el teléfono móvil cuando se encuentre ce rca de dispositivos
electrónicos de alta precisión. El teléfono podría afectar el
funcionamiento de dichos dispositivos.
No intente desarmar el teléfono n i sus acceso rios. El teléfon o sólo
puede ser reparado por personal calificado.
1
Page 80

No coloque el teléfono ni sus accesorios en recipientes con
presencia de campos electromagnéticos de gran potencia.
No coloque medios de almacenamiento magnético cerca del
teléfono. La radiación del teléfono podría borrar la información
almacenada en éstos.
No exponga el teléfono a temperaturas elevadas ni lo utilice en
lugares con presencia de gases inflamables, por ejemplo, en
gasolineras.
Mantenga el teléfono móvil y sus accesorios fuera del alcance de
los niños. No permita que los niños utilicen el teléfono sin
supervisión de adultos.
Sólo utilice baterías y cargadores aprobados para evitar el riesg o de
una explosión.
Obedezca las leyes y regulaciones aplicables al uso de dispositivos
inalámbricos. Respete la privacidad y los derechos de terceros al
utilizar el dispositivo inalámbrico.
Cumpla estrictamente con las instrucciones de este manual al
utilizar el cable USB. De lo contrario, el teléfono móvil o la PC
podrían dañarse.
1.2 Seguridad de datos e información personal
La utilización de algunas funciones o aplicaciones de terceros disponibles en el
dispositivo puede ocasionar la pérdida de datos o información pers onal, o permitir a
terceros acceder a dichos datos o información. Se recomienda la adopción de
distintas medidas para proteger la información confidencial y personal.
• Coloque el dispositivo en un lugar seguro para evitar su uso no aut orizado.
• Configure el bloqueo de la pantalla y cree una contraseña o pat rón de desbloqueo
para desbloquearla.
2
Page 81

• En forma periódica, realice un backup de la información pers onal almacenada en
la tarjeta de memoria o en la memoria del dispositivo. Si cambia de dispositivo,
asegúrese de transferir o eliminar toda la información personal d el dispositivo
anterior.
• Ante la duda de la existencia de virus en c orreos electrónicos o mensajes env iados
por un desconocido, elimínelos sin abrirlos.
• Si usa el dispositivo para navegar por Internet, evite ac ceder a sitios web que
puedan resultar inseguros para evitar el robo de información pe rsonal.
• Si utiliza servicios como Wi-Fi tether o Bluetooth, configure las contraseñas de
estos servicios para evitar el acceso no autoriza do a éstos. Cuando dichos
servicios no se utilicen, desactívelos.
• Instale o actualice el software de seguridad de los disposit ivos y realice análisis
regulares para detectar la existencia de virus.
• Asegúrese de obtener aplicaciones de terceros de f uentes legítimas. Analice las
aplicaciones de terceros que se hayan descargad o con el fin de detectar la
existencia de virus.
• Instale parches o software de seguridad desa rrollados por Huawei u otros
proveedores de aplicaciones.
• Algunas aplicaciones requieren y transmiten información de ubic ación. Por lo
tanto, terceros pueden compartir su información de loca lización.
• El dispositivo puede proveer información de diagnóst ico y detección a otros
proveedores de aplicaciones. Otros proveedores p ueden utilizar esta información
para mejorar sus productos y servicios.
• Si tiene dudas sobre la seguridad de los datos e información pe rsonal, envíe un
correo electrónico a mobile@huawei.com.
3
Page 82

1.3 Aviso legal
Copyright © Huawei Technologies Co., Ltd. 2012 Todos los derechos reservados.
Este documento no podrá ser reproducido ni transmitido de ninguna mane ra sin el
consentimiento previo escrito de Huawei Technologies Co., Ltd.
El producto que se describe en este manual puede contener softwar e cuyos
derechos de autor pertenecen a Huawei Technologies Co ., Ltd. y sus posibles
licenciantes. Los clientes no podrán reproducir, distribuir, modificar, decompilar,
desarmar, decodificar, extraer, ceder ni arrendar dicho soft ware de ningún modo,
como tampoco practicar ingeniería inversa, ni otorgar una sublicencia de éste, con
excepción del caso en que la ley aplicable disponga lo contrario, o que dichas
acciones hayan sido aprobadas por los titulares de los derechos de auto r respectivos.
Marcas comer ciale s y pe rmiso s
, y son marcas comerciales o registradas de Huawei
Technologies Co., Ltd.
Android es una marca comercial de Google inc.
Toda otra marca comercial, producto, servicio o denominación s ocial mencionada en
el presente es propiedad de sus respectivos titulares.
Aviso
Ciertas características del producto y de los accesorios aquí descriptos dependen del
software instalado, de las capacidades y de las configuraciones de la red local, y
pueden no estar activadas o estar limitadas por los operadores de la re d local o por
los proveedores de servicios de red. Por lo tanto, es posible que las descr ipciones
contenidas en el presente documento no coincidan exactamente con el producto o
con los accesorios adquiridos.
Huawei Technologies Co., Ltd. se reserva el derecho de cambiar o modif icar
cualquier información o especificación que aparezca en este manu al sin notificación
previa y sin implicar responsabilidad alguna.
Declaración en relación con software de terceros
Huawei Technologies Co., Ltd. no es titular de la propiedad intelec tual del software ni
de las aplicaciones de terceros que acompañan este producto. Por lo tanto, Huawei
Technologies Co., Ltd. no ofrece garantía alguna en relación con dichas aplicac iones
y software de terceros. Huawei Technologies Co., Ltd. no proveerá servicios de
4
Page 83

soporte técnico a los clientes que utilizan el software y las aplicaciones de terceros, ni
será responsable respecto de las funciones de dicho software y dichas aplicaciones.
La provisión de servicios de aplicaciones y so ftware de terceros puede inte rrumpirse
en forma temporal o permanente en cualquier momento. Huawei Technologies Co.,
Ltd. no garantiza el suministro del mismo contenido o servicio durante el pe ríodo de
disponibilidad de éstos. Los terceros proveedores de servicios ofr ecen contenido y
servicios a través de la red o de las herramientas de transmisión, y no est án
supeditados al control de Huawei Technologies Co., Ltd. En la medida que lo permite
la ley aplicable, se deja constancia explícita que Huawei Technologies C o., Ltd. no
será responsable de los servicios que provea un tercero, ni de la interru pción
temporal ni permanente de la provisión de contenido o servicios de terceros, así
como tampoco abonará indemnización por daños en relación con lo ant erior.
Huawei Technologies Co., Ltd. no será responsable del hecho d e que el software
instalado en este producto sea o no legal, ni de la calidad ni de otros aspectos de
dicho software. Tampoco será responsable de los elementos de te rceros que hayan
sido cargados o descargados, como texto , imágenes, videos o software. Los c lientes
asumirán el riesgo de los efectos, incluso de la incompatibilidad entre el software y
este producto, resultantes de la instalación del software o de la carg a o descarga de
elementos de terceros.
Este producto utiliza el sistema operativo Android™ de código abierto. Huawei
Technologies Co., Ltd. ha realizado los cambios necesarios al si stema. Por lo tanto,
es posible que este producto no soporte todas las funciones del s istema operativo
Android estándar o que no sea compatible con software de terceros . Huawei
Technologies Co., Ltd. no será responsable de las situaciones mencionadas.
EXCLUSIÓN DE GARANTÍA
LOS CONTENIDOS DE ESTE MANUAL NO ESTÁN SUJETOS A GARANTÍA
ALGUNA. A EXCEPCIÓN DE LOS CASOS EN QUE ASÍ LO REQUIERA LA LEY
APLICABLE, NO SE CONSTITUYEN GARANTÍAS DE NINGUNA CLASE, NI
EXPRESAS NI IMPLÍCITAS. ENTRE OTRAS, A TÍTULO MERAMENTE
ENUNCIATIVO, NO SE OFRECE NINGUNA GARANTÍA DE COMERCIABILIDAD
NI DE APTITUD PARA UN FIN ESPECÍFICO RESPECTO DE LA PRECISIÓN, LA
CONFIABILIDAD, NI DE LOS CONTENIDOS DE ESTE MANUAL.
LIMITACIÓN DE LA RESPONSABILIDAD
EN LA MEDIDA EN QUE LO PERMITAN LAS LEYES APLICABLES, HUAWEI
TECHNOLOGIES CO. LTD BAJO NINGUNA CIRCUNSTANCIA SERÁ
RESPONSABLE POR DAÑOS ESPECIALES, INCIDENTALES, INDIRECTOS O
5
Page 84

EMERGENTES, NI POR EL LUCRO CESANTE, LA PÉRDIDA DE
OPORTUNIDADES COMERCIALES, LA PÉRDIDA DE INGRESOS, DE DATOS
O DE BUEN NOMBRE, NI POR LA PÉRDIDA DE AHORROS PREVISTOS.
LA RESPONSABILIDAD DE HUAWEI TECH NOLOGIES CO., LTD. DERI VADA
DEL USO DEL PRODUCTO DESCRITO EN ESTE DOCUMENTO SE LIMITARÁ
A LA SUMA ABONADA POR LOS CLIENTES AL ADQUIRIR ESTE PRODUCTO
(ESTA LIMITACIÓN NO SE APLICARÁ A LA RESPONSABILIDAD POR
LESIONES YA QUE LA LEY APLICABLE PROHÍBE DICHA LIMITACIÓN).
Normas de importación y exportación
Los clientes deberán cumplir con todas las leyes y reglamentaciones aplicables en
materia de importaciones y exportaciones, y deberán obtener las licencias y los
permisos gubernamentales necesarios a f in de exportar, r eexportar o importar el
producto mencionado en este manual, lo que incluye el software y la información
técnica correspondiente.
6
Page 85
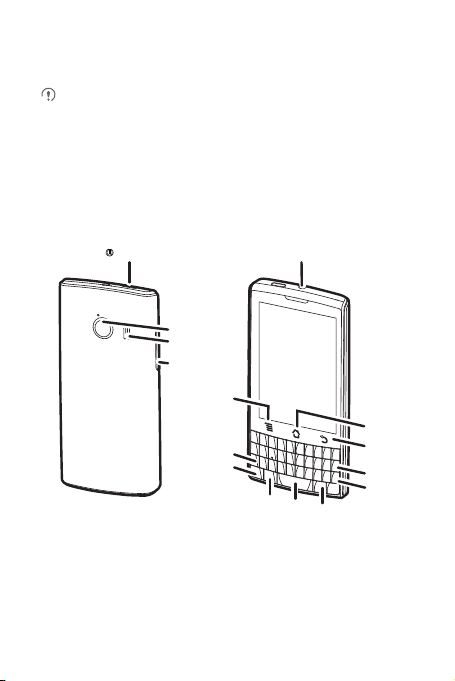
2 Introducción
Alimentación
Cámara
Altavoz
Tecla de
volumen
Entrada para auriculares
Inicio
Menú
Volver
Tecla
Eliminar
Enter
Tecla Alt
Tecla
Mayúsculas
Tecla de
emoticones
Tecla de
espacio
Tecla de
símbolos
Las imágenes de este documento se presenta n sólo a modo de referencia. Las
funcionalidades de pantalla del teléfono adquirido pueden no coincidir con las
descripciones de este documento y dependen de la versión de softwa re del
equipo.
2.1 Aspecto
2.1.1 Descripción rápida del teléfono móvil
7
Page 86

2.1.2 Funciones táctiles clave
• Mantenga presionada esta tecla para encender el teléfono móv il.
• Mantenga presionada esta tec la para abrir el menú
teléfono
.
• Presione esta tecla para bloquear la pantalla del teléfono móvil
cuando éste se encuentre activo.
• Presione esta tecla para volver a la pantalla principa l.
• Mantenga presionada esta tecla para activar el
Presione esta tecla para acceder al menú en la pantalla activa.
• Presione esta tecla para volver a la pantalla anterio r.
• Presione esta tecla para salir de cualquier aplica ción que se
encuentre en ejecución.
• Presione esta tecla para ocultar el teclado.
Opciones de
Reciente
.
2.2 Configuración del teléfono móvil
2.2.1 Carga de la batería
Antes de cargar la batería, asegúr ese de que ésta haya sido corre ctamente insertada
en el teléfono.
1. Conecte al cargador el cable USB provisto con el teléfono móvil.
8
Page 87
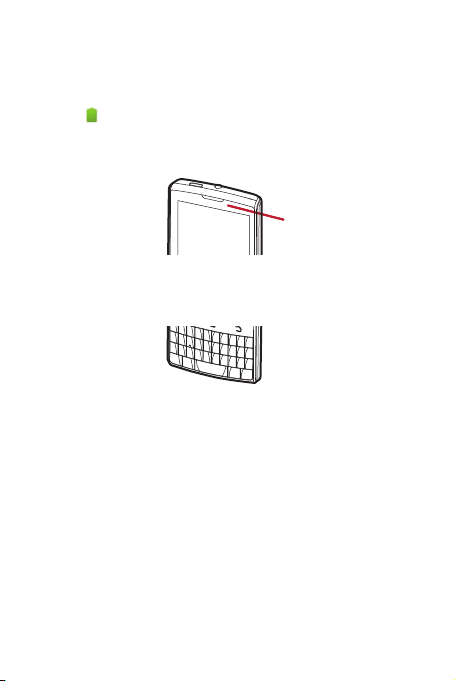
2. Conecte el extremo opuesto del cable USB al teléfono móvil. Luego, para iniciar la
carga, inserte el cargador en un tomacorriente.
Si el teléfono móvil está encendido durante la carga, el ícono d e la batería muestra el
progreso de la carga en la barra de notificaciones. Cuando el ícon o de la batería
cambia a , esto significa que el teléfono móvil está completamente car gado.
Indicador de estado
El color del indicador de estado muestra el estado de la batería del teléfono móvil.
SIndicador de estado
Verde: completamente cargada (cargador conectado).
Naranja: cargando (cargador conectado).
Rojo: batería baja.
2.2.2 Información importante de la batería
• Si la batería no ha sido utilizada por un largo período, es posible que no se pueda
encender el teléfono móvil inmediatamente despu és de comenzar a c argar la
batería. Deje cargar la bate ría durante unos minutos c on el teléfono apagado antes
de tratar de encenderlo.
• Con el tiempo, el rendimiento de la batería disminuye y, en especial, no
permanecerá cargada tanto tiempo como cuando era nueva . Si la batería dura
menos tiempo que lo habitual después de haber sido cargada adecuadamente,
reemplácela por otra del mismo tipo.
• Cuando se utilizan servicios de datos, el teléfono consumirá más energía y, por lo
tanto, disminuirá el período durante el cual se puede utilizar el equipo entre carga
y carga.
9
Page 88

• El tiempo necesario para cargar la batería en for ma completa depen de de la
temperatura ambiente y de la antigüedad de la batería.
• Cuando el nivel de carga de la batería es bajo, el teléfono da un aviso y muestra
un mensaje en pantalla. Cuando la batería se haya descarga do casi por completo,
el teléfono se apagará en forma automática.
2.2.3 Sugerencias para el ahorro de energía
La duración de la carga de la batería depende de la red a la que está conectad o el
usuario y del modo en el que el usuario utiliza el teléfono móvil.
Para preservar la carga de la batería, intente lo siguiente:
• Cuando el teléfono móvil no está en uso, apague la luz de fondo de la pantalla.
• Reduzca el tiempo de desactivación de la luz de fondo de la pantalla cuando el
teléfono está inactivo.
• Reduzca el brillo de la pantalla.
• Desactive la función Bluetooth cuando no esté en uso. Sólo haga e l teléfono visible
a otros dispositivos Bluetooth cuando n ecesite establecer una conexión Bluetooth.
• Desactive la conexión Wi-Fi cuando no esté en uso.
• Apague el receptor de GPS del teléfono cuando no esté en uso.
• Baje el volumen.
• Cierre los programas que consumen energía cuando no los necesite.
• Desactive el servicio de datos.
2.3 Encendido o apagado del teléfono
móvil
2.3.1 Cómo encender el teléfono móvil
Presione la tecla . La primera vez que encienda el teléfono, deberá iniciar sesión
en la cuenta respectiva y configurar el teléfono móvil.
2.3.2 Configuración del teléfono móvil
Al encender el teléfono móvil por primera vez, éste muestra el asistente de
configuración, que lo guiará en la configuración del teléfono.
10
Page 89

El asistente de configuración permite:
• Crear la cuenta o iniciar sesión en ésta
• Tomar decisiones iniciales sobre cómo desea utilizar el teléfono móvil
2.3.3 Activaci ón del inic io rápido
1. Presione >
2. Seleccione la casilla de verificación
No active la función
Configuraciones
Reinicio rápi do
>
Aplicaciones
Reinicio rápido
.
.
a bordo de una aeronave.
2.3.4 Cómo apagar el teléfono móvil
1. Mantenga presionada la tecla para acceder al menú
2. Presione
Apagar
Si se habilita
Reinicio rápido
.
Reinicio rápi do
, el teléfono entrará en modo de susp ensión. Si
está deshabilitado, presione
Opciones de teléfono
Aceptar
para apagar el teléfono.
2.4 Uso de la pantalla táctil
2.4.1 Acciones de l a pantall a táctil
•
Presionar
: puntee la pantalla con el dedo para seleccionar un el emento, confirmar
una selección o iniciar una aplicación.
•
Mantener presionado
presionándolo hasta que el teléfono móvil responda. Por ejemp lo, para acceder al
menú de opciones de la pantalla activa, mantenga presionada la pa ntalla hasta
que aparezca el menú.
•
Deslizar
: mueva el dedo sobre la pantalla en forma vertical u horizontal.
•
Arrastrar
elemento, arrástrelo hacia cualquier parte de la pantalla. Es posible arrastrar un
ícono para moverlo o eliminarlo.
: presione un elemento con el dedo y continúe
: mantenga presionado con el dedo el elemento desea do. Para mover el
.
11
Page 90

2.4.2 Rotación de la pantalla del teléfono móvil
La orientación de la mayoría de las pantallas cambiará de modo horizontal a modo
vertical al rotar el teléfono.
En la pantalla principal, presione >
pant.
para deshabilitar esta función.
Config.
>
Mostrar
>
Rotación aut. de
2.5 Bloqueo y desbloqueo de la pantalla
2.5.1 Bloqueo de la pantalla
• Cuando el teléfono móvil está encendido, presione para bloquear la pantalla.
Aunque la pantalla esté bloqueada, se pue den recibir mens ajes y llamadas.
• Si el equipo no se utiliza durante un tiempo, la pantalla se bloqueará en forma
automática.
2.5.2 Desbloqueo de la pantalla
1. Presione para activar la pantalla.
2. Arrastre el ícono de bloqueo de izquierda a derecha para desbloquear la pantalla.
Si se ha configurado un patrón de desbloqueo para la pantalla, el teléfono
solicitará realizar dicho patrón en la pa ntalla para d esbloquearla.
12
Page 91

2.6 Pantalla principal
10:23
Barra de notificaciones:
Muestra los recordatorios e íconos de estado
del teléfono. Deslice el dedo hacia abajo
para acceder al panel de notificaciones.
Área de visualización:
Área principal de visualización del teléfono.
Pantalla principal e indicador de extensión.
Accesos directos
Mantenga presionado uno de los accesos directos hasta que el teléfono móvil
vibre. Arrastre el acceso directo hasta la ubicación deseada o hasta la papelera
de reciclaje. También es posible arrastrar un ícono desd e un área de la pantalla
hasta la posición de accesos directos.
2.6.1 Íconos de noti ficaci ón y de estado
Intensidad de la señal No hay señal
Conectado a una red
móvil 3G
Roaming Modo avión
GPS activado
Presione aquí para ver todas las aplicaciones.
3G en uso
Recibiendo datos de
ubicación desde el GPS
13
Page 92

Bluetooth activado
Altavoz activado Alarma activada
Modo vibración Tono silenciado
Llamada silenciada Cargando batería
Batería llena
Llamada en curso Llamada perdida
Llamada en curso con
auriculares Bluetooth
Mensaje de texto o
multimedia nuevo
Mensaje de chat nuevo Correo electrónico nuevo
Correo de voz nuevo Conectado a una PC
Abrir la red Wi-Fi
disponible
Cargando Descargando
Área de acceso
inalámbrico Wi-Fi portátil
activada
Batería extremadamente
baja
Nuevo correo de Gmail
Problema con la entrega
del mensaje de texto o
multimedia
Evento próximo
Memoria llena
Problema de registro o de
sincronización
14
Page 93

Preparando la tarjeta
microSD
Sincronizando datos
Conectado a una VPN
Más notificaciones no
desplegadas en pantalla
No se pudo realizar la
sincronización
Función tethering USB
activada
Desconectado de la VPN
2.6.2 Panel de notificaciones
El teléfono móvil notificará al usuario la recepción de un mensaje nuevo o la
existencia de un evento próximo. El panel de notificaciones también informa al
usuario acerca de las alarmas y configuraciones; por ejempl o, cuando se activa la
función
Desvío de llamadas
operador de red o para ver un mensaje, un recordatorio o una notificación de eventos.
Cómo acceder al panel de notificaciones
1. Cuando en la barra de notificaciones aparece un nuevo ícono de notificaciones,
mantenga presionada dicha barra y luego deslice el dedo hacia abajo par a
acceder al panel de notificaciones.
También se puede abrir el panel de notificaciones desde la pantalla principal;
presione >
2. En el panel, podrá hacer lo siguiente:
• Presionar una notificación para abrir la aplicación corresp ondiente.
• Presionar
Cómo salir del panel de notificaciones
Mantenga presionada la parte inferior del panel. Luego, deslice el dedo hacia arriba
para cerrarlo.
. Abra el panel de notificaciones para ver quién es e l
Notificaciones
Borrar
para borrar todas las notificaciones.
para abrir el panel.
15
Page 94

2.6.3 Cómo ver otras partes de la pantalla principal
10:23
Deslice el dedo hacia la
izquierda o derecha sobre
la pantalla principal.
2.6.4 Personalización de la pantalla principal
Cómo agregar elementos a la pantalla principal
1. Mantenga presionada un área en blanco de la pantalla principal hasta que
aparezca en pantalla el menú
También es posible presionar >
visualizar el menú
2. Seleccione el elemento que desea agregar a la pantalla principal.
Cómo mover elementos de la pantalla principal
1. Mantenga presionado un elemento en la pantalla principal hasta que el elemento
se agrande y el teléfono móvil vibre.
2. Sin levantar el dedo, arrastre el elemento hasta la posic ión deseada en la pantalla y
luego suéltelo.
Eliminación de elementos de la pantalla principal
1. Mantenga presionado un elemento en la pantalla principal hasta que el elemento
se agrande y el teléfono móvil vibre.
Seleccionar acción
Seleccionar acción
.
Agregar
en la pantalla principal para
.
16
Page 95

2. Sin levantar el dedo del elemento, arrástrelo hasta la papelera. Cuando el
elemento y la papelera se pongan de color rojo, el elemento podrá ser eliminad o.
3. Libere el elemento para eliminarlo de la pantalla principal.
2.6.5 Accesos directos de servicio
1. Abra la barra de notificaciones.
2. Presione que aparece en la parte superior de la pantalla para activar o
desactivar los servicios de datos.
También es posible presionar , , o para activar o desactivar
los servicios correspondientes.
2.6.6 Configuración de las animaciones de la pantalla principal
1. En la pantalla principal, presione >
Animación
2. Seleccione una animación y luego presione
.
Configuraciones de pantalla principal
Guardar
.
2.6.7 Cambio del pap el tapiz
1. En la pantalla principal, presione >
2. Presione los siguientes elementos del menú para seleccionar una imagen y
configurarla como papel tapiz.
•
Galería
•
Fondos de pantalla animados
•
Papeles tapiz
Fondo de pantalla
.
2.6.8 Cambio de temas
1. En la pantalla principal, presione >
2. Realice cualquiera de las siguientes acciones:
• Presione
Tema
• Presione
aplicaciones.
3. Presione
para seleccionar un tema.
Íconos de ap licac iones
Guardar
.
Configuraciones de pantalla principal
para seleccionar una serie de íconos de
>
.
17
Page 96
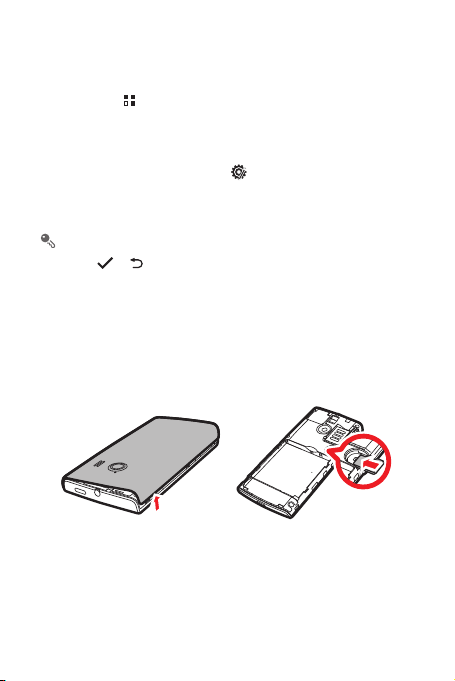
2.7 Pantalla de aplicaciones
La pantalla de aplicaciones incluye íconos de todas las aplicaciones del teléfono. Es
posible presionar en la pantalla principal para acceder a la pantalla de
aplicaciones.
2.7.1 Cómo mover íconos de la pantalla de aplicaciones
1. En la pantalla de aplicaciones, presione .
2. Mantenga presionado el ícono de la lista de aplicaciones que desea mover hasta.
3. Sin levantar el dedo, arrastre el ícono hasta la posición deseada y luego suéltelo.
Para mover más íconos, repita los pas os 2 y 3.
4. Presione o para guardar.
2.8 Uso de la tarjeta microSD
2.8.1 Instalación de la tarjeta microSD (Opcional)
El teléfono móvil ya cuenta con una Tarjeta Multimedia Integrada (eMMC) de gran
capacidad. Si desea expandir la memoria del teléfono, se puede insertar una tarjeta
microSD.
1. Retire la tapa de la batería.
2. Inserte la tarjeta microSD en la ranura correspondiente como se muestra en el
diagrama.
18
Page 97

2.8.2 Uso de la tarj eta microSD co mo disposit ivo de
almacenamiento masivo USB
Para transferir todos los archivos favo ritos de música e imágenes de la PC a la tarjeta
microSD del teléfono móvil, configure la tarjeta mic roSD como dispositivo de
almacenamiento masivo USB.
1. Conecte el teléfono móvil a la PC con el cable USB provisto. La PC detectará la
tarjeta microSD como un disco de a lmacenamiento extraíble.
2. Abra la barra de notificaciones y luego presione la opción
3. Presione
Activar el almacenamiento USB
para confirmar que desea transferir archivos.
Es posible transferir archivos desde la PC a la tarjeta microSD del teléfono móvil.
Cuando la tarjeta microSD funciona como dispositivo de almacenamien to
masivo USB, el teléfono móvil no utilizará este espacio de memoria. As egúrese
de seguir los procedimientos correctos para descone ctar el dispositivo de
almacenamiento masivo USB (su teléfono móvil) de la PC cuando haya
finalizado la transferencia de archivos.
conectado al USB
en el cuadro de diálogo que se abre
.
2.8.3 Extracci ón de la tar jeta micr oSD
1. En la pantalla principal, presione >
2. Desplácese hacia abajo y luego presione
Desconexión de la tarjeta SD
3. Extraiga con cuidado la tarjeta microSD.
Config
.
Espacio de almacenamiento
.
>
3 Cómo realizar llamadas
Para realizar una llamada telefónica, se puede marcar un número por medio del
teclado o presionar uno de los números de la lista de con tactos, de una página web
o de un documento. Mientras se está manteniendo una conversación telefónica, es
posible responder llamadas entrantes o desviarlas al correo de voz. También es
posible establecer llamadas en conferencia con varios partic ipantes.
19
Page 98

3.1 Cómo realizar llamadas
Para hacer una llamada, es posible utilizar la aplicación
número de teléfono desde
Durante una llamada en curso, se puede presionar para utilizar otras funciones.
Para volver a la pantalla de la llamada, deslice la barra de notificaciones hacia abajo
y presione
Llamada actual
Asegúrese de no bloquear el micró fono, que está en la parte inferio r del teléfono,
para que la voz se escuche en forma clara durante la llamada.
Contactos
.
o
Registro de llamadas.
3.1.1 Cómo hacer llamadas por medio de la aplicación
Marcador
1. En la pantalla principal, presione >
Si ya se encuentra dentro de las opciones
presione la pestaña
2. Presione las teclas numéricas que correspondan para ingresar un número de
teléfono.
El teléfono móvil soporta la función SmartDial, es de cir, al presionar números en
el marcador, el teléfono automáticamente busca en los contactos y muestra las
coincidencias que detecta ordenadas según el nivel de exacti tud de la
coincidencia. Si no hay contactos que coincidan con la información ingresa da,
el teléfono no mostrará ningún resultado.
3. Presione para iniciar la llamada.
Durante el transcurso de una llamada, presione
ingresar otros números en el panel de marcado.
Teléfono
.
3.1.2 Cómo realizar llamadas de sde Contact os
1. En la pantalla principal, presione >
contactos.
Si ya se encuentra dentro de las opciones
presione la pestaña
2. Dentro de la lista, presione el contacto al que desea llamar.
Contactos
.
Teléfono
Teléfono
para acceder al marcador.
Contactos
Teclado telefónico
Contactos
para acceder a la lista de
Teléfono
o seleccionar un
o
Registro de llamadas
para
o
Registro de llamadas
,
,
20
Page 99
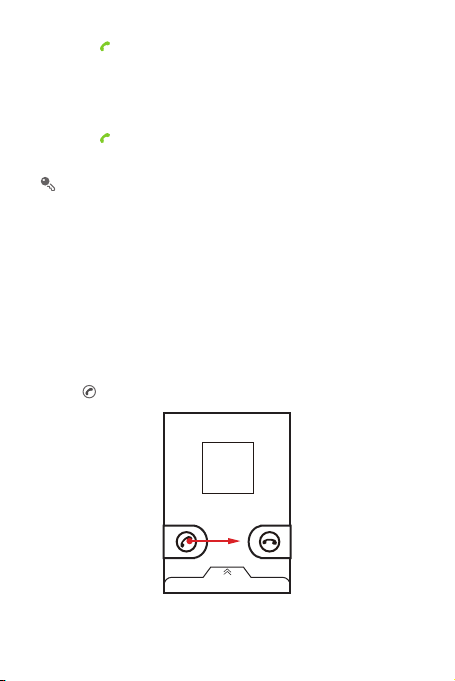
3. Presione para marcar el número de teléfono.
3.1.3 Cómo realiz ar llamadas desde
1. Si ya se encuentra dentro de las opciones
pestaña
Registro de llamadas
2. Presione a la derecha de la entrada del registro para marcar el número
correspondiente.
Si mantiene presionada la entrada del regist ro, se abrirá el menú de opcio nes.
.
Registro de llamadas
Contactos
o
Teléfono
, presione la
3.2 Cómo responder o rechazar
llamadas
3.2.1 Cómo contestar llamadas entrantes
Cuando se recibe una llamada telefónica, se despliega la pantalla de llamada
entrante. Si se ha guardado previamente el número del usuario llamante en
Contactos
, el nombre y el número de dicho usuario aparecerán en pantalla. Si el
número del usuario llamante no está guardado en
el número de dicho usuario.
Arrastre hacia la derecha para contestar la llamada.
Contactos
, aparecerá en pantalla
21
Page 100

3.2.2 Cómo finali zar llama das
Durante el transcurso de una llamada: presione
comunicación.
Finalizar
para cortar la
3.2.3 Cómo rechazar llamadas entrantes
Arrastre hacia la izquierda para rechazar la llamada.
También es posible arrastrar hacia arriba la bar ra que se encuentr a en la parte
inferior de la pantalla para rechazar la llamada y enviar un mensaje al usuario
llamante.
3.3 Otras operaciones que se pueden realizar durante una llamada
3.3.1 Cómo realiz ar llamadas en conferen cia
Si se recibe una llamada nueva durante una llamada en curso, se puede agregar la
segunda llamada a la llamada en curso. Esta función se conoce como llamada en
conferencia. También es posible establecer una llamada en conferencia con
múltiples usuarios llamantes.
Comuníquese con el operador de red para saber si se soporta la funció n de
llamadas en conferencia y, de ser así, cuántos usuarios pu eden participar de
ellas.
22
 Loading...