


THT60
User manual
THT47 – THT60
Copyright HT ITALIA 2014 Release 1.01 - 03/02/2014


THT47 - THT60
Table of contents:
1 PRECAUTIONS AND SAFETY MEASURES ........................................................................... 3
1.1 During use ........................................................................................................................................ 3
1.2 After use ........................................................................................................................................... 3
2 GENERAL DESCRIPTION ....................................................................................................... 4
3 PREPARATION FOR USE ....................................................................................................... 5
3.1 Initial checks ..................................................................................................................................... 5
3.2 Instrument power supply .................................................................................................................. 5
3.3 Calibration ........................................................................................................................................ 5
3.4 Storage ............................................................................................................................................. 5
4 NOMENCLATURE .................................................................................................................... 6
4.1 Instrument description ...................................................................................................................... 6
4.2 Description of function keys ............................................................................................................. 9
4.2.1 Switching on/off the instrument .......................................................................................................... 9
4.2.2 Key ................................................................................................................................................ 9
4.2.3 Key ............................................................................................................................................... 9
4.2.4 Key ............................................................................................................................................... 9
4.2.5 Key (THT60) ............................................................................................................................... 10
4.2.6 Key (THT47) ............................................................................................................................... 10
4.2.7 T key (Trigger) ................................................................................................................................. 10
5 OPERATING INSTRUCTIONS ............................................................................................... 11
5.1 Description of the main interface .................................................................................................... 11
5.1.1 Image focusing ................................................................................................................................ 11
5.1.2 Image rotation and zoom ................................................................................................................. 12
5.1.3 Adjusting the distance of the object in Fusion screens (THT60) ..................................................... 12
5.2 Main menu description ................................................................................................................... 13
5.2.1 Settings Menu .................................................................................................................................. 13
5.2.1.1 “General” section......................................................................................................................................... 13
5.2.1.2 “Control” section .......................................................................................................................................... 14
5.2.1.3 “Images” section .......................................................................................................................................... 17
5.2.1.4 “Date/Time” section ..................................................................................................................................... 18
5.2.1.5 “Information” section ................................................................................................................................... 18
5.2.2 Measure Menu ................................................................................................................................. 19
5.2.2.1 Setting of measuring cursors ...................................................................................................................... 19
5.2.2.2 Setting of Measuring lines ........................................................................................................................... 21
5.2.2.3 Setting of measuring areas ......................................................................................................................... 23
5.2.2.4 Setting the Measure Menu .......................................................................................................................... 25
5.2.2.5 Control parameters of temperature measurement ..................................................................................... 28
5.2.3 Image menu ..................................................................................................................................... 30
5.2.3.1 Setting the display type (THT60) ................................................................................................................ 30
5.2.3.2 Setting the colour palette ............................................................................................................................ 32
5.2.3.3 Adjusting the image temperature ................................................................................................................ 35
5.2.3.4 Setting the Isotherm function ...................................................................................................................... 37
5.2.4 Camera menu .................................................................................................................................. 38
5.2.4.1 Fixing the image on the display and saving ................................................................................................ 38
5.2.4.2 Voice annotation ......................................................................................................................................... 39
5.2.4.3 Text annotation ........................................................................................................................................... 40
5.2.4.4 Recording IR videos .................................................................................................................................... 40
5.2.5 Gallery menu ................................................................................................................................... 41
5.2.5.1 Deleting images .......................................................................................................................................... 42
5.2.6 Video menu ...................................................................................................................................... 43
5.2.6.1 Deleting IR videos ....................................................................................................................................... 43
5.3 Using the instrument ...................................................................................................................... 44
5.4 Transferring IR images/videos onto the PC ................................................................................... 46
5.5 Video output ................................................................................................................................... 46
6 USING THE THTLINK SOFTWARE ....................................................................................... 47
6.1 Minimum system requirements ...................................................................................................... 47
6.2 Installing the THTLink software ...................................................................................................... 47
6.3 Main characteristics of the THTLink software ................................................................................ 47
7 MAINTENANCE ...................................................................................................................... 48
7.1 General information ........................................................................................................................ 48
7.2 Recharging the internal battery ...................................................................................................... 48
7.2.1 Recharging the battery with direct connection to the electric mains ................................................ 48
7.2.2 Recharging by connection to the recharging base .......................................................................... 49
EN - 1

THT47 - THT60
7.3 Cleaning the instrument ................................................................................................................. 49
7.4 End of life ....................................................................................................................................... 49
7.5 Accessories .................................................................................................................................... 49
7.5.1 Accessories provided ....................................................................................................................... 49
7.5.2 Optional accessories ....................................................................................................................... 49
8 TECHNICAL SPECIFICATIONS ............................................................................................. 50
8.1 Environment ................................................................................................................................... 50
8.1.1 Environmental conditions for use ..................................................................................................... 50
9 SERVICE ................................................................................................................................ 51
9.1 Warranty conditions ........................................................................................................................ 51
9.2 Service ........................................................................................................................................... 51
EN - 2
THT47 - THT60
1 PRECAUTIONS AND SAFETY MEASURES
In the whole manual, the word “instrument” generically indicates models THT47 and
THT60, unless otherwise indicated. The instrument has been designed in compliance with
the directives relevant to electronic measuring instruments. For your safety and in order to
prevent damaging the instrument, please carefully follow the procedures described in this
manual and read all notes preceded by the symbol with the utmost attention. Before
and after carrying out the measurements, carefully observe the following instructions:
Do not carry out any measurements in case gas, explosive materials or
flammables are present, or in humid or dusty environments.
Do not carry out any measurement in case you find anomalies in the
instrument such as deformation, breaks, substance leaks, absence of
display on the screen, etc.
Keep the instrument steady during any measuring operation.
Do not carry out any measurements which exceed the working and storage
temperature ranges specified in § 8.1.1.
Only the accessories provided together with the instrument will guarantee
safety standards. They must be used only if in good conditions and
replaced with identical models, when necessary.
Check that the battery is correctly inserted.
Check that the LCD display gives indications consistent with the function
selected.
Do not direct the instrument at very high intensity radiation sources (e.g. the
sun) in order to prevent damaging the IR sensor.
Prevent hits or strong vibrations in order to keep the instrument from
damage.
When bringing the instrument from a cold to a hot environment, leave it on
long enough for condensation water to evaporate.
In this manual, and on the instrument, the following symbols are used:
Only use the micro SD card provided with the instrument.
Caution: observe the instructions given in this manual; improper use could
damage the instrument or its components.
This symbol on the display means that the instrument (THT60) is able to emit a
laser pointer in Class 2. Do not direct the radiation towards the eyes in order
to prevent physical damage to people.
CAUTION
Compliant with European Standards
1.1 DURING USE
CAUTION
Failure to comply with the caution notes and/or instructions may damage
the instrument and/or its components or be a source of danger for the
operator.
Use the instrument only in the temperature ranges indicated in this manual.
1.2 AFTER USE
When measurement is complete, switch off the instrument. If you expect not to use the
instrument for a long period, remove the battery.
EN - 3

THT47 - THT60
2 GENERAL DESCRIPTION
The instrument is a professional digital thermal camera capable of carrying out infrared
temperature measurements of objects and providing high-resolution images in an
extremely flexible way. It is also very easy to use and needs little maintenance.
The main characteristics of the instrument are:
Infrared temperature measurement ranging from -20°C to 400°C
Built-in photo camera for visible image (THT60)
Fusion PiP function (THT60)
3 selectable measuring cursors
TFT colour display with capacitive touch-screen
Alarm conditions on temperature measurement
Table with emissivity values of common material
8 standard colour palettes
10 custom colour palettes
Electronic zoom x1-x20
Advanced analyses (Spots, Lines, Areas, Isotherm)
Automatic detection of hot/cold spots of the image
Storage of JPG images on external micro SD card
IR sensor resolution: 160x120pxl
USB port for PC connection and image transfer
Voice and text annotations
IR MPEG4 video recording on micro SD card
Video and microphone output
Built-in laser pointer and illuminator (THT60)
Rechargeable Li-ION battery
Analysis and printing of images with the dedicated software provided
The applications of the digital thermal camera are:
Predictive and preventive maintenance of the electrical and mechanical appliances
Monitoring of the temperature of working processes
Maintenance and troubleshooting on forced ventilation ducts
Domestic/industrial use in troubleshooting environmental insulation problems
Applications in the construction field
Safety problems
EN - 4

THT47 - THT60
3 PREPARATION FOR USE
3.1 INITIAL CHECKS
Before shipping, the instrument has been checked from an electric as well as mechanical
point of view. All possible precautions have been taken so that it is delivered undamaged.
However, we recommend generally checking the instrument in order to detect possible
damage suffered during transport. In case anomalies are found, immediately contact the
forwarding agent.
We also recommend checking that the packaging contains all components indicated in §
7.5. In case of discrepancy, please contact the Dealer. In case the instrument should be
replaced, please carefully follow the instructions given in §. 9
3.2 INSTRUMENT POWER SUPPLY
The instrument is supplied by a 1x7.4V rechargeable Li-ION battery and AC mains power
supply, which also provides for the recharge of the mentioned battery. Both of these
systems are provided with the instrument. For battery recharge, please refer to § 7.2.
3.3 CALIBRATION
The instrument has the technical specifications described in this manual. The instruments
performance is guaranteed for one year.
3.4 STORAGE
In order to guarantee precise measurement, after a long storage time under extreme
environmental conditions, wait for the instrument to come back to normal condition (see §
8.1.1).
EN - 5
THT47 - THT60
4 NOMENCLATURE
4.1 INSTRUMENT DESCRIPTION
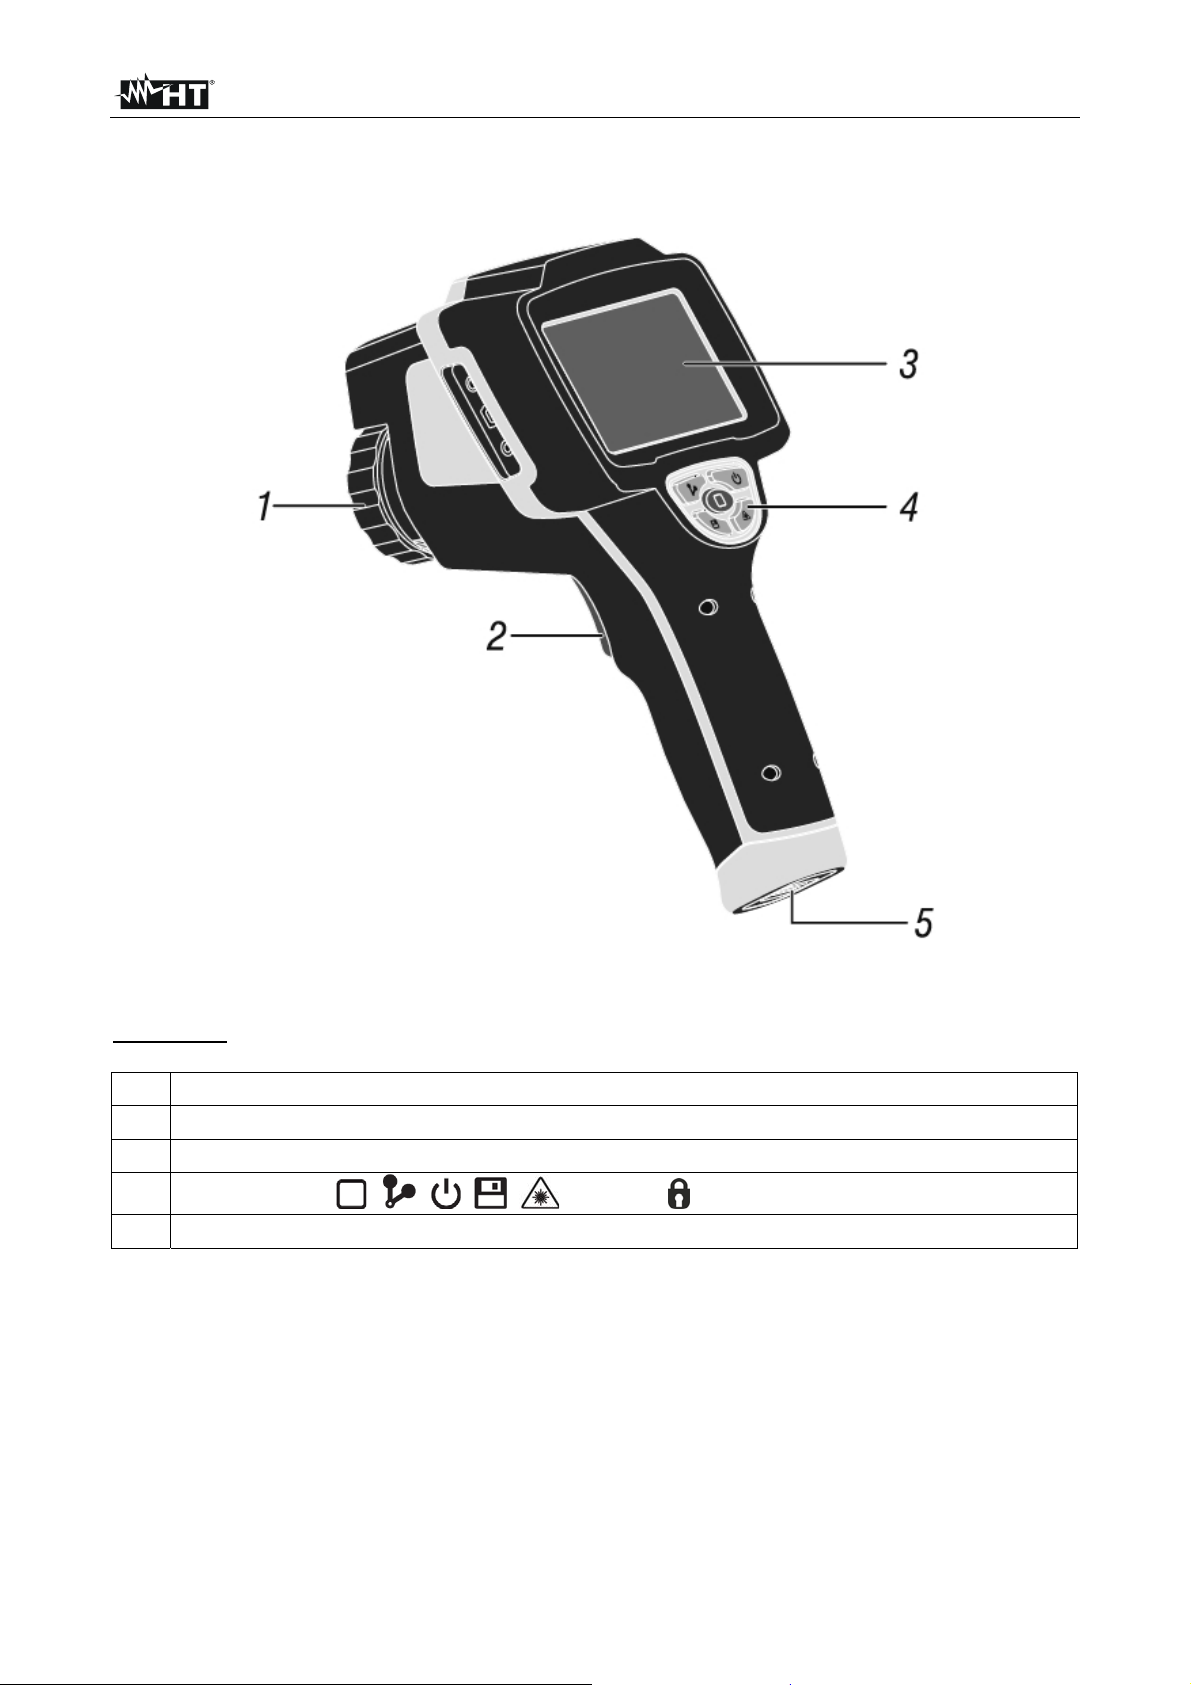
Fig. 1: Description of the instrument's backside
CAPTION:
1 Lens associated with the IR sensor
2 Trigger key (T)
3 LCD touch-screen display
4
Function keys , , , , (THT60), (THT47)
5 Battery compartment cover
EN - 6
THT47 - THT60
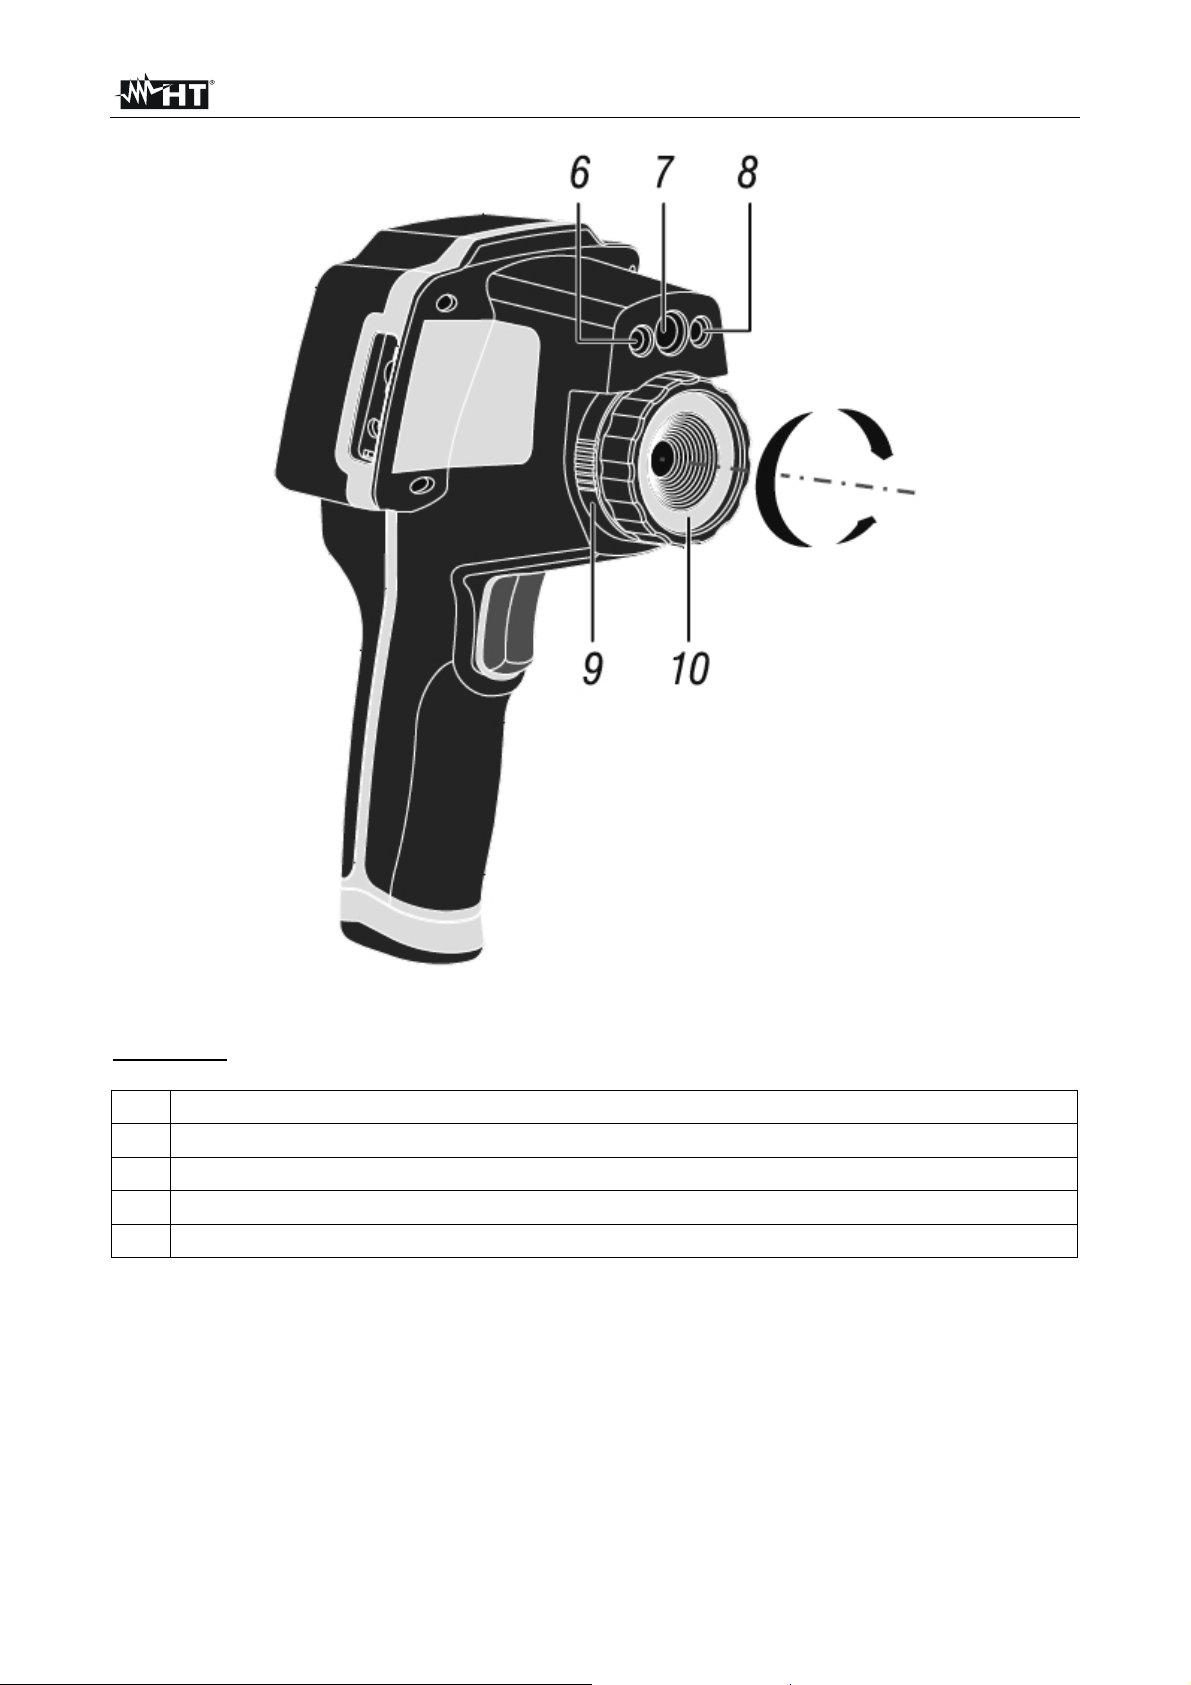
Fig. 2: Description of the instruments front side
CAPTION:
6 Built-in illuminator (THT60)
7 Photo camera (THT60)
8 Laser pointer (THT60)
9 Lens locking/releasing mechanism
10 Lens associated with the IR sensor
EN - 7
THT47 - THT60
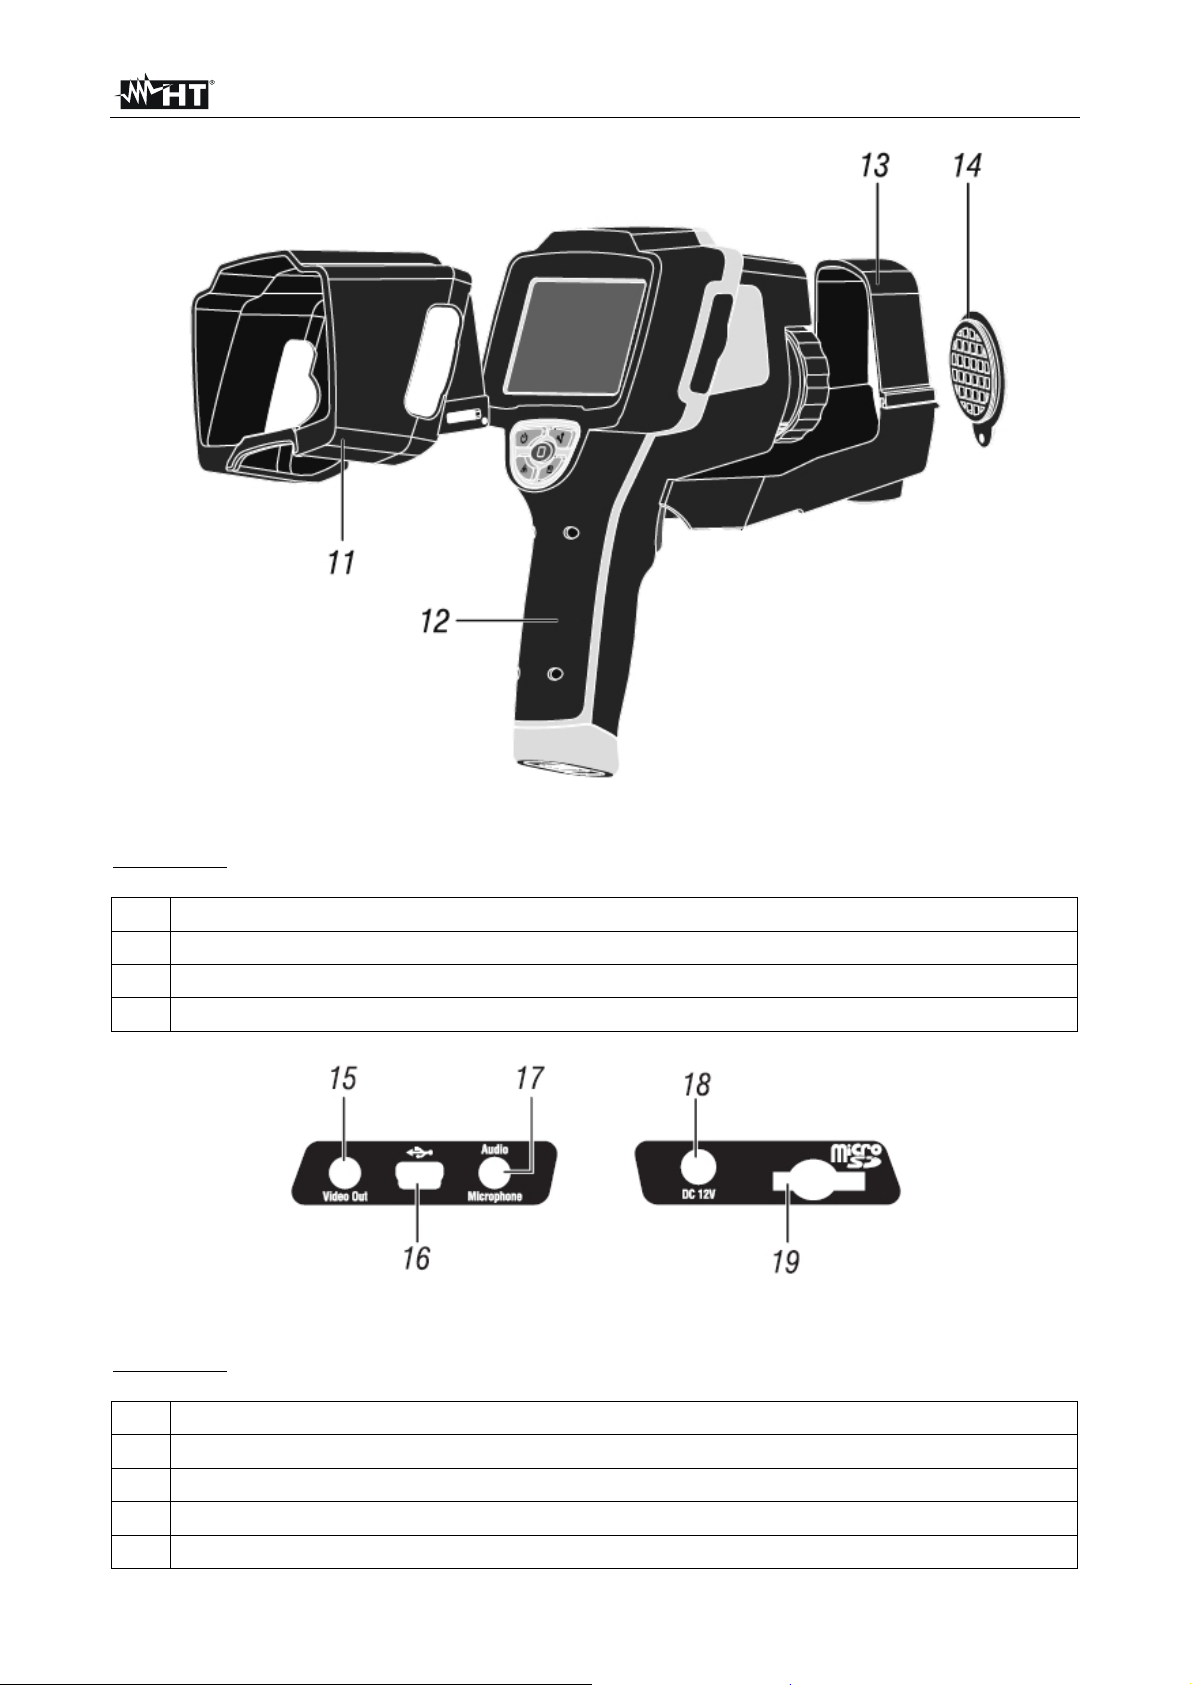
Fig. 3: General description of the instrument
CAPTION:
11 Sun shield
12 Instrument body
13 Universal adapter for tripods
14 Lens protection cap
Fig. 4: Description of the instrument's side interfaces
CAPTION:
15 Video output
16 USB port
17 Audio input for connecting microphone/headphones
18 Input for connecting AC adapter/battery charger
19 Slot for micro SD card insertion
EN - 8
THT47 - THT60
4.2 DESCRIPTION OF FUNCTION KEYS
The instrument has 5 function keys indicated as , , , , (THT60),
(THT47) further in the manual and a trigger key “T” with multiple functions.
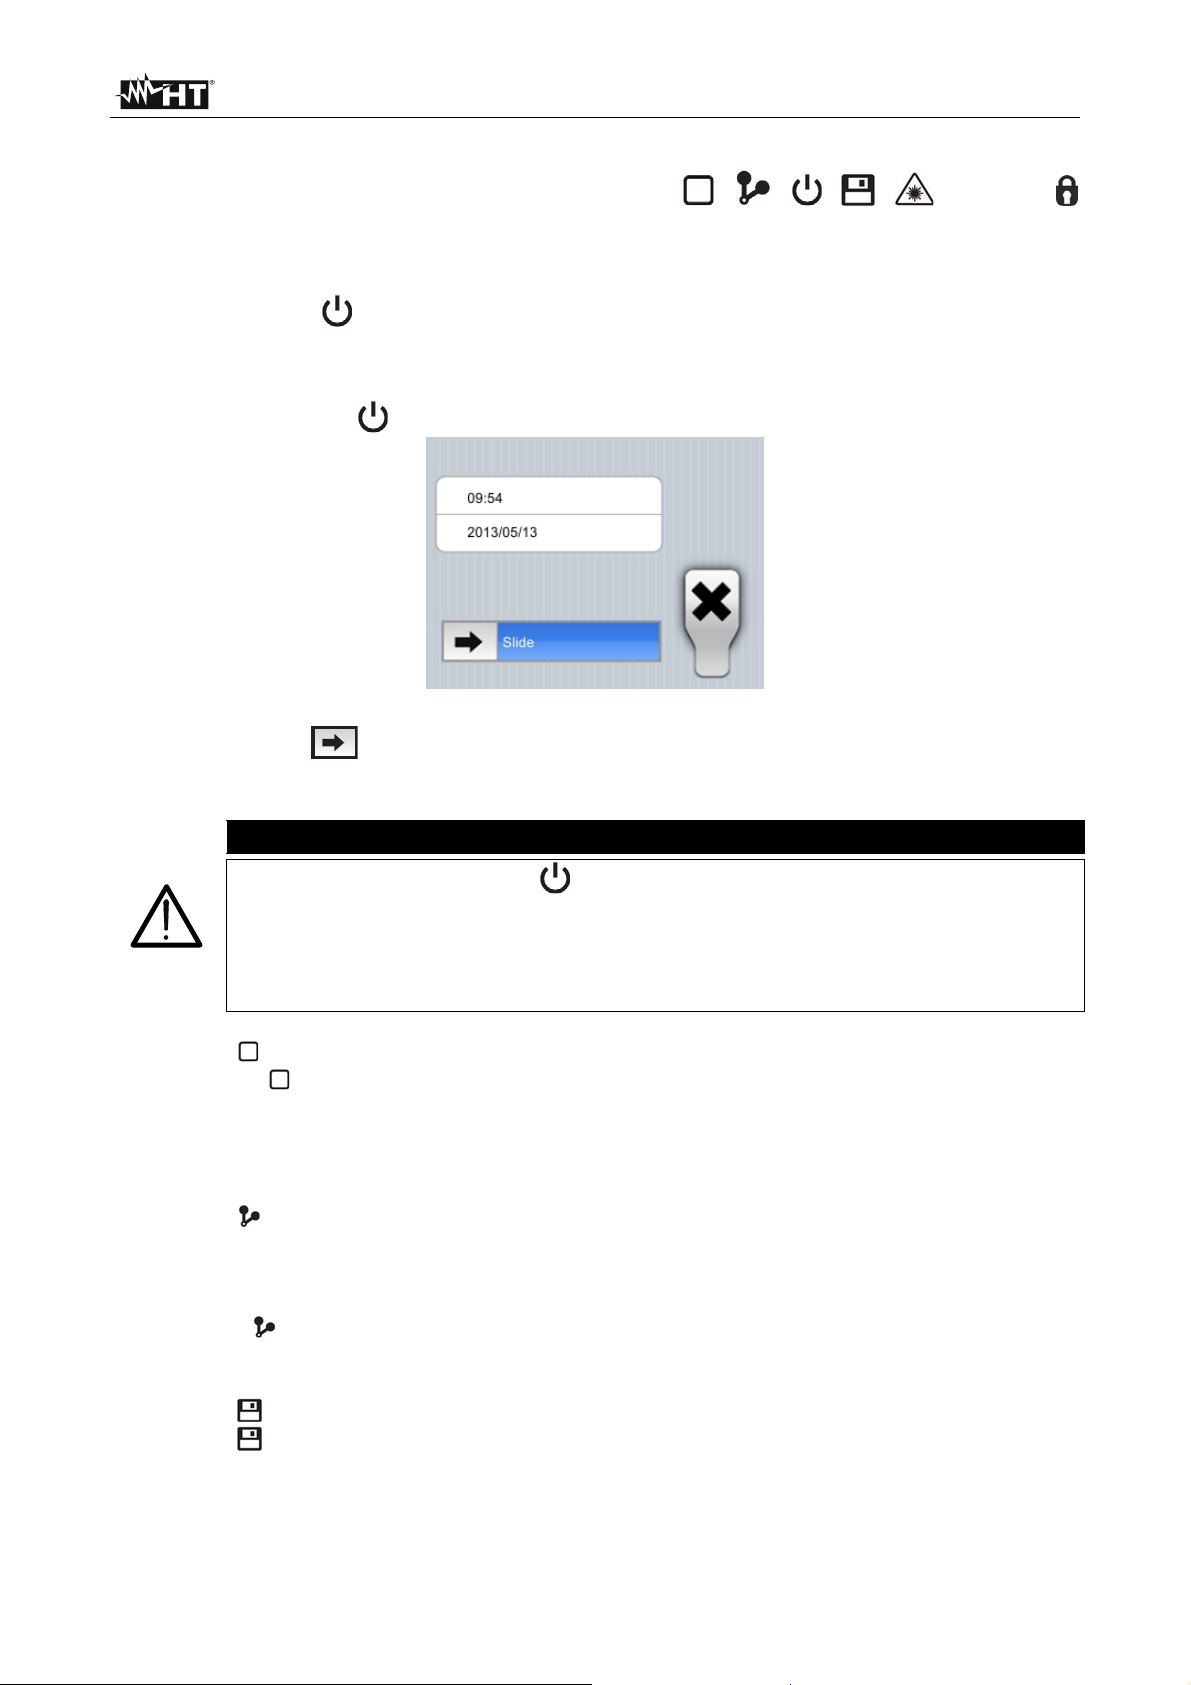
4.2.1 Switching on/off the instrument
Press and hold the key for approx. 3 seconds to switch on the instrument. After approx.
20 seconds internal autotest, the instrument shows its normal measuring screen.
To switch off the instrument, proceed as follows:
1. Press and hold the key for 3 seconds. The instrument shows the following screen:
Fig. 5: Instrument switch-off screen
2. Drag the icon to the right until the end of the blue section. The instrument will
automatically switch off after a few seconds. Touch the “X” key to cancel the operation.
CAUTION
A simple pressing of the key only causes the display to switch off and
on again. The instrument also allows the display to automatically switch
off after a selected time (see § 5.2.1.2).
The instrument may take approx. 10s to switch off in case it is connected
to the external power supply.
4.2.2 Key
Pressing the
key allows showing/hiding the icons of the instrument's main menu
(operation possible also by touching the display), setting the value of the distance from the
object in Fusion screens (see § 5.1.3) and quitting the internal function screens and going
back to the main menu.
4.2.3 Key
The IR image on the display may be out of focus after a few minutes or if a new object is
framed. In order to solve this problem it is necessary that the instrument performs its
internal calibration. It is possible to manually calibrate the instrument at any time by
pressing the key, or to let the instrument calibrate itself automatically after a certain set
time (see § 5.2.1.2).
4.2.4 Key
Press the key to automatically save the IR image shown on the display in the
instrument's memory (micro SD card) (see § 5.2.4.1).
EN - 9
THT47 - THT60
4.2.5 Key (THT60)
Press and hold the “ ” key to switch on the laser pointer which is always active on the
instrument. A small red circle “ ” is found in the middle and on the top left-hand side of
the display. Releasing the key automatically deactivates the laser pointer.
Simply press the “ ” key to activate/deactivate the built-in illuminator with white LED light.
The symbol “ ” appears in the top left-hand part of the display.
4.2.6 Key (THT47)
Press the “ ” key to select the instrument’s temperature adjust mode. The symbols “Auto”,
“M” or “HG” are shown at display (see § 5.2.3.3)
4.2.7 T key (Trigger)
Pressing the T key found in the front part of the instrument allows freezing (Hold) the IR
image on the display and automatically opens the section for saving the image (see §).
The symbol “ ” is found in the top part of the display. Press the T key again to save the
image and quit the Hold status.
EN - 10
THT47 - THT60
5 OPERATING INSTRUCTIONS
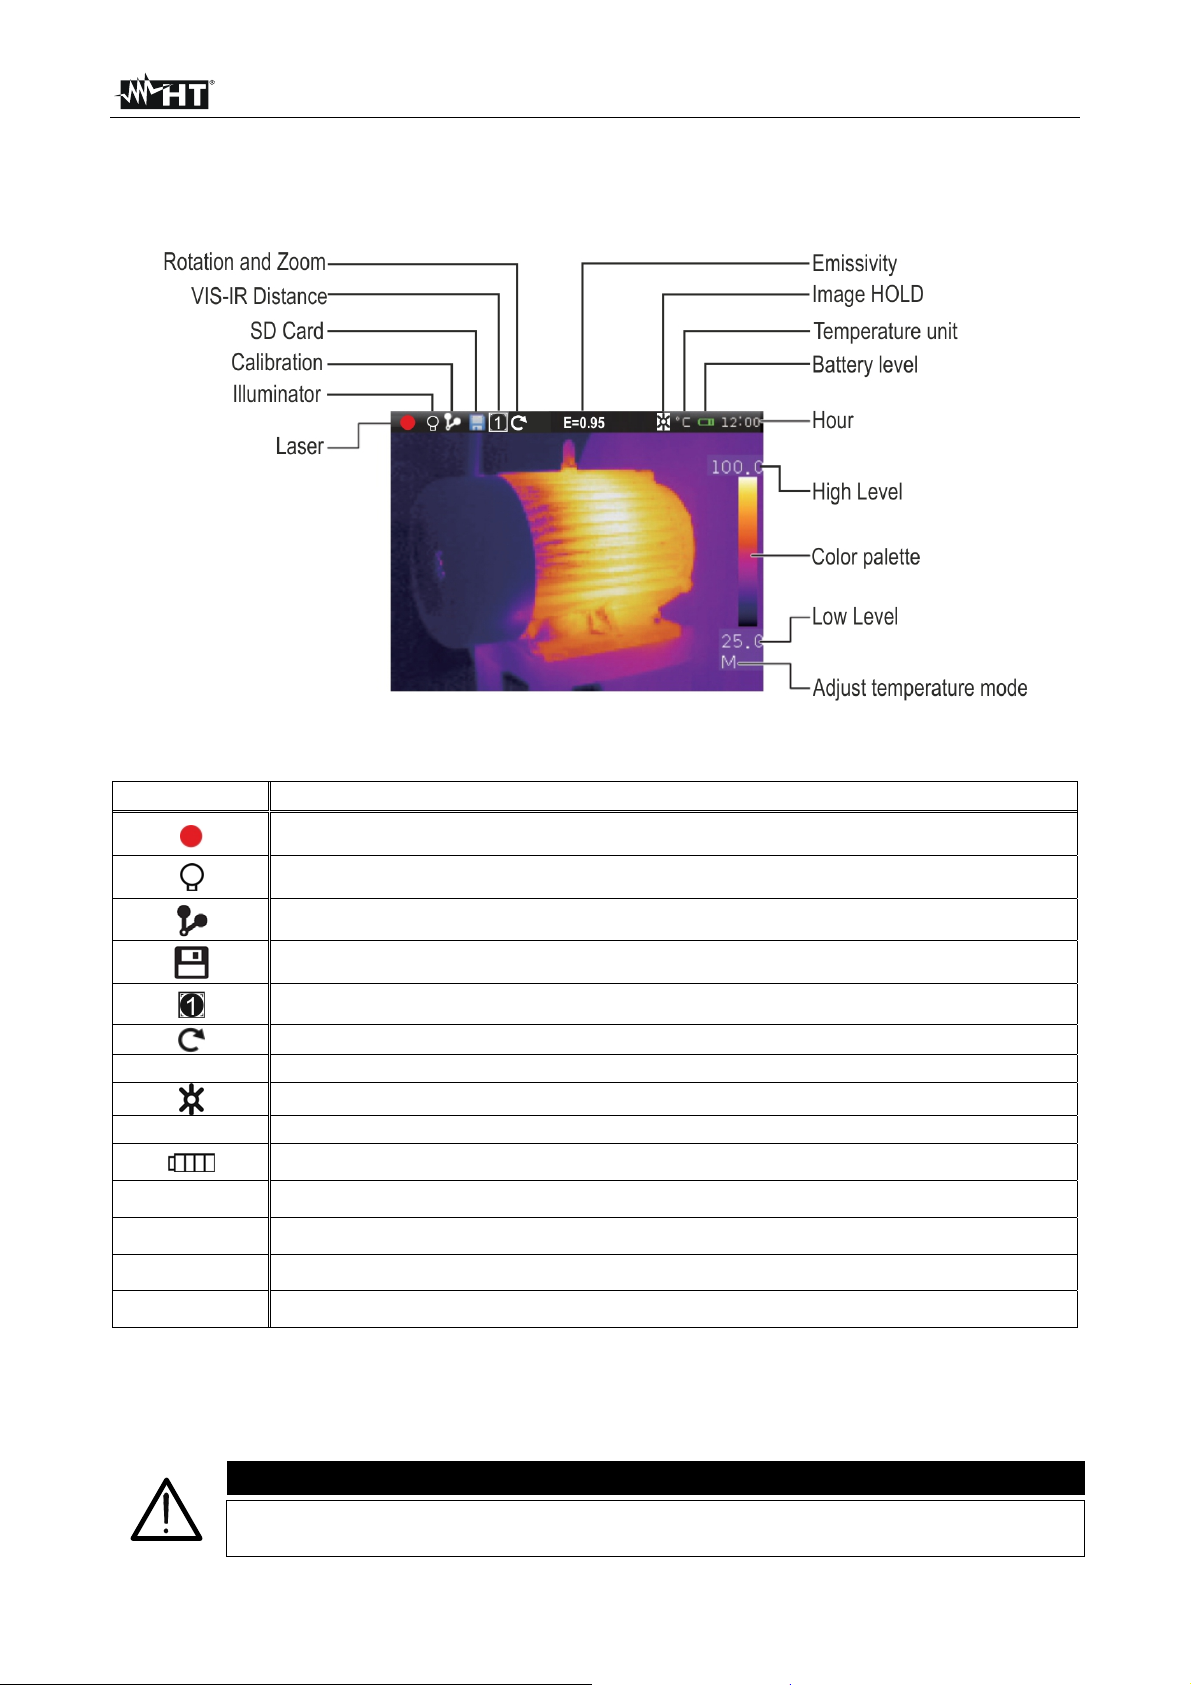
5.1 DESCRIPTION OF THE MAIN INTERFACE
The instrument shows the following main interface on the display:
Fig. 6: Main instrument interface
The meaning of the symbols found on the display is described below.
Symbol Description
E=0.95
°C
12.00
Level
Palette
Active laser pointer (THT60) (see § 4.2.5)
Active built-in illuminator (THT60) (see § 4.2.5)
Manual or automatic calibration activated (see § 4.2.3)
Micro SD card inside the instrument
Setting of distance from object in VIS-IR screens (see § 5.1.3)
Activation of rotation menu and image zoom (see § 5.1.2)
Set value of object emissivity
Active HOLD function (see § 4.2.7)
Temperature measuring unit selected on the instrument (see § 5.2.1.1)
Battery charge level indication (see § 7.2)
Indication of the system's current time (see § 5.2.1.1)
Indication of temperature levels of the IR image (see § 5.2.3.3)
Indication of colour palette (see § 5.2.3.2)
M,Auto,HG
Indication of image temperature adjustment mode (see § 5.2.3.3)
5.1.1 Image focusing
Focusing the IR image found on the instrument display must be performed manually by
rotating the lens installed on the IR sensor (see Fig. 1 - Pos.1). Keep the instrument
steady while performing this operation.
CAUTION
Always focus the image before saving it, in order to perform correct
temperature measurements of the framed object.
EN - 11
THT47 - THT60
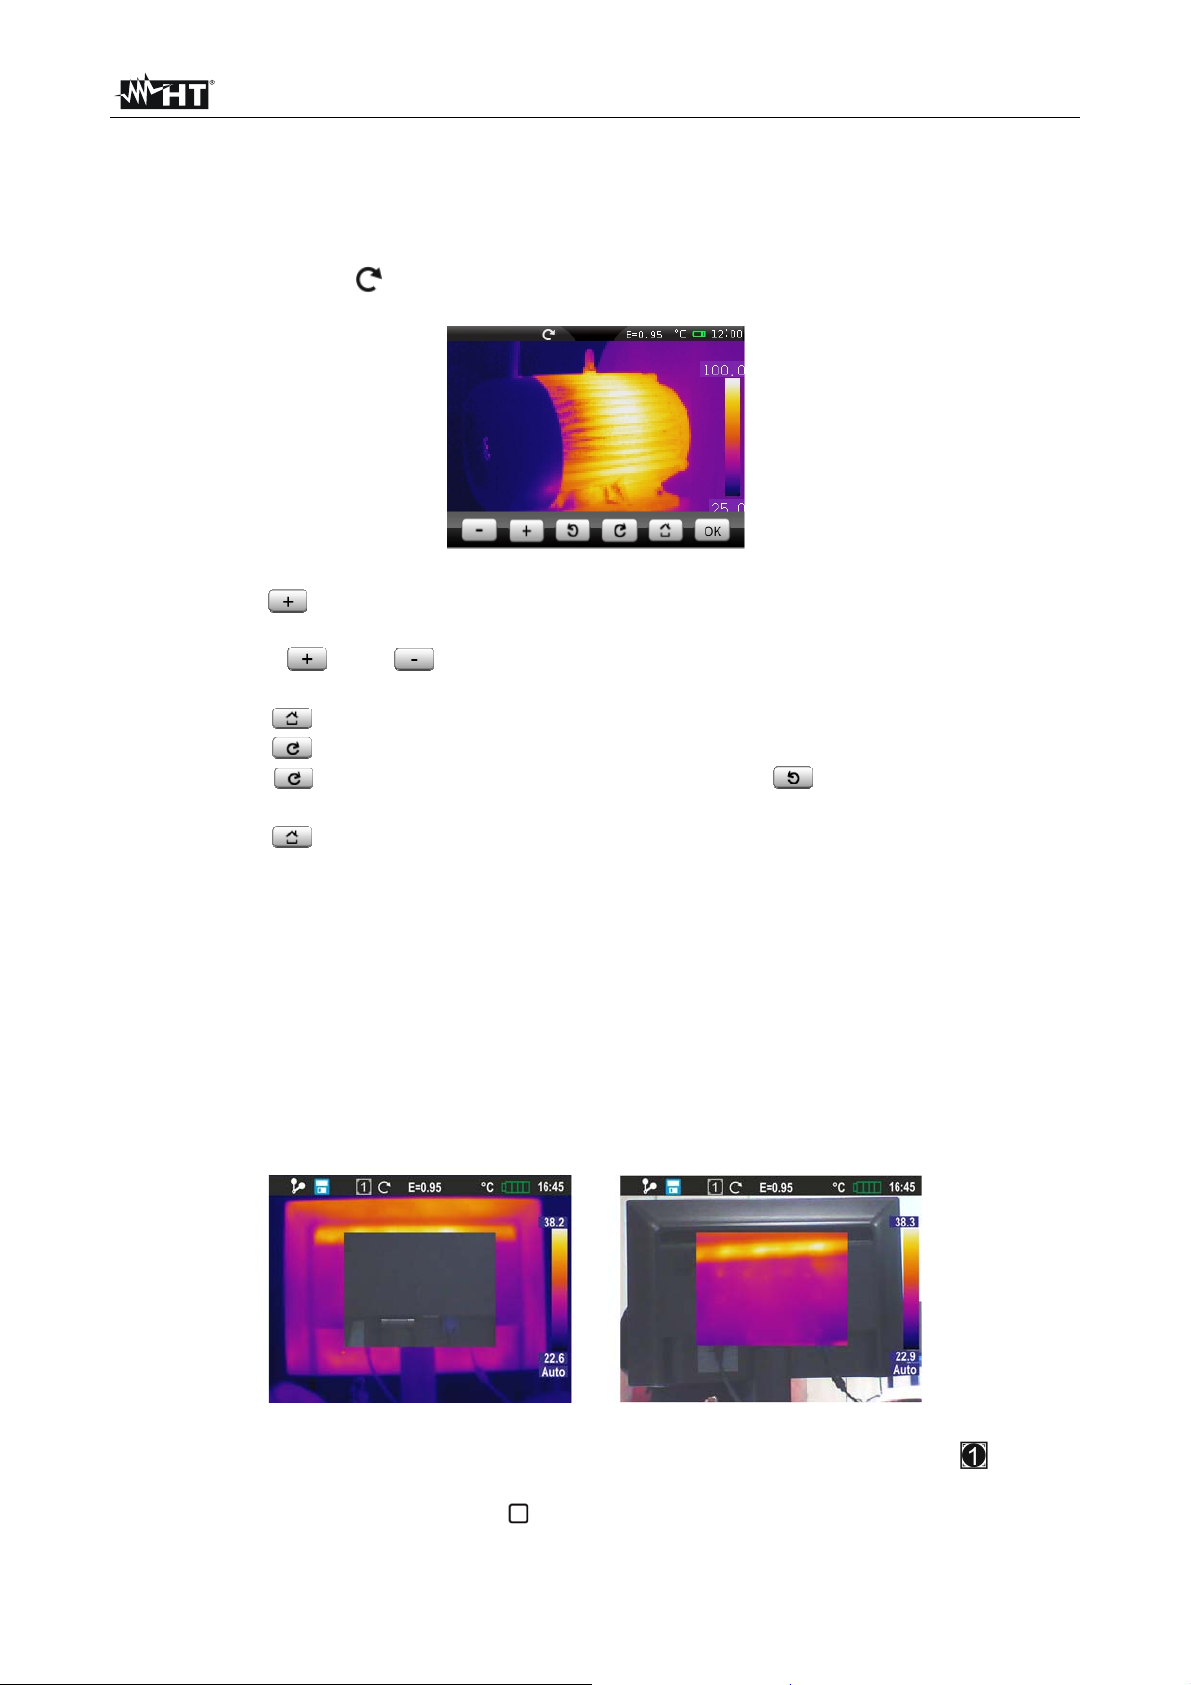
5.1.2 Image rotation and zoom
The instrument allows performing complete rotations (0 360°) and has a digital electronic
zoom function “x1 x20” of the framed IR image. To use these functions, proceed as
follows:
1. Touch the symbol “ ” on the display. The instrument shows the following menu at the
bottom of the display:
Fig. 7: Menu for setting image rotation and zoom
2. Press the “ ” key to activate the zoom function. The indication “0° / 1.1” is shown on
the display and the image is zoomed in 10% more with respect to the original image.
3. Touch the “ ” or “ ” keys to increase or decrease the image zoom with a
resolution of 10%. Zoom range 1.1 20.0
4. Touch the “ ” key to restore normal image view.
5. Touch the “ ” key to activate rotation. The indication “1°/1.0” appears on the display
6. Touch the “ ” key to rotate the image clockwise of the “ ” key to rotate the image
counterclockwise with a resolution of 1°. Rotation range 0° 360°
7. Touch the “ ” key to restore normal image view.
8. Touch the “OK” key to quit the menu.
5.1.3 Adjusting the distance of the object in Fusion screens (THT60)
In “IR_MIX_VIS” and “VIS_MIX_IR” display mode (see § 5.2.3.1), due to the different
position of the lens and of the built-in photo camera, when the object is close to the lens,
the visible image tends to become bigger, while the IR image tends to reduce. When the
object is more than 5m far from the lens, this effect tends to disappear The instrument
allows setting the distance of the object in order to compensate the effect at distances
shorter than 5m. Proceed as follows:
1. Select the “IR_MIX_VIS” or “VIS_MIX_IR” display on the instrument (see §). The
instrument shows the following screens:
Fig. 8: Adjusting the distance of the object in Fusion screens
2. At the top of the display, the instrument automatically shows the symbol “ ”, where
the value indicated inside the square represents the last value set for distance.
3. Press and hold for 2 seconds the key to set the value of distance of the lens from the
object. The following values are available: 1/2m (0.5m), 1m, 2m and 5m
EN - 12
THT47 - THT60
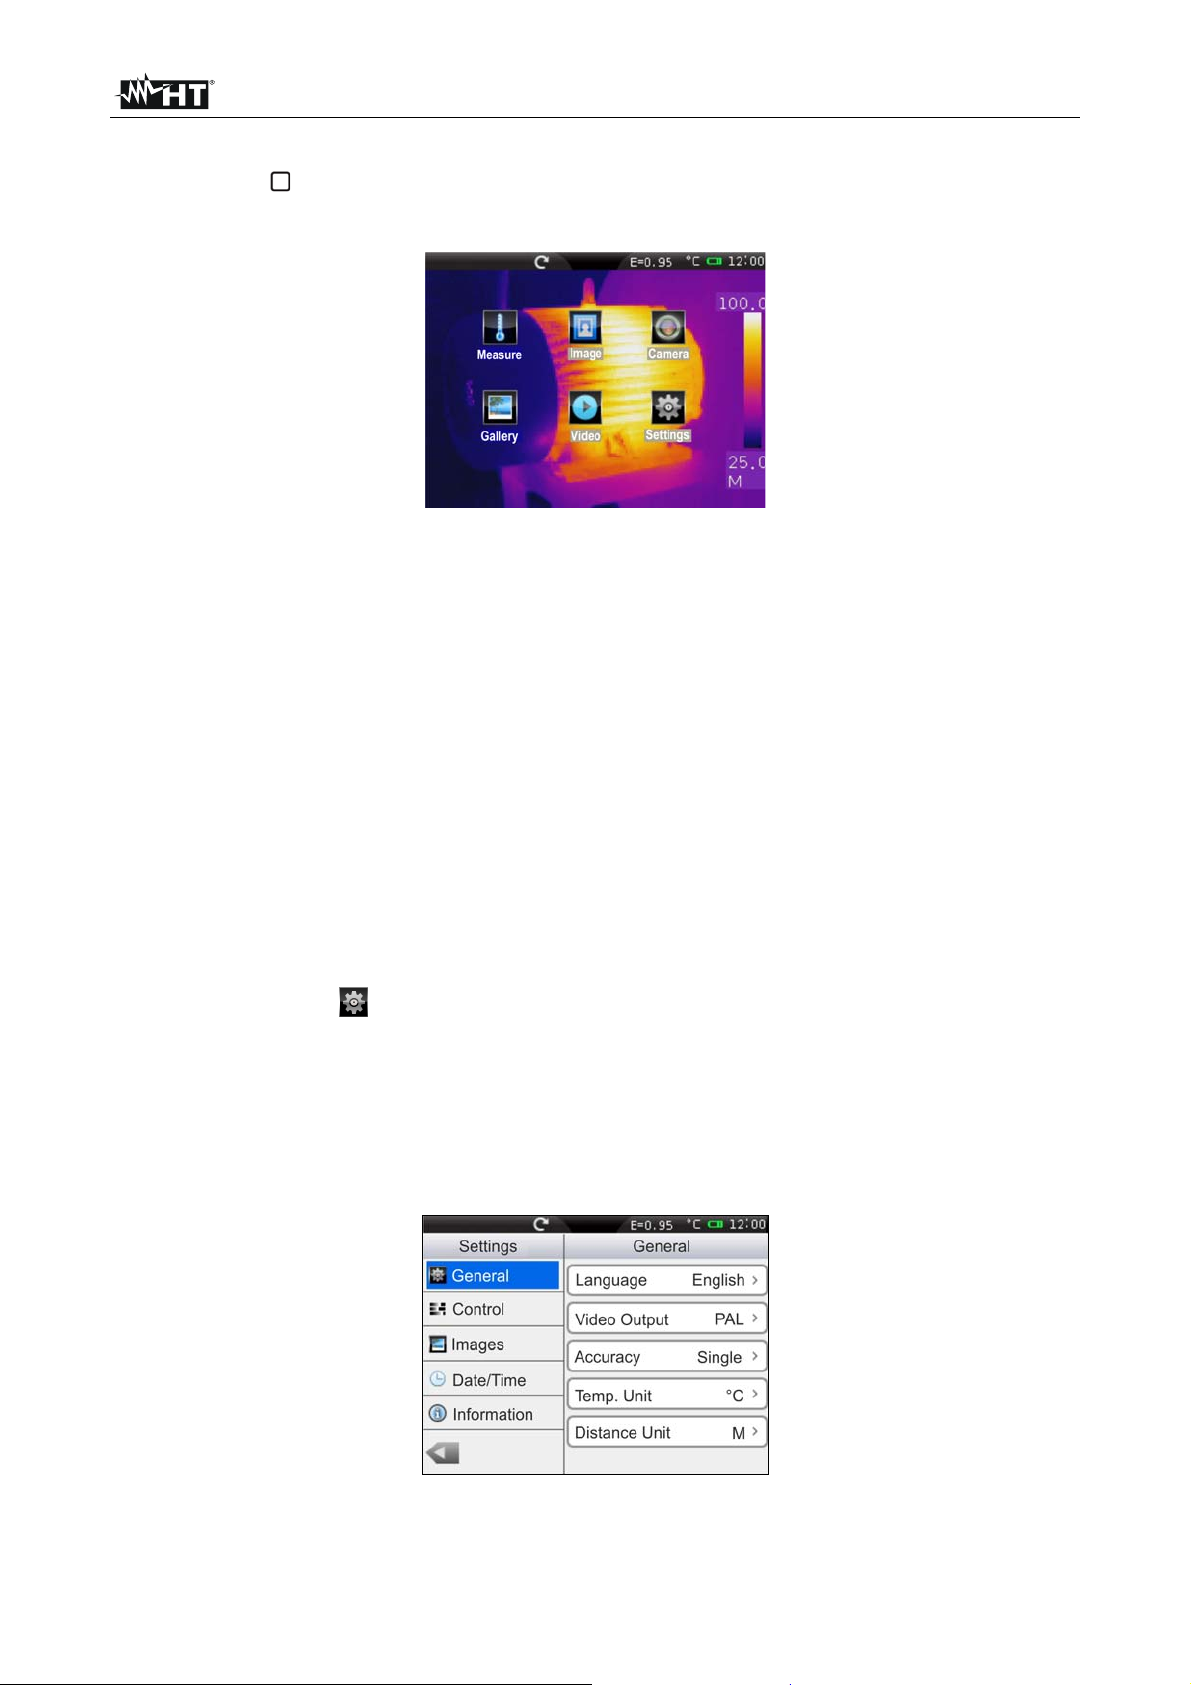
5.2 MAIN MENU DESCRIPTION
Pressing the key or simply touching the display, the instrument shows/hides the
following main menu consisting in 6 icons which allow accessing all internal functions:
Fig. 9: Main instrument menu
Measure menu defines the properties of the tools which can be used for measuring
(cursors, lines, areas, object parameters, alarm conditions).
Image menu defines the display mode of IR, Visible and Fusion images (THT60), the
Automatic/Manual modes and the Isotherm line tool.
Camera menu defines the saving modes of IR images and videos.
Gallery menu includes the gallery of the IR images saved in the micro SD card.
Video menu includes the list of the IR videos saved in the micro SD card.
Settings menu allows setting system parameters.
5.2.1 Settings Menu
By touching the icon the instrument enters the “Setting” menu, in which it is possible to
define the values of system parameters.
5.2.1.1 “General” section
In this section (see Fig. 10) it is possible to define the system language, the type of video
output, the accuracy in temperature measurement, the measuring unit of temperature and
distance.
Fig. 10: “General” section, Setting menu
EN - 13
THT47 - THT60
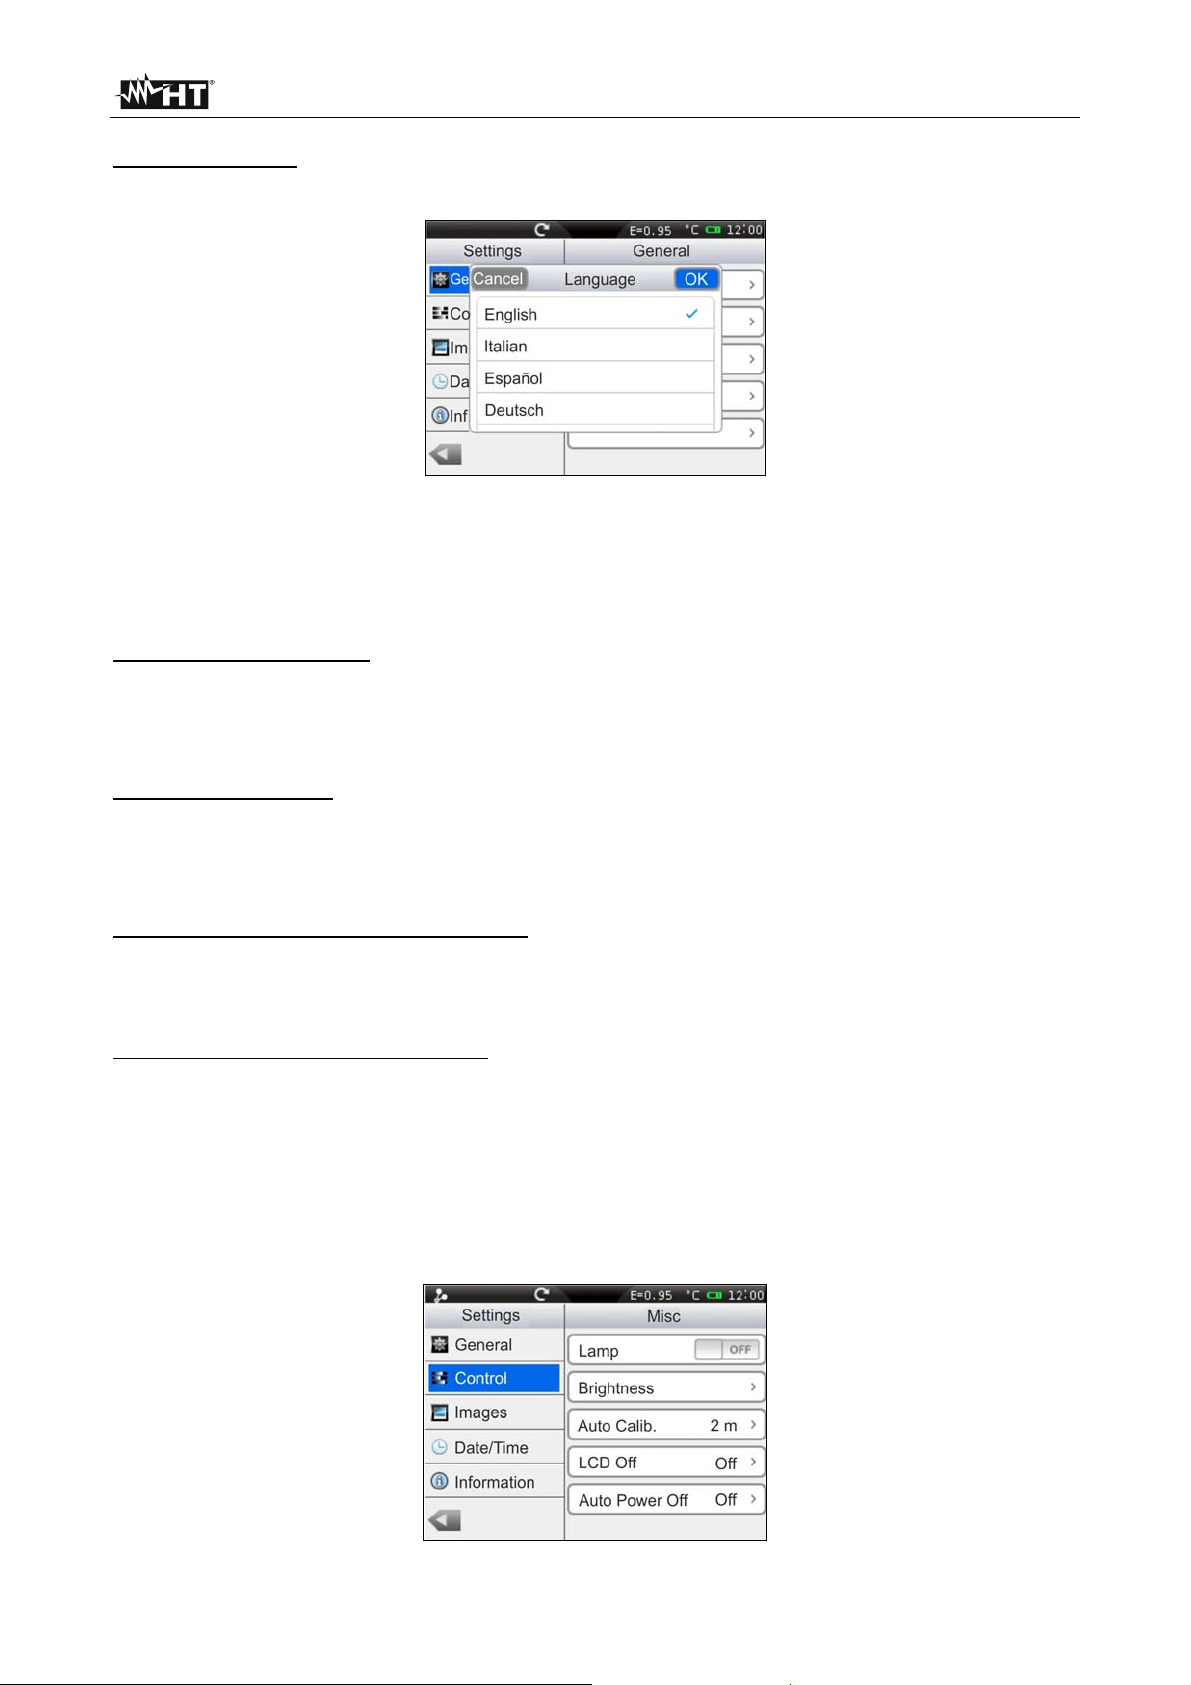
Language setting
1. Touch the box “Language”. The following screen appears on the instrument's display:
Fig. 11: System language setting
2. Scroll the list of the available languages and touch the desired one. A tick “” is
inserted into the corresponding line.
3. Touch “OK” to save your choice and exit the screen or “Cancel” to exit without saving.
Setting the Video output
Touch the box “Video output”. The following options are available to define the type of
video system to which to connect the instrument on the terminal with the same name (see
Fig. 4 – Part 15): PAL, NTSC, Off (disabled output)
Setting the Accuracy
Touch the box “Accuracy” to define the instrument's accuracy when measuring
temperature. Following options are available: Single (the value is displayed with one
decimal figure). Double (the value is displayed with two decimal figures).
Setting the temperature measuring unit
Touch the box “Temp. Unit” to define the measuring unit used by the instrument when
measuring temperature. Available options are: °C, °F (°F = 32 + 1.8x°C), °K (°K = °C +
273.15)
Setting the distance measuring unit
Touch the box “Distance Unit” to define the measuring unit used by the instrument when
measuring the distance from the object. Available options are: M (metres), FT (feet) (FT =
0.3048xM)
5.2.1.2 “Control” section
In this section (see Fig. 12) it is possible to define the activation of the built-in illuminator,
set display brightness, the automatic calibration time, the display's switch-off time and the
instrument's auto power-off time.
Fig. 12: “Control” section, Setting menu
EN - 14
THT47 - THT60
Activation of the built-in illuminator (THT60)
Touch the box “Lamp” to activate (ON) or deactivate (OFF) the built-in illuminator
(operation possible also by pressing the key)
Adjusting display brightness
1. Touch the box “Brightness”. The following screen appears on the instruments display:
Fig. 13: Setting display brightness
2. Scroll the adjusting bar until reaching the desired brightness percentage visible in real
time on the display. A very high level means an increased consumption of the internal
battery.
3. Touch “OK” to save your choice and exit the screen or “Cancel” to exit without saving.
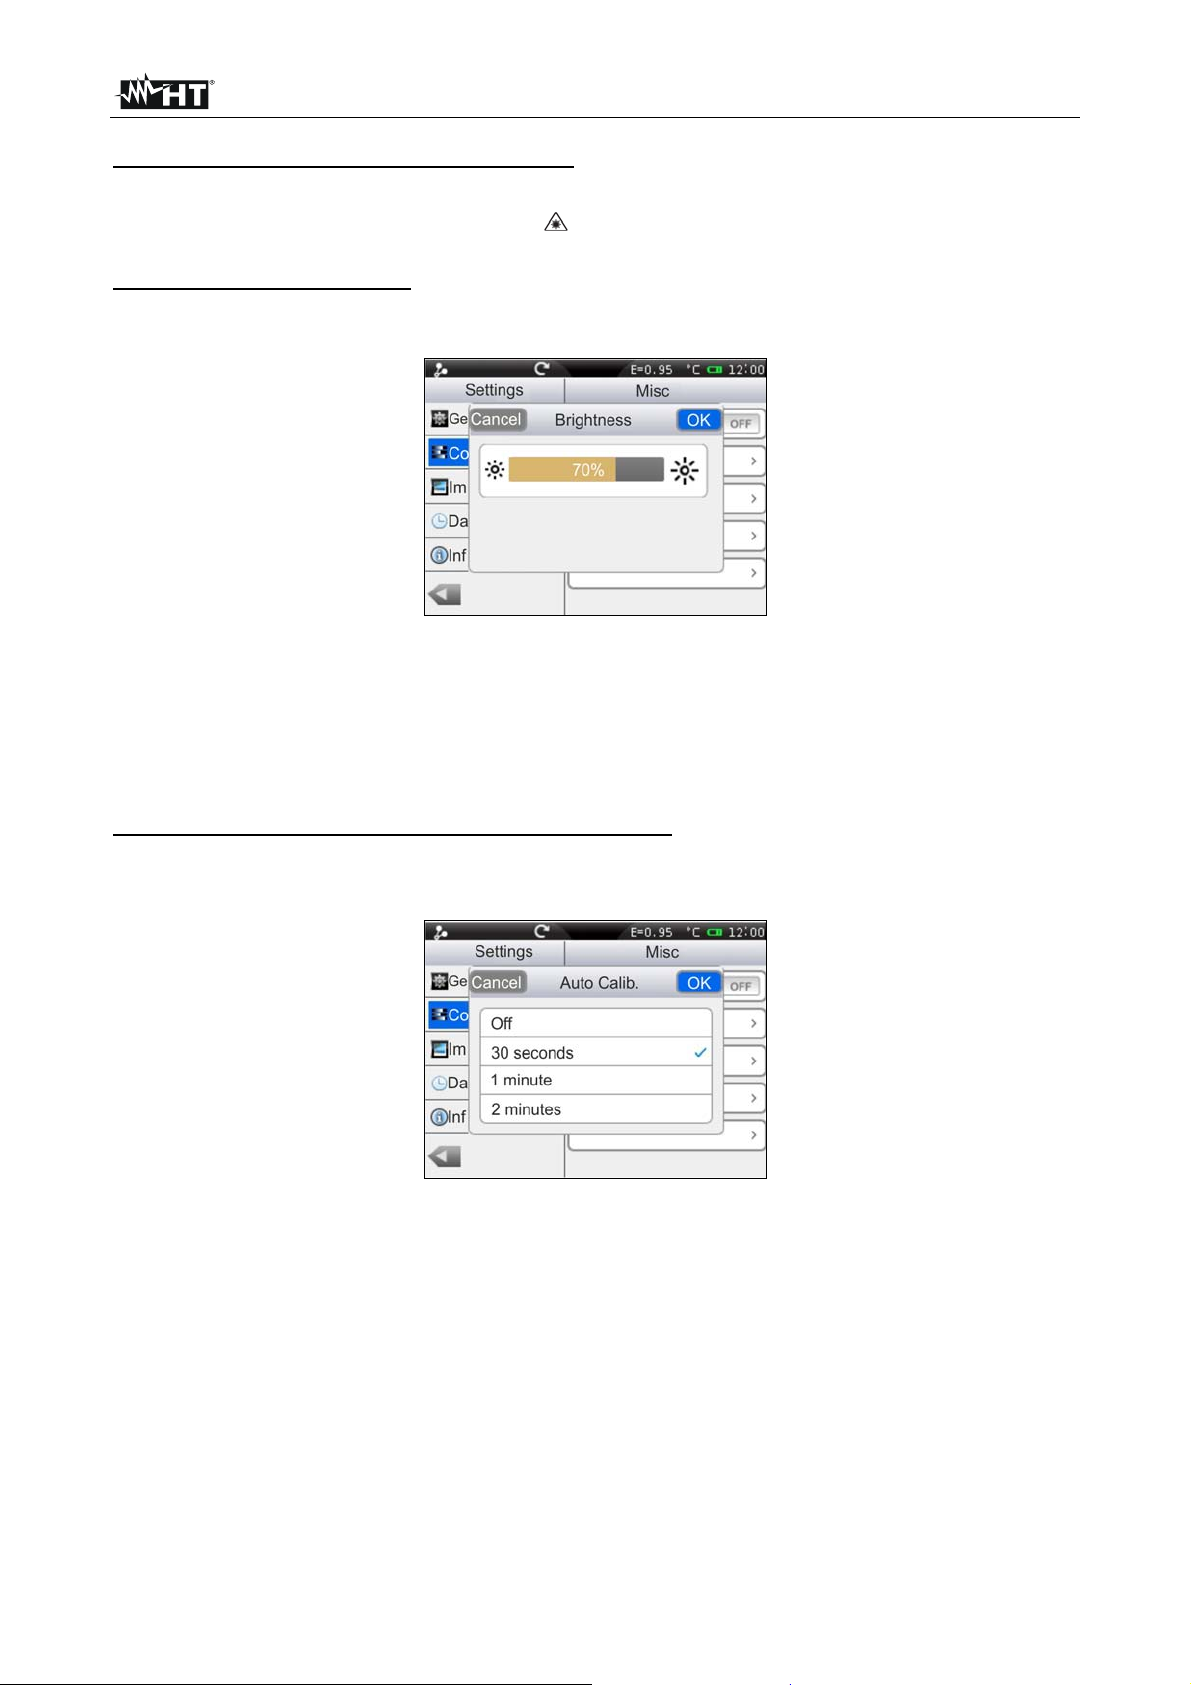
Adjusting the automatic calibration time (see § 4.2.3)
1. Touch the box “Auto Calib.”. The following screen appears on the instruments display:
Fig. 14: Setting the automatic calibration time
2. Scroll the list of the available options: 30s, 1min, 2min and Off (autocalibration
deactivated) and touch the desired one. A tick “” is inserted into the corresponding
line.
3. Touch “OK” to save your choice and exit the screen or “Cancel” to exit without saving.
EN - 15
 Loading...