

Page 1

User guide
Page 2

2 Contents
Contents
Unboxing
What's inside the box?
Headset and link box
Headset
Link box
Product care and repair
Troubleshooting
Base stations
About the Vive base stations
Installing the base stations
Tips for setting up the base stations
Using the mounting kit
Updating base station firmware via cable connection
Updating base station firmware via Bluetooth
What does the status light on the base stations mean?
What should I do if any of the base stations is not detected?
Do I need to use the sync cable?
Are the base stations covered by warranty if accidentally damaged?
When Vive is in use, my TV remote isn't working. What can I do?
Controllers
About the Vive controllers
Charging the controllers
Turning the controllers on or off
Pairing the controllers with the headset
Attaching the lanyards to the controllers
Updating controller firmware
What does the status light on the controllers mean?
What should I do if any of the controllers is not tracked?
How do I know which of the controllers is not being tracked?
What can I do if the controller's trackpad is oversensitive?
What should I do if my controller won't turn on?
My controller won't turn on after I accidentally unplugged it during firmware update. What should I do?
Viveport
Using Viveport
Viveport basics
Viveport Subscription
Viveport mobile app
HTC Account for Viveport
Viveport PIN
Purchasing content
Downloading and launching content
Reviewing content
Page 3

3 Contents
Viveport troubleshooting
Vive Home
What is Vive Home?
Launching Vive Home
Moving around Vive Home
Teleporting
Adding app shortcuts or objects to your Home space
Managing app shortcuts and objects
Working with app shortcuts
Adding picture frames on the Home space
Playing videos in Vive Home
Browsing the web in Vive Home
Changing your Home space
Resetting the Home space
Phone notifications
Downloading and installing the Vive phone app
Pairing your phone with Vive
Choosing which notifications to receive on VR
Receiving notifications while in VR
Checking your notifications
Editing or adding message replies (Android users)
Unpairing your phone with Vive
What types of phone notifications can I receive on Vive?
Can I receive notifications from more than one phone on Vive?
What features of the Vive phone app are not supported in the iOS version?
Play area
What is the play area?
Planning your play area
Choosing the play area
Setting up Vive for the first time
Setting up a standing-only play area
Setting up a room-scale play area
Resetting the play area
Verifying your setup
After setting up, how do I turn the Vive system on?
What is the recommended space for the play area?
Can I include space occupied by furniture for the play area?
Will VR apps for seated/standing-only experiences work with room-scale setup?
How do I resolve download errors during Vive Setup installation?
I can't complete the room setup. What should I do?
Settings
Vive app settings
System Dashboard settings
SteamVR
Activating the front-facing camera
Checking for firmware updates
What can I do if I'm having issues with the SteamVR app?
How do I resolve SteamVR Error 208?
Page 4

4 Contents
How can I opt-in to SteamVR Beta?
Trademarks and copyrights
Index
Page 5
5 About this guide
About this guide
In this user guide, we use the following symbols to indicate useful and important information:
This is a note. A note often gives additional information, such as what happens when you
choose to do or not to do a certain action. A note also provides information that may only be
applicable to some situations.
This is a tip. A tip gives you an alternative way to do a particular step or procedure, or lets you
know of an option that you may find helpful.
This indicates important information that you need in order to accomplish a certain task or to
get a feature to work properly.
This provides safety precaution information, that is, information that you need to be careful
about to prevent potential problems.
Page 6

6 Unboxing
Unboxing
What's inside the box?
Your Vive™ comes with the following items, which you'll use to experience immersive VR
environments:
Main component Accessories
Vive headset 3-in-1 cable (attached)
Audio cable (attached)
Earbuds
Face cushions (1 attached and 1 alternate for narrow face)
Cleaning cloth
Link box Power adapter
HDMI cable
USB cable
Mounting pad
Vive controllers (2) Power adapters (2)
Lanyards (2 attached)
Micro-USB cables (2)
Base stations (2) Power adapters (2)
Mounting kit (2 mounts, 4 screws, and 4 wall anchors)
Sync cable (optional)
You can also find documentation in the box, such as the Safety and regulatory guide and
warranty card.
Page 7

7 Headset and link box
Headset and link box
Headset
About the Vive headset
The headset is your window to the VR environment.
The headset has sensors that are tracked by the base stations.
The sensors on the headset are sensitive. Do not cover or scratch the sensor lenses, including
the proximity sensor.
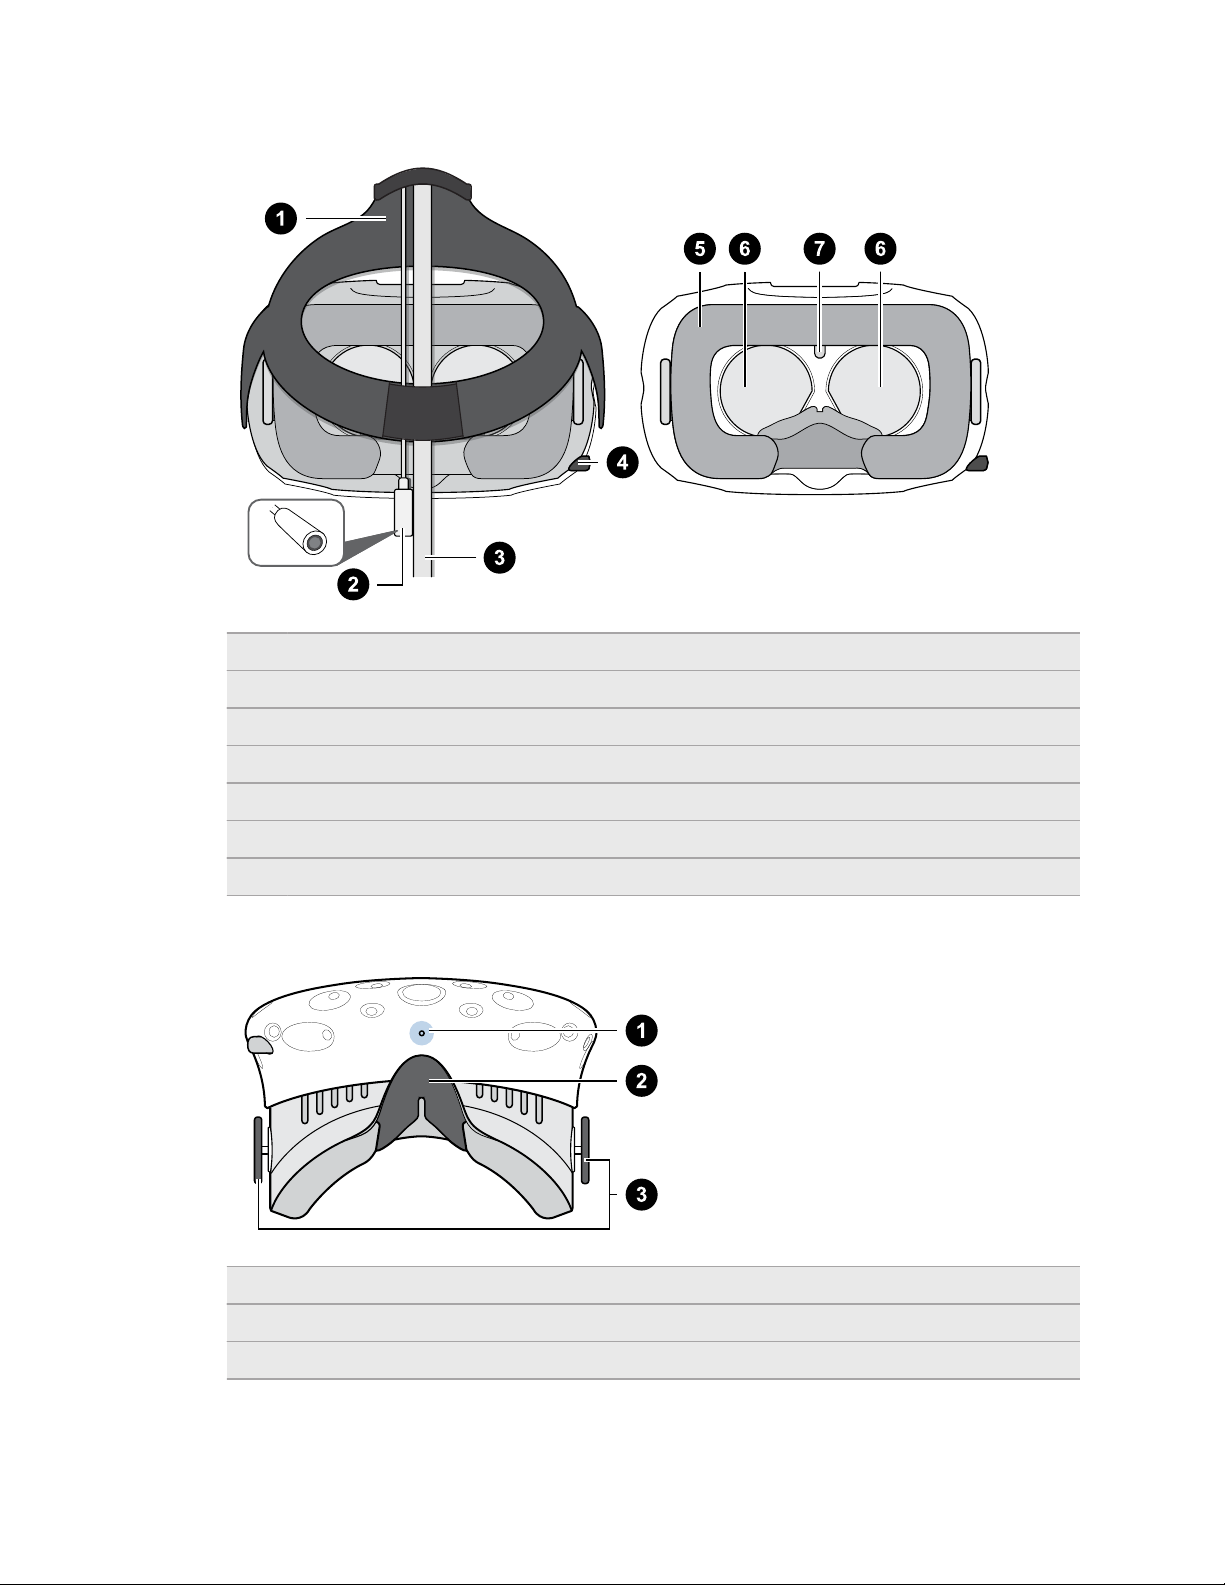
Front and side
1 Camera lens
2 Tracking sensor
3 Headset button
4 Status light
5 Lens distance knob
Page 8
8 Headset and link box
Back
1 Strap
2 Audio cable
3 3-in-1 cable
4 IPD (interpupillary distance) knob
5 Face cushion
6 Lenses
7 Proximity sensor
Bottom
1 Microphone
2 Nose rest
3 Lens distance knobs
Page 9
9 Headset and link box
Putting the headset on
Before putting the headset on, make sure that you've peeled off the protective film from the
lenses.
1. Pull the headset down over your eyes.
2. Slide the straps around the back of your head, and adjust them so that the headset fits
snugly and comfortably.
3. Make sure that the cables pass through the sleeve at the back of the headset, and are
positioned straight down your back.
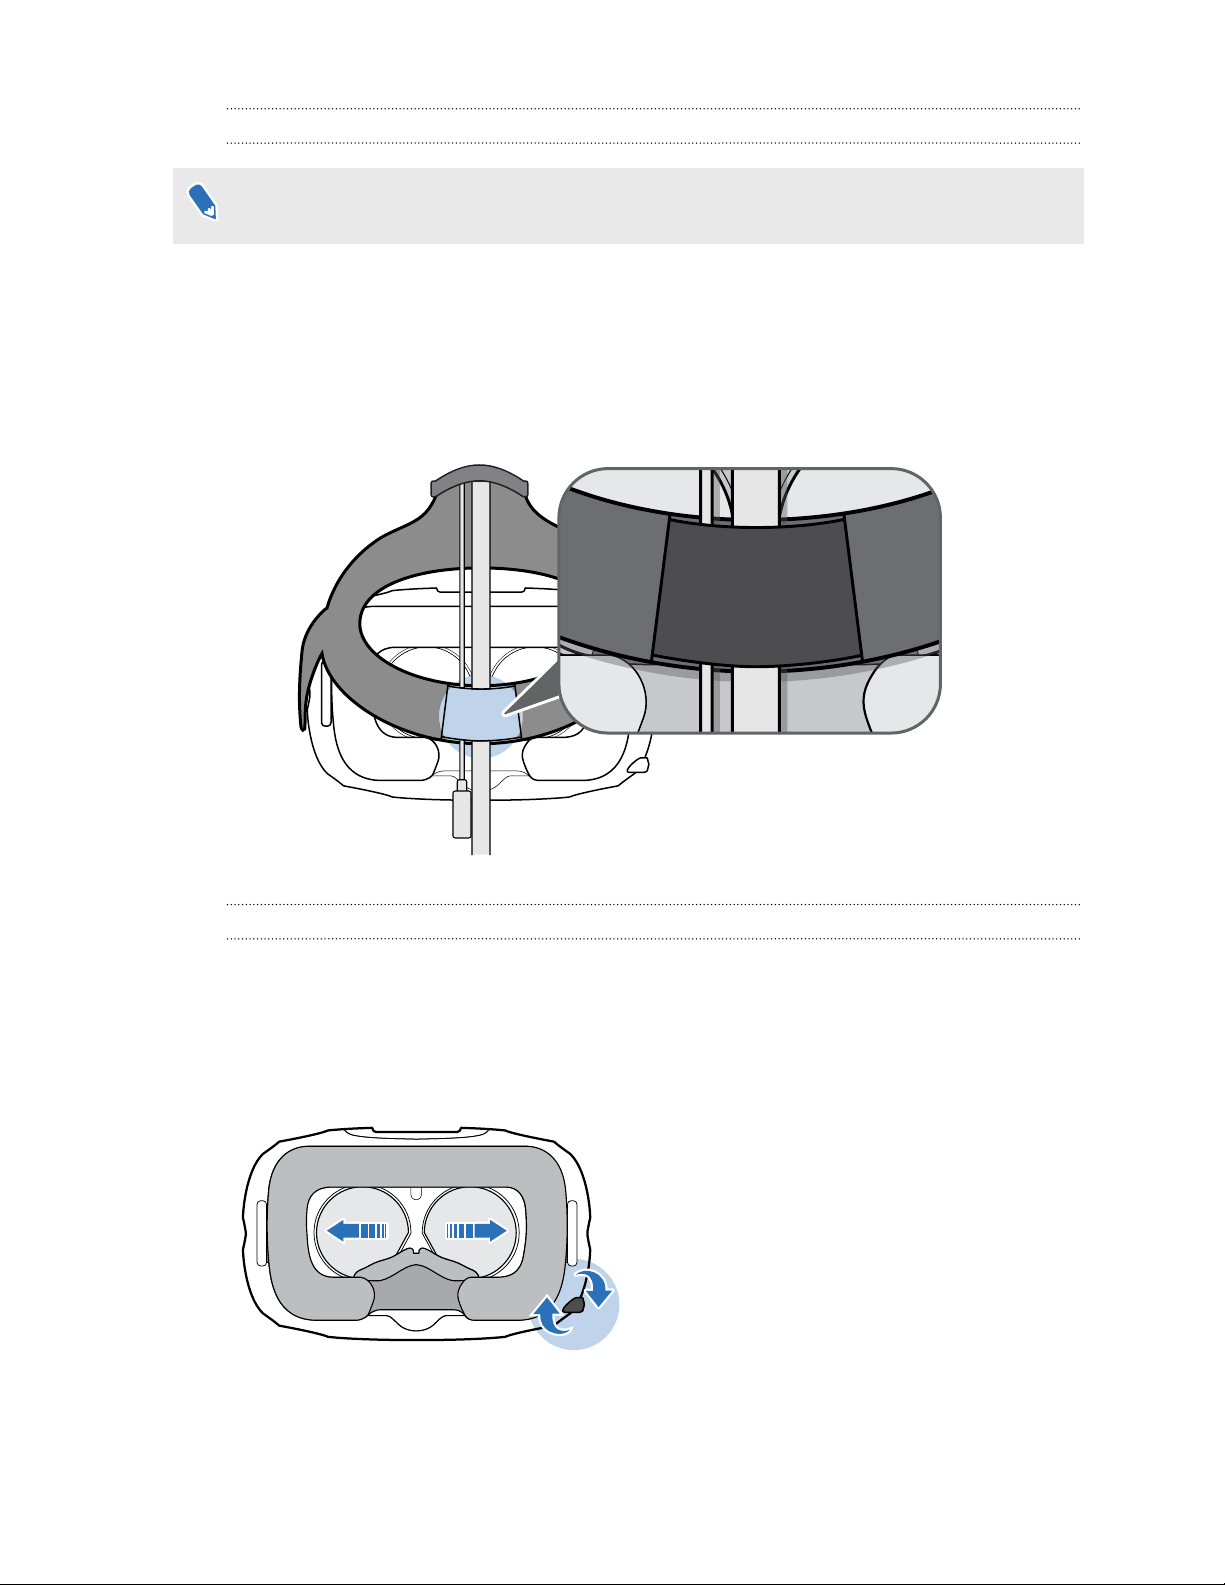
Using the IPD knob on the headset
Interpupillary distance (IPD) is the distance between the center of the pupils in your eyes. A quick
way to get an estimate is by facing a mirror and holding a millimeter ruler against your brow. Use
this measurement as a guide to adjust the distance between the lenses of the headset so that
you'll have a better viewing experience.
To change the distance between the lenses, rotate the IPD knob.
As you adjust the IPD, you'll see information displayed in the headset that indicates the current
distance between the centers of the lenses.
Page 10
10 Headset and link box
Can I wear my prescription glasses while using Vive?
Most glasses fit inside the headset. If you wear large prescription glasses, adjust the lens
distance knobs to increase the space in the headset.
Make sure that no part of your glasses scratch the headset lenses.
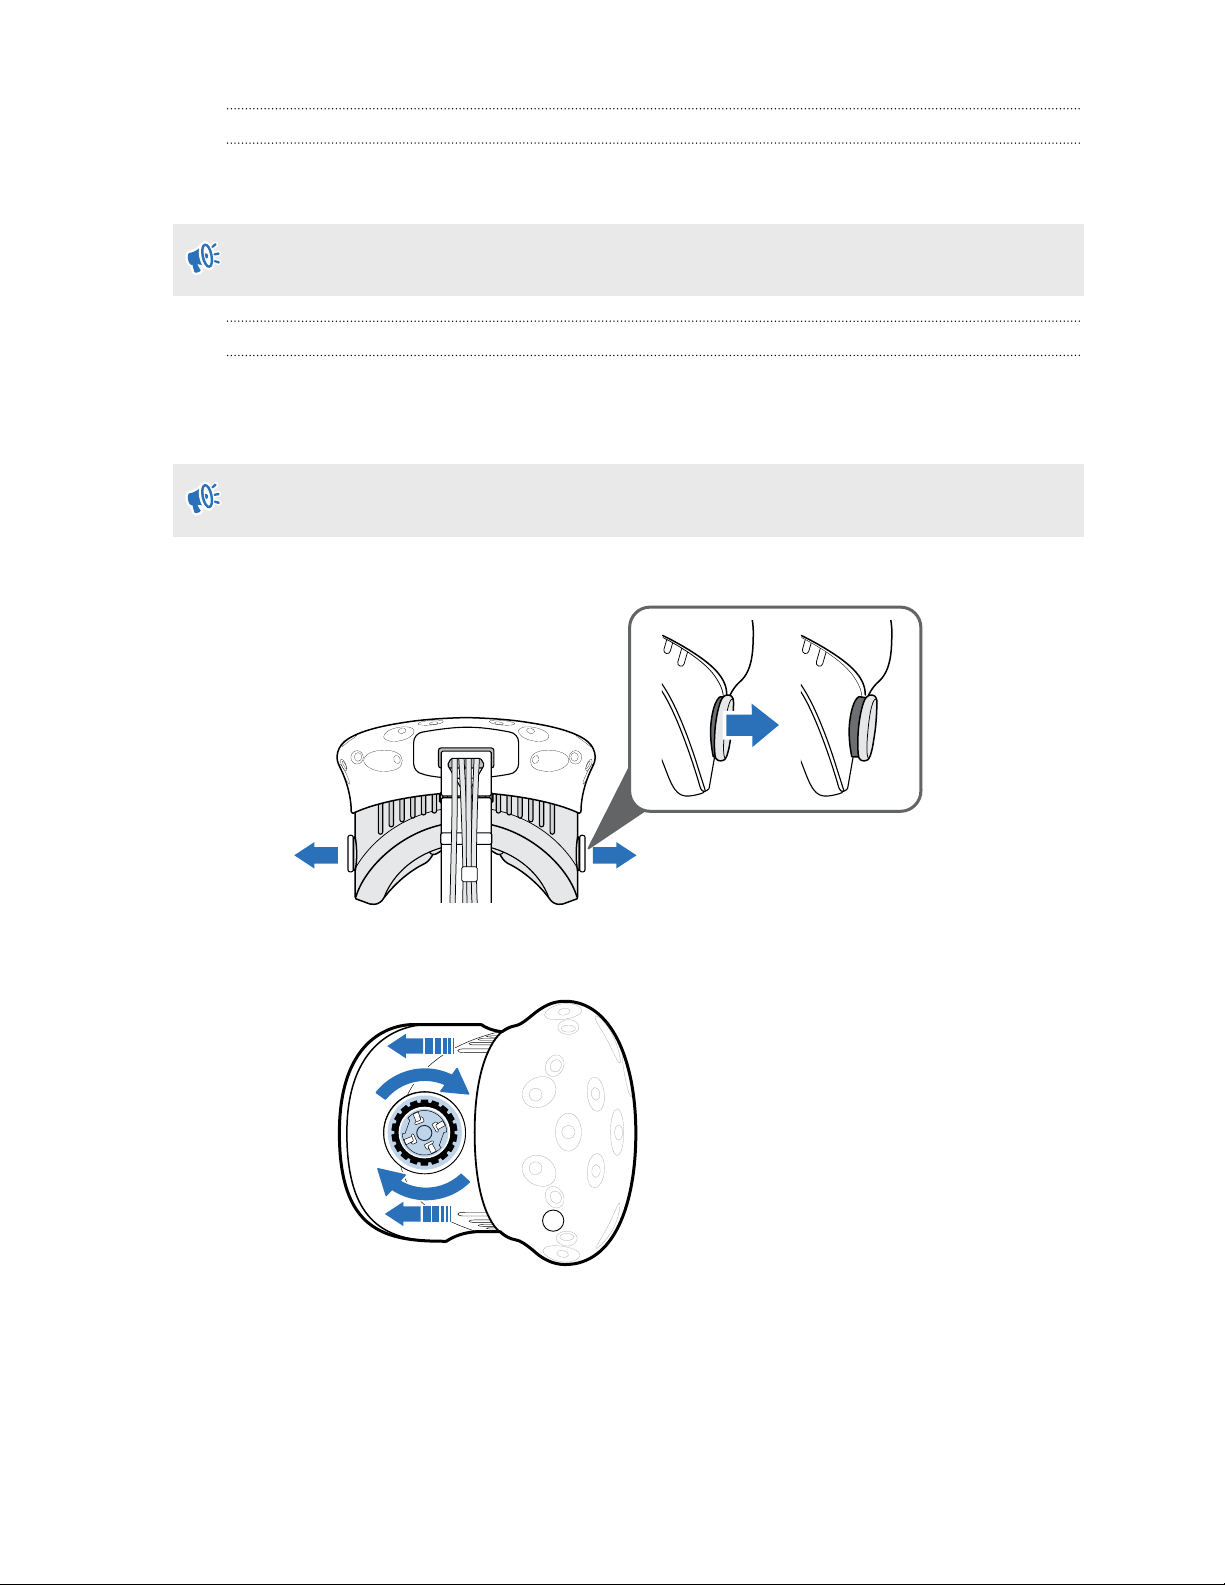
Adjusting the lens distance on the headset
If you wear large prescription glasses or have long eyelashes, you may need to increase the lens
distance further from your face. Only increase this distance as necessary, as the closer the lenses
are to your eyes, the better your field of view will be while wearing the headset.
Make sure that no part of your glasses scratch the headset lenses.
1. Pull out each lens distance knob to unlock it.
2. Rotate both lens distance knobs to adjust the lens further or closer to your face.
3. After you're done adjusting, push each knob to lock it back in.
Page 11
11 Headset and link box
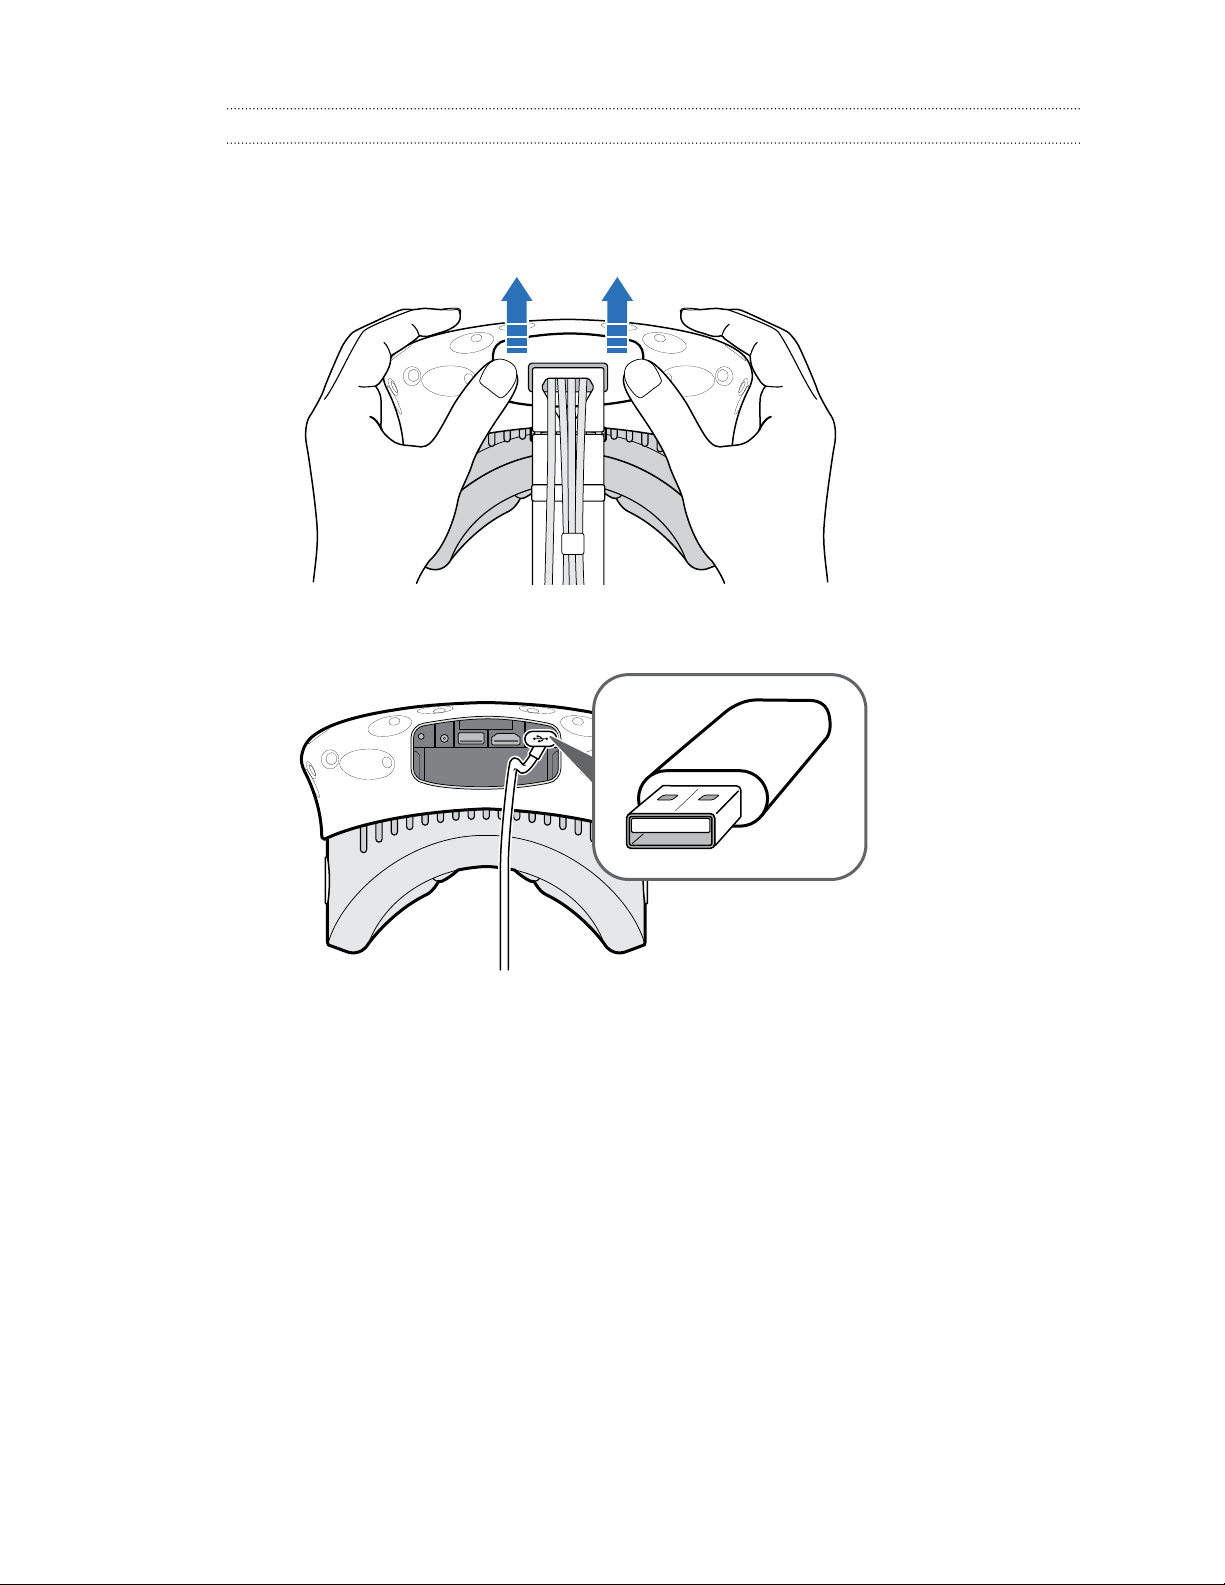
Connecting a USB device to the headset
Plug in a USB cable to the headset for using a compatible third-party device with Vive. Viveoptimized USB cable is sold separately by HTC.
1. Push open the compartment cover to access the connector slots on the headset.
2. Plug in the USB cable to its corresponding slot.
3. Connect the third-party device to the USB cable end.
4. Replace the compartment cover.
Page 12
12 Headset and link box
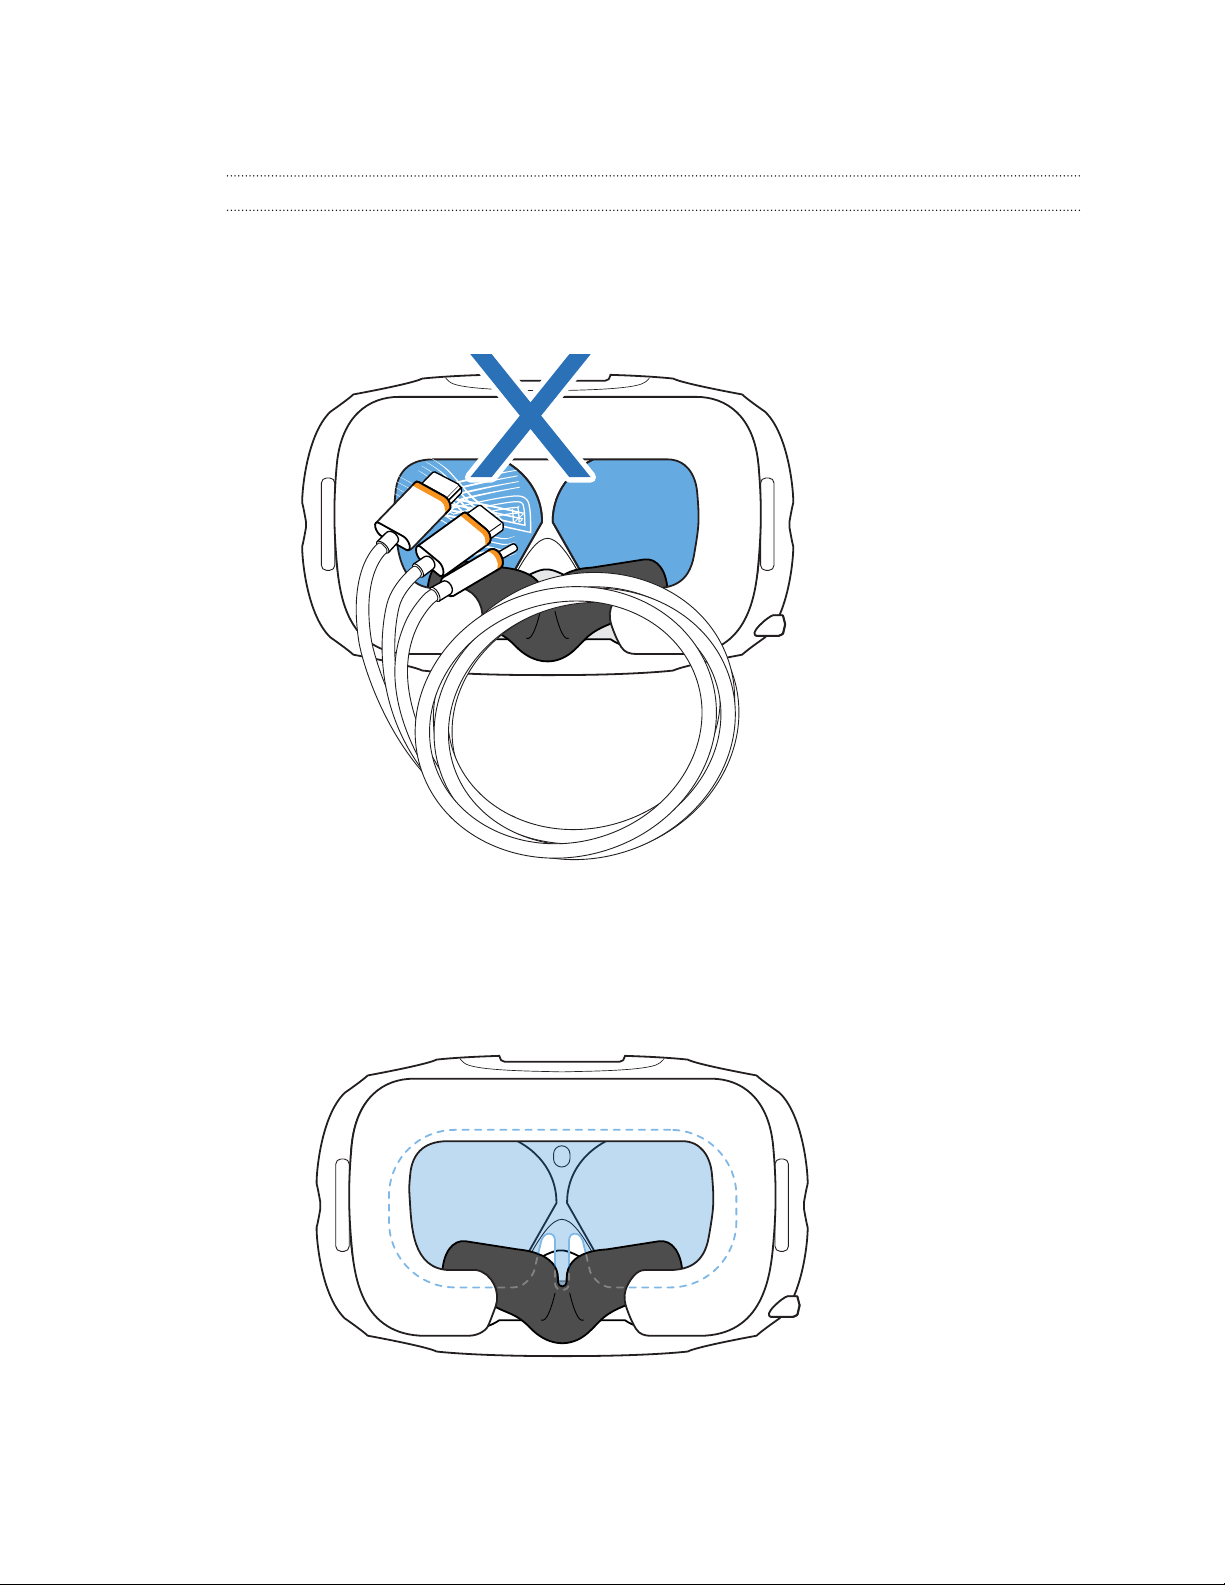
Unplugging the 3-in-1 cable from the headset
1. Push open the compartment cover to access the connector slots on the headset.
2. Carefully pull the tab until the HDMI cable is unplugged.
3. Unplug the power cable and USB cable from the connector.
4. Replace the compartment cover.
Page 13
13 Headset and link box
Replacing the face cushion
If the attached face cushion is too wide for you, replace it with the alternate cushion (narrow) that
comes in the box.
You should also remove the face cushion to clean it. For more information, see Cleaning the face
cushion on page 20.
1. To remove the face cushion, peel off starting from both ends of the face cushion until it
detaches from the headset.
2. To replace the face cushion, insert the tab on the face cushion into the slot on the headset,
and then align the hook and loop strips.
Page 14
14 Headset and link box
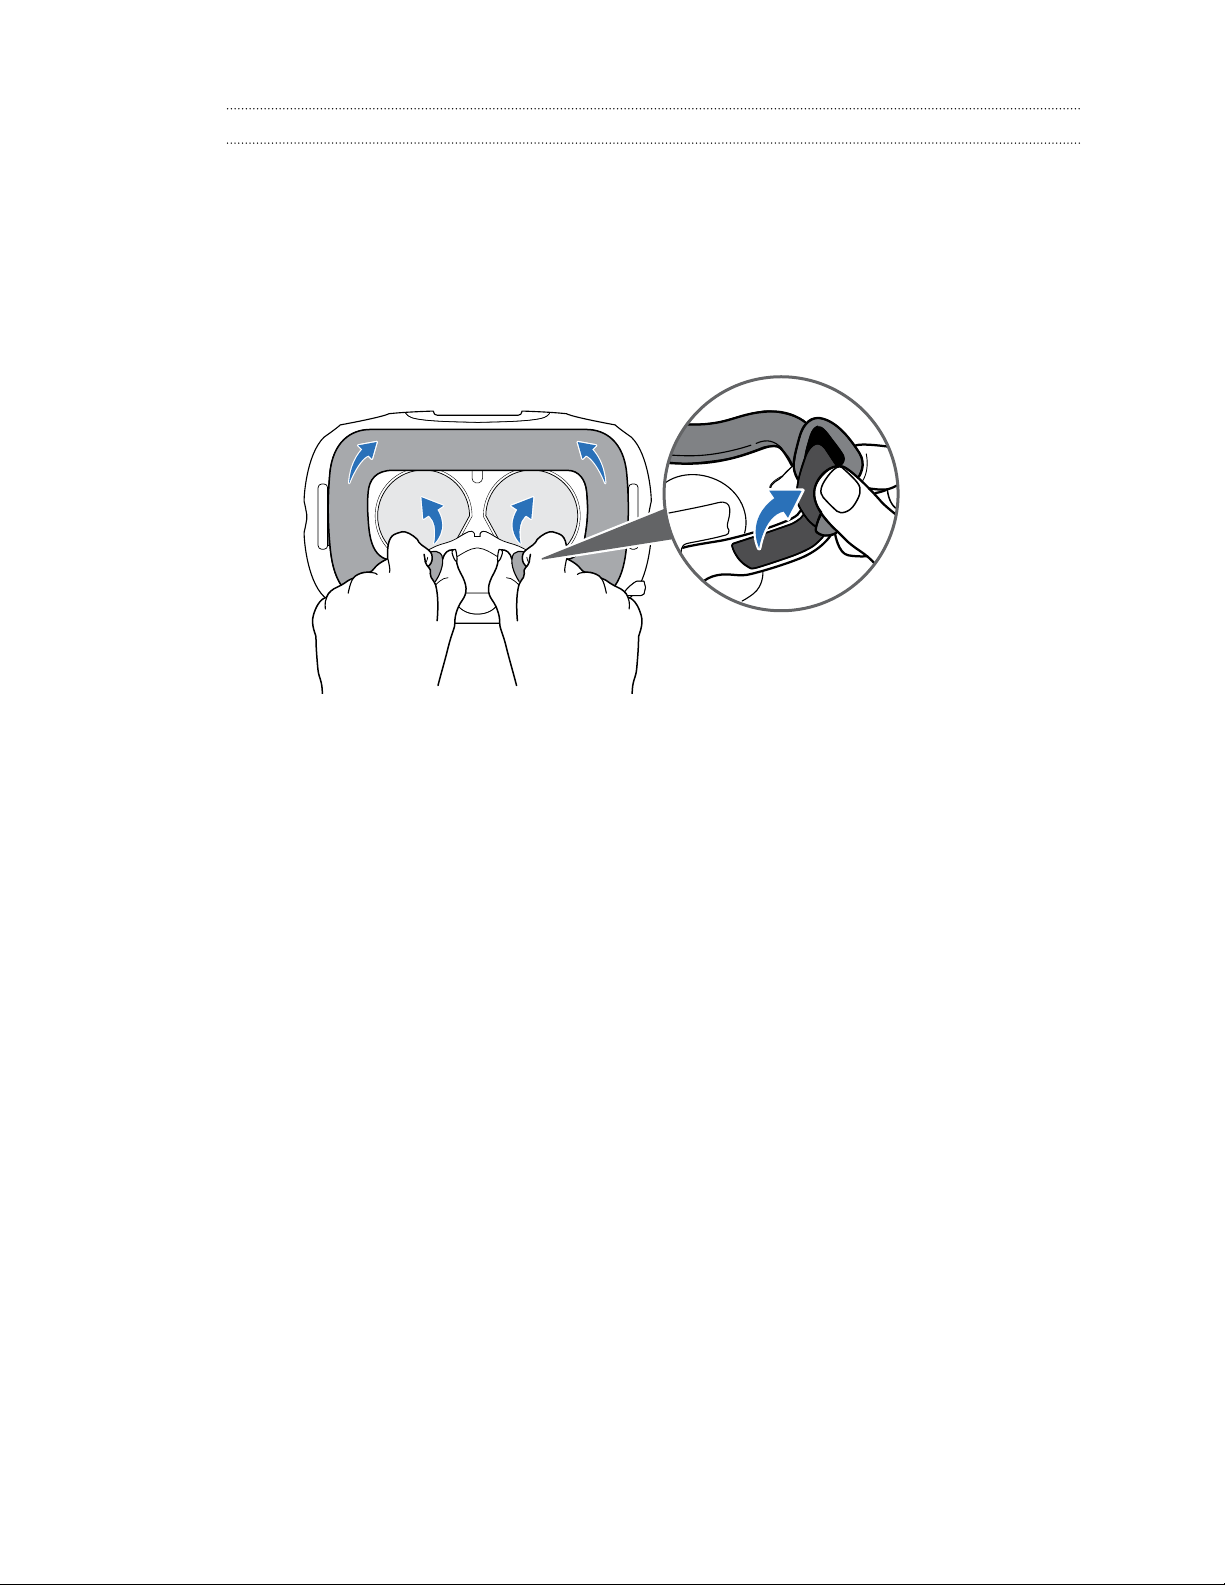
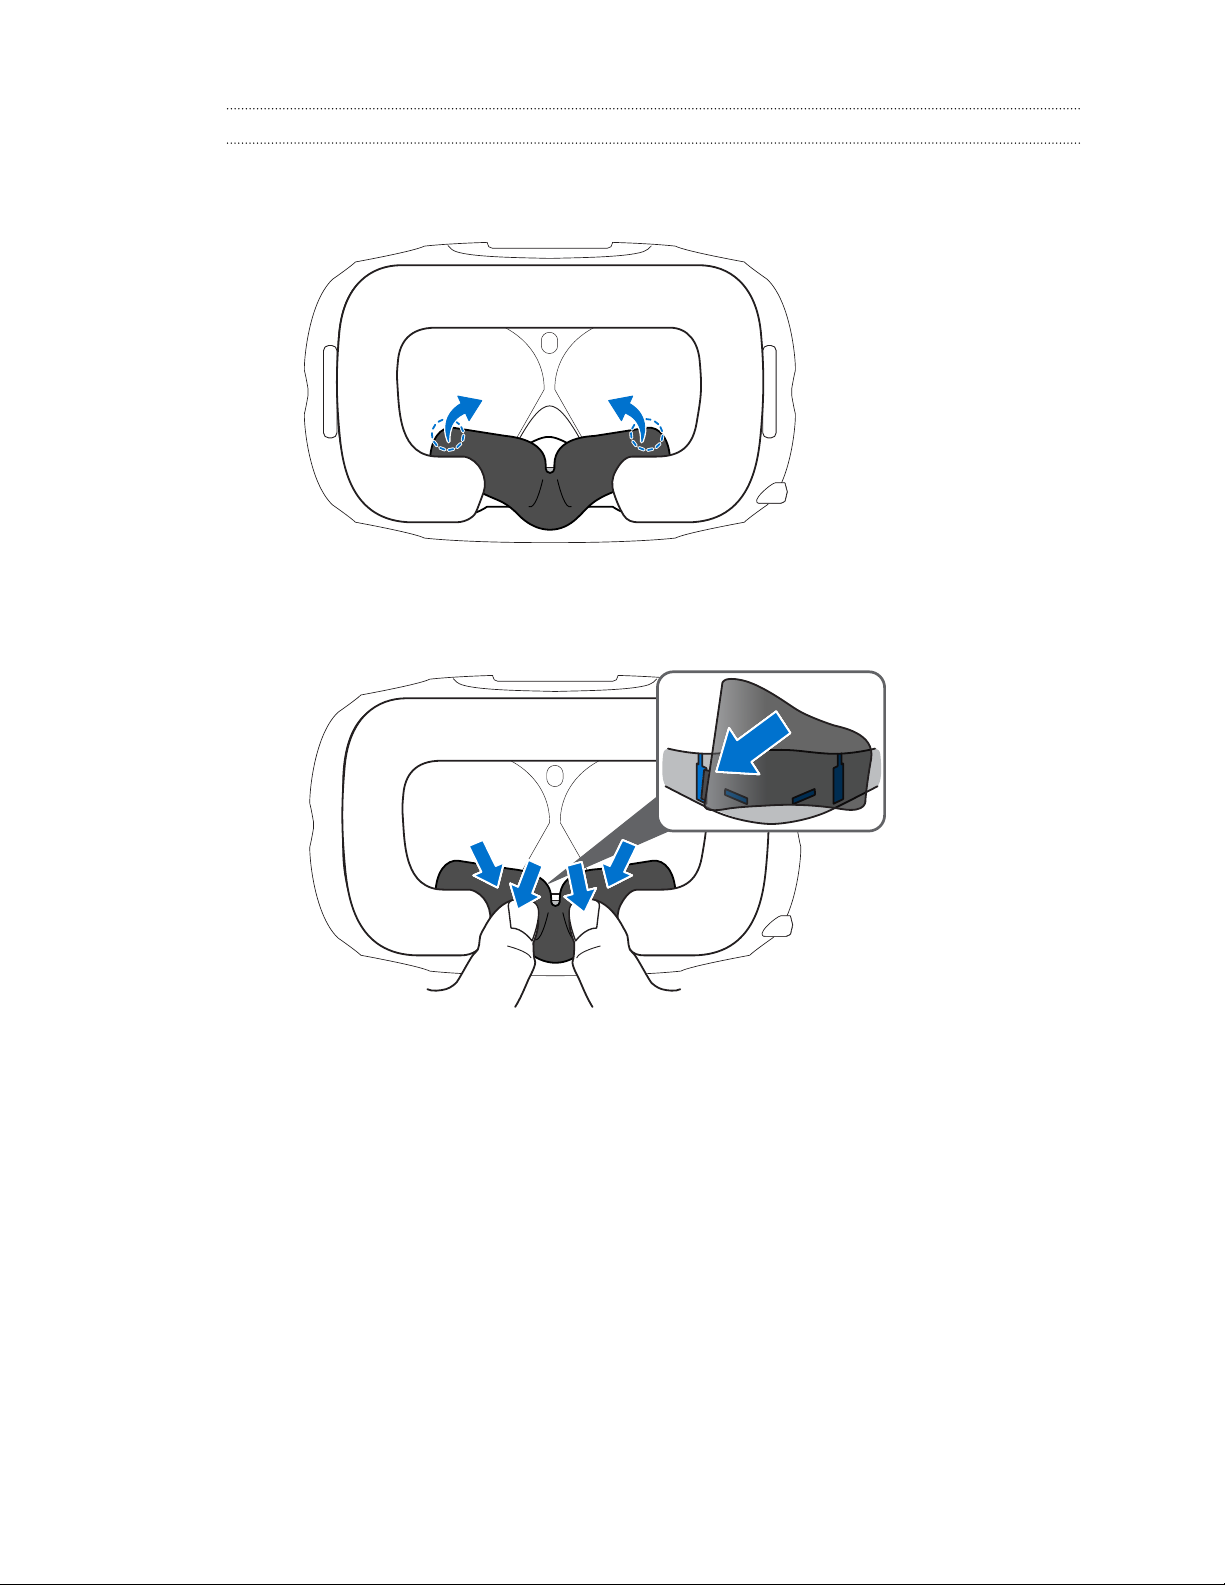
Replacing the nose rest
1. To remove the nose rest, peel off the flaps of the nose rest until it detaches from the
headset.
2. To replace the nose rest, press its tabs into the corresponding slots on the headset. Make
sure that the nose rest is fastened in place and its flaps are behind the face cushion.
Page 15
15 Headset and link box
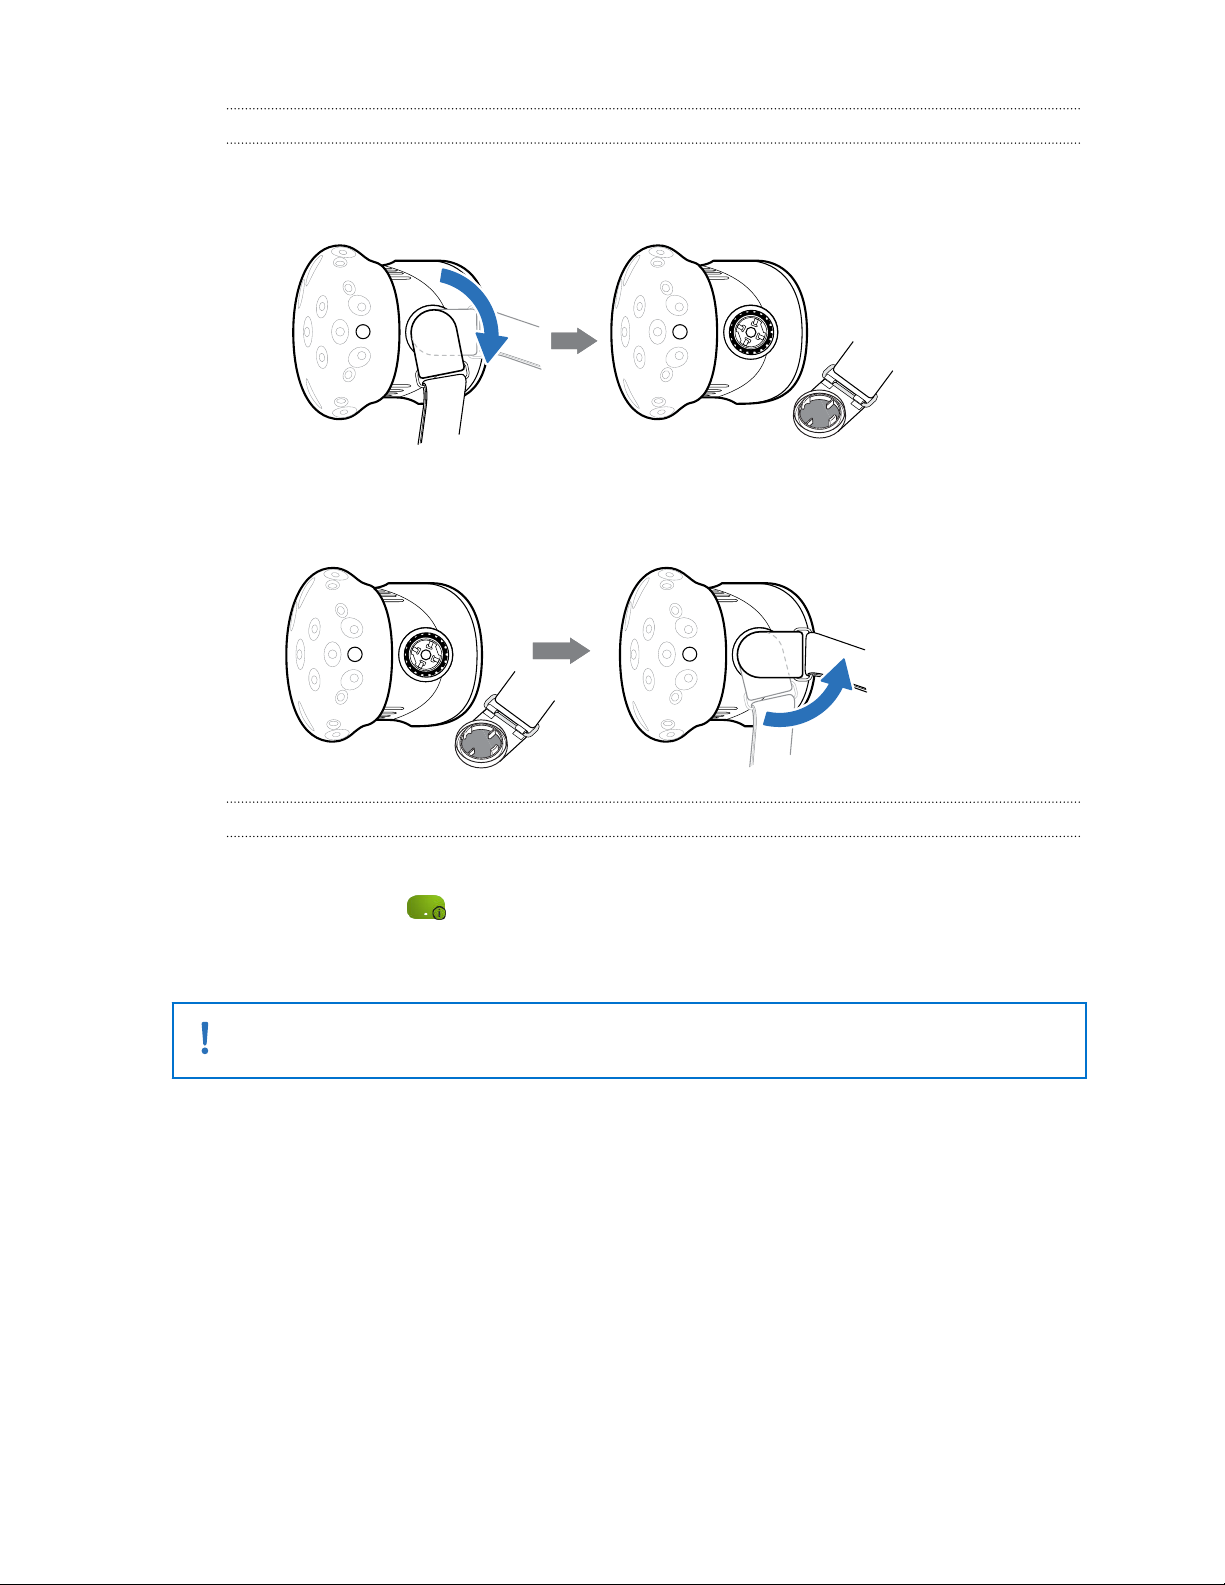
Replacing the headset buckle
To detach the buckle, rotate the buckle clockwise. You'll hear a click when the buckle is
released.
To reattach the buckle, with the headset strap hanging down, align the buckle to the
connector and then rotate it counterclockwise. You'll hear a click when the buckle locks in
place.
Updating headset firmware
1. From your computer, open the SteamVR app.
2. If you see the icon, mouse over it to check if the firmware is out of date. If so, click
Update headset firmware.
The firmware update will start automatically.
Do not unplug any cables from the headset, link box, or your computer any time before the
firmware update is complete. Doing so could result in a firmware error.
3. When the update is complete, click Done.
Page 16
16 Headset and link box
What does the status light on the headset mean?
The status light shows:
Green when the headset is in normal mode
Dim green when the headset is on standby
Red when an error is encountered (with cables, display, or the like)
Link box
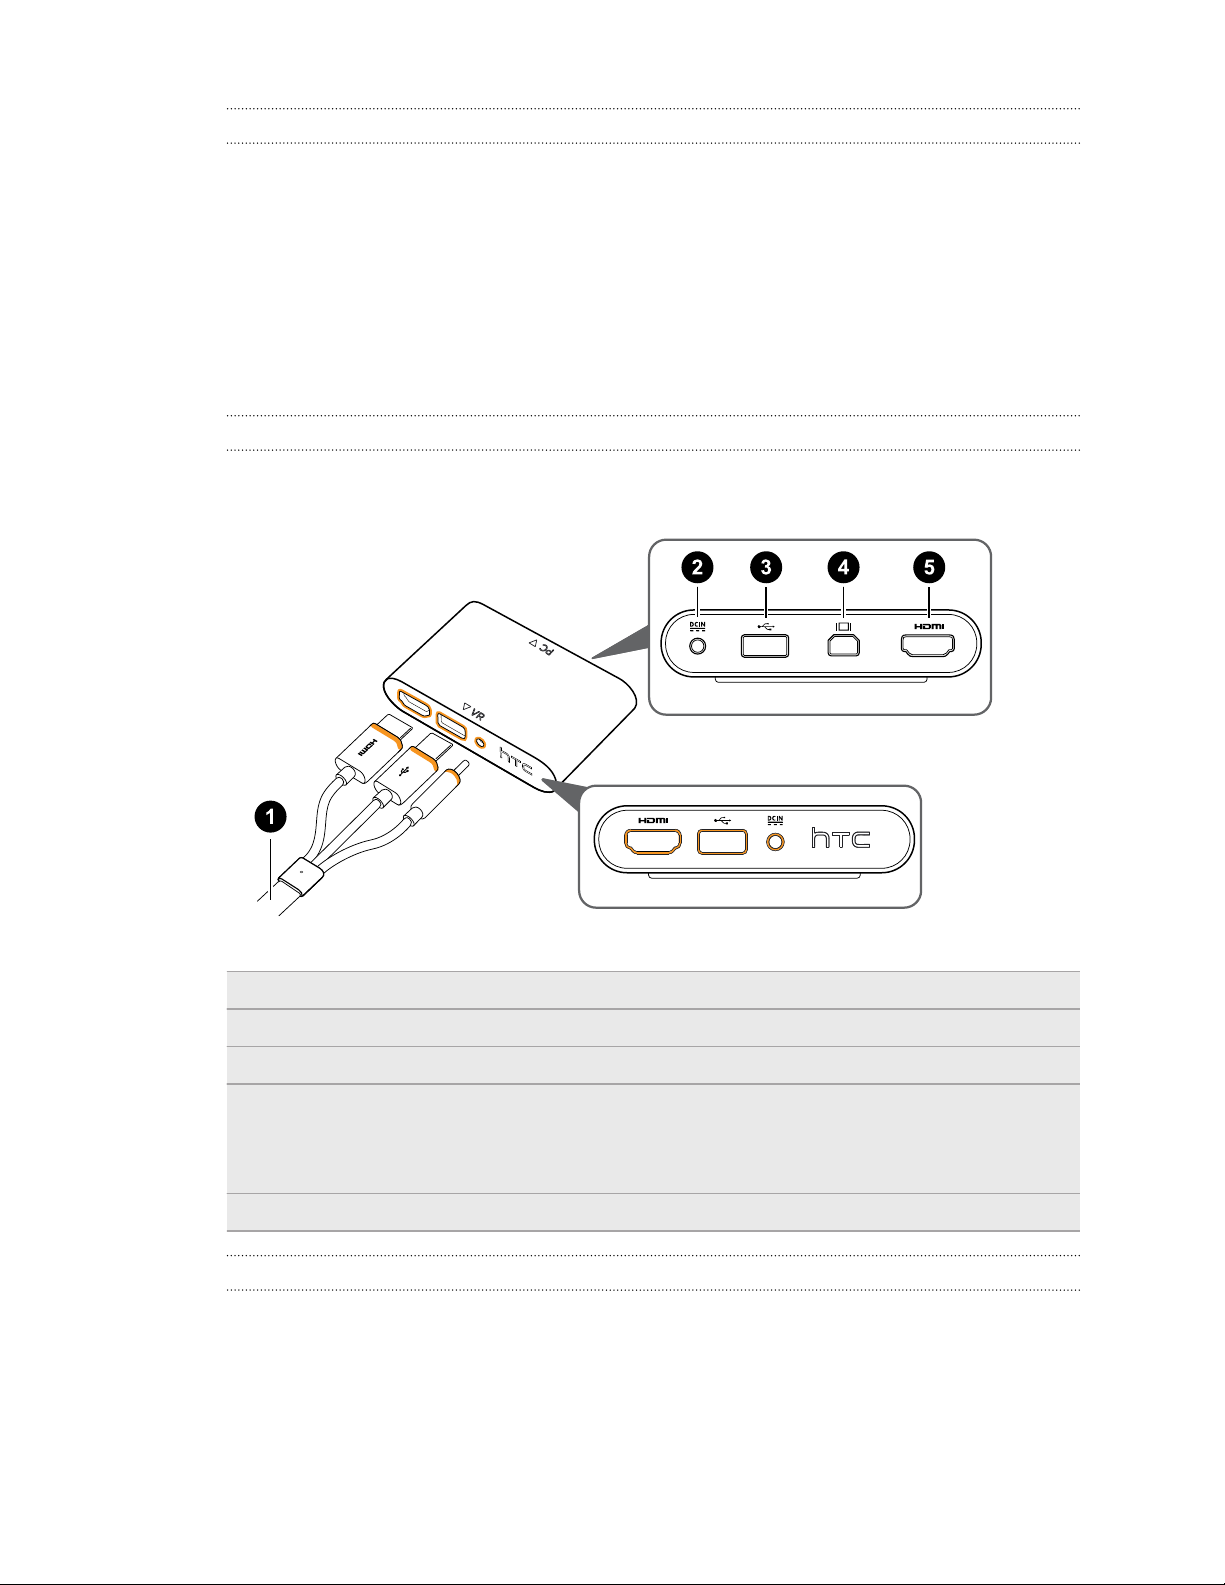
About the link box
Use the link box to connect the headset to your computer.
1 3-in-1 cable
2 Power port
3 USB port
4 Mini DisplayPort
Note: Cable is not provided. Use if your computer doesn't have a spare HDMI port or doesn't
support HDMI.
5 HDMI port
™
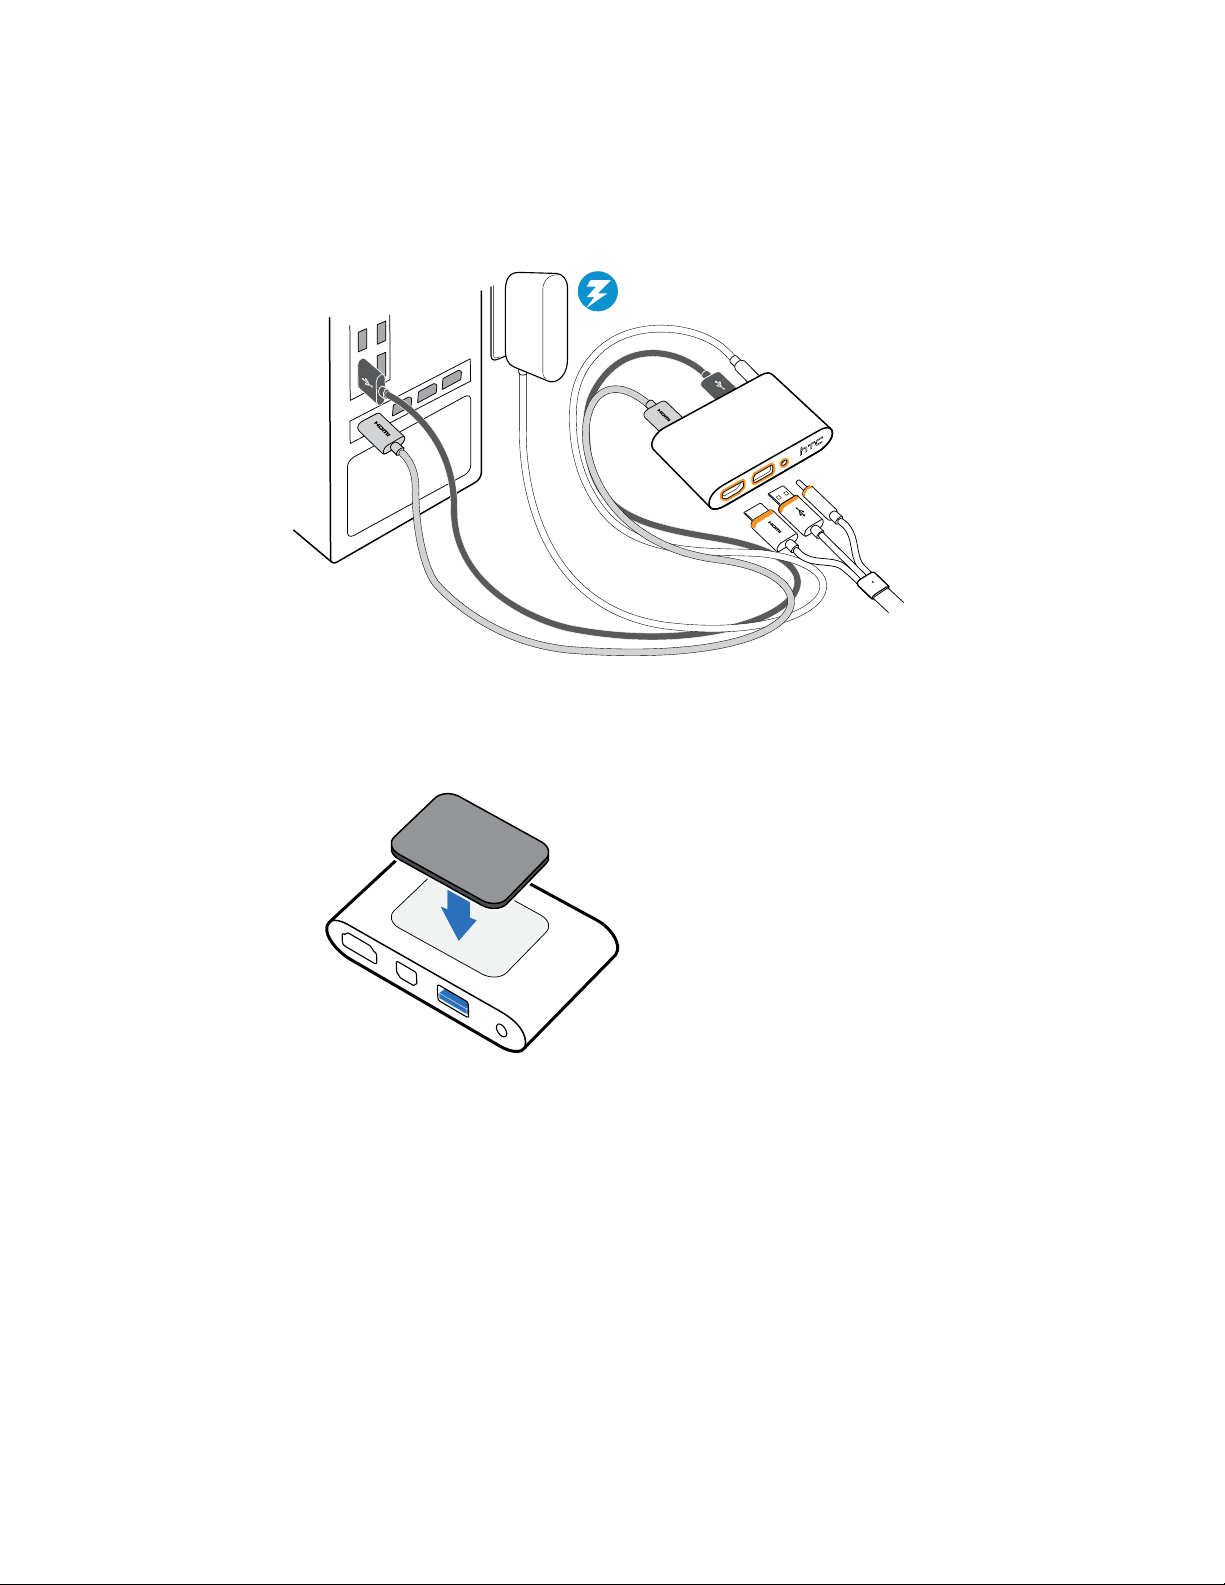
Connecting the headset to your computer
1. Connect the power adapter cable on its corresponding port on the link box, and then plug
the opposite end into an electrical outlet to turn the link box on.
2. Insert the HDMI cable on the HDMI port on the link box, and then insert the opposite end
on the HDMI port on your computer's graphic card.
Page 17
17 Headset and link box
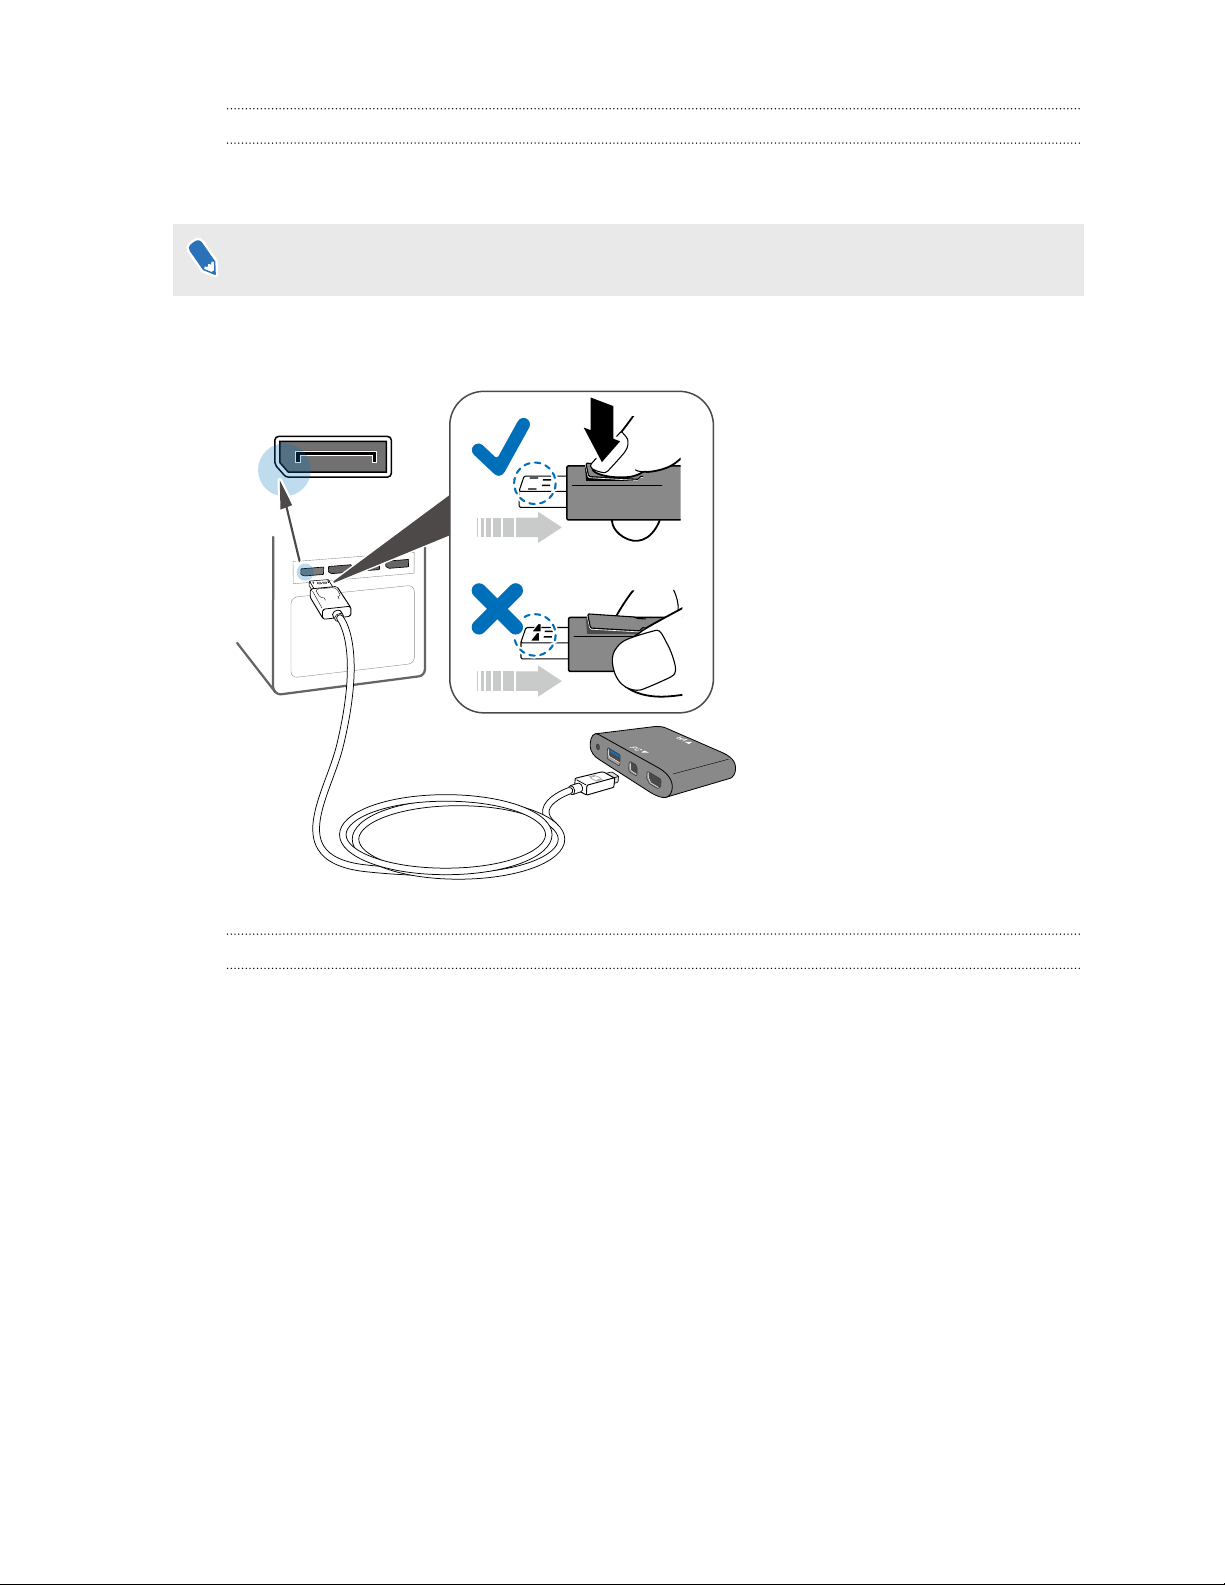
3. Insert the USB cable on the USB port on the link box, and then insert the opposite end on
your computer's USB port.
4. Connect the 3-in-1 headset (HDMI, USB, and power) cables on the side with matching
orange trims on the link box.
5. To secure the link box in a permanent position, peel the covers from the mounting pad and
firmly press one side of the adhesive surface on the bottom part of the link box, and then
attach the link box on the area where you want it installed.
Page 18
DisplayPort
Mini DisplayPort
18 Headset and link box
When should I use the Mini DisplayPort on the link box?
If your computer doesn't have a spare HDMI port or doesn't support HDMI, you can use a Mini
DisplayPort™ cable to connect your Vive to your PC.
Mini DisplayPort cable is not provided and must be purchased separately.
Connect the Mini DisplayPort cable end to the link box, and then plug the opposite end to the
DisplayPort™ on your computer's graphics card.
Restarting the link box
If you need to restart the link box, follow these steps.
1. Close all Steam apps on your computer, including the SteamVR app.
2. Unplug the power and USB cables from the PC side (without the orange trims) of the link
box.
3. Wait for a few seconds, and then plug the power and USB cables back in. On your
computer, you might see a notification that drivers are being installed. Wait for the
installation to finish.
4. To verify that Vive hardware are detected, restart SteamVR on your computer.
Page 19
19 Headset and link box
Product care and repair
Caring for your Vive
Follow these tips to properly care for your Vive.
Keep the headset lenses away from sharp objects, including cable tips. This will prevent
the headset lenses from being scratched.
When not in use, store the headset with the lenses pointed away from direct sunlight.
Failure to do so may damage the headset display.
When storing the headset, it is recommended to cover the lenses with the protective film
to help prevent accidental scratches.
Page 20

20 Headset and link box
Cleaning the face cushion
1. Before cleaning the face cushion, remove it first from the headset. For details, see
Replacing the face cushion on page 13.
2. When cleaning the face cushion, remember to:
Dampen a clean smooth cloth with cold water and gently wipe the area you want to
clean.
Air dry at room temperature. Don't tumble dry, iron, or expose it to direct sunlight.
Don't scrub, wring, or bleach.
Don’t dip or soak in water.
Cleaning the headset lenses
1. Use the cleaning cloth provided in the box to wipe the lenses.
2. Moisten the cleaning cloth with alcohol or lens cleaner.
3. Wipe in a circular motion from the center to the outer edges of the lenses.
While cleaning the lenses, do not scratch the lenses nor disassemble other parts of the
headset.
Page 21
21 Headset and link box
How do I prepare the headset if I'm returning it for repair?
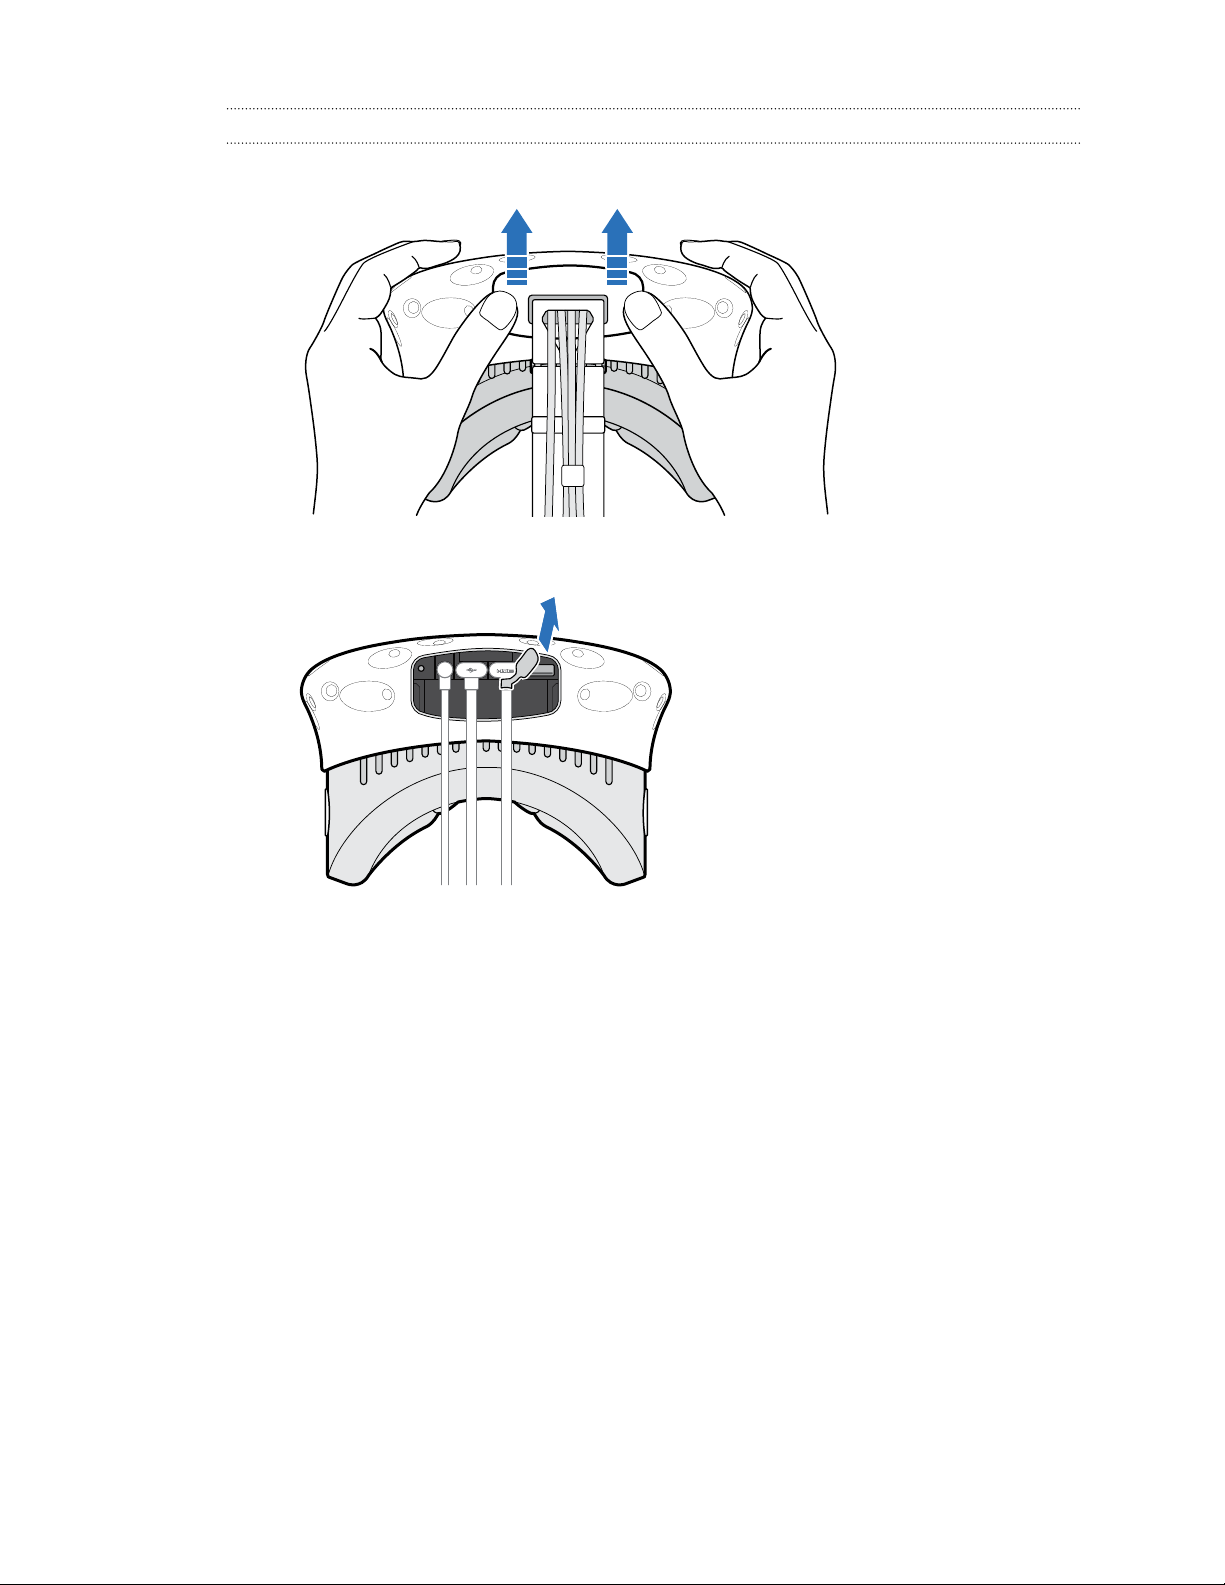
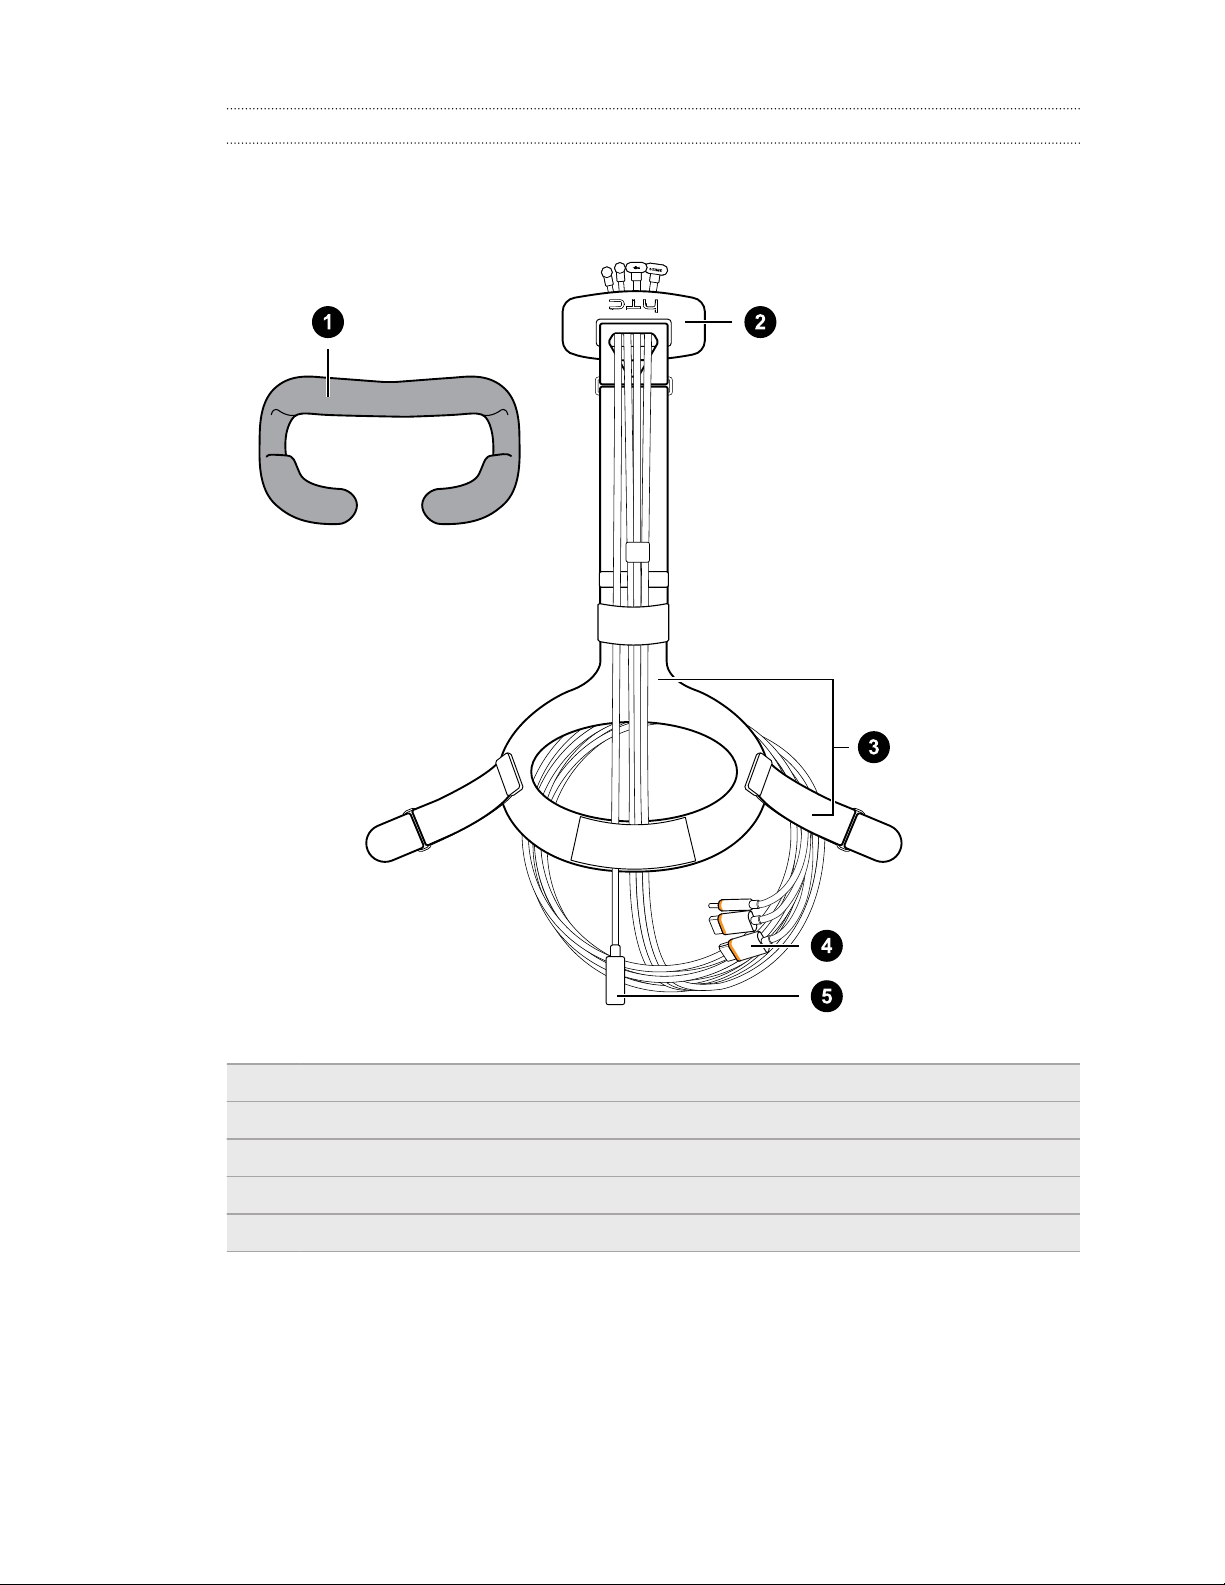
Before sending in the headset for repair, remove the following accessories and store them for
safekeeping:
1 Face cushion
2 Compartment cover
3 Headset strap with buckles
4 3-in-1 cable
5 Audio cable
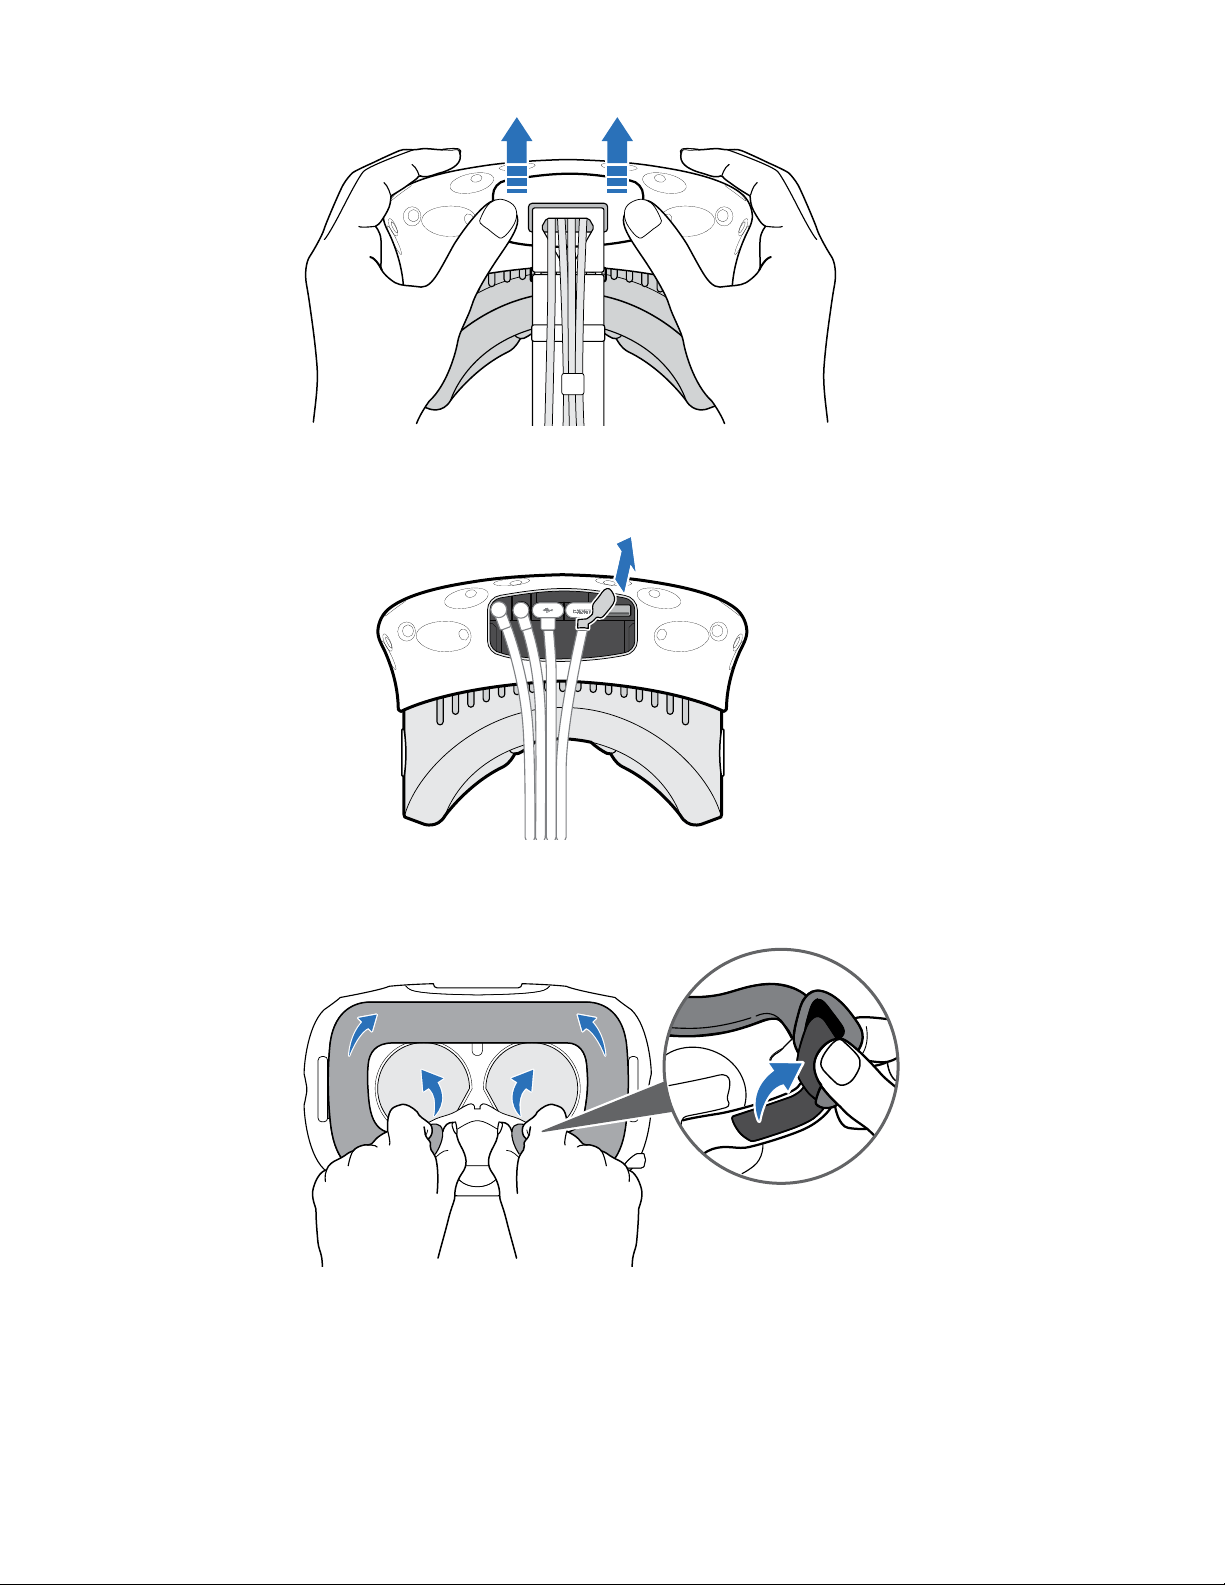
Follow these steps to properly detach the accessories from the headset:
Remove the compartment cover and unplug the 3-in-1 cable and audio cable from the
headset.
Push open the compartment cover to access the connector slots.
Page 22
22 Headset and link box
Carefully pull the tab until the HDMI cable is unplugged, and then unplug the power cable
and USB cable as well as the audio cable.
Remove the face cushion. Peel off starting from both ends of the face cushion until it
detaches from the headset.
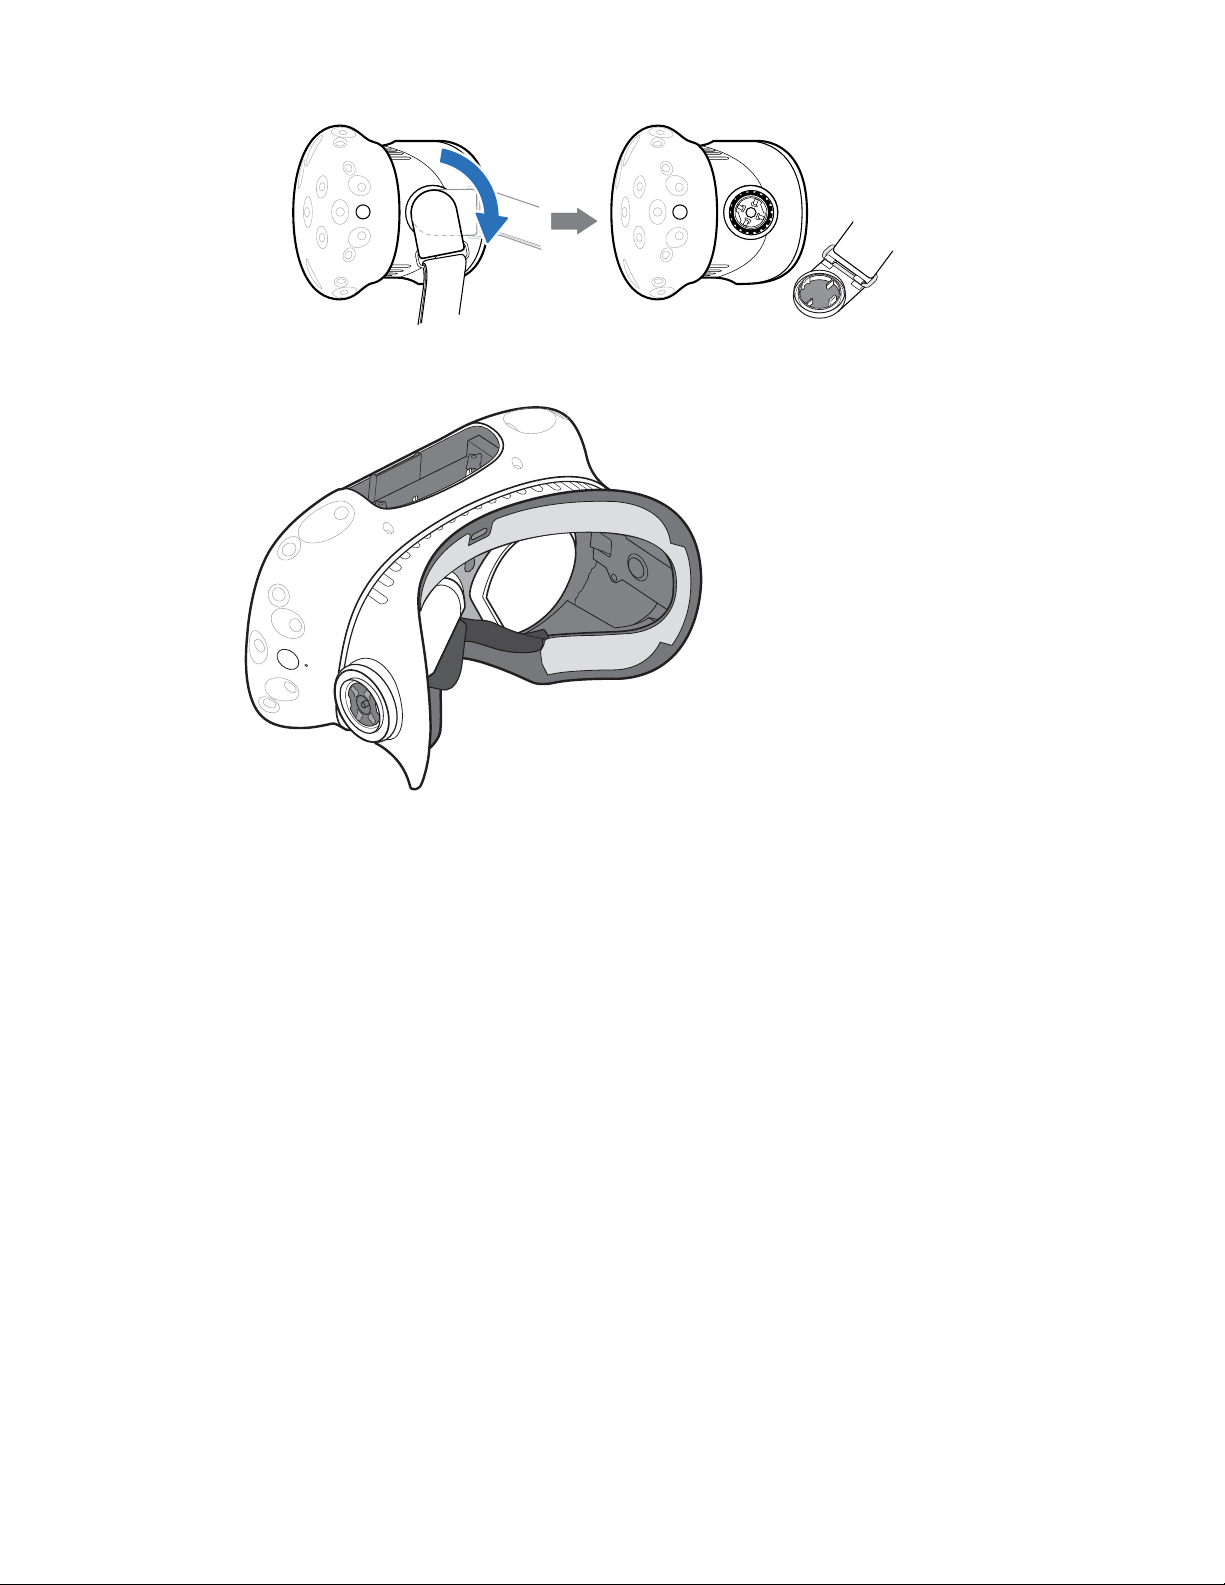
Remove the head strap and its buckle from the headset. To detach the buckle, rotate the
buckle clockwise. You'll hear a click when the buckle is released.
Page 23
23 Headset and link box
After removing the accessories, the headset you'll send for return should look like the following:
Page 24

24 Headset and link box
How do I reassemble the headset after repair?
After receiving your repaired headset, properly attach the accessories before using your headset
again.
Reconnect the 3-in-1 cable and audio cable, and then replace the compartment cover.
To replace the compartment cover, align the ridge on the cover with the tabs on the
compartment, and then push the cover until it snaps in place.
Make sure that the cables pass through the sleeve at the back of the headset.
Reattach the face cushion. Insert the tab on the face cushion into the slot on the headset,
and then align the hook and loop strips.
Reattach the headset strap and its buckles. With the strap hanging down, align the buckle
to the connector and then rotate it counterclockwise. You'll hear a click when the buckle
locks in place.
Page 25

25 Headset and link box
Troubleshooting
What can I do to troubleshoot the headset?
Try these troubleshooting suggestions.
Option Description
Check the
headset’s LED
status
Reboot the
headset
Check the cable
connections
If the LED is not lit, try connecting the link box to a different power outlet.
If the LED is dim green, the headset is on standby mode. Activate it by
moving the headset or starting a VR app.
If the LED is red, check if you're encountering a cable connection or driver
error.
For more information, you may refer to this SteamVR Troubleshooting
article.
1. From your computer, open the SteamVR app.
2. Click Settings Developer, and then make sure that Direct Mode
is enabled.
3. Right-click the icon, and then click Reboot Vive headset.
4. Wait for the reboot process to complete.
Make sure that your cable connections are securely attached on both
ends.
Check that the correct cables are connected to the corresponding side of
the link box (orange cables should connect to the side with orange trims).
Connect all video output cables to the same graphics card. Do not connect
video output cables to ports on the motherboard.
If available, try a different type of video output (for example, switching
HDMI with DisplayPort) from the graphics card to the link box.
Try connecting to a different USB port. If you're using USB 3.0, switch to a
USB 2.0 port to see if it corrects the issue.
Restart the link
box
For details, see Restarting the link box on page 18.
For more information, you may refer to this SteamVR Troubleshooting
article.
Page 26

26 Headset and link box
What can I do when the status light on the headset indicates an error?
If you see that the status light is red, try these methods to resolve the issue:
Disconnect and reconnect the headset 3-in-1 cable on the link box.
Check that the cables between the link box and your computer are properly connected.
Disconnect and reconnect the cables as needed.
Unplug and replug the power adapter into an electrical outlet to restart the link box.
For more information, you may refer to the SteamVR Troubleshooting page.
What should I do if the headset is not tracked?
Try the following methods to troubleshoot the issue:
Make sure that the headset is placed inside the play area.
If power on the headset was disconnected and reconnected, you need to also restart the
SteamVR app.
Try to disconnect and reconnect the HDMI cable to the HDMI port on your computer's
graphic card.
Restart the SteamVR app. If you still get an error, reboot your computer and reopen the
SteamVR app.
For more information, you may refer to the SteamVR Troubleshooting page.
My headset display is blurry. What should I do?
Try these troubleshooting suggestions:
Make sure that you've removed the protective film on the headset lenses.
Check that the lenses are clean. Use the cleaning cloth provided in the box to wipe the
lenses.
Make sure that you're wearing the headset properly.
The headset's bottom edge should rest on your cheekbones, while the strap should cup
the back of your head. You should feel comfortable bending down without the headset
slipping off.
If the headset is too low on your face, your display will appear blurry.
For more information, you may refer to the SteamVR Troubleshooting page.
What can I do to resolve the "headset not found" error?
Do the following steps to troubleshoot the issue:
1. Close all Steam apps on your computer, including the SteamVR app.
2. Unplug the link box cables (HDMI and USB) from your computer, as well as its power cable
from an electric outlet.
Page 27

27 Headset and link box
3. Wait for a few seconds, and then plug the cables back in. On your computer, you might see
a notification that drivers are being installed. Wait for the installation to finish.
4. Restart the SteamVR app.
If you still get a similar error, repeat the steps again. You can also check if you're encountering a
USB-related issue. For more details, see My headset can't be detected due to a USB port issue.
What should I do? on page 27.
For more information, you may refer to the SteamVR Troubleshooting page.
My headset can't be detected due to a USB port issue. What should I do?
Do the following steps to troubleshoot the issue:
Plug the USB cable into a different USB port to confirm if the error is due to a USB port-
related issue.
Option Description
If you have a USB
2.0 port...
If you don't have a
USB 2.0 port...
If the error is not resolved, your issue may not be due to USB port compatibility. For more
troubleshooting suggestions, see What can I do to resolve the "headset not found" error?
on page 26.
Manually update the USB driver on your computer. You can also download and install
official driver updates from the website of your motherboard or USB port manufacturer.
If updating your USB driver doesn't solve the error, purchase and use another PCI-Express
USB card (with Intel chipset). Based on our tests, this USB card work well with Vive:
Inateck® 2-Port USB3.0 PCI-Express Card (Serial: KTU3FR-2O2I)
For more information, you may refer to the SteamVR Troubleshooting page.
Plug the USB cable into the USB 2.0 port.
1. Plug the USB cable into a generic USB 3.0 port.
2. Open the SteamVR app, and then tap Create system
report.
3. Make sure that Vive devices connect via a 86%[+&, port rather
than to a port from a specific manufacturer, which might have a
compatibility issue with Vive.
After upgrading to Windows 10, Vive shows as the computer's main monitor. What should I do?
Try the following steps to troubleshoot the issue:
1. Disconnect the headset 3-in-1 cable on the link box.
2. Restart your computer.
3. Reconnect the headset 3-in-1 cable on the link box.
Page 28

28 Headset and link box
I'm experiencing skipped frames. What could I do?
If you've installed software in your computer that automatically adjusts the display (such as for
night mode), it may be causing the conflict.
To resolve the issue, disable the software that may cause the conflict (such as f.lux or Prismatik)
when using Vive.
What should I do if I don't hear a sound while using the audio cable?
Make sure that the headset is on normal mode and not on standby, and that the SteamVR app is
running on your computer.
If it doesn't solve your problem, do the following:
Option Description
Make sure that
SteamVR is sending
audio to Vive
Make sure that
Windows® is sending
audio to Vive
Check the volume of
HTC-VIVE audio
device and current
program
1. From your computer, open the SteamVR app.
2. Click , and then select Settings Audio.
3. On the Set playback device to drop-down list, choose HTC-VIVE or
select Speakers (USB-Audio Device).
1. On your computer, right-click the Volume icon on the task tray.
2. Click Playback devices, and then select HTC-VIVE.
3. Right click HTC-VIVE, and then select Set as default device.
You may also need to right-click on any detected audio device, and
select Show disabled devices and Show disconnected devices.
On your computer, right-click the Volume icon on the task tray. Do
the following:
Find the volume slider for +7&9,9(, and then set it to 50%.
Click Mixer. Find the current program, and then set the volume to
50%.
Is there a way to also hear from the computer what's in VR?
You can duplicate the audio from Vive to your computer. You may use another pair of
headphones or speakers.
1. From your computer, open the SteamVR app.
2. Click , and then select Settings Audio.
3. On the Mirror audio to device drop-down list, choose the audio device where you want to
send the additional audio.
Page 29

29 Base stations
Base stations
About the Vive base stations
The base stations beam signals to the headset and controllers. Do not cover the front panel
with any material.
When the base stations are turned on, they may affect some nearby infrared sensors, such as
those used by an IR TV remote control.
1 Status light
2 Front panel
3 Channel indicator (recessed)
4 Power port
5 Channel button
6 Sync cable port (optional)
7 Micro-USB port (for firmware updates)
Do not attempt to pry open the base stations as doing so could injure you or damage the
product.
If the front panel is cracked or damaged, stop using the base stations.
Page 30

30 Base stations
Installing the base stations
Before installing the base stations, decide first whether you want to set up a room-scale or
seated/standing-only play area. See Planning your play area on page 64.
During unboxing, remove the thin film that covers the front panel of the base stations.
1. Mount the base stations diagonally at opposite corners of your space.
For details on how to use the provided mounting kit, see Using the mounting kit on page
32.
You can also use tripods, light stands, or cargo poles when mounting the base stations, or
even place it on stable book cases. Just avoid using unstable mounting solutions or
surfaces that are prone to vibration.
2. Adjust the base stations so that the front panels are facing toward the center of the
play area.
3. Attach the power cables to the base stations, and then plug them each into a power outlet
to turn them on.The status lights should be green.
4. Connect the base stations and set the channels.
Without the sync
cable
With the sync cable
(optional for added
reliability)
Press the Channel buttons at the back of the base stations so
that one base station is set to channel “E”, while the other is set
to channel “F”.
Press the Channel buttons at the back of the base stations so
that one base station is set to channel “$”, while the other is set
to channel “E”.
Page 31

31 Base stations
Once turned on, do not move or adjust the angles of the base stations as it could disrupt the
tracking process. Otherwise, you will need to set up the play area again.
Tips for setting up the base stations
You may set up the base stations in a way that's suitable for your place. For best results,
you may follow these recommendations:
Mount the base stations diagonally and above head height, ideally more than 2 m (6
ft 6 in).
Secure the base stations in a location where they can't be easily jostled or moved.
Each base station has a 120-degree field of view, so it's ideal to adjust its angle
between 30 and 45 degrees to fully cover your play area.
For optimal tracking, make sure that the maximum distance between the two
base stations is 5 m (16 ft 4 in).
Page 32

1 2 3
4
65
32 Base stations
Using the mounting kit
For best results, install the base stations using the provided mounting kit.
You will need a screwdriver or drill to install the mounts. Ask a professional for help when
using power tools.
1. Mark where you want to install each of the mounts on your wall, and then screw the
mounts in.
When mounting on concrete or drywall, first drill ¼ inch holes and insert anchors before
screwing mounts in.
2. Rotate the base station to screw it onto the threaded ball joint. Do not screw the base
station all the way in, only enough to be stable and oriented correctly.
3. Tighten the wingnut to the base station to secure it in place.
4. To adjust the angle of the base station, loosen the clamping ring while carefully holding
the base station to prevent it from falling.
5. Tilt the base station toward the play area.
Make sure it has an unobstructed view of the other base station. Each base station has a
120-degree field of view. They should be angled down between 30 and 45 degrees.
To fix the angle of the base station, tighten the clamping ring back in.
6. Attach the power cable to each base station.
Page 33

33 Base stations
Updating base station firmware via cable connection
1. From your computer, open the SteamVR app.
2. If you see the icon, mouse over it to check if the firmware is out of date. If so, click
Update base station firmware.
3. Unplug the base stations from their power adapters, and then carefully unmount them.
4. Using a micro-USB cable, connect the base stations to one of your computer’s USB ports
one at time.
5. While pressing the Channel button at the back of the base station, plug in the base
station’s power adapter.
Once the base station is detected by the SteamVR app, the firmware update will start
automatically.
Do not unplug the micro-USB cable or power cable any time before the firmware update is
complete. Doing so could result in a firmware error.
6. When the update is complete, click Done.
Updating base station firmware via Bluetooth
1. From your computer, open the SteamVR app.
2. Click Settings General Install Bluetooth driver.
3. After installing the Bluetooth® driver, restart the computer.
4. Re-launch the SteamVR app.
5. Click Settings Enable Bluetooth communication.
6. Select Put Base Station in Standby mode when VR is not in use.
If the base stations do not go on standby mode when Vive is not in use, turn the base stations
off and then on again.
7. Do one of the following:
Click Devices. Click Update Firmware, and then select the base stations.
If you see the icon, mouse over it to check if the firmware is out of date. If so, click
Update base station firmware.
8. Follow the on screen instructions to complete the process.
Do not unplug the power cable any time before the firmware update is complete. Doing so
could result in a firmware error.
Page 34

34 Base stations
What does the status light on the base stations mean?
The status light shows:
Green when the base station is in normal mode
Blue when the base station is waiting to stabilize. If it remains in this state, check if it is
mounted securely or on a surface that's not prone to vibration.
Dim green when the base station is on standby
Purple when the base stations are trying to sync
Blinking purple when syncing is blocked. If you're connecting the base stations wirelessly,
you may need to use the sync cable. See Do I need to use the sync cable? on page 34.
What should I do if any of the base stations is not detected?
Try the following methods to troubleshoot the issue:
Turn the base station off and on again.
Make sure that you've installed your base stations correctly. For details, see Installing the
base stations on page 30.
If the base stations have trouble wirelessly syncing with each other, there might be an
obstruction in your play area. Check if using the sync cable would solve your issue. For
details, see Do I need to use the sync cable? on page 34.
Restart the SteamVR app. If you still get an error, reboot your computer and reopen the
SteamVR app.
For more information, you may refer to the SteamVR Troubleshooting page.
Do I need to use the sync cable?
In general, you don't need to connect your base stations to each other with the sync cable.
However, if you have a hanging object from the ceiling that is above the play area or if your base
stations need to be positioned low such that your head or hands block the bases from seeing one
another, this may affect the syncing of the base stations. You'll need to attach the sync cable.
1. Attach the sync cable to both base stations and make sure to route the cable outside of
your play area.
2. Press the Channel buttons on the back of the base stations so that one base station is set
to channel "$" and the other is set to channel "E".
Page 35

35 Base stations
Are the base stations covered by warranty if accidentally damaged?
Please follow the recommended setup instructions for the base stations carefully, since product
warranty does not cover accidental damage.
Stop using the base stations if they are damaged, especially if its front panels are cracked.
When Vive is in use, my TV remote isn't working. What can I do?
The base stations may affect some nearby infrared sensors, such as those used by an IR TV
remote control.
1. Re-adjust the angle of the base stations so that they are not directly facing your TV.
2. Verify that your remote control is working without interference from Vive.
3. Set up the play area again.
For more information, you may refer to the SteamVR Troubleshooting page.
Page 36

36 Controllers
Controllers
About the Vive controllers
Use the controllers to interact with objects in the VR world.
The controllers have sensors that are tracked by the base stations.
The sensors on the controllers are sensitive. Do not cover or scratch the sensor lenses.
1 Menu button
2 Trackpad
3 System button
4 Status light
5 Micro-USB port
6 Tracking sensor
7 Trigger
8 Grip button
Page 37

37 Controllers
Charging the controllers
You can check the battery level of the controllers when no apps are running, or when the System
Dashboard is up. When the battery is low, the indicator will show a single red dot .
Charge each controller using the provided power adapters and USB cables.
When the controller is plugged in and fully charged, its status light shows green if the controller
is on or white if the controller is off.
Turning the controllers on or off
To turn the controller on, press the System button until you hear a beeping sound.
To turn the controller off, press and hold the System button until you hear a beeping
sound.
When you quit the SteamVR app, the controllers will automatically turn off. The controllers
will also automatically turn off after being idle for a period of time.
Pairing the controllers with the headset
Once the controllers are turned on for the first time, they will automatically pair with the
headset.
The status light shows as blinking blue while the pairing is in progress. The status light
turns solid green when the controllers are paired with the headset.
To manually pair the controllers, launch the SteamVR app, tap , and then select
Devices Pair Controller. Follow the on-screen instructions to complete the process.
Page 38

38 Controllers
Attaching the lanyards to the controllers
Using the lanyards may help prevent the controllers from accidentally being dropped; however,
please do not fling or violently throw the controller because the lanyard may break.
1. While holding the controller, insert the lanyard’s thread from the top to the bottom hole.
2. Loop the lanyard through the thread, and then tug the lanyard to fasten it in place.
3. Place the lanyard on your wrist, and then adjust the lock to tighten the lanyard comfortably
around your wrist.
Updating controller firmware
1. From your computer, open the SteamVR app.
2. If you see the icon, mouse over it to check if the firmware is out of date. If so, click
Update controller firmware.
3. Using a micro-USB cable, connect the controllers to one of your computer's USB ports
one at time.
Once the controller is detected by the SteamVR app, the firmware update will start
automatically.
Do not unplug the micro-USB cable any time before the firmware update is complete. Doing
so could result in a firmware error.
4. When the update is complete, click Done.
Page 39

39 Controllers
What does the status light on the controllers mean?
The status light shows:
Green when the controller is in normal mode
Blinking red when battery is low
Blinking blue when the controller is pairing with the headset
Blue when the controller is connecting with the headset
Orange when charging
What should I do if any of the controllers is not tracked?
Try the following methods to troubleshoot the issue:
Make sure that the controller is placed inside the play area.
Turn the controller off and on again to reactivate the tracking.
Restart the SteamVR app. If you still get an error, reboot your computer and reopen the
SteamVR app.
For more information, you may refer to the SteamVR Troubleshooting page.
How do I know which of the controllers is not being tracked?
If one of your controllers is not being tracked and you want to find out which one, follow these
steps.
1. On your computer, open the SteamVR app.
2. Hover your cursor on the icon of the controller that's not tracked.
3. Click Identify controller.
The status light on the controller rapidly flashes white.
For more information, you may refer to the SteamVR Troubleshooting page.
Page 40

40 Controllers
What can I do if the controller's trackpad is oversensitive?
Check if there's a firmware update available for the controllers. After which, re-calibrate the
controller by doing these steps:
1. From your computer, open the SteamVR app.
2. Right-click on the icon, and then click Calibrate controller.
3. Follow the onscreen prompts to complete the calibration process.
For more information, you may refer to the SteamVR Troubleshooting page.
What should I do if my controller won't turn on?
Try these troubleshooting suggestions:
Press and hold the System button for at least 5 seconds and see if the controller turns on.
Charge the controller using the other cable and adapter, and plug the adapter to a
different power outlet.
On the SteamVR dashboard, check if the controllers are detected. If controllers are
detected but the LED light is off, it may indicate an issue with the LED.
Check if you have a firmware update that failed. To recover from this error, see My
controller won't turn on after I accidentally unplugged it during firmware update. What
should I do? on page 40.
My controller won't turn on after I accidentally unplugged it during firmware update. What should I do?
Do the following steps to recover your controller from bootloader mode.
1. Using a micro-USB cable, connect the controller to one of your computer's USB ports.
2. From your computer, open the SteamVR app.
3. Once the controller is detected by the SteamVR app, follow the onscreen prompts to
complete the firmware update.
Page 41

41 Viveport
Viveport
Using Viveport
What is Viveport?
Viveport is the app store for virtual reality content and experiences. Building on the fast growth
and success of VR gaming, Viveport will feature a wide range of VR experiences that inspire
people to discover, create, connect, watch, and shop in VR.
Accessing Viveport
You need to download Vive software from www.vive.com/setup. After installing, you can
access the Vive desktop app on your computer and the Viveport panel in VR.
You can go to Viveport from any of the following:
From the System Dashboard, switch to the Vive tab, and then select Viveport.
While in Vive Home, press the Menu button, and then select Viveport.
From your web browser, go to www.viveport.com.
On your computer's Vive app, click the Viveport tab.
Open your smart phone's Viveport mobile app.
Browsing for VR content in Viveport
You need to download Vive software from
access the Vive desktop app on your computer and the Viveport panel in VR.
1. Open Viveport. For details, see Accessing Viveport on page 41.
2. Scroll through the featured content or search for a title.
3. After selecting a title, you can:
Add the title to your bookmarks by selecting . You can buy or review it for later
from your Viveport's Bookmark tab. For details see, Bookmarking VR content in
Viveport on page 42.
Download the title. For details see, Downloading and purchasing content from
Viveport on page 42.
www.vive.com/setup. After installing, you can
Page 42

42 Viveport
Bookmarking VR content in Viveport
If you haven’t made up your mind about what VR content you want to download, you can
bookmark it for later.
In Viveport, while viewing the details of a VR app, click . The VR content will be added to your
bookmarks, which you can view by clicking the Bookmarks tab.
Downloading and purchasing content from Viveport
You need to download Vive software from www.vive.com/setup. After installing, you can
access the Vive desktop app on your computer and the Viveport panel in VR.
1. Open Viveport. For details, see Accessing Viveport on page 41.
2. Select the title that you want to download.
3. Review the description, including the category, rating, and user reviews. You can also play
the video or view the images to get a preview.
Make sure that you have a compatible play area and the system requirements as indicated in
the description.
4. Select Free (for free content) or the price button (for paid content).
5. If you're downloading paid content, enter your billing information and wait for the payment
confirmation message.
The first time you're downloading paid content, access Viveport from your computer and save
your payment details. Doing so will make the checkout process quicker next time while you're
in VR.
6. Wait for the progress to show that the download is complete.
To find your downloaded content, click the Library tab while on Viveport in VR or on your
computer's Vive app.
Setting up your Viveport PIN
Set a PIN to authorize purchases in Viveport.
1. From your computer, open the Viveport app.
2. Click on your profile name, and then click Account settings.
3. Under Payment info, click Set up Viveport PIN.
You'll be asked to sign in again.
4. When prompted, enter your preferred 4-digit PIN and then click Continue.
5. Confirm your PIN, and then click Save.
6. Once successful, click OK.
Page 43

43 Viveport
Changing your Viveport PIN
Change your PIN if you forgot your PIN or need to create a new one.
1. From your computer, open the Viveport app.
2. Click on your profile name, and then click Account settings.
3. Under Payment info, click Change Viveport PIN.
4. Follow the prompts to change your 4 digit PIN.
Opening VR content downloaded from Viveport
You need to download Vive software from www.vive.com/setup. After installing, you can
access the Vive desktop app on your computer and the Viveport panel in VR.
1. While on Viveport in VR or on your computer's Vive app, click the Library tab.
Make sure you're signed in to your HTC account to see your previously downloaded content.
2. Select the title that you want to launch.
Reviewing Viveport content
If you have feedback on VR content that you downloaded from Viveport, you can write a review.
To guarantee the quality of reviews, you can only leave feedback on VR content you've
purchased.
Do one of the following:
Sign in to your HTC Account on the Viveport web store, and then go to Library. Click
Review next to the title you would like to provide feedback on.
Open the Vive app on your computer, and then go to the My Content tab in your Library.
Select a title, and then scroll down to the text field to write your review.
You can also delete reviews you've made.
Page 44

44 Viveport
Viveport basics
I purchased content from Viveport.com. Where do I find the content on my Vive?
If you haven't installed Vive software, you need to install it first before you can download and
launch your Viveport purchases. Get Vive software from www.vive.com/setup.
If you're signed in with the same HTC Account you made the purchase with, you should be able to
find the VR content from:
Your computer:
1. Launch the Vive desktop app.
2. Click the Library tab.
3. Under Downloads, select the content. If it is not downloaded yet, click Download. The
download progress will be shown.
Within VR:
1. Do one of the following:
From the System Dashboard, switch to the Vive tab, and then select Viveport.
While in Vive Home, press the Menu button, and then select Viveport.
2. Select the Library tab.
3. Under Downloads, select the content. If it is not downloaded yet, click Download. The
download progress will be shown.
Can I launch content I purchased from Steam on Vive and vice versa?
Yes. You can launch the content you purchased on Steam from Vive if you've already downloaded
the content to your computer, and vice versa.
How often does Viveport add new content?
We're working closely with developers and publishers so that you'll enjoy the best VR
experiences. Regularly browse Viveport for the release of the most exciting and fun VR content.
Do I have to install Steam to use Viveport?
No. You don't need to install Steam software to start using Viveport. HTC and Valve are partners
in Vive, and each of their own content stores are focused on different areas.
Page 45

45 Viveport
Can I only access Viveport store in my country?
Yes. Please make sure that your computer is under the same network where your residency is.
Do I have to stay online in order to enjoy Viveport?
Yes. To make sure that you enjoy all the benefits while experiencing VR content from Viveport,
make sure that your computer stays online.
Viveport Subscription
What is Viveport Subscription?
In addition to purchasing individual titles from Viveport, you also have an option to enjoy
premium VR content through a monthly subscription plan. For a low monthly fee, you can
download a limited number of apps each month.
How do I sign up for Viveport Subscription?
Do any of the following:
In Viveport.com, click the banner to get details about Viveport Subscription and sign up. If
you're logged in, click the Subscription tab to sign up.
On Viveport mobile app, tap Subscription on the slide-out menu, and then select
Subscribe now to sign up.
On your computer, launch the Vive desktop app and sign in to your HTC Account, if
required. Click the Subscription tab to see more details.
Page 46

46 Viveport
Which titles are available as part of Viveport Subscription?
Viveport titles that are participating in Viveport Subscription are noted on their product pages.
They are also listed when you sign up for Viveport Subscription. More titles will be regularly
added to expand the collection.
How does the Viveport Subscription free trial work?
Everyone is eligible for a one-month free trial of Viveport Subscription. Your credit card details
are required during sign-up, but you will not be charged until the beginning of your second
month. You may cancel your Viveport Subscription at any time.
When will I be charged for my subscription?
If you are signing up for Viveport Subscription as a new customer, your first month is for free.
After this trial period, your selected method of payment will then be automatically charged on a
monthly basis. You may change your payment method or cancel at any time.
When you sign up for Viveport Subscription, you will be prompted to enter your payment
details. This step is required, but you will not be charged until the end of your first month.
If you have previously had a Viveport Subscription, upon re-subscribing, you will be charged for
the first month's subscription upon sign-up. Your selected method of payment will then be
automatically charged on a monthly basis.
How do I find out when my subscription will renew?
You can check your subscription's renewal date on your profile page:
Sign in to your HTC account on Viveport.com. Click the Subscription tab to see more
details.
On Viveport mobile app, tap Subscription on the slide-out menu to see more details.
On your computer, launch the Vive desktop app and sign in to your HTC Account, if
required. Click the Subscription tab to see more details.
Where can I see my monthly title selections?
You can access and review your monthly subscription selections in your Library tab:
Your selected titles are also marked on the Subscription page.
Sign in to your HTC account on Viveport.com. Click the Library tab to see your title
selections.
On Viveport mobile app, tap Library on the slide-out menu to see your title selections.
On your computer, launch the Vive desktop app and sign in to your HTC Account, if
required. Click the Library tab to see your title selections.
Page 47

47 Viveport
How do I update my monthly subscription selections?
During the first three days of any subscription period (i.e, the monthly period after which you sign
up, or are charged), you are able to pick five subscription titles to make up your selection. Once
you have picked all five, your choices are fixed until the end of the subscription period. At that
time, you'll have another three days to change your choice of titles. If you do not want to change
titles, you don't have to do anything.
To manage your Viveport Subscription titles:
Sign in to your HTC account on Viveport.com. Click the Library tab, select Manage
Subscription, and then follow the instructions.
On Viveport mobile app, tap Library on the slide-out menu, select Manage
Subscription, and then follow the instructions.
On your computer, launch the Vive desktop app and sign in to your HTC Account, if
required. Click the Library tab, select Manage Subscription, and then follow the
instructions.
What happens if I forget to update my title selections at the start of a subscription period?
If you do not change your selected titles within the three-day window in the beginning of a
subscription month, the titles you selected the preceding month will continue to be accessible
until the next month when you can change them.
How can I cancel my subscription?
You may cancel your subscription at any time in your profile page:
Sign in to your HTC account on Viveport.com. Click the Subscription tab, and then select
Unsubscribe.
On Viveport mobile app, tap Subscription Unsubscribe on the slide-out menu.
On your computer, launch the Vive desktop app and sign in to your HTC Account, if
required. Click the Subscription tab, and then select Unsubscribe.
After you unsubscribe, you will have access to your subscription titles until the end of your
subscription period.
Page 48

48 Viveport
I tried to cancel my subscription, but I can't seem to be able to. What should I do?
If on the unsubscribe confirmation screen you're unable to click Yes, it's because you haven't
selected your initial five titles yet.
The only scenario that this will happen is when you immediately try to cancel your subscription
right after sign-up.
To proceed with the cancellation, you need to complete selecting the titles first.
I see a small fee charged to my credit card, what is that?
Some banks and credit card companies will deduct an authorization charge, which this usually is.
This should be refunded by your bank soon after deduction. Contact your bank or credit card
company if you have issues.
Viveport mobile app
What is the Viveport mobile app?
On the Viveport mobile app, find and purchase VR experiences that you can download for your
Vive VR system.
How can I download the Viveport mobile app?
On your mobile device, open the Google Play™app. Search for 9LYHSRUW, and then download
and install it on your device.
Can I launch Vive VR content on Viveport mobile app?
No, you need Vive hardware and software to launch content designed for the Vive VR system. You
can download the Vive Setup file from www.vive.com/setup.
HTC Account for Viveport
Why do I need to sign in with an HTC Account to use Viveport?
HTC Account is an HTC membership system that you can use across different HTC services.
You don’t have to sign in to browse the content on Viveport web store. Once you decide to make
a purchase, you will have to sign in so that your purchase can be automatically downloaded to
your Vive system.
However, in Vive software, you will have to sign in so that you can browse all the content that is
available to you.
Signing in to HTC Account can also guarantee that you have a way to manage your purchase
history.
How do I get an HTC Account for Vive?
There are multiple ways for you to get an HTC Account.
Page 49

49 Viveport
During the installation of Vive software, you will be asked to sign in to your HTC Account.
Follow the instructions there to create an HTC Account or sign in to your social account to
connect.
Go to www.viveport.com, and then click Sign in at the right upper corner of the page.
Follow the onscreen instructions to create an HTC Account or sign in to your social
account to connect.
Please verify your email to help us identify you in our system. If you forget your password, you can
also use your email address to reset your password. If you opt in to communications from HTC,
you may receive special offers from Viveport. You can also be notified if there are special
discounts from Viveport.
Can I sign in to my HTC Account on multiple computers at the same time?
Yes. You can sign in to your HTC Account on multiple computers as well as on the web store.
However, some content limits the number of access from the same HTC Account used in Vive.
When the number of users on the same HTC Account exceeds the access number of that specific
content, the previous signed-in HTC Account user will be prompted to sign out.
Can I share VR content to family or friends by letting them use my HTC Account?
Viveport doesn’t restrict how many computers can access the content at the same time. Content
developers/publishers may set the rules to limit access on their own submissions.
If the content is set to allow only one computer to access it using the same HTC Account, the
previous signed-in HTC Account user may be prompted to sign out from the game if a later
signed-in HTC Account user attempts to access the content at the same time.
For Vive users, is there an age limitation for signing up for an HTC Account?
Yes. You need to be 14 years of age or older to create an HTC Account.
Each content also lists its age limitation. On the same page where you make the purchase, you
can see age limitation listed in the Content rating field.
I forgot my HTC Account password. Can I reset it?
Yes. On the sign-in page, click Forgot your password? and then follow the prompts to reset
your HTC Account password.
Check your email for further instructions. On the email, click the Reset your HTC Account
password link to confirm your request. The link will expire within an hour if not used.
If you didn't receive the reset password email, check your spam mail or resend another email by
clicking Forgot your password? again.
Page 50

50 Viveport
If you used a social network account when you registered for an HTC Account, you would need to
reset your password from your social network account.
Why can’t I sign in to my HTC Account?
If you created your HTC Account with an email address, make sure that you fill in the right email
address and password. If you forgot your password, you can reset your password from the signin page.
If you used a social network account when you created your HTC Account, make sure that you're
signed in with the same social network account.
Viveport PIN
How do I prevent my kids or other unauthorized people from purchasing content on Viveport using my account?
You can set up a PIN to prevent other people from purchasing content through your account
without your permission.
When will I need to enter my Viveport PIN?
As long as you have a PIN set up, you will be asked to provide your PIN each time you make a
purchase.
How do I remove my Viveport PIN?
At this time, you can’t remove your PIN once you set it up. You can contact our customer service
to remove it for you.
I was asked to set a PIN for Viveport after my first purchase. Is it mandatory?
No. To protect your payment information, you'll be asked if you want to set up a PIN when you
choose to save your payment information during the purchase.
Purchasing content
Page 51

51 Viveport
Will I receive an email after purchasing from Viveport?
Yes. You will receive an email that confirms your purchase. If you have any problem with your
purchase, use the order number in the email to communicate with customer support.
Which payment methods are accepted to purchase content on Viveport?
This depends on the country you're currently in. You can see the options during the checkout
process. In the near future, we will support more payment methods.
Can I cancel my purchase for Viveport?
Once you've gone through the checkout process, your purchase cannot be cancelled.
Why was my purchase attempt in Viveport declined?
Make sure that all the information you filled in is correct.
If you are using PayPal or Alipay to make the purchase, make sure that your account has enough
balance for the transaction.
Are taxes collected for Vive purchases?
If you made an online order and you're an international customer, there may be taxes or VAT
charges included in your purchase.
How do I get a refund from Viveport?
You can request for a refund if:
There’s a problem with the content itself.
The content was purchased fraudulently.
A redeem code was received after your purchase.
Contact our customer service to process the refund. You need to provide the order number sent
to your email after you made the purchase.
Why is it that instead of being labeled as "purchased", my VR content still lists the price or shows as "free"?
There’s a small chance that the purchase wasn’t updated correctly due to poor network
connection. Try to refresh or sign out and sign back in to your HTC Account.
Will I get an invoice after I make a purchase?
No. There will be no invoice if the purchase is made online. You will receive an email as your
receipt after you make a purchase.
Downloading and launching content
Page 52

52 Viveport
I purchased content from Viveport.com. Where do I find the content on my Vive?
If you haven't installed Vive software, you need to install it first before you can download and
launch your Viveport purchases. Get Vive software from www.vive.com/setup.
If you're signed in with the same HTC Account you made the purchase with, you should be able to
find the VR content from:
Your computer:
1. Launch the Vive desktop app.
2. Click the Library tab.
3. Under Downloads, select the content. If it is not downloaded yet, click Download. The
download progress will be shown.
Within VR:
1. Do one of the following:
From the System Dashboard, switch to the Vive tab, and then select Viveport.
While in Vive Home, press the Menu button, and then select Viveport.
2. Select the Library tab.
3. Under Downloads, select the content. If it is not downloaded yet, click Download. The
download progress will be shown.
My computer went offline while downloading content from Viveport. What should I do?
You need to download Vive software from www.vive.com/setup. After installing, you can
access the Vive desktop app on your computer and the Viveport panel in VR.
You can resume downloading the VR content. Make sure that you have an Internet connection.
1. From your computer, open the Vive app.
2. Sign in with the same HTC Account you used for the purchase.
3. Under the Downloads tab in the Library, find the VR content and tap Download to
complete the download.
Page 53

53 Viveport
Why can’t I launch VR content I downloaded from Viveport?
You need to download Vive software from www.vive.com/setup. After installing, you can
access the Vive desktop app on your computer and the Viveport panel in VR.
You might be encountering a compatibility problem. Please make sure that your Windows and
Vive software are updated to its latest versions.
Why can’t I download VR content that I purchased on Viveport?
You need to download Vive software from www.vive.com/setup. After installing, you can
access the Vive desktop app on your computer and the Viveport panel in VR.
Vive makes sure that the VR content you want to download is compatible with your Windows
environment. If the content doesn't support your Windows environment, you won't be able to
download the content.
Please note that it's not Viveport but the VR content developer or publisher that decides which
Windows environment is compatible with the VR content. Before making the purchase, it's
important that you're aware of your Windows environment.
If you're not otherwise experiencing a compatibility issue, there's a chance that your purchase
wasn’t updated correctly due to poor network connection. Try to sign out and sign back in to your
HTC Account. On the Downloads tab in the Library, find the VR content and click Download.
What happens to my Viveport content if I signed in on a different computer?
You need to download Vive software from www.vive.com/setup. After installing, you can
access the Vive desktop app on your computer and the Viveport panel in VR.
Content you purchased earlier can be found on the Downloads tab in your Library. Click
Download to use the content on the computer.
I re-installed Vive software. Do I need to purchase or download my previous Viveport content?
Purchases you made in Viveport will be associated with your HTC Account. If you've already
downloaded the content prior to the re-installation, your content will be seen in My Content tab.
However, if you're using a new computer, you do need to re-download the content.
1. From your computer, open the Vive app.
2. Sign in with the same HTC Account you used for the purchase.
3. Under the Downloads tab in the Library, find the VR content and click Download.
Page 54

54 Viveport
If I reformat my hard drive or get a new computer, will I need to purchase and/or download my content again?
You need to download Vive software from www.vive.com/setup. After installing, you can
access the Vive desktop app on your computer and the Viveport panel in VR.
You don't have to purchase the same content again. Purchases you made in Viveport will be
associated with your HTC Account.
To re-download the content:
1. From your computer, open the Vive app.
2. Sign in with the same HTC Account you used for the purchase.
3. Under the Downloads tab in the Library, find the VR content and click Download.
How do I remove Viveport content from my computer?
1. From your computer, open the Vive app.
2. Sign in with the same HTC Account you used for the purchase.
3. Under the My Content tab in the Library, click Delete.
Will I be notified if there's a content update, and how should I proceed?
Updates are downloaded automatically, if you have selected Auto update Viveport apps in the
Vive app's Settings tab.
Reviewing content
Do reviews create an overall score or rating for the VR content?
Not entirely. Your comment gives an evaluation of the VR content, but other users will decide
whether it's worthy for them to purchase the content.
Can I write a negative review on Viveport?
Yes. If you didn't like a particular VR content, you can make your review to let others know.
Phrasing it as a positive suggestion will help the developer improve their content.
How do I report abusive reviews on Viveport?
1. To flag an abusive review, tap .
2. Provide your reason for flagging the abusive review, and then click Submit.
Page 55

55 Viveport
Why was my review on Viveport deleted?
Your review might have been reported as abusive by other users. The Viveport administrator will
delete your review if it was proven to be abusive.
Viveport troubleshooting
Why can’t I see some Viveport content in my region?
Based on the content developer or publisher's choice, some content may be limited to a specific
region.
I'm signed in to a different computer. How do I access my Viveport content?
You need to download Vive software from www.vive.com/setup. After installing, you can
access the Vive desktop app on your computer and the Viveport panel in VR.
1. From your computer, open the Vive app.
2. Sign in with the same HTC Account you used for the purchase.
3. Under the Downloads tab in the Library, find the VR content and click Download.
Why can’t I launch Vive software properly?
You might be encountering a compatibility problem with Windows software or drivers. Try to
uninstall and reinstall your Vive software. Download the latest version of Vive software from
www.vive.com/setup/.
I'm getting a notification to upgrade Vive software. What should I do?
Vive software makes sure that you get the most updated version. When you're currently in VR,
you'll get a notification asking if you'd like to receive the latest update when you're done with VR.
Make sure to update your Vive to prevent compatibility issues with Windows software or drivers.
After using Vive for quite a while, I received a message about a disk writing error. What should I do?
This means that your disk is out of space. To resolve this issue, change the disk location where
you download and store your VR content.
1. From your computer, open the Vive app.
2. Click the Settings tab.
3. Under Default app folder, click Change, and then select the new disk location.
Page 56

56 Vive Home
Vive Home
What is Vive Home?
Vive Home is your own corner of VR.
Explore the Home space and personalize it with 3D shortcuts and objects.
Press the Menu button on the controller to show the Vive menu, where you can:
Launch VR apps
Add shortcuts and objects to the Home space
Change the Home space
Launching Vive Home
1. While in VR, press the System button to bring up the System Dashboard.
2. From your apps or from the Vive tab, select Vive Home.
Moving around Vive Home
Walk, crawl, jump—you can freely explore the virtual environment.
To make a selection, aim your controller at an item, and then pull the trigger.
Page 57

57 Vive Home
Teleporting
In Vive Home, teleport to an area within your field of view to move quickly to the spot.
1. Rest your thumb on the trackpad. You'll see circles marking a spot.
2. Aim at the location on the ground where you want to teleport.
3. Press the trackpad to teleport to the location.
Page 58

58 Vive Home
Adding app shortcuts or objects to your Home space
1. Press the Menu button, and then select Library or Objects.
2. Aim at the shortcut or object, and then press and hold the Grip buttons.
3. Drag the shortcut or object to where you want to place it on the Home space, and then let
go of the Grip buttons.
Managing app shortcuts and objects
You can change the appearance or position of a shortcut or object, or delete in from the Home
space.
1. Aim at the shortcut or object, and then press the Grip buttons.
2. Swipe the track pad from left to right (or vice versa) to see the options.
3. Choose one of the following, and then press the track pad to make a selection:
Scale
Rotate Select the arrows to adjust the angle of the shortcut or object
Select or to enlarge or reduce the size of the shortcut or object
Page 59

59 Vive Home
Push/Pull Select or to move the shortcut or object farther or closer to your view
Delete Select to remove the shortcut or object from the Home space
Working with app shortcuts
While aiming at a shortcut, you can:
Select Launch to open the app.
Press and hold the Grip buttons to drag the shortcut to another position.
Delete the shortcut from the Home space. For details, see Managing app shortcuts and
objects on page 58.
Adding picture frames on the Home space
Add picture frames and display your favorite photos right on the Home space.
1. Press the Menu button, and then select Objects.
2. Select .
3. Select Add your own photo.
4. Select , and then find the photo on your computer that you want to display.
If you added multiple photos, you can also set the interval for the slideshow.
Playing videos in Vive Home
Watch videos in VR. You can play videos stored on your computer.
1. Press the Menu button, and then select Objects.
2. Select .
3. Select , and then find the video on your computer that you want to play.
4. Use the controls to play or pause the video, adjust the volume, and more.
5. Select to lock the video player to move with your gaze.
6. Select to dim the lights while watching video.
7. Select to watch the video in an immersive environment.
You can choose the viewing format (mono or multiple stereoscopic) that matches the
video.
Page 60

60 Vive Home
Browsing the web in Vive Home
Conveniently browse the web while in VR.
1. Press the Menu button, and then select Objects.
2. Select .
3. Use the virtual keyboard to type the URL.
4. To hide or unhide the virtual keyboard, select .
5. To go back to the home page bookmarks, select .
Changing your Home space
1. Press the Menu button, and then select Spaces.
2. Select the Home space that you want to use.
Resetting the Home space
Revert your Home space to its default settings to remove any changes you've made, such as
added shortcuts.
1. Press the Menu button, and then select .
2. Select Reset space to default.
Page 61

61 Phone notifications
Phone notifications
Downloading and installing the Vive phone app
Before downloading the Vive app, please make sure that your phone meets the minimum
system requirements indicated on the Vive app's download page.
1. On your phone, open the Play Store or App Store apps.
2. Search for 9LYH.
3. Download and install the Vive app.
Pairing your phone with Vive
Pair your phone with the Vive system to start receiving notifications while you're on VR.
1. On your computer's Vive app, go to the Settings tab, and then click Set up a Phone.
2. On your phone, open the Vive app.
The first time that you open the Vive app, review the prompts and tap Allow.
3. On both your computer and phone, click Get started. Make sure that Bluetooth is turned
on and that your phone is discoverable.
4. From the list of discovered devices on your computer, select your phone, and then click
Next.
5. When prompted, accept the pairing request or enter the pairing code on your phone.
6. Once pairing is complete, click OK and Done on your computer and phone respectively.
Page 62

62 Phone notifications
Choosing which notifications to receive on VR
Manage which notifications you get while using Vive.
1. On your phone, open the Vive app.
2. Do one of the following:
Android™ users: Tap Settings.
iOS users: Switch to the Settings tab.
3. Choose which types of notifications you'd like to receive.
Receiving notifications while in VR
Don't worry about missing important notifications. While you're in any VR app, you'll see a
notification when you have an incoming call, message, or upcoming calendar event.
To receive notifications while in VR, you need to pair your phone with Vive first. To find out
how, see Pairing your phone with Vive on page 61.
To receive or open the notification, press the System button.
If you choose to ignore the incoming notification, you can always check it later on the Vive tab.
For details, see Checking your notifications on page 62.
Checking your notifications
Conveniently review notifications from your phone without leaving VR.
To receive notifications while in VR, you need to pair your phone with Vive first. To find out
how, see Pairing your phone with Vive on page 61.
From the Vive tab's Notifications panel, you can:
View a missed call or text message
View an upcoming calendar event
Call back a contact
Reply with a text message (Android users only)
Page 63

63 Phone notifications
Editing or adding message replies (Android users)
If you're using an Android phone, customize the messages that you can quickly send to your
contacts.
1. On your phone, open the Vive app.
2. Tap Settings.
3. Tap Quick replies.
4. Select a predefined message to edit or tap to add a custom message.
Unpairing your phone with Vive
You can only use one phone at a time with your Vive. Unpair your current phone first if you need
to use another phone with Vive.
1. On your phone, open the Vive app.
2. Do one of the following:
Android users: Tap Settings, and then tap Unpair.
iOS users: Switch to the Settings tab, and then tap Forget this device.
You can also unpair your phone through your computer's Vive app. Under Phone on the
Settings tab, click Unpair.
What types of phone notifications can I receive on Vive?
While in VR, you may receive phone calls, text messages, and calendar reminders. To do so, you
need to install the Vive app on your phone and complete the pairing process with the Vive
system. You can choose which notifications you want to get on your phone's Vive app settings.
Can I receive notifications from more than one phone on Vive?
Currently, only one phone is supported if you want to receive notifications while in VR. If you want
to use another phone with your Vive, unpair the previous phone first.
What features of the Vive phone app are not supported in the iOS version?
Currently, editing or adding personalized replies for calls or messages are not supported in the
app's iOS version.
Page 64

64 Play area
Play area
What is the play area?
The play area sets the virtual boundaries of Vive. Your interaction with VR objects happen within
the play area.
Vive is designed for room-scale setup, but you can also use it for standing and seated
experiences.
Planning your play area
Before choosing your setup, make sure that you have enough space.
Room-scale setup needs a minimum play area of 2 m x 1.5 m (6 ft 6 in x 5 ft). Examples of roomscale setup:
Page 65

65 Play area
Seated and standing experiences do not have space requirements. Examples of seated/standing
setup:
Choosing the play area
Find a space that you will designate as the play area. For best results, do the following:
Move furniture and other obstacles (like pets) out of the play area.
Place your computer next to your play area. The headset cable extends around 5 m (16 ft 4
in) from your computer.
Make sure that there are power outlets close to where you mount the base stations. Use
12V extension cords as needed.
Do not leave your headset in direct sunlight, as it may damage your headset display.
Page 66

66 Play area
Setting up Vive for the first time
Before you can use Vive, you’ll need to complete the setup process, which includes installing Vive
and SteamVR software, setting up the hardware, and defining your play area.
To start the setup process, download the setup file on your computer from:
www.vive.com/setup/
Run the setup file and follow the prompts to complete the process.
Setting up a standing-only play area
Choose this option if you only want to experience VR in a seated or standing position.
1. From your computer, open the SteamVR app.
2. Click , and then select Run Room Setup Standing only.
3. Review the prompts and follow the on-screen instructions to complete the process.
Page 67

67 Play area
Setting up a room-scale play area
Choose to set up a room-scale play area to enjoy moving around and fully engage with the VR
experience.
1. From your computer, open the SteamVR app.
2. Click , and then select Run Room Setup Room-scale.
3. Review the prompts and follow the on-screen instructions to complete the process.
When tracing the boundaries of the play area, make sure that the floor is cleared. Do not trace
across space occupied by things (such as a table or a chair) since this may cause you to trip
into the object while in VR.
Resetting the play area
1. From your computer, open the SteamVR app.
2. Click , and then select Run Room Setup.
3. Follow the prompts to complete the process.
Page 68

68 Play area
Verifying your setup
Once you've completed the Vive setup process, you can now put on the headset and hold the
controllers to start exploring VR.
While you're in the play area, the headset and the controllers should remain at least 0.5 m (1 ft 7
in) and no further than 5 m (16 ft 4 in) away from a base station. This will ensure that the devices
are properly tracked within the base station’s 120-degree field of view.
For health and safety warnings, please refer to the Safety and regulatory guide, which is
periodically updated for accuracy and completeness. For the latest version, check
www.vive.com.
After setting up, how do I turn the Vive system on?
1. From your computer, open the SteamVR app.
2. Make sure your base stations are powered.
3. Make sure that your headset is connected to the computer via the link box. For details, see
Connecting the headset to your computer on page 16.
4. Turn the controllers on. For details, see Turning the controllers on or off on page 37.
5. Check that Vive hardware is tracked. The status icons on the SteamVR app and the status
lights on the hardware should all be green.
6. Put the headset on. For details, see Putting the headset on on page 9.
7. Grab your controllers.
To bring up the System Dashboard, press the System button on either controller.
Page 69

69 Play area
What is the recommended space for the play area?
Movement within a diagonal area of up to 5 m (16 ft 4 in) is supported. For example, a 3.5 m x 3.5
m (around 11 ft 5 in x 11 ft 5 in) space. For room-scale setup, a minimum play area of 2 m x 1.5 m
(6 ft 6 in x 5 ft) is required. There's no minimum for seated and standing experiences.
Can I include space occupied by furniture for the play area?
It is not recommended to do so. When setting the boundaries of the play area, make sure that the
floor is cleared. Do not trace across space occupied by things (such as a table or a chair) since
this may cause you to trip into the object while in VR.
Will VR apps for seated/standing-only experiences work with room-scale setup?
Even if you have a room-scale setup, you can still use VR apps that are designed for seated or
standing-only experiences. Just make sure that your headset and controllers are tracked within
the play area.
To set or reset the seated position while in VR, do the following:
1. Press the System button to bring up the System Dashboard.
2. Select General.
3. Select Reset seated position, and then follow the prompts to complete the process.
How do I resolve download errors during Vive Setup installation?
Download errors are usually caused by incorrect network settings. For example, due to wrong
DNS, the download server address is unresolved by the host. Some network destinations may be
inaccessible, even as connection to other websites seems normal. Please make sure that your
network settings are correct, or ask your network administrator for support.
I can't complete the room setup. What should I do?
Check if you're using special characters (such as j or p) in your local Windows user name, which
could cause the problem.
As a workaround, you can add a new Windows account using basic Latin alphabet for its user
name. After logging in with the new user name, reinstall Vive Setup and complete the process.
Page 70

70 Settings
Settings
Vive app settings
Changing the Vive system language
Once you change the language on the Vive app, the language used in the Vive VR system will also
be changed.
1. From your computer, open the Vive app.
2. Click the Settings tab.
3. On the Language drop-down list, select the language that you want to use.
Changing the Vive system language doesn’t change the language for specific VR content
you've downloaded, which is decided by the content developer / publisher.
Setting the Vive app to automatically launch at startup
You can automatically launch the Vive app when you turn your computer on.
1. From your computer, open the Vive app.
2. Click the Settings tab.
3. Select Open at startup.
System Dashboard settings
System Dashboard
The System Dashboard serves as your central point of entry in VR.
While in the dashboard, some of the things you can do are:
Launch or close a VR app
Control sound volume and mic access
Change settings, such as style of the collision bounds in Chaperone or the in-headset
background
Turn the Vive system off
To bring up the dashboard, press the System button on either controller.
Page 71

71 Settings
Changing the Chaperone settings
The Chaperone shows a grid whenever you're close to the bounds of your play area. You can
change how the grid looks.
1. From the System Dashboard, select .
2. Select Chaperone.
3. Choose the style of the collision bounds that you prefer.
4. Drag the sliders to change the color and opacity.
5. To show a constant visual reference of your floor while in VR, select Floor bounds always
on.
Changing the default background display
When you turn on the Vive system, the first you'll see is a default background display. It's the
same background that shows when you select Room view in System Dashboard.
1. From the System Dashboard, select .
2. Select In-Headset.
3. Under Background style, select Image.
4. Choose which image you want from the options. If want to use an image from your
computer, select Open image folder.
5. Exit the current app to apply the changes.
Page 72

72 SteamVR
SteamVR
Activating the front-facing camera
You need to enable the settings for the front-facing camera before you can use it in VR, such as
for showing your actual room.
1. From your computer, open the SteamVR app.
2. Click , and then select Settings Camera.
3. Click Enable Camera.
4. Close and reopen the SteamVR app.
5. Click , and then select Settings Camera.
6. Select Allow Camera in Dashboard.
Checking for firmware updates
Firmware updates include improved features and bug fixes.
1. From your computer, do one of the following:
On the SteamVR status window, mouse over on any of the hardware icons to check if
the firmware is out of date, and then select to update the firmware.
On the SteamVR app, click , and then click Devices Update firmware.
2. Follow the prompts on the screen.
If the update is for the controllers or base stations, you'll be asked to connect them to your
computer using a micro-USB cable.
While firmware updates are in progress, do not unplug the micro-USB or power cables that
connect your hardware to your computer. Doing so could result in a firmware error.
What can I do if I'm having issues with the SteamVR app?
The problem could be due to missing or corrupt files in the SteamVR app. Make sure that your
installation is intact.
1. From your computer, close the SteamVR app.
2. Open the Steam app, and then click Library Tools.
Page 73

73 SteamVR
3. Right-click SteamVR, and then and select Properties.
4. Click the Local Files tab, and then select Verify integrity of tool cache.
For more information, you may refer to the SteamVR Troubleshooting page.
How do I resolve SteamVR Error 208?
If you encounter the 6WHDP95(UURU0RQLWRUQRW)RXQG issue, check if the
troubleshooting details on What can I do to troubleshoot the headset? on page 25 can resolve
the problem.
If you're using Windows 8 or later, the issue might be caused by enhancements in power
management settings. Do these steps as a workaround:
1. On your computer, go to Control Panel System and Security System.
2. Click Device Manager, and then click to expand the list under Universal Serial Bus
controllers.
3. Right-click Generic USB Hub (there may be more than one with the same label), and then
select Properties.
4. Click the Power Management tab, and then de-select Allow the computer to turn off
this device to save power.
5. Unplug and re-plug the power cable on the link box.
6. Restart the SteamVR app.
For more information, you may refer to the SteamVR Troubleshooting page.
How can I opt-in to SteamVR Beta?
1. From your computer, open the Steam app.
2. Under Library, right-click SteamVR, and then click Properties.
3. Select the Betas tab.
4. Under Select the beta you would like to opt into drop-down list, select beta - SteamVR
Beta Update.
If you'd like to opt out in the future, select
5. Close the window, and then wait for SteamVR to finish updating.
None – Opt out of all beta programs.
Page 74

74 Trademarks and copyrights
Trademarks and copyrights
©
2017 HTC Corporation. All Rights Reserved.
Vive, the Vive logo, HTC, the HTC logo, and all other HTC product and service names are
trademarks and/or registered trademarks of HTC Corporation and its affiliates in the U.S. and
other countries.
Steam, the Steam logo and SteamVR are trademarks and/or registered trademarks of Valve
Corporation in the U.S. and/or other countries.
All other trademarks and service marks mentioned herein, including company names, product
names, service names and logos, are the property of their respective owners and their use herein
does not indicate an affiliation with, association with, or endorsement of or by HTC Corporation.
Not all marks listed necessarily appear in this User Guide.
Screen images contained herein are simulated. HTC shall not be liable for technical or editorial
errors or omissions contained herein, nor for incidental or consequential damages resulting from
furnishing this material. The information is provided “as is” without warranty of any kind and is
subject to change without notice. HTC also reserves the right to revise the content of this
document at any time without prior notice.
No part of this document may be reproduced or transmitted in any form or by any means,
electronic or mechanical, including photocopying, recording or storing in a retrieval system, or
translated into any language in any form without prior written permission of HTC.
Page 75

75 Index
Index
B
Base stations
- about 29
- installing 30
- mounting with the kit 32
- setup tips 31
C
Chaperone 71
Controllers
- about 36
- attaching lanyards 38
- charging 37
- pairing with the headset 37
- turning on or off 37
F
Firmware updates 72
H
Headset
- about 7
- adjusting the IPD 9
- adjusting the lens distance 10
- connecting a USB device 11
- product care 19
- putting on 9
- replacing the face cushion 13
- replacing the nose rest 14
- unplugging the cables 12
L
Link box
- about 16
- connecting the headset 16
P
Phone notifications
- checking 62
- choosing 62
- editing replies 63
- receiving 62
Play area
- about 64
- choosing 65
- room-scale 67
- setting up 64
- standing/seated experience 66
- verifying the setup 68
R
Room-scale
- setting up 67
S
Settings
- Chaperone 71
- front-facing camera 72
- in-headset display image 71
Standing/seated experience
- setting up 66
System Dashboard 70
V
Vive Home
- adding shortcuts 58
- changing the Home space 60
- launching 56
- moving around 56
- resetting 60
- teleporting 57
Vive phone app
- downloading 61
- pairing 61
- unpairing 63
Page 76

76 Index
Vive system
- turning on 68
Viveport
- about 41
- accessing 41
- downloading apps 42
 Loading...