

Page 1

User guide
HTC U19e
Page 2

2 Contents
Contents
Features you'll enjoy
AI cameras 9
Game assistant 10
Biometrics for convenience 11
Android 9.0 in HTC U19e 11
Unboxing and setup
HTC U19e overview 13
Inserting the nano SIM and microSD cards 14
Charging the battery 16
Switching the power on or off 17
Setting up your phone for the first time 17
Adding your social networks, email accounts, and more 18
Ways to lock and unlock HTC U19e 19
Choosing which nano SIM card to use for your data connection 19
Managing your nano SIM cards with Dual network manager 20
Your first week with your new phone
Capturing your phone's screen 21
HTC Sense Home 21
Turning Sleep mode on or off 22
Lock screen 22
Touch gestures 23
Getting to know your settings 26
Using Quick Settings 26
Travel mode 27
Restarting HTC U19e (Soft reset) 28
Notifications 28
Selecting, copying, and pasting text 30
Entering text 31
Security
Setting a screen lock 32
Setting up Smart Lock 32
Turning the lock screen off 33
About Iris Unlock 33
About Face Unlock 35
Fingerprint scanner 36
Assigning a PIN to a nano SIM card 37
Updates
Software and app updates 39
Installing a software update 39
Page 3

3 Contents
Installing an application update 40
Installing app updates from Google Play Store 40
Home screen layout and fonts
Adding or removing a widget panel 41
Changing your main Home screen 41
Setting your Home screen wallpaper 42
Changing the default font size 42
Widgets and shortcuts
Launch bar 43
Adding Home screen widgets 43
Adding Home screen shortcuts 44
Grouping apps on the widget panel and launch bar 44
Moving a Home screen item 45
Removing a Home screen item 45
Entertainment
Setting up Game assistant 46
Using Game assistant 46
Locking or unlocking the Navigation Bar 47
Managing notifications when you're in a game or app 47
Recording your screen actions 48
HTC BoomSound for speakers 48
Taking photos and videos
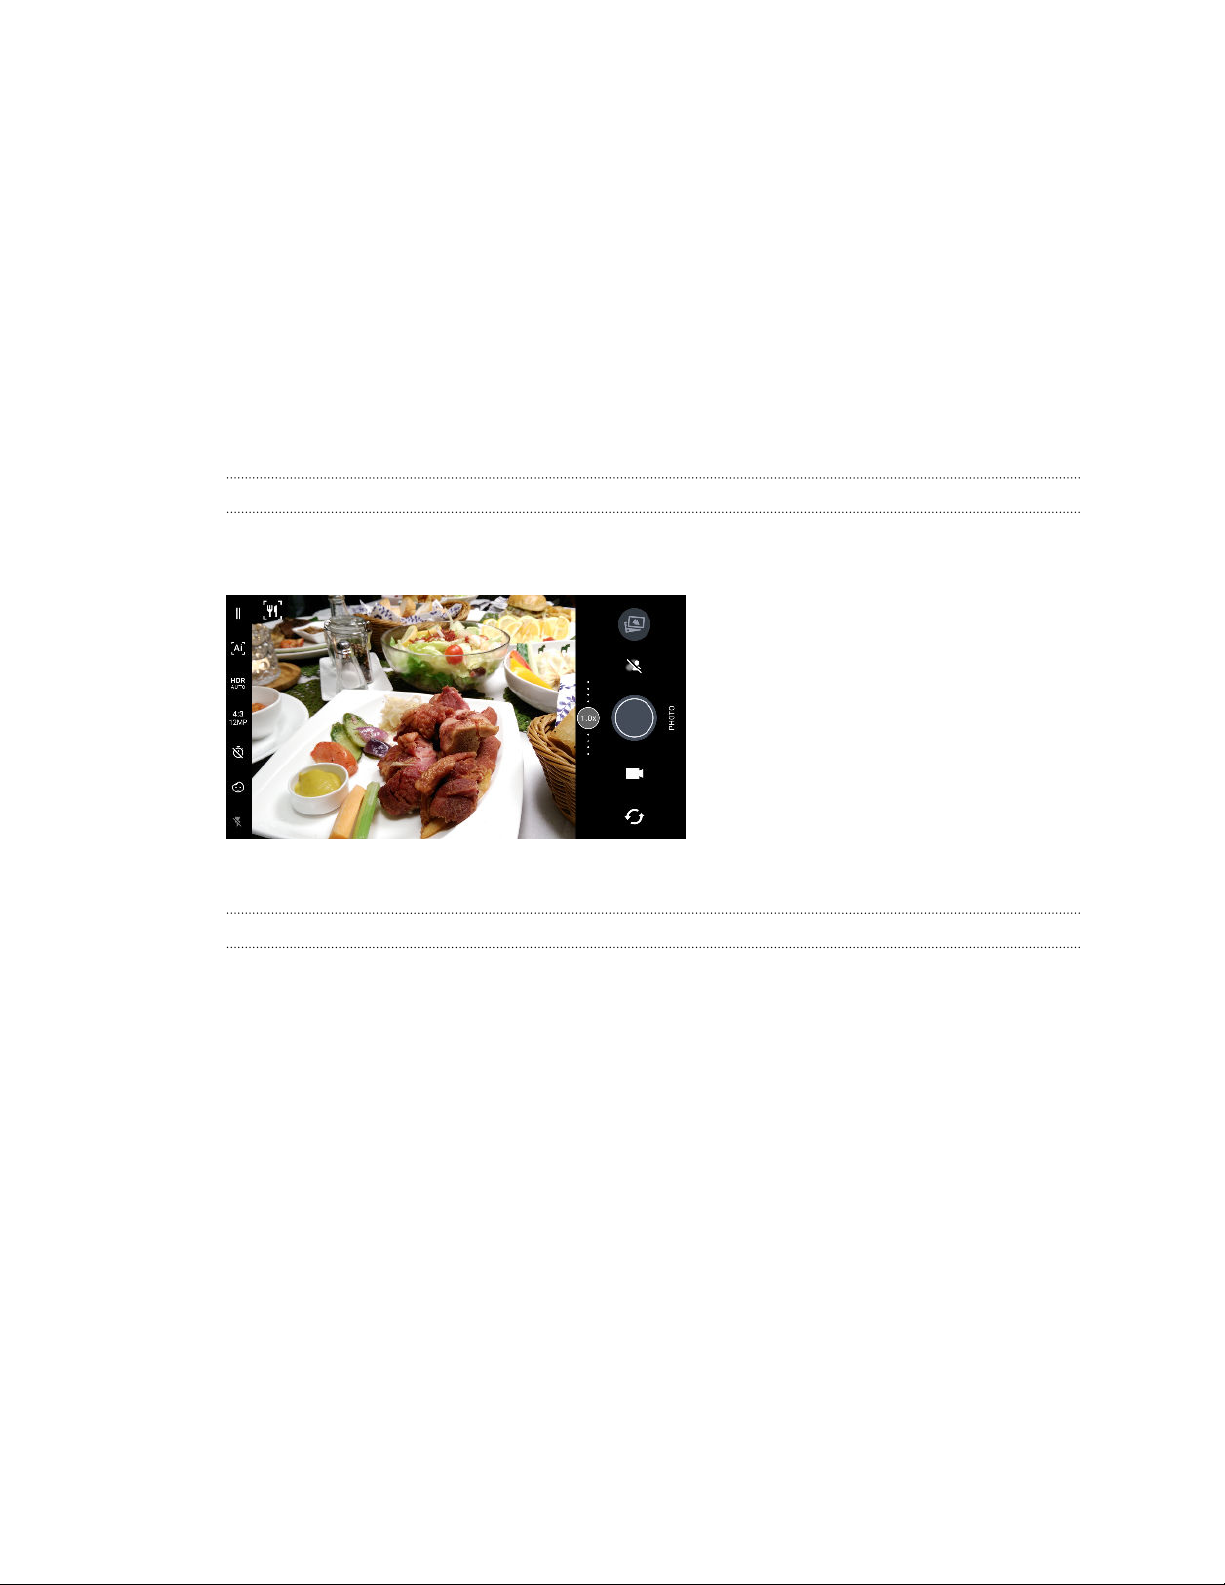
HTC Camera 49
Choosing a capture mode 50
Zooming 52
Quickly adjusting the exposure of your photos 53
Taking a photo 53
Scene detection 54
Taking continuous camera shots 55
Taking photos with the self-timer 55
Tips for capturing better photos 55
Selfies 56
Recording video 57
Using HDR Boost 58
Taking photos in Bokeh mode 58
Adding stickers to your shots 59
Advanced camera features
Choosing a scene 60
Manually adjusting camera settings 60
Taking a RAW photo 61
How does the Camera app capture RAW photos? 61
Taking a panoramic photo 62
Recording videos in slow motion 62
Page 4

4 Contents
Google Photos
What you can do on Google Photos 63
Viewing photos and videos 63
Editing your photos 64
Enhancing RAW photos 64
Trimming a video 64
Changing the playback speed of a slow motion video 65
Phone calls
Making a call with Smart dial 66
Dialing an extension number 67
Keeping your phone number private 67
Speed dial 67
Calling a number in a message, email, or calendar event 67
Receiving calls 68
Emergency call 69
What can I do during a call? 69
Setting up a conference call 70
Call History 70
Switching between silent, vibrate, and normal modes 71
Home dialing 71
SMS and MMS
About the Messages app 73
Sending a text message (SMS) 73
Sending a multimedia message (MMS) 74
Sending a group message (SMS) 74
Replying to a message 75
Forwarding a message 75
Blocking messages from unwanted contacts 75
Deleting messages and conversations 75
Changing the settings and getting help 76
Contacts
Your contacts list 77
Adding a new contact 78
Editing a contact’s information 79
Getting in touch with a contact 80
Importing or copying contacts 80
Merging contact information 81
Sending contact information 82
Contact groups 82
Private contacts 83
Battery
Tips for extending battery life 85
Using Battery saver mode 87
Displaying the battery percentage 87
Checking battery usage 87
Battery optimization for apps 87
Page 5

5 Contents
Enabling background restriction in apps 88
Storage
Freeing up storage space 89
Types of storage 90
Should I use the storage card as removable or internal storage? 90
Setting up your storage card as internal storage 91
Moving apps and data between the built-in storage and storage card 91
Moving an app to or from the storage card 92
Copying or moving files between the built-in storage and storage card 92
Copying files between HTC U19e and your computer 93
Unmounting the storage card 93
Transfer
Ways of getting content from your previous phone 94
Transferring content from an Android phone 94
Other ways of getting contacts and other content 95
Transferring photos, videos, and music between your phone and computer 95
Backup and reset
Backing up HTC U19e 96
Resetting network settings 96
Resetting HTC U19e (Hard reset) 97
Installing and removing apps
Getting apps from Google Play Store 98
Downloading apps from the web 99
Uninstalling an app 99
Working with apps
Accessing your apps 100
Arranging apps 100
App shortcuts 101
Switching between recently opened apps 102
Working with two apps at the same time 102
Using picture-in-picture 103
Controlling app permissions 104
Setting default apps 104
Setting up app links 104
Disabling an app 105
HTC and other apps
Boost+ 106
HTC BlinkFeed 106
HTC Themes 106
Mail 107
Clock 107
Weather 107
Sound Recorder 107
Page 6

6 Contents
Internet connections
Turning the data connection on or off 109
Managing your data usage 109
Wi-Fi connection 111
Connecting to VPN 112
Installing a digital certificate 113
Using HTC U19e as a Wi-Fi hotspot 114
Sharing your Internet connection over USB 114
Wireless sharing
Turning Bluetooth on or off 115
Connecting a Bluetooth headset 115
Unpairing from a Bluetooth device 116
Receiving files using Bluetooth 116
Using NFC 117
Common settings
Adjusting the volume and sound settings 119
Changing your ringtone 119
Changing your notification sound 120
Do not disturb mode 120
Turning the location setting on or off 121
Turning Airplane mode on or off 122
Setting when to turn off the screen 122
Screen brightness 122
Night mode 122
Adjusting the display size 123
Touch sounds and vibration 123
Changing the display language 124
Travel mode 124
Trademarks and copyrights
Index
Page 7
7 About this guide
About this guide
In this user guide, we use the following symbols to indicate useful and important information:
This is a note. A note often gives additional information, such as what happens when you choose
to do or not to do a certain action. A note also provides information that may only be applicable
to some situations.
This is a tip. A tip gives you an alternative way to do a particular step or procedure, or lets you
know of an option that you may find helpful.
This indicates important information that you need in order to accomplish a certain task or to
get a feature to work properly.
This provides safety precaution information, that is, information that you need to be careful
about to prevent potential problems.
Some apps may not be available in all regions or with your mobile operator.
Page 8

8 Important note on recoverable data
Important note on recoverable data
Files and other data that have been deleted, cleared, removed, or erased from your device
may still be recoverable by third-party data recovery software. Even a factory reset may not
permanently erase all data from your mobile device, including personal information.
Page 9
9 Features you'll enjoy
Features you'll enjoy
AI cameras
HTC U19e gives you imaging at its finest. It has AI-powered main cameras that can automatically
set the scene mode. 2x optical zoom gives you brilliant sharpness even from afar. There's also the
Bokeh mode that brings you dazzling studio-like portraits.
Automatic scene detection
The AI-powered main cameras on HTC U19e can detect what you're photographing and
automatically set the scene mode for you.
For more details, see Scene detection on page 54.
Zoom
HTC U19e features 2x optical zoom in Photo mode. Use up to 10x digital zoom when taking photos
and 4x digital zoom when recording videos.
For more details, see Zooming on page 52.
Page 10
10 Features you'll enjoy
Portraits
Capture awesome portraits with HTC U19e.
§ Bokeh mode – Adjust the depth-of-field in your photographs just like a professional. Blur the
background in real time before you take the shot.
§ Stickers – Spice up your photos and videos by adding funny effects and playful AR stickers in
real time. See Adding stickers to your shots on page 59.
§ Beauty Mode – Before taking a photo selfie, use Beauty Mode to apply real-time touch-ups
such as skin smoothening, facial slimming, and more. See Using Beauty Mode when taking
photo selfies on page 56.
Game assistant
Focus on your game and lose the distractions. With Game assistant, set notifications to appear unintrusively, lock the navigation bar so you won't accidentally press its buttons while in a game, and
more.
See Setting up Game assistant on page 46.
Page 11
11 Features you'll enjoy
Biometrics for convenience
Aside from the fingerprint scanner, HTC U19e features two other biometric authentication
methods to unlock your phone.
Iris Unlock
Set up HTC U19e to recognize your irises and instantly unlock your phone.
For more details, see About Iris Unlock on page 33.
Face Unlock
Set up HTC U19e to recognize and unlock your phone with your face.
For more details, see About Face Unlock on page 35.
Android 9.0 in HTC U19e
Android™ 9.0 in HTC U19e brings features that make handling phone calls, battery usage, and app
notifications more efficient. Here's an overview of some of its features.
Incoming call pop-up
From taking up the entire screen, you can set incoming phone calls to show as a pop-up. It takes the
pressure off to immediately accept or reject an incoming call, especially when you're busy using an
app.
For details, see Showing incoming call as a pop-up notification on page 68.
More control over battery-draining apps
Check which apps are draining your battery and enable background restriction for these apps. This
prevents them from using the battery while running in the background. See Enabling background
restriction in apps on page 88.
Page 12

12 Features you'll enjoy
Manage notifications better
You have more control over your notifications. It's easier to stop those that you don't want to
receive anymore. Just press and hold on a notification to see your options. When you're using apps
such as Google Messages and Gmail, you can now reply to messages right from the Notifications
panel.
More intuitive design
Enjoy a refreshed look for some screens, such as the Quick Settings. The volume bar is also more
accessible, and you can conveniently switch between silent, vibrate, and normal modes from it.
You'll be delighted as subtle design improvements make for a better overall experience.
Page 13
13 Unboxing and setup
Unboxing and setup
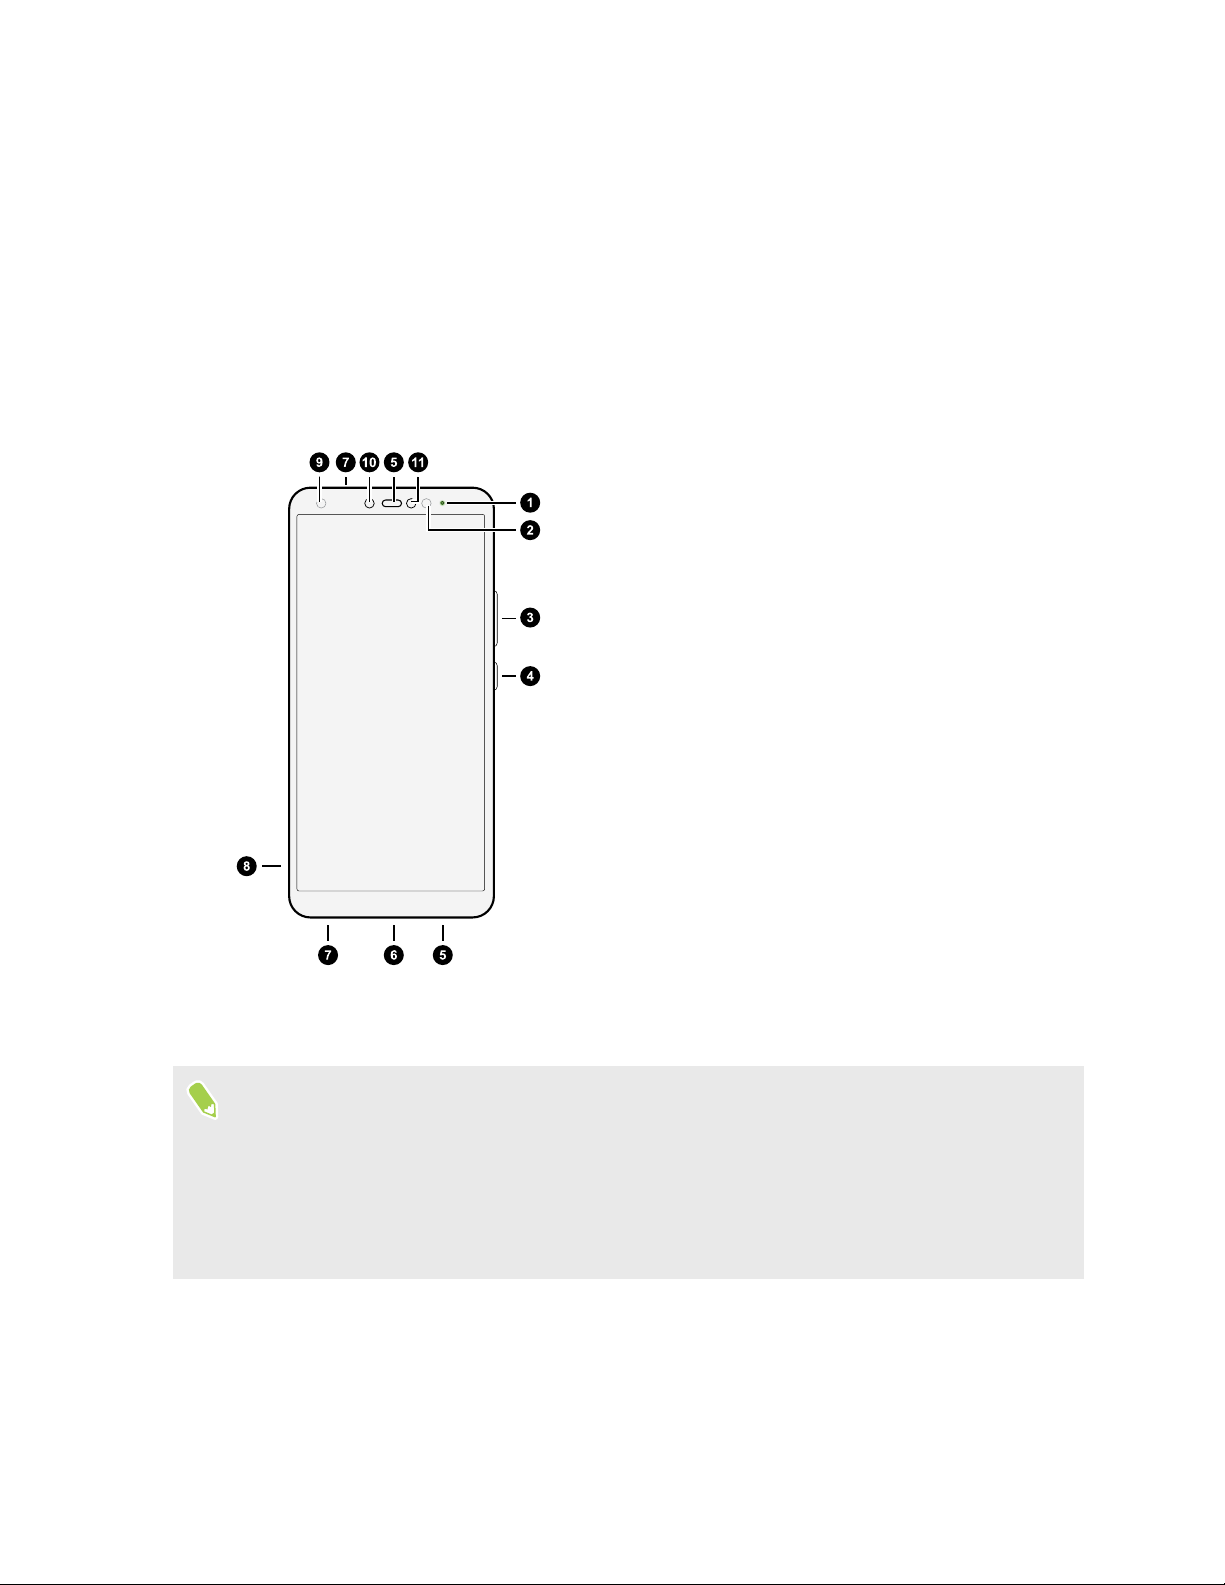
HTC U19e overview
After taking HTC U19e out of the box, familiarize yourself with the location of the card tray,
controls, and sensors.
1. Notification LED
2. Proximity and light sensor
3. VOLUME UP and VOLUME DOWN buttons
4. POWER button
5. HTC BoomSound™ Hi-Fi edition speakers
6. USB Type-C™ connector
7. Microphones
8. nano SIM and storage card tray
9. Iris Unlock LED
10. Front camera
11. Iris Unlock camera
You need a 4G/LTE™ plan to use your operator's 4G/LTE network for voice calls and data services.
Check with your operator for details.
§ If you want to use a case or screen protector, don’t cover and block the proximity and light
sensor. Purchase a case or screen protector designed for HTC U19e.
§ Avoid liquid or dust from entering the microphone hole to prevent damage to the microphone.
§ Don’t disassemble any part of the phone. Don’t try to open the phone or remove the battery by
force. This may damage the phone or its electronics and will invalidate the warranty.
Page 14
14 Unboxing and setup
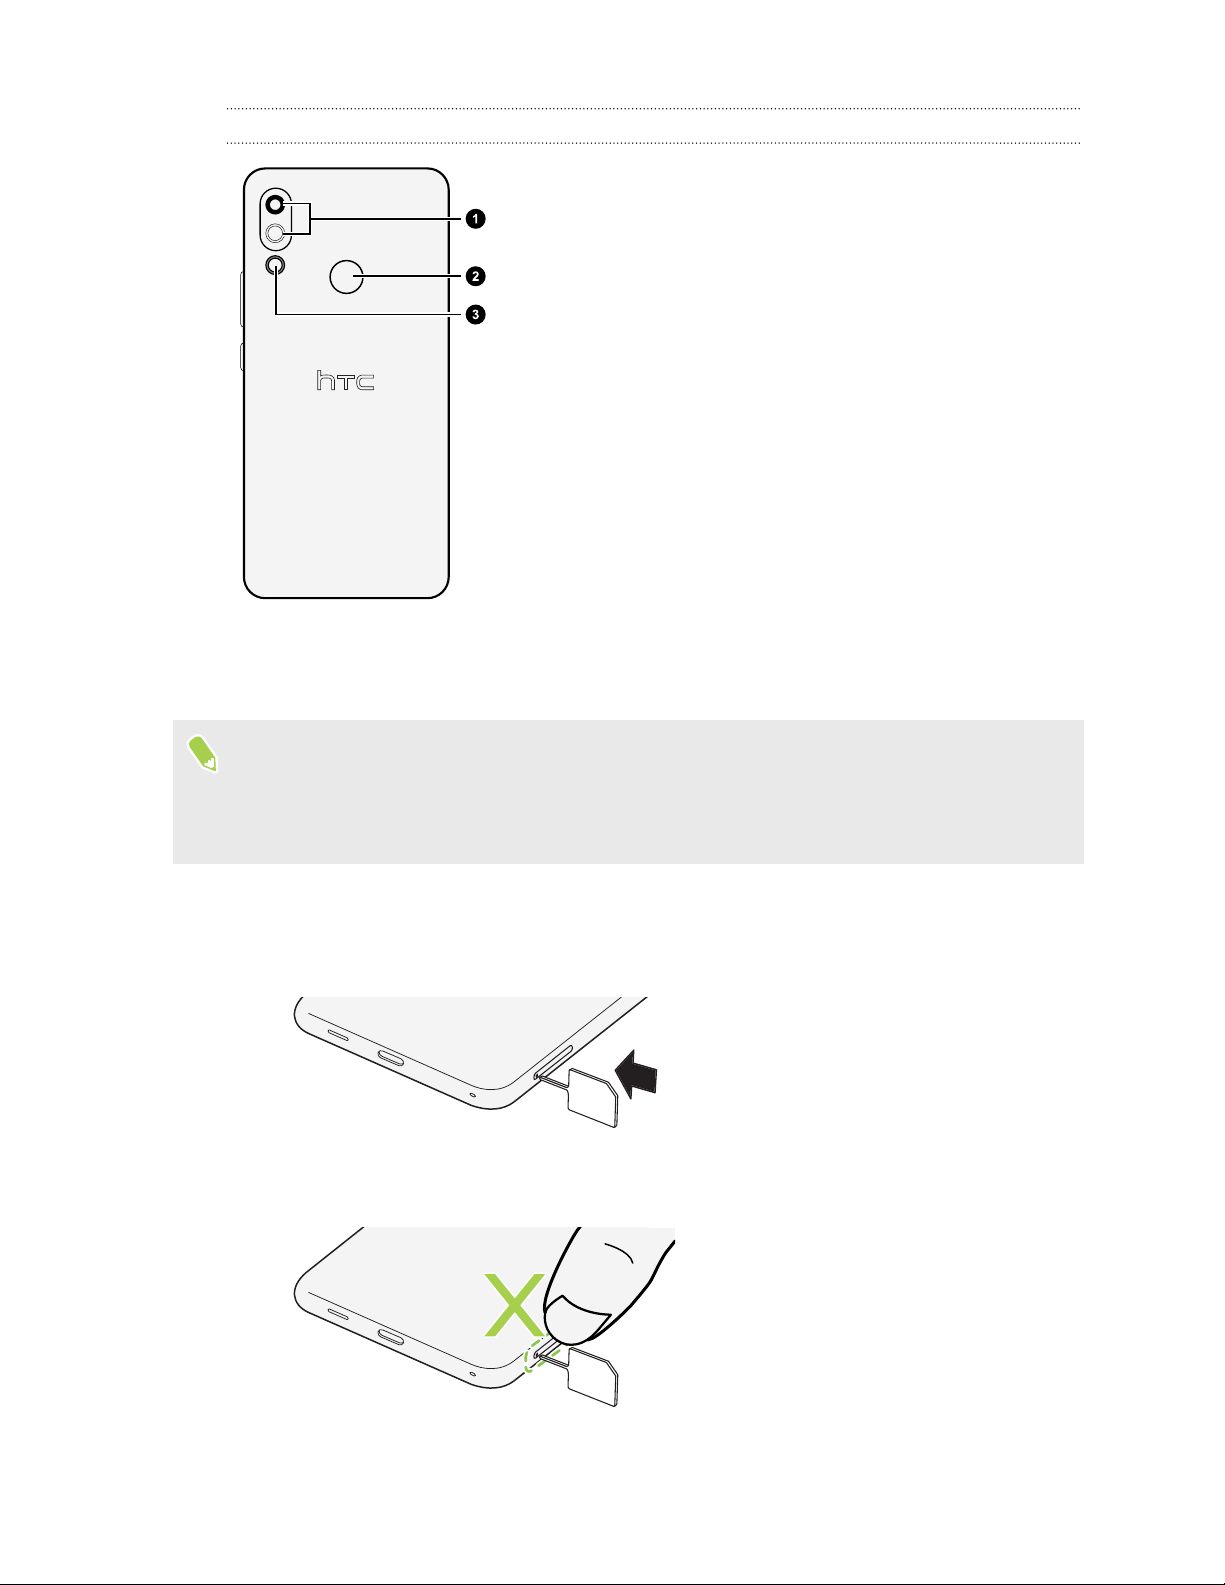
Back panel
1. Dual cameras
2. Fingerprint scanner
3. LED flash
Inserting the nano SIM and microSD cards
§ Use a standard nano SIM card. A modified card that is thicker than the standard nano SIM card
will not fit properly on the tray and may damage the card slot.
§ The microSD™ card is optional and sold separately.
1. Hold the phone face down.
2. Insert the tip of the tray eject tool that came with your phone—or a small bent paperclip—
into the tray eject hole.
When inserting the eject tool into the tray eject hole to remove the card tray, do not obstruct
the tray to avoid damaging the eject mechanism inside the slot.
3. Push the tip all the way into the hole until the tray ejects, and then pull the tray out.
Page 15
15 Unboxing and setup
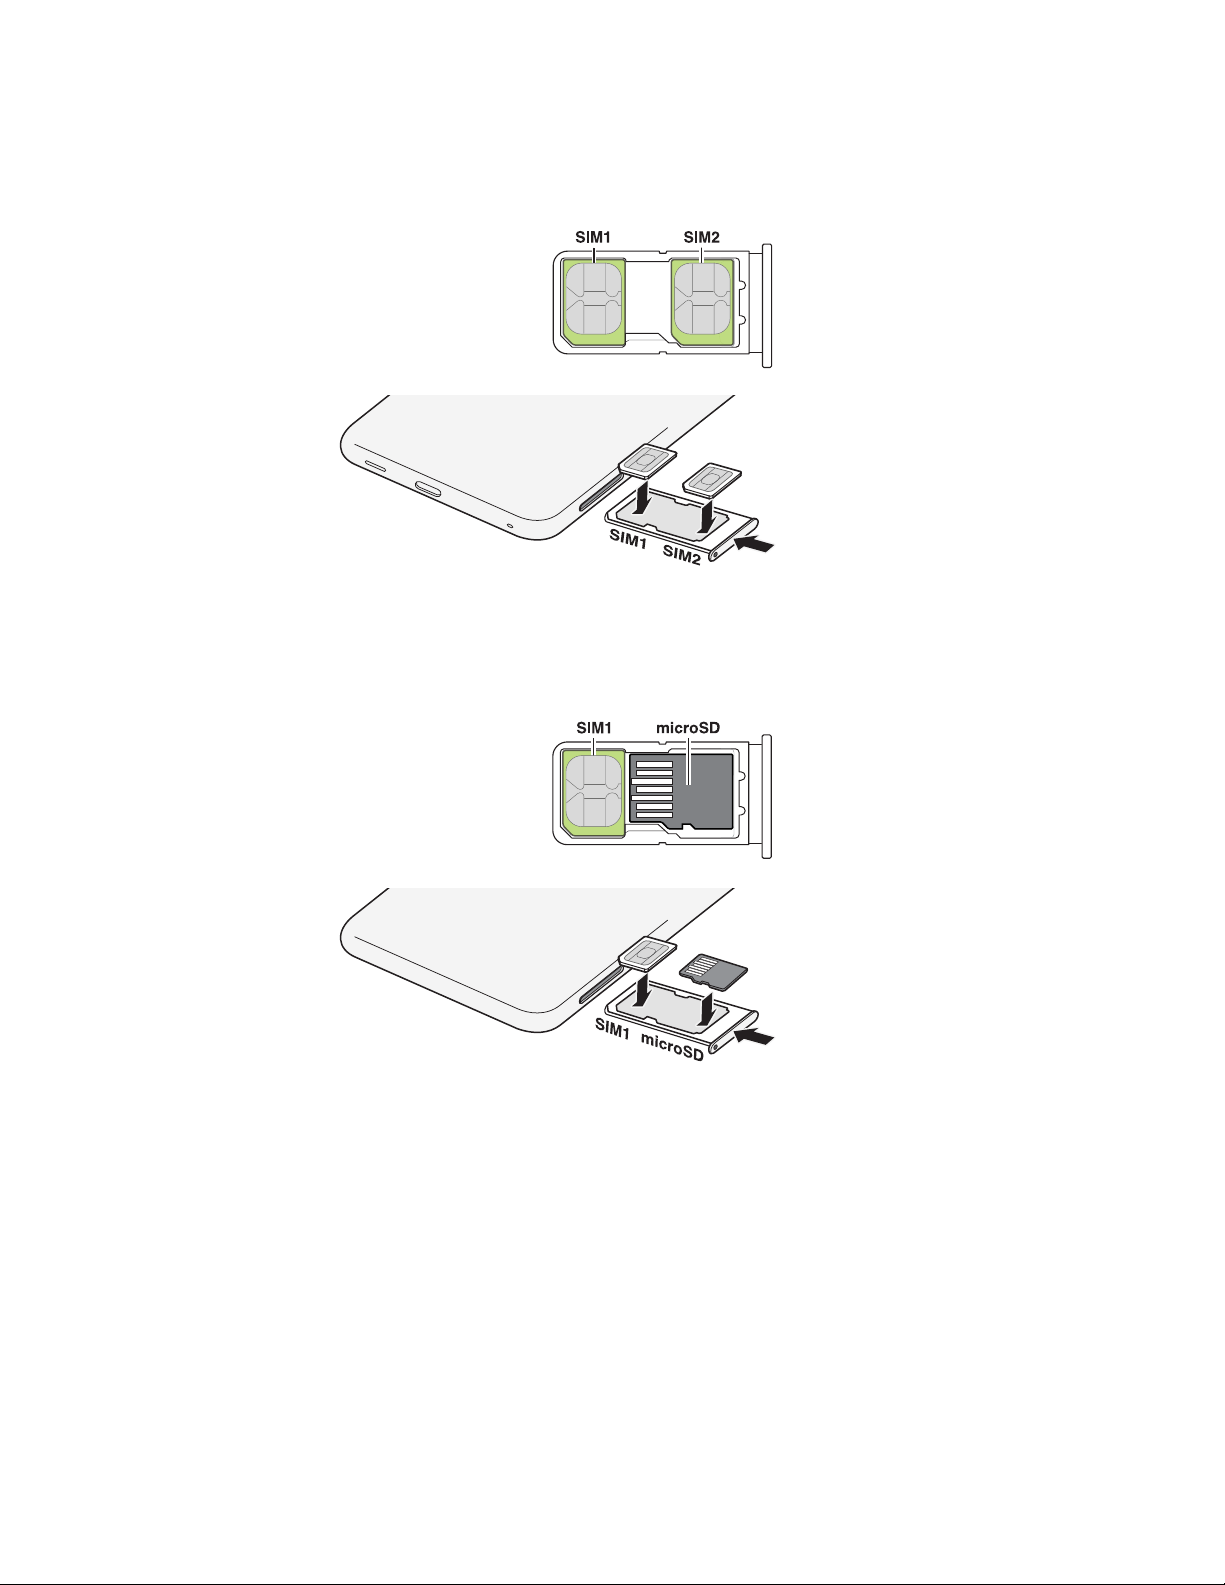
4. Do the following to place your nano SIM and microSD cards into the tray:
§ With the gold contacts facing up, place two nano SIM cards into the SIM 1 and SIM 2
holders of the tray. Make sure to align the cut-off corners to the notches on the holders.
Both SIM 1 and SIM 2 cards
can be 4G LTE cards. To
find out how to set the
preferred card for your
mobile data connection, see
Choosing which nano SIM
card to use for your data
connection on page 19.
§ When you need to use a microSD card, remove your second nano SIM card and then
place the microSD card with its gold contacts facing up on the SIM 2/SD holder. You
cannot have both the second nano SIM card and the microSD card inserted at the same
time.
Page 16
16 Unboxing and setup
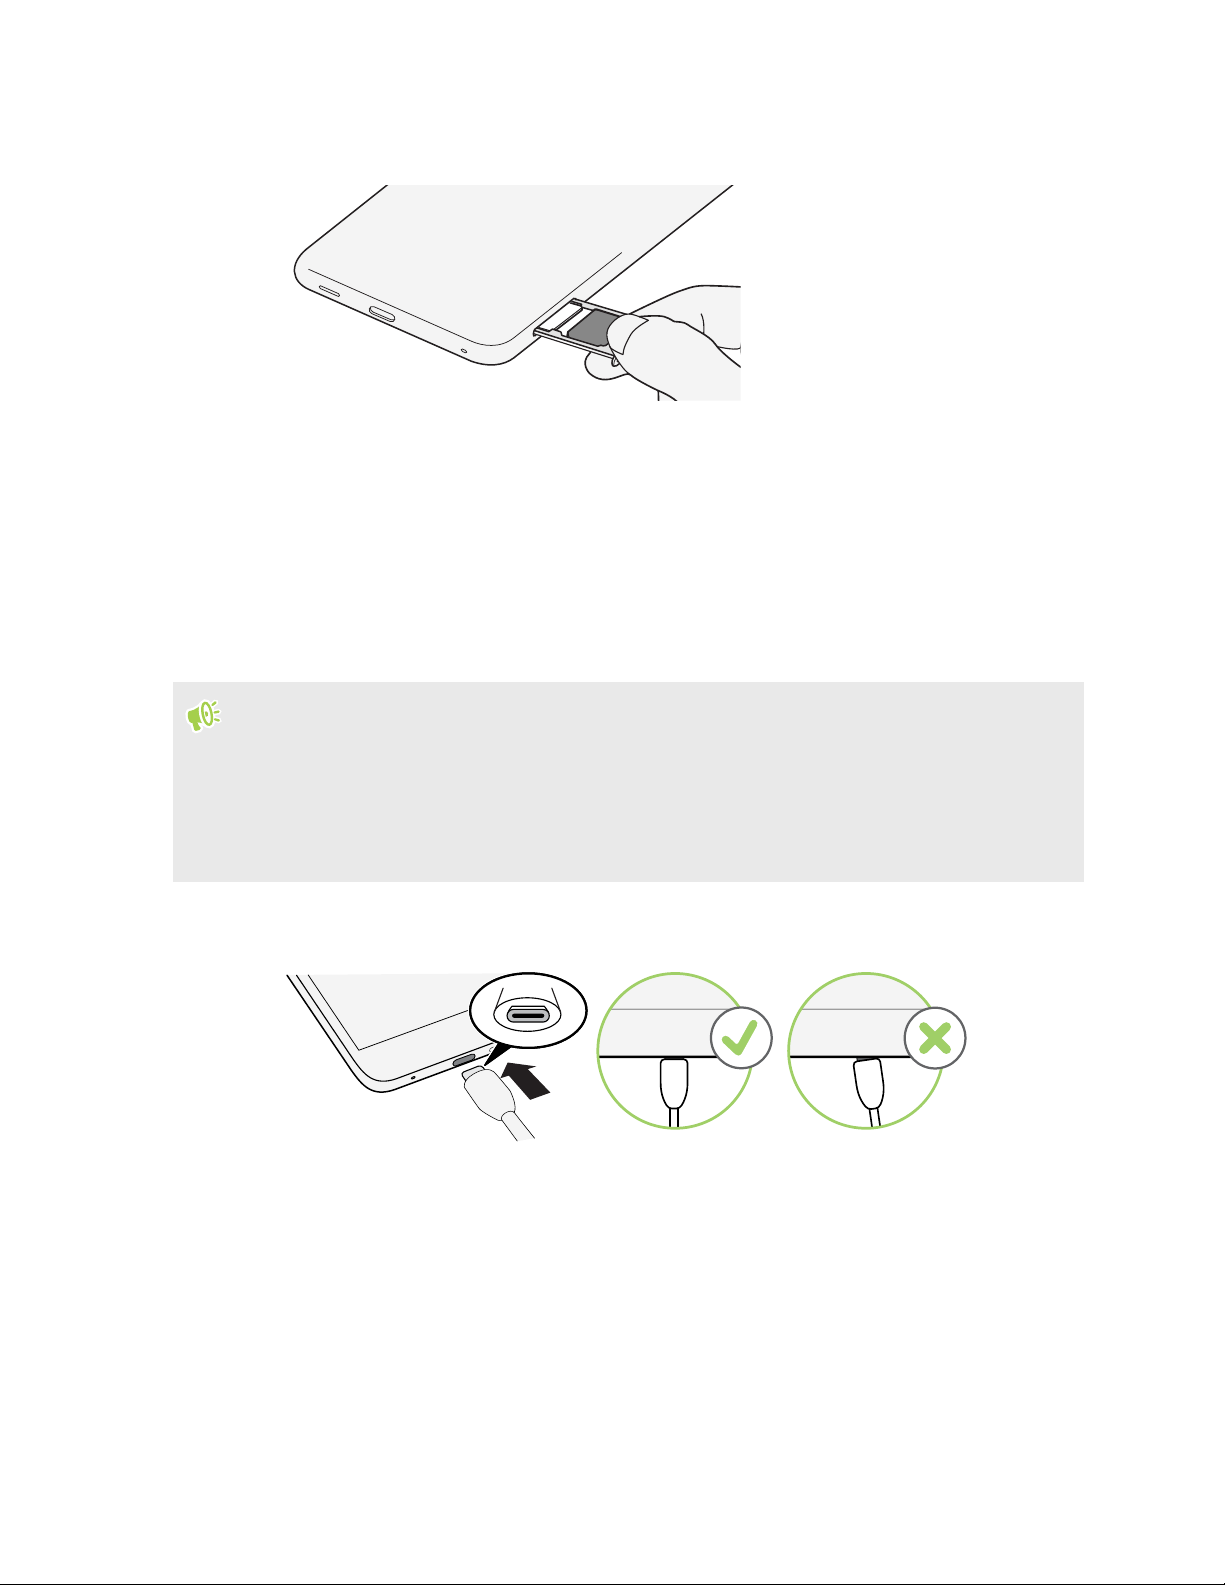
5. When reinserting the tray, make sure it is facing up so that your cards don't fall out. With the
outer card holder between your fingers, steadily slide the tray all the way into the slot.
6. Make sure the tray is fully inserted and doesn't protrude from the slot.
Follow the same procedure above to eject the tray and remove your cards. Before ejecting the tray,
make sure to unmount your microSD card first. See Unmounting the storage card on page 93.
Charging the battery
Before you turn on and start using HTC U19e, it is recommended that you charge the battery.
§ If the battery has been fully drained, you may need to charge HTC U19e for several minutes
before powering it on.
§ Use HTC's power adapter and USB Type-C cable to charge the battery. When the battery power
is too low, make sure to use the power adapter to charge, not the USB cable connection with
your computer.
1. Insert the small end of the USB Type-C cable into the USB Type-C connector.
2. Insert the other end of the USB Type-C cable into the power adapter.
Page 17
17 Unboxing and setup
3. Plug in the power adapter to an electrical outlet to start charging the battery.
4. After you finish charging, unplug the USB cable from your phone first. Hold the part of the
power adapter that's close to the USB port when you unplug the adapter from the outlet.
§ Avoid charging the battery in hot environments. As a safety precaution, the battery may stop
charging to avoid overheating.
§ When you're using battery-intensive apps such as games or video streaming apps while charging
the battery, your phone may become warmer. This is normal.
§ It is strongly recommended to unplug the power adapter from the electrical outlet when not in
use.
Switching the power on or off
Switching the power on
Press the POWER button until HTC U19e vibrates.
When you turn on HTC U19e for the first time, you’ll need to set it up.
Switching the power off
1. If the display is off, press the POWER button to turn it back on.
2. Press and hold the POWER button for a few seconds.
3. Tap Power off on the options menu.
Setting up your phone for the first time
When you switch on your HTC phone for the first time—or after you've done a factory reset—you’ll
need to set it up.
If you have data from a previous phone that you need to copy over to HTC U19e, back up the
previous phone's data first. Or use the HTC Transfer Tool to transfer content from your previous
phone after you've finished setting up HTC U19e. For details, see Ways of getting content from
your previous phone on page 94.
1. If you need to navigate by voice feedback, turn on TalkBack by pressing and holding two
fingers on the first screen until you hear a message and then a beep.
Or if you accidentally enabled TalkBack, follow the onscreen tutorial to turn it off.
2. Choose the system language you want to use, read and agree to the terms of use, choose your
Internet connection, and sign in to your Google® Account.
Page 18
18 Unboxing and setup
3. On the screen that asks you which device to restore from, do one of the following:
§ If you backed up your old phone using your Google Account, tap the phone name.
Choose the items you want from your old phone, and then tap Restore.
§ If you want to start fresh, tap Don't restore.
4. On the Google Services screen, make sure the Back up to Google Drive option is turned on to
enable Auto Backup. It's also recommended to have the options under Location and Device
maintenance turned on.
5. Set up device security for your phone, or skip and do this later in Settings. For details, see
Ways to lock and unlock HTC U19e on page 19.
6. Sign in to your HTC Account to use the same login credentials for HTC services such as
Themes.
7. Follow the remaining instructions to finish your phone setup.
Some features that need to connect to the Internet such as location-based services and auto-sync
of your online accounts may incur extra data fees. To avoid incurring data fees, disable these
features under Settings. For more information on location services, see Turning the location
setting on or off on page 121.
Adding your social networks, email accounts, and more
You can sync contacts, calendars, and other information from your social networks, email accounts,
and online services on HTC U19e. Depending on the account type, signing in to your online accounts
lets you sync updates between HTC U19e and the Web.
1. From the Home screen, swipe up and then tap Settings
2. Tap Add account.
3. Tap the account type you want to add.
4. Follow the onscreen instructions to enter your account information.
You can add several Google Accounts.
Syncing your accounts
1. From the Home screen, swipe up and then tap Settings Accounts & sync.
2. Tap the Automatically sync data On/Off switch to turn automatic sync of all your accounts
on or off.
3. To manually sync individual accounts, tap an account, tap Account sync, and then tap
Sync now.
Accounts & sync.
On the Account sync screen, you can also change the sync settings for your Google Account.
Page 19
19 Unboxing and setup
Removing an account
Remove accounts from HTC U19e if you no longer use them. Removing an account does not remove
accounts and information from the online service itself.
1. From the Home screen, swipe up and then tap Settings Accounts & sync.
2. Tap an account.
3. Tap Remove Account.
Some personal data may be retained by the third-party app after you have removed the account
from HTC U19e.
Ways to lock and unlock HTC U19e
It is important to set your phone to lock itself to prevent others from accessing your data in case it
gets lost or stolen. HTC U19e gives you several ways to lock and unlock your phone.
§ Screen lock: Set up your phone with a secure PIN, password, or pattern. See Setting a screen
lock on page 32.
§ Fingerprint scanner: Unlock your phone using your registered fingerprint. See Adding a
fingerprint the first time on page 36.
§ Face Unlock: While the screen is on, unlock your phone with your registered facel. See About
Face Unlock on page 35.
§ Iris Unlock: While the screen is on, unlock your phone with your registered irises. See About
Iris Unlock on page 33.
Choosing which nano SIM card to use for your data connection
When you have two nano SIM cards inserted on your phone, only one card can be used to connect to
the Internet at a time. If you're using Google or third-party apps, you can also choose which one to
use as the default card for making phone calls and sending SMS/MMS messages.
1. From the Home screen, swipe up and then tap Settings Network & Internet Dual
network manager.
2. Tap Data network, and then choose the card to use for connecting to the Internet. .
3. Tap Voice calls and SMS messages respectively to set the default card to use for making
phone calls and sending SMS/MMS messages.
Page 20

20 Unboxing and setup
Managing your nano SIM cards with Dual network manager
From the Home screen, swipe up and then tap Settings
manager. You can turn either card on or off, change the card names, and more.
Network & Internet Dual network
Page 21
21 Your first week with your new phone
Your first week with your new phone
Capturing your phone's screen
Want to show off your high game score? It's easy to take a picture of the screen to share.
1. To capture a screenshot, do any of the following:
§ Press and hold POWER and VOLUME DOWN at the same time.
§ Press and hold the POWER button until a menu opens, and then tap Screenshot.
2. Open the Notifications panel.
You'll see the Screenshot saved notification with options on what to do with the screenshot.
If you don't see the options, slide two fingers apart on the notification to display them.
3. Tap Share.
HTC Sense Home
After you've turned on and set up HTC U19e for the first time, you'll see the Home screen.
§ Swipe right and you'll find HTC BlinkFeed™. You can customize HTC BlinkFeed to show
posts from your social networks, headlines from your favorite news media, and more. For
details, see http://www.htc.com/support/apps/blinkfeed/.
To display news in HTC BlinkFeed, you need to download the News Republic app.
§ Swipe left and you’ll discover space for adding your favorite widgets, apps, and more so
they’re just a tap away. You can also add panels. For details, see Adding or removing a widget
panel on page 41.
§ You can change the apps on the launch bar at the bottom of the Home screen. See Launch bar
on page 43.
While you're in another screen or app, press
to return to the last Home screen you visited.
Page 22
22 Your first week with your new phone
Turning Sleep mode on or off
Sleep mode saves battery power by putting HTC U19e into a low power state while the display is off.
It also stops accidental button presses when HTC U19e is in your bag.
§ To turn off the display and switch to Sleep mode, briefly press the POWER button.
HTC U19e also automatically goes into Sleep mode when it’s left idle for a while. You can
change the time before HTC U19e sleeps by setting the screen timeout.
§ To wake up your phone from Sleep mode, press the POWER button.
Lock screen
Here's what you can do on the Lock screen:
§ Swipe up on the lock screen to unlock the screen.
Make sure to set up a screen lock to help protect your phone. See Setting a screen lock on page
32.
§ Tap twice on a notification to go directly to the related app.
§ Swipe left or right on the notification to remove it.
§ Slide left or right on a notification until you see and . Tap to snooze the
notification.
§ Press and hold a notification, and then choose whether to stop or continue showing
notifications from its app.
If you don't want notification content to appear on the lock screen, go to Settings Security
& location Lock screen preferences On lock screen, and then tap Don't show
notifications at all.
Page 23
23 Your first week with your new phone
Touch gestures
Use touch gestures to get around the Home screen, open apps, scroll through lists, and more.
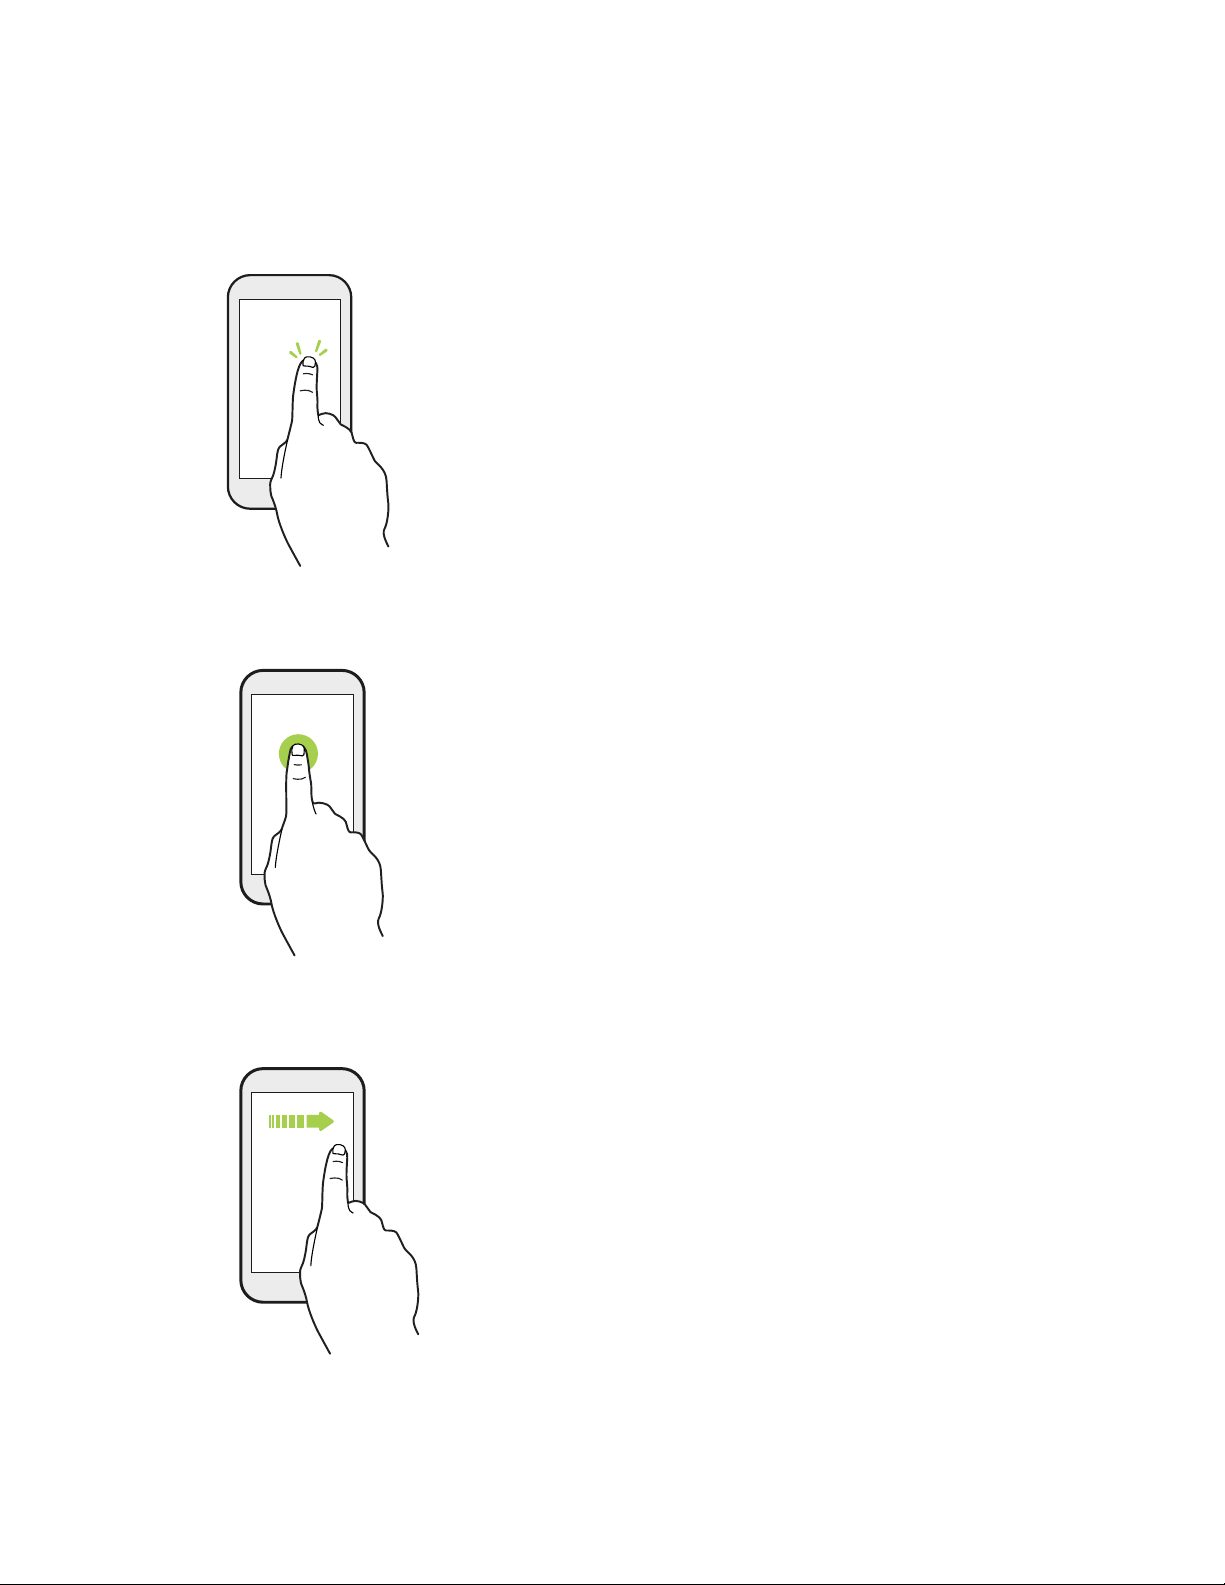
Tap
Tap the screen with your finger when you want to select onscreen items
such as application and settings icons, or press onscreen buttons.
Press and hold
Swipe or slide
To open the available options for an item (for example, a contact or
link in a webpage), just press and hold the item.
Quickly swipe your finger horizontally across the screen to go to
other Home screen panels. Swipe vertically to scroll through a list,
document, and more.
Page 24
24 Your first week with your new phone
Drag
Flick
Press and hold your finger with some pressure before you start to
drag. While dragging, don't release your finger until you have
reached the target position.
Flicking the screen is similar to swiping, except that you need
to swipe your finger in light, quicker strokes, such as when
moving right and left on the Home screen, or flicking through
a contacts or message list.
Press and flick
On the Home screen, you can easily move a widget or icon
from one screen to another.
Press and hold the widget or icon with one finger, and flick the
screen to the new location with another finger.
Page 25
25 Your first week with your new phone
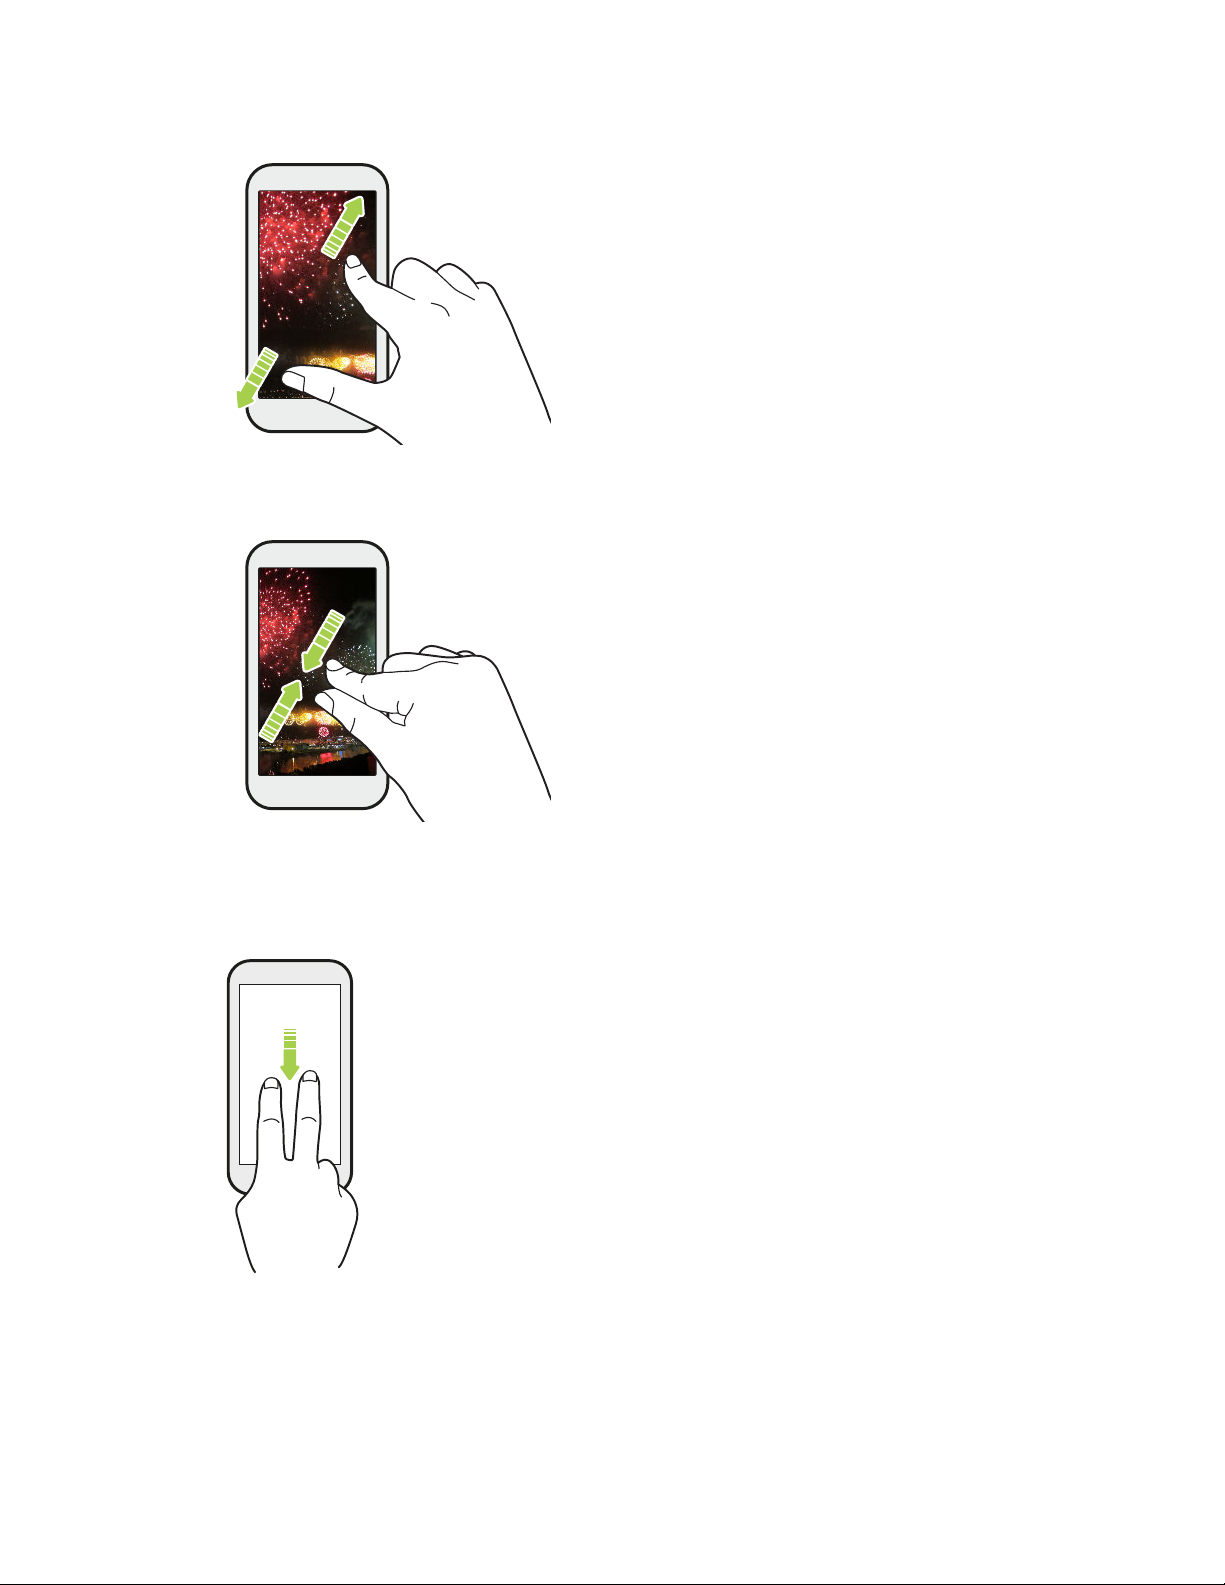
Slide with two fingers
In some apps, slide two fingers apart to zoom in when
viewing a picture or text.
Slide two fingers together to zoom out of the picture
or text.
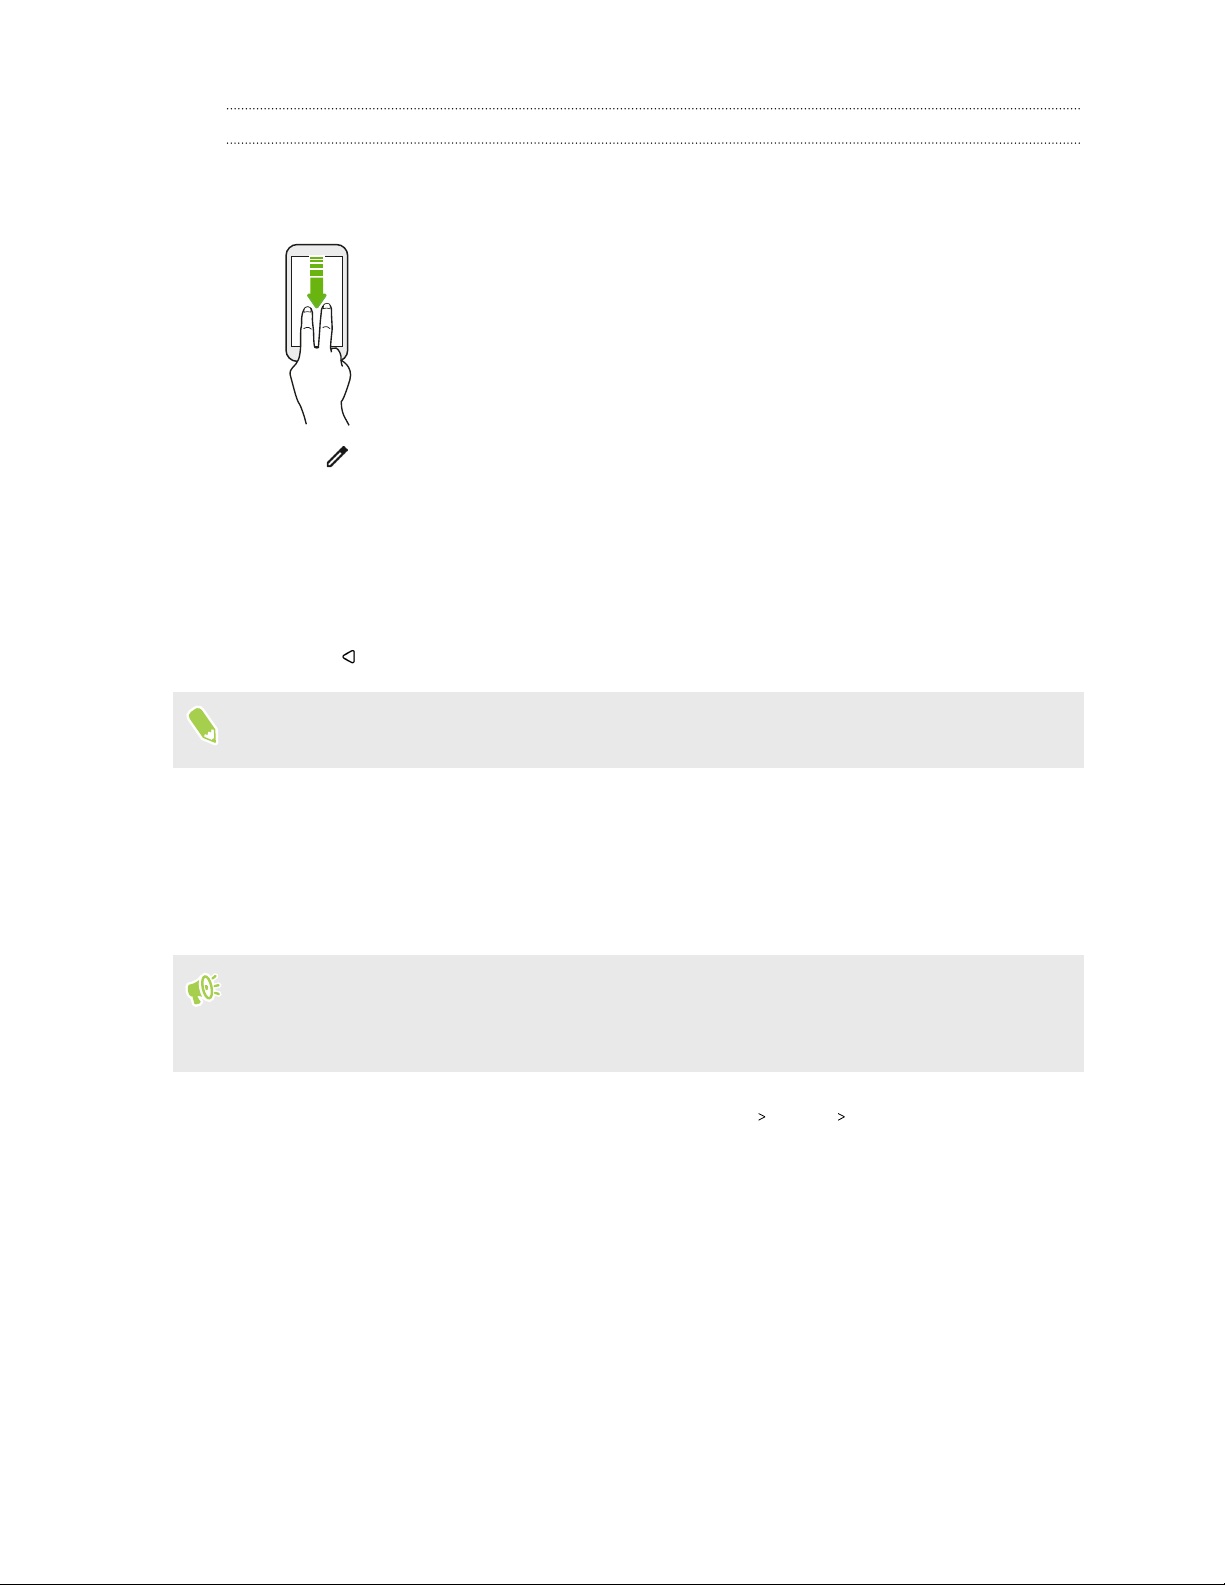
Two-finger swipe
Swipe down from the status bar using two fingers to access Quick Settings.
Page 26
26 Your first week with your new phone
Getting to know your settings
Want to change the ringtone, set up a Wi-Fi® connection, or add your accounts? Do this and more in
Settings.
1. Open Settings from the Apps screen or Notifications panel:
§ From the Home screen, swipe up and then find and tap Settings.
§ From the Home screen, tap , and then find and tap Settings.
§ Swipe down from the top of the screen and then tap .
2. Here are some of the basic settings you can change:
§ Tap Network & Internet to configure and manage your network connections.
§ Tap Display & gestures to change the wallpaper, adjust the font and display size, set a
screen saver, and more.
§ Tap Sound to change the ringtone, decide if sound and vibration occur when interacting
with the phone, set Do not disturb preferences, and more.
§ Tap Security & Location to help secure your phone, choose lock screen preferences, set
your location option, and more.
§ Tap an item under Suggestions to check out new or recommended settings to
customize.
Tap the search bar in Settings to quickly find options and settings.
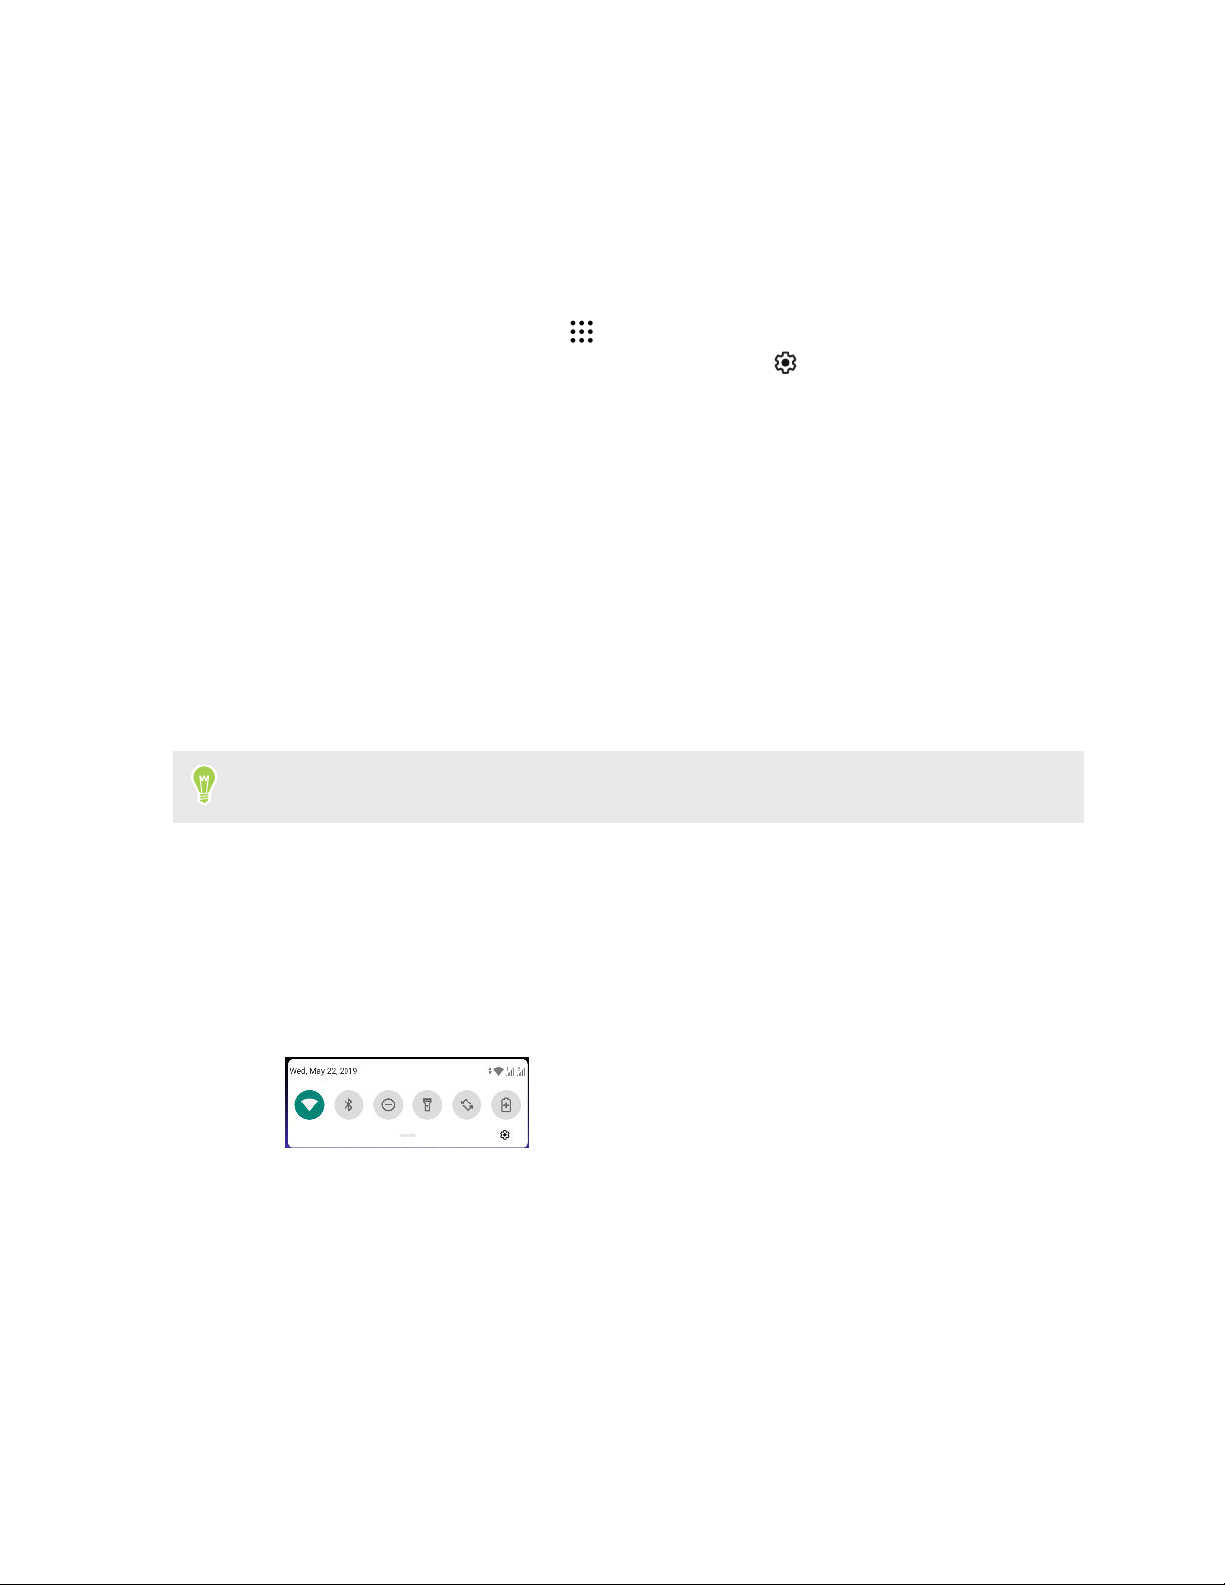
Using Quick Settings
In the Quick Settings panel, easily turn settings such as Wi-Fi and Bluetooth® on or off.
1. Swipe down from the top of the screen to open the Notifications panel.
Right below the status bar, you'll see the short Quick Settings bar.
2. To see the full Quick Settings panel, do any of the following:
§ On the lock screen, swipe down once from the top of the screen.
§ On any other screen, swipe down once with two fingers or swipe down twice with one
finger from the status bar.
3. Swipe left or right to see more tiles.
4. To turn a setting on or off, just tap its tile.
5. To customize a setting, press and hold its tile.
Page 27
27 Your first week with your new phone
Customizing Quick Settings
You can remove, replace, or rearrange the tiles in Quick Settings.
1. With two fingers, swipe down from the top of the screen to open Quick Settings.
2. Tap and do one of the following:
§ Press and hold a tile, and then drag it to your desired position.
§ Press and hold a tile, and then drag it down under the Hold and drag to add tiles section
to hide it from the Quick Settings panel.
§ Under the Hold and drag to add tiles section, drag a tile up to show it in the Quick
Settings panel.
3. Press .
There is a limit to the number of tiles that can be shown in the first panel of Quick Settings. You
may need to swipe left on the Quick Settings panel to see more Quick Settings tiles.
Travel mode
Do you often travel across time zones? Turn on Travel mode in Settings to see a dual clock on the
Home screen and lock screen that shows both your home and current time zones.
§ Make sure you turn on location services in your phone settings.
§ Set your home time zone first in the Clock app.
1. From the Home screen, swipe up and then tap Settings System Date & time.
2. Tap the Travel mode On/Off switch to turn travel mode on or off.
You'll see a dual clock of your home and current locations once your phone detects a different time
zone from the home time zone you've set.
Page 28
28 Your first week with your new phone
Restarting HTC U19e (Soft reset)
If HTC U19e is running slower than normal, is unresponsive, or has an app that is not performing
properly, try rebooting and see if that helps solve the problem.
1. If the display is off, press the POWER button to turn it back on.
2. Press and hold the POWER button, and then tap Restart.
HTC U19e not responding?
If HTC U19e does not respond when you touch the screen or press the buttons, you can still
restart it.
Press and hold the POWER button until your phone vibrates, and then release the button.
You may need to press and hold the button for 12 seconds before the phone vibrates.
Notifications
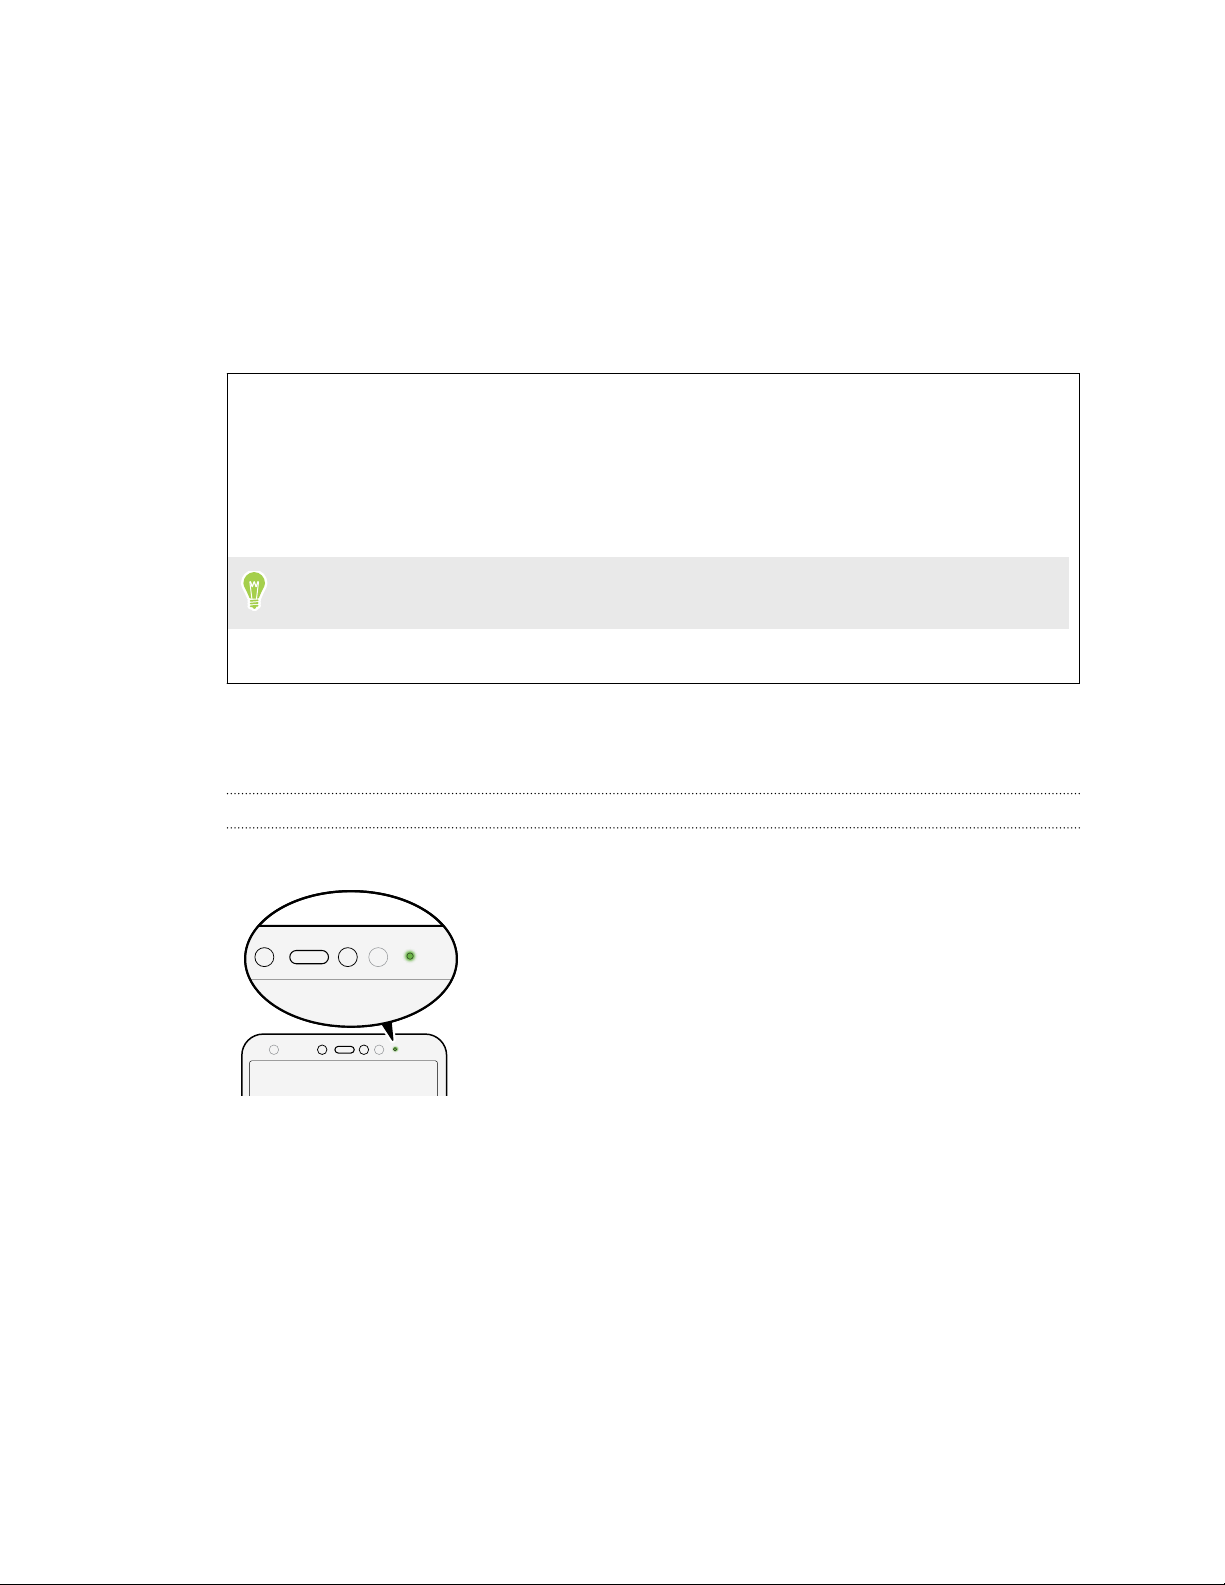
Notification LED
The notification LED shows a:
§ Solid green light when HTC U19e is connected to the
power adapter or a computer and the battery is fully
charged.
§ Flashing green light when you have a pending
notification.
§ Solid orange light when the battery is being charged.
§ Flashing orange light when the battery level reaches very
low.
Page 29
29 Your first week with your new phone
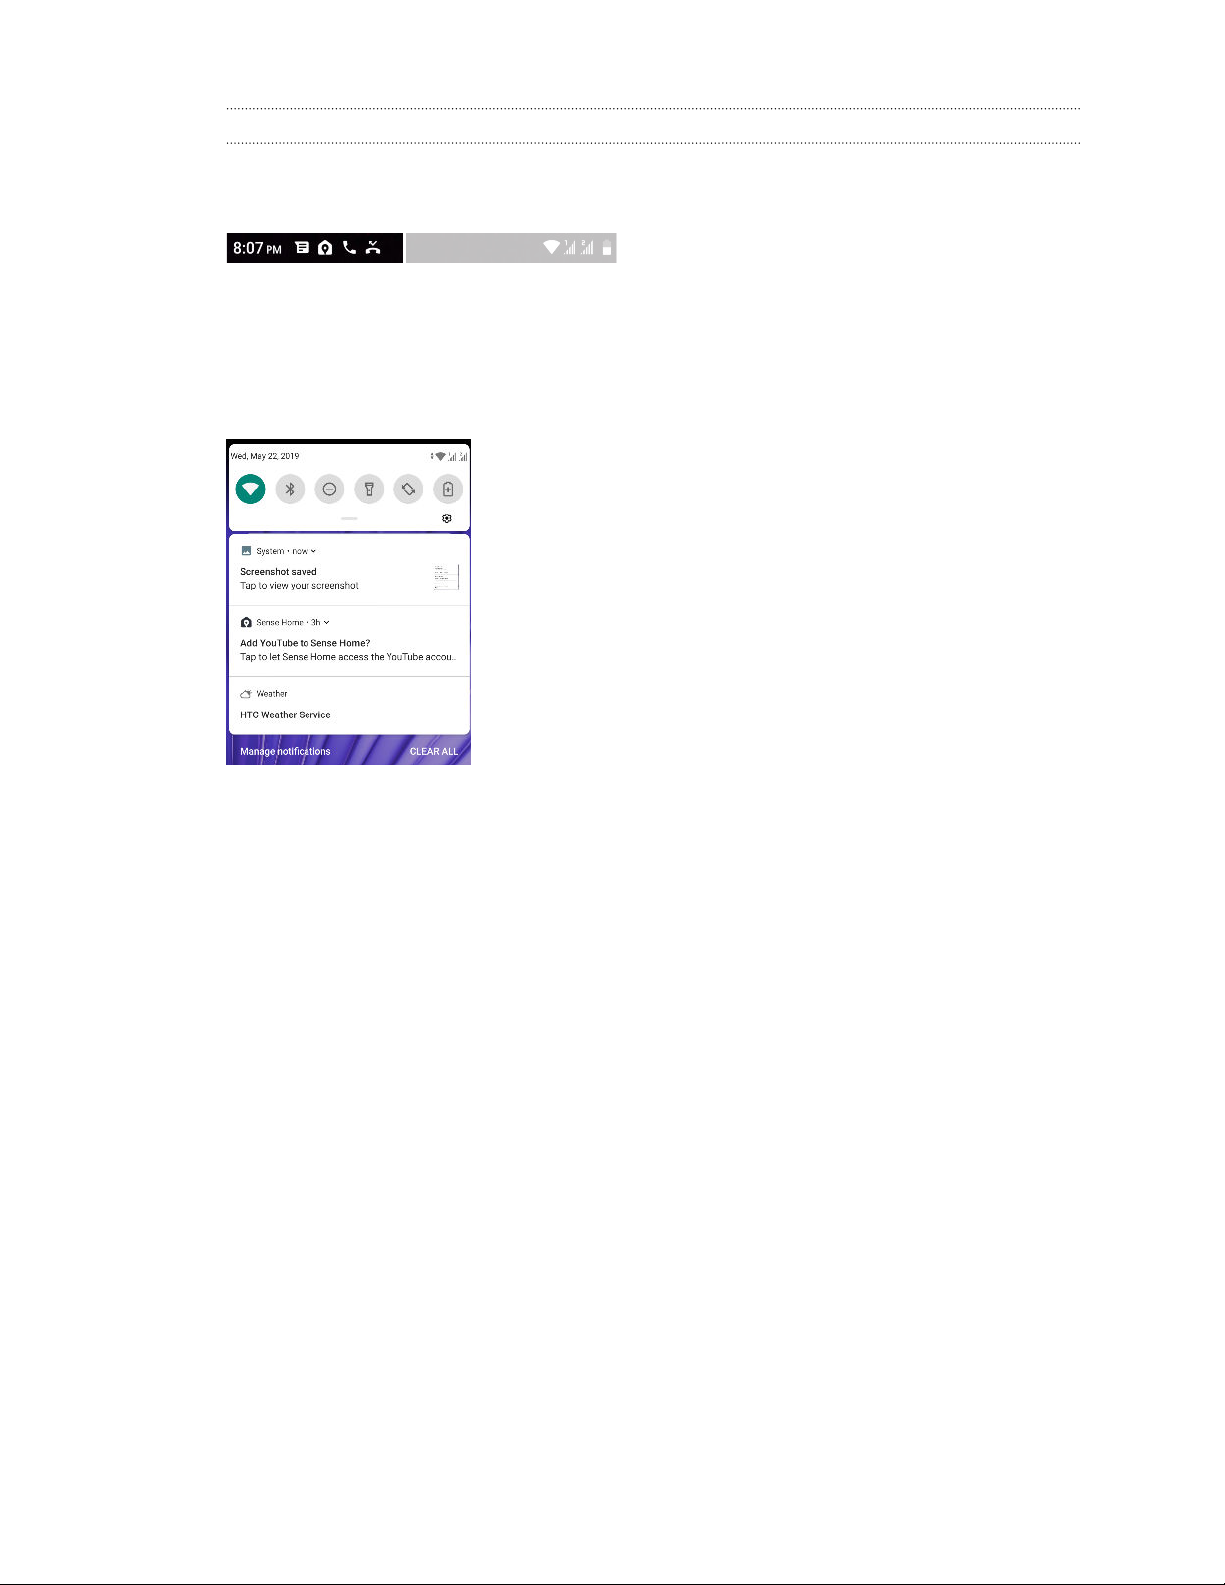
Notifications panel
Notification icons inform you of new messages, calendar events, alarms, and activities in progress
such as files downloading.
When you see notification icons, open the Notifications panel to check out details of the
notifications that you've received.
To open the Notifications panel, slide down from the top of the screen.
Or just swipe down anywhere on the Home screen.
§ Tap the notification to open the corresponding app.
§ To dismiss just one notification in the list, drag it left or right.
§ Slide two fingers apart on the notification to expand it and see more details or see if there are
more notifications bundled inside it. Slide two fingers together on the notification to minimize
it again.
§ Some notifications allow you to take immediate action. For example, tap a missed call
notification to return the call or reply with a text message.
§ If you have several notifications, scroll through the list screen to see them all.
§ To dismiss all non-persistent notifications, tap Clear all.
§ To change what app notifications you want to receive, tap Manage notifications. You can also
snooze some notifications to temporarily remove them. For more details, see Managing app
notifications on page 30.
Page 30
30 Your first week with your new phone
Snoozing notifications
You can snooze notifications to temporarily remove them from the status bar and notifications
panel.
1. Swipe down from the top of the screen to open the Notifications panel.
2. Slide the notification slowly to the right or left, and then tap .
3. Tap then choose how long you want to snooze the notification.
The snoozed notification shows up again on the status bar and notifications panel as soon as the
snooze time ends.
Turning Notification dots on or off
Some apps may show a dot when they have notifications. You can choose to turn the Notification
dots on or off.
1. From the Home screen, swipe up and then tap Settings Apps & notifications.
2. Tap Notifications.
3. Tap the On/Off switch next to the Allow notification dots option to turn it on or off.
Managing app notifications
Choose which types of app notifications to enable, disable, or override your Do Not Disturb settings.
1. From the Home screen, swipe up and then tap Settings Apps & notifications.
2. Do one of the following:
§ To choose any app, tap an app under the Recently opened apps section. Or tap See all __
apps to choose from more apps. Then tap Notifications.
§ To choose an app that recently sent you notifications, tap Notifcations. Under the
Recently sent section, tap the app you want. Or tap See all from last 7 days to choose
from more recent apps.
3. Tap the On/Off switch or check box next to the option you want to toggle.
App notification settings are applied to notifications in the Notifications panel and the lock screen.
You can also press and hold a notification in the Notifications panel or the lock screen to see the
notification settings you can customize.
Selecting, copying, and pasting text
1. Press and hold on a word.
2. Drag the start and end anchors to highlight the text you want to select.
3. Tap Copy.
Page 31

31 Your first week with your new phone
4. In a text entry field (for example, while composing an email), press and hold at the point
where you want to paste the text.
5. Tap Paste.
Sharing text
1. After you have selected the text, tap Share.
2. Choose where to share the selected text.
Entering text
The keyboard becomes available when you tap a text field in an app.
Here are some things to keep in mind while using Gboard:
The keyboard layout may slightly differ depending on the text field currently active.
§ Tap the keys on the onscreen keyboard to enter letters and numbers, as well as punctuation
marks and symbols.
§ Some keys have multiple characters or accents associated with them. Press and hold a key to
enter numbers, symbols, or accented letters.
§ Tap to show number and symbol keys.
§ Tap to choose from a wide selection of emojis and GIFs.
§ Tap to translate text, switch to one-handed typing mode, access keyboard settings, and
more.
§ Press to close the onscreen keyboard.
Entering text by speaking
1. Tap an area where you want to enter text.
2. On the keyboard, tap .
3. Say the words you want to enter. Enter punctuation marks by saying its name. For example,
say "Bring water comma towels comma and goggles period"". The text will
appear as "Bring water, towels, and goggles."
Page 32

32 Security
Security
Setting a screen lock
Help protect your personal information and help prevent others from using HTC U19e without your
permission.
Choose to set a screen lock pattern, numeric PIN, or other means of locking your screen. You'll be
asked to unlock the screen every time HTC U19e is turned on or when it’s idle for a preset period of
time.
1. From the Home screen, swipe up and then tap Settings
2. Under Device security, tap Screen lock.
3. Select a screen lock option and set up the screen lock.
4. Next to Screen lock, tap Automatically lock, then specify the idle time before the
screen locks.
If you've set up a screen lock pattern and you don't want the pattern shown as you draw it, tap
and tap the Make pattern visible On/Off switch to turn it off.
Security & location.
Setting up Smart Lock
Smart Lock keeps your phone unlocked when it's safe with you, such as when your phone is in your
pocket or you're at home. After you set up Smart Lock, you won't need to manually unlock the
phone.
Available Smart Lock options vary depending on the phone model.
1. From the Home screen, swipe up and then tap Settings Security & location.
2. Tap Smart Lock.
You need to have a screen lock set up before you can use Smart Lock. If you haven't set up a
screen lock, tap Screen lock. This will be your alternate screen lock method.
3. Confirm your screen lock.
4. Choose from the available options and set when you want to keep the phone unlocked. For
instance, when:
§ You're carrying the phone
§ You're in a trusted location such as your home or office
§ The phone is connected to a trusted device such as your Bluetooth watch or car system
Page 33

33 Security
5. Follow the onscreen instructions, and then press to return to the Security & location
screen.
6. Under Device security, tap next to Screen lock, tap Automatically lock, and then specify
the idle time before the screen is locked.
Turning the lock screen off
Rather not have to unlock your phone every time you wake it up? You can turn the lock screen off in
Settings.
It is recommended that you have a screen lock to help secure your phone from unwanted access.
1.
From the Home screen, swipe up and then tap Settings
2. Under Device security, tap Screen lock.
3. Enter or confirm your lock screen, and then tap None Yes, remove.
To turn lock screen on again, tap Screen lock again to set one.
Security & location.
About Iris Unlock
You can set up HTC U19e to unlock the screen with your irises when the screen is on.
Before using Iris Unlock
Before deciding whether to use Iris Unlock, here are a few things you need to be aware of.
§ Iris Unlock should not be used by children.
§ People with conditions triggered by light, such as epilepsy, should consult a doctor before
using this feature.
§ If you experience dizziness, eyestrain, or unusual symptoms, discontinue use and use a
different method to unlock your phone.
§ Iris Unlock is not a medical device, and should not be used for diagnosis or treatment of any
medical condition.
For best iris scanning results
Follow these tips when using Iris Unlock:
§ Register your irises in a bright, evenly-lit environment. Once registered, you can use Iris
Unlock in almost any lighting.
§ Avoid glare and direct sunlight.
§ Do not wear sunglasses or cosmetic contact lenses, such as colored contact lenses.
§ If you wear glasses, make sure to minimize glare when scanning.
Page 34

34 Security
§ Hold your phone at eye level and at a distance of 20 to 30 cm (8 to 12 in) from your face.
§ Make sure your phone is not tilted sideways while scanning.
§ Some screen protectors and cases might interfere with Iris Unlock.
§ Keep your eyes wide open and your phone still during scanning.
Biometric unlocking methods such as Iris Unlock may be less secure. Your phone could still be
unlocked by someone with similar biometrics. If you have any concerns, use other more secure
authentication methods such as a screen lock pattern, PIN, or password.
Setting up Iris Unlock
1. From the Home screen, swipe up and then tap Settings Iris Unlock.
2. If you haven't already set up a screen lock, you'll be asked to choose and set up a backup
pattern, PIN, or password for unlocking your phone. See Setting a screen lock on page 32.
3. If prompted, choose how you want to show notification content when your phone is locked,
and then tap Done.
4. Tap Register irises.
5. Tap Next and follow the onscreen instructions to scan your irises.
6. Tap Turn on to enable Iris Unlock.
By default, your phone automatically unlocks the screen when it recognizes your irises. If you
prefer to swipe from the lock screen before the phone unlocks, tap Settings Iris Unlock, and
then turn off the Iris Unlock without swiping option.
Unlocking your phone with Iris Unlock
You need to be on the lock screen to use Iris Unlock to unlock your phone.
1. If the screen is off, press the POWER button to wake up the screen.
You'll see the icon on the lock screen.
2. Hold your phone in portrait orientation at eye level and stare at the Iris Unlock camera until
the phone unlocks. To find out where this camera is located, see HTC U19e overview on page
13.
§ If Iris Unlock is successful, you'll see the blue icon then your phone unlocks.
§ If Iris Unlock is unsuccessful, you'll see the red icon. Tap it to try Iris Unlock again.
If
Iris Unlock without swiping is turned off in Settings, you'll need to swipe on the lock screen
after Iris Unlock is successful to unlock your phone.
If Iris Unlock is unsuccessful, swipe up and you'll see a similar interface as the iris data
registration appear on the screen. Just point your phone so your eyes are inside the onscreen
circles to unlock the phone.
Page 35

35 Security
About Face Unlock
With Face Unlock, you can set up HTC U19e to unlock the screen with your face when the screen is
on.
For best face scanning results
Follow these tips when registering your face:
§ Do the face scan indoors in a well-lit environment.
§ Do not cover your face with an object such as sunglasses, mask, or hat.
§ Hold your phone at face level and at a distance of 20 to 50 cm (8 to 20 in) from your face.
§ Stay still and do not move your phone while the phone scans your face.
Face Unlock is less secure since your phone could be unlocked by someone or something that
contains or looks like your image. If you have concerns, use other more secure authentication
methods such as a screen lock pattern, PIN, or password.
Setting up Face Unlock
1. From the Home screen, swipe up and then tap Settings Face Unlock.
2. If you haven't already set up a screen lock, you'll be asked to choose and set up a backup
pattern, PIN, or password for unlocking your phone. See Setting a screen lock on page 32.
3. If prompted, choose how you want to show notification content when your phone is locked,
and then tap Done.
4. Tap Register face data, and then read the tips and reminders.
5. Tap Next and follow the onscreen instructions to scan your face.
6. Tap Turn on to enable Face Unlock.
By default, your phone automatically unlocks the screen when it recognizes your face. If you
prefer to swipe on the lock screen first before the phone unlocks, tap Settings Face Unlock, and
then turn off the Face Unlock without swiping option.
Page 36

36 Security
Unlocking your phone with Face Unlock
You need to be on the lock screen to use Face Unlock for unlocking your phone.
1. If the screen is off, press the POWER button to wake up the screen.
You'll see the icon on the lock screen.
2. Hold your phone in portrait orientation at face level and look at the front camera.
§ If Face Unlock is successful, you'll see the blue icon then your phone unlocks.
§ If Face Unlock is unsuccessful, you'll see the red icon. Tap it to try Face Unlock
again.
If you turned off Face Unlock without swiping in Settings, you need to swipe on the lock screen
after Face Unlock is successful to unlock your phone.
Fingerprint scanner
You can quickly wake up and unlock the HTC U19e using your fingerprint. You can add up to 5
fingerprints.
When setting up and using the fingerprint scanner, follow these tips:
§ Make sure your finger and the fingerprint scanner are dry and clean.
§ Use the entire pad of your finger, including the sides and tip.
§ When recording your fingerprint, touch the scanner until it vibrates.
§ The fingerprint scanner has 360° readability—you can touch a recorded finger at any angle to
the scanner to turn on the screen or unlock the HTC U19e.
You may not be able to set the fingerprint scanner to unlock HTC U19e, if you've signed in to an
Exchange ActiveSync® account that requires you to set a different screen lock option (such as
password). Check with your Exchange Server administrator if your Exchange ActiveSync
account supports the fingerprint scanner.
Adding a fingerprint the first time
1. From the Home screen, swipe up and then tap Settings Security & location.
2. Tap Fingerprint scanner Next.
If you haven't already set up a screen lock, you'll be asked to set one up. See
Setting a screen lock on page 32.
3. If prompted, choose how you want to show notification content when your phone is locked,
and then tap Done.
4. Touch the fingerprint scanner.
5. Place your index finger on the fingerprint scanner to start scanning.
Page 37

37 Security
6. Repeatedly touch the scanner until the fingerprint has been successfully recorded. You'll get
the best results if you hold your finger in the same direction when touching the scanner.
7. After you've successfully recorded your fingerprint, tap Done.
You can now use your fingerprint to wake up and unlock your HTC U19e.
You'll need to input your backup lock screen pattern, PIN, or password if the scanner doesn't
identify your fingerprint after five attempts.
Adding, removing, or editing fingerprints
1. From the Home screen, swipe up and then tap Settings Security & location.
2. Tap Fingerprint scanner.
3. Enter your pattern, PIN, or password.
4. Do any of the following:
§ Tap Add fingerprint to add another fingerprint.
§ Tap a recorded fingerprint to rename it.
§ Tap
next to a recorded fingerprint to delete it.
Assigning a PIN to a nano SIM card
You can help to protect the nano SIM card by assigning a Personal Identification Number (PIN).
Make sure you have the default PIN provided by your mobile operator before continuing.
1. From the Home screen, swipe up and then tap Settings Security & location.
2. Tap Advanced.
3. Depending on the phone model, do the following:
§ Single SIM model: Tap SIM card lock.
§ Dual SIM model: Select which card you want to assign a new PIN to.
4. Tap Lock SIM card, enter the default PIN of the card, and then tap OK.
5. Tap the Lock SIM card On/Off switch to turn it on. Enter the default PIN of the card, and
then tap OK.
6. To change the card PIN, tap Change SIM PIN.
Page 38

38 Security
Restoring a nano SIM card that has been locked out
If you enter the wrong PIN more times than the maximum number of attempts allowed, the card
will become “PUK-locked.”
You need a Pin Unlock Key (PUK) code to restore access to HTC U19e. Contact your mobile
operator for this code.
1. When prompted, enter the PUK code, and then tap Next.
2. Enter the new PIN you want to use, and then tap Next.
3. Enter the new PIN again, and then tap OK.
Page 39

39 Updates
Updates
Software and app updates
Download and install software updates for the latest performance enhancements, bug fixes, and
security improvements. HTC U19e can check and notify you if there’s a new update available.
Some app updates are available from HTC or your mobile operator, and you'll receive notifications
on HTC U19e when there are new updates. Or you can install app updates from Google Play Store.
Some HTC apps that are not preloaded can also be downloaded from Google Play Store.
The information in this guide may not be most up-to-date if there are more recent software or
app updates available.
Checking your system software version
Before installing a system software update, you can check first what Android version you have on
your HTC device.
1. From the Home screen, swipe up and then find and tap Settings.
2. Tap System About phone Software information.
3. Check under Android version.
Checking for updates manually
Turn on mobile data or connect HTC U19e to a Wi-Fi network before you check for updates.
1. From the Home screen, swipe up and then find and tap Settings.
2. Tap System About phone Software updates.
3. Tap Check now.
Installing a software update
When HTC U19e is connected to the Internet and there's a new software update available, the
update notification icon appears in the status bar.
1. Slide the Notifications panel open, and then tap the system update notification.
2. If you don't want to download the update using your data connection, select Update over
Wi-Fi only.
Page 40

40 Updates
3. Tap Download.
4. When download is complete, select Install now, and then tap OK.
After updating, HTC U19e will restart.
Installing an application update
When Internet connection is on and there's an available update for your HTC apps, the update
notification icon
1. Slide the Notifications panel open, and then tap the update notification.
The Updates screen opens with the list of application updates to be installed.
2. Tap an item to view its details, and then tap .
3. When you're done reviewing the updates, tap Install. You'll be asked to restart HTC U19e if
needed.
appears in the status bar.
Installing app updates from Google Play Store
Most apps get updated with improvements and bug fixes through Google Play Store. You can
manually update apps or set the Google Play Store app to automatically download and install app
updates when available.
1. On the Home screen, swipe up and then find and tap Play Store.
2. Tap to open the slideout menu.
3. Tap My apps & games.
4. On the Updates tab, you'll see the list of apps that have updates available.
5. Tap Update beside the app you want to update.
Tap Update All if you want to update all the apps.
In Google Play Store, tap Settings Auto-update apps to choose how you want Google Play
Store to update your apps.
Page 41

41 Home screen layout and fonts
Home screen layout and fonts
Adding or removing a widget panel
§ You won't be able to add a new widget panel if you've already reached the maximum limit.
§ HTC BlinkFeed always appears as the first panel (if it's not removed). A widget panel cannot be
added before HTC BlinkFeed.
1. On HTC BlinkFeed or any widget panel, slide two fingers together to customize the Home
screen.
2. Tap .
3. To add a new widget panel, swipe left until you see the icon, and then tap it.
4. To remove a widget panel, swipe left or right until you see the panel, and then tap Remove.
5. When done, press .
Arranging widget panels
A widget panel cannot be moved and inserted before HTC BlinkFeed.
1. On HTC BlinkFeed or any widget panel, slide two fingers together to customize the Home
screen.
2. Press and hold a widget panel thumbnail, and then drag it left or right to the position that you
want.
3. When you're done arranging widget panels, press .
Changing your main Home screen
Set HTC BlinkFeed or a widget panel as your main Home screen.
1. On HTC BlinkFeed or any widget panel, slide two fingers together to customize the Home
screen.
2. Tap
.
Page 42

42 Home screen layout and fonts
3. Swipe left or right until you see the panel that you want to use as your main Home screen.
4. Tap Set as home.
5. Press .
Pressing from an app will first return you to the last panel you were in. Just press again to
go to your main Home screen.
Setting your Home screen wallpaper
Choose from the available wallpapers, or use any photo you've taken with the camera.
You can only change the wallpaper while in Classic home screen layout.
1. From the Home screen, swipe up and then tap Settings Personalize.
2. Tap Change wallpaper.
3. Choose from where you want to select a wallpaper.
4. Tap Apply or Set wallpaper.
5. If prompted, choose whether to use the wallpaper for the Home screen, lock screen, or both.
Changing the default font size
1. From the Home screen, swipe up and then tap Settings Display & gestures.
2. Tap Advanced Font size, and then select the size you want.
Page 43

43 Widgets and shortcuts
Widgets and shortcuts
Launch bar
The launch bar gives you one-touch access to commonly used apps and other shortcuts. You can
replace the apps on the launch bar with the ones you often use.
You can only customize the launch bar while in Classic layout.
1. Press and hold the app you want to replace, and then drag it out to .
2. Tap to go to the Apps screen.
3. Press and hold an app, and then drag it to the empty slot on the launch bar.
You can also group apps on the launch bar into a folder. See Grouping apps on the widget panel
and launch bar on page 44.
Adding Home screen widgets
Widgets make at-a-glance important information and media content readily available.
1. Press and hold an empty space on a widget panel.
2. In the pop-menu, tap Add apps and widgets.
3. Tap Widgets.
4. Scroll through the widgets, or tap to search for a specific widget.
5. Press and hold a widget, and then drag it to a widget panel you want to add it to.
Page 44

44 Widgets and shortcuts
Changing the widget settings
You can modify basic settings of some widgets.
1. Press and hold a widget on your Home screen, and then drag it to .
2. Customize the widget settings.
Resizing a widget
Some widgets can be resized after you've added them to your Home screen.
1. Press and hold a widget on the Home screen, and then release your finger. If a border
appears, that means the widget is resizable.
2. Drag the sides of the border to enlarge or shrink the widget size.
Adding Home screen shortcuts
Place apps you often use on any widget panel of your Home screen. You can also add shortcuts to
frequently used settings, favorite contacts, and more.
1. Press and hold an empty space on a widget panel.
2. In the pop-up menu, tap Add apps and widgets.
3. Tap
4. Scroll through the apps or shortcuts, or tap to search for one.
5. Press and hold an app or shortcut, and then drag it to a widget panel you want to add it to.
To add an app from the Apps screen, press and hold the app, and then drag it to a widget panel.
Apps or Shortcuts.
Grouping apps on the widget panel and launch bar
1. Press and hold an app, and then drag it over to another app to automatically create a folder.
2. Tap the folder to open it.
3. Tap the folder window’s title bar, and then enter a new folder name.
4. Add more apps into the folder. Tap , select your apps, and then tap Done.
You can also add shortcuts to settings or information to a folder. Add a shortcut first to a widget
panel, and then drag it over to the folder.
Page 45

45 Widgets and shortcuts
Removing items from a folder
1. On the launch bar or widget panel, tap a folder to open it.
2. Press and hold an app or shortcut in the folder, and then drag it out to .
Moving a Home screen item
You can easily move a widget, icon, or sticker from one widget panel to another.
1. Press and hold a Home screen item with one finger.
2. With another finger, flick left or right to rotate the screen to another widget panel.
3. Release the item to where you want to move it.
Removing a Home screen item
1. Press and hold the widget, icon, or sticker you want to remove, and then drag it to .
2. When the item turns red, lift your finger.
Page 46

46 Entertainment
Entertainment
Setting up Game assistant
With Game assistant, optimize your gaming experience and enjoy using your apps without
distractions.
1. From the Home screen, swipe up and then tap Settings
2. Tap In-game notifications, and then choose how to handle notifications while you're in a
game or app.
For details on these options, see Managing notifications when you're in a game or app on
page 47.
3. Make sure Auto performance boost is turned on. This allows HTC U19e to clear the memory
used by an app automatically whenever you launch it.
4. Tap Add more apps. Then select the apps to add Game assistant to.
You may see your games added automatically to the list under Apply game assistant to. Just
launch these games and you'll be able to use the Game assistant panel.
Game assistant.
Using Game assistant
Here are the things you can do with Game assistant:
1. Access Game assistant settings.
2. Set how you want notifications to appear so you can enjoy your games and apps without
distractions. See Managing notifications when you're in a game or app on page 47.
3. Dim and lock the screen when you need to take a break from your game or app.
When you're ready to resume, swipe up to unlock the screen.
Page 47

47 Entertainment
4. Temporarily lock the Navigation Bar to avoid accidentally pressing its buttons while in a
game or app. See Locking or unlocking the Navigation Bar on page 47.
5. Get instant performance boost for your current app by freeing up memory used by the app.
6. Capture a screenshot of your current screen.
The Game assistant panel will not be captured with the screenshot.
7. Do a screen recording in your game or app. See Recording your screen actions on page 48.
8. Select or clear the Auto option to turn auto brightness on or off. Drag the slider to manually
adjust the brightness.
This also changes the brightness setting in Display & gestures.
Locking or unlocking the Navigation Bar
Prevent accidental presses of the Navigation Bar buttons while playing a game in full screen. You
can temporarily lock the Navigation Bar buttons so that you don't get interrupted in your game.
1. In the game or app, tap on the Navigation Bar to open the Game assistant panel.
2. Tap Navigation bar lock. This locks the Navigation Bar buttons.
3. To unlock the buttons, drag left in portrait orientation or swipe it down in landscape
orientation.
Managing notifications when you're in a game or app
With Game assistant, choose how to handle notifications when you're in a game or app.
1. In the game or app, tap
2. Tap to cycle through the options and choose one.
Option Description
Minimal disturbance
No disturbance
General
on the Navigation Bar to open the Game assistant panel.
Reduce the visual notification size.
Block all notifications and direct incoming calls to voicemail.
This means there will be no visual, sound, and vibration when
you have notifications.
Show or hide notifications based on your system's notification
settings.
Page 48

48 Entertainment
§ The No disturbance option may not be supported by some third-party apps such as instant
messaging apps. Go to the app's settings to turn off or customize its notifications.
§ If you chose Minimal disturbance or No disturbance, it will have higher priority over your
system's Do not disturb mode settings.
Recording your screen actions
Share your gameplay to show a friend how to level up, or capture a walk-through to explain an app
feature.
1. In the game or app, tap on the Navigation Bar to open the Game assistant panel.
2. Navigate to the screen where you want to start recording. Then tap on the Game assistant
panel.
If this is your first time to do a screen recording, you may need to tap Start Now to start
recording.
3. Perform the steps that you want to record on the phone. While recording, you can:
§ Tap to pause recording. Tap to resume recording.
§ Tap to show the screen recording controls.
§ Drag to reposition it on the screen.
The screen recording controls and
screen where they won't be a distraction.
4. When finished, tap .
5. Open the Notifications panel, and then slide two fingers apart on the Screen recorded
notification.
6. Tap Share.
will be captured as well so move them to an area on the
HTC BoomSound for speakers
Immerse yourself in surround sound whether you're listening to music or enjoying movies and
games.
1. From the Home screen, swipe up and then find and tap Settings.
2. Tap BoomSound for built-in speakers to toggle between Theater mode and Music mode.
HTC BoomSound for speakers is not available over HDMI, Bluetooth, Miracast
out.
™
, or USB audio
Page 49

49 Taking photos and videos
Taking photos and videos
HTC Camera
Take great photos and videos with the camera. For your convenience, there's more than one way to
launch the Camera app.
§ On the Home screen, tap the camera icon to open the Camera app.
§ Press POWER twice while the display is off.
Make sure Quick launch camera is selected in Settings
You'll see Photo mode, which is the default capture mode.
Icon or button Function
Open the slideout menu to select a capture mode. .
Switch between the front and main cameras.
Switch between Video and Photo modes.
/
Display & gestures Advanced.
Capture a photo.
Choose either the manual or auto Bokeh mode option so you can take photos with
blurred background.
View the last photo or video taken.
Page 50

50 Taking photos and videos
Turning the camera flash on or off
Tap the flash icon to choose a flash setting.
When using or , the camera intelligently sets the best flash brightness for your photo.
In Selfie Photo mode, you can also tap the flash icon to turn the screen flash on or off.
Using the volume buttons for capturing
In the Camera app, you can set the VOLUME buttons to function as the shutter release or zoom
controls.
1. On the Home screen, tap the camera icon to open the Camera app.
2. Tap to open the Capture mode menu.
3. Tap Volume button options.
4. Choose how you want to use the VOLUME buttons when you're in the Camera app.
Choosing a capture mode
Switch to a capture mode to use for taking photos or videos.
1. Tap to open the Capture mode menu.
You can also swipe down in portrait orientation or swipe right in landscape orientation.
You can rearrange the capture modes. Just drag a mode icon to the position that you want in the
menu.
2. Tap the capture mode you want to use.
3. To quickly switch between the front and main cameras, tap on the Viewfinder screen.
4. You can quickly switch back to either Photo or Video mode when you're in other capture
modes without opening the Capture mode menu. Right below the main shutter button, just
tap to switch back to Photo mode or to switch back to Video mode.
Page 51

51 Taking photos and videos
Capture mode settings
You can change the settings for some of the capture modes such as Photo or Video mode. Select a
mode and then you'll see the available settings for the mode.
Setting Description Available in which modes
Turn the AI feature for scene detection on or off. Photo
Turn HDR on or off. Photo / Selfie Photo
Set the photo quality and aspect ratio. Photo / Selfie Photo /Pro
Cycle through the time settings to set the self-timer or
Photo / Selfie Photo / Pro
turn off the self-timer.
Choose from the fun stickers to add to your photo or
video.
Photo / Selfie Photo / Video /
Selfie Video
Choose a flash setting. All modes except Panorama
Set the video frame rate. Video
Set the video quality. Video / Selfie Video
Choose RAW or JPG format for photos. Pro
Page 52

52 Taking photos and videos
Zooming
HTC U19e has both optical zoom and digital zoom capabilities.
Zooming is not available in some modes.
§ Optical zoom
Tap the zoom knob to switch to 2.0x optical zoom. Tap it again to change back to 1.0x.
Optical zoom is available only in Photo mode. Tapping the zoom knob while in Video or other
modes switches to 2.0x digital zoom.
§ Manual zoom
Here are different ways to zoom in or out manually:
§ To zoom continuously, do the following:
In portrait orientation, drag the knob to the right to zoom in or to the left to zoom out.
In landscape orientation, drag the knob up or down to zoom in or out. The farther you
drag the knob on the zoom bar, the faster the zoom speed.
§ To set the magnification ratio, do the following:
1. Press and hold the zoom knob, and then release your finger when the
magnification ratio bar appears.
2. In portrait orientation, slide left or right on the magnification ratio bar until
you've set it to the zoom ratio that you want. In landscape orientation, slide up or
down on the magnification ratio bar.
Page 53

53 Taking photos and videos
3. Tap the zoom knob if you need to change back to 1.0x.
§ Slide two fingers apart to zoom in or together to zoom out.
Quickly adjusting the exposure of your photos
HTC U19e features a quick way of adjusting the exposure level or brightness in real time. Turn
Touch autoexposure on if you want the camera to automatically adjust the exposure when you tap
a darker or overexposed area on the Viewfinder screen.
This feature may not be supported in certain capture modes.
1. On the Home screen, tap the camera icon to open the Camera app.
2. Tap to open the Capture mode menu.
3. Tap .
4. Select the Touch autoexposure option.
5. Tap on the dark area to brighten it, or tap on the overexposed area to make it darker.
To fine tune further, you can manually adjust the exposure by dragging your finger up and
down.
6. When you're ready to take the photo, tap .
Taking a photo
1. On the Home screen, tap the camera icon to open the Camera app.
2. Switch to Photo mode, if you're not in this mode. See Choosing a capture mode on page 50 for
details.
Page 54

54 Taking photos and videos
3. Point the camera at what you want to capture. The camera adjusts the focus automatically as
you move it. You can also tap the screen to change the focus to a different subject.
4. To manually adjust the exposure, tap the screen, and then drag your finger up and down.
Or turn on Touch autoexposure so you can instantly brighten or darken a subject with a
single tap. See Quickly adjusting the exposure of your photos on page 53.
5. When you're ready to take the photo, tap .
Scene detection
In Photo mode, there's an AI feature that can determine what you're capturing and automatically
set the right scene mode to use.
1. On the Home screen, tap the camera icon to open the Camera app.
2. Switch to Photo mode, if you're not in this mode. See Choosing a capture mode on page 50 for
details.
3. Make sure
If is shown, tap to turn the AI feature on.
4. Point the camera at your subject.
You'll then see one of the following icons depending on what you're capturing:
Icon Scene mode
is shown on the screen which indicates the AI feature for scene detection is on.
Macro
Backlit
Portrait
Document
Page 55

55 Taking photos and videos
Icon Scene mode
Landscape
Lowlight
Food
If a backlit scene is detected, choose whether to apply Backlit or Silhouette to the photo.
5.
When you're ready to take the photo, tap .
Taking continuous camera shots
Do you want to take photos of moving subjects? Whether it’s your kid's football game or a car race,
you can capture the action.
1. On the Home screen, tap the camera icon to open the Camera app.
2. Switch to Photo mode. See Choosing a capture mode on page 50 for details.
3. Press and hold
The camera takes consecutive shots of your subject.
.
Taking photos with the self-timer
When you use the self-timer, the Camera app counts down before taking the shot. You can set the
countdown time.
1. On the Home screen, tap the camera icon to open the Camera app.
2. Choose the capture mode you want to use. See Choosing a capture mode on page 50 for
details.
3. Tap
4. To start the timer, tap . The camera takes the photo after the countdown.
to set the countdown time.
Tips for capturing better photos
To get better captures with the Camera app, here are some tips on what to do while taking your
shots.
Before capturing
§ Make sure that the camera and flash lenses are clean and without fingerprints. Use a soft,
clean, microfiber cloth to wipe them.
§ Hold the phone so that your fingers aren't blocking the camera and flash lenses.
Page 56

56 Taking photos and videos
For clear, sharp shots
§ Tap the screen to focus on a subject. Adjust the exposure to brighten the subject or make the
subject look darker and richer. For details, see Quickly adjusting the exposure of your photos
on page 53.
§ If the subject is moving, on the Viewfinder, press and hold the subject to lock the focus.
§ If there are parts of the image that are in shadows and others are in highlights, use HDR to
capture multiple shots of different exposures and combine them into one shot. Keep
HTC U19e steady or place it on a level surface when using HDR. See Using HDR Boost on
page 58 for details.
§ When taking a panoramic photo, consider the whole scene and focus on an object that has a
neutral tone to help keep the exposure balanced in the composite image.
§ Make sure you're not moving the camera when taking a photo, especially in low light
conditions. Hold the phone steady and don't move the camera while taking RAW photos in
Pro mode.
§ You can control image noise by adjusting the ISO, shutter, and exposure settings of your
camera. Use Pro mode to tweak these, and save up to three different manual photography
settings. See Manually adjusting camera settings on page 60.
It also captures in RAW format, which is suitable for post processing photos. See Taking a
RAW photo on page 61.
Other tips
§ In Camera settings, tap Grid to help frame the subject better or improve the composition.
§ After capturing, you can enhance the photo in the Google Photos™ app.
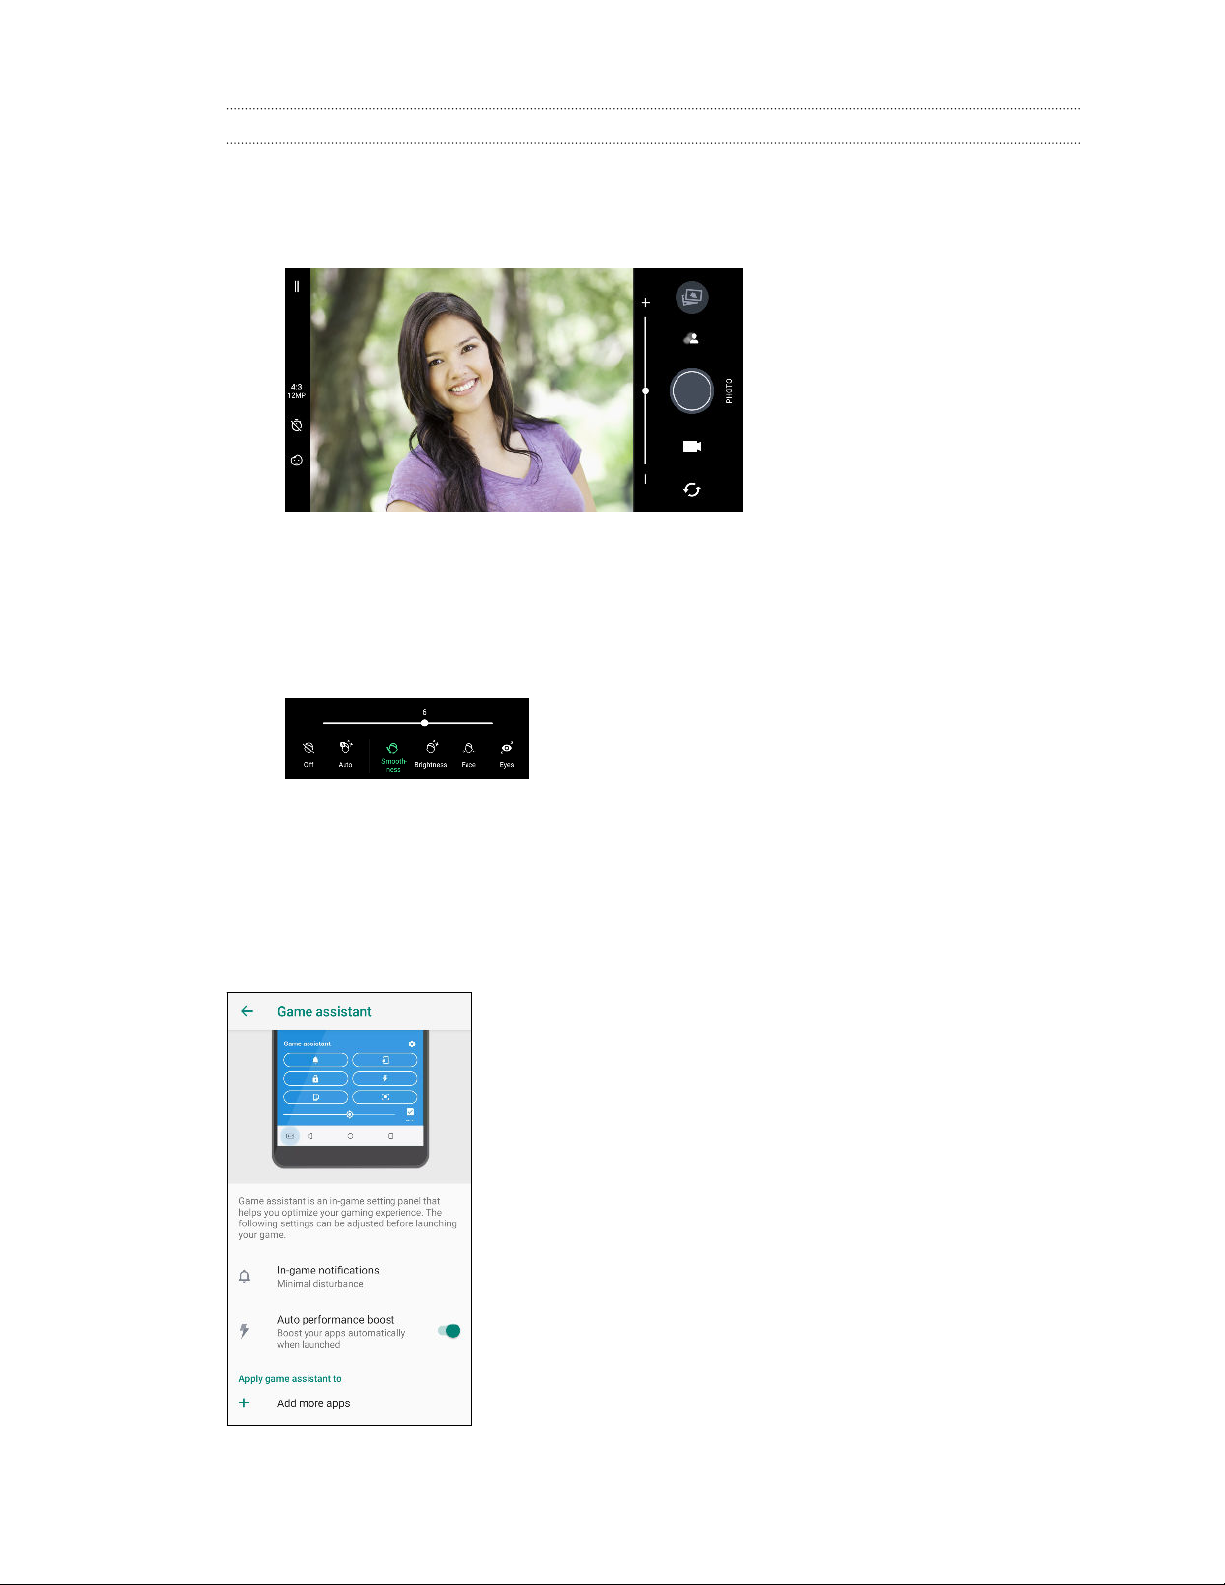
Selfies
Using Beauty Mode when taking photo selfies
Look best in your photo selfies. With Beauty Mode, apply real-time touch-ups such as skin
smoothening, face slimming, and more.
1. On the Home screen, tap the camera icon to open the Camera app.
2. Switch to Selfie Photo mode. See Choosing a capture mode on page 50 for details.
3. Tap to display the Beauty Mode options.
4. Tap each option, and then drag its slider to make your adjustments.
5. When ready, tap .
Page 57

57 Taking photos and videos
Unflipping photo selfies
When you view yourself on the Viewfinder screen, your selfie is actually a mirrored image. Here's
what to do if your captured photo looks flipped and is not the mirrored image.
1. Switch to Selfie Photo mode. To find out how to switch between capture modes, see
Choosing a capture mode on page 50.
2. Tap to open the Capture mode menu.
3. Tap Camera options.
4. Make sure the Save mirrored selfies option is selected.
Recording video
1. On the Home screen, tap the camera icon to open the Camera app.
2. Switch to Video mode. See Choosing a capture mode on page 50 for details.
3. When you're ready to start recording, tap .
4. Change focus to a different subject or area by just tapping it on the Viewfinder screen. You
can also change the exposure after tapping by dragging up and down on the screen.
5. Tap the flash icon to turn the flash on or off.
6. Tap to pause the recording, and then tap to resume.
7. To stop recording, tap .
Setting the video resolution
1. Switch to Video or Selfie Video mode.
2. Tap the icon that shows the current video resolution, and then tap another resolution you
want to use.
Taking a photo while recording a video—VideoPic
1. On the Home screen, tap the camera icon to open the Camera app.
2. Switch to Video or Selfie Video mode. See Choosing a capture mode on page 50 for details.
3. Tap to start recording.
4. While recording, tap whenever you want to capture a still shot.
5. Tap to stop recording.
Page 58

58 Taking photos and videos
Using HDR Boost
When shooting portraits against a bright background, use HDR Boost to capture your subjects
clearly. HDR Boost also works in low light situations, giving you clearer photos with less noise.
§ HDR Boost works best when your subject is steady. The camera takes multiple shots at different
exposure levels and combines them into one enhanced photo.
§ HDR Boost is not available for use when Bokeh mode is enabled.
1. On the Home screen, tap the camera icon to open the Camera app.
2. Switch to Photo mode. See Choosing a capture mode on page 50 for details.
3. Make sure that or is selected. If not, tap to change it.
HDR auto is also available in Selfie Photo mode, and is enabled by default.
4. Frame the scene or subject you want to capture.
5. Tap .
Taking photos in Bokeh mode
With Bokeh mode, you can take photos with a nice blurred background. Blur the background
automatically, or manually adjust the blur level before taking the shot.
§ To get a nice blurred background in your shots, the ideal distance between you and your subject
is 50 to 200 cm.
§ You need to be in a well-lit environment to use Bokeh mode.
§ Some features such as zooming, flash, touch autofocus, and continuous shooting are not
available in Bokeh mode. HDR Boost is also not available.
1. On the Home screen, tap the camera icon to open the Camera app.
2. Switch to Photo or Selfie Photo mode. See Choosing a capture mode on page 50 for details.
3. Tap to cycle through the Bokeh mode options.
Icon State
Off
Auto Bokeh
Manual Bokeh
Page 59

59 Taking photos and videos
4. If you selected Manual Bokeh, drag the slider to the right or left to increase or decrease the
blur level of the background.
5. When ready, tap .
Adding stickers to your shots
Add fun stickers when capturing shots of friends, family, or your selfies. Stickers can be added to
both photos and videos.
1. On the Home screen, tap the camera icon to open the Camera app.
2. Switch to Photo, Selfie Photo, Video, or Selfie Video mode. See Choosing a capture mode on
page 50 for details.
3. Tap to open the sticker menu.
4. Tap the sticker you want to use.
5. To close the sticker menu, swipe down on the menu or tap the Viewfinder screen.
To open the sticker menu again, swipe up on the menu or tap .
6. When ready, tap to take a photo or tap to record a video with the selected sticker.
The maximum duration is 20 sec. when recording video with an animated sticker.
Page 60

60 Advanced camera features
Advanced camera features
Choosing a scene
Instead of manually adjusting the camera settings, you can select a scene with predefined settings
that best matches the environment you're capturing.
1. On the Home screen, tap the camera icon to open the Camera app.
2. Switch to Pro mode. See Choosing a capture mode on page 50 for details.
3. Tap
4. When you're ready to take the photo, tap .
If you need to manually adjust a scene and save it as a new preset, see Manually adjusting camera
settings on page 60.
and then choose a preset scene. Select:
§ when capturing nightscape such as a city skyline or street with city lights. Keep the
camera steady when taking the shot for best results.
§ when capturing a fast-moving subject such as your kid playing sports or a moving
car.
§ when capturing a close-up shot of a subject such as a flower or insect.
Manually adjusting camera settings
Want to have expert command of your camera settings for different environments or lighting
conditions? Use Pro mode to manually adjust the values for settings like white balance, exposure,
ISO, and more. You can then save the adjustments for reuse.
1. On the Home screen, tap the camera icon to open the Camera app.
2. Switch to Pro mode. See Choosing a capture mode on page 50 for details.
3. Tap a setting, and then drag its wheel or slider to make adjustments.
Tap the setting again to hide the wheel or slider.
Page 61

61 Advanced camera features
4. To save the adjustments as a custom setting, tap , select Custom 1, 2, or 3, and then tap
Save.
To use one of your custom settings, tap or , and then select the custom setting ( ,
, or ) to use.
5. To change a setting back to auto, tap .
6. When you're ready to take the photo, tap .
Taking a RAW photo
Want to keep more detail in your shots, or fix the lighting in post processing? With Pro mode, you
can take photos that will be saved as RAW image files in DNG format, along with a JPG compressed
version.
RAW image files take up a lot of storage space. It's recommended to use a storage card as the
default storage for photos and videos.
1. On the Home screen, tap the camera icon to open the Camera app.
2. Switch to Pro mode. See Choosing a capture mode on page 50 for details.
3. Make sure is selected. If not, tap to change it.
Or, tap ,and then tap if you only want to save a JPG compressed version.
4. Tap .
How does the Camera app capture RAW photos?
The Camera app captures a photo in both the DNG RAW format and JPG format.
Digital Negative (DNG) is an open-standard lossless RAW image format. Since a RAW file is
typically 2 to 6 times larger than a JPEG file and is not viewable in most photo viewer apps, a photo
is captured in both DNG and JPG formats. When you use the Google Photos app, you'll see a
icon on a photo to indicate that there is a DNG RAW format version of the file.
RAW photos are not processed when captured to preserve most of the original image data—such as
dynamic range—so you can adjust lighting or make professional adjustments using advanced editing
tools. After making adjustments, save the RAW photo as a JPG file if you want to print or share it.
Page 62

62 Advanced camera features
Taking a panoramic photo
Get a wider shot of landscapes in one sweep.
Some camera features are not available when you’re in Sweep panorama mode, such as zooming.
1. On the Home screen, tap the camera icon to open the Camera app.
2. Switch to Panorama mode. See Choosing a capture mode on page 50 for details.
3. When you're ready to take the shot, tap .
4. Pan left or right in either landscape or portrait view. Hold HTC U19e as steadily as you can to
automatically capture frames.
You can also tap to stop capturing anytime.
The camera stitches the frames into a single photo.
Recording videos in slow motion
Relive high speed action bit by bit and add a touch of suspense to your videos.
Audio is recorded when you're in this mode, but will only be available when video is played back
in normal speed.
1. On the Home screen, tap the camera icon to open the Camera app.
2. Switch to Slow motion mode. See Choosing a capture mode on page 50 for details.
3. Tap to start recording.
4. To stop recording, tap .
Page 63

63 Google Photos
Google Photos
What you can do on Google Photos
The help content here is based on the following app version: 4.16.x.
Here are some of the things you can do when using Google Photos.
§ View, edit, and share your photos and videos. You can also access the media files previously
backed up to your Google Account.
§ To select photos and videos, tap Select. Tap a date to select all the media files under it.
Or, tap the thumbnails that you want to select.
§ Create collages, animations, and movies.
§ Search by people, things, or places in your photos.
§ Enhance RAW photos taken using the HTC Camera app.
§ Change the speed of your slow motion videos.
To learn more about Google Photos, tap
support.google.com/photos.
Help & feedback. Or, you can visit
Viewing photos and videos
When you open Google Photos for the first time, sign in to your Google Account, if prompted, and
choose whether to turn backup and sync on or off.
1. Open the Photos app.
You'll see your local and backed up photos and videos organized by date.
2. To switch to another view, tap Layout, and then choose how you want to view your
media files.
3. Tap a thumbnail to view it in full screen.
4. To view only the photos and videos saved on your HTC device and storage card, tap
Device folders.
Page 64

64 Google Photos
Editing your photos
1. Open the Photos app.
2. Tap a photo thumbnail to view it in full screen.
3. Tap , and then do any of the following:
§ Tap to apply a filter to the photo.
§ Tap to adjust the lighting, color, and pop effect.
Tap next to the sliders to adjust detailed settings such as exposure, contrast, and
color saturation.
§ Tap to rotate or crop the photo.
4. While you're editing, press and hold the photo to compare your changes to the original.
5. After making your adjustments, tap Save copy.
Enhancing RAW photos
After capturing RAW photos, you can improve its contrast and detail from the Photos app.
1. Open the Photos app.
2. Find and tap the RAW photo you want to enhance.
RAW photos are marked with the
3. Tap .
4. Tap and adjust the lighting, color, and pop effect.
5. Tap next to the sliders to adjust detailed settings such as exposure, contrast, and color
saturation.
6. Tap Save copy when done. The enhanced photo is saved as a copy. The original RAW photo
remains unedited.
icon on the thumbnail.
Trimming a video
1. Open the Photos app.
2. Tap a video thumbnail to view it in full screen.
3. Tap
, and then drag the trim sliders to the part where you want the video to begin and end.
4. Tap to preview your trimmed video.
5. Tap Save.
The trimmed video is saved as a copy. The original video remains unedited.
Page 65

65 Google Photos
Changing the playback speed of a slow motion video
Adjust the playback speed of a selected section of a slow motion video.
You can only change the video playback speed of videos captured using slow motion in the
Camera app.
1. Open the Photos app.
2. Find and tap the thumbnail of slow motion video to view it in full screen.
Slow motion videos are marked with the icon on the thumbnail.
3. Tap the screen to see the onscreen controls.
4. Frame the sequence you want to slow down by moving the left and right sliders.
Page 66

66 Phone calls
Phone calls
Making a call with Smart dial
You can either dial a number directly, or use Smart dial to quickly place a call. Smart dial searches
and calls a stored/synced contact or a number from your call history.
1. On the Home screen, tap the phone icon to open the Phone app.
2. Enter the phone number or first few letters of the contact’s name to see matching contacts.
3. To see all the numbers and contacts that match, tap the number (for example, 8 matches).
4. Tap the contact you want to call.
If the phone number has an extension, tap
extension number.
5. If you're using a dual SIM phone model. tap the call button that corresponds to the card you
want to use.
after connecting to the main line and then dial the
Making a call with your voice
Call a contact hands-free using your voice.
1. On the Home screen, tap the phone icon to open the Phone app.
2. Tap .
3. Say the name of the contact you want to call. A selection menu then opens with a list of
variations of the name you've just dictated.
4. Tap the name you want in the selection menu. Your phone then searches and displays
matched contacts from your phonebook.
5. Tap the contact you want to call.
6. If you're using a dual SIM phone model. tap the call button that corresponds to the card you
want to use.
Page 67

67 Phone calls
Dialing an extension number
To skip voice prompts when dialing an extension number, do one of the following:
§ After dialing the main number, press and hold * . A comma (,) is added to the number you are
dialing. Enter the extension number, and then tap the call button. You will be connected to
the mainline and then to the extension number.
§ After dialing the main number, press and hold # and tap Add wait (;). Enter the extension
number after the semicolon, and then tap the call button. After connecting to the main line,
tap Send to dial the extension number.
You can save phone numbers with an extension in the People app.
Keeping your phone number private
You can choose to hide your phone number from the person you're calling.
1. On the Home screen, tap the phone icon to open the Phone app.
2. Dial the number or press and hold a call entry and tap Edit number before calling.
3. Press and hold # and tap Hide number for this time.
4. Place your call.
Speed dial
Use Speed dial to call a phone number with a single tap.
1. On the Home screen, tap the phone icon to open the Phone app.
2. Tap Speed dial . You can also press and hold an unassigned key on the dialpad, and
then tap Yes.
3. Select a contact from the list.
4. On the Speed dial screen, choose the phone number of the contact to use, and a speed dial key
to assign.
5. Tap Save.
To use Speed dial, press and hold the speed dial number you want to call. If you're using a dual SIM
phone model, tap the call button that corresponds to the card you want to use.
Calling a number in a message, email, or calendar event
When you receive a text message, email, or calendar event that has a phone number in it, you can
just tap the number to place a call.
Page 68

68 Phone calls
Receiving calls
When you receive a phone call, the full Incoming call screen appears by default. This may be
distracting especially when you're playing a game or watching a video. You can set HTC U19e to
display a small pop-up notification for incoming calls instead.
Showing incoming call as a pop-up notification
1. From the Home screen, swipe up and then tap Settings Call.
2. Select Incoming call pop-out.
Another way is through the Phone app notification in the Notifications panel. If you see the Phone
app notification prompting you to show calls as Incoming call pop-out , tap Apply.
If you don't see the Apply option, expand the notification to see the option. See Notifications
panel on page 29 on how to expand notifications.
Answering or rejecting a call
Do one of the following:
§ On the full incoming call screen, tap Answer or Decline.
§ On the incoming call notification, tap to answer the call or to decline the call.
§ On the lock screen, drag or upwards.
Muting the ringing sound without rejecting the call
Do one of the following:
§ Press the VOLUME DOWN or VOLUME UP button.
§ Press the POWER button.
§ Place HTC U19e face down on a level surface.
Returning a missed call
You'll see the missed call icon in the status bar when you miss a call.
1. Slide the Notifications panel open to check who the caller is.
2. To return the call, tap Call back.
If you have multiple missed calls, tap the missed calls notification to open the Call History tab.
Page 69

69 Phone calls
Emergency call
In some regions, you can make emergency calls from HTC U19e even if the nano SIM card has been
blocked or if you don't have one installed.
If you don't have a network signal, you won't be able to make an emergency call.
1. On the Home screen, tap the phone icon to open the Phone app.
2. Dial the emergency number for your locale, and then tap Call.
If you've enabled but forgotten your lock password or lock pattern, you can still make emergency
calls by tapping Emergency on the screen.
What can I do during a call?
When a call is in progress, you can turn the speakerphone on, place the call on hold, and more.
Putting a call on hold
To put the call on hold, tap Hold. The status bar then displays the hold call icon .
To resume the call, tap Unhold.
Switching between calls
If you’re already in a call and you accept another call, you can switch between the two calls.
1. When you receive another call, tap Answer to accept the second call and put the first call on
hold.
2. To switch between the calls, tap the person you want to talk to on the screen.
Turning the speakerphone on or off during a call
To decrease potential damage to your hearing, do not hold HTC U19e to your ear when the
speakerphone is on.
§ On the call screen, tap . The speakerphone icon appears in the status bar.
§ To turn the speakerphone off, tap .
Muting the microphone during a call
On the call screen, tap to toggle between turning the microphone on or off. When the
microphone is turned off, the mute icon appears in the status bar.
Page 70

70 Phone calls
Ending a call
Do one of the following to end the call:
§ On the call screen, tap End Call.
§ Slide the Notifications panel open, then tap Hang Up.
Setting up a conference call
Conference calling with your friends, family, or co-workers is easy. Make or accept a call, and then
simply dial each subsequent call to add it to the conference.
Make sure that you have conference calling service activated. Contact your mobile operator for
details.
1. Make a call to the first conference call participant.
2. When connected, tap
participant is put on hold.
3. When connected to the second participant, tap .
4. To add another participant, tap , and then dial the number of the contact.
5. When connected, tap to add the participant to the conference call. Tap to access
options such as ending the call with a participant.
6. To end the conference call, tap End Call.
, and then dial the number of the second participant. The first
Call History
Use Call History to check missed calls, your dialed numbers, and received calls.
1. On the Home screen, tap the phone icon to open the Phone app.
2. Swipe right to go to the Call History tab.
3. Do one of the following:
§ Tap a name or number in the list to call.
§ Press and hold a name or number in the list to display the options menu.
§ Tap
to display just a particular type of call such as missed calls or outgoing calls.
Adding a new phone number to your contacts from Call History
1. On the Call History tab, tap next to the new phone number.
2. Choose whether to create a new contact or save the number to an existing contact.
Page 71

71 Phone calls
Clearing the Call History list
1. On the Call History tab, tap Remove call history.
2. Select the items you want to delete, or tap Select all.
3. Tap Delete.
Blocking a caller
When you block a phone number or a contact, all calls from the phone number or contact will be
declined automatically.
On the Call History tab, press and hold the contact or phone number you want to block, and then tap
Block contact.
You can always remove a caller from your blocked list. On the Call History tab, tap
contacts. In the All tab, press and hold a contact, and then tap Unblock contacts.
Blocked
Switching between silent, vibrate, and normal modes
Do one of the following:
§ To change from silent to normal mode, press the VOLUME UP button twice.
§ To change from vibrate to normal mode, press the VOLUME UP button.
§ Go to Settings, and then tap Sound
Sound profile.
Home dialing
When you're on a trip abroad, it's easy to dial friends and family from home.
Your home country code is automatically added when you call your contacts while roaming. But
when manually entering a phone number to call, you need to enter a plus (+) sign and country code
before the number.
Using a roaming service may incur additional charges. Check with your mobile operator for rates
before using a roaming service.
Changing the default country code for Home dialing
1. From the Home screen, swipe up and then tap Settings Call.
2. Tap Home dialing settings.
3. Select a country, and then tap OK.
Page 72

72 Phone calls
Turning off Home dialing
If you prefer to manually enter complete phone numbers to call while roaming, you can turn off
Home dialing.
1. From the Home screen, swipe up and then tap Settings Call.
2. Clear the Home dialing option.
Page 73

73 SMS and MMS
SMS and MMS
About the Messages app
With Messages, you can send and receive instant text (SMS) and multimedia (MMS) messages
between HTC U19e and another messaging-ready phone. MMS can contain text and pictures,
recorded voice, audio or video files, or contact cards (vCard). See your service plan for applicable
charges for messaging.
Sending a text message (SMS)
1. From the Home screen, swipe up and then find and tap Messages.
2. Tap .
3. Enter a contact name, mobile number, or email address in the To field. Or select a contact
from the list.
4. In the text box, start composing your message.
5. Tap to send, or press to save the message as a draft.
§ There is a limit on the number of characters for a single text message. Once you go over the
character limit, a new message is created but automatically joined into one when received. As
you near the limit, a character count will appear above the Send button.
§ Your text message automatically becomes a multimedia message if you attach an item, or
compose a very long message.
Page 74

74 SMS and MMS
Sending a multimedia message (MMS)
When you need to add a little more to a text message, you can send a multimedia message (MMS)
with pictures, voice recordings, audio or video files.
Before attaching and sending a video, compress it first so that the file size doesn't exceed the
message size limit.
1. From the Home screen, swipe up and then find and tap Messages.
2. Tap .
3. Enter a contact name, mobile number, or email address in the To field. Or select a contact
from the list.
4. Tap to attach a photo or video.
Tap , to include other types of attachments, such as a sticker, voice recording, or your
location.
5. Tap the text box, and then enter your message.
6. Tap to send, or press to save the message as a draft.
Depending on the resolution of your photo or video attachments, they may be displayed as
cropped thumbnails in your multimedia message.
Sending a group message (SMS)
Group messaging makes it easy to send a message to multiple contacts all at once. You can choose to
send a group SMS or group MMS.
1. From the Home screen, swipe up and then find and tap Messages.
2. Tap
3. Enter a contact name or mobile number in the To field. Or tap a contact in Top contacts or
from the list.
When choosing a contact from the list, not Top contacts, tap the name and not the contact photo.
4. When you're done, tap .
5. Tap the text box, and then start composing your message.
Start group conversation.
6. Tap to send, or press to save the message as a draft.
Page 75

75 SMS and MMS
Replying to a message
1. From the Home screen, swipe up and then find and tap Messages.
2. Tap a contact (or phone number) to display the exchange of messages with that contact.
3. Tap the text box, and then enter your message.
4. Tap .
Forwarding a message
1. From the Home screen, swipe up and then find and tap Messages.
2. Tap a contact (or phone number) to display the exchange of messages with that contact.
3. Press and hold the message until it is selected, and then tap Forward.
4. Select the contact from the pop-up window. If the contact is not listed, tap New message and
then enter or select a contact.
5. Tap .
Blocking messages from unwanted contacts
Block unwanted messages and keep your Messages screen clean.
1. From the Home screen, swipe up and then find and tap Messages.
2. Press and hold a contact (or phone number) to select.
3. Tap
in the Messages screen or receive notifications and calls.
4. To see all contacts and numbers you've blocked, tap Blocked contacts.
To read messages from a blocked contact or number, on the Messages screen, tap
at the top of the screen. When the contact sends you messages, you will not see them
Deleting messages and conversations
Open the Messages app and do any of the following:
To delete a Do these steps
Conversation Press and hold a contact (or phone number) to select it, and then tap .
Archived.
Message Tap the conversation thread with a contact (or phone number), press and hold the
message to select it, and then tap .
Page 76

76 SMS and MMS
Changing the settings and getting help
1. From the Home screen, swipe up and then find and tap Messages.
2. Do one of the following:
§ To change Messages app settings, tap Settings.
§ To get help or provide feedback, on the conversations or messages screen, tap Help
& feedback.
Page 77

77 Contacts
Contacts
Your contacts list
The People app lists all contacts you've stored on HTC U19e and from online accounts you're logged
in to. Use the People app to easily manage communications with people that matter to you.
1. From the Home screen, tap
2. On your contacts list, you can:
§ View your profile and edit your contact information.
§ Create, edit, find, or send contacts.
, and then find and tap People.
§ Tap a contact photo to find ways to quickly connect with the contact.
§ See when a contact has sent you new messages.
To sort your contacts by their first or last name, tap
Settings Sort contacts by.
Setting up your profile
Store your personal contact information to easily send it to other people.
1. From the Home screen, tap , and then find and tap People.
2. Tap My profile.
3. Tap Edit my contact card.
4. Enter or edit your name and contact details.
Page 78

78 Contacts
5. Tap or the current photo to change your contact photo.
6. Tap .
Filtering your contacts list
When your contacts list gets long, you can choose which contact accounts to show.
1. On the People tab, tap Phonebook.
2. Choose the accounts that contain the contacts you want to display.
3. Press .
Finding people
Search for contacts stored on HTC U19e, your company directory if you have an Exchange
ActiveSync account, or social networks you've signed into.
1. From the Home screen, tap , and then find and tap People.
2. On the People tab, you can:
§ Find people in your contacts list. Tap , and then enter the first few letters of the
contact name in the Search people box.
§ Find people on your company directory. Tap , enter the first few letters of the
contact name in the Search people box, and then tap Search contacts in your Company
Directory.
Adding a new contact
1. From the Home screen, tap , and then find and tap People.
2. On the People tab, tap . If you have email accounts set up on your phone, you will be
prompted to select which account to save the contact.
3. Tap the Name field, and then enter the contact name. Tap to separately enter the
contact's given, middle, or family name and name suffix, such as Jr.
4. Select the Contact type. This determines which account the contact will sync with.
5. Enter the contact information in the fields provided.
6. Tap .
When you tap the added contact in your contacts list, you'll see the contact information and your
exchange of messages and calls.
Page 79

79 Contacts
How do I add an extension number to a contact number?
While creating a new contact or editing a contact's details in People, you can add an
extension number to their number so you can skip the voice prompts when calling.
1. After entering the number of the main line, tap the *# key on the keyboard. Then do
one of the following:
§ Tap Pause to insert a pause before the phone dials the extension number. To
insert a longer pause, enter Pause several times.
§ Tap Wait to be prompted to confirm the extension number.
2. Enter the extension number.
Why can't I see newly added contacts in the People app?
Check if you've created the contact under a specific account type. On the People app, tap
Phonebook, and then select the accounts or sources you want your contacts to show from.
Editing a contact’s information
Social network contacts cannot be edited.
1. From the Home screen, tap , and then find and tap People.
2. On the People tab, press and hold the contact, and then tap Edit contact.
3. Enter the new information.
4. Tap .
Page 80

80 Contacts
Getting in touch with a contact
1. From the Home screen, tap , and then find and tap People.
2. Tap a contact's photo (not the name), and then choose how you want to get in touch with that
contact.
For more ways of getting in touch with your contact, tap an icon below the contact photo.
Importing or copying contacts
Importing contacts from your nano SIM card
1. From the Home screen, tap , and then find and tap People.
2. On the People tab, tap Manage contacts.
3. Depending on the phone model, do the following:
§ Single SIM model: Tap Import/Export contacts Import from SIM card.
§ Dual SIM model: Tap Import/Export contacts and then choose which card to import
from.
4. If prompted, select which account you'd like to import your contacts to.
5. Select the contacts you want to import.
6. Tap Save.
Importing a contact from an Exchange ActiveSync account
1. On the People tab, tap and enter the contact's name or email address in the search box.
2. Tap Search contacts in your Company Directory.
3. Tap the name of the contact you want copied to HTC U19e.
4. Tap to import the contact.
Page 81

81 Contacts
Copying contacts from one account to another
You may not be able to copy contacts from certain social network accounts.
1. On the People tab, tap Manage contacts.
2. Tap Copy contacts, and then choose a contact type or online account to copy from.
3. Select a contact type or account you want to save to.
Merging contact information
Avoid duplicate entries by merging contact information from different sources, such as your social
network accounts, into one contact.
Accepting contact link suggestions
When HTC U19e finds contacts that can be merged, you’ll see a link notification when you open the
People app.
1. From the Home screen, tap , and then find and tap People.
2. On the People tab, tap the Contact link suggestion notification when available. You'll see a
list of suggested contacts to merge.
3. Tap next to the contact you want to merge. Otherwise, tap to dismiss the link
suggestion.
If you don't want to receive contact link suggestions, on the People tab, tap
the Suggest contact link option.
Settings. Clear
Manually merging contact information
1. On the People tab, tap the name of the contact (not the icon or photo) you want to link.
2. Tap Link.
3. You can:
§ Under Suggest links, link the contact to an account.
§ Under Add contact, tap one of the options to link to another contact.
Breaking the link
1. On the People tab, tap the name of the contact (not the icon or photo) whose link you want to
break.
2. Tap Link.
3. Under the Linked contacts section, tap beside an account to break the link.
4. Tap Done.
Page 82

82 Contacts
Sending contact information
1. From the Home screen, tap , and then find and tap People.
2. On the People tab, do one of the following:
To send Do this
Someone's contact
information
Your contact information Press and hold My profile, and then tap Send my profile.
3. Choose how you want to send the vCard.
4. Select the type of information you want to send.
5. Tap Send.
Press and hold the name of the contact (not the icon or photo),
and then tap Send contact as vCard.
Sending multiple contact cards
1. On the People tab, tap Send contacts.
2. Select the contacts whose contact information you want to share
3. Tap Send.
4. Choose how you want to send the contact cards.
Contact groups
Organize your friends, family, and colleagues into groups so you can quickly send a message or email
to everyone in the group. We’ve also set up the Frequent group to automatically add the contacts
you dial or get calls from the most.
HTC U19e also syncs with groups you've created in your Google Account.
Creating a group
1. From the Home screen, tap , and then find and tap People.
2. On the Groups tab, tap .
3. Enter a name for the group, and then tap Add contact to group.
4. Select the contacts you want to add, and then tap Save.
5. When your group is complete, tap Save.
Page 83

83 Contacts
Sending a message or email to a group
You will be charged for each text message sent. For example, if you send a message to a group of
five people, you will be charged for five messages.
1. On the Groups tab, tap the group you want to send a message or email to.
2. Go to the Group action tab.
3. Choose if you want to send a group message or group email.
Editing a group
1. On the Groups tab, press and hold the group, and then tap Edit group.
2. You can:
§ Change the group name. You can only change the name for groups that you have
created.
§ Add more contacts to the group. Tap Add contact to group.
§ Remove contacts from the group.
§ Rearrange group members. Drag at the end of the contact’s name to move it to its
new position.
3. Tap Save.
Removing contact groups
1. On the Groups tab, tap Edit groups.
2. Select the contact groups you want to remove. You can only remove groups that you have
created.
3. Tap Save.
Private contacts
If you don't want to show a contact's name and photo on the lock screen when you have an incoming
call, add the contact to your private contacts list.
Adding a contact to the private contacts list
Contacts must have a phone number before they can be added to the private contacts list.
1. From the Home screen, tap , and then find and tap People.
2. On the People tab, press and hold the contact, and then tap Add to private contacts.
To view your private contacts list, on the People tab, tap Manage contacts Private contacts.
Page 84

84 Contacts
Organizing your private contacts
1. On the People tab, tap Manage contacts Private contacts.
2. To add contacts to the private contacts list, tap , select the contacts you want to add, and
then tap Save.
3. To remove private contacts from the list, tap Remove private contact, select the
contacts you want to remove, and then tap Remove.
Page 85

85 Battery
Battery
Tips for extending battery life
How long the battery can last before it needs recharging depends on how you use HTC U19e. Try out
some of these tips to help increase battery life.
Use the power management features
§ Turn Battery saver mode on in Settings. See Using Battery saver mode on page 87.
§ Monitoring your battery usage helps identify what's using the most power so you can choose
what to do about it. For details, see Checking battery usage on page 87.
Manage your connections
§ Turn off wireless connections such as mobile data, Wi-Fi, or Bluetooth when not in use.
§ Turn GPS on only when a precise location is needed, such as while using navigation or
location-based apps. See Turning the location setting on or off on page 121.
§ Turn on Airplane mode when you don't need any wireless connections and you don't want to
receive calls or messages.
Manage your display
Lowering the brightness, letting the display sleep when not in use, and keeping it simple helps save
battery power.
§ Lower the screen brightness when you don't need it. See Screen brightness on page 122.
§ Set the screen timeout to a shorter time. See Setting when to turn off the screen on page 122.
§ Don't use a live wallpaper for your Home screen. Animation effects are nice to show off to
other people but they drain your battery.
Changing your wallpaper to a plain, black background can also help a little. The less color is
displayed, the less battery is used. See Setting your Home screen wallpaper on page 42.
Manage your apps
§ Battery optimization helps extend battery standby time. See Battery optimization for apps
on page 87.
§ Restrict battery usage of apps running in the background. See Enabling background
restriction in apps on page 88.
Page 86

86 Battery
§ Install the latest software and application updates. Updates sometimes include battery
performance improvements.
§ Uninstall or disable apps that you never use.
Many apps run processes or sync data in the background even when you're not using them. If
there are apps that you don't need anymore, uninstall them.
If an app came preloaded and can't be uninstalled, disabling the app can still prevent it from
continuously running or syncing data. See Disabling an app on page 105.
Limit background data and sync
Background data and sync can use a lot of battery power if you have many apps syncing data in the
background. It’s recommended not to let apps sync data too often. Determine which apps can be set
with longer sync times, or sync manually.
§ In Settings, tap Accounts & sync and check what types of data are being synced in your
online accounts. When the battery is starting to run low, temporarily disable syncing some
data.
§ If you have many email accounts, consider prolonging the sync time of some accounts.
If you are using the HTC Mail app, select an account, tap Settings Sync, Send &
Receive, and then adjust the settings under Sync schedule.
§ When you’re not traveling from one place to another, sync weather updates of only your
current location, rather than in all of your named cities. Open the Weather app, and then tap
to edit and remove unneeded cities.
§ Choose widgets wisely.
Some widgets constantly sync data. Consider removing the ones that are not important from
your Home screen.
§ In Google Play Store, tap Settings, and then tap Auto-update apps Don't auto-update
apps if you're fine with updating apps from Google Play Store manually.
Other tips
To squeeze in a little bit more battery power, try these tips:
§ Tone down the ringtone and media volume.
§ Minimize the use of vibration or sound feedback. In Settings, tap Sound Advanced and
choose which ones you don't need and can disable.
§ Check your apps’ settings as you may find more options to optimize the battery.
Page 87

87 Battery
Using Battery saver mode
Battery saver mode helps to increase battery life. It reduces the usage of features that drain the
battery such as location services and mobile data.
1. From the Home screen, swipe up and then find and tap Settings.
2. Tap Battery Battery Saver.
3. Tap TURN ON NOW or TURN OFF NOW to turn Battery saver mode on or off.
To set when to automatically switch this mode on, tap the Turn on automatically On/Off
switch. Then adjust the slider to set t a battery level.
Displaying the battery percentage
You can check the percentage of remaining battery power right from the status bar.
1. From the Home screen, swipe up and then find and tap Settings.
2. Tap Battery.
3. Tap the Battery percentage On/Off switch to show the battery percentage on the status bar.
Checking battery usage
See how the system and apps are using the battery and how much power is being used.
1. From the Home screen, swipe up and then find and tap Settings.
2. Tap Battery.
You'll see how much power is left and about how long it will last.
3. Tap Battery usage and do the following:
§ To see battery usage of both system and apps, tap Show full device usage.
§ Tap an item to check how it uses the battery.
4. If you see the Manage battery usage section while viewing battery use details, you can tap the
option underneath it to adjust settings that affect battery usage.
Another way to check the battery usage per app is to go to Settings, and then tap Apps &
notifications App info. Tap the app you want to check, and then tap Advanced Battery.
Battery optimization for apps
When you have connections such as Wi-Fi on while the phone is in sleep mode, some apps may still
continue to use the battery. Starting from Android 6.0, battery optimization is enabled for all apps
by default which helps prolong battery standby time when you're not using the phone.
The phone needs to be sitting idle for an extended period of time before battery optimization takes
effect.
Page 88

88 Battery
Turning battery optimization off in apps
If there are apps that you don't want battery optimization enabled, you can turn the feature off in
those apps.
1. From the Home screen, swipe up and then find and tap Settings.
2. Tap Apps & notifications Advanced Special app access.
3. Tap Battery optimization.
4. Tap Not optimized All apps to see the complete list of apps.
5. To turn off battery optimization in an app, tap the app name, and then tap Don't optimize
Done.
Repeat this process to turn off optimization in other apps.
To filter the list and see which apps have battery optimization disabled, tap All apps Not
optimized.
Enabling background restriction in apps
In some apps, you can enable background restriction to prevent them from using the battery while
running in the background.
When background restriction is enabled, the restricted apps may not work as usual and
notifications may be delayed.
1. From the Home screen, swipe up and then tap Settings Apps & notifications.
2. Under Recently opened apps, tap an app you want to configure.
If you don't see the desired app, tap See all ___ apps, then tap the app that you want.
3. On the App info screen, tap Advanced Battery
4. Under Manage battery usage, tap Background restriction.
5. Tap Restrict.
Repeat the above steps to turn on background restriction in other apps.
Checking which apps are battery restricted
1. From the Home screen, swipe up and then find and tap Settings.
2. Tap Battery Battery Manager.
3. Tap Restricted apps to see the list of battery restricted apps.
§
You'll see this option only when there are apps running in the background that you've restricted
from using the battery.
§ On the Restricted apps screen, you can enable or disable restriction for each app.
Page 89

89 Storage
Storage
Freeing up storage space
As you use HTC U19e, you'll accumulate data and fill its storage capacity over time. Here are some
tips on how to free up phone storage space.
Manage photos and videos
§ After taking continuous camera shots, keep only the best shot. Discard the rest, if you don't
need them.
§ After editing a photo or trimming a video, the original file is kept. Delete original files or
move them elsewhere, such as to your computer.
§ If you're only sending videos through MMS, use a lower resolution. Hi-res video takes up
more space.
§ RAW image files take up a lot of storage space. It's recommended to use a storage card as the
default storage for photos and videos. If your storage card is running low on space, consider
moving RAW image files to your computer.
§ Turn on Storage manager to help handle old photos and videos on your phone.
Remove unused themes
Themes can quickly consume up storage space because themes can include images, sounds and
icons. Remove themes you're not using. See Deleting a theme on page 107.
For more details on HTC Themes, go to http://www.htc.com/support/apps/themes/.
Back up data and files
Keep only the most recent data in your apps and files that you often need to use. You can back up
your other data and files.
Remove or disable apps
Uninstall apps that you've downloaded if no longer need them. See Uninstalling an app on page 99.
Preinstalled apps can be disabled when you're not using them. See Disabling an app on page 105.
Manually free up space
On the Storage screen, tap Free Up Space. The phone then checks the phone storage and then
suggest items that you may want to delete.
Page 90

90 Storage
Move apps to the storage card
Third-party apps that you've downloaded and installed can be moved to the storage card if you've
set up the card as internal storage. See Moving apps and data between the built-in storage and
storage card on page 91 and Moving an app to or from the storage card on page 92.
Types of storage
Starting from Android 6.0, there have been some changes on how and where downloaded apps and
their data can be stored.
Phone storage
This is the internal storage which contains the Android system, preinstalled apps, email, text
messages, and cached data from the apps. You can also install apps that you've downloaded and
capture photos, videos, and screenshots to this storage.
Storage card
Use your storage card as a removable storage to store and access your media and other files on
HTC U19e or any Android phone, or set it up as an extension of the internal storage. See Should I use
the storage card as removable or internal storage? on page 90.
USB storage
You can plug in an external USB storage device such as a USB flash drive or an SD card reader. You
need a special cable to connect HTC U19e and a USB storage device.
Should I use the storage card as removable or internal storage?
Use your storage card as removable storage when you have content on the card, such as media or
photos, that you don't want to lose. If you have a brand new storage card, choose whether to use it as
removable storage or set it up as an extension of the internal storage.
Removable storage
Use a new storage card as removable storage to be able to access the card's contents on HTC U19e or
other Android devices.
Internal storage
Set up a new storage card as internal storage for more privacy and secure use. This encrypts and
formats the storage card to work just like the internal storage.
This also expands the internal storage space since:
§ Captured screenshots, photos, media, and other files will be stored on the storage card.
§ Third-party apps that you installed and their data can be moved between the built-in storage
and storage card.
Page 91

91 Storage
After setting up the storage card as internal storage, the card can only be used on HTC U19e
where it has been formatted.
Setting up your storage card as internal storage
When you insert a storage card that has not been used on HTC U19e before, the card will be
mounted as removable storage by default. If the storage card is new or doesn't have content you
want to keep, you can format it as internal storage for HTC U19e.
§ See Should I use the storage card as removable or internal storage? on page 90 to find out the
differences between using the storage card as removable storage or internal storage.
§ If there are still files on the storage card, back up the files first before you format the card.
1. From the Home screen, swipe up and then tap Settings Storage.
2. Under Portable storage, tap next to the storage card name.
3. Tap Format as internal Format SD card.
4. Follow the onscreen instructions to move your installed apps and their data from the built-in
storage to the storage card.
If you no longer want to use your storage card as internal storage, you can reformat the card as
removable storage. Before you do so, make sure to move all the apps and data from the card back
to the built-in storage. See Moving apps and data between the built-in storage and storage card
on page 91.
Moving apps and data between the built-in storage and storage card
If you've set up your storage card as internal storage, you can move third-party apps that you
installed and their data such as photos, media, and downloaded files to the storage card to free up
storage space.
If you no longer want to use your storage card as internal storage, make sure to move all the apps
and data from the card back to the built-in storage.
1. From the Home screen, swipe up and then tap Settings Storage.
2. Tap the name of your storage card if you're moving app data from the built-in storage to the
card, or tap Internal shared storage if you're moving data from the storage card back to the
built-in storage.
Page 92

92 Storage
3. Tap Migrate data.
4. Tap Move content.
§ Screenshots will also be migrated.
§ When you have new photos, videos, screenshots, or downloaded files after the migration, they
will be saved to the new storage location.
Moving an app to or from the storage card
When you're running out of storage space, you can move a downloaded app and its data to the
storage card if the card has been set up as internal storage.
If you need to reformat your storage card, make sure to move each app and its data back to the builtin storage before formatting the card.
Preinstalled apps cannot be moved. Some third-party apps you've downloaded and installed to
the built-in storage may also not allow you to move them to the storage card.
1. From the Home screen, swipe up and then tap Settings Storage.
2. Tap Internal shared storage, and then tap Other apps if you want to move an app from the
built-in storage to the storage card.
Or tap the name of your storage card, and then tap Apps if you need to move an app from the
storage card back to the built-in storage.
3. Tap an app you want to move.
4. Tap Change, and then tap where you want to move it to.
5. Tap Move.
Copying or moving files between the built-in storage and storage card
If you're using your storage card as removable storage, you can copy or move your files between the
built-in storage and storage card. You can also copy or move files to or from an external USB storage
device when you have it connected to HTC U19e.
1. From the Home screen, swipe up and then tap Settings Storage.
2. Tap Internal shared storage then tap Files, or tap the storage card name.
Or tap the external USB storage device if you have one connected.
3. Open the folder that contains the files you want to copy or move.
Page 93

93 Storage
4. To select or deselect files:
§ Press and hold a file to select it. To select more files, tap each file.
§ Tap a file to deselect it.
§ To select all files, tap Select all.
5. Tap , and then tap Copy to or Move to.
6. Tap to open the slideout menu, and then choose where you'd like to copy or move your
files.
7. Tap Copy or Move.
Copying files between HTC U19e and your computer
You can copy your music, photos, and other files to HTC U19e.
Save and close your files before copying them from your computer to HTC U19e, or vice versa.
1. Connect HTC U19e to the computer using your USB Type-C cable.
2. On HTC U19e, unlock the screen if it's locked.
3. Slide the Notifications panel open. Tap Android System Charging this device via USB, and
then do the following:
§ Under the USB controlled by setting, select This device.
§ Under the Use USB for setting, select File transfer.
4. When you see a pop-up window appear on your computer, choose to view files.
5. Copy the files from your computer to HTC U19e, or vice versa.
6. After copying the files, disconnect HTC U19e from the computer.
Unmounting the storage card
When you need to remove the storage card while HTC U19e is on, unmount the storage card first to
prevent corrupting or damaging the files in the storage card.
If your storage card is used as internal storage and there are apps that were moved to the card,
you will not be able to open these apps after unmounting the card.
1. From the Home screen, swipe up and then tap Settings Storage.
2. Do one of the following:
§ If your storage card appears under Portable storage, tap Eject.
§ If your storage card appears under Device storage, tap the card name, and then tap
Eject.
Page 94

94 Transfer
Transfer
Ways of getting content from your previous phone
Depending on the operating system in your old phone, choose the proper method of getting its
content onto HTC U19e.
From an Android phone
There are two ways you can do:
§ Use your Google Account to back up and restore data.
Back up your old phone to your Google Account first. When you set up HTC U19e for the first
time, sign in to your Google Account and restore your old phone's data to HTC U19e.
§ Use the HTC Transfer Tool.
On your old HTC or other Android phone, download the HTC Transfer Tool and use it to
transfer your content to HTC U19e. See Transferring content from an Android phone on page
94.
From an iPhone
Download and install the Google Drive™ app on your iPhone, and use it to back up iPhone content to
your Google Account.
On HTC U19e, go to Settings, and then tap System Get content from another phone iPhone to
see the instructions. Or visit https://www.android.com/switch/.
Transferring content from an Android phone
On your old Android phone, download the HTC Transfer Tool and use it to transfer your content to
HTC U19e.
The types of locally stored content on your old phone that the HTC Transfer Tool can transfer
include contacts, messages, music, photos, videos, and some settings. More types of data such as call
histories, email accounts, and some HTC app settings can be transferred from HTC phones that
have HTC Sense™ 5.5 or higher.
You need Android version 2.2 or later to use the HTC Transfer Tool on your old phone.
1. From the Home screen, swipe up and then tap Settings System.
2. Tap Get content from another phone.
Page 95

95 Transfer
3. Choose whether to transfer from an HTC Android phone or other Android phone.
4. On the Get content from another phone screen, tap Next.
5. Follow the steps shown on HTC U19e to download the HTC Transfer Tool to your old phone,
install it, and open the tool.
6. When you see a PIN on your old phone, make sure the same PIN also appears on HTC U19e
before you continue.
If the PIN code doesn't appear, tap Retry on your old phone. If it still won't appear, this may
mean that your old phone is unable to connect to HTC U19e. When this happens, try another
transfer method.
7. Tap Confirm on your old phone.
8. On your old phone, choose the types of content you want to transfer, tap Transfer.
9. Wait for the transfer to finish.
10. Tap Done on both phones.
Other ways of getting contacts and other content
There are different ways you can individually add contacts and other content to HTC U19e.
Source of content How to transfer
Google Account Google contacts are imported to HTC U19e after you sign in to your
Google Account. You can also create more Google contacts right from
HTC U19e.
Social network accounts Log in to your favorite social networks to sync contact information
from them.
Microsoft® Exchange
ActiveSync
Outlook.com account Sync personal contacts from your Microsoft Outlook.com account.
Phone contacts You can create contacts locally on HTC U19e, if you don't prefer to
nano SIM card Copy all your nano SIM contacts to HTC U19e.
HTC U19e syncs your work contacts from the Microsoft Exchange
ActiveSync Server in your workplace.
store them on your online accounts.
Transferring photos, videos, and music between your phone and computer
Here are ways you can transfer your media from or to your computer.
§ Connect HTC U19e to your computer. Your computer will recognize it just like any
removable USB drive, and you can copy your media between them. See Copying files between
HTC U19e and your computer on page 93.
§ Use cloud storage services to put your media in one place so you can manage them anywhere
—on your computer, HTC U19e, and other mobile devices.
Page 96

96 Backup and reset
Backup and reset
Backing up HTC U19e
Back up HTC U19e to Google Drive so you can restore content such as app data and settings after a
factory reset or when restoring your data to another Android device.
1. From the Home screen, swipe up and then tap Settings
2. Make sure Back up to Google Drive is turned on.
To select a backup account other than your primary Google Account, tap Account and then
select another Google Account. You can also tap Add account to add a new Google Account for
your backup.
3. Tap App data, and then check that Automatic restore is turned on.
This allows an app's data and settings to be restored when you reinstall the app on HTC U19e.
The auto backup feature in Android will periodically back up HTC U19e to a private folder in
Google Drive. Backup data will not count towards your Google Drive storage quota. Large files or
files that app developers have chosen to exclude will not be backed up.
You can also tap Back up now to manually back up HTC U19e anytime.
System Backup.
Resetting network settings
Reset the network settings when you're having problems connecting HTC U19e to the Internet or
Bluetooth devices.
1. From the Home screen, swipe up and then tap Settings System Reset options.
2. Tap Reset Wi-Fi, mobile & Bluetooth.
3. Tap Reset settings.
4. Tap Reset settings again.
Page 97

97 Backup and reset
Resetting HTC U19e (Hard reset)
If HTC U19e has a persistent problem that cannot be solved, you can perform a factory reset (also
called a hard reset or master reset). A factory reset reverts HTC U19e back to its initial state—the
state before you turned it on for the first time.
Apps you've downloaded and installed, your accounts, your files, as well as system and app data
and settings will be removed. Be sure to back up any data and files you want to keep before you do
a factory reset.
1. From the Home screen, swipe up and then tap Settings System Reset options.
2. Tap Erase all data (factory reset).
To avoid deleting media and other data from your storage card, make sure you do not select
the Erase SD card option.
3. Tap Reset Phone.
4. Tap Erase Everything.
A factory reset may not permanently erase all data, including personal information.
Page 98

98 Installing and removing apps
Installing and removing apps
Getting apps from Google Play Store
Google Play Store is the place to go to find new apps for HTC U19e. Choose from a wide variety of
free and paid apps ranging from productivity apps, entertainment, to games.
§ To purchase apps and other content on Google Play Store, you can use the payment methods
from your Google Account. When you make your first purchase, your selected payment method
will be added to your Google Account. To learn more about accepted payment methods, see
support.google.com/googleplay.
§ The available payment methods vary by country.
Finding and installing an app
When you install apps and use them on HTC U19e, they may require access to your personal
information or access to certain functions or settings. Download and install only apps that you trust.
Be cautious when downloading apps that have access to functions or a significant amount of your
data on HTC U19e. You’re responsible for the results of using downloaded apps.
1. On the Home screen, swipe up and then find and tap Play Store.
2. Tap the search bar and enter the app name you're looking for.
3. When you see the app in the search results list, tap it and read its description and user
reviews.
4. Do one of the following:
§ To install a free app, tap Install.
§ To install a paid app, tap the price button. If you have not added a payment method to
your Google Account, tap Continue, and then select the payment method.
Apps sometimes get updated with improvements or bug fixes. By default, updates are
automatically downloaded when you're connected to a Wi-Fi network. In the Google Play Store
app settings, you can turn auto-update off. See Installing app updates from Google Play Store on
page 40.
Page 99

99 Installing and removing apps
Restoring apps from Google Play Store
If you performed a factory reset or had some favorite apps on another Android device, you can easily
reinstall your apps on HTC U19e.
1. On the Home screen, swipe up and then find and tap Play Store.
2. Tap to open the slideout menu.
3. Tap My apps & games and swipe to the Library tab.
4. Tap Install next to the app you want to restore.
Downloading apps from the web
You can download apps directly from websites.
Apps downloaded from websites can be from unknown sources. To help protect HTC U19e and
your personal data, we strongly recommend that you only download from websites you trust.
1. Open the browser, and then go to the website where you can download the app you want.
2. If prompted, tap Settings, and then turn on Allow from this source.
3. Follow the website's download instructions for the app.
To review installation permissions for installed apps, go to Settings
Advanced Special app access Install unknown apps.
Apps & notifications
Uninstalling an app
If you no longer need an app that you've downloaded and installed, you can uninstall it.
Most of the preloaded apps cannot be uninstalled.
From the Apps screen, press and hold the app you want to remove, and then drag it to Uninstall.
If you uninstalled a purchased app, check support.google.com/googleplay for information about
refunds.
Page 100

100 Working with apps
Working with apps
Accessing your apps
There are two easy ways to access your app list.
§ Swipe up on the Home screen.
§ Tap
on the HTC BlinkFeed or Home screen.
Arranging apps
You can arrange and rearrange the apps on the Apps screen.
1. From HTC BlinkFeed or any widget panel, tap
2. Tap , and then choose how to arrange apps, such as alphabetically.
3. Select Custom if you want to rearrange or group apps into folders.
Showing or hiding apps in the Apps screen
1. On the Apps screen, tap Show/hide apps.
2. Select the apps you want to hide, or clear their check boxes to unhide them.
3. Tap Done.
Grouping apps into a folder
1. On the Apps screen, tap Custom.
.
2. Tap Rearrange apps.
3. Press and hold an app, and then drag it over to another app to automatically create a folder.
4. To add more apps, drag each app over to the folder.
5. When you're done, tap .
6. To name the folder, open the folder, tap its title bar, and then enter a folder name.
Moving apps and folders
1. On the Apps screen, tap Custom.
2. Tap Rearrange apps.
 Loading...