

HTC Typhoon Service manual

Service Manual
for
Typhoon
HTC Proprietary
Confidential T reatment Requested
Rev . A04
SEPT 20, 2004
HTC Corp.
Engineering Mobility
HTC confidential
© 2004, HTC Corporation. All rights reserved. TOTAL 60 CONT.ON. 2 PAGE NO. 1
TITLE: Service Manual for Typhoon
REV.
NO.
A01 6/16 First reversion TSC
A03 9/10 Revise TSC
A04 9/20 Add in RF spec TSC
DATE CONTENTS DEP. REVISED
APP
STGE.PER.
´
D
HTC confidential
© 2004, HTC Corporation. All rights reserved. TOTAL 60 CONT.ON. 3 PAGE NO. 2

Table of contents
Chapter 1 - Introduction 5
1.1 History 5
Chapter 2 - Product Specifications 6
Chapter 3 - Servicing Tools 8
Chapter 4 - Assembling and Disassembling 9
4.1 Disassembling 9
4.2 Assembling 18
4.3 MB Pre-Assembling 24
4.4 LCD Pre-Assembling 25
Chapter 5 - Diagnostic Programs 26
5.1 List of Test Items (Diagnostics in SD card)
5.2 Test Procedure
5.3 Test Result
Chapter 6 - Battery Test Procedure 29
6.1 Leakage current measurement with Fixture
6.2 Battery Capacity Test
Chapter 7 - Software Upgrade procedure 34
7.1 Software upgrade
7.2 Smartphone Reset
7.4 Software Backup to SD card
Chapter 8 - RF Antenna test spec andf criteria 42
8.1 Antenna Test Specification
8.2 Antenna Test Criteria
HTC confidential
© 2004, HTC Corporation. All rights reserved. TOTAL 60 CONT.ON. 4 PAGE NO. 3

Chapter 9 - Inspection Criteria 45
9.1 Definition
9.2 Inspection Area
9.3 Criteria
Chapter 10 - Trouble Shooting 46
Chapter 11 - Labeling Plan 53
Chapter 12 - Exploded Diagram & Spare parts list 54
12.1 Spare parts list for repair
12.2 Accessory Spare parts list
12.3 Board level parts list
Chapter 13 - Board Level Repair 57
13.1 Components to be Replaced
13.2 Problem Identification &Troubleshooting
HTC confidential
© 2004, HTC Corporation. All rights reserved. TOTAL 60 CONT.ON. 5 PAGE NO. 4

Chapter 1 - Introduction
This manual provides the technical information to support the service activities of Typhoon. It
contains highly confidential information, so any or all of this document should not be revealed to
any third party.
1.1 History
Reversion Update item Pages effected
A01 First release N/A
AO2
Spare part list, exploded diagram, parts
picture
Page 51,52
A03 Page
16&17 ,(Speaker ,Camera
dis-assembly part and receiver
tape),P56 (LCD connector)
A04 Add RF spec
HTC confidential
© 2004, HTC Corporation. All rights reserved. TOTAL 60 CONT.ON. 6 PAGE NO. 5

Chapter 2 - Product Specifications
Function Specification
Platform z Microsoft Smart Phone 2003 Dimensions z 107.54 (L) x 46.2 (W) x 17.5 (T) mm
Weight z 100g with battery
CPU z TI OMAP 730
Memory
GSM Function z Tri-band 900/1800/1900
Display z 2.2 inch, 176x220 dots resolution
Keyboard/Button z One Power Button (On the Top)
Interface z 3.0 V SIM Card.
Power z Rechargeable battery, Li-Ion 970 mAh
Device to device
connectivity
CMOS Camera z Color
z SDRAM:32MB
z Flash ROM:64MB
z GPRS, Class B
z Multi-slot class 10
z 64K colors TFT Transflecti ve LCD
z Dot Pitch:66um x 198 um
z LED back Light
z One Numeric Dialing Keypad(12 buttons)
z Two soft key button
z One Home/connection quick list button
z One Back button
z Send/Phone button
z End Phone button
z One 5- way navigation keypad
z One Camera Capture button
z Volume up button (Long Press as voice record)
z Volume down button(long press as Voice command/Dial.
z One mini-USB connector (Slave USB, Power IN)
z One Infrared IrDA SIR.
z One Mini SD memory card slot
z One external antenna connector.
z Talk:3.5 ~ 4 hours
z Standby:140 hours
z AC Adapter:
- AC input rating:100 ~ 240 VAC, 50/60 HZ.
- DC Output rating:5VDC,1 A.
z Ambient Light Sensor for LED power consumption
z Bluetooth
z Infrared IrDA SIR
z USB mini-B plug and receptacle
z Resolution: VGA
z Min 5 Lux
z Preview Mirror
HTC confidential
© 2004, HTC Corporation. All rights reserved. TOTAL 60 CONT.ON. 7 PAGE NO. 6

Notification z One Bi-color LED (Green and Red) for GSM STANDBY, GSM standby,
GSM network status, Event Notification, Power charging status.
z One Blue LED for Bluetooth connectivity status.
z Vibration for notification and Incoming call.
Notification by LED, Sound, Message, Vibration Motor.
z
Accessories
z Bundle:
¾ AC adapter w/ DC_In mini USB plug
¾ USB Sync cable
¾ Stereo wired headset with Microphone
¾ Standard Battery
¾ User Manual, Quick Start Guide, Sync. Software CD
z Option
¾ Car Adapter
¾ Traveler Charger with back up battery chargin g slot
¾ Car kit with Car Stereo Mute function
¾ Carrying case
HTC confidential
© 2004, HTC Corporation. All rights reserved. TOTAL 60 CONT.ON. 8 PAGE NO. 7

Chapter 3 - Servicing Tools
This chapter provides information for the servicing tools for Typhoon.
List of Servicing Tools
No. Item Use Remark
Disassembly tools Plastic stick for dismantle the unit
1
Cleaning wipers
Precision screw driver 0.9mm
Philips Screw driver
Protective Film
Tweezers
Air Gun
Clean Bench (Mandatory)
2
Mini USB cable For Synchronization Test
3
Mini SD Memory Card For SD card test
4
Headset For Hand free / Recording test
5
AC Adapter with DC In mini
Power supply to Typhoon
USB plug
6
Diagnostic Test Program Test Program for Functional Test
7
Software Upgrade tools For software version upgrade or re-flash
8
Label Printer & Scanner For Printing & Scanning regulation label when
housing or M/B is changed.
9 Battery Test Jig For Main Battery judgement
HTC confidential
© 2004, HTC Corporation. All rights reserved. TOTAL 60 CONT.ON. 9 PAGE NO. 8
Chapter 4 - Assembling and Disassembling
4.1 Disassembling
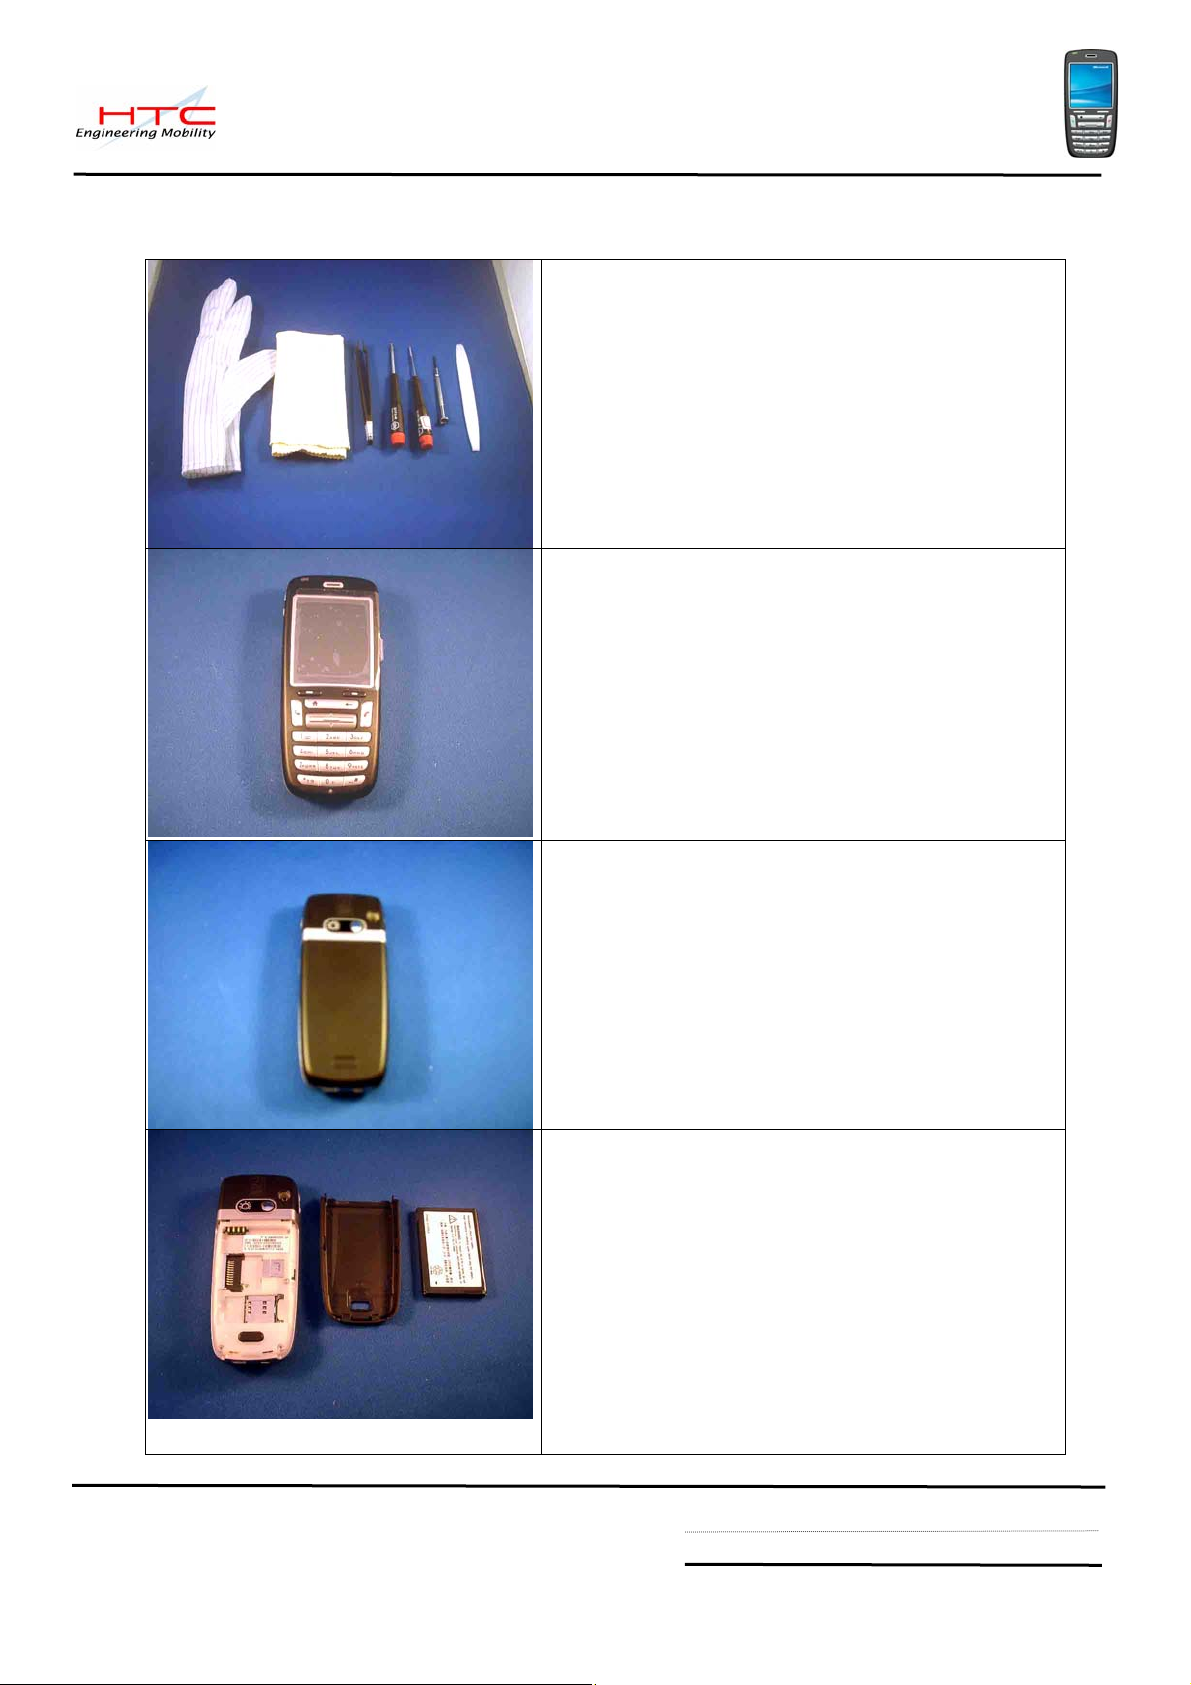
Tools needed for Assembling and Disassembling
the Smart Phone
1. Glove & Lens Cleaning Tissue.
2. Plastic type tweezer.
3. Philip Screw Driver #0.
4. Philip Screw Driver type T5
5. Precision driver flat(θ) type 0.9 mm
6. Special Made Plastic Stick
Disassembly process
Front side
Rear Side
Remove antenna rubber, battery cover, battery
from unit
HTC confidential
© 2004, HTC Corporation. All rights reserved. TOTAL 60 CONT.ON. 10 PAGE NO. 9

To remove antenna cover
Please use Precision driver flat(θ) type 1.2 mm
and insert in to the two hole as shown on
picture.
Insert in angle:30 °
TIPS:
Insert the driver to the hole with angle about 30
degree , after reach the end, move back
around 1mm and press it down to release the
the cover lock.
4
1
6
5 3
2
1. Remove the cover from its place.
2. Unscrew 6 ea screws which fix rear cover
to front panel.
Next, start disassembly the rear cover.
Please be noticed that improper way of
disassembly may caused the cover worn easily
1. Insert the plastic stick to the gap between
front and rear cover deep inside.
2. Move the stick slightly from lower side to
upper to release the 6 hooks (3 each at both side)
HTC confidential
© 2004, HTC Corporation. All rights reserved. TOTAL 60 CONT.ON. 11 PAGE NO. 10

Release all hooks at both side.
Remove the rear cover
Next remove one screw which fix the MB to
front case.
Following to release the LCD FPC .
To take out the upper half part, hold the MB
together with the LCD at the upside part near
antenna
MB+LCD have been remove from front panel.
Please keep the LCD at clean surface.
HTC confidential
© 2004, HTC Corporation. All rights reserved. TOTAL 60 CONT.ON. 12 PAGE NO. 11

Next, release the Speaker+ Camera module
from MB by releasing three holder at its right,
left and top side.
Camera is pre-assembled together with
Speaker module.
Next, remove the LCD from MB. Please notice
that there are two double sides tape sticked
between LCD and its FPC.
These two tapes are reusable for assembly.
HTC confidential
© 2004, HTC Corporation. All rights reserved. TOTAL 60 CONT.ON. 13 PAGE NO. 12

Release the LCD Connector cover to remove
the LCD from its connector by pulling upward.
Put the LCD to clean and safe place.
Now MB is separated from LCD
Continue with Front panel disassembly
Disassembly the switch board.
1. Release four screws which tighten the
switch board to front panel.
2. Take out the switch board.
HTC confidential
© 2004, HTC Corporation. All rights reserved. TOTAL 60 CONT.ON. 14 PAGE NO. 13

Remove the numeric keypad, function
keypad and Navigation keycap from the
switch board.
Nav.Keycap
Remove the numeric keypad from the front
panel.
Numeric keypad
Functional keypad
HTC confidential
© 2004, HTC Corporation. All rights reserved. TOTAL 60 CONT.ON. 15 PAGE NO. 14

To disassembly receiver
Slightly release it from its lower left part.
Remove the Vibrator from its place.
Take out and put on safe place.
Please be noticed since Camera, mirror and
camera lens is assembled together with
speaker module, once speaker is confirmed
defective and need to be replaced, it could be
replaced direcly as shown on next picture.
HTC confidential
© 2004, HTC Corporation. All rights reserved. TOTAL 60 CONT.ON. 16 PAGE NO. 15

Remove the speaker by releasing the three
screw to release its top cover.
Its top cover is sticked by tape, remove the
tape.
Take out the speaker from direction shown on
picture.
In case of camera defective, Donot remove it
directly from this side.
Need to remove the camera lens in advance
and then push out the camera from this side
using soft stick such as pencil eraser .
Note: Please protect the key part such as
LCD, camera, MB in appropriate box/packing
before sending as RTV part. Fail to do so, may
cause such parts treated as OOW.
HTC confidential
© 2004, HTC Corporation. All rights reserved. TOTAL 60 CONT.ON. 17 PAGE NO. 16

Remove the camera lens in advance.
Use soft tool such as stylus to push out the
camera
Disassembly process is Done.
CMOS camera.
If you send this part as RTV(return to vendor),
please protect (pack) it in appropriate way ,
otherwise broken parts will be treated as OOW
In this case, need to replace the camera lens
with new one to finish the assembly.
HTC confidential
© 2004, HTC Corporation. All rights reserved. TOTAL 60 CONT.ON. 18 PAGE NO. 17

4.2 Assembly Process
Assembly vibrator into its place on rear cover.
Assemble Receiver into its place, notice the
two pin should not bent on assembly process.
Notice: Receiver coming as spare part already
has double side tape on it, you could remove
the top layer and stick it on front panel.
Assemble the numeric keypad.
Put the Navigation keycap, functional keypad
and switch board into front panel.
HTC confidential
© 2004, HTC Corporation. All rights reserved. TOTAL 60 CONT.ON. 19 PAGE NO. 18
 Loading...