

Page 1

User Guide
HTC Touch Pro2
www.sprint.com
© 2009 Sprint. Sprint and the logo are trademarks of Sprint.
Other marks are the property of their respective owners.
Page 2

Consejo
Para encontrar esta guía para usuarios en español,
por favor visita a www.sprint.com y haz clic en
Support > Phones & Devices.
To find this user guide in Spanish, please visit
www.sprint.com and click Support > Phones &
.
Devices
Page 3

Table of Contents
Tip
Looking for something? If you don’t see it in the headings listed here, try the Index on page 221.
Introduction . . . . . . . . . . . . . . . . . . . . . . . . . . . . . . . . . . . . . . . . . . . . . . . . . . . . . . . . . i
Section 1: Getting Started . . . . . . . . . . . . . . . . . . . . . . . . . . . . . . . . . . . . . . . . . . . . 1
1A. Setting Up Service . . . . . . . . . . . . . . . . . . . . . . . . . . . . . . . . . . . . . . . . . . . . . . . . . . . . . . . . . . 2
Setting Up Your Device . . . . . . . . . . . . . . . . . . . . . . . . . . . . . . . . . . . . . . . . . . . . . . . . . . . . . . . . . . . . . . 2
Activating Your Device . . . . . . . . . . . . . . . . . . . . . . . . . . . . . . . . . . . . . . . . . . . . . . . . . . . . . . . . . . . . . . 3
Setting Up Your Voicemail . . . . . . . . . . . . . . . . . . . . . . . . . . . . . . . . . . . . . . . . . . . . . . . . . . . . . . . . . . . 4
Sprint Account Passwords . . . . . . . . . . . . . . . . . . . . . . . . . . . . . . . . . . . . . . . . . . . . . . . . . . . . . . . . . . . 4
Getting Help . . . . . . . . . . . . . . . . . . . . . . . . . . . . . . . . . . . . . . . . . . . . . . . . . . . . . . . . . . . . . . . . . . . . . . . 5
Section 2: Your Device . . . . . . . . . . . . . . . . . . . . . . . . . . . . . . . . . . . . . . . . . . . . . . . 7
2A. Device Basics . . . . . . . . . . . . . . . . . . . . . . . . . . . . . . . . . . . . . . . . . . . . . . . . . . . . . . . . . . . . . . 8
Your Device . . . . . . . . . . . . . . . . . . . . . . . . . . . . . . . . . . . . . . . . . . . . . . . . . . . . . . . . . . . . . . . . . . . . . . . . 9
Inside the Box . . . . . . . . . . . . . . . . . . . . . . . . . . . . . . . . . . . . . . . . . . . . . . . . . . . . . . . . . . . . . . . . . . . . . 11
Turning Your Device On and Off . . . . . . . . . . . . . . . . . . . . . . . . . . . . . . . . . . . . . . . . . . . . . . . . . . . . . 12
Using Your Device’s Battery and Charger . . . . . . . . . . . . . . . . . . . . . . . . . . . . . . . . . . . . . . . . . . . . . 12
Navigating on Your Device . . . . . . . . . . . . . . . . . . . . . . . . . . . . . . . . . . . . . . . . . . . . . . . . . . . . . . . . . 14
Using the Zoom Bar . . . . . . . . . . . . . . . . . . . . . . . . . . . . . . . . . . . . . . . . . . . . . . . . . . . . . . . . . . . . . . . 16
The Home Screen . . . . . . . . . . . . . . . . . . . . . . . . . . . . . . . . . . . . . . . . . . . . . . . . . . . . . . . . . . . . . . . . . 17
Adjusting the Volume . . . . . . . . . . . . . . . . . . . . . . . . . . . . . . . . . . . . . . . . . . . . . . . . . . . . . . . . . . . . . . 21
Using the Getting Started Application . . . . . . . . . . . . . . . . . . . . . . . . . . . . . . . . . . . . . . . . . . . . . . . . 23
Connecting Your Device to a Computer . . . . . . . . . . . . . . . . . . . . . . . . . . . . . . . . . . . . . . . . . . . . . . 23
2B. Entering Text . . . . . . . . . . . . . . . . . . . . . . . . . . . . . . . . . . . . . . . . . . . . . . . . . . . . . . . . . . . . . . 24
The Sliding QWERTY Keyboard vs. Onscreen Keyboards . . . . . . . . . . . . . . . . . . . . . . . . . . . . . . . 24
Using the Sliding QWERTY Keyboard . . . . . . . . . . . . . . . . . . . . . . . . . . . . . . . . . . . . . . . . . . . . . . . . 26
Using the Full QWERTY Layout . . . . . . . . . . . . . . . . . . . . . . . . . . . . . . . . . . . . . . . . . . . . . . . . . . . . . . 27
Using the Phone Keypad . . . . . . . . . . . . . . . . . . . . . . . . . . . . . . . . . . . . . . . . . . . . . . . . . . . . . . . . . . . 29
Using Predictive Mode . . . . . . . . . . . . . . . . . . . . . . . . . . . . . . . . . . . . . . . . . . . . . . . . . . . . . . . . . . . . . 30
Using Numeric and Symbol Mode . . . . . . . . . . . . . . . . . . . . . . . . . . . . . . . . . . . . . . . . . . . . . . . . . . 31
2C. TouchFLO 3D . . . . . . . . . . . . . . . . . . . . . . . . . . . . . . . . . . . . . . . . . . . . . . . . . . . . . . . . . . . . . . 32
The TouchFLO 3D Home Screen . . . . . . . . . . . . . . . . . . . . . . . . . . . . . . . . . . . . . . . . . . . . . . . . . . . . 32
Home . . . . . . . . . . . . . . . . . . . . . . . . . . . . . . . . . . . . . . . . . . . . . . . . . . . . . . . . . . . . . . . . . . . . . . . . . . . . 35
People . . . . . . . . . . . . . . . . . . . . . . . . . . . . . . . . . . . . . . . . . . . . . . . . . . . . . . . . . . . . . . . . . . . . . . . . . . . 37
Mail . . . . . . . . . . . . . . . . . . . . . . . . . . . . . . . . . . . . . . . . . . . . . . . . . . . . . . . . . . . . . . . . . . . . . . . . . . . . . . 44
Messages . . . . . . . . . . . . . . . . . . . . . . . . . . . . . . . . . . . . . . . . . . . . . . . . . . . . . . . . . . . . . . . . . . . . . . . . 45
Page 4

Calendar . . . . . . . . . . . . . . . . . . . . . . . . . . . . . . . . . . . . . . . . . . . . . . . . . . . . . . . . . . . . . . . . . . . . . . . . . 46
Internet . . . . . . . . . . . . . . . . . . . . . . . . . . . . . . . . . . . . . . . . . . . . . . . . . . . . . . . . . . . . . . . . . . . . . . . . . . . 47
Photos and Videos . . . . . . . . . . . . . . . . . . . . . . . . . . . . . . . . . . . . . . . . . . . . . . . . . . . . . . . . . . . . . . . . 49
Sprint Music . . . . . . . . . . . . . . . . . . . . . . . . . . . . . . . . . . . . . . . . . . . . . . . . . . . . . . . . . . . . . . . . . . . . . . 50
Sprint Navigation . . . . . . . . . . . . . . . . . . . . . . . . . . . . . . . . . . . . . . . . . . . . . . . . . . . . . . . . . . . . . . . . . . 52
Sprint TV . . . . . . . . . . . . . . . . . . . . . . . . . . . . . . . . . . . . . . . . . . . . . . . . . . . . . . . . . . . . . . . . . . . . . . . . . 53
Weather . . . . . . . . . . . . . . . . . . . . . . . . . . . . . . . . . . . . . . . . . . . . . . . . . . . . . . . . . . . . . . . . . . . . . . . . . . 54
Stock . . . . . . . . . . . . . . . . . . . . . . . . . . . . . . . . . . . . . . . . . . . . . . . . . . . . . . . . . . . . . . . . . . . . . . . . . . . . 55
Settings . . . . . . . . . . . . . . . . . . . . . . . . . . . . . . . . . . . . . . . . . . . . . . . . . . . . . . . . . . . . . . . . . . . . . . . . . . 56
2D. Using Phone Features . . . . . . . . . . . . . . . . . . . . . . . . . . . . . . . . . . . . . . . . . . . . . . . . . . . . . . 57
Displaying Your Phone Number . . . . . . . . . . . . . . . . . . . . . . . . . . . . . . . . . . . . . . . . . . . . . . . . . . . . . 57
Making Calls from the Phone Screen . . . . . . . . . . . . . . . . . . . . . . . . . . . . . . . . . . . . . . . . . . . . . . . . 57
Making Calls from the TouchFLO 3D Home Screen . . . . . . . . . . . . . . . . . . . . . . . . . . . . . . . . . . . . 60
Answering and Ending Calls . . . . . . . . . . . . . . . . . . . . . . . . . . . . . . . . . . . . . . . . . . . . . . . . . . . . . . . . 60
In-Call Options . . . . . . . . . . . . . . . . . . . . . . . . . . . . . . . . . . . . . . . . . . . . . . . . . . . . . . . . . . . . . . . . . . . . 61
Checking Missed Calls . . . . . . . . . . . . . . . . . . . . . . . . . . . . . . . . . . . . . . . . . . . . . . . . . . . . . . . . . . . . . 63
Call History . . . . . . . . . . . . . . . . . . . . . . . . . . . . . . . . . . . . . . . . . . . . . . . . . . . . . . . . . . . . . . . . . . . . . . . 63
Speed Dial . . . . . . . . . . . . . . . . . . . . . . . . . . . . . . . . . . . . . . . . . . . . . . . . . . . . . . . . . . . . . . . . . . . . . . . 64
Straight Talk . . . . . . . . . . . . . . . . . . . . . . . . . . . . . . . . . . . . . . . . . . . . . . . . . . . . . . . . . . . . . . . . . . . . . . 64
Turning the Phone On and Off . . . . . . . . . . . . . . . . . . . . . . . . . . . . . . . . . . . . . . . . . . . . . . . . . . . . . . 67
Phone Services . . . . . . . . . . . . . . . . . . . . . . . . . . . . . . . . . . . . . . . . . . . . . . . . . . . . . . . . . . . . . . . . . . . 68
2E. Synchronizing Information With Your Computer . . . . . . . . . . . . . . . . . . . . . . . . . . . . . . 69
About Synchronization . . . . . . . . . . . . . . . . . . . . . . . . . . . . . . . . . . . . . . . . . . . . . . . . . . . . . . . . . . . . . 69
Ways to Synchronize . . . . . . . . . . . . . . . . . . . . . . . . . . . . . . . . . . . . . . . . . . . . . . . . . . . . . . . . . . . . . . . 69
Setting Up Windows Mobile Device Center on Windows Vista . . . . . . . . . . . . . . . . . . . . . . . . . . 70
Setting Up ActiveSync on Windows XP . . . . . . . . . . . . . . . . . . . . . . . . . . . . . . . . . . . . . . . . . . . . . . . 71
Synchronizing With Your Computer . . . . . . . . . . . . . . . . . . . . . . . . . . . . . . . . . . . . . . . . . . . . . . . . . . 72
Synchronizing via Bluetooth . . . . . . . . . . . . . . . . . . . . . . . . . . . . . . . . . . . . . . . . . . . . . . . . . . . . . . . . 73
Synchronizing Music and Video . . . . . . . . . . . . . . . . . . . . . . . . . . . . . . . . . . . . . . . . . . . . . . . . . . . . . 73
2F. Contacts, Calendar, and Tools . . . . . . . . . . . . . . . . . . . . . . . . . . . . . . . . . . . . . . . . . . . . . . 74
Contacts . . . . . . . . . . . . . . . . . . . . . . . . . . . . . . . . . . . . . . . . . . . . . . . . . . . . . . . . . . . . . . . . . . . . . . . . . 74
Calendar . . . . . . . . . . . . . . . . . . . . . . . . . . . . . . . . . . . . . . . . . . . . . . . . . . . . . . . . . . . . . . . . . . . . . . . . . 76
Notes . . . . . . . . . . . . . . . . . . . . . . . . . . . . . . . . . . . . . . . . . . . . . . . . . . . . . . . . . . . . . . . . . . . . . . . . . . . . 78
Tasks . . . . . . . . . . . . . . . . . . . . . . . . . . . . . . . . . . . . . . . . . . . . . . . . . . . . . . . . . . . . . . . . . . . . . . . . . . . . 79
Calculator . . . . . . . . . . . . . . . . . . . . . . . . . . . . . . . . . . . . . . . . . . . . . . . . . . . . . . . . . . . . . . . . . . . . . . . . 79
Comm Manager . . . . . . . . . . . . . . . . . . . . . . . . . . . . . . . . . . . . . . . . . . . . . . . . . . . . . . . . . . . . . . . . . . 81
Adobe Reader LE . . . . . . . . . . . . . . . . . . . . . . . . . . . . . . . . . . . . . . . . . . . . . . . . . . . . . . . . . . . . . . . . . 82
Microsoft Office Mobile . . . . . . . . . . . . . . . . . . . . . . . . . . . . . . . . . . . . . . . . . . . . . . . . . . . . . . . . . . . . . 83
JETCET Presentation . . . . . . . . . . . . . . . . . . . . . . . . . . . . . . . . . . . . . . . . . . . . . . . . . . . . . . . . . . . . . . . 84
Automatic Speech Recognition (ASR) . . . . . . . . . . . . . . . . . . . . . . . . . . . . . . . . . . . . . . . . . . . . . . . . 86
Page 5

Voice Recorder . . . . . . . . . . . . . . . . . . . . . . . . . . . . . . . . . . . . . . . . . . . . . . . . . . . . . . . . . . . . . . . . . . . . 87
WorldCard Mobile (Business Card Scanner) . . . . . . . . . . . . . . . . . . . . . . . . . . . . . . . . . . . . . . . . . . 88
JETCET PRINT (Wireless Printing Application) . . . . . . . . . . . . . . . . . . . . . . . . . . . . . . . . . . . . . . . . . 89
2G. microSD Card . . . . . . . . . . . . . . . . . . . . . . . . . . . . . . . . . . . . . . . . . . . . . . . . . . . . . . . . . . . . . 90
Using a microSD Card on Your Device . . . . . . . . . . . . . . . . . . . . . . . . . . . . . . . . . . . . . . . . . . . . . . . 90
Managing the microSD Card . . . . . . . . . . . . . . . . . . . . . . . . . . . . . . . . . . . . . . . . . . . . . . . . . . . . . . . . 91
Using Your Device as a USB Drive . . . . . . . . . . . . . . . . . . . . . . . . . . . . . . . . . . . . . . . . . . . . . . . . . . 92
2H. Bluetooth . . . . . . . . . . . . . . . . . . . . . . . . . . . . . . . . . . . . . . . . . . . . . . . . . . . . . . . . . . . . . . . . . 93
Using Bluetooth . . . . . . . . . . . . . . . . . . . . . . . . . . . . . . . . . . . . . . . . . . . . . . . . . . . . . . . . . . . . . . . . . . . 93
2I. Experiencing Multimedia . . . . . . . . . . . . . . . . . . . . . . . . . . . . . . . . . . . . . . . . . . . . . . . . . . . 98
Taking Photos and Videos . . . . . . . . . . . . . . . . . . . . . . . . . . . . . . . . . . . . . . . . . . . . . . . . . . . . . . . . . . 98
Viewing Photos and Videos . . . . . . . . . . . . . . . . . . . . . . . . . . . . . . . . . . . . . . . . . . . . . . . . . . . . . . . . 105
Using Windows Media Player Mobile . . . . . . . . . . . . . . . . . . . . . . . . . . . . . . . . . . . . . . . . . . . . . . . 109
Using Audio Booster . . . . . . . . . . . . . . . . . . . . . . . . . . . . . . . . . . . . . . . . . . . . . . . . . . . . . . . . . . . . . . 112
Using MP3 Trimmer . . . . . . . . . . . . . . . . . . . . . . . . . . . . . . . . . . . . . . . . . . . . . . . . . . . . . . . . . . . . . . 113
2J. Managing Your Device . . . . . . . . . . . . . . . . . . . . . . . . . . . . . . . . . . . . . . . . . . . . . . . . . . . . 114
Copying and Managing Files . . . . . . . . . . . . . . . . . . . . . . . . . . . . . . . . . . . . . . . . . . . . . . . . . . . . . . 114
Settings on Your Device . . . . . . . . . . . . . . . . . . . . . . . . . . . . . . . . . . . . . . . . . . . . . . . . . . . . . . . . . . . 115
Changing Basic Settings . . . . . . . . . . . . . . . . . . . . . . . . . . . . . . . . . . . . . . . . . . . . . . . . . . . . . . . . . . 118
Using Task Manager . . . . . . . . . . . . . . . . . . . . . . . . . . . . . . . . . . . . . . . . . . . . . . . . . . . . . . . . . . . . . . 119
Connecting to an External Display . . . . . . . . . . . . . . . . . . . . . . . . . . . . . . . . . . . . . . . . . . . . . . . . . . 121
Protecting Your Device . . . . . . . . . . . . . . . . . . . . . . . . . . . . . . . . . . . . . . . . . . . . . . . . . . . . . . . . . . . . 122
Managing Memory . . . . . . . . . . . . . . . . . . . . . . . . . . . . . . . . . . . . . . . . . . . . . . . . . . . . . . . . . . . . . . . 122
Adding and Removing Programs . . . . . . . . . . . . . . . . . . . . . . . . . . . . . . . . . . . . . . . . . . . . . . . . . . . 122
Resetting Your Device . . . . . . . . . . . . . . . . . . . . . . . . . . . . . . . . . . . . . . . . . . . . . . . . . . . . . . . . . . . . . 123
Windows Update . . . . . . . . . . . . . . . . . . . . . . . . . . . . . . . . . . . . . . . . . . . . . . . . . . . . . . . . . . . . . . . . . 125
Section 3: Sprint Service . . . . . . . . . . . . . . . . . . . . . . . . . . . . . . . . . . . . . . . . . . . 127
3A. Sprint Service Features: The Basics . . . . . . . . . . . . . . . . . . . . . . . . . . . . . . . . . . . . . . . . 128
Voicemail . . . . . . . . . . . . . . . . . . . . . . . . . . . . . . . . . . . . . . . . . . . . . . . . . . . . . . . . . . . . . . . . . . . . . . . . 128
Text Messaging (SMS) . . . . . . . . . . . . . . . . . . . . . . . . . . . . . . . . . . . . . . . . . . . . . . . . . . . . . . . . . . . . 131
Video and Picture Messaging (MMS) . . . . . . . . . . . . . . . . . . . . . . . . . . . . . . . . . . . . . . . . . . . . . . . 134
Using Caller ID . . . . . . . . . . . . . . . . . . . . . . . . . . . . . . . . . . . . . . . . . . . . . . . . . . . . . . . . . . . . . . . . . . . 136
Call Waiting . . . . . . . . . . . . . . . . . . . . . . . . . . . . . . . . . . . . . . . . . . . . . . . . . . . . . . . . . . . . . . . . . . . . . 136
Call Forwarding . . . . . . . . . . . . . . . . . . . . . . . . . . . . . . . . . . . . . . . . . . . . . . . . . . . . . . . . . . . . . . . . . . 136
Making a Three-Way Call . . . . . . . . . . . . . . . . . . . . . . . . . . . . . . . . . . . . . . . . . . . . . . . . . . . . . . . . . . 137
Roaming . . . . . . . . . . . . . . . . . . . . . . . . . . . . . . . . . . . . . . . . . . . . . . . . . . . . . . . . . . . . . . . . . . . . . . . . 137
Page 6

3B. Web and Data Services . . . . . . . . . . . . . . . . . . . . . . . . . . . . . . . . . . . . . . . . . . . . . . . . . . . 140
Ways of Connecting to the Internet . . . . . . . . . . . . . . . . . . . . . . . . . . . . . . . . . . . . . . . . . . . . . . . . . 140
Getting Started With Data Services . . . . . . . . . . . . . . . . . . . . . . . . . . . . . . . . . . . . . . . . . . . . . . . . . 142
Navigating the Web . . . . . . . . . . . . . . . . . . . . . . . . . . . . . . . . . . . . . . . . . . . . . . . . . . . . . . . . . . . . . . . 145
Using Windows Live . . . . . . . . . . . . . . . . . . . . . . . . . . . . . . . . . . . . . . . . . . . . . . . . . . . . . . . . . . . . . . 149
Google Mobile App . . . . . . . . . . . . . . . . . . . . . . . . . . . . . . . . . . . . . . . . . . . . . . . . . . . . . . . . . . . . . . . 152
Using RSS Hub . . . . . . . . . . . . . . . . . . . . . . . . . . . . . . . . . . . . . . . . . . . . . . . . . . . . . . . . . . . . . . . . . . 154
Accessing Sprint Instant Messaging . . . . . . . . . . . . . . . . . . . . . . . . . . . . . . . . . . . . . . . . . . . . . . . . 157
Email Messaging . . . . . . . . . . . . . . . . . . . . . . . . . . . . . . . . . . . . . . . . . . . . . . . . . . . . . . . . . . . . . . . . . 158
Working With Company Email and Meeting Appointments . . . . . . . . . . . . . . . . . . . . . . . . . . . . 162
Using Your Device As a Modem . . . . . . . . . . . . . . . . . . . . . . . . . . . . . . . . . . . . . . . . . . . . . . . . . . . . 167
Using Remote Desktop Mobile . . . . . . . . . . . . . . . . . . . . . . . . . . . . . . . . . . . . . . . . . . . . . . . . . . . . . 168
3C. Entertainment: TV and Music . . . . . . . . . . . . . . . . . . . . . . . . . . . . . . . . . . . . . . . . . . . . . . 169
TV . . . . . . . . . . . . . . . . . . . . . . . . . . . . . . . . . . . . . . . . . . . . . . . . . . . . . . . . . . . . . . . . . . . . . . . . . . . . . . 169
Music — Sprint Music Store . . . . . . . . . . . . . . . . . . . . . . . . . . . . . . . . . . . . . . . . . . . . . . . . . . . . . . . . 171
Streaming Media . . . . . . . . . . . . . . . . . . . . . . . . . . . . . . . . . . . . . . . . . . . . . . . . . . . . . . . . . . . . . . . . . 173
YouTube . . . . . . . . . . . . . . . . . . . . . . . . . . . . . . . . . . . . . . . . . . . . . . . . . . . . . . . . . . . . . . . . . . . . . . . . . 174
NASCAR Sprint Cup Mobile . . . . . . . . . . . . . . . . . . . . . . . . . . . . . . . . . . . . . . . . . . . . . . . . . . . . . . . 177
NFL Mobile Live . . . . . . . . . . . . . . . . . . . . . . . . . . . . . . . . . . . . . . . . . . . . . . . . . . . . . . . . . . . . . . . . . . 180
3D. GPS Navigation . . . . . . . . . . . . . . . . . . . . . . . . . . . . . . . . . . . . . . . . . . . . . . . . . . . . . . . . . . 182
Guidelines and Preparation for Using GPS . . . . . . . . . . . . . . . . . . . . . . . . . . . . . . . . . . . . . . . . . . . 182
Downloading Satellite Data via QuickGPS . . . . . . . . . . . . . . . . . . . . . . . . . . . . . . . . . . . . . . . . . . . 183
Using Sprint Navigation . . . . . . . . . . . . . . . . . . . . . . . . . . . . . . . . . . . . . . . . . . . . . . . . . . . . . . . . . . . 183
Windows Live Search . . . . . . . . . . . . . . . . . . . . . . . . . . . . . . . . . . . . . . . . . . . . . . . . . . . . . . . . . . . . . 186
3E. Sprint Worldwide Wireless Service . . . . . . . . . . . . . . . . . . . . . . . . . . . . . . . . . . . . . . . . . 188
Your SIM Card . . . . . . . . . . . . . . . . . . . . . . . . . . . . . . . . . . . . . . . . . . . . . . . . . . . . . . . . . . . . . . . . . . . 188
Using Your Device in GSM Mode . . . . . . . . . . . . . . . . . . . . . . . . . . . . . . . . . . . . . . . . . . . . . . . . . . . 190
Using Your SIM Card’s PhoneBook . . . . . . . . . . . . . . . . . . . . . . . . . . . . . . . . . . . . . . . . . . . . . . . . . 194
Setting GSM Services Options . . . . . . . . . . . . . . . . . . . . . . . . . . . . . . . . . . . . . . . . . . . . . . . . . . . . . 197
Contacting Sprint . . . . . . . . . . . . . . . . . . . . . . . . . . . . . . . . . . . . . . . . . . . . . . . . . . . . . . . . . . . . . . . . . 198
Services . . . . . . . . . . . . . . . . . . . . . . . . . . . . . . . . . . . . . . . . . . . . . . . . . . . . . . . . . . . . . . . . . . . . . . . . . 199
Selecting a Network . . . . . . . . . . . . . . . . . . . . . . . . . . . . . . . . . . . . . . . . . . . . . . . . . . . . . . . . . . . . . . 200
Page 7

Section 4: Safety, Regulatory, and Warranty Information. . . . . . . . . . . . . . . 201
4A. Important Safety Information . . . . . . . . . . . . . . . . . . . . . . . . . . . . . . . . . . . . . . . . . . . . . . . 202
Important Health Information and Safety Precautions . . . . . . . . . . . . . . . . . . . . . . . . . . . . . . . . . . 202
General Precautions . . . . . . . . . . . . . . . . . . . . . . . . . . . . . . . . . . . . . . . . . . . . . . . . . . . . . . . . . . . . . . 205
Additional Safety Information . . . . . . . . . . . . . . . . . . . . . . . . . . . . . . . . . . . . . . . . . . . . . . . . . . . . . . . 207
4B. Regulatory Notices . . . . . . . . . . . . . . . . . . . . . . . . . . . . . . . . . . . . . . . . . . . . . . . . . . . . . . . 212
Regulatory Agency Identifications . . . . . . . . . . . . . . . . . . . . . . . . . . . . . . . . . . . . . . . . . . . . . . . . . . 212
Federal Communication Commission Interference Statement . . . . . . . . . . . . . . . . . . . . . . . . . . 212
FCC Hearing-Aid Compatibility (HAC) Regulations for Wireless Devices . . . . . . . . . . . . . . . . . 213
SAR Information . . . . . . . . . . . . . . . . . . . . . . . . . . . . . . . . . . . . . . . . . . . . . . . . . . . . . . . . . . . . . . . . . . 214
Body-worn Operation . . . . . . . . . . . . . . . . . . . . . . . . . . . . . . . . . . . . . . . . . . . . . . . . . . . . . . . . . . . . . 215
Telecommunications & Internet Association (TIA) Safety Information . . . . . . . . . . . . . . . . . . . . 215
WEEE Notice . . . . . . . . . . . . . . . . . . . . . . . . . . . . . . . . . . . . . . . . . . . . . . . . . . . . . . . . . . . . . . . . . . . . . 216
RoHS Compliance . . . . . . . . . . . . . . . . . . . . . . . . . . . . . . . . . . . . . . . . . . . . . . . . . . . . . . . . . . . . . . . . 216
4C. Warranty, Disclaimers and Other Notices . . . . . . . . . . . . . . . . . . . . . . . . . . . . . . . . . . . 217
Manufacturer’s Warranty . . . . . . . . . . . . . . . . . . . . . . . . . . . . . . . . . . . . . . . . . . . . . . . . . . . . . . . . . . . 217
Privacy Restrictions . . . . . . . . . . . . . . . . . . . . . . . . . . . . . . . . . . . . . . . . . . . . . . . . . . . . . . . . . . . . . . . 219
Weather Disclaimer . . . . . . . . . . . . . . . . . . . . . . . . . . . . . . . . . . . . . . . . . . . . . . . . . . . . . . . . . . . . . . . 219
Warranty Disclaimer . . . . . . . . . . . . . . . . . . . . . . . . . . . . . . . . . . . . . . . . . . . . . . . . . . . . . . . . . . . . . . 219
Limitation of Damages . . . . . . . . . . . . . . . . . . . . . . . . . . . . . . . . . . . . . . . . . . . . . . . . . . . . . . . . . . . . 219
4D. Copyright, Trademark, and Properietary Notices . . . . . . . . . . . . . . . . . . . . . . . . . . . . . 220
Index . . . . . . . . . . . . . . . . . . . . . . . . . . . . . . . . . . . . . . . . . . . . . . . . . . . . . . . . . . . . . 221
Page 8

Page 9
Introduction
This User Guide introduces you to Sprint® service and all the features of your new device. It’s divided into
four sections:
⽧ Section 1: Getting Started
⽧ Section 2: Your Device
⽧ Section 3: Sprint Service
⽧ Section 4: Safety Information and Other Notices
Throughout this guide, you’ll find tips that highlight special shortcuts and timely reminders to help you make
the most of your new device and service. The Table of Contents and Index will also help you quickly locate
specific information.
You’ll get the most out of your device if you read each section. However, if you’d like to get right to a specific
feature, simply locate that section in the Table of Contents and go directly to that page. Follow the
instructions in that section, and you’ll be ready to use your device in no time.
User Guide
Note
WARNING
Because of updates in the device’s software, this user guide may not be the most current version for your
device. Visit www.sprint.com and log on to My Sprint Wireless to access the most recent version of the
user guide.
Please refer to Important Safety Information on page 202 to learn about information that will help you
safely use your device. Failure to read and follow the Important Safety Information in this user guide may
result in serious bodily injury, death, or property damage.
i
Page 10

Page 11

Section 1
Getting Started
Page 12
Section 1A
Setting Up Service
⽧ Setting Up Your Device (page 2)
⽧ Activating Your Device (page 3)
⽧ Setting Up Your Voicemail (page 4)
⽧ Sprint Account Passwords (page 4)
⽧ Getting Help (page 5)
Setting up and activating your new device is quick and easy. This section walks you through the necessary steps to
set up your device, activate your device’s phone, set up your voicemail, establish passwords, and contact
Sprint for assistance with your Sprint service.
Setting Up Your Device
Note
You can also insert a microSD™ card into your device. To learn how to insert a microSD card, see “Using a
microSD Card on Your Device” on page 90.
Installing the Battery
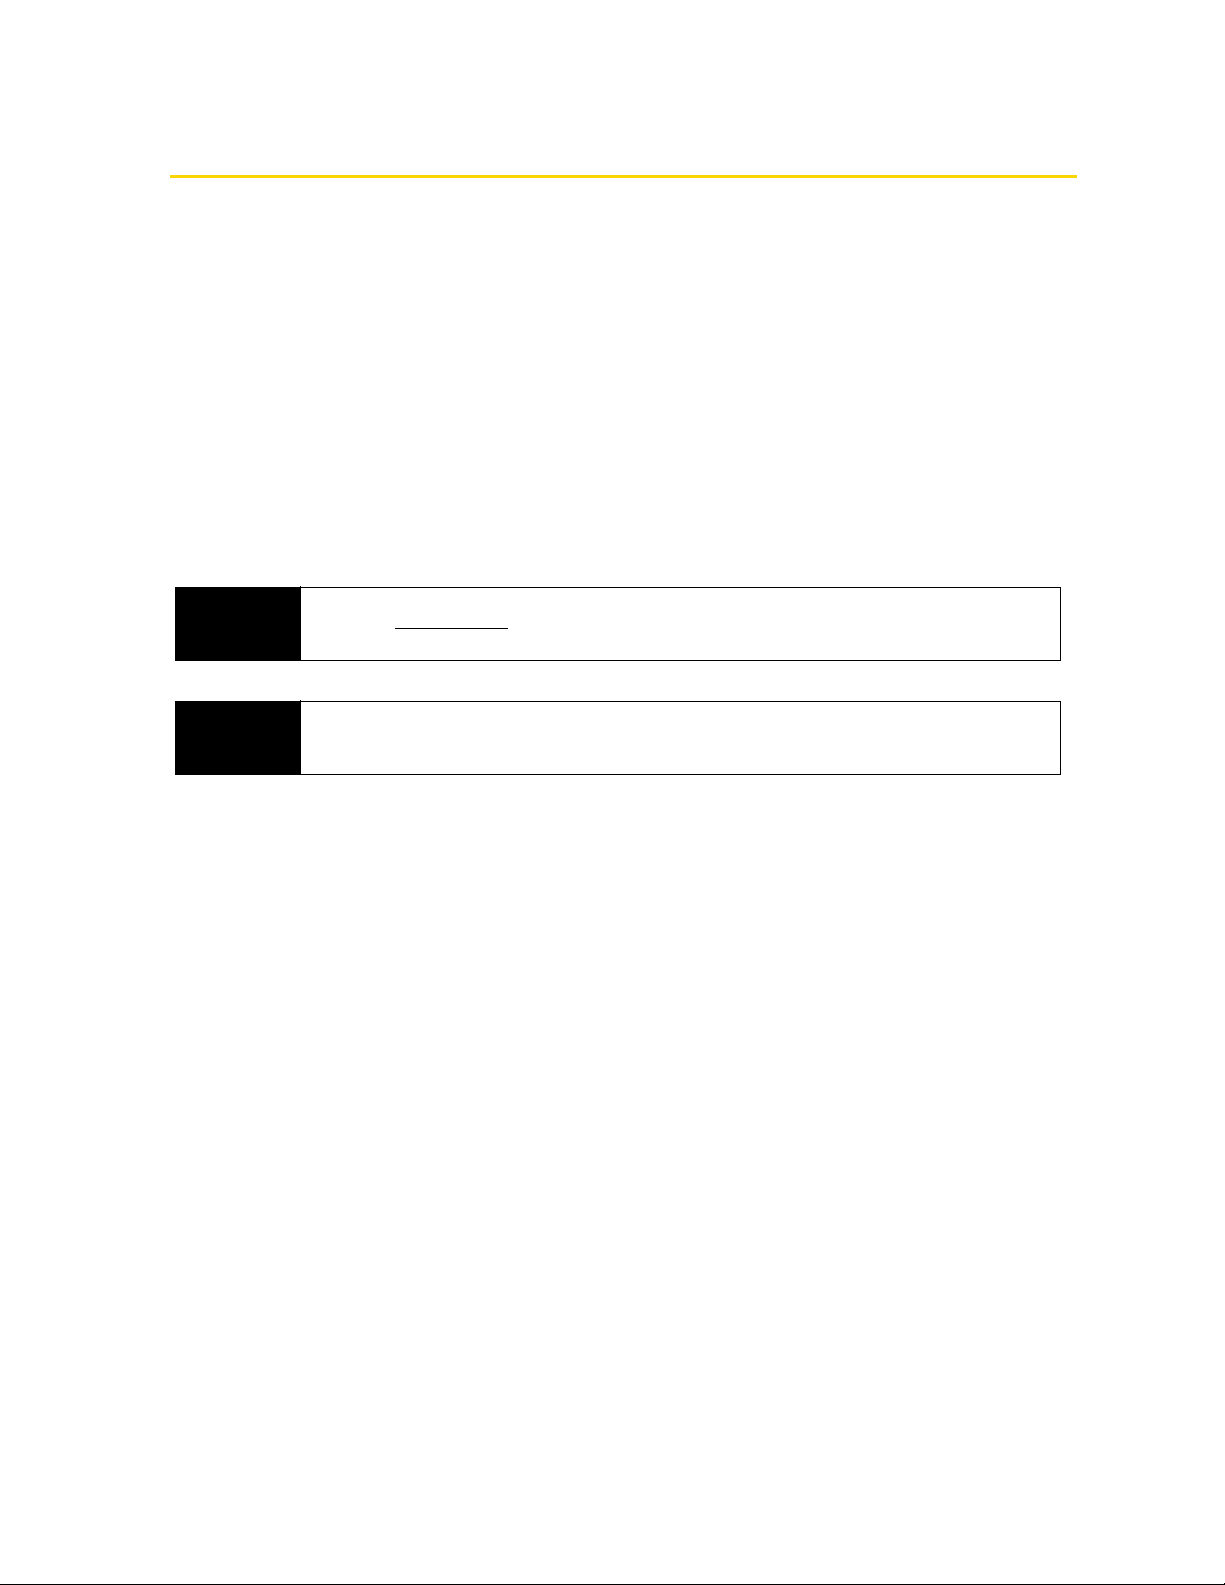
1. Remove the back cover by following these steps:
䡲 Remove the stylus. (You need to temporarily remove the stylus to be able to remove the back cover.)
䡲 Hold the device with both hands and the front panel facing down.
䡲 Push the back cover up with your thumb until it disengages from the device and then slide it up to
remove.
2 Section 1A. Setting Up Service
Page 13
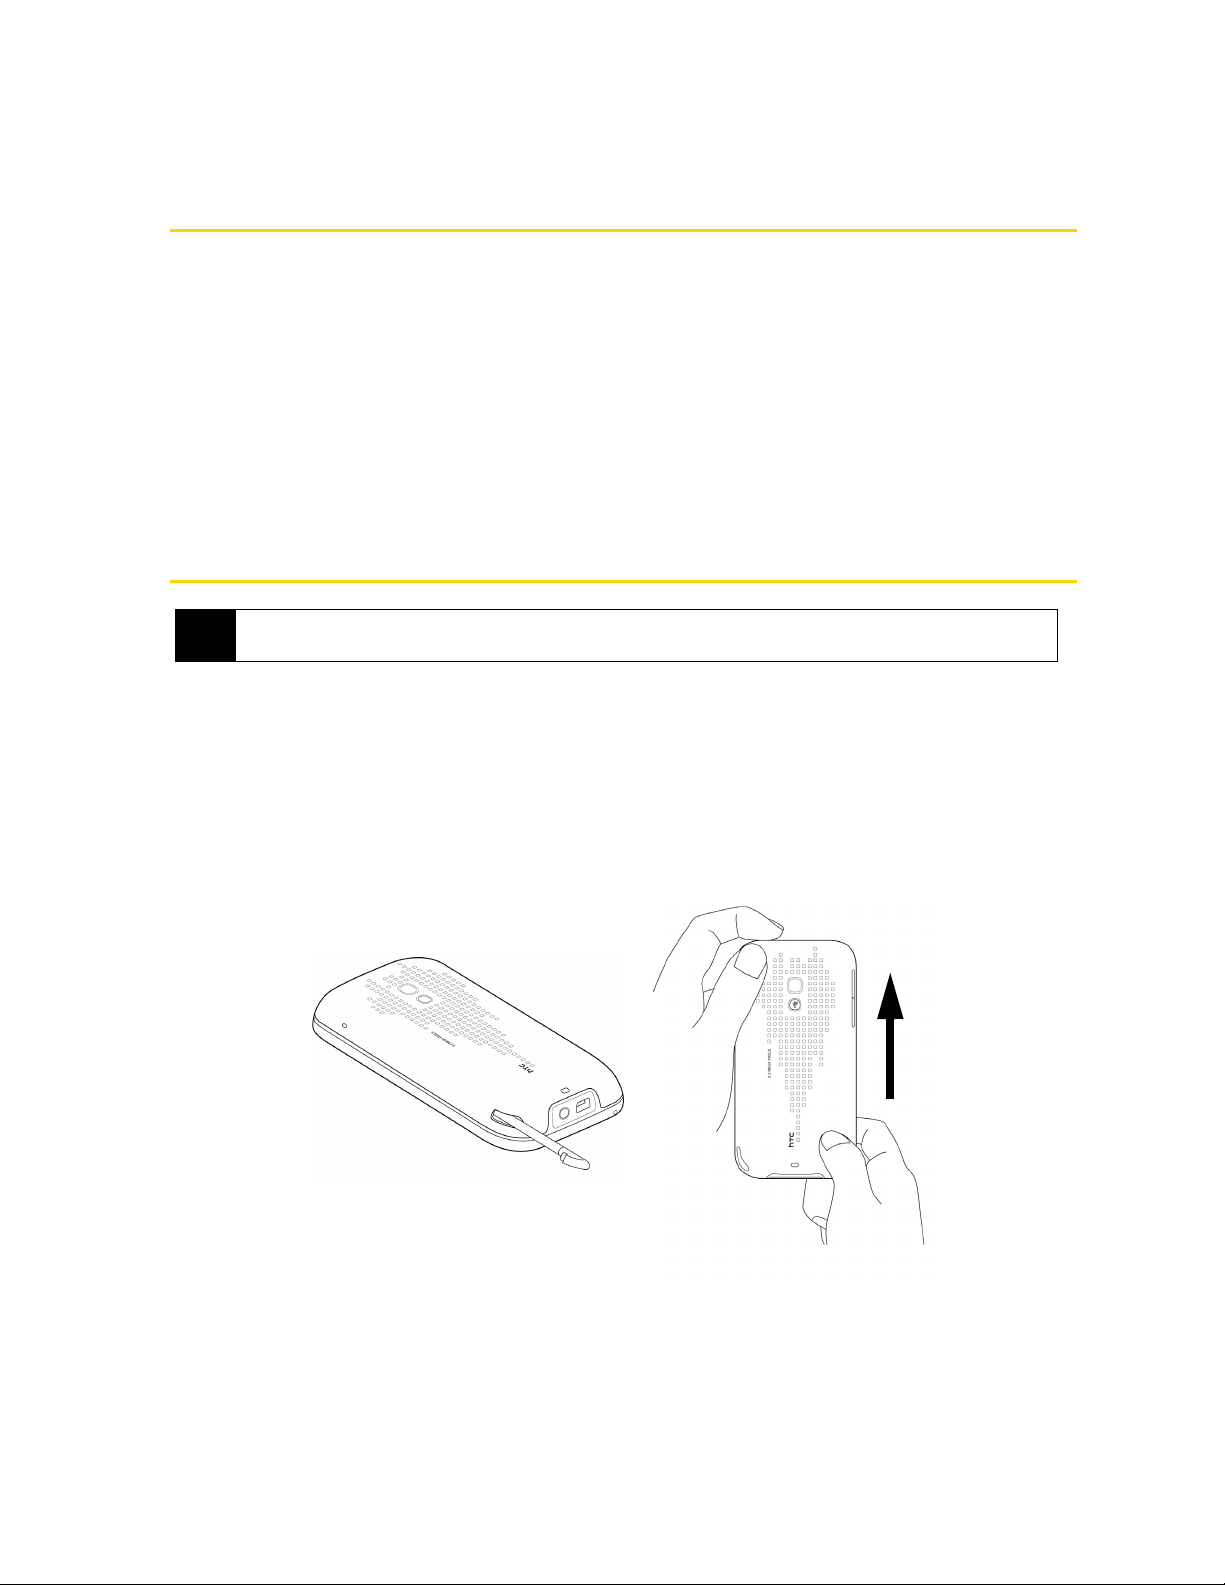
2. Install the battery by following these steps:
䡲 Align the battery’s exposed copper contacts with the battery connectors inside the battery
compartment.
䡲 Insert the contact’s side of the battery first and then gently push the battery into place.
3. Replace the back cover, and insert the stylus back into the stylus compartment.
Turning the Device On for the First Time
1. Press the Power button.
2. When you turn on your device for the first time, your device starts up and guides you to calibrate the
touch screen. Follow the onscreen instructions to complete the screen calibration process.
3. Your device will then be activated.
䡲 If your device’s phone is already activated, it will search for Sprint service and then enter standby mode.
䡲 If your device’s phone is not yet activated, see “Activating Your Device” on page 3 for more information.
Setting Up Service
Note
Your device’s battery should have enough charge for your device to turn on and find a signal, set up your
voicemail, and make a call. You should fully charge your battery as soon as possible. See “Charging the Battery”
on page 13 for details.
Activating Your Device
䢇 If you purchased your device at a Sprint Store, it is probably activated and ready to use.
䢇 If you received your device in the mail and it is for a new Sprint account or a new line of service, it is designed to
activate automatically. To confirm your activation, make a phone call.
䢇 If you received your device in the mail and you are activating a new device for an existing number on your account, you
will need to go online to activate your new device.
䡲 From your computer’s Web browser, go to www.sprint.com/activate and complete the onscreen
instructions to activate your new device.
When you have finished, make a phone call to confirm your activation. If your device is still not activated or
you do not have access to the Internet, contact Sprint Customer Service at
Notes
• Do not press the End key while your device is being activated. Pressing the End key cancels the activation
process.
• If you are having difficulty with activation, contact Sprint Customer Service by dialing
any other phone.
1-888-211-4727 for assistance.
1-888-211-4727 from
Section 1A. Setting Up Service 3
Page 14
Making Your First Call
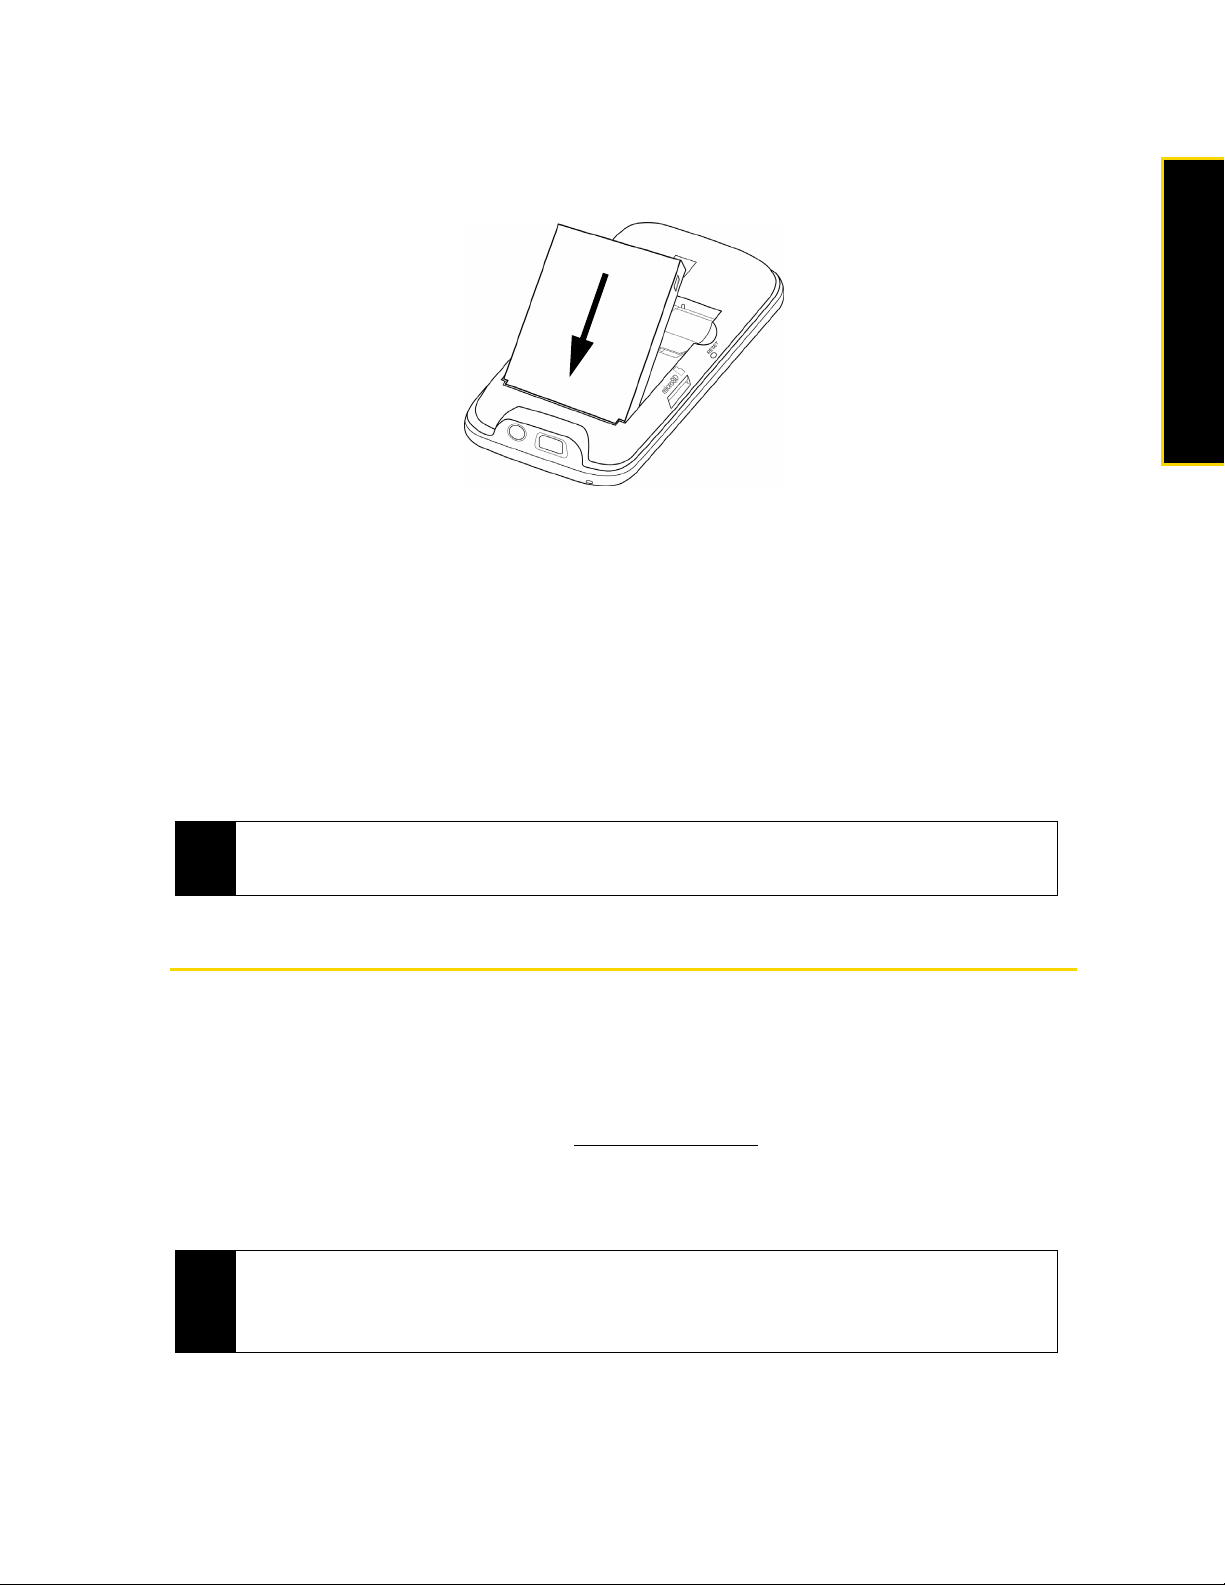
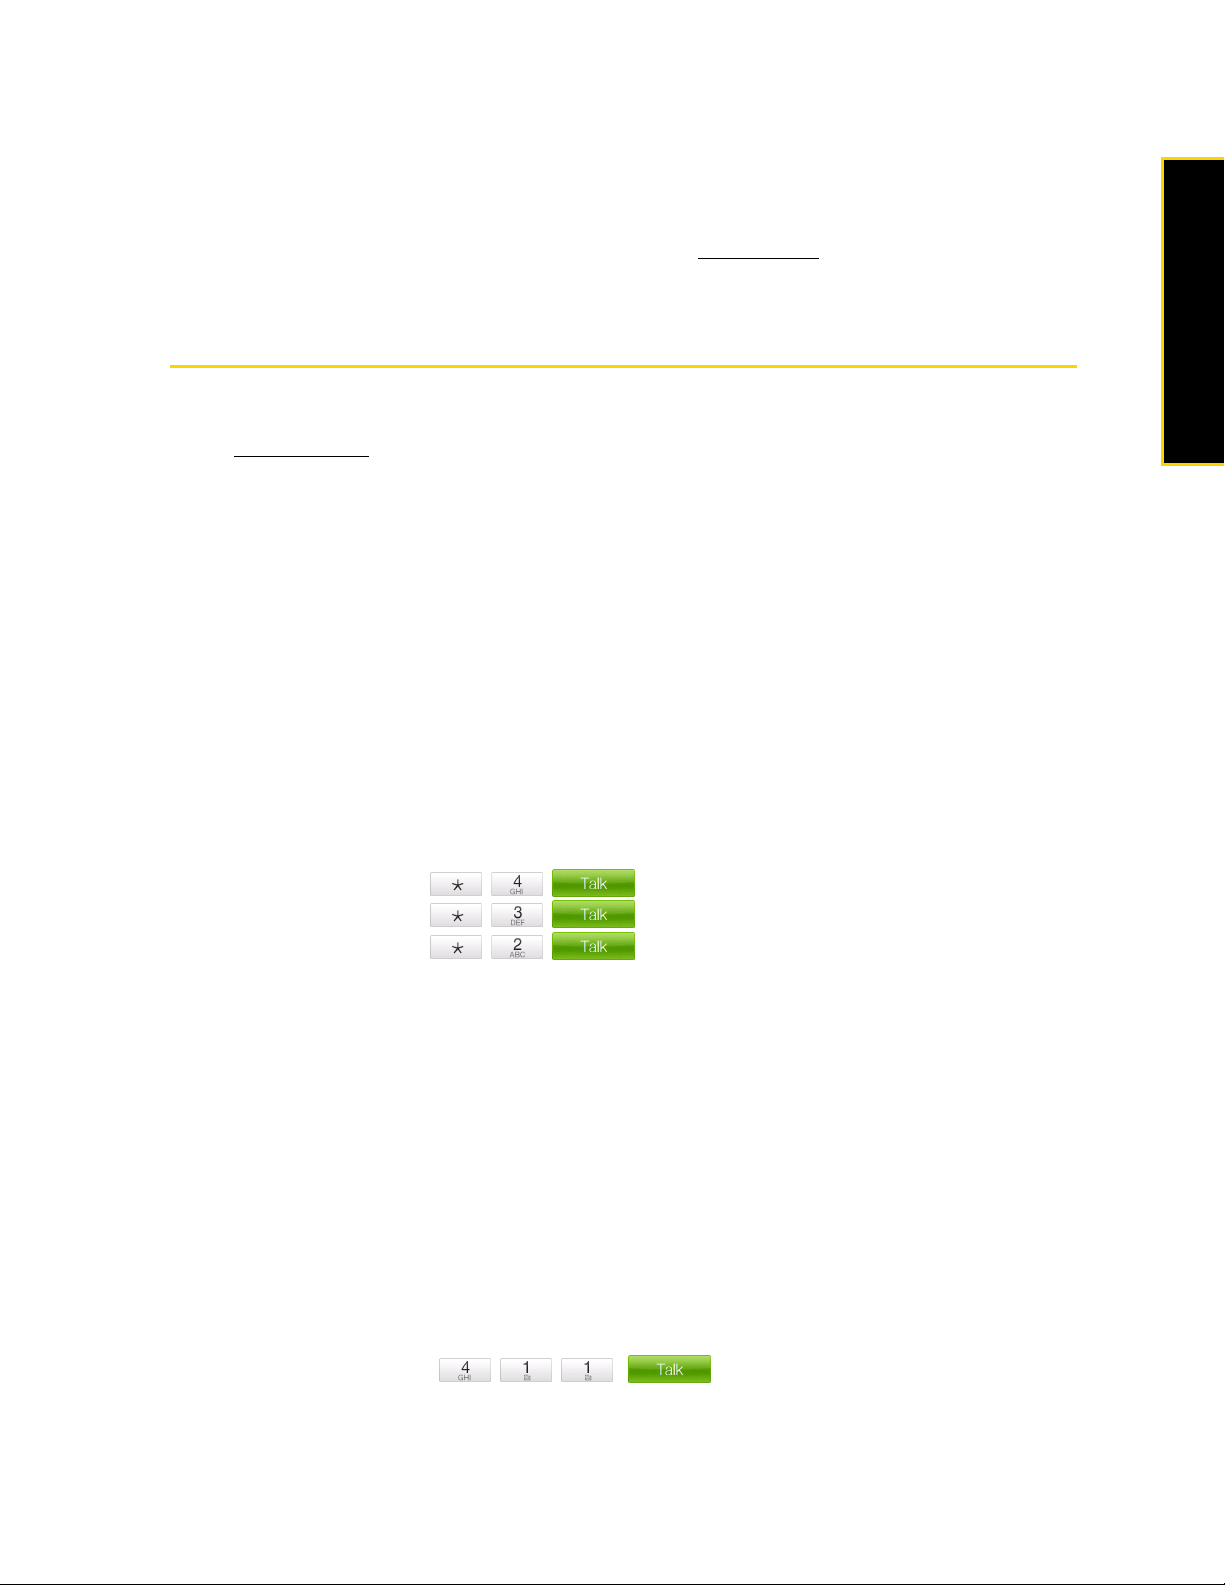
1. Press the Tal k key to display the Phone screen.
Tal k Key
2. Tap the keys on the Phone keypad to enter the phone number.
3. Tap to place the call.
For more information about using your device to make and receive phone calls, see “Using Phone Features”
on page 57.
Setting Up Your Voicemail
1. Press the Tal k key to display the Phone screen.
2. Tap and hold on the Phone keypad.
3. Follow the system prompts to:
䡲 Create your passcode.
䡲 Record your greeting.
䡲 Record your name announcement.
Note
Voicemail Passcode
Sprint strongly recommends that you create a passcode when setting up your voicemail to protect against
unauthorized access. Without a passcode, anyone who has access to your device is able to access your
voicemail messages.
For more information about using your voicemail, see “Voicemail” on page 128.
Sprint Account Passwords
As a Sprint customer, you enjoy unlimited access to your personal account information, your voicemail
account, and your data services account. To ensure that no one else has access to your information, you will
need to create passwords to protect your privacy.
Account User Name and Password
If you are the account owner, you will create an account user name and password when you sign on to
www.sprint.com. (Click Need to register for access? to get started.) If you are not the account owner (if someone
else receives the bill for your Sprint service), you can get a sub-account password at
Voicemail Password
You will create your voicemail password (or passcode) when you set up your voicemail. See “Setting Up
Your Voicemail” on page 4 for more information on your voicemail password.
4 Section 1A. Setting Up Service
www.sprint.com.
Page 15
Data Services Password
With your Sprint device, you may elect to set up an optional data services password to control data (Web)
access and authorize Premium Service purchases.
For more information or to change your passwords, sign on to
Service at
1-8 88 -211- 4727.
www.sprint.com or call Sprint Customer
Getting Help
Managing Your Account
Online: www.sprint.com
You can go online to:
䢇 Access your account information.
䢇 Check your minutes used (depending on your Sprint service plan).
䢇 View and pay your bill.
䢇 Enroll in Sprint online billing and automatic payment.
䢇 Purchase accessories.
䢇 Shop for the latest Sprint devices.
䢇 View available Sprint service plans and options.
䢇 Enable international wireless voice and data services.
䢇 Learn more about data services and other great products like Sprint Picture Mail, games, ringers, screen
savers, and more.
Setting Up Service
From Your Sprint Phone
䢇 From the Phone screen, tap to check minute usage and account balance.
䢇 From the Phone screen, tap to make a payment.
䢇 From the Phone screen, tap to access a summary of your Sprint service plan or
get answers to other questions.
From Any Other Phone
䢇 Sprint Customer Service: 1- 88 8-211-4727.
䢇 Business Customer Service: 1-8 00- 927-2199 .
䢇 Sprint Worldwide Service: 1-888-226-7212 (option 2).
Sprint 411
Sprint 411 gives you access to a variety of services and information, including residential, business, and
government listings; movie listings or showtimes; driving directions, restaurant reservations, and major local
event information. You can get up to three pieces of information per call, and the operator can automatically
connect your call at no additional charge.
There is a per-call charge to use Sprint 411, and you will be billed for airtime.
䊳 From the Phone screen, tap .
Section 1A. Setting Up Service 5
Page 16

Sprint Operator Services
Sprint Operator Services provides assistance when you place collect calls or when you place calls billed to
a local telephone calling card or third party.
䊳 From the Phone screen, tap .
For more information or to see the latest in products and services, visit us online at
www.sprint.com.
6 Section 1A. Setting Up Service
Page 17

Section 2
Your Device
Page 18
Section 2A
Device Basics
⽧ Your Device (page 9)
⽧ Inside the Box (page 11)
⽧ Turning Your Device On and Off (page 12)
⽧ Using Your Device’s Battery and Charger (page 12)
⽧ Navigating on Your Device (page 14)
⽧ Using the Zoom Bar (page 16)
⽧ The Home Screen (page 17)
⽧ Adjusting the Volume (page 21)
⽧ Using the Getting Started Application (page 23)
⽧ Connecting Your Device to a Computer (page 23)
Before you start using your device, take some time to familiarize yourself first with what is available on your device. This
section will introduce about the device controls and the home screen on your device. Basic functions such
as turning your device on and off and adjusting sound volume will also be covered in this section.
Tip
Device Software Upgrades – Updates to your device’s software may become available from time to time. Sprint
will automatically upload critical updates to your device. You can also open the Settings screen to check for and
download updates. Tap
and download available updates.
Start > Settings > All Settings. On the System tab, tap Update Firmware to search for
8 Section 2A. Device Basics
Page 19
Your Device
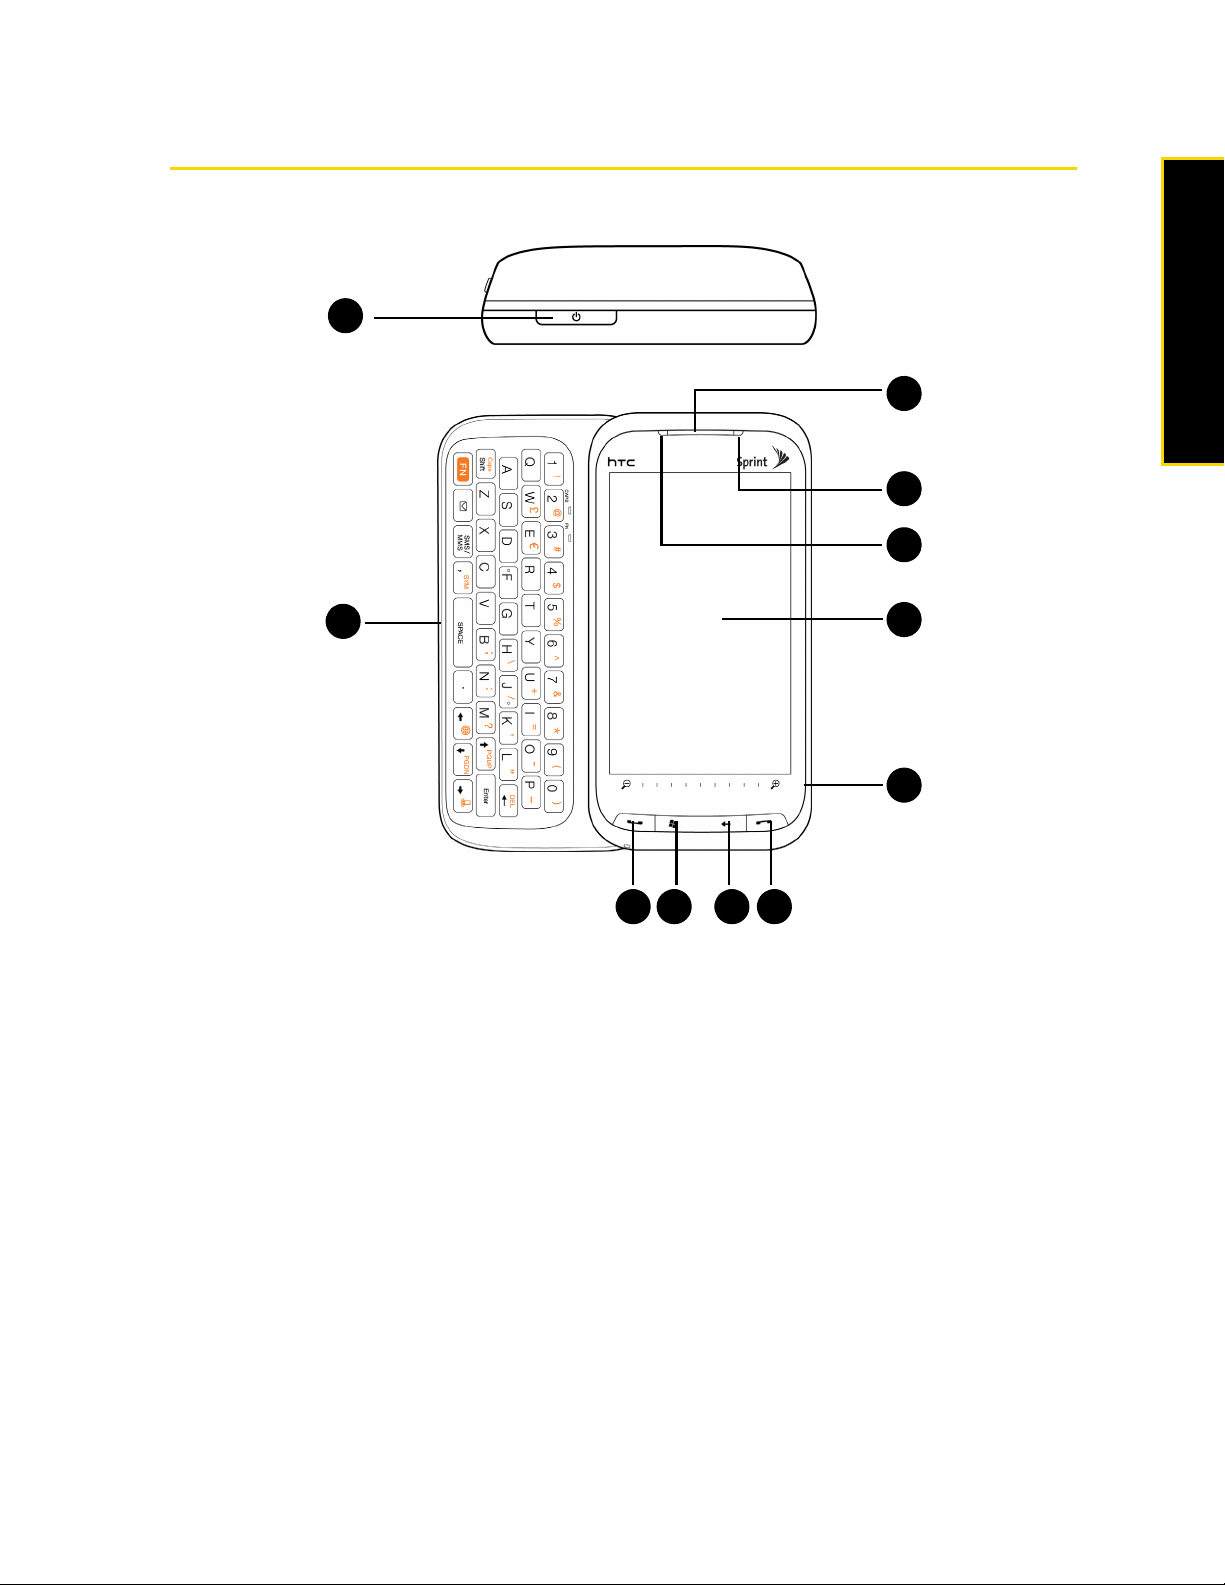
Top and Front Panels
1
Device Basics
11
10
9
2
374
1. Power Button. Press to turn off the display temporarily. To turn off the power, press and hold for about five
seconds. (For more information, see “Turning Your Device On and Off” on page 12.)
2. Sliding QWERTY Keyboard. Slide out the QWERTY keyboard and use it to type messages or documents.
(See “Using the Sliding QWERTY Keyboard” on page 26 for details.)
3. Ta lk Ke y. Press to answer an incoming call or display the Phone screen to place a call. During a call, press
and hold to toggle the speakerphone on and off. While viewing a text or email message, press to display
the Phone screen so you can call the sender of the message. (See “Using Phone Features” on page 57
for details.)
4. Start Key. Press to open or close the Start screen. (See “Start Screen” on page 18 for details.)
5. Back Key. Press to return to the previous screen.
6. End Key. Press to end a call or return to the TouchFLO 3D Home tab. By default, pressing and holding this
key turns Airplane mode on or off. You can reassign pressing and holding of the
function. (See “Buttons” in “Personal Tab” on page 115 for details.)
7. Zoom Bar. Slide your finger from left to right to zoom in, or from right to left to zoom out.
(See “Using the Zoom Bar” on page 16 for details.)
8. Touch Screen. Use finger gestures or the stylus to navigate and interact with the screen. (See “Navigating
on Your Device” on page 14 for details.)
5 6
8
End key to another
Section 2A. Device Basics 9
Page 20
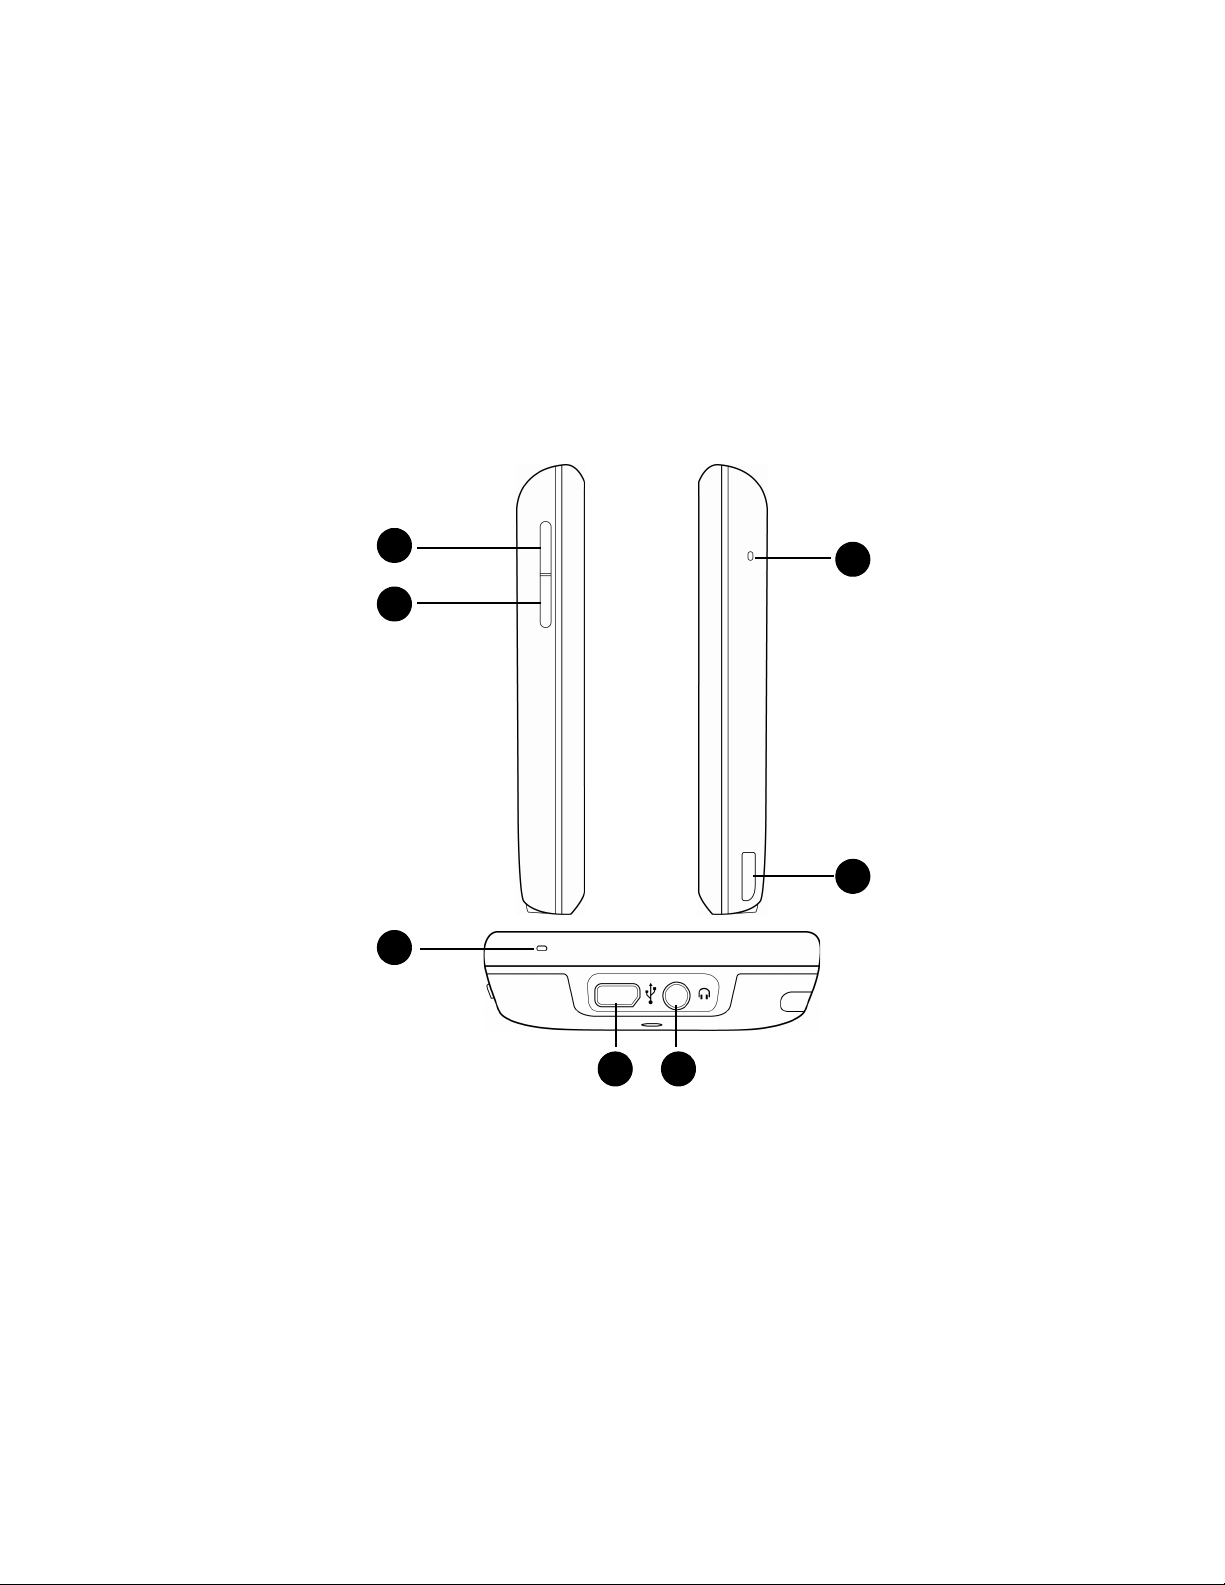
9.
Notification LED. This LED shows the following:
䡲 Flashing green light when there are new text, picture, video, or email messages, missed calls, or
reminders.
䡲 Solid green light when the device is connected to the power adapter or a computer and the battery is
fully charged.
䡲 Solid amber light when the battery is being charged.
䡲 Flashing amber light when the remaining battery level reaches below 10%.
10. Light Sensor. This senses the ambient light and adjusts the screen backlight accordingly.
11 . Earpiece. Listen to a phone call from here.
Left, Right, and Bottom Panels
12
18
13
17
14
15 16
12. Volume Up Button. During a call or when playing music, press this button to increase the volume.
13. Volume Down Button. During a call or when playing music, press this button to lower the volume.
14 . Primary Microphone. Speak into this microphone during phone conversations, when recording a voice
note, or when giving a voice command.
15. Sync Connector. Connect one of the following:
䡲 Connect the AC phone charger to recharge the battery.
䡲 Connect the supplied USB cable to a computer so you can synchronize information.
䡲 Connect a USB stereo headset (purchased separately) for hands-free conversation or for listening to
audio media.
䡲 Connect a composite video and audio cable (purchased separately) to output the device screen
contents and device audio to an external viewing device.
10 Section 2A. Device Basics
Page 21
16. Audio Connector. Connect any standard 3.5mm audio headset.
17. Stylus. Use the stylus to write, draw, or select items on the screen. (See “Stylus” on page 16 for details.)
18. Secondary Microphone. Both the primary and secondary microphones are enabled when the
speakerphone is turned on. (See “Straight Talk” on page 64 for details.)
Back Panel
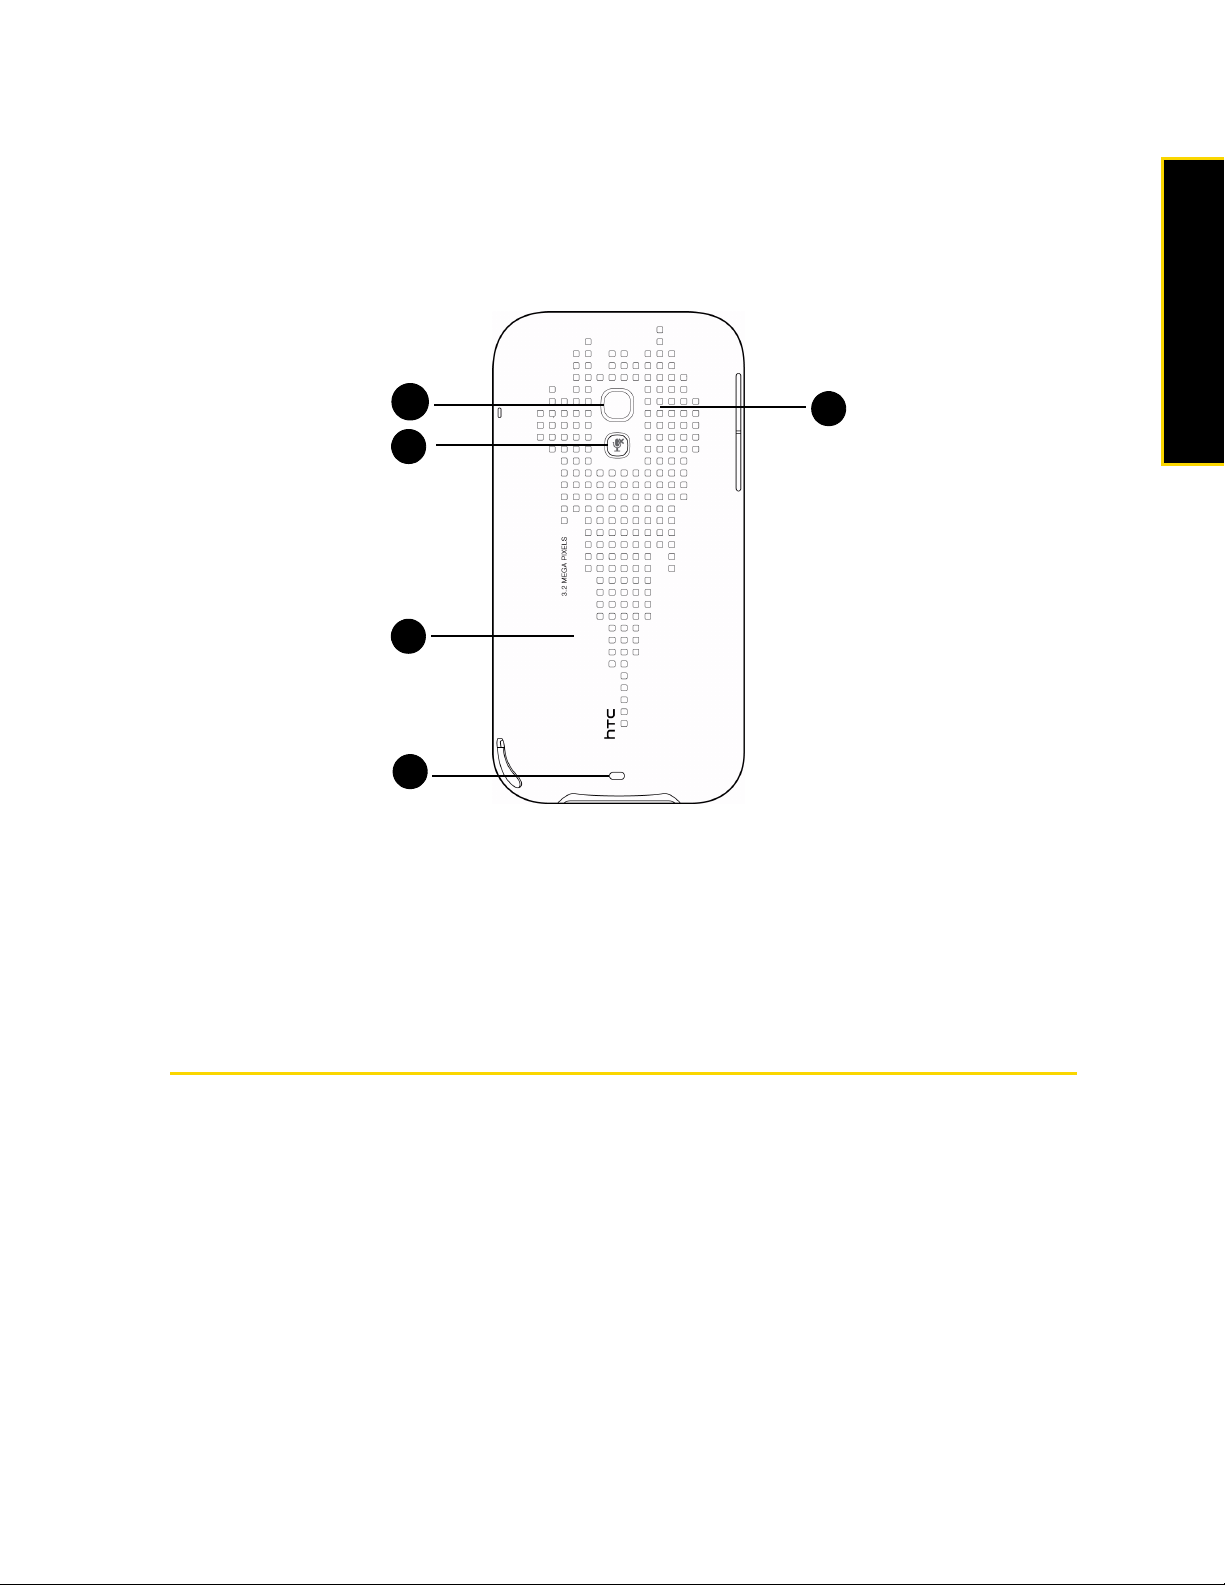
Device Basics
19
23
20
21
22
19. 3.2 Megapixel Camera. Use the camera to take photos and capture video clips. (See “Taking Photos and
Videos” on page 98 for details.)
20.Mute Button. Press to mute or unmute the dual microphone.
21. Back Cover. Push the back cover upward to remove it.
22. Strap Holder. Connect a strap or lanyard to easily carry your device.
23. Dual Speaker. Use this noise-cancelling dual speaker for three-way calls.
Inside the Box
The product package includes the following items and accessories:
䢇 HTC Touch Pro2
䢇 AC phone charger
䢇 USB sync cable
䢇 Battery
䢇 Extra stylus
䢇 LCD screen protector
䢇 Getting Started CD
䢇 Get Started Poster, Basics Guide, Set Up Your Email Guide, and Features Guide
Section 2A. Device Basics 11
Page 22

Turning Your Device On and Off
Turning the Power On
䊳 Press the Power button located at the top of your device.
Turning the Power Off
1. Press and hold the Power button for about five seconds.
2. Ta p Yes when a message prompts you to choose whether to turn off the power.
Switching to Sleep Mode When Not In Use
Press and immediately release the Power button to turn off the display temporarily and switch your device to
Sleep mode. Sleep mode suspends your device to a low power state while the display is off in order to save
battery power.
Your device automatically goes into sleep mode when you leave the device idle after a certain period of
time. You will still be able to receive messages and calls while your device is in sleep mode. Pulling the
stylus out of its compartment, pressing the
your device.
Power button again, or incoming calls or messages will wake up
Using Your Device’s Battery and Charger
Your device is equipped with a Lithium Ion (Li-Ion) battery. It allows you to recharge your battery before it is
fully drained. The battery provides up to nnn hours of continuous digital talk time.
Note
• Long backlight settings, searching for service, vibrate mode, browser use, and other variables may reduce the
battery’s talk and standby times.
• Watch your device’s battery level indicator and charge the battery before it runs out of power.
If you need to purchase extra batteries for your device, Sprint-approved or HTC-approved batteries and
accessories can be found at Sprint Stores or through HTC; or call
available at
WARNING
www.sprint.com.
Use only Sprint-approved or HTC-approved batteries and chargers with your device. The failure to use a
Sprint-approved or HTC-approved battery and charger may increase the risk that your device will overheat,
catch fire, or explode, resulting in serious bodily injury, death, or property damage.
To reduce risk of fire or burns:
• Do not attempt to open, disassemble, or service the battery pack.
• Do not crush, puncture, short external contacts, or dispose of in fire or water.
• Do not expose to temperatures above 140
• Replace only with the battery pack designated for this product.
• Recycle or dispose of used battery as stipulated by local regulations.
o
F (60oC).
1-866-343-1114 to order. They’re also
12 Section 2A. Device Basics
Page 23
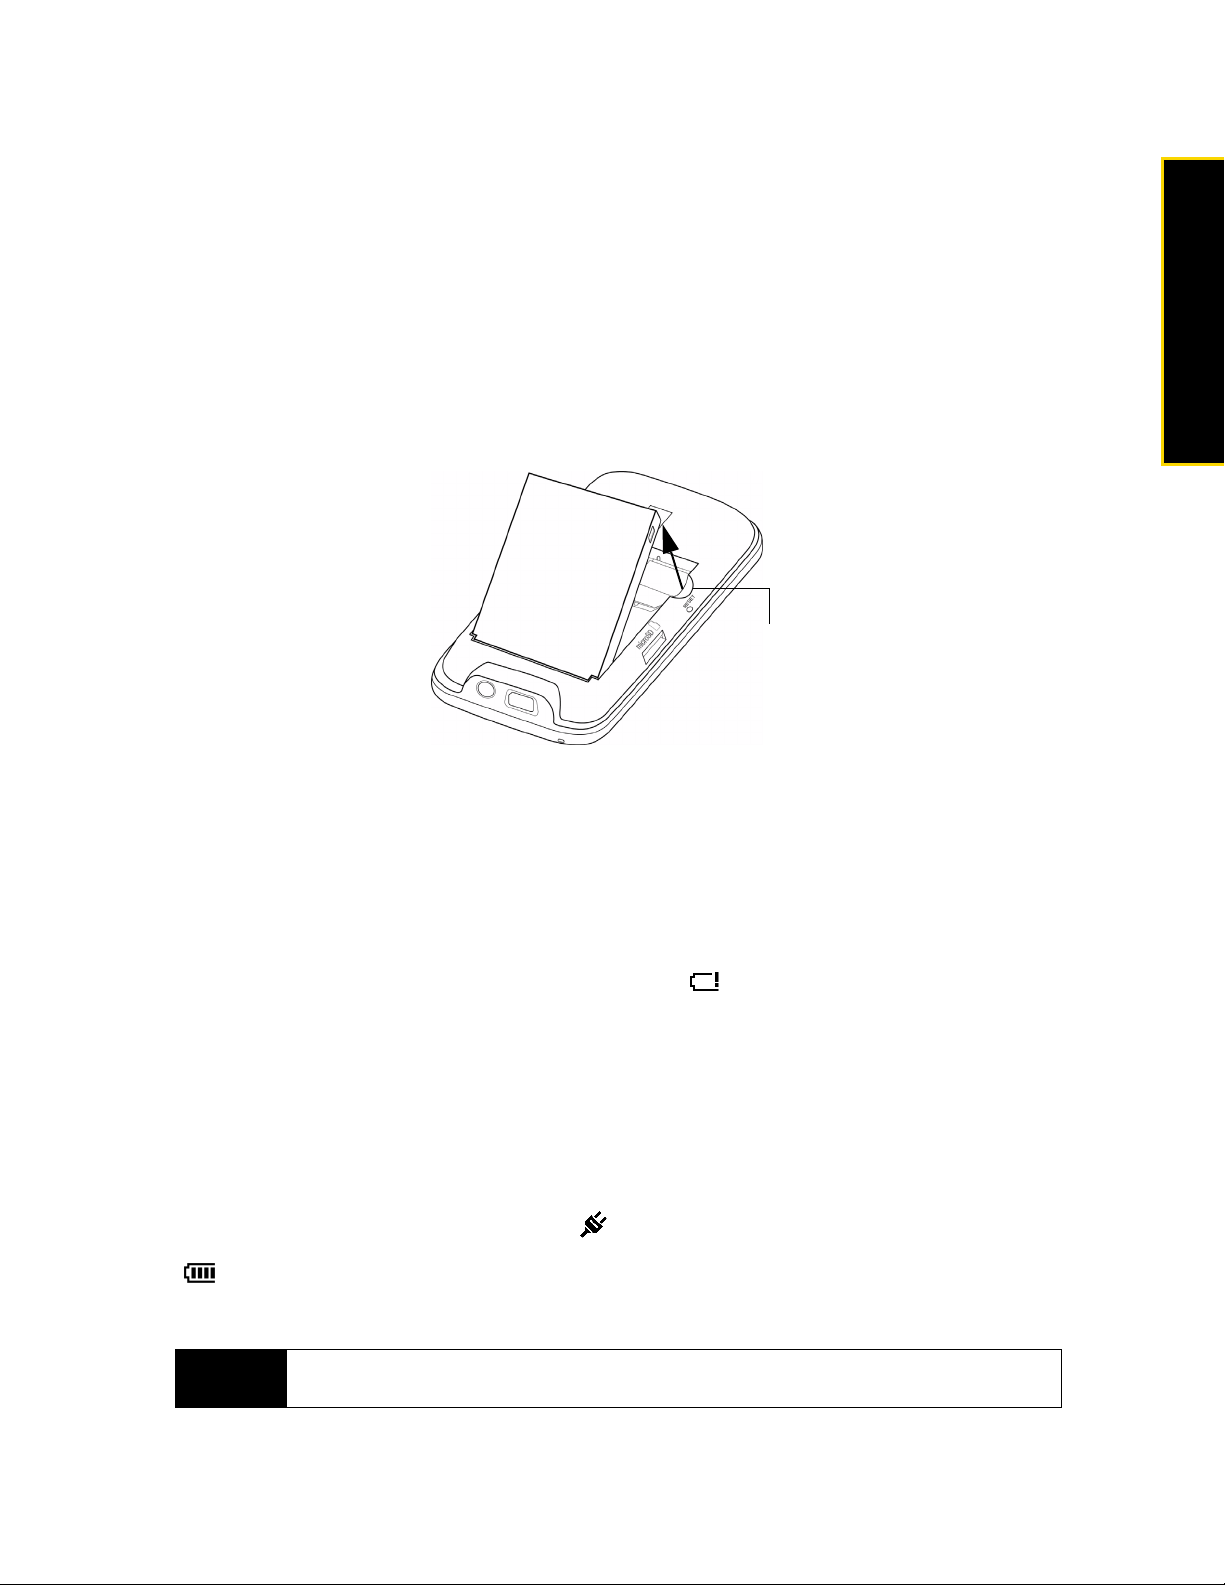
Installing and Removing the Battery
Always turn off your device before installing or replacing the battery. You also need to remove the back cover
before you can install these components.
To install the battery:
䊳 See “Setting Up Your Device” on page 2.
To remove the battery:
1. Make sure your device is turned off.
2. Remove the stylus, and then remove the back cover.
3. Lift out the battery from the groove at the upper right side of the battery compartment.
Groove
4. Replace the back cover and insert the stylus back into the stylus compartment.
Charging the Battery
Charge your battery as soon as possible so you can begin using your device.
Keeping track of your battery’s charge is important. If your battery level becomes too low, your device
automatically turns off, and you will lose any information you were just working on. For a quick check of your
battery level, glance at the battery charge indicator located in the upper-right corner of your device’s display
screen. If the battery charge is critically low, the battery icon ( ) will be shown in the title bar.
Device Basics
Always use a Sprint-approved or HTC-approved desktop charger, travel charger, or vehicle power adapter to
charge your battery.
To charge the battery:
1. Connect the USB connector of the phone charger to the sync connector on your device.
2. Plug in the phone charger to an electrical outlet to start charging the battery.
Charging is indicated by an amber light shown on the notification LED of your device. As the battery is being
charged while the power is on, a charging icon ( ) also appears in the title bar of the Home screen. After
the battery has been fully charged, the notification LED shows a green light, and a full battery icon
( ) appears in the title bar of the Home screen.
For more information about the notification LED, see “Top and Front Panels” on page 9.
WARNING
• Do not remove the battery while you are charging it using the phone charger or car adapter.
• As a safety precaution, the battery stops charging when it overheats.
Section 2A. Device Basics 13
Page 24

Battery Saving Tips
How long your battery power lasts depends on the battery type and how you use your device. Try the
following to help conserve battery life:
䢇 When the device is not in use, press the Power button to switch off the display.
䢇 Tap Start > Settings > All Settings. On the System tab, tap Power > Advanced tab of the Power settings screen.
Here, you can specify the time before your device automatically turns off the display and backlight to
conserve battery power. For optimum conservation, specify three minutes or less.
䢇 Tap Start > Settings > All Settings. On the System tab, tap Power > Backlight tab, clear the Auto adjust backlight
check box, and manually adjust the backlight brightness settings.
䢇 Use the AC phone charger to plug your device into an external power outlet whenever possible, especially
when using a modem or other peripherals.
䢇 Turn Bluetooth off when you are not using it. Make your device visible to other devices only when you are
trying to establish a Bluetooth partnership. For more information about Bluetooth, see “Using Bluetooth”
on page 93.
䢇 Turn Wi-Fi off when you are not using it.
䢇 Lower the volume.
䢇 Close battery-intensive programs such as the camera when you are done using them. Make sure the
programs are ended and are not continuously running in the background. See “Using Task Manager” on
page 119 for information on closing programs.
Navigating on Your Device
You can use finger gestures or the stylus to navigate and interact with the interface of your device:
Finger gestures
You can use finger gestures to select, scroll and pan on the touch screen.
Touching or tapping
When selecting items on the screen, such as the Home screen tabs, Start screen, programs and settings
icons, and large onscreen buttons, simply touch them with your finger. Apply some pressure with your finger
pad when touching an item on the screen.
“Tapping” is touching the screen lightly and quickly with your finger pad or fingertip. On screens that display
smaller-size items, you can more accurately select an item by tapping it with your fingertip.
Finger-scrolling
Finger-scrolling can be used to scroll up and down Web pages, documents, and lists such as the contacts
list, file list, message list, calendar appointments list, and more.
To scroll up and down:
䢇 To scroll down, swipe your finger upward on the touch screen. To scroll up, swipe your finger downward
on the touch screen. (“Swiping” means dragging your finger vertically on the screen.)
䢇 To auto-scroll, flick your finger upward or downward on the touch screen. Touch the screen to stop
scrolling. (“Flicking” is similar to swiping, except that you need to swipe your finger in light, quicker
strokes.)
14 Section 2A. Device Basics
Page 25
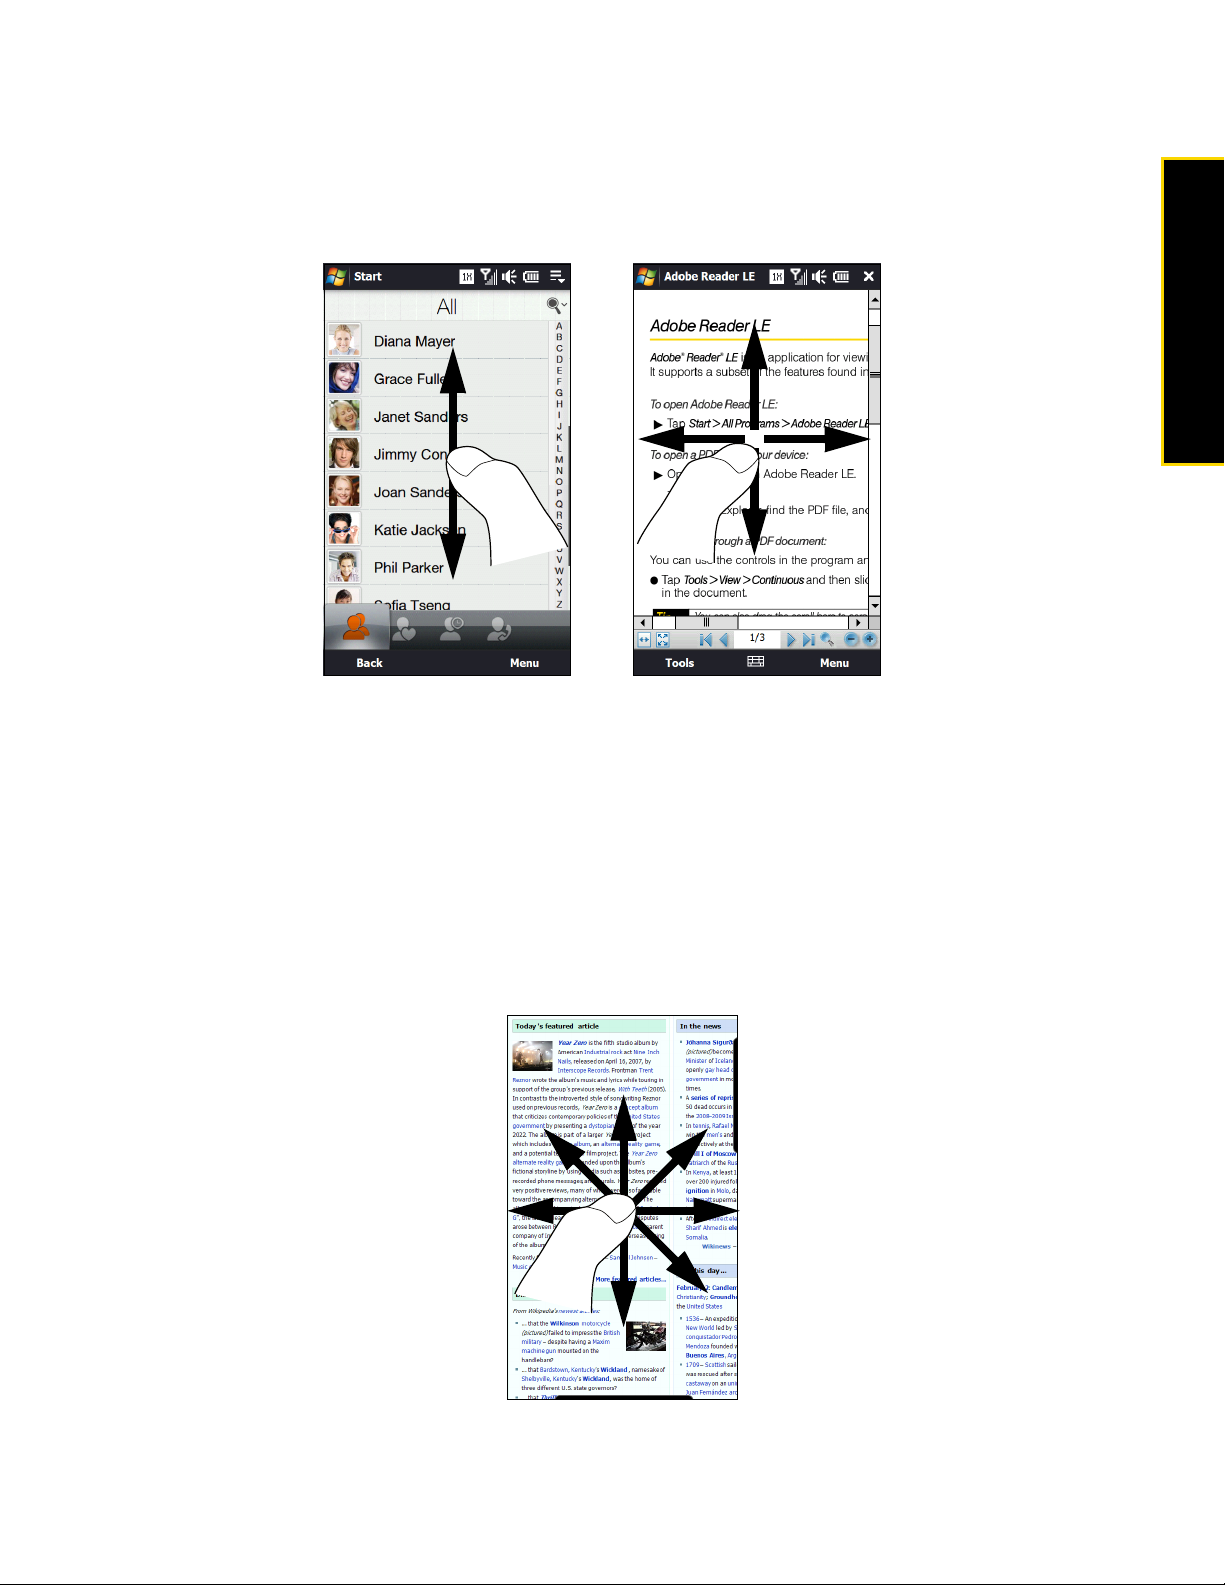
To scroll left and right:
䢇 To scroll towards the right, swipe your finger to the left. To scroll towards the left, swipe your finger to the
right.
䢇 To auto-scroll, flick your finger left or right. Touch the screen to stop scrolling.
When finger-scrolling, swipe or flick your finger on the touch screen.
Device Basics
Finger-zooming
To zoom in on a Web page in Opera Mobile or a photo in Album, tap your finger twice on the screen. To
zoom out, tap twice again on the screen.
For more information about using Opera Mobile, see “Using Opera Mobile” on page 145. For more
information about using Album, see “Viewing Photos and Videos” on page 105.
Finger-panning
You can use finger-panning to move to and view other parts of a zoomed photo, Web page, document, or an
email message. To pan, touch and hold on the touch screen and then drag your finger in any direction.
Section 2A. Device Basics 15
Page 26
Stylus
To use the stylus, pull it out from the stylus compartment at the bottom right of your device. If the backlight is
off, removing the stylus automatically turns the backlight back on.
Tap with the stylus to open programs and select items on the screen, and tap and hold on the screen to
open a shortcut menu. You can also use the stylus in a similar way to making finger gestures.
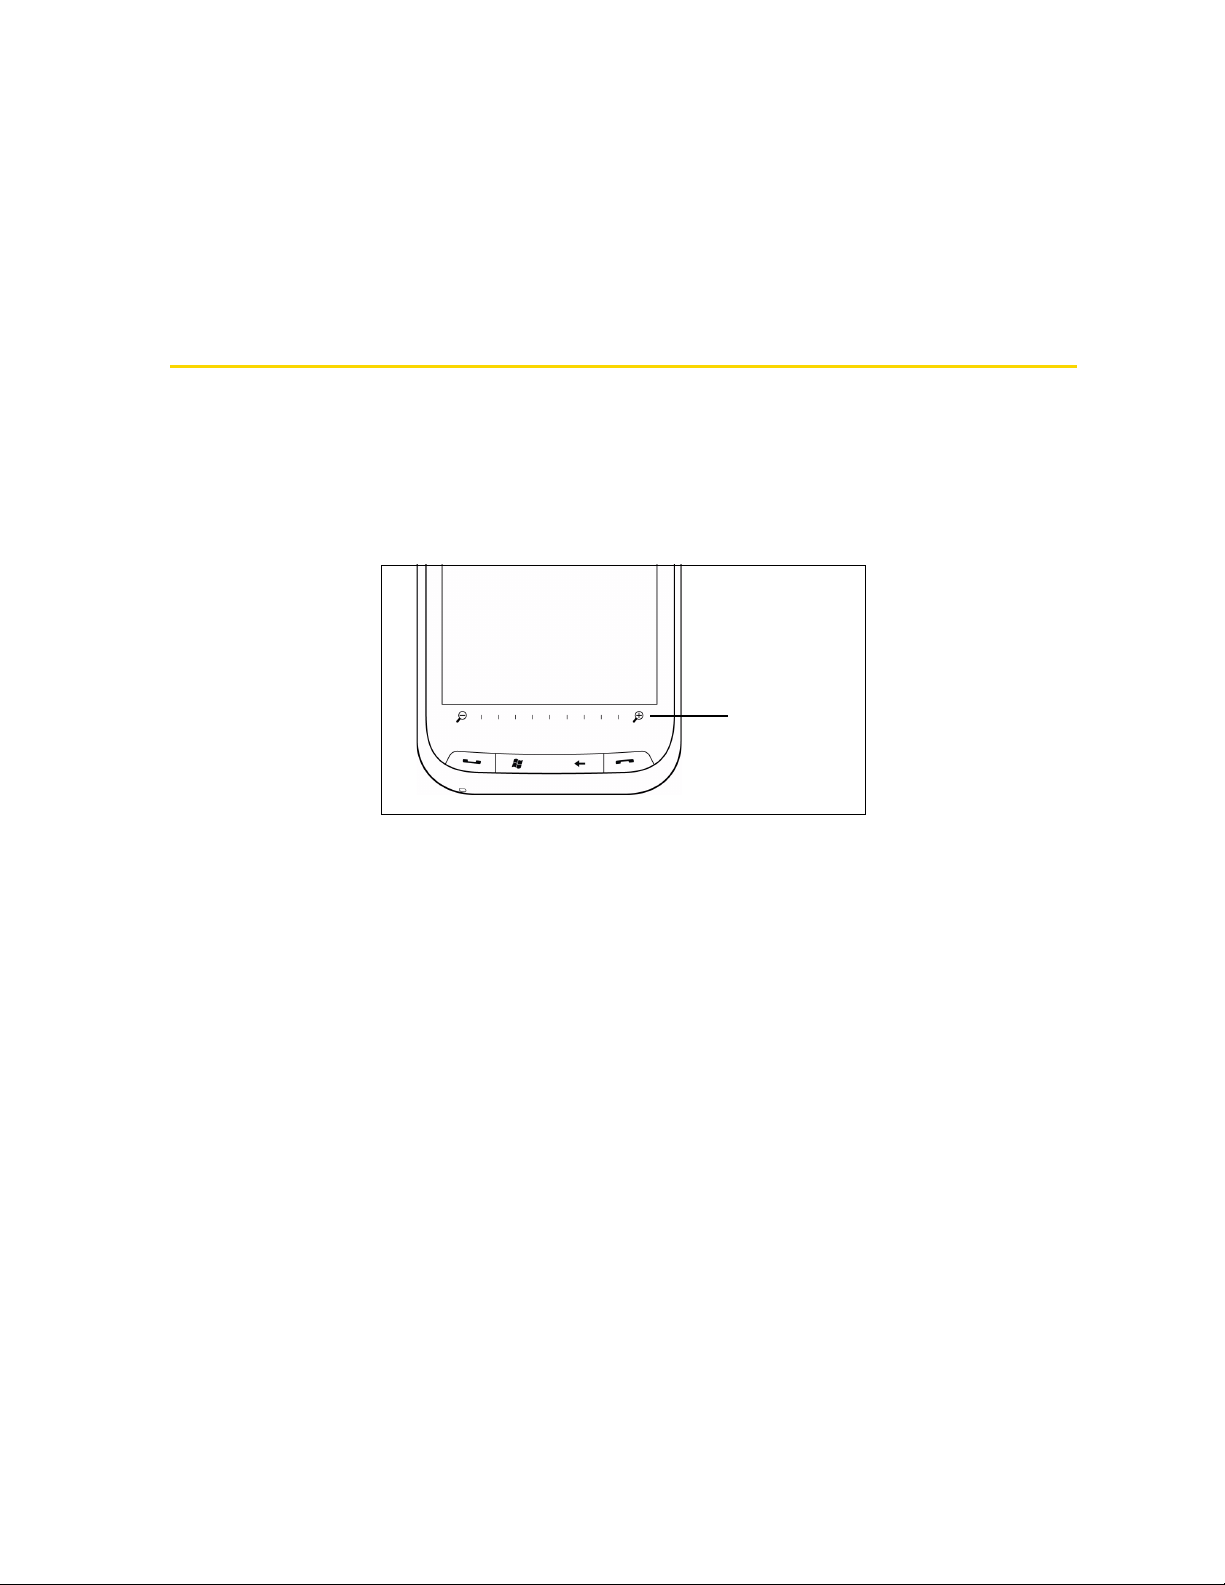
Using the Zoom Bar
The zoom bar located below the touch screen is a handy zoom control that is unique on your device. When
you are viewing a Web page in Opera Mobile or a photo in Album, you can zoom in by sliding your finger
from left to right across the Zoom bar, or zoom out by sliding from right to left.
You can also instantly enlarge or shrink the text size when you are reading messages or Word documents.
Slide your finger from left to right across the zoom bar to increase the text size, or slide from right to left to
decrease. To increase or decrease the text size more, slide across the zoom bar again.
Zoom Bar
16 Section 2A. Device Basics
Page 27
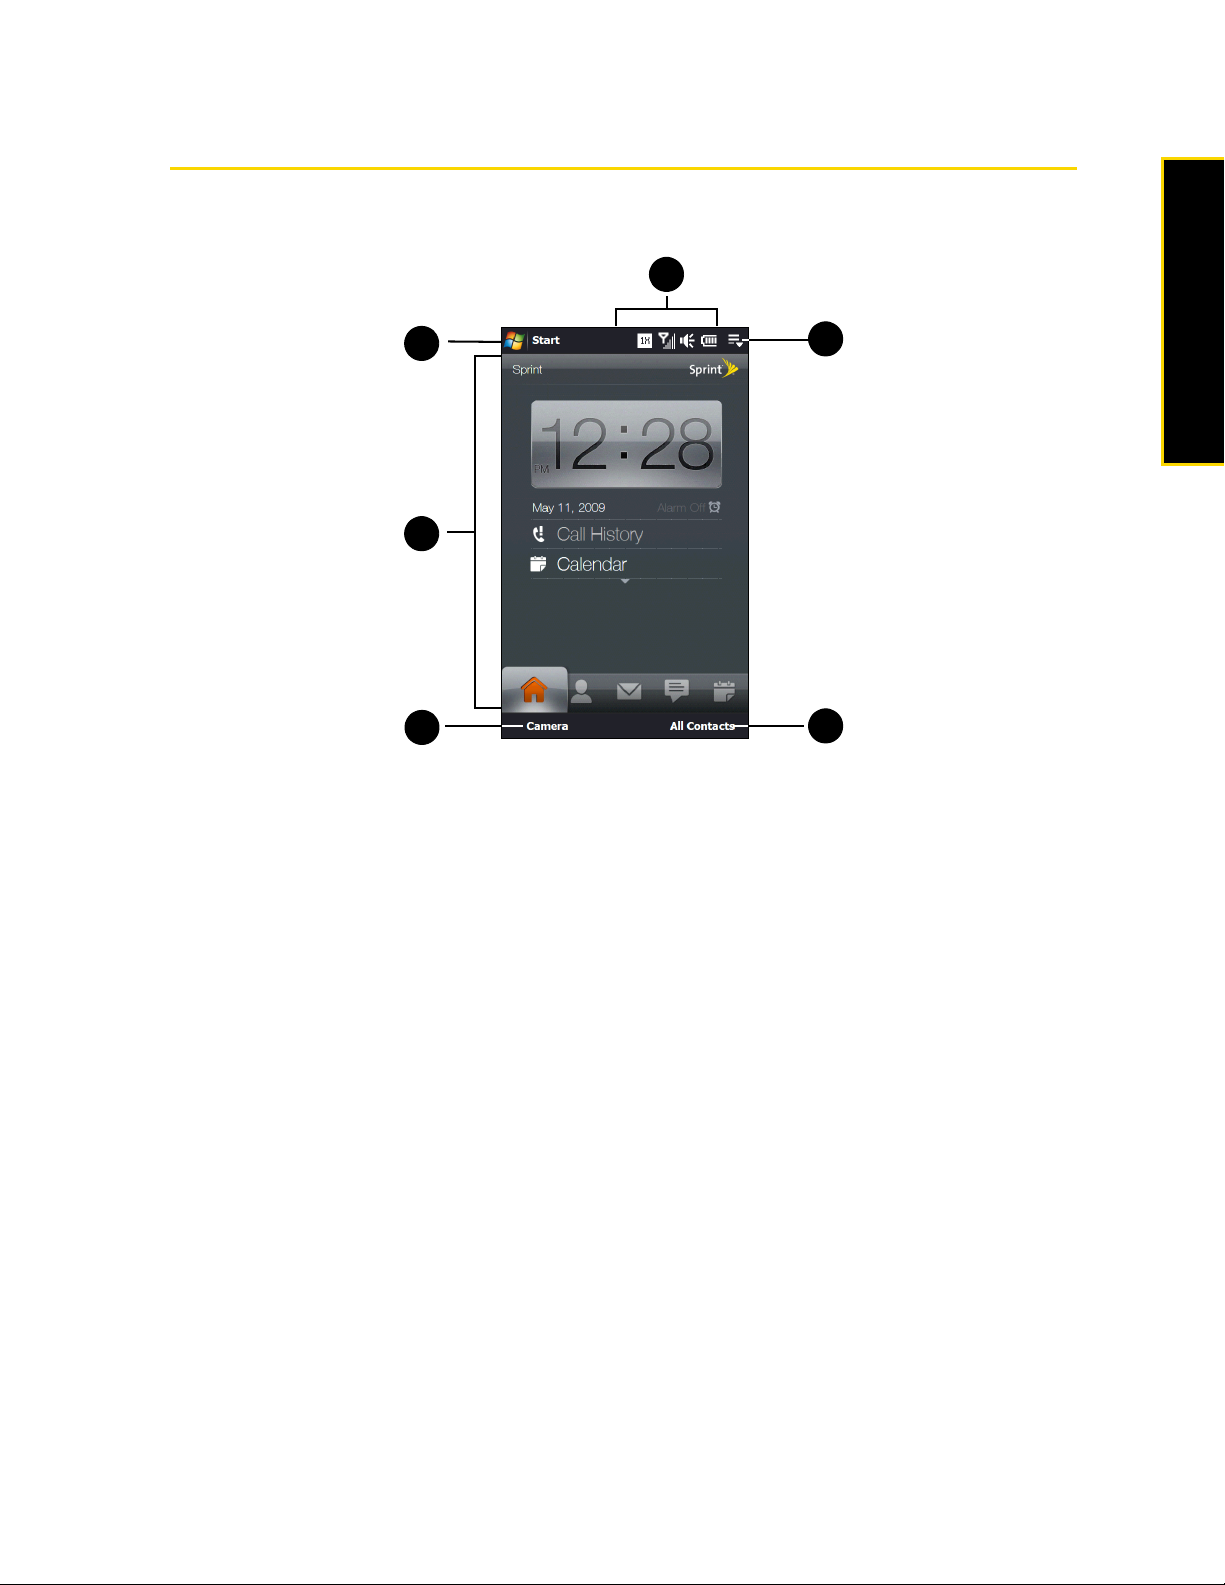
The Home Screen
The default screen of your device is the TouchFLO™ 3D Home screen which allows finger-touch access to
the most important functions such as contacts, text messages, email, calendar, Internet, and more.
6
1
5
2
3
1. Open the Start screen for quick access to important features and programs on your device. You can
also add shortcuts to your favorite programs. See “Start Screen” on page 18 for details.
2. Navigate the TouchFLO 3D Home screen. See “TouchFLO 3D” on page 32 for details.
3. Use the Camera to capture photos and video clips. See “Taking Photos and Videos” on page 98 for
details.
4. Open the All Contacts screen to view, add or edit contact information See “People” on page 37 for
details.
5. Open the Quick menu. See “Quick Menu” on page 21 for details.
6. Check the status icons for battery usage, connection status, and more. See “Status Icons” on page 19
for details.
4
Device Basics
Section 2A. Device Basics 17
Page 28
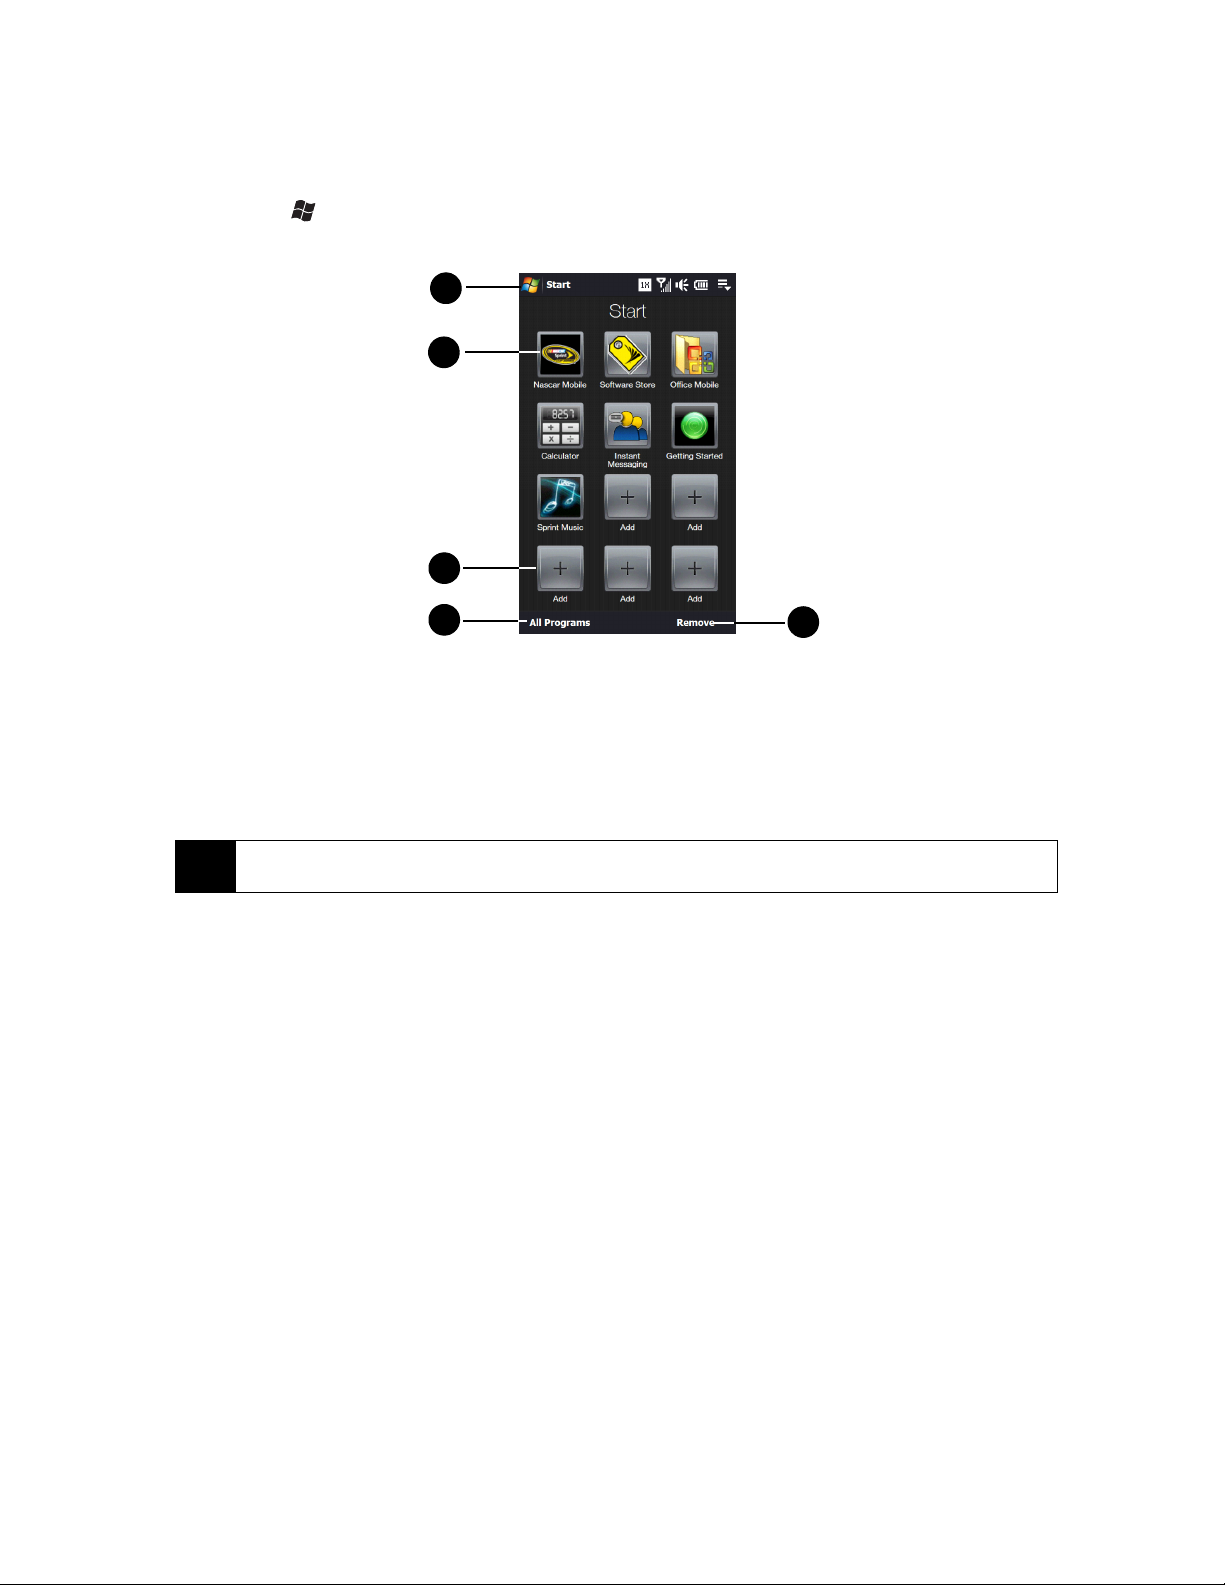
Start Screen
The Start screen, which can be opened by touching Start on the top-left corner of the screen or by pressing
the
Start key ( ), gives you one-touch access to all the programs and settings of your Windows Mobile-
powered device. You can also add your favorite programs to the Start screen so you can open them quickly.
1
2
3
4
1. Open or close the Start screen.
2. Open a program on the Start screen by tapping the corresponding icon.
3. Scroll down the Start screen, and then touch an empty slot to add a program.
4. View the complete list of programs that are available on your device.
5. Choose icons to remove from the Start screen. The Home, People, Calendar, and Settings icons are
permanent icons and cannot be removed or replaced with other program icons.
Note
To replace a slot with another program, you must delete the current program shortcut first and then add the new
program.
5
18 Section 2A. Device Basics
Page 29
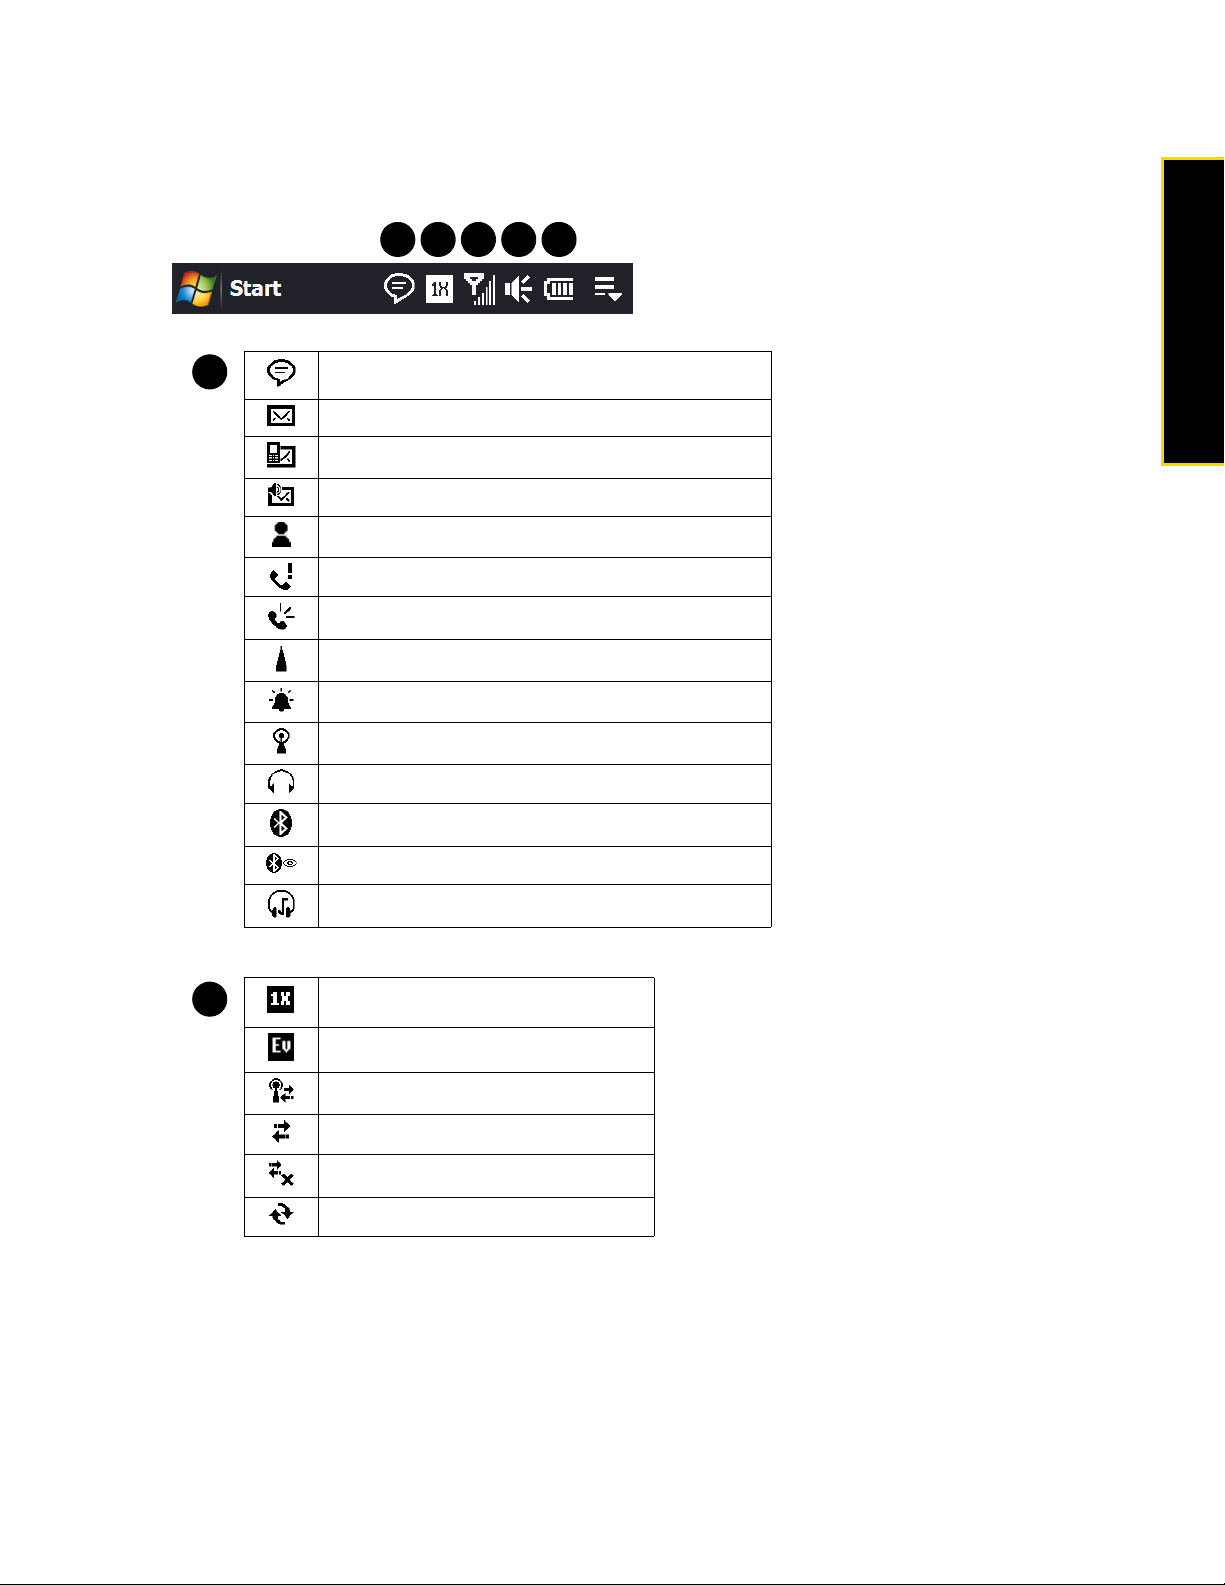
Status Icons
The following are some of the status icons that you may see on the device.
1 2 3 4 5
1
Multiple notifications; tap the icon to view all
New email messages
New SMS text messages
New voicemail notification
New instant message from Live Messenger
Missed call
Speakerphone on
Roaming
Alarm
Other wireless network(s) detected
Wired headset connected
Bluetooth on
Bluetooth visible mode on
Bluetooth stereo headset connected
Device Basics
2
1xRTT available
EVDO available
Connected to a wireless network
Connection is active
Connection is not active
Synchronization in progress
Section 2A. Device Basics 19
Page 30
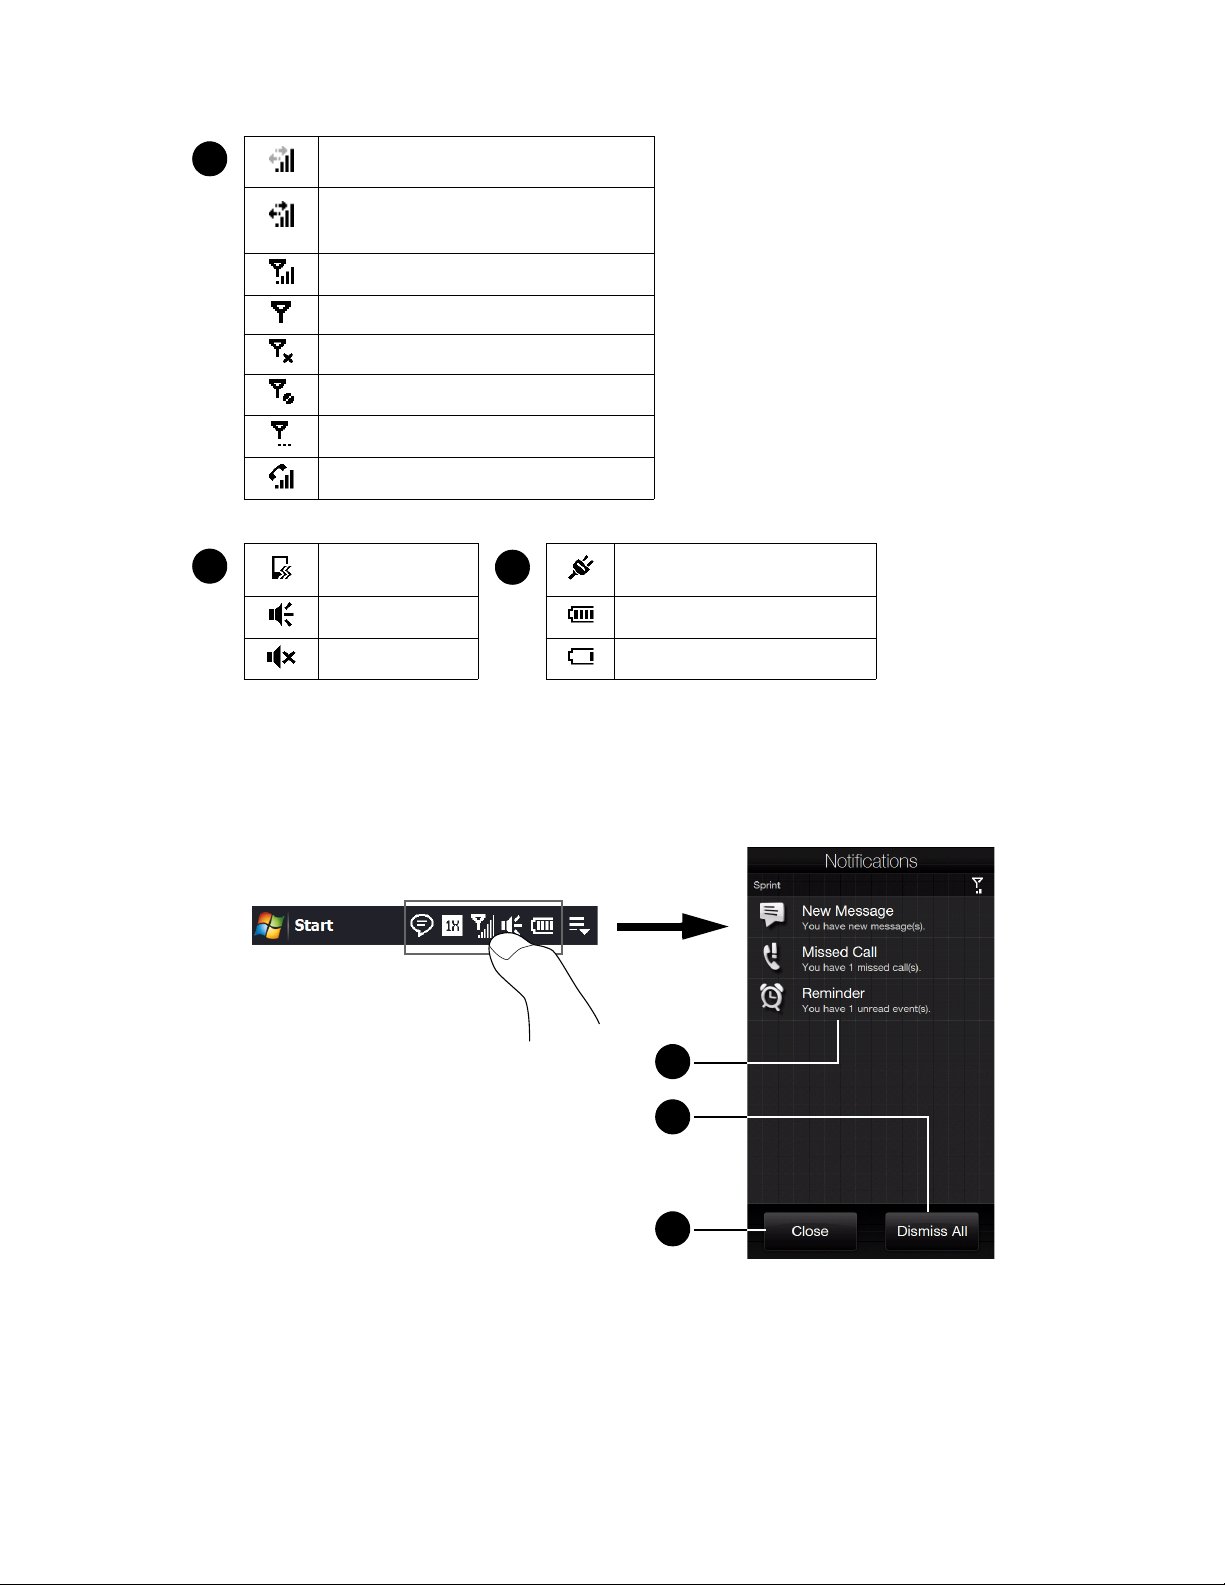
3
Data connection is active but idle
Data connection is active and
transmitting data
Maximum signal strength
No signal
Phone is turned off
No phone service
Searching for phone service
Voice call in progress
4
Vibrate mode Battery charging
Sound on Battery fully charged
Sound off Battery charge level very low
5
Notifications Screen
When you touch or tap any of the status icon area of the title bar, the Notifications screen opens to display
your connection status and lists all your pending notifications including missed calls, new text messages,
new email, event reminders, and more.
1
2
3
1. Tap an item on the Notifications screen to open the related screen.
2. Ta p Dismiss All to ignore all notifications.
3. To close the Notifications screen, tap Close or press the Back key.
20 Section 2A. Device Basics
Page 31

Quick Menu
The Quick menu, which can be opened from the top right corner of the screen, shows the currently running
programs. You can quickly switch between running programs, stop programs, and see how much program
memory is being used.
5 4 3
2
1
Device Basics
1. Allows you to switch to a running program by touching the program name.
Allows you to stop a running program by touching .
2. Opens the Quick Menu.
3. Shows the total percentage of program memory in use. Touch to open the Memory settings screen.
4. Allows you to customize Task Manager settings. See “Using Task Manager” on page 119 for details.
5. Stops all currently running programs.
Adjusting the Volume
By default, your device allows you to set a single volume level for both the system volume (notifications and
audio/video playback volume) and the phone ring volume. If you want to adjust the system volume and ring
volume separately, first you will need to disable the
To set a single volume:
1. Open the Volume screen by pressing either the Volume Up or Volume Down button on your device.
2. To increase or decrease the volume level, drag your finger up or down the volume bars, or press the
Volume Up or Volume Down button. You can also:
䡲 Touch Silent to mute the volume.
䡲 Touch Vibrate to switch the device to Vibrate mode.
3. The Volume screen automatically closes. You can also tap an empty area of the Volume screen to
close it.
Single Volume option in the settings.
Note
You can also press the Volum e Up or Volume Down button to adjust the earpiece volume during an ongoing call.
Section 2A. Device Basics 21
Page 32

To adjust the system and ring volumes separately:
1. Tap Start > Settings > Sound.
2. Turn off the Single Volume option.
3. Press the Volume Up or Volume Down button on your device.
4. To switch between the System Volume and Ring Volume screens, touch System or Ring at the top of the
screen.
5. To adjust the volume level on either screen, drag your finger up or down the volume bars, or press the
Volume Up or Volume Down button on your device. You can also set to Silent or Vibrate mode.
Tip
Also press the Volume U p or Volume Down button when adjusting the conversation phone volume during an
ongoing call.
22 Section 2A. Device Basics
Volume
bars
Page 33

Using the Getting Started Application
The
Getting Started
your device.
To learn the basics through the Getting Started application:
application is a list of “how to’s” that you can use to learn basic features and settings of
1. Tap Start > Getting Started. (You may need to scroll down the screen to see the icon.)
2. In the Getting Started application, tap one of the items onscreen to learn how to do a certain task.
3. If there is a link to the screen where you actually perform a selected task, tap the link to go to that screen.
Connecting Your Device to a Computer
Whenever you connect your device to the computer with the USB cable, the Connect to PC screen displays
and prompts you to choose the type of USB connection:
ActiveSync
Select this mode when you need to do the following:
䢇 Synchronize Outlook email messages, contacts, calendar appointments, files, and other data between
your device and your computer.
䢇 Have read and write access to the whole device.
See “Synchronizing Information With Your Computer” on page 69 for details.
Device Basics
Disk Drive
This mode is available for selection only when you installed a microSD card on your device. Select this
mode when you want to use your storage card as a USB thumb drive, and copy files between your device’s
storage card and your computer faster.
See “Using Your Device as a USB Drive” on page 92 for details.
Internet Sharing
When you do not have Internet access on your computer, you can select this mode to use your device as a
modem for your computer.
For more information about using Internet Sharing, see “Using Your Device As a Modem” on page 167.
Section 2A. Device Basics 23
Page 34

Section 2B
Entering Text
⽧ The Sliding QWERTY Keyboard vs. Onscreen Keyboards (page 24)
⽧ Using the Sliding QWERTY Keyboard (page 26)
⽧ Using the Full QWERTY Layout (page 27)
⽧ Using the Phone Keypad (page 29)
⽧ Using Predictive Mode (page 30)
⽧ Using Numeric and Symbol Mode (page 31)
Your device provides convenient ways to enter letters, numbers, and symbols whenever you are prompted to enter text (for
example, when adding a Contacts entry or when using email and SMS text messaging). This section shows
you how to enter text using the sliding QWERTY keyboard and various onscreen input methods that are
available on your device.
The Sliding QWERTY Keyboard vs. Onscreen Keyboards
You can use either the sliding QWERTY keyboard or one of the onscreen keyboards to enter text.
Sliding QWERTY Keyboard
Your device comes with a sliding QWERTY keyboard, which is similar to a standard keyboard on your
computer.
To use the keyboard, slide the screen panel to the right to reveal the keyboard. The screen orientation
automatically switches to landscape mode when the keyboard is opened.
For more information about using the QWERTY keyboard, see “Using the Sliding QWERTY Keyboard” on
page 26.
24 Section 2B. Entering Text
Page 35

Onscreen Keyboards
For single-handed text input in portrait mode, you can use one of the finger-friendly onscreen keyboards:
Full QWERTY and Phone Keypad.
3
1 2
1. When you use a program or select a field that allows you to enter text or numbers, the Input Panel icon
becomes available at the bottom center of the screen.
2. Ta p t he Input Selector arrow (that appears next to the Input Panel icon) to open the Input Method menu
where you can select an onscreen keyboard to use for entering text.
Input Method menu
Entering Text
3. After selecting a type of onscreen keyboard, the selected keyboard layout is displayed on the screen for
you to use.
Note
When in landscape mode, Phone keypad is not available.
Other Input Methods
In the Input Method menu, you can also choose from other available input methods by tapping Other Input
Methods
. For more information about using these input methods, see Help on your device.
Section 2B. Entering Text 25
Page 36

Using the Sliding QWERTY Keyboard
After opening the sliding QWERTY keyboard, you can adjust the angle of the device screen to minimize
glare and reflection.
Adjusting the LCD Screen Angle
The maximum tilting angle of the screen is 50 degrees. Do not force the screen to tilt further than the
maximum tilting angle as it will break the device.
50°
angle
Before you retract the screen, please be sure to adjust the screen angle back to the original horizontal
position.
Keys on the Sliding QWERTY Keyboard
䢇 To type lowercase letters and numbers, press the keys using your thumbs or fingers.
䢇 To enter all uppercase letters, press twice, or press first and then press .
To change back to all lowercase letters, press again.
䢇 To enter a single uppercase letter, press and then press the corresponding key.
26 Section 2B. Entering Text
Page 37

䢇 To enter a symbol or punctuation mark, or launch the program that is printed on the upper right corner of
a key, press and then press the corresponding key.
䢇 To open the Symbol Pad, press and then press .
䢇 Press to insert a hard return while typing.
䢇 Press the arrow keys / / / for directional movement.
䢇 To backspace and delete the previous character, press .
䢇 To delete the next character that appears to the right of the blinking cursor, press first and then
press .
To consecutively delete several characters that appear to the right of the blinking cursor, press twice
and then keep pressing until the characters are deleted.
䢇 Press to open the Messaging program.
䢇 Press to open your SMS/MMS messaging account.
Using the Full QWERTY Layout
Full QWERTY is a full onscreen QWERTY keyboard layout similar to a desktop computer keyboard.
Entering Text
8
1
7
2
3
6
5
4
1. Tap the keys to enter letters or symbols.
Tap and hold a key to enter a punctuation mark, symbol, or number shown on top of a key.
2. indicates you are in Predictive mode. Tap to change to Normal mode.
indicates you are in Normal mode. Tap to change to Predictive mode.
3. Tap t h e Shift key to enter an uppercase letter.
Tap the
4. Use the four arrow keys for directional movement on the screen.
5. Tap t h e Enter key to create a new line.
6. Tap t h e Back key to delete the previous character.
Shift key twice to turn on Caps Lock.
Section 2B. Entering Text 27
Page 38

7.
Tap to open a keyboard layout that lets you easily enter numbers and symbols. See “Using Numeric
and Symbol Mode” for details.
8. Displays the word candidate list in predictive mode. Tap a word to insert it into your text. Tap t to add
a word to the XT9 dictionary. (To learn how to enter text using Predictive mode, see “Using Predictive
Mode” on page 30.)
To enter text using the Full QWERTY layout:
1. Start a program that accepts text input, such as Word Mobile.
2. Ta p t he Input Selector arrow, and then tap Full QWERTY.
3. Start tapping keys on the keyboard as you would on a computer keyboard to enter your text.
To enter accented characters:
1. Tap and hold a key with accent options (for example, vowels) to display the accented characters bar.
2. Slide your finger left or right on the screen to select the desired accented character.
3. When you have selected the desired accented character, release your finger to insert it to your text.
You can also use the Numeric and Symbol mode to enter accented characters. See “Using Numeric and
Symbol Mode” on page 31 for details.
28 Section 2B. Entering Text
Page 39

Using the Phone Keypad
The Phone Keypad is an onscreen keypad that has a layout similar to mobile phone keypads, plus some
additional keys. The Phone keypad has large keys and enhanced input features such as predictive text input,,
which make it faster for you to enter text in your messages and documents.
8
1
7
Entering Text
2
3
6
5
4
1. Tap the keys to enter letters or symbols.
Tap and hold a key to enter a punctuation mark, symbol, or number shown on top of a key.
2. indicates you are in Predictive mode. Tap to change to Multitap mode.
indicates you are in Multitap mode. Tap to change to Predictive mode.
3. Tap t h e Shift key to enter an uppercase letter.
Tap the
4. Use the four arrow keys for directional movement on the screen.
5. Tap t h e Enter key to create a new line.
6. Tap t h e Back key to delete the previous character.
7. Tap to open a keyboard layout that lets you easily enter numbers and symbols. See “Using Numeric
and Symbol Mode” for details.
8. Displays the word candidate list in predictive mode. Tap a word to insert it into your text. Tap t to add
a word to the XT9 dictionary.
To enter text using the Phone keypad:
1. Start a program that accepts text input, such as Word Mobile.
2. Ta p t he Input Selector arrow, and then tap Phone Keypad.
3. When in Multitap mode ( ), enter a character by tapping a key until the desired character is displayed
on the screen. As you tap the keys, the activated key displays just above the tapped key.
䡲 To enter the first letter that shows on a key, tap the key once. To enter the second letter, tap twice, and
䡲 To enter a punctuation mark, symbol, or number that appears at the top of a key, tap and hold the key.
4. You can also use the Predictive text input mode in Phone Keypad. For more information, see “Using
Predictive Mode” on page 30.
Shift key twice to turn on Caps Lock.
so on.
Section 2B. Entering Text 29
Page 40

Using Predictive Mode
XT9 is a predictive text input mode that displays a word candidate list as you enter the first few characters so
you select just the word that you want.
To enter text using Predictive mode:
1. Make sure that the input mode is set to XT9 ( ).
2. Start entering the first few letters of a word. As you enter each letter, predicted words will appear in the
word candidate bar above the onscreen keyboard.
3. Tap the desired word to insert it to your text. If the word is highlighted in the word candidate bar, you can
also tap the
Enter key or the Space bar to insert it to your text.
Note
If there are several words to choose from, touch the left or right directional arrow keys at the bottom of the
onscreen keyboard to navigate through the predicted words on the word candidate bar.
To add a word to the XT9 dictionary:
If the word that you have entered is not found in the dictionary, you can add it to the dictionary.
1. While in Predictive mode, type a letter and then tap on the right side of the word candidate bar.
2. Type the word you want to add and then tap .
Add button
Cancel button
To customize Predictive mode settings:
1. Tap the Input Selector arrow, and then tap Touch Input Settings.
2. Ta p t he XT9 Settings tab, and then select or clear the following options according to your preferences:
䡲 Spell Correction. Lets you correct typographical errors by selecting from a list of possible words that
reflect the characters of the keys you have tapped as well as characters of nearby keys.
䡲 Word Completion in XT9 mode. Lets you select from a list of possible words based on the keys that you
have tapped and on the words available in the dictionary.
䡲 Word Completion in ABC mode (For Phone Keypad only). Lets you select from a list of possible combinations
based on the characters that appear on the keys that you tapped.
䡲 Auto-Substitution. Automatically inserts an apostrophe when you type common contracted words (for
example, “dont” automatically becomes “don’t”).
3. Tap ok.
30 Section 2B. Entering Text
Page 41

Using Numeric and Symbol Mode
Switch to Numeric and Symbol mode to easily enter numbers and common symbols such as parentheses,
braces, currency signs, punctuation marks, and special characters.
Tap a number or symbol
to insert it into your text.
Tap to go to the previous or
next page of symbols.
Tap to switch back to the
letter keyboard layout.
Phone Keypad Full QWERTY
To switch to Numeric and Symbol mode:
1. While using the Full QWERTY or Phone keypad, tap .
2. Locate your desired number or symbol, and then tap it to insert it into your text.
To automatically switch to the letter keyboard layout:
By default, the onscreen keyboard in Numeric and Symbol mode is locked so you can continuously enter
symbols and numbers. Do the following if you want the onscreen keyboard to automatically switch to the
letter keyboard layout after you have selected a symbol.
1. Tap the Input Selector arrow and then tap Touch Input Settings.
2. On the Options tab, clear Turn on symbol lock.
3. Tap ok.
Entering Text
Section 2B. Entering Text 31
Page 42

Section 2C
TouchFLO 3D
⽧ The TouchFLO 3D Home Screen (page 32)
⽧ Home (page 35)
⽧ People (page 37)
⽧ Mail (page 44)
⽧ Messages (page 45)
⽧ Calendar (page 46)
⽧ Internet (page 47)
⽧ Photos and Videos (page 49)
⽧ Sprint Music (page 50)
⽧ Sprint Navigation (page 52)
⽧ Sprint TV (page 53)
⽧ Weather (page 54)
⽧ Stock (page 55)
⽧ Settings (page 56)
TouchFLO™ 3D gives you touch control over your Windows Mobile-powered device. TouchFLO 3D provides a Home
screen that allows finger-touch access to the most widely-used functions, such as People, Mail, Calendar,
Internet, Weather, and more. This section will show you how to navigate the TouchFLO 3D Home screen by
simply using finger gestures.
The TouchFLO 3D Home Screen
The TouchFLO 3D Home screen has the following tabs:
Home screen tabs
32 Section 2C. TouchFLO 3D
Page 43

Icon Tab Name Icon Tab Name
Home Sprint Music
People Sprint Navigation
Mail Sprint TV
Messages Weather
Calendar Stock
Internet Settings
Photos and Videos
Switching Between Tabs on the Home Screen
䢇 Touch or tap the desired tab on the Home screen.
— or —
䢇 Press and hold your finger on the active tab, and then slide your finger right or left over the tabs. Release
when you have selected the desired tab.
Tou c hFLO 3D
Note
Apply some pressure when pressing and holding on the active tab to be able to slide over the tabs.
— or —
䢇 Swipe left across the screen to move to the next tab, and swipe right across the screen to move to the
previous tab.
䢇 When using the sliding QWERTY keyboard, press the right key to move to the next tab, and press the left
key to move to the previous tab.
Section 2C. TouchFLO 3D 33
Page 44

Navigating the Home screen in Landscape Mode
The TouchFLO 3D Home screen tabs are always displayed when the Home screen is in portrait view. When
you slide out the QWERTY keyboard, the Home screen automatically changes to landscape view and
temporarily hides the tabs. Touch the
display the tabs.
Expand button ( ) at the bottom left side of the Home screen to
Customizing Home Screen Tabs
You can rearrange or hide the tabs on the Home screen, except for the Home tab. The Settings tab cannot
be disabled and hidden also from the Home screen.
1. From the Home screen, slide your finger to the Settings tab, and then touch Customize Tabs.
2. To move a tab, touch and hold the icon before the tab name, and then drag it up or down the tabs list.
Release the icon when you reach the desired location.
3. To hide a tab, clear the check box at the right of the tab name.
4. Touch Done.
34 Section 2C. TouchFLO 3D
Page 45

Home
The Home tab displays the current date, a flip-style digital clock, and an alarm icon that indicates whether the
alarm is on or off. Missed calls, voicemails, and your upcoming calendar appointments are also shown on
the
Home tab.
To select an item on the Home tab, simply touch the item.
1
2
Tou c hFLO 3D
3
1. Touch the clock to open the World Clock screen where you can select your location to automatically set
the date and time accordingly or you can manually change the date and time. You can also access the
Alarm Clock screen to change alarm clock settings.
2. Touch the Missed Call item to view details about missed calls in the Call History.
(See “Call History” on page 63 for details.)
3. Touch an appointment to view or edit the details of the appointment. If there are no listed appointments
on the Home tab, touch
on page 76 for details.
4. Swipe upward on the screen to display the small digital clock and view more appointments. Swipe
downward on the screen to change back to the large flip-style digital clock.
Tip
When you are on another TouchFLO 3D tab, press the END key to return to the Home tab.
Calendar to go to the Calendar tab and create new appointments. See “Calendar”
4
World Clock
On the Home tab, tap the digital clock to open the World Clock tab ( ) where you can select the city
where you are located so that the Home tab displays your local time. If you do not find your city, touch
City
to add it. The World Clock tab can display up to 10 cities.
Add
You can also change the date and time of your local city, remove cities, or rearrange cities on the World
Clock tab.
Section 2C. TouchFLO 3D 35
Page 46

To change your local time, date and time zone:
1. On the World Clock screen, touch Menu > Local Time Settings.
2. Adjust the time (hour and minutes) by tapping the Up or Down arrow buttons.
3. Touch Date, select the date, year, and month, and then touch Select.
4. Touch City. The Select Country screen then appears.
5. Flick your finger on the screen or use the Quick Scroll bar on the right of the screen to scroll through the
country list. Touch the desired country to select it.
6. The Select City screen then appears. Flick your finger on the screen or use the Quick Scroll bar on the
right of the screen to scroll through the city list. Touch the desired city to set your time zone.
Tip
7. Ta p Done.
Note
When you synchronize your device with your computer, the time on your device is updated with the time on your
computer.
You can also slowly scroll through the country or city list by dragging your finger upward on the screen, or enter
the country or city name in the search box.
36 Section 2C. TouchFLO 3D
Page 47

Alarm Clock
On the Home tab, tap the digital clock, and then touch the Alarm Clock tab ( ) if you want to set up your
device as an alarm clock. You can set up to three alarms.
To set an alarm:
1. On the Alarm Clock screen, touch an alarm time.
2. On the Set Alarm screen, adjust the alarm time (hour and minutes), and then tap the day of the week for
the alarm.
Tou c hFLO 3D
Tip
Select multiple days by tapping each desired day. Tap a selected day to exclude it from the alarm.
3. Enter the alarm description, select the alarm ring tone, and then choose whether you want the device to
vibrate when the alarm goes off.
4. Tap Done.
5. On the Alarm Clock screen, tap the OFF/ON slider to turn on the alarm.
Note
When an alarm goes off, you have the choice to Snooze or Dismiss the alarm. When you select Snooze, the
alarm will sound again after 5 minutes.
People
On the People tab, you can add favorite contacts and quickly make calls or send text and email messages to
these contacts.
From the People tab, you can also set up your own contact card, create new contacts, view your stored
contacts list, as well as view exchanged calls and text, multimedia and email messages with a contact. If
your contacts have Facebook accounts, you can check if they have any Facebook updates and events.
Note
Setting Up My Contact Card
My Contact Card automatically opens the first time that you access the People tab. You can enter and save
your contact information on My Contact Card so you can easily share and send it to your contacts. If you
have a Facebook account, you can also sync your Facebook profile with My Contact Card so you can
receive instant notifications everytime you or your Facebook friends change profiles or post events.
You need an active data or wireless network connection to the Internet to link to Facebook.
1. From the Home screen, slide your finger to the People tab.
2. When the My Contact Card screen appears, tap Next.
Note
Tap Skip if you prefer to set up My Contact Card later. You can open My Contact Card from the Settings tab of
the TouchFLO 3D Home screen, or from the contacts list of the All Contacts screen.
3. On the subsequent screen, choose how to add your photo to your contact card. You can use the Camera
to take your photo, or if you have a Facebook account, login to your account and sync with your
Facebook profile.
Note
When the Link Profile window opens, select the Facebook information that you want to link, and then tap Done.
4. On the Detail Information screen, enter your information in the fields provided. You can scroll down the
screen to view more fields.
5. When finished entering information, tap Next, and then tap Done on the subsequent screen to return to
the People tab.
Section 2C. TouchFLO 3D 37
Page 48

Creating New Contacts
From the People tab, you can easily create and store the contact details of the people and businesses that
you communicate with.
1. On the People tab, touch All Contacts.
2. The All Contacts screen then opens and displays the All tab ( ). Touch New to create a new contact.
3. To add the contact’s photo, touch the square box on the upper-right side of the New Contact Card
screen. You can link to the contact’s Facebook photo, select an existing photo in Album, or open Camera
and take a photo of the contact.
4. Enter the contact information in the fields provided and then tap Done.
Tips
• To link with the contact’s Facebook account, scroll down the New Contact Card screen and then tap Link. For
more information about Facebook, see “Facebook Updates and Events” on page 42.
•Tap More at the bottom of the New Contact Card screen to enter additional contact information from
Windows Mobile’s Contacts program. See “Contacts” on page 74 for details.
Adding and Selecting Favorite Contacts
You need to have contacts already stored on your device before you can add them as favorite contacts to
the People tab. If there are no existing contacts, create them first on your device. See “Creating New
Contacts” for instructions.
To add favorite contacts:
You can add up to 15 favorite contacts on the People tab.
1. On the People tab, touch one of the Plus (+) icons, or touch Add Favorite.
2. On the Select a Contact screen, touch the name of the desired contact.
3. Select a phone number or email address to associate to the favorite contact.
If there is no picture associated with the contact, the Album program opens and lets you take a photo of
the contact or select an existing contact photo. For more information about Album, see “Viewing Photos
and Videos” on page 105.
4. To add another favorite contact, touch the small Plus icon ( ) at the right side of the Home screen’s
People tab and repeat steps 2 and 3.
38 Section 2C. TouchFLO 3D
Page 49

To select a favorite contact:
1. Do one of the following:
䡲 To flip through the contact pictures one at a time, swipe your finger up or down the screen.
䡲 On the picture strip at the right side of the People tab:
● Touch the picture of the desired favorite contact.
— or —
● Press and hold on the currently selected contact picture to display a slideout bar, and then slide up or
down the picture strip. Release your finger when the desired contact is selected.
Tou c hFLO 3D
Section 2C. TouchFLO 3D 39
Page 50

2.
After selecting a favorite contact, you can do any of the following to communicate with that contact:
䡲 Touch the contact’s name, phone number, or email address that is displayed below the contact picture
to call or send an email message. For more information about making a call or composing and
sending an email message, see “Using Phone Features” on page 57 and “Email Messaging” on page
158 .
䡲 Touch one of the following icons to choose a phone number to call, or to send a message:
Call the contact’s mobile phone.
Call the contact’s work/office phone.
Call the contact’s home phone.
Compose and send a text message.
Compose and send an email message.
The icons shown depend on available contact information. For example, the home phone icon ( )
is shown only if the stored contact information includes a home phone number.
䡲 Touch the picture of the favorite contact on the center screen to open the Contact Details screen, and
then choose how to communicate with the contact. See “The Contact Details Screen” on page 42 for
details.
Tip
To remove the current favorite contact, touch Menu > Remove Favorite.
The All Contacts Screen
Touch All Contacts on the Home tab or People tab to display the All Contacts screen where you can view and
manage all your contacts. The All Contacts screen has the following tabs:
3 41 2
1. All. Lists all your stored contacts. This tab lets you create, delete, or edit a contact. Touch a contact to
open the Contact Details screen. You can also use this tab to open or update My Contact Card.
2. Favorites. Shows the favorite contacts that you have added to the People tab. You can also add favorite
contacts through this tab.
3. Updates and Events. Displays notifications when there are updates that occurred in Facebook. This tab also
shows events of your stored contacts. See “Facebook Updates and Events” on page 42 for details.
4. Call History. Lists all your dialed numbers, and received and missed calls. See “Call History” on page 63
for details.
40 Section 2C. TouchFLO 3D
Page 51

Browsing the Contacts List
On the All Contacts screen’s All tab, swipe upward or downward on the screen to scroll through the contacts
list. You can also use the search box or the Quick Scroll bar to search for a certain contact.
7
6
1
2
Tou c hFLO 3D
3
5
4
1. Touch New to add a new contact. See “Creating New Contacts” on page 38 for details.
2. Touch Me to edit your own contact contact information. See “Setting Up My Contact Card” on page 37 for
details.
3. Touch a contact to open the Contact Details screen.
4. An exclamation point icon appears on a contact when:
䡲 You receive a new text or email message, or when you have a missed call from the contact.
䡲 The contact has updated his or her Facebook profile or added events in Facebook.
5. To quickly scroll down through the contacts list, touch and hold the Quick Scroll bar and then slide your
finger downward.
6. Touch the seach icon to display the search box so you can find a contact by entering the contact name.
Note
When you slide open the QWERTY keyboard and the screen switches to landscape view, the search box is
automatically displayed. You can use the QWERTY keyboard to enter and search for a contact.
7. Touch this icon to send My Contact Card as an attachment in a multimedia message.
Section 2C. TouchFLO 3D 41
Page 52

The Contact Details Screen
When you touch a contact name in the All tab of the All Contacts screen or touch the picture of a favorite
contact on the center screen of the People tab, the Contact Details screen opens. From this screen, you can
view the contact’s details, exchange of messages and calls with the contact, and more.
The Contact Details screen has the following tabs:
3 41 2
5
1. Details. Shows a contact’s details. From this tab, you can call the contact, send a text or email message,
edit the contact details, or delete the contact.
2. Messages. Displays exchanged text and multimedia messages with the contact. You can also reply with a
text message directly on this tab.
3. Email. Displays all received email messages from the contact.
4. Updates and Events. Displays notifications when the contact has updates on his or her Facebook account.
This tab also shows events of the contact. See “Facebook Updates and Events” on page 42 for details.
5. Call History. Lists all your incoming, outgoing, and missed calls to and from the contact. This tab also lets
you call the contact. See “Call History” on page 63 for details.
Facebook Updates and Events
If you and your stored contacts have Facebook accounts and you linked to Facebook when you were
creating My Contact Card, you can easily check which of your contacts have updates that occurred in
Facebook. The types of Facebook updates include changes in profile information and status as well as new
photos added to the Facebook album.
You can also easily check which contacts have events that occur on the current day. The types of events
include the birthday and anniversary, if specified and stored on the contact details, as well as events that are
created in Facebook.
Checking for Contacts Who Have Facebook Updates and Events
You can check for Facebook updates and events of contacts from one convenient location, which is on the
Updates and Events tab of the All Contacts screen.
1. From the Home screen, slide to the People tab and then tap All Contacts.
2. Ta p t he Updates and Events tab ( ).
3. If you haven’t linked your stored contacts to Facebook, the Updates and Events tab will show a Link
option. Tap this option, choose which contacts you want to link to Facebook, and then tap Next.
Profiles
4. On the Link Profiles window, select or clear the Facebook information that you want to link, and then tap
Done.
5. In the Updates list, when you tap a contact who has only one type of Facebook update, Opera Mobile
opens and brings you to your Facebook site where you can view details of the contact’s Facebook
update.
6. When you tap a contact who has multiple Facebook updates, the Contact Details screen opens and
displays the Updates and Events tab of this contact. See “Checking a Single Contact’s Facebook
Updates and Events” on page 43 for details.
42 Section 2C. TouchFLO 3D
Page 53

7. In the Events list, tap a contact to send a greeting via a text message to the contact or view the contact
details. If an event is a Facebook event, tap it to open Opera Mobile and view information about that
event.
Notes
• To manually refresh and display the latest Facebook updates, tap Menu > Update Now.
• To enable the Facebook updates to be refreshed automatically, tap
then select the
from Facebook in a fixed time period.
Download data automatically check box. The refresh is not instant. Your device checks
Menu > Data Connection Setting and
Checking a Single Contact’s Facebook Updates and Events
To check only for a single contact’s Facebook updates and his or her events, access the Updates and Events
tab from the Contact Details screen.
1. From the Home screen, slide to the People tab and then tap All Contacts to open the All Contacts screen.
2. Browse through the list of contacts and then tap a contact to open the Contact Details screen.
3. Tap t h e Updates and Events tab ( ).
4. In the Updates list, tap a Facebook update to Opera Mobile and view details of that update.
5. In the Events list, tap an event to send a greeting via a text message to the contact or view the
contact details. If it is a Facebook event, tap it to access your Facebook site and view information
about that event.
Changing Your Status in Facebook
You can change your status in Facebook directly from your own contact card.
1. On the All tab of the All Contacts screen, tap Me to open My Contact Card.
2. Scroll to the bottom of the screen and then tap the button that displays your status.
3. Enter your new status and then tap Done.
Tou c hFLO 3D
Logging Out From Facebook
To log out from your Facebook account, open My Contact Card, scroll to the bottom of the screen, and then
tap the message that says “Tap to logout.”
Reconnecting to Facebook
Do one of the following:
䢇 Open My Contact Card, scroll to the bottom of the screen, and then tap the message that says “Login to
my facebook”.
䢇 On the Updates and Events tab of the All Contacts screen, tap Link.
䢇 On the Updates and Events tab of a single contact, tap Link Profiles.
On the Facebook Login screen, enter the email address and password that you use for your Facebook
account.
Section 2C. TouchFLO 3D 43
Page 54

The Mail tab is where you send and receive email messages. Including Outlook Email, you can add up to
seven POP3/IMAP4 and Web-based email accounts in this tab. For instructions on how to set up email
accounts in the Mail tab, see “Email Messaging” on page 158.
Checking and Reading Email
The icon on the Mail tab and the respective icons of your email accounts show the number of newly
received or unread email messages. Select an email account and then swipe your finger up or down on the
center screen to browse through received email messages.
5
1
2
1. Touch the email on the screen to open and read the message.
2. Touch Inbox to access all email messages of the currently selected account.
3. Touch Menu to choose whether to add an email account, send and receive email, and more.
4. These are your email accounts. To select an email account:
䡲 Touch an email account icon to view the email messages in that account.
– or –
䡲 Touch and hold the icon of the email account that is currently displayed, and then drag your finger up
or down the account icons until the desired email account is selected.
5. After selecting an email account, touch this icon to create and send a new email message.
For more information about working with email, see “Email Messaging” on page 158 and “Working With
Company Email and Meeting Appointments” on page 162.
4
3
Making Calls Directly from an Email Message
You can directly call the sender of the email message that is currently shown on the Mail tab by pressing the
Tal k key.
For more information about directly making calls while viewing email, see “Making a Call from an Email
Message” on page 65.
44 Section 2C. TouchFLO 3D
Page 55

Messages
On the Messages tab, you can read text messages as they arrive and create a new text message. To flip
through received text messages, swipe your finger up or down the screen.
5
1
2
Tou c hFLO 3D
3
1. Touch the text message to open the Messages tab of the Contact Details screen where you can view all
received text messages from the contact and reply to the sender.
2. The icon on the Messages tab shows the number of unread text messages.
3. Touch All Messages to access all text messages in your inbox and other folders.
4. Touch Menu to choose whether to remove the current message and access more options.
5. Touch the New icon to create a new text message.
For more information about working with text messages, see “Text Messaging (SMS)” on page 131.
4
Making Calls Directly from a Text Message
While reading a text message on the Messages tab, you can directly call the sender of the text message by
pressing the
For more information about making calls while viewing text messages, see “Making a Call from a Text
Message” on page 64.
Tal k key.
Section 2C. TouchFLO 3D 45
Page 56

Calendar
Keep track of your important appointments by adding them on the Calendar tab.
Creating an Appointment
You can create appointments for the current day which is highlighted on the month calendar, or you can
select another date for creating your new appointments.
1. If you are creating an appointment for the current date, touch Menu > New. Otherwise, touch another date
on the calendar, and then touch
New Appointment.
Note
To select another month in the calendar, swipe our finger up or down the screen. You can also tap the Up or
Down arrow shown beside the month and year.
2. Enter a name for the appointment, and then specify the location.
3. If there is a time frame for the appointment, set the start and end dates and times. If it is a special
occasion such as a birthday or a whole-day event, set the
All Day option to Ye s.
4. When finished, tap ok to return to the Calendar tab.
Viewing and Managing Your Appointments
On the Calendar tab, dates with appointments are indicated by a triangle ( ) at the upper-right corner of
the date box.
1. Touch a date on the calendar to switch to Day view. The screen displays all your appointments and the
weather information for that day.
Note
The weather information appears only if you have set your local time to a city on the World Clock tab, and if the
appointment date is within the 5-day forecast on the Weather tab. See “World Clock” on page 35 and
“Weather” on page 54 for details.
2. Touch an appointment to view its details, and then touch Menu to edit, send, or delete the appointment.
Tip
• Your upcoming appointments also appear on the Home tab. See “Home” on page 35 for details.
• You can also use the Windows Mobile Calendar program to create, view, and send appointments. To open the
Calendar program, touch
Mobile Calendar, refer to the “Help & How-To” topics on the Windows Mobile website.
Start > All Programs > Calendar. For more information about using Windows
46 Section 2C. TouchFLO 3D
Page 57

Internet
On the Internet tab, you can browse the Web, search information, and add push Web pages. This tab also
lets you enable Push Internet to update the contents of your push Web pages before you browse them.
Navigating the Web
The Internet tab uses Opera Mobile™ as the Web browser.
1
2
3
4
7
Tou c hFLO 3D
5
1. To search for information on the Web using Opera Mobile, enter your text in the provided text box and
then touch the
2. Touch the globe image or touch Launch Browser to browse the Web using Opera Mobile.
3. Touch YouTu be to watch YouTube videos.
4. Touch Add a new Push page to choose a website that you want to add as a push page.
5. Touch Bookmarks to add, view or delete Web favorites in Opera Mobile.
6. Touch Menu and choose whether to delete a push page, adjust the update settings for your push Web
pages and bookmarks, and more.
7. Swipe your finger upward when you need to scroll down the screen.
Note
For more information about navigating the Web with Opera Mobile, see “Using Opera Mobile” on page 145.
When you open a Web page in Opera Mobile, the page may be displayed in its smallest size. To reformat Web
pages to fit the screen of your device so that the content is readable, set Opera Mobile to display in
Tap , ta p Settings > Display, and then select the Mobile view check box.
Search icon ( ).
6
Mobile View.
Section 2C. TouchFLO 3D 47
Page 58

Setting Up Push Internet
Set up Push Internet on the Internet tab so that you can have frequently visited Web pages preloaded and
ready for display on Opera Mobile anytime.
Adding a Push Web Page
You can add up to four push Web pages for quick access on the Internet tab.
1. On the Internet tab, touch Add a new push page.
2. On the New Push Page screen, you can select a bookmark and add it as a push page, or you can enter
a title name and the address (URL) of a desired website.
3. From the Frequency choices, select a time interval for automatically updating the push page, and then
touch
Save.
Push Internet Settings
Set your device to automatically update your push Web pages on the Internet tab to ensure that you are
browsing the most recent information that is available on your favorite websites. The updated push pages
are cached in the device memory so that they load faster in Opera Mobile.
To change the auto update time for your push Web pages:
1. On the Internet tab, touch Menu > Schedule Settings.
2. Under Day and Time, select the day or days you want to auto update your push Web pages, and then
specify the update time.
3. Scroll down the screen to the Frequency section, and then touch the update time below each of your push
Web pages to set the time interval for automatic updates.
4. Tap Done to return to the Internet tab.
To enable or disable Push Internet:
1. On the Internet tab, touch Menu > Data Settings.
2. Touch the OFF/ON slider to enable or disable the following options:
䡲 Push Internet. Enable (default) or disable Push Internet.
䡲 Roaming. Enable this option if you want to update your push Web pages and bookmarks even when
you are roaming. This may incur additional data charges. This option is disabled by default.
48 Section 2C. TouchFLO 3D
Page 59

Photos and Videos
The Photos and Videos tab lets you flip through your photos and video clips and view them full-screen. From
this tab, you can also launch the camera so you can take pictures and record video clips.
5
4
1
Tou c hFLO 3D
2
1. To flip through photos and videos, swipe your finger up or down the screen. Touch the photo or video on
the screen to view or play it full-screen.
2. Touch Album to open the Album program. See “Viewing Photos and Videos” on page 105 for details.
3. Touch Slideshow to view the photos as a slideshow. If a video is selected, touch Play.
4. Touch the video camera icon to shoot video.
5. Touch the camera icon to take a photo.
Tips
Setting an Album as a Favorite
The Photos and Videos tab displays pictures and video files from the current favorite album. By default, the
Camera Shots album, which stores the pictures and videos that you captured using the device camera, is set
as the favorite. You can change to another favorite album, if preferred.
1. On the Photos and Videos tab, touch Album to open the Album program.
2. Touch Albums and then select one of the listed favorite albums.
3. Tap Menu > Set Album as Favorite. and then tap OK on the confirmation screen.
• The file formats that can be viewed on the Photos and Videos tab are the same as the Album program.
• To transfer media files from a computer and view them on the
them to a folder under \My Device (the device memory) or \Storage Card.
Photos and Videos tab, copy or synchronize
3
Section 2C. TouchFLO 3D 49
Page 60

Sprint Music
The Sprint Music tab allows you to visually browse through albums and music tracks that are on your device
and play music. The albums and music tracks that you see on this tab are from the
Library.
Now Playing list of the
Note
From the
more information about purchasing and downloading music onto your device, see “Music — Sprint Music
Store” on page 171.
Your device searches for all music files that have the following audio formats: MP3 (.mp3), WMA (.wma), AAC/
AAC+ (.aac), and MPEG-4 (.m4a). It searches for music from the following locations:
Device: \My Music (including all subfolders)
\My Documents (including all subfolders)
Storage: \Storage Card (including all subfolders)
Sprint Music tab, you can also access the Sprint Music Store to purchase and download music. For
Playing Music
䊳 On the Sprint Music tab, flip through albums and all the music in each album, and then touch the
Play icon ( ) to start playback.
1
7
2
6
5
3
1. Touch Sprint Music Store to download music from Sprint Music Store. See “Music — Sprint Music Store” on
page 171 for details.
2. Swipe upward or downward on the screen to flip through albums and the music or songs in an album.
3. Touch Library to access the Library. See “The Library” on page 51 for details.
4. Touch Menu to set music playback to repeat, turn shuffle on or off, and more.
5. Touch the Down arrow icon to go to the next album or the next music in the current album.
6. Touch the Play icon to play or the Pause icon to pause playback.
7. Touch the up arrow icon to go to the previous album or the previous music in the current album.
50 Section 2C. TouchFLO 3D
4
Page 61

To advance forward or backward in the music:
䊳 Touch and hold on the thin bar below the album art to display the progress bar:
Drag your finger right or left on the progress bar to move forward or backward in the current music.
To set repeat and shuffle modes:
The icons on the upper-right side of the
Sprint Music tab show whether repeat and shuffle modes are
enabled.
Repeat [One] Repeat [All] Shuffle [On]
䢇 To u c h Menu > Repeat and choose whether to repeat the current track, repeat all tracks in the current album
or playlist, or do not repeat.
䢇 To turn shuffle mode on or off, touch Menu > Shuffle and then select Shuffle On or Shuffle Off.
The Library
The Library organizes music into categories, such as Now Playing, Artists, Albums, Genres, All Songs, and more.
When you add more albums or music tracks to your device, go to the Library to locate and play the new
albums or music tracks.
To browse and play music in the Library:
1. On the Music tab, touch Library to open the Library screen.
2. The tabs at the bottom of the Library screen correspond to the different categories. To browse music
under a certain category, slide to the tab that corresponds to the desired category.
3. Keep tapping an item on a category tab (for example, an artist) until the music tracks display on the
screen.
4. Tap a music track to play it.
Tou c hFLO 3D
Note
When you select a category in the Library such as Artists and play its music, the Now Playing list will be replaced
with the music tracks from that category.
Playlists
You can group your favorite music into a playlist and then play back the playlist.
To create a new playlist:
1. Select the desired music on the Music tab or the Library.
2. Touch Menu > Add to Playlist.
3. Touch Create new playlist, enter a playlist name, and then touch Done.
To add more music files to a playlist:
1. On the Library, slide to the Playlists tab, and then touch a playlist to open it.
2. Touch the plus icon at the upper-right side of the screen, or touch Menu > Add Songs, and then slide to the
All Songs tab.
3. Select the check boxes of the music tracks you want to add to the playlist, or touch Menu > Select All to
choose all tracks.
4. Touch Done to add the selected tracks to the playlist.
5. Touch Back to return to the Playlists tab.
Section 2C. TouchFLO 3D 51
Page 62

To play back a playlist:
1. On the Playlists tab, touch a playlist to open it.
2. Touch the first track in the playlist. The Music tab starts playing the first track. After each track, the next one
in the playlist will be played.
Note
Playlists are not automatically updated when music files have been deleted from the device memory or the
microSD card.
Types of Playlists
There are two types of playlists that can be shown on the Playlists tab:
䢇 Custom playlists. Playlists that are created on the Music tab.
䢇 Windows Media Player playlists. Playlists that are in Windows Media Player Mobile’s Library (which is
synchronized with Windows Media Player on your computer). They are indicated by the Windows Media
Player icon ( ). These playlists cannot be edited.
Note
If a Windows Media Player playlist contains a combination of music, video and image files, only music files in the
playlist will be synchronized to your device and other media types will be filtered out.
Sprint Navigation
The Sprint Navigation tab allows you to connect to Sprint’s wireless data network and use GPS navigation
services. If this is your first time to use Sprint Navigation, touching any of the icons on this tab will prompt you
to log into the Sprint Navigation service.
For more information about using Sprint Navigation, see “Using Sprint Navigation” on page 183.
52 Section 2C. TouchFLO 3D
Page 63

Sprint TV
On the Sprint TV tab, you can watch live TV and catch up on episodes of your favorite shows – anywhere on
the Nationwide Sprint Network.
4
1
2
1. If this is your first time to use Sprint TV, touch the center image to connect to Sprint data services using
the data connection and download channels. Afterwards, touch the displayed channel on the center of
the screen to watch the channel.
2. Touch Update Now to download the latest preset channel list from Sprint.
3. Touch Launch to open the Sprint TV application so you can connect to Sprint data services, access all
available channels, and choose to which channels you want to subscribe.
4. Preset channel selections are listed on the strip at the right side of the screen.
To watch a preset channel:
䊳 Touch the icon on the right that corresponds to the desired channel.
— or —
Press and hold on the highlighted channel icon to display a slide-out bar, and then slide your finger up or
down. Release your finger when you have selected the desired channel.
3
Tou c hFLO 3D
For more information about using Sprint TV, see “TV” on page 169.
Section 2C. TouchFLO 3D 53
Page 64

Weather
The Weather tab shows the current weather as well as weather information for the next four days of the week.
This tab can display weather information of up to 10 cities.
Your device automatically connects to the Internet via the data connection or Wi-Fi to download and display
weather information. The current temperature, temperature range, type of weather (sunny, cloudy, showers,
or other), and the weather information for the next four days of the week are shown on the
Weather tab.
3
1
2
1. To switch between cities, swipe your finger up or down the screen.
2. Touch Menu to add or delete a city, change the temperature to Celsius or Fahrenheit, and more.
3. Shows the last weather update. Touch this item or touch Update Now at the bottom-left side of the screen
to download the latest weather information.
To add a city:
1. On the Weather tab, touch Menu > Add Location.
2. The Select Country screen then appears. Flick or drag your finger on the screen, or use the Quick Scroll
bar on the right side of the screen when scrolling the country list. Touch the desired country to select it.
3. The Select City screen then appears. Flick or drag your finger on the screen, or use the Quick Scroll bar
on the right side of the screen when scrolling the city list. Touch the desired city to select it.
Tip
To choose download options:
1. On the Weather tab, touch Menu > Settings.
2. You can choose from the following options:
You can also enter the country or city name in the provided search box.
䡲 Download weather automatically. When this option is selected, weather information is automatically
downloaded whenever you select the
hours. Weather data is also downloaded every time an ActiveSync connection is established.
䡲 Download weather when roaming. Select this option only if you want to allow automatic download of
weather data when roaming. This may incur additional costs.
Weather tab, if the data has not been updated within the last three
54 Section 2C. TouchFLO 3D
Page 65

Stock
The Stock tab allows you to add, view, and analyze stocks and stock market movements using updated
financial information.
Note
Downloading stock or stock market information may incur additional fees from your wireless service provider.
Contact your service provider for details.
Adding Stock Quotes
You can add up to 14 stock quotes or stock market indexes on the Stock tab.
1. From the Home screen, slide to the Stock tab.
2. If this is your first time to add a stock quote or index, touch Add Stock. Otherwise, touch Menu > Add Stock.
3. On the Add Stock screen, enter the company name, stock market index, or ticker symbol in the search
box, and then touch the
4. Tap the company name, stock market index, or ticker symbol to add it to the Stock tab.
Search icon ( ).
Viewing Stock Information
The Stock tab lists all your stock quotes and stock market indexes including the current price or volume, and
the change in price or volume from the previous trading day. The change in price or volume box indicates
whether the stock or stock market has gained (green) or declined (red).
5
1
Tou c hFLO 3D
4
3
2
1. Touch a stock quote to view more details. Swipe your finger upward to scroll down the list of stock quotes
on the
Stock tab.
2. Touch Menu to add, delete or rearrange the stock quotes on the Stock tab.
3. Shows the current trading price or volume.
4. Touch the green or red box to switch between showing the change in points/price or percentage from
the previous trading day.
5. Shows the last stock information update. Touch this item or touch Update Now at the bottom-left side of
the screen to download the latest stock information.
Section 2C. TouchFLO 3D 55
Page 66

Settings
The Settings tab allows you to synchronize information with your computer or the Exchange Server, change
sound settings such as the ring tone, manage the communications features of your device such as Wi-Fi
and Bluetooth, and more. You will find the following settings on this tab:
1
2
3
4
5
6
7
8
9
1. Sync Data. Opens ActiveSync to connect and synchronize your device with the computer or Exchange
Server. (See “Synchronizing Information With Your Computer” on page 69 and “Starting Synchronization”
on page 163 for details.)
2. Sound. Allows you to set the sound profile, ring tone, and more.
3. Wallpaper. Allows you to change the wallpaper of the Home tab, or change the wallpaper back to the
default background.
4. Communications. Opens Comm Manager where you can easily turn features such as Wi-Fi and Bluetooth
on or off. (See “Comm Manager” on page 81 for details.)
5. Customize Tabs. Allows you to move or rearrange the Home screen tabs. (See “Customizing Home Screen
Tabs” on page 34 for details.)
6. My Contact Card. Allows you to set up My Contact Card. (See “Setting Up My Contact Card” on page 37 for
details.)
7. Mail Setup. Allows you to set up email accounts. (See “Email Messaging” on page 158 for details.)
8. G-Sensor. Allows you to enable or disable auto screen rotation and calibrate the device’s G-Sensor.
9. All Settings. Provides you access to all the settings of your device. (See “Managing Your Device” on page
114 for details.).
56 Section 2C. TouchFLO 3D
Page 67

Section 2D
Using Phone Features
⽧ Displaying Your Phone Number (page 57)
⽧ Making Calls from the Phone Screen (page 57)
⽧ Making Calls from the TouchFLO 3D Home Screen (page 60)
⽧ Answering and Ending Calls (page 60)
⽧ In-Call Options (page 61)
⽧ Checking Missed Calls (page 63)
⽧ Call History (page 63)
⽧ Speed Dial (page 64)
⽧ Straight Talk (page 64)
⽧ Turning the Phone On and Off (page 67)
⽧ Phone Services (page 68)
The same as with a standard mobile phone, you can use your device to make, receive, keep track of calls, and send text
messages.
Displaying Your Phone Number
This section will show you how to use the phone features of your device.
Using Phone Features
In case you forget what your phone number is, you can check your number from the Phone screen.
1. Press the Tal k key to display the Phone screen.
2. Ta p Menu > My Phone Number. (Your phone number and account information will be displayed.)
Notes
• To view information about your device, tap Menu > Device Information on the Phone screen.
• Your Sprint phone number is the same for both CDMA and GSM (international roaming).
Making Calls from the Phone Screen
The Phone program’s Smart Dial feature makes it easy for you to call a phone number or contact. When you
start entering a phone number or contact name, Smart Dial automatically searches and sorts the contact
entries in Contacts and the phone numbers in Call History (including incoming, outgoing, and missed calls).
You can then select the desired number or contact to call from the filtered list.
You can enter the first letter of the name or number of a contact. Smart Dial will search for contact phone
numbers and the first character of a contact name as well as from the character that appears after a space,
dash, or underscore in a contact name. For example, if you tap , which is associated with [a, b, and c]
on the Phone keypad, contact names such as “
“Dixon,
Allan,” “Thomas_Clark,” “JaneCampbell” would appear as matches.
If the matching list is long and you want to narrow down the search further, enter another letter. Using the
same example above, if you continue to tap “3” which is associated with [d, e, f], the matching list will be
narrowed down to the following names: “
Ben Miller,” “George Adams,” “John-Carter,” “Carter, Ellen,”
Ben Miller,” “George Adams,” “Carter, Ellen,” “Dixon, Allan.”
Section 2D. Using Phone Features 57
Page 68

Calling a Phone Number or Contact
1. Press the Tal k key to display the Phone screen.
2. Begin entering the first few numbers or characters by tapping the keys on the Phone keypad. As you
enter numbers or letters, the Smart Dial panel will display matches found.
If you tapped a wrong number or character, tap to erase each subsequent digit or character. To erase
the entire entry, tap and hold .
3. Tap to close the Phone keypad and to see if there are more matching numbers or contacts in the
Smart Dial panel. To browse through the filtered list, flick through the list or slide your finger up or down
the list slowly.
Smart Dial
panel
4. To call a number or contact, either:
䡲 Tap the desired phone number or contact from the list.
— or —
䡲 Call a different phone number associated with the displayed contact by tapping the contact card
icon ( ) at the right side of the contact name. On the Contact Details screen, tap the number you
want to call.
Tips
• When in a call, use the Volume Up or Down button on the side of the device to adjust the phone volume.
• After entering the first few digits and the phone number you are dialing is not found in your contacts, a
to Contacts?
• To save a phone number listed on the Phone screen to your Contacts, tap .
• To send a text message to a contact listed on the Phone screen, tap his or her contact card icon ( ) and
then tap
(SMS)” on page 131.
button will appear above the Phone keypad. Tap it to save the number to your Contacts.
Send Text Message. For more information about sending text messages, see “Text Messaging
Save
58 Section 2D. Using Phone Features
Page 69

Global Smart Dialing (International Calls)
When the Global Smart Dialing feature is enabled, placing international calls is a lot easier. You can
preconfigure the country where you are calling from and the country to call to, and then simply enter
the 10-digit number when placing your international call. Both the international access code and country
code will automatically be prepended to the number.
Configuring Global Smart Dialing
To enable Global Smart Dialing and preconfigure the dialing codes:
1. Press the Tal k key to open the Phone screen.
2. Ta p Menu, scroll down the menu, and then tap Global Smart Dialing.
3. Select the Enable Global Smart Dialing check box.
4. By default, the international access code has already been set to that for the United States. You do not
need to change it if you are making international calls from the United States.
However, if you are placing international calls from another country, select the country in which you are
located from the
International Direct Dialing Code box.
5. Select the country to which you are calling from the Dial to list. The corresponding country code will
appear in the
6. Tap Done.
Dial from list. If the country is not in the list, enter its international access code in the
Country Code box. (You cannot change the country code.)
Using Phone Features
Note
You can also configure Global Smart Dialing to automatically prepend the U.S. country code (1) when you place
domestic calls. Select
need enter the 10-digit number.
United States from both the Dial from and Dial to lists. When you place your call, you only
Using Global Smart Dialing
To use Global Smart Dialing to place an international call:
1. On the Phone screen, directly enter the 10-digit number to call. This number includes the area code and
phone number.
2. Tap on the Phone screen or press the Tal k key to place the call. Your device will dial the
complete number including the international access code, the country code, and the 10-digit number,
Direct Dial
Note
To use direct dialing to place an international call:
䊳 Enter the international access code, the country code, the city or area code, and the phone number, and
When Global Smart Dialing is not enabled, or when the number you want to call (area code and phone number)
contains fewer than 10 digits, you need to use direct dialing to place international calls.
then tap to complete the call.
Calling Voicemail
䊳 is reserved for your voicemail. Tap and hold on the Phone keypad to call voicemail and
retrieve your voicemail messages. For more information about using voicemail, see “Voicemail” on
page 128.
Section 2D. Using Phone Features 59
Page 70

Making Calls from the TouchFLO 3D Home Screen
You can add favorite contacts to the Home screen’s People tab and easily place calls to your favorite
contacts. See “Adding and Selecting Favorite Contacts” on page 38 for details.
From the Home screen’s People tab, you can also access the complete list of stored contacts and select a
contact to call. See “Browsing the Contacts List” on page 41 and “The Contact Details Screen” on page 42
for details.
Tip
You can also use Windows Mobile’s Contacts program to access your stored contacts and select a contact to call.
See “Contacts” on page 74 for details.
Answering and Ending Calls
Your device notifies you of incoming calls in the following ways:
䢇 The device rings or vibrates.
䢇 The Ta l k key flashes a white light.
䢇 The backlight illuminates, if your device was in sleep mode.
䢇 The device displays the Incoming Voice Call screen. If the incoming call is from a phone number stored in
your Contacts, the caller’s name is displayed. The caller’s phone number and picture may also be
displayed, if available.
Accepting or Rejecting an Incoming Call
When there is an incoming call, you can choose to accept or reject the call.
To answer the call:
䊳 Press the Tal k key.
— or —
On the incoming call screen, slide the center button of the
Answer/Ignore bar to the left.
To mute the ringing sound without rejecting the call:
䊳 Tap Mute Ring when you receive an incoming call.
— or —
Press the
Volume Down button.
— or —
Place your device face down.
To reject the call:
䊳 Press the End key.
— or —
On the Incoming Voice Call screen, slide the center button of the
60 Section 2D. Using Phone Features
Answer/Ignore bar to the right.
Page 71

To reject a call and send a text message:
When you reject a call, you can choose to automatically send a text message to the caller.
1. On the Phone screen, tap Menu > Options... > Advanced tab.
2. Select the Reject call with text message check box.
3. Change the default text message if needed, and then tap ok.
When
Reject call with text message is enabled, tap Send Text to reject the call and send the text message to
the caller.
You can automatically send a default text message to the caller and reject the incoming voice call. Tap
Tex t
when you have an incoming call to send the text message. You can change the default text message by
tapping
Menu > Options > Advanced tab while on the Phone screen.
Send
Ending a Call
When a call is in progress, tap End Call or press the End key to hang up.
In-Call Options
When a call is in progress, use the onscreen buttons to turn on the speakerphone, put a call on hold, accept
a second call and swap between the callers, set up a three-way call, and more.
For more information about starting a three-way call, see “Making a Three-Way Call” on page 137.
Using Phone Features
Putting a Call on Hold
1. Tap the Hold onscreen button or press the Tal k key to take the second call, and put the first one on hold.
2. To end the second call and return to the first call, tap End Call or press the End key on your device.
Swapping Between Two Calls
䊳 Tap the Ta lk onscreen button.
— or —
Press the
Ta lk key on your device.
Writing Down Notes While in a Call
1. Tap or pull out the stylus.
2. The Notes program automatically opens, with some information already entered in the notes, such as the
caller name, phone number, and more. Use the sliding QWERTY keyboard or an onscreen keyboard to
enter additional notes. For more information about using the sliding QWERTY keyboard and onscreen
keyboards, see “Entering Text” on page 24.
3. When you have finished entering your notes, tap ok to save your notes.
The file is saved in the Notes file list. To open the program and locate your file, tap
To learn more about using Notes, see “Notes” on page 78.
Start > All Programs > Notes.
Section 2D. Using Phone Features 61
Page 72

Turning On and Off the Speakerphone
During a call, do one of the following to turn the speakerphone on or off:
䊳 Tap to turn the speakerphone on. Tap this button again to turn the speakerphone off.
— or —
Placing your device face down automatically turns on the speakerphone. To turn the speakerphone off,
place your device face up.
— or —
You can also press and hold the
Ta lk key during a call to turn the speakerphone on or off.
Note
The speakerphone icon (
WARNING
To avoid damage to your hearing, do not hold your device against your ear when the speakerphone is
turned on.
appears in the title bar when the speakerphone is on.
)
Muting the Microphone During a Call
䊳 Tap to turn the microphone on or off. When the microphone is turned off, the mute icon (
appears on the screen.
)
Turning Noise Reduction On or Off
When you are using the earpiece and not the speakerphone during a call, you can tap Menu > Noise
Reduction On
is not needed, tap
You can also turn noise reduction on or off in the Phone settings. Tap
tab > Phone > Advanced tab and then select one of the following settings in the Reduce noise in phone calls
drop-down list:
䢇 Automatically. Analyzes ambient noise only at the beginning of a connected call and applies a certain noise
reduction setting based on the detected noise. However, when you move to a noisier environment during
the call, your device will not further decrease noise based on your new location.
䢇 Always. Always reduces ambient noise during the entire course of your phone call.
䢇 Never. Turns off noise reduction.
to reduce ambient noise if the other party cannot hear your voice clearly. When noise reduction
Menu > Noise Reduction Off to disable it and save battery power.
Start > Settings > All Settings > Personal
Notes
• If you want to change the noise reduction setting to Automatically, make sure to do this before starting a call.
• Noise reduction is not used when you have a wired or Bluetooth headset connected.
62 Section 2D. Using Phone Features
Page 73

Checking Missed Calls
Missed Call Notification
There are several ways your device alerts you when you have missed calls:
䢇 The missed call icon ( ) is displayed in the title bar.
䢇 The number of missed calls is shown on the TouchFLO 3D Home tab.
To check who the caller was:
䊳 Tap the title bar to display the Notifications screen, and then tap the missed call notification message.
— or —
On the TouchFLO 3D Home tab, tap the
Call History or Missed Call item. (For more information about the
TouchFLO 3D Home tab, see “Home” on page 35.)
— or —
On the Phone screen, tap or tap
Menu > Call History.
Call History
Call History shows you your incoming calls, outgoing calls, and missed calls. Call History makes redialing a
number fast and easy. It is continually updated as new numbers are added to the beginning of the list and
the oldest entries are removed from the bottom of the list.
Each entry contains the phone number (if it is available) and Contacts entry name (if the phone number is in
your Contacts). An icon appears to the left of the number, and it indicates the type of call:
Missed. These are incoming calls that you were not able to answer, and they
are routed to your voicemail.
Received. These are incoming calls that were answered.
Using Phone Features
Dialed. These are outgoing calls that you made.
Notes
• Call History records only those calls that occur while the device is turned on. If a call is received while your
device is turned off, it will not be added to the Call History.
• If you have a long list of calls in the Call History, you can tap one of the buttons at the bottom of the Call
History screen to filter the list according to the type of call that you want to display.
To make a call from Call History:
䊳 Tap a phone number you want to call.
To delete all Call History entries:
䊳 Tap Menu > Clear Call Logs.
Section 2D. Using Phone Features 63
Page 74

Speed Dial
Use Speed Dial to call frequently-used numbers with a single tap. For example, if you assign a contact to the
location
To create a Speed Dial entry:
1. On the Phone screen, tap Menu > Speed Dial.
2. Ta p Menu > New.
3. Tap a contact, and then select the phone number of the contact that you want assigned to the speed
4. In Location, select an available key to use as the speed dial key.
5. Tap ok.
2 in Speed Dial, you can tap and hold on the Phone keypad to dial the contact’s number.
dial key.
Notes
To make a call using Speed Dial:
If you have assigned a speed dial key to a contact, do the following to dial the contact’s number:
䊳 Tap and hold the assigned key, if it is a single-digit speed dial number.
• Number and keys are reserved and cannot be assigned as speed dial keys. The number
key is reserved for voicemail. You can set any number between “2” and “99” as a speed dial key.
• When you assign a new phone number in an occupied speed dial key, the new phone number will replace
the existing one.
• To delete a speed dial entry, in the
– or –
To dial a two-digit speed dial number, tap the first number key first, and then tap and hold the second
number key.
Speed Dial list, tap and hold the desired entry, and then tap Delete.
Straight Talk
Your device features Straight Talk™, a technology that integrates messaging, voice call, and three-way
calling. With a dual microphone and speaker that enhance voice quality and reduce noise, Straight Talk
turns your device into a conference room speakerphone system.
Making a Call from a Text Message
While you are viewing a text message on the Messages tab or in the Inbox, you can directly call the sender
of the message.
1. While viewing the text message, press the Ta lk key.
2. The Phone screen then opens, with the sender’s phone number automatically filled in and ready to be
dialed. To place the call, tap the
Tapping a phone number that is displayed in the body of the text message also allows you to call that
number.
For more information about viewing text messages on the Messages tab, see “Messages” on page 45. For
more information about working with text messages, see “Text Messaging (SMS)” on page 131.
Tal k button on the Phone screen or press the Tal k key again.
64 Section 2D. Using Phone Features
Page 75

Making a Call from an Email Message
While viewing a received email message, you can directly place a call to the sender of the message.
Tapping a phone number that is displayed in the body of the email message also allows you to call that
number.
Note
To receive email, set up your email account first on your device. See “Email Messaging” on page 158 for
instructions.
From the TouchFLO 3D Mail Tab or Inbox
䊳 When you are browsing email messages on the Mail tab or in the Inbox, select a received email and then
press the
Ta lk key. To call the sender, follow the same steps in “Making a Call from a Text Message” on
page 64.
For more information about browsing through email on the Mail tab, see “Mail” on page 44. For more
information about working with email messages, see “Email Messaging” on page 158.
From an Open Email
1.
From the Home screen, slide to the Mail tab.
2. Swipe your finger up or down the screen to browse through received messages. Tap an email message
to open it.
3. To place a call, you can do the following:
䡲 If the sender is a contact that is stored with a phone number on your device, tap the Tal k button ( )
that is displayed to the right of the sender name to directly dial the sender’s phone number.
Using Phone Features
Tal k
button
䡲 To call the phone number that is contained in the email message, tap that phone number.
Section 2D. Using Phone Features 65
Page 76

4.
While the call is in progress, you can view the email message directly on the Phone screen. An email
indicator is shown on the
Keyp ad button ( ). Tap this button to view the message.
Making a Call from a Meeting Request or Reminder
When you receive a calendar reminder or meeting request email that contains a phone number, you can tap
the number to directly place the call.
For example, if you are traveling and need to join a conference bridge call back in the home office, rest
assured that you can join the call without delay. Appointment reminders you receive on your device will
conveniently display the phone number and PIN, ready for you to dial.
If you made a call from a meeting request email, you can view the meeting details in the email directly on the
Phone screen while the call is in progress. Tap the
Keyp ad button ( ) to view the meeting details.
66 Section 2D. Using Phone Features
Page 77

Turning On the Speakerphone During a Call
While a call or three-way call is in progress, you can turn on the speakerphone by simply placing your
device face down.
Dual speaker
Mute key
Dual microphone
Your device provides crystal-clear sound quality and voice reception during three-way calls. When the
speakerphone is on, your device also enables the dual microphone to enhance your voice quality and
reduce noise.
When you need to temporarily mute the dual microphone so that the three-way call participants will not hear
you, press the
Mute button. Press it again to unmute.
Using Phone Features
Note
For instructions on how to make a three-way call, see “Making a Three-Way Call” on page 137 .
Turning the Phone On and Off
In many countries, you are required by law to turn off the phone while on board an aircraft.
Enabling or Disabling the Phone
1. Tap Start > Settings > Communications to open the Comm Manager.
2. Ta p t he OFF/ON slider at the right side of the Phone option to enable or disable the phone function.
When enabled, the
Enabling or Disabling Airplane Mode
Another way to turn off the phone function is to switch your device to Airplane Mode.
1. Tap Start > Settings > Communications to open the Comm Manager.
2. On the Comm Manager screen, tap Airplane Mode to enable or disable Airplane Mode. When enabled,
the ON indicator is activated.
When you enable Airplane Mode, all wireless radios on your device are turned off, including the phone
function, Bluetooth, and Wi-Fi. When you disable Airplane Mode, the phone function is turned back on and
the previous states of Bluetooth and Wi-Fi are restored.
ON indicator is activated.
Note
When you return from an international trip and you disable Airplane Mode after landing in the United States, your
device will first search for GSM networks if your device has been set to Global mode and was connected to a
GSM network before. A “No Service” status message may first appear on your device. Please wait for your device
to scan for CDMA service and connect to the Nationwide Sprint Network or a CDMA roaming network.
Section 2D. Using Phone Features 67
Page 78

Phone Services
When you are using your device in the United States, you can configure CDMA (domestic) phone services
for your device.
To access and change settings for domestic phone services:
1. From the Home screen, slide to the Settings tab and then tap All Settings.
2. On the Personal tab, tap Phone > CDMA Services tab.
3. Tap the service you want to change, and then tap Get Settings.
4. Tap ok after changing settings.
The following are some of the services that you can configure for your device:
Service Usage
Location Setting Allows the network to detect your current location using your device’s built-in
GPS chip. This is especially useful in emergencies.
TTY Mode Allows the use of a TTY (teletypewriter) device with the phone for users who are
visually or hearing impaired. Choose one of the following modes, depending on
the operation mode that is supported by the TTY device:
䢇 Full mode: Send and receive text during an ongoing call.
䢇 VCO mode: Voice Carry Over mode, which allows users to send voice and
receive text during an ongoing call.
䢇 HCO mode: Hearing Carry Over mode, which allows users to send text and
receive voice during an ongoing call.
䢇 Off: Disable TTY mode, and send and receive voice during an ongoing call.
Roaming To better control roaming costs, you can set your device to roam only on certain
networks. The Data Roam Guard also helps you to manage your roaming costs.
For more information about roaming, see “Roaming” on page 137.
Time Synchronization Allows the system time on your device to be synchronized with the time
information of the mobile phone network.
Voicemail Allows you to delete voicemail messages and clear the voicemail icon if it
appears on the screen.
Roaming Alert Enables sound alerts on your device so that you can be notified when your
device enters or goes out of the network coverage area.
DDTM Mode By default, voice calls take precedence over data. If, for instance, you are
browsing the Web or streaming media, the data connection may be interrupted
when you have an incoming call. To avoid interrupting the data connection, you
can turn on DDTM Mode so that voice calls can be automatically sent to
voicemail and the data connection will not be interrupted.
For more information about customizing settings of phone services, see Help on your device.
68 Section 2D. Using Phone Features
Page 79

Section 2E
Synchronizing Information With Your Computer
⽧ About Synchronization (page 69)
⽧ Ways to Synchronize (page 69)
⽧ Setting Up Windows Mobile Device Center on Windows Vista (page 70)
⽧ Setting Up ActiveSync on Windows XP (page 71)
⽧ Synchronizing With Your Computer (page 72)
⽧ Synchronizing via Bluetooth (page 73)
⽧ Synchronizing Music and Video (page 73)
You can take information from your computer wherever you go by synchronizing them to your device . This section
explains how to connect your device to the computer and synchronize your data.
About Synchronization
The following types of information can be synchronized between your computer and your device:
䢇 Microsoft® Office Outlook® information, which includes Office Outlook email messages, contacts, calendar,
tasks, and notes
䢇 Notes, which are created using Microsoft
䢇 Media, such as pictures, music, and video
䢇 Favorites, which are the bookmarked links to your favorite websites
䢇 Files, such as documents and other files
Before you can synchronize, you first need to install and set up the synchronization software on your
computer. For more information, see “Setting Up Windows Mobile Device Center on Windows Vista” and
“Setting Up ActiveSync on Windows XP” in this section.
®
Office OneNote® 2007
Computer
Synchronizing Information With Your
Ways to Synchronize
After you have installed the synchronization software on your computer, connect and synchronize your
device with your computer by:
䢇 Using the supplied USB sync cable.
Upon connecting the sync cable to your device and your computer, the synchronization process
automatically starts.
䢇 Using Bluetooth.
You must first set up a Bluetooth partnership between your device and your computer before you can
synchronize information between them using Bluetooth. For more information about setting up a
Bluetooth partnership, see “Bluetooth Partnerships” on page 94. For information about synchronizing
through Bluetooth, see “Synchronizing via Bluetooth.”
Try to synchronize regularly in order to keep information up-to-date in both your device and your computer.
Note
You can also synchronize Outlook email messages, contacts, calendar, and tasks on your device with the
Exchange Server at your workplace. For more information about setting up your device to synchronize with the
Exchange Server, see “Working With Company Email and Meeting Appointments” on page 162.
Section 2E. Synchronizing Information With Your Computer 69
Page 80

Setting Up Windows Mobile Device Center on Windows Vista
Microsoft Windows Mobile® Device Center is the replacement for Microsoft
Note
Some versions of Windows Vista come with Windows Mobile Device Center already installed. If Windows Mobile
Device Center is not available in your Windows Vista installation, you can install it from the Getting Started CD that
came with your device.
®
ActiveSync® on Windows Vista®.
Setting Up Synchronization in Windows Mobile Device Center
When you connect your device to your computer and start Windows Mobile Device Center for the first time,
you are asked to create a Windows Mobile partnership with your device. To create a partnership:
1. Connect your device to your computer. Windows Mobile Device Center configures itself, and then opens.
2. On the license agreement screen, click Accept.
3. On the Windows Mobile Device Center’s Home screen, click Set up your device.
Note
Choose Connect without setting up your device if you only want to transfer media files, check for updates,
and explore your device but not synchronize Outlook information.
4. Select the items you want to synchronize, and then click Next.
5. Enter a device name, and then click Set Up.
When you finish the setup wizard, Windows Mobile Device Center synchronizes your device automatically.
Outlook email messages and other information appear on your device after synchronization.
70 Section 2E. Synchronizing Information With Your Computer
Page 81

Using Windows Mobile Device Center
To open Windows Mobile Device Center, click Start > All Programs > Windows Mobile Device Center on your
Windows Vista computer.
Within Windows Mobile Device Center, you can do the following:
䢇 Click Mobile Device Settings to change synchronization settings.
䢇 Click Pictures, Music and Video > __ new pictures/video clips are available for import, and a wizard will guide you
through tagging and transferring photos from your device to the Photo Gallery on your computer.
䢇 Click Pictures, Music and Video > Add media to your device from Windows Media Player to synchronize music and
video files using Windows Media Player. For more information, see “Using Windows Media Player Mobile”
on page 109.
䢇 Click File Management > Browse the contents of your device to view documents and files on your device.
Computer
Synchronizing Information With Your
Note
See Windows Mobile Device Center Help for more information.
Setting Up ActiveSync on Windows XP
On a Windows® XP computer, you need to use Microsoft ActiveSync® 4.5 or later. If you do not have this
software on your computer, you can install it from the Getting Started CD that came with your device.
Setting Up Synchronization in ActiveSync
1. Connect your device to your computer. The Synchronization Setup Wizard automatically starts and
guides you to create a synchronization partnership. Click
2. To synchronize your device with your computer, clear the Synchronize directly with a server running Microsoft
Exchange
check box, and then click Next.
3. Select the information types that you want to synchronize, and then click Next.
4. Select or clear the Allow wireless data connections check box according to your preference.
5. Click Finish.
When you finish the wizard, ActiveSync synchronizes your device automatically. Notice that Outlook email
messages and other information appear on your device after synchronization.
Next to proceed.
Section 2E. Synchronizing Information With Your Computer 71
Page 82

Synchronizing With Your Computer
Connect and synchronize your device with your computer using the USB cable or Bluetooth connection.
Starting and Stopping Synchronization
You can manually synchronize from either your device or your computer.
From your Device
䊳 From the Home screen, slide to the Settings tab and then touch Sync Data.
– or –
Tap
Start > Programs > ActiveSync, and then tap Sync. To end synchronization before it completes, tap Stop.
Tip
To delete a partnership with one computer completely, disconnect your device from that computer. In ActiveSync
on your device, tap Menu > Options..., tap the computer name, and then tap Delete.
From Windows Mobile Device Center
1.
Click Start > All Programs > Windows Mobile Device Center.
2. Click at the lower left of the Windows Mobile Device Center. To end synchronization before it
completes, click .
From ActiveSync on Your Computer
When you connect your device to your computer, ActiveSync automatically opens on your computer and
synchronizes.
䢇 To manually start synchronization, click .
䢇 To end synchronization before it completes, click .
Specifying What Information Is Synchronized
You can change the information types and the amount of information to synchronize for each type on either
your device or your computer. Follow the steps below to change synchronization settings on your device.
Note
1. In ActiveSync on your device, tap Menu > Options.
2. Select the check box for any items you want to synchronize. If you cannot select a check box, you might
3. To change synchronization settings for an information type (for example, E-Mail), select it, and tap Settings.
Before changing synchronization settings on your device, disconnect it from your computer.
have to clear the check box for the same information type elsewhere in the list.
You can then set the download size limit, specify the time period of information to download, and more.
Notes
• Some information types such as Favorites, Files, and Media cannot be selected in ActiveSync Options on your
device. You can select or clear these items only from your computer’s Windows Mobile Device Center or
ActiveSync.
• A computer can have sync partnerships with many different Windows Mobile powered devices, but a device
can have sync partnerships with at most two computers. To ensure that your device will synchronize properly
with both computers, set up the second computer using the same synchronization settings you used on the
first computer.
• Outlook email messages can be synchronized with only one computer.
72 Section 2E. Synchronizing Information With Your Computer
Page 83

Troubleshooting Sync Connection Problems
In some cases, when the computer connects to the Internet or a local network, it may disconnect the
connection with your device in favor of the Internet or network connection.
If this happens, tap
faster data synchronization
device.
Start > Settings > All Settings. Tap Connections tab > USB to PC, and then clear the Enable
check box. This makes your computer use a serial USB connection with your
Synchronizing via Bluetooth
You can connect and synchronize your device with the computer using Bluetooth.
Note
1. Set up Windows Mobile Device Center or ActiveSync on your computer to synchronize through
2. Make sure that Bluetooth on both your device and the computer are turned on and set to visible mode.
3. On your device, tap Start > ActiveSync.
4. Tap Menu > Connect via Bluetooth > Add a device.
5. Tap the name of your computer, select Bluetooth Serial Port, and then tap Continue.
To connect and synchronize your device with a computer via Bluetooth, your computer must have a built-in
Bluetooth or installed with a Bluetooth adapter or dongle.
Bluetooth. See the program’s Help for instructions.
See “Using Bluetooth” on page 93 for details.
If this is the first time you have connected to this computer via Bluetooth, you must first complete the
Bluetooth wizard on your device and set up a Bluetooth partnership between your device and the
computer. For more information about creating a Bluetooth partnership, see “Bluetooth Partnerships” on
page 94.
Computer
Synchronizing Information With Your
Note
To conserve battery power, turn off Bluetooth when not in use.
Synchronizing Music and Video
If you want to carry your music or other digital media along with you while you travel, set up Windows Media®
Player on your computer to synchronize music and video with your device.
Other than selecting the
be set in Windows Media Player. Before media can be synchronized, you must do the following:
䢇 Install Windows Media Player Version 11 on your computer. (Windows Media Player 11 works only with
Windows XP or later versions).
䢇 Connect your device to the computer with a USB cable. If your device is currently connected using
Bluetooth, you must end that connection before media can be synchronized.
䢇 Set up a sync partnership between your device and your computer’s Windows Media Player.
For more information about using Windows Media Player Mobile, see “Using Windows Media Player Mobile”
on page 109.
Media information type to be synchronized, all media synchronization settings must
Section 2E. Synchronizing Information With Your Computer 73
Page 84

Section 2F
Contacts, Calendar, and Tools
⽧ Contacts (page 74)
⽧ Calendar (page 76)
⽧ Notes (page 78)
⽧ Tasks (page 79)
⽧ Calculator (page 79)
⽧ Comm Manager (page 81)
⽧ Adobe Reader LE (page 82)
⽧ Microsoft Office Mobile (page 83)
⽧ JETCET Presentation (page 84)
⽧ Automatic Speech Recognition (ASR) (page 86)
⽧ Voice Recorder (page 87)
⽧ WorldCard Mobile (Business Card Scanner) (page 88)
⽧ JETCET PRINT (Wireless Printing Application) (page 89)
Your device is equipped with several personal information management features that help you manage your busy lifestyle.
Document viewers, voice recognition and recording programs, a business card reader, and other useful tools
are also available. This section shows you how to use these features and tools.
Contacts
Adding New Contacts
You can use the Windows Mobile Contacts program to store and manage the contact information of the
people and businesses you communicate with. You can add the following types of contacts to your device:
䢇 Outlook contacts. Contacts that are stored on your device, which can be created on your device or
synchronized with your computer or the Exchange Server.
䢇 Windows Live™ contacts. Contacts that you communicate with using Windows Live™ Messenger or MSN.
Notes
To open the Contacts screen:
䊳 Tap Start > All Programs > Contacts.
To add a contact on your device:
1. Open the Contacts screen.
2. Ta p New, select Outlook Contact, and enter the contact information.
3. In the File as field, choose how you want the contact name to appear in the contact list.
4. To add a photo of the contact, tap Select a picture, and then select the picture file or tap Camera to take a
• You can also add contacts to your device through the All tab of the All Contacts screen which is accessed
from the TouchFLO 3D Home screen. See “People” on page 37 for details.
• You can add Windows Live™ contacts only after setting up Windows Live™ on your device. See “Adding
Windows Live Contacts” on page 152 for details.
photo of the contact.
74 Section 2F. Contacts, Calendar, and Tools
Page 85

5. To assign a ring tone to the contact, tap the Ring tone field, scroll through the list of tones, and then select
a desired tone.
6. When finished, tap ok.
Tips
• If a person who is not in your list of contacts called you and you want to save that person’s phone number,
you can tap Yes, Create new contact on the pop-up window that appears after the call is ended.
• To save a phone number that is contained in a message, open the message, tap the underlined phone
number, and then tap Save To Contacts.
• To edit contact information, tap the contact name on the Contacts screen and then tap
Menu > Edit.
Managing Contacts
To group similar contacts:
For easier management, you can group similar contacts by assigning them to categories.
1. Create a new Outlook contact or edit an existing Outlook contact.
2. Ta p Categories.
3. Select a preset category such as Business or Personal, or tap New to create your own category.
4. When finished, tap ok.
To find a contact on your device:
There are several ways to find a contact when your contact list is long:
䢇 Begin entering a contact name in the provided text box until the contact you want is displayed.
䢇 On the Quick Scroll bar on the right of the Contacts screen, scroll to or tap a letter to go directly to the part
of the contacts list where contact names start with that letter.
Contacts, Calendar, and Tools
Quick Scroll
bar
Note
䢇 Filter the list by categories. In the contact list, tap Menu > Filter, and then tap a category you’ve assigned to
a contact. To show all contacts again, select
You can disable the Quick Scroll bar by tapping Menu > Options... and selecting the Show alphabetical
check box. This will show the alphabetical index at the top of the Contacts list.
index
Menu > Filter > All Contacts.
Section 2F. Contacts, Calendar, and Tools 75
Page 86

To send contact information via Bluetooth:
You can quickly send contact information to another mobile phone or device through Bluetooth.
1. Tap and hold a contact on the Contacts screen.
2. Ta p Send via Bluetooth, and then select a device where to send the contact to.
Note
Before sending, make sure Bluetooth is turned on and set to visible mode on your device and the target mobile
device. You can also send contact information to your computer. See “Sending and Receiving Information Using
Bluetooth” on page 95 for details.
Calendar
You can use the Windows Mobile Calendar program to create appointments, including meetings and other
events, as well as synchronize Calendar appointments between your device and computer.
Note
To open the Calendar screen:
䊳 Tap Start > All Programs > Calendar.
Creating Appointments
To schedule an appointment:
1. Open the Calendar screen and then tap Menu > New Appointment.
2. Enter a name for the appointment in the Subject field.
3. Do one of the following:
4. Specify the type of category for your appointment, so that it can be grouped with other related
5. When finished, tap ok to return to the calendar.
You can also create appointments through the Calendar tab of the TouchFLO 3D Home screen. See “Calendar”
on page 46 for details.
䡲 If it is a special occasion such as a birthday or an all-day event, set the All Day option to Yes .
䡲 If there is a time frame for the appointment, set the start and end dates and times.
appointments. Tap
Seasonal), or tap
Categories, and then select a preset category (Business, Holiday, Personal, or
New to create your own category.
Notes
• All-day events do not occupy blocks of time; instead, they appear in banners at the top of the calendar.
• To have the time entered automatically, first, tap
Next, tap and hold on the start time, drag your finger down to select a time slot for the new appointment, and
then tap
• To remove an appointment, tap Menu > Delete Appointment.
Menu > New Appointment.
Day on the lower-left side of the screen to switch to Day view.
To set the reminder time for new appointments:
By default, Calendar has been set to display a reminder alert when you have new upcoming appointments.
You can change the reminder time.
1. On the Calendar screen, tap Menu > Tools > Options... > Appointments tab.
2. Make sure the Set reminders for new items check box is selected.
3. Set the time when you want the reminder to alert you, and then tap ok to return to the Calendar screen.
76 Section 2F. Contacts, Calendar, and Tools
Page 87

The Calendar Screen
By default, Calendar displays appointments in Agenda view. You can also look at your appointments in Day,
Week, Month, and Ye ar views.
1
2
4
3
Agenda view
1. The highlighted hours indicate the time of your appointments.
2. Tap an appointment to view details about the appointment.
3. Tap the lower-left side of the screen to change the calendar view to one of the following: Day, Week, Month,
Yea r, or Agenda.
4. The red box and red arrows indicate there are conflicting appointments.
Contacts, Calendar, and Tools
Viewing Appointments
䢇 To see detailed appointment information in any view, tap the appointment.
䢇 To view appointments by category, tap Menu > Filter, and then select the desired category.
䢇 To change the default view that Calendar uses to display appointments, tap Menu > Tools > Options... >
General
䢇 When in Month view, you will see the following indicators:
tab. Tap the Start in box, and then choose the calendar view.
Morning appointment
Afternoon or evening appointment
Both morning and afternoon or evening appointments
All-day event
Sending Appointments
Sending a Meeting Request
Use Calendar to schedule meetings via email with contacts who use Outlook or Outlook Mobile.
1. Open the Calendar screen, and then create an appointment or tap Menu > Edit to open an appointment.
2. Ta p Attendees, and then tap Add Required Attendee or Add Optional Attendee and add the contacts whom you
want to invite.
Note
You can specify whether an attendee is required or optional only if your device is connected to a Microsoft
Exchange 2007 server. Otherwise, all attendees are designated as required. For more information, see
“Managing Meeting Requests” on page 165.
Section 2F. Contacts, Calendar, and Tools 77
Page 88

3.
When you have finished adding attendees, tap Done.
4. Tap ok to send.
Notes
• To choose the email account to use for sending meeting requests, tap Menu > Tools > Options... >
Appointments
Internet email (POP3/IMAP4), or Windows Live™ account.
• If you’re sending the meeting request using your Outlook Email account, it will be sent to the attendees the
next time you synchronize your device with your computer or Exchange Server.
• When attendees accept your meeting request, the meeting is automatically added to their schedules. When
their response is sent back to you, your calendar is updated as well.
tab. Tap the Send meeting requests via box and choose to send via your Outlook Email,
Notes
Using Notes, you can create handwritten and typed notes, record voice notes in WAV format, convert
handwritten notes to text for easy readability, and more.
To create a note:
1. Tap Start > All Programs > Notes. In the note list, tap New.
2. Use the sliding QWERTY keyboard or choose an onscreen keyboard to enter your text.
Tip
3. When finished, tap ok to save and return to the note list.
Notes
For more information about using the sliding QWERTY keyboard or onscreen keyboard, see “Entering Text” on
page 24.
• To select handwritten text, tap and hold next to the writing. As soon as dots appear, and before they form a
complete circle, quickly drag across the writing.
• If a letter crosses three ruled lines, it is treated as a drawing rather than text.
To draw in a note:
1. Create or open a note file.
2. Use the stylus to draw on the screen. A selection box then appears around your drawing.
3. Tap ok to save.
Note
To select a drawing (for example, to copy or delete it), tap and hold the drawing briefly. When you lift the stylus, the
drawing is selected.
To record a voice note:
1. Tap Start > All Programs > Notes.
2. If you do not see the Recording toolbar, tap Menu > View Recording Toolbar.
To create a stand-alone recording, record from the note list. You can also create or open a note first, and
then add a recording to a note.
3. Tap t h e Record icon (
Tip
To select the voice recording format, return to the note list and then tap
link (at the bottom of the Options screen). On the Input screen, tap the
from the
Voice recording format
) to begin recording your voice. Tap the Stop icon ( ) to stop recording.
Menu > Options... > Global Input Options
Options
tab and choose the desired format
list.
78 Section 2F. Contacts, Calendar, and Tools
Page 89

Task s
Use Tas ks to keep track of things you need to do. A task can occur once or repeatedly (recurring).
Your tasks are displayed in a task list. Overdue tasks are displayed in red. A reminder will be displayed when
you have new tasks to be completed.
To create a task:
1. Tap Start > All Programs > Tasks.
2. Ta p Menu > New Task, enter a subject for the task, and fill in information such as start and due dates,
priority, and so on.
3. Specify the type of category for your task, so that it can be grouped with other related tasks. Tap
Categories, and then select a preset category (Business, Holiday, Personal, or Seasonal), or tap New to
create your own category.
4. When finished, tap ok.
To change the priority of a task:
Before you can sort tasks by priority, you need to specify a priority level for each task.
1. Tap Start > All Programs > Tasks.
2. Tap the task you want to change the priority for.
3. Tap Edit, and tap a priority level in the Priority box.
4. Tap ok to return to the task list.
Contacts, Calendar, and Tools
Note
To show start and due dates in the task list:
All new tasks are assigned a Normal priority by default.
1. Tap Start > All Programs > Tasks, and then tap Menu > Options.
2. Select the Show start and due dates check box, and then tap ok.
Calculator
Calculator features basic calculation functions, and also works as an advanced scientific calculator.
Basic Calculator
Use the Simple Calculator to do basic arithmetic such as addition, subtraction,
multiplication, and division. You can also work with numbers you store in the
calculator memory.
To use the Basic Calculator:
1. Tap Start > Calculator.
2. Operate the calculator the same as you would a handheld calculator by
touching the onscreen keys to enter numbers, clear the entered number, and
perform calculations.
3. You can also tap the respective buttons on the left side of the screen to add
values to the calculator memory, display the stored number from the calculator
memory, or clear the calculator memory.
Section 2F. Contacts, Calendar, and Tools 79
Page 90

Notes
• A maximum of 9 digits can be entered for each number.
•Tap
Copy at the lower-left side of the screen to copy the displayed value so that you can paste it to another
program that has a paste function, such as Notes.
• The Basic Calculator can only be used when the screen display is in portrait mode.
Scientific Calculator
Use the Scientific Calculator to perform more complex calculations such as square roots, logarithmic and
trigonometric functions, percentages, and more.
To display the Scientific Calculator:
1. Tap Start > Calculator.
2. Slide open the QWERTY keyboard to display the Scientific Calculator.
To use the Scientific Calculator:
5
6
1
2
3
4
1. Tap to toggle between degrees or radian measurement.
2. Tap to display the second layer of scientific calculation buttons.
3. When you tap one of these function buttons after entering a number, the corresponding operand or
operator is displayed. You can continue to enter numbers, operands and operators to build the formula
expression.
4. Tap to compute and display the calculation result.
5. Tap to clear the calculation result so you can build another equation.
6. Tap to clear the formula expression or calculation result.
80 Section 2F. Contacts, Calendar, and Tools
Page 91

Comm Manager
Comm Manager is a central location where you can easily turn on and off the communication features of your
device such as the phone connection, Wi-Fi, data connection, Bluetooth, and more.
To access the Comm Manager:
Do one of the following:
䊳 Touch Start > Settings to go directly to the Home screen’s Settings tab, and then touch Communications.
– or –
Touch
Start > All Programs > Comm Manager.
– or –
Touch
Start > Settings > All Settings > Connections tab > Comm Manager.
1
Contacts, Calendar, and Tools
2
3
4
5
6
12
11
10
9
8
7
1. Switch Airplane Mode on or off. Turning on Airplane Mode turns off the phone connection, Wi-Fi, and
Bluetooth functions. For more information, see “Enabling or Disabling Airplane Mode” on page 67.
2. Access the phone settings, configure phone services, and more.
3. Connect a Bluetooth headset or other Bluetooth-enabled device. For more information, see “Using
Bluetooth” on page 93.
4. Connect to a wireless network. See “Connecting via Wi-Fi” on page 141 for details.
5. Open ActiveSync and configure the push mail settings. See “Working With Company Email” on page
163 for details.
6. Open the Connections screen to check or manage data connection settings.
7. Access the phone, Bluetooth, and Wi-Fi settings.
8. Connect or disconnect the current data connection.
9. Switch between automatically receiving (as items arrive) or manually retrieving Outlook email messages.
See “Automatic Synchronization Using Direct Push” on page 163 for details.
10. Switch Wi-Fi on or off. Tap Settings > Wireless LAN to configure wireless network connection settings. See
“Connecting via Wi-Fi” on page 141 for details.
Section 2F. Contacts, Calendar, and Tools 81
Page 92

11 .
Switch Bluetooth on or off. Tap Settings > Bluetooth to configure Bluetooth on your device.
See “Using Bluetooth” on page 93 for details.
12. Switch the phone connection on or off. Tap Settings > Phone to set the ring tone, services, and other phone
settings. See “Using Phone Features” on page 57 and “Managing Your Device” on page 114 for details.
Adobe Reader LE
Adobe® Reader® LE is an application for viewing PDF (Portable Document Format) documents on your
device. It supports a subset of the features found in full versions of Adobe Reader.
To open Adobe Reader LE:
䊳 Tap Start > All Programs > Adobe Reader LE.
To open a PDF file on your device:
䊳 Open a PDF file in Adobe Reader LE.
– or –
Open File Explorer, find the PDF file, and then tap the file to open it.
To navigate through a PDF document:
You can use the controls in the program and finger gestures to navigate a PDF document.
䢇 Tap Tools > View > Continuous and then slide your finger up or down the screen to scroll through the pages
in the document.
Tip
䢇 Tap to zoom in or to zoom out. After zooming in, slide your finger on the screen to pan the current
You can also drag the scroll bars to scroll through the pages.
page.
䢇 Tap to return to the previous page; tap to move to the next page. Tap to jump to the first page; tap
to jump to the last page.
䢇 Tap Tools > Go To > Page Number to enter a page number that you want to view.
To search for text in the document:
1. Tap Tools > Find > Text or tap in the toolbar.
2. Type in the text to be searched, and then tap Find. The matched text in the document will be highlighted.
3. To view the next occurrence of the text, tap Tools > Find > Next.
Tips
• Adobe Reader LE displays a bookmark pane at the top panel if a PDF file contains bookmarks. Tap the
bookmarks to go to a specific section/page within the file.
• Adobe Reader LE supports password-protected PDF files with up to 128-bit encryption. When you open a
password-protected PDF file, you will be prompted to enter the password before opening it.
82 Section 2F. Contacts, Calendar, and Tools
Page 93

Microsoft Office Mobile
Microsoft® Office Mobile consists of the following applications:
䢇 Microsoft® Office Excel® Mobile lets you create and edit Excel workbooks and templates on your device.
䢇 Microsoft® Office OneNote® Mobile lets you create notes with text, photos, and voice recordings for
synchronization later with Microsoft Office OneNote 2007 on your computer.
䢇 Microsoft® Office PowerPoint® Mobile allows you to view (but not create) slide show presentations in *.ppt and
*.pps formats.
䢇 Microsoft® Office Word Mobile lets you create and edit documents and templates in Word Mobile and save
them as
To use Microsoft Office Mobile:
1. Tap Start > Office Mobile.
2. Tap the Office Mobile application that you want to use.
When working with Word Mobile and Excel Mobile files, you can use the Zoom bar on your device for
zooming:
䡲 To zoom in, slide your finger from left to right across the Zoom bar.
䡲 To zoom out, slide your finger from right to left across the Zoom bar.
Word Mobile and Excel Mobile do not fully support all features of Microsoft Office Word and Microsoft Office
Excel. To see a complete list of features that are not supported in Word Mobile and Excel Mobile, see Help
on your device.
*.doc, *.rtf, *.txt, and *.dot files.
Contacts, Calendar, and Tools
Tips
• By default, Word Mobile saves documents in .docx format, while Excel Mobile saves workbooks in .xlsx
format. If you want to open these types of files on a computer that uses Microsoft Office 2000, Office XP, or
Office 2003, you need to download and install the File Format Converter in your computer. You can find this
converter at
C6BB74CD1466&displaylang=en.
• If you want Word Mobile to save documents in
Options...
Document (.doc)
• If you want Excel Mobile to save workbooks in a format that is compatible with Microsoft Office 2000, Office
XP, or Office 2003, tap Menu > Options... (with no workbook opened), and then change Template for new
workbook
http://www.microsoft.com/downloads/details.aspx?FamilyId=941B3470-3AE9-4AEE-8F43-
.doc format, tap Menu > Tools > Options... (or Menu >
when no document is opened), and then change the Default template to Word 97-2003
.
to Blank 97-2003 Workbook.
Section 2F. Contacts, Calendar, and Tools 83
Page 94

JETCET Presentation
If you are away from your office and urgently need to make a presentation, you can use JETCET Presentation to
create a PowerPoint file and present it from your device.
JETCET Presentation also allows you to open and display presentations that were created in Microsoft
PowerPoint 97, PowerPoint 2000, PowerPoint 2002 (XP), or PowerPoint 2003.
Opening JETCET Presentation
䊳 Tap Start > All Programs > JETCET Presenter.
Creating a New Presentation
When you open JETCET Presentation, the main screen displays a folder tree. Tap Menu > Cancel first and then
tap
Menu > File > New to create a new presentation. You can then enter text, insert graphics, and add more
slides.
To add text to a slide:
1. Tap Edit > Shape > Insert, tap , and then tap ok.
2. Drag your finger or stylus to draw a text box on the slide.
3. While the text box is selected, set the font type, size and style first and then start entering your text using
the hardware keyboard or onscreen keyboard.
4. While the text box is selected, tap Menu > Paragraph and then set the paragraph alignment, indentation,
and line spacing.
5. To format the text with automated bullets or numbering, tap Menu > Paragraph > Bullets.
6. To modify the properties of the text box, select the text box and then tap Edit > Shape > Modify. You can
change the fill color, add or remove the border, and more. To wrap text inside the text box, tap the
tab and then select the
Word wrap text in AutoShape check box.
Tex t Box
To edit text:
1. Select the text box that contains the text you want to edit.
2. Ta p Edit > Text > Modify and then change your text. Tap within the text region to place the cursor exactly
where you want to start editing.
To insert an object shape:
1. Tap Edit > Shape > Insert.
2. Tap an object, for example, an arrow, from the Autoshape Objects.
3. Drag on the slide to draw the select shape.
Tip
To add and edit slides:
To insert a picture, tap Edit > Shape > Picture.
1. Tap Edit > Slide > New to add a new slide.
2. To change the background color of a slide, tap Edit > Slide > Background.
3. In Background fill, tap Fill Effects to apply a gradient or tap More Colors to choose a solid color.
4. Tap Apply to change the background color of the current slide, or tap Apply to All to change all slides.
5. To apply a transition effect to the slides, tap Edit > Slide > Transition.
84 Section 2F. Contacts, Calendar, and Tools
Page 95

6. In Effect, select the type of transition effect to use and then select a speed.
7. Choose whether to advance slides on mouse click or automatically. If you select to auto-display slides,
set the time delay.
8. To make the changes to the current slide only, tap Apply. For the changes to affect all slides in the
presentation, tap
To save the presentation:
䊳 If this is your first time to save your presentation, tap Menu > File > Save As and then enter a new file name.
To save changes made to your presentation, tap
Apply to All.
Menu > File > Save.
Displaying the Presentation
You can connect your device to a large-screen display such as a television and show your presentation to
an audience as a full-screen slideshow. For more information about connecting your device to a largescreen display, see “Connecting to an External Display” on page 121
To display the presentation as a slideshow:
1. Tap the PowerPoint file in the folder tree to open the file, or tap File > Open and then tap the
PowerPoint file.
2. Ta p Menu > Show > Set Up Show. Select whether to advance slides Manually or Using timings, if present, and
then tap
3. Tap Menu > Show > View Show. The presentation is then displayed in landscape and in full screen.
4. Slide open the hardware keyboard. If you have set up the slideshow to advance manually, press the right
arrow key to advance one slide forward and the left arrow key to go back one slide.
Another way to advance one slide forward is to tap the screen.
You can also tap the arrow watermark at the lower-left corner of the screen to open a selection menu,
and then tap
ok.
Next or Previous to move between slides.
Contacts, Calendar, and Tools
Arrow watermark
To exit the slideshow:
䊳 Tap the arrow watermark, tap the down arrow to scroll down the selection menu, and then tap End Show.
For more information about using JETCET Presentation, tap on the toolbar of JETCET Presentation to
view the program help.
Section 2F. Contacts, Calendar, and Tools 85
Page 96

Automatic Speech Recognition (ASR)
Your device’s built-in ASR lets you make phone calls, open programs, play back music, get calendar
information, and more, just by using your voice. It only responds to a set of predefined commands and does
not allow you to record your own commands.
This section gives a few examples on how to use ASR. For more information, see ASR help on the device.
To access help, tap
To use ASR:
1. Press and hold the Tal k key, and a microphone icon ( ) will appear on the title bar.
2. Hold your device a few inches away from your mouth. In a clear voice, say a command.
For example, say “Help” to ask for information about using ASR.
3. The ASR software then asks you a question. Say your answer.
To place a call:
You can call contacts that are stored on your device, dial a phone number, redial, and place a return call.
1. Press and hold the Tal k key until the microphone icon ( ) appears on the title bar.
2. In a clear voice, say one of the following commands:
䡲 “Call [contact name]” to call a contact.
䡲 “Dial [number]” to dial a phone number.
䡲 “Redial” to repeat the last call made.
䡲 “Callback” to return the last call received.
䡲 “Call [contact name] at [location]” to call a contact at a specific number.
For example, say:
“Call Ann at mobile”
“Call Ann at home”
“Call Ann at work”
3. The ASR software will then confirm with you the contact or number to call. Say “Yes” or “Correct.”
If the ASR software is wrong about the contact or number to call, say “No” or “Incorrect” to try again.
4. Your device starts to call the contact or number.
Start > All Programs > Help tab, tap Help for Added Programs, and then tap Voice Command.
To open a program:
1. Press and hold the Tal k key until the microphone icon ( ) appears on the title bar.
2. In a clear voice, say “Start”, “Open”, or “Show” then the program name.
To request information from your calendar:
1. Press and hold the Tal k key until the microphone icon ( ) appears on the title bar.
2. In a clear voice, ask for the information you want to retrieve.
For example, say:
“What’s my next appointment?”
“What’s my next meeting?”
“What’s my schedule tomorrow?”
86 Section 2F. Contacts, Calendar, and Tools
Page 97

To request for date and time:
1. Press and hold the Tal k key until the microphone icon ( ) appears on the title bar.
2. In a clear voice, say “What date is it?” The ASR software then tells you the current date.
3. Press and hold the Tal k key again, and then say “What time is it?”
4. The ASR software then tells you the current time.
Voice Recorder
Voice Recorder lets you record your voice and quickly send it as an email attachment, send it in a picture
message, or set the recorded voice as your ring tone.
Contacts, Calendar, and Tools
Note
Voice Recorder saves voice recordings in AMR-NB (Adaptive Multi-Rate Narrowband) format only. This is a
common speech audio format used in mobile devices.
To record your voice:
1. Tap Start > All Programs > Voice Recorder.
2. Hold the device’s microphone close to your mouth.
3. Touch Record or to start recording. Tap Stop or to end the recording.
To select or create a folder in which to save voice recordings:
By default, all recordings are saved in the
My Voices folder of the device. You can choose another folder or
create a new folder to save your voice recordings.
Tip
If a microSD card is installed before you open Voice Recorder, the recordings are saved in the My Voices folder
on the microSD card by default.
1. Tap the arrow beside the folder name on the upper left side of the screen.
2. In the menu that opens, choose an existing folder or touch Add/Delete to create a new folder.
To play back a voice recording:
䊳 On the Voice Recorder screen, touch a voice recording to play it.
Tip
If you need to adjust the sound volume, press the Volume Up or Volume Down button.
To set a voice recording as your ring tone:
䊳 Tap and hold a voice recording, and then tap Set as Ringtone.
To send a voice recording in an email or picture message:
1. Tap and hold a voice recording, and then tap Send.
2. Do one of the following:
䡲 To send the voice recording in an email message, select an email account, compose your email
message, and then tap
䡲 To send the voice recording in a picture message, tap Picture Message, compose your message, and
then tap
Send.
Send. See “Email Messaging” on page 158 to learn how to send email.
Section 2F. Contacts, Calendar, and Tools 87
Page 98

To send a voice recording via Bluetooth:
䊳 Tap and hold the voice recording you want to send, and then tap Send via Bluetooth. For more information
about Bluetooth, see “Using Bluetooth” on page 93.
To rename or move a recording:
1. Tap and hold the voice recording, and then tap Rename/Move.
Tip
To select multiple recordings, tap and drag over the desired recordings or tap Menu > Select All. Note that
you can move multiple files, but you cannot rename multiple files simultaneously.
2. In the Name box, enter the new voice recording name.
3. To move the voice recording, select the new destination in the Folder and Location boxes, and then tap ok.
WorldCard Mobile (Business Card Scanner)
WorldCard Mobile uses your device’s built-in camera to scan business cards and import the information into
your Contacts.
To access WorldCard Mobile:
䊳 Tap Start > All Programs > WorldCard Mobile.
To capture a business card and import the information to Contacts:
1. Tap on the WorldCard Mobile screen to open the Camera program.
2. Tap the Virtual Camera button ( ) to take a photo of the business card, and then tap the Back button
( ). For more information about using the Camera, see “Taking Photos and Videos” on page 98.
Tip
3. On the WorldCard Mobile screen, tap Recognize.
Make sure that lighting is adequate and that the entire business card is visible on the Camera screen before
taking a picture.
Tips
• If you want to retake the shot, tap Re-Capture.
• For better recognition, choose the
card.
Language and Region based on the language used in the business
4. The screen will display contact information captured from the business card. Use the onscreen keyboard
to edit the contact information, if needed.
Tip
Uncheck the box beside any contact information that you do not want to appear in your Contacts..
5. Tap Export to transfer the captured data to Contacts.
6. Tap Start > All Programs > Contacts to view the contact.
For more information about using WorldCard Mobile, tap on the WorldCard Mobile screen to view the
program help.
88 Section 2F. Contacts, Calendar, and Tools
Page 99

JETCET PRINT (Wireless Printing Application)
JETCET PRINT™ lets you print image files or documents from your device directly to a Bluetooth or network
printer. You can also print email messages, email attachments, appointments, contacts, and tasks.
To open JETCET PRINT:
䊳 Tap Start > All Programs > JETCET PRINT 5.
To se t up a pri nter:
䊳 On the JETCET PRINT screen, tap the Settings tab, and then tap:
䡲 Add Network Printer to set up and connect to a shared network printer.
Contacts, Calendar, and Tools
Note
The device will wait continuously if you have entered an incorrect IP address while setting up a network printer.
– or –
䡲 Add Bluetooth Printer to set up and connect to a Bluetooth printer.
To print a document, image, email, or other types of information:
1. On the JETCET PRINT screen, select what you want to print (document, picture, or email/PIM) by tapping
the corresponding tabs on top of the screen.
2. If you want to print a calendar appointment, contact or task, tap , and then select which type of
information you want to print.
3. Tap and hold the file, picture, or item that you want to print, and then tap Print.
4. Select the printer to use and the paper size, and then tap Next.
5. Choose a page layout from the list, and then tap Next to start printing.
Tip
For more information about using JETCET PRINT, tap
You can also print document and image files from File Explorer. To print, use File Explorer to locate the file you
want to print. Tap and hold the file, and then tap Print via JETCET 5... on the pop-up menu.
Menu > Help > Contents on the JETCET PRINT screen to
view the program help.
Section 2F. Contacts, Calendar, and Tools 89
Page 100

Section 2G
microSD Card
⽧ Using a microSD Card on Your Device (page 90)
⽧ Managing the microSD Card (page 91)
⽧ Using Your Device as a USB Drive (page 92)
Your device lets you insert a microSD™ card to expand the available storage space. This highly secure digital card
enables you to exchange images, music, and other data between SD-compatible devices, and also provides
additional storage space on your device.
Using a microSD Card on Your Device
Note
A microSD card is not included in the box.
Inserting the microSD Card
The microSD card slot is located under the back cover of your device.
1. Remove the back cover. (See “Installing the Battery” on page 2.)
2. Insert the microSD card into the slot with the gold contacts facing down (in the same orientation as the
image above the card slot).
3. Replace the back cover.
Removing the microSD card
1. Remove the back cover. (See “Installing the Battery” on page 2.)
2. Remove the microSD card by pressing on the exposed edge and releasing. The card should pop out
partway.
90 Section 2G. microSD Card
 Loading...