

Page 1
Barcode
P/N
Read First Poster
1
What’s in the Box
The Touch Diamond Phone
•
Battery
•
Extra Stylus
•
AC Adapter
•
USB Sync Cable
•
Multifunction Audio Cable
•
Read First Poster and Quick Start Guide
•
Getting Started Disc and VZ Access Manager CD
•
2
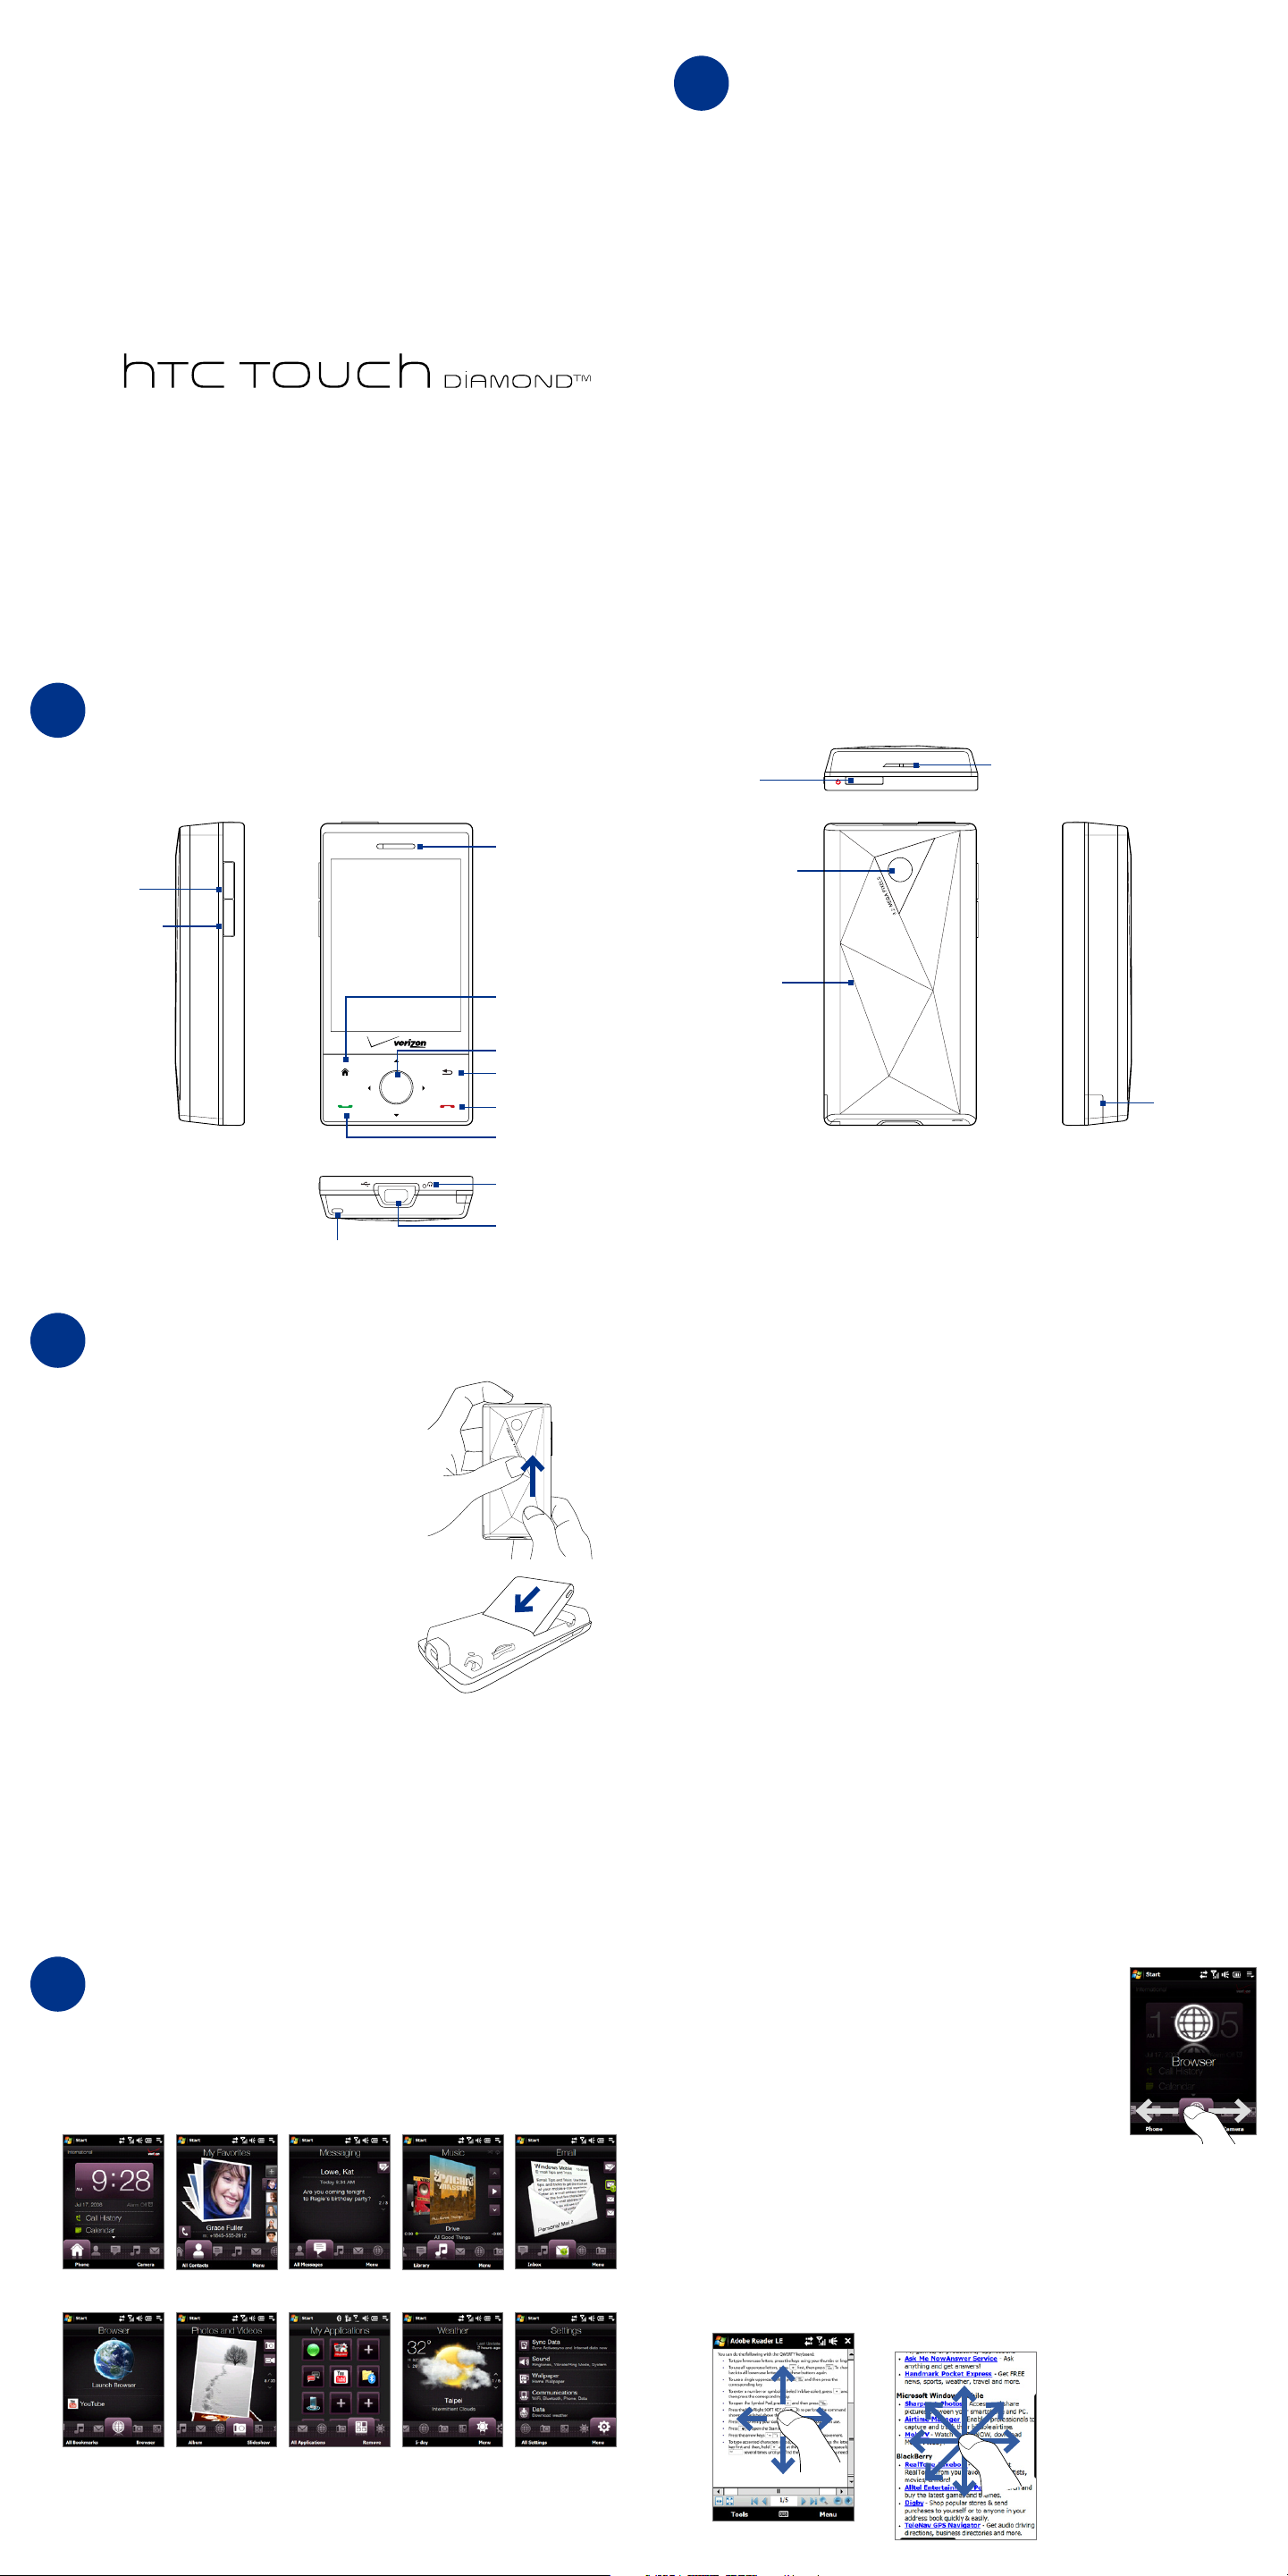
Your Device
Left, Front, and Bottom View
VOLUME UP
VOLUME DOWN
Touch Screen
Earpiece
HOME
Navigation Control
BACK
END
TALK/SEND
Microphone
Top, Back, and Right View
Speaker
POWER
3.2 Megapixel
Camera
Back Cover
Stylus
Sync Connector/
Strap Holder
3
Battery and Power
Earphone Jack
Installing the Battery
1. Make sure your device is turned o.
2. Hold the device with both hands and
the front panel facing down. Push the
back cover up with your thumb until it
disengages from the device and then
slide it up to remove.
3. Align the battery’s exposed copper
contacts with the battery connectors
inside the battery compartment. Insert
the contact’s side of the battery rst
and then gently push the battery into
place.
4. Replace the back cover.
Charging the Battery
1. Connect the USB connector of the AC adapter to the sync connector on your
device.
2. Plug in the AC adapter to an electrical outlet to start charging the battery.
The battery is fully charged after about 3 hours of charging.
Starting Up
After installing the battery and charging the battery, you can now power on and
start using your device.
1. Press and hold the POWER button for a few seconds.
2. A Quick Start Wizard guides you through the calibration of the screen and the
setup of regional settings, date and time, and password. Follow the onscreen
instructions to nish the Quick Start Wizard. After the Quick Start Wizard
nishes, the device installs customization settings, then restarts.
Sleep Mode
When the device is turned on, press and immediately release the POWER button to
turn off the display temporarily and switch your device to Sleep mode. Sleep mode
suspends your device to a low power state while the display is off in order to save
battery power.
Your device automatically goes into Sleep mode when you leave the device idle
after a certain period of time.
You will still be able to receive messages and calls while your device is in Sleep
mode. Pressing the POWER button again or incoming calls/messages will wake up
your device.
4
The Home Screen
TouchFLO™ 3D
The Home screen of the device is the TouchFLO™ 3D Home screen, which allows
finger-touch access to the most important functions such as contacts, text
messages, e-mail, Internet, and more.
Browser
Photos and
Videos
Music
My Applications SettingsWeather
EmailMessagingMy FavoritesHome
Switching between the Tabs
Press and hold your finger on the active tab, then slide your
finger right or left over the tabs. Release when you have
selected the desired tab.
You can also swipe left or right across the screen to go to the
next or previous tab.
Finger Gestures
You can use finger gestures to scroll, pan, and zoom on the touch screen of your
device.
Finger scrolling
You can easily scroll the
screen by simply sliding
your finger on the touch
screen.
Finger panning
On the touch screen, drag
your finger in any direction
to move to other parts of a
zoomed photo, Web page,
document, or an e-mail.
Finger zooming
The type of finger gesture
to use when zooming
varies in different
programs:
To zoom in on a Web
•
page, tap your finger
twice on the screen.
To zoom in on a photo
•
in Album, make a fullcircle swipe on the
touch screen.
Page 2
5
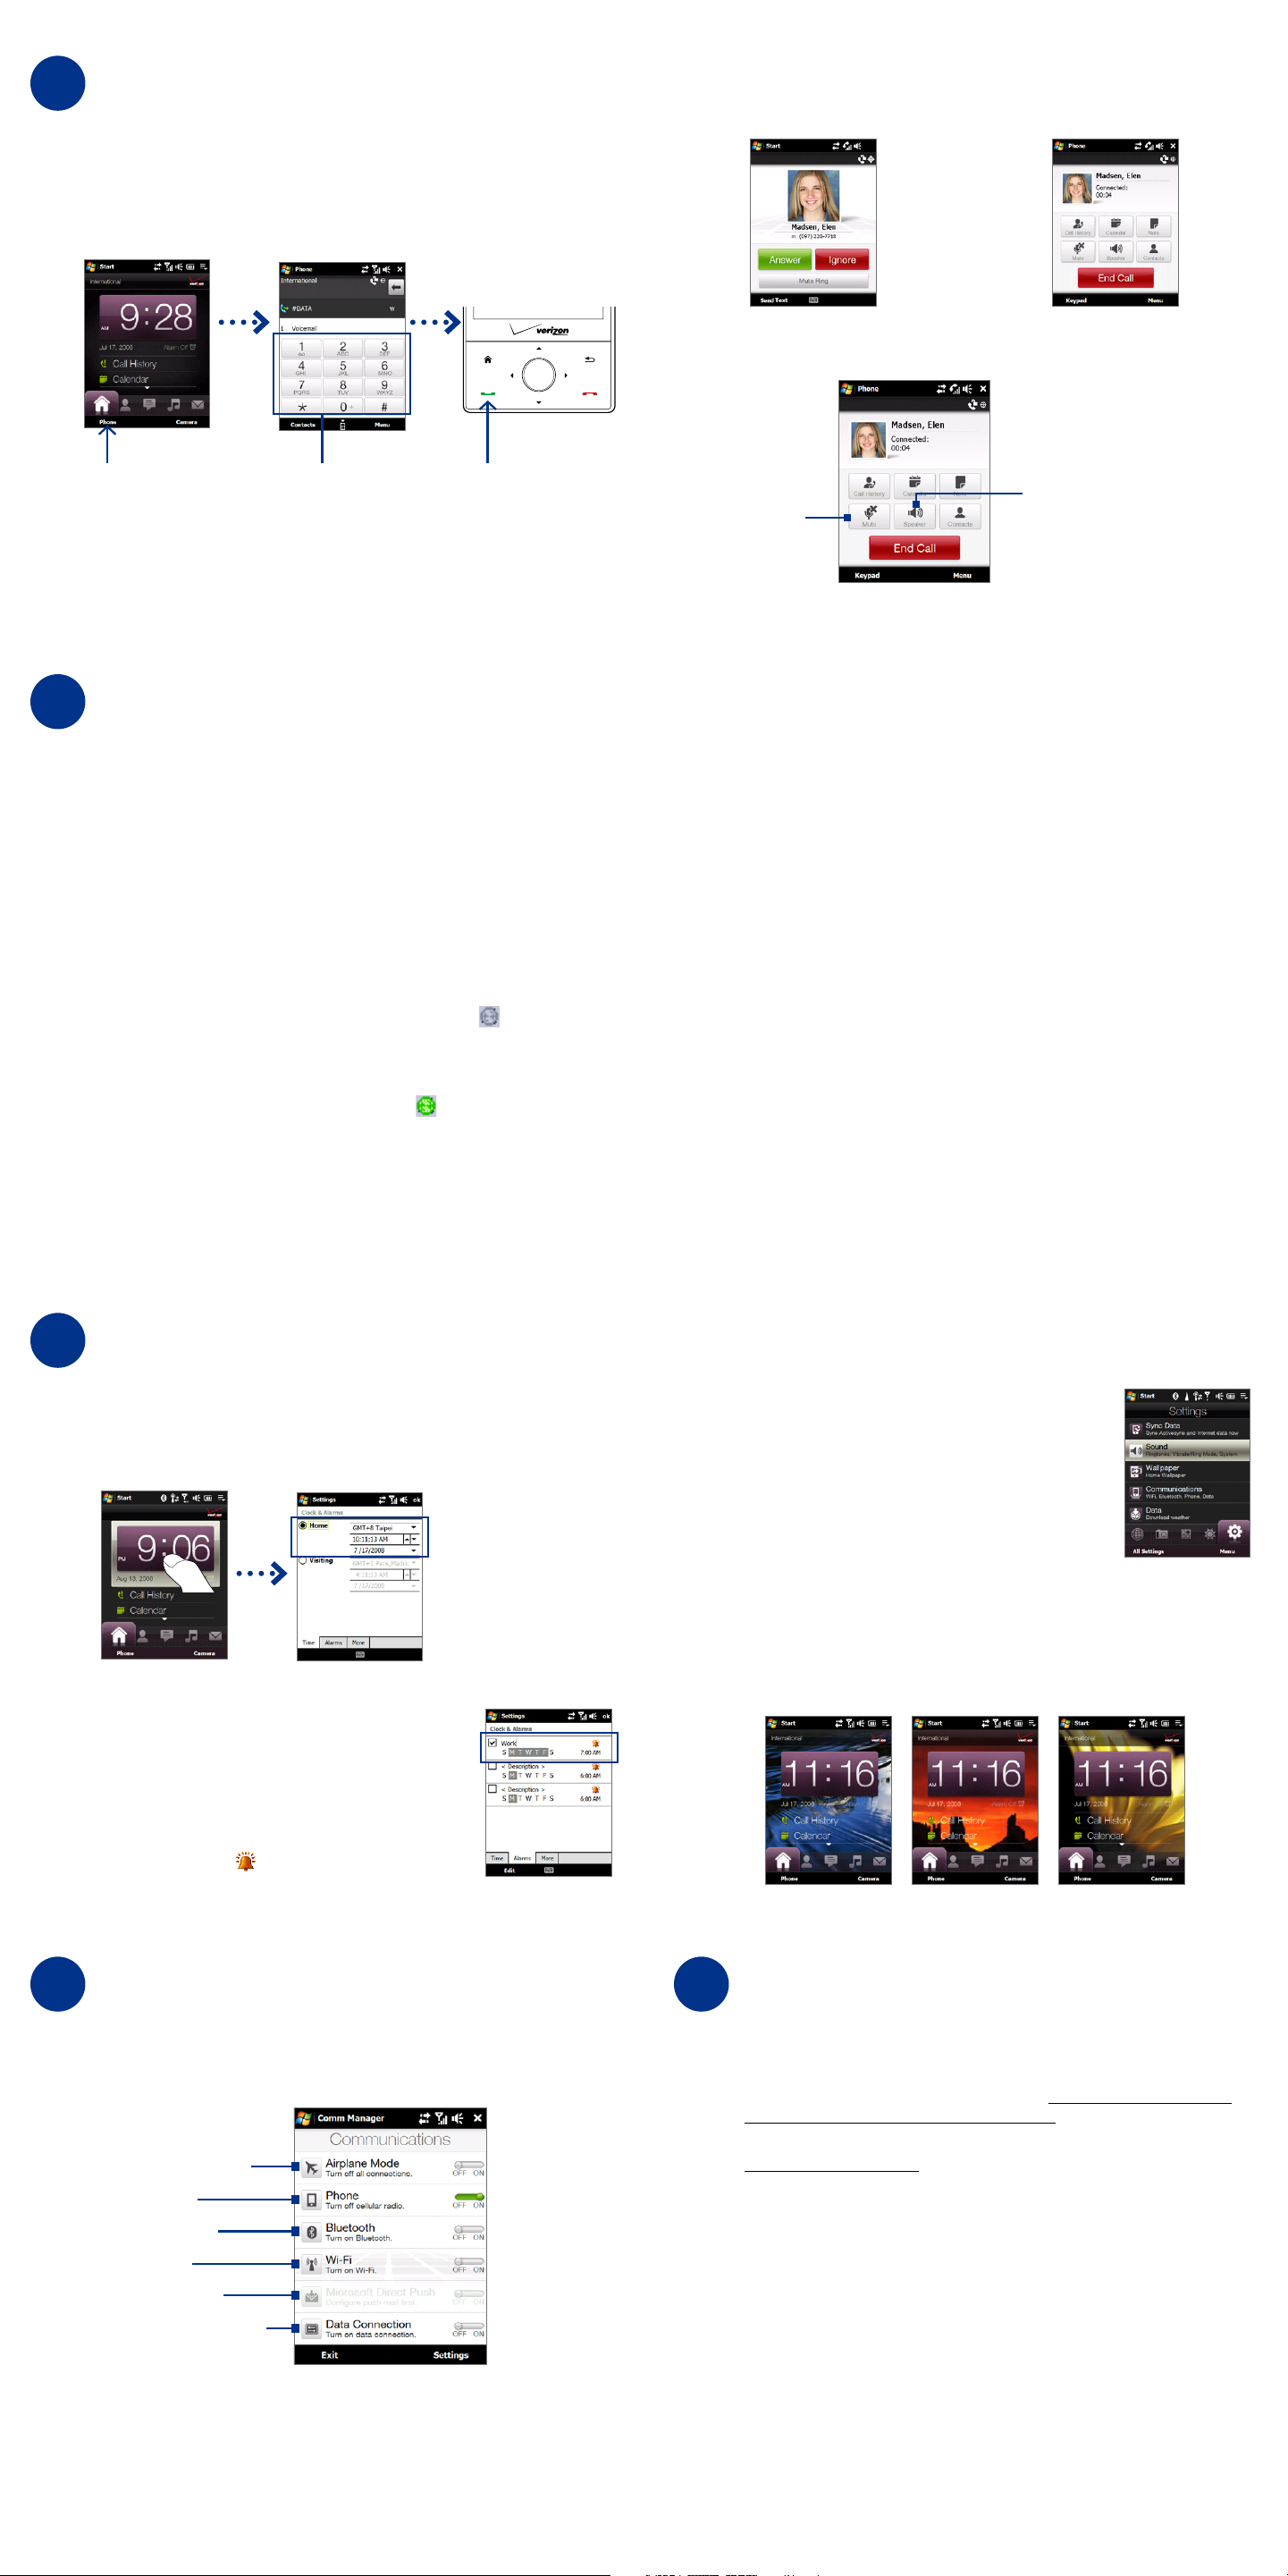
Using the Phone
Making your first call
1. On the Home screen, tap Phone to open the Phone screen.
2. Tap the keys on the keypad to enter the phone number.
3. Press the TALK/SEND button to place the call.
Answering a Call
Tap Answer or press TALK on the
device to answer an incoming call.
In-Call Options
End a Call
Tap End Call or press END on the
device to hang up.
Tap Phone Dial the phone number Press TALK
6
Synchronizing Information
Set up ActiveSync® on Windows XP®
The Getting Started Disc that comes with your device contains Microsoft
ActiveSync 4.5 or later. Follow the steps below to install and set up ActiveSync on
Windows XP or other compatible Windows systems.
Install ActiveSync
1. Insert the Getting Started Disc into the disc drive on your PC.
2. Click Setup and Installation.
3. Follow the step-by-step instructions to complete the installation. After the
software has been completely installed, restart your PC.
4. When your PC boots up, verify that the ActiveSync icon ( ) appears on
your desktop (in the lower right corner).
5. Connect your device to the PC, and ActiveSync will automatically detect
your device and prompt you to set up a partnership. When it is connected
successfully, the ActiveSync icon turns GREEN ( ).
Turn on/off the
Mute/unmute
the call
Speakerphone
Windows Mobile® Device Center
Microsoft Windows Mobile® Device Center is the replacement for Microsoft®
ActiveSync® on Windows Vista®. When you connect the device to your Windows
Vista PC and start Windows Mobile Device Center for the first time, you will be
asked to create a Windows Mobile partnership with the device.
1. Connect your device to your PC. The Windows Mobile Device Center will
open.
2. On the license agreement screen, click Accept.
3. On the Windows Mobile Device Center’s Home screen, click Set up your
device.
4. Select the information types that you want to synchronize, and then click
Next.
5. Enter a device name and click Set Up. When you nish the setup wizard,
Windows Mobile Device Center synchronizes your device automatically.
6. When you are nished, you can use Windows Mobile Device Center to
synchronize information and manage your device.
7
Personalizing Your Device
To set date and time
1. On the Home screen Home tab, tap the time display to open the Clock &
Alarms Settings screen.
2. On the Time tab, select the correct time zone and change the date or time.
To set an alarm
1. On the Clock & Alarms Settings screen, select the
Alarms tab.
2. Select a check box and tap <Description> to enter a
name for the alarm.
3. Tap the days of the week, and tap the time to open a
clock and set the time for the alarm.
4. Tap the alarm icon ( ) to specify the type of alarm
you want. When done, tap OK.
To change the ringtone
1. On the Home screen, slide to the Settings tab and
then tap Sound.
2. On the Sound screen, scroll down to Ringtone and
tap it.
3. On the Ringtones screen, tap the ringtone you want
to use and tap Done.
To change the Home screen display
1. On the Home screen, slide to the Settings tab and then tap Wallpaper.
2. On the Select a Picture screen, tap the picture that you want to use.
3. Tap OK. The background image of the Home screen will then change to your
own picture.
8
Using the Comm Manager
Comm Manager is a central location where you can easily turn on and off the
communication features of your device such as the phone, Wi-Fi, data connection,
Bluetooth, and more.
Airplane Mode on/off
Phone on/off
Bluetooth on/off
Wi-Fi on/off
DirectPush on/off
Data Connection on/off*
Comm Manager
* Tap to disconnect active data connections. However, you cannot reconnect data
connections in Comm Manager.
9
For More Information
To learn more about using your smartphone, please refer to the User Manual
•
(the PDF le on the provided Getting Started Disc).
For more information about ActiveSync, visit: http://www.microsoft.com/
•
windowsmobile/help/activesync/default.mspx.
For customer support, service rates, and product information, visit:
•
www.verizonwireless.com.
 Loading...