

Page 1

2011/05/05
UserGuide
Page 2
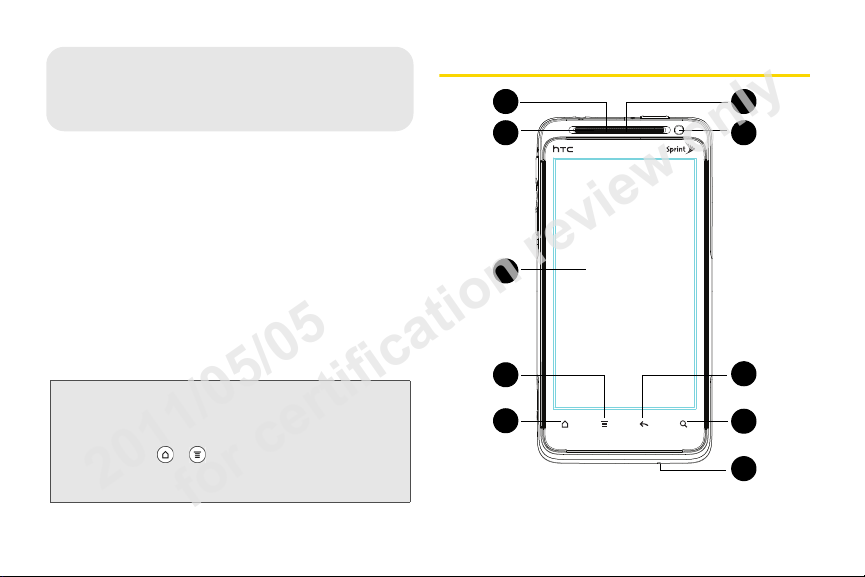
Your Device
1. Device Basics
1
2
10
3
4
5
9
8
7
6
2011/05/05
for certification review only
⽧ Your Device (page 4)
⽧ Turning Your Device On and Off (page 7)
⽧ Viewing the Display Screen (page 9)
⽧ Battery and Charger (page 14)
⽧ Getting Around Your Device (page 17)
⽧ Displaying Your Phone Number (page 20)
⽧ Making and Answering Calls (page 20)
⽧ Speed Dialing (page 26)
⽧ Dialing Sprint Services (page 26)
⽧ Entering Text (page 27)
⽧ Home Screen (page 33)
Tip: Device Software Upgrades – Updates to your device’s
software may become available from time to time.
Sprint will automatically send critical updates to your
device. You can also check for and download updates
by pressing
System updates > Firmware update
download available updates.
41. Device Basics
> , and then tapping Settings >
to search for and
Page 3
Key Functions
11 12
2011/05/05
for certification review only
1. Front Indicator Light (LED)
status or pending notifications at a glance.
2. Proximity Sensor automatically switches the display
screen off when you hold the device near your
face during a call. When activated, the proximity
sensor does not affect the device’s 3G, 4G, or
Wi-Fi connection.
3. Display Screen displays all the information needed
to operate your device, such as the call status, the
People list, the date and time, and the signal and
battery strength.
4. Menu Key allows you to open a list of actions that
you can do on the current screen.
5. Home Key takes you back to the Home screen.
When in standby mode, press and hold to open
the recently used applications window.
6. Microphone allows other callers to hear you clearly
when you are speaking to them.
7. Search Key allows you to search information on the
current screen or application. For example, while in
People, press to search for a contact.
shows your device’s
8. Back Key allows you to go back to the previous
screen, or close a dialog box, options menu, the
Notifications panel, or onscreen keyboard.
9. Front Camera allows you to take photos and videos
or start a video call.
10. Earpiece lets you hear the caller and automated
prompts.
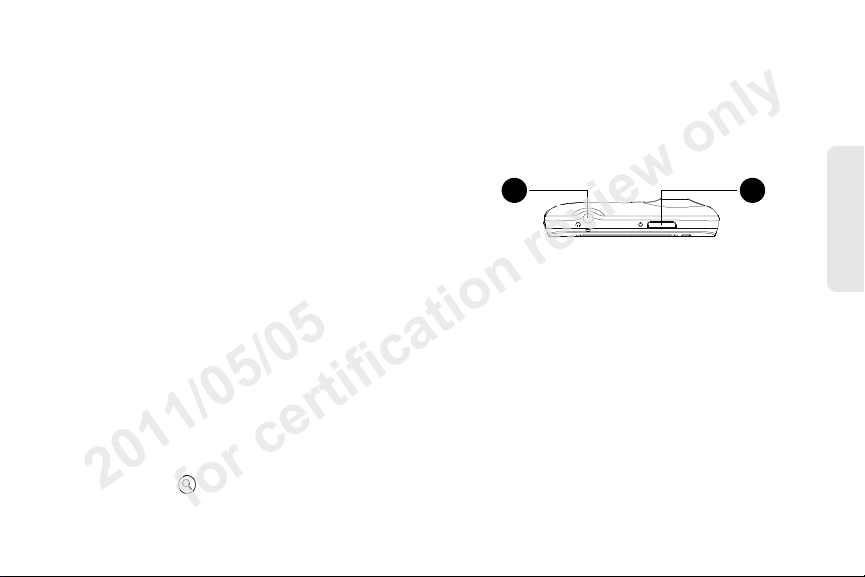
11. 3.5 mm Headset Jack allows you to plug in either a
stereo headset or an optional headset for
convenient, hands-free conversations.
CAUTION! Inserting an accessory into the incorrect
jack may damage the device.
12. Power Button lets you turn the device on or off, turn
the screen on or off, restart the device, or switch
the device to airplane mode.
1. Device Basics 5
Device Basics
Page 4
17
13
16
15
14
2011/05/05
for certification review only
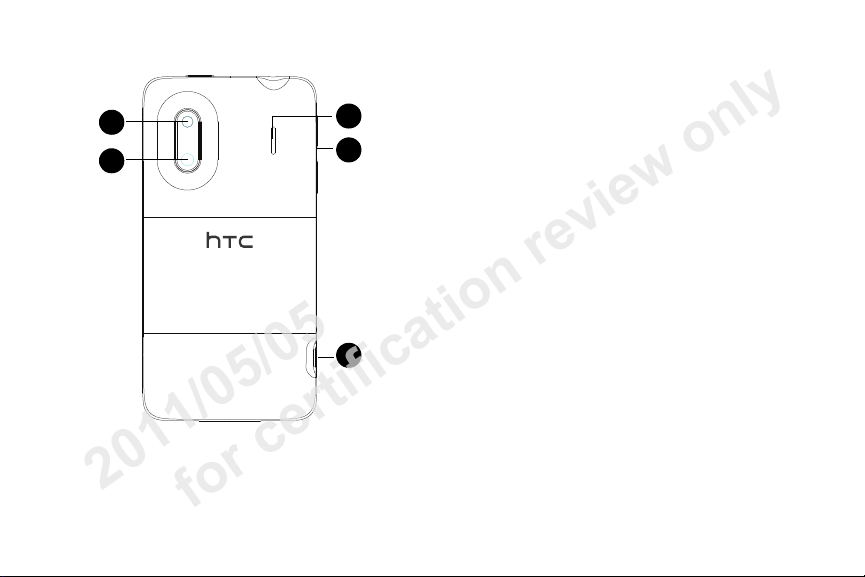
helps illuminate subjects in low-light
Flash
13.
environments when the camera is focusing and
capturing a photo or video.
14 . Camera lens allow you to capture high-definition
photos and videos.
15. Charger/Accessory Jack allows you to connect the
device charger or the USB cable (included).
CAUTION! Inserting an accessory into the incorrect
jack may damage the device.
16. Volume Buttons allow you to adjust the ringer or
media volume or adjust the voice volume during a
call.
17. Speaker lets you hear the different ringers and
sounds. The speaker also lets you hear the caller’s
voice in speakerphone mode.
61. Device Basics
Page 5
Turning Your Device On and Off
2011/05/05
for certification review only
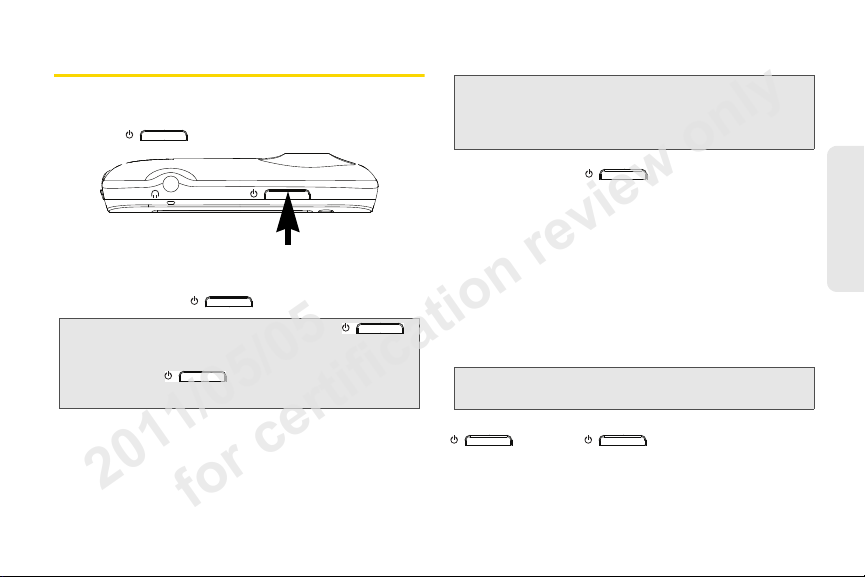
Turning Your Device On
Press at the top of the device.
䊳
Turning Your Device Off
1. Press and hold for about two seconds.
Note: When the screen is locked and you press ,
it will only turn off the screen and not the device. You
will need to unlock the screen first before you press
and hold to turn the device off. See
“Turning the Screen Off When Not in Use” for details.
2. On the Power options menu, tap Power off.
Restarting Your Device
Note: Restarting the device will close all running apps and
will clear all temporary files in the device’s memory.
Make sure to save your work before restarting the
device.
1. Press and hold for about two seconds.
2. On the Power options menu, tap Restart.
3. In the Restart phone confirmation box, tap Restart.
Turning the Screen Off When Not in Use
To save battery power, the device automatically turns
off the screen after a certain period of time when you
leave it idle. You will still be able to receive messages
and calls while the device’s screen is off.
Tip: For information on how to adjust the time before the
screen turns off, see “Display Settings” on page 44.
You can also turn off and lock the screen by pressing
incoming call will turn on your device screen and show
the lock screen.
. Pressing again or receiving an
Device Basics
1. Device Basics 7
Page 6
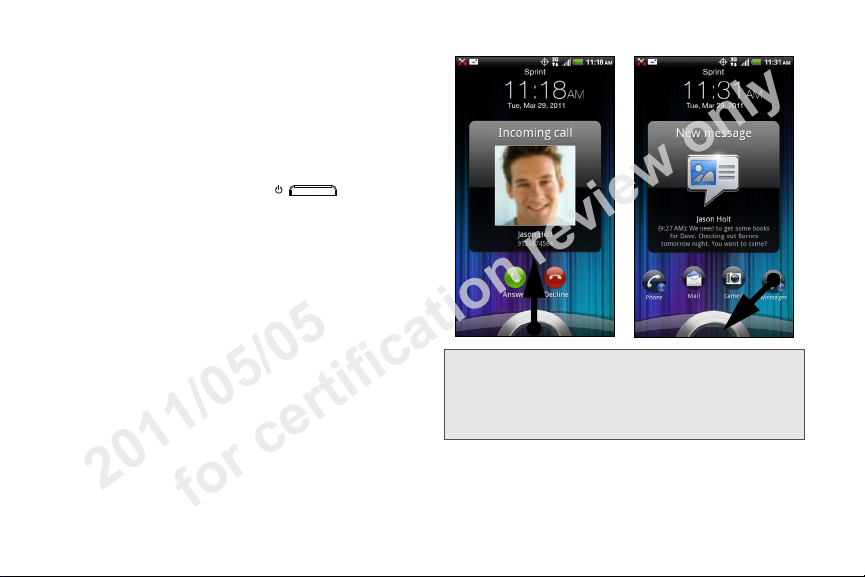
Using the Lock Screen
2011/05/05
for certification review only
Aside from protecting the device’s screen from
unwanted taps, the lock screen also displays important
information, updates, and messages at a glance, or
provide shortcut icons to your favorite applications.
To unlock the screen:
1. When the screen is off, press to show
the lock screen.
2. Drag the ring up to unlock the screen. When you
have an incoming call, dragging the ring up
answers the call.
– or –
Drag a shortcut icon, a photo, or a message board
to the ring to unlock the screen and launch the
related application.
Note: If you have set up a screen lock, you will be prompted
to draw the pattern, enter the PIN, or enter the
password. For more information on how to create and
enable a screen lock, see “Protecting Your Device with
a Screen Lock” on page 50.
81. Device Basics
Page 7
Viewing the Display Screen
2011/05/05
for certification review only
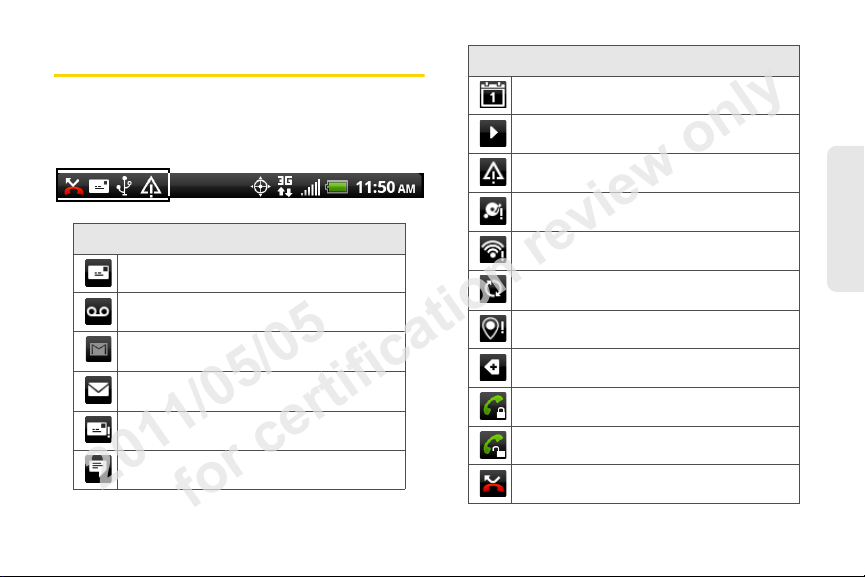
Status Bar – Notification Icons
Your device’s display screen provides information
about notifications and your device’s status. This list
identifies the symbols you’ll see on your device’s
display screen:
Status Bar – Notification Icons
New Text or Multimedia Message
New Voicemail
New Gmail message
New Microsoft Exchange ActiveSync or
POP3/IMAP email message
Problem with Text/Multimedia Message
delivery
New instant message from Google Talk
Upcoming event
Music is playing
General notification (for example, sync error)
Storage card is low on free space
Wi-Fi is on and wireless networks are
available
Data synchronizing – connected to HTC
Sync
New location detected
More (undisplayed) notifications
Call in progress (Voice Privacy locked)
Call in progress (Voice Privacy unlocked)
Missed call
Device Basics
1. Device Basics 9
Page 8
Status Bar – Notification Icons
2011/05/05
for certification review only
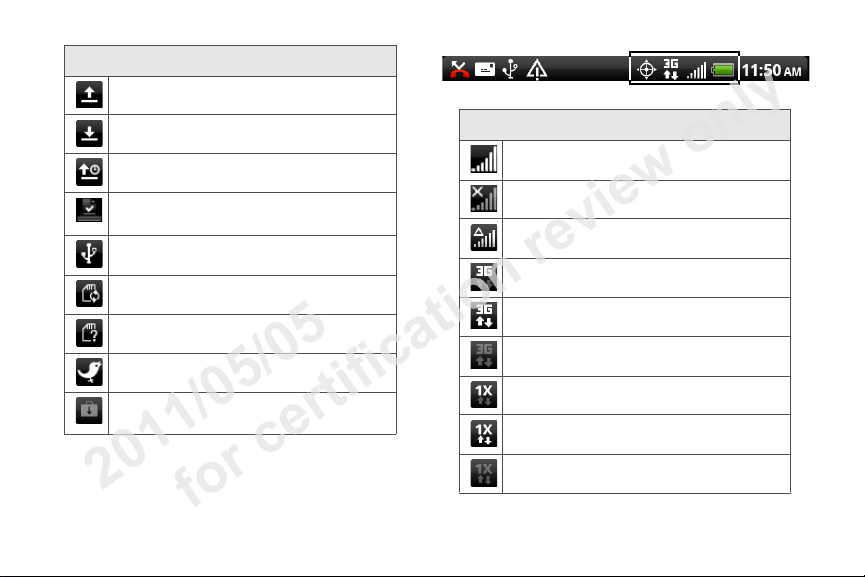
Uploading data (animated)
Downloading data (animated)
Waiting to upload
Content downloaded
Device connected to computer via USB
cable
Storage card is safe to remove or storage
card is being prepared
No storage card installed in the device
New tweet
Updates available for an application
Status Bar – Device Status Icons
Signal Strength
(More bars = stronger signal)
No Service
Device is “roaming” off the Nationwide Sprint
Network
Sprint 3G data service (EVDO) available
Sprint 3G data service (EVDO) available and
active (with icon animation)
Sprint 3G data service is currently
unavailable
Sprint 1xRTT network available
Sprint 1xRTT network available and active
(with icon animation)
Sprint 1xRTT network is currently unavailable
10 1. D evi ce B asics
Page 9
Status Bar – Device Status Icons
2011/05/05
for certification review only
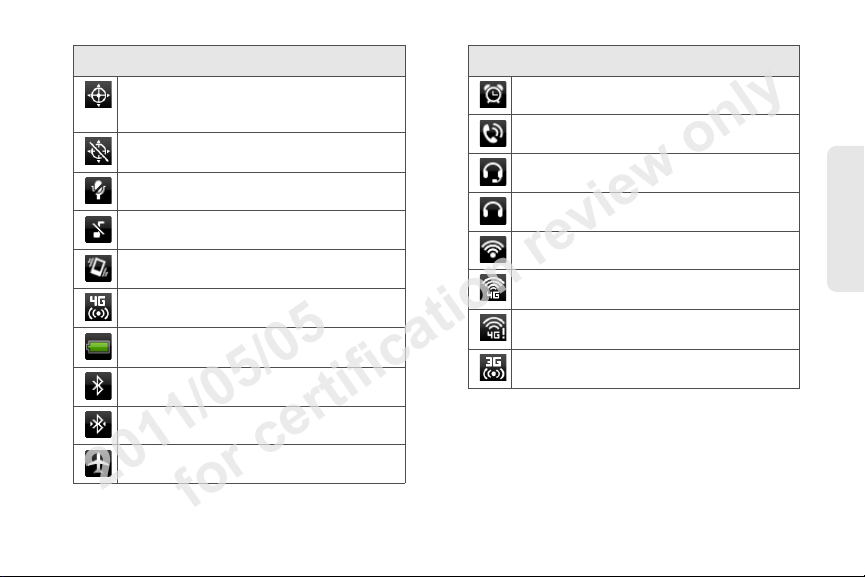
Device’s location feature is on and available
for location-based services such as GPS
Navigation
Device’s location feature off and your
location is available only for 911
Device microphone muted
Device speaker muted
Vibrate mode
Sprint Hotspot is on and is ready to share its
4G connection
Shows current battery charge level
(Icon shown is fully charged)
Bluetooth on
Connected to Bluetooth device
Airplane mode
Status Bar – Device Status Icons
Alarm set
Speakerphone on
Wired microphone headset connected
Wired headset connected
Connected to Wi-Fi network
Connected to a 4G network
4G is on and 4G networks are available
Sprint Hotspot is on and is ready to share its
3G connection
Device Basics
1. Device Basics 11
Page 10
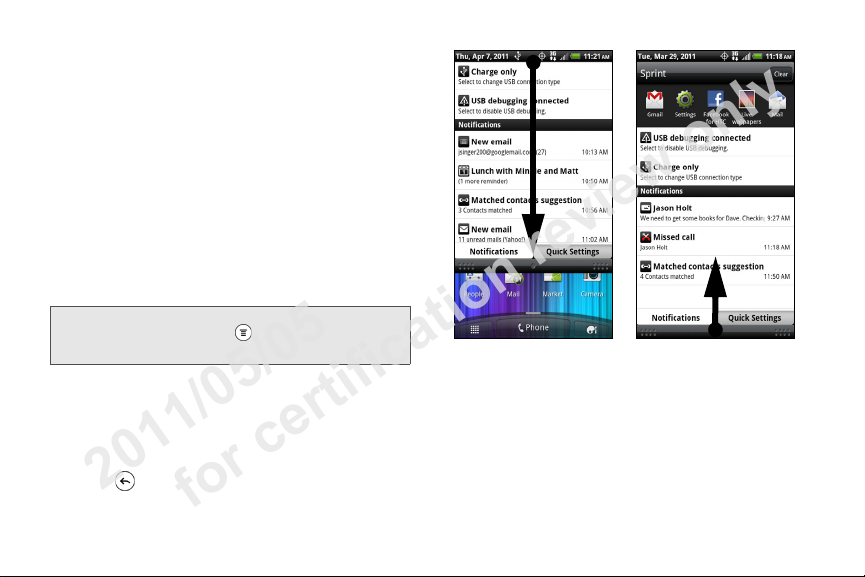
Notifications Panel
Tap a notification to
open the related
application.
Press and hold, and
then drag up to close
the Notifications panel.
2011/05/05
for certification review only
When you get a new notification, you can open the
Notifications panel to see the message, reminder or
event notification. The Notifications panel lets you
quickly switch between recently opened apps, and also
lets you easily turn on settings such as 4G, Wi-Fi and
Bluetooth.
To open the Notifications panel:
To open the Notifications panel, press and hold the
status bar, and then slide your finger downward.
If you have several notifications, you can scroll down
the screen to view more notifications.
Tip: You can also open the Notifications panel from the
Home screen by pressing and then tapping
Notifications.
To close the Notifications panel:
䊳
Press and hold the bottom bar of the Notifications
panel, and then drag it up the screen.
– or –
Press .
12 1. Devi c e Basi cs
Page 11
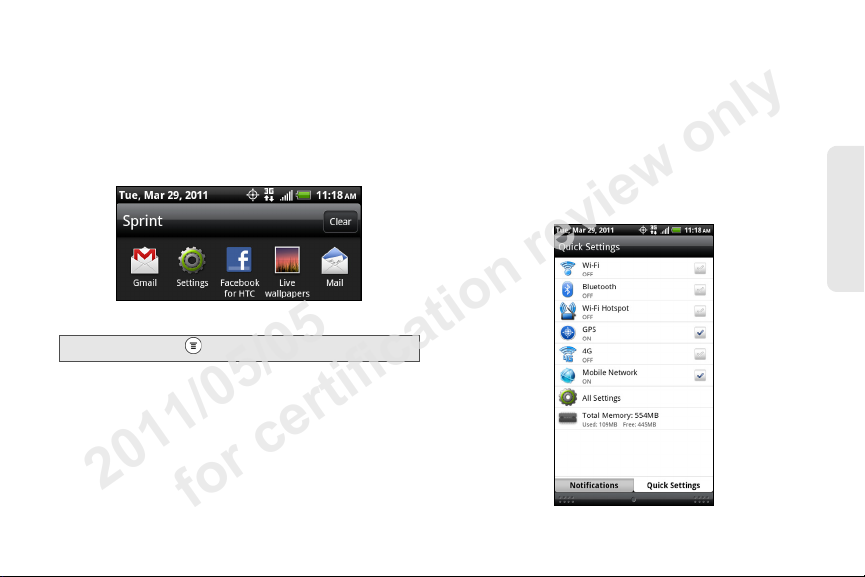
To switch between recently opened apps:
2011/05/05
for certification review only
On the Notifications panel, you can easily access up to
eight apps you just recently opened.
1. Open the Notifications panel.
2. In the Recent applications section, slide your finger
left or right to see recently opened apps.
3. Tap an application to open it.
Tip: Press and hold to view recently opened applications.
To use Quick Settings:
The Quick Settings tab lets you easily turn on 4G, Wi-Fi,
Bluetooth, GPS, and more, and also provides a quick
shortcut to all device settings.
1. Open the Notifications panel.
2. Ta p the Quick Settings tab.
3. Tap the check box next to an item to turn it off or
on.
Device Basics
1. Device Basics 13
Page 12
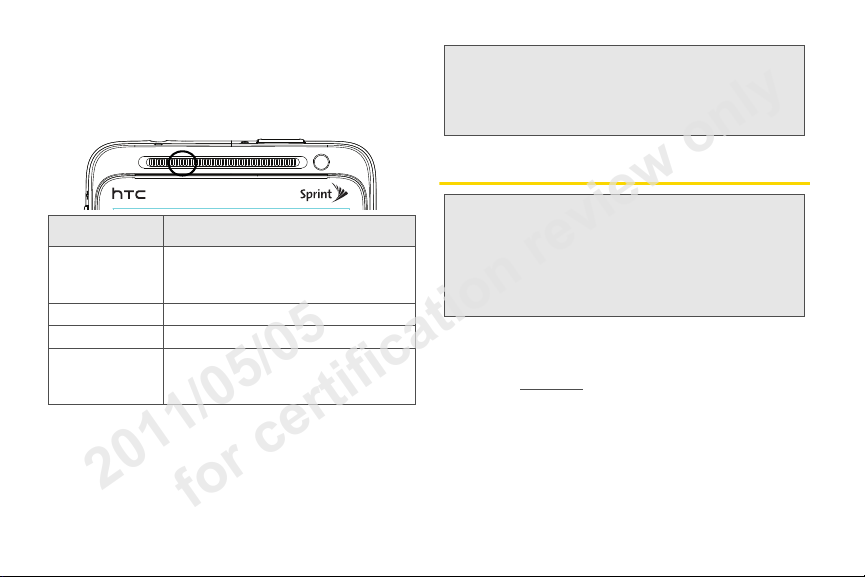
Notification LED
2011/05/05
for certification review only
The Notification LED located near the right end of the
earpiece provides information on the device status or
pending notifications.
Note: The indicators are listed in order of priority. For
example, if your device is connected to the AC adapter
and the battery is charging, the LED will be solid amber
and will not switch to a flashing green light even if there
is a pending notification.
Battery and Charger
LED Status Indication
Solid green Battery is fully charged (when the
device is connected to the AC adapter
or a computer).
Solid amber Battery is charging.
Flashing amber Battery is low. (Power is below 14%.)
Flashing green You have a pending notification (for
example, a new message or a missed
call).
WARNING: Use only Sprint-approved or HTC-approved
Sprint-approved or HTC-approved batteries and
accessories can be found at Sprint Stores or through
HTC; or call
available at
batteries and chargers with your device. The
failure to use an Sprint-approved or
HTC-approved battery and charger may
increase the risk that your device will overheat,
catch fire, or explode, resulting in serious bodily
injury, death, or property damage.
1-866-866-7509 to order. They’re also
sprint.com.
Battery Capacity
Your device is equipped with a rechargeable battery.
The battery provides up to 6 hours of continuous talk
time. For battery-saving tips, see “Power-Saving Tips”
14 1. D e v i ce B as i cs
on page 57.
Page 13
Note: Long backlight settings, searching for service, vibrate
2011/05/05
for certification review only
mode, browser use, and other variables may reduce
the battery’s talk and standby times.
Tip: Watch your device’s battery level indicator and charge
the battery before it runs out of power.
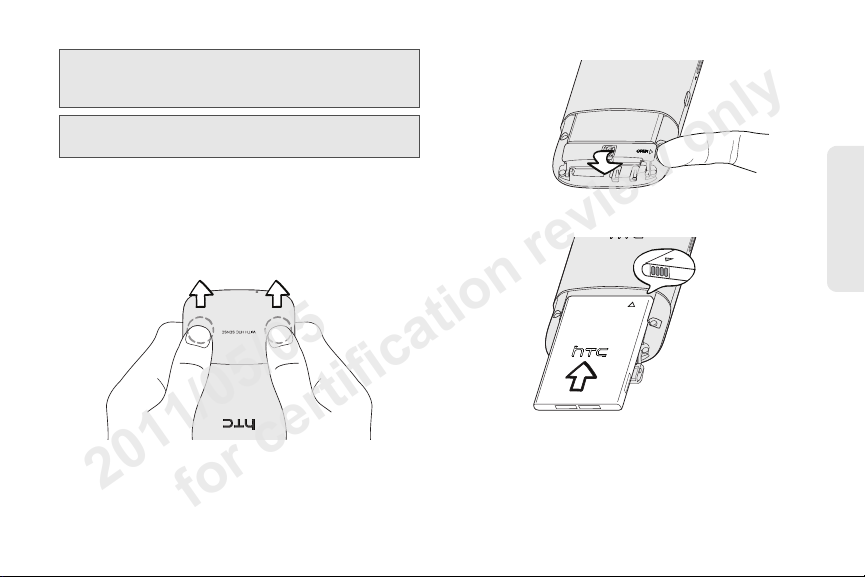
Installing the Battery
With the device turned off, hold the device securely
1.
with the front facing down.
2. Push the bottom cover out with your thumbs to
remove it.
3. Flip the battery compartment door from one side.
4. Insert the contact end of the battery first, and then
gently push the battery into place.
5. Close the battery compartment door until the
battery is locked into place.
6. Install the bottom cover back again.
Device Basics
1. Device Basics 15
Page 14
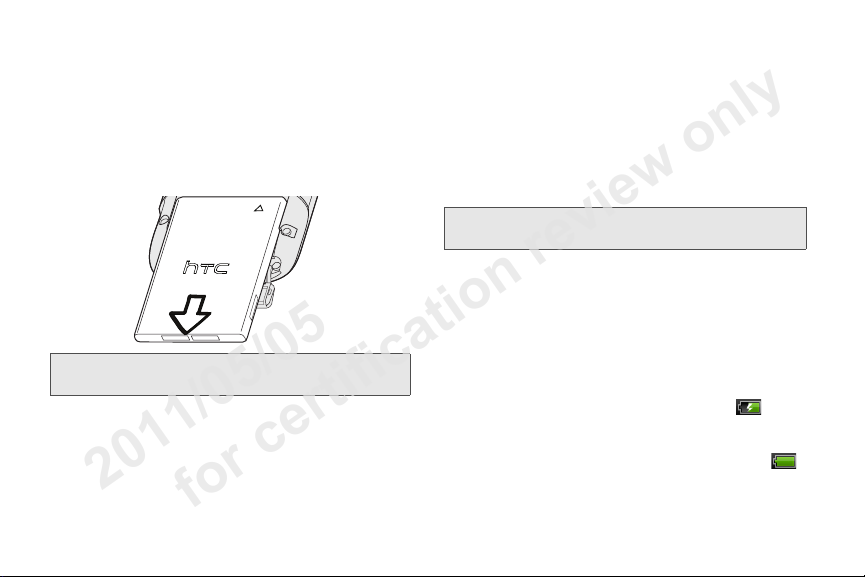
Removing the Battery
2011/05/05
for certification review only
Make sure the power is off so that you don’t lose
1.
any stored numbers or messages.
2. Remove the bottom cover. (See step 1 of “Installing
the Battery.”)
3. Flip the battery compartment door, and then pull
the battery out of the compartment.
WARNING: Do not handle a damaged or leaking Li-Ion
battery as you can be burned.
Charging the Battery
Keeping track of your battery’s charge is important. If
your battery level becomes too low, your device
automatically turns off, and you will lose any
information you were just working on.
Always use a Sprint-approved or HTC-approved
desktop charger, travel charger, or vehicle power
adapter to charge your battery.
Tip: With the Sprint-approved Li-ion battery, you can recharge
the battery before it becomes completely run down.
1. Plug the USB connector of the AC adapter into the
charger/accessory jack on the upper left side of
your device.
2. Plug the AC adapter in to an electrical outlet to
start charging the battery.
Charging is indicated by a solid amber light in the
Notification LED. As the battery is being charged while
the device is on, the charging battery icon ( ) is
displayed in the status bar of the Home screen. After
the battery has been fully charged, the Notification LED
shows a solid green light and a full battery icon ( )
displays in the status bar of the Home screen.
16 1. Devi c e Basi cs
Page 15
For more information about Notifications, see
2011/05/05
for certification review only
“Notification LED” on page 14 for more details.
Getting Around Your Device
There are different ways to navigate around your
device’s Home screen, menus, and application
screens.
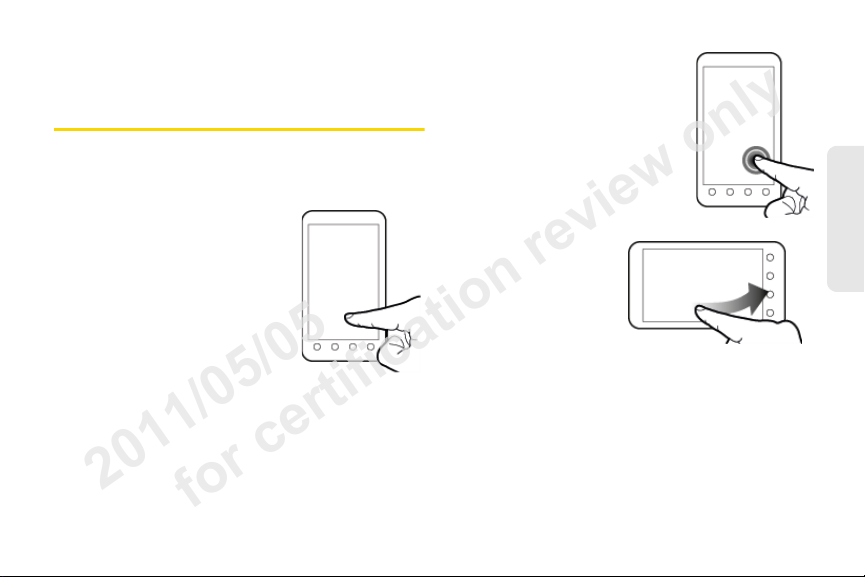
Ta p
When you want to type using the
onscreen keyboard, select items
on the screen such as
application and settings icons or
buttons, simply tap them with
your finger.
Press and Hold
To open the available options for
an item (for example, contact or
link in a Web page), simply press
and hold the item.
Swipe, Slide or Drag
To s w i pe or s l ide
means to quickly drag
your finger vertically or
horizontally across the
screen.
To drag, press and
hold your finger with
some pressure before you start to move your finger.
While dragging, do not release your finger until you
have reached the target position.
Device Basics
1. Device Basics 17
Page 16
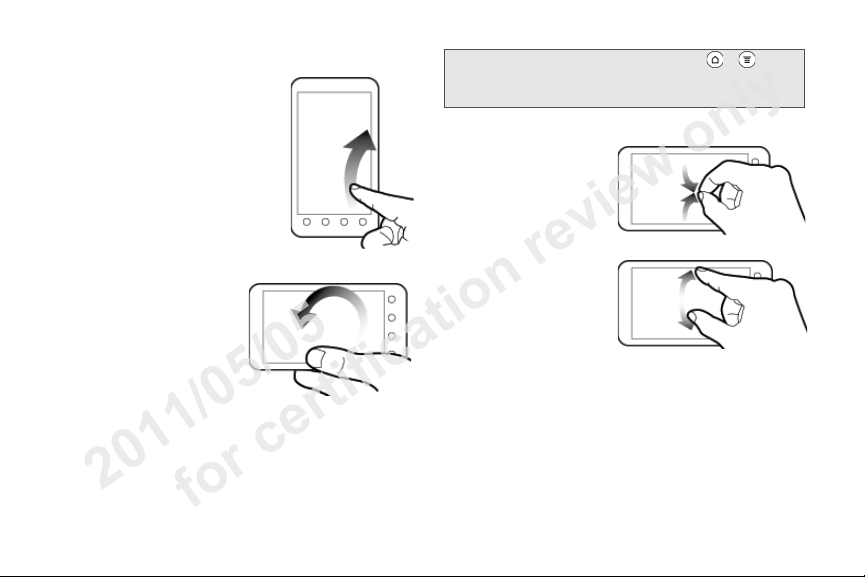
Flick
2011/05/05
for certification review only
Flicking the screen is similar to
swiping, except that you need to
swipe your finger in light, quick
strokes. This finger gesture is
always in a vertical direction,
such as when flicking the
contacts or message list.
Rotate
For most screens, you can
automatically change the
screen orientation from
portrait to landscape by
turning the device
sideways. When entering
text, you can turn the device
sideways to bring up a
bigger keyboard. See
“Using the Onscreen
Keyboard” for more details.
Note: The Auto-rotate screen check box in > >
Settings > Display
orientation to automatically change.
needs to be selected for the screen
Pinch and Spread
“Pinch” the screen
using your thumb and
forefinger to zoom out
or “spread” the screen
to zoom in when
viewing a picture or a
Web page. (Move
fingers inward to zoom
out and outward to
zoom in.)
18 1. Devi c e Basi cs
Page 17
Displaying Your Phone Number
2011/05/05
for certification review only
Press > and tap Settings > About phone >
䊳
Phone identity. (Your phone number and other
information about your device and account will be
displayed.)
Making and Answering Calls
Making Calls
There are several convenient methods to make a call
from your device.
Calling Using the Phone Dialer
You can dial a number directly in the Phone’s dialer. As
you enter the first digits of the phone number, Smart
Dial searchs for contacts that match. If you see the
number that you want, you can tap it to dial it
immediately without entering the rest of the phone
number.
Note: Smart Dial will also search your contacts if you enter the
letters in the name of a contact using the letters on the
number pad. As you enter more letters or numbers, the
list shows only the corresponding matches.
1. Press and tap .
2. Begin entering the first few digits or characters by
tapping the keys on the Phone keypad. If you enter
an incorrect digit, tap to erase it. To erase the
entire number, press and hold .
3. Tap the phone number or contact from the list.
– or –
To call a different phone number associated with
the contact, tap the contact card icon at the right
side of the contact name. On the contact details
screen, tap the number you want to call.
Tip: Tap to close the Phone keypad and to see if there
are more matching numbers or contacts. To browse
through the filtered list, flick through the list or slide
your finger up or down the list slowly.
Device Basics
1. Device Basics 19
Page 18

Calling a Phone Number in a Text Message
2011/05/05
for certification review only
While viewing a text message, you can place a call to a
number that is in the body of the message.
1. Press and tap > Messages.
2. Tap the message with the phone number, and
then tap the phone number.
3. On the Verify the phone number screen, tap Call.
Your device then dials the phone number.
For more information about text messages, see “Text
Messaging (SMS) and Multimedia Messaging (MMS)”
on page 162.
Calling a Phone Number in an Email Message
While viewing an email message, you can tap a phone
number within the body of the email message to open
the Phone screen and dial the selected number.
Calling a Speed Dial Number
To call a stored speed dial number, press and hold a
number key. For information on setting up speed dial
numbers, see “Speed Dialing” on page 26.
You can also place calls from your device using your
History listings (page 60) and Automatic Speech
Recognition (page 122).
Receiving Calls
When you receive a phone call from a contact, the
Incoming call screen appears and displays the caller
ID icon, name, and phone number of the calling party.
When you receive a phone call from someone who is
not stored in People, only the default caller ID icon and
phone number appear on the Incoming call screen.
Note: If your device is turned off, all calls automatically go to
voicemail.
Answering an Incoming Call
If the display is on, tap Answer.
䊳
䊳 If the display is off, the display will come on with the
Lock screen. To answer the call, pull the ring up, or
press and hold the
to the ring.
Answer button and then drag it
20 1. Device Basics
Page 19
Muting the Ringing Sound
2011/05/05
for certification review only
To mute the ringer without rejecting the call, you can do
any of the following:
䊳 Press the volume down button.
䊳 Press and tap Mute.
䊳 Place the device face down on a level surface.
(You can do this even on the Lock screen.)
Using the Quiet Ring on Pickup Feature
Your device automatically reduces the ringer volume
when you pick up the device to answer calls.
1. Press > , and then tap Settings > Sound.
2. Scroll down the screen, and then select the Quiet
ring on pickup check box.
3. Press .
Rejecting an Incoming Call
䊳 If the display is on, tap Decline.
䊳 If the display is off, the display will come on with
the Lock screen. Press and hold the
and then drag it to the ring to reject and send the
call to your voicemail.
Decline button
Rejecting a Call and Sending a Text Message
You can automatically send a default text message to a
caller and reject the incoming voice call. Press and
Send message when you have an incoming call to
tap
send the text message.
While on the Phone screen, you can change the default
text message by pressing and tapping
Edit default message.
Answering a Roam Call With Call Guard Enabled
Call Guard is an option that helps you manage your
roaming charges when making or receiving calls while
outside the Nationwide Sprint Network. See “Roaming”
on page 175 for more information.
䊳 Tap Answer to answer the call. (See “Roaming
Guards” on page 176 for more information.)
Note: If your device is turned off, all calls automatically go to
voicemail.
Ending a Call
䊳 Tap End call.
Settings >
Device Basics
1. Device Basics 21
Page 20
Missed Call Notification
2011/05/05
for certification review only
When you do not answer an incoming call, you will see
the missed call icon in the status bar.
To see who the caller was, press and hold the status
bar, and then drag downward on the screen to open
the Notifications panel. The missed call number or
contact name is displayed.
Tap the missed call number or contact name to open
the Call history. Missed calls are indicated by the
missed call icon ( ).
Calling Emergency Numbers
You can place calls to 911 even if the device’s screen is
locked or your account is restricted.
To call the 911 emergency number when the device’s
screen is locked with a screen lock:
Unlock the screen. For more information, see
1.
“Using the Lock Screen.”
2. Tap Emergency call on the screen.
3. Tap .
To call the 911 emergency number normally or when your
account is restricted:
1.
Unlock the screen. For more information, see
“Using the Lock Screen.”
2. Tap on the Home screen.
3. Tap .
Enhanced 911 (E911) Information
This device features an embedded Global Positioning
System (GPS) chip necessary for utilizing E911
emergency location services where available.
When you place an emergency 911 call, the GPS
feature of your device seeks information to calculate
your approximate location. Depending on several
variables, including availability and access to satellite
signals, it may take up to 30 seconds or more to
determine and report your approximate location.
Important: Always report your lo cation to the 911 operator
when placing an emergency call.
designated emergency call takers, known as
Public Safety Answering Points (PSAPs), may not
be equipped to receive GPS location information
from your device.
22 1. Device Basics
Some
Page 21
In-Call Options
2011/05/05
for certification review only
Pressing during a call displays a list of available
in-call features. Tap an option to select it.
The following options may be available through the
Options menu:
Note: When the device is completing a call, only the People,
Flash, and Speaker on options are available.
䢇 Add call to initiate a three-way call.
䢇 People to display your contacts list.
䢇 Flash to accept another incoming call and put the first
caller on hold. Tap
䢇 Mute to mute the microphone. Tap Unmute to unmute
the microphone.
䢇 Speaker on or Speaker off to route the device’s audio
through the speaker or through the earpiece.
䊳 Tap Speaker On to route the device’s audio through
the speaker. (You can adjust the speaker volume
by pressing the volume up or down button.)
䊳 Tap Speaker Off to use the device’s earpiece.
WARNING: Because of higher volume levels, do not place the
Flash again to talk to the first caller.
device near your ear during speakerphone use.
End-of-Call Options
After you receive a call from or make a call to a phone
number that is not in your People list, you can choose
to save the number to People. On the Phone screen,
tap at the right side of the number to add the new
number to People.
Tip: After receiving a call from a phone number that is not in
your People list, an options menu is briefly displayed to
allow you to save the number to People. On the options
Yes, create new contact.
menu, tap
Saving a Phone Number
You can store contacts entries in your device. Your
device automatically sorts People entries
alphabetically. (For more information, see “About
People” on page 63.)
To save a number from standby mode:
1. Press and tap .
2. Enter the phone number by tapping the keys on
the keypad.
3. Tap Save to People. (This button appears after
tapping six digits.)
Device Basics
1. Device Basics 23
Page 22
4. Tap Create new contact or Save to existing contact.
2011/05/05
for certification review only
5. Use the keyboard to enter the new contact name
Save to save the new entry.
and tap
– or –
Tap an existing contact name and tap
the new number.
Save to save
Finding a Phone Number
You can search People for entries by name.
1. Press and tap > People.
2. Press , tap the Search people bar and enter the
first letter or letters of an entry. (The more letters
you enter, the more specific the search.)
3. Tap the contact to display the contact’s phone
number(s).
Dialing From the People List
1. Press and tap > People.
2. Tap the entry you want to call.
3. Tap Call [Type of Number]. (For example, Call
mobile.)
24 1. De vice B asi c s
Speed Dialing
Your device can store up to nine phone numbers in
speed dial locations.
To assign a speed dial number to a People entry:
1.
Press and tap > People, and then tap an
entry in People.
2. Press and tap Set speed dial.
3. Tap the list menu under Number to select a
number from the contact to assign to speed dial.
4. Tap the list menu under Location to assign the
number to a speed dial location.
5. Tap Save.
Note: If you assign a number to an already in-use speed dial
location, the new phone number will automatically
replace the previous speed dial assignment.
Page 23
To call using Speed Dial:
2011/05/05
for certification review only
䊳 Press and hold the appropriate key on the Phone
keypad for approximately two seconds.
The display confirms that you have dialed the
number when it shows “Dialing” on the upper right
side of the screen.
Finding Speed Dial Numbers
Press and tap .
1.
2. Press and Speed dial.
3. Tap a speed dial entry to call the contact.
Tip: While on the Speed dial screen, tap Add new or press
Add to add new speed dial entries from People.
and tap
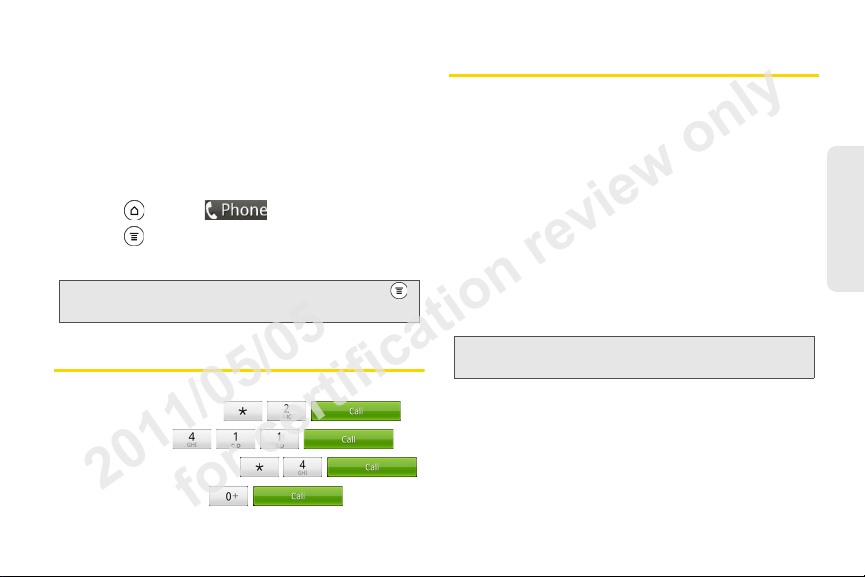
Dialing Sprint Services
䊳 Dial the appropriate service number:
䡲 Customer Service –
䡲 Sprint 411 –
䡲 Account Information –
䡲 Sprint Operator –
Entering Text
Using the Onscreen Keyboard
When you start a program or select a box that requires
entry of text or numbers, the onscreen keyboard
becomes available. You can choose from three
keyboard layouts:
Changing to Landscape Orientation
When entering text, you can choose to use the
landscape orientation of the onscreen keyboard by
turning the device sideways. This pops up a larger
Standard keyboard that lets you type easily using two
thumbs
Note: The landscape orientation keyboard is not supported in
all applications.
Standard, Phone, and Compact.
Device Basics
1. Device Basics 25
Page 24
Changing the Onscreen Keyboard Layout
2011/05/05
for certification review only
You can choose from three different keyboard layouts
to suit your typing style. To change the keyboard layout,
do the following:
1. Press > , and then tap Settings >
Language & keyboard > Touch Input.
2. Tap Keyboard types, and then select from the
following keyboard types:
䡲 Standard. This layout is similar to a desktop
computer keyboard. This is the default keyboard
layout.
䡲 Phone. This layout resembles a traditional wireless
phone keypad.
䡲 Compact. This layout features two letters on each
key. The keys are slightly larger than on the
standard layout.
26 1. Device Basics
Entering Text
Use the following keys while entering text using the
onscreen keyboard:
Press and hold keys with gray characters at the
top to enter numbers, symbols, or accented
letters. The gray character displayed on the key is
the character that will be inserted when you press
and hold that key. Some keys have multiple
characters or accents associated with them.
Shift key. Tap to capitalize the next letter you
enter. Tap twice to turn on caps lock.
Numeric key. Tap to switch to the numeric and
symbol keyboard.
Alphabet key. Tap to switch to the alphabetic
keyboard.
Enter key. Tap to create a new line.
Backspace key. Tap to delete the previous
character. Press and hold to delete multiple
characters.
Voice input key. Tap to speak the words you want
to type. See “Voice Input” on page 125.
Page 25
Tap to hide the onscreen keyboard.
2011/05/05
for certification review only
Tap to toggle between
predictive modes when using the Compact or
Phone layout. (See “Predictive Text” for details.)
Multitap and XT9
Predictive Text
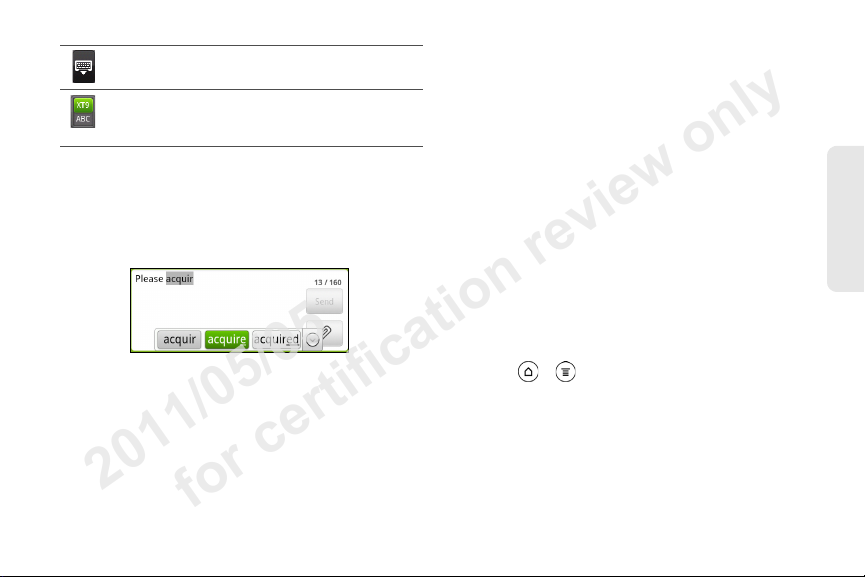
The onscreen keyboard has predictive text to help you
type quickly and accurately. Predictive text input is
enabled by default, and word suggestions are
displayed as you type.
To enter a word in predictive mode, do any of the
following:
䢇 If you see the word you want highlighted in green or
orange, you can simply tap the space bar to insert
the word into your text.
䢇 If you see the word you want shown in the
suggestions before you have finished typing the
entire word, tap the word to insert it into your text.
䢇 If an arrow is shown to the right of the suggestion list,
tap the arrow to see more suggestions.
Adding a Word to the Predictive Text Dictionary
Your device comes with a list of wo rds that it references
for predictive text suggestions. Sometimes you may
need to add a word to the predictive text dictionary, for
example a name or a specialized technical word.
While entering text using the Standard keyboard layout,
if you tap any word on the suggestion list, it is
automatically added to the predictive text dictionary if it
was not in the dictionary already.
To manually add a word to the predictive text dictionary:
Press > , and then tap Settings > Language &
1.
keyboard > Touch Input > Personal dictionary.
2. Ta p Edit personal dictionary and then tap Add new.
3. Enter the word to add, and then tap OK.
Device Basics
1. Device Basics 27
Page 26

Editing or Deleting a Word in Your Personal
2011/05/05
for certification review only
Dictionary
You can edit or remove words that you previously
added to the predictive text dictionary.
1. Press > , and then tap Settings > Language
& keyboard > Touch Input > Personal dictionary.
2. Tap Edit personal dictionary.
3. To edit a word, tap the word, enter your changes,
and then tap
– or –
To delete a word, press , tap
X icon to the right of the word.
the
OK.
Delete and then tap
Backing up Your Personal Dictionary to Your
Storage Card
You can use your microSD storage card to back up the
new words you’ve added to your personal dictionary.
1. Press > , and then tap Settings > Language &
keyboard > Touch Input.
2. Tap Personal dictionary > Sync personal dictionary >
Copy to storage card.
3. When prompted, tap OK.
Restoring Your Personal Dictionary from Your
Storage Card
Press > and then tap Settings > Language &
1.
keyboard > Touch Input.
2. Tap Personal dictionary > Sync personal dictionary >
Restore from storage card.
3. When prompted, tap OK.
28 1. Device Basics
Page 27

Adjusting Touch Input Settings
2011/05/05
for certification review only
䊳 Press > , and tap Settings > Language &
keyboard > Touch Input.
Touch Input Settings
䢇 Keyboard types
use. You can choose from
Compact.
䢇 International keyboard lets you add or remove
languages from the onscreen keyboard language list.
䢇 Bilingual prediction lets you activate word prediction
for a second language.
䢇 Text input lets you set text input options when
entering text, calibrate the keyboard, and set sound
or vibration feedback whenever you tap a key.
䡲 Standard
● Prediction
● Spell correction: Correct typographical errors
lets you select the keyboard layout to
Standard, Phone, or
: Enable the word prediction feature.
by selecting from a list of possible words
based on the keys you have tapped as well as
neighboring keys.
䡲 Phone & Compact
● Spell correction: Correct typographical errors
by selecting from a list of possible words that
reflect the characters of the keys you have
tapped as well as characters of nearby keys.
● Word completion: Select from a list of possible
combinations based on the characters that
appear on the keys that you tapped.
䡲 Other settings
● Sound feedback: Cause keys to audibly click
when tapped.
● Vibrate when typing: Cause keys to vibrate
when tapped.
䡲 Finger touch precision
● Calibration tool: Lets you recalibrate the
keyboard if you feel that the keys are not
responding accurately to your taps.
● Reset calibration: Reset the calibration back to
factory default.
䢇 Chinese Text input lets you set options when entering
text in Chinese.
Device Basics
1. Device Basics 29
Page 28
䡲 Pinyin: Choose Traditional Chinese or Simplified
2011/05/05
for certification review only
Chinese. In Simplified Chinese, you can enable
Fuzzy Pinyin pairs.
䡲 Stroke: Choose Traditional Chinese or Simplified
Chinese mode.
䢇 Tu tor ial lets you go through tutorials to learn how to
use the onscreen keyboard features.
䢇 Trace keyboard lets you choose the pen color and
pen width to use when tracing letters on the
keyboard.
䢇 Personal dictionary lets you add, edit, or remove
words in the predictive text dictionary. For more
information, see “Adding a Word to the Predictive
Text Dictionary” and “Editing or Deleting a Word in
Your Personal Dictionary.
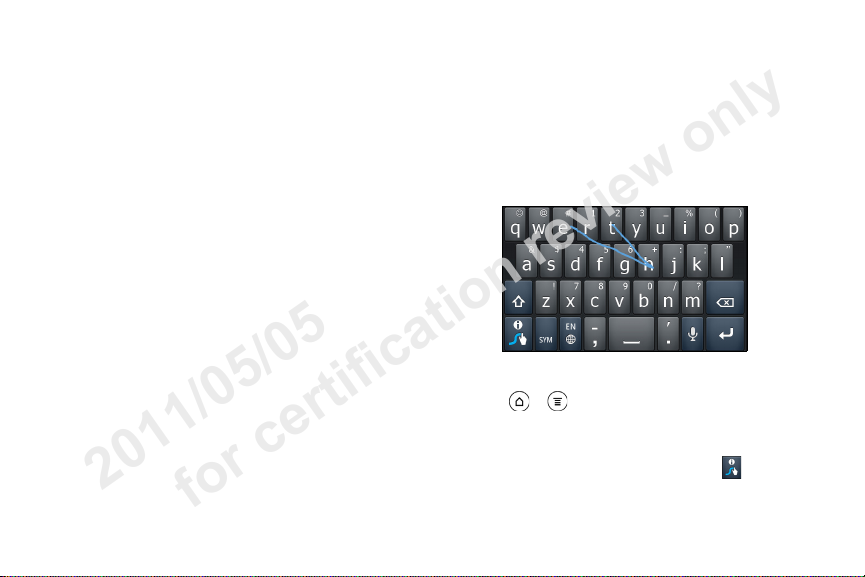
Using Swype to Enter Text
Aside from the touch input keyboards, you can also
use Swype® to trace the letters of the word that you
want to enter. With Swype, you slide your finger on the
onscreen keyboard to enter words. For example, if you
want to type “the”, put your finger on the “t” key, and
then trace the word (by sliding your finger) “the” on the
onscreen keyboard.
Adjusting Swype Settings
䊳 Press > and then tap Settings > Language &
keyboard > Swype.
– or –
While using the Swype keyboard, tap and then
Options.
tap
30 1. Device Basics
Page 29
Switching Between Touch Input and
1
2
3
4
5
2011/05/05
for certification review only
Swype Keyboard
By default, your device uses the touch input method.
You can choose to change the input method so you
can use Swype.
1. On an application (for example, Messages) that
lets you enter text, press and hold the text box.
2. Ta p Input method, and then select the input
method you want to use.
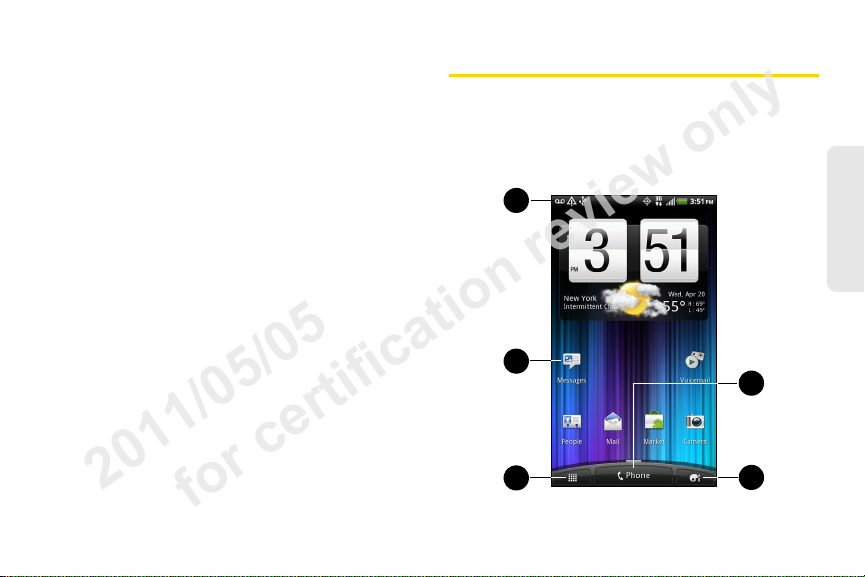
Home Screen
The Home screen is the starting point for many
applications and functions. The Home screen allows
you to add items like application icons, shortcuts,
folders, and widgets to give you instant access to
information and applications.
Device Basics
1. Device Basics 31
Page 30
1. Status Bar: Displays device status and notification
2011/05/05
for certification review only
icons. See “Viewing the Display Screen” on page 9
for a list of icons you will see on the status bar.
2. Application icon: Tap to open the related
application.
3. All apps: Tap to open the All apps screen. The All
apps screen holds all applications on your device.
4. Personalize: Tap to personalize or add items to the
Home screen or to an extended screen, or change
the sound settings of your device.
5. Phone: Tap to open the Phone screen to make
calls.
Tip: While in any application, press to go back to the
Home screen.
Extended Screens
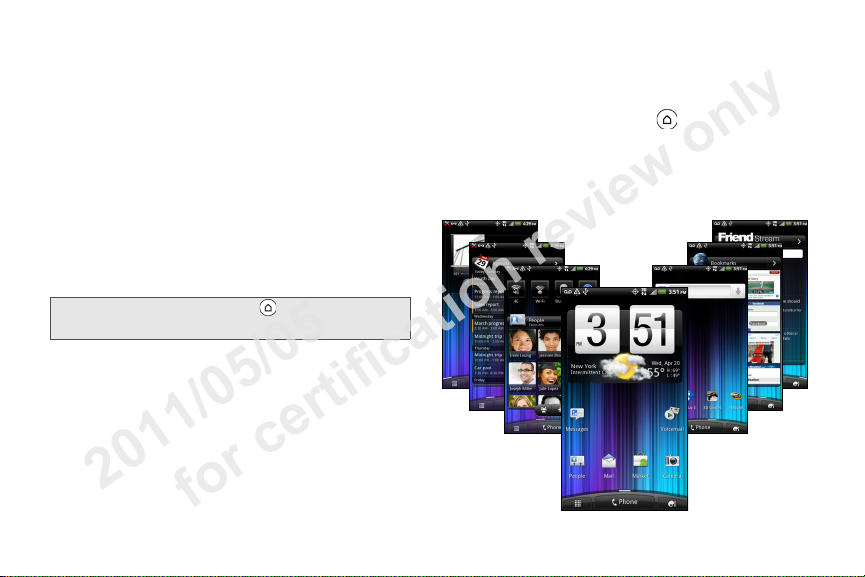
Besides the Home screen, you can access six
additional screens to provide more space for adding
icons, widgets, and more. Press , and then drag
across the screen to move from the Home screen to an
extended screen.
There are six extended screens besides the main
Home screen.
32 1. Device Basics
Page 31
Note: You cannot add more screens.
2011/05/05
for certification review only
Tip: While on an extended screen, press to return to the
main Home screen.
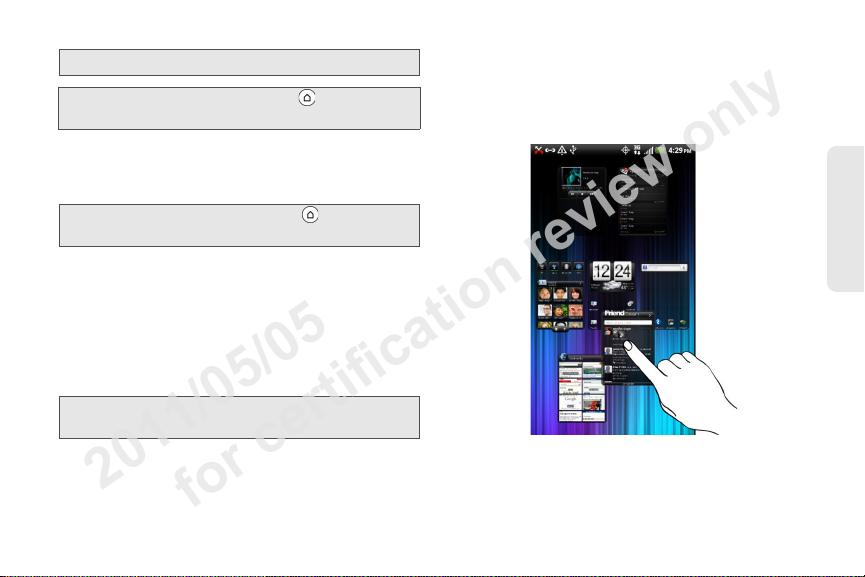
To go directly to a particular screen:
1. Pinch the Home screen to display thumbnail
images of all the screens.
Tip: On the Home screen, you can press to show the
thumbnail overview.
2. Tap the screen you want to open.
1. Pinch the Home screen to display thumbnail
images of all the screens.
2. Press and hold the thumbnail of the home screen
you want to move. Your device vibrates. Don’t lift
your finger just yet.
Rearranging the Home Screen
Reorder your Home screen panels in any way that fits
how you use them. For example, move the panels with
frequently-used widgets, shortcuts, and folders closer
to the main Home screen.
Note: The center thumbnail in is always the main Home
screen.
3. Drag the thumbnail to its new position, and then lift
your finger.
Device Basics
1. Device Basics 33
Page 32
Customizing the Home Screen
2011/05/05
for certification review only
To add a Home screen item:
1. Press and tap .
Note: You can also press and hold an empty area on the
Home screen.
2. On the Add items to Home section, tap the item
you want to add to the Home screen or an
extended screen:
䡲 Widget: Add HTC or Android™ widgets to a
screen such as a clock, calendar, mail, people,
Footprints, and more.
䡲 App: Add shortcuts to applications on your
device. To quickly add an application shortcut that
is on the All apps screen to a screen, press and
hold an application icon. When the device
vibrates, drag the icon to an empty area on the
screen, and then release it.
䡲 Shortcut: Add shortcuts to bookmarked Web
page, a favorite contact, a Gmail™ label, a music
playlist, and more.
䡲 Folder: Add a folder where you can organize
screen items. Add a shortcut to all your contacts,
contacts with phone numbers, or starred contacts.
Contact details are automatically updated when
there are changes in the source.
Customize any screen by adding application shortcuts
and widgets. You can also use preset widgets from a
Scene. To use a Scene, press and tap >
To add a widget:
1.
Press and tap > Widget.
2. Select a widget to add to a screen, and then select
a layout to use, when available.
Note: Most HTC widgets offer various layouts and sizes to fit
your needs.
3. Tap Select.
Note: Your device places the widget on an available home
screen. You may need remove a widget on the screen
first if there is no space to place the new widget.
34 1. Device Basics
Scene.
Page 33
To edit or reposition a screen item:
2011/05/05
for certification review only
1. Press and hold the item on the Home screen you
want to edit or reposition. The item then expands
and the device vibrates. Don’ lift your finger just yet.
2. To reposition the item, drag it to the position you
want on the screen, and then release it.
– or –
To edit the item (when editing is available), drag it
to the Edit button
Note: To move an item from the Home screen to an
extended screen, press and hold the item and then
drag it to the left or right edge of the screen until the
display shifts to the extended screen. Position the item
on the screen, and then release it.
To remove a screen item:
1.
Press and hold the item on the screen you want to
remove. The item then expands and the device
vibrates. Don’ lift your finger just yet.
2. Drag the item to the button on the lower
right of the screen.
3. When the button turns red, release the
item.
To create a folder and add items to it:
You can create folders on a screen to hold application
icons or shortcuts.
1. Press and tap > Folder > New folder. A new
folder appears on the screen.
2. Press and hold an application icon or a shortcut
on the screen, and then drag it on top of the folder.
To access the items inside a folder, tap the folder to
open it and then tap the icon of the application or
shortcut you want to open.
Note: To delete a folder, follow the same procedure as you
would for removing a screen item.
To rename a folder:
Tap the folder to open it.
1.
2. Press and hold the folder’s title bar to open the
Rename folder dialog box.
3. Enter the Folder name and then tap OK.
Device Basics
1. Device Basics 35
 Loading...