

Page 1

User Guide
Page 2

Table of Contents
Get Started ................................................................................................................................ 1
Your Phone at a Glance ......................................................................................................... 1
Charge Your Phone ................................................................................................................ 2
Complete the Setup Application.............................................................................................. 4
Set Up Voicemail .................................................................................................................... 5
Boost Mobile Account Information and Help ........................................................................... 6
Phone Basics ............................................................................................................................. 8
Your Phone’s Layout .............................................................................................................. 8
Turn Your Phone On and Off .................................................................................................10
Turn Your Screen On and Off ................................................................................................11
Your Phone’s Lock Screen ....................................................................................................12
Unlock the Screen ..............................................................................................................12
Customize the Lock Screen ...............................................................................................12
Touchscreen Navigation ........................................................................................................12
Motion Gestures ....................................................................................................................18
Your Home Screen ................................................................................................................20
Home Screen Basics .........................................................................................................20
Extended Screens ..............................................................................................................22
Customize the Home Screen .............................................................................................23
Launch Bar, Apps, and Folders ..........................................................................................24
Status and Notifications .........................................................................................................26
Status Bar ..........................................................................................................................26
Notifications Panel .............................................................................................................29
Notification LED .................................................................................................................30
Enter Text ..............................................................................................................................30
HTC Sense Input Keyboard ...............................................................................................30
Enter Text by Speaking ......................................................................................................32
Tips for Editing Text ...........................................................................................................33
Transfer Content Between Your Phone and Computer ..........................................................35
Change the USB Connection Type ....................................................................................35
Table of Contents i
Page 3

Phone Calls ..............................................................................................................................37
Make Phone Calls .................................................................................................................37
Call Using the Phone Dialer ...............................................................................................37
Call From Call History ........................................................................................................38
Call From People ................................................................................................ ...............38
Call Using a Speed Dial Number ........................................................................................38
Call a Number in a Text Message or Email Message .........................................................38
Call Emergency Numbers ..................................................................................................39
Make International Calls .....................................................................................................39
Receive Phone Calls .............................................................................................................40
Visual Voicemail ....................................................................................................................41
Set Up Visual Voicemail .....................................................................................................41
Review Visual Voicemail ....................................................................................................42
Voicemail (Traditional) ...........................................................................................................43
Set Up Voicemail ...............................................................................................................43
Voicemail Notification .........................................................................................................43
Retrieve Your Voicemail Messages....................................................................................44
Phone Call Options................................................................................................................44
Caller ID .............................................................................................................................44
Call Waiting ........................................................................................................................45
3-way Calling .....................................................................................................................45
Call Forwarding ..................................................................................................................45
In-call Options ....................................................................................................................46
Internet Calls .........................................................................................................................46
Add an Internet Calling Account .........................................................................................47
Make an Internet Call .........................................................................................................47
Set Up Speed Dialing ................................................................................................ ............47
Call History ............................................................................................................................48
View Call History ................................................................................................................48
Save a Number From Call History ......................................................................................49
Prepend a Number From Call History ................................................................................49
Erase Call History ................................ ................................................................ ..............49
Settings .....................................................................................................................................50
Table of Contents ii
Page 4

Wireless & Networks Settings ................................................................................................50
Airplane Mode ....................................................................................................................50
Wi-Fi ..................................................................................................................................50
Bluetooth............................................................................................................................50
Mobile Data ........................................................................................................................50
HTC Media Link HD ...........................................................................................................50
More Wireless & Network Settings .....................................................................................50
Personalization Settings ........................................................................................................51
Scene ................................................................................................................................51
Change the Wallpaper .......................................................................................................52
Change the Lock Screen Style ...........................................................................................52
Change the Default Ringtone .............................................................................................53
Accounts & Sync ...................................................................................................................53
Add Your Social Networks, Email Accounts, and More ......................................................53
Add One or More Google Accounts....................................................................................53
Manage Your Online Accounts ...........................................................................................54
Location & Security Settings ..................................................................................................55
Location .............................................................................................................................55
Security-Screen Lock .........................................................................................................55
Accessibility Settings .............................................................................................................57
Navigate Your Phone with TalkBack ..................................................................................57
Backup & Reset .....................................................................................................................60
Backup ...............................................................................................................................60
Reset Your Phone ..............................................................................................................61
Display Settings .....................................................................................................................62
Auto-rotate Screen .............................................................................................................62
Keep the Screen On While Charging .................................................................................62
Text Size ............................................................................................................................63
Brightness ..........................................................................................................................63
Screen Timeout..................................................................................................................63
Notification Flash ...............................................................................................................63
HTC Gestures ....................................................................................................................64
Calibrate the Screen ..........................................................................................................64
Table of Contents iii
Page 5

Beats Audio ........................................................................................................................... 64
Sound Settings ......................................................................................................................64
General Sound Settings - Sound Profile and Vibrate ..........................................................64
General Sound Settings - Volumes ....................................................................................65
Incoming Calls - Ringtones ................................................................................................65
Incoming Calls - Other Options ..........................................................................................65
Notification Sounds ............................................................................................................65
System Sound Settings ......................................................................................................66
Call Settings ..........................................................................................................................66
Voicemail Settings .............................................................................................................66
Other Call Settings .............................................................................................................66
Internet Call Settings ..........................................................................................................67
Applications Settings .............................................................................................................67
Uninstall Third-party Apps ..................................................................................................67
Clear Application Cache and Data .....................................................................................68
Stop Applications Using Task Manager ..............................................................................68
Application Tabs ................................................................................................................68
Allow Installation of Third-Party Programs ..........................................................................69
App Association .....................................................................................................................69
Storage Settings ....................................................................................................................69
Types of Storage ................................................................................................................69
Copy Files To or From Your Phone ....................................................................................70
Make More Storage Space ................................................................................................70
Encrypt Data on Your Phone..............................................................................................71
Power Settings ......................................................................................................................71
Check Battery Usage .........................................................................................................71
Check Battery History ........................................................................................................72
Optimize Battery Life with Power Saver Mode ...................................................................72
Battery Saving Tips ............................................................................................................72
Language & Keyboard Settings .............................................................................................74
Language Settings .............................................................................................................74
Post Spelling Check ...........................................................................................................75
Keyboard Settings - Google Voice Typing ..........................................................................75
Table of Contents iv
Page 6

Keyboard Settings - HTC Sense Input ...............................................................................75
Speech Settings .................................................................................................................75
Date & Time Settings .............................................................................................................75
Developer Options .................................................................................................................76
Activate This Device ..............................................................................................................76
System Updates ....................................................................................................................76
Update Your Profile ............................................................................................................76
Update Your Profile ............................................................................................................77
Update the Operating System ............................................................................................77
About Your Phone .................................................................................................................77
People ......................................................................................................................................79
Getting Contacts Into Your Phone .........................................................................................79
Transfer Contacts from Your Old Phone ............................................................................79
Your People List ....................................................................................................................80
Your People App Profile ........................................................................................................81
Set Up Your Profile ............................................................................................................81
Your Profile ........................................................................................................................82
Add Entries to People App .....................................................................................................82
Add a New People Entry ....................................................................................................82
Find People You Know on Social Networks .......................................................................83
Import or Copy Contacts ....................................................................................................83
Merge Entries in People ........................................................................................................84
Accept Contact Link Suggestions .......................................................................................84
Manually Merge Entries .....................................................................................................85
Break the Link ....................................................................................................................85
Contact Information and Conversations .................................................................................86
Manage People Entries .........................................................................................................86
Edit a People Entry ............................................................................................................86
Delete an Entry ..................................................................................................................86
Delete Multiple Entries .......................................................................................................87
Contact Groups .....................................................................................................................87
Create a Group ..................................................................................................................87
Edit a Contact Group .........................................................................................................87
Table of Contents v
Page 7

Send a Message or Email to a Group ................................................................................88
Rearrange Your Contact Groups ........................................................................................88
Delete Groups ....................................................................................................................88
Use People Widgets ..............................................................................................................88
Add a People Widget .........................................................................................................89
Set the Default Communication Method .............................................................................89
Get in Touch with a Contact ...............................................................................................89
Send Contact Information ......................................................................................................89
Back Up and Restore Your Contacts .....................................................................................90
Accounts and Messaging ..........................................................................................................92
Gmail .....................................................................................................................................92
Create a Google Account ...................................................................................................92
Sign In to Your Google Account .........................................................................................93
View Your Gmail Inbox .......................................................................................................93
Send a New Gmail Message ..............................................................................................94
Reply To or Forward an Email Message ............................................................................95
Get Help with Gmail ...........................................................................................................95
Email .....................................................................................................................................95
Add a POP3 or IMAP Email Account ..................................................................................95
Add an Exchange ActiveSync Account ..............................................................................96
Check Your Mail Inbox ................................................................................................ .......96
Send an Email Message ....................................................................................................98
Save an Email Message in Tasks ......................................................................................99
Print Your Email Messages ................................................................................................99
Search Email Messages .................................................................................................. 100
Work with Exchange ActiveSync Email ............................................................................ 101
Manage Email Messages ................................................................................................. 102
Sync Email Less Frequently ............................................................................................. 103
Change the Email Account Settings ................................................................................. 103
Delete an Email Account .................................................................................................. 105
Add the Mail Widget ......................................................................................................... 105
Text Messaging and MMS ................................................................................................... 105
Send a Text Message (SMS) ........................................................................................... 106
Table of Contents vi
Page 8

Send a Multimedia Message (MMS) ................................................................................ 107
Save and Resume Composing a Draft Message ................................ .............................. 109
Check Your Messages ..................................................................................................... 109
Manage Message Conversations ..................................................................................... 111
Back Up and Restore Your Text Messages ...................................................................... 113
Text and Multimedia Message Options ............................................................................ 114
Add the Messages Widget ............................................................................................... 117
Social Networking Accounts ................................................................................................ 117
Facebook ......................................................................................................................... 117
Twitter .............................................................................................................................. 117
FriendStream ................................................................................................................... 117
Google+ ........................................................................................................................... 121
YouTube .......................................................................................................................... 121
Google Talk ..................................................................................................................... 123
Applications and Entertainment ............................................................................................... 124
Google Play ......................................................................................................................... 124
Find and Install an Application ......................................................................................... 124
Uninstall an Application .................................................................................................... 124
Get Help with Google Play ............................................................................................... 125
Navigation ........................................................................................................................... 125
HTC Car .......................................................................................................................... 125
Google Maps ................................................................................................................... 128
Google Latitude................................................................................................................ 132
Scout by Telenav ............................................................................................................. 133
Music ................................................................................................................................... 134
Listen to Music ................................................................................................................. 134
Beats Audio - Make Your Music Sound Better ................................................................. 135
Find Music Videos on YouTube ....................................................................................... 135
Update Album Covers ...................................................................................................... 136
Playlists ........................................................................................................................... 136
Music and Ringtones ....................................................................................................... 137
Share Music Using Bluetooth ........................................................................................... 138
Use the Music Widget ...................................................................................................... 139
Table of Contents vii
Page 9

FM Radio ............................................................................................................................. 139
HTC Watch ................................ .......................................................................................... 140
Create or Sign In to Your HTC Watch Account ................................................................ 140
Rent or Buy a Video with HTC Watch .............................................................................. 140
Manage Your HTC Watch Downloads .............................................................................. 141
Change the HTC Watch Settings ..................................................................................... 141
Check What’s Linked to Your HTC Watch Account .......................................................... 141
Delete Your HTC Watch Account ..................................................................................... 141
HTC Watch FAQs ................................ ................................................................ ............ 142
Web and Data ......................................................................................................................... 143
Data Services – Sprint 4G LTE and Sprint 3G Networks ..................................................... 143
Your User Name .............................................................................................................. 143
Launch a Web Connection ............................................................................................... 143
Data Connection Status and Indicators ................................................................ ............ 143
Turn the Data Connection On or Off ................................................................................. 144
Data Services FAQs ........................................................................................................ 144
Manage Your Data Usage ................................................................................................ 145
Wi-Fi .................................................................................................................................... 147
Turn Wi-Fi On and Connect to a Wireless Network .......................................................... 147
Check the Wireless Network Status ................................................................................. 148
Connect to a Different Wi-Fi Network ............................................................................... 148
Add the Wi-Fi Widget ....................................................................................................... 148
Virtual Private Networks (VPN) ............................................................................................ 149
Add a VPN Connection .................................................................................................... 149
Connect to a VPN ................................................................ ............................................ 149
Disconnect From a VPN ................................................................................................... 149
Search for Information ......................................................................................................... 150
Perform Searches on the Web and Your Phone............................................................... 150
Search the Web with Your Voice ...................................................................................... 150
Set Search Options .......................................................................................................... 150
Get Instant Information with Google Now ......................................................................... 151
Browse the Web .................................................................................................................. 153
Open the Browser ............................................................................................................ 153
Table of Contents viii
Page 10

Private Browsing .............................................................................................................. 154
Add and Manage Your Bookmarks................................................................................... 154
Save Web Content For Later............................................................................................ 155
Browsing History .............................................................................................................. 156
Download File and Apps from the Web ............................................................................ 157
Set Browser Options ........................................................................................................ 157
Copy Text, Look Up Information, and Share .................................................................... 158
Use Google Chrome to Browse the Web......................................................................... 160
Camera and Video .................................................................................................................. 161
Using the Camera ............................................................................................................... 161
Launch the Camera ......................................................................................................... 161
Take a Photo ................................................................................................................... 162
Record a Video ................................................................................................................ 163
Camera Scenes ............................................................................................................... 164
Change Camera and Video Settings ................................................................................ 165
Access Photos and Videos ................................................................ .................................. 166
View Photos and Videos .................................................................................................. 166
Start a Photo Slideshow ................................................................................................... 166
Watch Videos ................................................................................................................... 166
Edit Your Photos and Videos ........................................................................................... 167
View Photos in Your Social Networks .............................................................................. 170
Print Your Photos ............................................................................................................. 170
Share Your Photos and Videos ........................................................................................ 171
Wireless Display .................................................................................................................. 174
Tools and Calendar ................................................................................................................. 176
Calendar .............................................................................................................................. 176
Create an Event ................................................................ ............................................... 176
View the Calendar ............................................................................................................ 176
Manage Calendar Events ................................................................................................. 177
Accept or Decline a Meeting Invitation ............................................................................. 178
Set Reminders for Your Events ........................................................................................ 179
Event Alerts ..................................................................................................................... 179
Show or Hide Calendars and Tasks ................................................................................. 179
Table of Contents ix
Page 11

Change Calendar Settings ............................................................................................... 180
About the Calendar Widget .............................................................................................. 180
Calculator ............................................................................................................................ 180
Clock & Alarm ...................................................................................................................... 180
HTC Clock Widget ........................................................................................................... 180
Open the Clock Application .............................................................................................. 181
World Clock ..................................................................................................................... 181
Alarm Clock ..................................................................................................................... 182
Weather ............................................................................................................................... 183
Tasks................................................................................................................................... 184
Create a Task .................................................................................................................. 184
Link a Task to a Contact .................................................................................................. 185
Link a Task to a Location ................................................................................................. 185
Manage Tasks ................................................................................................................. 186
View the Unified Task List ................................................................................................ 186
Create a Task List ............................................................................................................ 187
Manage Task Lists ........................................................................................................... 187
Back Up or Restore Tasks ............................................................................................... 187
Change Tasks Settings ................................................................................................ .... 188
Dropbox ............................................................................................................................... 188
HTC Sync Manager ................................ ................................................................ ............. 192
Install HTC Sync Manager on Your Computer ................................................................. 193
Transfer iPhone Content to Your HTC Phone .................................................................. 193
Copy or Remove Media on Your Phone ........................................................................... 194
Sync Data Between Your Phone and Your Computer ...................................................... 194
Sync Music, Photos, and Videos from Your Phone to Your Computer ............................. 195
Sync Playlists Between Your Phone and Your Computer ................................................. 196
Sync Documents from Your Computer to Your Phone ..................................................... 196
Get Help for HTC Sync Manager ..................................................................................... 196
Voice Recorder .................................................................................................................... 196
Record Your Voice ........................................................................................................... 196
Set a Voice Clip as a Ringtone ......................................................................................... 197
Bluetooth and NFC .............................................................................................................. 197
Table of Contents x
Page 12

Turn Bluetooth On or Off .................................................................................................. 197
Change the Phone Name ................................................................................................. 198
Connect a Bluetooth Headset .......................................................................................... 198
Reconnect a Headset ...................................................................................................... 198
Disconnect or Unpair From a Bluetooth Device ................................................................ 199
Send Information Using Bluetooth .................................................................................... 199
Where Sent Information is Saved ..................................................................................... 200
Receive Information Using Bluetooth ............................................................................... 201
Use Bluetooth FTP Server ............................................................................................... 202
Share Content with Android Beam ................................................................................... 202
Shop Using Google Wallet ............................................................................................... 203
microSD Card ...................................................................................................................... 204
Insert the microSD Card ................................................................................................... 204
Remove the microSD Card .............................................................................................. 205
Check the microSD Card Memory .................................................................................... 206
Erase the microSD Card .................................................................................................. 206
Unmount the microSD Card ............................................................................................. 206
Proprietary Notices and Important Instructions ................................................................ ........ 208
Radio Frequency Exposure Operating Instructions .............................................................. 209
Index ....................................................................................................................................... 210
Table of Contents xi
Page 13

Get Started
This section gives you all the information you need to set up your phone and Boost Mobile
service the first time.
Your Phone at a Glance
The following illustrations outline your phone’s primary external features, keys, and buttons.
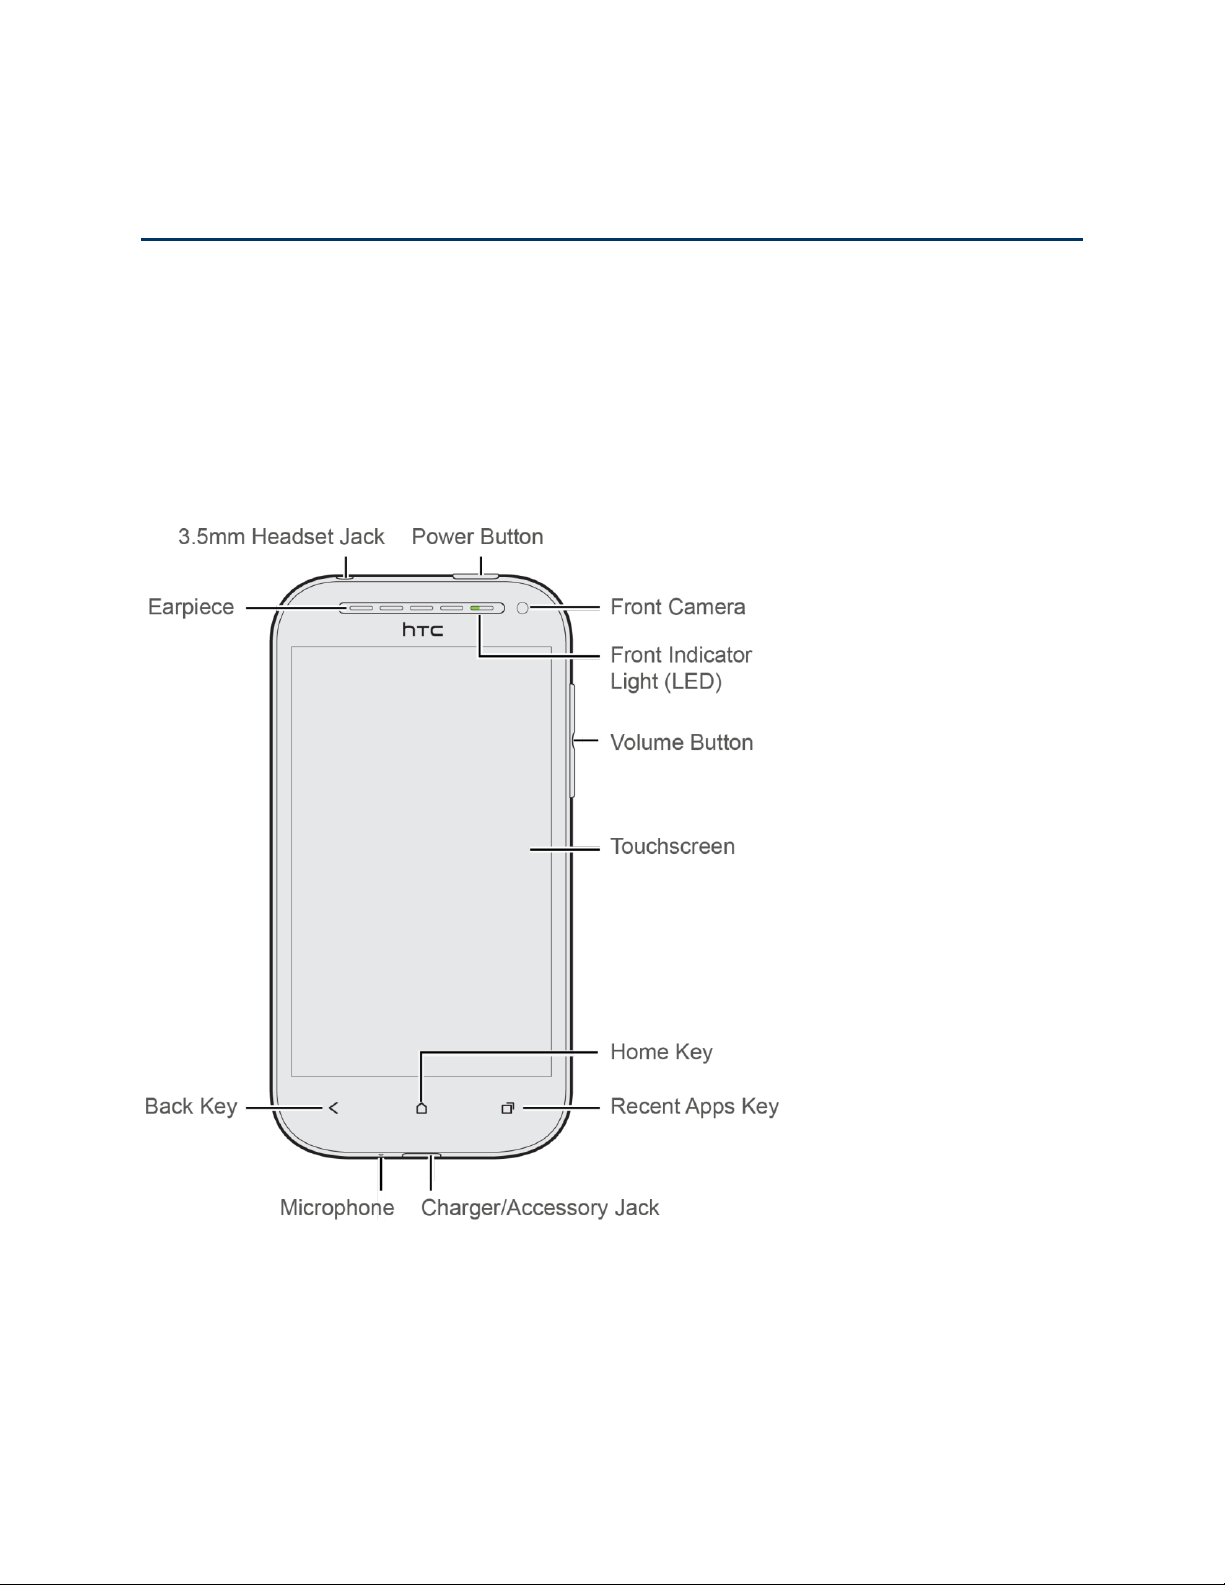
Front panel
Get Started 1
Page 14
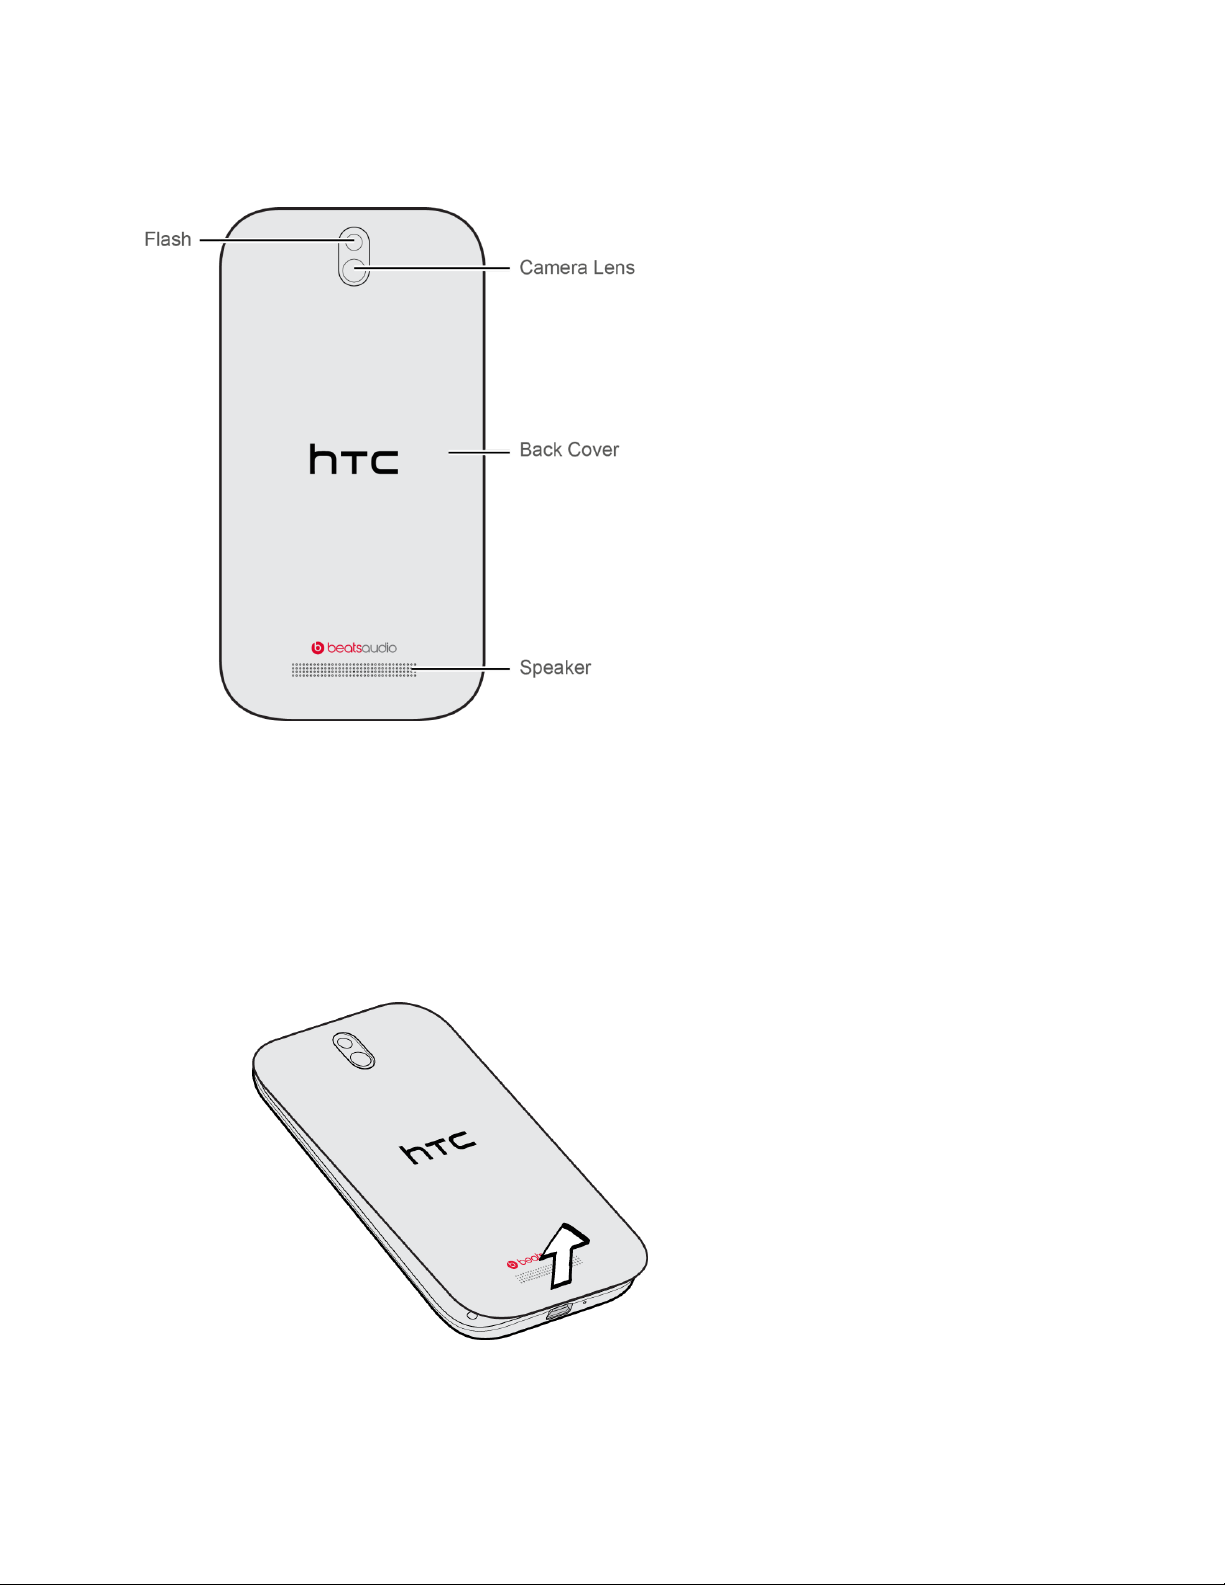
Back panel
Charge Your Phone
You must first install and charge the battery to begin setting up your phone.
1. Install the battery.
Hold the phone with the back panel facing you.
Lift the back cover from the notch at the bottom of the phone.
Get Started 2
Page 15
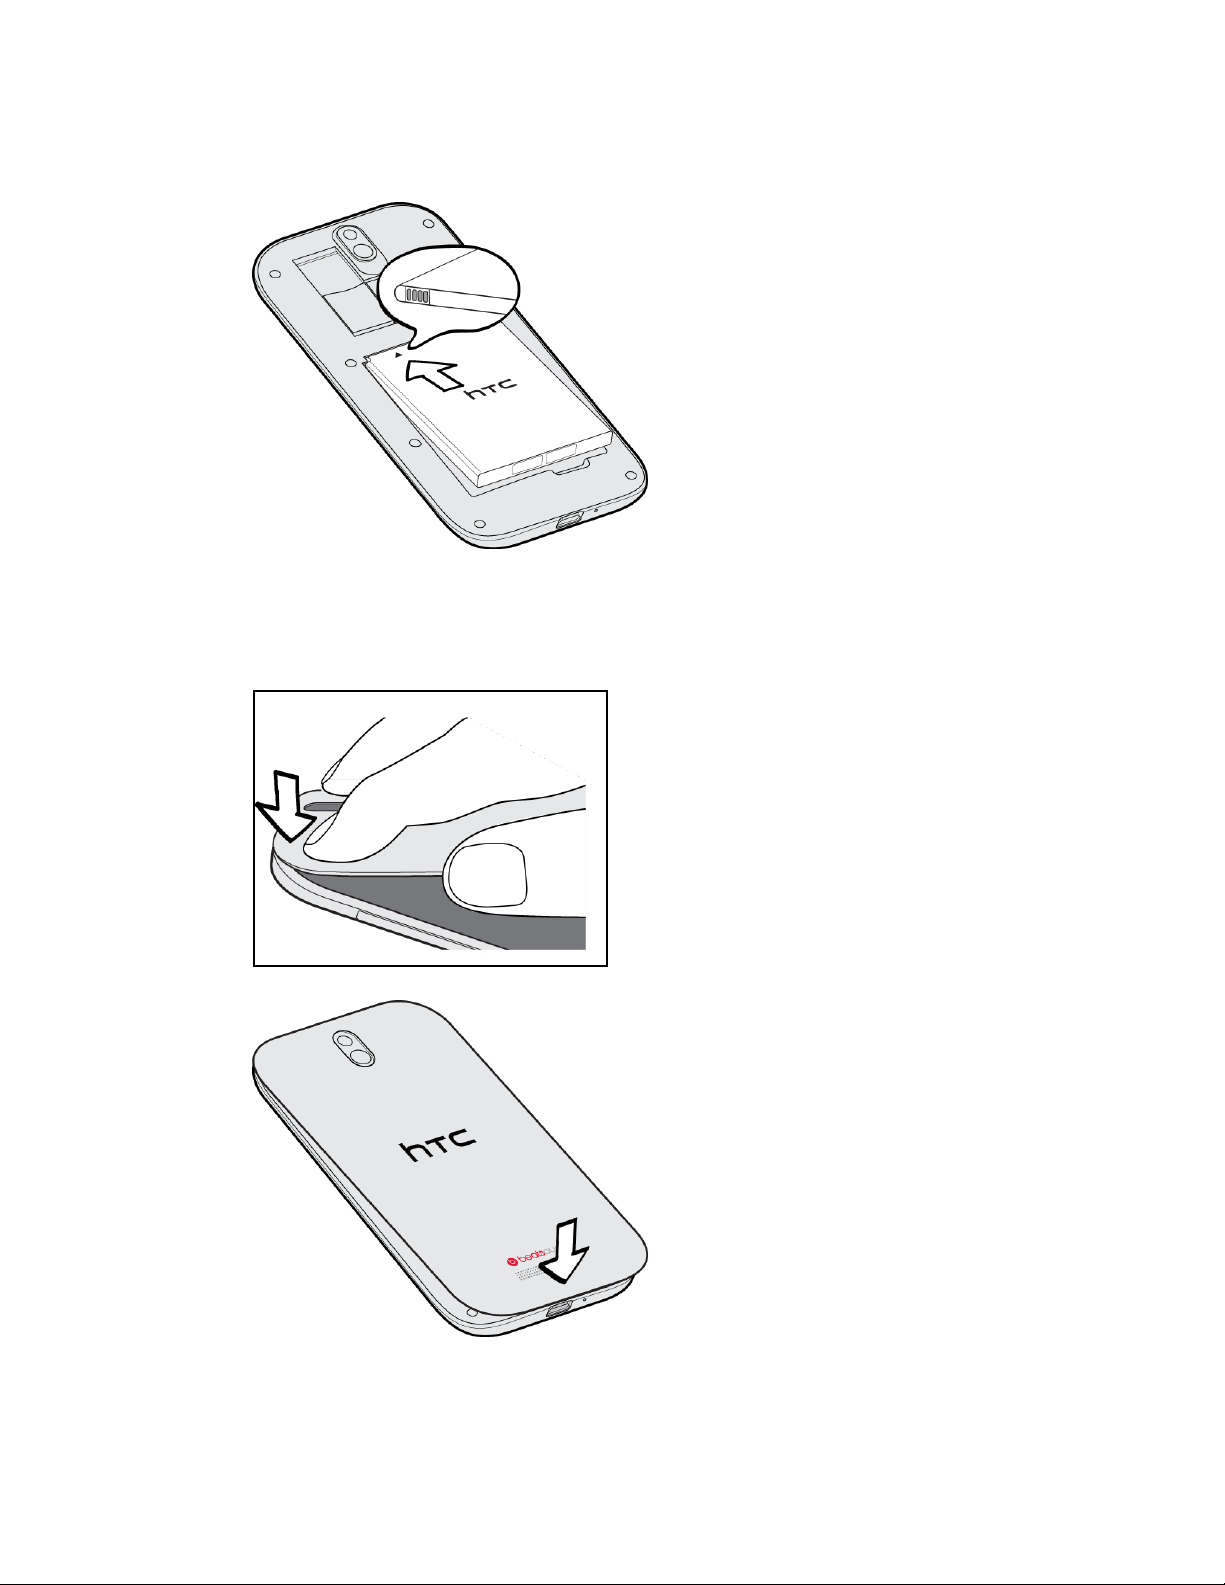
Insert the battery into the compartment, contacts side first.
Replace the back cover. Align the top part of the back cover with the phone, and
then press the sides and the bottom part of the cover until it locks into place. Make
sure that there are no gaps or bulges along the sides.
2. Charge your battery.
Get Started 3
Page 16

Plug one end of the USB cable to the AC adapter.
Plug the other end of the USB cable into the charger/accessory jack on the bottom
panel of your phone.
Plug the AC adapter into an electrical outlet. Fully charging a battery may take up to
three hours.
Note: Your phone’s battery should have enough charge for the device to turn on and find a
signal, run the setup application, set up voicemail, and make a call. You should fully
charge the battery as soon as possible.
3. Press to turn the phone on.
Your device will search for Boost Mobile service, and begin the setup application.
Complete the Setup Application
Once your phone has been turned on and activated, you will then be guided to the setup
process. Touch Next or Skip to skip any of the screens.
● Select the language. You can change this later in Settings. For more information, see
Language Settings.
● Scheduled sync. Select manual or automatic synchronization of information. For more
information, see Accounts & Sync.
● Set up Wi-Fi® network. Connect to a Wi-Fi network. For more information, see Wi-Fi.
● Get an HTC Account. Create a new or sign in to your existing HTC Account. Sign in
with your HTC Account to easily access HTC features, services, and content.
● Tell HTC. Choose whether to allow HTC to collect anonymous data in the background
about how you use your phone.
Get Started 4
Page 17

● Use Google location. Turn on Google® location services. For more information, see
Location.
● Set up your Dropbox account. Create a new or sign in to your Dropbox account and
enjoy a free 25GB Dropbox space. See Dropbox for more information. Additional terms
and requirements may apply (including a subscription fee) after your two year trial ends.
Note: Dropbox is a third-party application and is not provided by or associated with HTC
Corporation.
● Set up accounts. Set up your email and social network accounts including Google,
Exchange ActiveSync® Mail, Dropbox, Facebook, Flickr®, Hotmail®, and HTC Watch™.
For more information, see Accounts & Sync.
● Transfer my stuff. Transfer information from your old phone. You can do this at a later
time. For more information, see Transfer Contacts from Your Old Phone.
Note: You do not need to sign up for a Google Account to use your phone. However, to
download applications from Google Play™ or chat in Google Talk™, you must link your
phone to a Google Account.
Set Up Voicemail
Your phone automatically transfers all unanswered calls to your voicemail, even if your phone is
in use or turned off. You should set up your Boost Mobile Voicemail and personal greeting as
soon as your phone is activated. Always use a password to help protect against unauthorized
access.
1. Touch > . (If your screen is locked, press to turn on the display and then
drag the ring up to unlock the screen.)
2. Touch and hold to dial your voicemail number.
3. Follow the system prompts to:
Create your password.
Record your name announcement.
Record your greeting.
Note: Voicemail Password – Boost Mobile strongly recommends that you create a password
when setting up your voicemail to help protect against unauthorized access. Without a
password, anyone who has access to your phone is able to access your voicemail
messages.
Get Started 5
Page 18

Boost Mobile Account Information and Help
Find out about account passwords and information about managing your account and finding
help.
Manage Your Account
Manage your Boost Mobile account from your computer or your Boost Mobile phone.
Online: boostmobile.com
Click My Account and then enter login credentials.
On your Boost Mobile account page, you can do the following:
● Re-Boost Online
Add more credits to your account using a Re-Boost Card or the Credit Card you set up
with Boost Mobile Customer Care.
● View Your Profile
Find out how much remaining credit you have in your Boost Mobile account.
● Update Your Profile
Update your profile information such as your home phone, home address, and email
address.
● View Your Call Records
See your call history and how much you spent on each call.
● Change Your Account PIN
Change the PIN to your account to keep your info safe.
From Your Boost Mobile Phone
1. From the Home screen, touch > Boost Zone.
2. Do any of the following in the Boost Zone app:
Touch View Account Information to see your account balance, view and change
your existing Boost plan, review your account activity, and change your voicemail
greeting.
Add more funds to your Boost account with Re-Boost.
Check your voice and data connection by touching I Need Help.
Update your profile by touching I Need Help > Update Profile.
Get help by touching I Need Help > Call Boost.
Get Started 6
Page 19

Run device diagnostics by touching I Need Help > More Diagnostics.
Find out about Boost Mobile events, promotions, and more by touching Get More
From Boost.
Pay your utility bills by touching Pay My Bills.
Add credits to other phone accounts with Int’l Mobile Recharge.
Explore apps suggested by Boost Mobile.
Get Started 7
Page 20
Phone Basics
Your phone is packed with features that simplify your life and expand your ability to stay
connected to the people and information that are important to you. The topics in this section will
introduce the basic functions and features of your phone.
Your Phone’s Layout
The illustrations below outline your phone’s basic layout.
Front panel
● Power Button lets you turn the phone on or off, turn the screen on or off, restart the
phone, or switch your phone to airplane mode.
● Front Camera allows you to take photos and videos or start a video call.
● Front Indicator Light (LED) shows your phone’s status or pending notifications at a
glance.
Phone Basics 8
Page 21

● Volume Button allows you to adjust the ringer or media volume or adjust the voice
volume during a call.
● Touchscreen lets you view and control all the features of your phone.
● Home Key lets you display the main Home screen. When in standby mode, touch and
hold to open the recently used applications window.
● Recent Apps Key lets you select and return to recently opened apps. Press and hold to
open available menu options for certain screens and apps.
● Charger/Accessory Jack allows you to connect the phone charger or the USB cable
(included).
CAUTION! Inserting an accessory into the incorrect jack may damage the phone.
● Microphone allows other callers to hear you clearly when you are speaking to them.
● Back Key lets you return to the previous screen, or close a dialog box, options menu,
the Notifications panel, or onscreen keyboard.
● Earpiece lets you hear the caller and automated prompts.
● 3.5 mm Headset Jack allows you to plug in either a stereo headset or an optional
headset for convenient, hands-free conversations.
CAUTION! Inserting an accessory into the incorrect jack may damage the phone.
Phone Basics 9
Page 22
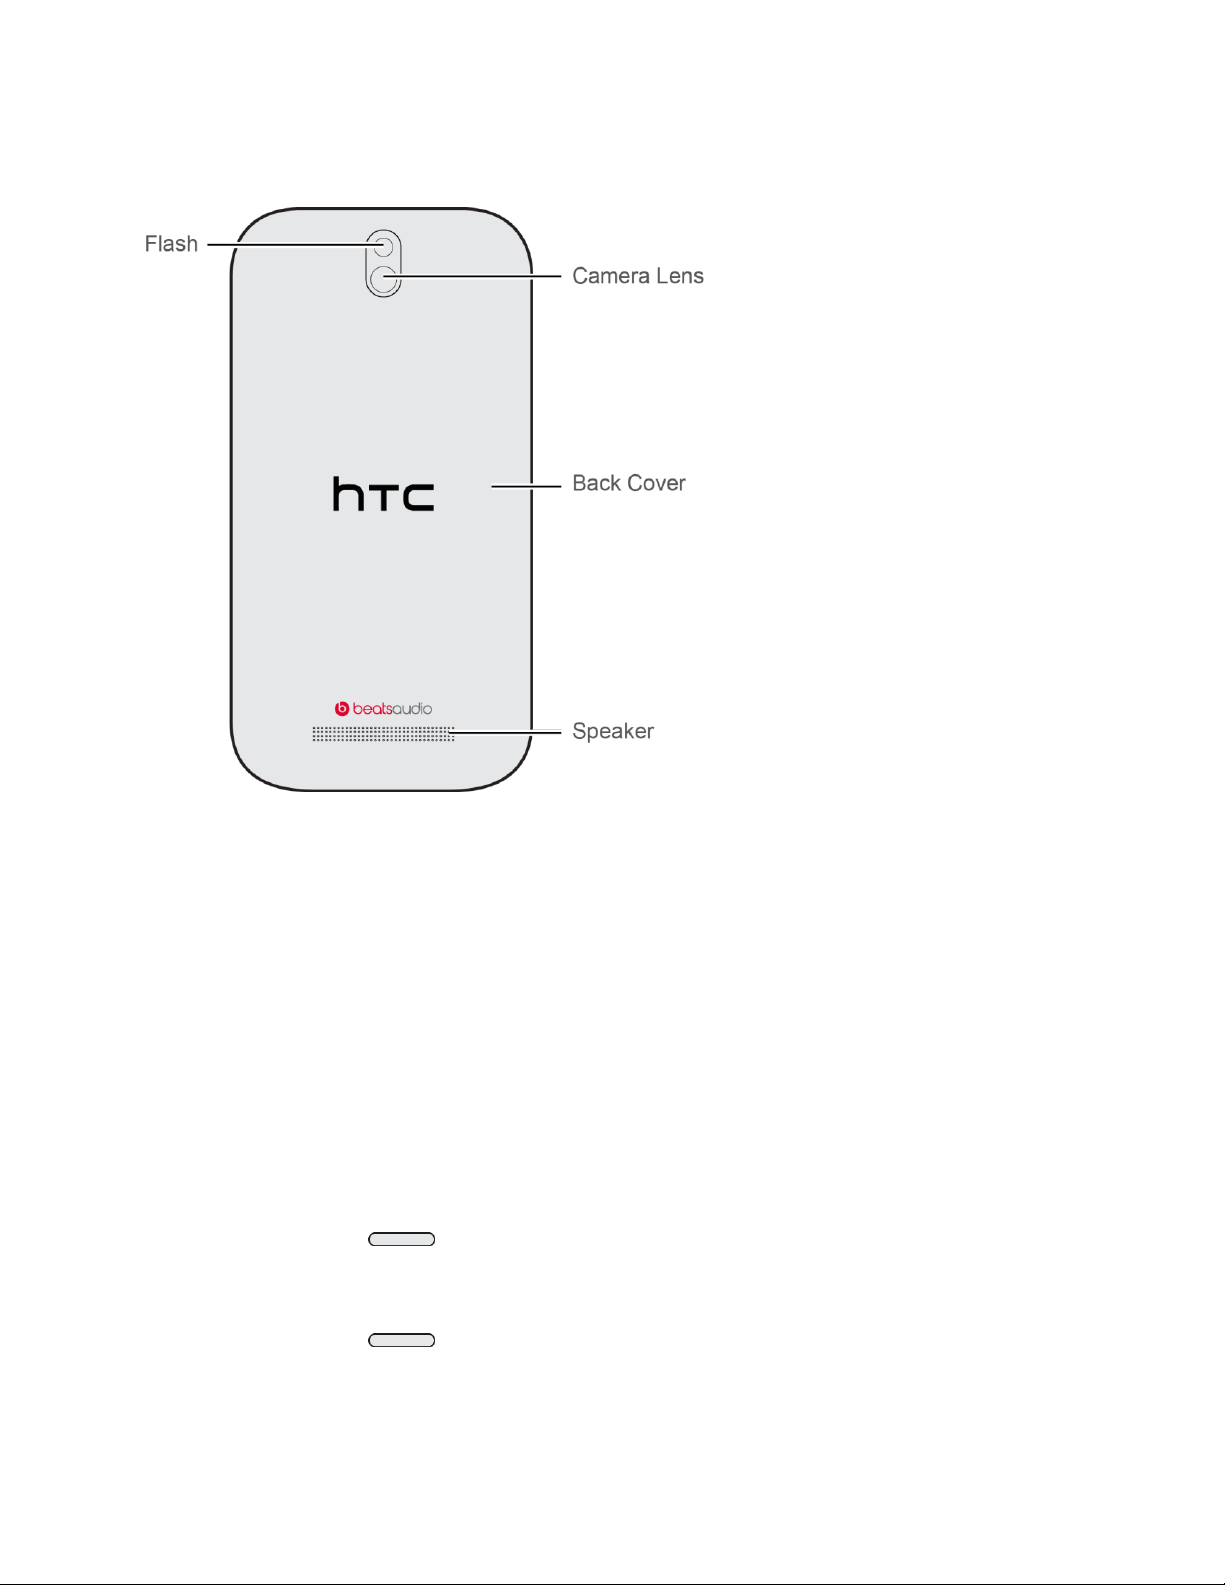
Back panel
● Camera Lens lets you take pictures and videos.
● Back Cover covers the battery compartment and microSD® card slot.
● Speaker lets you hear the different ringers and sounds. The speaker also lets you hear
the caller’s voice in speakerphone mode.
● Flash helps illuminate subjects in low-light environments when the camera is focusing
and capturing a photo or video.
Turn Your Phone On and Off
The instructions below explain how to turn your phone on and off, or how to restart the phone.
Turn Your Phone On
► Press and hold .
Turn Your Phone Off
1. Press and hold to open the Power options menu.
Phone Basics 10
Page 23

Note: When the screen is locked and you press , it will only turn off the screen and not
the phone. You will need to unlock the screen first before you press and hold to
turn the phone off. See Turn Your Screen On and Off for details.
2. Touch Power off to turn the phone off.
Restart Your Phone
Restarting the phone will close all running apps and will clear all temporary files in the phone’s
memory. Make sure to save your work before restarting the phone.
1. Press and hold for about two seconds.
2. On the Power options menu, touch Restart.
3. In the Restart phone confirmation box, touch Restart.
Note: If the phone hangs and the touchscreen does not respond, press and hold for
about 10 seconds to restart the phone.
Turn Your Screen On and Off
Your phone allows you to quickly turn the screen off when not in use and to turn it back on and
unlock it when you need it.
Turn the Screen Off When Not in Use
► To quickly turn the screen off, press . Pressing again or receiving an
incoming call will turn on your phone screen and show the lock screen.
To save battery power, the phone automatically turns off the screen after a certain period of
time when you leave it idle. You will still be able to receive messages and calls while the
phone’s screen is off.
Note: For information on how to adjust the time before the screen turns off, see Screen
Timeout.
Turn the Screen On and Unlock It
Below are steps for how to unlock your phone’s screen.
1. To turn the screen on, press .
2. Flick the ring up to unlock the screen.
Phone Basics 11
Page 24

Your Phone’s Lock Screen
Aside from protecting the phone’s screen from unwanted touches and presses, the lock screen
also displays important information, updates, and messages at a glance, and provides shortcut
icons to your favorite applications.
Unlock the Screen
Unlock the screen to receive an incoming call or to access your phone.
1. When the screen is off, press to show the lock screen.
2. Do any of the following:
Flick the ring up to unlock the screen. When you have an incoming call, flicking the
ring up answers the call.
Drag a shortcut icon, a photo, or a message to the ring to unlock the screen and
launch the related application.
Note: If you have set up a screen lock, you will be prompted to draw the pattern or enter the
password or PIN. See Security-Screen Lock.
Customize the Lock Screen
You can customize the lock screen style and change the shortcuts that appear on the lock
screen.
1. Slide down the Notifications panel, and then touch > Personalize.
2. On the Display tab, touch Lock screen style.
3. Slide your finger left or right to choose a lock screen style.
4. Touch the lock screen style to see a preview. If you want to further customize it, touch
Settings.
5. Touch Apply.
Tip: The shortcuts on the lock screen are the same apps as the ones on your Home screen’s
launch bar. To change them, you’ll have to replace the apps on the launch bar.
Touchscreen Navigation
Your phone’s touchscreen lets you control actions through a variety of touch gestures.
Touch
When you want to type using the onscreen keyboard, select items onscreen such as application
and settings icons, or press onscreen buttons, simply touch them with your finger.
Phone Basics 12
Page 25
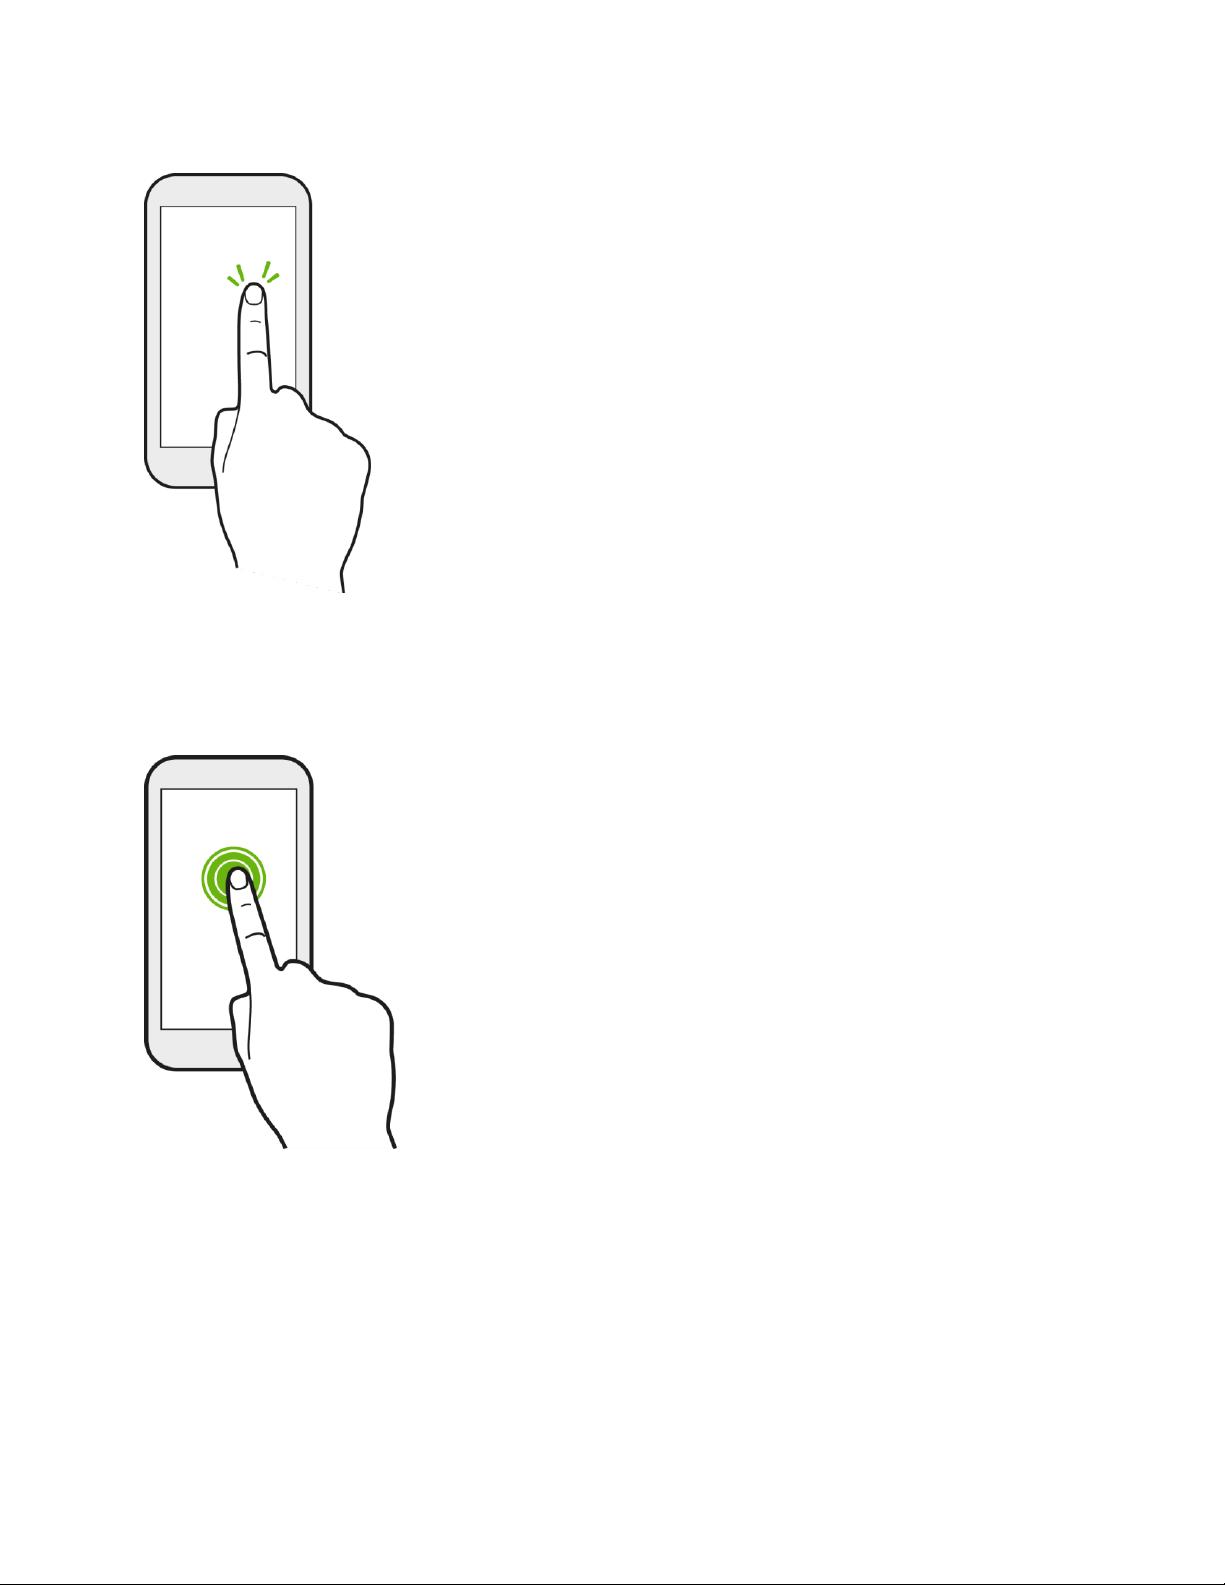
Touch and Hold
To open the available options for an item (for example, a contact or link in a Web page), touch
and hold the item.
Phone Basics 13
Page 26
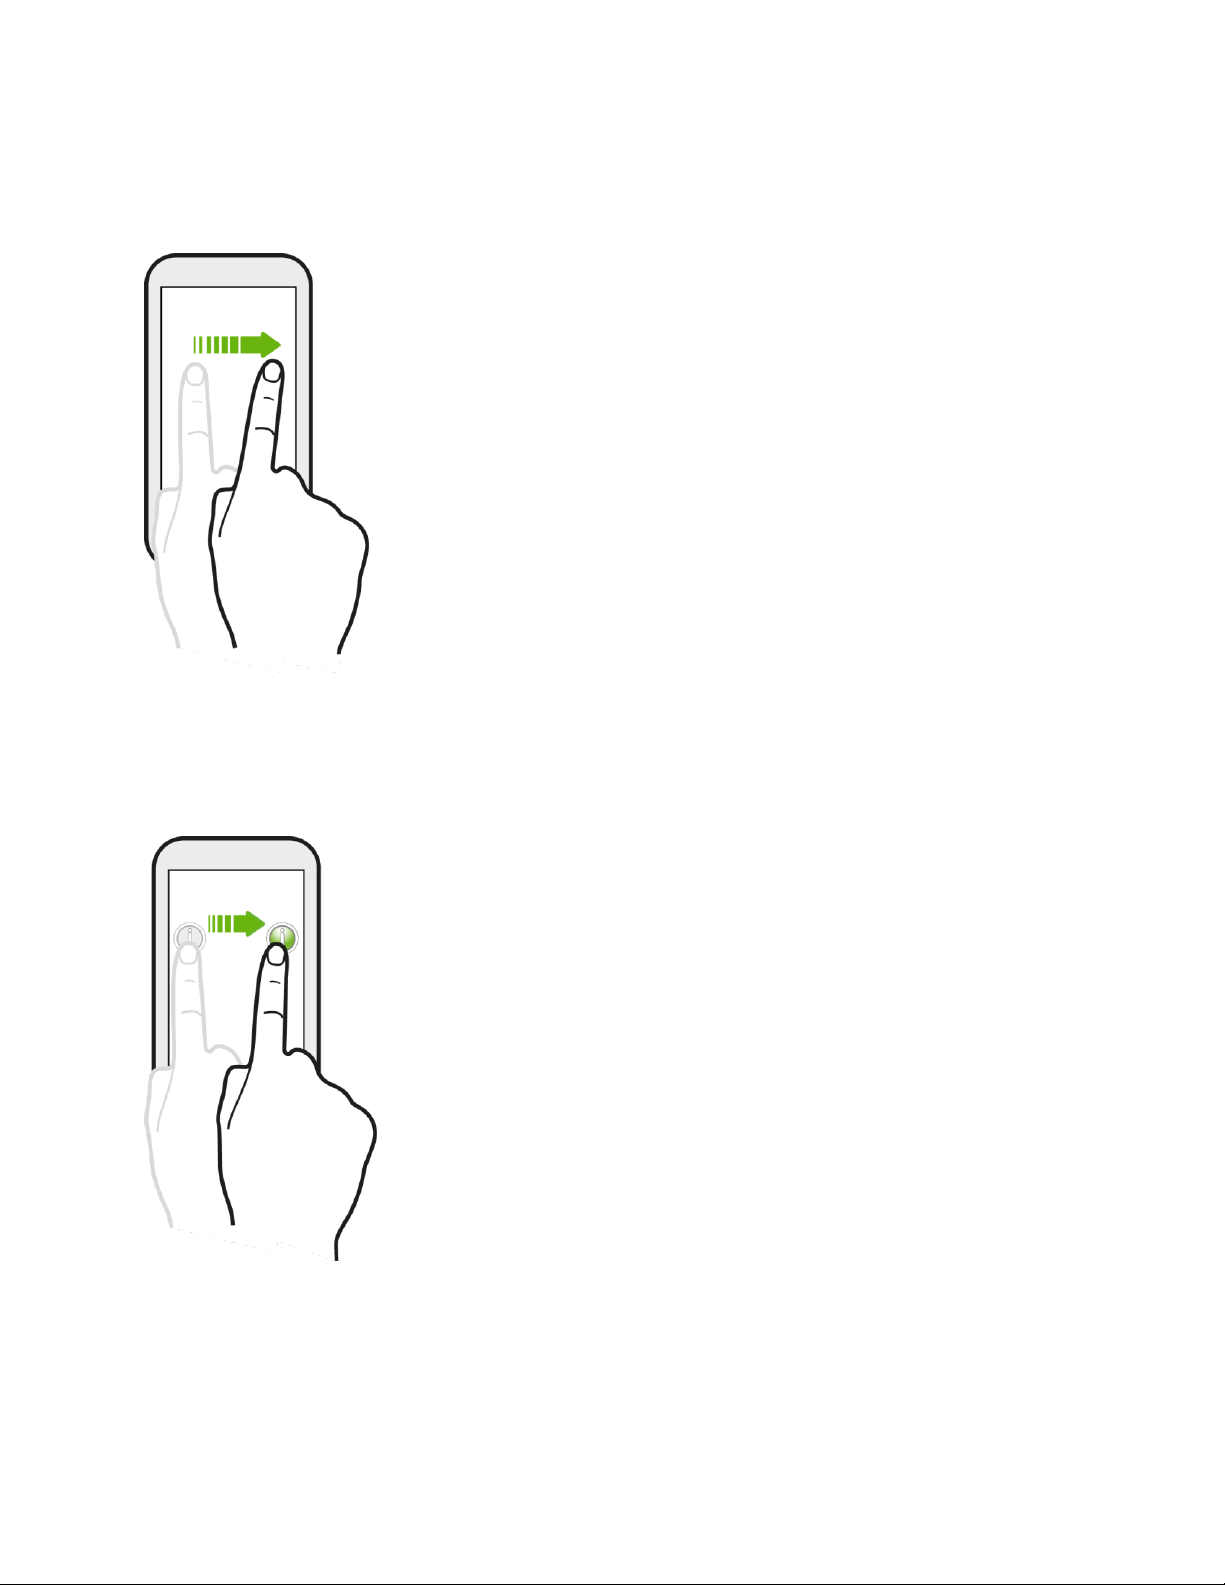
Swipe or Slide
To swipe or slide means to quickly drag your finger vertically or horizontally across the screen.
Drag
To drag, press and hold your finger with some pressure before you start to move your finger.
While dragging, do not release your finger until you have reached the target position.
Flick
Flicking the screen is similar to swiping, except that you need to swipe your finger in light, quick
strokes. This finger gesture is always in a vertical direction, such as when flicking the contacts
or message list.
Phone Basics 14
Page 27
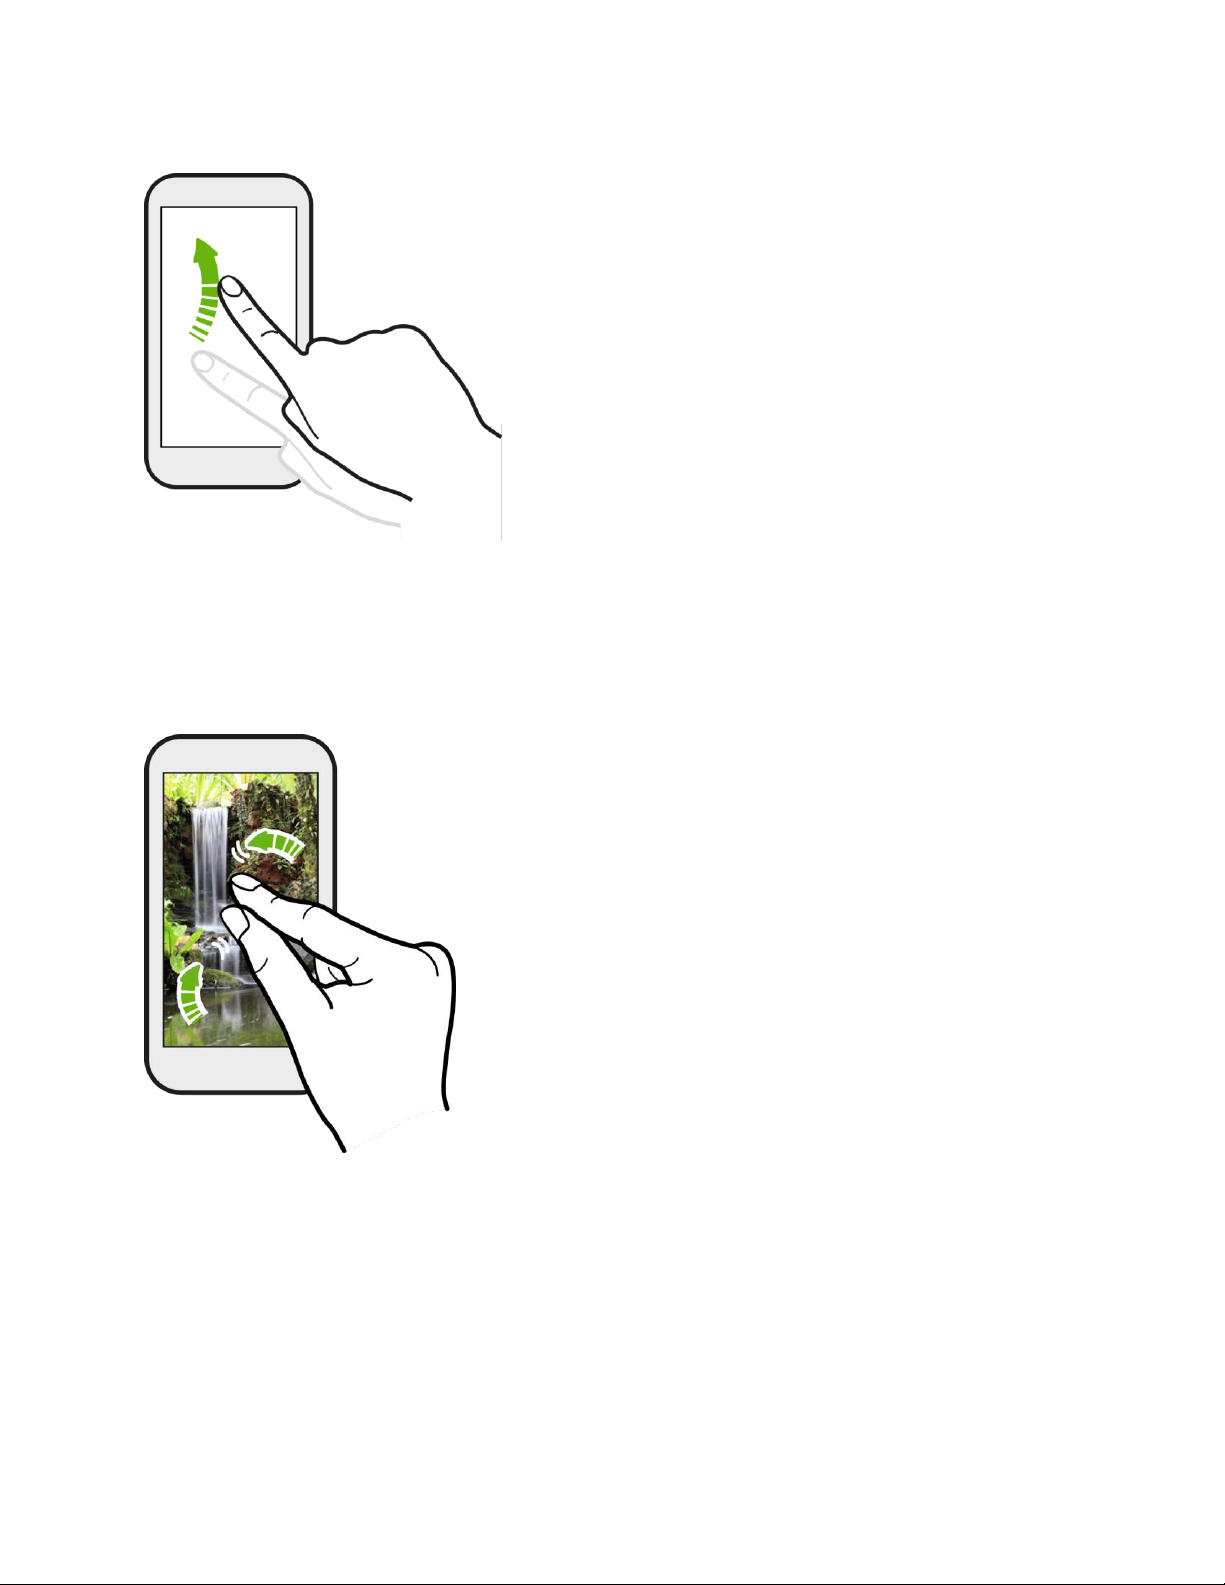
Pinch and Spread
―Pinch‖ the screen using your thumb and forefinger to zoom out, or ―spread‖ the screen to zoom
in when viewing a picture or a Web page. (Move fingers inward to zoom out and outward to
zoom in.)
Phone Basics 15
Page 28
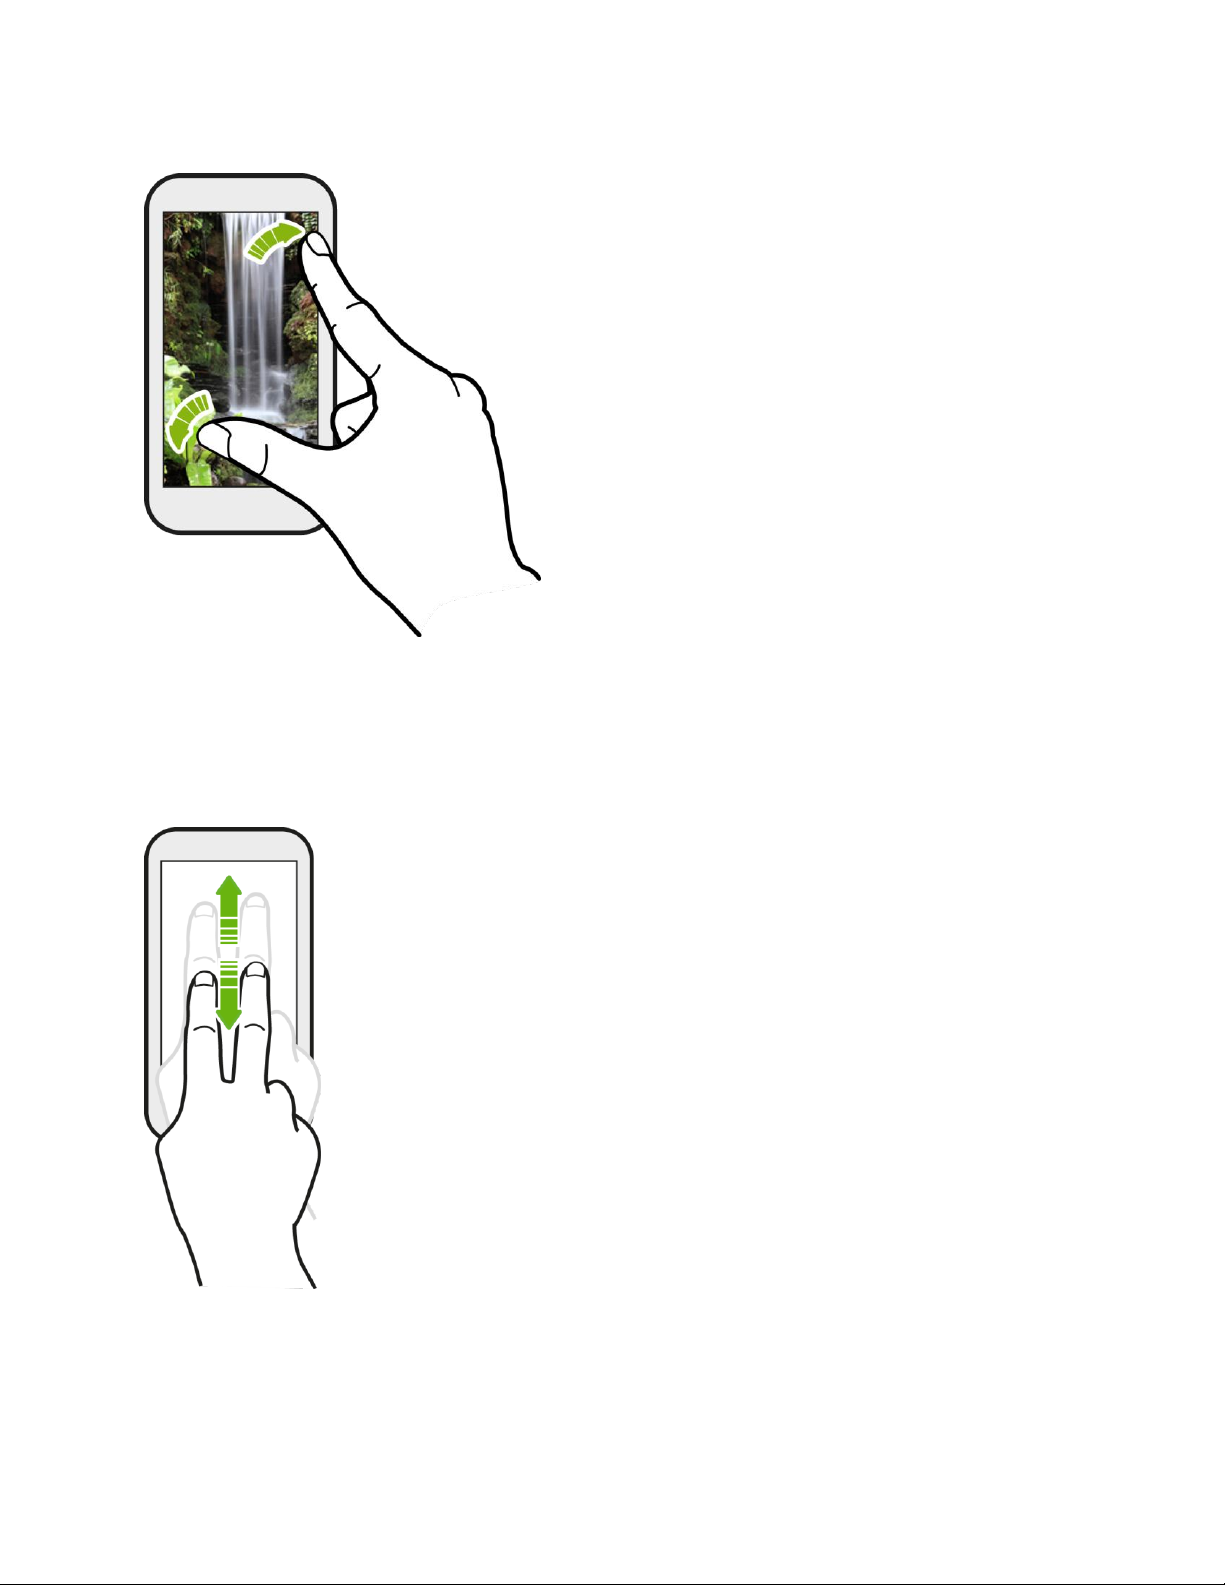
Two-finger Scrolling
In some applications that have sorting, like Mail or People, you can use two fingers to scroll the
screen. The screen displays the sorting order, and you can easily scroll to the information you
want.
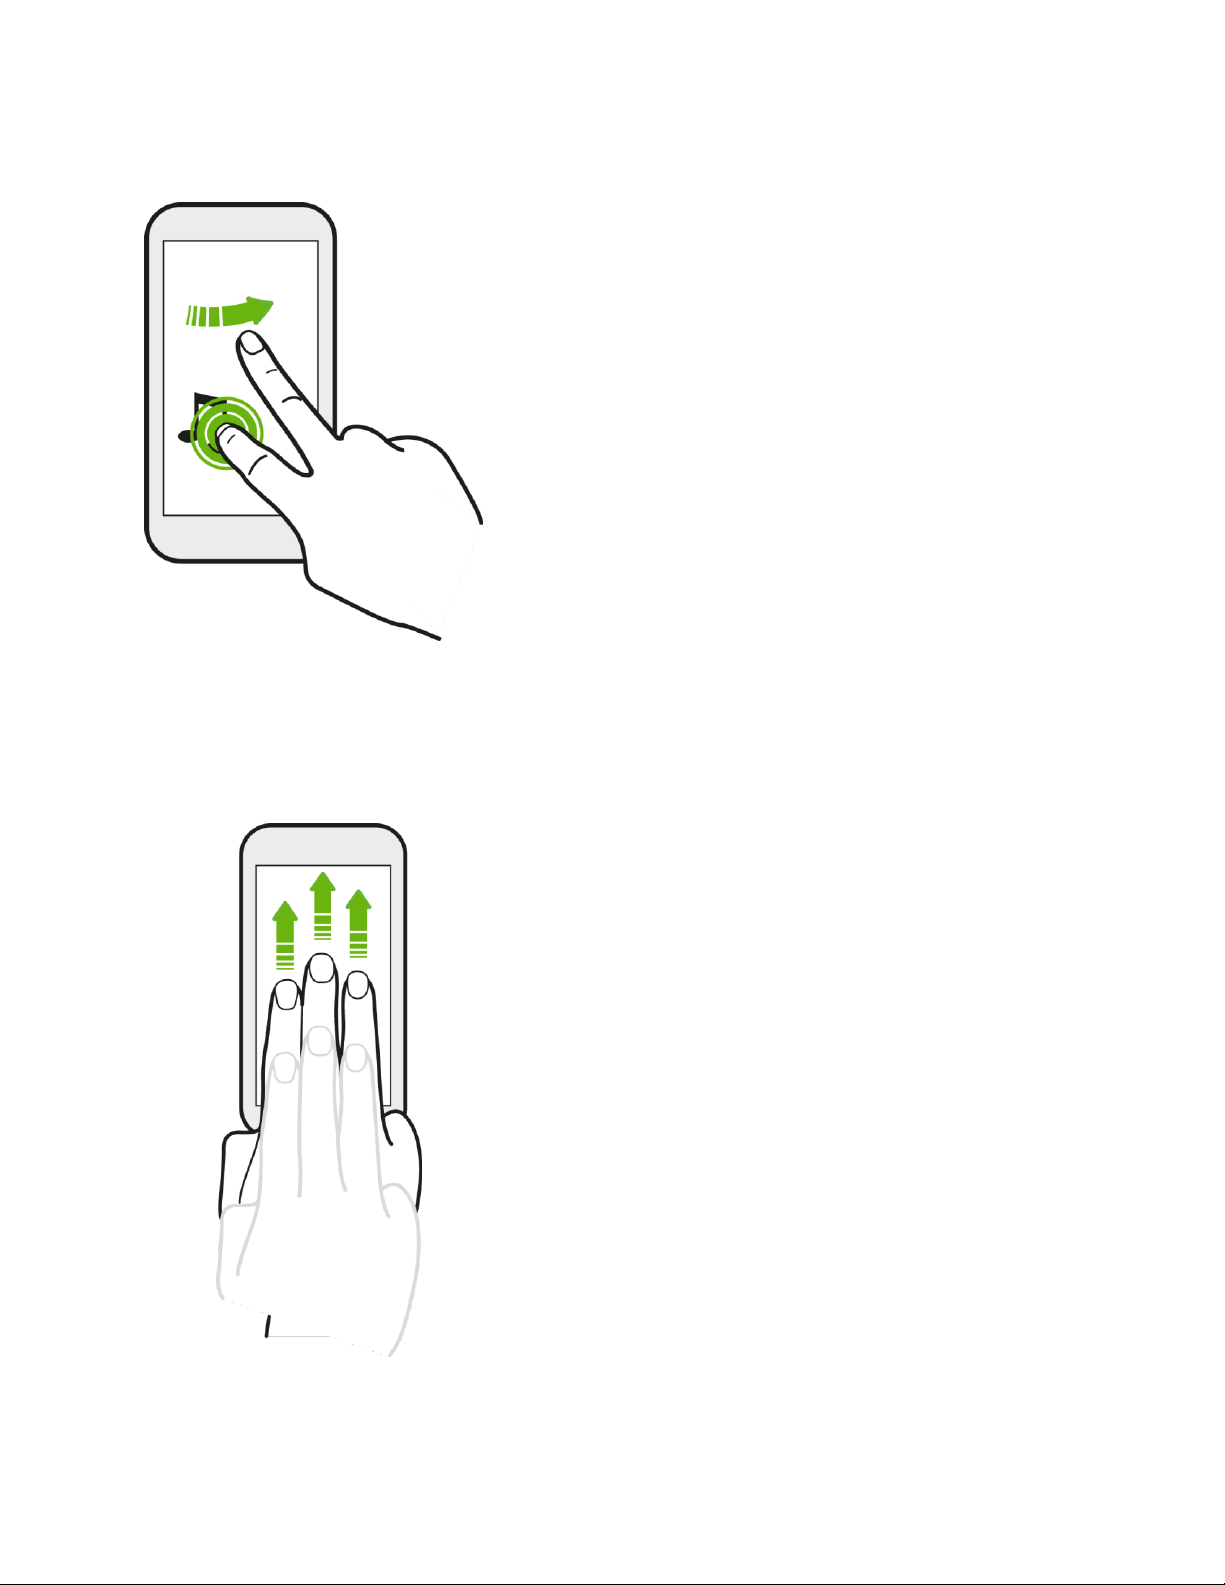
Press and Flick
On the Home screen, you can easily move a widget or icon from one screen to another. Press
and hold the widget or icon with one finger, and flick the screen to the new location with another
Phone Basics 16
Page 29
finger.
Three-finger Scrolling
● Swipe up using three fingers to share content such as photos, videos, and music from
your phone to your TV or speakers.
Phone Basics 17
Page 30
Note: HTC gestures is enabled by default, which makes the three-finger gesture work only
when sharing content or using HTC apps. If you want to use the multi-finger gesture in
other apps or games, clear the HTC gestures option in Settings > Display, gestures &
buttons.
The 3-finger gesture may not be available when TalkBack gestures are enabled. For
details, see Navigate Your Phone with TalkBack.
Motion Gestures
Use motion gestures to rotate the screen, mute, lower the ringtone volume, and more.
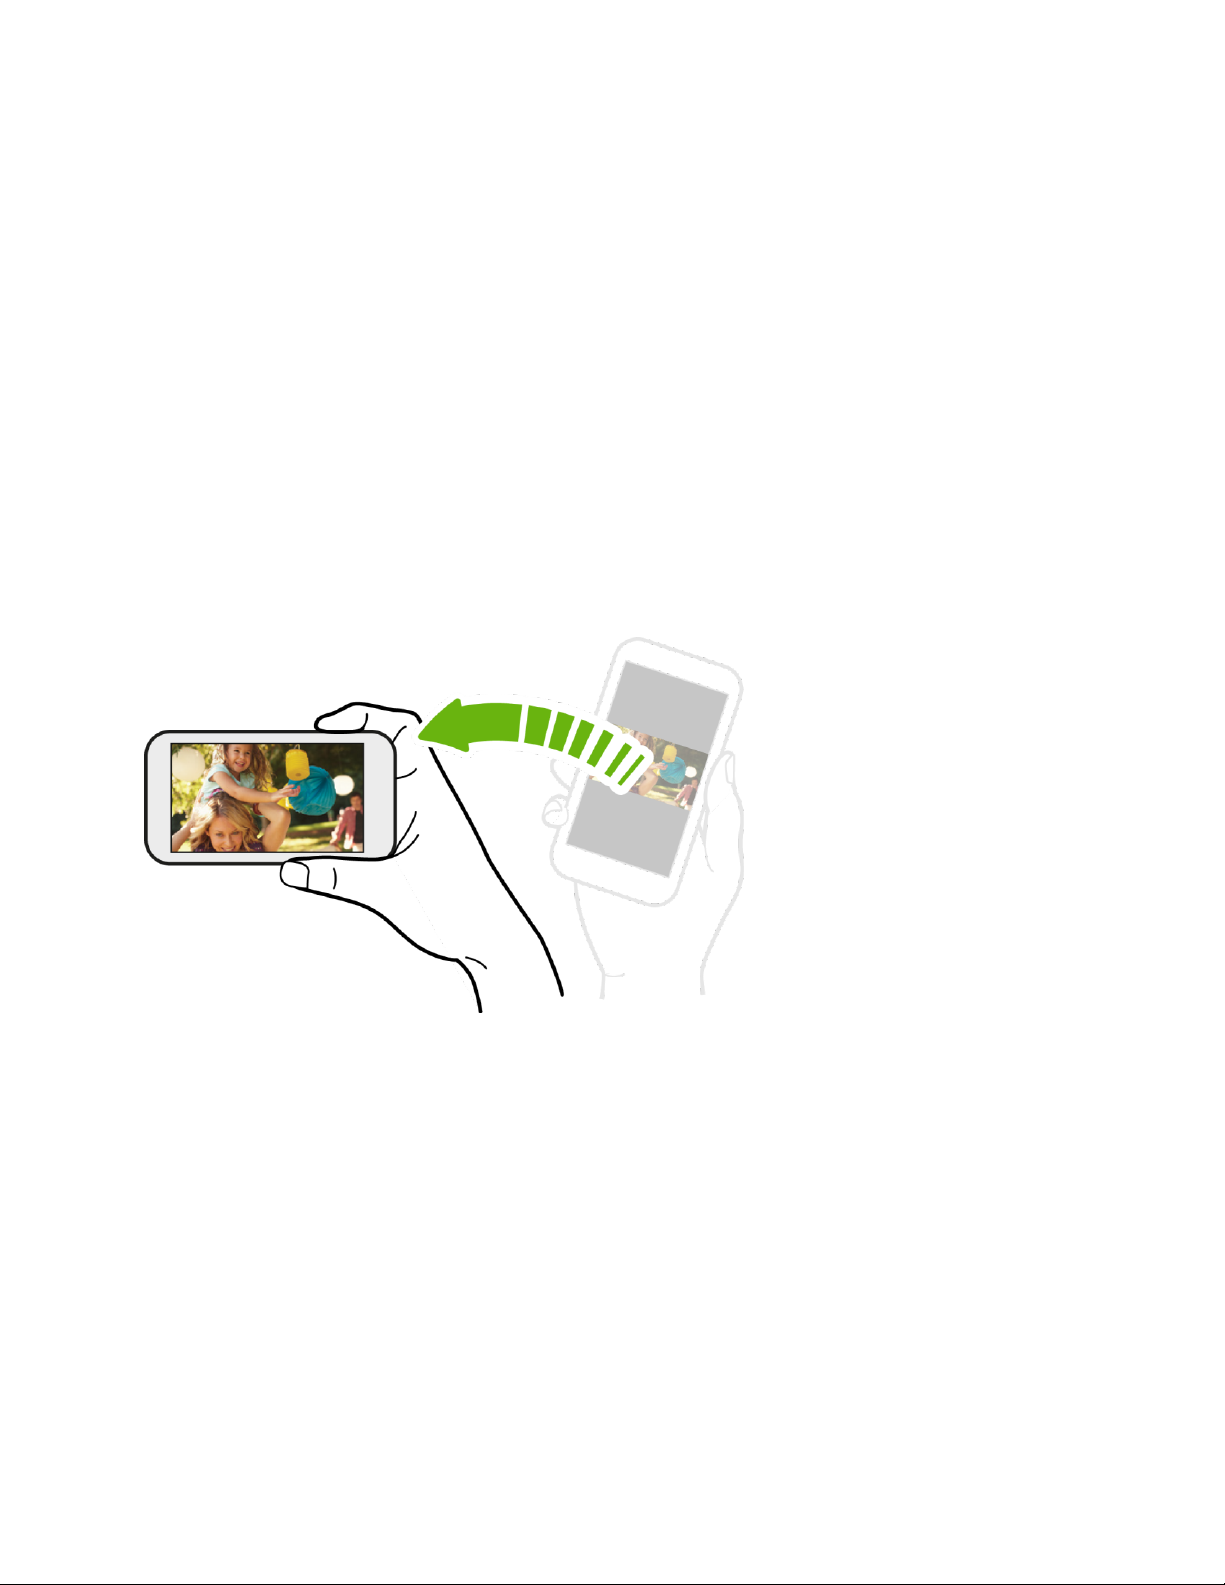
Rotate
For most screens, you can automatically change the screen orientation from portrait to
landscape by turning the phone sideways. When entering text, you can turn the phone sideways
to bring up a bigger keyboard. See HTC Sense Input Keyboard for more details.
Note: The Auto-rotate screen option in Settings > Display, gestures & buttons needs to be
selected for the screen orientation to automatically change.
The TalkBack accessibility feature works best if you turn off auto-rotate. For details, see
Navigate Your Phone with TalkBack.
Phone Basics 18
Page 31

Flip to Silence
When a call comes in, you can turn your over to mute it.
Pick Up to Lower Volume
In a business meeting or restaurant, pick HTC One up when a call comes in to lower the
ringtone volume.
Set Volume to Automatically Increase while in Your Pocket or Bag
You can set your phone to recognize when it’s in your bag or pocket and raise the ringtone
volume so that you can hear it in noisy environments.
Phone Basics 19
Page 32

Your Home Screen
The Home screen is the starting point for your phone’s applications, functions, and menus. You
can customize your Home screen by adding application icons, shortcuts, folders, widgets, and
more. Your Home screen extends beyond the initial screen. Swipe the screen left or right to
display additional screens.
Home Screen Basics
Your phone allows you to rearrange the order of your home screens and even remove extended
screens at any time.
Phone Basics 20
Page 33

Rearrange the Home Screen
Reorder your extended screens in any way that fits how you use them. For example, move the
screens with frequently used widgets, shortcuts, and folders closer to the Home screen.
1. Pinch the Home screen to display thumbnail images of all the screens.
Note: The main Home screen is indicated by the Home icon ( ).
2. Touch and hold the thumbnail of the screen you want to move. Your phone vibrates.
Don’t lift your finger just yet.
3. Drag the thumbnail to its new position, and then lift your finger.
Remove a Home Screen Panel
Remove any unwanted screens to make your phone less cluttered.
1. Pinch the Home screen to display thumbnail images of all the screens.
2. Touch and hold the thumbnail of the screen you want to remove. Your phone vibrates.
Don’t lift your finger just yet.
Phone Basics 21
Page 34

3. Drag the thumbnail to Remove at the top of the screen.
Note: You can add back a Home screen panel.
Extended Screens
In addition to the Home screen, your phone has six extended Home screens to provide more
space for adding icons, widgets, and more. Touch and then drag across the screen to move
from the Home screen to an extended screen.
● You cannot add more than seven screens.
● While on an extended screen, touch to return to the Home screen.
Go Directly to a Particular Screen
1. From any Home screen panel, pinch the screen to display thumbnail images of all
screens.
Tip: On the Home screen, you can touch to display the thumbnail images of all screens.
2. Touch the screen you want to open, and you’ll be taken there.
Phone Basics 22
Page 35

Customize the Home Screen
Learn how to add, move, or remove items from the Home screen.
Add Widgets on Your Home Screen
Widgets put at-a-glance important information and media content up front on your Home screen.
Some widgets are already added to your Home screen for your convenience. You can add more
from the available selections of widgets.
1. Touch and hold on an empty space on your Home screen.
2. On the Widgets tab, you can:
Slide left or right to browse through the complete set of widgets.
Touch to search for specific widgets.
Touch All Widgets to choose from a selection menu.
Tip: Some widgets are available in different styles and sizes.
3. Drag a widget to a Home screen thumbnail where you want to add it.
You can also add widgets that allow you to quickly switch on or off certain settings such as GPS
and Bluetooth®. Touch All Widgets > Settings, and then touch the widget that you want.
Add Apps and Other Shortcuts on Your Home Screen
Place apps you often use on your Home screen. You can also add shortcuts to frequently used
settings, bookmarked Web pages, and more.
1. Touch and hold on an empty space on your Home screen.
2. On the Apps or Shortcuts tab, drag an app or a shortcut to a Home screen thumbnail
where you want to add it.
Phone Basics 23
Page 36

Move, Remove, or Edit Items on Your Home Screen or Extended Screens
1. Touch and hold the item you want to move, remove, or edit.
2. Do one of the following:
To move the item, drag it to a new area and then release it.
To remove the item, drag it to the Remove button and then release it.
You can change the settings of some of the widgets (for example, you can change
the city that is displayed on the weather clock widget). To edit a widget, drag it to the
Edit button, and then follow screen instructions.
Launch Bar, Apps, and Folders
From your Home screen, you can customize your phone’s launch bar, group apps into custom
folders, and easily access recently used apps.
Customize the Launch Bar
The launch bar on your Home screen gives you one-touch access to commonly used apps. You
can replace the apps on the launch bar with other apps that you often use.
Tip: The apps or shortcuts you see on the lock screen are the same as the ones in the
launch bar.
Phone Basics 24
Page 37

1. Touch and hold the app you want to replace, and then drag it out of the launch bar.
2. Touch to go to the All apps screen.
3. Touch and hold an app, and then drag it to the empty slot on the launch bar.
You can also place shortcuts to settings or information on the launch bar. Add a shortcut first to
the Home screen, and then drag it to the launch bar.
Group Apps in a Folder
Find your apps even easier by grouping them into folders.
1. Touch and hold an app, and then drag it over to another app to automatically create a
folder.
2. Touch the folder to open it.
3. Touch , and then select one or more apps that you want to add to the folder.
4. Touch Add.
Switch to Recent Apps
Use the Recent Apps key to view your recently opened apps.
Phone Basics 25
Page 38

Icon
Description
1. Touch .
2. Slide your finger left or right to see recently-opened apps.
3. Touch an app to open it. Or drag up the app to remove from the Recent apps screen.
Tip: You can also use the Recent Apps key to open the menu options for a particular screen.
Go to Settings ( )> Display, gestures & buttons > Recent apps button to choose
the primary function of the Recent Apps key.
Status and Notifications
The status bar and notification panel make it easy to see your phone’s connection, alert you of
new messages, and much more.
Status Bar
The status bar at the top of the Home screen provides phone and service status information on
the right side and notification alerts on the left. To view notification alerts, touch and hold the
status bar and drag it down.
Status Icons
Phone Basics 26
Page 39
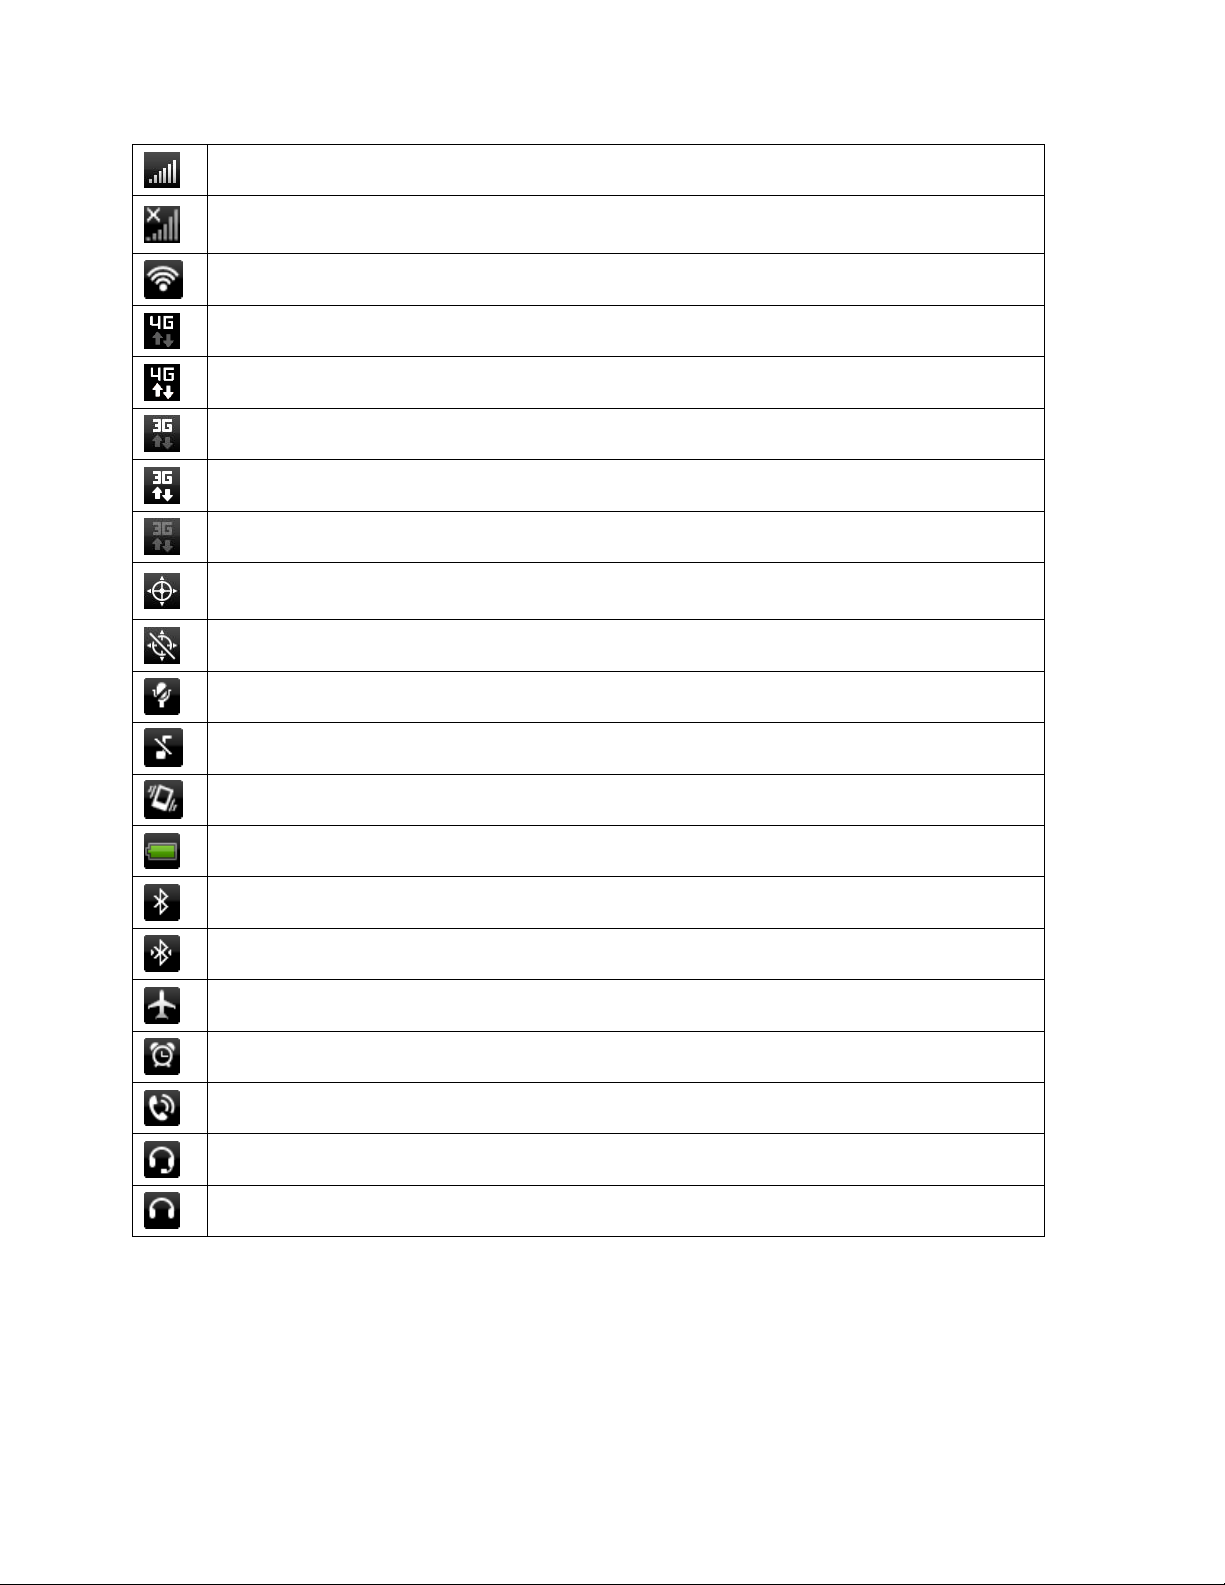
Signal strength (More bars = stronger signal)
No service
Connected to a Wi-Fi network
Sprint 4G LTE Network is available
Sprint 4G LTE Network available and active (with icon animation)
Sprint 3G Network is available
Sprint 3G Network available and active (with icon animation)
Sprint 3G Network is currently unavailable
Phone’s location feature is on and available for location-based services such as
GPS navigation
Phone’s location feature off and your location is available only for 911
Phone microphone muted
Phone speaker muted
Vibrate mode
Shows current battery charge level (icon shown is fully charged)
Bluetooth on
Connected to Bluetooth device
Airplane mode
Alarm set
Speakerphone on
Wired microphone headset connected
Wired headset connected
Notification Icons
Phone Basics 27
Page 40

Icon
Description
New text or multimedia message
New voicemail
New Gmail message
New Microsoft Exchange ActiveSync or POP3/IMAP email message
Problem with text or multimedia message delivery
New instant message from Google Talk
Upcoming event
Music is playing
General notification (for example, sync error)
Wi-Fi is on and wireless networks are available
Data synchronizing – connected to HTC Sync
New location detected
More (undisplayed) notifications
Missed call
Call in progress
Matched contacts suggestion
Uploading data (animated)
Downloading data (animated)
Waiting to upload
Content downloaded
Phone connected to computer via USB cable
Storage card is blank
Downloaded Google Play app installed successfully
Phone Basics 28
Page 41

Notifications Panel
When you get a new notification, you can open the Notifications panel to see the message,
reminder, or event notification. The Notifications panel lets you quickly switch between recently
opened apps, and also lets you easily turn on settings such as 4G, Wi-Fi, and Bluetooth.
Open the Notifications Panel
1. To open the Notifications panel, touch and hold the status bar, and then slide your finger
downward.
2. On the Notifications panel, you can:
Scroll down the screen to view more notifications.
You can expand certain notifications to see more information, such as email
previews and calendar events. Spread with your two fingers to expand a notification,
or pinch to collapse it.
You’ll see icons in some notifications that allow you to take immediate actions. For
example, when you have a missed call, touch the available icons to return the call or
reply with a text message.
Touch the notification to open the corresponding app.
To dismiss just one notification in the list, drag it left or right.
Phone Basics 29
Page 42

LED Status
Indication
Solid green
Battery is fully charged (when the phone is connected to the AC
adapter or a computer).
Solid red
Battery is charging.
Flashing red
Battery is low. (Power is below 14%.)
Flashing green
You have a pending notification (for example, a new message or a
missed call).
3. To close the Notifications panel, slide up from the bottom bar of the panel or touch .
You can also touch to dismiss all notifications and close the Notifications panel.
Notification LED
The Notification LED located near the right end of the earpiece provides information on the
phone status or pending notifications.
Note: The indicators are listed in order of priority. For example, if your phone is connected to
the AC adapter and the battery is charging, the LED will be solid red and will not switch
to a flashing green light even if there is a pending notification.
Enter Text
You can type on your phone using one of the available touchscreen keyboards.
HTC Sense Input Keyboard
When you start a program or select a box that requires entry of text or numbers, the HTC
Sense® input keyboard becomes available. You can select the keyboard layout to use.
Change the Keyboard Layout
You can choose from different keyboard layouts to suit your typing style. To change the
keyboard layout, do the following:
1. Open the Notifications panel, and then touch > Language & keyboard > HTC Sense
Input > Keyboard selection.
2. Touch Keyboard types, and then select from the following keyboard types:
Standard. This layout is similar to a desktop computer keyboard. This is the default
keyboard layout.
Phone. This layout resembles a traditional wireless phone keypad.
Enter Text Using the Touch Input Keyboard
Use the following keys while entering text using the onscreen keyboard:
Phone Basics 30
Page 43

Key
Description
Touch and hold keys with gray characters at the top to enter numbers, symbols,
or accented letters. The gray character displayed on the key is the character that
will be inserted when you touch and hold that key. Some keys have multiple
characters or accents associated with them.
Shift key. Touch to capitalize the next letter you enter. Touch twice to turn on
caps lock.
Numeric key. Touch to switch to the numeric and symbol keyboard.
Alphabet key. While in numeric or symbol keyboard, touch to switch to the
alphabetic keyboard
Enter key. Touch to create a new line.
Backspace key. Touch to delete the previous character. Touch and hold to
delete multiple characters
Voice input key. Touch to speak the words you want to type. See Enter Text by
Speaking.
Touch to toggle between Multitap and XT9® predictive modes when using the
Compact or Phone layout. See Predictive Text.
Change to Landscape Keyboard
When entering text, you can choose to use the landscape orientation of the touch input
keyboard by turning the phone sideways. This pops up a larger Standard keyboard that lets you
type easily using two thumbs.
Note: The landscape keyboard is not supported in all applications.
Adjust the Touch Input Settings
1. Open the Notifications panel, and then touch > Language & keyboard > HTC Sense
Input.
2. Change the following settings:
Keyboard selection: Add or remove languages from the touch input language list.
Phone Basics 31
Page 44

• Keyboard types: Select the keyboard layout to use.
• Bilingual prediction: Activate word prediction for a second language.
Enable or disable keyboard settings including sound and vibration feedback, show or
hide arrow keys, and enable trace keyboard.
Advanced settings
• Trace color lets you select the color to use when using the Trace keyboard.
• Quick "." Enable this option if you want to insert a period every time you double
tap the space bar.
Advanced settings: Prediction preference
• Word prediction: Enable the word prediction feature.
• Spell correction: Correct typographical errors by selecting from a list of possible
words based on the keys you have touched as well as neighboring keys.
Advanced settings: Finger touch calibration
• Calibration tool: Lets you recalibrate the keyboard if you feel that the keys are
not responding accurately to your touches.
• Reset calibration: Reset the calibration back to factory default.
Personal dictionary lets you add, edit, or remove words in the predictive text
dictionary. For more information, see Tips for Editing Text.
Tutorial lets you go through tutorials to learn how to use the touch input keyboard
features.
Enter Text by Speaking
Try speaking the words to enter them in most text fields that let you use the touch input
keyboard.
Important: First make sure to select the language you’ll be using in the Language &
keyboard settings. Also make sure that you have Internet connection before you
enter text by speaking.
1. Touch on the keyboard. Your phone then cues you to speak.
2. Tell your phone what you want to be typed in.
Set the Voice Input Language
Select a language you want your phone to recognize.
Phone Basics 32
Page 45

1. Open the Notifications panel, and then touch > Language & keyboard > Google
voice typing.
2. Touch Choose input languages.
3. Clear the Automatic option, and then select the language you want.
Tips for Editing Text
Your phone gives you many options to make entering text easier, including copying, cutting, and
pasting text, using voice-to-text input, customizing the user dictionary, using predictive text, and
more.
Using Predictive Text
The onscreen keyboard has predictive text to help you type quickly and accurately. Predictive
text input is enabled by default, and word suggestions are displayed as you type.
To enter a word in predictive mode, do any of the following:
● If you see the word you want highlighted, you can simply touch the space bar to insert
the word into your text.
● If you see the word you want shown in the suggestions before you have finished typing
the entire word, touch the word to insert it into your text.
● If an arrow is shown to the right of the suggestion list, touch the arrow to see more
suggestions.
Add a Word to the Predictive Text Dictionary
Your phone comes with a list of words that it references for predictive text suggestions.
Sometimes you may need to add a word to the predictive text dictionary, for example a name or
a specialized technical word.
Phone Basics 33
Page 46

While entering text using the Standard keyboard layout, if you touch any word on the suggestion
list, it is automatically added to the predictive text dictionary if it was not in the dictionary already.
To manually add a word to the predictive text dictionary:
1. Open the Notifications panel, and then touch > Language & keyboard > HTC Sense
Input > Personal dictionary.
2. Touch , enter the word to add, and then touch OK.
Edit or Delete a Word in Your Personal Dictionary
You can edit or remove words that you previously added to the predictive text dictionary.
1. Open the Notifications panel, and then touch > Language & keyboard > HTC Sense
Input > Personal dictionary.
2. Do one of the following:
To edit a word, touch the word, enter your changes, and then touch OK.
To delete a word, touch , select the word or words you want to delete, and then
touch Delete.
Back up Your Personal Dictionary to a Storage Card
You can use a microSD card (not included) to back up the new words you’ve added to your
personal dictionary.
1. Open the Notifications panel, and then touch > Language & keyboard > HTC Sense
Input > Personal dictionary.
2. Touch > Back up to storage.
3. When prompted, touch OK.
Restore Your Personal Dictionary from a Storage Card
You can restore your personal dictionary stored on a microSD card.
1. Open the Notifications panel, and then touch > Language & keyboard > HTC Sense
Input > Personal dictionary.
2. Touch > Restore from storage.
3. When prompted, touch OK.
Phone Basics 34
Page 47

Select Text
Highlight the text that you want to copy or cut.
1. Touch and hold a part of the text that you want to copy.
2. Drag the text markers to the start and end of the text that you want to select. Or touch
Select all to select everything in the text field.
Copy and Paste Text
1. After you have selected the text you want to copy, touch Copy or Cut. The selected text
is then copied to the clipboard.
2. Touch and hold a text field in the same or other app.
3. Touch or touch and hold the position where you want to paste the text, and then touch
Paste.
Transfer Content Between Your Phone and Computer
There are two ways you can transfer content to or from your computer.
● Connect your phone to your computer. Your computer will recognize it just like any
removable USB drive, and you can copy your media between them.
● Download and use the HTC Sync Manager software on your computer. You can set
it up to automatically get music, photos, and videos off your phone to your computer.
You can also sync playlists from your computer to the phone. If you have an iPhone, you
can even connect it and transfer the camera roll (photos and videos) to your computer.
Then reconnect your phone and copy them over. For details, see HTC Sync Manager.
Change the USB Connection Type
Whenever you connect your phone to a computer using the USB cable, you can choose the
type of USB connection.
Phone Basics 35
Page 48

1. Open the Notifications panel and then touch USB File sharing.
2. Select the USB connection type:
HTC Sync Manager. Select this option to sync media and your data such as
contacts, calendar, bookmarks, and other information between your computer and
your phone. See HTC Sync Manager for more information.
Disk drive. If you installed a microSD card on your phone, select this mode when
you want to copy files between the microSD card and your computer. See microSD
Card for more information.
3. Touch OK.
Phone Basics 36
Page 49

Phone Calls
With Boost Mobile, you can enjoy clear calling across the country.
Make Phone Calls
There are several convenient ways to place calls from your phone.
Call Using the Phone Dialer
The most ―traditional‖ way to place a call is by using the phone’s dialer screen.
1. Touch > to display the phone’s dialer screen.
2. Touch the number keys on the Phone keypad to enter the phone number.
3. As you enter digits, Smart Dial searches for contacts that match. If you see the number
you want to dial, touch it to place the call immediately without entering the rest of the
number.
4. If you enter an incorrect digit, touch to erase it. To erase the entire number, touch
and hold .
Tip: Touch to close the Phone keypad and to see if there are more matching numbers or
contacts. To browse through the filtered list, flick through the list or slide your finger up or
down the list slowly.
5. Touch Call to call the number.
Phone Calls 37
Page 50

6. To end the call, touch End call.
Call From Call History
You can directly call numbers stored in your Call history.
1. Touch > .
2. Touch the Call History tab.
3. Touch an entry on the Call history list to place a call to that entry.
Note: You cannot make calls from Call history to entries identified as No ID or Restricted.
Tip: Touch and hold an entry in the Call history list to open the options menu where you can
select to view the contact information (if number is stored in People), edit the number
before you redial, send a text message, or delete the entry from the Call history list and
more.
Call From People
Call your contacts from the People application.
1. Touch > > People.
2. Touch the contact you want to call to open the Contact details screen.
3. Touch Call [number type] to place a call.
For additional information, see People.
Call Using a Speed Dial Number
Speed dial numbers let you dial numbers by touching and holding a single number on the
Phone keypad. See Set Up Speed Dialing for information on assigning speed dial numbers.
1. Touch > to display the phone dialer’s screen.
2. Touch and hold the speed dial key on the Phone keypad. The display confirms that you
have dialed the number when it shows ―Dialing‖ on the upper right side of the screen.
Call a Number in a Text Message or Email Message
While viewing a text message or email message, you can place a call to a number that is in the
body of the message.
1. While viewing a text or email message, touch the phone number in the message.
2. Touch Call. Your phone then dials the phone number.
For additional information, see Text Messaging and MMS and Email.
Phone Calls 38
Page 51

Call Emergency Numbers
You can place calls to 911 even if the phone is locked or your account is restricted.
To call the 911 emergency number when the phone’s screen is locked with a screen lock:
1. Unlock the screen. For more information, see Turn Your Screen On and Off.
2. Touch Emergency call on the screen.
3. Touch .
To call the 911 emergency number normally or when your account is restricted:
1. Unlock the screen. For more information, see Turn Your Screen On and Off.
2. Touch on the Home screen.
3. Touch .
Enhanced 911 (E911) Information
This phone features an embedded Global Positioning System (GPS) chip necessary for utilizing
E911 emergency location services where available.
When you place an emergency 911 call, the GPS feature of your phone seeks information to
calculate your approximate location. Depending on several variables, including availability and
access to satellite signals, it may take up to 30 seconds or more to determine and report your
approximate location.
Important: Always report your location to the 911 operator when placing an
emergency call. Some designated emergency call takers, known as Public
Safety Answering Points (PSAPs), may not be equipped to receive GPS location
information from your phone.
Make International Calls
When placing international calls, plus code dialing automatically adds the international dialing
code for your location (for example, 011 for international calls made from the U.S.).
Note: In Settings > Call > Plus code dialing, make sure the North American dialing option
is selected.
To call someone in your contacts list, the stored phone number needs to have a "+" sign
followed by the country code, area code, and phone number.
1. Touch > .
2. You can:
Phone Calls 39
Page 52

Enter the first few letters of a contact name, and then touch a contact to call.
If you don’t have the number stored, touch and hold the zero key until a "+" sign
appears. Then enter the country code, area code, and phone number, and touch
Call.
The Phone dialer automatically adds your international dialing code to the number.
Note: The Phone dialer dials as is and doesn’t automatically add your international access
code when you dial a phone number that has a "+1" in front or when there’s no plus sign
in front of the number.
Important: International calls may incur additional fees. Call Boost Mobile for details.
Change the International Dialing Code
By default, the international dialing code is set to 011. When you’re traveling in another country,
you can set the international dialing code to your current location.
1. Open the Notifications panel, and then touch > Call.
2. Touch Plus code dialing > International dialing.
3. Enter the dialing code of the country where you’re located, and then touch OK.
Receive Phone Calls
When you receive a phone call from a contact, the Incoming call screen appears and displays
the caller ID icon, name, and phone number of the calling party. When you receive a phone call
from someone who is not stored in People, only the default caller ID icon and phone number
appear on the Incoming call screen.
Note: If your phone is turned off, all calls automatically go to voicemail.
Answer an Incoming Call
● If the display is on, touch Answer.
● If the display is off, the display will come on with the Lock screen. To answer the call,
flick the ring up, or touch and hold the Answer button and then drag it to the ring.
Mute the Ringing Sound
To mute the ringer without rejecting the call, you can do any of the following:
● Press the volume button.
● Briefly press the Power button ( ).
Phone Calls 40
Page 53

● Place the phone face down on a level surface. (You can do this even on the Lock
screen.)
Use the Quiet Ring on Pickup Feature
Your phone automatically reduces the ringer volume when you pick up the phone to answer
calls.
1. Open the Notifications panel, and then touch > Sound.
2. Make sure to select the Quiet ring on pickup option.
3. Touch .
Reject an Incoming Call
● If the display is locked when you get a call, drag the Decline button to the Lock screen
ring. Then drag to the ring the Remind me icon to create a task or the Send message
icon to send a text message to the caller.
● If the display is on when you get a call, touch Decline.
● If the display is off, the display will come on with the Lock screen. Touch and hold the
Decline button and then drag it to the ring to reject and send the call to your voicemail.
Visual Voicemail
Visual Voicemail gives you a quick and easy way to access your voicemail. Now you can find
exactly the message you are looking for without having to listen to every voicemail message
first. This new feature periodically goes out to your voicemail, and gathers the caller information
from all of the current voicemails. It then populates a list with the caller name and number, along
with the length of time and priority level of the voicemail message.
Set Up Visual Voicemail
Your phone automatically transfers all unanswered calls to your voicemail, even if your phone is
in use or turned off. You should set up your Boost Mobile voicemail and personal greeting as
soon as your phone is activated.
Note: To set up your traditional voicemail box, see Set Up Voicemail.
1. Touch > > Voicemail.
2. Touch Personalize now and follow the voice prompts to:
Create a password (part of standard voicemail).
Record your name announcement.
Record your greeting.
Phone Calls 41
Page 54

3. When prompted to enter information, use the onscreen dialpad to enter your numeric
responses.
Important: Voicemail Password – Boost Mobile strongly recommends that you create a
password when setting up your voicemail to help protect against unauthorized
access. Without a password, anyone who has access to your phone is able to
access your voicemail messages.
4. Once you have completed the setup process, return to the voicemail page (see step 1).
5. Touch the Welcome to Voicemail message on the screen to play a brief explanation of
the voicemail services.
Review Visual Voicemail
Visual Voicemail lets you easily access and select which messages you want to review.
1. Touch > > Voicemail.
2. Touch a message.
3. While reviewing a voicemail message, you can:
Touch to play or to pause the voicemail.
Touch > Archive to save the message.
Touch and drag the timeline to scrub through the message to different points.
Phone Calls 42
Page 55

Touch to call the person who left the voicemail message.
Touch to reply to the message. You can choose to reply via a text or audio
message.
Touch or to turn the speakerphone on or off during playback. If the
speakerphone feature was enabled in Settings, the speakerphone will always be
automatically enabled during voicemail playback.
Touch to delete the current voicemail message. Touch OK to confirm the deletion.
Touch > Help to learn more about this application.
Voicemail (Traditional)
In addition to Visual Voicemail, your phone and Boost Mobile service always offer traditional
voicemail service accessed through the Phone application.
Set Up Voicemail
Your phone automatically transfers all unanswered calls to your voicemail, even if your phone is
in use or turned off. You should set up your Boost Mobile Voicemail and personal greeting as
soon as your phone is activated. Always use a password to help protect against unauthorized
access.
1. Touch > .
2. Touch and hold to dial your voicemail number.
3. Follow the system prompts to:
Create your password.
Record your name announcement.
Record your greeting.
Important: Voicemail Password – Boost Mobile strongly recommends that you create a
password when setting up your voicemail to help protect against unauthorized
access. Without a password, anyone who has access to your phone is able to
access your voicemail messages.
Voicemail Notification
There are several ways your phone alerts you to a new message.
● By sounding the assigned ringer type.
Phone Calls 43
Page 56

● By displaying within the Notifications area of the Status bar when a single new
unheard voicemail message is received.
● By flashing the front indicator light (LED), if enabled.
Note: Your phone accepts messages even when it is turned off. However, your phone notifies
you of new messages only when it is turned on and you are in a Boost Mobile service
area.
Retrieve Your Voicemail Messages
You can review your messages directly from your wireless phone (using either traditional
voicemail or Visual Voicemail) or from any other touch-tone phone.
Use Traditional Voicemail to Access Your Messages
1. Touch > .
2. Touch and hold to dial your voicemail number.
3. Follow the voice prompts to listen to and manage your voicemail messages.
Use Another Phone to Access Your Messages
1. Dial your wireless phone number.
2. When your voicemail answers, press the asterisk key (*) on the phone.
3. Enter your password.
Tip: When you call voicemail from another phone, you first hear the header information (date,
time, and sender information) for the message. To skip directly to the message, touch
during the header.
Note: Depending on your plan, you may be charged for airtime minutes when you are
accessing your voicemail from your wireless phone.
Phone Call Options
Your phone provides many useful features and options to help you make the most of your
calling experience.
Caller ID
Caller ID identifies a caller before you answer the phone by displaying the number of the
incoming call. If you do not want your number displayed when you make a call, follow these
steps.
1. Touch > .
Phone Calls 44
Page 57

2. Touch .
3. Enter a phone number.
4. Touch .
To permanently block your number, call Boost Mobile Customer Service.
Call Waiting
When you’re on a call, Call Waiting alerts you to incoming calls by sounding two beeps. Your
phone’s screen informs you that another call is coming in and displays the caller’s phone
number (if it's available).
1. Answer the incoming call to put the first caller on hold.
2. To switch back to the first caller, touch > Flash.
3. To end the call, touch End Call.
Note: For those calls where you don’t want to be interrupted, you can temporarily disable Call
Waiting by touching before placing your call. Call Waiting is automatically
reactivated once you end the call.
3-way Calling
With 3-Way Calling, you can talk to two people at the same time. When using this feature, the
normal airtime rates will be charged for each of the two calls.
1. Touch > .
2. Dial a number and touch .
3. Once you have established the connection, touch > Add call, and dial the second
number. (This puts the first caller on hold and dials the second number.)
4. When you’re connected to the second party, touch .
Note: If one of the people you called hangs up during your call, you and the remaining caller
stay connected. If you initiated the call and are the first to hang up, all callers are
disconnected.
5. To end the three-way call, touch End call.
Call Forwarding
Call Forwarding lets you forward all your incoming calls to another phone number – even when
your phone is turned off. You can continue to make calls from your phone when you have
activated Call Forwarding.
Phone Calls 45
Page 58

Note: Depending on your plan, you may be charged a higher rate for calls you have forwarded.
To activate Call Forwarding:
1. Touch > .
2. Touch
3. Enter the area code and phone number to which you want your calls forwarded.
4. Touch . (You will hear a tone to confirm the activation of Call Forwarding.)
To deactivate Call Forwarding:
1. Touch > .
2. Touch
3. Touch . (You will see a message and hear a tone to confirm the deactivation.)
.
.
In-call Options
Touching during a call displays a list of available in-call features.
● Add call to initiate a three-way call.
● Flash to accept another incoming call and put the first caller on hold. Touch Flash again
to talk to the first caller.
● People to display your contacts list.
● Contact card to display the caller’s contact information.
Note: When the phone is completing a call, only the People and Flash are available.
You can also touch to mute the microphone. Touch the button again to unmute. To turn the
speakerphone on or off, touch . You can adjust the speaker volume by pressing the volume
button.
Warning: Because of higher volume levels, do not place the phone near your ear during
speakerphone use.
Internet Calls
When you’re connected to a Wi-Fi network, you can make and receive calls through an Internet
calling account.
Note: Before you add an Internet calling account, make sure that you’ve registered with an
Internet calling service that supports voice calls over Session Initiation Protocol (SIP).
Internet calls to phone numbers may incur additional fees.
Phone Calls 46
Page 59

Add an Internet Calling Account
You must add an Internet calling account before you can make Internet calls.
1. Open the Notifications panel, and then touch > Call.
2. Under Internet call settings, touch Accounts.
3. Touch Add account.
4. Enter your account details.
5. Touch > Save.
6. To set your phone to receive Internet calls on your added account, touch the Receive
incoming calls check button.
Make an Internet Call
Make an Internet call to either your contact’s Internet calling account or phone number.
● Internet calling account
In People, touch a contact who has an Internet calling account, and then touch
Internet call.
In Call History, touch an Internet call log.
● Phone number. First, enable Internet calling for your outgoing calls. Open the
Notifications panel, and then touch > Call. Touch Use Internet calling, and then
select either For all calls when data network is available or Ask for each call.
Set Up Speed Dialing
Your phone can store up to nine phone numbers in speed dial locations.
To assign a speed dial number to a contact:
1. Touch > > People, and then touch a contact.
2. Touch > Set speed dial.
3. Touch the Not assigned button under Number to select the contact’s number that you
want to assign to the speed dial key.
4. Touch the Not assigned button under Location and then select a speed dial location.
5. Touch Save.
Note: If you assign a number to an already assigned speed dial location, the new phone
number will automatically replace the previous speed dial assignment.
Phone Calls 47
Page 60

Call History
Call history lists all recent incoming, outgoing, and missed calls. Call history makes redialing a
number fast and easy. It is continually updated as your phone automatically adds new numbers
to the beginning of the list.
Note: Call history records only calls that occur while the phone is turned on. If a call is received
while your phone is turned off, it will not be included in History.
View Call History
Access your Call history to quickly call someone back or see who you have talked to recently.
1. Touch > > Call History tab.
Each entry contains the phone number (if it is available) and the contact name (if the
number is in People).
2. Do any of the following on the Call History tab:
Touch a name or number in the list to call. See Call From Call History.
Touch and hold a name or number in the list to display the options menu.
Touch to check only the Call history of a particular contact.
Touch to display only a particular type of call such as missed calls or outgoing
calls.
Phone Calls 48
Page 61

Save a Number From Call History
If the phone number of a person who called is not in People, you can choose to save the
number after you hang up.
1. Touch > > Call History tab.
2. Touch and hold the received call, and then touch Save to People on the options menu.
3. Touch Create new contact.
The phone number is automatically added to the Mobile box in the Phone section.
4. Enter the name and other contact information.
Tip: To store the number as another type (for example, home number), touch the Mobile
button.
5. Touch Save.
After you have saved the number, your phone displays the new contact. (See Your People List.)
Note: You cannot save phone numbers already in People or from calls identified as No ID or
Restricted.
Prepend a Number From Call History
If you need to make a call from the Call history and you are outside your local area code, you
can add the appropriate prefix by prepending the number.
1. Touch > > Call History tab.
2. Touch and hold the entry you want to call and touch Edit number before calling.
3. Enter the prefix and touch Call to call the number.
Erase Call History
If the Call history becomes long, you can delete an entry or the entire Call history list.
1. Touch > > Call History tab.
2. Do either of the following:
To delete a Call history entry, touch and hold the entry, and then touch Delete from
call history.
To erase the entire Call history list, touch > Remove call history > > Select all >
Delete. Touch OK to confirm deletion.
Phone Calls 49
Page 62

Settings
Wireless & Networks Settings
This group of settings lets you control your phone’s wireless network settings (3G and 4G LTE),
Wi-Fi settings, Bluetooth, and more.
Airplane Mode
Airplane Mode allows you to use many of your phone’s features, such as Gallery, Camera, and
Music, when you are on an airplane or in any other area where making or receiving calls or data
is prohibited. When you set your phone to Airplane Mode, it cannot send or receive any calls or
access online information.
To quickly turn Airplane Mode on or off:
► Press and hold , and then touch Airplane mode in Power options. While in
Airplane Mode, the status bar will display .
To turn Airplane Mode on or off in Settings:
1. Open the Notifications panel, and then touch .
2. Touch the Off/On switch next to the Airplane mode option. While in Airplane Mode, the
status bar will display .
Wi-Fi
Your phone lets you take advantage of Wi-Fi hotspots for high-speed data access using
available computer networks. For details on your phone’s Wi-Fi features and settings, see Wi-Fi.
Bluetooth
Your phone’s Bluetooth capabilities let you use wireless headsets, send and receive pictures
and files, and more. For details on your phone’s Bluetooth settings, see Bluetooth and NFC.
Mobile Data
This menu lets you turn your data connection on or off, and more. For details on mobile
networks, see Data Services – Sprint 4G LTE and Sprint 3G Networks.
HTC Media Link HD
Configure settings for optional Media Link HD connection to an HDTV. See Wireless Display.
More Wireless & Network Settings
Additional options that let you view your data usage and set up Media Link HD, VPN, NFC, and
Wi-Fi direct.
Settings 50
Page 63

● Usage. Keep track of your data usage by setting mobile data limit and alerts. See
Manage Your Data Usage.
● VPN. Configure your Virtual Private Network (VPN) settings so you can connect to your
company’s intranet sites. See Virtual Private Networks (VPN).
● NFC. Share information wirelessly with other NFC-enabled device. See Bluetooth and
NFC.
● Android Beam. Turn Android Beam on to use NFC. See Bluetooth and NFC.
Personalization Settings
Use the Personalize menu to customize your phone’s display, select a new Scene, add items to
the Home screen, or change the sound settings.
Scene
Customize your phone’s Home and extended screens’ appearance by selecting a scene to
reflect your lifestyle. Scenes are preset screen layouts that you can quickly apply.
Select a Scene
1. Open the Notifications panel, and then touch > Personalize.
2. On the Display tab, touch Scene.
3. Slide your finger on the screen from right to left to select the scene you want.
4. Touch Apply.
Create a Scene
You’ll start with an empty Home screen when you create a new scene.
1. Open the Notifications panel, and then touch > Personalize.
2. On the Display tab, touch Scene.
3. Touch > New. Slide your finger on the screen from right to left to select the scene you
want.
4. Enter a new scene name, and then touch Done.
5. Personalize the scene by adding widgets and apps, changing the wallpaper, and more.
All of your changes will be automatically saved to this scene.
Rename a Scene
1. Open the Notifications panel, and then touch > Personalize.
Settings 51
Page 64

2. On the Display tab, touch Scene.
3. Slide your finger on the screen from right to left to select the scene you want to rename.
4. Touch and hold a scene thumbnail, and then touch Rename.
5. Enter a new name for the selected scene, and then touch Done.
Delete a Scene
1. Open the Notifications panel, and then touch > Personalize.
2. On the Display tab, touch Scene.
3. Touch > Delete.
4. Slide your finger on the screen from right to left to browse through the scenes, and then
touch one or more scenes you want to delete.
5. Touch Delete.
Change the Wallpaper
Changing the phone’s display screen wallpaper with a preset wallpaper or your favorite photo is
a quick and easy way to change the feel of your phone and give it a fresh look. Browse the
collection of wallpapers included in your phone or choose from photos that you have taken with
the camera. You can also change to an animated wallpaper.
1. Open the Notifications panel, and then touch > Personalize > Wallpaper.
2. Select from the following:
HTC wallpapers to use a preset image.
Live wallpapers to choose from preset animated wallpapers.
Gallery to use a picture that you have captured using the camera or copied to your
phone as wallpaper. You can crop the picture before setting it as wallpaper.
3. Touch Save or Apply.
Change the Lock Screen Style
Choose from our selection of lock screens. Some lock screens are customizable.
1. Open the Notifications panel, and then touch > Personalize.
1. On the Display tab, touch Lock screen style.
2. Slide your finger left or right to choose a lock screen style.
Settings 52
Page 65

3. Touch the lock screen style to see a preview. If you want to further customize it, touch
Settings.
4. Touch Apply.
The shortcuts on the lock screen are the same apps as the ones on your Home screen’s launch
bar. To change them, you’ll have to replace the apps on the launch bar.
Change the Default Ringtone
See Change the Default Ringtone for details.
Accounts & Sync
The Accounts & sync settings menu lets you add and manage all your email, social networking,
and picture and video sharing accounts.
Add Your Social Networks, Email Accounts, and More
Add your favorite social networks, email accounts, and online storages on your phone so you
are connected anywhere you go.
1. Open the Notifications panel, and then touch > Accounts & sync.
2. Touch .
3. Touch an account type. You can set up these accounts on your phone: Dropbox,
Exchange ActiveSync, Facebook, Flickr, Google, HTC Account, LinkedIn®, Mail
(POP3/IMAP email), Hotmail, SkyDrive, Evernote, Twitter, and Watch.
4. Enter your account information and follow screen instructions to proceed.
Depending on the account type, you may need to enter an email address or user
address, password, domain name, or other information. For Exchange ActiveSync
accounts, contact your server administrator to determine what information you will need.
Add One or More Google Accounts
Sign in to your Google Account to see your Gmail™, contacts, and calendars, and to use
Google apps on your phone.
1. Open the Notifications panel, and then touch > Accounts & sync.
2. Touch > Google.
3. Follow the onscreen instructions to sign in to an account or create a new account.
Tip: If you added more than one Google Account, apps such as Gmail can allow you to
switch between your accounts. Your phone can only back up settings (such as
bookmarks and your Wi-Fi password) to the first Google Account that you added.
Settings 53
Page 66

Forgot Your Google Account Password?
If you have forgotten your Google Account password, you can try to recover it by going to the
Google website.
1. On your phone or on your computer, open your Web browser
2. Go to www.google.com/accounts/recovery.
3. Enter the email address or username that you use to sign in to your Google Account.
4. Click Submit.
5. Follow the instructions on the screen to reset your password.
Manage Your Online Accounts
Manage the online accounts you have associated with your phone.
Remove an Account
You can remove an account to delete all information associated with it from your phone.
Removing an account does not delete information from the online service itself.
1. Open the Notifications panel, and then touch > Accounts & sync.
2. Touch the account that you want to remove.
3. Touch > Remove.
Sync All Your Accounts Automatically
1. Open the Notifications panel, and then touch > Accounts & sync.
2. Touch the Auto-sync On/Off switch to turn automatic sync on or off.
Sync an Account Manually
1. Open the Notifications panel, and then touch > Accounts & sync.
2. Touch the account you want to sync.
3. Touch > Sync now.
Change Synced Data or Settings for an Account
1. Open the Notifications panel, and then touch > Accounts & sync.
2. Touch the account that you want to update.
3. Touch the item you want to sync or edit.
Settings 54
Page 67

Location & Security Settings
Your Location settings menu lets you select how your phone determines its location (using the
wireless network, GPS satellites, both, or neither). The Security settings menu let you set phone
security, lock codes, passwords, administrator settings, and more.
Location
Your phone is equipped with a Location setting for use in connection with location-based
services.
The Location feature allows the network to detect your position. Turning Location setting off will
hide your location from everyone except 911.
Note: Turning on Location setting will allow the network to detect your position using GPS
technology, making some Boost Mobile applications and services easier to use. Turning
Location setting off will disable the GPS location function for all purposes except 911,
but will not hide your general location based on the cell site serving your call. No
application or service may use your location without your request or permission. GPSenhanced 911 is not available in all areas.
To enable your phone’s Location setting feature:
1. Open the Notifications panel, and then touch > Location > Location setting.
2. Read the disclaimer and then touch LOCATION ON.
3. Touch .
When you turn the Location setting feature on, the phone displays the icon on the status bar.
When you turn Location setting off, the phone displays the icon.
Security-Screen Lock
You can help increase the security of your phone by creating a screen lock. When enabled, you
have to draw the correct unlock pattern on the screen, enter the correct PIN, or enter the correct
password to unlock the phone’s control keys, buttons, and touchscreen. You can also use face
recognition to lock your screen.
Use Face Unlock
1. Open the Notifications panel, and then touch > Security.
2. Touch Screen lock > Face Unlock.
3. Touch Set it up and follow the screen instructions.
4. Choose a backup lock to use in case the phone doesn’t recognize you.
Settings 55
Page 68

5. Touch OK.
6. Touch Lock phone after, and then specify the idle time before the screen is locked.
Tip: You can also touch Improve face matching in the Security screen to train your phone
to recognize your face in different situations, such as when you’re wearing glasses or
sporting a beard.
Use a Screen Unlock Pattern
1. Open the Notifications panel, and then touch > Security.
2. Touch Screen lock > Pattern.
3. Draw the screen unlock pattern by connecting at least four dots in a vertical, horizontal,
or diagonal direction. Lift your finger from the screen when finished.
4. The phone records the pattern. Touch Continue.
5. When prompted, draw the screen unlock pattern again, and then touch Confirm.
If you fail to draw the correct unlock pattern on the screen after five attempts, you will be
prompted to wait for 30 seconds before you can try again.
Note: To change your unlock screen pattern, open the Notifications panel, and then
touch > Security > Screen lock. Draw your current screen unlock pattern and then
touch Pattern.
Use a Screen Unlock PIN
1. Open the Notifications panel, and then touch > Security.
2. Touch Screen lock > PIN.
3. Enter a PIN and touch Continue.
4. Enter your PIN again to confirm and touch OK.
If you fail to enter the correct PIN after five attempts, you will be prompted to wait for 30
seconds before you can try again.
Use a Screen Unlock Password
1. Open the Notifications panel, and then touch > Security.
2. Touch Screen lock > Password.
3. Enter a password and touch Continue.
4. Enter your password again to confirm and touch OK.
Settings 56
Page 69

If you fail to enter the correct password after five attempts, you will be prompted to wait for 30
seconds before you can try again.
Disable the Screen Lock
1. Open the Notifications panel, and then touch > Security > Screen lock.
2. Draw your unlock screen pattern, enter your PIN, or enter your password, and then
touch Continue. If you fail to enter the correct password after five attempts, you will be
prompted to wait for 30 seconds before you can try again.
3. Touch None.
Accessibility Settings
Use these settings when you’ve downloaded and installed an accessibility tool, such as a
screen reader that provides voice feedback. You can turn accessibility functions or services on
or off.
1. Open the Notifications panel, and then touch .
2. Touch Accessibility and choose the settings you want. Options include:
TalkBack: Turn this option on if you want your phone to provide spoken feedback.
TalkBack helps blind and low-vision users. See Navigate Your Phone with TalkBack.
Font size: Touch this option to select a font size for better readability.
Power button ends call: When selected, you can press the Power button to end a
call.
Auto rotate screen: Select this option to automatically change the screen
orientation when the phone is rotated.
Speak passwords: When selected, your phone will speak the passwords you enter
on your phone.
Text-to-speech output: Touch to select the text-to-speech engine, set the speech
speed, or listen to a speech synthesis demo.
Touch & hold delay: Set the delay when touching and holding items on the screen.
Enhance web accessibility: Touch to allow apps to install Google scripts for Web
content accessibility.
Navigate Your Phone with TalkBack
Use TalkBack if you need to navigate your phone by spoken feedback. When you touch the
screen, your phone vibrates and gives you an audible response so you know what you are
touching.
Settings 57
Page 70

Turn TalkBack On
1. Open the Notifications panel, and then touch .
2. Touch Accessibility > TalkBack.
3. Touch the On/Off switch.
4. Read the TalkBack disclaimer and then touch OK. You'll be prompted to enable Explore
by touch, which provides an audible description of what you're touching on the screen.
A short tutorial explaining how to use TalkBack will begin playing after you turn on TalkBack.
Note: TalkBack works best if you turn off auto-rotate and turn on Explore by touch.
Use TalkBack Gestures
When TalkBack is turned on and the Explore by touch setting is selected, the regular touch
gestures are replaced by the TalkBack gestures.
Note: HTC gestures such as 3-finger swiping may not be available when TalkBack gestures
are enabled.
To open an item:
1. Drag your finger on the screen to find and select the item.
2. Double-tap anywhere on the screen to open the item.
To move an item:
1. Drag your finger on the screen to find the item.
2. Double-tap anywhere on the screen, but don't lift your finger on the second tap.
3. Drag the item to a new spot and then lift your finger.
To scroll through a screen:
► Use two fingers to swipe up, down, left or right.
To unlock the lock screen:
► Use two fingers to swipe up from the bottom of the screen.
To open the Notifications panel:
► Use two fingers to swipe down from the top of the screen.
Settings 58
Page 71

Assign TalkBack Shortcuts
TalkBack has customizable gestures that you can use to open the Notifications panel, view
recent apps, access TalkBack controls, and more.
Important: The steps below are described using the regular gestures. Use the
corresponding TalkBack gestures if you already have TalkBack turned on.
1. Open the Notifications panel, and then touch .
2. Touch Accessibility > TalkBack.
3. Touch > Settings > Manage shortcut gestures.
4. Touch any of the shortcut gestures, and then select an action.
Use TalkBack Context Menus
TalkBack has context menus for controlling continuous reading and global TalkBack controls.
These menus can be accessed using TalkBack shortcut gestures.
1. Turn TalkBack on.
2. Do one of the following:
To open the continuous reading menu, use one finger to swipe up and right in one
continuous movement.
To open the global context menu, use one finger to swipe down and right in one
continuous movement.
Note: If you already changed the TalkBack shortcut gestures, check your TalkBack settings for
the appropriate gesture.
3. Touch and hold anywhere on the screen.
4. Drag your finger around the screen to explore the options.
Note: To cancel an action, drag your finger to your starting position.
Change the TalkBack Reading Speed
Important: The steps below are described using the regular gestures. Use the
corresponding TalkBack gestures if you already have TalkBack turned on.
1. Open the Notifications panel, and then touch .
2. Touch Accessibility > Text-to-speech output > Speech rate.
3. Select a speech rate.
Settings 59
Page 72

Tip: You can test the speech rate by touching Listen to an example.
Change the TalkBack Language Settings
1. Open the Notifications panel, and then touch .
2. Touch Accessibility.
3. Do one of the following:
Select a different language: Touch Text-to-speech output > Google Text-to-
speech Engine > Language.
Install a language: Touch Text-to-speech output > Google Text-to-speech Engine
> Install voice data.
4. Select the language you want to use.
Note: Not all languages are supported.
Backup & Reset
Find ways on how to back up your data or how to reset the phone.
Backup
Worried that you might lose important stuff on your phone? Back up your phone before you
erase the storage, do a factory reset, or upgrade to a new phone.
Backup Options
● Backup using Google. Use your Google account to back up your app data, Wi-Fi
passwords, and other settings to Google servers.
● HTC Sync Manager. Use HTC Sync Manager to import music, photos, and videos to
your computer. You can also sync locally stored contacts, calendar events, bookmarks,
documents, and playlists to your computer. For details, see HTC Sync Manager.
● Other backup options. In some apps, you can back up data to the storage on the
phone so you can easily restore them after a factory reset.
Messages. Back up your text messages to the storage on the phone, or save them
as an email attachment. See Back Up and Restore Your Text Messages.
Contacts. Save contacts and other personal data to your online accounts so you can
just sync them when switching to another phone. If you have locally stored contacts
in the People app, export them to the storage on the phone. See Back Up and
Restore Your Contacts.
Settings 60
Page 73

Files. Manually copy and paste files by connecting your phone to your computer as a
disk drive. You can also upload files to online storage and services.
Other data. If you added new words to your personal dictionary in the onscreen
keyboard, back up the dictionary to the storage or save it as an email attachment.
See HTC Sense Input Keyboard. Check the other apps to see if they support
exporting data to the storage.
Note: If you’re backing up data to the storage, don’t choose to erase the storage when you do
a factory reset.
Use Your Google Account to Back Up Your Phone
You can use your Google account to back up your phone's data and settings.
1. Open the Notifications panel, and then touch .> Backup & reset.
2. Touch Back up my settings.
3. Touch the current backup account, and then select the Google account you want to use.
Otherwise, touch Add account to add another Google account that you want to use for
your back up.
Reset Your Phone
If your phone has a persistent problem that cannot be solved, you can perform a factory reset
(also called a hard reset or master reset). A factory reset reverts the phone back to its initial
state — the state before you turned on the phone for the first time.
The following will be removed from the phone when you do a factory reset:
● Your Google Account
● All accounts you've added in Settings > Accounts & sync and the data associated with
these accounts
● Personal data that you've created or synced to the phone such as your profile, contacts,
messages, email, calendar events, and more
● System and application data and settings
● Downloaded apps
Files such as your music, photos, videos, and documents will also be deleted if you select the
Erase all data option.
Be sure to back up any data and files you want to keep before you do a factory reset.
Note: A factory reset may not permanently erase all data from your phone, including personal
information.
Settings 61
Page 74

Reset Your Phone via Settings
1. Open the Notifications panel, and then touch > Backup & reset > Reset phone.
If you also want to delete media and other data on your phone, select Erase all data.
If you installed a microSD card and you also want to delete media and other data on
it, select Erase SD card.
2. Touch Reset phone. If you’ve set up a screen lock, you’ll be asked to enter the screen
lock before you can proceed.
3. Touch OK to confirm. Your phone will power down and reset itself, which may take up to
10 minutes.
Once the phone has reset, it will run through the Hands Free Activation and update processes
again. When finished, you will see the Welcome screen and Setup application. See Complete
the Setup Application to start over.
Reset Your Phone Using the Phone Keys
1. If you can’t turn your phone on or access Settings, you can still perform a factory reset
by using the hardware buttons on your phone.
2. With the phone turned off, press and hold the volume down button, and then
press .
3. When the phone’s display turns on, release the power and volume buttons.
4. Use the volume button to select FACTORY RESET, and then press .
All data on your phone will be deleted.
Display Settings
Adjusting your phone’s display settings not only helps you see what you want, it can also help
increase battery life.
Auto-rotate Screen
By default, the screen orientation automatically changes when the phone is rotated. To disable
automatic screen orientation:
1. Open the Notifications panel, and then touch > Display, gestures & buttons.
2. Clear the Auto-rotate screen option and touch .
Keep the Screen On While Charging
You can keep the screen on while you charge the phone.
Settings 62
Page 75

1. Open the Notifications panel, and then touch > Display, gestures & buttons.
2. Select the Stay awake option and touch .
Note: Not all application screens support automatic rotation. The screen orientation
automatically changes to landscape mode when you turn the phone sideways.
Text Size
You can adjust the text size for your viewing comfort.
1. Open the Notifications panel, and then touch > Display, gestures & buttons.
2. Touch Font size and then select the font size.
Brightness
By default, the screen brightness automatically adjusts depending on the surrounding lighting
conditions.
To manually adjust screen brightness:
1. Open the Notifications panel, and then touch > Display, gestures & buttons.
2. Touch Brightness, and then clear the Automatic brightness option.
3. Drag the slider to adjust the brightness.
4. Touch OK.
Screen Timeout
After a period of inactivity, the phone screen turns off to conserve battery power. You can set
the idle time before the screen turns off.
1. Open the Notifications panel, and then touch > Display, gestures & buttons.
2. Touch Sleep, and then touch the time before the screen turns off.
Note: Extended screen timeout periods may reduce the battery’s talk and standby times.
Tip: To turn off and lock the screen quickly, press .
Notification Flash
Touch this option to select which events you want the Front Indicator Light (LED) to light up and
notify you.
1. Open the Notifications panel, and then touch > Display, gestures & buttons.
2. Touch Notification flash, and then touch an event for which you want to see the
notification LED to light up.
Settings 63
Page 76

HTC Gestures
Select this option to allow other apps to recognize the 3-finger gesture. Otherwise, the 3-finger
gesture will only output the screen to the optional HTC Media Link HD.
Note: The 3-finger gesture may not be available when TalkBack gestures are enabled. For
details, see Navigate Your Phone with TalkBack.
1. Open the Notifications panel, and then touch > Display, gestures & buttons.
2. Touch HTC gestures to select or clear this option.
Calibrate the Screen
Recalibrate the screen if you feel that the screen orientation does not respond properly to the
way you hold the phone.
1. Open the Notifications panel, and then touch > Display, gestures & buttons > G-
Sensor calibration.
2. Place the phone on a flat surface, and then touch Calibrate.
3. After the recalibration process, touch OK.
Beats Audio
Turn Beats Audio on for a richer sound experience on your phone. For more information, see
Beats Audio - Make Your Music Sound Better.
Sound Settings
The Sound settings menu lets you control your phone’s audio, from ringtones and alerts to
touch tones and notifications.
General Sound Settings - Sound Profile and Vibrate
Use the following settings for such features as silent mode, vibrate, and overall phone volume.
1. Open the Notifications panel, and then touch > Sound > Sound profile.
2. Select Normal, Vibrate, or Silent.
3. To set your phone to always vibrate for calls in addition to any ringer settings, select the
Vibrate option below Volumes.
Note: If you selected Vibrate as your sound profile (step 2), your phone will vibrate for all
notifications and incoming calls.
4. Touch .
Settings 64
Page 77

General Sound Settings - Volumes
You can separately adjust your phone’s multimedia, ringtone and notifications, and alarm
volumes.
1. Open the Notifications panel, and then touch > Sound > Volumes.
2. Drag the volume sliders on the screen to adjust the ringtone and notifications, music and
videos, and alarm volumes.
3. Touch Done.
Note: You can adjust the ringer volume in standby mode (or the earpiece volume during a call)
by pressing the volume up or down button.
Incoming Calls - Ringtones
You can select and assign ringtones for your incoming calls. Your phone provides a variety of
ringtones that you can set as the default ringtone of your phone.
1. Open the Notifications panel, and then touch > Sound > Phone ringtone.
2. Touch the ringtone you want to use, and then touch Apply. The ringtone briefly plays
when selected.
Note: You can use *.wav, *.mid, *.mp3, *.wma, or other types of sound files that you have
downloaded from the Internet or copied from your computer as ringtones. To set a sound
file as ringtone, see Music and Ringtones.
Incoming Calls - Other Options
Enable Quiet ring on pickup so your phone lowers the ringtone volume the moment you pick it
up to answer a call. When your phone is in your bag or pocket, enable Pocket mode so the
phone rings louder when you have an incoming call.
You can choose to enable or disable the Quiet ring on pickup or Pocket mode incoming call
features.
1. Open the Notifications panel, and then touch > Sound.
2. Select or clear the Quiet ring on pickup or Pocket mode options to enable or disable
the features.
For more information, see Motion Gestures.
Notification Sounds
Use the Notification sounds setting to choose your notifications sound.
1. Open the Notifications panel, and then touch > Sound > Notification sound.
Settings 65
Page 78

2. Touch an event for the notification sound.
3. Select the sound you want to use, and then touch Apply.
System Sound Settings
The System sound settings menu lets you select whether you hear tones when touching
numbers on the dialpad, selecting onscreen options, and more.
1. Open the Notifications panel, and then touch > Sound.
2. Select or customize options under the System menu.
Dial pad touch tones: Select the short tones to use.
Touch sounds: Play sounds when making an onscreen selection.
Screen lock sounds: Play sounds when locking or unlocking the screen.
Vibrate on touch: Vibrate when touching soft keys and during certain other
instances.
Emergency tone: Set behavior when an emergency call is placed.
Call Settings
Your phone’s Call Settings menu lets you configure your voicemail options and a number of
other settings for the phone application.
Voicemail Settings
See Set Up Voicemail.
Other Call Settings
Use these options to adjust several call settings, such as hearing aid compatibility,
teletypewriter and DDTM.
Hearing Aids
Select the Hearing aids option to enable hearing aid compatibility that amplifies your phone’s
in-call volume.
TTY Mode
A TTY (teletypewriter, also known as a TDD or Text Telephone) is a telecommunications phone
that allows people who are deaf, hard of hearing, or who have speech or language disabilities,
to communicate by telephone.
Your phone is compatible with select TTY phones. Please check with the manufacturer of your
TTY phone to ensure that it supports digital wireless transmission. Your phone and TTY phone
Settings 66
Page 79

will connect using a special cable that plugs into your phone’s headset jack. If this cable was not
provided with your TTY phone, contact your TTY phone manufacturer to purchase the
connector cable.
When establishing your Boost service, please call Boost Mobile Customer Service using the
state Telecommunications Relay Service (TRS) by first dialing . Then provide the
state TRS with this number: 866-727-4889.
To turn TTY Mode on or off:
1. Open the Notifications panel, and then touch > Call > TTY mode.
2. Touch TTY Full, TTY HCO, or TTY VCO. Touch TTY Off to turn TTY mode off.
Note: When enabled, TTY mode may impair the audio quality of non-TTY phones connected to
the headset jack.
Warning: 911 Emergency Calling
Boost Mobile recommends that TTY users make emergency calls by other
means, including Telecommunications Relay Services (TRS), analog cellular,
and landline communications. Wireless TTY calls to 911 may be corrupted when
received by public safety answering points (PSAPs), rendering some
communications unintelligible. The problem encountered appears related to TTY
equipment or software used by PSAPs. This matter has been brought to the
attention of the FCC, and the wireless industry and the PSAP community are
currently working to resolve this.
DDTM Mode
Select this option if you want to direct all calls to your voicemail when you are using data
connection. See Data Services FAQs.
Internet Call Settings
See Internet Calls.
Applications Settings
Use the Apps menu to control your application settings or remove apps.
Uninstall Third-party Apps
Uninstall apps that you no longer need to save storage space.
1. Open the Notifications panel, and then touch > Apps.
2. Swipe to the Downloaded, Running, or All tab, and then touch the application you want
to uninstall.
Settings 67
Page 80

Tip: Touch to sort the apps list.
3. On the App info screen, touch Uninstall.
4. Touch OK to confirm.
Note: You cannot uninstall programs that are preinstalled on the phone.
Clear Application Cache and Data
Free up storage space and phone memory by deleting application cache and data.
1. Open the Notifications panel, and then touch > Apps.
2. Touch the Downloaded, On phone storage, Running, or All tab, and then touch the
application whose cache or data you want to delete.
Tip: Touch to sort the apps list.
3. In the App info screen, touch Clear data or Clear cache.
Stop Applications Using Task Manager
Use Task Manager to free up memory by stopping running applications that you’re not currently
using.
1. Touch > > Task Manager.
2. In the Applications list, touch to the right of the application name to stop it.
Application Tabs
You can rearrange the tabs at the bottom of some apps to prioritize the types of information you
frequently use. You can also add or remove tabs.
1. Open an app that has the usual tabs at the bottom of its screen.
2. Touch and hold the current tab until the screen changes and shows a message about
rearranging tabs.
3. If you don’t see any tabs on the app, touch > Edit tabs.
4. You can:
Change the order of the tabs. Touch and hold a tab, and then drag it to its new
position.
Drag a tab into or out of the bottom row to add or remove it.
When you’re done, touch .
Settings 68
Page 81

Allow Installation of Third-Party Programs
By default, you can install only programs and games downloaded from Google Play.
To install third-party programs on the phone:
► Open the Notifications panel, and then touch > Security. Select the Unknown
sources option.
App Association
You can set which app opens when you tap an item such as a phone number or email address
while reading a message, viewing a Web page, and more.
1. Open the Notifications panel, and then touch > App associations.
2. For each item type, select the app you want to open.
Storage Settings
The storage settings menu lets you view and manage the phone storage.
Types of Storage
Your phone uses these storage types.
● App storage. This is the internal storage where apps, email, data, and text messages
are stored. When you are running out of phone storage, you can free up space by
uninstalling apps or changing download settings.
● Phone storage. This is the file storage where photos, videos, and music files are kept.
When you are running out of phone storage, you can free up space by moving files to
your computer or to an online storage service.
● SD card. If you installed a microSD card, you can store your files such as photos, music,
and videos to this removable storage. When you connect your phone to your computer,
this storage is accessible and you can copy files between them. See microSD Card for
more information.
● USB storage. When you plug in an external USB storage device (such as a USB flash
drive or an SD card reader), you can view photos and videos stored on the device right
from Gallery and play songs stored on the device in Music. You can also open PDFs and
edit Office documents. You need a special cable to connect your phone and a USB
storage device. Your phone supports USB storage devices (except portable hard drives)
up to 64 GB.
● Online storage. If you’re using an online storage account that’s accessible from your
phone, you can store your files to your online storage.
Settings 69
Page 82

Note: The default storage for your files, whether it’s the Phone storage or SD Card, may vary
from app to app. Some apps allow you to set the default storage.
Copy Files To or From Your Phone
You can copy your music, photos, and other files to your phone.
1. Connect your phone to the computer using the supplied USB cable.
2. On your phone, open the Notifications panel, and the touch USB File sharing > Disk
Drive. You’ll see options for viewing or importing files on your computer screen.
3. Choose to view files.
4. Copy the files from your computer to your phone, or vice versa.
5. After copying the files, disconnect the phone from the computer.
Make More Storage Space
As you use your phone, you’ll accumulate data and fill its storage capacity over time. Here are
some tips on how to increase storage space.
Run the Storage Wizard
Easily free up space in the phone storage by cleaning the application cache, uninstalling apps,
and changing settings so that only the most recent data is kept. In Settings, touch Storage >
Make more space.
Store Files in Dropbox
Photos, email attachments, and other documents can be stored in Dropbox and accessed
anywhere you are. You can set the Camera app to automatically upload photos to Dropbox.
Note: Dropbox is a third-party app and is not provided by or associated with HTC Corporation.
Manage Photos and Videos
● Set the Camera app to automatically upload to a photo-sharing site or online storage.
When you reach the storage limit, just delete all your photos. You can retrieve them from
the photo-sharing site or online storage when needed.
● After taking continuous camera shots, keep only the best shot and discard the rest.
● After editing a photo or trimming a video, the original file is kept. You can delete original
files or move them to online storage or to your computer.
● If you are only sending videos through MMS, use a lower resolution. High-resolution
video takes up more space. In Camera settings, touch Video Quality to change the
resolution.
Settings 70
Page 83

Back Up Apps Data
Keep only the most recent data from apps on your phone. You can back up calendars, contacts,
and bookmarks or export text messages, and personal dictionaries. See Backup.
Disable Some Apps
Apps, even if not used often, may be running in the background and downloading data into the
phone storage. If the app cannot be removed, you can disable it. In Settings, touch Apps > All,
and select the app that you want to disable. Touch Disable.
Encrypt Data on Your Phone
You can encrypt data such as your online accounts, settings, music files and other media. After
encryption, you will need to enter the screen lock PIN or password to turn on your phone and
access the data.
Important: Set a lock screen PIN or password before encrypting your data.
Fully charge the battery and keep your phone connected to the power adapter
during encryption. The encryption process takes about an hour.
You cannot undo encryption. If you want to return to an unencrypted phone, you
must perform a factory reset.
1. Open the Notifications panel, and then touch > Storage.
2. Select the encryption option for the type of storage you want to encrypt.
3. Touch Encrypt.
4. Enter the lock screen PIN or password.
5. Touch Next.
6. Touch Encrypt. Encryption starts and the progress is displayed. The phone may restart
a few times.
7. When the encryption process is complete, enter your PIN or password.
Power Settings
Use the Power settings to check the phone’s battery, enable Power saver mode, and more.
Check Battery Usage
See a ranking list of apps that are using the battery. You can also see how much and how long
the battery has been used for each app.
Settings 71
Page 84

► Open the Notifications panel, and then touch > Power > Usage. You’ll see how much
battery power is used by apps and resources such as the operating system.
Tip: If you see buttons while viewing an app’s battery use details, you can touch them to
adjust settings that affect battery usage, stop the app, and more.
Check Battery History
Check how long you’ve been using the phone since the last charge. You can also see a chart
that shows how long the screen has been on, and how long you’ve been using connections like
the mobile network or Wi‑Fi.
1. Open the Notifications panel, and then touch > Power > History.
2. If you’ve used the phone for a long time since the last charge, swipe left or right to scale
the graph that details battery usage over time.
Tip: You can also spread your fingers or pinch to scale the graph.
Optimize Battery Life with Power Saver Mode
Turning power saver mode on helps increase battery life. It reduces the usage of phone
features that drain the battery such as the CPU and display.
1. Open the Notifications panel.
2. Touch the Power saver notification to choose which phone features to conserve power
for.
Note: If Data connection is selected, your phone automatically disconnects from the mobile
network after 15 minutes when the screen is off and the data connection is idle (no
download activity, streaming, or data usage). It reconnects and then disconnects
periodically when the data connection is idle to save battery power.
3. Touch the On/Off switch next to Power saver to turn power saver mode on or off.
Battery Saving Tips
How long the battery can last before it needs recharging depends on how you use your phone.
The power management features of your phone helps increase battery life. In times when you
need to extend the battery life more, try out some of these tips.
Check Power Usage
Monitoring your battery usage helps you identify what’s using the most power so you can
choose what to do about it. For details, see Check Battery Usage.
Settings 72
Page 85

Manage Your Connections
● Turn off wireless connections you’re not using. To turn on or off connections such as
Wi‑Fi, or Bluetooth, go to Settings and touch their On/Off switches.
● Turn off data connection when you don’t need it. More power is used when you’re in
low coverage areas. Temporarily turning off your data connection uses less battery
power.
● Turn GPS on only when a precise location is needed. To prevent some apps from
using GPS in the background, keep the GPS satellites setting off. Turn it on only when
you need your precise location while using navigation or location-based apps. Go to
Settings and touch Location to turn this setting on or off.
Manage Your Display
Lowering the brightness, letting the display sleep when not in use, and keeping it simple helps
save battery power.
● Use automatic brightness (the default), or manually lower the brightness.
● Set the screen timeout to a shorter time.
● Don’t use a live wallpaper for your Home screen. Animation effects are nice to show off
to other people but they drain your battery. Changing your wallpaper to a plain, black
background can also help a little. The less color is displayed, the less battery is used.
● Set the Web browser to auto dim the screen while webpages load. Open the Internet
app, and then touch > Settings > Accessibility > Dim screen during page loading.
For more details, see Display Settings.
Manage Your Apps
● Install the latest software and application updates. Updates sometimes include battery
performance improvements.
● Uninstall or disable apps that you never use.
Many apps run processes or sync data in the background even when you’re not using them. If
there are apps that you don’t need anymore, uninstall them. See Uninstall Third-party Apps.
If an app came preloaded and can’t be uninstalled, disabling the app can still prevent it from
continuously running or syncing data. In Settings > Apps, swipe to the All tab, touch the app,
and then touch Disable.
Settings 73
Page 86

Limit Background Data and Sync
Background data and sync can use a lot of battery power if you have many apps syncing data in
the background. It’s recommended not to let apps sync data too often. Determine which apps
can be set with longer sync times, or sync manually.
● In Settings, touch Accounts & sync and check what types of data are being synced in
your online accounts. When the battery is starting to run low, temporarily disable syncing
some data.
● If you have many email accounts, consider prolonging the sync time of some accounts.
In the Mail app, select an account, touch > Settings > Sync, Send & Receive, and
then adjust the settings under Sync schedule.
● When you’re not traveling from one place to another, sync weather updates of only your
current location, rather than in all of your named cities. Open the Weather app, and then
touch > Edit to remove unneeded cities.
● Choose widgets wisely. Some widgets constantly sync data. Consider removing the
ones that are not important from your Home screen.
● In Play Store, touch > Settings, and then clear Auto-add widgets to avoid
automatically adding Home screen widgets whenever you’ve installed new apps. Also,
touch Auto-update apps and select Do not auto-update apps if you’re fine with
updating apps from Play Store manually.
More Battery Saving Tips
To squeeze in a little bit more battery power, try these tips.
● Tone down the ringtone and media volume.
● Minimize the use of vibration or sound feedback. In Settings, touch Sound and choose
which ones you don’t need and can disable.
● Check your apps’ settings as you may find more options to optimize the battery.
Language & Keyboard Settings
Your phone’s Language & keyboard settings let you select a language for the phone screens
and menus, as well as manage a personal user dictionary. The Language & keyboard settings
let you select a preferred input method, control keyboard settings, and more.
Language Settings
Changing the language adjusts the keyboard layout, date and time formatting, and more.
1. Open the Notifications panel, and then touch > Language & keyboard.
Settings 74
Page 87

2. Touch System language.
3. Touch the language you want to use.
Post Spelling Check
Turn this feature on to underline misspelled words as you type.
1. Open the Notifications panel, and then touch > Language & keyboard.
2. Touch the On/Off switch next to Post spelling check.
Keyboard Settings - Google Voice Typing
This option lets you choose the input language for Google voice typing, block offensive words,
or download offline speech recognition.
► Open the Notifications panel, and then touch > Language & keyboard > Google
voice typing.
Keyboard Settings - HTC Sense Input
For details on the onscreen keyboard settings, see Enter Text.
Speech Settings
Use these settings to adjust your Google Voice Search preferences or select your default textto-speech output.
1. Open the Notifications panel, and then touch > Language & keyboard.
2. Change any of these settings:
Voice Search: Touch to change the default voice search language, speech output,
and more
Text-to-speech output: Touch to select the text-to-speech engine, set the speech
speed, or listen to speech synthesis demo.
Date & Time Settings
By default, your phone automatically uses the network-provided date, time zone, and time.
However, you can set the date, time zone, and time manually if you need to.
1. Open the Notifications panel, and then touch > Date & time.
2. Clear the Automatic date & time and Automatic time zone check buttons.
3. Touch Set date. In the Change date window, scroll the date wheel to change the date.
Touch OK when finished.
Settings 75
Page 88

4. Touch Set time. In the time window, scroll the time wheel to adjust the time. Touch OK
when finished.
5. Touch Select time zone, and then select the time zone in the list. Scroll down the list to
view more time zones.
6. Select the Use 24-hour format check box to toggle between using a 12-hour or 24-hour
time format.
7. Touch Select date format, and then select how you want dates to display on your
phone. The selected date format also applies to the date displayed in the Alarm Clock.
Developer Options
Turn on these settings for development and testing purposes. Take note that making changes to
Developer options may affect the phone’s performance.
1. Open the Notifications panel, and then touch > Developer options.
2. Touch the On/Off switch to access the developer options.
Activate This Device
If your phone has not been activated on the Boost Mobile network, you can use the Activate
this device menu option to begin the process.
► Open the Notifications panel open, and then touch > Activate this device. Follow
the onscreen prompts to begin activation.
Note: If your phone is already activated, you'll see a device Self Service screen with account
information, usage details, and more.
System Updates
From time to time, system software updates for your phone may be available. Your phone can
automatically check and notify you if an update is available. You can download and install the
update to your phone. Depending on the type of update, the update may erase all your personal
data and customized settings, and it could also remove any programs you have installed. Make
sure that you have backed up the information and files you want to keep.
Note: Checking and downloading system software updates may incur additional data transfer
fees.
Update Your Profile
This option allows you to automatically update your online user profile information. If you choose
to change your user name and select a new one online, you must then update the user name on
your phone.
Settings 76
Page 89

1. Open the Notifications panel, and then touch > System updates.
2. Touch Update profile and follow onscreen instructions.
Note: If your data services or account syncing ever seems to go out unexpectedly, use this
feature to reconnect with the network.
Update Your Profile
This option allows you to automatically update your online user profile information. If you choose
to change your user name and select a new one online, you must then update the user name on
your phone.
1. Open the Notifications panel, and then touch > System updates.
2. Touch Update profile and follow onscreen instructions.
Note: If your data services or account syncing ever seems to go out unexpectedly, use this
feature to reconnect with the network.
Update the Operating System
This option allows you to update the phone’s operating system (OS) via an over-the-air
connection.
1. Open the Notifications panel, and then touch > System updates.
2. Touch HTC software update > Check now.
3. Follow onscreen instructions to download and install any available updates.
About Your Phone
The About menu lets you access important phone information and view legal and safety
information.
1. Open the Notifications panel, and then touch > About.
2. Scroll through the list and select options to view or customize information.
Tell HTC and error reporting: Send error, preference, and usage reports to HTC.
Help: Enable quick tips to appear on the screen.
Network: Check the operator, signal strength, mobile network type, and more.
Phone identity: Check the phone's name, model number, IMEI, SIM ID, MEID
current user name, and number.
Settings 77
Page 90

Hardware information: View hardware related information such as the processor
type, memory, display resolution, and more.
Software information: View software related information such as the Android, HTC
Sense, and software versions.
Legal information: View HTC legal information, privacy alert, Google legal
information and open source licenses.
Settings 78
Page 91

People
In People, you can easily manage your communications with contacts through phone,
messaging, email, and social networks. And, if you have the same contacts from different
sources, you can merge their contact information so you won’ have duplicate entries.
Getting Contacts Into Your Phone
There are several ways you can add contacts to your phone.
● HTC Sync Manager. Sync the contacts from your old phone to your computer, and then
use HTC Sync Manager to sync your phone with your computer’s Microsoft® Outlook®,
Outlook Express, or Windows® Contacts. For more information, see HTC Sync Manager.
● Gmail. Google contacts are imported to your phone after you sign in to your Google
Account. You can also create more Google contacts right from your phone. For more
information, see Gmail.
● Facebook. Log in to your Facebook account to import your Facebook friends’ contact
information.
● Phone contacts. You can choose to create and store contacts directly in your phone or
transfer existing ones from your old phone. For more information, see Add a New People
Entry and Transfer Contacts from Your Old Phone.
● Microsoft Exchange ActiveSync. Your phone syncs your work contacts from the
Microsoft Exchange ActiveSync Server in your workplace. For more information, see
Email.
Transfer Contacts from Your Old Phone
Easily transfer contacts from your old phone to your new phone through Bluetooth. Depending
on your old phone’s model, you may also transfer other types of data such as calendar events
and text messages to your new phone.
1. Touch > > Transfer.
2. Touch Next and then choose your old phone’s name and model.
3. On your old phone, turn Bluetooth on and set it to discoverable mode.
4. On your new phone, touch Next to continue. Your phone automatically turns Bluetooth
on and searches for Bluetooth devices.
5. From the phone list, choose your old phone and then touch Next. Your new phone then
tries to pair with your old phone. You’ll see a security passkey on the screen.
People 79
Page 92

6. On your old phone, enter this passkey or simply confirm it.
7. Select the Contacts check box (and other supported types of data you want to import),
and then touch Next.
8. When your new phone finishes importing data, touch Done.
Your People List
The People app lists all contacts stored on your phone and from the online accounts you’re
logged in to. Touch > > People.
You can:
● View your profile and edit your contact information.
● Create, edit, or find contacts.
● See status updates.
● Touch a name to see that contact’s stored information.
● See a notification icon when a contact has sent you new messages or when it’s the
contact’s birthday.
● Check out who’s online in Google Talk. Online status icons are displayed if you’re signed
in to Google Talk.
Filter Your People List
Choose which account contacts to show.
People 80
Page 93

1. On the People tab, touch on the top bar.
2. Select the accounts that contain the contacts you want to display.
3. Touch .
Tip: To set your contact sorting options, touch > Settings.
Set Contact Search Options
In addition to searching contacts by name, you can also search by other criteria such as by their
group name or company.
1. On the People tab, touch > Settings.
2. Touch Search contacts by, and then choose the types of criteria to search for.
Your People App Profile
Your profile stores your personal contact information in an easy-to-access location.
Set Up Your Profile
Store your personal contact information to easily send it to other people.
1. Touch > > People > My profile.
2. Touch Edit my contact card.
3. Enter or edit your name and contact details.
4. Touch (or the current photo) to change your contact photo.
5. Touch Save.
People 81
Page 94

Your Profile
When you touch My profile, you’ll see the following tabs.
● Details. Shows your contact details. You’ll also see your most recent posts in social
networks (if you’re signed in to social networks.) You can also edit your profile or share it
with others.
● Updates. Shows the updates that you’ve posted in your social networks.
● Gallery. Shows your social network albums and photos.
Add Entries to People App
You can add new contacts to the People app or add existing ones from your social network or
Exchange ActiveSync accounts.
Add a New People Entry
Start adding your contacts on your phone. If you’ve set up an email account on your phone, you
can sync your new contacts with that account.
1. Touch > > People.
2. Touch .
3. Touch the Name field, and then enter the contact name.
Note: Touch if you want to separately enter the contact’s first, middle, and last name.
Depending on the contact type, you may also be able to add a name suffix (such as Jr.).
People 82
Page 95

4. Select the Contact type. This determines which account the contact will sync with.
5. Enter the contact information in the fields provided.
6. Touch Save.
Tip: ICE - In Case of Emergency
To make it easier for emergency personnel to identify important contacts, you can list
your local emergency contacts under ―ICE‖ in your phone’s People list. For example, if
your mother is your primary emergency contact, list her as ―ICE-Mom‖ in your Contacts.
To list more than one emergency contact, use ―ICE1-___,‖ ―ICE2-___,‖ etc.
Find People You Know on Social Networks
Your phone automatically searches for your phone contacts on different social networks you’re
signed into. Based on matching email addresses and contact details, you can send requests to
your contacts to join your social network.
To turn this feature on or off, touch > Settings on the People tab, and then select or clear the
Find people you know option.
Tip: To manually refresh the list of people suggestions, touch > Manage contacts >
Linked contacts. On the Suggested tab, touch > Refresh.
Send Social Network Requests to Your Contacts
1. Touch > > People.
2. Touch Notification.
3. Under the People you know section, select the people to follow or send friend requests
using the social networks you’re signed into.
Import or Copy Contacts
It’s easy to import or copy contacts from your online accounts and save them directly to your
phone.
Import a Contact from an Exchange ActiveSync Account
Note: You must add an Exchange ActiveSync account on your phone to import contacts from
your company directory. See Add an Exchange ActiveSync Account.
1. Touch > > People.
2. Enter the contact’s name or email address in the search box.
3. Touch Search contacts in your Company Directory.
4. Touch the name of the contact you want copied to your phone.
People 83
Page 96

5. Touch to save the contact to your Exchange ActiveSync account.
Copy Contacts from One Account to Another
Note: Contacts from your social network accounts may not be copied.
1. Touch > > People.
2. On the People tab, touch > Manage contacts.
3. Touch Copy contacts, and then choose a contact type or online account to copy from.
4. Select a contact type or account you want to save to.
5. Touch OK.
Merge Entries in People
If you have the same contacts on your phone, Google Account, and social network accounts
such as Facebook and Twitter, your phone will try to combine them automatically or let you
decide which contacts to combine. Combining the same contacts avoids duplicated entries in
your contacts list.
Accept Contact Link Suggestions
When your phone finds contacts that can be merged, you’ll see a link notification when you
open the People app.
1. Touch > > People.
2. Touch Contact link suggestion when available.
3. On the Suggested tab and under the Contact link suggestion section, you’ll see a list of
suggested contacts to merge.
People 84
Page 97

4. Select the contacts you want to merge.
Note: If you don’t want to receive contact link suggestions, on the People tab, touch >
Settings. Clear the Suggest contact link option.
Manually Merge Entries
You can merge your entries manually and choose the accounts to link the contact.
1. Touch > > People.
2. Touch the name of the contact (not the icon or photo) you want to link.
3. Touch .
4. You can:
Under Suggest links, touch to link the contact to an account.
Under Add contact, touch one of the options to link to another contact.
Break the Link
When contact information has changed, you can choose to break the contact’s link from another
account
1. Touch > > People.
2. Touch the name of the contact (not the icon or photo) whose link you want to break.
3. Touch .
People 85
Page 98

4. Under the Linked contacts section, touch beside an account to break the link.
Contact Information and Conversations
When you touch a contact on the People tab, the Contact details screen opens.
The Contact details screen has the following tabs:
● Details. Shows the information you’ve stored for the contact. Get in touch with the
contact by touching an option.
● Thread. Shows SMS messages and emails you’ve received from the contact. It also lists
all your incoming, outgoing, and missed calls to and from the contact.
● Updates. Shows the contact’s updates and events from social network accounts. If you
see a notification of the contact’s birthday under the Events section, you can touch the
notification and choose how you want to greet your contact.
● Gallery. Shows the linked contact’s albums and photos.
Manage People Entries
Make sure your contacts’ information are up to date. You can edit or delete an entry in People.
Edit a People Entry
You can add another phone number, email address, or assign a photo to a contact in People.
Note: Facebook and Twitter contacts cannot be edited.
1. Touch > > People.
2. Touch and hold the contact, and then touch Edit contact.
3. Enter the new information.
4. Touch Save.
Delete an Entry
Follow these steps to delete an entry in your contacts list.
1. Touch > > People.
2. Touch and hold the contact, and then touch Delete contact.
3. Touch OK to confirm.
People 86
Page 99

Delete Multiple Entries
Clean up your contacts list by deleting entries that you no longer need.
1. Touch > > People.
2. Touch > Delete contacts.
3. Select the entries you want to delete, and then touch Delete.
4. Touch OK to confirm.
Contact Groups
Assign contacts to groups so you can easily send a message or email to a whole group. You
can also sync groups on your phone with the groups in your Google Account, accessible via
your computer’s Web browser. We’ve also added the Frequent group as a special group type
that automatically stores the contacts you dial or get calls from the most.
Create a Group
Create a group for your sporting buddies or family members so you can easily send them a
message or email.
1. Touch > > People.
2. On the Groups tab, touch .
3. Enter a name for the group.
4. Touch to select a photo for the group.
5. Touch > Add contact to group.
6. Select the contacts you want to add, and then touch Save.
7. When your group is complete, touch Save.
Edit a Contact Group
You have full control of your groups. Change the group name, photo, or add and remove group
members from the People app.
1. Touch > > People.
2. On the Groups tab, touch and hold the group, and then touch Edit group.
3. You can:
Touch the group name to change the name. You can only change the name for
groups that you have created.
People 87
Page 100

Touch to change or remove the group photo.
Touch > Add contact to group to add more members.
To rearrange the group members, touch and hold at the end of the contact’s
name, and then drag it to its new position.
Touch beside a contact to remove from the group.
4. Touch Save.
Send a Message or Email to a Group
Easily send a message or email to all members of the group.
1. Touch > > People.
2. On the Groups tab, touch the group you want to send a message or email to.
3. Go to the Group action tab.
4. Choose if you want to send a text message or email.
Rearrange Your Contact Groups
Put your favorite group at the top of the groups’ list.
1. Touch > > People.
2. On the Groups tab, touch > Edit groups.
3. Touch and hold at the end of the group to move, and then drag it to its new position.
4. Touch Save.
Delete Groups
You can only delete groups that you have created.
► On the Groups tab, you can:
Touch and hold a group you want to delete, and then touch Delete group.
To delete several groups, touch , touch beside the contact groups you want to
remove, and then touch Save.
Use People Widgets
Stay close with the people that matter by adding a people widget for each of your groups and
setting the default communication method when you touch the contact from the widget.
People 88
 Loading...