

Page 1

Basic Manual
Page 2

Preface
Thank you for purchasing the HTC EVO WiMAX
ISW11HT (referred to as the device).
Before using this device, be sure to read the
HTC EVO WiMAX ISW11HT Basic Manual (this
PDF manual) to ensure correct usage.
memo
Basic Manual (this PDF manual) describes basic
operations of major functions of the ISW11HT.
For detailed descriptions on various functions, refer
to the ISW11HT full Instruction Manual (Japanese),
which is available on the au homepage.
Downloading Manuals
You can download the Basic Manual (this PDF
manual) and the full Instruction Manual (Japanese)
from the au homepage.
http://www.au.kddi.com/torisetsu/index.html
ii
memo
Online Manual
Online manuals are also provided on the au
homepage, which contents are from the full
Instruction Manual (Japanese) and are reorganized
in a searchable format.
http://www.au.kddi.com/manual/index.html
Note
• Unauthorized copying of any part of this manual is
prohibited.
• Manual content is subject to change without prior
notice.
• Efforts have been made to ensure the accuracy
and clarity of this manual. Please contact an au
shop or au Customer Service Center about
unclear or missing information.
Page 3

Safety Precautions
Be sure to read the Safety Precautions “安全上の
ご注意
”
in the full Instruction Manual (Japanese)
to ensure proper usage of the HTC EVO WiMAX
ISW11HT.
For troubleshooting, check the symptom of your
HTC EVO WiMAX ISW11HT in (au Customer
Support) on the au homepage.
http://www.kddi.com/customer/service/au/
trouble/kosho/index.html
Before Using an au Phone
● You cannot receive or make calls in a location
where the signal cannot be received, even
within the service area. Calling may not be
available in a location where the signal is
weak. If you move to a location where the
signal is weak during a call, the call may be
interrupted.
● This device is a digital cell phone and can
maintain a high call quality until the signal
weakness reaches its limit. Therefore, once
the limit has been reached, the call may be
disconnected suddenly.
● Note that this device uses signals which may
be intercepted by a third party. (However, the
CDMA system enables highly confidential call
communications.)
● This device is a wireless station which is
compliant with the Radio Act, and may be
subject to inspections regulated by the Radio
Act.
1
Page 4

● The device number information of this device
is sent to the au server for the security and
operation status notification of this device.
● Always be considerate of others around you
when using this device in public places.
● For a child's use, read this Basic Manual and
give your child instructions on proper use.
2
Page 5

Preface . . . . . . . . . . . . . . . . . . . . . ii
Contents
Safety Precautions . . . . . . . . . . . 1
Before Using an au Phone . . . . . 1
Contents . . . . . . . . . . . . . . . . . . . . 3
Contents by Functions . . . . . . . . 7
Your Device
Device Basics . . . . . . . . . . . . . . . 10
Your Device . . . . . . . . . . . . . . . . . . . . . 11
Turning Your Device On and Off . . . . 14
Viewing the Display Screen . . . . . . . . 16
Using the Touch Screen . . . . . . . . . . . 18
Battery and Charger . . . . . . . . . . . . . 18
Inserting/Removing microSD Card . . 22
Making and Answering Calls . . . . . . . 23
Entering Text . . . . . . . . . . . . . . . . . . . 27
Home Screen . . . . . . . . . . . . . . . . . . . 33
Settings . . . . . . . . . . . . . . . . . . . . 38
Sound Settings . . . . . . . . . . . . . . . . . . 38
Display Settings . . . . . . . . . . . . . . . . . 41
Location Settings . . . . . . . . . . . . . . . . 43
C-mail Settings . . . . . . . . . . . . . . . . . . 44
Airplane Mode . . . . . . . . . . . . . . . . . . 44
Security Settings . . . . . . . . . . . . . . . . 45
Data Synchronization Settings . . . . . . 45
3
Page 6

History . . . . . . . . . . . . . . . . . . . . 48
Viewing History . . . . . . . . . . . . . . . . . . 48
Making a Call From History . . . . . . . . . 49
Saving a Number From History . . . . . . 50
People . . . . . . . . . . . . . . . . . . . . . 51
About People . . . . . . . . . . . . . . . . . . . . 51
Using the People Screen . . . . . . . . . . . 52
Adding a New People Entry . . . . . . . . 54
Saving a Phone Number . . . . . . . . . . . 54
Editing an Entry in People . . . . . . . . . . 54
Finding Entries in People . . . . . . . . . . . 57
Connecting with Your Social
Networks . . . . . . . . . . . . . . . . . . . . . . . 57
Camera/Music . . . . . . . . . . . . . . 60
Taking Pictures and Shooting Videos
4
. . 60
Using Gallery . . . . . . . . . . . . . . . . . . . 63
Listening to Music . . . . . . . . . . . . . . . 65
Bluetooth® . . . . . . . . . . . . . . . . . . 67
Using Bluetooth® . . . . . . . . . . . . . . . . . 67
Network Services/Internet
Network Services . . . . . . . . . . . . 72
Voicemail . . . . . . . . . . . . . . . . . . . . . . 72
Messages (C-mail) . . . . . . . . . . . . . . . 73
Call Forwarding . . . . . . . . . . . . . . . . . 74
Web and Data Services . . . . . . . 77
Connecting Using Wi-Fi . . . . . . . . . . . 77
Connecting Using WiMAX . . . . . . . . . 79
Getting Started With Data Services . . 80
Using the Device's Web Browser . . . 82
Page 7

Accessing Messages . . . . . . . . . . . . . 85
Using Android Market . . . . . . . . . . . . . 88
Wi-Fi Tethering . . . . . . . . . . . . . . . . . . . 91
Appendix
Software Updates . . . . . . . . . . . 94
Updating software automatically . . . . 95
Checking for System Software Updates
Manually . . . . . . . . . . . . . . . . . . . . . . . 95
Troubleshooting . . . . . . . . . . . . . 96
Specifications . . . . . . . . . . . . . 101
Index . . . . . . . . . . . . . . . . . . . . . 102
5
Page 8

6
Page 9

Android Market
Contents by Functions
Android Market .....................88
Searching for Applications ...89
Email
Composing Email .................87
Adding Email Account..........86
Web
Wi-Fi Settings........................77
WiMAX Settings ....................79
Using the Web Browser........82
Camera
Taking Pictures .................... 62
Shooting Videos................... 62
Basic Functions
Adding Widgets ................... 35
Navigating Home Screen .... 35
Entering Text........................ 27
Settings
Changing Wallpaper............ 42
Adjusting Ringer Volume ..... 39
Changing Ringtone.............. 38
Call
Using Call History ................ 49
Making/Answering Calls ...... 23
Calling from Contacts .......... 24
Data Exchange
Using Bluetooth® Function ...67
Playing/Viewing Data
Playing Music....................... 66
Viewing Photos/Videos......... 64
Save
Saving Information to Contacts
Entry..................................... 54
Saving Web Page to
Bookmark............................. 82
7
Page 10

8
Page 11

Yo u r D ev i c e
Page 12
◆ Your Device (P.11)
Device Basics
◆ Turning Your Device On and Off (P.14)
◆ Viewing the Display Screen (P.16)
◆ Using the Touch Screen (P.18)
◆ Battery and Charger (P.18)
◆ Inserting/Removing microSD Card (P.22)
◆ Making and Answering Calls (P.23)
◆ Entering Text (P.27)
◆ Home Screen (P.33)
10
memo
• Check for firmware updates and download as
required. You can also check for and download
updates by pressing , and then tapping
Settings > About phone > System software
updates >
download available updates.
Check now to search for and
Page 13
Your Device
1
2
3
4
5
6
7
8
9
10
11
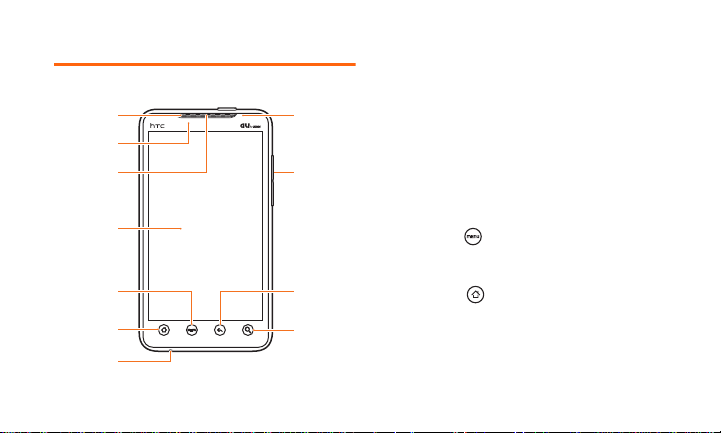
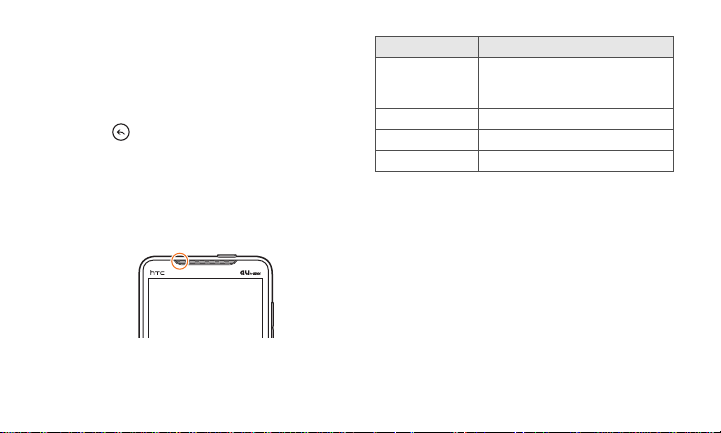
■Front
1
Front Indicator Light (LED) shows your
device’s connection status at a glance.
2
Proximity Sensor detects the ambient
brightness and adjusts the display
brightness.
3
Earpiece lets you hear the caller and
automated prompts.
4
Touch Scree n allows you to use finger
gestures to scroll, zoom and pan on the
touch screen.
5
Menu Key allows you to open a list of
actions or options menu that you can do on
the current screen.
6
Home Key allows you to return to the
Home screen (P.33).
• While on the main Home screen, press to
show a snapshot of the Home screens.
11
Page 14
• Press and hold to open the recently-used
12
13
14
15
applications window.
7
Microphone allows other callers to hear you
clearly when you are speaking to them.
8
Front Camera lets you capture a selfportrait
or a video.
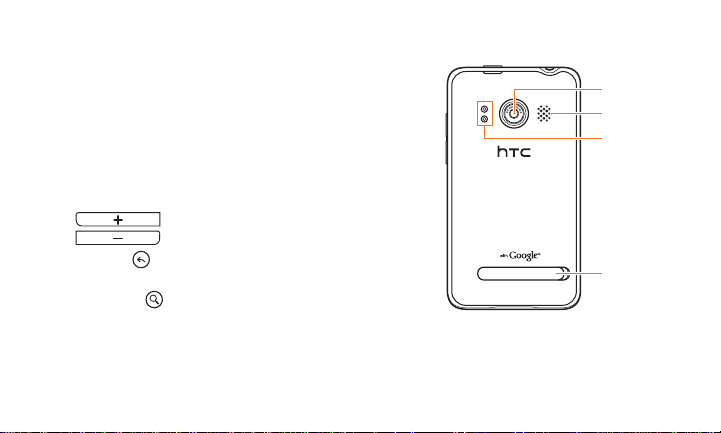
9
Vo lume Ke y allows you to adjust the ringer
or media volume or adjust the voice volume
during a call.
・:Volume Up Key
・:Volume Down Key
10
Back Key allows you to go back to the
previous screen.
11
Search Key allows you to search
information on the current screen or
application.
12
■Back
Page 15

12
16
17
18
19
Camera Lens as part of the built-in camera,
lets you take pictures and videos.
13
Speaker lets you hear the different ringers
and sounds.
14
Dual Flash allows you to use as the camera
flash.
15
Kickstand lets you prop up the device on a
desk or other flat surface for more
comfortable viewing.
■Top Panel
16
3.5 mm Headset Jack allows you to connect
a headset with microphone.
17
Power Key lets you turn the device on when
device is off. When device is on and the
screen is unlocked, press to turn off or on the
screen.
• With the screen unlocked, press and hold
to open Phone options menu that lets you
turn off device, switch device to Vibrate
mode, etc.
■Bottom Panel
18
External Terminal allows you to connect the
device charger (included) or the USB cable
(included).
19
HDMI Jack allows you to use an optional
HDMI cable.
13
Page 16
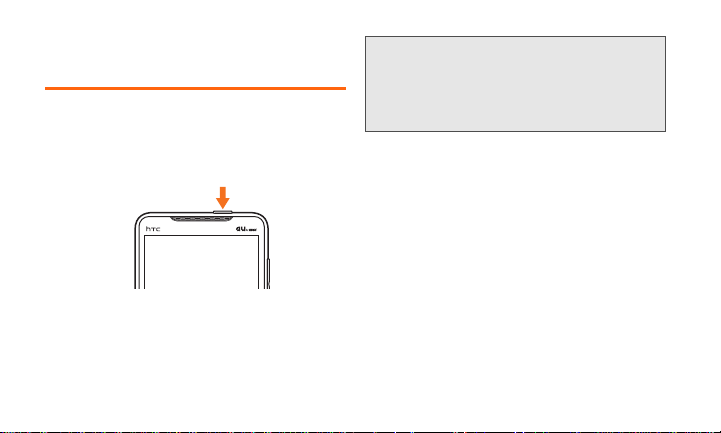
Turning Your Device On and Off
Turning Y our De vice On
X Press the Power Key at the top panel of the
device.
Lock screen appears.
14
memo
• When power on the device for the first time, you
will be prompted to set up your device. Follow the
onscreen instructions to complete the setup, or
skip setup and do it at another time.
Turning Y our De vice Off
1. Press and hold the Power Key
The Phone options menu appears.
2. Ta p Power off > OK
Page 17

Sleep Mode
Lock screen bar
Activate to suspend device activity, reduce
power consumption and extend battery time.
memo
• You can adjust the time before the screen turns off
(P.41).
■Waking up from Sleep Mode
To wake up the device, press the Power Key.
Incoming calls wake up the device
automatically.
To unlock the screen, touch the Lock screen bar
then slide it down, or answer incoming call.
15
Page 18
memo
• If you have set up a screen unlock pattern/PIN/
password, you can strengthen security more.
Viewing the Display Screen
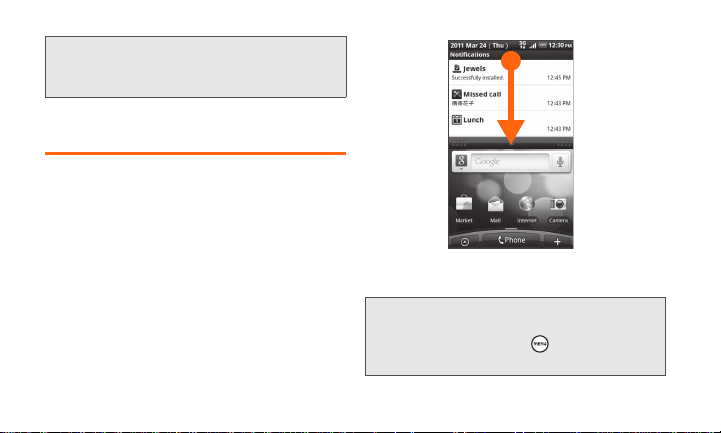
Notifications Panel
■Opening Notifications Panel
When a new notification icon appears in the
Status Bar, tap and hold Status Bar, then slide
your finger down to open the Notifications panel.
16
When viewing unshown notifications, scroll
down the screen.
memo
• Alternatively, open the Notifications panel in the
Home screen by pressing and then tapping
Notifications.
Page 19
■Closing Notification Panel
X Tap and hold the bottom bar of the
Notifications panel, and then slide your finger
up the screen.
or
Press .
Notification LED
The Notification LED located at the left corner of
the earpiece provides information on the device
status or pending notifications.
LED Status Indication
Solid green Battery is fully charged. (When
Solid amber Battery is being charged.
Flashing amber Battery level reaches very low.
Flashing green You have a pending notification.
the device is connected to the
AC adapter/PC.)
17
Page 20
Using the Touch Screen
This device is equipped with a touch panel
screen. You can perform actions by tapping
items on the screen with your finger.
■Tap
Touch a menu or item and quickly remove your
finger from the screen.
■Long Touch
Keep touching a menu or item.
■Slide
Keep touching and slide your finger across the
screen in the target direction.
■Flick
Touch and quickly slide your finger up/down, or
left/right across the screen.
18
■Pinch
Place two fingers on the screen and slide them
apart (Pinch out) or closer (Pinch in).
■Drag
Keep touching the item and slide your finger to
the desired location with the item.
Battery and Charger
This device is equipped with a Lithium Ion (LiIon) battery. Use only specified battery.
■Charging Time & Operating Time
Continuous Standby Time Approx. 340 hours*
Continuous Talk Time Approx. 290 minutes
* When using this device in Japan.
Page 21
memo
Back Cover
• Continuous standby time and continuous talk time
are an average measured in standby mode with
stable signals. Continuous standby time and
continuous talk time may vary with battery charge,
function settings, ambient temperature, signal
strength or other usage conditions.
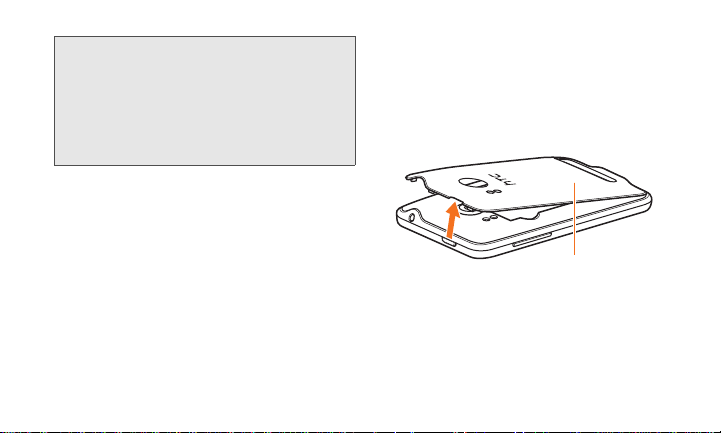
Inserting/Removing Battery
■Inserting Battery
1. Remove the Back Cover
Insert your fingernail into the slot at the top left of
Back Cover and lift gently to remove.
2. Insert battery
Align battery and device terminals ① , fit
battery into device ② .
19
Page 22

①
Te rm i na l s
Notch
②
3. Replace the Back Cover
Fit cover tabs in the device slots, press top part of
cover down to lock it into place until it clicks.
Make sure all the cover tabs are seated and there
are no gaps around the cover.
■Removing Battery
1. Make sure the power is off
2. Remove the Back Cover
3. Lift the battery from the notches on the
upper left and right sides of the battery
compartment
When lifting from other than notches, the device or
the contact end of battery may be damaged.
20
Page 23

Charging the Battery
New battery is not fully charged by default.
Before you start using your device, you need to
charge the battery.
Do one of the following:
● Charging with the AC Adapter
(Charging Time: Approx. 120 minutes)
● Charging via your PC using USB Cable
■Charging with the AC Adapter
1. Insert the USB plug into the AC Adapter,
then insert the microUSB plug into the
external terminal
2. Plug the AC Adapter into a 100V AC outlet
As battery charges, notification LED lights solid
amber and charging battery icon ( ) is
displayed in the Status Bar of the Home screen.
When the battery is fully charged, the LED lights
solid green and the full battery icon ( )
displayed in the Status Bar of the Home screen.
3. When the battery is fully charged,
disconnect the AC Adapter.
Unplug the AC Adapter, then disconnect the
device.
21
Page 24
Inserting/Removing
①
②
Slot Lock
microSD Card
Inserting microSD Card
1. Make sure the power is off
2. Remove the Back Cover, then remove the
battery (P.19)
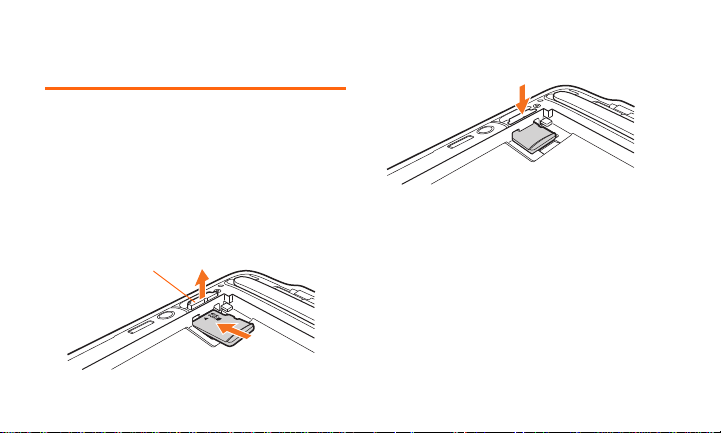
3. Lift the slot lock until it clicks ( ① ), then
insert microSD card in its slot with gold
contacts facing down ( ② )
4. Press the slot lock until it clicks
microSD card is installed.
5. Insert the Battery, then replace the Back
Cover (P.20)
22
Page 25
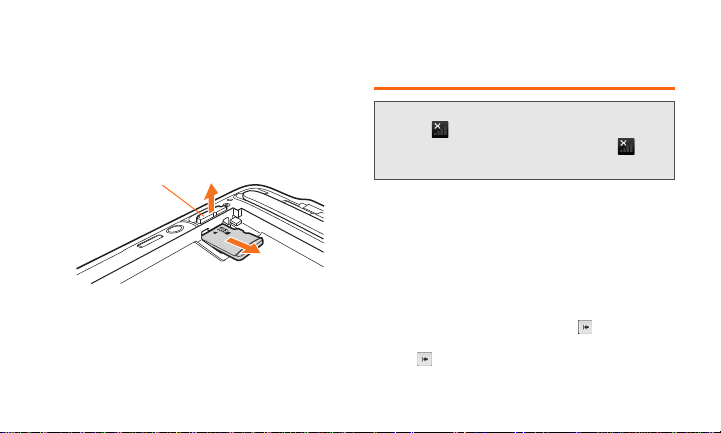
Removing microSD Card
Slot Lock
1. Make sure the power is off
2. Remove the Back Cover, then remove the
battery
3. Lift the slot lock until it clicks ( ① ), then
eject microSD card from its slot ( ② )
①
②
4. Insert the Battery, then replace the Back
Cover
Making and Answering Calls
memo
• When appears, the device is out-of-range or
signal is weak. Move to a location where
disappears.
Making Calls
In the Phone’s dialer, you can dial a number
directly.
1. Ta p Phone
2. Enter a phone number on the phone
keypad
• If you enter a wrong digit, tap to erase that
digit. To erase the entire number, tap and hold
.
23
Page 26
• When you enter the first letter of the name or
number of your contacts, Smart Dial searches for
contact phone numbers and the first character of
a contact name as well as from the character that
appears after a space, dash, or underscore in a
contact name. As you enter more letters or
numbers, the list shows only the corresponding
matches.
3. Ta p Call
memo
• After tapping six keys if the number you are dialing
is not in your contacts, Save to People will
appear above the keypad. Tap it to save the
number to the contacts.
■Calling from Contacts
1. On the Home screen, tap > People
2. Tap a contact
24
3. Tap a number you want to call
Receiving Calls
When a call arrives, you can select whether to
answer or to decline.
When you receive a phone call, the Incoming
call screen appears and displays the phone
number of the calling party. If the caller's phone
number saved in the contacts, the name is also
displayed. When you receive a phone call from
someone who is not stored in the contacts, only
the phone number appear on the Incoming call
screen.
■Answering an Incoming Call
X If the display is on, tap Answer.
X If the display is off, the display will turn on
showing the Lock screen. Drag the bar down
to answer the call.
Page 27

■Muting the Ringing Sound
To mute the ring without rejecting the call, you
can do as the following:
X Press the Volume Down Key.
• You can also mute the ringing sound by
placing the device face down on a level
surface.
■Using the Quiet Ring on Pickup
Feature
Your device automatically scales down the ring
volume when you pick up the device to answer
calls.
1. Press , and then tap Settings > Sound
2. Select the Quiet ring on pickup check box
■Rejecting an Incoming Call
X If the display is on, tap Decline.
X If the display is off, the display will turn on
showing the Lock screen. Drag the bar up to
reject the call.
■Ending a Call
X Tap End call.
Missed Call Notification
When you do not answer an incoming call, you
will see the missed call icon in the Status
Bar when you miss a call.
To check who the caller, do one of the following:
X Tap and hold the Status Bar, and then slide
your finger downward on the screen to open
the Notifications panel.
X Tap on the Phone screen. Missed calls
are indicated by the missed call icon ( ).
25
Page 28
Calling Emergency Numbers
You can place calls to emergency numbers
(110, 119, 118), even if your device is locked or
your account is restricted.
X Enter the emergency number, and then tap
Call.
In-Call Options
During calls, press to use the following
functions:
Item Description
Add call Add another call.
People View the contacts.
Flash Accept another incoming call and
Mute Mute the microphone. Tap Unmute
26
put the first caller on hold.
to unmute the microphone.
Speaker on Activate Speakerphone. Tap
memo
• Because of higher volume levels, do not place the
device near your ear during speakerphone use.
Speaker off to use the device's
earpiece.
Speed Dialing
Use speed dial to call frequently-used numbers
with a single tap.
■Assigning a Speed Dial Number to a
People entry
1. On the Home screen, tap > People,
and then tap an entry in People
2.
Press , and then tap
Set speed dial
Page 29
3. Select a phone number from the Number
list
4. Select phone keypad assignment from
Location list
5. Ta p Save
memo
• The digit 1 is reserved for calling your voicemail
mailbox as a speed dial. If you assign a number to
an already inuse speed dial location, the new
phone number will automatically replace the
previous speed dial assignment.
■Making a Speed Dialing Call
X Ta p Phone, and then tap and hold number
assigned to the contact.
■Checking the Speed Dial Entry
X Tap Phone and press , and then tap
Speed dial.
• To delete a speed dial entry, tap and hold
the contact from the speed dial list, and
then tap Delete.
Entering T e xt
Using Onscreen K eyboar d
When you start an application or select a field
that requires text or numbers, onscreen
keyboard becomes available.
1. Tap the text input area
27
Page 30
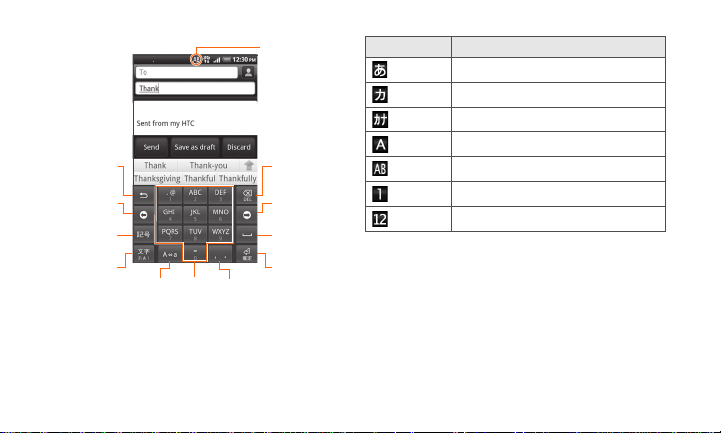
28
Input mode
1
2
3
4
5
6
7
8
91011
Indicator Input mode
Kanji hiragana
Double-byte katakana
Single-byte katakana
Double-byte alphabets
Single-byte alphabets
Double-byte numbers
Single-byte numbers
1
Reverse order key: Show the previous
character assigned to the key.
2
Cursor move key (left): Move the cursor to
the left. Shorten a segment by one character
for sequential segment conversion. Also
used for wild card character prediction.
Page 31

3
Symbol key: Open symbols/smiley list.
When appears perform alphanumeric
and Japanese kana conversion.
4
Input mode key: Switch input modes
(Hiragana → single-byte alphabets →
single-byte numbers → Hiragana → …). Tap
and hold to open a panel to enable
switching of input mode and switching to a
PC like keyboard.
5
Backspace key: Delete a character before
the cursor. Tap and hold for continuous
deletion.
6
Cursor move key (right): Move the cursor to
the right. Extend a segment by one
character for sequential segment
conversion. Also used for wild card
character prediction.
7
Space key: Enter a space or perform
sequential segment conversion.
8
Enter key: Enter return, or confirm a reading
of text being entered (segment being
converted).
9
Enter “゛” (dakuten)/ “゜” (han-dakuten) and
convert to upper/lower case for a character
being entered or before the cursor.
10
10 key
11
Enter “、” (toten) and “。” (kuten).
memo
• When you do not need the keyboard, close it by
pressing . To show the keyboard again, tap a
text box onscreen.
29
Page 32

Entering Hiragana/Kanji
(4 times) (2 times) (1 time)
(2 times)
け い た い
け い た い
(Japanese)
To enter kanji, press the corresponding keys
until target kana appear, then convert kana to
kanji.
Example: To enter “携帯 ”
1. In Kanji hiragana input mode
2. Enter “ けいたい ”
Candidate appears in the candidate area.
• To enlarge/minimize candidate area, tap /
right of candidate area.
• Tapping 英数カナ , perform alphanumeric or
Japanese kana conversion.
• Tapping 変換 , candidate for the entering
character appears.
30
• Tap the cursor key ( / ) to change
character conversion range.
3. In candidates, tap 携帯
■Using QWERTY Keypad
X Tap and hold the input mode key, then tap
to switch to QWERTY keyboard.
Example: To enter “ 携帯 ”
1. In Kanji hiragana input mode
2. Enter “ けいたい ”
■Entering in Roman Alphabet/Hiragana
3. Ta p 携帯 from candidates
Page 33

Using the Landscape Onscreen Keyboard
When entering text, you can choose to use the
landscape orientation of the onscreen keyboard,
by turning the device sideways.
memo
• The “Auto-rotate screen” check box in on the
Home screen > Settings > Display needs to
be selected for the screen orientation to
automatically change.
• For some screens including Home and Settings,
screen orientation may not change to landscape
even if you rotate device sideways.
Symbol/Emoticon
Select symbols/emoticon from corresponding
menu.
1. Text entry screen, tap 記号
Tap the symbol key to switch the symbol/emoticon
list.
2. Select symbols/emoticon
31
Page 34

Adjusting Touch Input Settings
Open touch input settings by doing one of the
following:
Press on the Home screen, and then tap
Settings > Language & keyboard > iWnn
IME.
Item Description
Sound on Key
Pres s
Vibrate on Key
Pres s
Key Preview Select to enlarge an entering
Auto
Capitalization
32
Select to hear a clicking sound
whenever you tap a key on the
keyboard.
Select to enable vibration
feedback whenever you tap a
key on the keyboard.
key.
Set to capitalize the first
character of a sentence in
alphabet mode.
Keyboard Image Set to change the keyboard
Input Word
Learning
Word Prediction Set to display predicted words
Typing Error
Correction
Wildcard
Pred ict ion
Japanese User
Dictionary
English User
Dictionary
Clear Learning
Dictionary
layout of the keyboard.
Set to learn input words.
as conversion candidates.
Set to show predicted words
for correcting typing error.
Set to use the wildcard
prediction function.
Add words in the predictive
text dictionary in Kanji
hiragana mode.
Add words in the predictive
text dictionary in the
Singlebyte alphabets mode.
Reset learning dictionary.
Page 35

Home Screen
1
2
3
4
5
The Home screen is the starting point for many
applications and functions, and it allows you to
add items like application icons, shortcuts,
folders, and widgets to give you instant access
to information and applications.
1
Status Bar: Displays the device status and
notification icons. To open the Notifications
panel, tap and hold the Status Bar, then slide
your finger down (P.16).
33
Page 36

2
Application icon: Tap to open the related
application.
3
All application: Tap to open the All apps
screen. The All apps screen holds all
applications on your device.
4
Phone: Tap to open the Phone screen to
make calls.
5
Add to Home:
and folders on the Home screen (P.35).
memo
• While in any application, press to return to the
Home screen.
Tap to add shortcuts, widgets,
Extended Home Screen
The Home screen extends beyond the screen
width to provide more space for adding icons,
widgets, and more. There are six additional
screens besides from the main Home screen.
34
Page 37

Navigating the Home Screen
Go to the extended Home screen by sliding your
finger horizontally across the screen to go to the
left or right side of the Home screen.
■To Directly Go t o a Particular Home
Screen
1. On any Home screen, press or pinch
the screen for Leap view which shows all
seven screens as thumbnails
2. Tap the screen you want to open
memo
• While on an extended Home screen, press to
return to the main Home screen.
Customizing the Home Screen
■Adding a Home Screen Item
1. Tap or tap and hold an empty area on
the Home screen
2. Select the item you want to add
• Widget : Add a Calendar, music player, a photo
frame, or Twitter, etc.
• App: Add an application shortcut on your Home
screen to open application quicker.
• Shortcut: Add shortcuts such as setting, a
bookmarked Web page, or a favorite contact.
• Folder: Add a folder where you can organize the
Home screen items, a shortcut to contacts with
phone numbers or starred contacts, etc.
3. Select the icon or widget
35
Page 38

4. Select item or style depending on selected
widget or icon
If the Home screen is already full, drag the item to
another screen.
memo
• To add an application shortcut to the Home
screen, tap and hold an application icon in the All
apps list. Without lifting your finger, drag the icon
to an empty area on the Home screen, and
release it.
■Moving a Widget or Icon
1. Tap and hold widget or icon you want to
move
2. When device vibrates, drag widget or icon
to a new location and release it
36
■Removing a Widget or Icon
1. Tap and hold widget or icon you want to
remove
2. When the device vibrates, drag widget or
icon to
3. When item and turn red, release
your finger
Personalizing Device with Scenes
Scenes are personalized the Home screen
layouts that you can quickly apply to device. By
switching between scenes, you instantly turn
device into your perfect work device, travel
device, etc.
Page 39

1. Press on the Home screen, and then
tap Scenes
2. Select the preset scene
If preset “au by KDDI” scene is customized, save
current scene confirmation appears. To save
current scene, tap Save, enter scene name, then
tap Done.
3. Ta p Done
■Creating a My Scene
Customize HTC scene and save it as My scene.
Alternatively, design your own Home screen
after deleting all items.
1. Press on the Home screen, and then
tap Scenes
2. Select the preset scene or tap Clean Slate
> Done
3. Add widgets and other elements, and then
arrange the layout
To add widgets and other elements, see P.35.
To arrange the layout of your Home screen, see
P. 36 .
4. Change the Home screen wallpaper
To change the Home screen wallpaper, see P.42.
5. When you are done designing, press ,
and then tap Scenes
6. Ta p Current (unsaved) > Save
7. Enter a new scene name, and then tap
Done
37
Page 40

◆ Sound Settings (P.38)
Settings
◆ Display Settings (P.41)
◆ Location Settings (P.43)
◆ C-mail Settings (P.44)
◆ Airplane Mode (P.44)
◆ Security Settings (P.45)
◆ Data Synchronization Settings (P.45)
38
Sound Settings
Setting a Ringtone
1. Press on the Home screen, and then
tap Settings > Sound
2. Ta p Phone ringtone, and then select a
ringtone
The ringtone briefly plays when selected.
3. Ta p OK
Setting Notification Sounds
Select the sound to play when device receives
new notifications.
1. Press on the Home screen, and then
tap Settings > Sound
2. Ta p Notification sound, and then select a
notification sound
The notification sound plays when selected.
Page 41

3. Ta p OK
Adjusting Volume
The Ringer volume and the Media volume can
be adjusted separately. The volume of music
and the video playing changes by adjusting the
Media volume.
1. Press on the Home screen, and then
tap Settings > Sound
2. Ta p Volume, and then drag Ringtone or
Media slider to adjust volume
3. Ta p OK
memo
• You can adjust the ringer volume by pressing the
Volume Keys. When playing music or watching
video, press the Volume Keys to adjust the Media
volume.
Setting a Sound Profile
Switch to Vibrate or Silent mode, or use the
normal device sound settings.
■Vibrate
To set your device to vibrate instead of making
any sounds;
1. Press on the Home screen, and then
tap Settings > Sound
2. Ta p Sound profile, and then tap Vibrate
The Vibrate mode icon ( ) appears on the
Status Bar.
• To cancel Vibrate mode, press the Volume Up
Key repeatedly to select a volume level.
39
Page 42

memo
• In Vibrate mode, ringer does not sound even if a
device is connected.
• The camera shutter sound and game sound is
heard even when Vibrate mode is active.
• You can also set Vibrate mode by pressing the
Volume Down Key until you see the image below
on the screen.
40
■Silence All
The Silence All option allows you to mute all
sounds without turning your device off.
1. Press on the Home screen, and then
tap Settings > Sound
2. Ta p Sound profile, and then tap Silent
The Silence All mode icon ( ) appears on the
Status Bar.
• To cancel Silence All mode, press the Volume Up
Key repeatedly to select a volume level.
Page 43

memo
• You can also set Silence All mode by pressing the
Volume Down Key until you see the image below
on the screen.
Alert Notification
Set your device to alert you with an audible tone
when you make an emergency call (110, 119,
118).
1. Press on the Home screen, and then
tap Settings > Sound
2. Ta p Emergency tone > Alert
Display Settings
Changing the Screen Timeout Period
After a period of inactivity, the device screen
turns off to conserve battery power. You can set
the idle time before the screen turns off.
1. Press on the Home screen, and then
tap Settings > Display
2. Ta p Screen timeout, and then select the
time before the screen turns off
memo
• To quickly turn off the screen, press the Power
Key.
41
Page 44

Changing Wallpaper
Change the Home screen or the Lock screen
wallpaper with your favorite photo. Browse the
collection of wallpapers included in device or
select from photos taken with camera or
animated wallpaper.
1. Press on the Home screen, and then
tap Wallpaper
2. Do one of the following:
• To select from preset animated wallpapers, tap
Live wallpapers, select an animated wallpaper,
and then tap Set wallpaper. Select style
depending on selected wallpaper after tapping
Settings....
• To use preset images, tap HTC wallpapers,
select from preset wallpapers, and then tap Set
wallpaper.
42
• To use a picture that you have captured using
the camera or copied to your device as a
wallpaper, tap Gallery. Tap Camera shots/All
photos, and then select a photo. Crop the photo
and tap Save.
Adjusting the Screen Brightness Manually
1. Press on the Home screen, and then
tap Settings > Display
2. Ta p Brightness, and then clear the
Automatic brightness check box
3. Adjust screen brightness, and then tap OK
Preventing the A utomatic Screen Rotation
1. Press on the Home screen, and then
tap Settings > Display
Page 45

2. Clear the Auto-rotate screen check box
memo
• Not the Camera Viewfinder screen support
automatic rotation.
Recalibrating G-sensor
Recalibrate G-sensor to improve screen
orientation response to device position, for
example when changing web browser
orientation.
1. Press on the Home screen, and then
tap Settings > Display
2. Ta p G-Sensor calibration, and then place
device on a flat and level surface
3. Ta p Calibrate > OK
Location Settings
1. Press on the Home screen, and then
tap Settings > Location
2. Check the Use wireless networks and Use
GPS satellites check boxes
memo
• Selecting Use GPS satellites lets you locate
places of interest in street-level. However, this
requires a clear view of the sky and more battery
power.
43
Page 46

C-mail Settings
Set C-mail notification.
1. On the Home screen, tap >Messages
2. Press , and then tap Settings
3. Set each item
• Received notification: Set whether to receive a
notification in the Status Bar when a new C-mail
arrives.
• Play notification sound: Set whether to ring
when a new C-mail arrives.
• Notification sound: Select a ring tone that is
specific to new C-mail.
• Vibrate: Set whether to vibrate device when a
new C-mail arrives.
44
Airplane Mode
Airplane Mode allows you to use many of your
device's features when you are on an airplane or
in any other area where making or receiving
calls or data is prohibited.
X Press and hold the Power Key, and then tap
Airplane mode.
While in Airplane Mode, the Status Bar will
display .
• To turn Airplane Mode off, press and hold
the Power Key, and then tap Airplane
mode again.
memo
• Abide by the rules of hospitals and other medical
institutions where it is forbidden to use or carry cell
phones.
Page 47

Security Settings
Resetting Your Device
Resetting the device deletes all data, including
downloaded applications, reset all function
settings to default values.
memo
• Make sure to back up important data you have on
the device before you perform a factory data
reset.
1. Press on the Home screen, and then
tap Settings > SD & phone storage
2. Ta p Factory data reset > Reset phone
3. A confirmation message appears, tap
Erase everything
Data Synchronization Settings
Google Account
Signing in to your Google account lets you
synchronize Gmail and your Google Contacts
and Calendars between the device and the
Web. You also need to sign in to a Google
account to use Google applications such as
Google Talk and Android Market.
When you turn on the device for the first time,
device shows guides you to set up your Google
account. If you already have a Google account,
enter information about your account. Otherwise
follow the onscreen instructions to quickly create
an account.
45
Page 48

■Adding an Google Account
You can add more than one Google account on
the device. However, subsequent Google
accounts can only synchronize Gmail, contacts,
and Calendars. Other Google services use the
first Google account you added.
1. Press on the Home screen, and then
tap Settings > Accounts & sync > Add
account
2. Ta p Google
Follow the onscreen instructions to sign in to an
account or create a new account.
46
Microsoft Exchange Server
You can synchronize your device with your
company's Microsoft Exchange Server to let you
access your device's Exchange Server
account's Email, contacts, and calendar events.
Ask your Exchange Server administrator for
details.
memo
• The device doesn't guarantee the performance of
all functions that Exchange Server covers.
■Synchronizing with a Microsoft
Exchange ActiveSync Account
You can only add one Microsoft Exchange
ActiveSync account on the device.
You can sync with Microsoft Exchange Server
2003 Service Pack 2 (SP2) or later.
Page 49

1. Press on the Home screen, and then
tap Settings > Accounts & sync > Add
account
2. Ta p Exchange ActiveSync
3. Enter the account details, and then tap
Next
4. Select the types of information, and then
tap Finish
Managing Your Accounts
1. Press on the Home screen, and then
tap Settings > Accounts & sync
• Background data:Applications can send and
receive online account information even if you
are not currently using them.
• Auto-sync:Applications can use the sync
schedule defined in the account settings.
■Changing Account Settings
Change settings such as the sync frequency
and the types of information synchronized, the
kinds of notification you receive, and the way
that account information appears.
1. Press on the Home screen, and then
tap Settings > Accounts & sync
2. Select account to edit, and then edit the
account settings
47
Page 50

◆ Viewing History (P.48)
History
◆ Making a Call From History (P.49)
◆ Saving a Number From History (P.50)
48
Viewing History
History is a list of phone numbers (or People
entries) for calls you placed, accepted, or
missed. When Caller ID is not sent, Private
number appears.
Page 51

1. On the Home screen, tap > People
2. Tap the tab
3. Tap at the right side of a number of
contact to view the call history for that
number or contact
Making a Call From History
Dial missed call, incoming call or outgoing call
records directly.
1. On the Home screen, tap > People
2. Tap the tab
3. Tap an entry on the Call history list to place
a call to that entry
memo
• To sort the records according to the call history
type, press in the call history list, and then tap
View.
• Tap and hold an entry in the Call history list to
open the options menu where you can select to
view the contact information (if number is stored in
People), edit the number before you redial, or
delete the entry from the Call history list.
49
Page 52

Saving a Number From History
1. On the Home screen, tap > People
2. Tap the tab
3. Tap and hold the call history, and then tap
Save to People
4. Select the contact type
• Google: Synchronize with Google account.
• Phone: Save the device memory.
5. Enter each item, and then tap Save
50
Page 53

◆ About People (P.51)
People
◆ Using the People Screen (P.52)
◆ Adding a New People Entry (P.54)
◆
Saving a Phone Number
◆ Editing an Entry in People (P.54)
◆ Finding Entries in People (P.57)
◆ Connecting with Your Social Networks
(P.57)
(P.54)
About People
In People, you can easily manage your
communications with contacts using phone,
messaging, and Email.
● Synchronize contacts on your device with
your Google or Facebook accounts on the
Web.
● Add contacts to the device from the following:
• Gmail contacts
• Exchange Server account
• Contacts on your PC using HTC Sync
• Contacts from the microSD card
• Facebook account
● Contact information savable on the device
depends on available memory.
51
Page 54

Using the P eople Screen
1234
The People list has the following four tabs. Tap
the desired tab in the People list or drag the
active tab, then release when you have selected
the desired tab.
All Gives you access to all contacts
1
52
on your device, including device
contacts, Google contacts,
Facebook contacts, and
Exchange ActiveSync contacts.
Also opens or updates My contact
card.
Groups Lets you assign contacts to
2
Online
3
directories
Call history Lists all your dialed numbers and
4
groups so you can easily send an
Email message to a whole group.
Search for contacts on your online
directories such as your Exchange
ActiveSync or Facebook account
to copy to the device.
received and missed calls.
Page 55

Viewing the People List
1
2
3
4
5
6
Create a new contact
1
Tap to view/edit your My contact card
2
Tap the photo to open the quick access icons
3
This icon appears when the contact has the
4
following:
New missed call, C-mail/mail message,
updated Facebook profile, upcoming
Facebook events, or added photos on Flickr or
Facebook
Facebook contact or link to your friend's
5
Facebook account/Twitter account/Flickr
account
Quick access icons
6
You can quickly choose how to communicate
with the contact. Depending on the contact
information stored, you can call or send a
message, etc.
53
Page 56

Adding a New People Entry
1. On the Home screen, tap > People
2. Ta p Add contact, and then select the
contact type
• Google: Synchronize with Google account.
• Phone: Save the device memory.
3. Enter each item, and then tap Save
The contact information savable depends on the
contact type.
3. Ta p Save to People
Save to People appears after tapping six digits.
4. Ta p Create new contact
• To add the phone number to the saved contact,
tap Save to existing contact and select the
contact. Select the type of phone number, and
then tap Save.
5. Enter each item, and then tap Save
Editing an Entry in People
Saving a Phone Number
To save a number on the Phone screen:
1. Ta p Phone
2. Enter the phone number by tapping the
keys on the keypad
54
Displaying an Entry in P eople
X On the Home screen, tap > People,
and then tap an entry.
Page 57

Adding a Number to or Editing an Entry in People
1. Display an entry in People
2. Ta p Edit
3. Ta p Add > Phone
4. Tap the type of phone number, and then
enter the phone number
5. Ta p Save
Editing an Entry in People
1. Display an entry in People
2. Ta p Edit
3. Tap the number you want to edit, and then
edit the number
• To change the type of number, tap the number
type (for example Mobile or Home).
• To delete the number, tap at the right side of
the number.
4. Ta p Save
Selecting a Ringer Type for an Entry
Assign a ringer type to an entry in People so you
can identify the caller by the ringer type.
1. Display an entry in People
2. Ta p Ringtone, and then select a ringtone
The ringtone plays when selected.
3. Ta p OK
55
Page 58

Assigning a Picture to an Entry
1. Display an entry in People
2. Ta p Edit
3. Ta p > Gallery
• If you selected Camera, the camera will launch
and you will use it to take a new picture. Take a
picture, and then tap Done > Save.
4. Select an album to find the picture, tap the
picture you want to use, crop the picture.
5. Ta p Save to save the picture
6. Ta p Save
Adding an Email Address to an Entry
1. Display an entry in People
2. Ta p Edit
56
3. Ta p Add > Email
4. Tap the type of Email address, and then
enter the Email address
5. Ta p Save
Adding Additional Information to an Entry
You can add additional information to an entry in
People.
1. Display an entry in People
2. Ta p Edit
3. Ta p Add
4. Tap the type of information you want to add
5. Ta p Save
Page 59

Finding Entries in P eople
1. On the Home screen, tap > People
2. Press
3. Enter the first character of the name or
company in the search bar
The search results appears as a list.
4. Tap an entry to display an entry
To dial the entry's default phone number (Primary),
tap the number under Action.
Finding Group Entries
1. On the Home screen, tap > People
2. Ta p th e Groups tab
3. Select the group name
The entries belonging to a group are displayed.
4. Tap the entry
To dial the entry's default phone number (Primary),
tap the number under Action.
Connecting with Your Social Networks
Facebook for HTC Sense
View Facebook Notifications in supported
device applications. Login to Facebook for HTC
Sense, to download your Facebook Friends to
People, Facebook Photos to Gallery, or
Facebook Wall posts, Status Updates, etc. to
Friend Stream.
57
Page 60

■Updating Your Facebook Status
1. On the Home screen, tap > Friend
Stream
2. Ta p All updates tab > What's on your
mind? text box
3. Ta p > Facebook > Done
4. Ta p Share
■
Synchronizing Faceb ook for HT C Se nse
1. Press on the Home screen, and then
tap Settings > Accounts & sync
2. Ta p Facebook for HTC Sense > Sync
now
58
■Changing Facebook for HTC Sense
Update Settings
1. Press on the Home screen, and then
tap Settings > Accounts & sync
2. Ta p Facebook for HTC Sense
3. Ta p Account settings > Update schedule
4. Select the time interval
Facebook for Android
The Facebook application on your device lets
you keep up and stay close with your friends in
Facebook. It offers most of the features that you
are familiar with when using Facebook on your
PC.
If you have more than one Facebook account,
you can sign in to the Facebook application
using your other Facebook account.
Page 61

■Using the Facebook Application
1. On the Home screen, tap > Facebook
If this is your first time to use Facebook, follow the
onscreen instructions to sign in to your Facebook
account.
memo
• In the Facebook home screen, press , then
tap Settings to set Refresh interval and
Notifications options.
• In some Facebook screens, tap and hold an item
to open options menu.
Use Facebook application for the following:
● Share your thoughts and check other
people's status updates.
● View your friends list and write on someone's
wall.
● Comment on and like a friend's post.
● View someone's personal information,
including photo albums.
● Check your Facebook notifications.
● Take a photo and upload it straight to your
Facebook account.
■Adding the Facebook Widget
Add the Facebook widget to the Home screen to
let you quickly share your thoughts and view
your friends' status updates.
1. Tap or tap and hold an empty area on
the Home screen
2. Ta p Widget > Facebook
• To move the Facebook widget, drag the widget
to a blank space on the Home screen, and then
release.
59
Page 62

◆ Taking Pictures and Shooting Videos
Camera/Music
(P.60)
◆ Using Gallery (P.63)
◆ Listening to Music (P.65)
60
Taking Pictures and
Shooting Videos
You can use the camera or camcorder to take
and share pictures and videos.
memo
• Make sure the microSD card is installed before
you use the camera or camcorder. All pictures or
videos that you capture using your device are
stored on the microSD card.
Opening the Camera
X Tap the Camera icon on the Home screen or
tap > Camera.
Page 63

Viewfinder Screen
1
2
3
4
5
6
Tap screen to show controls and indicators. The
Camera settings tab will disappear
automatically after a few moments.
Camera
1
settings tab
Auto-focus
2
indicator
Flash button Tap to toggle flash modes.
3
Zoom button Tap to show or hide onscreen
4
Shutter release
5
button
View button Tap to open Gallery
6
Tap to open the menu panel
and change camera settings.
Shows a white bracket when
focusing. When focus is set,
the bracket changes to a
green bracket.
zoom bar and available
number of shots or recordable
time.
Tap this button to take a photo
or begin capturing video. Tap
it again to stop capturing
video.
application so you can browse
and view photos or videos on
memory card (P.64).
61
Page 64

T aking Pictures
1. On the Home screen, tap the Camera icon
or tap > Camera
•
To zoom in/out on your subject, tap the Zoom button
and drag your finger across the zoom bar.
• To use camera flash, tap repeatedly to select
flash mode.
: Flash fires automatically when subject is
dark.
: Always use Flash.
: Turn off Flash.
2. Frame your subject in the Viewfinder, and
then tap
Let the camera auto focus on the center of the
screen. When in focus, the device sounds and
focus guide indicated by a green bracket. Tap
to take photo. Adjust focus guide by dragging it in
the Viewfinder.
3. Use captured photos (P.65)
62
Capturing Videos
1. On the Home screen, tap >
Camcorder
• To zoom in/out on your subject, tap the Zoom
button and drag your finger across the zoom bar.
• To use camera flash, tap repeatedly to select
flash mode.
: Always use Flash.
: Turn off Flash.
Page 65

2. Frame your subject in the Viewfinder, and
Recording indicator Capture duration
then tap
Let the camera auto focus on the center of the
screen. When in focus, the device sounds and
focus guide indicated by a green bracket. Tap
to start capturing video. Start tone sounds and
capturing starts.
3. Ta p
Stop tone sounds and capturing stops.
4. Use captured videos (P.65)
Using Gallery
Gallery lets you view photos and play back
videos that you've taken with Camera or
downloaded. You can edit photos, easily make a
photo as your contact picture or wallpaper, and
share photos to your friends.
63
Page 66

Opening Gallery
X On the Home screen, tap > Gallery.
The Gallery application opens in the Albums
tab where your photos and videos are
organized by albums for easy viewing.
64
● Camera shots: lets you view photos and
videos taken with the Camera.
● All photos: lets you view all photos stored in
all the folders on the microSD card.
● All videos: lets you view all videos stored in
all the folders on the microSD card.
● All downloads: lets you view photos and
videos that you downloaded or received by
®
Bluetooth
● Other: lets you view photos and videos that
are under the root path of the microSD card
(that are not contained in folders).
communication.
■Viewing Photos and Videos
After selecting an album from Gallery
application's Albums screen, you can browse
through the photos and videos of that album
either in filmstrip or grid view. Tap a photo or
video to view it in full screen.
Page 67

Sharing Photos and Videos
You can send photos and videos via mail or
®
Bluetooth
SNS and share videos on YouTube.
■
Attach several photos, videos, or both to internet
mail or Gmail.
. You can also share photos on your
Sending Photos or Videos by Mail
1. On the Home screen, tap > Gallery
2. Select an album
3. Ta p > Gmail or Mail
4. Select the photos or videos to share, and
then Next
5. Compose your message, and then send the
mail
Listening to Music
Music plays digital audio files from device's
microSD card.
memo
• Since Music only plays audio files saved on the
microSD card of the device, you must copy your
audio files to the microSD card before you open
Music.
65
Page 68

Playing Music
X On the Home screen, tap > Music.
The Playback screen appears.
When you are playing music and the screen
turns off, you can control music playback right
from the Lock screen when you “wake up” the
device by pressing the Power Key. If you do not
see the playback controls on the Lock screen,
tap anywhere on the screen to show the
playback controls.
Browsing Music in the Library
Tap in the Playback screen or the Now
playing list to go to the Library.
66
In the Library, your music is organized into
different categories such as Artists, Albums,
Playlists, Genres, Composers, and more. Select
a category by tapping one of the category tabs
at the bottom of the screen.
Page 69

◆ Using Bluetooth® (P.67)
Bluetooth
®
Using Blueto oth
®
Bluetooth® is a short-range wireless
communications technology. Devices with
®
Bluetooth
capabilities can exchange
information over a distance of about ten meters
without requiring a physical connection.
®
Bluetooth
different modes:
● On: Bluetooth
● Off: Bluetooth
● Visible: Bluetooth
on your device operates in three
®
is turned on. Your device can
detect other Bluetooth
not vice versa.
can neither send nor receive information
using Bluetooth
®
Bluetooth
-enabled devices can detect your
®
-enabled devices, but
®
is turned off. In this mode, you
®
.
®
is turned on, and all other
device.
67
Page 70

Turning Bluetooth® On or Off
1. Press on the Home screen, and then
tap Settings > Wireless & networks
2. Select the Bluetooth check box
Making the Device Visible
1. Press on the Home screen, and then
tap Settings > Wireless & networks
2. Ta p Bluetooth settings, and then select
the Discoverable check box
68
Connecting a Bluetooth® Headset
or Car Kit
Turn on the handsfree headset or Car Kit and
activate the partnership mode beforehand. For
details, see the Handsfree Headset User Guide.
1. Press on the Home screen, and then
tap Settings > Wireless & networks
2. Ta p Bluetooth settings, then select the
Bluetooth check box
The device will start to scan for Bluetooth® devices
within range and will show all detected devices
below the Bluetooth® devices section.
If you do not find the device in the list, tap Scan for
devices to scan again.
3. Select the handsfree headset or car kit in
the list
Page 71

4. Enter the passcode supplied with headset,
and then tap OK
For the passcode, see Handsfree Headset User
Guide.
When a Bluetooth® headset or car kit is connected
to the device, Bluetooth® connected icon
appears in the Status Bar. Depending on the type
of headset or car kit you have connected, you can
then start using the headset or car kit to listen to
music and/or make and receive phone calls.
69
Page 72

70
Page 73

Network Services/Internet
Page 74

◆ Voicemail (P.72)
Network Services
◆ Messages (C-mail) (P.73)
◆ Call Forwarding (P.74)
72
Voicemail
The Voicemail service takes messages for you,
as long as it answers a call with the answering
message, if there is an incoming voice call while
the device is powered off, when you are in a
location without the radio wave, Airplane mode
(P.44) is enabled, or when you are in a situation
where you cannot answer a call.
Voicemail Notification
The device alerts you to a new message by the
notification sound and message in the Status
Bar.
You can confirm the number of voicemails, the
time when voicemail was left and the other
party's phone number.
Page 75

memo
• The Voicemail can be recorded up to 20
messages.
• The Voicemail can be stored up to 48 hours. When
you cannot receive the Voicemail notification for 48
hours or more, the Voicemail is automatically
deleted.
Retrieving Your V o icemail Messages
1. When a voicemail is recorded, the C-mail
icon appears in the Status Bar
2. On the Phone screen, tap 1417
Follow voice guidance to play messages.
memo
• Tap and hold 1 on the phone keypad to retrieve
your Voicemail messages.
Messages (C-mail)
With Text Messaging (C-mail), you can receive
instant text messages between your device and
another au mobile phone.
In this device, only the reception of C-mail is
possible. You cannot compose and send Cmail messages.
73
Page 76

Receiving C-mail
1. Receive C-mail
When a new C-mail arrives, message briefly
appears in the Status Bar.
memo
• Notification disappears automatically.
2. On the Home screen, tap >
Messages
3. Select the C-mail
The C-mail details appear.
74
Call Forwarding
The Call Forwarding service forwards an
incoming call to a preset forwarding number
when you are in a situation where you cannot
answer a call.
You can select the forwarding condition from
“Forwarding in case of no answer”, “Forwarding
in case of busy”, and “Full transfer”.
Forwarding in Case o f No Answer
You can forwards incoming calls when you are in
a location without the radio wave, the device is
powered off, or you do not answer the call within
the ring time.
Page 77

1. On the Phone screen, tap 1422, enter a
forwarding number, and then tap Call
•To set “Forwarding in case of no answer” on the
Call forwarding service screen, press on the
Home screen and tap Settings > Call > au
Calling Options > Call forwarding service >
Setup number, and then set a forwarding
number beforehand.
•Tap “1423” to set “Forwarding in case of busy”,
tap “1424” to set “Full transfer” instead of “1422”.
2. Ta p End call
Deactivating Call Forwar ding
1. On the Phone screen, tap 1420, and then
tap Call
• You can also deactivate Call Forwarding by
pressing on the Home screen, and th en
tapping Settings > Call > au Calling Options
> Call forwarding service > Stop service.
2. Ta p End call
75
Page 78

76
Page 79

◆ Connecting Using Wi-Fi (P.77)
Web and Data Services
◆ Connecting Using WiMAX (P.79)
◆ Getting Started With Data Services (P.80)
◆ Using the Device's Web Browser (P.82)
◆ Accessing Messages (P.85)
◆ Using Android Market (P.88)
◆ Wi-Fi Tethering (P.91)
Connecting Using Wi-Fi
Wi-Fi provides wireless LAN Internet access. To
use Wi-Fi on the device, you need access to a
wireless access point or hotspot.
memo
• The availability and range of the Wi-Fi signal
depends on the number, infrastructure, and other
objects through which the signal passes.
T urning Wi-Fi On and Connecting to a Wireless Network
1. Press on the Home screen, and then
tap Settings > Wireless & networks
77
Page 80

2. Select the Wi-Fi check box
The device will scan for available wireless
networks.
3. Ta p Wi-Fi settings
The network names and security settings (Open
network or security key) of detected Wi-Fi networks
are displayed in the Wi-Fi networks section.
4. Select a Wi-Fi network
If you selected an open network, you will be
automatically connected to the network after
tapping Connect.
If you selected a network that is secured with the
security key, enter the key, and then tap Connect.
78
When your device is connected to a wireless
network, the Wi-Fi icon ( ) appears in the
Status Bar and tells you the approximate signal
strength (number of bands that light up). If
Network notification in Wi-Fi settings is
enabled, this icon ( ) appears in the Status
Bar whenever the device detects an available
wireless network within range.
memo
• The next time your device c onnects to a previously
accessed secured wireless network, you may
need to enter the security key again.
• Wi-Fi networks are self-discoverable, which
means no additional steps are required for your
device to connect to a Wi-Fi network. It may be
necessary to provide a username and password
for certain closed wireless networks.
Page 81

memo
• To remove the wireless network settings that
entered manually, do the following while not
connected with the network:
1.Press on the Home screen, and then
tap Settings
Wi-Fi settings
Tap the network names in the Wi-Fi settings
2.
screen
3.Ta p Forget
The selected wireless network setting is removed.
> Wireless & networks >
Connecting Using WiMAX
Large capacity data of the video streaming,
music download can be exchanged comfortably
by using mobile WiMAX (Worldwide
Interoperability for Microwave Access) service in
home and the destination. You can use this
device also as a mobile wireless LAN router
which can connect two or more wireless LAN
devices simultaneously.
● This service is service supported WiMAX that
UQ Communications Inc. provides.
Turning WiMAX On and Connecting to a WiMAX Network
1. Press on the Home screen, and then
tap Settings > Wireless & networks
2. Select the WiMAX check box
The connection to a mobile WiMAX network turns
on automatically.
When your device is connected to a mobile WiMAX
network, the WiMAX icon ( ) appears in the Status
Bar and tells you the approximate signal strength.
79
Page 82

memo
• Mobile WiMAX networks are self-discoverable,
which means no additional steps are required for
your device to connect to a mobile WiMAX
network.
• When WiMAX is disconnected, scan mobile
WiMAX networks again by pressing on the
Home screen and tapping Settings > Wireless
& networks > WiMAX settings > Tap to
scan for WiMAX service.
80
Getting Started With Data Services
This device allows you to use the Internet
connection and LAN connection by packet
transmission in maximum download speed
3.1Mbps/upload speed 1.8Mbps (depending on
the environment of use, 2.4Mbps (download
speed)/144K bps (upload speed)) by using the
data transmission service of CDMA1X WIN that
uses the packet transmission method.
You can access the Internet and perform packet
transmission by using “IS NET” or “au.NET”.
Moreover, you can use the Internet for a
communication fee at a fixed amount by
subscribing packet transmission fee discount
services, such as “Double-Teigaku-Super Light”.
For au.NET and the packet transmission fee
Page 83

discount service, refer to the latest au Catalog or
visit the au website.
■Packet Transmission Cautions
• If you have not applied for “IS NET”, access
will be through “au.NET”.
• If you access the website including the
image, download of a video data, or use
widget or Google service application are
used, the packet transmission fee may
become expensive.
• The transmission rate might be
automatically limited by the congestion
situation of the continuance of a large
amount of data sending and receiving at a
time to prevent an excessive load to the
network and the network.
■Checking the Packet Transmission Fee
You can check the packet transmission fee at
the following URL:
https://cs.kddi.com/ (au Customer Support)
(Japanese)
* It is necessary to apply when it uses first time.
■Charge for au.NET use
Monthly usage
charges
Communication
charge*
* For transmission fee, refer to the latest au Catalog or
visite the au website.
Charge (only the used month)
Charge
81
Page 84

Using the Device's Web Browser
Open the browser to start surfing the Web. The
browser is fully optimized and comes with
advanced features that let you enjoy Internet
browsing on your device.
Opening the Browser
X On the Home screen, tap > Internet.
■The Browser Menu
In the Browser screen, press to use the following
functions:
82
Item Description
Back Returns you to a previously viewed
Forward Returns you to a previously viewed
Add
bookmark
Bookmarks Allows you to access and manage
Window s Allows you to open additional
More Allows you to set the browser
page (after having tapped
Forward).
page (after having tapped Back).
Allows you to bookmark the current
site.
your bookmarks.
browser windows.
settings and options.
Page 85

Going to a Website
1. On the Browser screen, tap the URL box on
top of the screen
• If Address bar dose not appear, press .
2. Enter the URL address in the address bar
As you enter the address, matching Web page
addresses will appear on the screen. Tap an
address to go directly to that Web page or continue
entering the URL address.
Setting Your Home Page
1. Press on the Browser screen, and then
tap More > Settings > Set home page >
Set home page
2. Enter the URL to use as your home page,
and then tap OK
Changing the Screen Orientation
Change the screen orientation by simply rotating
the device sideways.
memo
• The Auto-rotate screen check box in >
Settings > Display needs to be checked for the
screen orientation to automatically change.
Browsing Full Versions (not Mobile Version) of Web Pages
Some websites display a mobile version of their
pages to phone Web browsers. You can choose
to view the full version of all pages, even for
these sites.
X
On the Browser screen, press and tap More >
Settings, then clear the Mobile view check box.
83
Page 86

Navigating on a Web Pa ge
■Panning on a Web Page
You can swipe your finger vertically or
horizontally across the screen to view other
areas of the Web page.
84
■Zooming In or Out on a Web Pa ge
Tap the screen twice quickly to zoom in, then tap
the screen twice quickly again to zoom out.
Alternatively, use your fingers to pinch or spread
the screen to zoom in and out.
Use your thumb and index fingers to pinch or
spread the Web page to zoom in and out.
Page 87

Downloading Applications From the Web
Before downloading applications from the Web,
you must first enable downloading from the
device settings.
1. Press on the Home screen, and then
tap Settings > Applications
2. Select the Unknown sources check box
memo
• Applications downloaded from the Web can be
from unknown sources. To protect the device and
personal data, download applications only from
trusted sources such as Android Market.
memo
• All downloaded applications are saved to the
microSD card. Before you download an
application from the Web, make sure that you
have installed a microSD card on the device
(P.22).
■Viewing Your Do wnl oad s
X On the Browser screen, press , and then tap
More > Downloads.
Accessing Messages
You can send and receive Email messages and
Gmail/Google Mail messages from your device.
85
Page 88

The Mail application lets you send and receive
Email from your webmail or other accounts,
using POP3 or IMAP. It also lets you access your
Exchange ActiveSync Email and other features
on your device. Files can be attached.
■Adding a POP3/IMAP Email Account
Set up an internet mail account or company
account on your device if you have an Email
account from an Internet service provider (ISP).
You can also add a work account that you
access using a VPN server connection as a
POP3/IMAP4 account.
For procedures, contact your system
administrator.
86
1. On the Home screen, tap > Mail
2. Ta p Exchange ActiveSync or Other
(POP3/IMAP)
3. Enter mail address and password, and then
tap Next
Alternatively, tap Manual setup to directly enter
incoming and outgoing settings for the mail
account.
4. Enter the account name and your name,
and then tap Finish setup
memo
• To manually add a mail account, contact an
Internet service provider (ISP).
• After creating one mail account, press , then
tap More > New account to create another mail
account.
Page 89

Composing and Sending Email
1. On the Home screen, tap > Mail
2. Select the mail account
3. Press , and then tap Compose
4. Ta p To (recipient field), and then enter a
recipient
Tap to enter a recipient from contacts.
• To send a carbon copy (Cc) or a blind carbon
copy (Bcc), press , and then tap Show Cc/
Bcc.
5. Ta p Subject (subject field), and then enter
subject
6. Tap message field, and enter your message
• To attach a file, press on the composition
screen, and then tap Add attachment. Select a
file to attach.
7. Ta p Send
• To save the message without sending, tap Save
as draft on the composition screen.
■Adding a Signature to an Email
Message
1. Press in the Inbox, and then tap More
> Settings > General Settings >
Signature
2. Enter your signature in the text box, and
then tap Save
3. Select the Use signature check box
87
Page 90

Using Andr oid Market
1
2
3
Android Market provides direct access to useful
applications which you can download and install
on the device.
To access Android Market, you must first
connect to the Internet using your device's Wi-Fi
or data connection and sign in to your Google
Account.
Opening Android Market
1. On the Home screen, tap Market
When you open Android Market for the first time,
the Terms of Service window appears. Tap Accept
to continue.
88
Tap to display the available apps or games on
1
Android Market, or display the applications
that au recommends by list.
Tap to search Android Market for applications
2
to install on your device.
Page 91

Featured applications list. Tap an application
3
to read a description about the application
and user reviews.
Finding and Installing an Application
1. On the Home screen, tap Market
2. Find an application
Browse applications by categories or search for
the application by entering the key word.
3. Tap an application to install and read a
description about the application and user
reviews in the details screen
4. Ta p Install
If the application requires either access to any of
your data or control of any functions on the device,
Market tells you what the application can access.
Ta p OK if you agree to the conditions of the
application.
Download starts.
5. Check the progress of the download
When download and installation are completed,
appears on the Status Bar.
memo
• Be especially cautious with applications that have
access to many functions or a significant amount
of your data. Once you tap OK on this screen, you
are responsible for the results of using this item on
your device.
89
Page 92

Requesting a Refund for an Application
If you are not satisfied with the application, you
can ask for a refund within the certain period of
the purchase. Your credit card will not be
charged and Android will remove the
application.
1. Ta p Market on the Home screen, press ,
and then tap My apps
2. Select the application to uninstall for a
refund
3. Ta p Uninstall
4. Select the reason for removing the
application, and then tap OK
90
Uninstalling an Application
You can uninstall any application that you have
downloaded and installed from Android Market.
1. Ta p Market on the Home screen, press ,
and then tap My apps
Downloaded application appears in the list.
2. Select the application to uninstall, and then
tap Uninstall
3. Ta p OK
4. Select the reason for removing the
application, and then tap OK
Page 93

Wi-Fi T ethering
This device can be used as wireless LAN hot
spot (Tethering), and the Internet connection be
used with your PC via Wi-Fi. The Wi-Fi Tethering
application supports the following wireless
communication standards and the encryption
methods:
● Wireless communication standard:
IEEE802.11 b/g/n
● Encryption method: OPEN, WEP (128bits),
WPA (TKIP), WPA2 (AES)
Setting Up Wi-Fi Tethering
1. On the Home screen, tap > Wi-Fi
tethering
If the outline of the Wi-Fi Tethering function is
displayed, tap OK.
2. Do one of the following:
• Router name (SSID): The Router name (SSID)
seen from the client (PC etc.) can be changed.
“HTC network” is set as the default router name.
• Security: Select a network security method.
• Password: Set the password (WEP key/WPA
key) to encrypt the communication with the
client. A client also needs to enter the WEP key/
WPA key set here.
• Manage users
Allowed users only: Select here when only the
permitted user accesses the Internet.
Max. connections: Set limits of the number of
users that connects into the Internet.
91
Page 94

Turning Wi-Fi Tethering On
The connection to the mobile network turns on
automatically when the Wi-Fi Tethering
application is turned on.
The MAC address filtering function is available
in the device by default. The MAC address is a
peculiar number assigned to connected device
when connecting it with Wi-Fi. The MAC address
filtering function confirms the MAC address, and
blocks the connections other than the registered
address. Confirm the connection according to
the following procedures when you use this
function as available.
1. On the Home screen, tap > Wi-Fi
tethering
2. Select the Wi-Fi tethering check box
3. Turn on the Wi-Fi function such as PC
92
4. Select “HTC network” from the list of the Wi-
Fi network
When Wi-Fi Tethering is active, the Wi-Fi
Tethering icon or appears in the Status
Bar.
Page 95

Appendix
Page 96

Check for firmware updates and download as
Software Updates
required.
● When software is updated, Wi-Fi function,
WiMAX function, and 3G packet transmission
can be used.
● The data communication fee applies to
download of the software updating data. The
data communication fee may vary depending
on your contract or plan.
● The device is disabled until update is
complete. Update may take time.
● Fully charge the battery beforehand.
94
● Select a place where signal is strong and
stable.
● Other functions are not available during
software update.
● Make sure you back up important information
and data (note that some files cannot be
copied) before you start updating the device.
au is not liable for damages resulting from
loss of data, information, etc.
● au is not liable for malfunctions, if any,
caused by the software update. In such case,
the repair is charged even during the
warranty period.
● Do not remove the battery during the update.
Update will fail.
● Software update failure may disable the
device. Contact Customer Service Center.
Page 97

memo
• If the device does not return to the Home screen
after update, power device off, reinsert battery,
then restart it. If it still does not restart, contact an
au shop or PiPit (with some exceptions).
Updating software automatically
1. Press on the Home screen, and then
tap Settings > About phone
2. Ta p System software updates, select the
Scheduled check check box, and then tap
Yes
Check for software updates according to schedule
from server.
3. When message to show that updating
system software is available appears,
select whether to download via mobile
network, and then tap OK
4. A confirmation message appears, and then
tap Install now > OK
Checking for System Software Updates Manually
1. Press on the Home screen, and then
tap Settings > About phone
2. Ta p System software updates > Check
now
When there is updated software, see “
software automatically” (P.95) for updating the
device software.
Updating
95
Page 98

Troubleshooting
Troub le Check/Action Page
Cannot turn on power by pressing the
Power Key
The power is turned off automatically Has the battery run out? P.21
The power is turned off while the wakeup animation is displayed
Cannot make calls Is your device turned on? P.14
Is the battery charged? P.21
Is the battery pack properly inserted? P.19
Are the contacts on the battery pack dirty?
Has the battery run out? P.21
Is the phone number you entered correct? (Did you
start with the area code fi rst?)
96
―
―
Page 99

Cannot make calls Did you tap Call after entering the phone number?
Is your device in Airplane mode? P.44
Cannot receive calls Do you have sufficient signal strength?
Are you outside the service area?
Is your device turned on? P.14
Is your device in Airplane mode? P.44
Is the Call Forwarding service enabled? P.74
(out of range indicator) appears
Cannot connect to Wi-Fi Is your device receiving a signal from the wireless
Cannot charge the battery Is the charger connected properly?
Are you outside the service area or in a location
with poor signal strength?
Are you covering the built-in antenna with your
fingers or hand?
access point?
Did you configure your Wi-Fi settings? P.77
Is the battery pack properly inserted? P.19
―
―
―
―
―
―
―
97
Page 100

Cannot operate key/touch panel Is your device turned on? P.14
Did you unlock the screen? P.15
Turn off the power and then turn it on again.
A message indicating that charging is
necessary appears
Battery usage time is short Is the battery charged enough? P.21
GPS function cannot be used Are you in a location with poor signal strength?
WiMAX cannot be connected Are you outside the service area or in a location
The battery is almost empty. P.21
Is battery life has expired?
Is the battery left in the place for a long period
where (out of range indicator) appears?
Is the GPS function turned on? P.43
with poor signal strength?
Is the WiMAX function turned on? P.79
98
―
―
―
―
―
 Loading...