

Page 1

Chapter 7
Working with Company
E-mails and Meeting
Appointments
7.1 Synchronizing Your Phone withYour
Company E-mail Server
7.2 Working with Company E-mails
7.3 Managing Meeting Requests
7.4 Finding Contacts in the Company Directory
7.5 E-mail Security
Page 2

62 Working with Company E-mails and Meeting Appointments
7.1 Synchronizing Your Phone with Your Company E-mail
Server
Synchronize your phone with your company’s Microsoft Exchange Server to keep you connected with your
e-mails, contacts, calendar, and other information.
Set up a company e-mail server connection
Use your phone to access your company e-mails by setting up an Exchange Server connection. You can get
the company e-mail server information from your network administrator:
1. Click Start > Messaging > New E-mail Account.
2. In the Your e-mail source list, select Exchange server and click Next.
3. On the screen that follows, click Next.
4. In Server address, enter the Exchange Server name, and click Next.
5. Enter your user name, password, and domain, and click Next.
6. Select the check boxes for the types of information items that you want to synchronize with the
Exchange Server.
Tip To change the rules for resolving synchronization conflicts, click Menu > Advanced.
7. To change synchronization settings of an information type, for example, E-mail, select the type of
information, and click Menu > Settings.
8. Click Finish.
Note If you synchronized e-mails with your PC before, open ActiveSync on your phone and click Menu > Add Server Source
to set up an Exchange Server connection. When you're prompted to select information types for synchronization, you
need to clear the
Exchange Server.
Tip To change Exchange Server settings, open ActiveSync on your phone and click Menu > Configure Server
E-mail check box under the Windows PC item first before you can select the E-mail check box under
.
Start synchronization
Before you start synchronizing with the Exchange Server, make sure your phone has been set up with a data
connection to the Internet so that you can synchronize wirelessly. See chapter 8 for details.
After you finish setting up an Exchange Server connection, your phone automatically starts synchronization.
You can manually start synchronization anytime by clicking Sync in ActiveSync.
Note If you connect your phone to your office computer via a USB or Bluetooth connection, you can use this connection to
the PC to “pass through” to the network and download Outlook e-mails and other information to your phone.
7.2 Working with Company E-mails
Your phone gives you instant access to your company e-mails and lets you manage your messages easier.
Messaging features such as Direct Push, Fetch Mail, and Filtering messages are just some of the tools you can
use to manage your e-mails.
Note Some messaging features depend on the MIcrosoft Exchange Server version used. Please check with your network
administrator for the availability of Exchange Server features.
Automatic synchronization through Direct Push
Direct Push technology (push e-mail feature) enables you to receive new e-mails on your phone as soon as
they arrive in your Inbox on the Exchange Server. With this feature, items such as contacts, calendar and tasks
Page 3
Working with Company E-mails and Meeting Appointments 63
are also immediately updated onto your phone when these items have been changed or new entries have
been added on the Exchange Server. To make Direct Push work, you need to have a active Internet connection
on your phone.
You need to perform a full synchronization between your phone and the Exchange Server first before Direct
Push can be enabled.
Requirement The Direct Push feature works for your phone only if your company is using Microsoft
Exchange Server 2003 Service Pack 2 (SP2) with Exchange ActiveSync or higher version.
To enable Direct Push via Comm Manager
1. Click Start > Comm Manager.
2. On the Comm Manager screen, click the Microsoft Direct Push button. The button will turn to
, which indicates that you will receive e-mails as they arrive.
When the button is in the state, you need to manually retrieve your e-mails.
To enable Direct Push via ActiveSync
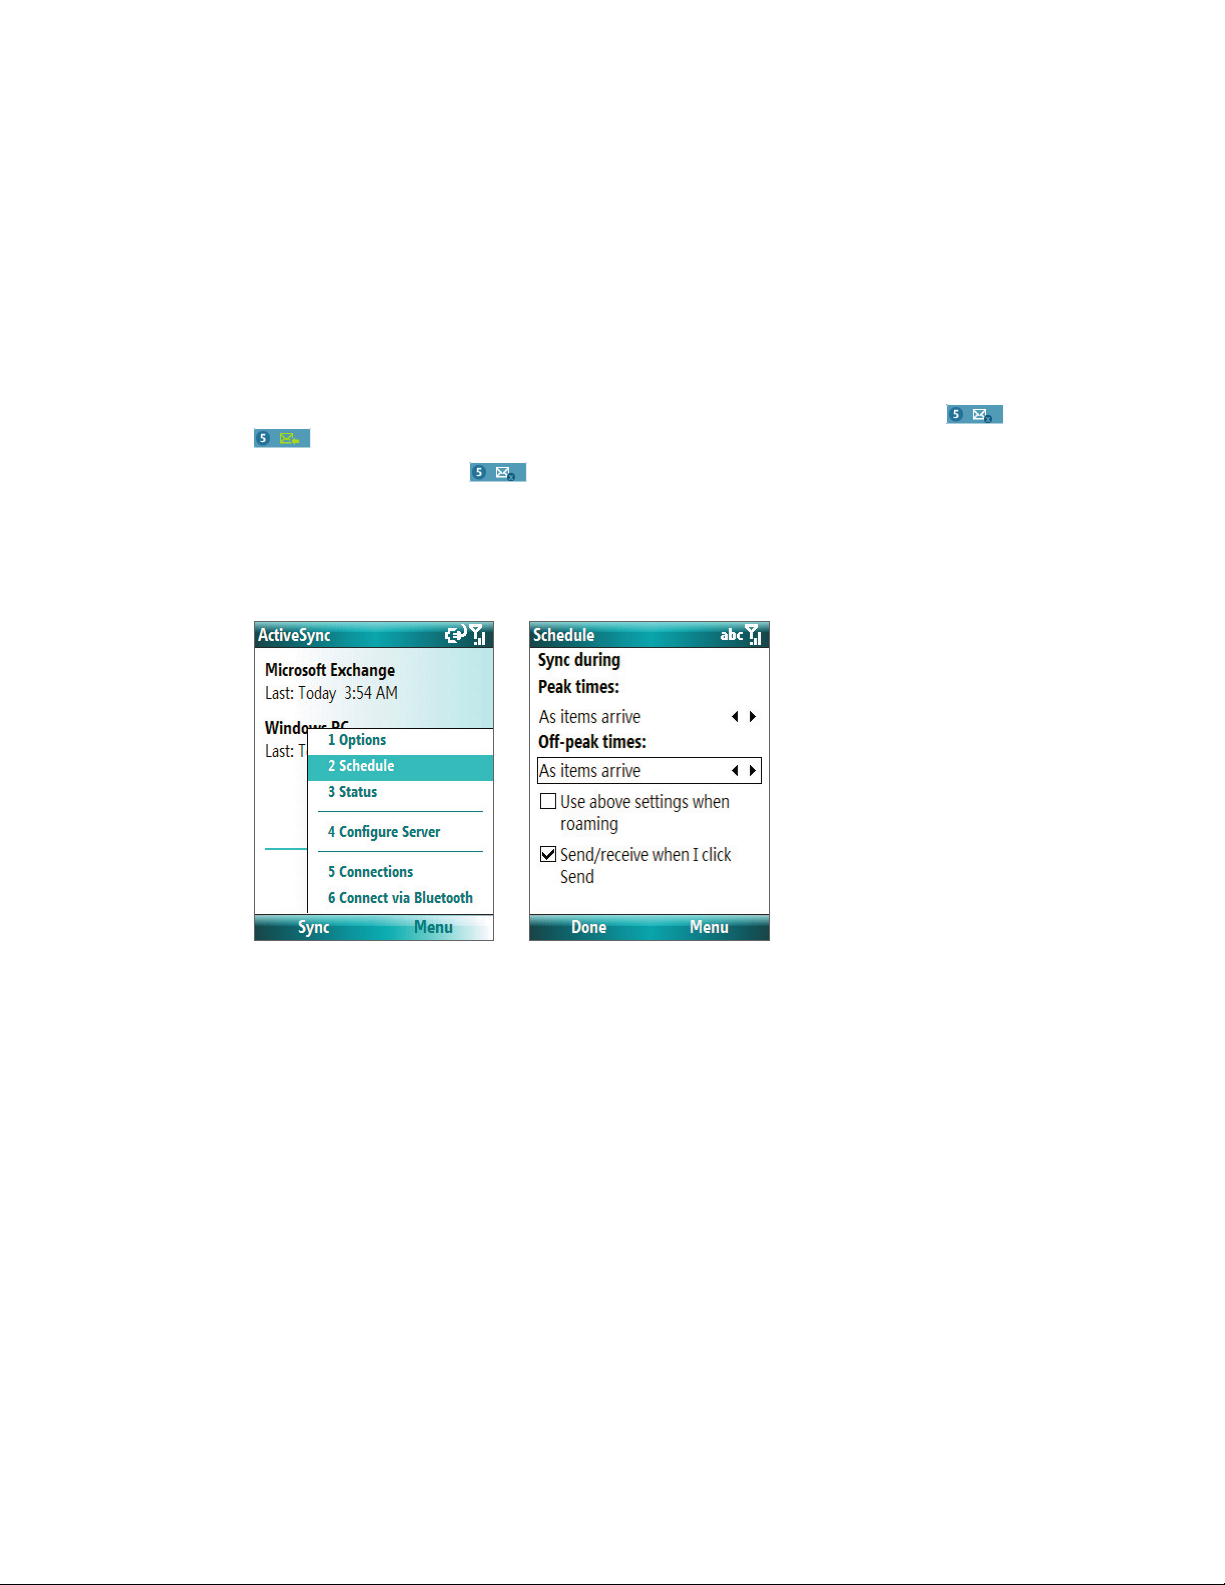
1. In ActiveSync on your phone, click Menu > Schedule.
2. Select As items arrive in the Peak times and Off-peak times boxes.
Scheduled synchronization
If you do not want to use Direct Push, you can set a regular schedule for synchronizing Outlook e-mail and
information.
1. In ActiveSync on your phone, click Menu > Schedule.
2. Select a shorter time interval in the Peak times box for you to be able to receive e-mails more
frequently.
3. Select a longer interval in the Off-peak times box.
Tip Click Menu > Peak Times to set the peak and off-peak times.
Instant download through Fetch Mail
Fetch Mail downloads an entire e-mail immediately without the need for you to perform a full Send/Receive
action.
Requirement Fetch Mail works for your phone only if your company is using Microsoft Exchange Server 2007 or higher.
1. Click Start > Messaging > Outlook E-mail.
2. Click an e-mail message to open it.
Page 4
64 Working with Company E-mails and Meeting Appointments
3. By default, only the first few kilobytes of the message is shown. To download the whole e-mail, scroll to
the bottom of the message then click Get the rest of this message.
4.
A “Downloading message” status appears. Wait for the remainder of the message body to be downloaded
Tip For information about changing e-mail sync options such as the initial download size limit for e-mail, see "Customize
e-mail settings" in chapter 6.
Search for e-mails on the Exchange Server
You can access messages that are not available on your phone by searching your Microsoft Exchange Server
mailbox. The search results will be downloaded and displayed in a Search Results folder.
Requirement Your company must be using Microsoft Exchange Server 2007 or higher.
1. Click Start > Messaging > Outlook E-mail.
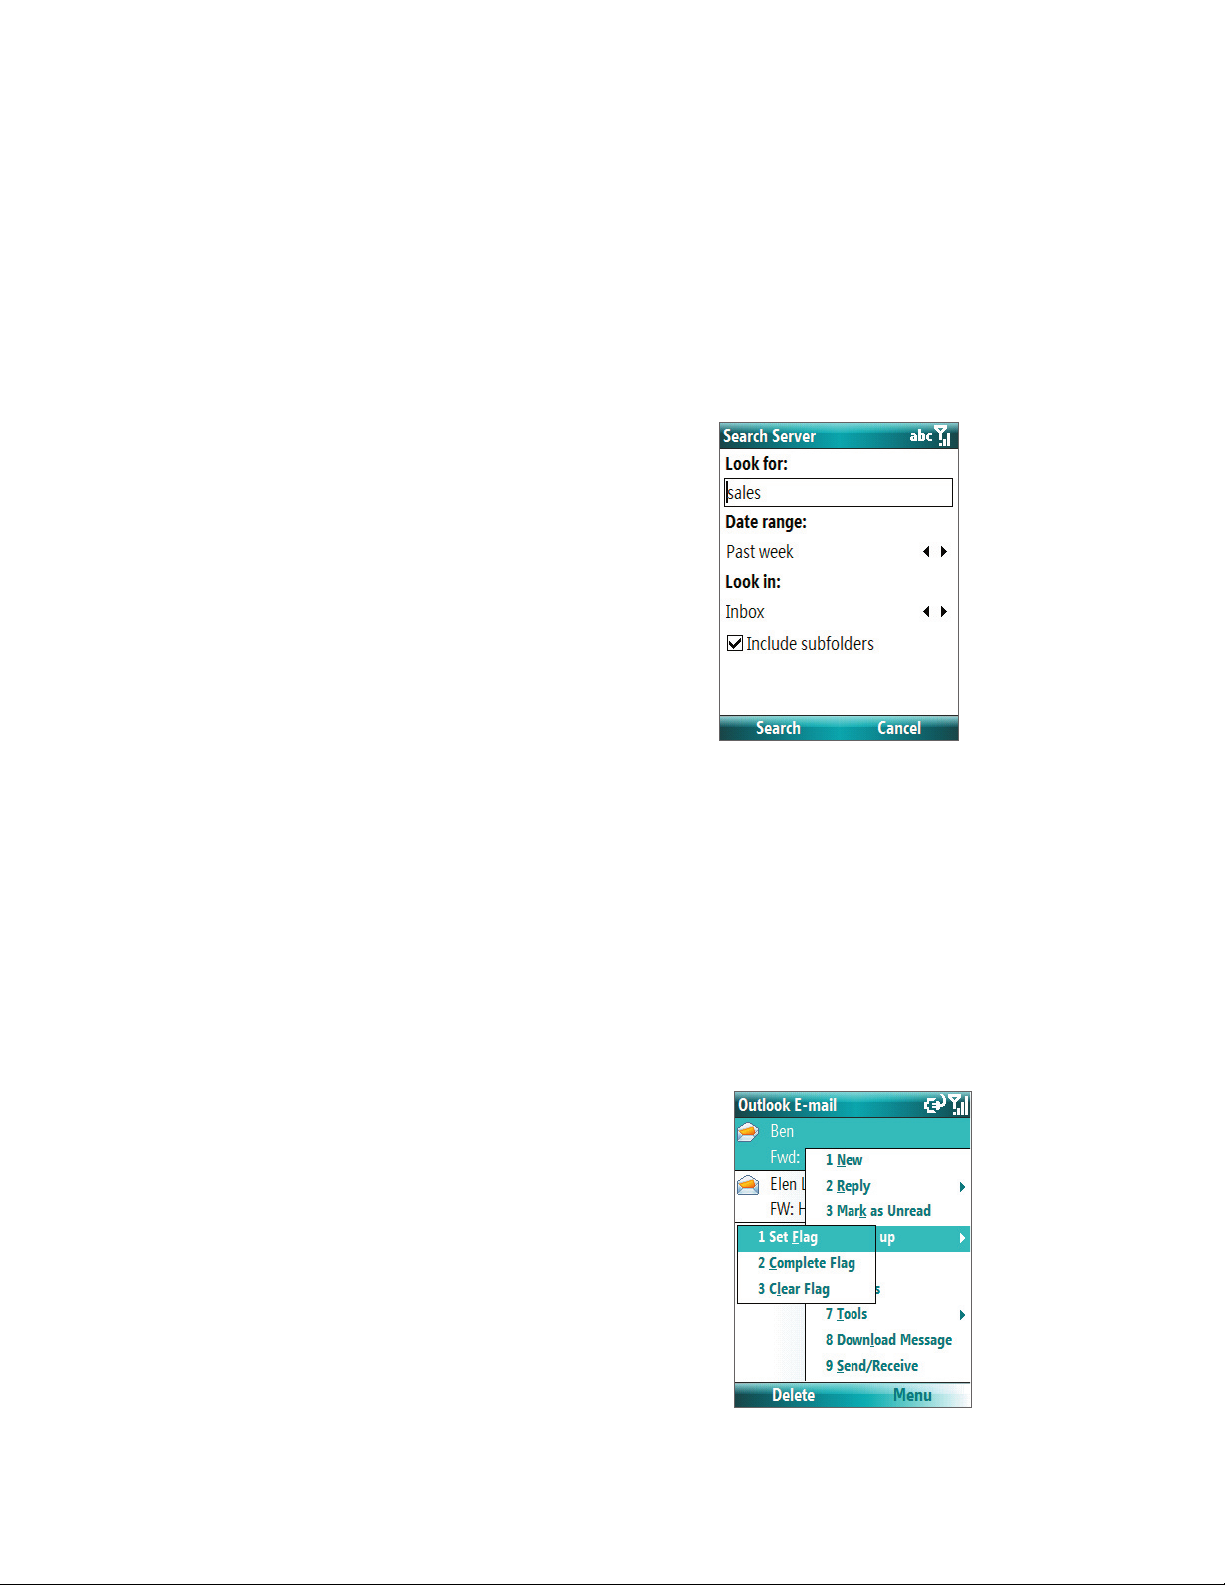
2. Click Menu > Tools > Search Server.
3. In the Look for text box, enter the search keyword.
4. Choose the Date range of messages to search from
and where to search in Look in.
5. Click Search.
.
Flag your messages
Flags serve as a reminder to yourself to follow-up on important issues or requests that are indicated in the
messages.
Requirement Flags are enabled only if e-mails are synchronized with Microsoft Exchange Server 2007 or higher. Flags are
disabled or hidden if e-mails are synchronized with earlier versions of Microsoft Exchange Server.
To flag or unflag a message
1. Click Start > Messaging > Outlook E-mail.
2. Select a message, or open a message.
3. Click Menu > Follow Up and select one of the following options:
• Set Flag Mark the message with a red flag to indicate
that it needs follow up.
• Complete Flag Mark the message with a check mark
to indicate that the issue or request in the e-mail is
already completed.
• Clear Flag Remove the flag to unmark the message.
Note E-mail message reminders are displayed on your phone if the messages are flagged with reminders and synchronized
from the Exchange Server.
Page 5

Working with Company E-mails and Meeting Appointments 65
Out-of-office auto-reply
Outlook Mobile allows you to retrieve and change your out-of-office status. Just like desktop Outlook E-mail,
Outlook Mobile automatically sends an auto-reply message when you’re not available.
Requirement Your company must be using Microsoft Exchange Server 2007 or higher.
To send out-of-office auto-reply messages
1. Click Start > Messaging > Outlook E-mail.
2. Click Menu > Tools > Out of Office.
3. From the I am currently list, select Out of the Office.
4. Enter your auto-reply message then click Done.
View SharePoint documents
When you receive an HTML e-mail containing a link to a SharePoint document, you can click the link to access
and view the document on your phone.
Requirement Your company must be using Microsoft Exchange Server 2007 or higher.
7.3 Managing Meeting Requests
When you schedule and send meeting requests from your phone, you can invite attendees to your meeting
and check their status to know their availability.
When you receive a meeting request, you can reply by accepting or declining the request. The meeting
request also clearly indicates whether or not there are conflicting or adjacent meetings.
Requirement Your company must be using Microsoft Exchange Server 2007 or higher.
To check the status of invited attendees
1. Click Start > Calendar.
2. Follow the procedure in “To send a meeting request” in chapter 5 to invite required and optional
attendees and send a meeting request.
3. Wait for the attendees to respond. When their responses are sent back to you, your calendar is updated
as well.
4. To check the status of the attendees who responded, click Start > Calendar and then click the
scheduled meeting.
5. In the meeting details, click Attendees.
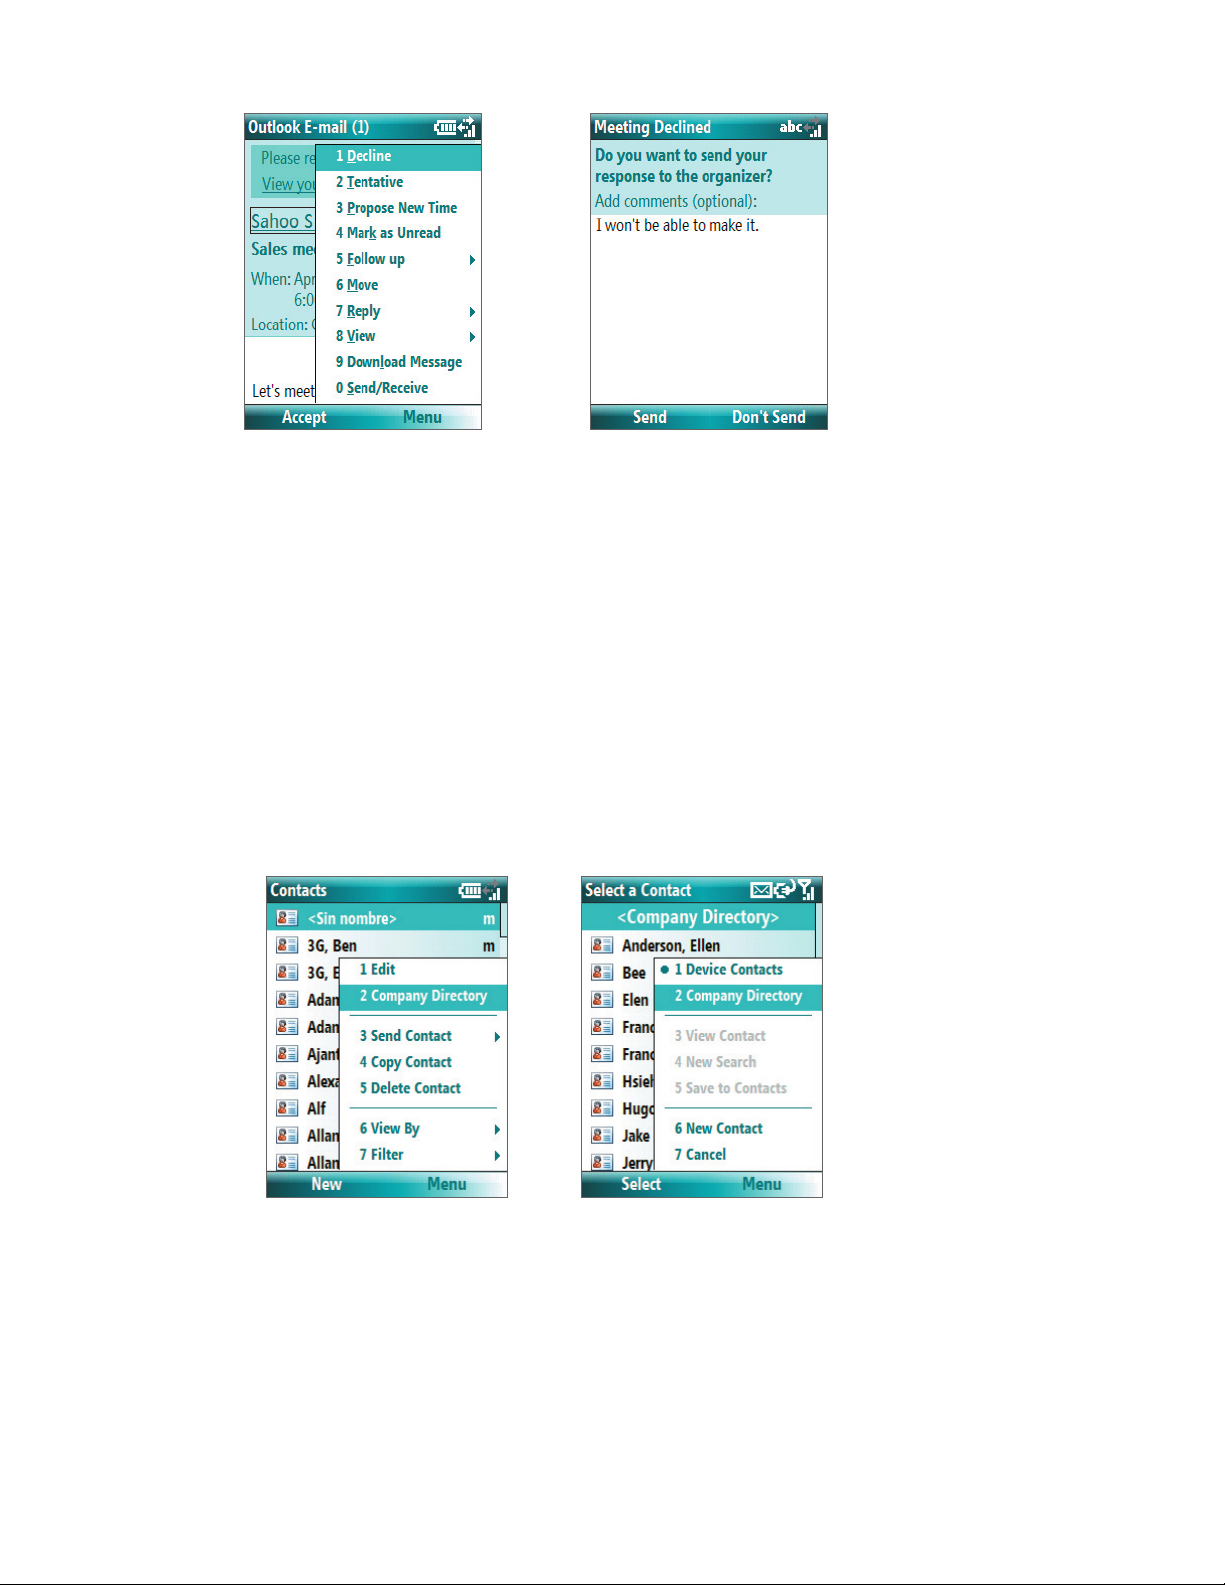
To reply to a meeting request
1. When there’s an incoming e-mail with a meeting request, a notification message will be displayed on
your phone’s Home screen. Scroll to Outlook e-mail and click it.
2. In the Outlook message list, click the e-mail to open it.
3. Click Accept to reply and accept the meeting request, or click Menu > Decline if you cannot attend the
meeting.
Tips • Before responding, you can check your availability during the time of the requested meeting by clicking View
your calendar.
• If the time of the meeting conflicts with your other appointments, a “Scheduling Conflict” status appears on top
of the e-mail.
3. Choose whether or not to edit the response e-mail before sending and then click OK:
Page 6
66 Working with Company E-mails and Meeting Appointments
4. If you accepted the meeting request, it will automatically be added as an appointment in Calendar on
your phone.
7.4 Finding Contacts in the Company Directory
In addition to having contacts on your phone, you can access contact information from your organization’s
Company Directory.
Requirement Access to the Company Directory is available only if your organization is running Microsoft Exchange Server
2003 SP2 or higher, and you have completed your first synchronization with the Exchange Server.
1. Synchronize with Exchange Server if you have never done so.
2. Do any of the following:
• In Contacts, click Menu > Company Directory
• In a new e-mail, click the To box and then click Company Directory at the top of the list or click
Menu > Company Directory
• In a new meeting request using Calendar, scroll to Attendees and click No attendees > Add Required
In Contacts In a new e-mail
Attendee or Add Optional Attendee and then click Company Directory at the top of the list.
.
.
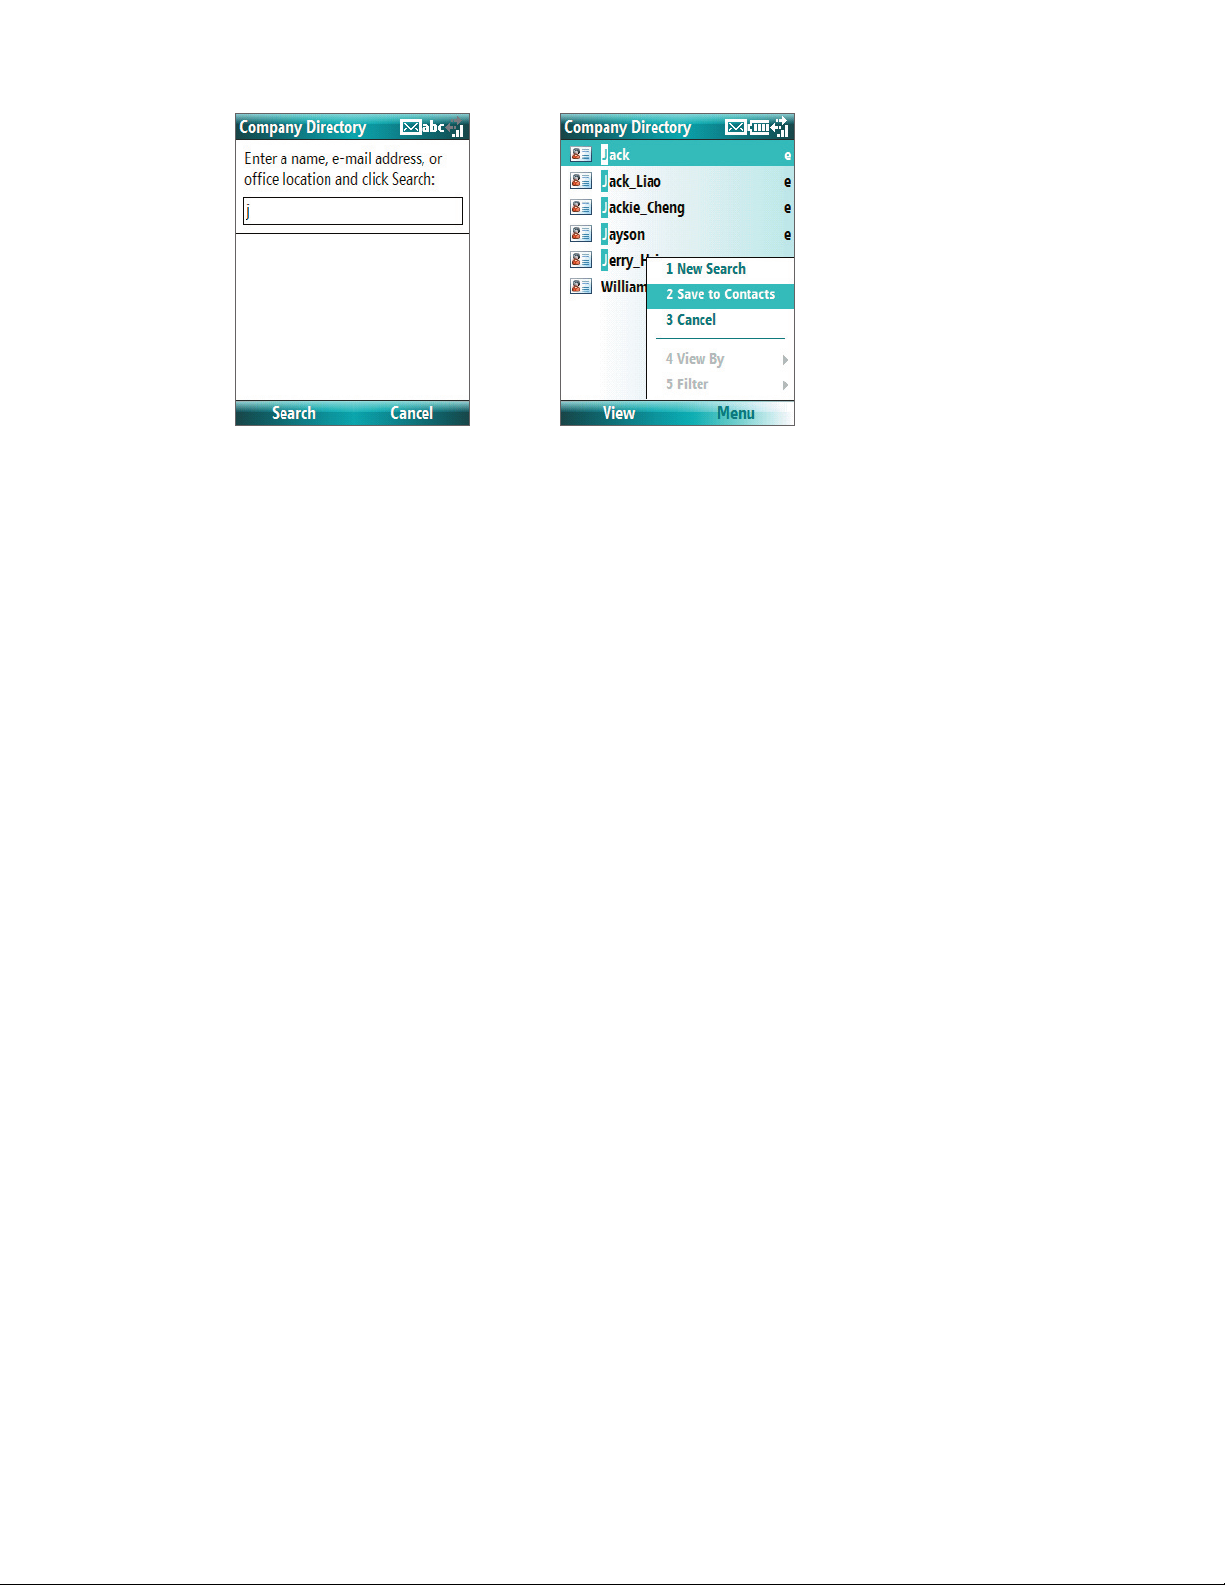
3. Enter the part or full contact name and click Search. In the search results list, click a contact to select it.
Page 7
Working with Company E-mails and Meeting Appointments 67
Notes • You can save the contact from the Company Directory to your phone by selecting the contact then clicking Menu >
Save to Contacts.
• You can search on the following information as long as that information is included in your organization’s Company
Directory: First name, Last name, E-mail name, Display name, E-mail address, or Office location.
7.5 E-mail Security
Windows Mobile on your phone protects your Outlook e-mails through Secure/Multipurpose Internet Mail
Extension (S/MIME), which allows you to digitally sign and encrypt your messages.
Requirement S/MIME encryption and digital signatures for Windows Mobile-based phones are available only with Exchange
Server 2003 SP2 or a later version that supports S/MIME. If you are not using one of these products, or have
not yet synchronized, these options are unavailable.
Note You can encrypt a message with or without a certificate. However, to read an encrypted message, you need a valid
certificate to decrypt it.
To individually sign and encrypt a new message
1. Click Start > Messaging > Outlook E-mail.
2. Click Menu > New to create a new message.
3. Click Menu > Message Options.
4. From the Security list, select whether to encrypt only, sign the message only, or do both.
5. Click Done.
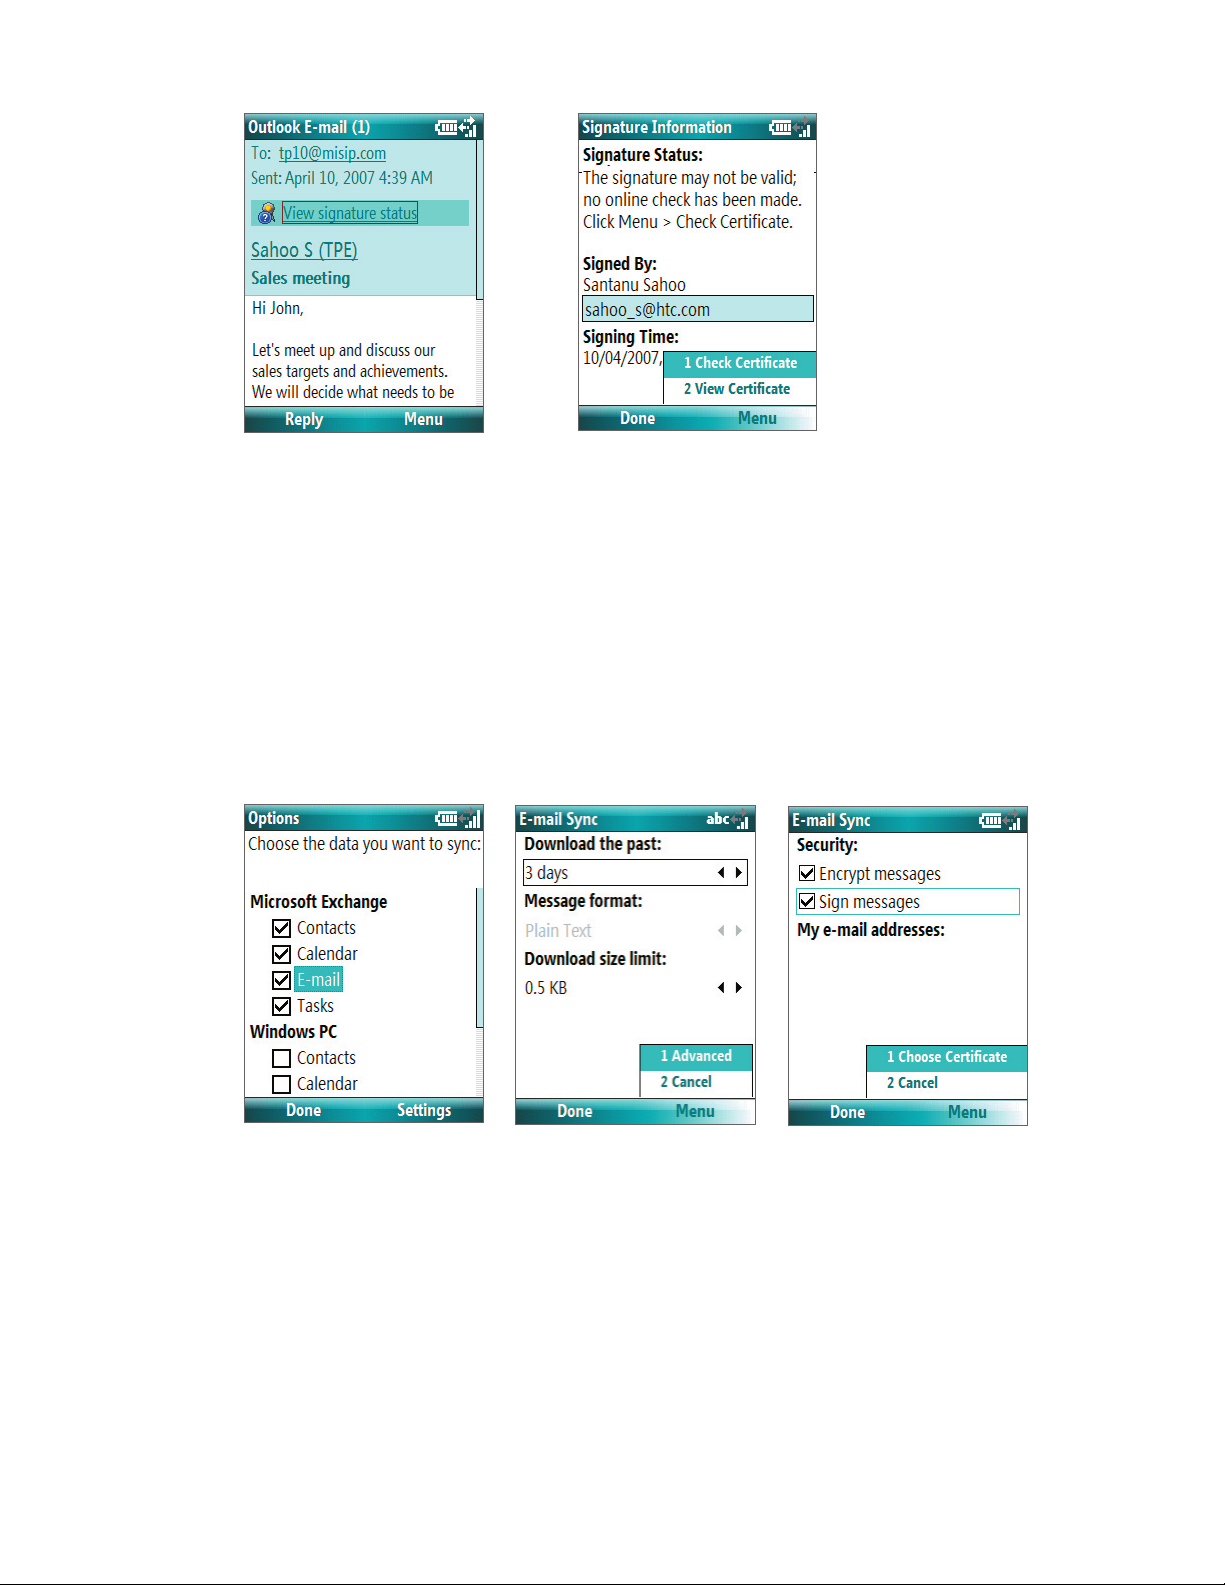
To verify the digital signature on a signed message you receive
1. Open the Outlook e-mail message that has been digitally signed.
2. At the top of the message, click View signature status.
3. Click Menu > Check Certificate.
Page 8
68 Working with Company E-mails and Meeting Appointments
To view the details of the certificate in the message, click Menu > View Certificate.
Note There can be several reasons why a digital signature is not valid. For example, the sender’s certificate may have expired,
it may have been revoked by the certificate authority, or the server that verifies the certificate is unavailable. Contact
the sender to report the problem.
To digitally sign and encrypt all messages
You can set up ActiveSync to digitally sign and encrypt all outgoing messages. You must obtain a valid
certificate to sign and encrypt e-mail messages successfully.
1. Click Start > ActiveSync.
2. Click Menu > Options.
3. Select the E-mail information type, and click Settings. On the E-mail Sync Options screen, click Menu
> Advanced.
4. Select Encrypt messages to protect your e-mails from being viewed except by the intended recipients.
Select Sign messages so that recipients are certain that e-mails are sent by you and have not been
altered.
5. Click Menu > Choose Certificate to select a certificate for signing or encrypting outgoing e-mail
messages.
Page 9

Working with Company E-mails and Meeting Appointments 69
Set permissions on an e-mail message
Another way of protecting your e-mail messages is to send messages with restricted permissions using
Information Rights Management (IRM).
Requirement This works only with a Microsoft Outlook e-mail account and if your company is using RMS Server SP1.
1. Click Start > Messaging > Outlook E-mail.
2. Create a message, then click Menu > Message Options.
3. In Permission, do one of the following:
• To allow anyone to read the message, select Unrestricted Access
• To prevent the message from being forwarded, printed, or copied, select Do Not Forward
4. Click Done.
Tip An IRM-protected message received on your phone can only be replied to or forwarded if the message permits it.
.
.
Page 10

70 Working with Company E-mails and Meeting Appointments
Page 11

Chapter 8
Getting Connected
8.1 Comm Manager
8.2 Connecting to the Internet
8.3 Internet Explorer Mobile
8.4 Wi-Fi
8.5 Bluetooth
8.6 Using your Phone as a Modem
8.7 Windows Live Mobile
Page 12

72 Getting Connected
8.1 Comm Manager
Comm Manager acts like a central switcher that lets you enable or disable phone features as well as manage
your data connections easily.
To open Comm Manager:
• Click Start > Comm Manager or Start > Settings > Connections > Comm Manager.
• Press POWER briefly and select Comm Manager from the Quick List.
• Press and hold HOME.
1. Click to toggle between turning on or off Flight mode. Turning on Flight
mode turns off the phone and Bluetooth functions.
2.
Click to toggle between enabling or disabling the phone. Click Settings
Phone to manage Phone settings.
3. Click to toggle between turning on or off Bluetooth. See “Using Bluetooth”
for details. Click Settings > Bluetooth Settings to configure Bluetooth on
your phone.
4. Click to toggle between turning on or off Wi-Fi. Click Settings > WLAN
Settings to configure Wi-Fi on your phone. See “Wi-Fi” for details.
5. Click to toggle between automatically receiving (as items arrive) or
manually retrieving Outlook e-mails. For more information, see “To receive
e-mails and synchronize other information instantly” in Chapter 3.
6. Click to stop active data services (e.g. ISP dial-up, 1xRTT, or 1xEVDO). You
cannot reconnect data services in Comm Manager.
7. Click to toggle between turning on the phone's ringer or setting it
to vibration/mute mode. Click Settings
customize notification settings.
8. Click to open ActiveSync so you can synchronize the phone and
computer. For more information about the configuration settings for
ActiveSync, see Chapter 3.
>
> Profiles to edit a profile or
Comm Manager screen
Note You can also change the Phone settings and Profiles from the Comm Manager screen by clicking Settings.
8.2 Connecting to the Internet
Your phone’s powerful networking capabilities allow you to access the Internet or your corporate network at
work through wireless and conventional connections. Specifically, you can configure your phone to establish
a connection via Dial-up, Wi-Fi, Bluetooth, Virtual Private Network (VPN), or Proxy.
If you need to manually set up a connection, it is important that you obtain the following information from
your Internet Service Provider (ISP) or the company whose intranet you are trying to access:
• ISP server phone number
• User name
• Password
• Domain name (required for accessing a corporate network or an intranet)
Set up a Dial-up connection
When you use your phone to dial up to your ISP and connect to the Internet or to your corporate network, you
will be billed by the number of minutes that you use.
However, there are some high speed and high performance data connection services (such as 1xRTT and
1xEVDO) available on your phone. While 1xRTT (1 times Radio Transmission Technology) is a third-generation
data service (equivalent to GPRS), 1xEVDO (1 times Evolution Data Optimized) is another high speed wireless
broadband service (equivalent to UMTS) available on your phone for quick Internet access and Direct Push to
work. For more information on how to avail these services, contact your network service provider.
Page 13

Getting Connected 73
To establish a dial-up connection on your phone, you need the same settings that you normally use when you
dial up from your computer. This includes the ISP server phone number, your user name, and password.
To set up a dial-up connection for browsing the Internet
1. On the Home screen, click Start > Settings > Connections > Dial-up.
2. Click New or Menu > Add.
3. In Description, enter a name for the connection.
4. In Connects to, select The Internet.
5. Enter the appropriate information in the remaining fields.
6. Click Done. To start browsing the Internet, click Start > Internet Explorer.
To set up a dial-up connection to your corporate network
1. On the Home screen, click Start > Settings > Connections > Dial-up.
2. Click Menu > Add.
3. In Description, enter a name for the connection.
4. In Connects to, select Work.
5. Enter the appropriate information in the remaining fields.
6. Click Done.
Note You can also add and set up the following connections:
• VPN: A VPN connection is used to access your corporate network by using an existing Internet connection.
• Proxy: A Proxy connection is used to access the Internet using an existing connection to your corporate or WAP
network.
Advanced options
From the Connections screen, you can access advanced options to specify the service provider, the number of
redial attempts, the amount of idle time to wait before disconnecting, and so on.
1. On the Home screen, click Start > Settings > Connections.
2. Click Menu > Advanced.
3. Select a network service provider for each connection type. You can choose Automatic to allow the
phone to set a service provider for each connection by default.
4. Click Menu > Options.
5. Choose the appropriate information in the remaining fields.
6. Click Done.
Page 14

74 Getting Connected
Add a URL exception
Some URLs for Web pages on your company intranet may use periods, for example: intranet.companyname.
com. To view these pages in Internet Explorer Mobile, you must create a URL exception.
1. On the Home screen, click Start > Settings > Connections.
2. Click Menu > Advanced.
3. Click Menu > Work URL Exceptions.
4. Click Menu > Add.
5. In URL Pattern, enter the URL name. To add multiple URLs, use a semicolon (;).
6. Click Done.
Note You do not need to create URL exceptions for Internet URLs.
8.3 Internet Explorer Mobile
Internet Explorer Mobile is a full-featured Internet browser, optimized for use on your phone.
To open Internet Explorer
• On the Home screen, click Start > Internet Explorer.
Note You can also open Internet Explorer by pressing from the QWERTY keyboard.
Browse the Web
1. In Internet Explorer, click Menu > Address Bar.
2. Enter the address and click Go.
3. Use the NAVIGATION CONTROL to browse the Web page. Press ENTER when a link is highlighted to
access it.
While browsing the Web, click Menu to open a list of options that will let you change the view, save Favorites,
and set Internet Explorer Mobile preferences, and more.
Click Menu > Add to Favorites to
save the current Web page in your
Favorites folder. Click Favorites to
access your Favorites folder.
For more information about Internet Explorer Mobile, please go to
http://www.microsoft.com/windowsmobile/help/smartphone/browseinternet.mspx
Click Menu > View and then select
the text size and type of view you
want to use while browsing a Web
page.
Click Menu > Tools to let you send
the link via e-mail, view the page’s
properties, or set Internet Explorer
Mobile preferences.
Page 15

Getting Connected 75
8.4 Wi-Fi
Wi-Fi provides wireless Internet access over distances of up to 100 meters.
Note The availability and range of your phone’s Wi-Fi signal depends on the number, infrastructure, and other objects
through which the signal passes.
To connect to an existing Wi-Fi network
1. On the Home screen, click Start > Comm Manager and click the WLAN icon. The WLAN icon is then
highlighted to indicate that WLAN is turned on.
2. After a few seconds, a message asks you if you want to see the list of available networks, click Yes.
3. In Select network, choose the WLAN network to connect to.
4. In Network type, select Internet and click Connect.
If you are connecting to a security-enabled network, you will be asked to enter the WEP Key. Enter the
WEP Key and click Done.
You can check the Wi-Fi icon the Title bar on the screen to see if you are connected to the Wi-Fi network. To
see the status icons, please see “Status Indicators” in chapter 1.
Notes
• Wi-Fi connects to the default network that is available on your phone. However, GPRS starts by default if your phone
does not detect any Wi-Fi signal.
• In Comm Manager, click Settings > WLAN Settings > Connection Status to check the current connection status and
signal quality of each Wi-Fi channel.
• Configure your phone so that the Wi-Fi function turns off automatically when no signal is detected to conserve battery
power. In Comm Manager, click Settings
> WLAN Settings > Wi-Fi > Menu > Wi-Fi Settings.
To create a new Wi-Fi connection
If the Wi-Fi connection you want to connect to is not in the list, you can create a new Wi-Fi connection.
1. On the Home screen, click Start > Settings > Connections >
WLAN Settings > Wi-Fi > New.
2. Enter the Network name and Network type and click Next.
Note If you want only to connect directly to another device or computer, and not to a network through an access point,
select This is a device to device (ad-hoc) connection.
3. Select the Authentication type and Data encryption, then click Next. For TKIP, AES, or WEP data
encryption, enter the needed information in the remaining fields.
4. Select Use IEEE 802.1x network access control to use Extensible Authentication Protocol (EAP). Select
the EAP type depending on the type of authentication. Click Finish.
To increase security on the Wi-Fi network
The LEAP (Lightweight Extensible Authentication Protocol) feature of Comm Manager helps increase security
on your phone, and ensures that nobody is able to access your network without your permission.
1. On the WLAN Settings screen, select LEAP.
2. Click Menu > New.
Note By default, the LEAP screen displays data that you entered previously. However, you can modify or delete the data as
required by clicking Menu > Modify or Menu > Delete on the LEAP screen.
3. Enter the SSID (Service Set Identifier).
You can obtain this information from your wireless service provider.
4. Enter the user name, password, and domain.
Page 16

76 Getting Connected
5. Select an Authentication Type.
By default, the Authentication Type for your phone is Open System authentication.
Note For LEAP to work correctly, the receiving phone (your phone) must be set with the same SSID, user name, and password
as the access point.
8.5 Bluetooth
Bluetooth is a short-range wireless communications technology. Phones with Bluetooth capabilities can
exchange information within a distance of about 10 meters without requiring a physical connection.
Bluetooth modes
Bluetooth on your phone operates in three different modes:
1. On. Bluetooth is turned on. Your phone can detect other Bluetooth-enabled devices, but not vice versa.
2. Off. Bluetooth is turned off. In this mode, you can neither send nor receive information using
Bluetooth. You might want to turn off the radio at times to conserve battery power, or in situations
where radio use is prohibited, such as onboard an aircraft and in hospitals.
3. Visible. Bluetooth is turned on, and all other Bluetooth-enabled devices within range can detect your
phone.
Note
By default, Bluetooth is turned off. If you turn it on, and then turn off your phone or turn on the flight mode, Bluetooth
also turns off. When you turn on your phone again or turn off the flight mode, Bluetooth automatically turns on
.
To turn on or off Bluetooth on your phone
You can enable Bluetooth by clicking the On/Off switch in Comm Manager. You can also do the following:
1. On the Home screen, click Start > Settings > Connections > Bluetooth.
2. Click Bluetooth > Menu > Turn on Bluetooth.
To turn off Bluetooth capabilities on your phone, click Bluetooth > Menu > Turn off Bluetooth
.
To make your phone visible
1. On the Home screen, click Start > Settings > Connections > Bluetooth.
2. Click Bluetooth > Menu > Turn on Visibility.
Tip Enter a Bluetooth phone name for your phone. This will be the phone name that will be shown on another
Bluetooth-enabled device when it searches and detects your phone. To enter a name, on the Bluetooth screen,
click Security and enter a Device name.
Bluetooth partnerships
A Bluetooth partnership is a relationship that you create between your phone and another Bluetooth-enabled
device in order to exchange information in a secure manner.
To create a Bluetooth partnership
1. On the Home screen, click Start > Settings > Connections > Bluetooth.
2. Click Bluetooth > Add new device.
Your phone searches for other Bluetooth-enabled devices and lists them.
3. Select the desired device name in the list and click Next.
4. Enter a passcode (1 up to 16 characters) to establish a secure connection, then click Next.
Page 17

Getting Connected 77
5. Wait for the paired device to accept the partnership:
6. On your phone, a message will appear, indicating that your phone has connected with the paired
device. Click OK.
7. The name of the paired device is then displayed. You may edit and enter a new name for that device,
then click Next.
8. Select the check boxes of services that you want to use from the paired device and click Done.
To accept a Bluetooth partnership
1. Ensure that Bluetooth is turned on and in visible mode.
2. Click Yes when prompted to establish a partnership with the other device.
3. Enter a passcode (the same passcode that is entered on the device requesting the partnership) to
establish a secure connection.
4. Click Next.
5. A message will appear, indicating that your phone has connected with the paired device. Click OK.
6. The name of the paired device is then displayed. You may edit and enter a new name for that device,
then click Next.
7. Select the check boxes of services that you want to use from the paired device.
8. Click Done. You can now exchange information with the other device.
To change the display name of a Bluetooth device
1. On the Home screen, click Start > Settings > Connections > Bluetooth.
2. Click Bluetooth and then on the screen, select a Bluetooth device.
3. Click Menu > Edit.
4. Enter a new display name for the Bluetooth device, then click Next.
5. Click Done.
To delete a Bluetooth partnership
1. On the Home screen, click Start > Settings > Connections > Bluetooth.
2. Click Bluetooth and then on the screen, select a Bluetooth device.
3. Click Menu > Delete, and then click Yes in the confirmation screen.
4. Click Done.
Connect a Bluetooth hands-free or stereo headset
For hands-free phone conversations or to listen to music, you can use a Bluetooth hands-free or stereo
headset.
Note You need a Bluetooth stereo headset to listen to music.
To connect a Bluetooth hands-free or stereo headset
1. Make sure that both your phone and the Bluetooth headset are turned on and within close range,
and that the headset is visible. Refer to the manufacturer’s documentation to find out how to set the
headset in visible mode.
2. On the Home screen, click Start > Settings > Connections > Bluetooth.
3. Click Bluetooth > Add new device. Your phone searches for other Bluetooth-enabled devices and
displays them in the list.
Page 18

78 Getting Connected
4. Select the name of the
headset, and click Next.
5. In Passcode, enter the
alphanumeric passcode for
the Bluetooth headset, then
click Next. The passcode is
usually “0000”.
A message will appear
saying that your phone has
connected to the headset,
click OK.
6. Enter the display name for
the headset and click Next.
7. Select the check boxes for the Wireless Stereo (if available) and Hands Free services, and click Done.
Note If the Bluetooth stereo headset becomes disconnected, turn the headset on and repeat steps 1 to 2 above. Select the
stereo headset and click Menu > Set as Wireless Stereo
Beam information using Bluetooth
.
You can beam information, such as contacts, calendar items, and tasks, as well as files from your phone to your
computer or to another Bluetooth-enabled device.
Notes
• If your computer does not have built-in Bluetooth capabilities, you need to connect and use a Bluetooth adapter or
dongle on your computer.
• Before beaming items to your computer, open Bluetooth Configuration or Bluetooth Settings in the Control Panel and
check if there’s an option for setting a location for saving beamed items.
To beam information from your phone to a computer
1.
Set Bluetooth on your phone to visible mode. For information about this, see “To make your phone visible
2. Next, set Bluetooth on your computer to visible mode, create a Bluetooth partnership, then enable
your computer to receive Bluetooth beams.
If your computer has Windows Vista or Windows XP SP2 and your computer’s Bluetooth adapter is
supported by your Windows version, do the following steps:
a. On your computer, open Bluetooth Devices from the Control Panel then click the Options tab.
b. For Windows Vista, select Allow Bluetooth devices to find this computer
For Windows XP, select Turn discovery on and Allow Bluetooth devices to connect to this computer
c. Create a Bluetooth partnership between your phone and computer. For information about creating
a partnership, see “Bluetooth partnerships”.
d. In the Options
tab of Bluetooth Devices, select Show the Bluetooth icon in the notification area.
.
”.
.
e. To enable your computer to receive Bluetooth beams, right-click the Bluetooth icon at the bottom-
right of your computer screen and select Receive a File
3. Now you are ready to beam. On your phone, select an item to beam. The item can be an appointment
in your calendar, a task, a contact card, or a file.
4. Click Menu > Beam [type of item].
5. Select the device name to which you want to beam to.
6. Click Beam.
.
Page 19

Getting Connected 79
7. If you beamed a calendar, task, or contact item to your computer and it is not automatically added to
Outlook, click File > Import and Export to import it to Microsoft Outlook on your computer.
To beam information to a Bluetooth-enabled device such as another phone, create a Bluetooth partnership
then do steps 3 to 6 in the above procedure.
Tip The default folder on your computer where beamed items are stored may be
Windows XP: C:\Documents and Settings\your_username\My Documents
Windows Vista: C:\users\your_username\My Documents
Bluetooth Explorer and Bluetooth file sharing
Bluetooth Explorer searches for other Bluetooth devices that have file sharing enabled and lets you access
their Bluetooth shared folder. You can copy files from and to their shared folder, and create subfolders in it.
When you enable Bluetooth file sharing on your device, other Bluetooth-enabled devices will also be able to
access your Bluetooth shared folder.
To enable Bluetooth Explorer and Bluetooth file sharing on your phone
1. Click Start > Settings > Connections > Bluetooth > FTP.
2. Select the Enable Bluetooth Explorer check box. This makes the /Bluetooth phone folder visible in
File Explorer.
3. Select the Enable File Sharing check box. Click Browse to change the folder to share.
To use Bluetooth Explorer
1. Bluetooth Explorer is integrated with the File Explorer program. You can open it by clicking Start >
Programs > Bluetooth Explorer or by clicking the Bluetooth folder under the My Device folder in File
Explorer.
2. Bluetooth Explorer then scans for other Bluetooth-enabled devices. From the list, select a Bluetooth
device you want to connect to. You may need to enter a passcode in order for you to connect to the
device.
3. If there are files contained in the Bluetooth shared folder on the other device, you will be able to see
them on the Bluetooth Explorer screen.
Select a file and click Menu > Edit and choose to cut or copy the files.
4. Click Up twice.
5. Navigate to the folder where you want to paste the files on your device, then click Menu > Edit >
Paste.
Page 20

80 Getting Connected
8.6 Using your Phone as a Modem
When you need Internet access on your notebook computer while traveling, you can use your phone as a
modem for your notebook. Install the VZAccess Manager software (from the provided CD) on your notebook
so you can use the NationalAccess or BroadbandAccess service from Verizon Wireless to connect your
notebook to the Internet.
This section shows how to install VZAccess Manager and quickly set up your notebook computer for
Internet access. You will also learn the basics on using VZAccess Manager, such as how to connect to
the NationalAccess or BroadbandAccess service, use its text messaging feature, etc. For more in-depth
information about this software, refer to the documentation on the CD.
Notes • Your data plan must include the NationalAccess or Broadband Access service. Contact Verizon Wireless or visit http://
www.verizonwireless.com to get pricing information and subscribe to any of these services.
• The VZAccess Manager software on the provided CD has been customized for your phone. However, some of the
features described in the documentation on the CD may not be supported.
Install VZAccess Manager
There are two items that you need to install on your notebook computer: your phone’s modem driver and
VZAccess Manager software. Follow the steps below to complete the installation.
To install your phone’s modem driver
1. Insert the provided CD into the CD or DVD
drive of your notebook computer.
2. Run Start.exe from the CD.
3. On the first window that opens, click Next.
4. The main installation window then appears.
Click Install USB Driver.
5. On the Welcome screen, click Next. The
installer then copies the phone’s modem
driver to your computer.
6. Select Yes, I want to restart my computer
now, click OK, and then click Finish.
After restarting your computer, run the installer again and install the VZAccess Manager software.
To install VZAccess Manager
1. Run Start.exe from the CD.
2. Click Next.
3. Click Install VZAccess Manager and follow the on-screen instructions to complete the installation.
Set Up Internet access
After installation is complete, the VZAccess Manager Setup Wizard automatically opens and walks you
through the process of setting up your notebook computer for Internet access. Follow the steps below to
complete the setup process.
Page 21

1. Before you continue with the setup wizard,
power on your phone and connect it
to your notebook computer using the
supplied USB cable.
2. On your phone, click Start > Modem Link,
then click Menu > Start.
3. On the Welcome screen of the VZAccess
Manager Setup Wizard, click Next.
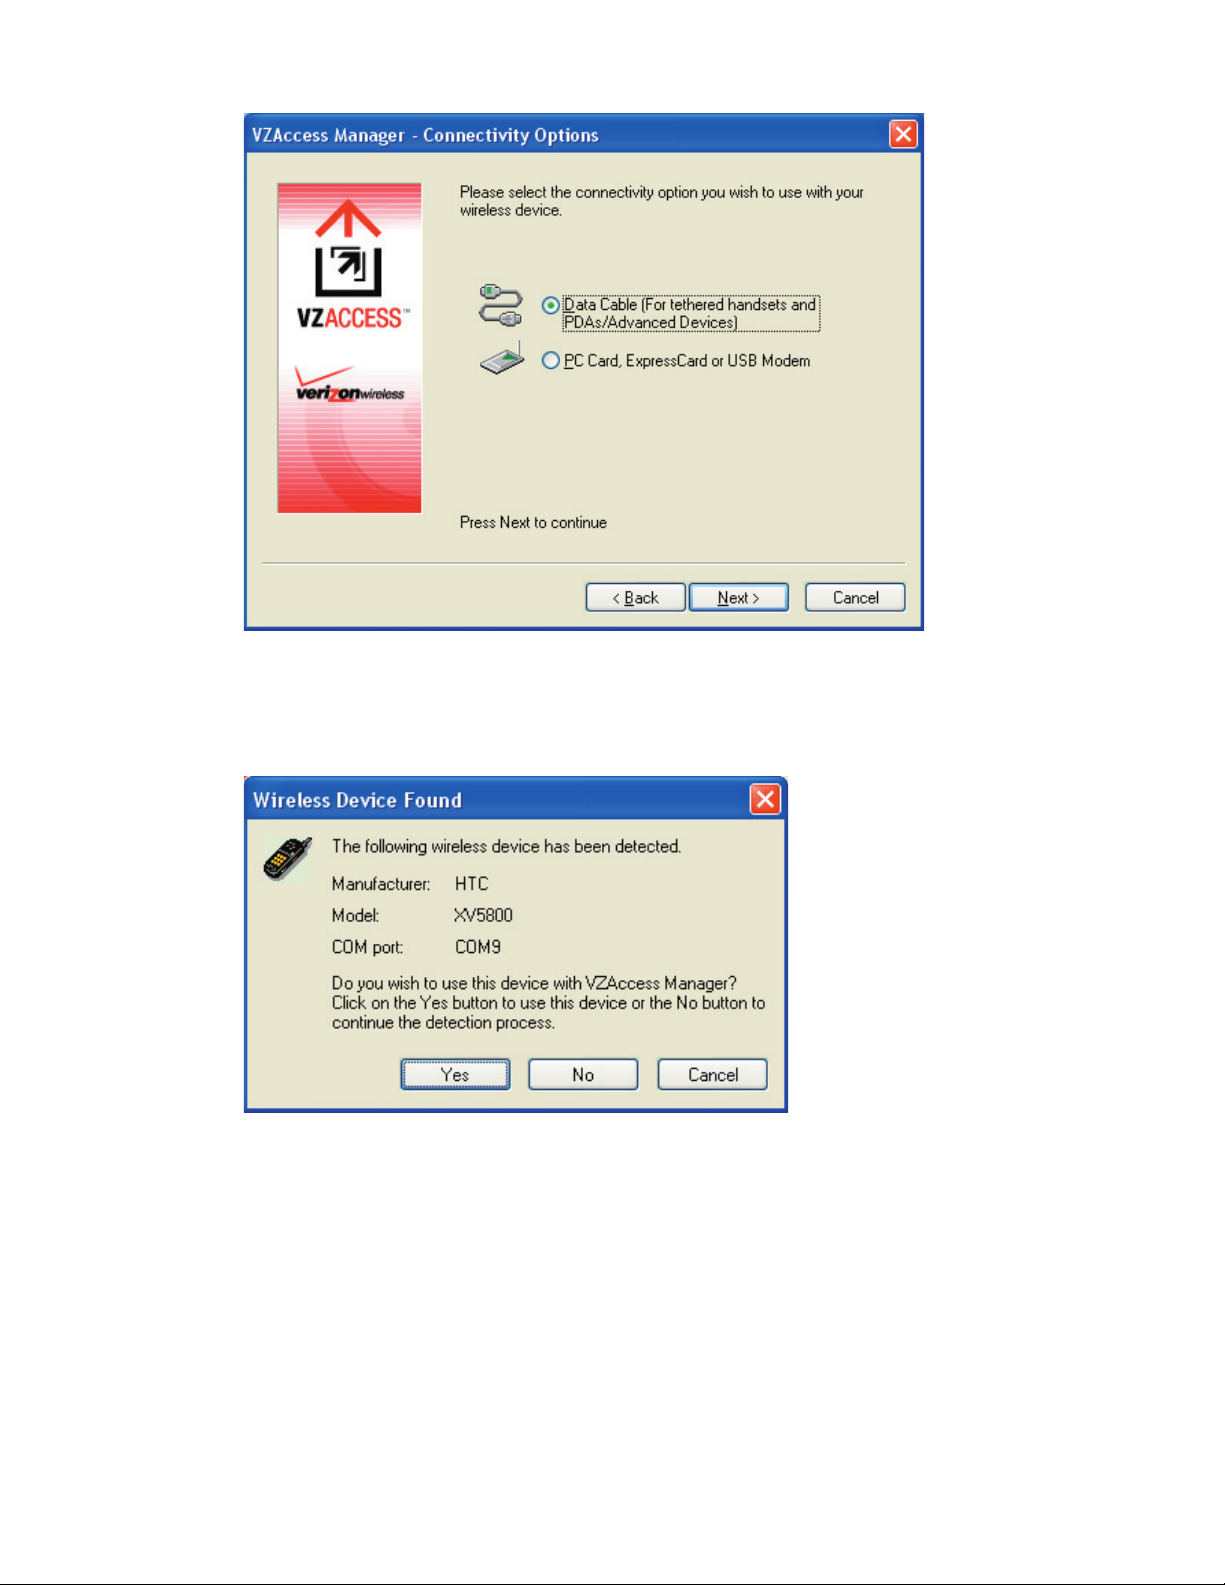
4. Select Detect WWAN device only then
click Next.
Getting Connected 81
Note If your notebook computer has built-in Wi-Fi or has a Wi-Fi card installed, you can select the Detect both Wi-Fi and
WWAN option. This allows you to use either your phone or your computer’s Wi-Fi adapter to connect your notebook to
the Internet. For more information, refer to the VZAccess Manager documentation on the CD.
5. VZAccess Manager will now detect and set up your phone. Click Next.
6. Select Data Cable and click Next.
Page 22
82 Getting Connected
7. Before proceeding, make sure your phone’s modem driver is already installed on your notebook
computer. See “To install your phone’s modem driver” for details.
If the driver has already been installed, click Next to continue.
8. A message then appears, indicating that your phone has been detected. Click Yes.
9. Your phone is generally recognized as HTC USB Modem by VZAccess Manager. Click Next to proceed.
Page 23

Getting Connected 83
10. The mobile phone number that you use on your phone is automatically recognized and then displayed
on the next screen. Click Next.
11. You can set VZAccess Manager to automatically run whenever you start up your computer by selecting
the Run VZAccess Manager at Startup check box.
12. Click Finish.
Use VZAccess Manager to connect your notebook to the Internet
After you finished setting up VZAccess Manager on your notebook, the software automatically launches. You
can also manually launch VZAccess Manager whenever you want to access the Internet on your notebook.
Page 24

84 Getting Connected
To manually launch VZAccess Manager
1. Connect your phone to your notebook’s USB port.
2. On your phone, click Start > Modem Link, then click Menu > Start.
3. On your notebook, double-click the VZAccess Manager icon on the Windows Desktop or click Start >
Programs > VZAccess Manager.
To connect to NationalAccess or BroadbandAccess
VZAccess Manager opens in Networks view, which lists all currently available network connections and
indicates their respective signal strengths. Connect to the NationalAccess or BroadbandAccess service of
Verizon Wireless so you can access the Internet on your notebook.
1. Double-click NationalAccess - BroadbandAccess
2. Click Continue to connect.
Once your notebook is successfully connected to the Internet, you will see a “Connected” status at the bottom
left-hand side of VZAccess Manager’s status bar. You can now surf the web and use e-mail on your notebook.
To disconnect the Internet connection
1. Click Disconnect on VZAccess Manager.
2. On Modem Link screen of your phone, click Menu > Stop.
Overview of the user interface
One cool feature of VZAccess Manager is that it allows you to view, send and receive SMS text messages
directly on the user interface. From VZAccess Manager, you can also launch Internet Explorer, open Outlook
E-mail if it is your notebook’s default e-mail software, and add shortcuts of your favorite applications.
 Loading...