

Page 1

1 Phone Basics
1.1 Getting to Know Your Phone and
Accessories ...................................................18
1.2 Installing the SIM Card (FOMA Card), Battery,
and Storage Card ..........................................20
1.3 Charging the Battery ..................................... 23
1.4 Phone Controls..............................................24
1.5 Getting Around Your Phone .........................25
1.6 Getting Started ..............................................25
1.7 Home Screen ................................................. 28
1.8 Phone Status and Notifications ...................31
1.9 Applications ...................................................33
1.10 Settings .......................................................... 33
1.11 Adjusting the Volume ...................................34
1.12 Using the Onscreen Keyboard .....................35
1.13 Using the Phone’s Storage Card as a USB
Drive ...............................................................38
17
Page 2
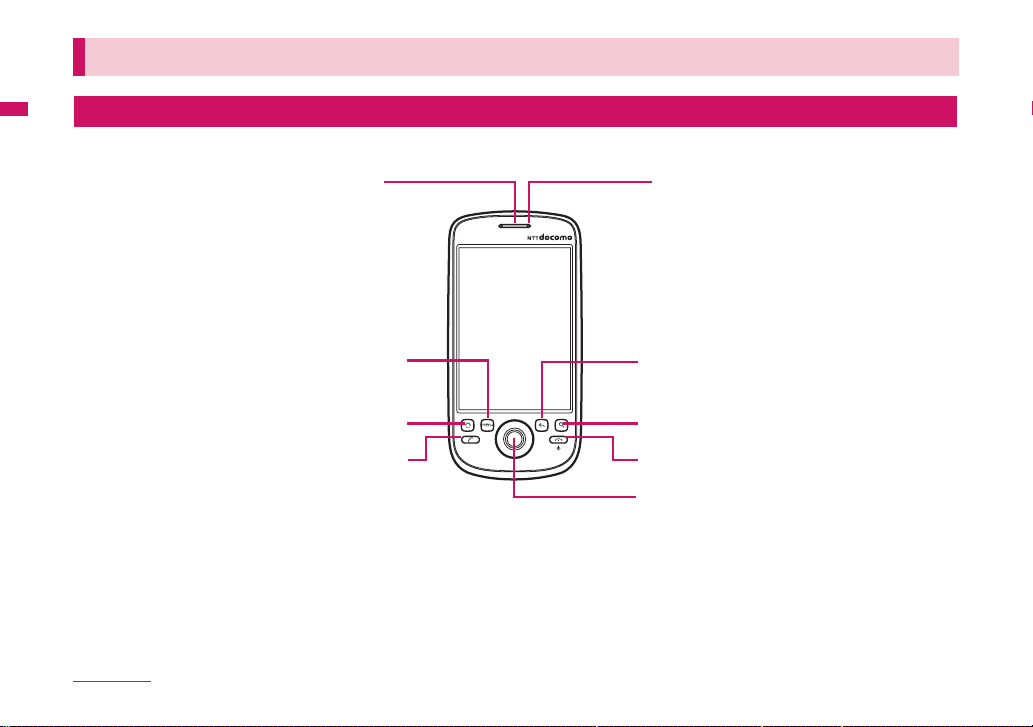
1.1 Getting to Know Your Phone and Accessories
Front panel
Earpiece
Listen to a call
from here.
MENU
HOME
CALL
For more information about the functions of the MENU, HOME, CALL, END CALL/POWER, SEARCH and BACK buttons, refer to "Phone
Controls" on page 24 for more details. For more information about the TRACKBALL, refer to "Use the Trackball" on page 25.
Phone Basics
18
Notification LED
See "Notification LED" on
page 32 for details.
BACK
SEARCH
END CALL/POWER
TRACKBALL
Page 3
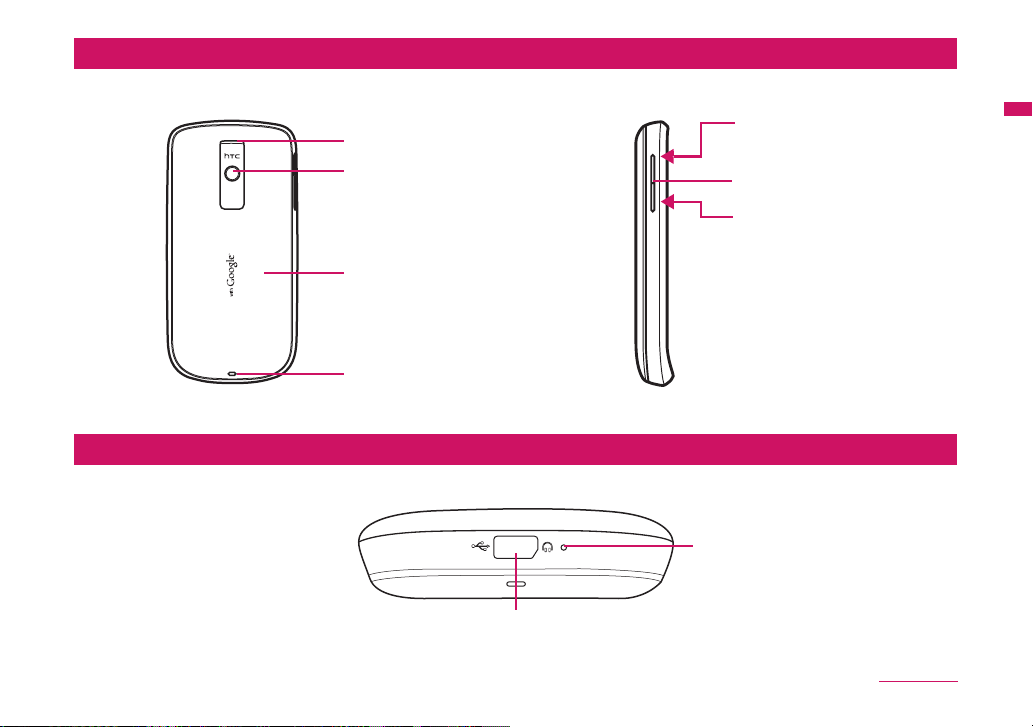
Back and left panels
Bottom panel
Speaker
3.2 Megapixel Camera
See "Using Camera" on
page 96 for details.
Back Cover
Strap Holder
USB connector/Earphone Jack
VOLUME UP
Press to increase the ringer or
media volume.
Volume adjustment button
VOLUME DOWN
Press to decrease the ringer or
media volume.
Microphone
Phone Basics
Continued on next page
19
Page 4
Inside the box
The product package may include the following items and
accessories:
• Battery Pack HT04 (2)
• microSDTM Card 2 GB (sample)
• INSTRUCTION MANUAL
• Stereo Earphones Cable with MIC (sample)
• FOMA miniUSB Conversion Adapter HT01
• USB Cable (sample)
• Battery Case (sample)
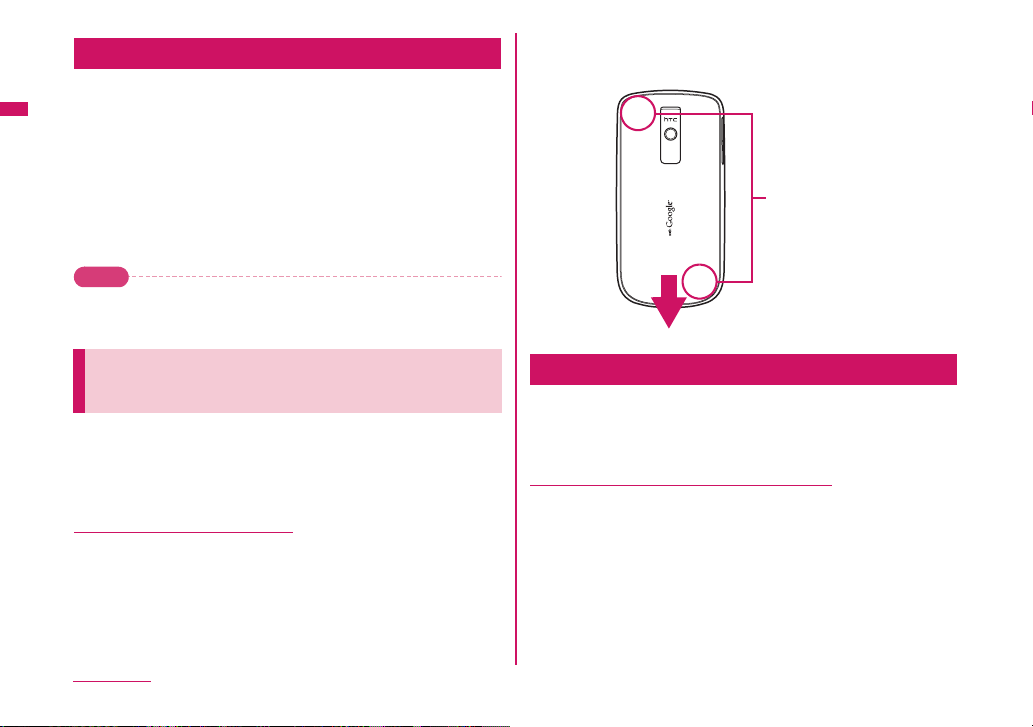
Push the back cover down with your thumb until it
3
disengages from the phone.
Push down from this corner
Note
• The sample microSD
purchase
.
TM
Card 2 GB is pre-installed at the time of
1.2 Installing the SIM Card (FOMA
, Battery, and Storage Card
Card)
Always turn off your phone before installing or replacing the SIM
card (FOMA card), battery, and storage card. You also need to
remove the back cover before you can install the SIM card
(FOMA card) and battery.
To remove the back cover
Make sure the phone is turned off.
1
Firmly hold the phone with both hands and the front
2
panel facing down.
Phone Basics
20
SIM Card (FOMA Card)
The SIM card (FOMA card) is an IC card containing such information
as your phone number. You cannot make a call or packet
communications without installing it on your phone.
To install the SIM card (FOMA card)
Make sure the phone is turned off.
1
Locate the SIM card slot, then insert the SIM card
2
(FOMA card)
its cut-off corner facing out the card slot.
with its gold contacts facing down and
Page 5
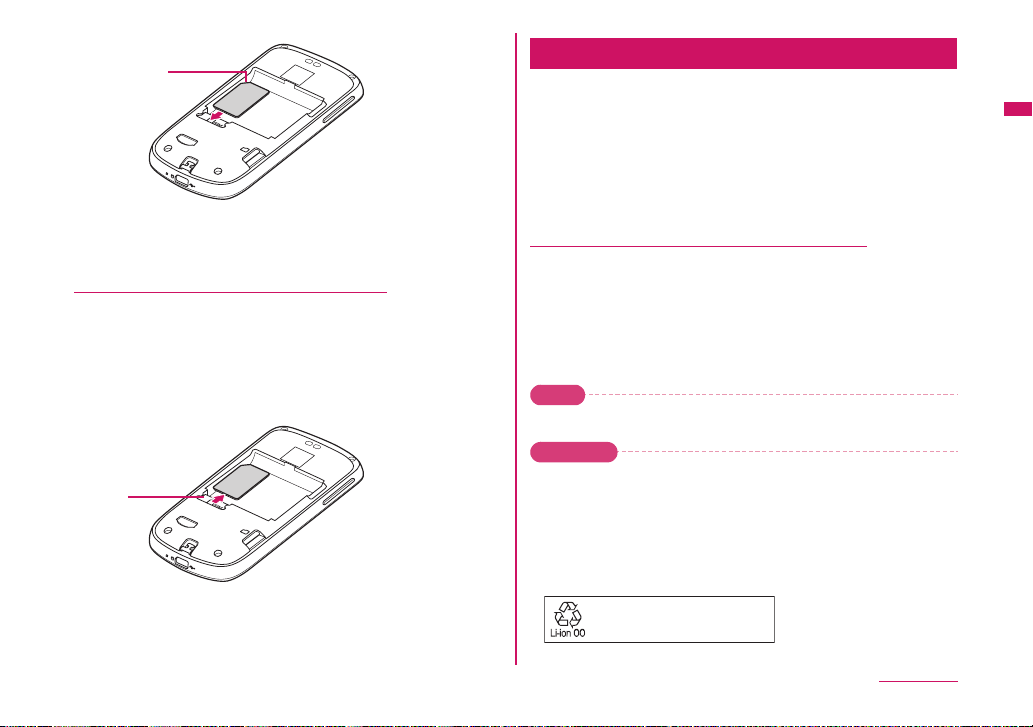
Cut-off corner
Slide the SIM card (FOMA card) completely into the
3
slot.
To remove the SIM card (FOMA card)
Remove the back cover and the battery if it is
1
installed.
Locate the groove below the SIM card (FOMA card)
2
slot, then push the SIM card (FOMA card) out of the
slot with your finger.
Groove
Battery
Your phone comes with a rechargeable Lithium-ion battery and is
designed to use only manufacturer-specified original batteries and
accessories. Battery performance depends on many factors,
including network configuration, signal strength, the temperature of
the environment in which you operate your phone, the features and/or
settings you select and use, items attached to connecting ports, and
your voice, data, and other program usage patterns.
Battery life estimates (approximations):
Talk time:
• Approx. 240 minutes for FOMA/3G
• Approx. 260 minutes for GSM
Standby time:
• Approx. 210 hours (stationary)/120 hours (in transit) for FOMA/3G
• Approx. 140 hours
Note
• Battery life is subject to network and phone usage.
Warni ng
• To reduce risk of fire or burns:
- Do not attempt to open, disassemble, or service the battery pack.
- Do not crush, puncture, short external contacts, or dispose of in fire or
water.
- Do not expose to temperatures above 35°C.
- Replace only with the battery pack designated for this product.
- Recycle or dispose of used battery as stipulated by local regulations.
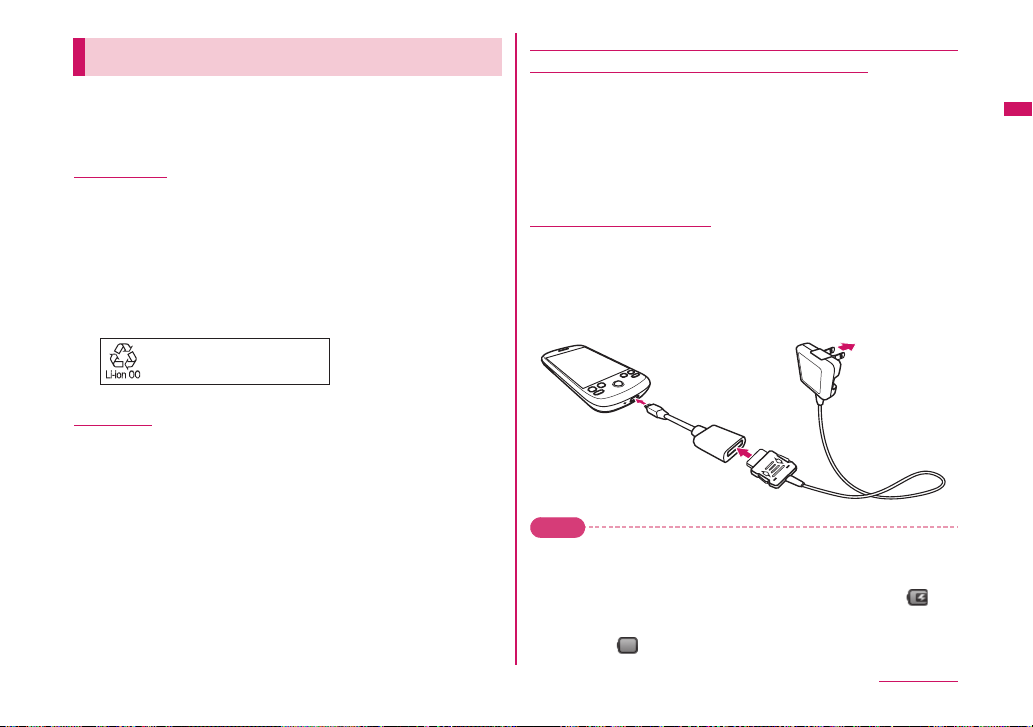
To protect the environment, bring
used battery packs to a docomo
Shop, agency, recycle shop, etc.
(stationary)
for GSM
Phone Basics
Continued on next page
21
Page 6

To install the battery
Align the battery’s exposed copper contacts with the
1
battery connectors inside the battery compartment.
Insert the contact side of the battery first then gently
2
push the battery into place.
Replace the back cover.
3
Battery contacts
To remove the battery
Make sure the phone is turned off.
1
Remove the back cover
2
The top side of the battery has a protruding grip. Lift
3
the battery from the grip to remove it.
Storage card
To store your pictures, music, and applications, install the supplied
Card (sample) into your phone.
microSD
Note
• You need to install the microSD card before you can use the Camera
application.
To install the storage card
Insert the microSD card into the slot with its gold contacts facing
down.
To remove the storage card
Press the storage card to eject it from the slot.
22
Phone Basics
Protruding grip
Note
• If you want to remove the storage card while the phone is on, see "To
safely remove the storage card while the phone is on" on page 38.
Page 7
1.3 Charging the Battery
New batteries are not charged when shipped.
Before you start using your phone, you need to install and
charge the battery.
Battery life
Use the HT04 Battery Pack designed for HT-03A.
● The battery has a finite lifetime. Operation duration will gradually
shorten with repeated charging.
● When the operation time drops to less than half of the duration at
the time of purchase, it is recommended to change the battery
pack
. When the battery life is near its end, the battery pack may
expand a little depending on the usage condition, but this is not a
malfunction.
To protect the environment, bring
used battery packs to a docomo
Shop, agency, recycle shop, etc.
Charging
● For details, refer to the manuals for the FOMA AC Adapter 01/02
(optional), FOMA AC Adapter for Global Use 01 (optional) and
FOMA DC Adapter 01/02 (optional).
● FOMA AC Adapter 01 supports 100 V AC only. FOMA AC Adapter
02 and FOMA AC Adapter 01 for Global use supports from 100 V
AC to 240 V AC.
● The shape of the AC adapter plug is for 100 V AC (domestic)
. For overseas use of the AC adapter supporting from 100 V
usage
AC to 240 V AC,
Do not charge the battery using
a compatible conversion plug adapter is required.
a transformer for travel.
Do not charge the battery for a long period of time
(several days) with the power turned on
● If you charge the battery pack for a long period of time with the
phone turned on, power to your phone will be supplied from the
battery pack once charging ends
your phone for a short time
In this case, recharge the battery pack correctly. Disconnect your
phone from the AC adapter or DC adapter then
for recharging.
and you will only be able to use
before the low-voltage alarm sounds.
connect it again
To charge the battery
Plug the USB connector of the AC adapter to the USB
1
connector at the bottom of your phone.
Plug in the AC adapter to an electrical outlet to start
2
charging the battery.
Note
• Only the FOMA miniUSB Conversion Adapter HT01 and USB Cable
provided with your phone must be used to charge the battery. Charging
is indicated by a solid red light in the Notification LED. As the battery is
being charged while the phone is on, the charging battery icon is
displayed in the status bar of the Home screen. After the battery has been
fully charged, the Notification LED shows a solid green light and a full
battery icon
displays in the status bar of the Home screen.
Phone Basics
Continued on next page
23
Page 8
For more information about the Notification LED, refer to "Phone
Status and Notifications" on page 31.
Warni ng
• Do not remove the battery from the phone while you are charging it using
the AC adapter or USB Cable.
• As a safety precaution, the battery stops charging when it overheats.
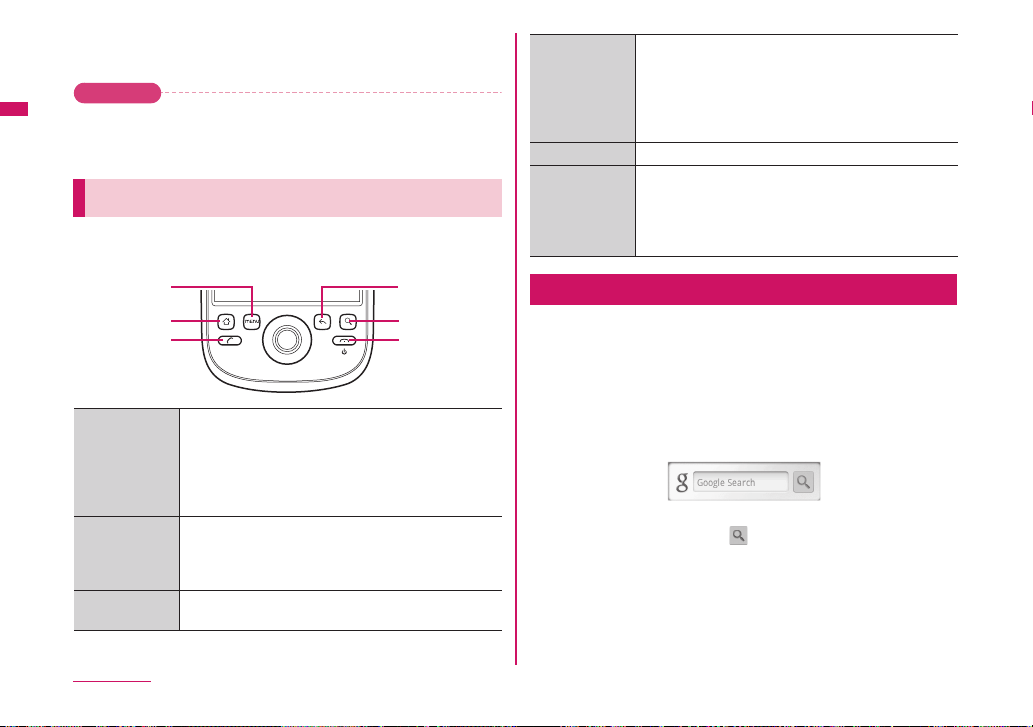
1.4 Phone Controls
Press the control buttons on the front panel of your phone to do
the following:
MENU
HOME
CALL
CALL • Press to open the Call log screen.
• When a contact, contact number, or phone number is
highlighted on the screen, press to call the contact or
phone number.
• If you navigated to another application during a call,
press to display the ongoing call on the screen.
HOME • While on any application or screen, press to return to
the Home screen.
• Press and hold to open the recently used
applications window.
MENU • Press to open a list of actions that you can do on the
current screen or options menu.
BACK
SEARCH
END CALL/
POWER
BACK • Press to go back to the previous screen, or to close a
SEARCH See "Search button" on page 24 for details.
END CALL/
POWER
dialog box, options menu, or the notifications panel.
• Press and hold to return to the main screen of the
current application.
• Press to close the onscreen keyboard when
displayed.
• While in a call, press to hang up.
• While not on a call, press and hold to open the
phone options menu that allows you to turn off the
phone, put your phone in silent mode, or turn on/off
Airplane mode.
Search button
Press SEARCH to search information on the current screen or
application. For example, while in the Contacts tab, press SEARCH
to search contact-related information such as names, phone
numbers, or email addresses in your contacts list.
Press SEARCH while in the Google MapsTM mapping service to
search for places of interest. Press SEARCH while in the
screen or
Browser to launch GoogleTM search and search information
on the web.
In any search bar, enter the information you want to search, then
press SEARCH again, or touch
.
Home
24
Phone Basics
Page 9

1.5 Getting Around Your Phone
There are different ways to navigate around the Home screen,
menus and application screens on your phone. You can also
change the screen orientation of the phone.
Touch
When you want to type using the onscreen keyboard, select items
onscreen such as application and settings icons, or press onscreen
buttons, simply touch them with your finger.
Note
• For some screens including Home and Settings, the screen orientation
may not change to landscape even if you turn the phone sideways.
Use the Trackball
Roll or press the TRACKBALL to select or highlight items on the
screen. The TRACKBALL also flashes when you receive an
incoming call or a notification.
1.6 Getting Started
Touch and hold
To open the available options for an item (for example, contact or link
in a webpage), simply touch and hold the item.
Drag
Touch and hold your finger with some pressure before you start to
drag. While dragging, do not release your finger until you have
reached the target position.
Rotate
For most screens, you can automatically change the screen orientation
from portrait to landscape by turning the phone sideways. When entering
text, you can turn the phone sideways to bring up a bigger keyboard.
Note
• The Orientation check box in Settings > Sound & display needs to be
selected for the screen orientation to automatically change.
Once you’ve installed your SIM card (FOMA card), battery, and
microSD card, you can turn on your phone and start using it.
Turn your phone on and off
To turn on the phone
Press the END CALL/POWER button.
1
Note
• When you turn on the phone for the first time, you will be prompted to sign
in to your Gmail
to "Set up your phone for the first time" on page 26.
• If you press and hold the HOME and END CALL/POWER buttons at the
same time before turning your mobile phone on, the following screen
appears. Remove the battery, re-install it and turn the power on.
TM
webmail service account. For more information, refer
Phone Basics
Continued on next page
25
Page 10

To turn off the phone
Press and hold the END CALL/POWER button until
1
the options menu opens.
On the options menu, touch Power off.
2
Touch OK when prompted to turn off the phone.
3
The default language setting is Japanese. Touching 言語変更
(Change language)
(Japanese) as the language to be displayed on the screen.
allows you to select 英語 (English) or 日本語
Enter PIN
If your SIM card (FOMA card) is preset with a PIN (personal
identification number), you will be prompted to enter the PIN before
you can use the phone. Enter the SIM card (FOMA card) PIN, then
touch OK. To learn how to enable or disable the SIM card (FOMA
card) PIN, refer to
page 128.
Important
• If you entered the wrong PIN three times, the SIM card (FOMA card) will
be blocked and you will not be able to use your phone. If this happens,
you can unblock it with the PUK (PIN Unblocking Key). See "To restore a
SIM card (FOMA card) that has been locked out" on page 129 for details.
"Protect your SIM card (FOMA card) with a PIN" on
Set up your phone for the first time
When you turn on the phone for the first time, the NTTdocomo logo is
displayed, followed by the Android log
The Android image appears together with the 緊急通報 (Emergency
dial) and 言語変更 (Change language) buttons.
Even if all the settings are not completed, you can touch 緊急通報
(Emergency dial) to make an emergency call (110, 119 and 118).
you cannot make a call if the SIM card (FOMA card) is not
However,
inserted.
Phone Basics
26
o and then the Android image.
Tap the Android image.
1
A screen shows introduction to the usage of your docomo HT03A.
Please read through this description.
• If you have not subscribed to Biz-hodai or Biz-hodai double,
you cannot
first setup screen. On the Android image screen, press MENU,
then touch APN設定 (APN setting) to add the mopera U
settings
access point" on page 76.
Important
• Your phone comes with functions such as automatic update and
automatic synchronization, which perform significant amount of
data communications. Subscription to a packet flat-rate service
such as
The initial setup screen is in Japanese.
Touch here to change to English.
sign in to or newly retrieve a Google account on the
. To learn how to add APN, refer to "To create a new
Biz-hodai double, is recommended.
Page 11

Touch Skip or Begin.
2
Press Begin to check the quick usage including the onscreen
keyboard
.
Press Skip to skip the usage and proceed to setting up a Google
account.
Set up a Google account
3
If you already have a Google account,
touch
Sign in then enter information about
your account. Otherwise touch Create to
quickly
create an account.
If you want to set the account later, touch
Skip.
Tip
• Even if you skipped Google account settings at initial configuration,
you can also setup the account when you use Google services (e.g.
TM
service. See below for details).
Gmail
• For example, to type "ca", touch three times to get a "c", touch
, then touch once to get an "a".
• If you use predictive conversion in input mode, alphabets, a single
space will be automatically added following a selected candidate
string. Delete the space as needed.
Important
• You can use your phone without setting a Google account, Google
services, such as Google talk
service, Android Market
available.
• A password for the Google account is required to sign in. If you forget
your password, retrieve it referring to "Retrieve your Google password"
on page 27.
• If you want to use your phone with a different Google account, you should
reset it to factory data. For details on how to perform factory data reset,
refer to "Resetting the Phone" on page 132.
Note
• Check that data connectivity (3G, GPRS) before signing in to a Google
account. To know the data connection status, refer to "Phone Status and
Notifications" on page 31.
TM
instant messaging service, GmailTM web
TM
application download service will not be
Retrieve your Google password
On your computer, open your browser and go to
1
http://google.com.
On the upper-right side of the web page, click Sign
2
in.
On the right side of the page, click I cannot access
3
my account.
In the Please select your issue section, select I forgot
4
my password.
Click Reset your password now and then follow the
5
procedure for recovering your password
.
Phone Basics
Continued on next page
27
Page 12

Turn off the screen when not in use
To save battery power, the phone automatically turns off the screen
when you leave it idle after a certain period of time. You will still be
able to receive messages and calls while the phone
Tip
• For information on how to adjust the time before the screen turns off, refer
to "To adjust the time before the screen turns off" on page 127. You can
also turn off the screen by pressing the END CALL/POWER button.
Pressing any of the control buttons again or incoming calls will turn on
your phone screen.
Note
• If you have set up a screen unlock pattern, you will be prompted to draw
the pattern on the screen before it unlocks. For more information on how
to create and enable the screen unlock pattern, refer to "Protect your
phone with a screen lock" on page 129.
’s screen is off.
1.7 Home Screen
The Home screen is your starting point for using the
applications on your phone. You can customize the Home
screen to display application icons, shortcuts, folders, and
widgets.
Signal strength
Connection status
Notifications.
1. See "Phone
Status and
Notifications" on
page 31 for
details.
2. Touch and hold
this area to
display the date.
Touch an icon to open the
related application
Tip
• While in any application, press HOME to go back to the Home screen.
Battery strength
Time
Applications tab.
Touch to open and
select an application.
(See "Applications" on
page 33 for details.)
28
Phone Basics
Page 13

Extended Home screen
The Home screen extends beyond the screen width to provide more
space for adding icons, widgets, and more. Press HOME, then slide
your finger horizontally across the screen to go to the left or right side
of the extended
Extended Home
screen left
Tip
• While on an extended Home screen, you can also press HOME to return
to the main Home screen.
Home screen.
Extended Home
screen right
Customizing the Home screen
To add a Home screen item
Press HOME, then touch and hold an empty area on
1
the screen.
When the Add to Home options menu opens, select
2
the item you want to add to the Home screen:
• Shortcuts
webpage, a favorite contact, a Gmail label, or a music playlist.
Tip
• To quickly add an application shortcut that is on the Applications tab
to the Home screen, touch and hold an application icon. When the
phone vibrates, release the icon on an empty area on the Home
screen.
•Widgets. Add a clock, music player, a picture frame, the Google
search bar, or a calendar that shows upcoming appointments.
Note
• If you installed applications from Android Market that have widgets,
those widgets will also appear here.
•Folders. Add a folder where you can organize Home screen
items, a shortcut to all your contacts, contacts with phone
numbers, or starred contacts. Contact details are automatically
updated when there are changes in the source.
For more information on how to create folders, refer to "To
create a folder and add items to it" on page 30.
• Wallpapers. Change the Home screen wallpaper. For more
information about customizing the wallpaper, refer to
change the Home screen wallpaper" on page 30.
. Add shortcuts such as applications, a bookmarked
"To
Phone Basics
Continued on next page
29
Page 14

To reposition a Home screen item
Touch and hold the item on the screen you want to
1
reposition to activate Move mode.
Note
• When Move mode is activated, the item magnifies and the phone
vibrates.
Without lifting your finger, drag the icon to the
2
desired position on the screen, then release it.
Note
• To move an item from the Home screen to an extended Home screen,
touch and hold the item and then drag it to the left or right edge of the
screen until the display shifts to the extended Home screen. Position the
item on the screen, then release it.
To remove a Home screen item
Touch and hold the item on the screen you want to
1
remove to activate Move mode.
Note
• When Move mode is activated, the item magnifies and the phone
vibrates.
Drag the icon to the Applications tab.
2
• The Applications tab changes into .
When the icon and Applications tab turn red, release
3
it.
To change the Home screen wallpaper
While on the Home screen, press MENU and then
1
touch Wallpaper.
Touch Pictures or Wallpaper gallery.
2
• Touch Pictures to use a picture that you have captured using
the camera or copied to your phone as a wallpaper. You can
crop the picture before setting it as a wallpaper. Refer to
crop a picture" on page 100 to learn how to crop the picture.
• Touch Wallpaper gallery to use preset wallpapers that came
with the phone.
Touch Save or Set wallpaper.
3
"To
To create a folder and add items to it
You can create folders on the Home screen to hold application icons
or shortcuts
1
2
To access the items inside a folder, touch the folder to open it and
then touch the icon of the application or shortcut you want to open.
• To delete a folder, follow the same procedure when you want to remove
.
Press HOME, press MENU, and then touch Add >
Folders > New folder.
• A new folder appears on the screen.
Touch and hold an application icon or a shortcut on
the Home screen to activate Move mode, then drag it
on top of the folder.
Tip
a Home screen item. See "To remove a Home screen item" on page 30
for details.
30
Phone Basics
Page 15

To rename a folder
Touch the folder to open it.
1
Touch and hold the folder’s title bar to open the
2
Rename folder dialog box.
Enter the Folder name and then touch OK.
3
1.8 Phone Status and Notifications
Status bar
On top of the phone screen is the status bar. The left side of the
status bar displays notification icons while the right side of the status
bar displays the phone status.
Tip
• When the status bar is full, touch to display hidden icons/notifications.
Notification icons
These are the icons that may appear on the notifications area of the
status bar:
Icons that appear in the boxed area
New email message More (not displayed)
New text message (SMS)
Problem with SMS delivery Missed call
New instant message Call on hold
New voicemail Call forwarding on
notifications
Call in progress
Icons that appear in the boxed area
Upcoming event Compass needs orientation
Song is playing Uploading data
Problem with sign-in/sync Downloading data
Storage card is full Content downloaded
Wi-Fi is on and wireless
networks are available
Phone connected to computer
via USB Cable
Uploading picture to Picasa
Upload to Picasa finished
Status icons
These are the icons that may appear on the status area of the status
bar:
Icons that appear in the boxed area
GPRS connected No signal
GPRS in use SIM card (FOMA card) or
3G connected Vibrate mode
3G in use Phone speaker is mute
Connected to a Wi-Fi network Phone microphone is mute
Bluetooth is on Battery is very low
Connected to another
Bluetooth device
Airplane mode Battery is full
Alarm is set Battery is charging
Signal strength GPS is on
Speakerphone on GPS is connected
Roaming Data is syncing
microSD card installed
Battery is low
Phone Basics
Continued on next page
31
Page 16

Notifications Panel
Notification icons report the arrival of new messages, calendar
events, alarms set and ongoing settings such as when call forwarding
is on or the current call status. You can open the notifications panel to
open the message, reminder, or event notification and see the
wireless service provider name.
To open the Notifications Panel
When a new notification icon displays in the status bar, touch and
hold the status bar, then slide your finger downward to open the
notifications panel.
If you have several notifications, you can scroll down the screen to
view more notifications.
Tip
• You can also open the notifications panel on the Home screen by
pressing MENU and then touching Notifications.
To close the Notifications Panel
Touch and hold the bottom bar of the notifications panel, then slide
your finger up the screen or press BAC K.
Notification LED
The Notification LED located at the right corner of the earpiece
provides information on the phone status or pending notifications.
Notification LED
Touch a notification
to open the related
application.
Phone Basics
32
Touch to clear all
notifications.
Touch and hold, then
slide up to close the
notification panel.
LED Status Indication
Solid green
Solid orange Battery is charging.
Flashing red Battery is low.
Flashing green You have a pending notification.
Battery is fully charged (When the phone is being
charged using the AC adapter or connected to the
computer).
Page 17

Note
• The indicators are listed in order of priority. For example, if your phone is
connected to a power adapter and is charging the battery, the LED will be
solid orange and will not switch to a flashing green light even if there is a
pending notification.
1.9 Applications
The Applications tab holds all applications on your phone. All
applications that you downloaded and installed from Android
Market or from the web are also added to the Applications tab.
To open the Applications tab
Press HOME, then touch . You can also touch
1
the Applications tab and then drag it up to open it.
Tip
• To open applications quickly, you can add the icons of frequently-used
applications to the Home screen or to folders which you have created. For
details, refer to "Customizing the Home screen" on page 29.
To close the Applications tab
Touch .
1
Recently-used applications
To open a recently-used application
Press and hold the HOME button to open the recently-
1
used applications window.
• The window displays the last six applications you have used.
Touch an icon in the window to open the related
2
application.
1.10 Settings
Control and customize phone settings on the Settings screen.
To open the Settings screen, do one of the following:
• Press HOME, then press MENU, and then touch Settings.
• Press HOME, then open the Applications tab, and then touch
Settings.
Wireless controls Configure your phone’s wireless connections, such
as Wi-Fi and Bluetooth, enable the Airplane mode, or
set the options for roaming, networks, and more. See
"Getting Connected" on page 75 for details.
Phone Basics
Continued on next page
33
Page 18

Call settings Set up call services such as voice mail, call
Sound & display Set the call and notification ring tones, or set the
Data
synchronization
Security &
location
Applications Manage applications and installation of new
SD card & phone
storage
Date & time Set the date, time, time zone, and date or time
Locale & text Set the operating system language and region. You
About phone View the phone status such as the network type,
forwarding, Call Waiting, and caller ID. See
"Adjusting Phone Settings" on page 48 for details.
screen brightness and screen timeout. See
"Changing Basic Settings" on page 126 for details.
Select which Google applications to synchronize.
See "Synchronizing Google Applications" on page
131 for details.
Select the GPS location source to use, set the screen
unlock pattern, or enable the SIM card lock. See
"Using Maps" on page 90 and "Protecting Your
Phone" on page 128 for details.
programs.
Check the available storage card and phone memory,
reset the phone to its factory default settings, or
format the SD card. See "Managing Memory" on
page 130 for details.
format. See "Set the date, time zone, and time" on
page 126.
can also set onscreen keyboard options.
battery power level, and network name. You can also
view the legal information and software version of
your phone.
1.11 Adjusting the Volume
Adjusting the Ringer volume changes the volume level of the
phone ring tone, whereas adjusting the Media volume changes
the volume level of sound notifications and music or video
playback. The ringer volume and media volume can be
separately adjusted.
To adjust the Ringer volume
You can adjust the Ringer volume when you are on the Home screen
or any application screens (except during a call or when playing
music/video).
• Press the VOLUM E U P or VOLUME DOWN buttons on the left
panel of the phone to adjust the ringer volume to your desired level.
The Ringer volume window appears on the screen to display the
volume levels.
• While in the lowest ringer volume level, press VO LU ME DOW N
once to set your phone to Vibrate mode. The phone vibrates and the
vibrate mode icon
• While in Vibrate mode, press VOLU ME D OWN once to turn off the
sound of your phone. The speaker mute icon
status bar.
Tip
• To quickly switch your phone to silent mode, press and hold the END
CALL/POWER button, then touch Silent mode on the options menu.
• You can also adjust the ringer volume on the Settings screen. To adjust,
press HOME, then press MENU, and then touch Settings > Sound &
display > Ringer volume.
appears on the status bar.
displays on the
34
Phone Basics
Page 19

To adjust the media volume
When playing music or watching video, press the VOLUME UP or
VOLUME DOWN buttons on the left panel of the phone to adjust the
media volume. The Music/video volume window appears on the
screen to display the volume level.
You can also adjust the media volume on the Settings screen.
Press HOME, then press MENU, and then touch
1
Settings.
Touch Sound & display > Media volume.
2
When the Media volume window appears, move the
3
slider to the left (to lower the volume) or to the right
(to increase the volume).
Touch OK to close the window.
4
1.12 Using the Onscreen Keyboard
When you start a program or select a field that requires text or
numbers, the onscreen keyboard becomes available.
Touch the text input area.
1
• The onscreen keyboard appears.
Input mode
These are the key marks shown on the onscreen keyboard.
Key mark
Move the cursor to the left. Shorten a segment by one character
for sequential segment conversion. Also used for wild card
character prediction.
Move the cursor to the right. Extend a segment by one
character for sequential segment conversion. Also used for wild
card character prediction.
Display the previous character assigned to the key.
Function
Phone Basics
35
Page 20

Key mark
Switch input modes.(Hiragana > single-byte alphabets > singlebyte numbers > Hiragana >….) Press and hold to display a
panel to enable switching of input mode and switching to a PClike keyboard.
Delete a character before the cursor.
Enabled only when a string exists before the cursor.
Press and hold for continuous deletion.
Enter a space or perform sequential segment conversion.
Perform alphanumeric and Japanese kana conversion.
Display symbols/smiley list.
Enter return, or confirm a reading of text being entered (segment
being converted).
Enter "゛" (dakuten)/"゜" (han-dakuten) and convert to upper/
lower case for a character being entered or before the cursor.
Display "、" (toten) and "。" (kuten).
Enter a character displayed on a key.
10 key
The available keys are different depending on input modes.
Function
Seven modes are provided for text input. You can confirm input
modes with an icon in the status bar
. The input modes are listed in the
following table:
Display of an icon in the status bar
Double-byte alphabets Single-byte alphabets
Hiragana and kanji Single-byte katakana
Double-byte katakana Single-byte numbers
Double-byte numbers
Phone Basics
36
Display of the onscreen keyboard
Double-byte alphabets Single-byte alphabets
Hiragana and kanji Single-byte katakana
Double-byte katakana Single-byte numbers
Double-byte numbers
Tip
• When you do not need the keyboard, you can close it by pressing BACK.
To show the keyboard again, touch a text box onscreen or when a text
field is selected, press the TRACKBALL.
• If you need to insert or delete a character, use the TRACKBALL to
position the cursor next to the character you want to edit, or touch a text
box on the screen.
Note
• Consult the system tutorial to learn how to use the onscreen keyboard.
To view the system tutorial, press HOME > MENU, then touch Settings
> About phone > System Tutorial.
• If you use predictive conversion when inputting single-byte alphabets, a
single space will be automatically added following a selected candidate
string. You should delete the space manually if needed.
Using wild card character prediction
A wild card prediction is a function to narrow words displayed as a
candidate down by entering the number of the
wild card prediction is available while entering characters or
displaying succee
ding character candidates.
read characters. The
Page 21

To ente r " 東海道新幹線" (Tokaido Shinkansen)
Touch た (Ta) five times and then enter と (To).
1
Touch → nine times.
2
Select "東海道新幹線" from candidates.
3
Enlarge a candidate area
To enlarge the selection, press and hold a displayed candidate.
Touch Select to confirm the selected candidate.
If a word is selected once, it appears first among candidates using the
learning function. To delete the learning function for the word, press
and hold the word displayed as a candidate to enlarge it, then touch
Delete learning?.
Press the Delete learning? button to delete the selected candidate.
You can delete only the learned candidate. Candidates, which are
included in a normal dictionary or saved on
The
deleted.
hold undeletable candidates.
Delete learning?
button does not appear if you press and
your dictionary cannot be
Use functions in the setting menu
Press HOME > MENU, then touch Settings > Locale & text > iWnn
to perform various settings for character input.
IME
Use the own dictionary
By saving frequently used words beforehand, they will be displayed
as candidates when you enter the reading on the character input
There are two user dictionaries: the Japanese user dictionary
screen.
using Hiragana and Kanji mode and the English user dictionary using
single-byte alphabet mode.
Up to 500 words can be saved for each.
Phone Basics
Continued on next page
37
Page 22

Press HOME > MENU, then touch Settings > Locale & text > iWnn
IME and in the
display the Registered words in English User Dic screen.
On this screen, press MENU, then touch Add to save another word.
Dictionary section, touch English User Dictionary to
1.13 Using the Phone’s Storage Card as a USB Drive
To transfer music, pictures, and other files from your computer
to your phone’s storage card, you need to set the phone’s
storage card as a USB drive.
Phone Basics
38
Important
• In addition to the following instructions, follow the instructions of the
computer you use for installing/removing a USB drive.
To set the phone’s storage card as a USB drive
Connect the phone to the computer using the USB
1
Cable (sample).
• A notification icon appears in the status bar.
• An installation of the driver may be requested. Cancel to
proceed.
Open the Notifications Panel.
2
• Refer to "To open the Notifications Panel" on page 32 to learn
how to open the Notifications Panel.
In the Notifications Panel, touch USB connected and
3
then touch Mount.
Note
• When you select Mount, the phone will not recognize the storage card
when it is connected to a computer. You will not be able to use some of
the phone’s applications such as Camera.
• If you want to use the camera again with your phone connected to a
computer, stop the use of the storage card as a USB drive.
To safely remove the storage card while the phone
is on
When you need to remove the storage card while the phone is on, you
must unmount the storage card first to prevent corrupting or
damaging the storage card.
Press HOME, then press MENU, and then touch
1
Settings.
Page 23

Scroll down the screen, then touch SD card & phone
2
storage.
Touch Unmount SD card.
3
Remove the storage card by following the instructions in "To remove
the storage card" on page 22.
To format the SD card
Press HOME, then press MENU, and then touch
1
Settings.
Scroll down the screen, then touch SD card & phone
2
storage.
Touch Unmount SD card.
3
• This enables the Format SD card option.
Touch Format SD card > Format SD card.
4
Note
• Note that formatting the SD card deletes all data in the storage card.
Phone Basics
39
Page 24

40
Phone Basics
 Loading...