


Pocket PC Phone
3
Safeguards
Congratulations on the purchase of your new Windows® Powered Pocket PC
Phone 2003 ! This information will help you set up your phone so you can
begin using it.
Warnings! Please Read Before Operating your Device
THE DEVICE IS NOT CHARGED WHEN YOU TAKE IT OUT OF
THE BOX. (For information, see Step 2: Charge the battery
below)
DO NOT REMOVE THE BATTERY PACK WHEN THE DEVICE
IS CHARGING.
WHEN INSERTING YOUR SIM CARD, MAKE SURE THE DEVICE
IS POWERED-OFF BEFORE YOU REMOVE THE BATTERY
PACK. THEN CLICKS IT INTO PLACE. (For more information,
see Step 1: Insert the SIM card below)
IN MANY COUNTRIES YOU ARE REQUIRED BY LAW TO
TURN OFF YOUR PHONE WHEN YOU FLY. TURNING OFF
YOUR POCKET PC DOESN’T TURN OFF YOUR PHONE; YOU
MUST TURN OFF YOUR WIRELESS CONNECTION TO YOUR
OPERATOR’S NETWORK.
YOUR WARRANTY IS INVALIATED IF YOU OPEN OR TAMPER
WITH THE DEVICE’s OUTER CASING. (For more information,
see the enclosed warranty card)

n Setting Up
n The Basics
n Navigating
n Using for the First Time
n Bluetooth
n Regulatory Notice
5
Step 1 : Insert the SIM card
1
2
3
4
Follow the steps outlined below to set up your phone and get it ready to synchronize with your PC:
Setting Up
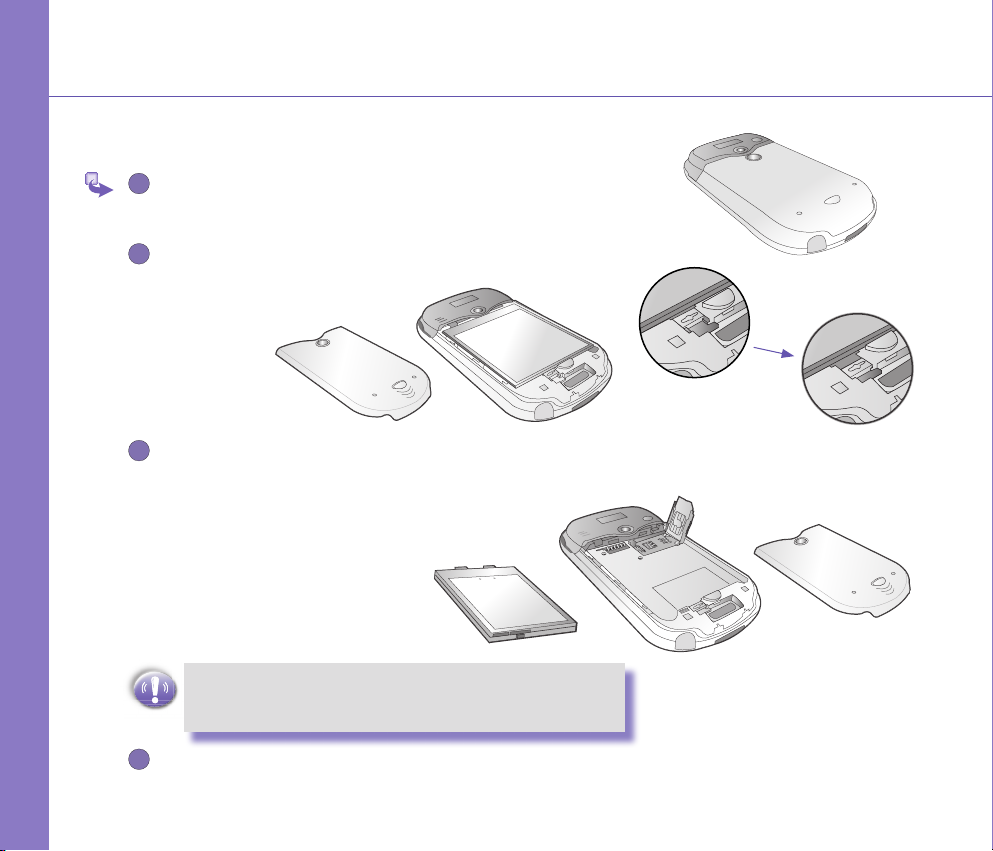
Turn over your device and press the xing lock button to remove the
back cover.
Press the stylus into the slot under the bottom end of the battery to
unlock and remove the battery.
F
Press to
unlock and
remove the
battery.
G
Lift up the SIM card case and insert the SIM. Push it forward and
pull back to secure the SIM.
MAKE SURE YOU HAVE SAVED ANY DATA IN OPEN
PROGRAMS: OPENING THE SIM DOOR WILL TURN
YOUR DEVICE OFF
Replace the battery and back cover. Remember to push back the
black lock point to clip it into place it the bottom.
F
Step 2 : Charge the Battery
1
2
3
1
2
3
1
2
1
2
3
2
1
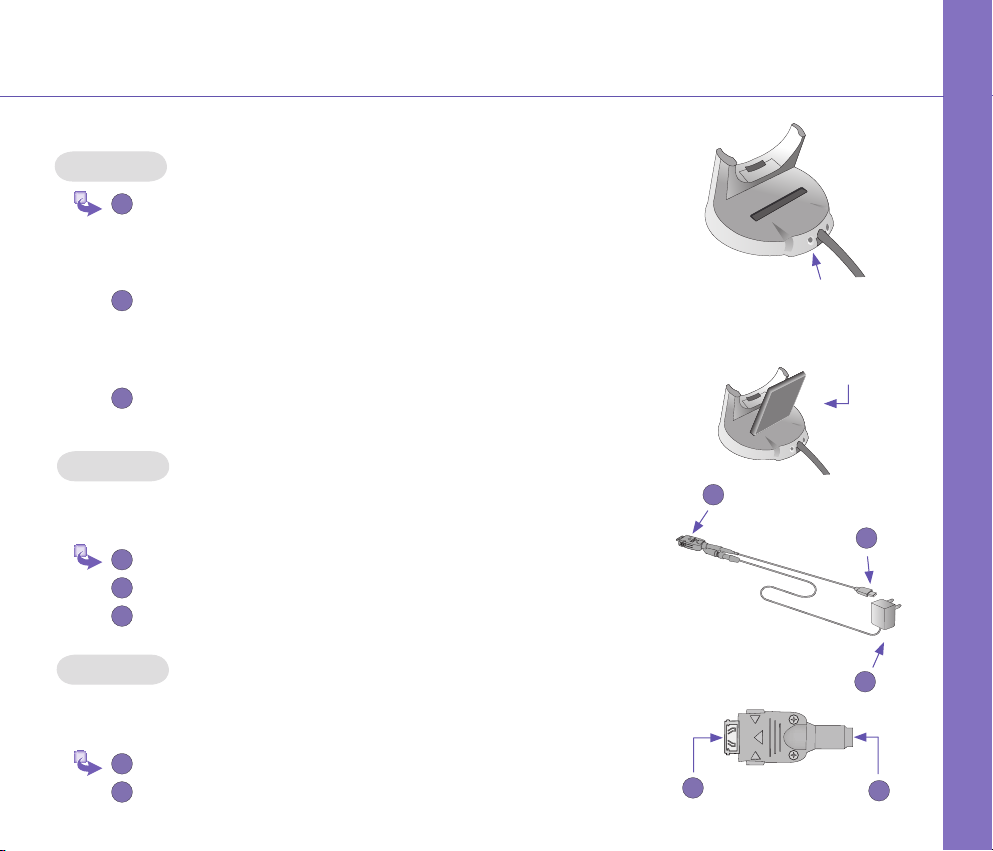
You can charge your Pocket PC Phone in the following ways:
Option 1
Insert the AC adapter into the back of the cradle, and then plug into
the mains.
Dock your Pocket PC phone in its cradle and fully charge for 3 ~ 4 hours.
A steady amber LED indicates charging; solid green fully charged.
If you have spare battery for your Pocket PC Phone, you can also put
your battery into the slot in the cradle for recharging.
Option 2
You can plug the AC adapter into the optional USB/Serial cable head and then connect your phone directly to an external power source.
To your Pocket pc phone.
USB synchronization cable.
Plug the AC adapter into a socket.
AC Adapter plugs
into the back of the
cradle
Put an optional
unit into
the slot for
recharging
Setting Up
Option 3
You can plug the AC adapter into the optional DC Converter and then connect your
phone directly to an external power source.
To AC adapter.
To your Pocket pc phone.

7
Step 3 : Switching on and Entering your PIN
1
2
3
4
Once you have started to charge your device, you can switch it on. First time, it
is however recommended that you fully charge your device about 1 hour - before
switching it on.
Setting Up
Press the button indicated below for about 3 seconds – wait for your
operator and Microsoft screens to load.
Remove the stylus from its housing.
When the Welcome Wizard Screen appears, tap with your stylus.
The wizard's onscreen instructions will lead you through the rest of
the setup process.
Enter your PIN, and then press Enter.

Step 4 : Installing ActiveSync
1
2
Using Microsoft® ActiveSync® you can synchronize information on your desktop
computer and/or a Microsoft® Exchange Server with the information on your Pocket
PC phone. ActiveSync compares the information on your Pocket PC phone with the
information on your desktop computer and/or the server and updates all locations,
keeping you up-to-date with the most recent information.
Before you can begin synchronization with your desktop PC, you must install ActiveSync on your desktop computer from the Pocket PC phone 2003 Companion
CD. ActiveSync is already installed on your Pocket PC phone.
Hardware Connection
Dock your Pocket PC phone in its cradle and plug the USB/Serial to your desktop
PC for synchronizaton.
Software Installation
Insert the Pocket PC phone 2003 Companion CD into the CD-ROM
drive of your desktop computer.
Click the yellow arrow, click Start Here, and then follow the directions
on the screen.
To Create a Partnership
After the installation is completed, the ActiveSync New Partnership Wizard will
helps you set up a partnership between your phone and your desktop computer
so that you can start synchronizing information and customizing your synchronization settings. Your rst synchronization process will automatically begin when
you nish using the wizard. After the rst synchronization, you will notice that your
Outlook information now appears on your phone.
USB port on your
desktop PC
Setting Up
To prevent synchronization problems, it is important that you select
Synchronise with this desktop in the New Partnership Wizard
options.

9
Front , Top and Left Side Panel Components
Power Button / Backlight
Press to turn on / off your pocket PCor backlight
The Basics
Notication LED
See the descrition to the right.
Contacts
Pr es s for q ui ck a cc es s to your
Contacts
Record
Press to record a voice note
Volume
Press to adjust the volume of your
device
Camera
Press to launch camera capture utility.
Press again to take a picture.
Soft Reset
Press into the hole with the stylus to
reset your device.
Send
Press to take an incoming call, or press
to dial a number
Microphone
Speak here when receiving / making a
phone call or voice recording.
Insert either MMC or SD cards in this
MMC and SD car slot
slot.
Infrared port
Enables you to exchange le(s) or data
with other devices without cables/ wires
Speaker
Listen to audio media or a phone call
from here.
Calendar
Press to quickly access
to the Calendar.
Touch Screen
For handwriting, drawing
or to make a selection
with the stylus
End
Press to end a call.
Navigation Pad
To move up/ down and left/ right through
any of the drop down menus or program
instructions; select by pressing in the
center.
When in the Dialerscreen :
Left - Press once to access the Speed
Dial feature.
Right- Press once to access the Call
Log feature.

Back, Bottom and Right Side Panel Components
The Basics
Stylus and Stylus Slot
Notication LED
Bi-color LED on the right :
For GSM standby, GSM message,
GSM network status, PDA notication,
PDA charging status.
Blue LED on the left :
For Bluetooth system notification of
powered-on and ready to transmit RF
signal.
Soft Reset
Press into the hole with the stylus to reset
your device.
Sync Connector
Use this connector when synchronizing /
transmitting data or recharging.
Camera Lens
Car Antenna
If your car supports, you can
attach your phone to its antenna and
utilize its superior reception quality.
Preview Mirror
Back Cover
Fixing Lock
Press to release the back cover
Earphone Jack
Allows you to listen to audio media or
use the phone hands-free kit.

11
Navigating
Using the Today screen
When you turn on your device for the rst time each day (or after 4 hours of inactivity), you’ll see the Today screen. You can also display it by tapping and
Navigating
then Today. On the Today screen, you can see at glance important information
for the day.
Navigation options from the Today screen
The center of the Today screen displays your next appointment, the number of
messages in Inbox, and your current prole. You can scroll to one of these items
and press the Action key, or simply tap it with your stylus.
Navigation bar and Command bar
The navigation bar is located at the top of the screen. It displays the active program
and current time, and allows you to switch to programs and close screens.
Use the command bar at the bottom of the screen to perform tasks in programs.
The command bar includes menu names, buttons, and the Input Panel button. To
create a new item in the current program, tap New. To see the name of a button,
tap and hold the stylus on the button. Drag the stylus off the button so that the
command is not carried out.
Pop up menus
With pop up menus, you can quickly choose an action for an item. For example,
you can use the pop up menu in the contact list to quickly delete a contact, make
a copy of a contact, or send an e-mail message to a contact. The actions in the
pop up menus vary from program to program. To access a pop up menu, tap and
hold the stylus on the item name that you want to perform the action on. When
the menu appears, lift the stylus, and tap the action you want to perform. Or tap
anywhere outside the menu to close the menu without performing an action.
Tap to select
menu commands
Tap to switch to a
program that you
recently used.
Tap to switch to a
program.
Tap to see more
programs.
Tap to change device
settings.
Tap to see a Help topic
for the current screen.
Tap to select
button commands
Tap to display the
input panel

Navigation pad
1
2
1
2
Use the navigation pad to move the selection focus up, down, left, or right. This
is called "scrolling." In a text eld, use the navigation pad to move the cursor right
or left, character by character.
Stylus and Touch screen
Your device has a touch screen meaning you can navigate and make selections
on your device by tapping an item with the stylus or your nger.
Hard keys
There are seven hard keys on your phone, located directly below and above the
display screen, and on the side. By default the two above the screen are set as
Calendar and Contacts and the three on the side Recorder, Volume and Camera,
however, they can be reprogrammed (The send and answer a call keys on either
side of the navigation pad cannot be reassigned):
Tap Start → Settings → Personal → and Buttons.
Select a button from the top box and a program from the bottom box.
Action key
Press the Action key to open a selected item, or to select or clear a check box.
The Action key works much like the ENTER key on a keyboard, and is sometimes
referred to as the "Do It" key.
Navigating
To navigate to a program
On the Today screen, tap in the top left hand corner for the navigation bar.
Select the program you want, and tap it or press the Action button.

13
Programs Menu
The main features of the programs menu are listed below. To access them simply press Start soft key
in the Home screen. To access an item scroll to it, and then press the Action key.
Navigating
Today
Tap to return to the Today
screen.
ActiveSync
Keep your contacts, tasks,
emails and calendar events
up-to-date be-tween your
computer and pho ne by
synchro-nizing regularly.
Calendar
Record your i mportant
events, and setup alarms to
remind you when important
events mature.
Contacts
Ope ns your contacts list
alphabetically.
Inbox
Opens the Messaging feature
in the Inbox, where you can
read text messages or emails,
and compose new ones.
Internet
Explorer
Browse the Internet or visit
your favo ri te WAP sites
straight from your phone,
even while on the move.
Notes
Record your thoughts and
save them to play b ack
later.
Tasks
Keep track of what you need
to do, when, and even have
your phone aler t you of
an important dead-line in
advance.go to its Help le.
Windows Media
Player
Play music and watch video
clips while on the move.
MSN Messenger
Keep in touch with your friends
in real time by subscribing to
this free service.
Settings
Personalize your phone to suit
the way you use it.
Find
Find les or programs stored
on your computer.
Help
Lists all the functions on your
device, tap one to go to its
Help le.

Indicators
Following are some of the status icons you may see.
Indicators Meaning
Turns all sounds on and off.
Main battery low.
Main battery very low.
Connection is active.
Synchronization is beginning or ending.
Synchronization is occurring.
Notication that one or more instant messages were received.
Notication that one or more mobile e-mail
/ SMS messages were received.
Shows the connection to your mobile
phone service provider is on and the
strength of the signal.
Indicates your phone is switched off.
If more notication icons need to be displayed and there is no room to display
them, than this indicator will display. Tap
the icon to view all notication icons.
Navigating

15
Write your rst notes
1
2
3
4
Entering text using the input panel
Use the input panel to enter information in any program on your device. You
can either type using the soft keyboard or write using Letter Recognizer, Block
Recognizer, or Transcriber. In either case, the characters appear as typed text
on the screen.
To show or hide the input panel, tap the Input Panel button. Tap the
arrow next to the Input Panel button to see your choices.
To type with the soft keyboard
When you use the input panel, your device anticipates the word you are typing or
Using for the First Time
writing and displays it above the input panel. When you tap the displayed word,
it is inserted into your text at the insertion point. The more you use your device,
the more words it learns to anticipate.
Tap to open the selected
input panel.
Tap to change
input panel
options.
Tap to select an
input panel.
Tap to see the
lists of input
panels.
To use Letter Recognizer
With Letter Recognizer you can write letters using the stylus just
Tab here if this
is the right word.
as you would on paper.
Tap the arrow next to the Input Panel button and then Letter
Recognizer.
Write a letter in the box.
When you write a letter, it is converted to typed text that appears on
the screen. For specic instructions on using Letter Recognizer, with
Letter Recognizer open, tap the question mark next to the writing
area.
 Loading...