

Page 1

Guide book
Page 2

Page 3

Contents 3
Contents
Discover
Introducing RE 6
Storage card 9
Battery 11
Waterproof protection 13
RE app 15
Wrist lanyard 18
Set up
Setting up your RE for the first time 19
Pairing your RE and your phone for the first time 20
Connecting your RE and phone 22
Exploring basic and advanced settings 23
Checking for firmware updates 23
Disconnecting your RE and phone 26
Take photos and videos
Getting to know the Live viewfinder 27
Turning Ultra-wide angle on or off 28
Taking photos 28
Page 4

4 Contents
Recording videos 29
Recording slow motion videos 31
Creating time-lapse videos 32
View, edit, and share
Viewing photos and videos 34
Sorting media by type 35
Removing fisheye effect 36
Downloading photos and videos from your RE 37
Sharing photos and videos 38
Copying media files from your RE to your computer 39
Deleting photos and videos 39
Stream live with RE
About live streaming 41
Setting up your RE for live streaming 42
Inviting contacts to watch your live stream 42
Recording a live stream 43
Sharing your live stream via email or social networks 44
Back up
Backing up your media files 45
Backing up photos and videos to your online storage 45
Page 5

Contents 5
Reset
Formatting your storage card 47
Resetting your RE to factory settings 47
Trademarks and copyrights
Index
Page 6
6 Discover
Discover
Introducing RE
There's a new way to capture life's priceless moments—and that's with RE.
With its Ultra-wide angle lens, you can dive into the scene and capture life
in full view.
Here are the parts and features that you need to know about this
remarkable little camera.
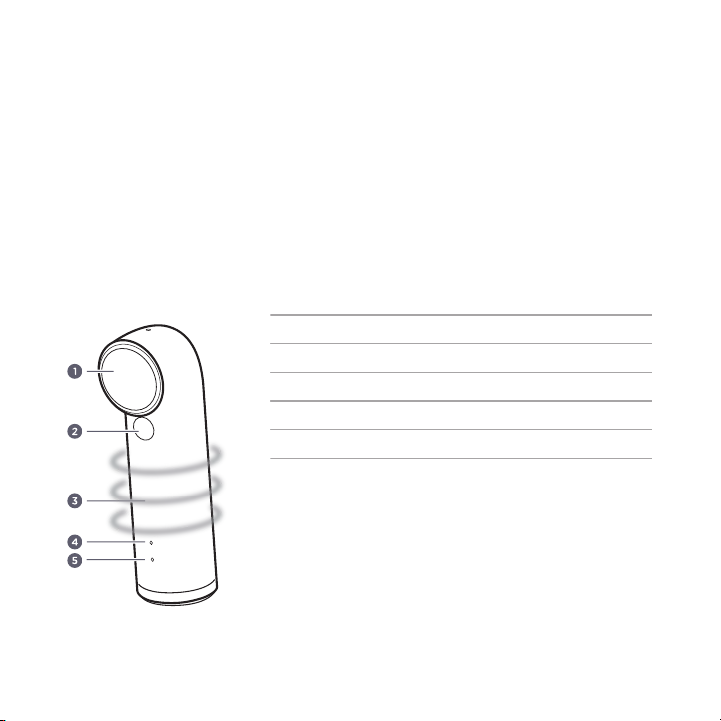
1 Lens
2 Slow motion mode switch
3 Grip sensor
4 Indicator LED
5 Speaker
Page 7
1 Micro USB port
2 Tripod socket
3 microSD™ slot cover
Key features at a glance
Intuitive controls
RE simplifies how you take photos and videos. After your firsttime setup, you only have to hold it by the grip sensor and it will
automatically switch on. Plus. with its one-button capture, you
can snap photos or shoot videos right away.
Discover 7
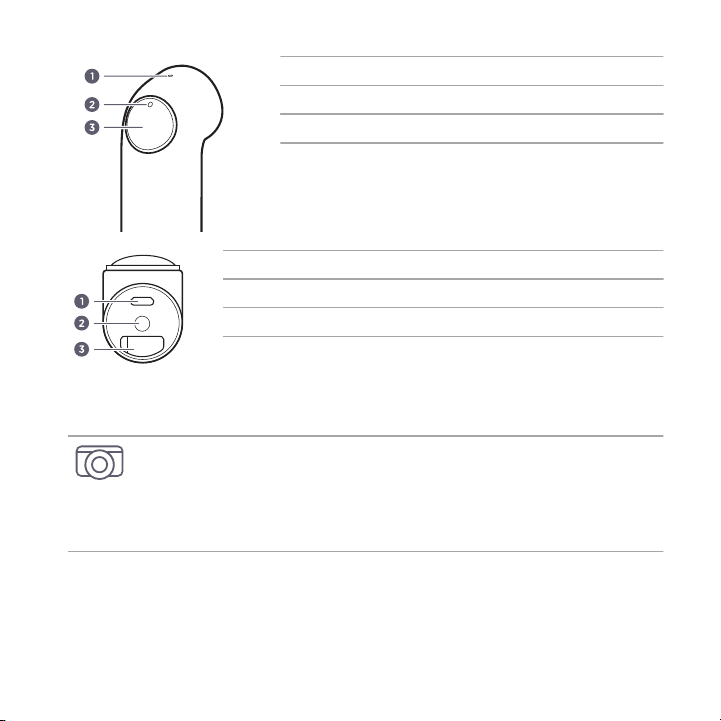
1 Mic
2 Indicator LED
3 Shutter button
Page 8
8 Discover
Slow motion recording
Add a cinematic flair to your action videos. Switch to Slow
motion mode and record slow motion videos on the fly.
See Recording slow motion videos on page 31 to learn more
about it.
Ultra-wide angle
Get more of that great scene. Capture an Ultra-wide angle view
of what's in front of you.
See Turning Ultra-wide angle on or off on page 28 to learn
more about it.
Time-lapse
Beautiful summer sky? Switch to Time-lapse mode, customize
your camera settings, and let your RE take sequential shots of a
scene for an extended period of time.
See Creating time-lapse videos on page 32 to learn more
about it.
Waterproof
Take RE on your next snorkeling adventure for snapshots of
what you see underwater.
Just don't forget to prepare it before you soak it. See
Waterproof protection on page 13 for details.
Easy pairing with your phone
Enjoy the RE experience on your phone, too. See RE app on
page 15 to learn more about it.
Page 9
Discover 9
Auto backup
Set up your RE to automatically save your photos and videos on
your phone or online storage. See Backing up your media files
on page 45 for details.
The backup feature is currently available on Android® phones only.
Storage card
RE may already have a microSD card preinstalled. Check and make sure
that microSD card is inserted before using your RE, as it will not operate
without a microSD card.
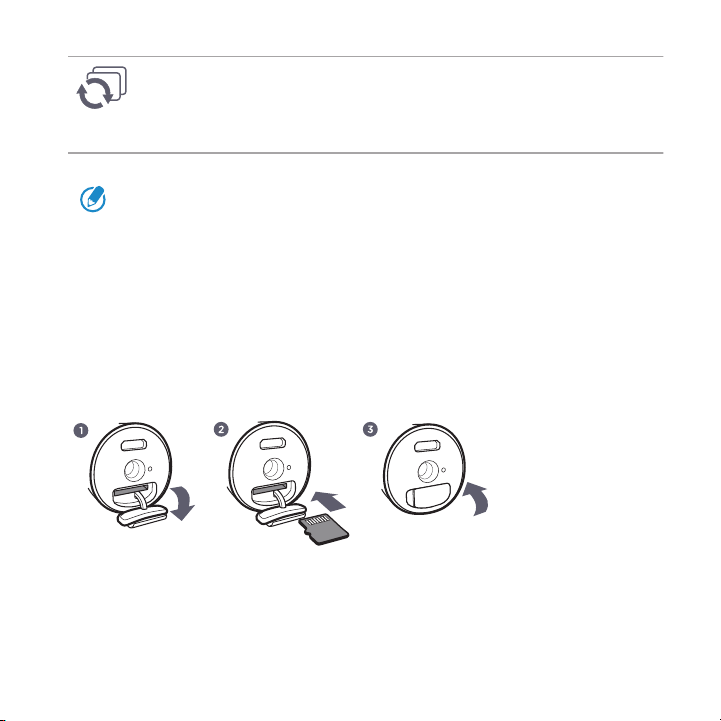
Inserting the microSD card
1. Open the microSD slot cover located at the bottom of your RE.
Page 10

10 Discover
2. Insert a microSD card with the gold-plated side facing the same
direction as the lens.
The card will make a slight clicking sound when it’s securely
inserted.
3. Close the slot cover by pressing down to lock it in place.
Be sure to close the slot cover tightly to prevent water or dust
from entering into your RE.
Removing the microSD card
1. Open the microSD slot cover.
2. Push the card in to eject it.
Page 11
Discover 11
Battery
Your RE comes with a non-removable battery. To efficiently manage
battery use, RE automatically powers on when you hold it by the grip
sensor and enters standby mode when you leave it idle for a certain period
of time.
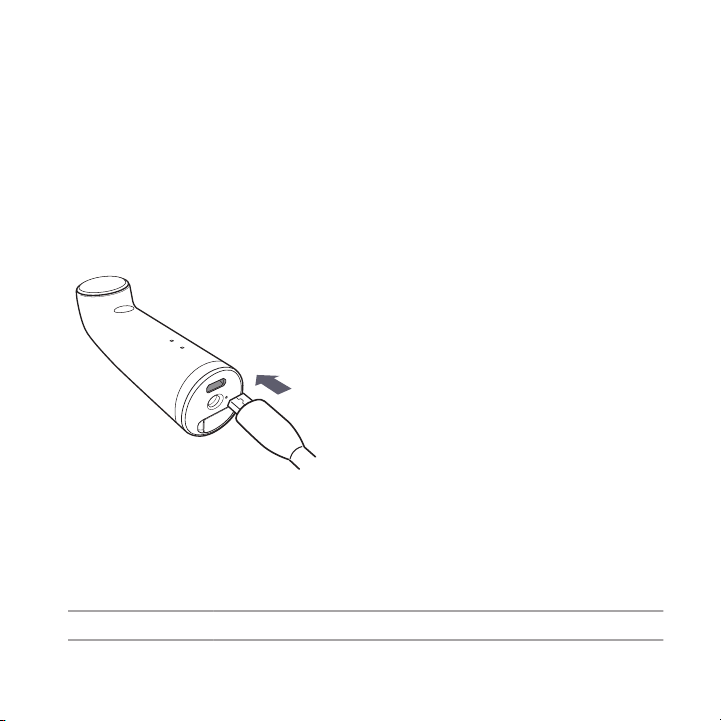
Charging the battery
Connect your RE to a power source using the supplied micro USB cable.
The indicator LED turns green when your RE is fully charged.
Checking the battery status
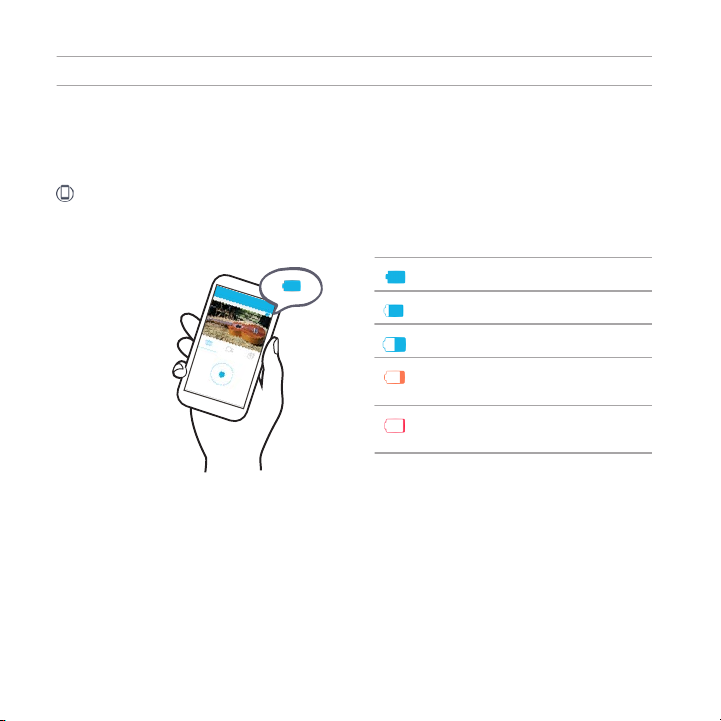
Hold your RE to check the battery status. The indicator LED will show:
Green Battery level is above 25%.
Page 12
12 Discover
Orange Battery level is below 25%.
If you’re already holding your RE and you want to check the battery status,
set it down for 30 seconds. When you pick it up again, you’ll see the
indicator LED light up with the current battery status.
On the RE app
You can also check the battery status of your RE from the RE app. The
battery status icon is shown above the Live viewfinder.
Battery is charged
Battery is 75% charged
Battery is 50% charged
Battery is low (25%
remaining)
Battery is very low (8% or
less remaining)
See RE app on page 15 to learn how to download and install the RE app
on your phone.
Page 13
Discover 13
Waterproof protection
RE is IPX7 compliant. This means that you can safely use it when immersed
in water under the following conditions:
§ Fresh water or sea water only
§ Maximum water depth: 1 meter (3.2 feet)
§ Maximum time underwater: 30 minutes
§ Water temperature: 15°C - 35°C (59°F - 95°F)
This rating does not ensure the waterproof performance of RE
under all conditions.
Important reminders
Tightly close the microSD slot cover.
Keep the microSD card dry.
If you're going deeper than 1 meter of water, make your RE IPX8compliant by attaching a waterproof cap.
The waterproof cap is included if you purchased the RE Protection
Pack.
Securely hold your RE while underwater by attaching the supplied
lanyard and wearing it on your wrist. See Wrist lanyard on page 18
for more details.
Page 14
14 Discover
RE is rated IPX8 for shooting images underwater at a depth of 3 m
(9.8 ft) for up to 120 minutes when used together with the
waterproof cap and IPX7 for shooting images underwater at a
depth of 1 m (3.2 ft) for up to 30 minutes without the cap.
Things to avoid
Avoid immersing RE or letting the USB port come into contact with
liquid chemicals such as liquid soap or detergent.
Never immerse RE in hot springs, or any liquid besides water (such
as alcohol, sugared drinks, etc.).
Do not jump into water with RE or subject it to high water pressure
conditions such as rapids or waterfalls. Subjecting RE to excessive
shock, vibration or pressure by dropping or hitting it, may affect
waterproof performance.
Keep away from dust and sand.
Do not charge RE while it's wet.
Do not open the microSD slot cover underwater or in areas exposed
to water spray, high winds, dust, or sand. Also, do not insert a wet
microSD card in RE.
RE does not float in water. Do not drop RE into water.
Page 15

Discover 15
Cleaning and drying after exposing RE to water
Always clean your RE after using underwater. Some water, especially salt
water, is corrosive to electronics and can result in damage to your RE.
It is recommended to clean your RE within 60 minutes of
underwater use.
1. Immerse your RE in a basin of fresh water, with its microSD slot
cover tightly sealed.
2. Leave your RE submerged in the basin of fresh water for about 10
minutes.
3. Shake off water caught in the USB port.
4. Wipe off water droplets with a soft cloth and dry your RE in a well-
ventilated place.
5. Make sure to let the USB port dry completely before using the port.
RE app
Download the RE app on your phone and explore exciting features you can
do with your RE.
§ View and take photos and videos via the Live viewfinder.
§ View, edit, and share photos and videos.
§ Set up and capture time-lapse videos.
§ Customize the settings for your RE.
Page 16
16 Discover
§ Check firmware updates for your RE.
§ Back up your captured photos and videos on your phone.
The backup feature is currently available on Android phone.
and more!
Downloading the RE app on your iPhone
Before downloading the RE app, please make sure that your phone
meets the minimum system requirements indicated on the RE
app's download page from the App StoreSM.
1. On your phone, open the App Store.
2. Search for RE app or RE.
3. Tap FREE > INSTALL to download and install the RE app.
After successfully installing RE app on your iPhone®, tap the RE app
icon on your Home screen.
Now, you are ready to pair and connect your iPhone and your RE. See
Pairing your RE and your phone for the first time on page 20 to learn how.
Page 17

Discover 17
Downloading the RE app on your Android phone
Before downloading the RE app, please make sure that your phone
meets the minimum system requirements indicated on the RE
app's download page from Google Play™.
1. On your phone, open the Play Store app.
2. Search for RE.
Or go to https://play.google.com/store/apps/details?
id=com.htc.gc.companion.
3. Tap Install to download and install the RE app.
4. Tap Accept.
After successfully installing the RE app on your phone, tap the RE
app icon
Now, you are ready to pair and connect your Android phone and your RE.
See Pairing your RE and your phone for the first time on page 20 to learn
how.
on your Home screen or Apps screen.
Page 18

18 Discover
Wrist lanyard
Use the wrist lanyard so you can securely hold your RE.
1. Hook the end of the supplied wrist lanyard onto the tripod screw
that also came in the box.
2. Align the lanyard into the small groove of the tripod screw.
3. Tightly fasten the tripod screw to your RE.
Page 19

Set up 19
Set up
Setting up your RE for the first time
Set up your RE in three easy steps.
RE will not operate without a microSD card.
1. Confirm that there is a microSD card inserted in your RE.
If you need to insert a card, see Inserting the microSD card on page
9 for details.
2. Fully charge the battery using the supplied USB cable.
3. Press and hold the Shutter button for two seconds to power on for
the first time.
Page 20

20 Set up
For subsequent use, simply hold your RE by the grip sensor and it will
instantly power on.
Pairing your RE and your phone for the first time
Set up the
RE app on your phone to remember your RE camera.
Before you begin:
Download and install the RE app on your phone.
Charge both your phone and RE camera.
Check that a microSD card is installed in your RE.
Make sure your RE isn't connected to another phone.
On your iPhone
1. On your iPhone, go to Settings > Bluetooth, and then tap the
Bluetooth® switch to turn it on.
2. Press the Home button, and then tap the RE app icon .
3. Tap Get Started.
4. Tap Next.
Your iPhone scans for nearby devices.
Page 21

Set up 21
5. Select the name of your RE from the list of detected devices.
6. Set a password, and then tap OK.
You'll see a screen that prompts you to connect your iPhone to the
Wi-Fi® network of your RE camera. The name and password you've
set is also displayed on screen.
7. Press the Home button, and then tap Settings > Wi-Fi.
8. Be sure that Wi-Fi is on, then select the name of your RE from the
list.
9. Enter the password you've set for RE, and then tap Join.
10. Press the Home button, and then tap the RE app icon .
Pairing devices is done only once. The next time you use your RE and your
phone, you only have to connect them. See Connecting your RE and phone
on page 22 to learn how.
You won't be able to connect to the Internet while you're
connected to the Wi-Fi network of your RE.
On your Android phone
1. Open the RE app.
2. Tap Get Started.
3. Tap Next.
Your phone scans for nearby devices.
4. Select the name of your RE from the list of detected devices.
Page 22

22 Set up
5. Set a password, and then tap OK.
Your phone turns on Wi-Fi if you haven't switched it on.
6. Start using the app with your RE camera.
Pairing devices is done only once. The next time you use your RE and your
phone, you only have to connect them. See Connecting your RE and phone
on page 22 to learn how.
Connecting your RE and phone
The RE app remembers the RE camera you've paired.
Before you begin:
You need to pair your RE and your phone.
Your RE shouldn't be connected to another phone.
Your RE and your phone should be within 10 meters.
iPhone users: Connect your iPhone to the Wi-Fi network of
your RE.
Open the RE app. You'll see thumbnails of photos and videos on your RE
or the Live viewfinder once you have connected your devices.
Page 23

Set up 23
Exploring basic and advanced settings
The RE app gives you options to customize settings for your RE camera.
Go to Settings and check out what you can customize.
1. Connect your phone and your RE.
2. Go to Settings.
iPhone users: Tap .
Android phone users: Tap .
Checking for firmware updates
A firmware update for your RE includes improved features and bug fixes.
The RE app can check and notify you if there's a new firmware update
available. Always remember to keep your RE up-to-date.
Before you begin:
Check that your phone and your RE have more than 50% of
battery power.
A microSD card is inserted in your RE.
Page 24

24 Set up
On your iPhone
You need a data connection on your iPhone to complete this
procedure. To download firmware updates using Wi-Fi, see Using
Wi-Fi to download firmware updates on page 24.
1. Connect your phone and your RE.
2. Tap > Advanced settings > Check for updates.
3. If there's an available firmware update, tap Update now.
4. After downloading, tap Install.
5. Wait until the firmware update is complete.
Your RE camera will restart after updating the firmware. This temporarily
disconnects your iPhone and RE. Tap Retry on the RE app screen, and then
connect your devices again. See Connecting your RE and phone on page
22 for more details.
Using Wi-Fi to download firmware updates
1. Go to Settings > Wi-Fi on your iPhone, then select your network to
connect to the Internet.
2. Press the Home button, and then tap the RE app icon .
You'll get a popup notification if there's an available firmware
update.
3. Tap Update, and then tap Update Now to start downloading the
firmware.
Page 25

Set up 25
4. After downloading, connect your iPhone to the Wi-Fi network of
your RE.
5. Press the Home button, and then tap the RE app icon .
You'll see an in-app notification below the Settings button.
6. Tap the Install RE update notification.
7. Tap Install, then wait until the firmware update is complete.
Your RE camera will restart after updating the firmware. This temporarily
disconnects your iPhone and RE. Tap Retry on the RE app screen, and then
connect your devices again. See Connecting your RE and phone on page
22 for more details.
On your Android phone
1. Connect your phone and your RE.
2. Go to Settings.
3. Tap Advanced settings.
4. Tap Check for updates.
5. If there's an available firmware update, tap Update.
6. Wait until the firmware update is complete.
Page 26

26 Set up
Disconnecting your RE and phone
You can easily disconnect the RE app and RE camera after use.
On your iPhone
§ Press the Home button to close the RE app.
§ Or, go to Settings, then tap Disconnect RE.
On your Android phone
§ Open the Notifications panel, and then tap beside the name of
your RE camera to disconnect it.
§ Or, go to Settings, then tap Disconnect RE.
Page 27

Take photos and videos 27
Take photos and videos
Getting to know the Live viewfinder
Connect your phone and your RE, then tap to see the Live viewfinder
of your RE camera.
1 Live viewfinder
2 Capture modes
3 Shutter button
Turn your phone sideways to see the Live viewfinder in full screen.
Page 28

28 Take photos and videos
Turn your phone to portrait orientation again, and then tap to view
photos and videos on your RE.
To use the Live viewfinder, your RE and your phone should be
within 10 meters.
Turning Ultra-wide angle on or off
Set your RE camera to capture wide angle shots.
1. Connect your phone and your RE.
2. Go to Settings.
3. Tap Camera settings.
4. Turn the Ultra-wide angle switch on or off.
Taking photos
Take beautiful photos on your RE camera. You can also use the RE app as
your Live viewfinder.
On RE
1. Hold your RE by the grip sensor.
2. Point your RE at what you want to capture.
3. Press the Shutter button.
The indicator LED will flash red and your RE will click.
Page 29

Take photos and videos 29
On the RE app
1. Connect your phone and your RE.
2. Tap to go to the Live viewfinder, if you're not yet in this view.
3. In portrait orientation, tap to select Photo mode.
Or, while holding your phone sideways, tap the button above the
onscreen Shutter button , and then tap .
4. Position your RE on a level surface or tripod.
5. Tap to take a photo.
The indicator LED flashes and your RE clicks when a photo is taken.
To change the photo resolution, go to Camera settings, then tap
Photo resolution.
Recording videos
Record high quality videos on your RE camera. You can also use the RE
app as your Live viewfinder.
On RE
1. Hold your RE by the grip sensor.
2. Point your RE at what you want to capture.
3. Press and hold the Shutter button until recording starts.
The indicator LED will keep flashing red while recording. You'll also
hear RE beep.
Page 30

30 Take photos and videos
4. Press the Shutter button again to stop recording.
The indicator LED turns off and your RE beeps again.
On the RE app
1. Connect your phone and your RE.
2. Tap to go to the Live viewfinder, if you're not yet in this view.
3. In portrait orientation, tap to switch to Video mode.
Or, while holding your phone sideways, tap the button above the
onscreen Shutter button
4. Position your RE on a level surface or tripod.
5. Tap to record a video.
The indicator LED will keep flashing red while recording. You will
also hear RE beep.
6. Tap to stop recording.
The indicator LED turns off and your RE beeps again.
To change the video resolution, go to Camera settings, then tap
Video resolution.
, and then tap .
Page 31

Take photos and videos 31
Recording slow motion videos
Relive high speed action bit by bit and add a touch of suspense to your
videos.
On RE
1. Hold your RE by the grip sensor.
2. Press the Slow motion mode switch until the indicator LED turns
blue.
3. Press and hold the Shutter button until recording starts.
The indicator LED will flash blue and your RE will beep.
4. Press the Shutter button again to stop recording.
The indicator LED turns off and your RE beeps again.
On the RE app
1. Connect your phone and your RE.
2. Tap to go to the Live viewfinder, if you're not yet in this view.
3. In portrait orientation, tap to switch to Video mode.
Or, while holding your phone sideways, tap the button above the
onscreen Shutter button , and then tap .
4. Tap the Slow motion option to switch it on.
5. Position your RE on a level surface or tripod.
6. Tap to record a video.
The indicator LED turns blue and your RE beeps.
Page 32

32 Take photos and videos
7. Tap to stop recording.
The indicator LED turns off and your RE beeps again.
Creating time-lapse videos
Capture the motion of objects and scenes that slowly unfold before the
human eyes.
You can do that with the Time-lapse mode. It automatically takes a series
of photos at intervals within a period of time. These photos then become
frames of your time-lapse video and you'll see movements play much
faster.
1. Connect your phone and your RE.
2. Tap to go to the Live viewfinder, if you're not yet in this view.
Think of sunsets and blossoming flowers.
You can only set and capture time-lapse videos from the RE app.
Before you begin:
Both your phone and RE must be charged. Or, you can
connect your RE to a power source while capturing timelapse video.
Your microSD should have enough space available.
Page 33

Take photos and videos 33
3. In portrait orientation, tap to switch to Time-lapse mode.
Or, while holding your phone sideways, tap the button above the
onscreen Shutter button , and then tap .
4. Tap , and then customize your Time-lapse mode settings.
5. Tap Set or OK.
6. Position your RE on a level surface or tripod.
7. Tap .
You can tap if you need to pause capturing.
8. If you didn't select Stop recording automatically in Time-lapse
mode settings, tap to manually stop your time-lapse.
Page 34

34 View, edit, and share
View, edit, and share
Viewing photos and videos
With the RE app, you can easily view the photos and videos you've
captured on your RE.
1. Connect your phone and your RE.
2. Tap
3. Swipe up and down the screen to more thumbnails of photos and
to see photos and videos on your RE, if you're not yet in
this view.
videos captured by your RE.
Notice that some thumbnails have small corner icons. These are
media file indicators.
1 Photo
2 Video
3 Slow motion video
Page 35

View, edit, and share 35
4 Time-lapse video
4. Tap a thumbnail to view it in full screen.
5. If you opened a video, tap the screen to see the playback controls.
6. Tap to go back to your photos and videos.
Or, swipe right or left to go to the next or previous item.
You may also see thumbnails with this icon . This indicates that it's a
Zoe™ preview. To know more about Zoe, visit www.zoe.com.
Zoe is currently available on Android phones only.
Sorting media by type
Easily locate a photo or video by filtering the photos and videos on your
RE and display a particular media type.
On your iPhone
When you see the thumbnails of photos and videos on your RE, tap the
buttons below the screen to go to see thumbnails of the same media type.
On your Android
When you see the thumbnails of photos and videos on your RE, tap ,
and then select a media type to show.
Page 36

36 View, edit, and share
Removing fisheye effect
With Ultra-wide angle switched on, your captured photos or may appear
like they were taken from fisheye lens. This is because your RE has a wider
field of view.
You can easily "de-fisheye" a photo on the RE app.
1. Connect your phone and your RE.
2. Tap to see photos and videos on your RE, if you're not yet in
this view.
3. Tap the thumbnail of the photo to de-fisheye.
4. Tap .
1 Ultra-wide angle photo
2 Ultra-wide angle photo after removing
the fisheye effect
To change the photo back to Ultra-wide angle with fisheye effect,
open the thumbnail in full screen, and then tap .
Page 37

View, edit, and share 37
Downloading photos and videos from your RE
You can save photos and videos from your RE camera to your phone.
On your iPhone
1. Connect your phone and your RE.
2. Tap
3. To download a photo or video, tap a thumbnail to open it in full
4. To download multiple items, tap , select items, and then tap .
When done, check the downloaded files from your phone's Photos app.
On your Android phone
1. Connect your phone and your RE.
2. Tap
3. To download a photo or video, tap a thumbnail to open it in full
4. To download multiple items, tap
to see photos and videos on your RE, if you're not yet in
this view.
screen, then tap > Save Image or Save Video.
Choose to save the files.
to see photos and videos on your RE, if you're not yet in
this view.
screen, then tap
items, and then tap Next.
.
> Save to phone, select the
When done, check the downloaded files from your phone's media gallery
app.
Page 38

38 View, edit, and share
Sharing photos and videos
Share photos and videos from your RE to your family and friends via email
or social networks.
On your iPhone
1. Connect your phone and your RE.
2. Tap to see photos and videos on your RE, if you're not yet in
this view.
3. To share a photo or video, tap a thumbnail to open it in full screen,
tap , then select where you want to share it. Share the photo or
video as you normally would on your selected platform.
4. To share multiple items, tap , select items, then tap . Share the
items as you normally would on your selected platform.
On your Android
1. Connect your phone and your RE.
2. Tap to see photos and videos on your RE, if you're not yet in
this view.
3. To share a photo or video, tap , and then select where you want
to share it. Share the photo or video as you normally would on your
selected platform.
4. To share multiple items, tap > Share, then select where you want
to share it. Select items, then tap Next. Share the photos or videos
as you normally would on your selected platform.
Page 39

View, edit, and share 39
Copying media files from your RE to your computer
Connect your RE to your computer. Your computer will recognize it just
like any removable USB drive, and you can copy your media files from your
RE.
1. Connect RE to the computer using the supplied USB cable.
You'll see options for viewing or importing files on the computer
screen.
2. Choose to view files.
3. Copy the files from your RE to your computer.
4. After copying the files, safely disconnect RE from the computer.
Deleting photos and videos
Deleting photos and videos on the RE app will erase them from the storage
card of your RE camera.
On your iPhone
1. Connect your phone and your RE.
2. Tap to see photos and videos on your RE, if you're not yet in
this view.
3. To delete a photo or video, tap a thumbnail to open it in full screen,
tap , then confirm your action.
4. To delete multiple items, tap
, select items, then tap .
Page 40

40 View, edit, and share
On your Android
1. Connect your phone and your RE.
2. Tap to see photos and videos on your RE, if you're not yet in
this view.
3. To delete a photo or video, tap a thumbnail to open it in full screen,
tap , then confirm your action.
4. To delete multiple items, tap > Delete, select items, then tap
Delete.
Page 41

Stream live with RE 41
Stream live with RE
About live streaming
Broadcasting your world just got easier. With RE, you can live stream an
event and invite your contacts or social networks to watch.
Before you begin:
You need to have a 3G/4G mobile data connection enabled
on your phone to be able to live stream your videos on
YouTube®.
Live streaming on Wi-Fi-only tablets is not supported.
Your video broadcast depends on your mobile network's
signal strength
You need to set up and sign in to your Google® account on
your phone.
Your recorded videos will be directly uploaded to your
YouTube account and won't be saved on your RE.
Live streaming videos are limited to 30 minutes and 480p
video resolution.
Page 42

42 Stream live with RE
This feature is currently available on Android phones only and may
not be supported in some regions.
Setting up your RE for live streaming
1. Connect your phone and your RE.
2. Go to Settings.
3. Tap Live streaming.
4. Sign in with your Google.
5. Tap Enable live streaming, then follow the onscreen instructions to
complete the setup.
6. When you see a confirmation message onscreen that you have
successfully enabled live streaming, tap Done.
Inviting contacts to watch your live stream
1. Connect your phone and your RE.
2. Go to Settings.
3. Tap Live streaming.
4. Tap Invitations will send to > Add Contact. You'll see a list of your
contacts with mobile phone numbers. To invite your friends via
email or social networks, see Sharing your live stream via email or
social networks on page 44.
Page 43

Stream live with RE 43
5. Tap a contact to add.
Tap Add Contact again to add more.
6. Tap when done.
7. Tap Video privacy to set your privacy settings.
8. Tap when done.
RE app remembers your live streaming settings.
SMS invitations will be sent to your selected contacts when you
start live streaming.
Recording a live stream
1. Connect your phone and your RE.
2. Tap to go to the Live viewfinder, if you're not yet in this view.
3. In portrait orientation, tap to switch to Video mode.
4. Select the Live streaming checkbox.
The indicator LED turns on and your RE beeps.
5. Tap to start recording.
At the bottom of the screen, notice a small progress bar below the
Share icon
progress bar turns completely blue.
6. Tap to stop live streaming.
. Your audience will see your live stream once the
Page 44

44 Stream live with RE
Sharing your live stream via email or social networks
Draw in a bigger audience to watch your live event by emailing the
YouTube link to more contacts or posting it to your social networks.
While live streaming, tap
live stream.
, and then choose how you want to share your
Page 45

Back up 45
Back up
Backing up your media files
Capture memories with RE and back them up to your phone without
worries.
This feature is currently available on Android phones only and may
not be supported in some regions.
Backing up photos and videos to your phone storage
1. Connect your phone and your RE.
2. Tap .
3. Tap Backup > Back up to.
4. Tap This phone.
Backing up photos and videos to your online storage
You need to set up your Dropbox or Google Drive™ account on
your phone.
1. Connect your phone and your RE.
Page 46

46 Back up
2. Tap .
3. Tap Backup > Back up to.
4. Choose an online storage.
5. Follow the onscreen instructions to set up and link your account.
Backup will begin after you leave the RE app.
To stop auto-backup, tap Backup > Back up to > Off.
Page 47

Reset 47
Reset
Formatting your storage card
Formatting your storage card permanently erases all data from your
storage card, including personal information.
1. Connect your phone and your RE.
2. Go to Settings.
3. Tap Advanced settings.
4. Tap Format SD card or Format.
Resetting your RE to factory settings
If RE has a persistent problem that cannot be solved, you can perform a
factory reset (also called a hard reset or master reset). A factory reset
reverts your RE camera back to its initial state—the state before you
turned it on for the first time.
This action removes all data and settings you have for your RE
camera and the RE app installed on your phone.
1. Connect your phone and your RE.
2. Go to Settings.
Page 48

48 Reset
3. Tap Advanced settings.
4. Tap Factory reset.
5. Choose if you also want to erase your media files on the microSD
card inserted in your RE.
If you choose to erase the files on your storage card, this action
cannot be undone.
6. Tap Reset or Factory Reset.
Using the Reset button
If you're experiencing a device issue or you've forgotten the password
you've set on the RE app, you can factory reset your RE using its hardware
Reset button.
This action removes all data and settings you have for your RE
camera and the RE app installed on your phone. Photos and
videos stored on your microSD card will not be deleted.
1. Hold your RE with the lens facing up.
Page 49

Reset 49
2. Open the microSD slot cover located at the bottom of your RE.
You'll see a small button located at
the top left corner of the microSD
slot.
3. Press and hold the Shutter button, and at the same time, push the
tip of a small bent paperclip onto the Reset button.
4. Release the Reset button.
5. Continue to press and hold the Shutter button until you hear a
startup sound.
A startup sound indicates that factory reset is complete.
Page 50

50 Trademarks and copyrights
Trademarks and copyrights
©
2015 HTC Corporation. All Rights Reserved.
HTC, the HTC logo, RE, the RE logo, Life In Full View, Zoe, and all other
HTC product and services names are the trademarks or registered
trademarks of HTC Corporation and its affiliates in the U.S. and other
countries.
Android and Google Play are trademarks of Google Inc.
Apple, iPhone, and the Apple logo are trademarks of Apple Inc., registered
in the U.S. and other countries. App Store is a service mark of Apple Inc.
The Bluetooth® word mark and logos are registered trademarks owned by
Bluetooth SIG, Inc.
microSD is a trademark of SD-3C LLC.
Wi-Fi® is a registered trademark of the Wireless Fidelity Alliance, Inc.
All other company, product, and service names are the property of their
respective owners and their use does not indicate an affiliation with,
association with, or endorsement of or by HTC Corporation.
Waterproof: Grade IPX7 - 1m for up to 30 minutes; Grade IPX8 - 3m for up
to 120 minutes with cap (sold separately).
Screen images contained herein are simulated. HTC shall not be liable for
technical or editorial errors or omissions contained herein, nor for
incidental or consequential damages resulting from furnishing this material.
The information is provided “as is” without warranty of any kind and is
subject to change without notice. HTC also reserves the right to revise the
content of this document at any time without prior notice.
Page 51

Trademarks and copyrights 51
No part of this document may be reproduced or transmitted in any form or
by any means, electronic or mechanical, including photocopying, recording
or storing in a retrieval system, or translated into any language in any form
without prior written permission of HTC.
RE is a product from HTC Corporation. The product is protected by
copyright, patent, and other intellectual property rights, laws, and treaties.
To use the product you will need an Android/iOS device and you will need
to download software provided by HTC Corporation and its licensors. The
software is not sold, it is licensed to you. The software is subject to a
license agreement that you must accept before you use the software. By
using the software, you agree with HTC Corporation to be bound by the
license agreement. A copy of the license is available at
www.recamera.com.
Page 52

52 Index
Index
C
Camera 28
Capture modes 28, 29, 31, 32
F
Firmware 23
Fisheye effect 36
I
Indicator LED 11
L
Live viewfinder 27
P
Photos
- deleting 39
- downloading 37
- sharing 38
- taking 28
- viewing 34
Photosimportingtransferring
- copying to your computer 39
Power 11
R
Reset
- camera 47
- reset button 48
- storage card 47
Resolution
- photo 28
- video 29
S
Settings 23
Slow motion videos 31
Storage card 9
T
Time-lapse recording 32
U
Ultra-wide angle
- fisheye effect 36
Page 53

Ultra-wide anglesuper wide
anglepanorama
- turning on or off 28
V
Video recording 29
Videos
- deleting 39
- downloading 37
- sharing 38
- slow motion 31
- taking 29
- time-lapse 32
- viewing 34
Viewfinder 27
W
Waterproof 13–15
- care and maintenance 15
- guidelines 13
- precautions 14
Index 53
 Loading...