

Page 1
HSM FA 500.3
Keep in a safe place for future use! 1.990.999.110 – 1005
OPERATING MANUAL
SHREDDER
english
Page 2

2 1005
FA 500.3
Contents
1 Proper use, warranty
....................................................................................................................3
2 Safety instructions .....................................................................................................................3
3 Overview ...................................................................................................................................4
4 Dimensions ...............................................................................................................................5
5 Transportation, installation ........................................................................................................6
6 Operating and display elements ...............................................................................................7
7 Start-up .....................................................................................................................................7
8 Malfunctions ..............................................................................................................................9
9 Maintenance and care ............................................................................................................11
10 Disposal / Recycling ................................................................................................................12
11 Scope of supply, accessories ..................................................................................................12
12 Technical data .........................................................................................................................13
13 Electric wiring diagrams ..........................................................................................................14
Cut size 1.9 x 15 mm ..............................................................................................................19
Page 3
1005 3
FA 500.3
Danger of injury
Do not reach into the paper feed
opening.
Splinters can cause injury
Wear protective goggles when destroying diskettes, CDs and hard
credit cards.
Danger of injury during intake
Do not go near the paper feed opening with long hair, loose clothing, ties,
scarves, necklaces, bracelets etc.
Do not destroy any material which
might become tangled, such as tapes,
binder ties or foil.
Switch off the shredder and pull
out the power plug before moving
or cleaning the shredder, or any other
task outside its normal scope of use.
Maintenance and service tasks may
only be performed by HSM customer
service and service engineers of our
dealers.
1 Proper use, warranty
The shredder is exclusively designed for destroying
paper and cardboard, as well as store cards, credit cards,
CD-ROMs and fl oppy disks. Its sturdy drive mechanism is
not damaged by paper clips and staples.
The document shredder is supplied as a single or
combined machine (with an HSM baling press). Please
observe the applicable instructions in the operating manual.
Our general business conditions are applicable. We
provide a one year warranty for the document shredder.
The warranty period is 6 months when used in multiple
shifts. This warranty excludes wear, damage due to
improper handling, natural depreciation, and actions
taken by third parties.
2 Safety instructions
Danger:
It is prohibited to operate one only machine
of a combination-version machine.
The safety clearances are only guaranteed
with the combined document shredder and
HSM press.
Ensure that no unauthorised persons can access the
document shredder. Do not leave the document shredder
switched on when it is unattended. The shredder may not
be operated by anyone under 16 years of age.
When the machine is not in use, it must be shut down
and secured against unauthorised use. To do so, you can
secure the mains switch with a padlock when it is in the
off position.
• Read the operating manual before starting up the
shredder.
• Do not remove or modify safety devices which guarantee the safe operation of the machine.
• Observe all safety instructions attached to the
machine.
• The shredder may not be operated by anyone under
16 years of age.
• Only open the front door once the machine has come
to a standstill.
• Carry out inspection and maintenance regularly.
• Switch off the shredder, disconnect the power plug
and call customer service in the following circumstances:
- Power cables or plugs are damaged
- Liquid has entered the shredder
- The shredder has been exposed to rain
- The machine does not work properly despite the
operating manual having been observed
- The shredder has been damaged
• No platforms or other raised surfaces may be placed
near the shredder if they encroach on the specifi ed
safety clearances.
Operating controls for your safety
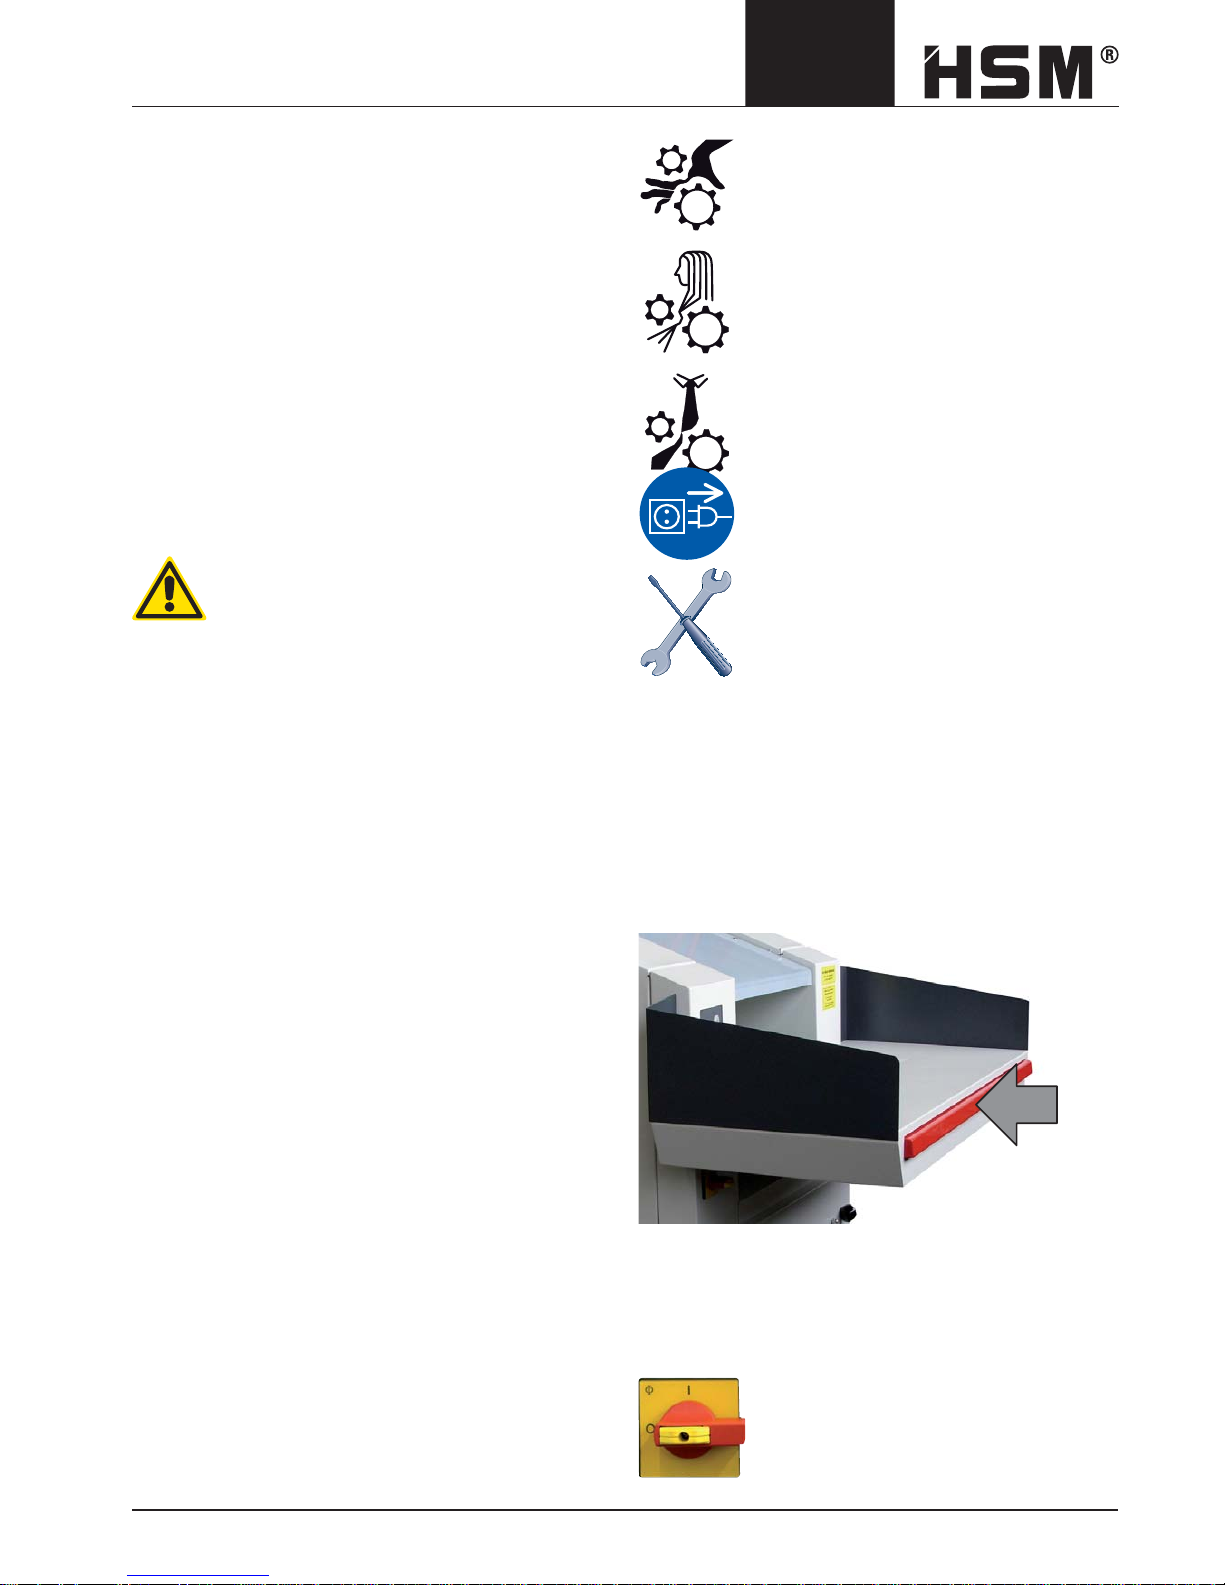
Emergency stop switch bar
In the event of danger, press the emergency stop switch
bar immediately.
This switches off the shredder, and stops the cutting
block and feed belt.
Main switch (only Solo-version)
In the event of danger, turn the main
switch to “0”.
You can secure the main switch in
this position with a padlock to prevent
restarting.
Translation of the original operating instructions
Page 4

4 1005
FA 500.3
3 Overview
1 Main switch (only solo-version)
2 Safety instructions
3 Operating and display elements
4 Emergency stop switch bar
5 Loading tray
6 Intake conveyor
7 Braking swivel castors
8 Nameplate
9 Oil reservoir opening
1
7
8
HSM GmbH + Co. KG
Austrasse 1-9
88699 Frickingen / Germany
4
3
2
5
6
9
Page 5
1005 5
FA 500.3
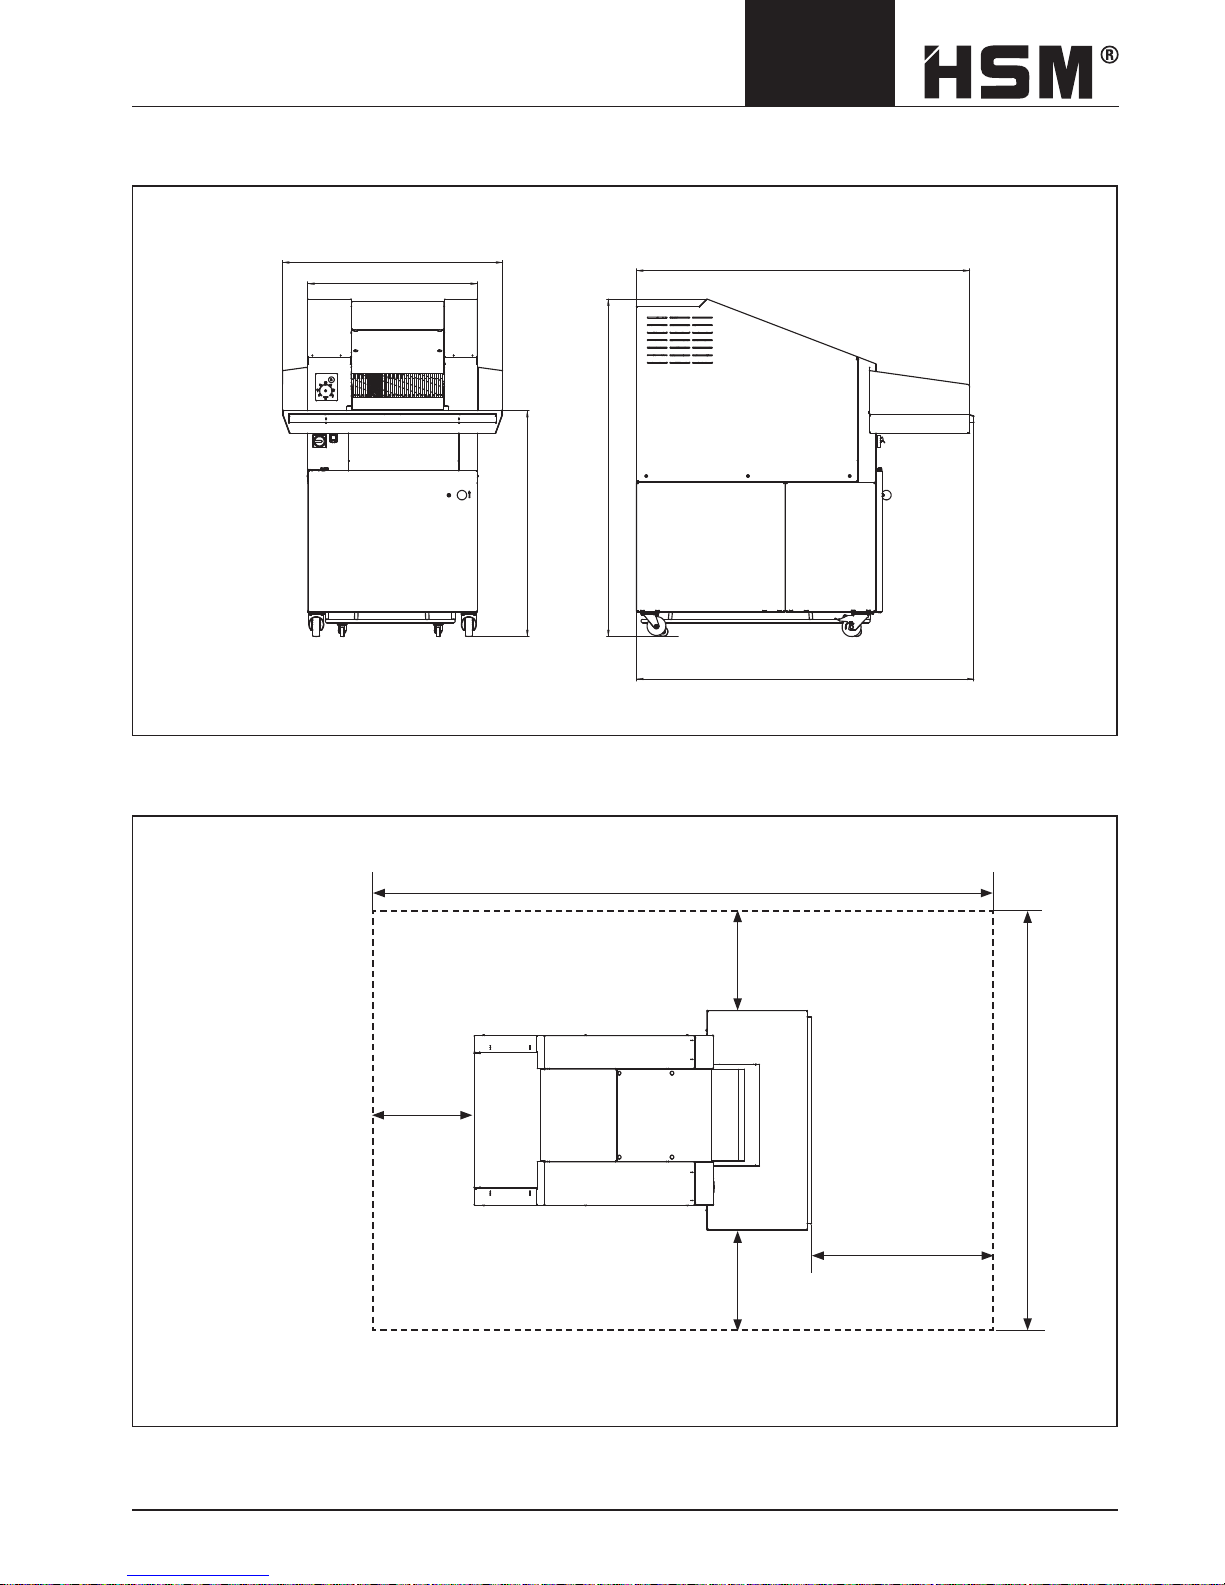
4 Dimensions
Space requirements for operation and maintenance
HSM FA 500.3
1792
1168
900
1200
1791,5
1769
1000
500
500500
3300
2200
Page 6
6 1005
FA 500.3
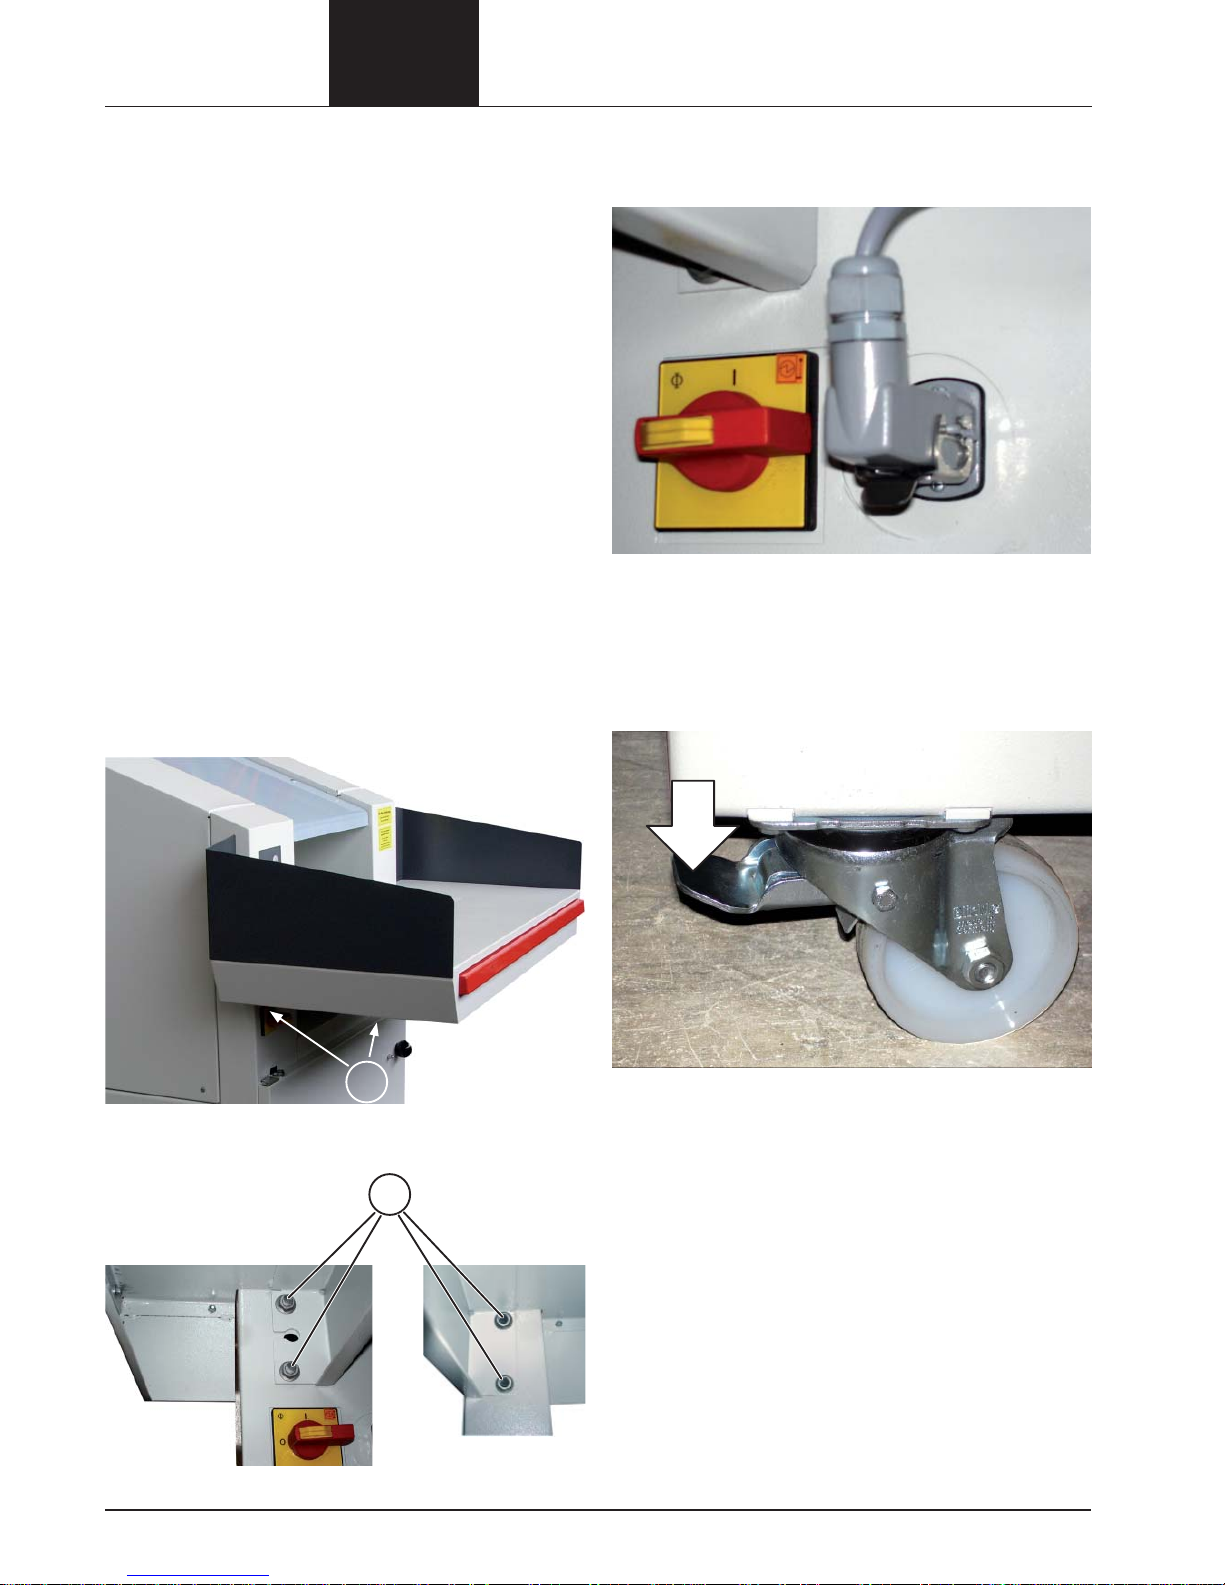
Mount the loading table onto the unit:
• Attach the table using the M 10 nuts (1)
Lock the front castors by pressing down the brake lever.
1
• Insert the plug (connection for emergency stop switch
bar) into the socket next to the main switch and turn it
to stop.
1
• Insert the machine’s power plug into the
CEE 3x32 A + N + PE connection socket on the
application site.
Notice: Extension cables are not permitted.
5 Transportation, installation
• During transport, observe the high centre of gravity of
the paper shredder!
• Place the pallet with the shredder in its packaging on
a smooth, level surface.
• Observe the instructions for unpacking.
• If you need to move the shredder through narrow
doors, you can wait until it is at its fi nal location before
fi tting the loading tray. Without the tray, the machine is
only 900 mm wide.
• The shredder may only be placed in dry rooms on
a hard, level fl oor – not on carpets. The fl oor load
on each roller is approximately 200 kg respectively
230 kg (machines with cutting unit 1.9 x 15 mm).
• The machine must be connected to a power source
which meets the specifi cations on the nameplate.
Make sure the power cable is unobstructed and that
nobody can tread on it
Page 7
1005 7
FA 500.3
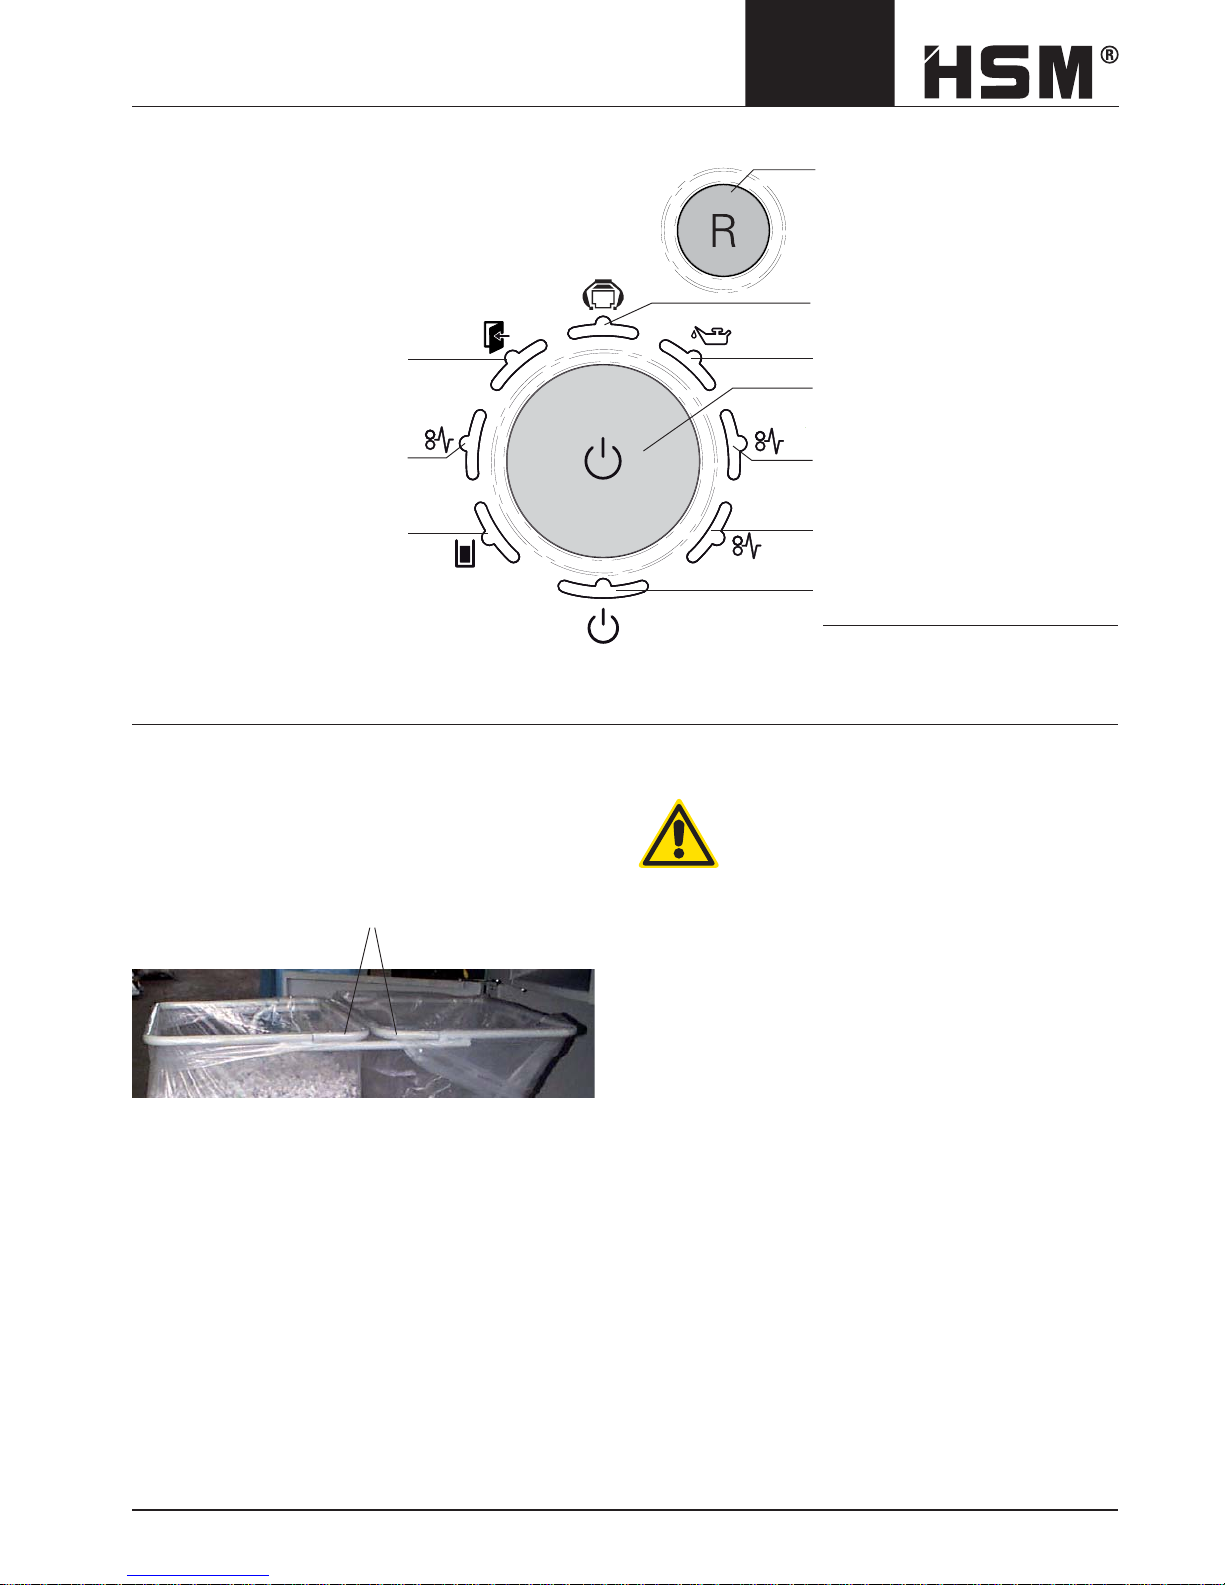
6 Operating and display elements
1
2
Z
Baling press operating status
(only for combined machines)
Indicator: oil reservoir empty
Function button
“On/off/start”
Indicator: Level 2 * overload
Indicator: Jam between the cutting units *
Indicator: ready for operation
* only for machines with
1.9 x 15 mm cutting widths
Indicator: Door open or
emergency stop was pressed
Indicator: Level 1
overload
Indicator: Paper container full
R button:
Cutting unit runs in reverse
7 Start-up
Attaching the waste bag (Solo version)
• Open the front door and pull out the waste trolley.
• You can modify the trolley from a double-chamber to a
single-chamber system by removing the brackets (1).
• Put in a new waste bag and fold it approximately
20 cm over the top frame tube. When using a twochamber system, make sure that there is also around
20 cm of plastic foil below the brackets (1).
• Push in the waste trolley and close the front door.
1
Inspecting the safety devices
Check that the safety devices are working
properly:
• At the start of each shift
• After any maintenance or repair work
Do not start the machine until you have checked the safety devices and found them to be in perfect working order.
If any defect arises during operation stop the machine
immediately and make sure it is corrected.
Page 8
8 1005
FA 500.3
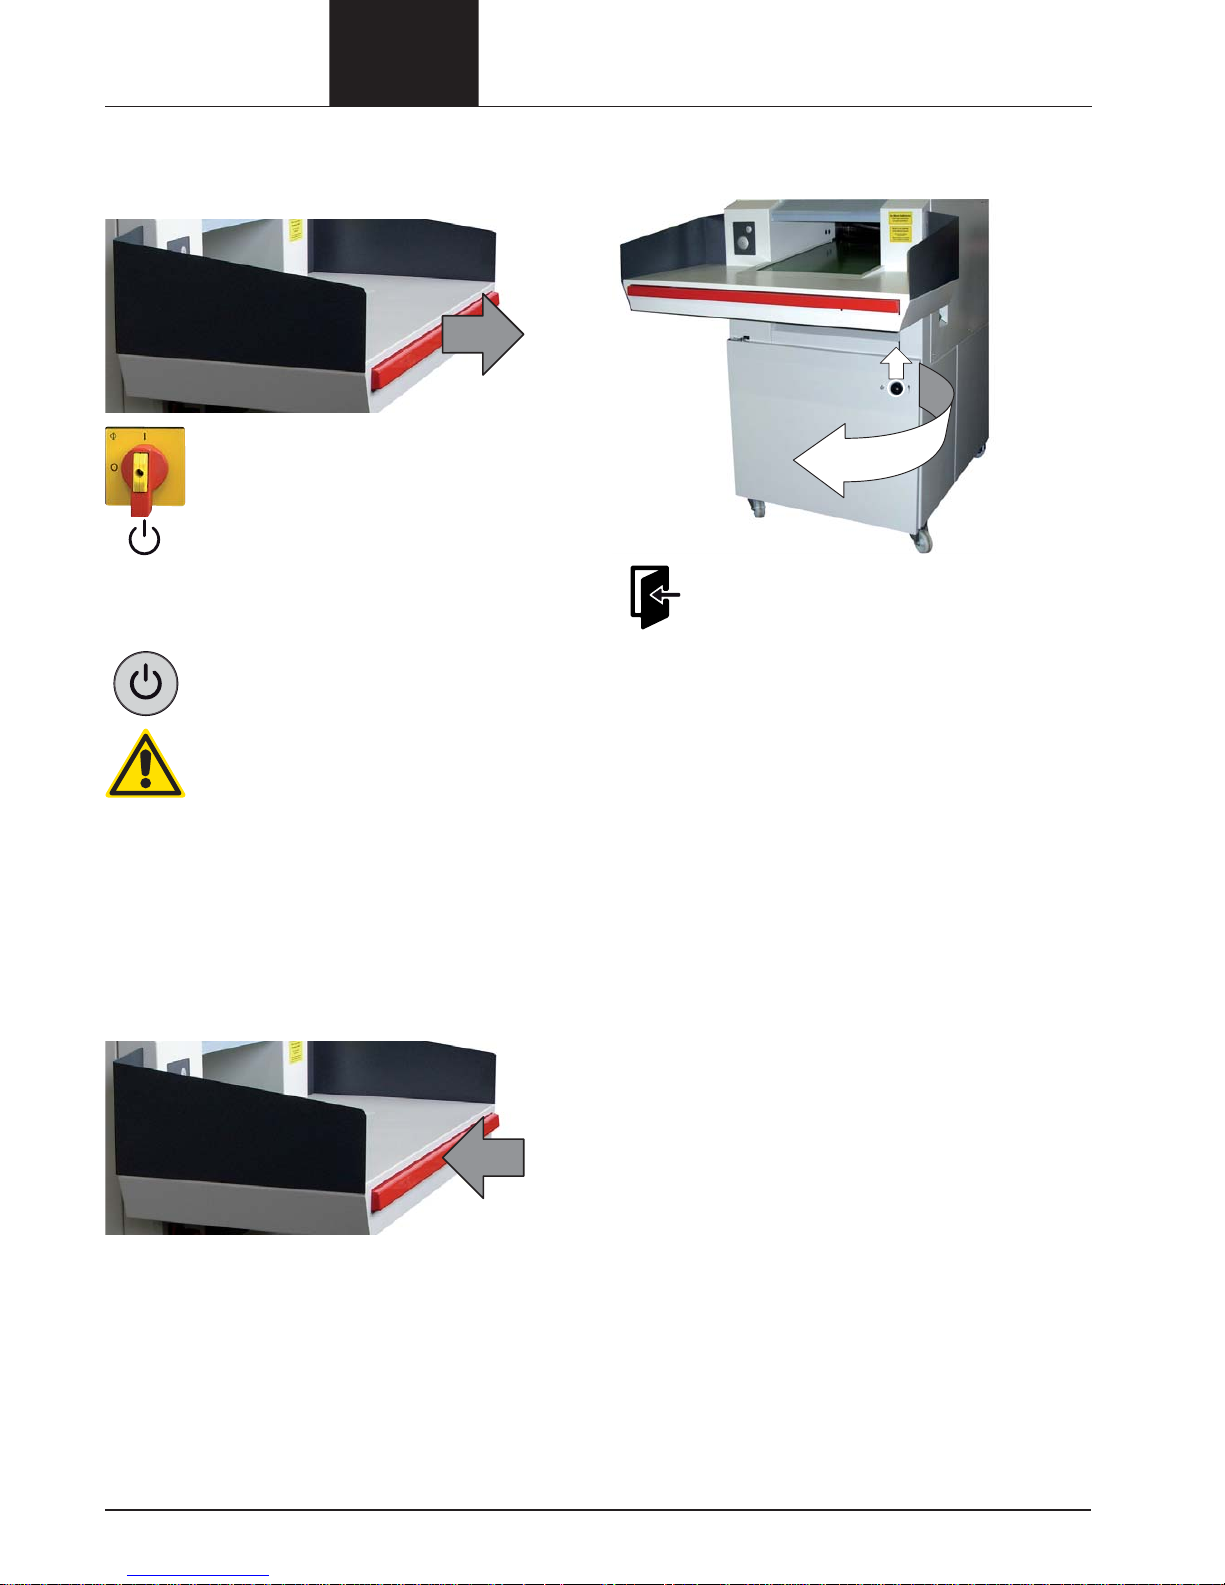
Switching on the paper shredder
• Activate the emergency stop control by pushing the
switch bar away from the machine.
• Solo-version: Turn the main switch to the
I position.
Combination-version: Turn the main switch
on the baling press to the I position.
The indicator „Ready for operation“ lights
up.
Note: If an error message lights up (such as “Door
open” or “Paper container full”), fi rst rectify
the error.
• Press the start button.
The cutting block and feed belt start up.
Caution!
The feed belt can run in reverse if the phase
wires in the power plug are incorrectly
connected.
Turn off the main switch immediately and
pull out the power plug!
Have an electrician change two of the three
phase wires.
Checking the emergency stop control
• Press the emergency stop switch bar while the
machine is running.
The shredder must switch off immediately. The cutting
block and the feed belt must stop.
The machine can only be switched on again once you
have pulled out the switch bar.
Inspecting the door switch
• Open the front door.
The indicator “Door open” must light up.
The cutting block and feed belt must stop.
After you close the door, the display should
go out and you can start the machine again
by pressing the start button.
Page 9

1005 9
FA 500.3
Shredding material
Place the material to be shredded on the loading tray and
then place batches on the feed belt.
If material that is not supposed to be shredded is mistakenly placed onto the belt, never attempt to pull it out
• Press the start button again.
The drive stops.
• Press the R-button.
The cutting block and feed belt run in
reverse.
• You can now remove the material from the
belt and start the shredder again by pressing the start button.
Note: Provided the cutting unit is running in the
shredding direction, you can stop it by
pressing the R button.
Waste bag full
The indicator “Paper container full” lights
up. The shredder switches off automatically.
• Press the reverse button for approx. 3 seconds.
Part of the material is pulled back into the
apparatus.
• Open the front door and shake the waste
trolley.
The cut material spreads in the cut mate-
rial sack and does not fall into the interior
of the shredder.
• Pull the waste trolley out and change the
cut material sack.
• Push the trolley back in and start the
shredder again by pressing the start
button.
Stopping the shredder
• Press the start button again.
The cutting block and feed belt stop.
The shredder switches to standby mode.
Switching off the shredder
• Turn the main switch on the paper shredder or the baling press to 0.
You can secure the main switch in this
position using a padlock.
8 Malfunctions
Check the following before calling customer service:
• Is the power plug connected?
• Is the shredder switched on?
• Is the front door closed?
• Is the waste bag full?
• Is there a paper jam in the shredder?
• Has the motor been overloaded?
Overload due to paper jam
“Overload” display (level 1 or level 2 – de-
pending on the machine model) lights up.
The cutting block automatically runs in
reverse for several seconds. Then the cutting unit switches off.
Caution!
The blade rollers can still cause injuries
even while they are not running. Do not
reach into the cutting apparatus! Wear
safety gloves!
Do not alternately press the “Forwards” and
“Reverse” buttons to remove the blockage.
This will damage the shredder.
• Take out the pile of paper.
• Press the start button and put less paper
on the feed belt.
Page 10

10 1005
FA 500.3
Electric motor overheated
“Overload” display (level 1 or level 2 – de-
pending on the machine model) fl ashes.
The shredder switches off automatically.
• Let the motor cool down for 20 - 30 minutes.
• Press the start button.
Door open or emergency stop was pressed
The indicator lights up.
The shredder switches off automatically.
• Close the front door and activate the
emergency stop control by pushing the
switch bar away from the machine.
• Press the start button.
Oil reservoir empty
“Oil reservoir empty” display lights up.
• Fill the reservoir with cutting apparatus oil.
order no. 1.235.997.500 for 5 litre container
The “Oil reservoir empty” signal is auto-
matically deactivated after the reservoir
is fi lled.
Note: The shredder remains operational even
when the oil reservoir is empty.
Note for machines with 1.9 x 15 mm cutting
widths:
Machines with the safety level 4 contain a two-level
cutting unit with 2 drives.
After starting the document shredder, level 2 starts
initially and about 1 second later level 1 starts in the
shredding direction. The drives are separately monitored
for possible overload by two rotation sensors. For level 1
overload, the drive is stopped and after a delay of approx.
0.5 seconds is switched into reverse for approx. 3 seconds.
Level 2 runs in the shredding direction again.
“Level 1 overload” message with illuminated red LED.
After reversing, the drive remains switched off.
The overload display disappears and the cutting unit
starts running in the shredding direction again when the
start button is pressed.
If it is not restarted – by pressing the start button – within
approx. 5 seconds, then level 2 is also automatically
switched off.
For level 2 overload, both drives are switched off and are
switched to reverse for approx. 4 seconds fi rstly for level 1
and then level 2.
Message: red “Level 2 overload” LED.
After reversing, the drives remain switched off.
The overload display disappears and the drives start
running in the shredding direction again when the start
button is pressed.
Jam between the cutting units
If a jam is detected between the two cutting units, the
drive for level 1 is stopped and switched into reverse.
“Jam between the cutting units” display
lights up
Drive 2 continues to run in the shredding direction until
the jam is cleared. If this is not possible, it switches off
after approx. 10 seconds.
If this is successful, the level 1 drive can be started again
in the shredding direction by pressing the start button. In
this case, the “Jam between the cutting units” message
disappears.
If the level 1 start does not take place within 10 seconds,
level 2 is automatically switched off.
Page 11

1005 11
FA 500.3
9 Maintenance and care
Cleaning the shredder:
• Switch off the shredder and disconnect the power
plug.
• Only use a soft cloth and mild soapy water for
cleaning. Never use scouring agent, cleaning fl uid,
petroleum or thinners.
Greasing the drive chains and cogs
(twice yearly)
• Switch off the shredder.
• Pull out the power plug.
• Remove the tray and the cover panels.
• Grease the cogs and the drive chains from the motor
to the cutting apparatus, the cutting block to the feed
belt and the cutting block to the regulating roller.
Recommended lubricating grease: K2K in accordance
with DIN 51502/DIN 51825
• Put the side cover panels and the tray back on.
F
E
T
T
G
R
E
A
S
E
G
R
A
S
O
G
R
A
I
S
S
E
V
E
T
F
E
T
T
G
R
E
A
S
E
G
R
A
S
O
G
R
A
I
S
S
E
V
E
T
F
E
T
T
G
R
E
A
S
E
G
R
A
S
O
G
R
A
I
S
S
E
V
E
T
Tightening the feed belt
The feed belt should not slip when loaded with material.
• Switch off the shredder.
• Loosen the hex nuts (1) on the left and right sides of
the snub roller.
• Loosen the lock nuts (2) of the tensioning bolts (3).
• Tighten the feed belt evenly using the tensioning
bolts.
Note:
Only tighten the feed belt until it stops slipping. The feed
belt bearing may be damaged if it is tightened too much.
• Tighten the hex nuts on the snub roller and the lock
nuts on the tensioning bolts again.
You must check that the feed belt runs
straight:
Switch on the shredder and let it run for
10 minutes. During this time, the feed belt
must run in the middle of the snub roller. If it
slips to the left or right edge, you must alter
the setting of the snub roller.
Checking the feed belt for wear
The surface of the feed belt can become worn after long
periods of use. If you can see the fabric inlay in the belt, it
must be replaced. Please notify our customer service.
1
1 23
23
Page 12

12 1005
FA 500.3
Cleaning the tensioning station (monthly)
• Remove the feeding table and the front panel of the
tensioning station.
• Remove particles and dirt.
Cleaning the conveyor-belt area (monthly)
• Remove the covers on both sides.
The cleaning openings in the conveyor-belt covers are
now accessible.
• Blow out the conveyor-belt area with compressed air
or use a vacuum cleaner to remove the dirt particles.
10 Disposal / Recycling
Dispose of the machine in an environmentally sound
way at the end of its service life. Observe the current
regulations when doing this. As legislation is subject to
ongoing changes, we request that you contact your local
authorities at the appropriate time. As the manufacturer,
HSM would be glad to advise you on the disposal of your
old machine.
11 Scope of supply, accessories
• Machine on pallet with a wooden frame, strapped with
packing tape and packed in foil
• 4 waste bags, order no. 1.513.995.000 for 2-chamber
system (Solo version)
• 1 waste bag, order no. 1.513.995.100 for 1-chamber
system (Solo version)
• Special cutting block oil
5 l container with spout, order no. 1.235.997.500
• Operating manual
Page 13

1005 13
FA 500.3
12 Technical data
EC declaration of conformity
The manufacturer HSM GmbH + Co. KG, Austrasse 1 - 9, D-88699 Frickingen hereby declares that the machine,
referred to here as
document shredder HSM FA 500.3
corresponds to the health and safety requirements of the following EC directives listed below due to its conception and
design of the version in which it was put into circulation by us:
Machinery directive 2006 / 42 / EC EMC directive 2004 / 108 / EC
Applied standards and technical specifi cations:
• EN 349:1993 + A1:2008 • EN 62061:2005
• EN 12100-1:2003 + A1:2009 • EN 12100-2:2003 + A1:2009
• EN 55014-1:2006 • EN 55014-2:1997 + A1:2001
• EN 61000-3-2:2006 • EN 60950-1:2006
• EN 61000-3-3:1995 + A1:2001 + A2:2005
Authorised representative for the compilation of technical documentation: Rolf Gasteier, HSM GmbH + Co. KG
Frickingen, 11.02.2010
Rolf Gasteier - Technical Director
Cutting type Cross cut
Cut size (mm) 10.5 x 40 - 76 7.5 x 40 - 80 6 x 40 - 53 1.9 x 15
Safety level DIN 32757 – 1 2234
Cutting capacity (sheets), DIN A4, 70g/m
2
80g/m
2
600 - 650
510 - 550
500 - 550
425 - 470
400 - 450
340 - 380
120 - 130
90 - 100
Throughput safety level 4 200 - 250 kg/h
Effective width 500 mm
Cutting speed 210 mm / s
Power supply 3 x 400 V, 50 Hz
Power for the maximum number of sheets 9.2 kW 5.5 + 4 kW
Plug CEE 3x32 A + N + PE
Safety fuse
Line safety switch
Type „gl“ 35 ampere
K or C / 32 ampere
Ambient conditions in operation:
Temperature
Relative humidity
Height above sea-level (MSL)
-10 °C to +40 °C
max. 90 %, without condensation
max. 2,000 m
Dimensions W x D x H (mm) 1170 x 1795 x 1795
Weight 790 kg 920 kg
Volume of the shredded paper container 530 l (2 x 265 l)
Page 14

14 1005
FA 500.3
13 Electric wiring diagrams
Legend:
=AV: Shredder
+S: in switch cabinet
+MA: on machine
+BF: Keypad
Solo
400 V / 50 Hz
Page 15

1005 15
FA 500.3
Page 16

16 1005
FA 500.3
Page 17

1005 17
FA 500.3
Page 18

18 1005
FA 500.3
Page 19

1005 19
FA 500.3
Solo
Cut size 1.9 x 15 mm
400 V / 50 Hz
Page 20

20 1005
FA 500.3
Page 21

1005 21
FA 500.3
Page 22

22 1005
FA 500.3
Page 23

1005 23
FA 500.3
Page 24

HSM GmbH + Co. KG
Austrasse 1-9
88699 Frickingen / Germany
Tel. +49 7554 21 00-0
Fax. +49 75 54 2100 160
info@hsm.eu
www.hsm.eu
HSM of America LLC
419 Boot Road
Downingtown, PA 19335
Tel. (610) 918-4894
(800) 613-2110
Fax (610) 918-4899
customerservice@hsmofamerica.com
info@hsmofamerica.com
www.hsmofamerica.com
HSM (UK) Ltd.
14 Attwood Road / Zone 1
Burntwood Business Park
Burntwood
Staffordshire
WS7 3GJ
Tel. +44(0) 1543.272.480
Fax +44(0) 1543.272.080
info@hsmuk.co.uk
www.hsmuk.co.uk
 Loading...