

Page 1

This publication, including all photographs, illustrations and software, is protected under
international copyright laws, with all rights reserved. Neither this manual, nor any of the
material contained herein, may be reproduced without the express written consent of the
manufacturer.
The information in this document is subject to change without notice. The manufacturer
makes no representations or warranties with respect to the contents hereof and
specifically disclaims any implied warranties of merchantability or fitness for any particular
purpose. Further, the manufacturer reserves the right to revise this publication and to
make changes from time to time in the content hereof without obligation of the
manufacturer to notify any person of such revision or changes.
Trademarks
VGA, and PS/2 are registered trademarks of International Business Machines.
Intel, Pentium, Pentium-II, Pentium-III, MMX, and Celeron are registered trademarks of
Intel Corporation.
Microsoft, MS-DOS and Windows 95/98/NT are registered trademarks of Microsoft
Corporation.
Sound Blaster is a trademark of Creative Technology Ltd.
A3D is a registered trademark of Aureal Inc.
PC-cillin is a trademark of Trend Micro Inc.
Gamut is a registered trademark of Formosoft International Inc.
SuperVoice is a registered trademark of Pacific Image Communications Inc.
MediaRing Talk is a registered trademark of MediaRing Inc.
WordPerfect is a registered trademark of Corel Corporation Ltd.
WinDVD is a registered trademark of Intervideo Incorporated.
Award is a trademark of Award Software Inc.
Other names used in this publication may be trademarks and are acknowledged.
Copyright © 2000
All Rights Reserved
BKI810, V3.3A
March 2000
Page 2

Book PC
Macrovision Corporation Product Notice
This product incorporates copyright protection technology that is protected by method claims of
certain U.S. patents and other intellectual property rights owned by Macrovision Corporation and
other rights owners. Use of this copyright protection technology must be authorized by Macrovision
Corporation, and is intended for home and other limited viewing uses only unless otherwise
authorized by Macrovision Corporation. Reverse engineering or disassembly is prohibited.
Page 3

Table of Contents
Table of Contents
Chapter 1: Getting Started.................................................................................1-1
Introduction................................................................................................................. 1-2
The Ideal Environment................................................................................................1-3
Where to Put the System....................................................................................................... 1-3
Extra Protection..................................................................................................................... 1-3
Maintaining and Caring for the System.......................................................................1-4
Cleaning the System............................................................................................................. 1-4
Transporting the System....................................................................................................... 1-4
Backups................................................................................................................................ 1-5
Shock Precautions................................................................................................................ 1-5
Care of the Computer............................................................................................................ 1-5
Unpacking................................................................................................................... 1-6
Checklist................................................................................................................................ 1-6
Installing the System...................................................................................................1-7
Introducing the System................................................................................................ 1-8
Looking at the Front.............................................................................................................. 1-9
Looking at the Back............................................................................................................. 1-10
Connecting the Cables..............................................................................................1-12
Chapter 2: Using the system.............................................................................2-1
Ready for Power......................................................................................................... 2-2
To Power Up for the First Time............................................................................................. 2-2
To Power Down..................................................................................................................... 2-3
About the Software...................................................................................................... 2-4
About the Drives.......................................................................................................... 2-5
Hard Disk Drive..................................................................................................................... 2-5
Diskette Drive........................................................................................................................ 2-6
CD-ROM Drive............................................................................................................2-6
Using the Drive:..................................................................................................................... 2-7
About Memory.............................................................................................................2-9
i
Page 4

Book PC
About the Audio and Video Onboard...........................................................................2-9
About the LAN Onboard..............................................................................................2-9
About the Modem Onboard.......................................................................................2-10
Chapter 3: Installing the Software.....................................................................3-1
Installing the Windows 98 Operating System..............................................................3-2
Installing the Bundled Software...................................................................................3-2
Installing the Drivers under Windows 98............................................................................... 3-2
Table of contents of the support CD...................................................................................... 3-4
Installing the Applications...................................................................................................... 3-6
Chapter 4: Going inside.....................................................................................4-1
Introduction................................................................................................................. 4-2
Important Precautions........................................................................................................... 4-2
Opening and Closing the Unit Case............................................................................4-3
To Open the System Unit Case............................................................................................. 4-3
To Close the System Unit Case............................................................................................ 4-4
Inside the System........................................................................................................ 4-5
Removing the Drive Cage..................................................................................................... 4-5
Mainboard Items.................................................................................................................... 4-6
Upgrading................................................................................................................... 4-7
Changing the CPU................................................................................................................ 4-7
Changing System Memory.................................................................................................... 4-8
Changing the Drives....................................................................................................4-9
The Drive Cage..................................................................................................................... 4-9
Connectors............................................................................................................................ 4-9
Changing the Hard Disk Drive............................................................................................... 4-9
Changing the CD-ROM/DVD Drive..................................................................................... 4-10
Changing the Diskette Drive................................................................................................ 4-11
Chapter 5: Peripheral Device Setup..................................................................5-1
Setup the Television as System Console....................................................................5-2
How to install your system with television console................................................................ 5-2
How to adjust the best video quality of your TV Output.........................................................5-3
Setup the SPDIF-Out for the Audio System..............................................................5-16
How to setup the SPDIF-Out function in Win98...................................................................5-16
How to setup the SPDIF-Out function in WinDVD...............................................................5-17
ii
Page 5

Table of Contents
Setup the SCART TV as System Console.................................................................5-19
How to install your system with SCART TV console........................................................... 5-19
Appendix A: Problem Solving...........................................................................A-1
Q & A.......................................................................................................................... A-2
The computer doesn’t work................................................................................................... A-2
The keyboard doesn’t work................................................................................................... A-2
The Mouse doesn’t work....................................................................................................... A-2
The CD-ROM/DVD drive does not operate properly.............................................................A-2
The audio doesn’t work......................................................................................................... A-2
How do I use the Four Channel Speaker feature?................................................................ A-3
How do I set up the video output selection?..........................................................................A-3
The DVD title playback seems slow or not smooth............................................................... A-3
The hard disk drive access indicator light stays on............................................................... A-3
The diskette drive indicator light stays on............................................................................. A-3
How to upgrade the Flash BIOS?......................................................................................... A-4
How do I backup my data files to prevent loss of data?........................................................A-4
Appendix B: Gamut Documentation................................................................B-1
Introduction.................................................................................................................B-2
Produce MP3 files – Use CD-Cashier................................................................................... B-3
Play MP3 files – Use Musician.............................................................................................. B-5
Play music CDs – Use 3DFS-ACD.........................................................................................B-6
Play MIDI files – Use Midier.................................................................................................. B-7
Regulate the audio sources – Use Mixer.............................................................................. B-7
Recording audio data—Use Voice-Catcher..........................................................................B-8
Appendix C: WINDVD Documentation.............................................................C-1
The WinDVD Controls................................................................................................ C-2
Start/Eject............................................................................................................................. C-2
Navigation Buttons................................................................................................................ C-3
Sliders................................................................................................................................... C-3
Counter................................................................................................................................. C-4
Navigation Arrows................................................................................................................. C-4
Numeric Keypad................................................................................................................... C-4
Menu Items........................................................................................................................... C-4
The Right-Mouse Click Menu................................................................................................C-5
Using WinDVD............................................................................................................C-6
Viewing a DVD Title.............................................................................................................. C-6
Creating a Playlist................................................................................................................. C-6
Loading a Previously Saved Playlist..................................................................................... C-6
iii
Page 6

Book PC
Changing Your Settings........................................................................................................ C-6
Setting Parental Control........................................................................................................ C-7
Ejecting a Disk...................................................................................................................... C-7
Hiding and Viewing the Player.............................................................................................. C-7
Enabling the Toolbar and Status bar.................................................................................... C-8
Viewing a DVD Movie or Video CD.......................................................................................C-8
Playing a DVD Interactive Title............................................................................................. C-8
Vocal options........................................................................................................................ C-8
Changing the Parental Control Password............................................................................. C-8
Closing WinDVD................................................................................................................... C-9
Understanding the DVD System...............................................................................C-10
Region Codes..................................................................................................................... C-10
NTSC and PAL................................................................................................................... C-11
Aspect Ratios...................................................................................................................... C-11
DVD Audio.......................................................................................................................... C-11
Parental Control Properties................................................................................................. C-12
Quality Setting.................................................................................................................... C-12
Hotkey Definitions for the WinDVD Operation..........................................................C-12
Set the DMA Mode for the CD-ROM/DVD-ROM.......................................................C-13
Appendix D: S-YXG50 Documentation...........................................................D-1
Features..................................................................................................................... D-2
Specifications............................................................................................................. D-2
Installation.................................................................................................................. D-3
Performance Settings.................................................................................................D-3
Functions....................................................................................................................D-4
S-YXG50 Player Operation Panel...............................................................................D-6
iv
Page 7

Chapter 1
Chapter 1
Getting Started
Getting Started
Page 8

Book PC
This chapter allows you to become familiar with the basic parts of your system and tells
you how to set up your Book PC.
Introduction
The key features of this Book PC include:
The Book PC uses the Intel 810 chipset.
Supports PPGA Celeron, FCPGA Pentium III processors, from 300 up to 800 MHz.
Supports maximum installed memory up to 512 MB.
Support for Bus mastering and UltraDMA 33 modes.
Support for Green PC standard, keyboard power on/off, and Wake on
Modem/LAN/Alarm.
Built-in Graphics System supports up to 1600 x 1200 resolution in 8-bit color at 85Hz-
refresh rate. Provides TV encoder for NTSC, PAL and SCART (for Europe only) TV
support (AV/S-Video).
Built-in Sound System meets PC98 audio specification.
1. HRTF 3D professional audio supports both Direct Sound 3D® and A3D
®
compatible interface, and support for Four Channel Speakers.
2. Prevides Digital Audio Interface (SPDIF In/Out) with 24-bit stereo, 44KHz
sampling rate and measured 120dB audio quality.
3. Optional optic fiber interface which enables communication with MiniDisk or highend audio systems.
Provides a floppy disk drive, a hard disk drive, and a CD-ROM or DVD drive.
Built-in 10/100Base LAN adapter and 56K V.90 fax/modem.
Built-in Trend’s Chip Away Virus ensures that the boot process is protected from
viruses. The bundled PC-Cillin software provides automatic virus protection under
Windows 95/98.
The Book PC is bundled with the SuperVoice for fax/modem communications,
MediaRing Talk for PC to PC internet phone communication, Gamut for professional
audio management, including MP3 encoding and playback, WordPerfect Suite 8, the
renowned office application suite, and optional Windows 98 operation system and
WinDVD application for DVD playback.
1 – 2
Page 9

Getting Started: Connecting the Cables
The Ideal Environment
Before anything else you should decide on a place to set it up your new computer. Below
you can find a few tips to keep in mind when choosing the ideal spot.
Your Book PC computer is engineered to provide years of reliable service. However, give
it the same care and protection as you would any other valuable piece of electronic
equipment. Most of the good care rules are common sense.
Where to Put the System
A cleared-off desk or table is a perfect location. Look out for the proximity of power
supply, telephone and/or network cables.
You should try to avoid dirt, dust and smoke, since these might cause system failure.
Also, keep your computer away from strong magnetic fields. This includes fans, air
conditioners, radios, large speaker systems, and other electric motors.
Do not set up your system in a room with extreme conditions of temperature and
humidity. Too hot or too cold temperature in a room causes your computer to misbehave.
Dampness causes oxidation, and dryness causes static electricity.
Heat is probably the single most damaging environmental element to a computer.
Because of this, never push the rear of the unit against a bookcase, wall, or anything that
restricts the air from circulating freely around the entire case. If the fan outlet in the back
of the computer system is blocked, heat builds up inside the computer. A marginal heat
problem can be aggravated by accumulated filth from dirt, dust and smoke.
Likewise, do not stack magazines on top of, under, or behind the computer system or the
video monitor.
Do not place the computer in direct sunlight, near a radiator, lamp, or a heat vent.
Remember that heat causes electronic circuitry to behave in strange ways. When
computer components heat up, they tend to fail. If this happens, it may not be a
permanent failure, but could lead to one.
Extra Protection
Electrical surges and spikes can cause serious damage to your system. Use a power
filter/surge protector on the system unit and everything connected to it. If just one device
is not connected, damaging surges can enter the system through unprotected peripheral
and damage everything connected to it.
1 – 3
Page 10

Book PC
A power strip/surge protector provides protection against many types of voltage spikes
that can travel on the power line and damage your system, but it isn’t much help against
lightning. If severe weather of an electrical storm threatens, it’s a good idea to unplug the
entire system from the power, and telephone and/or network lines, before the storm
starts.
Maintaining and Caring for the System
Follow the suggestions below to keep your valuable system in good condition.
Cleaning the System
Use a damp, lint-free cloth to clean the system unit and monitor. Avoid abrasives or
solvents, they can permanently damage the finish. Use a soft cloth and window cleaner to
clean the monitor. Turn off the monitor. Then squirt a little cleaner on the cloth and apply
it to the screen.
All diskette drives and tape backup units should be cleaned periodically. Cleaning kits are
available from a variety of sources. Carefully follow the instructions supplied with the
cleaning kit you use.
Subjecting a system to a dusty or smoky environment significantly shortens its life and
increases the probability of failure. If you use the system in a dirty environment, open it
periodically and vacuum the board and components with a small vacuum designed for
this kind of work. Don’t loosen anything in the process.
If the mouse pointer or cursor starts jumping when you move the mouse, it is probably
caused by a build-up of dirt on the rollers inside the mouse.
If you spill liquid inside the keyboard, unplug the keyboard immediately and turn it upside
down to allow the liquid to drain out. Let the keyboard dry overnight before attempting to
use it again.
Transporting the System
Dropping or jarring the system can damage the hard disk drive, particularly if the drive is
reading or writing when it is dropped. Hard disk drives are less vulnerable to shock when
they are shut off. Consequently, you should always power down the system unit before
moving it.
During transport, pack the system unit in its original packing boxes and cushioning
materials.
1 – 4
Page 11

Getting Started: Connecting the Cables
Backups
There hasn’t been a hard disk made that is guaranteed not to lose its data. Hard disk
reliability has improved significantly in the last few years, and it is unlikely that yours will
malfunction and lose its data. Still it is not impossible. It is a good idea to make backup
copies of your files on a regular basis. You can obtain a tape or backup unit, or optical
storage device, or another device that will allow you to save your whole configuration of
files at once. Software can be used to make that process automated. You should try to
back up your files on a regular basis.
Shock Precautions
This list is important to protect yourself from electrical shock and your system from
damage.
Be sure all cables are free from table or desk legs resting on them. Arrange cables
out of traffic areas.
Unplug all power cords from their power sources if severe weather threatens. When
you disconnect a cable, always pull on the plug or connector, not on the cable itself.
Know the static electricity precautions.
Always disconnect the power before opening the system unit. Just because the power
is off does not necessarily mean the computer is harmless. Never take chances with
the hazards of electricity.
Plug all three-prong cable into properly grounded power sources. Computers prefer
steady and reliable electricity. Use a power filter/surge protector for protection against
electrical surges. Do not use adapter plugs or remove the grounding prong. Try to
connect everything without the use an extension cord. If you must use one, use a
three-wire cable with grounded plugs.
Care of the Computer
Do not set up your system in a room with extreme conditions of temperature and
humidity.
Do not allow heat to build up inside of the system unit.
Never turn the power button off or move the system while the hard disk drive is
reading or writing.
1 – 5
Page 12

Book PC
Do not spray any kind of cleaning liquid directly on the case, keyboard or monitor.
Instead apply it to a soft cloth. Always turn the power off and unplug each power
cable from its power source before cleaning.
Use the computer in as clean an environment as possible. Cover the keyboard,
monitor and system unit.
Never push foreign objects into the slots on the riser card. Doing this may short out
interior components and could cause a fire.
Do not open the diskette drive door while the drive is active, the indicator LED will be
lit. This damages the disk and/or the drive.
Avoid dropping or jarring your computer. This loosens memory chips, expansion
cards, and can severely damage the hard disk drive. Always shut down the computer
when moving it, even if it’s only to the other side of the your desk.
Keep your computer away from magnetic fields.
Do not eat or drink while using the computer.
Unpacking
If your system arrives in very cold or damp weather, you should not apply power to the
system unit until it has reached room temperature, and no condensation is present.
Exposing a cold computer to a warm room causes condensation that could damage the
computer or shorten its life. Allow the box to warm up to room temperature for several
hours before opening them. Do not plug in the system until all moisture from any
condensation has completely dried.
Checklist
Some vendors may ship certain components as standard, while other vendors treat the
same components as optional. In its most basic configuration, your Book PC should
include the following:
A Book PC computer with built-in processor, system memory, hard disk drive, CD-
ROM (or DVD) drive, and diskette drive.
A system unit power cord and a telephone line for modem connection
A support CD-ROM and/or disk(s) with system drivers and bundled software.
Documentation, including this User’s manual, the WordPerfect manual, Quick
Reference Setup Sheet and the Stand Setup Sheet.
1 – 6
Page 13

Getting Started: Connecting the Cables
The following are normally optional, but some vendors may include them in the basic
package. Some items may not be available in certain countries, or some vendors may
choose not to carry all the optional items:
A Windows software package, including manual and CD-ROM
Keyboard and/or mouse
Video monitor
Audio speakers
Additional peripheral devices and/or cables
Note: Contact your system vendor for information on the availability of optional
items.
Until the system is up and running, it’s a good idea to leave all the software packages
intact. All of it is pre-installed and automatically starts when you turn on the power. They
are provided for backup purposes only.
Arrange all the unpacked items on an uncluttered desk or table when you plan to set up
and use the system computer. Each piece should be close enough together so that
cables can reach to the appropriate connectors. Be sure there is a wall outlet close to the
table or desk.
Installing the System
Most of the work of setting up your system computer is already done. Before shipping
your system, we installed all the software and specified the correct hardware
configuration in the setup program.
The part we have left for you is comparatively easy. Anyone who can orient cables to
mate with connectors can set up this Book PC computer. You won’t have to open the
computer to plug anything in. The steps on the next few pages are easy to follow, and
there are lots of pictures to help show you the correct way.
First we introduce you to the system components, and then we will help you set up the
system and install all the cables.
Warning: In this section you are instructed to connect several cables. To avoid
damage to your computer and peripherals, never plug in or unplug a cable when
the system unit power is ON. Always shut off the system first, only then make any
necessary cable connections or changes.
1 – 7
Page 14
Book PC
Introducing the System
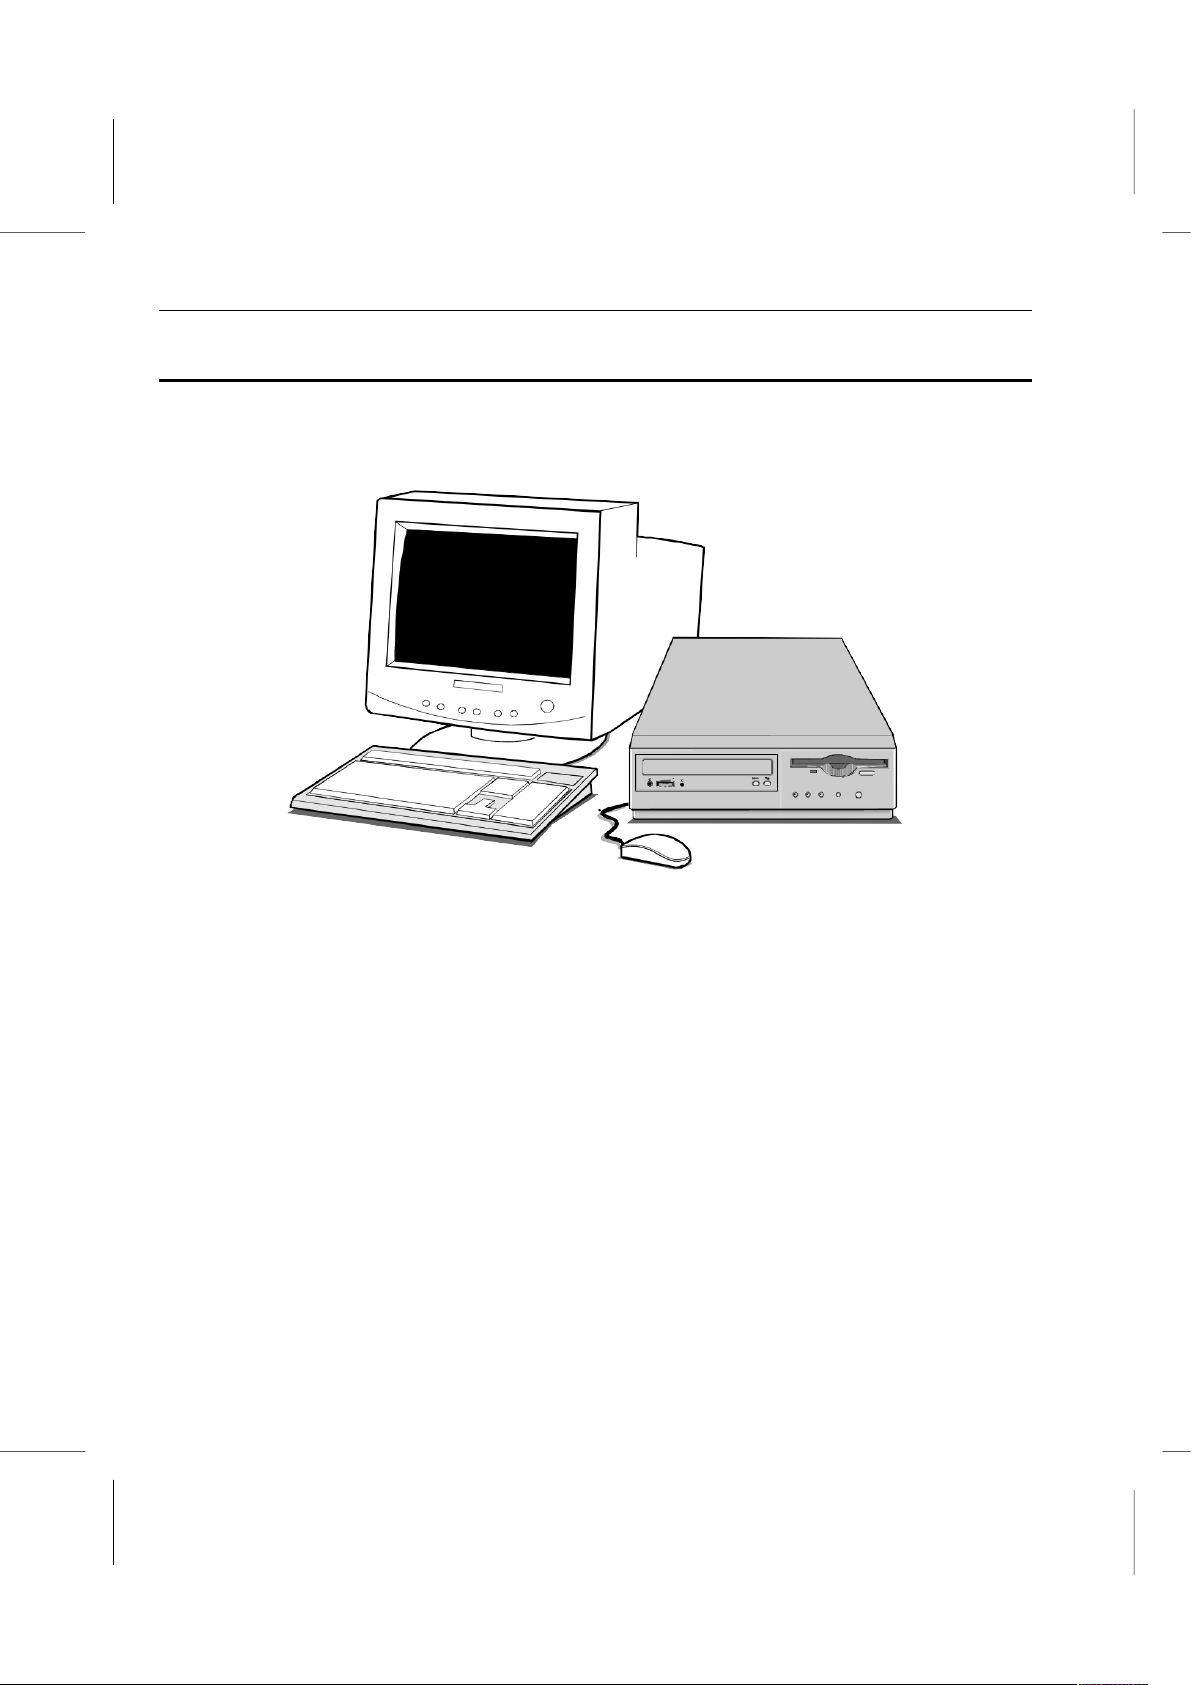
Before you actually set up your system and plug everything in, it’s a good idea to locate
all its features, switches and controls. The next few illustrations familiarize you with the
system computer external features.
1 – 8
Page 15
Getting Started: Connecting the Cables
Looking at the Front
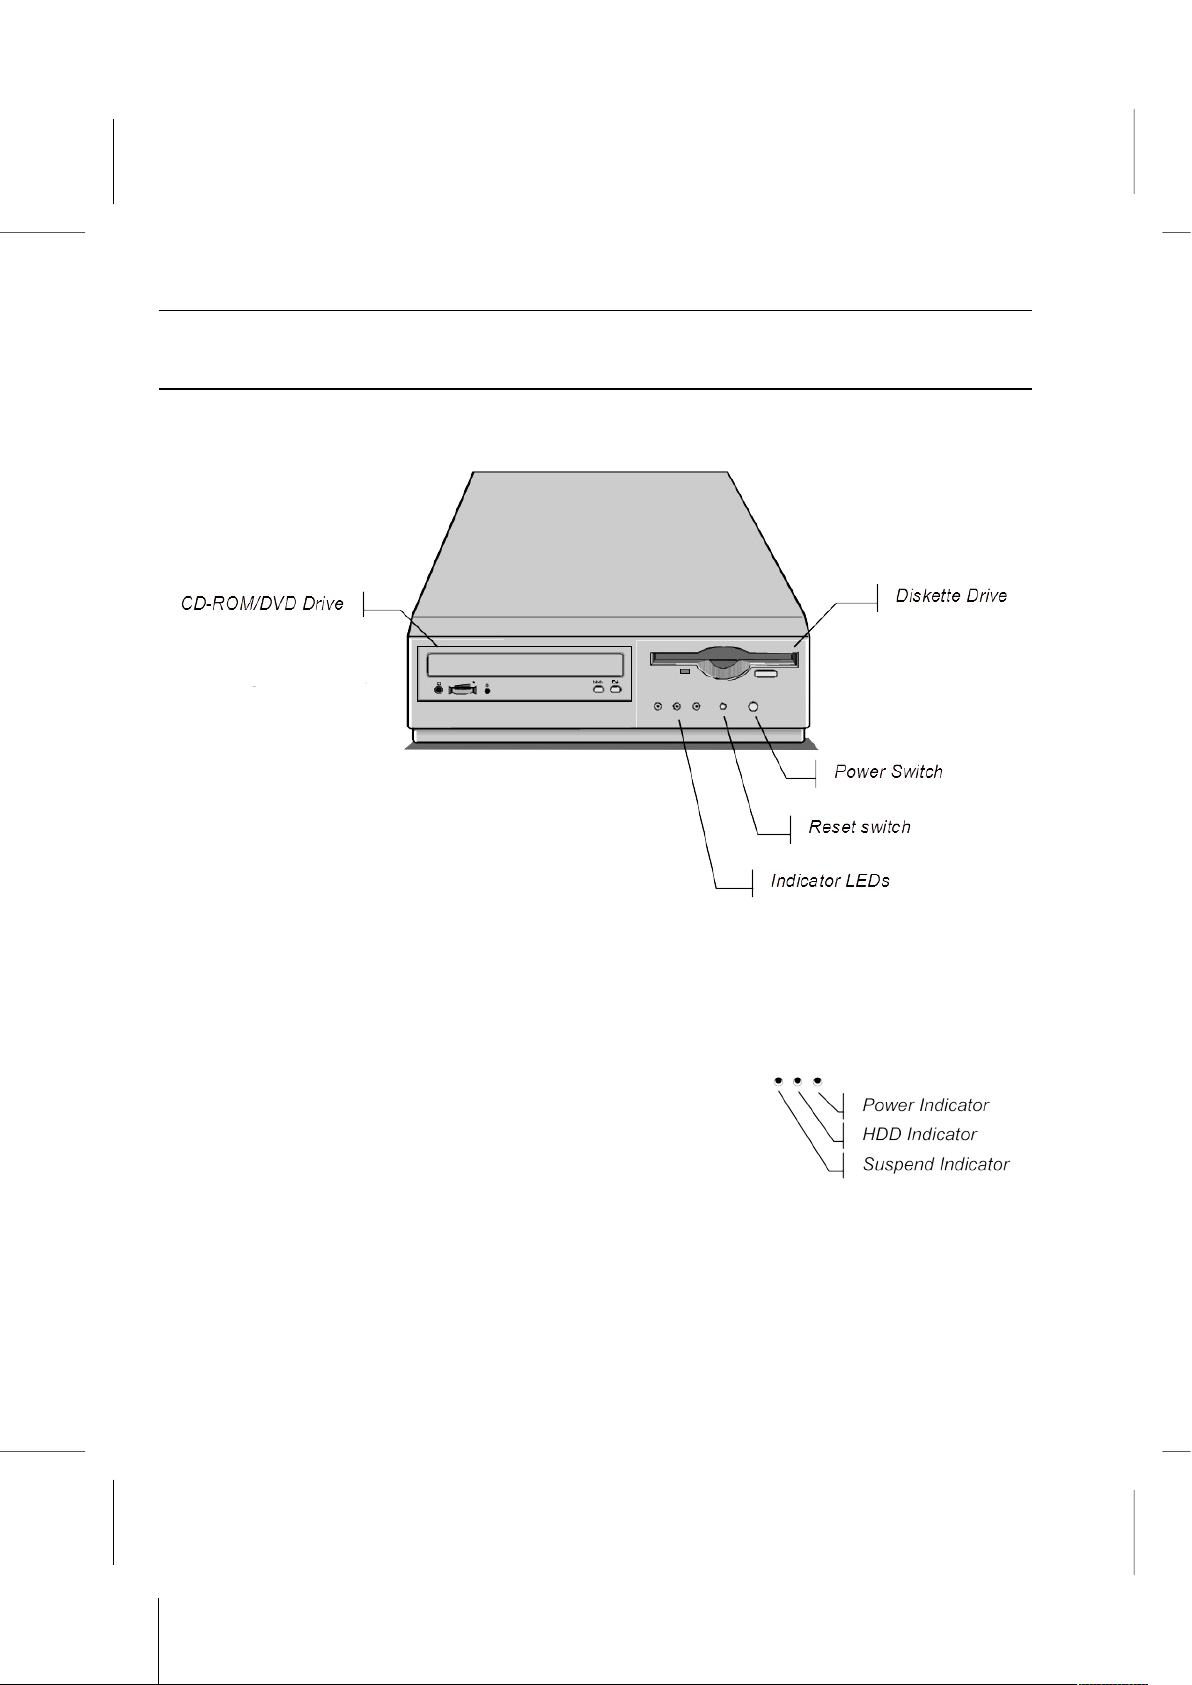
With your computer in front of you, use the picture below to locate each of the labeled
parts. Chapter 2 goes into more detail on some of the labeled parts and their usage.
Power switch – The power switch is located on the right-hand side of the front panel.
Press the power switch once to turn your computer on, and press it again to turn your
computer off.
Reset switch – Use this switch to ‘reboot’ the system instead of using the power
switch button.
Indicator LEDs – The front panel has three indicator
lights. The indicator LEDs turn on to show that a
particular function is active. From right to left the LEDs
indicate the following: the Power LED turns green as the
system is powered on; the HDD LED lights up if any hard
disk activity is detected; the Suspend LED blinks if the system is suspended.
Diskette Drive – The diskette drive, on the right side of the front panel, can read
from, or write to, 3.5” diskettes with capacities of either 720K or 1.44 MB. The diskette
drive provides a convenient way of storing and transferring short files.
1 – 9
Page 16
Book PC
CD-ROM/DVD Drive – The drive bay on the left hand side is either installed with a
CD-ROM or DVD drive. This option is factory installed. CD-ROM disks can store over
600 MB of audio, video, or data. DVD disks can store up to 4 GB and are currently
commonly used to distribute high-quality video. Usually your system identifies the CDROM/DVD drive as drive D:. Access to a CD/DVD-ROM is quite fast. CD and DVD
disks are used to distribute large software applications, and audio and video files that
require a lot of capacity. You can play audio and video files using the supplied Gamut
audio player or the optional WINDVD software.
Looking at the Back
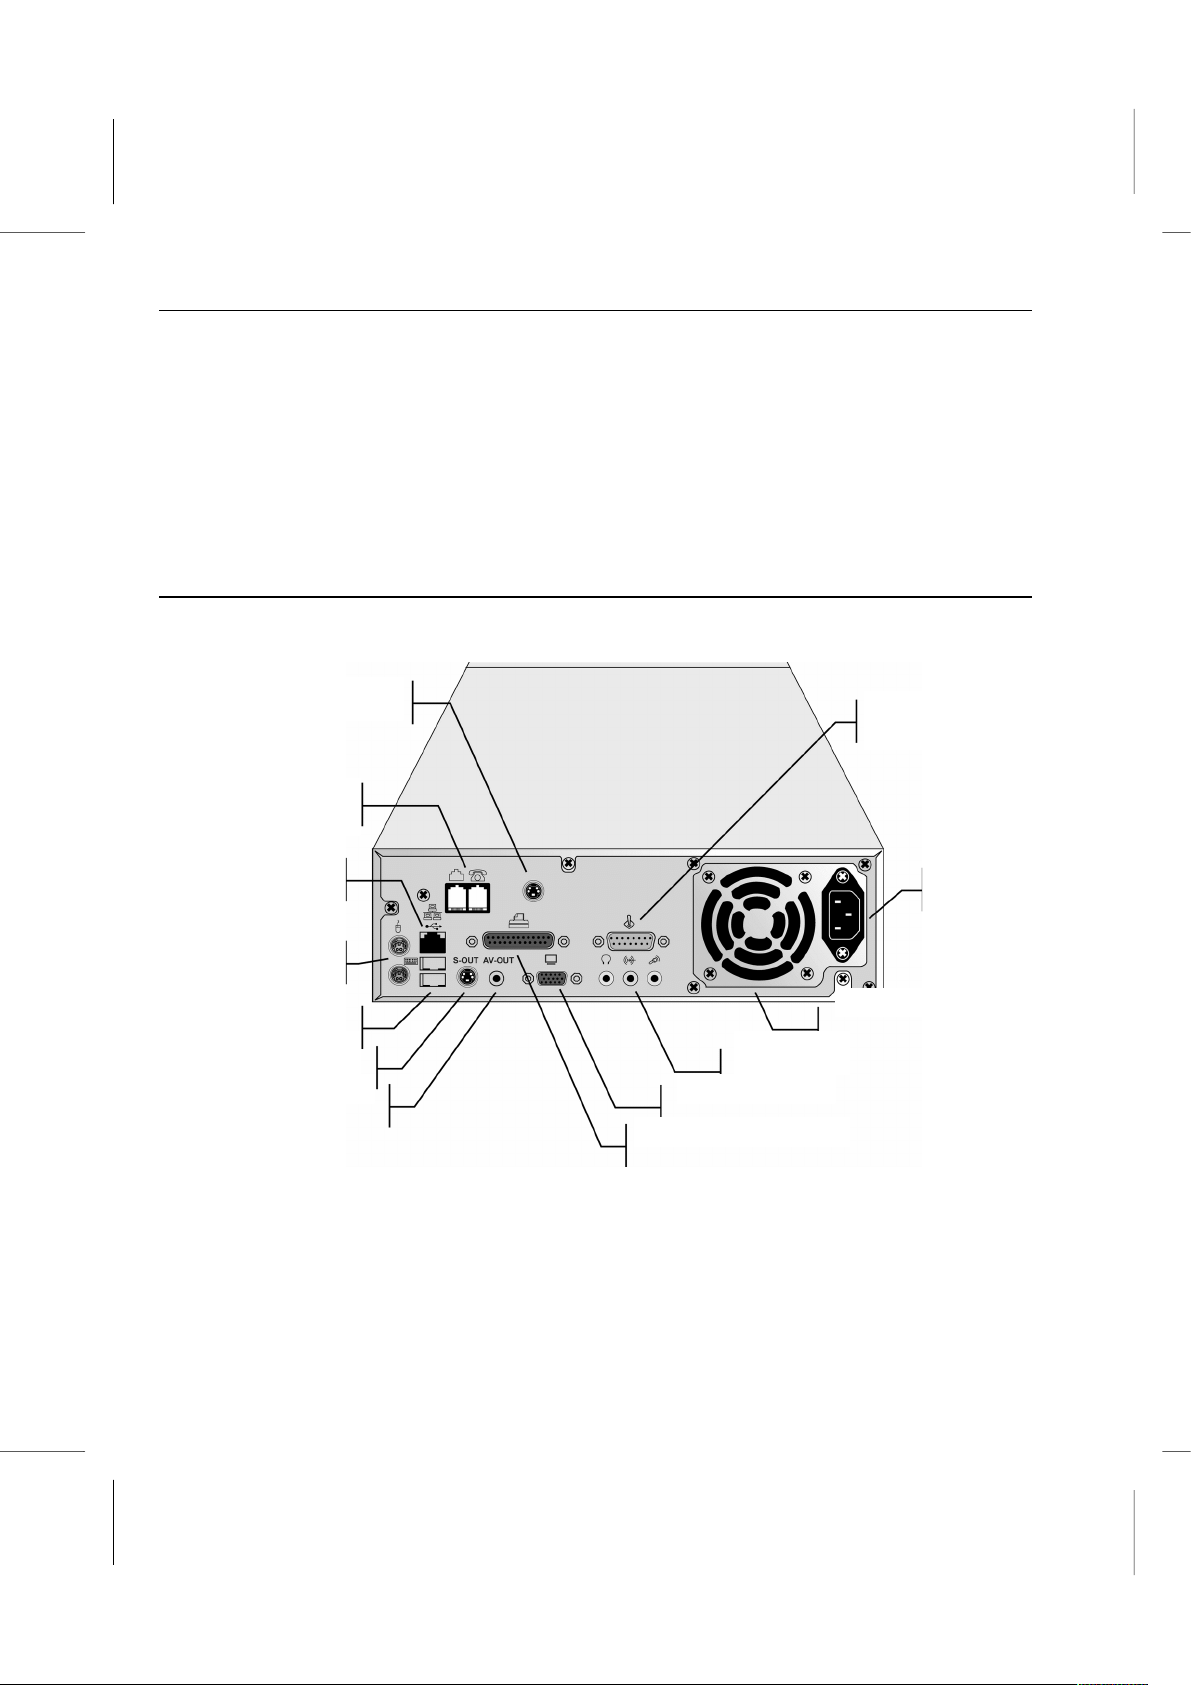
The back of the system is where most external connectors are.
AC Power Connector – Plug the main power cord in here. Within the range of 115 or
230V AC, the power adapter will automatically sense and adapt to the input power
voltage.
Fan Outlet – A fan inside the case cools the internal parts. Do not block this outlet.
LAN
Video Connector
Fan Outlet
VGA Connector
Parallel port Connector
Digital Audio
Line /
Phone (FCC only)
PS/2 Connectors
USB Connectors
S-Video Connector
Audio Jacks
Game port Connector
AC Power
Connector
1 – 10
Page 17
Getting Started: Connecting the Cables
Game port Connector – The 15-pin Game port can be used to connect your
computer to an IBM-compatible joystick or similar device, or to a MIDI device such as
a synthesizer.
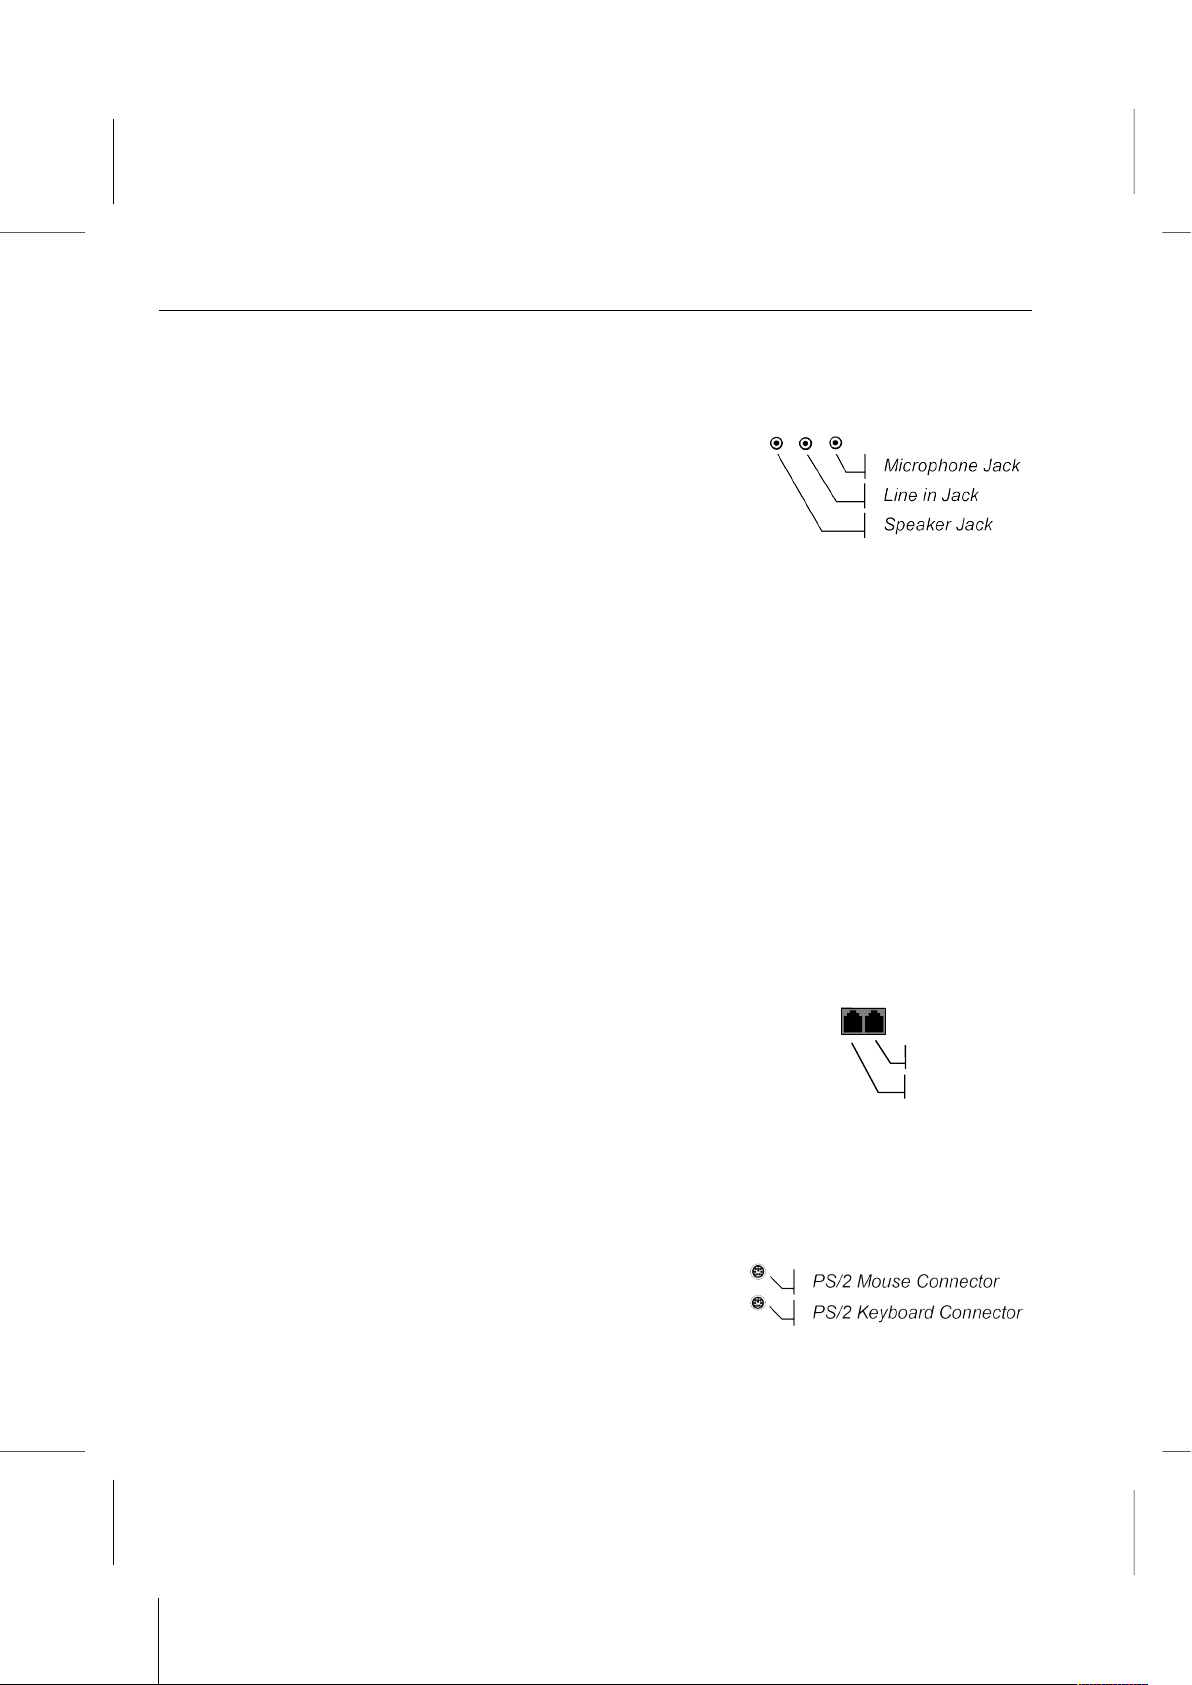
Audio Jacks – The three audio jacks provide you with
the ability to connect an external audio source or an
external microphone to the system. From right to left, the
Microphone jack is used to input sound from an
external microphone into your Book PC; the Line in jack
is used to input stereo sound from other devices, such as a radio or tape recorder,
into your computer; and the Speaker jack is used to output sound generated by your
computer to an external device, such as stereo loudspeakers.
Parallel Port Connector – The parallel port provides a connection for a parallel
printer or other parallel communications device.
VGA Connector – The external monitor port allows you to connect any standard
computer monitor to your system.
Video Connector – The RCA video jack can be used to output video to devices that
use RCA plugs such as most TV receivers.
S-Video Connector – The S-video jack can be used to output video to devices that
use S-video plugs such as camcorders and some TV receivers.
Digital Audio Jack – The Digital Audio jack provides a digital (SPDIF) interface with
an optional external audio device, and at the same time serves as an auxiliary Line in
port to import sounds while Four Speakers mode is enabled. An optional device and
optic fiber cable are needed in order to make use of the digital interface.
Line/Phone Jacks – The RJ-11 jacks can be used to connect a
phone line to the internal modem device. Use the Line jack to
connect a wall socket line to the Book PC. The Phone jack is
only available in FCC type modem, use it to export the line to a
telephone receiver.
LAN Jack – The RJ-45 jack can be used to connect the Book PC to an ethernet
network.
USB Connectors – The USB (Universal Serial Bus) port can be used to connect to
USB devices.
PS/2 Connectors – The two PS/2 ports can be used
to connect an external pointing device and keyboard.
Line Jack
Phone Jack
(FCC only)
1 – 11
Page 18
Book PC
Connecting the Cables
This section of setting up your new computer is very important. It talks about attaching all
the cables so that you can begin using the system.
The procedure is straightforward and easy to do, however, be sure to follow each step
carefully and don’t leave any steps out.
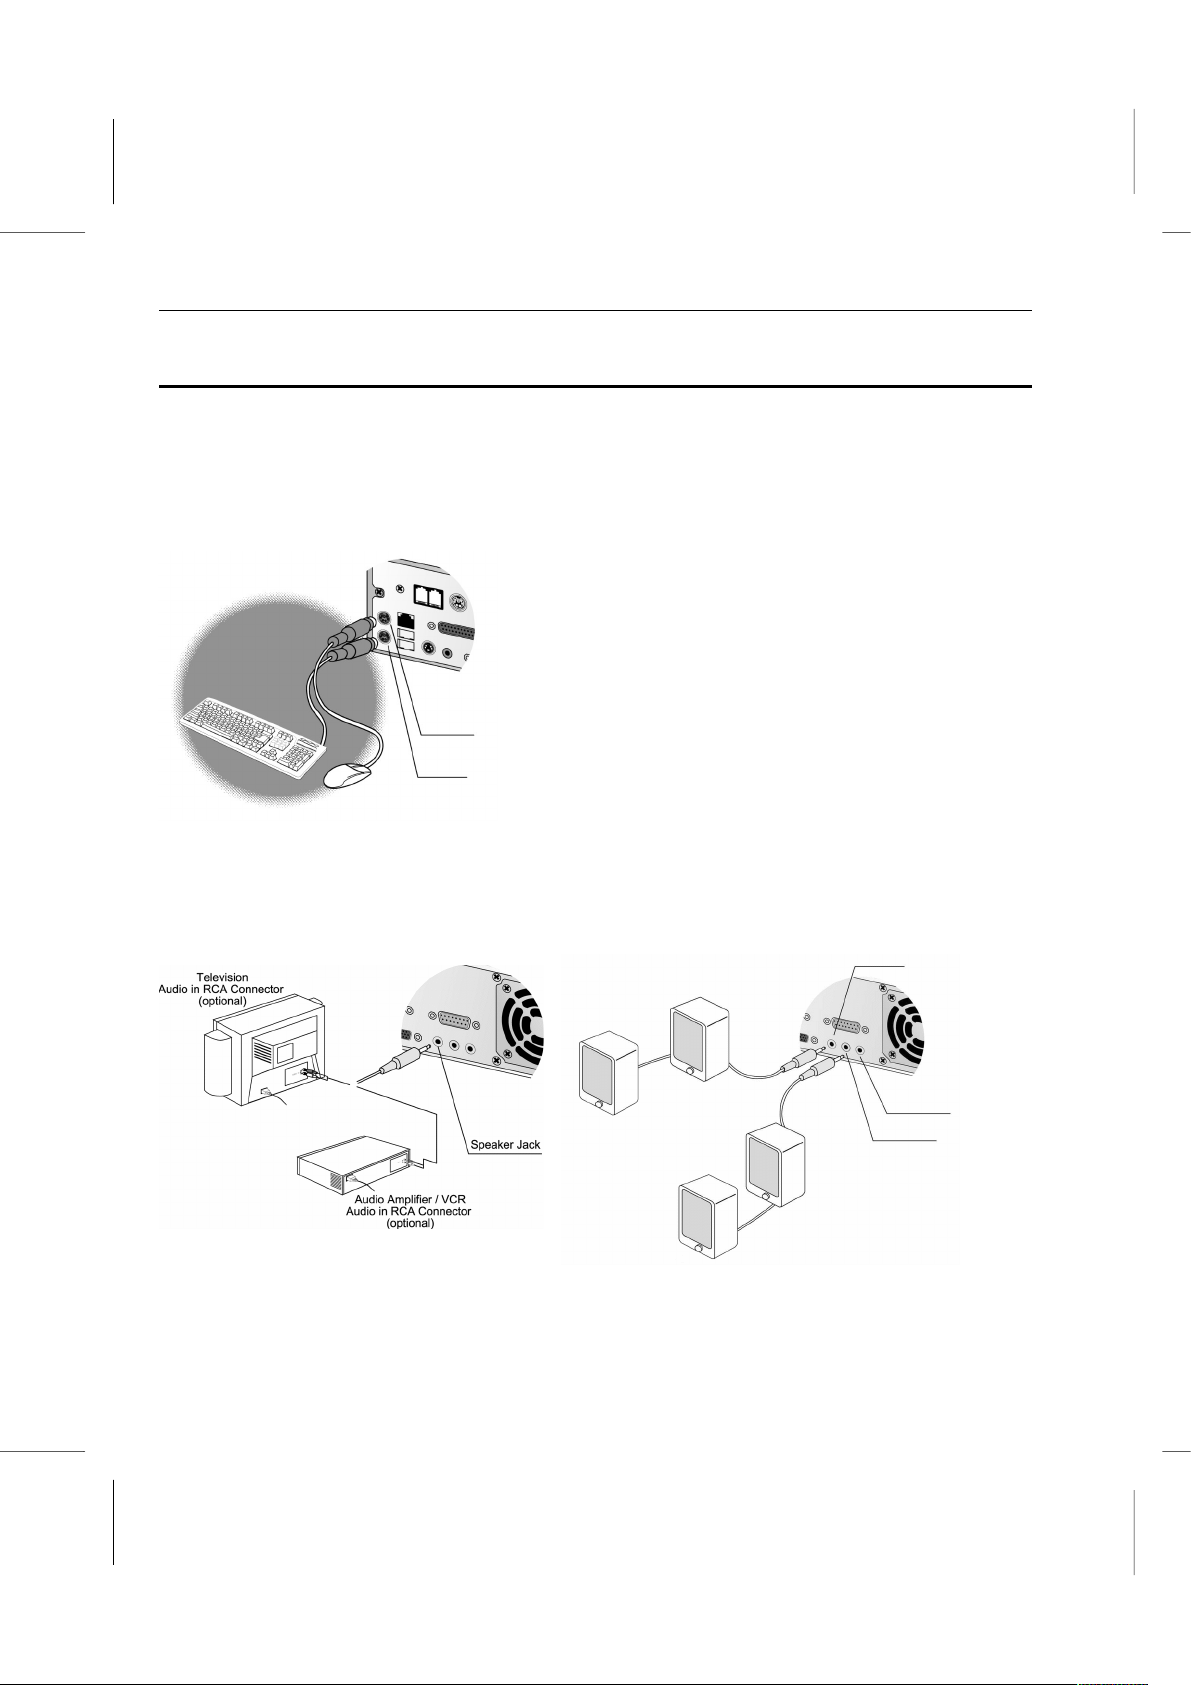
1. Connect a keyboard and pointing device
through the PS/2 connectors
2. Connect any speakers and/or microphones that you might have.
(
H
o
m
e
Entertainment Audio System )
( 4.1 Speaker System )
Speaker Jack
Microphone Jack
Line in/out
(rear) Jack
Front
Rear
L
L
R
R
Mouse Con.
Keyboard Con.
1 – 12
Page 19
Getting Started: Connecting the Cables
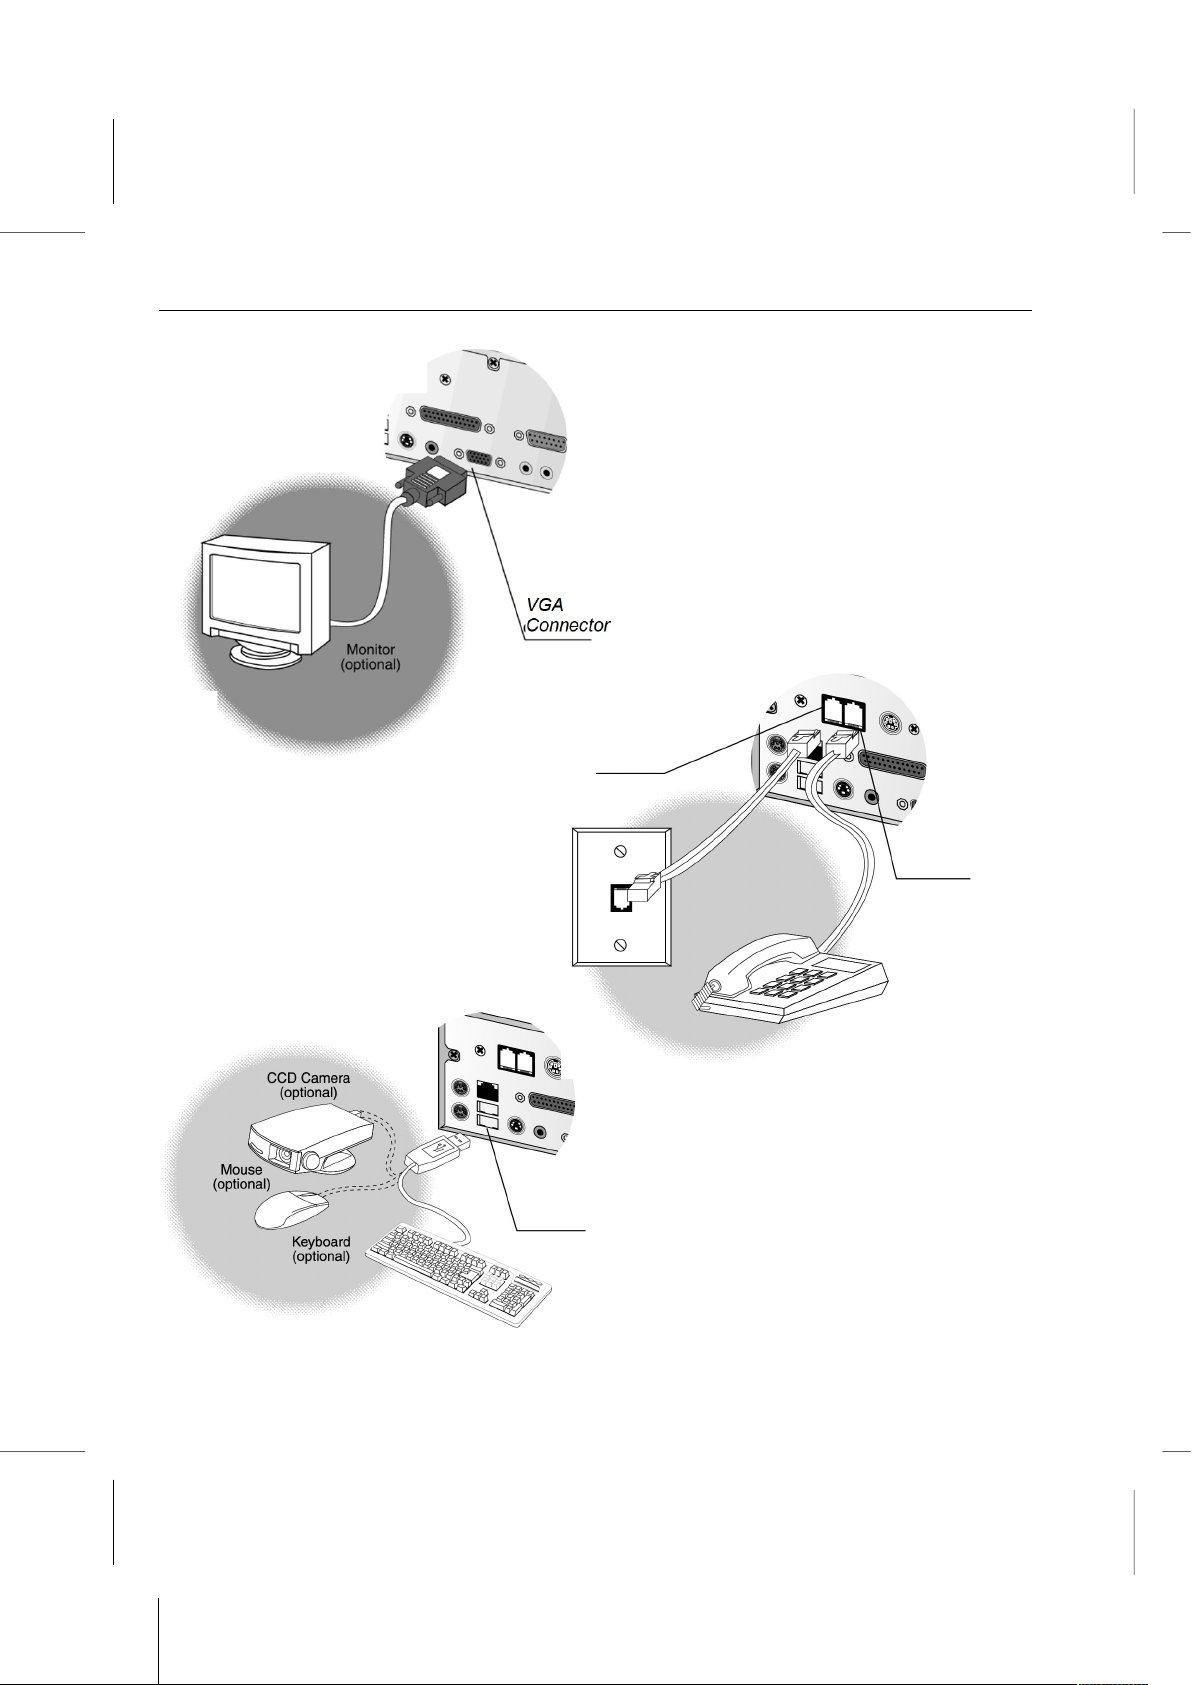
3. Connect a computer monitor to the
VGA connector.
4. Connect phone lines to the Line
/Phone jacks.
5. Connect any USB devices you want
to use with your system.
USB Con.
RJ-11 Line Jack
RJ-11 Phone
Jack (FCC only)
1 – 13
Page 20
Book PC
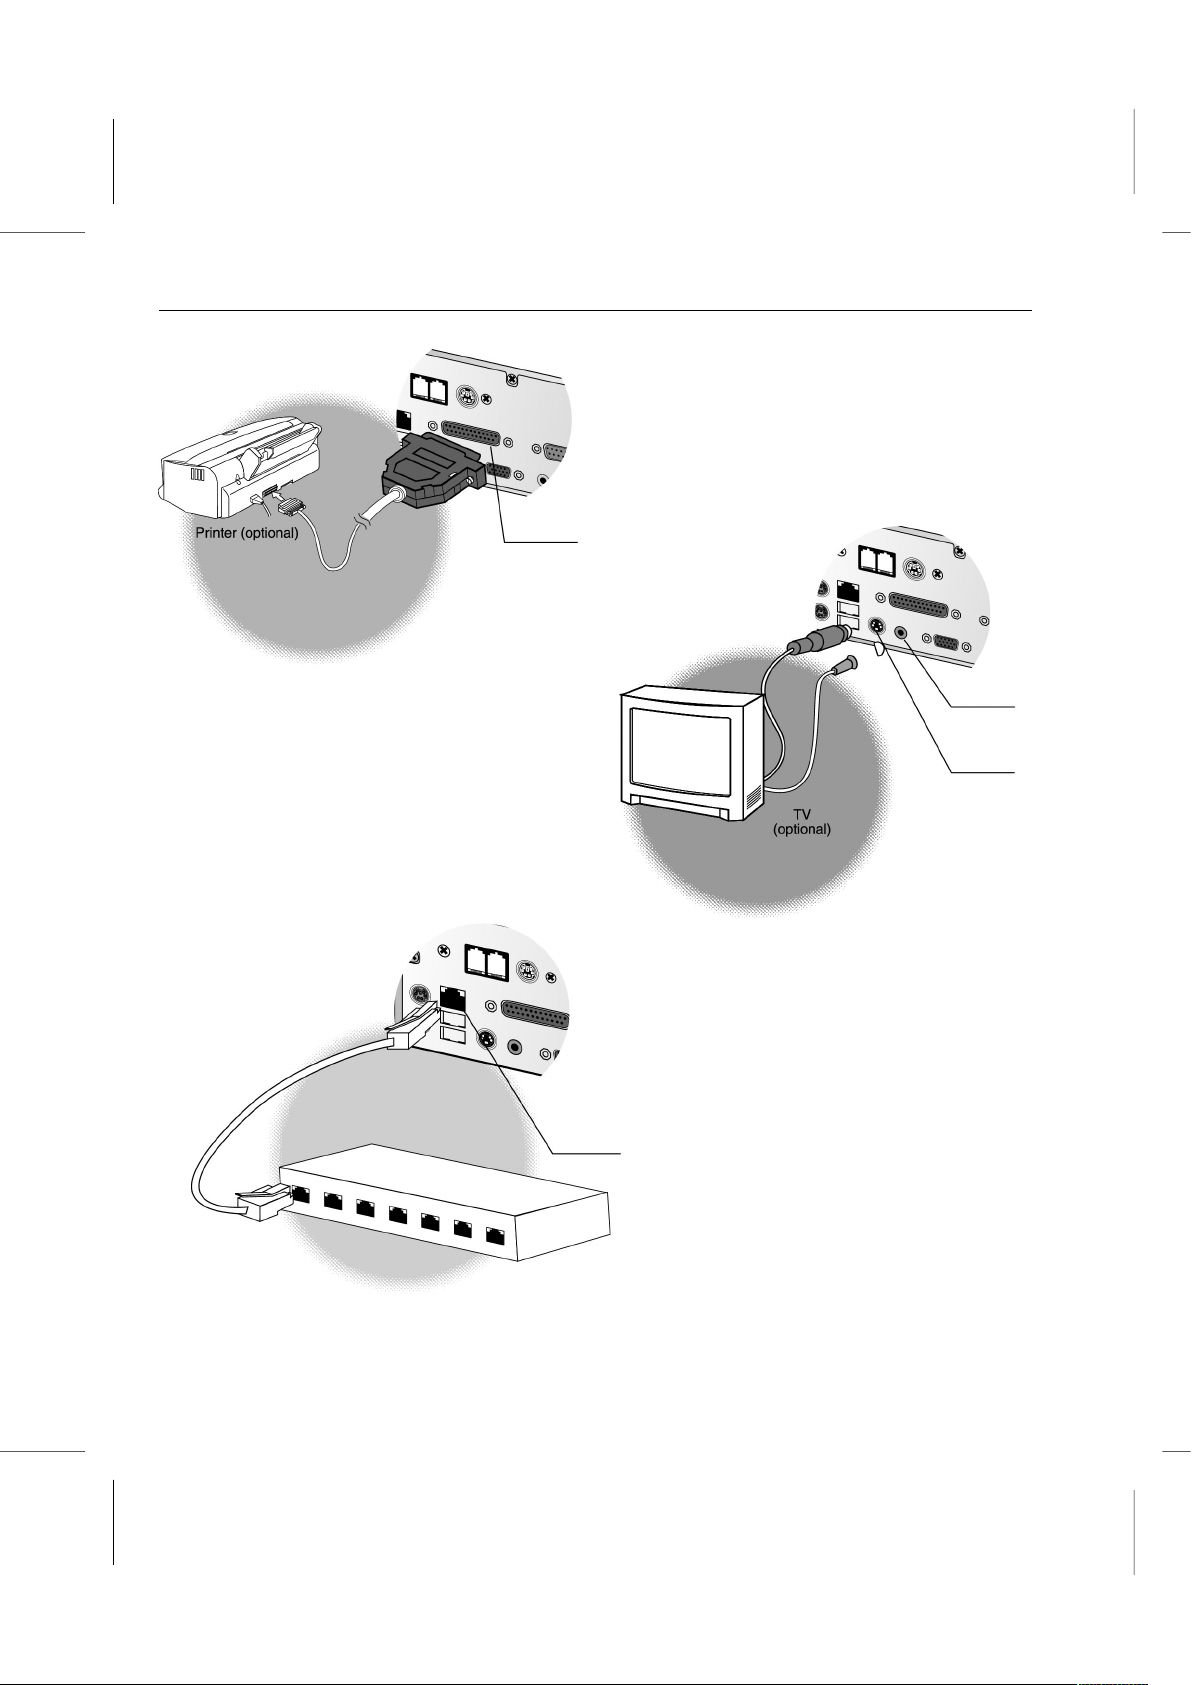
6. Connect any printer or other parallel
device you might want to use to the
Parallel port.
7. Connect a TV receiver to the Video or
S-Video Connectors.
8. Connect a network cable to
the LAN connector.
Parallel Port
Connector
Video
Connector
S-Video
Connector
RJ-45 Network Connector
1 – 14
Page 21
Getting Started: Connecting the Cables
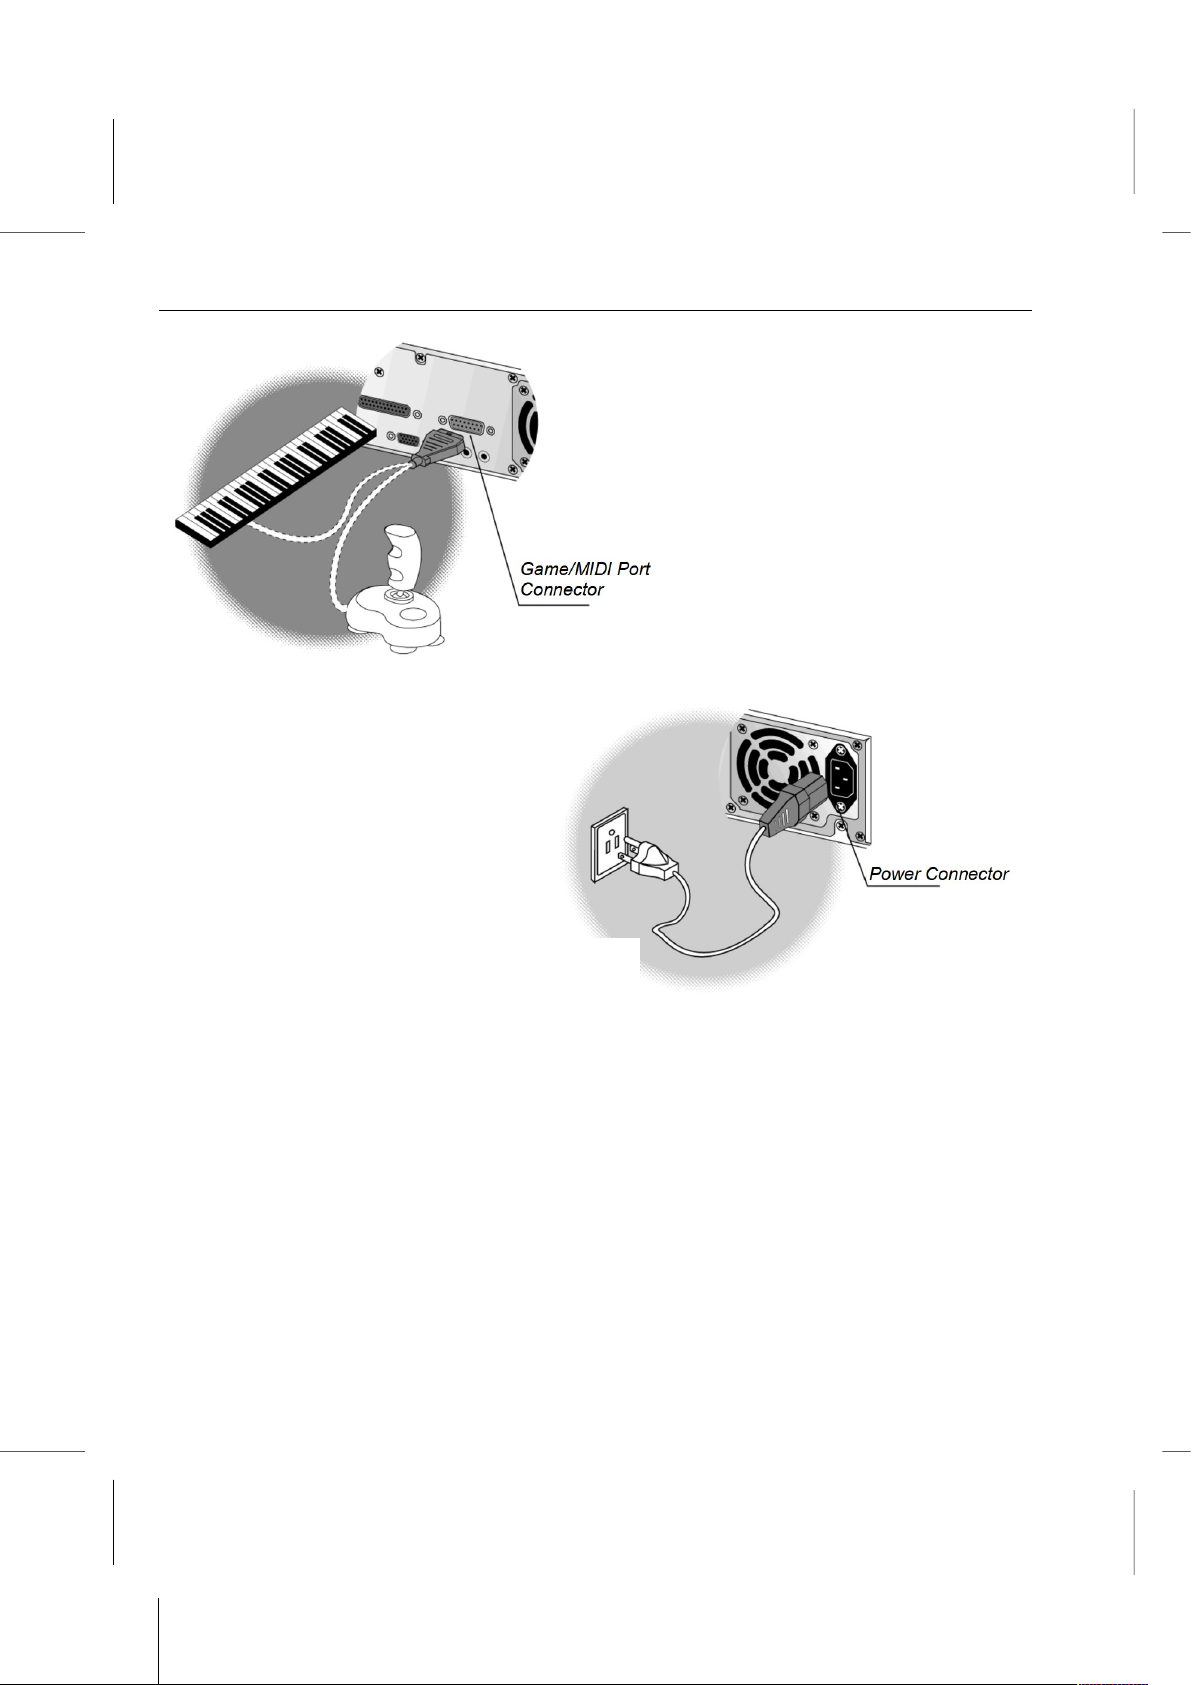
9. Connect any Game/MIDI
devices you might want to use.
11. Make sure all other peripheral devices are properly connected to a power source if
they do not draw their power from the system.
You are now ready to start up your system. Check Chapter 2 for detailed information on
starting up your system for the first time.
into a grounded outlet or power strip/surge
10. Plug in the power cable, one end goes into
the back of the system, the other end goes
1 – 15
Page 22

Chapter 2
Chapter 2
Using the system
Using the system
Page 23

Book PC
This chapter helps you starting up your system and allows you to become familiar with
some of the main features.
Ready for Power
Once you have completed the setup of the system unit as described in Chapter 1, it is
ready for power up.
To Power Up for the First Time
1. Turn on your monitor first.
2. Next power up all other peripheral devices attached to the system.
3. Be sure there are no diskettes and/or CD-ROM/DVD disks in any of the drives.
4. Power up the computer by pushing the power button on the front of the case. The
power indicator will light. You will hear a distinct sound as the power supply turns on
and the hard disk spins up to speed.
Note: If your system does not power up as described here, check to make sure you
have made all the connections properly. Double check to see all the cables are still
securely attached to the appropriate connectors.
5. The hard disk and other drive indicators will blink briefly as the system checks them
quickly.
6. Various messages appear on the display, including the BIOS version and the memory
count.
7. Your system should continue to load the Windows operating software automatically.
When you first start your new system, you will need your Windows manual. On its
cover is your registration number for Windows.
8. During this first setup, you can click on the Next button to move to the next step.
Clicking on the Back button allows you to return to the previous step and review the
information entered during that step.
9. You will be asked to type your name and the name of your company, if applicable. Be
careful to enter this information correctly, since this information will be entered to the
Windows Registry for your system. Correcting a misspelled name at a later date could
prove challenging, even for an experienced user of Windows.
2 – 2
Page 24

Using the system: CD-ROM Drive
10. You will be shown the End User’s License Agreement. After reading this agreement
carefully you can then accept its terms by clicking on the “I accept the agreement”
checkbox.
11. In the next window you will be asked to enter the registration number, i.e. Product
Key, which can be found on the Certificate of Authenticity on the front cover of your
Windows 98 manual.
12. Setup will then configure your system, registering your hardware and software into the
Windows Registry. The system might restart to finish the configuration process.
13. Next you will be prompted to enter a user name and password. If you don’t want to
log on with a password, only enter a user name and leave the password box blank.
This way you’ll never see this prompt again, unless you activate it again later.
14. Next you will be asked to setup your printer. If you do not have a printer, you can skip
this step. If you are familiar with the process of setting up your printer, you can
complete that setup now.
15. This finalizes the Windows setup procedure. Your system is now running and ready to
use. After Windows 98 is completely installed and running, a welcome screen
appears which allows you to take a guided tour of the newly installed operating
system.
Note: To learn more about the Windows operating system, read the Microsoft
Windows User’s Guide included with your system.
To Power Down
To shut down the computer, follow these instructions:
1. Close any applications that are running.
2. Shut down Windows, by clicking on the Start/Shut Down item and then selecting the
option you want.
3. Make sure that the hard disk activity indicator is not lit or flashing.
4. Next power down the monitor and any other peripheral device, if applicable.
2 – 3
Page 25

Book PC
About the Software
As described above, your system comes pre-installed with the Windows operating
system. In addition, the hard disk of your system might also already have the necessary
drivers for your system hardware and even some bundled software packages installed. In
addition to the software that you run and see, there is some preloaded software that runs
in the background. Specific drivers, files that allow pieces of hardware to communicated
effectively with the computer and operating system, will probably have been preloaded for
the various hardware units that have been packaged with your system. These drivers are
also important in allowing you to alter certain aspects of your system, such as the
resolution of your video image.
If you ever need to reinstall all the pre-installed software, you can use the master
diskette(s) and/or CD-ROM(s), which contain copies of all the bundled drivers and
software for your system.
If you purchased any other additional software with your system, you will need to install
that software yourself before you can use it, which is discussed below.
The installation of software can be done through the Add/Remove Program icon in the
Start/Settings/Control Panel. Once you are in the Add/Remove window, click on install
in the Install/Remove menu, and follow the instructions.
Another way of installing software in Windows involves clicking on Run in the Start
menu, and typing in the necessary program information. Most programs will install directly
from within Windows. If your program must be installed from within DOS you can run a
DOS session within Windows by selecting the MS-DOS option in the Start/Programs
menu.
You should always read the installation instructions provided by the software
manufacturer.
The Book PC system is designed to run straight out of the box. If you are an experienced
user, you should be ready to go. You can find additional information about specific
features of your system below. If you are not an experienced user you should take some
to review and familiarize yourself with some basic aspects of computing with your system.
2 – 4
Page 26

Using the system: CD-ROM Drive
About the Drives
The most common combination of internal drives you will find in this system will be one
hard disk drive, a diskette drive, and either a CD-ROM or DVD drive. Other combinations
are possible, but here we will only talk about these most common drives.
Hard Disk Drive
The hard disk drive is the fixed disk, which provides the primary storage medium for your
data. Most of your programs will be stored on the hard disk drive. The programs you run
and the data you create will be stored on the hard disk and take up some of the available
space. Programs tend to take up a lot of disk space, while the files that you create will
generally take up much less.
Your hard disk drive is usually the C: drive in your system. There are a number of tools
that will allow you to keep track of disk usage and keep your hard drive running
effectively.
You can find out what is stored on this drive by double-clicking on the My Computer icon
and then double-clicking on the C: drive icon. You can find out the capacity, used space
and available space on the C: drive by right clicking on the C: icon and then selecting
properties.
The Windows Explorer (Start/Programs/Windows Explorer) provides an alternative way
of seeing the contents of the C: drive. See the Windows 98 documentation for information
on how to use this program.
Hard disks can fail. While some data recovery is sometimes possible even from a faulty
drive, you can save yourself a lot of trouble if you are careful to back up your hard drive
on a regular basis.
When the system is reading from, or writing to, a hard disk drive, the hard disk indicator
light on the front panel will turn on. Never turn the power button off or move the system
while the hard disk drive is reading or writing.
Note: Most of the software provided for this computer, and most of the software
that you might purchase for installation on this computer, is only licensed for a
single installation on one hard disk drive. If you are creating more than one hard
disk drive, you may not be entitled to install all the programs that are installed on
the original hard disk drive. Check the software license before you install any
program on more than one hard disk.
2 – 5
Page 27
Book PC
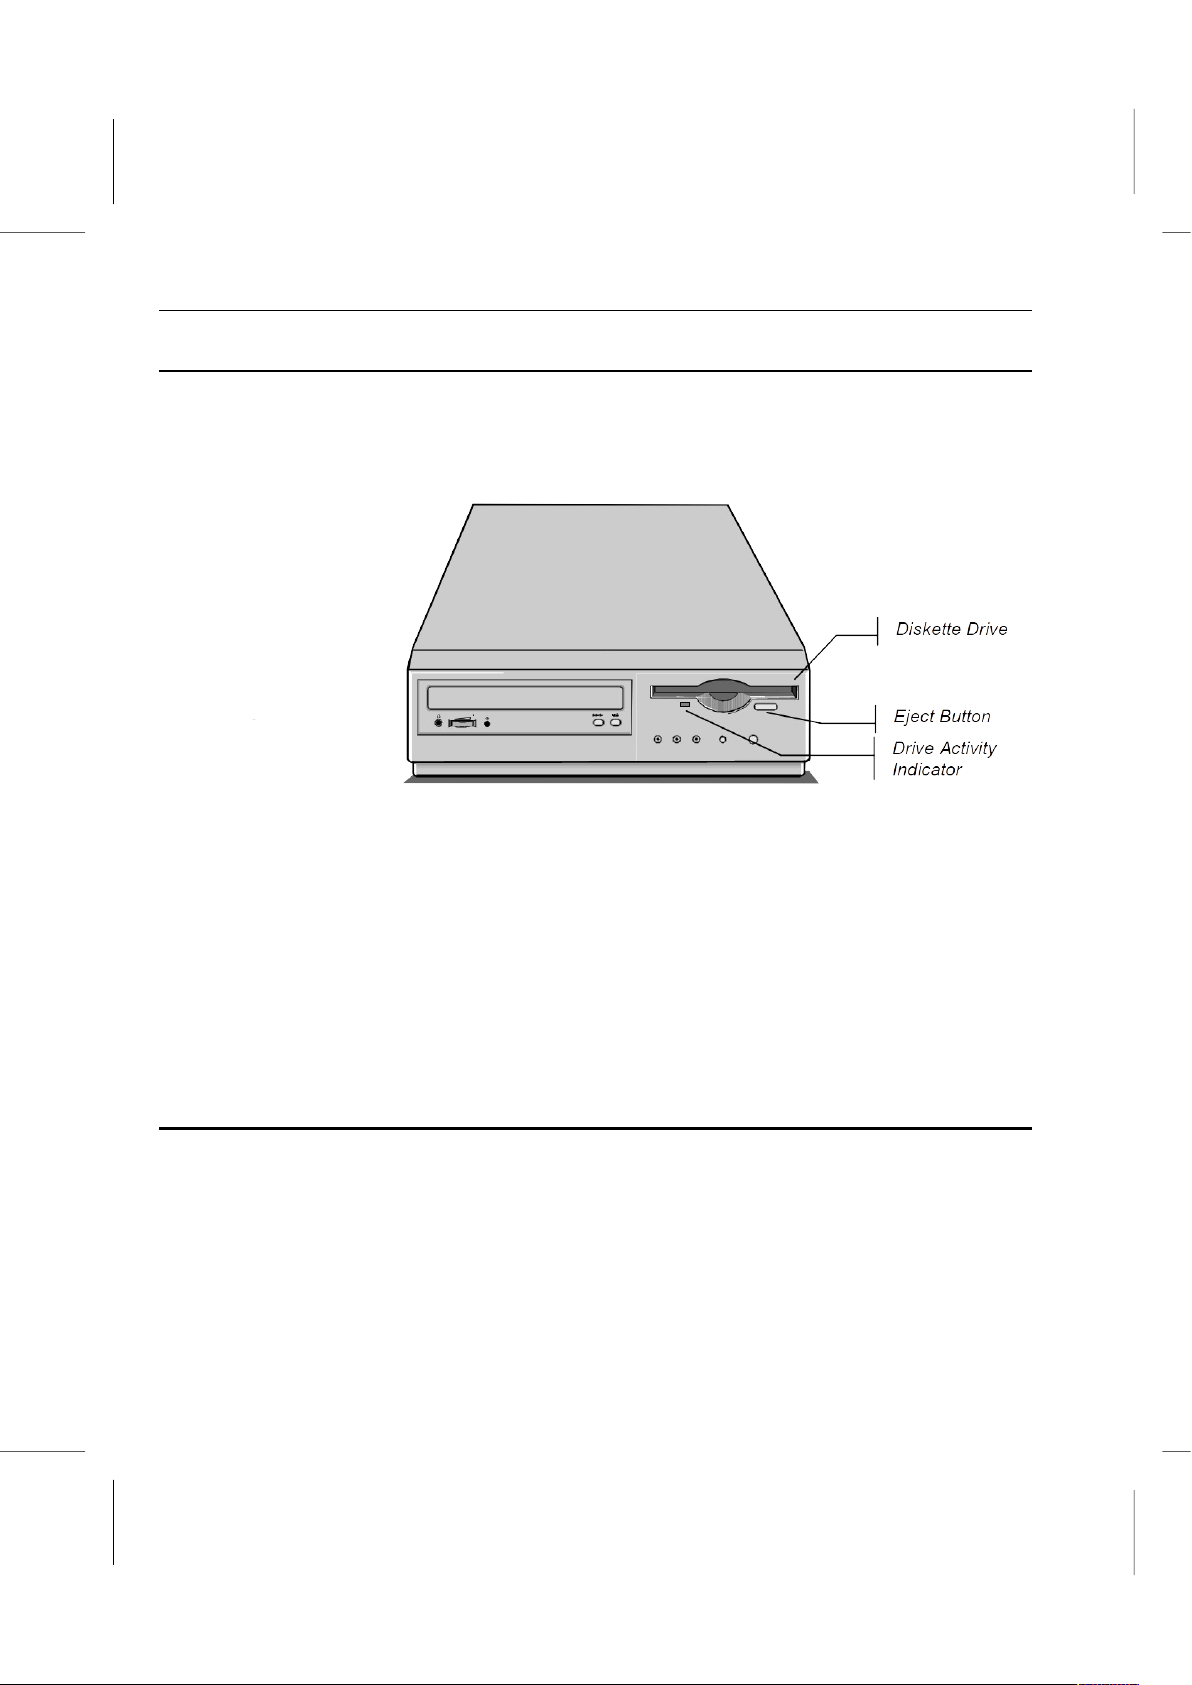
Diskette Drive
The diskette drive, on the right side of the front panel, can read from, or write to, 3.5”
diskettes with capacities of either 720K or 1.44 MB. The diskette drive provides a
convenient way of storing and transferring small files. Your computer identifies the
diskette drive as drive A:.
To use the floppy diskette drive, insert a diskette into the drive slot, label side up. The
diskette slides all the way into the drive. You can then use your computer to read or write
data to or from drive A. Log you computer on to the A drive. To remove a diskette from
the drive, press the eject button on the front of the floppy drive module. The diskette
ejects, and you can pull it out of the drive.
When the system is reading from, or writing to, a diskette, the light underneath the
diskette drive will turn on. Do not try to eject the diskette when the light is on or you may
lose data.
If you have stored important information on a diskette, you can protect it from accidental
erasure by using the Write Protect sliding shutter on the reverse side of the diskette.
CD-ROM Drive
The Book PC is installed with either a CD-ROM or a DVD drive. This option is factory
installed. The CD-ROM/DVD drive is an internal component, and is located on the left
side on the front of the system. It cannot be used to write data to a recordable compact
disk.
The CD-ROM drive can be used to read data, or it can be used to play audio or video
CDs (e.g. movie titles which use MPEG-1 compression). Compact Disks store massive
amounts of data, and provide relatively fast access.
2 – 6
Page 28
Using the system: CD-ROM Drive
DVD (Digital Video/Versatile Disc) is a new technology that packs much more data onto
the disc, so that more data, more audio, or better quality video can be stored on the disc.
Usually your system identifies the CD-ROM/DVD drive as drive D:. Access to a CD/DVDROM is quite fast.
Using the Drive:
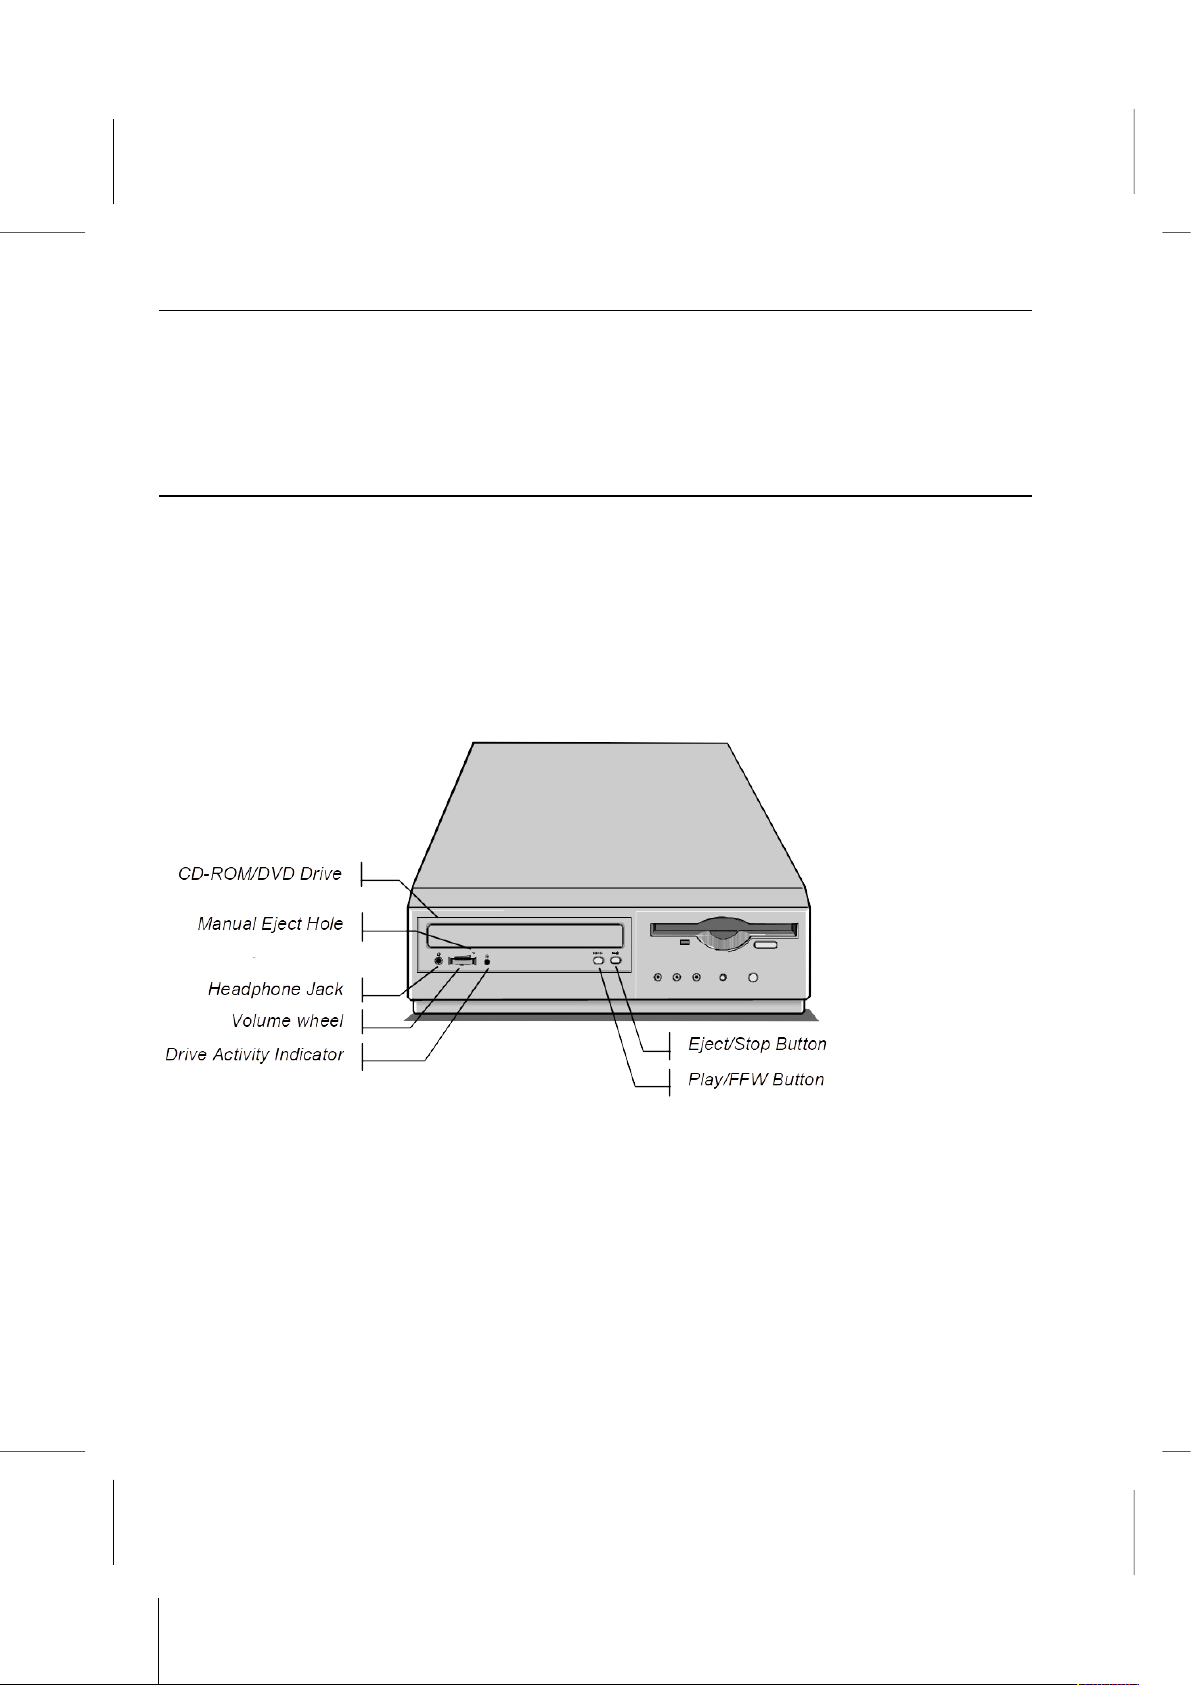
1. Press the open tray button on the front panel of the CD-ROM/DVD drive. The tray will
slide out from the computer. If your computer is not standing on a smooth surface,
you might need to raise the right edge of the computer slightly so that the tray is not
impeded.
2. Carefully pull the tray out to its fullest extent and place the disk into the tray. Hold
disks by the edge so that you don't smear the storage surface. Normally the disks
install with the label side facing upwards. The disk fits into the circular depression in
the tray, and the spindle of the tray fits into the hole in the center of the disk.
Note: Please note that the drive in the illustration may not be identical to the drive in
your system.
3. Carefully slide the tray back into the computer until it is flush with the left edge of your
notebook.
How you access titles on the disk depends on the format. If the disk has DOS formatted
files, you can access the files by logging on to drive D:. You can log on to the drive from
the DOS command line, or by using Windows Explorer.
2 – 7
Page 29

Book PC
If you wish to play an audio CD-ROM, you can use the Gamut software application. See
appendix B for more information on using the Gamut application.
Note: When playing an audio CD-ROM, you can use the extra control buttons that
may be available on the front panel of the CD-ROM/DVD drive, as indicated in the
picture above. If you have headphones, you can also listen to audio tracks by
plugging it into the headphones jack of the drive. Use the volume control wheel to
adjust the volume.
To play movies or access multimedia files on a CD-ROM/DVD disk, you can use the
optional WINDVD software application. See appendix C for more information on using the
WINDVD application.
Both the Gamut audio application and, if the system comes with the optional DVD drive,
the WINDVD multimedia application are bundled with the Book PC, and are either
preinstalled on the hard disk or available for installation from a support disk.
Alternatively you can use the standard Windows Media Player, which has similar but
somewhat limited functions as the software applications mentioned above.
1. In Windows Start menu, point to the Programs, Accessories, and Entertainment
headings to display the Media Player name and icon. Click on Media Player to open
the Media Player utility.
2. In Media Player, point to the Device item to display the Device menu. Select the kind
of device that you want to play.
3. If you have selected a movie or audio title, your computer automatically locates the
CD-ROM title in the CD-ROM drive.
4. When you select a file to play, Media Player displays a dialog box that allows you to
select the drive and file name that you wish to play.
5. Before you click on the Play button in Media Player, you may wish to open the Audio
Accessories program group and display the volume control utility so you can adjust
the sound level and balance. You can use the Properties option in the Device menu to
configure the way your computer plays certain media files.
If you need to open the drive tray while the power is turned off, or because the eject tray
switch is not working, you can insert a straightened paper clip into the manual eject hole.
2 – 8
Page 30

Using the system: CD-ROM Drive
About Memory
RAM (Random Access Memory), also known as system memory, is the active memory of
your computer. It is used to hold programs and data that are currently in use. The more
RAM your system has, the more space it has to run programs. Your system comes with a
certain amount of RAM, but that is not the limit of memory used by Windows. Windows
will set up a swap file on your hard disk drive to provide additional ‘virtual memory’.
When the programs you are running need more memory than available in RAM on your
system, Windows will swap some programs from RAM to that hard drive. When those bits
of memory are needed, Windows will swap them back into RAM. Even with the fast data
bus and fast hard drive in your system, the reading and writing to the disk is slower than
having the data available in RAM. If you find that your computer is doing a lot of swapping
and this is slowing down the response time of your system, you should consider
upgrading the total amount of memory in your system. This will optimize the performance
of system.
See chapter 4 of this user’s manual for information on upgrading your Book PC’s
memory.
About the Audio and Video Onboard
The system mainboard has an audio and video chipset onboard, which means your
system is all set to go without adding in any extra sound and/or video graphics cards.
You just need to plug a monitor into the external monitor port in the back of the system,
and connect external speakers and/or a microphone or other audio devices to the audio
ports located the rear side of the system.
In addition to the standard audio jacks, the Book PC also features a digital audio jack,
which allows for high quality audio transfer between your system and a peripheral device.
About the LAN Onboard
The system mainboard has an Ethernet 10/100 Base-T adapter chipset onboard. This
means your system is ready to join a network without adding in any other hardware
cards.
Use the LAN jack in the rear of the system to plug a network cable. Contact your local
network administrator for help on setting up your network environment.
2 – 9
Page 31

Book PC
About the Modem Onboard
The system mainboard has a 56K (V90) fax/modem chip onboard. This means your
system is ready to dial into the Internet or any other computer, or to send faxes, without
adding any other hardware cards.
In some countries, local regulations may not permit the use of the fax/modem that is
designed for this system.
The fax/modem is capable of running in two modes, both as a fax and as a modem,
which can be used to connect to other computers. The fax/modem can send and receive
data at up to 56 Kbps and send and receive faxes at up to 14.4 Kbps.
In order to use the fax/modem you need to first plug a telephone cable into the RJ-11
socket at the rear side of the Book PC, and then use the fax or communications software
to operate the device.
2 – 10
Page 32

Chapter 3
Chapter 3
Installing the Software
Installing the Software
Page 33

Book PC
This chapter provides information on how to reinstall the software on the hard disk in
case of disk failure.
Installing the Windows 98 Operating System
You will be using the Windows 98 CD disk that came with your system to install the
operating system. For detailed information on how to install the operating system, refer to
chapter 2 of the Windows 98 Getting Started manual, which is bundled with the
Windows 98 CD.
Note: Before you start installing the Windows operating system to your Book PC’s
hard disk drive, make sure that you have access to the CD-ROM/DVD drive. If
necessary, install the proper CD-ROM/DVD driver first. You can find the necessary
files on the support CD.
Installing the Bundled Software
The support CD shipped with your system contains an original copy of all the software
that was preinstalled on the hard disk drive, including all the drivers and the application
software. You can use it to restore the Book PC’s hard disk to its original form.
Before you proceed to install any of the bundled software, make sure to have installed the
Windows 98 operating system first.
Installing the Drivers under Windows 98
During the Windows 98 installation the setup program will already try to identify and
match the proper drivers for the hardware connected to your system. Even so, Windows
might not automatically detect all your new hardware. This means you might have to
install some driver software in order for all your hardware to be recognized and work
properly together.
3 – 2
Page 34
Installing the Software: Installing the Bundled Software
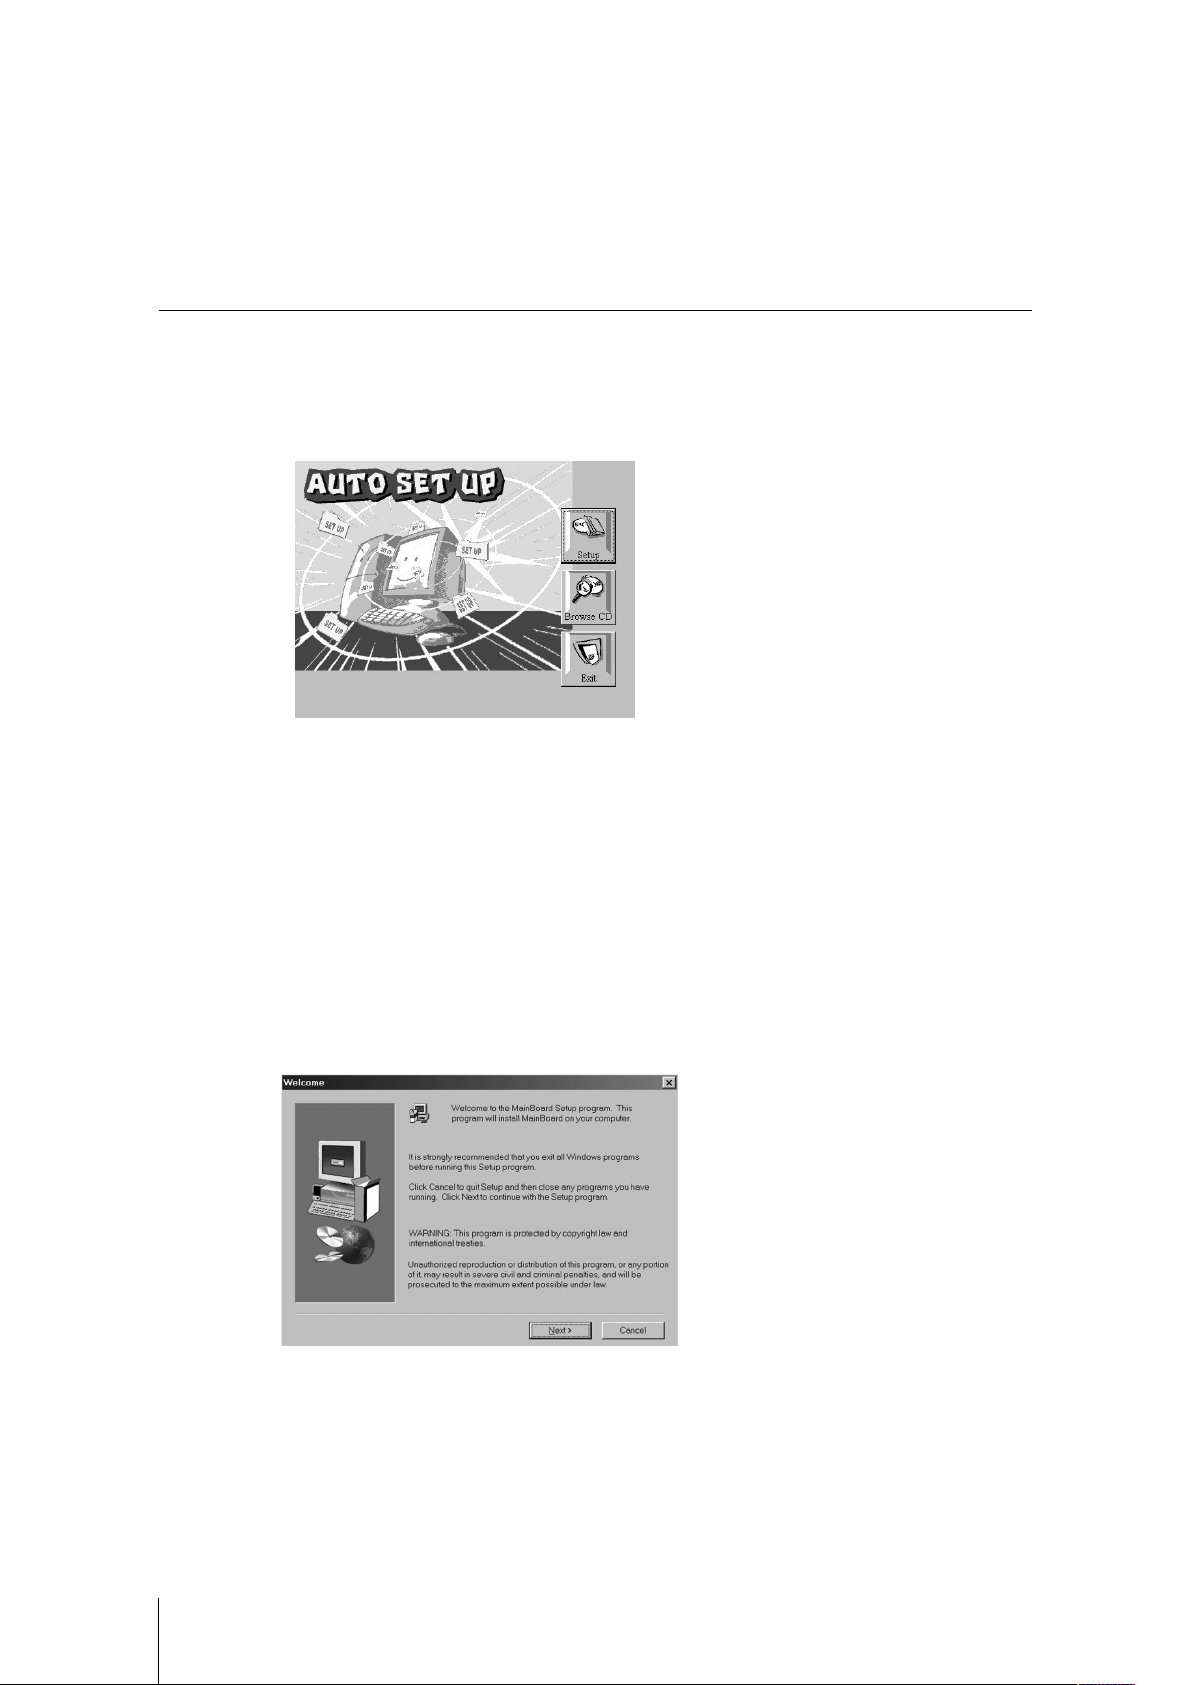
The support software CD-ROM disc loads automatically under Windows 98. When you
insert the CD-ROM disc in the system CD-ROM drive the Autorun feature will
automatically bring up the install screen. The screen has three buttons on it, Setup,
Browse CD and Exit. See the following screen illustration.
When you click on the Setup button the software installation program will run and you
can select what kind of installation you want to do, as explained later in this section.
The Browse CD button is the standard Windows command that allows you to examine
the contents of the disc using the Windows 98 file browsing interface.
The Exit button closes the Auto Setup window. To run the program again, reinsert the
CD-ROM disc in the drive or click on AutoRun in the context sensitive menu for the CDROM drive icon in a file browser window.
Installing Software with Auto Setup
To install support software for the system board follow this procedure:
1. Click on the Setup button. The install program will load and display the following
screen. Click the Next button.
3 – 3
Page 35
Book PC
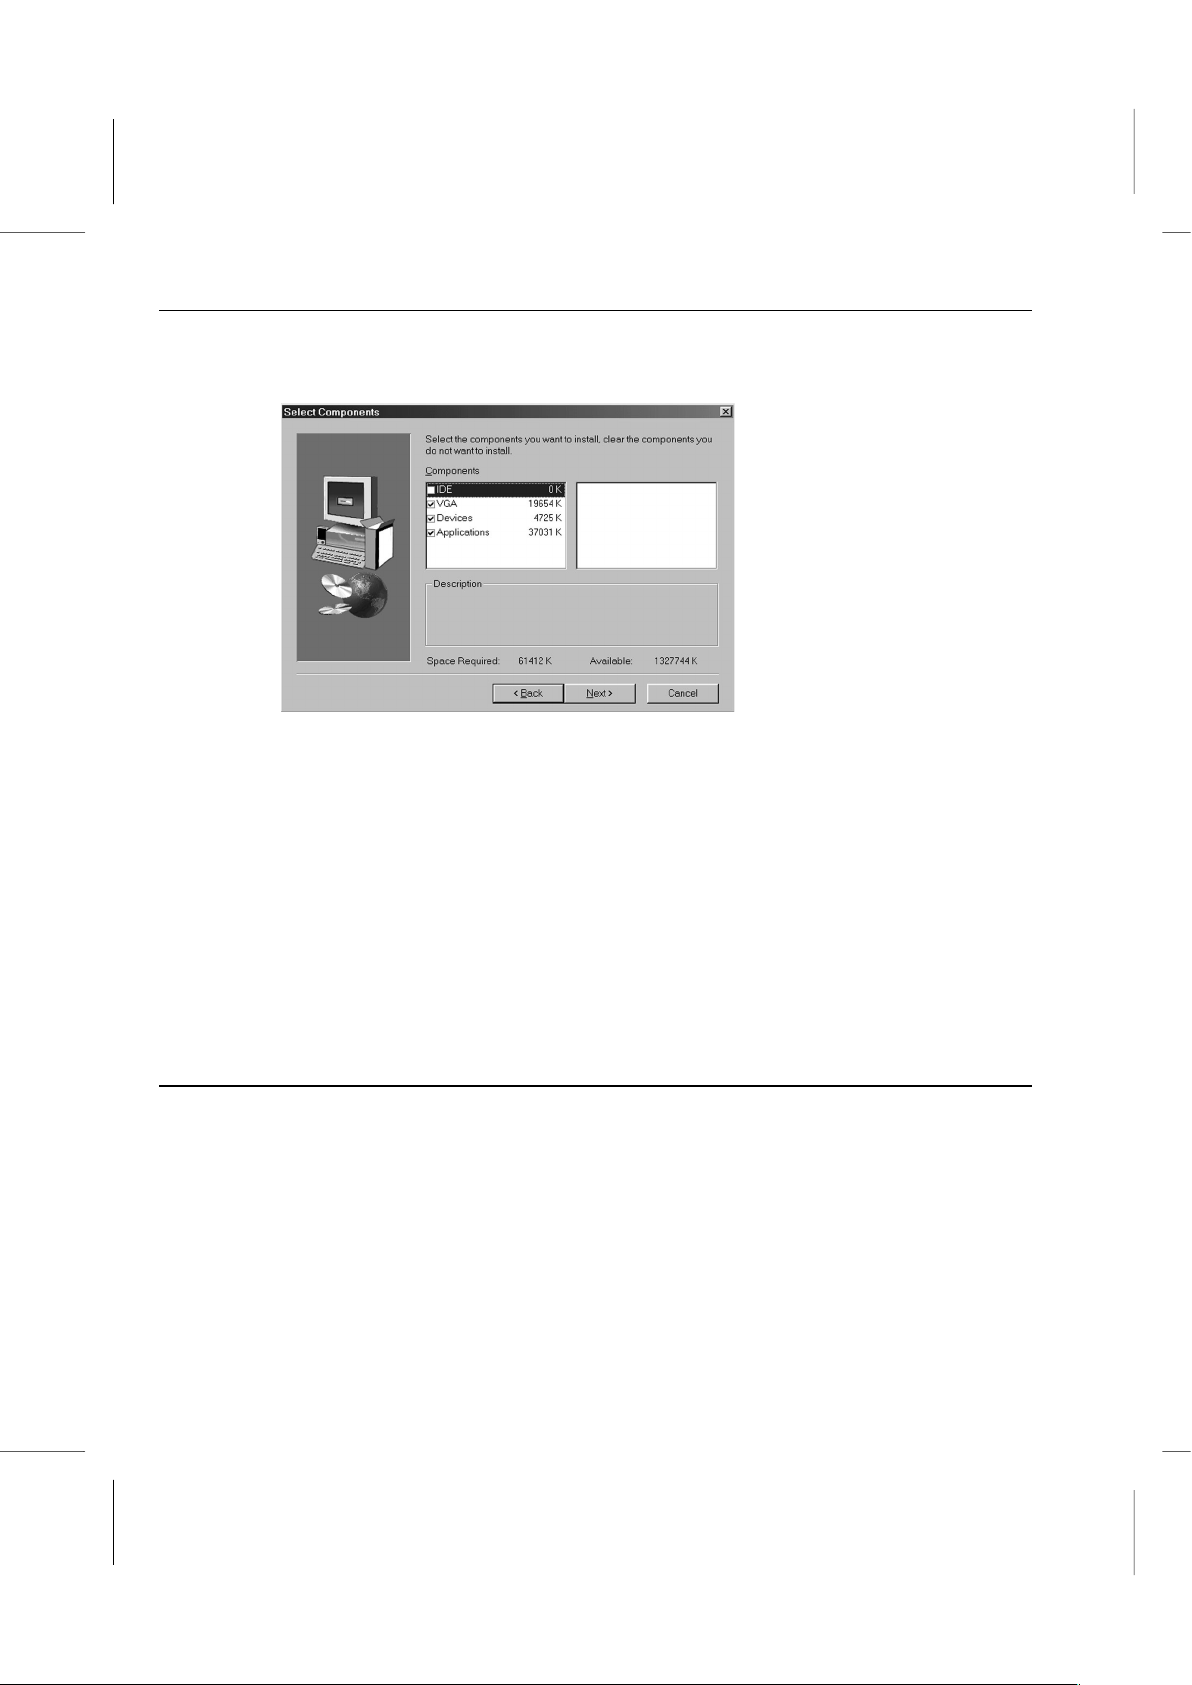
2. Select the items that you want to setup by clicking on it (the default options are
recommended). Click the Next button to proceed.
3. The support software will automatically install.
Once any of the installation procedures start, software is automatically installed in
sequence. You will need to follow the onscreen instructions, confirm commands and
allow the computer to restart as few times as is needed to complete installing whatever
software you selected to install. When the process is finished, all the support software will
be installed and working.
If your operating system is not Windows 98, you have to manually install for your drivers,
refer to the Table of contents of the support CD section below. When put the support CD
in the CD-ROM drive, the system might get an error message. Don’t care the message,
and don’t execute the Auto Setup program.
Table of contents of the support CD
Note: The correct path name for each software driver is provided, where D:
identifies the CD-ROM drive letter – modify if necessary.
Bus Master IDE Driver
The IDE Bus Master Driver allows the system to properly manage the IDE channels on
the mainboard. You need to install two drivers if you are using Windows 9x.
Win9x – D:\IDE\BKI810\WIN9x\Install\SETUP.EXE and then
D:\IDE\BKI810\WIN9x\Utility\SETUP.EXE
3 – 4
Page 36

Installing the Software: Installing the Bundled Software
USB Driver
The USB Driver allows the system to recognize the USB ports on the mainboard. You
need to install this driver if you are running Windows 95.
This driver is available for:
Windows 95 – D:\BKI810\USB\EUSBSUPP\USBSUPP.EXE
Windows 95 (Chinese) – D:\BKI810\USB\CUSBSUPP\CUSBSUPP.EXE
Sound Driver
The Sound driver allows he system to generate optimal sound effects. This driver is
available for:
DOS – D:\SOUND\Driver\DOSDRV\
Windows 9x – D:\SOUND\Driver\W95-98\
Windows NT – D:\SOUND\Driver\NT40\
There is also an Audio Rack application program available for:
Windows 9x – D:\SOUND\Gamut\Audio Player\
Graphics Drivers and Software
Find the Graphics drivers and software here:
D:\VGA\BKI810\Win9x\Graphics\SETUP.EXE
(D:\VGA\BKI810\SCART Win9x\Graphics\SETUP.EXE, for SCART TV only)
Fax/Modem Drivers and Software
Find the fax/modem drivers and software here:
D:\Modem\Driver\Win9x\
D:\Modem\SuperVoice\
MediaRing Talk Software
MediaRing Talk provides an internet telephone for the onboard modem.
D:\Modem\MediaRingTalk\
Network Adapter Driver
Find the network adapter driver here:
D:\LAN\DAVICOM9102
3 – 5
Page 37

Book PC
BIOS Update Utility
The BIOS Update utility allows you to update the BIOS setup file on your mainboard to a
newer version. You can download the latest version of the BIOS setup available from the
website.
D:\UTILITY\AWDFL711.EXE
PC-Cillin Software
The PC-Cillin software program provides anti-virus protection for your system.
This program is available for:
DOS – D:\PC-CILLIN\DOS\PCSCAN.EXE
Windows 95 – D:\PC-CILLIN\WIN95\DISK1\SETUP.EXE
Windows 98 – D:\PC-CILLIN\WIN98\SETUP.EXE
WordPerfect Suite 8
The WordPerfect Suite 8 is a set of office applications for Windows.
Must sure in 800x600 display mode before you install it.
Windows 95/98/NT – D:\Corel\Suite8\AppMan\Setup\SETUP.EXE
Installing the Applications
The installation of application software can be done through the Add/Remove Program
item in the Start/Settings/Control Panel.
Once you are in the Add/Remove window, click on Install in the Install/Remove menu,
and follow the instructions.
Another way of installing software is through the Run option in the Start menu. After you
click Run, a small window pops up and you can either type or browse to the location of
the installation file of the application software you want to add. When available, make
sure to read the installation instructions provided by the software manufacturer.
3 – 6
Page 38

Chapter 4
Chapter 4
Going inside
Going inside
Page 39

Book PC
This chapter takes a look inside the system and talks about upgrading certain key
components
Introduction
You probably won’t need the information in this chapter right away, but if you ever plan to
upgrade your system configuration, e.g. adding memory, this chapter shows you how to
open your computer and explains a little about the inside.
If you are unfamiliar with the hardware inside your computer system, this chapter offers a
basic introduction.
Important Precautions
Many of the computer system’s internal components are extremely sensitive to static
electricity. The following techniques reduce the possibility of damaging components with
electrostatic discharge or static.
Before handling any components or touching anything inside the system unit,
discharge your body’s static electric charge by touching a grounded surface. Wear a
grounding wrist strap if one is available.
Do not take hard drives, memory chips, or the like from their antistatic containers or
bags until you are ready to install them. When removing cards or chips from a system,
immediately place them in an antistatic bag.
When handling cards, hold them by their edges, and avoid touching the circuitry.
Do not slide cards or ICs over any surface.
Limit your movements during installation reduces static electricity.
Warning: Always disconnect the computer system from AC power before opening
the system unit cover.
4 – 2
Page 40
Going inside: Upgrading
Opening and Closing the Unit Case
Unlike many electronics devices, your Book PC was designed to be opened up by you.
Whether you need to install additional options, change jumper settings, or just want to
have a look inside, you can open the case without breaking your warranty.
To Open the System Unit Case
1. Power down the system.
2. Disconnect the power cable.
3. Observe the static electricity precautions stated above.
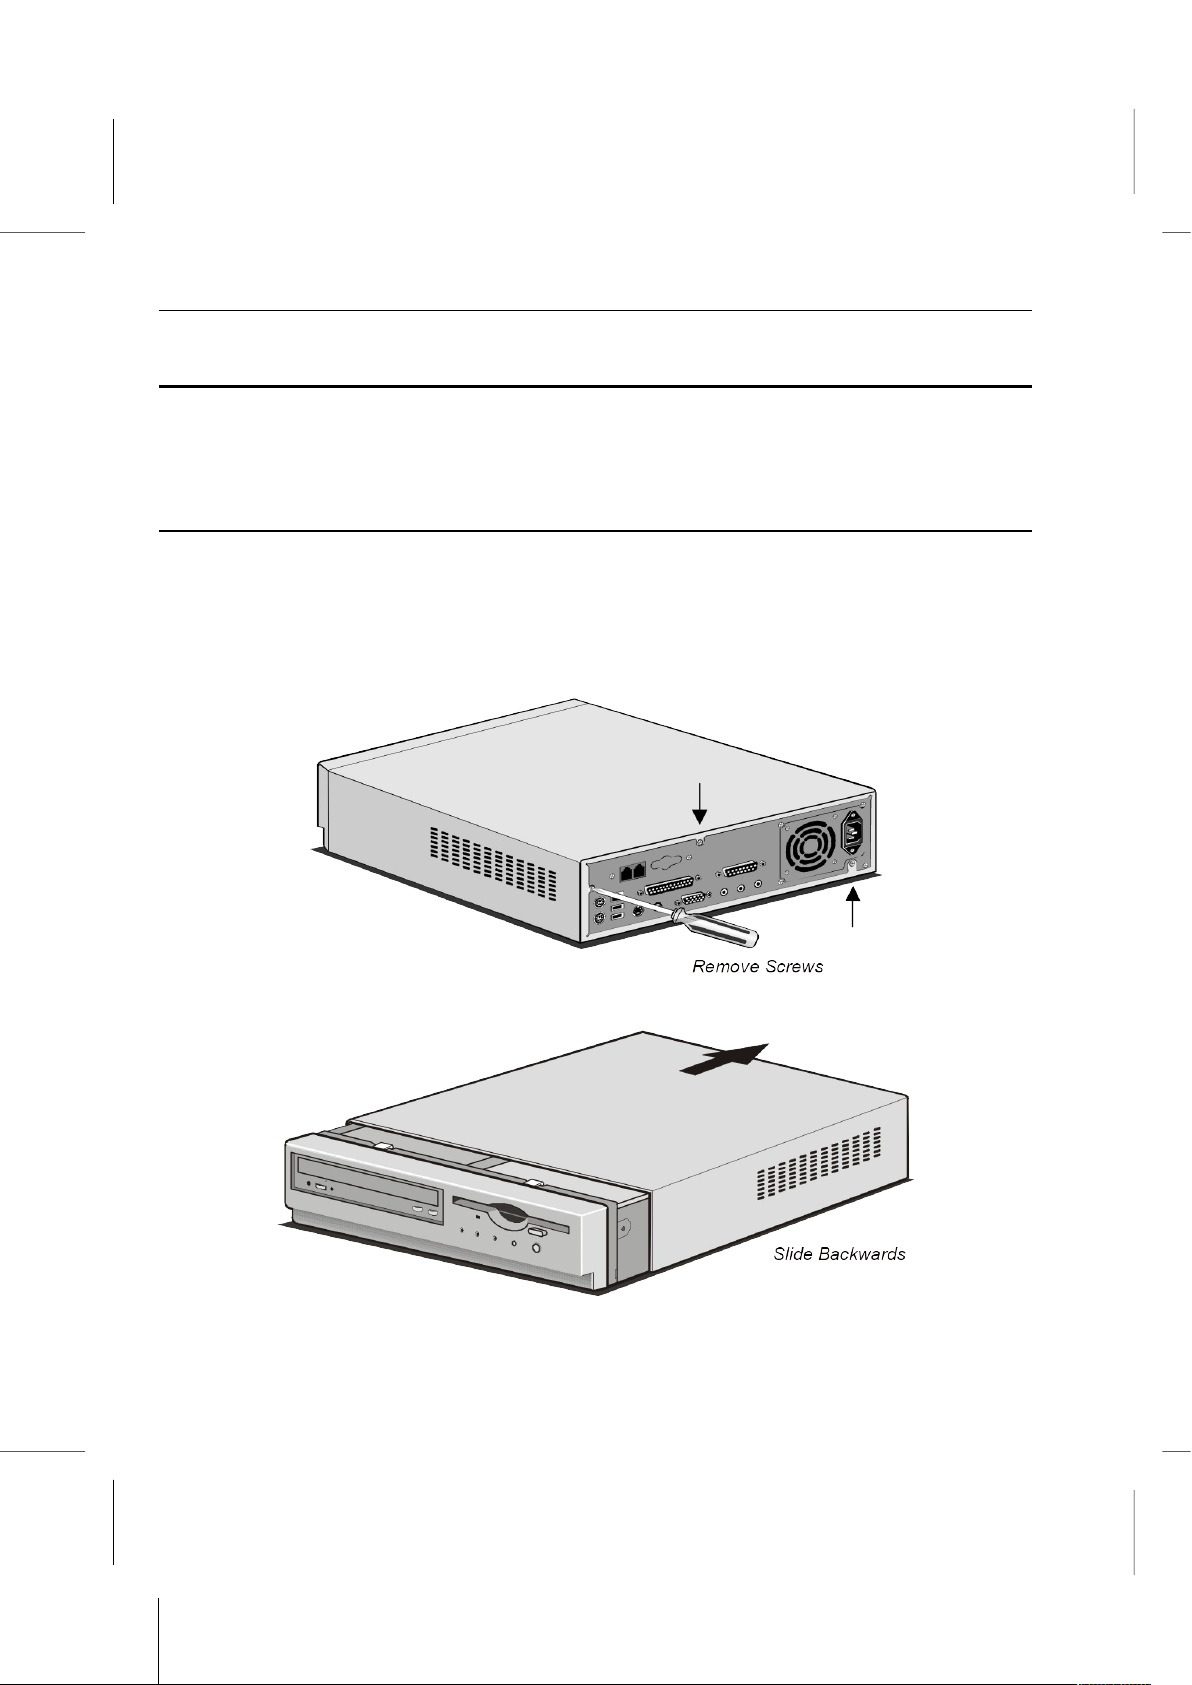
4. Use a Philips-head screwdriver to remove the screws on the back.
5. Slide the case cover backward.
6. Guide the cover away from the chassis.
4 – 3
Page 41
Book PC
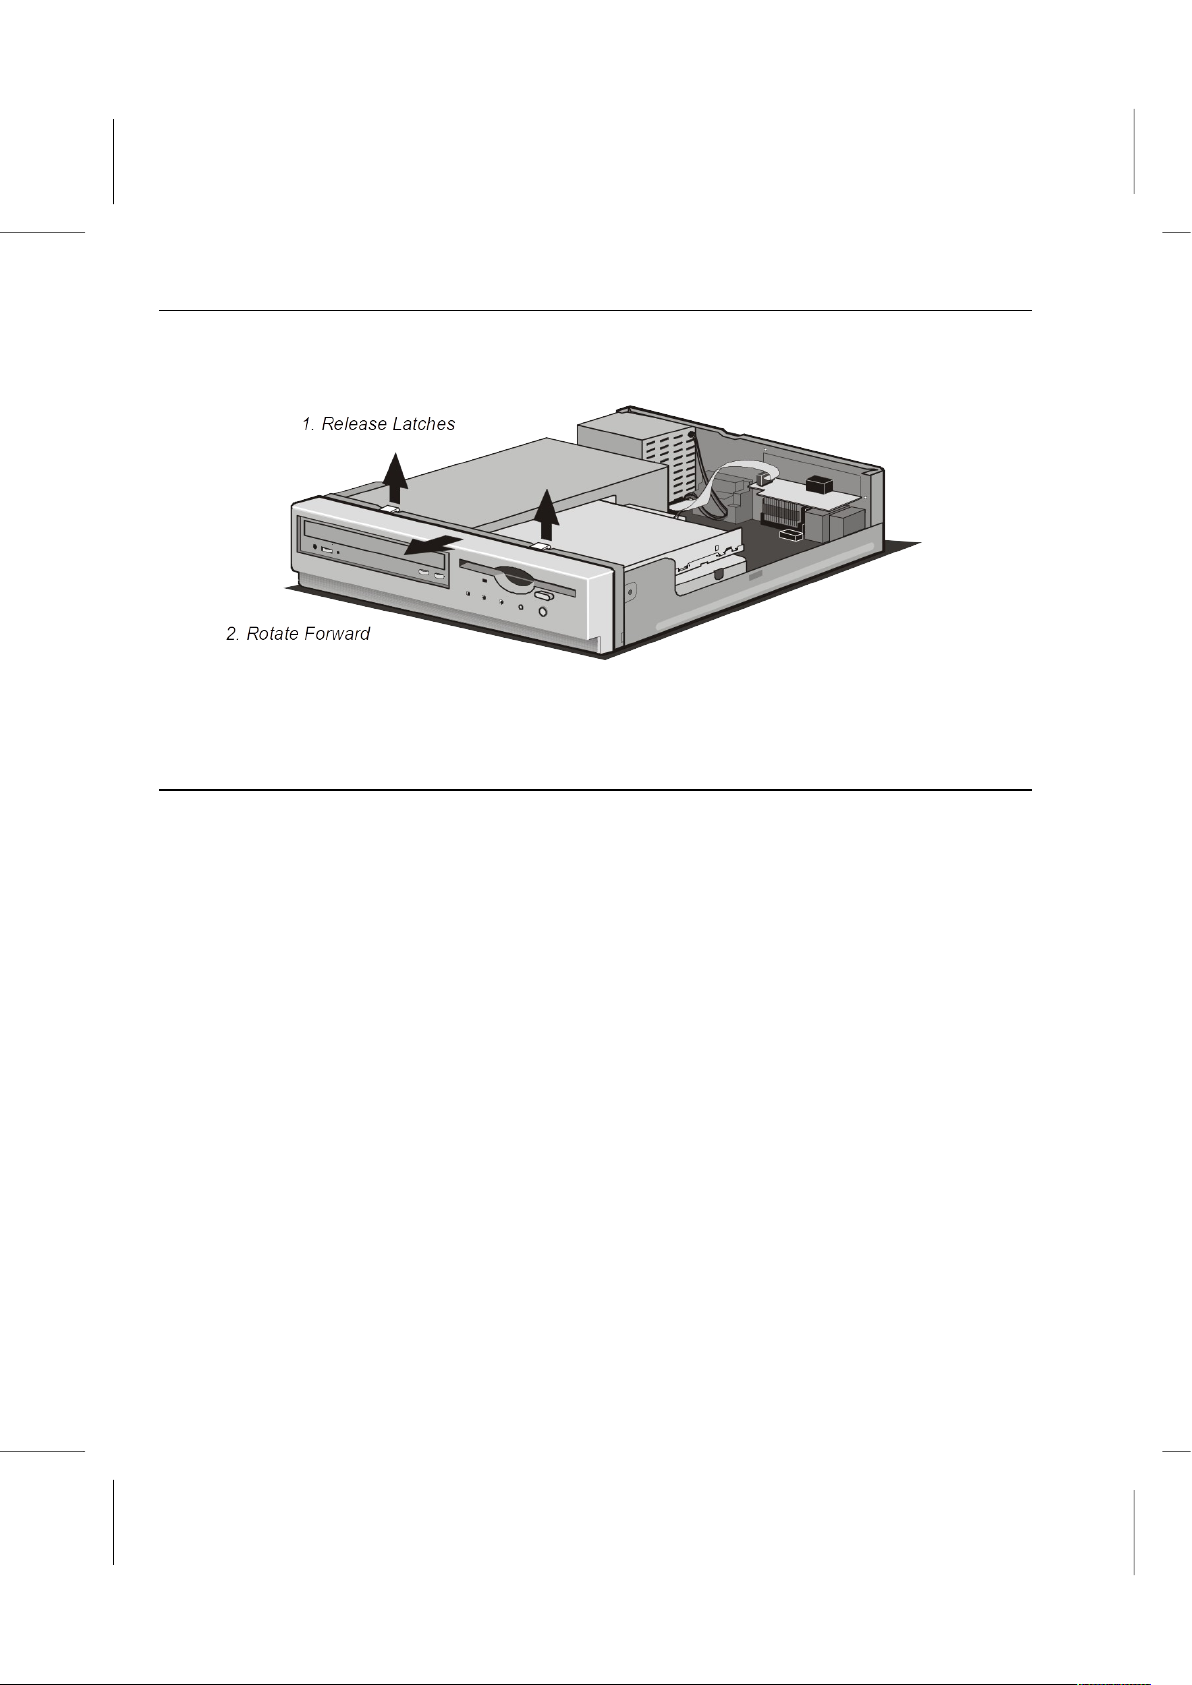
7. Remove the front cover by releasing the latches at the top. Slowly rotate the front
cover away from the chassis until the latches at the bottom give way.
8. Set it aside. Look inside the unit and find the components labeled in the illustrations
below.
To Close the System Unit Case
1. Replace the front cover by first fixing the latches at the bottom of the chassis. Gently
push the top of the front cover towards the chassis until the latches at the top snap to
it.
2. Place the top cover over the chassis.
3. Slide the cover forward.
4. Replace the screws on the back.
4 – 4
Page 42
Going inside: Upgrading
Inside the System
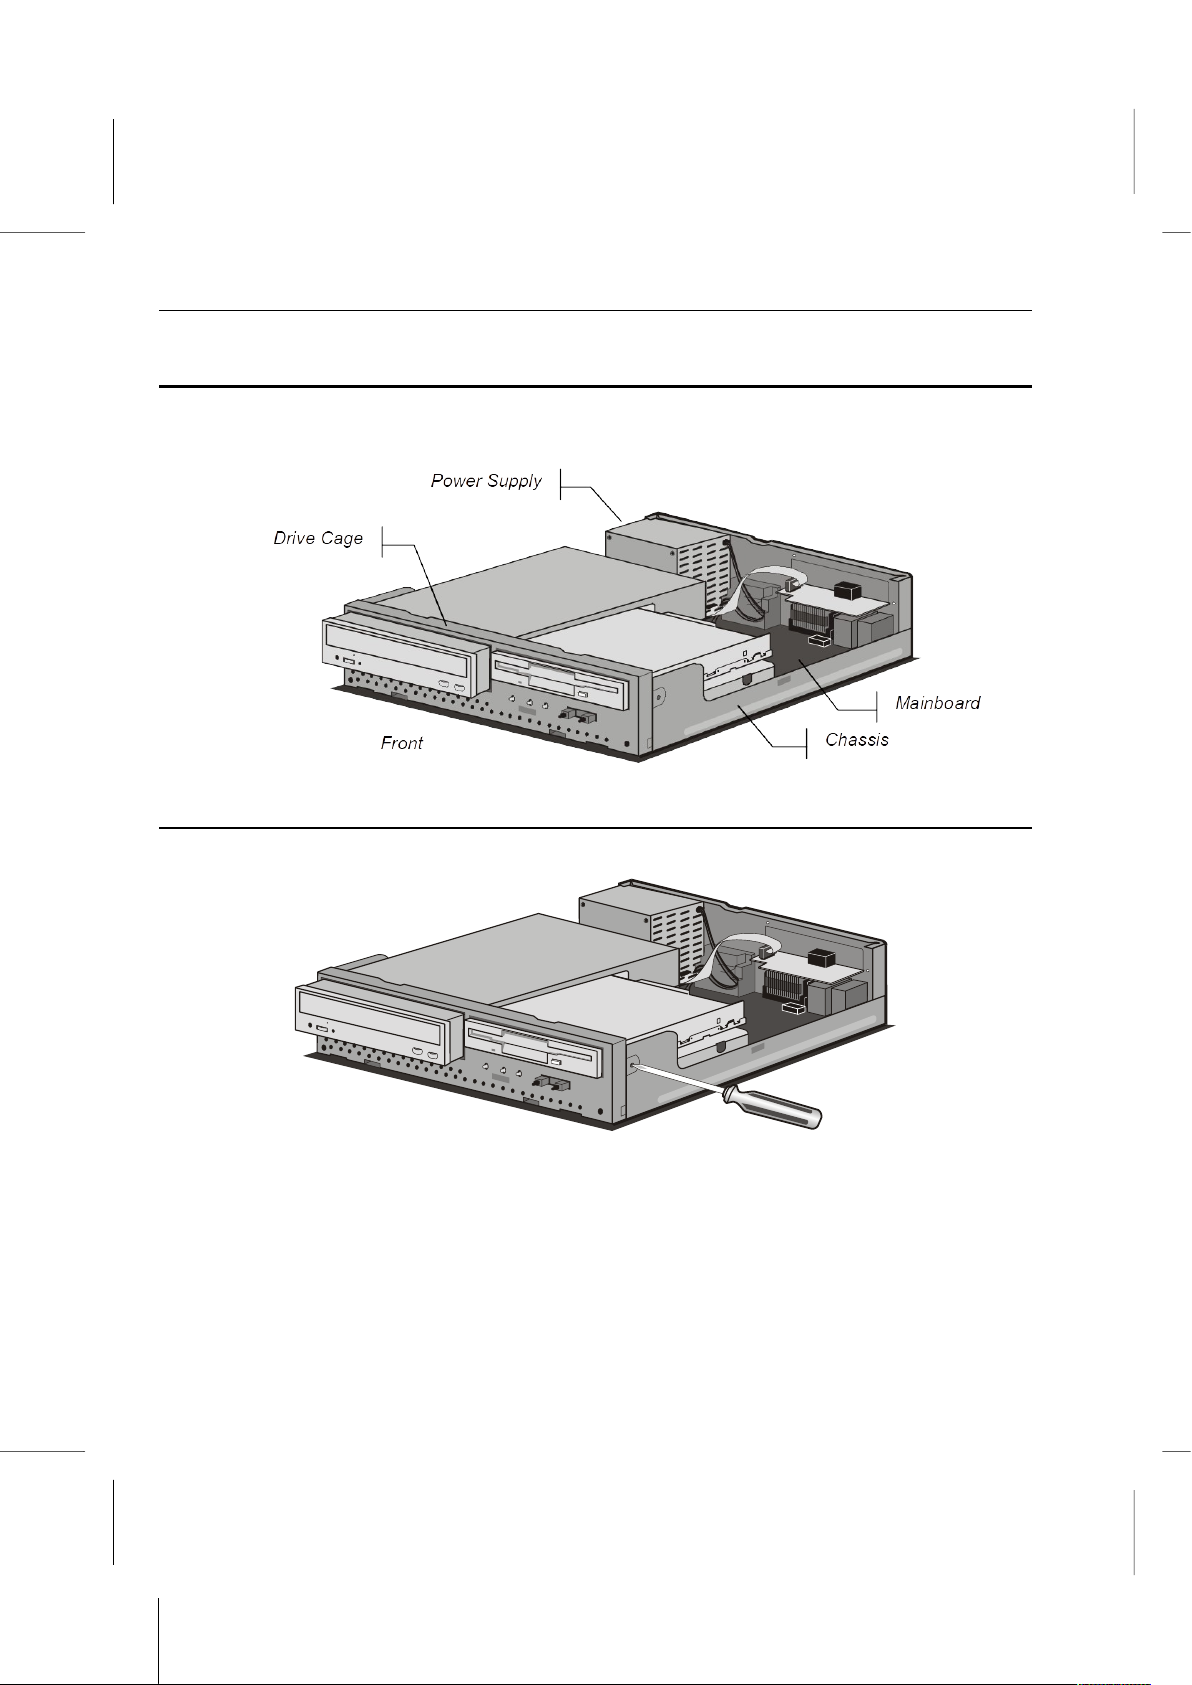
With your open Book PC in front of you, use the pictures below to locate each of the
labeled parts.
Removing the Drive Cage
1. Use a Philips-head screwdriver to remove the screws on each side of the chassis.
2. Disconnect all the connectors and power supply cables from the drives in the drive
cage. Also disconnect the indicator panel connector cable.
3. Pull the drive cage out of the chassis from the front, and gently slide it out until it is
completely free.
4 – 5
Page 43
Book PC
Mainboard Items
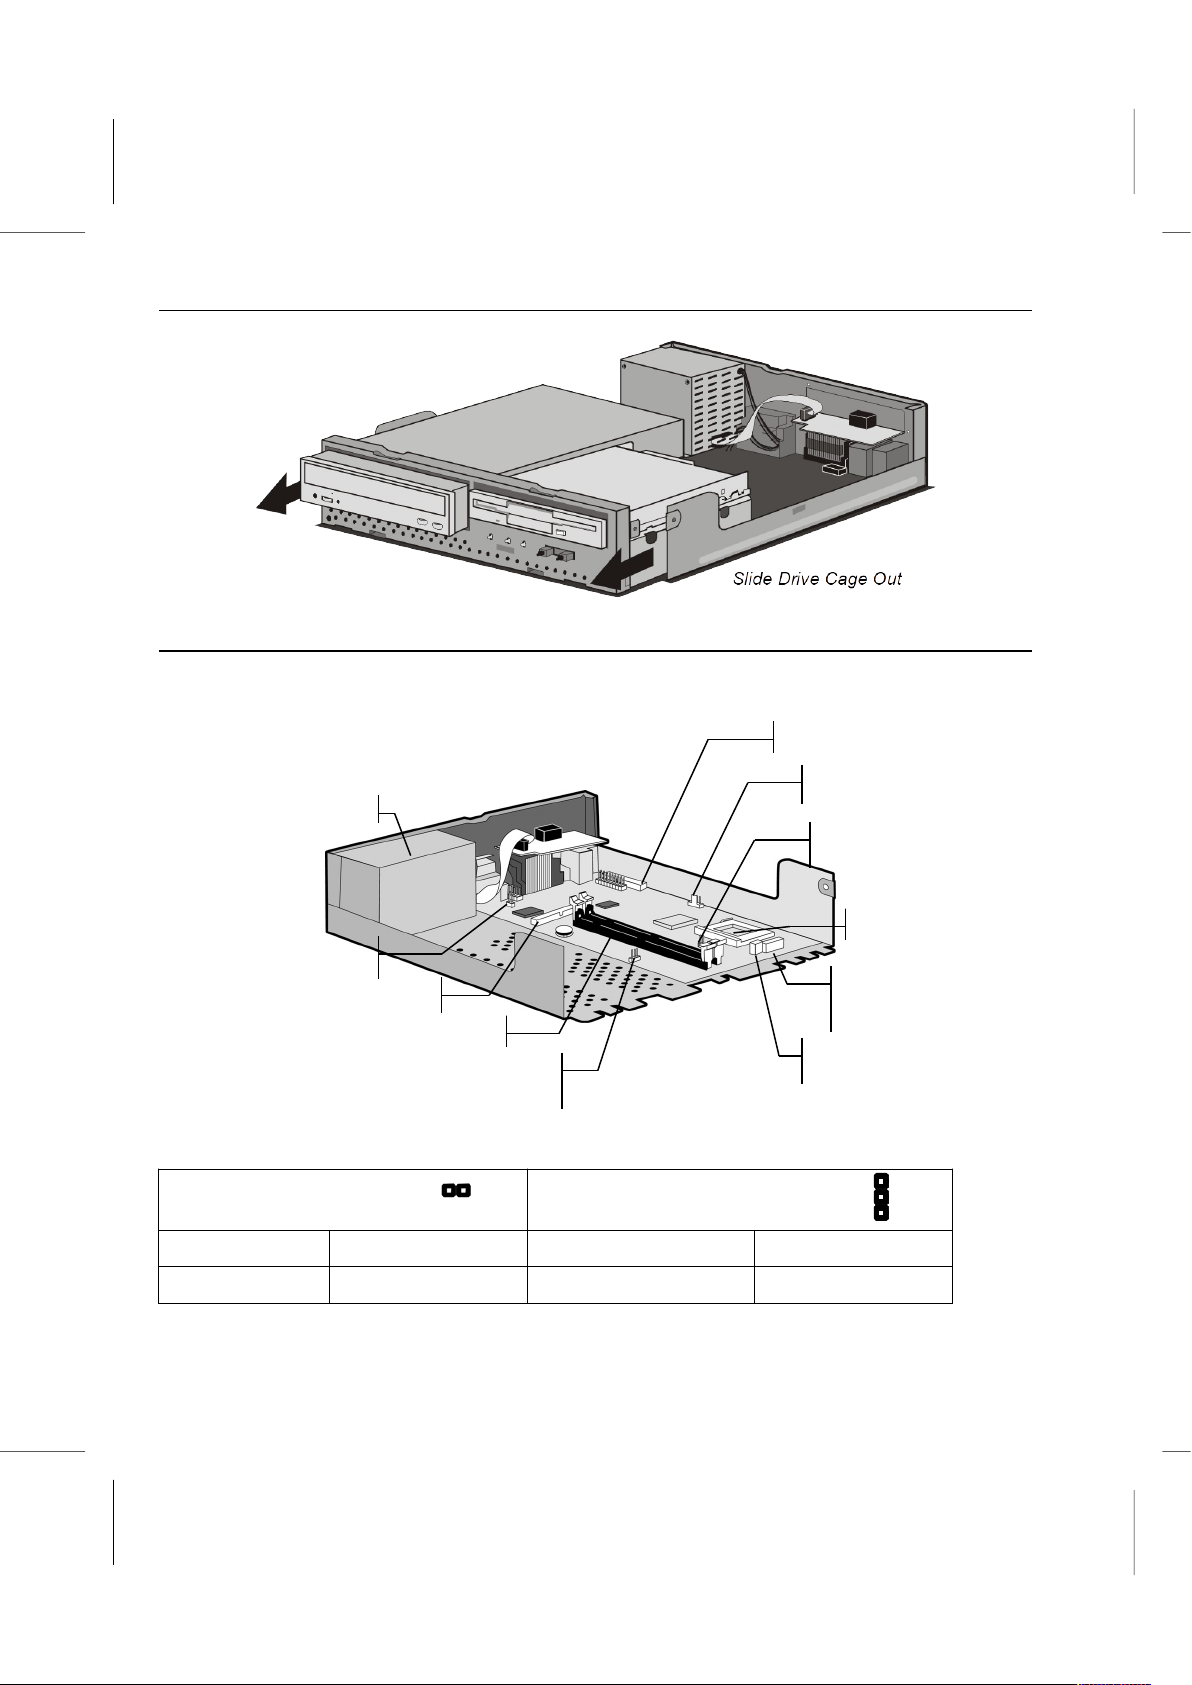
With the drive cage removed, use the pictures below to locate the labeled mainboard
items.
Jumper Settings:
JP8 – CPU Type Selector JP11 – 133 MHz CPU Selector
(for BKi810E model only)
Pentium III CPU Short Pins 1-2 133 MHz CPU Short Pins 1-2
Celeron CPU Open Pins 1-2 66/100 MHz CPU Short Pins 2-3
Processor Socket
System Memory
Power Supply
Connector for
Drives
Power Supply
FDD Connector
IDE Connector
Power Supply Connector
to Mainboard
CPU Fan Connector
JP8 - for CPU Type
Digital In Connector
(for CD/DVD/MP3)
JP11 – for 133 MHz CPU
(for BKi810E model only)
4 – 6
Page 44
Going inside: Upgrading
Upgrading
In this chapter we will limit ourselves to talking about upgrading or changing the CPU,
system memory, and the drives.
Changing the CPU
The Book PC features a Socket-370 for housing the system’s processor. Take care that
you do not try to install a Socket-7 processor such as the Pentium MMX, or the AMD
K5/K6 into the Socket-370, since it will not fit.
The following list of processors is currently supported by the Socket-370: PPGA Celeron
300A to 600 MHz or FCPGA Pentium III 500 to 800 MHz.
Note: New processors may be released after this manual is printed
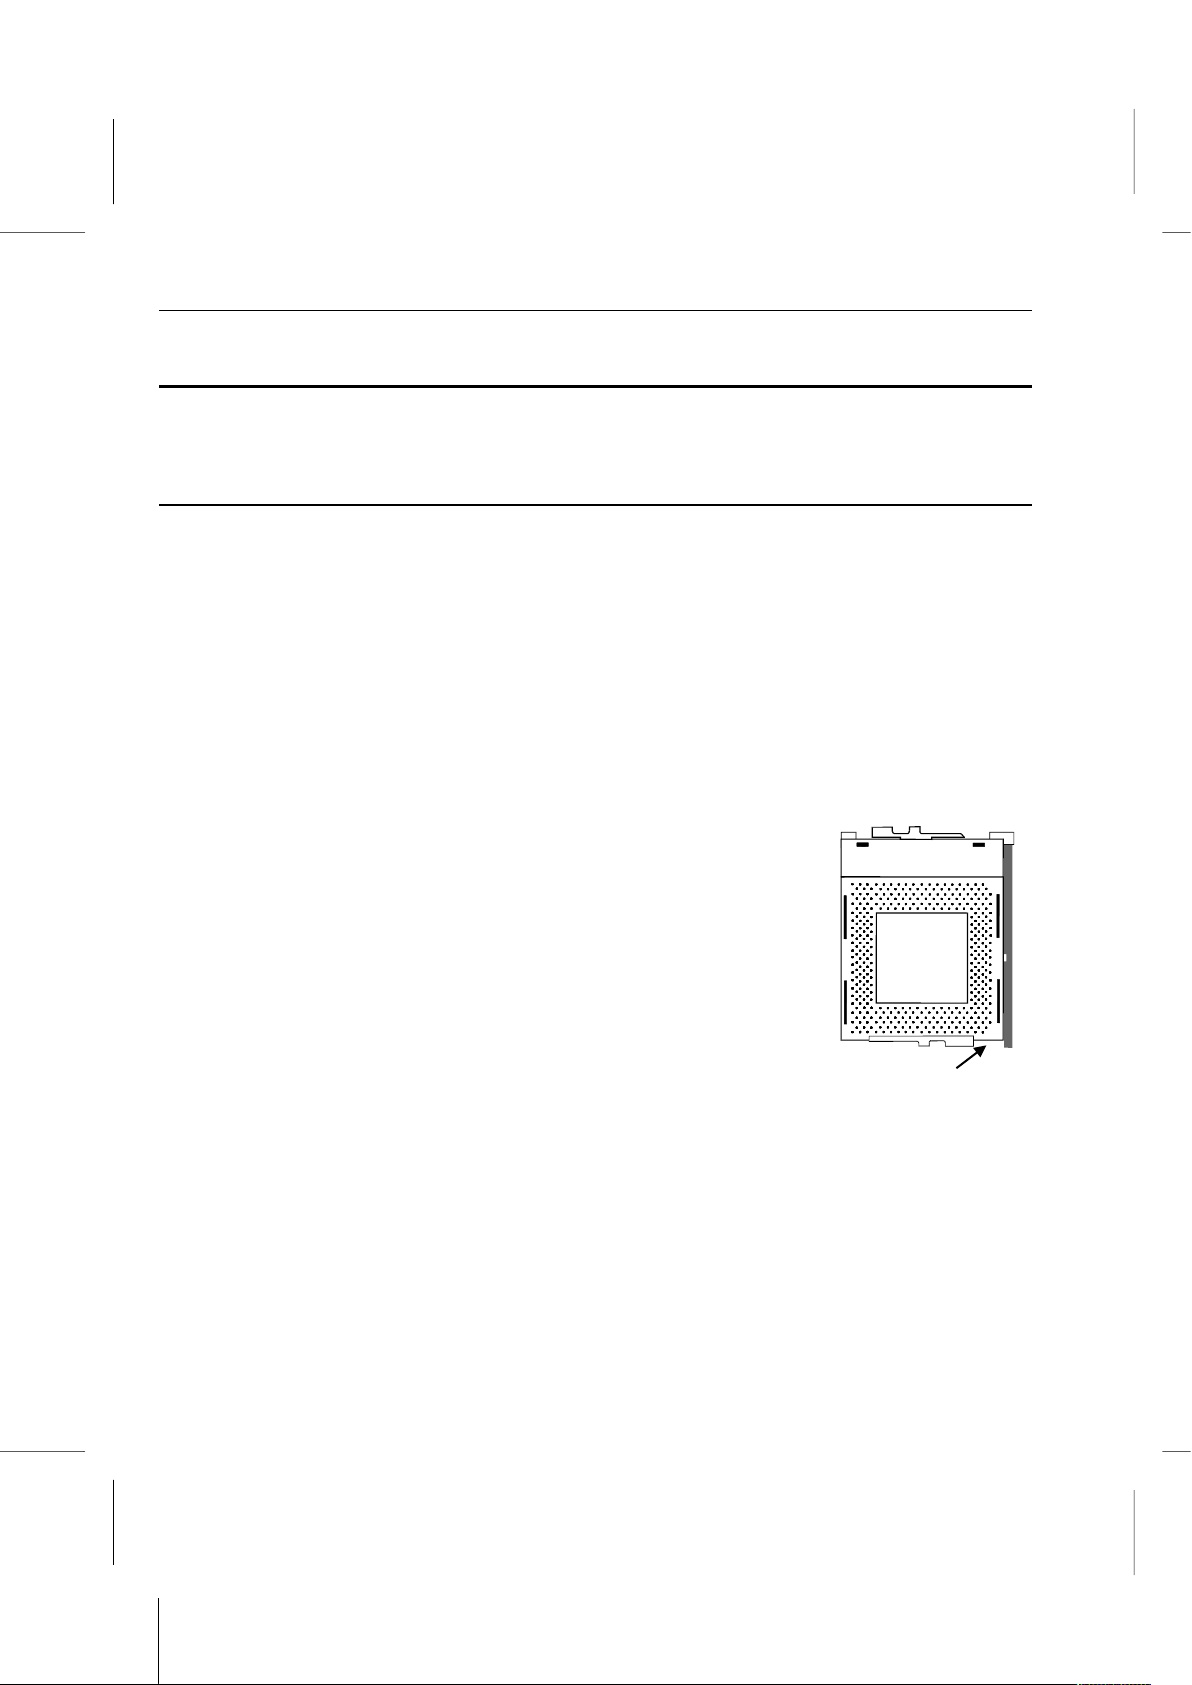
The processor installs into the ZIF (Zero Insertion Force) Socket-370 on the mainboard.
1. Locate the Socket-370 on the motherboard.
2. Pull the locking lever out from the socket and swing it to the upright position.
3. On the processor, identify the pin-1 corner by noting that it has a
slight bevel.
4. On the Socket-370, identify the pin-1 corner. The pin-1 corner is
on the same side as the locking lever, closest to the top of the
lever when it is in the locked position.
5. Match the pin-1 corners and insert the processor into the socket.
No force is required and the processor should drop into place
freely.
6. Swing the locking lever down and hook it under the catch on the
side of the socket. This locks the processor in the socket.
7. Locate the jumper JP8 and JP11 (if your model is BKi810E). Use these jumpers to
select the installed CPU type and the 133 MHz FSB CPU or not. See the Jumper
Settings section in the above.
8. If the processor is installed with a cooling fan assembly, connect the cable from the
fan to the CPU fan power connector CPUFAN1.
9. While power-on your system, press “DEL” key to enter BIOS SETUP.
Pin-1 Corner
4 – 7
Page 45

Book PC
10. Set the CPU Host/SDRAM/PCI Clock item to Defaul (the BIOS will automatically
detect the kind of processor) and the CPU Ratio item to match in the clock multiplier
of the installed CPU in the CPU Frequency Control page.
11. Press “ECS” key, and then press “F10” key to save and exit the setup program.
Changing System Memory
The Book PC mainboard has two 168-pin, 3.3 V DIMM (Dual In-line Memory Modules)
slots, which can be installed with SDRAM (Synchronous Dynamic Random Access
Memory) memory modules. You can use either 66 or 100 MHz memory modules.
You must install at least one memory module in order to use the Book PC. You can install
the memory module into any of the two DIMM slots. Each module can have a capacity
from 16 MB up to 256 MB, for a maximum system capacity of 512 MB.
The edge connectors on the memory modules have cut outs, which coincide with struts in
the DIMM slots, so the memory modules can only be installed in the correct way.
On the DIMM slot, pull the locking latches at either end of the slots outwards. Position the
memory module correctly and insert it into the DIMM slot. Press the module down into the
slot so that the locking latches lever inwards and lock the module in place.
DIMM2
DIMM1
4 – 8
Page 46
Going inside: Upgrading
Changing the Drives
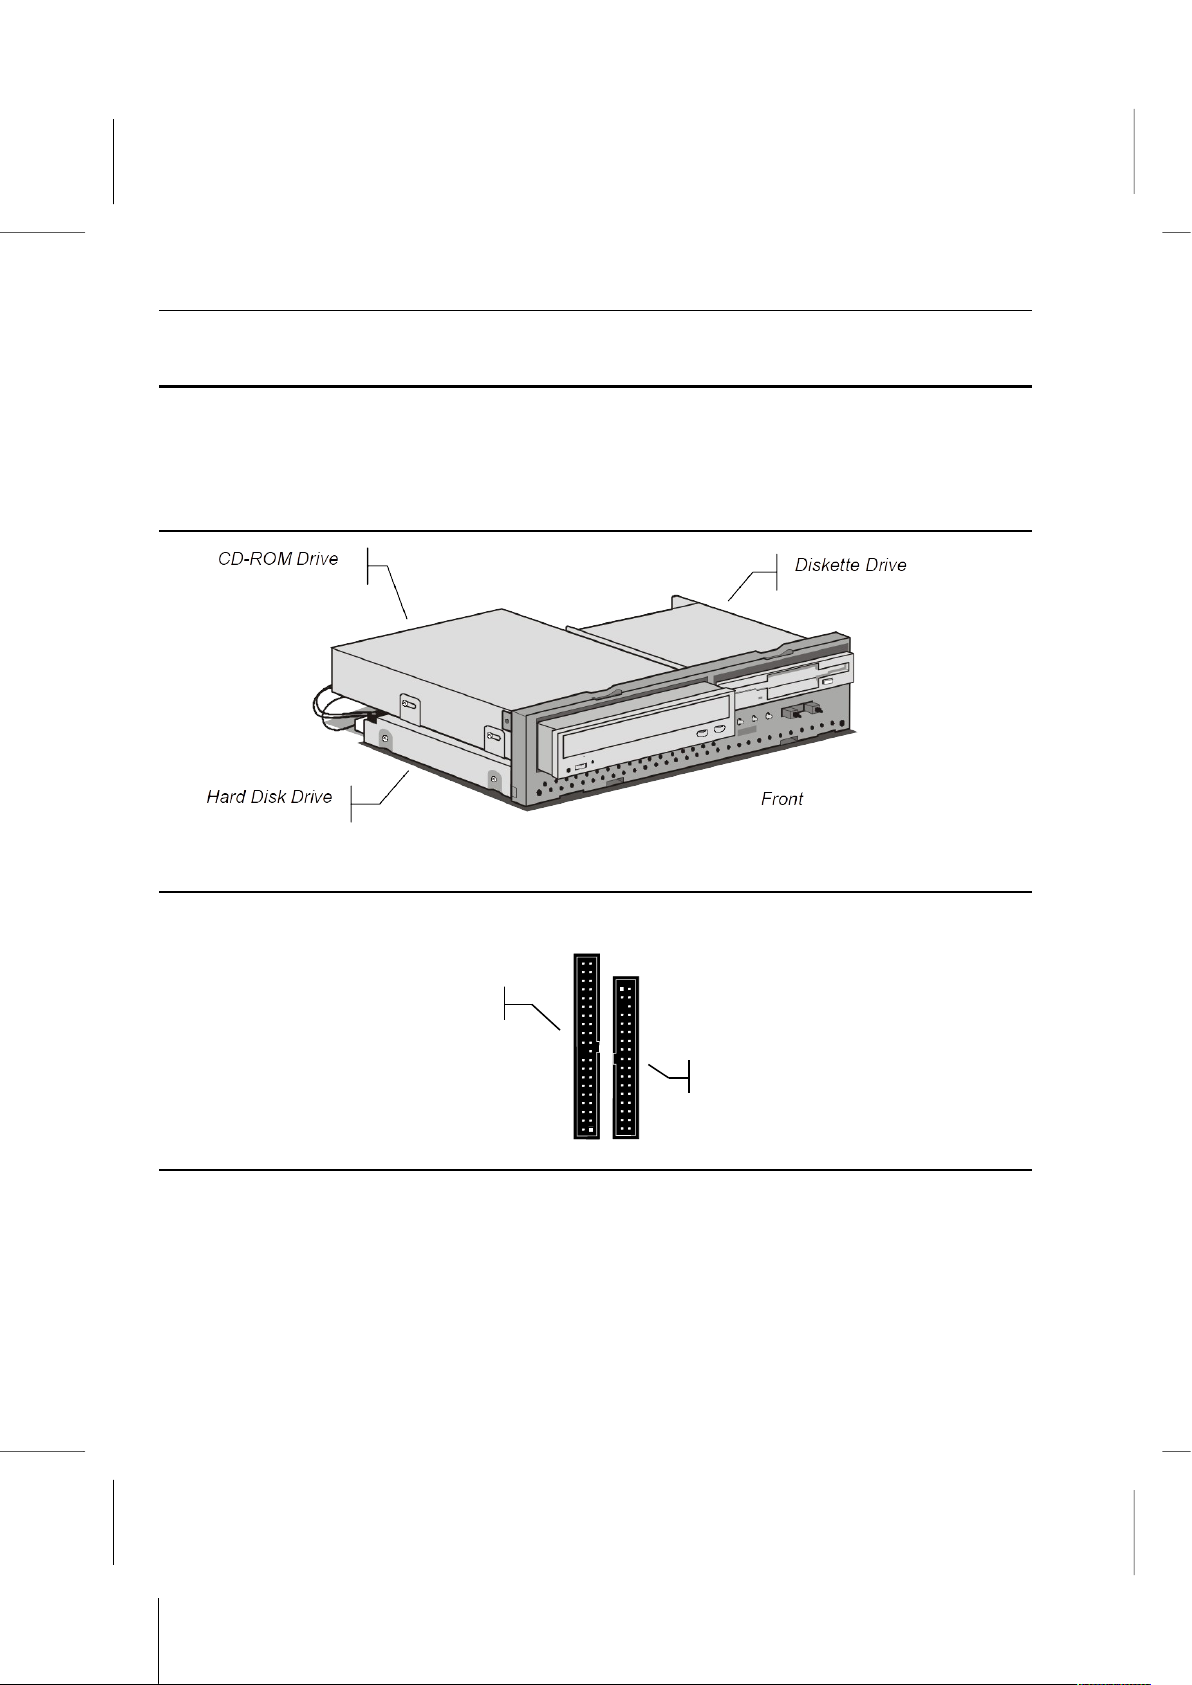
All the drives within the system are located in the drive cage. You can refer to the picture
above to see how to separate the drive cage from the chassis once the case cover is
removed.
The Drive Cage
Connectors
The connectors for the drives are located on the mainboard.
Changing the Hard Disk Drive
Locate the IDE connector on the mainboard. A single IDE cable is provided with the
mainboard. Connect the cable to the IDE connector. The cable has two connectors for
IDE devices. If you connect two devices, you must configure one device as Master, and
one device as Slave. See the documentation provided with the devices for information on
this.
Diskette Drive
IDE Drive
4 – 9
Page 47
Book PC
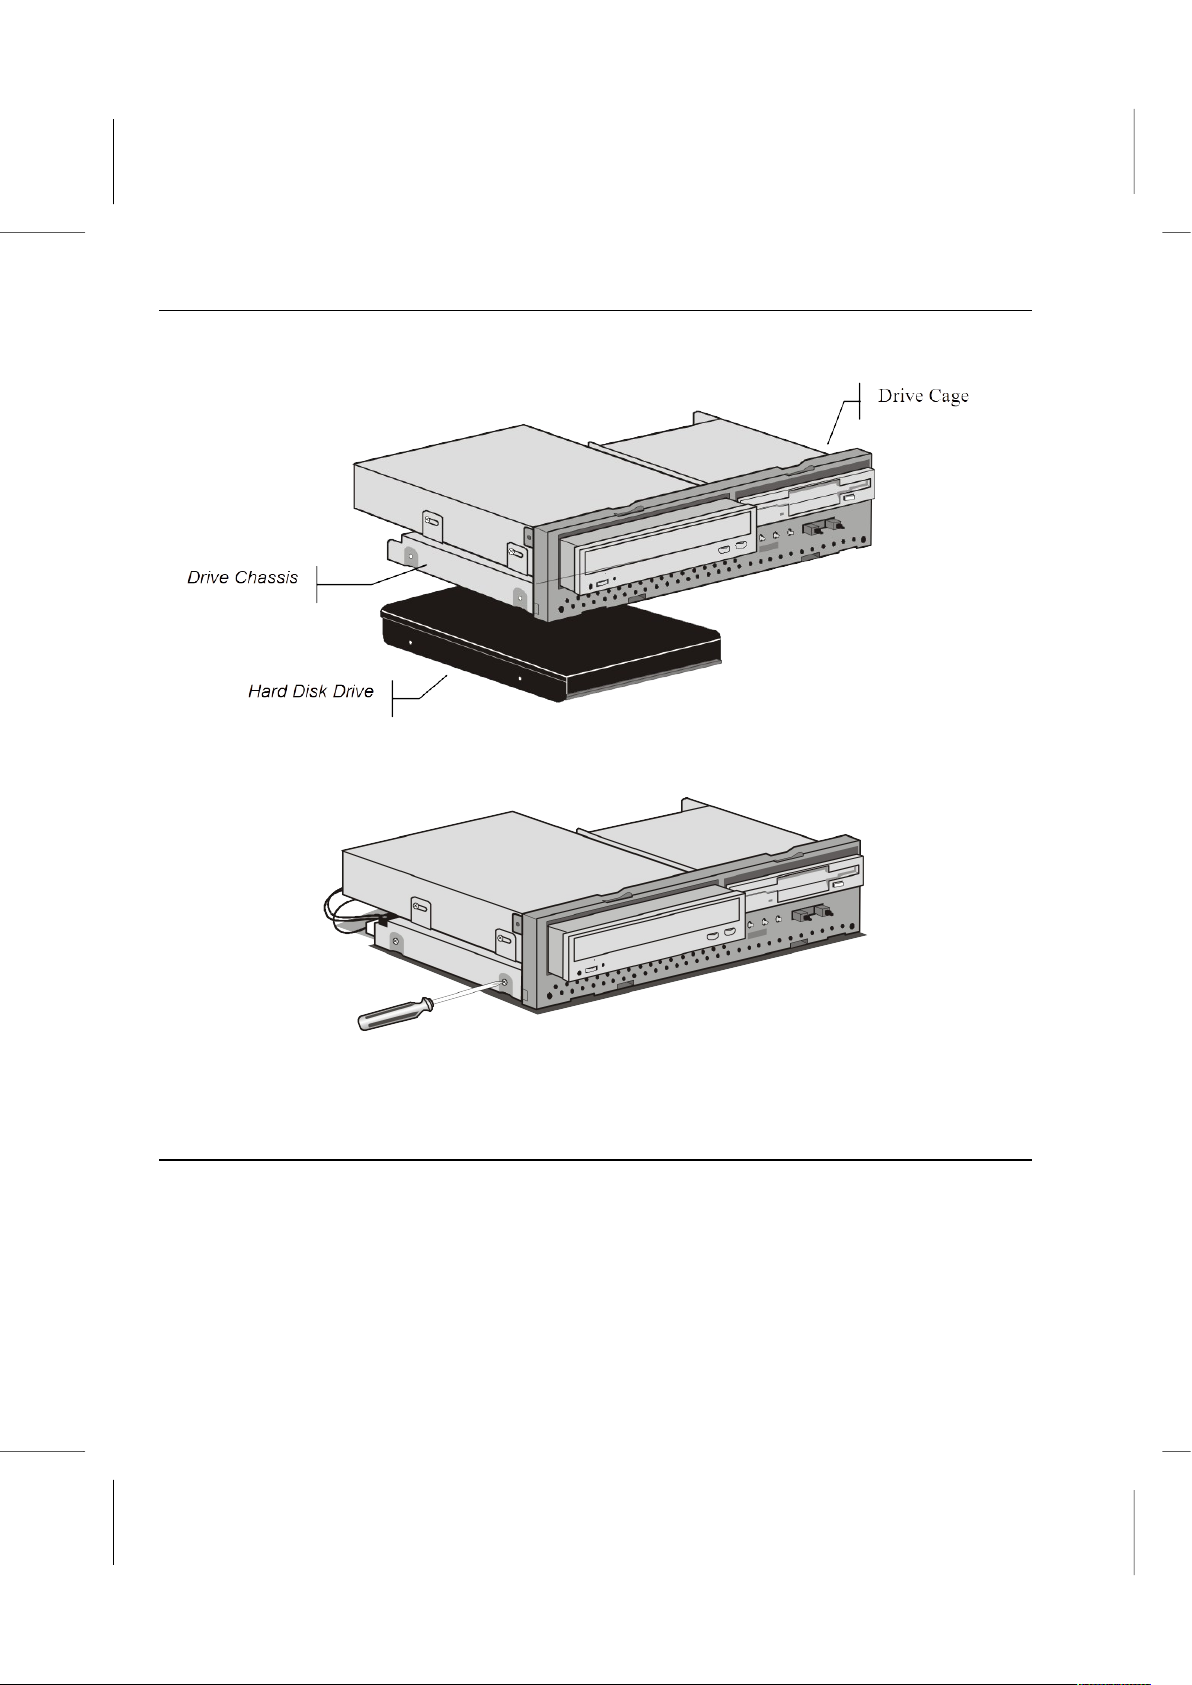
1. Place the hard disk drive in the drive chassis at the bottom side of the drive cage.
2. Using a Philips-head screwdriver and screws, secure the hard disk drive in the drive
cage.
3. Connect the IDE cable to the mainboard.
4. Connect a power supply connector to the hard disk drive.
Changing the CD-ROM/DVD Drive
Locate the IDE connector on the mainboard. A single IDE cable is provided with the
mainboard. Connect the cable to the IDE connector. The cable has two connectors for
IDE devices. If you connect two devices, you must configure one device as Master, and
one device as Slave. See the documentation provided with the devices for information on
this.
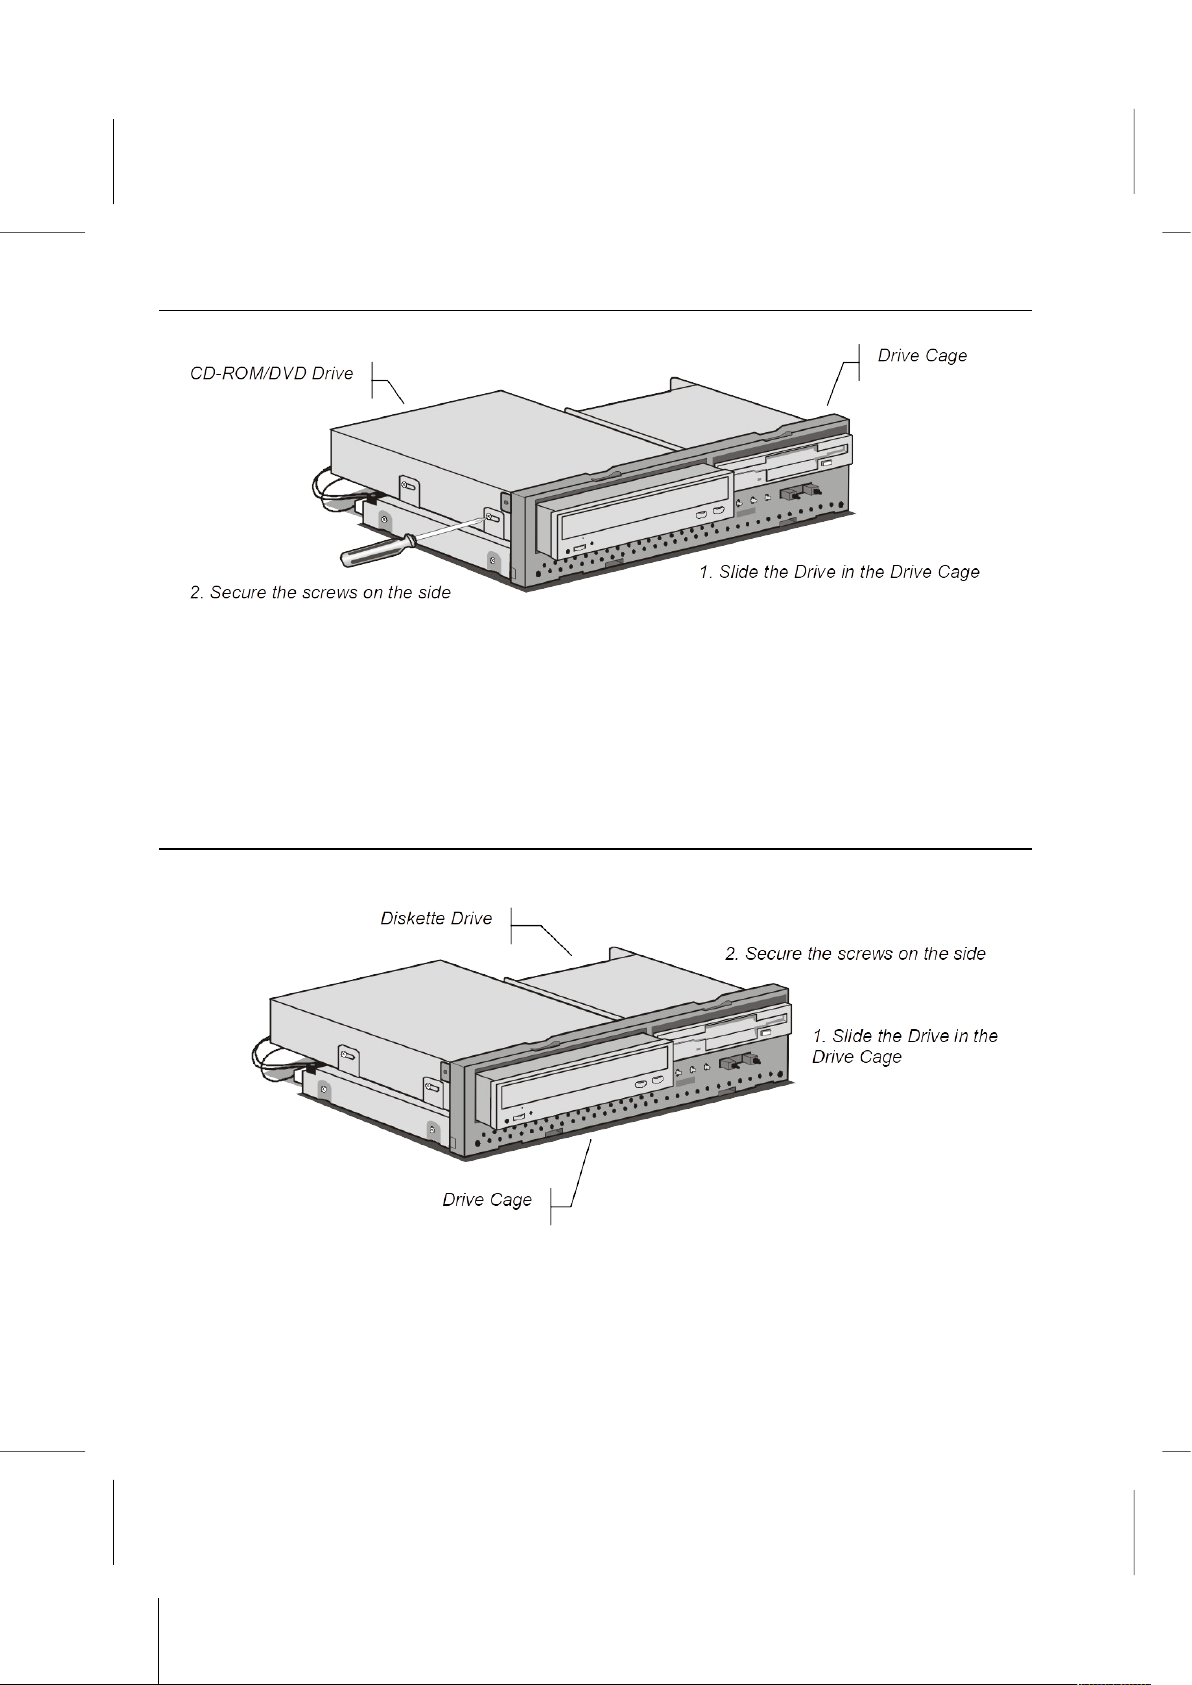
1. Place the CD-ROM/DVD drive in the drive chassis by sliding it in from the front.
4 – 10
Page 48
Going inside: Upgrading
2. Using a Philips-head screwdriver and screws, secure the drive in the drive cage.
3. Connect the IDE cable to the mainboard.
4. Connect a power supply connector to the drive.
Note: The most common setup of this system will include a CD-ROM drive, but this
slot in the drive cage can also hold alternative devices such as a DVD player.
Changing the Diskette Drive
Locate the diskette drive connector on the mainboard.
1. Place the diskette drive in the drive chassis by sliding it in from the front.
2. Using a Philips-head screwdriver and screws, secure the diskette drive in the drive
cage.
4 – 11
Page 49

Book PC
3. Connect the diskette drive connector cable to the mainboard.
4. Connect a power supply connector to the diskette drive.
4 – 12
Page 50

Chapter 5
Chapter 5
Peripheral Device Setup
Peripheral Device Setup
Page 51
Book PC
This chapter provides information on how to setup the peripheral device.
Setup the Television as System Console
Note: Selecting TV to be the display equipment is an optional choice.
How to install your system with television console?
Selecting your television to NTSC or PAL mode.
Step 1: Make sure your system’s power is off.
Step 2: Connecting video cable between the Television and Book PC.
Note: 1. The video cable is an optional accessory.
2. S-video cable is recommended to use between the Television and Book PC to
get better video quality.
Step 3: Power-on your system.
Step 4: Press “DEL” key to enter BIOS SETUP mode, while the “Press DEL to enter
SETUP” message is displayed on the screen.
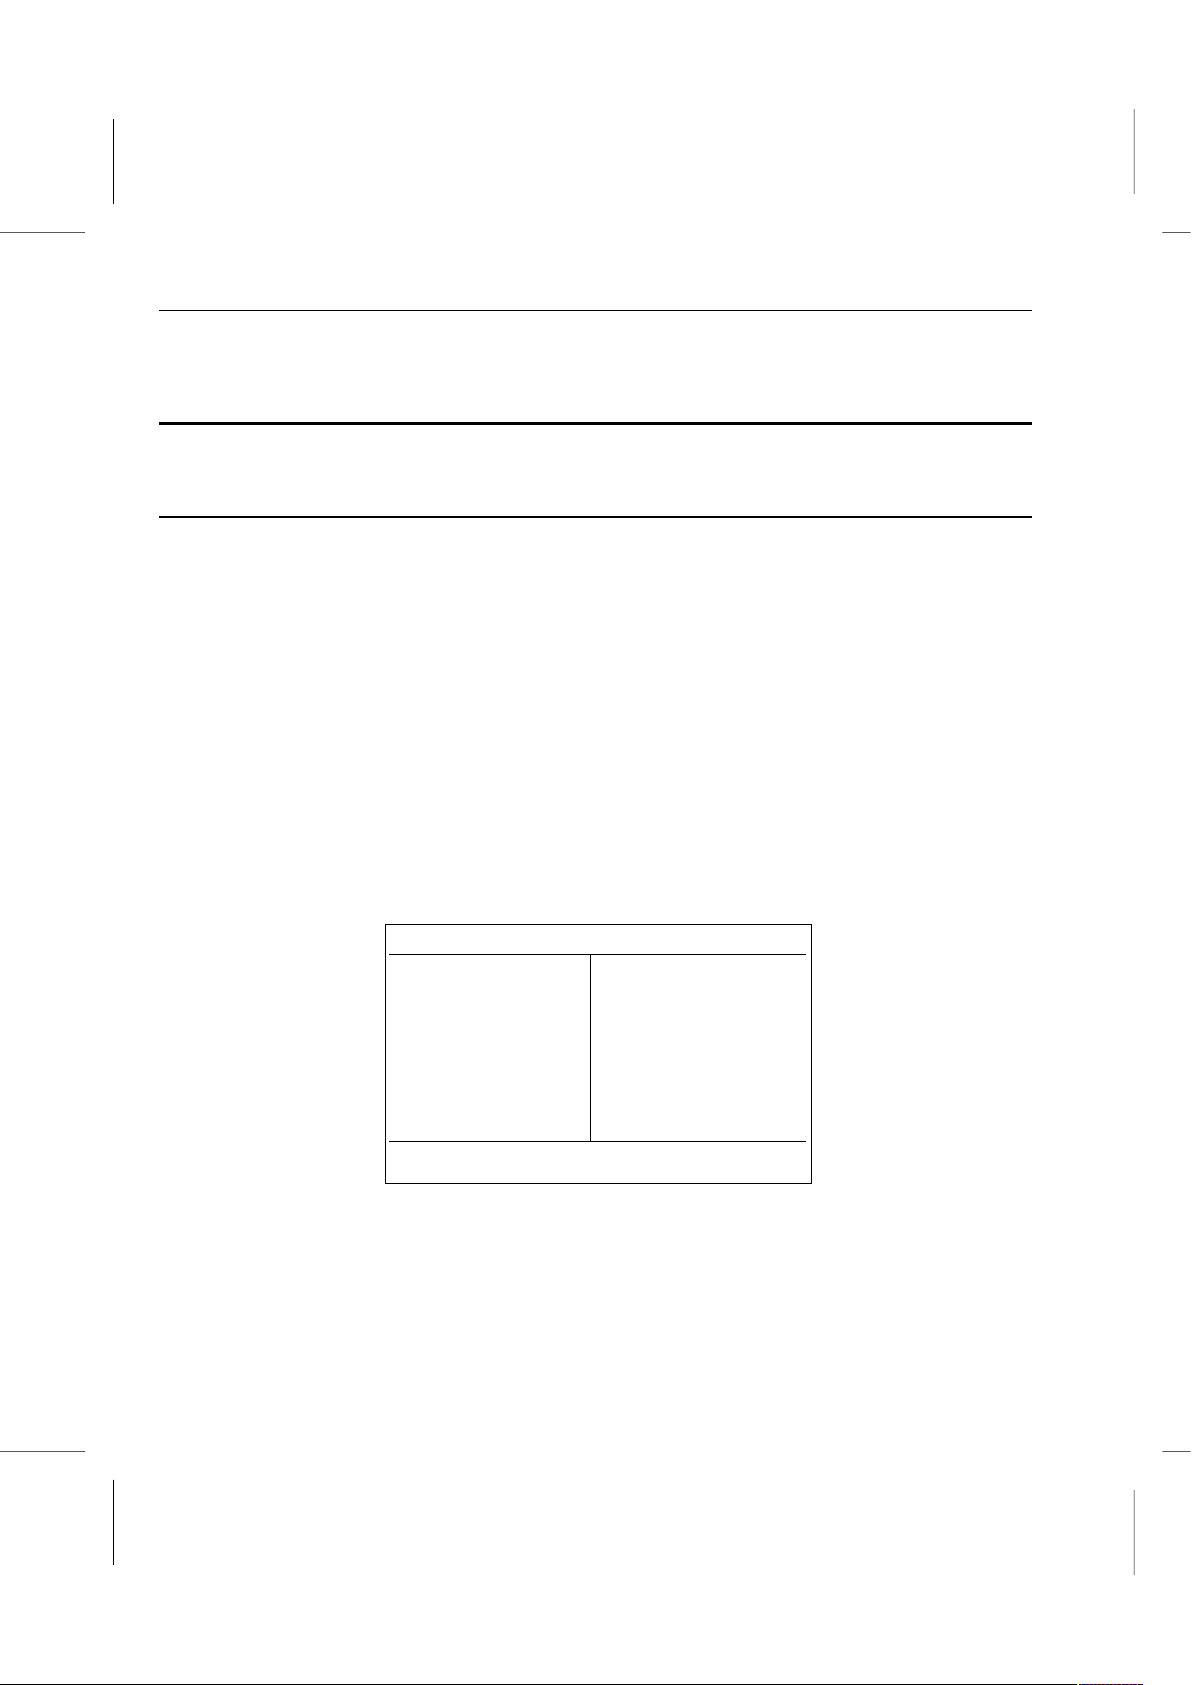
Step 5: Move the cursor to the item, “Integrated Peripherals”, then press “Enter” key to
select the “Integrated Peripherals” setup.
CMOS Setup Utility – Copyright ( C ) 1984-1999 Award Software
Standard CMOS Features CPU Frequency Control
Advanced BIOS Features Load Fail-Safe Defaults
Advanced Chipset Features Load Optimized Defaults
Integrated Peripherals Set Supervisor Password
Power Management Setup Set User Password
PnP/PCI Configurations Save & Exit Setup
PC Health Status Exit Without Saving
5 – 2
Page 52
How to install your system with SCART TV console?
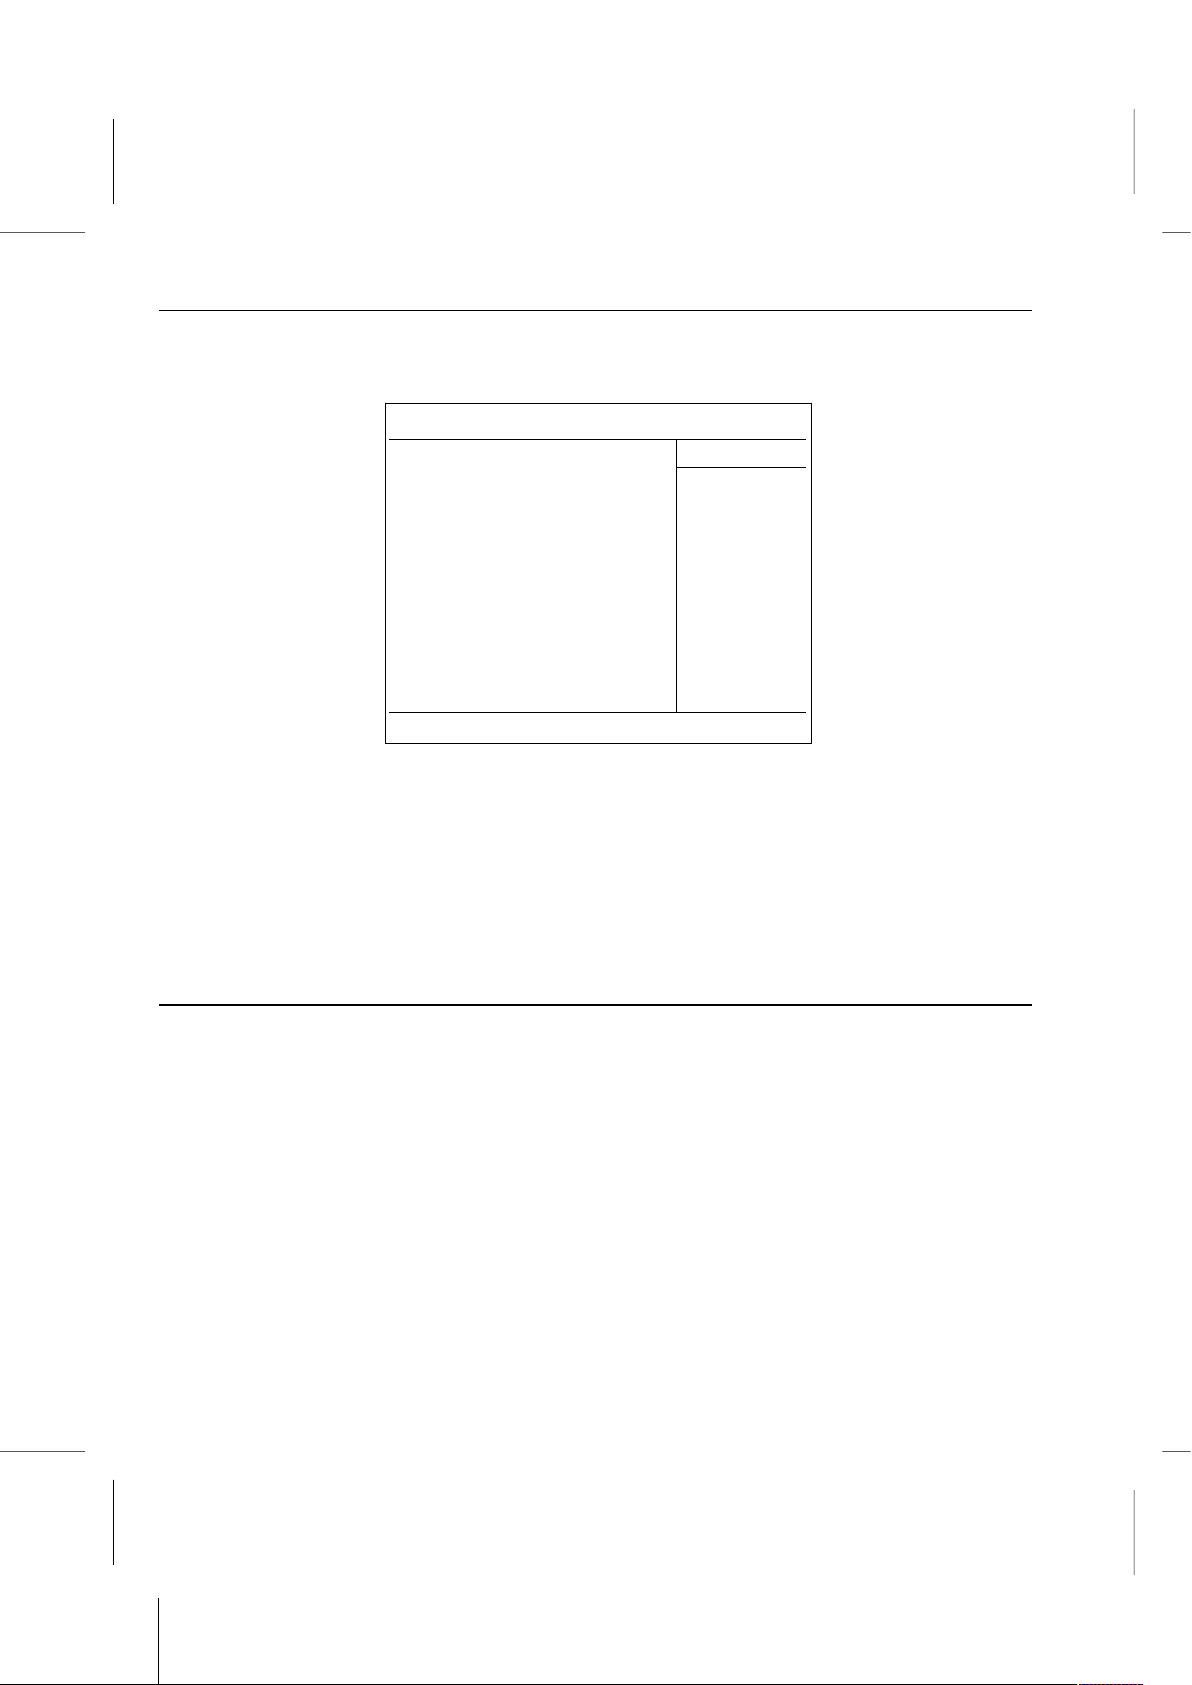
Step 6: In “TV System Selection”, select the television mode to NTSC or PAL depended
on your TV.
CMOS Setup Utility – Copyright ( C ) 1984-1999 Award Software
Integrated Peripherals
OnBoard IDE Channel Enabled Item Help
IDE Master PIO Auto
IDE Slave PIO Auto Menu Level
IDE Master UDMA Auto
IDE Slave UDMA Auto
USB Controller Enabled
USB Keyboard Support Disabled
Onboard Audio/Modem Chip Enabled
Onboard Lan Chip Disabled
IDE HDD Block Mode Enabled
POWER ON Function Hot Key
KB Power ON Password Enter
Hot Key Power ON Ctrl-F1
TV System Selection NTSC
Onboard FDC Controller Enabled
Onboard IR Port Select Disabled
IR Mode Select IrDA
IR Duplex Mode Half
Onboard Parallel Port 3BC/IRQ7
Note: 1. If you do not know which system your TV provides, please check with your TV
supplier.
2. If you use the SCART TV, select the television mode to PAL.
Step 7: Press “ECS” key to return the BIOS SETUP Main menu.
Step 8: Press “F10” key to save and exit the setup program.
How to adjust the best video quality of your TV Output?
This section explains how to adjust the computer’s display settings under Microsoft
Windows to optimize them for use with a television as the display device.
Follow the procedure outlined here to make the necessary settings.
I. Set the display font to the largest size.
Please follow this procedure to adjust the display font size.
5 – 3
Page 53
Book PC
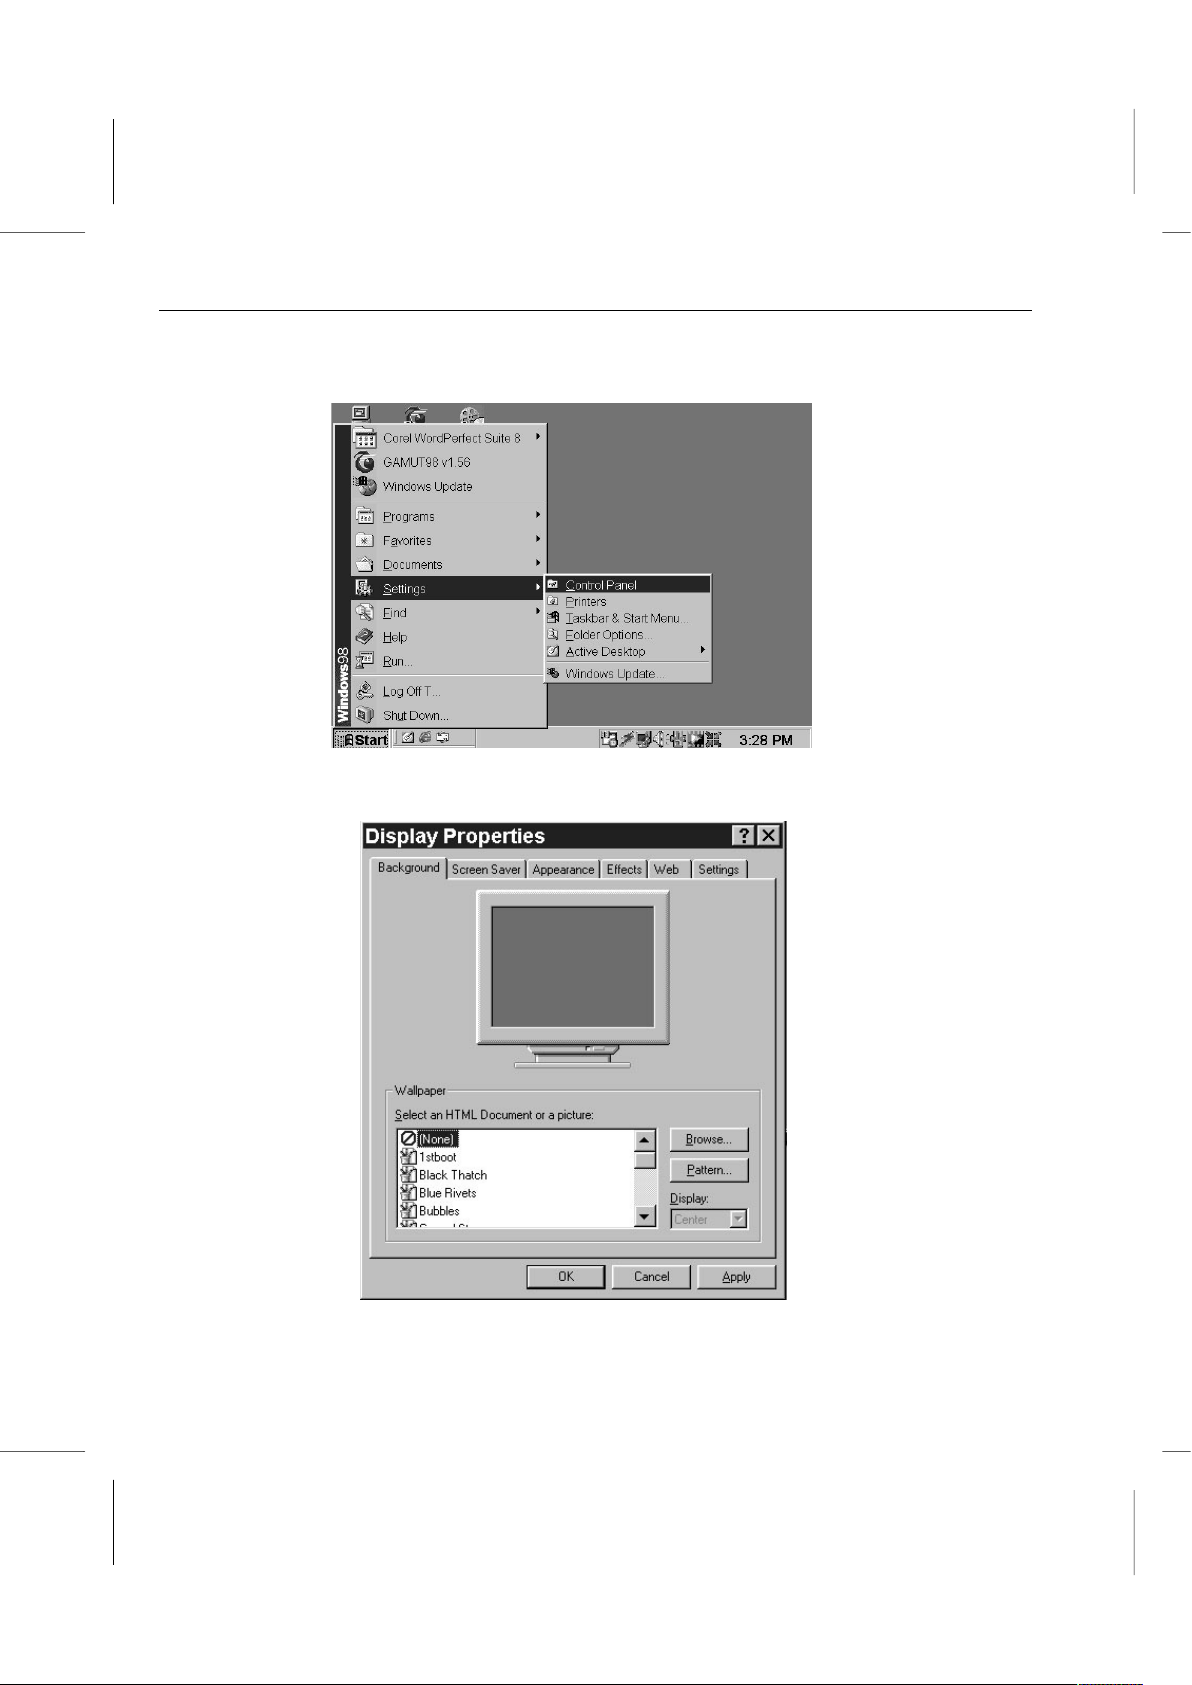
1. Open the Control Panel. Click on the Start button and then point to Settings and click
on the Control Panel item in the menu that appears.
2. Find the Display item in the Control Panel window and double-click on it to open it.
The Display Properties control panel will appear.
5 – 4
Page 54
How to install your system with SCART TV console?
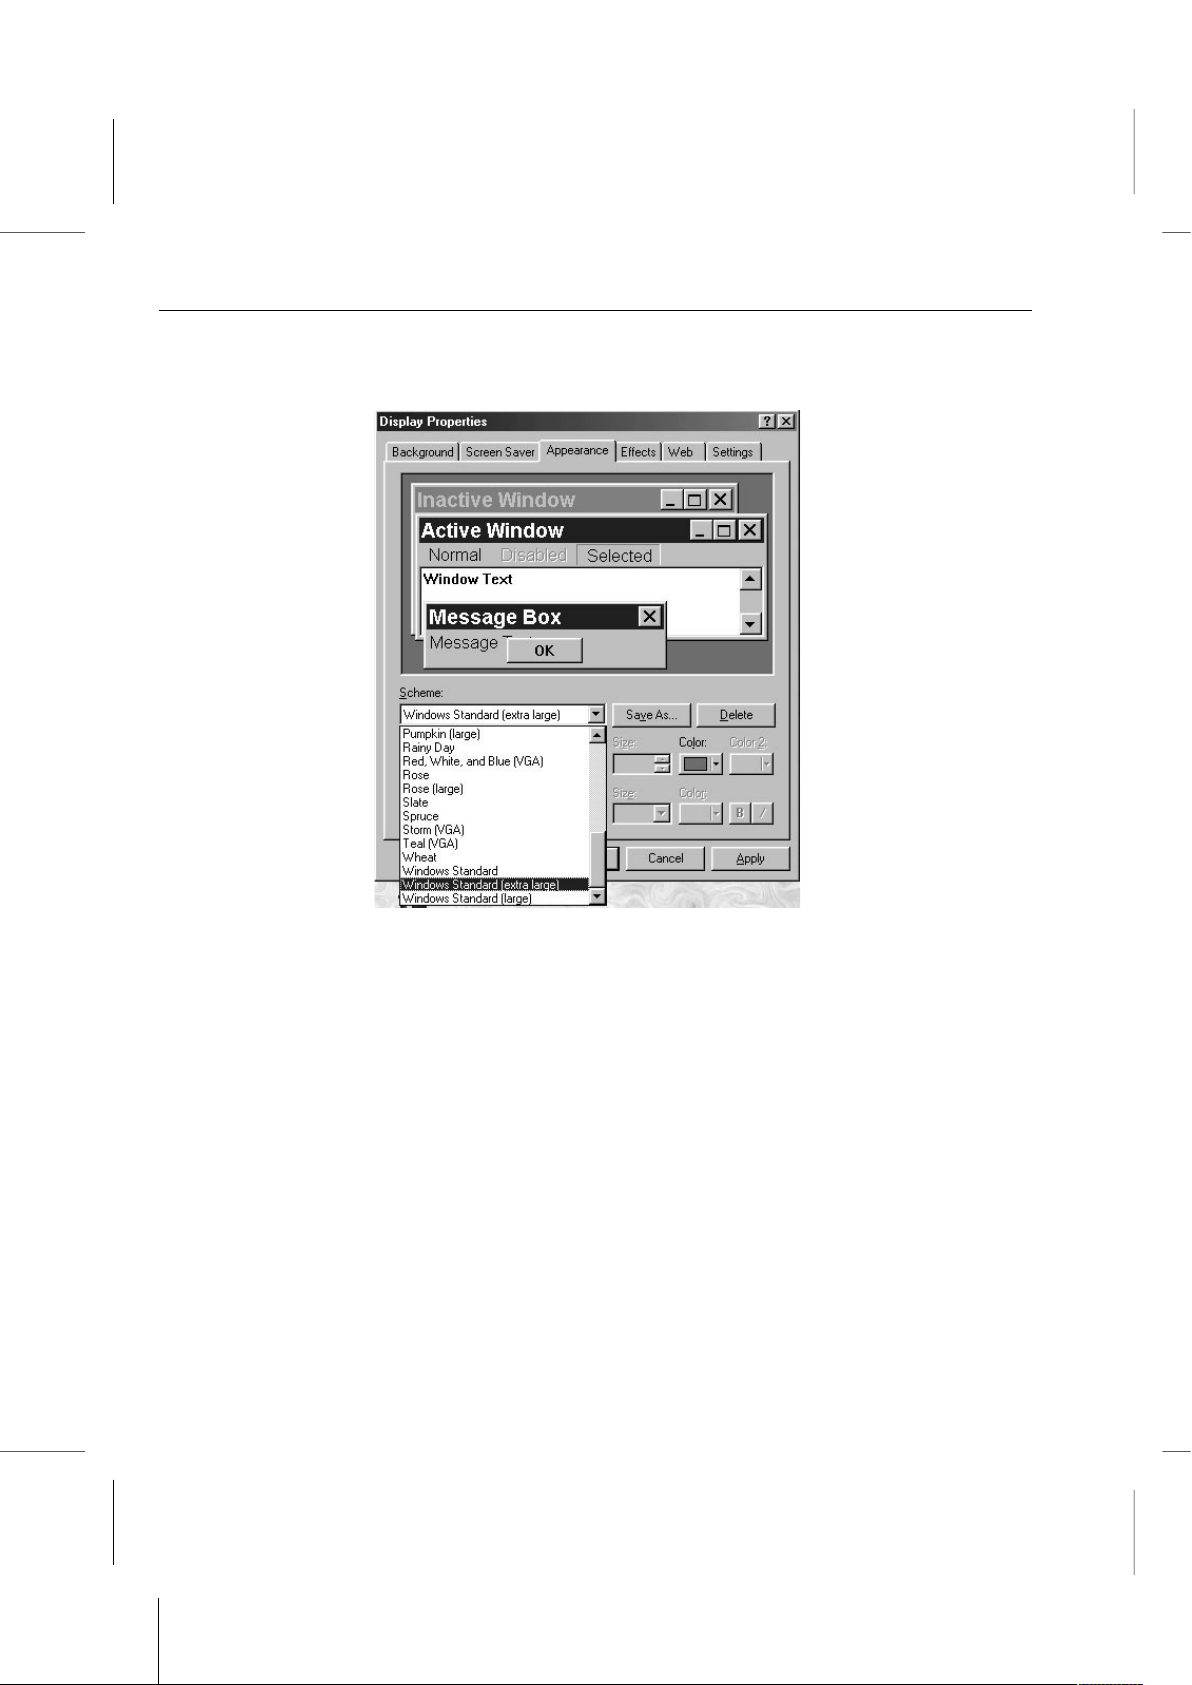
3. Click on the Appearance tab to bring it to the front.
4. Change the appearance Scheme setting to Windows Standard (extra large). Click
on the Scheme scroll arrow to display the Scheme list and scroll down to the setting
and click on it.
5. Click on the Apply button to apply the new appearance setting. Leave the Display
Properties window open and proceed to the next step.
5 – 5
Page 55
Book PC
II. Set TV as the display device
Please follow this procedure to set the display device.
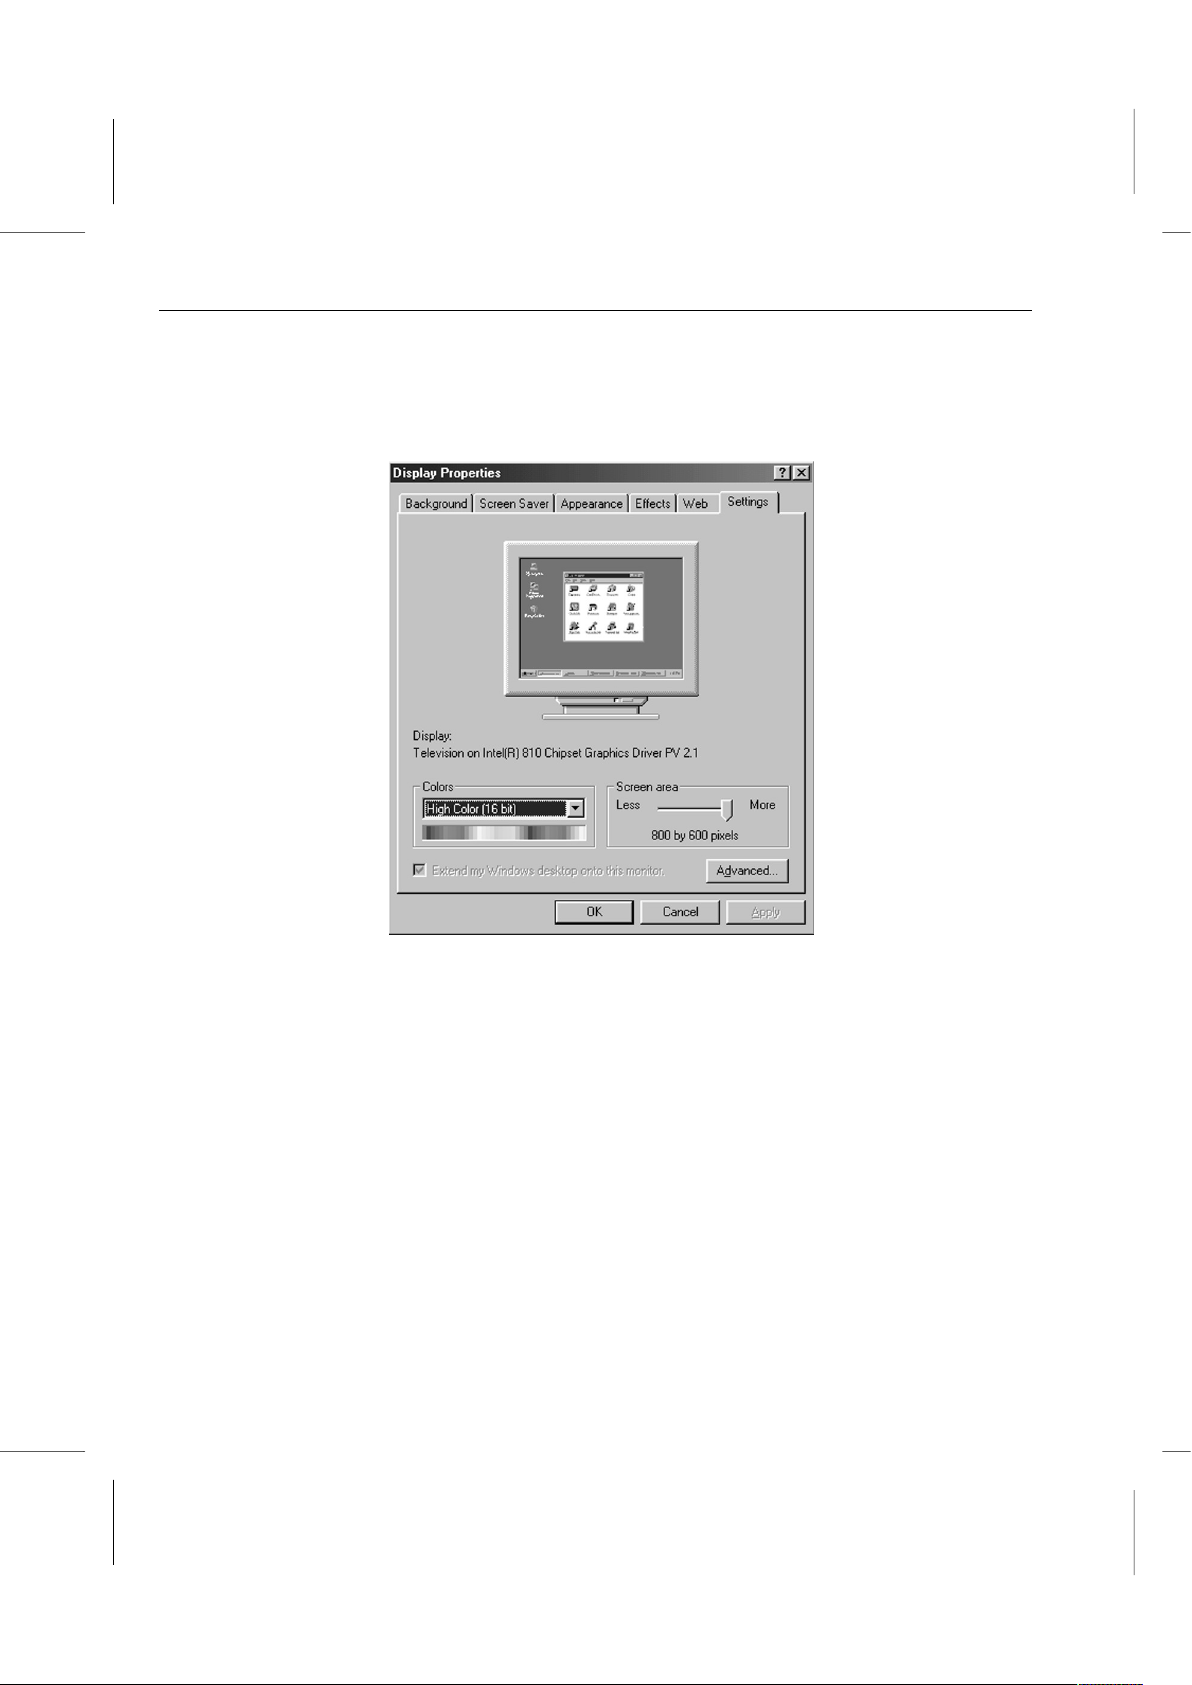
1. Click on the Settings tab in the Display Properties window to bring it to the front.
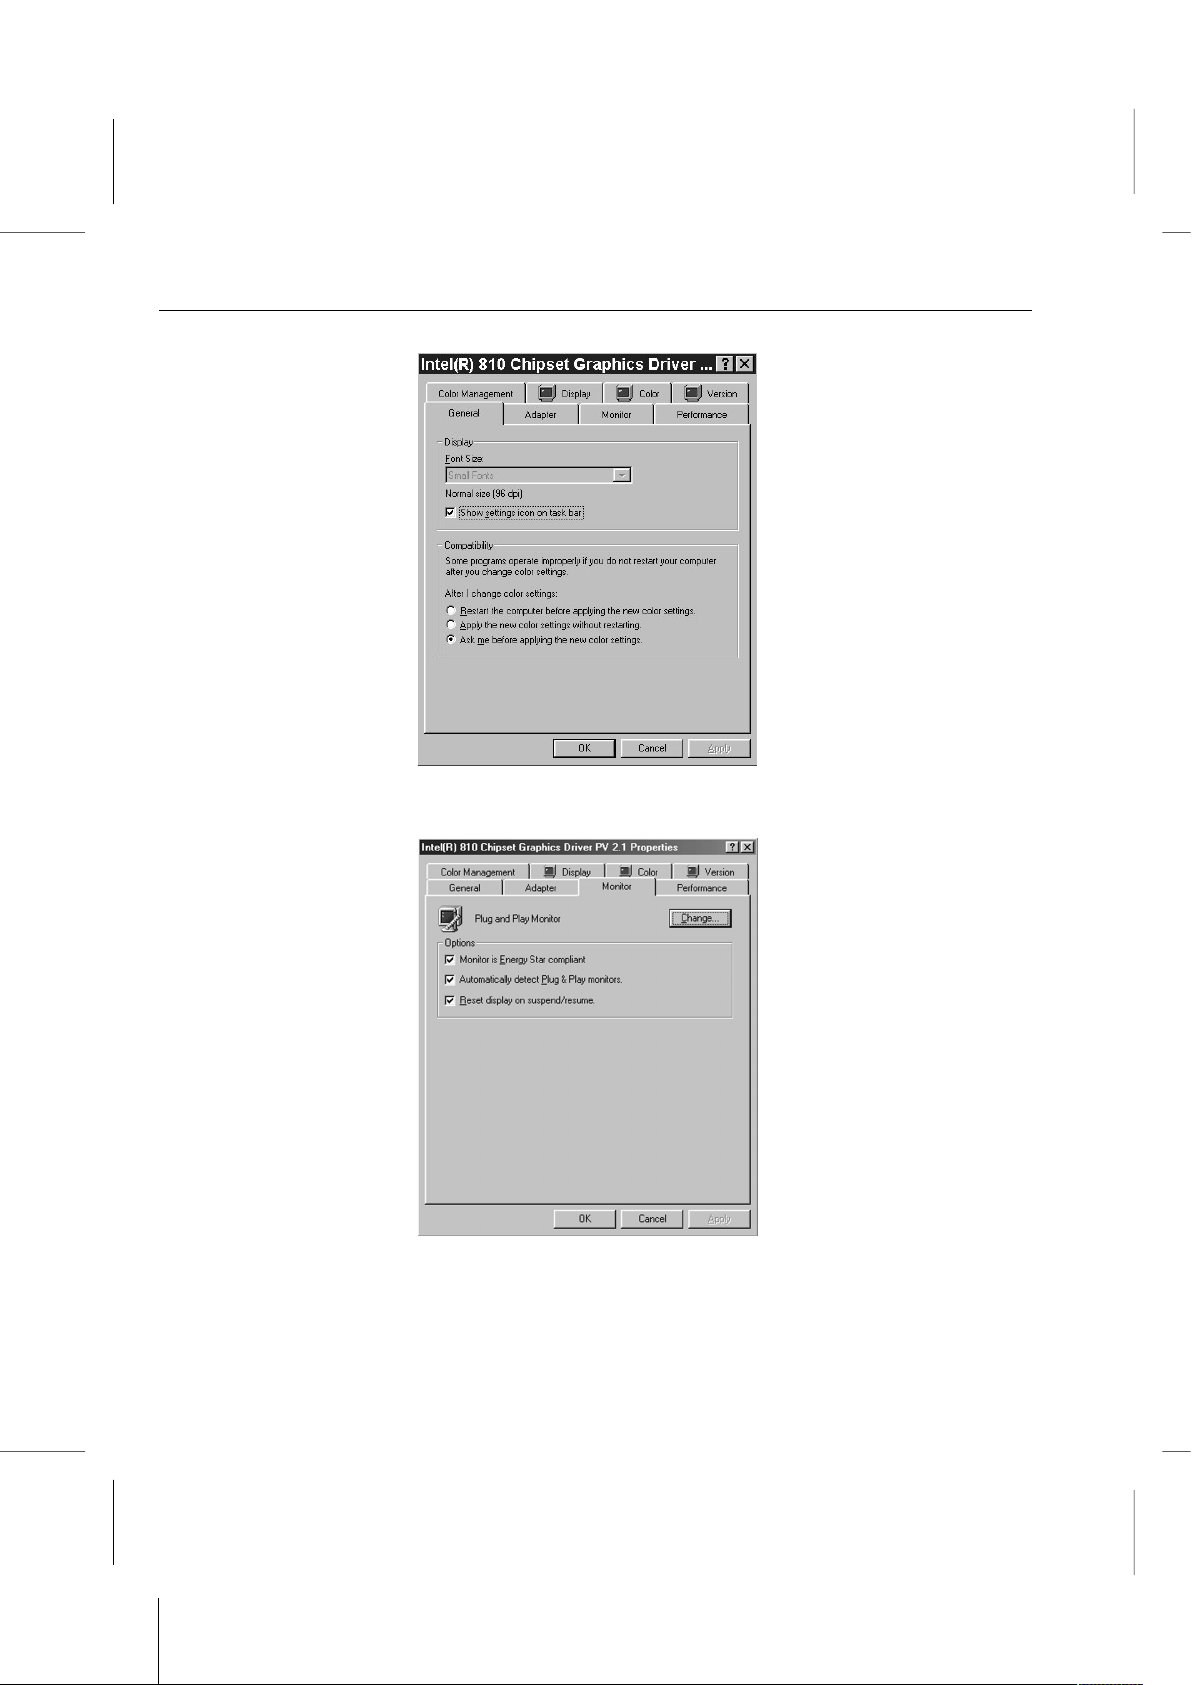
2. Click on the Advanced button to bring up the Driver Properties window. The
General tab will be at the front. The Font Size setting should be set to Large Fonts
for 800x600 screen resolution. If you will use 640x480 resolution, set the font size to
Small Fonts.
5 – 6
Page 56
How to install your system with SCART TV console?
3. Click on the Monitors tab to bring it to the front. Click on the Change button.
5 – 7
Page 57
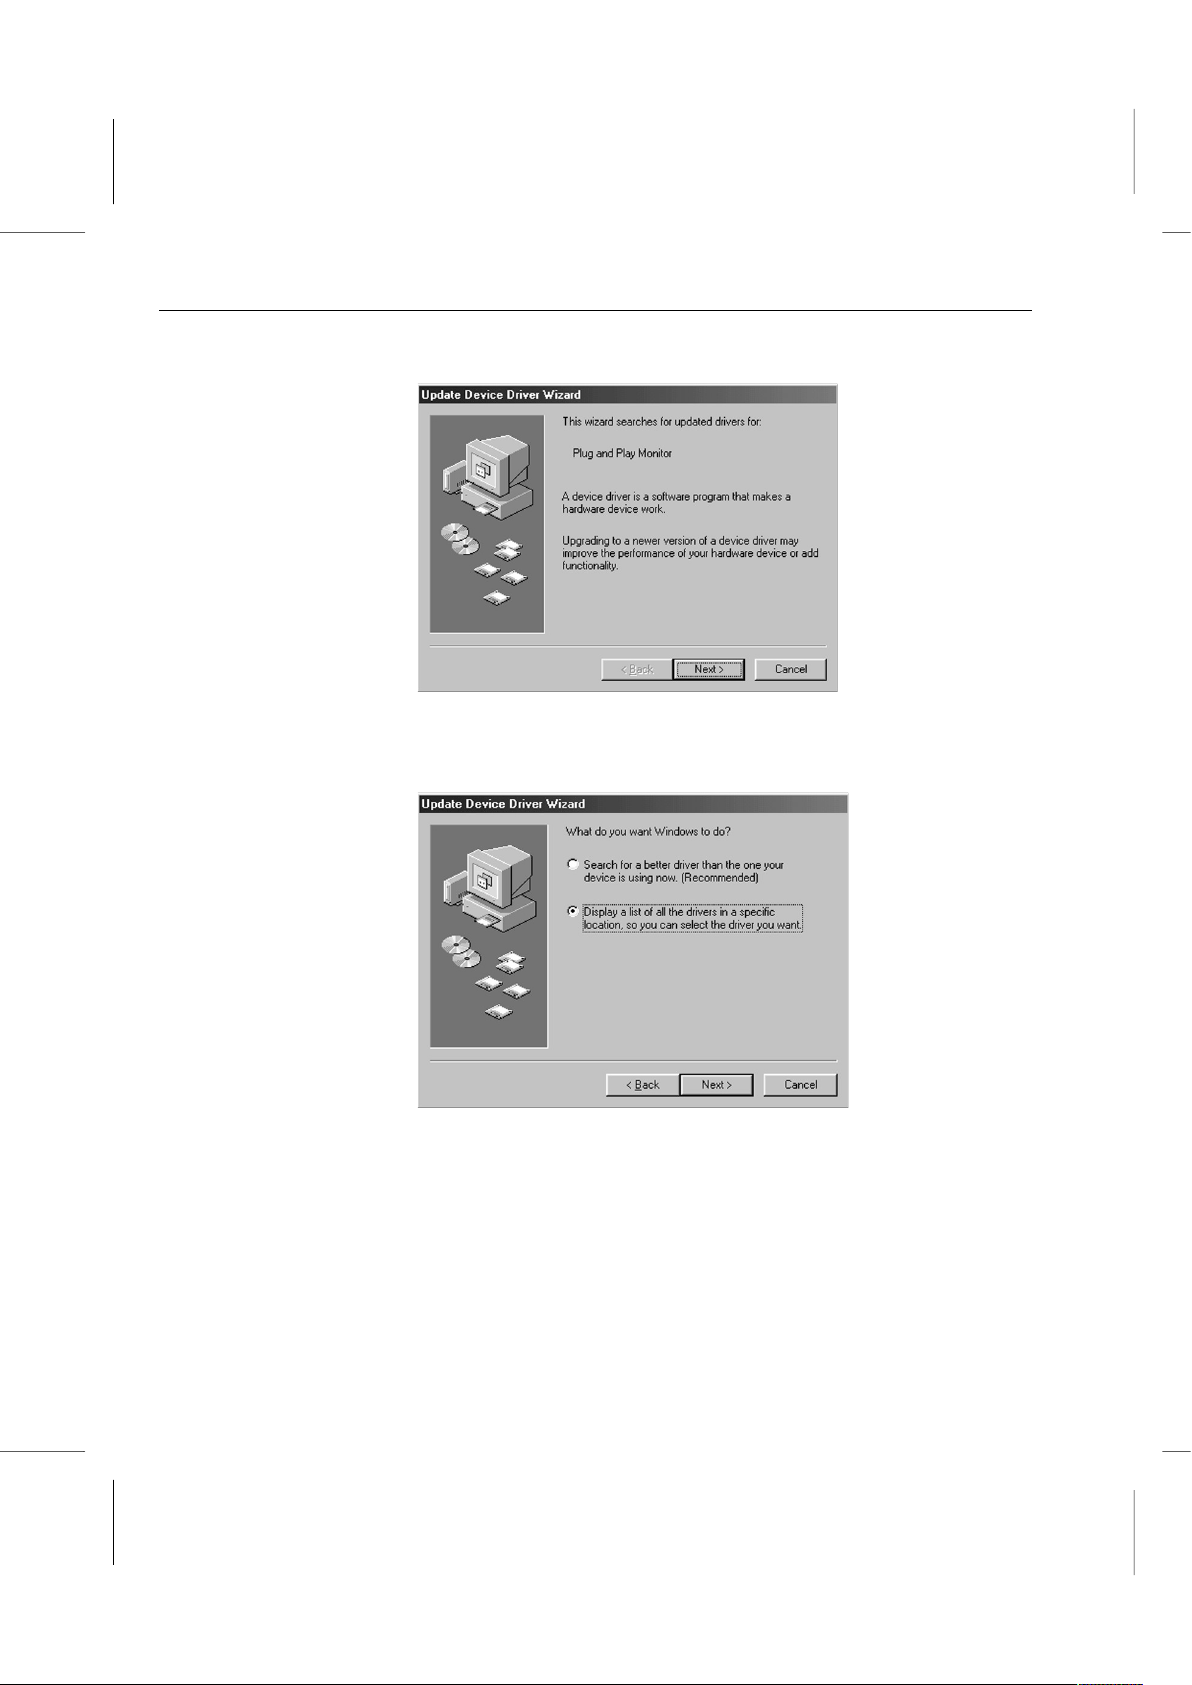
Book PC
4. The Update Driver Wizard window will appear. Click on the Next button to proceed.
5. In the window that appears, select the item to display a driver list. Click on the radio
button to its left to select it. A black dot will appear in the circle. Click the Next button
to proceed to the next step.
6. Click on the Next button again to skip to the next window.
5 – 8
Page 58
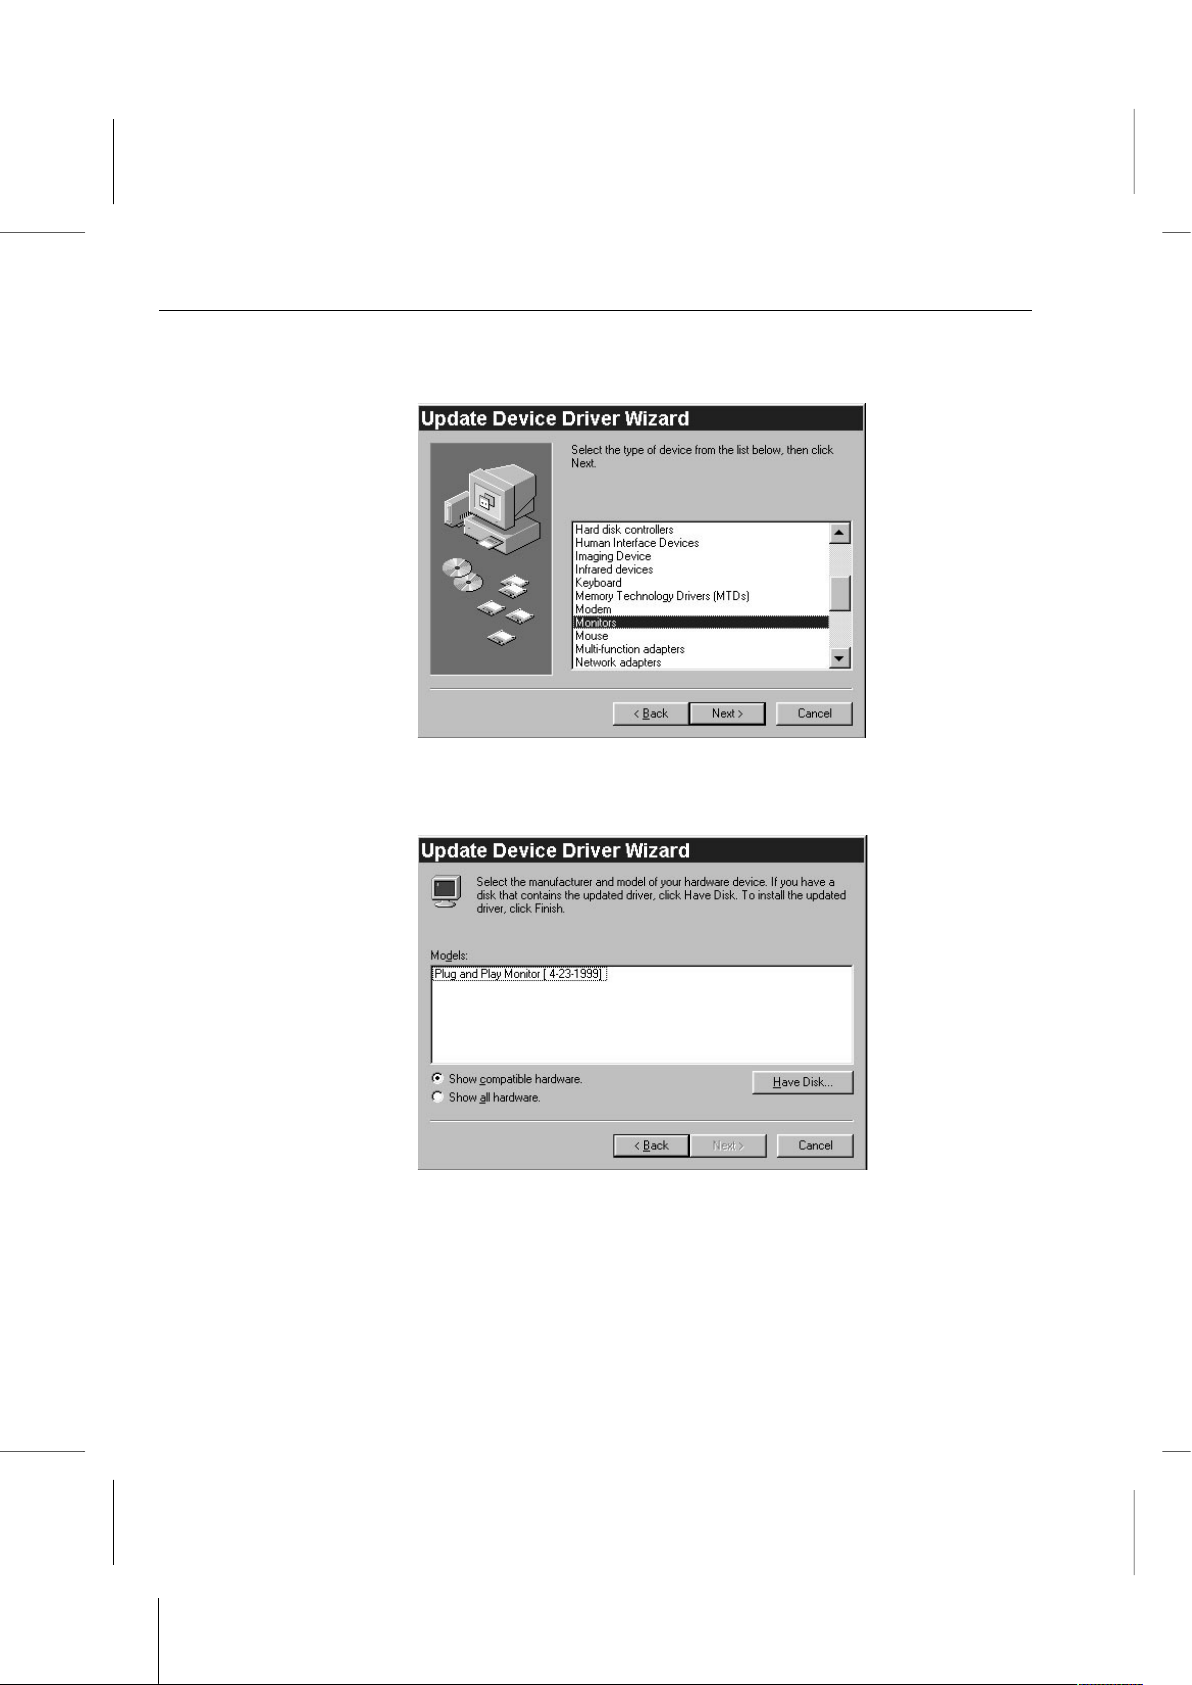
How to install your system with SCART TV console?
7. If the hardware list appears, scroll down the hardware list, select the Monitors item
by clicking on it and then click on the Next button to proceed.
If the window below appears, click on the Show all hardware radio button to select
it.
5 – 9
Page 59
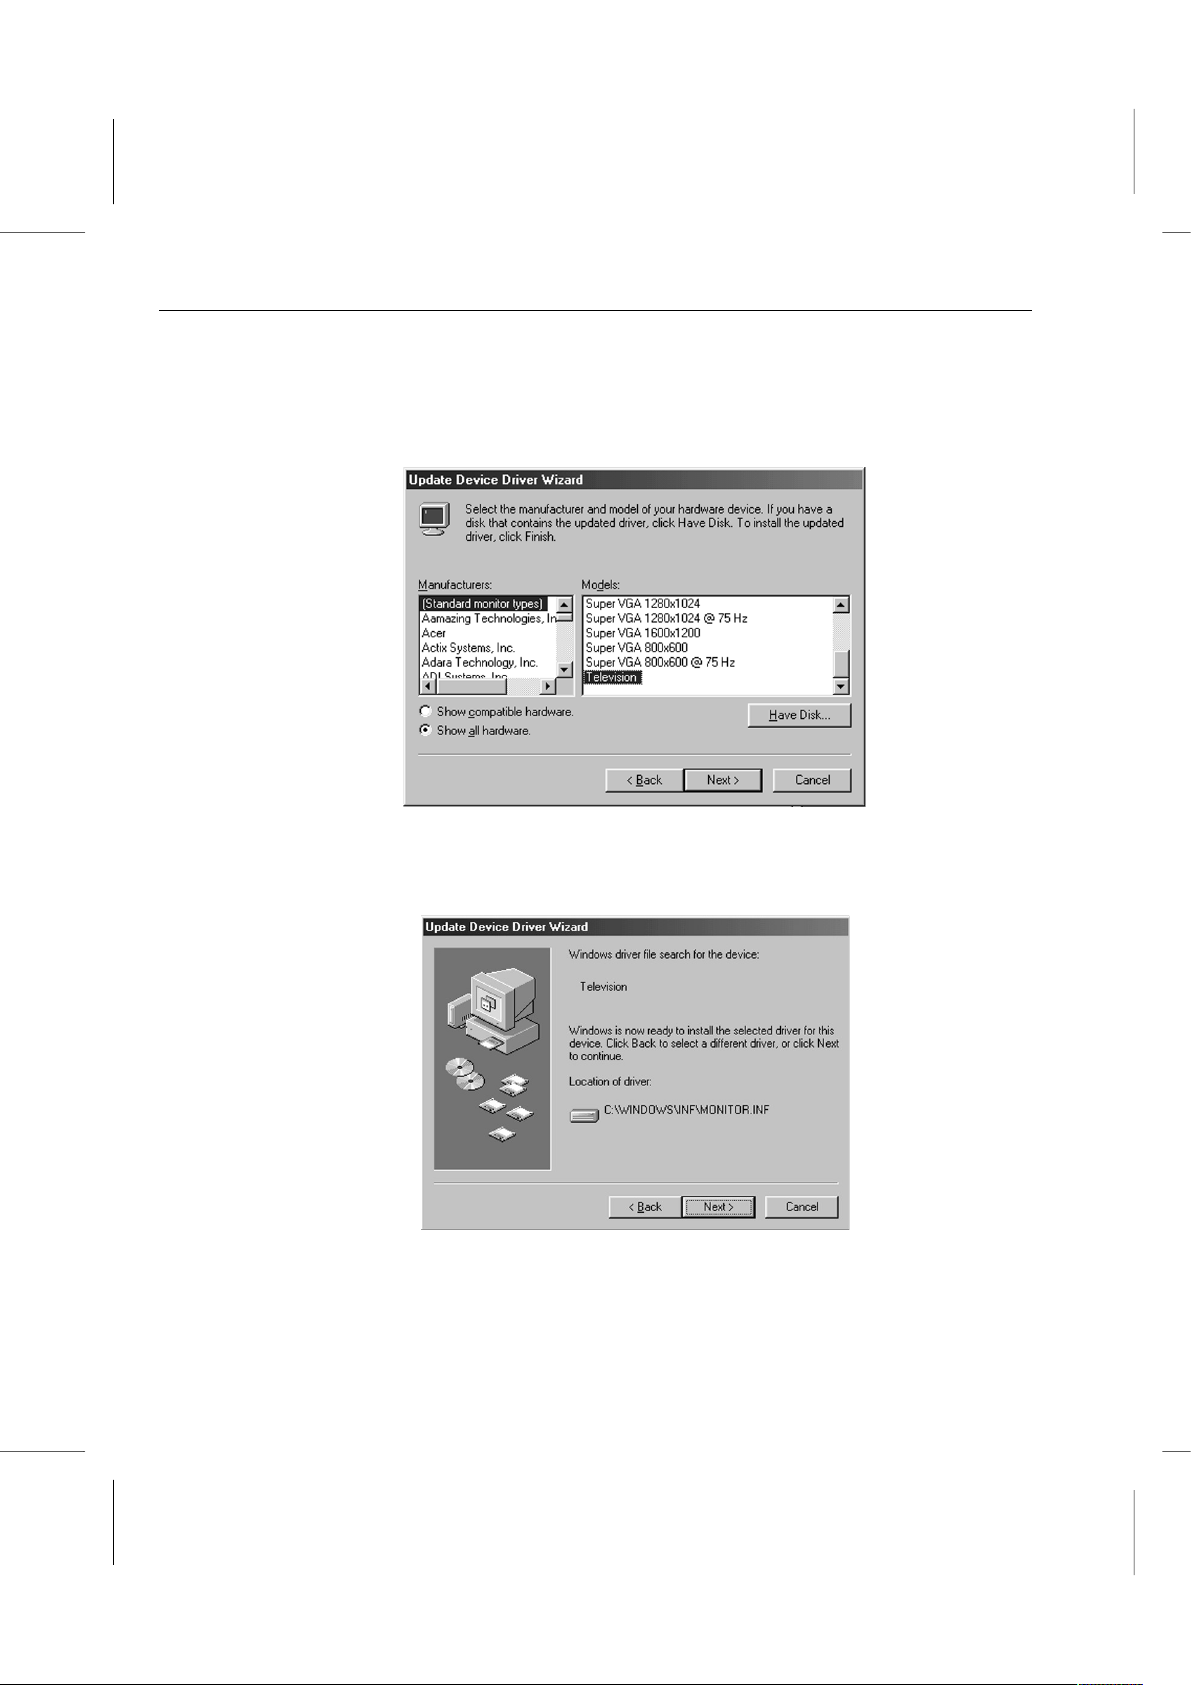
Book PC
8. The window will display a list of display hardware by manufacturer and model. Click
on Standard monitor types in the Manufacturers list and then click on Television or
Generic Television (varies by OS version) in the Models list. Click on the Next
button to proceed.
9. When the next window appears, click on the Next button to confirm the configuration
created by the Wizard.
5 – 10
Page 60
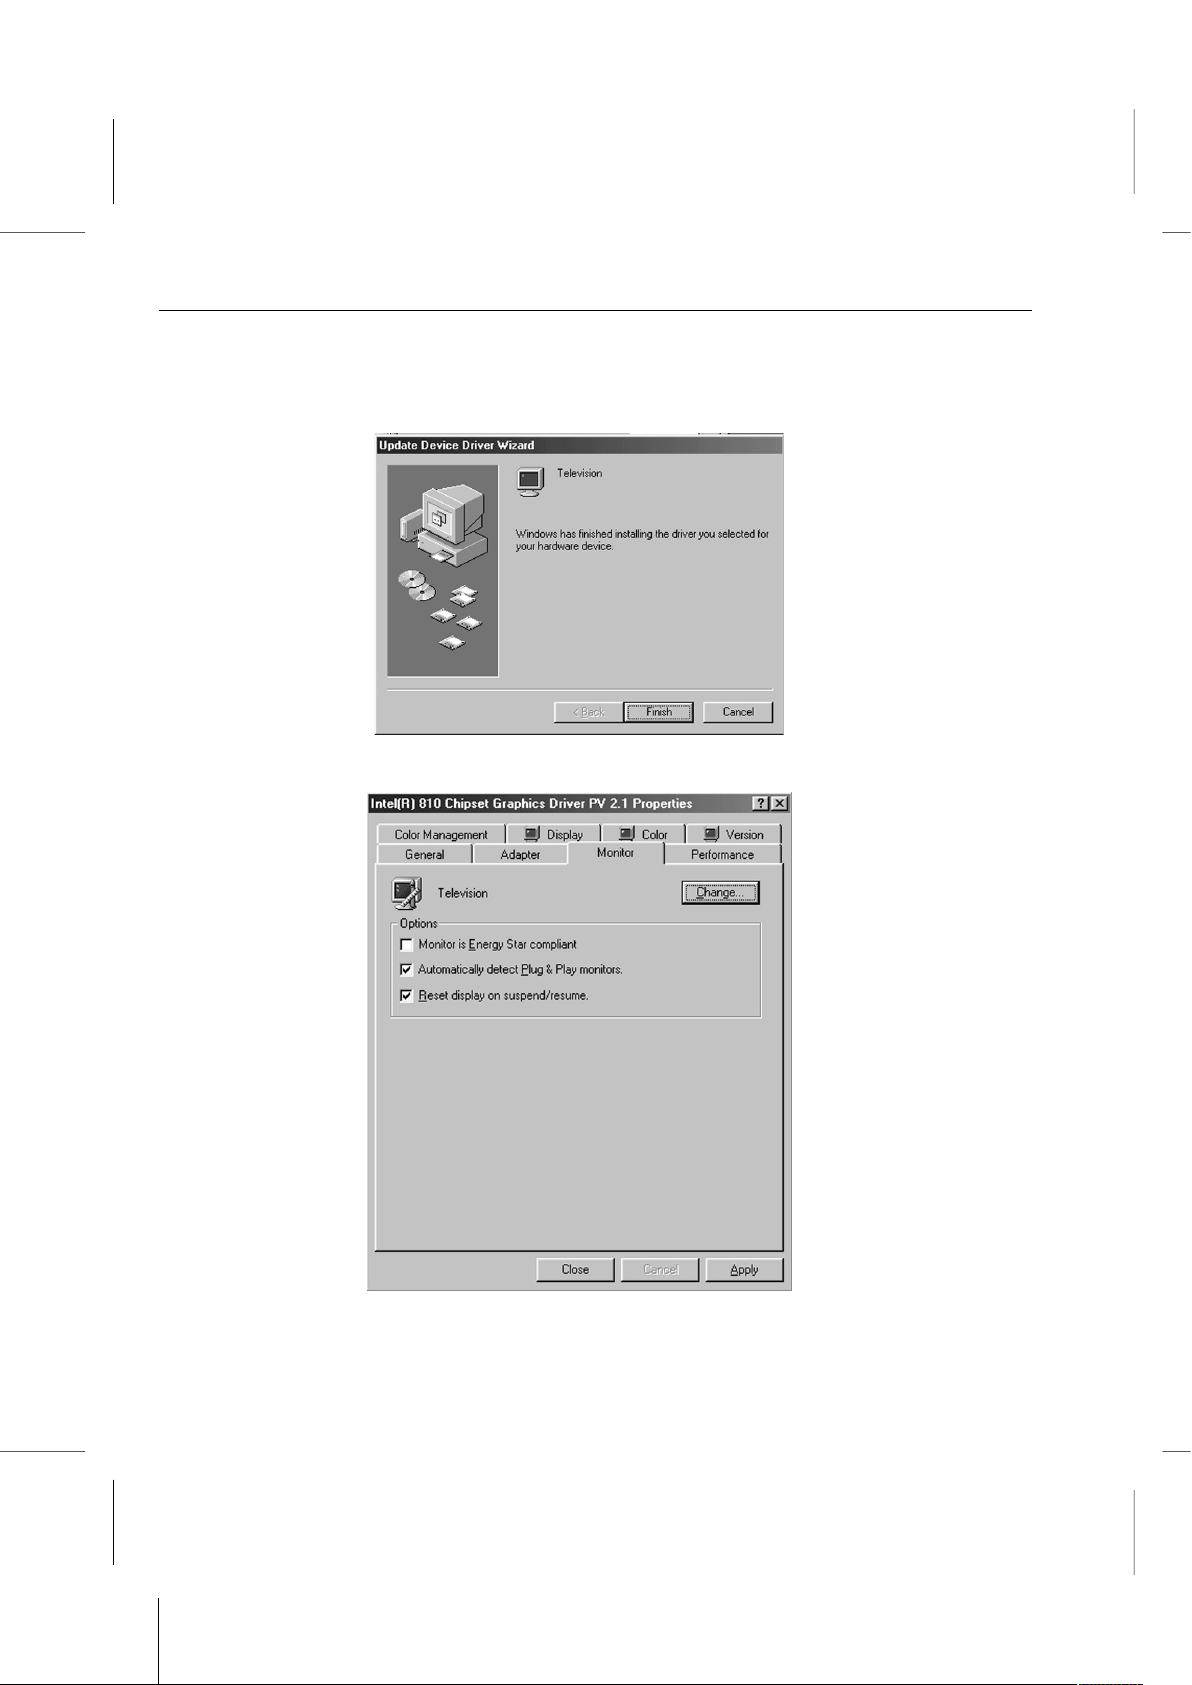
How to install your system with SCART TV console?
10. Click on the Finish button in the next window to complete configuring TV as the
display device. The Wizard window will close and return to the driver properties
window with the Monitor tab displayed.
11. Click on the Apply button at the lower right to apply the new setting.
III. Adjusting TV Out Settings Under Windows
5 – 11
Page 61
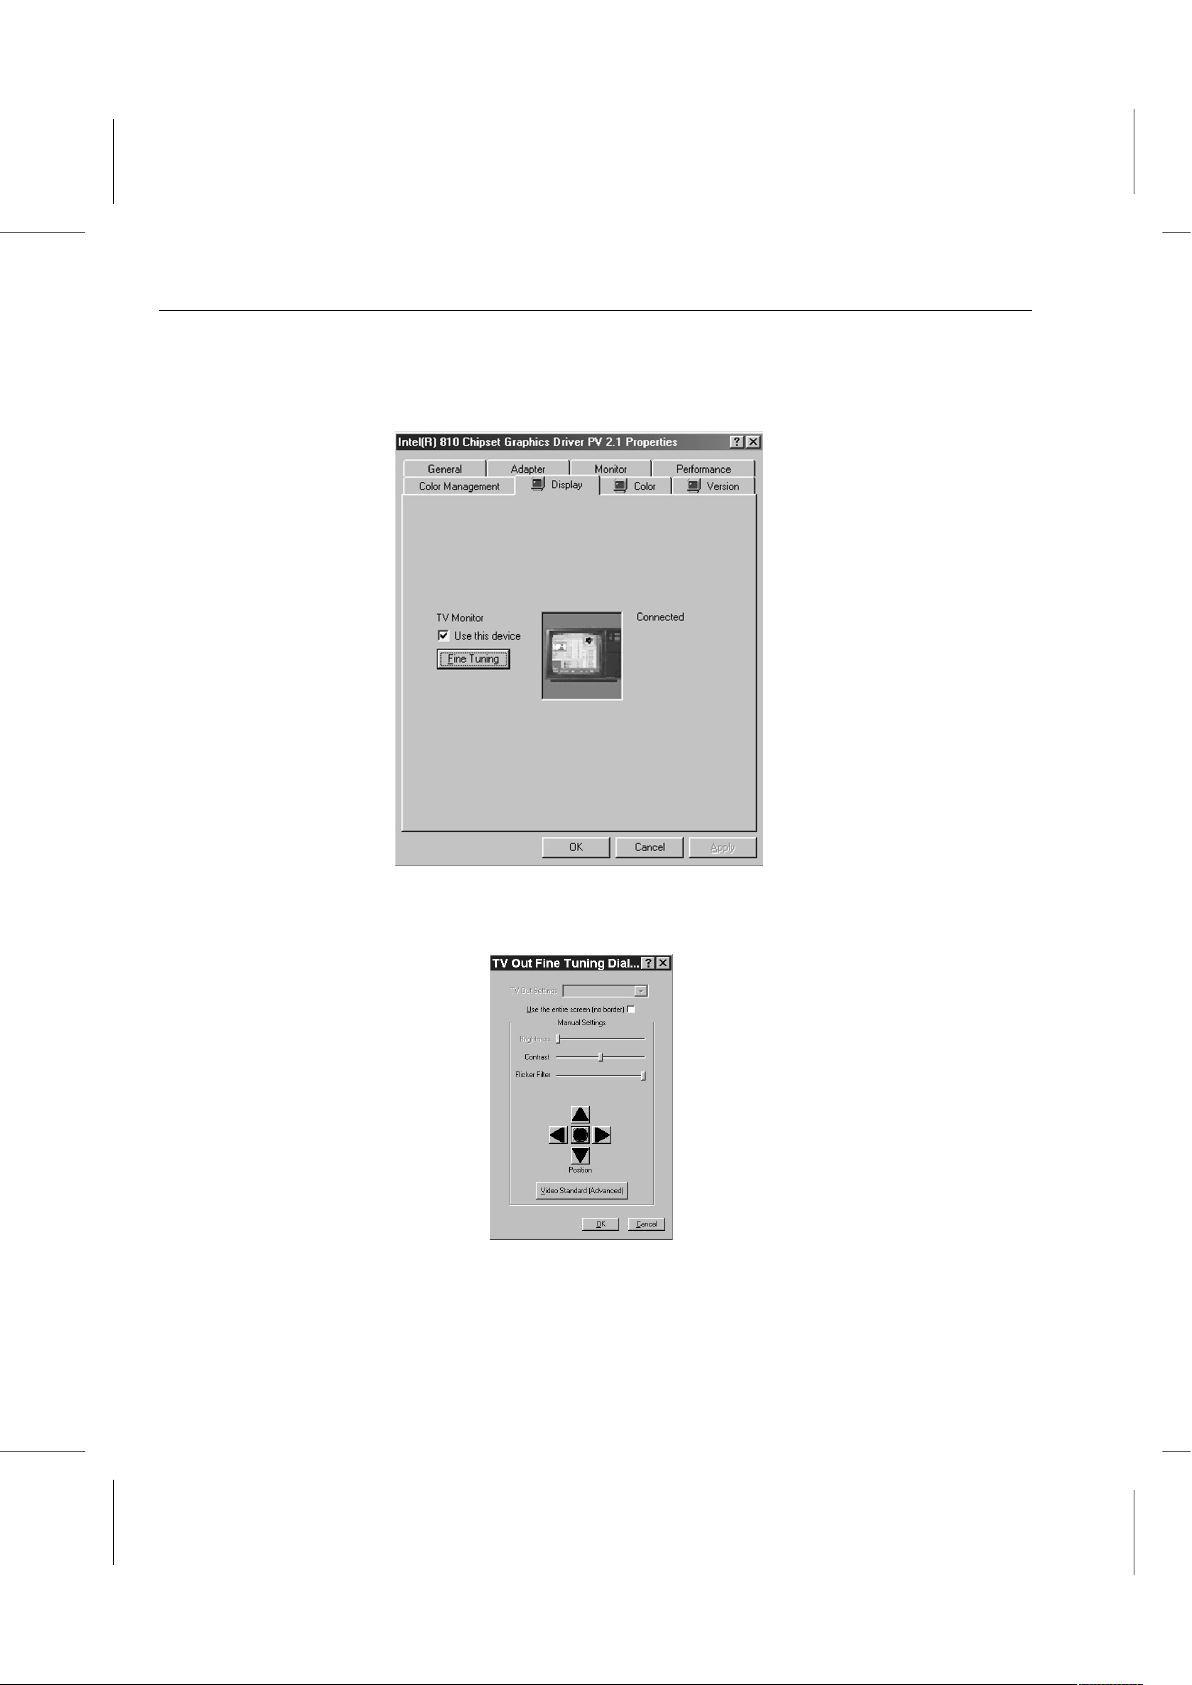
Book PC
Please follow the procedure below to adjust the display settings for a television
connected to the TV Out port.
1. Click on the Display tab in the Display Properties window.
2. Click on the check box for Use this device under TV Monitor. A check should appear
in the box. Click on the Fine Tuning button. The Fine Tuning Dialog Box will appear.
3. Adjust the Contrast, Flicker Filter and Position settings.
Set the contrast to the middle position by clicking on the adjustment bar and dragging
it into position. You can adjust this later to suit your preference.
5 – 12
Page 62
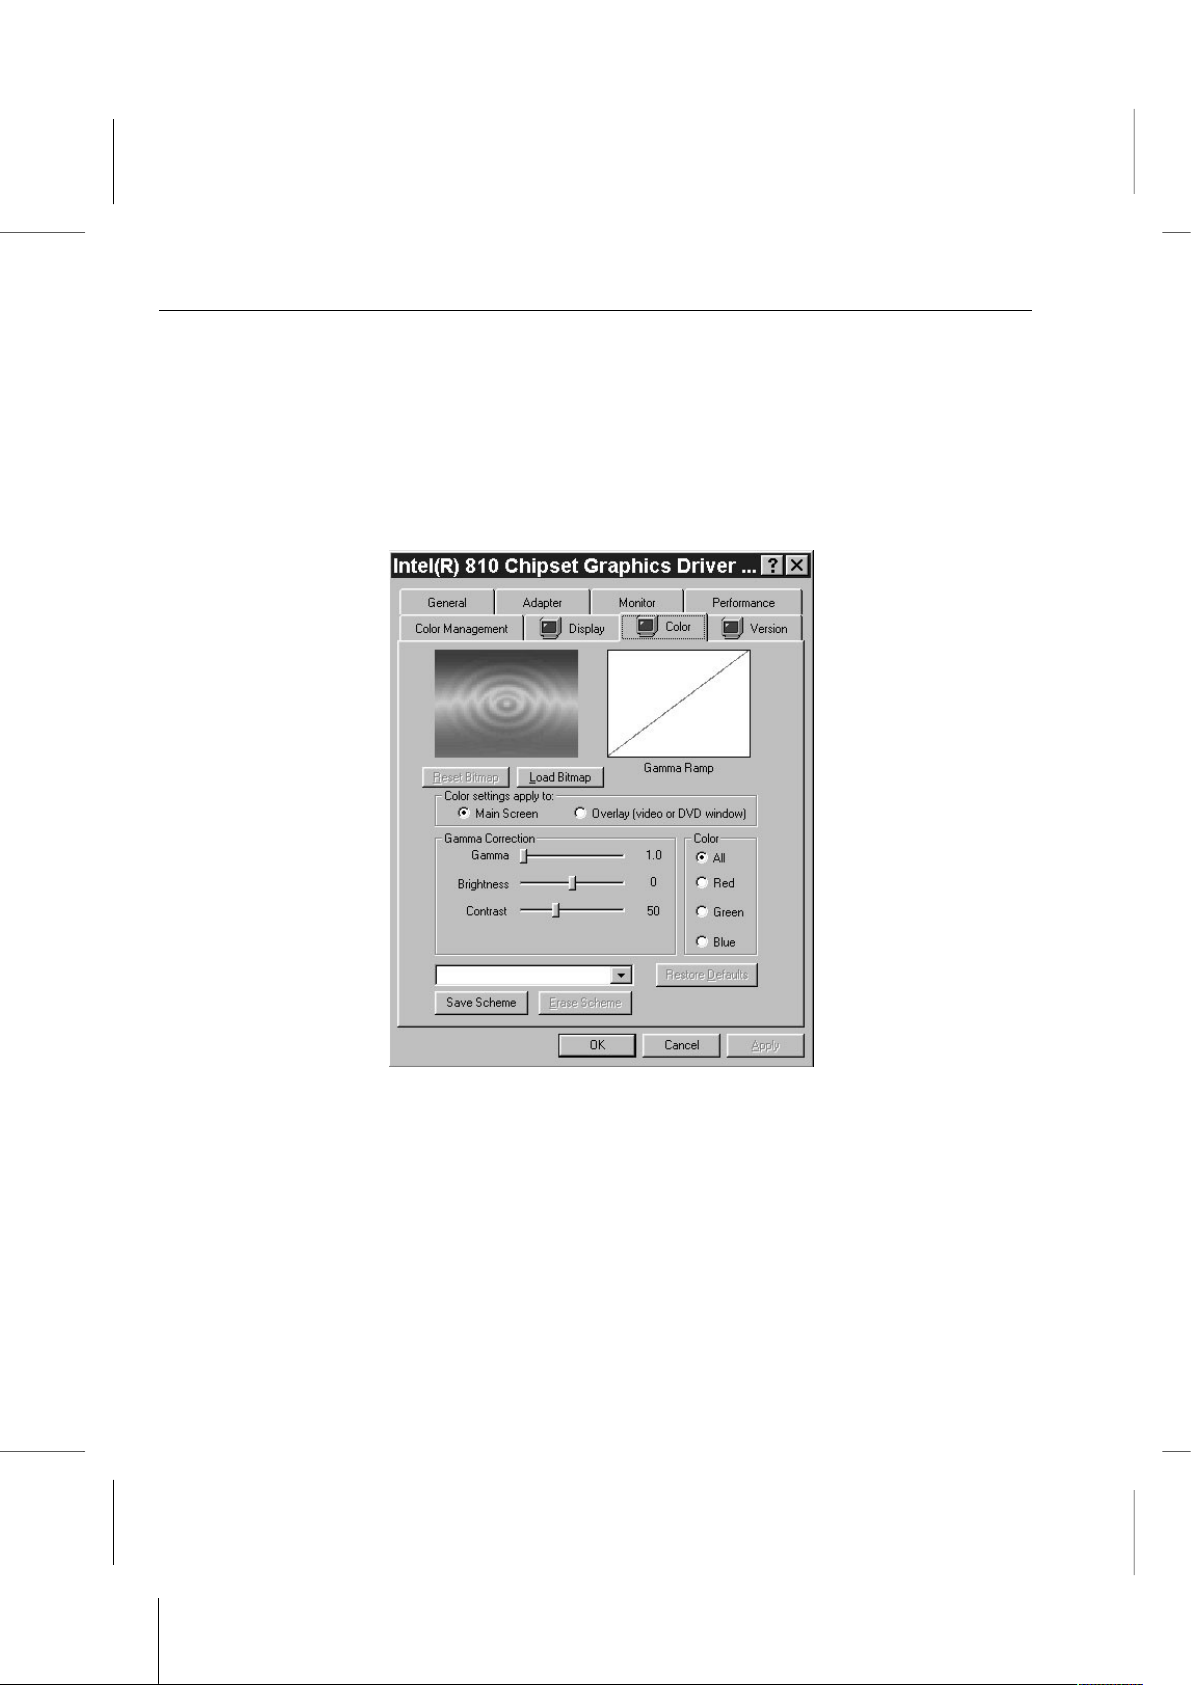
How to install your system with SCART TV console?
Adjust the flicker filter to at least 80%. The right end of the slider is 100%.
Adjust the position of the screen image using the Position control. Click on the circle
in the middle to automatically adjust the image position and then make further
adjustments with the directional arrows if needed.
4. Click on the Okay button to close the dialog box and return to the Driver Properties
window.
5. Click on the Color tab in the Driver Properties window.
6. Adjust the Gamma Correction controls for Gamma, Brightness and Contrast to the
suggested settings.
Set Gamma to 1.0
Set Brightness to –10
Set Contrast to 45
When you’re done, click on the Okay button to confirm the settings and return to the
Display Properties window.
7. Set the Screen area setting in the Display Properties window to 800x600 pixels by
sliding the setting bar to the left. Click the Okay button when you’re done.
5 – 13
Page 63
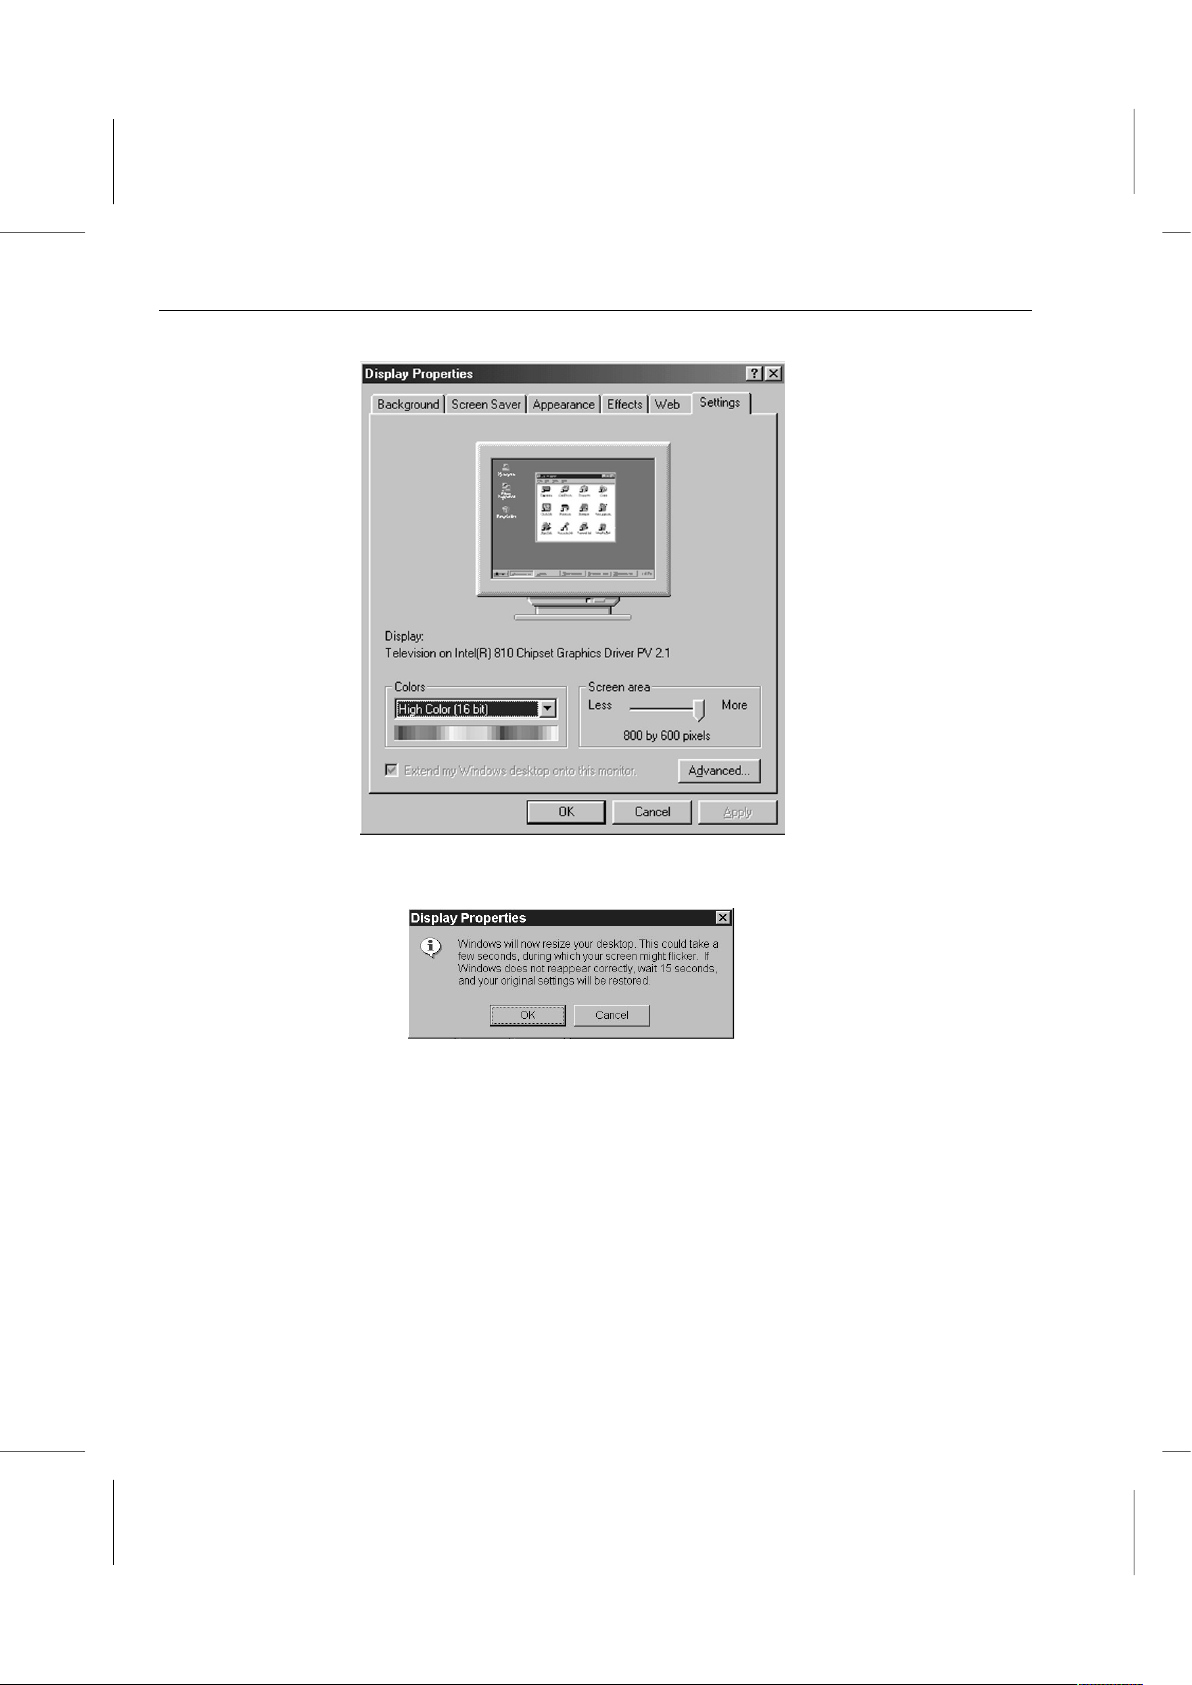
Book PC
8. Click the Okay button in the next dialog box to confirm the desktop size change. The
screen area will reset to the 800x600 resolution you selected.
5 – 14
Page 64
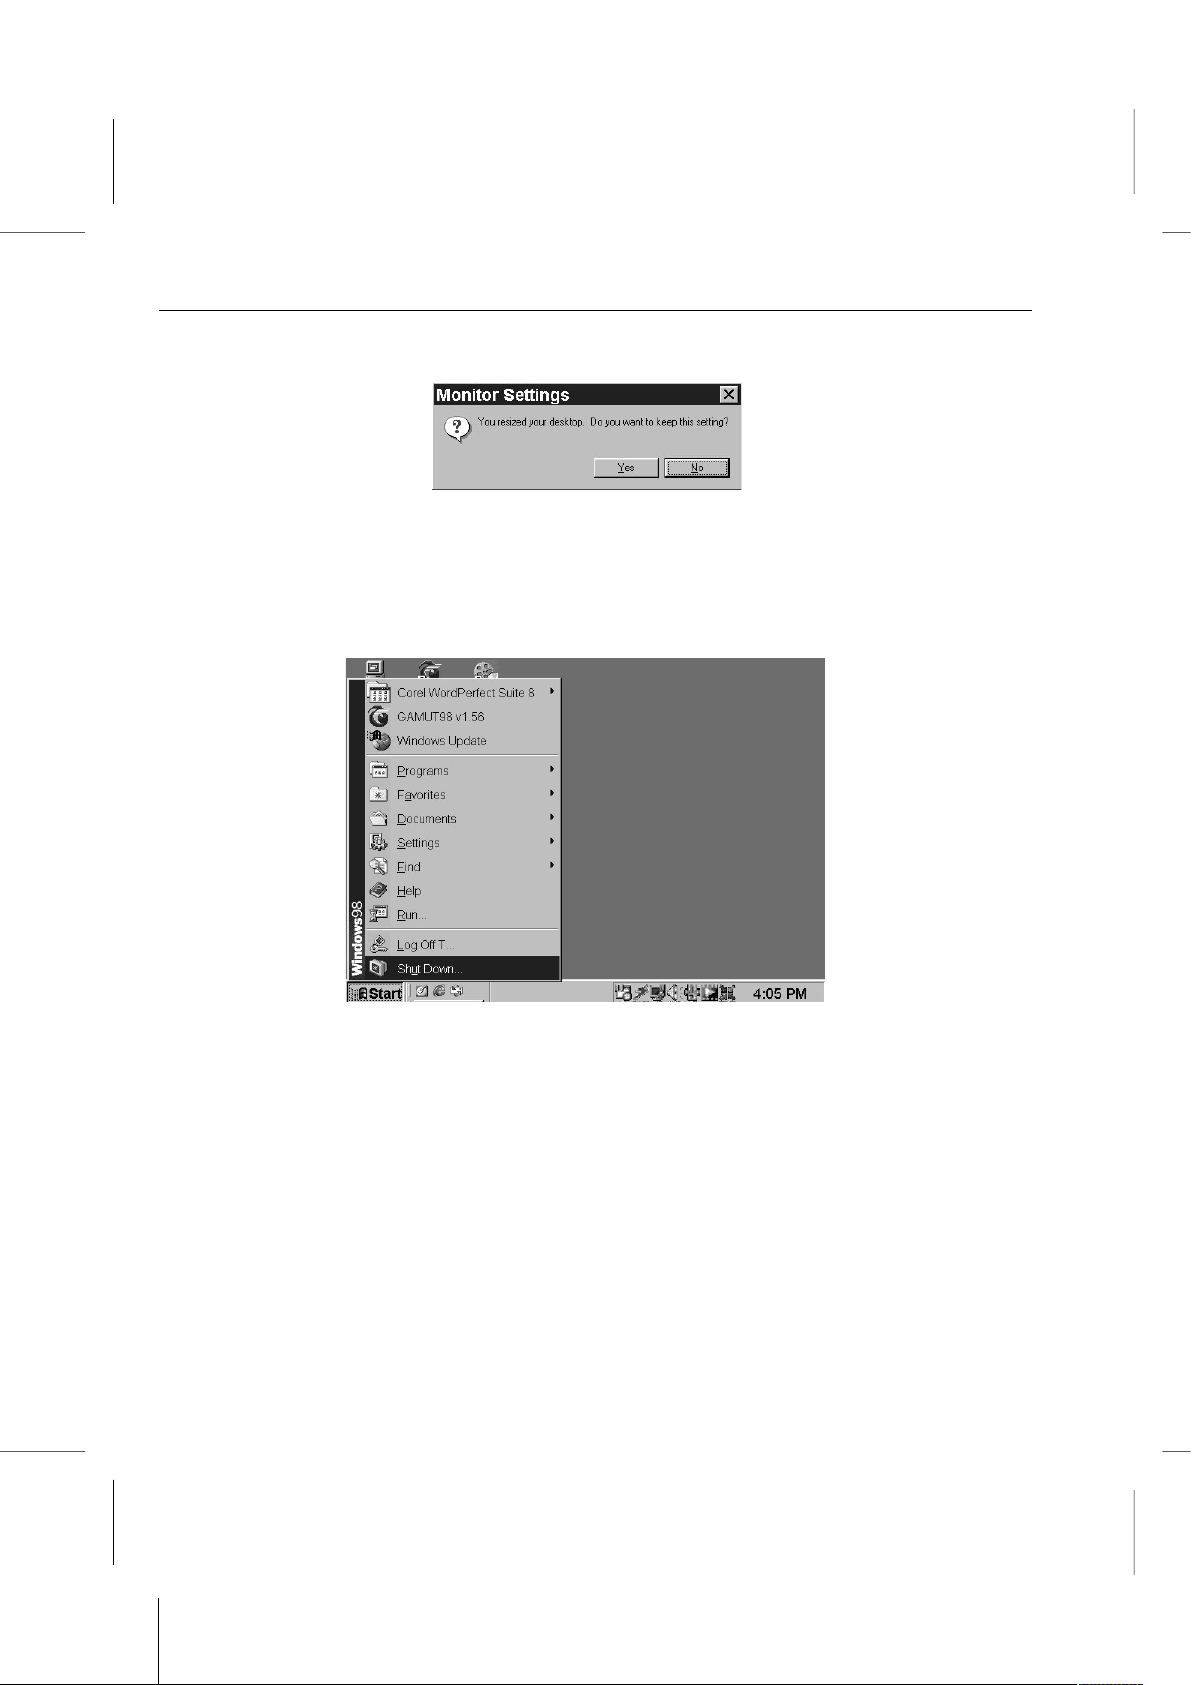
How to install your system with SCART TV console?
9. Click on the Yes button to accept the new setting.
10. The Display Properties window will close. Close the Control Panel.
11. Restart the computer by clicking on the Start button and then the Shut Down…
command. Click on the Restart radio button to select it if it isn’t already selected and
then click on the Okay button to confirm you want to restart the computer.
Please Note:
Make sure to also adjust the Brightness and Contrast controls on the
television to an intermediate setting. Adjust Sharpness ( or Detail ) settings
to their maximum settings. You can adjust these settings to adjust the
screen image to suit your preference. If onscreen text is not clear enough,
try reducing the contrast setting.
5 – 15
Page 65
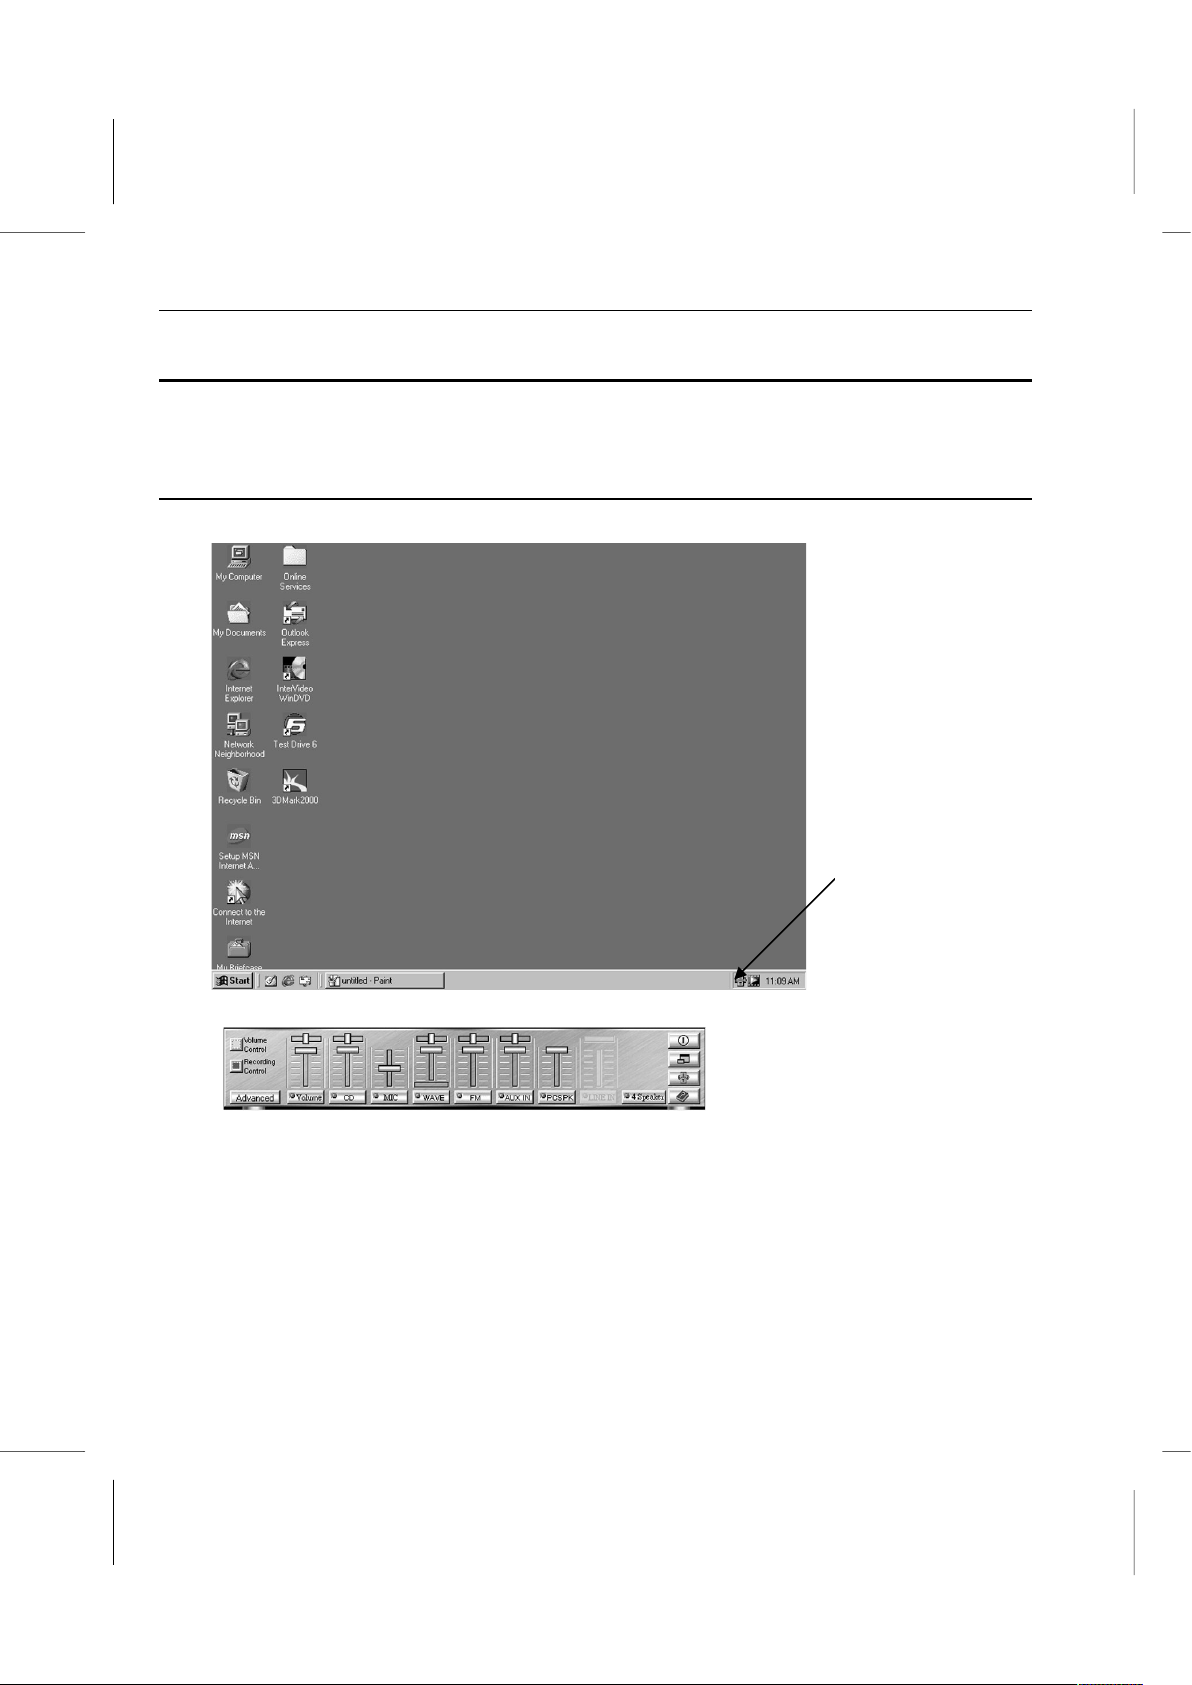
Book PC
Setup the SPDIF-Out for the Audio System
Note: Selecting SPDIF-Out for the audio system is an optional choice, and that might
cause invalidly the Analog audio (Speaker, Line in, Microphone).
How to setup the SPDIF-Out function in Win98?
Please follow this procedure to setup the SPDIF-Out function.
1. Click on the Sound icon at the lower right to open the Sound Properties.
2. Click on the Advanced button at the lower left to bring up the Advanced window.
Sound icon
5 – 16
Page 66
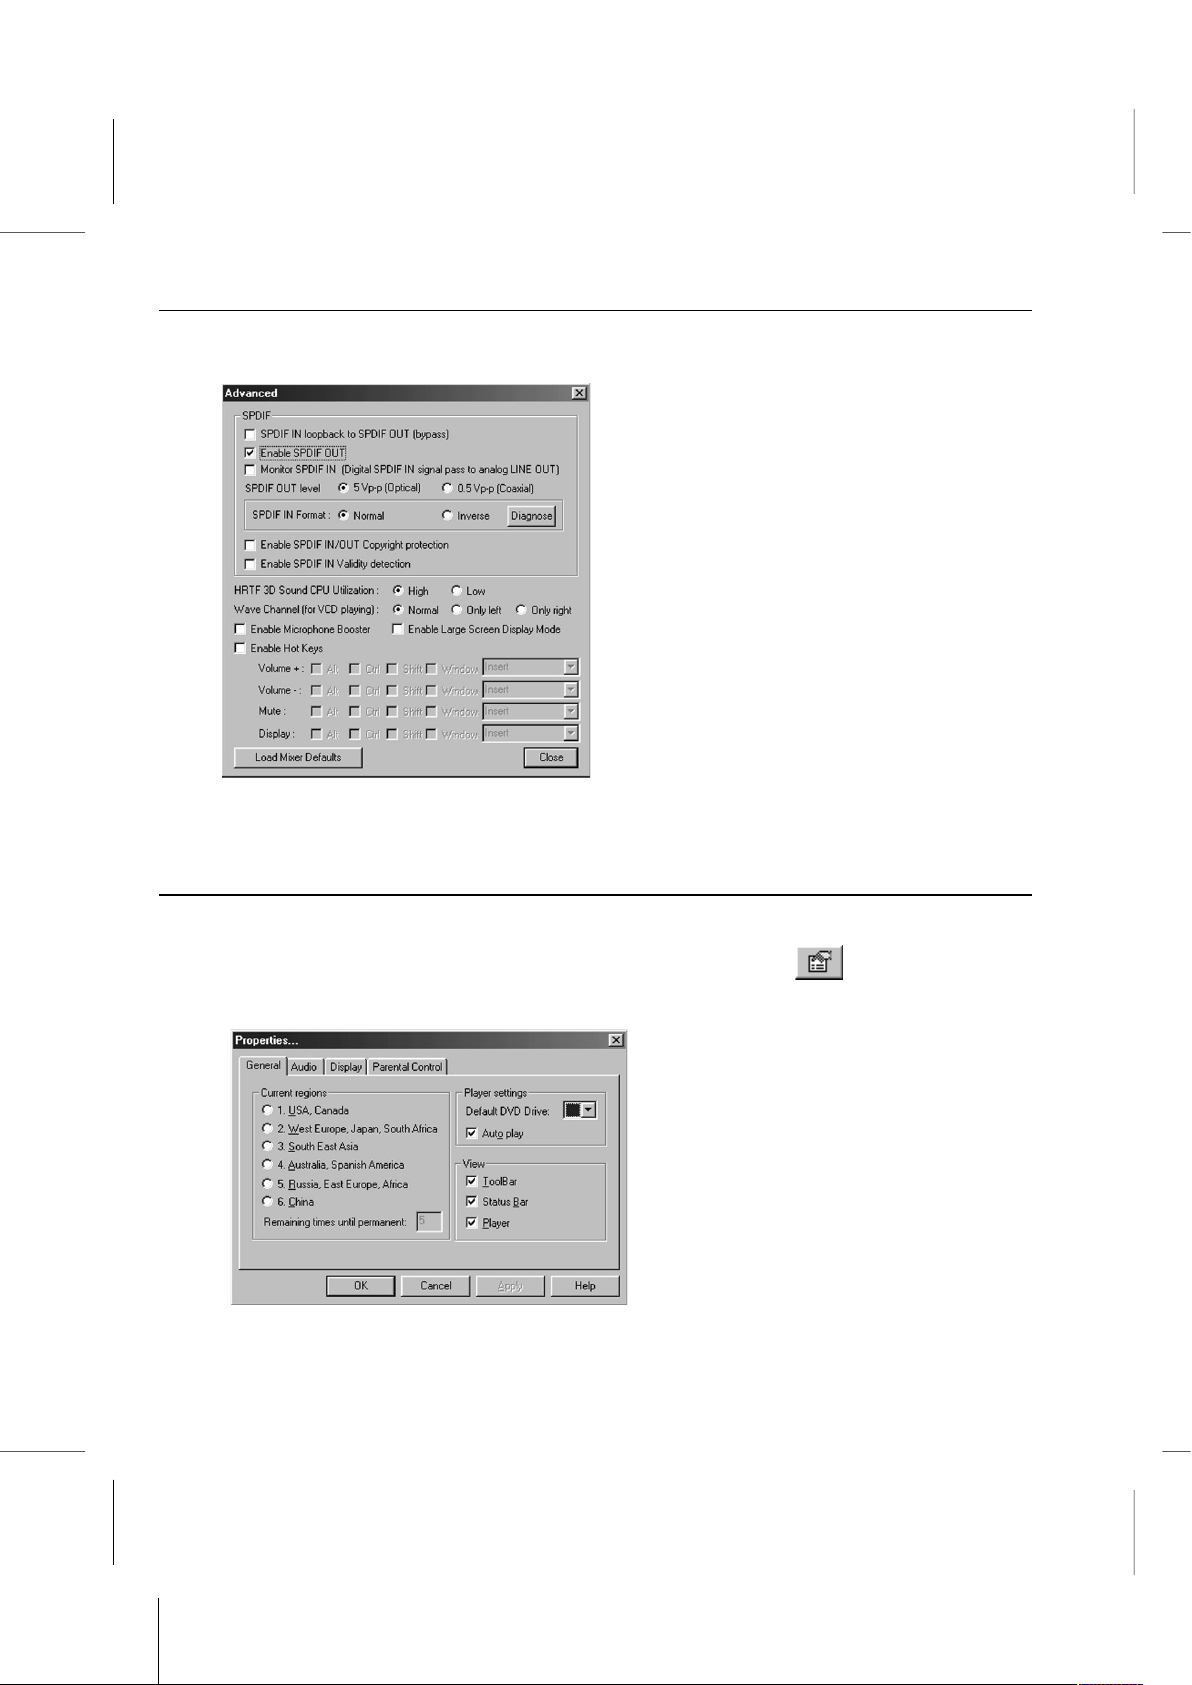
How to install your system with SCART TV console?
3. Click on the check box for Enable SPDIF OUT under SPDIF as following illustration.
4. Click the Close button to complete enabling SPDIF Out function for the audio system.
Note: Enabling this function might cause invalidly the analog audio.
How to setup the SPDIF-Out function in WinDVD?
Please follow this procedure to setup the SPDIF-Out function.
1. Under the WinDVD control panel, click on the Properties icon to open Properties
window.
5 – 17
Page 67
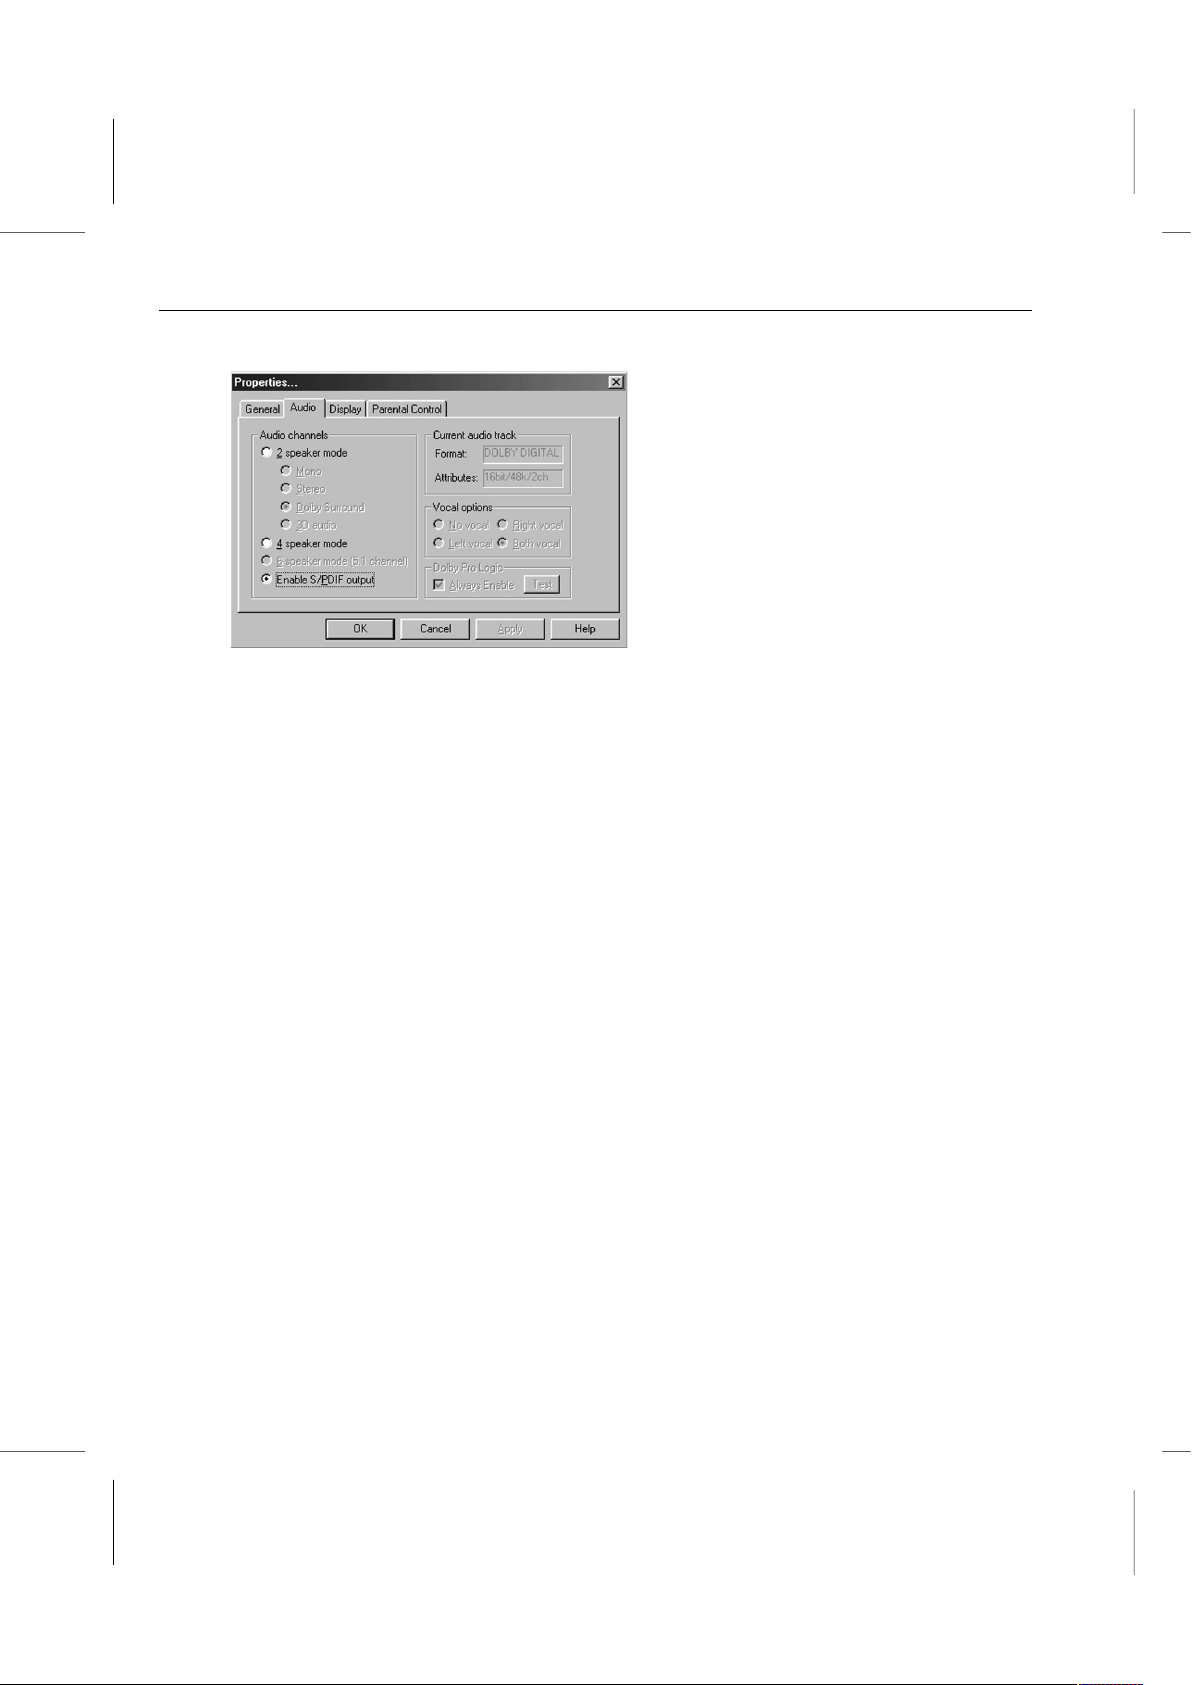
Book PC
2. Click on the Audio tab to bring it to the front.
3. Click on the check box for Enable S/PDIF output under Audio channels. (If the used
CD/DVD ROM does not support SPDIF function, the Enable S/PDIF output item might
be hidden.)
4. Click on the OK button to complete enabling SPDIF Out function for the WinDVD.
Note:
1. Enabling this function might cause invalidly the Microphone function in the KARAOKE
mode.
2. Make sure to disable this function before use the CD/DVD ROM that does not support
SPDIF function.
5 – 18
Page 68
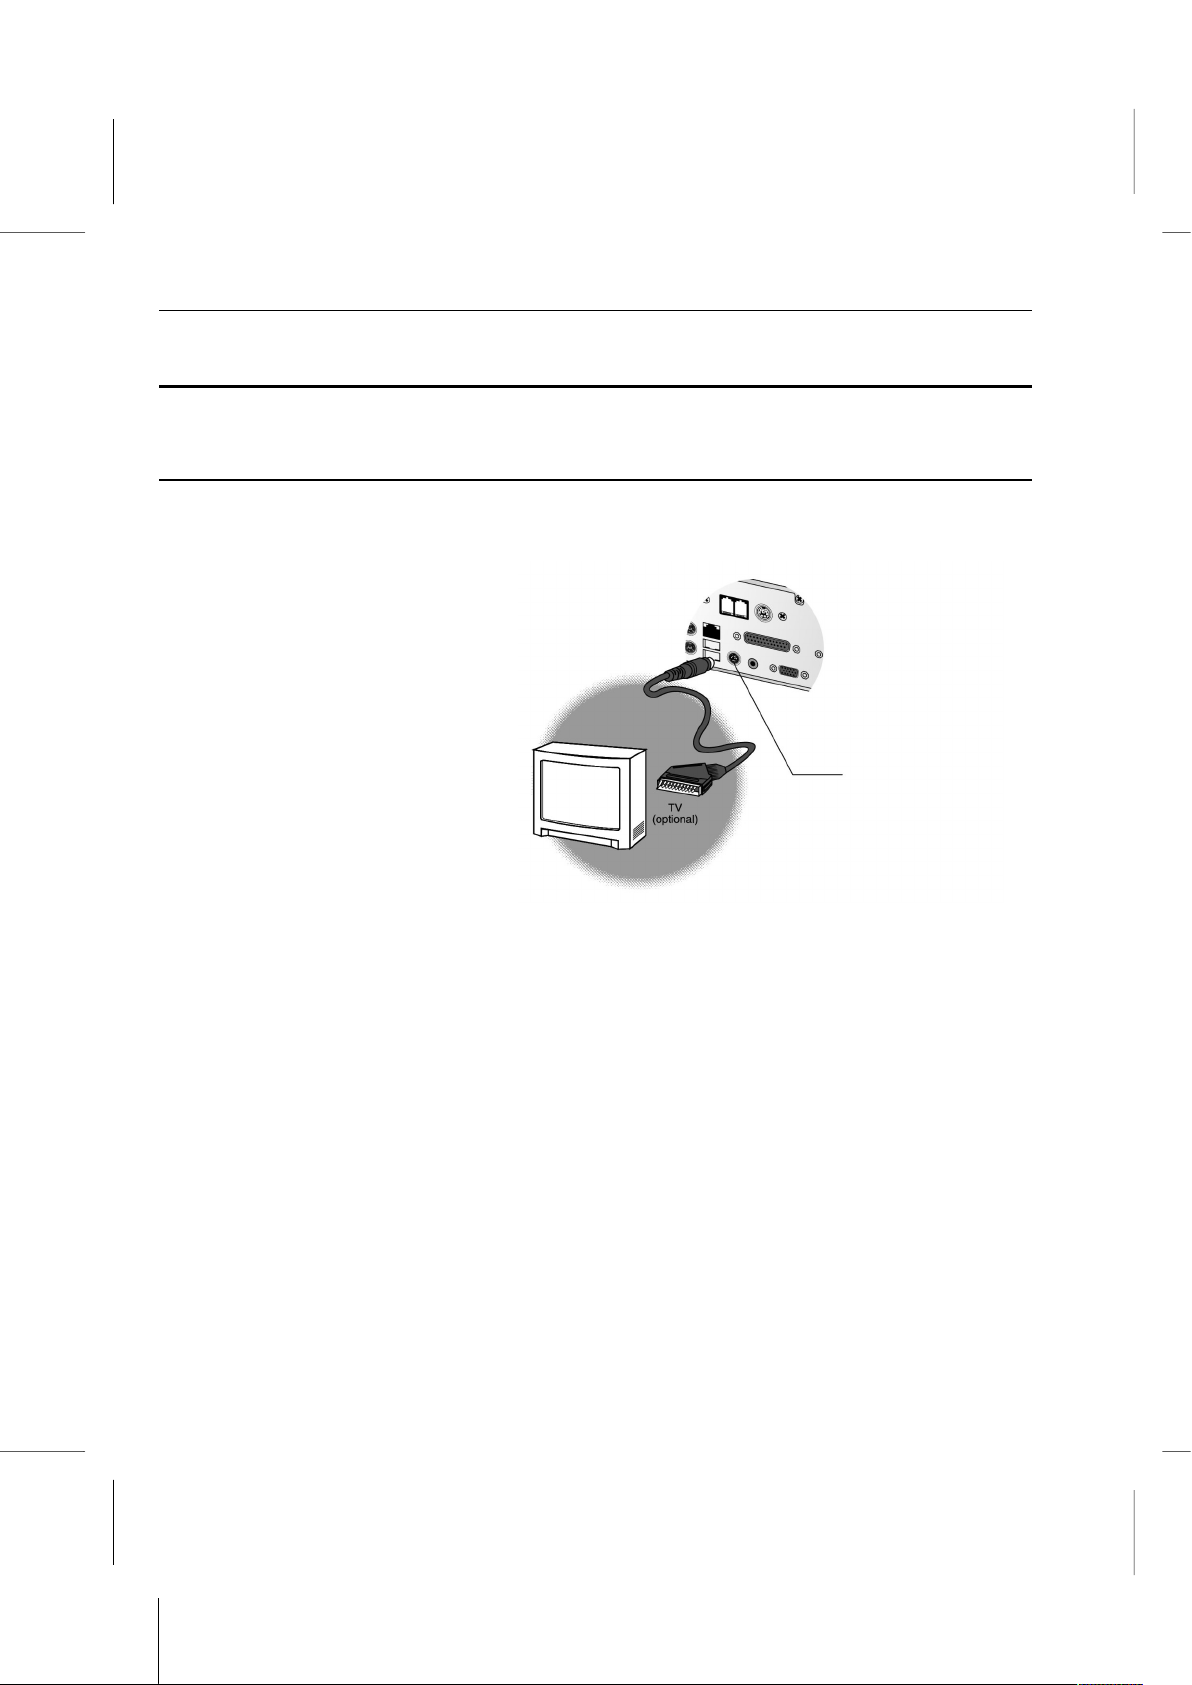
How to install your system with SCART TV console?
Setup the SCART TV as System Console
Note: Selecting SCART TV to be the display equipment is an optional choice.
How to install your system with SCART TV console?
Selecting your system to SCART TV mode.
1. Connecting SCART cable between the Television and Book PC.
2. Power-on your system.
3. Press “DEL” key to enter BIOS SETUP mode, while the “Press DEL to enter SETUP”
message is displayed on the screen.
4. Move the cursor to the item “Integrated Peripherals”, then press “Enter” key to enter
the “Integrated Peripherals” setup page.
5. In item “TV System Selection”, select “PAL” for the SCART TV, refer to Chapter 5.
6. Press “ECS” key to return the BIOS SETUP Main menu.
7. Press “F10” key to save and exit the setup program.
8. Restart the system and boot to Win98 system.
9. Setup the driver for the SCART TV. Refer to the Graphics Drivers and Software in
Chpter 3.
S-Video/SCART
Connector
5 – 19
Page 69

Appendix A
Appendix A
Problem Solving
Problem Solving
Page 70

Book PC
This chapter contains a troubleshooting section that can help you solve common
problems that you might encounter when using the Book PC. Read this information
carefully as it might help you on your way. If you encounter a problem that you cannot
solve, contact your vendor for assistance.
Q & A
The computer doesn’t work.
Make sure the power cord is firmly plugged into the wall outlet and the rear side of the
computer.
Next check that the wall outlet is working properly.
The keyboard doesn’t work.
Make sure that the keyboard is firmly and securely connected to the proper connector on
the rear side of your computer. Do not plug it into the designated PS/2 port for the
pointing device.
The Mouse doesn’t work.
Make sure that the mouse is firmly and securely connected to the proper connector on
the rear side of your computer. Do not plug it into the designated PS/2 port for the
keyboard.
Next check to see if the mouse needs cleaning.
The CD-ROM/DVD drive does not operate properly.
Open the tray and take the CD-ROM/DVD disk out. Check to see if the disk is properly
place in the tray, most of the times this means putting the disk in with the printed side up.
Next check to see if the disk is dirty or defected. Try again with another disk.
The audio doesn’t work.
Make sure that the speakers are properly connected to the Line Out connector (or to the
Line In connector if four channel speaker mode is enabled).
Check the volume settings of your system. Click on the speaker icon located on the
Windows taskbar, and make sure sound is not muted. Turn up the volume.
A – 2
Page 71

Problem Solving: Q & A
How do I use the Four Channel Speaker feature?
Connect the front speakers to the Line Out jack, and connect the rear speakers to the
Line In jack, on the rear side of the system. Click on the speaker icon located on the right
side of the Windows taskbar. Make sure to check the Four Channel Speaker item and
make sure the Mute bottom is not checked. Set the volume level to a proper level.
Most distributed music was originally recorded in stereo format (two channels). Playing
this kind of music quality will cause the rear speakers to output identical sound as the
front speakers.
Whenever you play a DVD title, using the DVD drive, make sure that the DVD audio
output is selected to the AC-3 or 5.1 Channel. Some titles still default to stereo quality
sound, even though they can support the Four Channel Speaker feature.
How do I set up the video output selection?
After all the video display devices are properly connected to the system, power up the
system, and the Book PC will automatically detect the connected devices and distribute
the video display to them. If both a monitor and a TV receiver are hooked up to the Book
PC, the system will only select the monitor by default.
The DVD title playback seems slow or not smooth
Make sure to quit all running tasks and/or to close applications running in the background
before you start the DVD playback.
The hard disk drive access indicator light stays on
There might be some lost allocations units within your hard disk drive, or some files
stored in the disk may have been corrupted. You can check on this by using Disk
Defragmenter. This is a Windows 98 program that can be found at
Start/Programs/Accessories/System Tools.
The diskette drive indicator light stays on
Check to see that the diskette is inserted properly. Eject the disk and insert it again. Try
again using another disk. You can also run Scan Disk. This is a Windows 98 program that
can be found at Start/Programs/Accessories/System Tools. This program can detect if
your disk is defective.
A – 3
Page 72

Book PC
How to upgrade the Flash BIOS?
The setup program on the Flash BIOS chip holds basic information on your system.
Normally you do not need to access it, since all hardware settings are automatically
recognized by default.
Note: If your system runs without problems, there is no need to upgrade the Flash
BIOS. Incorrect installation of the Flash BIOS might cause you system to
malfunction. If you are not familiar with this procedure, contact a certified technician
familiar with the system for assistance.
Follow these steps to upgrade the Flash BIOS:
1. Obtain the latest version from your system vendor or download it from the
manufacturer’s web site.
2. Make a bootable diskette. E.g. at a DOS prompt, use the following command:
format a: /s
(where A: is the diskette drive)
3. Copy the downloaded files to the diskette.
4. Next copy the BIOS flash utility program (Awdfl711.exe for Award BIOS) from the
support CD to the diskette.
5. At the DOS prompt, generate the auto execute command:
Awdfl711 [binary_file_name] /sn /py
6. Make sure the diskette is in the drive, then restart the system.
7. As the system restarts, it will automatically upgrade the Flash BIOS. Follow the
instructions on the screen.
How do I backup my data files to prevent loss of data?
You can backup your personal data by using the backup feature of Windows 98. Click on
Start/Programs/Accessories/System Tools, then choose Backup. Choose the files
you want to backup. Select the destination path name, the target drive should be a disk or
partition other than the one your are backing up from. Set the conditions, security and
report of the backup file. Next start the backup.
To recover files from a backup file, return to the Backup program, and choose the restore
function.
A – 4
Page 73

Appendix B
Appendix B
Gamut
Gamut
Documentation
Documentation
Copyright 1999 Formosoft International Inc. All rights reserved.
The contents of the associated Gamut software are the property and
copyright of Formosoft International Inc. Any reproduction in whole
or in part is strictly prohibited.
Page 74
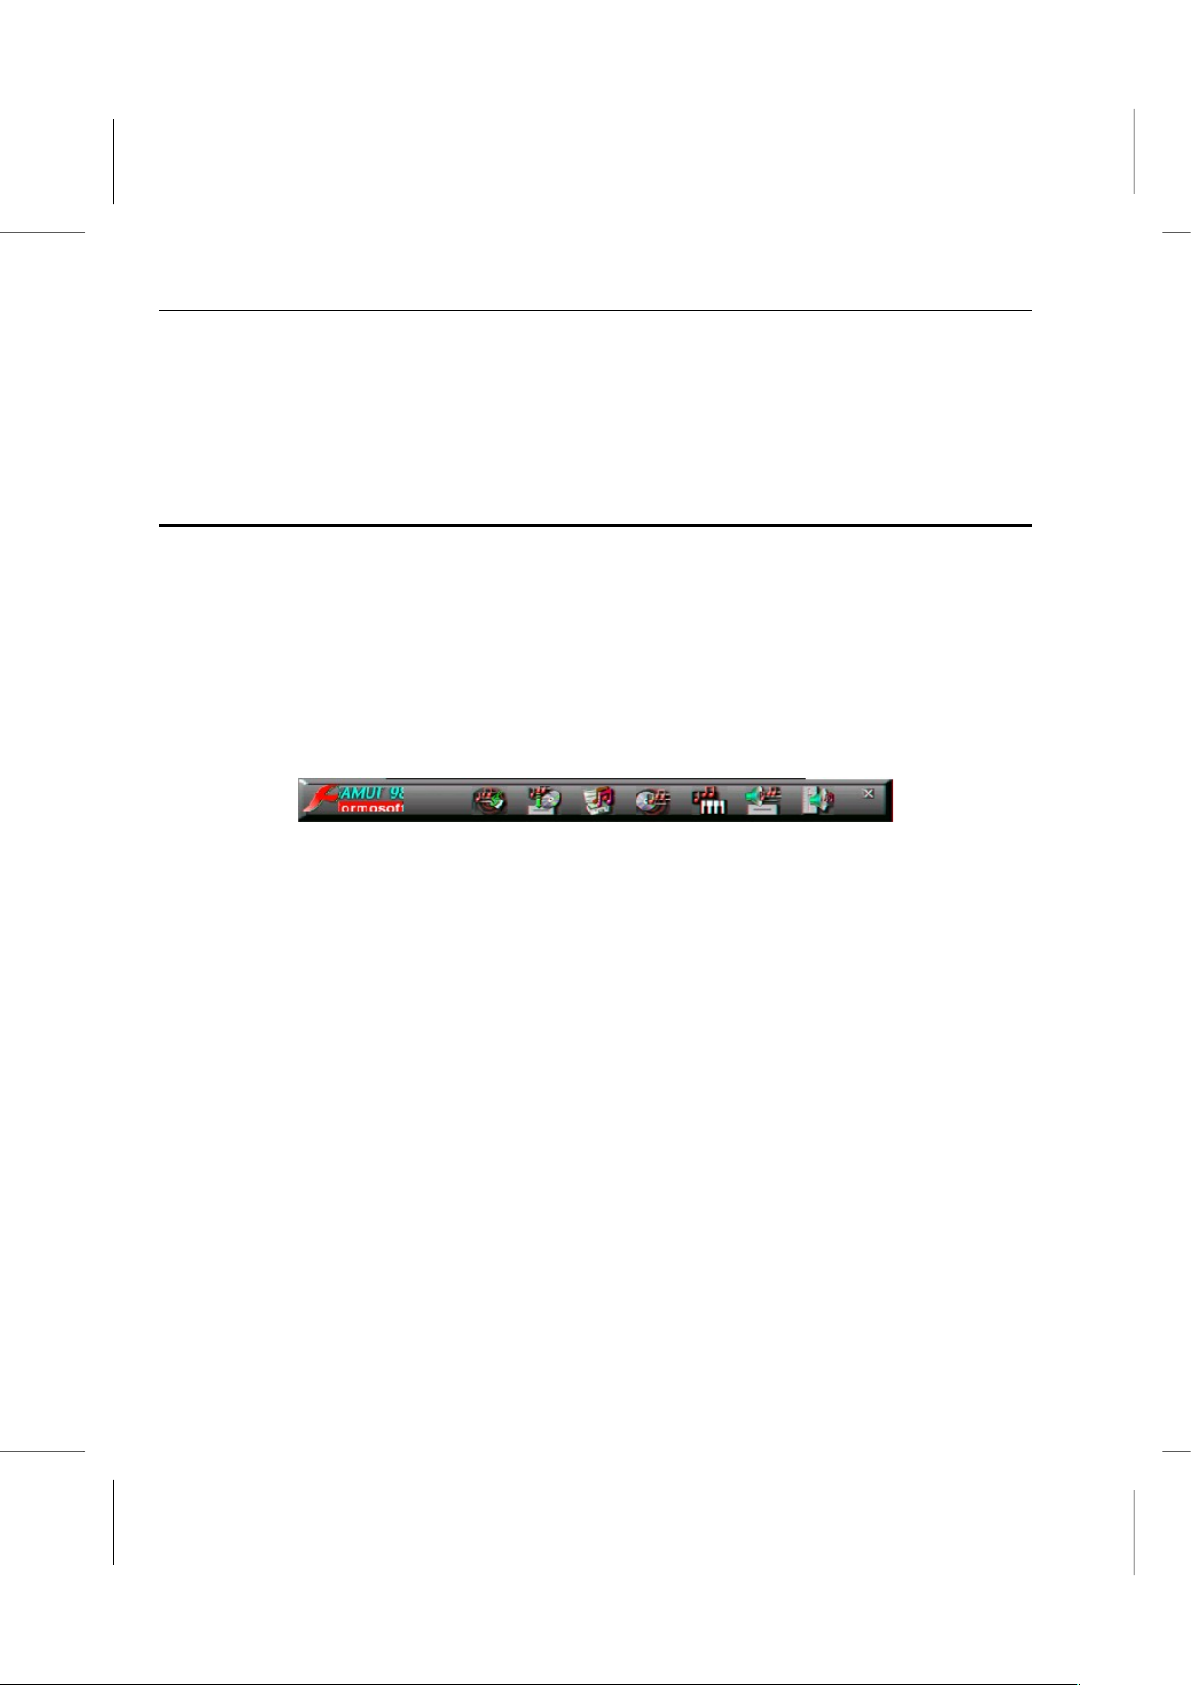
Book PC
This chapter contains documentation for the GAMUT application. FORMOSOFT’s
GAMUT provides users with high compression audio CD recording, incredible music
playing quality, and versatile music management for various applications. The recording,
playing, and music management capabilities of GAMUT lead to a completely new audio
experience, and turns your Book PC into a professional audio device.
Introduction
GAMUT integrates all aspects of sound recording and playback, combining high-tech
digital sound effects with state-of–the-art audio encoding and decoding technology. It
makes your PC the control center of your home audio equipment.
With high compression rate MP3 technology, GAMUT performs efficiently on storing and
managing music on your PC. Designed to exploit the latest MP3 technology, it can
dynamically synchronize MP3 files with a user-friendly Wizard interface.
GAMUT consists of seven tools: Musician, CD-Cashier, Music-Box, 3DFS-ACD, Midier,
Voice-Catcher, and Mixer.
Musician –Play MP3 files and provides digital sound effect functions.
CD-Cashier – Produces and compresses MP3 files.
Music-Box – Manages MP3 files.
3DFS-ACD –Plays audio CDs and provides digital sound effect functions.
Midier – Plays MIDI music with high quality and offers playlist to control the playing
order.
Voice-Catcher – Records compressed audio files.
Mixer – Checks the functions and controls all the Book PCs audio options.
B – 2
Page 75
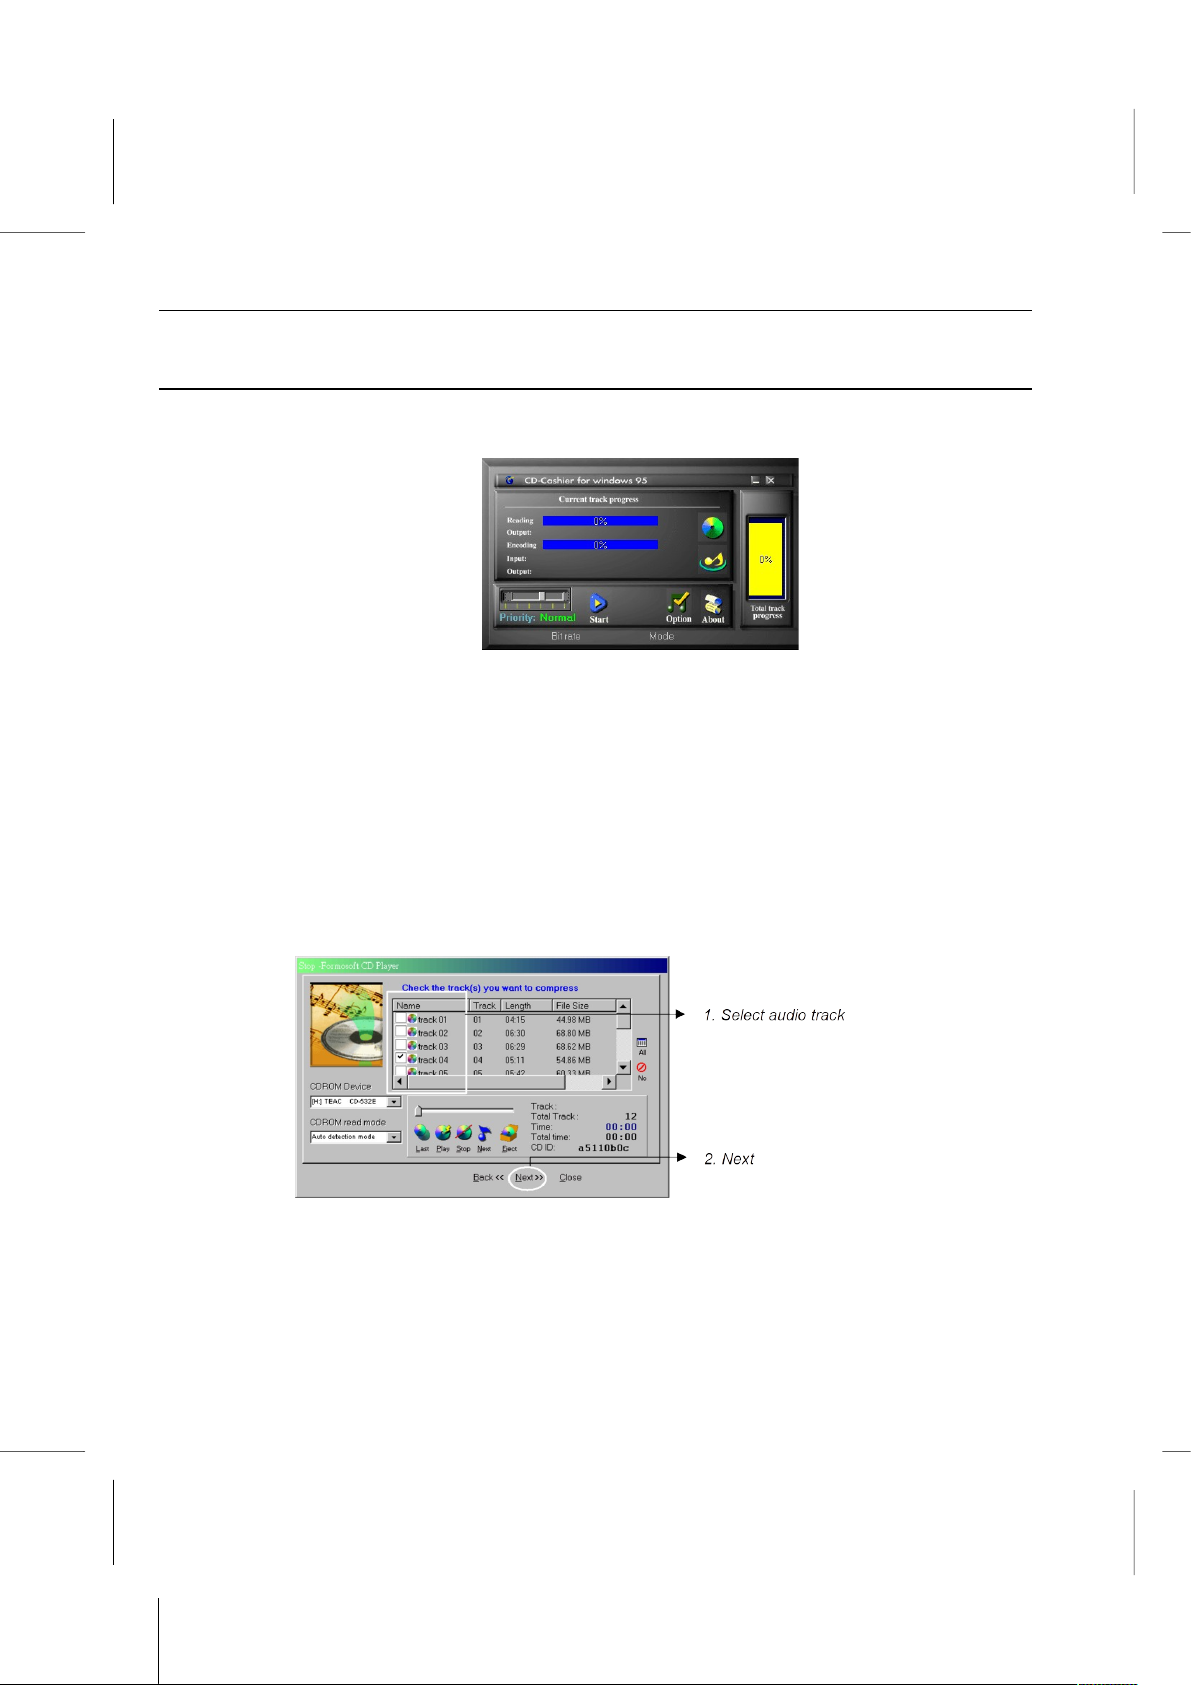
Gamut Documentation: Introduction
Produce MP3 files – Use CD-Cashier
Start CD-Cashier from the GAMUT Menu Bar or click Start/Program Files/GAMUT/
CD-Cashier.
1. Place an audio CD into CD-ROM/DVD drive and click the Start button on the CDCashier panel. Follow the Wizard instructions, and continue by clicking Next after
each step.
2. Select ‘Digital recording from Audio CD’ to capture the audio track with high quality
digital technology.
If the CD-ROM drive doesn’t provide CDDA audio track capture function, select
‘Analog recording from Audio CD’ to record MP3 files with analog technology.
However, analog technology may not result in the same quality as digital technology
recording does.
3. Select the audio tracks in ‘Check the track(s) you want to compress’ window.
4. Choose a directory for saving the MP3 files.
5. Select the default ‘Variable bit rate (Guaranteed audio quality)’ option to enable the
best quality audio compression. Then click Encode to begin the production of the MP3
files.
B – 3
Page 76
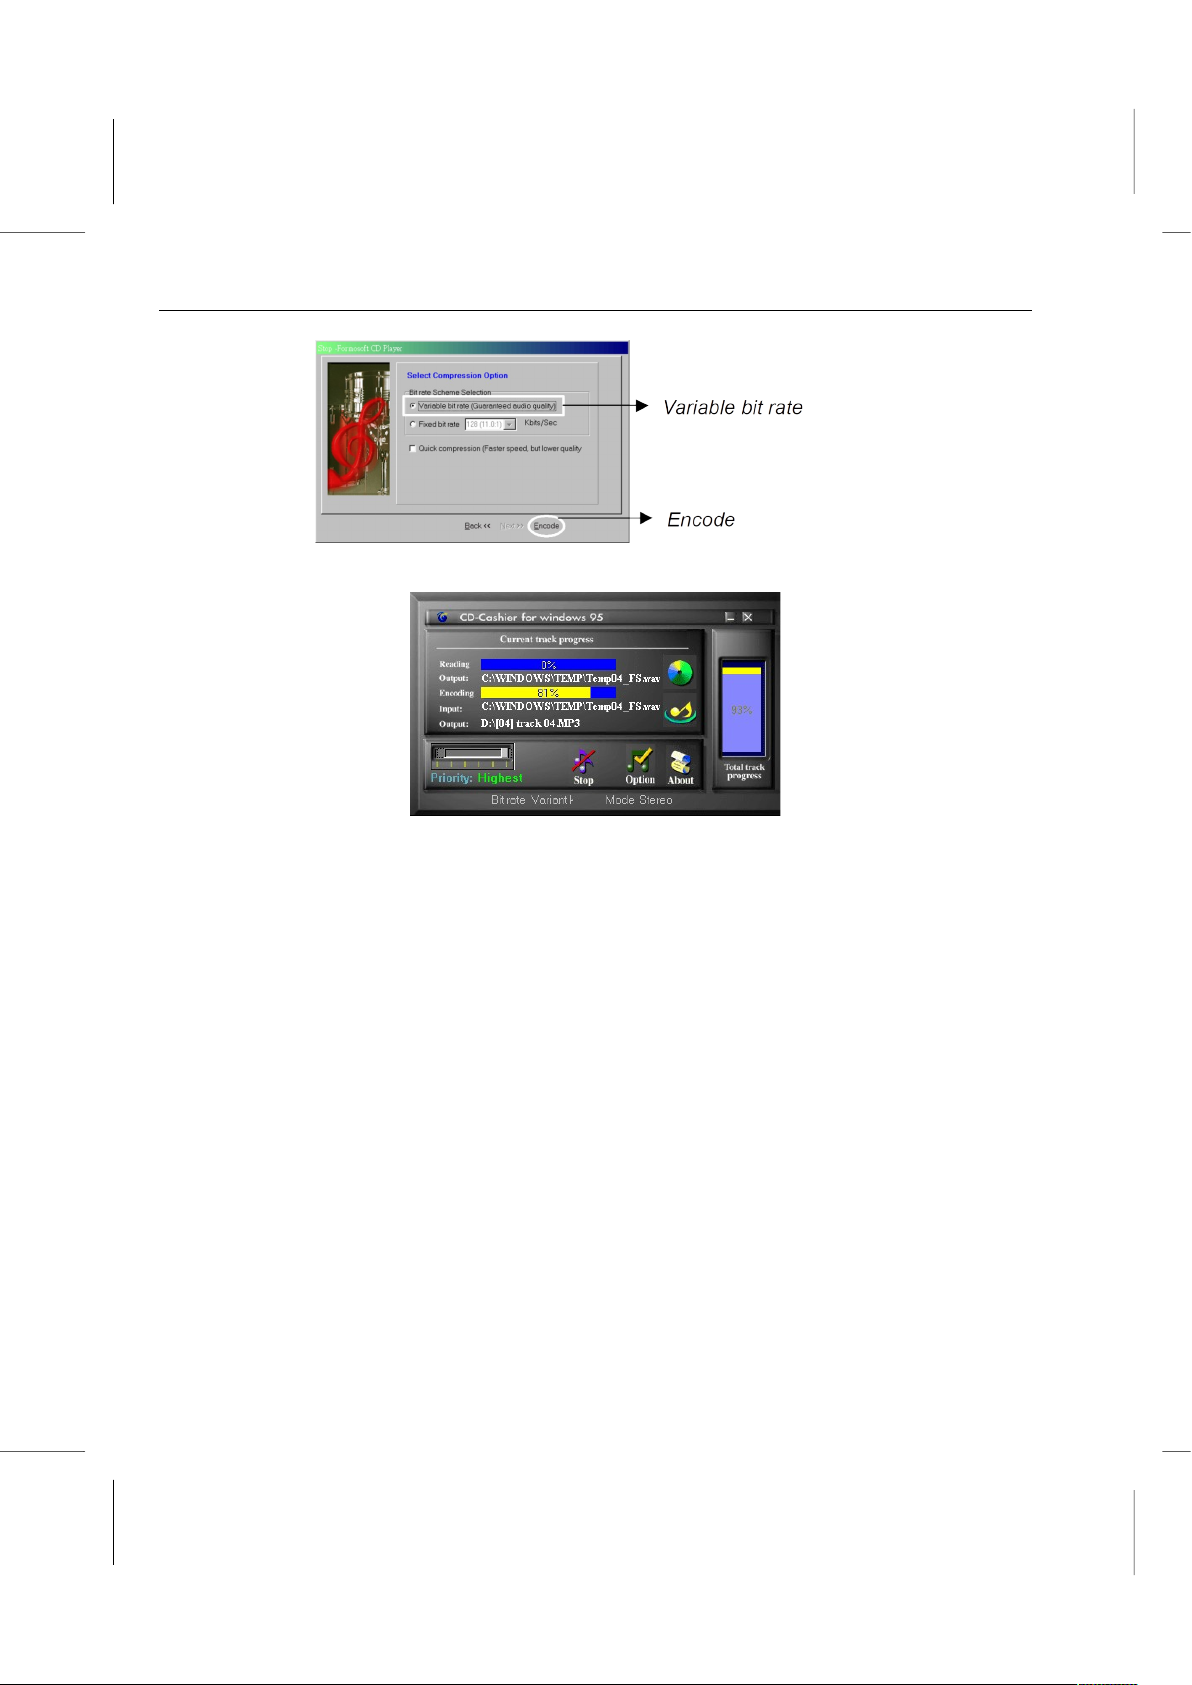
Book PC
6. Next, a window will appear that allows you to track the encoding progress.
B – 4
Page 77
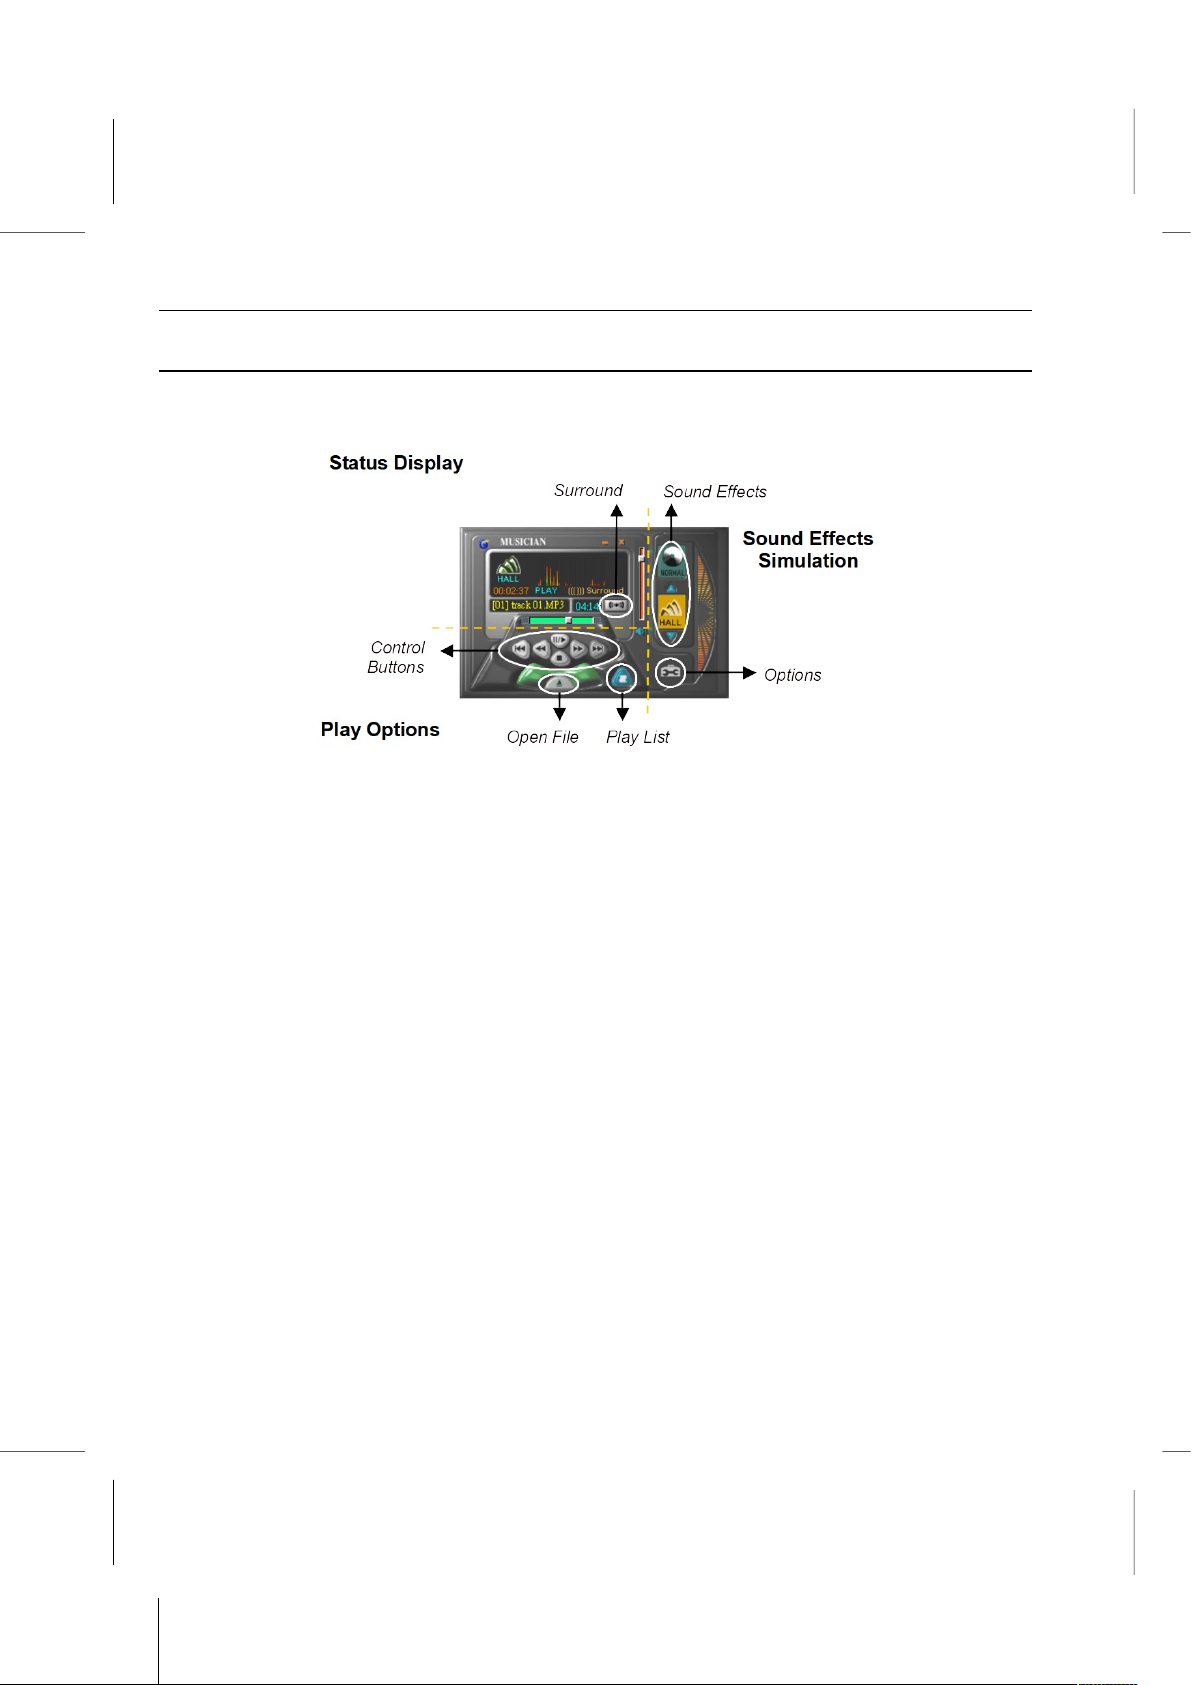
Gamut Documentation: Introduction
Play MP3 files – Use Musician
Start Musician from the GAMUT Menu Bar or click Start/Program/GAMUT/ Musician.
The panel consists of 3 individual parts:
Status Display shows the current progress of playing, selected sound effects and
sound files.
Play Options consists of control buttons.
Sound Effects Simulation allows you to set up sound effects.
1. Press the ‘Open File’ button to select MP3 files.
2. After selecting the MP3 files, Musician will start playing the music automatically. You
can read the track progress from the Status Display. You can also adjust the sound
effects to your needs.
3. Press the ‘Surround’ button to activate the Four Channels Speaker feature.
Sound Effects Simulation provides selective simulated digital sound effects such as
HALL, VOCAL, SOFT, ROCK and BASS. Review the available sound effects by
switching the blue up and down arrows, enable the selected sound effect by clicking
on the associated icons. Selecting the Normal icon disables all other sound effects.
B – 5
Page 78
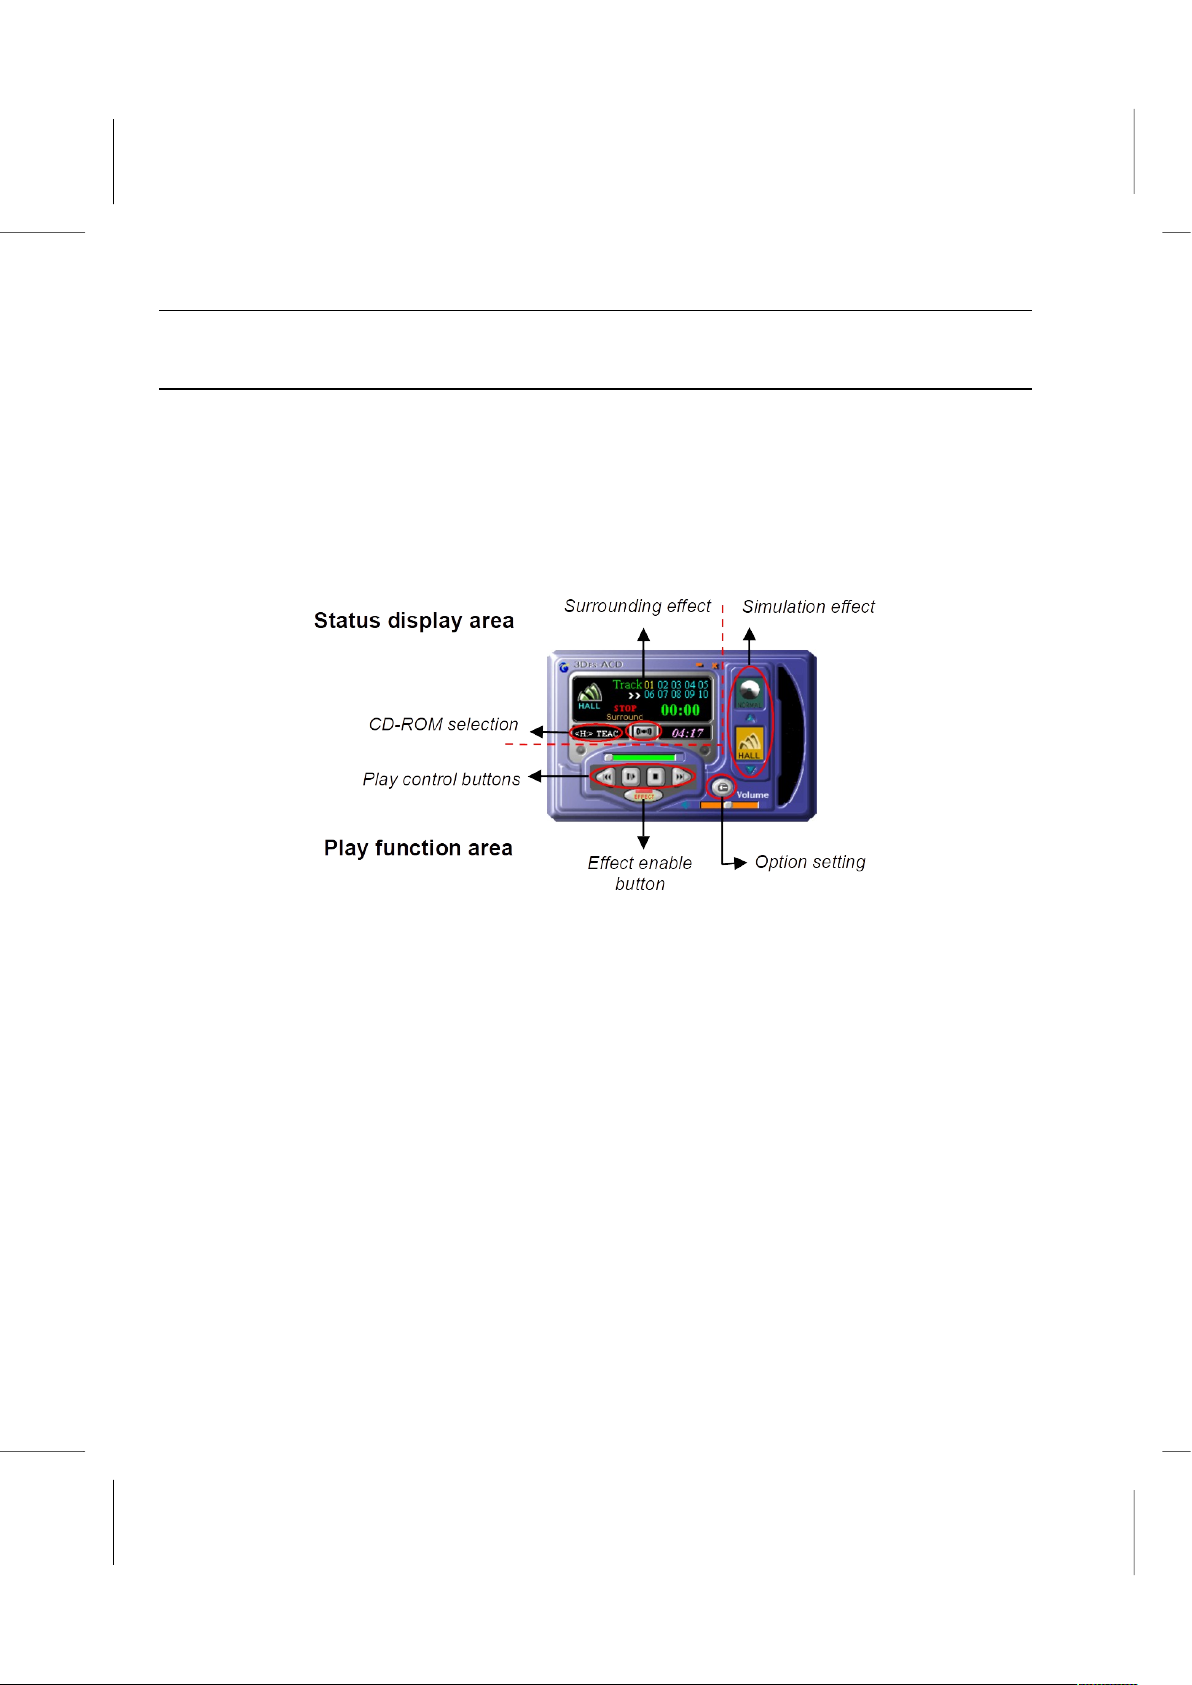
Book PC
Play music CDs – Use 3DFS-ACD
Start 3DFS-ACD from the GAMUT Menu Bar or click Start/Program/Gamut/3DFS-ACD.
1. After 3DFS-ACD is activated, the program will detect any audio CD in the
CD-ROM/DVD drive automatically. The number of tracks will be shown in the ‘Status
Display Area’. You can start the music by clicking on the track number.
2. Through the control buttons (play, stop, rewind, and forward) you can gain full control
of music playback.
3. Click on the ‘Effect enable’ button to select simulation effects. After the effect is enabled, you
can click on the ‘surrounding effect’ in the Play Function area to enable it.
4. On the right side of the main panel, the ‘simulation effect’ area, you can set various digital
effect options including HALL, VOCAL, SOFT, ROCK and BASS.
NORMAL sets the default effect.
HALL simulates effect of concert hall.
VOCAL enhances vocal clarity and the quality of the voice.
SOFT enhances the listening effect, especially suitable for Jazz and New age music.
ROCK creates Rock effect, suitable for dancing and dynamic music.
BASS enhances the bass effect.
When you are using the “Effect enable’ mode, or are switching from one effect to another,
there is a 1 to 3 seconds delay. The delay time differs from one sound card to another.
B – 6
Page 79
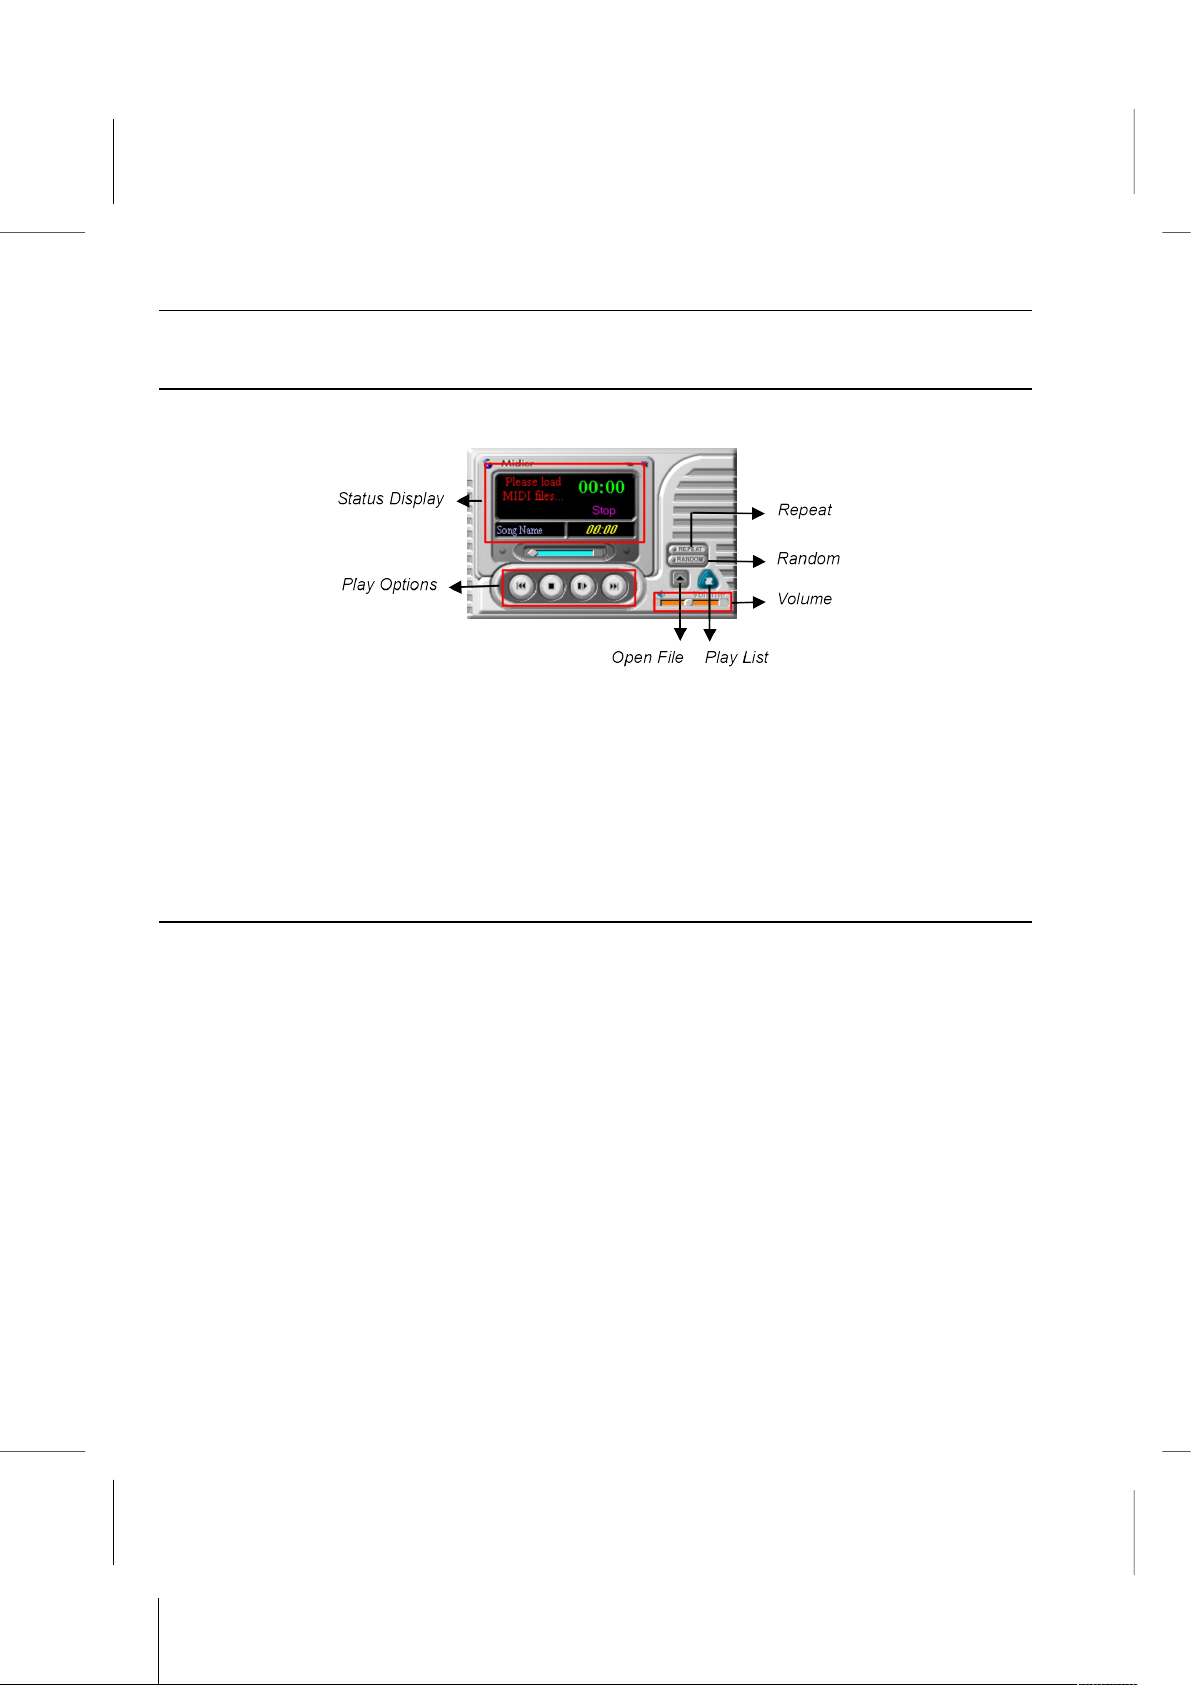
Gamut Documentation: Introduction
Play MIDI files – Use Midier
Start Midier from the GAMUT Menu Bar or click Start/Program/GAMUT/Midier.
1. Press the ‘Open File’ button to select the required MIDI files.
2. Midier will automatically play the selected files and display their current status, such
as track name and time, on the panel. The control buttons on the ‘Play Options’ area
allow you to navigate the files.
3. The ‘Play List’ allows you to manage the selected tracks. It’s easy to add or delete
tracks, or to change the order.
Regulate the audio sources – Use Mixer
Start Mixer from the GAMUT Menu Bar or click Start/Program/GAMUT/Mixer.
Mixer is used to control the audio sources for playing and recording using your Book PC
computer. The supported sound sources include Wave-out, CD, MIDI, etc. The
categories of the audio sources vary with each sound card. Mixer can automatically
detect and show the sound sources for the specific sound card in a computer.
The ‘Mute’ button enables or disables the associated audio source. You can control the
volume and balance level of each sound source, using the vertical and horizontal
scrollbars. You can also select ‘Playback’ or ‘Record’ to regulate the conditions for each
environment.
B – 7
Page 80
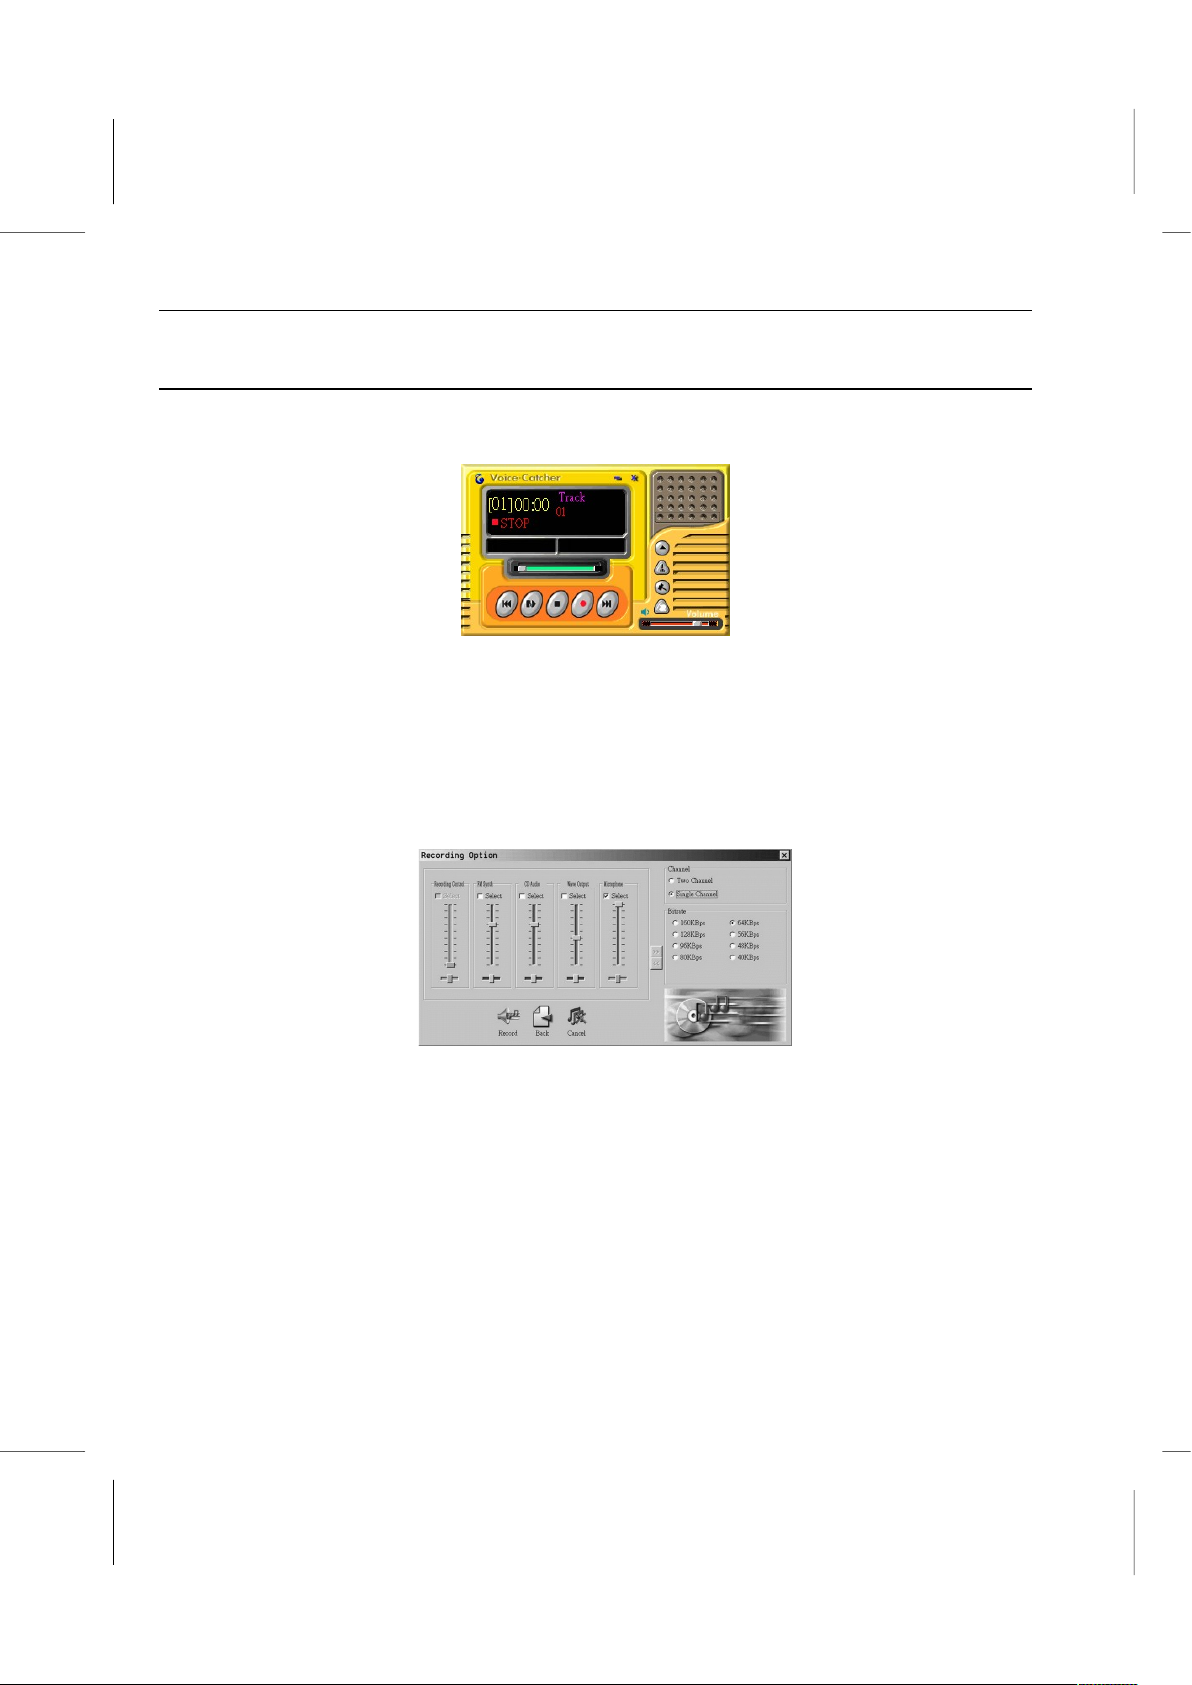
Book PC
Recording audio data—Use Voice-Catcher
Start Voice catcher from the GAMUT Menu Bar or click Start/Programs/Gamut/
Voice Catcher.
1. Make sure that your recording environment setup is ready. Then click on the ‘Start
recording’ button to start.
2. Next select the recording format. The system default GM2 is a compressed format.
3. Next type the name of the recorded file or browse to find an existing file.
4. Select the recording source, and adjust the volume, then select the desired recording
mode and compression ratio.
Note: Normally, when recording vocal audio, select Single Channel 64K BPS. A
one-hour recording will take up about 28 MB. For recording common music files,
Two Channel 128K BPS is suggested. A one-hour recording will take up about 56
MB.
5. After the setup is done, single click the ‘Record’ button to start recording.
6. Once you have finished recording, click the ‘Stop’ button. Click on the ‘Play’ button to
play the recorded file.
B – 8
Page 81

Appendix C
Appendix C
WINDVD
WINDVD
Documentation
Documentation
Copyright 1998 Intervideo, Inc. All rights reserved.
The contents of the associated WINDVD software are the
property and copyright of Intervideo, Inc. Any reproduction in
whole or in part is strictly prohibited.
Manufactured under license from Dolby Laboratories.
Page 82
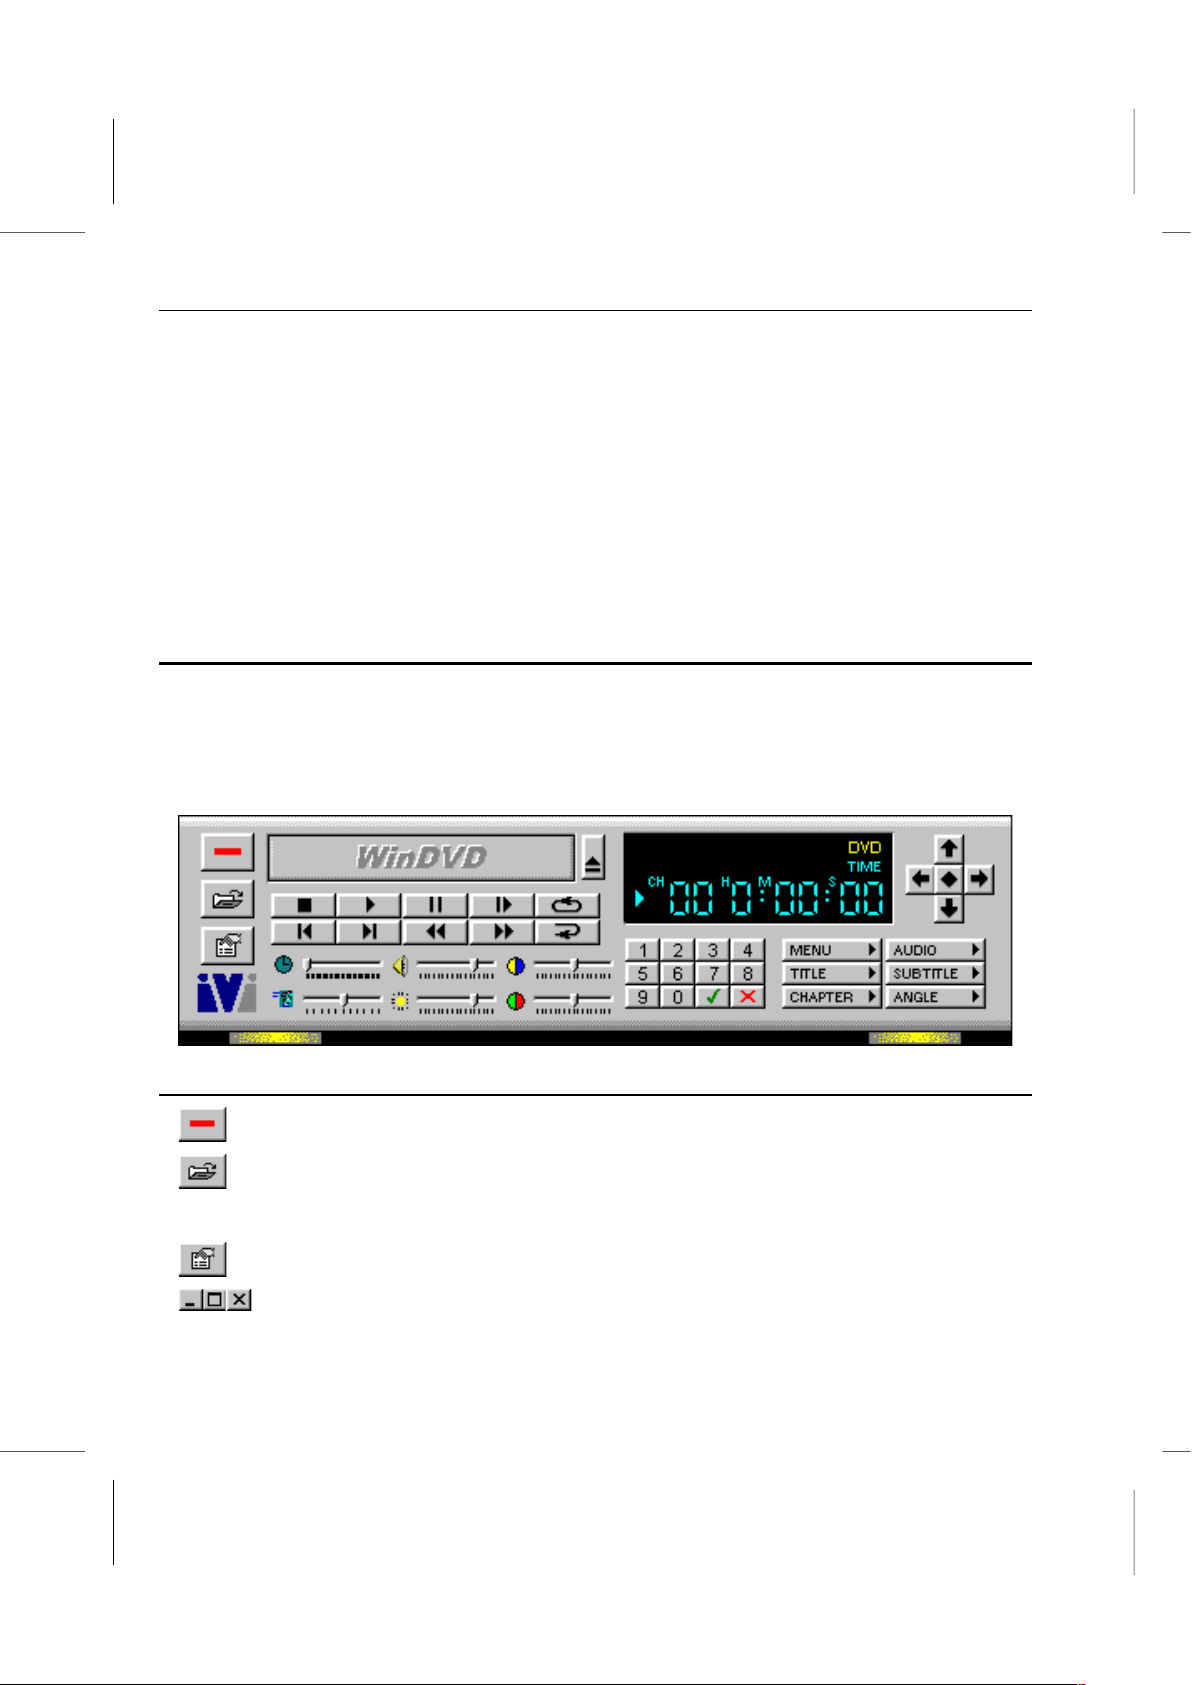
Book PC
This chapter contains documentation for the WinDVD application. InterVideo Inc.'s
WinDVD is a simple-to-use DVD player with all the features you would expect to find in a
standard consumer DVD player, in addition to some very advanced functionality, such as
full VCD 2.0 support, full precision video decode, a choice of user interfaces, and video
display options. You can play DVD titles or Video CDs - WinDVD automatically
determines the type of disk in the DVD drive and uses the correct playback method.
Each DVD (Digital Video Disk or Digital Versatile Disk) is designed by the a different
author, who can create different features for each disk. WinDVD handles all features
commonly used today. Most DVD disks have menus, which you can navigate. WinDVD
recognizes these features and lets you access them through the WinDVD user interface.
The WinDVD Controls
Once WinDVD is launched and active, use the controls on the WinDVD panel to navigate
through the DVD Title. The WinDVD controls are designed to look like a standalone DVD
player, so they may already look familiar to you. Keep in mind that not all options are
available with all DVD Titles. If a feature is not available with a particular title, it will be
grayed out. Below is a description of each section of the full WinDVD control panel.
Start/Eject
Power off, closes the WinDVD application.
Opens the Playlist window, letting you select a specific order and group of
files. Select from .vob, .dat, .mpg, and .ac3 files. You cannot select a file
while a movie is playing.
Opens the Properties window.
Minimizes, maximizes, and closes the WinDVD video window.
C – 2
Page 83
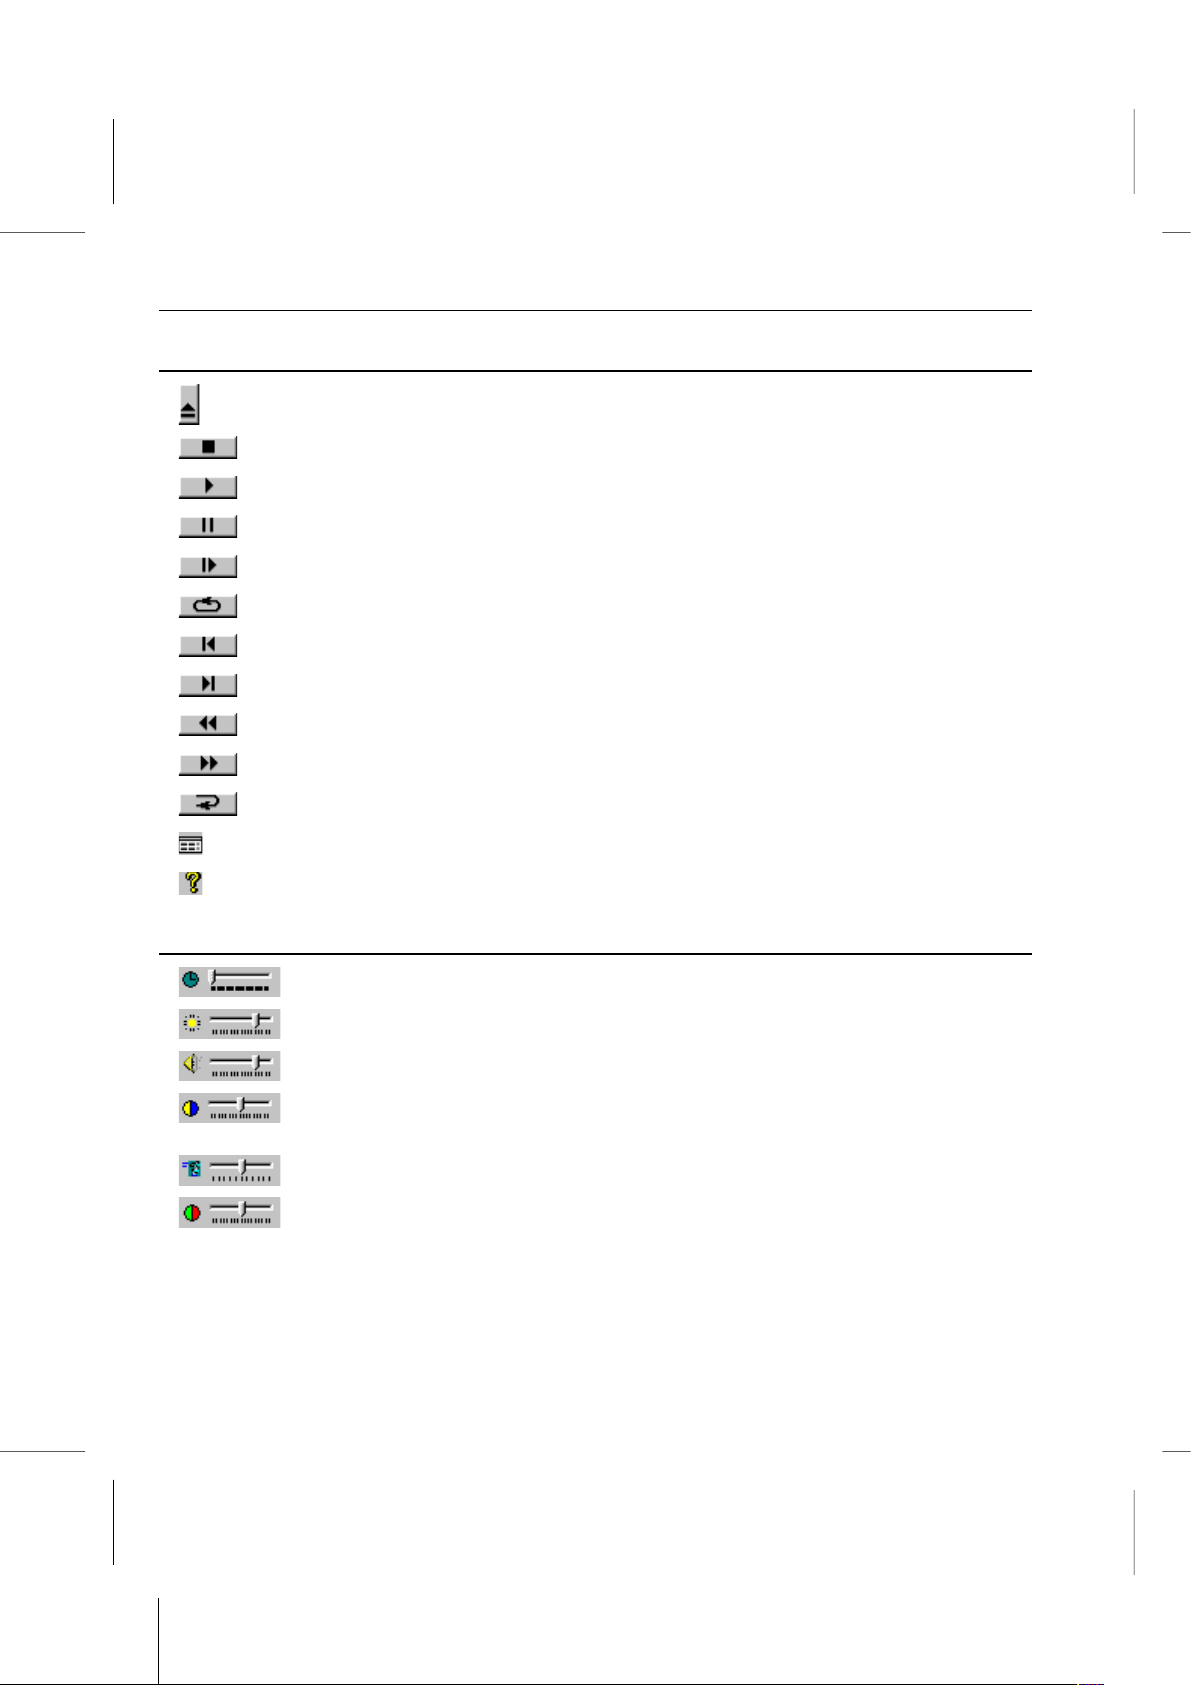
WINDVD Documentation: Set the DMA Mode for the CD-ROM/DVD-ROM
Navigation Buttons
Eject.
Stop.
Starts playback of the disk.
Pauses the current playback.
Single frame advance while in Pause mode
Loops current title or chapter.
Jumps to previous chapter.
Jumps to next chapter.
Plays the disk in fast reverse mode.
Plays the disk in fast forward mode.
Restarts the same chapter.
Opens the Audio and Video adjustment window.
Opens the online help system.
Sliders
Moves to a specific time in the title.
Increases or decreases the brightness of the video output.
Increases or decreases the audio output.
Color Control Bar 1. Adjusts the relative strength (balance) between
video colors blue and yellow.
Smooth slow motion and smooth fast forward.
Color Control Bar 2. Adjusts the relative strength (balance) between
video colors red and green.
C – 3
Page 84
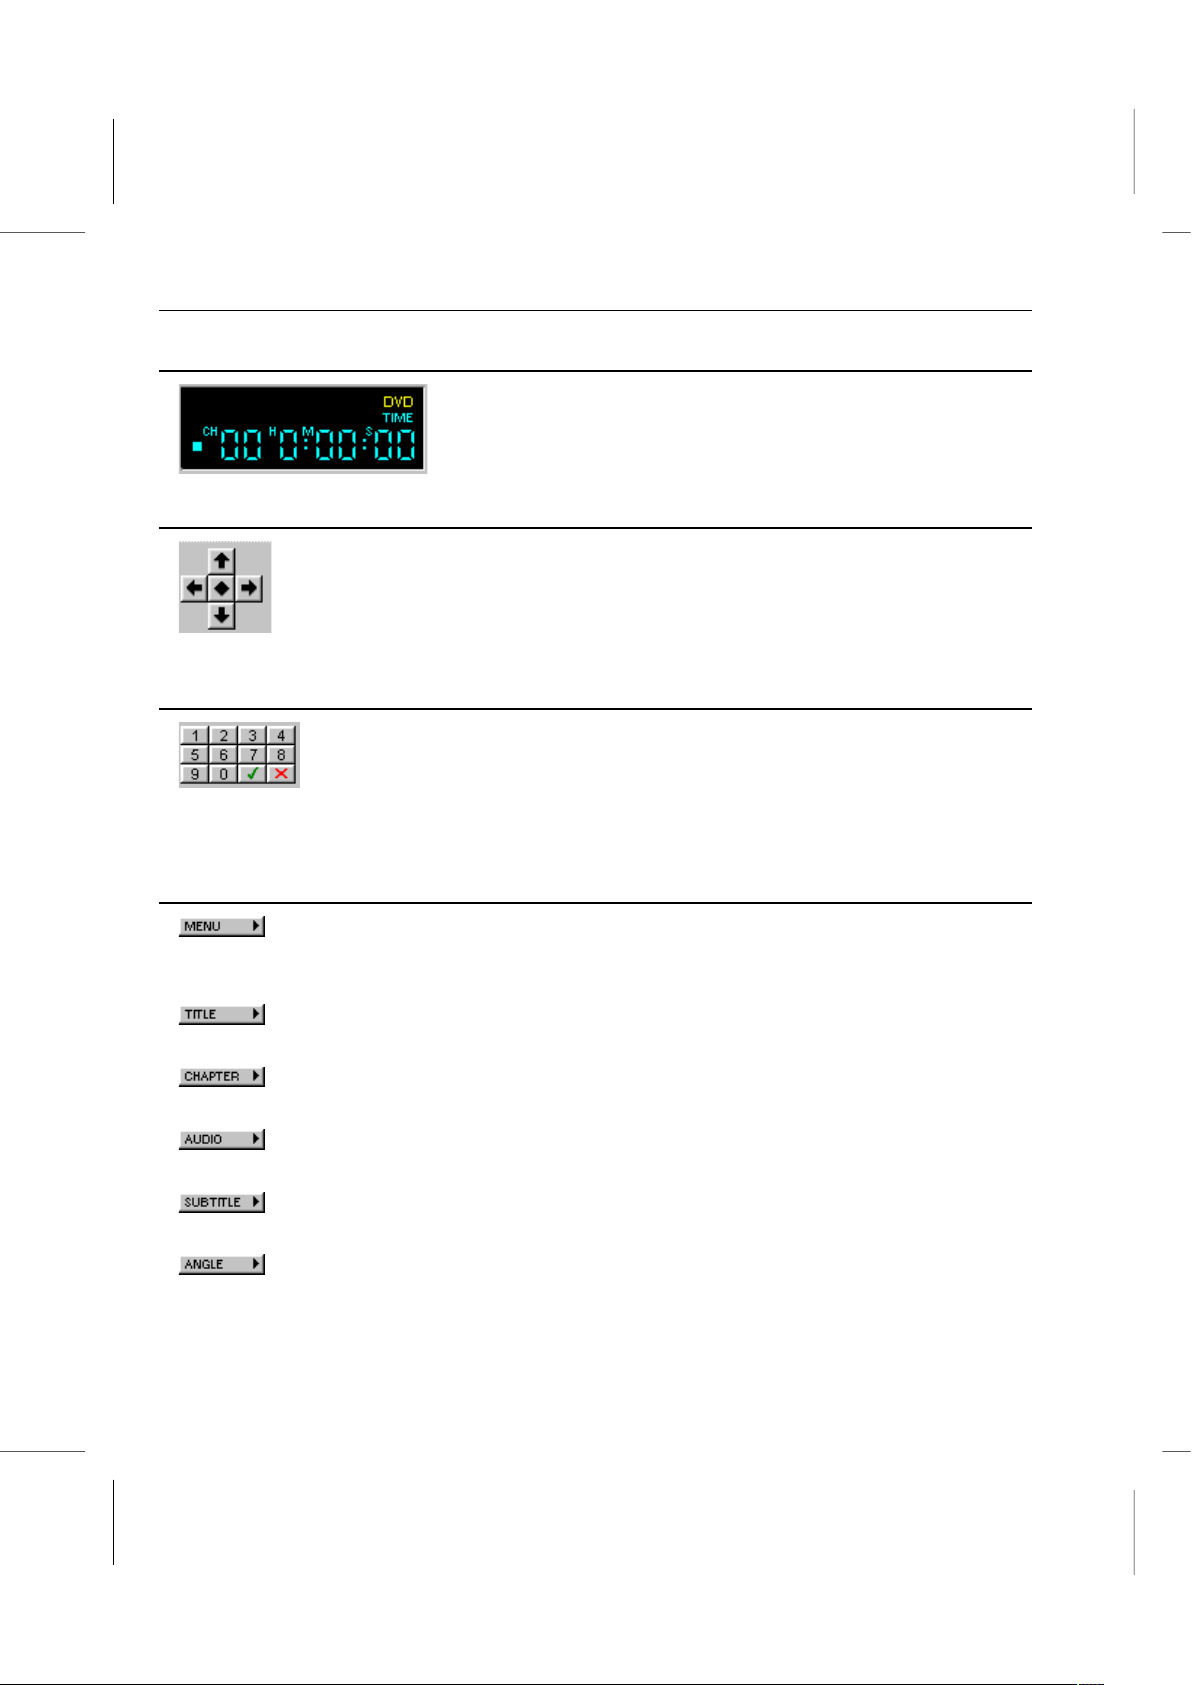
Book PC
Counter
The counter shows the chapter currently being played,
and how much time has elapsed since the Title began
playing.
Navigation Arrows
Use the navigation arrows just as you would use a mouse button or the
Tab key.
The arrows represent (clockwise from top): Navigate up, Navigate right,
Navigate down, Navigate left. Center: Select or Enter.
Numeric Keypad
The numeric keypad provides you with a method of selecting numbers.
This is more likely to be used while playing a Video CD than a DVD
disk. Any time that you enter a numeric value, click the corresponding
key on the numeric keypad and then click the green checkmark to
accept that number.
Menu Items
Displays all of the menus available (Root, Audio Language, Subtitles, etc.)
on the DVD disk currently being played and allows you to select a menu to
navigate.
Opens a submenu showing you all of the titles available on the DVD disk
currently being played and allows you to select a new title to play back.
Opens a submenu showing you the chapter currently being played. You
can select another chapter from this menu.
Displays the current DVD disks audio track options. If multiple audio tracks
or languages are available, use this menu to select your choice.
Displays the subtitle menu. If multiple language subtitles are available, use
this menu to select your choice.
When available, select the angle to view from a list of optional angles.
C – 4
Page 85
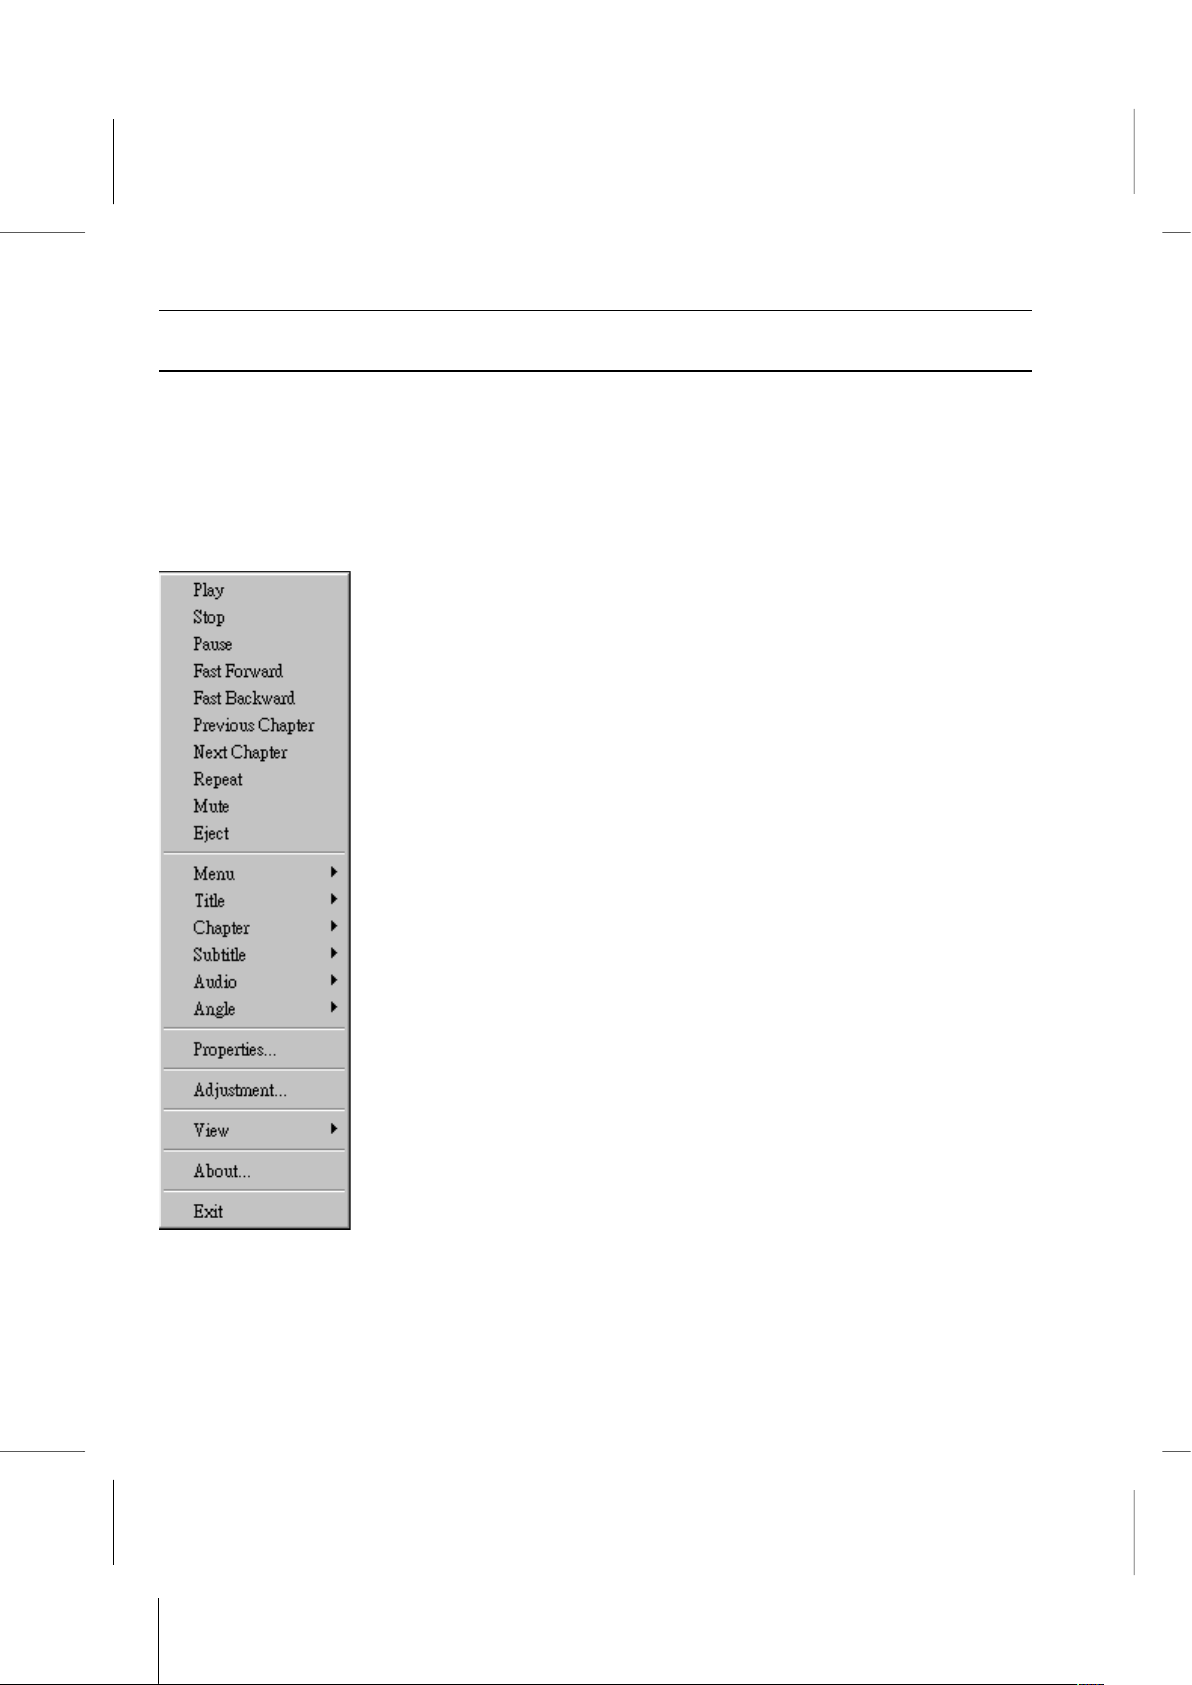
WINDVD Documentation: Set the DMA Mode for the CD-ROM/DVD-ROM
The Right-Mouse Click Menu
While you are viewing a movie, you can put the cursor on the display window and rightmouse click to see a ‘video menu’.
The commands on this menu are the same as those in the regular menu. You can also
use this window to show the main WinDVD control panel when it has been hidden by
viewing full-screen video, or as set in the Properties section.
The Video menu is shown as below:
Play – plays the current title, restores play after a pause.
Stop – stops the current playback.
Pause – pauses the current playback.
Fast Forward – plays the disk in fast forward mode.
Fast Backward – plays the disk in fast reverse mode.
Previous Chapter – jumps to the previous chapter.
Next Chapter – jumps to the next chapter.
Repeat – repeats the disk play
Mute – mutes the sound on the disk currently playing.
Eject – ejects the disk from the drive.
Menu – shows menu selections
Title – shows title information
Chapter – shows chapter selections
Subtitle – shows subtitle selections
Angle – shows angle selections
Properties – opens the Properties window
View – shows tool bar, status bar and player
About – shows version and copyright information.
Exit – closes WinDVD.
C – 5
Page 86

Book PC
Using WinDVD
Viewing a DVD Title
To view a DVD title, put the disk into the DVD drive. WinDVD will automatically begin
playing the disk. To launch WinDVD manually:
1. Select Start/Program/WinDVD, or if you have created one, click the WinDVD
desktop shortcut.
2. Make your selections from the menu within the WinDVD window, or click the Play
icon on the control panel.
Creating a Playlist
1. With the disk in the drive, click the Playlist icon.
2. The Playlist window opens. Select File from the lower right set of options (File or
Disk). Move to the drive and directory in which the files are stored. Select the first file
to be played.
3. Click Add. Repeat this procedure with as many files as you want. Remember that
these files will now play in the order in which they appear. Delete and replace files to
create the correct order, if needed.
4. Click Save to save your playlist for future use. Click Close to close the window. When
you click Play, the playlist automatically plays the files in the order specified. You can
play .mpg, .vob, and .ac3 files.
Loading a Previously Saved Playlist
1. With the disk in the drive, click the Playlist icon.
2. The Playlist window opens. Click Load Playlist.
3. The list of saved playlists appears. Select the playlist to load.
4. Click Close to close the window. When you click Play, the playlist automatically plays
the files in the order specified. You can play .mpg, .vob, and .ac3 files.
Changing Your Settings
You may want to enable or disable certain features of your WinDVD. To change any
properties and features of your WinDVD:
C – 6
Page 87

WINDVD Documentation: Set the DMA Mode for the CD-ROM/DVD-ROM
1. Launch WinDVD and view the main control panel.
2. Click the Properties icon. The Properties window appears.
3. Tap to the desired properties to be changed. Select from General properties, Audio
properties, Parental Control properties, and Display properties.
4. Select the properties you want. If you are unsure about what a particular property
means, see the online help for that properties property page, or check the glossary.
You can change these properties at any time.
5. Click OK again to accept your changes.
Setting Parental Control
Parents may want to set the parental controls, allowing only those movies and titles that
are age-appropriate to be viewed. (In some cases, movies can be shown in modified form
to allow different ratings for the same movie.) To set movie rating limits on your WinDVD:
1. Launch WinDVD and view the main control panel.
2. Click the Properties icon. The Properties window appears.
3. Tap to the desired properties to be changed. Select Parental Control Properties.
4. Select the desired age-appropriate level. This will be the highest level allowed. No
titles with movie ratings higher than the one selected will be viewable. You can
change this again at any time.
5. If you have set a password, enter the password now, then click OK. You can change
your password at any time.
6. Click OK again to accept your changes. The parental control feature will now use the
new settings.
Ejecting a Disk
To eject a disk from the player, click the Eject button from the video viewing
window or the toolbar.
Hiding and Viewing the Player
You can choose to only see the Video Viewing window. To hide the Player:
1. Open the Properties page.
C – 7
Page 88

Book PC
2. Tap to General. Disable (remove the checkmark) View Player.
3. The player is now hidden. Enable the option again to view the player. You can open
the properties page from the right-click menu or from the toolbar on the video viewing
window.
Enabling the Toolbar and Status bar
You can choose to include a toolbar and a status bar when using the Video Viewing
window.
1. Open the Properties page.
2. Tap to General. Enable View Toolbar to see the toolbar in the video viewing window,
and View Statusbar to see the status bar on the window.
3. You can remove the toolbar or status bar from the video viewing window by disabling
the selected feature.
Viewing a DVD Movie or Video CD
Insert the Title into the CD-ROM/DVD Drive. WinDVD reads the format of the disk and
starts automatically.
Playing a DVD Interactive Title
Interactive DVD or MPEG2 video based titles require no special action from the user. Just
install the application and it should properly call the WinDVD drivers to playback the DVD
or MPEG2 video files embedded in the application.
Vocal options
When you insert a karaoke or other vocal disk into the DVD drive, WinDVD automatically
reads and correctly decodes the type of disk. The audio output is determined by the
Vocal Options properties you have selected.
Changing the Parental Control Password
To create a new password:
1. From the Parental Control window, click Change Password.
2. Type your desired password directly into the New Password text area.
C – 8
Page 89

WINDVD Documentation: Set the DMA Mode for the CD-ROM/DVD-ROM
3. Type the same password again in the Confirm New Password text area. Be sure to
type it exactly the same both times, or it will not be accepted.
To change your password:
1. From the Parental Control window, click Change Password.
2. Type your current password in the Old Password text area.
3. Type your desired password directly into the New Password text area.
4. Type the same password again in the Confirm New Password text area. Be sure to
type it exactly the same both times, or it will not be accepted.
Closing WinDVD
To close WinDVD:
1. Stop any DVD disk in the DVD drive.
2. Click the Close icon.
C – 9
Page 90

Book PC
Understanding the DVD System
Digital Video Disk (DVD) stores and plays digital information, such as a movie, on a disk
similar in size to the common CD-ROM disk. DVD output is clearer, sharper, and uses a
higher color resolution than previous formats. Audio content is also sharper. DVD disks
store up to nine hours of exceptionally high quality video and multi-channel surroundsound audio, interactive multimedia computer programs, or 30 hours of CD-quality audio.
DVD allows features that were impossible with movies (or games) on tape. DVD players
can play from any point on the disk. It can also pause, play in slow motion or fast forward,
or freeze frames. These random access features allow previously unheard of features
such as multiple endings for a movie, first-person interactive video games, and multiple
camera angles.
DVD can store multiple sound tracks, it supports up to eight languages for a single movie.
In addition, the format supports 32 closed caption tracks.
Region Codes
Motion picture studios want to control the home release of movies in different countries
because theater releases aren't simultaneous. They have required that the DVD standard
include codes that can be used to prevent playback of certain disks in certain
geographical regions. The player will refuse to play disks that are not allowed in that
region.
Regional codes are entirely optional for the maker of a disk. Disks without codes will play
on any player in any country. Most DVD-ROM drives let you change the region code a
few times, usually between 5 and 9. Once a drive has reached the limit it can't be
changed again unless the vendor or manufacturer resets the drive. There are 6 regions:
1 Canada, U.S., U.S. Territories
2 Japan, Europe, South Africa, Middle East (including Egypt)
3 Southeast Asia, East Asia (including Hong Kong)
4 Australia, New Zealand, Pacific Islands, Central America, Mexico, South
America, Caribbean
5 Former Soviet Union, Indian Subcontinent, Africa, N. Korea, Mongolia)
6 China
C – 10
Page 91

WINDVD Documentation: Set the DMA Mode for the CD-ROM/DVD-ROM
NTSC and PAL
When the National Television Systems Committee (NTSC) prepared the standards for
commercial television broadcasting in the United States, Canada, Japan, and parts of
Central and South America, they decided on 525 lines of display at thirty frames per
second. In most of Europe, Australia, and parts of Central and South America, however,
the Phase Alteration Line (PAL) standard, 625 lines at 25 frames per second was used.
Aspect Ratios
Video can be stored on a DVD in any one of four ways:
“Standard”, which has a ratio of 4 to 3,
“Wide screen”, with a ratio of 16 to 9;
“Letterbox”, which uses a 16 to 9 ratio but displays in a standard size screen;
"Pan & scan", which crops parts of the display out of the visible image in order to fit
into a standard size display.
DVD Audio
A DVD-Video disk can have up to 8 audio tracks, with each track being PCM, MPEG-2, or
Dolby Digital.
PCM is uncompressed digital audio - the same format used on CDs. Using from one
to eight channels, it can be sampled at 48 or 96 kHz with 16, 20, or 24 bits per
sample.
MPEG audio is multi-channel digital audio, using compression with sample rate of 48
kHz at 16 bits. Both MPEG-1 and MPEG-2 formats are supported.
Dolby Digital is multi-channel digital audio, with a sample rate of 48 kHz at up to 24
bits. The bit rate is 384 Kb/s being the normal rate for 5.1 channels and 192 being the
normal rate for stereo, although most Dolby Decoders support a slightly higher bit
rate.
C – 11
Page 92

Book PC
Parental Control Properties
You can set password-protected parental controls on your WinDVD. From the list of
ratings, select the one you want to allow for viewing.
G - suitable for general audiences
PG - parental guidance suggested
PG-13 - parental guidance suggested, not suitable for children under 13
R - restricted
NC-17 - adult theme or content, not suitable for children under 17
Quality Setting
Low - When this selection is enabled, all features displayed in Custom Quality
settings are turned off.
High - When this selection is enabled, all features displayed in Custom Quality
settings are turned on.
Custom - Unlocks the Custom Quality section of Display Properties. Select the
specific features such as smooth scaling or software de-interlacing.
Hotkey Definitions for the WinDVD Operation
Play/Pause – [Space] key Vocal change – “V” key
Stop – [End] key Mute/Unmute – “M” key
Eject/Close – “E” key Menu – [Ctrl] + “M” keys
Fast forward – “F” key Numeric keypad – “1”~”9”
Rewind – “R” key Navigate select – [Enter] key
Next chapter – [PgDn] key Subtitle – “S” key
Previous chapter – [PgUp] key Audio select – “A” key
Brightness up – [+] key Title – “T” key
Brightness down – [-] key Next Audio – [Ctrl] + “A” keys
Resume – [Ctrl] + [Enter] keys Exit Application – “X” key
C – 12
Page 93
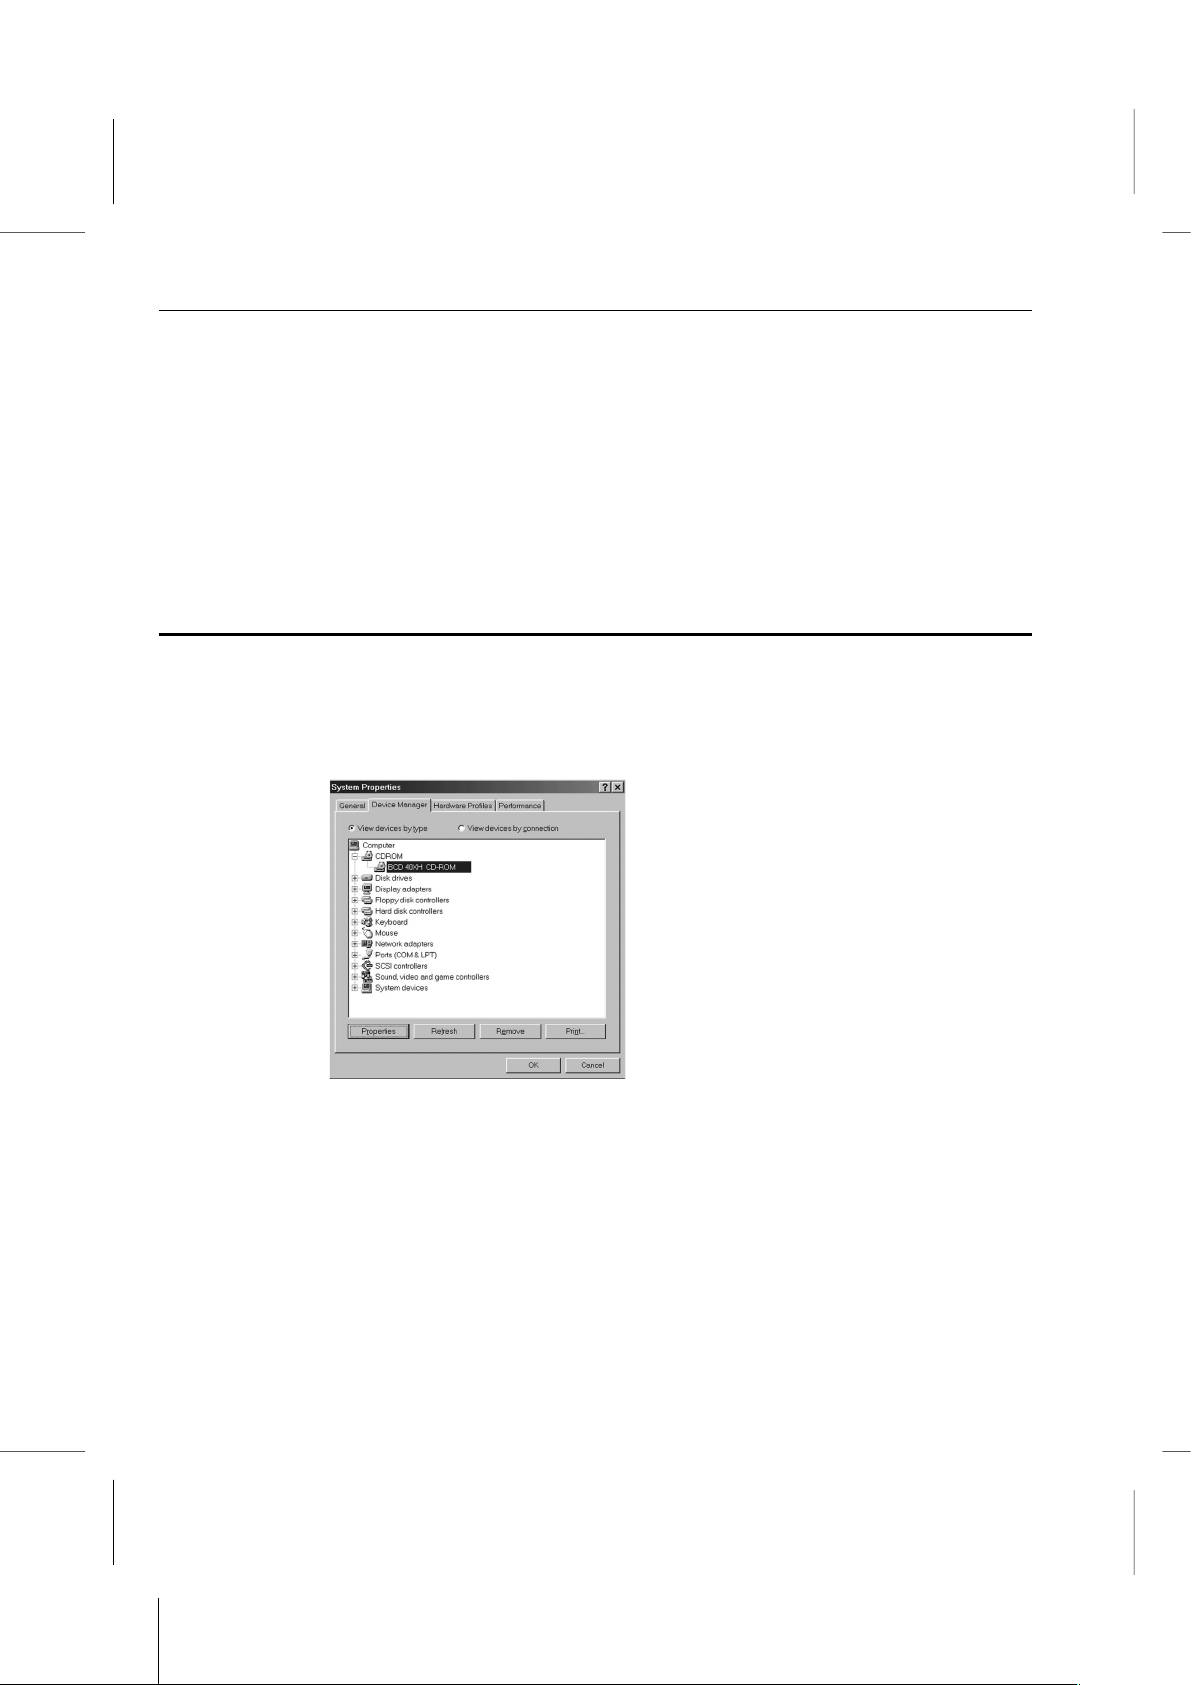
WINDVD Documentation: Set the DMA Mode for the CD-ROM/DVD-ROM
Volume up – [Shift] + [] keys Title menu – [Ctrl] + “T” keys
Volume down – [Shift] + [] keys Next angle – [Ctrl] + “V” keys
Next subtitle – [Ctrl] + “L” keys Subtitle On/Off – [Ctrl] + “O”
Navigate left/right/up/down – []/[]/[]/[]
If the version of the Drivers Support CD is lower than V1.6, we suggest that you
should set the DMA mode for the DVD-ROM first, before you running the WinDVD.
Set the DMA Mode for the CD-ROM/DVD-ROM
1. Open the Control Panel. Click on the Start button and then point to Settings and click
on the Control Panel item
2. Find the System item in the Control Panel window and double-click on it to open it.
3. Click on the Device Manager tab to bring it to the front.
4. Double-click on the CDROM/DVDROM item to bring out the used device.
5. Click on the used device and click Properties button. The device Properties window
will appear.
C – 13
Page 94
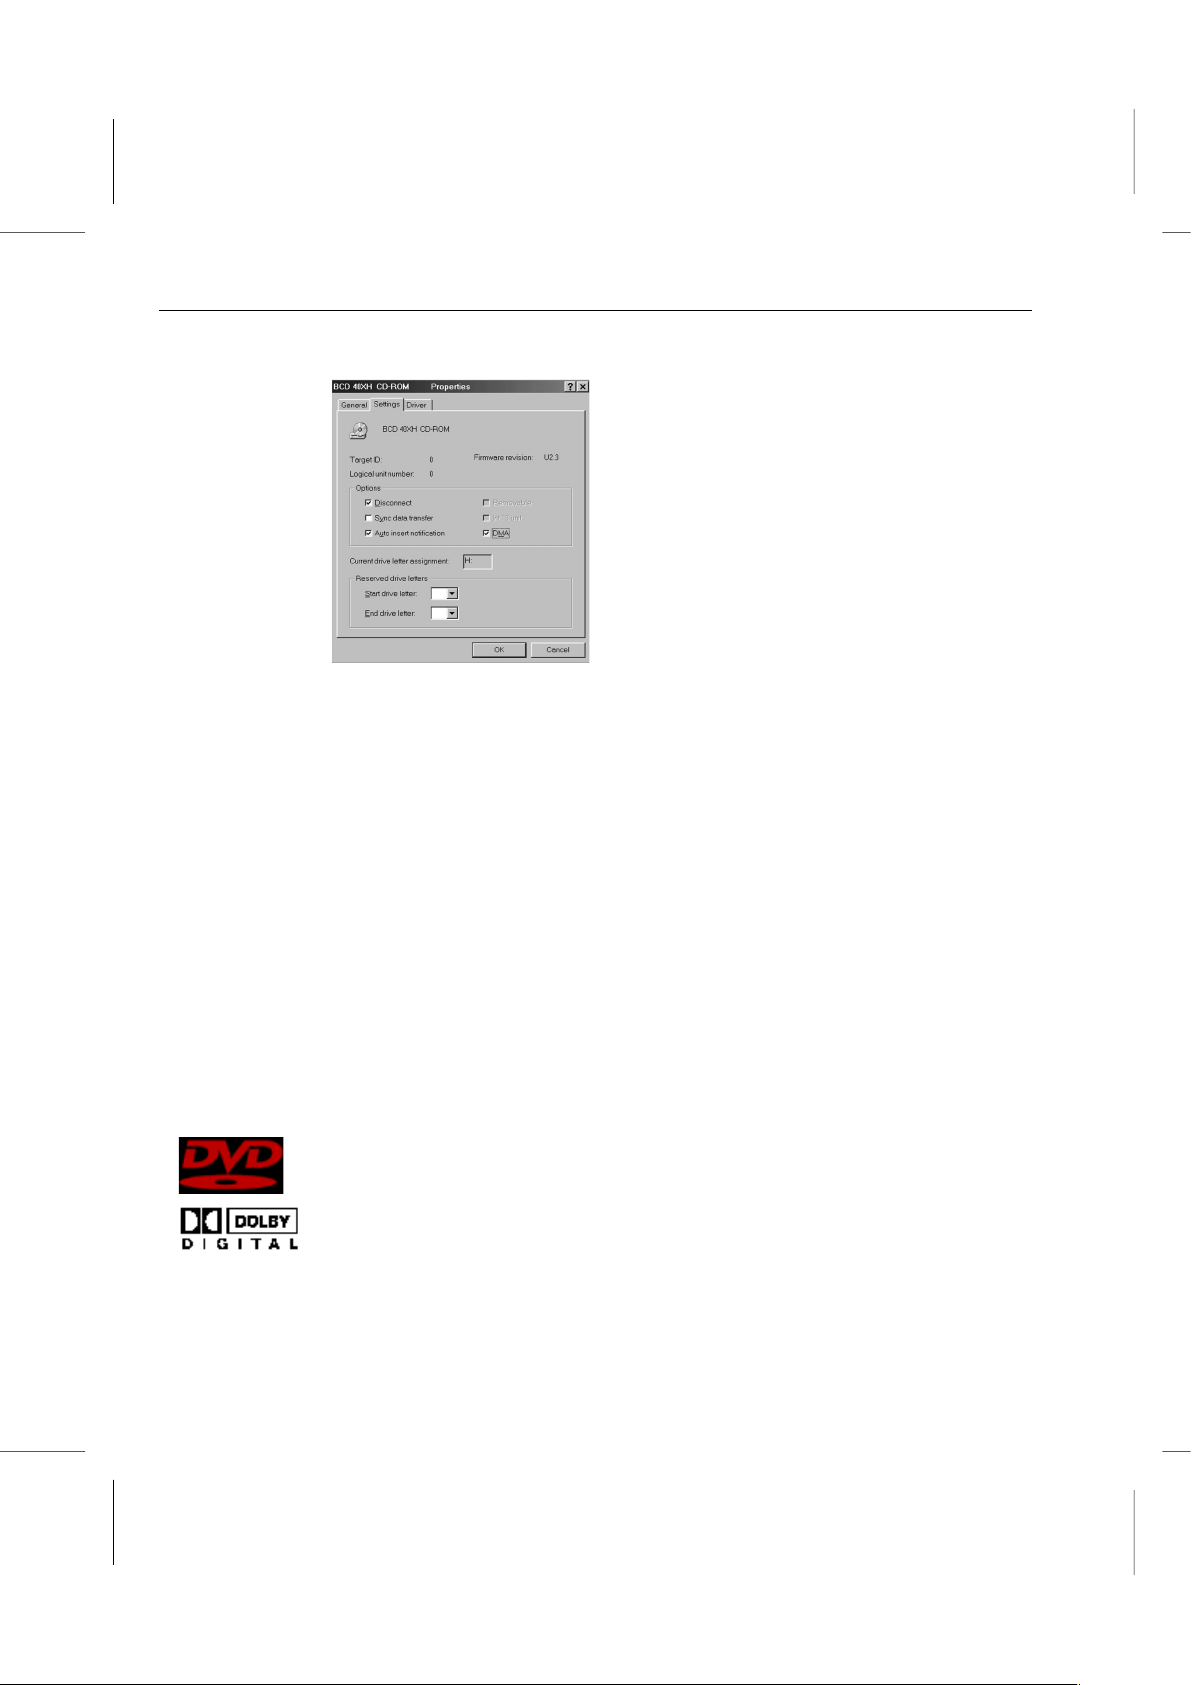
Book PC
6. Click on the Settings tab to bring it to the front.
7. Click on the check box for DMA under Options. A check should appear in the box.
8. Click OK button to accept the new setting. And the system will be restart.
Confidential Unpublished Works Copyright 1992-1997 Dolby Laboratories, Inc. All rights reserved.
"DVD" and the DVD logo are copyright The DVD Forum.
This product includes technology manufactured under license from Dolby
Laboratories. "Dolby" and the "Double-D" symbol are trademarks of Dolby
Laboratories.
C – 14
Page 95

Appendix D
Appendix D
S-YXG50
S-YXG50
Documentation
Documentation
* Copyright 1996,1997,1999 - Yamaha Corporation , All Rights Reserved. No parts of this publication
may be reproduced in any form or for any purpose without prior written authorization from Yamaha
Corporation .
Page 96

Book PC
This chapter contains documentation for the S-YXG50 application.
Features
The Yamaha Soft Synthesizer S-YXG50 allows you to play back MIDI files on your
computer without using a hardware tone generator. Its high fidelity sounds, match the
sounds from an authentic tone generator, are based on and realized by advanced MMX
technology. The S-YXG50 lets your computer be a music synthesizer.
Specifications
Tone Generator
Type Wave table synthesis
Wave Size 2MB
Maximum Polyphony 128 notes
No. of Voices 676 voices + 21 drum kits
Sampling Rate 44kHz / 22kHz / 11kHz
Output Stereo
Dynamic Filter
Filter Time-variable dynamic filter for each note
Effects
Effect Set Three blocks (Reverb, Chorus, Variation)
Types Reverb : 8 types
Chorus : 8 types
Variation : 36 types
MIDI Input Driver
Recognized MIDI Messages: GM System Level 1
XG System Exclusive Message
TG300B Mode
D – 2
Page 97

Functions
Installation
Double-click the Setup.exe file in the S-YXG50 folder and answer the displayed prompts,
and installation will be performed automatically. However if another soft synthesizer is
already installed, the program will automatically decide to halt installation.
To uninstall the software, choose <Start - Program - YAMAHA Soft Synthesizer SYXG50 - Uninstall S-YXG50 >.
(All deletions will be completed when Windows is restarted.)
Even if you have deleted only the Yamaha folder or the Syxg50 folder, use the above
procedure to uninstall the software.
Performance Settings
You can select the desired performance appropriately for the computer or applications.
(By optimize Polyphony, CPU load, Sampling Late, DirectSound).
To make settings
Choose < Start - Settings - Control panel > and double-click the XG Synth
Driver icon
or
Choose < Start - Programs - YAMAHA S-YXG50 - S-YXG50 setup > and make the
settings in the window
that appears as below.
D – 3
Page 98
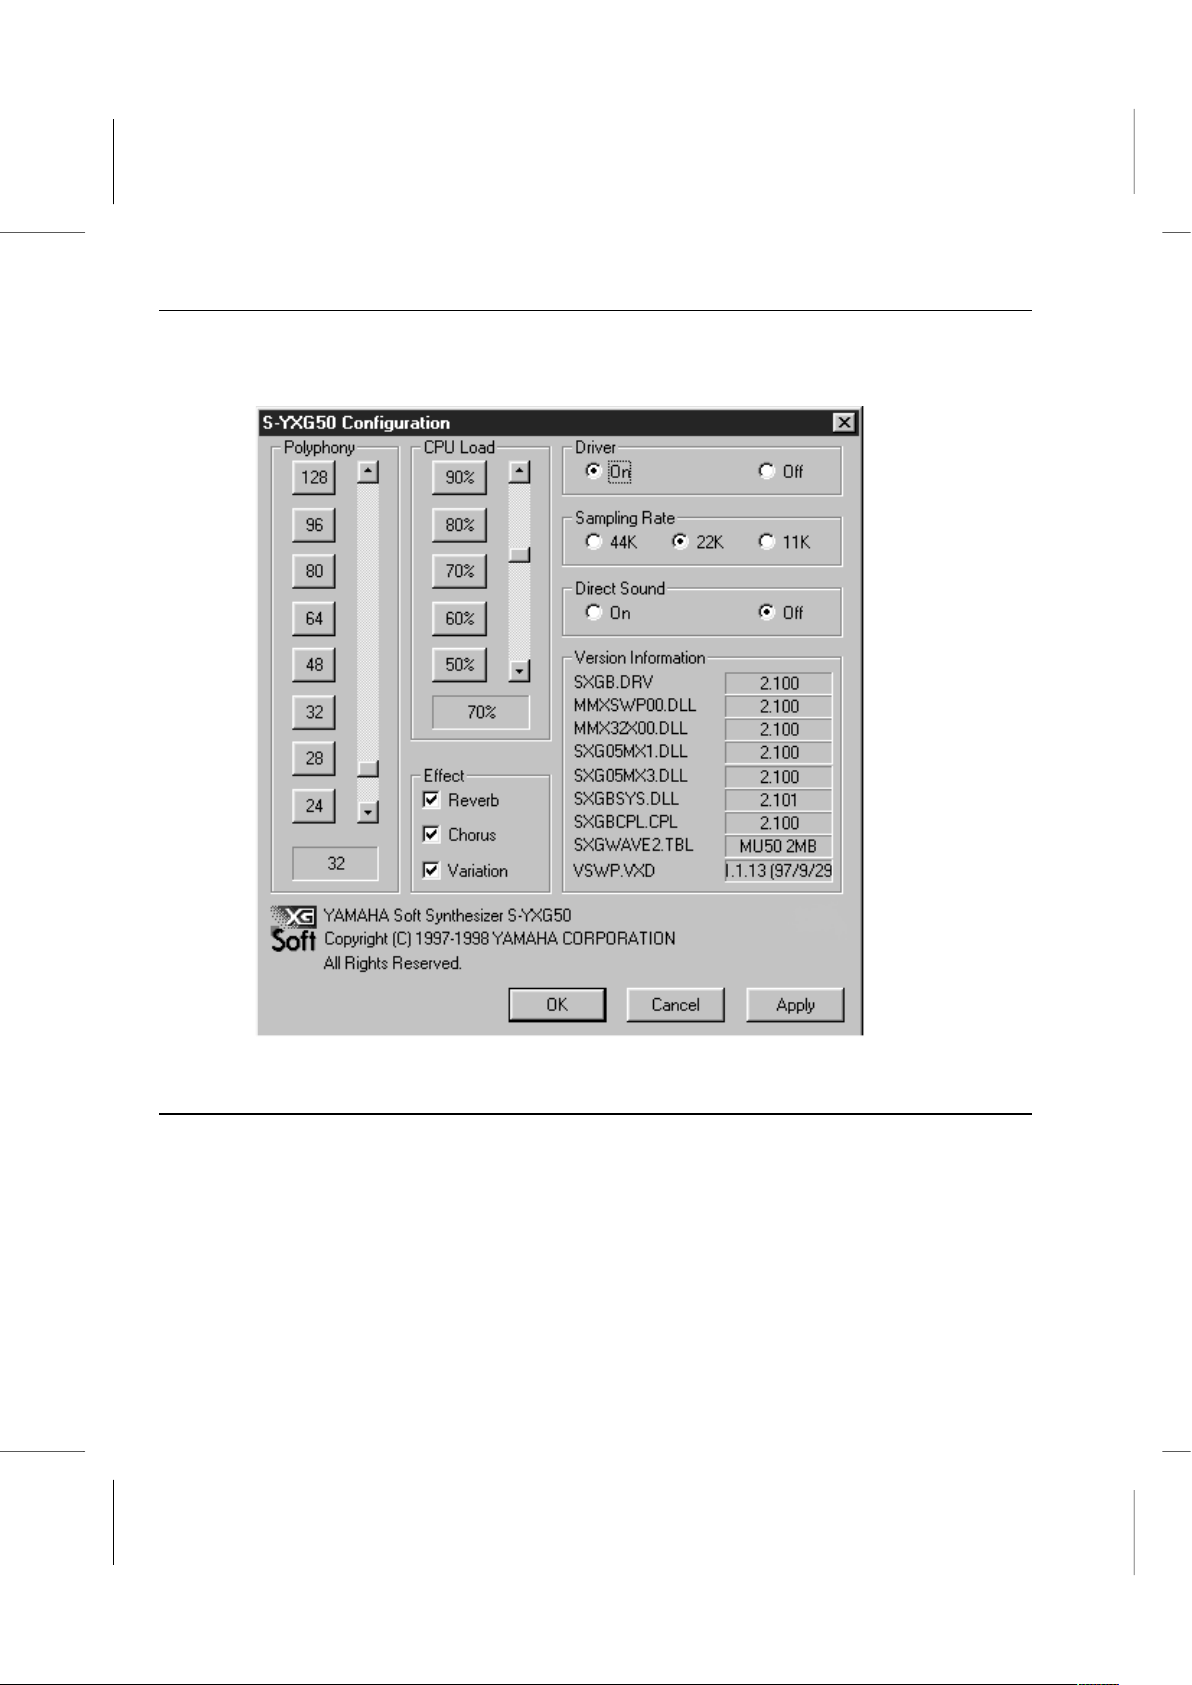
Book PC
(This screen shot is a sample. The version number etc. of the product you are using will be
different.)
Functions
The S-YXG50 has two playback modes -- XG and TG300B -- and will startup in XG
mode.
When playing song data from commercially available XG collections or GM collections, a
signal (System exclusive message) recorded at the beginning of the data will specify the
playback mode, so that S-YXG50 will automatically switch to the appropriate playback
mode.
D – 4
Page 99

Functions
Even when you create your own song data, you can insert a system exclusive message
such as XG System On etc. at the beginning of your data to switch the playback mode.
* Starting up your computer will automatically initialize all settings.
* Changing modes requires about half a second. We recommend that you insert at
least one blank measure between the playback mode message(s) and the beginning
of the musical data.
XG Mode
In XG mode the S-YXG50 will play XG-compatible midi data, as well as multitimbral
data created for the GM System Level 1 format.
In XG mode the S-YXG50 can:
* Play up to 16 Parts.
* Choose from 480 Normal Voices and 11 Drum Voices.
* 3 effect sends.
TG300B Mode
In this mode, S-YXG50 can be used as an XG compatible multitimbral tone generator.
For Voices and Elements, Normal Voices and Drum Voices, Part Priority, Element
Reserve, Selecting Voices and Effect Types detail description, please check the online
help to get more information.
D – 5
Page 100
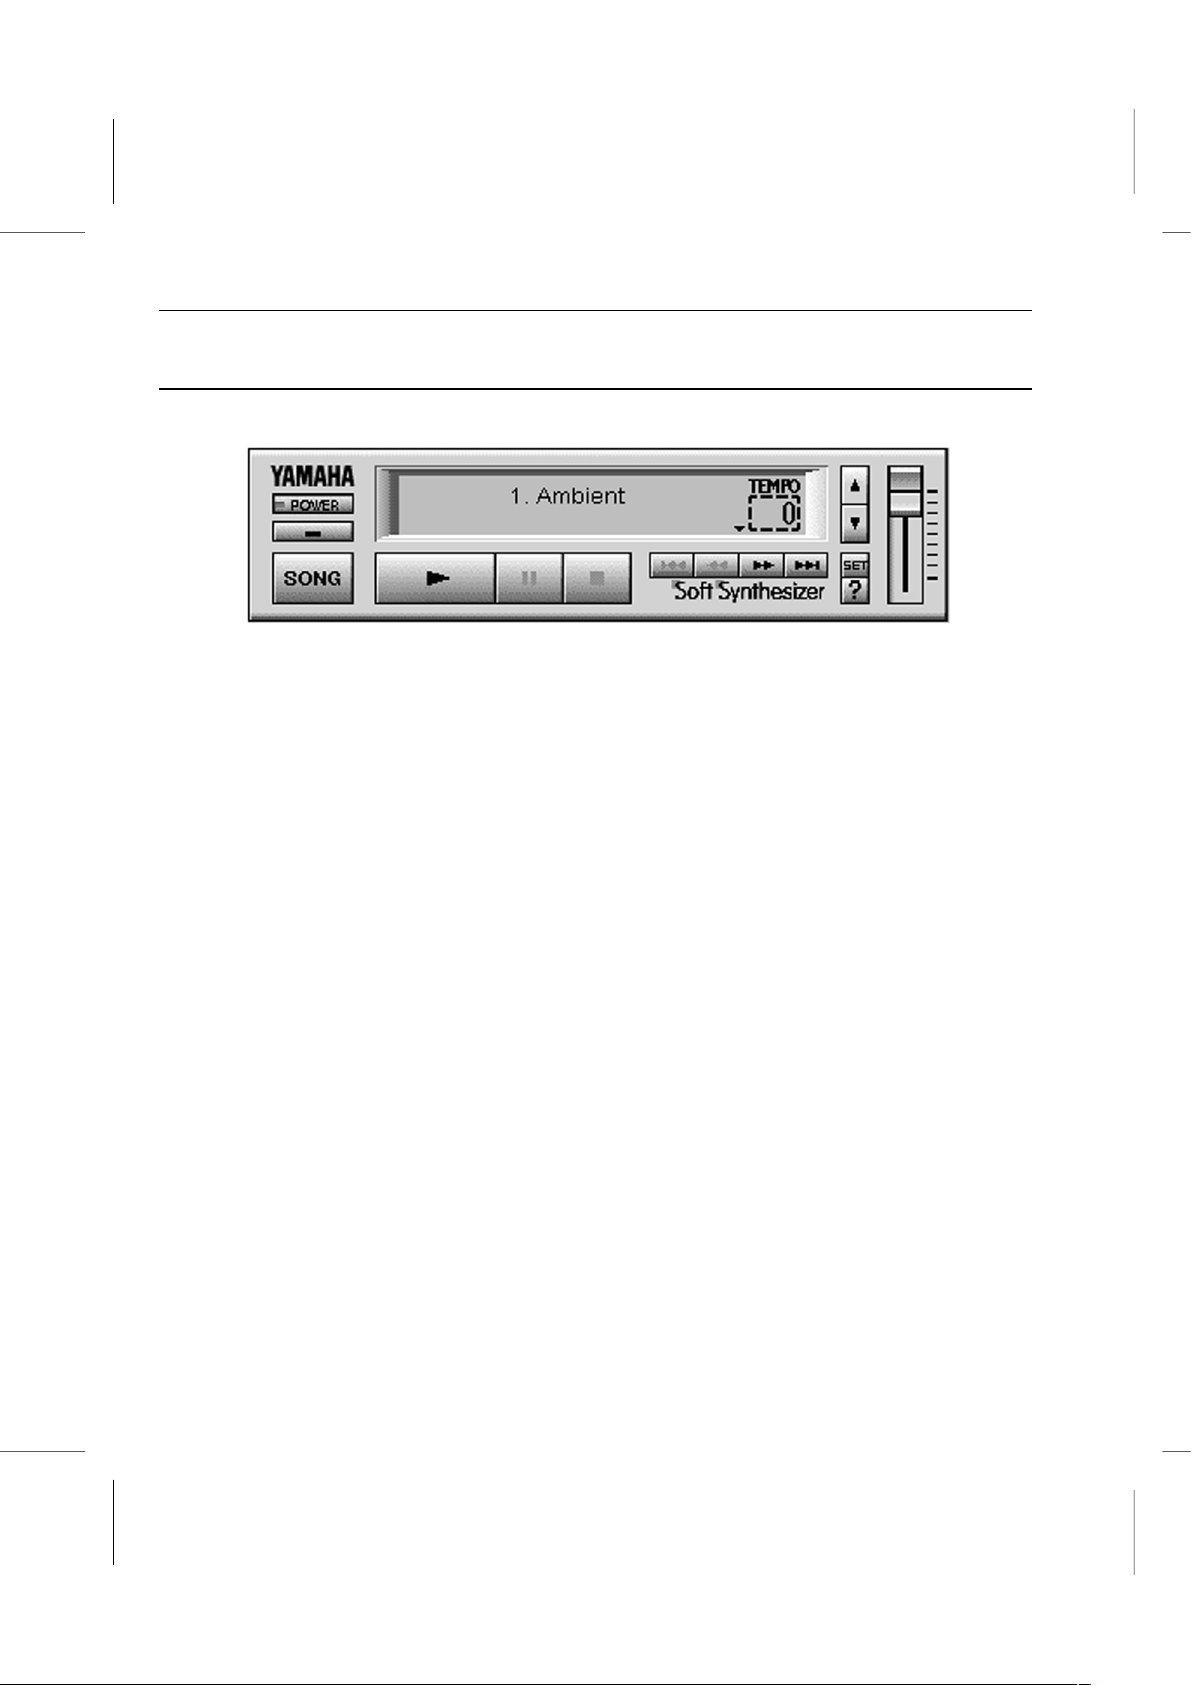
Book PC
S-YXG50 Player Operation Panel
Clicking on an item displays help information about it.
[ 1. Ambient ] Song Name display box: By clicking in this window, you can switch
between the song name display and the level meter display.
[POWER] button: Clicking on this button quits S-YXG50 Player.
[ - ] Minimize button: Clicking on this button minimizes the S-YXG50 Player to an icon.
[SONG] button: Clicking on this button displays the Set Play List dialog box.
[ ] Play button: Clicking on this button loads the MIDI file displayed in the Song Name
display panel, and starts playback.
[ II ] Pause button: Clicking on this button pauses the song.
[ ] Stop button: Clicking on this button stops the song.
[ ] First song select button: Clicking on this button jumps to the first song in the Play
List.
D – 6
 Loading...