

HRS HT801/MDF97-22S Instruction Manual
ATAD-P0234-00 第3版/3rd edition
取扱説明書 / INSTRUCTION MANUAL
取扱説明書 / INSTRUCTION MANUAL 取扱説明書 / INSTRUCTION MANUAL
取扱説明書 / INSTRUCTION MANUAL
手動圧着工具名/Manual crimping tool name
製品コード/Product code
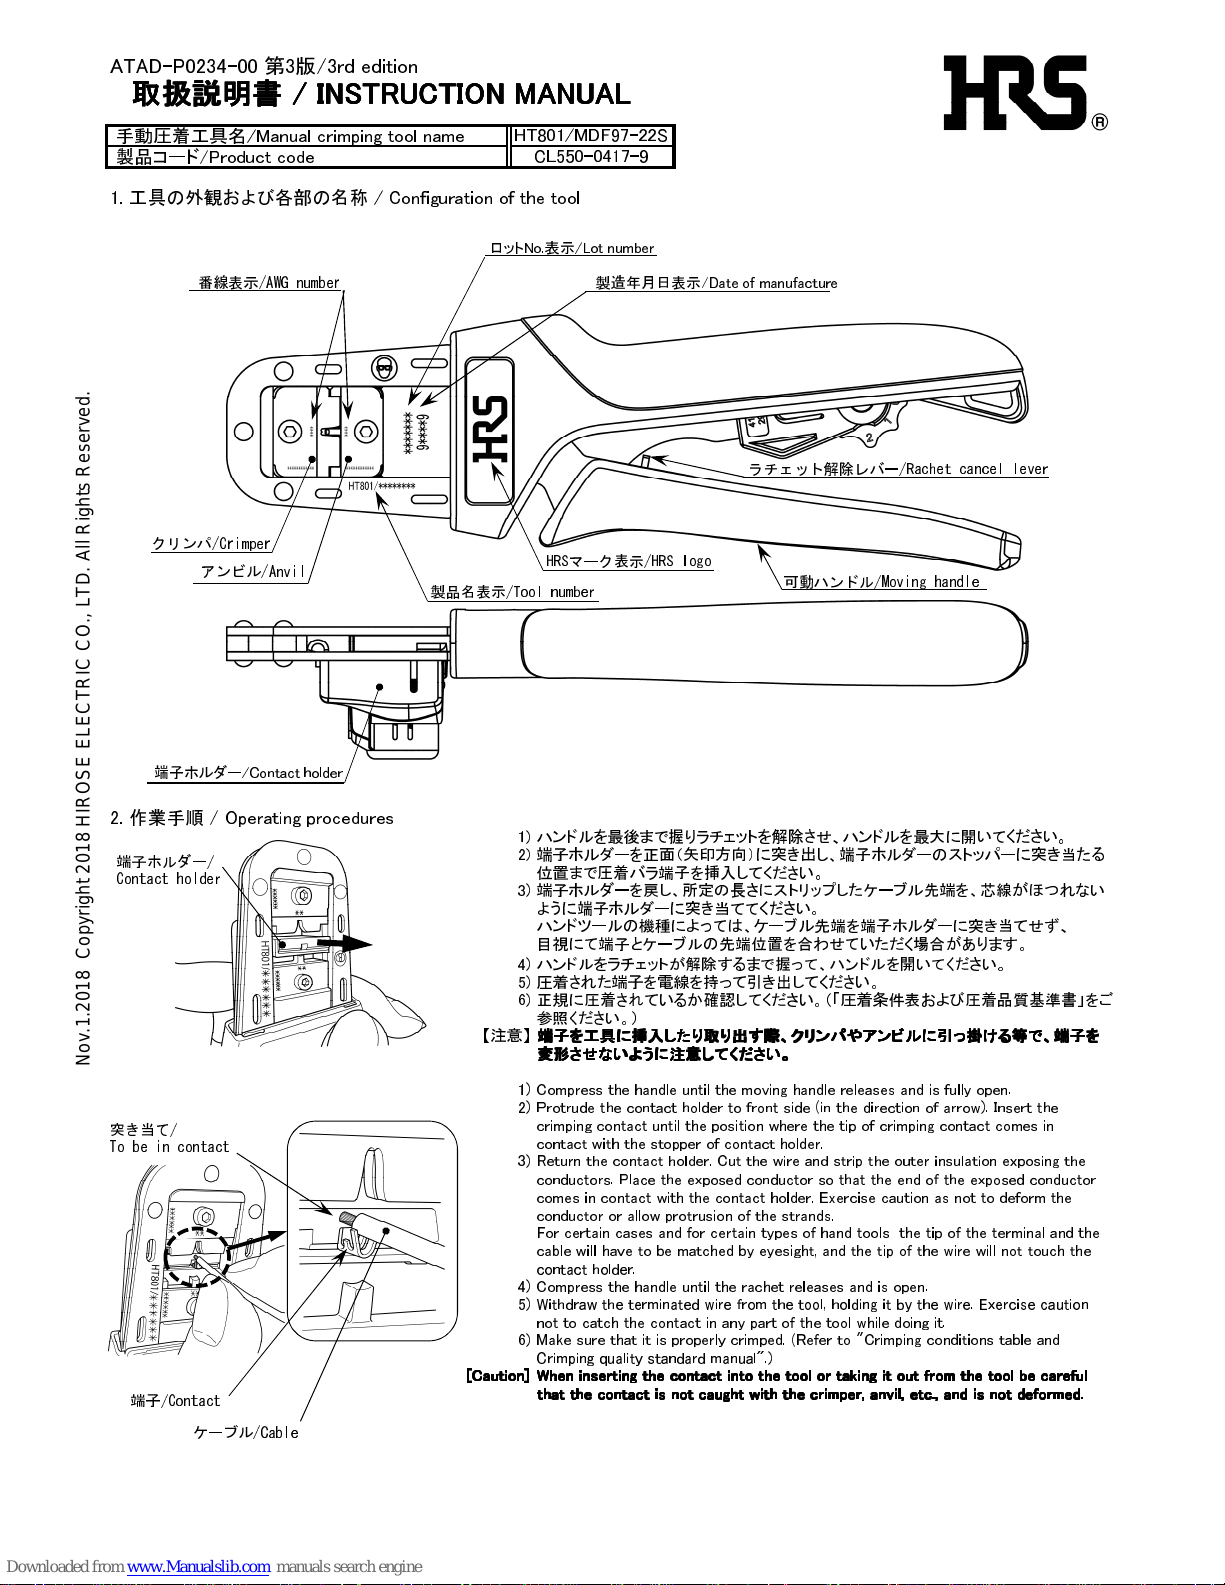
1. 工具の外観および各部の名称 / Configuration of the tool
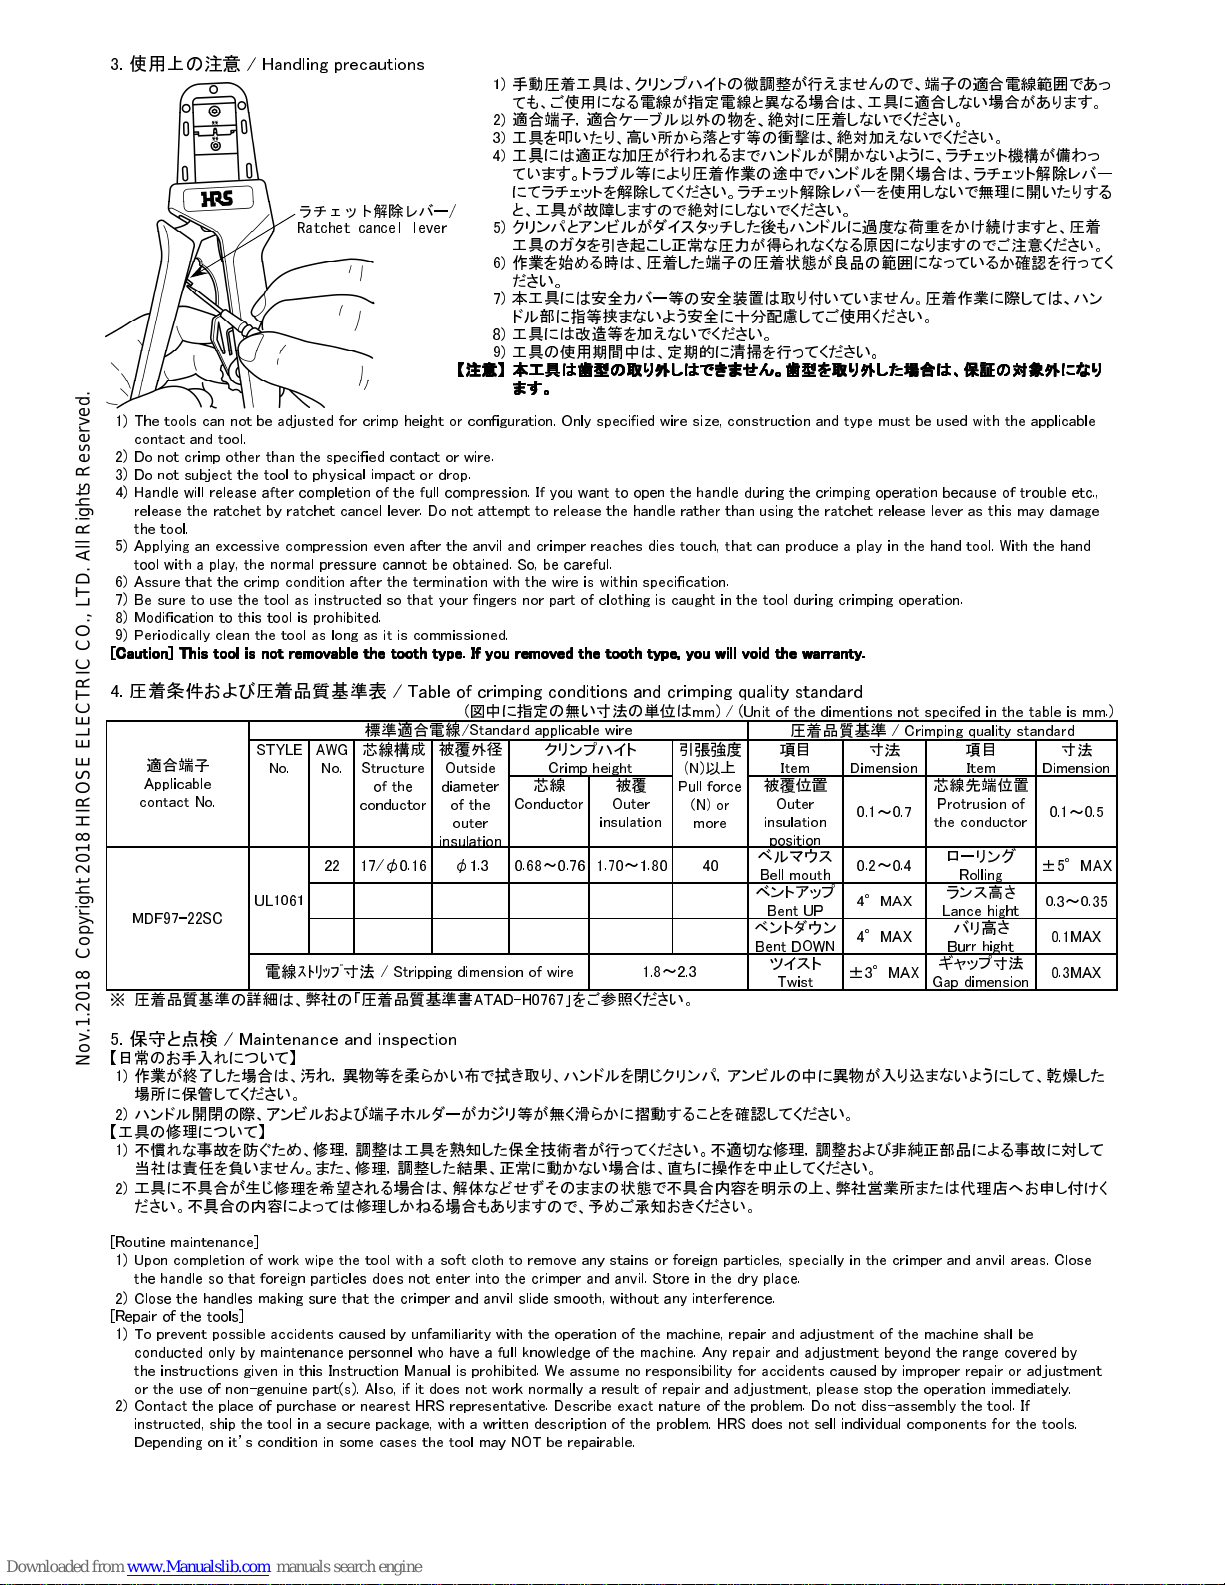
2. 作業手順 / Operating procedures
1)
2)
3)
4)
5)
6)
【注意】
1)
2)
3)
4)
5)
6)
[Caution]
[Caution][Caution]
[Caution]
Withdraw the terminated wire from the tool, holding it by the wire. Exercise caution
not to catch the contact in any part of the tool while doing it.
Make sure that it is properly crimped. (Refer to "Crimping conditions table and
Crimping quality standard manual".)
When inserting the contact into the tool or taking it out from the tool be careful
When inserting the contact into the tool or taking it out from the tool be carefulWhen inserting the contact into the tool or taking it out from the tool be careful
When inserting the contact into the tool or taking it out from the tool be careful
that the contact is not caught with the crimper, anvil, etc., and is not deformed.
that the contact is not caught with the crimper, anvil, etc., and is not deformed.that the contact is not caught with the crimper, anvil, etc., and is not deformed.
that the contact is not caught with the crimper, anvil, etc., and is not deformed.
Compress the handle until the moving handle releases and is fully open.
Protrude the contact holder to front side (in the direction of arrow). Insert the
crimping contact until the position where the tip of crimping contact comes in
contact with the stopper of contact holder.
Return the contact holder. Cut the wire and strip the outer insulation exposing the
conductors. Place the exposed conductor so that the end of the exposed conductor
comes in contact with the contact holder. Exercise caution as not to deform the
conductor or allow protrusion of the strands.
Compress the handle until the rachet releases and is open.
For certain cases and for certain types of hand tools the tip of the terminal and the
cable will have to be matched by eyesight, and the tip of the wire will not touch the
contact holder.
端子ホルダーを戻し、所定の長さにストリップしたケーブル先端を、芯線がほつれない
ように端子ホルダーに突き当ててください。
ハンドルをラチェットが解除するまで握って、ハンドルを開いてください。
正規に圧着されているか確認してください。(「圧着条件表および圧着品質基準書」をご
参照ください。)
端子を工具に挿入したり取り出す際、クリンパやアンビルに引っ掛ける等で、端子を
端子を工具に挿入したり取り出す際、クリンパやアンビルに引っ掛ける等で、端子を端子を工具に挿入したり取り出す際、クリンパやアンビルに引っ掛ける等で、端子を
端子を工具に挿入したり取り出す際、クリンパやアンビルに引っ掛ける等で、端子を
変形させないように注意してください。
変形させないように注意してください。変形させないように注意してください。
変形させないように注意してください。
圧着された端子を電線を持って引き出してください。
HT801/MDF97-22S
CL550-0417-9
ハンドルを最後まで握りラチェットを解除させ、ハンドルを最大に開いてください。
端子ホルダーを正面(矢印方向)に突き出し、端子ホルダーのストッパーに突き当たる
位置まで圧着バラ端子を挿入してください。
ハンドツールの機種によっては、ケーブル先端を端子ホルダーに突き当てせず、
目視にて端子とケーブルの先端位置を合わせていただく場合があります。
端子ホルダー/
Contact holder
端子/Contact
ケーブル/Cable
突き当て/
To be in contact
番線表示/AWG number
クリンパ/Crimper
アンビル/Anvil
HRSマーク表示/HRS logo
ラチェット解除レバー/Rachet cancel lever
可動ハンドル/Moving handle
製造年月日表示/Date of manufacture
ロットNo.表示/Lot number
端子ホルダー/Contact holder
製品名表示/Tool number
Nov.1.2018 Copyright 2018 HIROSE ELECTRIC CO., LTD. All Rights Reserved.
3. 使用上の注意 / Handling precautions
1)
2)
3)
4)
5)
6)
7)
8)
9)
【注意】
【注意】【注意】
【注意】
1)
2)
3)
4)
5)
6)
7)
8)
9)
4. 圧着条件および圧着品質基準表 / Table of crimping conditions and crimping quality standard
(図中に指定の無い寸法の単位はmm) / (Unit of the dimentions not specifed in the table is mm.)
項目
Item寸法Dimension
項目
Item寸法Dimension
芯線
Conductor被覆Outer
insulation
被覆位置
Outer
insulation
position
0.1~0.7
芯線先端位置
Protrusion of
the conductor
0.1~0.5
22 17/φ0.16 φ1.3 0.68~0.76 1.70~1.80 40
ベルマウス
Bell mouth
0.2~0.4
ローリング
Rolling
±5°MAX
ベントアップ
Bent UP
4°MAX
ランス高さ
Lance hight
0.3~0.35
ベントダウン
Bent DOWN
4°MAX
バリ高さ
Burr hight
0.1MAX
ツイスト
Twist
±3°MAX
ギャップ寸法
Gap dimension
0.3MAX
※
圧着品質基準の詳細は、弊社の「圧着品質基準書ATAD-H0767」をご参照ください。
5. 保守と点検 / Maintenance and inspection
【日常のお手入れについて】
1)
2)
【工具の修理について】
1)
2)
[Routine maintenance]
1)
2)
[Repair of the tools]
1)
2)
Applying an excessive compression even after the anvil and crimper reaches dies touch, that can produce a play in the hand tool. With the hand
tool with a play, the normal pressure cannot be obtained. So, be careful.
Modification to this tool is prohibited.
Periodically clean the tool as long as it is commissioned.
MDF97-22SC
標準適合電線/Standard applicable wire
Contact the place of purchase or nearest HRS representative. Describe exact nature of the problem. Do not diss-assembly the tool. If
instructed, ship the tool in a secure package, with a written description of the problem. HRS does not sell individual components for the tools.
Depending on it’s condition in some cases the tool may NOT be repairable.
作業が終了した場合は、汚れ,異物等を柔らかい布で拭き取り、ハンドルを閉じクリンパ,アンビルの中に異物が入り込まないようにして、乾燥した
場所に保管してください。
ハンドル開閉の際、アンビルおよび端子ホルダーがカジリ等が無く滑らかに摺動することを確認してください。
不慣れな事故を防ぐため、修理,調整は工具を熟知した保
全技術者が行
ってください。不適切な修理,調整および非純正部品による事故に対して
当社は責任を負いません。また、修理,調整した結果、正常に動かない場合は、直ちに操作を中止してください。
UL1061
工具に不具合が生じ修理を希望される場合は、解体などせずそのままの状態で不具合内容を明示の上、弊社営業所または代理店へお申し付けく
ださい。不具合の内容によっては修理しかねる場合もありますので、予めご承知おきください。
Upon completion of work wipe the tool with a soft cloth to remove any stains or foreign particles, specially in the crimper and anvil areas. Close
the handle so that foreign particles does not enter into the crimper and anvil. Store in the dry place.
電線
ストリップ
寸法 / Stripping dimension of wire 1.8~2.3
Assure that the crimp condition after the termination with the wire is within specification.
Be sure to use the tool as instructed so that your fingers nor part of clothing is caught in the tool during crimping operation.
芯線
構成
Structure
of the
conductor
[Caution] This tool is not removable the tooth type. If you removed the tooth type, you will void the warranty.
[Caution] This tool is not removable the tooth type. If you removed the tooth type, you will void the warranty.[Caution] This tool is not removable the tooth type. If you removed the tooth type, you will void the warranty.
[Caution] This tool is not removable the tooth type. If you removed the tooth type, you will void the warranty.
適合端子
Applicable
contact No.
STYLE
No.
圧着品質基準 / Crimping quality standard
本
工具には安全カバー等の
安全装
置は取り付いていません。圧着作業に際しては、ハン
ドル部に指等挟まないよう安全に
十分配慮
してご使用ください。
The tools can not be adjusted for crimp height or configuration. Only specified wire size, construction and type must be used with the applicable
contact and tool.
To prevent possible accidents caused by unfamiliarity with the operation of the machine, repair and adjustment of the machine shall be
conducted only by maintenance personnel who have a full knowledge of the machine. Any repair and adjustment beyond the range covered by
the instructions given in this Instruction Manual is prohibited. We assume no responsibility for accidents caused by improper repair or adjustment
or the use of non-genuine part(s). Also, if it does not work normally a result of repair and adjustment, please stop the operation immediately.
Close the handles making sure that the crimper and anvil slide smooth, without any interference.
手動圧着工具は、クリンプハイトの
微調整が行えません
ので、端子の適合電線範囲であっ
ても、ご使用になる電線が指定電線と異なる場合は、工具に適合しない場合があります。
適合端子,適合ケーブル以外の物を、絶対に圧着しないでください。
工具を叩いたり、高い所から落とす等の衝撃は、
絶対加え
ないでください。
工具には適正な加圧が行われるまでハンドルが開かないように、ラチェット機構が備わっ
ています。トラブル等により圧着作業の途中でハンドルを開く場合は、ラチェット解除レバー
にてラチェットを解除してください。ラチェット解除レバーを使用しないで無理に開いたりする
と、工具が故障しますので絶対にしないでください。
クリンプハイト
Crimp height
引
張強度
(N)
以上
Pull force
(N) or
more
Do not crimp other than the specified contact or wire.
Do not subject the tool to physical impact or drop.
被覆
外径
Outside
diameter
of the
outer
insulation
AWG
No.
クリンパとアンビルがダイスタッチした後もハンドルに過度な荷重をか
け続け
ますと、圧着
工具のガタを引き起こし正常な圧力が得られなくなる原因になりますのでご注意ください。
Handle will release after completion of the full compression. If you want to open the handle during the crimping operation because of trouble etc.,
release the ratchet by ratchet cancel lever. Do not attempt to release the handle rather than using the ratchet release lever as this may damage
the tool.
工具には改造等を加えないでください。
工具の
使用期間
中は、定期的に清掃を行ってください。
本工具は歯型の取り外しはできません。歯型を取り外した場合は、保証の対象外になり
本工具は歯型の取り外しはできません。歯型を取り外した場合は、保証の対象外になり本工具は歯型の取り外しはできません。歯型を取り外した場合は、保証の対象外になり
本工具は歯型の取り外しはできません。歯型を取り外した場合は、保証の対象外になり
ます。
ます。ます。
ます。
作業を始める時は、圧着した端子の圧着状態が良品の範囲になっているか確認を行ってく
ださい。
ラチェット解除レバー/
Ratchet cancel lever
Nov.1.2018 Copyright 2018 HIROSE ELECTRIC CO., LTD. All Rights Reserved.
Powered by TCPDF (www.tcpdf.org)
 Loading...