

HQ HQ-HA60W Installation And User Instructions Manual
PUBLIC ADDRESS
AMPLIFIER
Installation and User Instructions
For models:
- HQ-HA60W

WARNING:THIS APPLIANCE MUST BE EARTHED
RISK OF ELE CTRI C SHOCK
DO NOT OPEN
IMPORTANT
The wires in the mains lead are coloured
in accordance with the following code:
GENERAL INSTALLATION
DO NOT run microphone cables near mains, data, telephone or 100V line cables.
DO NOT run 100V line cables near data, telephone or other low voltage cables.
DO NOT exceed 90% of the amplifiers output power when using 100V line (speech only).
DO NOT exceed 70% of the amplifiers output power when using 100V line (high level
background music).
DO NOT use re-entrant horn loudspeakers for background music unless the loudspeaker has
been specifically designed for this purpose.
AVOID jointing the microphone cable, when this is unavoidable make sure a good screened
connector is used, e.g. XLR.
ALWAYS use a balanced or floating low impedance microphone terminating into a balanced
input on long microphone cable runs.
ALWAYS use a mains grade double insulated cable for the loudspeaker cable runs.
ENSURE that all loudspeakers are in-phase.
ENSURE that there are no short circuits on the loudspeaker line before connecting to the
amplifier.
Green and Yellow: Earth (E)
Blue: Neutral (N)
Brown : Live (L)
As the colours of the wires in the mains lead of this
appliance may not correspond with the coloured
markings identifying the terminals in your plug proceed as
follows:
• The green and yellow coloured wire must be
connected to the terminal that is marked by the letter
E, marked by the safety earth symbol or coloured
green and yellow.
• The blue coloured wire must be connected to the
terminal that is marked with the letter N or coloured
black.
• The brown coloured wire must be connected to the
terminal that is marked with the letter L or coloured
red.
If a 13 Amp (B.S.1363) plug or any other type of plug is
used,a 5 Amp fuse must be fitted either in the plug or at
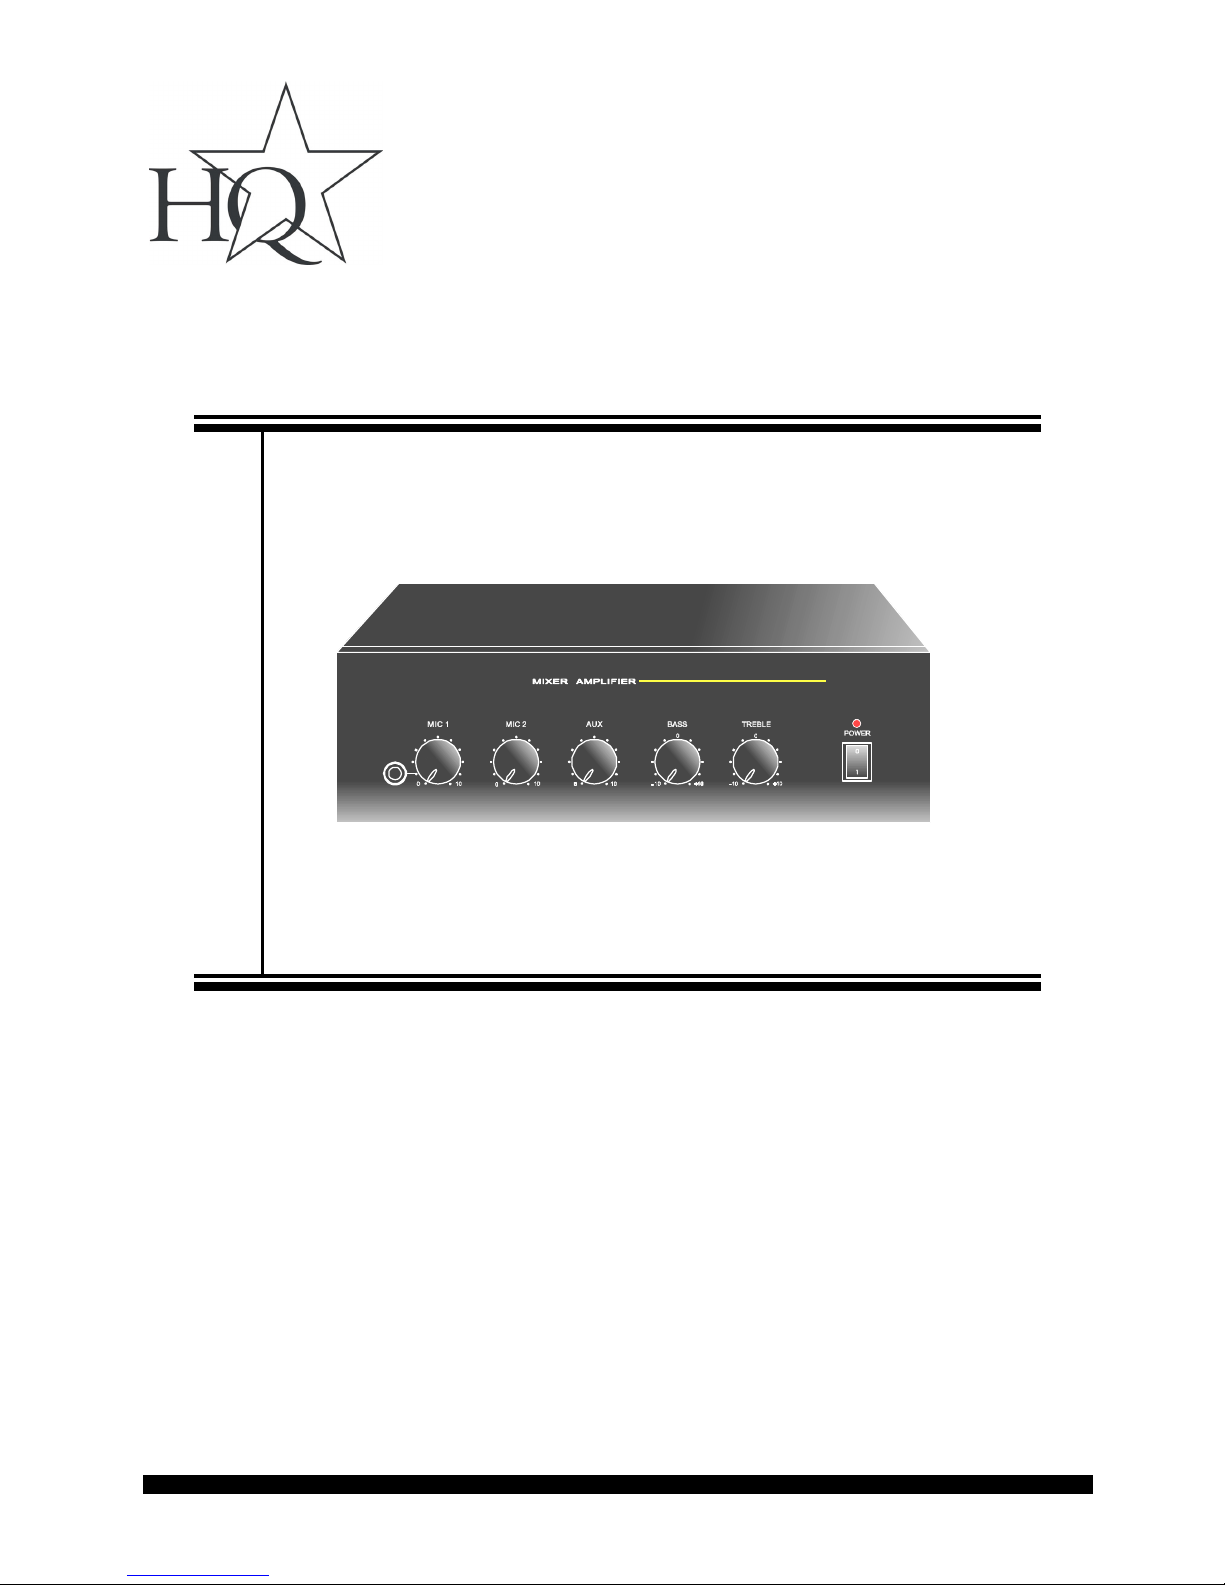
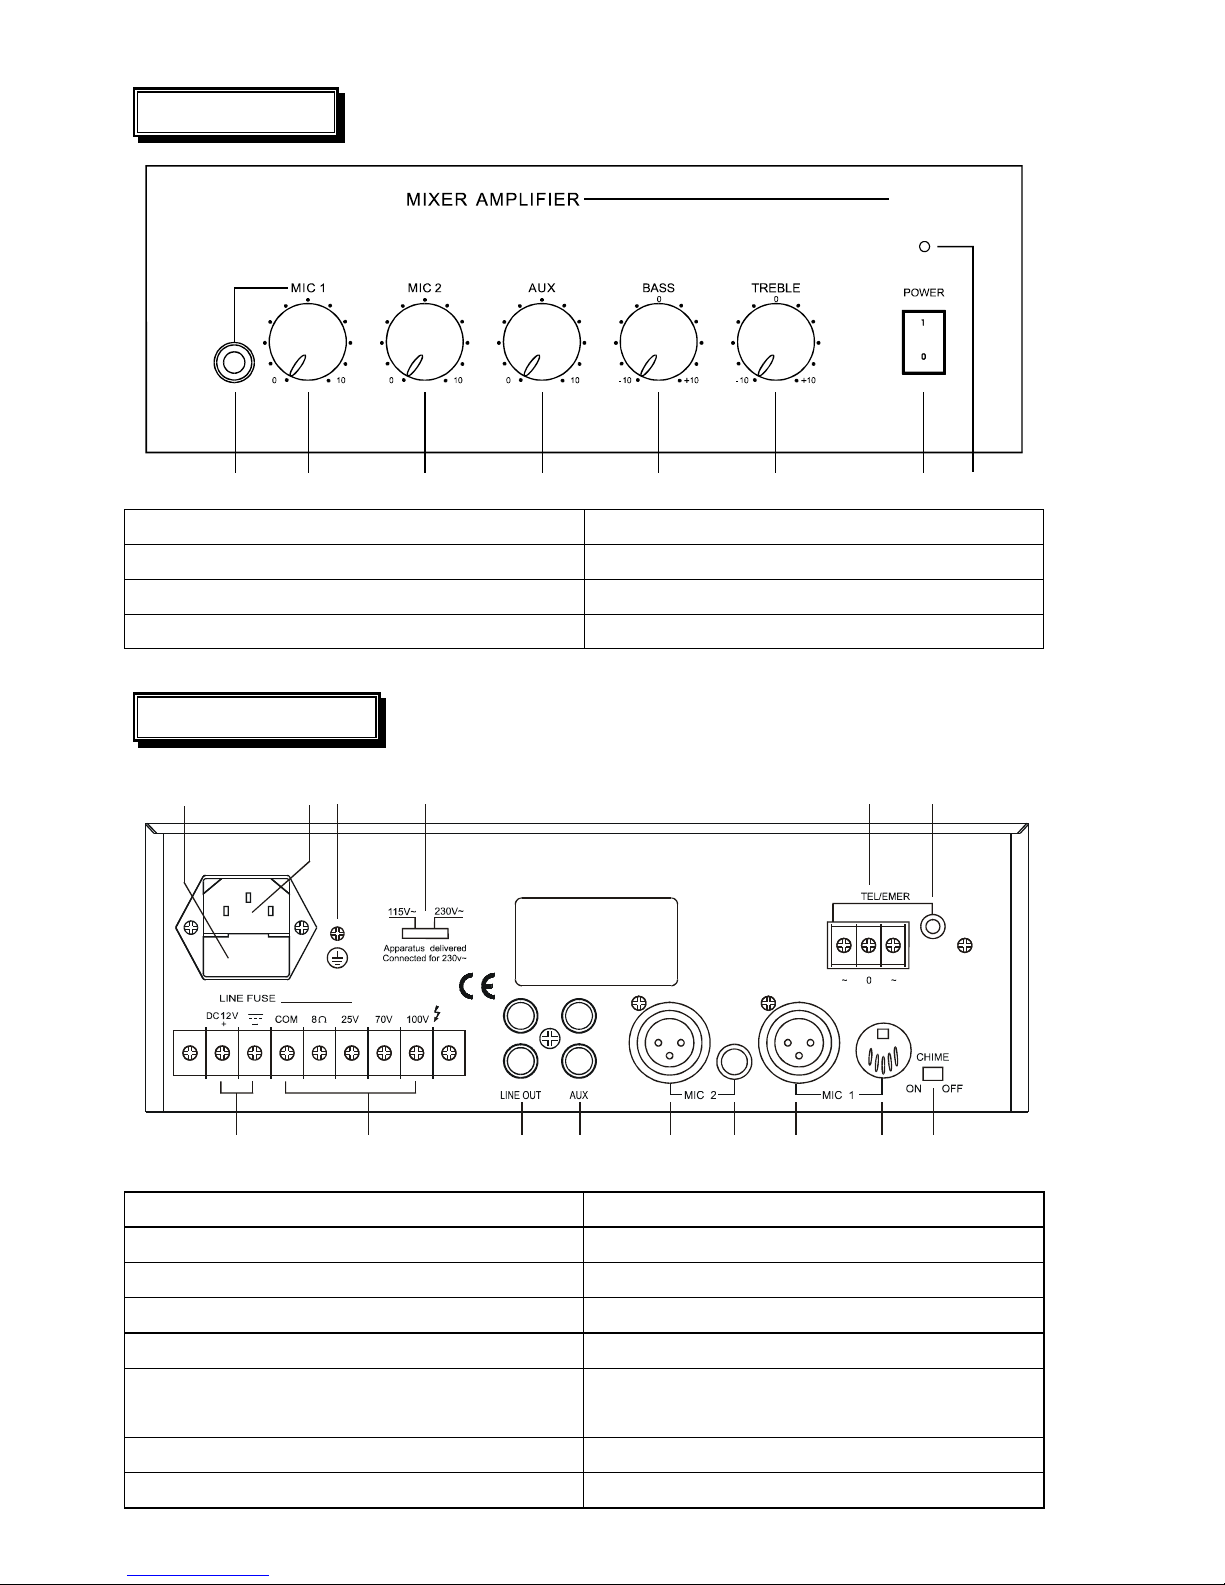
FRONT PANEL Mixer Amplifier
76
5
4321 8
1. Mic 1 Input (Phone) 5. Master Tone Control (Bass)
2. Mic 1 Volume Control 6. Master Tone Control (Treble)
3. Mic 2 Volume Control 7. Power On/Off Switch
4. Aux Volume Control 8. Power On/Off Indicator LED
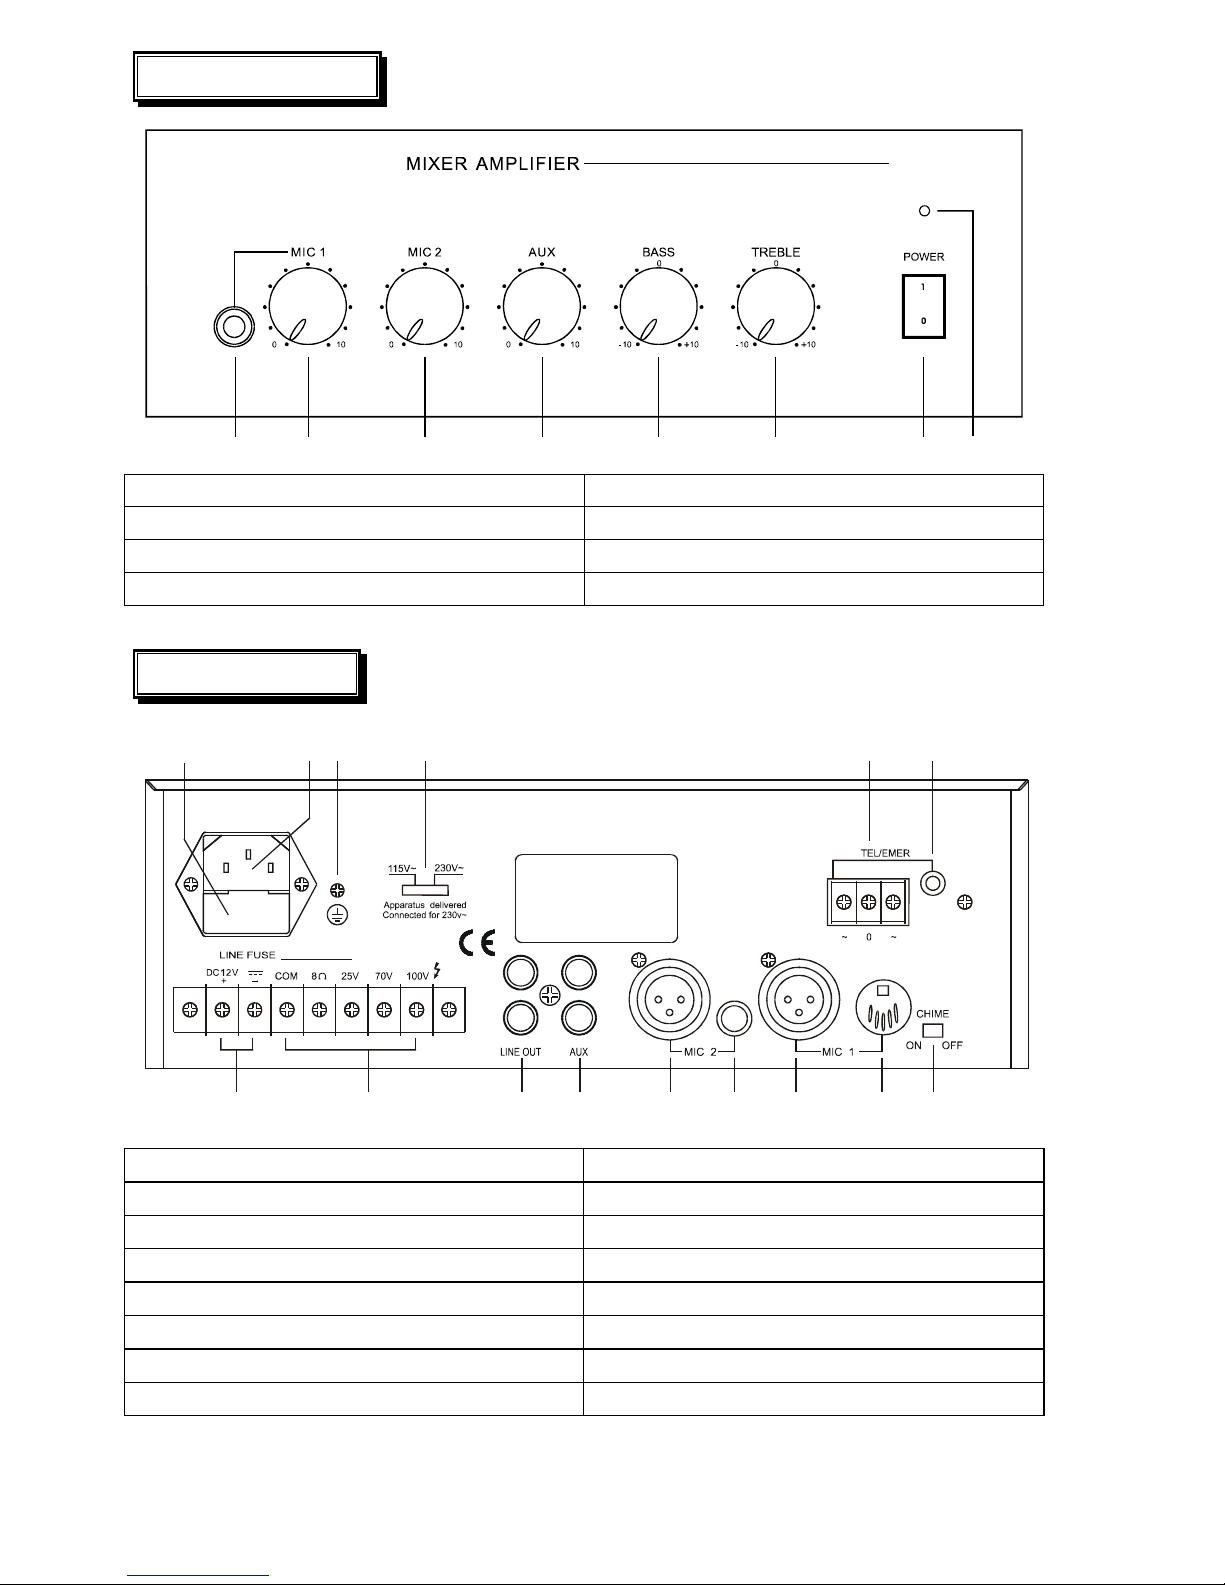
REAR PANEL
1110 1513 14
987654321
12
1. DC Power Supply Terminals 9. Chime On/Off Switch
2. Loudspeaker Output Terminals 10. AC Fuse Holder
3. Line Output (2 x RCA Phono) 11. Mains Input Socket
4. Aux Input (2 x RCA Phono) 12. Earth Connection Screw
5. Mic2 Input (XLR / Balanced) 13. Mains Voltage (115V/ 230V) Selector Switch
6. Mic2 Input (Phone / Balanced) 14. TEL / EMER Input Terminals
7. Mic1 Input (XLR / Balanced) 15. TEL / EMER Input Level Control
8. Mic1 Input (DIN / Balanced)
1 2 3 4 5 6 78
A
B
C
D
8
7654321
D
C
B
A
Titl e
Number RevisionSize
A3
Date: 7-May-2 002 Sheet of
File: A:\PBL2000.SCH Drawn By:
3
2
1
3
2
1
2
5314
MUTE
CHIME
VOX
VOX
POWER AMP
O
U
T
P
U
T
B
O
A
R
D
100V
70V
25V
8ohm
COM
115V
230V
DC 24V OR 12V
+
_
G
+B
16V OR 10V
PHANTOM POWER
+V
O
N
O
F
F
MIC1 PRE
MIC2 PRE
AUX1 PRE
LINEOUT
OFF
ON
TONE
TEL PRE
V+
GND
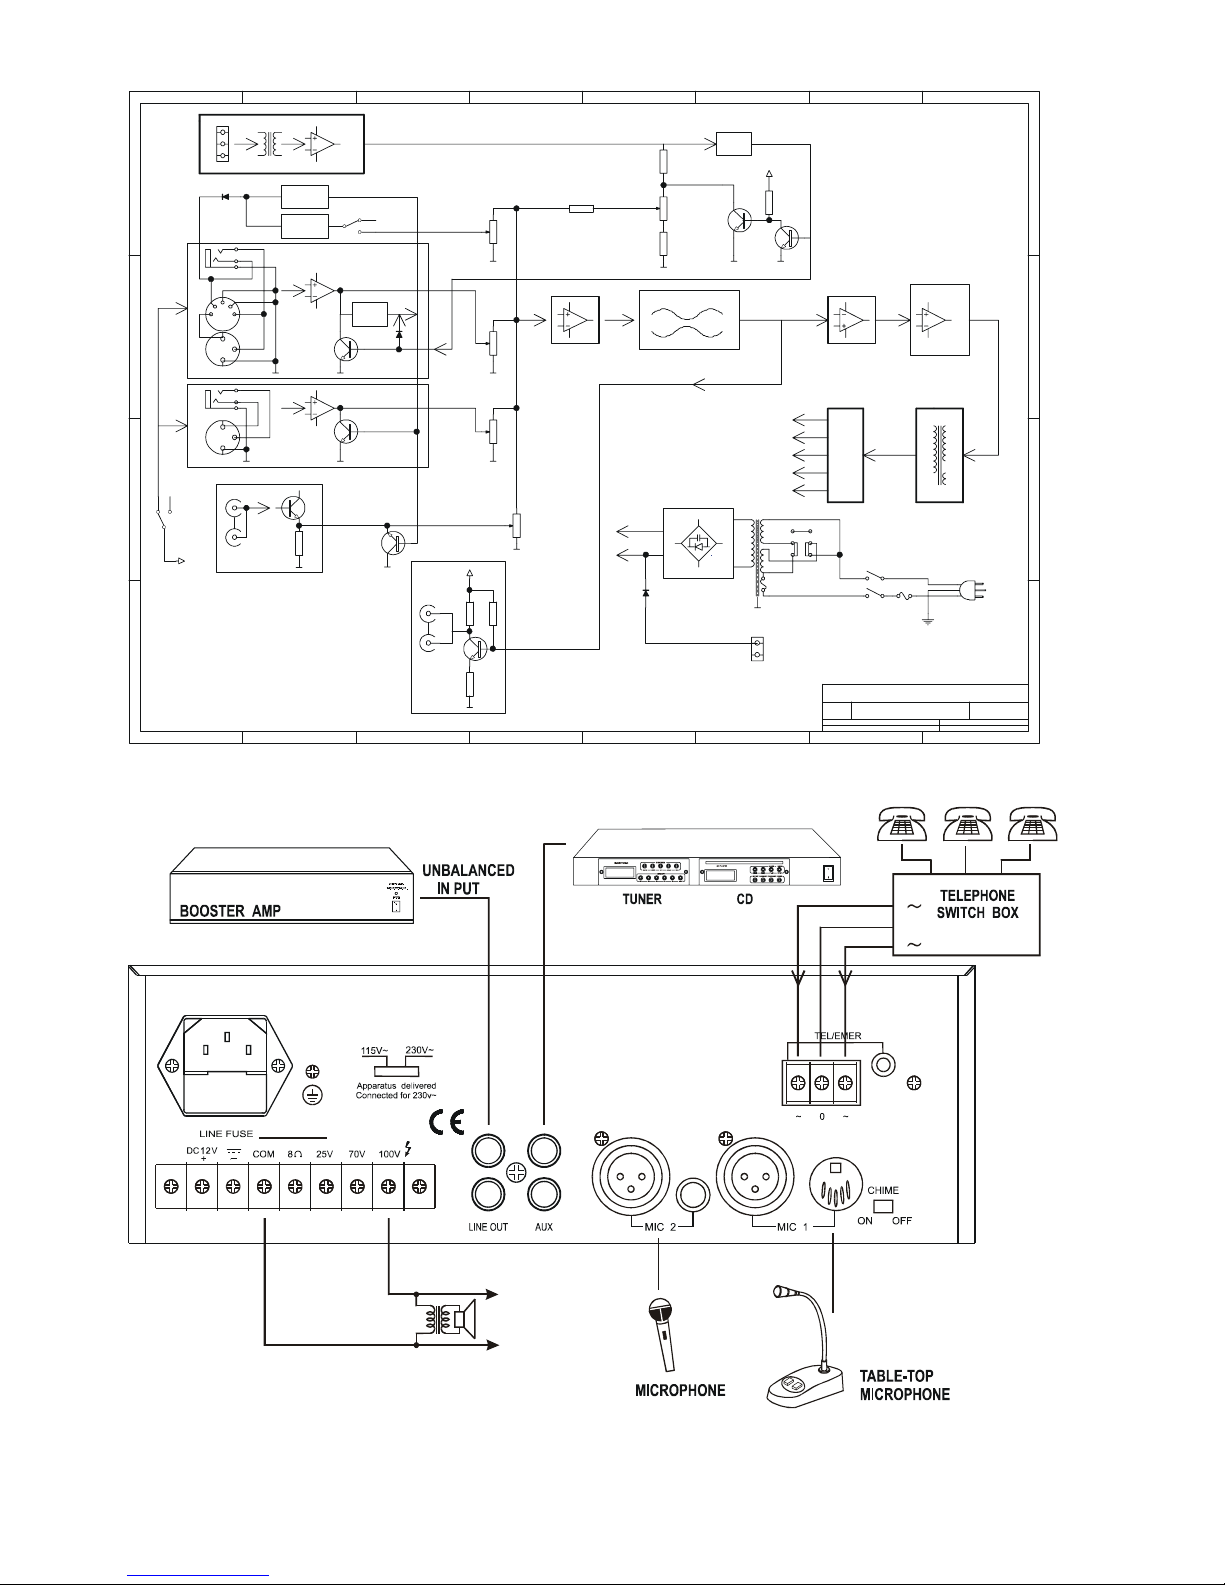
Mains Connection
The supply transformer has been designed for use either 115V AC or 230V AC,
selected by slide switch on rear panel. The amplifier is factory set at 230V AC mains
voltage.
Battery Connection (12V DC for 20W / 40W, 24V DC for 60W)
When using external batteries, earth the amplifier via the screw terminal because there are high
voltages present. Electrical stability of the system will be increased by earthing the case.
NOTE: The connection cable must be fitted with an in-line fuse, quick blow type (20W : 6.3A,
40W :10A , 60W : 8A). When connecting batteries please ensure correct polarity.
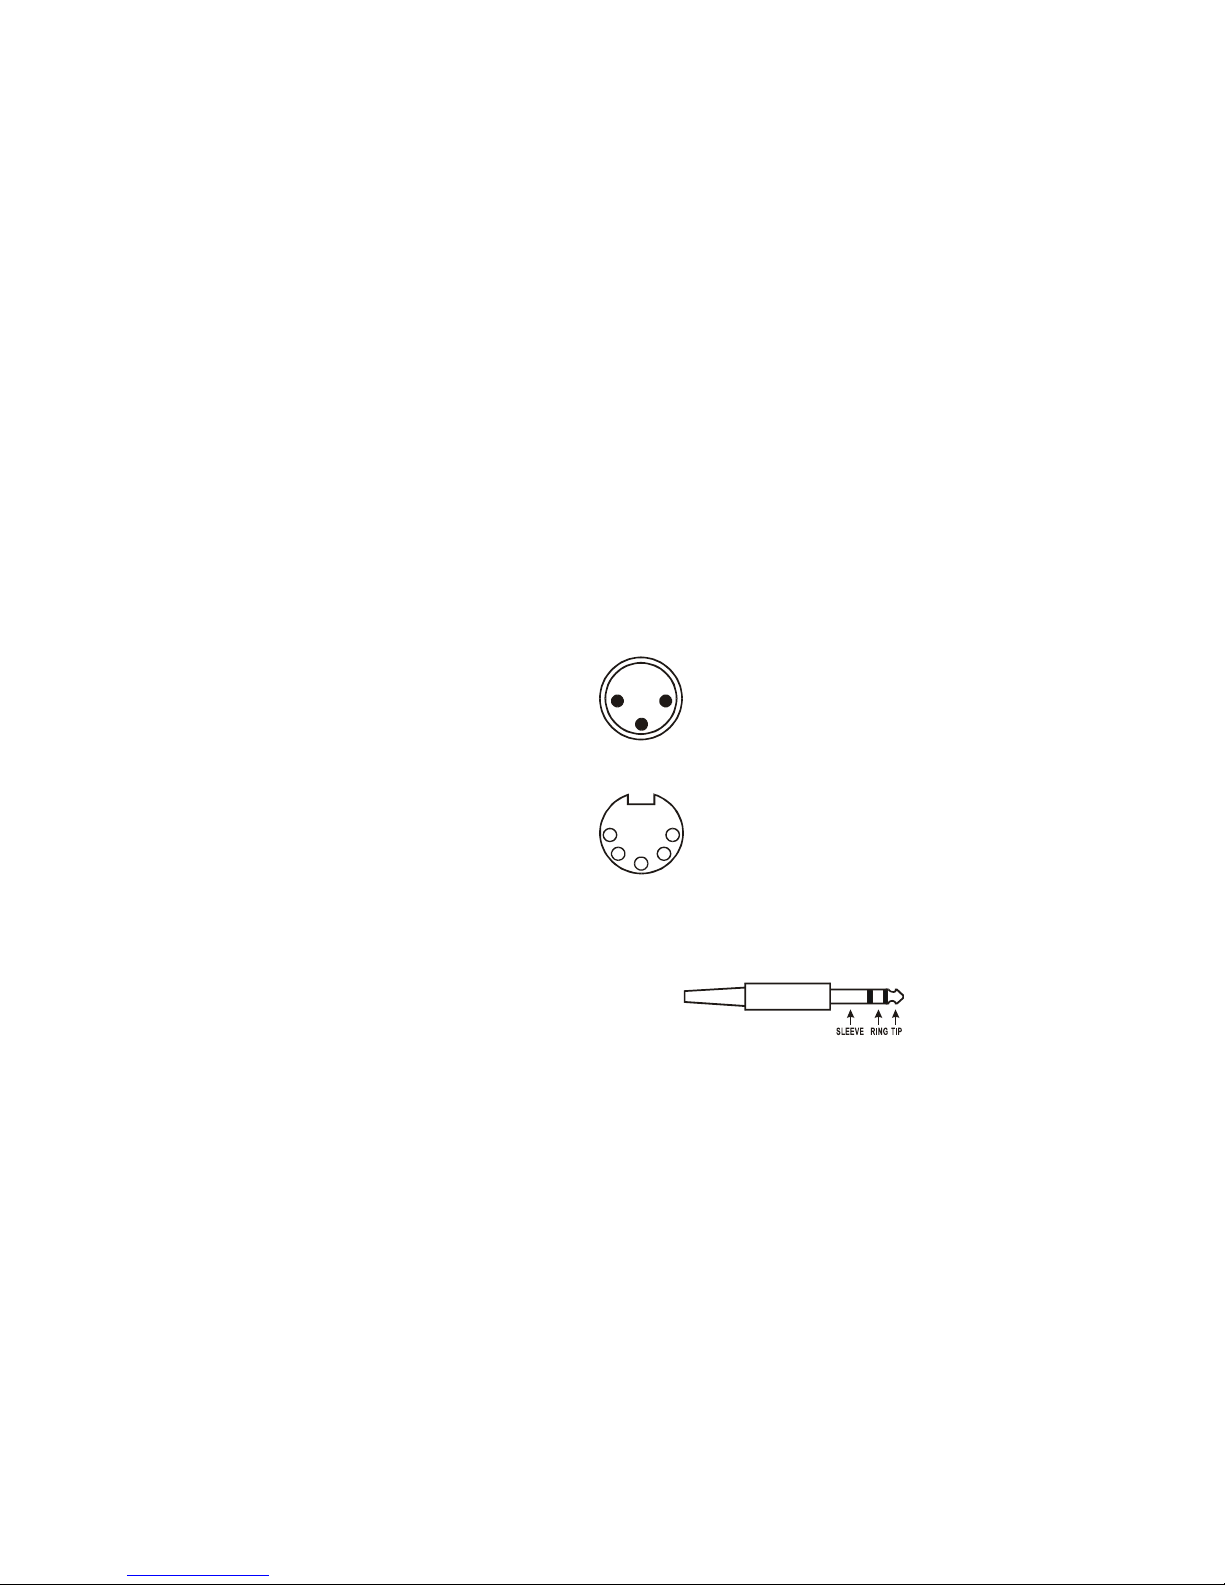
Microphone Connections
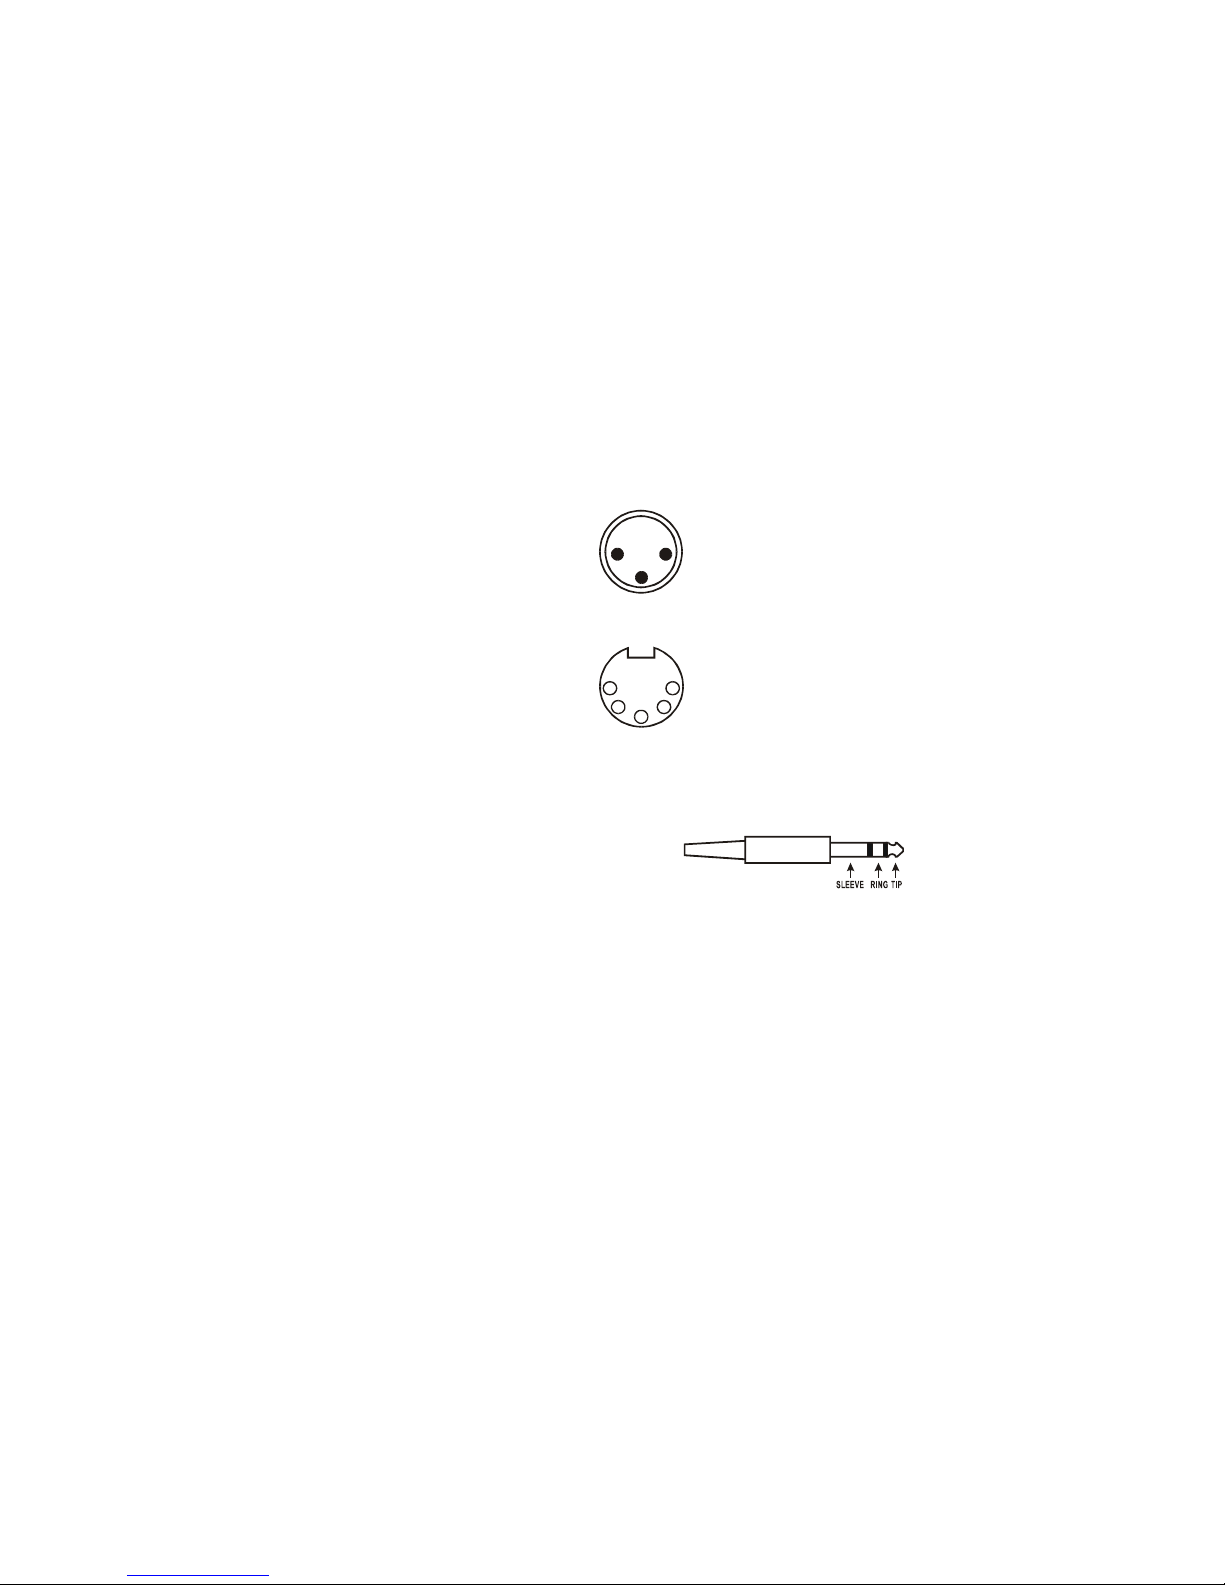
Mic1 input is either a balanced standard 6.35mm stereo jack on the front panel or XLR and DIN
on the rear panel (With selectable phantom power). Wiring is as follows:
XLR (Balanced Operation)
Pin1 : Screen
Pin2 : Signal (live)
Pin3 : Signal (return)
DIN (Balanced operation)
Pin1 : Signal (live)
Pin2 : GND
Pin3 : Signal (return)
Pin4 : Priority Control
Pin5 : GND
6.35mm Stereo Jack Plug (Balanced operation)
Tip : Signal (live)
Ring : Signal (return)
Sleeve : Screen
Mic1 input has VOX priority which will override both Mic2 and Aux input signals but
NOT the TEL/EMER input.
Mic1-2 input are XLR, DIN and phone jack with selectable phantom power located on the
rear panel and wired as above. The phantom power is factory set and can be enabled as
follows:
1. Remove the power lead from the AC wall socket.
2. Remove the top cover.
3. Locate the link pins (Marked SW102) on the Printed Circuit Board behind the microphone
XLR input socket.
4. Connect the black shorting plug to the centre pin and ON position to enable the phantom
power.
Chime
Switch on the chime on/off switch on the rear panel and short the pin4, pin5 of DIN
socket or short the sleeve and ring of phone plug Mic 1. This will activate the chime function
(“Ding-Dong” attention signal preceding a call). The default volume of the chime is pre-set at the
factory and is adequate for most applications.
1
4
2
5
3
21
3
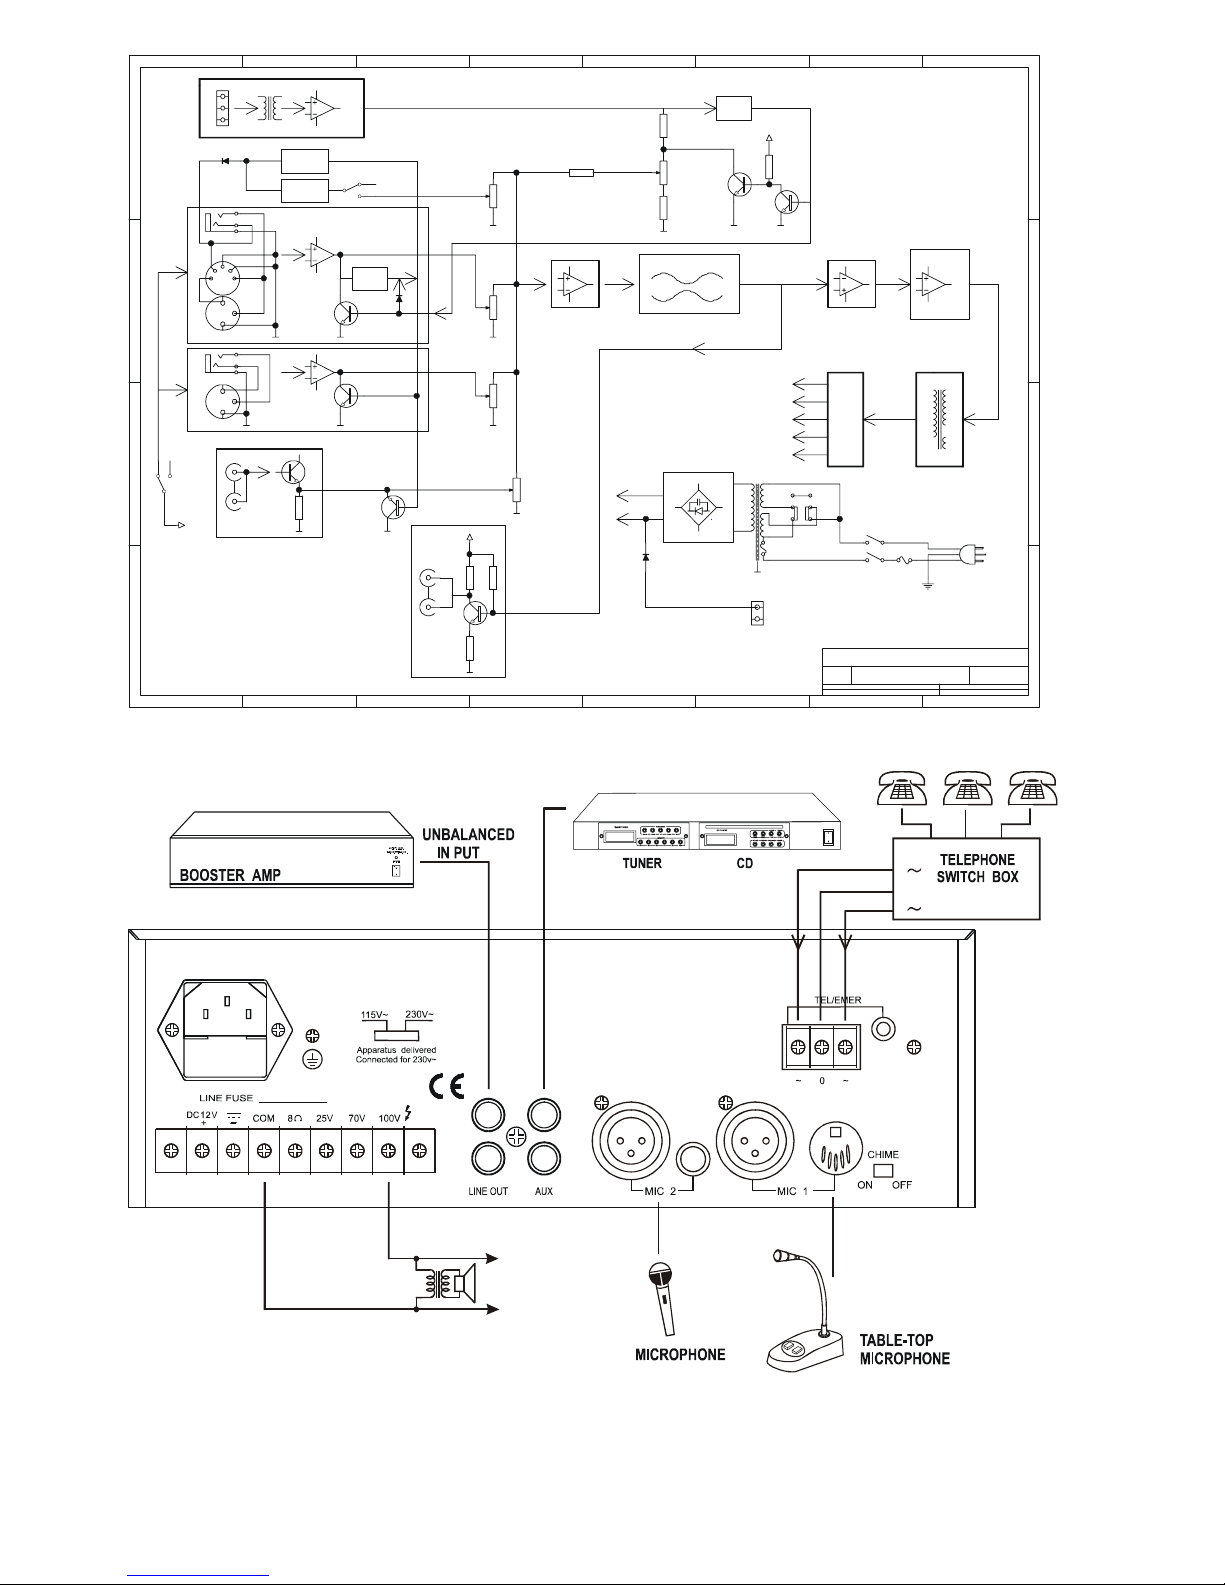
Telephone Connection
This input is for emergency announcements/signals. Input level can be set by level control on the
rear panel. The TEL input has the highest priority and will override all other inputs.
Aux Connection
This amplifier provides an auxiliary input which may be used for connecting other signal sources
such as a radio tuner, CD player or cassette player. Turn the volume control clockwise to increase
the volume or anticlockwise to reduce the volume.
The Aux input sockets are standard RCA phono, two sockets are supplied and these are linked
together internally. This allows stereo signal sources to be used without the need to obtain a
special lead, however you may wish to check with the manufacturer of the signal source to ensure
that no damage will result if the left and right output channels are put in parallel.
RCA Phono plug connections
Line Output Connection
This amplifier is equipped with two booster output sockets which can be used to drive a booster
amplifier in situations where more power is required. Connection is via RCA phono plugs (See
above).
Loudspeaker Connection
This amplifier has got four different types of loudspeaker output, these are 100V, 70V and 25V line
output, and low impedance output. You can only use one of these outputs at a time, any attempt to
use two or more of these may result in damage to the amplifier.
100V Line
These loudspeakers are most commonly used in the Europe for PA distribution. When the
amplifier is at full output, 100V RMS will be present at the output terminals. Only use 100V line
loudspeakers with this output. All loudspeakers should be wired in parallel and the sum of the
power tapping of each loudspeaker must not exceed the rated output of the amplifier, due to the
nature of the loudspeaker and transformer impedance. It is advisable not to load the amplifier to
more than 70% of its rated output when using music sources.
70V / 25V Line
This system is common in the USA, it operates on exactly the same principals as 100V line except
that at rated output the amplifier will have 70V RMS or 25V RMS on its output terminals.
Low Impedance (8Ω)
This output allows connection of standard low impedance loudspeakers, the minimum load
impedance must be 8Ω. When two or more loudspeakers are used, ensure that they are wired in
such a way that the load impedance is between 8Ω and 16Ω.
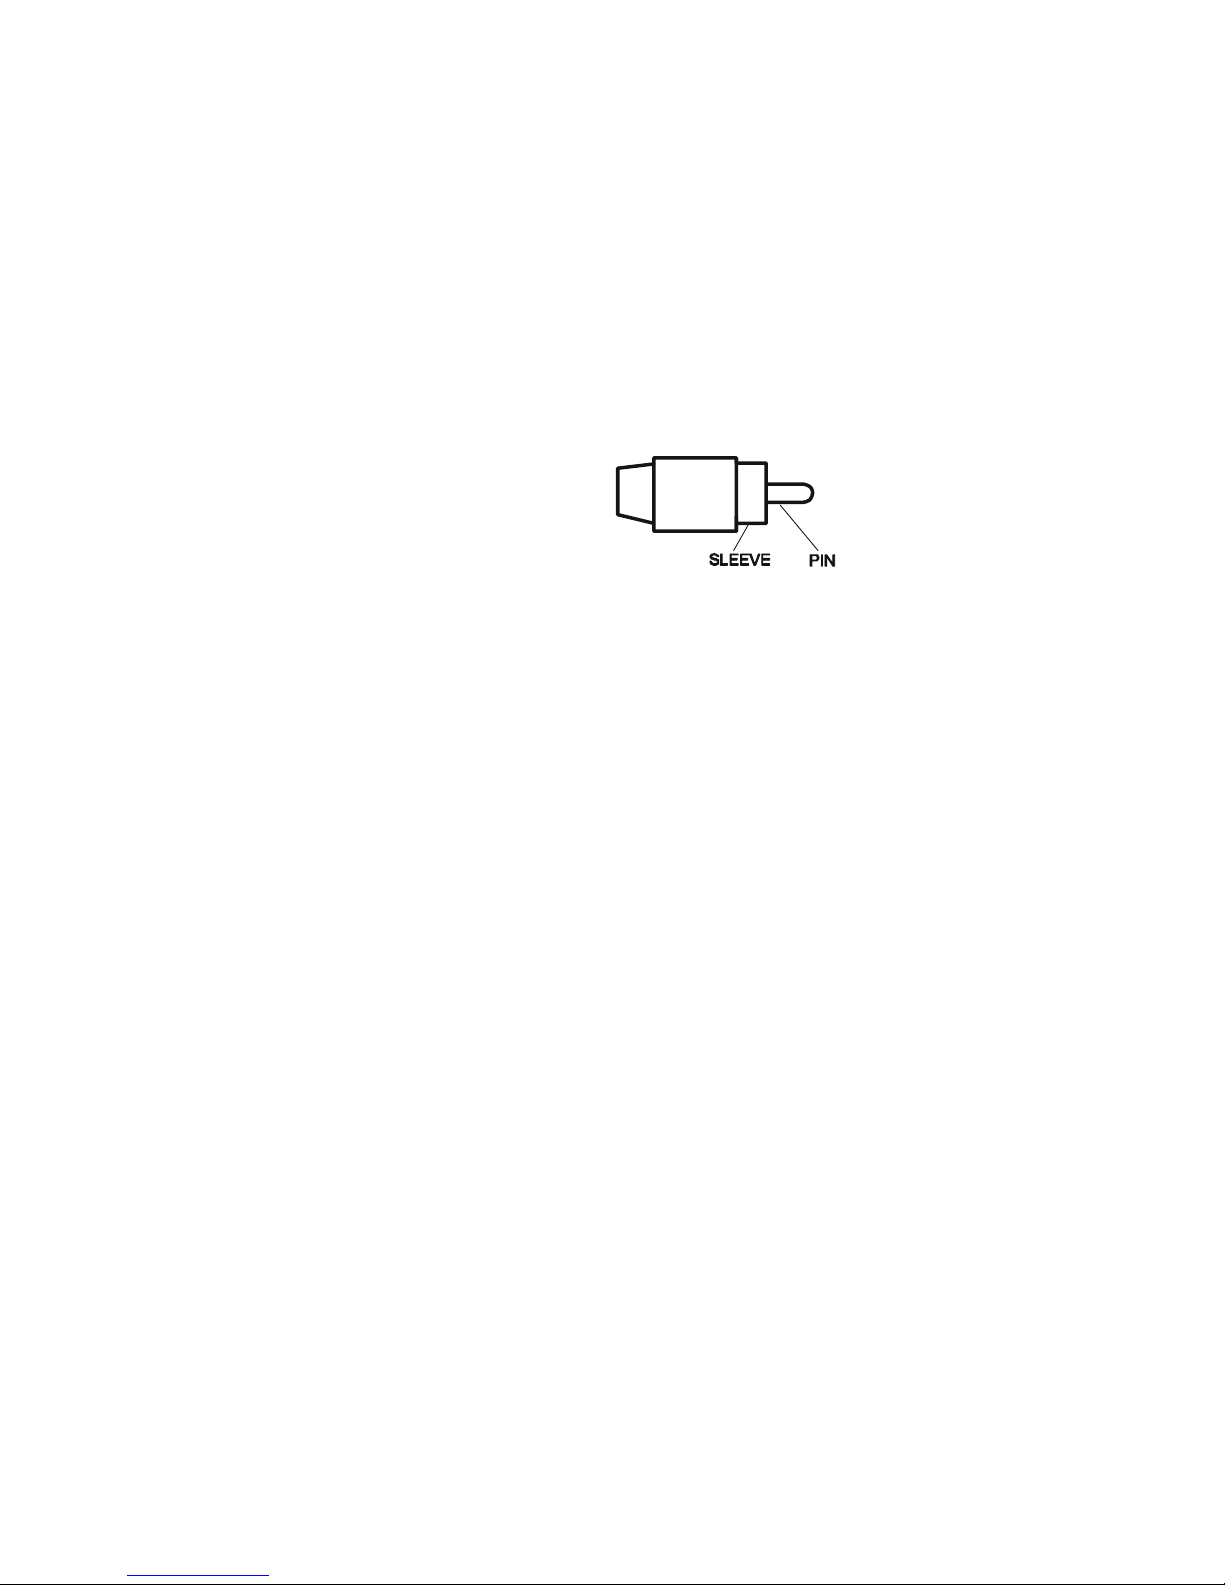
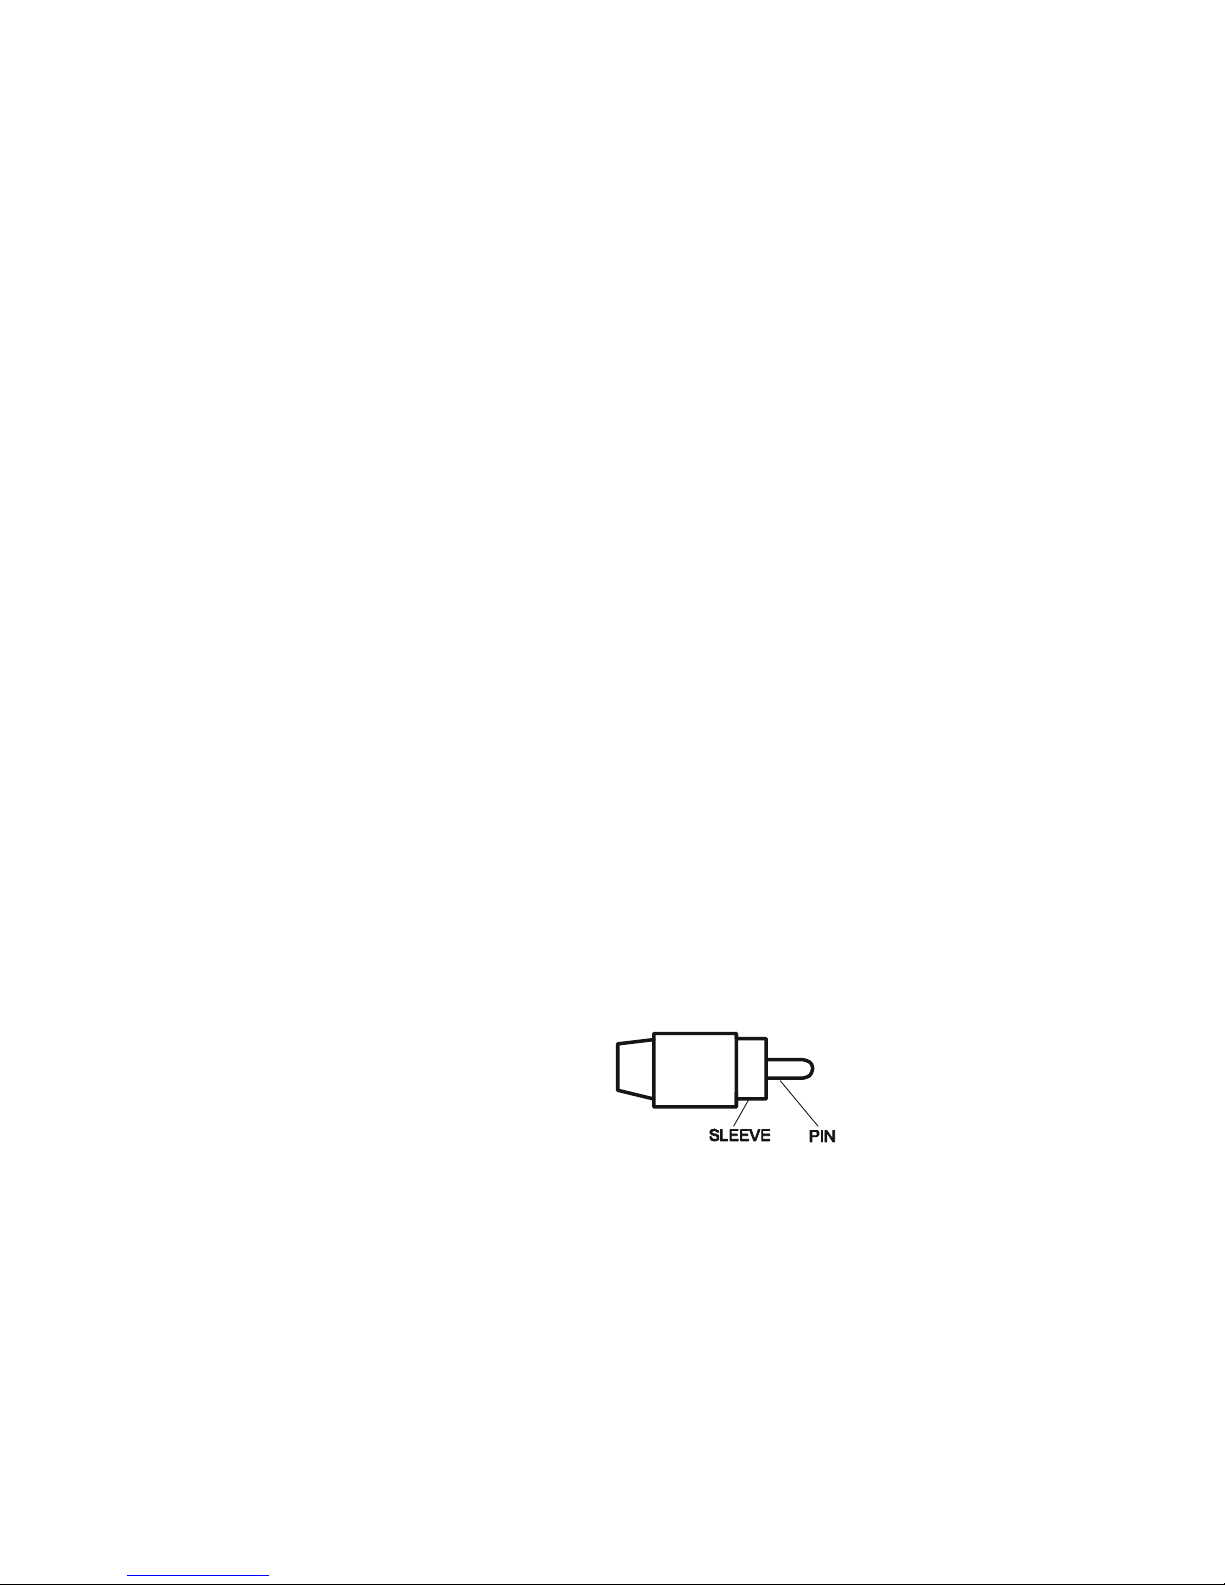
Sleeve: Screen
Pin: Signal

Technical Specifications
Type Mixer Amplifier
Model HQ-HA60W
Mains Voltage AC 115V / 230V, 50 / 60Hz ± 10% switchable Supply
Battery Voltage DC 24V (MAX 10% deviation)
Max :
90W
Output power
Rated : 60W
Outputs Speaker outputs: 8Ω, 25V, 70V, 100V
Line out: 1V, 600Ω
Inputs Mic1~2: 1mV, 250Ω balanced with phantom power selectable
Aux: 200mV, 47KΩ, unbalanced.
TEL: 0.1~1V, 600Ω, adjustable, balanced
Frequency response Mic1~Mic2: 60Hz ~ 15KHz ± 3dB
Aux: 60Hz ~ 15KHz ± 3dB
TEL: 100Hz ~ 15KHz ± 3dB
Total harmonic distortion Less than 1% at 1KHz,rated power
Signal to noise ratio All Volume Controls C.C.W. : 75dB below rated power
Mic1~2: 60dB below rated power
Aux: 70dB below rated power
TEL: 70dB below rated power
Tone controls Bass: ±10 dB at 100Hz
Treble: ±10 dB at 10KHz
Controls
Mic1~Mic2 volume control
Aux volume control
Tone controls (Bass, Treble)
TEL input level control
Chime on/off switch
AC 115V / 230V voltage selector switch
Indicators Power indicator (LED),output level indicators (3 LEDS)
AC power consumption 200 watts
DC power consumption 5A
Chime Two tone chime (Ding-dong attention signal preceding a call).
Priority (VOX) Priority level (Using for Mic1, the 5-pole DIN connector, phone
jack or XLR connector):
TEL / Emer: 3 Mic1: 2 Mic2: 1 Aux: 1
Dimentions ( H ×W ×D ) 88×272×300 mm
Weight Approx 7.2kg
Color Black
Mounting options Table top or 19” rack mountable


PUBLIC ADDRESS
VERSTERKER
INSTALLATIE- EN GEBRUIKSAANWIJZING
Voor modellen:
- HQ-HA60W

WAARSCHUWING:
DIT APPARAAT DIENT GEAARD TE WORDEN AANGESLOTEN
RISK OF ELE CTRI C SHOCK
DO NOT OPEN
BELANGRIJK
De bedrading in het netsnoer zijn gecodeerd
in overéénstemming met de volgende
aanduiding:
Groen en Geel: Aarde (E)
Blauw: Neutraal (N)
Bruin : Fase (L)
Indien de codering van de bedrading in de netsnoer van
dit apparaat niet overéénkomt met de codering van uw
aansluiting, vervolg dan als volgt;
- De groene en gele draad dient aangesloten te
worden op de (pool)klem die gemarkeerd is met de
letter E, het aarde symbool of op de groen en gele
markering.
- De blauwe draad dient aangesloten te worden op
de (pool)klem die gemarkeerd is met de letter N of
op de kleur zwart.
- De bruine draad dient aangesloten te worden op
de (pool)klem die gemarkeerd is met de letter L of
op de kleur rood.
Bij gebruik van een 13A (B.S.1363) stekker, of als een
ander type stekker gebruikt wordt, dient een 5A zekering
aangebracht te worden in de stekker of op de printplaat.

ALGEMENE INSTALLATIE
- Gebruik geen microfoonkabels in de buurt van net-, data-, telefoon-, of 100V lijnkabels.
- Gebruik geen 100V lijnkabels in de buurt van data-, telefoon-, of andere
laagspanningskabels.
- Gebruik niet meer dan 90% van het versterkers vermogen bij gebruik van de 100V lijn
(alleen spraak).
- Gebruik niet meer dan 70% van het versterkers vermogen bij gebruik van de 100V lijn
(achtergrondmuziek).
- Gebruik geen hoornluidsprekers voor achtergrondmuziek tenzij de hoornluidspreker
specifiek voor dit doeleinde is ontworpen.
- Vermijd knikken of buigen aan het uiteinde van de plug van de microfoonkabel, indien dit
onvermijdelijk is, gebruik een degelijke plug. Bijvoorbeeld XLR.
- Gebruik altijd een gebalanceerde of lage impedantie microfoon op een gebalanceerde
ingang, bij gebruik van lange kabels.
- Gebruik altijd dubbel geïsoleerde kabels voor gebruik van de luidsprekers.
- Ben er van overtuigd dat de luidsprekers “in-fase” zijn aangesloten.
- Ben er van overtuigd dat er geen kortsluiting is in het luidsprekercircuit voordat de
versterker ingeschakeld wordt.
VOORZIJDE Mixer Versterker
76
5
4321 8
1. Microfoon 1 ingang (6.35mm Jack Plug). 5. Hoofd toonregeling (laag).
2. Microfoon 1 volumeregeling. 6. Hoofd toonregeling (hoog).
3. Microfoon 2 volumeregeling. 7. Aan/uit schakelaar.
4. Aux 1 volumeregeling. 8. Aan/uit LED indicator.
ACHTERZIJDE
1110 1513 14
987654321
12
1. DC stroomklemmen. 9. Bel aan/uit schakelaar
2. Uitgang luidsprekerklemmen. 10. AC zekeringhouder
3. LINE OUT uitgang (2x RCA aansluiting). 11. Netsnoer aansluiting
4. AUX uitgang (2x RCA aansluiting). 12. Aarde aansluiting
5. Microfoon 2 ingang (XLR/gebalanceerd). 13. Voltageschakelaar (115V/230V)
6. Microfoon 2 ingang (6.35mm Jack
Plug/gebalanceerd).
14. TEL/EMER ingang aansluitpunt
7. Microfoon 1 ingang (XLR/gebalanceerd). 15. TEL/EMER ingangsniveau regeling
8. Microfoon 1 ingang (DIN/gebalanceerd).
1 2 3 4 5 6 78
A
B
C
D
8
7654321
D
C
B
A
Titl e
Number RevisionSize
A3
Date: 7-May-2 002 Sheet of
File: A:\PBL2000.SCH Drawn By:
3
2
1
3
2
1
2
5314
MUTE
CHIME
VOX
VOX
POWER AMP
O
U
T
P
U
T
B
O
A
R
D
100V
70V
25V
8ohm
COM
115V
230V
DC 24V OR 12V
+
_
G
+B
16V OR 10V
PHANTOM POWER
+V
O
N
O
F
F
MIC1 PRE
MIC2 PRE
AUX1 PRE
LINEOUT
OFF
ON
TONE
TEL PRE
V+
GND
230V AC aansluiting
De transformator/voeding is ontworpen voor gebruik op zowel een 115V AC of 230V AC
Stroompunt, instelbaar met de schakelaar op de achterzijde. De fabrieksinstelling van de
versterker is standaard ingesteld op 230V AC.
Aansluiting op Accu (12V DC voor 20W en 40W, 24V DC voor 60W)
Bij gebruik van een externe accu aansluiting dient de versterker geaard te worden middels de
aardeklem omdat er hoge voltages kunnen ontstaan. Elektrische stabiliteit wordt hierdoor
vergroot. OPMERKING: de aansluitkabel moet voorzien zijn van een snelle zekering (20W:
6.3A, 40W: 10A, 60W: 8A). Zorg ervoor dat bij deze manier van aansluiten, de polariteit correct
is.
Microfoonaansluitingen
Microfoon 1 ingang (MIC1) is een standaard gebalanceerde 6,35mm aansluiting op de
voorzijde en zowel een XLR en DIN aansluiting op de achterzijde. (met schakelbare phantoom
voeding). De aansluiting is als volgt:
XLR ( Gebalanceerde werking )
Pin1 : Aarde
Pin2 : Plus
Pin3 : Min
DIN ( G
ebalanceerde werking )
Pin1 : Plus
Pin2 : Aarde
Pin3 : Min
Pin4 : Prioriteitsfunctie
Pin5 : Aarde
6.35mm Stereo Aansluiting ( Gebalanceerde werking )
Tip : Plus
Ring : Min
Sleeve : Aarde
MIC1 ingang met VOX prioriteit zal bij inschakelen MIC2 en AUX onderdrukken. Echter niet de
TEL/EMER ingang.
De MIC1 en 2 aansluitingen zijn XLR, DIN en 6.35mm ingangen met schakelbare phantoom
voeding op de achterzijde en bedraad zoals hierboven vermeld. De phantoom voeding is een
standaard fabrieksinstelling en als volgt in werking te stellen:
1. Ontkoppel het netsnoer van de wandcontactdoos.
2. Verwijder de kap van het apparaat.
3. Lokaliseer op de printplaat de aansluitpunten (gemarkeerd met SW102) op de positie
achter de XLR aansluiting.
1
4
2
5
3
21
3
4. Verbind de zwarte aansluitplug met het middelste aansluitpunt en ON positie om de
phantoom voeding in werking te stellen.
Bel ( Chime )
Schakel de aan/uit schakelaar in van de chime functie op de achterzijde en verbind PIN 4, PIN 5
van de DIN aansluiting of PIN 1 en PIN 2 van de 6.35mm plug van MIC1 met elkaar. Dit activeert
de chime functie (te herkennen aan het zgn. “DING-DONG” signaal bij binnenkomst van een
telefoonsignaal.
Telefoonaansluiting.
Deze aansluiting is voor (nood) oproepen/signalen en is onafhankelijk ingesteld van de hoofd
volume regelaar. Het niveau hiervan wordt ingesteld op de achterzijde van het apparaat. De TEL
aansluiting heeft prioriteit en onderdrukt alle andere ingangen.
AUX aansluiting.
Het apparaat heeft een AUX ingang die gebruikt kan worden voor apparaten zoals een TUNER,
een CD speler of cassettedeck. Het volume niveau is individueel instelbaar.
Draai de knop met de klok mee voor meer volume en tegen de klok in voor minder volume.
De AUX aansluiting is een standaard RCA aansluiting, het apparaat is uitgevoerd met twee
aansluitbussen welke intern aan elkaar worden gekoppeld. Dit zorgt ervoor dat stereo bronnen
aangesloten kunnen worden zonder gebruik te moeten maken van speciale bekabeling. Echter is
het raadzaam om te controleren of het aangesloten apparaat niet kan beschadigen als de rechter-
en linkeruitgang met elkaar worden verbonden.
RCA Plug , aansluitingen
LINE OUT aansluiting.
Op deze standaard RCA aansluiting komt het (gemengde) signaal, afhankelijk van de
afregeling van het apparaat op de voorzijde, welke geschikt is voor aansluiting op bijvoorbeeld
een eindversterker in het geval dat er meer uitgangsvermogen gewenst is.
Sleeve: Aarde
Pin: Plus

Luidsprekeraansluiting.
Dit apparaat heeft vier verschillende type luidsprekeraansluitingen. Een 100V, 70V, 25V en
lage impedantie aansluiting. Deze aansluitingen zijn niet in combinatie te gebruiken. Indien dit
toch gedaan wordt, zal dit het apparaat beschadigen.
100V lijn.
Deze soort luidsprekers zijn het meest gebruikelijk in Europa voor PA distributie. Als de
versterker op vol vermogen functioneert, wordt 100V RMS uitgestuurd op de
luidsprekeraansluitingen. Gebruik alleen maar 100V luidsprekers op deze uitgangen. Alle
luidsprekers dienen parallel aangesloten te worden en de som van de aangesloten
luidsprekers dient niet hoger te zijn dan het maximale vermogen van de versterker. Dit wordt
bepaald door de specificaties van de luidsprekers en de impedantie van de transformator. Het
is aan te raden om niet meer dan 70% van het vermogen te gebruiken wanneer er gebruik
gemaakt wordt van muziekbronnen.
70V / 25V lijn.
Dit soort systemen zijn gebruikelijk in de Verenigde Staten. Het functioneert volgens het zelfde
principe als 100V systemen, echter is het maximale vermogen van de versterker op de
luidsprekeruitgangen 70V RMS of 25V RMS.
Lage impedantie (8Ω).
Deze aansluiting is voor gebruik van standaard lage impedantie luidsprekers. De minimale
aansluitwaarde dient 8Ω te zijn. Wanneer er twee of meer luidsprekers zijn aangesloten dient
de waarde van de impedantie tussen de 8Ω en16Ω te zijn.
Technische specificaties
Type: Mixer Versterker
Model: HQ-HA60W
Net Voltage : AC 115V / 230V, 50 / 60Hz ± 10%, instelbaar Voeding
Accu Voltage: DC 24V (max. 10% afwijking)
Max. :
90W
Uitgangsvermogen
RMS : 60W
Uitgangen: Luidspreker uitgangen: 8Ω, 25V, 70V, 100V
LINE OUT: 1V, 600Ω
Ingangen: Mic1~2: 1mV, 250Ω gebalanceerd met instelbare phantoom
voeding
AUX: 200mV, 47KΩ, ongebalanceerd
TEL: 0.1~1V, 600Ω, instelbaar, gebalanceerd
Frequentiebereik: Mic1~Mic2: 60Hz ~ 15KHz ± 3dB
Aux: 60Hz ~ 15KHz ± 3dB
TEL: 100Hz ~ 15KHz ± 3dB
Totale harmonische
vervorming:
Minder dan 1% at 1KHz bij gemiddeld vermogen
Signaal-/ruisverhouding: Alle volumeregelaars (C.C.W.): <75dB bij gemiddeld vermogen
Mic1~2: <60dB bij gemiddeld vermogen
Aux: <70dB bij gemiddeld vermogen
TEL: <70dB bij gemiddeld vermogen
Klankregelaars: BASS: ±10 dB at 100Hz
TREBLE: ±10 dB at 10KHz
Regelaars:
Mic1~Mic2 volumeregeling
AUX volumeregeling
Klankregelaars (BASS, TREBLE)
TEL ingangsniveau
Bel (CHIME) aan/uit schakelaar
AC 115V / 230V keuzeschakelaar
Indicators: Aan/uit indicator (LED), uitgangsniveau indicators (3 LEDS)
AC verbruik: 200W
DC verbruik: 5A
Bel (CHIME): Twee tonen (DING-DONG)
Prioriteitsschakeling (VOX): Prioriteitsniveau (Bij gebruik van Mic1, de 5-polige DIN
aansluiting, 6.35mm of XLR aansluiting):
TEL / EMER: 3 MIC1: 2 MIC2: 1 AUX: 1
Afmetingen ( H ×B ×D ): 88×272×300 mm
Gewicht: +/- 7.2kg
Kleur: Zwart
Montagemogelijkheden: Staand of in 19” rack.

 Loading...