

HQ HQ-CP10 User Manual

HQ-CP10
(S. 4)
KOMPASS
(p. 2)
COMPASS
(p. 6)
BOUSSOLE
(p. 10)
BUSSOLA
(p. 22)
COMPAS
(14. o.)
TÁJOLÓ
(s. 18)
KOMPASS
(p. 8)
KOMPAS
(S. 16)
KOMPASSI
(p. 12)
BRÚJULA
(s. 20)
KOMPAS
2
ENGLISH
1. To fi nd your current position, you will need two visible
landmarks (mountain, hill, island, etc.) whose locations are
indicated on the map. Your lensatic compass enables you
to draw the proper lines on your map from two landmarks
towards your location. The intersection of these two lines
is your current position. Choose landmarks a wide distance
apart for greater accuracy.
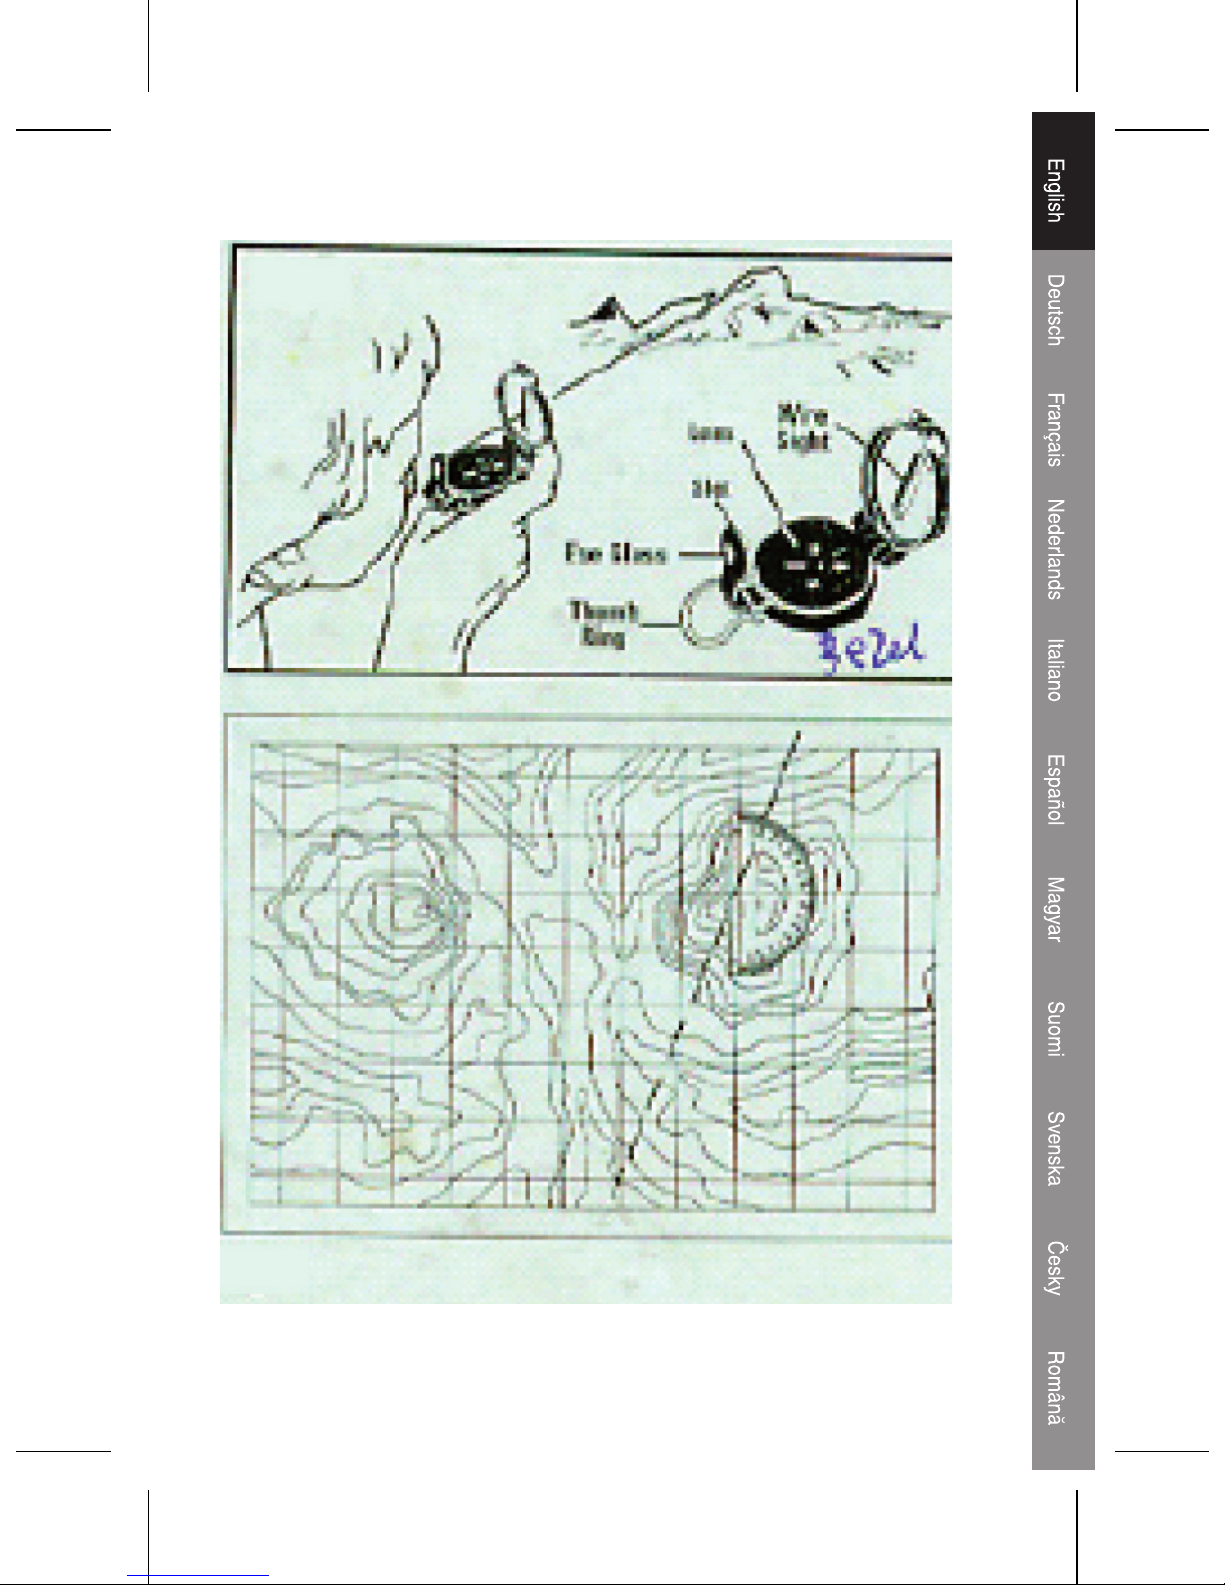
2. Rotate the lens to align the longer line on the lens with the
wire in the lid as shown in Fig. 1, then hold the compass up
close to your eye for viewing. Use the thumb ring to hold the
compass steady and horizontal. Peer through the slot on
top of the eyepiece and sight one landmark through the wire
and slot, then look down at the compass through the lens
and note the degree reading directly in front of you. This
compass reading is referred to as a “bearing”.
3. Repeat step 2 for the second landmark.
4. Position your map on a fl at level surface and align the
magnetic north on the map with your compass. Your
map is now oriented. Noting the local variation between
true north and magnetic north, either add or subtract the
local variation to the bearing readings from Steps 2 and
3. Subtract if magnetic north is west of true north. Add if
magnetic north is east of true north.
5. With protractor zeroed at map location of the fi rst landmark,
align protractor with true north as shown in Fig. 2. Draw a
line at the angle of your corrected bearing from Step 4.
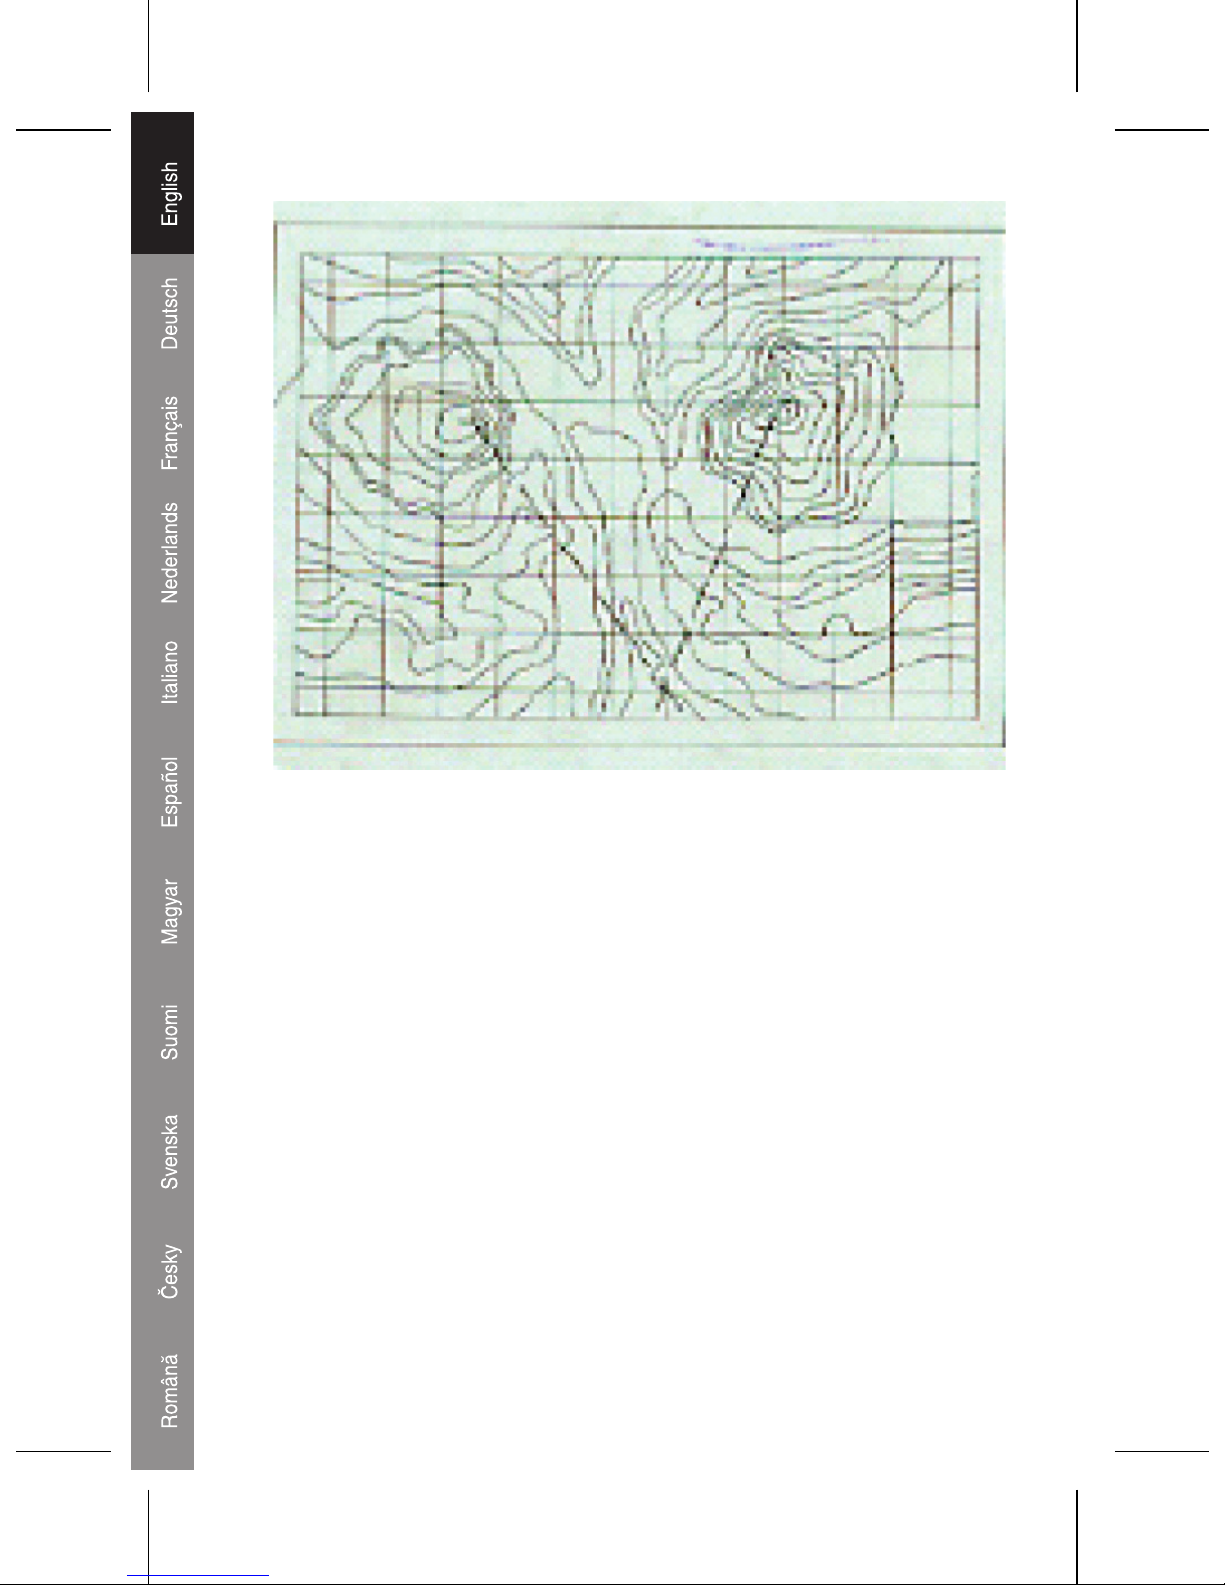
6. Repeat Step 5 for the second landmark. Where these two
lines intersect is your current position as shown in Fig.3.
7. As you reach your destination, this procedure can
be repeated with the previous landmarks or with new
landmarks as circumstances dictate.
3
Fig. 1
Fig. 2
4
Maintenance:
Clean only with a dry cloth. Do not use cleaning solvents or
abrasives.
Warranty:
No guarantee or liability can be accepted for any changes and
modifi cations of the product or damage caused due to incorrect
use of this product.
General:
Designs and specifi cations are subject to change without
notice.
All logos brands and product names are trademarks or
registered trademarks of their respective holders and are hereby
recognized as such.
Copyright ©
Fig. 3
5
DEUTSCH
1. Um Ihre aktuelle Position zu bestimmen, benötigen Sie zwei
sichtbare Landmarken (Berg, Hügel, Insel, usw.), deren
Standort auf der Karte eingezeichnet ist. Ihr Kompass
bietet Ihnen die Möglichkeit, die ordnungsgemäßen
Linien auf Ihrer Karte von beiden Landmarken in Richtung
Ihres Standorts einzuzeichnen. Der Schnittpunkt dieser
beiden Linien ist Ihre aktuelle Position. Um eine höhere
Genauigkeit zu erreichen, wählen Sie Landmarken aus, die
einen großen Abstand zueinander haben.
2. Drehen Sie die Linse, um die längere Linie auf der Linse
mit der Markierung im Deckel wie in Abb. 1 dargestellt
auszurichten, halten Sie den Kompass anschließend
zum Betrachten nahe an Ihr Auge. Verwenden Sie den
Daumenring, um den Kompass stabil und horizontal zu
halten. Blicken Sie durch die Kimme auf der Oberseite des
Okulars und sichten Sie eine Landmarke durch Korn und
Kimme. Sehen Sie anschließend im Kompass nach unten
durch die Linse und beachten Sie den Grad-Ablesewert
direkt vor Ihnen. Dieser Kompass-Ablesewert wird als
“Peilung” bezeichnet.
3. Wiederholen Sie Schritt 2 für die zweite Landmarke.
4. Legen Sie Ihre Karte auf eine fl ache, ebene Oberfl äche und
richten Sie den magnetischen Norden auf der Karte mit Ihrem
Kompass aus. Ihre Karte ist nun ausgerichtet. Beachten Sie
die lokale Abweichung zwischen geografi schem Norden
und magnetischem Norden und addieren beziehungsweise
subtrahieren Sie die lokale Abweichung zu den PeilungsAblesewerten aus Schritt 2 und 3. Subtrahieren Sie, wenn
der magnetische Norden westlich des geografi schen
Nordens liegt. Addieren Sie, wenn der magnetische Norden
östlich des geografi schen Nordens liegt.
5. Wenn der Winkelmesser am Kartenstandort der
ersten Landmarke auf Null gestellt ist, richten Sie den
Winkelmesser mit dem geografi schen Norden aus, wie in
Abb. 2 dargestellt. Zeichnen Sie eine Linie am Winkel Ihrer
korrigierten Peilung aus Schritt 4.
6
6. Wiederholen Sie Schritt 5 für die zweite Landmarke. An der
Stelle, an der sich die beiden Linien kreuzen, befi ndet sich
Ihre aktuelle Position, dargestellt in Abb. 3.
7. Wenn Sie Ihr Ziel erreichen, kann dieses Verfahren mit
den vorherigen Landmarken oder, wenn es die Umstände
erfordern, mit neuen Landmarken wiederholt werden.
Wartung:
Nur mit einem trockenen Tuch säubern. Keine Lösungsmittel
oder Schleifmittel verwenden.
Garantie:
Es kann keine Garantie oder Haftbarkeit für jegliche
Änderungen und Modifi kationen des Produkts oder für Schäden
übernommen werden, die aufgrund einer falschen Anwendung
dieses Produktes entstanden sind.
Allgemein:
Konstruktionen und technische Daten können ohne vorherige
Ankündigung geändert werden.
Alle Logos, Marken und Produktnamen sind Warenzeichen
oder registrierte Warenzeichen ihrer jeweiligen Eigentümer und
werden hiermit als solche anerkannt.
Copyright ©
7
FRANCAIS
1. Afi n de localiser votre position actuelle, deux points de
repère visibles sont nécessaires (montagne, colline, île
etc... indiqués sur la carte. La boussole Lensatic permet
de tracer les lignes appropriées sur la carte à partir de
deux points de repère. L‘intersection de ces deux lignes
représente votre position actuelle. Choisir des points de
repère très éloignés l‘un de l‘autre Pour obtenir une plus
grande précision.
2. Tourner la lentille pour aligner la ligne la plus longue sur
la lentille avec le fi l sur le couvercle comme indiqué sur la
Fig. 1, ensuite maintenir la boussole près de votre oeil pour
observer. Avec l‘anneau pour pouce, tenez la boussole
fermement et de manière horizontale. Regarder dans la
fente sur la partie supérieure de l‘oculaire et viser un point
de repère à travers le fi l et la fente, puis regarder en bas
vers la boussole à travers la lentille et noter la lecture en
degrés directement devant vous. La valeur exprimée par la
boussole est considérée comme un „relèvement“.
3. Répéter l‘étape 2 relativement au second point de repère.
4. Positionner votre carte sur une surface plate et aligner le
nord magnétique sur la carte à celui de la boussole. Votre
carte est à présent orientée. En notant la variation locale
entre le nord géographique et le nord magnétique, ajouter
ou soustraire la variation locale aux lectures de relèvement
obtenues avec les étapes 2 et 3. Soustraire si le nord
magnétique se trouve à l‘Ouest du nord géographique.
Ajouter si le nord magnétique se trouve à l‘Est du nord
géographique.
5. A l‘aide d‘un rapporteur d‘angle mis à zéro à la position de
la carte du premier point de repère, aligner le rapporteur
d‘angle avec le nord magnétique comme indiqué sur la
Fig.2. Tracer une ligne à l‘angle du relèvement corrigé
obtenu avec l‘étape 4.
6. Répéter l‘étape 5 pour le second point de repère.
L‘intersection de ces deux lignes représente votre position
actuelle.
8
7. Une fois arrivé à destination, la procédure peut être répétée
avec les points de repère précédents ou avec de nouveaux
points de repère en fonction des circonstances.
Entretien :
Nettoyer uniquement avec un chiffon sec. N‘utiliser pas de
solvants ou de produits abrasifs.
Garantie :
Aucune garantie ou responsabilité ne sera acceptée en cas
de modifi cation et/ou de transformation du produit ou en cas
de dommages provoqués par une utilisation incorrecte de
l‘appareil.
Généralités :
Le design et les caractéristiques techniques sont sujets à
modifi cation sans notifi cation préalable.
Tous les logos de marques et noms de produits sont des
marques déposées ou immatriculées dont leurs détenteurs sont
les propriétaires et sont donc reconnus comme telles dans ce
document.
Copyright ©
 Loading...