

ENGLISH 4
POLSKI 19
РУССКИЙ 33
УКРАЇНСЬКА 49
EESTI 64
LATVISKI 78
LIETUVIŠKAI 93
107
ROMÂNĂ 122
ČESKY 136
MAGYAR 150
SLOVENSKY 165
HRVATSKI 179
SLOVENŠČINA 193
БЪЛГАРСКИ 208
SRPSKI 224
HQ9160
4222 002 48152 08-11-2006 14:32 Pagina 3
Important
Read these instructions for use carefully before
using the appliance and save them for future
reference.
◗ Only use the powerplug supplied.
◗ The powerplug transforms 100-240 volts to a
safe low voltage of less than 24 volts.
◗ The powerplug contains a transformer. Do
not cut off the powerplug to replace it with
another plug, as this will cause a hazardous
situation.
◗ Do not use a damaged powerplug.
◗ If the powerplug is damaged, always have it
replaced by one of the original type in order
to avoid a hazard.
◗ Make sure the powerplug does not get wet.
◗ Charge and store the appliance at a
temperature between 5cC and 35cC.
C
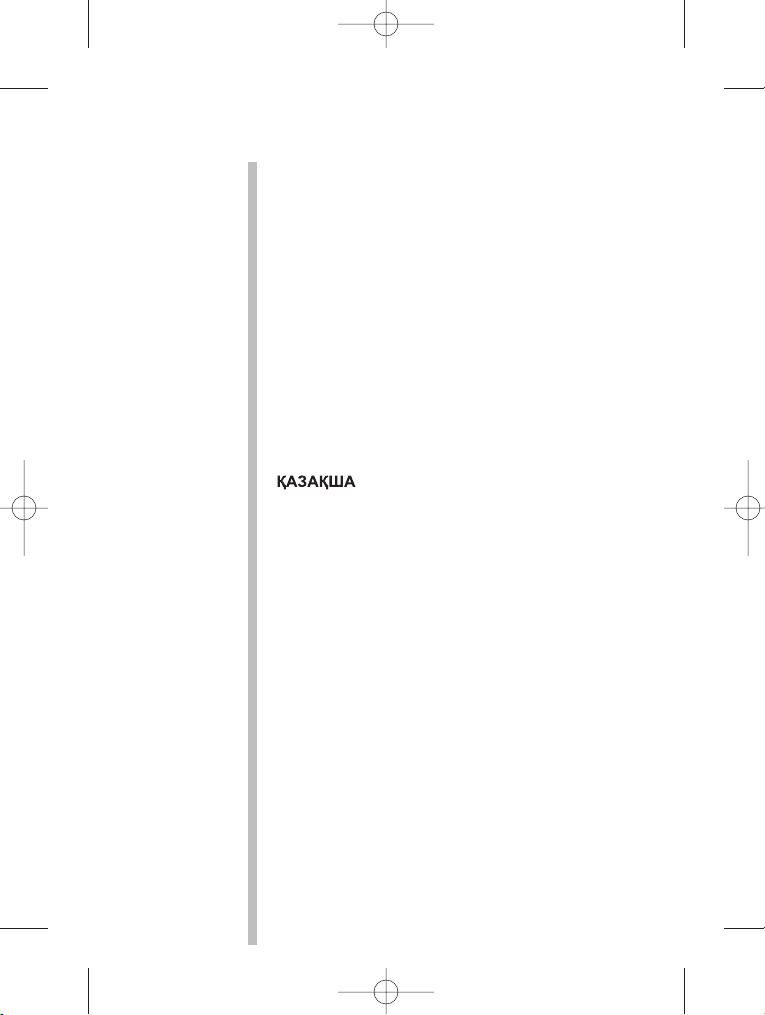
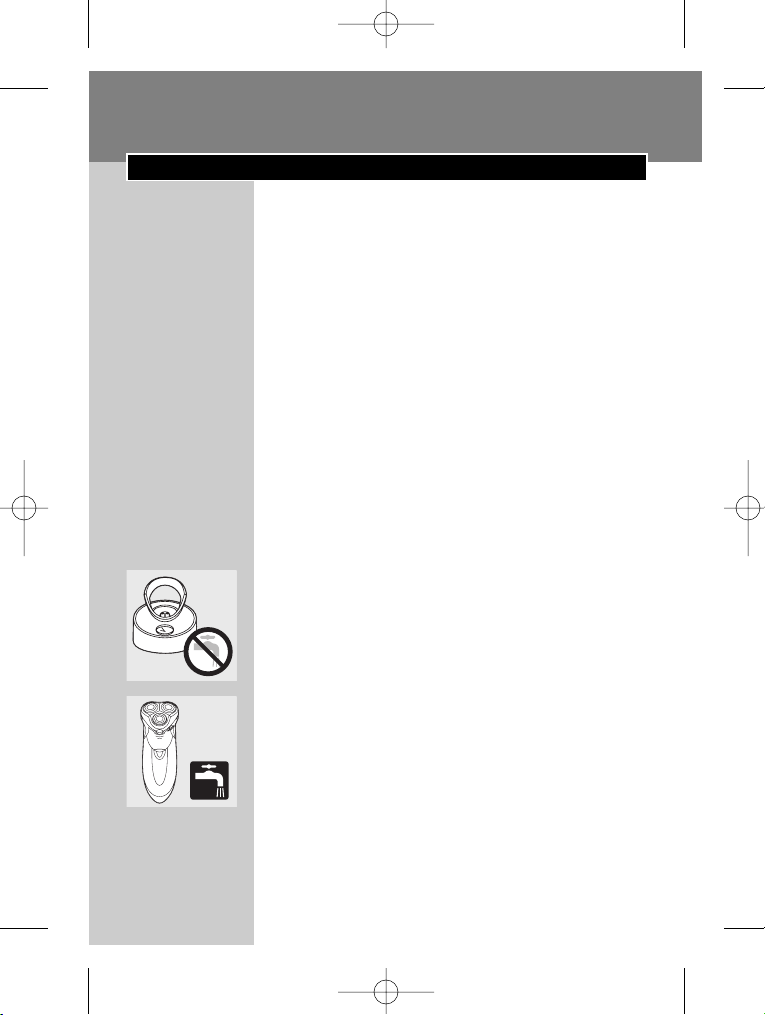
◗ Never immerse the charging stand in water
nor rinse it under the tap.
◗ Do not recharge the shaver in a closed pouch.
◗ Always unplug the shaver before cleaning it
under the tap.
C
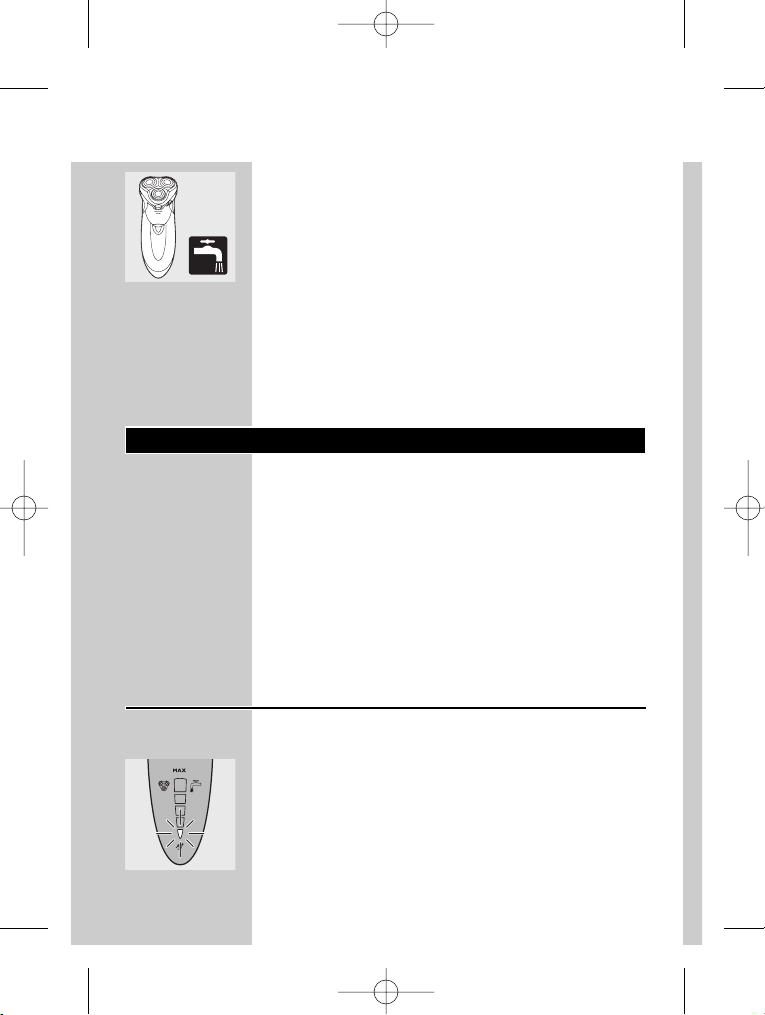
◗ The appliance complies with the
internationally approved IEC safety regulations
and can be safely cleaned under the tap.
Be careful with hot water. Always check if the
water is not too hot, to prevent your hands from
getting burnt.
◗ Noise level: Lc = 64 dB [A]
ENGLISH4
4222 002 48152 08-11-2006 14:32 Pagina 4

Charging
Make sure the appliance is switched off before
you start charging it.
Charging normally takes approx. 1 hour.
You can also shave without charging by
connecting the shaver to the mains.
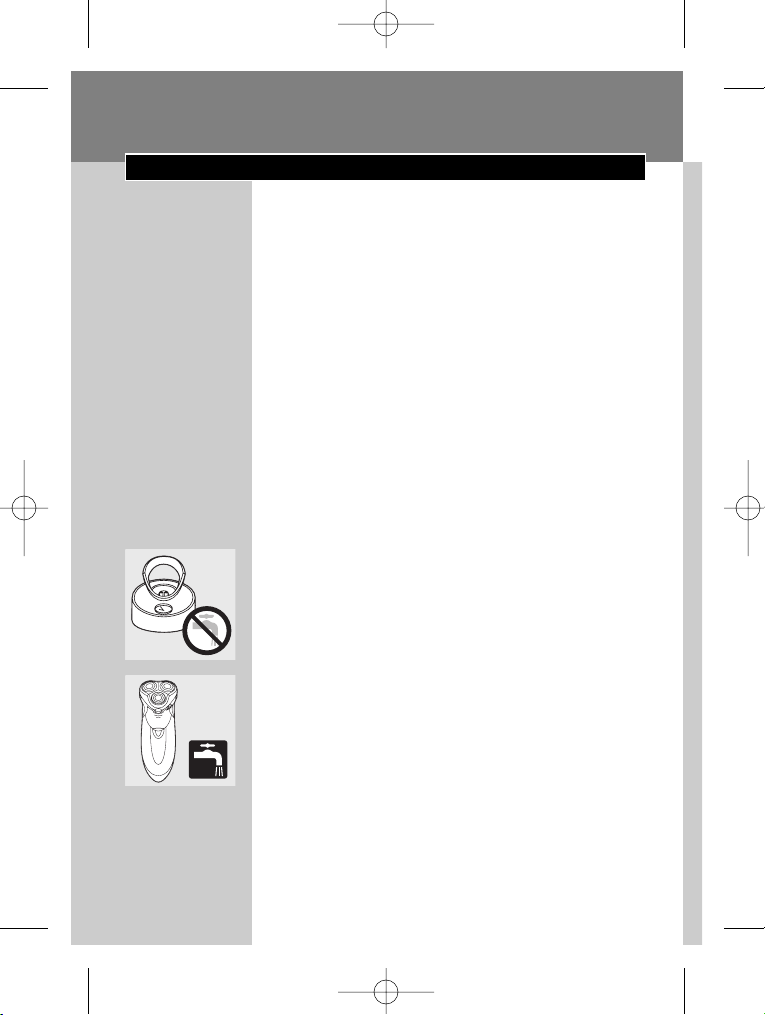
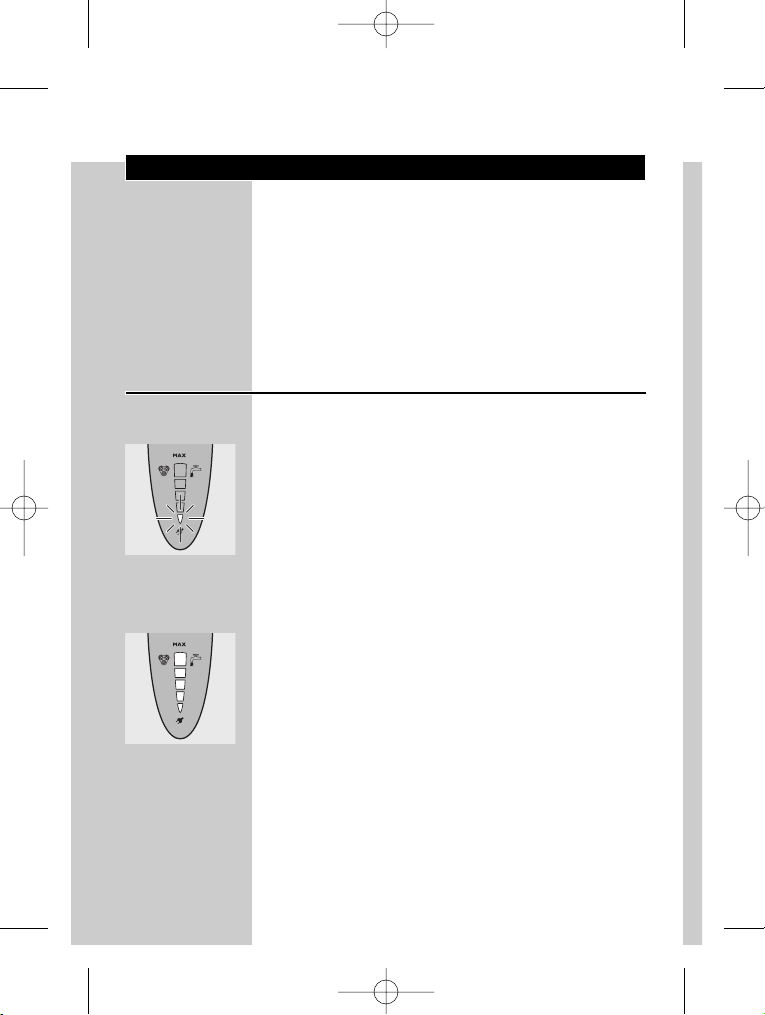
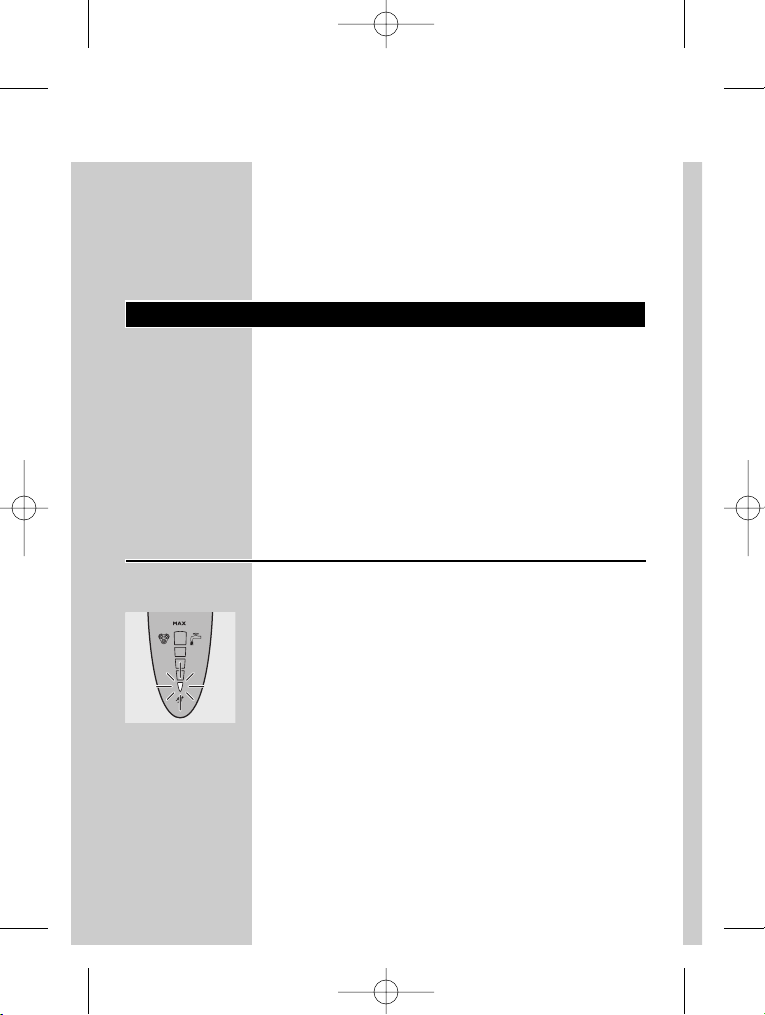
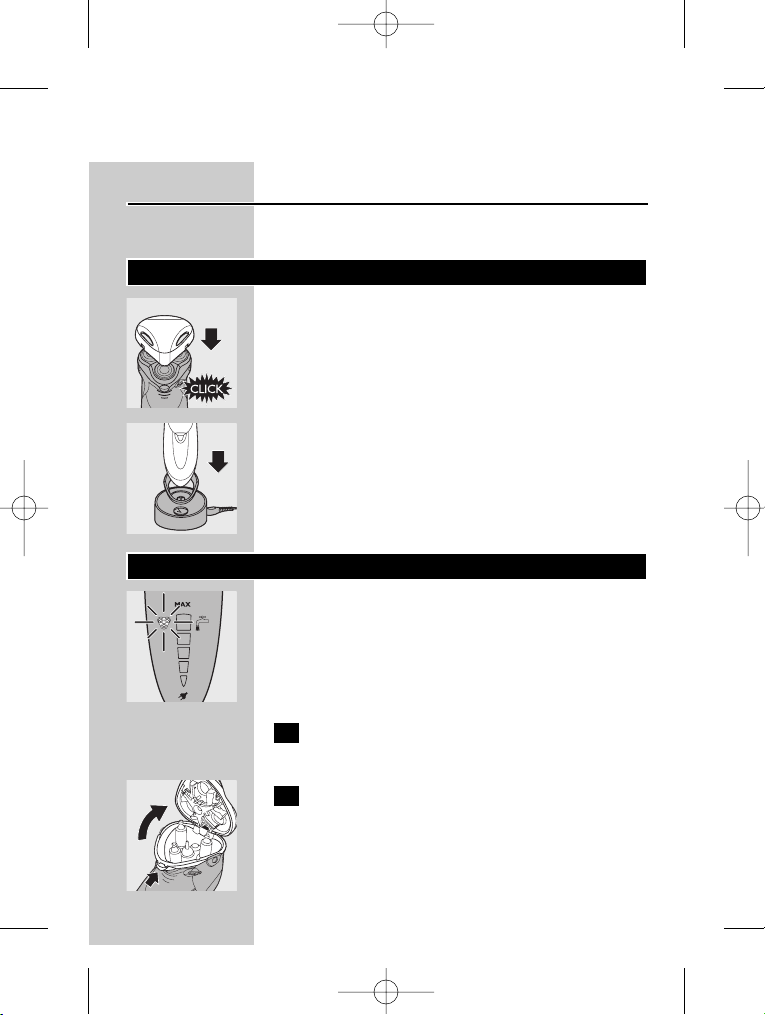
Charge indications
Charging
C
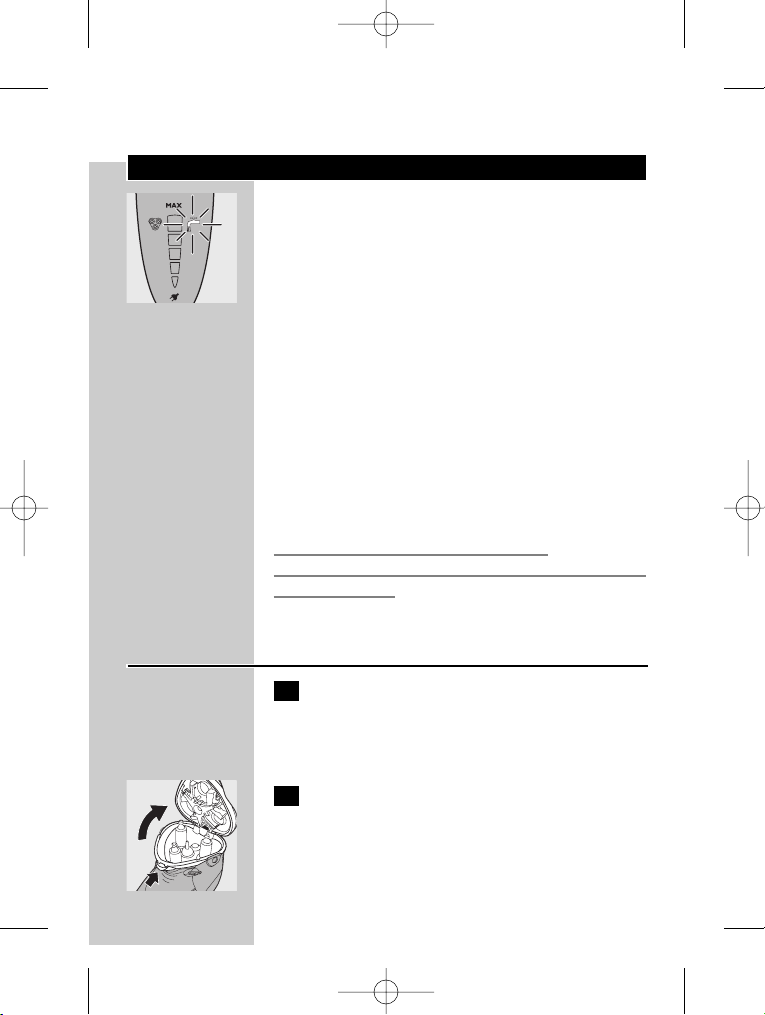
◗ When you start charging the empty shaver,
the bottom light burns red.When the battery
contains enough power for one shave, all
lights start blinking green sequentially.
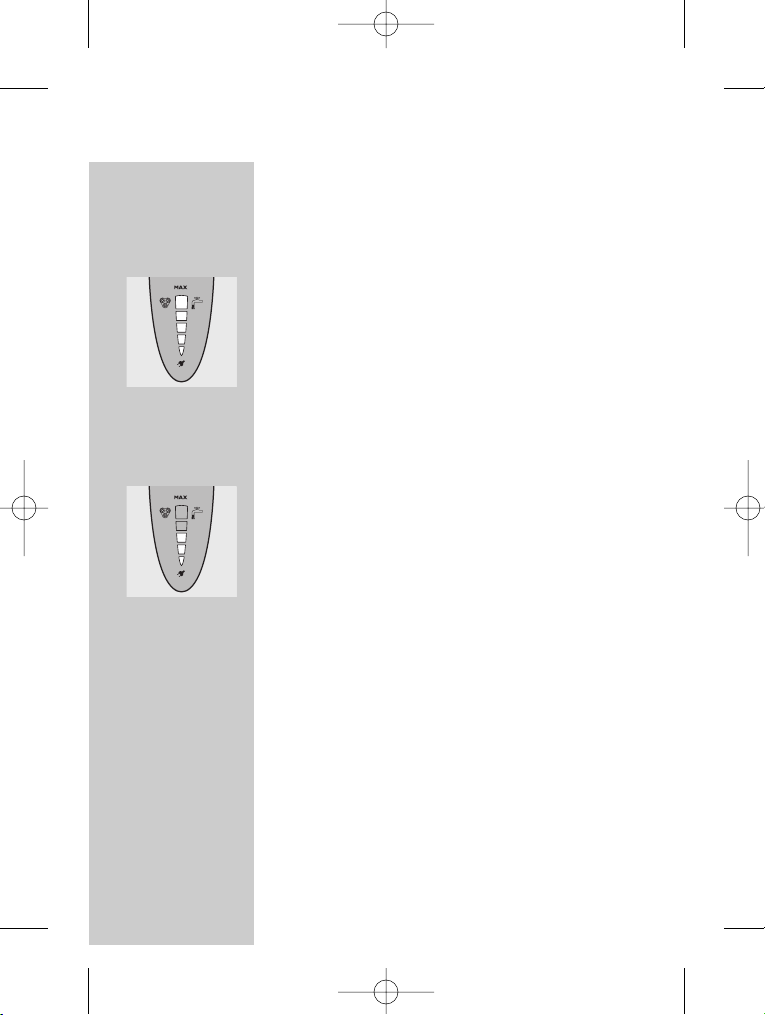
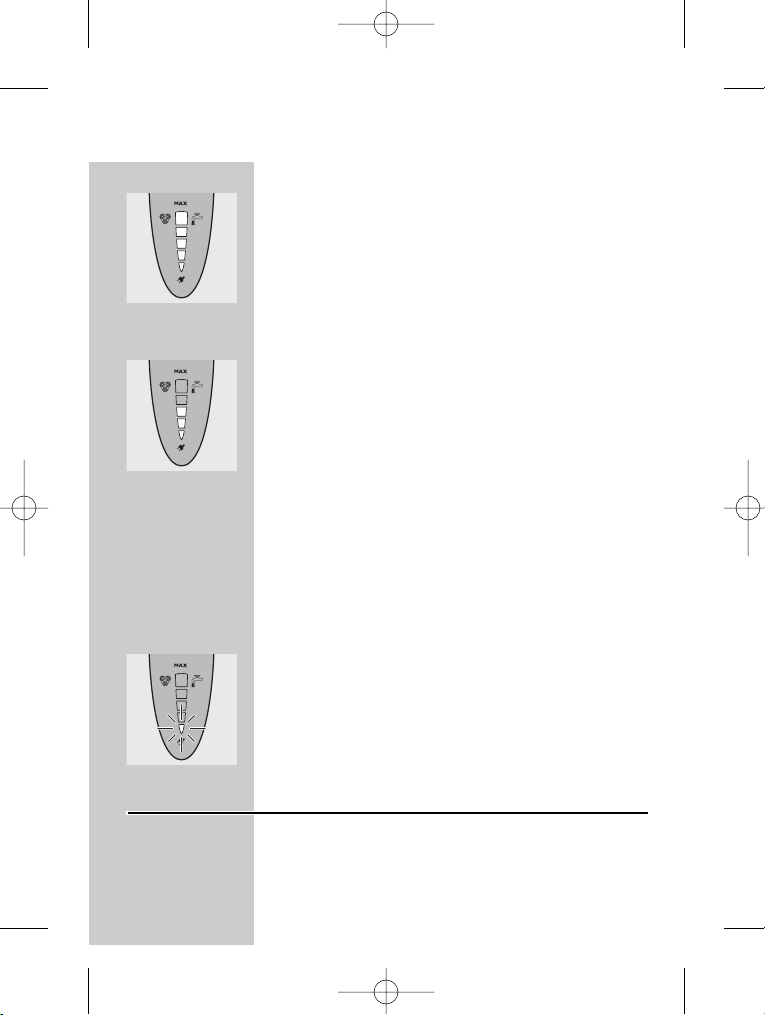
Battery fully charged
C
◗ When the battery has been fully charged, all
green light are on.
A few hours after charging, all lights go out.
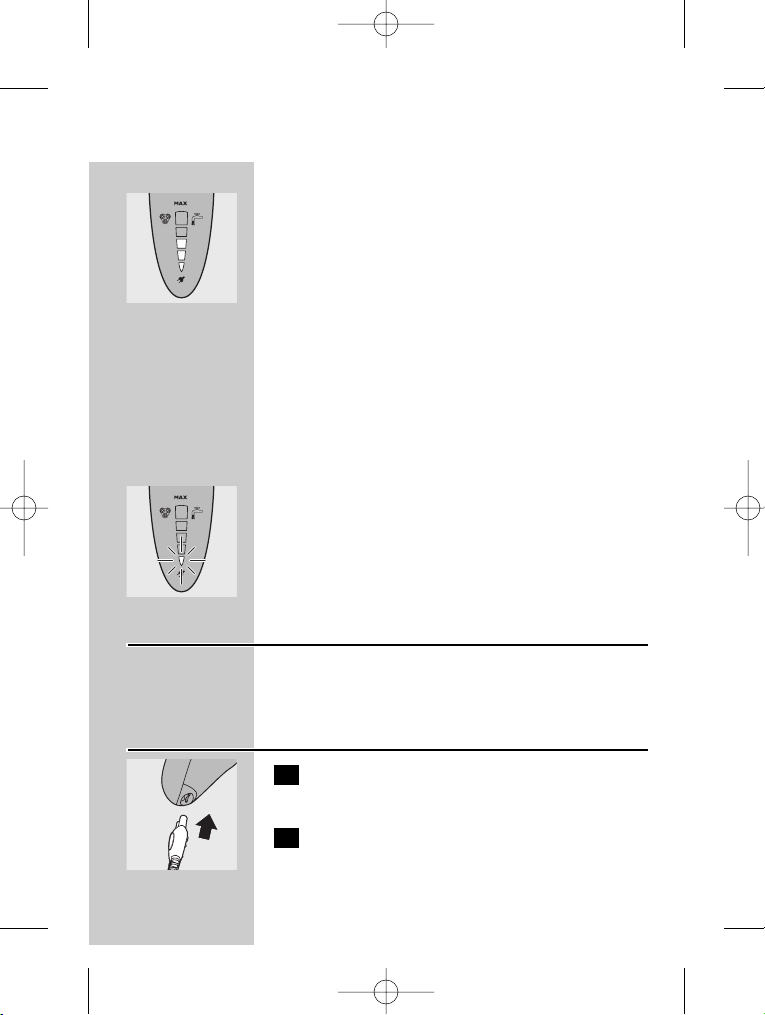
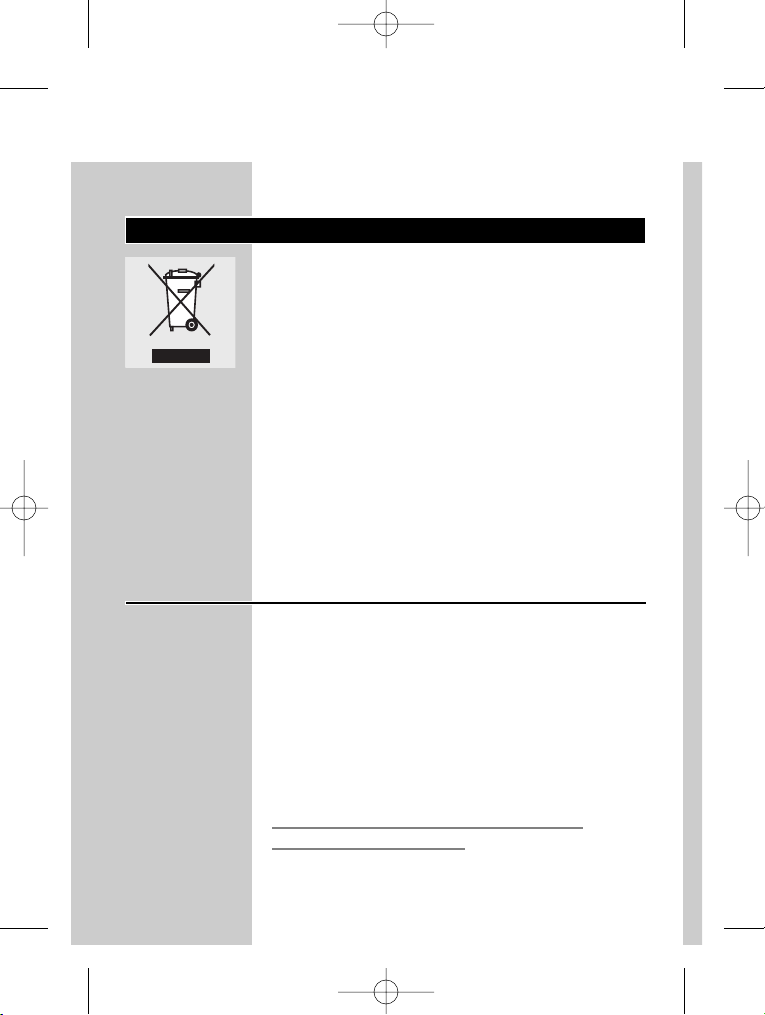
Remaining battery capacity
C
◗ The amount of power left in the battery is
indicated by the number of lights that are on.
ENGLISH 5
4222 002 48152 08-11-2006 14:32 Pagina 5
The remaining battery capacity is shown when
you unplug the shaver or when you switch it on
or off:
- When all lights burn green, the battery is 100%
charged.
- When the bottom light burns green, 20% of the
battery capacity is left.
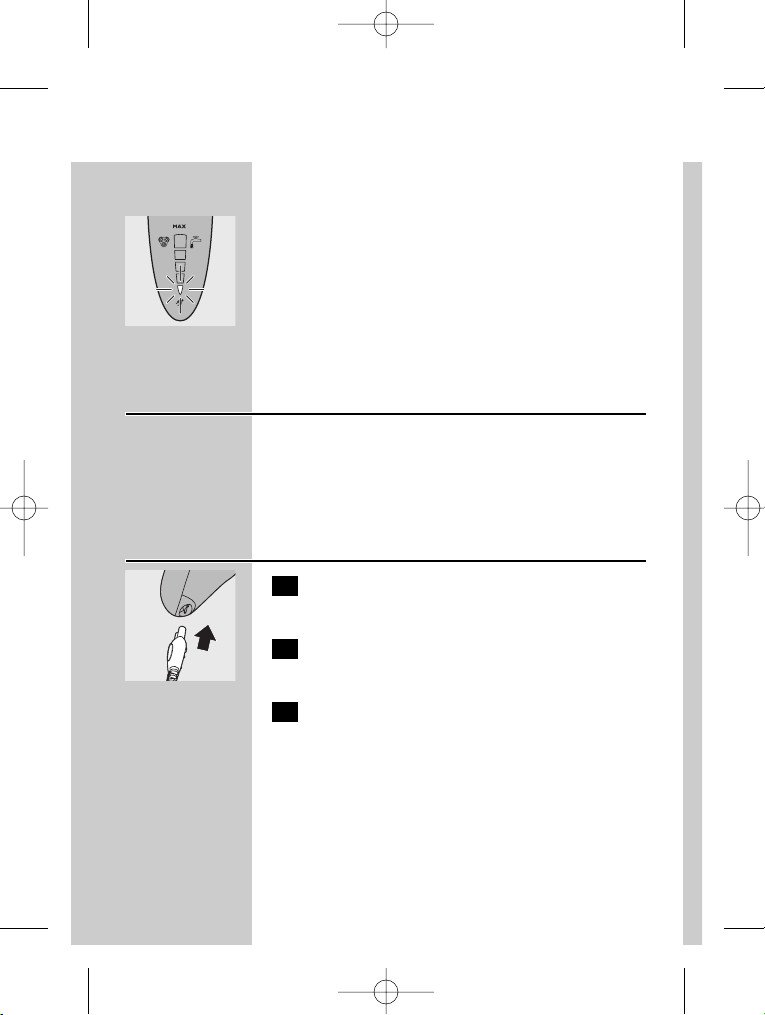
Battery running low
C
◗ When the battery is running low, the bottom
light starts burning red.
When you switch the shaver off, this light blinks a
few times.
Cordless shaving time
A fully charged shaver has a cordless shaving time
of up to 80 minutes.
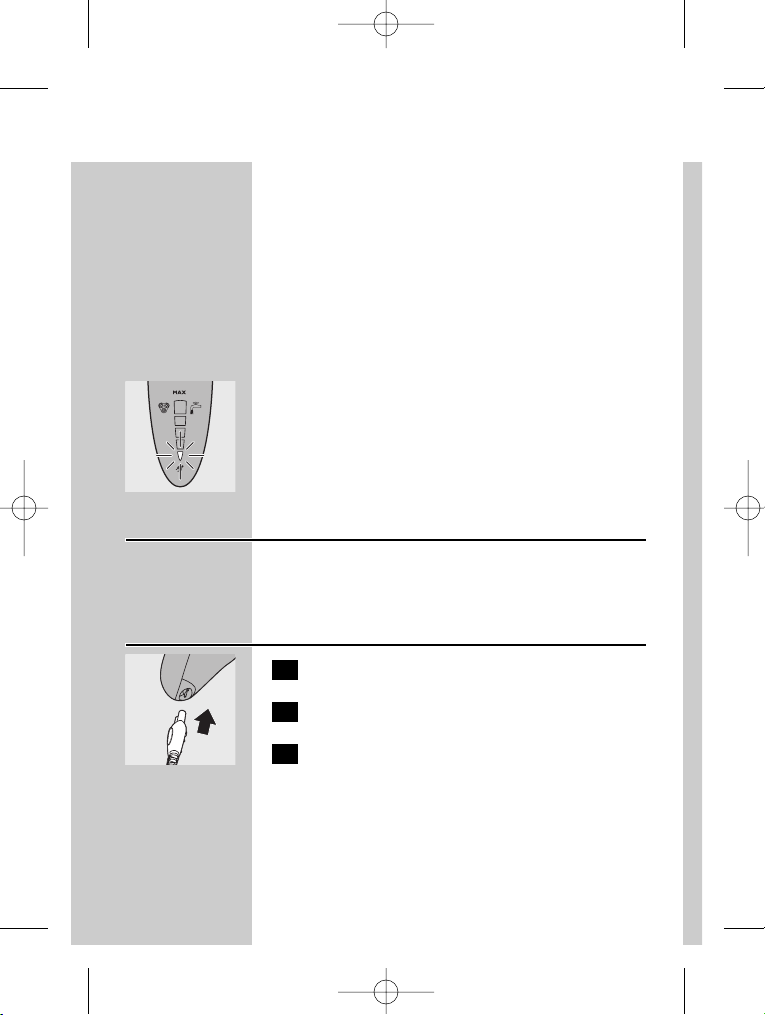
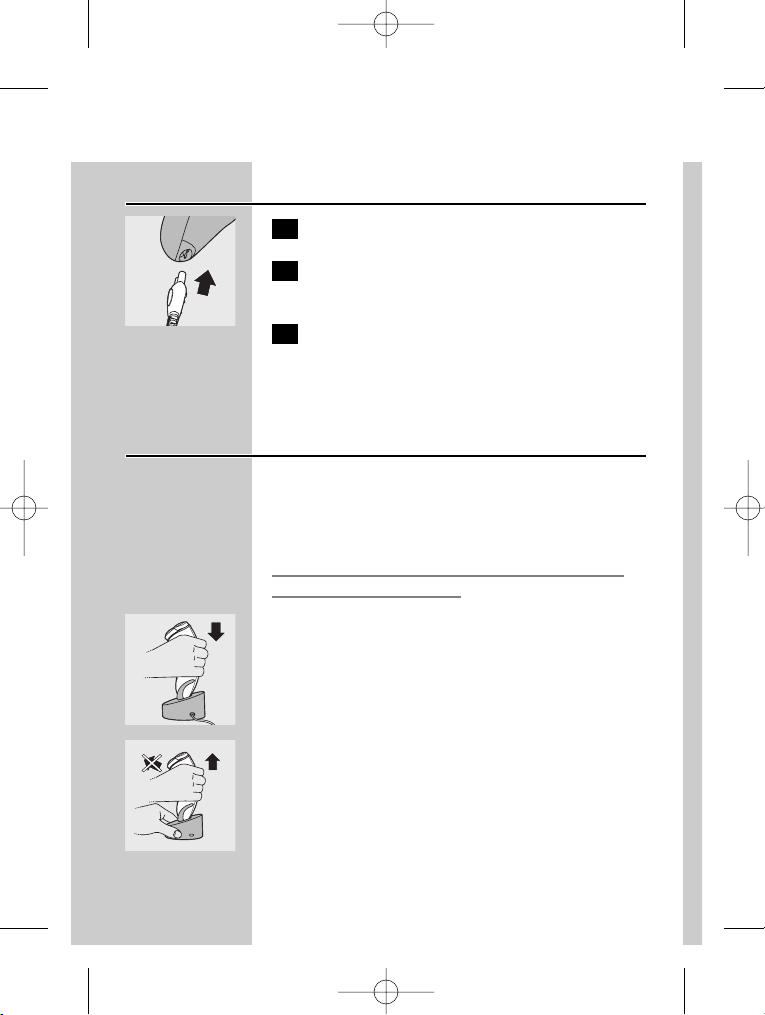
Charging the appliance
C
1 Put the appliance plug in the shaver.
2 Put the powerplug in the wall socket.
3 Remove the powerplug from the wall
socket and pull the appliance plug out of
the shaver when the battery has been fully
charged.
ENGLISH6
4222 002 48152 08-11-2006 14:32 Pagina 6
Charging stand
You can also charge the appliance by placing it in
the charging stand, if provided.
Never immerse the charging stand in water nor
rinse it under the tap.
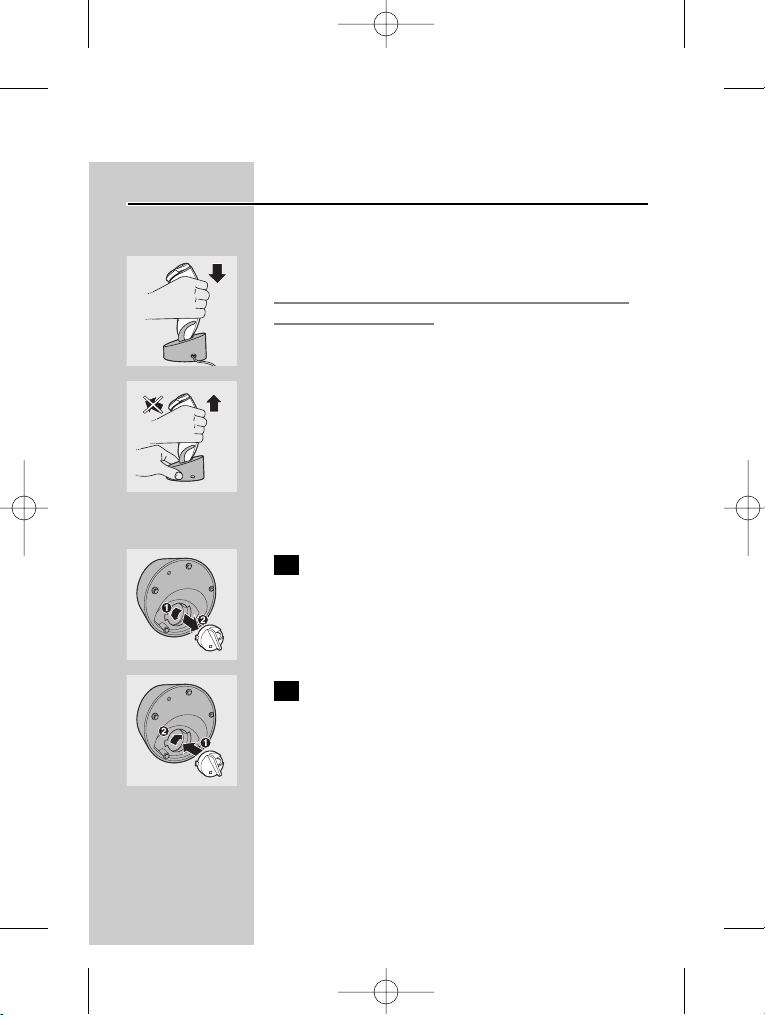
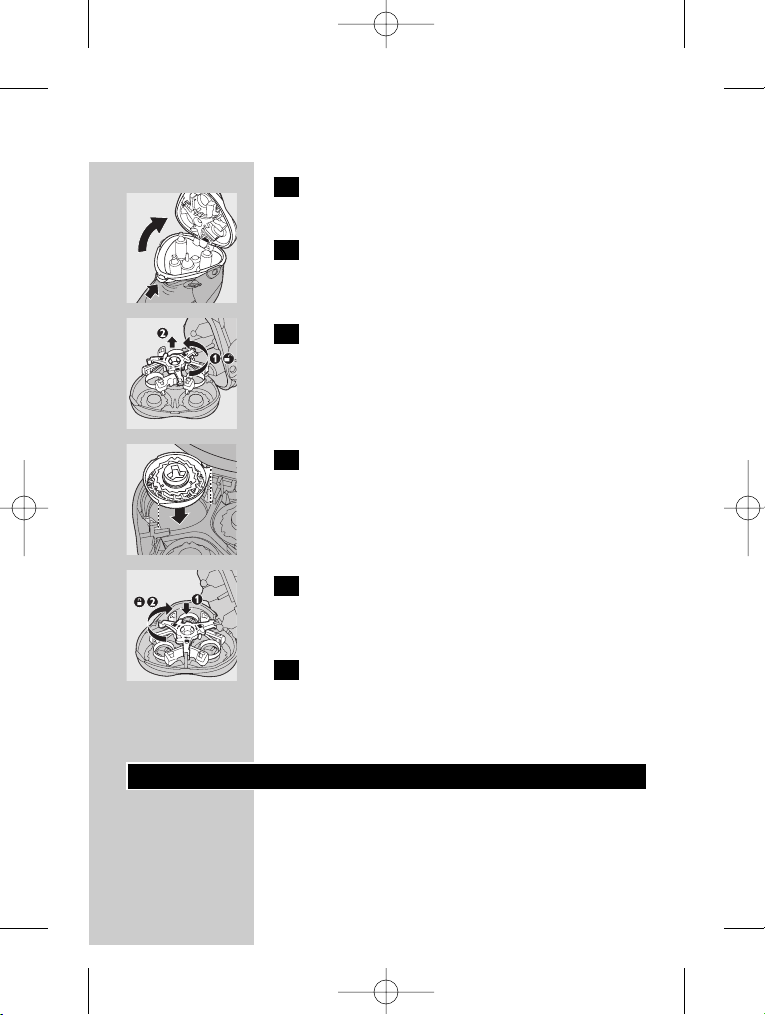
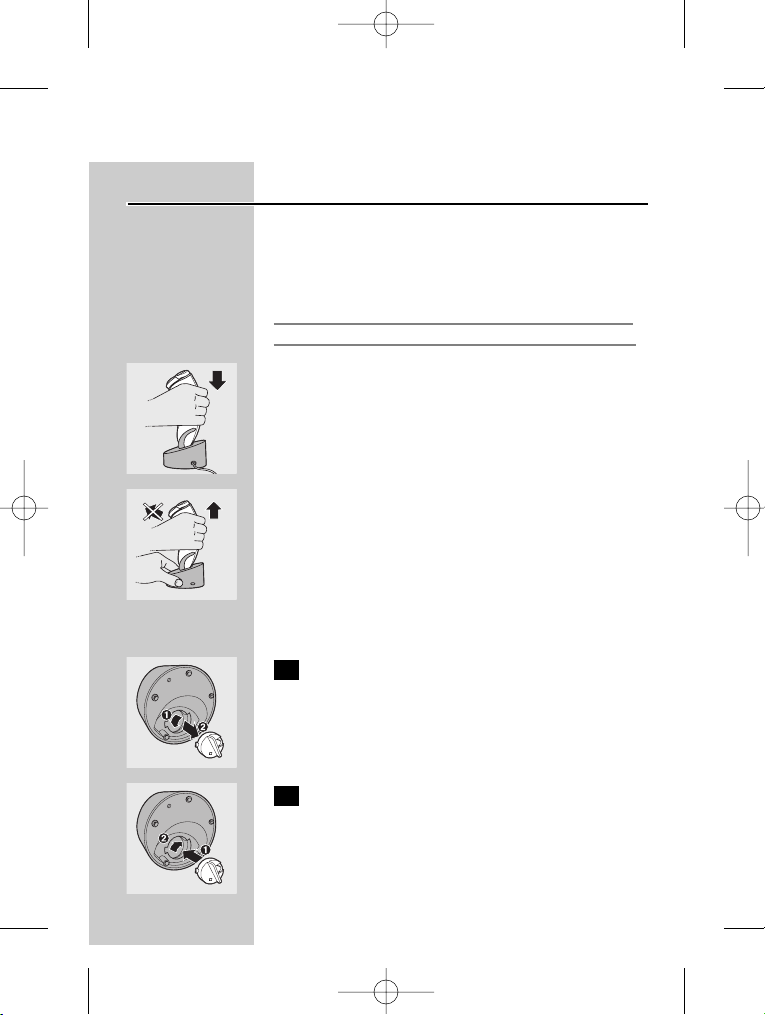
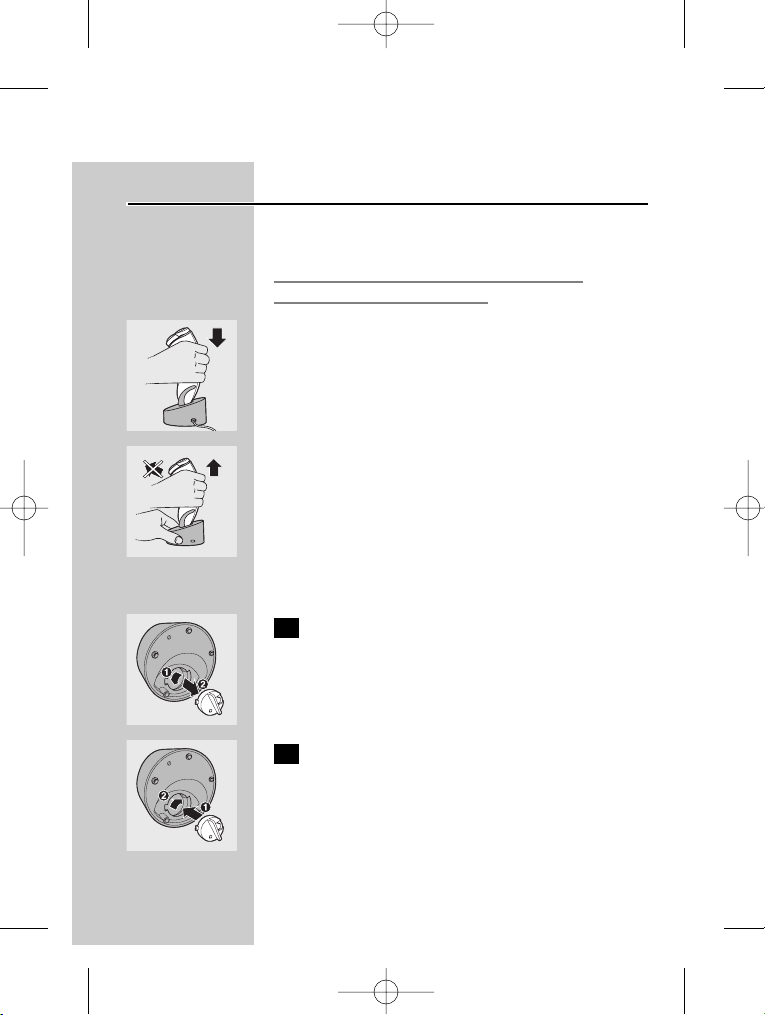
C
◗ Place the shaver properly in the plugged-in
charging stand.
The bottom light starts burning red.
C
◗ Lift the shaver from the stand without tilting
it.
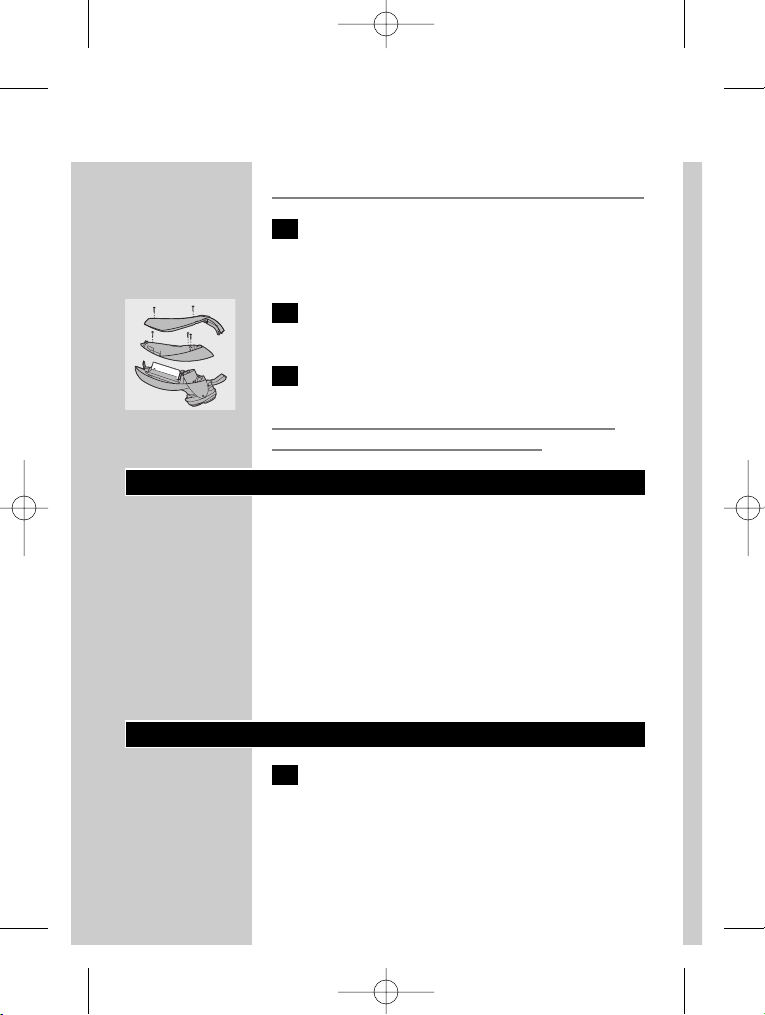
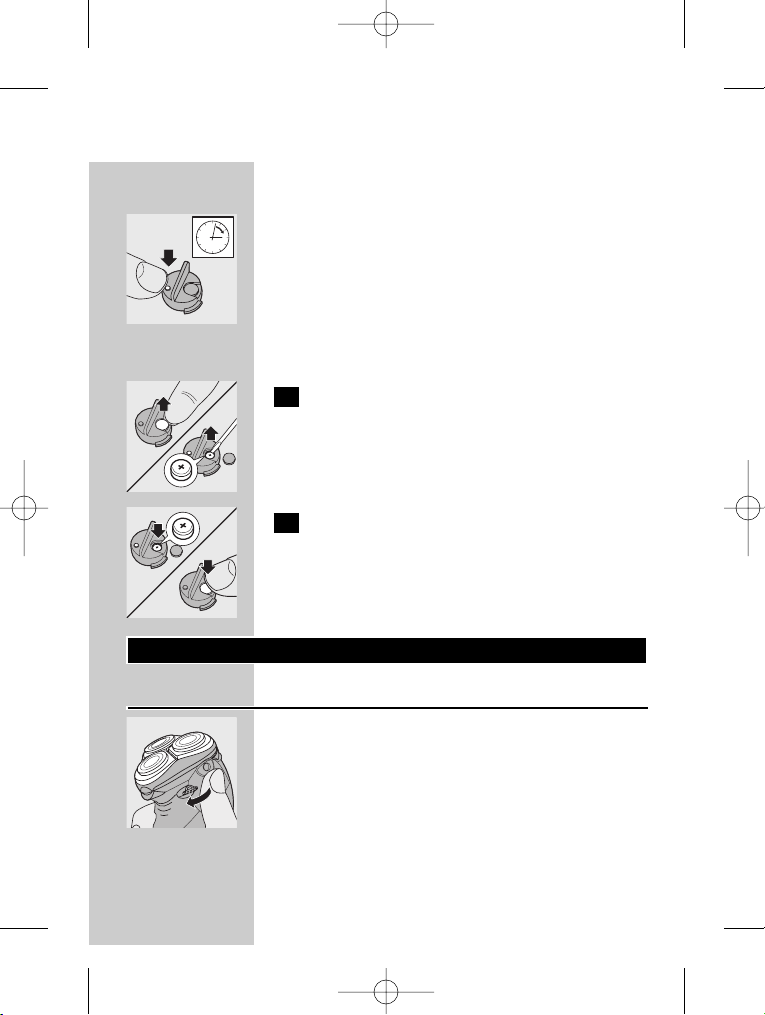
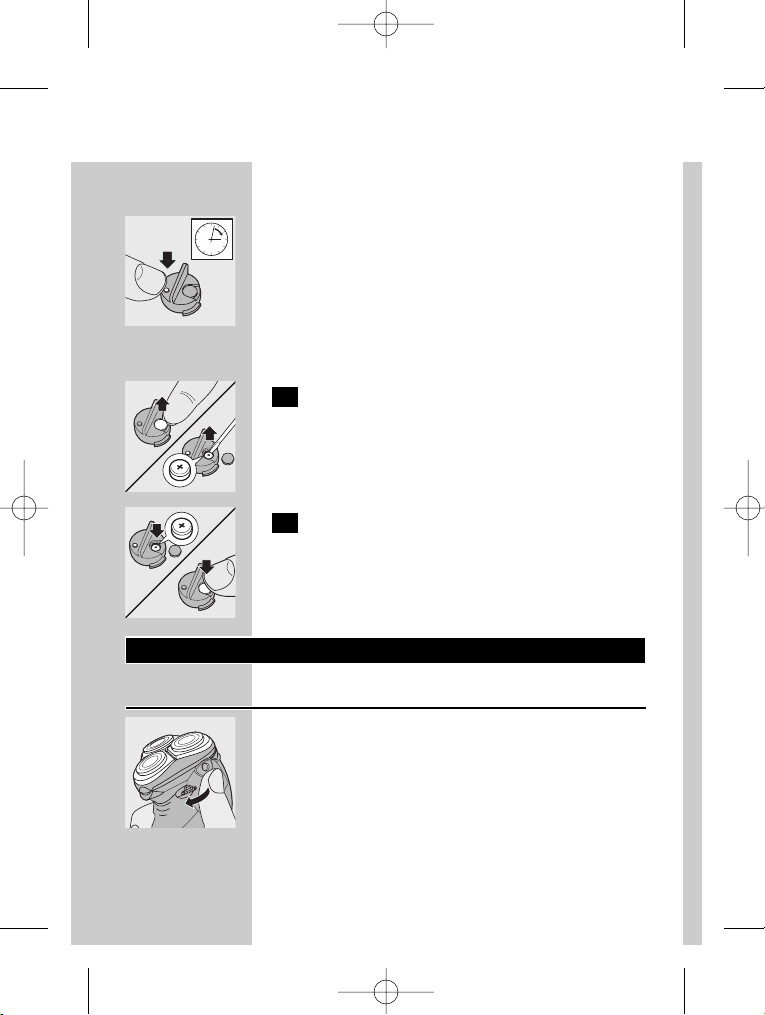
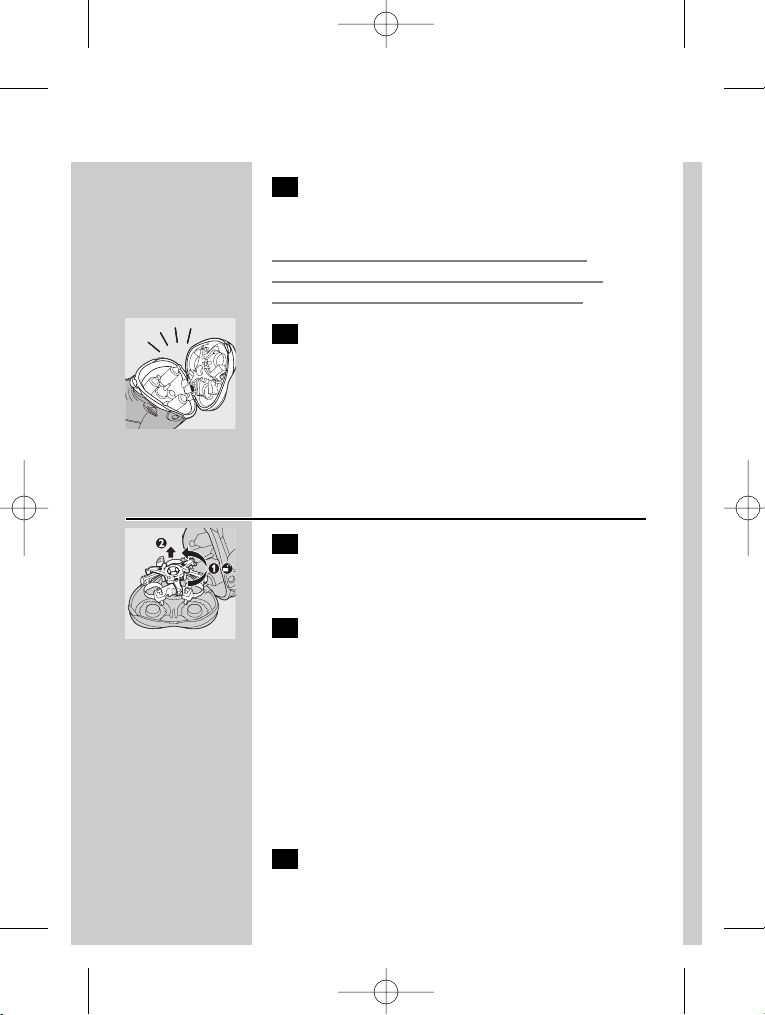
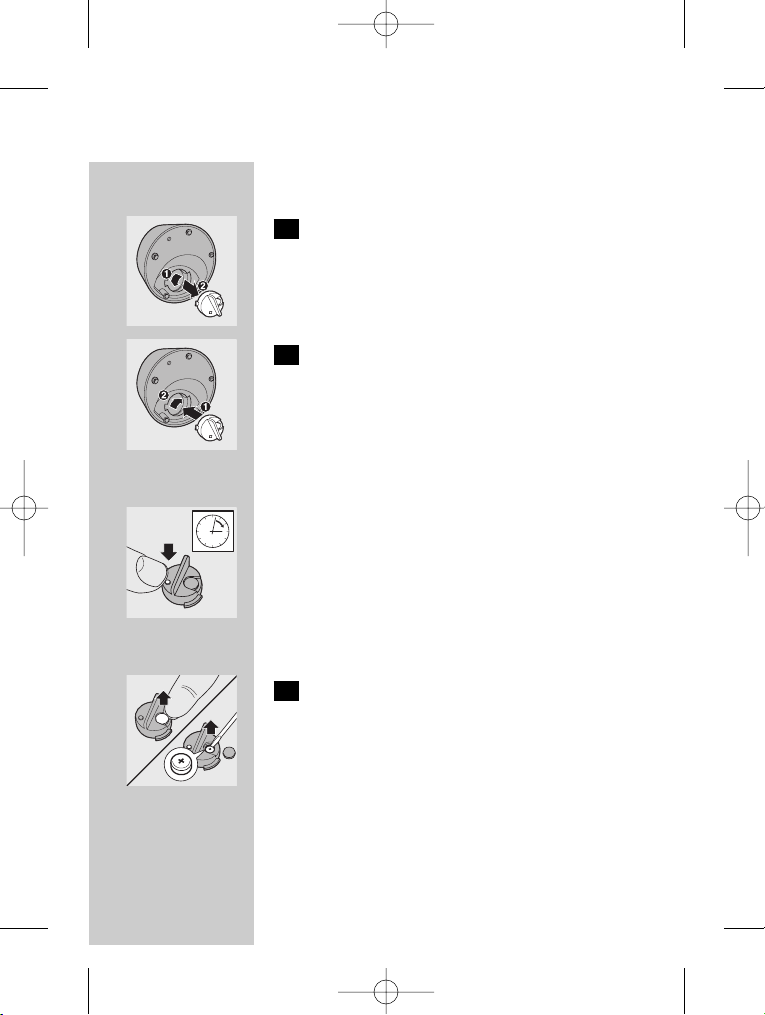
Removing and inserting the clock
C
1 Turn the clock anticlockwise (1) ('click')
and pull it out (2).
C
2 Insert the clock (1) and turn it clockwise
(2) ('click').
ENGLISH 7
4222 002 48152 08-11-2006 14:32 Pagina 7

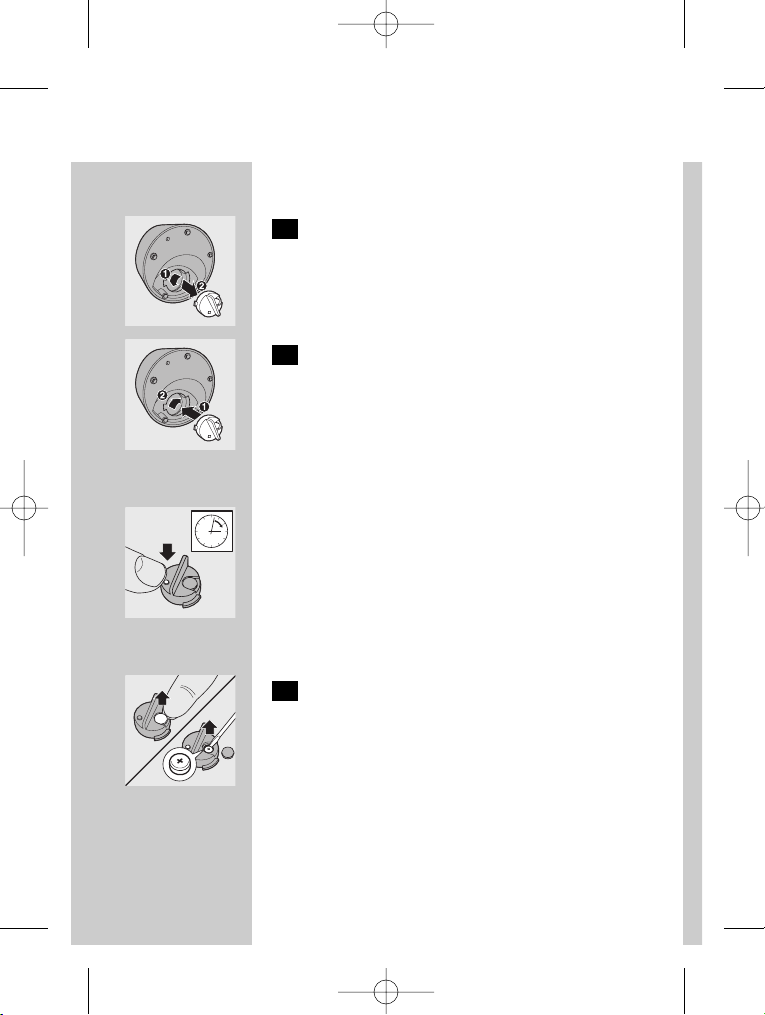
Setting the time
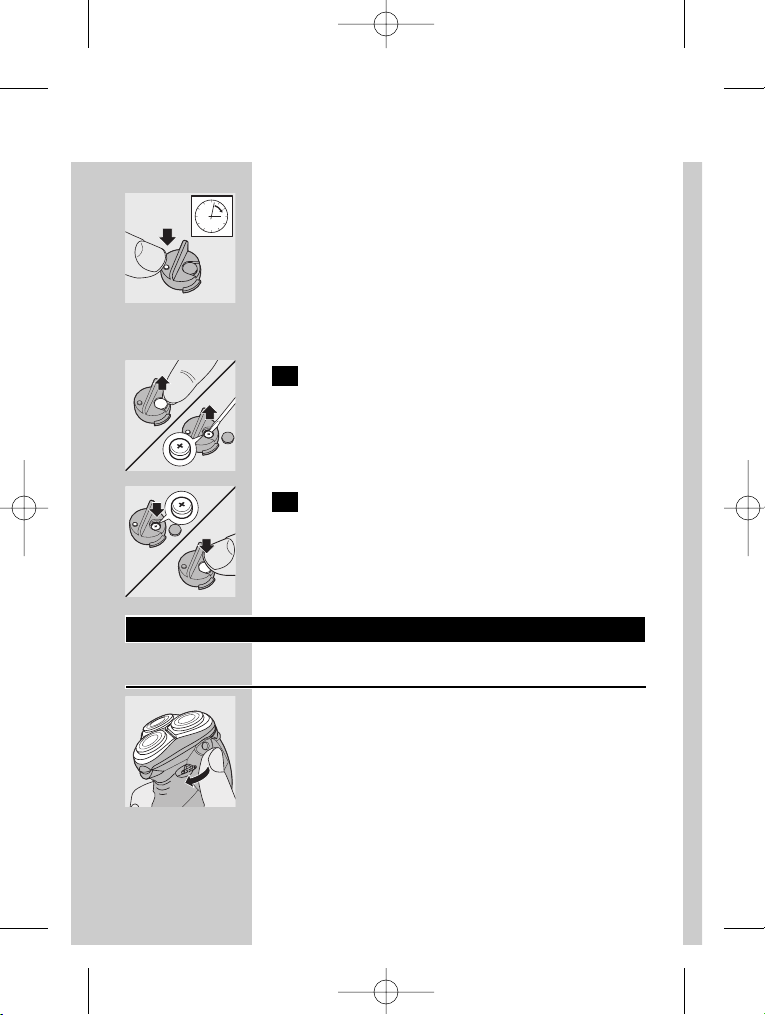
C
◗ Set the time by pressing the small button at
the back of the clock.
The time can only be set forward.
Replacing the battery
C
1 Remove the cap.Then remove the battery
by means of a miniature screwdriver.
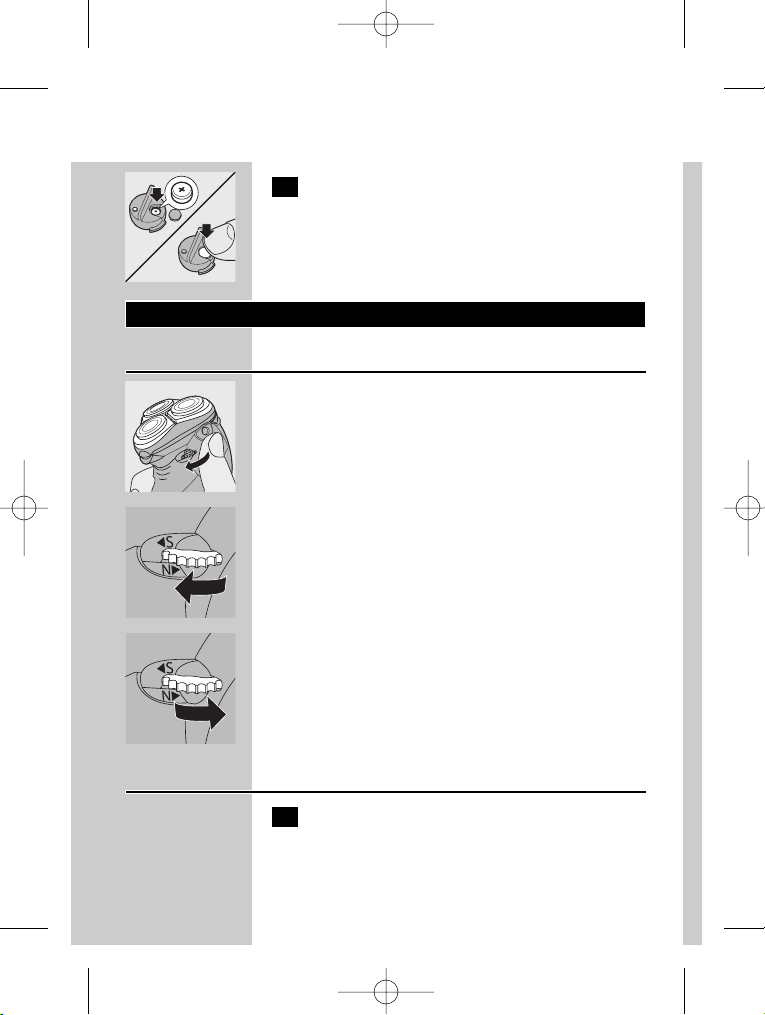
C
2 Insert a new battery and put the cap back
into place.
Using the appliance
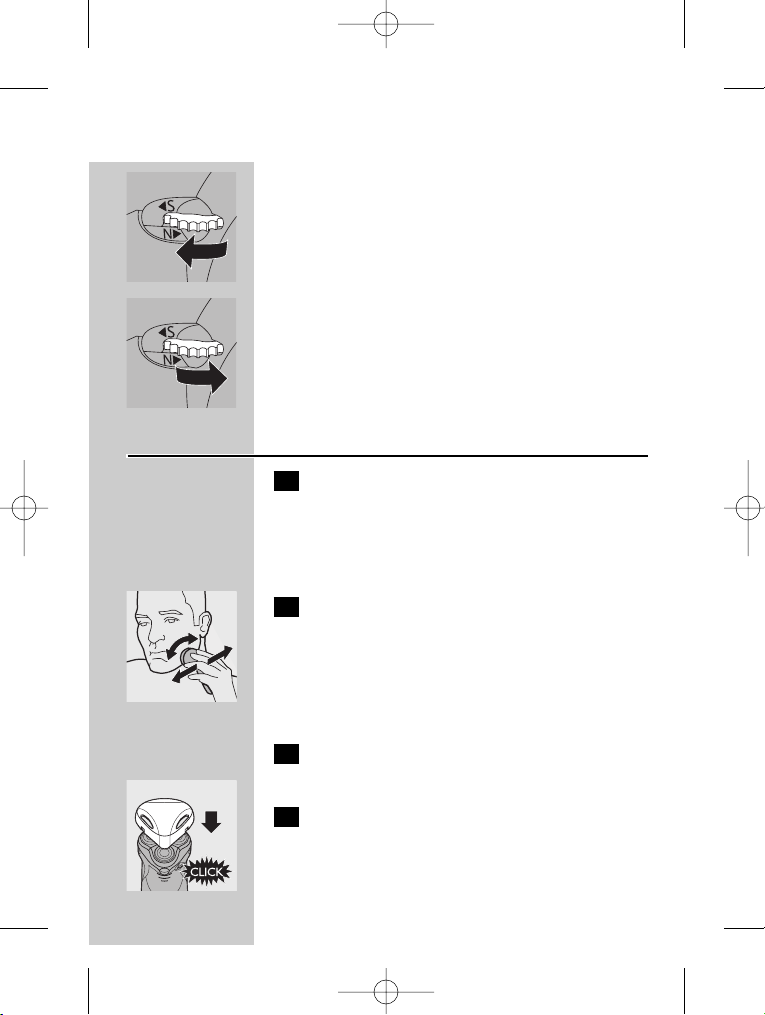
Personal Comfort Control
C
◗ The Personal Comfort Control system allows
you to adapt the shaver to your skin type.
- You can set the shaver to 'Normal' for a fast
and comfortable close shave.
- You can set the shaver to 'Sensitive' for a
comfortable close shave with optimal skin
comfort.
ENGLISH8
4222 002 48152 08-11-2006 14:32 Pagina 8
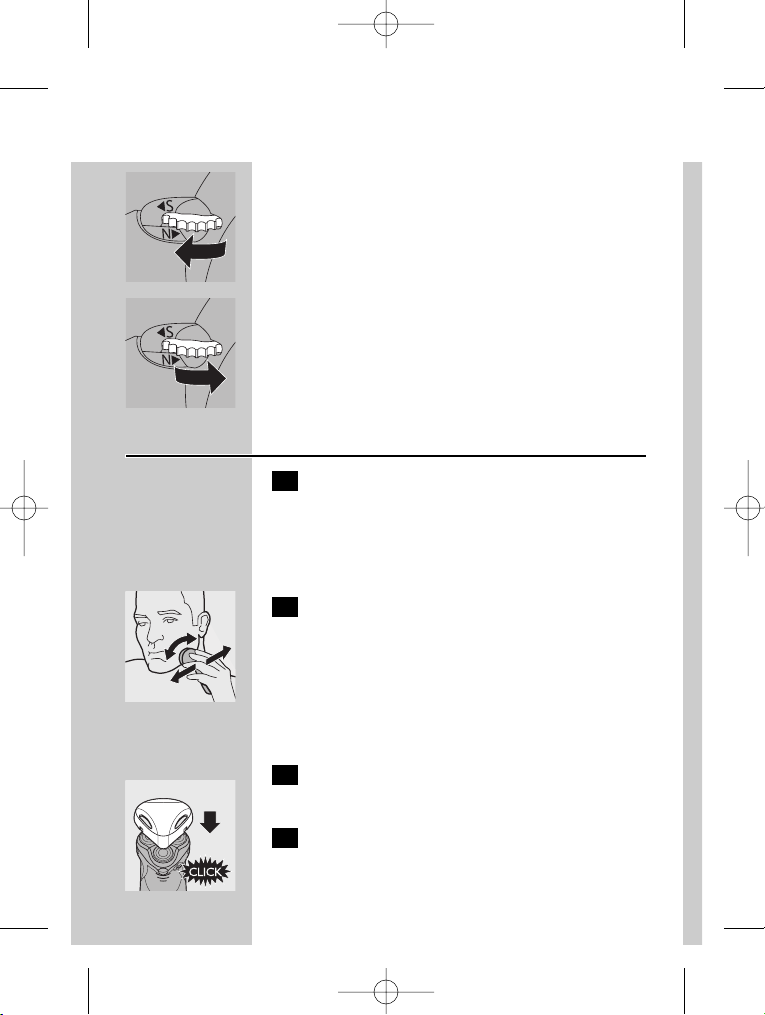
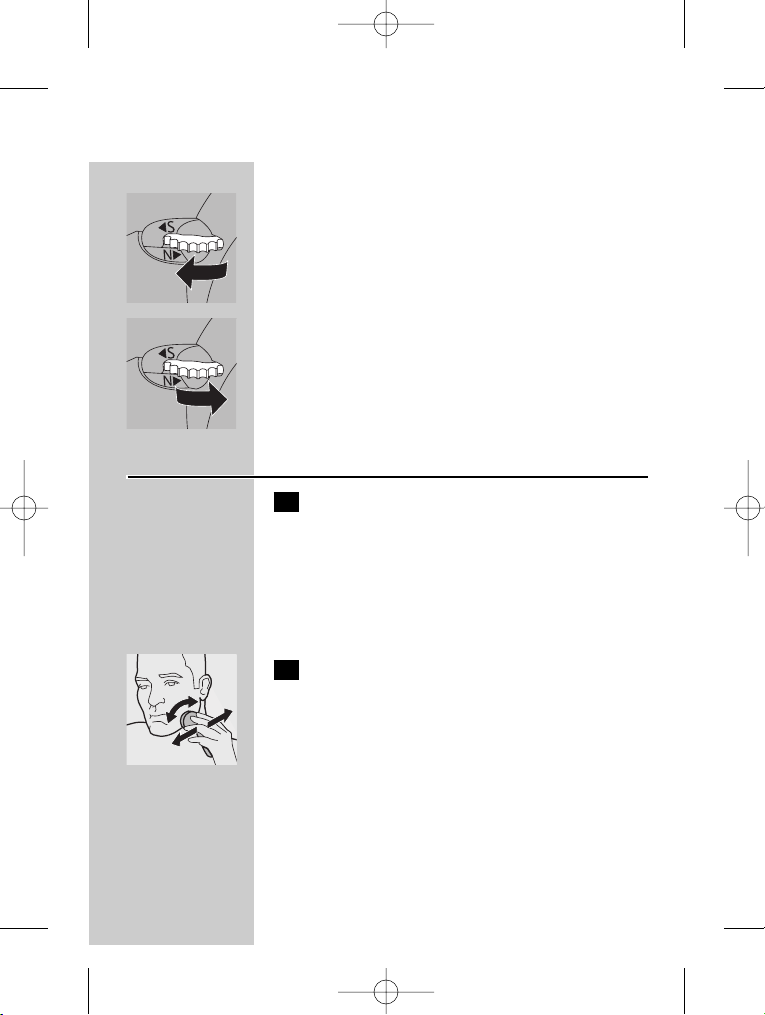
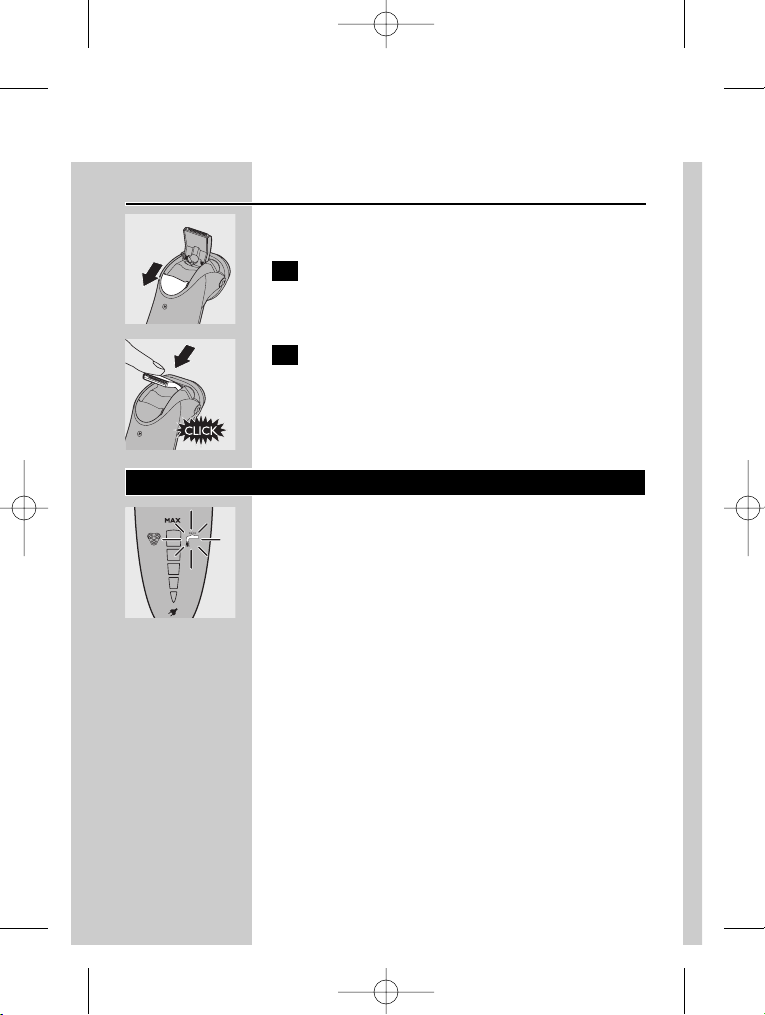
C
◗ The 'S' position is best suited for sensitive
skin.
C
◗ The 'N' position is best suited for normal
skin.
◗ The in-between positions are suitable for skin
types between normal and sensitive.
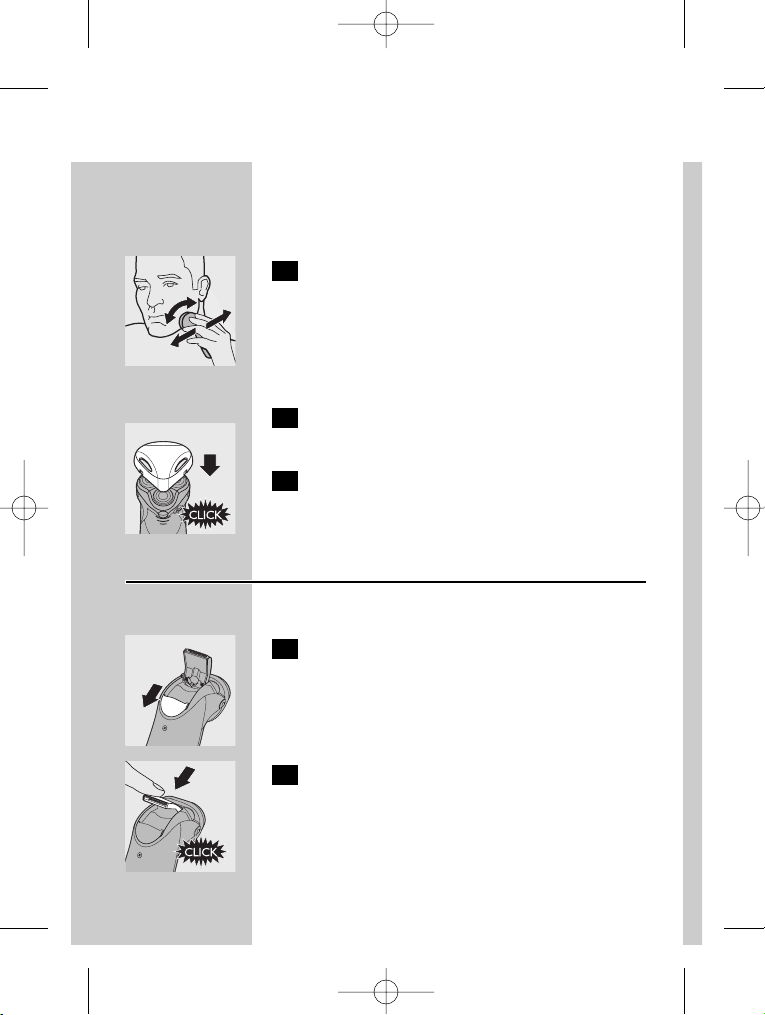
Shaving
1 Switch the shaver on by pressing the on/off
button once.
When you switch the shaver on or off, all lights
and symbols go on and then the remaining
battery capacity is shown for a few seconds.
C
2 Move the shaving heads quickly over your
skin, making both straight and circular
movements.
- Shaving on a dry face gives the best results.
- Your skin may need 2 or 3 weeks to get
accustomed to the Philips system.
3 Switch the shaver off by pressing the on/off
button once.
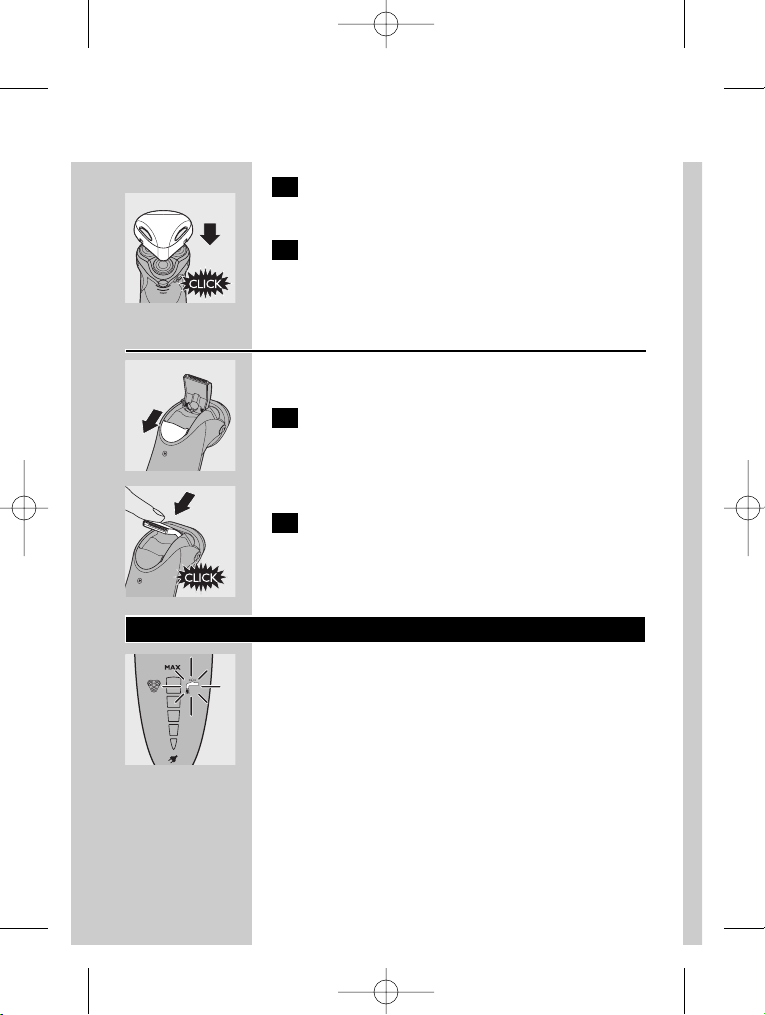
C
4 Put the protection cap on the shaver every
time you have used it, to prevent damage.
ENGLISH 9
4222 002 48152 08-11-2006 14:32 Pagina 9

Trimming
For grooming sideburns and moustache.
C
1 Open the trimmer by pushing the slide
downwards.
The trimmer can be activated while the motor is
running.
C
2 Close the trimmer with your index finger.
Cleaning and maintenance
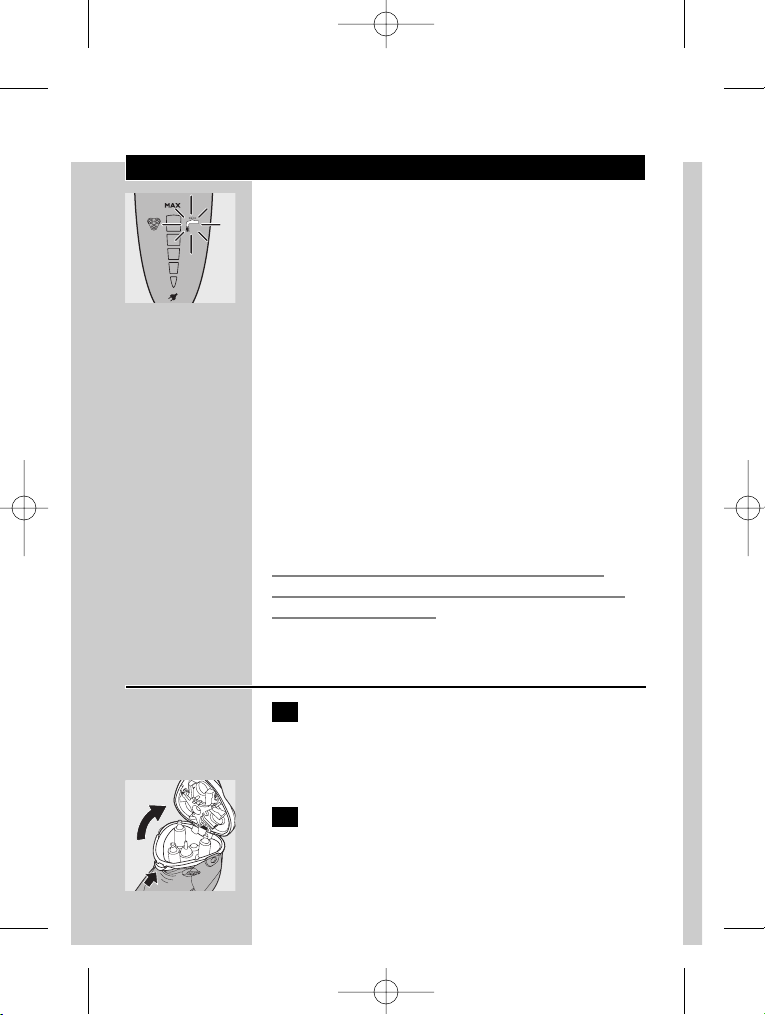
C
◗ The tap symbol starts blinking after every
shave to remind you that the shaver needs to
be cleaned (except when the bottom light
burns red).
Regular cleaning guarantees better shaving
performance.
◗ If provided, use the washing machine to clean
the shaver. See the seperate instruction
booklet.
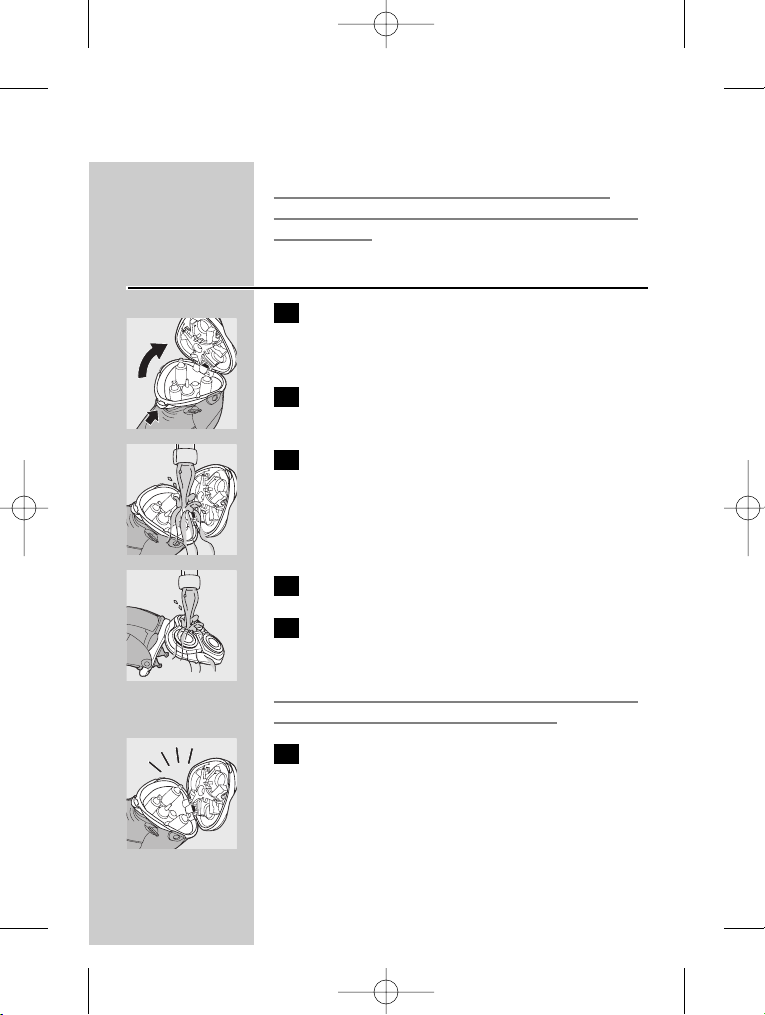
The normal way to clean the appliance is to rinse
the shaving unit and the hair chamber with hot
water every time you have used the shaver.
ENGLISH10
4222 002 48152 08-11-2006 14:32 Pagina 10
Be careful with hot water. Always check if the
water is not too hot, to prevent your hands from
getting burnt.
Every day: shaving unit and hair chamber
1 Switch the shaver off, remove the
powerplug from the wall socket and pull
the appliance plug out of the shaver.
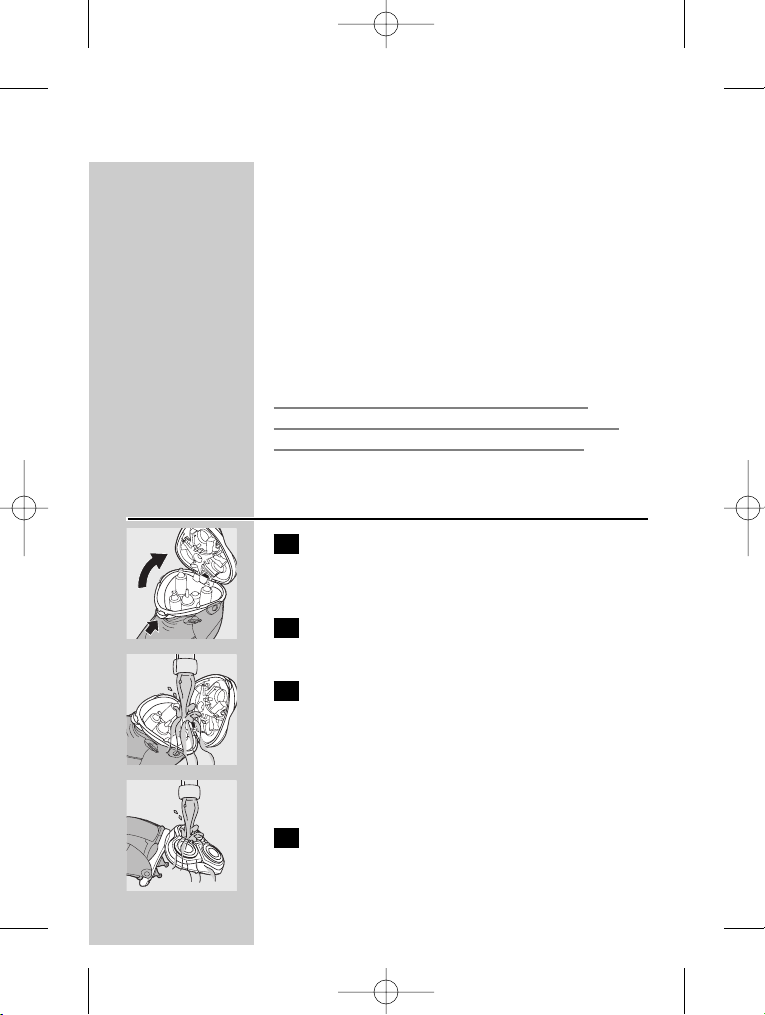
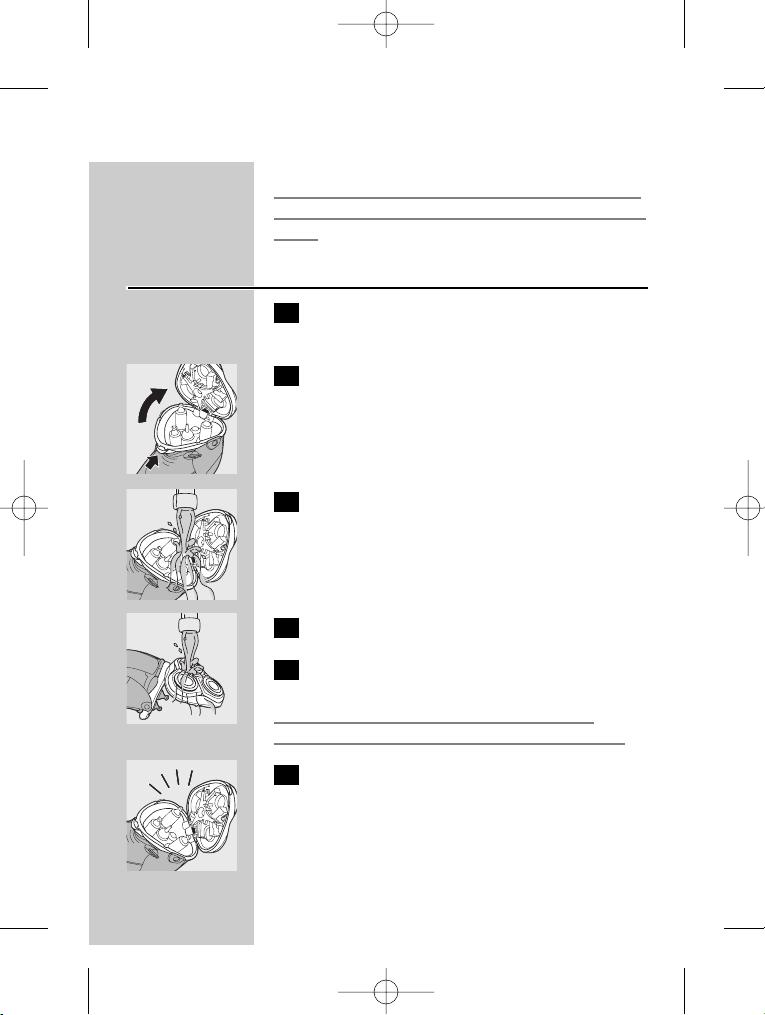
C
2 Press the release button to open the
shaving unit.
C
3 Clean the shaving unit and the hair
chamber by rinsing them under a hot tap
for some time.
Make sure the inside of the shaving unit and the
hair chamber have been cleaned properly.
C
4 Rinse the outside of the appliance.
5 Close the shaving unit and shake off excess
water.
Never dry the shaving unit with a towel or tissue
as this may damage the shaving heads.
C
6 Open the shaving unit again and leave it
open to let the appliance dry completely.
You can also clean the hair chamber without
water by using the brush supplied.
ENGLISH 11
4222 002 48152 08-11-2006 14:32 Pagina 11
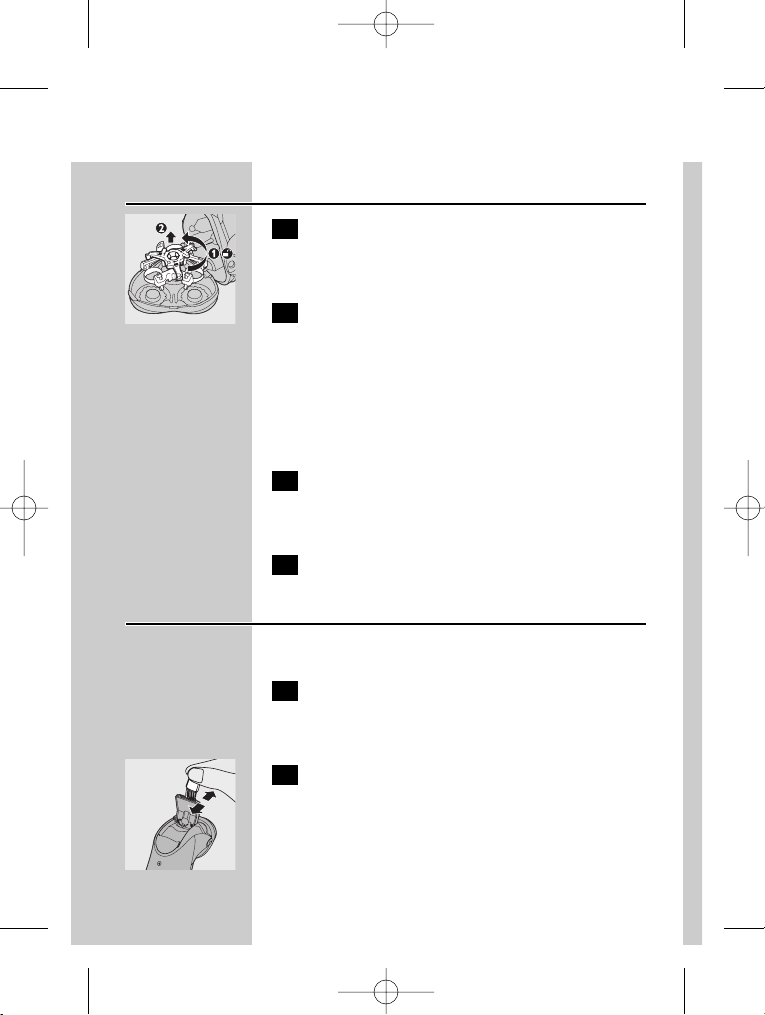
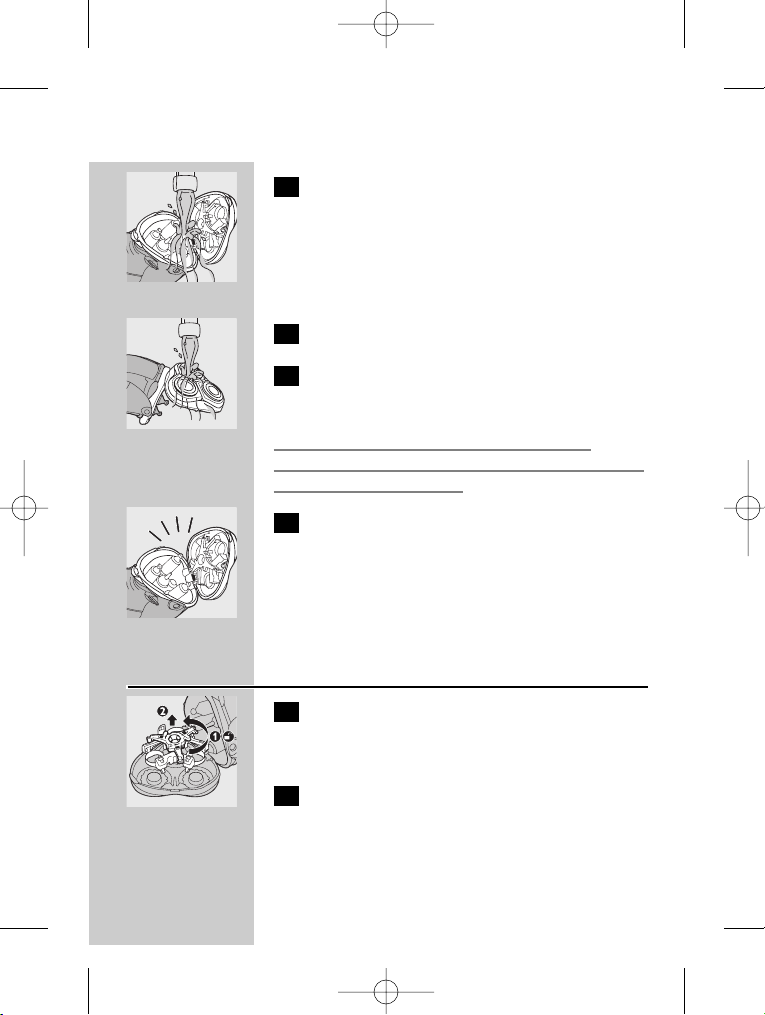
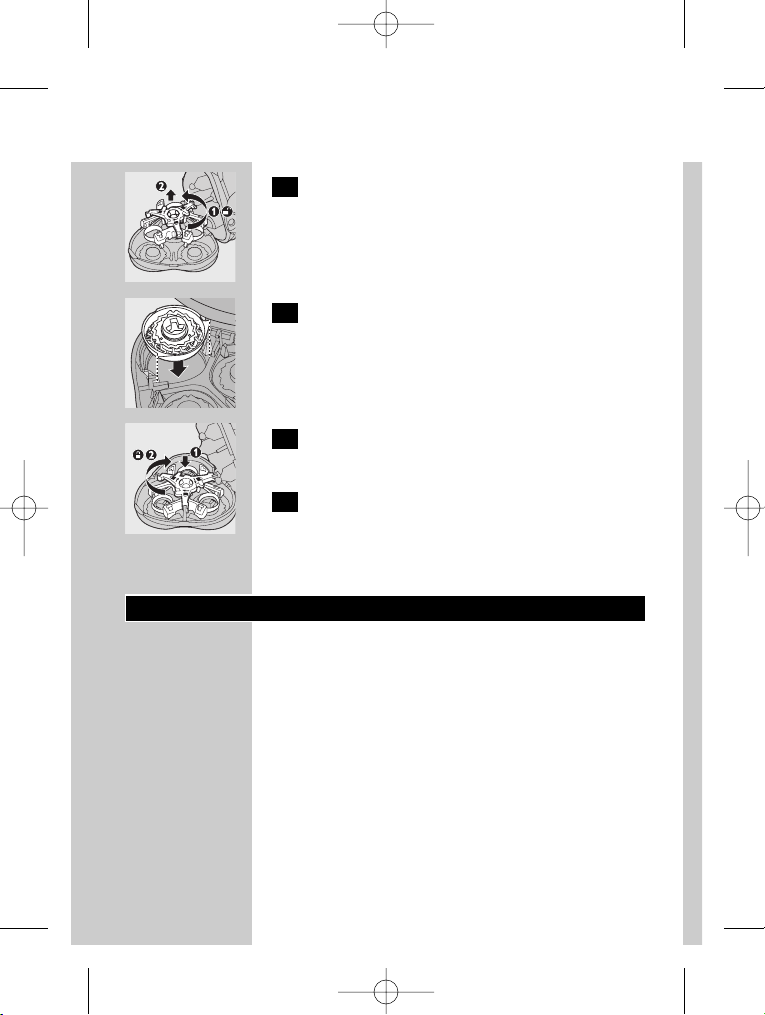
Every six months: shaving heads
C
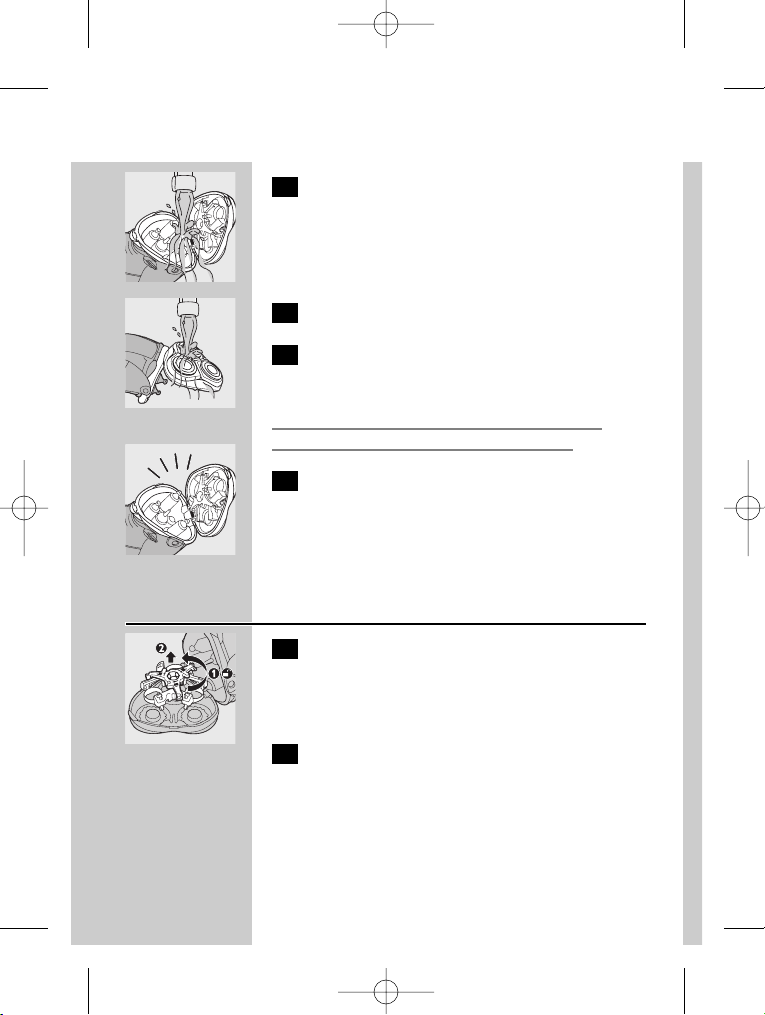
1 Open the shaving unit, turn the lock
anticlockwise (1) and remove the retaining
frame (2).
2 Clean the cutters and guards with the
brush supplied.
Do not clean more than one cutter and guard at
a time, since they are all matching sets. If you
accidentally mix up the cutters and guards, it may
take several weeks before optimal shaving
performance is restored.
3 Put the shaving heads back into the shaving
unit. Put the retaining frame back into the
shaving unit and turn it clockwise.
4 Close the shaving unit.
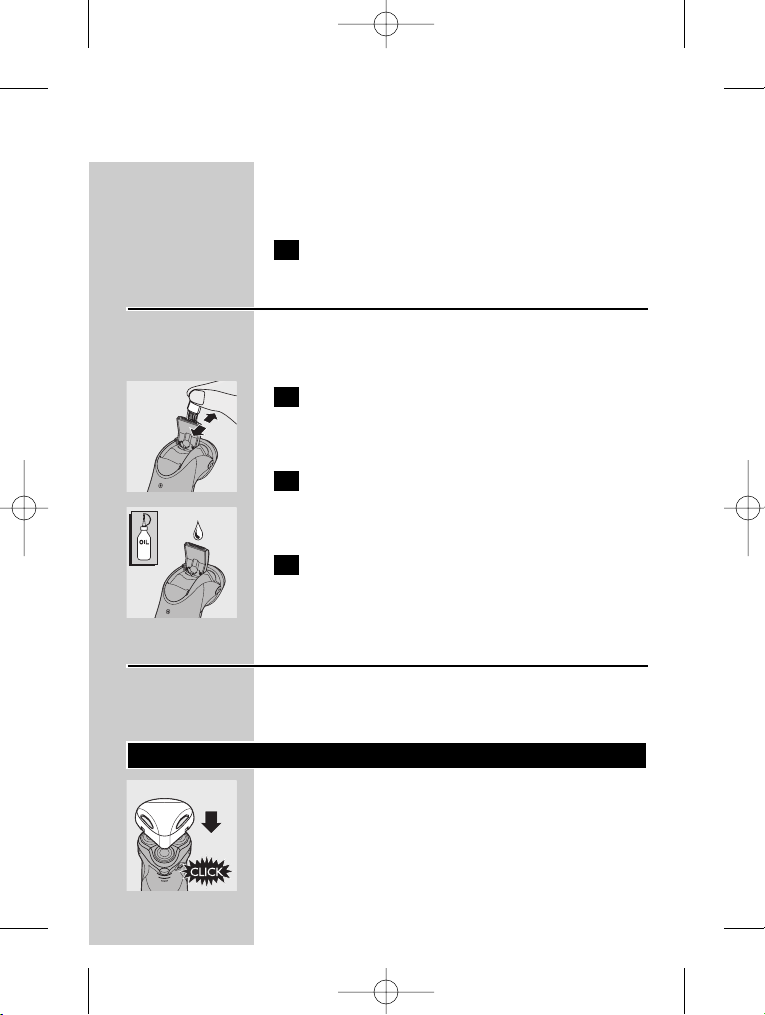
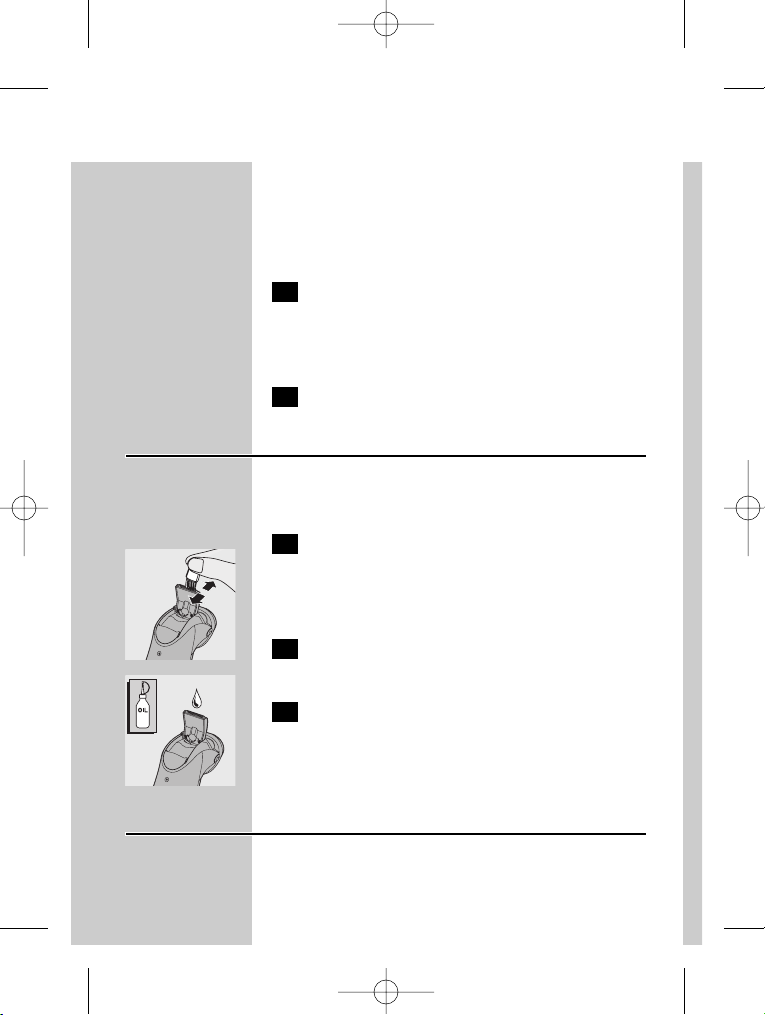
Trimmer
Clean the trimmer every time you have used it.
1 Switch the shaver off, remove the
powerplug from the wall socket and pull
the appliance plug out of the shaver.
C
2 Clean the trimmer with the brush
supplied.
ENGLISH12
4222 002 48152 08-11-2006 14:32 Pagina 12

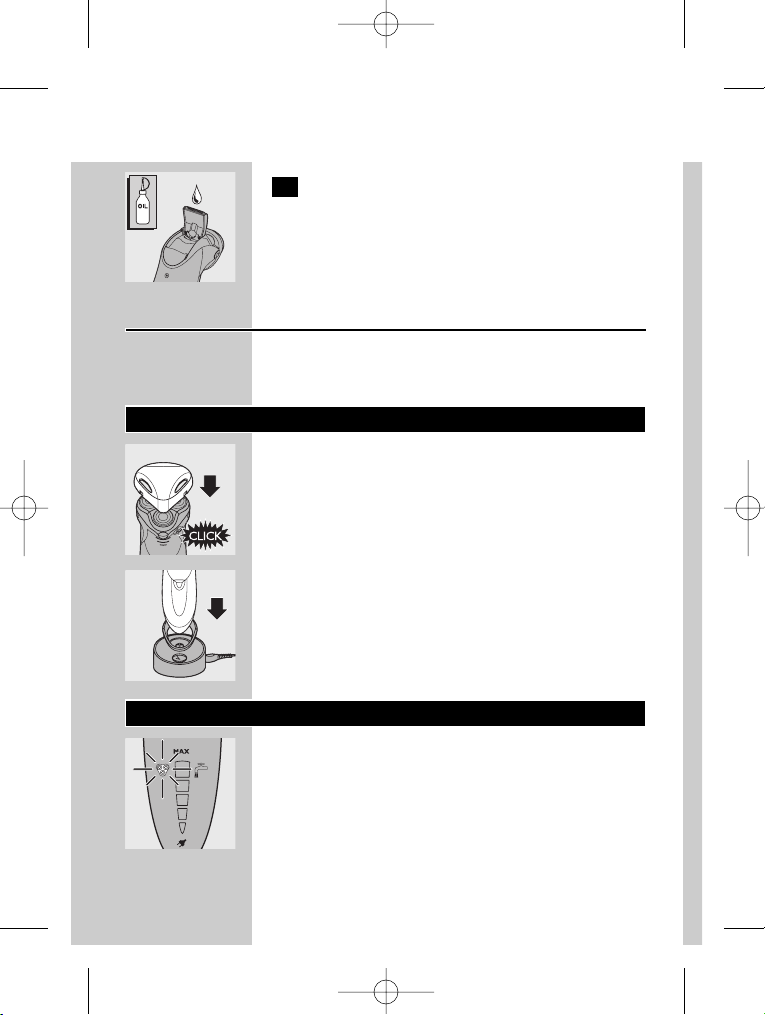
C
3 Lubricate the trimmer teeth with a drop
of sewing machine oil every six months.
Charging stand
You can clean the charging stand with a moist
cloth.
Storage
C
◗ Put the protection cap on the shaver to
prevent damage.
C
◗ Store the appliance in the luxury pouch or
place the appliance in the stand to dry.
Replacement
C
◗ Replace the shaving heads as soon as the
shaving unit symbol starts blinking.
Replace damaged or worn shaving heads with
HQ9 Philips shaving heads only.
ENGLISH 13
4222 002 48152 08-11-2006 14:32 Pagina 13
1 Switch the shaver off, remove the
powerplug from the wall socket and pull
the appliance plug out of the shaver.
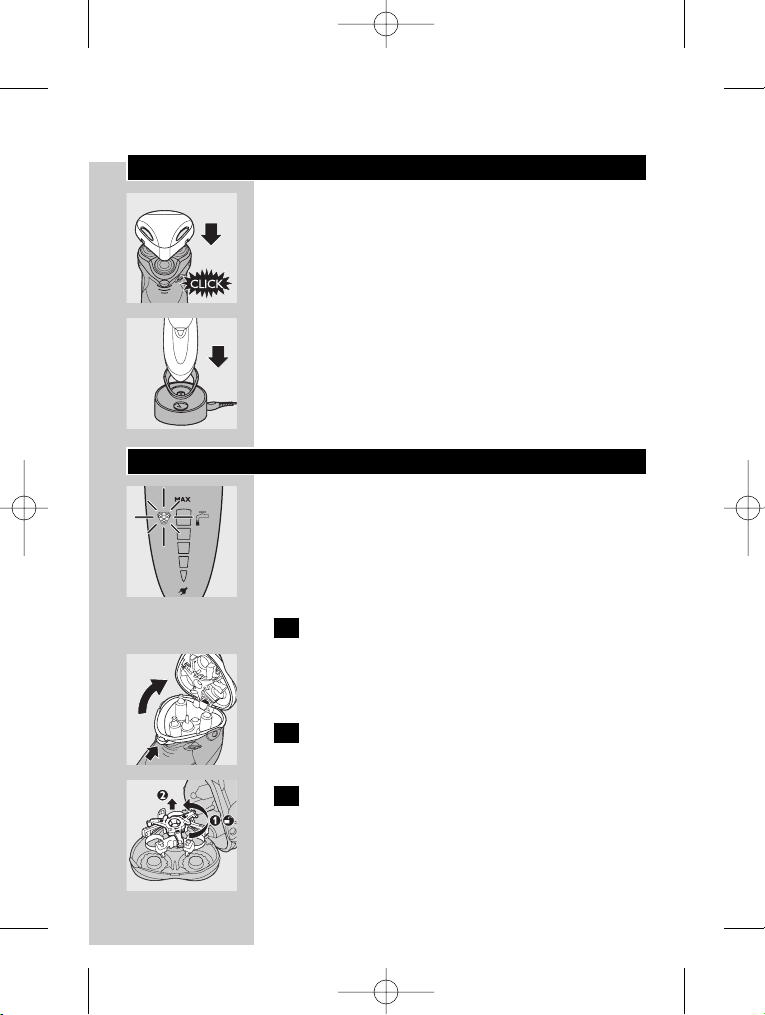
C
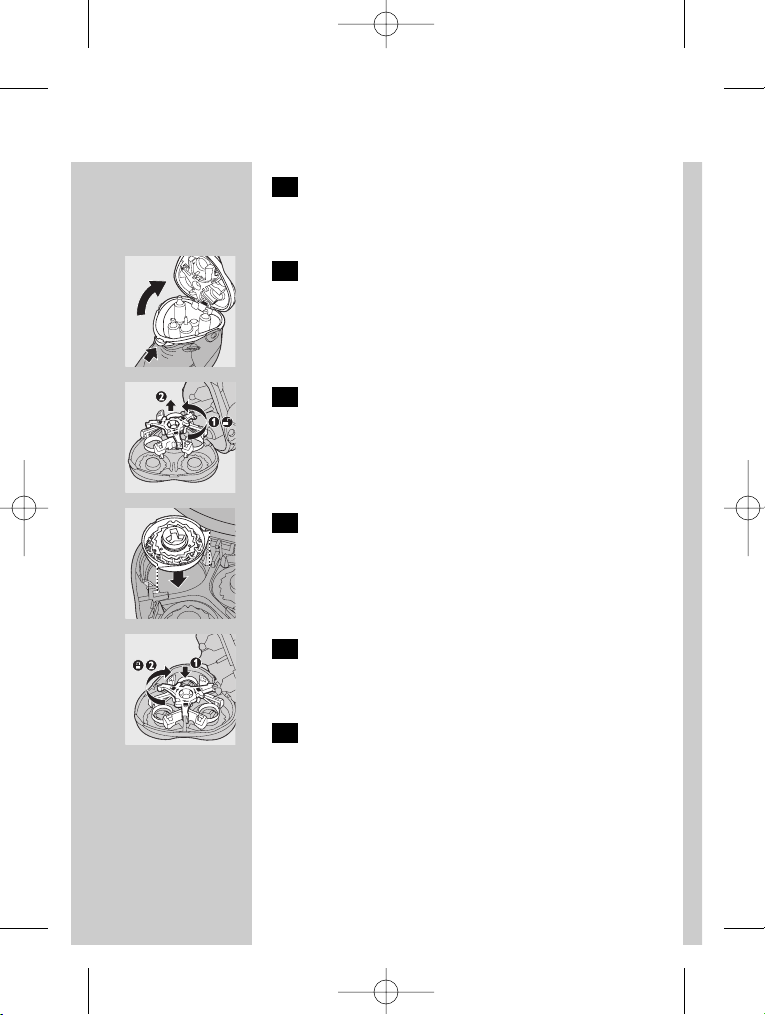
2 Press the release button to open the
shaving unit.
C
3 Turn the lock anticlockwise (1) and
remove the retaining frame (2).
C
4 Remove the shaving heads and place new
ones in the shaving unit.
Make sure that the projections of the shaving
heads fit exactly into the recesses.
C
5 Put the retaining frame back into the
shaving unit (1) and turn the lock
clockwise (2).
6 Close the shaving unit.
◗ The shaving unit symbol will go out if you
keep the on/off button pressed for 6 seconds.
ENGLISH14
4222 002 48152 08-11-2006 14:32 Pagina 14
Accessories
The following accessories are available:
- HQ8500/HQ8000 powerplug.
- HQ9 Philips shaving heads.
- HQ110 Philips shaving head cleaner
(shaving head cleaning spray).
- HQ8010 car cord.
Environment
C
◗ Do not throw the appliance away with the
normal household waste at the end of its life,
but hand it in at an official collection point for
recycling. By doing this you will help to
preserve the environment.
◗ Charging stand
Do not throw the battery away with the normal
household waste, but hand it in at an official
collection point.
◗ Shaver
The built-in rechargeable battery contains
substances that may pollute the environment.
Disposal of the shaver battery
Remove the battery when you discard the
appliance. Do not throw the battery away with
the normal household waste, but hand it in at an
official collection point.You can also take the
appliance to a Philips service centre, which will
remove the battery for you and will dispose of it
in an environmentally safe way.
ENGLISH 15
4222 002 48152 08-11-2006 14:32 Pagina 15
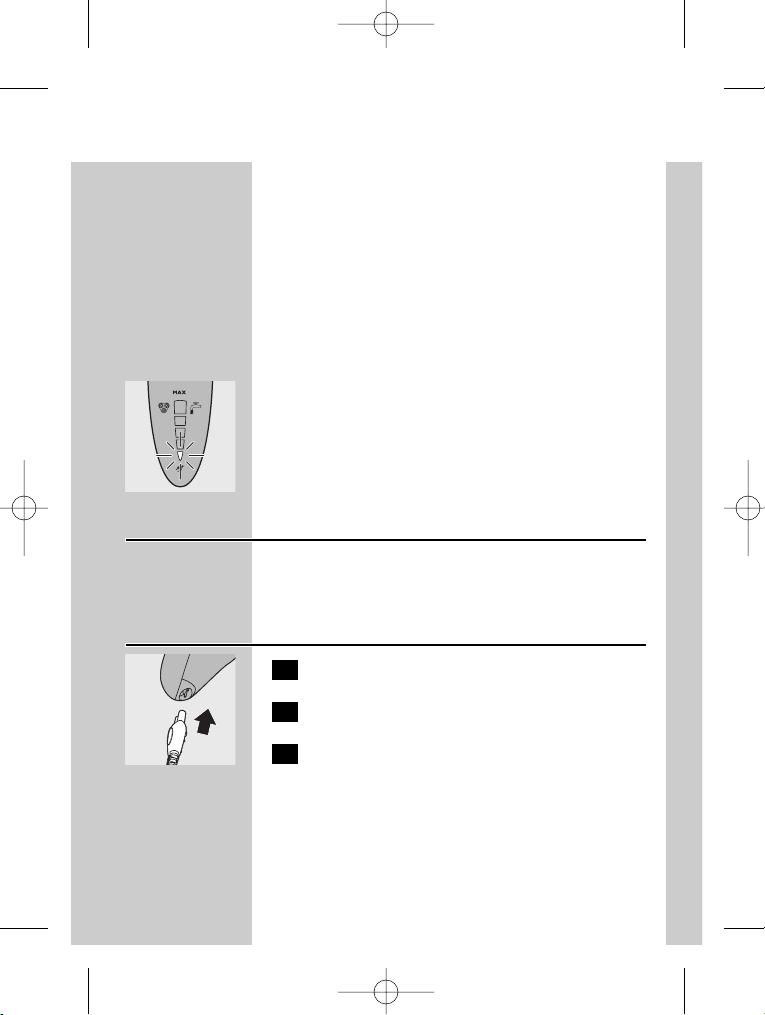
Only remove the battery if it is completely empty.
1 Remove the powerplug from the wall
socket and pull the appliance plug out of
the shaver.
C
2 Let the shaver run until it stops, undo the
screws and open the shaver.
3 Remove the battery.
Do not connect the shaver to the mains again
after the battery has been removed.
Guarantee & service
If you need information or if you have a problem,
please visit the Philips website at www.philips.com
or contact the Philips Customer Care Centre in
your country (you will find its phone number in
the worldwide guarantee leaflet). If there is no
Customer Care Centre in your country, turn to
your local Philips dealer or contact the Service
Department of Philips Domestic Appliances and
Personal Care BV.
Troubleshooting
1 Reduced shaving performance
B
Cause 1: the shaving heads are dirty.
B
The shaver has not been rinsed long enough or
the water used was not hot enough.
ENGLISH16
4222 002 48152 08-11-2006 14:32 Pagina 16

◗ Clean the shaver thoroughly before you
continue shaving. See chapter 'Cleaning and
maintenance'.
B
Cause 2: long hairs are obstructing the shaving
heads.
◗ Clean the cutters and guards with the brush
supplied. See chapter 'Cleaning and
maintenance', section 'Every six months:
shaving heads'.
B
Cause 3: the shaving heads are damaged or worn.
◗ Replace the shaving heads. See chapter
'Replacement'.
2 The shaver does not work when the on/off
button is pressed.
B
Cause 1: the batter y is empty.
◗ Recharge the battery. See chapter 'Charging'.
B
Cause 2: the appliance is not connected to the
mains.
◗ Put the powerplug in the wall socket.
C
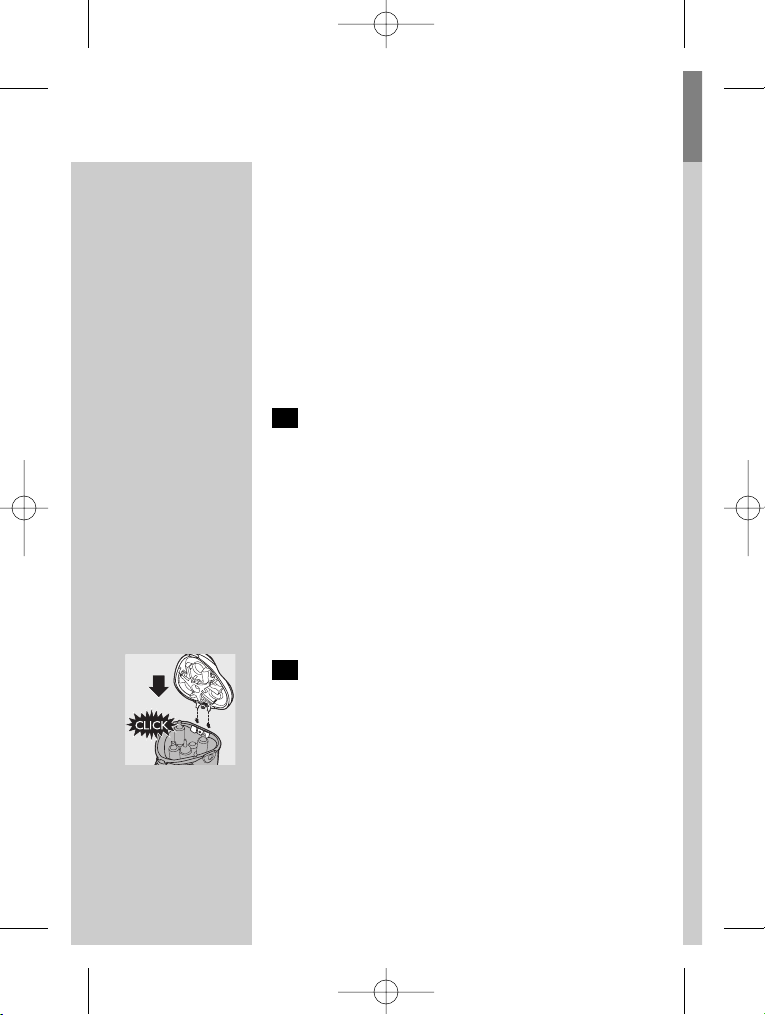
3 The shaving unit has come off the shaver.
ENGLISH 17
4222 002 48152 08-11-2006 14:32 Pagina 17
B
Cause: the shaving unit has not been placed
correctly.
◗ If the shaving unit becomes detached from the
shaver, you can easily reattach it ('click').
ENGLISH18
4222 002 48152 08-11-2006 14:32 Pagina 18
Ważne
Przed pierwszym użyciem urządzenia zapoznaj się
dokładnie z instrukcją jego obsługi i zachowaj ją na
przyszłość, do ewentualnej konsultacji.
◗ W celu naładowania akumulatorów używaj
wyłącznie załączonej do urządzenia ładowarki.
◗ Zasilacz przekształca napięcie 100-240 V na
bezpieczne niskie napięcie niższe niż 24 V.
◗ Wtyczka zasilacza zawiera transformator.
Odcięcie wtyczki celem wymiany jej na nową
może spowodować niebezpieczeństwo.
◗ Nie używaj uszkodzonego zasilacza.
◗ Jeśli uszkodzona jest wtyczka przewodu
zasilającego,wówczas, aby uniknąć
niebezpieczeństwa należy zawsze zastąpić ją
wtyczką oryginalną
◗ Sprawdź, czy zasilacz jest zupełnie suchy.
◗ Ładuj i przechowuj urządzenie w
temperaturze pomiędzy 5c a 35cC.
C
◗ Nigdy nie zanurzaj podstawki ładującej w
wodzie ani nie spłukuj jej pod kranem.
◗ Nie ładuj golarki w zamkniętej saszetce.
◗ Zanim zaczniesz czyścić golarkę pod kranem,
zawsze wyjmij wtyczkę z gniazdka sieciowego.
C
◗ Niniejsze urządzenie spełnia międzynarodowe,
zatwierdzone normy bezpieczeństwa IEC i
można je myć pod kranem.
Postępuj ostrożnie z gorącą wodą.Zawsze
sprawdzaj, czy jej temperatura jest odpowiednia
dla kontaktu z rękami.
◗ Poziom hałasu: Lc = 64 dB [A]
POLSKI 19
4222 002 48152 08-11-2006 14:32 Pagina 19
Ładowanie
Przed rozpoczęciem ładowania należy sprawdzić,
czy urządzenie jest wyłączone.
Normalne ładowanie trwa ok. 1 godziny.
Możesz także używać golarki bez ładowania,
podłączając ją bezpośrednio do sieci.
Wskaźniki ładowania
Ładowanie
C
◗ W momencie rozpoczęcia ładowania golarki
zaświeci się w kolorze czerwonym lampka
umieszczona w jej dolnej części. Gdy
akumulator dysponuje pojemnością
wystarczającą tylko na jedno golenie,zaczynają
kolejno migotać wszystkie lampki.
Ładowanie
C
◗ Po pełnym naładowaniu akumulatora świecą
się wszystkie zielone lampki.
Kilka godzin po ładowaniu golarki wszystkie
lampki zgasną.
POLSKI20
4222 002 48152 08-11-2006 14:32 Pagina 20
Pozostała pojemność akumulatora
C
◗ Liczba świecących się lampek wskazuje na
ilość zmagazynowanej w akumulatorze energii.
Pozostała pojemność akumulatora wyświetlana
jest po wyjęciu z gniazdka wtyczki lub po
wyłączeniu golarki.
- Gdy wszystkie lampki świecą się w kolorze
zielonym, akumulator jest naładowany w 100%.
- Gdy dolna lampka świeci się w kolorze
zielonym, oznacza to, że pozostało 20%
pojemności akumulatora.
Akumulatory wyczerpują się
C
◗ Gdy akumulator jest już niemal całkowicie
rozładowany, dolna lampka zaczyna świecić się
w kolorze czerwonym.
Po wyłączeniu golarki lampka ta kilkakrotnie
migocze.
Czas bezprzewodowej pracy
W pełni naładowana golarka może pracować
bezprzewodowo nie dłużej niż 80 minut.
Ładowanie urządzenia
C
1 Włóż małą wtyczkę przewodu zasilającego
do golarki.
2 Podłącz ładowarkę do sieci.
POLSKI 21
4222 002 48152 08-11-2006 14:32 Pagina 21

3 Gdy akumulator jest całkowicie
naładowany wyjmij wtyczkę z gniazdka
sieciowego i odłącz urządzenie.
Podstawka ładująca
Urządzenie można naładować również,
umieszczając je w podstawce ładującej, jeśli jest
ona dołączona do kompletu.
Nigdy nie zanurzaj podstawki ładującej w wodzie
ani nie spłukuj jej pod kranem.
C
◗ Umieść prawidłowo golarkę w podłączonej do
sieci elektrycznej podstawce ładującej.
Dolna lampka zaczyna świecić się w kolorze
czerwonym.
C
◗ Wyjmij golarkę z podstawki ładującej, nie
przechylając jej.
Wyjmowanie i zakładanie zegara.
C
1 Obróć zegarem w kierunku przeciwnym
do ruchu wskazówek zegara (1)
("kliknięcie") i wyjmij go (2).
C
2 Wsuń zegar (1) i obróć nim zgodnie z
ruchem wskazówek zegara (2)
("kliknięcie").
POLSKI22
4222 002 48152 08-11-2006 14:32 Pagina 22
Ustawianie godziny
C
◗ Ustaw godzinę,wciskając mały przycisk z tyłu
zegara.
Ustawienie godziny polega na przesuwaniu
godziny wyłącznie naprzód.
Wymiana baterii
C
1 Zdejmij nakładkę. Korzystając z małego
wkrętaka, wyjmij akumulator.
C
2 Włóż nowy akumulator i załóż nakładkę na
swoje miejsce.
Golenie
Regulacja komfortu golenia
C
◗ System Personal Comfort Control
dopasowuje golarkę do rodzaju skóry.
- Możesz ustawić golarkę w pozycji "Normal" w
celu szybkiego, dokładnego i wygodnego
golenia.
- Możesz ustawić golarkę w pozycji "Sensitive", co
zapewni ci wygodne, dokładne golenie z
zachowaniem optymalnego komfortu dla skóry.
POLSKI 23
4222 002 48152 08-11-2006 14:32 Pagina 23
C
◗ Najlepszym ustawieniem dla skóry wrażliwej
jest pozycja "S".
C
◗ Najlepszym ustawieniem dla skóry mniej
wrażliwej jest pozycja "N".
◗ Pozycje pośrednie odpowiadają rodzajom
skóry pomiędzy skórą normalną a skórą
wrażliwą.
Golenie
1 Włącz golarkę, wciskając włącznik.
Po wyłączeniu lub włączeniu golarki zaczynają się
świecić wszystkie lampki i symbole, a następnie na
kilka sekund wyświetlona zostaje pozostała
pojemność akumulatora.
C
2 Przesuwaj głowice po skórze, wykonując
zarówno proste, jak i okrężne ruchy.
- Najlepsze efekty golenia osiąga się na skórze
suchej.
- Skóra Twojej twarzy potrzebuje pewnego czasu
(2-3 tygodni), by przyzwyczaić się do nowego
systemu golenia.
3 Wyłącz golarkę przez jednokrotne
wciśnięcie przycisku off/on.
C
4 Po każdym użyciu załóż na golarkę
ochronną osłonkę, zabezpieczającą głowice
golące przed uszkodzeniem mechanicznym.
POLSKI24
4222 002 48152 08-11-2006 14:32 Pagina 24

Trymer
Służy do przystrzygania wąsów i bokobrodów.
C
1 Otwórz trymer, wciskając suwak ku
dołowi.
Trymer może być używany po uprzednim
włączeniu urządzenia.
C
2 Zamknij trymer palcem wskazującym.
Czyszczenie i konserwacja
C
◗ Po każdym goleniu zaczyna migotać symbol
kranu, przypominający,że należy golarkę
oczyścić (oprócz sytuacji, w której dolna
lampka świeci się w kolorze czerwonym).
Regularne oczyszczanie golarki gwarantuje lepsze
efekty golenia.
Normalnym sposobem czyszczenia urządzenia
jest opłukanie gorącą wodą, po każdym użyciu
golarki, modułu golącego i komory na ścięte
włosy.
POLSKI 25
4222 002 48152 08-11-2006 14:32 Pagina 25

Postępuj ostrożnie z gorącą wodą.Zawsze
sprawdzaj, czy jej temperatura jest odpowiednia
dla kontaktu z rękami.
Codziennie: część goląca i komora na ścięty
zarost
1 Wyłącz golarkę,wyjmij ładowarkę z
gniazdka ściennego oraz wtyczkę z golarki.
C
2 Wciśnij przycisk blokujący, aby otworzyć
element golący.
C
3 Przez jakiś czas płucz moduł golący i
komorę na ścięty zarost pod gorącą
bieżącą wodą.
Upewnij się, czy wnętrze części golącej oraz
komora na ścięty zarost zostały dobrze
wypłukane.
C
4 Spłucz zewnętrzną powierzchnię golarki.
5 Zamknij moduł golący i strząśnij pozostałą
wodę.
Nidy nie wycieraj modułu golącego ręcznikiem lub
chusteczką - możesz uszkodzić głowice golące.
C
6 Otwórz ponownie część golącą i pozostaw
ją tak do wyschnięcia.
Komorę na ścięty zarost można też czyścić na
sucho, używając specjalnej załączonej szczoteczki.
POLSKI26
4222 002 48152 08-11-2006 14:32 Pagina 26

Co sześć miesięcy: głowice golące
C
1 Otwórz moduł golący, obróć blokadą w
kierunku przeciwnym do ruchu
wskazówek zegara (1) i wyjmij obsadę (2).
2 Za pomocą dołączonej szczoteczki oczyść
nożyki i osłonki.
Nie myj jednorazowo więcej niż jednego ostrza i
jednej głowicy, ponieważ tworzą one dopasowane
zestawy. Jeśli przypadkowo pomieszasz ostrza i
głowice, potrwa kilka tygodni,zanim ponownie
przywrócisz optymalną skuteczność golenia.
3 Ponownie załóż głowice golące na moduł
golący. Następnie załóż obsadę na moduł
golący i obróć nią w kierunku zgodnym z
ruchem wskazówek zegara.
4 Zamknij część golącą.
Trymer
Oczyszczaj trymer po każdym użyciu.
1 Wyłącz golarkę,wyjmij ładowarkę z
gniazdka ściennego oraz wtyczkę z golarki.
C
2 Trymer oczyść dołączoną do golarki
szczoteczką.
POLSKI 27
4222 002 48152 08-11-2006 14:32 Pagina 27
C
3 Co 6 miesięcy należy naoliwić ząbki
trymera kroplą oleju maszynowego.
Podstawka ładująca
Możesz oczyścić podstawkę ładującą wilgotną
szmatką.
Przechowywanie
C
◗ Załóż na golarkę ochronną pokrywę, by
uniknąć uszkodzenia.
C
◗ Golarkę przechowuj w pokrowcu lub w
podstawce do suszenia.
Wymiana
C
◗ Wymieniaj głowice golące, gdy tylko zacznie
migotać symbol modułu golącego.
Uszkodzone lub zużyte głowice golące wymieniaj
jedynie na oryginalne głowice golące HQ9.
POLSKI28
4222 002 48152 08-11-2006 14:32 Pagina 28
1 Wyłącz golarkę,wyjmij zasilacz z gniazda
ściennego oraz wtyczkę z golarki.
C
2 Wciśnij przycisk blokujący, aby otworzyć
element golący.
C
3 Obróć blokadą w kierunku przeciwnym do
ruchu wskazówek zegara (1) i wyjmij
obsadę (2).
C
4 Zdejmij głowice golące z modułu golącego
i załóż nowe.
Upewnij się, czy części wystające głowic pasują
dokładnie w zagłębienia.
C
5 Następnie załóż obsadę na moduł golący
(1) i obróć blokadą (2) w kierunku
zgodnym z ruchem wskazówek zegara.
6 Zamknij część golącą.
◗ Po wciśnięciu na 6 sekund przycisku on/off
symbol modułu golącego zgaśnie.
Akcesoria
Dostępne są następujące akcesoria:
- Zasilacz HQ8500/HQ8000
- Głowice golące HQ9 Philips
- HQ110 Philips spray do czyszczenia głowic
POLSKI 29
4222 002 48152 08-11-2006 14:32 Pagina 29
- Ładowarka samochodowa HQ8010
Ochrona środowiska
C
◗ Nie wyrzucaj zużytego urządzenia wraz ze
zwykłymi odpadkami/śmieciami. Zanieś je do
specjalnego punktu zbierającego odpadki do
utylizacji w celu ich utylizacji.W ten sposób
pomożesz chronić środowisko naturalne.
◗ Podstawka ładująca
Nie wyrzucaj zużytego akumulatora razem z
innymi odpadami pochodzącymi z gospodarstwa
domowego, lecz oddaj go do punktu skupu
przyjmującego tego typu odpady.
◗ Golarka
Wbudowany akumulator zawiera substancje,
które mogą zanieczyścić środowisko.
Usuwanie akumulatora golarki
Przed wyrzuceniem wyeksploatowanego
urządzenia wyjmij z niego akumulator. Nie
wyrzucaj akumulatora z odpadami gospodarstwa
domowego, lecz oddaj go do oficjalnego punktu
skupu. Możesz również zwrócić się z urządzeniem
do serwisu Philipsa, gdzie personel pomoże ci
wyjąć baterię i pozbyć się jej w sposób przyjazny
dla środowiska.
Wyrzucaj akumulatory tylko wtedy,gdy są
kompletnie wykorzystane.
POLSKI30
4222 002 48152 08-11-2006 14:32 Pagina 30

1 Wyjmij zasilacz z gniazdka ściennego oraz
wyjmij małą wtyczkę z golarki.
C
2 Uruchom golarkę i poczekaj, aż przestanie
pracować, odkręć śrubki i otwórz golarkę.
3 Wyjmij akumulator
Po wyjęciu akumulatora nie podłączaj golarki do
sieci.
Gwarancja i serwis
Jeśli chcesz skorzystać z serwisu lub potrzebujesz
informacji, bądź jeśli masz jakiś problem, odwiedź
naszą stronę w Internecie: www.philips.com lub
skontaktuj się z Biurem Obsługi Klienta firmy
Philips (numer telefonu znajdziesz w ulotce
gwarancyjnej).
Rozwiązywanie problemów
1 Zmniejszona wydajność golenia
B
Przyczyna 1: głowice golące są zanieczyszczone.
B
Golarka nie była dostatecznie długo płukana lub
woda nie była wystarczająco ciepła.
◗ Zanim przystąpisz do golenia, dokładnie
oczyść golarkę. Patrz: rozdział "Czyszczenie i
konserwacja".
B
Przyczyna 2: długie włoski blokują głowice golące.
POLSKI 31
4222 002 48152 08-11-2006 14:32 Pagina 31
◗ Za pomocą dołączonej szczoteczki oczyść
nożyki i osłonki. Patrz: rozdział "Czyszczenie i
konserwacja", punkt "Co sześć miesięcy:
głowice golące".
B
Przyczyna 3: głowice golące są uszkodzone lub
zużyte.
◗ Wymień głowice golące. Patrz: rozdział
"Wymiana".
2 Golarka nie działa, gdy wciśnięty jest
przycisk on/off.
B
Przyczyna 1: rozładowany jest akumulator.
◗ Naładuj akumulator. Patrz: rozdział
"Ładowanie".
B
Przyczyna 2: Golarka nie jest podłączona do sieci.
◗ Podłącz ładowarkę do sieci.
C
3 Moduł golący zsunął się z golarki.
B
Przyczyna: Nie został założony prawidłowo moduł
golący.
◗ Jeśli moduł golący odłączył się od golarki,
ponownie umięśc go na miejscu ("kliknięcie").
POLSKI32
4222 002 48152 08-11-2006 14:32 Pagina 32

Внимание
Прежде чем начать пользоваться прибором,
внимательно ознакомьтесь с настоящим
руководством и сохраните его в качестве
справочного материала.
◗ Используйте только сетевую вилку,
поставляемую в комплекте.
◗ Блок питания преобразует сетевое
напряжение 100-240 вольт в напряжение
питания прибора 24 вольт.
◗ Вилка шнура электропитания содержит
адаптер. Не производите замену
оригинальной вилки на какую-либо другую.
Это может привести к опасным
последствиям.
◗ Не пользуйтесь поврежденной вилкой
сетевого шнура.
◗ При повреждении блока питания всегда
заменяйте его оригинальным блоком
питания, чтобы обеспечить безопасную
эксплуатацию прибора.
◗ Убедитесь в том, что блок питания сухой.
◗ Заряжайте аккумуляторы и храните прибор
при температуре от 5cC до 35cC.
C
◗ Запрещается погружать зарядное
устройство в воду, а также промывать его
под струей воды.
◗ Не подзаряжайте электробритву в
закрытом футляре.
◗ Прежде чем промыть электробритву под
струей воды,отключите ее от электросети.
РУССКИЙ 33
4222 002 48152 08-11-2006 14:32 Pagina 33
C
◗ Электробритва соответствует принятому
международному стандарту по технике
безопасности IEC(МЕЖДУНАРОДНОЙ
ЭЛЕКТРОТЕХНИЧЕСКОЙ КОМИССИИ),
и ее можно промывать водопроводной
водой.
Будьте осторожны с горячей водой. Всегда
проверяйте, не слишком ли горяча вода, чтобы
уберечь ваши руки от получения ожога.
◗ Уровень шума: Lc= 64 дБ [A]
Зарядка
Перед тем как зарядить прибор, убедитесь,
что он выключен.
Обычно для полной зарядки аккумуляторов
требуется приблизительно 1 час.
Вы можете также бриться без зарядки
аккумуляторов, подключая электробритву
непосредственно к электросети.
Индикация зарядки
Зарядка
C
◗ Когда вы начнете зарядку разряженной
аккумуляторной батареи электробритвы, на
нижней части прибора загорится красный
светодиод. Как только степени зарядки
аккумуляторов станет достаточно для
одного сеанса бритья, все светодиоды
РУССКИЙ34
4222 002 48152 08-11-2006 14:32 Pagina 34
начнут последовательно мигать зеленым
светом.
Зарядка
C
◗ Когда аккумуляторная батарея полностью
зарядится, все светодиоды будут гореть
зеленым светом.
Через несколько часов после завершения
зарядки аккумуляторов все светодиоды
погаснут.
Степени зарядки аккумуляторной
батареи
C
◗ Степени зарядки аккумуляторной батареи
отображается количеством горящих
светодиодов.
Степени зарядки аккумуляторной батареи
отображается при отсоединении
электробритвы от сети, либо при ее включении
иди выключении:
- Если горят все зеленые светодиоды, это
означает, что степень зарядки
аккумуляторной батареи составляет 100%.
- Если горит зеленый светодиодна нижней
части прибора, это означает, что степень
зарядки аккумуляторной батареи составляет
20%.
РУССКИЙ 35
4222 002 48152 08-11-2006 14:32 Pagina 35
Батарея разряжена.
C
◗ При разрядке аккумуляторов во время
бритья загорится расположенный в нижней
части электробритвы красный светодиод.
При выключении электробритвы этот
светодиод будет мигать еще в течение
некоторого времени.
Время бритья без подключения к
электросети
Полностью заряженная аккумуляторная
батарея обеспечивает автономное бритье (без
подключения к электросети) в течении 80
минут.
Зарядка аккумуляторов электробритвы
C
1 Вставьте штекер шнура сетевого
адаптера в электробритву.
2 Вставьте сетевую вилку в розетку
электросети.
3 Как только батарея будет полностью
заряжена,выньте вилку сетевого
адапрера из розетки и отсоедините
штекер шнура сетевого адаптера от
электробритвы.
РУССКИЙ36
4222 002 48152 08-11-2006 14:32 Pagina 36
Зарядное устройство
Для зарядки электробритвы можно также
установить ее в зарядное устройство, если оно
входит в комплект поставки.
Запрещается погружать зарядное устройство
воду, а также промывать его под струей воды.
C
◗ Правильно устанавливайте электробритву в
подключенное к электросети зарядное
устройство.
Расположенный на нижней части прибора
красный светодиод загорится.
C
◗ Снимайте электробритву с зарядного
устройства, не наклоняя ее.
Удаление и установка часов
C
1 Поверните часы против часовой стрелки
(1) (до щелчка) и вытяните их из
прибора (2).
C
2 Вставьте часы в электробритву (1) и
поверните по часовой стрелке (2) (до
щелчка).
РУССКИЙ 37
4222 002 48152 08-11-2006 14:32 Pagina 37
Установка времени
C
◗ Установите время, нажав на небольшую
кнопку, расположенную на задней стороне
часов.
При установке времени стрелки можно
двигать только вперед.
Замена аккумуляторных батарей
C
1 Снимите колпачок.После этого
извлеките батарею с помощью
небольшой отвертки.
C
2 Вставьте новую батарею и установите
колпачок на место.
Бритье
Удобное персональное управление
C
◗ Система Personal Comfort Control
позволяет приспособить электробритву к
вашему типу кожи.
- Вы можете установить положение 'Normal'
для быстрого, комфортного, чистого бритья.
- Вы можете установить положение 'Sensitive'
(для чувствительной кожи) для чистого
РУССКИЙ38
4222 002 48152 08-11-2006 14:32 Pagina 38
бритья при оптимальном комфорте для
кожи.
C
◗ Положение 'S' наиболее подходит для
чувствительной кожи.
C
◗ Положение 'N' наиболее подходит для
нормальной кожи.
◗ Промежуточное положение регулятора
подходит для типов кожи от нормального
до чувствительного.
Бритье
1 Включите бритву, нажав на кнопку
Вкл./Выкл.
При включении или выключении
электробритвы загораются все светодиоды и
светятся все символы, после чего в течение
нескольких секунд отображается текущее
состояние степени зарядки аккумуляторов.
C
2 Быстро перемещайте бритвенные
головки по коже, совершая
одновременно возвратнопоступательные и вращательные
движения.
- Наилучшие результаты бритья достигаются в
том случае, когда ваша кожа сухая.
- Вашей коже может потребоваться
2-3 недели для того, чтобы привыкнуть к
бритвенной системе Philips.
РУССКИЙ 39
4222 002 48152 08-11-2006 14:32 Pagina 39
3 Выключите электробритву, нажав один
раз кнопку вкл./выкл.
C
4 Во избежание поломки, после
использования наденьте на бритву
защитную крышку.
Подравниватель.
Для подравнивания висков и ухода за усами.
C
1 Откройте подравниватель,передвинув
ползунковый переключатель вниз.
Подравнивателем можно пользоваться только
при включенном электродвигателе.
C
2 Закройте подравниватель,нажав на него
указательным пальцем.
Очистка и уход
C
◗ После каждого сеанса бритья начинает
мигать символ водопроводного крана,
напоминая о необходимости очистки
электробритвы (за исключением тех
случаев, когда на нижней части прибора
загорается красный светодиод).
Регулярная очистка гарантирует наилучшие
результаты бритья.
РУССКИЙ40
4222 002 48152 08-11-2006 14:32 Pagina 40
◗ Используйте приспособление для очистки
электробритвы, если оно входит в комплект
поставки прибора. См. отдельный буклект с
инструкциями.
В качестве обычного способа очистки прибора
следует промывать горячей водой бритвенный
блок и волососборник после каждого сеанса
бритья.
Будьте осторожны с горячей водой. Все
проверяйте, не слишком ли горяча вода, что
уберечь ваши руки от получения ожога.
Каждый день: бритвенный блок и камера
волососборника
1 Выключите бритву, выньте сетевую вилку
из розетки и отсоедините штекер шнура
сетевого адаптера от электробритвы.
C
2 Откройте бритвенный блок, нажав
кнопку фиксатора.
C
3 Очистите бритвенный блок и камеру
волососборника, промывая их под
горячей водопроводной водой.
Внутренняя часть бритвенного блока и камера
волососборника должны быть очищены
надлежащим образом.
C
4 Промойте бритву снаружи.
РУССКИЙ 41
4222 002 48152 08-11-2006 14:32 Pagina 41
5 Закройте бритвенный блок и стряхните
воду.
Запрещается сушить бритвенный блок с
помощью полотенца или салфетки, так как
можно повредить бритвенные головки.
C
6 Снова откройте бритвенный блок и
оставьте его открытым, чтобы дать
бритве полностью высохнуть.
Вы также можете очистить камеру
волососборника без воды, пользуясь
кисточкой, входящей в комплект поставки.
Через каждые 6 месяцев: бреющие
головки
C
1 Откройте бритвенный блок, поверните
фиксатор против часовой стрелки (1) и
снимите фиксирующую рамку (2).
2 Очистите вращающиеся и неподвижные
ножи с помощью поставляемой в
комплекте щеточки.
Не очищайте одновременно более одной
пары ножей, поскольку вращающийся и
неподвижный ножи каждой пары пригнаны
друг к другу. Если вы случайно перепутаете
ножи, то может потребоваться несколько
недель для того, чтобы восстановить
оптимальные характеристики бритья.
3 Вставьте бритвенные головки в
бритвенный блок. Установите
РУССКИЙ42
4222 002 48152 08-11-2006 14:32 Pagina 42
фиксирующую рамку в бритвенный блок
и поверните его по часовой стрелке.
4 Закройте бритвенный блок.
Подравниватель
Очищайте подравниватель после каждого
использования.
1 Выключите бритву, выньте сетевую вилку
из розетки и отсоедините штекер шнура
сетевого адаптера от электробритвы.
C
2 Очищайте подравниватель с помощью
кисточки, входящей в комплект
поставки.
C
3 Смазывайте зубцы подравнивателя
каждые шесть месяцев каплей
машинного масла для швейных машин.
Зарядное устройство.
Зарядное устройство можно очистить
кусочком влажной ткани.
Хранение
C
◗ Во избежание повреждений наденьте на
электробритву защитный колпачок.
РУССКИЙ 43
4222 002 48152 08-11-2006 14:32 Pagina 43

C
◗ Храните бритву в футляре или на подставке
Замена бритвенных головок
C
◗ Производите замену бритвенных головок
как только начнет мигать символ
бритвенного блока.
Поврежденные или изношенные бреющие
головки следует заменять только бреющими
головками HQ9 Philips.
1 Выключите бритву, выньте сетевую вилку
из розетки электросети и отсоедините
штекер шнура сетевого адаптера от
электробритвы.
C
2 Откройте бритвенный блок, нажав
кнопку фиксатора.
C
3 Поверните фиксатор против часовой
стрелки (1) и снимите фиксирующую
рамку (2).
C
4 Выньте бритвенные головки и вставьте
новые бритвенные головки в
бритвенный блок.
Убедитесь, что выступы бритвенных головок
точно совпадают с соответствующими пазами.
РУССКИЙ44
4222 002 48152 08-11-2006 14:32 Pagina 44

C
5 Установите фиксирующую рамку в
бритвенный блок (1) и поверните его по
часовой стрелке (2).
6 Закройте бритвенный блок.
◗ Символ бритвенного блока начнет
светиться, если вы будете удерживать
кнопку вкл./выкл. нажатой не менее 6
секунд.
Принадлежности
В продаже имеются следующие
принадлежности:
- Блок питания HQ8500/HQ8000.
- Бреющие головки HQ9 Philips.
- Очиститель бритвенных головок HQ110
Philips (спрей для очистки бритвенных
головок).
- Автомобильный шнур питания HQ8010.
Защита окружающей среды
C
◗ По окончании срока службы не
выбрасывайте прибор вместе с обычными
бытовыми отходами,а сдавайте в
специальные пункты приема. Поступая так
вы способствуете делу сохранения
окружающей среды.
◗ Зарядное устройство
Не выбрасывайте батарею вместе с бытовым
мусором, а сдайте ее в официальный пункт
приема.
РУССКИЙ 45
4222 002 48152 08-11-2006 14:32 Pagina 45

◗ Электробритва
Встроенная аккумуляторная батарея содержит
вещества, которые могут представлять
опасность для окружающей среды.
Утилизация аккумуляторной батареи
электробритвы
Прежде чем выбросить электробритву, выньте
из нее батарею. Не выбрасывайте батарею
вместе с бытовым мусором, а сдайте ее в
официальный пункт приема. Вы также можете
сдать прибор в сервисный центр компании
«Филипс», персонал которого выполнит для
вас работу по удалению батарей и их
безопасной утилизации.
Перед удалением батарея должна быт
полностью разряжена.
1 Выньте вилку сетевого адаптера из
розетки электросети и отсоедините
штекер шнура сетевого адаптера от
электробритвы.
C
2 Оставьте электробритву во включенном
состоянии до остановки
электродвигателя, отверните винты и
откройте электробритву.
3 Извлеките аккумуляторную батарею.
Не включайте бритву в сеть после того, как
аккумуляторная батарея была извлечена.
РУССКИЙ46
4222 002 48152 08-11-2006 14:32 Pagina 46

Информация и сервисное обслуживание
По поводу дополнительной информации или в
случае возникновения каких-либо проблем
обращайтесь на Web-сайт компании «Филипс»
по адресу www.philips.ru или в центр компании
«Филипс» по обслуживанию потребителей в
вашей стране (вы найдете его номер телефона
на международном гарантийном талоне). Если
подобный центр в вашей стране отсутствует,
обратитесь в вашу местную торговую
организацию компании «Филипс» или
сервисное отделение компании Philips
Domestic Appliances and Personal Care BV.
Поиск и устранение неисправностей
1 Плохое качество бритья
B
Причина 1: загрязнились бритвенные головки.
B
Бритва промывалась недостаточно долго
или недостаточно горячей водой.
◗ Перед тем как продолжить бритье,
тщательно очистите электробритву. См.
раздел «Очистка и уход».
B
Причина 2: бритвенные головки забиты
длинными волосами.
◗ Очистите вращающиеся и неподвижные
ножи с помощью поставляемой в
комплекте щеточки.См. раздел «Через
каждые 6 месяцев: бреющие головки»
РУССКИЙ 47
4222 002 48152 08-11-2006 14:32 Pagina 47

B
Причина 3: бритвенные головки повреждены
или изношены.
◗ Замените бреющие головки. См. раздел
«Замена».
2 При нажатии кнопки ON/OFF
электробритва не работает.
B
Причина 1:аккумуляторная батарея
разряжена.
◗ Зарядите батарею.См. раздел "Зарядка"
B
Причина 2: прибор не подключен к
электросети.
◗ Вставьте сетевую вилку в розетку
электросети.
C
3 Бритвенный блок отсоединился от
бритвы.
B
Причина: бритвенный блокне был правильно
установлен.
◗ Если произошло отсоединение
бритвенного блока от электробритвы, вы
можете просто установить его на место
(до щелчка).
РУССКИЙ48
4222 002 48152 08-11-2006 14:32 Pagina 48

УКРАЇНСЬКА 49
Важлива інформація
Прочитайте цю інструкцію уважно перед
використанням пристрою та зберігайте для
подальшого використання.
◗ Використовуйте лише блок живлення, що
додається.
◗ Блок живлення перетворює напругу
100-240 В у безпечну низьку напругу менше
24 В.
◗ У блоку живлення знаходиться
трансформатор.Не від'єднуйте блок
живлення для заміни іншим, оскільки це
може спричинити небезпечну ситуацію.
◗ Не використовуйте пошкоджений блок
живлення.
◗ Якщо блок живлення пошкоджено, його
обов'язково треба замінити оригінальним
блоком живленням,щоб уникнути
небезпеки.
◗ Переконайтеся, що блок живлення не
намок.
◗ Заряджайте й використовуйте пристрій при
температурі між 5cC та 35cC.
C
◗ Ніколи не занурюйте зарядний пристрій у
вод та не мийте під краном.
◗ Не заряджайте бритву у закритому пакунку
◗ Завжди від'єднуйте бритву від мережі
перед промиванням під краном.
C
◗ Пристрій відповідає міжнародним
нормативним актам із безпеки IEC, і його
можна безпечно мити під краном.
4222 002 48152 08-11-2006 14:32 Pagina 49
50
Будьте обережні з гарячою водою.Завжди
перевіряйте, чи не надто гаряча вода, щоб не
допустити опіків рук.
◗ Рівень шуму: Lc = 64 дБ [A]
Заряджання
Переконайтеся, що пристрій вимкнено, перед
тим, як заряджати його.
Зарядження займає приблизно 1 годину.
Ви можете також голитися без
перезарядження батарей, увімкнувши бритву
безпосередньо у мережу живлення.
Індикація підзарядки
Заряджання
C
◗ Коли ви починаєте заряджати бритву, що
розрядилася, індикатор внизу загорається
червоним.Якщо акумулятор містить
достатньо заряду для одного гоління, усі
лампи починають послідовно мигати
зеленим.
УКРАЇНСЬКА
4222 002 48152 08-11-2006 14:32 Pagina 50
51
Акумулятор повністю заряджений
C
◗ Коли акумулятор повністю розрядиться, усі
зелені контрольні лампи загоряться.
За декілька годин після зарядження всі лампи
згасають.
Заряд акумулятора, що залишився.
C
◗ Кількість заряду, що залишається в
акумуляторі,визначається числом ламп, що
горять.
Заряд, що залишається в акумуляторі,
показується, коли ви від'єднуєте бритву або
вмикаєте чи вимикаєте її.
- Коли всі лампи горять зеленим, акумулятор
заряджено на 100%.
- Коли нижня лампа горить зеленим,
залишається 20% заряду акумулятора.
Вичерпування заряду акумулятора
C
◗ Коли заряд акумулятора вичерпується,
нижня лампа загорається червоним.
Коли ви вимикаєте бритву, цей індикатор мигає
декілька разів.
Час гоління без шнура
Напълно заредената самобръсначка може да
подстригва безкабелно до 80 минути.
УКРАЇНСЬКА
4222 002 48152 08-11-2006 14:32 Pagina 51
52
Підзарядка пристрою
C
1 Вставте вилку приладу у електробритву.
2 Вставте вилку-адаптер до розетки
електромережі.
3 Коли акумулятор повністю розряджено,
вийміть вилку шнура живлення з розетки
електромережі, а вилку приладу з
електробритви.
Зарядний пристрій
Ви також можете заряджати пристрій,
встановлюючи його в зарядну підставку, якщо
вона додається.
Ніколи не занурюйте зарядний пристрій у во
та не мийте під краном.
C
◗ Вставте бритву в приєднану до мережі
зарядну підставку.
Нижня лампа загорається червоним.
C
◗ Знімайте бритву з підставки, не нахиляючи
її.
УКРАЇНСЬКА
4222 002 48152 08-11-2006 14:32 Pagina 52
53
Зняття та встановлення годинника
C
1 Поверніть годинник проти
годинникової стрілки (1) ("клацання") та
витягніть (2).
C
2 Вставте годинник (1) та поверніть за
годинниковою стрілкою (2) ("клацання").
Встановлення часу
C
◗ Встановлюйте час, натискаючи малу кнопку
на задньому боці годинника.
Час можна встановлювати лише вперед.
Заміна акумулятора
C
1 Зніміть ковпачок.Витягніть акумулятор за
допомогою мініатюрної викрутки.
УКРАЇНСЬКА
4222 002 48152 08-11-2006 14:32 Pagina 53
54
C
2 Встановіть новий акумулятор та
насуньте ковпачок.
Використання пристрою
Регулювання особистого комфорту
C
◗ Система контролю персонального гоління
пристосовує бритву до типу Вашої шкіри.
- Ви можете обрати режим "Нормальний" для
швидкого та зручного щільного гоління.
- Ви можете обрати режим "Чутливий" для
зручного щільного гоління з оптимальним
комфортом для вашої шкіри.
C
◗ Положення 'S' придатне для чутливої шкіри.
C
◗ Положення 'N' придатне для нормального
типу шкіри.
◗ Проміжні положення придатні для типів
шкіри між нормальною та чутливою.
Гоління.
1 Ввімкніть бритву, один раз натиснувши
на кнопку вмикання /вимикання.
Коли ви вмикаєте чи вимикаєте бритву, усі
лампи та символи загораються, а потім заряд
УКРАЇНСЬКА
4222 002 48152 08-11-2006 14:32 Pagina 54

55
акумулятора, що залишається, показується
протягом кількох секунд.
C
2 Швидкими поступальними і коловими
рухами переміщуйте голівку для гоління
по шкірі.
- Якість гоління буде найвищою, якщо шкіра
суха.
- Для звикання шкіри до бритви Philips може
знадобитися 2 - 3 тижні.
3 Вимкніть бритву, натиснувши одного
разу на кнопку on/off (вмик/вимкн).
C
4 Надівайте захисний ковпачок на бритву
кожного разу після використання, щоб
запобігти пошкодженню.
Підстригання
Для підстригання бакенбардів та вусів.
C
1 Відкрийте тример, штовхаючи повзунок
донизу.
Тример можна привести в робочий стан тільки
при працюючому двигуні.
C
2 Закрийте тример вказівним пальцем.
УКРАЇНСЬКА
4222 002 48152 08-11-2006 14:32 Pagina 55
Чищення й догляд
C
◗ Символ крана починає мигати після
кожного гоління,нагадуючи вам про те, що
бритва потребує чищення (якщо тільки
нижня лампа не горить червоним).
Регулярне чищення гарантує кращу роботу
електробритви.
◗ Використовуйте миючу машину для
чищення бритви, якщо вона є.Дивіться
окремий буклет.
Звичайний спосіб чищення - це промивання
бритвеного блоку й камери для волосся під
краном гарячої води кожного разу після
використання.
Будьте обережні з гарячою водою.Завжди
перевіряйте, чи не надто гаряча вода, щоб не
допустити опіків рук.
Кожного дня: голівки для гоління та
триммер
1 Вимкніть електробритву, вийміть вилку-
адаптер з розетки електромережі та
вийміть штекер приладу з
електробритви.
C
2 Натисніть фіксуючу кнопку, щоб
відкрити бритвений блок.
56 УКРАЇНСЬКА
4222 002 48152 08-11-2006 14:32 Pagina 56
57
C
3 Чистіть блок гоління та камеру для
збирання відрізаних волосків ,
промиваючи їх під гарячою водою.
Переконайтеся, що внутрішня частина
бритвеного блоку та камери для волосся
почищені належним чином.
C
4 Промийте пристрій зовні.
5 Закрийте блок для гоління та струсить
воду, що залишилися після промивання.
Ніколи не протирайте голівки для голінн
полотенцем або якоюсь ганчіркою, бо це може
пошкодити леза бритви.
C
6 Відкрийте блок для гоління знову та
залиште їх відкритими, доки пристрій
повністю не висохне.
Камеру для волосків ви можете почистити й
без води - щіточкою, що входить у комплект
бритви.
Кожні шість місяців:бритвені головки
C
1 Відкрийте бритвений блок, поверніть
замок проти годинникової стрілки (1) та
зніміть утримуючу рамку (2).
2 Почистіть леза та ≠ратки щіткою,що
додається.
Не чистіть одночасно більш ніж одно лезо та
захисну гратку, щоб не переплутати - кожну
УКРАЇНСЬКА
4222 002 48152 08-11-2006 14:32 Pagina 57
58
пару підігнано одне до одного. Якщо ви
випадково переплутаєте лезо чи гратку, може
знадобитися декілька тижнів, щоб відновити
оптимальну ефективність гоління.
3 Встановіть бритвені головки на
бритвений блок. Встановіть утримуючу
рамку на бритвений блок та поверніть за
годинниковою стрілкою.
4 Закрийте бритвений блок.
Тример
Тример слід чистити кожного разу після його
використання.
1 Вимкніть електробритву, вийміть вилку-
адаптер з розетки електромережі та
вийміть штекер приладу з
електробритви.
C
2 Пристрій слід чистити щiткой, яка
додається до нього при продажу.
C
3 Один раз на шість місяців змащуйте
зубці ножиць краплею машинного
мастила.
Зарядний пристрій
Ви можете чистити зарядний пристрій
вологою ганчіркою.
УКРАЇНСЬКА
4222 002 48152 08-11-2006 14:32 Pagina 58
Зберігання
C
◗ Надіньте захисний ковпачок на бритву, щоб
запобігти пошкодженню.
C
◗ Зберігайте пристрій у футлярі або
встановлюйте пристрій на стійку для
висихання.
Заміна
C
◗ Замінюйте бритвені головки, як тільки
символ бритвеного блоку починає мигати.
Замінюйте пошкоджені та зношені насадки
тільки насадками " HQ9 Philips".
1 Вимкніть електробритву, вийміть вилку-
адаптер з розетки електромережі та
вийміть штекер приладу з
електробритви.
C
2 Натисніть кнопку замка і відкрийте блок
для гоління.
C
3 Поверніть замок (1) проти годинникової
стрілки та зніміть утримуючу рамку (2).
59УКРАЇНСЬКА
4222 002 48152 08-11-2006 14:32 Pagina 59

60
C
4 Зніміть бритвені головки та встановіть
нові у бритвений блок.
Виступи на голівках повинні попадати точно у
пази.
C
5 Встановіть утримуючу рамку на
бритвений блок (1) та поверніть за
годинниковою стрілкою (2).
6 Закрийте бритвений блок.
◗ Символ бритвеного блоку згасає, якщо ви
тримаєте кнопку "вмк/вимк" натиснутою
протягом 6 секунд.
Приладдя
Доступне таке приладдя:
- Блок живлення "HQ8500/HQ8000".
- Насадки для гоління HQ55 Philips.
- Розпилювач для чищення голівок для гоління
"HQ110 Philips Head Cleaner".
- Автошнур HQ8010.
Захист оточуючого середовища
C
◗ Не викидайте пристрій зі звичайним
побутовим сміттям, доставляйте його після
того, як сплине термін використання, до
офіційного приймального пункту для
переробки. Цим ви допоможете зберегти
довкілля.
◗ Зарядний пристрій
УКРАЇНСЬКА
4222 002 48152 08-11-2006 14:32 Pagina 60

61
Не викидайте батарею зі звичайним побутовим
сміттям, доставляйте її до офіційного
приймального пункту.
◗ Бритва
Убудований акумулятор містить речовини, що
можуть забруднювати навколишнє середовище.
Утилізація акумулятора бритви
Виймайте батарею, коли Ви викидаєте
пристрій.Не викидайте акумулятор зі
звичайним побутовим сміттям, доставляйте
його до офіційного прийомного пункту.Ви
також можете віднести пристрій до сервісного
центру "Philips", де витягнуть акумулятор та
ліквідують його безпечним для середовища
чином.
Витягуйте акумулятор тільки тоді, коли з
повністю вичерпано.
1 Витягніть блок живлення з розетки та
шнур - з пристрою.
C
2 Дайте бритві попрацювати, поки вона
зупиниться, викрутіть гвинти і відкрийте
бритву.
3 Витягніть батарею.
Не підключайте бритву до мережі після того
як акумулятор було вийнято.
УКРАЇНСЬКА
4222 002 48152 08-11-2006 14:32 Pagina 61

Гарантія та обслуговування
Якщо Вам потрібна інформація або у Вас
виникли проблеми з приладом, будь ласка,
завітайте до веб-сайту фірми Philips (aдреса в
Інтернеті: www.philips.com) або зв'яжіться з
найближчим центром Philips по
обслуговуванню клієнтів Philips Customer Care
Centreу Вашій країні (Ви можете знайти його
номер телефону у єдиному гарантійному
талоні, дійсному в усьому світі). Якщо у Вашій
країні немає центру Philips по обслуговуванню
клієнтів Philips Customer Care Centre,
зверніться до Вашого місцевого торгового
представникафірми Philips або зв'яжіться з
департаментом обслуговування Service
Department відділення Philips Domestic
Appliances and Personal CareBV.
Пошук та усунення несправностей
1 Погіршене гоління
B
Причина 1: голівки з лезами забруднено.
B
Бритву не мили достатньо довго, або вода
була недостатньо гарячою.
◗ Ретельно почистіть бритву перед тим, як
продовжувати гоління.Див.главу "Чищення
та догляд".
B
Причина 2: довге волосся заважає голівкам з
лезами.
62 УКРАЇНСЬКА
4222 002 48152 08-11-2006 14:32 Pagina 62

63
◗ Почистіть леза та ≠ратки щіткою,що
додається.Див. главу "Чищення та догляд",
розділ "Кожні шість місяців:бритвені
головки".
B
Причина 3:бритвені головки пошкоджені або
зношені.
◗ Замініть бритвені головки.Див. розділ
„Заміна.
2 Бритва не працює з нажатою кнопкою
ON/OFF.
B
Причина 1:акумулятор розряджений.
◗ Перезарядіть акумулятор.Див.розділ
„Підзарядка.
B
Причина 2:пристрій не приєднано до мережі.
◗ Вставте вилку-адаптер до розетки
електромережі.
C
3 Бритвений блок висунувся з бритви.
B
Причина:бритвений блок встановлено
неправильно.
◗ Якщо бритвений блок від'єднано від
бритви, ви можете легко встановити його
("клацання).
УКРАЇНСЬКА
4222 002 48152 08-11-2006 14:32 Pagina 63

Tähtis
Enne seadme ühendamist vooluvõrku kontrollige,
kas adapterile märgitud pinge vastab kohalikule
võrgupingele.
◗ Kasutage ainult kaasasolevat toitepistikut.
◗ Pistik muundab 100-240 voldise
voolutugevuse trafo abil turvaliseks
24- voldiseks vooluks.
◗ Pistikul on voolumuundur. Ärge lõigake seda
ära, et asendada teise pistikuga, see võib
põhjustada ohtlikke olukordi.
◗ Ärge kasutage vigastatud toitepistikut.
◗ Kui pistik on vigastatud,vahetage see ainult
originaalpistiku vastu vältimaks ohtlikke
olukordi.
◗ Toitepistik ei tohi märjaks saada.
◗ Seadme laadimine, hoidmine ja kasutamine
toimugu temperatuurivahemikus 5cC ja 35cC.
C
◗ Ärge kunagi kastke laadimisalust vette ega
loputage seda voolava veega.
◗ Võtke pardel laadimise ajaks vutlarist välja.
◗ Võtke alati pistik pistikupesast välja enne
pardli kraani all pesemist.
C
◗ Seade on varustatud rahvusvaheliselt
tunnustatud IEC turvaregulatsiooniga ja seda
võib pesta voolava vee all.
Olge tulise veega ettevaatlik. Kontrollige alati, et
vesi poleks liiga tuline ega tekitaks kätele
põletushaavu.
◗ Müratase: Lc = 64 dB [A]
EESTI64
4222 002 48152 08-11-2006 14:32 Pagina 64

Laadimine
Kontrollige, et seade oleks väljalülitatud enne kui
hakkate seadet laadima.
Tavaliselt võtab laadimine aega umbes 1 tunni.
Te võite raseerida ka laadimata pardliga, kui
ühendate selle võrguga.
Laadimise märgutuled
Laadimine
C
◗ Kui hakkate laadima tühja pardlit,põleb
tagumine punane märgutuli. Kui akus on
ühekordseks raseerimiseks piisavalt voolu,
vilguvad järjestikku kõik rohelised märgutuled.
Aku on täis
C
◗ Kui aku on laetud,siis põlevad kõik rohelised
märgutuled.
Mõne tunni möödudes pärast laadimist kustuvad
kõik märgutuled.
Energiajääk akus
C
◗ Akusse järelejäänud jõudlust näitab süttinud
märgutulede hulk.
65EESTI
4222 002 48152 08-11-2006 14:32 Pagina 65
66
Akusse järelejäänud jõudlust on näha, kui võtate
pistiku pistikupesast välja, lülitate pardli sisse või
välja.
- Kui kõik rohelised tuled põlevad, on aku 100%
laetud.
- Kui tagumine punane märgutuli põleb, on akus
veel 20% voolu.
Aku saab tühjaks
C
◗ Kui aku hakkab tühjaks saama,hakkab
tagumine punane märgutuli põlema.
Kui lülitate pardli välja, vilgub tuli mõned korrad.
Voolutoiteta raseerimisaeg
Täislaetud aku võimaldab ajada habet ilma
toitejuhtmeta umbes 80 minutit.
Seadme laadimine
C
1 Ühendage toitejuhtme pistik pardliga.
2 Ühendage võrgupistik pistikupessa.
3 Kui aku on täis laetud,eemaldage
võrgupistik pistikupesast ja seadme pistik
pardli küljest.
EESTI
4222 002 48152 08-11-2006 14:32 Pagina 66
67
Laadimislaus
Seadet on võimalik laadida laadimisalusel hoides.
Ärge kunagi kastke laadimisalust vette ega
loputage seda voolava veega.
C
◗ Pange pardel korralikult vooluvõrku
ühendatud laadimisalusele.
Tagumine punane märgutuli hakkab põlema.
C
◗ Tõstke pardel aluselt maha seda mitte
kallutades.
Kella eemaldamine ja sisestamine
C
1 Keerake kella vastupäeva (1) (`klõps`) ja
tõmmake siis välja (2).
C
2 Sisestage kell (1) ja keerake päripäeva (2)
(ÍklõpsÍ).
EESTI
4222 002 48152 08-11-2006 14:32 Pagina 67
68
Aja reguleerimine
C
◗ Kellaaeg seadistage kella taga oleva väikese
nupuga.
Kellaaega saab keerata ainult edasisuunas.
Aku asendamine
C
1 Eemaldage kate. Seejärel eemaldage aku
tillukese kruvikeerajaga.
C
2 Sisestage uus aku ja pange kate oma kohale
tagasi.
Seadme kasutamine
Personal Comfort Control
C
◗ Personal Comfort Control süsteem võimaldab
pardlit kohandada oma nahatüübile.
- Saate pardli seada asendisse 'Normal' kiireks ja
mugavaks raseerimiseks, teeb naha siledaks.
- Saate pardli seada asendisse 'Sensitive' kiireks ja
mugavaks raseerimiseks, mis tagab nahale
optimaalse mugavustunde.
EESTI
4222 002 48152 08-11-2006 14:32 Pagina 68

69
C
◗ 'S' asend sobib tundlikule nahatüübile.
C
◗ 'N' asend sobib normaalsele nahatüübile.
◗ Vahepealsed asendid sobivad nahatüübile,mis
on normaalse ja tundliku vahepealsed.
Raseerimine
1 Lülitage pardel sisse vajutades ühe korra
sisse/välja nuppu.
Kui lülitate pardli sisse või välja, sütivad kõik
märgutuled ja sümbolid ning akusse järelejäänud
jõudlus ilmub mõneks sekundiks.
C
2 Liigutage pardli pead mööda nahka nii
sirgete, kui ka ringikujuliste liigutustega.
- Parima tulemuse saate siis, kui raseerite kuiva
nahka.
- Teie nahal võib Philips süsteemiga harjumiseks
kuluda 2-3 nädalat.
3 Vajutage sisse/välja nupule üks kord, et
pardlit välja lülitada.
C
4 Vigastuste vältimiseks pange pardlile pärast
iga kasutuskorda kaitsekaas peale.
EESTI
4222 002 48152 08-11-2006 14:32 Pagina 69
70
Piiramine
Põskhabeme ja vuntside piiramine.
C
1 Lükake plaadikest allapoole ja avage piirel.
Piirel hakkab tööle, kui mootor käib.
C
2 Sulgege piirel nimetissõrmega.
Puhastamine ja hooldus
C
◗ Kraanisümbol hakkab pärast iga
raseerimiskorda vilkudes eelde tuletama,et
pardel vajab puhastamist (v.a. kui sütib
tagumine punane märgutuli ).
Seadme regulaarne puhastamine tagab parema
raseerimistulemuse.
◗ Kasutage kaasasolevat pesemisseadet pardli
puhastamiseks.Vt eraldiolevat kasutusjuhendi
voldikut.
Tavaline seadme puhastamine on parlipea ja
karvakambri loputamine tulise veega pärast iga
kasutuskorda.
EESTI
4222 002 48152 08-11-2006 14:32 Pagina 70
71
Olge tulise veega ettevaatlik. Kontrollige, et vesi ei
oleks liiga tuline, vastasel korral võite põletushaavu
saada.
Iga päev: pardlipea ja karvakamber
1 Lülitage pardel välja, eemaldage võrgupistik
pistikupesast ja seadme toitepistik pardlist.
C
2 Vajutage vabastusnuppu ja avage pardlipea.
C
3 Peske pardlipea ja karvakamber voolava
kuuma vee all.
Kontrollige, et pardlipea sisepind ja karvakamber
oleksid korralikult puhtad.
C
4 Loputage seadme välispool.
5 Sulgege pardlipea ja raputage vesi maha.
Ärge kunagi kasutage paberist käterätte või
salvrätikuid, sest need võivad rikkuda pardlipäid.
C
6 Avage pardlipea,jätke see avatuks ja laske
seadmel täielikult ära kuivada.
Võite karvakambrit puhastada ka veeta, kasutades
kaasasolevat harja.
EESTI
4222 002 48152 08-11-2006 14:32 Pagina 71

72
Iga kuue kuu tagant: lõikepead
C
1 Avage pardlipea,keerake lukusti vastupäeva
(1) ja eemaldage fikseerraam (2).
2 Puhastage terad ja võred kaasasoleva
harjaga.
Puhastage korraga vaid ühe lõikepea tera ja võre,
muidu võivad tera ja võred segi minna. Iga tera on
teritatud oma võre jaoks. Kui terad ja võred
omavahel segi lähevad, võib kuluda mitu nädalat,
enne kui raseerimiskvaliteet taasub.
3 Pange lõikepead tagasi pardlipeasse. Pange
fikseerraam tagasi pardlipeasse ja keerake
päripäeva.
4 Sulgege pardlipea.
Piirel
Puhastage piirlit pärast iga kasutamist.
1 Lülitage pardel välja, eemaldage võrgupistik
pistikupesast ja seadme toitepistik pardlist.
C
2 Puhastage piirlit kaasasoleva harjaga.
C
3 Määrige piirli hambaid iga kuue kuu tagant
tilga õmblusmasinaõliga.
EESTI
4222 002 48152 08-11-2006 14:32 Pagina 72
73
Laadimislaus
Laadimisalust võib puhastada niiske lapiga.
Hoidmine
C
◗ Vigastuste vältimiseks pange seadmele
kaitsekaas peale.
C
◗ Hoidke seadet pardlikotis või pange see
hoidikusse kuivama.
Vahetamine
C
◗ Vahetage lõikepead kohe, kui pardlipea sümbol
hakkab vilkuma.
Vahetage vigastatud või kulunud lõikepead ainult
HQ9 Philips lõikepeade vastu.
1 Lülitage pardel välja, eemaldage võrgupistik
pistikupesast ja seadme toitepistik pardlist.
C
2 Eemaldage pardlipea pardlist vajutades
vabastusnuppu.
EESTI
4222 002 48152 08-11-2006 14:32 Pagina 73
74
C
3 Keerake lukusti vastupäeva (1) ja
eemaldage fikseerraam (2).
C
4 Eemaldage lõikepead ja asendage uutega.
Veenduge, et lõikepeade eendid fikseeruksid
korralikult õnarustesse.
C
5 Pange fikseerraam tagasi pardipeasse (1) ja
keerake lukustit päripäeva (2).
6 Sulgege pardlipea.
◗ Pardlipea sümbol kustub, kui vajutada
sisse/välja nuppu 6 sekundit.
Lisavarustus
On võimalik järgmine lisavarustus:
- HQ8500/HQ8000 toitejuhe
- HQ9 Philips lõikepead,
- HQ110 Philips Head Cleaner
(pihustusaine lõikepeade puhastamiseks).
- HQ8010 juhe autos kasutamiseks.
EESTI
4222 002 48152 08-11-2006 14:32 Pagina 74

Keskkonnakaitse
C
◗ Ärge visake kasutusest kõrvaldatud seadet
tavalise olmeprügi hulka, vaid viige see
vastavasse kogumispunkti.Olge
keskkonnasõbralik.
◗ Laadimislaus
Ärge visake akut olmeprahi hulka, vaid toimetage
vastavasse kogumispunkti.
◗ Pardel
Sissemonteeritud aku sisaldab ümbritsevat
keskkonda saastavaid ained.
Pardliaku kõrvaldamine
Eemaldage pardlist akud, kui olete otsustanud
seadme kasutusest kõrvaldada. Ärge viske akusid
muu olmeprahi hulka, vaid viige need
spetsiaalsesse kogumiskohta.Võite akud viia ka
Philipsi hoolduskeskusse, sealsed töötajad
hävitavad akud keskkonnasõbralikul moel.
Eemaldage seadmest vaid täiesti tühi aku.
1 Eemaldage võrgupistik seina pistikupesast
ja seadme toitepistik seadmest.
C
2 Laske pardlil seiskumiseni töötada,
vabastage kruvid ja avage pardel.
3 Eemaldage aku.
Kui olete akud välja võtnud, ärge pardlit enam
vooluvõrku lülitage.
75EESTI
4222 002 48152 08-11-2006 14:32 Pagina 75

Garantii ja teenindus
Kui Te vajate teenuseid või informatsiooni või teil
on tekkinud probleeme, külastage Philips internetveebilehte www.philips.com või võtke ühendus
Philipsi hoolduskeskusega oma riigis
(telefoninumbrid leiate garantiitalongilt). Kui Teie
riigis ei ole hoolduskeskust, pöörduge oma Philipsi
toodete müüja poole või võtke ühendus Philipsi
koduseadmete Teeninduskeskusega.
Vead ja nende kõrvaldamine
1 Habemeajamine ei ole piisavalt efektiivne
B
Põhjus 1: lõikepead on umbes.
B
Pardleid pole piisavalt kaua või piisavalt kuumas
vees pestud.
◗ Enne raseerimise jätkamist puhastage pardlit
põhjalikult.Vt pt `Puhastamine ja hooldamineÍ.
B
Põhjus 2: pikad kar vad on ummistanud lõikpea.
◗ Puhastage terad ja võred kaasasoleva harjaga.
Vt pt `Puhastamine ja hooldus`, lõik `Iga kuue
kuu tagant: lõiketerad`.
B
Põhjus 3: lõikepead on vigastatud või kulunud.
◗ Vahetage lõikepead.Vt pt `Lõikepea
vahetamine`.
2 Pardel ei tööta, kui sisse/välja nuppu on alla
vajutatud.
76 EESTI
4222 002 48152 08-11-2006 14:32 Pagina 76

77
B
Põhjus 1: aku on tühi.
◗ Laadige aku.Vt pt `Laadimine`.
B
Põhjus 2: seade ei ole vooluvõrku korralikult
ühendatud.
◗ Ühendage võrgupistik pistikupessa.
C
3 Pardlipea on tulnud pardlist lahti.
B
Põhjus: pardlipea ei ole korralikult oma kohal.
◗ Kui pardlipea on pardli küljest lahti tulnud,
pange see tagasi (klõpsatus).
EESTI
4222 002 48152 08-11-2006 14:32 Pagina 77

Svarīgi
Lūdzu, izlasiet šīs pamācības pirms ierīces
lietošanas.
◗ Lietojiet tikai komplektā iekļauto
elektrostrāvas pārveidotāju.
◗ Kontaktspraudnis pārveido 100-240 voltu
spriegumu par drošu spriegumu,kas
nepārsniedz 24 voltus.
◗ Kontaktspraudnī ir iebūvēts elektrostrāvas
pārveidotājs. Nenoņemiet kontaktspraudni, lai
aizstātu to ar citu, - tas var būt bīstami.
◗ Neizmantojiet bojātu kontaktspraudni.
◗ Lai izvairītos no bīstamām situācijām, bojātu
kontaktspraudni aizstājiet ar tāda paša modeļa
kontaktspraudni.
◗ Raugieties, lai kontaktspraudnis nesamirkst.
◗ Uzlādējiet un glabājiet ierīci no 5cC līdz 35cC
temperatūrā.
C
◗ Nekad neiegremdējiet uzlādēšanas statīvu
ūdenī un neskalojiet tekošā ūdenī.
◗ Neuzlādējiet skuvekli aizvērtā futrālī.
◗ Pirms skalojat skuvekli tekošā ūdenī,vienmēr
atvienojiet to no elektrotīkla.
C
◗ Šī ierīce atbilst starptautiski atzītajiem IEC
noteikumiem, un to var droši mazgāt tekošā
ūdenī.
Uzmanieties, lietojot karstu ūdeni. Lai
neapplaucētu rokas, vienmēr pārbaudiet, vai ūdens
nav pārāk karsts.
◗ Trokšņa līmenis: Lc = 64 dB [A]
LATVISKI78
4222 002 48152 08-11-2006 14:32 Pagina 78

Uzlādēšana
Pirms sākat ierīces uzlādēšanu, pārliecinieties, ka tā
ir izslēgta.
Parasti akumulatora uzlādēšanai nepieciešama
apmēram viena stunda.
Varat skūties arī bez akumulatoru baterijas
uzlādēšanas, vienkārši pievienojot skuvekli
elektrotīklam.
Uzlādēšanas norādes
Uzlādēšana
C
◗ Tiklīdz sākas skuvekļa akumulatoru baterijas,
kas ir pilnīgi izlādējusies, uzlādēšana, iedegas
apakšējā sarkanā signāllampiņa. Kad
akumulatoru baterijas jaudas pietiek vienai
skūšanās reizei, visas signāllampiņas secīgi
iedegas zaļā krāsā.
Pilnīgi uzlādēta akumulatoru baterija
C
◗ Kad akumulatoru baterija ir pilnīgi uzlādēta,
iedegas visas zaļās signāllampiņas.
Dažas stundas pēc uzlādēšanas visas
signāllampiņas nodziest.
79LATVISKI
4222 002 48152 08-11-2006 14:32 Pagina 79

80
Atlikusī akumulatoru baterijas
enerģija
C
◗ Atlikušo akumulatoru baterijas enerģijas
daudzumu norāda iedegušos signāllampiņu
skaits.
Atlikušais akumulatoru baterijas enerģijas
daudzums tiek rādīts, atvienojot skuvekli no
elektrotīkla vai to ieslēdzot, vai izslēdzot.
- Ja visas signāllampiņas spīd zaļā krāsā,
akumulatoru baterija ir 100% uzlādēta.
- Ja apakšējā signāllampiņa spīd zaļā krāsā,
akumulatoru baterijā atlikuši 20% enerģijas.
Akumulatoru baterijas enerģijas
līmenis ir zems
C
◗ Kad akumulatoru baterijas enerģijas līmenis
tuvojas beigām, apakšējā signāllampiņa
izgaismojas sarkanā krāsā.
Izslēdzot skuvekli, signāllampiņa dažas reizes
iemirgojas.
Skūšanās ilgums bez strāvas pievada
Ar pilnīgi uzlādētu skuvekli bez strāvas pievada var
skūties līdz 80 minūtēm.
LATVISKI
4222 002 48152 08-11-2006 14:32 Pagina 80

81
Ierīces uzlādēšana
C
1 Iespraudiet elektrovada kontakttapu
skuveklī.
2 Iespraudiet elektrostrāvas pārveidotāja
kontaktspraudni elektrotīkla sienas
kontaktrozetē.
3 Kad akumuIators ir pilnībā uzlādējies,
izvelciet kontaktdakšu no elektrotīkla
kontaktligzdas un atvienojiet elektrības
vadu no skuvekļa.
Uzlādēšanas statīvs
Ierīci var uzlādēt, arī novietojot to uzlādēšanas
statīvā, ja tas iekļauts ierīces komplektā.
Nekad neiegremdējiet uzlādēšanas statīvu ūden
un neskalojiet tekošā ūdenī.
C
◗ Rūpīgi novietojiet skuvekli elektrotīklam
pievienotā uzlādēšanas statīvā.
Apakšējā signāllampiņa iedegas sarkanā krāsā.
C
◗ Izņemiet skuvekli no statīva, to nesasverot.
LATVISKI
4222 002 48152 08-11-2006 14:32 Pagina 81
82
Pulksteņa ievietošana un izņemšana
C
1 Pagrieziet pulksteni pretēji pulksteņa
rādītāju kustības virzienam (1) (atskan
klikšķis) un izvelciet to (2).
C
2 Ievietojiet pulksteni (1) un pagrieziet to
pulksteņa rādītāju kustības virzienā (2)
(atskan klikšķis).
Pareiza laika noregulēšana
C
◗ Noregulējiet pareizu laiku,piespiežot mazo
taustiņu pulksteņa aizmugurē.
Laiku var regulēt tikai uz priekšu.
Baterijas nomaiņa
C
1 Noņemiet vāciņu. Pēc tam izņemiet
bateriju, izmantojot nelielu skrūvgriezi.
LATVISKI
4222 002 48152 08-11-2006 14:32 Pagina 82

83
C
2 Ievietojiet jaunu bateriju un novietojiet
vāciņu atpakaļ vietā.
Ierīces lietošana
Personal Comfort Control sistēma
C
◗ Personal Comfort Control sistēma ļauj
pielāgot skuvekli savam ādas tipam.
- Varat noregulēt skuvekli 'Normal' stāvoklī, lai
skūšanās būtu gluda, ātra un ēr ta.
- Varat noregulēt skuvekli 'Sensitive' stāvoklī,lai
gludas skūšanās laikā maksimāli saudzētu ādu.
C
◗ 'S' stāvoklis visvairāk piemērots jutīgai ādai.
C
◗ 'N' stāvoklis visvairāk piemērots normālai ādai.
◗ Starpstāvokļi ir piemēroti ādai,kuras tips ir
starp normālu un jutīgu.
Skūšanās
1 Lai ieslēgtu skuvekli, vienreiz piespiediet
ieslēgšanas/izslēgšanas taustiņu.
Ieslēdzot vai izslēdzot skuvekli, iedegas visas
LATVISKI
4222 002 48152 08-11-2006 14:32 Pagina 83
84
signāllampiņas un parādās visi simboli. Pēc tam
dažas sekundes tiek rādīta atlikušās akumulatoru
baterijas enerģijas līmenis.
C
2 Gan ar taisnām, gan apļveida kustībām ātri
virziet skuvekļa galviņas pa ādu.
- Vislabāk var noskūties, ja skuvekli lieto uz sausas
ādas.
- Var paiet divas vai trīs nedēļas, līdz āda pierod
pie Philips skūšanas sistēmas.
3 Lai izslēgtu skuvekli, vienreiz piespiediet
ieslēgšanas/izslēgšanas taustiņu.
C
4 Lai pasargātu skuvekli no bojājumiem, pēc
katras lietošanas reizes uzlieciet tam
aizsargvāciņu.
Trimera lietošana
Vaigubārdas un ūsu kopšanai.
C
1 Atveriet trimeru, pārbīdot pārslēgu lejup.
Trimers darbojas, kamēr skuveklis ir ieslēgts.
C
2 Aizveriet trimeru ar rādītājpirkstu.
LATVISKI
4222 002 48152 08-11-2006 14:32 Pagina 84
Tīrīšana un apkope
C
◗ Krāna simbols pēc katras skūšanās reizes sāk
mirgot, atgādinot, ka skuveklis jāiztīra
(izņemot, ja apakšējā signāllampiņa deg sarkanā
krāsā).
Regulāra tīrīšana nodrošina labāku skūšanas
kvalitāti.
◗ Ja komplektā iekļauta mazgāšanas ierīce,
izmantojiet to skuvekļa tīrīšanai. Sk. atsevišķo
lietošanas pamācību.
Parasti ierīci tīra, izskalojot skūšanas bloku un
matiņu nodalījumu ar karstu ūdeni ikreiz pēc
skuvekļa lietošanas.
Uzmanieties, lietojot karstu ūdeni. Lai
neapplaucētu rokas, vienmēr pārbaudiet, vai ūdens
nav pārāk karsts.
Katru dienu: skūšanas bloka un matu
nodalījuma tīrīšana
1 Izslēdziet skuvekli, izvelciet elektrostrāvas
pārveidotāja kontaktspraudni no
elektrotīkla sienas kontaktrozetes un
atvienojiet elektrovadu no skuvekļa.
C
2 Piespiediet atbrīvošanas taustiņu un
atveriet skūšanas bloku.
85LATVISKI
4222 002 48152 08-11-2006 14:32 Pagina 85
86
C
3 Lai iztīrītu skūšanas bloku un matu
nodalījumu, īsu brīdi skalojiet tos karstā,
tekošā ūdenī.
Raugieties, lai skūšanas bloka iekšpuse un matiņu
nodalījums tiktu rūpīgi iztīrīts.
C
4 Noskalojiet ierīces korpusu.
5 Aizveriet skūšanas bloku un nopuriniet
lieko ūdeni.
Nekad nesusiniet skūšanas bloku ar dvieli vai
salveti, jo tā var sabojāt skuvekļa galviņas.
C
6 Vēlreiz atveriet skūšanas bloku un atstājiet
to atvērtu, lai ierīce pilnīgi izžūtu.
Matu nodalījumu varat tīrīt arī bez ūdens ar
komplektā iekļauto birstīti.
Ik pēc sešiem mēnešiem: skuvekļa galviņu
tīrīšana
C
1 Atveriet skūšanas bloku, pagrieziet aizslēgu
pretēji pulksteņa rādītāju kustības
virzienam (1) un noņemiet saturētājrāmi
(2).
2 Notīriet asmenīšus un aizsargdetaļas ar
komplektā iekļauto birstīti.
Vienlaikus tīriet tikai vienu asmenīti un aizsargrežģi,
lai visi asmenīšu komplekti būtu saskaņoti. Nejauši
sajaucot detaļas, būs nepieciešamas dažas nedēļas,
lai atjaunotu ierīces nevainojamu darbību.
LATVISKI
4222 002 48152 08-11-2006 14:32 Pagina 86
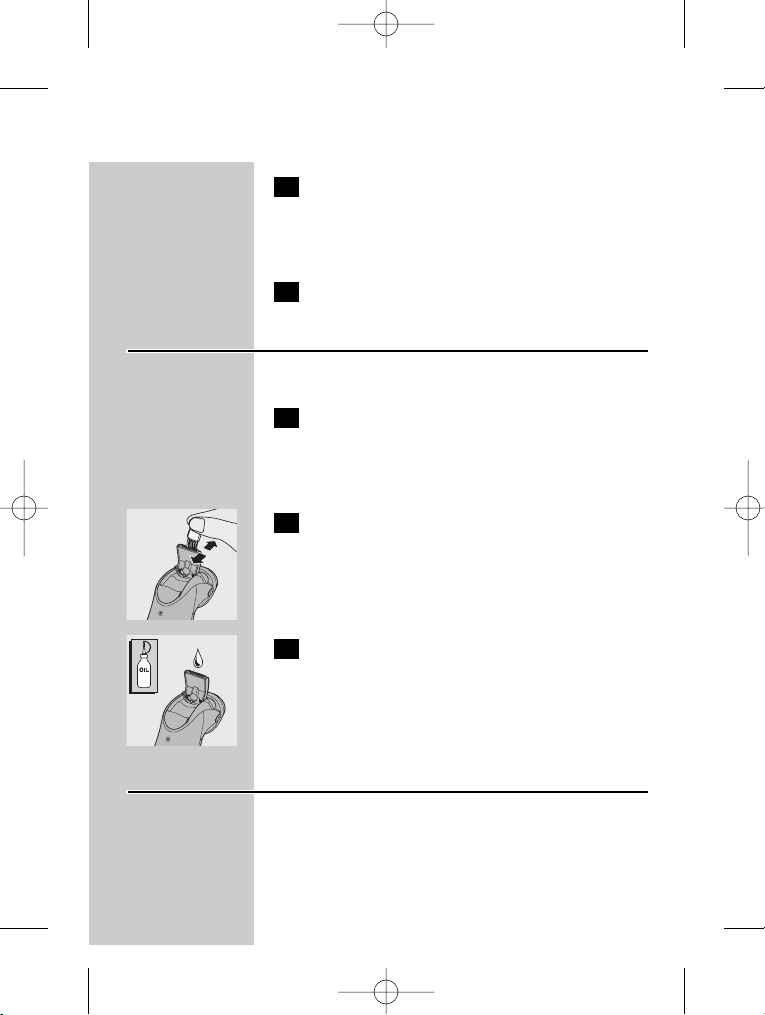
87
3 Ielieciet skuvekļa galviņas atpakaļ skūšanas
blokā. Ielieciet saturētājrāmi atpakaļ
skūšanas blokā un pagrieziet to pulksteņa
rādītāju kustības virzienā.
4 Aizveriet skūšanas bloku.
Trimers
Tīriet trimeru pēc katras lietošanas reizes.
1 Izslēdziet skuvekli, izvelciet elektrostrāvas
pārveidotāja kontaktspraudni no
elektrotīkla sienas kontaktrozetes un
atvienojiet elektrovadu no skuvekļa.
C
2 Tīriet trimeru ar komplektā iekļauto
birstīti.
C
3 Reizi sešos mēnešos ieeļļojiet trimera
zobiņus ar pilienu šujmašīnu eļļas.
Uzlādēšanas statīvs
Uzlādēšanas statīvu var tīrīt ar mitru drānu.
LATVISKI
4222 002 48152 08-11-2006 14:32 Pagina 87
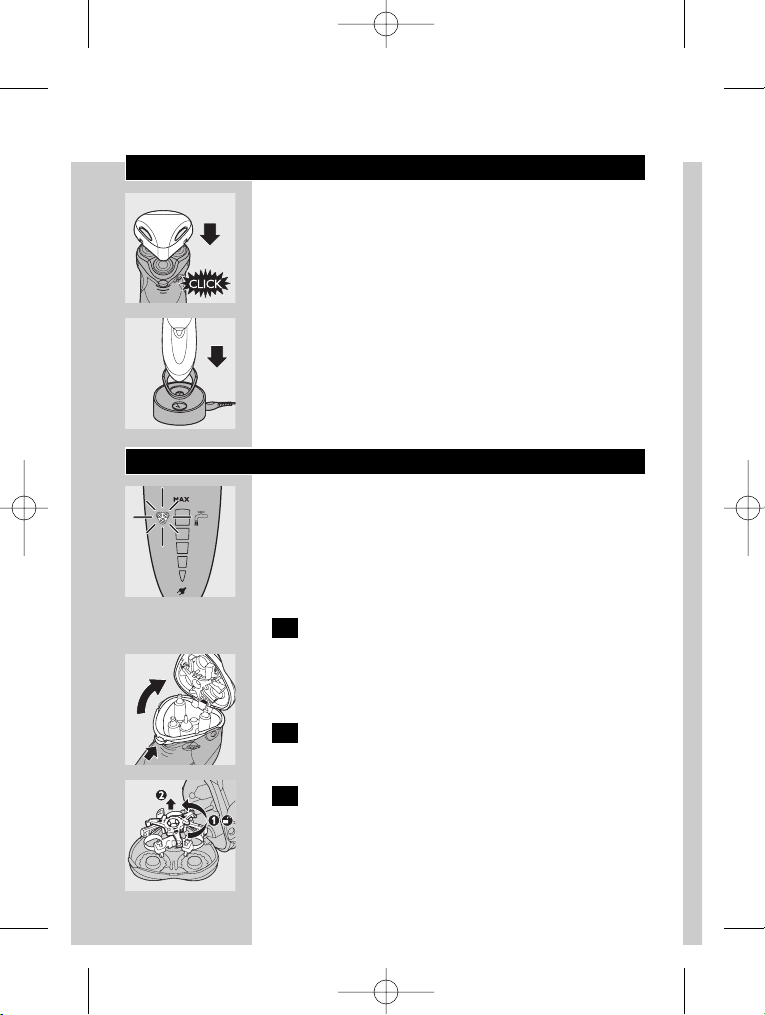
Uzglabāšana
C
◗ Lai pasargātu ierīci no bojājumiem, uzlieciet tai
aizsargvāciņu.
C
◗ Glabājiet ierīci pārvalkā vai novietojiet statīvā,
lai nožūst.
Nomaiņa
C
◗ Nomainiet skuvekļa galviņas, tiklīdz sāk mirgot
skūšanas bloka simbols.
Nomainiet bojātas vai nolietotas skuvekļa galviņas
tikai ar HQ9 Philips skuvekļa galviņām.
1 Izslēdziet skuvekli, izvelciet elektrostrāvas
pārveidotāja kontaktspraudni no
elektrotīkla sienas kontaktrozetes un
atvienojiet elektrovadu no skuvekļa.
C
2 Lai atvērtu skūšanas bloku, piespiediet
atbrīvošanas taustiņu.
C
3 Pagrieziet aizslēgu pretēji pulksteņa
rādītāju kustības virzienam (1) un izņemiet
saturētājrāmi (2).
88 LATVISKI
4222 002 48152 08-11-2006 14:32 Pagina 88
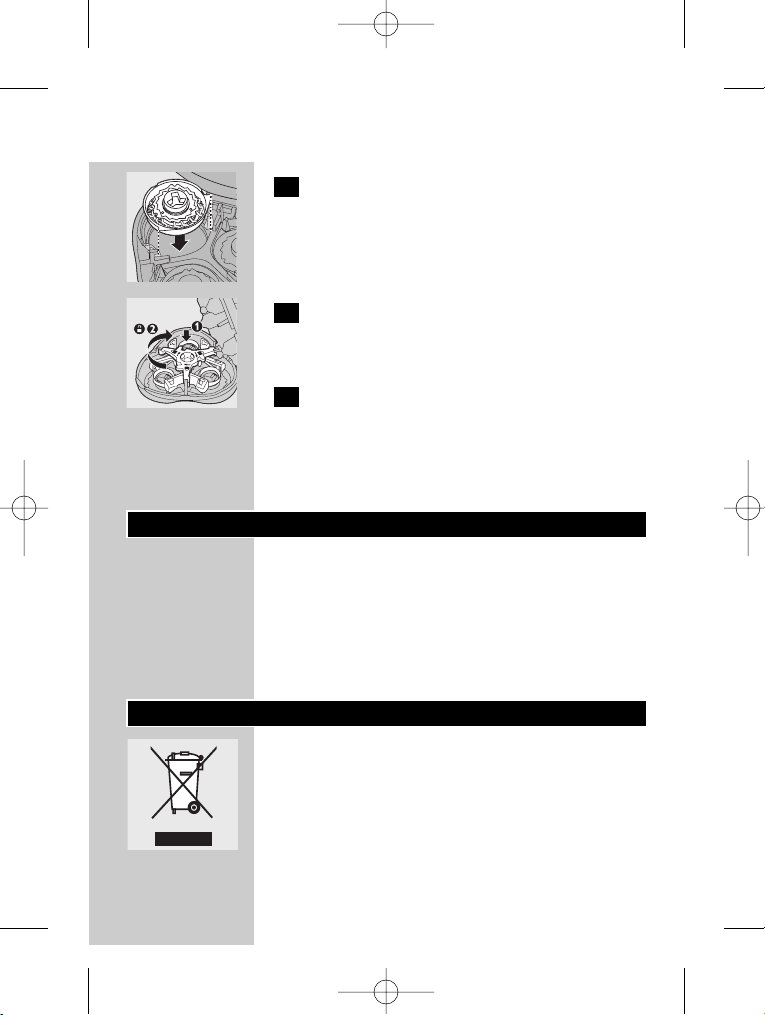
89
C
4 Izņemiet nolietotās skuvekļa galviņas un
ievietojiet skūšanas blokā jaunas.
Raugieties, lai skuvekļa galviņu izvirzījumi precīzi
iekļautos skūšanas bloka padziļinājumos.
C
5 Ielieciet saturētājrāmi atpakaļ skūšanas
blokā (1) un pagrieziet aizslēgu pulksteņa
rādītāju kustības virzienā (2).
6 Aizveriet skūšanas bloku.
◗ Skūšanas bloka simbols nodziest, ja sešas
sekundes tiek turēts piespiests
ieslēgšanas/izslēgšanas taustiņš.
Piederumi
Iespējams iegādāties šādus piederumus:
- HQ8500/HQ8000 kontaktspraudni;
- HQ9 Philips skuvekļa galviņas;
- HQ110 Philips Head Cleaner
(skuvekļa galviņu tīrīšanas aerosols).
- HQ8010 automašīnas elektrovadu.
Vides aizsardzība
C
◗ Neizmetiet ierīci kopā ar parastajiem
mājturības atkritumiem, bet nododiet oficiālā
atkārtotai pārstrādei paredzēto lietu
savākšanas vietā, tādējādi saudzējot apkārtējo
vidi.
◗ Uzlādēšanas statīvs
LATVISKI
4222 002 48152 08-11-2006 14:32 Pagina 89
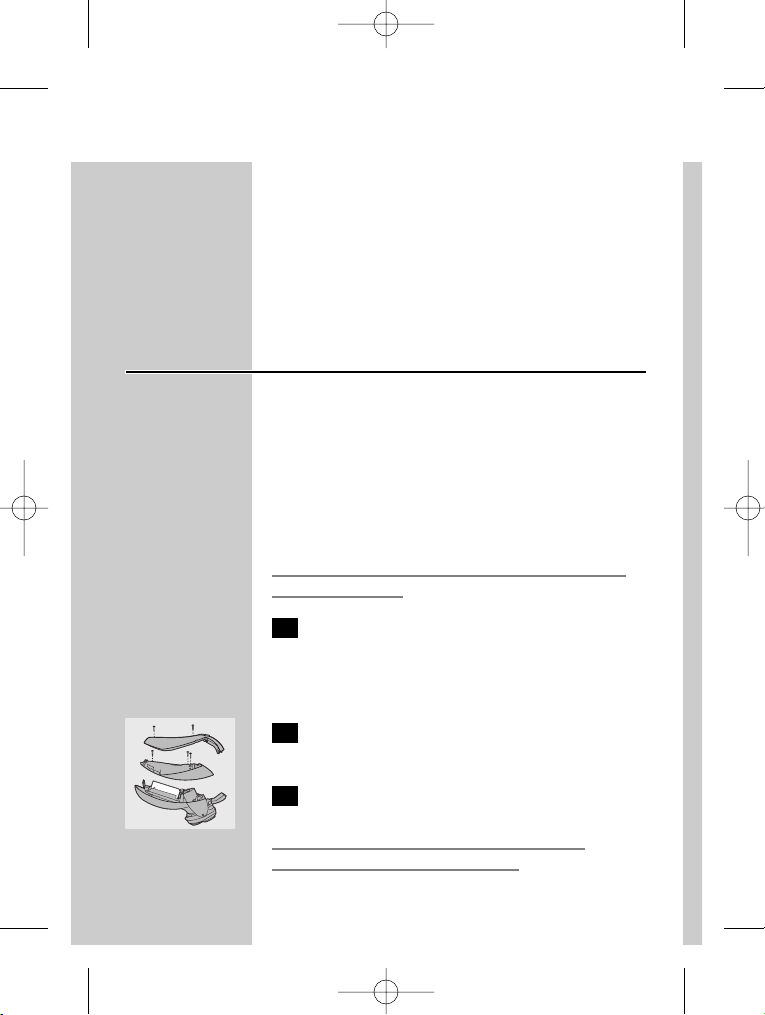
90
Neizmetiet akumulatoru bateriju kopā ar
parastajiem mājturības atkritumiem, bet nododiet
oficiālā savākšanas vietā.
◗ Skuveklis
Iebūvētā akumulatoru baterija satur vielas, kas var
piesārņot apkārtējo vidi.
Atbrīvošanās no akumulatoru baterijas
Atbrīvojoties no ierīces, izņemiet akumulatoru
bateriju. Neizmetiet akumulatoru bateriju kopā ar
parastiem mājturības atkritumiem, bet nododiet
to oficiālā savākšanas vietā. Ierīci varat arī aiznest
uz Philips pakalpojumu centru, kur akumulatoru
bateriju izņems un no tās atbrīvosies videi
nekaitīgā veidā.
Izņemiet akumulatoru bateriju tikai tad, kad tā ir
pilnīgi izlādējusies.
1 Izvelciet elektrostrāvas pārveidotāja
kontaktspraudni no elektrotīkla sienas
kontaktrozetes un atvienojiet elektrovadu
no skuvekļa.
C
2 Darbiniet skuvekli, līdz tas apstājas,
atskrūvējiet un atveriet skuvekļa korpusu.
3 Izņemiet akumulatoru bateriju.
Ja akumulatoru baterija ir izņemta, skuvekli
elektrotīklam vairs nepievienojiet.
LATVISKI
4222 002 48152 08-11-2006 14:32 Pagina 90
Garantija un apkope
Ja nepieciešama palīdzība vai informācija, lūdzu,
izmantojiet Philips tīmekļa vietni www.philips.com
vai sazinieties ar Philips pakalpojumu centru savā
valstī (tā tālruņa numurs atrodams pasaules
garantijas bukletā). Ja jūsu valstī nav Philips
pakalpojumu centra, lūdziet palīdzību Philips preču
izplatītājiem vai Philips Mājturības un personīgās
higiēnas ierīču nodaļas pakalpojumu dienestam.
Kļūmju novēršana
1 Nepietiekami gluda skūšana
B
Pirmais iemesls: skuvekļa galviņas ir netīras.
B
Skuveklis sen nav skalots, vai arī ūdens nav bijis
pietiekami karsts.
◗ Pirms turpināt skūšanos, rūpīgi notīriet
skuvekli. Sk. nodaļu "Tīrīšana un apkope".
B
Otrais iemesls: gari mati aizsprosto skuvekļa
galviņas.
◗ Notīriet asmenīšus un aizsargdetaļas ar
komplektā iekļauto birstīti. Sk. nodaļas
"Tīrīšana un apkope" apakšnodaļu "Ik pēc
sešiem mēnešiem: skuvekļa galviņu tīrīšana".
B
Trešais iemesls: skuvekļa galviņas ir bojātas vai
nolietotas.
◗ Nomainiet skuvekļa galviņas. Sk. nodaļu
"Nomaiņa".
91LATVISKI
4222 002 48152 08-11-2006 14:32 Pagina 91

92
2 Ieslēgšanas/izslēgšanas taustiņš ir
piespiests, bet skuveklis nedarbojas.
B
Pirmais iemesls: akumulatoru baterija ir
izlādējusies.
◗ Uzlādējiet akumulatoru bateriju. Sk. nodaļu
„Uzlādēšana".
B
Otrais iemesls: ierīce nav pievienota elektrīklam.
◗ Iespraudiet elektrostrāvas pārveidotāja
kontaktspraudni elektrotīkla sienas
kontaktrozetē.
C
3 Skūšanas bloks ir atdalījies no skuvekļa.
B
Iemesls: skūšanas bloks nav pareizi uzlikts.
◗ Ja skūšanas bloks atdalās no skuvekļa, to var
vienkārši vēlreiz pievienot (atskan klikšķis).
LATVISKI
4222 002 48152 08-11-2006 14:32 Pagina 92

Svarbu žinoti
Prieš paradėdami naudoti aparatą, atidžiai
perskaitykite šias naudojimo instrukcijas ir
saugokite jas tolimesniam naudojimui.
◗ Naudokite tik rinkinyje esantį laidą.
◗ Kištukas transformuoja 100-240 voltų srovę į
saugią žemesnę nei 24 voltų srovę.
◗ Maitinimo laide yra transformatorius. Niekada
nepjaukite maitinimo laido, norėdami jį
pakeisti nauju, nes galite sukelti pavojingą
situaciją.
◗ Nenaudokite pažeisto laido.
◗ Jei laidas yra pažeistas, norint išvengti
pavojaus,visada pakeiskite jį tik originaliu laidu.
◗ Patikrinkite, ar laidas nesudrėkęs.
◗ Kraukite ir laikykite aparatą temperatūroje
tarp 5cC ir 35cC.
C
◗ Niekada nemerkite pakrovimo stovo į vandenį
ir neskalaukite po tekančiu vandeniu.
◗ Neperkrovinėkite skustuvo uždarame
krepšelyje.
◗ Prieš plaunant skustuvą po tekančiu vandeniu,
visada išjunkite jį iš tinklo.
C
◗ Aparatas atitinka tarptautinius IEC saugumo
reikalavimus ir jį galima saugiai valyti po
tekančiu vandeniu.
Būkite atsargūs su karštu vandeniu.Visada
patikrinkite, ar vanduo nėra per karštas, kad
nenusidegintumėte rankų.
◗ Triukšmingumo lygis: Lc = 64 dB [A]
LIETUVIŠKAI 93
4222 002 48152 08-11-2006 14:32 Pagina 93

Pakrovimas
Prieš pradėdami krauti aparatą, patikrinkite, ar jis
yra išjungtas.
Įprastinis pakrovimas trunka apie vieną valandą.
Galite skustis ir nepakrovę aparato, įjungdami jį į
elektros tinklą.
Pakrovimo nurodymai
Pakrovimas
C
◗ Kai pradedate įkrauti išsikrovusią barzdaskutę,
apačioje įsižiebia raudona lemputė. Kai
elemente yra pakankamai energijos vienam
skutimuisi, visos lemputės ims paeiliui mirgėti
žalia šviesa.
Pilnai pakrauta baterija
C
◗ Kai elementas pilnai įkrautas, įsižiebs visos
žalios lemputės.
Praėjus keletui valandų po krovimo, visos
lemputės išsijungs.
Likusi elemento talpa
C
◗ Degančių lempučių skaičius parodo likusį
energijos kiekį elemente.
94 LIETUVIŠKAI
4222 002 48152 08-11-2006 14:32 Pagina 94

95
Likusia elemento energiją galite pamatyti įjungę
arba išjungę barzdaskutę, taip pat kai išjungiate
aparatą iš maitinimo tinklo.
- Kai visos lemputės įsižiebs žaliai, tai reikš, jog
elementas yra įkrautas 100%.
- Kai apačioje esanti lemputė įsižiebs žaliai, yra likę
tik 20% elemento talpos.
Baterija senka
C
◗ Kai elementas senka, apačioje įsižiebia
raudona lemputė.
Kai išjungsite barzdaskutę, ši lemputė sumirksės
keletą kartų.
Skutimasis be laido
Kai barzdaskutės elementas yra pilnai įkrautas,
galite skustis iki 80 minučių.
Aparato pakrovimas
C
1 Įstatykite aparato kištuką į barzdaskutę.
2 Įjunkite laidą į elektros tinklą.
3 Kai baterija pilnai pasikraus, išjunkite
aparatą iš elektros lizdo ir ištraukite
aparato kyštuką iš skustuvo.
LIETUVIŠKAI
4222 002 48152 08-11-2006 14:32 Pagina 95

96
Pakrovimo stovas
Jūs taip pat galite krauti aparatą, pastatę jį į
pakrovimo stovą (jei jis yra rinkinyje).
Niekada nemerkite pakrovimo stovo į vandenį ir
neskalaukite po tekančiu vandeniu.
C
◗ Įstatykite barzdaskutę tinkamai į pakrovimo
stovą, kuris yra įjungtas į maitinimo tinklą.
Apačioje įsižiebs raudona lemputė.
C
◗ Barzdaskutę išimkite iš stovo nepakreipę jos.
Laikrodžio įdėjimas ir išėmimas
C
1 Pasukite laikrodį prieš laikrodžio rodyklę
(1) (pasigirs spragtelėjimas) ir ištraukite jį
(2).
C
2 Įstatykite laikrodį (1) ir pasukite jį pagal
laikrodžio rodyklę (2) (pasigirs
spragtelėjimas).
LIETUVIŠKAI
4222 002 48152 08-11-2006 14:32 Pagina 96

97
Laiko nustatymas
C
◗ Laiką galite nustatyti, paspaudę laikrodžio
nugaroje esantį mygtuką.
Laiką galima nustatyti tik į priekį.
Elemento pakeitimas
C
1 Nuimkite dangtį, tada mažu atsuktuvu
išimkite elementą iš aparato.
C
2 Įdėkite naują elementą ir uždarykite dangtį.
Aparato naudojimas
Personal Comfort Control (personalinio
komforto kontroliavimo sistema)
C
◗ Personal Comfort Control (personalinio
komforto kontroliavimo sistema) pritaiko
skustuvą jūsų odos tipui.
- Galite nustatyti barzdaskutę į "Normal" padėtį
greitam, patogiam ir švariam skutimuisi.
- Galite nustatyti barzdaskutę į "Sensitive" padėtį
patogiam ir švariam skutimuisi, suteikiančiam
maksimalų komfortą odai.
LIETUVIŠKAI
4222 002 48152 08-11-2006 14:32 Pagina 97
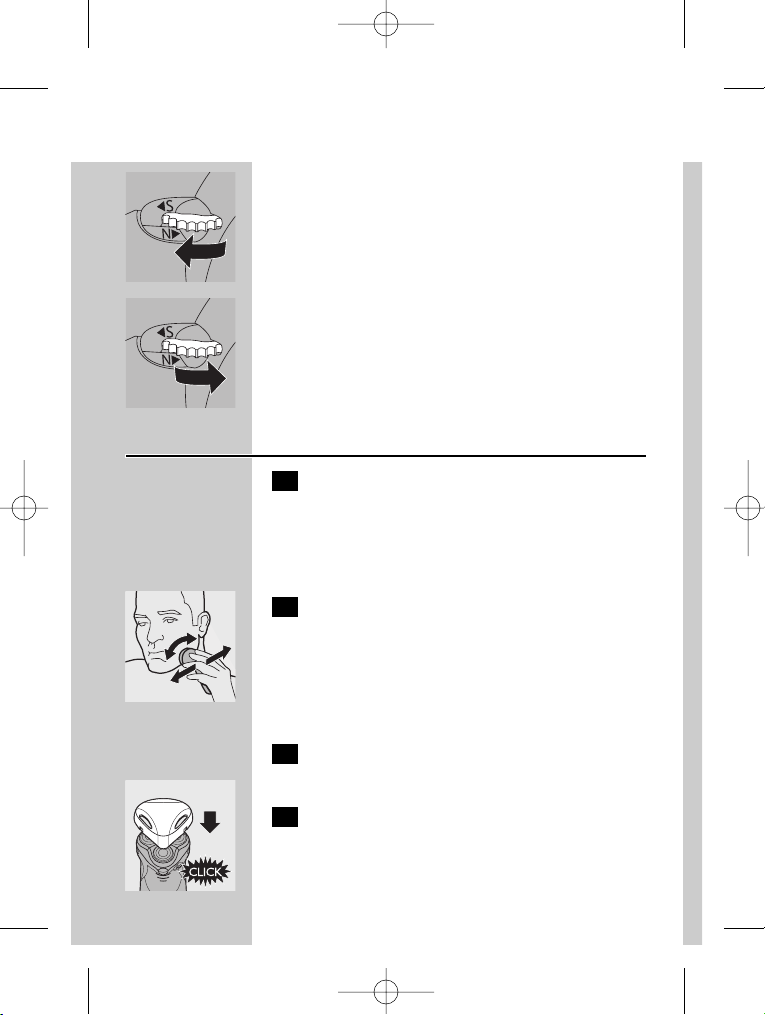
98
C
◗ "S" pozicija geriausiai tinkama jautriai odai.
C
◗ "N" pozicija geriausiai tinkama normaliai odai.
◗ Tarpinė padėtis tinka odai, kuri yra tarpinė
tarp jautrios ir normalios.
Skutimasis
1 Įjunkite barzdaskutę, vieną kartą
paspausdami jungiklį.
Kai įjungiate arba išjungiate barzdaskutę, visos
lemputės bei simboliai įsižiebia ir kelias sekundėms
galite matyti likusią elemento energiją.
C
2 Skutimo galvutėmis braukite per odą
tiesiais ir apvaliais judesiais.
- Skuskite sausą veidą.Taip pasieksite geriausių
rezultatų.
- Jūsų odai gali prireikti 2 - 3 savaičių tam, kad
priprastų prie "Philips" sistemos.
3 Išjunkite barzdaskutę, paspausdami
išjungimo/įjungimo mygtuką dar kartą.
C
4 Kad nepažeistumėte barzdaskutės,
kiekvieną kartą ant jos uždėkite apsauginį
gaubtelį.
LIETUVIŠKAI
4222 002 48152 08-11-2006 14:32 Pagina 98
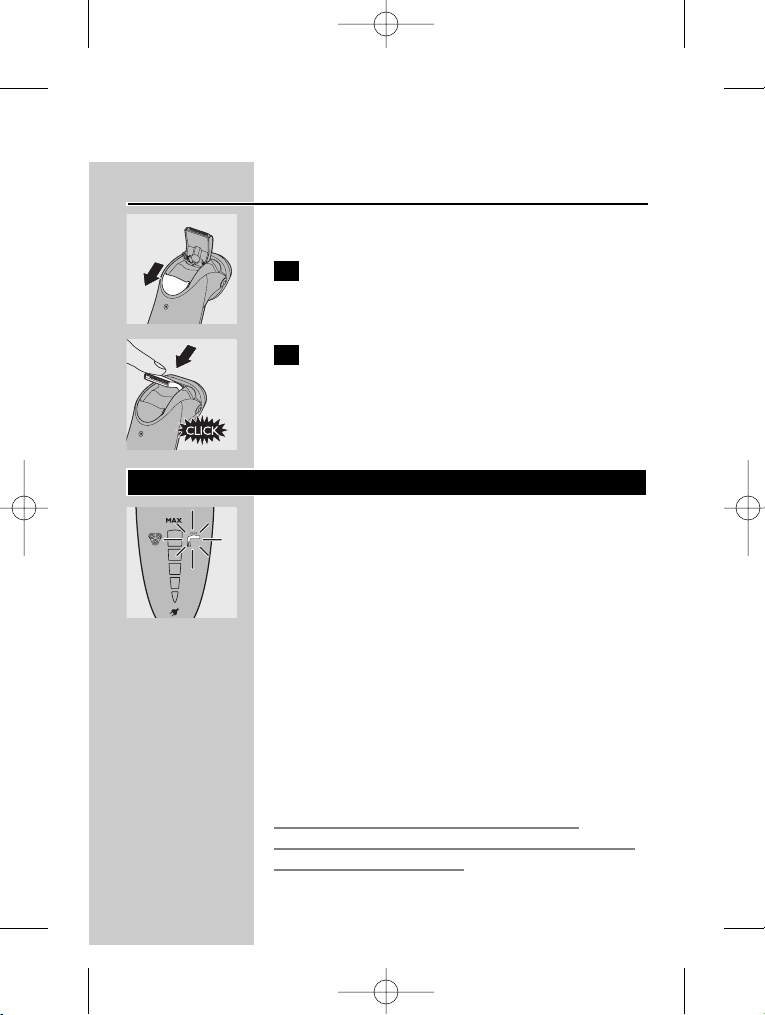
99
Korektorius
Išpuoselėtoms žandenoms ir ūsams.
C
1 Atidarykite korektorių, pastūmę šliaužiklį
žemyn.
Varikliui veikiant korektorius gali įsijungti.
C
2 Smiliumi uždarykite korektorių.
Valymas ir priežiūra
C
◗ Vandens čiaupo simbolis ims mirksėti po
kiekvieno skutimosi, primindamas jums, jog
barzdaskutę reikia išvalyti (šis simbolis
neįsižiebs, kai apačioje dega raudona lemputė).
Reguliarus valymas užtikrina geresnį skutimą.
◗ Barzdaskutę plaukite plovimo mašina, jei ji yra
rinkinyje. Daugiau informacijos rasite
atskirame instrukcijų lankstinuke.
Kaskart pasinaudoję barzdaskute, skutimo galvutę
ir plaukų kamerą skalaukite karštu vandeniu.
Būkite atsargūs su karštu vandeniu.Visada
patikrinkite, ar vanduo nėra per daug karštas, kad
nenusidegintumėte rankų.
LIETUVIŠKAI
4222 002 48152 08-11-2006 14:32 Pagina 99

100
Kasdien: skutimo įtaisas ir plaukų skyrelis
1 Išjunkite barzdaskutę, išjunkite laidą iš
elektros lizdo ir ištraukite laidą iš aparato.
C
2 Norėdami atidaryti skutimo įtaisą,
paspauskite atjungimo mygtuką.
C
3 Skutimo įtaisą ir plaukų skyrelį išvalykite,
praskalaudami juos po karštu vandeniu.
Įsitikinkite, kad skutimo įtaiso vidus ir plaukų
skyrelis yra tinkamai išvalyti.
C
4 Aparato išorę nuplaukite.
5 Uždarykite skutimo įtaisą ir išpurtykite
likusį vandenį.
Niekada nevalykite skutimo įtaiso rankšluoščiu ar
audiniu, nes tai gali pakenkti skutimo galvutei.
C
6 Atidarykite skutimo įtaisą ir palikite jį
atvirą, kol aparatas pilnai išdžius.
Plaukų skyrelį galite išvalyti ir be vandens,
naudodami rinkinyje esantį šepetėlį.
Kas šeši mėnesiai: skutimo galvutės
C
1 Atidarykite skutimo įtaisą, pasukite užraktą
prieš laikrodžio rodyklę (1) ir nuimkite
laikantį rėmą (2).
LIETUVIŠKAI
4222 002 48152 08-11-2006 14:32 Pagina 100
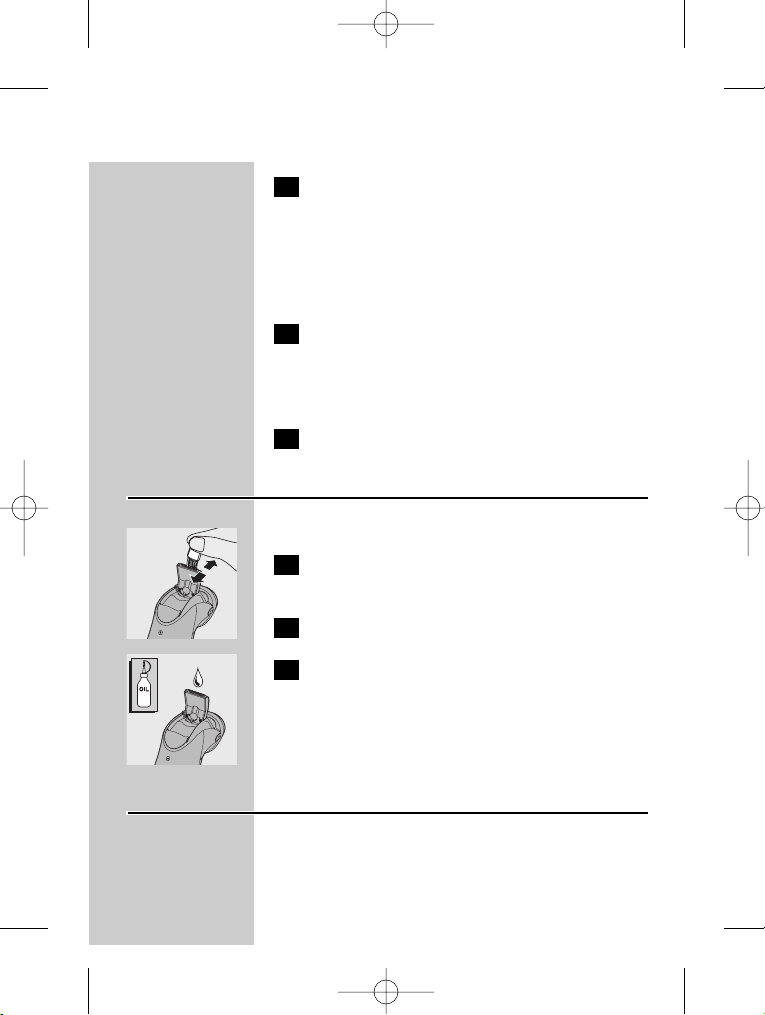
101
2 Rinkinyje esančiu šepetėliu išvalykite
skutančią ir apsauginę galvutes.
Vienu metu nevalykite daugiau nei vieną skutančią
ir apsauginę galvutes, kadangi jos visos sudaro
poras. Jei netyčia sumaišote galvutes, gali prireikti
kelių savaičių, kol aparatas vėl skus optimaliai.
3 Skutimo galvutes uždėkite atgal ant
skutimo įtaiso.Ant skutimo įtaiso uždėkite
laikantįjį rėmą ir pasukite jį pagal laikrodžio
rodyklę.
4 Uždarykite skutimo įtaisą.
Korektorius
Valykite korektorių po kiekvieno panaudojimo
1 Išjunkite barzdaskutę, išjunkite laidą iš
elektros lizdo ir ištraukite laidą iš aparato.
C
2 Valykite korektorių tam skirtu šepetėliu.
C
3 Kas šeši mėnesiai sutepkite skustuvo
dantelius lašu mašininės alyvos.
Pakrovimo stovas
Pakrovimo stovą galite išvalyti drėgna skepetaite.
LIETUVIŠKAI
4222 002 48152 08-11-2006 14:32 Pagina 101
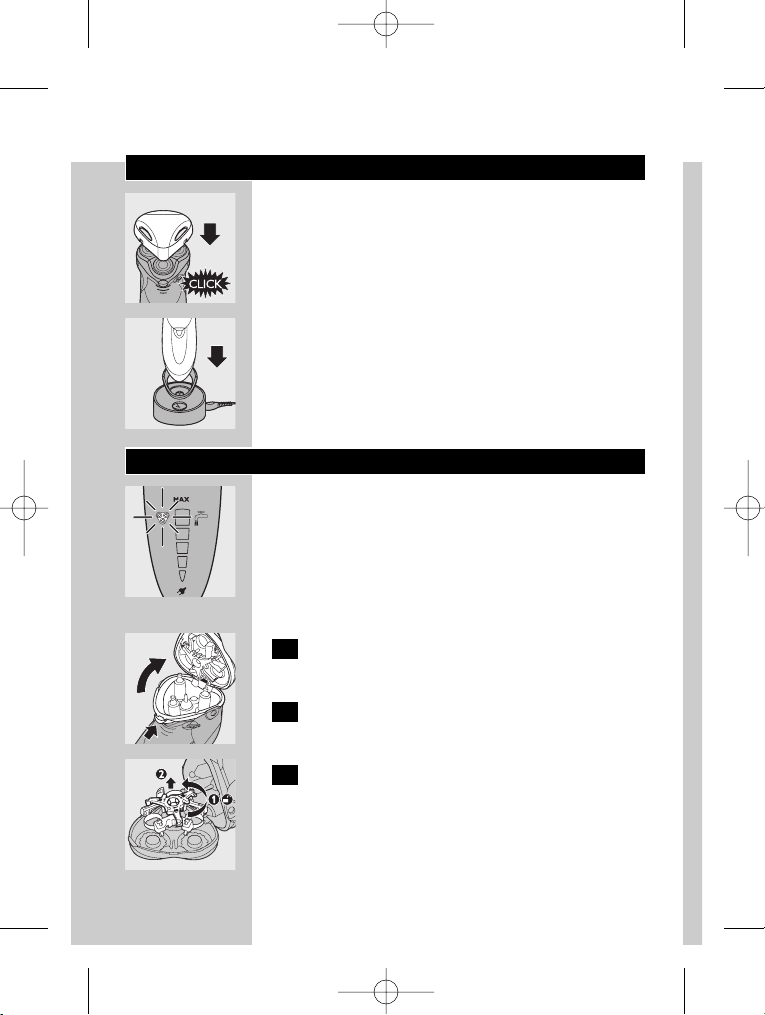
Saugojimas
C
◗ Vengdami pažeidimų ant barzdaskutės
uždėkite apsauginį gaubtelį.
C
◗ Aparatą laikykite prabangiame krepšelyje arba
padėkite sausoje vietoje.
Pakeitimas
C
◗ Skutimo galvutę pakeiskite iškart, kai ims
blyksėti skutimo įtaiso simbolis.
Sugadintas arba susidėvėjusias skutimo galvutes
pakeiskite tik originaliomis HQ9 Philips skutimo
galvutėmis.
1 Išjunkite barzdaskutę, išjunkite laidą iš
elektros lizdo ir ištraukite laidą iš aparato.
C
2 Paspauskite atjungimo mygtuką ir
atidarykite skutimo įtaisą.
C
3 Pasukite užraktą prieš laikrodžio rodyklę
(1) ir nuimkite laikantį rėmą (2).
102 LIETUVIŠKAI
4222 002 48152 08-11-2006 14:32 Pagina 102
 Loading...