

Page 1
Software Reference Guide
HP Digital Entertainment Center
Page 2

Page 3

Microsoft Windows XP
Media Center Edition 2005
Reference Guide
Page 4

The only warranties for HP products and services are set forth in the
express warranty statements accompanying such products and services.
Nothing herein should be construed as constituting an additional
warranty. HP shall not be liable for technical or editorial errors or
omissions contained herein.
HP assumes no responsibility for the use or reliability of its software on
equipment that is not furnished by HP.
This document contains proprietary information that is protected by
copyright. No part of this document may be photocopied, reproduced,
or translated to another language without the prior written consent
of HP.
Hewlett-Packard Company
P.O. Box 4010
Cupertino, CA 95015-4010
USA
© 2002, 2003, 2004 Hewlett-Packard Development Company, L.P.
This product incorporates copyright protection technology that is
protected by method claims of certain U.S. patents and other intellectual
property rights owned by Macrovision Corporation and other rights
owners. Use of this copyright protection technology must be authorized
by Macrovision Corporation, and is intended for home and other limited
viewing uses only unless otherwise authorized by Macrovision
Corporation. Reverse engineering or disassembly is prohibited.
Apparatus Claims of U.S. Patent Nos. 4,631,603, 4,577,216,
4,819,098, and 4,907,093 licensed for limited viewing uses only.
HP supports lawful use of technology and does not endorse or
encourage the use of our products for purposes other than those
permitted by copyright law.
Intel, Pentium, Intel Inside, and the Intel Inside logo are trademarks
or registered trademarks of Intel Corporation or its subsidiaries in
the United States and other countries/regions. Microsoft, the Microsoft
logo, Windows, and Windows XP are U.S. registered trademarks of
Microsoft Corporation.
The information in this document is subject to change
without notice.
Page 5

Table of Contents
Welcome...........................................1
Experience the Entertainment Fun ............................. 1
Watch and record live TV.................................. 1
The right music for the moment ........................... 1
Share your digital memories .............................. 2
Transform your living space into a theater............ 2
Using Media Center Features...................................2
Using Media Center...........................5
Setting Up Media Center.........................................5
Completing the setup wizard steps...................... 5
Getting the Most out of Media Center ....................... 6
Opening Media Center ..................................... 7
Media Center Start Menu ........................................ 8
Using Online Spotlight ............................................ 9
Using More Programs in Media Center ..................... 9
Navigating Media Center................................ 10
Closing Media Center........................................... 10
Synchronizing Media to a Portable
Media Device ..................................................11
Viewing files on a portable media device .......... 11
Using Media Center Help...................................... 12
Opening Media Center Help............................ 12
Media Center menu bars and control menu .......13
Using Instant Messaging in Media Center................ 14
Logging in to your messenger account............... 14
Changing Media Center Settings............................ 15
Media Center settings categories...................... 15
Changing audio, video, display resolution,
and other settings ........................................... 16
Changing the display resolution .......................17
Contacting HP Support in Media Center.................. 17
Finding Additional Media Center Information........... 18
Using the Remote Control ............... 19
Remote Control Buttons Overview ........................... 20
Begin using your remote control........................ 22
Remote Control Buttons..........................................23
Shortcut buttons .............................................. 23
Standby button ...............................................24
Recording in standby mode..............................25
Remote control LED and the remote
sensor LED .....................................................25
Media playback buttons ..................................26
Navigation and other buttons ...........................28
Alphanumeric Keypad and Print buttons ............29
Watching and Recording
TV Programs .................................. 31
Navigating My TV ................................................ 31
Watching TV........................................................32
Watching Live TV............................................33
Controlling TV playback ..................................34
Using the remote control in My TV ....................35
Using the Television Program Guide........................36
Important information about the
Television Program Guide ................................36
Viewing the Television Program Guide ..............37
Setting up how Media Center downloads
the Guide ......................................................38
Manually downloading the Guide.....................39
Changing a postal code to receive the
correct Television Guide ..................................39
Adding missing channels to the Guide............... 40
Removing channels from the Guide ...................40
Searching for TV Programs ....................................41
Searching for TV programs using categories ......42
Table of Contents
Table of Contents iii
Page 6

Recording TV Programs ......................................... 43
Recording TV from the Guide ........................... 44
Recording manually ........................................ 44
Recording TV without the Television
Program Guide .............................................. 45
Record by using the Record button.................... 45
Recording TV from Search ............................... 46
The Record icon in the taskbar .........................47
Recording TV tips ........................................... 47
Important information about My TV
and FM radio................................................. 47
Standby mode and scheduled recordings .......... 48
Recording quality and hard disk drive
storage space ................................................48
Copying recorded TV programs to
DVD or CD .................................................... 49
Playing Recorded TV Programs............................... 50
Using the More Information button
with recorded TV programs............................. 50
Playing a recorded program on a
non-HP Digital Entertainment Center.................. 51
Locating recorded TV programs on your
hard disk drive ............................................... 52
Viewing recording errors ................................. 52
About Recording Errors ......................................... 53
Common recording errors................................ 53
Resolving Recording Conflicts ................................ 54
Recording priority rules ...................................54
Resolving a recording conflict .......................... 55
Deleting TV Programs............................................ 55
Deleting a scheduled program or series............. 55
Deleting a recorded program or series .............. 56
Setting Parental Controls ....................................... 56
Blocking unwanted TV programs
and movies.................................................... 56
Setting movie/DVD ratings .............................. 57
Changing parental control access code............. 57
Setting Caption Display................................... 58
Displaying Teletext.......................................... 58
Safeguarding Recorded TV Programs ......................59
Important information about recorded
TV programs .................................................. 59
Preparing the code key files .............................60
Making the backup CD ...................................62
Using the code key backup CD after a
system recovery ..............................................62
Using Two TV Tuner Cards..................................... 63
Recording two programs at the same time..........63
Watching live TV and recording a
different channel at the same time..................... 64
Managing Hard Disk Drive Space ..........................64
Increasing hard disk drive space ......................65
Adjusting TV recording and storage settings.......65
Using the Disk Cleanup utility ...........................66
Adjusting System Restore settings ......................66
Deleting recorded TV programs ........................67
Uninstalling software programs that are
not needed ....................................................67
Content Protection Update .....................................68
Playing Music Files..........................69
HP Tunes .............................................................69
My Music ............................................................70
Using HP Tunes with Media Center .........................70
Adding Music to the iTunes Library .........................71
Adding music files from a CD in iTunes..............71
Adding music files from a CD in HP Tunes .........72
Adding music files from the Internet...................72
Adding music files from your hard disk drive...... 73
Using supported music file types .......................73
Changing song name, genre, artist, or
album in iTunes ..............................................74
Playing CDs with HP Tunes ....................................74
Creating a Playlist with iTunes ................................75
Creating and Editing a New Playlist
with HP Tunes...................................................76
Creating Music CDs with iTunes .............................77
iv Microsoft Windows XP Media Center Edition 2005 Reference Guide
Page 7

Using My Music with Media Center........................ 78
Adding Music to My Music Library ......................... 79
Adding music files from your
hard disk drive ............................................... 79
Adding music files from a CD........................... 80
Deleting music files from the
My Music library ............................................81
Using supported music file types.......................81
Playing Music Files in My Music............................. 82
Playing an album in My Music ......................... 83
Playing a song in My Music............................. 83
Creating a Queue List in My Music......................... 84
Finding and Playing an Album in My Music............. 84
Creating a Playlist in My Music .............................. 85
Copying Music Files to CD in My Music .................. 86
Deleting music files from the
My Music library ............................................87
Editing song and album information.................. 87
Selecting a Visualization.................................. 87
Working with Pictures.....................89
HP Image Zone Plus.............................................. 89
My Pictures.......................................................... 90
Working with Digital Images.................................. 90
Using HP Image Zone Plus in Media Center............. 91
Organizing Pictures in HP Image Zone Plus .............91
Creating your picture catalog in
HP Image Zone Plus ........................................ 92
Creating albums ............................................. 94
Modifying a date assigned to your pictures........ 94
Assigning a keyword to your pictures................ 95
Assigning a place to your pictures .................... 95
Searching for pictures in
HP Image Zone Plus ........................................ 96
Viewing Pictures in HP Image Zone Plus ..................97
Viewing a slide show in
HP Image Zone Plus ........................................97
Viewing a slide show with music in
HP Image Zone Plus ........................................97
Changing view and slide-show options..............98
Editing Pictures in HP Image Zone Plus ....................98
Updating edited picture files in
Media Center.................................................98
Using supported picture file types with
HP Image Zone Plus ........................................99
Printing Pictures in HP Image Zone Plus .................100
Using My Pictures in Media Center .......................101
Organizing Pictures in My Pictures........................102
Adding Pictures to My Pictures .............................103
Adding picture files from your
hard disk drive .............................................103
Viewing Pictures in My Pictures.............................104
Viewing pictures as a slide show ....................105
Viewing a slide show with music in
My Pictures ..................................................105
Zooming into and panning across
your pictures ................................................105
Sorting pictures.............................................106
Changing picture settings...............................106
Turning photo captions on or off .....................107
Using supported picture file types in
My Pictures ..................................................107
Editing Pictures in My Pictures ..............................108
Fixing red eye or contrast ..............................108
Cropping pictures in My Pictures ....................108
Rotating pictures ...........................................109
Printing Pictures in My Pictures .............................110
Setting up your printer ...................................110
Copying Pictures to CDs and DVDs.......................111
Using the Desktop for Some Picture Tasks ..............111
Table of Contents
Table of Contents v
Page 8

Playing Videos ............................. 113
Playing Digital Videos in Media Center................. 114
Using Supported Video File Types ........................115
Transferring and Recording Video Files ................. 115
Creating a CD/DVD from Video Files ...................116
Organizing Videos ............................................. 117
Playing a Video Stored on
Removable Media ..........................................118
Changing the Display for Better
Image Quality ................................................ 118
Creating a Desktop Background from
a Video File ................................................... 119
Adding Digital Videos to My Videos ..................... 119
Using the More Information Button
with My Videos .............................................. 121
Playing DVDs ............................... 123
Playing DVD Movies in Media Center ................... 123
Changing the DVD Movie Language..................... 124
Changing DVD Audio Settings ............................. 124
About playing DVDs .....................................125
Stopping a DVD movie.................................. 125
Watching DVD in the inset window or
in a resized window ..................................... 125
Playing a DVD movie already in
your drive.................................................... 126
Programming Remote Control Buttons for DVD ....... 126
Listening to FM Radio ................... 127
Playing FM Radio Stations ................................... 128
Organizing Pre-set Radio Stations......................... 129
Using the FM Radio and the TV Signal
at the Same Time............................................ 129
Recording TV Programs.................131
Copying Recorded TV Programs to DVD................131
Copying a TV program to CD/DVD
using Media Center ......................................131
Copy a recorded TV program to a DVD
with other programs ......................................132
Watching Recorded TV Programs on DVD .............132
Digital Media Copy Protection .............................133
Copy protection for DVD movies.....................134
CGMS*....................................................... 134
Macrovision .................................................134
Using Double-Layer Technology and Media ...........135
Playing CDs and DVDs ..................137
Playing Music CDs with iTunes ............................. 137
Setting Media Center as the automatic
CD or DVD player.........................................138
Playing DVD Movies with
InterVideo WinDVD ........................................139
Using country/region codes...........................140
Playing Video CDs (VCD) with
InterVideo WinDVD ........................................141
Creating (Burning) CDs
and DVDs .....................................143
Creating (Burning) CDs and DVDs with
RecordNow! ..................................................143
Creating music CDs with RecordNow!.............144
Creating CDs to play in your car or home
CD players...................................................144
Creating CDs to play on your HP Digital
Entertainment Center .....................................145
Creating a music CD.....................................146
vi Microsoft Windows XP Media Center Edition 2005 Reference Guide
Page 9

Storing Files on a DVD or CD............................... 146
Storing data files on disc ............................... 148
Copying a DVD or CD ........................................ 148
Erasing a DVD or CD.......................................... 149
Removing Files in RecordNow!............................. 149
Removing Files from a Recorded
Data Disc .................................................... 150
Creating an Image File.................................. 150
Saving an Image .......................................... 150
Burning an Image ......................................... 151
Archiving Files on a CD or DVD ........................... 151
Recording Video Files .........................................152
Using Disc Labels ...............................................152
Using Compatibility Information ...........................153
Identifying Disc Feature and Compatibility............. 154
Using the Optical Drive Quick
Reference Table.............................................. 156
Using the Software Quick Reference Table............. 157
Importing, Editing, and
Burning Videos .............................161
Using InterVideo WinDVD Creator ....................... 161
Getting Started with WinDVD Creator................... 162
Using the Preview window in
WinDVD Creator.......................................... 162
Using the Media Library in
WinDVD Creator.......................................... 162
Using the Storyboard in WinDVD Creator........ 163
Identifying Requirements for Capturing Video
with WinDVD Creator ..................................... 163
Capturing Digital Camcorder Video with
WinDVD Creator............................................ 164
Capturing Analog Video with
WinDVD Creator............................................ 164
Capturing a Still Image .......................................165
Editing Video Files with WinDVD Creator ..............165
Adding images with WinDVD Creator.............166
Adding audio effects with
WinDVD Creator ..........................................167
Adding transition effects with
WinDVD Creator ..........................................167
Adding title effects with WinDVD Creator ........167
Adding video filters with WinDVD Creator.......168
Authoring Your DVD with WinDVD Creator ...........168
Making a movie with WinDVD Creator ...........169
Recording VHS Files Direct to DVD with
WinDVD Creator ............................................170
Converting Recorded TV to VCD or
DVD Format ...................................................170
Using muvee autoProducer unPlugged................... 171
Getting Started with muvee autoProducer...............171
Adding Videos to Your Movie with
muvee autoProducer........................................172
Adding Pictures to Your Movie with
muvee autoProducer........................................173
Adding Music to Your Movie with
muvee autoProducer........................................173
Setting the Style in muvee autoProducer.................174
Changing the Settings in muvee autoProducer ........174
Making the Movie with muvee autoProducer ..........175
Recording muvee autoProducer Movie to Disc
with WinDVD Creator .....................................176
Using an HP Personal
Media Drive ................................. 177
Setting Up the HP Personal Media Drive to
Work with Media Center .................................178
Locating the Drive After Installation .......................178
Assigning a Drive Letter to the
HP Personal Media Drive.................................179
Table of Contents
Table o f C on te nts vii
Page 10

Viewing and Storing Files.................................... 179
Playing Media Files ............................................ 180
Playing Music Files ............................................. 180
Viewing Picture Files ........................................... 180
Playing Video Files ............................................. 181
Watching TV Programs Stored on the
HP Personal Media Drive................................. 181
About Recording TV to the
HP Personal Media Drive................................. 182
Recording TV programs to the
HP Personal Media Drive............................... 183
Changing the TV recording path to the
HP Personal Media Drive............................... 183
Changing the TV recording path to the
local hard disk drive ..................................... 184
Disconnecting the HP Personal Media
Drive Safely ................................................... 184
Changing Disk Allocation.................................... 185
Updating Recorded TV List after Removing
the HP Personal Media Drive............................ 185
System Requirements to View Recorded
TV Programs on Other PCs...............................186
Troubleshooting ............................187
Troubleshooting Problems and
Finding Solutions ............................................187
Hardware and Operating System ......................... 188
Music................................................................190
Television, Guide, Recording TV...........................192
Video/DVD: Video or Display
Problems or Errors...........................................196
Pictures..............................................................198
Burning CDs or DVDs.......................................... 198
Index............................................199
viii Microsoft Windows XP Media Center Edition 2005 Reference Guide
Page 11
Welcome
Experience the Entertainment Fun
Microsoft® Windows® XP Media Center Edition 2005
lets you do amazing things with your HP Digital
Entertainment Center. With a full range of easy-to-use
digital entertainment features, experience TV, movies,
music, and photos like never before.
Media Center is simple and easy to use. You can easily
find and choose your media. You can play movies, listen
to music, view photos, and watch TV with a single remote
control. Combine the powerful features of your HP Digital
Entertainment Center with a home theater receiver to
enjoy an even more dynamic entertainment experience.
Watch and record live TV
With Media Center you can pause, advance frame by
frame, skip ahead, or use instant replay to catch every
moment of live TV. Use fast-forward to bypass unwanted
content. When you are not able to watch your favorite
show, you can use Media Center to record it.
The right music for the moment
Browse your entire music library by artist, genre, and
song. Select a playlist or a single album, or do a random
shuffle from your music collection. You can even play
songs from your iTunes music Library.
Record TV with ease by using the Television Program
Welcome
Guide to select the shows you want to record. You can
record one show or an entire series and watch it when it
is convenient for you. You will never miss a moment of
your favorite shows.
Welc om e 1
Page 12

Share your digital memories
Create personalized slide shows with music for viewing
on your TV. Easily edit and create professional-looking
home videos from the comfort of your couch with the
remote control.
Transform your living space into a theater
Whether you are watching a DVD movie or your own
home videos, Media Center delivers a rich viewing
experience with a high-quality digital sound system.
Sit back and enjoy the show.
Using Media Center Features
You can control the Media Center functions and navigate
Media Center windows by using the remote control, the
keyboard, or the trackball. You can easily switch back
and forth between them by moving the trackball, or by
pressing a button on the remote control or the keyboard.
You can run Media Center side-by-side with other
Windows software programs. It’s possible to browse
through your pictures, watch videos, play music, and
even record TV while using other Windows programs
.
Some of the Media Center features listed are
for select models only.
2 Microsoft Windows XP Media Center Edition 2005 Reference Guide
n
Page 13

When using the remote control and the Media Center
program, you can:
■ Watch, record, and play back television programs
on any TV in the house.
■ Pause, rewind, and fast-forward TV programs.
■ Watch an instant replay.
■ Play back your digital videos.
■ View your digital pictures or play them as a slide
show with music. Easily print your photos.
■ Browse, select, and play music CD files with
full-screen visualizations.
■ Record CD tracks to your media library.
■ Play DVD movies. Resume playing your DVDs where
you left off.
■ Listen to FM radio stations.
■ Access streaming music and video subscription
services.
■ Record your TV shows automatically while you are
doing something else.
■ Open specific windows in Media Center by using
the shortcut buttons on the remote control.
■ Communicate with your friends and family by using
instant messaging.
■ Enjoy Media Center remotely (select models only).
■ Easily back up your media files to CD, DVD, or
another hard disk drive such as the HP Personal
Media Drive.
n
The Television Program Guide may not be
available in all countries/regions.
Welcome
Welc om e 3
Page 14

4 Microsoft Windows XP Media Center Edition 2005 Reference Guide
Page 15
Using Media Center
Setting Up Media Center
The first time you start your HP Digital Entertainment
Center, a Media Center setup wizard opens. It is best to
complete each step in the Media Center setup wizard to
be able to use all the features in Media Center. The
Media Center setup wizard may take approximately
10 to 40 minutes to complete. If there are steps you still
need to complete, you can go to the Settings menu by
following the procedure below.
Completing the setup wizard steps
1 Press the Media Center Start button on the
remote control.
2 Select Settings. You may need to use the arrow
buttons on the remote control to scroll down to see all
the menu items.
3 Select General, Media Center Setup, and then
select Run Media Center Setup Again. Follow
the onscreen instructions to complete the wizard.
Using Media Center 5
Using Media Center
Page 16

Listed below are some of the items included in the setup
wizard:
■ Check for your Internet connection. An
Internet connection allows Media Center to
download and update your Television Program
Guide and display information about your music
CDs and other media.
■ Configure your TV tuner, TV signal source,
and Television Program Guide. You need to
provide information about your TV signal source and
your TV signal equipment (set-top box, cables, and
so on). This step makes sure your Digital
Entertainment Center receives the correct TV signal
and Television Program Guide information. If you
have a cable box or satellite receiver, the setup
wizard programs your remote control to work
with them.
■ Optimize how Media Center looks on your
display. You can change display settings such as
brightness, contrast, RGB color, and centering.
■ Set up your speakers. Select how many
speakers you have and test them.
n
You must subscribe with an Internet Service
Provider (ISP) to have an Internet connection.
n
You can change your Media Center settings in
the Settings menu.
Getting the Most out of Media Center
To maximize effective use of Media Center and to ensure
access to all of its features, complete the following list
before getting started. Refer to the Start Here booklet
and the User’s Guide that came with your HP Digital
Entertainment Center. Before opening Media Center,
make sure:
■ The HP Digital Entertainment Center is set up
correctly.
■ The remote control has two AA alkaline batteries
installed.
■ The remote sensor is properly plugged into a USB
connector on your HP Digital Entertainment Center
and is placed where you can point the remote
control at it.
■ The remote sensor control cable is securely plugged
into the remote sensor and attached to your cable or
satellite set-top box, if present.
■ The HP Digital Entertainment Center has a properly
configured and working Internet connection.
■ The HP Digital Entertainment Center is properly
connected to your TV signal source.
6 Microsoft Windows XP Media Center Edition 2005 Reference Guide
Page 17
Opening Media Center
Press the Media Center Start button on the remote
control.
Or
Click Start on the taskbar, and then click
Media Center.
Using Media Center 7
Using Media Center
Page 18
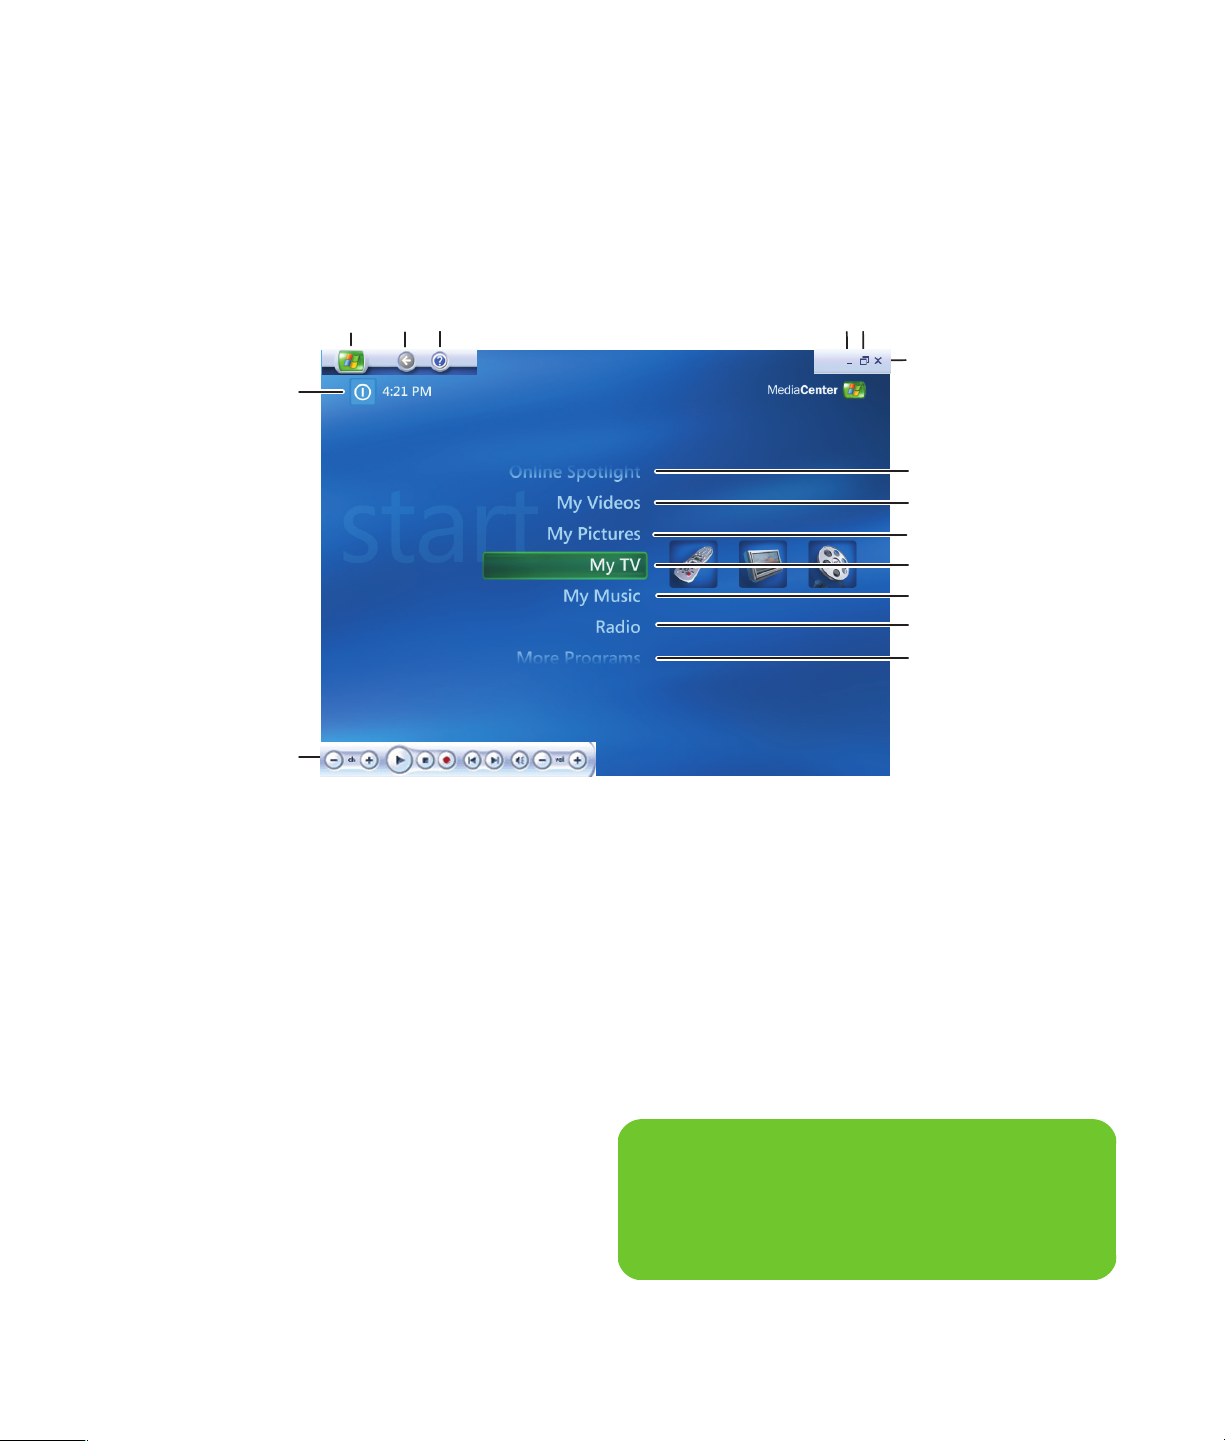
Media Center Start Menu
CDE FG
A
B
H
J
K
L
M
N
O
P
A Access a menu to exit Media Center, to
shut down or to restart the HP Digital
Entertainment Center, to log off to end your
Media Center session, to put the HP Digital
Entertainment Center into standby mode, or
to switch users
B Use media playback controls: Play, Stop,
Pause, Skip, Fast-Forward, Replay, Rewind,
and Record, Volume Up/Down, Channel
Up/Down
C Open the Media Center Start menu
D Go back one screen
E Open the Media Center Help
F Minimize the Media Center window
G Resize the Media Center window
H Close the Media Center window
J Go to the Media Center Web site for the
latest Media Center information
K Watch your home videos
L View digital pictures or play a slide show;
print photos
M Watch, record, and play back TV programs
N Play music files or music CDs, create and
edit playlists, and record music files to CD
O Play FM radio stations
P Find utilities and programs: instant
messaging, video editing, and creating
CDs/DVDs, and sync to device
Some of the features listed are for select
models only.
8 Microsoft Windows XP Media Center Edition 2005 Reference Guide
n
Page 19

Other menus not shown:
■ HP Image Zone — View digital pictures, play a
slide show, and print photos
■ HP Tunes — Play music from your iTunes music
Library or from music CDs
Using Online Spotlight
Online Spotlight is a link to the Media Center Web site
for the latest Media Center information and for media
offers and services.
Music: This area includes links to music service
providers, such as Napster and Live365.
Movies: This area includes links to movie service
providers such as MovieLink and Cinema Now. You can
find information about popular films, view trailers,
download movies, and more.
News/Sports: This area lists top stories from news and
sports broadcasters such as MSNBC and ESPN.
■ Play DVD — Watch DVD movies
■ Settings — Change Media Center program settings
Tips: This area includes tips from Microsoft on how to use
Media Center.
Downloads: This area includes information and
services that you can download.
n
Some features listed for Online Spotlight may
not be available for all countries/regions.
Using More Programs in Media Center
More Programs contains links to programs, services, and
common tasks.
■ Create CD/DVD is a link to a CD creation wizard
that helps you find the media files you want to copy
to CD or DVD. For more information about creating
CDs and DVDs, see “Creating (Burning) CDs and
DVDs with RecordNow!” on page 143.
■ Messenger opens an instant messaging log on
window. For more information see “Logging in to
your messenger account” on page 14.
■ Sync to Device allows you to automatically transfer
your music, picture, video, and recorded TV files
from the HP Digital Entertainment Center to a
portable device such as a portable Media Center
device, a SmartPhone, a pocket PC, or a mass
storage device. Select Help in Media Center for
more information.
Using Media Center 9
Using Media Center
Page 20
Navigating Media Center
In the Media Center windows, a selected item such as a
folder, file, or menu item is outlined with a green border.
You can control the Media Center functions and navigate
Media Center windows by using the remote control, the
keyboard, or a trackball.
To select items in Media Center by using the remote
control, use the arrow buttons on the remote control, and
then use the OK button to enter your selection.
If you have media playing, such as music or television, it
appears in an inset window in the lower-left corner. To
switch from watching your media in the inset window to
watching it in full-screen mode, use the arrows on the
remote control to select it, and then press OK.
.
Closing Media Center
1 Move the trackball to display the Media Center
menu bars.
2 Click the Close icon to close Media Center.
10 Microsoft Windows XP Media Center Edition 2005 Reference Guide
Page 21

Synchronizing Media to a Portable Media Device
Sync to Device in More Programs allows you to
automatically transfer your music, picture, video, and
recorded TV files from the HP Digital Entertainment Center
to a portable device such as a portable Media Center
device, a SmartPhone, a pocket PC, or a mass storage
device. Select Help in Media Center for more
information.
1 Connect your portable media device to the
HP Digital Entertainment Center.
2 Select Yes when the message appears asking if you
want to sync content to the device.
3 If device is connected, press Start on the remote
control.
4 Select More Programs, and then select Sync to
Device.
5 Select the Up arrow or Down arrow on the screen to
move a playlist up or down in the list. The playlist at
the top of the list is synchronized to the portable
device first.
Or
Select Delete next to a playlist you do not want to
transfer to the device.
Or
Select Add More to select other media categories
you want to add to the list.
6 Select Start Sync.
Viewing files on a portable media device
1 Connect your portable media device to the
HP Digital Entertainment Center.
2 Minimize Media Center by selecting the
minimize icon.
3 Click Start on the taskbar, and then click
Windows Media Player.
4 Click the Sync tab to view files on the portable
media device.
Using Media Center 11
Using Media Center
Page 22
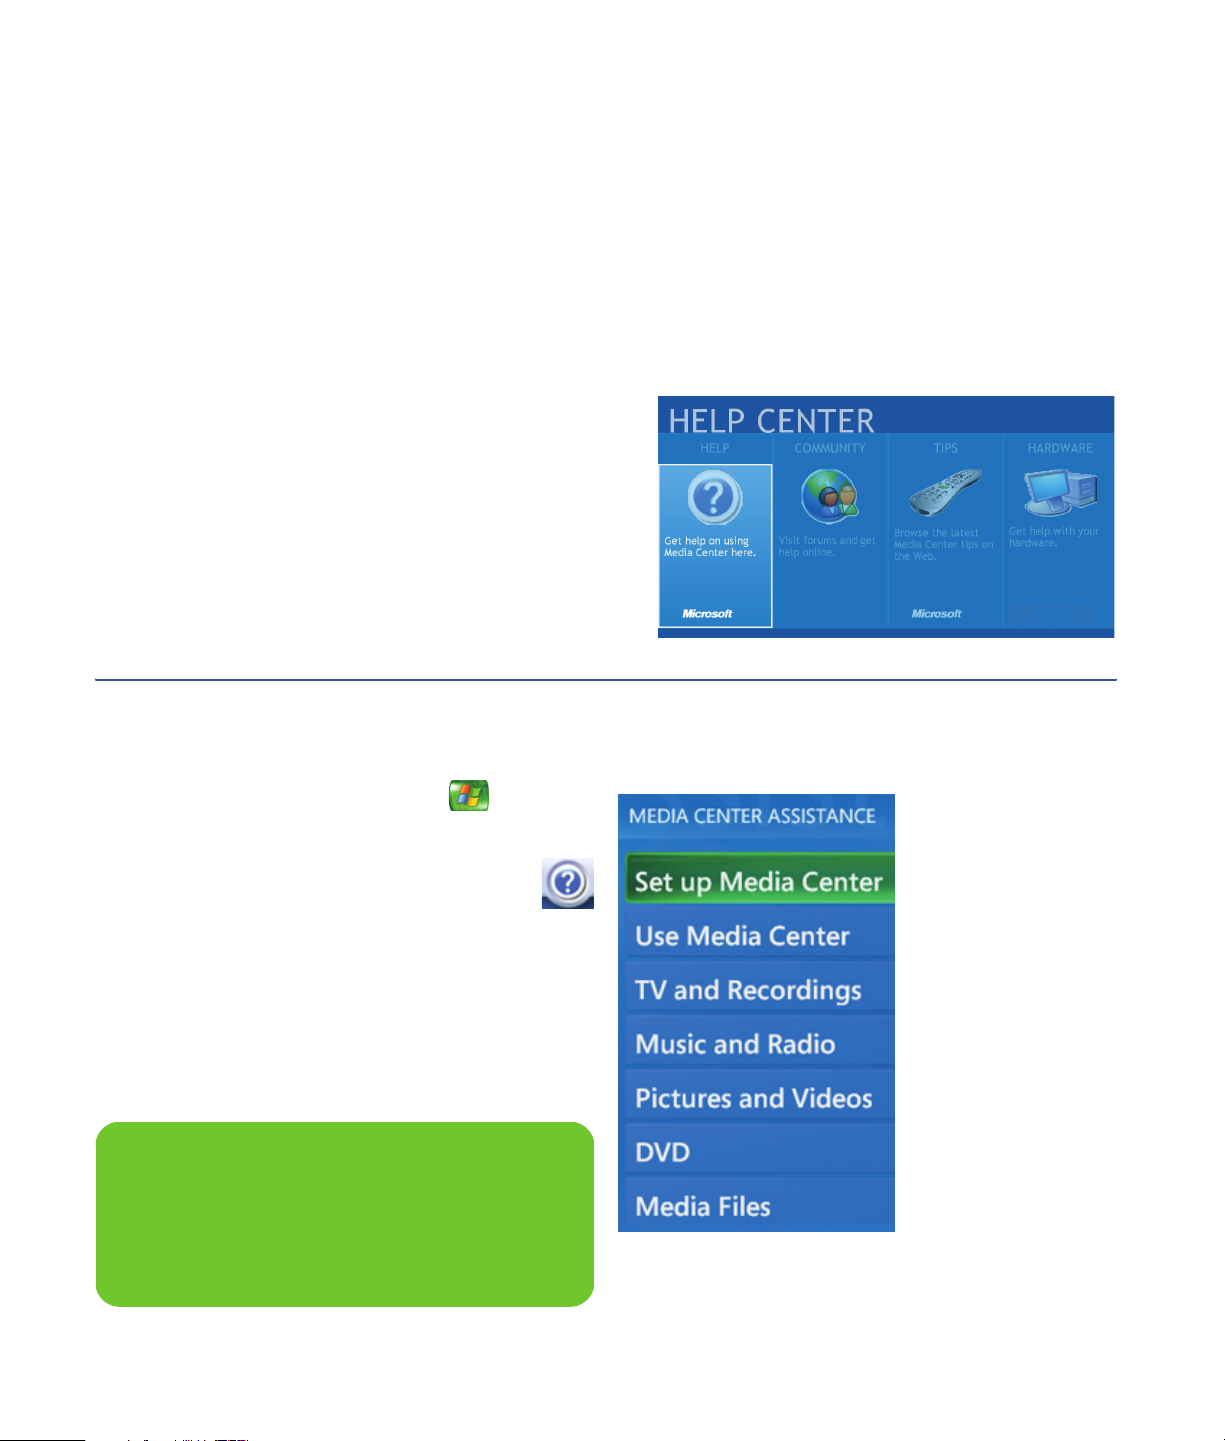
Using Media Center Help
When you select the Help icon in Media Center, the Help
Center window opens. From here you can access local
help files located on your HP Digital Entertainment Center
as well as help files found on the Internet.
The help categories are:
■ Help: Find help on using Media Center from files
located on your HP Digital Entertainment Center.
■ Community: Visit Media Center forums and get
help online.
■ Tips: Go to the Microsoft Web site for helpful tips
about using Media Center.
Opening Media Center Help
1 Press the Media Center Start button on the
remote control.
2 Move the trackball to show the Media Center
navigation bar, and then select the Help (?)
icon from any window in Media Center.
■ Hardware: Find support information about your
Media Center HP Digital Entertainment Center
hardware.
3 From the Help Center, select Help.
4 When Media Center Help files appear, use your
trackball, keyboard, or your remote control to select
a help category.
5 Select a help topic.
n
When Media Center is open, you can also
press F1 on the keyboard to open Media
Center Help.
12 Microsoft Windows XP Media Center Edition 2005 Reference Guide
Page 23
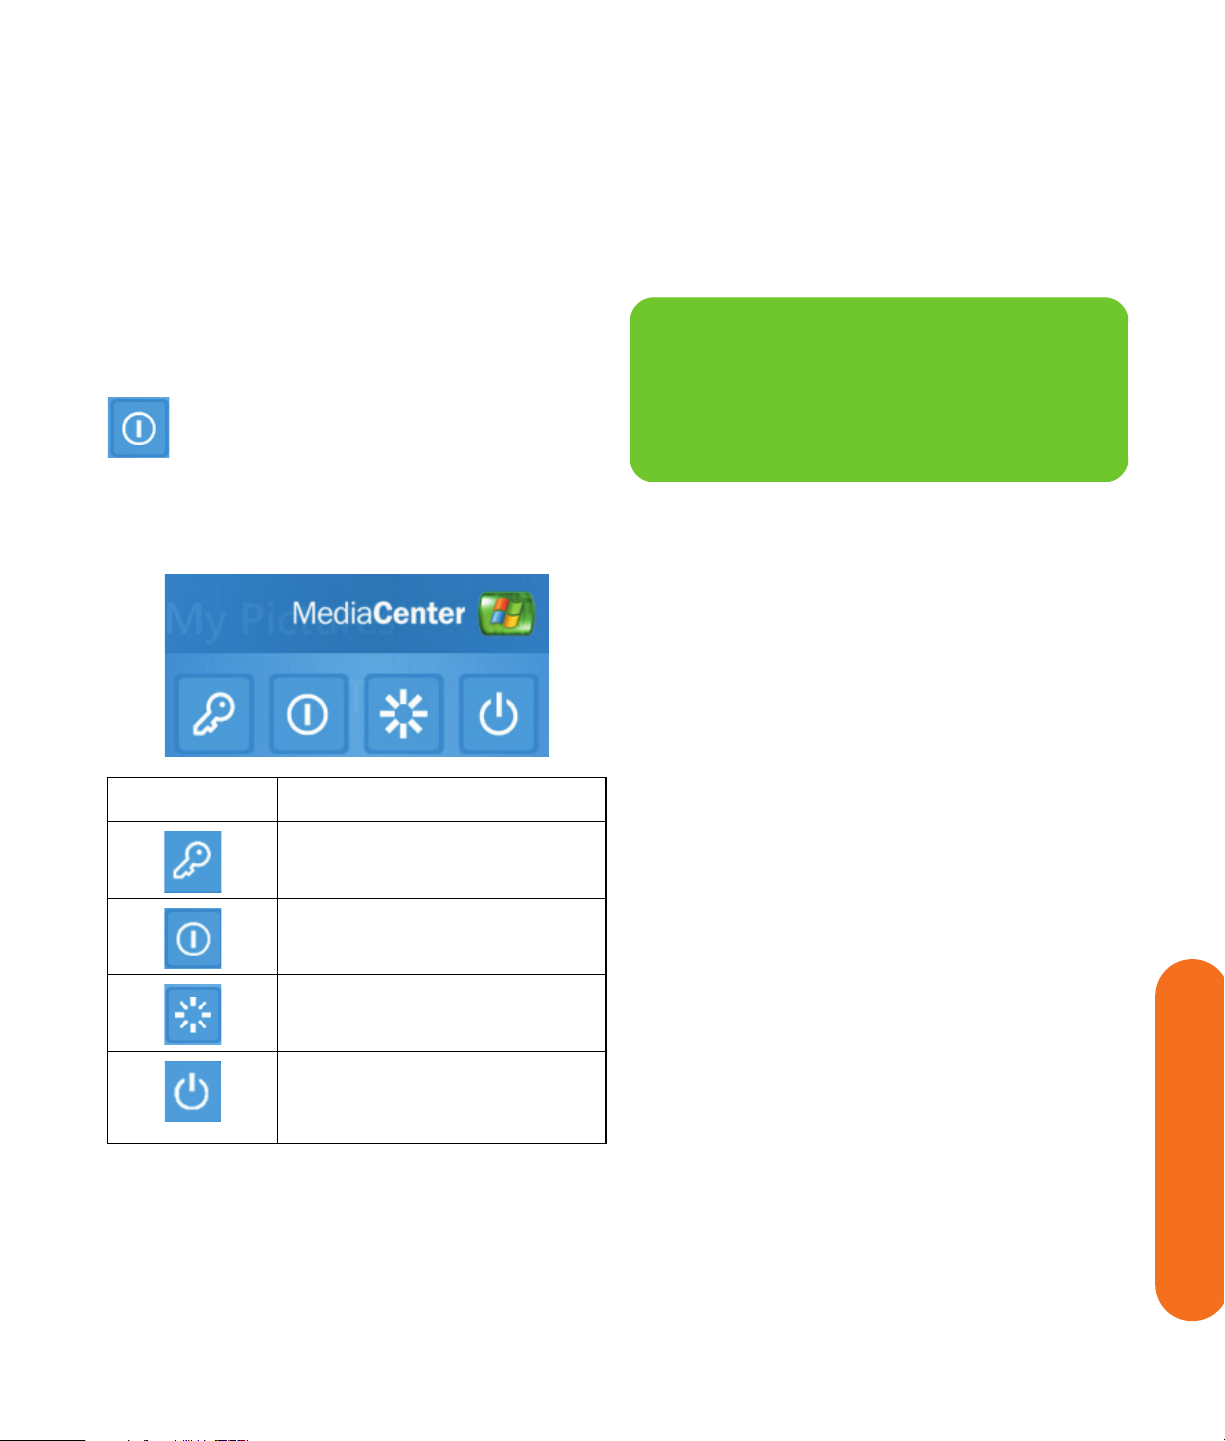
Media Center menu bars and control menu
When you move the trackball, the Media Center menu
bars appear. When you use the remote control, or when
you stop using the trackball (after 5 seconds), the menu
bars disappear.
To access the control menu in Media Center
menu, move the trackball to display the menu
bars. Select the Turn Off icon on the main
Media Center window.
From this menu, you can select icons to perform various
actions.
Icon Action
You can use the Minimize and Resize buttons
to switch to the desktop or to run Media
Center side-by-side with another program.
n
Log off and end your Media
Center session and switch users
Turn off the HP Digital
Entertainment Center
Restart the HP Digital
Entertainment Center
Put the HP Digital Entertainment
Center in a reduced power state
— standby mode
Using Media Center
Using Media Center 13
Page 24
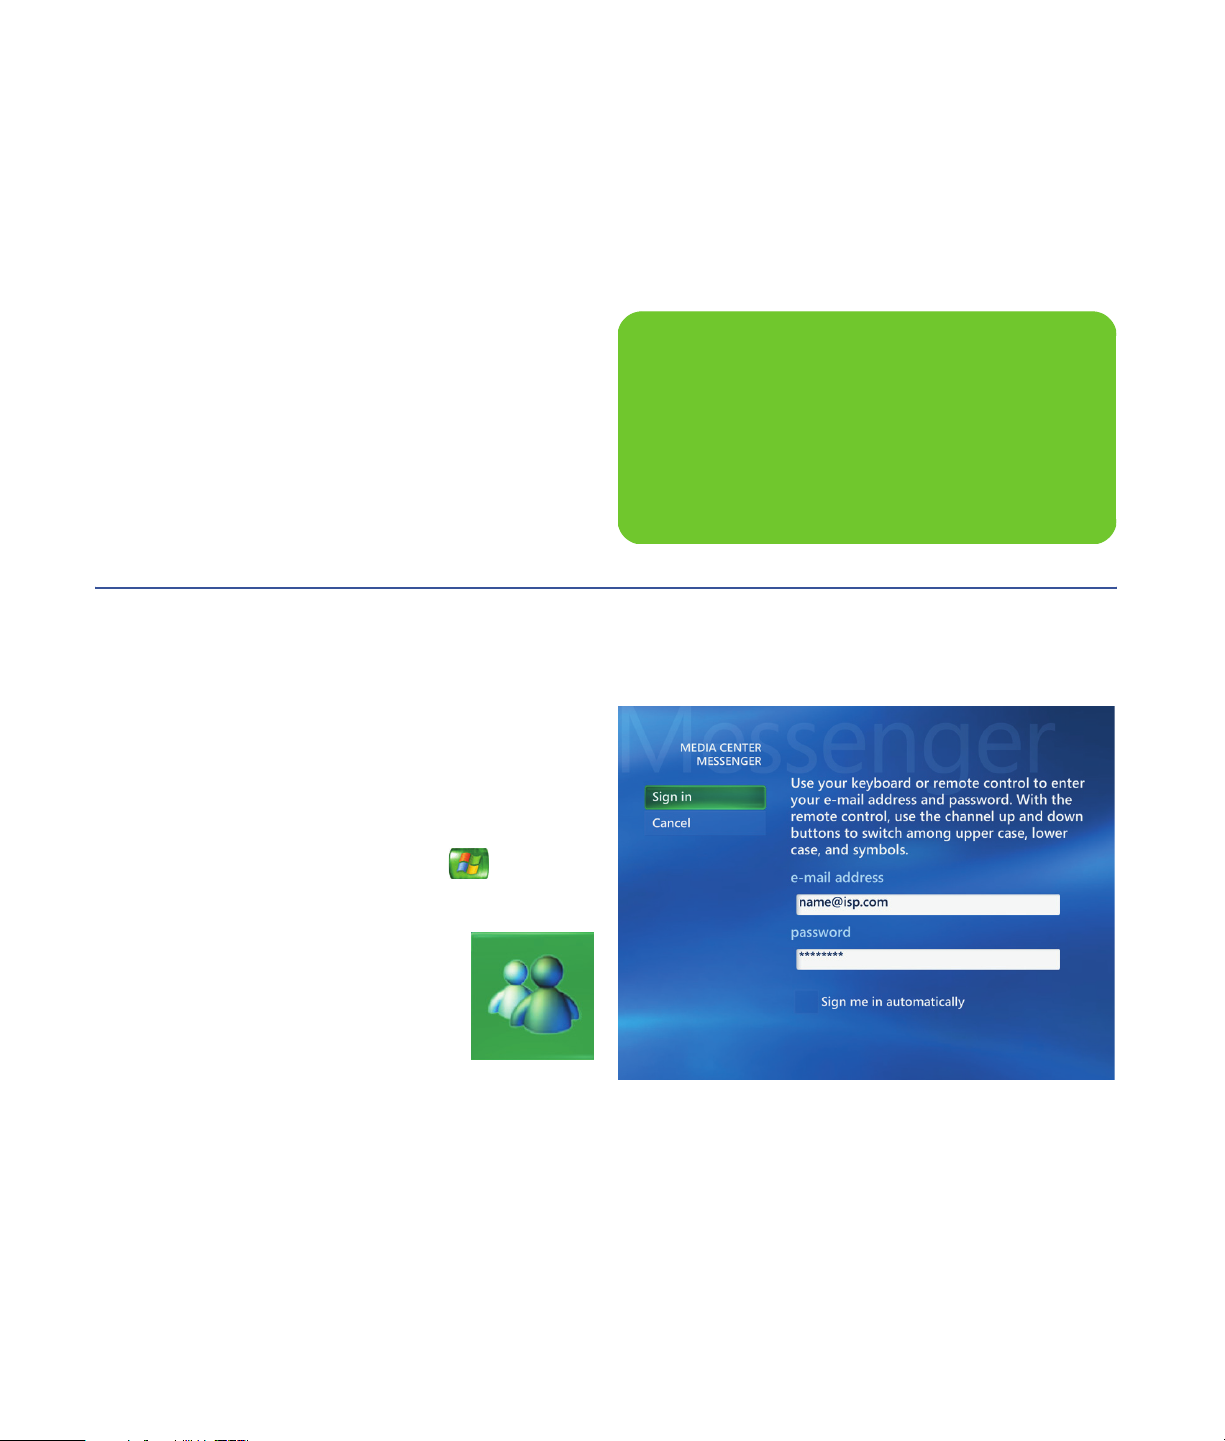
Using Instant Messaging in Media Center
Media Center supports instant messaging so you can
communicate with your friends and family while you are
doing something in Media Center. You always have the
option to turn this feature on or off.
You can use your remote control to log in and type
messages. You can even have multiple conversations.
From most areas in Media Center you can
press Ctrl + D on the keyboard, or select a
media file and press the More Info button on
the remote control to access the Messenger
login screen.
Logging in to your messenger account
1 First, you must go to http://www.msn.com to set
up your messenger account. You will need a .NET
passport to log in to messenger. A .NET passport is
an e-mail address, a login name, and a password.
Make sure you verify the account with MSN before
you try to log in from Media Center.
n
2 Press the Media Center Start button on the
remote control to open Media Center.
3 Select More Programs, and then
select the Messenger icon.
4 Select Sign In.
5 Enter your net passport information,
and then select Sign In.
14 Microsoft Windows XP Media Center Edition 2005 Reference Guide
Page 25
Changing Media Center Settings
In the Media Center Settings window, you can change
settings for watching television, for viewing your pictures
and slide shows, and for controlling sound and the
display of all the Media Center windows.
To change your Media Center settings:
1 Press the Media Center Start button on the
remote control.
2 Select Settings.
3 Select a category.
4 Select one of the settings listed. Then, use the arrow
buttons to select an option or follow the onscreen
instructions.
5 Select Save to save your changes.
Media Center settings categories
■ TV to set up TV signal, audio, and closed
captioning. You can download or edit the Television
Program Guide, view or clear recording history, set
hard disk drive recorder storage space, configure
your display, and set recording defaults.
n
Some settings, such as parental control and
caption display settings for TV and DVDs, are
included with select models only. Not all
channels support closed captioning.
■ Pictures to set slide-show settings.
■ Music to select visualizations or song information to
display when playing a song.
■ DVDs to select a language for subtitles, audio
tracks, and menus of your DVDs, program the remote
control buttons for your DVDs, and select closed
captioning. You can also access audio settings for
your speakers. You must use a trackball or keyboard
to select the audio settings.
■ Messenger and Caller ID to allow instant
messages within Media Center and set notifications
for caller ID.
■ Radio to organize or delete pre-set radio stations.
Using Media Center
Using Media Center 15
Page 26

■ General to set:
■ Startup and Window behavior.
■ Visual and Sound Effects to set transition
animations and sounds when navigating in
Media Center.
■ More Programs Options to change settings
for other programs on the HP Digital
Entertainment Center.
■ Media Center Setup to configure your Internet
connection, TV signal, speakers, TV, or monitor;
■ Parental controls to block unwanted TV
channels and block unwanted TV and movie
ratings, change access code, and reset parental
controls.
■ Automatic Downloads Options to get
media information about CDs, DVDs, and movies
from the Internet and to select how to download
the Television Program Guide.
■ Help to find help about using Media Center and
your hardware.
access Windows updates; run Media Center
setup again; set up remote desktop; and reset
Start Page defaults.
Changing audio, video, display resolution, and other settings
To change your audio and video settings:
1 Press the Media Center Start button on the
remote control.
2 Select More Programs.
3 Select HP Settings.
■ Front Panel to adjust the brightness of the front
panel display on the HP Digital Entertainment
Center.
■ HP Media Drive to set up your HP Personal
Media Drive to access music, pictures, videos,
and recorded TV shows from within HP Media
4 Select one of the following settings:
■ DVD to adjust audio and video settings for DVD
playback using InterVideo WinDVD player.
■ Resolution to adjust the appearance of
Center.
5 Use the arrow buttons to select an option or follow
the onscreen instructions.
Windows Desktop for your TV.
16 Microsoft Windows XP Media Center Edition 2005 Reference Guide
Page 27

Changing the display resolution
The desktop display resolution utility changes the viewing
experience outside of Media Center. Use this if you have
trouble reading programs running from the Windows
Desktop. Some programs may not work with the lower
resolution recommended for standard definition TVs.
1 Press the Media Center Start button on the
remote control.
2 Select More Programs, and then select
HP Settings.
3 Select Resolution, and then select OK.
4 Select a resolution that is best for your type of
n
Resolution settings:
1024 x 768 is best on high definition TVs.
800 x 600 is best for standard definition TVs
larger than 32".
640 x 480 is best for standard definition TVs
smaller than 32".
display, and then select Apply.
Or
Select the Advanced button to open the display
properties control panel where you can select the
Settings tab, and then select another resolution
setting by moving the slider bar under Screen
resolution. Select OK.
Contacting HP Support in Media Center
You can access a link to HP Support in Media Center by
using your remote control. At HP Support you can:
■ Register your product with HP.
■ Learn more about your HP Digital Entertainment
Center and Media Center.
■ Test your hardware with interactive diagnostic
software.
■ Connect to online technical support or access a
telephone number to talk with a technical support
agent.
1 Press the Media Center Start button on the
remote control.
2 Select More Programs.
3 Select HP Settings.
4 Select HP Support.
5 Select an option, and then follow onscreen
instructions. You need to use your trackball and
keyboard in this Web site.
n
HP Support is available 24 hours per day,
7 days per week, 365 days per year.
Using Media Center 17
Using Media Center
Page 28

Finding Additional Media Center Information
To learn more about using Media Center, refer
to the online and other Help files located in
Media Center. Using your trackball, click the
Help icon in the Media Center toolbar.
You can select Online Spotlight from the main Media
Center menu to go online for the latest Media Center tips
and other information.
Also, you can access the Microsoft Windows XP Media
Center Edition 2005 Reference Guide when you go
online to the HP Support Web site at:
http://www.hp.com/support
To find the online documentation for your product, search
for your model number, and then click Manuals.
18 Microsoft Windows XP Media Center Edition 2005 Reference Guide
Page 29
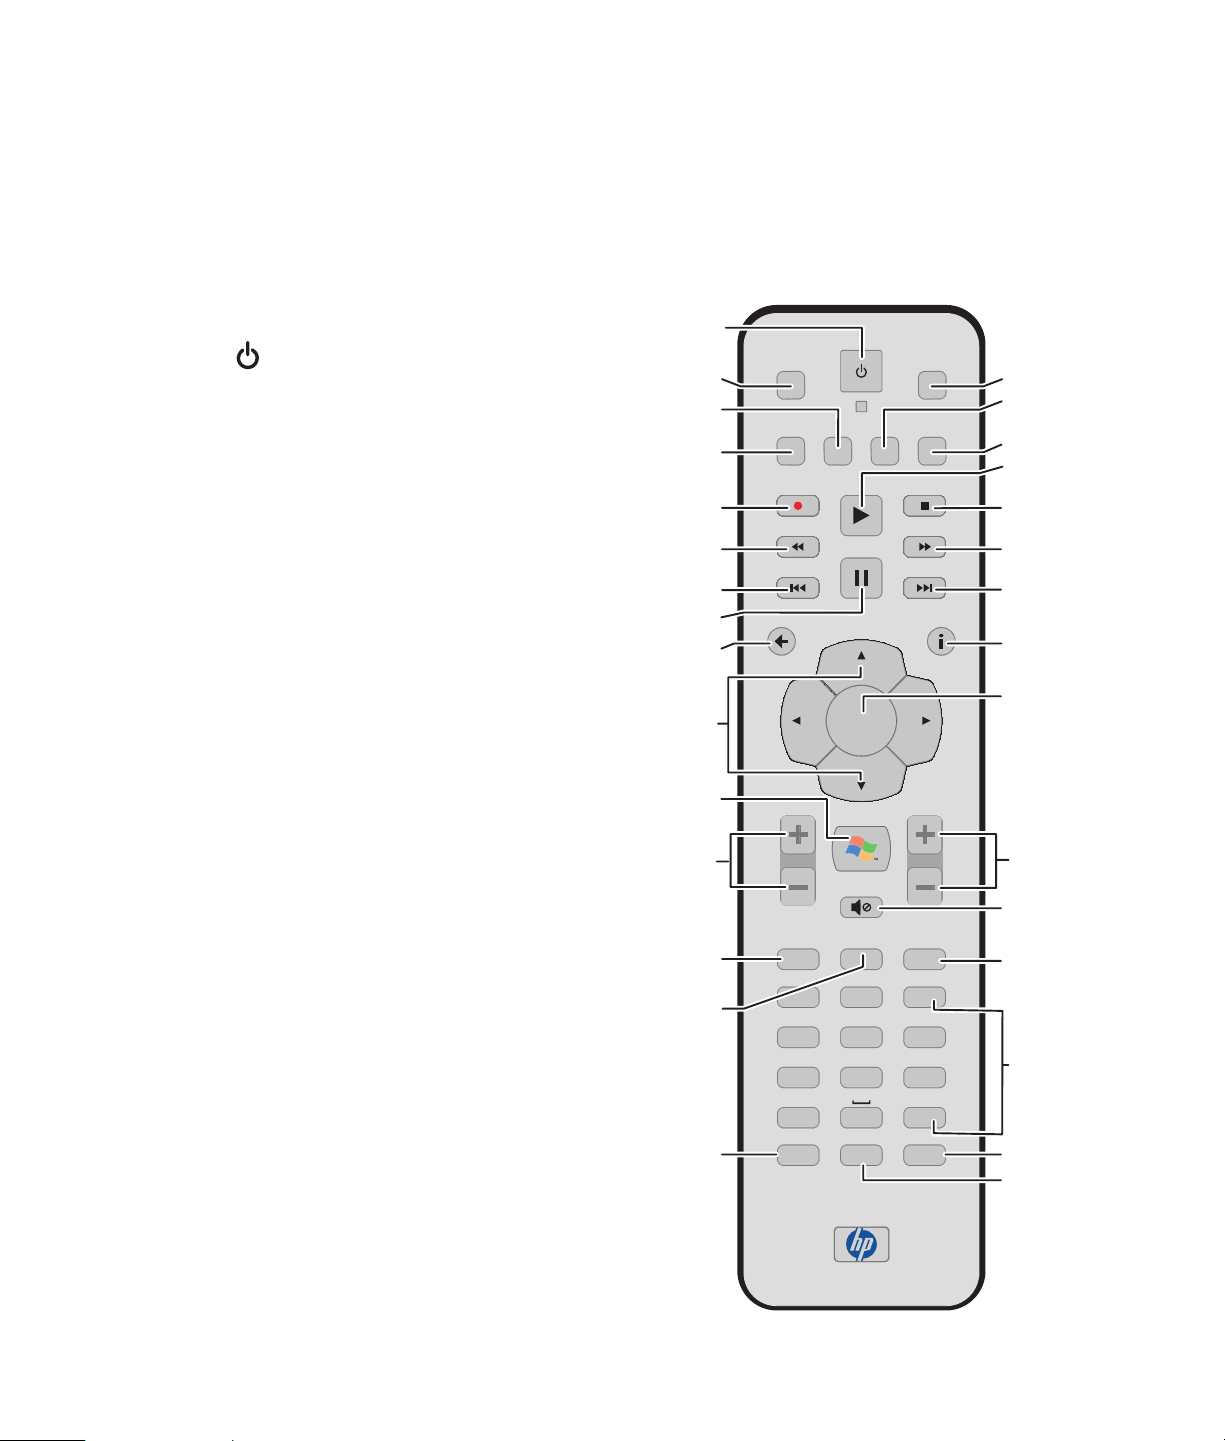
Using the Remote Control
The remote control is designed to work with Media Center.
You can use your remote control with Media Center to play
CDs and DVDs, to view pictures, and to watch and record
television programs.
DVD MENU
TV
This remote control helps you navigate the Media Center
windows on your computer just as a TV remote control helps
you navigate cable TV options or control the playback of a
movie in a VCR or DVD player.
The remote control can:
■ Navigate and control all Media Center windows.
■ Control the video or live TV display.
■ Place the computer in and out of standby mode.
■ Shut down or restart the HP Digital Entertainment
Center.
■ Log off from Media Center or switch users.
The remote control cannot:
■ Navigate the Windows desktop or control other
computer programs outside of Media Center.
■ Be used as a VCR, DVD player, or stereo remote
control.
■ Turn on or off a TV that is connected to your HP Digital
Entertainment Center.
■ Turn on the HP Digital Entertainment Center.
n
The remote control has a range of about
26 feet.
Make sure there is nothing blocking the
pathway between your remote control and
the remote sensor.
MUSIC
RADIO
RECORD
REW
REPLAY
BACK
VOLUME
LIVE TV
GHI
PQRS
*
CLEAR ENTERPRINT
PLAY
PAUSE
OK
MUTE
GUIDE
ABC
JKL
TUV
0
PICTURES
VIDEOS
STOP
FWD
SKIP
Using the Remote Control
MORE
CH/PG
RECORDED TV
DEF
321
MNO
654
WXYZ
987
#
Using the Remote Control 19
Page 30
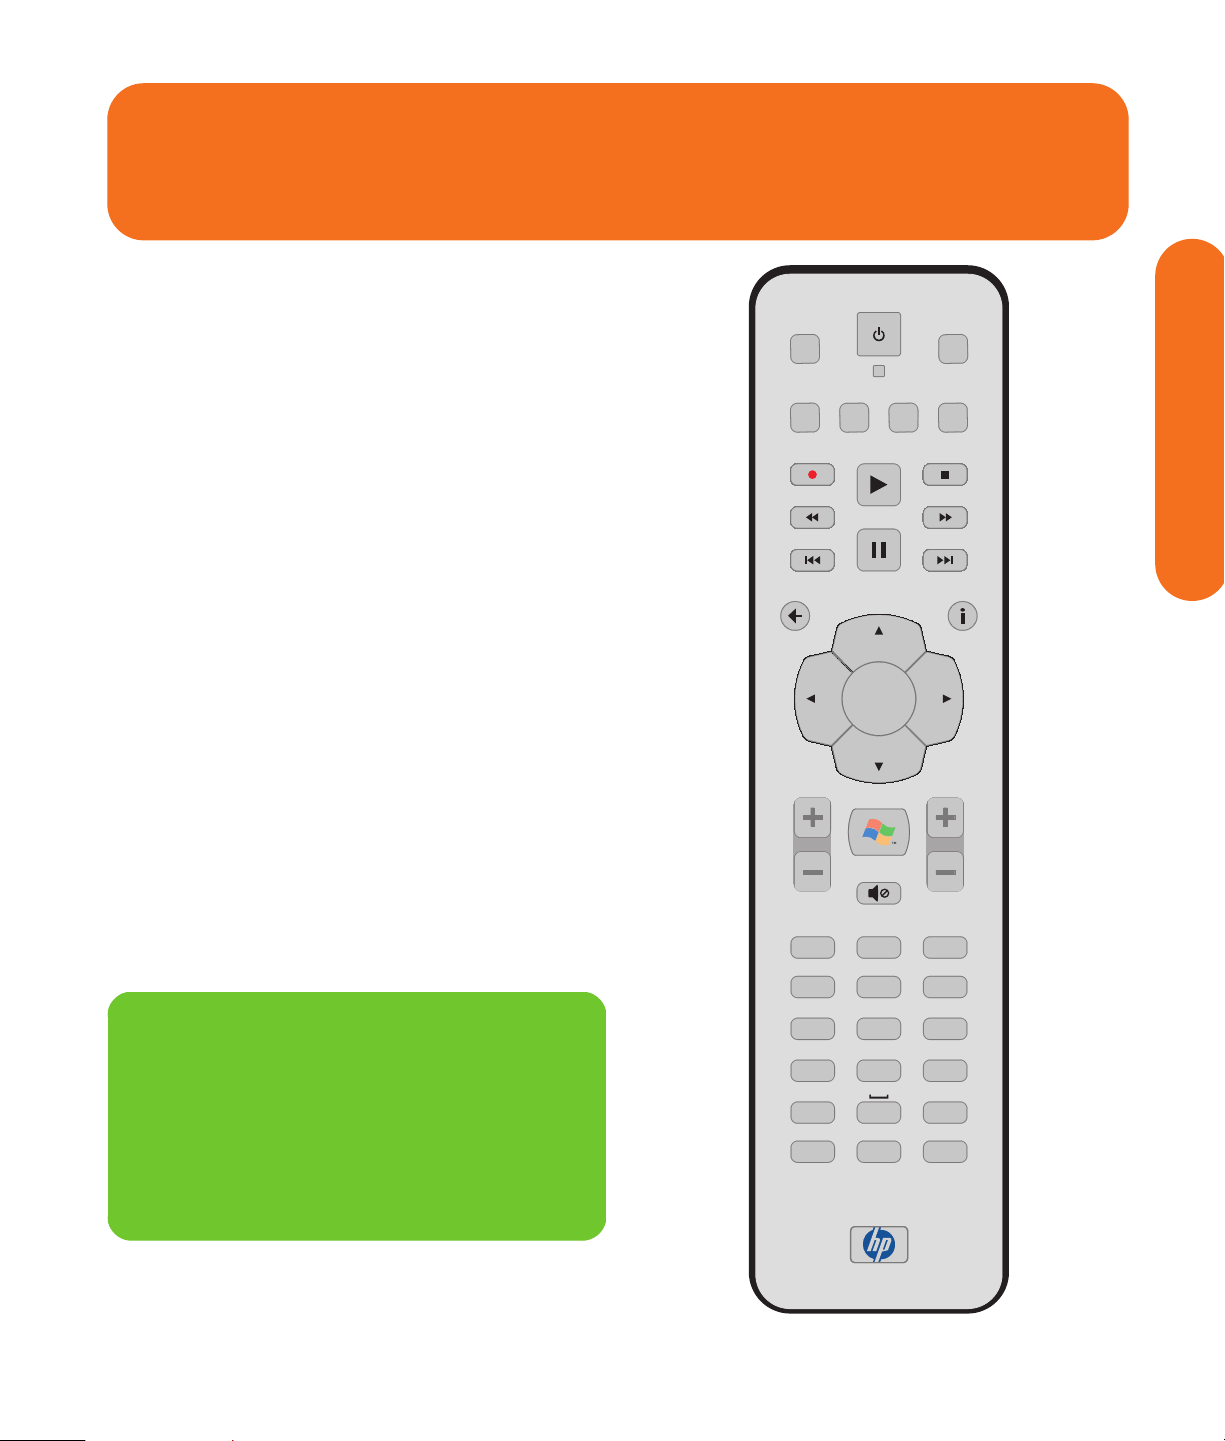
Remote Control Buttons Overview
Features and location may vary
AStandby puts the HP Digital Entertainment Center
into and out of a power-reduced state.
BDVD Menu opens the Play DVD window or opens the
main menu of a DVD movie, if available.
CMusic opens the My Music window.
D Radio opens the Radio window.
ERecord records a selected television program and
stores it on the hard disk drive when in Live TV mode.
The Record button is inactive for all other media.
FRew (Rewind) moves the media backward at two
speeds.
GReplay moves media backward 7 seconds.
HPause pauses audio and video tracks and live or
recorded TV programs.
JBack returns HP Digital Entertainment Center to the
previous window within Media Center.
KArrow buttons move the cursor to navigate and select
actions within all Media Center windows.
LStart opens Media Center to the main Start menu.
MVolume increases (+) and decreases (–) volume.
NLive TV is a shortcut to the full-screen view of live TV.
Moves a TV program forward to the end of the pause
buffer and resumes playing live TV.
OGuide opens the Television Program Guide.
PClear deletes the last character entered.
M
N
O
A
D
G
H
K
B
DVD MENU
C
RADIO
MUSIC
PICTURES
TV
VIDEOS
Q
R
S
T
RECORD
PLAY
E
REW
F
REPLAY
PAUSE
STOP
FWD
SKIP
U
V
W
J
BACK
MORE
X
Y
OK
L
VOLUME
CH/PG
Z
MUTE
AA
GHI
GUIDE
RECORDED TV
ABC
JKL
TUV
*
PRINT
DEF
321
MNO
654
WXYZ
987
0
#
BB
CC
DD
LIVE TV
PQRS
P
CLEAR ENTER
EE
20 Microsoft Windows XP Media Center Edition 2005 Reference Guide
Page 31

QTV opens the My TV window.
RPictures opens the My Pictures window.
SVideos opens the My Videos window.
TPlay plays the selected media.
UStop stops the media currently playing.
V Fwd (Fast-forward) moves media forward at
three speeds.
WSkip moves media forward — for example,
30 seconds in videos and live TV or one music track.
X More (i) displays available information about a
selected media file and displays other menus.
YOK selects the desired action or window option and
acts as the Enter key.
Z CH/PG up (+) and down (–) changes the TV
channels or moves pages up and down, depending
on available options. Moves to the next DVD
chapter.
AA Mute turns computer sound off. The word Mute is
displayed when Mute is turned on.
BB Recorded TV opens the Recorded TV window
where recorded TV programs are listed.
w
If you turn off (shut down) your HP Digital
Entertainment Center, Media Center will
not record a scheduled TV program. The
HP Digital Entertainment Center must be
turned on or in standby mode to record TV
programs.
Using the Remote Control
n
Make sure you turn off the monitor and turn
down or mute the volume; for example, if
you have a scheduled recording in the middle
of the night and don’t want to be disturbed.
The HP Digital Entertainment Center will not
automatically go into standby mode if Media
Center is open. It is best to close Media Center
before you manually place the HP Digital
Entertainment Center in standby mode.
CC 0 to 9, #, * are the numeric keypad buttons to
change channels or enter text into a Media Center
search or text box. Each time you press a number
button, a different character appears. Press the Enter
button to select a character.
DD Enter selects the desired action, menu, or window
option.
EE Print prints your pictures that you select in the My
Pictures window of Media Center.
Using the Remote Control 21
Page 32

Begin using your remote control
1 Point the remote control at the remote sensor. The
remote sensor should be located near your monitor
or in a convenient place. Make sure there is nothing
blocking the pathway between your remote control
and the remote sensor.
2 To start Media Center and to open the Media Center
Start menu, press the Start button .
3 If this is your first time using the remote control, the
Media Center setup wizard opens. Follow the
onscreen instructions to complete the remote control
setup steps.
Or
If you have completed the Media Center setup
wizard, the Media Center Start menu opens. Use the
arrow keys on the remote control to select an item,
and then press OK to select an option and to begin
using Media Center.
22 Microsoft Windows XP Media Center Edition 2005 Reference Guide
Page 33

Remote Control Buttons
Shortcut buttons
(Select models only)
You can use the remote control shortcut buttons to open
specific windows in Media Center.
The direct access buttons open the main Media Center
windows.
n
Some older DVDs may not include a
DVD menu.
Button Function
DVD Menu Opens the Play DVD main menu, where you can play your DVD movies.
Using the Remote Control
TV Opens the My TV window, where you can watch and record TV, open your Television Guide,
schedule future TV recordings, and find your recorded TV programs.
Radio Opens the FM radio station window, where you can select FM radio stations to listen to.
Music Opens the My Music window, where you can browse and play music CDs and your music
files.
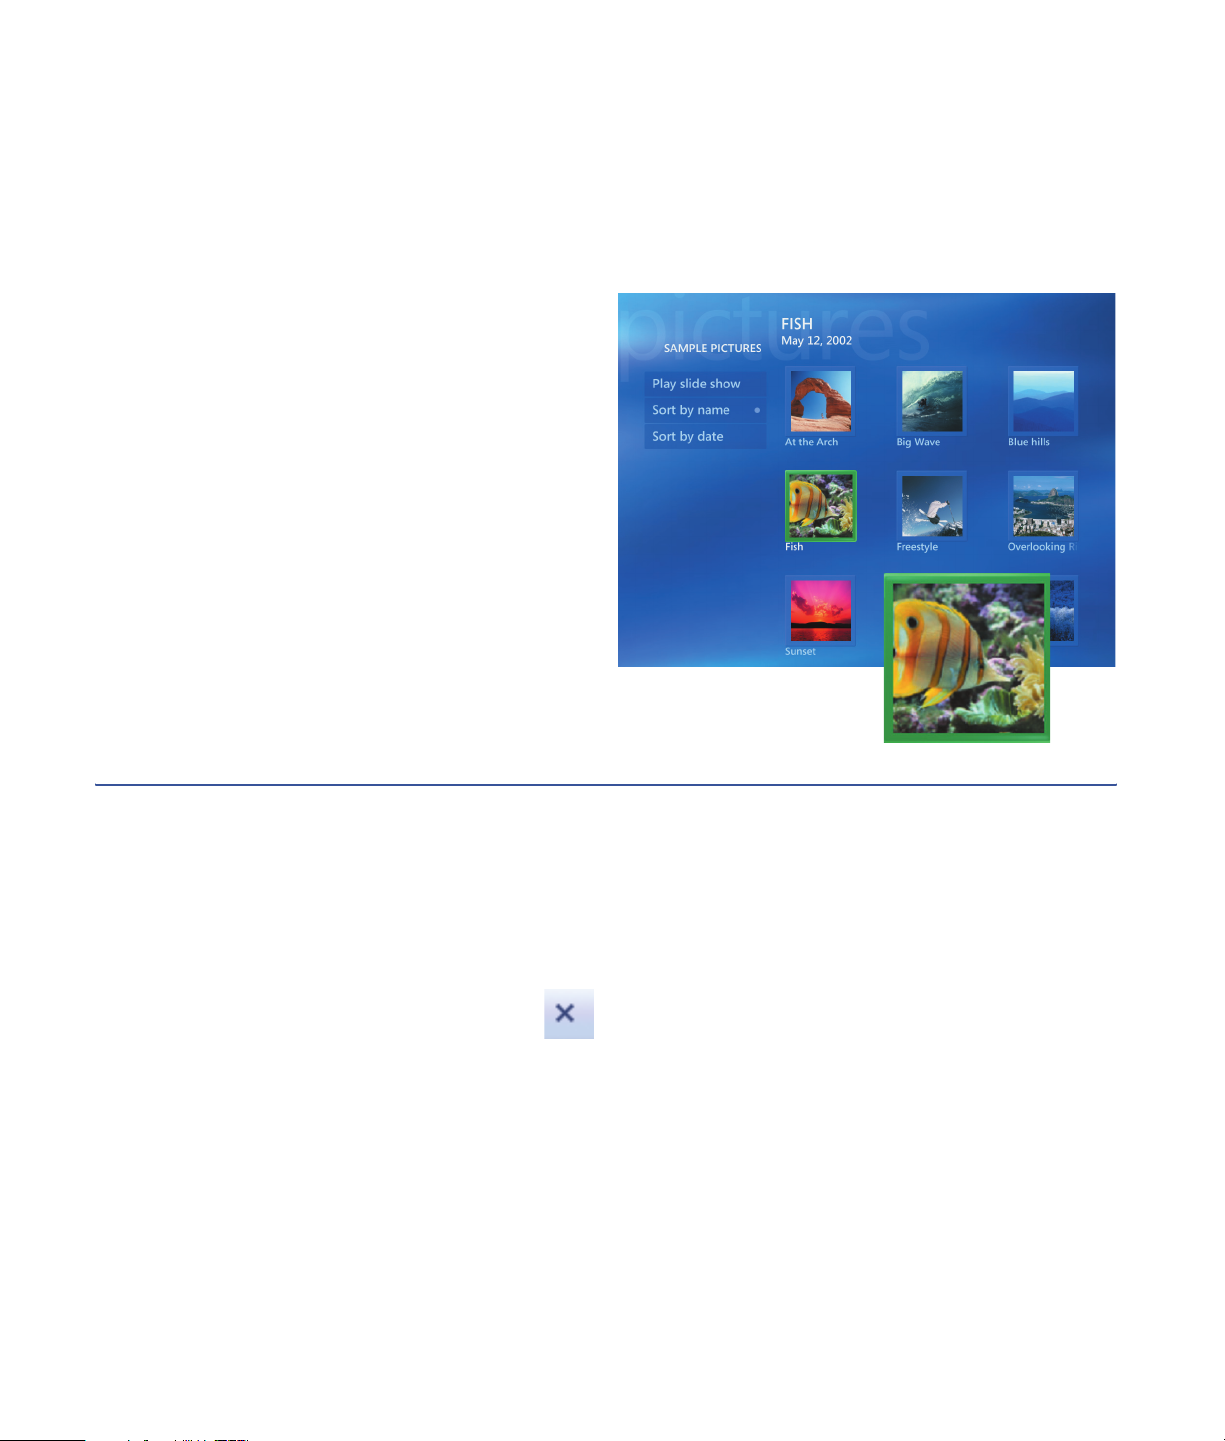
Pictures Opens the My Pictures window, where you can search for, sort, and view pictures and slide
shows that are stored in the My Pictures or the Shared Pictures folder in Windows Explorer.
You can also view your pictures on other media such as a digital camera or a memory card.
Videos Opens the My Videos window, where you can search for, sort, and play back your video files
that are stored in the My Videos or the Shared Video folder in Windows Explorer. You can
also view your videos on other media such as a memory card.
Live TV Moves a TV program forward to the end of the pause buffer and resumes playing live TV.
When you pause a TV program, you can use the Live TV button to move forward to live TV.
Opens Media Center and then begins playing live TV in full-screen mode.
Using the Remote Control 23
Page 34

Button Function
Guide Opens the Television Guide.
Recorded TV Opens the Recorded TV window where all your recorded TV programs are stored. From this
window, you can search for and play back a recorded show.
Standby button
The Standby button puts the computer into and out
of a power-reduced state, called standby, which
runs the computer with minimal power until you
give it a command. To take the computer out of standby,
press the Standby button for at least 1 to 2 seconds on the
remote control. It is recommended that you use this button
when Media Center is closed.
An LED (light-emitting diode) located under the Standby
button blinks when the remote control is transmitting a
signal to the remote sensor.
Make sure you turn off the monitor and turn
down or mute the volume; for example, if
you have a scheduled recording in the middle
of the night and don’t want to be disturbed.
The HP Digital Entertainment Center will not
automatically go into standby mode if Media
Center is open. It is best to close Media Center
before you manually place the HP Digital
Entertainment Center in standby mode.
n
24 Microsoft Windows XP Media Center Edition 2005 Reference Guide
Page 35

Recording in standby mode
Media Center can take the HP Digital Entertainment
Center out of standby mode just before a scheduled show
begins recording. The HP Digital Entertainment Center
returns to standby mode when the recording is complete.
Media Center begins recording with the monitor and
sound turned on unless you manually turn them off before
the scheduled recording.
Media Center cannot record TV programs if the computer
is turned off.
Remote control LED and the remote sensor LED
Under the Standby button is an LED that blinks when the
remote control is sending a signal to the remote sensor.
The remote sensor displays a red LED when you press a
button on the remote control (select models only). Some
kinds of lighting may cause the remote sensor to blink
without you pressing the remote control.
If you turn off (shut down) your HP Digital
Entertainment Center, Media Center will not
record a scheduled TV program. The HP
Digital Entertainment Center must be turned
on or in standby mode to record TV
programs.
w
Using the Remote Control
Using the Remote Control 25
Page 36

Media playback buttons
These buttons allow you to play back picture slide shows,
music files, playlists, music CDs, DVD movies, home
videos, and live TV from within the Media Center
program.
n
Press the Rew or the Replay button and then
the Play button to watch an instant replay.
Button Function
Record Records TV programs. The Record button works only when My TV is used to play a TV show.
It is inactive when other media is playing.
■ Press Record once to record a TV show while watching live TV or while in the TV Guide.
■ Press Record twice to record a TV series while in the TV Guide.
■ Press Record repeatedly, until the record icon disappears from the TV Guide, to cancel a
recording.
Play Plays selected media.
Stop Stops selected media. When Stop is pressed while you are watching TV, the Media Center
pause buffer continues to record in the background.
Rew Rewinds selected media. Press Rew again to increase the rewinding speed.
■ Moves the video backward.
■ Moves live TV program to the beginning of the 30-minute pause buffer.
■ Moves the TV Guide back 3 hours.
Pause Pauses selected media. Press Pause and then Fwd repeatedly to play media frame-by-frame
in slow motion. To continue slow motion, you must press the Fwd button more than once.
26 Microsoft Windows XP Media Center Edition 2005 Reference Guide
Page 37

Button Function
Fwd Moves selected video media forward. Press Fwd up to three times to increase the
fast-forwarding speed.
■ Moves MP3 music files forward
■ Moves a video forward
■ Moves the TV Guide forward 3 hours
Replay Moves selected video media backward. To move backward in live TV by 7 seconds, press
Replay. You can repeatedly rewind with the instant replay option, but only to the beginning of
the pause buffer or recorded program. Allows you to go back 12 hours in the Guide.
Skip Moves selected video media forward. To advance in live TV or in a recorded program by 30
seconds, press Skip once. You can repeatedly skip forward, but only to the end of the pause
buffer or the recorded program. Allows you to skip 12 hours in the Guide.
Using the Remote Control
Using the Remote Control 27
Page 38

Navigation and other buttons
These buttons allow you to play picture slide shows, music
files, playlists, music CDs, DVD movies, home videos, and
live TV from within the Media Center program.
Button Function
Back Returns to the previous window.
More
Information (i)
Arrows Move between menus, windows, or activities. Move the cursor to select actions within the
OK Selects a desired action and works as an Enter button. If you are watching live TV, press OK
Volume
(+ and –)
Start Opens the Media Center Start menu if you are in Media Center or if you are at the desktop.
CH/PG
(+ and –)
Mute Turns off the sound. The word Mute appears in the window when it is turned on.
Displays available information about a selected media file and displays other menus. Some
media may not include this information. This button displays details such as TV program
summary or music artist. You may need to be connected to the Internet to receive TV
programming or CD artist information.
Media Center windows.
to go to the previous channel. Press OK again to toggle back to the original channel you
were watching.
Increases or decreases volume.
Changes channels up and down or moves the cursor to the next or previous page of options.
Changes channels for live TV or moves to the next chapter of a DVD movie.
28 Microsoft Windows XP Media Center Edition 2005 Reference Guide
Page 39

Alphanumeric Keypad and Print buttons
The alphanumeric keypad buttons allow you to enter text,
change channels, and print your pictures.
Button Function
Using the Remote Control
Numeric
keypad
(1-9, #, and *)
Clear Deletes the last character entered. Clear works the same way as a Backspace key on a
Print Prints picture files from the My Pictures window of Media Center. This button does not print
Enter Selects a desired action, menu, or window. Enter works the same way as the OK button.
Changes channels and enters text. Each time you press a number key, a different character
appears. When you find the character you want, press the Enter button or wait a few
seconds.
keyboard.
files from Windows Explorer or from the HP Image Zone Plus area of Media Center.
Using the Remote Control 29
Page 40

30 Microsoft Windows XP Media Center Edition 2005 Reference Guide
Page 41

Watching and Recording TV
Programs
Watch live TV or record your favorite shows for later
playback. Use the Television Program Guide to find the
show you want to watch or record. You can also record a
show while watching another prerecorded show.
Navigating My TV
From the My TV window you can search for and play
your favorite TV shows. Use the following menu items to
help you locate what you want to do:
■ Live TV: Watch, pause, fast-forward, or rewind your
favorite TV shows. You can watch recorded TV shows
while recording another show. Use the More
information button on the remote control to display
TV show information.
■ Recorded TV: View a list of recorded programs by
date or title, view a list of programs scheduled to be
recorded, play a recorded program, find out why a
program wasn’t recorded, or add a TV recording
manually.
■ Search: Quickly find a TV program or a series to
watch or record by entering a descriptive word,
program title, or program category.
■ Guide: (Not available in all countries/regions.)
Scroll through the free Television Program Guide to
find programs to watch and record. You can record
specific TV shows or a whole series to your hard disk
drive or an HP Personal Media Drive.
■ Movies: (Select models only.) Go online to find
movies to watch now or later. Get the latest
information about movies on TV: read reviews, see
cast lists, find other times the movie is broadcast,
view the DVD cover, browse for related movies, and
find other movies with the same cast members.
n
Digital video recording features and the
Television Program Guide are for select
models only.
TV Programs
Watching and Recording
n
The Movies online information feature is
available for some countries/regions.
Watching and Recording TV Programs 31
Page 42

Watching TV
Before you can watch TV by using Media Center,
make sure:
■ The computer is set up correctly for your TV signal
source. Refer to the Start Here booklet and the
HP Digital Entertainment Center User’s Guide for
more information.
■ You have completed the Media Center setup wizard.
If you have not completed the setup wizard, refer to
“Completing the setup wizard steps” on page 5.
n
You can change the channel by using the
remote control while in full-screen mode or
when the inset window is selected.
You can go to live TV from anywhere in
Windows Media Center by pressing Live TV
on the remote control.
You can select a channel to see upcoming
programs for that channel.
32 Microsoft Windows XP Media Center Edition 2005 Reference Guide
Page 43

Watching Live TV
1 Press the TV button on the remote control or select
My TV from the main start menu. Use the arrow
buttons on the remote control to select Live TV, and
then press OK. The last channel selected or the first
channel available begins playing.
2 Select a channel by using the CH/PG (+) or (–)
buttons or by using the numeric keypad on the
remote control, and then press Enter on the remote
control. The channel number and program
information are displayed in the window.
3 Press the More information button to open
another menu with the following options and
information:
■ A zoom option.
■ Access to Messenger and Settings windows.
■ Program information such as channel number
and station, title and time period of program,
actual time, and a brief summary of the program
and TV rating, if available. Recording options
are also shown.
4 To exit full-screen mode and return to the previous
window, press Back on the remote control.
i
TV Programs
Watching and Recording
Watching and Recording TV Programs 33
Page 44

Controlling TV playback
The personal video recorder functionality lets you record
single shows or capture entire series for later viewing.
.
When you open the My TV window and begin watching
live TV, Media Center begins recording the selected
program in the background for up to 30 minutes. When
you pause a live TV program while watching in full-screen
mode, the time-shifting window appears.
You can return to the live broadcast by pressing the Live
TV button on the remote control.
When you change the channel, Media Center deletes the
previously recorded portion and begins recording again
after a short delay.
You cannot use time shifting when recording a TV
program. For example, you can’t pause a live TV
program and then rewind to the beginning of the pause
buffer and then begin recording. You can record a TV
program only from live TV.
n
The 30-minute pause buffer applies only
when pausing, rewinding, and fastforwarding live TV. Media Center allows
you to record a program for longer than
30 minutes.
n
The digital video recording features are for
select models only.
34 Microsoft Windows XP Media Center Edition 2005 Reference Guide
Page 45

Using the remote control in My TV
Button Action
To freeze the live TV image, press Pause. While paused, My TV continues to record a pause
buffer for up to 30 minutes. To resume watching TV where you left off, press Play.
To stop live TV or a recorded program, press Stop once. To resume watching the program,
press Play.
To move forward in the live TV program that has been paused, or in a recorded program,
press Fast-Forward (Fwd). To speed up the fast-forwarding, press Fwd two or three times. Fwd
allows you to skip 3 hours in the Television Program Guide.
To play a recorded TV program or to resume watching a program after pressing the Pause,
Fast-Forward, Rewind, Replay, or Skip buttons.
To advance in live TV or in a recorded program by 30 seconds, press Skip once. You can
repeatedly skip forward, but only to the end of the pause buffer or the recorded program.
Allows you to skip 12 hours in the Guide.
To move backward in live TV or a recorded program, press Rewind (Rew). To speed up
rewinding, press Rew three times. To resume watching the program, press Play. Rew allows
you to move back 3 hours in the Guide.
To move backward in live TV by 7 seconds, press Replay. You can repeatedly rewind with the
instant replay option, but only to the beginning of the pause buffer or recorded program.
Allows you to move back 12 hours in the Guide.
Live TV To maximize the TV viewing window to full-screen mode, press Live TV. Also, to advance to
the end of the pause buffer and resume watching the live TV broadcast, press Live TV.
More
information
i
CH/PG To move to the next channel or page in the Television Program Guide, press the CH/PG (+)
Guide To open the Television Program Guide, press Guide. When in the Guide window, press
To see the channel number, station identifier, title of program, time slot, and category of
program, press the More information button while in full-screen mode. If you select a
recorded show and then press the More information button, you can access more information
about a program, stop or delete a program, record a series, change the “Keep Until” setting,
copy a selected program to CD/DVD, access the instant messaging dialog box, and access
TV settings.
and (–) buttons.
Guide again to view a program categories menu. To filter your Guide to display only
programs in a category, you can select a category, such as Drama.
Watching and Recording TV Programs 35
TV Programs
Watching and Recording
Page 46

Using the Television Program Guide
In the Television Program Guide, you can scroll through a
list of the current and upcoming television programs and
channels available from your television service provider.
The Guide displays the channel and network, as well as
the program title, scheduled time block, and a brief
description of the program. The number of days
displayed depends on your television service provider;
most providers display up to 14 days. By selecting a
program title, a detailed description of the program
appears at the bottom of the window.
Important information about the Television Program Guide
Television Guide data may not be available in your
country/region. You can still record TV programs
without a Guide; see “Recording TV without the
Television Program Guide” on page 45.
If there is no Guide data available when you try to
download or search for Guide information, you may
receive one of several error messages. An error can
occur because your HP Digital Entertainment Center is
not connected to the Internet, guide listings are not
available in your country/region, or your TV signal
provider and HP Digital Entertainment Center location
settings are not supported.
Make sure you are connected to the Internet and check
your TV signal and guide settings in the Settings menu of
Media Center.
n
The Television Program Guide is not available
in all countries/regions.
36 Microsoft Windows XP Media Center Edition 2005 Reference Guide
Page 47
Viewing the Television Program Guide
1 Press the Media Center Start button on the
remote control.
2 Select My TV, and then select Guide.
3 Use the arrow buttons to select a channel, and then
use the arrow buttons to scroll through up to two
weeks of programming for that channel.
4 Select a program, and then press OK to watch it.
Press the Record button on the remote control to
record the program.
Make sure the HP Digital Entertainment
Center has a connection to the Internet and
that you have completed the Media Center
setup wizard before you try to download the
Guide or change the settings for the Guide.
When you select a channel and then press OK
on the remote control, you can view up to
two weeks of programming. Use the scroll
arrows at the bottom of the window.
w
n
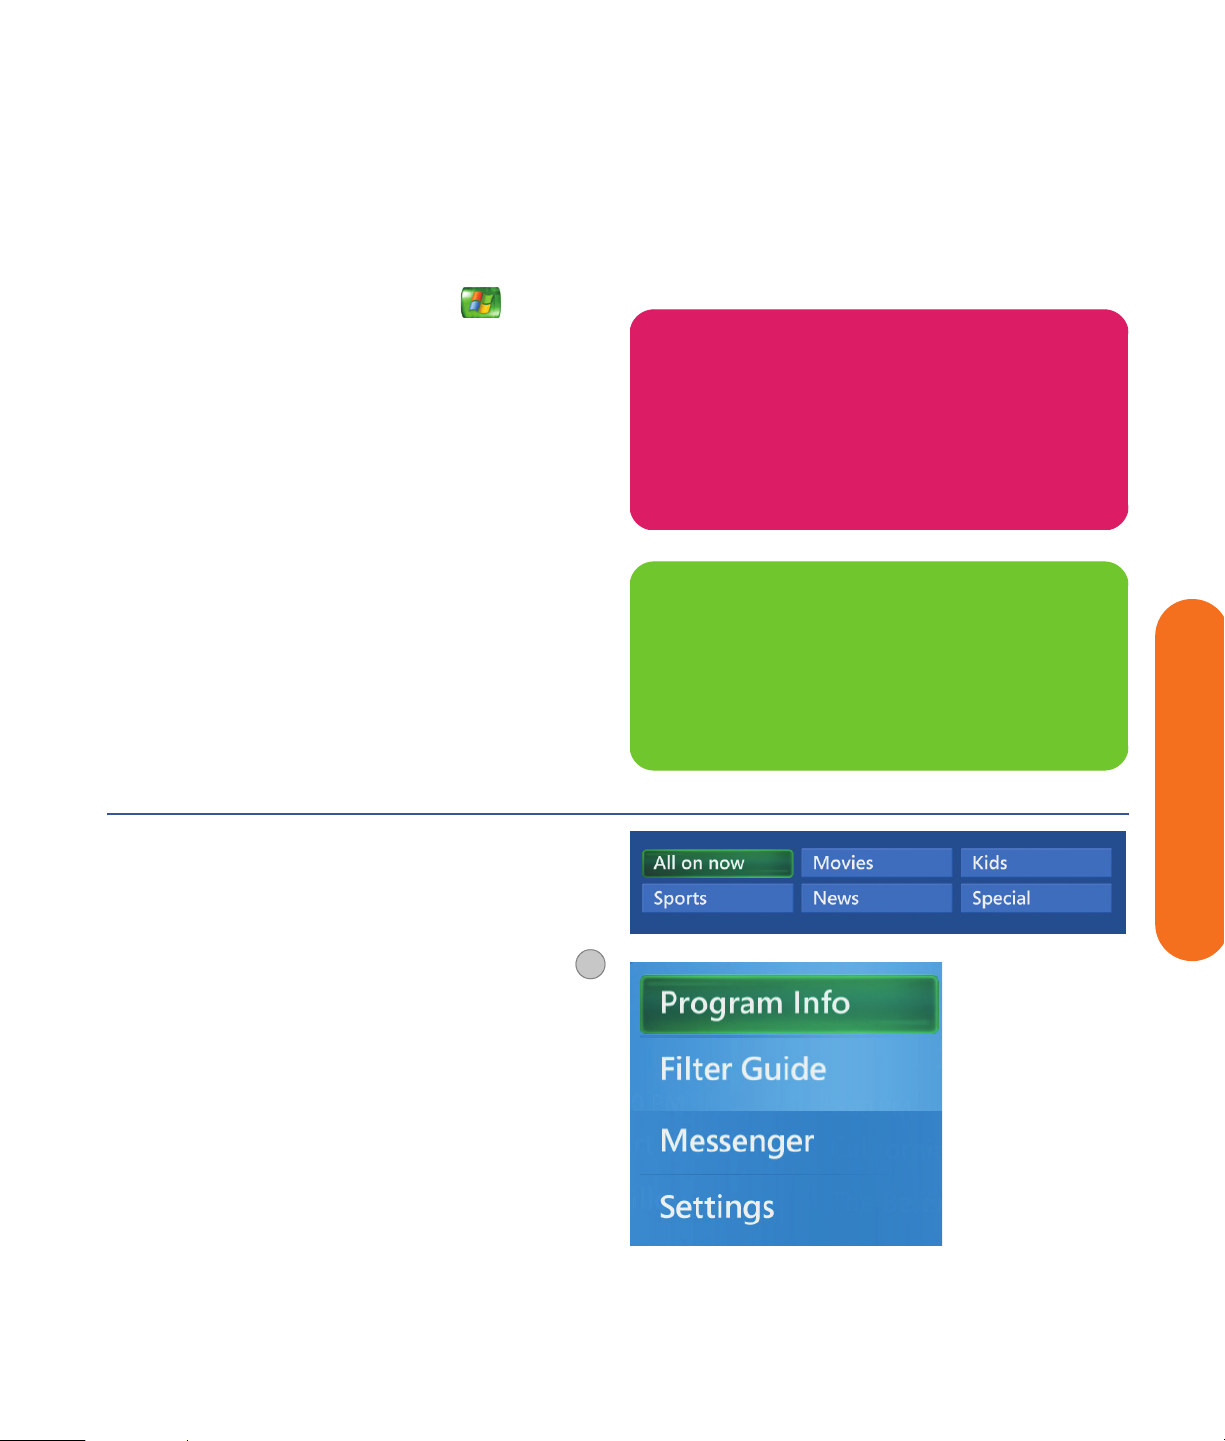
If you press the Guide shortcut button on the remote
control while you are already in the Guide, you can
select one of the Guide filter categories, such as Movies,
to search for a movie.
Press the More information button on the remote
control to access another menu for more options of
searching the Guide.
TV Programs
Watching and Recording
i
Watching and Recording TV Programs 37
Page 48

Setting up how Media Center downloads the Guide
You must select a TV listings provider before you can use
and download the Guide. You can set up Media Center
to download the Guide when you connect to the Internet
or your can select to manually download the Guide.
1 Press the Media Center Start button on the
remote control.
2 Select Settings, General, Automatic
Download Options, and then select:
■ Connect to the Internet and download:
Media Center connects to the Internet, and then
downloads the Guide.
Or
■ Download when connected: Connect to the
Internet, and Media Center automatically
downloads the Guide.
Or
■ Manual download: Connect to the Internet
and then manually download the Guide in
Media Center TV Settings menu.
3 Follow the onscreen instructions. When the Television
Program Guide starts downloading from the Internet,
it can take up to 30 minutes, depending on the
amount of data to download and the speed of your
Internet connection.
.
n
No data available appears next to each
channel if the Guide has not been
downloaded. This can occur if the HP Digital
Entertainment Center does not have an
Internet connection or if there is no service
available in your country/region.
38 Microsoft Windows XP Media Center Edition 2005 Reference Guide
If your HP Digital Entertainment Center has,
for example, a DSL connection, your
HP Digital Entertainment Center is always
connected. The Guide is downloaded at a
specified time every few days. This option
may not be supported by all providers. The
download interval varies, depending on
the ISP.
n
Page 49

Manually downloading the Guide
1 Press the Media Center Start button on the
remote control.
2 Select Settings, TV, Guide, and then select Get
Latest Guide Listings.
3 Follow the onscreen instructions. The Guide can take
up to 30 minutes to download, depending on the
amount of data to download and the speed of your
Internet connection.
Changing a postal code to receive the correct Television Guide
1 Press the Media Center Start button on the
remote control.
2 Select Settings, TV, Guide, and then select Set
Up Guide listings.
3 Select Next, and follow the onscreen instructions.
4 Enter your postal code, and then select Next.
5 To download your provider information and then
start downloading your Guide information, follow
the onscreen instructions.
Watching and Recording TV Programs 39
TV Programs
Watching and Recording
Page 50

Adding missing channels to the Guide
Some program channels are seasonal and do not appear
in the Guide all the time. To add the names and numbers
of the television channels you are missing or to change
the associations between channel numbers and lineups:
1 Press the Media Center Start button on the
remote control.
2 Select My TV, Settings, Guide, and then select
Add Missing Channels to add the names and
numbers of the channels you are missing.
3 Select Add Channel.
4 Use the numeric keypad on your remote control or
your keyboard to enter the name of the missing
channel, and then select Next.
5 Enter the correct channel number, and then
select Add.
6 Repeat steps 3 through 5 to add additional channels.
7 Click Done when you have added all the channels.
Removing channels from the Guide
You may want to remove some channels from your Guide
to prevent users from having access to them.
1 Press the Media Center Start button on the
remote control.
2 Select My TV, Settings, Guide, and then select
Edit Channels to remove the names and numbers
of the channels you do not want to appear in the
Guide.
3 Select or clear a check box to add or remove the
channel.
4 Select Save.
40 Microsoft Windows XP Media Center Edition 2005 Reference Guide
Page 51

Searching for TV Programs
To find a TV program, you can enter a title or keyword or
select a category in your Guide by using your remote
control.
1 Press the Media Center Start button on the
remote control, select My TV, and then select
Search.
2 Select Title. Use the numeric keypad on your remote
control or your keyboard to enter a program title
word, and then press OK on the remote control.
Or
Select Keyword. Use the numeric keypad on your
remote control or your keyboard to enter a
descriptive word that would appear in a program
title or program description, and then press OK on
the remote control.
3 To scroll through search results, use the arrow buttons
to select a program, and then press OK. If multiple
times for the program are displayed, select a time
and press OK.
4 To begin watching the program in full-screen mode,
select the program, and then press OK. If the
program is not currently playing, select Record or
Record Series, and then press OK.
TV Programs
Watching and Recording
n
■ Using Categories to search can help you
find, for example, all football games. A title
or keyword search displays every program
that has “football” in the title or
description.
■ The TV search results do not include
previously recorded TV programs.
n
Guide filtering features, such as searching by
keyword or category, are available for select
models only.
Watching and Recording TV Programs 41
Page 52

Searching for TV programs using categories
You can search the Guide to find a TV program by
selecting a category using your remote control.
1 Press the Media Center Start button on the
remote control, select My TV, and then select
Search.
2 Select Categories.
3 Select a category of program types, such as
Movies.
4 Select an option such as Genres or Top Rated.
5 Select a sorting option, such as By movie title.
6 Use the arrow buttons to scroll through
search results and to select a program. Then
press OK on the remote control.
7 Select an option to find out more about the
program, to watch it, to schedule a recording, or to
view other showings of your program.
42 Microsoft Windows XP Media Center Edition 2005 Reference Guide
Page 53

Recording TV Programs
Media Center allows you to record TV programs so that
you can watch them when it is convenient. You can
record the program you are watching, or you can record
a future program or series from the Guide, the Search,
or the Recorded TV window in My TV. You can record
two programs at the same time if your HP Digital
Entertainment Center has two TV tuners (select
models only).
If a recording error occurs, the program will not be
recorded unless the conflict is resolved. If you try to
schedule a recording and another is already scheduled
for the same time, a conflict window appears and gives
you the option to record the new program or record the
previously scheduled program.
To make sure your program is being recorded, select
My TV, Recorded TV, and then select Scheduled.
The Record icon also appears next to the program in
the Guide while you are recording. The Record icon
disappears when the recording is complete.
Recording icons
The Record icon appears in the Television
Program Guide next to the program
scheduled to record.
The Record Series icon appears in the
Television Program Guide next to each
occurrence of a program in a series that is
scheduled to be recorded.
The Record Conflict/Error icon appears in
the Television Program Guide and the
taskbar if another program is scheduled to
be recorded at the same time.
Record Series means that you select to record each
episode of that program from one channel. Media Center
won’t record duplicate episodes. Media Center also looks
for alternative times to record an episode if a recording
conflict arises.
w
If you turn off (shut down) your HP Digital
Entertainment Center, Media Center will not
record a scheduled program. The HP Digital
Entertainment Center must be turned on or in
standby mode to record a TV program. The
HP Digital Entertainment Center will not
automatically go into standby mode if Media
Center is open.
Make sure you turn off the monitor and turn
down or mute the volume if, for example,
you have a scheduled recording in the middle
of the night and do not want to be disturbed.
TV Programs
Watching and Recording
n
For more information about recording to your
HP Personal Media Drive, see “About
Recording TV to the HP Personal Media
Drive” on page 182.
Watching and Recording TV Programs 43
Page 54

Recording TV from the Guide
To record a current or future program or series from the
Guide:
1 Press the Media Center Start button on the
remote control, select My TV, and then select
Guide.
2 To find the program you want to record, use the
arrow buttons on the remote control, and then select
the program. You can also use the numeric keypad
on the remote control to enter a channel number.
Press the right arrow button in the Guide to select a
program that will be broadcast in the future.
Recording manually
Recording a program manually allows you to select a
specific date, channel, and recording time period. For
some programs, you may want to begin recording
before the scheduled beginning and after the scheduled
ending of the program.
3 Press the Record button on the remote control.
The Record icon appears next to the program in
the Guide. Press Record twice to record a series.
The Record Series icon is displayed to
indicate a series. Press Record again to cancel the
recording.
4 To return to the previous window, press Back on the
remote control.
5 If there is a recording conflict, Media Center displays
a message and allows you to select which program
you want to record.
1 Press the Media Center Start button on the
remote control, select My TV, Recorded TV, and
then select Add Recording.
2 Select Channel and Time.
3 Select the channel number box and enter the
channel number using the numeric keypad on the
remote control.
44 Microsoft Windows XP Media Center Edition 2005 Reference Guide
Page 55

4 Select the (+) or (–) buttons, and then press OK on
the remote control to scroll through choices and enter
the recording frequency, date, start and stop times,
and storage and quality options.
5 To set the recording and return to the Recorded TV
window, select Record in the window, and then
press OK on the remote control.
6 To return to the previous window, press Back on the
remote control.
■ Recorded TV programs that have been
copied to a DVD can be played on your
HP Digital Entertainment Center and on
some DVD players.
■ Recorded TV programs can be backed up as
part of a full system backup and restored
to the same HP Digital Entertainment
Center, but not to other PCs.
n
Recording TV without the Television Program Guide
You do not need the Television Program Guide to record
TV. You can record a TV program by pressing the Record
button on the remote control while watching live TV. You
can also select the program you want to record manually.
See “Recording manually” on page 44.
Record by using the Record button
1 Press the Media Center Start button on the
remote control, select My TV, and then select
Guide.
2 Select the program you want to record, and then
press the Record button on the remote control.
TV Programs
Watching and Recording
Watching and Recording TV Programs 45
Page 56

Recording TV from Search
You can find a program to record based on a keyword
such as an actor or director name, program title, or a
category (select models only). To record a current or
future program or series using Search:
1 Press the Media Center Start button on the
remote control, select My TV, and then select
Search.
2 Select Title, Keyword, or Categories. For Title
and Keyword searches, enter your descriptive search
words. Media Center starts searching from the first
letter you type into the text box. For a Categories
search, select the category you want and press OK.
3 Use the arrow buttons to scroll through the search
results to select the program you want to record,
select the program, and then press OK.
4 Select Record or Record Series in the window,
and then press OK. The Record icon for a single
program or the Record Series icon for a series
appears next to the program in the Guide. If there is
a scheduling conflict, Media Center displays a
message and allows you to select which program
you want to record.
Title search
5 To return to the previous window, press Back on the
remote control.
Category search
46 Microsoft Windows XP Media Center Edition 2005 Reference Guide
Page 57

The Record icon in the taskbar
If a program is currently being recorded, the Record icon
also appears in the taskbar. If you move your cursor over
the icon, Media Center displays which program is
currently being recorded. You can right-click the icon to
open Media Center and stop recording.
Recording TV tips
■ If your HP Digital Entertainment Center has one TV
tuner and you are watching live TV during a
scheduled recording time, you can watch only the
program being recorded. If you change channels,
recording stops.
■ If you go to another area in Media Center, the TV
channel you last selected will be displayed in the
inset window at the bottom of the window.
■ Some channels can be shared by two or more
networks, depending on the time of day. The Guide
may display only one network’s programming. This
may cause recording options to be unavailable. You
may need to manually update the Guide before
scheduling a recording.
n
To copy a recorded TV program to DVD to
view on a home DVD player, see “Copying
recorded TV programs to DVD or CD” on
page 49.
TV Programs
Important information about My TV and FM radio
If your Digital Entertainment Center has one TV tuner, the
FM radio shares the use of the single tuner card with My
TV. In Media Center, you are unable to watch or record
TV and listen to FM radio at the same time. If your system
has two TV tuners, you could watch or record TV and
listen to FM radio at the same time.
When Media Center is scheduled to start a recording, a
warning appears that says FM radio stops when the TV
recording starts. If you do not select Cancel recording,
Media Center automatically stops radio and begins
recording TV.
Watching and Recording TV Programs 47
Watching and Recording
Page 58

Standby mode and scheduled recordings
You should always close Media Center before you
manually place the HP Digital Entertainment Center in
standby mode, to avoid file corruption and other
recording problems.
Recording quality and hard disk drive storage space
The space available for recording TV programs depends
on your hard disk drive size, the percentage of hard disk
drive space allocated to recorded TV, and the recording
quality setting.
To get the maximum recording time, change the recording
quality to Fair instead of the default setting of Best.
n
Refer to Media Center Help for more
information about recording errors,
advanced recording features, and My TV
settings.
Quality of
recording
Best *2.7 GB/hour
Better *2.4 GB/hour
Good *1.4 GB/hour
Fair *1.2 GB/hour
*This table shows approximate sizes of recorded TV program files.
Some files may be smaller or larger.
1 GB = 1 billion bytes when referring to hard disk drive
capacity. Actual formatted capacity is less.
Hard disk drive space used
48 Microsoft Windows XP Media Center Edition 2005 Reference Guide
Page 59

Copying recorded TV programs to DVD or CD
You can record TV programs to DVD in Media Center to
create a backup copy or to save space on your hard disk
drive by using the following procedure. These DVDs can
be played from an HP Digital Entertainment Center and
from some set-top DVD players.
The HP Digital Entertainment Center includes several
other recording software programs for you to create CDs
and DVDs. You can use InterVideo WinDVD Creator to
record the recorded TV program to format that can be
played from an HP Digital Entertainment Center and from
some set-top DVD players. See “Using InterVideo
WinDVD Creator” on page 161.
For more detailed information about recording CDs and
DVDs, refer to information on the HP Support Web site at:
http://www.hp.com/support
n
TV programs that have been encrypted
(protected) by the broadcaster cannot be
copied and played back on any player other
than the HP Digital Entertainment Center that
they were recorded to.
1 Press the Media Center Start button on the
remote control.
2 Select More Programs.
3 Insert a blank DVD+RW, DVD+R, CD-RW, or
CD-R disc.
4 Select Create CD/DVD.
5 Select the type of CD or DVD you want (Music
or Data).
6 Enter a title for your DVD by using the numeric
buttons on the remote control, and then select OK.
7 Select Recorded TV.
8 Select the Recorded TV programs you want to copy
to CD or DVD.
9 Select View DVD or View CD.
10 Select Create DVD or Create CD.
11 Select Yes.
12 Follow the onscreen instructions to complete burning
your TV show to disc.
TV Programs
Watching and Recording TV Programs 49
Watching and Recording
Page 60

Playing Recorded TV Programs
Recorded TV is the storage place for all your recorded
programs. In the Recorded TV window, you can sort your
programs by name, date, or category. You can also
delete a recorded program or series of programs and
check for any recording errors.
1 Press the Media Center Start button on the
remote control, select My TV, and then select
Recorded TV.
2 To organize all of your previously recorded
programs, select Sort by Date or Sort by Title.
3 To begin watching the program, select the recorded
program you want to watch, and then press OK on
the remote control.
Media Center places recorded TV programs in the
Recorded TV folder that is located in your Shared
Documents folder on your hard disk drive.
Using the More Information button with recorded TV programs
When you select a recorded TV program and then
press the More Information button on the remote
control, a menu appears with several options you
can select.
■ More Information (i) displays details about the
recorded TV show such as the title, the date and
time recorded, a summary of the program, and the
original date it was aired.
■ Play allows you to play the recorded program.
■ Delete allows you to delete the recorded program.
■ Record Series allows you to record other shows in
that series, if available.
i
■ Keep Until allows you to change the setting for
keeping the program until space is needed or until a
specific date, until you watch it or until you manually
delete it.
■ Copy to CD/DVD allows you to record this
program to CD or DVD.
■ Messenger allows you to access your instant
messaging login window.
■ Settings allows you to access the main Settings
window.
50 Microsoft Windows XP Media Center Edition 2005 Reference Guide
Page 61

Playing a recorded program on a non-HP Digital
Entertainment Center
1 Make sure the PC has Windows XP Service Pack 1
and DVD player software installed.
a Click Start and then click My Computer.
b Click Help and then click About Windows.
c In the About Windows dialog box, if you see
Service Pack 1 in the version information, go to
step 2. If not, you must install Windows XP
Service Pack 1. For more information go to:
http://www.microsoft.com
2 Make sure the PC has a media player that works
with Windows XP Service Pack 1, such as Windows
Media Player 9 or later. If Windows Media Player is
installed, check for software updates.
3 Download and install the update from Microsoft’s
Web site. Search for “Watch television shows
recorded by HP Digital Entertainment Centers on
other Microsoft Windows XP PCs.”
4 Open the media player program and then open the
digital video recording file (.dvr-ms extension) you
want to watch.
Recorded TV shows are stored by default in the Recorded
TV folder in the Shared Documents folder on the local
hard disk drive of an HP Digital Entertainment Center.
n
To play recorded TV programs in Windows
Media Player, a PC requires:
■ The Windows XP operating system.
■ Windows Media Player 9 or later.
■ A special Media Center codec file that may
be available through Windows Update (for
select models only).
TV Programs
Watching and Recording TV Programs 51
Watching and Recording
Page 62

Locating recorded TV programs on your hard disk drive
1 Click Start on the taskbar, and then
click My Computer.
2 Double-click the Shared Documents folder.
3 Double-click the Recorded TV folder.
4 Double-click your recorded TV program file.
5 Use the playback controls in Windows Media Player
to control the playback of your recorded TV
program.
Viewing recording errors
1 Press the Media Center Start button on the
remote control; select My TV.
2 Select Recorded TV.
52 Microsoft Windows XP Media Center Edition 2005 Reference Guide
3 Select Scheduled.
4 Select History.
Page 63

About Recording Errors
A recording error means that a program scheduled to
record is not recorded. This can occur for several
reasons. If your HP Digital Entertainment Center is turned
off and not in standby mode during the time the program
is scheduled to record, or if there is a recording conflict
with another scheduled program, a recording error
occurs. If you are watching live TV when the program is
scheduled to record and decline the prompt to change
channels, a recording error occurs.
For more information about troubleshooting
the recording conflicts, refer to Media Center
Help.
Common recording errors
Recording error Description of error
Redundant Program already exists in Recorded TV library or has been recorded and deleted in the
past eight weeks.
Missed HP Digital Entertainment Center was turned off during scheduled recording time.
Conflict Another program was scheduled to record at the same time.
Canceled You s el ec ted Don’t record on the Program Info menu and canceled the recording.
Repeat In Advanced Record, you selected First Run only for a series recording so any programs in
a series that are not first run are not recorded.
Error Unknown technical error:
n
TV Programs
Watching and Recording
Media Center failed to start the recorder.
TV signal was lost.
Failed communication with the set-top box.
Not enough space Hard disk drive is too full.
Deleted You deleted the program.
Not recorded Program was not recorded because of recording conflict or because of other error.
Partial Part of the program was recorded.
Watching and Recording TV Programs 53
Page 64

Resolving Recording Conflicts
Media Center can record only one TV program at a time.
If your HP Digital Entertainment Center includes one TV
tuner and you schedule two recordings for the same time,
a message appears telling you to resolve the conflict. If
you do not resolve the conflict, Media Center
automatically makes the selection just before the program
begins recording. Before the program records, a conflict
icon (a red circle with an exclamation point) is listed next
Recording priority rules
Media Center selects which program to record based on
the following priority rules:
1 A scheduled program that is not a rerun
2 The program that was scheduled first
3 Manual recordings
Often, Media Center is able to find an alternative date
and time for recording one of the programs so that both
programs can be recorded. If one recording partially
overlaps another, Media Center records to the end of the
first and then begins recording the second.
After you resolve a recording conflict, the conflict icon
continues to appear for the program that is not scheduled
to record so you can return to the conflict and reverse it, if
needed.
to the program in the Guide. Press the Media Center Start
button on the remote control, select My TV, Recorded
TV, and then select Scheduled.
To enable Media Center to resolve recording conflicts,
you can set up how program recordings are handled.
When you try to record a program and another is
scheduled at the same time, Media Center prompts you to
choose a program to record.
If you are watching TV while recording a program, you
can watch only the channel being recorded. If a
recording is scheduled to begin and you are watching a
different channel, a message appears giving you the
choice to change the channel to begin the recording. If
no choice is made, the channel changes automatically.
n
If two recordings are in conflict, but one is
scheduled to air at another time, Media
Center displays a message with the option to
record an alternate recording of one of the
programs.
54 Microsoft Windows XP Media Center Edition 2005 Reference Guide
Page 65

Resolving a recording conflict
1 Press the Media Center Start button on the
remote control, select My TV, Recorded TV, and
then select Scheduled.
2 Select a program you want to change.
3 Select Resolve Conflict and then select the show
you want to record.
Or
Select Record settings, and then Change
settings.
Or
Select a recording option: Do not record, Record
Series, or Other Showings to find other times it is
playing.
Deleting TV Programs
n
To select the recording start and stop times
and other recording priority settings, select
Record settings or Series settings, and then
select the option you want.
TV Programs
Deleting a scheduled program or series
To prevent recording conflicts, you may need to delete a
program or series that is scheduled to be recorded.
1 Press the Media Center Start button on the
remote control, select My TV, Recorded TV, and
then select Scheduled.
2 Use the arrow buttons to select the program title you
do not want to record, and press OK.
3 To remove a single program, select Do not record
in the window, and press OK on the remote control.
Or
To remove the entire series from the recording
schedule, select Series, Cancel Series, and then
press OK.
Watching and Recording TV Programs 55
Watching and Recording
Page 66

Deleting a recorded program or series
To free up hard disk drive space, you may need to delete
a program or series that has been recorded.
1 Press the Media Center Start button on the
remote control, select My TV, and then select
Recorded TV. A list of all the programs you have
recorded and saved appears.
3 To remove the selected program from the hard disk
drive, select Delete.
4 Select Yes.
2 To select the program title you want to delete, use the
arrow button to highlight the program title, and then
press OK.
Setting Parental Controls
Blocking unwanted TV programs and movies
(Select models only)
If you set Media Center to block unrated channels, an
error can occur. It is recommended that you make sure
this option is not selected.
To do th is :
1 Press the Media Center Start button on the
remote control.
2 Select Settings, General, and then select
Parental Controls.
6 Select Advanced to select more restrictive ratings to
block such things as fantasy violence, suggestive
dialogue, offensive language, and sexual content.
7 Select Yes, and then select Save.
3 Enter your four-digit code number.
4 Select TV Ratings.
5 Select Turn on TV blocking by selecting the area
next to Turn on TV blocking to display a check mark.
Make sure that Block unrated TV programs is
not selected.
Parental control and caption display settings
for TV and DVDs are included with select
models only.
56 Microsoft Windows XP Media Center Edition 2005 Reference Guide
n
Page 67

Setting movie/DVD ratings
(Select models only)
1 Press the Media Center Start button on the
remote control.
2 Select Settings, General, and then select
Parental Controls.
6 Select (+) or (–) next to the rating that is currently
selected to change the movie rating.
7 Select Save.
3 Enter your four-digit code.
4 Select Movie/DVD Ratings.
5 Select Turn on movie blocking by using the
arrow buttons on the remote control to select the area
to the left of Turn on movie blocking. A check mark
appears when it is selected.
Some DVDs do not have ratings assigned
to them.
Changing parental control access code
(Select models only)
1 Press the Media Center Start button on the
remote control.
2 Select Settings, General, and then select
Parental Controls.
3 Enter your four-digit code, and select Change
Access Code.
4 Enter a new four-digit code twice, and then click OK.
n
TV Programs
Watching and Recording
Watching and Recording TV Programs 57
Page 68

Setting Caption Display
(Select models only)
If you set Media Center to display captions while in
window mode (not full-screen mode), the window or the
caption text may flash as the text scrolls in the window. To
fix this problem, change the display to full-screen mode or
turn off the caption display option.
To turn off the caption display option:
1 Press the Media Center Start button on the
remote control.
2 Select Settings, TV, and then select Audio.
Displaying Teletext
(Select models only)
To display the Teletext toolbar:
1 While watching TV in full-screen mode, press
the More Information (i) button on the remote
control to display the information bar.
2 Select the Teletext button on the information bar.
The Teletext toolbar will also appear at the bottom of
the screen so that you can navigate the Teletext
pages.
3 Click (+) or (–) next to the current Caption display
setting to change it. You can select:
■ On to view speech as text in a TV program
containing the captioning signal.
■ On when muted to display speech in a muted
TV program.
■ Off to disable caption display.
4 Select Save.
i
n
The Teletext feature may not be supported in
some countries/regions.
For more information about the Teletext toolbar, refer to
the Help menu in Media Center.
58 Microsoft Windows XP Media Center Edition 2005 Reference Guide
Page 69

About Teletext
Teletext is additional information that is broadcast within
a TV signal in some countries/regions. You can navigate
the Teletext main page and subpages to find information
such as the weather, sports scores, or community events.
You can turn on subtitles in a specific language for a
program you are watching. When a TV show is
recorded, the Teletext subtitles are stored with the
recording so you can view the subtitles when you play the
recording later.
Teletext may not be available for all the channels you
receive. The Teletext button will only display on the
information bar if Teletext is available for that channel. If
you would like more information about which channels
have Teletext available, contact your TV service provider.
Safeguarding Recorded TV Programs
Most television broadcasters do not encrypt programs, so
a recording can be played on any HP Digital
Entertainment Center. A recording of a broadcasterencrypted TV program, though, can be played only on
the PC that recorded it.
When you record TV programs using Media Center, the
TV program broadcaster may have an encryption code
that Microsoft includes as a special code in the recorded
files. This code is keyed to your HP Digital Entertainment
Center and is required to play broadcaster-encrypted TV
programs previously recorded to your hard disk drive,
copied to DVD, or copied to other media. When you
perform a system recovery or replace the hard disk drive
in your HP Digital Entertainment Center, you lose the
special code.
You can safeguard your capability to play recorded TV
programs by making a backup CD and using it as
described in the procedures provided here. Make the
backup CD now, before you need it, so that you can use
the CD after you perform a system recovery or replace
the hard disk drive in your HP Digital Entertainment
Center. If you do not have the backup CD after you
perform a system recovery or replace the hard disk drive,
you will not be able to play any previously recorded TV
programs that are broadcaster-encrypted.
The procedures that follow describe how to prepare your
HP Digital Entertainment Center, make the backup files
you need, copy the file to CD, and use the backup CD to
restore the files to your HP Digital Entertainment Center
after a system recovery.
To safeguard your recorded TV programs you need to:
■ Prepare the code key files.
■ Make a backup CD.
■ Perform a system recovery, if necessary.
■ Use the code key backup CD after a system recovery.
TV Programs
Watching and Recording
Important information about recorded TV programs
When you replace the hard disk drive, you lose any files
or software that you created, saved, or installed on the
HP Digital Entertainment Center. You also lose a special
code that Microsoft includes in the files of the recorded TV
programs.
Without the code, Media Center will not play the TV
programs previously recorded to disk or copied to DVD
or to other media.
Watching and Recording TV Programs 59
Page 70

Preparing the code key files
n
The code key files and backup CD you make
can be used in your Digital Entertainment
Center only.
1 After you set up your HP Digital Entertainment Center
and turn it on, complete the initial Microsoft
Windows setup. Open Media Center and complete
its setup.
2 Record at least one TV program.
3 Close Media Center.
4 Open the Microsoft Backup utility: Click Start on the
taskbar, choose All Programs, Accessories,
System Tools, and then click Backup. The Backup
or Restore Wizard opens.
5 Click the Advanced Mode link near the middle of
the window.
6 At the top of the Backup Utility window, click Tools
and select Options.
7 Click the Exclude Files tab.
60 Microsoft Windows XP Media Center Edition 2005 Reference Guide
Page 71

8 In the Files excluded for all users box, put your cursor
over the vertical line between Filename and
Application in the title bar, and then click and drag
the line to the right to see the full list of entries.
9 Scroll down the list to see and then click the entry:
C:\Documents and Settings\All Users\
DRM\*
10 Click Remove, click Apply, and then click OK.
The Options window closes.
11 In the Backup Utility window, click the Backup tab.
12 In the left box, click the plus sign (+) for Local Disk
(C:). The file tree expands. Click the plus sign (+) for
Documents and Settings, click the plus sign (+) for All
Users, and then click the DRM box so a check mark
appears.
13 Scroll down the list and click the System State box
so a check mark appears.
14 At the bottom of the window, beneath Backup media
or file name, click Browse. Because a diskette is too
small to save the backup file on, you will need to
save the file to the desktop portion of the hard disk
drive before writing the file to CD. If the message
Insert a disk into drive A appears, click Cancel.
15 The Save as window opens. In the Save as type box,
select Desktop from the drop-down list. In the Save
as box, use the default name (Backup.bkf) or type a
file name with the extension .bkf and then click
Save. The window closes.
16 Click Start Backup in the Backup Utility window.
The Backup Job Information window opens.
17 Click Start Backup. The Backup Progress window
opens. When the process finishes, the window
displays the message The backup is complete.
18 Click Close.
19 Close the Backup Utility window. Continue with the
next procedure.
TV Programs
Watching and Recording
Watching and Recording TV Programs 61
Page 72

Making the backup CD
1 Click Start on the taskbar, choose All Programs,
RecordNow!, and then click RecordNow!
again. The RecordNow! window opens.
2 Insert a blank CD.
3 Select the Data Projects tab, and then click
Data Disc.
4 Click Continue.
5 Click Add Files and Folders. The Select files and
folders to add window opens.
6 In the Look in box, select Desktop from the drop-
down list.
7 Click the backup file (for example, Backup.bkf) so it
appears in the File name box. Click Add. The
window closes.
8 In the RecordNow! window, click the red Burn icon.
If a warning window opens, click OK.
9 Wait while the program writes to the CD and the disc
tray ejects.
10 Remove the CD, label it, and store it in a safe place
for use with the next procedure. Click Done.
11 Close the RecordNow! window.
12 Because you do not need the backup file you
created, drag the file to the Recycle Bin on the
desktop. This deletes the copy of the file that was on
the hard disk drive.
Using the code key backup CD after a system recovery
1 Insert the backup CD you made into a drive. The
drive window opens and shows the disc contents.
Or
If the window does not open automatically, click
Start, My Computer, and then right-click the drive
icon to view the contents of your backup disc.
2 Double-click the backup file (for example,
Backup.bkf). The Backup or Restore Wizard opens.
5 When the What to restore window opens, click
Browse, and the Browse window shows the
(A:) drive.
6 Click Browse again, and the window shows Select
file to catalog.
7 Click the drop-down menu arrow, and click the
optical drive with the backup CD.
8 Click the backup file name.
3 Click Next.
4 Choose Restore files and settings, and then
click Next.
9 Click Open and then click OK.
10 In the Items to restore box, click the plus sign (+) for
the backup file name. The file tree expands. Click the
C box so a check mark appears. Click the System
State box so a check mark appears.
62 Microsoft Windows XP Media Center Edition 2005 Reference Guide
Page 73

11 Click Next.
12 The Backup or Restore Wizard window shows the
message You have created the following restore
settings. In the window, click the Advanced button.
Click Next.
15 Wait until the process completes, and then click
Close in the Restore Progress window.
16 A Backup Utility message window opens. Click Yes
to restart the HP Digital Entertainment Center. Wait
until the restart completes.
13 A warning message window opens. Click OK in the
Warning window.
Open Media Center and complete the setup. You can
now play previously recorded TV programs that are
broadcaster encrypted.
14 Select Replace existing files and then click
Next. Click Next again. Click Finish. The Restore
Progress window opens.
Using Two TV Tuner Cards
(Select models only)
Your HP Digital Entertainment Center can support two
analog antennae (NTSE, PAL, or SECAM), two analog
cables (no set-top box), two cable set-top boxes, or two
satellite TV set-top boxes. You cannot set up the tuners to
different TV signal sources, such as satellite and antenna.
Both TV tuners must be connected to the same signal
source. For example, you must use an antenna, cable,
two cable boxes, or two satellite set-top boxes for both
tuner inputs.
With two TV tuners, your HP Digital Entertainment Center
can record two programs at the same time. You can also
watch live TV while recording a program on another
channel.
TV Programs
Watching and Recording
Recording two programs at the same time
(Select models only)
1 Press the Media Center Start button on the
remote control.
2 Select My TV, and then select Guide.
3 Use the arrow buttons to select a show to record, and
then press the Record button on the remote control.
4 Select a second show to record at the same time,
and then press the Record button again.
5 Follow any onscreen instructions.
Watching and Recording TV Programs 63
Page 74

Watching live TV and recording a different channel at the same time
(Select models only)
1 Press the Media Center Start button on the
remote control.
2 Select My TV, and then select Guide.
4 Select a second show to watch, and then press the
OK button to begin watching it.
5 Follow any onscreen instructions.
3 Use the arrow buttons to select a show to record, and
then press the Record button on the remote control.
Managing Hard Disk Drive Space
The space available for recording TV programs depends
on your hard disk drive allocation, drive size, and default
recording quality selections. The HP Digital Entertainment
Center requires a certain amount of space to run your
Windows XP operating system, run software programs,
and store data files. If your hard disk drive becomes full,
it may affect the HP Digital Entertainment Center speed
and performance. You may need to free up storage space
to record more programs or to optimize the performance
of your HP Digital Entertainment Center. There are several
things you can do to optimize and increase your
available hard disk drive space.
The size of your HP Digital Entertainment
Center hard disk drive depends on your
model.
n
64 Microsoft Windows XP Media Center Edition 2005 Reference Guide
Page 75

Increasing hard disk drive space
■ Adjust TV recording and recorder storage settings.
See “Adjusting TV recording and storage settings”
on page 65.
■ Use the Disk Cleanup Utility. See “Using the Disk
Cleanup utility” on page 66.
■ Adjust the System Restore settings. See “Adjusting
System Restore settings” on page 66.
■ Delete recorded TV programs from the Recorded TV
folder in Shared Documents. See “Deleting recorded
TV programs” on page 67.
■ Uninstall software programs. See “Uninstalling
software programs that are not needed” on
page 67.
■ Archive TV programs to a DVD if your HP Digital
Entertainment Center has a DVD Writer drive. See
“Copying Recorded TV Programs to DVD” on
page 131.
■ Archive TV programs to an HP Personal Media Drive.
See “Recording TV programs to the HP Personal
Media Drive” on page 183.
Adjusting TV recording and storage settings
1 Press the Media Center Start button on the
remote control.
2 Select Settings, TV, and then select Recorder.
3 Select Recorder Storage to change your Disk
allocation and Recording quality settings. Increase
the percentage of hard disk drive space available for
recorded TV programs in Default Settings.
TV Programs
Or
Select Recording Defaults to change your
recording storage settings. Select Fair as the default
recording quality. The better the quality of the
recording, the more space the file takes. Select Until
I watch as the Keep setting for each recorded
program.
n
The storage space for your Digital
Entertainment Center may differ from the
amount listed here.
Watching and Recording
Watching and Recording TV Programs 65
Page 76

4 Use your arrow buttons on the remote control to
select the (+) or (–) next to the recording default
setting to change your options. Press OK on the
remote control to change the setting.
5 Select Save.
Using the Disk Cleanup utility
1 Click Start on the taskbar.
3 Select the drive you want to clean up, and then
2 Choose All Programs, Accessories, System
Tools, and then Disk Cleanup.
4 Select the type of files you want to delete, and then
Adjusting System Restore settings
1 Click Start on the taskbar.
2 Right-click My Computer.
3 Click Properties.
4 Select the System Restore tab.
5 Select a drive, and then click the Settings button.
6 Move the slider under Disk space to use to a lower
7 Click OK, and then click OK again.
click OK.
click OK.
setting to save disk space.
66 Microsoft Windows XP Media Center Edition 2005 Reference Guide
Page 77

Deleting recorded TV programs
1 Click Start on the taskbar, and then click My
Computer.
2 Double-click Shared Documents, and then
double-click Recorded TV.
3 Right-click recorded TV files, and then select Delete.
To delete a recorded TV program from within Media
Center, see “Deleting a recorded program or series” on
page 56.
Uninstalling software programs that are not needed
1 Click Start.
2 Click Control Panel.
3 Double-click Add or Remove Programs, if it is
present.
4 Click the program, and then click the Change/
Remove button.
5 Click Yes when the confirmation window opens.
6 Repeat steps 4 and 5 for each program you want to
remove.
7 Click Close.
TV Programs
Watching and Recording TV Programs 67
Watching and Recording
Page 78

Content Protection Update
Media Center will protect content based on all widely
known flags delivered in NTSC, PAL, DVD, and other
formats. All protected programs are encrypted to the
HP Digital Entertainment Center via time-limited Digital
Rights Management (DRM) based licenses.
Some DVD movies and other programs that are broadcast
are copy-protected. A Copy Never message may be
displayed if the content cannot be recorded or archived
to disc.
For more information about protected content and other
restrictions about transferring or copying digital media,
refer to Media Center Help or go to the Microsoft Web
site at: http://www.microsoft.com
68 Microsoft Windows XP Media Center Edition 2005 Reference Guide
Page 79

Playing Music Files
The HP Tunes and My Music areas in Media Center are
great ways to play, organize, and back up your music
files. HP Tunes is designed to work with the Apple iTunes
program in your All Programs menu, and My Music is
designed to work with the Windows Media Player
program.
HP Tunes
With HP Tunes, you can play your favorite music you
have added to your iTunes music Library. For more
information about using HP Tunes, see “Using HP Tunes
with Media Center” on page 70.
n
When a CD is in your drive, it takes longer to
open HP Tunes. Also, you must be in HP Tunes
to play your iTunes music files from within
Media Center. If you leave this area, your
music files stop playing.
HP Tunes is designed to work with Apple iTunes
Playing Music Files 69
Playing Music Files
Page 80

My Music
With My Music, you can find and play your favorite
music files and CDs you have added to the Windows
Media Player Library. For more information about using
My Music, see “Using My Music with Media Center” on
page 78.
My Music is designed to work with Windows
Media Player.
Using HP Tunes with Media Center
iTunes is an Apple-developed software program located
in your All Programs menu that works together with the
HP Tunes area in Media Center. HP Tunes is linked to
your Apple iTunes music Library. Both programs work
together to organize and play back your favorite music
files, CDs, and created playlists.
HP Tunes menu in Media Center
70 Microsoft Windows XP Media Center Edition 2005 Reference Guide
Page 81

Some tasks you must do in the iTunes program with your
trackball and keyboard, and some tasks you can do from
within Media Center with your remote control. For
example, you must add music files to the iTunes music
Library before you can access them in HP Tunes in Media
Center. Also, you can record your playlists to CDs in the
iTunes program but not in Media Center.
For more information on using the iTunes
program, refer to the HP support Web site at:
http://www.hp.com/support
n
Adding Music to the iTunes Library
To create your iTunes music Library, you can import music
files from a CD, download iTunes music files from the
iTunes Music Store or the Internet, or import them from
your hard disk drive.
If your songs don’t appear in HP Tunes, make
sure your songs are added to the iTunes
Library. You may need to close and open
Media Center to update your display.
n
Adding music files from a CD in iTunes
1 With your trackball, click Start on the
Windows taskbar, choose All Programs, iTunes,
and then click iTunes.
2 Insert an audio CD.
3 Select your CD under the Source menu.
4 Make sure the songs you want to add to your library
are selected. A check mark appears next to the song
when it is selected.
5 Click the Import icon in the toolbar to
bring the songs into the library.
Playing Music Files
Playing Music Files 71
Page 82

Adding music files from a CD in HP Tunes
1 Press the Media Center Start button on the
remote control, and then select HP Tunes.
2 Insert a CD.
4 Under CD Playlists select your CD title.
5 Select Copy CD. Your CD is copied into the iTunes
Library and is accessible in HP Tunes.
3 Select Playlists.
Adding music files from the Internet
For more information about downloading music from the
iTunes Music store, refer to the Help menu in the iTunes
program.
1 Connect to the Internet.
2 Follow the online instructions to download your
songs. If songs are downloaded from the iTunes
Music Store, they appear in your iTunes Library.
3 If songs are downloaded to your desktop, drag them
into the iTunes Library. If the files are in an
unprotected .wma format, they are encoded into
.aac files by default (or into the importing format you
select from the Preferences menu) and placed into the
library.
4 To change your import format:
5 Select Library. Songs are listed alphabetically or by
the sort order of the library column heading you
select.
If your songs are listed as track numbers
instead of names, make sure the HP Digital
Entertainment Center is connected to the
Internet so iTunes can look up the song and
album names.
n
a Click the Edit menu, and then select
Preferences.
b Select the Importing tab.
c Select the Import Using drop-down menu, and
then select an import format.
72 Microsoft Windows XP Media Center Edition 2005 Reference Guide
Page 83

Adding music files from your hard disk drive
If the music files are in another format, iTunes will
automatically convert most files to the .aac format before
it adds them to your iTunes Library.
1 Click Start on the taskbar, choose All
Programs, iTunes, and then click iTunes.
2 If your music file is on the desktop, select the file and
drag it into the iTunes Library.
Or
Using supported music file types
You can play the following types of digital audio files in
iTunes. By default, iTunes converts several file types to
.aac files when you import them into the iTunes Library.
Some file types, such as protected .wma files and other
proprietary file types, cannot be played in iTunes.
Media Center cannot play .aac files from My Music.
With iTunes, you can share .mp3, .aiff, .wav, and .aac
files between other computers on a local network.
File extension File type
.aac Apple Lossless Encoder
.aiff Apple Compressed Encoded
.wav Windows audio file
.mp3 Audio files
Click the File menu, and then select Add File
to Library. Click the drop-down arrow to browse
for your music files. Select your file, and then
click Open.
n
MP3 files are the most compatible music file
format for playing back on most PCs and
other audio playback devices.
n
You can select Media Center as the default
player for any of the listed file types. Refer to
iTunes Help for information about supported
file types.
Playing Music Files 73
Playing Music Files
Page 84

Changing song name, genre, artist, or album in iTunes
For more information about changing name, genre, artist,
or album information with iTunes, refer to the Help menu
in the iTunes program. It is not possible to make these
changes from within HP Tunes in Media Center.
Playing CDs with HP Tunes
When you insert a CD that has not been added to your
iTunes music Library, it will be listed under Playlists or
Albums. If it has been added to your library, it will be
displayed under Songs, Albums, Artists, or Genres.
1 Press the Media Center Start button on the
remote control, and then select HP Tunes.
2 Insert a CD.
3 Select Playlists or Albums.
4 Scroll through the displayed playlists or albums, and
then select your CD title. If the songs on this CD
weren’t added to your iTunes music Library, this
playlist or album will disappear when you eject
the CD.
n
For more information about music file
compatibility with iTunes, go to the iTunes
Help menu.
74 Microsoft Windows XP Media Center Edition 2005 Reference Guide
Page 85

Creating a Playlist with iTunes
A playlist is a customized list of songs that you saved
together and can play later or record to CD. Using
playlists, you can group various digital music files
together and determine the order in which you want the
files to play.
You can create a playlist that includes several tracks from
various CDs or even a playlist that contains background
music for a slide show.
You can use iTunes or HP Tunes in Media Center to create
playlists.
1 Click Start on the taskbar, choose All
Programs, iTunes, and then click iTunes again.
2 Click File, and then select New Playlist.
3 Type a name for your playlist.
4 Select Library.
5 Drag your music files from the library to your
Playlist icon.
6 Select the Playlist icon to check whether your songs
were added. Your playlist is now available in the
HP Tunes area of Media Center.
n
If your playlist doesn’t appear in HP Tunes,
make sure your songs are in your iTunes
library. You may need to close and open
Media Center to update your display.
Playing Music Files 75
Playing Music Files
Page 86

Creating and Editing a New Playlist with HP Tunes
A queue (or Now Playing) list is a temporary list of songs
that are scheduled to be played in the order they were
selected. A queue list acts like a group of songs you select
to play on a jukebox. You can continue to add songs, or
you can delete songs from your queue list. You also have
the option of saving your queue list as a playlist.
1 Press the Media Center Start button on the
remote control, and then select HP Tunes.
2 Select Songs.
3 Use the arrow buttons on the remote control to select
a song, and then press OK on the remote control to
place a check mark next to the song.
4 Select Add to Queue.
5 Press the Back button on the remote control to return
to the queue list. Click View Queue and then Edit
Queue to select songs to move or delete.
Or
Repeat steps 2 through 4 to add more songs to your
queue list.
n
Once you create a queue list, you can save it
as a playlist that you can play again and
again.
76 Microsoft Windows XP Media Center Edition 2005 Reference Guide
Page 87

Creating Music CDs with iTunes
To create a music CD using iTunes:
1 With your trackball, click Start on the Windows
taskbar, choose All Programs, select iTunes, and
then click iTunes.
2 Click the Edit menu, and select Preferences.
3 Click the Burning tab, and choose Audio CD as
the disc format.
4 Click the Use Sound Check check box if you
would like all songs on the CD to play at the same
volume level, and click OK.
5 Click the File pull-down menu, and select New
Playlist.
6 Enter a name for your new playlist, and an empty
playlist window opens.
7 Drag and drop selected songs from your source to
your new playlist.
8 Click the Burn Disc icon in the toolbar
area. When the disc is finished recording,
the Burn Disc icon disappears.
9 Insert a blank CD-R disc into your drive
(double-layer DVD+R discs are not compatible).
For more information about creating music CDs with
iTunes, click the Help menu in the iTunes menu bar. For
help online, go to: http://www.hp.com/support
n
iTunes music files cannot be recorded to
double-layer DVD media.
n
IMPORTANT: HP supports the lawful use of
technology and does not endorse or
encourage the use of our products for
purposes other than those permitted by
copyright law.
10 Click Burn Disc to begin recording your playlist.
Playing Music Files
Playing Music Files 77
Page 88

Using My Music with Media Center
You can copy digital music files and organize a music
library by using My Music in Media Center or by using
the Windows Media Player program.
Music files that are added from within My Music in
Media Center are copied into the Windows Media
Player Library and are then accessible from within
Media Center.
In My Music you can:
■ Play CDs or selected music tracks from your created
Windows Media Player Library that you access in
Media Center.
■ Select and edit a personalized queue list of songs
from your library.
■ Delete songs from a music library or queue list.
■ Burn your favorite songs to CDs.
■ Back up your music tracks to a DVD or to an
HP Personal Media Drive.
My Music menu in Media Center
n
You can store your music files in the My Music
folder or in other folders on your hard disk
drive, but you need to add those files to the
Windows Media Player Library for Media
Center to be able to find and play them.
78 Microsoft Windows XP Media Center Edition 2005 Reference Guide
Page 89

Adding Music to My Music Library
When you add music files to your My Music library, they
are placed into the music library in Windows Media
Player. The added music files can immediately be found
and played back by using My Music in Media Center.
You can also add music files to your music library from
within the Windows Media Player program. For more
information about adding and deleting music files to
the library, use the Windows Media Player Help menu.
Adding music files from your hard disk drive
1 Press the Media Center Start button on the
remote control, and then select My Music.
2 Press the More Information button on the remote
control, and select Add Music.
3 Select Add folders, and then select Next.
4 Select Add folders on this computer, and then
select Next.
5 Use the arrow buttons on the remote control to
select a location. Press the OK button to expand a
folder. When you find the folder that contains your
music folder, select it by making sure an arrow
appears next to the folder. Repeat this step to add
additional folders, and then select Next and then
select Finish.
Playing Music Files 79
Playing Music Files
Page 90

Adding music files from a CD
To add the CD tracks to your Media Center music library:
1 Press the Media Center Start button on the
remote control, and then select My Music.
2 Insert a CD into the CD drive.
3 Select Albums.
4 Select the Album CD you want to add to your music
library.
5 Select Copy CD. The first time you copy a music
CD you must select your copy-protection option,
and then follow any onscreen instructions.
6 Select Yes to begin copying tracks to your music
library. This process may take several minutes,
depending on the length of your music tracks.
7 Click OK.
n
Each time you add music files outside of
Windows Media Player, you must use the
Tools menu to add music files to your
Windows Media Player Library for Media
Center to find them.
80 Microsoft Windows XP Media Center Edition 2005 Reference Guide
Page 91

Deleting music files from the My Music library
1 Press the Media Center Start button on the
remote control, and then select My Music.
2 Select Songs.
Using supported music file types
You can play the following types of digital audio files in
My Music. Refer to Windows Media Player Help for more
information about supported file types.
File extension File type
.cda CD audio
.wav Windows audio file
.mp3, .m3u MP3
.asx, .wm, .wma,
.wmv, .wmp, .wmx
Windows Media audio
files
3 Use the arrow buttons on your remote control to scroll
through your songs. Select the song you want to
delete, and then press OK on the remote control.
4 Select Delete, and then select Yes.
n
For more information about music file
formats, use Windows Media Player Help
and Media Center Help.
Only supported audio file types are
displayed in the My Music window.
Unsupported files won’t play.
Playing Music Files 81
Playing Music Files
Page 92

Playing Music Files in My Music
When you first open Media Center and open the My
Music window, you may not find any music files listed
unless there is a music CD in your CD drive or unless you
have already added audio files to your Windows Media
Player Library.
When you copy music files using Windows Media Player
and your computer is connected to the Internet, the CD
information is copied and displayed in Media Center and
in the Windows Media Player Library.
If you insert a music CD when Media Center is not open,
a message appears asking what you want to do. You can
select Windows Media Player as your default audio
player. If you have another program set as the default
audio player, Windows opens the program and begins
playing the CD.
n
You can place all your music files into the My
Music folder or into other folders on your
hard disk drive, but you need to add those
files to the Windows Media Player Library for
Media Center to be able to find and
play them.
82 Microsoft Windows XP Media Center Edition 2005 Reference Guide
Page 93

Playing an album in My Music
1 Press the Media Center Start button on the
remote control.
2 Select My Music.
3 Insert a music CD into the CD drive.
4 Select Albums.
5 Select the album you want to play.
6 Select Play.
Playing a song in My Music
You can play a song from anywhere in My Music. You
can select it from the View Song list, or from the Album,
Artist, and Genre lists. You can also play a single song
from a playlist:
1 Press the Media Center Start button on the
remote control.
2 Select My Music.
3 Select Songs. The list displays all the songs in your
library.
4 Use the arrow buttons to select a song, and then
press OK on the remote control to play it.
n
You can select Visualize in the Now Playing
window to see a visualization while you play
a music track.
Playing Music Files
Playing Music Files 83
Page 94

Creating a Queue List in My Music
A queue list is a temporary list of songs that is created in
My Music as you select songs, albums, or playlists to
play. You can continue to add songs or you can delete
songs from your queue list.
You can create a queue list and save it as a playlist that
you can access in Media Center.
1 From the My Music window:
■ Select Songs, and then use the arrow keys to
select a song you want, and then select Add to
Queue.
Or
■ Select Albums or Playlists, select an album or
a playlist, and then select Add to Queue to
add the entire album or playlist to the queue.
2 Use the Back button on the remote control to go back
to the Songs, Albums, or Playlists menu if you want to
select more songs to add to your queue list. Repeat
step 1.
3 After you add the last song for your queue list, select
Play. All songs in your queue list are played in the
order you have selected them.
Finding and Playing an Album in My Music
1 In the Media Center Start menu, select My Music,
and then select Albums.
2 Use the arrow buttons to select an album, and then
press OK on the remote control. You can also press
Play on the remote control to play the album. The
Now Playing window opens, and the album starts
playing.
3 In the Play window, you can also select:
■ Buy Music to connect to the Internet, find CD
information, and buy music CDs. To go back to
Media Center, press Start on the remote control.
■ Visualize to view a picture while listening to
asong.
4 To return to the previous window, press Back on the
remote control.
■ View Cover to view cover art and play one
track.
■ View Queue to view an ordered list of all
tracks that will be played on the album.
■ Shuffle to rearrange the play order.
■ Repeat to play the album again.
■ Copy CD to copy an album into your Media
Library.
When you select Buy Music, your Internet
browser opens the Microsoft Web site. Here
you’ll find information about the artist or
album you’re currently listening to or similar
artists. You have the option to purchase CDs.
84 Microsoft Windows XP Media Center Edition 2005 Reference Guide
n
Page 95

Creating a Playlist in My Music
A playlist is a customized list of songs you can keep to
play later or record to CD. Using playlists, you can group
various digital music files together and determine the
order in which you want the files to play.
You can create a playlist that includes several tracks from
various CDs or even a playlist that contains background
music for a slide show.
You can create playlists in Windows Media Player or
from within Media Center.
To create a playlist:
1 Select My Music, and then select either Albums,
Artists, Playlists, Songs, or Genres.
2 Use the arrow buttons to navigate to the music you
want to add to your playlist.
3 Press OK to select a song.
4 Select Add To Queue. A confirmation displays that
the music was added to the list of music in the queue.
5 Select the inset window in the lower-left corner to go
to the Queue.
6 On the Queue screen, select Edit Queue, and then
select Save As Playlist.
7 Use the numeric keypad to enter a name for the
playlist, and then select Save.
n
If your HP Digital Entertainment Center is
connected to the Internet, the CD track titles
and cover art appear in Media Center.
Playing Music Files 85
Playing Music Files
Page 96

Copying Music Files to CD in My Music
To copy your music files to CD:
1 Press the Media Center Start button on the
remote control, and select More Programs.
2 Insert a blank CD-R disc.
3 Select Create CD/DVD.
4 Use the arrow buttons on the remote control to select
the Untitled text box.
5 Use the numeric keypad buttons on the remote
control to enter a name for your CD, and then
select OK.
6 Select Music.
7 Select the music files to record. A check mark
appears next to the song when it is selected. Use the
Back button on the remote control to select more
songs from different menus.
8 When you are finished adding songs, select View
CD to see the songs you have selected. If you want
to delete songs, use the arrow buttons on the remote
control to select the X next to the song you want to
delete. Press OK on the remote control to delete the
song from your list of songs to be recorded to CD.
This does not delete the song from your library.
9 Select Create CD.
10 Select Yes.
IMPORTANT: HP supports the lawful use of
technology and does not endorse or
encourage the use of our products for
purposes other than those permitted by
copyright law.
n
86 Microsoft Windows XP Media Center Edition 2005 Reference Guide
Page 97

Deleting music files from the My Music library
To delete your music files:
1 Press the Media Center Start button on the
remote control, and then select My Music.
2 Select Songs.
3 Use the arrow buttons on your remote control to scroll
through your songs. Select song you want to delete
and then press OK on the remote control.
4 Select Delete.
5 Select Yes.
Editing song and album information
1 Press the Media Center Start button on the
remote control, and then select My Music.
2 Select the song or album you want to edit.
3 Select Edit Info.
4 Use the arrow buttons and the numeric keypad on
the remote control to enter new information about the
song or album.
5 Select Save.
Selecting a Visualization
To select which visualization to display when you play
asong:
1 Press the Media Center Start button on the
remote control, select Settings.
2 Select Music.
3 Select Visualization Options.
4 Use the arrow buttons to select the visualization
settings you want, and then press OK on the remote
control change the setting.
5 Select Save.
Playing Music Files
Playing Music Files 87
Page 98

88 Microsoft Windows XP Media Center Edition 2005 Reference Guide
Page 99

Working with Pictures
Use the HP Image Zone Plus and My Pictures areas in
Media Center to view and print your pictures.
HP Image Zone Plus
HP Image Zone Plus is a software program located in
your All Programs menu that works together with the
HP Image Zone Plus area in Media Center. Both
programs work together to organize, search for, and
display your digital images. It is designed to organize
your photos, scanned images, and video clips by date,
keyword, or place. For more information about using
HP Image Zone Plus, see “Using HP Image Zone Plus in
Media Center” on page 91.
Working with Pictures
Work in g wi th Pic tures 89
Page 100

My Pictures
With My Pictures, you can view and print your pictures
from the folders you create in the My Pictures directory in
Windows Explorer. For more information about using My
Pictures, see “Using My Pictures in Media Center” on
page 101.
Working with Digital Images
You can connect a digital image source, such as a digital
camera or a digital video camera, directly to the
HP Digital Entertainment Center or through a docking
station. Most digital picture files you copy or download
from the device appear in the My Pictures folder.
You can copy digital picture files from the memory cards
used by digital cameras and other digital imaging
devices by using the memory card reader (select
models only).
90 Microsoft Windows XP Media Center Edition 2005 Reference Guide
 Loading...