

Page 1

HP XP P9000 External Storage Access Manager User Guide
Abstract
This manual provides instructions and information for setting up, using, and maintaining External Storage Access Manager on
the P9500 storage systems.
HP Part Number: AV400-96607
Published: January 2014
Edition: Eighth
Page 2

© Copyright 2011, 2014 Hewlett-Packard Development Company, L.P.
Confidential computer software. Valid license from HP required for possession, use or copying. Consistent with FAR 12.211 and 12.212, Commercial
Computer Software, Computer Software Documentation, and Technical Data for Commercial Items are licensed to the U.S. Government under
vendor's standard commercial license.
The information contained herein is subject to change without notice. The only warranties for HP products and services are set forth in the express
warranty statements accompanying such products and services. Nothing herein should be construed as constituting an additional warranty. HP shall
not be liable for technical or editorial errors or omissions contained herein.
Acknowledgements
Intel®, Itanium®, Pentium®, Intel Inside®, and the Intel Inside logo are trademarks or registered trademarks of Intel Corporation or its subsidiaries
in the United States and other countries.
Microsoft®, Windows®, Windows® XP, and Windows NT® are U.S. registered trademarks of Microsoft Corporation.
Adobe® and Acrobat® are trademarks of Adobe Systems Incorporated.
Oracle is a registered US trademark of Oracle Corporation, Redwood City, California.
UNIX® is a registered trademark of The Open Group.
Export Requirements
You may not export or re-export this document or any copy or adaptation in violation of export laws or regulations.
Without limiting the foregoing, this document may not be exported, re-exported, transferred or downloaded to or within (or to a national resident
of) countries under U.S. economic embargo, including Cuba, Iran, North Korea, Sudan, and Syria. This list is subject to change.
This document may not be exported, re-exported, transferred, or downloaded to persons or entities listed on the U.S. Department of Commerce
Denied Persons List, Entity List of proliferation concern or on any U.S. Treasury Department Designated Nationals exclusion list, or to parties directly
or indirectly involved in the development or production of nuclear, chemical, biological weapons, or in missile technology programs as specified
in the U.S. Export Administration Regulations (15 CFR 744).
Warranty
WARRANTY STATEMENT: To obtain a copy of the warranty for this product, see the warranty information website:
http://www.hp.com/go/storagewarranty
Revision History
DescriptionDateEdition
Applies to microcode version 70-02-01-00/00 or later.May 2011First
Applies to microcode version 70-02-5x-00/00 or later.September 2011Second
Applies to microcode version 70-03-00-00/00 or later.November 2011Third
Applies to microcode version 70-03-30-00/00 or later.April 2012Fourth
Applies to microcode version 70-03-30-00/00 or later.August 2012Fifth
Applies to microcode version 70-03-30-00/00 or later.November 2012Sixth
Applies to microcode version 70-06-00-00/00 or later.July 2013Seventh
Applies to microcode version 70-06-11-00/00 or later.January 2014Eighth
Page 3

Contents
1 External Storage Access Manager overview...................................................7
How ESAM works.....................................................................................................................7
ESAM components....................................................................................................................8
P9500 storage systems.........................................................................................................8
Main and remote control units...............................................................................................9
Pair volumes........................................................................................................................9
Data paths..........................................................................................................................9
Quorum disk.......................................................................................................................9
Multipath software ..............................................................................................................9
Remote Web Console GUI..................................................................................................10
RAID Manager (RAID Manager)..........................................................................................10
Data replication.....................................................................................................................10
Failover ................................................................................................................................10
2 System implementation planning and system requirements .............................11
The workflow for planning External Storage Access Manager implementation.................................11
Required hardware ................................................................................................................11
Multipath software .................................................................................................................12
Storage system requirements ...................................................................................................12
Licenses ................................................................................................................................12
License capacity ....................................................................................................................12
Pair volume requirements ........................................................................................................13
Quorum disk requirements ......................................................................................................14
Data path requirements and recommendations...........................................................................14
Remote Web Console requirements...........................................................................................15
External storage systems .........................................................................................................15
Planning failover.....................................................................................................................16
Preventing unnecessary failover................................................................................................17
Sharing volumes with other HP software products........................................................................17
Cache Partition .................................................................................................................18
Cache Residency...............................................................................................................19
Performance Monitor .........................................................................................................19
LUN Manager...................................................................................................................19
Open Volume Management................................................................................................19
LUN Expansion .................................................................................................................19
Configurations with Business Copy volumes ..........................................................................19
Configuring ESAM with Business Copy.............................................................................19
Configurations with Continuous Access Journal volumes .........................................................20
Configuring ESAM with Continuous Access Journal............................................................20
3 System configuration.................................................................................21
The basic workflow for configuring the system configuration.........................................................21
Connecting the hardware components.......................................................................................21
Prerequisites......................................................................................................................22
The workflow for connecting the hardware components...........................................................22
Installing and configuring software............................................................................................22
Additional documentation...................................................................................................23
Prerequisites......................................................................................................................23
The workflow for installing and configuring External Storage Access Manager...........................23
Configuring the primary and secondary storage systems..............................................................23
Additional documentation...................................................................................................23
Prerequisites......................................................................................................................24
Contents 3
Page 4

Workflow..........................................................................................................................24
Configuring the quorum disks...................................................................................................24
Prerequisites......................................................................................................................24
Procedure.........................................................................................................................24
Adding the ID for the quorum disk to the storage systems.............................................................25
Prerequisites......................................................................................................................25
Procedure.........................................................................................................................25
Configuring host mode options.................................................................................................26
Prerequisites......................................................................................................................26
Procedure.........................................................................................................................26
4 Working with volume pairs........................................................................27
Workflow for ESAM volume pairs.............................................................................................27
Reasons for checking pair status...............................................................................................27
When to check pair status?......................................................................................................27
How pair status reflects system events and use............................................................................27
What pairs information can you view and where is it?.................................................................28
Where to find the information..............................................................................................29
How hosts see volume pairs.....................................................................................................29
Checking pair status ..............................................................................................................29
Pair status values....................................................................................................................30
Split types (PSUS status)......................................................................................................32
Suspend types (PSUE status)................................................................................................32
Volume pair creation ..............................................................................................................33
Creating an ESAM pair .....................................................................................................33
Prerequisites.................................................................................................................33
Procedure....................................................................................................................33
To verify host recognition of the ESAM P-VOL and S-VOL..............................................................35
How multipath software shows storage serial number for pairs......................................................36
Splitting pairs ........................................................................................................................36
Prerequisites......................................................................................................................36
Procedure.........................................................................................................................36
Resynchronizing pairs.............................................................................................................37
Reverse resynchronization....................................................................................................38
Prerequisites.................................................................................................................38
Procedure....................................................................................................................38
Releasing a pair.....................................................................................................................38
Changing Continuous Access Synchronous pairs to ESAM pairs ...................................................39
Requirements.....................................................................................................................40
Procedure.........................................................................................................................40
Comparison of the RAID Manager commands and Remote Web Console......................................41
5 System maintenance.................................................................................43
Applications used to perform maintenance tasks.........................................................................43
Required Remote Web Console settings................................................................................43
Related documentation............................................................................................................43
The different types of maintenance tasks....................................................................................43
Switching paths using multipath software .............................................................................43
Discontinuing ESAM operations ..........................................................................................43
Quorum disk ID deletion ....................................................................................................44
Deleting quorum disk IDs (standard method).....................................................................44
Deleting quorum disk IDs by system attribute (forced deletion).............................................45
Recovery of accidently deleted quorum disks.........................................................................45
Recovering the disk when the P-VOL was receiving host I/O at deletion................................45
Recovering the disk when the S-VOL was receiving host I/O at deletion................................46
Planned outages for system components................................................................................46
4 Contents
Page 5

Options for performing the planned outages.....................................................................46
The procedures for performing planned outages................................................................47
Performing planned outages (quorum disk only) ...............................................................47
Performing planned outages (primary storage system and quorum disk)................................48
Performing planned outages (secondary storage system and quorum disk)............................49
Performing planned outages (both storage systems and quorum disk)...................................50
6 Disaster recovery......................................................................................51
Main types of failures that can disrupt your system......................................................................51
The basic recovery process......................................................................................................51
System failure messages..........................................................................................................51
Detecting failures....................................................................................................................51
Option 1: Check for failover first..........................................................................................51
Using Remote Web Console to check for failover...............................................................52
Using RAID Manager to check for failover........................................................................52
Using multipath software to check for failover....................................................................52
Option 2: Check for failures only.........................................................................................52
Determining which basic recovery procedures to use...................................................................53
Selecting Procedures..........................................................................................................53
Recovery from blocked pair volumes.........................................................................................54
Recovering from primary volume failure on the MCU..............................................................54
Recovering from secondary volume failure on the MCU...........................................................55
Recovering from primary volume failure on the RCU...............................................................56
Recovering from secondary volume failure on the RCU ...........................................................57
Recovery from quorum disk failure............................................................................................57
Replacement of quorum disks..............................................................................................57
Replacing a quorum disk when the MCU is receiving host I/O............................................57
Replacing a quorum disk when the RCU is receiving host I/O.............................................58
Recovery from power failure.....................................................................................................59
primary storage system recovery..........................................................................................59
Recovering the system when the RCU is receiving host I/O updates......................................59
Recovering the system when host I/O updates have stopped...............................................60
Secondary system recovery.................................................................................................61
Recovering the system when the P-VOL is receiving host updates..........................................61
Recovering the system when host updates have stopped.....................................................61
Recovery from failures using resynchronization............................................................................62
Required conditions............................................................................................................62
Determining which resynchronization recovery procedure to use...............................................62
Prerequisites.................................................................................................................63
Procedure....................................................................................................................64
Recovering primary volume from Business Copy secondary volume...........................................64
Prerequisites.................................................................................................................64
Procedure....................................................................................................................64
Recovering secondary volume from Continuous Access Journal primary volume .........................64
Prerequisites.................................................................................................................65
Procedure....................................................................................................................65
Postrequisites.....................................................................................................................65
Recovering from path failures ..................................................................................................65
Allowing host I/O to an out-of-date S-VOL.................................................................................66
Recovery for pairs shared by multiple hosts with VMware.............................................................66
7 Using ESAM in a cluster system..................................................................68
Cluster system architecture.......................................................................................................68
Required software...................................................................................................................68
Supported cluster software.......................................................................................................68
Configuration requirements .....................................................................................................69
Contents 5
Page 6

Configuring the system............................................................................................................69
Disaster recovery in a cluster system..........................................................................................69
Restrictions ............................................................................................................................70
8 Troubleshooting........................................................................................71
Potential causes of errors ........................................................................................................71
Is there an error messages for every type of failure? ...................................................................71
Where do you look for error messages?....................................................................................71
Basic types of troubleshooting procedures..................................................................................71
Troubleshooting general errors ................................................................................................71
Suspended volume pair troubleshooting ....................................................................................73
The workflow for troubleshooting suspended pairs when using Remote Web Console..................73
Troubleshooting suspended pairs when using RAID Manager .................................................74
Location of the RAID Manager operation log file...............................................................74
Example log file............................................................................................................74
Related topics...............................................................................................................76
Recovery of data stored only in cache memory...........................................................................76
Pinned track recovery procedures.........................................................................................76
Recovering pinned tracks from volume pair drives...................................................................76
Recovering pinned tracks from quorum disks .........................................................................76
9 Support and other resources......................................................................77
Contacting HP........................................................................................................................77
Subscription service............................................................................................................77
Documentation feedback....................................................................................................77
Related information.................................................................................................................77
HP websites......................................................................................................................78
Conventions for storage capacity values....................................................................................78
Typographic conventions.........................................................................................................78
Rack stability..........................................................................................................................79
A Conventions............................................................................................80
Business Copy and Snapshot volumes.......................................................................................80
B ESAM GUI reference.................................................................................81
Pair Operation window...........................................................................................................81
Possible VOL Access values for pairs....................................................................................83
Detailed Information dialog box...........................................................................................84
Paircreate(ESAM) dialog box...............................................................................................86
Pairsplit-r dialog box..........................................................................................................88
Pairresync dialog box.........................................................................................................88
Pairsplit-S dialog box..........................................................................................................89
Quorum Disk Operation window .............................................................................................90
Add Quorum Disk ID dialog box.........................................................................................91
Glossary....................................................................................................93
Index.........................................................................................................95
6 Contents
Page 7
1 External Storage Access Manager overview
ESAM ensures high availability of host applications used in P9500 (P9500) storage systems. ESAM
provides protection against the loss of application availability when input and output (I/O) failures
occur in the primary storage system by automatically switching host applications from the primary
storage system to the secondary storage system and by enabling recovery from the failures that
caused the I/O failure.
ESAM is designed for recovery from on-site disasters such as power supply failure. Continuous
Access Synchronous is suited to large-scale disaster recovery.
How ESAM works
ESAM uses Continuous Access Synchronous software to create a synchronous remote copy of a
production volume. But where Continuous Access Synchronous is suited to large-scale disaster
recovery, ESAM is intended for recovery from on-sight disasters such as power supply failure.
Because of this, ESAM is configured differently than a typical Continuous Access Synchronous
configuration.
• The ESAM primary and secondary storage systems are connected to the same host. When
an ESAM pair is created, the host sees the primary and secondary volumes as the same
volume.
• ESAM requires multipath software to be installed on the host. In the event that the host cannot
access the production volume on the primary storage system, host I/O is redirected via the
host multipath software to the secondary volume on the remote system. Failover is accomplished
without stopping and restarting the application.
• ESAM is used on open host systems only.
• An ESAM pair consists of a primary data volume (P-VOL) on the primary storage system and
a secondary data volume (S-VOL) on the secondary storage system (like Continuous Access
Synchronous). The S-VOL is the copy of the P-VOL.
• ESAM uses a quorum disk located on an external storage system, which keeps track of
consistency between the P-VOL and S-VOL. Consistency data is used in the event of an
unexpected outage of the data path or primary storage system. In this case, the differential
data in both systems is compared and, if the pairs are consistent, host operations continue on
the secondary storage system.
How ESAM works 7
Page 8
ESAM components
A typical configuration consists of two P9500 storage systems installed at the primary and secondary
sites. In addition, the ESAM system consists of the following components:
• ESAM and Continuous Access Synchronous software, which are installed on both systems.
• A host server running a multipath software solution, qualified with ESAM software, that is
connected to both storage systems.
• Dedicated Fibre Channel data paths linking the primary and secondary storage systems, with
Fibre Channel switches.
• A qualified external storage system to host the quorum disks. This storage system must be
accessible to both the primary and secondary storage systems.
• The following interface tools for configuring and operating the pairs:
Remote Web Console (RWC) graphical user interface (GUI), located on a management
◦
LAN.
◦ RAID Manager (RAID Manager), located on the host.
ESAM components are illustrated in the following figure and described in more detail in the
following topics.
P9500 storage systems
ESAM operations are conducted between P9500 (P9500) and another storage system on the
primary and secondary sites. The primary storage system consists of the main control unit (MCU)
and service processor (SVP). The secondary storage system consists of the remote control unit (RCU)
and SVP.
The primary storage system communicates with the secondary storage system over dedicated Fibre
Channel remote copy connections.
8 External Storage Access Manager overview
Page 9

Main and remote control units
Like Continuous Access Synchronous, ESAM replication relationships exist at the Logical Control
Unit (LCU) level within the storage systems.
• Primary storage system LCUs containing the production volumes to be replicated are called
MCUs (main control units).
• Secondary storage system LCUs containing the copy volumes are called remote control units
(RCUs).
Normally the MCU contains the P-VOLs and the RCU contains the S-VOLs.
The MCU communicates with the RCU via the data path. You can simultaneously set P-VOL and
S-VOL in the same storage system if the volumes are used by different pairs. In this case, the CU
can function simultaneously as an MCU for the P-VOL and as an RCU for the S-VOL.
The MCU is often referred to as the primary storage system in this document; the RCU is often
referred to as the secondary storage system.
Pair volumes
Original data from the host is stored in the P-VOL; the remote copy is stored in the S-VOL. Data is
copied as it is written to the P-VOL; new updates are copied only when the previous updates are
acknowledged in both primary and secondary volumes.
Once a pair is created, you can do the following:
• Split the pair, which suspends copy activity.
• Resynchronize the pair, which restores and maintains synchronization.
• Delete the pair, which removes the pair relationship, though not the data.
Data paths
The physical links between the primary and secondary storage systems are referred to as the "data
path." These links include the Fibre Channel interface cables and switches. ESAM commands and
data are transmitted through the data path. The data path links the primary and secondary storage
systems through two types of Fibre Channel ports, Initiator and RCU Target ports.
Because paths are one-directional, and ESAM communicates in both directions, a minimum of two
data paths are needed; however, HP requires a minimum of two in each direction for greater
support and security of the data. A maximum of eight data paths in each direction are supported.
Therefore, the maximum number of logical paths between any two storage systems is sixteen (eight
forward and eight reverse).
Quorum disk
The quorum disk is a continuously updated volume that contains information about the state of data
consistency between the P-VOL and S-VOL. The information is used by ESAM in the event of failure
to direct host operations to the secondary volume. The quorum disk is located in an externally
attached storage system.
Multipath software
Multipath software distributes the loads among the paths to the current production volume. For
ESAM, the multipath software duplicates the paths between the host and P-VOL, so that the paths
are in place between the host and the S-VOL also.
If a failure occurs in the data path to the primary storage system, or with the primary storage
system, the multipath software transfers host operations to the S-VOL in the secondary storage
system.
ESAM components 9
Page 10
Remote Web Console GUI
You perform ESAM tasks using the RWC graphical user interface. RWC is installed on a
management computer. It communicates with the SVP of each storage system over defined TCP/IP
connections.
RAID Manager (RAID Manager)
You can run commands using RAID Manager to perform pair tasks, which is installed on the host.
You run commands from a command device on the host. Disaster recovery operations use a mix
of RWC and RAID Manager.
Data replication
ESAM supports data sharing between the following volumes:
• A volume in the primary P9500 system and a volume in secondary P9500 system.
• Volumes in external storage systems.
• A volume in the primary or secondary storage system and a volume in an external storage
system.
Failover
A failover is an automatic takeover of operations from the primary storage system to the secondary
storage system. This occurs when the primary storage system cannot continue host operations due
to a failure in either the data path or the primary storage system. The multipath software in the
host switches I/O to the remote system. A multipath software package that has been qualified with
ESAM must be installed on the host.
10 External Storage Access Manager overview
Page 11

2 System implementation planning and system requirements
Understanding the system planning process and the various requirements of ESAM enables you
to plan a system that functions properly and can be configured to meet your business needs over
time.
The workflow for planning External Storage Access Manager implementation
The process for planning your ESAM implementation involves these two main tasks:
• Plan and configure the volume pairs, data path configurations, bandwidth sizing, RAID
configuration.
For more information, see the HP XP P9000 Continuous Access Synchronous User Guide.
• Follow all of the ESAM requirements and recommendations.
There are major differences between ESAM and Continuous Access Synchronous. For example,
use of the quorum disk and multipath software on the host are specific to ESAM.
NOTE: HP strongly recommends that you contact Global Solutions Services for assistance in the
planning and configuration of your HP system.
Required hardware
The following hardware is required for an ESAM system:
• Storage systems must be installed on the primary and secondary sites.
• ESAM pairs can be set up between the following HP systems. Note the required microcode
versions.
◦ Two P9500s, on the primary and secondary sites (70-01-62-XX/XX or later)
◦ A P9500 (70-03-0X-XX/XX or later) and XP24000 (60-05-0x or later). Either storage
system can be on the primary or secondary site.
• A host must be connected to both primary and secondary storage systems.
• An external storage system for the quorum disk.
• External storage system for data storage (optional).
• Data path connections between primary and secondary storage systems.
• A physical path connection between the primary storage system and the external system
hosting the quorum disk.
• A physical path connection between the secondary storage system and the external system
hosting the quorum disk.
• Path connections from host to primary and secondary storage systems. Multipath software
must be installed on each host server for this purpose.
• If necessary, physical path connections between external storage and primary and/or
secondary storage systems.
The workflow for planning External Storage Access Manager implementation 11
Page 12

Multipath software
A multipath software package qualified with ESAM is required on each host platform for failover
support. Hitachi's multipath software, Dynamic Link Manager, supports the following host platforms:
• AIX
• Linux
• Solaris
• Windows. Requires host mode option 57 on the host group where Windows resides.
• VMware. Requires host mode option 57 on the host group where VMware resides.
Dynamic Link Manager manages I/O through a disk driver.For version information, contact your
HP representative.
Storage system requirements
The requirements for the primary, secondary, and external storage systems must be met to ensure
these systems function properly.
• Make sure that the primary, secondary, and external storage systems have their own
independent sources of power.
• The ESAM P-VOL and S-VOL must be located in different storage systems.
• Primary and secondary storage systems each require two initiator ports and two RCU target
ports.
• If you use switches, prepare them for both the primary and the secondary storage systems.
• Secondary storage system cache should be configured to support remote copy workloads, as
• Cache and non-volatile storage (NVS) must be operable for both the MCU and RCU. If not,
• The required program products for ESAM operations must be installed.
Licenses
The following HP software products must be installed on both the primary and secondary storage
systems. Each product each requires a license key.
◦ The initiator port sends ESAM commands to the paired storage system. Initiator ports must
be configured on the primary storage system for ESAM operations. However, for disaster
recovery, you should also configure initiator ports on the secondary storage system.
◦ RCU Target port receives ESAM commands and data. RCU target ports must be configured
on the secondary storage system for ESAM operations. You should also configure RCU
target ports on the secondary storage system for disaster recovery.
Additional microprocessors for replication links may be required based on replication workload.
Do not share a switch between the two. Using two independent switches provides redundancy
in the event of failure in one.
well as any local workload activity.
the ESAM Paircreate RAID Manager command will fail.
• External Storage Access Manager
• Continuous Access Synchronous
• External Storage
License capacity
A single ESAM license must be purchased for each P9500 system. The ESAM license is not capacity
based. The capacity of the Continuous Access Synchronous license determines the capacity of
12 System implementation planning and system requirements
Page 13

ESAM volumes that may be replicated. Review the Continuous Access Synchronous license installed
on your system to verify that it meets your requirements.
For example, when the license capacity for Continuous Access Synchronous is 10GB, the volume
capacity that can be used for ESAM is up to 10GB. When 2GB out of 10GB of license capacity
for Continuous Access Synchronous is used, the volume capacity that can be used for ESAM is up
to the remaining 8GB.
For information on licenses and the actions to take for expired licenses and exceeded capacity,
see the HP XP P9000 Remote Web Console User Guide.
Pair volume requirements
Data in the P-VOL on the primary storage system is copied to the S-VOL on the secondary storage
system. These two volumes are a pair.
The following are requirements for setting up P-VOLs and S-VOLs:
• LDEVs for the P-VOL and S-VOL must be created and formatted before creating a pair.
• The volumes must have identical block counts and capacity.
• A P-VOL can be copied to only one S-VOL; and an S-VOL can be the copy of only one P-VOL.
• Maximum number of pairs per storage system is 65,536.
The number of ESAM pairs that can be created depends on whether Continuous Access
Synchronous and/or Continuous Access Journal are used in the same storage system. ESAM,
Continuous Access Synchronous, and Continuous Access Journal share the same bitmap areas
used to manage differential data, which affects number of pairs. If one or both of these products
are used, the maximum number of the ESAM pairs allowed is than 65,536 and must be
calculated.
For instructions, see the topic on difference management in the HP XP P9000 Continuous
Access Synchronous User Guide.
• The emulation type for P-VOLs and S-VOLs is OPEN-3, OPEN-8, OPEN-9, OPEN-E, OPEN-L,
and OPEN-V.
• Multiple LU paths to each volume must be set using LUN Manager.
For instructions, see the HP XP P9000 Provisioning for Open Systems User Guide.
• If you are storing data in an external volume or volumes, make sure the external volumes are
mapped to the primary or secondary storage system they support.
• If you plan to create multiple pairs during the initial copy operation, observe the following:
All P-VOLs must be in the same primary storage system, or in mapped external systems.◦
◦ All S-VOLs must be in the same secondary storage system, or in mapped external systems.
◦ You can specify the number of pairs to be created concurrently during initial copy
operations (1 to 16).
For more information about the System Option dialog box, see the topic on changing
option settings in the HP XP P9000 Continuous Access Synchronous User Guide.
◦ During the initial pair operation in RWC, you will select multiple P-VOLs on the primary
storage system for pairing. After selecting the P-VOL, only the P-VOL with the lowest LUN
appears in the subsequent Paircreate dialog box. To pair the other P-VOLs to the correct
S-VOLs, observe the following:
- In the Paircreate dialog box, you can select only one S-VOL. This should be the volume
to be paired with the P-VOL that is shown.
- S-VOLs for the remaining P-VOLs are assigned automatically by RWC, according to their
LUNs. If you are creating three P-VOLs, and you assign LUN001 as the S-VOL in the
Pair volume requirements 13
Page 14

Paircreate dialog box, the remaining S-VOLs will be assigned incrementally by LUN (for
example, LUN002 and LUN003).
- Make sure that all S-VOLs to be assigned automatically are available, are numbered in
an order that will pair them properly, and that they correspond in size to the P-VOLs.
- If an S-VOL is not available for a P-VOL, the pair must be created individually.
Quorum disk requirements
Quorum disks store continually-updated information about data in ESAM P-VOLs and S-VOLs for
use during failover operations.
• All ESAM pairs created between one MCU and one RCU must use the same quorum disk.
Thus, The P-VOL and S-VOL for a pair must use the same quorum disk.
• A quorum disk must be located in an external storage system that is separate from the primary
and secondary storage systems.
• Only external storage systems supported by External Storage can be used for the quorum
disk. see the HP XP P9000 External Storage for Open and Mainframe Systems User Guide
for a list of supported external systems.
NOTE: If the ESAM pair is created between P9500 and XP24000, the quorum disk must
be located in an external storage system supported by XP24000.
For a list of supported storage systems, see the HP XP 24000 External Storage User’s Guide.
• Multiple quorum disks can be created in one external storage system.
• The maximum number of quorum disks per external system is 128.
• The external system is not required to be dedicated to quorum disks exclusively.
• Quorum disk size requirements: 47 MB to 4 TB (96,000 blocks to 8,589,934,592 blocks).
• The quorum disk must not be expanded or divided by LUN Expansion or Hitachi Virtual
LVI/LUN.
• An LU path must not be configured to the quorum disk.
• Read/Write operations from the storage system to the quorum disk are for internal use. These
operations are performed even when Write Pending operations reach 70%.
CAUTION: Quorum disks are used in a unique way in that they are shared with two storage
systems. For data protection reasons, make sure not to share any other kind of volume with two
storage systems.
Data path requirements and recommendations
Data is transmitted from the P-VOL to the S-VOL over the data path. Please observe the following
requirements and recommendations:
• Data path requirements for ESAM are the same as Continuous Access Synchronous
requirements.
For more information, see the HP XP P9000 Continuous Access Synchronous User Guide.
• Do not share the data paths with Continuous Access Synchronous. Install independent data
paths for ESAM.
• Install at least two data paths from the primary storage system to the secondary storage system,
and two data paths from the secondary storage system to the primary storage system. This
allows data transfer to continue in the event of failure one path's cables or switches.
• Optical fibre cables are required to connect the primary and secondary storage system.
14 System implementation planning and system requirements
Page 15

• Direct and switch connections are supported.
• Use target ports in the primary and secondary storage systems to connect with the host Fibre
Channel ports.
Initiator ports cannot be used for host connections.
For more information about port attributes, see the topic on configuring host interface ports
in the HP XP P9000 Continuous Access Synchronous User Guide.
• The following table shows maximum, minimum, and recommended number of data paths,
logical paths, and ports for ESAM.
RecommendedMax.Min.ItemCategory
Physical Data
Paths
Ports
host.
quorum disk.
system and quorum disk).
connected to an initiator port.
system target port.
Remote Web Console requirements
The following requirements must be met to ensure that you are able to use RWC to manage the
system:
• RWC is required for ESAM.
2 or more41Path between primary/secondary systems and a
2 or more81Data path from primary to secondary system.
2 or more81Data path from secondary to primary system.
2 or more81Path between primary/secondary systems and
2 or more81From primary to secondary system.Logical Paths
2 or more81From secondary to primary system.
2 or more81Mapping path (path between primary/secondary
641Secondary system target port that can be
161Initiator port that can be connected to a secondary
• You can connect a RWC computer to both the primary and secondary storage system.
• You must have storage administrator authority to perform ESAM tasks. If you do not, you will
only be able to view ESAM information.
• To perform any ESAM task, make sure RWC is in Modify Mode.
For more information, see the HP XP P9000 Remote Web Console User Guide.
External storage systems
You can use HP storage systems, original equipment manufacturer (OEM) storage systems, and
other vendors' storage systems (such as IBM or EMC) as connectable external storage systems.
Hosts will recognize these volumes as internal volumes of the P9500 storage system.
Remote Web Console requirements 15
Page 16
When using external storage systems with ESAM, please observe the following:
• Optional external storage systems may be used to store pair data.
For supported external systems, see the HP XP P9000 External Storage for Open and Mainframe
Systems User Guide.
• You can connect one external system per ESAM P-VOL, and one per S-VOL.
• The maximum number of external systems that can be connected depends on the number of
the external ports that can be defined for a storage system.
Planning failover
Automatic failover of host operations to the secondary storage system is part of the ESAM system.
Failover occurs when the primary storage system cannot continue I/O operations due to a failure.
The multipath software in the host switches I/O to the secondary storage system.
• The multipath software automatically configures the path to the P-VOL as the owner path when
you create an ESAM pair.
• The path to the S-VOL is automatically configured as the non-owner path.
In the ESAM system, the quorum disk stores the information about the state of data consistency
between the P-VOL and S-VOL, which is used to check whether P-VOL or S-VOL contains the latest
data. If the P-VOL and S-VOL are not synchronized due to a failure, the MCU and RCU determine
which volume should accept host I/O based on the information stored in the quorum disk.
The following figure illustrates failover when a failure occurs at the MCU.
ESAM also performs the following checks to detect failures:
• The RCU issues service information messages (SIMs) when the data path is blocked. The
multipath software issues messages about the failure in the host-MCU paths.
• Health check of the quorum disk by the MCU and RCU. The primary or secondary storage
system issues a SIM if a failure in the quorum disk is detected. Host operations will not switch
to the S-VOL if the quorum disk fails. In this case, the failure must be cleared as soon as possible
and the quorum disk recovered.
• If the multipath software detects a failure in the host-to-pair volume paths, the operation switches
to a different available path and no SIM is issued. To stay informed about path status, monitor
the path failure messages issued by the multipath software.
• The multipath software issues message when all host-MCU paths fail. These messages must
then be checked and the cause corrected. If failover took place, host operations should be
switched back to the primary storage system.
16 System implementation planning and system requirements
Page 17

It is possible that maintenance operations require both storage systems to be powered off at the
same time. In this case, the health checking periods would be shortened to prevent unexpected
failover while both systems are powered off.
After failover, when a failure is corrected, you may continue operations on the S-VOL, though HP
recommends switching them back to the P-VOL. To find which volume was originally a P-VOL, use
the multipath software on the host to refer to path information, checking for the volume with the
owner path. The owner path is set to the volume that you specified as a P-VOL when you created
an ESAM pair. The owner path never switches even if the P-VOL and S-VOL were swapped due
to a failover.
Preventing unnecessary failover
Some applications issue the read command to the ESAM S-VOL. When these applications are
used, and when the number of read commands to the S-VOL reaches or exceeds the threshold
(1,000 times per six minutes), ESAM assumes that a P-VOL failure has occurred. This situation
results in an unnecessary failover to the ESAM S-VOL.
At this time, the Solaris VERITAS Volume Manager (VxVM) vxdisksetup command issues more
read commands than allowed by the threshold.
You can prevent unnecessary failover by setting host mode option 48 to ON. Note that when this
option is ON, the S-VOL responds slower to the read command.
Review system conditions and resulting behaviors related to host mode option 48 in the following
table.
Table 1 System behavior for host mode option 48
Normal operation.
The S-VOL receives more
read commands than
allowed by the threshold,
and receives no write
command.
more write commands.
Failover occurs only when you run certain
applications.
• Updates from a host go to S-VOL, and
S-VOL status becomes SSWS.
• •The S-VOL responds to the read
command as quickly as the P-VOL
responds.
• Updates from a host go to S-VOL, and
S-VOL status becomes SSWS.
• The S-VOL responds to the read
command as quickly as the P-VOL
responds.
For more information about setting host mode options, see the HP XP P9000 Provisioning for Open
Systems User Guide.
Sharing volumes with other HP software products
ESAM volumes can be used as volumes for other HP software products, such as Business Copy or
Virtual LUN.
The following table shows the ESAM volumes that can be shared with other software. Only those
volumes listed can be shared.
Behavior when ONBehavior when OFFEvent
No failover, even when you run the
applications.
• Updates from a host go to P-VOL, and
S-VOL status remains PAIR.
The S-VOL responds slower to the read
command than the P-VOL does. The
S-VOL takes several milliseconds to
respond.
Same as when option 48 is OFF.The S-VOL receives one or
Preventing unnecessary failover 17
Page 18

Table 2 Volume types that can be shared with ESAM volumes
Management
Used as ESAM S-VOL?Used as ESAM P-VOL?VolumesProduct
YesYesVolume where an LU path is definedLUN Manager
NoNoVolume where no LU path is defined
YesYesVolume where LUN security is applied
YesYesCustomized Volume volumeOpen Volume
NoNoSystem disk
YesYesLUSE volumeLUN Expansion
NoNoN/AVolume Shredder
YesYesTHP V-VOL (virtual volume)Thin Provisioning
NoNoPool volume
YesYesExternal volume (after mapping is finished)External Storage
YesNoBusiness Copy P-VOLBusiness Copy
NoNoBusiness Copy S-VOL
NoNoReserved volume
NoNoData volume, Virtual volume, Pool volumeFast Snap
NoNoData volume, virtual volume, pool volumeSnapshot
NoNoP-VOL, S-VOLContinuous Access
Synchronous
YesNoPrimary data volumeContinuous Access
Journal
NoNoSecondary data volume
NoNoJournal volume
NoNoSource volumeAuto LUN
NoNoTarget or reserved volume
YesYesVolume with the Read/Write attributeData Retention
NoNoVolume with attribute other than the above
NoNoN/ADatabase Validator
NoNoN/AMultiplatform Backup
The quorum disk cannot be used by other software products, except as follows:
• Cache Partition can allocate the CLPR (virtually partitioned cache) to the quorum disk when
you map the quorum disk to the storage system.
• Performance Monitor can monitor usage or performance of the quorum disk.
The following topics clarify key information regarding the use of other software products.
Cache Partition
Virtually partition the cache (CLPR), and allocate the CLPR to the host that issues the I/O to the
ESAM pairs.
18 System implementation planning and system requirements
Page 19
Cache Residency
With Cache Residency, you can improve data access performance by storing the ESAM data in
the storage system's cache memory.
Performance Monitor
• Performance Monitor is used to monitor usage or performance of the storage system. You can
also show statistical I/O data of ESAM and Continuous Access Synchronous pairs.
• When Performance Monitor data collection results in a large amount of data, significant traffic
on the P9500 internal LAN can occur. To prevent time-outs while performing ESAM operations
on the RWC computer, cancel Performance Monitor data collection activities.
LUN Manager
LU paths cannot be deleted after you create ESAM pairs. To delete the LU path, you need to release
the ESAM pair first.
Open Volume Management
• Customized Volume volumes can be assigned to ESAM pairs, provided that the S-VOL has
the same capacity as the P-VOL.
• To perform Customized Volume operations on an existing ESAM P-VOL or S-VOL, the pair
must be released first to return the volume to the SMPL status.
LUN Expansion
LUSE volumes can be assigned to ESAM pairs, provided that both P-VOL and S-VOL are LUSE
volumes consisting of the same number of LDEVs, the same size, and the same structure.
Configurations with Business Copy volumes
You can use the ESAM S-VOL as a Business Copy P-VOL. This configuration benefits the ESAM
pair if the P-VOL is logically destroyed. In this case, you can recover the data from the split Business
Copy S-VOL.
Configuring ESAM with Business Copy
You perform this configuration by creating an ESAM pair, a Business Copy pair, then splitting the
Business Copy pair.
1. Create the ESAM pair. Make sure that pair status becomes PAIR.
2. Create the Business Copy pair, using the ESAM S-VOL as a Business Copy P-VOL.
3. Split the Business Copy pair and resume host operations on the ESAM P-VOL.
Sharing volumes with other HP software products 19
Page 20
Configurations with Continuous Access Journal volumes
You can use the ESAM S-VOL as a Continuous Access Journal (Cnt Ac-J) P-VOL. This configuration
benefits the ESAM pair if data in the P-VOL and S-VOL become inconsistent due to a disaster. In
this case, you can recover the data from the split Cnt Ac-J S-VOL.
Configuring ESAM with Continuous Access Journal
You perform this configuration by creating an ESAM pair and a Cnt Ac-J pair.
1. Create the ESAM pair. Make sure that the pair status becomes PAIR.
2. Create the Cnt Ac-J pair. Specify the ESAM S-VOL as a Cnt Ac-J P-VOL.
20 System implementation planning and system requirements
Page 21

3 System configuration
The ESAM system configuration process is the first main task in the process of setting up the ESAM
system. It follows the planning of the system implementation and is based on the outcome of the
system implementation planning effort. All of the configuration procedures must be completed
before you can begin using the system.
The basic workflow for configuring the system configuration
The configuration process involves connecting the system hardware components, installing all
required software, configuring the primary and secondary storage systems, setting up the quorum
disk, and configuring host mode options.
Complete the configuration tasks in the indicated order and configure the components according
to the configuration requirements.
Use the following process to configure ESAM:
1. Connect the system hardware components.
For more information, see “Connecting the hardware components” (page 21).
2. Install the required software.
For more information, see “Installing and configuring software” (page 22).
3. Configure the primary and secondary storage systems (MCU and RCU).
“Configuring the primary and secondary storage systems” (page 23).
4. Set up a quorum disk.
For more information, see “Configuring the quorum disks” (page 24).
5. Add the quorum disk ID.
For more information, see “Adding the ID for the quorum disk to the storage systems” (page 25).
6. Configure host mode options.
For more information, see “Configuring host mode options” (page 26).
Connecting the hardware components
Connecting certain hardware components of the system is the first main task in the system
configuration. Completion of this task ensures that the data paths required for normal system
operation are set up and ready for use.
During this task, you and HP representatives connect the following system components:
• The host to the primary and secondary P9500 systems.
• The primary to the secondary storage system.
• The external system that has the quorum disk to the primary and secondary storage systems.
• Any optional external storage systems to the primary and/or secondary storage systems.
• Initiator ports (primary storage system) to the RCU Target ports (secondary storage system).
The basic workflow for configuring the system configuration 21
Page 22
Prerequisites
Before you begin, make sure you have:
• Completed the system implementation (see “System implementation planning and system
requirements ” (page 11)).
The workflow for connecting the hardware components
Use the following process to connect the hardware components for a ESAM system:
1. If you have external storage for storing pair data, connect the external systems to the external
ports on the P9500 systems.
2. Connect the host to the primary and secondary storage systems using target ports on the
P9500 systems.
3. Make the connections for the data path between the primary and secondary storage systems
by doing the following:
• Connect the initiator ports on the primary storage system to the RCU Target ports on the
secondary storage system.
• Connect the initiator ports on the secondary storage system to the RCU Target ports on
the primary storage system.
4. Connect the quorum disk to the primary and secondary storage systems using external ports
on the P9500 systems.
CAUTION: For data protection reasons, make sure that quorum disks are not shared by two
storage systems.
The following figure shows these connections.
Installing and configuring software
Installing and configuring the system software is the second main task in the system configuration.
Completion of this task ensures that all of the software required for normal system operation is
installed and ready for use. This task involves installing multipath software and RAID Manager on
the host and installing the main system software on the primary and secondary storage systems.
22 System configuration
Page 23

Additional documentation
To ensure that you use the correct steps to install the software, refer to the installation instructions
in the following documentation during the installation process:
• The documentation for the multipath software.
• The HP XP P9000 Remote Web Console User Guide.
• The HP XP P9000 RAID Manager Installation and Configuration User Guide.
Prerequisites
Before you begin, make sure you have:
• Connected the system hardware components (see “Connecting the hardware components”
(page 21)).
• The required software for ESAM is installed (see “System implementation planning and system
requirements ” (page 11)).
CAUTION: Make sure that you install the software in the order described in the procedure. If
you do not, you may have to uninstall and reinstall the software.
The workflow for installing and configuring External Storage Access Manager
Use the following process to install and configure ESAM and the required software:
1. Install multipath software on the host.
2. Using the multipath software, set the path health-checking period to three minutes.
3. Install the following required software on the primary and secondary storage systems using
RWC:
• External Storage Access Manager
• Continuous Access Synchronous
• External Storage
4. Install RAID Manager on the hosts.
Configuring the primary and secondary storage systems
Configuring the primary and secondary storage systems (MCU and RCU) is the third main task in
the system configuration. Completion of this task ensures that the systems are configured to enable
the communication and data transfer between the systems that is essential to normal system
operation. Part of this task is setting up the logical paths between the systems.
This task involves setting port attributes You can set the number of pairs the system creates
concurrently (at the same time) during this task This task involves installing multipath software and
RAID Manager on the host and installing the main system software on the primary and secondary
storage systems.
Additional documentation
To ensure that you use the correct steps to configure the systems, refer to these instructions in the
following documentation during the configuration process:
• Setting the number of volumes to be copied concurrently in the HP XP P9000 Continuous
Access Synchronous User Guide.
• Defining port attributes in the HP XP P9000 Continuous Access Synchronous User Guide.
• Configuring storage systems and defining logical paths in the HP XP P9000 Continuous Access
Synchronous User Guide.
Configuring the primary and secondary storage systems 23
Page 24

• Details about mapping the primary and secondary storage systems to the external system that
contains the in the HP XP P9000 Provisioning for Open Systems User Guide and HP XP P9000
External Storage for Open and Mainframe Systems User Guide.
• Details about CLPR in the HP XP P9000 Cache Partition User Guide.
• Details about external path groups in the HP XP P9000 External Storage for Open and
Mainframe Systems User Guide.
Prerequisites
Before you begin, make sure you have:
• Installed the multipath and system software (see “Installing and configuring software”
(page 22)).
Workflow
Use the following process to configure the primary and secondary storage systems:
1. Stop Performance Monitor, if it is running, to avoid performance impact on the TCP/IP network.
2. Set the port attributes for ESAM.
3. Configure the primary and secondary storage systems and establish logical paths between
the primary and secondary VSP systems.
Configuring the quorum disks
The quorum disk stores information about the data in the P-VOL and S-VOL. The quorum disk is
used to determine which pair volume has the latest data when a failover is required.
Instructions in this topic describe the following:
• How to configure a quorum disk
• How to configure port parameters for the quorum disk on the primary and secondary systems
Prerequisites
• The quorum disk must be located in an external storage system that is separate from the primary
and secondary storage systems. For all requirements, see “Quorum disk requirements ”
(page 14).
• If MCU and RCU system configuration has changed, you must reformat the quorum disk volume
in the external storage system.
• Multipath and system software must be installed. See “Configuring the primary and secondary
storage systems” (page 23).
Procedure
1. In the external storage system, prepare a volume for use as the quorum disk and specify any
required system options. See “Quorum disk requirements ” (page 14).
2. Using the External attribute, configure the ports on the primary and secondary storage systems
that are connected to the disk.
3. Set the paths from the disk to the primary and secondary storage systems to Active.
4. Using RWC’s Ports/Host Groups and External Storages windows, map the primary and
secondary storage systems to the disk by doing the following:
• Configure at least two cross-system paths between the primary storage system and quorum
disk, and two between the secondary storage system and the quorum disk.
• Specify the these external volume parameters:
- Emulation type: OPEN-V.
24 System configuration
Page 25

- Number of LDEVs: 1.
- Cache mode: This parameter is not used for quorum disks. Either Enable or Disable can
be specified.
- Inflow control: Select Disable. Data will be written in the cache memory.
- CLPR: If you partition cache memory, specify the CLPR that the quorum disk uses.
- LDKC:CU:LDEV number: The number is used to identify the quorum disk for the primary
and secondary storage systems.
5. In the External Path Groups tab in RWC, configure port parameters for the primary and
secondary storage systems by specifying the following values:
• QDepth: This is the number of Read/Write commands that can be issued (queued) to the
quorum disk at a time.
The default is 8.
• I/O TOV: This is the timeout value to the quorum disk from the primary and secondary
storage systems. The value must be less than the time-over value from the application.
Recommended: 15 seconds
Default: 15 seconds
• Path Blockade Watch: This is the time that you want the system to wait after the quorum
disk paths are disconnected before the quorum disk is blocked.
Recommended: 10 seconds; Default: 10 seconds.
Adding the ID for the quorum disk to the storage systems
Adding the ID for the quorum disk is the fourth main task in the system configuration. Completion
of this task ensures that the primary and secondary storage systems to which the disk has been
mapped can recognize the disk.
Prerequisites
Before you begin, make sure you have:
• Configured the quorum disk (see “Configuring the quorum disks” (page 24)).
Procedure
To ensure that the quorum disk ID is added correctly, make sure that:
• You complete the procedure on the primary and secondary storage systems.
• You use the same ID for the disk on both systems.
1. Delete any data in the external volume that you assigned to be the quorum disk.
2. Access the MCU or RCU in RWC, then click Actions > Remote Copy > Continuous Access
Synchronous > Quorum Disk Operation.
3. Make sure that you are in the modify mode.
4. In the Quorum Disk Operation window, right-click the quorum disk ID that you want to add,
then click Add Quorum Disk ID.
5. In Add Quorum Disk ID dialog box, from the Quorum Disk drop-down menu, select the
LDKC:CU:LDEV number that you specified when mapping the external volume. This is the
volume that will be used for the quorum disk.
6. From the RCU drop-down menu, select the CU that is to be paired with the CU on the current
storage system. The list shows the RCU serial number, LDKC number, controller ID, and model
name registered in CU Free.
7. Click Set. The settings are shown in the Preview area.
Adding the ID for the quorum disk to the storage systems 25
Page 26

8. Verify your settings. To make a correction, select the setting, right-click, and click Modify.
9. Click Apply to save your changes.
Configuring host mode options
Configuring host mode options is the last main task in the system configuration. Completion of this
task ensures that the host mode option setting are correct. The settings vary depending on the
whether the system is a standard or cluster implementation.
Prerequisites
Before you begin, make sure you have:
• Added the ID for the quorum disk to the storage systems (see “Adding the ID for the quorum
disk to the storage systems” (page 25)).
Procedure
Use the following host mode options for your system:
• If using VMware or Windows, set host mode option 57 on the host group where VMware or
Windows reside.
• If using software that uses a SCSI-2 Reservation, set host mode option 52 on the host groups
where the executing node and standby node reside.
For more information on host mode options, see the HP XP P9000 Provisioning for Open Systems
User Guide.
26 System configuration
Page 27

4 Working with volume pairs
A number of tasks must be performed on volume pairs as part of your normal ESAM system
maintenance activities, when troubleshooting system issues, or when taking action to recover from
failure.
Workflow for ESAM volume pairs
You perform several different types of tasks with volume pairs as part of your system maintenance
and recovery activities.
The different types of tasks include:
• Checking pair status.
• Creating pairs.
• Releasing pairs.
• Resynchronizing pairs.
• Splitting pairs.
All of the different pair-related tasks can be performed using RWC or RAID Manager.
Reasons for checking pair status
Pair status information indicates the current state or condition of the pair.
There are two main reasons for checking the current status of a volume pair. One is to verify the
status of the pair while you run pair RAID Manager commands during normal system maintenance
or failure recovery. The other reason is to check the status of pairs as part of your normal system
monitoring activities to ensure they are working properly.
When to check pair status?
You should check the status of volume pairs whenever you run pair RAID Manager commands and
as part of your normal system monitoring activities.
When you run pair RAID Manager commands, you check pair status:
• Before you run a pair RAID Manager command.
• During pair changes. Check pair status to see that the pairs are operating correctly and that
data is updating from P-VOLs to S-VOLs in PAIR status, or that differential data management
is happening in Split status.
NOTE: You can perform a pair task can only be completed if the pair is in a status that permits
the task. Checking the status before you run a RAID Manager command lets you verify that the
pair is in a status that permits the task.
How pair status reflects system events and use
The storage system records information about the current status of ESAM pairs. You can check the
current status of any volume pair at any time.
Status changes occur for the following reasons:
• Automatic system events, such as errors or failover situations.
• Administrator actions, such as creating, releasing, or deleting pairs.
The following figure shows ESAM pair status before and after pair creation, splitting pairs, various
errors, and after releasing a pair.
Workflow for ESAM volume pairs 27
Page 28
1. When a volume is not in an ESAM pair, its status is SMPL.
2. When you create an ESAM pair using SMPL volumes, the status of the P-VOL and the S-VOL
changes to COPY while the system copies the data.
3. A stable synchronized pair has the status PAIR.
4. When you split a pair, the status of the P-VOL and the S-VOL changes to PSUS (pair
suspended-split, split by command).
5. When the MCU cannot maintain in synch the P-VOL and the S-VOL because of an error, the
status of the P-VOL and the S-VOL changes to PSUE (pair suspended-error, split due to an
error). If the MCU cannot communicate with the RCU, the status of the S-VOL stays PAIR.
6. When a failover occurs in the storage system, the status of the S-VOL changes to SSWS, and
the status of the P-VOL changes to PSUS.
7. When you resynchronize the pair in PSUS or PSUE status (see No.4 and No.5), the status of
the P-VOL and the S-VOL changes to COPY.
8. When you resynchronize the pair with the S-VOL in SSWS status (see No.6), (using the RAID
Manager pairresync -swaps command on the S-VOL), the P-VOL and the S-VOL swap,
and the pair status changes to COPY.
9. When you release a pair, the status of the P-VOL and the S-VOL changes to SMPL.
What pairs information can you view and where is it?
You can monitor the following information for pairs:
• Percentage of synchronization (Sync. column)
• Pair details (Detailed Information dialog box)
Pair status◦
◦ Split types
◦ Suspend types
28 Working with volume pairs
Page 29
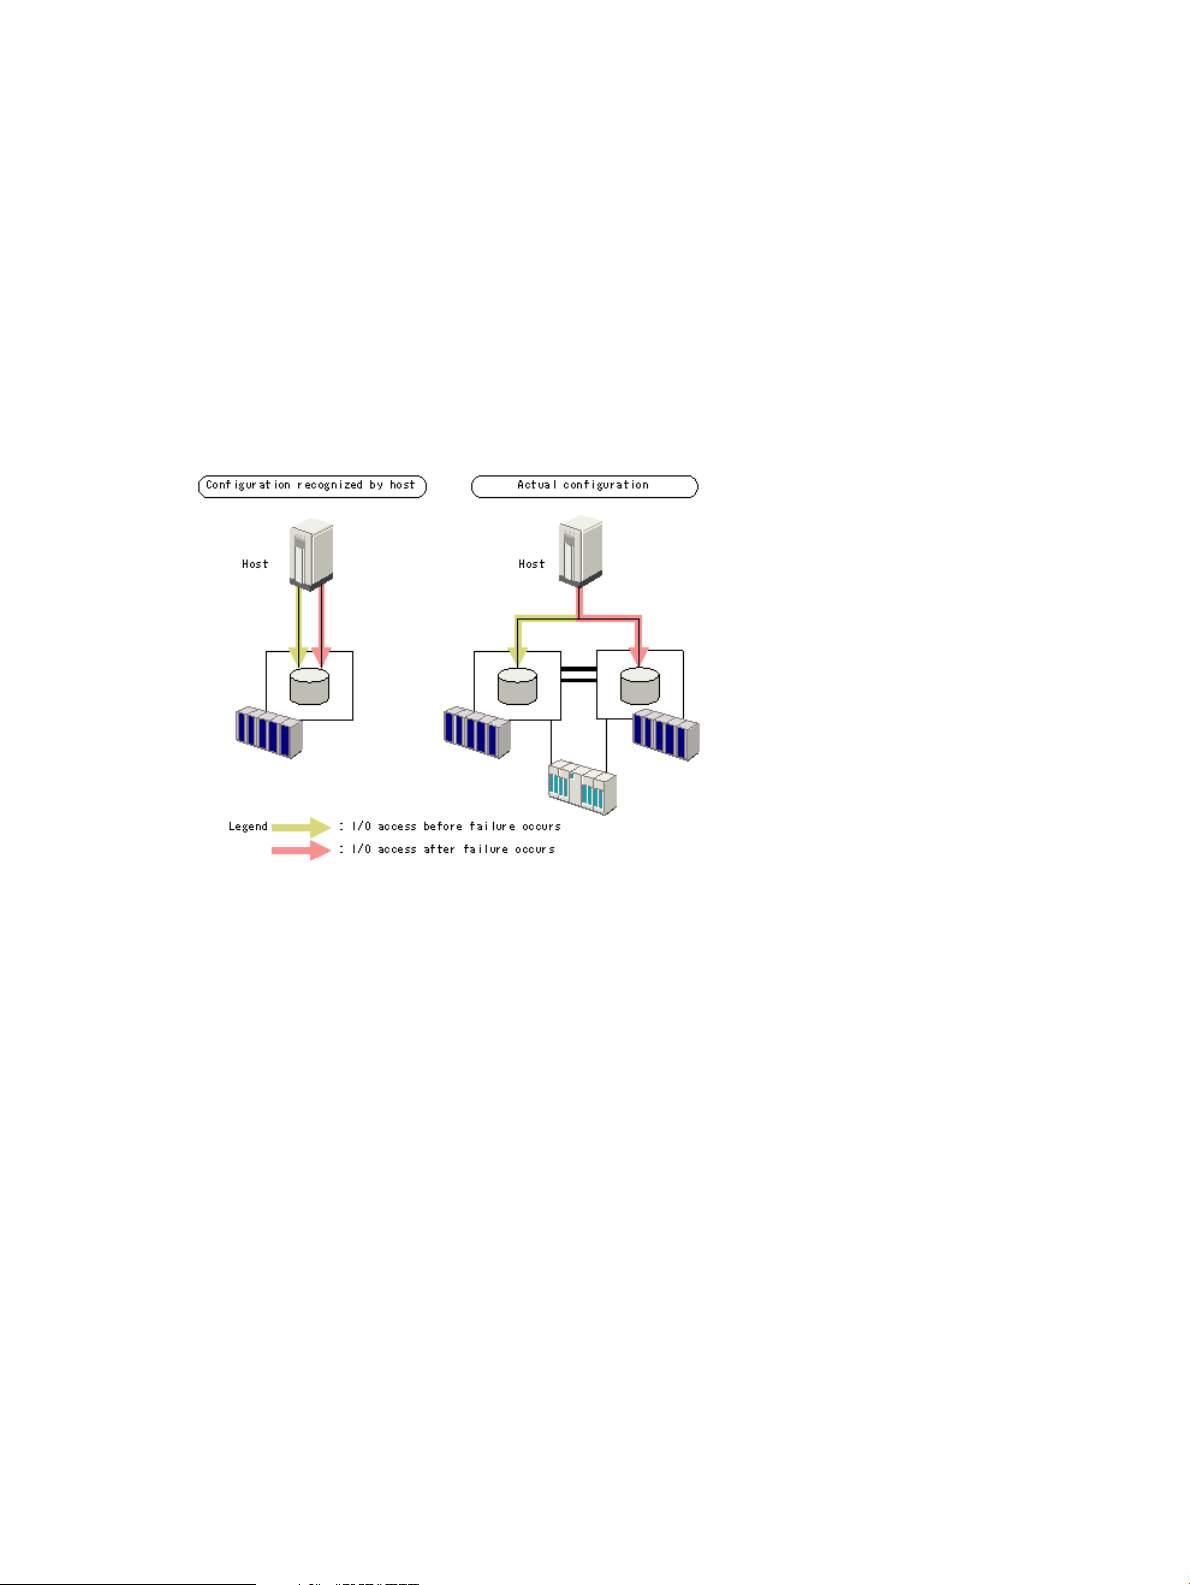
Where to find the information
You can view all information about pairs in the GUI. If you configured the system to send email
notifications, you can monitor those particular events remotely.
When a pair is in PSUS, SSWS, or PSUE status, the primary storage system generates SIMs (service
information messages). You can check SIMs in RWC’s Alerts window.
How hosts see volume pairs
When you create an ESAM pair, the host sees the primary and secondary volumes as the same
volume.
The following figure shows:
• The configuration as seen by the host.
• The actual configuration with primary and secondary volumes.
Checking pair status
Use RWC to view the current status of volume pairs.
1. In the RWC main window, click Actions > Remote Copy > Continuous Access Synchronous >
Pair Operation.
2. In the Pair Operation window tree, select the CU group, CU, port, or the host group where
the ESAM pair belongs.
The list shows Continuous Access Synchronous and ESAM pairs.
3. You can complete the following tasks:
• To make sure data is current and review the status information in the Status column, click
File/Refresh.
• To filter the list to show only ESAM pairs, open the Display Filter window.
• To view pair status details, right-click the ESAM pair and click Detail.
You can complete the following tasks in the Detailed Information dialog box:
• See information about other volumes. Click Previous or Next.
• Edit the current information for the pair. Click Update.
• Close the dialog box. Select the Refresh the Pair Operation window after this dialog box
closes option to update the information in the Pair Operation window based on the
updated information on the Detailed Information dialog box. Click Close.
How hosts see volume pairs 29
Page 30

Pair status values
When checking pair status in RWC, click File/Refresh to verify that the data is current.
In RWC, the pair status is shown in the [pair status in Remote Web Console/pair
status in RAID Manager] format. If the pair status name in RWC and the pair status name
in RAID Manager are the same, the pair status name in RAID Manager is not shown.
The following table lists ESAM pair status and whether the volumes can be accessed. The
accessibility to P-VOL or S-VOL depends on the pair status and VOL Access. You can see VOL
Access in the Pair Operation window or the Detailed Information dialog box.
SMPLSMPL
COPYCOPY
PAIRPAIR
SSUS
(No Lock)
DescriptionVOL AccessPair Status
BlankBlank
ESAM pair.
BlankAccess
is in progress. This pair is not yet
synchronized.
BlankBlank
reads and writes updates from the
host to the P-VOL and duplicates them
in the S-VOL.
Access (Lock)Blank
BlankBlank
The I/O operation to S-VOL or the
swapping and suspending operation
was successful. If the pair status of the
S-VOL is SSWS, the S-VOL is
accessible. The most recent data is on
the S-VOL.
Pair failed to get the lock at swapping
and suspended command
(pairsplit -RS command). Status
of the SSUS was forcibly changed. If
the pair status of the S-VOL is SSWS,
the S-VOL is accessible. Data on the
S-VOL might be old.
Access
to
S-VOLP-VOLS-VOLP-VOLS-VOL-PVOL
Read/writeRead/writeThe volume is not assigned to an
Not accessibleRead/writeThe initial copy operation for this pair
Read/write*Read/writeThe pair is synchronized. The system
Read/writeNot
Accessible
Read/writeNot
accessible
PSUS
PSUSPSUS
(see
“Suspend
types (PSUE
30 Working with volume pairs
(Lock)
Access (Lock)Blank
BlankBlank
BlankAccess
After the status of the S-VOL was
changed to SSWS, you ran
pairsplit-RB command to
rollback. Suspend the pair and
resynchronize. After a rollback, do
not access the P-VOL or S-VOL until
resynchronization is finished. Data on
P-VOL might be old.
After the status of the S-VOL was
forcibly changed to SSWS, you ran
the pairsplit-RB command to
rollback. Suspend the pair and
resynchronize. After a rollback, do
not access the P-VOL or S-VOL until
resynchronization is finished. Data on
P-VOL might be old.
This ESAM pair is not synchronized
because the user has split the pair
P-VOL data is up-to-date.
accessible
accessible
Read-only can
be set with(pairsplit-r command). The
the option
pairsplit-r)
Not accessibleNot
Not accessibleNot
Not accessible.Read/write.
Page 31

DescriptionVOL AccessPair Status
Access
to
S-VOLP-VOLS-VOLP-VOLS-VOL-PVOL
(page 32)
(see
“Suspend
types (PSUE
status)”
(page 32)
SSWS
SMPL
PSUEPSUE
PAIR
SSWS
(Lock)
(Lock)
Lock)
(Lock)
Lock)
(Lock)
BlankBlankstatus)”
Access (Lock)Blank
Access (Lock)Blank
BlankBlank
BlankAccess
BlankAccess
BlankAccess (No
BlankAccess
BlankAccess (No
BlankAccess
After the status of the S-VOL was
forcibly changed to SSWS, you ran
the pairsplit-RB command to
rollback. After a rollback, do not
access the P-VOL or S-VOL until
resynchronization is finished. Data on
P-VOL might be old.
The ESAM pair is not synchronized
because a failover has occurred. The
data on S-VOL is the latest.
The user has performed a swap and
suspend operation (pairsplit-RS). Data
on S-VOL may be old.
operation (pairsplit -r), the user
performed swap and suspend
operations (pairsplit-RS). Data on
S-VOL may be old.
RCU (pairsplit -S). This ESAM pair is
not synchronized.
because the MCU suspended the
ESAM pair with an error. Data in the
P-VOL is up to date.
failure, the user performed the
swapping and suspending command
(pairsplit -RS). If the pair status
of the S-VOL is SSWS, the S-VOL is
accessible. Data on the S-VOL might
be old.
accessible
accessible
accessible
accessible
Not accessibleNot
Not accessibleNot
Read/writeNot
Read/WriteNot
Read/WriteRead/WriteAfter the user performed a suspend
Read/WriteRead/WriteThe user has released the pair from
Not accessibleRead/WriteThis ESAM pair is not synchronized
Read/WriteRead/WriteAfter the pair was suspended by a
PSUS
PDUBPDUB
* If an S-VOL in PAIR status accepts write I/O, the storage system assumes that a failover occurred. Then the S-VOL changes to
SSWS status and the P-VOL usually changes to the PSUS status.
Lock)
(Lock)
(Lock)
BlankAccess (No
BlankAccess
BlankAccess
After the ESAM pair was suspended
due to an error, the user performed
the swapping and suspending
operation (pairsplit-RS) and performed
the rollback operation (pairsplit -RB).
After the rollback, do not access either
the P-VOL or the S-VOL until the resync
operation is finished. The data on the
P-VOL might be old.
volumes. The status of the pair is
COPY or PAIR. The status of at least
one LUSE volumes is SMPL or PSUE.
accessible
Read/writeThe ESAM pair consists of LUSE
Not accessibleNot
Read Only (Not
accessible in
case of COPY or
PSUE)
Pair status values 31
Page 32

The following table describes pair status in RAID Manager.
DescriptionItem
The volume is not assigned to an ESAM pair.SMPL
The initial copy for an ESAM pair is in progress, but the pair is not synchronized yet.COPY
The initial copy for an ESAM pair is completed, and the pair is synchronized.PAIR
PSUS
SSUS
PSUE
PDUB
SSWS
Although the paired status is retained, the user split the ESAM pair, and update of S-VOL is stopped.
This status only applies to SVOL. While the pair is split, the storage system keeps track of updates
to P-VOL.
Although the paired status is retained, the user split the ESAM pair, and update of S-VOL is stopped.
This status only applies to P-VOL. If the pair is split with the option of permitting update of S-VOL
specified, the storage system keeps track of updates to S-VOL.
Although the paired status is retained, update of S-VOL is stopped because of an error status.
PSUE is the same as PSUS (SSUS) in terms of symptom; the difference is that PSUE is caused by
an internal error.
This status is shown only for pairs using LUSE. Although the paired status is retained, the pair status
transition is suspended because of an error in some LDEVs within LUSE.
The paired status is retained. Processing for resync with P-VOL and S-VOL swapped
(horctakeover command) is in progress.
Split types (PSUS status)
Split types are shown in the Detailed Information dialog box; they specify the reason a pair is split.
When you split a pair, the pair status changes to PSUS and the system stops updates to the S-VOL.
You can set an option to block updates to the P-VOL also while the pair is split. This results in the
P-VOL and S-VOL staying synchronized.
If the P-VOL accepts write I/O while the pair is split, the primary storage system records the updated
tracks of the P-VOL as differential data. This data is copied to the S-VOL when the pair is
resynchronized.
The following table lists PSUS types.
P-VOLP-VOL by Operator
S-VOL by Operator
P-VOL
S-VOL
S-VOLby MCU
P-VOLDelete pair to RCU
Suspend types (PSUE status)
Suspend types are shown in the Detailed Information dialog box; they specify why the pair was
suspended by the system.
32 Working with volume pairs
DescriptionApplies toSplit type
The user split the pair from the primary storage system using the P-VOL Failure
on the Suspend Type option for Suspend Kind. The S-VOL split type is PSUS-by
MCU.
The user split the pair from the primary or secondary storage system using
the S-VOL on the Suspend Type option for Suspend Kind. Or, the pair is split
because of a failover in the storage system.
The secondary storage system received a request from the primary storage
system to split the pair. The P-VOL split type is PSUS-P-VOL by Operator or
PSUS-S-VOL by Operator.
The primary storage system detected that the S-VOL status changed to SMPL
because the user released the pair from the secondary storage system. The
pair cannot be resynchronized because the S-VOL does not have the
PSUS/PSUE status.
Page 33

The primary storage system suspends a pair when the following conditions occur:
• The user has released the pair from the secondary storage system.
• An error condition related to the secondary storage system, the S-VOL, or the update copy
operation.
• Communications with the secondary storage system have stopped.
When a pair is suspended, the primary storage system stops sending updates to the S-VOL, even
though host applications may continue updating the P-VOL. The primary storage system records
the P-VOL's updated tracks as differential data. This data is copied to the S-VOL when the error
condition is cleared and the pair is resynchronized.
P-VOL/S-VOL differential data is not retained if a primary or secondary storage system is powered
off and its backup batteries are fully discharged while the pairs are suspended. In this unlikely
case, the primary storage system performs the equivalent of an entire initial copy operation when
the pairs are resynchronized.
For descriptions of suspend types and the troubleshooting steps to resolve them, see “Suspended
volume pair troubleshooting ” (page 73).
Volume pair creation
A volume pair consists of primary and secondary volume whose data is synchronized until the pair
is split. During the initial copy, the P-VOL remains available to the host for read/write.
Creating an ESAM pair
There are two basic steps involved in creating an ESAM pair. They are:
• Performing the initial copy.
• Verifying that the host recognizes both the P-VOL and S-VOL as a single volume.
Prerequisites
Make sure you have configured the pair (see “System configuration” (page 21)).
Procedure
When creating the pair, make sure that:
• LDEVs for the primary and secondary volumes:
Are created and formatted.◦
◦ Have identical block counts.
◦ Are in SMPL status.
• The S-VOL must be offline; the P-VOL can be online.
• You copy each volume's port number, host group number (GID), and LUN. This is needed
during the procedure.
• You copy the CU Free RCU from which you will assign the secondary volume. Copy the serial
number, LDKC number, controller ID, model name, path group ID, and the channel type.
• You assign a quorum disk to the ESAM pairs during the initial copy procedure. The pairs
created between the same primary and secondary storage system must be assigned the same
quorum disk.
Volume pair creation 33
Page 34

• The initial copy parameters you specify during the procedure cannot be successfully changed
after a pair is created. If you attempt to change or delete them, the Pair Operation window
and Detailed Information dialog box shows misleading and inaccurate information.
• If you are creating multiple pairs in one operation, all pairs are assigned the same parameters
and the same quorum disk ID.
1. Access the MCU in RWC, then click Actions > Remote Copy >Continuous Access Synchronous
> Pair Operation.
2. Make sure that you are in the modify mode.
3. In the Pair Operation window tree, select the CU group, CU, port, or host group where the
primary volume or volumes are located. The volumes available to be paired are shown in the
volume list.
4. Right-click a volume that you want as a P-VOL and select Paircreate and ESAM from the menu.
• You can create more than one pair at one time by selecting then right-clicking more than
one volume. The related secondary volumes must be in the same secondary storage
system.
• Volumes with the pair icon are already used as primary data volumes.
5. In the Paircreate(ESAM) dialog box, the volume you selected for pairing is shown for P-VOL.
If you selected multiple volumes, the volume with the lowest LUN is shown.
NOTE: When a P-VOL or S-VOL appears in a dialog box, it is identified by port number,
GID, LUN (LDKC number: CU number: LDEV number), CLPR number, and CLPR name of the
LU.
• A # at the end of the string indicates an external volume.
• An X t the end of the string indicates a Thin Provisioning virtual volume.
From the S-VOL drop-down menus, select the volume that you want to pair with the shown
P-VOL. Select the port number, GID, and LUN. This will become the secondary volume (S-VOL).
• If you are creating multiple pairs, select the S-VOL for the P-VOL shown for P-VOL. The
S-VOLs for the remaining group of P-VOLs will be automatically assigned according to
the LUN.
For example, if you are creating three pairs, and you select LUN001 as the S-VOL, the
remaining S-VOLs for the other P-VOLs will be LUN002 and LUN003.
6. From the RCU drop-down menu, select the remote system where the S-VOL is located. The list
shows all registered CU Free RCUs, which are shown by serial number, LDKC number, controller
ID, model name, path group ID, and channel type. The system you select must be the same
for all pairs being created in this operation.
7. The P-VOL Fence Level is automatically set to Never. The P-VOL will never be fenced, or blocked
from receiving host read/write.
NOTE: In the Initial Copy Parameters area, remember that the parameters you specify cannot
be changed after a pair or pairs are created. To make changes to the parameters specified
below, you will need to release and recreate the pair.
8. From the Initial Copy drop-down menu, specify whether to copy data or not copy during the
paircreate operation:
• Select Entire Volume to copy P-VOL data to the S-VOL (default).
• Select None to set up the pair relationship between the volumes but to copy no data from
P-VOL to S-VOL. You must be sure that the P-VOL and S-VOL are already identical.
9. From the Copy Pace drop-down menu, select the desired number of tracks to be copied at one
time (1-15) during the initial copy operation. The default setting is 15. If you specify a large
34 Working with volume pairs
Page 35

number, such as 15, copying is faster, but I/O performance of the storage system may
decrease. If you specify a small number, such as 3, copying is slower, but the impact on I/O
performance is lessened.
10. From the Priority drop-down menu, select the scheduling order for the initial copy operations.
You can enter between 1-256. The highest priority is 1, the lowest priority is 256. The default
is 32.
For example, if you are creating 10 pairs and you specified in the System Option window
that the maximum initial copies that can be made at one time is 5, the priority you assign here
determines the order that the 10 pairs are created.
11. From the Difference Management drop-down menu, select the unit of measurement for storing
differential data. You can select Auto, Cylinder, or Track.
With Auto, the system decides whether to use Cylinder or Track. This is based on the size
of the volume.
• If VLL is used, the number of cylinders set for VLL is applied.
• If the pair volume has 10,019 or more cylinders, Cylinder is applied.
• If the pair volume has less than 10,019 cylinders, Track is applied.
12. From the Quorum Disk ID drop-down menu, specify the quorum disk ID that you want to assign
to the pair or pairs.
13. Click Set. The settings are shown in the Preview area.
14. In the Preview list, check the settings. To change a setting, right-click and select Modify. To
delete a setting, right-click and select Delete. When satisfied, click Apply. This starts pair
creation and initial copying if specified.
To verify host recognition of the ESAM P-VOL and S-VOL
1. Using RAID Manager, make sure the ESAM pair is created with the -fe option of the pairdisplay
command.
2. Make sure pair status is PAIR, and that Type on the Remote Web Console Pair Operation
window displays “ESAM” for the primary and secondary storage systems. (Until Type = ESAM,
application I/Os cannot be taken over in case of a failover.)
3. Either reboot the host or use the host operating system's device recognition command. For
more information, see the documentation provided with the system.
• For Linux host operating systems, make sure that the ESAM pair’s status is PAIR before
rebooting. If the host reboots when the ESAM pair is not in the PAIR status, a check
condition might be reported to the host.
• For Solaris host operating systems, make sure the ESAM pair status is PAIR before
performing the following operations, otherwise a failure can occur:
◦ An online operation on a path you are not allowed to access.
◦ Rebooting the host.
◦ Dynamic addition of the host device.
◦ Opening the host device.
If a path becomes offline, change the ESAM pair status to PAIR and then perform the
online operation for the offline path.
4. Check path configuration to the P-VOL and S-VOL using the multipath software command on
the host. Set the owner and non-owner paths to the P-VOL. For more information about the
multipath software commands, see the documentation provided with the multipath software.
To verify host recognition of the ESAM P-VOL and S-VOL 35
Page 36

How multipath software shows storage serial number for pairs
How multipath software shows storage serial number for pairs Multipath software shows the serial
number of the primary storage system for both the P-VOL and the S-VOL.
However, the storage system model shown for both P-VOL and S-VOL is the earliest model used in
your configuration, regardless of its location, primary or secondary site.
• If you use P9500s on the primary and the secondary sites, multipath software shows the serial
number of the primary storage system for both the P-VOL and the S-VOL. The storage system
is shown as P9500.
• When P9500 is used on the primary site and XP24000 is used on the secondary site, multipath
software shows the serial number of the primary storage system for both the P-VOL and the
S-VOL. The storage system is shown as XP24000.
• When XP24000 is used on the primary site and P9500 is used on the secondary site, multipath
software shows the serial number of the primary storage system for both the P-VOL and the
S-VOL. The storage system is shown as XP24000.
Splitting pairs
When the pair is synchronized, data written to the P-VOL is copied to the S-VOL. This continues
until the pair is split.When you split a pair, the pair status changes to PSUS and updates to the
S-VOL stop.
You can set an option to block updates to the P-VOL while the pair is split. This results in the P-VOL
and S-VOL staying synchronized.
If the P-VOL accepts write I/O while the pair is split, the primary storage system records the updated
tracks as differential data. This data is copied to the S-VOL when the pair is resynchronized.
The pair can be made identical again by resynchronizing the pair.
NOTE: You can split a pair from either the P-VOL or S-VOL.
Prerequisites
The pair must be in PAIR status.
Procedure
1. Access the MCU or RCU in RWC, then click Actions > Remote Copy > Continuous Access
Synchronous > Pair Operation.
You do not need to vary the P-VOL offline.
2. Make sure that you are in the modify mode.
3. In the Pair Operation window tree, select the CU group, CU, port, or host group where the
pair volume is located.
4. In the volume list, right-click the pair to be split and click Pairsplit-r from the menu. You can
split more than one pair by selecting then right-clicking more than one volume.
5. In the Pairsplit-r dialog box, information for the selected volume is shown for Volume. When
more than one volume is selected, the volume with the lowest LUN is shown.
From the Suspend Kind drop-down menu, specify whether or not to continue host I/O writes
to the P-VOL while the pair is split. (If you are running the RAID Manager command from the
S-VOL, this item is disabled.)
• Select P-VOL Failure not to allow write I/O to the P-VOL while the pair is split, regardless
• Select S-VOL to allow write I/O to the P-VOL while the pair is split. The P-VOL will accept
of the P-VOL fence level setting. Choose this setting if you need to maintain synchronization
of the ESAM pair.
all subsequent write I/O operations after the split. The primary storage system will keep
36 Working with volume pairs
Page 37

track of updates while the pair is split. Choose this setting if the P-VOL is required for
system operation and you need to keep the P-VOL online while the pair is split.
6. Click Set. The settings are shown in the Preview area.
7. In the Preview list, check the settings. To change a setting, right-click and select Modify. When
satisfied, click Apply. The primary storage system will complete all write operations in progress
before splitting the pair, so that the pair is synchronized at the time of the split.
8. Verify that the operation is completed successfully by checking the Status column. The status
should be PSUS.
Resynchronizing pairs
When you resynchronize a split pair, the volume that was not being updated—usually the S-VOL—is
synchronized with the volume that was being updated by the host—usually the P-VOL.
Pair status during resynchronization changes to COPY. It changes again to PAIR when the operation
is complete.
The method for performing this operation differs according to whether the P-VOL or the S-VOL is
accepting write I/O from the host. Check the VOL Access column in the Pair Operation window
to see which volume is online.
• Pairs must be in PSUS or PSUE when the P-VOL is receiving I/O. If status is PSUE, clear the
error before resynchronizing. The operation can be performed using the RWC procedure
below.
• When the S-VOL is receiving host I/O, pair status must be SSWS. The operation is performed
by running the RAID Manager pairresync-swaps command.
NOTE: If you want to resynchronize the pair that has been released from the S-VOL side, do not
use this procedure. Instead, complete the following:
1. Release the pair from the P-VOL side by running the pairsplit-S RAID Manager command.
2. Create the pair from the P-VOL side using the Paircreate(ESAM) dialog box, making sure to
set the appropriate initial copy option (Entire Volume or None).
1. Access the MCU in RWC, then click Actions > Remote Copy > Continuous Access Synchronous
> Pair Operation.
2. Make sure that you are in the modify mode.
3. In the Pair Operation window tree, select the CU group, CU, port, or host group where the
P-VOL is located.
4. In the volume list, right-click the P-VOL in the pair to be resynchronized and click Pairresync.
In the Pairresync dialog box, P-VOL Fence Level is automatically set to Never. The volume
receiving updates from the host will never be fenced, or blocked, from receiving host
read/write.
5. In the Pairresync dialog box, from the Copy Pace drop-down menu, select the desired number
of tracks to be copied at one time (1-15) during the copy operation. The default setting is 15.
If you specify a large number, such as 15, copying is faster, but I/O performance of the
storage system may decrease. If you specify a small number, such as 3, copying is slower,
but the impact on I/O performance is lessened.
6. From the Priority drop-down menu, select the scheduling order for the copy operations. This
applies when multiple pairs are being resynchronized. You can enter between 1-256. The
highest priority is 1, the lowest priority is 256. The default is 32.
7. Click Set.
8. In the Preview list, check the settings. To change a setting, right-click and select Modify. When
satisfied, click Apply.
Update the pair status by clicking File/Refresh, then confirm that the operation is completed with
a status of PAIR.
Resynchronizing pairs 37
Page 38

Reverse resynchronization
After a failover, when the S-VOL is receiving updates from the host instead of the P-VOL, you can
resynchronize the P-VOL with the S-VOL by running the RAID Manager pairresync-swaps
command. Copy direction is from S-VOL-to-P-VOL.
The P-VOL and S-VOL are swapped in this operation: the secondary storage system S-VOL becomes
the P-VOL; the primary storage system P-VOL becomes the S-VOL.
The pairresync -swaps command is the only supported method for reverse resynchronizing
ESAM pairs.
Prerequisites
• Make sure that:
All errors are cleared.◦
◦ Pair status is SSWS.
•
Important
managed uniformly. Otherwise, the pair can become inaccesible to one of the hosts. Before
performing this procedure, see “Recovery for pairs shared by multiple hosts with VMware”
(page 66).
Procedure
: If a pair is shared by multiple hosts with VMware, access to the pair must be
1. Run the RAID Manager pairresync -swaps command on the S-VOL.
The data in the RCU S-VOL is copied to the MCU P-VOL. Also, the P-VOL and S-VOL is
swapped. The MCU P-VOL becomes the S-VOL, and the RCU S-VOL becomes the P-VOL.
2. When the operation completes, verify that the pair is in PAIR status.
The following figure shows the swapping of an ESAM P-VOL and S-VOL.
Releasing a pair
You can release a pair when you no longer need to keep the P-VOL and S-VOL synchronized. You
can release a single pair or multiple pairs using the same procedure.
When you release a pair from the P-VOL, the primary storage system stops copy operations and
changes pair status of both P-VOL and S-VOL to SMPL. The system continues to accept write I/O
to the P-VOL volume, but does not keep track of the updates as differential data.
When you release a pair from the S-VOL, the secondary storage system changes S-VOL status to
SMPL, but does not change P-VOL status. When the primary storage system performs the next pair
38 Working with volume pairs
Page 39

operation, it detects that S-VOL status as SMPL and changes P-VOL status to PSUS. The suspend
type is Delete pair to RCU.
TIP: Best Practice: Release a pair from the P-VOL. If the pair has a failure and cannot be released
from the P-VOL, then release it from the S-VOL.
1. Verify that the P-VOL has the latest data using one of the following methods:
• On the secondary storage system, open the Pair Operation window. Check that the
Volume Access column for the S-VOL is blank (must not show Access Lock).
• Use the multipath software command to check if the P-VOL path (owner path) is online.
2. Vary the S-VOL path offline using the multipath software command.
3. Access the MCU in RWC, then click Actions > Remote Copy > Continuous Access Synchronous
> Pair Operation.
4. Make sure that you are in the modify mode.
5. In the Pair Operation window tree, select the CU group, CU, port, or host group where the
P-VOL is located.
6. Right-click the pair to be released and click Pairsplit-S.
7. In the Pairsplit-S dialog box, Delete Pair by Force drop-down menu, select one of the following:
• Yes: The pair will be released even if the primary storage system cannot communicate
with the secondary storage system. This option can be used to free a host waiting for a
response from the primary storage system, thus allowing host operations to continue.
• No: The pair will be released only if the primary storage system can change pair status
for both P-VOL and S-VOL to SMPL.
When the status of the pair to be released is SMPL, the default setting is Yes and it cannot be
changed. If the status is other than SMPL, the default setting is No.
8. Click Set.
9. Click Apply.
10. Verify that the operation completes successfully (changes to SMPL status).
11. The device identifier for one or both pair volumes changes when the pair is released. Therefore
you should enable host recognition of the volumes, using one of the following methods:
• Run the device recognition command provided by the operating system on the host.
For more information, see the following table.
• Reboot the host.
Determined byDevice recognition required for
S-VOL
• Both volumes are on P9500
• P-VOL is on XP24000 and S-VOL is on P9500.
P-VOL is on P9500 and S-VOL is on XP24000.P-VOL and S-VOL
Changing Continuous Access Synchronous pairs to ESAM pairs
You can convert a Continuous Access Synchronous pair to an ESAM pair.
Changing Continuous Access Synchronous pairs to ESAM pairs 39
Page 40

Requirements
Make sure that the following requirements are met to ensure the pair can be changed correctly
without errors or failures:
• ESAM system requirements must be met.
• The microcode version of the primary and secondary storage systems must be DKCMAIN
70-01-62-XX/XX or later.
• A quorum disk ID must be registered.
• The Continuous Access Synchronous pair must not be registered to a consistency group.
• CU Free are specified on the primary and secondary storage systems when the Continuous
Access Synchronous pair was created.
• The P-VOL is in the primary storage system. If the S-VOL is in the primary storage system, run
the horctakeover command on the S-VOL to reverse the P-VOL and the S-VOL of the pair.
CAUTION: If this operation fails, check Continuous Access Synchronous pair options to make
sure that they have not changed. A failure can cause unexpected changes, for example, the P-VOL
fence level could change from Data to Never.
Procedure
1. Access the MCU in RWC, then click Actions > Remote Copy > Continuous Access Synchronous
> Pair Operation.
2. Make sure that you are in the modify mode.
3. In the Pair Operation window tree, select a CU group, CU, port, or host group where the
Continuous Access Synchronous P-VOL belongs.
4. Split the Continuous Access Synchronous pairs that you want to convert to ESAM pairs.
5. On the Pairsplit -r dialog box, specify parameters you want and then click Set.
6. On the Pair Operation window, verify the setting for Preview and click Apply.
7. Verify that the pair status is PSUS.
8. In the list, select and right-click the Continuous Access Synchronous P-VOL, and then click
Pairresync.
9. In the Pairresync dialog box, use the following settings:
• For P-VOL Fence Level, specify Never.
• In Change attribute to ESAM, specify Yes.
• In Quorum Disk ID, specify a quorum disk ID for the ESAM pair.
10. Click Set.
11. Verify settings in Preview pane, then click Apply.
12. Verify that the Status column shows COPY for the pair that you converted, and that the Type
column shows ESAM.
To update the information in the window, click File > Refresh.
13. Access the secondary storage system, open the Pair Operation window, and verify that the
Type column for the S-VOL is ESAM.
CAUTION: Application I/Os cannot be taken over in case of a failover until the window
shows ESAM for the S-VOL. Before moving onto the next step, wait for a while and refresh the
window to make sure ESAM appears.
14. Make sure that the host recognizes the ESAM pair.
40 Working with volume pairs
Page 41

Comparison of the RAID Manager commands and Remote Web Console
You can perform many ESAM pair tasks using the RAID Manager. The following list compares
RAID Manager commands and RWC functionality for operations that can be performed on ESAM
pairs:
• Though the host recognizes the ESAM volumes as a single volume, RAID Manager views the
P-VOL and S-VOL as separate volumes.
• RAID Manager shows the ESAM pair, the Continuous Access Synchronous pair, and the UR
pair, according to the following table.
Display of JIDDisplay of CTGDisplay of FencePair Type
Quorum Disk IDNEVERESAM pair
The CTG IDDATAContinuous Access
Synchronous pair
Journal pair
• When running RAID Manager commands on the S-VOL, make sure that you specify S-VOL
information in the scripts.
The following table shows the supported RAID Manager commands and corresponding RWC tasks.
The CTG IDSTATUS
The CTG IDNEVER
The journal IDThe CTG IDASYNCContinuous Access
Create a pair.Pair operations
direction).
from SSWS to PSUS (rollback).
resynchronizing a pair (reverse
direction).
Synchronous pair to an ESAM
pair.
RWC window or dialog boxRAID Manager commandTaskType of task
Add Quorum Disk ID dialog boxN/AAdd the quorum disk ID.Configuration
Paircreate dialog boxpaircreate -jp <quorum
disk ID> -f never
paircreate -jq <quorum
disk ID> -f never
Pairsplit-r dialog boxpairsplit -rSplit a pair.
Pairresync dialog boxpairresyncResynchronize a pair.
N/Apairresync -swapsResynchronize a pair (reverse
pairresync -swapp
N/Apairsplit -RSSwap & suspend a pair.
N/Apairsplit-RBForcibly change the S-VOL status
N/AhorctakeoverSwapping, suspending, and
Pairresync dialog boxN/AChange a Continuous Access
Pair Operation window orpairdisplayView pair status.Maintenance
Detailed Information dialog box
Pairsplit-S dialog boxpairsplit-SRelease pair.
Comparison of the RAID Manager commands and Remote Web Console 41
Page 42

RWC window or dialog boxRAID Manager commandTaskType of task
Delete Quorum Disk ID buttonN/ADelete the quorum disk ID.
Note the following:
• You cannot run the pairresync command on a pair when the storage system cannot access the quorum disk due
to a failure.
• To resynchronize an ESAM pair, the fence level must be Never.
• After you run the pairsplit -RS command, the write command to the P-VOL will fail.
• You cannot run the following commands on ESAM pairs: pairresync -fg <CTGID> and pairsplit -rw.
42 Working with volume pairs
Page 43

5 System maintenance
To ensure that the ESAM system function properly and is able to provide robust and reliable
high-availability protection for host applications, it is essential for you to be able to perform ESAM
system maintenance tasks.
Applications used to perform maintenance tasks
All of the typical maintenance tasks can be completed using RWC or RAID Manager.
Required Remote Web Console settings
You must be in Modify Mode in RWC.
Related documentation
For more information about other system maintenance tasks, see the HP XP P9000 Continuous
Access Synchronous User Guide.
The different types of maintenance tasks
The following tasks can be performed.
• “Switching paths using multipath software ” (page 43)
• “Discontinuing ESAM operations ” (page 43)
• “Quorum disk ID deletion ” (page 44)
• “Recovery of accidently deleted quorum disks” (page 45)
• “Planned outages for system components” (page 46)
Switching paths using multipath software
Before switching paths using multipath software, make sure that P-VOL and S-VOL status is PAIR.
If the path is switched while the ESAM pair is not in the PAIR status, I/O updates could be suspended
or the host might read older data.
Vary the paths as follows:
• When both owner and non-owner paths are online, vary the owner path offline.
• When the owner path is offline and non-owner path is online, vary the owner path online.
CAUTION: When the ESAM pair is in the PAIR status, if you vary the owner path online, non-owner
paths on RCU may be changed to offline. Since no failure actually occurred in these paths, you
should restore the status of the ESAM pair to PAIR, and then vary the non-owner paths online.
I/O scheduled before making the owner paths online with the multipath software is issued to
non-owner paths. According to circumstances, I/O scheduled after making owner paths online
might be issued prior to I/O scheduled before making owner paths online. In this case, the check
condition on I/O which is issued to non-owner paths may report to the host because the RCU
ESAM pair is in the PSUS status and the MCU ESAM pair is in the SSWS status. I/O which is
reported on the check condition are reissued to the owner path, and then ended normally.
Non-owner paths which are reported on the check condition become offline due to failures.
Discontinuing ESAM operations
You can discontinue ESAM operations at any time.
Applications used to perform maintenance tasks 43
Page 44

NOTE: During the procedure, you must delete the external volume mapping of the quorum disk.
If the ESAM pair is still connected to the disk, you cannot delete the mapping. To ensure you can
delete the mapping, before you delete the mapping, make sure you disconnect the quorum disk
by running the Disconnect External Volumes command.
1. Using multipath software, vary the non-owner path to offline.
2. Release all ESAM pairs from the primary storage system.
3. From the primary and secondary storage systems, verify that the pair status for all volumes is
SMPL.
If the status does not change to SMPL due to a failure of the remote copy connections, release
all ESAM pairs from the secondary storage system.
4. From the primary and secondary storage systems, delete all quorum disk IDs. The quorum disk
becomes a normal external volume.
5. From the primary and secondary storage systems, disconnect the quorum disk by doing the
following:
1. Open the External Storages window.
2. Select the quorum disk and specify the Disconnect External Volumes command.
6. From the primary and secondary storage systems, delete the external volume mapping of the
quorum disk. In the External Storages window, select the quorum disk and specify the Delete
External Volumes command.
7. Remove the cables between the host and secondary storage system, between the primary and
secondary storage systems and the quorum disk.
To cause the host to recognize P9500 S-VOLs as non-pair volumes, and P-VOLs and S-VOLs as
non-pair volumes, when the MCU is P9500 and the RCU XP24000, see “To verify host recognition
of the ESAM P-VOL and S-VOL” (page 35).
Quorum disk ID deletion
You delete a quorum disk ID during some normal maintenance activities and failure recovery.
When you delete a disk ID, the system lists the quorum disk as an external volume and not as a
pair.
Two procedures can delete a quorum disk ID. One is a standard deletion, and the second is a
forced deletion. You use the forced deletion when access to the disk is blocked due to a failure in
the disk or the path.
• “Deleting quorum disk IDs (standard method)” (page 44)
• “Deleting quorum disk IDs by system attribute (forced deletion)” (page 45)
Deleting quorum disk IDs (standard method)
You delete a quorum disk ID using the standard method if you are able to access the disk (access
may be blocked if there is a disk failure or a path failure).
Requirements
To ensure that you delete the disk ID properly, make sure that:
• The disk is not being used by any ESAM pair. If it is, you cannot delete the ID.
• You delete the ID on both the primary and secondary storage systems. The procedure is the
same for both systems.
• The ID you delete on the systems is the same ID.
1. Access an MCU or RCU in RWC and click Actions > Remote Copy > Continuous Access
Synchronous > Quorum Disk Operation.
2. On the Quorum Disk Operation window, make sure that you are in the modify mode.
44 System maintenance
Page 45

3. In the quorum ID list, right-click the quorum disk ID that you want to delete, then click Delete
Quorum Disk ID.
4. Confirm the operation in the Preview list, then click Apply.
If the quorum disk ID cannot be deleted, a failure might have occurred in the quorum disk. Do one
of the following:
• Recover from the failure, then try to delete the ID again using this procedure.
• Forcibly delete the quorum disk (see “Deleting quorum disk IDs by system attribute (forced
deletion)” (page 45)).
Deleting quorum disk IDs by system attribute (forced deletion)
You can forcibly delete a quorum disk ID when access to the disk is blocked due to a failure in
either the disk or path. This is done by turning a system option ON and then forcibly deleting the
disk. This causes the disk to become a normal external volume.
Requirements
To ensure that you delete the disk ID properly, make sure that:
• The disk is not being used by any ESAM pair. If it is, you cannot delete the ID.
• You delete the ID on both the primary and secondary storage systems. The procedure is the
same for both systems.
• The ID you delete on the systems is the same ID.
1. On the primary storage system, release all ESAM pairs using the quorum disk that you want
to delete.
2. Call the HP Support Center and ask them to turn ON the appropriate system option on the
storage system that cannot access the quorum disk.
3. On the primary and secondary storage system, delete the quorum disk ID from the Continuous
Access Synchronous/Quorum Disk Operation window in RWC.
4. On the primary and secondary storage system, make sure that the ID is correctly deleted. If
you deleted the wrong ID, register the ID again.
5. Call the HP Support Center and ask them to turn OFF the system option.
Recovery of accidently deleted quorum disks
If you forcibly deleted a quorum disk by mistake, you can recover the quorum disk. The procedure
you use depends on whether the P-VOL or S-VOL was receiving host I/O when the disk was deleted.
You can use RWC and RAID Manager, or only RAID Manager to complete the recovery procedures.
TIP: Some of the steps can be done using either RWC or RAID Manager. Typically, these steps
can be completed more quickly using RAID Manager.
The procedures are:
• “Recovering the disk when the P-VOL was receiving host I/O at deletion” (page 45)
• “Recovering the disk when the S-VOL was receiving host I/O at deletion” (page 46)
Recovering the disk when the P-VOL was receiving host I/O at deletion
Use this procedure to recover a disk that was accidentally deleted when the primary volume was
receiving host I/O at the time of deletion.
1. Vary the host-to-S-VOL path offline using the multipath software.
2. Release all pairs that use the forcibly-deleted quorum disk.
3. Make sure the quorum disk ID is deleted from both primary and secondary storage systems.
The different types of maintenance tasks 45
Page 46

4. On the primary and secondary storage system, add the quorum disk ID.
5. On the primary storage system, create the ESAM pair.
6. On both the primary and secondary storage systems, make sure that Type shows ESAM.
Recovering the disk when the S-VOL was receiving host I/O at deletion
Use this procedure to recovery a disk that was accidentally deleted when the secondary volume
was receiving host I/O at the time of deletion.
1. Stop the I/O from the host.
2. Release all pairs using the forcibly-deleted quorum disk.
3. Make sure the quorum disk ID is deleted from both primary and secondary storage systems.
4. On the secondary storage system, create a Continuous Access Synchronous pair. The data
flow is from secondary to primary sites.
To do this, specify the ESAM S-VOL as a Continuous Access Synchronous P-VOL.
5. Do one of the following:
• If changing a Continuous Access Synchronous pair to a ESAM pair: When the copy
operation is completed, run the horctakeover command on the Continuous Access
Synchronous S-VOL. This reverses the Continuous Access Synchronous P-VOL and S-VOL.
• If using RAID Manager to recreate the ESAM pair: When the copy operation is completed,
run the pairsplit -S command and release the Continuous Access Synchronous pair.
• If using RWC: When the copy operation is completed, release the Continuous Access
Synchronous pair.
6. Using multipath software, vary the host-to-P-VOL path online.
7. On the primary and secondary storage systems, add the quorum disks.
8. Do one of the following:
• If changing the Continuous Access Synchronous pair to a ESAM pair: From the primary
system P-VOL using Remote Web Console, split the Continuous Access Synchronous pair,
then change the pair to a ESAM pair. See “Changing Continuous Access Synchronous
pairs to ESAM pairs ” (page 39).
• If creating the pair again:
- If using RAID Manager, run the paircreate command on the primary storage system.
• If using RWC, create the ESAM pair on the primary storage system.
9. On the primary and secondary storage systems, make sure the volume type is ESAM.
Planned outages for system components
As part of your normal system maintenance activities, you can perform planned outages by turning
the power for system components on and off as needed.
The following are the types of components you can use to turn on and off power:
• Primary storage systems
• Secondary storage systems
• Quorum disks
Options for performing the planned outages
You do not have to use multiple procedures to perform a planned outage on multiple components.
You can use a single procedure to perform all of the steps required to complete a planned outage
for multiple components.
46 System maintenance
Page 47

You can use a single procedure to perform a planned outage on:
• A quorum disk
• A primary storage system and the quorum disk connected to it
• A secondary storage system and the quorum disk connected to it
• A primary and secondary storage system and the disk connected to them
The procedures for performing planned outages
The following procedures contain all of the steps required to perform a planned outage. Use the
procedure that fits the requirements for the planned outage.
Use one of the following:
• “Performing planned outages (quorum disk only) ” (page 47).
• “Performing planned outages (primary storage system and quorum disk)” (page 48).
• “Performing planned outages (secondary storage system and quorum disk)” (page 49).
• “Performing planned outages (both storage systems and quorum disk)” (page 50).
Performing planned outages (quorum disk only)
The procedure you use for a planned outage of a quorum disk depends on whether the primary
or secondary storage system is receiving host I/O updates.
Use one of the following:
• “Performing outages when the P-VOL is receiving host I/O”.
• “Performing outages when the S-VOL is receiving host I/O”.
Performing outages when the P-VOL is receiving host I/O
Use this procedure when the P-VOL is receiving host I/O updates. If you also need to power off
and on the primary or secondary storage system connected to the disk, use one of the other
procedures (see “The procedures for performing planned outages” (page 47)).
1. Using multipath software, vary the non-owner path offline.
2. On the primary storage system, complete the following:
1. Split the pair.
2. Make sure the P-VOL is PSUS.
3. Run the following command on the quorum disk:
Disconnect External Volumes
3. On the secondary storage system, run the following command on the quorum disk:
Disconnect External Volumes
4. Power off the quorum disk.
5. Power on the quorum disk.
6. On the secondary storage system, run the following command on the quorum disk:
Reconnect External Volumes
7. On the primary storage system, complete the following:
1. Run the following command on the quorum disk:
Reconnect External Volumes
2. Resynchronize the pair.
3. Make sure the P-VOL status is PAIR.
8. Using multipath software, vary the non-owner path online.
The different types of maintenance tasks 47
Page 48

Performing outages when the S-VOL is receiving host I/O
Use this procedure when the S-VOL is receiving host I/O updates. If you also need to power off
and on the primary or secondary storage system connected to the disk, use one of the other
procedures (see “The procedures for performing planned outages” (page 47)).
1. On the secondary storage system, split the pair.
2. On the secondary storage system, make sure the P-VOL is in PSUS status.
3. On the primary storage system, run the following command on the quorum disk:
Disconnect External Volumes
4. On the secondary storage system, run the following command on the quorum disk:
Disconnect External Volumes
5. Power off the quorum disk.
6. Power on the quorum disk.
7. On the secondary storage system, run the following command on the quorum disk:
Reconnect External Volumes
8. On the primary storage system, run the following command on the quorum disk:
Reconnect External Volumes
9. On the secondary storage system, complete the following:
1. Resynchronize the pair.
2. Make sure the P-VOL status is PAIR.
10. Using multipath software, complete the following:
1. vary the owner path online.
2. Vary the non-owner path offline.
11. On the secondary storage system, make sure the P-VOL status is PSUS.
12. On the primary storage system, complete the following:
1. Make sure the S-VOL status is SSWS.
2. Reverse the copy direction so that it is again from primary storage system P-VOL to
secondary storage system S-VOL by running the following command on the S-VOL:
pairresync -swaps
3. Make sure P-VOL and S-VOL status is PAIR.
13. If the non-owner path is offline, vary it online using the multipath software.
Performing planned outages (primary storage system and quorum disk)
1. Make sure the P-VOL and S-VOL status is PAIR.
2. Using multipath software, complete the following:
1. Vary the owner path offline. *1
2. Make sure that host I/O switches to the non-owner path (a failure occurred)
3. On the primary storage system, make sure that P-VOL status is PSUS.
4. On the secondary storage system, complete the following:
1. Make sure that S-VOL status is SSWS.
2. Run the following command on the quorum disk:
Disconnect External Volumes
5. Power off the primary storage system.
6. Power off the quorum disk. *2
7. Power on the quorum disk. *2
8. Power on the primary storage system. *3
48 System maintenance
Page 49

9. On the secondary storage system, complete the following:
1. Run the following External Storage command on the quorum disk:
Reconnect External Volumes
2. Run the following command on the S-VOL:
pairresync -swaps
3. Make sure that P-VOL and S-VOL status is PAIR.
10. Using the multipath software, complete the following:
1. Vary the owner path online.
2. Vary the non-owner path offline.
11. On the primary storage system, make sure that S-VOL status (original P-VOL) is SSWS.
12. On the secondary storage system, make sure that P-VOL status (original S-VOL) is PSUS.
13. On the primary storage system, complete the following:
1. Run the following command on the S-VOL:
pairresync -swaps
2. Make sure that P-VOL and S-VOL are reversed to their original pair configuration and
that status is PAIR.
14. (If the non-owner path is offline) Using the multipath software, vary it online.
*1: If you vary the owner path offline during I/O processing, the multipath software may display
a message saying that the path is offline due to a path failure. In this case, you can ignore the
message.
*2: Skip this step when you power off the primary storage system only.
*3: When the host operating system is Windows, the multipath software may return a host-to-P-VOL
path failure when you power on the primary storage system. In this case, you can ignore the
message. This happens because ESAM blocks access to the primary storage system after the plug
and play function automatically recovers the owner path to online.
Performing planned outages (secondary storage system and quorum disk)
Use this procedure to perform a planned outage of the secondary storage system and the quorum
disk connected to the system.
1. Using multipath software, vary the non-owner path offline.
2. On the primary storage system, complete the following:
1. Split the pair.
2. Make sure that P-VOL status is PSUS.
3. Run the following External Storage command on the quorum disk:
Disconnect External Volumes
3. Power off the secondary storage system.
4. Power off the quorum disk. If you are powering-off only the secondary storage system, skip
this step.
5. Power on the quorum disk. If you are powering-off only the secondary storage system, skip
this step.
6. Power on the secondary storage system.
7. On the primary storage system, complete the following:
1. Run the following External Storage command on the quorum disk:
Reconnect External Volumes
2. Resynchronize the pair.
3. Make sure that P-VOL status is PAIR.
The different types of maintenance tasks 49
Page 50

8. Using multipath software, vary the non-owner path online.
Performing planned outages (both storage systems and quorum disk)
Use this procedure to perform a planned outage of the primary storage system, the secondary
storage system, and the disk connected the systems.
1. On the primary storage system, complete the following:
1. Split the pair.
2. Make sure that P-VOL status is PSUS.
2. Stop host I/O.
3. Using multipath software, vary the non-owner path offline.
4. Power off the primary storage system.
5. Power off the secondary storage system.
6. Power off the quorum disk.
7. Power on the quorum disk.
8. Power on the secondary storage system.
9. Power on the primary storage system.
10. Using multipath software, vary the owner path online.
11. Restart host I/O.
12. On the primary storage system, complete the following:
1. Resynchronize the pair.
2. Make sure that P-VOL status is PAIR.
13. Using multipath software, vary the non-owner path online.
50 System maintenance
Page 51

6 Disaster recovery
On-site disasters, such as power supply failures, can disrupt the normal operation of your ESAM
system. Being able to quickly identify the type of failure and recover the affected system or
component helps to ensure that you can restore high-availability protection for host applications
as soon as possible.
Main types of failures that can disrupt your system
The main types of failures that can disrupt the system are power failures, hardware failures,
connection or communication failures, and software failures. These types of failures can cause
system components to function improperly or stop functioning.
System components typically affected by these types of failures include:
• Main control unit (primary storage system)
• Service processor (primary or secondary storage system)
• Remote control unit (secondary storage system)
• Volume pairs
• Quorum disks
The basic recovery process
The basic process for recovering from an on-site disaster is the same, regardless of the type of
failure that caused the disruption in the system. The recovery process involves:
• Detecting failures
• Determining the type of failure
• Determining which recovery procedure to use
• Completing the recovery procedure.
System failure messages
The system automatically generates messages that you can use to detect failures and determine
the type of failure that occurred. The messages contain information about the type of failure.
Detecting failures
Detecting failures is the first task in the recovery process. Failure detection is essential because you
need to know the type of failure before you can determine which recovery procedure to use.
You have two options for detecting failures. You can check to see if failover has occurred and then
determine the type of failure that caused it, or you can check to see if failures have occurred by
using the SIM and path failure system messages.
Generated by the primary and secondary storage systemsSystem information messages (SIM)
Generated by the multipath software on the hostPath failure messages
• “Option 1: Check for failover first” (page 51)
• “Option 2: Check for failures only” (page 52)
Option 1: Check for failover first
You can use status information about the secondary volume and path status information to see if
failover occurred. You can do this using RWC, RAID Manager, or multipath software.
Main types of failures that can disrupt your system 51
Page 52

NOTE: You need to determine the type of failure before you can determine which recovery
procedure to use.
For more information, see “Using system messages to check for failures”.
• “Using Remote Web Console to check for failover” (page 52)
• “Using RAID Manager to check for failover” (page 52)
• “Using multipath software to check for failover” (page 52)
Using Remote Web Console to check for failover
If you are using RWC, you use status information about the secondary volume to check to see if
failover has occurred.
• In the Pair Operation window, if the following values appear for the secondary volume, failover
occurred:
• Status is SSWS
• Vol Access is Access (Lock)
Using RAID Manager to check for failover
If you are using RAID Manager, use the following procedure to obtain status information about
the secondary volume to see if failover has occurred.
1. Run the pairdisplay command on the secondary storage system.
2. If the status value for the secondary volume is SSWS, failover occurred.
Using multipath software to check for failover
If you are using multipath software, check the path status information to see if failover has occurred.
1. Run the path status viewing command.
2. If the system returns the following status values for the owner and non-owner paths, failover
occurred:
• Owner path is offline
• Non-owner path is online
Next steps
You need to determine the type of failure before you can determine which recovery procedure to
use.
For more information, see “Using system messages to check for failures”.
Option 2: Check for failures only
You can use automatically generated system messages to see if failures have occurred and to
determine the type of failure. These system messages contain information about the type of failure
that occurred.
Based on these messages, you determine which recovery procedure to use.
For more information, see “Determining which basic recovery procedures to use” (page 53).
Using system messages to check for failures
Use the system information messages (SIM) and path failure system messages to check for failures
and to determine the type of failure.
1. Check for system information messages from the primary or secondary storage system.
2. Check for path failure messages generated by the multipath software on the host.
52 Disaster recovery
Page 53

Determining which basic recovery procedures to use
Determining which basic recovery procedures to use involves analyzing the information in the
system information messages (SIM) and path failure system messages to identify the type of failure,
then selecting the correct procedure based on the type of failure.
Each of the following basic types of failures uses a different set of recovery procedures:
• Blocked volumes
• Quorum disk
• Power outage
• Resynchronization of volume pairs
• Owner or non-owner path failures
Selecting Procedures
Make sure you have identified the type of failure that occurred by using the system information
messages (SIM) and path failure system messages.
For more information, see “Using system messages to check for failures”.
1. Analyze these failure messages to determine which basic type of failure occurred. The failure
types are: blocked volumes, quorum disk, power outage, or failures that can be resolved by
resynchronizing affected pairs.
2. Use the decision tree in the following figure to select the correct set of procedures. Use the
links below the figure to go to the appropriate procedures.
1. “Recovery from blocked pair volumes” (page 54)
2. “Recovery from quorum disk failure” (page 57)
3. “Recovery from power failure” (page 59)
4. “Recovery from failures using resynchronization” (page 62)
Determining which basic recovery procedures to use 53
Page 54

Recovery from blocked pair volumes
In most cases, a blocked volume pair results in automatic failover. This helps to ensure that host
I/O continues and host applications remain available.
The process used to recover pair volumes from this failure varies depending on:
• Whether the volume is a primary or secondary volume.
• Whether the volume is in the primary or secondary storage system.
Depending on which systems and volumes are affected and whether failover occurred, the recovery
process can involve:
• Releasing the pair
• Clearing the failure
• Clearing any other failures that may prevent normal host I/O
• Recreating the pair
• Restoring the original relationship of the volumes
• Restoring normal host I/O (or restarting host I/O)
The following figure shows the different volume failure scenarios that are possible with volume
pairs.
1. “Recovering from primary volume failure on the MCU” (page 54).
2. “Recovering from secondary volume failure on the MCU” (page 55).
3. “Recovering from primary volume failure on the RCU” (page 56).
4. “Recovering from secondary volume failure on the RCU ” (page 57).
Recovering from primary volume failure on the MCU
When this failure occurs, automatic system failover switches host I/O to the primary volume on
the RCU. Recovering the volume from this failure involves releasing the pair, clearing the failure,
recreating the pair, restoring the original relationship of the volumes, and restoring normal host
I/O.
NOTE: If the failed volume is an external volume, contact the HP Support Center for assistance
clearing the failure.
You use multipath software and either RWC or RAID Manager to complete the recovery procedure.
TIP: Some of the steps can be performed by using either RWC or RAID Manager. Typically, you
can complete these steps quicker using RAID Manager.
1. Using multipath software, make sure that the secondary storage system is receiving host I/O.
2. Stop I/O from the host.
54 Disaster recovery
Page 55

3. On the primary storage system, run the Pairsplit-S RAID Manager command on the P-VOL
to release the ESAM pair.
4. Clear the failure in the primary storage system P-VOL.
5. On the secondary storage system, create a Continuous Access Synchronous pair from the
original S-VOL to the P-VOL. Data flow is from the secondary to primary storage systems.
6. Continue by either changing the Continuous Access Synchronous pair to a ESAM pair (below)
or recreating the ESAM pair (next steps).
If changing the Continuous Access Synchronous pair to a ESAM pair, complete this step. If
using RWC, go directly to the RWC step.
1. On the primary storage system, run the RAID Manager horctakeover command on
the new Continuous Access Synchronous S-VOL. This reverses the relationship of the pair.
2. On the primary storage system, split the Continuous Access Synchronous pair using the
Pairsplit-r dialog box.
3. On the primary storage system, use RWC’s Pairresync dialog box to change the
Continuous Access Synchronous pair to a ESAM pair. For more information, see
“Changing Continuous Access Synchronous pairs to ESAM pairs ” (page 39).
7. If recreating the ESAM pair using RAID Manager:
1. On the secondary storage system, when the copy operation is completed, run the following
command to release the Continuous Access Synchronous pair:
pairsplit -S
2. On the primary storage system, run the following command to create the ESAM pair:
paircreate
8. If recreating the ESAM pair using RWC:
1. On the secondary storage system, release the Continuous Access Synchronous pair.
2. On the primary storage system, create the ESAM pair.
9. On the primary and secondary storage systems, make sure that Type shows ESAM.
10. Using multipath software, vary the owner path online.
11. Restart I/O.
Recovering from secondary volume failure on the MCU
When this failure occurs, automatic system failover switches host I/O to the primary volume on
the RCU. Recovering the volume from this failure involves releasing the pair, clearing the failure,
recreating the pair, restoring the original relationship of the volumes, and restoring normal host
I/O.
NOTE: If the failed volume is an external volume, contact the HP Support Center for assistance
clearing the failure.
You use multipath software and either RWC or RAID Manager to complete the recovery procedure.
TIP: Some of the steps can be done using either RWC or RAID Manager. Typically, these steps
can be completed more quickly using RAID Manager.
1. Using multipath software, make sure that the secondary storage system is receiving I/O.
2. Stop I/O from the host.
3. On the secondary storage system, release the ESAM pair by running the following RAID
Manager command on the P-VOL:
Pairsplit-S
4. Clear the failure in the primary storage system P-VOL.
Recovery from blocked pair volumes 55
Page 56

5. On the primary storage system, make sure that no other failures exist and that it is ready to
accept host I/O.
6. On the secondary storage system, create a Continuous Access Synchronous pair from the
original S-VOL to the P-VOL. The data flow is from the secondary to primary storage system.
7. Continue by changing the Continuous Access Synchronous pair to a ESAM pair (below) or
recreating the ESAM pair (next step).
If changing the Continuous Access Synchronous pair to a ESAM pair, complete this step on
the primary storage system.
1. On the primary system, use RAID Manager to run the horctakeover command on the new
TrueCopy S-VOL. This reverses the relationship and the copy flow from S-VOL to P-VOL.
2. On the primary system, use RWC to split the TrueCopy pair.
3. On the primary system, perform the RWC pair resync operation to change the TrueCopy
pair to a HAM pair. See “Changing Continuous Access Synchronous pairs to ESAM pairs
” (page 39).
8. If recreating the ESAM pair:
1. Using either RAID Manager or RWC, on the secondary storage system, release the
Continuous Access Synchronous pair (for RAID Manager, use the pairsplit -S
command.
2. On the primary storage system, create the ESAM pair.
9. On both systems, in RWC, make sure that Type shows ESAM.
10. Using multipath software, vary the owner path online.
11. Restart I/O.
Recovering from primary volume failure on the RCU
This failure occurs after automatic system failover switches host I/O to the primary volume on the
RCU due to a failure of the primary volume on the primary storage system. Because both systems
have volume failures, all host I/O stops. Recovering the volume from this failure involves releasing
the pair, clearing the failure (and any failures on the primary storage system), recreating the pair,
restoring the original relationship of the volumes, and restoring normal host I/O.
NOTE: If the failed volume is an external volume, contact the HP Support Center for assistance
clearing the failure.
You use multipath software and RWC to complete this task.
1. Make sure that I/O is stopped.
2. Using multipath software, vary the non-owner path offline.
3. On the secondary storage system, release the ESAM pair by running the Pairsplit-S
command on the P-VOL.
4. Clear the failure in the secondary storage system P-VOL.
5. If using RAID Manager, on the primary storage system, run the paircreate command to
create the ESAM pair.
6. If using RWC, on the primary storage system use a Paircreate (ESAM) window to create the
ESAM pair.
7. Clear any failures on the primary storage system so that it can accept I/O.
8. On the primary storage system, create the pair (Paircreate(ESAM)).
9. On both systems, make sure that Type shows ESAM.
10. Using multipath software, vary the owner and non-owner paths online.
11. Restart host I/O.
56 Disaster recovery
Page 57

Recovering from secondary volume failure on the RCU
When this failure occurs, automatic system failover switches host I/O to the primary volume on
the RCU. Recovering the volume from this failure involves releasing the pair, clearing the failure,
recreating the pair, and restarting host I/O. Unlike the other types of pair volume failures, host
I/O is not interrupted and failover does not occur.
NOTE: If the failed volume is an external volume, contact the HP Support Center for assistance
clearing the failure.
1. Using multipath software, make sure that the primary storage system is receiving host I/O.
2. Using multipath software, vary the non-owner path offline.
3. On the primary storage system, run the Pairsplit-S RAID Manager command to release
the pair.
4. Clear the failure in the secondary storage system S-VOL.
5. If using RAID Manager, on the primary storage system, run the paircreate RAID Manager
command to create the ESAM pair.
6. If using RWC, on the primary storage system create the ESAM pair using the Paircreate(ESAM)
dialog box.
7. On the primary storage system, create the pair (Paircreate(ESAM)).
8. On both systems, make sure that Type shows ESAM.
9. Using multipath software, vary the non-owner path online.
10. Restart host I/O.
Recovery from quorum disk failure
There are two basic methods for recovering from quorum disk failure. In some cases, the disk must
be replaced. In other cases, you can recover from the failure by resynchronizing the pair volume
that is connected to the disk.
• “Replacement of quorum disks” (page 57)
• “Recovery from failures using resynchronization” (page 62)
Replacement of quorum disks
Replacement of a quorum disk is done when the disk fails and the external storage system that
contains the disk cannot be recovered by resynchronizing the volume pair connected to the disk.
The procedure you use varies depending which system (primary or secondary) is receiving host
I/O.
The procedures are:
• “Replacing a quorum disk when the MCU is receiving host I/O” (page 57)
• “Replacing a quorum disk when the RCU is receiving host I/O” (page 58)
NOTE: You can use the replacement procedures to replace a disk that is connected to one or
more volume pairs.
Replacing a quorum disk when the MCU is receiving host I/O
Replacing the disk involves preparing the systems and the volume pair (or pairs) connected to the
disk so that you can safely remove the failed disk and replace it. After it is replaced, you reconnect
the systems to the disk, add the disk ID, and re-create the volume pair (or pairs).
When you replace a disk, data on the disk is erased and you cannot continue using ESAM.
CAUTION: To prevent host I/O from stopping, make sure you complete the steps exactly as they
are listed in the procedure.
Recovery from quorum disk failure 57
Page 58

1. Use the multipath software to vary the non-owner path offline.
2. On the primary storage system, release the pair by running the pairsplit-S RAID Manager
command on the P-VOL.
3. On the primary storage system, make sure that P-VOL status is SMPL.
4. On the primary storage system, delete the quorum disk ID. If a failure in the quorum disk
prevents deletion, forcibly delete it.
5. On the secondary storage system, delete the quorum disk ID. You can forcibly delete it, if
necessary.
6. On the primary storage system, run the Disconnect External Volumes command on
the quorum disk. If the connection to the quorum disk cannot be released due to the failure of
the quorum disk, skip the Disconnect External Volumes operation.
7. On the secondary storage system, run the External Storage Disconnect External
Volumes command on the quorum disk. If the connection to the quorum disk cannot be
released due to the failure of the quorum disk, do not run this command.
8. Replace the quorum disk.
9. On both systems, run the Reconnect External Volumes command on the quorum disk.
10. On both systems, add the quorum disk ID.
11. On the primary storage system, run the Paircreate(ESAM) command to create the ESAM
pair.
12. On both the primary and secondary storage systems, make sure that Type shows ESAM.
13. Use the multipath software to vary the non-owner path online.
Replacing a quorum disk when the RCU is receiving host I/O
Replacing the disk involves preparing the systems and the volume pair (or pairs) connected to the
disk so that you can safely remove the failed disk and replace it. After it is replaced, you reconnect
the systems to the disk, add the disk ID, and re-create the volume pair (or pairs).
When you replace a disk, data on the disk is erased and you cannot continue using ESAM.
CAUTION: To prevent host I/O from stopping, make sure you complete the steps exactly as they
are listed in the procedure.
You can use RWC or RAID Manager to complete the recovery procedure.
TIP: Some of the steps can be done using either RWC or RAID Manager. Typically, you can
complete these steps quicker using RAID Manager.
1. Stop I/O from the host.
2. On the secondary storage system, run the pairsplit-S RAID Manager command on the
P-VOL to release the ESAM pair.
3. On the secondary storage system, make sure that P-VOL status is SMPL.
4. On the secondary storage system, create a Continuous Access Synchronous pair. The data
flow is from secondary to primary storage system.
5. Perform one of the following operations:
• If changing the Continuous Access Synchronous pair to a ESAM pair on the primary
• If using RAID Manager to create a ESAM pair again, on the primary storage system, run
• If using RWC, from the secondary storage system, release the Continuous Access
58 Disaster recovery
storage system: Run the RAID Manager horctakeover command on the S-VOL. This
reverses the relationship of the pair.
the pairsplit command on the S-VOL and release the Continuous Access Synchronous
pair.
Synchronous pair.
Page 59

6. On the primary storage system, delete the quorum disk ID.
If the quorum disk ID cannot be deleted due to a disk failure, forcibly delete the quorum disk.
7. On the secondary storage system, delete the quorum disk ID.
8. On both systems, run the Disconnect External Volumes command on the quorum disk.
If the connection to the quorum disk cannot be released due to the failure of the quorum disk,
skip the Disconnect External Volumes operation.
9. Replace the quorum disk.
10. On both systems, run the Reconnect External Volumes command on the quorum disk.
11. On both systems, add the quorum disk ID.
12. Perform one of the following operations:
• If changing the Continuous Access Synchronous pair to a ESAM pair: use RWC to split
the the Continuous Access Synchronous pair, then change the pair to a ESAM pair. See
“Changing Continuous Access Synchronous pairs to ESAM pairs ” (page 39).
• If using RAID Manager and are recreating the ESAM pair: On the primary storage system,
run the paircreate command to create the ESAM pair.
• If using RWC and are recreating the ESAM pair again: On the primary storage system,
use the paircreate(ESAM) dialog box to create a ESAM pair.
13. On both the primary and secondary storage systems, in RWC make sure that Type shows
ESAM.
14. Use the multipath software to vary the owner path online.
15. Restart I/O.
Recovery from power failure
You can recover the primary storage system or secondary storage system from power failures that
cause the system’s backup batteries to discharge and cause the loss of differential data.
The recovery process varies depending on the type of system.
• “primary storage system recovery” (page 59)
• “Secondary system recovery” (page 61)
primary storage system recovery
There are two procedures you can use to recover the system following a power failure that results
in the initialization of the system memory. Which task you use depends on whether or not host I/O
updates have stopped. You must use the correct procedure to ensure the recovery is successful.
The tasks are:
• “Recovering the system when the RCU is receiving host I/O updates” (page 59).
• “Recovering the system when host I/O updates have stopped” (page 60).
Recovering the system when the RCU is receiving host I/O updates
Recovering the primary storage system from power failure, when host I/O updates continue after
failover, involves the completion of tasks on both the primary storage system and secondary storage
system. Because failover occurred, you must complete the steps required to restore the original
relationship of the volumes.
You use multipath software and either RWC or RAID Manager to complete the recovery procedure.
TIP: Some of the steps can be done using either RWC or RAID Manager. Typically, you can
complete these steps quicker using RAID Manager.
Recovery from power failure 59
Page 60

1. Verify that the S-VOL has the latest data and is being updated. Open the Pair Operation
window on the secondary storage system and check that the VOL Access column shows Access
(Lock).
2. Stop I/O from the host.
3. On the secondary storage system, release the ESAM pair.
4. On the secondary storage system, delete the quorum disk ID.
5. On the secondary storage system, create a Continuous Access Synchronous pair. The data
flow is from secondary to primary sites.
6. Format the quorum disk.
7. On the primary storage system, register the ESAM secondary storage system to the primary
storage system.
8. Continue by changing the Continuous Access Synchronous pair to a ESAM pair (below) or
recreating the ESAM pair (next steps).
If changing the Continuous Access Synchronous pair to a ESAM pair, complete this step.
1. When the Continuous Access Synchronous operation finishes, run the horctakeover
command on the primary storage system S-VOL to reverse the P-VOL and S-VOL.
2. On the primary and secondary storage systems, add the quorum disk.
3. Using RWC, on the primary system, split the Continuous Access Synchronous pair.
4. Using RWC, on the primary system, change the Continuous Access Synchronous pair to
a ESAM pair. See “Changing Continuous Access Synchronous pairs to ESAM pairs ”
(page 39) for details.
9. If recreating the ESAM pair using RAID Manager:
1. When the copy operation in Step 5 completes, release the Continuous Access Synchronous
pair.
2. On the primary and secondary storage systems, add the quorum disk.
3. On the primary storage system, run the paircreate command to create the ESAM pair.
10. If recreating the ESAM pair using RWC:
1. On the secondary storage system, release the Continuous Access Synchronous pair.
2. On the primary and secondary storage systems, add the quorum disk.
3. On the primary storage system, create the ESAM pair.
11. On both the primary and secondary storage systems, in RWC make sure that Type shows
ESAM.
12. Using the multipath software, vary the owner and non-owner paths online.
13. Restart host I/O.
Recovering the system when host I/O updates have stopped
Recovering the primary storage system from power failure, when host I/O updates have stopped,
involves the completion of tasks on both the primary storage system and secondary storage system.
You use multipath software and either RWC or RAID Manager to complete the recovery procedure.
TIP: Some of the steps can be performed using either RWC or RAID Manager. Typically, you
can complete these steps quicker using RAID Manager.
1. Verify that the P-VOL has the latest data by opening the Pair Operation window on the
secondary storage system (S-VOL side) and checking that the VOL Access column is empty
(blank).
2. On the secondary storage system, release the ESAM pairs.
3. On the secondary storage system, delete the quorum disk ID.
4. Format the quorum disk.
60 Disaster recovery
Page 61

5. On the primary storage system, register the ESAM secondary storage system to the primary
storage system.
6. On the primary and secondary storage systems, add the quorum disk.
7. On the primary storage system, create the ESAM pair.
8. On both the primary and secondary storage systems, make sure that Type shows ESAM.
9. Vary the owner and non-owner paths online using the multipath software.
10. Restart host I/O.
Secondary system recovery
There are two procedures you can use to recover the system after a power failure that results in
the initialization of the system memory. The procedure you use depends on whether or not host
I/O updates have stopped. You must use the correct procedure to ensure the recovery is successful.
The procedures are:
• “Recovering the system when the P-VOL is receiving host updates” (page 61).
• “Recovering the system when host updates have stopped” (page 61).
Recovering the system when the P-VOL is receiving host updates
Recovering the secondary storage system from power failure involves the completion of tasks on
both the primary storage system and secondary storage system. Because failover does not occur,
it is not necessary to complete the steps required to restore the original relationship of the volumes.
You use multipath software and either RWC or RAID Manager to complete the recovery procedure.
TIP: Some of the steps can be performed using either RWC or RAID Manager. Typically, these
steps can be completed more quickly using RAID Manager.
1. Verify that the P-VOL has the latest data and is being updated. Open the Pair Operation
window on the primary storage system and check that the VOL Access column shows Access
(Lock).
2. On the primary storage system, release the ESAM pair.
3. On the primary storage system, delete the quorum disk ID.
4. Format the quorum disk.
5. On the secondary storage system, register the ESAM primary storage system to the secondary
storage system.
6. On the primary and secondary storage systems, add the quorum disk.
7. On the primary storage system, create the ESAM pair.
8. On both the primary and secondary storage systems, make sure that Type shows ESAM.
9. Using multipath software, vary the non-owner paths online.
Recovering the system when host updates have stopped
Recovering the secondary storage system from power failure when host I/O updates have stopped
involves the completion of tasks on both the primary storage system and secondary storage system.
You use multipath software and either RWC or RAID Manager to complete the recovery procedure.
TIP: Some of the steps can be performed using either RWC or RAID Manager. Typically, you
can complete these steps quicker using RAID Manager.
1. Verify that the S-VOL has the latest data by opening the Pair Operation window on the primary
storage system (P-VOL side) and checking that the VOL Access column is empty (blank).
2. On the primary storage system, release the ESAM pairs.
Recovery from power failure 61
Page 62

3. On the primary storage system, delete the quorum disk ID.
4. On the secondary storage system, register the ESAM primary storage system to the secondary
storage system.
5. On the secondary storage system, create a Continuous Access Synchronous pair. The data
flow is from secondary to primary sites.
6. Format the quorum disk.
7. Continue by changing the Continuous Access Synchronous pair to a ESAM pair (below) or
recreating the ESAM pair (next steps).
If changing the Continuous Access Synchronous pair to a ESAM pair, continue with this step.
If using RWC, go directly to the RWC step, below.
1. When the Continuous Access Synchronous pair creation operation is completed, run the
horctakeover RAID Manager command on the primary storage system S-VOL. This
reverses the P-VOL/S-VOL relationship; the S-VOL on the primary storage system now
becomes the P-VOL.
2. On the primary and secondary storage systems, add the quorum disk.
3. Using RWC, on the primary system, split the Continuous Access Synchronous pair.
4. Using RWC, on the primary system, change the Continuous Access Synchronous pair to
a ESAM pair. See “Changing Continuous Access Synchronous pairs to ESAM pairs ”
(page 39) for details.
8. If recreating the ESAM pair using RAID Manager:
1. When the copy operation in Step 5 completes, release the Continuous Access Synchronous
pair.
2. On the primary and secondary storage systems, add the quorum disk.
3. On the primary storage system, run the paircreate command to create the ESAM pair.
9. If recreating the ESAM pair using RWC:
1. Make sure the Continuous Access Synchronous pair creation operation completed, then
release the Continuous Access Synchronous pair.
2. On the primary and secondary storage systems, add the quorum disk.
3. On the primary storage system, create the ESAM pair.
10. On both primary and secondary storage systems, in RWC make sure that Type shows ESAM.
11. Using multipath software, vary the owner and non-owner paths online.
12. Restart host I/O.
Recovery from failures using resynchronization
In some cases, you can resynchronize an ESAM pair to recover a volume pair, quorum disk, or a
volume pair and quorum disk from failure. The recovery process can only be used if certain
conditions exist.
Required conditions
You can only use this method if all of the following conditions exist:
• The ESAM volumes are not blocked.
• If there was a quorum disk failure, the disk does not need to be replaced.
• Data was not lost as a results of shared memory initialization caused by a power outage.
Determining which resynchronization recovery procedure to use
Determining which recovery procedure to use involves analyzing the information in the system
information messages (SIM) and path failure system messages to determine if all of the conditions
required to use resynchronization exist, then selecting the procedure to use.
62 Disaster recovery
Page 63

You select the procedure to use based on a number of factors, including the continuation of host
I/O, failover, and the status of the secondary volume.
Prerequisites
Make sure you have identified the type of failure that occurred by using the system information
messages (SIM) and path failure system messages.
For more information, see “Using system messages to check for failures”.
NOTE: The procedures for RAID Manager and RWC are the same.
1. If failures occur and you perform pair operations, host I/O may stop. Make sure that all failures
are cleared.
2. Use RAID Manager on the host.
3. Use multipath software on the host.
Recovery from failures using resynchronization 63
Page 64

4. If a pair is shared by multiple hosts with VMWare, see important recovery information regarding
the horctakeover or pairresync –swaps command in “Recovery for pairs shared by multiple
hosts with VMware” (page 66).
5. If a pair is shared by multiple hosts with VMWare, see important recovery information regarding
failover in “Recovery for pairs shared by multiple hosts with VMware” (page 66).
Procedure
1. Analyze the failure messages to determine if all conditions required for resynchronization
exist:
• The ESAM volumes are not blocked.
• If there was a quorum disk failure, the disk does not need to be replaced.
• Data was not lost as a result of shared memory initialization caused by a power outage.
2. Use the decision tree in the flowchart to select the correct set of procedures. Use the links
below to go to the appropriate procedures.
Related topics
• “Recovering primary volume from Business Copy secondary volume” (page 64).
• “Recovering secondary volume from Continuous Access Journal primary volume ” (page 64)
Recovering primary volume from Business Copy secondary volume
In some cases, you can use resynchronization to recover the ESAM P-VOL from a Business Copy
S-VOL located on the secondary storage system.
Prerequisites
Make sure you have analyzed the failure messages to determine if all of the conditions required
to use resynchronization exist.
For more information, see “Determining which resynchronization recovery procedure to use”
(page 62).
Procedure
1. Using multipath software, vary the owner path offline.
2. Swap and suspend the ESAM pair using the RAID Manager pairsplit -RS command.
3. Resynchronize the Business Copy pair on the secondary storage system in the opposite
4. Split the Business Copy pair by running the pairsplit command.
5. Resynchronize the ESAM pair in the opposite direction using the pairresync -swaps command.
6. Using multipath software, vary the owner path online.
7. Using multipath software, vary the non-owner path offline.
8. When the ESAM P-VOL and S-VOL are in PAIR status, swap and suspend the pair using the
9. Resynchronize the ESAM pair in the opposite direction using the pairresync -swaps
10. Using multipath software, vary the non-owner path online.
direction, using the Quick Restore or Reverse Copy operations. The system copies the data in
the Business Copy S-VOL to the ESAM S-VOL.
The system copies the data in the S-VOL to the P-VOL.
pairsplit -RS command.
command.
Recovering secondary volume from Continuous Access Journal primary volume
In some cases, you can use resynchronization to recover the ESAM S-VOL from a Continuous
Access Journal P-VOL. When you do this, the system automatically splits the Continuous Access
64 Disaster recovery
Page 65

Journal pair after you resynchronize the ESAM P-VOL that accepts host I/O or after you
resynchronize the pair in the opposite direction.
Prerequisites
Make sure you have analyzed the failure messages to determine if all of the conditions required
to use resynchronization exist.
For more information, see “Determining which resynchronization recovery procedure to use”
(page 62).
Procedure
1. Using multipath software, vary the owner path offline.
2. Swap and suspend the ESAM pair using the pairsplit -RS command.
3. Swap and suspend the Continuous Access Journal pair using the pairsplit -RS command.
4. Resynchronize the Continuous Access Journal pair in the opposite direction using the pairresync
5. When the Continuous Access Journal pair is in PAIR status, swap and suspend the pair using
6. Resynchronize the Continuous Access Journal pair in the opposite direction using the pairresync
7. When the Continuous Access Journal pair is in PAIR status, split the pair using the pairsplit -r
8. Resynchronize the ESAM pair in the opposite direction using the pairresync -swaps command.
9. Using multipath software, vary the owner path online.
10. Using multipath software, vary the non-owner path offline.
11. When the ESAM pair is in PAIR status, swap and suspend the pair using the pairsplit -RS
12. Resynchronize the ESAM pair in the opposite direction using the pairresync -swaps command.
13. Using multipath software, vary the non-owner path online.
14. When the ESAM pair is in PAIR status, resynchronize the Continuous Access Journal pair using
-swaps command. The system copies data in the Continuous Access Journal S-VOL to the
ESAM S-VOL.
the pairsplit -RS command.
-swaps command.
operation.
The system copies data in the ESAM S-VOL to the ESAM P-VOL.
command.
the Pairresync operation.
Postrequisites
After the ESAM pair finishes resynchronizing, you must:
• Resynchronize the Continuous Access Journal pair.
• Run RAID Manager commands to complete the task.
Recovering from path failures
You can recover an owner path, non-owner path, or both paths from failure by restoring the paths.
CAUTION: If failures occur in both the owner and non-owner paths, you must restore the paths
in the correct order to prevent unexpected failover or failback. Make sure you restore the path to
the storage system that resumes host operations before you restore the other path.
Recovering from path failures 65
Page 66

The following table lists whether failover or failback will occur based on the order in which you
restore the paths (owner path first or non-owner path first).
Will failover or failback occur?Order for restoring pathsVolume receiving host I/O
No.1. Owner pathPrimary system P-VOL
2. Non-owner path
1. Non-Owner path
2. Owner path
Secondary system P-VOL
(original S-VOL)
1. Owner path
2. Non-owner path
2. Owner path
Allowing host I/O to an out-of-date S-VOL
If you attempt a recovery of a primary storage system, you might need to use the S-VOL to continue
host operations, even though its data is older than the data on the P-VOL.
Contact the HP Support Center and ask to have the appropriate system option turned ON. This
enables the S-VOL to receive host I/O.
Yes, if data in the S-VOL is newer than in the
P-VOL, failover occurs after the non-owner path is
restored. However, failover does not occur if data
in the S-VOL is older. Check this by viewing the
VOL Access column on the Pair Operation window
for the P-VOL. If you see Access (Lock), then the
P-VOL is receiving host I/O.
Yes, failover occurs after the owner path is
restored. However, if data in the primary storage
system S-VOL is older, failover does not occur.
Check the VOL Access column on the Pair
Operation window for the secondary storage
system P-VOL. If you see Access (Lock), then this
volume is receiving host I/O.
No.1. Non-Owner path
NOTE: The system option applies to the whole storage system. You cannot set this option to an
individual pair or pairs.
To continue using the pair after the failure has been cleared, release and re-create the pair. The
storage system builds the initial copy from the P-VOL to the S-VOL.
Recovery for pairs shared by multiple hosts with VMware
When a pair is shared by multiple hosts with VMware, it is important that access to the pair is
managed uniformly. Otherwise, the pair can become inaccessible to one of the hosts.
The following procedures are necessary for recovery using the horctakeover and pairresync swaps
commands, and for failover. For more information regarding changing host access or status, see
the Dynamic Link Manager User Guide for your operating system.
Managing access for hortcakeover and pairresync swaps commands
1. Switch access from all hosts to the pair via owner paths to access via non-owner paths.
2. When all host access is via non-owner paths, execute the horctakeover or pairresync
–swaps command on the S-VOL.
Changing owner path status for failover
Procedure 1 When using Hitachi Dynamic Link Manager a version earlier than v. 7.6.0
1. Specify a host to access the pair, and move all guest OSs to the specified host.
2. Shut down all hosts other than the specified host in the Step 1.
3. Make online the owner paths of the hosts that access the pair.
66 Disaster recovery
Page 67

4. Reboot hosts that were shut down in the Step 2.
5. Return the guest OSs that were moved in the Step 1 to the original hosts.
Procedure 2 When using Hitachi Dynamic Link Manager v. 7.6.0 or later
1. Change the status of all HDLM owner paths accessing the pair to Online(D).
2. Change Online(D) status to the Online status. Some paths may have changed from Online(D)
to Online automatically.
3. If non-owner paths status has changed to Offline(E), change the status to Online.
Recovery for pairs shared by multiple hosts with VMware 67
Page 68

7 Using ESAM in a cluster system
There are specific software and configuration requirements for using ESAM in a cluster system.
Cluster system architecture
The following diagram shows the architecture of a typical implementation of a cluster system.
You connect an executing node and a standby node to MCU and RCU so that the nodes can
access both MCU and RCU. A heartbeat network must be set up between the nodes.
If a failure occur in the executing node, operations are continued by a failover to the standby node.
Required software
The following software is required to use ESAM in a cluster system:
• Software that uses a SCSI-2 Reservation with the hypervisor platform, Virtual Machine File
System 5 (VMFS 5).
• Cluster software.
Supported cluster software
ESAM supports the following types of cluster software:
Microsoft Failover Cluster (MSFC)
Operating systemsSoftware
• Windows Server® 2008
• Windows Server® 2008 R2
AIX 6.1 TL6PowerHA (HACMP) 5.4.1 SP7
68 Using ESAM in a cluster system
Page 69

Configuration requirements
To ensure that ESAM functions properly, make sure that:
• Both the MCU and RCU are be P9500s.
• The same version of Hitachi Dynamic Link Manager are used in the MCU and RCU.
• If using MSFC, specify Node and File Share Majority in Quorum Mode.
• If using MSFC, use only basic disks.
• If using PowerHA (HACMP), use enhanced concurrent volume groups.
Configuring the system
Use the following workflow for setting up and creating an ESAM pair. Some steps vary, depending
on whether you use cluster software or software with SCSI-2 Reservation. This noted is noted in
the step.
1. Install and connect the hardware.
2. Set up a heartbeat network between an executing node and a standby node.
3. Install software.
4. Configure MCU and RCU.
5. Configure a quorum disk.
6. Configure host mode options. Host mode option 52 is required for host groups when using
cluster software with SCSI-2 Reservation where an executing node and a standby node reside.
Also, when using software with SCSI-2 Reservation, if host mode option 52 is enabled, confirm
that the volume to be used as the S-VOL does not have SCSI-2 Reservation and SCSI-3 Persistent
Reservation. To check, see the section on host-reserved LUN windows in the HP XP P9000
Provisioning for Open Systems User Guide.
7. Create the ESAM pairs.
NOTE: If using software with SCSI-2 Reservation, create the ESAM pairs specifying Entire
Volume for Initial Copy in the Paircreate(ESAM) dialog box. This setting results in a full initial
copy; all of the P-VOL data is copied to the S-VOL.
However, if you need to create the pair without copying P-VOL data to the S-VOL, then create
a Continuous Access Synchronous pair and specify None for Initial Copy. When the pair is
created, split it, then change to an ESAM pair.
8. Configure a cluster.
Fore more information, see the documentation for your software. If necessary, contact the HP
Technical Support.
Disaster recovery in a cluster system
Use the following workflow to recover from failure.
1. Confirm that the primary and secondary storage systems are operating normally.
If a failure has occurred in one of the systems, use the appropriate disaster recovery procedure.
2. Confirm that the software is operating normally.
If a failure has occurred in the software, see the software’s documentation for recovery
instructions.
3. Use the software to fail back from a standby node to an executing node.
Configuration requirements 69
Page 70

Restrictions
The following restrictions apply when using ESAM in a cluster system:
• You cannot use ESAM pair volumes for SAN boot.
• You cannot store OS page files in ESAM pair volumes.
• For Windows Server® 2008 R2, ESAM does not support Hyper-V function and Cluster Shared
Volumes (CSV) function.
• If using software with SCSI-2 Reservation, and SCSI-2 Reservation is registered on the P-VOL,
a pair cannot be created or resynchronized if SCSI-3 Persistent Reservation key information
is also registered on the S-VOL.
If SCSI-2 Reservation or SCSI-3 Persistent Reservation key information are not registered on
the P-VOL, but SCSI-3 Persistent Reservation key information is registered on the S-VOL, the
pair can be created or resynchronized, but it will then suspend because of host I/O.
To perform these operations (including reverse resync), remove the host where the SCSI-3
Persistent Reservation key is registered, delete the key on the S-VOL, and then create or
resynchronized the pair. If you cannot delete the key from the host, contact the HP Technical
Support.
70 Using ESAM in a cluster system
Page 71

8 Troubleshooting
ESAM is designed to provide you with error messages so that you can quickly and easily identify
the cause of the error and take corrective action. Many types of errors you encounter can be
resolved by using fairly simple troubleshooting procedures.
Potential causes of errors
Errors can be caused by power, hardware, or software failures, the use of incompatible or
unsupported software, firmware issues, incorrect configuration settings, communication errors, and
factors that result in the suspension of volumes.
Is there an error messages for every type of failure?
Although many types of failures have error messages, some do not. Some failures are indicated
by status information, incorrect display of system data, or interruptions in operation.
Where do you look for error messages?
If you are using RWC, the RWC GUI displays all ESAM error messages and error codes. If you
are using RAID Manager, the RAID Manager operation log file contains all ESAM error messages.
Related topics
For more information about error messages and error codes that are displayed by RWC, see the
HP XP P9000 Remote Web Console Messages.
Basic types of troubleshooting procedures
The troubleshooting procedures you use to resolve issues you encounter depend on whether the
error type. The main error types are general errors, suspended volume pairs, and data stored only
in cache memory.
• “Troubleshooting general errors ” (page 71)
• “Suspended volume pair troubleshooting ” (page 73)
• “Recovery of data stored only in cache memory” (page 76)
Troubleshooting general errors
Most of the errors that occur when using ESAM are general errors. They can occur in different
parts of the system and can be caused by power, hardware, or software failures, the use of
incompatible or unsupported software, firmware issues, incorrect configuration settings, or
communication errors.
The only type of error that is not a general error is a suspended volume pair.
Potential causes of errors 71
Page 72

The following table lists the general errors that can occur and the corrective action to take for each
error.
Corrective actionError
The RWC computer hangs, or ESAM does
not function properly.
(on the P9500 control panel) is off or
flashing.
are not shown correctly.
RWC computer.
Quorum disk failure
• Make sure that the problem is not being caused by the RWC computer
or Ethernet hardware or software. Restart the RWC computer—this does
not affect storage system operations.
• Make sure that ESAM requirements and restrictions are met.
• Make sure that the primary and secondary storage systems are powered
on and fully operational (NVS, cache).
• Check all input values and parameters to make sure that you entered
the correct information in RWC (for example, secondary storage system
S/N, path parameters, P-VOL and S-VOL IDs).
• If you are using Performance Monitor, refrain from using it.
Please call the HP Support Center for assistance.An initiator channel-enable LED indicator
Make sure the correct CU is selected.The status of the pairs and/or data paths
Resolve the error and then try the operation again.An ESAM error message appears on the
Check the path status on the RCU Status dialog box and resolve the error.The data path status is not Normal.
For more information, see the HP XP P9000 Continuous Access Synchronous
User Guide.
The primary or secondary storage system issues a SIM when a failure occurs
in the quorum disk. After checking the SIM, review “Disaster recovery”
(page 51), and specifically, see “Recovery from quorum disk failure”
(page 57).
Paircreate or pairresync operation resulted
in a timeout error.
volume or the quorum disk.
Cannot downgrade the firmware.
Though no failure occurred, the P-VOL is
offline, or host I/O switched to the S-VOL.
• If the timeout error was caused by a hardware failure, a SIM is
generated. Check the SIM, then call the HP Support Center. After you
have corrected the problem, retry the operation.
• If no SIM is generated, wait 5 or 6 minutes, then check the pair status.
If the status is changed to PAIR, the operation completed after the timeout.
If pair status did not change to PAIR, heavy workload might have
prevented the operation from being completed. In this case, retry when
the storage system has a lighter workload.
• If a communication error between the RWC computer and SVP occurs,
correct the error.
For more information about correcting error between the RWC computer
and SVP, see the HP XP P9000 Remote Web Console User Guide.
See “Recovery of data stored only in cache memory” (page 76).There is a pinned track on an ESAM
To downgrade the firmware to a version that does not support ESAM,
complete the steps described in “Planned outages for system components”
(page 46), and then perform the downgrade.
When the storage system has a heavy workload, the multipath software
turns the P-VOL offline. This does not mean that there is a failure, it is an
expected occurrence.
You can reduce the possibility of this happening by adding additional parity
groups, cache memory, and/or disk adapters.
However, first make certain that no failure has occurred on the primary or
secondary storage system, quorum disk, the host, or with cabling.
72 Troubleshooting
Page 73

Suspended volume pair troubleshooting
A suspended volume pair is a pair in which normal data replication is not occurring between the
primary and secondary volumes. Until the failure or condition that caused the suspension is resolved,
production data on the primary volume is not copied to the secondary volume.
A number of failures or conditions can cause a volume pair to become suspended, including:
• Power supply failure
• Secondary storage system failure
• Communication failure between the primary and secondary storage systems
• I/O failures
• Quorum disk failure
• Incompatible host mode option settings
• Incomplete initial copy operation
The troubleshooting procedures you use to resolve suspended volume pairs depends on the interface
you are using when the pair becomes suspended.
• When using RWC
• When using RAID Manager
The workflow for troubleshooting suspended pairs when using Remote Web Console
Use the following process to resolve suspended volume pairs when using RWC:
• Checking the pair status on the Detailed Information dialog box.
• Following the troubleshooting steps based on the suspend type and the volume type (primary
or secondary).
The following table lists the troubleshooting steps to use for each suspend type and volume type.
Corrective actionErrorVOL TypeSuspend type
PSUE,
by RCU
PSUE,
S-VOL Failure
P-VOL
S-VOL
P-VOL
S-VOL
The primary storage system detected
an error condition at the secondary
storage system which caused the
primary storage system to suspend the
pair. The S-VOL suspend type is S-VOL
Failure.
an error during communication with
the secondary storage system, or an
I/O error during update copy.
The suspend type for the S-VOL is
usually S-VOL Failure.
Clear the error condition at the secondary
storage system or S-VOL, then resynchronize
the pair from the primary storage system.
Do the following:The primary storage system detected
• Check data path status on the secondary
storage system Status dialog box. Clear
any errors.
• Clear any error conditions on the
secondary storage system or S-VOL.
• After errors are cleared, resynchronize
from the primary storage system.
PSUE,
S-VOL Failure
P-VOL
S-VOL
a failure in the quorum disk.
Do the following:The primary storage system detected
• Recover the quorum disk failure by
following the recovery procedure defined
by the external storage system.
• If SIMs related to External Storage are
issued, call the HP Support Center and
follow the recovery procedure defined by
the HP XP P9000 External Storage for
Open and Mainframe Systems User
Guide. After the failure is recovered,
Suspended volume pair troubleshooting 73
Page 74

Corrective actionErrorVOL TypeSuspend type
resynchronize the pair from the MCU
(Pairresync).
• Because of the quorum disk failure, the
multipath software will show that the S-VOL
is offline. Resynchronize the pair as
described above, and then make the path
to the S-VOL online with the multipath
software.
PSUE,
S-VOL Failure
PSUE,
MCU IMPL
PSUE,
Initial Copy
Failed
P-VOL
S-VOL
P-VOL
S-VOL
P-VOL
S-VOL
differ between ports on the primary
and secondary storage systems.
The primary storage system could not
find valid control information in its
nonvolatile memory during IMPL. This
condition only occurs if the primary
storage system is without power for
more than 48 hours (for example, a
power failure and fully discharged
backup batteries).
The pair was suspended before the
initial copy completed. Data on the
S-VOL is not identical to data on the
P-VOL.
Do one of the following:The settings for host mode option 52
• If you do not use cluster systems, disable
host mode option 52.
• If you use cluster systems, enable host
mode option 52 for host groups where an
executing node and a standby node
belong.
Resynchronize the pair. This results in an
initial copy operation.
Do the following:
• Release the pair from the primary storage
system.
• Clear all error conditions at the primary
storage system, P-VOL, secondary storage
system, and S-VOL.
• Restart the initial copy operation.
Troubleshooting suspended pairs when using RAID Manager
The basic steps involved in resolving suspended volume pairs when using RAID Manager include:
• Using the RAID Manager operation log file to identify the cause of the error.
• Following the troubleshooting steps based on the SSB1 and SSB2 error codes (the codes are
recorded in the log file).
Location of the RAID Manager operation log file
The file is stored in the following directory by default:
/HORCM/log*/curlog/horcmlog_HOST/horcm.log.
Where:
• * is the instance number.
• HOST is the host name.
Error codes appear on the right of the equal symbol (=).
Example log file
Two error codes are included in this example (B9E1 and B901).
74 Troubleshooting
Page 75

The following table lists the codes for the errors that can occur when using RAID Manager and the
steps involved in troubleshooting the errors.
Error code
(SSB1)
(SSB2)
B901B90A
B902B90A
B904B90A
B980B90A
DescriptionError code
You cannot run the command because the user was not authenticated.91002E31
An ESAM pair cannot be created or resynchronized because ESAM does not support
the option, or the command cannot be accepted in the current pair status.
An ESAM pair cannot be created or resynchronized because the quorum disk is being
blocked.
Reservations that are set to the P-VOL by the host have been propagated to the S-VOL
by ESAM. The cause is one of the following:
• The pair cannot be created because the reservations that were propagated earlier
still remain in the volume. Wait then try again.
• You cannot run the horctakeover and pairresync - swaps commands because
the reservations that were propagated to the S-VOL remain in the volume. Wait then
try the command again.
If the error occurs again, release the LUN reservation by host, and then try the
command again.
For more information about how to release the LUN reservation by host, see the HP
XP P9000 Provisioning for Open Systems User Guide.
An ESAM pair cannot be created because the Continuous Access Synchronous program
product is not installed.
An ESAM pair cannot be created because the ESAM program product is not installed.B981B90A
B982B90A
An ESAM pair cannot be created or resynchronized because the specified quorum disk
ID was not added to the secondary storage system.
The specified value of the quorum disk ID is out of range.B983B90A
An ESAM pair cannot be suspended because of one of the following conditions:B902B912
• ESAM does not support the pairsplit -rw command.
• The operation cannot be accepted in the current pair status.
One of the following causes apply:CBEFD004
• An ESAM pair cannot be created or resynchronized because of one of the following
causes:
- The specified quorum disk ID is not added to secondary storage system.
- The specified quorum disk ID does not match the quorum disk ID that the S-VOL uses.
- The same quorum disk ID is assigned to different external volumes separately by the
primary and secondary storage systems.
- On the paired CU side, the specified quorum disk ID is configured to a different
external volume.
- The quorum disk is blocked, or the path between secondary storage system and the
quorum disk has a failure.
• The pair cannot be resynchronized using the Sync copy mode because the S-VOL has
the ESAM attribute.
Suspended volume pair troubleshooting 75
Page 76

Related topics
For more information about troubleshooting other types of errors, see the HP XP P9000 Continuous
Access Synchronous User Guide.
Recovery of data stored only in cache memory
When a hardware failure occurs while the storage system is running, data in cache memory may
not be written to data drives. In this case, the data stored only in cache memory is referred to as
a pinned track. Pinned tracks can occur on volume pair drives and on quorum disks. You can
recover pinned tracks.
Pinned track recovery procedures
You can use one of the following procedures to recover pinned tracks from volume pairs and
quorum disks. The procedure you use depends on the type of data drive:
• “Recovering pinned tracks from volume pair drives” (page 76).
• “Recovering pinned tracks from quorum disks ” (page 76).
Recovering pinned tracks from volume pair drives
When you recover pinned tracks from volume pair drives, you release the volume pair before you
recover the pinned track. This is required because the primary storage system automatically suspends
the volume pair when a pinned track occurs on a P-VOL or S-VOL.
1. On the primary storage system, release the pair containing the volume with the pinned track.
2. Recover data from the pinned track.
For more information about recovering data from pinned tracks, see the pinned track recovery
procedures for your operating system or contact your HP representative for assistance.
3. Connect to the primary storage system.
4. Resynchronize the pair using the Entire Volume initial copy option.
Recovering pinned tracks from quorum disks
When you recover pinned tracks from quorum disks, you release all volume pairs that use the disk
before you recover the pinned track (the data in cache memory).
NOTE: Host tools cannot be used to recover a pinned track on the quorum disk.
1. Connect to the primary storage system and release all the pairs that use the quorum disk with
the pinned track.
2. On the primary and secondary storage systems, delete the quorum disk ID. If you cannot
release the ID, forcibly delete it.
For more information about deleting quorum disk IDs by system attribute, see “Deleting quorum
disk IDs by system attribute (forced deletion)” (page 45).
3. Format the quorum disk and recover data from the pinned track.
For more information about recovering pinned tracks, see the recovery procedures for your
operating system or contact your HP representative for assistance.
4. On the primary and secondary storage systems, add the quorum disk ID.
5. On the primary storage system, recreate the released volume pair (or pairs) using the Entire
Volume initial copy option.
76 Troubleshooting
Page 77

9 Support and other resources
Contacting HP
For worldwide technical support information, see the HP support website:
http://www.hp.com/support
Before contacting HP, collect the following information:
• Product model names and numbers
• Technical support registration number (if applicable)
• Product serial numbers
• Error messages
• Operating system type and revision level
• Detailed questions
Subscription service
Receive, by email, support alerts announcing product support communications, driver updates,
software releases, firmware updates, and customer-replaceable component information by signing
up at http://www.hp.com/go/myadvisory.
To change options for support alerts you already receive, click the Sign in link on the right.
Documentation feedback
HP welcomes your feedback.
To make comments and suggestions about product documentation, please send a message to
storagedocsfeedback@hp.com. Include the document title and manufacturing part number. All
submissions become the property of HP.
Related information
The following documents provide related information:
• HP XP P9000 Business Copy User Guide
• HP XP P9000 Cache Partition User Guide
• HP XP P9000 Continuous Access Journal User Guide
• HP XP P9000 Continuous Access Synchronous User Guide
• HP XP P9000 External Storage for Open and Mainframe Systems User Guide
• HP XP P9000 Provisioning for Open Systems User Guide
• HP XP P9000 RAID Manager Installation and Configuration User Guide
• HP XP P9000 RAID Manager Reference Guide
• HP XP P9000 Remote Web Console Messages
• HP XP P9000 Remote Web Console User Guide
You can find these documents on the Manuals page of the HP Business Support Center website:
http://www.hp.com/support/manuals
In the Storage topic, click Disk Storage Systems for hardware or Storage Software for software,
and then select your product.
Contacting HP 77
Page 78

HP websites
For additional information, see the following HP websites:
• http://www.hp.com
• http://www.hp.com/go/storage
• http://www.hp.com/service_locator
• http://www.hp.com/support/manuals
• http://www.hp.com/support/downloads
• http://www.hp.com/storage/whitepapers
Conventions for storage capacity values
HP XP P9000 disk arrays use the following values to calculate physical storage capacity values
(hard disk drives):
• 1 KB (kilobyte) = 1,000 bytes
• 1 MB (megabyte) = 1,0002bytes
• 1 GB (gigabyte) = 1,0003bytes
• 1 TB (terabyte) = 1,0004bytes
• 1 PB (petabyte) = 1,0005bytes
• 1 EB (exabyte) = 1,0006bytes
HP XP P9000 disk arrays use the following values to calculate logical storage capacity values
(logical devices):
• 1 KB (kilobyte) = 1,024 bytes
• 1 MB (megabyte) = 1,0242bytes
• 1 GB (gigabyte) = 1,0243bytes
• 1 TB (terabyte) = 1,0244bytes
• 1 PB (petabyte) = 1,0245bytes
• 1 EB (exabyte) = 1,0246bytes
Typographic conventions
Table 3 Document conventions
Blue text: Table 3 (page 78)
ElementConvention
• Cross-reference links and e-mail addresses
• A cross reference to the glossary definition of the term
in blue text
email addressesBlue, bold, underlined text
Bold text
78 Support and other resources
Website addressesBlue, underlined text: http://www.hp.com
• Keys that are pressed
• Text typed into a GUI element, such as a box
• GUI elements that are clicked or selected, such as menu
and list items, buttons, tabs, and check boxes
Text emphasisItalic text
Page 79

Table 3 Document conventions (continued)
ElementConvention
Monospace text
Monospace, italic text
• File and directory names
• System output
• Code
• Commands, their arguments, and argument values
• Code variables
• Command variables
Emphasized monospace textMonospace, bold text
WARNING! Indicates that failure to follow directions could result in bodily harm or death.
CAUTION: Indicates that failure to follow directions could result in damage to equipment or data.
IMPORTANT: Provides clarifying information or specific instructions.
NOTE: Provides additional information.
TIP: Provides helpful hints and shortcuts.
Rack stability
Rack stability protects personnel and equipment.
WARNING! To reduce the risk of personal injury or damage to equipment:
• Extend leveling jacks to the floor.
• Ensure that the full weight of the rack rests on the leveling jacks.
• Install stabilizing feet on the rack.
• In multiple-rack installations, fasten racks together securely.
• Extend only one rack component at a time. Racks can become unstable if more than one
component is extended.
Rack stability 79
Page 80

A Conventions
This appendix describes phrases in this manual that correspond to phrases in the Remote Web
Console windows and messages.
Business Copy and Snapshot volumes
Business Copy and Snapshot volumes displayed in the Remote Web Console windows and messages
differ between Remote Web Console main windows and secondary windows. The differences are
shown below.
Table 4 Volumes displayed in the window and messages
window
For details on the Remote Web Console main window and secondary window, see the HP XP
P9000 Remote Web Console User Guide.
Copied volumesOriginal volumesWindow
Secondary VolumePrimary VolumeRemote Web Console main window
S-VOLP-VOLRemote Web Console secondary
80 Conventions
Page 81

B ESAM GUI reference
This topic describes ESAM windows, dialog boxes, items, and behaviors in RWC.
In addition, information related to ESAM systems also shown in the following windows and is
documented in the HP XP P9000 Continuous Access Synchronous User Guide:
- The RCU Operation window
- The Usage Monitor window
- The History window
- The System Option window
- The Quorum Disk Operation window
Pair Operation window
Use this window to view ESAM and Continuous Access Synchronous pairs. Filter the list to show
only ESAM pairs by clicking Display Filter.
You can perform these procedures from the window:
• “Creating an ESAM pair ” (page 33)
• “Splitting pairs ” (page 36)
• “Resynchronizing pairs” (page 37)
• “Releasing a pair” (page 38)
• “Checking pair status ” (page 29)
Pair Operation window 81
Page 82

DescriptionItem
Tree
List
Used Capacity
Export
Shows the connected storage system, the LDKC, the CU grouping, the CUs, ports, and host groups.
Select the desired CU grouping, CU( ), port ( ), or host group ( ) to shows related LUs.
Only one CU grouping, CU, port, or host group can be selected.
Shows detailed pair information about the local storage system. To sort the items that are shown
in ascending/descending order, click the column heading. To perform ESAM operations such as
creating/splitting/resynchronizing an ESAM pair, right-click a row in the list.
If a volume has multiple LU paths, each LU path appears in a separate row. However, when you
select a CU group or a CU in the tree, only one LU path per volume is shown in the list.
For more information about the list, see the following table.
• Used Capacity: The capacity of the volume used in Continuous Access Synchronous pairs.
Licensed capacity is enclosed in parenthesis.
• ESAM: Unlimited is shown.
Click to open the Display Filter dialog box, from which you can narrow down the list of volumes.Display Filter
For more information about the Display Filter dialog box, see the HP XP P9000 Continuous Access
Synchronous User Guide.
Saves ESAM pair information currently in view, which matches settings in the Display Filter dialog
box. Information is saved in a text file. You can use the file to review the progress of your ESAM
operations.
For more information about this snapshot function, see the HP XP P9000 Continuous Access
Synchronous User Guide.
Preview
Apply
Shows the settings to be saved to the system when you click Apply. You can change or delete the
settings by right-clicking.
Saves the operation or changes to the storage system. If an error occurs, an error code appears
on the Error Code column in Preview. To show an error message, select one setting, right-click,
and click Error Detail. After you see the error message, click OK to close the error message.
Cancels all the settings in Preview.Cancel
The S/N, ID, and Fence columns can be blank while an ESAM pair is in transition to the SMPL
status. To show the latest information, refresh the window by clicking File and then Refresh on the
menu bar of RWC windows.
DescriptionItem
An icon shows whether the volume is assigned to a pair.VOL
• : SMPL (not assigned to a pair).
• : P-VOL.
• : S-VOL.
The LU path (a path from a host to a volume) information appears on the right of the icon, the port
number, the host group number, and LUN (LDKC:CU:LDEV), separated by hyphens.
The following symbols might appear at the end of the LDEV number:
• # (e.g., 00:00:3C #): Indicates the volume is an external volume.
For more information about external volumes, see the HP XP P9000 External Storage for Open
and Mainframe Systems User Guide.
Status
82 ESAM GUI reference
• X (e.g., 00:00:3C X): Indicates the volume is a Thin Provisioning virtual volume.
For more information about virtual volumes, see the HP XP P9000 Provisioning for Open Systems
User Guide.
In the RWC window, pair status is shown in the [pair status in Storage Navigator
format/ pair status in RAID Manager] format. If the pair status name in the Storage
Page 83

DescriptionItem
Navigator and the pair status name in RAID Manager are the same, the pair status name in RAID
Manager is not shown. For more information, see the table of “Pair status values” (page 30).
Serial number of the paired storage system.S/N(LDKC)
SSID of the paired storage system, or Path group ID that you entered when registering the RCU.ID
Paired VOL
Information about the path from the host to the paired volume appears as port number, the host
group number, and LUN (LDKC:CU:LDEV), separated by hyphens.
The symbols used in the VOL column might appear at the end of the LDEV number.
Pair type, ESAM or Cnt Ac-S.Type
The fence level, which is a Cnt Ac-S setting. Does not apply for ESAM pairs.Fence
The unit of measurement used for storing differential data (by cylinder, track, or auto).Diff
Shows nothing for ESAM volumes.CTG
Sync Rate
During the copy process, Sync shows the percentage of completion of the copy operation. During
the split volume process, Sync shows the concordance ratio of the specified local volume.
The quorum disk ID assigned to the ESAM pair.Quorum Disk ID
Shows which pair volume is online and thus receiving I/O from the host.VOL Access
For more information, see “Possible VOL Access values for pairs” (page 83).
The number and name of the cache logical partition that the local volume belongs to.CLPR
You can to determine the volume that is receiving host I/O, which is the “online” volume by checking
the VOL Access values in the Pair Operation window. The particular combination of values (one
for the P-VOL and one for the S-VOL) indicates which volume is the online volume.
Possible VOL Access values for pairs
The following table lists the possible combinations of VOL Access values for a volume pair.
P-VOL status
1
1
Online volumeVOL access of S-VOLVOL access of P-VOLS-VOL status
P-VOLBlankAccess (No Lock)COPYCOPY
P-VOLBlankBlankPAIRPAIR
S-VOLAccess (Lock)BlankSSWS
2
BlankBlank
Access (Lock)BlankPSUS
BlankBlank
Any
Any
Any
2
2
P-VOLBlankAccess (Lock)PSUSPSUS
2
BlankBlank
Access (Lock)Blank
Any
Any
2
S-VOLAccess (Lock)BlankSSWS
2
BlankBlank
BlankAccess (Lock)
Any
Any
2
P-VOLBlankAccess (Lock)SMPL
P-VOLBlankAccess (No Lock)PSUEPSUE
Pair Operation window 83
Page 84

P-VOL status
1
1
1. Remote Web Console pair statuses are shown in the format, RWC status/RAID Manager status. If the two statuses
are the same, the RAID Manager status is not shown. You can see pair status definitions in “Pair status values”
(page 30).
2. The S-VOL pair status is forcibly changed to SSWS by the swap suspended operation, or else the S-VOL pair status
is changed from SSWS to PSUS by the rollback operation. This status can be see when you try to use the volume
that has the older data. You can use any one volume as an on-line volume.
Detailed Information dialog box
Use this dialog box to view details for the selected ESAM pair.
Online volumeVOL access of S-VOLVOL access of P-VOLS-VOL status
P-VOLBlankAccess (Lock)PAIR
2
BlankAccess (No Lock)SSWS
BlankAccess (Lock)
BlankAccess (No Lock)PSUS
BlankAccess (Lock)
Any
Any
Any
Any
2
2
2
P-VOLBlankAccess (Lock)PDUBPDUB
84 ESAM GUI reference
Page 85

DescriptionItem
P-VOL and S-VOL
Pair Status
• Port - GID – LUN(LDKC number: CU number: LDEV number).
The following symbols might appear at the end of the LDEV number:
- # (e.g., 00:00:3C #): Indicates the volume is an external volume.
For more information about external volumes, see the HP XP P9000 External
Storage for Open and Mainframe Systems User Guide.
- X (e.g., 00:00:3C X): Indicates the volume is a Thin Provisioning virtual
volume.
For more information about virtual volumes, see the HP XP P9000 Provisioning
for Open Systems User Guide.
• Emulation type.
• Capacity in MB (to two decimal places).
• The number of blocks.
The CLPR number and name of the local volume.CLPR
Host group name where the local volume is connected.Group Name
ESAM pair status. The split/suspend type is shown as well, if the pair is split or
suspended. For information about the ESAM pair status, see “Pair status values”
(page 30).
The percentage of synchronization or consistency between the pair volumes.Pair Synchronized
If you are viewing S-VOL information, the percentage for all pair statuses except
COPY is shown.
If you are viewing P-VOL information, the percentage for all pair statuses is shown.
Note: If the operation is waiting to start, (Queueing) is shown.
Pair Copy Time
Serial number and path group ID of the paired storage system.S/N and ID
If you selected a P-VOL to open this dialog box, the information about the RCU
will appear.
If you selected an S-VOL to open this dialog box, the information about the MCU
will appear.
Controller ID and model name of the paired storage system.Controller ID
• P9500 controller ID: 6
• XP24000 controller ID: 5
Channel type of the path interface between the storage systems.MCU-RCU Path
Pair type. ESAM indicates that this pair is an ESAM pair.Update Type
1-15 tracks (disabled when the status becomes PAIR).Copy Pace
1-256 (disabled when the status becomes PAIR).Initial Copy Priority
Not used for ESAM pairs.P-VOL Fence Level
Not Received appears; and write operations to the S-VOL are rejected.S-VOL Write
Date and time that the pair was created.Paired Time
Date and time that pair status was last updated.Last Updated Time
Time taken to copy pairs. The time shown for this item differs from the time shown
in the Copy Time on the History window. The difference is as follows:
• Pair Copy Time: Time from step 3 to 4 of the pair creating procedure.
• Copy Time: Time from step 1 to 4 of the pair creating procedure.
Pair Copy Time is determined by the following:
Pair Operation window 85
Page 86

DescriptionItem
1. MCU receives a request to create a pair.
2. MCU receives a request to start the paircreate operation.
3. The paircreate operation is started according to the conditions of initial copy
priority and maximum initial copy activities.
4. The paircreate operation is completed (the progress of the operation reaches
100%).
The unit of measurement used for storing differential data.Difference Management
Values: Cylinder or Track
The quorum disk ID assigned to the ESAM pair.Quorum Disk ID
Shows the online volume.VOL Access
For more information, see “Possible VOL Access values for pairs” (page 83).
The Consistency group number for a Synchronous-C or Multi-C pair.Sync CT Group
If the consistency group number is bracketed ([1]), the consistency group consists
of multiple primary and secondary storage systems.
Refresh the Pair Operation window
after this dialog box is closed
Paircreate(ESAM) dialog box
Use this dialog box to create a pair.
For instructions, see “Creating an ESAM pair ” (page 33).
Select to refresh the Pair Operation window after the Detailed Information dialog
box closes.
Shows pair status for the pair in *the row above.Previous
Shows pair status for the pair in the row below.Next
Updates the information.Refresh
Closes the dialog box.Close
86 ESAM GUI reference
Page 87

DescriptionItem
P-VOL
S-VOL
Initial Copy Parameters
Initial Copy
Shows the port number, host group number (GID), LUN(LDKC number: CU
number: LDEV number), CLPR number, and CLPR name of the selected LU. This
item shows the P-VOL with the lowest LUN when you create multiple pairs at a
time. The following symbols might appear at the end of the LDEV number:
• # (e.g., 00:00:3C #): Indicates the volume is an external volume.
For more information about external volumes, see the HP XP P9000 External
Storage for Open and Mainframe Systems User Guide.
• X (e.g., 00:00:3C X): Indicates the volume is a Thin Provisioning virtual
volume.
For more information about virtual volumes, see the HP XP P9000 Provisioning
for Open Systems User Guide.
The port number, GID, and LUN for the pair’s S-VOL. Port number entered directly
can be specified with two characters, for example, 1A as CL1 A. Port number
can be entered in lowercase and uppercase characters.
RCU for the pairs being created.RCU
Not used for ESAM, Never is default, meaning P-VOL is never fenced.P-VOL Fence Level
• Entire Volume: Copies all P-VOL data except alternative tracks used for
diagnosis and not needed for the S-VOL.
• None: Does not copy any P-VOL data to S-VOL.
Copy Pace
Priority
Difference management
Desired number of tracks to be copied at one time (1-15) during the initial copy
operation. The default setting is 15.
Scheduling order of the initial copy operations (1-256) if the number of requested
initial copy operations is greater than the maximum initial copy activity setting
on the System Option window. The highest priority is 1, the lowest priority is
256, and the default setting is 32.
The unit of measurement used for storing differential data (by cylinder, track, or
auto). The default setting is Auto.
Pair Operation window 87
Page 88

ESAM Parameters
DescriptionItem
Quorum Disk ID
Pairsplit-r dialog box
Use this dialog box to split a pair.
For instructions, see “Splitting pairs ” (page 36).
The quorum disk ID to be assigned to the ESAM pairs. The list shows the quorum
disk ID and the RCU information such as the serial number, controller ID, and
model name.
Volume
Suspend Kind
Pairresync dialog box
Use this dialog box to resynchronize a pair.
For instructions, see “Splitting pairs ” (page 36).
DescriptionItem
Port - GID – LUN (LDKC number: CU number: LDEV number) of the selected volume. The following
symbols might appear at the end of the LDEV number:
• # (e.g., 00:00:3C #): Indicates the volume is an external volume.
For more information about external volumes, see the HP XP P9000 External Storage for Open
and Mainframe Systems User Guide.
• X (e.g., 00:00:3C X): Indicates the volume is a Thin Provisioning virtual volume.
For more information about virtual volumes, see the HP XP P9000 Provisioning for Open Systems
User Guide.
Disable appears. The S-VOL of this pair will reject the write I/Os while the pair is being split.S-VOL Write
Setting for whether or not the system continues host I/O writes to the P-VOL while the pair is split.
(If you run the command from the S-VOL, this item is disabled.)
88 ESAM GUI reference
Page 89

DescriptionItem
P-VOL
Change attribute
to ESAM
Quorum Disk ID
Pairsplit-S dialog box
Port - GID – LUN (LDKC number: CU number: LDEV number) of the selected volume. The following
symbols might appear at the end of the LDEV number:
• # (e.g., 00:00:3C #): Indicates the volume is an external volume.
For more information about external volumes, see the HP XP P9000 External Storage for Open
and Mainframe Systems User Guide.
• X (e.g., 00:00:3C X): Indicates the volume is a Thin Provisioning virtual volume.
For more information about virtual volumes, see the HP XP P9000 Provisioning for Open Systems
User Guide.
Not used for ESAM, Never is default, meaning P-VOL is never fenced.P-VOL Fence Level
The number of the tracks 1-15 for the resync operations (default = 15). Initial copy parameter.Copy Pace
Scheduling order for the resync operation (1-256, default = 32). Initial copy parameter.Priority
• Yes: Changes a Continuous Access Synchronous Sync pair to an ESAM pair.
• No: Does not change a Continuous Access Synchronous Sync pair to an ESAM pair.
For more information, see “Changing Continuous Access Synchronous pairs to ESAM pairs ”
(page 39).
Used to specify a quorum disk ID when changing a Continuous Access Synchronous Sync pair to
an ESAM pair. The list shows the quorum disk ID and the RCU information such as the serial
number, controller ID, and model name.
Use this dialog box to release a pair.
For instructions, see “Releasing a pair” (page 38).
Pair Operation window 89
Page 90

DescriptionItem
Volume
Delete Pair by
Force
Port - GID – LUN (LDKC number: CU number: LDEV number) of the selected volume. The following
symbols might appear at the end of the LDEV number:
• # (e.g., 00:00:3C #): Indicates the volume is an external volume.
For more information about external volumes, see the HP XP P9000 External Storage for Open
and Mainframe Systems User Guide.
• X (e.g., 00:00:3C X): Indicates the volume is a Thin Provisioning virtual volume.
For more information about virtual volumes, see the HP XP P9000 Provisioning for Open Systems
User Guide.
• Yes: The pair is released even if the primary storage system cannot communicate with the
secondary storage system.
• No: The pair is released only when the primary storage system can change pair status for both
the P-VOL and S-VOL to SMPL.
When the status of the pairs to be released is SMPL, the default setting is Yes (cannot be changed).
Otherwise, the default setting is No.
Quorum Disk Operation window
Use this window to perform quorum disks operations.
90 ESAM GUI reference
Page 91

DescriptionItem
Shows the connected Storage System, LDKC, and Used and Not Used.Tree
• When Storage System or LDKC is selected, the associated quorum disk IDs show in the list area.
• When Used or Not Used is selected, the used and unused quorum disk IDs in the system is
shown in the list area.
List
Preview
The quorum disk ID list shows quorum disk information. You can sort the list by column in ascending
or descending order. The list contains the following items:
• Quorum Disk ID:
Quorum disk ID.
• Quorum Disk (LDKC:CU:LDEV):
LDEV number for the quorum disk. # appears at the end of the LDEV number, indicating that
the volume is an external volume.
• Paired S/N:
Serial number of the paired storage system.
• Controller ID:
Controller ID and model name of the paired storage system.
Shows any changes you have made. You can alter or delete changes by right-clicking a row in
Preview.
When clicked, saves changes.Apply
When clicked, cancels changes.Cancel
Add Quorum Disk ID dialog box
Use this dialog box to add a quorum disk ID.
For instructions, see “Adding the ID for the quorum disk to the storage systems” (page 25).
Quorum Disk Operation window 91
Page 92

DescriptionItem
Where the external volume to be used as a quorum disk is selected.Quorum Disk
RCU
Where the paired CU is selected. The list shows the RCU information registered in CU Free. Multiple
RCUs with the same serial number and controller ID, but different path group IDs, appear as one
RCU.
92 ESAM GUI reference
Page 93

Glossary
BC P9000 or XP Business Copy. An HP application that provides volume-level, point-in-time copies
in the disk array.
CLPR Cache logical partition.
Cnt Ac-J P9000 or XP Continuous Access Journal software.
Cnt Ac-S P9000 or XP Continuous Access Synchronous software.
command device A volume in the disk array that accepts Continuous Access, Business Copy, or P9000 for Business
Continuity Manager control operations, which are then executed by the array.
CTGID Consistency group ID. The group identifier used to identify a group of volumes in the HP
StorageWorks P9500 Disk Array being replicated using an asynchronous technology. The
consistency group feature guarantees the sequencing of updates to the secondary volumes.
CU Control Unit. Used to organize the storage space attached to the disk controller (DKC). You can
group similarly configured logical devices (LDEVs) with unique control unit images (CUs). CUs
are numbered sequentially. The disk array supports a certain number of CUs, depending on the
disk array model. Each CU can manage multiple LDEVs; therefore, both the CU number and the
LDEV number are required to identify an LDEV.
emulation mode The LDEVs associated with each RAID group are assigned an emulation mode that makes them
operate like OPEN system disk drives. The emulation mode determines the size of an LDEV or
volume.
OPEN-V: User-defined custom size
3390-3/3R: 2.838 GB
3390-9: 8.514 GB
3390-L: 27.844 GB
3390-M: 55.689 GB
3380-3 2.377 GB
failover The process that occurs when one device assumes the workload of a failed companion device.
Failovers can be planned or unplanned.
fence level A method of setting rejection of P9000 or XP Continuous Access write I/O requests from the host
according to the condition of mirroring consistency.
Fibre Channel A data transfer architecture designed for mass storage devices and other peripheral devices that
require high bandwidth.
LDKC Logical disk controller.
LUN Logical unit number. A LUN results from mapping a logical unit number, port ID, and LDEV ID to
a RAID group. The size of the LUN is determined by the emulation mode of the LDEV and the
number of LDEVs associated with the LUN.
LUSE Logical Unit Size Expansion. The LUSE feature is available when the HP StorageWorks LUN
Manager product is installed, and allows a LUN, normally associated with only a single LDEV,
to be associated with 1 to 36 LDEVs. Essentially, LUSE makes it possible for applications to access
a single large pool of storage.
MCU Main control unit.
OPEN-
x
P-VOL Primary volume.
parity group A set of hard disk drives that have the same capacity and that are treated as one group. A parity
A general term describing any of the supported OPEN emulation modes (for example, OPEN-E).
There are two types of OPEN-x devices: legacy OPEN-x devices with a fixed size (such as OPEN-3,
OPEN-8, OPEN-9, and OPEN-E), and OPEN-V, which has a variable size and is a CVS-based
volume.
group contains both user data and parity information, which enables user data to be accessed
if one or more drives in the group is not available.
93
Page 94

path A path is created by associating a port, a target, and a LUN ID with one or more LDEVs. Also
known as a LUN.
port A physical connection that allows data to pass between a host and the disk array. The number
of ports on a disk array depends on the number of supported I/O slots and the number of ports
available per I/O adapter. The P9000 and XP family of disk arrays supports Fibre Channel (FC)
ports and other port types. Ports are named by port group and port letter, such as CL1-A. CL1 is
the group; A is the port letter.
PSUE Pair suspended-error.
PSUS Pair suspended-split.
RAID Manager The CLI configuration and replication tool for the P9000 or XP disk array that system administrators
can use to enter RAID Manager commands from open-system hosts to perform Continuous Access,
Business Copy, Database Validator, and Data Retention operations, as well as provisioning
commands on logical devices.
RCU Remote control unit.
Remote Web
Console
A browser-based program installed on the SVP that allows you to configure and manage the disk
array.
RM HP StorageWorks RAID Manager.
S-VOL Secondary or remote volume. The copy volume that receives the data from the primary volume.
SIM Service information message.
SMPL Simplex.
SVP Service processor. A computer built into a disk array. The SVP, used only by an HP service
representative, provides a direct interface to the disk array.
synchronous Describes computing models that perform tasks in chronological order without interruption. In
synchronous replication, the source waits for data to be copied at the destination before
acknowledging that it has been written at the source.
takeover The process in which a remote standby disk array takes over processing from the previously active
local disk array.
V-VOL Virtual Volume.
VOL, vol Volume.
volume Volume on disk. An accessible storage area on disk, either physical or virtual.
94 Glossary
Page 95

Index
A
Add Quorum Disk dialog box, 91
B
Business Copy and ESAM, 19
C
Cache Partition Manager, sharing volumes with, 18
capacity, 12
changing Continuous Access Synchronous pair to ESAM,
39
components, 8
configuration
hardware order, 21
P9500, 23
quorum disk, 24
software order, 22
with Business Copy, 19
with Continuous Access Journal, 20
with ShadowImage, 19
with Universal Replicator, 20
contacting HP, 77
Continuous Access Journal and ESAM, 20
Continuous Access Synchronous, changing pair to ESAM,
39
conventions
document, 78
storage capacity values, 78
text symbols, 79
create pairs, 33
D
data path
general, 9
max, min, recommended, 15
overview, 9
requirements, 14
switching, 43
deleting pairs, 38
document
conventions, 78
related information, 77
documentation
HP website, 77
providing feedback, 77
E
ending ESAM operations, 43
expired license, 13
External Storage Access Manager, discontinuing, 43
external storage systems, requirements, 15
F
failover
description, 10
planning, 16
G
GUI, using to
add quorum disk ID, 25
create pairs, 33
delete pairs, 38
resync pairs, 37
split pairs, 36
H
hardware
required, 11
setup, 21
help
obtaining, 77
HP
subscription service, 77
technical support, 77
I
initial copy, 33
interoperability;sharing volumes, 17
L
LDEV requirements, 13
license capacity, 12
licenses required, 12
logical paths
max, min, recommended, 15
LUN Expansion, sharing volumes with HAM, 19
LUN Manager, 19
LUSE, sharing volumes with HAM, 19
M
max. number of pairs, 13
MCU, 9
multipath software
description, 9
multipath software, requirements, 12
N
non-owner path, restore, 65
O
Open Volume Management, sharing volumes with, 19
overview, 7
owner path, restore, 65
P
P-VOL, 9
P-VOL, disallow I/O when split, 36
P9500, configuring for ESAM, 23
pair status
definitions, 30
monitoring, 27
95
Page 96

Paircreate(ESAM) dialog box, 86
pairs
create, 33
max. number, 13
releasing, 38
requirements, 13
resynchronizing, 37
split, 36
troubleshooting, 73
Performance Monitor, 19
planning, workflow, 11
ports
max, min, recommended, 15
power on/off system, 46
power outage, recovery from, 59
program products, others with ESAM, 17
PSUS types and definitions, 32
Q
quorum disk
and other products, 18
delete, 44
overview, 9
recover if deleted by accident, 45
replace, 57
requirements, 14
setup, 24
quorum disk ID, adding, 25
Quorum Disk Operation window, 90
S
S-VOL, 9
S-VOL write option, allowing I/O, 36
SIM, 29
software setup, 22
split operation, maintaining synchronization, 36
splitting pairs, 36
storage capacity values
conventions, 78
storage systems, 8
subscription service, HP, 77
suspended pairs, troubleshooting, 73
symbols in text, 79
system
configuration for ESAM, 23
hardware requirements, 11
power on/off procedure, 46
primary, secondary requirements, 12
T
technical support
HP, 77
service locator website, 78
text symbols, 79
troubleshooting
general errors;, 71
suspended pairs;, 73
using RAID Manager, 74
typographic conventions, 78
R
rack stability
warning, 79
RAID Managaer
using for pair operations, 41
RAID Manager
troubleshooting with, 74
RCU, 9
recovering quorum disk if deleted, 45
recovery
after failure, 54
after power outage, 59
with Business Copy, 64
with Continuous Access Journal, 64
related documentation, 77
releasing pairs, 38
Remote Web Console
general, 10
requirements, 15
requirements
data path, 14
for multiple pair creation, 13
hardware, 11
licences, 12
pair volumes, 13
quorum disk, 14
resynchronizing pairs, 37
reverse resynchronizing, 38
V
VOL Access explained, 83
W
warning
rack stability, 79
web sites
HP subscription service, 77
websites
HP , 78
product manuals, 77
96 Index
 Loading...