

Page 1

HP StorageWorks
RAID Manager XP
User’s Guide
XP48
XP128
XP512
XP1024
XP10000
XP12000
ninth edition (November 2005)
part number: T1610-96004
This guide describes HP StorageWorks RAID Manager XP (RM) and provides installation and
configuration procedures, RM command usage, and troubleshooting instructions.
Page 2

© Copyright 2003-2005 by Hewlett-Packard Development Company, L.P.
Confidential computer software. Valid license from HP required for possession, use or copying. Consistent with FAR
12.211 and 12.212, Commercial Computer Software, Computer Software Documentation, and Technical Data for
Commercial Items are licensed to the U.S. Government under vendor's standard commercial license.
The information contained herein is subject to change without notice. The only warranties for HP products and
services are set forth in the express warranty statements accompanying such products and services. Nothing herein
should be construed as constituting an additional warranty. HP shall not be liable for technical or editorial errors or
omissions contained herein.
Microsoft, Windows, Windows XP, and Windows NT are U.S. registered trademarks of Microsoft Corporation.
Oracle is a registered US trademark of Oracle Corporation, Redwood City, California.
Linux is a U.S. registered trademark of Linus Torvalds.
UNIX is a registered trademark of The Open Group.
HP StorageWorks Disk Array XP RAID Manager: User’s Guide
ninth edition (November 2005)
part number: T1610-96004
2 HP StorageWorks Disk Array XP RAID Manager: User’s Guide
Page 3

About this guide 9
Intended audience 9
Disk arrays 9
Related documentation 9
HP technical support 10
HP storage website 10
HP sales and authorized resellers 11
Document conventions 11
Revision history 12
Warranty statement 13
HP StorageWorks LUN Security XP Extension disclaime r 15
1 Description 17
RAID Manager features and environment 18
Continuous Access (CA) 19
Business Copy (BC) 20
Pairs and pair management 21
RAID Manager instances 23
RAID Manager command device 25
Manually switching command de vices 26
Contents
2 Installation and configuration 27
Disk array and host requirements 28
RAID Manager requirements with Continuous Access 28
Using RAID Manager with Business Copy 29
Installation and configuration outline 30
Installing RAID Manager on UNIX systems 31
Installing RAID Manager on Windows systems 33
Installing RAID Manager on MPE/iX systems 34
Contents 3
Page 4

Installing RAID Manager on OpenVMS systems 37
Configuring the services and hosts files 39
Directory locations 39
Services file 40
Hosts file 40
Setting up the RM instance configuration file 41
RM instance configuration files 41
Creating an instance configuration file 42
RM instance configuration file parameters 43
HORCM_MON section 44
HORCM_CMD section 46
HORCM_DEV section 49
HORCM_LDEV section 52
HORCM_INST section 53
Starting the instances 54
Environment variables for BC 54
Environment variables for CA 56
Paired volume configuration 57
3 Using RAID Manager 59
RAID Manager pair commands 60
RAID Manager commands in scripts 61
Paired CA volume status definitions 62
Paired BC volume status definitions 64
Paired SnapShot volume status definitions 66
File types and structure 69
Log files 73
Log file format 73
Log directories 75
Output to host log file 75
User-created files 76
User-setta ble environm ent variables 77
RM environment variables 77
RM command environment variables 78
RM instance environment variable 79
4 HP StorageWorks Disk Array XP RAID Manager: User’s Guide
Page 5

RM protection 80
Protection facility specification 81
Permission command 82
Protection facility support 82
Command device configuration 83
Commands controlled by RM protection 86
Permitting operations on protected volumes 87
Environment variables 91
Identifying a command device using protection mode 92
Using RAID Manager on a Windows 2000/2003 sys tem with “user” syste m
privileges 93
Windows System Administrator 93
RAID Manager user 98
Sample BAT file 100
LUN Securi ty Extension 102
Guarding options 102
Commands affected 102
Notes and Restrictions 103
Identifying Open LDEV Guard volumes 104
4 RAID Manager command reference 105
General commands 106
Windows NT/2000/2003 commands 107
Data integrity check comm ands 108
horcctl 109
horcmshutdown 112
horcmstart 113
horctakeover 114
inqraid 118
mkconf 131
paircreate 134
paircurchk 142
pairdisplay 145
pairevtwait 156
pairmon 162
pairresync 165
pairsplit 173
pairsyncwait 179
pairvolchk 186
raidar 197
raidqry 200
Contents 5
Page 6

raidscan 202
Command Options for Windows NT/2000/2003 214
drivescan 215
env 217
findcmddev 218
mount 220
portscan 223
setenv 225
sleep 226
sync 227
umount 231
usetenv 233
Data Integrity Check Commands 235
raidvchkset 236
raidvchkdsp 243
raidvchkscan 250
5 Troubleshooting RAID Manager 263
Error reporting 264
Operational notes 265
Error codes 268
Command return values 270
Command errors 273
A Configuration file examples 279
Configuration definition for cascading volumes 280
Correspondence between a configuration file and mirror
descriptors 280
Cascading connection configuration files 281
CA configuration (remote CA, two hosts) 285
CA (remote CA, two host) command examples 288
CA configuration (local loopback, two hosts) 290
CA (local loopback, two hosts) command examples 292
CA configuration (two RM instances, one host) 294
CA (two RM instances, one host) command examples 296
BC configuration 298
BC command examples 301
Configuration for a BC cascaded connection 307
BC cascaded connection command examples 309
Configuration for a CA/BC cascaded connection 311
CA/BC cascaded connection command examples 314
Two-host BC configuration 317
6 HP StorageWorks Disk Array XP RAID Manager: User’s Guide
Page 7

Two BC mirror configuration 319
Three-host BC configuration 321
Device group configuration 323
B HA Failover and failback 325
Using RAID Manager in HA environments 326
HA control script state transitions 326
Failback after SVOL-SMPL takeover 330
PVOL-PSUE takeover 335
S-VOL data consistency function 343
Takeover-switch function 346
Swap-takeover function 348
SVOL-takeover function 350
PVOL-takeover function 352
Recovery procedures of HA system configuration 353
Regression and recovery of CA 356
CA recovery procedures 357
C Fibre Channel addressing 359
Fibre Channel address conversions 360
D STDIN file formats 365
E Porting notice for MPE/iX 367
Porting notice for MPE/iX 368
Introduction 368
Restrictions in the current release 368
Known issues and concerns 371
MPE/iX startup procedures 373
F Porting notice for OpenVMS 377
Porting notice for OpenVMS 378
Introduction 378
Requirements and restrictions 378
Known issues and concerns 385
DCL command examples 391
Startup procedures on bash 396
Glossary 401
Index 409
Contents 7
Page 8

8 HP StorageWorks Disk Array XP RAID Manager: User’s Guide
Page 9

About this guide
This guide describes HP StorageWorks RAID Manager XP (RM) and
provides installation and configuration procedures, RM command usage,
and troubleshooting instructions. It also has configuration file examples
and information about High Availability failover and failback, Fibre
Channel addressing, and standard input (STDIN) file formats.
Intended audience
This guide is intende d for syst em administrator s with knowledge of the host
server, the operating system, RAID technology, and XP disk arrays.
Disk arrays
Unless otherwise noted, the term disk array refers to these disk arrays:
HP Surestore Disk Array XP512
HP Surestore Disk Array XP48
HP StorageWorks Disk Array XP128
HP StorageWorks Disk Array XP1024
HP StorageWorks XP10000 Disk Array
HP StorageWorks XP12000 Disk Array
Related documentation
HP provides the following related documentation:
• HP StorageWorks Continuous Access XP: User’s Guide
• HP StorageWorks Business Copy XP: User’s Guide
• HP Storage Works Command View XP for XP Disk Arrays: User Gui de
• HP StorageWorks Command View XP Advanced Edition Device
Manager Web Client User's Guide
• HP StorageWorks XP Remote Web Console User Guide for the
XP1024/XP128
• HP StorageWorks XP Remote Web Console User Guide for the
XP12000/XP10000
About this guide 9
Page 10

HP technical support
In North America, call technical support at 1-800-633-3600, available 24
hours a day, 7 days a week.
Outside North America, call technical support at the location nearest you.
The HP web site lists telephone numbers for worldwide technical support
at:
Collect the following information before calling:
For continuous quality improvement, calls may be recorded or monitored.
HP strongly recommends that customers sign up online using the
Subscriber’s choice web site at
Subscribing to this service provides you with email updates on the latest
product enhancements, newest drivers, and firmware documentation
updates as well as instant access to numerous other product resources.
http://www.hp.com/support
• Technical support registration number (if applicable)
• Product serial numbers
• Product model names and numbers
• Applicable error message s
• Operating system type and revision level
• Detailed questions
. From this web site, select your country.
http://www.hp.com/go/e-updates
.
HP storage website
For the most current information about HP StorageWorks XP products,
visit:
http://h18006.www1.hp.com/storage/arraysystems.html
For information about product availa bili ty, configuration, and connecti vity,
contact your HP support representative.
10 HP StorageWorks Disk Array XP RAID Manager: User’s Guide
.
Page 11

HP sales and authorized resellers
To reach HP sales or find a local authorized reseller of HP products, call
1-800-282-6672 or visit the HP How To Buy web site:
http://welcome.hp.com/country/us/en/howtobuy.html
You can also find HP sales and resellers at
Contact HP.
http://www.hp.com
. Click
Document conventions
Convention Element
Blue text (Figure 1) Blue text represen ts a cro ss-refe rence. In the onlin e version of this guide,
the reference is linked to the target.
Bold Bold text represents application names, file names, menu items, dialog
box titles, buttons, key names, field names, and literal values that you
type exactly as shown.
Italics Italic type indica te s that you must supply a valu e. It al ic type is also used
for manual titles.
Blue underlined sans serif
font (www.hp.com
monospace font Monospace font deno tes use r inpu t and s ystem re spo nses, s uch as o utp ut
Example
)
Underlined, blue text represents a website on the Internet. In the online
version of this guide, the reference is linked to the target.
and messages.
The word “example” in italics denotes an example of input or output.
[ ] Square brackets indicate an optional parameter.
{ } Braces indicate that you must specify at least one of the listed options.
| A vertical bar separates alternatives in a list of options.
About this guide 11
Page 12

Revision history
September 1999 OPEN-8 emulation added.
January 2000 Content extensively revised and reorganized.
September 2000 Content extensively revised.
February 2001 Added support of MPE/iX. Content significantly
March 2001 Added mkconf command. Content enhanced.
November 2003 Added Oracle Data Validation. Added OpenVMS.
July 2004 General edit of content, layout, and language.General
enhanced.
Content significantly enhanced.
update to reflect recent changes. Modified installation
procedure. Modified doc ument to refl ect HP12 000 disk
arrays. Added “Using RAID Manager with ‘user’
system privileges on a Windows 2000/2003 system.”
Added HP StorageWorks LUN Security XP Extension
disclaimer.
March 2005 Added -fe option for the raidvchkdsp, raidscan, and
pairdisplay commands (display of information about
external LUNs).
Clarified use of -l option in pairsplit command (applies
to Continuous Access only).
Added CA-Journal description and operations. Added
CA-Journal options to raidscan, pairdisplay, inqraid,
raidscan, raidvchkdsp, raidvchkscan, pairdisplay, and
pairsyncwait commands.
November 2005 Updated to include XP10000, Command View XP
Advanced Edition, Remote Web Console XP, SnapShot
option for BC, and CA Journal updates.
12 HP StorageWorks Disk Array XP RAID Manager: User’s Guide
Page 13

Warranty statement
HP warrants that for a period of ninety calendar days from the date of
purchase, as evidenced by a copy of the invoice, the media on which the
Software is furnished (if any) will be free of defects in materials and
workmanship under normal use.
DISCLAIMER. EXCEPT FOR THE FOREGOING AND TO THE
EXTENT ALLOWED BY LOCAL LAW, THIS SOFTWARE IS
PROVIDED TO YOU “AS IS” WITHOUT WARRANTIES OF ANY
KIND, WHETHER ORAL OR WRITTEN, EXPRESS OR IMPLIED.
HP SPECIFICALLY DISCLAIMS ANY IMPLIED WARRAN TIES
OR CONDITIONS OF MERCHANTABILITY, SATISFACTORY
QUALITY, NON-INFRINGEMENT, TITLE, ACCURACY OF
INFORMATIONAL CONTENT, AND FITNESS FOR A
PARTICULAR PURPOSE. Some jurisdictions do not allow exclusions
of implied warranties or conditions, so the above exclusion may not apply
to you to the extent prohibited by such local laws. You may have other
rights that vary from country to country, state to state, or province to
province.
WARNING! YOU EXPRESSLY ACKNOW LEDGE AND AGREE
THAT USE OF THE SOFTWARE IS AT YOUR SOLE RISK. HP
DOES NOT WARRANT THAT THE FUNCTIONS CONTAINED IN
THE SOFTWARE WILL MEET YOUR REQUIREMENTS, OR THAT
THE OPERATION OF THE SOFTWARE WILL BE UNINTERRUPTED,
VIRUS-FREE OR ERROR-FREE, OR THAT DEFECTS IN THE
SOFTWARE WILL BE CORRECTED. THE ENTIRE RISK AS TO THE
RESULTS AND PERFORMANCE OF THE SOFTWARE IS ASSUMED
BY YOU. HP DOES NOT WARRANT OR MAKE ANY
REPRESENTATIONS REGARDING THE USE OR THE RESULTS OF
THE USE OF THE SOFTWARE OR RELATED DOCUMENTATION IN
TERMS OF THEIR CORRECTNESS, ACCURACY, RELIABILITY,
CURRENTNESS, OR OTHERWISE. NO ORAL OR WRITTEN
INFORMATION OR ADVICE GIVEN BY HP OR HP’S AUTHORIZED
REPRESENTATIVES SHALL CREATE A WARRANTY.
About this guide 13
Page 14

LIMITATION OF LIABILITY. EXCEPT TO THE EXTENT
PROHIBITED BY LOCAL LAW, IN NO EVENT INCLUDING
NEGLIGENCE WILL HP OR ITS SUBSIDIARIES, AFFILIATES,
DIRECTORS, OFFICERS, EMPLOYEES, AGENTS OR
SUPPLIERS BE LIABLE FOR DIRECT, INDIRECT, SPECIAL,
INCIDENTAL, CONSEQUENTIAL, PUNITIVE OR OTHER
DAMAGES (INCLUDING LOST PROFIT, LOST DATA, OR
DOWNTIME COSTS), ARISING OUT OF THE USE, INABILITY
TO USE, OR THE RESULTS OF USE OF THE SOFTWARE,
WHETHER BASED IN WARRANTY, CONTRACT, TORT OR
OTHER LEGAL THEORY, AND WHETHER OR NOT ADVISED
OF THE POSSIBILITY OF SUCH DAMAGES. Your use of the
Software is entirely at your own ris k. Shoul d th e Soft war e prove defective,
you assume the entire cost of all service, repair or correction. Some
jurisdictions do not allow the exclusion or limitation of liability for
incidental or conse quenti al damag es, so t he above limit atio n may not a pply
to you to the extent prohibited by such local laws.
NOTE. EXCEPT TO THE EXTENT ALLOWED BY LOCAL LAW,
THESE WARRANTY TERMS DO NOT EXCLUDE, RESTRICT OR
MODIFY, AND ARE IN ADDITION TO, THE MANDATORY
STATUTORY RIGHTS APPLICABLE TO THE LICENSE OF THE
SOFTWARE TO YOU;
PROVIDED, HOWEVER, THAT THE
CONVENTION ON CONTRACTS FOR THE INTERNATIONAL
SALE OF GOODS IS SPECIFICALLY DISCLAIMED AND SHALL
NOT GOVERN OR APPLY TO THE SOFTWARE PROVIDED IN
CONNECTION WITH THIS W ARRANTY STATEMENT.
14 HP StorageWorks Disk Array XP RAID Manager: User’s Guide
Page 15

HP StorageWorks LUN Security XP Extension disclaimer
HP StorageWorks LUN Security XP Extension provides the abil ity to place
logical volumes into secure states. In these secure states, da ta on the
volumes can not be modified until the retention time specified when the
volume is placed in the secured state has elapsed. TO THE FULLEST
EXTENT PERMITTED BY LAW, UNLESS EXPRESSLY PROVIDED
OTHERWISE UNDER WRITTEN AGREEMENT BETWEEN HP AND
CUSTOMER, HP WILL NOT BE LIABLE FOR ANY DIRECT,
SPECIAL OR CONSEQUENTIAL DAMAGES (INCLUDING BUT
NOT LIMITED TO LOSS OF PROFITS AND LOSS OF DATA)
REGARDLESS OF WHETHER SUCH DAMAGES ARE BASED ON
TORT, WARRANTY, CONTRACT OR ANY OTHER LEGAL
THEORY, EVEN IF ADVISED OF THE POSSIBILITY OF SUCH
DAMAGES, ARISING OUT OF ANY PERFORMANCE OF OR IN
FUR THERANCE OF UNLOCKING OR OTHERW IS E UNSECURING
AT THE REQUEST OF THE CUSTOMER DATA THAT HAS BEEN
SECURED USING HP StorageWorks LUN Security XP Extension
BEFORE THE RETENTION TIME HAS EXPIRED.
About this guide 15
Page 16

16 HP StorageWorks Disk Array XP RAID Manager: User’s Guide
Page 17

1
Description
HP StorageWorks RAID Manager XP (RM) enables you to perform
operations with HP StorageWorks Continuous Access XP (CA) and HP
StorageWorks Business Copy XP (BC) by issuing commands from a host
to the disk array. The RM software interfaces with the host sys tem software
and host high availabili ty (HA) softwar e, as well as with th e BC and CA
software on the disk array.
This book provides inst ructions for inst alling and usi ng the RM software on
various versions of UNIX, Microsoft Windows, Open VMS, and MPE/iX.
It has an extensive command reference and additional materials about
configuration, failover, and failback.
Description 17
Page 18

RAID Manager features and environment
RAID Manager lets you issue Bus in ess Copy ( BC) and Continuous Access
(CA) commands from a host. These commands can be issued from the
command line or built into a script (for example, a ksh, perl script, or an
MS-DOS batch file).
You can execute a large number of BC and CA commands in a short period
of time by using scripts containing RM commands. In MPE/iX, you can
create POSIX command scripts. For more information about scripting, see
“RAID Manager commands in scripts” (page 61).
RM also provides failover and operation commands that can support
mutual hot standby when used with industry-standard failover software.
RM software consists of the following:
• RM instances (daemons)
• configuration files
• BC/CA commands and shell scripts
RM uses these entities:
• a special volume calle d a command device
• BC/CA volumes
RM runs in these (and other) environments
:
UNIX RM runs on a UNIX host as the HORCM
daemon.
Windows NT/2000/2003 RM runs on a Windows NT/2000/2003 host as
a service.
MPE/iX RM runs in MPE/iX as a job stream. See
Appendix E,
OpenVMS RM runs on OpenVMS as a detached process.
See Appendix F,
OpenVMS” .
18 HP StorageWorks Disk Array XP RAID Manager: User’s Guide
“Porting notice for MPE/iX” .
“Porting notice for
Page 19

Continuous Access (CA)
CA copies data from a local HP XP disk array to one or more remote HP
XP disk arrays. You can use CA for da ta duplication, migration, and offsite
backup.
RM displays CA volume or group information and allows you to perform
CA operations through either the command line, a script (UNI X), or a batch
file (Windows).
CA has a number of features that ensure reliable transfers in asynchronous
mode, including journaling and protection against link failure.
For effective and complete disaster recovery solutions, CA (and therefore
RM) is integrated with many cluster solutions, such as Cluster Extension
(CLX) for Windows, Linux, Solaris and AIX, as well as MetroCluster and
ContinentalCluster for HP-UX.
CA modes
CA can operate in 3 different modes:
CA-Synchronous (CA-Sync): With CA-Sync all write operation s on the
primary (source) volume have to be replicated to the secondary (copy)
volume before the write can be acknowledged to the host. This mode
ensures the highest level of data concurrency possible. Host I/O
performance is directly impacted by the di stance between the primary and
secondary volumes and therefore CA-Sync is recommended for
metropolitan distances.
CA-Asynchronous (CA-Async): With CA-Async all write operations on
the primary volume are time stamped and stored in a the array system
cache, also known as the side file, before the write is acknowledged to the
host. The data is th en a synchronously replicated to the seconda ry ar ray and
re-applied in seq uence to the se condary device s. W ith CA-Asyn c data is not
always current, but due to the unique timestamp implementation data will
always be consistent. The side file functions to protect host I/O
performance from any temporary degradations of the communication link
between the sites. It also acts as a buffer for temporary high write bursts
from the host. CA-Async is ideal for long distance replication.
Description 19
Page 20

Business Copy (BC)
CA-Journal: CA-Journal is supported on XP10000/XP12000 arrays.
CA-Journal works in principal the same as CA-Async, but instead of
buffering write I/Os in th e mo re ex pensive and limited XP array cac he (t he
side file), CA-Journal wri tes data on special XP LUNS called journal pool s.
Journal pools can con si st s of up to 16 physical LDEVs of any size, and can
therefore buffer much larger amounts of data. CA-Journal also implements
a unique read operation from the remote array, instead of the normal write
(push) operation from t he local ( primary) ar ray, and is therefore much more
tolerant of short communication link outages.
BC software allows you to c re at e an d mai ntain up to nine copies of data on
the local disk array. You can use these copies for backup, data duplication,
or testing.
BC duplicate volumes are created within the same disk array at hardw are
speeds.
RM displays BC volume or group information and allows you to perform
BC operations through e ither th e command lin e, a script ( UNIX), or a ba tch
file (Windows).
When you use CA to make a duplicate copy of a volume on a remote disk
array, and then make up to 9 internal BC copies on the remote disk array
from that volume, you can effectively create up to 10 copies of a logical
volume on the remote disk array.
SnapShot
SnapShot introduces a new capability within BC. It allows the user to
create point-in-time copies of only changed data blocks (Copy-on-Write)
and store them in a SnapShot storage pool, thus reducing the amount of
required storage capacity.
SnapShot creates a virtual volume (V-VOL) for copy-on-write without
designating a specific LUN as S-VOL. However, for the host to use the
ShapShot volume, there must be a LUN mapped.
20 HP StorageWorks Disk Array XP RAID Manager: User’s Guide
Page 21
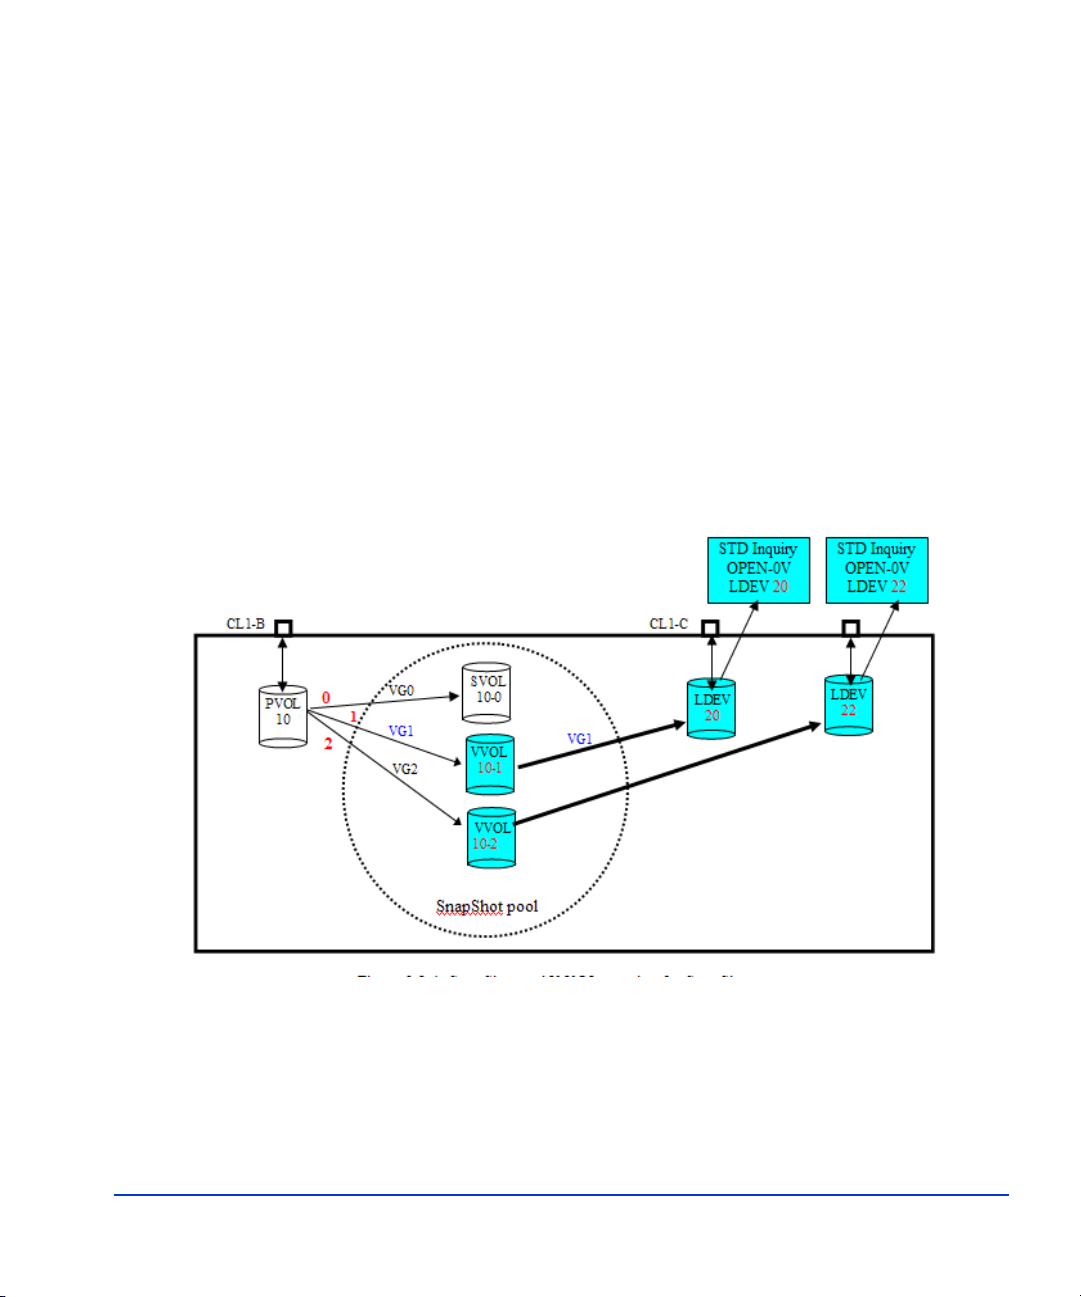
SnapShot employs two techniques:
• creating or mapping a virtual volume (V- VOL)
• copy on write to a SnapShot pool volume (pool-VOL) identified by a
pool ID.
SnapShot does not require any new RM commands, it uses current BC
commands with new arguments.
Note: SnapShot is used in Unix and Windows environments only. SnapSho t does
not work in MPE/iX and OpenVMS environments.
The following figure illustrates the basic concept.
Pairs and pair management
Both BC (non-SnapShot) and CA continuously copy data from a primary
source volume known as a P-VOL to a secondary volume known as an
S-VOL.
Description 21
Page 22

The relationship between a P-VOL and an S-VOL is called a pair.
You can use RM’s paircreate command to est ablish pairs. Once a pair is
established, updates to the P-VOL are automatically and continuously
copied to the S-VOL.
There are other commands to manage pairs. You can temporarily suspend
copy operations, create a Sna pShot pai r, resync the pair , an d del et e the pai r
relationship.
In addition, RM has many commands to display status, manage failover,
manage failback, and set the conditions under which BC and CA execute.
Creating SnapShot pairs
-When a command is given that will generate a pair-volume, such as
paircreate, its type (SnapShot or BC) is determined by the attributes of the
S-VOL. If either of the following requirements are met, a SnapShot pair is
created:
• If the S-VOL is specified as OPEN-0V (creates an unmapped
V-VOL).
• If no S-VOL is specified.
V-VOL characteristics.
• Identified as OPEN-0V after a SCSI Inquiry or RAID Manager
command.
• An unmapped V-VOL will reply to a SCSI Inquiry but does not have
read/write ability. It will provide read capacity only. However, after a
V-VOL is mapped as the S-VOL, read/write ability is enabled.
22 HP StorageWorks Disk Array XP RAID Manager: User’s Guide
Page 23

RAID Manager instances
Each execution of RM is known as an RM instance. Instances are local or
remote and can run on the same host or different hosts. Two RM instances
are typically required to manage BC or CA pairs.
Local instance The RM instance currently being used, that is, the
Remote instance The RM instance that the l ocal instance communicates
There are four possible RM topologies:
• One host connected to one disk array
If you are using one host, both RM instances are located on the same
host.
• One host connected to two or more disk arrays
instance to which commands are issued. Local
instances link to remote instances by using UDP socket
services.
with, as configured in the HORCM_INST section of
an RM instance configuration file. (For further
information on the RM instance configuration file see
page 41)
Using a single host connec ted to two or more dis k arrays al lows you to
maintain duplicate da ta on two di ffe rent disk arrays. When you choose
this option, the host Logical Volume Manager must not be able to see
both sides of the same BC or CA pair or it will become confused.
• Two or more hosts connected to one disk array
Using two hosts connected to one disk array allows you to locate one
RM instance on each host and thus maintain separate copies of the
data controlled by independent hosts; primary volumes (P-VOLs) are
used by one host while secondary volumes (S-VOLs) are used by the
other host (for example, for backup, testing, or data duplication).
• Two or more hosts connected to two or more disk arrays
Using two or more hosts connected to two or more disk arrays allows
the most flexib le CA disaster recovery plan. The rem ote and local sets
Description 23
Page 24

of data are administered by different hosts, guarding against host and
disk failure.
This is the configurat ion used by high a vailabilit y (HA) softwa re (such
as HP MetroCluster) in conjunction with RAID Manager’s
horctakeover command (see
page 114) allowing for b oth fail over an d
failback.
24 HP StorageWorks Disk Array XP RAID Manager: User’s Guide
Page 25

RAID Manager command device
You must designate a special volume on the disk array as the RAID
Manager command device. Th e command devi ce acce pts BC or CA control
operations. These are seen as in-band SCSI read and write commands, and
are executed by the disk array. The volume designated as the command
device is used only by RM and is blocked from other user access.
The command device can be any OPEN-x device that the host can access.
An RM command device uses a minimum of 16 MB of space. The
remaining volume space i s reserve d for RM and its utili ties. You cannot use
a Logical Unit Size Expansion (LUSE) volume as a command device;
however, you can use the Volume Size Configuration (VSC) feature of
Command View XP, LUN Configuration Manager XP, Remote Web
Console XP, or Command View XP Advanced Edition to make custom
volumes as small as 35
accomplished using CVXP AE on XP12000/XP10000 disk arrays)
Caution Be certain that there is no data on the volume you select as the command
device. Data on the volume you select becomes inaccessible.
MB. (NOTE: VSC operations cannot be
Caution MPE/iX systems will need a dummy volume set. Create this through the
VOLUTIL utilit y pro gram and scratch the volume set befor e converting to a
command device.
Caution OpenVMS systems need a LUN 0 device of 35 MB. Note that storage
assigned to the LUN 0 device is not accessible from OpenVMS.
RM issues SCSI read/write commands to the command device. If the
command device fails for any reason, all BC and CA commands terminate
abnormally and the host cannot issue RM commands to the disk array.
To avoid data loss and system downtime, you can designate an alternate
command device. Then, sho uld RM receive an error notification in r ep ly to
a request, RM automatically switches to the alternate command device.
Description 25
Page 26

Manually switching command devices
To avoid having comman ds te rmi nat e abno rmal ly during a failure, RM has
a command device alternating function, which allows you to manually
switch devices.
• When the command device switches
When RM receives an e rror notifi cation fro m the operatin g system, the
RM switches automatically to the alternate device.
You can also alternate command devices manually by issuing a RM
horcctl command. See
• When to issue the horcctl (alternate command device) command
Issue a horcctl command to switch command devices before a
command device is blocked due to online maintenance.
After completing online maintenance, reissue the command. The first
command device is then re-activated.
• How to define alternate command devices
You can define two or more command dev ices in t he HORCM_CMD
section of the configuration definition file. If you specify two or more
devices on the same line, they are recognized as alternating control
devices for the same array. See
“horcctl” (page 109).
“HORCM_CMD section” (page 46).
26 HP StorageWorks Disk Array XP RAID Manager: User’s Guide
Page 27

Installation and configuration
This chapter describes how to install and configure RAID Manager for
UNIX, Windows, MPE/iX, and OpenVMS systems.
2
Installation and configuration 27
Page 28

Disk array and host requirements
RM requires an activated installation of BC or CA on the disk array. For
information on activating and operating these programs, refer to the
following manuals:
• HP StorageWorks Business Copy XP: User’s Guide
• HP StorageWorks Continuous Access XP: User’s Guide
• HP StorageWorks Command View XP for XP Disk Arrays: User
Guide
• HP StorageWorks Command View XP Advanced Edition Device
Manager Web Client User's Guide
• HP StorageWorks XP Remote Web Console User Guide for the
XP1024/XP128
• HP StorageWorks XP Remote Web Console User Guide for the
XP12000/XP10000
RAID Manager requirements with Continuous Access
• Have your HP representative configure the disk arrays for CA
functions.
• Install CA license keys on the disk arrays.
• Configure the sender ports (Initiator for Fibre Channel, RCP for
ESCON) and receiver ports (RCU-Target for Fibre Channel and LCP
for ESCON) on the local and remote disk arrays.
• Establish a path between the local and remote control units (CUs)
using Continuous Access.
• Enable bidirectional swap between local and remote volumes. Verify
that at least two physical links exist in each direction.
• Designate one or more RM command devices using Command View
XP, LUN Configuration Manager XP, Remote Web Console XP, or
Command View XP Advanced Edition. If none of these are available,
ask your HP representative to configure the devices.
28 HP StorageWorks Disk Array XP RAID Manager: User’s Guide
Page 29

• Plan the mapping of the CA disk volume pairs. Determine which
volumes to access.
• Map the paths to be used for each host.
Using RAID Manager with Business Copy
• Have your HP representative configure the disk array for BC
functions.
• Install the BC license key on the disk array.
• Designate one or more RM command devices using Command View
XP, LUN Configuration Manager XP, Remote Web Console XP, or
Command View XP Advanced Edition. If none of these are available,
ask your HP representative to configure the devices.
• Plan the mapping of the BC disk volume pairs. Determine which
volumes to access.
• Map the paths to be used for each host.
Installation and configuration 29
Page 30

Installation and configuration outline
RM installation and configuration consists of the following tasks. Task
details appear in the subsequent sections.
• Installing RAID Manager
Install the RM software on the hosts.
• Configuring the services and hosts files
Add a service name/number to the host services file (for example,
/etc/services) for each RM instance. Configure the hosts file.
• Setting up the RM instance configuration file
Configure paths to one or more RM command devices for each host.
All hosts and RM instances can use the same command device for a
given disk array. However, it is recommended that each host have its
own command device.
• Starting the instan ces
Set the necesary environment variables to issue commands to the
desired RM instance.
30 HP StorageWorks Disk Array XP RAID Manager: User’s Guide
Page 31

Installing RAID Manager on UNIX systems
Follow the steps specific for your UNIX system to install RM.
Note: Before performing the installation (upgrade), shut down all active
RM instances that are running on the primar y host and any secondar y hosts
it is communicating with.
1. Place the CD-ROM in the CD-ROM drive.
2. Identify the CD-ROM device file to be substituted in the mount
commands below (for example, /dev/dsk/c1t1d0).
3. Log in as root.
su root
4. Create a CD-ROM mount directory a nd make it acce ssible to all users.
mkdir –p /cdrom
chmod 777 /cdrom
5. Mount the CD-ROM.
HP-UX For HP-UX, use the mount comma nd with the –f option:
mount –f cdfs –o ro /dev/dsk/c1t1d0 /cdrom
Sun Solaris For Sun Solaris, use the mount command with the –f option:
mount –f hs fs –o ro /dev/dsk/c0t6d0s2 /cdrom/cdrom0
In most cases, Sun Solaris aut omat ica ll y mount s t he CD- ROM. I f no t,
use this mount command:
mount –f hsfs –o ro /vol/dev/dsk/c0t6d0/cdrom0 /cdrom/cdrom0
IBM AIX For IBM AIX, use the mount command with the –rv option:
mount –rv cdrfs /dev/cd0 /cdrom
6. Choose a file syst em for the RM so ftware. Y o u need about 5 MB of disk
space. The standard and recommend ed file sys tem to load the soft ware
to is /opt.
Installation and configuration 31
Page 32

7. From the /opt directory, use cpio to unpack the appropriate archive .
Create the HORCM directory if it does not already exist.
cd /opt
mkdir HORCM (choose the next command according to your OS)
cat /cdrom/LINUX/rmxp* | cpio –idum (or)
cat /cdrom/AIX/rmxp* | cpio –idum (or)
cat /cdrom/DIGITAL/rmxp* | cpio –idum (or)
cat /cdrom/HP_UX/rmxp* | cpio -idum (or)
cat /cdrom/SOLARIS/rmxp* | cpio –idum
8. Change the directory to /opt/HORCM and verify the contents.
cd /opt/HORCM
ls
Example
etc horcmuninstall.sh log0 usr
horcminstall.sh log log1
9. Create a link from the root directory to the /opt/HORCM directory.
ln –s /opt/HORCM /HORCM
10. Run the RM Installer.
/HORCM/horcminstall.sh
This script creates symbol ic li nks in the /usr/bin directory for RM
commands.
32 HP StorageWorks Disk Array XP RAID Manager: User’s Guide
Page 33

Installing RAID Manager on Windows systems
1. Boot the Windows server and log in with administrator access.
2. Insert the RAID Manager CD in the CD-ROM drive.
3. Under the Start menu, select Run.
4. When the Run window opens, enter D:\WIN_NT\setup.exe (where D
is the letter of your CD-ROM drive) in the Open dialog box and click
OK.
5. The installation wizard opens. Follow the on-screen instructions to
install the RM software.
Installation and configuration 33
Page 34

Installing RAID Manager on MPE/iX systems
Note: Before performing the installation (upgrade), shut down all active
RM instances that are running on t he primary host and any secondary hos ts
it is communicating with.
1. Update your system with MPE/iX 6.5 or greater, along with that OS
version’s latest Power Patch.
2. Install the MPE/iX RAID Manager Patch ID XPMMX65.
3. Verify that at least one logical volume on the disk array is configured
to function as a command device.
Caution MPE/iX systems require that the command device be recognized as a
dummy volume set. Create this through the VOLUTIL utility program and
then scratch the volume before converting it to a command device.
4. Run the POSIX shell f rom CI and change y our working dire ctory to the
temporary directory /tmp/raidmgr.
: Sh
Shell/iX> cd /tmp/raidmgr
5. Execute the install script
Shell/iX> ./RMinstsh
This install script requests that you specify a POSIX directory where
the RAID Manager executables and log files will be placed. The
standard and recommended POSIX directory is /opt.
This script creates the necessary POSIX directories. All relevant files
are placed under the directory /opt/HORCM. The RAID Manager
executables are placed under /opt/HORCM/usr/bin. A symbolic link
(/HORCM) that points to /opt/HORCM is created under the root
directory.
34 HP StorageWorks Disk Array XP RAID Manager: User’s Guide
Page 35

6. Once the above installation completes successfully, create the device
files:
Shell/iX> mknod /dev/ldev99 c 31 99 ← LDEV devices
Shell/iX> mknod /dev/ldev100 c 31 100
Shell/iX> mknod /dev/cmddev c 31 102 ← Command device
The 31 in the above example is called th e ma jor number. The 99, 100,
102 are called minor numbers. For RAID Manager, always specify 31
as the major number. The minor number should correspond to the
LDEV numbers as configured in sysgen. Creat e device files for all the
LDEVs configured through sysgen and for the command device. The
device link file for the command device should be called
/dev/cmddev.
7. Add a service entry for each RM in stance in th e SERVICES.NET .SYS
file.
8. Each host running an instance should be lis ted in the HOSTS.NET .SYS
file.
9. Create RM instance configuration files for each instance.
You will have to start RAID Manager without a description for
HORCM_DEV and HORCM_INST because the target ID and LUN
are not yet known. After RAID Manager is up and running, you can
find the target ID and LUN by using the raidscan –find command.
:SHOWJOB
JOBNUM STATE IPRI JIN JLIST INTRODUCED JOB NAME
#S2 EXEC 20 20 THU 5:29P MANAGER.SYS
#J15 EXEC 10S LP FRI 5:08P JRAIDMR1,MANAGER.SYS
#J16 EXEC 10S LP FRI 5:08P JRAIDMR2,MANAGER.SYS
10. Get the physical mapping of the available LDEVs to fi ll in the
HORCM_DEV and HORCM_INST sections of the horcm1.conf file.
Invoke the shell and change your working directory to
/HORCM/usr/bin. Execute:
:sh
Shell/iX> cd /HORCM/usr/bin
Shell/iX> export HORCMINST=1
Shell/iX> ls /dev/* | ./raidscan -find
Installation and configuration 35
Page 36

DEVICE_FILE UID S/F PORT TARG LUN SERIAL LDEV PROD_ID
/dev/cmddev 0 S CL1-D 1 0 35393 22 OPEN-3-CM
/dev/ldev407 0 S CL1-E 8 0 35393 263 OPEN-3
/dev/ldev408 0 S CL1-E 9 0 35393 264 OPEN-3
/dev/ldev409 0 S CL1-E 10 0 35393 265 OPEN-3
/dev/ldev410 0 S CL1-E 11 0 35393 266 OPEN-3
/dev/ldev411 0 S CL1-E 12 0 35393 267 OPEN-3
/dev/ldev412 0 S CL1-E 13 0 35393 268 OPEN-3
11. Now fill in the HORCM_DEV and HORCM_INST sections in your
/etc/horcm#.conf fi les.
Sample Configuration
for Instance 1:
#
#/*************************For HORCM_MON****************************/
HORCM_MON
#ip_address service poll(10ms) timeout(10ms)
NONE horcm0 1000 3000
#/************************** For HORCM_CMD**************************/
HORCM_CMD
#dev_name dev_name dev_name
/dev/cmddev0
#/************************** For HORCM_DEV**************************/
HORCM_DEV
#dev_group dev_name port# TargetID LU# MU#
VG01 oradb1 CL1-E 8 0
VG02 oradb2 CL1-E 9 0 0
#/************************* For HORCM_INST *************************/
HORCM_INST
#dev_group ip_address service
VG01 HSTB horcm1
VG02 HSTC horcm1
12. Shut down the RAID Manager dae mon withi n the sh ell and the curr ent
working directory /HORCM/usr/bin.
Shell/iX> ./horcmshutdown.sh 1
Restart the RAID Manager job using the compl eted RM confi gurat ion
file:
: stream jraidmr1.pub.sys
36 HP StorageWorks Disk Array XP RAID Manager: User’s Guide
Page 37

Installing RAID Manager on OpenVMS systems
Installation prerequisites
• A user account for RAID Manager must have the same privileges as
“SYSTEM” (that is, it must be able to use the SCSI class driver and
Mailbox driver directly) . Some Ope nVMS syst em admi ni str at or s may
not allow RAID Manager to run fr om the system acc ount. In this cas e,
create another accoun t on t he syst em, such as “RMadmin ” that ha s the
same privi l eges as “SYSTEM.”
• RAID Manager uses the Mailbox driver for communication between
RAID Manager components. So, the RAID Manager command
processor and RM daemon (called HORCM) must have the same
privileges.
If the RAID Manager command processor and HORCM execute with
different privileges, then the RAID Manager command processor will
hang or be unable to attach to the daemon.
• RAID Manager also requires that the logical name sys$posix_root
exist on the system. Theref ore, you must d efine sys$posix_root before
installing RAID Manager.
It is recommended that you define the following in LOGIN.COM
before RM installation:
$ DEFINE/TRANSLATION=(CONCEALED,TERMINAL)
SYS$POSIX_ROOT "Device:[directory]"
$ DEFINE DCL$PATH SYS$POSIX_ROOT:[horcm.usr.bin],
SYS$POSIX_ROOT:[horcm.etc]
$ DEFINE/TABLE=LNM$PROCESS_DIRECTORY
LNM$TEMPORARY_MAILBOX LNM$GROUP
$ DEFINE DECC$ARGV_PARSE_STYLE ENABLE
$ SET PROCESS/PARSE_STYLE=EXTENDED
In the above defines, Device:[directory] is the SYS$POSIX_ROOT.
Installation and configuration 37
Page 38

Installation
Install RA ID Manager by using the file
HP-AXPVMS-RMXP-V0117-3-1.PCSI
1. Insert and mount the installation media.
2. Execute the following command.
$ PRODUCT INSTALL RMXP
/source=Device:[PROGRAM.RM.OVMS]/LOG _$ /destination=SYS$POSIX_ROOT:[000000]
where Device:[PROGRAM.RMOVMS] is where file
HP-AXPVMS-RMXP-V0117-3-1.PCSI exists.
3. Confirm the installation:
$ raidqry –h
Model : Raid-Manager-XP/OpenVMS
Ver&Rev: 01.17.03
:
:
For additional information, see Appendix F, Porting notice for OpenVMS
(page 377).
38 HP StorageWorks Disk Array XP RAID Manager: User’s Guide
Page 39

Configuring the services and hosts files
After installing, configuring RM requires editing the services and hosts
files on the hosts that run RM instances.
Directory locations
UNIX
The services and hosts files are contained in this directory:
/etc
Windows NT/2000/2003
The services and hosts files are contained in this directory:
%systemroot%\system32\drivers\etc
MPE/iX
The services and hosts files are contained in the MPE group directory:
SERVICES.NET.SYS
HOSTS.NET.SYS
OpenVMS
The services file is conta ined in this directory:
SYS$SYSROOT:[000000.TCPIP$ETC]SERVICES.DAT
The hosts file is contained in this directory:
SYS$SYSROOT:[SYSEXE]HOST.DAT
Installation and configuration 39
Page 40

Services file
Example horcm0 11000/udp #RaidManager instance 0
Example horcm0 6100g #RaidManager instance 0
Hosts file
To configure the services file:
1. Edit the services file on each system.
2. Add a udp service entry for each RM instance th at runs on the host and
each RM instance referenced in the configuration file. The service
number selected must be unique to the services file and in the range
1024 to 65535.
horcm1 11001/udp #RaidManager instance 1
To configure the services file in MPE/iX:
1. Add a service entry for each RM in stance in th e SERVICES.NET .SYS
file.
horcm1 6100g #RaidManager instance 1
Each host running an RM instance should be entered in the hosts file (for
example, /etc/hosts). This lets you refer to any remote host by either its
name or IP address.
If a DNS (domain name server) manages host name resolution on your
network, no hosts file editing is re quired.
40 HP StorageWorks Disk Array XP RAID Manager: User’s Guide
Page 41

Setting up the RM instance configuration file
Each BC and CA pair has a primary volume (P-VOL), the volume that
contains the data to be copied, and a secondary volume (S-VOL), the
volume that receives the data from the primary volume. Each of these
volumes is linked to at least one instance of RM for the purpose of pair
creation, suspension, and deletion. Each instance of RM can manage
multiple volumes (on up to four arrays) and manage either P-VOLs or
S-VOLs.
Reminder: Instances can be on the same or different host systems. The
host that is running the instance must have access to the volumes to which
it is linked and have access to a disk array command device for the array.
The RM instance configuration file defines the link between a volume and
an RM instance. This file a l so defines the r elationships between RM
instances and the physical and logical names for volumes.
The RM instance configuration file is a UNIX text file. The system
administrator creates it using a text editor. A sample HORCM_CONF file
is provided. The system administrator copies the sample file, changes
necessary parameters, and saves the copied file under the specified
directory. Formatting and editing procedures follow.
RM instance configuration files
HP-UX
An example horcm.conf file can be found in the /HORCM/etc directory.
Windows NT/2000/2003
An example horcm.conf file can be found in the C:\HORCM\etc
directory.
Installation and configuration 41
Page 42

MPE/iX
An example horcm.conf file can be found in the /HORCM/etc directory.
See Appendix E, Porting notice for MPE/iX (page 367).
Open VMS
See Appendix F, Porting notice for OpenVMS (page 377).
Creating an instance configuration file
When you create an RM configura ti on f il e, f oll ow t his nami ng convention,
where instance is the instance number:
horcminstance.conf
Example
horcm0.conf
The configuration file has four sections:
HORCM_MON (page 44)
HORCM_CMD (page 46)
HORCM_DEV (page 49)
HORCM_LDEV (page 52)
HORCM_INST (page 53)
You can use the mkconf command to create a configuration file. See
mkconf (page 131) for usage information.
If the level of detail provided in the following pages is not sufficient, ask
your HP representative to consult the HP internal docu ment:
RAID Manager XP Basic Specifications
For examples of configuration files, see Appendix A, “Configuration file
examples” (page 279).
42 HP StorageWorks Disk Array XP RAID Manager: User’s Guide
Page 43

RM instance configuration file parameters
The configuration file contains all parameters and values for a RM
instance. Some parameters have size or type constraints as listed in the
table below :
Default
Parameter
IP_address None Character string 63 characters
host_name None Character string 31 characters
service_name
or
service_number
Value
None Character string or
Type Limit
15 characters
numeric value
poll_value
1000 Numeric value None
(10 ms increments)
timeout_value
3000 Numeric value None
(10 ms increments)
device_name
None Character string 31 characters
for HORCM_DEV
dev_group None Character string 31 characters
port None Character string 31 characters
target_ID None Numeric value 7 characters
LUN None Numeric value 7 characters
mirror_unit 0 Numeric value 7 c haracters
RM_group None Character string 31 characters
dev_name
None Character string 63 characters
for HRCM_CMD
Installation and configuration 43
Page 44

HORCM_MON section
Description The HORCM_MO N section describes the host name or IP address, the
port number, and the paired volume error monitoring interval of the local
host.
Syntax HORCM_MON
{ host_name | IP_address } { service_name | service_number } poll_value
timeout_value }
host_name Name of the host on which this RM instance runs.
IP_address IP address of the host on which this RM instance runs.
service_name Service name that was configured in the host services
service_number Service number that was configur ed in the h ost servi ces
Specify NONE when two or more network cards are
installed in the serv er , or sever al networks (s ubnets ) are
configured, and you want to use this RM feature to
listen on all networks.
file.
file.
poll_value Specifies a moni toring interva l for paired vol umes. By
making this interval longer, the RM daemon load is
reduced, but it may take longer to notice a change in
pair status.
If this interval is set to –1, paired volumes are not
monitored. Set to –1 when two or more inst ances of RM
run on the same machine and one is alread y monitoring
the pair.
timeout_value Specifies the remote server communication timeout
period.
44 HP StorageWorks Disk Array XP RAID Manager: User’s Guide
Page 45

Examples HORCM_MON
blue horcm1 1000 3000
The RM instance is running on system blue, service name horcm1, with a
poll value of 10 seconds and a timeout value of 30 seconds.
HORCM_MON
NONE horcm1 1000 3000
The RM instance is running on system NONE, indicating two or more
network cards are installed in the server, or several networks (subnets) are
configured, and the RM listens on all networks. The service name is
horcm1 with a poll value of 10 seconds and a timeout value of 30 seconds.
Execute the raidqry –r group command on each host to examine multiple
network configurations . The fol lo wing fi gur e shows that the volume group
known as oradb is controlled from the right side of the diagram by host
HST1 (using either subnet A or B) and from the lef t side of the diagram by
either HST2 or HST3 (using either subnet A or B).
HORCM_MON
#ip_address service poll(10ms) time o ut(10ms)
NONE
.
.
HORCM_INST
#dev_group ip_address servic e
oradb HST1_IPA horcm
oradb
horcm 1000 3000
HST1_IPB
IPA IPB
horcm
IPA IPB
horcm
PVOL
XP Array
HST3
XP512/XP48/XP1024/XP128
horcm
HST2
HORCM_MON
#ip_address servic e poll(10ms) tim eout(10ms)
NONE horcm 1000 3000
.
.
HORCM_INST
#dev_group ip_address service
oradb HST2_IPA horcm
oradb
oradb HST2_IPB horcm
oradb HST3_IPB horcm
HST3_IPA
horcm
SubnetA
SubnetB
IPA IPB
horcm
HST1
XP512/XP48/XP1024/XP128
SVOL
XP Array
Installation and configuration 45
Page 46

HORCM_CMD section
Description The HORCM_CMD section defines the RM command devi ces RM uses to
communicate with the disk array. A RM command is initiated to write
command data to the special disk array command device. The disk array
then reads this data and carries out the appropriate actions.
Multiple command devices are defined in this section of the configuration
file to provide alternate command devices and paths in the event of failure.
It is recommended that each host have a unique command device. A
command device should not be accessed by more than one host. Multiple
instances on the same host can use the same command device.
To configure command devices, use Command View XP, LUN
Configuration Manager, Remote Web Console XP or Command View XP
Advanced Edition. If none of these are available, ask your HP
representative to configure the command devices.
Syntax HORCM_CMD
command_device [ command_device ] . . .
Examples
HP-UX HORCM_CMD
/dev/rdsk/c2t3d0 /dev/rdsk/c6t2d4
This example defi nes t wo devi ce f iles as p aths to a co mmand d evice . These
devices can be pvlinks to the same volume on the disk array, or may be
different command devices. Placing the second command device on the
same line im plies that it is an alternate within the same array.
HORCM_CMD
#unitID0 (Array 1)
/dev/rdsk/c1t3d5
#unitID1 (Array 2)
/dev/rdsk/c2t3d5
46 HP StorageWorks Disk Array XP RAID Manager: User’s Guide
Page 47

This HP-UX example shows multiple disk arrays connected to the host.
One RM instance can control multiple disk arrays. To enable this feature,
the different command devices have to be specified on different lines. RM
uses unit IDs to control multiple disk arrays. A device group can span
multiple disk arrays (sync-CA only). The unit ID must be appended for
every volume device name in the HORCM_DEV section, as shown in the
following figure.
HORCM_MON
#ip_address service poll (10ms) timeout (10ms)
HST1 horcm 1000 3000
HORCM_CMD
#unitID 0... (seq#30014)
#dev_name dev_name dev_name
/dev/rdsk/c0t0d0 /dev/rdsk/c0t0d1
#unitID 1... (seq#30015)
#dev_name dev_name dev_name
/dev/rdsk/c1t0d0
HORCM_DEV
#dev_group dev_name port# TargetID LU# MU#
oradb oradb1 CL1-A 3 10
oradb oradb2 CL1-A 3 11
oralog oralog1 CL1-A 5 0
oralog oralog2 CL1-A1 5 0
oralog oralog3 CL1-A1 5 1
HORCM_INST
#dev_group ip_address service
oradb HST2 horcm
oradb HST3 horcm
oralog HST3 horcm
Installation and configuration 47
Page 48

Windows NT/2000/
2003
MPE/iX See Appendix E, Porting notice for MPE/iX (page 367).
OpenVMS See Appendix F, Porting notice for OpenVMS (page 377).
HORCM_CMD
\\.\PHYSICALDRIVE3
This example shows the path to a shared command device in Windows.
\\.\Volume{GUID}
This example shows th e us e o f a Volume GUID for the command devic e i n
Windows.
48 HP StorageWorks Disk Array XP RAID Manager: User’s Guide
Page 49

HORCM_DEV section
Description The HORCM_DEV section describes the physic al vol umes correspon din g
to the paired volume names. Each volume listed in HORCM_DEV is
defined on a separate line.
Syntax HORCM_DEV
device_group device_name port target_ID LUN [ mirror_unit ]
device_group Each device group contains one or more volumes. This
device_name User-defined and unique to the instances using the
port Disk array I/O port through which the volume is
parameter gives you the capability to act on a group of
volumes with one RM command . The dev ice gr oup ca n
be any user-defined name up to 31 characters in length.
device groups. It can be up to 31 characters in length
and is a logical name that can be used instead of the
physical Port/TID/LUN/MU# designation.
configured to be access ed. Port s pecif icat ion is no t case
sensitiv e (CL1-A= cl1-a= CL1-a= cl1-A).
target_ID SCSI/Fibre target ID assigned to the volume.
LUN Decimal logical unit number assigned to the volume.
mirror_unit Used when you are making multiple BC copies from a
P-VOL. The mirror unit is a number ranging from 0 to 2
and has to be explicitly supplied for all BC volumes.
If mirror_unit is left blank it will be assumed that
CA-Sync or CA-Async is being used. The number is
not a count of the number of copies to be made but
rather a label for a specific P-VOL to S-VOL
relationship.
CA-Journal will allow up to fo ur cop ies f rom a P- VOL.
The mirror unit for a CA-Journal volume is indicated
by an “h” and a number ranging from 0 to 3. If
Installation and configuration 49
Page 50

mirror_unit is omitted, the value of h0 wil l be assumed.
Mirror unit value “h 1”, “h2” and “h3” a re vali d only for
CA-Journal operations.
Example
HORCM_MON
#ip_address service poll(10ms timeout(10ms)
HST1 horcm 1000 3000
HORCM_CMD
#dev_name dev_name dev_name
/dev/rsd0e
HORCM_DEV
#dev_group dev_name port# TargetID LU# MU#
Group dev CL1-A 3 1
Group1 dev1 CL1-A 3 1 0
Group2 dev2 CL1-A 3 1 1
Group3 dev3 CL1-A 3 1 2
Group4 dev4 CL1-A 3 1 h1
HORCM_INST
#dev_group ip_address service
Group HST2 horcm
Group1 HST3 horcm
The validity of the mirror descriptor is shown for
various pair states in the tables below.
MU# in CA and CA Journal
Feature SMPL P-VOL S-VOL
MU#0 MU#1-3 MU#0 MU#1-3 MU#0 MU#1-3
CA Valid Invalid Valid Invalid Valid Invalid
CA-Journal Valid Valid Valid Valid Valid Valid
MU# in BC and SnapShot
Feature SMPL P-VOL S-VOL
MU#0-2 MU#3-63 MU#0-2 MU#3-63 MU#0 MU#1-63
BC Valid Invalid Valid Invalid Valid Invalid
SnapShot Valid Valid Valid Valid Valid Invalid
50 HP StorageWorks Disk Array XP RAID Manager: User’s Guide
Page 51

Example HORCM_DEV
group1 g1–d1 CL1–A 12 1 0
This example shows a volume defined in device group1 known as device
g1–d1. It is accessibl e through disk array unit 0 and I/O port CL1-A. The
SCSI target ID is 12, the LUN is 1, and the BC mirror unit number is 0.
You can use RM to control multiple disk arrays with one RM instance by
specifying the unit ID appended to the port. This example refers to the
example in the
HORCM_DEV
group1 g1–d1 CL1–A 12 0
group2 g2 –d1 CL1–A1 12 0
This example shows that the volume pair with the device name g2–d1
resides on disk array unit 1 while the volume pair with device name g1–d1
resides on disk array unit 0.
Tip In the case of Fibre Channel, if the host reports a different target ID and
LU# than raidscan, use the raidscan value.
HORCM_CMD section (page 46).
Related
informat ion
To see configuration file examples, and to see how devices belonging to
different unit IDs are configured, see Appendix A,
Configuration file
examples (page 279).
Installation and configuration 51
Page 52

HORCM_LDEV section
Description The HORCM_LDEV section specifies stable LDEV#’s and Serial#’s of
physical volumes that correspond to paired logical volume names. Each
group name is unique and typically has a name fitting its use (e.g. database
data, Redo log file, UNIX fi le). The group and paired logical volume name
described in this item must also be known to the remote server.
NOTE: HORCM_LDEV is for XP10000/XP12000 use only
Syntax HORCM_LDEV
device_group device_name Serial# CU:LDEV(LDEV#) MU#
device_group Each device group contains one or more volumes. This
device_name User-defined and unique to the instances using the
parameter gives you the capability to act on a group of
volumes with one RM command . The dev ice group can
be any user-defined name up to 31 characters in length.
device groups. It can be up to 31 characters in length
and is a logical name that can be used instead of the
physical Port/TID/LUN/MU# designation.
Serial# Serial number of the array
CU:LDEV(LDEV#) Specifies the LDEV number in three possible formats:
• As hex used by the SVP or Web console
Example (LDEV# 260) 01: 04
• As decimal used by the inqraid command
Example (LDEV# 260) 260
• As hex used by the inqraid command
Example (LDEV# 260) 0x104
Example
52 HP StorageWorks Disk Array XP RAID Manager: User’s Guide
HORCM_LDEV
#dev_group dev_name Serial# CU:LDEV(LDEV#) MU#
oradb dev1 30095 02:40 0
oradb dev2 30095 02:41 0
Page 53

HORCM_INST section
Description The HORCM_INST section defines how RM groups link to remote RM
instances.
Syntax HORCM_INST
device_group { host_name | IP_address } { service_name |
service_number }
device_group Defined in the HORCM_DEV section. Each group
host_name Host name of the host on which the remote instance
IP_address IP address of the host on which the remote instance
service_name Service nam e that was entered into the services file for
defined in HORCM_DEV must be represented in the
HORCM_INST section only once for eve ry remote RM
instance.
runs. The remote instance can run on the same host as
the local instance.
runs. The remote instance can run on the same host as
the local instance.
the remote instance.
service_number Service num ber that was entered into the services file
for the remote instance.
Example The example below shows that the opposite side of the pairs contained
within the group called group1 are serviced by a RM instance residing on
host yellow that listens on a UDP port defined in /etc/services named
horcm0.
HORCM_INST
group1 yellow horcm0
Installation and configuration 53
Page 54

Starting the instances
After setting up the RM inst ance configuration files, you can start the
instances.
HP-UX
Run this shell command on each host that runs an RM instance:
/usr/bin/horcmstart.sh [ instance_number ] [ instance_number ] . . .
If you do not specify an instance number, the command uses the value
stored in the HORCM_INST environment variable. The def aul t val ue is 0.
Windows NT/2000/2003
From the command prompt, under the \HORCM\etc directory, type this
command:
horcmstart instance_number [ instance_number ] . . .
MPE/iX
See Appendix E, Porting notice for MPE/iX (page 367).
OpenVMS
Run instances as a detached process. See Appendix F, Porting notice for
OpenVMS (page 377).
Environment variables for BC
By default, all RM operations affect CA volumes. To enable RM
commands to control BC operations, set the HORCC_MRCF environment
variable to 1.
RM commands are issued to the local instance host. To specify which
instance is the local instance, set the HORCMINST environment variable,
54 HP StorageWorks Disk Array XP RAID Manager: User’s Guide
Page 55

as in the following environment variable examples, where n is the value of
the RM instance.
UNIX
For UNIX ksh, use the export command:
export HORCC_MRCF=1
export HORCMINST=n
For UNIX csh, use the setenv command:
setenv HORCC_MRCF=1
setenv HORCMINST=n
Windows NT/2000/2003
For Windows NT/2000/2003, use the set command:
set HORCC_MRCF=1
set HORC MINST=n
MPE/iX
For MPE/iX, use the setenv command.
setenv HORCC_MRCF 1
setenv HORCMINST n
OpenVMS
For OpenVMS, set the environment variable using symbol.
HORCC_MRCF := 1
HORCMINST := 0
Installation and configuration 55
Page 56

Environment variables for CA
To issue CA commands, the HORCC_MRCF environment variable must
be removed and the HORCMINST environment variable must be set.
UNIX
Setting a null value is not sufficient.
For UNIX ksh, use the unset command:
unset HORCC_MRCF
set HORC MINST=n
For UNIX csh, use the unsetenv command:
unsetenv HORCC_MRCF
setenv HORCMINST=n
Windows NT/2000/2003
For Windows NT/2000/2003, use the usetenv command option:
raidscan –x usetenv HORCC_MRCF
raidscan –x setenv HORCMINST n
Related In formation For syntax descriptions, see usetenv (page 233) and setenv (page 225).
MPE/iX
Within the POSIX sh ell, use the unset command:
unset HORCC_MRCF
set HORC MINST=n
OpenVMS
For Open VMS, use the following command:
$DELETE/SYMBOL HORCC_MRCF
56 HP StorageWorks Disk Array XP RAID Manager: User’s Guide
Page 57

Paired volume configuration
Users describe the connection between physical volumes used by the
servers and the paired logical (named) volumes (and the names of the
remote servers connecte d to t he vol umes ) in a configuration def in it ion file.
See the figure below.
Configuration definition file
G1,Oradb1... P1,T1,L1
G1...HOSTB
G2,Oradb2... P2,T2,L3
G2,Oradb3... P2,T2,L4
G2...HOSTC
HOSTA
Device
Special file
HOSTB
Device
Special file
Configuration definition file
G1,Oradb1...P3,T2,L2
G1...HOSTA
P2,T2,L3
L3
L4
XP512/48
XP Array
XP1024/XP128
[Explanation of symbo l s]
Pn: Port name
Tn: Target ID
Ln: LUN number
P1,T1,L1
G1,Oradb1
L1
Paired logical volume
P3,T2,L2
L2
XP512/XP48
XP Array
XP1024/XP128
Oradb2
L1
Oradb3
L2
Group = G2
XP512/48
HOSTC
Device
Special file
XP Array
XP1024/XP128
P4,T1,L1
Configuration defini t ion f ile
G2,Oradb2...P4,T1,L1
G2,Oradb3...P4,T1,L2
G2...HOSTA
Installation and configuration 57
Page 58

58 HP StorageWorks Disk Array XP RAID Manager: User’s Guide
Page 59

Using RAID Manager
This chapter discusses pair commands, scripts, definitions, log and
user-created files, vairables, protection, and LUN security for RAID
Manager (RM).
3
Using RAID Manager 59
Page 60

RAID Manager pair commands
To create and manage CA and BC pairs with RM, use the following
commands:
paircreate Establishes a primary to secondary pair relationship
between volumes. See
pairdisplay Displays the state of volumes. See “pairdisplay” (page
145).
pairsplit Suspends or deletes a paired volume. See “pairsplit”
(page 173).
pairresync Restores a volume from a PSUE/P SUS/SSWS state to a
PAIR state. See
Before issuing RM commands, set the HORCMINST environment
variable to refer to the instance number you want to use for the local RM
instance.
Continuous Access
“paircreate” (page 134).
“pairresync” (page 165).
After installing CA, the system administrator must conduct operation tests
for recovery and maint enance, to check for possible failures that c an occur.
The HP representatives can i dentify the poss ible causes of a pos sible failu re
by using the SVP.
Caution For CA, make sure to unset the HORCC_MRCF variable. Do not set the
HORCC_MRCF variable to 0.
Business Copy
For BC, set HORCC_MRCF=1.
60 HP StorageWorks Disk Array XP RAID Manager: User’s Guide
Page 61

RAID Manager commands in scripts
An RM script is a list of instructions contained in a host file to automate a
series of CA and BC operations. The host reads the script file and carries
out each command as if it were typed in individually.
Using RM host scripting, you can execute a large number of CA and BC
commands in rapid sequence.
Using RAID Manager 61
Page 62

Paired CA volume status definitions
Each pair of CA volumes consists of a primary volume (P-VOL) and
secondary volume (S-VOL). Each pair has six possible paired statuses.
The major CA pair statuses are:
•SMPL
•PAIR
•COPY
• PSUS
• PSUE
• PFUS
The P-VOL controls the status for the pair, which is reflected in the status
of the S-VOL. When you issue a CA command, the status usually changes.
A read or write request from the host is allowed or rejected, depending on
the status of the paired volume, as shown in the figure on the next page.
Caution Terminology and functionality differ somewhat between the RM CLI
interface and the RC GUI interface. For instance:
• The terms “suspend” and “split” may have opposite meanings
• S-VOL read/write options while suspended may differ
• The GUI allows you to choose/force a PSUE state
For more detail, refer to the following manuals (XP48/XP512 only):
HP StorageWorks Business Copy XP: User’s Guide
HP StorageWorks Continuous Access XP: User’s Guide
62 HP StorageWorks Disk Array XP RAID Manager: User’s Guide
Page 63

If one of the volumes making up an aggregated LUSE volume is PSUE
status, the LUSE volume will be reported as PDUB (dubious) status.
Read/Write
CA SYNC/ASYNC
Primary
Vol ume
Copy
P
Status Pairing status Primary Secondary
Read/Write
Secondary
Volu me
S
SMPL Unpaired volume R/W enabled R/W enabled
PAIR Paired/duplicated volume, consistency assured R/W enabled R enabled
(See Note 3)
COPY In paired state, but (out of order) copying to the
secondary volume is not yet completed
PSUS In paired state, but updating the secondary volume is
suspended. The P-VOLs and S-VOLs track the
R/W enabled R enabled
(See Note 3)
R/W enabled R/W enabled
(See Note 1)
differences in the changed data.The P-VOL data is
typically dominant.
PSUE
(Error)
PFUS PSUS status due to a side file full error R/W enabled
PSUS status due to an internal or link error R/W enabled
(See Note 2)
(See Note 2)
R enabled
(See Note 3)
R enabled
(See Note 3)
Note 1: Valid when reading and writing are enabled using an option of the pair splitting.
Note 2: Reading and writing are enabled as long as no errors occur in the primary volume.
Note 3: Reading disabled when -m noread is specified in the paircreate command.
Note that the data at the async -CA S-VOL is assured to be cons istent, but is
only current in PSUS state.
Using RAID Manager 63
Page 64

Paired BC volume status definitions
Each pair of BC volumes consists of a primary volume (P-VOL) and
secondary volume (S-VOL). Each volume maintains its own pair status.
The major BC pair statuses are:
•SMPL
•PAIR
•COPY
• RCPY
• PSUS
• PSUE
The P-VOL controls the pair state that is typically reflected in the status of
the S-VOL. The status can be changed when a RM command is issued. A
read or write request from the host is allowed or rejected according to the
status, as shown in the following figure.
Caution Terminology and functionality differ somewhat between the RM CLI
interface and the RC GUI interface. For instance:
• The terms “suspend” and “split” may have opposite meanings
• S-VOL read/write options while suspended may differ
• The GUI allows you to choose/force a PSUE state
For more detail, refer to the following manuals (XP48/XP512 only):
HP StorageWorks Business Copy XP: User’s Guide
HP StorageWorks Continuous Access XP: User’s Guide
Note that reading the BC S-VOL in any state except PSUS is “at your own
risk.” Data in any state except PSUS is likely to be inconsistent and not
current.
64 HP StorageWorks Disk Array XP RAID Manager: User’s Guide
Page 65

Read/Write
Read/Write
Primary
Vol ume
S
Status Pairing status Primary Secondary
BC Asynchronous copy
Restore copy
Secondary
Volume
S
SMPL Unpaired volume R/W enabled R/W enabled
PAIR Paired/duplicated volumes. Data in the primary and
secondary volumes are not assured to be identical.
COPY In paired state, but copying to the s econdar y vol ume is
not completed. The P-VOL/S-VOL are not assured to
R/W enabled R enabled
(See Note 2)
R/W enabled R enabled
(See Note 2)
be identical.
RCPY This reverse copy state infers copying from the
secondary to the primary volume by using the
R enabled
(See Note 2)
R enabled
–restore option of pairresync.
PSUS In paired state, but updating the secondary volume is
R/W enabled R/W enabled
suspended. The P-VOL and S-VOL notes any new
changes in a bitmap.
PSUE
(Error)
PSUS status due to an internal failure (or RC GUI
command). The P-VOL and S-VOL maintain a delta
R/W enabled
(See Note 1)
R enabled
(See Note 2)
bitmap.
Note 1: Valid when reading and writing are enabled, as long as no failure occurs in the P-VOL.
Note 2: Reading disabled when the user specified the –m noread option in the paircreate command.
Using RAID Manager 65
Page 66

Paired SnapShot volume status definitions
Each pair of SnapShot vol umes consists of a primary vo lume (P- VOL) a nd
secondary volume (S-VOL) which is actually a virtual volume (V-VOL).
Each volume maintains its own pair status.
The supported volume type i s OPEN-V only fo r the P-VOL, and OPEN-0V
for the S-VOL.
The major SnapShot pair statuses are:
•SMPL
•PAIR
•COPY
• RCPY
• PSUS
• PSUE
The P-VOL controls the pair state that is typically reflected in the status of
the S-VOL. The status can be changed when a RM command is issued. A
read or write request from the host is allowed or rejected according to the
status, as shown in the following figure.
66 HP StorageWorks Disk Array XP RAID Manager: User’s Guide
Page 67

Status Pairing Status Primary Secondary
SMPL Unpaired (SnapShot) volume R/W enabled R/W disabled
(Note 2)
PAIR
The snapshot available state allocated the resource. R/W enabled R/W disabled
(PFUL)
COPY The preparing state allocates the resource for the
R/W enabled R/W disabled
snapshot.
RCOPY The copying state from snapshot to the primary
R/W disabled R/W disabled
volume by using restore option.
PSUS
(PFUS)
The differences of the updated data of the primary
and secondary volume are controll ed with copyi ng
R/W enabled R/W enab led
on write.
PSUE
(Error)
"PSUS" status owing to an internal failure. The
differences of the updated data for the snapshot
R/W enabled
(Note 1)
R/W disabled
volume are not controlled.
Note 1: Valid when reading and writing are enabled, as long as no failure occurs in the P-VOL.
Note 2: V-VOL unmapped to the SVOL of SnapShot will replies to SCSI Inquiry, but it will not
be allowed for Reading and/ or Writing.
Using RAID Manager 67
Page 68

File types and structure
The RM product includes files supplied for the user, log files created
internally, and files created by the user. These files are stored in the s erver’ s
local disk. See the following tables.
Title File name, Location
HORCM (RM) /etc/horcmgr none
HORCM_CONF /HORCM/etc/horcm.conf none
Takeover /usr/bin/horctakeover horctakeover
Executable for
Command
Make configuration
/usr/bin/mkconf.sh mkconf
file
Volume
/usr/bin/paircurchk paircurchk
Accessibility check
Pair generation /usr/bin/paircreate paircreate
Pair
/usr/bin/pairsplit pairsplit
splitting/suspending
Pair
/usr/bin/pairresync pairresync
resynchronization
Event wait ing /usr/bin/pairevtwait pairevtwait
Error not ification /usr/bin/pairmon pairmon
Volume checking /usr/bin/pairvolchk pairvolchk
Pair configuration
/usr/bin/pairdisplay pairdisplay
confirmation
RAID scan /usr/bin/raidscan raidscan
RAID activity
/usr/bin/raidar raidar
report
Connection
/usr/bin/raidqry raidqry
confirmation
(continued)
68 HP StorageWorks Disk Array XP RAID Manager: User’s Guide
Page 69

Executable for
Title File name, Location
Command
Trace control /usr/bin/horcctl horcctl
Synchronization
/usr/bin/pairsyncwait pairsyncwait
waiting command
HORCM (RM)
/usr/bin/horcmstart.sh horcmstart.sh
activation script
HORCM shutdown
/usr/bin/horcmshutdown.sh horcmshutdown.sh
script
Connection
/HORCM/usr/bin/inqraid* inqraid
confirmation
Oracle validation
/usr/bin/raidvchkset raidvchkset
setting
Oracle validation
/usr/bin/raidvchkdsp raidvchkdsp
confirmation
Oracle validation
usr/bin/raidvchkscan raidvchkscan
confirmation
*The inqraid command is provided only for Linux, HP-UX, Solaris,
MPE/iX, and OpenVMS.
Title File name, Location Command file
HORCM (RM) \HORCM\etc\horcmgr.exe none
HORCM_CONF \HORCM\etc\horcm.conf none
Takeover \HORCM\etc\horctakeover.exe horctakeover
Make configuration file \HORCM\etc\mkconf.exe mkconf
Accessibility check \HORCM\etc\paircurchk.exe paircurchk
Pair generation \HORCM\etc\paircreate.exe paircreate
(continued)
Using RAID Manager 69
Page 70

Title File name, Location Command file
Pair split/suspend \HORCM\etc\pairsplit.exe pairsplit
Pair resynchronization \HORCM\etc\pairresync.exe pairresync
Event wait ing \HORCM\etc\pairevtwait.exe pairevtwait
Error not ification \HORCM\etc\pairmon.exe pairmon
Volume checking \HORCM\etc\pairvolchk.exe pairvolchk
Pair configuration confirmation \HORCM\etc\pairdisplay.exe pairdisplay
RAID scanning \HORCM\etc\raidscan.exe raidscan
RAID activity reporting \HORCM\etc\raidar.exe raidar
Connection confirmation \HORCM\etc\raidqry.exe raidqry
Trace contro l \HORCM\etc\horcctl.exe horcctl
HORCM activation script \HORCM\etc\horcmstart.exe horcmstart
HORCM shutdown script \HORCM\etc\horcmshutdown.exe horcmshutdown
Synchronous waiting \HORCM\etc\pairsyncwait.exe pairsyncwait
Connection confirmation \HORCM\etc\inqraid.exe inqraid
Takeover \HORCM\usr\bin\horctakeover.exe horctakeover
Accessibility check \HORCM\usr\bin\paircurchk.exe paircurchk
Pair generation \HORCM\usr\bin\paircreate.exe paircreate
Pair split/suspend \HORCM\usr\bin\pairsplit.exe pairsplit
Pair resynchronization \HORCM \usr\bin\pairresync.exe pairresync
Event wait ing \HORCM\usr\bin\pairevtwait.exe pairevtwait
Volume check \HORCM\usr\bin\pairvolchk.exe pairvolchk
Synchronization waitin g command \HORCM\usr\bin\pairsyncwait.exe pairsyncwait
Pair configuration confirmation \HORCM\usr\bin\pairdisplay.exe pairdisplay
RAID scan \HORCM\usr\bin\raidscan.exe raidscan
(continued)
70 HP StorageWorks Disk Array XP RAID Manager: User’s Guide
Page 71

Title File name, Location Command file
Connection confirmation \HORCM\usr\bin\raidqry.exe raidqry
Oracle validation settin g \HORCM\usr\bin\raidvchkset raidvchkset
Oracle validation confirmation \HORCM\usr\bin\raidvchkdsp raidvchkdsp
Oracle validation confirmation \HORCM\usr\bin\raidvchkscan raidvchkscan
Tool \HORCM\Tool\chgacl.exe chgacl
Windows NT/2000/2003 command notes:
• \HORCM\etc\ commands are used when issuing commands
interactively from the console.
• If the user issues these commands without any arguments, RM will
enter inter active mode.
• \HORCM\usr\bin commands are not interactive.
• \HORCM\usr\bin commands are used for programatic execution
from a user application.
Using RAID Manager 71
Page 72

Log files
Log file format
RM and RM commands write internal logs and trace information to help
the user:
• identify causes of RM failures
• keep records of the transition history of pairs.
Log files provided include the startup log file, error log file, trace file, and
core file, which are located as shown below. HOST denotes the host name,
and PID denotes the process ID within that host.
UNIX Systems
startup log files HORCM startup log
$HORCM_LOG/horcm_HOST.log
Command log
$HORCC_LOG/horcc_HOST.log
error log file HORCM error log
$HORCM_LOG/horcmlog_HOST/horcm.log
trace files HORCM trace
$HORCM_LOG/horcmlog_HOST/horcm_PID.trc
Command trace
$HORCM_LOG/horcmlog_HOST/horcc_PID.trc
core files HORCM core
$HORCM_LOG/core_HOST_PID/core
Command core
$HORCM_LOG/core_HOST_PID/core
72 HP StorageWorks Disk Array XP RAID Manager: User’s Guide
Page 73

Windows NT/2000/2003 Systems
startup log files HORCM startup log
$HORCM_LOG\horcm_HOST_log.txt
Command log
$HORCC_LOG\horcc_HOST_log.txt
error log file HORCM error log
$HORCM_LOG\horcmlog_HOST\horcm_log.txt
trace files HORCM trace
$HORCM_LOG\horcmlog_HOST\horcm_PID_trc.txt
Command trace
$HORCM_LOG\horcmlog_HOST\horcc_PID_trc.txt
core files HORCM core
$HORCM_LOG\core_HOST_PID\core
Command core
$HORCM_LOG\core_HOST_PID\core
MPE/iX Systems
startup log files HORCM startup log
$HORCM_LOG/horcm_HOST.log
Command log
$HORCC_LOG/horcc_HOST.log
error log file HORCM error log
$HORCM_LOG/horcmlog_HOST/horcm.log
trace file HORCM trace
$HORCM_LOG/horcmlog_HOST/horcm_PID.trc
OpenVMS Systems
startup log file sys$posix_root :[horcm.log]
Using RAID Manager 73
Page 74

Log directories
The log directories for the RM instance specify the command log files
using the environment variables:
$HORCM_LOG A trace log file directory specified using the
environment variable HORCM_LOG. The HORCM
(RM) log file, trace file and core file (as well as the
command tr ace file and cor e file) are stored in this
directory. If you do not specify an environment
variable, /HORCM/log/curlog becomes the default.
$HORCC_LOG A command log file directory specified using the
environment variable HORCC_LOG. If you do not
specify an environment variable, the directory
/HORCM/logn (n is the instance number) becomes the
default.
While CA is ru nning, log files are stored in the
$HORCM_LOG directory. When RM starts up, the
log files created are saved automatically in the
$HORCM_LOGS directory shown below.
RM “in operation” log file directory
$HORCM_LOG = /HORCM/logn/curlog
n is the instance number.
RM “automatic archives” log file dir ectory
$HORCM_LOGS = /HORCM/logn/tmplog
n is the instance number.
Output to host log file
If you cannot create RM log files or an error occurs before the log files are
created, error logs are output in the system log file.
If an RM instance activation fails, check the system log file, identify the
error cause, and take any necessary action.
74 HP StorageWorks Disk Array XP RAID Manager: User’s Guide
Page 75

User-created files
When constructing the RM environment, the system administrator should
make a copy of the HORCM_CONF file, edit th e file for the sys tem
environment, and save the file:
UNIX
/etc/horcm.conf
or
/etc/horcmn.conf
where n is the instance number.
Windows NT/2000/2003
\WINNT\horcm.conf
or
\WINNT\horcmn.conf
where n is the instance number.
MPE/iX
/etc/horcm.conf
or
/etc/horcmn.conf
where n is the instance number.
OpenVMS
sys$posix_root : [etc]horcmn.conf
where n is the instance number.
Using RAID Manager 75
Page 76

User-settable environment variables
When activating RM or initiating a command, you can specify any of the
following environment variables:
• RM Environment Variables
• RM command Environment Variables
• RM instance Environment Variables
• environment variable for BC commands
RM environment variables
$HORCM_CONF
Specifies the name of the RM configuration file.
Default: /etc/horcm.conf
$HORCM_LOG Specifies the name of the RM log directory.
Default: /HORCM/log/curlog
$HORCM_TRCSZ
Specifies the size of the RM trace file in kilobytes. The
file size of 1 MB is used by default if no size is
specified.
You cannot change the trace file siz e of RM in real time
using the horcctl command.
$HORCM_TRCLVL
Specifies the RM tra ce le vel ( b et wee n 0 and 15). If you
specify a negative value, the trace mode is canceled. If
you do not specify a level, tracing becomes level 4 by
default.
You can change the trace level of RM in real time by
using the horcctl –c –l command.
$HORCM_TRCBUF
Specifies the RM trace mode. If you specify this
76 HP StorageWorks Disk Array XP RAID Manager: User’s Guide
Page 77

environment variable, data is written to the trace file in
nonbuffered mode. If you do not specify it, data is
written in buffered mode.
The trace mode of RM can be changed in real time by
using the horcctl –c –b command.
$HORCM_TRCUENV
This variable specifies whether to use the trace control
parameters (TRCLVL and TRCBUF trace types) as
they are when a command is issued. When you specify
this environment variable, the latest set trace control
parameters are used. If you do not specify it, the default
trace control parameters for RM commands are used,
and tracing becomes level 4, and trace mode is set to
buffer mode.
$HORCM_FCTBL
This variable changes th e fibre address conver sion table
number when the target ID, whic h is indicated by the
raidscan command, is different from the target ID used
by the host.
RM command environment variables
When issued, CA commands use these environment variables:
$HORCC_LOG Specifies a command log directory name. If this
variable is not specified, the following di rectory is
used:
/HORCM/logn
(n is the instance number)
Using RAID Manager 77
Page 78

$HORCC_TRCSZ
Specifies the size of the command trace file in
kilobytes. If you do not specify a size, the default trace
size for CA commands i s used. Thi s defaul t trace size is
the trace size used by CA.
The default trace size for CA commands can be
changed in real time by using the horcctl –d –s
command.
$HORCC_TRCLVL
Specifies the command trace level (between 0 and 15).
If you specify a negative value, the trace mode is
canceled. If you do not specify a level, the default trace
level for CA commands is used. This tracing is level 4
by default (or the CA level) . You can change the defau lt
trace level for CA commands in real time using the
horcctl –d –l command.
$HORCC_TRCBUF
This variable sp ecifies th e command trace mode. If yo u
specify this environment variable, data is written to the
trace file in nonbuffer mode. If you do not specify it,
the default trace mode for CA commands is used. This
default tracing mode is buffered mode (or the CA trace
mode). You can change the default trace mode for CA
commands in real time using the horcctl –d –b
command.
RM instance environment variable
The $HORCMINST variable specifies the RM instance number when
operating two or more RM instances on a single server.
You must specify an instance number in the command execution
environment and the RM activation environment.
78 HP StorageWorks Disk Array XP RAID Manager: User’s Guide
Page 79

RM protection
The RAID Manager protection facility restricts RM volume control
operations to volumes that:
• the host is allowed to see, with or without host-based LUN security
(Secure LUN XP)
• are listed in the RM configuration file.
To avoid inconsistency, RM security cannot be controlled within RM itself.
RM security is determined by command device definition within the SVP,
Remote Console, or via SNMP. Upon definition, the protection facility for
each command device can be enabled by setting an attribute. RM refers to
this attribute when it first recognizes the command device.
Command devices with protection ON permit access to volumes that are
not only on their list of allowed volumes, but are also host viewable.
The following figure shows the definition of a protected (access refused)
volume:
Protected (refused) volumes
Volumes within Host view via
HOST1
Permit ted volumes
Using RAID Manager 79
HOST2
LUN Security
Volumes in the
protection ON command device
horcm.conf
file viewable via
Page 80

Protection facility specification
Only permitted volumes an d volume s visi ble to th e host can be list ed in the
horcm.conf file. A volume must fulfill two requirements to be considered
“permitted” by the RM protection facility:
• It is host viewable (for example, with the HP supplied Inquiry tool).
• It is a volume listed in the horcm.conf file.
RM manages volume mirror descriptors (MU# for CA, BC0/BC1/BC2) as
a unit. The permitted volum es in the followin g table lie at the intersection
(the dark shaded areas) of volume device files, representing volumes that
the host is allowed to see (row), and volumes that are listed in the
horcm.conf file (column).
Vol umes on
horcm.conf
Unknown N N N N N N N N
/dev/rdsk/c0t0d0 P N P N P N P N
Mirror descriptor defined in horcm.conf
CA BC0 BC1 BC2
L not L not L not L not
Guide to table terms:
L The volume mirror descriptor is listed in the
horcm.conf file.
Not The volume mirror descriptor is not listed in the
horcm.conf file.
Unknown Volumes that the host cannot see, even though the
volumes were listed in the horcm.conf file.
P Permitted
N Not permitted
80 HP StorageWorks Disk Array XP RAID Manager: User’s Guide
Page 81

Permission command
To allow initial access to a protected volume, the Permission command
must be executed. This command is the –find inst option of raidscan; see
“raidscan” (page 202). It is executed by /etc/horcmgr automatically upon
RM startup. With security enabled, RM permits operations on a volume
only after the Permission c ommand i s executed. Operations target volumes
listed in the horcm.conf file.
The command compares volumes in the horcm.conf file to all ho st
viewable volumes. Results are noted within RM in an internal table of
protected and permitted volumes based on the horcm.conf file and the
results of the Inquiry command. The Inquiry result is based on the LUN
security for that host; you must configure LUN security before beginning
RM operation.
Attempts to control protected volumes are rejected with the error code
EX_ENPERM.
Protection facility support
XP12000 Protection facility supported.
XP10000 Protection facility supported.
XP1024/128 Protection facility supported.
XP512/48 Protection facility supported.
XP256 Not supported. XP256 can protect volumes only by
using the protection mode of RM.
Sequent (Dynix/ptx)
Not supported. If a command device is set to enable
protection mode, it is ignored by RM.
Digital UNIX
Not supported. If a command device is set to enable
protection mode, it is ignored by RM.
Using RAID Manager 81
Page 82

MPE/iX Not supported (only SCSI connections). MPE/iX can
OpenVMS
Command device configuration
You can use both protected and unprotected modes in a single array by
enabling or disabling the protection facility of each command device. As a
minimum configuration, it is possible to have two command devices, one
with protection enabled and the other disabled.
Protection mode is enabled for the host that uses a LUN security enabled
command device.
LUN visibility from two host configuration
The following figure shows a two host protection mode configuration
sharing one array. Operations directed at Ora2 are rejected because of no
visibility for Grp4 from HOST2.
protect volumes only by using the protection mode of
RM.
Not supported. If a command device is set to enable
protection mode, it is ignored by RM.
CM* represents a command device with protection set to ON at creation
time.
82 HP StorageWorks Disk Array XP RAID Manager: User’s Guide
Page 83

horcm.conf on HOST1
volumes for Grp1
volumes for Grp3
Visibility to Grp1,Grp3,Grp4
Ora1
Ora2
horcm.conf on HOST2
volumes for Grp2
volumes for Grp4
Visibility to Grp2 only
Grp1
Grp3
CM*
XP
Grp2
Grp4
Using RAID Manager 83
Page 84

Horcm0.conf on
HOST1
volumes for
Grp1
volumes for
Grp3
LUN visibility from one host configuration
The following figure shows a one host protection mode configuration
sharing one array. Ora1 and Ora2 control operations are rejecte d because of
no visibility to Grp2 and Grp4 from HOST1. If HOST1 uses a command
device with protection set to OFF at creation time, then Ora1 and Ora2
volume pairs can be controlled.
CM* represents a command device with protection ON.
Horcm1.conf on
HOST1
Ora1
Ora2
Visibility to Grp1,Grp3
volumes for Grp2
volumes for Grp4
Horcm0.conf on
HOST2
volumes for
Grp2
Horcm1.conf on
HOST2
Ora3
Visibility to Grp2,Grp4
volumes for
Grp4
Grp1
Grp3
CM*
Grp2
Grp4
XP
Protection is implemented completely within RM. If RM uses a command
device with protection enabled, RM will check permissions on all paired
volumes with which it deals.
84 HP StorageWorks Disk Array XP RAID Manager: User’s Guide
Page 85

Commands controlled by RM protection
The following commands are controlled by RM protection:
• horctakeover, paircurchk, paircreate, pairsplit, pairresync,
pairvolchk, pairevtwait, pairsyncwait
When these commands are issued to non-permitted volumes, RM
rejects the request with an error code of
•pairdisplay
The pairdisplay command has no RM protection restrictions. Using
this command, you ca n confir m whethe r volumes are perm itted or not.
Non-permitted volumes are shown without any LDEV# information.
LDEV# information is shown as ****.
Example
# pairdisplay -g oradb
Group PairVol(L/R) (Port#,TID,LU-M),Seq#, LDEV#.P/S,Status, Seq#,P-LDEV# M
oradb oradev1(L) (CL1-D , 3, 0-0) 35013 ****..---- ----,----- ---- oradb oradev1(R) (CL1-D , 3, 1-0) 35013 ****..---- ----,----- ---- -
•raidscan
The raidscan command shows all v olumes without restriction because
it does not use the HORCM_DEV and HORCM_INST fields in the
horcm.conf f ile.
EX_ENPERM.
To identify permitted volumes with raidscan, use the –find option
(supported with version 01.05.00). This option shows the device file
name and array serial number information. You can use
–find
to create the horcm.conf file, because only permitted volumes
raidscan
(from the host's perspective) will be displayed.
Example
(HP-UX)
# ioscan -fun | grep rdsk | raidscan -find
DEVICE_FILE UID S/F PORT TARG LUN SERIAL LDEV PRODUCT_ID
/dev/rdsk/c0t3d0 0 F CL1-D 3 0 35013 17 OPEN-3
/dev/rdsk/c0t3d1 0 F CL1-D 3 1 35013 18 OPEN-3
Using RAID Manager 85
Page 86

• raidscan –find inst
RM recognizes permitted volumes as a result of executing raidscan
–find inst
(the Permission command). This command issues a SCSI
inquiry to the specified device file to get the array Ser# and volume
LDEV# from t he XP array. Then, it cross checks volumes in the
horcm.conf file against host viewable volumes and stores the result
within the RM ins tance.
The following example shows the relationship between device files
and the
horcm.conf file upon manual execution of the Permission
command in an HP-UX environment. Operations to all volumes
displayed by
ioscan will be allowed.
Example
(HP-UX)
# ioscan -fun | grep rdsk | raidscan -find inst
DEVICE_FILE Group PairVol PORT TARG LUN M SERIAL LDEV
/dev/rdsk/c0t3d0 oradb oradev1 CL1-D 3 0 - 35013 17
/dev/rdsk/c0t3d0 oradb oradev1 CL1-D 3 0 0 35013 17
Permitting operations on protected volumes
Protection Mode requires a recognition step to check the host accessibility
of volumes against the
device with protection ON. This registration process (
automatically by
c The following is executed to register permitted volumes in a file
($HORCMPERM). If the $HORCMPERM file already exists, then it will
use the existing file without doing a new
If you want to permit even fewer volumes, edit the device file list in the
$HORCMPERM file. If you t ry to add device files that
(due to nonexistence or a LUN security product), an error will be returned
at access time. This file is simply the text output (device files only) of a
ioscan with the non XP device files removed.
prior
horcm.conf file at RM startup, using a command
c or d) is executed
/etc/horcmgr at RM startup.
ioscan (d).
ioscan does not see
86 HP StorageWorks Disk Array XP RAID Manager: User’s Guide
Page 87

Naming the $HORCMPERM file
UNIX systems
The $HORCMPERM variable is set by default to either
/etc/horcmperm.conf or /etc/horcmperm*.conf (where * is the RM
instance number).
Example
(HP-UX)
'cat $HORCMPERM | /HORCM/usr/bin/raidscan -find inst'
# The following is an example to show permitted LVM
# Volume groups.
# For MU# 0
vg00 /dev/rdsk/c0t3d0 /dev/rdsk/c0t3d1
vg00 /dev/rdsk/c0t3d2 /dev/rdsk/c0t3d3
# For MU# 1
vg01 /dev/rdsk/c0t3d0 /dev/rdsk/c0t3d1
vg01 /dev/rdsk/c0t3d2 /dev/rdsk/c0t3d3
Verifying a group for vg01:
The following example ver ifies wheth er a LVM volume group is ma pped to
a group (MU#1 for BC) in the
# export HORCC_MRCF=1
# cat /etc/horcmperm.conf | grep vg01 | raidscan -find verify 1 -fd
OR
# vgdisplay -v /dev/vg01|grep dsk|sed
's/\/*\/dsk\//\/rdsk\//g'|raidscan -find verify 1 -fd
DEVICE_FILE Group PairVol Device_File M SERIAL LDEV
/dev/rdsk/c0t3d0 oradb1 oradev1 c0t3d0 1 35013 17
/dev/rdsk/c0t3d1 oradb1 oradev2 c0t3d1 1 35013 18
/dev/rdsk/c0t3d2 oradb oradev3 c0t3d2 1 35013 19
/dev/rdsk/c0t3d3 - - - 1 35013 20
horcm.conf file correctly.
Using RAID Manager 87
Page 88

Windows NT/2000/2003 systems
The $HORCMPERM variable is set by default to either
\WINNT\horcmperm.conf or \WINNT\horcmperm*.conf (where * is
the instance number).
'type $HORCMPERM | x:\HORCM\etc\raidscan.exe -find inst'
# The following is an example to permit DB Volumes.
# Note: a numerical value is interpreted as Harddisk#.
# DB0 For MU# 0
Hd0-10
harddisk12 harddisk13 harddisk17
# DB1 For MU# 1
hd20-23
Verifying a group for DB1:
The following example sho ws how to verif y whether a DB volume gr oup is
correctly mapped to a horcm.conf group (MU#1 for BC).
D:\HORCM\etc> set HORCC_MRCF=1
D:\HORCM\etc> echo hd20-23 | raidscan -find verify 1 -fd
DEVICE_FILE Group PairVol Device_File M SERIAL LDEV
Harddisk20 oradb1 oradev1 Harddisk20 1 35013 17
Harddisk21 oradb1 oradev2 Harddisk21 1 35013 18
Harddisk22 oradb oradev3 Harddisk22 1 35013 19
Harddisk23 - - - 1 35013 20
88 HP StorageWorks Disk Array XP RAID Manager: User’s Guide
Page 89

d If no $HORCMPERM file exists, then the following commands can be
manually executed to permit the use of all volumes the host is currently
allowed to see (LUN security products may or may not be in place).
HP-UX
'ioscan –fun | grep rdsk | /HORCM/usr/bin/raidscan –find inst'
Linux
'ls /dev/sd* | /HORCM/usr/bin/raidscan –find inst'
Solaris
'ls /dev/rdsk/* | /HORCM/usr/bin/raidscan –find inst'
AIX
'lsdev –C –c disk | grep hdisk | /HORCM/usr/bin/raidscan –find
inst'
If the lsdev command does not show the TID and LUN (for example,
2F-00-00-2,0) in the column output for the devices as shown below, then
–d[g] raw device option (on all commands) and raidscan –find will be
the
unable to find target devices.
# lsdev –C –c disk
hdisk1 Defined 04-02-01 Other FC SCSI Disk Drive
This happens when a Fibre Channel adapter is us ed with a different device
driver (for example, an Emulex adapte r wi th an AIX driver ).
MPE/iX
'callci dstat | /HORCM/usr/bin/raidscan -find inst'
Windows NT/2000/2003
'echo hd0-999 | x:\HORCM\etc\raidscan.exe -find inst'
The MAX volume to be scanned is 1000 by default.
Using RAID Manager 89
Page 90

Important This registration process is not without price because it is executed
automatically upon
mode in order to validate the
brings a performance degradation in
RM daemon runs as usual, depending on how many devices a host has.
If you want RM to start up faster in non-protection mode, then you can set
$HORCMPERM to
HORCMPERM=MGRNOINST. At that time, the
Device_File name as Unknown. Afterwards, you can use
inst
Environment variables
$HORCMPROMOD
This environment variable sets protection mode ON by force. If your
command device was created with protection mode OFF, this parameter
forces protection mode ON, as shown in the table below.
Original Command
Device Setting
/etc/horcmgr startup without checking for protection
–fd option. Permitted volume registration
horcmstart.sh (RM startup), but the
SIZE 0 byte as a dummy file or set
–fd option will show the
raidscan –find
in order to validate the –fd option.
HORCMPROMOD Resulting Mode
Protection mode ON No Effect
Protection mode ON
(already on) →
Protection mode OFF Variable not set → Protection mode OFF
Variable set → Protection mode ON
$HORCMPERM
This variable is used to specify the RM permission file. If no file name is
specified, the default is
(where * is the instance number).
• If a RM permission file exists , then /etc/horcmgr executes the
following command to permit the volumes listed in the file.
(HP-UX)
90 HP StorageWorks Disk Array XP RAID Manager: User’s Guide
'cat $HORCMPERM | /HORCM/usr/bin/raidscan –find inst'
/etc/horcmperm.conf, or /etc/horcmperm*.conf
Page 91

(Windows
NT/2000/2003
'type $HORCMPERM | x:\HORCM\etc\raidscan.exe -find inst'
• If no RM permission file exists, then /etc/horcmgr executes this
built-in command to permit all volumes owned by the host.
(HP-UX)
(Linux)
(Solaris)
(AIX)
(Tru64 UNIX)
(Digital UNIX)
(DYNIX/ptx)
(MPE/iX)
(Windows
NT/2000/2003)
'ioscan –fun | grep rdsk | /HORCM/usr/bin/raidscan –find
inst'
'ls /dev/sd* | /HORCM/usr/bin/raidscan -find inst'
'ls /dev/rdsk/* | /HORCM/usr/bin/raidscan -find inst'
'lsdev -C -c disk | grep hdisk | /HORCM/usr/bin/raidscan
-find inst'
'ls /dev/rdisk/dsk* | /HORCM/usr/bin/raidscan -find inst'
'ls /dev/rrz* | /HORCM/usr/bin/raidscan -find inst'
'/etc/dumpconf -d | grep sd | /HORCM/usr/bin/raidscan -find
inst'
'callci dstat | /HORCM/usr/bin/raidscan -find inst'
'x:\HORCM\etc\raidscan.exe -pi $PhysicalDrive -find inst'
• If $HORCMPERM is set to MGRNOINST, /etc/horcmgr does not
execute the built-in command.
This is used to execute a system command to permit the volumes
specified from a user's shell script.
OpenVMS
$ inqraid dka145-146
Identifying a command device using protection mode
The SCSI inquiry output can not be changed to identify a command device
in protection mode. Therefore, RM needs to provide a way to find the
protection mode command device. The
designates a protection mode command device by appending ‘*’ to the
device file name as follows:
(HP-UX)
Using RAID Manager 91
# horcctl –D
Current control device = /dev/rdsk/c0t0d0*
horcctl –D –C command
Page 92

Using RAID Manager on a Windows 2000/2003 system with “user” system privileges
By default, RAID Manager requires Windows system administrator
privileges to execute RM commands. This is because RAID Manager
needs to open the command device directly as a physical drive.
This section describes how to use the chgacl.exe to use RAID Manager
commands without Administrator system privileges.
For a user to use “user” privileges to execute RM commands, the system
administrator and the user need to perform some the following procedures.
Note: The parameters for the commands shown below are case sensitive.
Windows System Administrator
Allowing a user to use HORCM_CMD by adding a user name to
the physical drive
As System Administration, add the user name to the Device Object of the
command device in the configuration definition file. This will allow
HORCM_CMD to work.
By default, chgacl.exe grants read, write and execute permissions. To
restrict the perm issions, s ee the sect ion
to a Device Object” (page 96).
To add a user name to all physical drives:
1. Enter chgacl /A:<user_name> Phys
92 HP StorageWorks Disk Array XP RAID Manager: User’s Guide
“Allowing differe nt levels of ac cess
Page 93

Example
To add a user name to one or more physical drives:
1. Enter: chgacl /A:<user_name> <object_name>…
Example 1 chgacl /A:RMadmin \\.\PHYSICALDRIVE10
Example 2 chgacl /A:RMadmin \\.\PHYSICALDRIVE10 \\.\PHYSICALDRIVE9
Allowing a user to use the “-x mount/umount” option
If the user needs to use the “-x mount/umount” option of RM commands
(for example,
volume access control list.
raidscan -x mount Z: \vol2), add the user name to the
By default, chgacl.exe grants read, write and execute permissions. To
restrict the perm ission s, see the s ection
“Allowing dif ferent leve ls of acces s
to a Device Object” (page 96).
To add a user name to all volumes:
1. Enter chgacl /A:<user_name> Volume
Using RAID Manager 93
Page 94

Example
To add a user name to one or more volumes:
1. Enter: chgacl /A:<user_name> <Volume{GUID}> …
Example chgacl /A:RMadmin
\\.\Volume{7dd3ba6b-2f98-11d7-a48a-806d6172696f}
You can also use the \\?\\Volume{GUID} format used by W ind ows
commands such as
mountvol.
Allowing a user to use the “-x portscan” option
If the user needs to use the “-x portscan” option of RM commands (for
example,
SCSI port access list.
To add a user name to all SCSI ports:
1. Enter: chgacl /A:<user_name> Scsi
94 HP StorageWorks Disk Array XP RAID Manager: User’s Guide
raidscan -x mount ports can port0,20), add the use r name to the
Page 95

Example
To add a user name to one or more SCSI ports:
1. Enter: chgacl /A:<user_name> <SCSIX> …
Example 1 chg acl /A:RMadmin S csi0
Example 2 chgacl /A:RMadmin Scsi0 Scsi1 Scsi2
Allowing different levels of access to a Device Object
chgacl.exe allows you to set a combination of read, write, execute or “all”
access rights to a Device Object. If no permission parameter is given,
chgacl grants “all” access to the Device Object.
An RM user needs read, write an d execute rights to the comman d device in
order to start a HORCM instance.
Enter: chgacl /A:<user_name> [/P:A-R-W-E] <object_name> ...
Example (Grant read and write access for the user horcm to all physical drives.)
chgacl /A:horcm /P:R-W Phys
Using RAID Manager 95
Page 96

Deleting a user name from the access control list of the Device
Object
Caution: The first t wo commands below may delete the user’s privileges to
access the system drive (C:\).
To delete a user name from all physical drives:
1. Enter: chgacl /D:<user_name> Phys
To delete a user name from all volumes:
1. Enter: chgacl /D:<user_name> Volume
To delete a user name from one or more Device Objects:
1. Enter: chgacl /D: <user_name> <object_name> …
Restrictions
The ACL (Access Control List) for the Device Object is set every time
Windows boots, so access must be reset every time the system starts up.
Use the Windows Scheduled Tasks application to run a batch file that adds
the RM user name to the access list when system reboots.
To add a scheduled task (Windows 2000/Windows 2003):
1. Click Start. Click Control Panel.
2. Double-click Scheduled Tasks. Double-click Add Scheduled Task.
The Scheduled Task Wizard apears.
3. Click Next.
4. Browse to the batch file. Select the batch file.
A sample batch file is shown in this section.
5. Enter a name for the task. Select “When my computer starts”
6. Enter the system administrator password. Enter the password again.
7. Click Next. Click Finish.
96 HP StorageWorks Disk Array XP RAID Manager: User’s Guide
Page 97

RAID Manager user
You can redirect the output of the batch file by adding redirection in the
batch file. Alternately, you can specify redirection in the Scheduled Task
item’s Run field in advanced properties (for example,
C:\HORCM\add_RM_user.bat > C:\HORCM\logs\add_RM_user.log).
Note: If you change the Windows system administrator’s password, this
scheduled task will not execute. You will need to modify the task by
entering the new password.
When new Device Objects (physical drives) are created, you must update
user access for these devices.
Establishing the HORCM (/etc/horcmgr) startup environment
By default, the RM configuration definition file is stored in the
“%SystemDrive%\windows” or “%SystemDrive%\WINNT” directory. A
user with no system administrator privilege is denied writing to these
directories. Therefore, the RM user needs to ha ve his or her configuration
file in some other directory and set the HORCM_CONF variable to that
location.
Example 1
C:\HORCM\etc\>set HORCM_CONF=C:\Documents and
Settings\RMadmin\horcm10.conf
C:\HORCM\etc\>set HORCMINST=10
C:\HORCM\etc\>horcmstart
horcmstart must be executed without arguments.
Using RAID Manager 97
Page 98
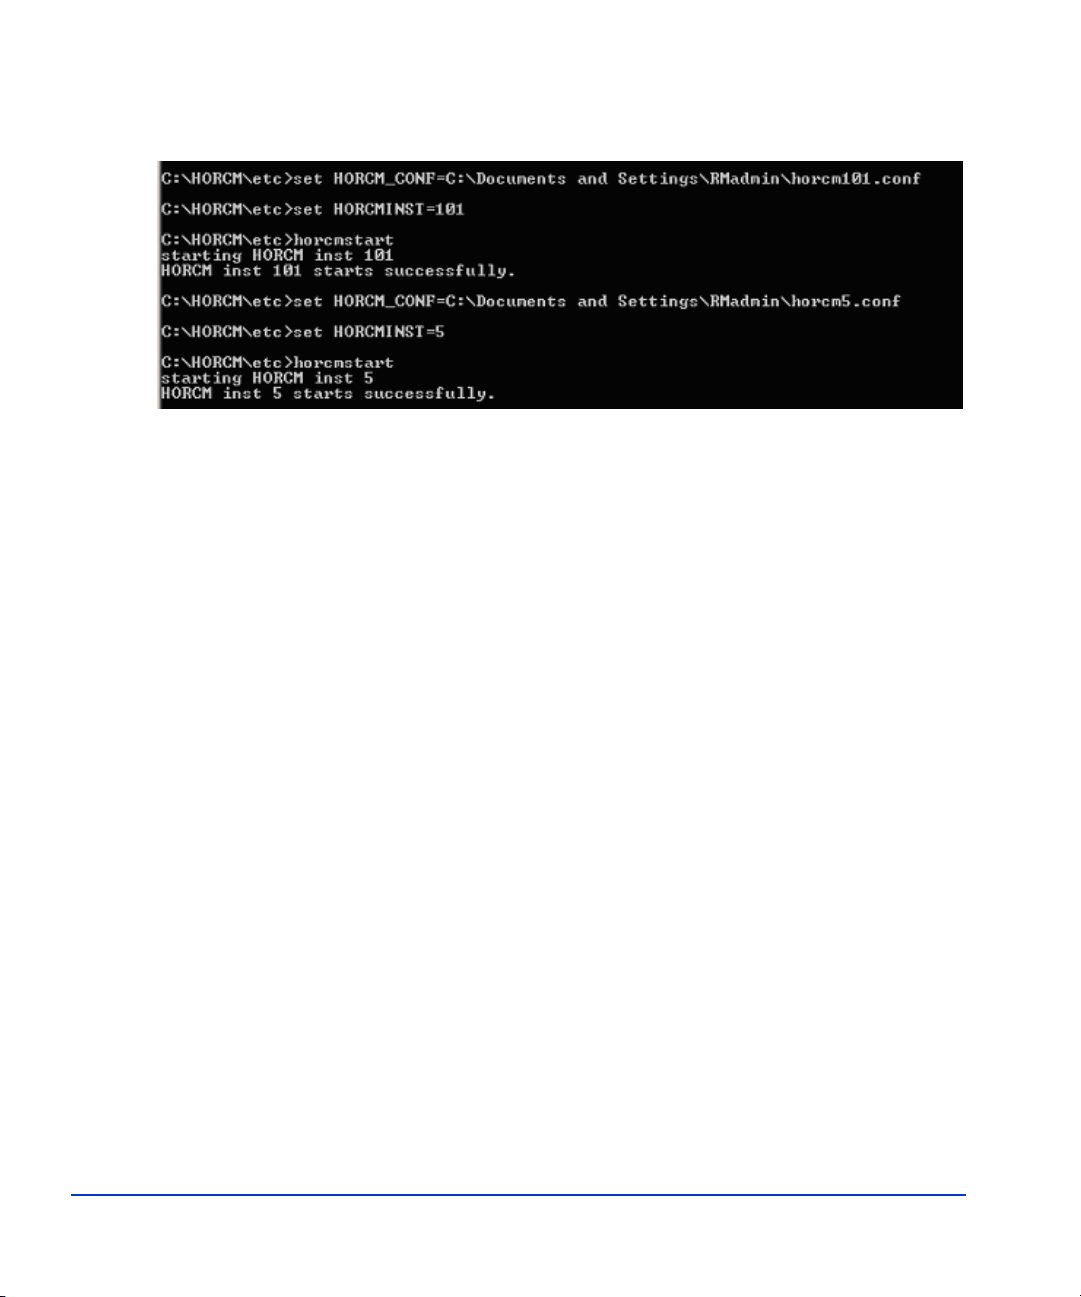
Example 2 Starting two instances:
Restrictions
Restriction 1. A user without system administrator privilege is not allowed
to use the Win dows
2000 revisions allow a user to mountvol a directory to a volume).
Therefore, a user cannot execute the “directory mount” option of RM
commands using the
For example, “raidscan -x mount C:\test \vol5” will generate an error even
though the system administrator has added the user name to the access list
of the volume.
mountvol command (although some current Windows
mountvol command.
Restrictio n 2. The inqraid “gvinf” option uses the
“%SystemDrive%:\windows\” or “%SystemDrive%:\WINNT\” directory.
Therefore, the us er exe cut in g t his command will get some errors u nle ss the
system administrator grants the user write access to the directory.
RM version 01.15.02 and later allows the user to set the
HORCM_USE_TEMP variable to prevents the errors.
Example
C:\HORCM\etc\>set HORCM_USE_TEMP=1
C:\HORCM\etc\>inqraid $Phys -gvinf
Restrictio n 3. The user using the RAID Manager commands and the user
starting the HORCM instance must have the same system privileges. The
following scenario is an example:
98 HP StorageWorks Disk Array XP RAID Manager: User’s Guide
Page 99

An administ rator stated a HORCM instance 5. User A with “user”
privileges will not be able to use any RAID Manager commands with
HORCM instance 5. This is because even if user A has been added to the
access control list for the devices, user A’s RM commands will not be able
to communicate with t he HORCM inst ance that was started by another use r
with different priv il ege s.
RM version 01.15.02 and later allow the user to connect to HORCM by
setting the “HORCM_EVERYCLI” environment variable.
Example:
Sample BAT file
C:\HORCM\etc\>set HORCM_CONF=C:\Documents and
Settings\RMadmin\horcm10.conf
C:\HORCM\etc\>set HORCMINST=10
C:\HORCM\etc\>set HORCM_EVERYCLI=1
C:\HORCM\etc\>horcmstart
horcmstart must be executed without arguments.
A batch file can be useful in reestablishing user access after a system
reboot.
@echo off
echo Run at
Date /T
Time /T
rem (1) Allow a user to use HORCM_CMD by adding a
user_name to the physical drive
rem (1a) Add an user name to all physical drives
rem usage: chgacl /A:<User_name> Phys
c:\horcm\tool\chgacl /A:RMadmin Phys
rem (1b) Add a user name to one or more physical drives
rem usage: chgacl /A:<User_name> <Object_name>…
c:\horcm\tool\chgacl /A:RMadmin \\.\PHYSICALDRIVE0
\\.\PHYSICALDRIVE1
rem (2) Allowing an user to use -x mount/umount option
of the RM commands
rem (2a) Add the user name to ALL volumes
rem usage: chgacl /A:<user_name> Volume
c:\horcm\tool\chgacl /A:RMadmin Volume
rem (2b) Add the user name to one or more volumes
rem usage: chgacl /A:<user_name> <Volume{GUID}>...
Using RAID Manager 99
Page 100

c:\horcm\tool\chgacl /A:RMadmin
\\.\Volume{7dd3ba6b-2f98-11d7-a48a-806d6172696f}
rem (3) Allow a user to use the "-x portscan" option of
RM commands
rem (3a) Add a user name0 to access list of ALL SCSI
ports
rem usage: chgacl /A:<user_name> Scsi
c:\horcm\tool\chgacl /A:RMadmin Scsi
rem (3b) Add the user name to Access List of one or more
SCSI ports
rem usage: chgacl /A:<user_name> <SCSIX>...
c:\horcm\tool\chgacl /A:RMadmin Scsi0 Scsi1
100 HP StorageWorks Disk Array XP RAID Manager: User’s Guide
 Loading...