

Page 1

HP StorageWorks
XP24000/XP20000 Volume Security User's Guide
Abstract
This document describes and provides instructions for configuring and performing Volume Security operations
on the HP storage system.
Part number: T5214-96074
Sixth edition: June 2009
Page 2

Legal and notice information
© Copyright 2008-2009 Hewlett-Packard Development Company, L.P.
Confidential computer software. Valid license from HP required for possession, use or copying. Consistent with FAR 12.211
and 12.212, Commercial Computer Software, Computer Software Documentation, and Technical Data for Commercial Items
are licensed to the U.S. Government under vendor's standard commercial license.
The information contained herein is subject to change without notice. The only warranties for HP products and services are set
forth in the express warranty statements accompanying such products and services. Nothing herein should be construed as
constituting an additional warranty. HP shall not be liable for technical or editorial errors or omissions contained herein.
Acknowledgments
Export Requirements
You may not export or re-export this document or any copy or adaptation in violation of export laws or regulations.
Without limiting the foregoing, this document may not be exported, re-exported, transferred or downloaded to or within (or to
a national resident of) countries under U.S. economic embargo, including Cuba, Iran, North Korea, Sudan, and Syria. This
list is subject to change.
This document may not be exported, re-exported, transferred, or downloaded to persons or entities listed on the U.S. Department
of Commerce Denied Persons List, Entity List of proliferation concern or on any U.S. Treasury Department Designated Nationals
exclusion list, or to parties directly or indirectly involved in the development or production of nuclear, chemical, biological
weapons, or in missile technology programs as specified in the U.S. Export Administration Regulations (15 CFR 744).
Revision History
DescriptionDateEdition
This edition applies to microcode version 60-01-31-00/00 or later.June 2007First
This edition applies to microcode version 60-01-68-00/00 or later.September 2007Second
This edition applies to microcode version 60-02-25-00/00 or later.January 2008Third
This edition applies to microcode version 60-02-48-00/00 or later.March 2008Fourth
This edition applies to microcode version 60-04-04-00/00 or later.December 2008Fifth
This edition applies to microcode version 60-05-00-00/00 or later.June 2009Sixth
Page 3

Contents
1 Overview of Volume Security ............................................................... 7
Overview ................................................................................................................................... 7
Terminology ............................................................................................................................... 7
2 About Volume Security Operations ....................................................... 9
Overview of Volume Security Functions .......................................................................................... 9
Protecting Volumes from I/O Operations at Mainframe Hosts ........................................................... 9
Enabling Only the Specified Hosts to Access Volumes ............................................................... 9
Port-Level Security ............................................................................................................... 10
Port-Level Security Implementation ......................................................................................... 10
Prohibiting All Hosts from Accessing Volumes ......................................................................... 11
Protecting Volumes from Erroneous Copy Operations .............................................................. 12
Warnings Regarding Volume Security .......................................................................................... 12
Supported Volume Emulation Types ............................................................................................. 13
Maximum Possible Number of Groups ......................................................................................... 14
Maximum Possible Number of Hosts and Volumes ........................................................................ 14
3 Using the Volume Security GUI .......................................................... 15
The Volume Security Window ..................................................................................................... 15
Security Group Tree ................................................................................................................. 16
Hosts Table .............................................................................................................................. 18
LDEVs Table ............................................................................................................................ 19
The Add/Change Security Group Dialog Box ............................................................................... 20
The Add/Change Host Group Dialog Box ................................................................................... 23
The Add/Change LDEV Group Dialog Box .................................................................................. 25
The Add/Change Host Dialog Box ............................................................................................. 27
The Select LDEV Dialog Box ....................................................................................................... 29
The Select Port Dialog Box ......................................................................................................... 30
The Specify Security Group Dialog Box ....................................................................................... 32
The Host to Security Group Dialog Box ........................................................................................ 33
The Host to LDEV Dialog Box ...................................................................................................... 34
Host Group to Security Group Dialog Box .................................................................................... 35
The Host Group to Port Dialog Box .............................................................................................. 36
The LDEV to Security Group Dialog Box ....................................................................................... 37
The LDEV to Host Dialog Box ...................................................................................................... 38
The LDEV Group to Security Group Dialog Box ............................................................................. 40
The Error Detail Dialog Box ........................................................................................................ 41
4 Performing Volume Security Operations ............................................... 43
Launching Volume Security ......................................................................................................... 43
Viewing Security Settings ........................................................................................................... 43
Locating Volumes in a Specified Security Group ..................................................................... 44
Locating Security Groups that Contain a Specified Host ........................................................... 44
Locating Volumes in a Security Group that Contains a Specified Host ........................................ 44
XP24000/XP20000 Volume Security User's Guide 3
Page 4

Locating Ports through Which Hosts Can Access Volumes ........................................................ 45
Locating Security Groups that Contain a Specified Volume ....................................................... 45
Locating Hosts in a Security Group that Contains a Specified Volume ........................................ 46
Locating Security Groups that Contain a Specified Host Group ................................................. 46
Locating Security Groups that Contain a Specified LDEV Group ................................................ 47
Limiting Host Access .................................................................................................................. 47
Creating a Host Group ....................................................................................................... 47
Registering Hosts in a Host Group ........................................................................................ 48
Registering Ports in a Host Group ......................................................................................... 49
Creating an LDEV Group ..................................................................................................... 50
Registering Volumes in an LDEV Group ................................................................................. 51
Creating a Security Group for Use As an Access Group .......................................................... 52
Registering a Host Group and an LDEV Group in a Security Group ........................................... 53
Prohibiting Host Access ............................................................................................................. 53
Creating an LDEV Group ..................................................................................................... 53
Registering Volumes in an LDEV Group ................................................................................. 54
Creating a Security Group for Use As a Pool Group ............................................................... 55
Registering an LDEV Group in a Security Group ..................................................................... 56
Protecting Volumes from Copy Operations .................................................................................... 57
Disabling Volume Security .......................................................................................................... 58
Editing Security Groups ............................................................................................................. 59
Unregistering a Host Group ................................................................................................. 59
Unregistering an LDEV Group .............................................................................................. 59
Renaming Security Groups .................................................................................................. 60
Deleting Security Groups ..................................................................................................... 61
Editing Host Groups .................................................................................................................. 61
Registering Hosts to be Attached to the Storage System ........................................................... 61
Deleting Hosts from Host Groups .......................................................................................... 62
Deleting Ports from Host Groups ........................................................................................... 63
Renaming Host Groups ....................................................................................................... 64
Deleting Host Groups ......................................................................................................... 65
Editing LDEV Groups ................................................................................................................. 65
Deleting Volumes from LDEV Groups ..................................................................................... 65
Renaming LDEV Groups ...................................................................................................... 66
Deleting LDEV Groups ........................................................................................................ 67
5 Troubleshooting ............................................................................... 69
Troubleshooting Volume Security ................................................................................................. 69
Calling HP Technical Support ..................................................................................................... 69
6 Support and Other Resources ............................................................ 71
Related Documentation .............................................................................................................. 71
Conventions for Storage Capacity Values ..................................................................................... 71
HP Technical Support ................................................................................................................ 71
Subscription Service .................................................................................................................. 72
HP Websites ............................................................................................................................ 72
Documentation Feedback ........................................................................................................... 72
A Acronyms and Abbreviations ............................................................. 73
Index ................................................................................................. 75
4
Page 5

Figures
Security Example 1 ................................................................................................. 101
Security Example 2 ................................................................................................. 112
Security Example 3 ................................................................................................. 123
The Volume Security Window ................................................................................... 164
Security Group Tree ............................................................................................... 175
Hosts Table ............................................................................................................ 196
LDEV table ............................................................................................................. 207
The Add/Change Security Group Dialog Box ............................................................. 218
The Add/Change Host Group Dialog Box .................................................................. 249
The Add/Change LDEV Group Dialog Box ................................................................. 2610
The Add/Change Host Dialog Box ............................................................................ 2711
The Select LDEV Dialog Box ..................................................................................... 2912
The Select Port Dialog Box ....................................................................................... 3113
The Specify Security Group Dialog Box ...................................................................... 3214
The Host to Security Group Dialog Box ...................................................................... 3315
The Host to LDEV Dialog Box .................................................................................... 3516
The Host Group to Security Group Dialog Box ............................................................ 3617
The Host Group to Port Dialog Box ............................................................................ 3718
The LDEV to Security Group Dialog Box ..................................................................... 3819
The LDEV to Host Dialog Box .................................................................................... 3920
The LDEV Group to Security Group Dialog Box ........................................................... 4121
The Error Detail Dialog Box ...................................................................................... 4222
XP24000/XP20000 Volume Security User's Guide 5
Page 6

Tables
Acronyms and Abbreviations .................................................................................... 731
6
Page 7

1 Overview of Volume Security
Unless otherwise specified, the term storage system in this guide refers to the following disk arrays:
• HP StorageWorks XP24000 Disk Array
• HP StorageWorks XP20000 Disk Array
• HP StorageWorks XP12000 Disk Array
• HP StorageWorks XP10000 Disk Array
The GUI illustrations in this guide were created using a Windows computer with the Internet Explorer
browser. Actual windows may differ depending on the operating system and browser used. GUI
contents also vary with licensed program products, storage system models, and firmware versions.
Overview
Volume Security protects data in your HP storage system from I/O operations performed at mainframe
hosts. Security can be applied to logical volumes so that specified mainframe hosts are unable to
read from and write to the specified logical volumes. Volume Security also enables you to prevent
data on logical volumes from being accidentally overwritten by erroneous local or remote copy
operations.
Volume Security can be used in conjunction with the Volume Security Port Option. This optional
program is used to specify storage system ports through which hosts can access logical volumes.
Using Volume Security you can manipulate up to 64 hosts and 65,280 logical volumes for one storage
system. Volume Security also enables you to create up to 64 security groups, 64 host groups, and
64 Volume Groups for one storage system.
Volume Security operations are performed using the licensed HP StorageWorks XP Remote Web
Console software. The Remote Web Console software communicates directly with the storage system
via a local-area network (LAN). Remote Web Console displays detailed Volume Security information
and allows you to configure and perform Volume Security operations for the mainframe systems data
stored on the storage system. For further details, see the HP StorageWorks XP24000/XP20000 Remote
Web Console User’s Guide.
To apply port-level security, you must install the Volume Security Port Option. Before installing this
program, ensure that Volume Security is already installed. For details on the installation procedure,
see the HP StorageWorks XP24000/XP20000 Remote Web Console User’s Guide.
Terminology
There are a few notes regarding terminology that users should be aware of when using this manual:
• In the storage system documentation, logical volumes are sometimes referred to as logical devices
(or LDEVs). Also, the storage system documentation sometimes uses the term, LDEV security to refer
to security policy that volume security enables you to apply to logical volumes.
• In the Hitachi TrueCopy™ for Mainframe User's Guide, primary volumes are often referred to as
M-VOLs, or main volumes. Also, secondary volumes are often referred to as R-VOLs or remote
volumes. In the Hitachi ShadowImage™ for Mainframe User's Guide, primary volumes are often
XP24000/XP20000 Volume Security User's Guide 7
Page 8

referred to as S-VOLs, or source volumes. Secondary volumes are often referred to as T-VOLs, or
target volumes.
Overview of Volume Security8
Page 9

2 About Volume Security Operations
Overview of Volume Security Functions
The Volume Security feature protects data in your storage system from I/O operations performed at
mainframe hosts. Volume Security enables you to apply security to volumes so that the specified
mainframe hosts will be unable to read from and write to the specified volumes. Volume Security also
enables you to prevent data on volumes from being overwritten by erroneous copy operations.
Volume Security can be used in conjunction with an optional program Volume Security Port Option.
This optional program can be used to specify storage system ports via which hosts can access volumes.
In the storage system documentation, volumes are sometimes referred to as logical devices (or LDEVs).
Also, the storage system documentation sometimes uses the term LDEV security to refer to security
policy that Volume Security enables you to apply to volumes.
Protecting Volumes from I/O Operations at Mainframe Hosts
Volume Security enables you to protect volumes from unauthorized accesses by mainframe hosts. To
protect volumes from unauthorized accesses, you must create security groups and then register
mainframe hosts and/or volumes in security groups. Security groups are classified into access groups
or pool groups. To allow some (but not all) mainframe hosts to access volumes, you must classify the
security group as an access group. To prohibit all mainframe hosts from access volumes, you must
classify the security group as a pool group.
Enabling Only the Specified Hosts to Access Volumes
To allow only some mainframe hosts in your network to access volumes, you must register the mainframe
hosts and the volumes in an access group. For example, if you register two hosts (host_A and host_B)
and two volumes (vol_C and vol_D) in an access group, only the two hosts will be able to access
vol_C and vol_D. No other hosts will able to access vol_C and vol_D.
If mainframe hosts are registered in an access group, the hosts will be able to access volumes in the
same access group, but will be unable to access other volumes. For example, if you register two hosts
(host_A and host_B) and two volumes (vol_C and vol_D) in an access group, the two hosts can access
vol_C and vol_D and cannot access other volumes.
To register hosts in an access group, you must create a host group, register the hosts in the host group,
and then register the host group in the desired access group. To register volumes in an access group,
you must create an LDEV group, register the volumes in the LDEV group, and then register the LDEV
group in the desired access group. Any access group can only contain one host group and one LDEV
group.
In Figure 1, six mainframe hosts are attached to a storage system and two access groups are created.
Here, the following security settings are applied:
• The volumes ldev1 and ldev2 are accessible only from host1, host2, and host3 because the two
volumes and the three hosts are registered in the same access group.
XP24000/XP20000 Volume Security User's Guide 9
Page 10
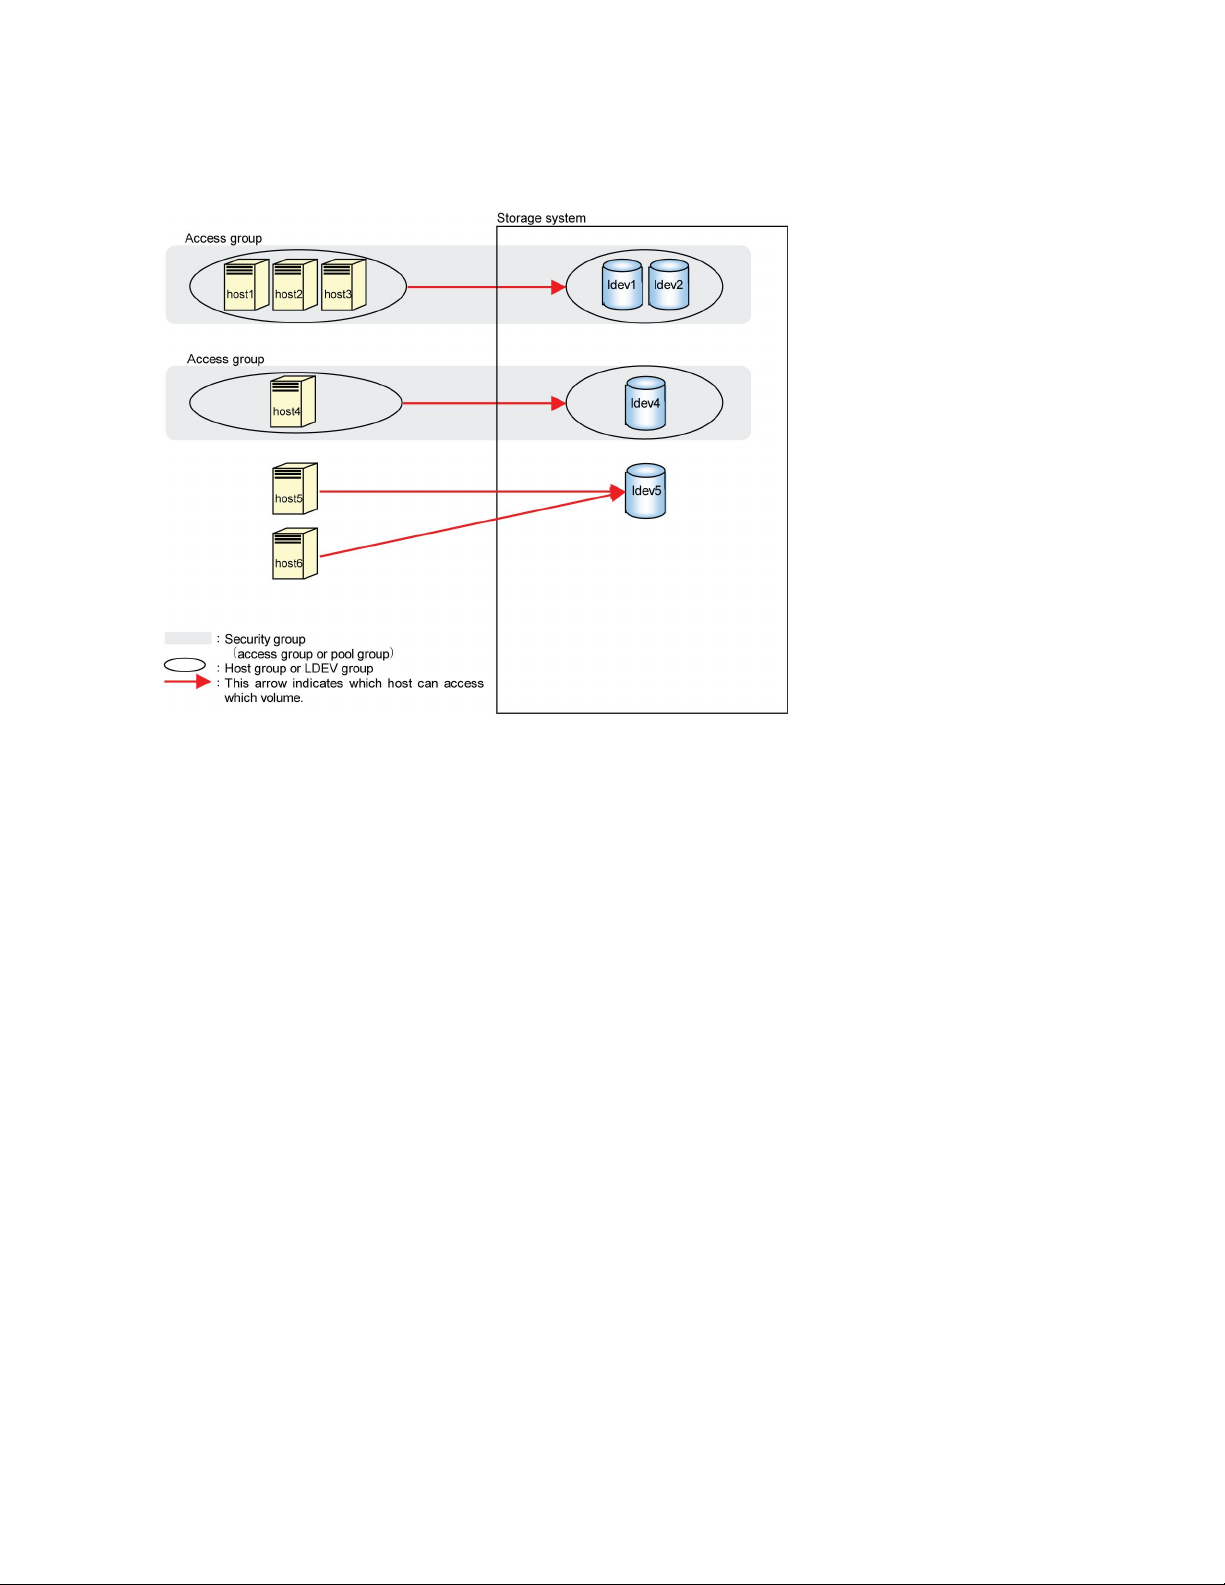
• The volume ldev4 is accessible only from host4 because ldev4 and host4 are registered in the
same access group.
• The volume ldev5 does not belong to any access groups. For this reason, hosts in access groups
cannot access ldev5. ldev5 is only accessible from host5 and host6, which are not registered in
access groups.
Figure 1 Security Example 1
Port-Level Security
Usually, hosts are connected to two or more ports via cables and have access to volumes via these
ports. In the security example in Figure 1, hosts in access groups can access volumes via every port
to which the hosts are connected.
Note, however, that Volume Security Port Option enables you to prohibit hosts from accessing volumes
via specified ports. For example, if a host named host1 is connected to two ports port1 and port2,
you can permit the host to access volumes via port1 and prohibit the host from accessing volumes via
port2.
Port-Level Security Implementation
To implement such port-level security, first you must determine ports via which hosts can access volumes,
and then you must register the ports in host groups. For example, if you register host1 and port1 in
the same host group named hg1 and then register hg1 in an access group, host1 can access volume
via port1 but cannot access volumes via port2.
In Figure 2, the following security settings are applied:
• The hosts host1, host2, and host3 can access the volumes ldev1 and ldev2 via port1, port2, and
port3. However, the hosts cannot access the volumes via other ports.
• The host host4 can access the volume ldev4 via port4. However, the host cannot access the volume
via other ports.
About Volume Security Operations10
Page 11

Figure 2 Security Example 2
If no ports are registered in a host group, hosts in the host group can access volumes via ports to
which the hosts are connected.
This manual uses the term port-level security, which is a security policy for enabling hosts to access
volumes only via ports registered in host groups and thus prohibiting hosts to access the volumes via
other ports.
CAUTION:
Before you apply security, you should confirm what hosts are performing I/O operations on volumes
in access groups. If any hosts perform I/O operations on volumes in access groups that the hosts do
not belong to, you will need to stop the I/O operations before you apply security. For example, if
you attempt to apply security settings illustrated in Figure 2, an error occurs and the attempt fails if
host4
and
host5
to ensure that
are performing I/O operations on
host4
and
host5
are not performing I/O operations on
ldev1
Prohibiting All Hosts from Accessing Volumes
To prevent all the mainframe hosts from accessing volumes, you must register the volumes in a pool
group (Note that you do not need to register hosts in pool groups). For example, if you register two
. To apply the security settings, you will need
ldev1
.
XP24000/XP20000 Volume Security User's Guide 11
Page 12

volumes (vol_A and vol_B) in a pool group, all the mainframe hosts connected to your storage system
will be unable to access vol_A and vol_B. To register volumes in a pool group, you must create an
LDEV group, register the volumes in the LDEV group, and then register the LDEV group in the desired
pool group. Any pool group can only contain one LDEV group.
In Figure 3, a pool group is created. Volumes in this pool group (that is, ldev7, ldev8, and ldev9) are
inaccessible from all the hosts:
Figure 3 Security Example 3
Protecting Volumes from Erroneous Copy Operations
When storage system copy software (TrueCopy for Mainframe, Universal Replicator for Mainframe,
ShadowImage for Mainframe, and HP StorageWorks XP for FlashCopy Mirroring Software or XP for
FlashCopy Mirroring V2 Software) is used to perform copy operations, data will be overwritten onto
the secondary volumes (that is, the copy destination volumes). If a volume containing important data
is specified as a secondary volume (that is, the copy destination volume) by mistake, storage system
copy software operations can overwrite important data on the volume and you could suffer loss of
important data.
Volume Security enables you to avoid such loss of data. If a volume contains data that should not be
overwritten, you can prevent the volume from being used as a secondary volume (that is, the copy
destination volume).
Secondary volumes (that is, copy destination volumes) are often referred to as remote volumes or
R-VOLs in the Hitachi TrueCopy™ for Mainframe User's Guide. Also, secondary volumes are referred
to as target volumes or T-VOLs in the Hitachi ShadowImage™ for Mainframe User's Guide.
Warnings Regarding Volume Security
Do not apply security to volumes on which any job is running. If you apply security to such a volume,
the job will possibly end abnormally.
About Volume Security Operations12
Page 13

When applying security, make sure that your security settings are correct. If incorrect security settings
are made, the system will be difficult or impossible to control.
If the CPU of a mainframe host is upgraded after you apply security settings, you must execute the
system command D M=CPU at the mainframe host to obtain the latest information about the host.
Next, you must use the latest information to update host information in the Add/Change Host dialog
box (for details, see “The Add/Change Host Dialog Box” on page 27).
If you do not update host information, the system will be impossible to control.
• If you are using storage system copy software (TrueCopy for Mainframe, Universal Replicator for
Mainframe, ShadowImage for Mainframe, and XP for FlashCopy Mirroring or XP for FlashCopy
Mirroring V2): When you use Volume Security to make security settings, you must register the
primary volume and the secondary volume (that is, the copy source volume and the copy destination
volume) in the same LDEV group. For details on how to register volumes in LDEV groups, see
“Registering Volumes in an LDEV Group” on page 51 or
“Registering Volumes in an LDEV Group” on page 54.
If you apply security to a primary volume (that is, copy source volume) of a pair of storage system
copy software, some or all mainframe hosts might become unable to read from and write to the
primary volume. However, the copy operation will be performed normally; data will be copied
from the primary volume to the secondary volume.
If you register a primary volume or secondary volume in a security group and then make a setting
for preventing the volume from being used as a secondary volume, this setting will take effect after
the pair is split.
Mainframe hosts cannot access volumes in pool groups. If a volume in a pool group is specified
as a primary volume, the pair creation command might fail.
In the Hitachi TrueCopy™ for Mainframe User's Guide, primary volumes (that is, copy source
volumes) are often referred to as M-VOLs or main volumes. Also, secondary volumes (that is, copy
destination volumes) are often referred to as R-VOLs or remote volumes.
In the Hitachi ShadowImage™ for Mainframe User's Guide, primary volumes (that is, copy source
volumes) are often referred to as S-VOLs or source volumes. Also, secondary volumes (that is, copy
destination volumes) are often referred to as T-VOLs or target volumes.
• If you are using Virtual LVI/LUN (VLL) volumes:If you apply security to a VLL volume, you will be
unable to change the VLL settings on the volume. To change the VLL settings, you must use Volume
Security to disable security on the VLL volume. For details on how to disable security, see
“Disabling Volume Security” on page 58.
• If you are using HP StorageWorks XP for Compatible Parallel Access Volumes Software: If you
apply security to a Parallel Access Volumes base volume, the security settings will also apply to
the corresponding alias volume.
• Removing secured volumes:If you apply security to a volume, you will be unable to remove the
volume. To remove the volume, you must disable security on the volume. For details on how to
disable security, see “Disabling Volume Security” on page 58.
• Removing PCBs with secured ports: If port-level security is applied to your storage system, you
cannot remove the PCBs (printed circuit boards) that include secured ports. To remove PCBs that
include secured ports, you must use Volume Security Port Option to disable security on the ports.
For details on how to disable security, see “Deleting Ports from Host Groups” on page 63.
Supported Volume Emulation Types
• Volume emulation types (that is, device emulation types): Volume Security supports the following
volume emulation types:
• 3380-3, 3380-3A, 3380-3B, 3380-3C
• 3390-3, 3390-3A, 3390-3B, 3390-3C, 3390-3R
XP24000/XP20000 Volume Security User's Guide 13
Page 14

• 3390-9, 3390-9A, 3390-9B, 3390-9C
• 3390-L, 3390-LA, 3390-LB, 3390-LC
• 3390-M, 3390-MA, 3390-MB, 3390-MC
• PCB types: Volume Security supports the following PCB types:
• ESCON or ACONARC
• FICON or FIBARC
Maximum Possible Number of Groups
Volume Security enables you to create up to 128 security groups per storage system, and up to 64
security groups per LDKC. Security groups are classified into access groups and pool groups:
• One access group can contain only one host group and one LDEV group. One host group can
contain up to 32 hosts. One LDEV group can contain up to 65,280 volumes.
• One pool group can contain only one LDEV group. One LDEV group can contain up to 65,280
volumes.
The maximum possible number of host groups is 128 per storage system, and 64 per LDKC.
The maximum possible number of LDEV groups is 128 per storage system, and 64 per LDKC.
Maximum Possible Number of Hosts and Volumes
Volume Security allows you to manipulate up to 128 hosts for storage system, and up to 64 hosts per
LDKC. Volume Security enables you to manipulate up to 130,560 volumes per storage system, and
up to 65,280 volumes per LDKC.
About Volume Security Operations14
Page 15

3 Using the Volume Security GUI
This chapter explains Volume Security window and dialog boxes.
The Volume Security Window
The Volume Security window (Figure 4) appears when you start Volume Security. This window is the
starting point for all the Volume Security operations.
To start the Volume Security software:
1. Log on to the disk array to open the Remote Web Console main window. For details, see the HP
StorageWorks XP24000/XP20000 Remote Web Console User’s Guide.
2. Click Go, Mainframe Connection, and then select Volume Security on the menu bar of the Remote
Web Console main window.
• To make security settings and apply the settings, you must use a user account that has the write
permission (For example, the Administrator account). If you use a user account that does not have
the write permission, you will be able to view security settings but will neither be able to make
security settings nor apply security settings.
• To set security using Volume Security, you must make sure that Remote Web Console is in Modify
mode. For detailed information on how to do this, see the HP StorageWorks XP24000/XP20000
Remote Web Console User’s Guide.
Figure 4 shows the Volume Security window when a Security Group belonging to an LDKC is selected.
XP24000/XP20000 Volume Security User's Guide 15
Page 16

Figure 4 The Volume Security Window
DescriptionItem
Security Group tree
Hosts table
CU list
LDEVs table
Apply
Cancel
Displays the security, host, and LDEV groups assigned to each LDKC defined on the
storage system. For details see “Security Group Tree ” on page 16.
Displays the type, model, SEQNUMBER, Logical Partition (LPAR) and vendor of each
host. For details, see “Hosts Table” on page 18.
Allows you to select the desired command unit(s) available in each group. When you
select a CU image, the table below shows a list of volumes in the selected CU image
Shows the LDEV, emulation, and attribute information assigned to each logical device
on the storage system. For details, see “LDEVs Table ” on page 19.
Applies the requested XRC setting changes to the storage system. Any change made to
a volume appears in blue italics until you click Apply.
Discards the requested changes without applying them to the storage system. A confirmation message appears to allow you to cancel the requested operation(s). Click OK on
the confirmation message to cancel the requested operation(s), or click Cancel to keep
(but not start) the requested operation(s).
Security Group Tree
Figure 5 shows the Security Group tree where you can select the LDKC (logical disk controller), and
then choose a security group, host group, or LDEV group residing on that LDKC.
When you double-click LDKC:00 or LDKC:01, you can display a list of security groups, host groups,
and LDEV groups in that LDKC. Once you have selected the LDCK you can choose from these options:
Using the Volume Security GUI16
Page 17

• Double-click Security Group and a list of security groups appears. Then select a host group or
LDEV group in that security group.
• Double-click Host Group and a list of host groups appears. Then select a specific host group.
• Double-click LDEV Group. The tree view shows the host group and/or LDEV group registered in
the security group.
Figure 5 Security Group Tree
DescriptionIcon
Indicates an access group whose volumes can be used as secondary volumes (i.e., copy
destination volumes) for copy operations.
Indicates an access group whose volumes cannot be used as secondary volumes (i.e., copy
destination volumes) for copy operations.
Indicates a pool group whose volumes can be used as secondary volumes (i.e., copy destination volumes) for copy operations.
Indicates a pool group whose volumes cannot be used as secondary volumes (i.e., copy
destination volumes) for copy operations.
XP24000/XP20000 Volume Security User's Guide 17
Page 18
DescriptionIcon
Indicates that the security settings in this security group are currently disabled. If you enable
the security settings, this security group is classified as an access group. Also, volumes in
this security group can be used as secondary volumes (i.e., copy destination volumes) for
copy operations.
Indicates that the security settings in this security group are currently disabled. If you enable
the security settings, this security group will be classified as an access group. Also, volumes
in this security group are unavailable for use as secondary volumes (i.e., copy destination
volumes) for copy operations.
Indicates that the security settings in this security group are currently disabled. If you enable
the security settings, this security group will be classified as a pool group. Also, volumes in
this security group will be available for use as secondary volumes (i.e., copy destination
volumes) for copy operations.
Indicates that the security settings in this security group are currently disabled. If you enable
the security settings, this security group will be classified as a pool group. Also, volumes in
this security group will be unavailable for use as secondary volumes (i.e., copy destination
volumes) for copy operations.
To make changes to a group, right-click a group or the group entry in the tree, then select Add/Change
from the pop-up menu. Changes you make in the resulting dialog box appear in blue italics until you
click Apply or Cancel.
NOTE:
If you make Volume Security settings on one LDKC and then move on to another LDKC, click Apply
or Cancel before moving on to the LDKC.
Hosts Table
This table provides information about hosts. The table contents depend on the selection in the Security
Group tree, as explained below:
• If you select Subsystem, LDKC:00, LDKC:01, Security Group, Host Group, or LDEV Group, the table
shows information about all the hosts.
• If you select a security group, the table shows information about all the hosts that belong to the
selected security group.
• If you select a host group, the table shows information about all the hosts that belong to the selected
host group.
• If you select an LDEV group, the table displays nothing.
Using the Volume Security GUI18
Page 19
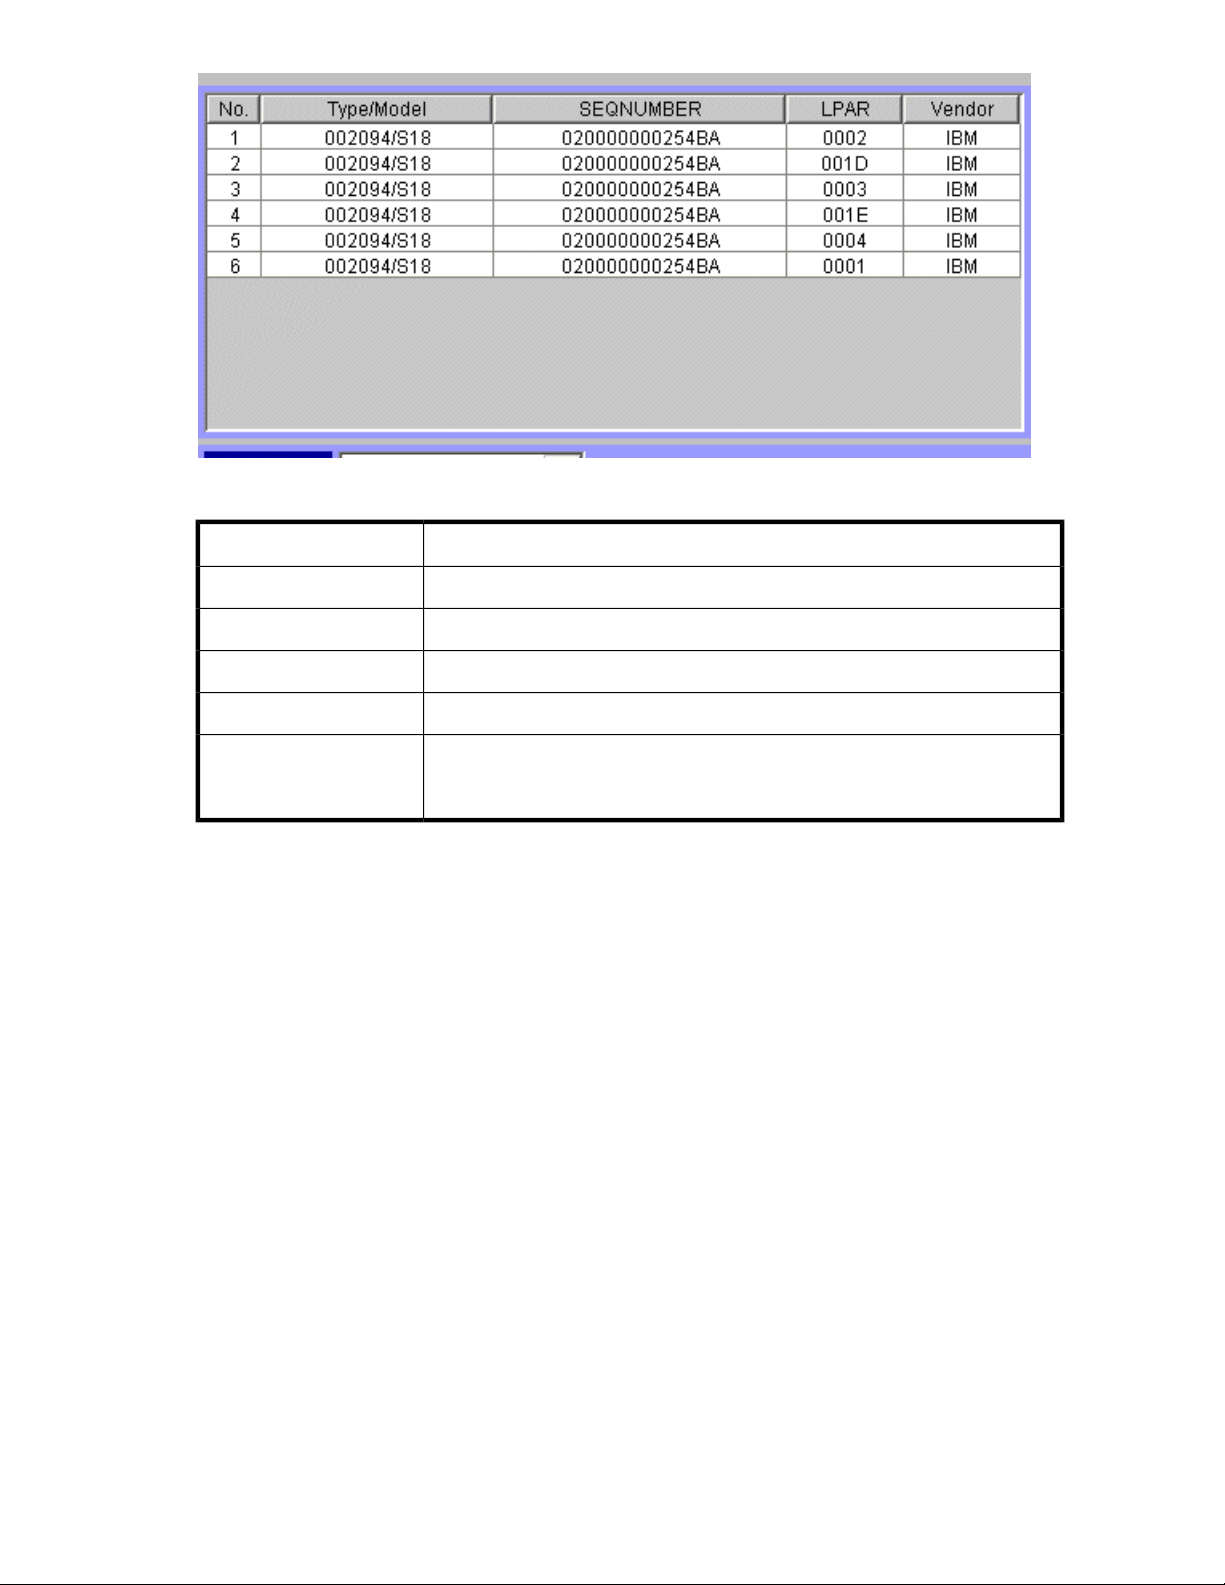
Figure 6 Hosts Table
Vendor
If you make any change to a host, the host appears in blue italics. When you click Apply or Cancel,
the host is restored to its original typeface and color.
The Reports Display dialog boxes in Remote Web Console also show information about hosts. For
details, see the HP StorageWorks XP24000/XP20000 Remote Web Console User’s Guide.
LDEVs Table
Figure 7 provides information about volumes. The information available depends on the selection in
the Security Group tree:
• If you select Subsystem, Security Group, Host Group, or LDEV Group, the table provides information
about all the volumes that are accessible from the mainframe hosts.
• If you select a security group, the table provides information about all the volumes that belong to
the selected security group.
• If you select an LDEV group, the table provides information about all the volumes that belong to
the selected LDEV group.
• If you select a host group, the table displays nothing.
DescriptionColumn
A sequential number associated with a host (or channel extender).No.
Type and model number of a host (or a channel extender).Type/Model
Node ID of a host (or a channel extender).SEQNUMBER
The logical partition number of a host.LPAR
The host vendor. Vendors include FJT (Fujitsu), IBM, HTC (Hitachi), and CNT(Ex).
If CNT(Ex) appears, the table row indicates the type, model number, and node
ID of a channel extender.
XP24000/XP20000 Volume Security User's Guide 19
Page 20

Figure 7 LDEV table
LDEV
DescriptionColumn
The volume ID (in hexadecimal from 00 to FF)
NOTE:
A volume ID ending in # (for example, 00#) indicates , the volume is an external
volume.
Emulation
Attribute
The emulation type of the volume
The volume status:
• An asterisk (*) denotes a secondary volume (copy destination) for USP V/VM
copy software.
• A plus symbol (+) denotes that one or more LU paths are assigned to the volume.
The Add/Change Security Group Dialog Box
The Add/Change Security Group dialog box (Figure 8) appears when you right-click a security group
or the Security Group entry in the tree view of the Volume Security window (Figure 4) and then select
Add/Change from the pop-up menu.
This dialog box enables you to:
• create a security group and classify the security group as an access group or a pool group (sees
“Creating a Security Group for Use As an Access Group” on page 52 and
“Creating a Security Group for Use As a Pool Group” on page 55)
• prevent data in volumes from being overwritten by copy operations (see
“Protecting Volumes from Copy Operations” on page 57)
• disable security settings (see “Disabling Volume Security” on page 58)
• rename security groups (see “Renaming Security Groups” on page 60)
• delete security groups (see “Deleting Security Groups” on page 61)
Using the Volume Security GUI20
Page 21

Figure 8 The Add/Change Security Group Dialog Box
DescriptionItem
LDKC
Security
Group List
Indicates the selected LDKC number.
Descriptive information about the security groups in the LDKC.
• Security indicates whether the security settings in the security group are Enabled or Disabled.
CAUTION:
It is possible that security settings are disabled even if Enabled is displayed. If the Status
is Access and the security group contains neither a host nor an LDEV group, security
settings in the security group are disabled unconditionally.
• Group Status indicates whether the security group is an Access or a Pool group. If Access
appears, the security group is an access group; volumes in the group can be accessed only
by hosts registered in the same group. If Pool appears, the security group is a pool group;
volumes in the group cannot be accessed by any hosts.
• T-VOL/R-VOL indicates whether volumes in the security group can be used as secondary
volumes (i.e., copy destination volume). Enable indicates the volumes can be used as secondary volumes. Disable indicates the volumes cannot be used as secondary volumes.
NOTE:
Secondary volumes (that is, copy destination volumes) are often referred to as
remote volumes or R-VOLs in the
Also, secondary volumes are referred to as target volumes or T-VOLs in the
ShadowImage™ for Mainframe User's Guide
Hitachi TrueCopy™ for Mainframe User's Guide
Hitachi
.
.
XP24000/XP20000 Volume Security User's Guide 21
Page 22

Enter Security Group
Security
DescriptionItem
When creating a new security group, you enter the name of the security group in this Enter
Security Group text box. When renaming an existing security group, you select the security group
in the Security Group List table and then enter a new name.
The following conventions apply to security group names:
• Up to eight characters can be used.
• Characters are case-sensitive.
• The following characters cannot be used:
\ , / : ; * ? " < > |
• The first character and the last character must not be a space.
Select to make no changes, enable, or disable security settings. The default is Enable.
• No Change does not change the security status of the security groups selected in the Security
Group List table. For example, if you select a security-enabled group and a security-disabled
group in the table, Disable disables security settings in both groups, but No Change does not
change the current security status for both groups (The former remains security-enabled and
the latter remains security-disabled).
• Enable enables the security settings that are made in the security groups selected in the Se-
curity Group List table.
CAUTION:
It is possible that security settings are disabled even if Enable is selected. If Access is
selected in the Group Status box (see below) and the security group contains neither
a host group nor an LDEV group, security settings in the security group are disabled
unconditionally.
Group
Status
T-VOL/RVOL
• Disable disables the security settings that are made in the security groups selected in the Se-
curity Group List table.
Sets a selected security group as access groups or pool groups. The default is Access.
• No Change does not change the group status of the security groups selected in the Security
Group List table. For example, if you select one access group and one pool group, Access
changes the two groups into access groups, but No Change does not change the two groups
(The former remains an access group and the latter remains a pool group).
• Access specifies the selected security groups as access groups. Volumes in an access group
can only be accessed by hosts registered in the same access group but cannot be accessed
by other hosts.
• Pool specifies the selected security groups as pool groups. Volumes in a pool group cannot
be accessed by any hosts.
Specifies whether volumes in the security group can be used a secondary volumes (i.e., copy
destination volumes). The default is Enable.
• No Change does not change the secondary volume settings of the security groups selected
in the Security Group List table. For example, if volumes in one of the selected security groups
are usable as copy destinations, but volumes in the other security group are unusable, Enable
makes volumes in both groups usable as destinations. However, No Change does not change
volumes in both groups (The former remains usable, and the latter remains unusable).
• Enable makes volumes in the selected security groups usable as secondary volumes (copy
destinations).
• Disable makes volumes in the selected security groups unusable as secondary volumes (copy
destinations).
Add
Enter the name of a new security group and click Add. Then the new security group is added to
the Security Group List table.
Using the Volume Security GUI22
Page 23

DescriptionItem
Change
OK
When settings of the selected security groups are changed, click Change to make the changes
appear in the Security Group List table.
Applies settings in the Add/Change Security Group dialog box to the Volume Security window,
and then closes the dialog box.
CAUTION:
Clicking OK applies the settings to the Volume Security window, but does not apply the
settings to the storage system. To apply the security settings to the subsystem, you must
continue to click Apply in the Volume Security window until they appear in the dialog
box.
Discards settings in the Add/Change Security Group dialog box and closes the dialog boxCancel
The Add/Change Host Group Dialog Box
The Add/Change Host Group dialog box (Figure 9) appears when you right-click a host group or
the Host Group entry in the tree view of the Volume Security window (Figure 4) and then select
Add/Change from the pop-up menu.
This dialog box enables you to:
• create host groups (see “Creating a Host Group” on page 47)
• rename host groups (see “Renaming Host Groups” on page 64)
• delete host groups (see “Deleting Host Groups” on page 65)
XP24000/XP20000 Volume Security User's Guide 23
Page 24

Figure 9 The Add/Change Host Group Dialog Box
DescriptionItem
Indicates the selected LDKC number.LDKC
A list of host groups in the LDKC.Host Group List
When creating a new host group, you enter the name of the host group in this Enter Host
Group text box. When renaming an existing host group, you select the host group in the
Host Group List table and then enter a new name.
The following conventions apply to host group names:
Enter Host Group
• Up to eight characters can be used.
• Characters are case-sensitive.
• The following characters cannot be used:
\ , / : ; * ? " < > |
• The first character and the last character must not be a space.
Add
Change
Enter the name of a new host group, click Add, and the new security group is added to
the Host Group List table.
When settings of the selected host groups are changed, click Change to make the changes
appear in the Host Group List table.
Using the Volume Security GUI24
Page 25

DescriptionItem
This button applies settings in the Add/Change Host Group dialog box to the Volume
Security window, and then closes the Add/Change Host Group dialog box.
OK
CAUTION:
The OK button applies the settings to the Volume Security window, but does
apply the settings to the storage system. To apply the settings to the subsystem, you
must continue to click Apply in the Volume Security window.
Discards settings in the Add/Change Host Group dialog box and closes the dialog boxCancel
The Add/Change LDEV Group Dialog Box
The Add/Change LDEV Group dialog box (Figure 10) appears when you right-click an LDEV group
or the LDEV Group entry in the tree view of the Volume Security window (Figure 4) and then select
Add/Change from the pop-up menu.
This dialog box enables you to:
• create LDEV groups (see “Creating an LDEV Group” on page 50 or
“Creating an LDEV Group” on page 53)
• rename LDEV groups (see “Renaming LDEV Groups” on page 66)
• delete LDEV groups (see “Deleting LDEV Groups” on page 67)
not
XP24000/XP20000 Volume Security User's Guide 25
Page 26

Figure 10 The Add/Change LDEV Group Dialog Box
DescriptionItem
Indicates the number of the selected LDKC.LDKC
A list of LDEV groups in the LDKC.LDEV Group List
When creating a new LDEV group, you enter the name of the LDEV group in this Enter
LDEV Group text box. When renaming an existing LDEV group, you select the LDEV group
in the LDEV Group List table and then enter a new name.
The following conventions apply to LDEV group names:
Enter LDEV Group
• Up to eight characters can be used.
• Characters are case-sensitive.
• The following characters cannot be used:
\ , / : ; * ? " < > |
• The first character and the last character must not be a space.
Add
Change
Enter the name of a new LDEV group and click Add. Then the new LDEV group is added
to the LDEV Groups List table.
When settings of the selected LDEV groups are changed, click Change to make the changes
appear in the LDEV Groups List table.
Using the Volume Security GUI26
Page 27

DescriptionItem
This button applies settings in the Add/Change LDEV Group dialog box to the Volume
Security window, and then closes the Add/Change LDEV Group dialog box.
OK
CAUTION:
The OK button applies the settings to the Volume Security window, but does
apply the settings to the storage system. To apply the settings to the subsystem, you
must continue to click Apply in the Volume Security window.
Discards settings in the Add/Change LDEV Group dialog box and closes the dialog boxCancel
The Add/Change Host Dialog Box
The Add/Change Host dialog box (Figure 11) appears when you right-click a host group in the tree
view of the Volume Security window (Figure 4) and select Specify and then Host from the pop-up
menu.
This dialog box enables you to:
• register hosts attached to the storage system in host groups (see
“Registering Hosts in a Host Group” on page 48)
• register hosts unattached to the storage system in host groups (see
“Registering Hosts to be Attached to the Storage System” on page 61)
• delete hosts from host groups (see “Deleting Hosts from Host Groups” on page 62)
not
Figure 11 The Add/Change Host Dialog Box
DescriptionItem
Indicates number of the selected LDKC.LDKC
XP24000/XP20000 Volume Security User's Guide 27
Page 28

DescriptionItem
Host Group
List
Host table
Specify the name of the host group in which hosts will be registered.
Host information.
• No. A sequential number associated with a host.
NOTE:
Each table row usually shows information about a host. However, if a host is
attached to the storage system via a channel extender, the table row shows
information about the channel extender.
• Type/Model indicates the type and the model number of a host (or a channel extender).
The type appears on the left of the slash (/). The model number appears on the right of
the slash. The following explains the meaning of icons in this column:
The host is registered in the current host group (which
is displayed above the table), and is attached to the
storage system via a cable.
The host is registered in the current host group, and is
not attached to the storage system.
The host is registered in another host group (though
the host can be registered in the current host group).
The host is attached to the storage system via a cable.
Add/Change
Hosts table
The host is registered in another host group (though
the host can be registered in the current host group).
The host is not attached to the storage system.
No icon
• SEQNUMBER indicates the node ID of a host (or a channel extender).
• LPAR indicates the logical partition number of a host. Logical partitions are virtual systems
created as a result of sectioning a computer's memory into separate units.
• Vendor indicates the vendor of a host. This column can display FJT (Fujitsu), IBM, and HTC
(HP). This column can also display CNT(Ex); if CNT(Ex) is displayed, the Type/Model column
indicates the type and the model number of a channel extender, and the SEQNUMBER
column indicates the node ID of the channel extender.
Host group information.
• Type/Mode indicates the type and the model number of a host (or a channel extender).
• SEQNUMBER indicates the node ID of a host (or a channel extender).
• LPAR indicates the logical partition number of a host.
• Vendor indicates the vendor of a host. Vendors include FJT (Fujitsu), IBM, HTC (Hitachi)
and CNT(Ex) for channel extender.
The host is not registered in any host group. The host
is attached to the storage system via a cable.
Using the Volume Security GUI28
Page 29

DescriptionItem
Applies settings in the Add/Change Host dialog box to the Volume Security window, and
then closes the dialog box.
CAUTION:
OK
Clicking OK applies the settings to the Volume Security window, but does not apply the
settings to the storage system. To apply the security settings to the storage system, you
must continue to click Apply in the Volume Security window until they appear in the
dialog box.
Discards settings in the Add/Change Host dialog box and closes the dialog boxCancel
The Select LDEV Dialog Box
The Select LDEV dialog box (Figure 12) appears when you right-click an LDEV group in the tree view
of the Volume Security window (Figure 4), select Specify and then LDEV from the pop-up menu.
This dialog box enables you to:
• register volumes (LDEVs) in an LDEV group (see “Registering Volumes in an LDEV Group” on page
51 or “Registering Volumes in an LDEV Group” on page 54)
• delete volumes from an LDEV group (see “Deleting Volumes from LDEV Groups” on page 65)
Figure 12 The Select LDEV Dialog Box
DescriptionItem
Indicates the number of the selected LDKCLDKC
Specifies the name of the LDEV in which the volumes are registered.LDEV Group
CU
Selects the number of the logical CU image. The two tables below this list provide information about the volumes in the selected CU image.
XP24000/XP20000 Volume Security User's Guide 29
Page 30

Registered in LDEV
Group table
Not Registered in
LDEV Group table
DescriptionItem
Lists volumes registered in the LDEV group. One table row indicates one volume.
• The LDEV column indicates LDEV numbers.
NOTE:
If a volume ID is displayed with a pound sign (for example, 00#), the volume
is an external volume.
• The Emulation column indicates emulation types of volumes. If an asterisk (*) appears
in the cell on the right, the volume is a secondary volume (that is, copy destination
volume for copy operations) or an ShadowImage for Mainframe reserved volume.
If a plus symbol appears in the cell on the right, one or more LU paths are assigned
to the volume.
Lists volumes that not registered in the LDEV groups. One table row indicates one volume.
• LDEV displays the LDEV numbers.
• The Emulation column indicates emulation types of volumes.
• Select All selects all volumes in the table.
Regist
Not Regist
Registers volumes in the LDEV group. Select volumes in Not Registered in LDEV group
and then click this button to move the selected volumes to Registered in LDEV group.
Deletes volumes from the LDEV group. Select volumes in Registered in LDEV group and
then click this button to move the selected volumes to Not registered in LDEV group.
Applies settings in the Select LDEV dialog box to the Volume Security window and closes
dialog box.
CAUTION:
OK
Clicking OK applies the settings to the Volume Security window, but does not
apply the settings to the storage system. To apply the security settings to the
subsystem, you must continue to click Apply in the Volume Security window until
they appear in the dialog box.
Discards settings in the Select LDEV dialog box and closes the boxCancel
The Select Port Dialog Box
To use the Select Port dialog box, you must ensure that Volume Security Port Option is already installed.
The Select Port dialog box (Figure 13) appears when you right-click a host group in the tree view of
the Volume Security window (Figure 4) and then select Specify -> Port from the pop-up menu. The
Select Port dialog box enables you to register ports in the specified host group (see
“Registering Ports in a Host Group” on page 49).
Using the Volume Security GUI30
Page 31

Figure 13 The Select Port Dialog Box
DescriptionItem
Indicates the number of the selected LDKCLDKC
Specifies a host group in which ports will be registered.Host Group
Shows the registered ports in the host group:
• LDEV displays the LDEV numbers.
NOTE:
Registered Port
table
When the dialog box opens for the first time, the Port list does not display
ports. This means that hosts in the host group can access volumes via every
port displayed in the Port list in the Unregistered port box.
• Select All selects all ports in the Port list.
Lists ports that not registered.
Unregistered Port
table
• The Port list lists ports that are not registered in the host group. When the dialog box
is displayed for the first time, the Port list shows all ports on the disk subsystem.
• Select All selects all ports in the Port list.
Regist
Not Regist
Registers ports in the host group. If you select ports in the Unregistered port table and
then click this button, the selected ports are moved to the Port list under Registered port.
Deletes registered ports from the host group. If you select a port in the Registered port
table and then click this button, the selected port(s) are moved to Unregistered port table.
XP24000/XP20000 Volume Security User's Guide 31
Page 32

DescriptionItem
Applies settings in the Select Port dialog box to the Volume Security window, and then
closes the Select Port dialog box.
CAUTION:
OK
Clicking OK applies the settings to the Volume Security window, but does not apply
the settings to the storage system. To apply the security settings to the subsystem,
you must continue to click Apply in the Volume Security window until they appear
in the dialog box.
Discards settings in the Select Port dialog box, and then closes the dialog box.Cancel
The Specify Security Group Dialog Box
The Specify Security Group dialog box (Figure 14) appears when you right-click an LDKC or a security
group in the tree view of the Volume Security window (Figure 4), select Specify and then Security
Group from the pop-up menu.
This dialog box enables you to register a host group and an LDEV group in a security group (see
“Registering a Host Group and an LDEV Group in a Security Group” on page 53).
Figure 14 The Specify Security Group Dialog Box
DescriptionItem
Indicates the number of the selected LDKC.LDKC
Select Security Group
Specifies the security group in which you want to register a host group and an LDEV
group.
Specifies a host group that you want to register in the security group.Host Group
Specifies an LDEV group that you want to register in the security group.LDEV Group
Applies settings in the Specify Security Group dialog box to the Volume Security
window and closes the dialog box.
CAUTION:
OK
Clicking OK applies the settings to the Volume Security window, but does not
apply the settings to the storage system. To apply the security settings to the
subsystem, you must continue to click Apply in the Volume Security window
until they appear in the dialog box.
Using the Volume Security GUI32
Page 33

DescriptionItem
Discards settings in the Specify Security Group dialog box and closes the dialog box.Cancel
The Host to Security Group Dialog Box
The Host to Security Group dialog box (Figure 15) appears when you do either of the following in
the Volume Security window (Figure 4):
• when you right-click a host from the upper-right table and then select Host to Security Group from
the pop-up menu.
• when you right-click an item in the tree view and then select List -> Host to Security Group from
the pop-up menu. The List -> Host to Security Group pop-up command does not display if you
double-click a security group and then right-click a host group or LDEV group from immediately
below the security group.
This dialog box enables you to specify a host and then displays security groups in which the host is
registered (see “Locating Security Groups that Contain a Specified Host” on page 44).
Figure 15 The Host to Security Group Dialog Box
DescriptionItem
Indicates the number of the selected LDKC.LDKC
XP24000/XP20000 Volume Security User's Guide 33
Page 34

Host
Security Group
table
DescriptionItem
Provides information about a host, where the number groups, from left to right, indicate:
• First: The Type/Model the type and model number of a host (or a channel extender).
• Second: The Node ID of a host (or a channel extender).
• Third: The Logical Partition Number of the host.
• Fourth: The vendor of the host. Vendors include: FJT (Fujitsu), IBM, HTC (Hitachi), and
CNT(Ex). If CNT(Ex) appears, the table row indicates the type, model number, and
node ID of a channel extender.
Specifies a host group that you want to register in the security group.Host Group
Lists security groups in which the specified host is registered.
• Security Group indicates the name of a security group.
• Security indicates whether the security settings in the security group are enabled or
disabled.
• Group Status indicates whether the security group is an access group or a pool group.
• T-VOL/R-VOL indicates whether volumes in the security group can be used as secondary
volumes (i.e., copy destination volume). Enable indicates the volumes can be used as
secondary volumes. Disable indicates the volumes cannot be used as secondary volumes.
Closes the dialog box.OK
The Host to LDEV Dialog Box
The Host to LDEV dialog box (Figure 16) appears when you do either of the following in the Volume
Security window (Figure 4):
• when you right-click a host from the upper-right table and then select Host to LDEV from the pop-
up menu.
• when you right-click an item in the tree view and then select List -> Host to LDEV from the pop-up
menu. The List -> Host to LDEV pop-up command does not display if you double-click a security
group and then right-click a host group or LDEV group from immediately below the security group.
This dialog box enables you to specify a host and then displays volumes in the security group in which
the host is registered (see
“Locating Volumes in a Security Group that Contains a Specified Host” on page 44).
Using the Volume Security GUI34
Page 35

Figure 16 The Host to LDEV Dialog Box
DescriptionItem
Indicates the number of the selected LDKCLDKC
Provides information about a host, where the number groups, from left to right, indicate:
• First: The Type/Model the type and model number of a host (or a channel extender).
• Second: The Node ID of a host (or a channel extender).
Host
LDEV table
• Third: The Logical Partition Number of the host.
• Fourth: The vendor of the host. Vendors include FJT (Fujitsu), IBM, HTC (Hitachi), and
CNT(Ex). If CNT(Ex) appears, the table row indicates the type, model number, and node
ID of a channel extender.
Specifies a CU image number.CU
Lists host groups in which the specified CU is registered.
• LDEV indicates the name of an LDEV. A volume ID ending in # (for example, 00#) indic-
ates the volume is an external volume.
• Emulation indicates the emulation types of volumes.
Closes the dialog box.OK
Host Group to Security Group Dialog Box
The Host Group to Security Group (Figure 17) appears when you right-click an item in the tree view
of the Volume Security window (Figure 4) and then select List -> Host Group to Security Group from
the pop-up menu.
The List -> Host Group to Security Group pop-up command does not display if you double-click
a security group and then right-click a host group or LDEV group from immediately below the
security group.
This dialog box enables you to specify a host group and then displays security groups in which the
specified host group is registered (see “Locating Security Groups that Contain a Specified Host
Group” on page 46).
XP24000/XP20000 Volume Security User's Guide 35
Page 36

Figure 17 The Host Group to Security Group Dialog Box
DescriptionItem
Indicates the number of the selected LDKCLDKC
Specifies a host group.Host Group
Lists information about the security groups in which the specified host group is registered.
• Security Group indicates the name of a security group.
• Security indicates whether the security settings in the security group are enabled or
disabled.
Security Group table
• Group Status indicates whether the security group is an access group or a pool
group.
• T-VOL/R-VOL indicates whether volumes in the security group can be used as sec-
ondary volumes (i.e., copy destination volume). Enable indicates the volumes can
be used as secondary volumes. Disable indicates the volumes cannot be used as
secondary volumes.
Closes the dialog box.OK
The Host Group to Port Dialog Box
To use the Host Group to Port dialog box, you must ensure that Volume Security Port Option is already
installed.
The Host Group to Port dialog box (Figure 18) appears when you right-click an item in the tree view
of the Volume Security window (Figure 4) and then select List -> Host Group to Port from the pop-up
menu. The Host Group to Port dialog box enables you to find ports via which hosts can access volumes
(see “Locating Ports through Which Hosts Can Access Volumes” on page 45).
Using the Volume Security GUI36
Page 37

Figure 18 The Host Group to Port Dialog Box
DescriptionItem
Indicates the number of the selected LDKC.LDKC
Provides information about a host group, where the number groups, from left to right,
indicate:
• First: The Type/Model the type and model number of a host (or a channel extender).
Host Group
• Second: The Node ID of a host (or a channel extender).
• Third: The Logical Partition Number of the host.
• Fourth: The vendor of the host. Vendors include FJT (Fujitsu), IBM, HTC (Hitachi), and
CNT(Ex). If CNT(Ex) appears, the table row indicates the type, model number, and
node ID of a channel extender.
Lists ports that are available and registered.Port table
Closes the dialog box.OK
The LDEV to Security Group Dialog Box
The LDEV to Security Group dialog box (Figure 19) appears when you do either of the following in
the Volume Security window (Figure 4):
• when you right-click a volume from the lower right table and then select LDEV to Security Group
from the pop-up menu.
• when you right-click an item in the tree view and then select List -> LDEV to Security Group from
the pop-up menu. The List -> LDEV to Security Group pop-up command does not display if you
double-click a security group and then right-click a host group or LDEV group from immediately
below the security group.
This dialog box enables you to specify a volume and then displays security groups in which the volume
is registered (see “Locating Security Groups that Contain a Specified Volume” on page 45).
XP24000/XP20000 Volume Security User's Guide 37
Page 38

Figure 19 The LDEV to Security Group Dialog Box
DescriptionItem
Indicates the number of the selected LDKC.LDKC
Specifies a CU image number.CU
Describes the available LDEVs:
• LDEV indicates a number assigned to the LDEV.
• Emulation indicates the emulation types of the volume.
LDEV table
NOTE:
A volume ID ending in # (for example, 00#) indicates the volume is an
external volume.
Lists security groups in which the specified volume is registered:
• Security Group indicates the name of a security group.
• Security indicates whether the security settings in the security group are enabled or
Security Group
table
disabled.
• Group Status indicates whether the security group is an access group or a pool group.
• T-VOL/R-VOL indicates whether volumes in the security group can be used as second-
ary volumes (i.e., copy destination volume). Enable indicates the volumes can be used
as secondary volumes. Disable indicates the volumes cannot be used as secondary
volumes.
Closes the dialog box.OK
The LDEV to Host Dialog Box
The LDEV to Host dialog box (Figure 20) appears when you do either of the following in the Volume
Security window (Figure 4):
• when you right-click a volume from the lower right table and then select LDEV to Host from the
pop-up menu.
Using the Volume Security GUI38
Page 39

• when you right-click an item in the tree view and then select List -> LDEV to Host from the pop-up
menu. The List ->LDEV to Host pop-up command does not display if you double-click a security
group and then right-click a host group or LDEV group from immediately below the security group.
This dialog box enables you to specify a volume and then displays hosts in the security group in which
the specified volume is registered (see
“Locating Hosts in a Security Group that Contains a Specified Volume” on page 46).
Figure 20 The LDEV to Host Dialog Box
LDEV table
DescriptionItem
Indicates the number of the selected LDKC.LDKC
Specifies a CU image number.CU
Describes the available LDEVs:
• LDEV indicates a number assigned to the LDEV.
• Emulation indicates the emulation types of the volume.
NOTE:
A volume ID ending in # (for example, 00#) indicates the volume is an external
volume.
XP24000/XP20000 Volume Security User's Guide 39
Page 40

DescriptionItem
Lists hosts in the security group in which the specified volume is registered.
• No. A sequential number associated with a host.
NOTE:
Each table row usually shows information about a host. However, if a host is
attached to the disk subsystem via a channel extender, the table row shows
information about the channel extender.
Host table
• Type/Model indicates the type and the model number of a host (or a channel extender).
The Type appears on the left of the slash (/). The Model number appears on the right of the
slash. Before the Type/Model, an icon indicates the registration status of the host in these
ways:
• SEQNUMBER indicates the node ID of a host (or a channel extender).
• LPAR indicates the logical partition number of a host. Logical partitions are virtual systems
created as a result of sectioning a computer's memory into separate units.
• Vendor indicates the vendor of a host. Vendors include FJT (Fujitsu), IBM, HTC (Hitachi),
and CNT(Ex). If CNT(Ex) appears, the Type/Model column indicates the type and the
model number of a channel extender, and the SEQNUMBER column indicates the node ID
of the channel extender.
Closes the dialog box.OK
The LDEV Group to Security Group Dialog Box
The LDEV Group to Security Group dialog box (Figure 21) appears when you right-click an item in
the tree view of the Volume Security window (Figure 4) and then select List -> LDEV Group to Security
Group from the pop-up menu.
NOTE:
However, the List -> LDEV Group to Security Group pop-up command does not display if you
double-click a security group and then right-click a host group or LDEV group from immediately below
the security group.
This dialog box enables you to specify an LDEV group and then displays security groups in which the
specified LDEV group is registered (see
“Locating Security Groups that Contain a Specified LDEV Group” on page 47).
Using the Volume Security GUI40
Page 41

Figure 21 The LDEV Group to Security Group Dialog Box
DescriptionItem
Indicates the number of the selected LDKC.LDKC
Specifies an LDEV group.LDEV Group
Lists information about the security groups in which the specified LDEV group is registered.
• Security Group indicates the name of a security group.
• Security indicates whether the security settings in the security group are enabled or
Security Group table
disabled.
• Group Status indicates whether the security group is an Access or a Pool group.
• T-VOL/R-VOL indicates whether volumes in the security group can be used as sec-
ondary volumes (i.e., copy destination volume). Enable indicates the volumes can
be used as secondary volumes. Disable indicates the volumes cannot be used as
secondary volumes.
Closes the dialog box.OK
The Error Detail Dialog Box
When you attempt to apply security in the Volume Security window, an error might occur if hosts are
performing I/O operations (for details, see the
Caution
in
“Port-Level Security Implementation” on page 10). The Error Detail dialog box (Figure 22) enables
you to find hosts that are performing I/O operations.
For instructions on how to remove errors, see “Troubleshooting Volume Security” on page 69.
XP24000/XP20000 Volume Security User's Guide 41
Page 42

Figure 22 The Error Detail Dialog Box
DescriptionItem
Host
CU
LDEV table
Lists the number of the host available on the selected LDKC which are performing I/O
operations.
Indicates the number of the selected LDKC.LDKC
Specifies a Command Unit image and forces the display of any volumes on which the
host is performing I/O operations and which belong to the specified CU image.
Provides information about the selected CU.
• LDEV: The available LDEV numbers.
• Emulation: The emulation types of volumes.
Closes the dialog box.OK
Using the Volume Security GUI42
Page 43

4 Performing Volume Security Operations
This chapter explains the following Volume Security operations:
• Launching Volume Security (see Launching Volume Security, page 43)
• Viewing Security Settings (see Viewing Security Settings, page 43)
• Enabling only the specified hosts to access certain volumes, so that the other hosts cannot access
the volumes (see Limiting Host Access, page 47)
• Preventing all the hosts to access volumes (see Prohibiting Host Access, page 53).
• Preventing data in volumes from being overwritten by copy operations (see
Protecting Volumes from Copy Operations, page 57)
• Disabling security (see Disabling Volume Security, page 58listedref)
Launching Volume Security
This section describes how to start the Volume Security software.
If Volume Security Port Option is installed, the functions of the Volume Security Port Option program
will become usable when you start Volume Security.
To start the Volume Security software:
1. Log on to the Remote Web Console main window. For details, see the HP StorageWorks
XP24000/XP20000 Remote Web Console User’s Guide.
To make security settings and apply the settings, you must use a user account that has the write
permission (For example, the Administrator account). If you use a user account that does not have
the write permission, you will be able to view security settings but will neither be able to make
security settings nor apply security settings.
2. Click Go, Mainframe Connection, and then Volume Security on the menu bar of the Remote Web
Console main window.
The Volume Security window appears (see Figure 4).
To set security using Volume Security, you must make sure that Remote Web Console is in
Modify mode. For detailed information on how to do this, see the HP StorageWorks
XP24000/XP20000 Remote Web Console User’s Guide.
Viewing Security Settings
This section describes how to view security settings.
• Locating Volumes in a Specified Security Group (see
“Locating Volumes in a Specified Security Group” on page 44)
• Locating Security Groups that Contain a Specified Host (see
“Locating Security Groups that Contain a Specified Host” on page 44)
• Locating Volumes in a Security Group that Contains a Specified Host (see
“Locating Volumes in a Security Group that Contains a Specified Host” on page 44)
XP24000/XP20000 Volume Security User's Guide 43
Page 44

• Locating Ports through Which Hosts Can Access Volumes (see
“Locating Ports through Which Hosts Can Access Volumes” on page 45)
• Locating Security Groups that Contain a Specified Volume (see
“Locating Security Groups that Contain a Specified Volume” on page 45)
• Locating Hosts in a Security Group that Contains a Specified Volume (see
“Locating Hosts in a Security Group that Contains a Specified Volume” on page 46)
• Locating Security Groups that Contain a Specified Host Group (see “Locating Security Groups
that Contain a Specified Host Group” on page 46)
• Locating Security Groups that Contain a Specified LDEV Group (see
“Locating Security Groups that Contain a Specified LDEV Group” on page 47)
Locating Volumes in a Specified Security Group
To search a security group for volumes, select the security group in the tree view of the Volume Security
window (Figure 4) and then see the list of volumes in the lower-right table.
Locating Security Groups that Contain a Specified Host
To specify a host and find the security groups in which the host is registered, you can follow either
of the two procedures below. Follow the first procedure if the desired host is displayed in the upper-right
table of the Volume Security window (Figure 4). Follow the second procedure if the desired host is
not displayed in the upper-right table.
If the desired host is displayed in the upper-right table:
1. Right-click the host in the table.
2. From the pop-up menu, select List -> Host to Security Group.
The Host to Security Group dialog box appears (Figure 15). The dialog box displays the security
groups that you want.
If the desired host is not displayed in the upper-right table:
1. In the tree view of the Volume Security window (Figure 15), right-click an item except for a host
group or LDEV group that appears immediately below a security group.
2. From the pop-up menu, select List -> Host to Security Group.
The Host to Security Group dialog box appears
(“The Host to Security Group Dialog Box” on page 33).
3. From the Host drop-down list, select the desired host.
The table lists the security groups that you want.
Locating Volumes in a Security Group that Contains a Specified Host
If a security group is classified as an access group, the security group contains both host and volumes.
The procedures below enable you to specify a host and to find volumes in the security group in which
the specified host is registered.
Follow the first procedure if the desired host is displayed in the upper-right table of the Volume Security
window (Figure 4). Follow the second procedure if the desired host is not displayed in the upper-right
table.
If the desired host is displayed in the upper-right table:
1. Right-click the host in the table.
2. From the pop-up menu, select List -> Host to LDEV.
Performing Volume Security Operations44
Page 45

The Host to LDEV dialog box appears (Figure 16). The dialog box displays a list of volumes.
3. Right-click an arrow at the right end of the CU drop-down list, and then see how many CU image
numbers appear.
• If only one CU image number appears, the table in the dialog box displays all the volumes
that you want.
• If two or more CU image numbers appear, the table in the dialog box currently displays some
of the volumes that you want. Select each CU image number to find volumes in the specified
CU image.
If the desired host is not displayed in the upper-right table:
1. In the tree view of the Volume Security window (Figure 4), right-click an item except for a host
group or LDEV group that appears immediately below a security group.
2. From the pop-up menu, select List -> Host to LDEV.
The Host to LDEV dialog box appears (Figure 16).
3. From the Host drop-down list, select the desired host.
4. Right-click an arrow at the right end of the CU drop-down list, and then see how many CU image
numbers appear.
• If only one CU image number appears, the table in the dialog box displays all the volumes
that you want.
• If two or more CU image numbers appear, the table in the dialog box currently displays some
of the volumes that you want. Select each CU image number to find volumes in the specified
CU image.
Locating Ports through Which Hosts Can Access Volumes
To find ports via which a host can access volumes, you must ensure that Volume Security Port Option
is already installed.
To find ports via which a host can access volumes, follow the procedure below.
To find ports via which a host can access volumes:
1. In the Volume Security window (Figure 4), right-click an item in the tree view and then select List
-> Host Group to Port from the pop-up menu.
The Host Group to Port dialog box appears (Figure 18).
2. Select a host group from the Host Group drop-down list.
3. Select a host from the Host drop-down list.
The Port list displays ports via which the specified host can access volumes.
4. Click OK to close the Host Group to Port dialog box.
You are returned to the Volume Security window.
Locating Security Groups that Contain a Specified Volume
To specify a volume and find the security groups in which the volume is registered, you can follow
either of the two procedures below. Follow the first procedure if the desired volume is displayed in
the lower-right table of the Volume Security window (Figure 4). Follow the second procedure if the
desired volume is not displayed in the lower-right table.
If the desired volume is displayed in the lower-right table:
1. Right-click the volume in the table.
XP24000/XP20000 Volume Security User's Guide 45
Page 46

2. From the pop-up menu, select List -> LDEV to Security Group.
The LDEV to Security Group dialog box appears (Figure 19). The table on the right displays the
security groups that you want.
If the desired volume is not displayed in the lower-right table:
1. In the tree view of the Volume Security window (Figure 4), right-click an item except for a host
group or LDEV group that appears immediately below a security group.
2. From the pop-up menu, select List -> LDEV to Security Group.
The LDEV to Security Group dialog box appears (Figure 19).
3. Select a CU image number from the CU drop-down list, and then select an LDEV number from
the lower-left table.
The table on the right lists the security groups that you want.
Locating Hosts in a Security Group that Contains a Specified Volume
If a security group is classified as an access group, the security group contains both host and volumes.
The procedures below enable you to specify a volume and to find hosts in the security group in which
the specified volume is registered.
Follow the first procedure if the desired volume is displayed in the lower-right table of the Volume
Security window (Figure 4). Follow the second procedure if the desired volume is not displayed in
the lower-right table.
If the desired volume is displayed in the lower-right table:
1. Right-click the volume in the table.
2. From the pop-up menu, select List -> LDEV to Host.
The LDEV to Host dialog box appears (Figure 20). The table on the right displays a list of hosts.
If the desired volume is not displayed in the lower-right table:
1. In the tree view of the Volume Security window (Figure 4), right-click an item except for a host
group or LDEV group that appears immediately below a security group.
2. From the pop-up menu, select List -> LDEV to Host.
The LDEV to Host dialog box appears (Figure 20).
3. Select a CU image number from the CU drop-down list, and then select an LDEV number from
the lower-left table.
The table on the right lists the security groups that you want.
Locating Security Groups that Contain a Specified Host Group
To specify a host group and then find security groups in which the specified host group is registered,
follow the procedure below:
1. In the tree view of the Volume Security window (Figure 4), right-click an item except for a host
group or LDEV group that appears immediately below a security group.
2. From the pop-up menu, select List -> Host Group to Security Group.
The Host Group to Security Group dialog box appears (Figure 17).
3. From the Host Group drop-down list, select the desired host Group.
The table lists the security groups that you want.
Performing Volume Security Operations46
Page 47

Locating Security Groups that Contain a Specified LDEV Group
To specify an LDEV group and then find security groups in which the specified LDEV group is registered,
follow the procedure below:
1. In the tree view of the Volume Security window (Figure 4), right-click an item except for a host
group or LDEV group that appears immediately below a security group.
2. From the pop-up menu, select List -> LDEV Group to Security Group.
The LDEV Group to Security Group dialog box appears (Figure 21).
3. From the LDEV Group drop-down list, select the desired LDEV Group.
The table lists the security groups that you want.
Limiting Host Access
Take the following steps if you want to enable some hosts to access certain volumes so that the other
hosts cannot access the volumes:
• Creating a host group (see “Creating a Host Group” on page 47)
• Registering hosts in the host group (see “Registering Hosts in a Host Group” on page 48)
• Registering ports in the host group (see “Registering Ports in a Host Group” on page 49)
• Creating an LDEV group (see “Creating an LDEV Group” on page 50)
• Registering volumes in the LDEV group (see “Registering Volumes in an LDEV Group” on page 51)
• Creating a security group and classifying the security group as an access group (see
“Creating a Security Group for Use As an Access Group” on page 52)
• Registering the host group and the LDEV group in the security group (see
“Registering a Host Group and an LDEV Group in a Security Group” on page 53)
Creating a Host Group
To specify hosts that can access volumes, you must create a host group and then register the hosts in
the host group.
The following is the procedure for creating a host group. For details on how to register hosts in a host
group, see “Registering Hosts in a Host Group” on page 48.
CAUTION:
When creating a host group, you are strongly recommended to click the Apply button in the Volume
Security window, as described in the last step of the following procedure. If you forget to click Apply,
you might lose the host group when you encounter an error registering the host group and the LDEV
group (see “Registering a Host Group and an LDEV Group in a Security Group” on page 53).
To create a host group:
1. Ensure that you are in Modify mode.
2. In the Volume Security window (Figure 4), double-click an LDKC number.
3. Right-click Host Group.
A pop-up menu appears.
4. Select Add/Change from the pop-up menu.
XP24000/XP20000 Volume Security User's Guide 47
Page 48

The Add/Change Host Group dialog box (Figure 9) appears.
5. In the Enter Host Group box, enter the name of the host group that you want to create, and then
click the Add button.
NOTE:
Host group names can be up to eight characters and are case-sensitive. The first character and
the last character must not be a space. Also, the following characters are unusable in host group
names:
\ , / : ; * ? " < > |
6. Confirm that the new host group is displayed by blue in Host Group List, and then click OK.
CAUTION:
Here, the settings in the window have not been applied to the storage system.
7. Click Apply in the Volume Security window (Figure 4).
A message appears and asks if you want to apply the settings to the storage system.
8. Click Yes.
The settings are applied to the storage system.
Registering Hosts in a Host Group
Now that you have created a host group, then you need to register hosts in the host group.
CAUTION:
When registering hosts a host group, you are strongly recommended to click the Apply button in the
Volume Security window, as described in the last step of the following procedure. If you forget to
click Apply, the hosts might be unregistered when you encounter an error registering the host group
and the LDEV group (see
“Registering a Host Group and an LDEV Group in a Security Group” on page 53).
To register hosts in a host group:
1. Ensure that you are in Modify mode.
2. In the Volume Security window (Figure 4), double-click an LDKC number.
3. Right-click a host group.
A pop-up menu appears.
4. Select Specify and then Host from the pop-up menu.
The Add/Change Host dialog box (Figure 11) appears and displays a list of hosts.
5. Select and then right click one or more hosts that you want to register.
If a host is indicated by the icon or , the host is already registered in the specified host
group. For details on the meaning of icons, see “The Add/Change Host Dialog Box” on page 27.
If ports are registered in the displayed host group, you can register only the hosts that do not
belong to any other host group. You cannot register hosts that belong to any other host group.
Performing Volume Security Operations48
Page 49

If no ports are registered in the displayed host group, you can register the following hosts:
• hosts that do not belong to any host group
• hosts belonging to host groups in which no ports are registered
However, you cannot register hosts belonging to host groups in which ports are registered.
6. Select Registration and then Register Host in Host Group from the pop-up menu.
The specified hosts are displayed by blue and also indicated by the icon or the icon.
7. Click OK in the Add/Change Host dialog box.
CAUTION:
Here, the settings in the window have not been applied to the storage system.
8. Click Apply in the Volume Security window (Figure 4).
A message appears and asks if you want to apply the settings to the storage system.
9. Click Yes.
The settings are applied to the storage system.
Registering Ports in a Host Group
After registering hosts in a host group, you can register ports in the host group to implement port-level
security.
To register ports in a host group, you must ensure that Volume Security Port Option is already installed.
If you do not want to implement port-level security, you do not need to register ports in host groups.
If no ports are registered in a host group, hosts in the host group can access volumes via every port
to which the hosts are connected.
CAUTION:
When you register ports in a host group, it is strongly recommended that you click the Apply button
in the Volume Security window at the end of the operation (see the end of the following procedure).
If you do not click Apply, registration of ports could be cancelled when an error occurs registering a
host group and an LDEV group (see
“Registering a Host Group and an LDEV Group in a Security Group” on page 53).
To register ports in a host group:
1. Ensure that you are in Modify mode.
2. In the Volume Security window (Figure 4), double-click an LDKC number.
3. Right-click a host group.
A pop-up menu appears.
4. Select Specify and then Port from the pop-up menu.
The Select Port dialog box (Figure 13) appears and displays a list of ports.
5. From the Port list in the Unregistered port box, select one or more ports via which hosts in the
host group should access volumes. Next, click the Regist button.
The specified ports are displayed in blue in the Port list in the Registered port box.
To select all the ports in the Port list in the Unregistered port box, click the Select All button.
XP24000/XP20000 Volume Security User's Guide 49
Page 50

If hosts registered in the host group are also registered in another host group, you cannot register
ports in the Port list in the Registered port box, and thus you cannot implement port-level security.
6. Click OK in the Select Port dialog box.
The Select Port dialog box closes and you are returned to the Volume Security window.
CAUTION:
Here, the settings in the window have not been applied to the storage system.
7. Click Apply in the Volume Security window (Figure 4).
A message appears and asks if you want to apply the settings to the storage system.
8. Click Yes.
The settings are applied to the storage system.
Creating an LDEV Group
To specify volumes that should be secured, you must create an LDEV group and then register the
volumes in the LDEV group.
The following procedure explains how to create an LDEV group. For details on how to register volumes
in an LDEV group, see “Registering Volumes in an LDEV Group” on page 51.
CAUTION:
When creating an LDEV group, you are strongly recommended to click the Apply button in the Volume
Security window, as described in the last step of the following procedure. If you forget to click Apply,
you might lose the LDEV group when you encounter an error registering the host group and the LDEV
group (see “Registering a Host Group and an LDEV Group in a Security Group” on page 53).
To create an LDEV group:
1. Ensure that you are in Modify mode.
2. In the Volume Security window (Figure 4), double-click an LDKC number.
3. Right-click LDEV Group.
A pop-up menu appears.
4. Select Add/Change from the pop-up menu.
The Add/Change LDEV Group dialog box (Figure 10) appears.
5. In the Enter LDEV Group box, enter the name of the LDEV group that you want to create, and
then click the Add button.
NOTE:
LDEV group names can be up to eight characters and are case-sensitive. The first character and
the last character must not be a space. Also, the following characters are unusable in host group
names:
\ , / : ; * ? " < > |
6. Confirm that the new LDEV group is displayed by blue in LDEV Group List, and then click OK.
Performing Volume Security Operations50
Page 51

CAUTION:
Here, the settings in the window have not been applied to the storage system.
7. Click Apply in the Volume Security window (Figure 4).
A message appears and asks if you want to apply the settings to the storage system.
8. Click Yes.
The settings are applied to the storage system.
Registering Volumes in an LDEV Group
Now that you have created an LDEV group, then you need to register volumes in the LDEV group.
CAUTION:
When registering volumes in an LDEV group, you are strongly recommended to click the Apply button
in the Volume Security window, as described in the last step of the following procedure. If you forget
to click Apply, the volumes might be unregistered when you encounter an error registering the host
group and the LDEV group (see
“Registering a Host Group and an LDEV Group in a Security Group” on page 53).
To register volumes in an LDEV group:
1. Ensure that you are in Modify mode.
2. In the Volume Security window (Figure 4), double-click an LDKC number.
3. Right-click an LDEV group.
A pop-up menu appears.
4. Select Specify and then LDEV from the pop-up menu.
The Select LDEV dialog box (Figure 12) appears.
5. Use the CU drop-down list to specify a CU image.
The two boxes below the drop-down list displays volumes in the specified CU image.
• The Registered in LDEV group box displays volumes registered in the LDEV group.
• The Not registered in LDEV group box displays volumes that are not registered in the LDEV
group.
6. In the Not registered in LDEV group box, select volumes that you want to register. Then, click the
Regist button.
The selected volumes move to the Registered in LDEV group box.
7. To register volumes in other CU images, return to step 5.
8. Click OK.
CAUTION:
Here, the settings in the window have not been applied to the storage system.
9. Click Apply in the Volume Security window (Figure 4).
XP24000/XP20000 Volume Security User's Guide 51
Page 52

A message appears and asks if you want to apply the settings to the storage system.
10. Click Yes.
The settings are applied to the storage system.
Creating a Security Group for Use As an Access Group
To make security settings, you must create security groups. Security groups can be classified as access
groups or pool groups. You must classify a security group as an access group if you want to allow
volumes to be accessed only by specified hosts.
To create a security group and classify the group as an access group:
1. Ensure that you are in Modify mode.
2. In the Volume Security window (Figure 4), double-click an LDKC number.
3. Right-click Security Group.
A pop-up menu appears.
4. Select Add/Change from the pop-up menu.
The Add/Change Security Group dialog box (Figure 8) appears.
5. In the Enter Security Group box, enter the name of the security group that you want to create.
NOTE:
Security group names can be up to eight characters and are case-sensitive. The first character
and the last character must not be a space. Also, the following characters are unusable in security
group names:
\ , / : ; * ? " < > |
6. In the Security box, select Enable.
7. In the Group Status box, select Access.
8. In the T-VOL/R-VOL box, select Enable or Disable.
• Select Enable if you want make volumes in the security group usable as secondary volumes
(that is, copy destination volumes) for copy operations.
• Select Disable if you want make volumes in the security group unusable as secondary volumes
(that is, copy destination volumes) for copy operations.
9. Click Add.
Information about the new security group is added to the Security Group List table and is displayed
in blue.
10. Click OK.
CAUTION:
Here, the settings in the window have not been applied to the storage system.
11. Click Apply in the Volume Security window (Figure 4).
A message appears and asks if you want to apply the settings to the storage system.
12. Click Yes.
The settings are applied to the storage system.
Performing Volume Security Operations52
Page 53

Registering a Host Group and an LDEV Group in a Security Group
Now that you have classified your security group as an access group, your next (and the last) task is
to register your host group and LDEV group into the security group. When you finish registration, the
volumes in the LDEV group are secured and can only be accessed by hosts in the host group. Other
hosts cannot access the volumes.
To register a host group and an LDEV group into a security group:
1. Ensure that you are in Modify mode.
2. In the Volume Security window (Figure 4), double-click an LDKC number.
3. Right-click a security group.
A pop-up menu appears.
4. Select Specify and then Security Group from the pop-up menu.
The Specify Security Group dialog box (Figure 14) appears.
5. Use the Select Security Group drop-down list to select the security group in which you want to
register a host group and an LDEV group.
6. Use the Host Group drop-down list to select the host group that you want to register in the security
group.
7. Use the LDEV Group drop-down list to select the LDEV group that you want to register in the se-
curity group, and then click OK.
8. Click Apply in the Volume Security window (Figure 4).
A message appears and asks if you want to apply the settings to the storage system.
9. Click Yes.
The settings are applied to the storage system.
CAUTION:
If the Error Detail dialog box (section “The Error Detail Dialog Box” on page 41) appears, see
the
Caution
in “Port-Level Security Implementation” on page 10 and then remove errors.
Prohibiting Host Access
Volume Security enables you to prohibit all the hosts from accessing the specified volumes. To do this,
take the following major steps:
• Creating an LDEV group (see “Creating an LDEV Group” on page 53)
• Registering volumes in the LDEV group (see “Registering Volumes in an LDEV Group” on page 54)
• Creating a security group and classifying the security group as a pool group (see
“Creating a Security Group for Use As a Pool Group” on page 55)
• Registering the LDEV group in the security group
(“Registering an LDEV Group in a Security Group” on page 56)
Creating an LDEV Group
To specify volumes that should be secured, you must create an LDEV group and then register the
volumes in the LDEV group.
XP24000/XP20000 Volume Security User's Guide 53
Page 54

The following procedure explains how to create an LDEV group. For details on how to register volumes
in an LDEV group, see “Registering Volumes in an LDEV Group” on page 54.
CAUTION:
When creating an LDEV group, you are strongly recommended to click the Apply button in the Volume
Security window, as described in the last step of the following procedure. If you forget to click Apply,
you might lose the LDEV group when you encounter an error registering the LDEV group (see
“Registering an LDEV Group in a Security Group” on page 56).
To create an LDEV group:
1. Ensure that you are in Modify mode.
2. In the Volume Security window (Figure 4), double-click an LDKC number.
3. Right-click LDEV Group.
A pop-up menu appears.
4. Select Add/Change from the pop-up menu.
The Add/Change LDEV Group dialog box (Figure 10) appears.
5. In the Enter LDEV Group box, enter the name of the LDEV group that you want to create, and
then click the Add button.
NOTE:
LDEV group names can be up to eight characters and are case-sensitive. The first character and
the last character must not be a space. Also, the following characters are unusable in host group
names:
\ , / : ; * ? " < > |
6. Confirm that the new LDEV group is displayed by blue in LDEV Group List, and then click OK.
CAUTION:
Here, the settings in the window have not been applied to the storage system.
7. Click Apply in the Volume Security window (Figure 4).
A message appears and asks if you want to apply the settings to the storage system.
8. Click Yes.
The settings are applied to the storage system.
Registering Volumes in an LDEV Group
Now that you have created an LDEV group, then you need to register volumes in the LDEV group.
Performing Volume Security Operations54
Page 55

CAUTION:
When registering volumes in an LDEV group, you are strongly recommended to click the Apply button
in the Volume Security window, as described in the last step of the following procedure. If you forget
to click Apply, the volumes might be unregistered when you encounter an error registering the LDEV
group (see “Registering an LDEV Group in a Security Group” on page 56).
To register volumes in an LDEV group:
1. Ensure that you are in Modify mode.
2. In the Volume Security window (Figure 4), double-click an LDKC number.
3. Right-click an LDEV group.
A pop-up menu appears.
4. Select Specify and then LDEV from the pop-up menu.
The Select LDEV dialog box (Figure 12) appears.
5. Use the CU drop-down list to specify a CU image.
The two boxes below the drop-down list displays volumes in the specified CU image.
• The Registered in LDEV group box displays volumes registered in the LDEV group.
• The Not registered in LDEV group box displays volumes that are not registered in the LDEV
group.
6. In the Not registered in LDEV group box, select volumes that you want to register. Then, click the
Regist button.
The selected volumes move to the Registered in LDEV group box.
7. To register volumes in other CU images, return to step 5.
8. Click OK.
CAUTION:
Here, the settings in the window have not been applied to the storage system.
9. Click Apply in the Volume Security window (Figure 4).
A message appears and asks if you want to apply the settings to the storage system.
10. Click Yes.
The settings are applied to the storage system.
Creating a Security Group for Use As a Pool Group
To make security settings, you must create security groups. Security groups can be classified as access
groups or pool groups. You must classify a security group as a pool group if you want to prohibit all
the hosts from accessing volumes.
To create a security group and classify the group as a pool group:
1. Ensure that you are in Modify mode.
2. In the Volume Security window (Figure 4), double-click an LDKC number.
3. Right-click Security Group.
A pop-up menu appears.
XP24000/XP20000 Volume Security User's Guide 55
Page 56

4. Select Add/Change from the pop-up menu.
The Add/Change Security Group dialog box (Figure 8) appears.
5. In the Enter Security Group box, enter the name of the security group that you want to create.
NOTE:
Security group names can be up to eight characters and are case-sensitive. The first character
and the last character must not be a space. Also, the following characters are unusable in security
group names:
\ , / : ; * ? " < > |
6. In the Security box, select Enable.
7. In the Group Status box, select Pool.
8. In the T-VOL/R-VOL box, select Enable or Disable.
• Select Enable if you want make volumes in the security group usable as secondary volumes
(that is, copy destination volumes) for copy operations.
• Select Disable if you want make volumes in the security group unusable as secondary volumes
(that is, copy destination volumes) for copy operations.
9. Click Add.
Information about the new security group is added to the Security Group List table and is displayed
in blue.
10. Click OK.
CAUTION:
Here, the settings in the window have not been applied to the storage system.
11. Click Apply in the Volume Security window (Figure 4).
A message appears and asks if you want to apply the settings to the storage system.
12. Click Yes.
The settings are applied to the storage system.
Registering an LDEV Group in a Security Group
Now that you have classified your security group as a pool group, your next (and the last) task is to
register your LDEV group into the security group. When you finish registration, the volumes in the
LDEV group are secured and inaccessible from any hosts.
To register an LDEV group into a security group:
1. Ensure that you are in Modify mode.
2. In the Volume Security window (Figure 4), double-click an LDKC number.
3. Right-click a security group.
A pop-up menu appears.
4. Select Specify and then Security Group from the pop-up menu.
The Specify Security Group dialog box (Figure 14) appears.
Performing Volume Security Operations56
Page 57

5. Use the Select Security Group drop-down list to select a security group in which you want to register
an LDEV group.
6. Use the LDEV Group drop-down list to select an LDEV group that you want to register in the security
group, and then click OK.
7. Click Apply in the Volume Security window (Figure 4).
A message appears and asks if you want to apply the settings to the storage system.
8. Click Yes.
The settings are applied to the storage system.
CAUTION:
If the Error Detail dialog box (section “The Error Detail Dialog Box” on page 41) appears, see
the
Caution
in section “Port-Level Security Implementation” on page 10 and then remove errors.
Protecting Volumes from Copy Operations
The following procedure makes volumes in a security group unusable as secondary volumes (that is,
copy destination volumes) for copy operations, so you will be able to protect data the volumes from
being overwritten by copy operations.
To make volumes in a security group unusable as secondary volumes:
1. Ensure that you are in Modify mode.
2. In the Volume Security window (Figure 4), double-click an LDKC number.
3. Right-click Security Group or the desired security group.
A pop-up menu appears.
4. Select Add/Change from the pop-up menu.
The Add/Change Security Group dialog box (Figure 8) appears.
5. Ensure that the desired security group is selected in the Security Group List table.
6. Select Disable in the T-VOL/R-VOL box.
7. Click Change.
The change is reflected in the dialog box.
8. Click OK.
CAUTION:
Here, the settings in the window have not been applied to the storage system.
9. Click Apply in the Volume Security window (Figure 4).
A message appears and asks if you want to apply the settings to the storage system.
10. Click Yes.
The settings are applied to the storage system.
XP24000/XP20000 Volume Security User's Guide 57
Page 58

TIP:
To make volumes in your security group usable as secondary volumes (that is, copy destination
volumes) for copy operations, you must select the security group in the Add/Change Security Group
dialog box (Figure 8) and then select Enable in the T-VOL/R-VOL box. Next, click Change and then
OK. Finally, click Apply in the Volume Security window (Figure 4).
Disabling Volume Security
If you follow the procedure below to manipulate a security group, you will be able to disable security
on volumes in the security group. If security is disabled, volumes in the security group are accessible
from all hosts and are usable as secondary volumes (that is, copy destination volumes) for copy
operations, regardless of whether the security group is an access group or a pool group. To restore
security, you can restore it in an easy and simple operation.
If you are sure that you will not need to restore security, you can delete your security group to disable
security. For details on how to delete security groups, see “Deleting Security Groups” on page 61.
To disable security on volumes:
1. Ensure that you are in Modify mode.
2. In the Volume Security window (Figure 4), double-click an LDKC number.
3. Right-click the security group in which the desired volumes are registered.
A pop-up menu appears.
4. Select Add/Change from the pop-up menu.
The Add/Change Security Group dialog box (Figure 8) appears.
5. Ensure that the desired security group is selected in the Security Group List table.
6. Select Disable in the Security box.
7. Click Change.
The change is reflected in the dialog box.
8. Click OK.
CAUTION:
Here, the settings in the window have not been applied to the storage system.
9. Click Apply in the Volume Security window (Figure 4).
A message appears and asks if you want to apply the settings to the storage system.
10. Click Yes.
The settings are applied to the storage system.
TIP:
To restore security, you must select the security group in the Add/Change Security Group dialog box
(Figure 8) and then select Enable in the Security box. Next, click Change and then OK. Finally, click
Apply in the Volume Security window (Figure 4).
Performing Volume Security Operations58
Page 59

Editing Security Groups
This section explains the following operations, which allow you to edit your security groups:
• Unregistering a host group from a security group (see “Unregistering a Host Group” on page 59)
• Unregistering an LDEV group from a security group (see
“Unregistering an LDEV Group” on page 59)
• Renaming a security group (see “Renaming Security Groups” on page 60).
• Deleting a security group (see “Deleting Security Groups” on page 61)
Unregistering a Host Group
To unregister a host group from a security group, take the following steps:
To unregister a host group from a security group:
1. Ensure that you are in Modify mode.
2. In the Volume Security window (Figure 4), double-click an LDKC number.
3. Locate and double-click a security group.
The tree view displays the host group in the specified security group.
4. Right-click the host group and the select Delete from the pop-up menu.
A message appears and asks if you want to unregister the specified host group.
5. Click Yes to close the message.
CAUTION:
Here, the changes in the window have not been applied to the storage system.
6. Click Apply in the Volume Security window (Figure 4).
A message appears and asks if you want to apply the changes to the storage system.
7. Click Yes.
The changes are applied to the storage system.
Unregistering an LDEV Group
To unregister an LDEV group from a security group, take the following steps:
To unregister the LDEV group from a security group:
1. Ensure that you are in Modify mode.
2. In the Volume Security window (Figure 4), double-click an LDKC number.
3. Locate and double-click a security group.
The tree view displays the LDEV group in the specified security group.
4. Right-click the LDEV group and the select Delete from the pop-up menu.
A message appears and asks if you want to unregister the specified LDEV group.
5. Click Yes to close the message.
XP24000/XP20000 Volume Security User's Guide 59
Page 60

CAUTION:
Here, the changes in the window have not been applied to the storage system.
6. Click Apply in the Volume Security window (Figure 4).
A message appears and asks if you want to apply the changes to the storage system.
7. Click Yes.
The changes are applied to the storage system.
Renaming Security Groups
To rename a security group, take the following steps:
To rename a security group:
1. Ensure that you are in Modify mode.
2. In the Volume Security window (Figure 4), double-click an LDKC number.
3. Right-click Security Group or a security group.
A pop-up menu appears.
4. Select Add/Change from the pop-up menu.
The Add/Change Security Group dialog box (Figure 8) appears.
5. Ensure that the desired security group is selected in the Security Group List table.
6. In the Enter Security Group box, enter the new name for the security group.
NOTE:
Security group names can be up to eight characters and are case-sensitive. The first character
and the last character must not be a space. Also, the following characters are unusable in security
group names:
\ , / : ; * ? " < > |
7. Click Change.
The change is reflected in the dialog box.
8. Click OK.
CAUTION:
Here, the change in the window has not been applied to the storage system.
9. Click Apply in the Volume Security window (Figure 4).
message appears and asks if you want to apply the change to the storage system.
10. Click Yes.
The change is applied to the storage system.
Performing Volume Security Operations60
Page 61

Deleting Security Groups
To delete a security group, take the following steps:
To delete a security group:
1. Ensure that you are in Modify mode.
2. In the Volume Security window (Figure 4), double-click an LDKC number.
3. Do either of the following:
• Right-click a security group in the tree view.
• Right-click Security Group in the tree view and then select Add/Change from the pop-up menu.
Next, in the Add/Change Security Group dialog box (Figure 8), select one or more security
groups in the Security Group List table and right-click the selection.
4. Select Delete from the pop-up menu.
A message appears and asks if you want to delete the specified security group(s).
5. Click Yes to close the message. If the Add/Change Security Group dialog box (Figure 8) still
remains displayed, click OK to close the dialog box.
CAUTION:
Here, the change in the window has not been applied to the storage system.
6. Click Apply in the Volume Security window (Figure 4).
A message appears and asks if you want to apply the change to the storage system.
7. Click Yes.
The change is applied to the storage system.
Editing Host Groups
This section explains the following operations, which allow you to edit your host groups:
• Registering hosts that have not been attached to the storage system into a host group (see
“Registering Hosts to be Attached to the Storage System” on page 61)
• Deleting hosts from a host group (see “Deleting Hosts from Host Groups” on page 62)
• Deleting ports from a host group (see “Deleting Ports from Host Groups” on page 63)
• Renaming a host group (see “Renaming Host Groups” on page 64).
• Deleting a host group (see “Deleting Host Groups” on page 65)
Registering Hosts to be Attached to the Storage System
If your organization is planning to attach new mainframe hosts to the storage system, you will possibly
need to revise security settings on volumes. For example, if you do not want to allow the new hosts
to access some volumes, you might need to register the new hosts in the host group in an existing
access group. Volume Security enables you to register new hosts in host groups before the new hosts
are attached via cables to the storage system.
To register a mainframe host to be attached into a host group:
1. Execute the following system command at the mainframe host:
XP24000/XP20000 Volume Security User's Guide 61
Page 62

D M=CPU
This command displays the type, the model number, the node ID and the logical partition number
of the host. Write down the information on a paper so that you will not forget it.
For details on the system command, see the documentation for system commands.
2. Ensure that you are in Modify mode.
3. In the Volume Security window (Figure 4), double-click an LDKC number.
4. Right-click Host Group to display a list of host groups.
5. Right-click the host group in which you want to register the host. Next, select Specify and then
Host from the pop-up menu.
The Add/Change Host dialog box (Figure 11) appears.
6. Use the text boxes and the drop-down list to specify information about the host you want to register;
you have already obtained the information earlier in this procedure (see step 1).
7. Click Add.
The specified host is added to the table and is indicated by the icon .
8. Click OK.
CAUTION:
Here, the settings in the window have not been applied to the storage system.
9. Click Apply in the Volume Security window (Figure 4).
A message appears and asks if you want to apply the settings to the storage system.
10. Click Yes.
The settings are applied to the storage system.
TIP:
• If you registered a host in an incorrect host group, first you must follow the above procedure to
register the host in the correct host group. Then, you must follow the procedure in section
“Deleting Hosts from Host Groups” on page 62 to remove the host from the incorrect host group.
•
You can modify information about hosts indicated by in the Add/Change Host dialog box
(Figure 11). To modify information, first select the desired host in the table and then use text boxes
and/or drop down list to change information. Next, click Change and then OK. Finally, click
Apply in the Volume Security window (Figure 4).
•
To delete a host indicated by from the Add/Change Host dialog box (Figure 11), you must
first select and right-click the host, select Delete from the pop-up menu, and then select OK. Finally,
click Apply in the Volume Security window (Figure 4).
Deleting Hosts from Host Groups
To delete hosts from a host group, take the following steps:
To delete hosts from a host group:
1. Ensure that you are in Modify mode.
2. In the Volume Security window (Figure 4), double-click an LDKC number.
Performing Volume Security Operations62
Page 63

3. Right-click a host group.
A pop-up menu appears.
4. Select Specify and then Host from the pop-up menu.
The Add/Change Host dialog box (Figure 11) appears and displays a list of hosts. The icons
and indicate hosts registered in the specified host group.
5.
Select and then right click one or more hosts (indicated by or ) that you want to delete.
6. Select Registration and then Unregister Host from Host Group from the pop-up menu.
The specified hosts are displayed by blue. Also, icons disappear or change to or .
The icons and indicate that the host is registered in another host group.
7. Click OK in the Add/Change Host dialog box.
CAUTION:
Here, the settings in the window have not been applied to the storage system.
8. Click Apply in the Volume Security window (Figure 4).
A message appears and asks if you want to apply the settings to the storage system.
9. Click Yes.
The settings are applied to the storage system.
Deleting Ports from Host Groups
To delete ports from host groups, you must ensure that Volume Security Port Option is already installed.
To delete ports from a host group, take the following steps:
To delete ports from a host group:
1. Ensure that you are in Modify mode.
2. In the Volume Security window (Figure 4), double-click an LDKC number.
3. Right-click a host group.
A pop-up menu appears.
4. Select Specify and then Port from the pop-up menu.
The Select Port dialog box (Figure 13) appears.
5. In the Port list in the Registered port box, select one or more ports that you want to delete. Next,
click the Unregist button.
The specified ports are displayed in blue in the Port list in the Unregistered port box.
NOTE:
To select all ports in the Port list in the Registered port box, click the Select All button.
6. Click OK in the Select Port dialog box.
The Select Port dialog box closes and you are returned to the Volume Security window.
XP24000/XP20000 Volume Security User's Guide 63
Page 64

CAUTION:
Here, the settings in the window have not been applied to the storage system.
7. Click Apply in the Volume Security window (Figure 4).
A message appears and asks if you want to apply the settings to the storage system.
8. Click Yes.
The settings are applied to the storage system.
Renaming Host Groups
To rename a host group, take the following steps:
To rename a host group:
1. Ensure that you are in Modify mode.
2. In the Volume Security window (Figure 4), double-click an LDKC number.
3. Right-click Host Group or a host group.
A pop-up menu appears.
4. Select Add/Change from the pop-up menu.
The Add/Change Host Group dialog box (Figure 9) appears.
5. Ensure that the desired host group is selected in the Host Group List table.
6. In the Enter Host Group box, enter the new name for the host group.
NOTE:
Host group names can be up to eight characters and are case-sensitive. The first character and
the last character must not be a space. Also, the following characters are unusable in security
group names:
\ , / : ; * ? " < > |
7. Click Change.
The change is reflected in the dialog box.
8. Click OK.
CAUTION:
Here, the change in the window has not been applied to the storage system.
9. Click Apply in the Volume Security window (Figure 4).
A message appears and asks if you want to apply the change to the storage system.
10. Click Yes.
The change is applied to the storage system.
Performing Volume Security Operations64
Page 65

Deleting Host Groups
To delete a host group, take the following steps.
To delete a host group:
1. Ensure that you are in Modify mode.
2. In the Volume Security window (Figure 4), double-click an LDKC number.
3. Do either of the following:
• Right-click a host group in the tree view.
• Right-click Host Group in the tree view and then select Add/Change from the pop-up menu.
Next, in the Add/Change Host Group dialog box (Figure 9), select one or more host groups
in the Host Group List table and right-click the selection.
4. Select Delete from the pop-up menu.
A message appears and asks if you want to delete the specified host group(s).
5. Click Yes to close the message. If the Add/Change Host Group dialog box (Figure 9) still remains
displayed, click OK to close the dialog box.
CAUTION:
Here, the change in the window has not been applied to the storage system.
6. Click Apply in the Volume Security window (Figure 4).
A message appears and asks if you want to apply the change to the storage system.
7. Click Yes.
The change is applied to the storage system.
Editing LDEV Groups
This section explains the following operations, which allow you to edit your host groups:
• Deleting volumes from an LDEV group (see “Deleting Volumes from LDEV Groups” on page 65)
• Renaming an LDEV group (see “Renaming LDEV Groups” on page 66).
• Deleting an LDEV group (see “Deleting LDEV Groups” on page 67)
Deleting Volumes from LDEV Groups
To delete volumes from an LDEV group, take the following steps:
To delete volumes from an LDEV group:
1. Ensure that you are in Modify mode.
2. In the Volume Security window (Figure 4), double-click an LDKC number.
3. Right-click an LDEV group.
A pop-up menu appears.
4. Select Specify and then LDEV from the pop-up menu.
The Select LDEV dialog box (Figure 12) appears.
5. Use the CU drop-down list to specify a CU image.
XP24000/XP20000 Volume Security User's Guide 65
Page 66

The two boxes below the drop-down list displays volumes in the specified CU image.
• The Registered in LDEV group box displays volumes registered in the LDEV group.
• The Not registered in LDEV group box displays volumes that are not registered in the LDEV
group.
6. In the Registered in LDEV group box, select volumes that you want to delete. Then, click the Not
regist button.
The selected volumes move to the Not registered in LDEV group box.
7. To delete volumes in other CU images, return to step 5.
8. Click OK.
CAUTION:
Here, the settings in the window have not been applied to the storage system.
9. Click Apply in the Volume Security window (Figure 4).
A message appears and asks if you want to apply the settings to the storage system.
10. Click Yes.
The settings are applied to the storage system.
Renaming LDEV Groups
To rename an LDEV group, take the following steps:
To rename an LDEV group:
1. Ensure that you are in Modify mode.
2. In the Volume Security window (Figure 4), double-click an LDKC number.
3. Right-click LDEV Group or an LDEV group.
A pop-up menu appears.
4. Select Add/Change from the pop-up menu.
The Add/Change LDEV Group dialog box (Figure 10) appears.
5. Ensure that the desired LDEV group is selected in the LDEV Group List table.
6. In the Enter LDEV Group box, enter the new name for the LDEV group.
NOTE:
LDEV group names can be up to eight characters and are case-sensitive. The first character and
the last character must not be a space. Also, the following characters are unusable in security
group names:
\ , / : ; * ? " < > |
7. Click Change.
The change is reflected in the dialog box.
8. Click OK.
Performing Volume Security Operations66
Page 67

CAUTION:
Here, the change in the window has not been applied to the storage system.
9. Click Apply in the Volume Security window (Figure 4).
A message appears and asks if you want to apply the change to the storage system.
10. Click Yes.
The change is applied to the storage system.
Deleting LDEV Groups
To delete an LDEV group, take the following steps.
To delete an LDEV group:
1. Ensure that you are in Modify mode.
2. In the Volume Security window (Figure 4), double-click an LDKC number.
3. Do either of the following:
• Right-click an LDEV group in the tree view.
• Right-click LDEV Group in the tree view and then select Add/Change from the pop-up menu.
Next, in the Add/Change LDEV Group dialog box (Figure 10), select one or more LDEV
groups in the LDEV Group List table and right-click the selection.
4. Select Delete from the pop-up menu.
A message appears and asks if you want to delete the specified LDEV group(s).
5. Click Yes to close the message. If the Add/Change LDEV Group dialog box (Figure 10) still re-
mains displayed, click OK to close the dialog box.
CAUTION:
Here, the change in the window has not been applied to the storage system.
6. Click Apply in the Volume Security window (Figure 4).
A message appears and asks if you want to apply the change to the storage system.
7. Click Yes.
The change is applied to the storage system.
XP24000/XP20000 Volume Security User's Guide 67
Page 68

Performing Volume Security Operations68
Page 69

5 Troubleshooting
Troubleshooting Volume Security
The Error Detail dialog box (Figure 22) may appear when you attempt to apply security settings. The
probable causes of the error are:
• Some hosts in one security group are accessing volumes in another security group.
• Some hosts do not belong to any security group, but the hosts are accessing volumes in a security
group.
To remove this error, you must find the hosts and the volumes that cause the error. To find them, take
the following steps:
1. In the Error Detail dialog box, click the arrow button at the right end of the Host drop-down list.
• If the drop-down list displays only one entry, only one host is causing the error.
• If the drop-down list displays two or more entries, two or more hosts are causing the error.
2. Select a host from the Host drop-down list.
3. Right-click the arrow button at the right end of the CU drop-down list, and then check how many
CU images are displayed in the drop-down list.
• If the drop-down list displays only one entry, the table displays all the volumes that are causing
the error.
• If the drop-down list displays two or more entries, some of the error-causing volumes are dis-
played in the table. To view other error-causing volumes, use the CU drop-down list to specify
another CU image.
4. If two or more hosts are causing the error, repeat steps 2. to 3.
If error-causing hosts and volumes are detected, do either of the following to remove the error:
• Vary the error-causing volume offline from the error-causing host. For detailed information about
varying the volume offline, see the documentation for host commands.
• Find the security group that contains the error-causing hosts and the error-causing volumes. Next,
disable the security settings of the security group (see “Disabling Volume Security” on page 58).
For troubleshooting information on the storage system, see the HP StorageWorks XP24000/XP20000
Disk Array Owner's Guide. For a complete list of Remote Web Console Error Codes, see the HP
StorageWorks XP24000/XP20000 Remote Web Console Error Codes.
For troubleshooting information on host operations, see the MVS documentation.
Calling HP Technical Support
If you need to call HP technical support, make sure to provide as much information about the problem
as possible, including:
• The circumstances surrounding the error or failure.
• The content of any error message(s) displayed on the host system(s).
XP24000/XP20000 Volume Security User's Guide 69
Page 70

• The content of any error message(s) displayed on the Remote Web Console computer.
• The Storage Navigator configuration information (use the FD Dump Tool).
• The service information messages (SIMs), including reference codes and severity levels, displayed
by the Remote Web Console computer.
• The Volume Security (or other) error code(s) displayed on the Remote Web Console computer.
• The exact content of any error messages displayed on the host system(s).
• The service information messages (R-SIMs), including reference codes and severity levels, displayed
by Remote Web Console and/or logged on the host.
For worldwide technical support information, see the HP support website:
http://www.hp.com/support
Troubleshooting70
Page 71

6 Support and Other Resources
Related Documentation
• HP StorageWorks XP24000/XP20000 Disk Array Owner's Guide
• Hitachi ShadowImage™ for Mainframe User's Guide
• Hitachi TrueCopy™ for Mainframe User's Guide
You can find these documents on the HP Manuals website:
http://www.hp.com/support/manuals
In the Storage section, click Storage Software and then select a product.
Conventions for Storage Capacity Values
HP XP storage systems use the following values to calculate physical storage capacity values (hard
disk drives):
• 1 KB (kilobyte) = 1,000 bytes
•
1 MB (megabyte) = 1,0002bytes
•
1 GB (gigabyte) = 1,0003bytes
•
1 TB (terabyte) = 1,0004bytes
•
1 PB (petabyte) = 1,0005bytes
HP XP storage systems use the following values to calculate logical storage capacity values (logical
devices):
• 1 KB (kilobyte) = 1,024 bytes
•
1 MB (megabyte) = 1,0242bytes
•
1 GB (gigabyte) = 1,0243bytes
•
1 TB (terabyte) = 1,0244bytes
•
1 PB (petabyte) = 1,0245bytes
• 1 block = 512 bytes
HP Technical Support
For worldwide technical support information, see the HP support website:
http://www.hp.com/support
Before contacting HP, collect the following information:
• Product model names and numbers
• Technical support registration number (if applicable)
• Product serial numbers
XP24000/XP20000 Volume Security User's Guide 71
Page 72

• Error messages
• Operating system type and revision level
• Detailed questions
Subscription Service
HP recommends that you register your product at the Subscriber’s Choice for Business website:
http://www.hp.com/go/e-updates
After registering, you will receive email notification of product enhancements, new driver versions,
firmware updates, and other product resources.
HP Websites
For additional information, see the following HP websites:
• http://www.hp.com
• http://www.hp.com/go/storage
• http://www.hp.com/support/manuals
• http://www.hp.com/storage/spock
Documentation Feedback
HP welcomes your feedback.
To make comments and suggestions about product documentation, send a message to
storagedocsFeedback@hp.com. All submissions become the property of HP.
Support and Other Resources72
Page 73

A Acronyms and Abbreviations
Table 1 Acronyms and Abbreviations
logical deviceLDEV
logical disk controllerLDKC
main volumeM-VOL
Multiple Virtual Storage (IBM)MVS
personal computerPC
printed circuit boardPCB
remote service information messageR-SIM
remote volumeR-VOL
HP StorageWorks XP Business Copy SoftwareSI
service information messageSIM
ShadowImage for MainframeSIz
service processorSVP
HP StorageWorks XP Continuous Access SoftwareTC
TrueCopy for MainframeTCz
TrueCopy Asynchronous for MainframeTCzA
target volumeT-VOL
XP24000/XP20000 Volume Security User's Guide 73
Page 74

Acronyms and Abbreviations74
Page 75

Index
A
access group, 9
Add/Change Host dialog box, 27
Add/Change Host Group dialog box, 24
Add/Change LDEV Group dialog box, 26
Add/Change Security Group dialog box, 21
C
conventions
storage capacity values, 71
D
device emulation types, 13
dialog boxes
Add/Change Host dialog box, 27
Add/Change Host Group dialog box, 24
Add/Change LDEV Group dialog box, 26
Add/Change Security Group dialog box, 21
Error Detail dialog box, 42
Host Group to Port dialog box, 37
Host Group to Security Group dialog box,
36
Host to LDEV dialog box, 35
Host to Security Group dialog box, 33
LDEV Group to Security Group dialog box,
41
LDEV to Host dialog box, 39
LDEV to Security Group dialog box, 38
Select LDEV dialog box, 29
Select Port dialog box, 31
Specify Security Group dialog box, 32
document
related documentation, 71
documentation
HP website, 71
providing feedback, 72
E
emulation types
volume (device), 13
Error Detail dialog box, 42
G
Groups
max qty host and vol, 7
GUI, 15
H
help
obtaining, 71
Host group
maximum possible number, 7
host group
creating, 9, 11, 47
maximum possible number, 14
registering hosts in, 48
registering in security group, 53
Host Group to Port dialog box, 37
Host Group to Security Group dialog box, 36
Host to LDEV dialog box, 35
Host to Security Group dialog box, 33
hosts
maximum possible number, 14
HP
technical support, 71
I
icons
in the Add/Change Host dialog box, 28
L
Launching Volume Security, 43
LDEV, 9
LDEV group
creating, 50, 53
maximum possible number, 14
registering in security group, 53, 56
registering volumes in, 51, 54
LDEV Group to Security Group dialog box, 41
LDEV security, 9
LDEV to Host dialog box, 39
LDEV to Security Group dialog box, 38
logical device, 9
XP24000/XP20000 Volume Security User's Guide 75
Page 76

P
pool group, 11
port-level security
overview, 10
R
R-VOL, 12
related documentation, 71
S
secondary volume, 12
Security
disabling, 58
policy, 7
security
enabling the specified hosts to access
volumes, 47
example, 10, 11, 12
prohibiting all hosts from accessing LDEVs,
53
protecting volumes from copy operations, 57
security group
classifying as a pool group, 55
classifying as an access group, 52
creating, 52, 55
maximum possible number, 14
registering a host group in, 53
registering an LDEV group in, 53, 56
Select LDEV dialog box, 29
Select Port dialog box, 31
Specify Security Group dialog box, 32
storage capacity values
conventions, 71
storage systems
supported models, 7
Subscriber's Choice, HP, 72
W
websites
HP, 72
HP Subscriber's Choice for Business, 72
product manuals, 71
windows
Volume Security window, 16
T
T-VOL, 12
technical support, 72
HP, 71
V
volume emulation types, 13
Volume Security group
maximum possible number, 7
Volume Security window, 16
volumes
maximum possible number, 14
76
 Loading...