

Page 1

in the box
contenu en la caja
F E
na caixa
P
connecting devices
connexions conexión de dispositivos
F E
conectando dispositivos
P
1
hp vectra xe320
Printed
01/2002
optional
DVD Playback
hp pc
operating system
image engineer -
backup cd-rom 1/2
hp pc
image engineer -
Boot on this cd-rom to
image creation and
start the recovery process.
recovery cd-rom
http://www.hp.com/go/support
W2K - DT and NT4 - DT SP6 - English
For distribution only with a new HP PC.
Store this cd-rom in a safe place.
hp p/n : 5970-0510-EN
commercial computer software
This cd-rom contains system recovery
software for backup purposes only.
The performance of this software is
the sole responsibility of HP. Carefully
read the software license agreement
in the documentation before using
the software. For regional support
information, refer to the paper
documentation.
© 1985-2000 Microsoft Corporation.
Portions
All rights reserved.
© Copyright 2001 Hewlett-Packard
Company
image creation and
recovery cd-rom
W2K - DT and NT4 - DT SP6 - English
hp p/n : 5970-0510-EN
commercial computer software
This cd-rom contains system recovery
software for backup purposes only.
The performance of this software is
the sole responsibility of HP. Carefully
read the software license agreement
in the documentation before using
the software. For regional support
information, refer to the paper
documentation.
© 1985-2000 Microsoft Corporation.
Portions
All rights reserved.
© Copyright 2001 Hewlett-Packard
Company
operating system
backup cd-rom 1/2
Boot on this cd-rom to
start the recovery process.
operating system
backup cd-rom 1/2
Boot on this cd-rom to
start the recovery process.
http://www.hp.com/go/support
For distribution only with a new HP PC.
Store this cd-rom in a safe place.
The information contained in this document is subject to change without notice.
Les informations de ce document sont sujettes à modifications sans préavis.
La información contenida en este documento está sujeta a modificación sin previo aviso.
A informação contida neste documento está sujeita a alterações sem aviso prévio.
DVD Playback
Software
Use this CD-ROM
to install the DVD
playback
software.
hp pc
image engineer -
image creation and
recovery cd-rom
W2K - DT and NT4 - DT SP6 - English
hp p/n : 5970-0510-EN
Software
Software CD-ROM for:
Use this CD-ROM
Microsoft® Windows® 98
to install the DVD
Second Edition, Windows®
playback
NT 4.0 (Service pack 4, 5, 6 or 6a),
software.
Windows® 2000 and Windows® XP.
WinDVDTM 2000
©
2001 Intervideo Inc.
All right reserved.
WinDVD is a trademark of
InterVideo Inc.
h
p
p
/
n
commercial computer software
This HP Software product is
copyrighted and licensed by HP.
Carefully read the software licence
agreement in your installation
guide or user's guide before
using this software product.
©
Copyright 2001 Hewlett-Packard Company
:
5
9
7
0
-
4
Software CD-ROM for:
Microsoft® Windows® 98
Second Edition, Windows®
NT 4.0 (Service pack 4, 5, 6 or 6a),
Windows® 2000 and Windows® XP.
6
X
X
©
Copyright 2001 Hewlett-Packard Company
All right reserved.
h
p
p
/
n
commercial computer software
This HP Software product is
copyrighted and licensed by HP.
Carefully read the software licence
agreement in your installation
guide or user's guide before
using this software product.
:
5
9
7
0
4
6
X
X
2
PS/2
PS/2
serial
parallel
line out
32
LAN
monitor
line in
mic
Ω
600
Ω
electret
3
USB x 2
PN:
final steps
3
a
b
c
d
http://www.hp.com/go/support
For distribution only with a new HP PC.
Store this cd-rom in a safe place.
©2002 Hewlett-Packard Company
hp pc
operating system
image engineer -
backup cd-rom 1/2
hp pc
image engineer -
Boot on this cd-rom to
image creation and
start the recovery process.
recovery cd-rom
http://www.hp.com/go/support
W2K - DT and NT4 - DT SP6 - English
For distribution only with a new HP PC.
Store this cd-rom in a safe place.
Portions
© 1985-2000 Microsoft Corporation.
All rights reserved.
© Copyright 2001 Hewlett-Packard
Company
Software CD-ROM for:
Microsoft® Windows® 98
Second Edition, Windows®
NT 4.0 (Service pack 4, 5, 6 or 6a),
Windows® 2000 and Windows® XP.
This HP Software product is
copyrighted and licensed by HP.
Carefully read the software licence
agreement in your installation
guide or user's guide before
using this software product.
©
Copyright 2001 Hewlett-Packard Company
W2K - DT and NT4 - DT SP6 - English
hp p/n : 5970-0510-EN
commercial computer software
This cd-rom contains system recovery
software for backup purposes only.
The performance of this software is
the sole responsibility of HP. Carefully
read the software license agreement
in the documentation before using
the software. For regional support
information, refer to the paper
documentation.
DVD Playback
Software
Use this CD-ROM
to install the DVD
playback
software.
WinDVDTM 2000
©
2001 Intervideo Inc.
All right reserved.
WinDVD is a trademark of
InterVideo Inc.
hp p/n :
5970
-46XX
commercial computer software
image creation and
recovery cd-rom
hp p/n : 5970-0510-EN
commercial computer software
This cd-rom contains system recovery
software for backup purposes only.
The performance of this software is
the sole responsibility of HP. Carefully
read the software license agreement
in the documentation before using
the software. For regional support
information, refer to the paper
documentation.
Portions
© 1985-2000 Microsoft Corporation.
All rights reserved.
© Copyright 2001 Hewlett-Packard
Company
Software CD-ROM for:
Microsoft® Windows® 98
Second Edition, Windows®
NT 4.0 (Service pack 4, 5, 6 or 6a),
Windows® 2000 and Windows® XP.
All right reserved.
hp p/n :
commercial computer software
This HP Software product is
copyrighted and licensed by HP.
Carefully read the software licence
agreement in your installation
guide or user's guide before
using this software product.
©
Copyright 2001 Hewlett-Packard Company
5970-46XX
operating system
backup cd-rom 1/2
Boot on this cd-rom to
start the recovery process.
DVD Playback
Use this CD-ROM
to install the DVD
playback
software.
Software
étapes finales últimos pasos
F E
autres informations más información
F E
more information
passos finais
P
a Check the voltage selection switch on the back of the PC is set to the correct
voltage.
b Plug the power cord into the wall outlet and turn on your PC. Follow the onscreen
instructions to install your operating system and drivers.
c If you want to downgrade or recover your OS, you must use the Image Creation
& Recovery CD and Image Library & Diagnostics CD provided with your
d You may have to install applications and utilities for devices such as CD-RW and
DVD drives from the CDs provided.
a Vérifiez que le sélecteur de tension situé à l’arrière du PC est réglé sur la tension
appropriée.
b Branchez le cordon d’alimentation sur la prise murale et mettez votre
PC sous tension. Suivez les instructions pour installer le système d’exploitation
et les pilotes.
c Si vous souhaitez rétrograder ou récupérer le système d’exploitation, utilisez le
F
E
hp pc
operating system
image engineer -
backup cd-rom 1/2
image creation and
recovery cd-rom
Boot on this cd-rom to
start the recovery process.
W2K - DT and NT4 - DT SP6 - English
hp p/n : 5970-0510-EN
P
CD de création d’image et de récupération et le CD Image Library &
Diagnostics fournis avec votre PC.
d Il vous faudra peut-être installer des applications et des utilitaires pour des
périphériques tels que les lecteurs de CD-RW et de DVD, à l’aide des CD
fournis.
a Compruebe que el selector de voltage de la parte posterior del PC senale el
voltage correcto.
b Conecte el cable de alimentación a la toma de corriente de la pared y encienda
el PC. Siga las instrucciones que aparecen en la pantalla para instalar el
sistema operativo y los controladores.
c Si desea recuperar o instalar una versión inferior del sistema operativo, deberá
utilizar el CD de creación y recuperación de imágenes y el CD-ROM Image
Library & Diagnostics suministrados con el PC.
d Para que el PC funcione correctamente, puede que tenga que instalar
aplicaciones y utilidades para dispositivos tales como unidades de CD-RW y
DVD, que se incluyen en los CDs suministrados.
a Verifique que o comutador de seleção da tensão, na parte traseira do PC, está
ajustado na tensão correta.
b Ligue o cabo de alimentação na tomada elétrica e ligue seu PC. Siga as
instruções na tela para instalar seu sistema operacional e drivers.
c Se você desejar diminuir ou recuperar seu sistema operacional deve usar o CD
Creation & Recovery (criação e recuperação) e o CD Image Library &
Diagnostics (biblioteca de imagem e diagnóstico) fornecido com seu PC.
d Você pode ter que instalar aplicativos e utilitários para dispositivos tais como
unidades de CD-RW e DVD desde os CDs fornecidos.
PC.
4
www.hp.com/go/vectrasupport
www.hp.com/go/vectrasupport
www.hp.com/go/instantsupport
www.hp.com/go/instantsupport
mais informação
P
Go to www.hp.com/go/vectrasupport:
and information.
Go to hp instant support:
Visitez le site www.hp.com/go/vectrasupport : pour les
manuels, les informations et les fichiers à télécharger les plus
récents.
F
Allez sur hp instant support:
du PC, des diagnostics et des solutions.
Vaya a www.hp.com/go/vectrasupport: para obtener los
últimos manuales, descargas e información.
E
Vaya a hp instant support: para obtener resolución de
problemas en la web, soluciones y diagnósticos.
Visite www.hp.com/go/vectrasupport
recentes manuais, downloads e informação.
Visite hp instant support: para resolução de problemas,
P
diagnóstico e soluções através da Web.
for web troubleshooting, diagnostics and solutions.
pour un dépannage en ligne
for the latest manuals, downloads
: para obter os mais
Page 2
instant servicing:
memory and pci cards
e
f
mémoire/carte PCI memoria y tarjetas pci
F E
placas de memória
P
e pci
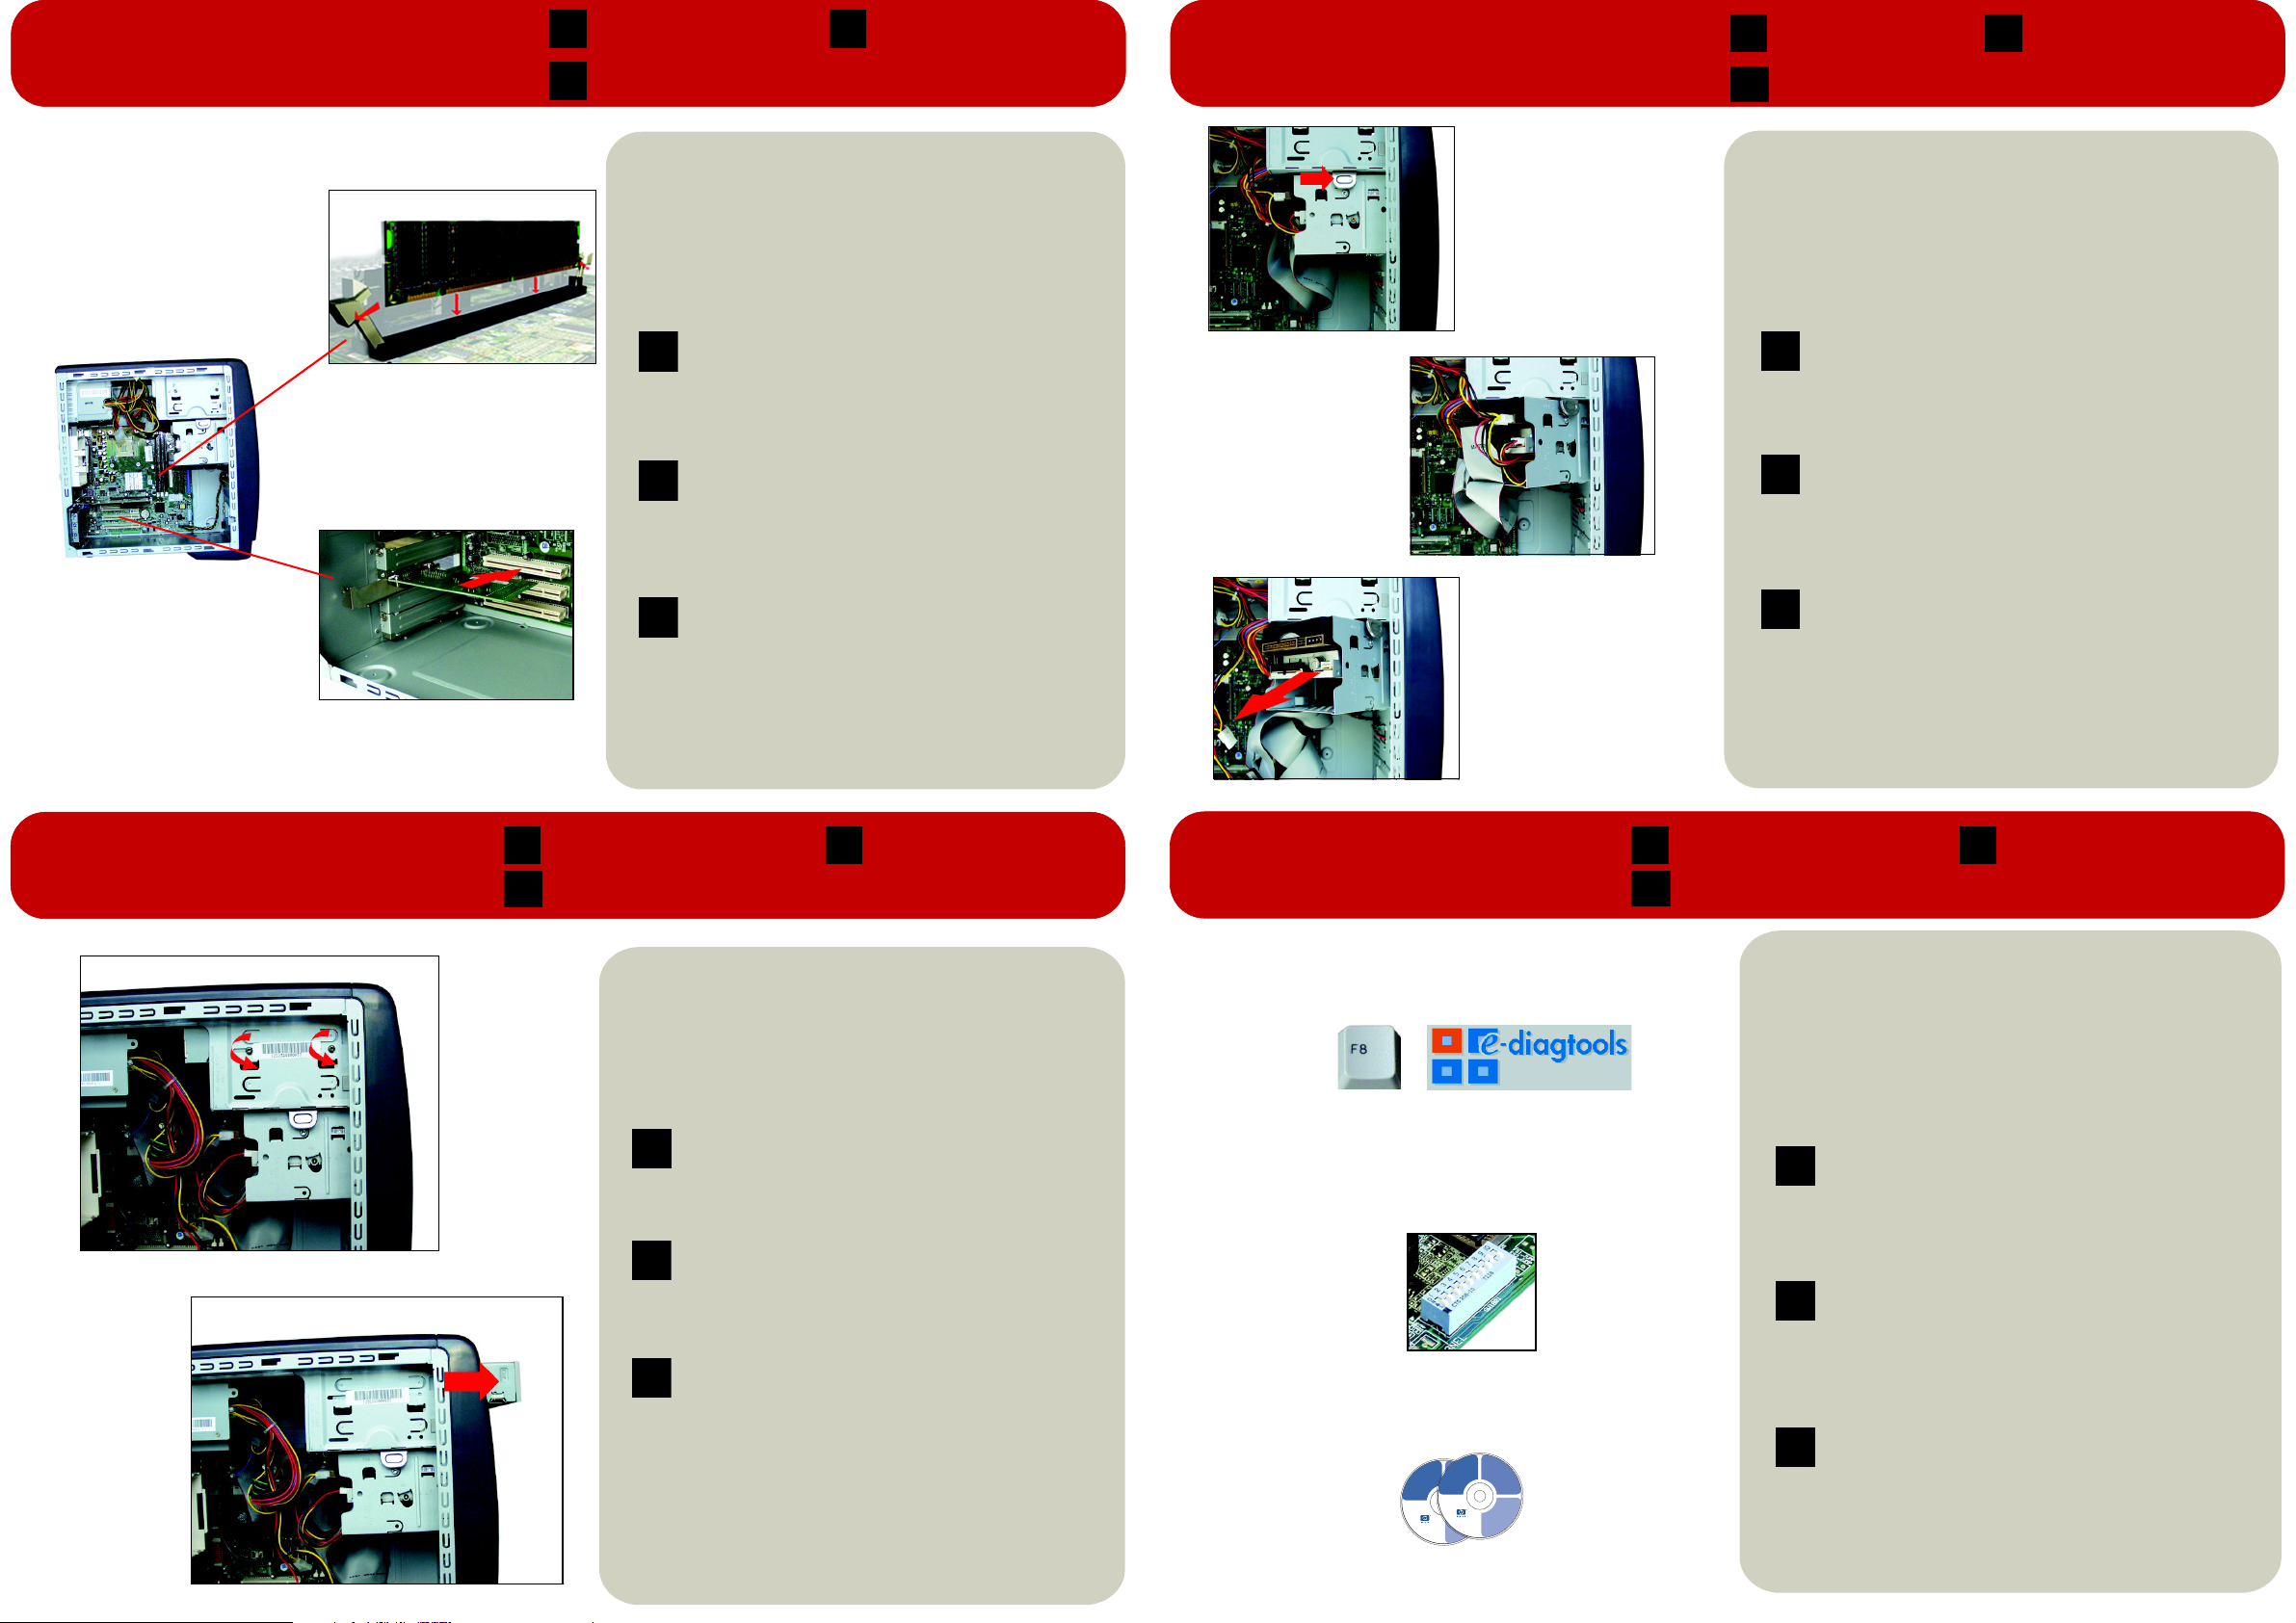
Switch off the monitor and PC.
a
b Disconnect the power cord and any telecommunications cables.
c Unscrew the two rear thumbscrews, slide back and lift off the compartment
cover.
d Replace the memory module as shown, ensuring that it is aligned correctly and
pushed firmly into place.
e Add the PCI card as shown, ensuring that it is aligned correctly and pushed
firmly into place.
f Replace the compartment cover and reconnect all cables.
a
Eteignez le moniteur et le PC.
b Débranchez le cordon d’alimentation et tout câble de télécommunications.
c Desserrez les deux vis de fixation situées à l’arrière, faites glisser le capot vers
l’arrière puis retirez-le.
d Mettez le module de mémoire en place, comme indiqué, en vous assurant qu’il
F
E
P
est correctement aligné et inséré.
e Insérez la carte PCI comme illustré ci-contre, en vous assurant qu’elle est
correctement alignée et insérée.
f Remettez le capot du compartiment en place et reconnectez tous les câbles.
a Apague el monitor y el PC.
b Desconecte el cable de alimentación y cualquier otro cable de
telecomunicaciones.
c Desatornille los dos tornillos de mariposa posteriores, deslice hacia atrás la
cubierta del compartimento y levántela.
d Sustituya el módulo como se indica, asegurándose de que esté alineado
correctamente y firmemente encajado.
e Añada la tarjeta PCI como se indica, asegurándose de que esté alineado
correctamente y firmemente encajado.
f Vuelva a colocar la cubierta del compartimento y conecte de nuevo todos los
cables.
a Desligue o monitor e o PC.
b Desconecte o cabo de alimentação e todos os cabos das telecomunicações.
c Desaparafuse os dois parafusos traseiros de aperto manual, deslize para trás
a tampa do compartimento e levante-a.
d Substitua o módulo da memória como mostrado, assegurando-se de que
esteja alinhado corretamente e introduzido firmemente no lugar.
e Adicione a placa PCI como mostrado, assegurando-se de que esteja alinhada
corretamente e introduzida firmemente no lugar.
f Volte a colocar a tampa do compartimento e conecte todos os cabos.
instant servicing:
hard and
d
f
floppy drives
e
disque dur et lecteur
F E
disquette
unidades de disco
P
rígido e de disquete
Switch off the monitor and PC.
a
b Disconnect the power cord and any telecommunications cables.
c Unscrew the two rear thumbscrews, slide back and lift off the compartment cover.
d Push the catch inwards and pull the hard drive tray out part of the way.
e Disconnect the cables.
f Pull the hard drive tray out.
g Remove the three screws that attach the hard drive or floppy drive to the hard drive
tray
h Reverse this process to install it.
a Eteignez le moniteur et le PC.
b Débranchez le cordon d’alimentation et tout câble de télécommunications.
c Desserrez les deux vis de fixation situées à l’arrière, faites glisser le capot vers
l’arrière puis retirez-le.
d Appuyez sur la languette et sortez partiellement le tiroir du disque dur.
F
e Débranchez les câbles.
f Retirez complètement le tiroir du disque dur.
g Enlevez les trois vis fixant le disque dur ou le lecteur de disquette au tiroir.
h Effectuez la procédure inverse pour installer le disque dur ou le lecteur de disquette.
a
Apague el monitor y el PC.
b Desconecte el cable de alimentación y cualquier otro cable de telecomunicaciones.
c Desatornille los dos tornillos de mariposa posteriores, deslice hacia atrás la cubierta
del compartimento y levántela.
d Presione las pestañas y extraiga parte de la bandeja de la unidad de disco duro.
E
e Desconecte los cables.
f Extraiga la bandeja de la unidad de disco duro.
g Retires los tres tornillos que unen el disco duro o la unidad de disquetes a la bandeja
de la unidad de disco duro.
h Invierta el proceso para instalarla.
a Desligue o monitor e o PC.
b Desconecte o cabo de alimentação e todos os cabos das telecomunicações.
c Desaparafuse os dois parafusos traseiros de aperto manual, deslize para trás a
tampa do compartimento e levante-a.
d Empurre o prendedor para dentro e puxe a bandeja da unidade até que possa
P
acessar os cabos.
e Desconecte os cabos.
f Retire a bandeja da unidade.
g Remova os três parafusos que fixam a unidade de disco rígido ou de disquetes à
bandeja da unidade.
h Para efetuar a instalação realize o processo inverso.
unidades de disco duro y
disquetes
instant servicing:
optical drives
e
f
lecteurs optiques unidades ópticas
F E
unidades óticas
P
Switch off the monitor and the PC.
a
b Disconnect the power cord and any telecommunications cables.
c Unscrew the two rear thumbscrews, slide back and lift off the compartment
cover.
d Disconnect the cables from the optical drive.
e Unscrew the retaining screws.
f Pull the optical drive out.
g Reverse this process to install it.
a Eteignez le moniteur et le PC.
b Débranchez le cordon d’alimentation et tout câble de télécommunications.
c Desserrez les deux vis de fixation situées à l’arrière, faites glisser le capot
F
E
P
vers l’arrière puis retirez-le.
d Débranchez les câbles du lecteur optique.
e Desserrez les vis de fixation.
f Retirez le lecteur optique.
g Suivez la procédure inverse pour installer le lecteur.
a Apague el monitor y el PC.
b Desconecte el cable de alimentación y cualquier otro cable de
telecomunicaciones.
c Desatornille los dos tornillos de mariposa posteriores, deslice hacia atrás la
cubierta del compartimento y levántela.
d Desconecte los cables de la unidad óptica.
e Desatornille los tornillos de retención.
f Extraiga la unidad óptica.
g Invierta el proceso para instalarla.
a Desligue o monitor e o PC.
b Desconecte o cabo de alimentação e todos os cabos das
telecomunicações.
c Desaparafuse os dois parafusos traseiros de aperto manual, deslize para
trás a tampa do compartimento e levante-a.
d Desconecte os cabos da unidade ótica.
e Desaparafuse os parafusos de retenção.
f Retire a unidade ótica
g Para efetuar a instalação realize o processo inverso.
instant servicing:
troubleshooting
a
b
e
CMOS
operating system
backup cd-rom 1/2
hp pc
operating system
image engineer -
Boot on this cd-rom to
backup cd-rom 1/2
image creation and
start the recovery process.
recovery cd-rom
Boot on this cd-rom to
start the recovery process.
http://www.hp.com/go/support
W2K - DT and NT4 - DT SP6 - English
For distribution only with a new HP PC.
http://www.hp.com/go/support
Store this cd-rom in a safe place.
For distribution only with a new HP PC.
Store this cd-rom in a safe place.
Portions
© 1985-2000 Microsoft Corporation.
All rights reserved.
© Copyright 2001 Hewlett-Packard
Company
W2K - DT and NT4 - DT SP6 - English
hp p/n : 5970-0510-EN
commercial computer software
This cd-rom contains system recovery
software for backup purposes only.
The performance of this software is
the sole responsibility of HP. Carefully
read the software license agreement
in the documentation before using
the software. For regional support
information, refer to the paper
documentation.
hp pc
image engineer -
image creation and
recovery cd-rom
© 1985-2000 Microsoft Corporation.
Portions
All rights reserved.
© Copyright 2001 Hewlett-Packard
Company
hp p/n : 5970-0510-EN
commercial computer software
This cd-rom contains system recovery
software for backup purposes only.
The performance of this software is
the sole responsibility of HP. Carefully
read the software license agreement
in the documentation before using
the software. For regional support
information, refer to the paper
documentation.
backup cd-rom 1/2
Boot on this cd-rom to
start the recovery process.
operating system
hp pc
image engineer -
image creation and
recovery cd-rom
W2K - DT and NT4 - DT SP6 - English
hp p/n : 5970-0510-EN
dépannage resolución de problemas
F E
solução de problemas
P
Try this first
a Run e-Diagtools. Reboot the PC, then press and hold down F8 just after the
computer powers on.
b Clear CMOS jumper. Go to www.hp.com/go/vectrasupport for instructions.
c Update BIOS and drivers. Go to www.hp.com/go/vectrasupport.
d If a problem occurs after installing software, uninstall the software to see if the
problem disappears.
e If you experience problems such as hangs or blue screens, HP recommends
reinstalling your operating system. To do so, insert the Image Creation & Recovery
CD and follow the onscreen instructions.
A faire en priorité
a Lancez e-Diagtools. Redémarrez le PC et appuyez sur F8 à l’invite.
b Effacez le CMOS. Pour les instructions, voir www.hp.com/go/vectrasupport.
c Mettez à jour le BIOS et les pilotes. Voir www.hp.com/go/vectrasupport.
d En cas de problème après l’installation d’un logiciel, désinstallez le logiciel
F
E
P
incriminé et vérifiez si le problème persiste.
e En cas de blocage ou d’écran bleu, HP recommande de réinstaller le système
d’exploitation. Pour ce faire, insérez le CD de création d’image et de récupération
et suivez les instructions.
Intente esto en primer lugar
a Ejecute e-Diagtools. Reinicie el PC y oprima F8 cuando se le indique.
b Borre el CMOS o la contraseña. Vaya al sitio www.hp.com/go/vectrasupport
para obtener instrucciones.
c Actualice el BIOS y los controladores. Vaya al sitio www.hp.com/go/
vectrasupport.
d Si surge algún problema después de instalar el software, desinstálelo para
comprobar si el problema desaparece.
e Si tiene algún problema, como pantallas bloqueadas o en azul, HP recomienda
que vuelva a instalar el sistema operativo. Para ello, inserte el CD de creación y
recuperación de imágenes y siga las instrucciones de la pantalla.
Tente isto primeiro
a Execute e-Diagtools. Reinicie o PC, e imediatamente depois pressione e mantenha
pressionada a tecla F8 após ligar o computador.
b Cancele a ligação em ponte do CMOS. Visite www.hp.com/go/vectrasupport
para instruções.
c Atualize o BIOS e os drivers. Visite www.hp.com/go/vectrasupport.
d Se ocorrer um problema após ter instalado o software, desinstale o software para
ver se o problema desaparece.
e Se você experimentar problemas como inatividade ou telas azuis, a HP
recomenda reinstalar seu sistema operacional. Para fazer isto, insira o CD
Creation & Recovery (criação e recuperação) e siga as instruções na tela.
 Loading...