

Page 1

Page 2

The only warranties for Hewlett-Packard products and services are set forth in the express
statements accompanying such products and services. Nothing herein should be construed as
constituting an additional warranty. HP shall not be liable for technical or editorial errors or
omissions contained herein.
HP assumes no responsibility for the use or reliability of its software on equipment that is not
furnished by HP.
This document contains proprietary information that is protected by copyright. No part of this
document may be photocopied, reproduced, or translated to another language without the prior
written consent of HP.
Hewlett-Packard Company
P.O. Box 4010
Cupertino, CA 95015-4010
USA
Copyright © 2008 Hewlett-Packard Development Company, L.P.
This product incorporates copyright protection technology that is protected by U.S. patents and
other intellectual property rights. Use of this copyright protection technology must be authorized by
Macrovision, and is intended for home and other limited pay-per-view viewing uses only unless
otherwise authorized by Macrovision. Reverse engineering or disassembly is prohibited.
Microsoft and Windows Vista are U.S. registered trademarks of Microsoft Corporation.
The Windows logo and Windows Vista are trademarks or registered trademarks of Microsoft
Corporation in the United States and/or other countries/regions.
HP supports lawful use of technology and does not endorse or encourage the use of our products
for purposes other than those permitted by copyright law.
The information in this document is subject to change without notice.
Page 3

Table of Contents
Setting Up Your HP TouchSmart PC to Watch TV in
Windows Media Center............................................................................1
Setting Up the TV Signal.......................................................................................... 1
Changing Settings for Digital TV Antenna Signal Strength............................................2
Configuring the Display on Your HP TouchSmart PC ...................................................2
Setting Your TV Audio Preferences............................................................................3
Setting Your Closed Captioning Preferences ..............................................................3
Using the Windows Media Center Remote Control ....................................5
Remote Control Buttons Overview.............................................................................6
Using the remote control with Windows Media Center................................................8
Setting up the HP TouchSmart PC with a Set-top Box ...................................................9
Troubleshooting the Remote Control........................................................................10
Watching and Recording TV Programs ...................................................11
Navigating TV + Movies .......................................................................................11
Watching TV .......................................................................................................13
Watching live TV.............................................................................................13
Controlling TV playback ...................................................................................14
Using the remote control in TV + Movies.............................................................15
Using the Television Program Guide .......................................................................16
Using Windows Media Center without the guide.................................................16
Television Program Guide errors........................................................................ 17
Viewing the Television Program Guide ...............................................................18
Setting up how Windows Media Center downloads the guide ..............................19
Adding a postal code to receive the correct guide ...............................................20
Adding missing channels to the guide ................................................................ 20
Editing and removing channels in the guide........................................................21
Searching for TV Programs ....................................................................................21
Searching for TV programs by using categories................................................... 22
Table of Contents iii
Page 4

Recording TV Programs......................................................................................... 23
Recording TV by using the guide .......................................................................24
Recording programs manually without using the guide .........................................24
Recording quality and hard disk drive storage space ........................................... 25
Watching TV programs stored on the HP Media Drive .........................................26
About recording TV to the HP Media Drive .........................................................27
Recording TV programs to the HP Media Drive....................................................27
Changing the TV recording path to the HP Media Drive .......................................28
Changing the TV recording path to the local hard disk drive................................. 28
Add TV recording folder for Windows Media Center to find .................................29
Changing disk space for recording TV programs................................................. 29
Updating recorded TV list after removing the HP Media Drive ...............................29
System requirements to view recorded TV programs on other computers.................30
Copying recorded TV programs to DVD or CD....................................................30
Media copy protection .....................................................................................31
Playing Recorded TV Programs...............................................................................32
Playing DVDs in Windows Media Center ................................................................32
Index.....................................................................................................33
iv Watching and Recording TV
Page 5

Setting Up Your HP TouchSmart PC to
Watch TV in Windows Media Center
For information on connecting the TV signal, refer to the setup instructions
that came with your computer.
Once you have a TV signal, Microsoft Windows Media Center enables you to watch live
TV and record TV programs on your computer. Windows Media Center is optimized for
widescreen and high-definition displays.
With Windows Media Center, you can:
Watch, record, and play back television programs.
Pause, rewind, and fast-forward TV programs.
Watch an instant replay.
Record your TV shows automatically while you are doing something else.
Setting Up the TV Signal
1 Click the Windows Start Button on the taskbar, and then All Programs.
2 Click Windows Media Center .
3 Locate the Tasks menu, and click settings. If “settings” is not in the selection box
under Tasks when you first click it, click settings again when it appears in that box.
4 Click TV, and then Set Up TV Signal.
5 Click Yes, and then Next.
6 Select a region, and click Next.
Setting Up Your HP TouchSmart PC to Watch TV in Windows Media Center 1
Page 6

Changing Settings for Digital TV Antenna Signal Strength
1 Click the Windows Start Button on the taskbar, and then All Programs.
2 Click Windows Media Center .
3 Locate the Tasks menu, and click settings. If “settings” is not in the selection box
under Tasks when you first click it, click settings again when it appears in that box.
4 Click TV, and then Digital TV Antenna Signal Strength.
5 Click Yes to change the settings, and then Next.
Configuring the Display on Your HP TouchSmart PC
Use the Display Configuration wizard to change the way Windows Media Center looks on
your display. Adjustments are based on your display type and your aesthetic preferences.
1 Click the Windows Start Button on the taskbar, and then All Programs.
2 Click Windows Media Center .
3 Locate the Tasks menu, and click settings. If “settings” is not in the selection box
under Tasks when you first click it, click settings again when it appears in that box.
4 Click TV, Configure Your TV or Monitor, and then Next.
5 Select Built-in Display, and then click Next.
6 Select Widescreen (16:9), and then click Next.
7 Click Yes to keep the current resolution, click Next, and then click Finish.
Or
Click No to change the resolution.
Select your preferred solution, and then click Next.
Select Keep my current settings and continue, click Next, and then
Finish.
Or
Select Preview automatic adjustments, and then click Next.
Select a new display resolution, and then click Next.
Select Keep my current settings and continue, click Next, and then click
Finish.
Or
Select Preview automatic adjustments, and then click Next.
Select Yes to accept the new settings, and then click Next.
Or
2 Watching and Recording TV
Page 7

Click No, and then Next.
8 If you selected Yes to accept the new settings, you can:
Select Finish this wizard, click Next, and then Finish.
Or
Click Next to view a list of controls you set to your preferences: Onscreen
Centering and Sizing, Aspect Ratio (Shape), Brightness (Black &
Shadow), Contrast (White), and RGB Color Balance.
Adjust the settings to your preferences, click Next, and then Finish.
Setting Your TV Audio Preferences
1 Click the Windows Start Button on the taskbar, and then All Programs.
2 Click Windows Media Center .
3 Locate the Tasks menu, and click settings. If “settings” is not in the selection box
under Tasks when you first click it, click settings again when it appears in that box.
4 Click TV, and then Audio.
5 Select the appropriate audio format, and then click Save.
Setting Your Closed Captioning Preferences
1 Click the Windows Start Button on the taskbar, and then All Programs.
2 Click Windows Media Center .
3 Locate the Tasks menu, and click settings. If “settings” is not in the selection box
under Tasks when you first click it, click settings again when it appears in that box.
4 Click TV, and then Closed Captioning.
5 Use the plus (+) and minus (–) signs to set your preferences.
6 Click Save.
7 Click Advanced to take advantage of advanced Closed Captioning options.
8 Select Use Settings in Broadcast, and then click Save.
Or
Select Use Custom Settings Below, and use the plus (+) and minus (–) signs to set
your preferences.
9 Click Save, and then Save again.
Setting Up Your HP TouchSmart PC to Watch TV in Windows Media Center 3
Page 8

4 Watching and Recording TV
Page 9
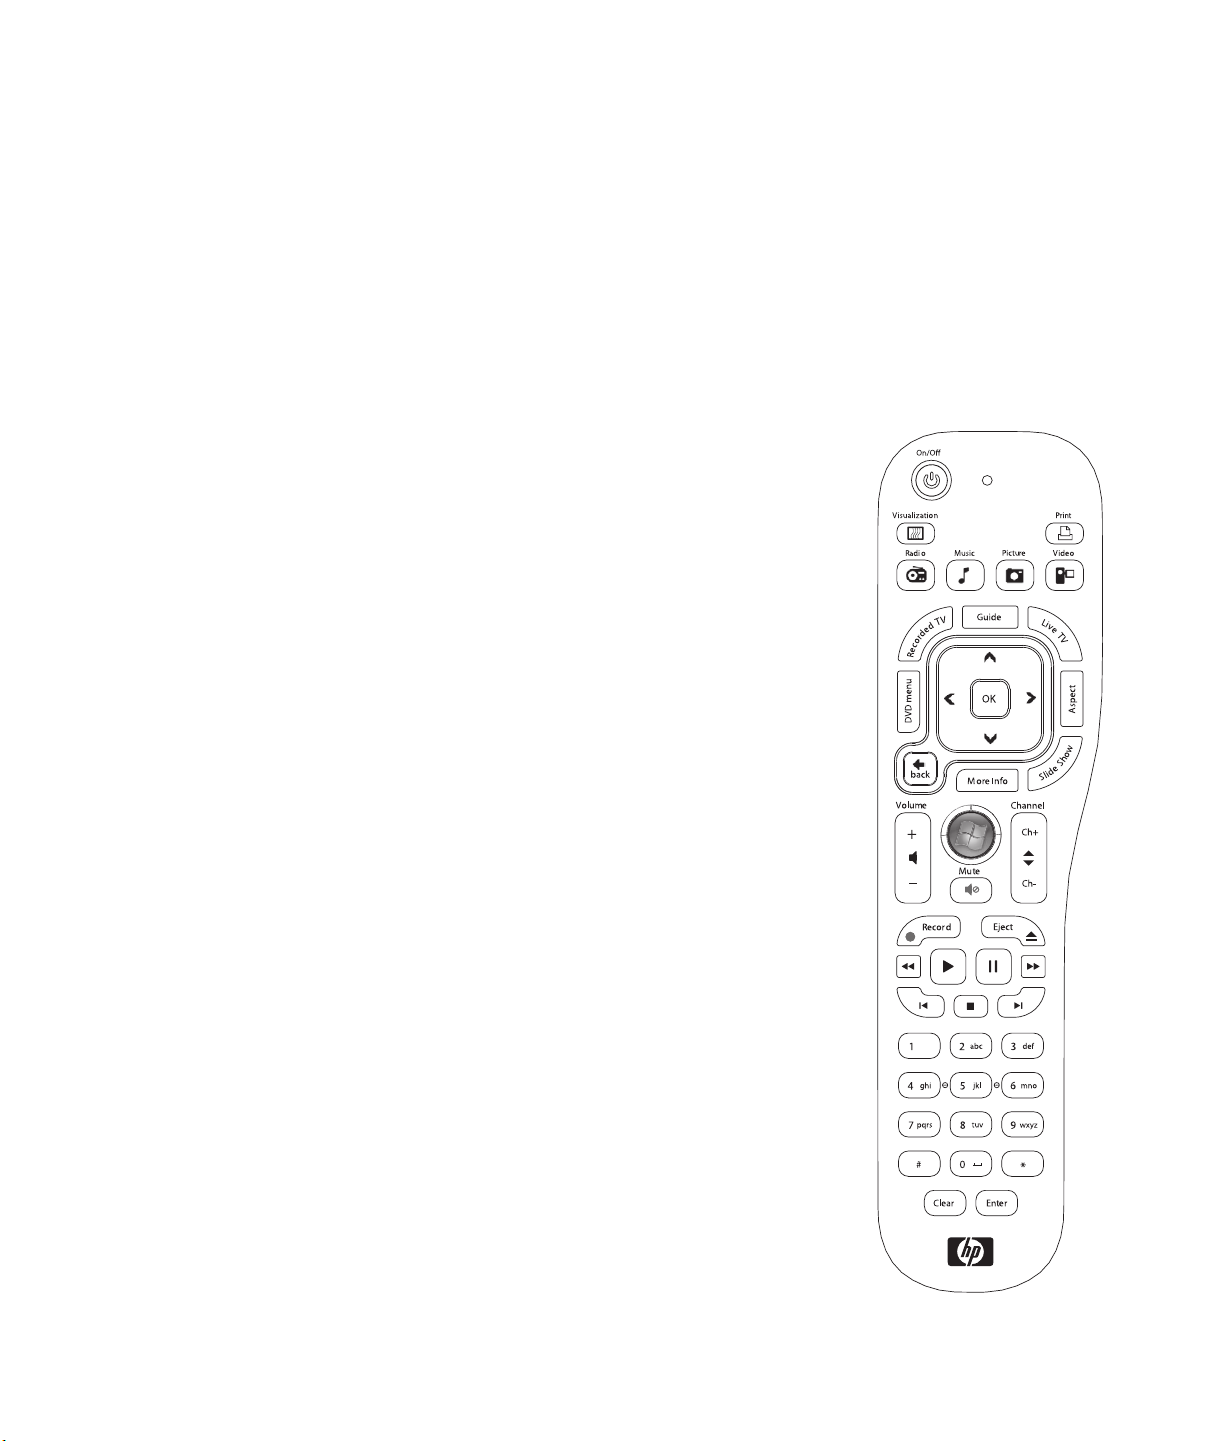
Using the Windows Media Center
Remote Control
The remote control is designed to work with Windows Media
Center. You can use the remote control with Windows Media
Center to play CDs and DVDs, view pictures, and much more.
This remote control helps you navigate the Windows Media
Center windows on the computer just as a TV remote control
helps you navigate cable TV options or control the playback of
a movie in a VCR or DVD player.
The remote control can:
Navigate and control all Windows Media Center
windows.
Control the video display.
Place the computer in and out of sleep mode.
Shut down or restart the computer.
Close Windows Media Center or switch users.
The remote control cannot:
Navigate the Windows desktop or control other computer
programs outside of Windows Media Center.
Be used as a VCR, DVD player, or stereo remote control.
Turn on the computer.
Using the Windows Media Center Remote Control 5
Page 10
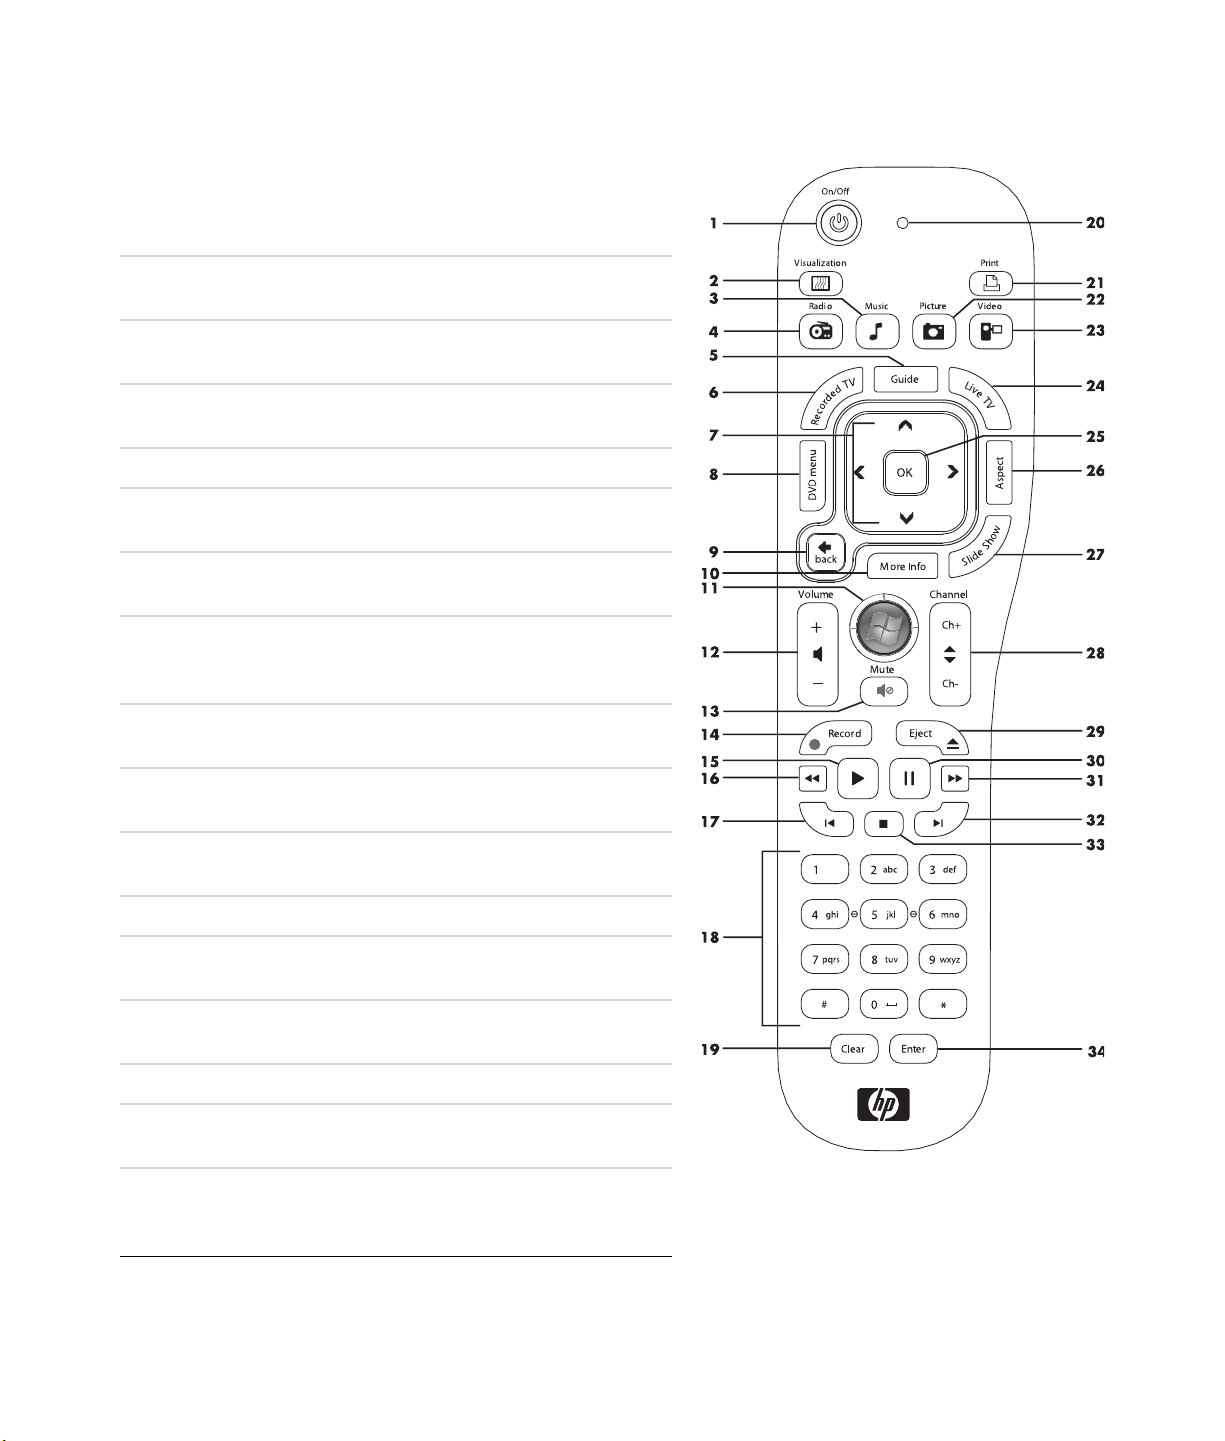
Remote Control Buttons Overview
1 On/Off — Puts the computer into and out of a
power-reduced Sleep mode. It does not turn the
computer off.
2 Visualization — Displays visual imagery that is
synchronized to the sound of the music tracks.
3Music — Opens the Music Library window in
Windows Media Center.
4Radio — Opens the FM Radio window in Windows
Media Center.
5Guide — Opens the Television Program Guide.
6 Recorded TV — Opens the recorded tv window
where recorded TV programs are listed.
7Arrows — Moves the cursor to navigate and select
actions within all Windows Media Center windows.
8DVD Menu — Opens the Play DVD window in
Windows Media Center or opens the main menu of a
DVD movie, if available.
9Back — Returns to the previous window within
Windows Media Center.
10 More Info — Displays available information about a
selected media file and displays other menus.
11 Start — Opens the Windows Media Center
main menu.
12 Volume — Increases (+) and decreases (–) volume.
13 Mute — Turns computer sound off. The word Mute is
displayed when Mute is turned on.
14 Record — Records a selected television program and
stores it on the hard disk drive.
15 Play — Plays the selected media.
16 Rewind — Moves the media backward at
three speeds.
17 Skip Backward — Moves media backward
7 seconds or to the beginning of a music track or a
DVD chapter.
6 Watching and Recording TV
Page 11

18 0 to 9, #, * — Enters text and numbers into a Windows Media Center search or text box. Each time
you press a number button, a different character appears. Press the Enter button to select a character.
19 Clear — Deletes the last character entered.
20 LED — Activity indicator light. The LED tells you that the remote control is emitting a signal when you
press a button.
21 Print — Prints an item in Windows Media Center.
22 Picture — Opens the Pictures Library window in Windows Media Center.
23 Video — Opens the Videos Library window in Windows Media Center.
24 Live TV — Displays the full-screen view of live TV. Moves a TV program forward to the end of the pause
buffer and resumes playing live TV.
25 OK — Selects the desired action or window option and acts as the Enter key.
26 Aspect — Changes the aspect ratio of the display. Zooms in on the picture three times, and then returns
to the full-screen aspect ratio.
27 Slide Show — Plays a slide show of all the pictures on the hard disk drive.
28 Ch+ and Ch– — Changes the TV channels or moves pages up and down, depending on available
options. Moves to the next DVD chapter.
29 Eject — Ejects CD or DVD drive.
30 Pause — Pauses audio and video tracks and live or recorded TV programs.
31 Fast Forward — Moves the media forward at three speeds.
32 Skip Forward — Moves the media forward 30 seconds in videos and live TV, one music track, or one
DVD chapter.
33 Stop — Stops the media currently playing.
34 Enter — Selects the desired action, menu, or window option.
NOTE: Make sure the computer goes into sleep mode and turn down or mute the volume if you have, for
example, a scheduled recording in the middle of the night and do not want to be disturbed. The computer does
not automatically go into sleep mode if Windows Media Center is open. It is recommended that you close
Windows Media Center before you manually place the computer in sleep mode.
Using the Windows Media Center Remote Control 7
Page 12

Using the remote control with Windows Media Center
You can use the remote control within Windows Media Center to view photos, play music,
watch TV programs, and perform many other activities. Use the arrow keys to select a
shortcut, and then press the OK key to activate the selected shortcut.
To navigate within the Windows Media Center program, point the remote control at the
remote control sensor at the front of the HP TouchSmart PC, and then press a button on the
remote control.
To turn on the HP TouchSmart PC or put it into Sleep mode, press the On/Sleep button on
the remote control.
8 Watching and Recording TV
Page 13

Setting up the HP TouchSmart PC with a Set-top Box
If your TV signal for Windows Media Center requires a cable TV set-top box, a satellite settop box, or another set-top box, you must connect the infrared (IR) emitter cable to the
computer and your set-top box in order to use the remote control properly.
The IR emitter cable is a remote control sensing device that connects to the computer and
covers the remote sensor on a set-top box. It enables the remote control that came with
your HP TouchSmart PC to operate your set-top box when you use the Windows Media
Center program to select TV channels.
To use a set-top box with Windows Media Center:
1 Connect the IR emitter cable (A) to the IR Out connector (D) on the back of the PC.
2 Remove the paper from the backing tape on the end of the cable (B), and then press
the end of the cable over the remote infrared (IR) sensor (receiver) window on the settop box (C). To locate the remote infrared sensor window, shine a flashlight through
the plastic on the front of the set-top box.
3 When you use the remote control, point it at the front of the HP TouchSmart PC (E), not
at the set-top box.
USB 2.0
USB 2.0
USB 2.0
Gigabit Ethernet LAN
SPDIF (output)
2.1 Audio (output)
TV Signal Input (F-Type or PAL Coax, varies by region)
S-video (input)
Stereo Audio (input)
D
IR Blaster (output)
C
A
E
B
WARNING: Please read “Additional Safety Information” in the Limited
Warranty and Support Guide before you install your HP TouchSmart PC and
connect it to the electrical power system.
Using the Windows Media Center Remote Control 9
Page 14

Troubleshooting the Remote Control
If the remote control doesn’t work:
Make sure that the batteries for the remote control are charged and installed correctly.
Make sure the front of the remote sensor (IR receiver) is not blocked.
If a pressed key repeats itself or sticks, try altering the lighting conditions in the room if
this continues.
Press the Enter button on the remote control after changing a channel.
Point the remote control toward the remote sensor, and press a button. A faint red light
should appear on the remote sensor. If the light appears, then the problem is probably
in the Windows Media Center software. Close Windows Media Center, restart the
computer, and then open Windows Media Center again.
If the remote control works in Windows Media Center but not when changing channels,
you need to reconfigure the Windows Media Center software settings for the cable set-top
box or satellite receiver.
10 Watching and Recording TV
Page 15

Watching and Recording TV Programs
Windows Media Center is where you can watch live TV or record your favorite programs
for later playback with a few clicks of the remote control. You can use the Television
Program Guide to find the program that you want to watch or record. You can also record
a program while watching another prerecorded program.
Navigating TV + Movies
From the TV + Movies menu, you can search for and play your favorite TV programs. Use
the following menu items to help you locate what you want to do:
live tv: Watch, pause, fast-forward, or rewind your favorite TV programs. You
can watch recorded TV programs while recording another program. Use the
i (More information) button on the remote control to display TV program information,
record the program, zoom, and access TV settings.
recorded tv: View a list of recorded programs by date recorded or title, view a list
of programs scheduled to be recorded, find information about a recorded program,
play a recorded program, or add a TV recording.
search: Quickly find a TV program or a series to watch or record by entering a
descriptive word, program title, program category, movie actor, or movie director.
guide: (Not available in all countries/regions.) Scroll through the Television Program
Guide (Internet service required) to find programs to watch and record. You can
record specific TV programs or a whole series to the hard disk drive or an
HP Media Drive (purchased separately).
Watching and Recording TV Programs 11
Page 16

movies guide: Go online to find movies to watch either now or later. Get the latest
information about movies on TV: read reviews, see cast lists, find other times at which
the movie is broadcast, view the DVD cover, browse for related movies, and find other
movies that have the same cast members.
play dvd: Play DVD movies.
NOTE: The Movies online information feature is available for some countries/regions.
12 Watching and Recording TV
Page 17

Watching TV
Before you can watch TV by using Windows Media Center, make sure:
The computer is set up correctly for your TV signal source. Refer to the setup
You have completed the Windows Media Center setup wizard.
instructions that came with your computer for more information.
NOTE: You can change the channel by using the remote control while in full-screen mode
or when the inset window is selected.
You can go to live TV from anywhere in Windows Media Center by pressing the Live TV
button on the remote control.
While in the Television Program Guide, you can select a channel to see upcoming
programs for that channel by pressing the arrow buttons on the remote control.
Watching live TV
1 Press the Live TV button on the remote control or click TV + Movies from the main
Start menu. Use the arrow buttons on the remote control to select live tv, and then
press OK. The last channel selected or the first channel available begins playing.
2 Select a channel by using the Ch+ or Ch– button or the numeric keypad on the remote
control. The channel number and program information display in the window.
Watching and Recording TV Programs 13
Page 18

3 Press the More Info button to open another menu that features the following
options and information:
Program information, such as channel number and station, title and time period of
program, actual time, and a brief summary of the program and TV rating, if
available.
Record a program.
Record a program series.
Access to the Windows Media Center Settings windows.
4 Press the media buttons on the remote control, such as Pause, Stop, and Fast-forward
to control the playback of live TV.
5 To exit full-screen mode and return to the previous window, press the Back button on
the remote control.
Controlling TV playback
The digital video recording functionality lets you record a single program or capture an
entire series for later viewing.
When you open the live TV window and begin watching live TV, Windows Media Center
automatically begins recording and playing back the selected program in the background.
This allows you to pause or review a live TV program for up to 60 minutes. To replay a
program longer than the allotted 60 minutes, you must select to record the program.
You can return to the live broadcast by pressing the Live TV button on the remote control.
When you change the channel, Windows Media Center deletes the previously recorded
portion and begins recording again after a short delay.
NOTE: The 60-minute pause buffer applies only when pausing, rewinding, and
fast-forwarding live TV. Windows Media Center allows you to record a program for longer
than 60 minutes when you select to record the program.
NOTE: You cannot pause a live TV program, then rewind to the beginning of the pause
buffer, and then begin recording. You can only begin recording a TV program from
real-time live TV as soon as you switch to a channel.
14 Watching and Recording TV
Page 19

Using the remote control in TV + Movies
Button Action
To freeze the live TV image, press Pause. While paused, Windows
Media Center continues to record a pause buffer for up to
60 minutes. To resume watching TV where you left off, press Play.
To stop live TV or a recorded program, press Stop. To resume
watching the program, press Play.
To move forward in a live TV program that has been paused, or in a
recorded program, press Fast-forward (Fwd). To speed up the
fast-forwarding, press Fast-forward two or three times. Fast-forward
allows you to skip 3 hours in the Television Program Guide.
To play a recorded TV program or to resume watching a program
after pressing the Pause, Fast-forward, Rewind, Replay, or Skip
buttons, press Play.
To advance in live TV or in a recorded program by 30 seconds, press
Skip once. You can repeatedly skip forward, but only to the end of
the pause buffer or the recorded program. Skip allows you to
advance 12 hours in the guide.
To move backward in live TV or a recorded program, press Rewind
(Rew). To speed up rewinding, press Rewind three times. To resume
watching the program, press Play. Rewind allows you to move back
3 hours in the guide.
To move backward in live TV by 7 seconds, press Replay. You can
repeatedly rewind with the instant replay option, but only to the
beginning of the pause buffer or recorded program. Replay allows
you to move back 12 hours in the guide.
Live TV (TV) To maximize the TV viewing window to full-screen mode, press Live
TV. Also, to advance to the end of the pause buffer and resume
watching the live TV broadcast, press Live TV.
Recorded TV To open the recorded tv window, press the Recorded TV button. From
this window, you can search for recorded TV programs by title or the
date recorded, and then play them.
More Info To see the channel number, station identifier, title of program, time
slot, and category of program, press the More Info button while in
full-screen mode. If you select a recorded program and then press the
More Info button, you can access more information about a
program and access TV settings.
Watching and Recording TV Programs 15
Page 20

Button Action (continued)
Ch To move to the next channel or page in the guide, press the Ch+ or
Ch– button.
Guide To open the Television Program Guide, press the Guide button. While
in the guide window, press the More Info button, and then select
Category to view a program categories menu. To filter the guide to
display only programs in a category, you can select a category, such
as Movies, Sports, or News.
Using the Television Program Guide
The Television Program Guide (Internet service required) is a free service from Microsoft
that provides TV listings information, such as channel, network, program title, program
summary, and scheduled broadcast times. This service is currently not available in some
countries/regions. You can go to http://www.microsoft.com to find out if the guide
is available in your country/region, and for the terms and conditions of the Television
Program Guide service.
In countries/regions in which the guide is not available, refer to “Using Windows Media
Center without the guide” and see “Recording programs manually without using
the guide” for more information about recording TV programs.
By using the guide, you can scroll through a list of the current and upcoming television
programs and channels that are available from your television service provider. The guide
displays the channel and network, as well as the program title, scheduled time block, and
a brief description of the program. The number of days that are displayed depends on
your television service provider; most providers display up to 14 days. By selecting a
program title, a detailed description of the program appears at the bottom of the window.
NOTE: The computer requires a connection to the Internet to access the guide.
Using Windows Media Center without the guide
Before using Windows Media Center, it is important that you complete the Windows
Media Center setup wizard. This wizard takes you through steps to identify your TV signal
source and scan for channels that you are able to receive from your TV service provider.
By scanning for channels, you can manually select TV programs to watch and record, even
if your country/region is unable to download the guide.
The Television Program Guide data might not be available in your country/region. You
can still record TV programs without a guide; see “Recording programs manually without
using the guide.”
16 Watching and Recording TV
Page 21

If you have already completed the setup wizard, but want to change the settings or scan
for TV channels again:
1 Press the Windows Media Center Start button on the remote control, or, with the
mouse, click the Windows Start Button on the taskbar, and then click
Windows Media Center.
2 In the Tasks menu, click settings, General, Windows Media Center Setup,
and then Run Setup Again.
3 Follow the onscreen instructions to scan for your channels.
Television Program Guide errors
If there is no guide data available when you try to download or search for guide
information, the following messages might appear:
Download incomplete. We were unable to locate any Television Program Guide
information for the following reason: Guide data is not available for the
country/region setting that you selected in the Control Panel Settings.
Search is unavailable, because there is no guide information.
The current lineup and/or location selected for the guide is not supported.
The guide information is either missing or corrupt.
No data available.
Channel information is currently not available.
If you receive any of these messages, the guide data is not available in your
country/region, and you cannot use Television Program Guide features. Check back
periodically to see if guide data has been provided.
WARNING: Make sure the computer is connected to the Internet and Windows
Media Center is properly set up before you try to change the guide settings.
NOTE: The Television Program Guide (Internet service required) is not available in all
countries/regions.
Watching and Recording TV Programs 17
Page 22

Viewing the Television Program Guide
1 Press the Windows Media Center Start button on the remote control, or, with the
mouse, click the Windows Start Button on the taskbar, and then click
Windows Media Center.
2 Press the Guide button on the remote control.
Or
From the TV + Movies menu, click Guide.
3 Use the arrow buttons to select a channel, and then use the arrow buttons to scroll
through up to 2 weeks of programming for that channel.
NOTE: When you select a channel and then press OK on the remote control, you can
view up to 2 weeks of programming information. Use the scroll arrows at the bottom
of the window.
4 Select a program, and then press OK to watch it. Press the Record button on the
remote control to record the program.
NOTE: If you press the i (More information) button on the remote control while you
are already in the guide, you can select one of the guide filter categories, such as
Movies, to search for a specific program.
18 Watching and Recording TV
Page 23

Setting up how Windows Media Center downloads the guide
The computer must have a connection to the Internet, and you must select a TV listings
provider in the Windows Media Center setup wizard before you can use and download
the guide information. You can set up Windows Media Center to download the guide
information when you connect to the Internet, or you can select to download the guide
manually.
1 Press the Windows Media Center Start button on the remote control, or, with the
mouse, click the Windows Start Button on the taskbar, and then click
Windows Media Center.
2 In the Tasks menu, click settings, General, Automatic Download Options,
and then:
Download when connected: Connect to the Internet, and Windows Media
Center automatically downloads the guide.
NOTE: If the computer has a digital subscriber line (DSL) connection, the
computer is always connected. The guide is downloaded at a specified time every
few days. The download interval varies, depending on the Internet service
provider.
Or
Manual download: Connect to the Internet, and then manually download the
guide in Windows Media Center TV Settings menu.
3 Click Download Now, and then click OK.
4 When the message, Guide listings were downloaded successfully, appears,
click OK.
NOTE: When the Television Program Guide starts downloading from the Internet, it can
take between 1 and 30 minutes, depending on the amount of data to download and the
speed of the Internet connection.
NOTE: The message, No data available, appears next to each channel if the guide has
not been downloaded. This can occur if the computer does not have an Internet connection
or if there is no service available in your country/region.
Watching and Recording TV Programs 19
Page 24

Adding a postal code to receive the correct guide
1 Press the Windows Media Center Start button on the remote control, or, with the
mouse, click the Windows Start Button on the taskbar, and then click
Windows Media Center.
2 In the Tasks menu, click settings, TV, Guide, and then click Set Up Guide
Listings.
3 Click Next.
4 Click Yes, use this region to configure TV services, and then click Next.
5 Click Yes, and then click Next. Microsoft downloads current updates.
6 Click Yes, and then click Next.
7 Click I agree, and then click Next.
8 Select Download when connected or Manual download, and then
click Next.
9 Enter the postal code, and then click Next for Windows Media Center to determine
which TV/program guide listings are available for your country/region. Microsoft
downloads the program guide.
10 Click Finish.
Adding missing channels to the guide
If some program channels do not appear in the guide, you can add them. To add the
names and numbers of the channels that are missing, or to change the association
between channel numbers and lineups:
1 Press the Windows Media Center Start button on the remote control, or, with the
mouse, click the Windows Start Button on the taskbar, and then click
Windows Media Center.
2 In the Tasks menu, click settings, TV, Guide, and then Add Missing Channels to
add the call letters and numbers of the channels that you are missing.
3 Click Add Channel.
4 Use the numeric keypad on the remote control or the keyboard to enter the name of
the missing channel, and then click Next.
5 Enter the correct channel number, and then click Add.
6 Click Assign channel to assign a new channel number.
Or
Click Share channel to share the channel number with another channel.
7 Repeat steps 3 through 6 to add additional channels.
8 Click Done when you have added all the channels.
20 Watching and Recording TV
Page 25

Editing and removing channels in the guide
Some program channels might not appear correctly in the guide information. To edit the
channel numbers that are incorrect for your TV service provider information:
1 Press the Windows Media Center Start button on the remote control, or, with the
mouse, click the Windows Start Button on the taskbar, and then click
Windows Media Center.
2 In the Tasks menu, click settings, TV, Guide, and then Edit Channels to edit the
channel numbers that are currently assigned by Windows Media Center.
3 Click Edit Numbers.
4 To remove a channel, select the check next to a channel that you want to remove, and
then press the OK button on the remote control or the Enter key on the keyboard to
remove the channel from the lineup.
Click Assign channel to assign a new channel number.
Or
Click Share channel to share the channel number with another channel.
5 To edit a channel, use the numeric keypad on the remote control or keyboard to enter
the number of the correct channel, and then press OK on the remote control or the
Enter key on the keyboard.
Click Assign channel to assign a new channel number.
Or
Click Share channel to share the channel number with another channel.
6 Click Save when you have edited all the channels.
7 If you need to go back to the channel numbers automatically assigned by Windows
Media Center, click Restore Default from the Edit Channels window, and then
click Yes.
Searching for TV Programs
To find a TV program, you can enter a title or keyword or select a category in the guide by
using the remote control or the keyboard and mouse.
1 Press the Windows Media Center Start button on the remote control, or, with the
mouse, click the Windows Start Button on the taskbar, and then click
Windows Media Center.
2 From the TV + Movies menu, click search twice.
NOTE: Using categories to search can help you find, for example, all football games.
A title or keyword search displays every program that has “football” in the title or
description.
The TV search results do not include previously recorded TV programs.
Watching and Recording TV Programs 21
Page 26

3 Click Title. Use the numeric keypad on the remote control or the keyboard to enter a
program title word, and then press OK on the remote control or press the Enter key on
the keyboard.
Or
Click Keyword. Use the numeric keypad on the remote control or the keyboard
to enter a descriptive word that would appear in a title or program description,
and then press OK on the remote control or the Enter key on the keyboard.
NOTE: To delete letters, you can use the Clear button on the remote control, the Clear
button on the screen, or the Backspace key on the keyboard.
4 To scroll through search results, use the arrow buttons to select a program, and then
press OK. If multiple times for the program display, select a time, and then press OK
on the remote control.
5 To begin watching the program in full-screen mode, select the program, and then
press OK on the remote control. If the program is not currently playing, select Record
or Record Series, and then press OK on the remote control.
Searching for TV programs by using categories
You can search the guide to find a TV program by selecting a category. Some categories
are not available in all countries/regions.
1 Press the Windows Media Center Start button on the remote control, or, with the
mouse, click the Windows Start Button on the taskbar, and then click
Windows Media Center.
2 From the TV + Movies menu, click search twice.
3 Click Categories.
4 Select a category of program types, such as Movies.
5 Select a category type, such as Drama.
6 Select a sorting option, such as Sort by Date or Sort by Name.
7 Use the arrow buttons onscreen to scroll through search results and to find a program.
Then, press OK on the remote control or the Enter key on the keyboard to select the
program.
8 Select an option to find out more about the program, watch the program, schedule a
recording, or view other showings of the program.
22 Watching and Recording TV
Page 27

Recording TV Programs
Windows Media Center allows you to record TV programs, so that you can watch them
when it is convenient. You can record the program that you are watching, or you can
record a future program or series from the Television Program Guide, the search, or the
recorded tv window in the TV + Movies menu. You can record two programs at the same
time, if the computer has two TV tuners that have the same type of TV signal input (select
models only).
WARNING: If you turn off the computer, Windows Media Center will not record
a scheduled program. The computer must be turned on or be in sleep mode to
record a TV program. The computer will not automatically go into sleep mode
if Windows Media Center is open.
Make sure that you put the computer in sleep mode and turn down or mute
the volume if, for example, you have a scheduled recording in the middle of
the night and do not want to be disturbed.
If a recording error occurs, the program will not be recorded unless the error is corrected.
If you try to schedule a recording and another is already scheduled for the same time, a
conflict window appears and gives you the option to record the new program or record
the previously scheduled program.
To make sure that a program is being recorded, click TV + Movies, recorded tv, and
then View scheduled. The Record icon also appears next to the program in the guide
while you are recording. The Record icon disappears when the recording is complete.
Recording icons Description
The Record icon appears in the Television Program Guide next to
the program that is scheduled to be recorded.
The Record Series icon appears in the Television Program Guide
next to each occurrence of a program in a series that is scheduled
to be recorded.
The Record Conflict/Error icon appears in the Television Program
Guide and the taskbar if another program is scheduled to be
recorded at the same time.
To record a series means that you select to record each episode of that program from one
channel. Windows Media Center will not record duplicate episodes. Windows Media
Center also looks for alternative times to record an episode, if a recording conflict arises.
NOTE: For more information about recording to the HP Personal Media Drive (purchased
separately), see “About recording TV to the HP Media Drive.”
Watching and Recording TV Programs 23
Page 28

Recording TV by using the guide
To record a current or future program or series by using the Television Program Guide:
1 Press the Windows Media Center Start button on the remote control, or, with the
mouse, click the Windows Start Button on the taskbar, and then click
Windows Media Center.
2 Click TV + Movies, and then click guide twice.
3 To find the program that you want to record, use the arrow buttons on the remote
control, and then select the program. You can also use the numeric keypad on the
remote control or the keyboard to enter a channel number. Press the right arrow button
in the guide to select a program broadcasted in the future.
4 Click the program to select it, and then click Record or Record Series.
Or
Press the Record button on the remote control.
The Record icon appears next to the program in the guide. Press Record twice to
record a series.
The Record Series icon displays to indicate a series. Press Record again to
cancel the recording.
5 To return to the previous window, press the Back button on the remote control or the
Backspace key on the keyboard.
6 If there is a recording conflict, Windows Media Center opens a message and allows
you to select which program that you want to record.
Recording programs manually without using the guide
You do not need to use the Television Program Guide to record TV. You can record a TV
program by pressing the Record button on the remote control while watching live TV, or
you can select a specific date, channel, and recording time period in Windows Media
Center.
For some programs, you might want to begin recording before the scheduled beginning
and after the scheduled ending of the program.
NOTE: Recorded TV programs that have been copied to a DVD can be played on the
computer and on some DVD players.
Recorded TV programs can be backed up as part of a full system backup and restored to
the same HP computers, but not to other computers.
24 Watching and Recording TV
Page 29

To record a program manually:
1 Press the Windows Media Center Start button on the remote control, press the Live
TV button, and then press the Record button to begin recording the program.
Or
Click the Windows Start Button on the taskbar, and then click Windows
Media Center, or press the Windows Media Center Start button on the remote
control, click TV + Movies, recorded tv, and then click add recording.
2 Click Channel and Time.
3 Select the channel number box, and enter the channel number by using the numeric
keypad on the remote control or the keyboard.
4 Select the (+) or (–) buttons, and then press the Enter key on the keyboard or the OK
button on the remote control to scroll through choices and to enter the recording
frequency, date, start and stop times, and storage and quality options.
5 To set the recording and return to the recorded tv window, click Record in the
window, and then press the OK button on the remote control or the Enter key on the
keyboard.
6 To return to the previous window, press the Back button on the remote control or the
Backspace key on the keyboard.
Recording quality and hard disk drive storage space
The space that is available for recording TV programs depends on the size of the hard disk
drive, the percentage of hard disk drive space that is allocated to recorded TV, and the
recording quality setting.
To get the maximum recording time, change the recording quality to Fair instead of the
default setting of Best.
Watching and Recording TV Programs 25
Page 30

To change these settings:
1 Open Windows Media Center.
2 In the Tasks menu, click settings, TV, Recorder, and then Recorder Storage.
3 Under Recording quality and Maximum TV limit (storage for TV recordings), select the
settings by clicking the (+) or (–) next to the item that you want to change.
4 Click Save.
5 In the Tasks menu, click settings, TV, Recorder, and then Recording Defaults.
6 Select the settings by clicking the (+) or (–) next to the item that you want to change.
7 Click Save.
Quality of recording Approximate hard disk drive space used*
Best 2.7 GB/hour
Better 2.1 GB/hour
Good 1.4 GB/hour
Fair 1.2 GB/hour
*This table shows approximate sizes of recorded TV program files. Some files might be smaller or larger.
1 GB = 1 billion bytes when referring to hard disk drive capacity. Actual formatted capacity is smaller.
Watching TV programs stored on the HP Media Drive
An HP Media Drive can be purchased separately.
To play recorded TV files that are stored on the HP Media Drive, you must:
1 Connect the HP Media Drive to the computer with the power turned off.
2 Turn on the computer, and then open Windows Media Center.
3 In the Tasks menu, click settings, TV, Recorder, and then Recorder Storage.
4 Under Record on drive, select the HP Media Drive, and then click Save. A
Recorded TV folder is created and placed in the HP Media Drive. Recorded TV
programs must be placed in this folder for you to access them by using Windows
Media Center.
NOTE: You must close Windows Media Center before removing or connecting the
HP Media Drive for the stored TV files to update properly.
5 Under Record on drive, select the local hard disk drive, and then click Save.
6 Move or copy your recorded TV programs to the Recorded TV folder on the HP Media
Drive. Now, you can view your stored TV programs in Windows Media Center, or
you can double-click the file and view the program in Windows Media Player.
26 Watching and Recording TV
Page 31

7 Close Windows Media Center before disconnecting the drive.
When you connect the drive, stored TV files appear a few seconds after you open
Windows Media Center.
About recording TV to the HP Media Drive
The computer is set up to record TV programs to the local hard disk drive when you use
Windows Media Center. It is possible to change the recording path to an HP Media Drive
(purchased separately), but several errors can occur if the drive is unexpectedly or
improperly removed.
It is recommended that you record TV programs to the local hard disk drive and then copy
the files over to an HP Media Drive.
If you decide to change the recording path to the HP Media Drive, consider the following:
The TV recording path does not revert to the local hard disk drive after the HP Media
Drive is disconnected. This means that scheduled recordings might not be recorded. If
the recording message Low Disk Space appears, the program will not be recorded.
See “Changing disk space for recording TV programs” for more information about
changing the hard disk space settings.
When the drive is disconnected, the disk allocation for recorded TV programs reverts
to 10%, and your recorded programs can be lost if you have selected the Keep until
space is needed setting. See “Changing disk space for recording TV programs” for
more information about changing the allocation.
If you disconnect the drive while live TV is active, a video error can occur.
Recorded TV programs are not updated in Windows Media Center when the drive is
removed.
The drive might be assigned a different drive letter, which prevents Windows Media
Center from recognizing the recording path or the stored recorded TV files.
When you set the TV recording path to the HP Media Drive, Windows Media Center
stores the recording buffer data for pausing live TV on the drive. This means that if live TV
is playing, you won’t be able to remove the drive safely.
To avoid this scenario, change the recording path back to the local hard disk drive, and
then restart the computer before disconnecting the HP Media Drive.
Recording TV programs to the HP Media Drive
1 Change the recording path to the HP Media Drive (purchased separately). See
“Changing the TV recording path to the HP Media Drive.”
2 Open Windows Media Center.
3 Record TV programs. The programs are recorded to the HP Media Drive.
Watching and Recording TV Programs 27
Page 32

4 Before disconnecting the drive:
Make sure that there are no scheduled recordings or recordings in progress, to
avoid losing data.
Change the recording path back to the local hard disk drive. See “Changing the
TV recording path to the local hard disk drive.”
5 Disconnect the HP Media Drive safely.
Changing the TV recording path to the HP Media Drive
If you decide to change the recording path to record directly to the HP Media Drive
(purchased separately), Windows Media Center creates a Recorded TV folder on
the drive:
1 Assign a drive letter to the HP Media Drive.
2 Open Windows Media Center.
3 In the Tasks menu, click settings, TV, Recorder, and then Recorder Storage.
4 Under Record on Drive, select (+) to select the HP Media Drive. You can also set the
disk allocation and recording quality settings in this window.
NOTE: HP recommends that you:
Record TV programs directly to the local hard disk drive and then transfer your
recorded programs to the HP Media Drive, if you so desire.
Know the drive letter assigned to and the storage amount of the HP Media Drive.
5 Click Save.
To change the TV recording path back to the local hard disk drive, follow this procedure
and select the hard disk drive in step 4 of the previous procedure.
Changing the TV recording path to the local hard disk drive
To change the Windows Media Center TV recording path to the local hard disk drive:
1 Open Windows Media Center.
2 In the Tasks menu, click settings, TV, Recorder, and then Recorder Storage. You
can also set the disk allocation and recording quality settings in this window.
3 Select the local hard disk drive (C:).
4 Click Save.
28 Watching and Recording TV
Page 33

Add TV recording folder for Windows Media Center to find
1 Open Windows Media Center.
2 In the Tasks menu, click settings, TV, Recorder, and then More TV Locations.
3 Select Add folder to watch, and then click Next.
4 Select folder by clicking the (+) by the drive or folder, and then click Next.
5 Click Finish.
Changing disk space for recording TV programs
If you get a Low Disk Space message, and you want to change the disk allocation to
a higher percentage for the HP Media Drive:
1 Open Windows Media Center.
2 In the Tasks menu, click settings, TV, Recorder, and then Recorder Storage.
3 Under Maximum TV limit, change the amount of space that is used to store recorded
TV programs by selecting the (+) or (–) button.
4 In the Tasks menu, click settings, TV, Recorder, and then Recording Defaults.
5 Select the settings by clicking the (+) or (–) next to the item that you want to change.
6 Click Save.
Updating recorded TV list after removing the HP Media Drive
If you want to update the recorded TV list after removing the drive:
1 Close Windows Media Center.
2 Open Windows Media Center.
3 If this does not update the files, restart the computer.
Watching and Recording TV Programs 29
Page 34

System requirements to view recorded TV programs on other computers
To play recorded TV files (.dvr-ms files) that were recorded on your HP computer onto
another non-Windows Media Center computer, the computer must have the following items
installed:
Windows Vista operating system or Windows XP operating system.
Windows XP Service Pack 1 (needed only for Windows XP).
Windows Media Player 9 or later.
Software to play DVDs.
The audio and video codec file, which allows Windows Media Player to play
recorded TV programs (.dvr-ms files). You can find this file in Windows Update. Click
the Windows Start Button , click All Programs, and then click Windows
Update. If you want more information about this code file (QB10243), you can go to
the Microsoft Web site at: http://www.microsoft.com
Copying recorded TV programs to DVD or CD
You can record TV programs to DVD or CD in Windows Media Center to create a backup
copy or to save space on the hard disk drive, by using the following procedure. These
discs can be played from an HP computer and from some set-top DVD players.
NOTE: TV programs that have been encrypted (protected) by the broadcaster cannot be
copied and played on any player other than the HP computer that recorded the program.
The HP computer includes several other recording software programs that you can use to
create CDs and DVDs. You can use CyberLink PowerDirector to record the recorded TV
program to a format that can be played from an HP computer and from some set-top DVD
players.
For more detailed information about recording CDs and DVDs, refer to information on the
HP Support Web site at: http://www.hp.com/support
To copy a recorded TV program to CD or DVD:
1 Press the Windows Media Center Start button on the remote control, or, with the
mouse, click the Windows Start Button on the taskbar, and then click
Windows Media Center.
2 In the Tasks menu, click burn cd/dvd.
3 Insert a blank writable disc that is compatible with the CD or DVD recorder.
4 Click Burn files to disc using Windows.
5 Type a disc title or date, and then click Next. Windows may need to format the disc.
If so, follow the onscreen instructions.
30 Watching and Recording TV
Page 35

6 Select the disc format, and then click Next. Windows opens a message telling you if
the disc needs to be erased. If so, click Erase Disc.
7 Enter a title for the disc by using the numeric buttons on the remote control or the
numeric keypad on the keyboard, and then click Next.
8 Click Recorded TV or Video Library, and then click Next.
9 Select the recorded TV programs that you want to copy to CD or DVD. A check mark
appears in the corner of the program when it is selected, and then click Next.
10 Click Burn DVD.
11 Click Yes.
12 Click OK to do other things while the disc is being burned.
13 Follow the onscreen instructions to complete the recording of your TV program to disc.
Media copy protection
Media content, such as DVDs or TV programs, might place restrictions on rights to
distribute or copy the content, depending on what is permitted by the copyright owner.
Such restrictions protect copyrighted media files from being illegally copied and used. If
you try to record a program that contains such restrictions, the following message
appears: Recording Canceled. Manual Recording cannot be recorded. Restrictions that
are set by the broadcaster and/or originator of the content prohibit recording of this
program. When you record certain music or video files, they might retain copy-protection
restrictions that will prevent copying or distribution, including technology that encrypts
media content and/or limits access only to people who have a license to play the content.
Watching and Recording TV Programs 31
Page 36

Playing Recorded TV Programs
The recorded tv window in Windows Media Center is where you can access all of your
recorded programs. In the recorded tv window, you can sort your programs by name,
date, or category. You can also delete a recorded program or series of programs, and
check for any recording errors.
Your recorded TV programs are automatically stored on the primary hard disk drive in a
public folder.
To find and play the recorded TV programs from the hard disk drive:
1 Click the Windows Start Button on the taskbar, and then click Computer.
2 Double-click the local disk.
3 Click Users, Public, and then double-click Recorded TV.
4 Right-click the recorded TV program, and then click Play with Windows Media
Center. Windows Media Center opens and begins playing the program.
To play the recorded TV programs from within Windows Media Center:
1 Press the Windows Media Center Start button on the remote control, or, with the
mouse, click the Windows Start Button on the taskbar, and then click
Windows Media Center.
2 From the TV + Movies menu, click recorded tv.
3 To organize all of the previously recorded programs, click date recorded or title.
4 To begin watching the program, select the recorded program that you want to watch,
and then click Play.
Windows Media Center places recorded TV programs in the Recorded TV folder that is
located in the Shared Documents folder on the hard disk drive.
Playing DVDs in Windows Media Center
The TV + Movies window in Windows Media Center is where you can select to play a
DVD from the DVD drive.
1 Press the Windows Media Center Start button on the remote control, or, with the
mouse, click the Windows Start Button on the taskbar, and then click
Windows Media Center.
2 Insert a DVD into the DVD drive.
3 If no other media is playing, the DVD automatically begins playing. If other media is
playing, Windows Media Center opens a dialog window with the options to begin
playing the DVD.
32 Watching and Recording TV
Page 37

Index
B
buttons
remote control
6
C
computer
connecting the IR emitter
9
E
error messages
Channel information is currently not available
common recording errors 32
Download Incomplete 17
Low Disk Space 27, 29
No data available 17
Search is unavailable because there is no guide
information
The current lineup and/or location selected for the guide is
not supported
The guide information is either missing or corrupt 17
17
17
17
G
Guide, see Television Program Guide
I
IR emitter cable
connecting
9
P
PC
connecting the remote sensor
Program Guide, see Television Program Guide
9
R
recording
options
recording icons 23
recording TV
how to stop recording
making sure a program is being recorded 23
manually 24
recorded TV 32
single program or series, canceling 23
TV programs 23
using the guide 24
when two are scheduled for the same time 24
remote control
buttons
sensor 8
using in TV + Movies 15
using with HP TouchSmart 8
24
23
6
S
searching for programs 21
set-top box
remote emitter cable for
9
T
Television Program Guide
no data available
recording TV programs 24
searching for TV programs 21
setting up a download method 19
using the More information button 18
viewing 18
TV
adding missing channels to the guide
advanced recording options 24
editing channels in the guide 21
manually downloading the guide 19, 20
playback, time shifting 14
17
20
Index 33
Page 38

playing recorded TV programs 32
recording icons 23
recording TV from the guide 24
recording TV manually 24
removing channels from the guide 21
searching for TV programs 21
searching for TV programs by category 22
sorting programs 32
Television Program Guide errors 17
time shifting 14
using digital video recorder while watching 14
using the remote control 14
watching 13
watching TV programs 13
W
Windows Media Center
what you can do
in TV + Movies
11, 12
Part number: 466698-001
34 Watching and Recording TV
 Loading...