

Page 1
hp toptools 5.6 for OpenView NNM
User Guide
Page 2

hp toptools for openview nnm user guide
Notice Page
Hewlett-Packard makes no warranty of any kind with regard to this material, including, but not
limited to, the implied warranties of merchantability and fitness for a particular purpose.
Hewlett-Packard shall not be liable for errors contained herein or for incidental or consequential damages
in connection with the furnishing, performance, or use of this material.
This document contains proprietary information, which is protected by copyright. All rights are reserved.
No part of this document may be photocopied, reproduced, or translated to another language without the
prior written consent of Hewlett-Packard Company. The information contained in this document is subject
to change without notice.
HP Toptools, HP Network Node Manager, and HP-UX are trademarks of Hewlett-Packard Company.
Microsoft®, Windows®, and Windows NT® are registered trademarks of Microsoft Corporation.
Pentium® is a registered trademark of Intel Corporation.
Netware® and Novell® are registered trademarks of Novell Corporation.
Solaris is a trademark of Sun Microsystems, Inc.
Other brand and product names are registered trademarks or trademarks of their respective holders.
Hewlett-Packard Company 2002 All Rights Reserved.
Document Version 1.0
Hewlett-Packard Company
10955 Tantau Ave.
Cupertino, CA 95014 U.S.A.
Page 2 Version 5.6
Page 3

hp toptools for openview nnm user guide
Table of Contents
1 OVERVIEW ...............................................................................................................................................5
1.1 BEFORE YOU BEGIN...................................................................................................................................... 6
1.2 PLANNING .....................................................................................................................................................7
1.2.1 Managing hp Computing Products................................................................................................ 7
1.2.2 The nnm Environment....................................................................................................................7
1.3 REQUIREMENTS.............................................................................................................................................8
1.3.1 Supported hp toptools Configurations...........................................................................................8
1.3.2 Supported nnm Configurations......................................................................................................9
1.3.3 Supported hp Computing Products................................................................................................ 9
1.3.4 Supported Web Browsers and Configuration ..............................................................................10
1.3.5 Disk Space Usage ........................................................................................................................11
1.3.6 Memory Requirements .................................................................................................................11
1.3.7 Processor Requirements ..............................................................................................................11
1.3.8 Single System Installation............................................................................................................11
1.3.9 Evaluation and Registration ........................................................................................................12
1.3.10 Support and Contact information ................................................................................................ 12
2 INSTALLING THE HP TOPTOOLS SERVER BRIDGE COMPONENT .......................................13
2.1 PRE INSTALLATION RECOMMENDATIONS....................................................................................................13
2.2 PREPARING THE TOPTOOLS SERVER ............................................................................................................14
2.3 STEP-BY-STEP INSTRUCTIONS .....................................................................................................................14
2.4 VERIFYING A SUCCESSFUL INSTALLATION ..................................................................................................19
3 INSTALLING THE HP OPENVIEW NNM PLATFORM BRIDGE COMPONENT......................21
3.1 PREPARING THE HP OPENVIEW NNM SYSTEM ..............................................................................................21
3.2 SNMP WITH NETSERVERS & NNM-NT .........................................................................................................21
3.3 STEP-BY-STEP INSTRUCTIONS .....................................................................................................................22
3.3.1 Installation on hp openview nnm-ux or nnm-solaris ...................................................................22
3.3.2 Installation on hp openvie nnm-nt ...............................................................................................24
3.4 VERIFYING A SUCCESSFUL INSTALLATION ..................................................................................................27
4 INSTALLING HP WEB JETADMIN BRIDGE FOR OPENVIEW NNM-NT .................................29
4.1 HP WEB JETADMIN BRIDGE FOR OPENVIEW NNM-NTWINDOWS 2000 INSTALLATION PROCEDURE ...............29
4.1.1 Installation on hp openview nnm-nt.............................................................................................29
4.2 VERIFYING A SUCCESSFUL INSTALLATION HP WEB JETADMIN FOR OPEVIEW NNM-NT.................................32
4.3 USING HP WEB JETADMIN FOR OPENVIEW NNM-NT ......................................................................................32
4.3.1 Accessing Printer Properties.......................................................................................................32
4.4 PRINTER TRAP PROXY.................................................................................................................................34
5 USING HP TOPTOOLS FOR OPENVIEW NNM.............................................................................35
5.1 TOPTOOLS AUTHENTICATION AND OPENVIEW NNM .....................................................................................35
5.2 HP DEVICE DISCOVERY ...............................................................................................................................35
5.3 LAUNCHING TOPTOOLS FROM NNM .............................................................................................................35
5.4 FINDING HP DEVICES...................................................................................................................................35
5.5 HP DEVICE ACTIONS ...................................................................................................................................38
5.6 USING SNMP SECURITY.............................................................................................................................40
5.7 MANAGING HP KAYAKS .............................................................................................................................. 41
5.8 MANAGING HP VECTRAS .............................................................................................................................43
5.9 MANAGING HP VISUALIZE WORKSTATIONS .................................................................................................47
5.10 MANAGING HP OMNIBOOKS ........................................................................................................................47
5.11 MANAGING HP NETSERVERS........................................................................................................................49
5.11.1 Discovery and Events ..................................................................................................................49
5.11.2 Menu Actions ...............................................................................................................................50
5.11.3 hp netserver Subsystems ..............................................................................................................52
5.12 MANAGING THE HP TOPTOOLS REMOTE CONTROL CARD ............................................................................. 54
5.13 MANAGING HP LASERJET PRINTERS AND PLOTTERS....................................................................................55
5.13.1 hp printer Properties Page ..........................................................................................................56
5.14 MANAGING HP PROCURVE AND HP ADVANCESTACK NETWORKING PRODUCTS ...........................................59
Page 3
Page 4

hp toptools for openview nnm user guide
5.14.1 Set Traffic Data Collection to Manual Mode in Large Networks................................................ 62
5.14.2 SNMP and Event Management....................................................................................................63
6 TROUBLESHOOTING...........................................................................................................................65
6.1 OVERVIEW OF BRIDGE OPERATION .............................................................................................................65
6.1.1 Platform Bridge Processes ..........................................................................................................65
6.1.2 Server Bridge Process .................................................................................................................66
6.2 TROUBLESHOOTING STEPS ..........................................................................................................................66
6.3 VERIFYING TOPTOOLS INTEGRATED DEVICE MANAGER...............................................................................66
6.4 VERIFYING THE TOPTOOLS SERVER BRIDGE ................................................................................................66
6.5 VERIFYING THE PLATFORM BRIDGE ............................................................................................................66
6.6 USEFUL LOG FILES......................................................................................................................................67
6.6.1 Log Files for Multiple Users........................................................................................................67
6.6.2 Log File States .............................................................................................................................67
6.6.3 Log File Debug Levels................................................................................................................. 67
6.6.4 Setting Debug Levels ...................................................................................................................67
6.6.5 Log Files on the toptools server ..................................................................................................68
6.6.6 Log Files on the openview nnm server ........................................................................................69
6.7 TROUBLESHOOTING TIPS.............................................................................................................................70
7 UNINSTALLING THE BRIDGE...........................................................................................................73
7.1 UNINSTALLING THE SERVER BRIDGE COMPONENT .....................................................................................73
7.2 VERIFYING A SUCCESSFUL SERVER COMPONENT UNINSTALL ....................................................................74
7.3 UNINSTALLING THE PLATFORM BRIDGE COMPONENT ................................................................................74
7.3.1 Uninstalling on nnm-nt on Windows 2000 Systems ..................................................................... 74
7.3.2 Uninstalling on nnm-ux or nnm-Solaris Systems.........................................................................75
7.4 VERIFYING A SUCCESSFUL PLATFORM COMPONENT UNINSTALL ...............................................................76
7.5 UNINSTALLING HP WEB JETADMIN FOR OPENVIEW NNM..............................................................................76
7.5.1 Uninstalling hp web jetadmin for openview nnm-nt....................................................................76
7.5.2 Verifying a Successful Uninstall ..................................................................................................76
8 INSTALLED MIBS..................................................................................................................................77
9 TABLE 9. MIBS ADDED TO OPENVIEW NNM BY PLATFORM BRIDGE................................77
10 CREATING FILTERS FOR HP DEVICES..........................................................................................77
11 ENABLING TOPTOOLS IN NNM REMOTE AND WEB CONSOLE SESSIONS.........................80
12 RECOMMENDATIONS FOR MANAGING LARGE NETWORKS ................................................82
13 INDEX.......................................................................................................................................................84
Page 4 Version 5.6
Page 5
hp toptools for openview nnm user guide
1 Overview
HP Toptools for OpenView NNM is one of several HP Toptools Enterprise Products that enable access to HP
computing product manageability directly from enterprise management solutions like HP OpenView Network Node
Manager. HP Toptools for OpenView NNM enhances native NNM applications with HP hardware support while
adding or 'bridging' HP Toptools management utilities into the NNM console.
HP Toptools is a collection of applications and agents that enable fault, configuration, performance, security, and
asset management of HP Netserver, Visualize, Kayak, Omnibook, Vectra, NetPC, HP-UX, Advancestack, Procurve,
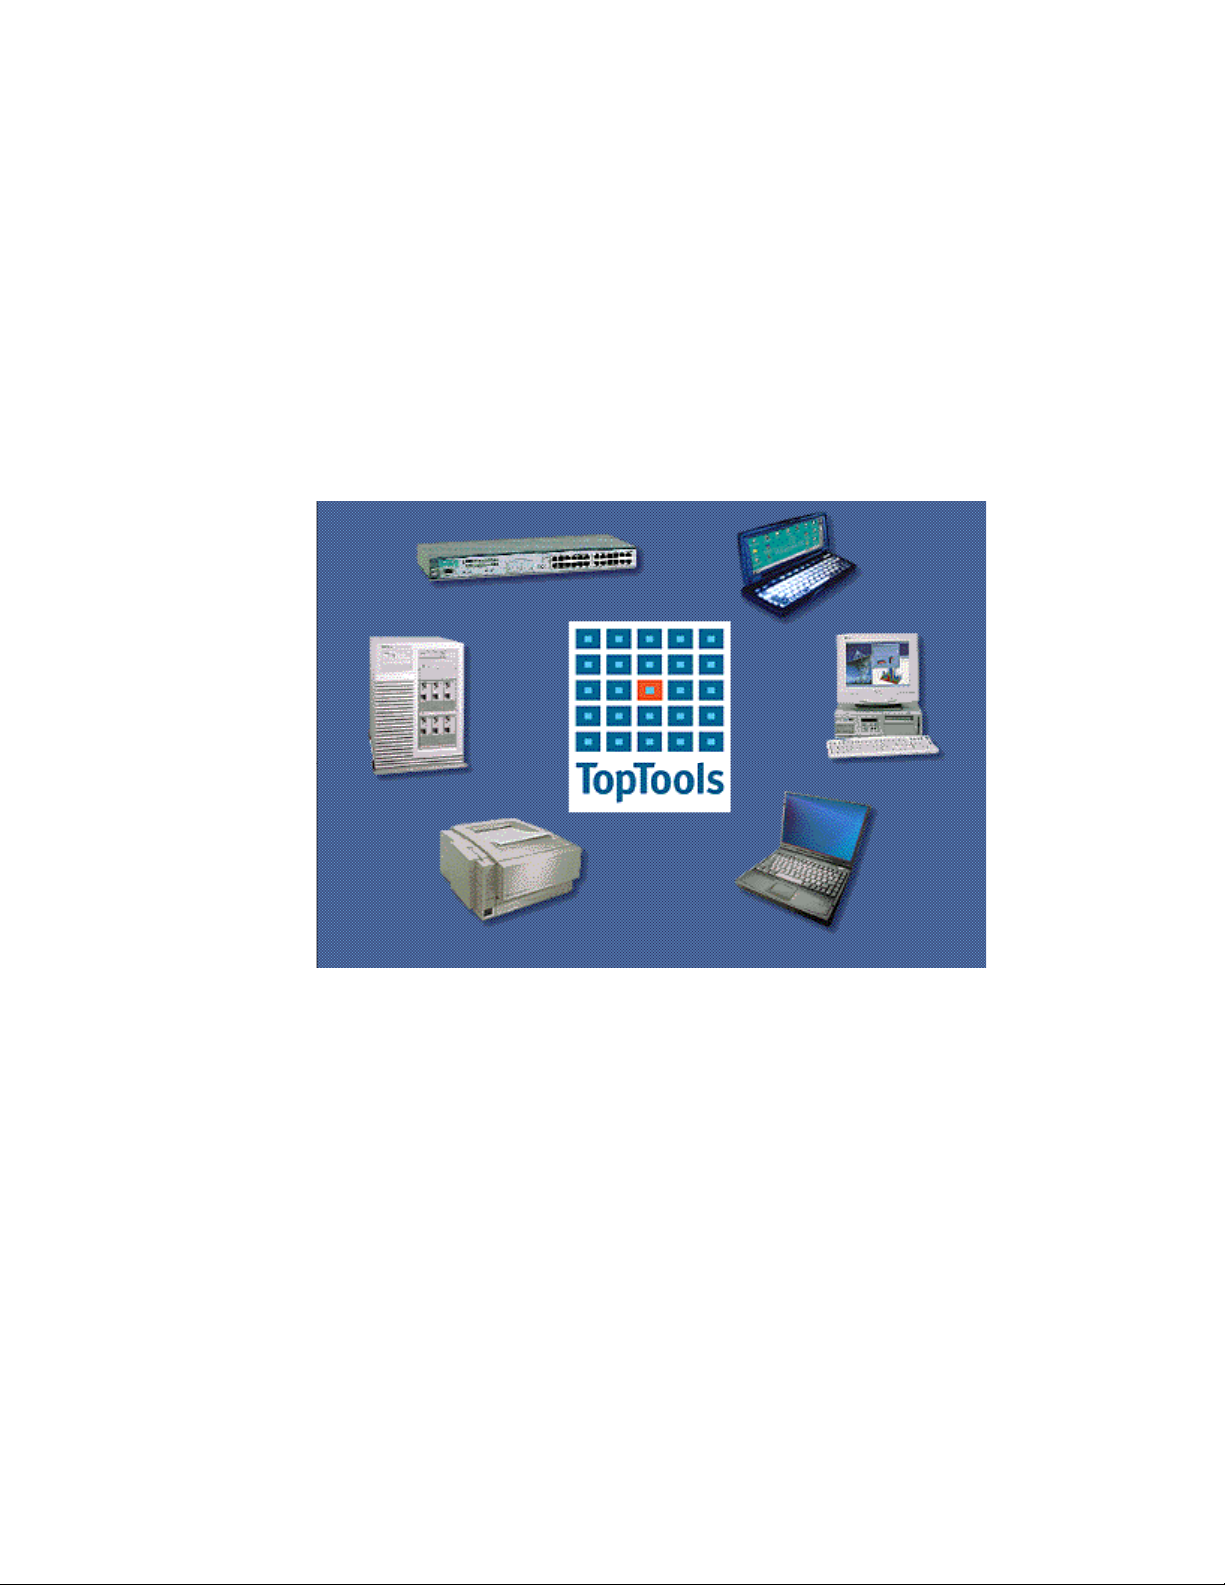
PalmTop, Surestore, and LaserJet products. At the center of HP Toptools solutions is the toptools server, a webbased device management application which generates web pages to display information obtained from managed
devices, permitting monitoring and administration of HP hardware from anywhere on the network through the use of
a web browser.
Figure 1-1. The HP Toptools Device Manager consists of a Toptools Server and a browser-based console.
The toptools server includes integrated modules that may be obtained and deployed independently, such as
HP Toptools for Hubs and Switches, HP Toptools for Servers, and HP Web Jetadmin.
HP Toptools Enterprise Products is an accessory product. For more information on HP Toptools products, visit the
HP Toptools website at www.hp.com/toptools
For information on which toptools products are supported by HP Toptools for OpenView NNM, check the
"Requirements" section of this document.
Page 5
.
Page 6
hp toptools for openview nnm user guide
Using HP Toptools for OpenView NNM from the NNM console, you can:
• Automatically receive, view, and act on alerts from HP computing products.
• Identify and search for specific HP computing products through enhancements to NNM discovery and Find By
tools.
• 'Drill down' on individual HP devices through toptools pages to access configuration management.
• Launch toptools actions such as Lock System or Reboot against a device or NNM selection list.
• Use advanced toptools network management tools such as the Traffic Monitor and Automatic Management.
• Use NNM tools like the SNMP MIB Browser, Application Builder, Data Collector and Event Configuration to
target specific hardware attributes to monitor, browse, and configure.
1.1 Before You Begin
Before you install HP Toptools for OpenView NNM (also referred to as the 'bridge'), you should:
• Verify that your NNM environment is supported as specified in the "Requirements" section.
• Review the "Planning" section of this guide for deploying in complex environments.
• Deploy/enable management agents on HP devices (see “Supported HP Computing Products”).
• Enter SNMP community strings into NNM for HP SNMP-based devices (i.e. Procurve switches and
HP Netservers) that do not have the default SNMP community 'public'.
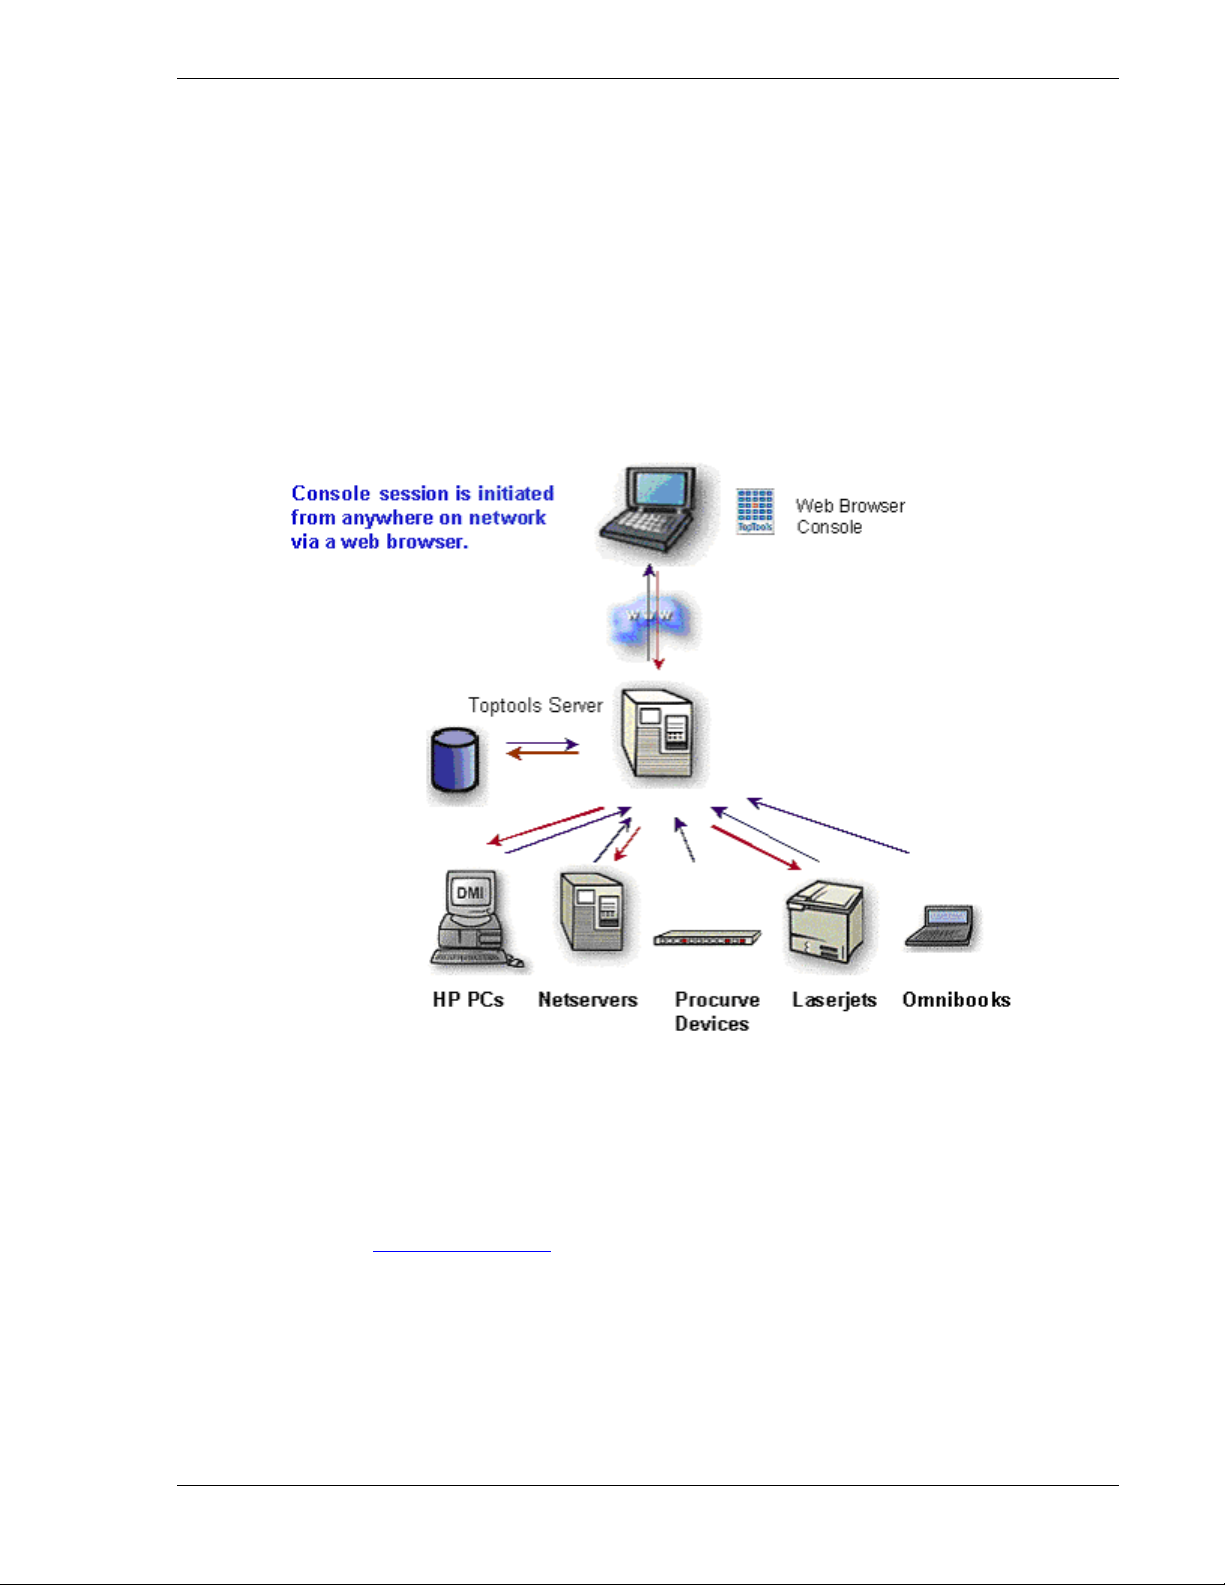
HP Toptools for OpenView NNM consists of 6 components:
• The toptools server application
• The HP OpenView NNM application
• Management agents on HP devices
• A web browser installed on the NNM console or Remote Console (supported with NNM-NT only)
• Integration software, referred to as the 'platform bridge' installed on the NNM server
• Integration software, referred to as the 'server bridge' installed on the toptools server
NNM-NT 6.x remote console sessions are supported directly by the platform bridge component.
Figure 1-2. Location of HP Toptools for OpenView NNM components
Page 6 Version 5.6
Page 7
hp toptools for openview nnm user guide
The "Requirements" section will define requirements for each component and how to prepare the environment for
successful and supported operation of the bridge. For a description of how to use the bridge, refer to the "Using HP
Toptools for OpenView NNM" section. For a description of how the bridge works (how the components interact),
refer to the "Troubleshooting" section.
1.2 Planning
This version of HP Toptools for NNM has been developed to provide flexible solutions for different NNM
configurations and customer requirements, based on:
• The HP computing products to be managed
• The NNM environment
1.2.1 Managing hp Computing Products
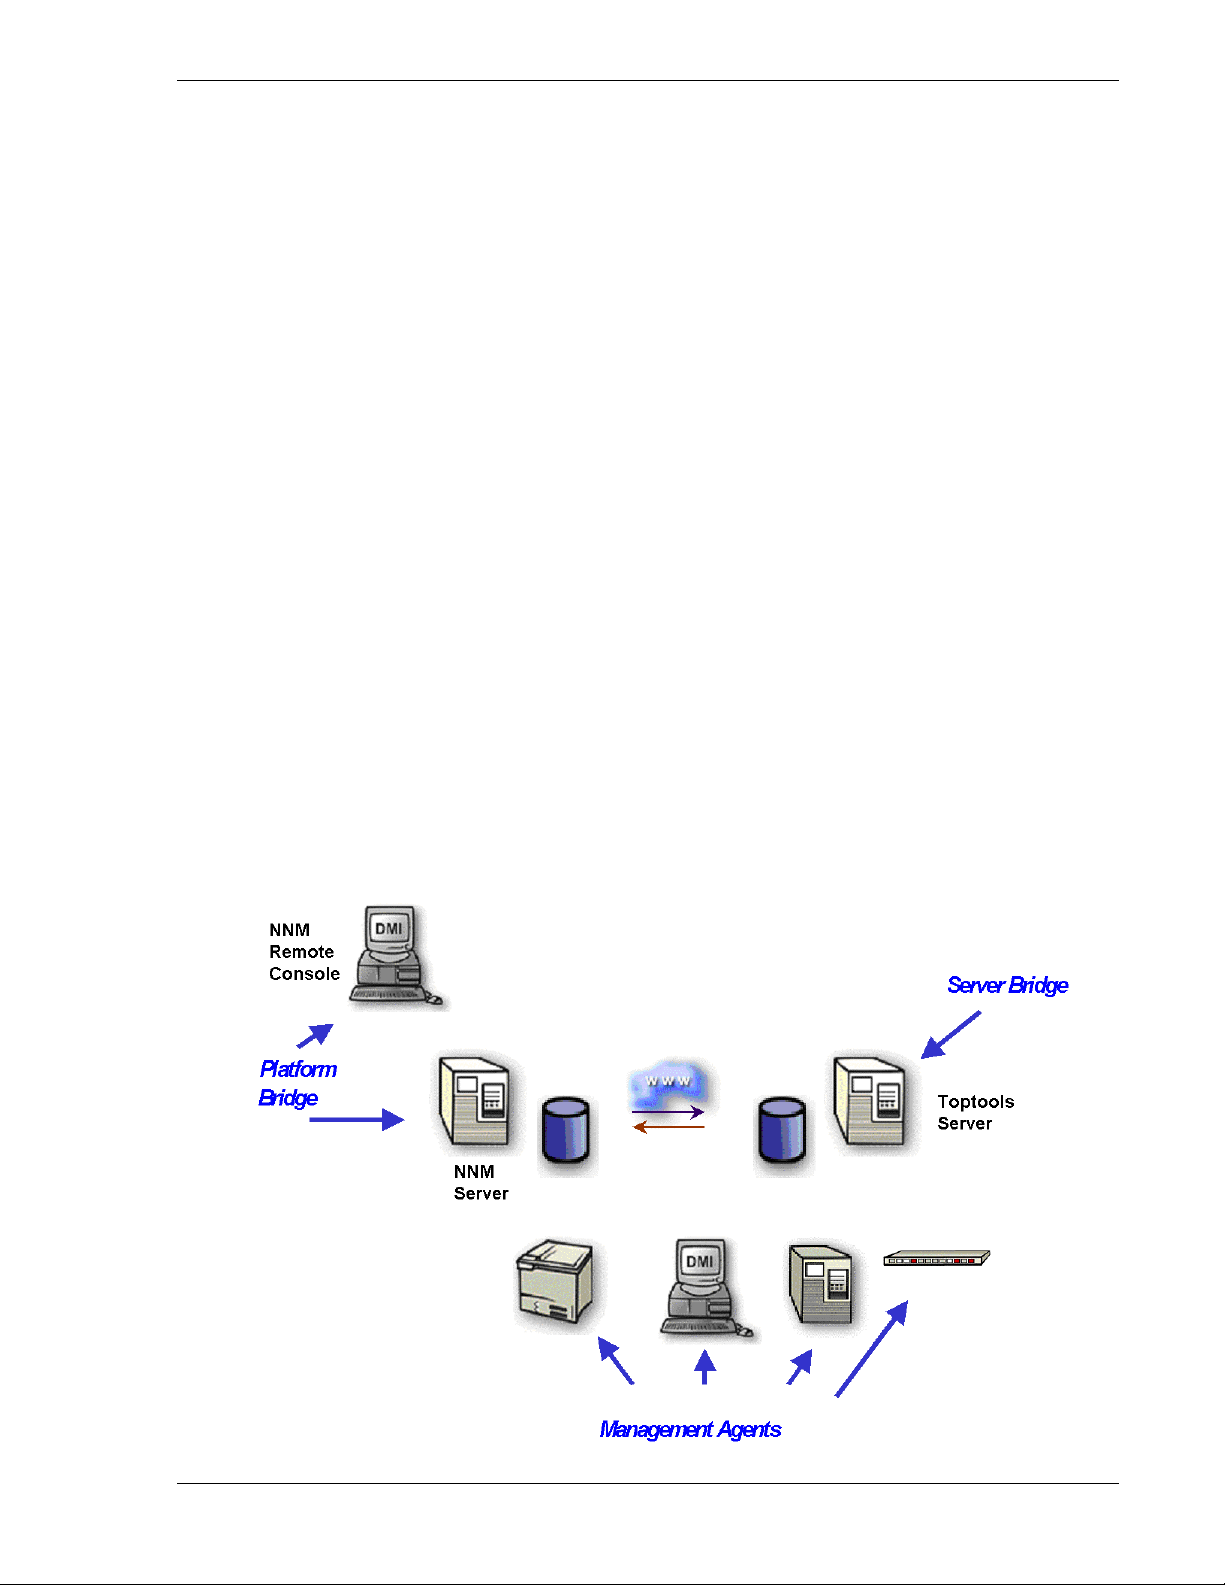
HP Toptools for OpenView NNM is designed to manage a variety of HP computing products. If you wish to
manage other HP computing products (e.g. HP Netservers), you must install HP Toptools for OpenView NNM. In
this case, NNM will be configured to discover and receive events from all supported HP device types, and will link
to a toptools server.
Figure 1-3. Typical HP Toptools for OpenView NNM configuration
1.2.2 The nnm Environment
When preparing to install the platform bridge (integration software that is installed on NNM), you need to
determine:
• NNM Version. This User Guide covers three distinct versions of HP Toptools for OpenView NNM - for
Windows NT, HP-UX and Solaris. The OS version (e.g. Windows NT) of HP Toptools for OpenView NNM
needs to correspond to the version of NNM you wish to use with the integration software. Refer to the
"Requirements" section for supported configurations.
• Remote Consoles HP Toptools for OpenView NNM-NT supports remote console sessions, but the platform
bridge must be installed on each remote console to enable support.
Page 7
Page 8
hp toptools for openview nnm user guide
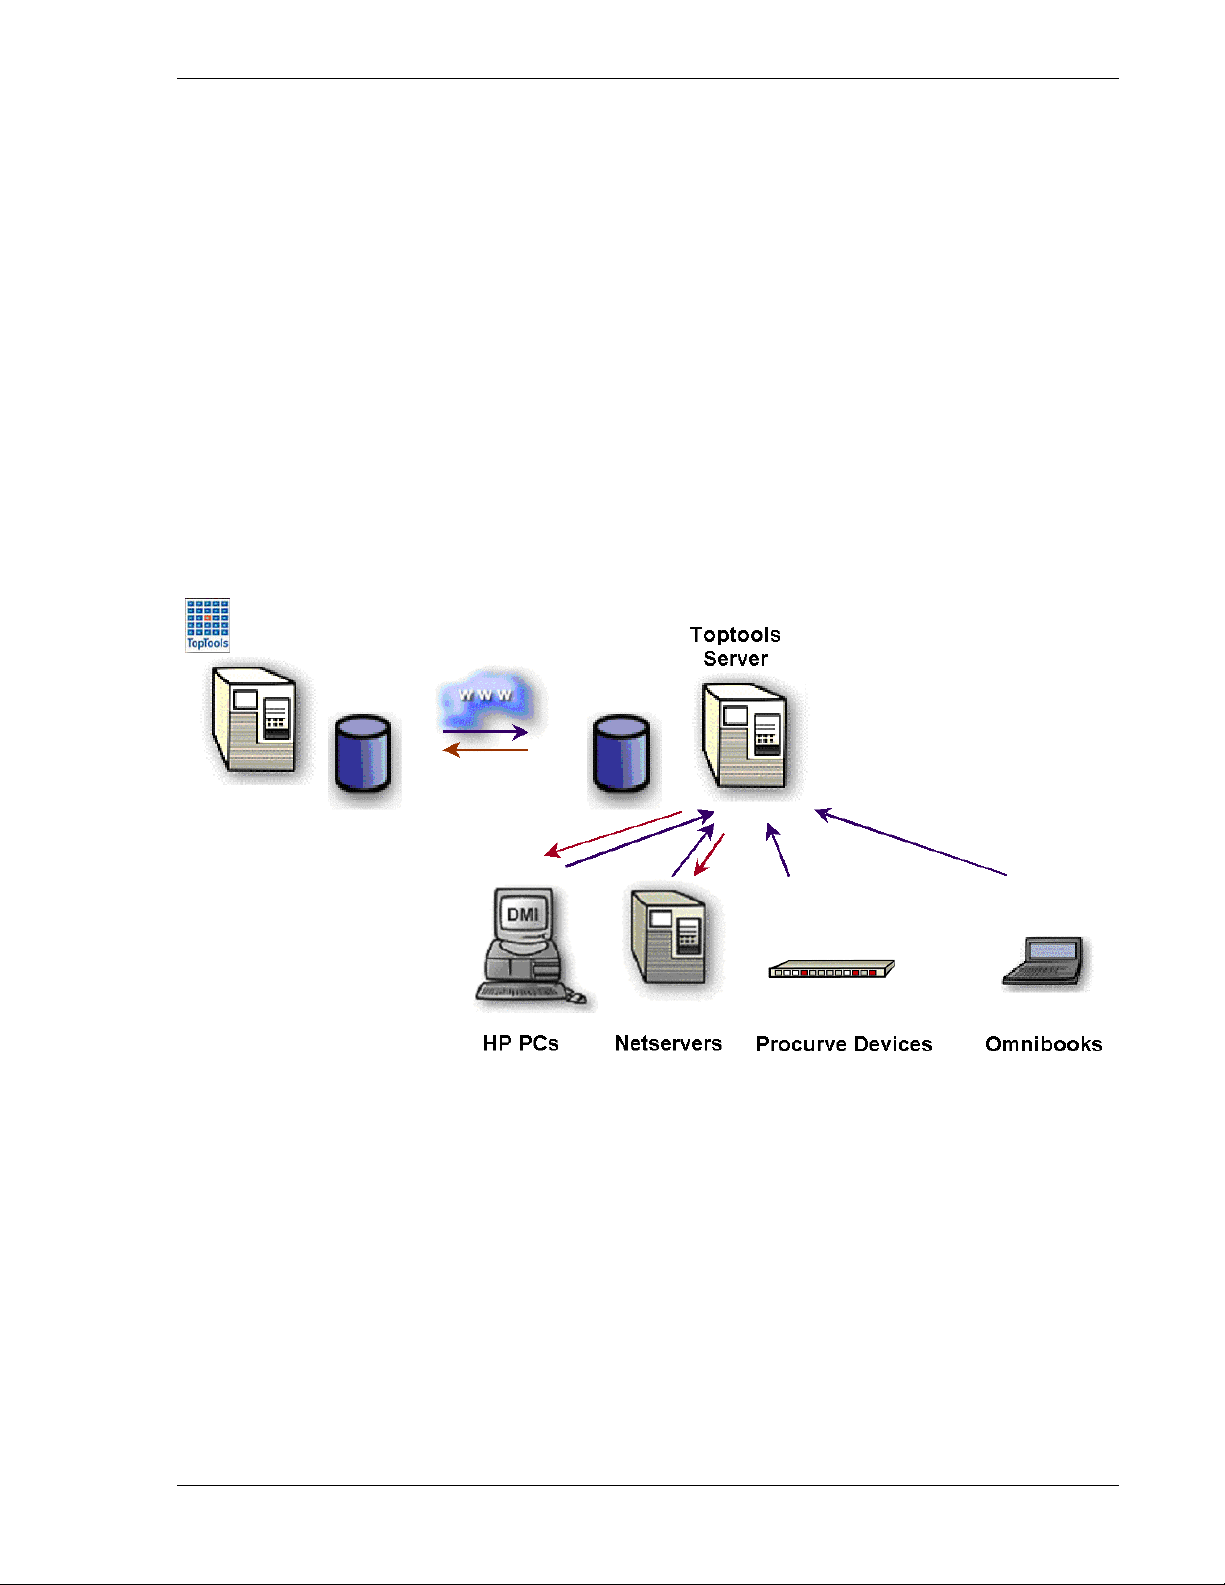
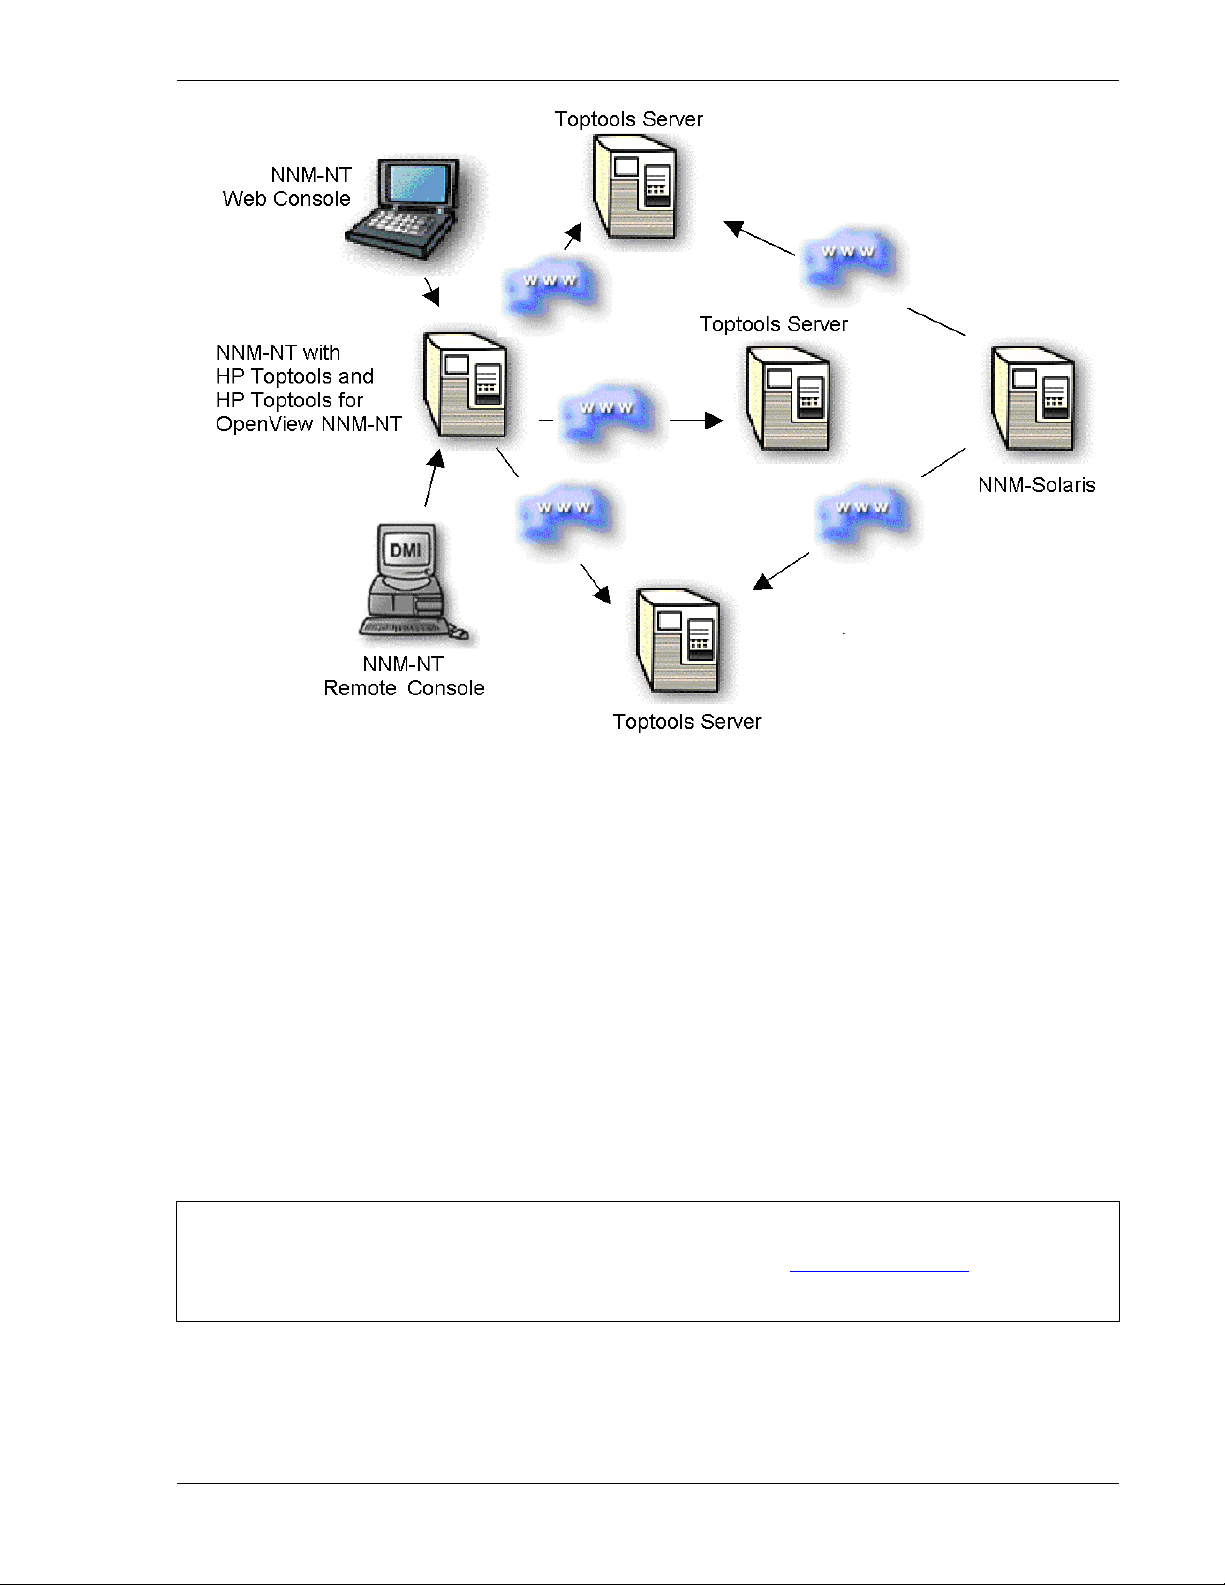
Figure 1-4. HP Toptools for OpenView NNM in a distributed NNM environment
• Distributed NNM HP Toptools for OpenView NNM is designed to link a single NNM server to a single toptools
server, but users may take advantage of the web-based design of HP Toptools to enable links to multiple
toptools servers from a single NNM map.
1.3 Requirements
Prior to installing the server and platform bridge components, supported versions of HP Toptools, HP OpenView
Network Node Manager and a web browser must be installed and verified operational.
1.3.1 Supported hp toptools Configurations
HP Toptools 5.6 for OpenView NNM supports HP Toptools 5.6 (Build A.05.6 1) and can be obtained online from
the HP Toptools website. It is also included on the HP Toptools 5.6 CD set which can be obtained online from the
HP Toptools website, or through an HP-authorized reseller.
NOTE: This is the version of HP Toptools that will operate with HP Toptools 5.6 for OpenView NNM.
Previous releases are NOT supported. Refer to our web site www.hp.com/toptools for additional
information.
Documentation describing HP Toptools installation is included on the HP Toptools CD set in the readme file located
at the root of the CD-ROM, as well as in the HP Toptools User's Guide (/Manuals/Users_Manual.pdf)).
Page 8 Version 5.6
Page 9

hp toptools for openview nnm user guide
The installation of HP Toptools permits the selection of management components installed. Any combination of the
four components (“desktops”, “servers”, “printers” or “hubs and switches”) is supported for operation with this
bridge. In addition, “Advanced Configuration” should be selected at the end of the installation and discovery
categories (IPX, WMI, etc) enabled as appropriate*. Discovery should NOT be scheduled. Note that you may be
prompted to overwrite existing files during the installation. You MUST choose to overwrite existing files or the
installation will fail.
*Unless you intend to use HP Toptools for Hubs and Switches management features, do not enable 'Topology'
discovery.
1.3.2 Supported nnm Configurations
The following versions of NNM are supported by HP Toptools for OpenView NNM:
HP OpenView NNM 6.20, or 6.1 for NT4.X/Windows 2000, HP-UX 10.20 and 11.0, and Sun Solaris 2.6
•
including full support for NNM-NT remote consoles and limited support for web consoles.
• Operating Systems are supported with the following patches:
Windows NT 4.0 HP-UX 11.0 HP-UX 10.20 Sun Solaris 2.6
Service Pack 4 and above
PHCO_14775 (Japanese)*
PHCO_17317
PHCO_19666
PHCO_22453
PHCO_22923
PHKL_18543
PHKL_23002
PHSS_17535
PHSS_21982
PHSS_22341
PHSS_22946
PHSS_18891 PSOV_02435
PHSS_19465 PSOV_02493
PHSS_20129 PSOV_02535
PHSS_20255 PSOV_02563
PHSS_20623 PSOV_02603
* Only required for support of Japanese U.I.
Refer to the HP Network Node Manager web site for the latest NNM and Operating System patches
(support.openview.hp.com).
1.3.3 Supported hp Computing Products
The following HP computing products are supported by HP Toptools for OpenView NNM:
• HP Netservers and Toptools Remote Control cards
• HP IA-64 servers
• HP Blade GSP cards
• HP Visualize workstations
• HP Kayak workstations
• HP Vectra desktops
• HP Omnibook notebooks
• HP Advancestack and Procurve networking products
• HP Blade switches
• HP NetVectra clients
HP Toptools Remote Control card, Advancestack, and Procurve devices support firmware agent software. Firmware
may be updated using HP Toptools. HP Netserver, Visualize, Kayak, Vectra, and Omnibook products support HP
Toptools agents that are loaded into the Operating System. All agents and firmware are provided with purchased
products and may also be downloaded from the HP website. Upgrading agents and firmware to current versions is
highly recommended.
Page 9
Page 10

hp toptools for openview nnm user guide
1.3.4 Supported Web Browsers and Configuration
The toptools console is accessed using a web browser. Access configuration on the toptools server is done
automatically by the Installation wizard. A web browser must be installed on each NNM console on which you
intend to install the bridge. Microsoft Internet Explorer v.5.0 is included on the HP Toptools 5.6 CD. To access the
toptools server you must:
• Use a supported web browser application and version.
• Be authenticated with HP Toptools (the web server application).
Make sure that the platform user is a member of the toptools admin group on the toptools server. Use the NT User
Manager on the toptools server to add authorized users to the admin group on the toptools server. Only members of
this group or administrators of the toptools server can access toptools. You can then access toptools from any
system using the browser versions in the table below:
Platform System Browsers
Windows 2000, NT, or XP
HP-UX 10.20 Netscape 4.51 (use the Sun fonts)
HP-UX 11.0 Netscape 4.73 (use the Sun fonts)
Sun Solaris 2.6 Netscape 4.51, IE 5.0
During installation the Directory Security for the web server (IIS or PWS) on the following virtual directories will
be set to Basic Authentication on the toptools server:
Installed Components Virtual Directories to set “Basic Authentication”
Device Manager Hptt, Viewer
Device Manger + Desktops or Netservers or Windows
Based Terminals
Hubs & Switches HpttTopology, Scripts
If you set up NTFS on the toptools server and set your IIS to BASIC security, you will be challenged for your
username and password (domain\username for Netscape).
On NNM-UX systems, you should set the browser fonts to be the Sun fonts rather than the HP fonts. Set the
environment variables as follows:
export MOZILLA_HOME=/opt/netscape/4.7 # the netscape directory
export PATH =$MOZILLA_HOME:$PATH
export MOZILLA_JAVA_FONT_PROPERTY_PATH=$MOZILLA_HOME/java/classes/sun
In all cases of using Netscape, the “afc11.zip” file must be present in the java\classes directory. toptools will sense
the presence or absence of this file the first time you connect to it via Netscape and walk you through installation of
this file. Do not unzip it. Make sure the Netscape program is included in your PATH setting.
IE 4.01 SP2 (JVM 2436)
IE 5.0 (JVM 3167)
IE 5.5
IE 6.0
Netscape 4.61
Netscape 4.72
Netscape 4.61 (use the Sun fonts)
Netscape 4.75 (use the Sun fonts)
Hptt, Viewer
Page 10 Version 5.6
Page 11

hp toptools for openview nnm user guide
Browser Settings
To configure the browser on your management platform:
1. Set your browser to exclude using a proxy to access your toptools server. This can be done for your entire
domain or just for the server depending on your network requirements.
IE 401.SP2: Internet Options => Connections => Advanced => Exceptions
IE 5.0: Tools => Internet Options => Connections => LAN Settings => Advanced
Netscape: Edit => Preferences => Advanced => Proxies => Manual => View
2. On IE, check Bypass proxy server for local addresses as well as entering the domain in the Exceptions list on
the Advanced configuration page.
3. The URL to the management server should include your domain:
http://TTManagmentServerName.company.com/hptt
4. Always accept cookies and always refresh new page.
It is also helpful to set your browser to check for newer versions of stored pages on every visit to the page.
To verify correct operation of browser connection to the toptools server, perform the following test:
1. Launch toptools from your browser (the URL to the toptools server should include your domain (e.g.,
2. The product will start up. If you set up NTFS on the management server, and set your IIS to BASIC security
http://machine.company.com/hptt).
(required for using Netscape), you will be challenged for your username and password (domain\username for
Netscape).
1.3.5 Disk Space Usage
The platform bridge uses approximately 5 MB on the NNM system and the server bridge uses 1 MB on the toptools
system. (6 MB for single system installation.)
1.3.6 Memory Requirements
HP Toptools for OpenView NNM uses approximately 4 MB of memory in background processes on the NNM
system, and approximately 2 MB of memory on the toptools server. If both NNM-NT/WINDOWS 2000 and
toptools are installed on the same system along with the bridge, the system should have a minimum of 256 MB. If
you are managing a large number of devices (>4000) you should have a minimum of 320 MB (see section 11).
1.3.7 Processor Requirements
The requirements for the bridge are the same as the requirements for NNM and toptools. If both NNMNT/WINDOWS 2000 and toptools are installed on the same system, a minimum of a 300 MHz Pentium is suggested
for adequate performance. For additional requirements for managing large networks refer to section 11.
1.3.8 Single System Installation
The toptools server may be installed on the same system as the NNM-NT/Windows 2000 server (HP Toptools is not
supported on HP-UX or Sun Solaris); however, it is important that such a system have memory and disk space
adequate for both programs. A minimum of 256 MB of memory is required for such a system, with higher amounts
recommended. Beyond the disk space requirements of NNM and toptools, an additional 10 MB of disk space is
required for HP Toptools for OpenView NNM.
Note that the toptools action items "Device View", "SNMP Trap Configuration" and “Update firmware” for hubs
are only available when the toptools server is installed on the same system as HP OpenView NNM-NT. Because of
performance and configuration complexity, it is strongly recommended that you not install HP Toptools and NNMNT/WINDOWS 2000 on the same system unless you require single system operation.
Page 11
Page 12
hp toptools for openview nnm user guide
1.3.9 Evaluation and Registration
The HP Toptools Enterprise Products CD provides a 60-day, full featured evaluation of each HP Toptools Enterprise
Product that expires unless a free license key is obtained by registration. To enable evaluation, follow the installation
instructions as described below.
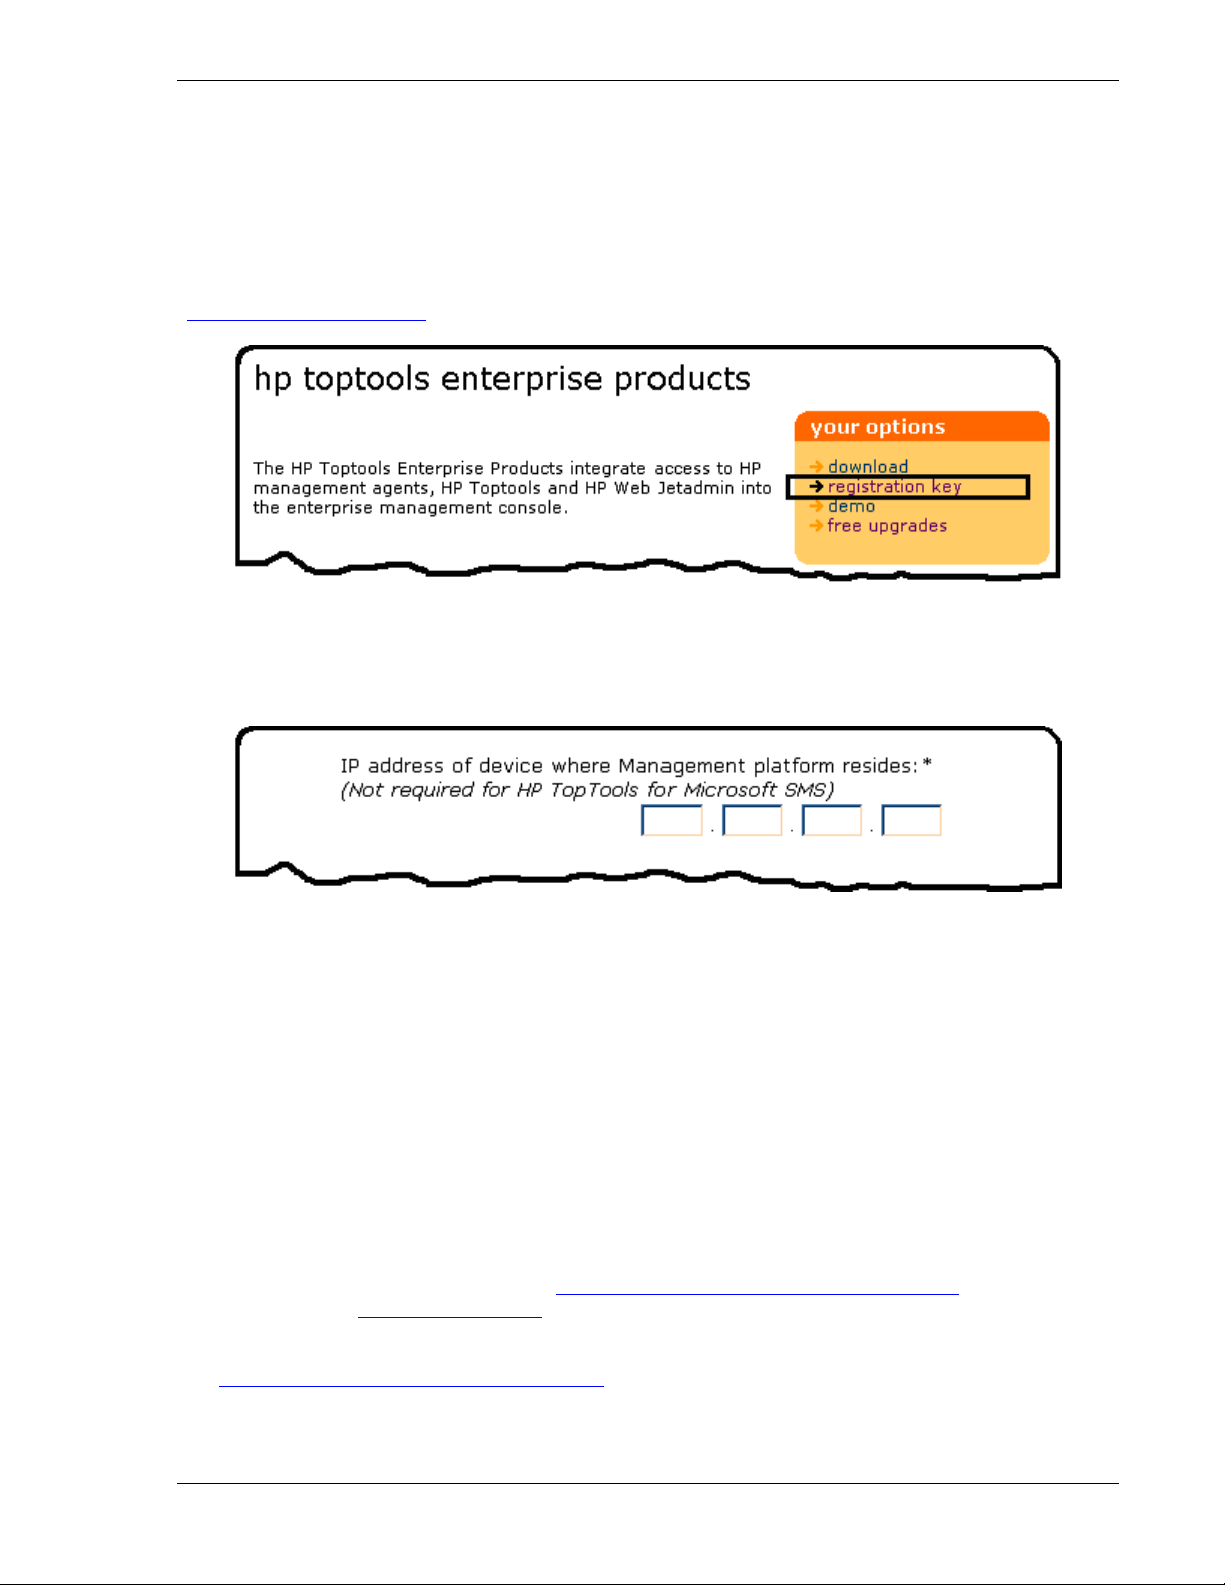
Registration: To obtain a free license key for HP Toptools for OpenView NNM, go to the HP Toptools website
(www.hp.com/toptools/entsols
) and click on “registration key”.
Fill in the registration form. Be sure to enter a valid email address as this is where your license file will be sent.
For NNM-NT/Windows 2000 you must provide the IP address of the NNM server (remote console support
•
is included).
• For NNM-UX or NNM-Solaris systems you must provide the IP address of the toptools server.
You will need to register to receive your key even if you obtain your CD through an HP-authorized reseller. When
you register to receive your license key, you will be emailed a new license.dat file.
License Installation:
• For NNM-NT/WINDOWS 2000 - copy the license file to <drive>:\<NNM-NT/WINDOWS 2000 home
directory>\bin\license.dat on the NNM-NT/WINDOWS 2000 system.
• For NNM-UX or NNM-Solaris - copy the license file to <drive>:\TTBridge on the toptools server system.
Activation:
Activate and verify the new license by stopping and then restarting NNM. You should be able to access toptools
features for HP devices.
1.3.10 Support and Contact information
Both pre- and post-sales support for HP Toptools for OpenView NNM is provided free-of-charge and may be
obtained from the HP Customer Care Centers: http://www.hp.com/cposupport/mail_support.html. Also refer to the
HP Toptools web site www.hp.com/toptools for updates and information on and future releases.
Training modules describing toptools as well as bridge installation and operation are provided on the toptools web
site (www.hp.com/toptools/techsupport/support.html).
Page 12 Version 5.6
Page 13
hp toptools for openview nnm user guide
2 Installing the hp toptools Server Bridge Component
The CD contains a directory called \Enterprise. As described in "Before You Begin", there are two 'sides' of the
bridge. The server bridge component installs on the toptools server. The platform bridge component installs on the
NNM server. For information on enabling support on remote consoles, refer to Section 10 of this manual and the
Network Node Manager documentation.
The welcome file on the Enterprise Solutions CD describes the CD's content. Each of the HP Toptools Enterprise
Products is contained is a separate directory. Products for HP OpenView Network Node Manager are contained in
the following directories:
Ttwja4nnmnt
Tt4nnmsol Contains software for HP Toptools for OpenView NNM-Solaris
Tt4nnmux Contains software for HP Toptools for OpenView NNM-UX
For tt4wjannmnt, a single Setup.exe is used to install both the platform and the server bridge components.
2.1 Pre Installation Recommendations
The toptools server must have its discovery database cleared BEFORE the installation of the Toptools Server Bridge
component. The installation modifies the discovery criteria so that it no longer automatically runs. To start fresh,
the discovery database should be cleared. This can be done using the following steps:
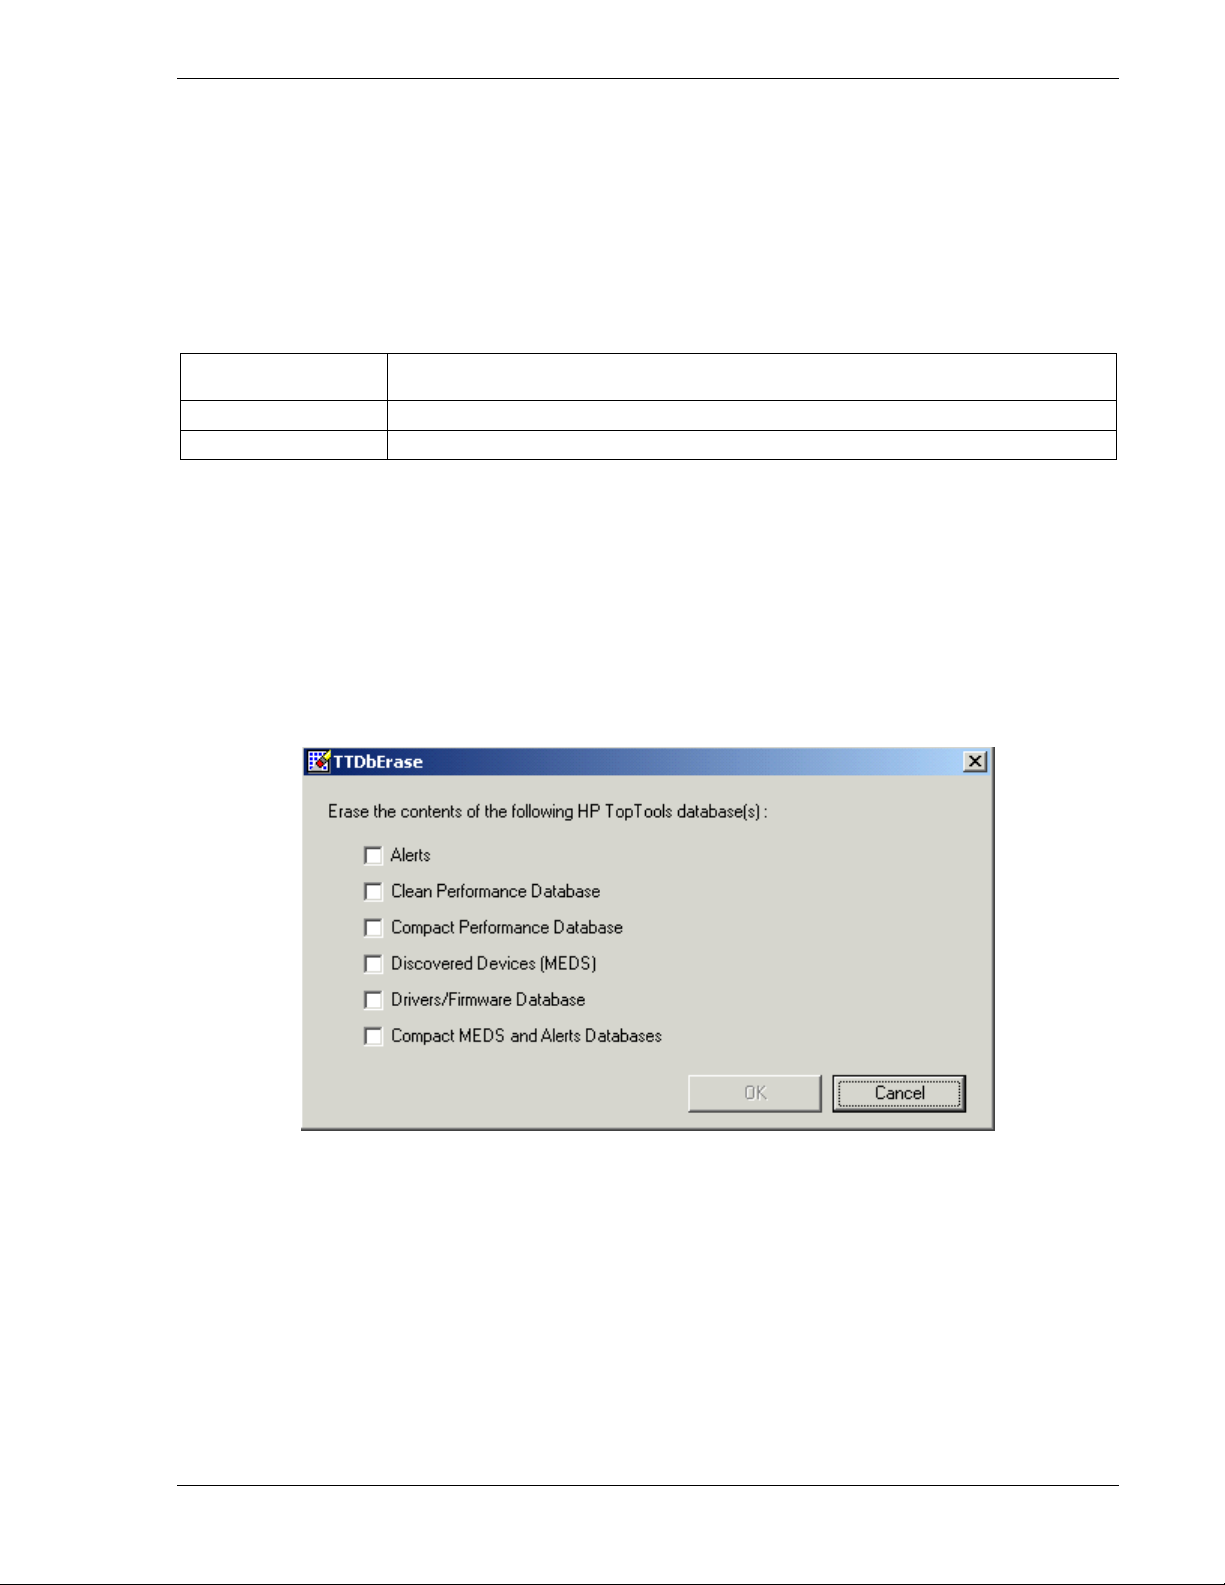
1. Select from the Windows NT menu Start->Programs->HP Toptools->Clean Database to launch the
following screen:
Contains software for HP Toptools for OpenView NNM-NT/WINDOWS 2000
and Web Jetadmin
2. Select "Alerts", "Clean Performance Database", “Discovered Devices (MEDS)”, "Revision Management
Database", and "Maps" and press the OK button to completely clear the database.
These steps are required for the discovery database of OpenView to populate the toptools server database.
Page 13
Page 14

hp toptools for openview nnm user guide
2.2 Preparing the toptools Server
The toptools server must be installed and accessible to the system running HP OpenView NNM. Refer to Section 1
for instructions for configuring toptools and browsers.
Using the browser, invoke the URL http://<Toptools_Server>/hptt where <Toptools_Server> is the fully-qualified
DNS hostname or IP address of the system running the toptools server application. If you are unable to access the
toptools server, consult the toptools manuals directory to troubleshoot the problem.
You may be prompted for a login. Only members of one of the three toptools user groups “toptools”, “toptools
operator”, or “toptools admin” are authenticated to access the toptools server.
To simplify logins from the OpenView NNM server, use the Windows NT
User Manager to add OpenView NNM users to the the appropriate toptools
group(s) on the toptools server. Otherwise, each browser launch will be
accompanied by an authentication prompt.
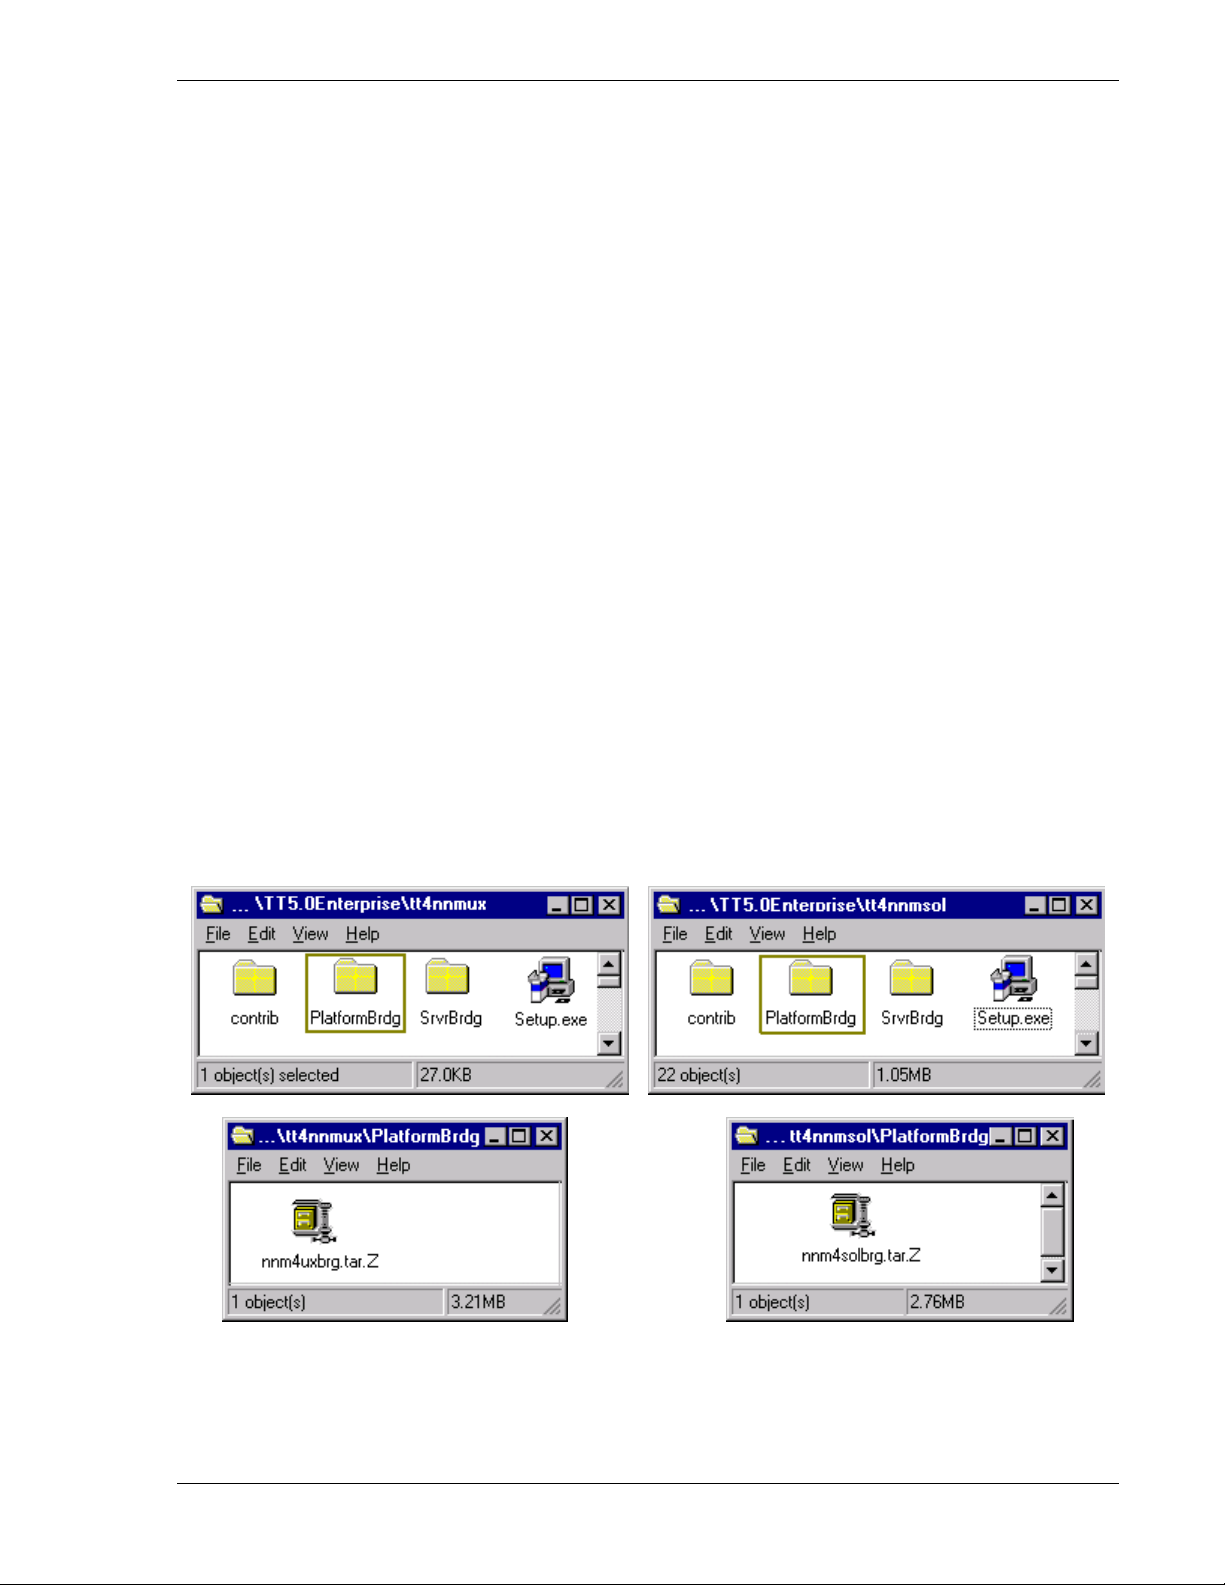
2.3 Step-by-Step Instructions
On the toptools server, run the Setup.exe file located on the CD at
\Enterprises\ttwja4nnmnt for NT systems and \Enterprises\tt4nnmux or tt4nmsol for HPUX or Solaris systems.
WARNING:
Discovery is turned off by
this installation. Proper
operation of both Toptools
and the bridge require that it
NOT be turned on again.
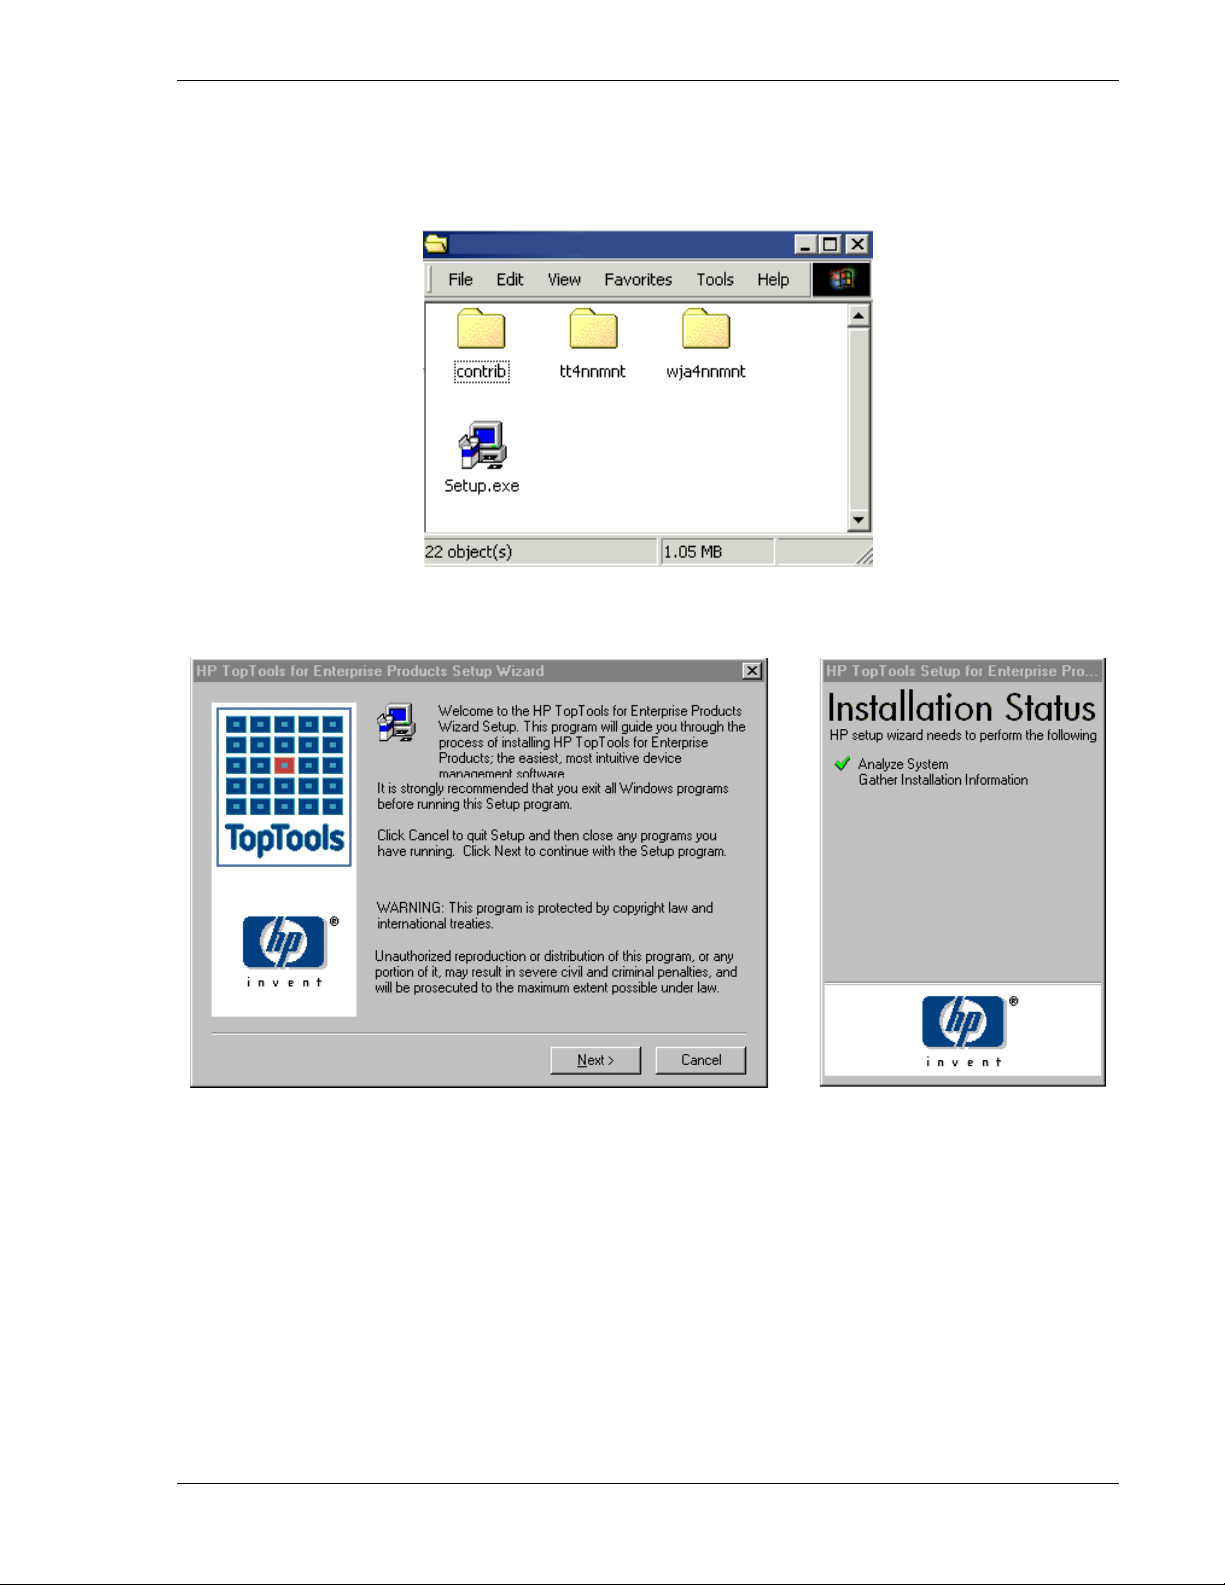
When you execute the file the Setup wizard will check your system to see which applications (NNM, toptools) are
present. During the installation process the wizard will display its status.
Page 14 Version 5.6
Page 15
hp toptools for openview nnm user guide
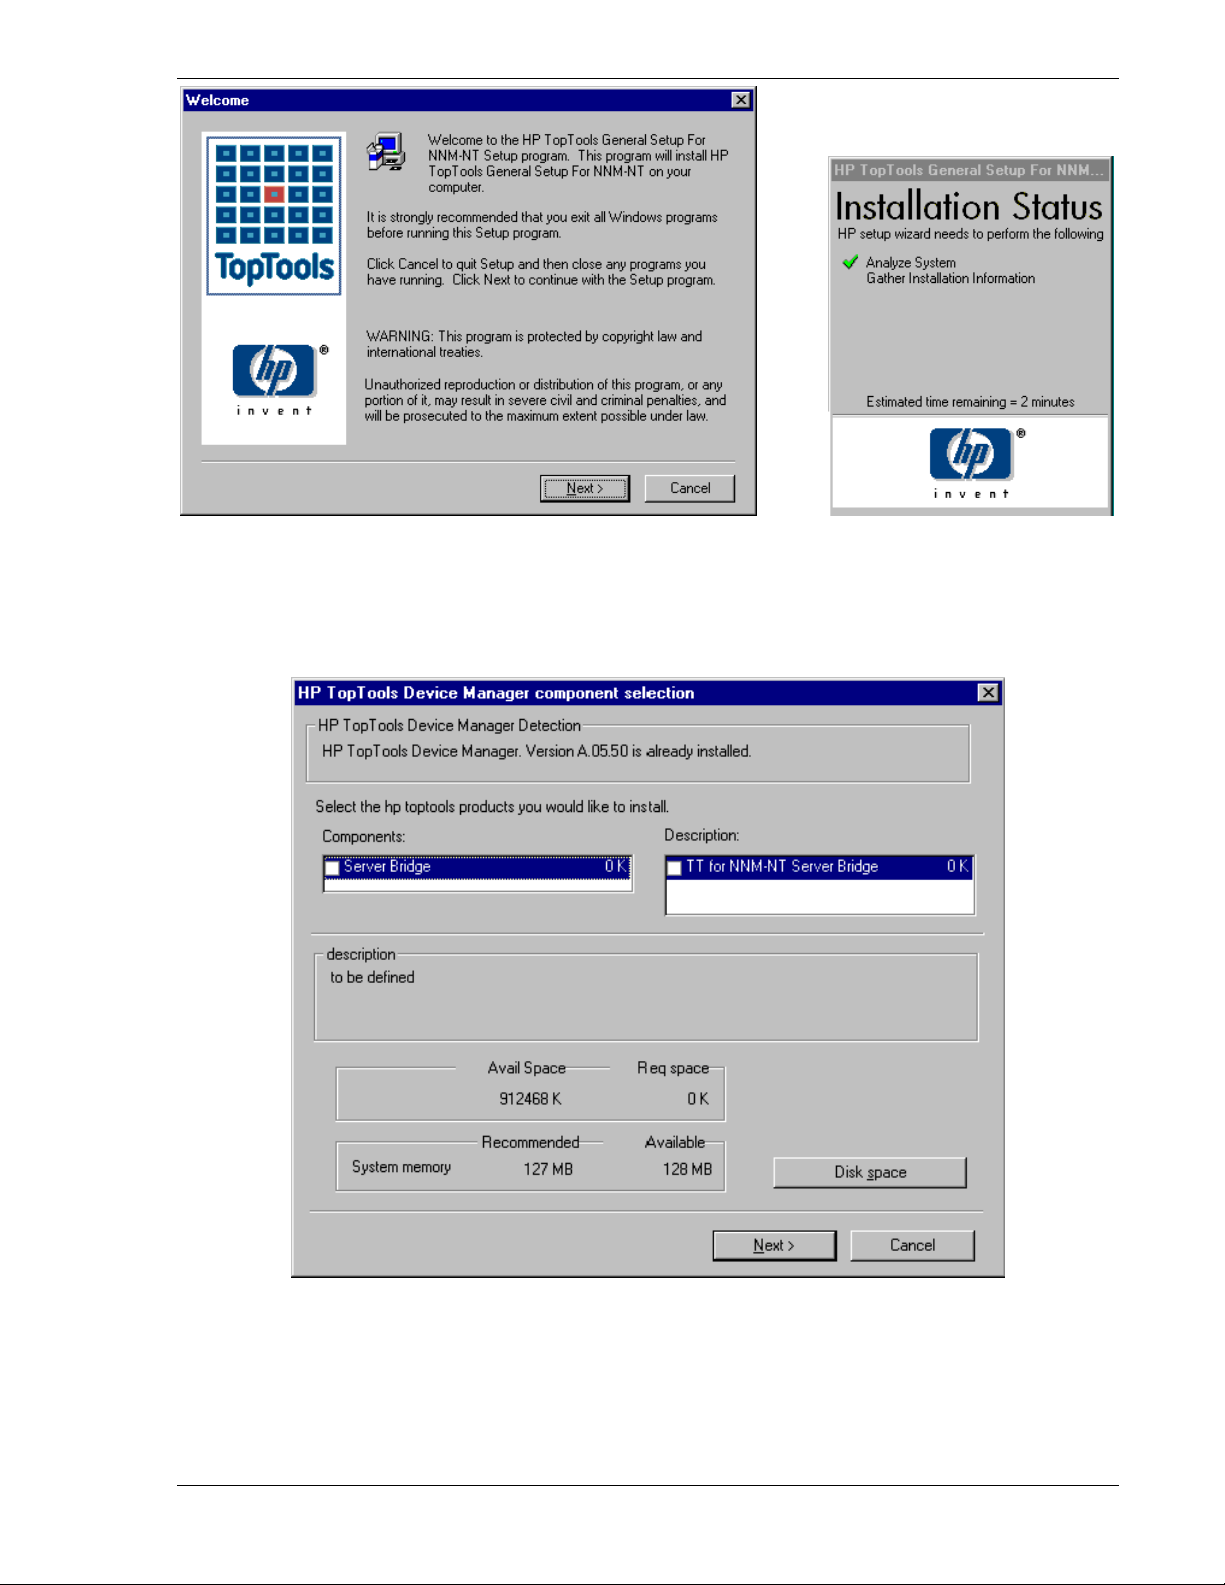
Figure 2-1. Opening screen of installation program for Toptools for NNM bridge components.
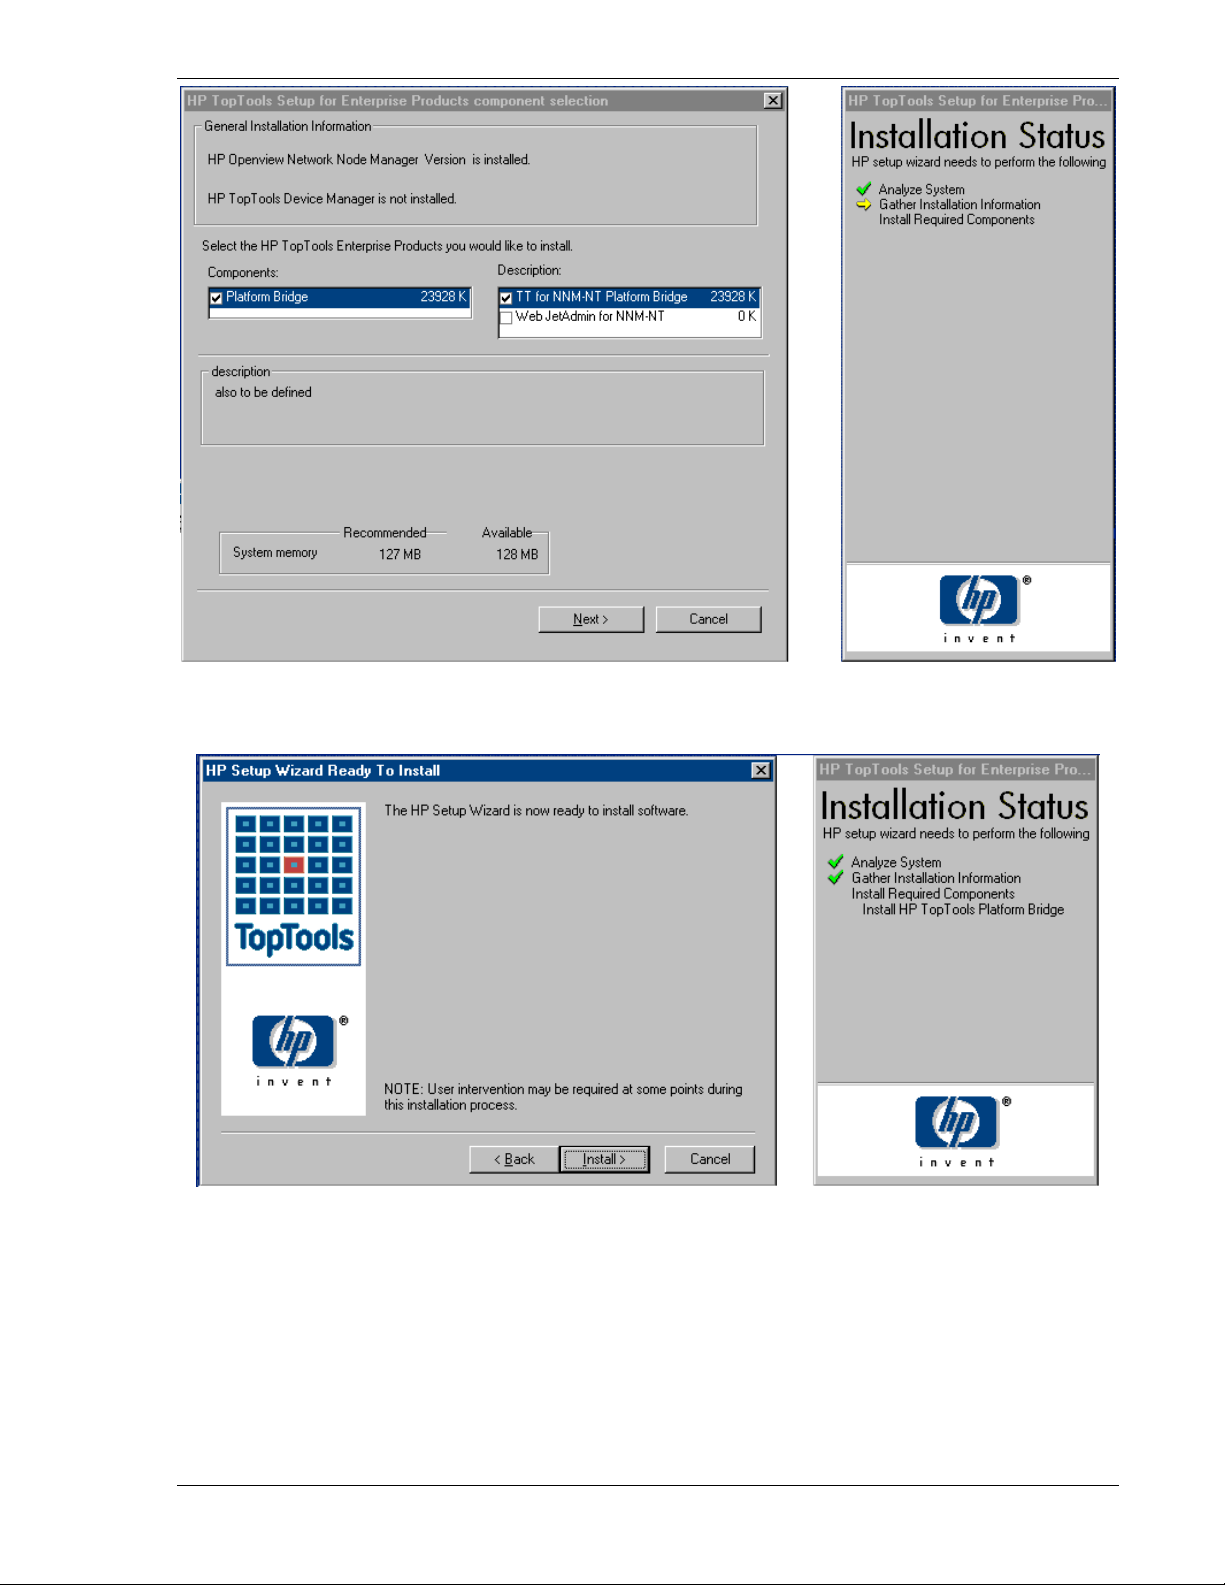
After a few moments, the wizard will display the installation options available to you depending on the software that
it found on your system. In the example shown in Figure 2-2 only HP Toptools was found. You can then select the
desired component to be installed (Server Bridge).
Figure 2-2. Server Bridge component selection.
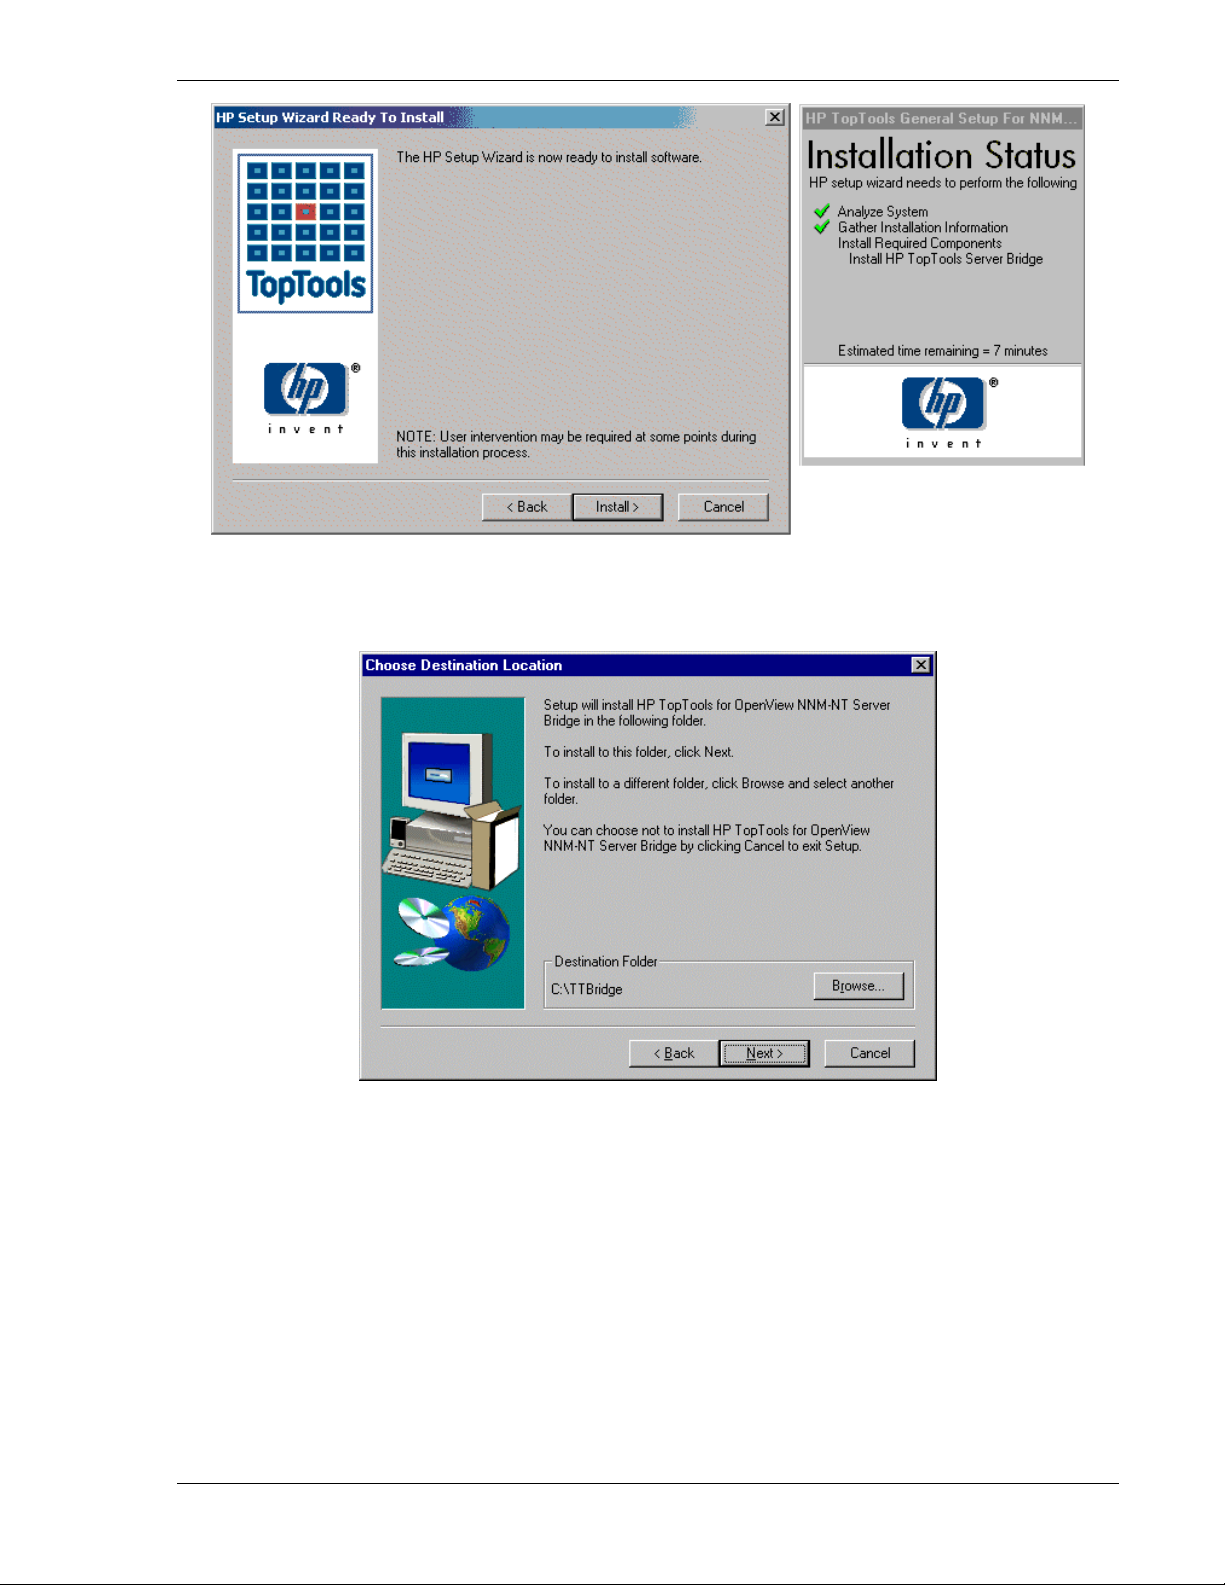
A dialog will be displayed showing that the Wizard is ready to install the selected component.
Page 15
Page 16
hp toptools for openview nnm user guide
You will then be asked to accept a license agreement for the Server bridge.
The wizard then asks for the directory where the server bridge is to be installed (Figure 2-3).
Figure 2-3. The Toptools Server Bridge uses a default install directory of c:\TTBridge.
Page 16 Version 5.6
Page 17
hp toptools for openview nnm user guide
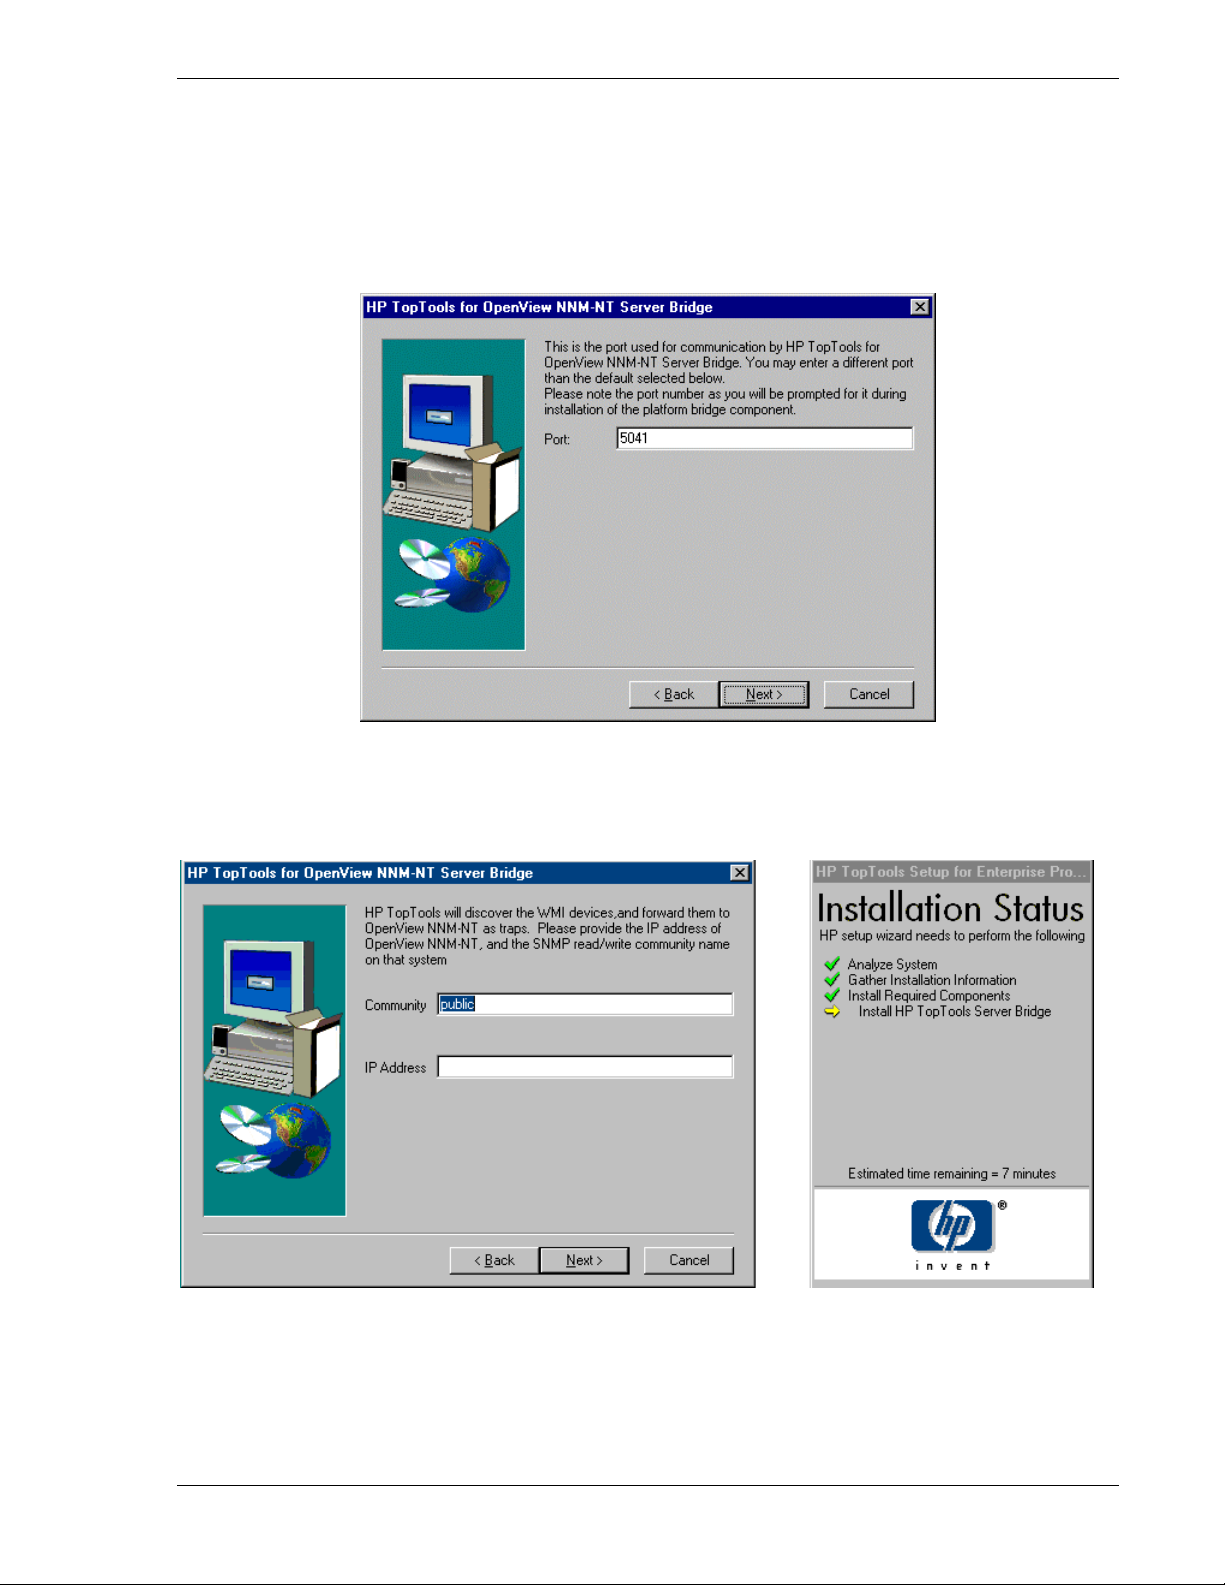
At this point, setup displays the port number on which it intends to service requests. The default is 5041. If for
some reason, this TCP port is not available on your system, select an available port, and specify it here. A list of
reserved TCP ports is available in the \winnt\system32\drivers\etc\services file. Note that these are not necessarily
used, but that they are specified for use by certain applications. You can see a list of actively used ports by using
‘netstat –p tcp’. Regardless of which free TCP port you select, make a note of it, as you will need to indicate that
port in the second part of this installation.
Figure 2-4. TCP port 5041 is the default used by Toptools for OpenView NNM.
You will then be asked to enter the community string and IP address of the NNM system.
Page 17
Page 18
hp toptools for openview nnm user guide
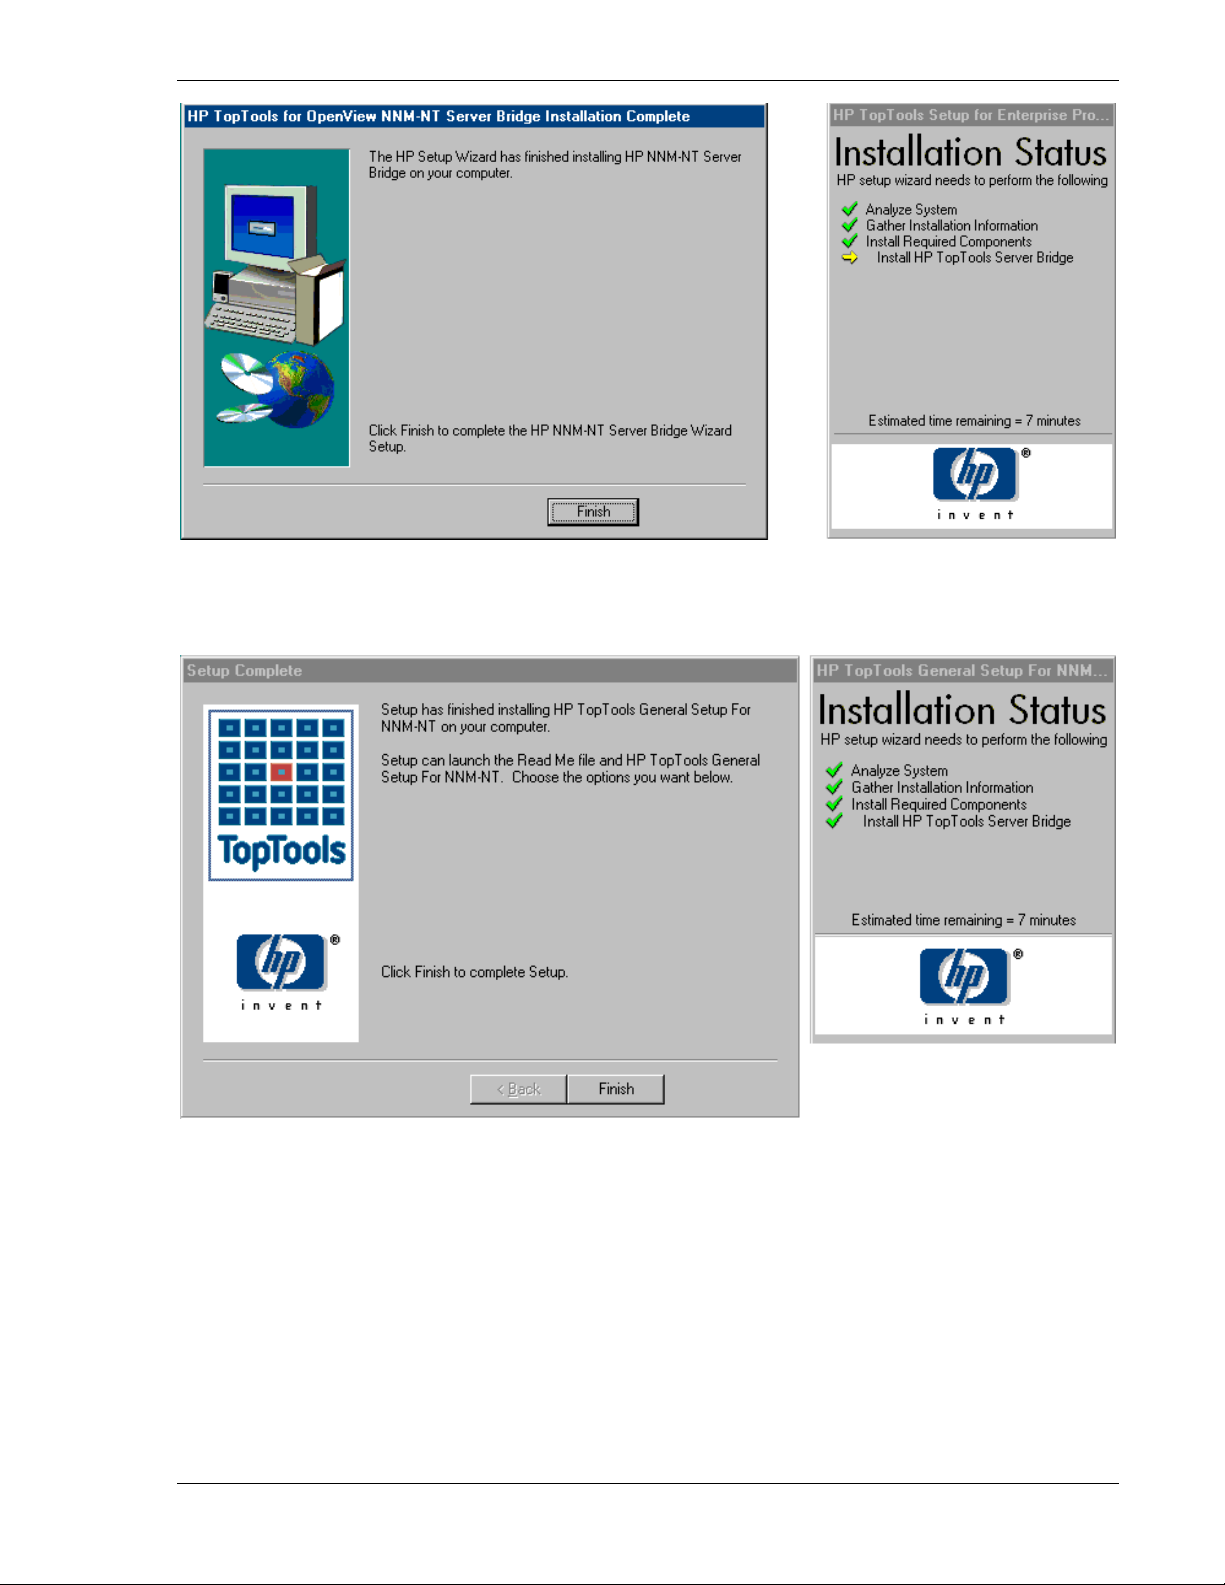
Clicking on Finish will cause the Server bridge components to be installed. A final dialog will be displayed
indicating that the installation is complete.
Once you complete this installation, you should reboot your system.
Page 18 Version 5.6
Page 19
hp toptools for openview nnm user guide
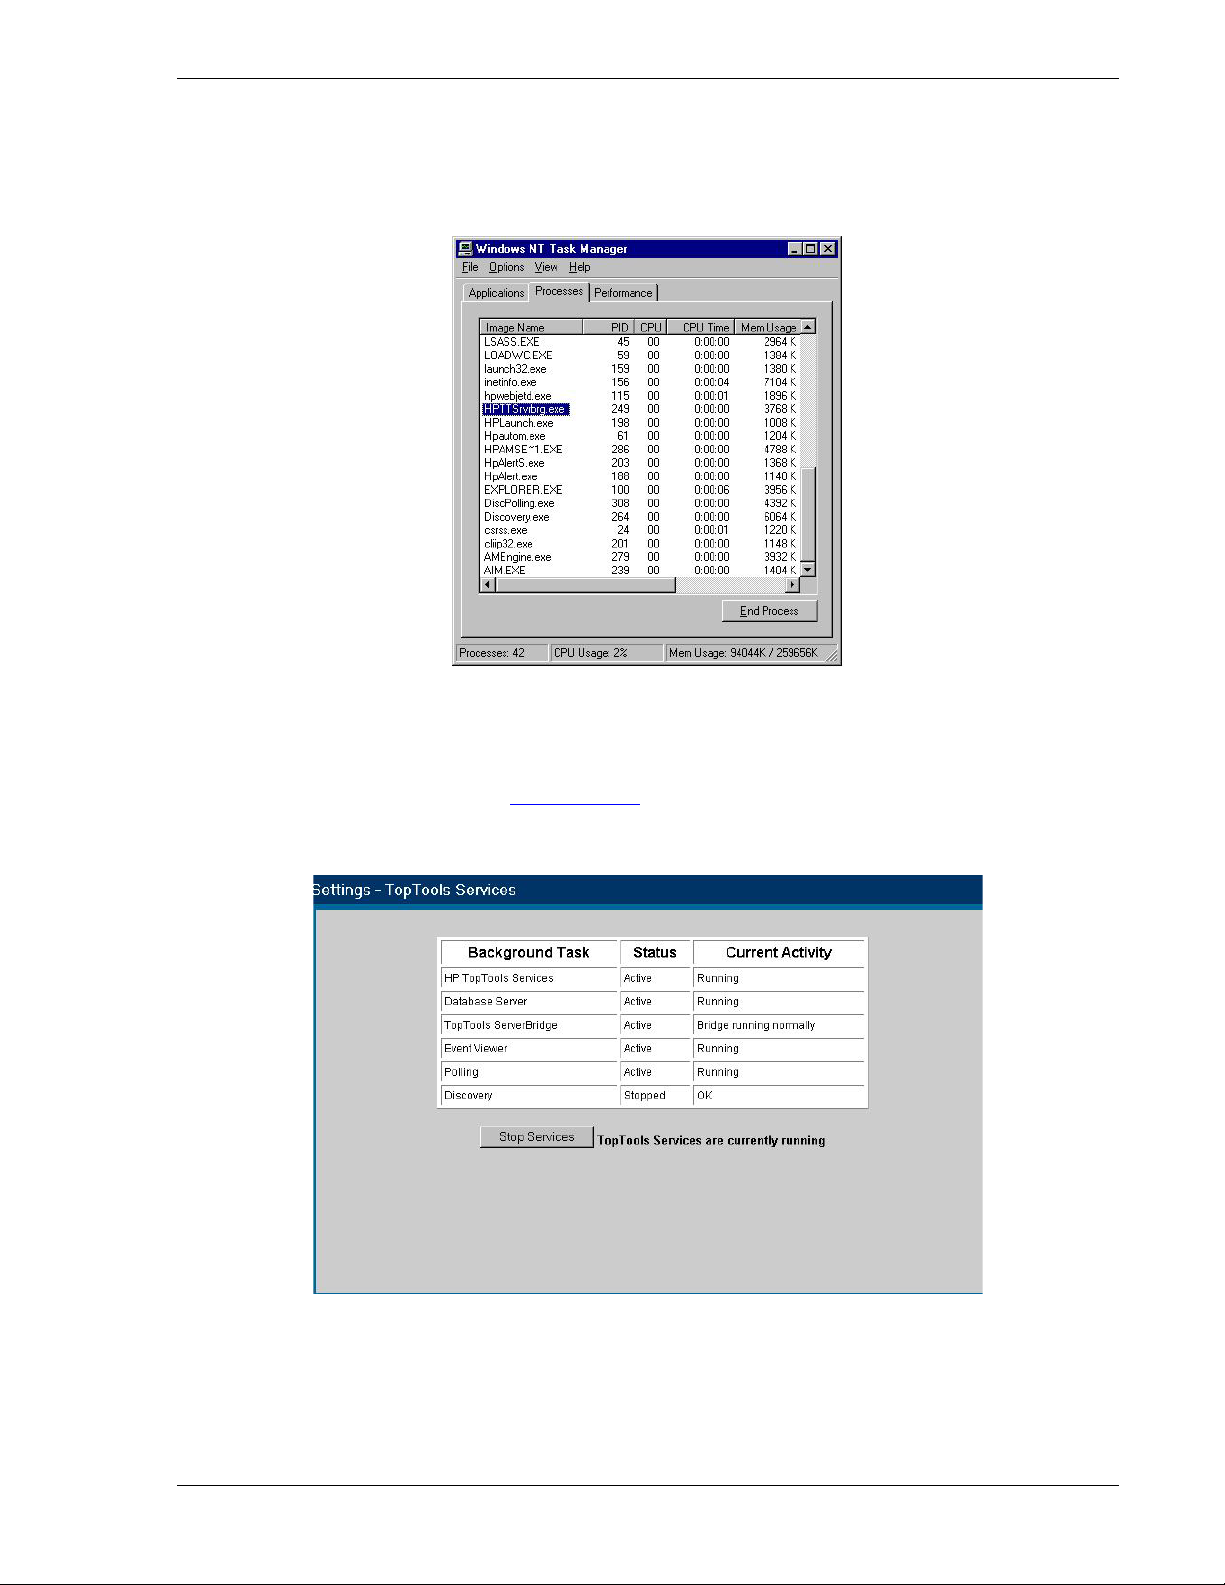
2.4 Verifying a Successful Installation
There are two simple ways of verifying that the installation of this side of the bridge was successful. First,
after the system has rebooted, a new process should be listed in the task manager: HPTTsrvbrg.exe as shown below:
Figure 2-5. The Toptools Server Bridge component uses a background process called "HPTTSrvbrg.exe".
Second, this process should be listed as one of the toptools services managed by the RVIEWSCM.EXE manager, a
toptools server process called the Service Control Manager. You can verify this by launching the standalone version
of toptools from the toptools server. (As indicated by an icon on the workspace of the system running the toptools
server, or by launching IE with the URL http://<Toptools
by the browser, select Settings->Toptools Services and verify the status of the Toptools Server Bridge as shown in
Figure 2-6.
_Server_IP address>/hptt.) From the main screen shown
Figure 2-6. The Toptools Services window displays the status of the Toptools Server Bridge.
The Toptools Server Bridge background task should be “Active” and the current activity should be “Bridge running
normally”.
Page 19
Page 20

hp toptools for openview nnm user guide
Page 20 Version 5.6
Page 21

hp toptools for openview nnm user guide
3 Installing the hp openview nnm Platform Bridge Component
3.1 Preparing the hp openview nnm System
In addition to having a properly installed and functioning HP OpenView NNM version 6.1 or 6.2 system, the HP
Toptools for OpenView NNM platform bridge component requires the installation of a qualified browser (see
section 1.2). In addition, the HP Toptools Server Bridge component must already be installed so that the platform
bridge component can link to it.
Pre-Installation Checklist:
HP OpenView NNM Version 6.1 or 6.2 is installed and functioning properly.
A qualified browser is installed and configured such that it is able to bring up the toptools
console.
The HP Toptools Server Bridge component of HP Toptools for OpenView NNM has been
successfully installed, is running, and is reachable over the network. (Try “telnet <hostname>
5041” and see if you can connect without a warning.)
All 4 SNMP services should be started. From the Control Panel, run the Services applet and
verify that “SNMP”, “SNMP EMANATE Adapter for NT”, “SNMP EMANATE Master Agent” and
“SNMP Trap Service” are all started and set on “Automatic” startup.
HP OpenView NNM services should be started. This can be done from the Windows menu.
Start->Programs->HP OpenView->NNM Services – Start
or by executing ovstart. To check the status of the services from the Windows menu, select
Start->Programs->HP OpenView->NNM Status
HINT:
The Toptools console
can be displayed from
the browser using the
URL:
http://<ttserver>/hptt
where <ttserver> is
the IP address or
DNS name of the
Toptools Server.
3.2 SNMP with netservers & nnm-nt
If Netserver Agents and NNM-NT/WINDOWS 2000 are installed on the same system the NNM-NT/WINDOWS
2000 SNMP EMANATE agents take precedence over the normal SNMP agent and settings. If you want the
Netserver to send traps to a management console you must perform the following:
1. Modify SNMP read/write community strings on a Netserver with NNM-NT. The community string is
usually set in the SNMP Properties field on the Netserver. When you install NNM-NT/Windows 2000, the
NNM-NT/WINDOWS 2000 EMANATE SNMP agent overrides and intercepts the normal SNMP
communication.
To set the SNMP read and write community strings, you must manually modify the snmpd.conf file
(usually located in C:\Openview\conf\SNMPAgent\ ) using an ASCII editor such as notepad. When
NNM-NT/WINDOWS 2000 processes start, this file is read and its entries are used to update the SNMP
configuration options in snmp.cnf.
get-community-name: public
set-community-name: <enter community name>
contact: <contact’s name/location/number>
location: <enter location of agent>
max-trap-dest: <enter max no. of trap-dest entries to be maintained.>
trap-dest: <enter trap destination>
Page 21
Page 22
hp toptools for openview nnm user guide
2.
Verify that the NNM-NT/WINDOWS 2000 EMANATE agent works correctly when an SNMP put is
received from another management console (i.e. registering your trap address).
If an SNMP put (set Trap Destination) is sent to a Netserver with NNM-NT, it should register the IP
address of the console that sent it in the trap destination table. Then, when a Netserver event occurs that
triggers a trap, the SNMP EMANATE agent should send a trap to that console.
If you discovered the Netserver node, the console address should be registered in the regular SNMP trap
destination table.
Test NNM-NT/WINDOWS 2000 SNMP EMANATE agent:
1.
Make sure trap destination is set in SNMP trap tables.
2.
Cause a trap by using storage capacity, volume switches and change the alert for a low volume.
3.
Make sure the alert shows up in the local Netservers event log.
4.
Make sure the alert was sent to and received by the destination console.
3.3 Step-by-Step Instructions
Before installing the platform bridge component, it is necessary to install the server bridge component as detailed in
the previous section.
To install the platform bridge, select the appropriate \Enterprises product subdirectory (Tt4wjannmnt, Tt4nnmsol, or
Tt4nnmux) on the CD.
3.3.1 Installation on hp openview nnm-ux or nnm-solaris
For HP-UX or Solaris systems, go to the \Enterprises\tt4nnmux\Platformbrdg or
\Enterprises\tt4nnmsol\Platformbrdg subdirectory and copy the nnmuxbrg.tar.Z or nnmsolbrg.tar.Z file to a
temporary directory (i.e. /tmp/nnmuxbrdg).
Uncompress and then untar the file. Execute the resulting "install" script. A sample of the dialog for an HP-UX or
Solaris system is shown in Figure 3-1.
Page 22 Version 5.6
Page 23

hp toptools for openview nnm user guide
# ./install
HP Openview Network Node Manager Version 6.20 installed
********************************************************************
Welcome to HP TopTools 5.6 for Openview NNM-UX (A.05.05.00)(Local) Installation.
You are about to install the HP TopTools 5.6 for
OpenView NNM-UX (A.05.05.00) (Local).
Make sure all NNM consoles, including the manager console
and the remote consoles are closed before beginning the
installation.
Warning!
********
Performing the installation without closing all the
OpenView consoles including the remote consoles will result in
malfunction of NNM.
Please enter the TopTools Server address[IP]:15.27.244.37
Please enter the Server port:5032
This installation will execute ovstop, ok to continue?(Y/N):y
WARNING: DO NOT use the kill command or Control-C to get out of this
installation.
If you want to closely track the progress of the installation,
open another terminal window and type the command:
tail -f /tmp/hpttBrdgInstall.log
Notes and warnings will be written to this log as well as
indications of the installation's progress.
This installation will take at least 15-30 minutes to complete. Please wait....
<mibs are loaded here>
.
.
.
<HP device types registered here>
.
.
.
Mibs are loaded successfully
*******************************************************************
* Your installation was successful. *
* *
* Review the notes and warnings from this installation *
* that are recorded in the log file(/tmp/hpttBrdgInstall.log) *
* *
* Please make sure that hpttBrdgDisc finishes discovering *
* all HP devices, then bring up ovw. *
*******************************************************************
Figure 3-1. HP UX or Solaris Installation Script.
Page 23
Page 24
hp toptools for openview nnm user guide
3.3.2 Installation on hp openvie nnm-nt
On the NNM system, run the Setup.exe file located on the CD at \Enterprises\Ttwja4nnmnt for NT systems.
When you execute the file the Setup wizard will check your system to see which applications (NNM, toptools) are
present. During the installation process the wizard will display its status.
Figure 3-2. Installing the platform bridge component.
When you click Next, a dialog will be displayed to allow you to select the Platform bridge and/or the Web Jetadmin
bridge components. In the following example only the Platform bridge will be selected for installation. (Refer to
section 5 for instructions for installing Web Jetadmin.)
Page 24 Version 5.6
Page 25
hp toptools for openview nnm user guide
When you click Next a dialog will be displayed letting you know that user input will be required during the install
process.
A license agreement screen will be displayed next.
After accepting the license agreement, you will be asked to enter
the address and port number for the toptools server.
Note that SNMP services must be started in order to install the platform bridge component.
At this point, the installation program prompts you to enter the IP address of the system running the toptools server
and bridge, along with the TCP port number used by the bridge. The default port is 5041.
Page 25
Page 26

hp toptools for openview nnm user guide
Figure 3-3. The TCP port number must be the same port number entered for the Server Bridge.
After entering the toptools server information, the installation program continues installing and displays windows
showing the progress of the installation.
MIBs for HP Netservers, HP hubs, and HP switches will be compiled. This takes approximately 10 minutes. Some
warnings may be displayed in the HP OpenView console if the MIBs have previously been installed. (These
warnings may indicate that the “–replace” option would force installation of the MIBs. If these MIBs are already
installed, the appropriate behavior for the installation is to NOT reinstall them, so the messages can be ignored.)
Figure 3-4. SNMP MIBs for HP devices will be compiled into NNM during the installation.
By installing these MIBs, the HP OpenView NNM MIB browser can now permit you to closely examine and modify
SNMP variables for HP devices. A list of MIBs installed is given at the end of this manual.
When the installation completes, the NNM Console output will be displayed, showing you the status of the NNM
integration. The console will display information about each step of the installation. When this console display
indicates that the integration is complete, close the console output window.
Page 26 Version 5.6
Page 27

hp toptools for openview nnm user guide
Figure 3-5. The platform bridge component will finish by displaying the NNM console output.
The final screen will then be displayed indicating that the installation has been successful.
If you integrate new components into your toptools server, such as a new version of HP Toptools for Servers, HP
Web Jetadmin, or Toptools for Hubs and Switches you must uninstall and then reinstall the platform bridge
component in order for these new capabilities to be available in the NNM console.
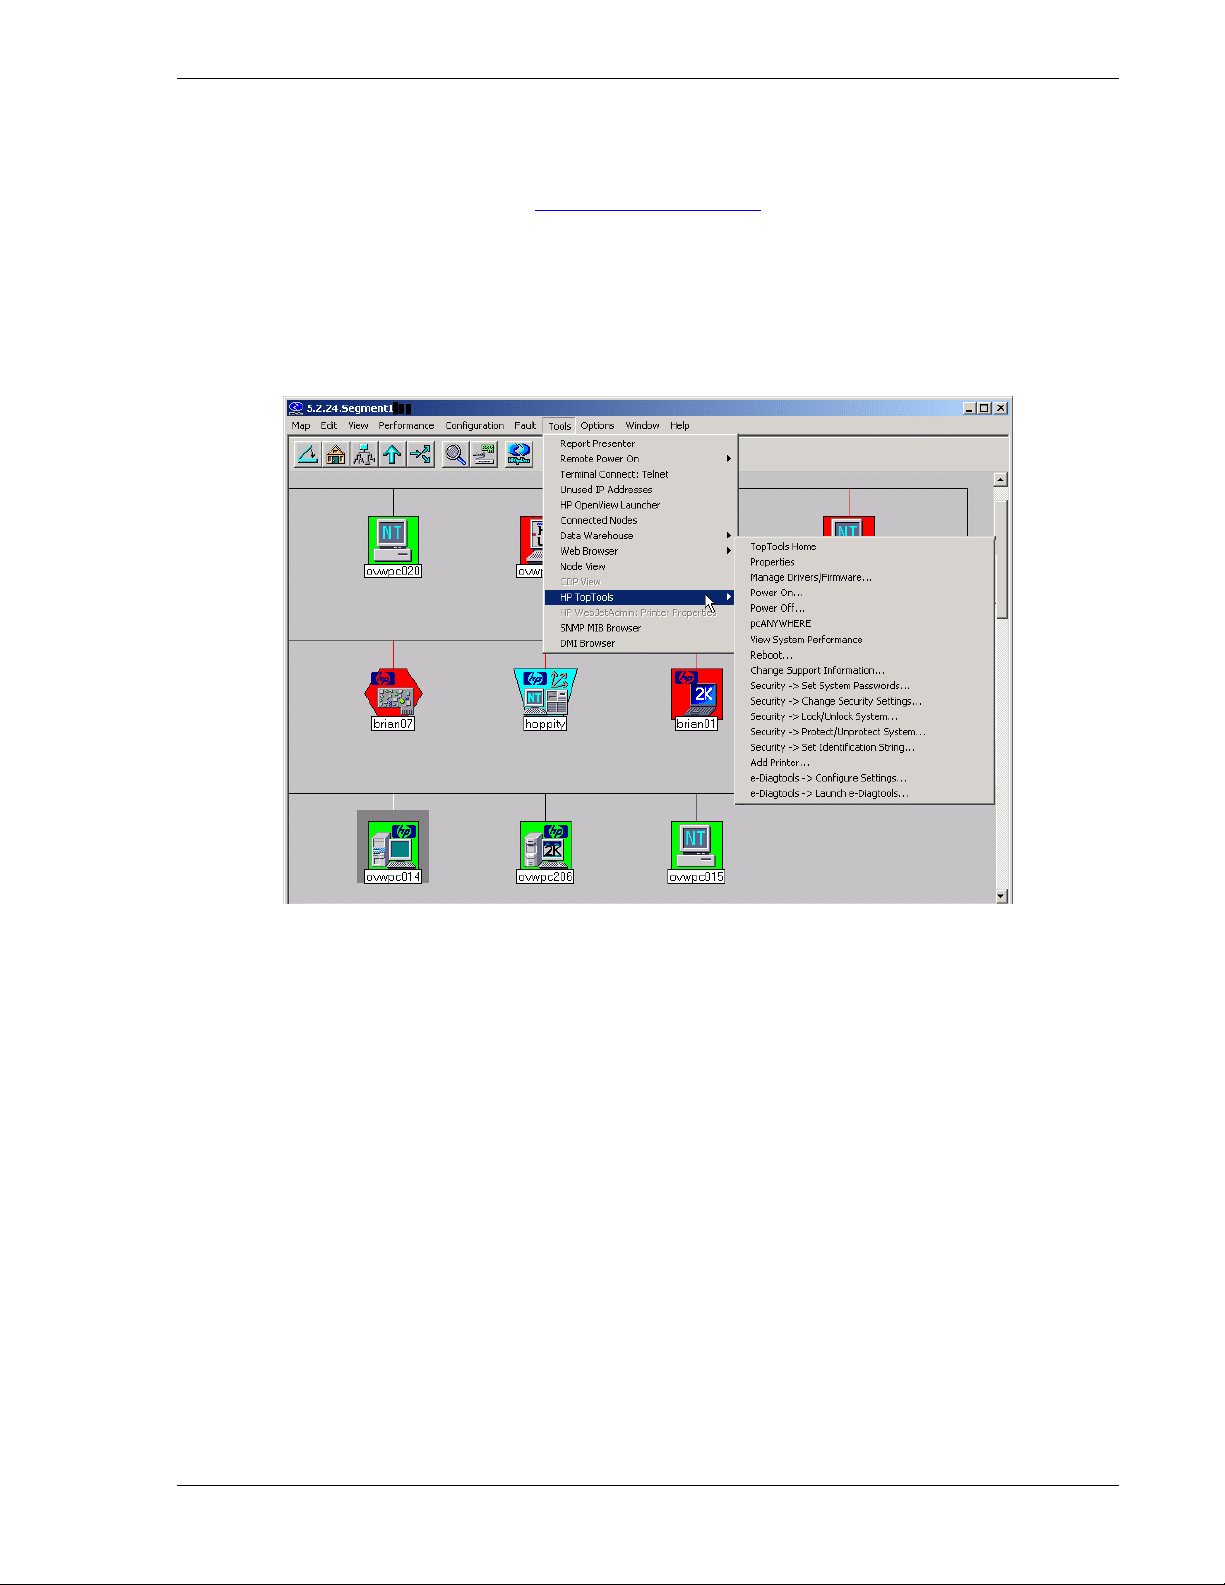
3.4 Verifying a successful installation
The first way to verify that the bridge has been installed and is functioning properly is to start NNM. The Tools
menu should have a new entry, HP Toptools, which brings up a sub-menu such as the one in Figure 3-6. (Note that if
you have previously uninstalled HP Toptools for OpenView NNM, toptools menu actions may not appear for SNMP
managed devices. To correct this, do a Find Object by Attribute on "isSNMPSupported", select those devices on the
map you wish to update, and then go to Fault->Network Connectivity->Poll Node to update those nodes.)
Page 27
Page 28

hp toptools for openview nnm user guide
Figure 3-6. NNM now includes an HP Toptools menu item.
Note that all the items will be grayed out and disabled since no HP devices have been selected on the map.
Particular menu items will be enabled depending on which devices have been selected.
A second indication that the platform bridge is working is that the background processes, hpttBrdgMgr and
hpttBrdgDisc, are listed in the task manager as shown below:
Figure 3-7. The platform bridge adds two new processes: hpttBrdgDisc and hpttBrdgMgr.
hpttBrdgDisc is always running whenever ovservices are started. Launching the NNM Status application will list
hpttBrdgDisc as one of the encapsulated applications and indicate whether it is running or not. Its job is to transmit
newly discovered nodes to the HP Toptools server, and also to do its own advanced “2
nd
” level discovery on each
node to see if it is an HP device. One general benchmark is that hpttBrdgDisc takes less than 10 minutes to do the
2nd level discovery on 1000 nodes. If hpttBrdgDisc is restarted, say by using ovstop/ovstart, or on a reboot, the
entire ovwdb node database is transmitted to the toptools server.
Note that hpttBrdgMgr is only running when ovw is running. When ovw starts, hpttBrdgMgr is launched, and
manages the menu items and icons for each map node classified as an HP device.
Page 28 Version 5.6
Page 29

hp toptools for openview nnm user guide
4 Installing hp web jetadmin bridge for openview nnm-nt
This section provides instructions on installing, using, and uninstalling HP Web Jetadmin for OpenView NNMNT/WINDOWS 2000 (Web Jetadmin bridge).
HP Web Jetadmin provides management for HP printers. (Refer to the Web Jetadmin documentation for information
on how to install Web Jetadmin.) If a Web Jetadmin server has been installed on a system in the network, the Web
Jetadmin bridge links NNM to the Web Jetadmin server to provide additional management for HP printers. For more
information on using Web Jetadmin, refer to Web Jetadmin product documentation. For information on managing
HP printers as part of HP Toptools for OpenView NNM, refer to "Using HP Toptools for OpenView NNM" later in
this section.
Note: this functionality is not supported on HP NNM-UX or HP NNM Solaris. Refer to the Contributed Library
directories on the CD for additional information.
4.1 hp web jetadmin bridge for openview nnm-ntwindows 2000 Installation
Procedure
4.1.1 Installation on hp openview nnm-nt
To install HP Web Jetadmin for OpenView NNM-NT, run Enterprises\Ttwja4nnm\Setup.exe.
Select HP Web Jetadmin on the Enterprise Products component selection dialog.
Page 29
Page 30

hp toptools for openview nnm user guide
Select HP Web Jetadmin for NNM-NT/WINDOWS 2000 and click Next.
When you click Next a dialog will be displayed letting you know that user input will be required during the install
process.
Page 30 Version 5.6
Page 31

hp toptools for openview nnm user guide
A Welcome page for the Web Jetadmin component installation will be displayed. Click on Next to continue.
Welcome Screen
A license agreement will be displayed. Click on Yes to accept the agreement and continue.
You will be asked to input the address and port for the address of your Web Jetadmin server. The default port is
8000. If the address and port are incorrect an error message will be displayed.
Enter the address and click on Next.
Page 31
Page 32

hp toptools for openview nnm user guide
The following message will be displayed:
A Setup Complete dialog will then be displayed. Click Finish. You do not need to reboot your system.
4.2 Verifying a Successful Installation hp web jetadmin for opeview nnm-nt
Check for the following items:
• The Tools menu should have a new entry, HP WebJetAdmin: Printer Properties.
• If a printer is selected on the map, the functions supported by that printer will be displayed in the NNM context
menu.
4.3 Using hp web jetadmin for openview nnm-nt
4.3.1 Accessing Printer Properties
If Web Jetadmin has been installed on a system in the network and the Web Jetadmin bridge has been installed, the
HP Web Jetadmin Printer Properties function will be added to the menu displayed when you right click on an HP
Printer. HP Web Jetadmin Printer Properties opens Web Jetadmin in your default browser for the selected
printer. Printer properties can be accessed in two ways:
1. Right-click on a printer from the NNM Map Screen to bring up the popup menu as shown in the figure below.
2. Select HP WebJetadmin: Printer Properties.
Page 32 Version 5.6
Page 33

hp toptools for openview nnm user guide
You can also click the Tools menu and select HP WebJetadmin: Printer Properties.
The following Web Jetadmin window will be displayed:
Page 33
Page 34

hp toptools for openview nnm user guide
4.4 Printer Trap Proxy
A proxy program for sending printer traps to the NNM console is provided in the contributed library directories of
the NNM bridge components on the Enterprise CD. It is also available from the HP Toptools web site. This program
is not supported and is made available for use only where needed for customer convenience. Refer to the readme file
in the contributed software directory for additional information.
Page 34 Version 5.6
Page 35

hp toptools for openview nnm user guide
5 Using hp toptools for openview nnm
HP Toptools for OpenView NNM enhances NNM functions and integrates the functionality of HP Toptools directly
into the native HP OpenView NNM console. The first noticeable enhancement can be seen upon displaying the
NNM map. Each HP device is now displayed with a custom HP icon. A table of HP icons is shown in Table 1.
Each HP device now has an enhanced menu of action items which are accessible from the NNM Tools menu, or
within the context menu of a selected node object. Note that in most cases, you must select one or more nodes in
order to enable HP Toptools menus. Right-clicking the mouse over an HP node will not enable the HP Toptools
menus, you must select the node or nodes. Nodes may be selected through selection on the map, or as the result of a
search using the Find By utility. For more information on selecting nodes and creating selection lists, consult your
NNM documentation.
5.1 toptools Authentication and openview nnm
If you install the toptools server on the same system as HP OpenView NNM, security settings for access to toptools
will not be an issue. However, if the toptools server is installed on a separate system, authentication for requests
from the system running HP OpenView NNM may be requested.
By default, only users in one of the toptools groups (“toptools”, “toptools operator”, “toptools admin”) on the
toptools server are permitted access to toptools pages. You must add NNM users to the one of the toptools groups. If
no additional users are added, then the first attempt to launch a browser on the OpenView NNM system will result in
an authentication prompt. Once you have added users to one or more of the toptools groups on the toptools server
subsequent toptools page requests will be automatically authenticated without prompting using NT authentication of
the cached credentials.
NT authentication will automatically send user information transparently, and no prompting of a password will
occur. Care must be exercised in this approach in order to avoid permitting unauthorized access to toptools. Users
logging into the user account used to operate OpenView NNM can now gain access to the toptools actions (such as
locking or rebooting all the HP devices in your organization).
5.2 hp Device Discovery
Each time the hpttBrdgDisc service is restarted (for example, by doing a ovstop/ovstart) the HP discovery program
attempts to classify all devices in the ovwdb database by doing extended SNMP and DMI/WMI discovery on those
devices. For each HP device discovered, the icon on the NNM map is changed, and additional functionality is
enabled via the toptools menu in NNM. The discovery process is not instantaneous; extended DMI/WMI and
SNMP requests can take some time. Discovery can take over an hour. A file, hpttBrdgDiscData.log, notes each
discovered HP device and can be used to monitor the status of the reclassification. For more information on how
bridge discovery works, refer to the "Troubleshooting" section of this document.
5.3 Launching toptools from nnm
You can access the toptools home page from the NNM menu. To access, go to the NNM Tools menu and scroll
down to the “HP Toptools” menu item. From the cascading menu, select “Toptools Home. This will display the
toptools home page on the configured toptools system. You can then access the toptools functions such as the
Network Performance Advisor directly.
5.4 Finding hp Devices
The NNM Find tools help you quickly locate devices and create selection lists based on attributes such as selection
name or device type. HP Toptools for OpenView NNM discovers HP devices and links them to new attributes for
NNM. On the NNM map select Edit menu, Find-> Find By Attribute (see Figure 5-16 and Table 2).
Page 35
Page 36

hp toptools for openview nnm user guide
Table 1. Customized HP Icons for NNM
HP Vectra
HP Vectra
Windows 2000
HP Vectra
Visualize
Workstation
HP Vectra
Visualize
Workstation
Windows 2000
HP Netvectra
HP Netvectra
Windows 2000
HP Kayak
HP Kayak
Windows 2000
IA-64 Windows
2000 Servers
IA-64 Linux
Servers
HP Netserver
Automatic Server
Restart
Subsystem
HP Netserver Disk
Subsystem
HP Netserver NIC
Card Subsystem
HP Netserver
System Hardware
Environment
Subsystem
HP Toptools
Remote Control
card
HP Blade GSP
Card
HP 24-Port Hub
HP Procurve Switch
4000M
HP Procurve Switch
1600M
HP Blade Switch
HP Advancestack
Switch 800T
HP Fiber-Optic Hub
HP Advancestack
100VG Hub
HP Advancestack
Switch 2000 (B)
HP Omnibook
HP Omnibook
Windows 2000
HP Palmtop
HP Netserver
Predictive Failure
Monitoring
Subsystem
HP Netserver
NetWare
HP Netserver
OS/2
HP Netserver Linux
HP 12-Port Hub
HP Advancestack
Switching Hub
HP Advancestack
10/100 Lan
Switch-16
HP Advancestack
100Base-T Hub
HP Remote
Bridge!
HP LAN Bridge
HP ThinLAN Hub
HP Advancestack
Switch 100, 200
HP Advancestack
Switch 2000
HP Advancestack
Switch 208, 224
HP 48-Port Hub !
HP Procurve Routing
Switch
HP Procurve Routing
Switch 6308-SX
Page 36 Version 5.6
Page 37

hp toptools for openview nnm user guide
g
p
Table 2. Additional Attributes for HP Devices
Attribute Type Description Example
hasHPNetserverSubsystem HP Netserver withSubsystems
hasHPTTDMIAgent HP Netservers and HP PCs with HP DMI Agent
hasHPTTRemoteControl HP Netserver with Remote Control Card HP Netserver LH3
hasHPTTWMIAgent HP PCs with HP WMI Agent
isHPBladeGSP HP Blade GSP card
isHPBladeSwitch HP Blade Switch
isHPBrLAN HP 10:10 LAN Bridge HP 28673A
isHPBrRemote HP Remote Bridge HP 28674A
isHPBridge Any HP bridge HP 28673A
isHPDevice Any HP device HP Vectra VL7
isHPHub Any HP hub HP J3234A
isHPHub100TX HP Advancestack 100BT Hub-12TX HP J3234A
isHPHub100VG HP 14-port 100VG / SNMP HP J2415A
isHPHub12 HP 12-port Ethernet Hub HP 28638B
isHPHub24 HP 10-Base-T Hub-24 HP J3302A
isHPHub48 HP 10-Base-T Hub-48 HP 28699A
isHPHubAdvStack Any HP Advancestack Hub HP J2600A
isHPHubAdvStack8 HP 8-port Advancestack Hub HP J2610A
isHPHubFiber HP FDDI Hub HP 28682A
isHPHubThin HP ThinLan Hub HP 28692A
isHPHubWeb HP Web-enabled Hubs HP J3301A
IsHPIA64Server2K HP IA-64 Servers running Windows 2000
IsHPIA64ServerLinux HP IA-64 Servers running Linux
isHPKayak HP Kayaks HP Kayak XU
isHPNetPC HP NetPCs
isHPNetserver HP Netservers HP Netserver LH3
isHPNetserver2K HP Netservers running Windows 2000
isHPNetserverSubsystem HP Netservers Subsystem
isHPNetserverNT HP Netservers running NT
isHPNetserverNW HP Netservers running NetWare
isHPNetserverOS2 HP Netservers running OS2
isHPNetserverLinux HP Netservers running Linux
IsHPNetserver Type HP Netservers
IsHPNSAsr HP Netserver Automatic Server Restart
IsHPNSDisk HP Netservers Disk Sysytem
IsHPNSNic HP Netservers Network Card
IsHPNSSysHW HP Netservers System Hardware Environment
IsHPNSPfm HP Netservers Predictive Failure Monitorin
isHPOmnibook HP Omnibooks HP Omnibook 800CT
isHPPC HP PCs
IsHPPlotter * HP Plotters
IsHPPrinter * HP Printers HP LaserJet
IsHPPrinting Device * HP Printers
isHPRtrSwitch HP Routing Switch
isHPRtrSwitch6308 HP Routing Switch 6308 HP J4840A
isHPRtrSwitch9304M HP Routing Switch 9304M HP J4139A
isHPRtrSwitch9308M HP Routing Switch 9308M HP J4138A
isHPSwitch HP Switches HP J3125A
isHPSwitch100 HP Switch 100 HP J3175A
isHPSwitch16 HP Advancestack 10/100VG Switch 16 HP J2980A
isHPSwitch212M HP Procurve Switch 212M HP J3298A
isHPSwitch224M HP Procurve Switch 224M HP J3299A
isHPSwitch1600 HP Procurve Switch 1600 HP J4120A
isHPSwitch2400 HP Procurve Switch 2400 HP J4122A
isHPSwitch2424 HP Procurve Switch 2424 HP J4093A
isHPSwitch2512 HP Procurve Switch 2512 HP J4812A
isHPSwitch2524 HP Procurve Switch 2524 HP J4813A
isHPSwitch4000 HP Procurve Switch 4000 HP J4121A
IsHPSwitch4108 HP Procurve Switch 4108 HP J4865A
isHPSwitch6208 HP Procurve Switch 6208 HP J4841A
isHPSwitch8000 HP Procurve Switch 8000 HP J4110A
isHPSwitch200 HP Advancestack Switch 200 HP J3125A
isHPSwitch2000 HP Advancestack Switch 2000B HP J3100B
isHPSwitch8 HP Advancestack Switch 8 HP J3175A
isHPSwitch800T HP Advancestack Switch 800T HP J3245A
isHPSwitchHub HP Advancestack 10BT Switching Hub HP J3210A
isHPSwitchWeb HP Advancestack Switch 800T HP J3245A
isHPTTmanaged HP Toptools can be used to manage the device
isHPTTRemoteControl HP Remote Control card
isHPTTSupported HP Toptools supported device
isHPVectra HP Vectra Deskto
isHPVisualize HP Visualize Workstation
HP Vectra VL7
* Available when Web Jet Admin is installed.
Page 37
Page 38

hp toptools for openview nnm user guide
5.5 hp Device Actions
Once you have located the desired HP device, you can right click on the device to perform a variety of actions.
The actions available will vary depending on the device type. The following actions are available for most HP PCs:
• Manage Drivers/Firmware consists of distributing BIOS, agent, or driver packages to one or more Vectras,
Kayaks, or Omnibooks, scheduling the software upgrade to occur on the next reboot, and then rebooting the
system. Updating the diagnostics consists of distributing a diagnostics package using a technique similar to the
system software upgrade.
• Power On/ Power Off allows you to turn systems on and off remotely.
• pcAnywhere launches the pcAnywhere application for remote access. If you click on the pcAnywhere command
in the menu and pcAnywhere has been enabled on the remote device, toptools will launch pcAnywhere Express
and attempt to connect to the remote device. (You may need to enter a valid user and password.) If connection
to the remote device is successful, a window will be opened on your system displaying the screen for the remote
system. Refer to the Toptools online help for additional information.
• View System Performance allows you to monitor system resources. Clicking on View System Performance
opens the System Performance Analysis page for the selected device. On this page you can view the CPU,
Memory, Disk I/O, or Storage utilization and configuration for the selected device.
• Reboot allows you to restart a system remotely.
• Change Support Information allows you to update system support information.
• Set System Passwords allows you to set passwords to limit system access.
• Change Security Settings offers the administrator the option to prevent access to various hardware devices such
as removable and bootable drives, serial ports, or printer ports.
• Lock/Unlock System allows you to limit keyboard access to the system.
• Protect/Unprotect System access to the system front panel and power controls (see Figure 5-5).
• Set Identification String, also referred to as the “tattoo” string, is useful for configuring your environment to
support asset management.
• Add Printer allows you to remotely configure a printer on the system.
• e-Diagtools lets you perform system diagnostics remotely.
The most important menu item for each HP device is Properties. For PCs such as HP
Kayaks, Vectras, or Omnibooks, Property pages are generated with information collected
through a connection to a toptools agent running on the PC. Property pages are similar
for HP Kayaks, Vectras, and Omnibooks. See the section on Vectras for a more in-depth
overview of Property pages.
The remaining menu items invoke management operations such as “Reboot”, “Lock
system”, or “Manage Drivers/Firmware”. Figure 5-1 shows the screen that is displayed
after selecting the reboot menu entry.
HINT:
The Properties page is
generated on the
Toptools Server by DMI
or WMI requests to the
PC.
If the PC is down, the
Toptools Server uses
entries stored in its
database to generate a
minimal page, with only
two tabs of information.
Figure 5-1. One or more HP PCs can be rebooted.
Page 38 Version 5.6
Page 39

hp toptools for openview nnm user guide
Figure 5-2 shows the Lock system dialog, which has several useful applications such as restricting access to a
system during a remote control session, or when implementing organizational security policies. Example: An
unauthorized user is trying to log into a critical PC as the local Administrator to change configuration settings. The
HP PC generates and sends DMI alerts to indicate an unauthorized user is making several unsuccessful attempts to
log in as the local Administrator. The OpenView NNM event log provides notification of this event. In response,
the NNM console operator can invoke the “Lock System” action. This action dynamically locks the keyboard and
mouse of the selected system preventing further unauthorized access.
Toptools actions can be performed against single or multiple targets. For example, a group of PC’s can be
prevented from a power-off via the front panel prior to a network-wide backup routine.
Figure 5-2. Locking the system prevents users from using the keyboard or powering off.
Some toptools actions directly control the power-state of the PC. The ability to power-on a system can be very
useful. For example: An administrator wants to install a new system software package on all the Kayaks in a
company. This can be done very quickly from the NNM station by executing a Find By-> Attribute – isHPKayak,
to select all Kayaks, going to the Tools -> HP Toptools -> Power On to awaken the Kayaks, then selecting the
Manage Drivers/Firmware menu item to distribute the new package.
Figure 5-3. Prevent Shutdown permits the user to still use the keyboard, but not power off the system.
The power-on password is also referred to as the DMI or WMI password. As DMI and WMI offer administrators an
extensive range of remote manageability, it is important to use DMI/WMI passwords to protect access to remote
management actions. The toptools menu item Set System Password gives the administrator access to change
DMI/WMI passwords for the protection of a single system, or for a collection of systems on a periodic security
maintenance schedule.
Refer to the HP Toptools User’s Guide and Toptools Online Help for more information on device actions.
Page 39
Page 40

hp toptools for openview nnm user guide
5.6 Using SNMP Security
NNM is an SNMP management system. It provides several services and applications that use SNMP to
communicate with devices that have SNMP agents. These services and applications include discovery, the SNMP
MIB browser, the data collector, and the application builder. NNM also provides several utilities on the menu bar
that are pre-customized SNMP applications such as "System Information".
To be able to identify SNMP managed devices during the discovery and use the various tools provided by NNM and
HP Toptools for OpenView NNM, the correct SNMP community name must be known to NNM. The default
community name ("string") used by NNM and toptools for network devices is normally "public". If devices do not
use "public" you will need to enter the configured community name for each device into NNM. To set SNMP
community strings, you may use the NNM “SNMP Configuration” application found on the NNM menu bar. For
instructions, consult your NNM documentation or online help.
Note: If an HP device, such as a Netserver, has a community configured that is not known to NNM prior
to discovery, it will not be recognized by the bridge. If the community is entered into NNM after
discovery, the Netserver will be identified following the next discovery cycle. To force a refresh,
ovstop and ovstart hpttBrdgDisc.
Page 40 Version 5.6
Page 41

hp toptools for openview nnm user guide
5.7 Managing hp kayaks
HP Toptools for OpenView NNM enables extensive management of HP PC's with toptools agents – HP Kayak,
Vectra, Omnibook and Visualize products. This support includes toptools management actions and event
management.
HP Toptools for OpenView NNM will receive alerts from managed PC's. Managing HP Kayaks requires that the HP
Kayaks have a toptools agent installed and running. The agent can be downloaded from the HP web site at
http://www.hp.com/toptools
.
Figure 5-4. New Actions added by HP Toptools.
The HP Toptools menu can be displayed from the NNM Tools pull-down or node context menus. One or more HP
devices must be selected within OVW for the menu items to be enabled. Figure 5-4 shows the menu that is available
when an HP Kayak is selected.
Page 41
Page 42

hp toptools for openview nnm user guide
The amount of enabled menu items is dependent on the toptools agent version installed on the selected Kayak. The
list of menu actions available for HP Kayaks is listed in Table 3.
Table 3. HP Toptools Actions Available for HP Kayak
Menu Item
Properties
Manage Drivers/Firmware…
Power On…
Power Off…
pcAnywhere
View System Performance
Reboot…
Change Support Information…
Security -> Set System Passwords…
Security -> Change Security Settings
Security -> Lock/Unlock System
Security -> Protect/Unprotect System
Security -> Set Identification String
Add Printer
e-DiagTools -> Configure Settings…
e-DiagTools -> launch e-DiagTools…
Figure 5-5. HP Toptools menu can be displayed from the Tools pull-down menu.
Page 42 Version 5.6
Page 43
hp toptools for openview nnm user guide
5.8 Managing hp vectras
Managing HP Vectras requires that the HP Vectras have a toptools agent installed and running . The toptools agent
can be downloaded from the HP web site at http://www.hp.com/toptools.
Toptools functionality is displayed on the nested menu shown when right clicking the mouse on a selected HP
Vectra icon, or when pulling down the Tools->Toptools menu from NNM. The feature set is the same as for HP
Kayaks. Figure 5-6 shows the menu that is available when an HP Vectra is selected.
The amount of enabled menu items is dependent on the capability of the selected Vectra. If two or more Vectras are
selected, the menu items depend on the capabilities of the selected Vectras.
Figure 5-6. The number of enabled Toptools menu items depends on the Vectra's DMI version.
The toptools actions listed for HP Vectras are similar to the actions listed for HP Kayaks shown earlier. In this
section, the Properties action will be explored. For details on other menu items, see the previous section on
Managing HP Kayaks.
Property pages for an HP Vectra are shown in Figure 5-7. Property pages contain up to seven sub-pages selectable
via tabs with the labels: Identity, Status, Configuration, Security, Reports, e-Diagtools, and Support. The main
difference between the pages for HP Vectras, Kayaks, and Omnibooks is the Identity page, where different banners
and photos are used depending on the remote system product type.
Page 43
Page 44

hp toptools for openview nnm user guide
Figure 5-7. HP Vectra Property Pages are similar to Kayak and Omnibook pages.
The information displayed is obtained from two locations: a small amount of information is pulled from the
discovery database on the toptools server, and the remainder is obtained from direct requests to the system itself.
The Identity page displays the word “Connected” or “Not Connected” above the photograph of the system to
indicate whether or not the toptools server can directly connect to the system. If the toptools server cannot connect
to the system, only the information from the toptools server discovery database is used to generate the Property
pages. In this case, the Property pages will consist of the Identity page and Status page.
Note: The Properties menu item is only available for one system at a time. If there is more than one
system in the NNM selection list, the Properties item will not be enabled (Figure 5-8).
Figure 5-8. Toptools actions can be applied to more than one HP PC.
Page 44 Version 5.6
Page 45

hp toptools for openview nnm user guide
Figure 5-9 show the Status page for an HP Vectra. The range of status categories is dependent on the DMI/WMI
functionality of the Vectra. In this case, two system status entries are available: Current Processes and System
Performance.
Figure 5-9. The Status page can be used to check the state of the Vectra's processes.
The Configuration page consists of three parts: Configuration, Explore PC, and User Settings. Figure 5-10 shows a
screen capture of the Configuration page displaying an organized view of the extensive management information
available from the toptools agent on the HP Vectra. In this case, details of the Video BIOS are being examined.
Comparably in-depth information is available for various parts of the HP Vectra using this section’s formatted report
of the system.
Figure 5-10. The Configuration page has extensive information on the Vectra.
Explore PC provides an alternative view of the information available from agents on the remote system. Figure 5-11
shows a sample of this information, with the window displaying the Operating System (Windows NT) variable of
the HP Vectra PC MIF.
Page 45
Page 46

hp toptools for openview nnm user guide
Figure 5-11. DMI variables can be examined via the Configuration page.
The Security page contains three sub-sections: System Passwords, System Settings, and Control. The Passwords
page is shown in Figure 5-12. This page permits modifications of the power-on password and power-on password
control. The Change Power-On Passwords screen is also directly accessible from the toptools menu in NNM.
DMI/WMI power-on passwords are stored in encrypted form on the toptools server database. DMI/WMI
connections with action requests use these password to authorize on the client system. When you attempt an action
with the wrong password, the toptools web page will prompt you to enter the correct one. The correct password will
be stored in the toptools server database for future DMI/WMI action requests.
Figure 5-12. The power-on passwords can be changed using the Security page.
The System Settings portion of the Security page is the same page that is invoked from the toptools menu on the
NNM map. This screen is shown in Figure 5-13.
Page 46 Version 5.6
Page 47

hp toptools for openview nnm user guide
Figure 5-13. Extensive control over the Vectra can be exercised from the Security page.
The Reports tab displays a formatted configuration summary of the selected system. This report may be printed or
saved.
The Support tab displays information on obtaining assistance for the HP device.
5.9 Managing hp visualize workstations
HP Visualize Workstations may be purchased from HP with three different operating system choices: HP-UX,
Linux, and Windows NT. Visualize workstations running Unix operating systems are supported as SNMP systems
by NNM if SNMP has been installed and enabled. These systems will be displayed on the NNM map with a Unix
icon.
Visualize workstations running Windows may install HP Toptools for Visualize agents. These agents have the same
management features as the HP Kayak Workstations except for Manage Drivers/Firmware. Refer to Managing HP
Kayaks for additional information.
5.10 Managing hp omnibooks
HP Omnibooks are displayed on the OpenView NNM map with a customized icon as shown in Figure 5-14.
Omnibook toptools menu actions are similar to those for HP Vectras and HP Kayaks. HP Omnibooks do not
support Lock/Unlock System or Protect/Unprotect. For an overview of PC menu items, see the section Managing
HP Kayaks.
Notebooks are frequently disconnected from the network, and as a result, may appear down in the NNM map or
display limited data in the Toptools Property pages as only marginal information is stored in the toptools database.
For traveling notebooks, it is recommended that you configure NNM’s xnmtrap service to ignore link down events
from notebooks or implement an event correlation. Consult NNM documentation for more information on
configuring NNM event management.
Page 47
Page 48

hp toptools for openview nnm user guide
Figure 5-14. Toptools actions supported on Omnibooks.
Property pages for an HP Omnibook are shown in Figure 5-15. Property pages tabs are the same as those displayed
for HP Kayaks and Vectras. For an overview of Property pages tabs, see the previous section Managing HP
Vectras.
Figure 5-15. The DMI Properties page for an HP Omnibook.
Page 48 Version 5.6
Page 49

hp toptools for openview nnm user guide
5.11 Managing hp netservers
HP Netserver L-series and E-series products running Windows NT, Windows 2000, Linux or Novell NetWare are
managed by HP Toptools for OpenView NNM through:
• Automatic discovery and identification on the NNM console
• Automatic trap destination setting for HP Netservers
• Automatic detection of HP Toptools Remote Control (with control actions enabled)
• Access to HP Toptools property pages
• Creation of subsystem status icons that display hardware status as a result of events
• Wake on LAN function
To enable management of HP Netserver products, HP Toptools for Servers agents must be installed on each server.
Agents may be obtained from the Netserver Navigator CD or downloaded from the HP Toptools website. The
Netserver agent installation program for Windows NT or Netware allows distribution of Netserver agents to multiple
target systems, and may not require a reboot to ‘take effect’. Using a ‘push’ distribution saves cost in deployment
time while avoiding reboot reduces downtime – especially during the workday.
Figure 5-16. HP Netservers can be located using the Find By Attribute feature of NNM.
5.11.1 Discovery and Events
Support for HP Netservers begins during installation of HP Toptools for OpenView NNM when Netserver MIBs are
compiled, trap definitions loaded, and the bridge discovery service (hpttBrdgDisc.exe) is installed. As the bridge
performs discovery, it identifies HP Netserver agents and enables the attribute “isHPNetserver”. Once identified,
the bridge changes the Netserver icon on the map and enables toptools menu items. Users can search for all
Netserver products using the Find By tool as shown in Figure 5-16, or build a map filter based on the attribute
isHPNetserver.
As discovery continues, each Netserver is automatically configured to send its alerts to the NNM console where the
alerts are translated and displayed in the Alarm browser and as status in the Netserver’s node submap. By
automatically setting the trap destination on Netservers, administrators avoid the time-consuming task of having to
visit each system individually to manually set the correct destination.
Page 49
Page 50

hp toptools for openview nnm user guide
5.11.2 Menu Actions
The menu items enabled for Netservers include toptools property pages and Manage Drivers/Firmware, and
pcAnywhere. If detected, the HP Toptools Remote Control product adds the Remote Control, Power On, and Power
Off features.
Table 4. HP Netserver Menu Items
Menu Item Without RMC Menu Items with RMC
Properties Properties
pcAnywhere Remote Control
Manage Drivers/Firmware Power On
Wake on LAN Power Off
pcAnywhere
Manage Drivers/Firmware
Figure 5-17. The HP Netserver menu items.
The property page function is enabled if during the installation of toptools, server management was enabled. HP
Toptools for Servers displays a collection of information that includes information on identification, status,
threshold monitoring, configuration, reporting, and support.
Figure 5-14 shows an example of the identity page. For Netservers with an HP Toptools Remote Control card
installed, a link to the web pages of the card will be enabled.
Page 50 Version 5.6
Page 51

hp toptools for openview nnm user guide
Figure 5-18. HP Toptools for Servers
The Status page is shown in Figure 6-15. Information from the Netserver agents is presented here in a graphical and
tabular form. Figure 6-15 shows CPU utilization, memory utilization, storage capacity, and network statistics.
Figure 5-19. The Status page summarizes Netserver agent information.
The Storage Capacity pane of the Status page is shown in Figure 5-20. In addition to reporting the actual volume
capacity, this screen allows users to modify the storage capacity thresholds by clicking on indicators and dragging
them to new values.
The remainder of the Properties page for Netservers is comparable in appearance to the Properties pages shown for
HP Vectras, but includes information on advanced features like NetRAID. See the Toptools for Servers
documentation for full details. Alternatively, the item Properties will bring up pages that will provide SNMP and/or
DMI specific information for Netservers. The Properties option is available even if server management was not
specifically enabled during the toptools server installation. These pages share the same format as the pages presented
for Kayaks and Vectras.
Page 51
Page 52

hp toptools for openview nnm user guide
Figure 5-20. Users can modify the Storage Capacity alert levels by dragging the indicators.
The Manage Drivers/Firmware feature allows you to check the status of drivers, agents, and firmware on
HP Netservers. You can then download and update software remotely in the same manner used for PC systems.
Refer to the toptools online help for additional information.
5.11.3 hp netserver Subsystems
Clicking on an HP Netserver will display a subsystem map for the server containing icons for each of the major
server subsystems. When traps are sent by the Netserver and received by NNM, the event will be listed in the NNM
alarm browser and colors will change on the respective subsystem icon to indicate status (i.e. red for critical severity
events). Status conditions associated with a subsystem icon are propagated up to the Netserver icon on the main
map according to the propagation rules configured for the map.
The Netserver subsystem icons are:
Automatic Server Restart Subsystem – Shows the status of server restart actions.
Disk Subsystem – Shows the status of the disk drives.
NIC Card Subsystem – Shows the status of the network interface.
System Hardware Environment Subsystem – Shows the status of system hardware.
Predictive Failure Monitoring Subsystem – Indicates probability of future failure.
Subsystem icon status colors always represent the severity of the most recent trap received. To check for the cause
in status change, select the Netserver node object on the map, right-mouse click to bring up the context menu and
select “Alarms”.
Page 52 Version 5.6
Page 53

hp toptools for openview nnm user guide
Figure 5-21. HP Netserver subsystem icons associated with Netservers.
To acknowledge status on the map for the subsystem icon (to indicate that you are aware of the problem), right
mouse click on the subsystem icon and select the item ‘reset status’. This will return the subsystem icon status back
to green (normal).
If you do not wish to view status changing on the map (subsystem icons) you may use the Event Configuration tool
in NNM to edit Netserver traps and remove the action item for “nsaAgentStatus.exe”. Upon removing the
nsaAgentStatus.exe action item, events will still appear in the Alarm Browser, but will not change colors on the
map.
If your map is configured for transience at all levels, you may receive a message such as the following:
This is caused by nsaAgentStatus trying to change the subsystem icon status color when it is not in memory. To
prevent this message from appearing, you can:
• Make your submaps persistent
• Create a persistence filter to make all HP Netservers persistent
• Remove the nsaAgentStatus action from the trap configuration
For more information on persistence and filtering in NNM, consult Section 9 of this manual and the HP OpenView
Network Node Manager Guide to Scalability.
Page 53
Page 54

hp toptools for openview nnm user guide
5.12 Managing the hp toptools remote control card
The HP Toptools Remote Control card is an HP Netserver accessory product that enables inband and out-of-band
management for HP Netservers – even when the server is ‘hung’ or powered off. Using the card, Netserver
customers can remotely power on and off the Netserver, view errors, or initiate a remote control session via
pcAnywhere.
When using inband management, the card is installed into the HP Netserver and configured with its own network
identity (IP address and hostname). Once on the network, HP Toptools for OpenView NNM can discover and
identify the card and in which server it resides. As a result, HP Toptools Remote Control cards are discovered as
network nodes on the NNM map with actions enabled that specifically manage the card (as shown in Table 4).
Table 4. HP Toptools Actions Available for the HP RMC
Menu Item
Properties
User Maintenance
Add
Delete
Change Password
View Reports
Update Software
Replicate Configuration
HP Toptools Remote Control cards use webagent technology (a webserver on the card) to provide remote
management of the card and its features via a web browser. When selecting the Properties menu item, the card’s
web pages will be raised. If the card has been configured with a password, the pages will prompt for login
information.
The User Maintenance menu items Add, Delete, Change Password, and View Reports launch actions that maintain
user accounts for Remote Control card access (not the Netserver), and may be invoked against a single device or
selection list of cards selected from within the NNM console. Update Software allows the user to remotely update
the card’s firmware.
The Replicate Configuration action allows you to transfer the configuration settings used on one HP Toptools
Remote Control card to others. This can save a great deal of time in configuring large numbers of HP Netservers.
In addition to managing the card’s configuration, the action items Power On and Power Off are added to the menu
items for the Netserver in which the card resides (as described in the Managing HP Netservers section).
Page 54 Version 5.6
Page 55

hp toptools for openview nnm user guide
5.13 Managing hp laserjet Printers and Plotters
HP Web Jetadmin for OpenView NNM-NT is available on the Enterprise Products CD or may be downloaded from
the HP web site at http://www.hp.com/toptools. The HP Web Jetadmin integration is only supported on NNM-NT,
however unsupported version for HPUX and Solaris are provided in the contributed library for customer
convenience. Consult the readme files in \Enterprise\product subdirectory (Tt4nnmux, Tt4nnmsol)\contrib on the
CD for further information.
HP Web Jetadmin supports the following HP printing products (HP Jetdirect Connect Peripherals):
• HP LaserJets • HP PaintJets • HP 2000C
• HP DeskJets • HP DesignJets • HP Digital Sender
Figure 5-22. HP Web Jetadmin manages HP Printers.
Each HP printer is identified on the NNM map by a customized printer icon. To access HP management actions,
select a printer in NNM and invoke Web Jetadmin from the context menu. You will see items displayed above in
Figure 5-22.
Page 55
Page 56

hp toptools for openview nnm user guide
5.13.1 hp printer Properties Page
Property pages for an HP printer are displayed in the figure below. HP printer Property pages are different from the
Property pages of other HP devices. They consist of a menu bar with 8 parts: Status, Configuration, Install,
Diagnostics, Alerts, Print Jobs, Refresh/Expand All and Context-sensitive Help. The Status button displays a
realistic representation of the HP printer, a stop light status indicator with accompanying status message, network
details, and a description of hardware capabilities for the particular model.
Figure 5-23. Printer Properties Display.
Once raised, specific pages are opened by clicking from the buttons at the top of the status page.
• Configuration. The Configuration button brings up a screen with extensive information and control
capabilities as shown in the figure below. The range of manageability is dependent on the printer model.
Figure 5-24. Extensive information and control is available on the Configuration page.
Page 56 Version 5.6
Page 57

hp toptools for openview nnm user guide
• Install. The Install button can be used to configure new printers. The Diagnostics button displays a list of 7
categories of diagnostics: Device, JetDirect, TCP/IP, NetWare, IPX/SPX, EtherTalk, and DLC/LLC. Selecting a
category displays information and diagnostics.
• Diagnostics. This button takes displays diagnostic information to help troubleshoot printer problems.
Figure 5-25. The Diagnostics page features a wide range of diagnostics.
• Alerts – The Alerts button displays alerts configuration for the printer.
Page 57
Page 58

hp toptools for openview nnm user guide
• Print Jobs - The Print Jobs button displays a list of print jobs, the originator of the job, and their completion
status. Each print job can be cancelled as shown in the figure below.
Figure 5-26. Print jobs can be monitored and controlled.
• Refresh - This button updates the information being displayed.
• Context Help - The final button on the HP printer Properties page is Context Help. This button generates
context-sensitive help screens.
Page 58 Version 5.6
Page 59

hp toptools for openview nnm user guide
5.14 Managing hp procurve and hp advancestack Networking Products
HP Toptools for OpenView NNM includes support for HP Procurve and Advancestack networking products. You
can discover and receive events from an unlimited number of HP networking devices that support webagent
technology. You can also access the advanced management features of HP Toptools for Hubs and Switches such as
Quality of Service (QOS) or Traffic Monitor, directly from the NNM map by launching the Toptools Device
Manager from the NNM toolbar (Tools menu).
To access the full device and network management capability of HP hubs, switches, and bridges, the toptools server
should have HP Toptools for Hubs and Switches installed. If you install HP Toptools for Hubs and Switches after
installing the platform bridge component of HP Toptools for OpenView NNM, you must uninstall the platform
bridge component and reinstall it. (This is because the platform bridge component performs an install-time
configuration of menu items rather than a run-time configuration.)
Figure 5-27. HP Toptools for Hubs and Switches adds management of network devices.
Each HP networking device is uniquely identified on the NNM map by a customized icon. After selecting the HP
networking device, new menu items become enabled (Table 6).
There are three options for viewing the configuration of a managed networking device.
• Device View is available on NNM-NT/WINDOWS 2000 single system installations. It displays a realistic,
graphical view of the networking device on the console with options for configuration and traffic monitoring.
(Figure 5-29)
• Properties launches the SNMP property pages within toptools for all HP networking products supporting
SNMP. These pages display basic identification, location, and network traffic details.
• Management Home Page is supported by HP networking devices that use a webagent. Similar to
Properties(Device View), the webagent pages provide extensive control of the device’s configuration. Selecting
the option opens a browser directly to the device from NNM-NT, NNM-UX, or NNM-Solaris consoles. (Figure
5-30)
Support for menu items is dependent on the particular model of the networking device, and which management
technologies it has enabled.
Page 59
Page 60

hp toptools for openview nnm user guide
Table 5 Toptools Menu Items for HP Network Devices.
Toptools Menu Items for HP Network
Devices
Properties
Update Firmware…
Node Port Table
SNMP/Trap Configuration…
Management Home Page
Figure 5-28. Each HP networking device has a custom icon and new menu items.
Management windows for an HP hub and an HP switch are shown in the following figures. Refer to the device
documentation for a description of management functions. These windows permit users to examine network
statistics, reconfigure the network devices, and monitor performance. For example, the graphical representation of
each port is shown in green when that port is active and enabled.
Page 60 Version 5.6
Page 61

hp toptools for openview nnm user guide
Figure 5-29. The Toptools Device View action brings up a realistic representation of the hub to permit
management.
The degree of management control available is dependent on the capabilities of the particular HP hub, bridge, or
switch that is selected.
Figure 5-30. Webagent pages for an HP Procurve Switch provide extensive configuration control and status
monitoring.
Update Firmware (Figure 5-31) is supported by selected models. Some older models require an HP Toptools 5.6
for OpenView NNM-NT/WINDOWS 2000 single system installation.
Page 61
Page 62

hp toptools for openview nnm user guide
Figure 5-31. Multiple hubs can have their firmware updated simultaneously.
5.14.1 Set Traffic Data Collection to Manual Mode in Large Networks
The traffic monitoring capabilities of the HP Toptools Traffic Monitor application can require a lot of system
resources. Therefore, in large network environments, it is suggested that you manually select the points at
which you would like to collect traffic data. Usually, you will want to collect traffic data on your network
backbone segments and on segments with heavily utilized servers.
Traffic Monitor can use the HP X-RMON functionality built into HP Procurve and HP Advancestack and even
HP Ethertwist network devices to provide detailed information on who is using network segments. It also uses
standard traffic counters to provide basic traffic levels on network segments. Traffic Monitor can realistically
monitor up to 200 network segments using the HP X-RMON technology. It can monitor up to 1800 additional
segments using standard traffic counters. You should use the following instructions to turn on Manual traffic
data collection and configure which network segments will be monitored with HP X-RMON and which
additional segments will be monitored using standard traffic counters.
• Go to the Toptools Home page by selecting Tools -> HP Toptools ->Toptools Home from the OpenView
NNM menu bar
• On the Toptools Home page, select Performance ->Traffic Data Collector Settings
• On the Performance – Traffic Data Collector Settings
Ports (Manual)” setting
• Use the Add Device(s) button to add the devices on which you would like to collect Traffic Data
• On each device, select the ports on which you would like to collect Traffic Data by expanding the device
and then selecting either the Traffic Stats or the HP X-RMON check box for the desired ports.
• Click on Restart Collector. The Traffic Data Collector starts with your changes.
page select the “User Selected Switch and Hub
Page 62 Version 5.6
Page 63

hp toptools for openview nnm user guide
5.14.2 SNMP and Event Management
During platform bridge installation, HP hub and switch MIBS are loaded into OpenView NNM. This means that
hub and switch traps will be formatted and the NNM MIB browser and other SNMP management tools can be used
to GET and SET SNMP MIB variables.
To automatically configure HP networking products to send traps to the NNM server, there are two options that
apply to the models listed below:
Models supported by SNMP/Trap Configuration and Automatic Management
Advancestack 10 Base-T Switching Hub
Advancestack Switch 800T, 2000B
Procurve 10 Base-T hub 12M, 24M
Procurve 10/100 hub 12M, 24M
Procurve Switch 2400, 2424, 4000, 1600, 8000
1. Use the SNMP/Trap Configuration menu item (Figure 5-32) to configure thresholds and trap destinations on the
selected device. This dialog is only supported on NNM-NT.
Figure 5-32. SNMP/Trap Configuration dialog
2. Access HP Toptools for Hubs and Switches SNMP/Trap Configuration using the following procedure.
From the NNM menu bar, select Tools, Toptools Home to launch the Toptools Server home page. In
toptools, display the available devices by selecting Devices, Devices by Type, Networking Devices.
Select the desired device(s) and right click. Then select SNMP/Trap Configuration from the action menu.
This will display the Device Configuration dialog. To configure a new trap destination select the Trap
Receivers tab. Enter the address of the new device to receive traps. Click Add, Apply. You will be asked
to enter a password to log on to the device(s) to complete the configuration. By selecting multiple devices
in the list, you are able to specify trap destinations for all of them that support the SNMP/Trap
Configuration feature. This feature is supported on NNM-NT, NNM-Solaris, and NNM-UX.
Note: To use Device View or SNMP/Trap Configuration to set trap destinations, the read community for the
selected device must be set to public. You will be prompted to enter the correct write community.
Page 63
Page 64

hp toptools for openview nnm user guide
Page 64 Version 5.6
Page 65
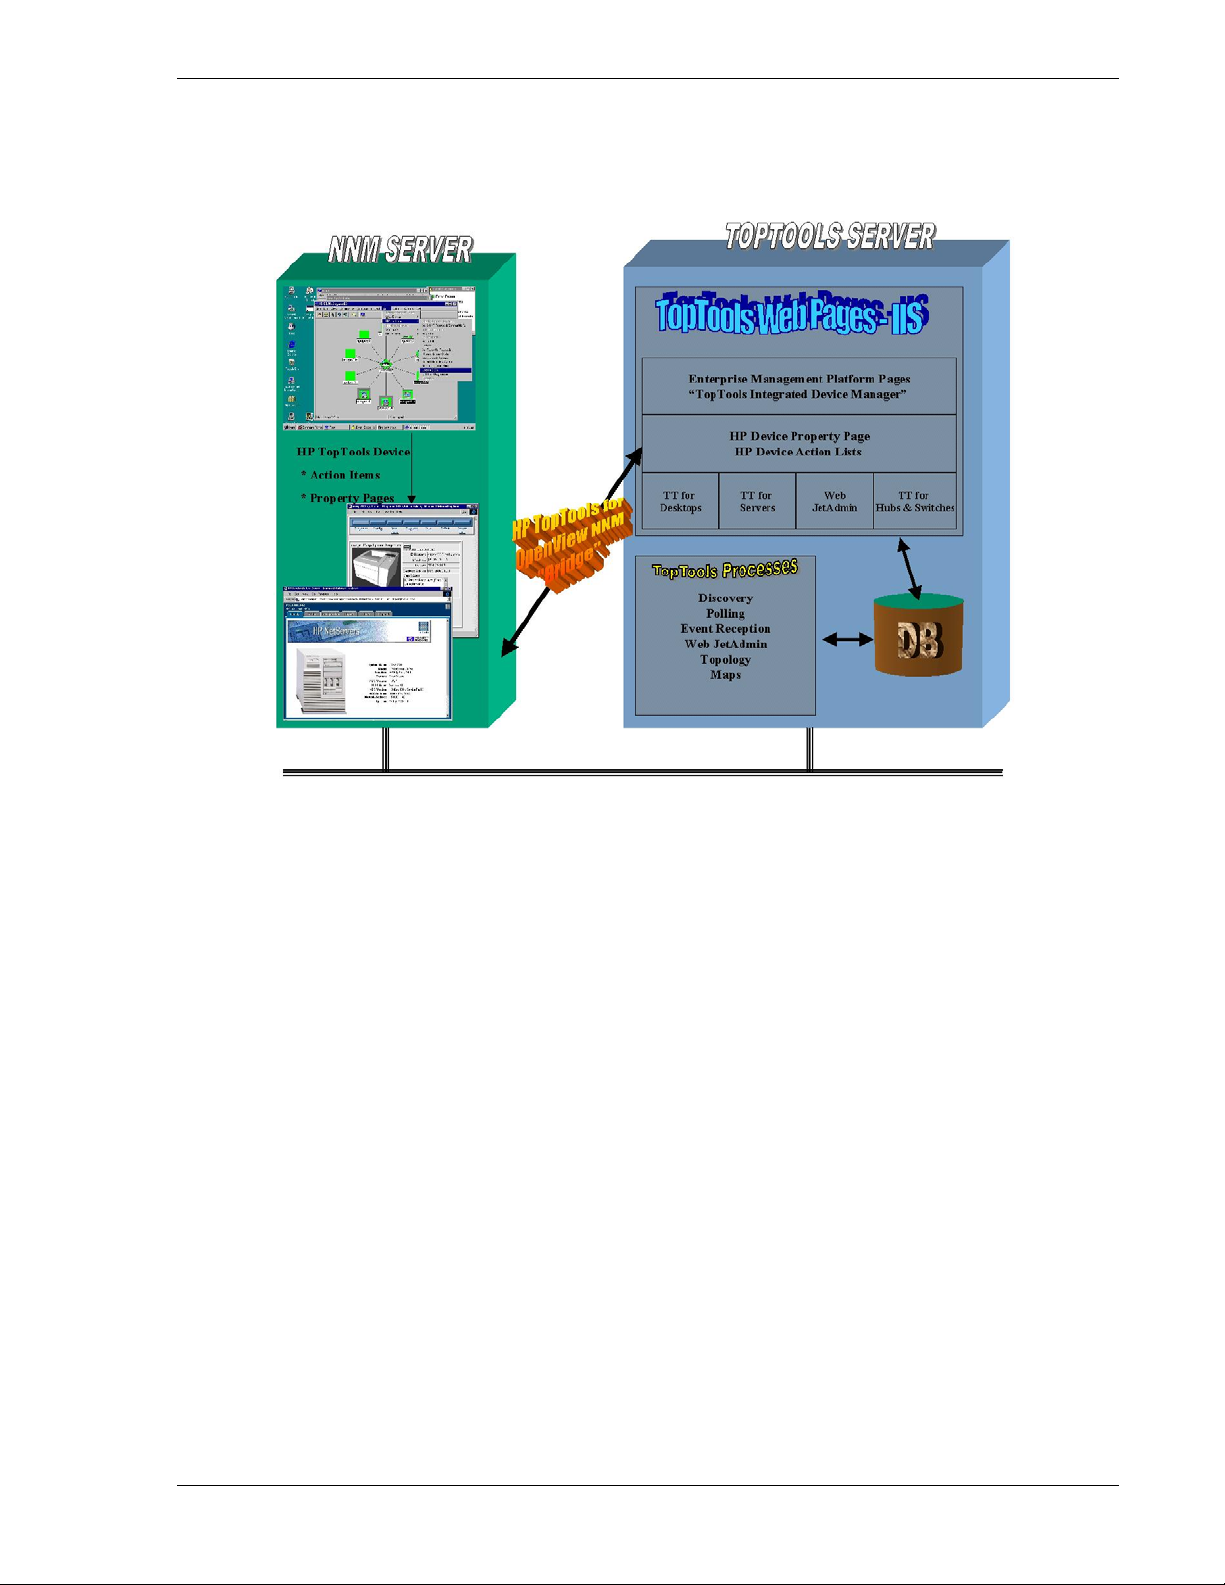
hp toptools for openview nnm user guide
6 Troubleshooting
HP Toptools for OpenView NNM installs software, referred to as bridge components, on both the HP OpenView
Network Node Manager console and the HP Toptools server.
6.1 Overview of Bridge Operation
The bridge is made up of Platform and Server processes.
6.1.1 Platform Bridge Processes
The component installed on the NNM server is referred to as the platform bridge component. The platform bridge
adds four processes to the NNM console: hpttBrdgDisc, hpttBrdgMgr, hpttLaunchAction and nsaAgentStatus.
hpttBrdgDisc
The hpttBrdgDisc process is controlled via the NNM ovspmd process, which means that it can be started, stopped,
and polled using ovstart, ovstop, and ovstatus. (It is considered a well-behaved OpenView object manager.) The
hpttBrdgDisc process performs second level discovery on HP Netserver and HP PC products.
hpttBrdgMrg
The hpttBrdgMgr process interacts with the OpenView map to change node symbol types to HP symbols and to
enable menu items based on selections within OpenView. The hpttBrdgMgr process launches toptools applications
by using the hpttLaunchAction process which gets the correct URL from the HP Toptools Plug-In Manager running
on the toptools server.
hpttLaunchAction
The hpttLaunchAction process is invoked when a toptools menu item is selected within ovw. Each menu item action
for an HP device is used to invoke a web browser with a particular URL that relates to the menu item action. The
hpttLaunchAction process creates an instance of a browser if one is not available, or finds a handle to an existing
instance of a browser if one is available. By reusing the instance of the browser, the URL is more quickly retrieved.
nsaAgentStatus
Page 65
Page 66

hp toptools for openview nnm user guide
NsaAgentStatus is executed as an action-on-event when a Netserver trap is received by NNM. It changes the status
of a Netserver subsystem symbol to reflect the severity of the trap.
6.1.2 Server Bridge Process
The HP Toptools for OpenView NNM server bridge component installs on the toptools server. The installation
wizard adds one process to toptools that is controlled by the toptools services manager rviewscm.exe.
HPTTSrvrBrg
The HPTTSrvBrg process receives 1
process. Discovery information from NNM populates the toptools database. HPTTSrvBrg forwards DMI and WMI
discovery information to hpttBrdgDisc so that DMI and WMI-based HP products can be identified within the NNM
database.
st
level discovery information (e.g. node address) from the hpttBrdgDisc
6.2 Troubleshooting Steps
Troubleshooting should proceed in the sequence listed below, as each item is dependent on the proper behavior of
the items listed before it.
•
Verify component operation
•
Check log files
•
Review Tips and Suggestions in section 6.7
6.3 Verifying toptools integrated device manager
Since all NNM menu item actions involve launching a web browser with a URL, it is important to verify that this
can be done outside of OpenView NNM. From the system running OpenView NNM, launch the browser with the
following URL:
http://<Toptools_Server_DNS_name>/hptt
This should bring up the opening screen of HP Toptools. If this fails, refer to the HP Toptools documentation to
correct the problem.
6.4 Verifying the toptools server bridge
Go to the Toptools Home Page by selecting Tools->HP Toptools->Toptools Home from the OpenView NNM menu
bar. Select Settings from the left-hand panel. Select the item on the pull-down menu, Toptools Services. This
should bring up a status list of all the HP Toptools services in the right-hand panel of the web browser. One of the
services should be called HP Toptools Server Bridge. This service should be running. If it is not listed, this means
that this component has been uninstalled, and needs to be reinstalled. If it is not running, the services should be
started, which can be done from this screen. If it is running, try running “telnet <Toptools_server_dns_name>
5041” which should successfully connect you to the port which this component uses. (Note that telnet should not
provide you with an other indication of success other than an error-free connect; a failure would be a message
indicating that it was unable to connect to this port. If you encounter a failure, try rebooting the system.)
6.5 Verifying the Platform Bridge
Running ovstatus should display a list of NNM object managers including the discovery process called
hpttBrdgDisc. This process should be running and not indicate any errors. If it is not running, start the process
using “ovstart hpttBrdgDisc”.
When ovw is running, hpttBrdgMgr should be running. If it is not, try restarting ovw. If it still does not show up
in the task manager, reinstall the bridge.
Page 66 Version 5.6
Page 67

hp toptools for openview nnm user guide
From the OpenView NNM map, use the Find Object By Attribute menu item to find all nodes that have
"isHPKayak", "isHPVectra", "isHPNetserver", or "isHPPrinter". After locating an HP device, verify that the icon is
an HP icon. (Each HP icon has an HP logo in the upper corner.) This verifies that the hpttBrdgMgr process is
running properly. (Note that if any devices have a non-public community name, NNM must be configured. Consult
section 5.3 and the NNM documentation for more information.)
Try selecting an HP device and launching a toptools menu action. The browser should be launched with the
appropriate URL. Select a second HP device and then launch another toptools menu action. The existing instance
of the browser should be reused for this new URL.
6.6 Useful Log Files
The bridge creates log files on both the toptools server system and the OpenView NNM system. A separate log file
is created for each executable. The log file name will be <filename.log> where "filename” is the name of the
executable. Information will be saved to the log file based on the debug level set for each executable. Error
messages and Mode 0 activation messages will always be logged. Additional mode activation information will be
logged depending on the debug level set for the executable. (hpttBrdgInstall and hpttBrdgRemove do not have
DEBUGMODE settings.)
Table 6. Program Executables and their Log Files.
Function NNM-NT
Executable
Discovery hpttBrdgDisc.exe hpttBrdgDisc hpttBrdgDisc.log
HP Toptools Bridge hpttBrdgMgr.exe hpttBrdgMgr hpttBrdgMgr.log
Bridge Installation hpttBrdgInstall.exe hpttBrdgInstall hpttBrdgInstall.log
Bridge Removal hpttBrdgRemove.exe hpttBrdgRemove hpttBrdgRemove.log
Launch Action hpttLaunchAction.exe hpttLaunchAction hpttLaunchAction.log
Server Status nsaAgentStatus.exe nsaAgentStatus nsaAgentStatus.log *
* On HPUX and Solaris systems nsaAgentStatus is a script file and no log file is created.
NNM-UX, Solaris
Executable
Log File Name
6.6.1 Log Files for Multiple Users
On Unix systems there can be multiple users. In this case there is a separate log file for each user accessing the
hpttBrdgMgr executable. The hpttBrdgMgr log information is written to a log file in the OV_PRIV_LOG directory.
The log file is named hpttBrdgMgr.<pid>.log where <pid> is the process ID for the specific hpttBrdgMgr instance.
6.6.2 Log File States
Log files that are empty when the hptttBrdgMgr executable terminates will be deleted. Otherwise the log files will
be deleted when the bridge is removed (uninstalled).
6.6.3 Log File Debug Levels
You can set the debug mode (level) for a bridge executable to 0-15. 0 logs only base level program events and
errors. Level 15 provides the maximum amount of information. This information is primarily for use of HewlettPackard support personnel in diagnosing system problems.
6.6.4 Setting Debug Levels
The debug level for an executable is stored as follows:
• NNM-NT/WINDOWS 2000 - in a registry setting under HKEY_LOCAL_MACHINE for the executable,
"DEBUGMODE".
• On Unix systems the DEBUGMODE setting is set through file "/etc/<application>.debug".
Sample NNM-NT/WINDOWS 2000 Debug entry
Page 67
Page 68

hp toptools for openview nnm user guide
Sample NNM-UX or Solaris debug file:
HpttBrdgDisc.Debug
# Debug switch for Hewlett-Packard's Toptools Bridge\hpttBrdgDisc
DEBUGMODE 0
6.6.5 Log Files on the toptools server
The Toptools Server Bridge component can create a log file called ttbrg.log (located in the directory where the
bridge was installed) if certain registry settings are modified. By default, logging is turned off. To activate logging,
edit the key:
Depending on the value of the key, different levels of debugging activity is possible:
Page 68 Version 5.6
HKEY_LOCAL_MACHINE\SOFTWARE\Hewlett-Packard\toptools\TTBridge\DEBUGLEVEL
Table 7. Toptools Server Bridge Logging Levels
DEBUG LEVEL Description of Logging
0 Program execution and errors
1 Logs “GET URL” activity
2 Logs “GET_MENU” actions
3 Logs "DISCOVERY_DATA" passed by the platform
4 Logs "DISCOVERY_ASPECT" node placement in TT queue
5 Logs "DISCOVERY_DATA" transfer in detail
6 Logs "SEND_TRAPS"(DMI) for Unix clients
9 Logs licensing information for Unix clients
Page 69

hp toptools for openview nnm user guide
After changing the debug logging level "HP Toptools Services" must be restarted before the new logging setting will
take effect. If an error occurs, the toptools server bridge appends error messages into a file called ttbrgerr.log
regardless of the registry settings.
6.6.6 Log Files on the openview nnm server
The log files are listed in Table 8.
Table 8. NNM Platform Bridge Log Files
NT File Unix (HPUX or Solaris) File Description of Logging
<bridge install
directory>\log\hpttBrdgDiscData.log
<bridge install
directory>\log\HPTTLaunchAction.log
<bridge install
directory>\log\hpttBrdgInstall.log
<bridge install
directory>\log\hpttBrdgDisc.log
<bridge install
directory>\log\hpttBrdgMgr.log
/var/opt/OV/share/log
/hpttBrdgDiscData.log
/var/opt/OV/share/log
/hpttLaunchAction.log
/tmp/hpttBrdgInstall.log
/var/opt/OV/share/log
/hpttBrdgDisc.log
/var/opt/OV/share/log
/hpttBrdgMgr.<pid>.log
HP nodes discovered
HPTTLaunch application debug info and
errors; interaction with browser.
Created during install. Contains action Ids
returned by toptools for different
combinations of subclasses and
capabilities.
Logging created from the DLL library, Items
sent to toptools, and HpttBrdgDisc info on
nd
level discovery.
2
HpttBrdgMgr debug info
On NT systems the log files in the table are created depending on the setting of the following registry key:
HKEY_LOCAL_MACHINE\SOFTWARE\Hewlett-Packard\HP Toptools Bridge\<program name>\DEBUGMODE
Where: <program name> = hpttBrdgDisc
hpttBrdgMgr
hpttLaunchAction
nsaAgentStatus
On HP-UX or Solaris systems the debug level is selected by setting the /etc/hpttBrdgDisc.debug or
/etc/hpttBrdgMgr.debug file equal to the debug level.
If the value is 0, these files are not created. If the value is 1, these files are created. If they exist, they will be
overwritten, rather than appended to.
The OpenView NNM bridge component logs each discovered HP device into a file called
$OV_PATH\log\hpttBrdgDiscData.log. This file can be used to monitor the progress of the bridge discovery.
The OpenView NNM component logs additional information into hpttBrdgDisc.log. The hpttBrdgMgr.log
contains information from the hpttBrdgMgr process. hpttLaunchAction.log contains debug info on interaction
with the browser, tts.log contains a detailed listing of what has been sent from the NNM server to the toptools
server.
Page 69
Page 70

hp toptools for openview nnm user guide
6.7 Troubleshooting Tips
Whenever there is a problem:
• Check the HP Toptools website for the latest bridge information.
• When contacting HP for support, make sure to provide details about your operating environment. This
includes the OS and service pack versions for both the server and the platform systems.
• Check to see if management applications other than NNM are installed. This is helpful when checking the
behavior of the SNMP agent.
• Verify that the installation completed without any errors. (On the platform bridge you can check the
httpBrdg install.log file.) Note the error message and the point in the installation when the error occurs.
• Verify that all services are running correctly on the NNM side (i.e. OpenView, SNMP). Run ovstatus to
check that all the processes are running correctly.
• On the NNM station run ovstop and set the debug level as specified in sections 6.6.5 and 6.6.6.
• Save copies of the log files (under $OV_LOG)
Tips and Suggestions:
• While installing the toptools server bridge, it will ask you for a port number. Make sure you enter a port
number that is not currently being used.
• When you install the platform bridge component on the NNM server, it will ask you to enter the port
number on which the toptools server is listening. Make sure you enter the same port number that you
entered during the toptools server bridge installation. If you do not, you will get a message saying "unable
to establish a connection with the toptools server".
• On the NNM server you may get a windows socket error with an error number such as 10038. If you do, try
to make a telnet connection to the toptools server on the same port number and see if it establishes a
connection. If not restart the server bridge.
• On the NNM station you might see a window giving an error message with error number 10064. Verify the
server bridge is running on the toptools server. If you restart the machine, the service control manager
(RVIEWSCM) should start the process (srvrbrg.exe). This might take a little while. If you don’t see this in
the task manager then shut down all the programs and restart the machine. If it still doesn’t start then there
is a problem with the service control manager. You can also run srvrbrg.exe from \ttbridge\.
• After you install the platform bridge and restart NNM, you should see the hpttBrdgDisc running on the
NNM console. If this does not start for some reason then you can start it manually. On the console if you
see other services not running then there is a problem with the startup of NNM itself. Also check to make
sure that the toptools server is running. If the toptools server is running, shut down everything and restart
NNM.
• It may take a long time to discover the nodes and change the symbols depending on the number of nodes
and the network traffic. Check the hpttBrdgDiscData.log file to see if new entries are made over time.
Discovery can take a long time.
• hpttBrdgDisc performs second level discovery on all nodes known to NNM when it starts (ovstart). Then it
waits to receive traps on added or deleted nodes. If a new HP device is added (e.g, the Netserver agent
installed after NNM discovers the system), you may need to ovstop and ovstart hpttBrdgDisc to force a
refresh.
• If discovery is done and you invoke a URL for an action and you get the error message, " invoke URL
before launching the browser", then HPTTLaunchAction has had a problem. If the browser is invoked and
it gives the message "invoke URL" it means that toptools returned an incorrect URL.
For the preceding problem you should activate debugging for the server bridge. Refer to the description of
debug levels and logging.
Debugging information is stored in ‘ttbrg.log’ file. When an error occurs on the Server side it is logged in
‘ttbrgerr.log’.
Page 70 Version 5.6
Page 71

hp toptools for openview nnm user guide
• If there is a problem with traps not formatting correctly check NNM Event Configuration to see if the trap
definition for the unformatted trap exists. If not check the trapd.conf file and search for that particular trap
Oid. If it doesn’t exist in trapd.conf then that trap is not supported.
• If the Netserver trap is formatted properly but the color of the symbol doesn’t change in response to the
trap, go to that particular trap definition using the Event Configuration menu action and in the actions tab
check to see that nsaAgentStatus is configured as an action on event.
The following are common problems and their solutions:
Problem: While installing the platform bridge, it gives a message saying it is unable to establish a connection with
the toptools server.
• The installation program will request the port number on which the toptools server bridge is listening. Verify
that you are entering the same port number specified during the server bridge installation. Verify that the
toptools server is running, the toptools server bridge is running, and that the toptools server is accessible over
the network.
Problem: When selecting a toptools menu item from NNM, you get a windows socket error or a connection error.
• Verify that toptools is running and accessible over the network from your NNM station.
• Verify that the toptools server bridge is running by making a telnet connection to the same port number and
verifying that a connection is made. From the command line, run “telnet Ipaddress port number”, using the
IP address of the toptools server system and the port number, typically 5041.
• Verify that the hpttSrvrBrg.exe process is running in the Task Manager on the toptools server. If it is not, then
stop and start the HP Toptools services from the control panel’s NT service manager.
Problem: Telnet connection is successful and all menu items are showing up correctly, but the browser doesn’t get
launched when you try to carry out some action.
• Go to Internet Information Services on the Toptools server. Under “Default Web Site” find the “Hptt” directory
and verify that its directory security level is set to “Basic Authentication”. This will be set automatically by
installation of the server bridge. Please be aware that installation of some programs or patches will change this
setting back to the unsupported “Integrated Windows Authentication”.
Problem: I sometimes get a message indicating that actions for an HP icon cannot execute because the node is not
yet in the toptools database.
• It may take some time to reclassify all nodes. By viewing log files you can monitor the reclassification. First,
the bridge sends all the nodes (1
Then, simultaneously, the bridge is doing a 2
nodes, at the same time that the toptools server is doing the same. This is logged in hpttBridgeDiscData.log on
the NNM server. Until these tasks are complete, the bridge is unable to get an action menu list from the
toptools server. Note that this process takes place each time that you restart the OpenView server.
• The hpttBrdgDiscData.log file contains information on the second level discovery using the following format:
‘Seconds’ ‘machine name’ ‘OvwID’ ‘Dmf file name’
• The hpttBrdgDisc.log file (created if the DEBUGLEVEL=1 as described in the logging section) contains an
indication of when the “discovery over” signal is sent to the toptools. This is the best file for viewing a
complete list of all nodes sent to the toptools server.
st
level discovery information) from the NNM server to the toptools server.
nd
level discovery, using SNMP, DMI or WMI, to classify these
Page 71
Page 72

hp toptools for openview nnm user guide
Problem: After discovery is done, you try to invoke a URL for some action and it returns with an error message
“Unable to invoke URL”.
• If this message comes before launching the browser this indicates that hpttLaunchAction has had a problem.
Check if hpttLaunchAction is running once you click on an toptools action menu item.
• If the browser is invoked and then it gives a message about invoke URL it means that the plug-in manager on
the toptools server returned an incorrect URL. Consult your toptools documentation for verifying the
performance of the toptools server.
Problem: Some of the menu items for the HP devices are not showing up.
• For maximum functionality of managing HP devices, make sure that HP Toptools for Servers, HP Toptools for
Hubs and Switches, and HP Web Jetadmin are installed on the HP Toptools server. The range of menu action
items inside NNM is dependent on the actions available within toptools. If you add components to toptools
after you install the bridge, you must reinstall the platform bridge component.
Problem: When you uninstall HP Toptools for NNM and then re-install it at a later date, HP SNMP devices such as
hubs and switches, printers, and remote control cards do not have toptools menu items listed via a right click on the
object.
• This can be corrected by having NNM poll these nodes and update their capabilities. To do this, do a Find
Object by Attribute on "isSNMPSupported", select those devices on the map you wish to update, and then go to
Fault->Network Connectivity->Poll Node to update those nodes. Note that if you remove the OpenView
database before re-installing HP Toptools for NNM, you will not encounter this problem. In this case, NNM
will do a completely new discovery of all devices and find all of the updated capabilities.
Problem: On the NNM system, an error message is displayed saying that NNM cannot contact the toptools server.
• If the toptools server bridge is not running or the server is down, the NNM console will display a window
giving an error message with the error number as 10064. This indicates that the platform bridge is unable
to contact the toptools server. Make sure the server bridge is running on the toptools server. If you restart
the toptools server station, the toptools service control manager (RVIEWSCM) should start the process
(hpttSrvrBrg.exe). This might take a little while. If it still doesn’t start then there may be a problem with
the service control manager. You can also manually execute the file (hpttSrvrBrg.exe). Verify that the
NNM system can contact this process by running “telnet <ttserver_ip_address> 5041”. If no error returns,
contact is successful. Then restart hpttBrdgDisc on the NNM system by running “ovstart hpttBrdgDisc”. If
these steps do not work, reinstall the server bridge.
Problem: Updating firmware works for PCs, but not for hubs.
• To update firmware for some older HP hubs the toptools server must be installed on the same system as
OpenView NNM-NT. Refer to the Hubs and Switches section of the toptools readme file for additional
information and a list of models of HP hubs requiring a single system.
Page 72 Version 5.6
Page 73

hp toptools for openview nnm user guide
7 Uninstalling the Bridge
Before uninstalling Bridge components you must exit Network Node Manager. Following the uninstall of the Bridge
components you should restart Network Node Manager and verify that HP devices are displayed using the original
(generic) icons and that the toptools functions have been removed. Bridge components on PC systems are
uninstalled using the Add/Delete Programs function in the Control Panel. Bridges on HP-UX or Solaris systems are
removed using a "remove" script.
7.1 Uninstalling the Server Bridge Component
The toptools server bridge component should be uninstalled using the Add/Remove Programs function in the
Control Panel.
Figure 7-1. Display the Add/Remove Programs dialog (typical Windows 2000 System).
Figure 7-2. Uninstall the HP Toptools Server Bridge.
Select the HP Toptools Server Bridge and click on Change/Remove. Because the bridge is used to populate the
toptools server database, it is recommended that the toptools database also be cleared. The Clear Database
procedure is documented in the Installation section of this guide. You may be asked to reboot your system to
complete the uninstall process.
Page 73
Page 74

hp toptools for openview nnm user guide
7.2 Verifying a Successful Server Component Uninstall
Launch toptools and select Settings->Services. The list of toptools services should no longer include an entry called
“Toptools Server Bridge”.
7.3 Uninstalling the Platform Bridge Component
The OpenView NNM services do not need to be stopped to uninstall the platform bridge.
7.3.1 Uninstalling on nnm-nt on Windows 2000 Systems
Uninstall the platform bridge using the Windows NT control panel Add/Remove Programs function in the Control
Panel.
Figure 7-3. Uninstalling the platform bridge component (typical NT System).
Display the Add/Remove Programs dialog, select HP Toptools for OpenView NNM-NT, and click Add/Remove.
You may be asked to reboot your system to complete the uninstall process.
Page 74 Version 5.6
Page 75

hp toptools for openview nnm user guide
7.3.2 Uninstalling on nnm-ux or nnm-Solaris Systems
On HP-UX or Solaris systems, run the "remove" script to remove the tt4nnmux or tt4nnmsol platform bridges.
A sample dialog is shown in Figure 7-4. The corresponding log file is shown in Figure 7-5.
Enter 1 to Uninstall HP Toptools 5.6 for OpenView NNM-SOLARIS (Local)
Enter 2 to Uninstall HP WebJetadmin 6.0 for OpenView NNM-SOLARIS (Local)
Enter 3 to Exit.
Task : Uninstallation of HP Toptools 5.6 for OpenView NNM-SOLARIS (Local)
Time : 10 - 15 minutes
You are about to uninstall the HP Toptools 5.6 for
OpenView NNM-SOLARIS.
Make sure all NNM consoles, including the manager console
and the remote consoles are closed before beginning the
uninstallation.
Warning!
Performing the uninstallation without closing all the
OpenView consoles including the remote consoles will result in
malfunction of NNM.
Do you want to continue the uninstallation (y/n)?
Checking if HP Toptools 5.6 for OpenView NNM-SOLARIS is installed
HP Toptools 5.6 for OpenView NNM-SOLARIS will now be uninstalled
This installation will execute ovstop hpttBrdgDisc, ok to continue?(Y/N):Deleting
symbols...
Symbols deleted successfully
Deleting fields....
Fields deleted successfully
Deleting: <device events> ...
...
Unloading the Mibs....
This will take at least 10 minutes........Please wait.
MIB File is not loaded: hpHttpMg.mib
Mibs are Unloaded successfully
Cleaning up all the directories...
All files removed sucessfully
Restarting the NNM daemons
HP Toptools 5.6 for OpenView NNM-SOLARIS uninstall needs to start up the ovw
GUI to reinitialize the nnm fields.
Would you like to start ovw now (y/n)? Rememeber to run ovw *before* installing any
snap-ins
Uninstall of HP Toptools 5.6 for OpenView NNM-SOLARIS completed successfully.
Figure 7-4. Unix Uninstall Dialog
Page 75
Page 76

hp toptools for openview nnm user guide
MODE0 - Apr 26 16:26:20 # Begin Remove HPTT Bridge Session
<delete bridge components>
...
MODE0 - Apr 26 16:26:28 # End Remove HPTT Bridge Session
MODE0 - Apr 26 16:26:28 # Leaving hpttBrdgeRemove main()
* Deleting field registration files ..
Rebuilding database Success....
Rebuilding database Success....
* Deleting the discovery object manager
Deleting: <device events> ...
...
: Completed
Unloading: MIBS
: Completed.
Restarting NNM
* Successfuly deleted discovery manager from NNM
====================Uninstallation completed=====================
Inititalizing ovw
HP Toptools 5.6 for OpenView NNM-SOLARIS uninstall needs to start the ovw GUI
to reinitialize the NNM fields
Please run ovw *before* reinstalling any snap-ins
****End HP Toptools 5.6 for OpenView NNM- Session****
Figure 7-5. Unix Uninstall Log
7.4 Verifying a Successful Platform Component Uninstall
Run ovstatus. This should display a list of object managers and a status indication. The hpttBrdgDisc discovery
service should no longer be listed. The menu items for HP Toptools should no longer be displayed in ovw. Also, the
map icons for HP devices should revert to their generic form.
7.5 Uninstalling hp web jetadmin for openview nnm
The OpenView NNM services do not need to be stopped to uninstall the HP Web Jetadmin bridge.
7.5.1 Uninstalling hp web jetadmin for openview nnm-nt
Uninstall HP Web Jetadmin for OpenView NNM-NT using the Windows NT Control Panel Add/Remove Program
function..
7.5.2 Verifying a Successful Uninstall
• The menu items for HP Web Jetadmin should no longer be listed in the NNM Tools menu.
• HP printers should be displayed with generic printer icons provided by NNM.
Page 76 Version 5.6
Page 77

hp toptools for openview nnm user guide
8 Installed MIBs
A list of the device MIBs installed with the bridge is given in Table 10. Note that this list will vary as newer MIBs
are released. You should check the appropriate HP web sites for new MIBs for the devices that you manage.
On NNM-NT/WINDOWS 2000 installations the MIBs will be installed in OpenView\snmp_mibs. On NNM-HPUX
and Solaris systems the location of MIB files will vary.
9 Table 9. MIBs added to OpenView NNM by platform bridge.
MIB File Date MIB File Date MIB File Date MIB File Date
adaptec.mib 6/12/02 hpicfIpRoute.mib 6/19/02 hpSwitchStat.mib 6/19/02 rfc1850.mib 6/19/02
cageagt.mib 6/12/02 hpicfLinktest.mib 6/19/02 hpVlan.mib 6/19/02 rfc1850b.mib 6/19/02
cisco-cdp.mib 6/19/02 hpicfOid.mib 6/19/02 ianaiftype.mib 6/19/02 rfc1906.mib 6/19/02
cisco-smi.mib 6/19/02 hpicfOid.mib.def 6/13/02
cisco-tc.mib 6/19/02 hpicfOspf.mib 6/19/02 ieee8021pae.mib 6/19/02 rfc2011.mib 6/19/02
cisco-vtp.mib 6/19/02 hpicfRip.mib 6/19/02 ieee8023lag.mib 6/19/02 rfc2012.mib 6/19/02
hc-rmon.mib 6/19/02 hpicfSecurity.mib 6/19/02 ipx.mib 6/19/02 rfc2013.mib 6/19/02
hpeccmib.mib 6/12/02 hpicfSntp.mib 6/19/02 mlxraid.mib 6/12/02 rfc2020.mib 6/19/02
hpenv.mib 6/17/02 hpicfStack.mib 6/19/02 nsaasr.mib 5/31/02 rfc2021.mib 6/19/02
hpMemAgt.mib 8/16/02 hpicfTC.mib 6/19/02 nsadimm.mib 5/31/02 rfc2096.mib 6/19/02
hpn.mib 6/12/02 hpicfVg.mib 6/19/02 nsaevent.mib 5/31/02 rfc2108.mib 6/19/02
hpnetctz.mib 5/31/02 hpicfVgRptr.mib 6/19/02 nsafc.mib 6/17/02 rfc2266.mib 6/19/02
hpnr.mib 5/31/02 hpNetSwitch.mib 6/19/02 nsainfo.mib 6/17/02 rfc2571.mib 6/19/02
hpnrtrap.mib 6/12/02 hpr-sn-switch.mib 6/19/02 nsapci.mib 5/31/02 rfc2578.mib 6/19/02
hpprfmib.mib 5/31/02 hp-sn-agent.mib 6/19/02 nsarps.mib 6/12/02 rfc2579.mib 6/19/02
hpriagt.mib 6/17/02 hp-sn-appletalk.mib 6/19/02 nsascsi.mib 5/31/02 rfc2613.mib 6/19/02
hpswa.mib 5/31/02 hp-sn-bgp4.mib 6/19/02 nsatrap.mib 6/17/02 rfc2618.mib 6/19/02
hptat.mib 5/31/02 hp-sn-igmp.mib 6/19/02 nsatrcfg.mib 5/31/02 rfc2620.mib 6/19/02
hpEntMib.mib 6/19/02 6/19/02 nsatrmgr.mib 6/12/02 rfc2665.mib 6/19/02
hpHttpMg.mib 6/19/02 hp-sn-ipx.mib 6/19/02 nsavolcp.mib 5/31/02 rfc2668.mib 6/19/02
hpicf8023Rptr.mib 6/19/02 hp-sn-ospf.mib 6/19/02 nsnicmib.mib 5/31/02 rfc2674_p.mib 6/19/02
hpicfBasic.mib 6/19/02 hp-sn-pos.mib 6/19/02 parselog.mib 6/3/02 rfc2674_q.mib 6/19/02
hpicfBridge.mib 6/19/02 hp-sn-root.mib 6/19/02 rfc1213.mib 6/19/02 rfc2737.mib 6/19/02
hpicfChain.mib 6/19/02 hp-sn-sw-l4-switch.mib 6/19/02 rfc1493.mib 6/19/02 rfc2819.mib 6/19/02
hpicfChassis.mib 6/19/02 hp-sn-trap.mib 6/19/02 rfc1512.mib 6/19/02 rfc2863.mib 6/19/02
hpicfDownload.mib 6/19/02 hpSwitchConfig.mib 6/19/02 rfc1513.mib 6/19/02 symtrap.mib 6/17/02
hpicfEtwist.mib 6/19/02 hpSwitchDma.mib 6/19/02 rfc1724.mib 6/19/02
hpicfFf.mib 6/19/02 hpSwitchDrivers.mib 6/19/02 rfc1742.mib 6/19/02
hpicfGenRptr.mib 6/19/02 hpSwitchStack.mib 6/19/02 rfc1749.mib 6/19/02
hp-sn-ip.mib
ianaiprouteprotoco
l.mib 6/19/02 rfc1907.mib 6/19/02
10 Creating Filters for hp devices
NNM offers filtering to enable users to define which devices and/or networks to discover, which objects in one
NNM server database should be exported to another, which objects should be displayed in a particular map, and
which map objects should remain persistent in memory.
However, only a subset of 'attributes' identified by NNM are directly available as criteria for filtering (Defined in “A
Guide To Scalability and Distribution for HP OpenView Network Node Manager” Appendix A).
To enable filtering of additional attributes such as those that are added by the platform bridge (e.g. isHPDevice or
isHPKayak), an environment variable must be set on the NNM management server.
To set the environment variable on an NNM-NT management servers:
Right-click the “My Computer” icon on the desktop and select “Properties”. Then click the “Environment” tab and
enter information as shown below:
Page 77
Page 78

hp toptools for openview nnm user guide
For HP-UX or Solaris systems use the following K-shell script:
$IPMAP_FILTER_FROM_OVWDB=1
$export IPMAP_FILTER_FROM_OVWDB
Once the environment variable is set, all attributes added by the bridge will be available for inclusion when building
filters.
Page 78 Version 5.6
Page 79

hp toptools for openview nnm user guide
For HP Netservers, it may be necessary to implement a persistence filter to support the creation and functioning of
Netserver subsystem status icons for NNM maps in transient mode. A file, hpNetserverfilter, has been provided in
the patches directory. You may replace your existing filter file with this file (through renaming it), or copy and
paste the following lines from the new file to your existing filters file:
Filters
isHPNetserver "Objects with the attribute isHPNetserver true"
{ isHPNetserver }
FilterExpressions
HPNetservers "map or persistence filter for HP Netserver
products" { NetsNSegs || isHPNetserver }
Once the HPNetservers filter expression is included in the filters file, it needs to be specified under the map->
properties-> ipmap configuration dialog as shown below:
Page 79
Page 80

hp toptools for openview nnm user guide
11 Enabling toptools in nnm Remote and Web Console Sessions
Table 10 below provides information on toptools support for NNM remote and web console sessions:
Table 10. NNM Console Support
Remote Console Web Console
NNM 6.x
Windows NT Full support Limited support
HP-UX Not supported Limited support
Solaris Not supported Limited support
Before installing the platform bridge, it is important to exit all remote console sessions. Once the platform bridge
has been installed on the NNM server, install the HP Toptools for OpenView NNM platform bridge on each remote
console. The wizard on Windows NT/2000 will automatically detect whether the station is the NNM server or
remote console and install the appropriate files. For proper functioning of the NNM remote console, it is important
to install the platform bridge on the remote console before initiating a remote console session with an integrated
NNM server. If the platform bridge is not installed on each remote console, the following popup (e.g. in Windows
NT) will appear on the remote console display:
HP Toptools for OpenView NNM provides limited support of NNM 6.x web consoles without additional effort or
installation. From the web console, you will see customized icons for HP devices within the network presenter
(Figure 10-1), have access to compiled HP MIBs and can view HP events.
Page 80 Version 5.6
Page 81

hp toptools for openview nnm user guide
Figure 10-1. NNM web console with HP Toptools for OpenView NNM.
Page 81
Page 82

hp toptools for openview nnm user guide
12 Recommendations for Managing Large Networks
If you are managing large networks (greater than 5000 devices) you should increase the capabilities of the toptools
server. A processor such as Intel Pentium 4 with a processor speed > 1.3 GHz and an additional 256 MB of RAM
for every 10,000 nodes (e.g. HP Vectra VL800). The faster the processor and more RAM the better your
performance will be.
If you do not require the Hubs and Switches component, do not install it. If you need to install the Hubs and
Switches component, the following is recommended:
Set Traffic Data collection to Manual mode. The traffic monitoring capabilities of the HP Toptools Traffic Monitor
application can require a lot of system resources. Therefore, in large network environments, it is suggested that you
manually select the points at which you would like to collect traffic data. Usually, you will want to collect traffic
data on your network backbone segments and on segments with heavily utilized servers.
Traffic Monitor can use the HP X-RMON functionality built into HP Procurve and HP Advancestack and even HP
Ethertwist network devices to provide detailed information on who is using network segments. It also uses standard
traffic counters to provide basic traffic levels on network segments. Traffic Monitor can realistically monitor up to
200 network segments using the HP X-RMON technology. It can monitor up to 1800 additional segments using
standard traffic counters. You should use the following instructions to turn on Manual traffic data collection and
configure which network segments will be monitored with HP X-RMON and which additional segments will be
monitored using standard traffic counters.
• Go to the Toptools Home page by selecting Tools -> HP Toptools ->Toptools Home from the OpenView
NNM menu bar
• On the Performance – Traffic Data Collector Settings
Ports (Manual)” setting
• Use the Add Device(s) button to add the devices on which you would like to collect Traffic Data
page select the “User Selected Switch and Hub
• On each device, select the ports on which you would like to collect Traffic Data by expanding the device
and then selecting either the Traffic Stats or the HP X-RMON check box for the desired ports.
Page 82 Version 5.6
Page 83

hp toptools for openview nnm user guide
Page 83
Page 84

hp toptools for openview nnm user guide
13 Index
A
accessing toptools, 38
acf11.zip, 12
actions for HP devices, 40
actions, Kayaks, 44
actions, Netservers, 51, 52
actions, Omnibooks, 44, 49
actions, Vectras, 44
actions, Workstations, 49
address, NNM system, 20
Advancestack hubs, 61
agents, 5, 11
attributes, device, 38
Authentication, Basic, 11
authentication, HP Toptools for NNM, 38
B
Basic Authentication, 11
bridge components, 6
bridge operation, 67
bridging, 5
browser, 5
browser configuration, 11
browsers supported, 11
C
change security settings, PCs, 40
clean database, 15
clearing the toptools database, 15
community name, 42
community string, 6, 20
components, 6
configuration, browser, 11
configuration, PCs, 45
console, 5
console, remote, 6
console, web, 6
consoles, remote, 85
Customer Care Centers, 14
D
debug levels, 70
device actions, 40
devices supported, 11
Directory Security, 11
directory, server bridge, 19
discovery, 38
discovery, Netservers, 51
disk reliability, PCs, 47
disk space requirements, 12
distributed environment, 9
DNS hostname, 16
E
enterprise products, 5
evaluation, 13
events, Netservers, 51
F
filters for HP devices, 83
finding HP devices, 38
firmware, 11
fonts, UNIX browser, 12
G
group, toptools, 16, 38
H
Hostname, toptools server, 38
HP devices filters, 83
HP Toptools authentication, 38
HP Toptools for NNM, using, 37
hpttBrdgDisc, 30, 67
hpttBrdgDisc service, 38
hpttBrdgDiscData.log, 38
hpttBrdgInstall, log files, 25
hpttBrdgMgr, 30
hpttBrdgMrg, 67
hpttLaunchAction, 67
HPTTsrvbrg.exe, 22
HPTTSrvrBrg, 68
hubs, 61
I
icons, 37
identity page, PCs, 45
installation log files, 25
installation verification, server bridge, 22
installation, platform bridge, 23
installation, server bridge, 15
installation, single system, 13
installation, Web Jetadmin, 31
IP address, NNM system, 20
IP address, toptools server, 27
IP address, Web Jetadmin, 34
J
java classes, 12
K
Kayaks, 43
Page 84 Version 5.6
Page 85

hp toptools for openview nnm user guide
L
large networks, 87
Laserjet printers, 57
launching toptools, 38
license, 13
license agreement, server bridge, 18, 27
log files, 69
log files, installation, 25
login, 16
platform bridge, 6
platform bridge installation, 23
platform bridge installation, testing, 29
platform bridge Setup.exe, 26
platform bridge, uninstalling, 78
platform version, 11
platformbrdg directory, 24
plotters, 57
port number, Web Jetadmin, 34
M
MEDS, clearing, 15
memory requirements, 12
MIBs, 28, 81
MIF, PCs, 47
N
name, community, 42
Netserver actions, 52
Netserver discovery, 51
Netserver events, 51
Netserver subsystems, 54
Netservers, 51
port, TCP, 20
power on password, 45
power on Self Test, PCs, 47
power on, PCs, 41
preinstallation, server bridge, 15
preparation, platform bridge, 23
preparation, toptools server, 16
printer properties, 35
printer trap proxy, 36
processor requirements, 12
Procurve switches, 61
properties, PCs, 40
properties, printer, 35
proxy, printer trap, 36
networks, large, 87
NNM system IP address, 20
NNM version, 8
NNM versions supported, 10
NNM-Solaris platform bridge installation, 24
nnmsolbrdg, temporary directory, 24
NNM-UX platform bridge installation, 24
nnmuxbrdg, temporary directory, 24
nsaAgentStatus, 68
NTFS, security, 12
O
reboot, server bridge installation, 21
registration, 13
registry entry, debug levels, 70
remote console, 6, 8
remote console sessions, 85
Remote Control Card, 56
reports, PCs, 45
requirements, 6
requirements, system, 9
RVIEWSCM.EXE, 22
R
Omnibooks, 43, 49
overview of bridge operation, 67
ovservices, 30
ovstart, 23
ovw, 30
ovwdb, 30, 38
OVWSERVER, 16
P
password, community string, 6
password, power on, 45
password, SNMP, 42
password, toptools user, 16
password, user, 12
pcAnywhere, 5, 56
persistance, filter, 55
persistance, submap, 55
planning, 7
Security, 11
Security, Directory, 11
security, NTFS, 12
security, PCs, 45
security, SNMP, 42
security, toptools authentication, 38
selection lists, 38
server bridge, 6
server bridge directory, 19
server bridge installation, 15
server bridge, uninstalling, 77
server Hostname, toptools, 38
server, toptools, 5
Service Control Manager, 22
sessions, remote, 85
set ID string, PCs, 40
S
Page 85
Page 86

hp toptools for openview nnm user guide
settings, browser, 11
Setup.exe, platform bridge, 26
Setup.exe, server, 17
Setup.exe, Web Jetadmin, 31
trap proxy, printer, 36
trap services, 23
troubleshooting, 67
TTDbErase, 15
SNMP EMANATE services, 23
SNMP security, 42
SNMP services, 23, 27
status, PCs, 45
sting, community, 42
subsystems, Netservers, 54
support, 14
supported browsers, 11
supported devices, 11
switches, 61
system memory, platform bridge, 27
System Memory, Server bridge, 18
system requirements, 9
T
tar files, 24
TCP port, 20
TCP port number, 27
telnet, testing, 23
testing platform bridge installation, 29
testing Web Jetadmin, 35
toptools components, updating, 29
toptools database, clearing, 15
toptools group, 38
toptools launching, 38
toptools server, 5
toptools server Hostname, 38
toptools server preparation, 16
Toptools Services, 22
toptools versions supported, 9
uninstalling, platform bridge, 78
uninstalling, server bridge, 77
uninstalling, Web Jetadmin, 80
updating toptools components, 29
user password, 12
user, platform, 11
user, toptools, 11, 16
using HP Toptools for NNM, 37
using Web Jetadmin, 35
Vectras, 43
verifying platform bridge installation, 29
verifying Web Jetadmin installation, 35
version, platform, 11
versions supported, NNM, 10
versions supported, toptools, 9
Visualize workstations, 49
web console, 6
Web Jetadmin installation, 31
Web Jetadmin port number, 34
Web Jetadmin Setup.exe, 31
Web Jetadmin, testing, 35
Web Jetadmin, uninstalling, 80
Web Jetadmin, using, 35
U
V
W
Page 86 Version 5.6
 Loading...