

Page 1

HP
SureStore
T20
Models T20i, T20Xi, T20e, T20Xe
User’s Guide
Page 2

Product Details
Note your tape drive details here so you can find them easily when you need them.
Model name:
Product number:
Serial number:
Date purchased/installed:
SCSI ID:
HP SureStore T20___
Page 3

HP SureStore T20
User’s Guide
Page 4

© Copyright 19 98 by Hewlett-Packard Company.
The information contained in this document is subject to change without notice.
This document contains proprietary information which is protected by copyright. All rights are reser ved. No
part of this document may be photocopied, reproduced or translated to another language without the prior
written consent of Hewlett-Packard Company.
Hewlett-Packard shal l not be liable for errors contai ned herein or for incidental or consequential damages
(including lost profits) in c onnection with the furn ishing, perfo rmance, or use of this ma terial whether based o n
warranty, contract, or other legal theory.
October 1998
Part Number C4394-90100
Page 5

Contents
1 Preparing for Installation
Your New HP SureStore T20 Tape Drive. . . . . . . . . . . . . . . . . . . 1-2
Before You Start . . . . . . . . . . . . . . . . . . . . . . . . . . . . . . . . . . . . . . 1-2
Internal Drives. . . . . . . . . . . . . . . . . . . . . . . . . . . . . . . . . . . . . . . . 1-3
Check the Contents of the Box . . . . . . . . . . . . . . . . . . . . . . . . . 1-3
Installation Overview . . . . . . . . . . . . . . . . . . . . . . . . . . . . . . . . 1-4
External Drives . . . . . . . . . . . . . . . . . . . . . . . . . . . . . . . . . . . . . . . 1-5
Check the Contents of the Box . . . . . . . . . . . . . . . . . . . . . . . . . 1-5
Installation Overview . . . . . . . . . . . . . . . . . . . . . . . . . . . . . . . . 1-6
Checking System Prerequisites. . . . . . . . . . . . . . . . . . . . . . . . . . . 1-7
Hardware Requirements . . . . . . . . . . . . . . . . . . . . . . . . . . . . . . 1-7
Operating System Requirements. . . . . . . . . . . . . . . . . . . . . . . . 1-8
Backup Software . . . . . . . . . . . . . . . . . . . . . . . . . . . . . . . . . . . . 1-8
Planning the SCSI Bus . . . . . . . . . . . . . . . . . . . . . . . . . . . . . . . . . 1-9
Checking Your Current SCSI Configuration. . . . . . . . . . . . . . . 1-9
What Next? . . . . . . . . . . . . . . . . . . . . . . . . . . . . . . . . . . . . . . . . . . 1-10
2 Installing an Internal Tape Drive
Overview of the Installation Process. . . . . . . . . . . . . . . . . . . . . . . 2-2
Tools You May Need. . . . . . . . . . . . . . . . . . . . . . . . . . . . . . . . . . . 2-3
Preparing the Computer . . . . . . . . . . . . . . . . . . . . . . . . . . . . . . . . 2-3
Preparing the Tape Drive. . . . . . . . . . . . . . . . . . . . . . . . . . . . . . . . 2-6
Installing the Tape Drive in the Bay . . . . . . . . . . . . . . . . . . . . . . . 2-9
Verifying the Installation. . . . . . . . . . . . . . . . . . . . . . . . . . . . . . . . 2-13
Installing Backup Software. . . . . . . . . . . . . . . . . . . . . . . . . . . . . . 2-14
Installing Driver Software. . . . . . . . . . . . . . . . . . . . . . . . . . . . . . . 2-14
What Next? . . . . . . . . . . . . . . . . . . . . . . . . . . . . . . . . . . . . . . . . . . 2-14
Contents-1
Page 6

3 Installing an External Tape Drive
Overview of the Installation Process. . . . . . . . . . . . . . . . . . . . . . . 3-2
Tools You May Need. . . . . . . . . . . . . . . . . . . . . . . . . . . . . . . . . . . 3-2
Preparing the Tape Drive . . . . . . . . . . . . . . . . . . . . . . . . . . . . . . . 3-3
Installing the Tape Drive. . . . . . . . . . . . . . . . . . . . . . . . . . . . . . . . 3-5
Verifying the Installation. . . . . . . . . . . . . . . . . . . . . . . . . . . . . . . . 3-7
Installing Backup Software. . . . . . . . . . . . . . . . . . . . . . . . . . . . . . 3-8
Installing Driver Software. . . . . . . . . . . . . . . . . . . . . . . . . . . . . . . 3-8
What Next? . . . . . . . . . . . . . . . . . . . . . . . . . . . . . . . . . . . . . . . . . . 3-8
4 Caring for Your Tape Drive
Care of the Tape Drive . . . . . . . . . . . . . . . . . . . . . . . . . . . . . . . . . 4-2
Choosing Tapes for Your Tape Drive . . . . . . . . . . . . . . . . . . . . . . 4-3
Recommended Tape Cartridges and Compatibility . . . . . . . . . . 4-3
Erasing Tapes. . . . . . . . . . . . . . . . . . . . . . . . . . . . . . . . . . . . . . . 4-4
Retensioning Tapes . . . . . . . . . . . . . . . . . . . . . . . . . . . . . . . . . . 4-4
Inserting and Removing Tape Cartridges . . . . . . . . . . . . . . . . . . . 4-5
Write-Protecting a Tape Cartridge . . . . . . . . . . . . . . . . . . . . . . . . 4-7
Caring for Your Tape Cartridges. . . . . . . . . . . . . . . . . . . . . . . . . . 4-8
Operating Conditions. . . . . . . . . . . . . . . . . . . . . . . . . . . . . . . . . 4-8
Storing Tape Cartridges. . . . . . . . . . . . . . . . . . . . . . . . . . . . . . . 4-8
5 Troubleshooting
Save Yourself a Call . . . . . . . . . . . . . . . . . . . . . . . . . . . . . . . . . . . 5-2
Troubleshooting Tips . . . . . . . . . . . . . . . . . . . . . . . . . . . . . . . . . . 5-2
Things to Try First. . . . . . . . . . . . . . . . . . . . . . . . . . . . . . . . . . . . . 5-2
TapeAssure . . . . . . . . . . . . . . . . . . . . . . . . . . . . . . . . . . . . . . . . 5-3
Problems with Your Computer . . . . . . . . . . . . . . . . . . . . . . . . . 5-3
Problems with Your Tape Drive . . . . . . . . . . . . . . . . . . . . . . . . 5-4
Contents-2
Page 7

6 Product Specifications and Ordering Information
Product Specifications . . . . . . . . . . . . . . . . . . . . . . . . . . . . . . . . . A-2
Interface. . . . . . . . . . . . . . . . . . . . . . . . . . . . . . . . . . . . . . . . . . . A-2
Backup Speed . . . . . . . . . . . . . . . . . . . . . . . . . . . . . . . . . . . . . . A-2
Tape Format. . . . . . . . . . . . . . . . . . . . . . . . . . . . . . . . . . . . . . . . A-2
Reliability Specifications . . . . . . . . . . . . . . . . . . . . . . . . . . . . . A-3
Power Requirements . . . . . . . . . . . . . . . . . . . . . . . . . . . . . . . . . A-3
Specified Operating Temperature . . . . . . . . . . . . . . . . . . . . . . . A-3
Physical Specifications . . . . . . . . . . . . . . . . . . . . . . . . . . . . . . . A-3
LED Specifications . . . . . . . . . . . . . . . . . . . . . . . . . . . . . . . . . . A-3
Certifications. . . . . . . . . . . . . . . . . . . . . . . . . . . . . . . . . . . . . . . A-4
Ordering Information . . . . . . . . . . . . . . . . . . . . . . . . . . . . . . . . . . A-5
Recommended Tape Cartridges. . . . . . . . . . . . . . . . . . . . . . . . . A-5
SCSI Accessories . . . . . . . . . . . . . . . . . . . . . . . . . . . . . . . . . . . A-5
7 Customer Support
Hewlett-Packard Limited Warranty Statement. . . . . . . . . . . . . . . B-2
Express Exchange. . . . . . . . . . . . . . . . . . . . . . . . . . . . . . . . . . . . . B-3
Service and Support . . . . . . . . . . . . . . . . . . . . . . . . . . . . . . . . . . . B-4
Obtaining Technical Support. . . . . . . . . . . . . . . . . . . . . . . . . . . B-4
Obtaining Service . . . . . . . . . . . . . . . . . . . . . . . . . . . . . . . . . . . B-4
HP Service Agreements . . . . . . . . . . . . . . . . . . . . . . . . . . . . . . B-5
Returning your HP SureStore Tape Drive. . . . . . . . . . . . . . . . . B-5
Worldwide Online Services. . . . . . . . . . . . . . . . . . . . . . . . . . . . B-6
Contacting Customer Support. . . . . . . . . . . . . . . . . . . . . . . . . . . . B-7
North and South America . . . . . . . . . . . . . . . . . . . . . . . . . . . . . B-7
Europe . . . . . . . . . . . . . . . . . . . . . . . . . . . . . . . . . . . . . . . . . . . . B-8
Australia . . . . . . . . . . . . . . . . . . . . . . . . . . . . . . . . . . . . . . . . . . B-10
China (PRC) . . . . . . . . . . . . . . . . . . . . . . . . . . . . . . . . . . . . . . . B-10
Hong Kong . . . . . . . . . . . . . . . . . . . . . . . . . . . . . . . . . . . . . . . . B-11
Indonesia . . . . . . . . . . . . . . . . . . . . . . . . . . . . . . . . . . . . . . . . . . B-11
Japan . . . . . . . . . . . . . . . . . . . . . . . . . . . . . . . . . . . . . . . . . . . . . B-11
India. . . . . . . . . . . . . . . . . . . . . . . . . . . . . . . . . . . . . . . . . . . . . . B-11
Korea. . . . . . . . . . . . . . . . . . . . . . . . . . . . . . . . . . . . . . . . . . . . . B-12
Malaysia . . . . . . . . . . . . . . . . . . . . . . . . . . . . . . . . . . . . . . . . . . B-13
New Zealand . . . . . . . . . . . . . . . . . . . . . . . . . . . . . . . . . . . . . . . B-13
Philippines. . . . . . . . . . . . . . . . . . . . . . . . . . . . . . . . . . . . . . . . . B-13
Singapore. . . . . . . . . . . . . . . . . . . . . . . . . . . . . . . . . . . . . . . . . . B-13
Taiwan (ROC) . . . . . . . . . . . . . . . . . . . . . . . . . . . . . . . . . . . . . . B-14
Thailand. . . . . . . . . . . . . . . . . . . . . . . . . . . . . . . . . . . . . . . . . . . B-14
Contents-3
Page 8

Contents-4
Page 9

1
Preparing for Installation
This chapter provides an overview of the installation process and tells you
what you will need before installing the HP SureStore T20 tape drive.
Page 10

Preparing for Installation
Your New HP SureStore T20 Tape Drive
Your New HP SureStore T20 Tape Drive
The HP SureStore T20 tape drive provides reliable data protection at an
affordable price. The HP SureStore T20 integrates easily into your small
network server, peer-to-peer network, or desktop computer. Based on
Travan (TR-5) technology, each tape cartridge has a native storage
capacity of 10 GB, enough capacity to back up a small server or peer-topeer network on a single tape. Backup applications such as Replica
Backup, Replica Single Server, and HP Colorado Backup II provide
software data compr ession so that a single tape may s t ore up to 20 G B of
data (assuming a 2:1 co mpression ratio).
Before You Start
Before you install your HP SureStore T20 drive:
1 Check the contents of the box against the list on page 1-3 for internal
drives or page page 1-5 for external drives.
2 Write your drive’s serial number and other details on the inside front
cover of this book. The serial number can be found inside the drive’s
tape door. The product number is:
•
T20i internal drive: C4394A
•
T20Xi internal drive: C4401 A
•
T20e external drive: C4395A
•
T20Xe external drive: C4402A
3 Check that your computer meets the requirements for installation.
4 Collect information about the SCSI configuration of your computer an d
any other devices attached to it and decide how you are going to
configure the drive on the SCSI bus. You can use the TapeAssure
software provided on the HP SureStore Tape CD to do this.
5 Select a free bay for an internal drive.
or
Select a site for an external drive.
1-2
Page 11
Internal Drives
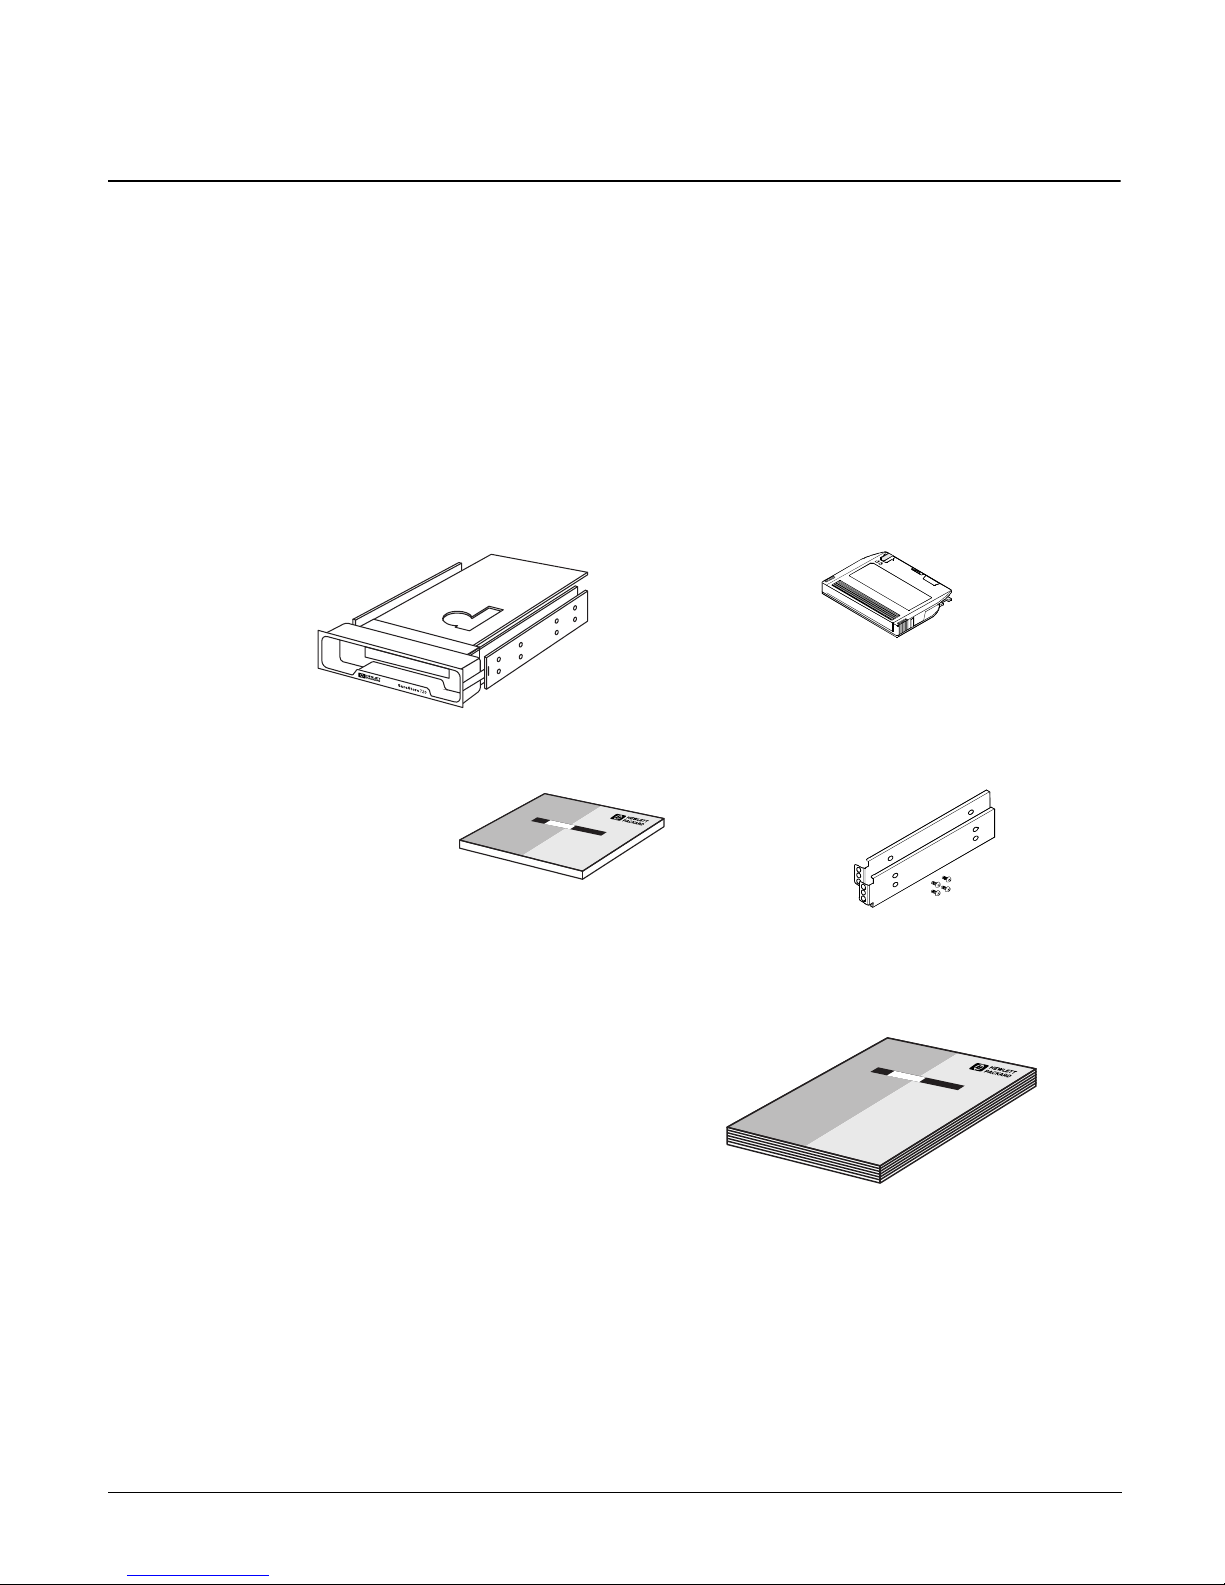
Check the Contents of the Box
Check each item that came in the HP SureStore T20 box to make sure you
have everything you need. Take a moment now to write the model name
(T20i/Xi), product number (C4394A/C4401A), and serial number (look
inside the tape door) of your tape drive on the inside front cover of the
User’s Guide.
HP SureStore T20i/Xi tape drive HP 20GB/TR-5 mini-cartridge
Preparing for Installation
Internal Drives
HP SureStore
CD
Tape
containing:
• HP
Colorado
Backup II (for T20i)
• Replica Backup for HP SureStore
Tape (for T20i)
or
Replica Single Server for HP
SureStore Tape (for T20Xi)
• Tape Alert
• TapeAssure
• Driver software
• User’s Guides
If anything i s missing or appears damaged, con tact your d elivery company
or supplier.
Rails and screws suitable for
mounting the tape drive in an
HP NetServer E E-series or Vectra
computer
User’s Guide
(Please discard the unneeded
languages in the recycling bin.)
1-3
Page 12
Preparing for Installation
Internal Drives
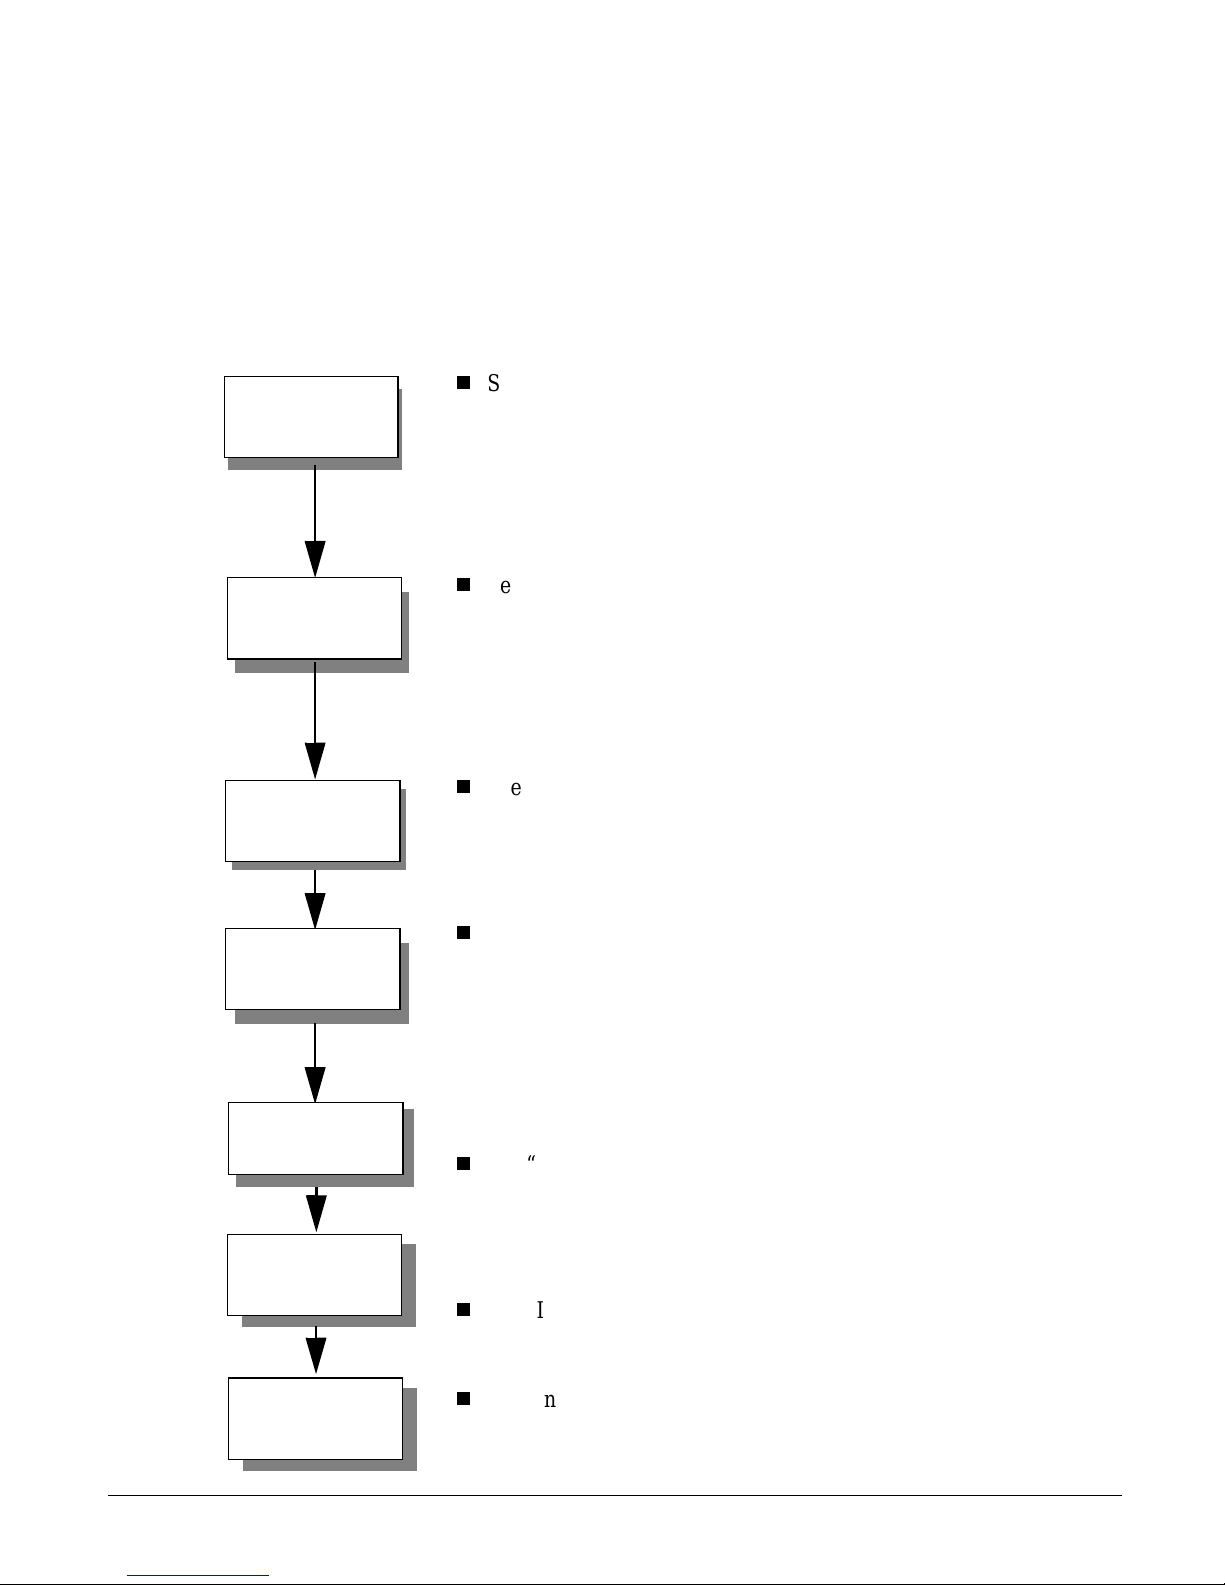
Installation Overview
Installing the HP SureStore T20 tape drive is a simple procedure requiring
no special skills, providing that your system meets the prerequisites and
you have the right tools. The h ardware install ation process should take l ess
than an hour.
Check System
Prerequisites
Prepare
Computer
See “Checking Sy stem Prerequisites” on page 1-7.
•
Properly installed and con figured SCSI controlle r
•
CD-ROM drive to load so ftware
•
Empty 5¼-in bay
•
Mounting hardwar e, if required for your computer
•
SCSI cable with available 50-pin connector
See “Preparing the Computer” on page 2-3.
•
Run TapeAssure (optional)
•
Perform a normal system shutdown
•
Remove power cabl es
•
Remove cover
•
Remove cover plate and any mo unting hardw are from bay
Prepare
Tape Drive
Install
Tape Drive
Verify the
Installation
Install Backup
Software
See “Preparing the Tape Drive” on page 2-6.
•
Check SCSI ID and reset if necessary
•
Check termination and cha n ge if necessa ry
•
Attach rails or other mounting hardware if required for your com p uter
See “Installing the Tape Drive in the Bay” on page 2-9.
•
Slide drive into bay
•
Attach SCSI cable
•
Attach power cable
•
Secure drive in place wi th screws
•
Replace comp uter’s cover
•
Reconnect pow er c abl es
See “Verifying the Installation” on page 2-13
•
Switch on computer and boot up
•
Install TapeAssure from CD-ROM
•
Run TapeAssure and perform a test backup and restore
See “Installing Backup Software” on page 2-14
•
Install backup software from CD-ROM
.
.
Install Driver
Software
1-4
See “Installing Driver Software” on page 2-14
•
Install driver software fro m CD-ROM
.
Page 13
External Drives
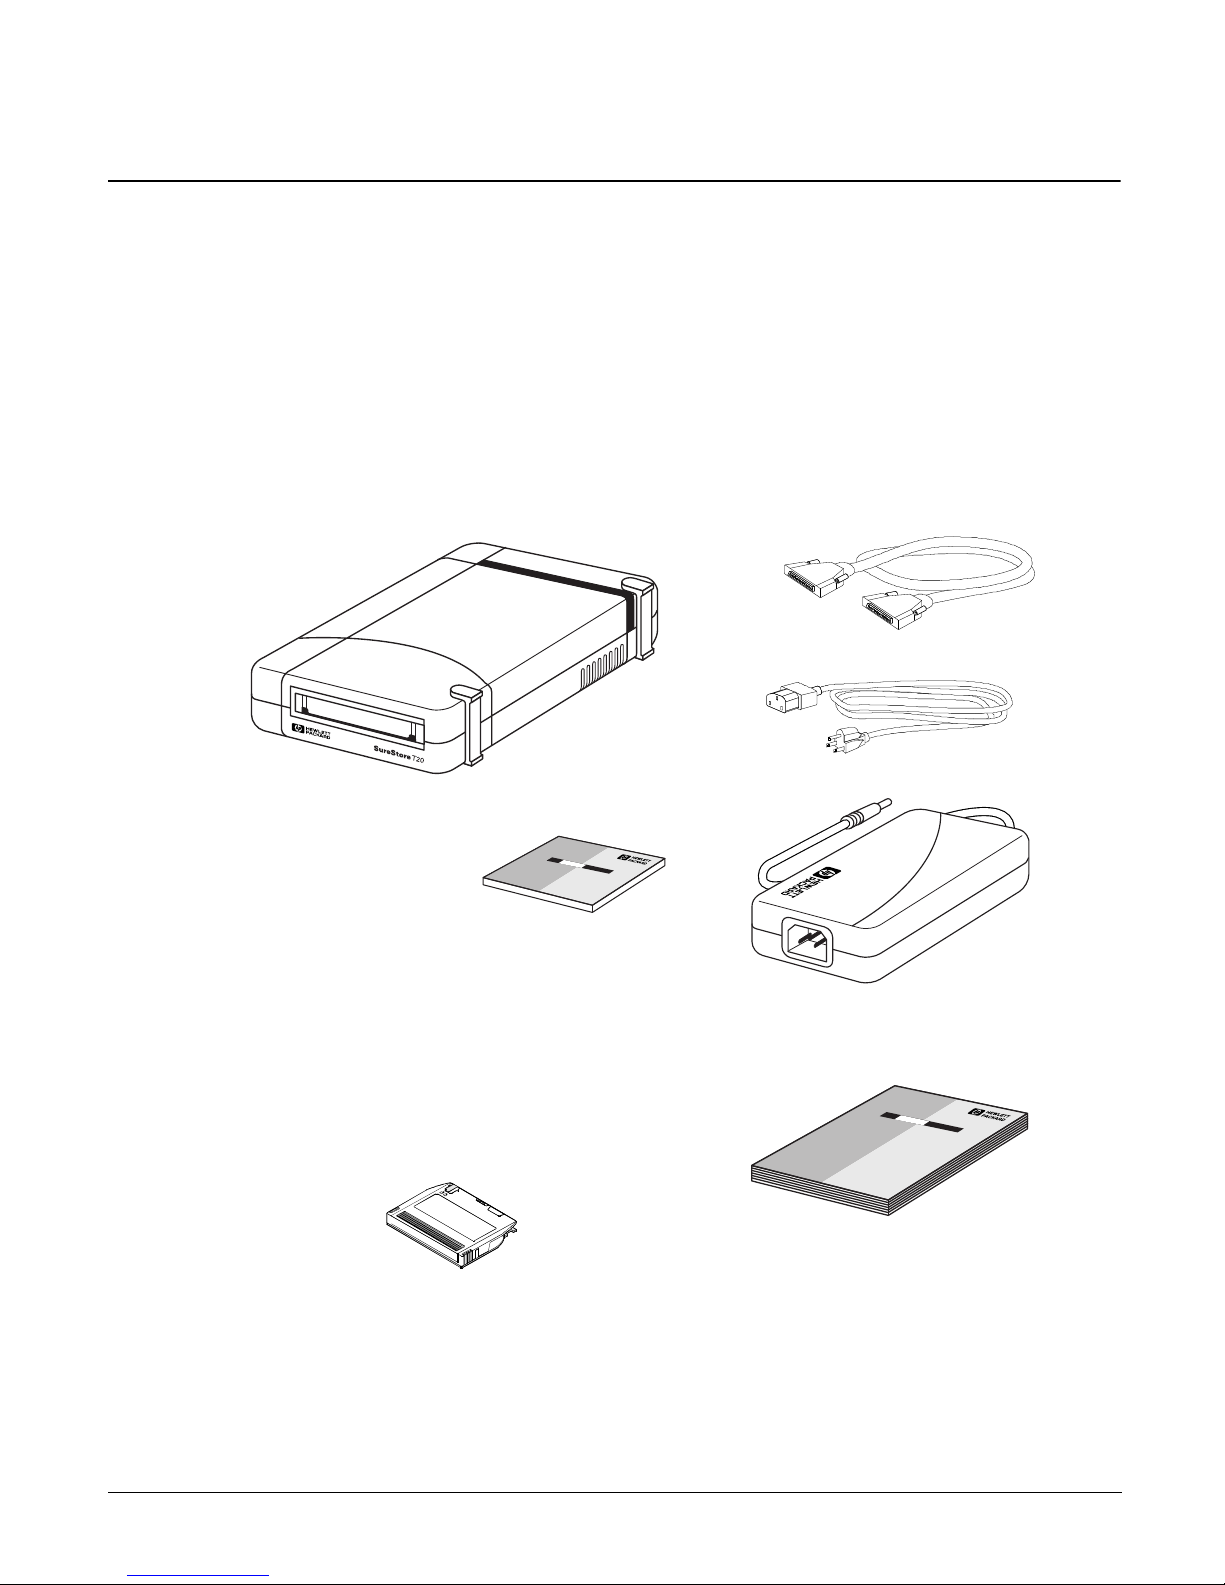
Check the Contents of the Box
Check each item that came in the HP SureStore T20 box to make sure you
have everything you need. Take a moment now to write the model name
(T20e/Xe), product number (C4395A/C4402A), and serial number (look
inside the tape door) of your tape drive on the inside front cover of the
User’s Guide.
HP SureStore T20e tape drive SCSI cable
Preparing for Installation
External Drives
Power cable
HP SureStore Tape
• HP Colorado
Backup II (for
T20e)
• Replica Backup
for HP SureStore Tape (for T20e)
or
Replica Single Server for HP
SureStore Tape (for T20Xe)
• Tape Alert
• TapeAssure
• Driver software
• User’s Guides
CD containing:
HP 20GB/TR-5 mini -ca rtrid ge
If anything i s missing or appears damaged, con tact your d elivery company
or supplier.
Power supply
User’s Guide
(Please discard the unneeded
languages in the recycling bin.)
1-5
Page 14
Preparing for Installation
External Drives
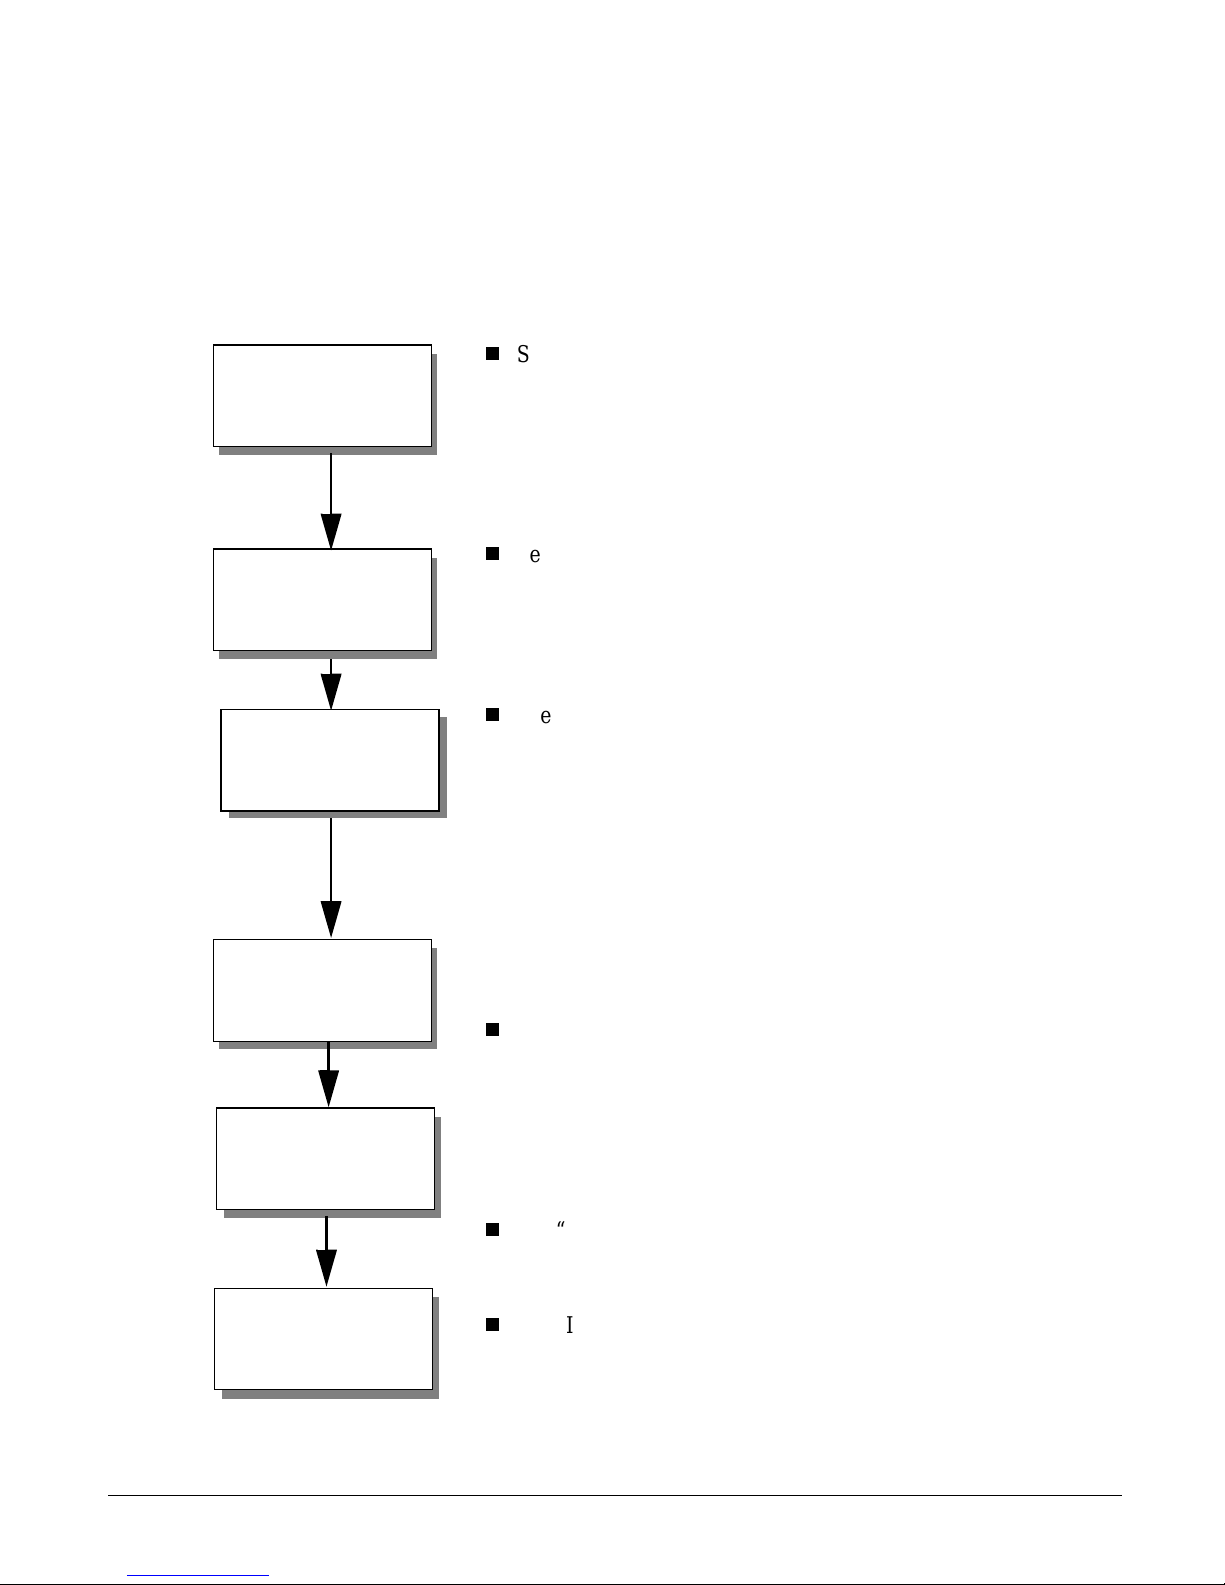
Installation Overview
Installing the HP SureStore T20 tape drive is a simple procedure requiring
no special skills, providing that your system meets the prerequisites. The
hardware installation process sh ould take about 15 minutes.
Check System
Prerequisites
Prepare
Tape Drive
See “Check ing Syst em Pr erequi site s” on pag e 1-7.
•
Properly installed and configured S C SI
controller
•
CD-ROM drive to load software
•
High-density, 50-pin SCSI connector
See “Preparing the Tape Drive” on page 3-3.
•
Run TapeAssure (optional)
•
Check SCSI ID and reset if necessary
Install
Tape Drive
Verify the
Installation
Install Backup
Software
See “Installing the Tape Drive” on page 3-5.
•
Perform a normal system shutdown
•
Remove power cables
•
Attach SCSI cable
•
Attach power supply to tape driv e
•
Attach power cord to power supply and plug
into outlet
•
Reconnect computer’s power cables
See “Verifying the Installation” on page 3-7
•
Switch on computer and boot up
•
Install Tap eAssure from CD-ROM
•
Run T apeAssure and perform a test backup and
restore
See “Installing Backup Software” on page 3-8
•
Install backup software from CD-ROM
.
.
Install Driver
Software
1-6
See “Installing Driver Software” on page 3-8
•
Install driver software from CD-ROM
.
Page 15

Checking System Prerequisites
Before you install your HP SureStore T20 tape drive on your computer,
make sure that you have all the necessary hardware and information you
will need.
Hardware Requirements
To install the HP SureStore T20 tape drive, your computer mus t b e a 486 or Pentium-based computer that has:
A properly installed SCSI host adapter (or a SCSI c ontroller o n the
motherboard) with the appropriate Advanced SCSI Programming Interface
(ASPI) driver
A CD-ROM drive to install the software
Preparing for Installation
Checking System Prerequisites
Note
For an internal drive, you will also need:
An available 5¼-inch, half-height drive bay
Any special tray or rails required to fix the drive into the empty bay. (Rails are
provided for the HP NetServer E-series servers or Vectra co mputers.)
A SCSI ribbon cable with an available 50-pi n connector. Your computer may
already have this cable. If not, contac t your dealer.
If your system has a 68-pin bus, then a 68-pin to 50-pin adapter is
required. See your dealer or use Adaptec’s ACK-68P-50P-IU (internal) or
ACK-68P-50P-E (external).
For an external drive, your computer must have a 50-pin high-density
connector.
You may have to open up your computer to determine whether it has the
necessary components and to check the SCSI ID settings. See “Preparing
the Computer” on page 2-3 for instructions on how to do this.
While installation is similar for all compu ters, there are variations among
them. You may want to have you r compu ter manual s avail able to help you
remove the computer’s cover and identify internal components.
1-7
Page 16

Preparing for Installation
Checking System Prerequisites
Operating System Requirements
The HP SureStore T20 tape drive is compatible with the following
operating systems:
Novell NetWare (v3.12 and 4.11)
Microsoft Windows NT (v3.51 SP 5 and 4.0)
Microsoft Windows 95
SCO UNIX OpenServer 5 (3.2v5.02)
You can also use your HP SureStore T20 with many other operating
systems, but third-party backup software may be required.
Backup Software
To test and use your HP SureStore T20 tape drive, you will need backup
software that supports the drive. The tape drive comes with software
drivers to support the Microsoft Windows NT Backup utility (no data
compression available).
Check the README file on the HP SureSt o re T ap e CD for the latest
information about the software drivers supplied with the tape drive.
For standalone systems, peer-to-peer systems , and Windows NT
workstations, HP Colorado Backup II and associated documentation is
provided on the HP SureStore Tape CD (T20i/e only).
For server systems,
Single Server for HP SureStore T ape (T20Xi/Xe)
Replica Backup for HP SureStore Tape (T20i/e) or Replica
and associated documentation
are provided on the HP SureStore Tape CD.
Other commercial backup applications are also available. For the latest list
of backup packages and drivers that support this tape drive, refer to our
World Wide Web site (http://www.hp.com/tape).
1-8
Page 17

Planning the SCSI Bus
The SCSI controlle r in your compu ter links the comput er to your tape dri ve
and possibly other devices through the SCSI bus. If you have other SCSI
devices in addition to the tape drive, you need to decide where the tape
drive will go in relation to the other devices. If the tape drive is going to be
the only device on the bus, there is no decision to make: you can use the
drive’s defaults.
Each device on a SCSI bus, including the SCSI controller itself, must hav e
a unique address, a number from 0 to 7, called the SCSI ID or target ID.
SCSI ID 7 is reserved for the SCSI controller because it has the highest
priority on the bu s. A SCSI bo ot disk usuall y has a SCSI ID of 0. Th e tape
drive should be assigned an unused SCSI ID between 1 and 6. The tape
drive’s default is 4. To configure the drive properly when you install it, you
will need to identify the SCSI IDs of any other devices on the SCSI bus to
be sure that there is no conflict with the tape drive’s SCSI ID.
Preparing for Installation
Planning the SCSI Bus
SCSI buses must be terminated correctly at each physical end of the cable.
Both internal and external T20 drives use active termination. An internal
HP SureStore T20 tape drive comes with a jumper that can be removed if
the tape drive is not at the end of the SCSI chain. The external T20
automatically determines if it is at the end of the SCSI chain and terminates
itself if necessary. No user intervention is necessary.
If you need more information about arranging your SCSI bus, refer to our
World Wide Web site (http://www.hp.com/tape) or the HP First
Faxback service (see the telephone numbers listed in Appendix B).
Checking Your Current SCSI Configuration
The TapeAssure software provided on the HP SureStore Tape CD can be
used to check your computer’s current SCSI configuration. If you are not
sure what this configuration is, install and run TapeAssure from the CD.
This will check for the presence of a SCSI controller and its driver software
and identify the SCSI IDs of existing SCSI devices. Exit the program after
you view the SCSI configuration information.
1-9
Page 18

Preparing for Installation
What Next?
What Next?
If your computer has all the hardware and software it needs to su ppo rt the
tape drive, you are ready to start installing the drive.
If your drive is internal, go to Chapter 2.
If your drive is external, go to Chapter 3.
1-10
Page 19

2
Installing an Internal Tape Drive
This chapter provides directions for installing an HP SureStore T20i/Xi
drive in your computer.
The entire hardware installation process should take about an hour.
Page 20
Installing an Internal Ta pe Drive
Overview of the Installation Process
Overview of the Installation Process
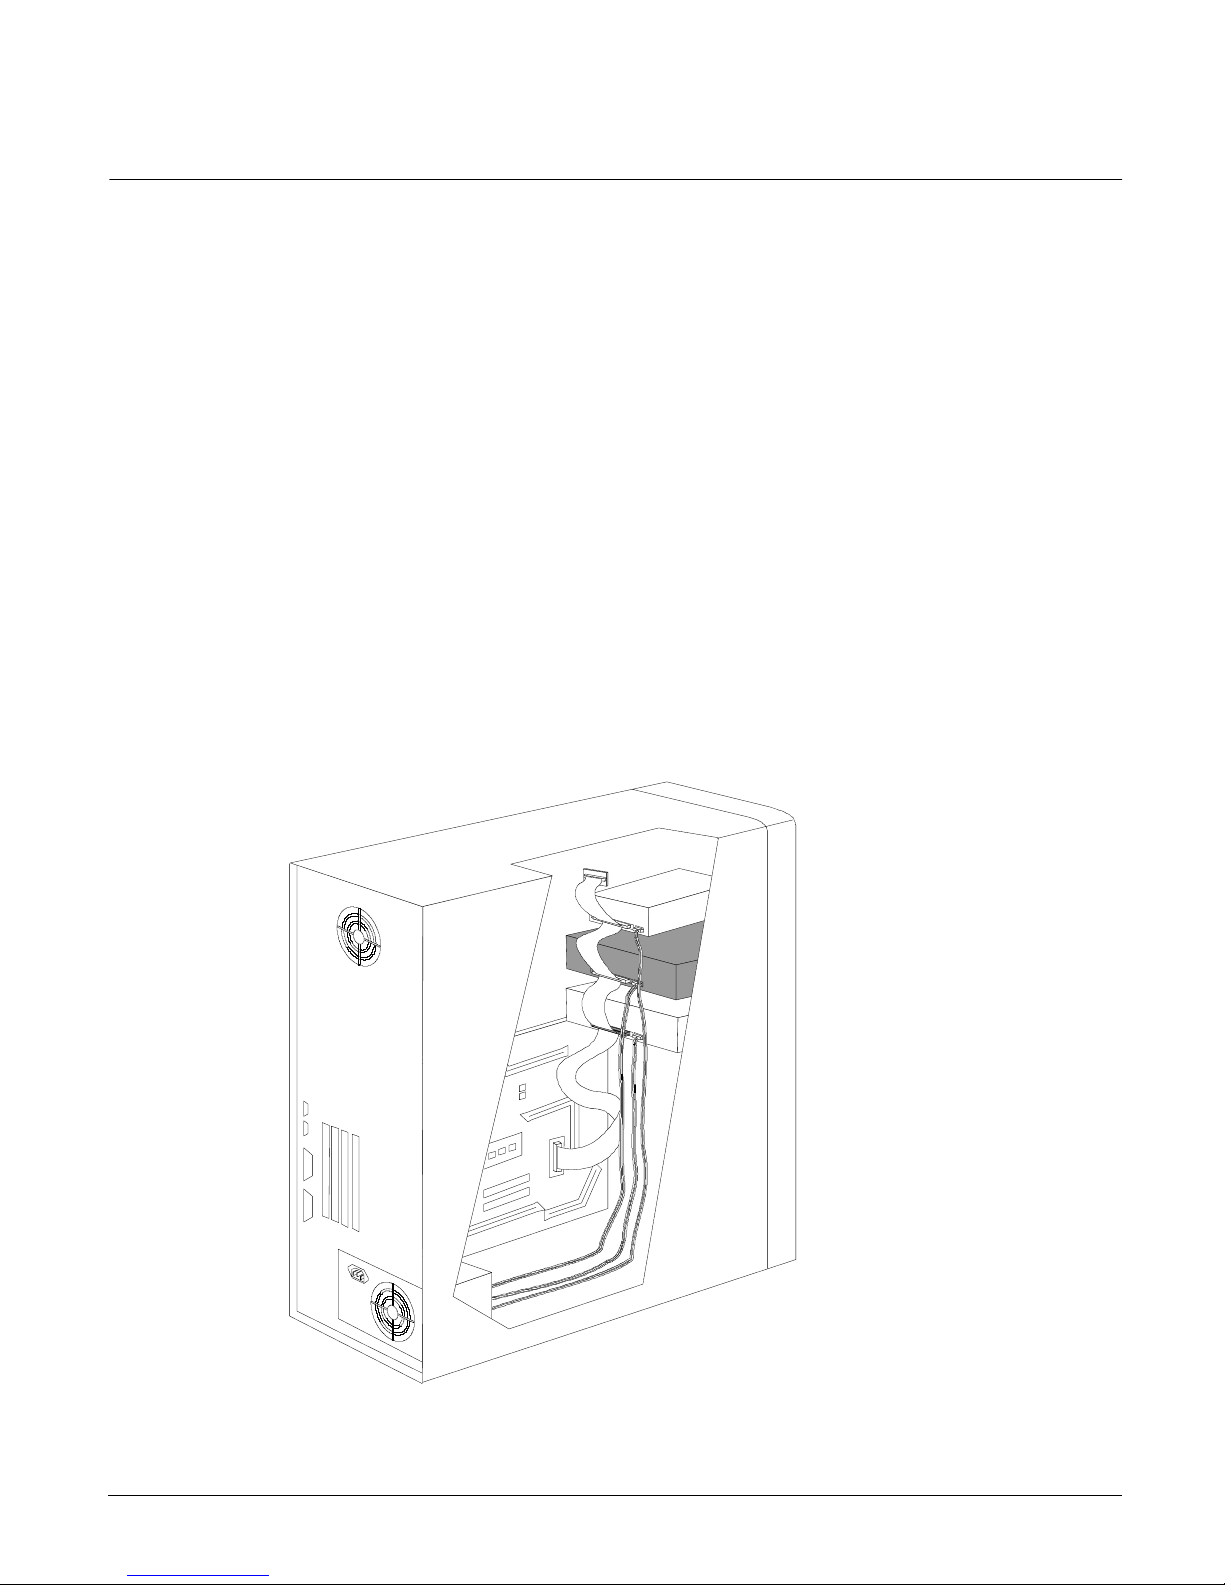
The installation process involves:
1 Preparing the computer by shutting down all applications, turning off
the power, removing the cover, and checking for cables and mounting
hardware.
2 Preparing the tape drive by checking the SCSI ID (and changing it if
necessary) and attaching any mounting hardware (tray or rails) that may
be needed.
3 Installing the tape drive in the empty bay and connecting the SCSI and
power cables.
4 Verifying that the tape drive is properly installed and functional by
running TapeAssure.
5 Installing backup software and drivers for your tape drive.
Figure 2.1 Installing an internal tape drive in your computer
2-2
Page 21

Tools You May Need
You may need the following tools to complete the installation:
A medium-size Phillips screwdriver
A medium-size flat-bladed screwdriver (if your computer uses slotted
screws)
A Torx screwdriver (if your computer us es Torx screws)
Needle-nose pliers
A grounding mat or wrist strap (optional but recommended)
Preparing the Computer
Installing an Internal Tape Drive
Tools You May Need
Before you begin the installation process, ensure that your computer is
equipped with a SCSI host adapter or on-board SCSI controller with its
associated driver installed according to the directions in its installation
guide.
You may want to have your computer manuals available for reference
during this procedure.
Caution Static electricity can damage electronic components. Turn all equipment
off before removi n g the comp ut er’s cover. A grounding mat or wrist strap
provides the best protection against static. If you don’t have either of
these, always touch the computer’s chassis before and while touching any
internal boards or devices.
If there are other SCSI devices in your computer, you may want to check
1
their SCSI ID numbers and termination status before you switch off the
computer. See “Checking Your C urren t SC SI C onf i gurati o n” on page 1-9
for more information.
Close down all applications, switch off the computer and any peripherals,
2
and unplug them from the power outlets.
2-3
Page 22

Installing an Internal Ta pe Drive
Preparing the Computer
Remove the cover from your computer.
3
Caution As you work inside your computer, you may find that you have to
disconnect the internal SCSI cable or power cable from other devices to
maneuver the new tape drive into place. If you do this, take note of
existing cable connections and their orientation, so you can put them back
correctly later.
Determine whether you need another SCSI cable.
4
If your SCSI controller has a ribbon cable attached to it and there is an
unused connector, you will n ot need another SCSI cable. Go to step 5.
If your SCSI controller has a ribbon cable with an unused 68-pin
connector , you will need a SCSI 68-to-50 pin adapter . Once this adapter
is attached, go to step 5.
If your SCSI controller does not have a cable attached to it, you will
need a new SCSI cable. Once you have this cable, go to step 5.
If your SCSI host adapter has a cable attached to it but there are no
available connectors, you must do one of the following:
•
Install a SCSI cable with more connectors (a SCSI host adapter can
support up to seven devices)
•
Install another SCSI host adapter and cable
Figure 2.2 SCSI cable connections
Terminator block
SCSI cable
Other internal
SCSI devices
Tape
drive
Connection to
SCSI controller
2-4
Page 23

Installing an Internal Tape Drive
Preparing the Computer
Locate an available 5¼-inch, half-height drive bay in your computer.
5
Remove the cover plate and any mounting hardware (screws, rails, or a
6
tray, for example) from the bay. Keep any mounting hardware that can be
used to secure the tape drive in the bay.
If your computer requ ires special mount ing hardware that you d o not have,
you must purchase this hardware before continuing.
Make sure the available SCSI connec tor reaches the back of the empty bay
7
in which you plan to install the new tape drive, as shown in figu re 2.2.
Locate an available internal power cable and make sure it reaches the back
8
of the empty bay.
2-5
Page 24
Installing an Internal Ta pe Drive
Preparing the Tape Drive
Preparing the Tape Drive
T o prepare the tape drive for installation, you need to make sure that it has
the correct SCSI ID and termination settings. Each SCSI device requires a
unique SCSI ID. You need to change the tape drive’s default SCSI ID
setting of 4 only if the computer already has a device wi th ID 4. See
“Planning the SCSI B us” on page 1-9 for more information about SCSI IDs
and SCSI bus termination.
Check the tape drive’s SCSI ID setting to ensure that it is set to the number
1
you expect. See “Preparing the Computer” on page 2-3 for more
information.
If you do not need to change the SCSI ID
4 on the inside front cover of this book and then go to step 4.
To change the tape drive’s SCSI ID
Caution Static electricity can damage electronic components. To equalize the static
electricity between the tape drive and the computer, rest the tape drive in
its plastic bag on top of the computer’s chassis while you remov e the drive
from the bag. Handle the drive as little as possible during the installation
procedure.
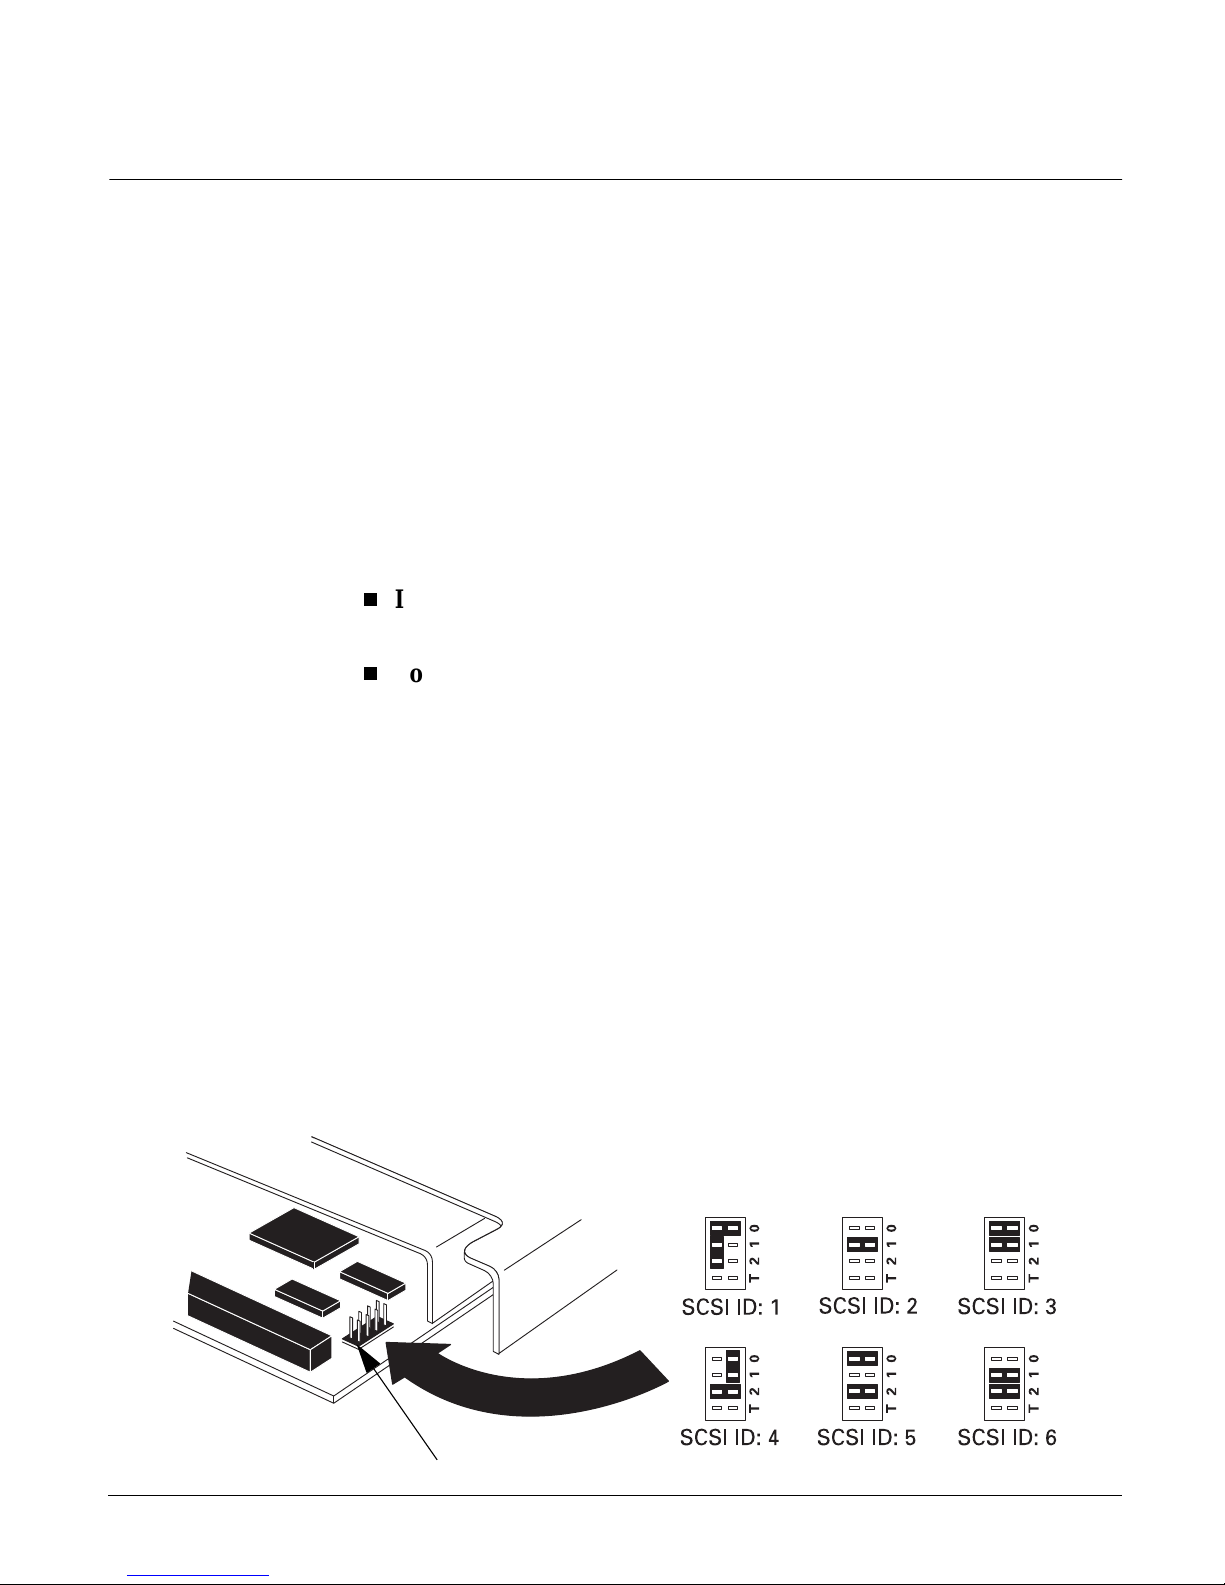
Locate the jumper block on the edge of the circuit bo ard that runs along the
2
back of the tape drive. Set the SCSI ID by moving the jumpers to the correct
position. (See figure 2.3.)
set the SCSI ID
jumpers. Make a note of the SCSI ID setting on the inside front cover of
this book for future reference.
Figure 2.3 SCSI ID jumper settings
, note the def ault SCSI ID of
, continue with the next step.
The jumpers marked 0, 1, and 2 are used to
. Use needle-nose pliers or your fingers to move the
2-6
jumper block
Page 25

Determine whether the tape drive should be terminated or unterminated.
3
The jumper marked T on the jumper block controls termination
•
If the tape drive is the last device or the only device on the internal
SCSI bus and the computer’s SCSI ribbon cable has no active
termination, the tape drive’s termination jumper should remain in
place. (See figure 2.4.) Any other device between the SCSI controller
and the tape drive must not be terminated. Go to step 4.
•
If the tape drive is not the last device on the internal SCSI bus and/or
the computer’s SCSI ribbo n cable has active termination (a terminator
block on the end of the cable or an in-line terminator), yo u must
remove the termination jumper from the bottom of the tape drive, as
shown in figure 2.4.
Figure 2.4 Changing the drive’s termination
Installing an Internal Tape Drive
Preparing the Tape Drive
.
jumper block
Default configuration:
SCSI ID = 4, drive
terminated
4
Drive
not
terminated,
termination jumper
removed
Drive terminated,
termination jumper
in place
If your computer requi res speci al rails or ot her hard ware to inst all th e tape
drive, mount them on the tape drive in this step. Many computers require
no special mounting hardware, however. If other devices in your computer
are not mounted with special rails or tray, proceed with the next section,
“Installing the Tape Drive in the Bay” on page 2-9.
If you are installing the drive in an HP NetServer E-series or an HP
Vectra, attach the HP rails to the tape drive with the screws provided, as
shown in figure 2.5.
If your computer uses mounting hard ware (either rails or a tray) and you
have a spare set, attach them to the tape drive as directed in your
2-7
Page 26

Installing an Internal Ta pe Drive
Preparing the Tape Drive
computer documentation.
If you do not have the appropriate mounting hardware for your
computer , contact your computer dealer or manufacturer to purchase it.
Attach the mounting hardware to the tape drive, then proceed with the
next section, “Installing the Tape Drive in the Bay” on page 2-9.
Figure 2.5 Attaching rails for an HP NetServer E-Series or Vec tra computer
2-8
Page 27

Installing the Tape Drive in the Bay
Slide the tape drive into the open bay. (See figure 2.6.) If your computer
1
uses rails, align them with the slots or fittings in the bay. Do not secure the
drive with screws at this point because you may have to move the drive a
bit to get the cables into place.
Figure 2.6 Fitting the tape drive into an empty bay
Installing an Internal Tape Drive
Installing the Tape Drive in the Bay
Your drive may or may
not use rails to slide into
the empty bay.
Attach the SCSI cable to the tape drive, as shown in figure 2.7 and
2
figure 2.8.
Align the raised square on the cable’ s connector with the slot on the tape
drive’ s connector . (The edge of the SCSI cable with the red stripe should
be closest to the power connector.)
Press the connectors gently but firmly together.
Half-height
drive bay
2-9
Page 28
Installing an Internal Ta pe Drive
Installing the Tape Drive in the Bay
Figure 2.7 SCSI cable connections
Terminator block
SCSI cable Red stripe
Other internal
SCSI devices
Tape
drive
Connection to
SCSI controller
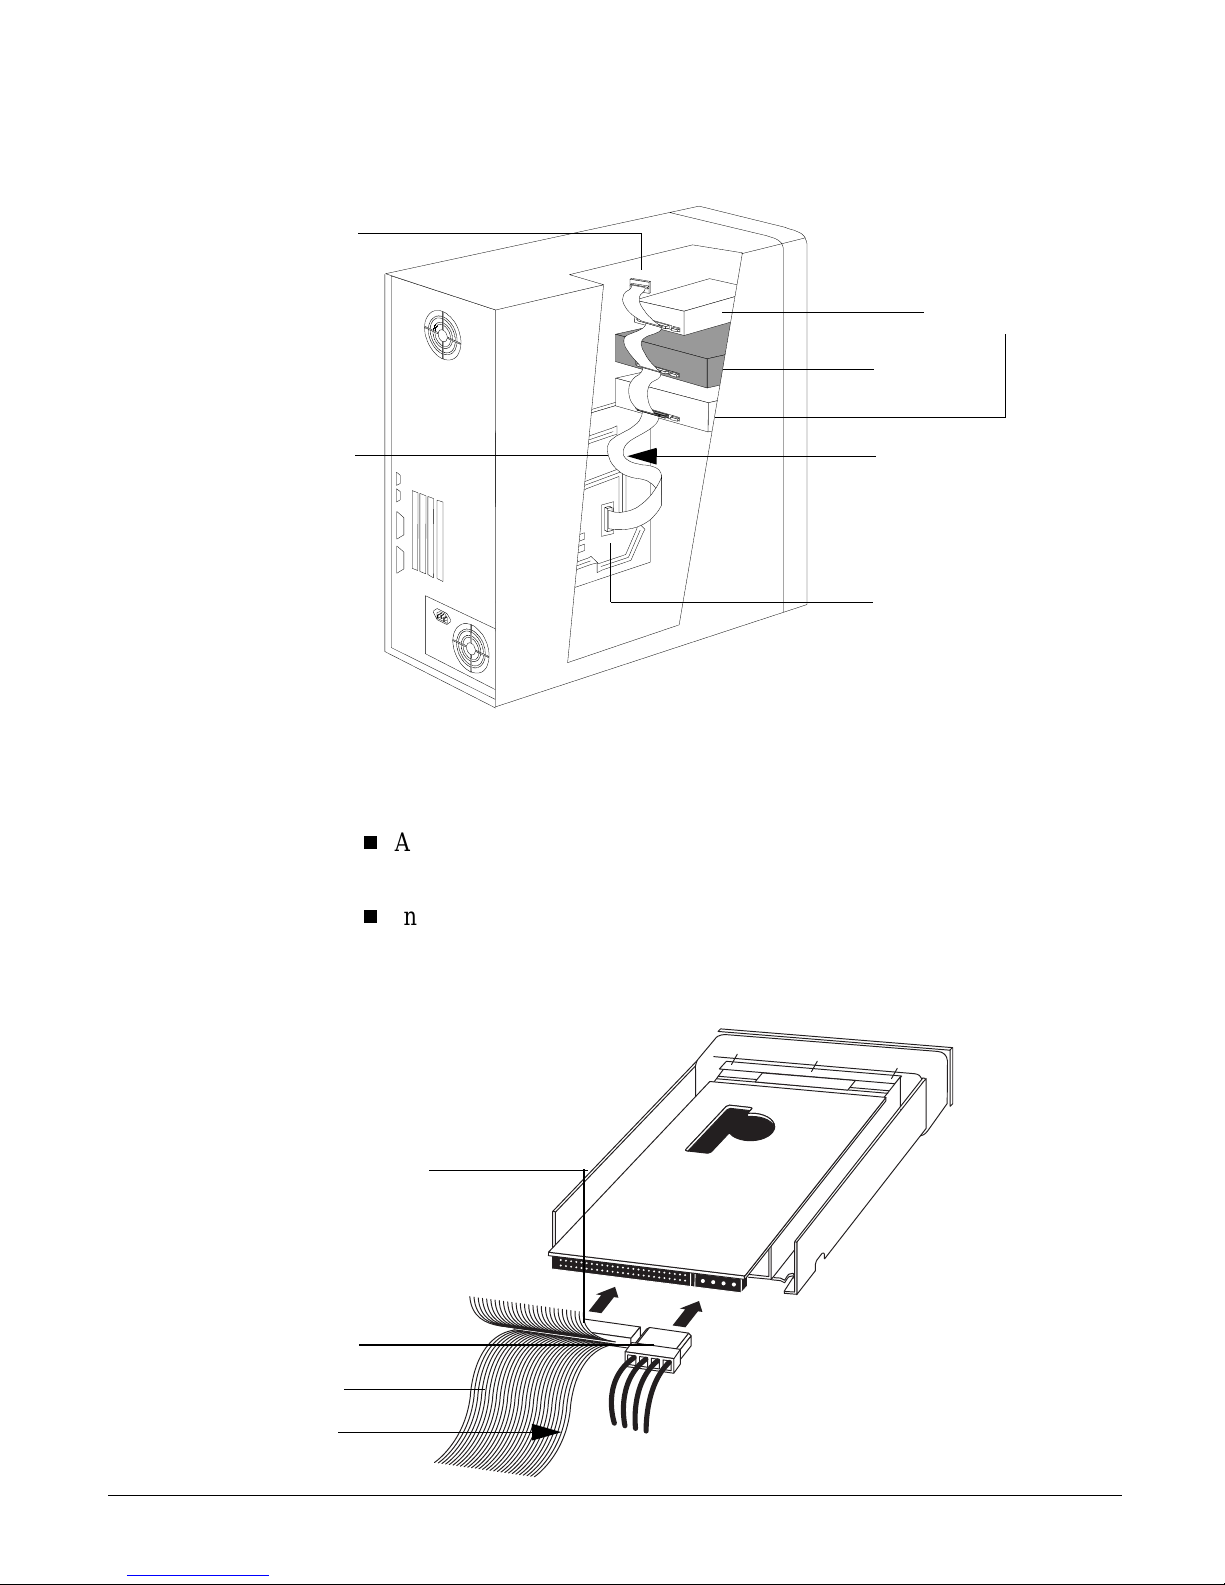
Plug one of the computer’s power cables into the back of the tape drive.
3
(See figure 2.8.)
Align the beveled edges of the computer’s power connector with the
beveled edges of the drive’s connector.
Insert it into the drive’s power con nector and press the connectors firmly
together .
Figure 2.8 Connecting the power cable and SCSI cable
Align the plastic
square on the cable’s
connector with the slot
on the drive’s
connector.
Power Cable
SCSI cable
Red stripe
2-10
Page 29

Secure the tape drive in the bay.
4
Position the drive so its face plate is aligned with the front of the
computer. Other installed devices should give you an idea of
positioning. The drive itself will be recessed.
Align the screw holes in the drive’s mounting hardware with the holes
in the drive bay. Depending on your computer , the screws may go in on
the front of the bay or through the sides of the chassis. (See figure 2.9
or figure 2.10.)
Fix the drive into place with screws.
•
Use the screws that held on the cover plate if your computer has
mounting hardware that fixes the tape drive in from the front
(figure 2.9).
•
Use the screws provided with the HP rails if you are fixing the tape
drive in through the sides of the chassis. (See figure 2.10.)
Installing an Internal Tape Drive
Installing the Tape Drive in the Bay
Figure 2.9 Fixing the tape drive in a system with mounting hardware
2-11
Page 30

Installing an Internal Ta pe Drive
Installing the Tape Drive in the Bay
Figure 2.10 Fixing the tape drive in a chassis-mount system
Reconnect any internal cables you may have removed from other devices
5
and check that no cables or boards were knocked loose d uring installation.
If your computer’s cover uses blank plates over empty bays, remove the
6
plate that corresponds to the new tape drive’s position.
Replace the computer’s cover.
7
Reconnect any external cables and power cords you removed.
8
Plug in the computer and peripherals.
9
2-12
Page 31

Verifying the Installation
Once you have installed the tape drive hardware, you should verify that it
is functioning properly before you store your valuable data. The
TapeAssure soft ware on the HP SureStore Tape CD-ROM will perform a
series of tests on the tape drive to verify that it has been properly installed
and provide guidance on what to do if there is a problem.
Switch on the computer and boot it up. In Windows 95, you will be asked
1
to install drivers. Ignore this message because the necessary drivers will be
installed later when you install your HP Colorado Backup II software. If
you encounter any problems, refer to Chapter 5, “Troubleshooting.”
Installing an Internal Tape Drive
Verifying the Installation
Install T apeAssure using the
2
SETUP.EXE
program on the HP SureStore Tape
CD-ROM. (Insert the HP SureStor e Tape CD into you r CD-ROM driv e. If
autorun is enabled, the program will automatically start. Otherwise, click
Start, Run
, and type D:\
SETUP.EXE
and click
OK
.)
In Windows NT, you can install TapeAssure directly on the server. In
NetWare, you will need to install TapeAssure on the server from a client
workstation runni ng Windows 95. Ta peAss ure can be inst alled dir ectly on
a standalone computer that runs Windows 95.
Run TapeAssure and follow the on-s creen instructions to verify that your
3
new tape drive is oper ational . No other backup p rogram shou ld be runni ng
at the same time. Have a blank cartridge ready for the write-to-tape test,
which you should per form to check that the drive can back up data to tape.
(For tape loading instructions, see page 4-5.)
If the TapeAssure test fails, check:
Cabling (see “Preparing the Computer” on page 2-3) to ensure that the
SCSI and power cables are attached correctly.
SCSI terminatio n (see “Preparing the T a pe Drive” on page 2-6) to make
sure your drive is terminated correctly.
SCSI ID (see “Preparing the Tape Drive” on page 2-6) to make sure no
other device on your system is using this ID.
When the tape drive has passed the test s run by TapeAssure, you hav e
installed it correctly.
2-13
Page 32

Installing an Internal Ta pe Drive
Installing Backup Software
Installing Backup Software
Once the tape drive is installed correctly, you are ready to install tape
backup software from the HP Sur eSto r e Tape CD. The following software
and documentation are available:
For standalone systems, peer-to-peer systems , and Windows NT
workstations, HP Colorado Backup II and associated d ocumentation are
provided on the HP SureStore Tape CD (T20i/e only).
For server systems, Replica Backup for HP SureStore Tape (T20i/e) or
Replica Single Server for HP SureStore Ta pe (T20 Xi/Xe) and
associated documentation are provided on the HP SureStore Tape CD.
You can install other commercial backup applications if you want. For the
latest list of backup packages and drivers that support this tape drive, refer
to our World Wide Web site (http://www.hp.com/tape).
Installing Driver Software
Windows 95 d rivers are installed when you install the HP Colorado Backup
II software.
Windows NT users mus t install dr ivers separatel y . NT dri vers are prov ided
on the HP Surestore Tape CD. Refer to the README file on the HP
SureStore Tape CD for the latest information on installing drivers.
Netware drivers are installed when you install the Replica software.
What Next?
See Chapter 4 for details of how to operate and care for the drive. Make
sure you read the advice about choosing and caring for tape cartridges.
2-14
Page 33

3
Installing an External Tape Drive
This chapter provides directions for installing an HP SureStore T20e/Xe
drive in your computer.
The hardware installation process should take about 15 minutes .
Page 34

Installing an External Tape Drive
Overview of the Installation Process
Overview of the Installation Process
The installation process involves:
1 Preparing the tape drive by checking the SCSI ID and changing the
SCSI ID if necessary.
2 Preparing the computer by shuttin g down all applications and turning
off the power.
3 Connecting the SCSI cable.
4 Connecting the power cord.
5 Verifying that the tape drive is properly installed and functional by
running TapeAssure.
6 Installing backup software and drivers for your tape drive.
Figure 3.1 Installing an external tape drive in your computer
Tools You May Need
You do not need any special tools to install the drive. If you need to change
the SCSI ID on the drive, you will need a narrow pointed object s uch as a
ball-point pen or a small sc rewdriver.
3-2
Page 35

Preparing the Ta pe Drive
T o prepare the tape drive for installation, you need to make sure that it has
the correct SCSI ID settings. Each SCSI device requires a unique SCSI ID.
You need to change the tape drive’s default SCSI ID setting of 4 only if the
computer already has a device with ID 4. See “Checking Your Current
SCSI Configuration” on page 1-9 for more information about SCSI IDs and
SCSI bus termination.
Check the tape drive’s SCSI ID setting to ensure that it is set to the number
1
you expect.
Installing an External Tape Drive
Preparing the Tape Drive
If you do not need to change the SCSI ID
4 on the inside front cover of this book and then go to step 3.
To change the tape drive’s SCSI ID
Locate the SCSI ID selector on the back panel of your tape drive (see
2
figure 3.2) and use a pen or small screwdriver to press the buttons on the
right or left of the SCSI ID selector until the correct SCSI ID number is
displayed.
Figure 3.2 SCSI ID selector on rear panel of tape drive
, note the default SCSI ID of
, continue with the next step.
Note
Both the computer and the tape drive check the SCSI ID only at power-on .
If you change the tape drive’s SCSI ID while the system is running, the
new SCSI ID will not take effect until next time the system and the tape
drive are powered on.
Press these - and +
buttons to change the
SCSI ID setting
3-3
Page 36

Installing an External Tape Drive
Preparing the Tape Drive
Examine the SCSI devices already in place.
3
Is there another external device on the SCSI bus?
If yes, attach the tape drive in the middle of the SCSI chain, allowing
the other external device to provide termination. Plug the tape drive into
the computer’s SCSI connector and plug the other device into the tape
drive’s second SCSI connector. The device that comes last in the chain
must be actively terminated.
Note Remember that if you have devices attached to your SCSI host adapter
both inside your computer and external to your computer, the SCSI host
adapter must NOT be terminated (since it is, therefore, in the middle of the
SCSI chain). Consult your SCSI host adapter documentation for
instructions on how to change the board’s termination.
3-4
Page 37

Installing the Tape Drive
Perform a normal system shutdown and turn off the computer and any
1
connected peripherals. Disconnect the power cable from the outlet.
Attach one end of the SCSI cable to one of the connectors on the back of
2
the tape drive (it does not matter which conn ector you use ). Press the clips
on the sides of the connector as you attach it, then release the clips, making
sure that the cable is securely attached.
Figure 3.3 Attaching the SCSI cable
Installing an External Tape Drive
Installing the Tape Drive
SCSI cable
Attach the other end of the SCSI cable to your computer’s external SCSI
3
connector.
Connect the power supply to the power connector on the back of the tape
4
drive as shown in figure 3.4.
Tape drive
3-5
Page 38

Installing an External Tape Drive
Installing the Tape Drive
Connect the power cord to the power supply and then to a wall outlet or
5
power strip, as shown in figure 3.4.
Figure 3.4 Connecting the power supply to the tape drive
Power cord*
*U.S. version is show n.
Others may vary.
Note
There is no po wer s w it ch on the tape dri v e. It remains on in s t and by mode
as along as it is plugged in. It goes into operating mode automatically.
Power supply
3-6
Page 39

Verifying the Installation
Once you have installed the tape drive hardware, you should verify that it
is functioning properly before you store your valuable data. The
TapeAssure soft ware on the HP SureStore Tape CD-ROM will perform a
series of tests on the tape drive to verify that it has been properly installed
and provide guidance on what to do if there is a problem.
Switch on the computer and boot it up. In Windows 95, you will be asked
1
to install drivers. Ignore this message because the necessary drivers will be
installed later when you install your HP Colorado Backup II software. If
you encounter any problems, refer to Chapter 5, “Troubleshooting.”
Installing an External Tape Drive
Verifying the Installation
Install TapeAssure using the
2
SETUP.EXE
program on the
HP SureStore Tape CD-ROM. (Insert the HP SureStore Tape CD into you r
CD-ROM drive. If autorun is enabled, the program will automatically start.
Otherwise, click
Start, Run
, and type D:\
SETUP.EXE
and click OK.)
In Windows NT, you can install TapeAssure directly on the server. In
NetWare, you will need to install TapeAssure on the server from a client
workstation runni ng Windows 95. Ta peAss ure can be inst alled dir ectly on
a standalone computer that runs Windows 95.
Run TapeAssure and follow the on-s creen instructions to verify that your
3
new tape drive is oper ational . No other backup p rogram shou ld be runni ng
at the same time. Have a blank cartridge ready for the write-to-tape test,
which you should per form to check that the drive can back up data to tape.
(For tape loading instructions, see page 4-5.)
If the TapeAssure test fails, check:
Cabling (see “Installin g the Tape Drive” on page 3-5) to ensure that the
SCSI and power cables are attached correctly.
SCSI ID (see “Preparing the Tape Drive” on page 3-3) to make sure no
other device on your system is using this ID.
When the tape drive has passed the test s run by TapeAssure, you hav e
installed it correctly.
3-7
Page 40

Installing an External Tape Drive
Installing Backup Software
Installing Backup Software
Once the tape drive is installed correctly, you are ready to install tape
backup software from the HP Sur eSto r e Tape CD. The following software
and documentation are available:
For standalone systems, peer-to-peer systems , and Windows NT
workstations, HP Colorado Backup II and associated d ocumentation are
provided on the HP SureStore Tape CD (T20i/e only).
For server systems, Replica Backup for HP SureStore Tape (T20i/e) or
Replica Single Server for HP SureStore Ta pe (T20 Xi/Xe) and
associated documentation are provided on the HP SureStore Tape CD.
You can install other commercial backup applications if you want. For the
latest list of backup packages and drivers that support this tape drive, refer
to our World Wide Web site (http://www.hp.com/tape).
Installing Driver Software
Windows 95 drivers are installed when you install the HP Colorado
Backup II software.
Windows NT users mus t install dr ivers separatel y . NT dri vers are prov ided
on the HP Surestore Tape CD. Refer to the README file on the HP
SureStore Tape CD for the latest information on installing drivers.
Netware drivers are installed when you install the Replica software.
What Next?
See Chapter 4 for details of how to operate and care for the drive. Make
sure you read the advice about choosing and caring for tape cartridges.
3-8
Page 41

4
Caring for Your Tape Drive
This chapter provi des information about cari ng for your HP SureStore T20
tape drive and its cartridge tapes.
Page 42

Carin g for Your Tape Drive
Care of the Tape Drive
Care of the Tape Drive
The HP SureStore T20 tape drive is simple to care for . No routine cleaning
or maintenance is required. Take note of the following cautions, however.
Caution Do not clean the tape drive’s read-write head.
Caution Do not degauss or demagnetize the tape drive’s read-write head. This will
damage the tape drive.
4-2
Page 43

Choosing Tapes for Your Tape Drive
Choosing Tapes for Your Tape Drive
Y our HP SureStore T20 tape drive is compatible with the high-capacity HP
Colorado 20GB/TR-5 mini-cartridge (QIC-3220 format), one of which is
supplied with the tape drive. This is the norm al tape cartridge you should
use for your backup data. See page A-5 for part numbers and ordering
information.
Various brands of tape cartridges will work with your tape drive. T o ensure
the highest level of performance, HP brand tapes, which have been tested
for compatibility with your drive, are recomme nded. The following table
lists the tapes compatible with your HP SureStore T20 tape drive.
Recommended Tape Cartridges and Compatibility
Caring for Your Tape Drive
Part No Product
C4435A 1 pack TR-5 20 GB
minicartridge
C4435B 2 pack TR-5 20 GB
minicartridge
C4435D 5 pack TR-5 20 GB
minicartridge
C4429A 1 pack HP Colorado
5.0 GB cartridge
C4429B 2 pack HP Colorado
5.0 GB cartridge
C4429D 5 pack HP Colorado
5.0 GB cartridge
C4425A 1 pack TR-4 8.0 GB
minicartridge
C4425B 2 pack TR-4 8.0 GB
minicartridge
HP
SureStore
T20
RW
RW
RW
R* RW RW RW
R* RW RW RW
R* RW RW RW
R* RW RW
R* RW RW
HP
Colorado
5GB
HP
Colorado
8GB
HP
SureStore
T4
C4425D 5 pack TR-4 8.0 GB
minicartridge
Read/Write, R Read only
RW
* Readable only by the same software used to write the tape.
R* RW RW
4-3
Page 44

Carin g for Your Tape Drive
Choosing Tapes for Your Tape Drive
Erasing Tapes
The Erase or Format utility provided by most backu p applications is the
safest and quickest method of removing data from your tapes.
Caution Do not erase any type of T20-compatible tape with bulk erasers. Magnetic
bulk erasing removes the tracking reference points that are placed on the
tape at the factory. Without these points, the tapes cannot be read by your
tape drive.
Retensioning Tapes
Most backup applications include a Tape Retension function. You should
retension your tape every time it is inserted into the tape drive. The
retension function fast-forwards and rewinds the tape, settling the tape
pack. This helps guarantee the reliability of data transfer when backup
operations are performed.
4-4
Page 45

Caring for Your Tape Drive
Inserting and Removing Tape Cartridges
Inserting and Removing Tape Cartridges
To insert a tape cartridge into your drive:
Hold the tape cartridge with the metal base plate down and the tape window
1
facing the drive, as shown in figure 4.1.
Figure 4.1 Inserting a tape cartridge
Metal base plate
Align the tape cartridge with the tape drive’s opening and push it firmly
2
into the drive. You will feel it click into place.
After the cartridge is inserted, you will hear the sound of the tape being
wound back and forth. This sound indicates that the tape drive is finding
the beginning of the tape, determining the tape’s length and format, and
positioning the drive’s read-write head.
4-5
Page 46

Carin g for Your Tape Drive
Inserting and Removing Tape Cartridges
Figure 4 .2 HP Colo rado 20GB /Travan TR-5 cartridg e
The back of the cartridge
will be flush with the
recessed bezel.
Caution
Interfering with a tape cartridge during operations can cause data loss and
may make the tape temporarily unrecordable. During read-write
operations (while the operation light on the front panel is flashing), do not:
Pull the tape cartridge out of the drive
Bump the tape cartridge
Turn off the power to the computer
If this does happen, you may not be able to read the data currently written
to the tape. In addition, the tape may not be recordable until it is erased
with an Erase utility.
To remove a tape cartridge from the drive:
Wait until the operation light on the front of your tape drive stops blinking
1
and your backup software indicates that it is all right to remove the tape
cartridge. Do not remove a tape cartridge during an operation. See the
Caution above.
Grasp the tape cartridge firmly and pull it straight ou t of th e drive.
2
4-6
Page 47

Write-Protecting a Tape Cartridge
If you write-protect a tape cartridge, the tape drive can only read data from
the tape, not write to it. Use this setting to protect data on the tape cartridge
from being erased or overwritten, for example, when you are restoring files
from tape.
To write-protect a cartridge, slide the write-protect tab on the cartridge
to the right.
T o remove write-protection from a cartridge, slide the write-protect tab
to the left.
See figure 4.3 to see how the write-protect tabs look on the TR-5 cartridge.
Figure 4.3 Write-protecting a TR-5 cartridge
Caring for Your Tape Drive
Write-Protecting a Tape Cartridge
Write-prot ec t tab
in locked
position
4-7
Page 48

Carin g for Your Tape Drive
Caring for Your Tape Cartridges
Caring for Your Tape Cartridges
Y our data is valuable. Treat cartridges with r espect so that they provide you
with the security you need. Follow these gu idelines for handling tape
cartridges:
Do not open the tape door unnecessarily. This may expose the tape to
contami nation or dam age.
Do not touch the tape or leader . Dust and natural skin oils can affect tape
performance.
Operating Conditio ns
Tape cartridges should be used in an environment within the following
ranges:
Te mperature: 5°C to 45°C ( 41 °F to 113°F)
Relative humidity: 20% to 80% (non-condensing)
Caution If a cartridge has been exposed to conditions outside its operating range,
you should acclimatize the cartridge by leaving it in the operating
environment for 8 hours before using it.
Storing Tape Cartridges
Tap e cartridges should be stored safely to ensure that they perform their
desired role: protecting your data.
Do not place tape cartridges near sources of electromagnetic
interference, such as under a telephone or near computer monitors,
motors, video or X-ray equipment.
Keep cartridges out of direct sunlight and away from heaters.
Store cartridges in their plastic cases in an environ ment that is free from
dust.
4-8
Page 49

5
Troubleshooting
This chapter introduces you to some troubleshooting techniques you can
try if you have a problem with your tape drive after installation.
Page 50

Troubleshooting
Save Yourself a Call
Save Yourself a Call
If you experience difficulties with your HP SureStore T20 tape drive, this
chapter provides a few suggestions that may help you solve the problem
yourself. It may soun d intimidating to t roubleshoot your own machine, but
these procedures are simple and take only a few minutes.
The “Troub leshooting Tips” below contain some general recommendatio ns
for identifying problems. “Things to Try First” covers more specific
problems and how to handle them.
Troubleshooting Tips
Effective troubleshooting involves isolating the component of the system
that is causing the problem. The general procedure is:
1 Change one thing at a time; for example, make sure all the cables are
snugly connected. If you’re going to change a setting, make a note of the
original setting so you can change it back again later, if necessary.
2 Try the operation that failed again.
3 If the operation still fails, make a note of the setting or condition y ou
tried, make another change and try again. If the prev ious change altered
a switch or software setting, it is best to reset it back to its original
setting so that you are testing only one thing at a time.
Things to T ry First
The first step in problem-solving is establishing whether the problem lies
with the tape, the drive, the host computer and its connections, or with the
way the system is b eing operated. I f none of the fol lowing advice helps y ou
to solve the problem, call for service. The HP Customer Support numbers
are listed in Appendix B.
5-2
Page 51

Troubleshooting
Things to Try First
TapeAssure
The TapeAssure software provided on the HP SureStore Tape CD-ROM
can be used as a diagnos tic tool if you r compu ter is up and runni ng. Inst all
TapeAssure from the CD-ROM and follow the instructions on the screen.
Problems with Your Computer
Problem Possible Cause Potential Solution
The computer
does not
boot up.
The computer
takes a long time
to boot up.
The computer
hangs.
If you have ju st installed a SCSI host
adapter card in your computer and the
computer did not boot up when you
switched it on, the new adapter is the
likely cause of the problem.
There may be a loose connection. Turn off the computer’s power.
The computer’s memory registers may
not have cleare d properly.
This can occ ur when the BI O S on a ho s t
adapter card is enabled, but there is no
bootable SCSI device connected to it.
Check that you have no hardware
conflicts in your hardware or software
configuration, such as two devices with
the same SCSI ID.
Refer to your host adapter documentation
to check that the adapter is configured
correctly.
Disconnect and then reconnect all cables
that may have been moved during
installation. Sometim es just rec onnecting
a cable aligns it correctly or adjusts the
pins to make the connection.
Turn off the computer’s power for at least
20 seconds, then turn it on again. This
process of “cycling power” restarts
processes and clears memory.
You may be able to disabl e the ho st
adapter BIOS to resolve this problem.
Check the host adapter manual for
instructions on how to disable the BIOS.
Refer to your hardware and software
installation documentation. Make sure
that no two devices have the same SC SI
ID. Check that the SCSI bus is properly
terminated.
5-3
Page 52

Troubleshooting
Things to Try First
Problems with Your Tape Drive
Problem Possible Cause Potential Solution
The tape drive
does
not power up.
(The light does not
come on.)
You cannot back
up
or restore.
The power cable may not be connected to
the tape drive properly.
Proper precautions we re not taken to
prevent damage by st at i c electricity
during installation.
The driver software for the tape drive may
not be properly installed.
The SCSI connection may be loose. Check that all expansio n b oa rd s are fu lly
The SCSI bus may not be properly
terminated.
Can you hear the tape move when a
cartridge is inserted? If not, check the
power connection to the tape driv e. If it is
properly connected, th e device has
probably failed. Call for service.
If the tape drive has been damaged by
static, call for service.
Check that a driver h as been installed tha t
supports bo th yo ur H P SureStore T20
drive and your ba c ku p so f tw a r e . If no t,
install the appropriate drive r. If so,
reinstall the HP SureStore T20 driver
software.
seated and the SCSI cabl e is connected
properly. Run TapeAssure to ascertain
whether the SCSI board is installed and
functioning properly.
Check that the SCSI termination is
installed and secure. The SCSI bus must
be terminated at both ends and only at the
ends. Most internal cables will have a
terminator plug on the end of the cabl e
farthest from the SCSI controller. If there
are no external devices, the SCSI bus
must be terminated on the SCSI host
adapter or motherboard. If there are
external devices, the last device in the
external chain must b e terminated
properly.
The appropriate ASPI driver for your
SCSI controller may not be installed.
5-4
When you boot up the computer, check
for error messages that refer to SCSI
devices or ASPI drivers. Verify that the
correct ASPI driver for your SCSI
controller is installed. Run T apeAssure to
ascertain whether the SCSI board is
installed and functionin g pro perly.
Page 53

Troubleshooting
Things to Try First
Problem Possible Cause Potential Solution
You cannot back
up
or restore.
The tape drive’s SCSI ID may conflict
with anothe r de vic e .
Check that the tape drive SCSI ID is not
the same as that of any other device
attached to the same SCSI controller.You
can run TapeAssure to check th e SCSI
IDs of attached devi ces.
NOTE: If you change an external tape
drive’ s SCSI ID, unplug the power cord to
the tape driv e. Then pl ug it back in again.
This completes the tape drive’s resetting
of the SCSI ID.
Your backup software may have
encountered a problem.
Refer to the user documentation for your
backup software. This should cont ain a
list of error cond itions and suggested
remedies.
The operator may not know how to use
your backup app lication , especia lly if the
operator is new or has been away from the
Ask the person to repeat the opera tion
while you watch, to check th at they are
not omitting some vital step.
job for a while.
The cartridge may be defective. Try the operation with a different
cartridge. Make sure th e cartridge is fully
inserted int o the tape dr iv e . If yo u ha ve
been using the same cartridge for a long
time, copy the data on it to a new cartridge
and discard the old one.
The cartridge format may have been
destroyed by a bulk eraser. That process
removes the reference points needed by
the tape drive to read and write the tape.
The cartridge may not be the correct
format.
The drive may be used in an unsuitable
location or outside its operatin g lim its. If
it is unusua lly hot, cold, damp, dry, or
dusty, the tape drive may not perform
well.
A new operating system has been
installed without the correct drivers for
the tape drive.
Use a new tape. Any data stored on the
tape will have been erase d by the bu lk
eraser.
Check that you are using the right type of
cartridge. (See “Choosing Tapes for Y our
T ape Drive” on page 4-3.) If you are using
a different brand of cartridge, it may not
be of sufficient quality.
Check the environment al conditions
against the drive's specified limits
(described in Appendix A). If they are
outside the limits, move the drive to a
more suitable site.
Install the correct driver software for the
operating system and tape drive.
5-5
Page 54

Troubleshooting
Things to Try First
5-6
Page 55

Appendix A
Product Specifications and
Ordering Information
This chapter provides the technical specifications for the
HP SureStore T20 tape drive and lists part numbers for compatible tape
cartridges, SCSI cables, and accessories.
Page 56

Product Specifications and Ordering Information
Product Specifications
Product Specifications
Interface
SCSI-2
Backup Speed
Data transfer rate
Sustained: 1,042 KB/second at 100 ips
Burst: 3 MB/second
Tape speed
Read-write: 50, 75, 100 ips
Load time: 30 seconds
Retension time:
Tape Format
Format: QIC-3220
Media: HP 20GB/Travan TR-5 (QIC-3220)
Number of tracks: 108
Bit densit y: 106,4 00 bpi
Encoding method: RLL1,7
Error Correction: Level-10 Reed-Solomon
Search/rewind: 90, 120 ips
740-foot tape, 150 seconds
400-foot tape, 81 seconds
Appendix A-2
Page 57

Reliability Specifications
Product Specifications and Ordering Information
Product Specifications
Hard error rate: <1 in 10
Predicted mean time between failures (20% duty cycle):
Internal: 250,000 hours
External: 200,000 hours
15
bits read with Reed-Solomon ECC
Power Requirements
External:
Tape Drive: +16 VDC @ 1.3 A
Power Supply: 100-240 VAC, 50/60 Hz, 1.0A
Internal:
5V ±5%, 0.9A peak; 0.8A max steady state
12V ±10%, 2.5A peak; 1.3A max steady state
Specified Operating Temperature
External:
Minimum: 5 degrees C (41 degrees F)
Maximum: 40 degrees C (104 degrees F)
Internal:
Minimum: 5 degrees C (41 degrees F)
Maximum: 40 degrees C (104 degrees F)
Physical Specifications
Internal:
Dimensions: 43mm H x 14 9mm W x 2 06m m D (1.69 in x 5.86 in x 8 .1 i n )
Weight: 0.55 kg ( 1 lb, 3 oz)
External:
Dimensions: 55.9mm H x 147mm W x 208mm D (2.2 in x 5.8 in x 8.2 in)
Weight: 0.83 kg (1.82 lbs)
LED Specifications
Class 1 LED product
Appendix A-3
Page 58

Product Specifications and Ordering Information
Product Specifications
Certifications
Internal:
UL
cUL
TÜV
CE
Meets or exceeds FCC class B requirements
External:
UL
cUL
TÜV
NOM-NYCE
CE
Meets or exceeds FCC class B requirements
Appendix A-4
Page 59

Ordering Information
The following HP products are recommended for use with the
HP SureStore T20 tape drive. They can be ordered from your HP dealer or
sales office.
Recommended Tape Cartridges
Product Specifications and Ordering Information
Ordering Information
HP Part
Number
C4435A 1 pack 20GB/TR-5 minicartridge
C4435B 2 pack 20GB/TR-5 minicartridge
C4435D 5 pack 20GB/TR-5 minicartridge
SCSI Accessories
Item Description
4-header 50-pin SCSI ribbon cable with active
termination (used to atta ch an interna l tape drive to a
narrow SCSI connector)
Item Description
HP Part Number
C5644-61000
Appendix A-5
Page 60

Product Specifications and Ordering Information
Ordering Information
Appendix A-6
Page 61

Appendix B
Customer Support
This appendix describes Hewlett-Packard's tape drive warranty, service
and support arrangements, and how to contact HP Customer Support.
Page 62

Customer Support
Hewlett-Packard Limited Warranty Statement
Hewlett-Packard Limited Warranty Statement
HP SureStore T20 Tape Drive
DURATION OF LIMITED WARRANTY
Hardware - 2 year
Software - 90 days
1 HP warrants to you, the end-user customer, that HP hardware,
accessories and supplies will be free from defects in materials and
workmanship after the date of purchase, for the period specified abov e.
If HP receives notice of such defects during the warranty period, HP
will, at its option, either repair or replace products which prove to be
defective. Replacement products may be either new, refurbished, or
later products of comparable or greater performance.
2 HP warrants to you that HP software will not fail to execute its
programming instructions after the date of purchase, for the period
specified above, due to defects in material and workmanship when
properly installed and used. If HP receives notice of such defects during
the warranty period, HP will replace software which does not execute
its programming instructions due to such defects.
3 HP does not warrant that the operation of HP pro ducts will be
uninterrupted or error free. If HP is unable, within a reasonable tim e, to
repair or replace any product to a condition as warranted, you will be
entitled to a refund of the purchase price upon prompt return of the
product.
4 HP products may contain remanufactured parts equivalent to new in
performance or may have been subject to incidental use.
5 Warranty does not apply to defects resulting from (a) improper or
inadequate maintenance or calibrat ion , (b) software, interfacing, parts
or supplies not supplied by HP, (c) unauthorized modification or
misuse, (d) operation outside of the published environmental
specifications for the product, or (e) improper site preparation or
maintenance.
6 TO THE EXTENT ALLOWED BY LOCAL LAW, THE ABOVE
WARRANTIES ARE EXCLUSIVE AND NO OTHER WARRANTY
OR CONDITION WHETHER WRITTEN OR ORAL, IS
EXPRESSED OR IMPLIED AND HP SPECIFICALLY DISCLAIMS
ANY IMPLIED WARRANTIES OR CONDITIONS OF
MERCHANTABILITY, SATISFACTORY QUALITY, AND
FITNESS FOR A PARTICULAR PURPOSE. Some countries, states or
Appendix B-2
Page 63

Customer Support
Express Exchange
provinces do not allow limitations on the duration of an implied
warranty, so the above limitation or exclusion might not apply to you.
This warranty gives you specific legal rights and you might also have
other rights that vary from country to country, state to state, or province
to province.
7 TO THE EXTENT ALLOWED BY LOCAL LAW, THE REMEDI ES
IN THIS WARRANTY STATEMENT ARE YOUR SOLE AND
EXCLUSIVE REMEDIES. EXCEPT AS INDICATED ABOVE, IN
NO EVENT WILL HP OR ITS SUPPLIERS BE LIABLE FOR LOSS
OF DATA OR FOR DIRECT, SPECIAL, INCIDENTAL,
CONSEQUENTIAL (INCLUDING LOST PROFIT OR DATA), OR
OTHER DAMAGE, WHETHER BASED IN CONTRACT, TORT, OR
OTHERWISE. Some countries, states or provinces do not allow the
exclusion or limitation of incidental or consequential damages, so the
above limitation or exclusion may not apply to you.
THE WARRANTY TERMS CONTAINED IN THIS STATEMENT,
EXCEPT TO THE EXTENT LAWFULLY PERMITTED, DO NOT
EXCLUDE, RESTRICT OR MODIFY AND ARE IN ADDITION TO
THE MANDATORY STAT UTORY RIGHTS APPLICABLE TO THE
SALE OF THIS PRODUCT TO YOU.
Express Exchange
During the first two years, the 24-hour Express Exchange1 program allows
you to receive a refurbished unit by next-d ay delivery up on verification o f
a faulty tape drive.
If you choose not to use Express Exchange, your HP SureStore tape drive
must be serviced by one of t he auth orized repai r depot s with in the co untry
in which it was originally purchased. You must prepay shipping charges
(together with all duty and taxes) for products returned for serv ice. Except
for products returned to you from another country, Hewlett-Packard will
pay for return of products to you. If the drive is repaired by an authorized
dealer, you will need to negotiate the method and cost of returning the drive
with the dealer.
1. Please note that 24-hour Express Exchange is not available in all countries.
Appendix B-3
Page 64

Customer Support
Service and Support
Service and Support
Hewlett-Packard and its authorized dealers stand behind the HP product
you have purchased.
Note Before calling for service or support:
Check that your drive is installed correctly.
Check the troubleshooting advice in this User’s Guide and in the
documentation that came with your computer, the host adapter, and
your backup software.
Obtaining Technical Support
If you need help, your dealer has the latest information regarding HP
products and services and can provide support under HP's comprehensive
menu of reseller services. If your dealer is not able to help, you can obtain
support from HP directly either through online services or by telephone.
Colorado Backup Support
For questions or problems with HP Colorado Backup II, see “Contacting
Customer Support” on page B-7.
Replica Backup Support
For questions or problems with Replica Backup for HP SureStore T ape or
Replica Single Server for HP SureStore Tape, contact Stac, Inc. Select the
Support
icon in the Replica program group for more information.
Obtaining Service
During the warranty period : HP prov ides a free te lephone s uppor t servi ce
during the warranty period. Co ntact your local HP dealer or t el epho ne t he
relevant number listed on page B-7. Y ou will be connected to a responsive
team waiting to help you.
After the warranty period: If you require support after your warranty has
expired, you can receive support for a fee through the same telephone
numbers. The fee is charged on a per incident basis. Alternatively, you can
contact your local HP dealer who will be able to advise you and arrange for
service.
Appendix B-4
Page 65

HP Service Agreements
HP offers a number of service agreements to meet yo ur needs. Contact your
local dealer or local HP office for further information.
Returning your HP SureStore Tape Drive
HP SureStore Tape products come with a 24-hour Express Exchange
warranty. W hen return ing a drive, refer to the list below for the correct
telephone number for your area. When you call, make sure that you have
the following information available:
The product name and serial number (see inside front cover)
Date of purchase
A description of the pro duct fault
A contact name for details of the failure
A contact telephone number
Your shipping address
Customer Support
Service and Support
The telephone service agent will verify that the unit is faulty and will make
sure that a replacement unit is sent to you within 24 hours. When you
receive the replacement unit, remove it from the packaging and use the
packaging material for returning the faulty unit. All shipment costs are prepaid by HP.
Note When returning the drive to HP, any damage caused as a result of
inadequate packaging is your responsibility. Use the original packing
materials whenever possible.
Appendix B-5
Page 66

Customer Support
Service and Support
Worldwide Online Services
HP offers electronic services that give you a fast, interactive way to access
information and help on set-up, configuratio n, installation and op eration of
your product. The online services are available on the World Wide Web
and FTP, as well as the country-specific resources listed later in this
section.
World Wide Web
Access our World Wide Web site on the internet at:
http://www.hp.com/isgsupport
Software drivers, product and support information is available from HP's
web site.
FTP
The address of our FTP site on the internet is:
ftp.hp.com/pub/information_storage/surestore
Software drivers, product and support information are available from this
location.
CompuServe
Download software, firmware and support documents; discuss issues in
user forums.
Address:
GO HPSYS
America Online
Download software, firmware and support documents; discuss issues in
user forums
Keyword:
hpstor
Appendix B-6
Page 67

Contacting Customer Support
North and South America
Mailing Address:
HP SureStore Technical Support
815 14th Street SW, Bldg. E
Loveland, CO 80537 USA
Internet E-mail:
To send messages to HP SureStore technical support:
Colorado_Support@hp.com
Messages are usually answered within 48 hours.
QuickFAX Faxback Service:
Customer Support
Contacting Customer Support
Automated system to request product information or technical support
documents to be faxed to you.
Telephone: +1 (800) 368-9673
or +1 (970) 635-1510
Fax Machine:
Faxes are answered within 48 hours.
Fax Number: +1 (970) 667-0997
Telephone Support:
Hours of Operation:
Monday – Friday,
6am – 6pm (Mountain time)
Telephone: +1 (970) 635-1500
Appendix B-7
Page 68

Customer Support
Contacting Customer Support
Europe
Mailing Address:
America Online/Bertelsmann:
Available in France, Germany, and the UK.
Hewlett-Packard Nederland B.V.
European Customer Support Center
P.O. Box 58144
1040 HC Amsterdam
The Netherlands
Address:
HP
CompuServe:
A vailable in the UK, France, Belgium, Germany , Switzerland, and Austria.
Address:
GO HP
HP First Faxback Service:
Automated system to request product information or technical support
documents to be faxed to you free of charge. Available 24 hours a day.
Austria (German) 0660 8218
Belgium (Dutch) 0800 11906
Belgium (French) 0800 17043
Denmark (Danish) 800 10453
Finland (Finnish) 9800 13134
France (French) 05 90 59 00
Germany (German) 0130 81 00 61
Italy (Italian) 1678 59020
Appendix B-8
Netherlands (Dutch) 0800 022 2420
Norway (Norwegian) 800 11319
Portugal (Portuguese) 0505 313 342
Spain (Spanish) 900 993 123
Sweden (Swedish) 020 795 743
Switzerland (French) 0800 55 1526
Switzerland (German) 0800 55 1527
United Kingdo m (English) 0800 960271
Other European countries
(English) +31 (20) 681 5792
Page 69

Customer Support
Contacting Customer Support
Bulletin Board:
Download software, firmware and support docum ents; leave messages fo r
technical support.
Telephone: +31 495 546 909
Settings: 8,1,N, 2, 400 to 28,800 baud
Telephone Support:
Hours of Operation:
Monday – Friday
8:30 – 18:00 (Central European time)
No charge for technical support during the warranty period; a per-in cident
charge applies after the warranty period.
Austria (German) 0660 6386
Belgium (Dutch) 02 626 88 06
Belgium (French) 02 626 88 07
Denmark (English) 3929 4099
Finland (English) 0203 47288
France (French) 01 43 623434
Germany (German) 0180 5 25 81 43
Ireland (English) 01 662 5525
Italy (Italian) 02 2 641 0350
Netherlands (Dutch) 020 606 8751
Norway (English) 22 11 6299
Portugal (English) 01 441 7199
Spain (Spanish) 902 321 123
Sweden (English) 08 619 2 170
Switzerland
(French, German, Italian) 0848 80 11 11
United Kingdom (English) 0171 512 5202
Other European countries
(English) +44 (171) 512 5202
Appendix B-9
Page 70

Customer Support
Contacting Customer Support
Australia
Bulletin Board:
Download software, firmware and support documents, and leave messages
for technical support.
HP First Faxback Service:
Automated system to request product information or technical support
documents to be faxed to you free of charge. Available 24 hours a day.
Telephone Support:
Telephone: (03) 9890 0276
Telephone: (03) 9272 2627
Hours of Operation:
Monday – Friday
7am – 7pm Eastern Standard Time
Telephone: +61 (03) 887 8000
China (PRC)
Mailing Address:
Hewlett Packard Customer Support Center
China World Trade Center
No.1 Jian Guo Men Wai Avenue
P.O.Box: 9401
Beijing 100004
China
Telephone Support:
Hours of Operation:
Telephone Numbers:
Monday – Friday, 8:30 – 17:30
+86 (10) 65053888 or 65055958
Appendix B-10
Page 71

Hong Kong
Telephone Support: 800 96-7729
Indonesia
Telephone Support: (62) 21-350-3408
Japan
World Wide Web:
Information from HP Japan
HP First Faxback Service:
Automated system to request product information or technical support
documents to be faxed to you free of charge. Available 24 hours a day.
Customer Support
Contacting Customer Support
http://www.jpn.hp.com
India
Telephone: +81 (3) 3335-8622
Fax Machine:
Please include contact information, the name of your HP product, and the
type of computer you have.
Fax Number: +81 (3) 33 35-8338
Telephone Suppo rt :
Hours of Operation: Monday – Friday, 9:00 –12:00, 1:00 – 5:00
Telephone: +81 (3) 3335-8338
Mailing Address:
Hewlett Packard India Ltd.
HP Customer Support Centre
Chandiwala Estate
Maa Anandmai Marg
Kalkaji
Dehli -110 019 India
E-mail:
Fax Machine:
Please include contact information, the name of your HP product, and the
type of computer you have.
Telephone Support:
csc_india@hp.com
+91 (11) 6826041
+91 (11) 6826035
Appendix B-11
Page 72

Customer Support
Contacting Customer Support
Korea
Mailing Address:
FTP Site:
Download software and firmware files, as well as technical newsletters for
dealers directly from the internet.
Hewlett Packard Customer Support Center
1F, Yongsan Electronic Office
16-58, Hangangro 3-ga, Yongsan-gu,
Seoul, Korea
IP Address (NT Server):
15.32.11.50
Remote access telephone number: (02) 3270-0808
Bulletin Board:
Download software, firmware and suppor t documents ; leave messages for
technical support.
Telephone:
Hitel: (02) 762-0228
Chollian: (02) 220-2001
Address: Go HPK
World Wide Web:
Information from HP Korea
URL:
www.hp.co.kr
HP First Faxback Service:
Automated system to request product information or technical support
documents to be faxed to you free of charge. Available 24 hours a day.
Telephone: (02) 769-0543
Fax Machine:
Faxes are answered within 48 hours.
Fax Number: (02) 3270-0707
Telephone Support:
Hours of Operation:
Telephone:
Appendix B-12
Monday – Friday
9:00 – 18:00
(02) 3270-0700
080-999-0700 (Toll Free)
Page 73

Malaysia
Telephone Support: (60) 3-295-2566
New Zealand
Bulletin Board:
Download software, firmware and support documents
Telephone: (09) 356 3660
HP First Faxback Service:
Automated system to request product information or technical support
documents to be faxed to you free of charge. Available 24 hours a day.
Telephone: (09) 356 6642
Fax Machine:
Customer Support
Contacting Customer Support
Faxes are answered in 24 hours or less.
Telephone Suppo rt :
Philippines
Telephone Support: (63) 2-867-3551
Singapore
Mailing Address:
Fax Number: (+61 3) 9272 4099
Hours of Operation:
Monday – Friday,
9am – 9pm (Auckland time)
Telephone: (09) 356 6640
Hewlett-Packard Far East (Pte) Ltd.
South East Asia Customer Support Centre
Blk A #05-12 Alexandra Technopark
438A Alexandra Road
Singapore 1 19 967
HP First Faxback Service:
Automated system to request product information or technical support
documents to be faxed to you free of charge. Available 24 hours a day.
Telephone: (65) 275-7251
Appendix B-13
Page 74

Customer Support
Contacting Customer Support
Fax Machine:
Telephone Support:
Taiwan (ROC)
Mailing Address:
Bulletin Board:
Fax Number: (65) 274-2033
Hours of Operation:
Monday – Friday, 9:00 – 17:00
Telephone: (65) 272-5300
Hewlett Packard Customer Care Center
8F, 337, Fu-Hsing North Road
Taipei 105, Taiwan, R.O.C.
Download software, firmware and suppor t documents ; leave messages for
technical support.
Telephone: (02) 923-3233
Login:
First name:
Last name:
HP First Faxback Service:
Automated system to request product information or technical support
documents to be faxed to you free of charge. Available 24 hours a day.
Telephone: (02) 2717-0055
Fax Machine:
Fax Number: (02) 2514-0276
Telephone Support:
Hours of Operation:
Monday – Friday, 8:30 – 18:00
Telephone: (02) 2717-0055
HP
BBS
Thailand
Telephone Support: (66) 2-661-4011
Appendix B-14
Page 75

Index
Numerics
20 GB mini-cartridges
68-pin to 50-pin SCSI a dapter 1-7
A
accessories A-5
acclimatizing tapes 4-8
active termination 1-9, A-5
adapter, 68-pin to 50-pin 1-7
addresses, customer support B-7
America Online B-6, B-8
application software 1-8
ASPI driver 1-7, 5-4
B
backup
failure 5-4
backup software 1-8
Erase utility 4-4
backup software installation
2-14, 3-8
backup speed A-2
backup test 2-13, 3-7
Backup utility 1-8
Bertelsmann B-8
BIOS 5-3
bit density A-2
blinking light 4-6
boot-up fails 5-3
boot-up lengthy 5-3
box contents
external tape drive 1-5
internal tape drive 1-3
bulk eraser 4-4
problems 5-5
C
cable, internal power 2-5
capacity, tape 1-2
care instructions 4-2
caring for tapes 4- 8
cartridge. See tape cartridge
CD-ROM 1-3, 1 -5, 1-8, 1-9
certifications A-4
certifications. See back of book
cleaning read-write head 4-2
client workstation, Net Ware
2-13, 3-7
Colorado Backup
technical support B-4
compression software 1-2
CompuServe B-6, B-8
computer
does not boot up 5-3
hangs 5-3
computer prerequisites 1-7
computers, installation
differences 1-7
conditions for operation 4-8
connector, SCSI 3-5
contacting HP B-7
contents of box
external tape drive 1-5
internal tape drive 1-3
customer support B-4
customer support telephone
numbers B-7
cycling power 5-3
D
data compression 1-2
data loss 4-6
data security 4-8
data transfer rate A-2
default SCSI ID 1-9, 2-6, 3-3
defective tape cartridges 5-5
degaussing 4-2
demagnetizing 4-2
devices, SCSI IDs 2-3
diagnostic so ftware 5-3
dimensions A-3
driver software 1-8, 5-5
available online B-6
not installed 5-4
driver software installation 2-14,
3-8
E
ejecting tapes 4-6
electrical supply 3-5
electromagnetic interference 4-8
encoding method A-2
environmental conditions,
problems with 5-5
Erase utility 4-4, 4-6
erasing tapes 4-4
error correction A-2
error rate A-3
European support numbers B-8
Express Exchange warranty B-3,
B-5
F
flashing light 4-6
Format utility 4-4
format, tape A-2
formatting tapes 4-4
FTP site B-6
G
grounding 2-3, 2-6
grounding mat 2-3
H
handling tape cartridges 4-8
hardware included
external tape drive 1-5
internal tape drive 1-3
hardware prerequisites 1-7
HP Colorado 20GB mini-
cartridges
HP Colorado Backup II software
2-14, 3-8
HP NetServer. See NetServer
HP part numbers A-5
HP service agreements B-5
HP SureStore Ta pe CD-ROM
1-3, 1-5, 1-8, 1-9
humidity
conditioni ng cartridges 4- 8
Index-1
Page 76

I
O
R
inserting tapes 4-5
installation
backup software 2- 14, 3-8
driver software 2-14, 3-8
overview of external 3-2
overview of internal 2-2
prerequisites 1-7
tools required 2-3, 3-2
interface specification A-2
internet 1-8, B-6
J
jumper, termination 1-9, 2-7
jumpers, SCSI ID 2-6
L
light, blinking 4-6
load time A-2
M
magnetic bu lk er as u re 4- 4
magnetic interferen ce 4-8
media. See tape cartridge
mini-cartridge 4-3
motherboard-based SCSI 1-7
mounting hardware 1-7, 2-5, 2-7,
2-11
N
native storage capacity 1-2
NetServer 2-7
NetServer E 1-7
NetWare
installing TapeAssure 2-13,
3-7
versions supported 1-8
non-warranty service B-4
North American support numbers
B-7
Novell NetWare. See NetWare
online services 1-8, B-6
Open Desktop 3 1-8
OpenServer 5 1-8
operating conditions fo r tapes 4-8
operating mode 3-6
operating system r equirements
1-8
operating system, new 5-5
operation light 4-6
ordering information A-5
out-of-warranty service B-4
P
packaging for shipment B-5
part numbers A-5
phone numbers B-7
power cable
external 1-5, 3- 6
internal, connecting 2 -10
loose 5-4
power cable, internal 2-5
power connector 3-5
power cycling 5-3
power requirements A-3
power supply 1-5, 3-5
power switc h, lack of 3-6
prerequisites
hardware 1-7
installation 1-7
operating system 1- 8
tools 2-3, 3-2
problems
determining 5-2
with computer 5-3
with tape drive 5-4
product numb ers 1-2
purchasing supplies or
accessories A-5
Q
QIC-3220 format 4-3, A-2
radio frequency interference
statements. See back of boo k
rails 2-5, 2-7, 2-11
included with drive 1-3
required for mounting 1-7
README file 1-8
read-write head, no cleaning
required 4-2
read-write operations, data loss
4-6
Reed-Solomon error correction
A-2
reference points 5-5
reformatting tapes 4-4
reliability specifications A-3
removing tapes 4-5, 4-6
Replica Backup software 2-14,
3-8
Replica technical support B-4
restore, failure 5-4
retension time A-2
returning a drive B-5
ribbon cable. See SCSI cable
RLL1,7 A-2
S
SCO UNIX 1-8
screws 2-5
attaching rails 2-7
fixing drive into computer
2-11
SCSI
68-pin to 50-pin adapter 1-7
accessories A-5
checking configu ra tio n 1-9
connection loose 5-4
planning the bus 1-9
termination 1-9
termination problems 5-3,
5-4
SCSI address 1-9
SCSI boot disk 1-9
Index-2
Page 77

SCSI cable 1-5
attaching external 3- 5
attaching internal 2-4
connecting to tape dr iv e 2-9
ordering A-5
planning the bus 1-9
required 1-7
SCSI controller 1-7, 1-9
checking for 1-9
on motherboar d 1-7
SCSI host adapter
BIOS 5-3
problems with 5-3
SCSI host adapter, prerequisite
for installation 1-7
SCSI ID 1-9
at power on 3-3
checking current 1-9
choosing 1-9
conflicting 5-5
default 1-9, 2-6, 3-3
devices sharing 5-3
jumper settings 2-6
other devices 2-3
selecting for tape drive 2-6,
3-3
SCSI ID selector 3-3
SCSI-2 A-2
security of data 4-8
serial number 1-2
servers, installation differenc es
1-7
service B-4
service agreements B-5
service, arranging for B-4
shipping safely B-5
software
backup 1-8
driver 1-8, 5-4, 5-5
drivers, online B-6
Erase utility 4-4
HP Colorado Backup II
2-14, 3-8
provided w ith drive 1-3, 1-5,
1-8
Replica Backup 2-14, 3-8
TapeAssure 1-9, 2-13, 3-7,
5-3, 5-4, 5-5
software data compression 1-2
South American support numbers
B-7
specifications
physical A-3
power A-3
reliability A-3
standby mode 3-6
static electricity precautions 2-3 ,
2-6
static electricity, problem s
caused 5-4
storage capacity 1-2
storing tape s 4- 8
supplies and accessories A-5
support B-4
telephone numbers B-7
system prerequisites 1-7
T
tape cartridge 1-3, 1-5
acclimatizing 4-8
brands 4-3
capacity 1-2, 4-3
caring for 4-8
causes of data loss 4-6
defective 5-5
electromagnetic interference
4-8
erasing 4-4
format A-2
incorrect format 5-5
inserting an d r e mo ving 4-5
no bulk erasers 4-4
operating conditions 4-8
ordering 4-3
poor quality 5-5
reference points 4-4
removing 4-6
specifi c ations A -2
storing 4-8
temperature and humidity
ranges 4-8
write-protecting 4-7
tape door 4-8
tape drive
cannot back up or restore
5-4
care instructions 4-2
connecting internal power
cable 2-10
connecting SCSI cable 2-9
dimensions A- 3
does not power up 5-4
installing external 3-5
installing internal 2-9
operating system
requirements 1-8
preparing for installation 2 -6
returning for service B-5
SCSI ID 2-6, 3-3
specifications A-2
troubleshooting. See
Chapter 5
warranty B-3
weight A-3
tape speed A-2
tape. See tape cartridge
TapeAssure 1-9, 2-13, 3-7
installing 2-13, 3-7
operating systems supported
2-13, 3-7
SCSI proble ms 5-4, 5-5
troubleshooting aid 5-3
target ID 1-9
default 1-9
technical support B-4
telephone numbers B-7
technical support, Replica B-4
telephone numbers B-7
temperature, con diti on ing
cartridges 4-8
termination 1-9
problems with 5-3
termination jumper 1-9, 2-7
testing installation 2-13, 3-7
tools needed 2-3
tools needed for installation 3-2
Index-3
Page 78

TR-5 cartridge 4-3
TR-5 tape cartridge
inserting 4-6
tracking reference points 4-4, 5-5
transfer rate A-2
Travan cartridge. See TR-5
cartridge
troubleshooting. See Ch apter 5
U
UL certification A-4
UNIX 1-8
URL B-6
US support numbers B-7
V
Vectra co m puter 1-7, 2-7
verifying installation 2-13, 3-7
W
warranty B-3, B-5
warranty service B-4
weight A-3
Windows 95 1-8
Windows NT
backup utility 1-8
installing TapeAssure 2-13,
3-7
versions supported 1-8
World Wide Web si te 1-8, B-6
write-protection 4-7
write-to-tape test 2-13, 3-7
Index-4
Page 79

Federal Communications Commission Radi o
Freq ue nc y I nt e rference St at e m ent
Warning: This equipment has been tested and found to
comply with the limits for a Class B digital device, pursuant
to Part 15 of the FCC Rules.
These limi ts a r e de s igned to provide reasonable protection
against harmful interference in a resi dential installation.
This equipment generates, uses, and can radiate radio
frequency energ y and, if not installed a nd use d in
accordance with the instruction manual, may cause harmful
interference to radio communications. However, there is no
guarantee that i nterference will not occur in a particular
installation. If this equipment does cause harmful
interference to radio or television reception , which can be
determined by turning the equipment off and on, the user is
encouraged to try to correct the interference by one or more
of the following m ea s ure s:
Reorient or relocate the receiving antenna.
•
Increase the separation between the equipment and the
•
receiver.
Connect the equipment into an outlet on a circuit different
•
from that to which the receiver is connected.
Consult your dealer or an experienced radio/TV technician
•
for help.
Note that if you change or modify the equ ipm e nt in a way
that is not expressly approved by Hewlett-Packard, any
assurances of safety or performance can no longer be held
to apply, and could result in violation of Part 15 of the FCC
Rules.
To maintain compliance with FCC Rules and Regulations,
use properly shielded cables with this de vic e.
FCC Declaration of Conformity
According to 47CFR , Parts 2 and 15, Class B Computer
Peripherals:
This device complies with Part 15 of the FCC Rules.
Operation is s ubject to the fol lowing two conditions: (1)
This device may not cause harmful interference, (2) This
device must accept any interference received including
interference that may cause undesired operations. This
applies to all pro duct options.
Hewlett-P ackard Company
815 SW 14th Street, Bldg. E
Loveland, Colorado 80537
July 1, 1998
Colin Swan, Manufacturing Manag er
Notice for Canada
This digital apparatus does not exceed the Class B limits for
radio noise emissions from digital apparatus as set out in the
radio interferenc e regulations of the Can adi an Department
of Communications.
Le présent appareil numé rique n'émet pas de bruits
radioélectriques dépassant les limites applicables aux
appareils numériques de Cla sse B pre s cri tes dans l e
règlement s ur le brouillag e r adi oélectrique édicté par le
Ministère des Communicat io ns du Canada.
Notice
Europe: This drive shall be installed only with an EN60950
(IEC 950) approved powe r supply.
USA/Canada: This drive is for use only with IBM
compatible UL
®
listed personal computers.
DECLARATION OF CONFORMITY
according to ISO/IEC Gui de 22 and EN 45014
Manufacturer’s Name:
Hewlett-Packard Company
Loveland Tape Operation
Manufacturer’s Address:
815 SW 14th Street, Building E
Loveland, Colorado 80537
declares that prod uct
Product Name Product Number
HP SureStore T20i C4394
HP SureStore T20e C4395
HP SureStore T20Xi C4401
HP SureStore T20Xe C4402
Product Options:
conforms to the following product specifica ti ons:
Safety:
EN60950 A4:1997/ IE C 950 A4:1996
EMC:
EN 55022:1994 Class B/ CISPR 22:1993 Class B
EN 50082-1:199 2
IEC 801-2:1991 - 4kV CD, 8kV AD
IEC 801-3:1984 - 3V/m
IEC 801-4:1988 - 1kV powe r lines,
0.5kV signal lines
ENV 50140:1993 - 3V/m
Supplementary Information
The product herewith complies with the requirements of
the Low Voltage Directive 73/23/EEC and the EMC
directive 89/ 336/EEC and carri es the “CE” mark
accordingly.
July 1, 1998
Colin Swan, Manufacturing Manager
European Contact
Your local Hewlett-Packard Sales and Service Office, or
Hewlett-Packard GmbH
Department HP-TRE
Herrenberger Straße 130
D-71034 Böblinge n
(FAX: +49-7031-143143).
All
Page 80

Japanese VCCI Statement
[This apparatus is Class B Information Technology Equipment, based on the rules of the Voluntary Control Council for
Interference by Information Technology Equipment (VCCI). Although designed for use in residential areas, radio
interferenc e may be caused when used near a r adio or TV receiver.
Read the instru ct ions for correc t operation.]
 Loading...