

HP SureStore E Disk Array 12H System Administrator Manual
HP SureStore E Disk Array 12H
System Administrator’s Guide for
HP-UX, MPE, and Microsoft
Windows NT
with AutoRAID™ Technology
HP Part Number C5445-90902
Printed in U.S.A.
September 1999

Notice
Copyright © 1997, 1998, 1999 Hewlett-Packard Company
The information contained in this document is subject to change without notice.
Hewlett-Packard Company makes no warranty of any kind with regard to this material, including, but not
limited to, the implied warranties of merchantability and fitness for a particular purpose. Hewlett-Packard
shall not be liable for errors contained herein or for incidental or consequential damages in connection with
the furnishing, performance, or use of this material.
This document contains proprietary information, which is protected by copyright. All rights are reserved.
No part of this document may be photocopied, reproduce d, or translated to another language without the
prior consent of Hewlett-Packard.
Print History
Edition 1, May 1997
Edition 2, January 1998
Edition 3, May 1998
Edition 4, August 1998
Edition 5, February 1999
Edition 6, June 1999
Edition 7, September 1999
Typographical Conventions
NOTE! Notes contain important information.
CAUTION! Caution messages indicate procedures which, if not observed, could result in
damage to your equipment or loss of your data.
WARNING! Warning messages indicate procedures or practices which, if not observed,
could result in personal injury.
2

About this Book
This book describes the tasks and tools involved in managing the HP SureStore E Disk Array 12H on HPUX, MPE, and Windows NT
. This material is intended for system administrators and others involved in
the installation, operation, and management of network storage. The content of this book is organized as
follows:
The first section describes the tasks involved in managing the HP SureStore E Disk Array 12H on HP-UX.
•
Chapter 1 provides an overview of the management tools, system requirements, and software
installation.
•
Chapter 2 describes how to use the HP-UX System Administration Manage r (SAM) to manage the d i sk
array.
•
Chapter 3 describes how to manage the disk array using the HP-UX ARM command line utilities.
•
Chapter 4 explains how to use the ARDIAG Offline Diagnostic to isolate and solve disk array
problems.
The next sectio n describes the tasks involved in managing the HP SureStore E Di sk Ar ray 12H on MPE.
•
Chapter 5 provides an overview of the management tools, system requirements, and software
installation.
•
Chapter 6 describes how to manage the disk array using the MPE ARM command line utilities.
•
Chapter 7 explains how to use the ARDIAG Offline Diagnostic to isolate and solve disk array
problems.
The last section describes management of the HP SureStore E Disk Array 12H on Windows NT.
•
Chapter 8 provides an overview of the system requirements and software installation.
•
Chapter 9 de scribes how to use the Auto RAI D Manager for Windows to manage the disk a rray.
•
Chapter 10 describes how to manage the disk array using the Wi ndows NT ARM command line
utilities.
During installation of the AutoRAID Manager for Windows NT software, an electronic copy of this book in
Adobe
Acrobat format is included in the Program Files\AutoRAID\Doc directory (default
location).
3

Supporting Documentation
The following documentation is included with the HP SureStore E Disk Array 12H and should be available
for reference when installing and managing the disk array.
•
HP SureStore E Disk Array 12H User’s and Service Manual, part number C5445-90901
For Windows NT users, an electronic copy of this book in Adobe
Acrobat format is included in the
Program Files\AutoRAID\Doc directory.
Trademark Credits
AutoRAID™ is a trademark of Hewlett-Packard Company.
Microsoft Windows
and Microsoft Windows NT are registered trademarks of Microsoft Corporation.
HP on the World Wide Web
The latest information about your HP SureStore E Disk Array 12H is available on the HP web site at
www.hp.com/go/support
Check our web site for
•
Updated editions of product documentation
•
Firmware and software upgrades
•
Current supported system configurations
•
General information for optimizing the operation of your disk array
4

Table of Contents
CHAPTER 1. MANAGING THE HP SURESTORE E DISK ARRAY 12H ON HP-UX.................... 13
D
ISK ARRAY MANAGEMENT TOOLS.......................................................................................................... 14
System Administration Manager (SAM)............................................................................................... 14
AutoRAID Management (ARM) utilities.............................................................................................. 14
Disk array control panel........................................................................................................................ 14
W
HICH TOOLS TO USE FOR EACH TASK .................................................................................................... 15
I
NSTALLING THE DISK ARRAY MANAGEMENT SOFTWARE......................................................................... 16
Operating System Support.................................................................................................................... 16
IPR Program......................................................................................................................................... 16
T
IPS FOR CONFIGURING THE DISK ARRAY ON HP-UX............................................................................... 17
CHAPTER 2. USING THE HP-UX SYSTEM ADMINISTRATION MANAGER.............................. 19
S
ELECTING HARDWARE PATHS ON HP-UX 10.20 ..................................................................................... 20
C
ONFIGURING A NEW DISK ARRAY ........................................................................................................... 23
C
HECKING DISK ARRAY STATUS ............................................................................................................... 24
C
HANGING DISK ARRAY CONFIGURATION SETTINGS................................................................................. 24
M
ANAGING LUNS (LOGICAL DRIVES)....................................................................................................... 25
Checking LUN Configuration............................................................................................................... 26
Creating a LUN..................................................................................................................................... 26
Deleting a LUN..................................................................................................................................... 27
A
DDING A DISK.......................................................................................................................................... 28
Including a Disk.................................................................................................................................... 29
Downing (Excluding) a Disk ................................................................................................................ 30
R
EBUILDING THE DISK ARRAY................................................................................................................... 31
Setting Rebuild Priority........................................................................................................................ 31
S
WITCHING PRIMARY CONTROLLERS......................................................................................................... 32
CHAPTER 3. USING THE ARM COMMAND LINE UTILITIES FOR HP-UX................................33
I
NFORMATION IN MAN PAGES..................................................................................................................... 33
C
OMMAND SYNTAX CONVENTIONS........................................................................................................... 34
T
HE ARMSERVER PROCESS...................................................................................................................... 34
T
HE ARRAY MONITOR DAEMON (ARRAYMOND)....................................................................................... 35
Routing arraymond Error Messages...................................................................................................... 35
S
ELECTING A DISK ARRAY TO MANAGE .................................................................................................... 36
C
ONFIGURING A NEW DISK ARRAY ........................................................................................................... 37
C
HECKING DISK ARRAY STATUS ............................................................................................................... 39
D
ISPLAYING DISK ARRAY SERIAL NUMBERS............................................................................................. 40
C
HANGING DISK ARRAY CONFIGURATION SETTINGS................................................................................. 40
5

M
ANAGING LUNS (LOGICAL DRIVES).......................................................................................................42
Checking LUN Configuration...............................................................................................................42
Creating a LUN ................................................................................................................. .................... 42
Renumbering a LUN.............................................................................................................................43
Deleting a LUN.....................................................................................................................................43
A
DDING A DISK..........................................................................................................................................44
Including a Disk....................................................................................................................................45
R
EBUILDING THE DISK ARRAY................................................................................................................... 46
Rebuilding the Disk Array Manually ....................................................................................................46
Setting Rebuild Priority.........................................................................................................................46
Checking the Progress of a Rebuild ......................................................................................................47
Canceling a Rebuild.............................................................................................................................. 47
A
NALYZING DISK ARRAY PERFORMANCE..................................................................................................48
Command Examples..............................................................................................................................48
Selecting a Time Period for Analysis....................................................................................................49
Checking the Working Set Metric......................................................................................................... 49
P
ERFORMING DISK ARRAY MAINTENANCE TASKS.....................................................................................50
Shutting Down the Disk Array.............................................................................................................. 50
Restarting the Disk Array ......................................................................................................................50
Resetting the Disk Array.......................................................................................................................51
Downing (Excluding) a Disk................................................................................................................. 51
Testing a Disk.......................................................................................................................................52
Displaying Test Results.........................................................................................................................52
Canceling a Disk Test...........................................................................................................................53
Printing ARMServer Log Contents.......................................................................................................53
Displaying Hardware Logs.................................................................................................................... 53
Formatting the Disk Array.....................................................................................................................54
Changing SCSI Settings........................................................................................................................55
Changing the Controller SCSI ID..........................................................................................................55
Switching Primary Controllers.............................................................................................................. 55
Setting Data Resiliency......................................................................................................................... 56
Creating a Disk Array Alias..................................................................................................................58
D
OWNLOADING FIRMWARE........................................................................................................................ 59
Firmware Download Procedure With LVM..........................................................................................60
R
ECOVERING DATA MAPS .........................................................................................................................62
V
IEWING THE DISK ARRAY GENERAL CONFIGURATION SETTINGS .............................................................64
Simplified Resiliency Setting................................................................................................................70
CHAPTER 4. USING THE ARDIAG OFFLINE DIAGNOSTIC ON HP-UX......................................73
O
PERATING ENVIRONMENT........................................................................................................................73
Support Software...................................................................................................................................73
Minimum hardware............................................................................................................................... 73
6

Minimum software................................................................................................................................ 73
D
EFINITION OF TERMS ............................................................................................................................... 74
ARDIAG O
ARDIAG I
O
PERATIONAL COMMAND DESCRIPTIONS.................................................................................................. 77
PERATIONAL COMMANDS ....................................................................................................... 75
NTERFACE COMMANDS ............................................................................................................ 76
CLRLOG.............................................................................................................................................. 77
DELETELUN....................................................................................................................................... 78
DESCRIBE........................................................................................................................................... 79
DOWNLOAD....................................................................................................................... ................ 81
FORMAT.............................................................................................................................................. 85
INQUIRY ............................................................................................................................................. 87
READLOG........................................................................................................................................... 88
RECOVER............................................................................................................................................ 92
REQSENSE.......................................................................................................................................... 94
RESTART ............................................................................................................................................ 95
REVISION............................................................................................................................................ 96
ROMT................................................................................................................................................... 97
SETOPTIONS ...................................................................................................................................... 99
SHUTDOWN ..................................................................................................................................... 102
WRTMT ............................................................................................................................................. 103
I
NTERFACE COMMAND DESCRIPTIONS...................................................................................................... 105
DISPMAP........................................................................................................................................... 105
DISPMECH....................................................................................................................... ................. 106
RANGE............................................................................................................................................... 107
SHOWENV ........................................................................................................................................ 108
TESTDISK ......................................................................................................................................... 109
TESTLEVEL...................................................................................................................... ................ 110
ODE
INTERFACE...................................................................................................................................... 111
ARDIAG
INTERFACE TO ODE................................................................................................................. 113
CHAPTER 5. MANAGING THE HP SURESTORE E DISK ARRAY 12H ON MPE...................... 115
D
ISK ARRAY MANAGEMENT TOOLS........................................................................................................ 116
AutoRAID Management (ARM) utilities............................................................................................ 116
Disk array control panel...................................................................................................................... 116
W
HICH TOOLS TO USE FOR EACH TASK .................................................................................................. 117
I
NSTALLING THE DISK ARRAY MANAGEMENT SOFTWARE....................................................................... 118
Operating System Support.................................................................................................................. 118
T
IPS FOR CONFIGURING THE DISK ARRAY ON MPE ................................................................................ 119
C
ONFIGURING AUTORAID SCSI LUNS FOR MPE/IX............................................................................. 121
Configuration Requirements............................................................................................................... 121
MPE/iX SYSGEN Configuration....................................................................................................... 122
Device Adapter Configuration:........................................................................................................... 123
7

SCSI Target Configuration: ................................................................................................................123
LDEV (SCSI LUN) Configuration...................................................................................................... 124
CHAPTER 6. USING THE ARM COMMAND LINE UTILITIES FOR MPE.................................. 125
S
ETTING UP MPE POSIX SHELL.............................................................................................................125
I
NFORMATION IN MAN PAGES ...................................................................................................................126
C
OMMAND SYNTAX CONVENTIONS .........................................................................................................126
T
HE ARMSERVER PROCESS ....................................................................................................................127
S
ELECTING A DISK ARRAY TO MANAGE...................................................................................................128
C
ONFIGURING A NEW DISK ARRAY .......................................................................................................... 129
C
HECKING DISK ARRAY STATUS..............................................................................................................131
D
ISPLAYING DISK ARRAY SERIAL NUMBERS ...........................................................................................132
C
HANGING DISK ARRAY CONFIGURATION SETTINGS ...............................................................................132
M
ANAGING LUNS (LOGICAL DRIVES).....................................................................................................134
Checking LUN Configuration.............................................................................................................134
Creating a LUN ................................................................................................................. .................. 134
Renumbering a LUN...........................................................................................................................135
Deleting a LUN...................................................................................................................................135
A
DDING A DISK........................................................................................................................................136
Including a Disk..................................................................................................................................136
R
EBUILDING THE DISK ARRAY................................................................................................................. 138
Rebuilding the Disk Array Manually ..................................................................................................138
Setting Rebuild Priority.......................................................................................................................138
Checking the Progress of a Rebuild ....................................................................................................139
Canceling a Rebuild............................................................................................................................ 139
A
NALYZING DISK ARRAY PERFORMANCE................................................................................................140
Command Examples............................................................................................................................140
Selecting a Time Period for Analysis..................................................................................................141
Checking the Working Set Metric....................................................................................................... 141
P
ERFORMING DISK ARRAY MAINTENANCE TASKS...................................................................................142
Shutting Down the Disk Array............................................................................................................ 142
Restarting the Disk Array ....................................................................................................................142
Resetting the Disk Array.....................................................................................................................143
Downing (Excluding) a Disk............................................................................................................... 143
Testing a Disk.....................................................................................................................................144
Displaying Test Results.......................................................................................................................144
Canceling a Disk Test.........................................................................................................................145
Printing ARMServer Log Contents.....................................................................................................145
Displaying Hardware Logs.................................................................................................................. 145
Formatting the Disk Array...................................................................................................................146
Changing SCSI Settings......................................................................................................................147
Changing the Controller SCSI ID........................................................................................................147
8

Switching Primary Controllers............................................................................................................ 148
Setting Data Resiliency....................................................................................................................... 148
Creating a Disk Array Alias................................................................................................................ 150
D
OWNLOADING FIRMWARE ..................................................................................................................... 151
Firmware Download Procedure .......................................................................................................... 152
R
ECOVERING DATA MAPS ....................................................................................................................... 153
V
IEWING THE DISK ARRAY GENERAL CONFIGURATION SETTINGS........................................................... 155
Simplified Resiliency Setting .................................................................................................. ............ 161
CHAPTER 7. USING THE ARDIAG OFFLINE DIAGNOSTIC ON MPE....................................... 165
O
PERATING ENVIRONMENT...................................................................................................................... 165
Support Software................................................................................................................................ 165
Minimum hardware............................................................................................................................. 165
Minimum software.............................................................................................................................. 165
D
EFINITION OF TERMS ............................................................................................................................. 166
ARDIAG O
ARDIAG I
O
PERATIONAL COMMAND DESCRIPTIONS................................................................................................ 169
PERATIONAL COMMANDS ..................................................................................................... 167
NTERFACE COMMANDS .......................................................................................................... 168
CLRLOG............................................................................................................................................ 169
DELETELUN..................................................................................................................................... 170
DESCRIBE......................................................................................................................................... 171
DOWNLOAD....................................................................................................................... .............. 173
FORMAT............................................................................................................................................ 177
INQUIRY ........................................................................................................................................... 179
READLOG......................................................................................................................................... 180
RECOVER.......................................................................................................................................... 184
REQSENSE........................................................................................................................................ 186
RESTART .......................................................................................................................................... 187
REVISION.......................................................................................................................................... 188
ROMT................................................................................................................................................. 189
SETOPTIONS .................................................................................................................................... 191
SHUTDOWN ..................................................................................................................................... 194
WRTMT ............................................................................................................................................. 195
I
NTERFACE COMMAND DESCRIPTIONS...................................................................................................... 197
DISPMAP........................................................................................................................................... 197
DISPMECH....................................................................................................................... ................. 198
RANGE............................................................................................................................................... 199
SHOWENV ........................................................................................................................................ 200
TESTDISK ......................................................................................................................................... 201
TESTLEVEL...................................................................................................................... ................ 202
ODE
INTERFACE...................................................................................................................................... 203
ARDIAG
INTERFACE TO ODE................................................................................................................. 205
9

CHAPTER 8. MANAGING THE HP SURESTORE E DISK ARRAY 12H ON WINDOWS NT....207
A
UTORAID MANAGER COMPONENTS.....................................................................................................208
HP O
PENVIEW INTEGRATION ..................................................................................................................209
Disk Array Events...............................................................................................................................209
S
YSTEM REQUIREMENTS.......................................................................................................................... 210
Checking the System Hardware Configuration ................................................................................... 210
I
NSTALLING AUTORAID MANAGER SOFTWARE ......................................................................................211
Installation Tips...................................................................................................................................211
Controlling Access to the Disk Arrays................................................................................................ 213
S
ETTING UP AUTORAID MANAGER FOR WINDOWS NT.......................................................................... 214
The HPAutoRAID Manager GUI........................................................................................................215
What is a view?...................................................................................................................................216
How do I add a customized view?.......................................................................................................217
D
ISCOVERINGDISK ARRAYS.....................................................................................................................219
M
ANAGING DISK ARRAYS ON A REMOTE HOST.......................................................................................219
E
DITING THE DISK ARRAY LIST................................................................................................................220
S
OLVING COMMON INSTALLATION PROBLEMS.........................................................................................220
CHAPTER 9. USING AUTORAID MANAGER FOR WINDOWS NT..............................................223
O
NLINE HELP........................................................................................................................................... 223
S
ELECTING A DISK ARRAY.......................................................................................................................223
C
ONFIGURING A NEW DISK ARRAY .......................................................................................................... 224
C
HECKING DISK ARRAY STATUS..............................................................................................................224
C
HANGING DISK ARRAY CONFIGURATION SETTINGS ...............................................................................225
M
ANAGING LOGICAL DRIVES................................................................................................................... 226
Creating a Logical Drive....................................................................................................... .............. 226
Renumbering a Logical Drive.............................................................................................................227
Deleting a Logical Drive.....................................................................................................................227
A
DDING A DISK........................................................................................................................................228
Including a Disk Manually.................................................................................................................. 229
R
EBUILDING THE DISK ARRAY................................................................................................................. 230
Rebuilding the Disk Array Automatically...........................................................................................230
Rebuilding the Disk Array Manually ..................................................................................................231
Checking the Progress of a Rebuild ....................................................................................................231
Canceling a Rebuild............................................................................................................................ 232
A
NALYZING DISK ARRAY PERFORMANCE................................................................................................232
Selecting a Time Period for Analysis..................................................................................................232
Displaying Performance Metric Thresholds........................................................................................ 233
P
ERFORMING DISK ARRAY MAINTENANCE TASKS...................................................................................234
Shutting Down the Disk Array............................................................................................................ 234
Restarting the Disk Array ....................................................................................................................235
Resetting the Disk Array.....................................................................................................................235
10

Formatting the Disk Array.................................................................................................................. 235
Formatting a Logical Drive................................................................................................................. 236
Testing a Disk..................................................................................................................................... 236
Downing a Disk................................................................................................................. ................. 237
Switching Array Controllers............................................................................................................... 237
Displaying Hardware Logs ................................................................................................................. 238
D
OWNLOADING CONTROLLER FIRMWARE ............................................................................................... 239
CHAPTER 10. USING THE ARM COMMAND LINE UTILITIES FOR WINDOWS NT............. 241
O
NLINE HELP........................................................................................................................................... 241
C
OMMAND SYNTAX CONVENTIONS......................................................................................................... 242
S
ELECTING A DISK ARRAY TO MANAGE .................................................................................................. 242
C
ONFIGURING A NEW DISK ARRAY ......................................................................................................... 243
C
HECKING DISK ARRAY STATUS ............................................................................................................. 244
D
ISPLAYING DISK ARRAY SERIAL NUMBERS........................................................................................... 245
C
HANGING DISK ARRAY CONFIGURATION SETTINGS............................................................................... 246
M
ANAGING LOGICAL DRIVES .................................................................................................................. 247
Checking Logical Drive Configuration ........................................................................................... .... 247
Creating a Logical Drive..................................................................................................................... 247
Renumbering a Logical Drive............................................................................................................. 248
Deleting a Logical Drive..................................................................................................................... 248
A
DDING A DISK........................................................................................................................................ 249
Including a Disk Manually.................................................................................................................. 250
R
EBUILDING THE DISK ARRAY................................................................................................................. 251
Rebuilding the Disk Array Manually.................................................................................................. 251
Setting Rebuild Priority...................................................................................................................... 251
Checking the Progress of a Rebuild.................................................................................................... 252
Canceling a Rebuild............................................................................................................................ 252
A
NALYZING DISK ARRAY PERFORMANCE ............................................................................................... 253
Command Examples........................................................................................................................... 253
P
ERFORMING DISK ARRAY MAINTENANCE TASKS .................................................................................. 254
Shutting Down the Disk Array............................................................................................................ 254
Restarting the Disk Array.................................................................................................................... 254
Resetting the Disk Array..................................................................................................................... 255
Downing (Excluding) a Disk .............................................................................................................. 255
Testing a Disk..................................................................................................................................... 256
Displaying Test Results...................................................................................................................... 256
Canceling a Disk Test......................................................................................................................... 257
Printing ARMServer Log Contents................................................................................................ ..... 257
Displaying Hardware Logs ................................................................................................................. 257
Formatting the Disk Array.................................................................................................................. 258
Changing SCSI Settings...................................................................................................................... 259
11

Changing the Controller SCSI ID........................................................................................................259
Switching Primary Controllers............................................................................................................ 259
D
OWNLOADING FIRMWARE...................................................................................................................... 260
Downloading Firmware to a Disk Module.......................................................................................... 260
Downloading Firmware to the Disk Array Controllers .......................................................................261
Copying Firmware From the Primary Controller to the Secondary Controller ...................................262
V
IEWING THE DISK ARRAY GENERAL CONFIGURATION SETTINGS ...........................................................263
Simplified Resiliency Setting..............................................................................................................269
Setting Data Resiliency....................................................................................................................... 272
Creating a Disk Array Alias................................................................................................................273
INDEX........................................................................................................................................................275
12

Chapter 1. Managing the HP SureStore E
Disk Array 12H on HP-UX
This chapter introduces the tools available for managing your HP SureStore E Disk Array 12H on HP-UX.
These tools provide complete control over all aspects of disk array operation.
The following information is included in this chapter:
•
A brief description of each management tool
•
Which tools can be used for each management task.
•
Instructions for installing the disk array management software
HP-UX
13

Managing the HP SureStore E Disk Array 12H on HP-UX
Disk Array Management Tools
Disk Array Management Tools
Three disk array management tools are available for managing the disk array — two online tools and the
disk array control panel.
HP-UX
System Administration Manager (SAM)
Most of the common tasks invo l ved in managing the disk arr ay can be performed using the HP-UX System
Administration Manager, or SAM. This allows you to manage the host system and the disk array using the
same tool.
AutoRAID Management (ARM) utilities
Included with the disk array is a set of ARM utilities, which provide advanced capabilities for managing the
disk array. Although you will primarily use SAM to manage the disk array, you will need to use the ARM
utilities to perform functions such as formatting or diagnostics.
Disk array control panel
An alternative to the online management too ls is the disk arra y control panel. Although you can use the disk
array control panel to perform most of the management tasks available through the ARM utilities, the added
convenience and functionality provided by SAM and the ARM utilities make them better tools for managing
the disk array.
14
Managing the HP SureStore E Disk Array 12H on HP-UX
Which Tools to Use for Each Task
Which Tools to Use for Each Task
The various management tasks have been divided between SAM and the command- line utilities. In general,
the more common tasks are available from SAM while the more advanced tasks are performed from the
ARM utilities. Most tasks can also be performed using the disk array control panel.
Table 1. Tools and Tasks
Tasks Tools
Including a disk Yes Yes (arraycfg) Yes
Checking disk array status Yes Yes (arraydsp) Yes
Creating/deleting LUNs Yes Yes (arraycfg) Yes
Renumbering LUNs No Yes (arraycfg) Yes
Starting/canceling a Rebuild No Yes (arrayrbld) Yes
Downing (excluding) a disk Yes Yes (arraycfg) No
Formatting a LUN or array No Yes (arrayfmt) Yes
Shutting down the disk array No Yes (arraymgr) Yes
Changing operating settings Y es Yes (arraymgr) Yes
Changing SCSI settings No Yes (arraymgr) Yes
Monitoring performance No Yes (arraydsp) No
Switching primary controller Yes Yes (arraymgr) Yes
Testing a disk No Yes (drivetest) No
Displaying disk test results No Yes (dteststat) No
Displaying disk array serial
numbers
Changing controller SCSI ID No Yes (arraymgr) Yes
Resetting/restarting the disk array No Yes (arraymgr) Yes
Setting data resiliency No Yes (arraymgr) No
Creating a disk array alias No Yes (arraymgr) No
Recovering data maps No Yes (arrayrecover) Yes
SAM ARM
Utilities
Yes Yes (arraydsp) Yes
Control
Panel
HP-UX
15

Managing the HP SureStore E Disk Array 12H on HP-UX
Installing the Disk Arr ay Management Software
Installing the Disk Array Management Software
The AutoRAID Manager (ARM) disk array management software is distributed on the IPR (Independent
Product Release) CD-ROM (B6191AA). The IPR CD-ROM should have been ordered and delivered with
your disk array.
HP-UX
The IPR CD-ROM includes an instruction sheet for installing the software. Follow the instructions to install
the ARM software.
NOTE! The HP SureStore E Disk Array 12H disk array requires IPR CD-ROM release
IPR9810 or later. Earlier releases of the IPR CD-ROM do not contain the required
software.
At the time of printing the following ARMServer patches were available:
PHCO_15699 for HP-UX 10.X
PHCO_15700 for HP-UX 11.0
The latest patches are available from the HP Patch web site:
(www.hp.com/go/support
which will indicate if the above patches have been superceded.
)
Operating System Support
The HP SureStore E Disk Array 12H is currently supported on the following HP-UX releases:
•
10.01
•
10.10
•
10.20
•
11.0
IPR Program
To provide you with the latest software patches and drivers, Hewlett-Packard offers the Independent
Product Release (IPR) program. As a subscriber to this program you will receive a complete collection of
all updated patches and drivers at regular intervals, thus ensuring you always have the latest software. Using
the latest software upgrades will ensure optimal performance of the disk array and other hardware
peripherals.
Contact your Hewlett-Packard sales representative for more details on subscribing to the IPR program.
16

Managing the HP SureStore E Disk Array 12H on HP-UX
Tips for Configuring the Disk Arr ay On HP-UX
Tips for Configuring the Disk Array On HP-UX
Before installing a new disk array, you should determine what is more important for your operating
environment — performance or capacity. This decision will influence how you configure the disk array
hardware and LVM. There are several configuration options that impact the performance of the disk array.
Table 2 identifies the various configuration options, their impact on disk array performance, and any
considerations regarding disk array capacity.
NOTE! Overall system performance is a complex issue influenced by many factors. The
configuration options described here will increase the
However, the actual performance of the disk array will be determined largely by host demand.
AutoRAID technology is particularly suited to I/O-intensive application environments such as
OLTP and NFS. It is in these environments that the performance benefits offered by AutoRAID
will be fully realized.
Table 2. Configuration Options
Configuration
Option
Number of LUNs
per disk array
Performance. Increase the number of LUNs per disk array to improve
performance. More LUNs increases the size of the I/O command queue
allocated by HP-UX, which increases throughput. The recommended
number of LUNs is 4 to 6.
Capacity. To allow for future capacity expansion, avoid creating the
maximum number of LUNs (8) on the disk array. New capacity is made
available through the creation of a new LUN. If the maximum number of
LUNs have already been created, it will be necessary to delete and
recreate an existing LUN to increase capacity.
Impact on Performance and Capacity
potential
performance of the disk array.
HP-UX
Number of disk
arrays per SCSI
host adapter
Performance. Limit the number of disk arrays per host adapter to
improve performance. The recommended configuration for maximum
performance is:
NIO adapter - 3 disk arrays
GSC adapter - 8 disk arrays
Capacity. If maximum capacity is more important than performance,
connect the maximum number of disk arrays to each adapter.
17

Managing the HP SureStore E Disk Array 12H on HP-UX
Tips for Configuring the Disk Array On HP-UX
Configuration
Option
Impact on Performance and Capacity
HP-UX
Number of disk
drives
Unallocated disk
array capacity
LVM configuration
Performance. Increase the number of disk mechanisms in the disk array
for maximum performance. As the number of individual disks is
increased, the number of potential I/Os that can be performed
simultaneously increases as well. This will improve performance in
environments that place heavy I/O demand on the disk array.
Capacity. The capacity of a disk array that is fully populated with disk
mechanisms can only be increased by replacing lower capacity disks with
higher capacity disks.
Performance. Unallocated capacity is used as additional RAID 0/1
space. The amount of RAID 0/1 space required to maintain optimal
performance is determined by the write working set parameter.
Capacity. To create the maximum amount of storage capacity, allocate
all available capacity to LUNs.
Performance. To improve performance, configure LVM as follows:
• Stripe logical volumes across LUNs on different disk arrays.
Including LUNs on different disk arrays will improve throughput by
spreading I/Os across arrays.
• Divide LUN access between both disk array controllers. Mapping
every LUN to the same controller does not utilize the two data paths
available on the disk array. The default path is through the primary
disk array controller, but this can be changed to the secondary
controller when adding the physical volume to an LVM volume group.
The process for changing the path differs for each version of HP-UX:
HP-UX 10.1. From the Disk Devices list, select the disk hardware
path through the secondary controller before adding the disk to
a volume group.
HP-UX 10.2. When adding the disk to a volume group, in the
“Creating A Volume Group” dialog change the hardware path to
the secondary controller
Capacity. These LVM configurations have no impact on disk array
capacity configuration.
18

Chapter 2. Using the HP-UX System
Administration Manager
Most disk arra y management ca n be done using the HP-UX System Administration Manager, or SAM.
Using SAM you can:
•
Check disk array status
•
Change configuration settings
•
Manage the disk a rray LUNs
•
Add a disk to the array configuration
•
Set the rebuild priority
You must login as superuser or root to use SAM or the disk array utilities.
LUNs and Logical Drives. To maintain consistency with HP-UX terminology, the term LUN is
used to refer to a disk array logical drive. The two terms are used interchangeably and refer to the
same logical entity on the disk array.
NOTE! Before SAM can be used to manage the HP SureStore E Disk Array 12H, the AutoRAID
Manager (ARM) utility software must be installed as described in “Installing the Disk Array
Management Software“.
HP-UX
To run the SAM disk array management utilities:
1. Run SAM by typing sam at the system prompt.
2. On the main SAM screen, select “Disks and File Systems.”
3. On the “Disks and File Systems” screen, select “Disk Devices.” A list of disk devices including arrays
will be displayed.
You are now ready to work with the disk array. The remaining procedures in this chapter assume that you
have already performed these steps.
19
Using the HP-UX System Administration Manager
Selecting Hardware Paths on HP-UX 10.20
Selecting Hardware Paths on HP-UX 10.20
On dual controller disk arrays, each controller provides a separate hardware path to the disk array. The host
identifies one of these paths as the default hardware path and will use the default as the primary data path
for access to the LUNs created on the disk array.
HP-UX
To improve disk array performance, the paths to the LUNs on the disk array should be shared by both
controllers. Dividing the primary data paths across both controllers balances the I/O load and optimizes disk
array performance. The primary hardware path to each LUN is established when adding the LUN to a
volume group.
On HP-UX 10.01 and 10.10, both controller hardware paths are displayed on the Disk Devices windows.
The hardware path for a LUN is established by selecting the appropriate path.
On HP-UX 10.20 and later, only the primary controller hardware path is displayed in the Disk & File
Systems window (with an indication that there are two paths to the device). This makes the selection of an
alternate path to the LUN a bit more involved. The following steps should clarify the process of defining an
alternate path for a LUN.
To select an alternate hardware path:
1. From the Disk & File Systems window select the LUN you want to add.
2. From the Actions menu select “Add…” , and then select “Using The Logical Volume Manager”.
20
Using the HP-UX System Administration Manager
Selecting Hardware Paths on HP-UX 10.20
3. The Create a Volume Group window indicates the default hardware path to the LUN. Click the Use
Hardware Path… button to change the path.
HP-UX
21

Using the HP-UX System Administration Manager
Selecting Hardware Paths on HP-UX 10.20
4. From the Alternate Paths window, select the alternate (non-default) hardware path to the LUN. Click
OK.
HP-UX
22

Using the HP-UX System Administration Manager
Configuring a New Disk Arra y
Configuring a New Di sk Array
After installing a new disk array, you can perform the initial configuration using the disk array utilities. This
establishes the desired operating environment for the disk array.
To configure a new disk array:
1. Plan your capacity management strategy.
Decide how you want to use the capacity of the disk array. Factors such as data redundancy and
performance influence how you manage the capacity. To support your strategy, it may be necessary to
disable Active Hot Spare, Auto Include, or Auto Rebuild. See “Managing Disk Array Capacity” in the
HP SureStore E Disk Array 12H User’s and Service Manual for help in planning your strategy. Also
see “Tips for Configuring the Disk Array On HP-UX” in Chapter 1 of this guide.
2. If necessary, c hange disk array confi guration settings to implement your capacit y management strategy.
If the planning in step 1 require s you to change any of the de fault configuration settings, do so now.
These include Active Hot Spare, Auto Rebuild, and Auto Include. For more information, see
“Changing Disk Array Configuration Settings” in this chapter.
3. Check the available unallocated capacity on the disk array. See “Checking Disk Array Status” in this
chapter.
4. Create each LUN on the disk array.
This required step makes disk array capacity available to your operating system, and it must be
repeated for each LUN you are creating. For more information, see “Creating a LUN” in this chapter.
HP-UX
23

Using the HP-UX System Administration Manager
Checking Disk Array Status
Checking Disk Array Status
One of the most important management tasks is monitoring the operation and status of the disk array.
Because it is a vital piece of your system, it is important to know how well the disk array is operating and if
HP-UX
any problems or failures have occurred.
To view disk array component status:
1. Select the desired disk array controller from the list displayed on the screen.
2. Select “Actions” on the menu bar.
3. Select “View More Information . . .”
Changing Disk Array Configuration Settings
There are a number of configuration settings that control the operation of the disk array. These settings are
usually established during installation, and once set, should rarely have to be changed.
The default settings have been selected to provide the best operation for most systems. However, if you
determine that any setting does not meet your needs, you can easily change it.
Table 3 lists the various settings that can be changed with SAM, including factors you may want to consider
before cha nging them.
24
Using the HP-UX System Administration Manager
Managing LUNs (Lo gical Drives)
HP-UX
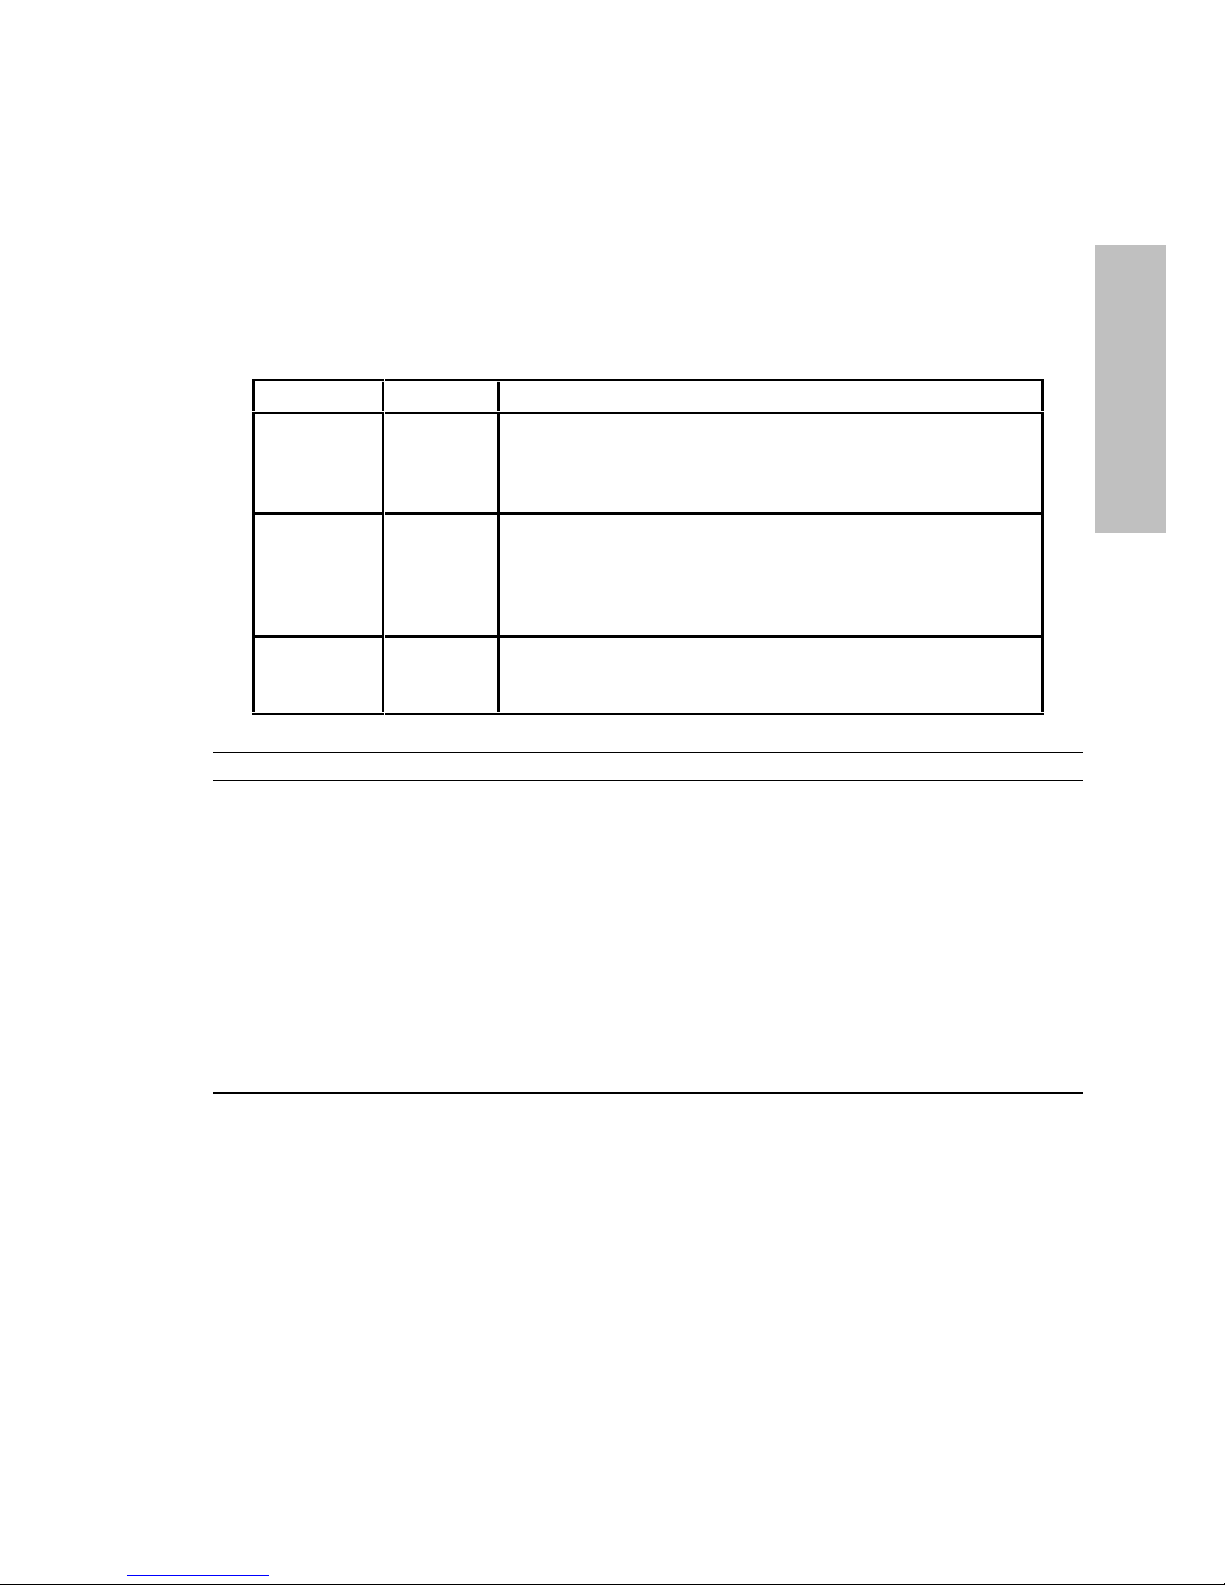
Table 3. Disk Array Configuration Settings
Setting Default Comments and Considerations
Active
Spare
Rebuild
Priority
Auto
Include
On Active Spare provides optimum protection against disk
failure. Disabling Active Spare will make additional
capacity available to the host, but at the expense of
maintaining full data redundancy.
High Rebuild Priority determines how quickly a Rebuild
completes. It allows you to balance the servicing of host
I/Os with the rebuilding of the disk array. The same rebuild
priority is used for both Auto Rebuilds and manual
Rebuilds.
On Auto Include simplifies the task of adding a new disk to
your array. Disabling it will require you to manually include
each disk you install in the array.
NOTE! The Rebuild type (automatic or manual) is displayed but cannot be changed using SAM.
To change configuration settings:
1. Select the desired disk array controller from the list on the screen.
2. Select “Actions” on the menu bar.
3. Select “Disk Array Maintenance.”
4. Select “Modify Array Configuration . . .”
5. Click setting boxes to make changes.
6. Click “OK” to effect the change, or “Cancel” to ignore.
Managing LUNs (Logical Drives)
An important par t of managing the disk array involves defining a nd maintaining the optimal LUN structure
for the disk array. Your system requirements will influence the LUN structure you choose.
Managing LUNs is a part of the overall task of managing the disk array capacity. For more information on
managing array capacity to meet your system needs, see “Managing Disk Array Capacity” in the HP
SureStore E Disk Array 12H User’s and Service Manual.
25

Using the HP-UX System Administration Manager
Managing LUNs (Lo gical Drives)
Checking LUN Configuration
Anytime you are managing LUNs, you may find it convenient to check the current LUN configuration and
the available capacity.
The current LUN definitions can be seen on the standard “Disk Devices” screen. The available capacity is
HP-UX
displayed as “Unallocated” on the “View Array Status Information” screen. See “Checking Disk Array
Status” in this chapter.
Creating a LUN
Only capacity assigned to LUNs is visible to the HP-UX operating system. When creating LUNs, consider
the following factors:
•
Any size limitations imposed by the operating system, for example, LVM.
•
Your backup strategy. If you do unattended backup to a devic e such as tape, you may want to avo id
creating a LUN that is larger than the capacity of the media. This allows you to backup an entire LUN
without changing media.
•
Configuring the LUN into LVM for maximum perfo rmance as described in Table 2.
NOTE! Before creating a LUN, check your operating system documentation for any additional
information or steps that may be required to create a LUN.
To create a LUN:
1. Select the desired disk array controller from the list on the screen.
2. Select “Actions” on the menu bar.
3. Select “Disk Array Maintenance.”
4. Select “Bind LUN . . .”
5. Set the LUN size (not greater than unallocated capacity).
6. Select “OK.”
7. Note the new LUN definition in the list of disks and arrays.
26

Using the HP-UX System Administration Manager
Managing LUNs (Lo gical Drives)
Deleting a LUN
CAUTION! All data on a LUN is lost when it is deleted. Make sure you backup any
important data on the LUN before deleting it.
When a LUN is deleted, its capacity is returned to the pool of unallocated capacity. Deleting a LUN is a
good way of freeing up capacity for the Active Hot Spare or for RAID 0/1 space to improve disk array
performance.
NOTE! Before deleting a LUN, check your operating system documentation for any additional
information or steps that may be required to delete a LUN.
To delete a LUN:
1. From the list of disks and arrays, select the LUN to be deleted.
2. Select “Actions” from the menu bar.
3. Select “Disk Array Maintenance.”
4. Select “Unbind LUN...”
5. Select “OK” to confirm the request.
6. Note the removal of the LUN from the list of disks and arrays.
HP-UX
27

Using the HP-UX System Administration Manager
Adding a Disk
Adding a Disk
At some time you will probably want to add another di sk to your array. Features such as hot-pluggable disks
and Auto Include simplify the process of adding a disk to the array even while it is operating. A disk can be
HP-UX
added to the array without disrupting host operation.
After you have added a new disk, you have three options on how to use it:
•
Increase capacity - you can use the disk to increase the capacity available to the operating system by
creating a new LUN.
•
Improve performance - you can use the disk to improve disk array performance by simply leaving it as
unallocated capacity.
•
Enable Active Spare - you can use the additional capacity to enable Active Spare if the disk array does
not currently have the capacity to implement this feature.
To add a disk to the array:
1. Make sure the new disk has been inserted into the array cabinet.
2. If Auto Include is on, the disk is automatically added to the array and you can skip to the next step. If
Auto Include is off, manually include the disk as described in the next section, “Including a Disk.”
NOTE! In some situations, the array will not include a disk automatically, even if Auto Include is
enabled. This will happen if the new disk’s status is not Normal. See “Auto Include” in the
SureStore E Disk Array 12H User’s and Service Manual
might occur.
3. Depending on how the new disk will be used, perform the appropriate next step:
•
To use the disk to increase capacity, create a LUN using all or a portion of the disk capacity. For
more information, see “Creating a LUN” in this chapter.
•
To use the disk to increase performance, leave the disk capacity unallocated.
•
To use the disk capacity for Active Spare, enable the Active Spare feature if disabled.
for more information about when this
HP
28

Using the HP-UX System Administration Manager
Adding a Disk
Including a Disk
A disk must be included in the disk array configuration before it can be used by the disk array. There are
two ways to include a disk:
•
You can enable Auto Include, which will automatically include a disk when it is inserted into the disk
array enclosure.
•
You can manually include each new disk.
For convenience, Auto Include is enabled by default on a new disk array. For information on disabling Auto
Include, see “Changing Disk Array Configuration Settings” in this chapter.
After including a disk, you must decide how you want to use it. For more information, see the preceding
section, “Adding a Disk.”
To manually include a disk:
1. Select the desired disk array controller from the list on the screen.
2. Select “Actions” on the menu bar.
3. Select “Disk Array Maintenance.”
4. Select “Include Disk . . .”
Disks not currently included will be highlighted on the display.
5. Select one of the highlighted disks to include.
HP-UX
6. Click “OK” to effect the change.
29

Using the HP-UX System Administration Manager
Adding a Disk
Downing (Excluding) a Disk
Downing (or excluding) a disk is typically done in preparation for testing the disk. After the disk is downed,
testing can be done without impacting disk array operation. If testing reveals that the disk is good, the disk
can be included back in the array configuration.
HP-UX
Downing a disk has the same effect as if the disk failed or was physically removed from the cabinet. If Auto
Rebuild is enabled, the disk array will immediately begin a Rebuild when a disk is downed.
The down operation can be either destructive or nondestructive. The type of down performed determines
whether the disk array will assume there is any valid data on the disk if it is returned to the array
configuration. If a destructive down is performed, the disk array will assume no data on the disk is valid. If
the down is nondestructive, the disk array will assume any data on the disk that was not updated in the
disk’s absence is valid.
To protect data availability, the disk array will normally not let you down a disk if doing so would result in
loss of data redundancy or data unavailability. However, you can override this protection by specifying the
appropriate Exclusion Restriction. You can choose to down the disk even if a loss of redundancy would
result, but not data unavailability. Or you can down the disk even if data unavailability would occur.
NOTE. Two disks on the disk array are used to store the information for recovering data
maps if they are lost. The disk array will not let you down one of these RDM disks.
To down a disk:
1. Select the desired disk array controller from the list on the screen.
2. Select “Actions” on the menu bar.
3. Select “Disk Array Maintenance.”
4. Select "Exclude Disk...”
5. Select the disk to exclude.
6. Select the desired "Exclusion Restriction".
7. Select "Assume Valid Data Next Time" to make the exclude nondestructive. If this option is not
selected, the exclude will be destructive.
8. Click “OK” to effect the change, or click "Apply" to select another disk to exclude.
After testing, a downed disk can be returned to the disk array configuration by manually including it. For
more information, see the preceding section, “Including a Disk”.
30
 Loading...