

HP SureStore DLT 80i, SureStore DLT 40e, SureStore DLT 70e, SureStore DLT 80e, SureStore DLT 40i User Manual
...
HP SureStore DLT Internal/External Tape Drive
DLT 40i/e, DLT 70i/e, DLT 80i/e
User’s Guide

dlt.book Page i Monday, February 12, 2001 5:42 PM
Internal Drives—Installation Overview
HP SureStore DLT
Installation Guiden (Internal Drives)
Refer to:
Before you start:
Check the packing list inside this guide. Check system prerequisites.
Step 1: Check the drive’s SCSI ID
Check the tape drive’s SCSI ID. If necessary change it from the default
of 5 by setting jumpers on the side of the drive.
Step 2: Attach local language l abels, if necessary
Step 3: Prepare the mounting bay
Switch off the computer and remov e its outer casing. Remove the cover
plate from two adjacent, empty, 5¼-inch, half-height bays. (Keep the
screws.)
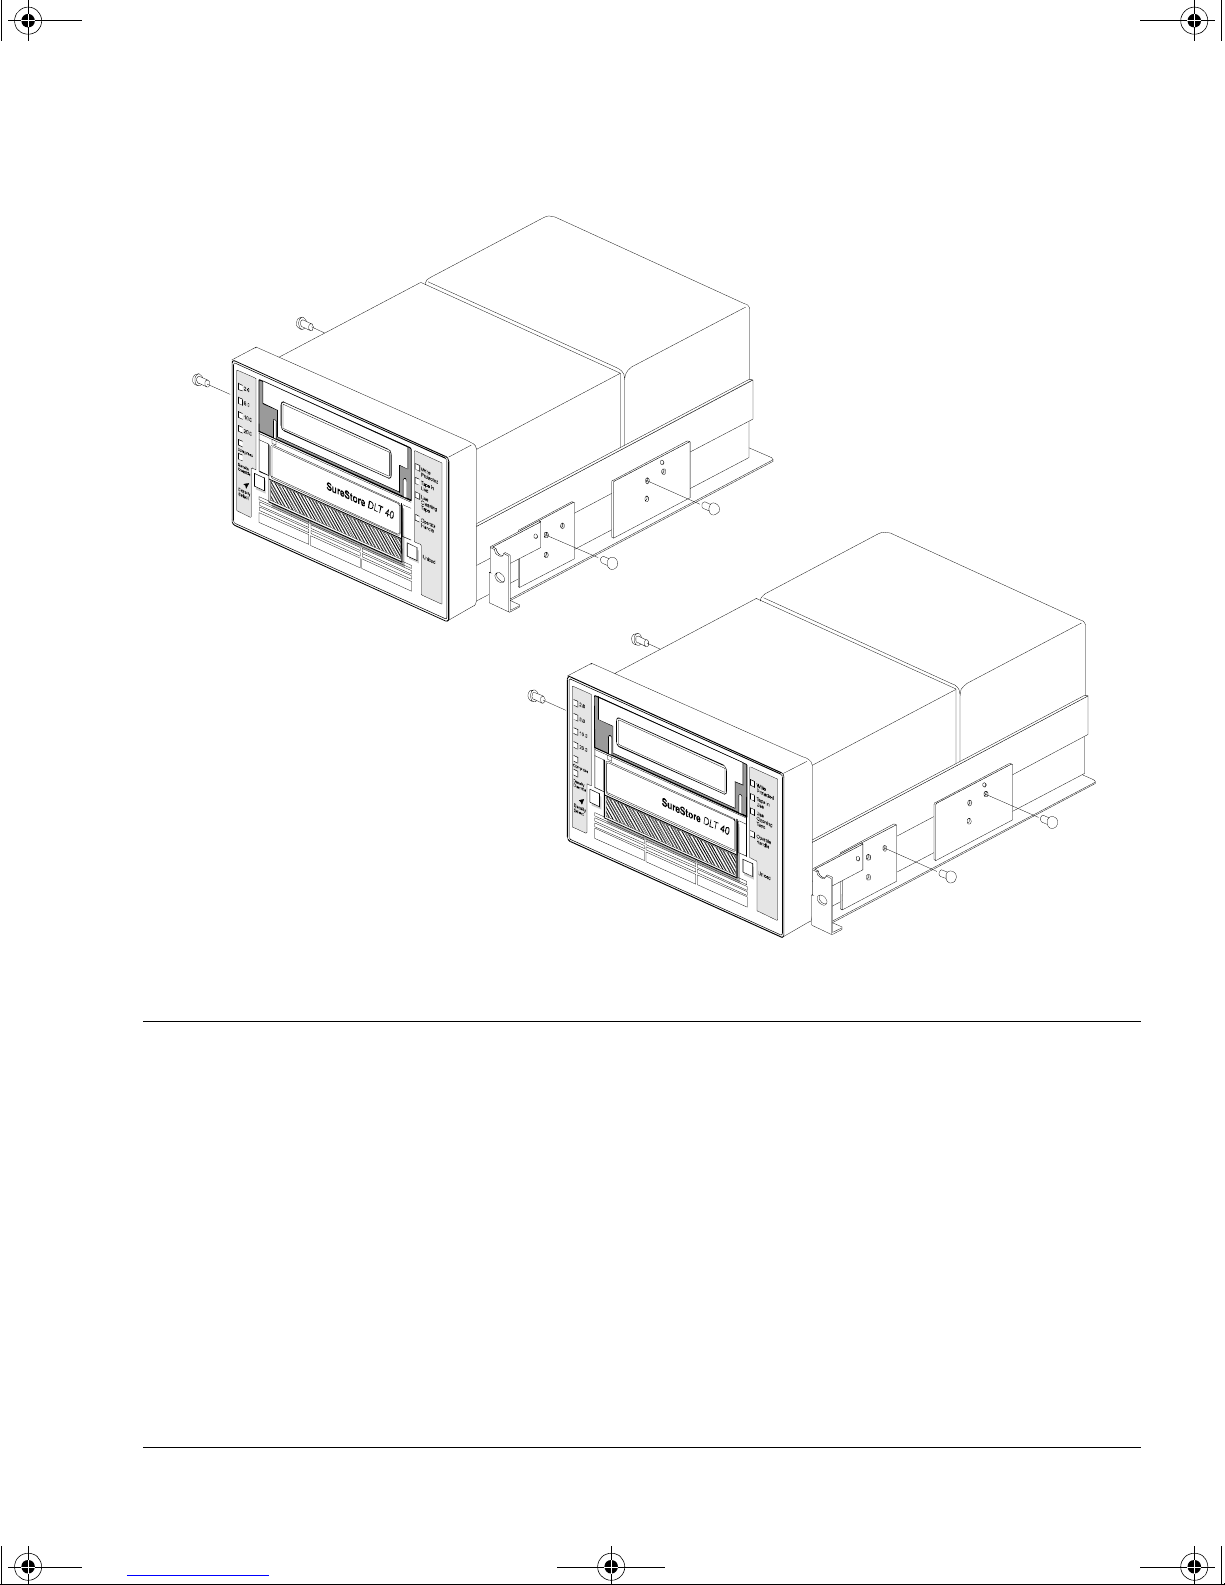
Step 4: Attach mounting rails or tray (if required)
Attach any mounting hardware (rails or tray) necessary for your
computer. In the box you will find a tray for use with HP NetServer
L-series and a pair of rails for use with Compaq servers.
Step 5: Install the drive
Slide the tape drive into the bay, but do not fasten with screws yet.
page 1-2
page 1-5
Overview
page 1-7
page 1-8
page 1-8
page 1-9
Step 6: Attach power and SCSI cables
Attach a spare power cable from the computer’s internal power supply.
Attach the drive to a spare connector on the SCSI ribbon cable.
page 1-10
Step 7: Secure the drive
Secure the drive in place with t he screws. Replace the computer’s cov er
and reconnect cables.
page 1-12
For UNIX systems only: Go to the HP SureStore DL T UNIX Configuration Guide
This will enable you to configure your system to support the drive
and to verify the installation.
On Completion
Power on the system and check that the tape drive is operational. Insert
the HP SureStore Tape CD-ROM. It contains drivers, backup software
and various utilities.
Register the tape drive
page 1-12
page 1-4

dlt.book Page ii Monday, February 12, 2001 5:42 PM
Copyright © 1999 Hewlett-Packard Limited.
The information contained in this document is
subject to change without notice.
This document contains proprietary information
which is protected by copyright. All rights are
reserved. No part of this docum en t may b e
photocopied, reproduced or trans lated to another
language without the prior written consent of
Hewlett-Packard Limited.
Hewlett-Packard shall not be liable for errors
contained herein or for in cidental or consequential
damages (includin g lost pro fits) in co nnect ion with
the furnishing , performance , or use of thi s material
whether based on warranty , contract, or other legal
theory.
November 1999
Part Number: C1579-90905
Printed in the UK
The DLTtape logo is a trademark of Quantum
Corporation in the U.S. and other countries
®
Windows
Microsoft Corporation
UNIX® is a registered trademark of X/Open
Company in the U.S. and other countries
is a U.S . registered trademark of
Product Details
Write your tape drive details here so you can find them easily if you need them.
Model name:
Model number:
Serial number:
Date purchased/installed:
SCSI ID:

dlt.book Page iii Monday, February 12, 2001 5:42 PM
Contents
Internal Drives—Install ation Overview inside front cover
1 Installing Your Internal Drive
Before You Start 1-2
Registering Your Tape Drive 1-4
Step 1: Check the Drive’s SCSI ID 1-5
Step 2: Attach Local Language Labels if Necessary 1-7
Step 3: Prepare the Mounting Bay 1-8
Step 4: Attach Mounting Rails or Tray (if required) 1-8
Step 5: Install the Drive 1-9
Step 6: Attach Power and SCSI Cables 1-10
Step 7: Secure the Drive 1-12
On Completion 1- 12
What Next? 1-13
2 Installing an External Drive
Before You Start 2-2
Step 1: Check the Drive’s SCSI ID 2-5
Step 2: Attach Local Language Labels if Necessary 2-8
Step 3: Attach the SCSI Termina tor 2-8
Step 4: Connect the SCSI Cable 2-8
Step 5: Connect the Power Cable 2-9
On Completion: 2-10
Registering Your Tape Drive 2-11
What Next? 2-12
3 Operating the Drive
Front Panel (HP SureStore DLT 80) 3-2
Front Panel (HP SureStore DLT 70) 3-4
Front Panel (HP SureStore DLT 40) 3-6
Operating the Drive 3-8
Using the Cartridge Locking Handle 3-9
The Power-On Self-Test 3-12
iii

dlt.book Page iv Monday, February 12, 2001 5:42 PM
Contents
4 Care of the Drive and Tape Cartridges
Cleaning the Tape Heads 4-2
Types of Tape Cartridges 4-4
Write-Protecting a Cartridge 4-4
Taking Care of Data Cartridges 4-5
Inspecting Cartridges Before Loading and After Unloading 4-6
Handling Tape Cartridges 4-7
Labeling Cartridges 4-8
Operating Conditions 4-8
Conditioning Cartridges 4-9
Storing Cartridges 4-9
Transporting Cartridges 4-9
How to detect a lost leader in a tape drive: 4-7
5 Tape Cartridge Densities and Compression
Density 5-2
Changing the Density and Compression for Writing 5-2
6 Troubleshooting
HP TapeAssure 6-2
If the Self-Test Fails 6-2
Other Problems 6-3
7 Product Specifications and Ordering Information
Product Specification A-2
Ordering Information A-5
8Customer Support
Warranty B-2
Hewlett-Packard Year 2000 Wa rranty B-3
Service and Support B-3
Contacting Customer Support B-5
Index
Regulatory Information
Installation Overview—External Drives
iv

dlt.book Page 1 Monday, February 12, 2001 5:42 PM
1
Installing Your Internal Drive
This chapter describes how to install an internal HP SureStore DLT drive.
• HPSureStoreDLT40i
• HP SureStore DLT 70i
• HPSureStoreDLT80i
Note For an overview of the installation process, see inside the front cover.
dlt.book Page 2 Monday, February 12, 2001 5:42 PM
Installing Your Internal Drive
Before You Start
Before You Start
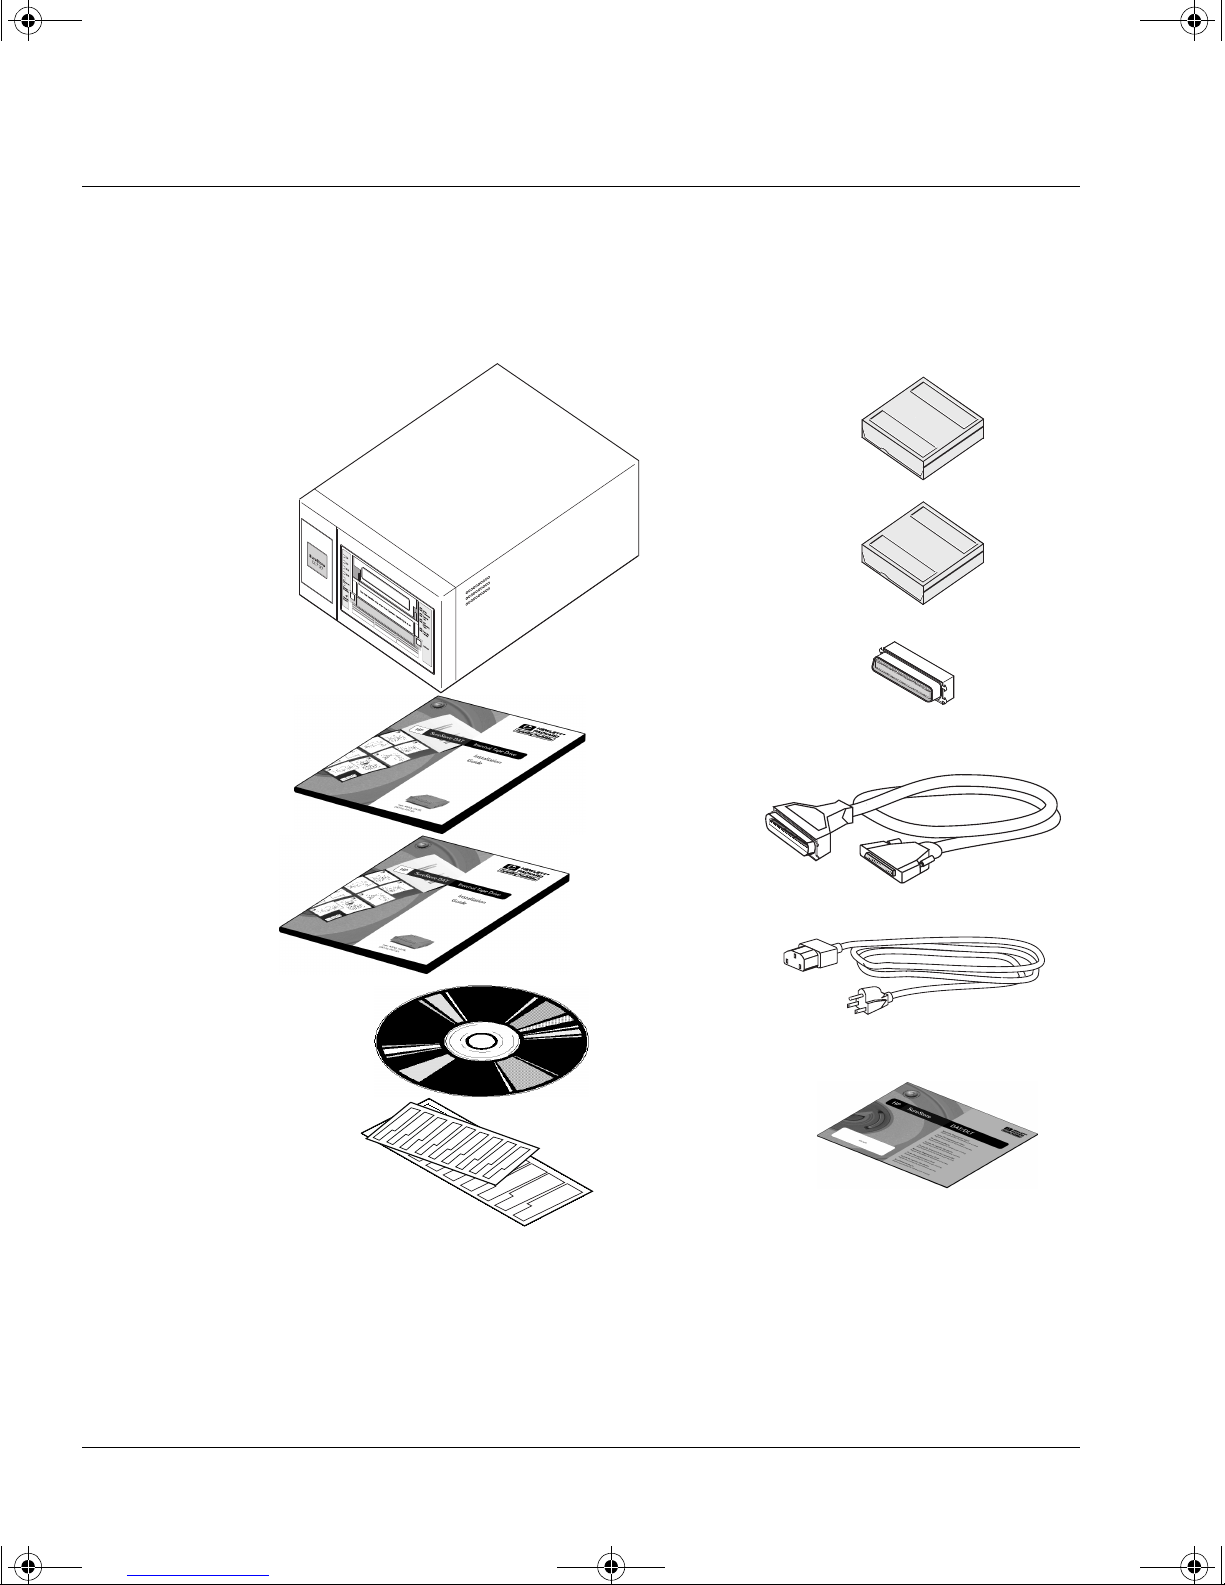
Check the Contents of the Box
Unpack the box containing the drive and identify the following items:
HP SureStore DLT™ drive
User’s Guide
(Please discard
unused languages in
recycling bin)
UNIX Configuration
Guide
HP SureStore Tape
CD-ROM containing:
•HPTapeAssure
• TapeAlert utilities
DLTtapeIV™
cartridge
Cleaning
cartridge
Compaq rails
with screws
HP NetServer
L-series
tray
Jumper kit
(five jumpers)
Warranty Registration
Card and
labels
Front panel labels
in different
languages
If any items appear to be mis sing or damaged, conta ct your supplier o r the
delivery company.
1-2
HP SureStore DLT 40i
only: 50-68 pin SCSI
adapter

dlt.book Page 3 Monday, February 12, 2001 5:42 PM
Check Sy stem Prerequisites
Before you start installing, make sure that your computer has the
following:
A properly installed and configured SCSI host adapter (SCSI-2 or SCSI-3
compliant)
For optimal performance, Hewlett-Packard recommends that your DLT
drive is placed on a dedicated SCSI bus. If this means you need to install a
new host adapter, contact your supplier . Many host adapters are available,
and your supplier will tell you which are suitable for HP SureStore DLT
drives.
HP SureStore DLT 40i only: An internal SCSI ribbon cable with a spare
50-pin connector
If your computer uses wide SCSI, you need to use the adapte r supplied with
the drive that enables you to connect a narrow SCSI device (50 pins) into
the wide SCSI bus (68 pins).
Installing Your Internal Drive
Before You Start
HP SureStore DLT 70i and 80i only: An internal SCSI ribbon cable with a
spare 68-pin connector. The drive requires a wide HBA to perform to
specification, or, in the case of the HP SureStore DLT 80i, an LVD (lowvoltage di ff erential ) HBA .
Two adjacent, 5¼-inch, half-height bays in which to install the drive
Note that the depth of the drive — 228.3 mm (9 in) behind the front bezel —
is greater than the depth of most 5¼-inch devices. Make sure that the bays
can accommodate this depth.
Mounting hardware
To install the drive, you may need to fix it to a set of rails or a tray:
• A tray for use with HP NetServer L-series is provided with the drive.
• A pair of rails for use with Compaq servers is provided with the drive.
• For other computers, trays or rails are likely to be supplied with the
system. For Dell rails, see Appendix A for order numbers.
Note Some computer companies use non-standard rails and do not include
spares with the computer. If this is the case with your system, you will
have to order rails from the computer manufacture r before y ou can install
the tape drive.
If you are not sure what type of rails to use, refer to your computer
documentation. You may want to have this documentation available for
reference during the installation process.
1-3

dlt.book Page 4 Monday, February 12, 2001 5:42 PM
Installing Your Internal Drive
Registering Your Tape Drive
Registering You r Tape Drive
You must register with HP to ensure that you benefit from the full 3-year
warranty period. The second and third years of warranty are subject to
registration within 30 days.
Y ou ca n register electronica lly on the internet or you can use th e W arranty
Registration card that is provided with your drive.
In order to ensure your registration is complete, there are a number of
questions on the registration card and electronic form that are mandatory.
Other questions a re opt ional. However, the more you feel able to complete ,
the better HP can meet your needs. (If you wish, you may register your
drive and choose not to receive any further information from HP.)
If you have internet access, register e lectronically as described below.
1 Select the “Warranty Registration” topic on the HP SureStore Tape
CD-ROM.
2 Select the “Register on the Web” link. This links you to HP’s Warranty
Registration web site.
3 Complete the regis tratio n form. Op tional q uestions are mark ed with a n
“*” and the text is in red.
4 Click the Submit button to forward your registration immediately to HP.
If you do not have internet access:
1 Complete the Warranty Registration card supplied with the drive.
Mandatory questions are in black, bold text.
2 Post or fax the completed form to HP.
1-4

dlt.book Page 5 Monday, February 12, 2001 5:42 PM
Step 1: Check the Drive’s SCSI ID
Note For optimal performance, Hewlett-Packard recommends that your DLT
drive be installed on a dedicated SCSI bus. This is shown in figure 1.8.
Your HP SureStore DLT drive is shipped with a default SCSI ID of 5, but
it can be assigned any unused ID . Do no t use SCSI ID 7, which is reserved
for the SCSI controller. You can use SCSI ID 0 provided the drive is on a
separate SCSI bus from the boot disk (as is recommended). Available IDs
are as follows:
• HP SureStore DLT 40i: 1 through 6
• HP SureStore DLT 70i and 80i: 1 through 6 and 8 through 15
Checking the SCSI IDs of Existing Devices
Installing Your Internal Drive
Step 1: Check the Drive’s SCSI ID
If you are installing on a UNIX system, check the UNIX Configuration
Guide for how to determine the SCSI IDs of ex isting devices.
If you are installing on a Microsoft Windows or NetWare system, install
and run HP TapeAssure from the HP SureStore Tape CD-ROM to check
your computer’s current SCSI configuration. There are HP TapeAssure
versions for Windows NT, Windows 95/98 and NetWare.
To do this, select “HP TapeAssure” from the Welcome page on the CDROM. Once HP TapeAssure is installed, you can run it from the Programs
menu in the Windows Start menu.
Note In Windows 95/98 or Windows NT, you can install HP TapeAssure di rectly
on the system to which the tape drive is connected. In NetWare, you will
need to install HP TapeAssure on the server from a client workstation
running Windows 95/98 or Windows NT, and then run HP TapeAssure
from the NetWare server console.
HP TapeAssure will check for the presence of a SCSI controller and its
driver software and identify the SCSI IDs of existing SCSI devices. View
the current configuration and determine whether you need to change the
SCSI ID from the default of 5. Exit HP TapeAssure after you view the SCSI
configuration informatio n .
Note If the program does not work correctly or hangs during processing, there
may be a compatibility problem with the SCSI card. The current version of
HP TapeAssure may not support Adaptec 1510 cards (6350 chip set) and
Symbios cards.
1-5
dlt.book Page 6 Monday, February 12, 2001 5:42 PM
Installing Your Internal Drive
Step 1: Check the Drive’s SCSI ID
If you need a different SCSI ID, you must set it by using jumpers on a set
of pins at the side of the drive as shown in figure 1.1.
There should be no jumpers on the block when you receive the dri ve. This
gives the drive a default SCSI ID of 5.
Figure 1.1 SCSI ID settings on internal drives
Side view of drive
The jumper block has five pairs of pins that are used as shown in figure 1.2.
Figure 1.2 SCSI ID jumper blocks
HP SureStore DLT 40i
HP SureStore DLT 70
i and 80i
The SCSI ID pins are used to set the ID as shown in figure 1.3.
Figure 1.3 SCSI ID jumper settings
SCSI ID jumper block Front panel
SCSI ID pins (three pairs)
Disable parity . A jumper set a cross thes e pins dis ables parity
checking. Normally you should leave this jumper OFF.
Remote ID prese nt. A jum per ac ross th ese p ins tel ls the hos t to
read the SCSI ID from the SCSI ID pins. Place a jumper across
these pins if you want the drive to have an ID other than 5.
SCSI ID pins (four pairs)
Remote ID prese nt. A jum per ac ross th ese p ins tel ls the hos t to
read the SCSI ID from the SCSI ID pins. Place a jumper across
these pins if you want the drive to have an ID other than 5.
(Default)
5 012346
HP SureStore DLT 70i
and 80i only:
891112131415
1-6
dlt.book Page 7 Monday, February 12, 2001 5:42 PM
To select another ID, refer to figure 1.3:
1 Place a jumper a cross th e left- most pin s (Remote ID Present ), to te ll the
2 Set the ID you want on the pins as shown in figure 1.3.
Whether you change the SCSI ID or not, make a note of the drive’s SCSI
setting on the inside of the front cover of this guide for future reference.
Caution Do not use SCSI ID 7, which is reserved for the SCSI controller
If the drive is on the same SCSI bus as the computer’s hard disks (not
recommended), do not use ID 0, which is normally reserved for the boot
disk.
Termination Power
Installing Your Internal Drive
Step 2: Attach Local Language Labels if Necessary
host to read the ID from the pins.
SCSI bus terminators require power from at least one device on the bus.
HP SureStore DL T dr ives a re set to provid e terminat ion power b y defaul t.
You should not need to change this.
If you do need to stop the d rive from providing of termination power,
remove the jumper o n t he righ tmos t jumpe r pi n bl oc k o n t he oppo site side
of the drive from the SCSI ID jumper block, as shown in figure 1.4.
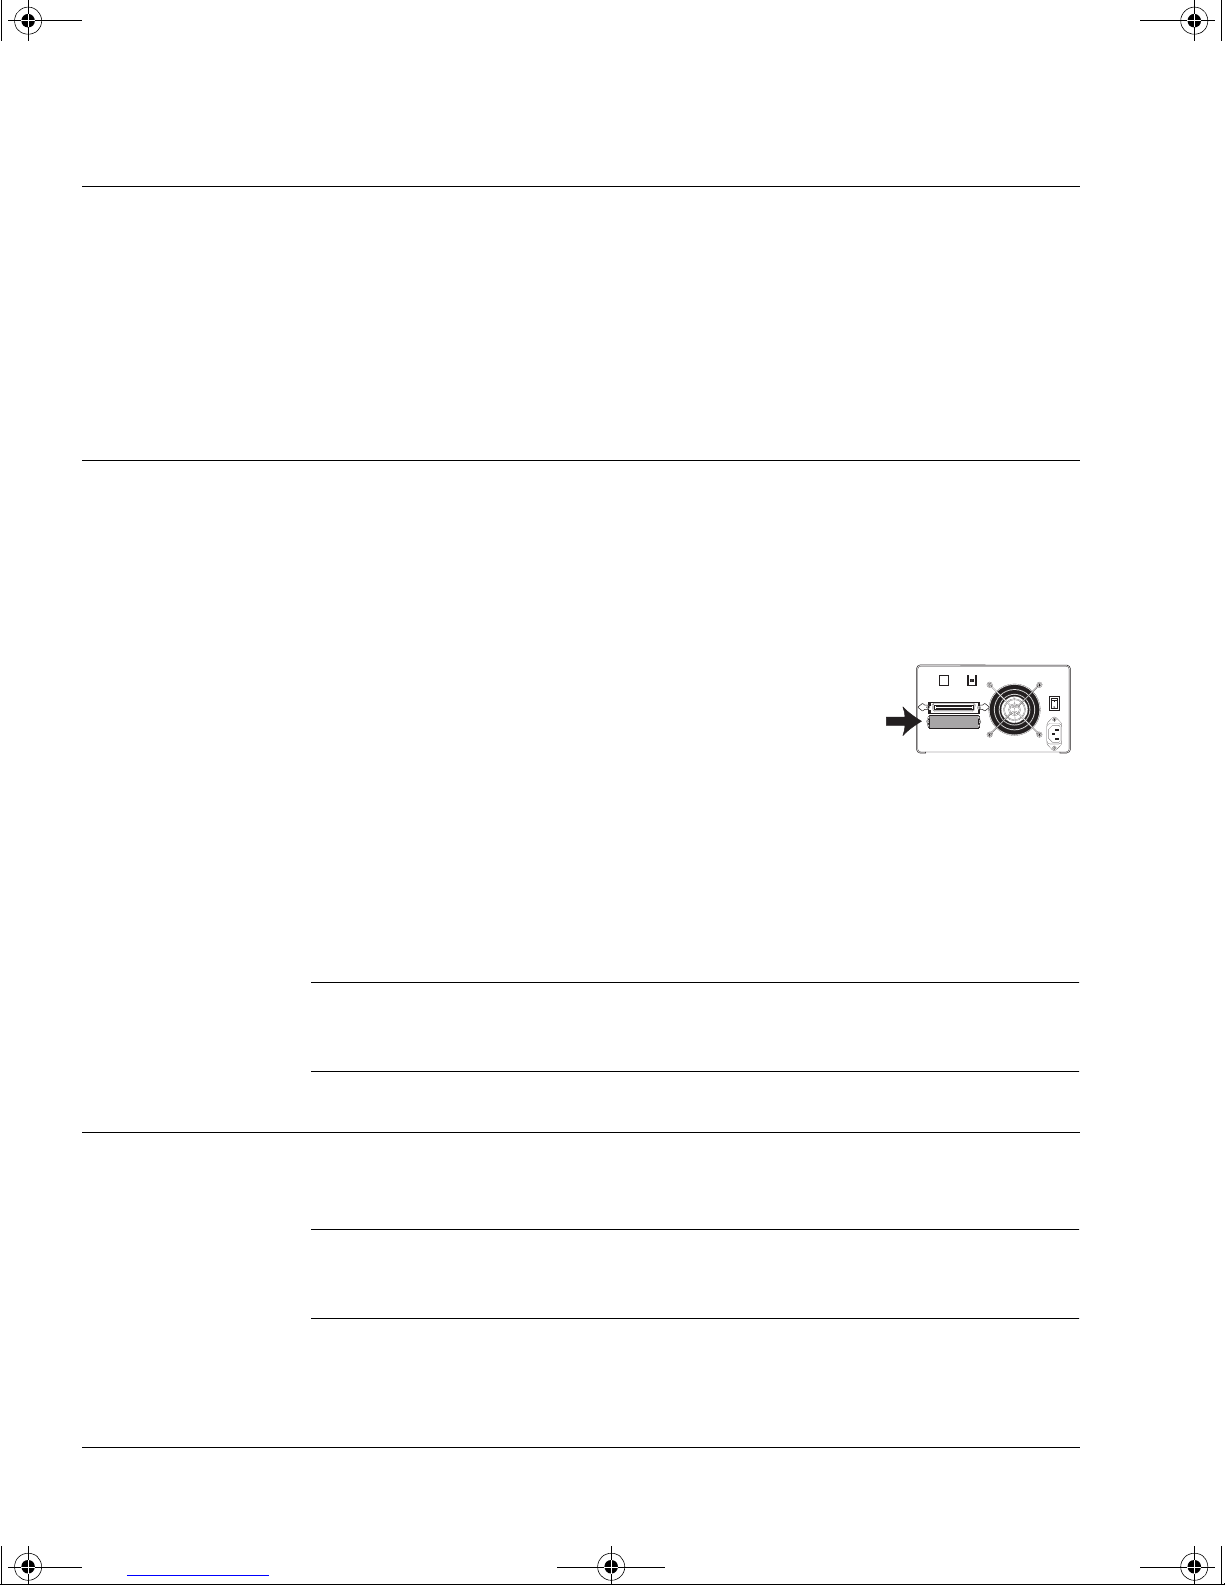
Figure 1.4 Location of the termination power block
Side view of drive
Front panel
No termination power
Termination power
Step 2: Attach Local Language Labels if Necessary
A set of labels for the front panel in several different languages is provided
with the drive. Identify those with your local language, peel them from the
backing paper and stick them fi rmly to the front panel of th e drive over the
English-language labels.
1-7

dlt.book Page 8 Monday, February 12, 2001 5:42 PM
Installing Your Internal Drive
Step 3: Prepare the Mounting Bay
Step 3: Prepare the Mounting Bay
Take the following steps to install the tape drive into your computer.
Caution To avoid damaging the computer, ensure that it is powered off before you
install the drive.
Static electricity can damage electronic components. To equalize the
electrostatic charges, touch a bare metal part of the computer (such as the
back plate) before you remove the tape drive from its bag.
a You may need a Phillips, flat-bladed or Torx screwdriver, depen ding on the
computer you have.
b Perform a normal system shutdown and turn off the computer and any
connected peripherals. Disconnect power cables from the outlet.
c Remove the cover from the computer.
As you work inside the computer, you may have to disconnect the SCSI
cable or power cable from other devices to maneuver the new drive into
place. If you have to d o this, ma ke a note of their position s and conne ctions
so that you can replace them correctly later.
d Remove the front cover plates from two spare, adjacent, 5¼-inch, half-
height bays of the computer. Keep the screws for use in step 7.
Step 4: Attach Mounting Rails or Tray (if required)
If your computer requires special rails or othe r hardware to install the tape
drive, mount them on the tape drive in this st ep.
Figure 1.5 shows how to use the tray provided with internal drives.
The drives are longer than most 5½-inch devices and some cabinets are not
deep enough for the drives to be inserted fully. For these cabinets, t he tray
allows the drive to be fixed so that the front protrudes slightly (position 1).
In deeper cabinets, use position 2, so that the drive is fully inserted.
1-8
dlt.book Page 9 Monday, February 12, 2001 5:42 PM
Figure 1.5 Attaching the tray to the drive
Installing Your Internal Drive
Step 5: Install the Drive
Position 1:
With the fixing screws in the
frontmost holes, the front of the
drive protrudes from the front of
the cabinet.
Use position 1 if there is there is
not enough depth in the cabinet
for position 2.
Position 2:
With the fixing screws in the
rearmost holes, the front bez el of the
drive lies flush on the cabinet.
Use this position if there is enough
depth in the cabinet.
Step 5: Install the Drive
Slide the drive into the open bay. If yo ur computer does not use mounting
hardware, check that the holes in the chassis are aligned with the holes in
the side of the tape drive.
Do not secure the drive with scre ws a t t his s tage becau se you ma y h a ve t o
move the drive slightly to get the cables into place.
1-9
dlt.book Page 10 Monday, February 12, 2001 5:42 PM
Installing Your Internal Drive
Step 6: Attach Power and SCSI Cables
Step 6: Attach Power and SCSI Cables
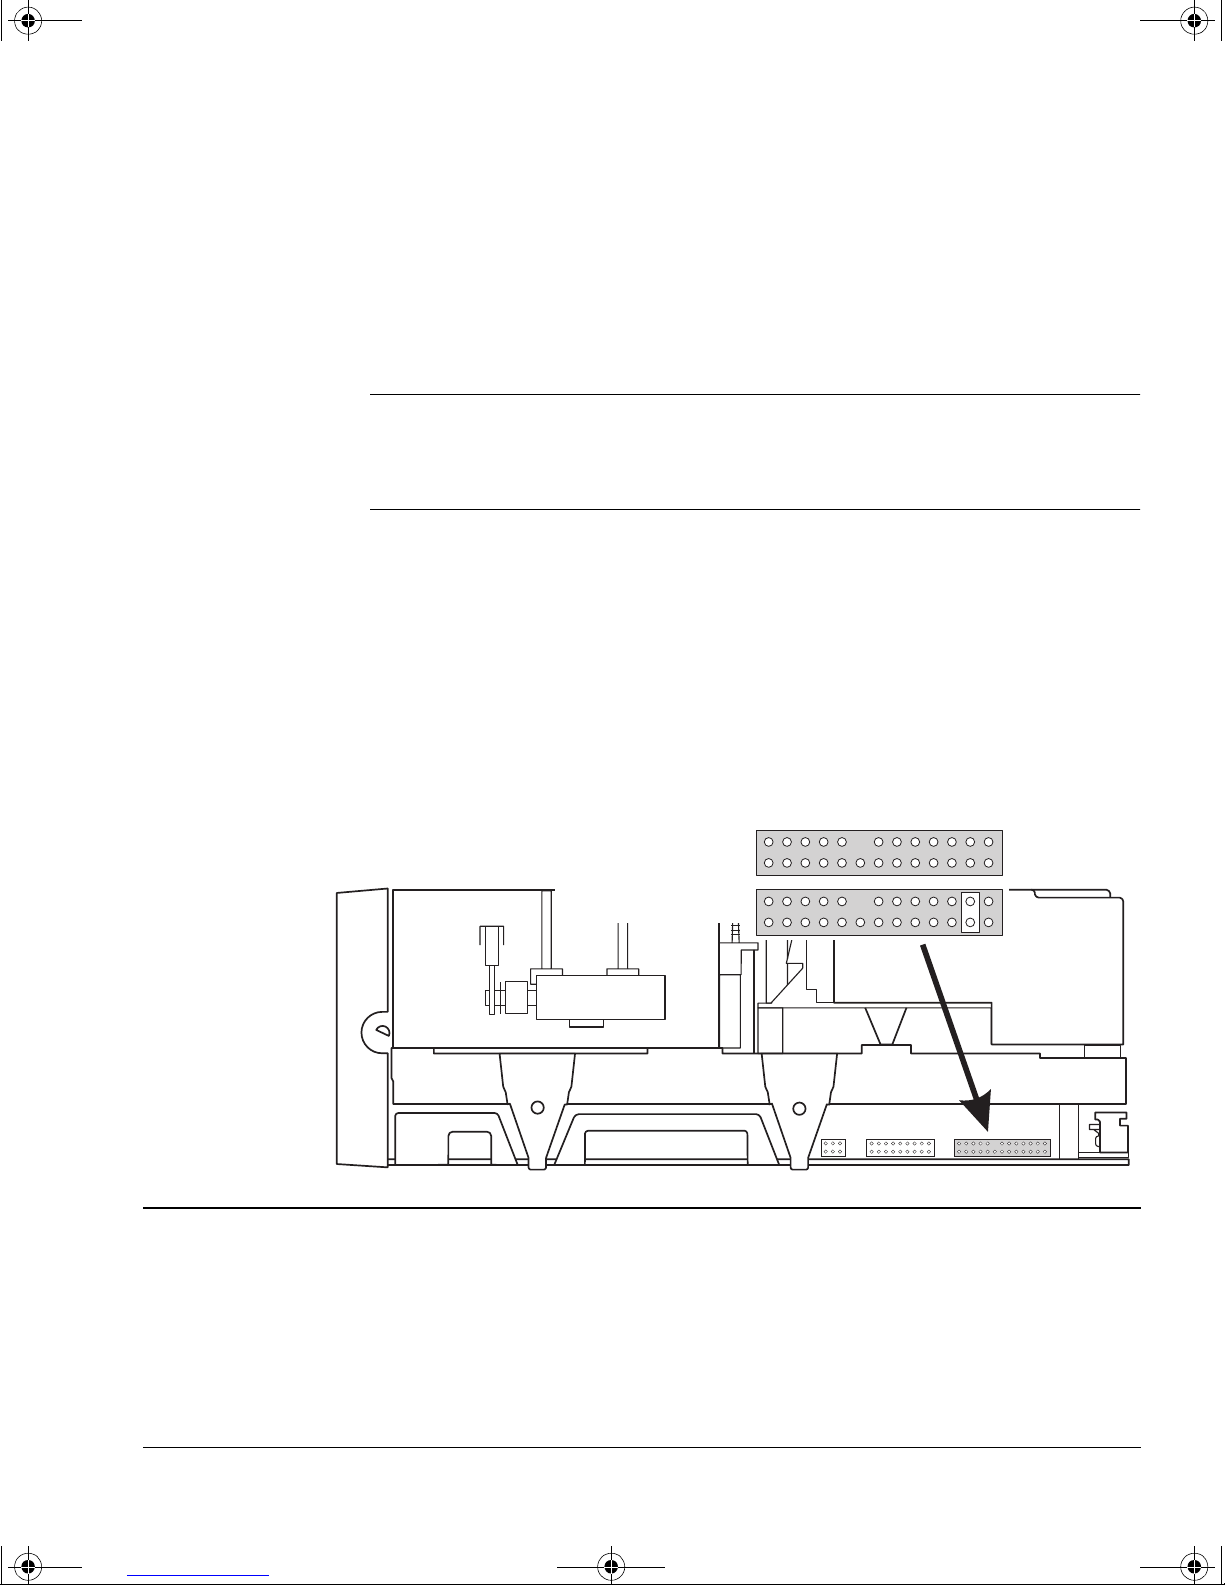
a Attach a spare power cable from the computer’s internal power supply to
the rear of the tape drive, as shown in figure 1.6.
Figure 1.6 Attaching the power cable and SCSI cable
HP SureStore DLT 40i
Rear of drive
HP SureStore DLT 70i
and 80i
b Attach the SCSI cable.
SCSI connector
SCSI connector
Power connector
Rear of drive
Power connector
1-10

dlt.book Page 11 Monday, February 12, 2001 5:42 PM
Attaching the 50-Pin to 68-Pin Adapter (DLT 40i drives only)
The DLT 40i drive has a 50-pin narrow SCSI connector. If your computer
uses wide SCSI, you will need a cable or adapter that enables you to
connect a narrow SCSI device (50 pins) into the wide SCSI bus (68 pins).
HP provides a wide to narrow SCSI adapter as standard with all internal
tape drives. Plug the adapter into the 68-pin SCSI connector on the
computer and then connect a SCSI cable from the connector to the tape
drive.
Figure 1.7 HP SureStore DLT 40i only: Attaching the SCSI adapter
Installing Your Internal Drive
Step 6: Attach Power and SCSI Cables
Connect to a
SCSI cable and
the tape drive
Plug into the computer’s
SCSI connector
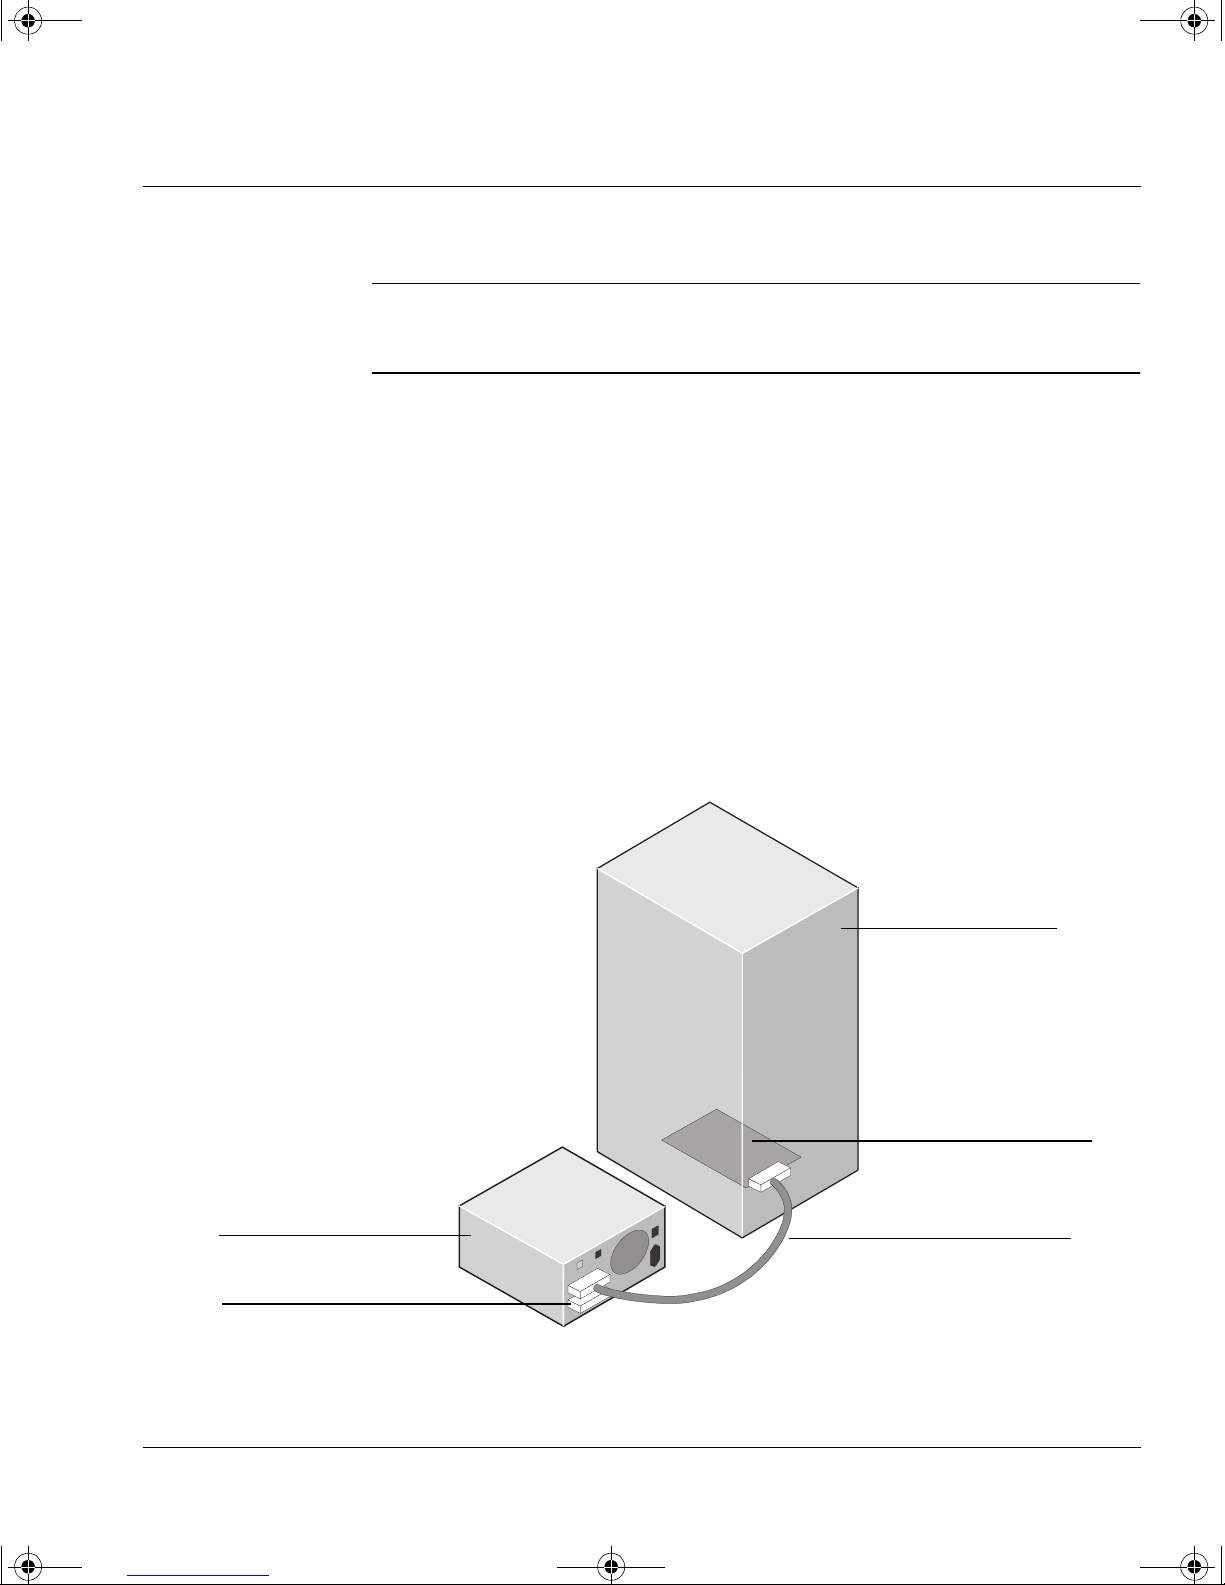
• If you are using a new cable, attach the end farthest from the terminator
block to the host adapter and attach one of the connectors to the tape
drive, as shown in figure 1.6.
• If you are u sin g an existing inte rn al ca bl e, simply atta c h t he d ri ve to a
spare connector on the computer’s SCSI ribbon cable. (There may be
other SCSI devices already connected to the cable, though this is not
recommended.)
Figure 1.8 Connecting an internal drive
Terminator block
SCSI ribbon cable
Tape drive
SCSI controller connection
1-11

dlt.book Page 12 Monday, February 12, 2001 5:42 PM
Installing Your Internal Drive
Step 7: Secure the Drive
Step 7: Secure the Dr ive
a Secure the tape drive to the computer using the screws you removed in
step 3d.
b Replace the cover on the computer and reconnect the power cables.
On Completion
Verify the Installation
Note If you are installing the drive in a UNIX system, go now to the UNIX
Configuration Guide to configure your system to support the drive and to
verify the installation.
Once you have installed the tape drive, you should verify that it is
functioning properly before you store your valuable data. If you have a
Windows NT, Windows 95/98 or NetWare system, the HP TapeAssure
software provided on the HP SureStore T ape CD-ROM will perform a series
of tests to verify that the drive has been prop erly installed and provide
guidance on what to do if there is a problem.
1 Switch on the computer. The drive will run its self-test, which takes about
13 seconds if no cartridge is loaded. At the end of the self-test, only the
green “Operate H andl e” light should be lit (assuming there is no cartridge
in the drive). Read more about the front panel lights in Chapter 3.
2 Verify that the tape drive installation was successful.
If you are installing on a Windows 95/98, Windows NT , or NetW are system,
use HP TapeAssure to verify that the tape drive is operational.
• Select HP TapeAssure from the Windows Start menu. (If you did not
install TapeAssure in Step 1, install it now from the Welcome page on
the HP SureStore Tape CD-ROM.) No other backup software should be
running at the same time.
• Have a blank cartridge ready for the backup and restore test, which you
should perform to check that the drive can write data to tape. (For tape
loading instructions, see page 3-10.)
1-12

dlt.book Page 13 Monday, February 12, 2001 5:42 PM
Install Backup Software and Driver
Note If you are installing the drive in a UNIX system, go to the UNIX
Configuration Guide to configure your syst em to support the drive and to
verify the installation.
Before you can use the tape drive, you will need a backup application with
driver software that supports your tape drive model.
Depending on which backup software you use, the driver may be supplied
on the HP SureStore Tape CD-ROM, your backup software disks, or your
operating system disk s. See the appropriate
directory on the HP SureStore Tape CD-ROM for which drivers are
available for your specific model.
Installing Your Internal Drive
What Next?
README file in the DRIVERS
What Next?
If the tape drive has passed the tests run by HP TapeAssure, you can be
confident that you have installed it correctly. You are now ready to put it
to regular use backing up your system. See your backup application’s
documentation for instructions on how to back up and restore data.
Chapter 3 provides details of how to operate your drive. Make sure you
read Chapter 4 regarding the care of the drive and cartridges.
1-13

dlt.book Page 14 Monday, February 12, 2001 5:42 PM
Installing Your Internal Drive
What Next?
1-14

dlt.book Page 1 Monday, February 12, 2001 5:42 PM
2
Installing an External Drive
This chapter describes how to install an external HP SureStore DLT drive.
• HP SureStore DLT 40e
• HP SureStore DLT 70e
• HP SureStore DLT 80e
Note For an overview of the installation process, see inside the back cover.
dlt.book Page 2 Monday, February 12, 2001 5:42 PM
Installing an External Drive
Before You Start
Before You Start
Check the Contents of the Box
Unpack the box containing the drive and identify the following items:
HP SureStore DLT™ drive
Note: the DLT 80e is
narrower than the
drive shown here
User’s Guide
(Please discard
unused languages in
recycling bin)
UNIX Configuration
Guide
DLTtapeIV™
cartridge
Cleaning
cartridge
SCSI
terminator
SCSI cable
Power cable*
HP SureStore Tape
CD-ROM containing:
• HP TapeAssure
• TapeAlert utilities
Front panel labels
in different
languages
If any items appear to be missing or damaged, contact your supplier or
the delivery company.
* Hewlett-Packard supplies the correct power cable for each country. Your power cable may
differ from the illustration.
2-2
War ranty Registration
Card and
labels

dlt.book Page 3 Monday, February 12, 2001 5:42 PM
Check Sy stem Prerequisites
To install and use your new tape drive, you will need the following:
A properly installed and configured SCSI host adapter (SCSI-2 or SCSI-3
compliant).
For optimal performance, Hewlett-Packard recommends that your DLT
drive is placed on a dedicated SCSI bus. If this means you need to install a
new host adapter, contact your supplier . Many host adapters are available,
and your supplier will tell you which are suitable for HP SureStore DLT
drives.
HP SureStore DLT drives have the following SCSI characteristics:
• The HP SureStore DL T 40e is an 8-bit narr ow single-ended SCSI device,
• The HP SureStore DLT 70e is a 16-bit fast, wide, single-ended SCSI
Installing an External Drive
Before You Start
which can be connected to either a narrow or wide SCSI bus.
device, which must be connected to a wide SCSI host adapter.
• The HP SureStore DLT 80e is an ultra-wide SC SI-2 device, which can
be used with both LVD (low-voltage differential) and single-ended host
bus adapters (HBAs). The drive is not compatible with SCSI-2 highvoltage differential SCSI HBAs.
If you want the full benefits of longer cable lengths and full-speed
compatibility with other LVD devices on the same bus, choose an LVD
compatible HBA.
An appropriate SCSI cable , if the one suppli ed with the tape drive do es not
fit your computer.
• The HP SureStore DLT 40e is provided with a 68-pin to 50-pin cable
with active high-byte termination. Use this if your computer has a
68-pin wide SCSI connector, so that the unused lines in the cable are
terminated properly.
If you need a different cable, for example, if you a re inst al ling the d r ive
on a narrow SCSI bus, see page A-5 for part numbers and descriptions.
HP SureStore DLT 40e drives require a SCSI cable with a 50-pin lowdensity bail connector at one end to connect to the drive.
• HP SureStore DLT 70e is provided with a 68-pin to 68-pin cable, which
connects the drive to a wide SCSI connector.
• HP SureStore DLT 80e is provided with a 68-pin to 68-pin cable, which
connects the drive to an LVD connector or a wide SCSI connector.
If you are installing the drive on a UNIX system, refer to the separate
UNIX Configuration Guide for further information about the systems
supported and software configuration.
2-3

dlt.book Page 4 Monday, February 12, 2001 5:42 PM
Installing an External Drive
Before You Start
Backup software that suppo rts your tape drive.
Replica Backup for Single Server is included with the drive.
Check with your suppli er for backup applications compatible with your
tape drive and operating sys tem.
Select a Site for the Drive
You need to find a firm flat surface on which to place the drive. The site
should satisfy the following conditions:
• It should be away from doors and windows that open outside to avoid
sudden changes in temperature.
• It should be reasonably free from dust and excessive humidity. Do not
place the drive on the floor, near a door, near a heavily-traveled
walkway, or near a coffee machine.
• Keep the drive away from laser printers and photocopiers where there
could be a risk of toner entering the drive.
• Avoi d placing the drive on furniture that could get kn ocked.
For more details on the conditions under which the drive should operate,
see “Environmental Specification” on page A -3.
Power Down the Computer
Shut down the operating system on the computer to which the drive is to
be attached and power down the computer.
2-4
dlt.book Page 5 Monday, February 12, 2001 5:42 PM
Step 1: Check the Drive’s SCSI ID
Note For optimal performance, Hewlett-Packard recommends that you install
your DL T drive on a dedicated SCSI bus. This arrangement is shown in
figure 2.1.
Your HP SureStore DLT drive is shipped with a default SCSI ID of 5, but
it can be assigned any unused ID in the following ranges:
Do not use SCSI ID 7, which is reserved for the SCSI controller. You can
use SCSI ID 0 provided the drive is on a separate SCSI bus from the boot
disk (as is recommended).
Installing an External Drive
Step 1: Check the Drive’s SCSI ID
HP SureStore DLT 40e 1 through 6
HP SureStore DLT 70e/80e 1 through 6, 8 through 15
Whether you intend to change t he SCSI ID or not, always check the ID
when installing the drive to ensure that it has not accidentally been
changed.
Figure 2.1 Recommended SCSI configuration for an external drive
Host computer
SCSI host adapter
(fitted in the host and
terminated)
DLT drive
SCSI terminator
SCSI cable,
connected one end
to the host adapter,
the other to the drive
2-5

dlt.book Page 6 Monday, February 12, 2001 5:42 PM
Installing an External Drive
Step 1: Check the Drive’s SCSI ID
If you follow this recommendation, the following points apply:
• You can leave the SCSI ID at 5 (the default).
• You must attach the SCSI terminator to one of the SCSI connectors on
the rear of the drive.
If you choose to have other devices on the SCSI bus (not recommended with
a DLT drive):
1 Determine whe ther you need to c hange t he SC SI ID of the tape dr ive f rom
the default of 5.
• If you are installing on a UNIX system, check the UNIX Configuration
Guide for how to determine the SCSI IDs of ex isting devices.
• If you are installing on a Microsoft Windows or NetW are system, install
and run HP TapeAssure from t he HP SureStore Tape CD-ROM to check
your computer’s current SCSI configuration. There are HP TapeAssure
versions for Windows NT, Windows 95/98 and NetWare.
To do this, select “HP TapeAssure” from the Welcome page on the CDROM and follow the instructions on the screen. Once HP TapeAssure is
installed, you can run it from the Programs menu in the Windows Start
menu.
Note In Windows 95/98 or Windows NT, you can install HP TapeAssure di rectly
on the system to which the tape drive is connected. In NetWare, you will
need to install HP TapeAssure on the server from a client workstation
running Windows 95/98, and then run HP Ta peAssure from the NetWare
server console.
HP TapeAssure will check for the presence of a SCSI controller and its
driver software and identify the SCSI IDs of existing SCSI devices. View
the current configuration and determine whether you need to change
the SCSI ID from the default of 5. Exit HP TapeAssure after you view
the SCSI configuration information.
Note If the program does not work correctly or hangs during processing, there
may be a compatibility problem with the SCSI card. T he current version of
HP TapeAssure may not support Adaptec 1510 cards (6350 chip set) and
Symbios cards.
2-6
dlt.book Page 7 Monday, February 12, 2001 5:42 PM
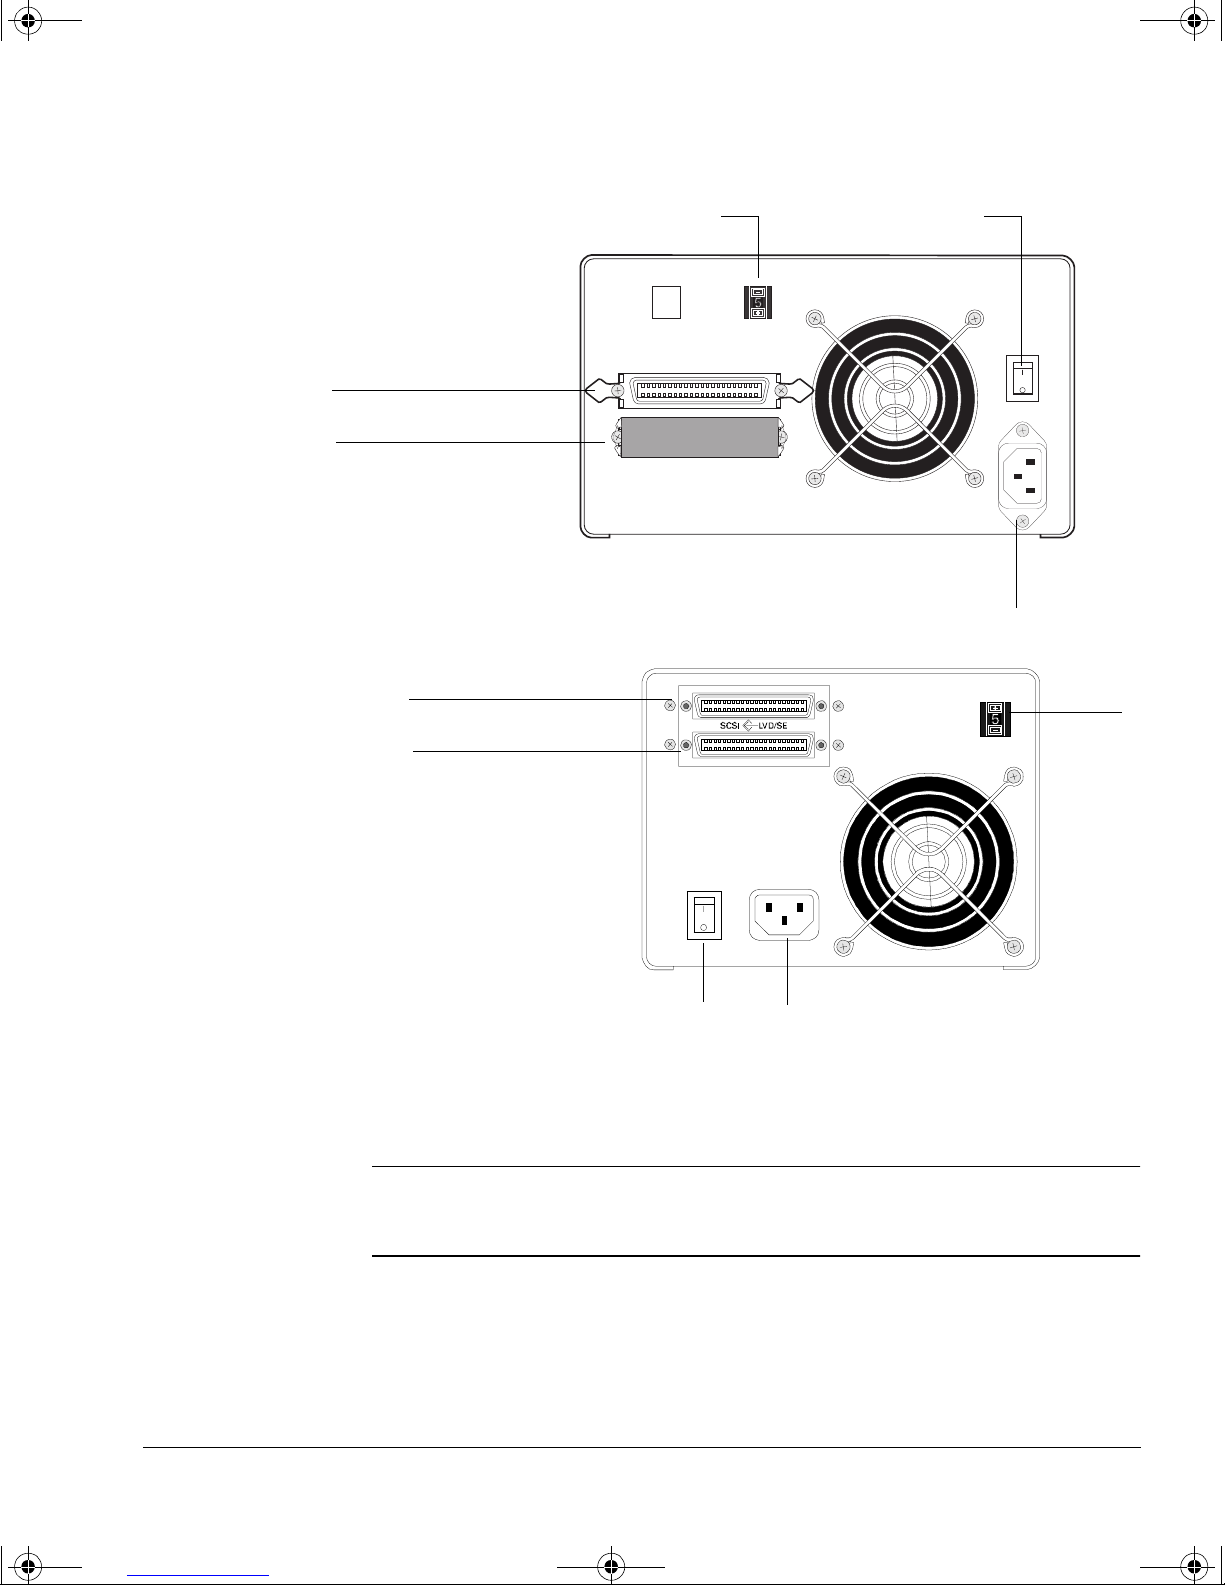
Figure 2.2 Rear panel of an HP SureStore DLT 40e and 70e drives
SCSI connector 1
SCSI connector 2
with terminator
fitted
SCSI ID
Installing an External Drive
Step 1: Check the Drive’s SCSI ID
Power switch
Note: HP SureStore DL T 70e drives have 68-pin thumb-screw
SCSI connectors, not the 50-pin connectors shown here.
Figure 2.3 Rear panel of an HP SureStore DLT 80e drive
SCSI connector 1
SCSI connector 2
Power switch
2 Change the SCSI ID . Use a ball-point pen or si milar pointed obje ct to press
the + and
− buttons above and below the SCSI ID display on the rear of the
drive to increase or decrease the number. Do not use a pencil because
particles of pencil lead might get into the drive.
Power
connector
SCSI ID
Power connector
Caution Both the computer and tape drive check the SCSI ID only at power-on.
Always power-cycle the dri ve and reboot the computer after you change
the SCSI ID.
2-7
dlt.book Page 8 Monday, February 12, 2001 5:42 PM
Installing an External Drive
Step 2: Attach Local Language Labels if Necessary
Step 2: Attach Local Language Labels if Necessary
A set of labels for the front panel in several different languages is provided
with the drive. Identify those with your local language, peel them from the
backing paper and stick them fi rmly to the front panel of the dri ve over the
English-language labels.
Step 3: Attach the SCSI Terminator
You need to attach the SCSI terminator provided with the drive. The
terminator is kept separate from the drive in the box when shipped from
the factory to avoid damage.
1 Connect the SCSI terminator to either of the SCSI
connectors on the rear of the drive.
2 Secure the connector firmly in place.
The only situation in which you do not need to attach
the terminator is if the drive is situated in the middle of the SCSI bus with
some other device at the end. This should not be the case if you follow HP’s
advice to place your DLT drive on its own on a dedicated SCSI bus in order
to achieve optimal performance. If you choose to ignore this
recommendation, plug the SCSI cable of the next device into the second
SCSI connector.
Note HP SureStore DLT 80e only: The terminator supplied with the drive is
multi-mode and automatically senses whether the bus is LVD (low-voltage
differential) and SE (single-ended) and terminates correctly.
Step 4: Connect the SCSI Cable
Caution To avoid damaging the computer or tape drive, ensure that both they and
any other devices attached to the SCSI bus are powered off while you
attach the SCSI cable.
2-8

dlt.book Page 9 Monday, February 12, 2001 5:42 PM
NotesHP SureStore DLT 40e only: If you are installing the drive on a system
that has a 68-pin wide SCSI connector, use the 68-pin to 50-pin cable
provided with the drive. This incorporates active termination so that the
unused lines are properly terminat ed. Other cables may cause problems.
HP SureStore DLT 80e only: The drive is an ultra-wide SCSI compatib le
device. It can be used with both LVD and SE host bus adapters. It cannot
be used with SCSI high-voltage differential HBAs.
Note that if you combine SE a nd L VD dev ices on the same bus, the h ost bus
adapter will automatically switch to single-ended mode and optimum
performance for any device on the bus will be at Ultra speeds and cable
length. This means that the pe rformance of any Ultra2 device s will drop to
that of Ultra devices. All other devices will operate at their opti mum speed.
If you connect only LVD devices, the bus will operate in low voltage
differential mode and Ultra2 speeds will be enabled. You can use a
combination of Ultra and Ultra2 devices. Each device will operate at its
optimum speed.
Installing an External Drive
Step 5: Connect the Power Cable
1 Perform a normal system shutdown and turn off the computer and any
connected peripherals. Disconnect power cables from the outlet.
2 Attach one end of the SCSI cable to the free SCSI
connector on the rear of the drive and secure the
connector firmly in place.
3 Connect the other end of the cable to the computer’s
external SCSI connector.
Step 5: Connect the Power Cable
An external HP SureStore DLT drive will operate using any voltage in the
range 100–240 volts. No a djustment is ne eded. T o connect your driv e to the
power supply, proceed as follows:
1 Ensure that the power switch on the drive is off (set to
2 Connect the power cable to the connector on the rear
of the drive.
0). See figure 2.3 .
3 Plug the other end of the cable into the power outlet.
2-9
 Loading...