

Page 1

Connecting the
CD-Writer 6020
R
U.S.: Hewlett-Packard Company, 800 S. Taft Ave., Loveland, CO 80537
Europe: Hewlett-Packard Nederland B.V., P.O. Box 58144, 1040 HC Amsterdam, The Netherlands
F1166 Rev. A
Copyright 1996. Hewlett-Packard Company. All rights reserved.
Hewlett-Packard is a registered trademark of the Hewlett-Packard Company. Easy-CD is a registered trademark of Incat
Systems, an Adaptec Company. Microsoft and Windows are U.S. registered trademarks of Microsoft Corporation. Pentium
is a U.S. registered trademark of Intel Corp. Names of products mentioned herein are used for identification purposes only
and may be trademarks and/or registered trademarks of their respective company.
Printed in USA.
Page 2

ii
La ser Sa fe ty
This unit employs a laser. Do not remove the cover or attempt to service this
device when connected due to the possibility of eye damage.
Laser-Sicherheit
In das Gerät ist ein Laser eingebaut. Nehmen Sie die Abdeckung nicht ab und
versuchen Sie nicht, das Gerät zu reparieren, solange es angeschlossen ist. Es
besteht die Gefahr einer Augenverletzung.
CAUTION
Use of controls or adjustments or performance of proced ures other than those
specified herein may result in hazardous laser radiation exposure.
WARNUNG
Die Vornahme von Regelungen oder Einstellungen oder die Durchführung von
Verfahren, die nicht in diesem Dokument angegeben sind, kann eine gefährliche
Einw irk ung vo n L a se r st r ahlung zu r Folg e ha ben .
Class 1 Laser Product
Klass 1 Laserapparat
Luokan 1 Laserlaite
Klasse 1 Laser-Produkt
CAUTION:
VARO!
säteesen.
VARNING:
strålen.
ADVERSEL:
stråling.
DANGER:
beam.
VORSICHT:
Nicht dem Strahl aussetzen.
Invisible laser radiat ion when open. Avoid exposure to beam.
Avattaessa ole t al tiina n äkym ätt ömälle laser sätteilylle älä katso
Osynlig laserstrålning när denna del är öppnad betrakta ej
Usynlig laserstråling ved åbning. Undgå unsaettelse for
Invisible laser radiation when open. A void direct exposure to
Unsichtbare Laserstrahlung wenn Abdeckung geöffnet.
Page 3

Laser
Type: Semiconductor laser GaAlAs
Wave length: 775~795 nm (at 25°C)
Output power: 2.5 mW (read), 35 mW (write)
Beam divergence: 60 degrees
Notice
Europe: This drive shall be installed only with an EN60950 (IEC950) approved
Power supply.
USA/Canada: This drive is for use only with IBM compatible UL listed personal
computers.
For Europe
This drive is in conformity with the EMC directive and low-voltage directive.
iii
Interference
This device complies with Part 15 of the FCC Rules. Operation is subject to the
following two conditions: (1) this device may not cause harmful interference
(2) this device must accept any interference received including interference that
may cause undesired operations.
Federal Communications Commission R.F.
Interference Statem ent
WARNING: This equipment has been tested and found to comply with the limits
for a Class B digital device, pursuant to Part 15 of the FCC Rules. These limits are
designed to provide reasonable protection against harmful interference in a
residential installation. This equipment generates, uses and can radiate radio
frequency energy and, if not installed and used in accordance with the
instructions, may cause harmful interference to radio communications. However,
there is no guarantee that interf erence will not occur in a particular installation. If
this equipment does cause harmful interference to radio or television reception,
which can be determined by turning the equipment off and on, the user is
encouraged to try to correct the interference by one or more of the following
measures:
Page 4

iv
■
Reorient or relocate the receiving antenna.
■
Incre ase the separation between the equipment and receiver.
■
Connect the equipment into an outlet on a circuit different from that to
which the receiver is connected.
■
Consult the dealer or an experienced radio/TV technician for help.
Inform a tio n for user :
CAUTION: C hanges or mo dific ations to th is e quipment n ot exp re ssly appro ved by
Hewlett-Packard could result in violation of Part 15 of the FCC rules.
Notice for Canada
This digital apparatus does not exceed the Class B limits for radio noise emissions
from digital apparatus as set out in the radio interferenc e regulations of the
Canadian Depa rtme nt of Commu nicat ion s.
Le présent appareil numérique n'émet pas de bruits radioélectriques dépassant les
limites applicables aux appareils numériques de Classe B prescrites dans le
règlement sur le brouillage radioélectrique édicté par le Ministère des
Communic a tions du Canada.
Canadian Standards Association Information
Statement
INSTRUCTION TO USER:
WARNING: This component is only considered to be approved when installed in
CSA certified equipment evaluated to the standards C22.2 No. 220-M1986 or
C22.2 No. 950-M89. The operator accessibility into the end use enclosure is
defined with strict accordance in the operator's manual for the installation of
components into the equipment.
Page 5

One-Year Limited Warranty
Hewlett-P ackard (“HP”) warrants to the Purchaser that the HP hardware and
software media will be free from defects in materials and workmanship and that
the software will execute its programming instructions when properly installed.
HP does not warrant that the software will be uninterrupted or error free.
If HP receives notice of such defects during the warranty period, HP will, at its
option, either repair or replace such products. To obtain service, Purchaser must
return the hardware to HP. To obtain assistance on where to deliver the product,
see the section “Returning Your Drive” in this Installation Guide. The postage,
shipping insurance and risk of loss when returning a product to HP shall remain
with purchaser. HP shall pay for postage, shipping and insurance when returning
repaired product to purchaser. HP may use reconditioned or like new parts or units
at its sole discretion when repairing or replacing any product. Repaired products
carry the same amount of outstanding warranty as from original purchase or 90
days, whichever is greater. Any claim under this warranty must include a dated
proof of purchase or invoice. If HP is unable, within a reasonable time, to repair or
replace any product then purchaser shall be entitled to a refund of the purchase
price.
This warran ty is conti ngent upon pr oper use of the p rodu ct by Purc haser and does
not cover: expendable component parts such as recordable compact discs and the
like; or damage due to accident, unusual physical, electrical or electromechanical
stress, neglect, misuse, failure of electric power, air conditioning, humidity
control, transportation, operation with media not approved by HP, or tampering
with or altering of the product.
v
HP MAKES NO OTHER EXPRESS WARRANTY WHETHER WRITTEN OR ORAL.
ANY IMPLIED WARRANTY OF MERCHANTABILITY OR FITNESS FOR A
PARTICULAR PURPOSE IS LIMITED TO THE 1 YEAR DURATION OF THIS
WRITTEN WARRANTY. Some states or provinces do not allow limitation on how
long an imp lied warra nty la sts, so th e ab ove l imitation or exclu sion may n ot apply
to you. This warranty gives you specific legal rights, and you may also have other
rights that vary from state to state or province to province.
THE REMEDIES PRINTED ABOVE A RE PURC H AS ER'S S OLE A N D EXCLUSIVE
REMEDIES. IN NO EVENT SHALL HP BE LIABLE FOR ANY DIREC T, INDIRECT ,
SPECIAL OR CONSEQUENTIAL DAMAGES (INCLUDING LOST PROFITS)
WHETHER BASED ON CONTRACT, TORT OR ANY OTHER LEGAL THEORY. Some
states or provinces do not allow the exclusion or limitation of incidental of
consequential damages so the above limitation or exclusion may not apply to you.
Consumer transactions in Australia, New Zealand, and United Kingdom. The
disclaimers and limitations shall not affect the statutory rights of a consumer.
Hewlett-Packard
800 Sou th Taft Av e nu e
Love land, Co l orado 80537 U.S.A.
Page 6

vi
Software License Agreement
ATTE NTION: USE OF THE SOFTWA RE IS SUBJ EC T TO THE HP SOF TWAR E
LICENSE TERMS SET FORTH BELOW. USING THE SOFTWARE INDICATES YOUR
ACCEPT ANCE OF T HESE LICENSE TE RMS. IF YOU DO NOT ACCEPT THESE
LICENSE TERMS, YOU MAY RETURN THE SOFTWARE FOR A FULL REFUND. IF
THE SOFTWARE IS BUNDLED WITH ANOTHER PRODUCT, YOU MAY RETURN
THE ENTIR E UNUSED P ROD UC T FOR A FULL REFUND .
HP SOFTWARE LICENSE TERMS
License Grant. HP grants you a license to Use multiple copies of the Software but
only for Use in conjuntion with the HP hardware product that accompanied the
Software. "Use" means storing, loading, installing, executing or displaying the
Software. You may not modify the Software or disable any licensing or control
features of the Software.
Ownership. The Software is owned and copyrighted by HP or its third party
suppliers. Your license confers no title or ownership in the Software and is not a
sale of any rights in the Software. HP's third party suppliers may protect their
rights in the event of any violation of these License Terms.
Copies and Adaptations. You may only make copies or adaptations of the
Software for archival purposes or when copying or adaptation is an essential step
in the authorized U se of the Soft ware. You must reprod uce all copyrig ht notices in
the original So ftwa re on all co pies or a daptations . Yo u may not co py th e Software
onto any bulletin board or similar system.
No Disassembly or Decryption. You may not disassemble or decompile the
Software unless HP's prior written consen t is obtained. In some jurisdict ions, HP's
consent may not be required for limited disassembly or decompilation. Upon
request, you will provide HP with reasonably detailed information regarding any
disassemb ly or decompilation. You may not decrypt the Software unless
decryption is a necessary part of the operation of the Software.
Transfer. Your license will automatically terminate upon any transfer of the
Software. Upon transfer, you must deliver the Software, including any copies and
related doc umentation, to the transf eree. The tr ansferee must accept th ese License
Terms as a condition to the transfer.
Termination. HP may terminate your license upon notice for failure to comply
with any of these Licens e Terms. Upon termination, you must immediately
destroy the Software, together with all copies, adapt ations and merged port ions in
any form.
Export Requirements. You may not export or re-export the Software or any copy
or adaptation in violation of any applicable laws or regulations.
U.S. Government Restricted Rights. The Software and any accmpanying
documentatio n have been developed entirely at private expense. They are
delivered and licensed as "commercial computer software" as defined in DFARS
252.227- 7013 ( Oct 1988), DFARS 252 .211-7015 (May 1991) or DFARS 252.227-
Page 7

vii
7014 (Jun 1995), as a "comme rc ial item" as defin ed in FAR 2.101( a), or as
"Restricted computer software" as defined in FAR 52.227-1 9 (Jun 1987)(or any
equivalent agency regulation or contract clause), whichever is applicable. You
have only those rights provided for such Software and any accompanying
documentation by th e a pplicable FAR or DFARS cl ause or the HP st andard software
agreement for the product involved.
Page 8

Welcome
This guide explains how to connect the external CD-Writer to
your computer. This qui d e shows you ho w to:
1. Connect the external CD-Writer to your computer
2. Install the software that runs the CD-Writer
3. Select CDs fo r your C D-Writer and maintain them
4. Solve any problem s that may arise
When you finish, yo ur CD-Writer wi ll be r e ady to rec o rd CDs.
SCSI or Parallel Mode?
Your CD-Writer can operate in either SCSI or parallel mode,
depending on the way it is connected.
In SCSI mode, the CD- Writer is connected t o a SCSI ada pter board
you already have or purchased with the CD-Writer. A SCSI
adapter board allows you to connect multiple devices to a single
expansio n slo t. I n parallel mode , th e CD-Writer is connect ed to
the printer port. The system requirements for each mode vary
slightly.
While your CD- Writer is able to work in ei ther mode, your
package includes accessories for only one mode. That is, the SCSI
package incl ude s a SCSI adapter cable . The p ara lle l package
incl ud es a para l le l a dapt e r cable and d riv er s oft wa re f or thi s cabl e.
You have purchased the SCSI packag e . You can e asily switc h to
parallel mode by purchasing a parallel adapter cable and drivers
from HP.
viii
Page 9

Table of Contents
Chapter1: Before You Start
What’s in Your Package . . . . . . . . . . . . . . . . . . . . . . . . . . . . . . . . . . . . . . 1
Minimum System Configuration. . . . . . . . . . . . . . . . . . . . . . . . . . . . . . . 2
What affects system performance. . . . . . . . . . . . . . . . . . . . . . . . . . . 2
The SCSI Adapter Board. . . . . . . . . . . . . . . . . . . . . . . . . . . . . . . . . . . . . . 3
Chapter 2: Connecti ng the CD-Writer
CD-Writer Back Panel . . . . . . . . . . . . . . . . . . . . . . . . . . . . . . . . . . . . . . . 6
Preparing to Operate in SCSI Mode. . . . . . . . . . . . . . . . . . . . . . . . . . . . . 6
Connecting the CD-Writer . . . . . . . . . . . . . . . . . . . . . . . . . . . . . . . . . . . 8
Identifying the CD-Writer Drive . . . . . . . . . . . . . . . . . . . . . . . . . . . . . . 1 2
If you cannot see the drive . . . . . . . . . . . . . . . . . . . . . . . . . . . . . . . 12
Using the CD-Writer on Other Computers . . . . . . . . . . . . . . . . . . . . . . .1 3
Initial connection . . . . . . . . . . . . . . . . . . . . . . . . . . . . . . . . . . . . . . 1 3
Moving the CD-Writer to other computers . . . . . . . . . . . . . . . . . . 14
Switching from SCSI to Parallel Mode. . . . . . . . . . . . . . . . . . . . . . . . . . 16
Chapter 3: Installing Software in Windows 3.x
Installing the Applications. . . . . . . . . . . . . . . . . . . . . . . . . . . . . . . . . . . 19
Uninstalling the Software Programs . . . . . . . . . . . . . . . . . . . . . . . . . . . .23
Chapter 4: Installing Software in Windows 95
Installing the Applications. . . . . . . . . . . . . . . . . . . . . . . . . . . . . . . . . . . .25
Uninstalling the Software Programs . . . . . . . . . . . . . . . . . . . . . . . . . . . .29
Chap ter 5: Using CDs
Inserting a CD . . . . . . . . . . . . . . . . . . . . . . . . . . . . . . . . . . . . . . . . . . . . 31
Removing a CD . . . . . . . . . . . . . . . . . . . . . . . . . . . . . . . . . . . . . . . . . . . 32
Choosing CDs for Your CD-Writer . . . . . . . . . . . . . . . . . . . . . . . . . . . . 32
Maintenance . . . . . . . . . . . . . . . . . . . . . . . . . . . . . . . . . . . . . . . . . . . . . 33
Where to Go Next . . . . . . . . . . . . . . . . . . . . . . . . . . . . . . . . . . . . . . . . . 33
Page 10

x
Chapter 6: Problem Solving
Things to Try First . . . . . . . . . . . . . . . . . . . . . . . . . . . . . . . . . . . . . . . . . 35
Common Symptoms and Solutions. . . . . . . . . . . . . . . . . . . . . . . . . . . . 36
Before You Call Customer Support . . . . . . . . . . . . . . . . . . . . . . . . . . . . 43
Where to find this information . . . . . . . . . . . . . . . . . . . . . . . . . . . 44
Returning Your Drive. . . . . . . . . . . . . . . . . . . . . . . . . . . . . . . . . . . . . . . 47
Technical Specifications . . . . . . . . . . . . . . . . . . . . . . . . . . . . . . . . . . . . . 48
Index
Page 11
Chapter 1:
Befo r e You St a rt
Before you start connecting your CD-Writer, be sure that:
1. You received the entire CD-Writer package.
2. Your system meets certain requirement s.
3. Your computer has a SCSI ad apter board.
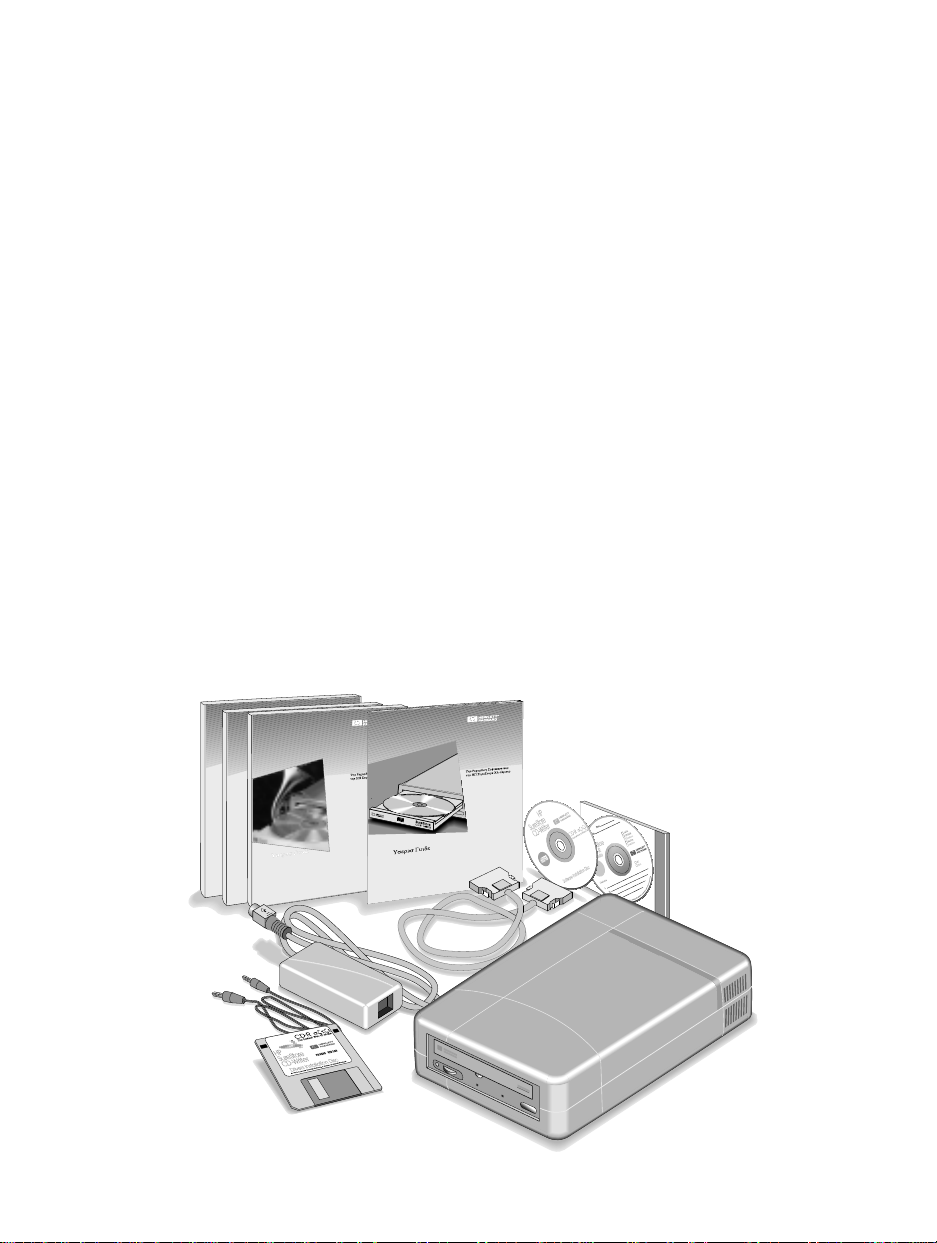
What’s in Your Package
Make sure you have the items shown below. (Keep your
packaging in case you need to return or transport the CD-Writer.)
Installa ti o n guideUser’s guides
Power supply
Power cables
Audio
cable
Data cab le
Utility disk
Software
installation disc
Blank disc
CD-Writer
1
Page 12

2
Mini mum Syste m Confi gu rat ion
Minimum System Configuration
For the most reliable performance, your computer should meet
these requirements:
IBM or compatible PC
■
486/DX 33 pro ces s or
■
Windows NT®, Microsoft® Windows 95® , Windows 3.1® or
■
Windows 3.11
MS DO S 6.0 ( or later) and MSC DEX 2. 23, only if run n in g
■
Windows 3.1 or Windows 3.11
Hard disk with at least 528 MB of storage capacity (that is,
■
with a transf er r ate o f at least 8 00 kB/sec and disk acc e ss time
of less than 20 msec)
SCS I -2 adap ter boa rd w i th ex terna l p ort ( d rive r softw are
■
installed)
8 MB RAM
■
®
10 MB free hard disk spac e
■
What affects system performance
To use the CD-Writer, your computer should be equipped with
the ability to run a recordable CD drive. How well your computer
functions with the CD-Writer, particularly how fast it writes data
to a CD, depends on a number of factors. These factors are listed
below.
Processor. The type and speed of your proc e sso r greatly affects
the speed at which your computer transfers data to and from the
CD-Writer. If the processo r speed is to o slo w , you may have to
write at 1x speed.
Page 13

The SCSI Adapter Board
Your Hard Disk Drive. The speed at which your hard disk
accesses and transfers data (its
performance. Newer hard disks, those with a storage capacity
greate r than 528 MB, include
fast enough to handle the CD-W riter’s 2x wri te speed. Older hard
disks may only be able to write at 1x speed.
Inte rface Type: SCSI Port. To operate the CD-Writer in SCSI
mode, you computer requires a SCSI-2 adapter board with an
external connector. More information appears below.
DMA. A DMA channel must be available for a bus-mastering
SCSI-2 adapter board. Mo st c o mp ute r s auto m atically assign a
DMA. But you may run into conflicts with other devices if a DMA
channel is not available.
RAM. Your computer must have enough memory available to
handle its op erat ing system, the C D-Wr iter applicat io ns, and the
data you are transferring to and from CDs. The system should not
have to swap data to and from the har d disk.
access ti me
Enhanc ed IDE
transfer rate
and
. These hard disks are
) affects
3
NOTE: See your computer and SCSI adapter board manuals or contact
your computer vendor if you have any qu esti ons about your computer’s
configuration or capabilities.
The SCSI Ada pte r Board
You can operate the CD-Writer in SCSI mode if a SCSI-2 adapter
board and its d ri vers have been installed in your compute r. The
SCSI adapter boar d ca n connect multiple de vices to one
expansion slot. This grou p of devic e s is called SCSI chain.
The CD-Writer can be connected to its own SCSI adapter board
(the most reliable method), or it can form a SCSI chain with other
devices. However, you
you are using the CD-Writer. (You can, of course, run the hard
driv e at the s a me tim e as the CD -Writer.)
should not run
these other devices while
Page 14

4
The SCSI Adapter Board
During the write process, a constant stream o f data m ust re ach
the CD-Writer. If other devices are running on the same board at
the same tim e, thi s stre am could be interrupted. An inte rr u p tio n
could cause a buffer underrun, making the current session on the
CD unreadable.
The CD-Writer is compatible with most SCSI adapter boards
currently on the market. It was tested extensively with the
follow in g board s:
Driver software
Brand/Model
Adaptec AHA-2940C EZ-SCSI 4.0C (800) 959-7274
Adaptec AHA-2920C EZ-SCSI 4.0C (800) 959-7274
Adaptec AHA-1542CP EZ-SCSI 4.0C (800) 959-7274 "
AdvanSys 5140C (800) 525-7440
version required
Company
phone number
Worl d Wide Web
Address
http://
www.adaptec.com
"
http:/ /
www.advans y s. co m
NOTE : The drive r sof twa re for your SCS I bo ard mu s t be able to s up port
multisession and audio CDs.
Contact the manufac turer of your SCSI adapter board if you have
any questions about its capa bilities.
Page 15

Chapter 2:
Connecting the CD-Writer
This section describes how to connect the CD-Writer to your
computer . It shows yo u:
1. The CD-Writer’s back panel
2. How to prepare for operating in SCSI mode
3. How to connect the CD-Writer to your computer
4. How to mo v e the CD-Writer from one compu te r to th e next
5. How switch from SCSI mode of operation to parallel mode
NOTE: To connect this device properly, you will need to know about
your computer hardware. See the manual that came with your computer
if you need more information than what is provided here.
5
Page 16
6
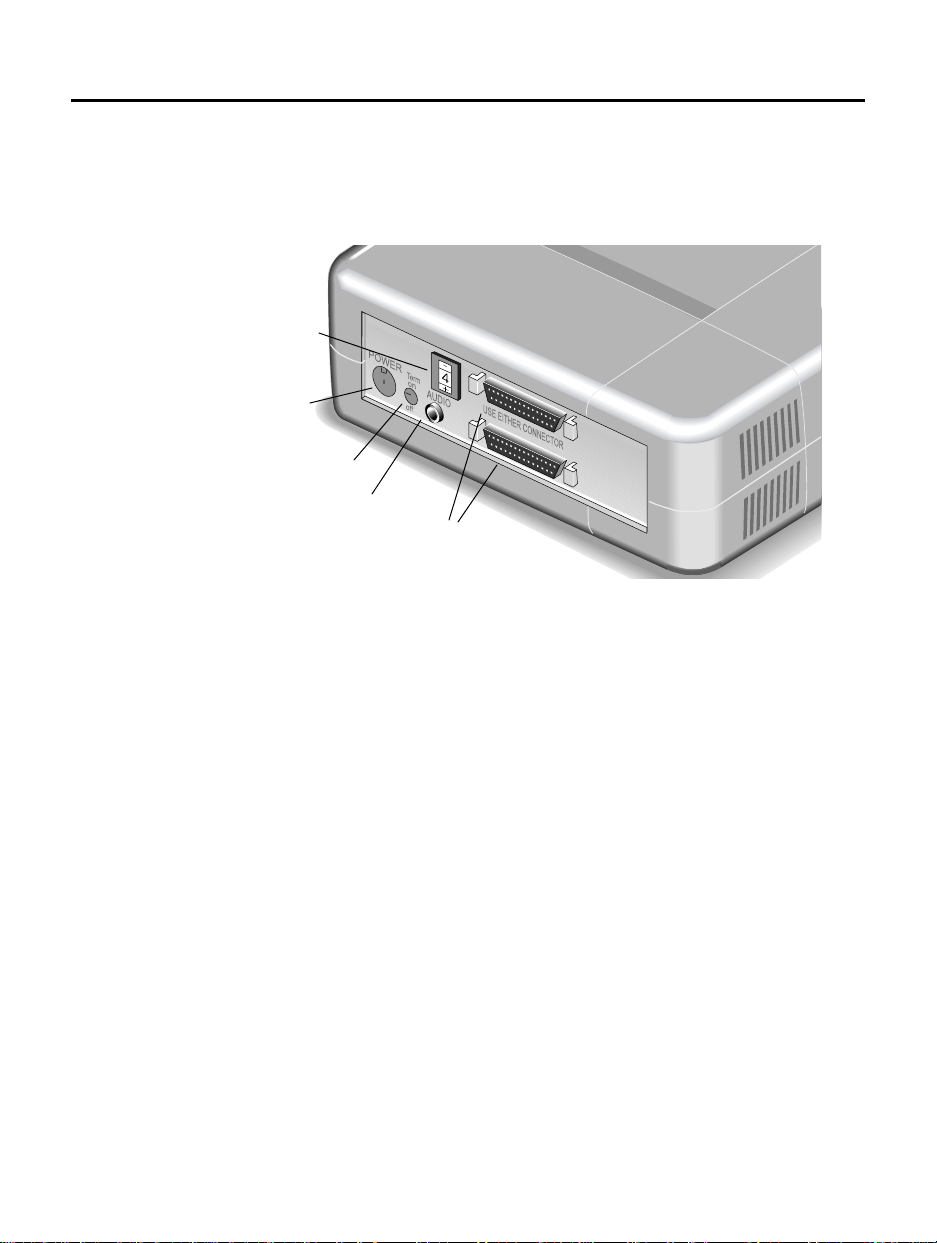
CD-Writer Back Panel
CD- Wri te r Back Pane l
The drawing belo w illustrates the back panel o f the CD-Writer.
SCSI ID
Power connector
Termination switch
Audio connect or
High-density
SC SI connec tors
Prep a r i ng to Op er ate in S C SI Mod e
The CD-Wri ter is con n ect ed to a SCSI-2 a d apte r boa r d ins i de you r
computer. You can connect the CD-Writ e r t o its own SC S I
adapter board or add it to a chain of other devices also connected
to the s a me SCSI adapte r boar d.
The SCSI ID a n d term i n ation settings on the CD-Writer ide n tif y
its place in a SCSI chain. If the CD-Writer is part of a chai n, you
must be sure that its SCSI ID is not the same as the ID of another
devi ce on the cha i n. ( T his i s ca l le d a ha rdwa r e con fl ict .) You mu st
also be sure tha t its t ermination is set co rre ctly.
If y o u conn e c t th e CD - W r i ter to i t s o w n SC S I a d a p ter b oa r d, t h e re
will be no conf licts with othe r devic es. The CD-Writer’s
termination s etti n g sh ould be o n .
Page 17

Preparing to Operate in SCSI Mode
To prepare your SCSI adapter board:
1. Make sure that your SCSI adapter board is terminat e d or
unterminated as necess ary according to your system’s
configurat ion. (See your S CSI adapter board’s installation guide
for inform ation about changing the termination sett ings.)
2. Make sure that your SCSI adapter board is properly installed
according to the d ir e ct ions in its installation guide.
3. Make sure that the driver software that came with your adapter
board has bee n installed ac cor ding to the direct ions in its
installat ion guide.
Pr epa ri n g the CD - Wri ter
The C D-Wri ter’s default s etti n gs are:
SCSI ID: 4
■
Termination: On
■
1. Select a unique SCSI ID number for the CD-Writer, from 0 to 6.
Make sure this numb e r is not the same as another device on th e
same SCSI adapter board.
7
2. Change the SCSI ID setting on the back panel. Use a pen to press
the buttons on the top or bottom of the SCSI ID switch. The
address setting will roll forward or backward, depending on the
button you press.
Pre ss button s h e re to roll
th e s e tting
Page 18

8
Connecting the CD-Writer
3. On the back of the CD-Writer, make sure the termination switch
is set corr ectly fo r your configura ti on.
On
Off
NOTE : I f in tern al devi ces a re c onn ecte d to you r SCSI ad apt er b oar d an d
the CD-Writer is first external device connected to it, you may also need
to turn the termination on your SCSI adapter board to Off. See the
manual that came with your SCSI adapter board for more information.
Connecti n g the CD -W ri ter
Follo w thes e st eps to co n n e ct the CD-Writer to y our co mputer.
NOTE: You can leave your computer on or turn it off when connecting
the CD -Writer .
: CD-Writer is at the end of the SCSI chain.
CD-Writer is the only device on the SCSI adapter board.
No oth er SC S I de v ice i s con necte d to th e ba ck o f the
CD-Writer.
:CD-Writer is in the middle of a SCSI chain.
Anoth e r SCS I devi ce i s con n ec ted to the back o f the
CD-Writer.
1. Atta ch the SCS I co n nec tor o n th e data cabl e to one of the p orts
on the back of the CD-Writer. It does not matter which port you
use.
Press the clips on the sides of the connector as you attach it. Then
release the clips, making sure that the cable is attached securely.
Page 19
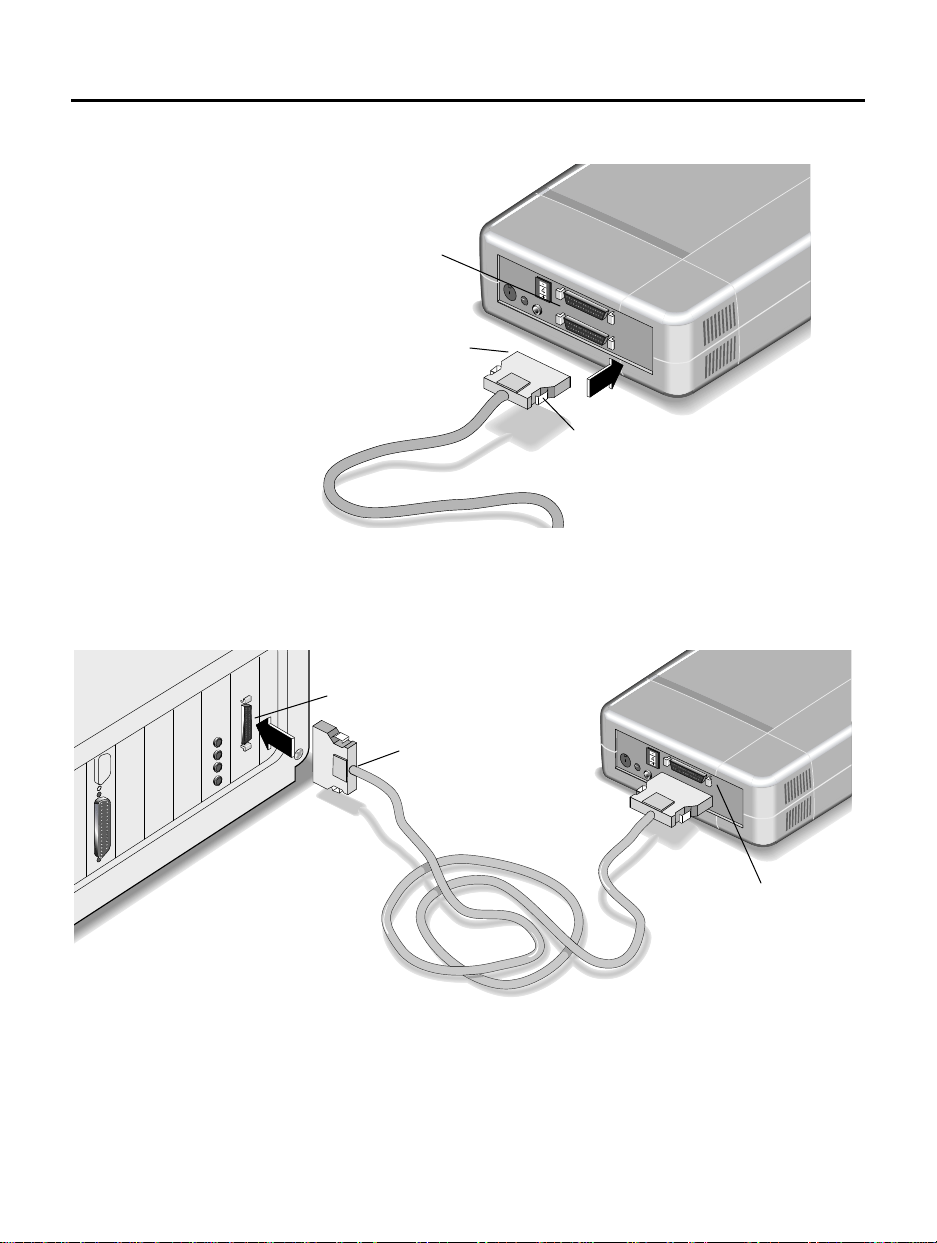
Connecting the CD-Writer
High-density
SC SI connec tors
High-density
SC SI connec tor
Pre ss cli p s here
2. Connec t the other high-density SCSI connector to the SCSI
connector on your computer. (You will need an adapter if your
computer has a low-density SCSI connector.).
9
SCSI port
High-density
SC SI connector
(Press c lip s)
Attach another SCSI
device here (optional)
(Make sure termination
is s e t correc tly)
3. If you have a sound board, connect the audio cable to the audio
connector on the back of the CD-Writer. (This cable is optional.)
Page 20
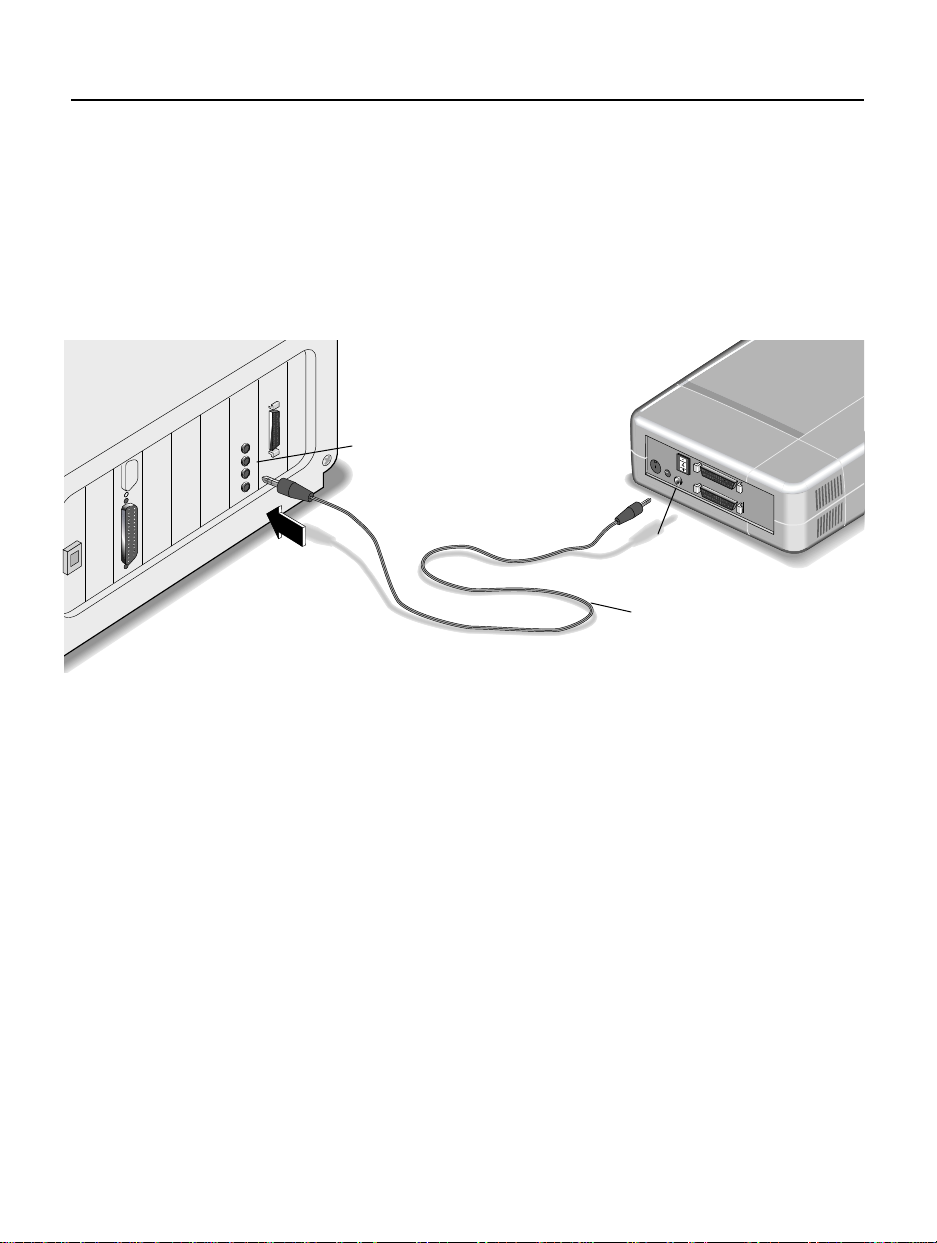
10
Connecting the CD-Writer
The audio cable is used only for listening to music CDs through
your computer’s sound system. If you do not have a sound board,
yo u can h ear mus ic CDs thr ough speak ers or earphones attached
to the front of t h e CD-W riter.
NOTE: When the CD-Writer records music or data, it uses the data
cab le, not the au di o cable.
LI NE IN co n ne cto r on
sound boa rd (Your sou nd
board may be l a be led
dif ferentl y)
Audio connecto r
Au d io cab le
(opt io nal)
4. Connect the other end of the audio cable to a LINE IN audio
connector on the back of your computer. (Your sound board may
be labeled diff e rently .)
If the c onnecto r type on you r c omputer does n ot matc h the c abl e,
you will need to purchase an adapter from your local electronics
store.
Page 21

Connecting the CD-Writer
11
5. Co nnect the power supply to the power connector on the back of
the CD-Writer, with the arrow on the cable end facing up.
To power supply
Power connector
(arro w u p)
Pow e r co nn e ctor
6. Connect one end of the power cord into the power supply and
the other end to a wall outlet or power stri p. (The power plug an d
outlet may look diff e rent in your count ry.)
To CD-Writer
Pow e r co rd
Power supply
When you p lug in th e power sup ply, the green l ight on t he power
supply should be on. You should also notice that the CD-Writer is
on.
NOTE: There is no power switch on the CD-Writer. It remains on in
standby mode as along as it is plugged in. It goes into operating mode
automatically.
7. Turn your computer on, if it is not already turned on.
Page 22

12
8. If you have already installed drive r software for your SCSI adapter
boa rd, mak e sure your co m put er recogni ze s th e C D-Wri t er d riv er.
(See below.)
NOTE: If you have not installed the SCSI driver software, do so now.
You will not be able to use the CD-Writer until this software is
installed. Refer to the instructions that came with your SCSI board.
9. Confirm that your CD-ROM drive, if you have one, or other SCSI
devices connected to your computer are working properly.
Identifying the CD-Writer Drive
Identif ying th e C D- W r i ter D r i ve
If you h ave al re ad y load e d S C S I driv e r s , y o u r com p ute r should
recognize the CD-Writ e r drive . In Windows 95, do uble-click on
My Comput er. In Windows 3 .x , you sh oul d see the d rive from the
File Manager.
Different computers assign drive letters differently. If you have a
CD-ROM drive, you can dete rmine which is your CD-ROM drive
and which is your CD-Writer by insertin g a CD in one of the
drives. The l abel a ppears near t he driv e icon, iden tifyin g the drive
for you.
NOTE: You will get an error message if you try to run the CD-Writer
drive without a CD in it or with a blank CD in it.
If your computer recognizes the CD-Writer drive, you are now
ready to instal l the S ureStore app lication software.
If you cannot see the drive
If you cannot see your CD-Writer drive, first try restarting your
computer, or turning it of f and on again. If you stil l cannot see
the drive, check the following:
Is the CD-Writer connected properly? I s th e CD- W riter
■
receiving power? Review the connection procedure in this
chapter.
Page 23

Using the CD-Writer on Other Computers
Are the SCSI drivers installed? See the manual that came with
■
your SCSI adapt e r board for more information.
Do other devices on the SCSI chain have the same SCSI ID
■
number a s the CD- Writer? The de fault SCSI ID nu mber for the
CD-Writer is 4. See the manual that came with your SCSI
adapter board for more info rmation.
Are both ends of the SCSI chain terminated corr ectly? See the
■
manual that cam e wi th your SCSI adapter boar d f or mo re
informatio n.
See Chapter 6, “Problem Solving,” if you need more help.
Using the CD-Writer on Other Computers
You can disconnect the CD-Writer and move it to another
computer, as long as the other computer meets the requirements
for operating in e ither SCSI or par alle l m ode. The first time you
connect the CD-Writer, you must also install any necessary driver
software and the applicatio n so f twar e .
13
NOTE: The CD-Writer can be used by only one computer at a time.
Initial connection
The first time you connect the CD-Writer to another computer,
you must follow the sam e installatio n proc e ss de scribed
previously. That is:
1. Make sure the computer has a SCSI adapter board if you will be
using the CD-Writer in SCSI mode and that there are no
addressing conflicts. (Install a SCSI adapter board if necessary.)
2. Make sure the computer has the ne cessary drivers. It m ust have
drivers for the SCSI adapter board (SCSI mode) or drivers for the
parallel adapter cable ( parallel mode) .
3. Co nnect the CD-Writer. (See page 8.)
4. Load the applic ation softwa re. ( Se e Chapter 3 or 4.)
Page 24

14
Using the CD-Writer on Other Computers
Movi ng th e CD- W ri t er to ot h er co m p ute r s
Once the initial installation has be e n comp le ted on each
computer to which you will co nne ct the CD-Writer, follo w t he se
steps to move the CD-Writer from one computer to the next.
To dis c on nect the CD-Write r:
1. Un plug the CD-Writer’ s power supply from the outlet or power
strip. (There is no power switch on the power supply or CDWriter.)
Power supply
(The power plug and outlet may look different in your country.)
2. Disconnect the data cable from the back of your computer.
Data cable
Page 25

Using the CD-Writer on Other Computers
To reconnect the CD-Writer:
15
1. Connect the data cable to the back of the next computer.
Data cable
2. Plug the CD-Writ e r’s power supply into an outlet or powe r strip.
(Power is supplie d to the CD-Writ e r as soo n as yo u plug it in.)
Power supply
(The power plug and outlet may look different in your county.)
3. If you are running Windo w s 3. x, restart your c omputer.
If you are running Windo w s 95, refres h the sc reen. To do this,
select the CD-Writer drive from My Computer and press F5. In
some cases, you m ay have to restart your computer.
Page 26

16
Switching from SCSI to Parallel Mode
Switching from SCSI to Parallel Mode
The CD-Writer can be used in either parallel or SCSI mode,
dependin g on t he wa y it is connect ed t o th e co mputer. To op erate
in parallel mo de, your co mp ute r will need:
a parallel adapter data cable and drivers, which can be ordered
■
from HP (orde r the Parallel U pgrade Kit, part num ber
C4348A)
486/DX 66 pro ces s or or be tter
■
a high-spee d parallel port (ol de r, standard-sp e ed por ts will
■
write to the CD at the slower 1x speed, rather than 2x speed)
IRQ 7 and I/O channe l 37 8 available or IRQ 5 and I/O
■
channel 278 available
CAUTION: If you have an Acer brand computer, model 100 or 120,
you should not connect the CD-Writer to the printer (parallel) port. On
these models, the port does not work with external storage devices, like
the CD -Writer .
Conn ec t in g in pa ra ll e l mode
Connect the CD-Writer in the same manner described earlier in
this chapter, with these exceptions:
1. Connect the SCSI end of the parallel adapter cable to the CDWriter. (Do not use the SCSI data cable.)
2. Disconnect the pri nter (if any) from the printer (parallel) por t.
3. Connect the other end of the parallel adapter cable to the printer
port, attaching the thumb screws.
Page 27

Switching from SCSI to Parallel Mode
Parallel a dap ter
Parallel
connector
cable
High-density
SCSI connector
Printer pass - throu gh port
17
4. A f ter con fi rmi ng t hat the CD -W rit e r is wo rk in g p rope rly , co n nec t
the printer (if yo u have o ne ) to the printer pass-thr o ugh port on
the parallel a d a p ter cab l e.
Page 28

18
Switching from SCSI to Parallel Mode
Page 29

Chapter 3:
Installing Software in Windows 3.x
When you have successfully installed the driver software and
connect ed the CD-Writer, you are ready to install the appl ica tio n
software. The CD that came with your package includes these
applicatio ns f o r Windows 3.x:
Easy-CD
■
Easy-CD Audio
■
Alchemy
■
1-Min ute Guide tu to rial
■
The
Utility Disk
are not necessar y f o r your com puter. You w ill use it only if you
run into cert ain problems and are instructed by Custome r
Support to use it.
NOTE: You must run the installation program. Do NOT simply copy
the files from the installation diskette or CD to your hard drive. The
installation program converts the files into a usable format.
floppy you receive d contains files t hat pr o bably
Installing the Applications
Install the applications as f o llows:
1. Insert the CD labeled
Writer, if you have no t already done so.
Software Installation Disc
into your C D -
19
Page 30

20
Installing Software in Windows 3.x
NOTE: For information about inserting a CD into the CD-Writer, see
page 31.
2. F rom W indow s Pro gra m Man age r, sel ect File / Run, and then
type (CD-Writer drive letter):\SETUP.EXE and press
.
ENTER
A window appears, asking you to identify the language of your
software.
NOTE: If you get an error message, see page 37 or page 38 for
assistance . Your comp uter ma y be havi ng tro ub le recognizing the CDWriter o r the CD.
3. Check English, if it is not already sele ct e d ; the n click on OK.
The HP CD-Writer Se tup windo w appe ars.
4. Click on Continue.
The HP CD-Writer Setup window asks you to choose between a
complete or custom installation.
5. Click on t he Complete Installatio n icon to install all the
programs, including the 1-Minute Guide . The system will install
the programs as soon as you click on this icon. The programs will
be stored in the directory C:\HPCDR.
Page 31

Installing Software in Windows 3.x
21
Click on the Custom Installation icon to select specific programs
or install the programs to a directory other than C:\HP CDR.
If you chose Custom Installation, perform these three steps:
Type the name of the direct or y into whi ch you want t o install
■
the progra ms.
Select the programs by clicking on the check boxes. (An
■
x
in d i ca te s th a t th e pr o gr a m is selecte d . )
For more information about each of the CD-Writer programs,
cl ic k on the Tell me more about each program... button.
Click on Continue to install the programs.
■
Page 32

22
Installing Software in Windows 3.x
The program logos appear on the screen as the programs are
installed. When all files ar e installed, the f ol lowing messa ge is
displayed .
6. Click on OK.
A window showing the HP SureStore program group appears.
Depending on your configuration, you may be prompted to
restart your computer.
7. Remove the
with the
NOTE: You will need the Utility Disk only if you run into certain
hardware problems. Customer Support will instruct you to use it.
Software Instal la tion Disc
Utility Disk
.
and store it in a safe place
Page 33

Installing Software in Windows 3.x
Uninstalling the Software Programs
This section shows you how to remove a CD-Writer application in
Windows 3.x.
NOTE: If you want to reinstall the CD-Writer software, be sure to
remove the original software first.
Removing software
1. From the File Manager, display the HP SureStore program group.
2. Highlight the icon of the applic ation yo u wa nt to r emove .
3. Pr e ss the dele te k e y o r selec t Delete from the File menu.
23
Page 34

24
Installing Software in Windows 3.x
Page 35

Chapter 4:
Installing Software in Windows 95
When you have successfully connected the CD-Writer and
installed the d r ive r softwar e for your SCSI adapter board, yo u ar e
ready to install the application software. The CD that came with
your package includes these applications for Windows 95:
Easy-CD Pr o 95
■
Al chemy Personal
■
QuickTour mult im e dia tutoria l
■
The
Utility Disk
are not necessar y f o r your com puter. You w ill use it only if you
run into cert ain problems and are instructed by Custome r
Support to use it.
NOTE: You must run the installation program. Do NOT simply copy
the files from the installation diskette or CD to your hard drive. The
installation program converts the files into a usable format.
floppy your received contains f ile s that probably
Installing the Applications
Install the applications as f o llows:
1. Insert the CD labeled
Writer, if you have no t already done so.
NOTE: For information about inserting a CD into the CD-Writer, see
page 31.
Software Installation Disc
into your C D -
25
Page 36

26
Installing Software in Windows 95
2. From the Start menu, sel ect Run, and type (CD-Writer drive
letter):\SETUP.EXE and pre ss
ENTER
.
A window appears, asking you to identify the language of your
software.
NOTE: If you get an error message, see page 37or page 38 for
assistance . Your comp uter ma y be havi ng tro ub le recognizing the CDWriter o r the CD.
3. Check English, if it is not already sele ct e d ; the n click on OK.
The HP CD-Writer Se tup windo w appe ars.
4. Click on OK.
The HPCD-Writer Setup welcome window appears.
5. Click on Continue.
The HP CD-Writer Setup window asks you to choose between a
complete or custom installation.
6. Click on t he Complete Installatio n icon to install all the
programs, including the QuickTo ur t utorial. The system will
install the pr o grams as soon as you c lick on this icon . The
programs will b e s tored in the director y C :\H PCDR.
Page 37

Installing Software in Windows 95
27
Click on the Custom Installation icon to select specific programs
or install the programs to a directory other than C:\HP CDR.
If you chose Custom Installation, perform these three steps:
Type the name of the direct or y into whi ch you want t o install
■
the progra ms.
Select the programs by clicking on the check boxes. (A check
■
in d i ca te s th a t th e pr o gr a m is selecte d . )
For more information about each of the CD-Writer programs,
cl ic k on the Tell me more about each program... button.
Click on Continue to install the programs.
■
Page 38

28
Installing Software in Windows 95
The program logos appear on the screen as the programs are
installed. When all files ar e installed, the f ol lowing messa ge is
displayed .
7. Click on OK.
A window showing the HP SureStore program group appears.
Depending on your configuration, you may be prompted to
restart your computer.
8. Remove the
with the
NOTE: You will need the Utility Disk only if you run into certain
hardware problems. Customer Support will instruct you to use it.
You will see the HP SureStore program group when you select
Programs from the Start menu.
Software Instal la tion Disc
Utility Disk
.
and store it in a safe place
Page 39

Installing Software in Windows 95
Uninstalling the Software Programs
If you need t o rem ove t he CD- Writer ap plicati on soft ware, use t he
Add/Remo ve Pr ogr am s f e atur e in the C o ntr ol Panel. You w ill
have to remove all the CD-Wri te r applicati on s at once, rather
than a particular prog r am . Afte r removing the soft w are, comp le te
a custom installation to reinstall the programs you want.
NOTE: If you want to reinstall the CD-Writer software, be sure to
remove the original software first.
Removing softwar e
1. Click the Start button in your task bar, select Settings, then select
Co ntrol Panel.
The control pane l appe ars.
2. Double-click the Add/Remove Programs icon:
29
A list of software pro grams appears in the Add/R e move Programs
Properties window.
3. Click on CD-Writer Software.
4. Click the Add/Remove button and follo w the sc reen prompts.
Page 40

30
Installing Software in Windows 95
Page 41

Chapter 5:
Using CDs
This section describes the use of the recordable CD. It explains
how to:
1. In s ert a CD
2. Remove a CD
3. Purchase new CDs
4. Maintain your CD-Writer
NOTE: Make sure you use a separate CD for each program included
wi th the CD -W ri te r.
Inserting a CD
Follow the steps below to insert a CD in the CD- Writer drive.
1. Press the eject button on the CD-Writer front panel.
2. Se t th e CD in the tray with the la bel ed sid e up.
Eject button
31
Page 42

32
Removing a CD
3. Press the eject button again or push gently on the front of the tray
to shut the tray.
When you selec t this CD-Writer, yo u sho uld se e the disk f ile s. I f
you get an error message, the CD might be in the tray upsidedown or in the tray a little off-center. Replace the CD and try
again.
Removing a CD
Follo w the s tep s be low to re move a CD fro m th e CD-Wri ter d rive :
1. Press the eject button on the CD-Writer front panel.
2. Remove the CD from the tray.
3. Press the eject button again or push gently on the front of the tray
to shut the front panel.
Choosing CDs for Your CD-Writer
HP SureStore CD-R media is available from HP or your local
vendor. Ask for this HP Recordable CD media:
12 cm ( 650 MB, 74 -mi nute) 5 pa ck (C4423 B )
■
12 cm (650 MB, 74-minute) 10 pack (C4423C)
■
12 cm (650 MB, 74-minute) 25 pack (C4423D)
■
Or look for any brand of recordable CD media with these
specifications:
650 MB / 74 -m i nu te Or a n ge bo ok p a rt II compl i an t
■
NOTE: Make sure that you use a separate CD for each program
incl ud ed with the CD- Write r .
The programs that came with your CD-Writer use different
recording formats, which are incompatible with each other.
Therefore, you must use separate CDs for each program.
Page 43

Maintenance
The CD-Writer requir es no maintenance or cl eaning. If you
simply keep your discs clean , you will prevent most pr o b le m s.
CAUTION: Do NOT use the CD-ROM cleaning discs that rely on a
small brush to sweep dirt off the laser. Do NOT use high-pressure air to
clean the i nside of the drive . These clea ning techniq ues will da mage the
CD-Writer.
Where to Go Next
To learn more about using your CD-Writer, c he ck the
informa tion in the 1-Minute Guid e (Windows 3.x) o r QuickTo ur
tutorial (Windows 95), check the online help within each
program, and read the user’s guides for each program.
Maintenance
33
Page 44

34
Where to Go Next
Page 45

Chapter 6:
Problem Solving
This chapter helps you solve problems you may run into during
installat ion. It provi d es this info rmation:
1. Things to try first
2. Common symptoms and solutions
3. Contactin g Customer Suppor t
4. How to return the CD-Writer
5. Technical specifications
Review this section first when you run into trouble. Call HP
Customer Support if you need further assistance. When you call
Support, mak e sure you have inf o rmation about your computer
ready. (See page 43)
facilitate your call.
Having this information ready will greatly
Thing s to Try Firs t
These are some basic steps to take when you run into trouble. If
the problem persists, See the “Common Symptoms and
Solutions” section.
Turn off the computer’s power, then turn it on again. (This is
■
called
Disconnect all the cables and then reconnect them.
■
Sometimes just reconnecting a cable aligns it correctly or
adjusts the pin conne c tio ns, f ixing a faulty co nne ct io n.
Make sure the power cords are connected.
■
Try the operation with a different CD.
■
cycling power
.)
35
Page 46

36
■
Common Symptoms and Solutions
Make sure that you are using the right type of CD. See
Chapter 5, “Using CDs.”
If you are operating in SCSI mode, make sure that your SCSI
■
adapter board is firmly seated. If you just installed this board,
make sure that all of your expansion boards are firmly seated.
They may have been loosened when you installed the SCSI
adapter board.
Remove (uninstall) the applicatio ns so f tware and then
■
reinstal l it in a diff e r en t dir e ct ory. Sometimes a f ile ne cessary
to run the software becomes corrupted.
Com mo n Sy mpt o ms a nd Sol uti o n s
This secti on descr ibes the following symptoms:
System does not recognize the CD-Writer (page 37)
■
Other SCSI devices no longer work after I connected the CD-
■
Writer (page 37)
Unable to see the CD label (page 37)
■
Error message when I double-click on the CD-Writer icon
■
(page 38)
Un able to rea d a CD wri tt en wi th the CD-Wri t er, ga rb l ed dat a
■
in directories, static on audio CDs (page 38)
Audio sounds poor (page 38)
■
The speed test fails or buffer underruns occur (page 39)
■
It take s a l ong ti me to clo s e a session (pag e 4 0)
■
The video is ch oppy (page 40)
■
Copying fi le s take s a lo ng time (page 40)
■
Unable to see a second session on the CD (pag e 41)
■
App l i c a t ions c a n n o t lo c a te th e C D in th e CD -W rit er ( p ag e 41)
■
I can’t connect the SCSI data cable to my computer (page 42)
■
Page 47

Common Symptoms and Solutions
37
System does not recognize the CD-Writer
The CD-Writer is not connected, or other devices have the same
IRQ, DMA, SCSI ID, or I/O settings as the CD-Writer (hardware
conflicts). Try the following:
Make sure the CD-Writer is connected.
■
In Windows 95, display the Device Manager and double-click
■
on SCSI Controllers. A yellow exclamation mark over this
icon confi rms th a t the CD-Writer is not connected or th a t
other devices have the same settings as the CD-Writer.
Mak e su re t h e CD-Wri te r i s te rmi nat ed correctly . If it i s p art o f
■
a SCSI chain, make sure the chain is terminated correctly.
If operating in parallel mode, make sure that another device
■
does not have the same I RQ or DM A sett ing as the parallel
port. For example, a sound board or fax/modem board may be
using the same IRQ. If you discover conflicts, change the IRQ
setting on the other device. See the manuals that came with
your computer and other devices for instructions.
If operating in SCSI mo de , make sur e othe r devices do not
■
share the same I RQ, I/ O address, or DMA channel as the SCSI
adapter board. Also see if oth er SCS I devi ces in t he chain
share the same SCSI ID as the CD-Write r. See the manual that
came with your SCSI adapter board for instructions on
res olving ha rdwa re c onfli cts.
Other SCSI devices no longer work after I connected the
CD-Writer
There is probably a hardware conflict between the CD-Writer and
another SCSI device. Try the following:
Check for any hardware conflicts. (See above.)
■
Unable to see the CD label
Sometimes when you first insert a CD into the CD-Writer, the
label is not displayed on the Windows screen. Try the following:
Page 48

38
Common Symptoms and Solutions
Refresh the screen. In Windows 95, select the CD drive you
■
are using in Wi ndows Explorer or My Computer and press F5.
In Windows 3.x, select the CD drive in File Manager and press
F5.
Error message when I dou b le -click on the CD-Writ e r
icon
The CD -Writ er needs a mo ment t o ini tiali ze, ther e i s no CD in the
CD-Writer, the CD is in the tray upside-down or a little off-center,
or you are trying to read from a blank CD. Try the fo llowing:
Wait a moment, then click on the CD ic o n again.
■
Insert a CD.
■
Replace the CD.
■
Un ab l e to read a CD writte n wi th the CD-Write r,
garbled data in directories, static on audio CDs
The DMA speed is too fast, or there is a conflict with the DMA
channel. Either condition corrupts data written to the CD. Try the
following:
Referring to the manual that came with yo ur SCSI adapter
■
board, change the DMA speed to 3MB/sec. If this does not
correct the problem, change the DMA channel.
Audio sounds poor
Audio connector is not completely plugged in, or the quality of
the sound card or spe ake rs is poor. Try the foll owing:
Make sure the audio connectors are completely plugged in to
■
the LINE IN connector of the sound card, on the back of the
computer. (Your sound board may be labeled differently.)
Make sure that you do not have a sound-muting feature
■
turned on, by way of the monitor or software.
Page 49

Common Symptoms and Solutions
Check the sound coming from the CD-Writer by plugging
■
earphones or spe ake rs to the
front
of the CD-Writer. If the
39
sound qual ity is g o o d , th e prob le m is prob ably with the
sound board or speakers. See the documentation that came
with your sound board and speakers for help.
The speed test fails or buffer underruns occur
There are several causes for this: the hard drive/controller is slow;
free memory is low; other programs are running; the computer
received notification from the network or email; the CD-Writer is
reading from a slow source, like a CD-ROM, network, MO drive,
etc.; the screen saver came on; your computer’s power
management feature is trying to shut down devices; you have
hard disk errors; the central processing unit (CPU) in your
computer was busy per f o rming another task .
In any of these cases, try the following:
Make sure your syste m meets the minimum syst em
■
requirements. (See page 2.)
Do not run
■
any
other programs, log off any networks, and
disable any fax modem, email programs, etc. while writing
da t a to th e C D.
If your computer has a power-management feature, disable it.
■
If you suspect hard disk errors, run SCANDISK. Run DEFRAG
■
if you suspect yo ur hard disk is fragmented. See the manual
that came with your computer for instructions.
You can also fail the speed test or get buffer underruns if you are
copying lots of small files (less than 2 kB each). Try the following:
Build a disc image. See the
■
Copying Data and Music to CD
manual for Easy-CD Pro 95.
Write at 1x speed.
■
Page 50

40
Common Symptoms and Solutions
In parallel mode, speed test failures and buffer underruns could
also be caused by a slow parallel port. This would be likely if you
have an olde r com pu ter (purch as ed before Ja nuary 1995) . Try the
following:
Install new EC P or EPP parallel po rt card.
■
Write data to the CD at 1x speed.
■
The video is choppy
This can be caused by the same situations that cause speed test
failures and b uff e r underruns. This can also happe n if you r video
card is slow. Try the following:
Try the soluti on s for spe e d test failures and buffer underru ns
■
(page 39).
Upgrade your video card.
■
Copying files takes a long ti me
This can be caused by the same situations that cause speed test
failures o r buff e r underruns. This will also happe n if the CDWriter, paral le l adapter cable, or SCSI adapter board is defec tive.
Try the follo w ing:
Try the soluti on s for spe e d test failures and buffer underru ns
■
(page 39).
If these do not co rrec t the pr oblem, test the CD-W riter on
■
another high-end computer. If the results are the same, the
CD-W rit e r or p ara l lel a da pter cabl e may nee d to be s erv i ce d or
replaced . Contac t C ustomer Suppor t. I f the CD- Writer works,
the SCSI adapter board in the first computer may be defective.
It takes a long time to close a session
This is an inherent characteristic of r e cor dable CD technology.
Page 51

Common Symptoms and Solutions
41
Unable to see a second session on the CD
The screen may need to be refreshed, your CD-ROM drive might
not be able to read multisession CDs, or the SCSI adapter board’s
drivers do not support multisession CDs. If you are running
Windows 3.x, you might have the wrong MSCDEX version. Try
the following:
Refresh the screen. In Windows 95, select the CD drive you
■
are using in Windows Explorer or My Computer and press F5.
In Windows 3.x, select the CD drive in File Manager and press
F5.
If you are running Windo w s 3. x, look in your
■
AUTOEXEC.BAT file for the MSCDEX.EXE file version. You
should be running version 2.23 or later. (The text that appears
on the screen while your comput e r st art s also displays the
MSCDEX version.)
If you are having this problem with a CD-ROM drive, see if
■
the CD- W riter o r ot he r C D-R OM dri ve s ca n re ad t h e CD. I f s o,
the problem is probab ly with the CD-ROM drive. Conta ct the
manufacturer of t his dr ive for updated drivers.
If the problem is not with the CD-ROM drive and you are
■
running Window s 95 , turn off the autom atic inse r t
notifi cation, as follows:
From the Device Manager, double-click on CDROM , a nd then
double-click on the H P dr ive . Click on the Settings tab. If
Auto insert notification is checked, click on the check to turn
it off (so there is no check).
Applications cannot locate the CD in the CD-Writ er
Some programs (CD-ROM games, etc.) look only for the first
logical d rive letter assig ne d to a CD-ROM drive or CD- Writer. For
example, if yo ur CD-ROM drive is assigne d d rive D:\ and the CDWriter is assigned drive E:\, the program is looking for the CD
only in drive D:\ and will not see the CD in drive E:\. Try the
following:
Page 52

42
Common Symptoms and Solutions
If you want to use the CD-Writer for these types of programs,
■
rea s s i gn the d rive l e tters , mak i n g the CD-Writer come be for e
the CD-ROM drive, as follows:
In Windows 95, display the Device Manager and double-click
on CDRO M. Click on the CD-ROM d r ive, and then c lick on
the Settings tab. Under Reserved drive letters, select the drive
after
letter
the existing letter (for both start and end drive
letter) and c lick on OK. Then double-click on the HP drive,
and then click on the Settings tab. Under Reserved drive
letters, select the drive le tter
before
the current one and click
on OK.
In Windows 3.x, See your DOS manual for instructions on
assigning drive letters in MSCDEX. EXE.
I cannot connect the SCSI data cable to my computer
You might be trying to connect the high density, SCSI-2 cable to a
low density, SCSI-1 connector. Try the follow ing :
Purchase a low-density to high-density SCSI connection
■
con verter fr om your local com puter sto re.
Page 53

Be fore Yo u Call Cust omer Support
Before You Call Customer Support
If your own troubleshooting efforts fail, contact Customer
Support at one of the numbers in the front of this guide. Before
you con tact them, hav e the i n f ormation below read y . For hel p
finding this information, see page 44. If you receive an error
message, write it down before you call.
Information For your computer
CD-Writer model
Drive seria l number
Drive firmware version
Operatin g s yst em
Computer brand a nd m odel
Amou n t of RAM in stalled
43
Other CD-ROM drives?
yes
(If
, l is t them)
(If
yes/no
yes
, l ist them)
Sound card?
Parallel port type
SCS I adapte r board brand /model
(SCSI mode)
SCSI adapter board settings
mode)
Other SCSI devices connected?
yes/no
yes/no
(p aral le l mode)
(SC SI
EPP, ECP, other
IRQ . . . . . . . . . . . . _______
I/O port . . . . . . . . _______
DMA channel . . . . _______
DMA speed . . . . . . _______
SCSI ID-board . . . . _______
SCSI ID-drive . . . . _______
Page 54

44
Be fore Yo u Call Cust omer Support
Where to find this information
CD-W ri ter model
The CD-Writer model number appears on t he front of the CDWriter, as well as on the box and in other d o cumentat io n. Note
also whether y ou purchased an internal or exter nal model. If you
purchased an external model, note whether yo u are ru nning it in
SCSI or parallel mode.
Drive serial number
The drive’s serial number appears on the underside of the CD
Example: BEOxxxxxxx
tray.
Dri ve firmware version
In Windows 3.x, the drive firm wa re ver sion is displaye d in the
driver boot text, when the ASPI driver loads.
In Windows 95, the drive firmware versio n appe ars in the CDROM setting s. F rom the Device Manag e r, do ub le -click on
CDROM. D ouble-click on the HP drive, and then click on the
Settin g s tab.
Example: Firmware revision 1.20
Example: 6020es
Example: 1.20
Operating system
The operating system is displayed as yo ur system boot s.
Windows 3.1, Windows for Workgroups 3.11, Windows 95.
Computer brand and model
The computer brand appears on the front of your computer and
in the d ocumentation that came with your computer.
Dell Dimension XP-90, HP Vectra 486/66 ST, Clone Pentium 133.
Example:
Example:
Page 55

Be fore Yo u Call Cust omer Support
Amount of RAM installe d
If you are running Windo w s 3. x, use DOS to find me mory
information. From the DOS pro m pt, type msd. This displays t he
Micros oft Diagnostic wi nd o w. In the m e m o ry section, you w ill
see a figure for XMS (extended memor y). This is the amount of
memory avai lable to Windows.
In Windows 95, the amount RAM appears in t he syste m profile.
From the Start menu, select on Settings and then Control Panel.
Double-click on System. Then click on the Performance tab.
Exampl e: 16 MB R AM
Other CD-ROM drives
Your computer may have come with an internal CD-ROM or you
may have purchased CD-ROM drive. Check the documentation
that came with your computer or CD-ROM drive.
Mitsumi 4x CD-ROM
Sound board
Exam p l e: 14841K X MS
Example:
45
Your computer m ay have come w ith a sound board and speak e rs
or you may have purc hase d the m se paratel y. Check the
documentation that came w ith your com puter or sound boar d.
Exampl e: 16 -bit audio card
Parallel port t ype
In general, computers manufactured after January 19 95 have a
high speed parallel port (EPP or ECP). Check the manuals that
came with you r computer to confirm this. Other computers
generally have a standard port.
bidirectional
SCSI adapter b o ard brand/model
Check the manual that came with your SCSI adapter board.
Exampl e: Adaptec 1520
.
Example: EPP, ECP, standard,
Page 56

46
Be fore Yo u Call Cust omer Support
SCSI se ttings
In Windows 3.x , the SCSI settings a re displayed in the driver boot
Exampl e: I/O Port 011h, IRQ 11, DMA 6, SC SI ID 7.
text.
In Windows 95, display the Devic e Manag e r. D ou ble-click o n
SCSI Controllers. Double-clic k on the SCSI card name, and then
click on the Resourc es tab.
SCSI ID 7
Other SCSI devices
SCSI devices include items that are connected to a SCSI adapter
board, like CD-ROM drive, extra hard drive, tape drive, and so on.
Example: NEC CD-ROM, Maxtor 1GB Hard Drive, HP JetStore Tape
Drive.
.
Example: I/O Port 011h, IRQ 11, DMA 6,
Page 57

Returning Your Drive
Ret urning Your Dr ive
In Europe. If your Hewlett-Packard product requires repair or
replacement, call Custome r Support at the phone number listed on the
card insert at the front of this guide to r eceive instructi o n s.
In the USA. If your Hewlett-Packard product requires repair or
replacement, follow these instructions:
Call the number listed on the Customer Support Services card at the front
of this guide. Customer Support will help you determine if your drive is
defective. Provide the product type, serial number, and date of purchase.
You will be given a return authorization number. Keep the return
authorization (RA) number for future reference.
Securely repackage the product to prevent shipping damage ( use the
original packaging, if possible) and mark the return authorization
number on the box.
All product returns must have an accompanying return authorization
number. To ensure timely and accurate processing of your return, the
number mus t be clea rly printed on the outside of the box.
47
Use the appropriate address for your location . A traceable shipping
method is recom mended. Send the package to:
Hewlett-Packard Company
815 SW 14th Street, Building E
Loveland, CO 80537
Attn: Warranty and Returns
Return Number: __________
The postage, shipping and insurance charges incurred in shipping to
Hewlett-Packard will be paid by Purc ha ser and all risk for the produc t
shall remain with Purchaser until such time as Hewlett-Packard
Company takes receipt of the product.
Once your product is received at Hewlett-Packard, we will ship the
replacement product. Hewlett-Pa cka rd will pay shipping charges to the
Purchaser f or replacement product covered under warranty.
If the product is sti ll un der warranty, there is no charge for th e
replacement. If the product is not covered under warranty, an exchange
cost will be quoted when the return authorization number is issued.
Page 58

48
Techni ca l Sp ecif ica t ions
Technical Specificat ions
Disc data capacity
1 session : 65 8 M B
5 sessions: 6 03 MB
10 s essions: 534 M B
30 s essions: 258 M B
48 sessions: 9 MB (maximum)
1 MB is defined as 106 bytes
Performance
Buffer size: 1 MB
Average access tim e ( 1/3 st rok e ) : < 40 0 ms
Data transfer rate:
150 KB/s (1x speed)
300 KB/s (2x speed)
up to 900 KB/s (6x speed) (read only)
Error rate: < 1 frame/10
Audio distortion: < 0.1%
12
bits
Discs suppor t ed
120 mm and 80 mm CD-R media
Interface
Electrical interface: SCSI-2
Loading mec hanism: tray
Logical recording format: ISO 9660
Page 59

Techni ca l Sp ecif ica t ions
Dimensions
(5 1/4-inch form factor)
Height: 41. 5 mm (1.63 in.)
Width: 146 mm (5.75 in.)
Depth: 206 mm (8.11 in.)
Weight (net): 1 kg (2.2 lbs.)
Environmental
Temperature
operating: 5° to 35° C
nonoperating: -40° to 70° C
Humidity (no condensation allowed)
ope rating: 15% to 95 % RH
nonoperating: 5% to 95% RH
Shock and vibration
HP Corporate Environmental Test Class B1
Power requirement s
Typic al dissipation: 7 W
Maximum dissipation: 10 W
49
Product Certifications
Safety: UL, cUL, TÜV
Laser: CDRH (on internal laser product )
Page 60

50
Techni ca l Sp ecif ica t ions
Page 61

Index
A
access time
Acer brand computer
acoustic emission
Adaptec
application software
audio cable
audio connect or
audio distortion
automatic insert noti fication
3,
48
4
See also software
Windows 3.x
Windows 95
10,
19,
25,
38
38
38,
49
48
16
22
28
B
back panel
buffer size
buffer underrun
6
48
4, 39–
40
C
CD-ROM drive, identifying
45
CDs
audio
4
choosing
cleaning discs
ga rb l ed da ta
inserting
maintenance
multisession
32
38
31
33
4,
12, 41,
33
41
specifications
static on audio
unable to locate
unable to read
using with programs
CD-Writer
back panel
connecting
data transfer rate
dimensions
disc data ca pa city
power switch
returning
41
SCSI ID setting
specficications
termination setting
CD-Writer drive
error message
identifying
not r e cognized
cleaning
computer model, identifying
connecting the CD-Writer
copying files, p roble m with
cu stom installation. See software
Customer Support, contacting
cycling power
33
to other computers
47
35
6
8–
49
12
32
38
41
38
12
48
48
11
7
48
7–8,
38
12, 37,
13–
32
41
8–
15
40
37
44
12
43
D
data stream, in terruption
data transfer rate
dimensions
disc data ca pa city
49
48
48
4
I-i
Page 62

I-ii
disc image, building
DMA channel
DMA channel setting
DMA speed
drive letters
driver softw are
parallel
SCSI adapter board
38
12,
viii
39
3
37
41
12
E
eject bu tton
environ m ental specifications
error message
error rate
31,
48
12,
32
38
F
firmware versio n
44
H
hard dis k drive
hard dis k errors
hardware conflicts
high-pressure air
HPCDR directory
humidity
2,
3
39
3, 6,
37
33
20, 21,
49
26
I
I/O channel s ettin g
interface
IRQ setting
3,
See also SCSI adapter board
16,
48
37
16,
37
M
maintenance
memory
memory, low
mo del, iden tifying
MSCDE X vers ion
mult ise ss i o n cap abi li tie s
33,
2, 3, 39,
39
48
45
2,
44
41
4,
41
O
49
operati ng s yst em
compatible
identifying
2
44
P
package contents
parallel adapt er cable
parallel adapter cable, ordering
parallel driver software
parallel mode
parallel mode vs SCSI m ode
parallel mode, switching to
parallel port
performance
power connector
power management feature
power requirements
power supply
printer pass-throug h port
printer port. See parallel port
processor
prod u c t cer t ific a t io n s
programs
2,
for CD-Writer
running other
1
viii, 16
16
viii
viii, 16, 37, 40, 45
2–3,
48
11
49
11
16,
16
49
19, 22, 25,
39
viii
16–
39
17
28
16
17
Page 63

I-iii
R
RAM. See memory
recording forma ts
refreshing the screen
returnin g the CD-Writer
32
15, 38,
47
S
SCSI adapter board
6–7, 13, 37
driver softw are
ID setting
models
termination
SCSI cable
SCSI chain
SCSI connector
SCSI data cable
SCSI data cable, adapter
SCSI devices
SCSI mode vs parallel mode
serial number, finding
session
closing, time for
unable to see second
unreadable
shock
small files, copying
software
cu stom installation
installing
uninstalling
sound board
sound, poor
speakers
viii
3, 6,
49
Windows 3.x
Windows 95
Windows 3.x
Windows 95
Windows 3.x
Windows 95
10,
6, 7,
4
6,
8
8,
3,
46
4
9, 10,
38
38
viii, 2, 3, 3–4
4, 7, 12, 13,
46
7
37
10
9, 10,
44
40
39
21
27
19
25, ??–
23
29
45
41
specifications
speed test fai lure
system requi rem ents
41
48
39–
40
2
T
temperature
termination
transfer rate
tray, opening and closing
,
troubleshooting
41
49
6, 7,
3
35–
37
42
31,
32
U
ut ility disk
42
19,
25
V
viii
vibration
video, choppy
49
40
W
write speed
29
2, 3, 16, 39, 40,
48
Page 64

I-iv
Page 65

Cus t om er Suppor t S ervices
World Wide Web
FTP Si te
. . . . . . . . . . . . . . . . . . . . . . . . . . . . . . . . . . . . . . . . . . . . ftp.hp.com
Login: . . . . . . . . . . . . . . . . . . . . . . . . . . . . . . . . . . . . . . .anonymous
Password: . . . . . . . . . . . . . . . . . . . . . . . . . . . . .(Your email address)
Directory: . . . . . . . . /pub/infor mation_storage/surestore/cd-writer
. . . . . . . . . . . http://www.h p.com/go/storage_support
Bulletin board (8,N,1,F, 1200-28.8K baud)
USA. . . . . . . . . . . . . . . . . . . . . . . . . . . . . . . . . . . . . . . . . . . . 970-635-0650
Europe . . . . . . . . . . . . . . . . . . . . . . . . . . . . . . . . . . . . . +31 (0)495 546909
CompuServe
America Online
. . . . . . . . . . . . . . . . . . . . . . . . . . . . . . . . . . . . . . . . Go HPSYS
. . . . . . . . . . . . . . . . . . . . . . . . . . . . . . . . Keyword: hpstor
HP First/QuickFax Faxback Service
USA and Canada . . . . . . . . . . . . . . . . . . . 800-368-9673 or 970-635-1510
Europe
Austria (free line ) . . . . . . . . . . . . . . . . . . . . . . . . . . . . . . . .0660 8128
Belgium (free line)
- Dutch . . . . . . . . . . . . . . . . . . . . . . . . . . . . . . . . . . . . . . . 0800 11906
- French . . . . . . . . . . . . . . . . . . . . . . . . . . . . . . . . . . . . . . 0800 1704 3
Denmark (free line) . . . . . . . . . . . . . . . . . . . . . . . . . . . . . . 800 10453
Finland (free line). . . . . . . . . . . . . . . . . . . . . . . . . . . . . . . 9800 13134
France (free line) . . . . . . . . . . . . . . . . . . . . . . . . . . . . . . . .05 905900
Germany (free l ine) . . . . . . . . . . . . . . . . . . . . . . . . . . . 0130 810 061
Italy (free line ) . . . . . . . . . . . . . . . . . . . . . . . . . . . . . . . . .1678 59020
Netherlands (free line) . . . . . . . . . . . . . . . . . . . . . . . . . . 06 022 2420
Norway (free line) . . . . . . . . . . . . . . . . . . . . . . . . . . . . . . . 800 11319
Spain (free line) . . . . . . . . . . . . . . . . . . . . . . . . . . . . . . . . 900 993123
Sweden (free li ne). . . . . . . . . . . . . . . . . . . . . . . . . . . . . . .020 795743
Switzerland (f ree line)
- French . . . . . . . . . . . . . . . . . . . . . . . . . . . . . . . . . . . . . . . .155 1526
- German . . . . . . . . . . . . . . . . . . . . . . . . . . . . . . . . . . . . . . .155 1527
United King do m (fre e line) . . . . . . . . . . . . . . . . . . . . . . 0800 96027 1
E-mail
Toll line other locations in Europe . . . . . . . . . . .+31 (0)20 681 5792
. . . . . . . . . . . . .Surestore_Support@HP-Loveland-om10.om.hp.com
Page 66

2
Telephone
USA (M-F, 7am-5pm Mou ntain time)
Technical support. . . . . . . . . . . . . . . . . . . . . . . . . . . . . 970-635-1575
Literature a nd dealer referral . . . . . . . . . . . . . . . . . . . . 970-635-1000
Europe (M-F, 8:30am-6pm Netherlands time)
English lang u age sup port. . . . . . . . . . . . . . . . . . .+31 (0)20 682 2628
French langu a ge suppo rt . . . . . . . . . . . . . . . . . . .+31 (0)20 681 7750
German language support . . . . . . . . . . . . . . . . . .+31 (0)20 681 7810
Italian lang u age sup port . . . . . . . . . . . . . . . . . . .+31 (0)20 581 337 8
Spanish langu a ge support . . . . . . . . . . . . . . . . . .+ 31 (0)20 581 3379
FAX
USA. . . . . . . . . . . . . . . . . . . . . . . . . . . . . . . . . . . . . . . . . . . . 970-667-0997
To order more CDs
USA. . . . . . . . . . . . . . . . . . . . . . . . . . . . . . . . . . . . . . . . . . . . 970-635-1500
 Loading...