

Page 1

HP Support Anywhere
Installation and User Guide
Server Management Software
For the Support Expert
HP Part Number 5967-1534
Printed August 1997
Page 2

Notice
The information contained in this document is subject to change without notice.
Hewlett-Packard makes no warranty of any kind with regard to this material, including,
but not limited to, the implied warranties of merchantability and fitness for a particular
purpose. Hewlett-Packard shall not be liable for errors contained herein or for incidental
or consequential damages in connection with the furnishing, performance, or use of this
material. Hewlett-Packard assumes no responsibility for the use or reliability of its
software on equipment that is not furnished by Hewlett-Packard.
This document contains proprietary information that is protected by copyright. All rights
are reserved. No part of this document may be photocopied, reproduced, or translated to
another language without the prior written consent of Hewlett-Packard Company.
Materials reprinted with the permission of Symantec Corporation. Symantec makes no
warranty of any kind regarding the accuracy, correctness, or sufficiency of the information
in the publication, and the use of any information therein is or will be free from claims of
intellectual property infringement of any kind.
The use of trademarks or other designations is for reference purposes only. The following
trademarks are used in this manual:
SCSI Status SNMP agent software copyright Adaptec, Inc., 1997; all rights reserved;
distributed by Hewlett-Packard Company under license. Adaptec is a trademark of
Adaptec, Inc. Microsoft and MS-DOS are U.S. registered trademarks of Microsoft Corp.
Windows and Windows NT are trademarks of Microsoft Corp. Novell, NetWare, and
IntranetWare are registered trademarks of Novell, Inc. pcANYWHERE,
pcANYWHERE32, and Symantec are trademarks of Symantec Corporation. CompuServe
is a U.S. registered trademark of CompuServe, Inc.
See Appendix E, "Warranty, Software License, and Support" for further information.
Hewlett-Packard Company
Network Server Division
Technical Communications / MS 53U-FJ
5301 Stevens Creek Boulevard
P.O. Box 58059
Santa Clara, CA 95052-8059, USA
© Copyright 1997, Hewlett-Packard Company
ii
Page 3

Contents
1 Quick Start....................................................................................................1
Part 1. Setup at the Client Workstation .........................................................4
Part 2. Setup at Each HP NetServer.............................................................5
Part 3. Verify Correct Installation...................................................................6
Part 4. Enable Remote Console Options.......................................................7
2 What is HP Support Anywhere?..................................................................9
Audience Assumptions...................................................................................9
Documentation.............................................................................................10
HP Auto Alert Helps You Monitor Your Servers............................................10
HP Support Anywhere Helps You Manage Your Servers..............................11
Your Servers Alert You to Problems.........................................................12
Problems With Solutions..........................................................................12
Web Interface Features ...............................................................................14
HP Auto Alert Features................................................................................16
HP Auto Alert Alarms List ........................................................................17
Remote Console Options.............................................................................17
Software Components..................................................................................19
Required Hardware and Software.................................................................21
HP NetServer Hardware Required ...........................................................21
HP NetServer Software Required.............................................................21
HP Support Anywhere Client Hardware Required.....................................22
HP Support Anywhere Client Software Required......................................23
3 Installing HP Support Anywhere...............................................................25
Installation Overview....................................................................................25
Part 1. Setup at the Local Client Workstation..............................................29
Part 2. Setup at Each HP NetServer...........................................................34
Installing on Novell NetWare Servers ......................................................34
Installing on Windows NT Servers ...........................................................34
Part 3. Verify Correct Installation.................................................................37
Troubleshooting.......................................................................................40
Part 4. Remote Console Options.................................................................43
HP Remote Console Redirection (E 40 and E 45 only).............................44
Graphic Console Redirection (Windows NT)............................................55
iii
Page 4

Contents
RCONSOLE (NetWare)...........................................................................61
4 Using HP Support Anywhere.....................................................................65
Running HP Support Anywhere....................................................................65
HP Support Anywhere Auto Alert.............................................................66
Auto Alert Response Options...................................................................67
Using HP Support Anywhere's Web Interface...............................................70
Server Description Page..........................................................................71
Server Configuration Pages.....................................................................72
Menu Buttons...........................................................................................75
Web Security Considerations.......................................................................78
User IDs and Passwords..........................................................................79
IP Address Restriction..............................................................................79
Encryption................................................................................................79
A Customizing the Support Anywhere HP NetServer .................................81
Installing SNMP Software Agents Manually on Novell NetWare Servers......81
Loading the Automatic Server Restart Software for Novell NetWare........81
ASR NLM Files and Parameters for Novell NetWare ...............................82
ASR Program Files and Parameters for Windows NT..............................83
B Terminal Emulation Keys (E 40 and E 45 only)........................................85
C Glossary of Network Terminology............................................................87
D Configuration Worksheet..........................................................................91
E Warranty, Software License, and Support ...............................................93
Software Product Limited Warranty..............................................................93
HP Software License Agreement..................................................................94
Technical Support........................................................................................96
Index...............................................................................................................99
iv
Page 5
1 Quick Start
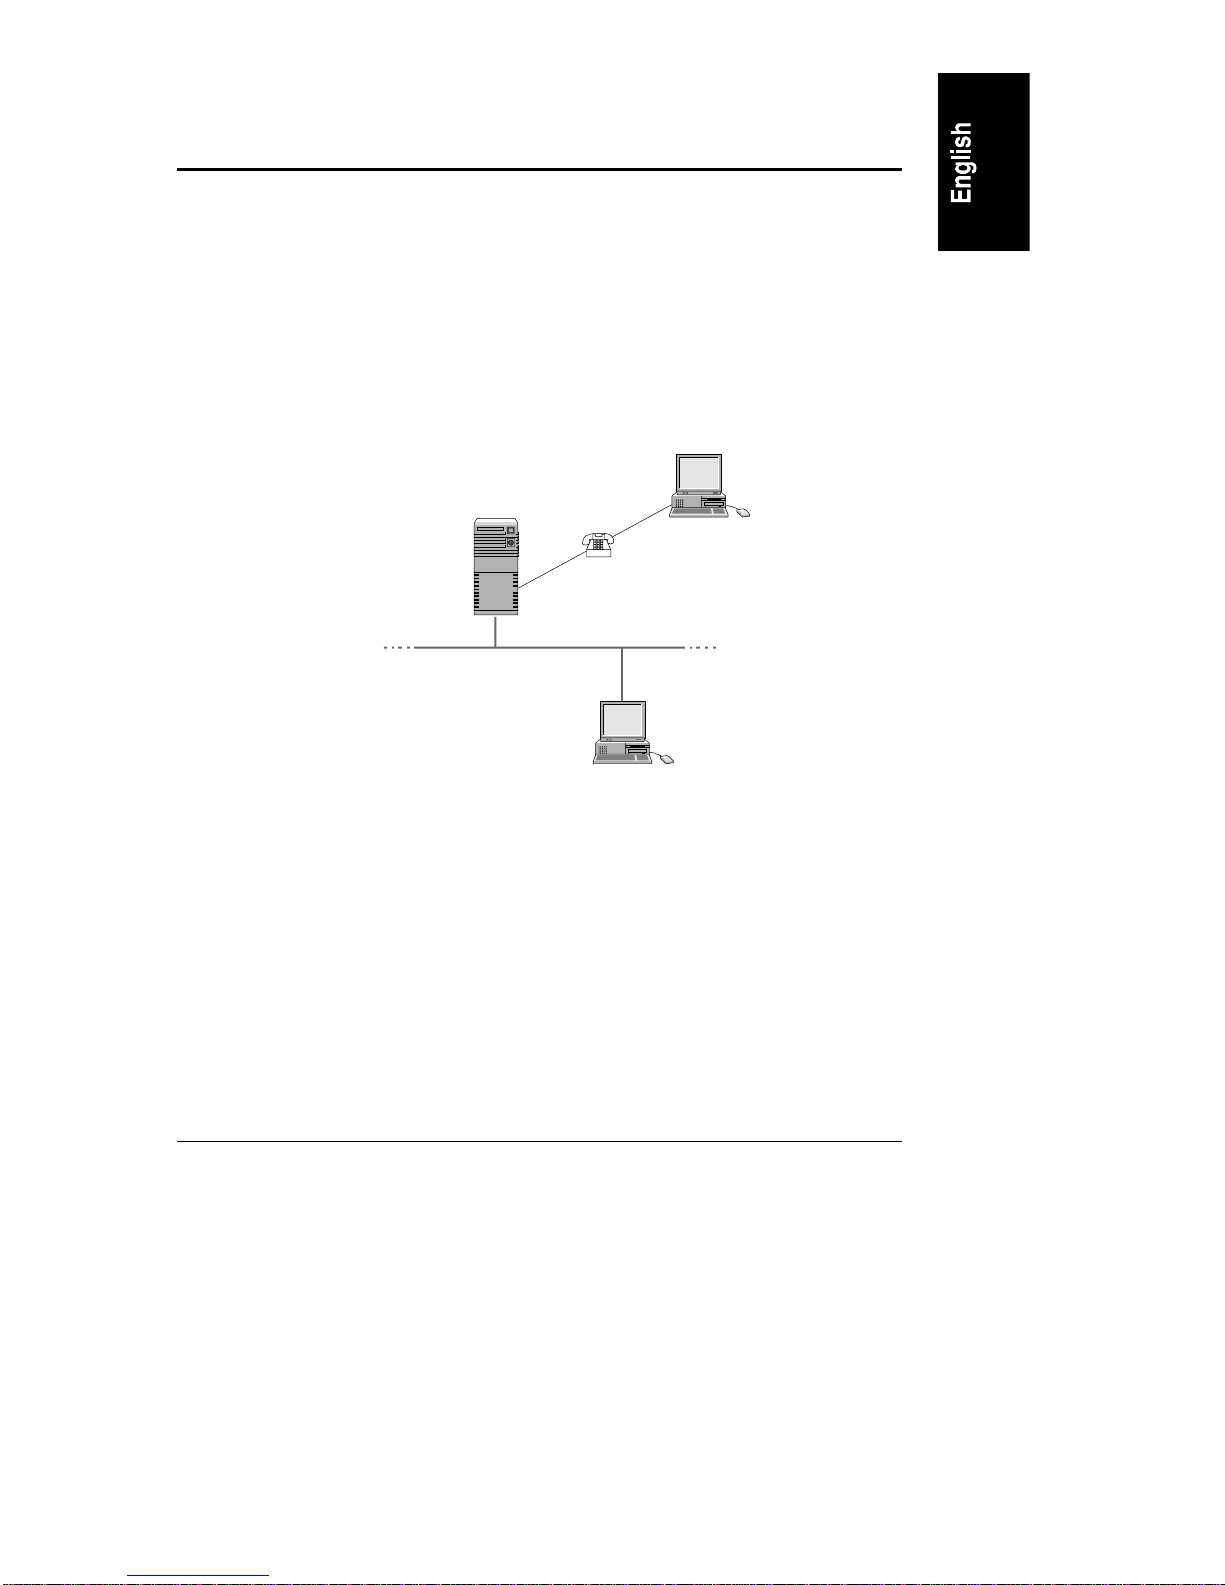
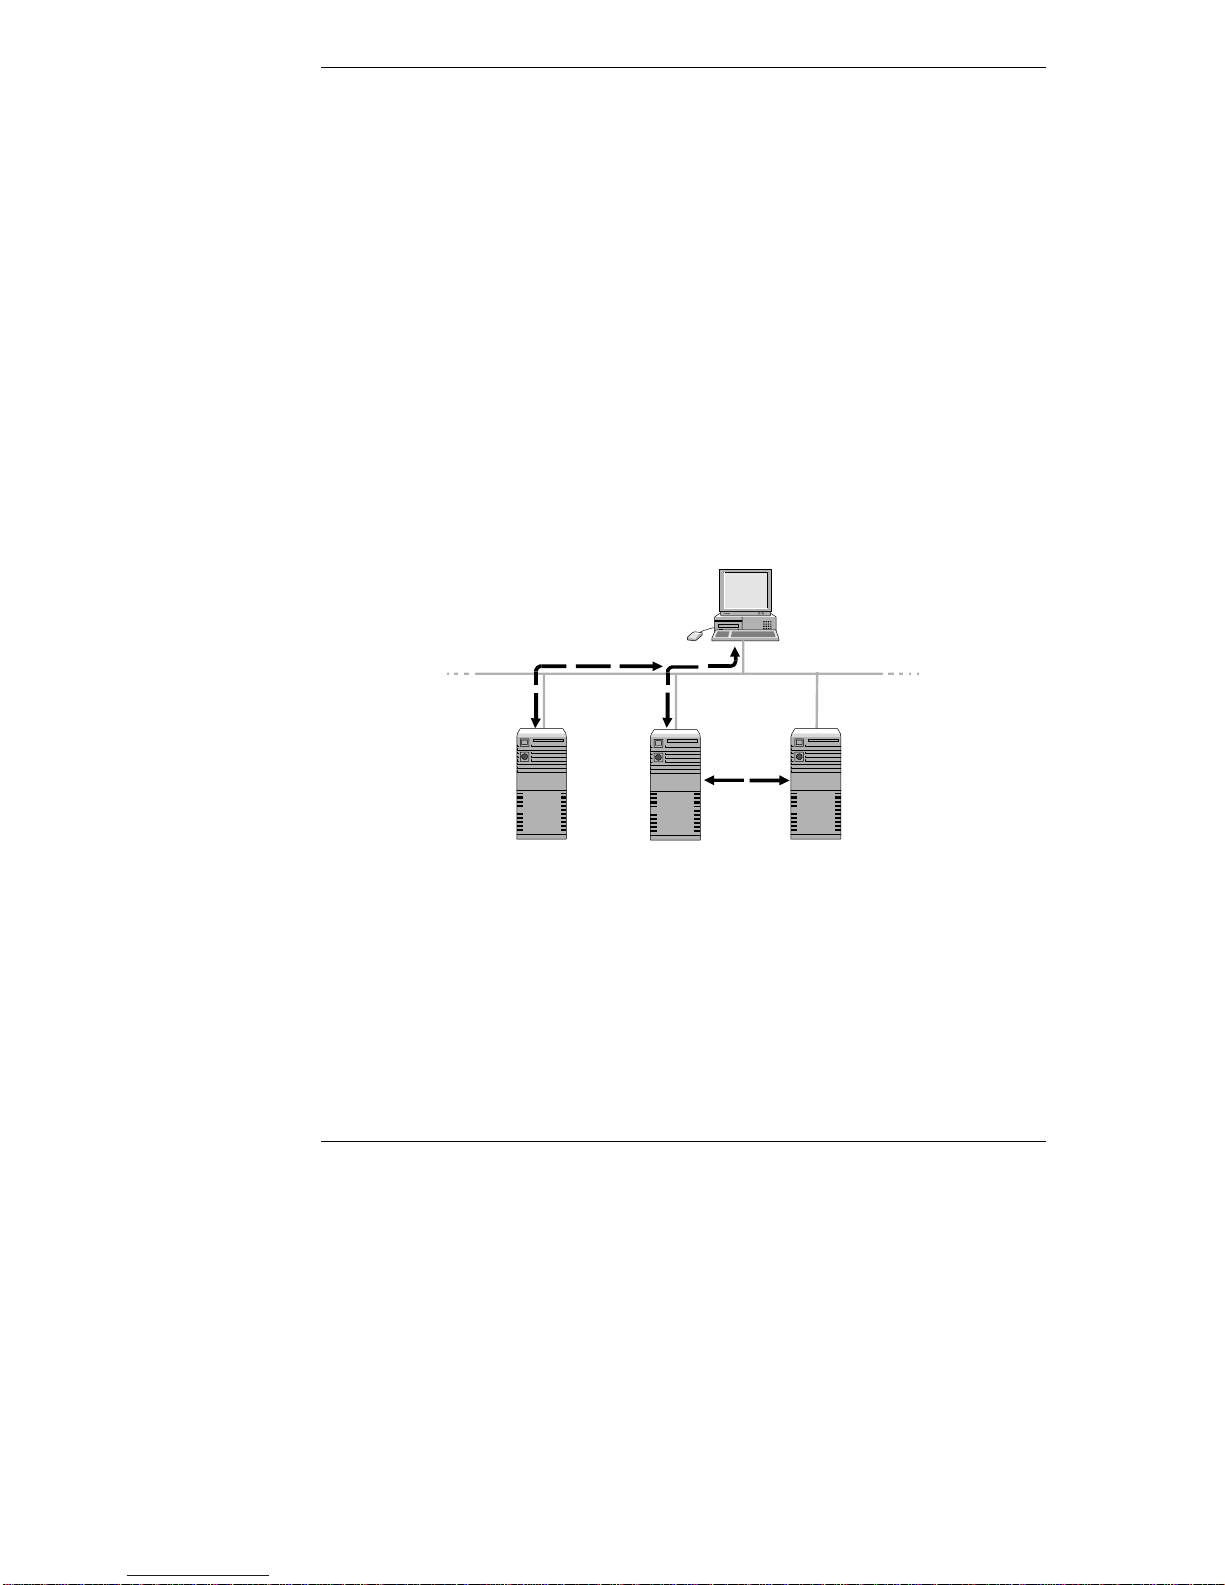
HP Support Anywhere is a group of network management tools that allows you to
efficiently monitor and maintain your HP NetServers E Series. At the client,
Support Anywhere's Auto Alert feature notifies you of server dysfunction, and its
web interface provides you with management tools including error logging,
configuration information, and error threshold setting. In addition, Support
Anywhere includes a remote console support feature that allows you or your
Value Added Reseller (VAR) to remotely run server diagnostics and access server
controls.
Support Anywhere
offsite Remote Console
Support Anywhere
Server
Support Anywhere
Client
Figure 1: Overview: HP Support Anywhere on a LAN
Support Anywhere installation includes four parts:
Part 1. Setup at the Client Workstation
Part 2. Setup at Each HP NetServer
Part 3. Verify Correct Installation
Part 4. Enable Remote Console (Optional, see Chapter 3)
1
Page 6

Chapter 1 Quick Start
You can choose the Support Anywhere features you want to use during Client
Setup (Part 1). If you want to install only the Auto Alert feature, during setup, do
not configure your NetServer's as web servers.
Steps for installing Support Anywhere software differ depending on whether your
NetServers are running Novell NetWare/IntranetWare or Microsoft Windows
NT.
Should you use Quick Start? If you are unfamiliar with terms such as
SNMP and IP address, refer to the detailed installation instructions in Chapter 3.
If you want more background before using Quick Start, review the information
provided in Chapter 2. If you are an experienced network administrator, these
Quick Start procedures may be all you need to install Support Anywhere.
Before Proceeding: Review "Required Hardware and Software" in Chapter 2
to ensure you have the necessary components to set up Support Anywhere.
If you want to use Support Anywhere's web-based management features, copy
and fill out the Configuration Worksheet in Appendix D. You will need the
following information for each HP NetServer:
Server name
NOS installed (either Windows NT or Novell NetWare/IntranetWare)
Web server software installed? Yes/No
IP address
SNMP community name
IPX address (if your server is running NetWare/IntranetWare or supports
IPX)
Use your Configuration Worksheet (Appendix D) to keep track of the
information for each NetServer you are setting up.
NOTE Be sure you have supervisor-level privileges for the Novell
NetWare servers you want to include under Support Anywhere
management. Likewise, verify that you have administrator
privileges for your Microsoft Windows NT servers.
IP and IPX Addresses: Use IP addresses if your network protocol is
TCP/IP, or if your NetServer includes operational web server software. Use IPX
addresses if your network protocol is IPX. You can use both protocols, although
as a general rule, NetWare-based networks support IPX addressing.
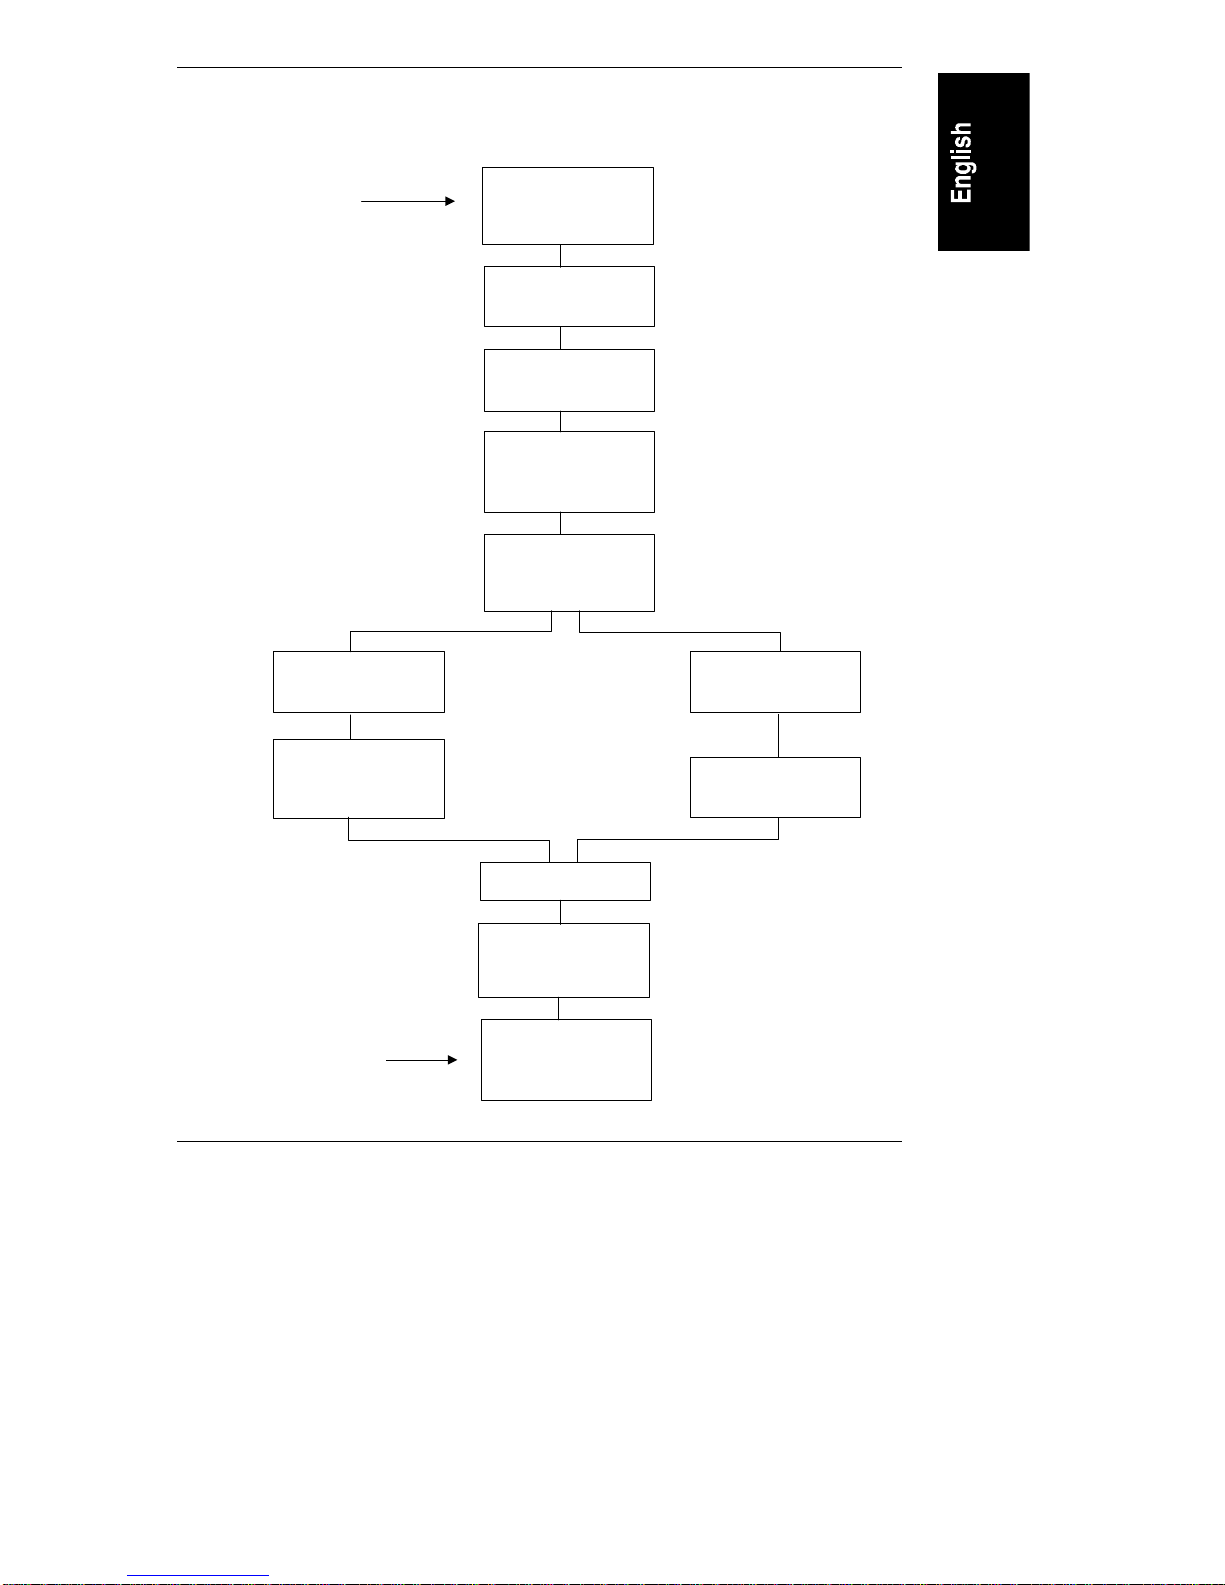
The following illustration is a flowchart of the installation process. Use it as a
checklist as you proceed through the installation.
2
Page 7
Chapter 1 Quick Start
HP Support Anywhere Installation Flowchart
ConfigureServer
Start
Windows NT Servers
hardware,
Install Utility Partition
(E 40Road Map)
Install NOS and
Web S erver software
(NOS Documentation)
Fill outConfiguration
Worksheet
( Appendix D)
Run SupportAnywhere
Client Setup at local
client
(Quick Start/Chapter 3)
Run SupportAnywhere
Server Setup on
server(s)
(Quick Start/Chapter 3)
NetWare Servers
Run S erver Setup at
each server
(Quick Start/Chapter 3)
Set clientSNMP trap
destination at each
server
(Quick Start/Chapter 3)
Finish
ServerSetupisdonefor
you over the network
during Client Setup
Client SNMP trap
destination is set for you
during Client Setup
Reboot eachserver
Verify server up/down
alarms are received at
the client
(Quick Start/Chapter 3)
Setup offsite Remote
Console
(Optional, see
Chapter 3)
3
Page 8

Chapter 1 Quick Start
Part 1. Setup at the Client Workstation
¨
Step 1 Start Setup
Insert the HP NetServer Navigator CD-ROM in your Support Anywhere
Client's CD-ROM drive. From the Windows Program Manager, run
setup.exe located in the HPSA\US\CONSOLE\DISK1 subdirectory.
A welcome screen directs you to close all currently active Windows
applications.
¨
Step 2 Choose Installation Option
For a first time installation, choose the default option, Initial Install. For
servers running Novell NetWare/IntranetWare, Support Anywhere setup
installs both client and server(s) software.
¨
Step 3 Select Directory for Support Anywhere
Support Anywhere presents you with the default: C:\PROGRAMf\HPSA.
Setup copies its program files to the selected directory.
¨
Step 4 Select a Web Browser
Setup checks your Windows configuration and, if possible, identifies your
current web browser. You can use the identified browser, or select a new
one.
¨
Step 5 Server List Configuration
Identify and configure your web and non-web servers. Click Create or
Update List. For web-based management, you need to identify the IP
address, the SNMP community and, if appropriate, the IPX address for
each selected server.
◊ In an environment that includes Windows NT servers, Windows NT
web servers can support your non-web servers, including both Novell
NetWare/IntranetWare and Windows NT. Continue to Step 6.
◊ In an exclusive Novell NetWare/IntranetWare environment, all HP
NetServers must include web server software for web-based
management. If this describes your network, client installation is
finished. Please read "Before Proceeding to Part 2," for HP
NetServer installation.
4
Page 9

Chapter 1 Quick Start
¨
Step 6 Configure Web Servers
You can manage non-web servers over the web using Windows NT
NetServers. Select a web server, and then identify all the non-web servers
it will support. If you have listed NetWare servers, setup will include them
as well.
¨
Step 7 Print Out Windows NT Server List
At the end of Client setup, a text file (based on information you entered
during setup) lists your managed Windows NT servers and your client
address information including host name, IP address, and IPX address. Be
sure to print this file. You'll need the information to install the SNMP
agent software on your HP NetServers running Windows NT.
Before Proceeding to Part 2: When HP Support Anywhere Client setup is
finished, the Support Anywhere icon appears in the display, or, in Windows 95,
on the program bar. Leave the client operational; installation is not complete.
As soon as Support Anywhere's Auto Alert feature is launched, the program
starts regular periodic polling of all NetServers on the servers list. At this point,
each listed server posts a Server Down Auto Alert notice because installation has
not yet been completed at your NetServers.
You still need to install the Server software at each Windows NT server you
want to monitor with Support Anywhere. In addition, all listed NetServers must
be restarted.
Part 2. Setup at Each HP NetServer
HP NetServer running Novell NetWare/IntranetWare: Restart each
HP NetServer running NetWare/IntranetWare to activate the SNMP agents that
were installed during client setup. (Logging off and on does not constitute a
server restart.) Proceed to Part 3: Verify Correct Installation.
NOTE If you installed your Network Operating System utilizing the
Configuration Assistant "Express mode" or Custom
"Automated mode" from the HP NetServer Navigator CD
(version F.01.05 and later) , you may skip at least Step 1 of the
Windows NT instructions listed below. If you've also set the
SNMP trap destination of your client during the NOS install,
you may skip steps 1 to 3 of the Windows NT instructions
listed below.
5
Page 10

Chapter 1 Quick Start
HP NetServer running Microsoft Windows NT: Follow these steps to
complete installation for each NetServer running Windows NT.
¨
Step 1 Run HP Support Anywhere Server Setup
Insert the HP NetServer Navigator CD-ROM in your NetServer's CDROM drive, and run setup.exe, located in the
HPSA\US\SERVER\DISK1\WINNT subdirectory. Choose "Install
SNMP Agents and WEB Interface Software".
¨
Step 2 Check SNMP Setup
Check SNMP setup to insure the correct listing of your client's community
name and address information. In the Windows Program Manager,
double-click Control Panel, then Network. Configure your SNMP Service
using the community name and address (as listed in the printout you
generated in Step 7 of Part 1). Enter IP and/or IPX addresses, and the
hostname if your network uses the DHCP protocol.
¨
Step 3 Restart the HP NetServer
To complete the installation, you must restart each HP NetServer that you
included in your Support Anywhere setup.
Part 3. Verify Correct Installation
Go to the client workstation to verify correct installation.
You will find that each restarted NetServer has sent a Server Restart message to
your designated client to let you know that installation was successful.
Depending on the number of NetServers installed, Auto Alert Server Restart
messages should already be queued up on the client display. However, they will
not be visible until you clear the Server Down messages that were automatically
posted before installation was completed.
1. Clear the Server Down notifications.
2. At each NetServer's Server Restart message, click Go There to test the
web connection.
3. Close the web browser displaying the NetServer's web page to return to
your local client's Auto Alert message.
4. Click OK to clear the Auto Alert message.
This reveals any previous Auto Alert notifications.
6
Page 11

Chapter 1 Quick Start
Continue this procedure to verify that all NetServers generated a Server
Restart and that all web connections are operational.
Part 4. Enable Remote Console Options
For detailed information about enabling Support Anywhere's optional Remote
Console features, see Chapter 3.
7
Page 12

Page 13

2 What is HP Support A ny where?
One of the challenges faced by today's network manager is to maintain control
over increasingly decentralized computing environments. As networks become
more complex, the servers need to be carefully managed and their performance
tracked. This is where Support Anywhere fits in. Support Anywhere provides a
set of management tools you can use to maintain and control networked HP
NetServers E Series running Microsoft Windows NT or Novell
NetWare/IntranetWare.
Support Anywhere assists in maintaining your network by providing you with
timely information about your network servers. Basically, you need to know when
a server is experiencing problems, or if it is likely to have problems in the near
future. Support Anywhere management tools include:
• Auto Alert provides prompt notification of server operations
• Web Interface takes you directly to your NetServer's web page for
detailed information about NetServer operations
• Remote Console Redirection allows a Value Added Reseller (VAR),
system administrator, or support technician to take control of the server in
order to maintain, configure, or otherwise manage server operations.
A udience A ssumptions
This guide is designed for the VAR, and for the user who is familiar with
installing and configuring computer and network software. You need to be
familiar with:
• client operating systems such as Microsoft Windows
• Novell NetWare/IntranetWare and/or Microsoft Windows NT network
operating systems, and Internet/intranet web server software
• logging on to a server as a supervisor or administrator
• the basic administrative tasks required to maintain network operations
• Internet browsers, such as NetScape Navigator (v2.0 and v3.0) and
Microsoft Internet Explorer (v3.0)
9
Page 14

Chapter 2 Introducing HP Support Anywhere
• installing and configuring network software, including web-based
products
If you are unfamiliar with software installation, or have not previously
administered computer networks, contact your computer dealer or HewlettPackard for technical support.
Documentation
HP Support Anywhere includes the following documentation:
• This guide, which describes how to install and use HP Support Anywhere
to manage your HP NetServer E Series servers.
• HP Support Anywhere application online help
• pcANYWHERE online documentation. The complete pcANYWHERE
User Guide is in Adobe Acrobat PDF format on the HP NetServer
Navigator CD in the \HPSA\language\PCA32 subdirecory (where
language represents a two letter abbreviation for your local language).
• The HP Support Anywhere README file. For the client and your Novell
NetWare servers, a version of this file is available from the "HP Support
Anywhere" program group on your Windows client. For Windows NT
servers, a version of this file is available in the "HP Support Anywhere"
program group. Use these README files to obtain the latest information
about HP Support Anywhere.
HP Auto Alert Helps You Monitor Your Servers
HP Auto Alert simplifies network administration by forwarding messages from
your NetServers about changes in operating condition to a client workstation of
your choice.
Using Support Anywhere, your HP NetServer E Series systems can send alarm
messages over the LAN when a problem occurs. Auto Alert uses the industry
standard Simple Network Management Protocol (SNMP) as its message delivery
system. SNMP is available in both the Microsoft Windows NT and Novell
NetWare/IntranetWare network operating systems.
10
Page 15

Chapter 2 Introducing HP Support Anywhere
HP Support A nywhere Helps You Manage Your
Servers
Support Anywhere's web interface allows you to browse critical information
about your servers from the office intranet. Network administration is simplified
because you can remotely view a summary of alarms generated by a given server,
set alarm parameters, check disk drive capacity, and review SCSI bus and
network interface configuration, and server configurations.
The figure below provides an example of an office using Support Anywhere's
network management tools.
HP Support Anywhere
Web Servers
Windows NT or Novell
NetWare servers on the
LAN set up as web
servers. These s ervers
can send alarms to the
clientabout their
operating condition.
They also provide a
home page wherea
clientmay browse
additional information
aboutthe server.
HP NetServer
Support Anywhere
Web Server
HP NetServer
Support Anywhere
Non-Web Server
Support Anywhere
Client
HP NetServer
Support Anywhere
Non-Web Server
HP Support Anywhere
Client
APCworkstationonaLAN
designated to receive
alarms describingthe
operatingcondition of
networkedHP NetServer E
Seriesservers.
HP Support Anywhere
Non-Web Servers
Non-web servers, such a s
file or application servers, on
a LAN that can send alarms
to the client about their
operatingcondition. These
serversmay also have links
on a Windows NT web
server to allow a client to
browse information about
these servers.
Figure 2: HP Support Anywhere on a Local Area Network
Your Servers Alert You to Problems
Support Anywhere's Auto Alert feature provides you with instant alarm
notification from your NetServers via SNMP agents installed on your NetServers.
• SNMP alarm agent software is loaded onto each of your servers. The
software works behind the scenes to monitor critical server operations,
11
Page 16
Chapter 2 Introducing HP Support Anywhere
such as SCSI device status, disk capacity, and network card status. When
an agent on the server discovers an unusual condition or a potential
problem that may affect server function, the server software sends an
SNMP alarm message over the LAN to a client PC that you designate.
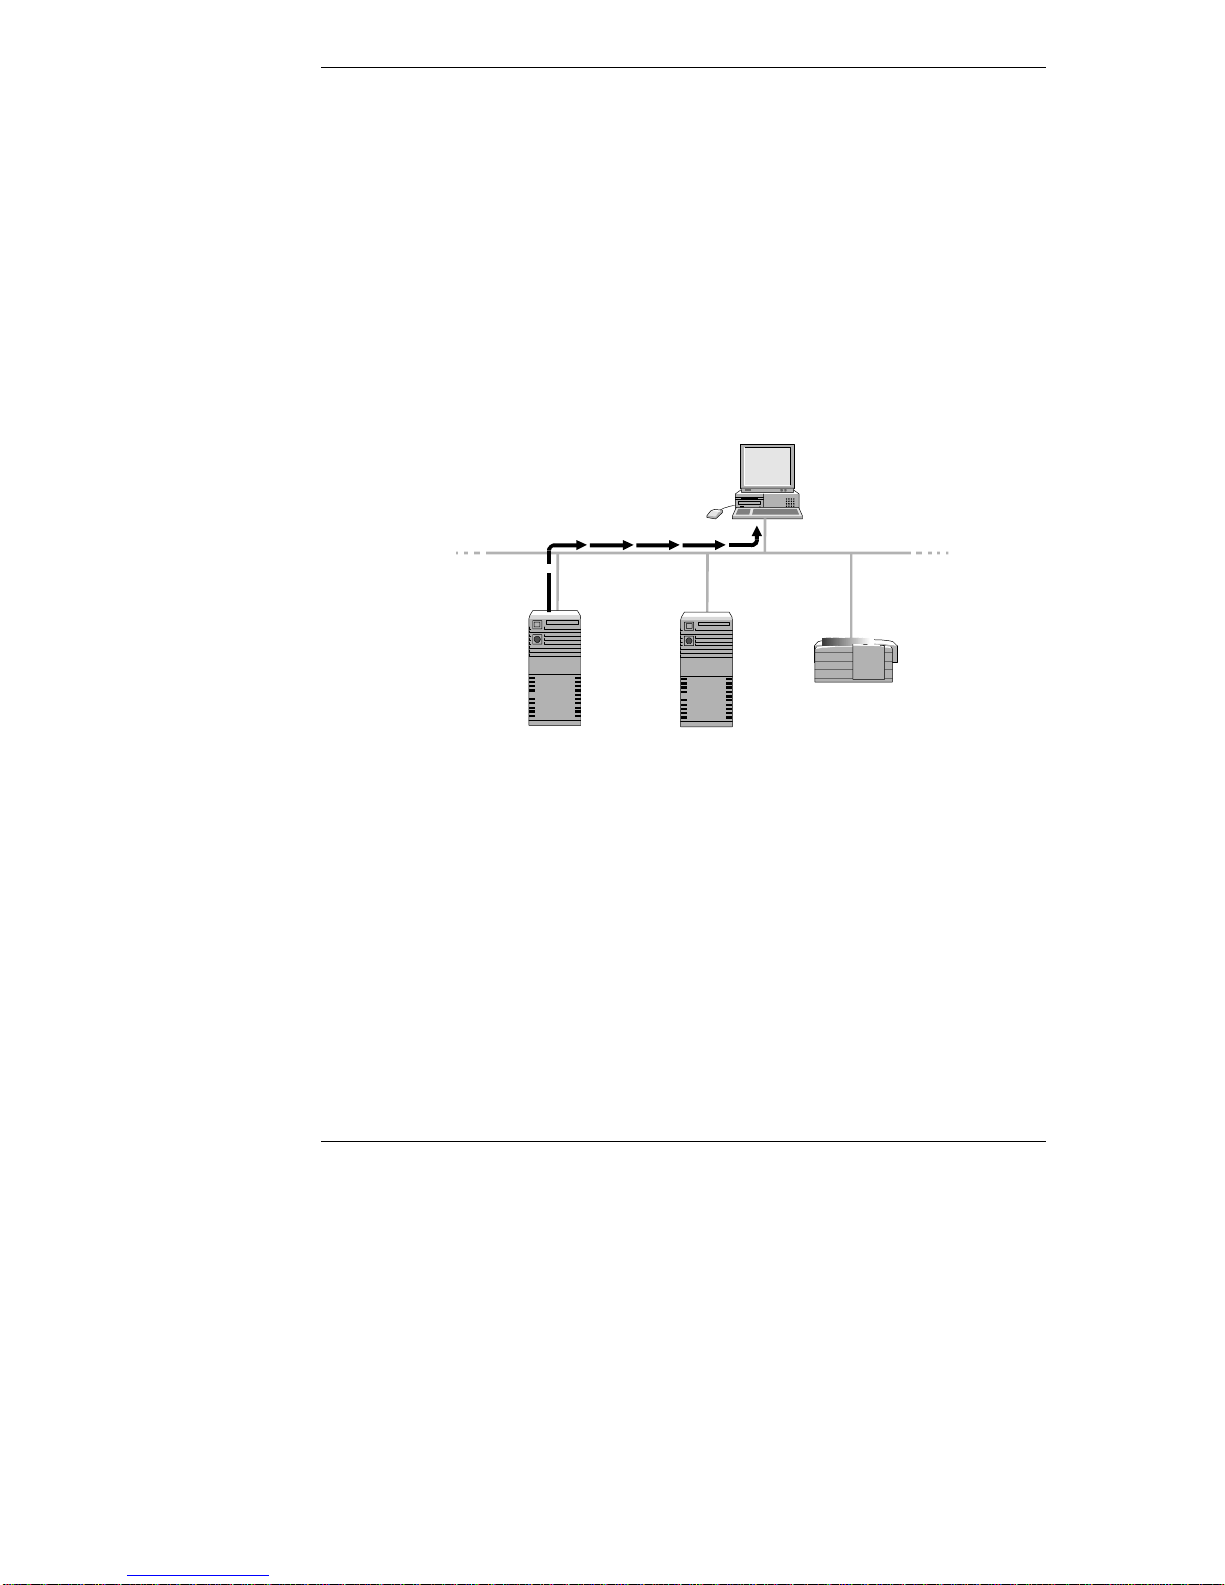
• Support Anywhere's Auto Alert client software allows any designated
client PC running Windows to receive server messages over the LAN.
The following illustration shows how this works.
Support Anywhere
2
Client The designated
Support Anywhere Server
1
Server software detects that
one of the hard disks is
almost full. A message is
sent over the LAN via SNMP
to a designated client
workstation.
Client
SNMP Alarm
client workstation
receives the alarm and
displays an Auto Alert
message on the screen.
The message contains
a description of the
problem and advice on
what to do.
Printer
NetWare
NetServer
Figure 3: How You Receive Alarm Notification
Windows NT
NetServer
Problems W ith S olution s
By assigning a client workstation to network management, you can use Auto
Alert to oversee all HP NetServer E Series servers connected on the local
network.
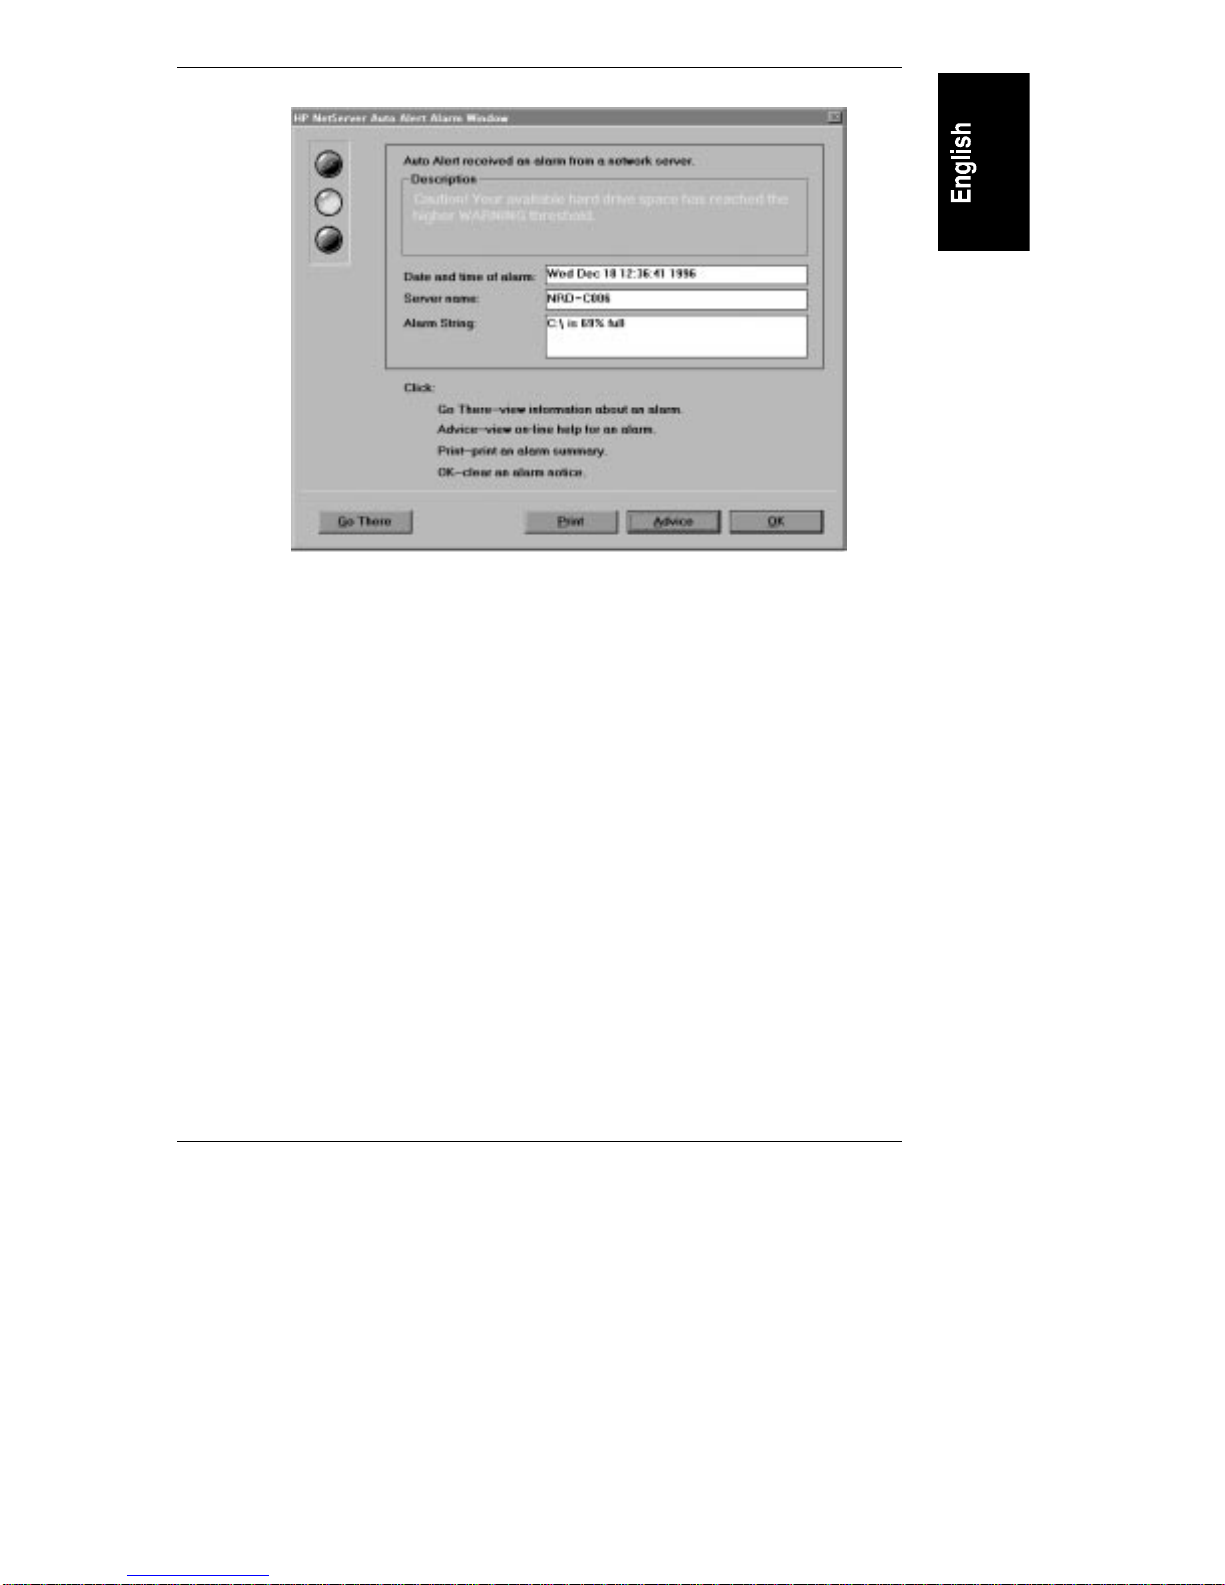
A typical Auto Alert notification is shown in the figure below. In this case, the
HP NetServer is notifying the Auto Alert Client via the network that a hard drive
is nearing total storage capacity.
12
Page 17
Chapter 2 Introducing HP Support Anywhere
Figure 4: Example HP Auto Alert Alarm
Auto Alert's traffic light displays the severity of the alarm at a glance. A red light
indicates a problem requiring immediate attention. A yellow light signals a
warning and a green light indicates a return to normal server operations. The
blue "i" symbol is an informational message only; no action is necessary. In this
example, Auto Alert warns that a change (in this case a notice regarding disk
storage on the server's drive C has occurred at HP NetServer "NRD-C006". The
date and time of the alarm are also noted. To interpret the alarm, click Advice.
If you want to find out more about the server that sent the message (and you fully
installed Support Anywhere), click Go There to launch your client's web browser
program to automatically access the server's home page.
Web Interface Features
Support Anywhere's web interface takes you right to a problematic server. You
can browse through your server's web pages to get detailed information about the
server's current operation, configuration, and operational history. In fact, you can
view critical functions and statistics for each server you've setup for web support
whenever you want using the interface provided by your own browser (either
Netscape or Microsoft Internet Explorer).
13
Page 18
Chapter 2 Introducing HP Support Anywhere
Support Anywhere is flexible in its management of multiple network operating
systems (NOS). However, to use the web interface features, the following NOSspecific rules apply:
• For Novell NetWare/IntranetWare, each server that you want to manage
via a Support Anywhere web page must either be a web server, or must be
managed via a Windows NT web server.
• For Microsoft Windows NT, only one server needs to be set up as a web
server. Non-web servers can have links on the web server's Support
Anywhere web page. Note that you may establish a secondary Windows
NT web server as a backup in case the primary web server goes down.
The following figure shows Support Anywhere installed in a typical office
intranet environment.
Support Anywhere
1
Client
Using a web
browser, thedesignated
client workstation may
go to the HP Support
Anywhere web page on
the web server to view
detailed information
about any server on the
LAN.
Client
Support Anywhere
Support Anywhere
2
Server
Each Novell
NetWare web
server can have an
HP Support
Anywhere web
page.
NetWare
Web Server
Windows NT
Web Server
Windows NT
or NetWare
Non-Web Server
3
Server
A single Windows
NT web server can
have an HP Support
Anywhere web
page with links to
any other servers.
Figure 5: HP Support Anywhere in an Office Intranet
Using a web browser on the client, you can get critical information about your
servers and their operational status. The following figure illustrates the server
management features of Support Anywhere's web interface.
14
Page 19

Chapter 2 Introducing HP Support Anywhere
Figure 6: HP Support Anywhere Server Description Page
HP Auto Alert Features
Support Anywhere's alarm notification feature, Auto Alert, provides:
• Alarm notification in an easy-to-use, intuitive 'stoplight' interface
• Problem identification, coupled with appropriate remedies
• Server operational status: up/down
• Centralized monitoring of multiple HP NetServers running either Novell
NetWare/IntranetWare or Windows NT network operating systems
• Notification of NetServer disk space capacity, network interface card
(NIC) status, SCSI adapter and device problems, and potential HP
NetServer SCSI hard disk problems
• Multiple Client support. (Data from monitored HP NetServers can be
directed to more than one workstation.)
• Automatic Server Restart (ASR) notification
15
Page 20

Chapter 2 Introducing HP Support Anywhere
HP Auto Alert Alarms List
The table below lists the types of monitoring and alarm notifications that may be
sent to your HP Auto Alert Client.
Table 1: HP Support Anywhere Monitor and Alarm Capabilities
Status and Alarm Capabilities
Server SCSI status* Warns you of SCSI adapter and device problems
HP Disk System* Warns you of predicted SCSI disk drive failures
Storage Capacity Planning Helps track a server's volume usage
Server Network Cards Monitors PC LAN adapter card performance
* This alarm is not supported for disks connected to the HP Disk Array Controller
accessory product.
Description
statistics and notifies you if any threshold values
are exceeded
Remote Console Options
The HP NetServers E Series incorporate remote access capabilities. Using
pcANYWHERE32 (included on the HP NetServer Navigator CD-ROM) or
terminal emulation software of your own choosing, you can access your
NetServer from a remote site. Remote access is particularly useful for network
administrators, VARs, support technicians, and other maintenance personnel
who can evaluate, maintain and, if necessary, reconfigure a NetServer remotely.
The HP NetServer E 40 and E 45 offers a range of remote control capabilities.
With a modem connection at one of the NetServer's serial ports, personnel at a
distant workstation or terminal can control server functions (including the boot
process), run diagnostic utilities, and perform NOS-level configuration
procedures.
Support Anywhere includes three distinct methods you can use to control an HP
NetServer remotely. These are:
• HP's Console Redirection (E 40 and E 45 only)
• Graphics Console Redirection (Windows NT)
• RCONSOLE (Novell NetWare)
In addition to HP's hardware-level Console Redirection (E 40 and E 45 only), two
NOS-specific methods of redirecting NetServer operations are supported and
documented for use with a NetServer E Series system:
16
Page 21

Chapter 2 Introducing HP Support Anywhere
HP Console Redirection (E40 only )
HP Console Redirection is built into the E 40 and E 45 NetServer BIOS and is
NOS independent. Use HP's BIOS level remote access to diagnose and remedy
problems associated with a NetServer's hardware operations or configuration.
Using Remote Console, you can remotely access a customer's NetServer to:
• Update the system BIOS. This feature is particularly useful since it allows
you to update a NetServer's BIOS remotely.
• Run HPVGSet Utility to configure and test HP 10Base-T adapters
(J2973A or J2970A).
• Run the SCSI Configuration Utility. This utility allows you to configure
the server's SCSI host adapter settings, format a disk, or verify disk
media.
• Run the Diagnostic Assistant. This utility provides you with ways to test a
NetServer's hardware components, including main circuit board function.
• Remotely boot the server and view startup messages.
• Set or reset system date, time, and keyboard language.
• Take complete remote control of a customer's HP NetServer running
Windows NT. Using pcANYWHERE32 graphic console redirection, you
can perform all management operations on the HP NetServer from your
remote console.
Graphics Console Redirection (Windows NT)
You can use pcANYWHERE32's capabilities (when installed at both NetServer
and remote console) to gain virtually full graphic control over an HP NetServer E
40 or E 45 from a remote location.
Using this feature, the console display exactly mimics the display at the
NetServer. In this way, you can take full control of your HP NetServer from the
remote console. pcANYWHERE32 graphics console redirection requires your HP
NetServer to be running Windows NT.
pcANYWHERE32 allows you to redirect what's graphically displayed on an HP
NetServer running Windows NT 3.51 or 4.0 to a remote Windows NT 3.51 or
Windows 95 PC console. Features include the ability to:
• launch the NetServer's registry editor
17
Page 22

Chapter 2 Introducing HP Support Anywhere
• run NOS-level diagnostics on the NetServer
• access the NetServer's control panel to review and modify a connected
NetServer's NOS level configuration settings, including network settings,
administrative tools, and driver installation.
RCONSOLE (NetWare)
You can use Novell NetWare's RCONSOLE program to take control of a
customer's HP NetServer running Novell NetWare/IntranetWare. RCONSOLE
works at the NOS-level to provide full character-based remote access to a
NetServer running IntranetWare 4.11. Features include the ability to:
• load and unload modules (NLMs)
• run NOS-level diagnostics on the NetServer
• monitor and evaluate NetServer performance
• perform NOS-level configuration including modification of network
settings
For supplemental information on setup and use of the Remote Console feature at
the NetServer, see "Server Management Using HP Support Anywhere" in the HP
NetServer E Series User Guide.
Software Components
The Support Anywhere software stored on the HP NetServer Navigator CD-ROM
consists of two components: Support Anywhere server software and Support
Anywhere client software.
HP Support A ny where Server Software
Support Anywhere software must be installed on each HP NetServer and
includes:
• HP SNMP Alarm Agent Software HP's Simple Network Management
Protocol (SNMP) based software works behind the scenes to identify
changes in the HP NetServer status. When a monitored operation on the
server exceeds a pre-defined threshold, a notice is relayed over the
network using SNMP software (installed at both the HP NetServer and
Support Anywhere Client).
18
Page 23

Chapter 2 Introducing HP Support Anywhere
• HP Web Interface Software During setup, web interface software is
installed on your Novell NetWare or Windows NT web server. It is preconfigured to provide you with details about each of your selected HP
NetServer E Series servers, including configuration and alarm details.
• HP Automatic Server Restart Automatic Server Restart (ASR) eases the
burden of dealing with a system crash or "hang" by automatically
restarting the system if a failure occurs. ASR uses a combination of
software and hardware to do this. (The hardware components are built in
to the HP NetServer.)
When ASR service is enabled, the ASR software periodically notifies the
ASR hardware that the system is running correctly. When the system
crashes or hangs, the ASR hardware stops receiving the OK notices and
automatically initiates a system restart.
NOTE In order for the ASR service to function correctly, the system
must be configured to restart successfully without user
intervention.
Be advised, not all system hangs will cause a system restart. For example,
if the network operating system is still functional, but all forms of user
input have been disabled due to error (giving the appearance of a system
hang), ASR will not initiate a system restart.
HP Support A ny where Client Software
Support Anywhere client software is installed on a designated workstation
(referred to in this guide as the Support Anywhere Client). The software is
designed to receive alarms and display notifications from HP NetServer E Series
servers regarding the servers' operational status. Also, in conjunction with your
web browser, Support Anywhere allows you to connect to a problematic server to
investigate an alarm or change its configuration.
Required Hardware and Software
The following hardware and software components are necessary for the proper
installation and operation of Support Anywhere on both your HP NetServer and
Support Anywhere Client.
HP NetServer Hardware Required
Minimum server hardware requirements include:
19
Page 24

Chapter 2 Introducing HP Support Anywhere
• An HP NetServer E Series connected to the network
• For an HP NetServer running Novell NetWare (v3.12 or later), you need
at least 500K of unused disk space on the NetWare SYS volume. For an
HP NetServer running Microsoft Windows NT, you need at least 500K of
available disk space on the drive where the operating system is located.
• HP Predictive SCSI disk drive failure monitoring supports all HP hard
drives that are factory installed in HP NetServer E Series systems
HP NetServ er S oftware Requ ired
Minimum server software requirements include:
• HP NetServer Navigator CD-ROM (included with your server)
• Network operating system server software (installed and running
correctly), either
◊ Novell NetWare v3.12, v4.1, or IntranetWare v4.11(including SMP,
excluding SFT III)
OR
◊ Microsoft Windows NT server software v3.51 or v4.0
NOTE If your NetServer is running Novell Netware v3.12, you can
access the server's home page only via a NetServer running
Windows NT (v3.51 or v4.0) and Microsoft's (IIS) server
software.
• For web-based management support, your server may use the following
web server software:
◊ For Novell NetWare servers:
Novell 2.5 (or 2.51) web server software
For use with Novell Netware 4.1 and IntranetWare 4.11
◊ For Windows NT servers:
Microsoft Internet Information Server (IIS)
Version 2.0 for Windows NT 4.0
Version 1.0 for Windows NT 3.51
20
Page 25

Chapter 2 Introducing HP Support Anywhere
NOTE For web-based management of non-web servers (either Novell
NetWare or Windows NT), the only requirement is that there
must be a Microsoft Windows NT web server to support them.
Web support in a NetWare/IntranetWare-only environment is
limited to NetWare/IntranetWare web servers only.
HP Su pport A ny wh ere C lient H ardwa re Requ ir ed
Minimum hardware requirements for the Support Anywhere Client include:
• A 486 computer, connected to the network
• A VGA color monitor
• 500K of hard disk space
• A CD-ROM drive in order to gain access to the Support Anywhere and
HP Information Assistant software (located on the HP NetServer
Navigator CD-ROM)
The CD-ROM drive you use for installation must be located either in your
Support Anywhere client workstation, or it must be accessible via the network.
NOTE You can make floppy masters of the Support Anywhere
software using the "Create Disks" option on the "HP
Management Solutions" menu located on the HP NetServer
Navigator CD-ROM.
HP Suppor t A ny wher e Clie nt Softwar e Requ ired
Minimum software requirements for proper operation of Support Anywhere are
as follows.
• Microsoft Windows software:
◊ Windows 3.1 clients running in enhanced mode. If you plan on
managing NetWare servers, your Microsoft Windows 3.1 client must
be configured for a NetWare network. Run the DOS version of
Windows Setup to verify or change your Windows network
configuration.
21
Page 26

Chapter 2 Introducing HP Support Anywhere
◊ Windows for Workgroups 3.1, or 3.11, running in enhanced mode. If
you plan on managing Novell NetWare servers, your Windows for
Workgroups Support Anywhere Client must be configured for
NetWare network access. Run Network Setup from the Network group
in the Windows Program Manager to verify or change your Windows
network configuration.
◊ Windows NT Workstation 3.51 (For Support Anywhere's NetWare
features to work properly with the Windows NT NetWare Client
Services, you must replace Microsoft's NETWARE.DRV file with the
copy included in the NET33X.EXE update supplied by Novell
Corporation through CompuServe, or the World Wide Web.)
◊ Windows 95
• Network operating system client software (one or both of the following):
◊ Novell NetWare NETX shell v3.26 or VLM client v1.1 with either
IPX.COM v3.10 or IPXODI.COM v2.10 protocol drivers for IPX
support
◊ TCP/IP stack that includes a Windows Sockets stack. For clients
running Windows for Workgroups, Microsoft's TCP/IP-32 software
includes a Windows Sockets stack.
Web Browser Software Supported
For web-based management support you need to have a web browser installed on
the workstation you designate as your client. The Support Anywhere web
interface can function using either one of the following web browsers:
• Netscape Navigator, v2.0 and v3.0
• Microsoft Internet Explorer, v3.0 (Windows 95 only)
NOTE For information about Support Anywhere that was not
available when this guide was published, see the Support
Anywhere README.WRI file. To view this file, click the
README icon in the Support Anywhere Program Manager
Group.
22
Page 27

3 Installing HP Support Anywhere
This chapter details the installation of Support Anywhere software for both the
client workstation and for each NetServer you want to include in your setup.
Before beginning installation, be sure you have complied with the requirements
in the "Required Hardware and Software" section of Chapter 2.
Support Anywhere Client installation is performed in the context of the HP
NetServer's network operating system—either Novell NetWare or Microsoft
Windows NT.
Installation Overview
You can choose the Support Anywhere features you want to install during Client
Setup (Part 1). For instance, you may elect to install only the Auto Alert features
of Support Anywhere and forego Support Anywhere's web interfacing
capabilities. To disable web interface components during installation, simply
designate all your servers as non-web, that is, "NOT a WEB Server" during
NetServer configuration. Likewise, you can select the remote console features you
wish to use in Part 4 of the installation.
To begin installation of Support Anywhere, run the Support Anywhere software
stored on the HP NetServer Navigator CD-ROM that came with your system.
NOTE In order to use the HP NetServer E 40 or E 45's BIOS-level
console redirection, you must have an installed HP Utility
Partition.
The instructions listed here are based on a CD-ROM installation. If you prefer to
install Support Anywhere from diskettes, you can make diskette masters of the
Support Anywhere software through the "HP Management Solutions" menu of
the HP NetServer Navigator CD-ROM. If you make diskette masters, be sure to
note any changes in drive designation or directory structure as you install the
software.
Support Anywhere installation includes four parts:
Part 1. Setup at the Client Workstation
Part 2. Setup at Each HP NetServer
23
Page 28

Chapter 3 Installing the HP Support Anywhere Software
Part 3. Verify Correct Installation
Part 4. Remote Console Options
Before You Be gin
Keep in mind that the steps for installing Support Anywhere software differ
depending on whether your servers are running Novell NetWare/IntranetWare or
Microsoft Windows NT.
If you want to use Support Anywhere's web-based management features, copy
and fill out the Configuration Worksheet in Appendix D. Regardless of NOS,
you need to gather the following information for each HP NetServer you want to
incorporate into web-based Support Anywhere management:
Web server software installed? Yes/No
NOS installed (either Windows NT or Novell NetWare/IntranetWare)
IP address
SNMP community name
IPX address (if your server supports IPX)
Use your Configuration Worksheet to keep track of the information for each
NetServer you are setting up.
NOTE A unique IP address must be assigned to each HP NetServer to
be incorporated into web management, including NetWare HP
NetServers. Additionally, all NetWare servers require an IPX
address for configuration.
Use IP addresses if your network protocol is TCP/IP, or if your NetServer
includes operational web server software. Use IPX addresses if your network
protocol is IPX. Generally, NetWare/IntranetWare-based networks support IPX
addressing. You can utilize both IP and IPX addresses as necessary.
Finally, be sure you have supervisor-level privileges for the Novell NetWare
servers you want to include under Support Anywhere management. Likewise,
verify that you have administrator privileges for your Windows NT NetServers.
You'll need proper authorization to complete some of the later installation steps.
To find the IPX address of a Novell NetServer, use Novell's "config" program,
which can supply both IP and IPX addresses. To determine the IP and/or IPX
addresses for the Novell NetServers you want to manage using Support
Anywhere. From your NetWare/IntranetWare console workstation, at the
NetWare prompt, execute the utility:
24
Page 29

Chapter 3 Installing the HP Support Anywhere Software
config
The IPX address takes the following form:
internal network number-000000000001
An IPX is always composed of two elements, the 8-character internal network
number and, separated by a dash, a 12-character, device number node address.
Thus:
XXXXXXXX-YYYYYYYYYYYY
where X =internal network number, and Y=000000000001.
Assemble the IPX address using the information provided by the NetWare config
command.
NOTE Be sure to list the network address (internal network number)
first, and separate it with a dash from the node address.
To find the IP address of a Windows NT server, use the "ipconfig" program.
At the Windows NT NetServer:
1. At the DOS prompt, execute the program:
ipconfig.exe
2. Be sure to write down the IP address number. For example:
14.60.81.230
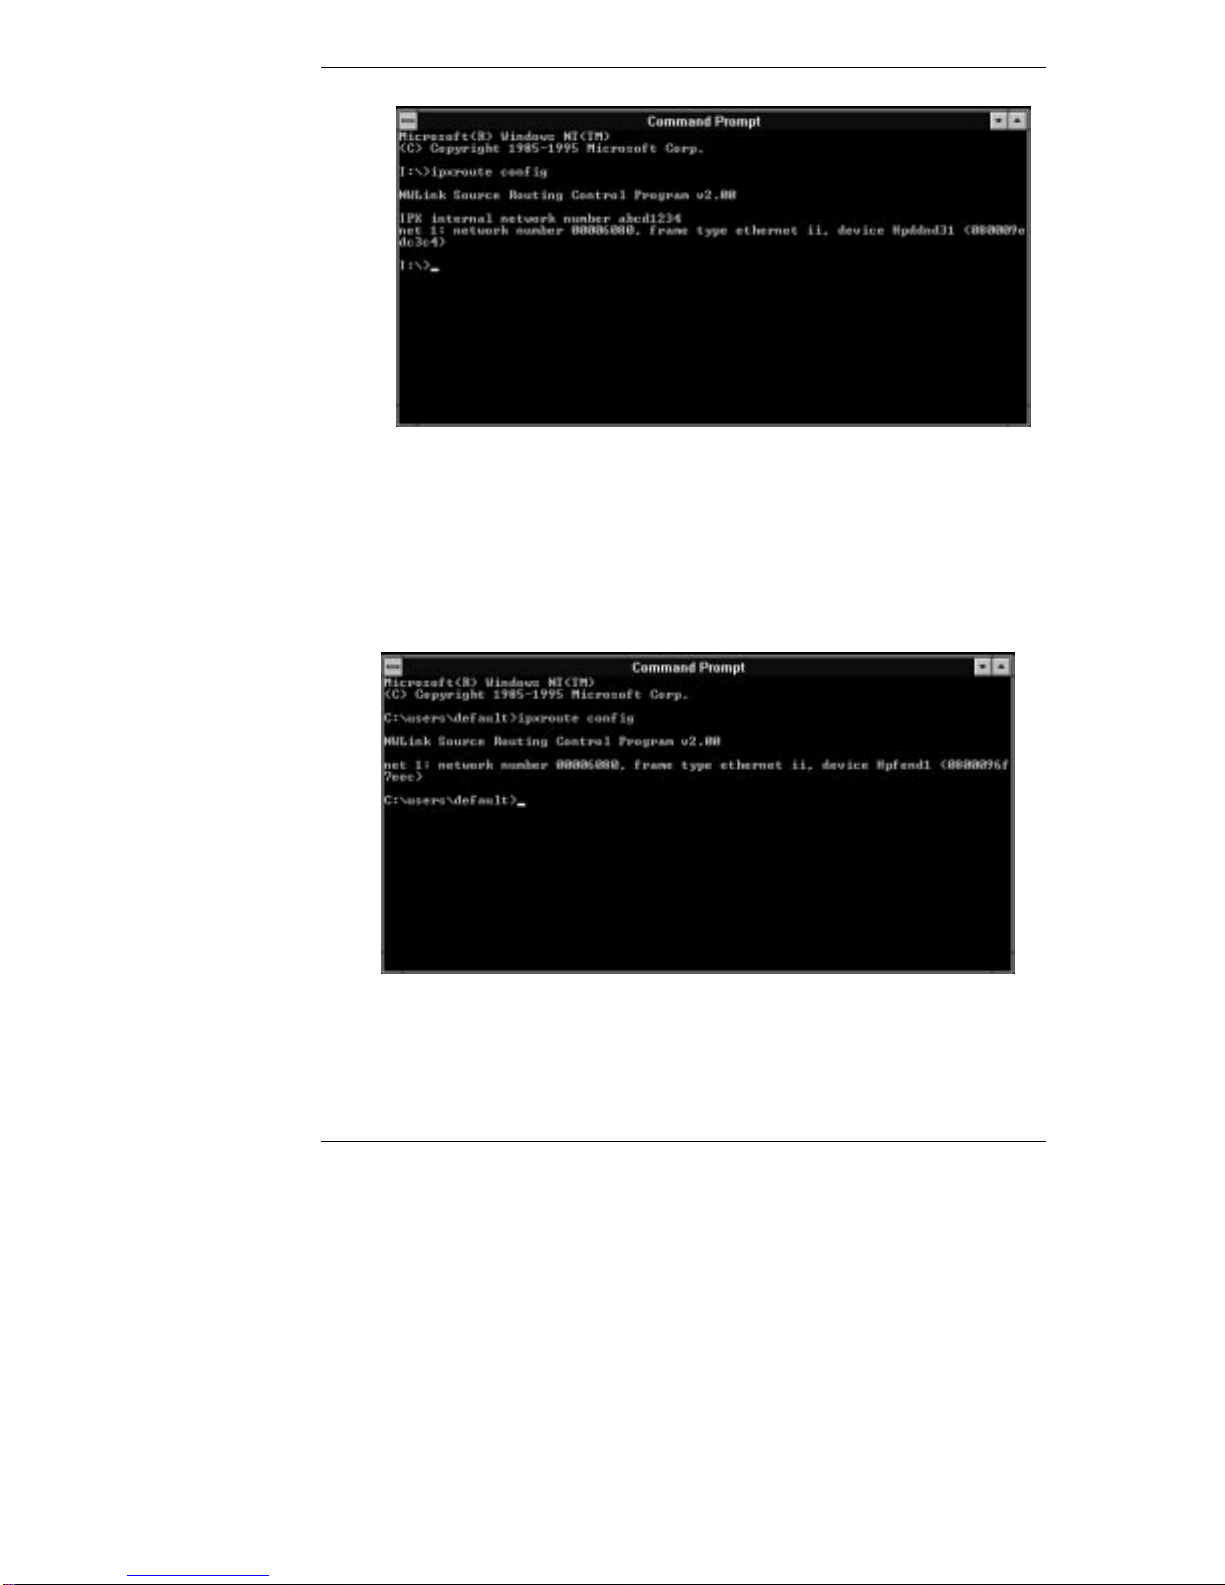
To find the IPX address of a Windows NT NetServer, use the "ipxroute
config" program.
At the Windows NT NetServer:
1. At the DOS prompt, execute the following program (include the config
parameter):
ipxroute config
2. The ipxroute config program may or may not specify the complete IPX
number.
◊ If the IPX internal network number is specified, the IPX address takes
the following form:
internal network number-000000000001
25
Page 30
Chapter 3 Installing the HP Support Anywhere Software
Be sure not to couple the device number and the network number. In
this example, the correct IPX address is:
abcd1234-000000000001.
◊ If the IPX internal network number is not specified, the IPX address
takes the following form:
network number-device number
26
In this example, the correct IPX address is:
00006080-0800096f7eec
Page 31

Chapter 3 Installing the HP Support Anywhere Software
Part 1. Setup at the Local Client Workstation
Close all open applications currently running on the workstation you have
designated as your Support Anywhere Client.
Your client workstation must be network connected and running the TCP/IP or
IPX, or both.
If you have HP NetServers running Novell NetWare/IntranetWare, remember
that Support Anywhere software is installed on both the client and server(s) while
you're at the client workstation. During client installation, SNMP agents are
installed automatically via the network to each of your HP NetServers running
Novell NetWare/IntranetWare.
Before proceeding with the installation involving Novell NetWare servers, verify
that each listed NetWare server has an ASPI manager loaded.
To setup the client workstation:
1. Insert the HP NetServer Navigator CD-ROM in your Support Anywhere
Client's CD-ROM drive, or a network-accessible CD-ROM drive.
NOTE If your client workstation doesn't have access to a CD-ROM
drive, you can make floppy masters from the diskette library
on the HP NetServer Navigator CD-ROM.
2. Choose Run from the Windows Program Manager File menu, and enter:
X
:HPSA\US\CONSOLE\DISK1\SETUP.EXE
where
x
is the CD-ROM drive containing the HP NetServer Navigator
CD-ROM.
3. Select an install option.
For an initial installation, choose the default, Initial Install.
An Initial Install includes Support Anywhere's Auto Alert and web
management software, including all necessary SNMP agents needed to
manage the alert notifications.
Choose Configure Servers if you have changed your network and want to
add or remove servers from your list of managed servers.
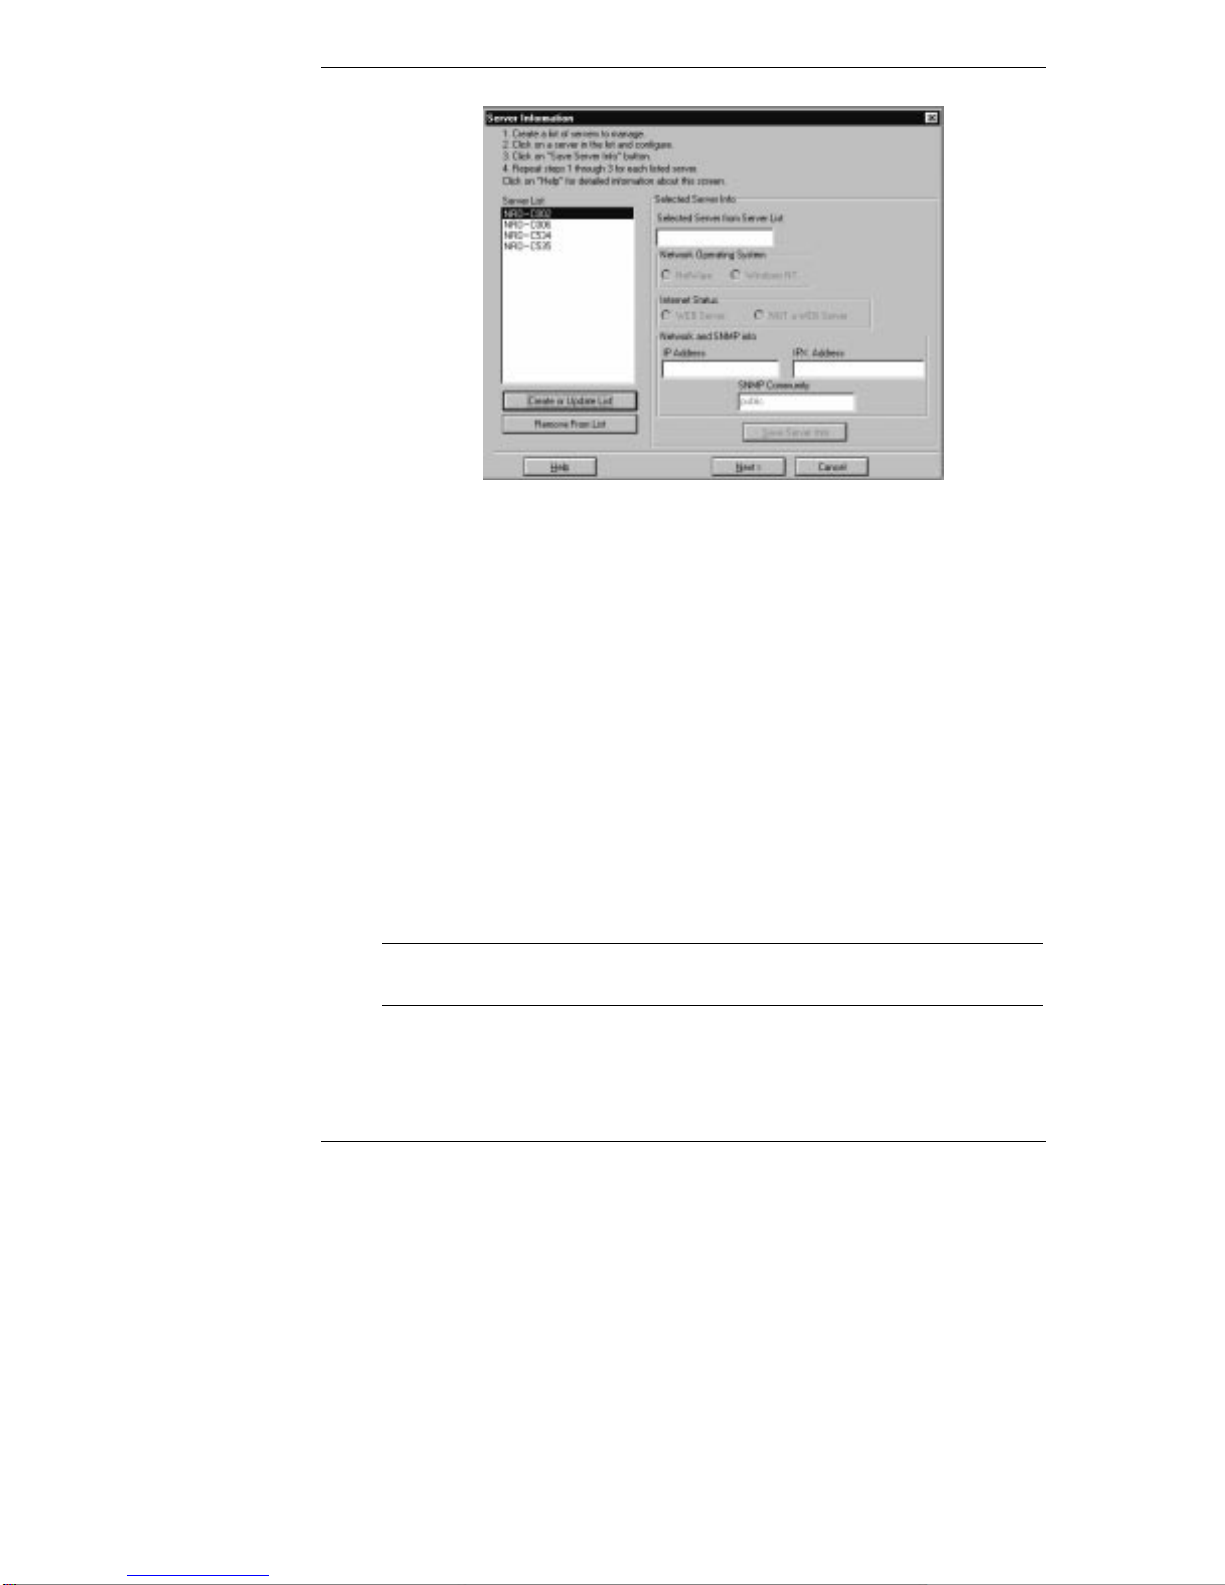
4. From the Server Information screen, click Create or Update List.
27
Page 32
Chapter 3 Installing the HP Support Anywhere Software
Figure 7: Configuring the Server Information Screen
Setup automatically builds a list of all your NetWare servers, but does not
identify your Windows NT servers (if any). However, setup provides you
with an opportunity to include the names of the Windows NT NetServers
you want to manage.
5. Configure NetServers identified on Server List.
Click a listed server to select it. You need to identify for each server:
◊ Network Operating System
You need to tell Support Anywhere whether the selected server is a
NetWare server, or a Windows NT server. Click the appropriate
choice to select it.
◊ Internet Status
Is web server software installed on the NetServer? Click the
appropriate button to tell Support Anywhere whether the selected
server is a "WEB Server" or "NOT a WEB Server".
NOTE If you want to utilize only the Auto Alert features of Support
Anywhere, click "NOT a WEB Server" for all servers.
28
Page 33

Chapter 3 Installing the HP Support Anywhere Software
◊ Network and SNMP Info
∗ IP and IPX Addresses (as appropriate)
A Windows NT server can be assigned either an IP address (such
as 15.60.89.90), or an IPX address.
A NetWare server is usually assigned an IPX address
(A1234567.123456789123), but may also have an IP address. Type
in the IP and/or IPX address(es) for each selected server.
NOTE Web servers cannot function without an IP address. You must
designate the IP address for NetWare web servers.
∗ SNMP Community
You need to tell Support Anywhere the NetServer's SNMP
Community name. This is "public" by default, but if your server is
identified using a different community name, type that name in the
SNMP Community field.
After filling out the Selected Server Info fields for each NetServer, click
Save Server Info. Setup saves the configuration information about the
selected server. Go on to configure the next server on your Server List. Be
sure to save configuration information for each server as you continue
through the Server List.
In an exclusive Novell NetWare environment, all HP NetServers must
include web server software for web interface management. If this
describes your network, client setup is complete. Proceed to Part 2:
Setup at Each NetServer.
6. Configure your web servers.
In an environment that includes Windows NT servers, remember that
Windows NT web servers can support non-web servers, both NetWare and
Windows NT.
A. Start by selecting a web server from the servers you specified as
Windows NT web servers earlier in the setup process.
B. Click to select a web server in this list box.
C. Select all non-web servers that the selected web server will support.
Remember, to utilize Support Anywhere's web management feature
for your non-web servers, you must add them to the support list of
a Windows NT web server. To select a non-web server in this list,
click to highlight it. You may select more than one.
29
Page 34
Chapter 3 Installing the HP Support Anywhere Software
Repeat these configuration steps if you wish to split support of your nonweb servers with more than one web server.
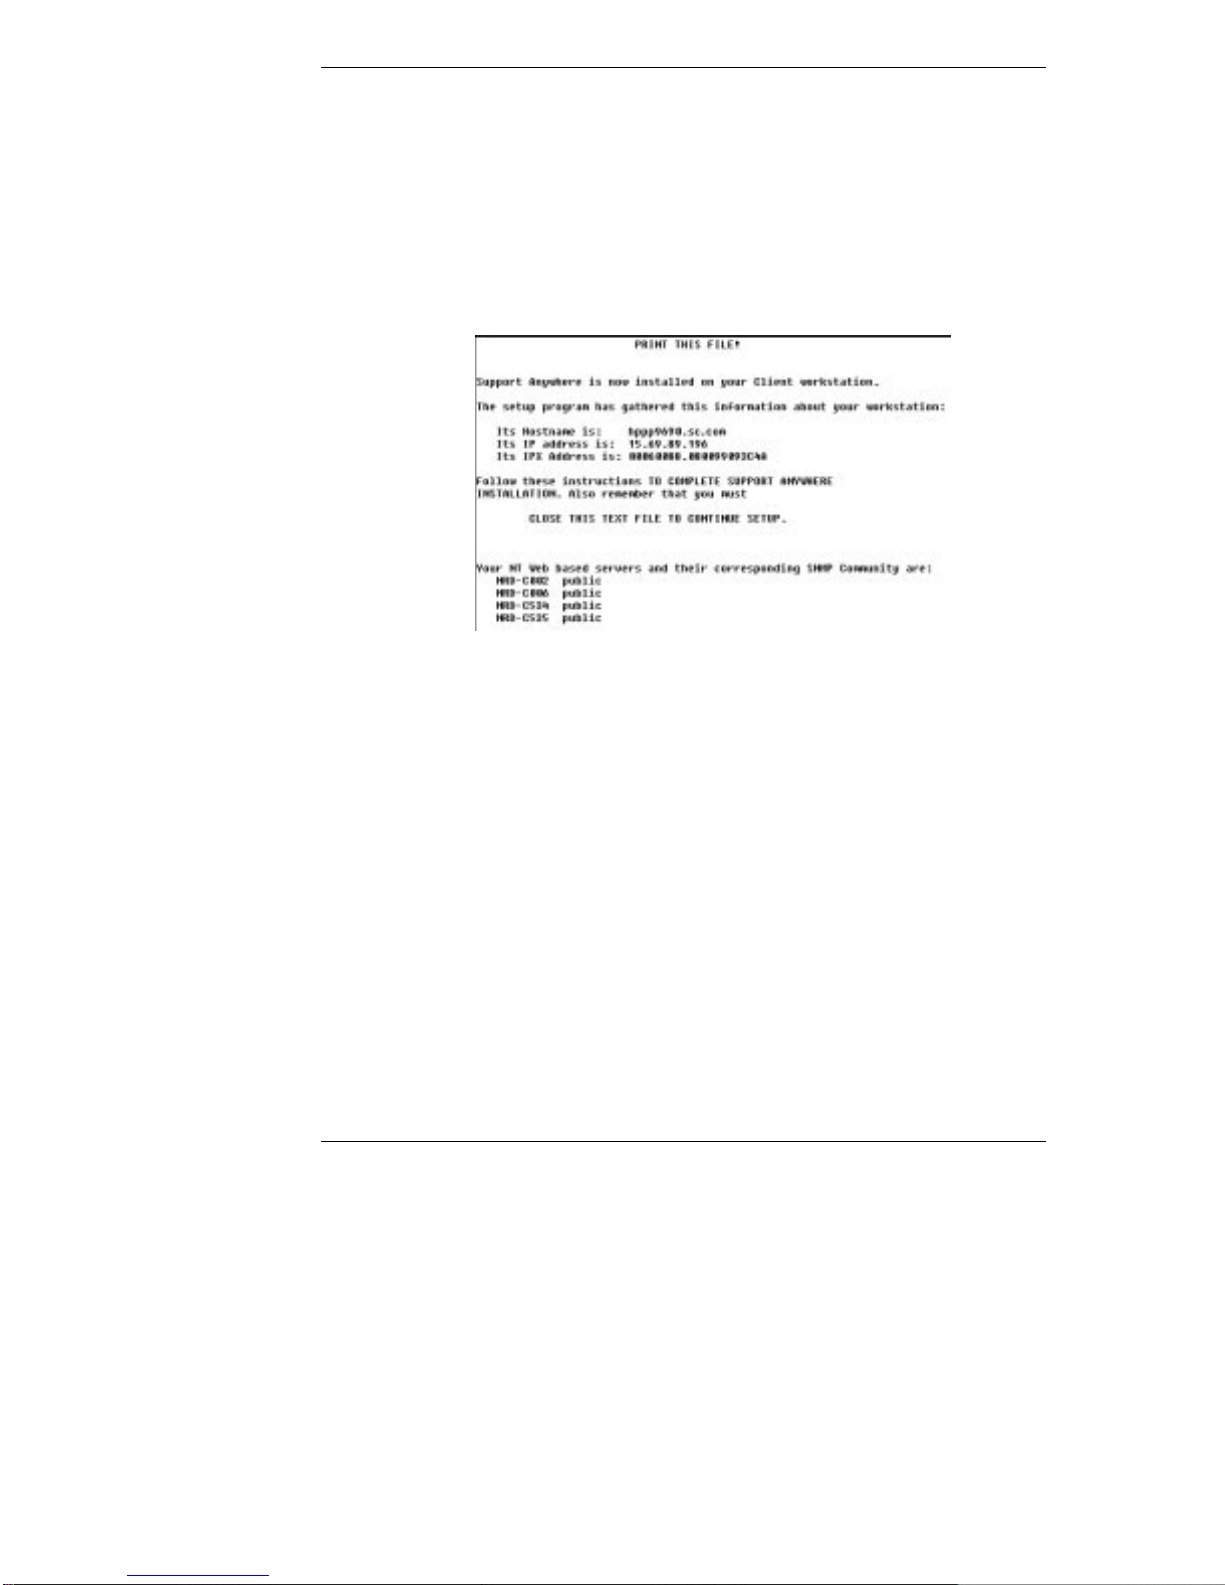
7. Print out the Windows NT server list.
At the end of Client Setup (Part 1), a text file lists your managed NT
servers and your client's hostname and IP address. Be sure to print this
file. You'll need the information to install the SNMP software agents on
your HP NetServers running Windows NT. The figure below shows a
typical printout.
After Setup has finished installing your Support Anywhere client software,
Support Anywhere's Auto Alert service is automatically activated. In Windows
95 you will see the Auto Alert icon in the Windows 95 task bar. In Windows NT
3.51 or Windows for Workgroups, the HP Support Anywhere program group
appears containing the Support Anywhere program icon, the Auto Alert program
icon, a help icon, and a README file.
Notice that the icon representing the web browser you identified during client
setup is incorporated in the HP Support Anywhere group. In this example,
Support Anywhere is set up to use NetScape for Internet or intranet access. (If
you chose not to configure your servers for web management, no Support
Anywhere web icon will be included in the Support Anywhere group.)
Double-clicking the Support Anywhere icon launches your chosen web browser
and provides you with a list of NetServers configured for use by Support
Anywhere.
30
Page 35

Chapter 3 Installing the HP Support Anywhere Software
Figure 8: HP Support Anywhere Group in Program Manager for Windows
NT 3.51 or Windows for Workgroups
NOTE After you have installed Support Anywhere, Auto Alert is
automatically loaded every time you boot the Support
Anywhere Client. If you don't want Support Anywhere's Auto
Alert feature to load automatically, remove the program from
the Startup Group.
Part 2. Setup at Each HP NetServer
Installing on Nov ell NetWare Ser ver s
The server software including all applicable web components is installed
automatically during Support Anywhere client setup. If you opted not to install
the Support Anywhere software on your NetWare servers, you may do so now by
re-running Client Setup (Part 1). See "Setup at the Client Workstation" for
detailed information.
After you've finished installing Support Anywhere client software, be sure to
leave your Support Anywhere Client running so you can test your server
connection(s).
To complete setup, at each NetServer you identified in client installation, you
need to restart the NetServer to complete the installation.
Unless you also have Windows NT NetServers to set up, proceed to Part 3:
Verify Correct Installation. Except for verification of operation, your
installation is complete.
31
Page 36

Chapter 3 Installing the HP Support Anywhere Software
Installing on W indows NT Servers
Setup has already installed Support Anywhere client software, but you still need
to install the Support Anywhere server software to complete setup. Remember
that you must have administrator privileges for the servers you plan to manage
using Support Anywhere.
Be sure that you've set up SNMP services to include a community name ("public"
by default) and that you have the correct address of your Support Anywhere
Client (IP and/or IPX). TCP/IP and SNMP services are included with the
standard Windows NT product and must be running on all Microsoft Windows
NT servers you want to monitor using Support Anywhere.
If IPX is the network protocol, you may use the client's IPX address to configure
your Microsoft Windows NT servers to send notifications (in the form of SNMP
traps) to your client. Note that the IPX address must use the format:
xxxxxxxx.yyyyyyyyyyyy
which includes the 8-digit network address (the IPX address prefix) and the 12digit node (also called MAC) address of your client's network interface card (the
IPX address suffix).
If the client TCP/IP software is configured to use DHCP (Dynamic Host
Configuration Protocol) on a network with DHCP servers, use the client's
hostname to configure your Windows NT servers. This way they will send SNMP
traps instead of an IP address. A hostname constitutes a permanent assignment.
NOTE On a network configured with DHCP servers, unless you
assign a fixed IP address for your client, the DHCP server
automatically assigns you a temporary IP address that can
change over time. If it does, your client will no longer receive
alarms from your Windows NT servers.
With your Support Anywhere Client and Auto Alert running, proceed to the next
section for instructions on Windows NT server setup.
32
Page 37

Chapter 3 Installing the HP Support Anywhere Software
NOTE If you installed your Network Operating System utilizing the
Configuration Assistant "Express mode" or Custom
"Automated mode" from the HP NetServer Navigator CD
(version F.01.05 and later) , you may skip at least steps 2 to 6
of the Windows NT instructions listed below. If you've also
set the SNMP trap destination of your client during the NOS
install, you may also skip step 1 of the Windows NT
instructions listed below.
If you need to set an IPX address or hostname as the SNMP
trap destination address of your client, you must do steps 1 and
6.
Windows NT Server Setup
To install the Support Anywhere server software on an HP NetServer running
Windows NT:
1. Check SNMP setup to insure proper community name and correct
address. The correct address includes:
◊ IP address of the client
◊ Hostname, if the client is using DHCP
◊ IPX, if Novell NetWare/IntranetWare is the network protocol
In the Windows Program Manager, double-click Control Panel, then
Network. Configure your SNMP Service using the community name and
trap address of your Support Anywhere client workstation (as listed in the
printout you made at the end of the Client setup—see Step 7 in Part 1
above).
2. Insert the HP NetServer Navigator CD-ROM in your server's CD-ROM
drive, or log on to a network-accessible CD-ROM drive.
3. After logging into the server, run File Manager, and then run the Support
Anywhere Setup program located in the following sub-directory on the HP
NetServer Navigator CD-ROM:
X
:\HPSA\US\SERVER\DISK1\WINNT\SETUP.EXE
where
x
is the CD-ROM drive containing the HP NetServer Navigator
CD-ROM.
33
Page 38

Chapter 3 Installing the HP Support Anywhere Software
NOTE You cannot install the Support Anywhere software while the
SNMP service is running. If the SNMP service is running on
your HP NetServer, Support Anywhere setup will detect it and
stop it for you.
4. Choose "Install SNMP agent and Web Interface software."
5. Based on the printout you generated at the end of Client Setup (Part 1),
identify your NetServers as either web or non-web.
6. When server setup is complete, restart the server. Once the server has
restarted, the SNMP service should start up automatically. If it does not,
initiate the service manually, then change the startup configuration (in
Control Panel/Services) for automatic startup.
Repeat steps 1 through 6 for each Windows NT server listed in the printout you
created at the end of Client Setup (Part 1).
Part 3. Verify Correct Installation
To verify correct installation, return to the client workstation.
When Client Setup (Part 1) is complete, the Client automatically starts polling
the NetServers included on the Managed Servers List. However, because Server
setup (Part 2) was not completed at that time, each NetServer on the list
generates a Server Down message, indicating that either your server is down, or
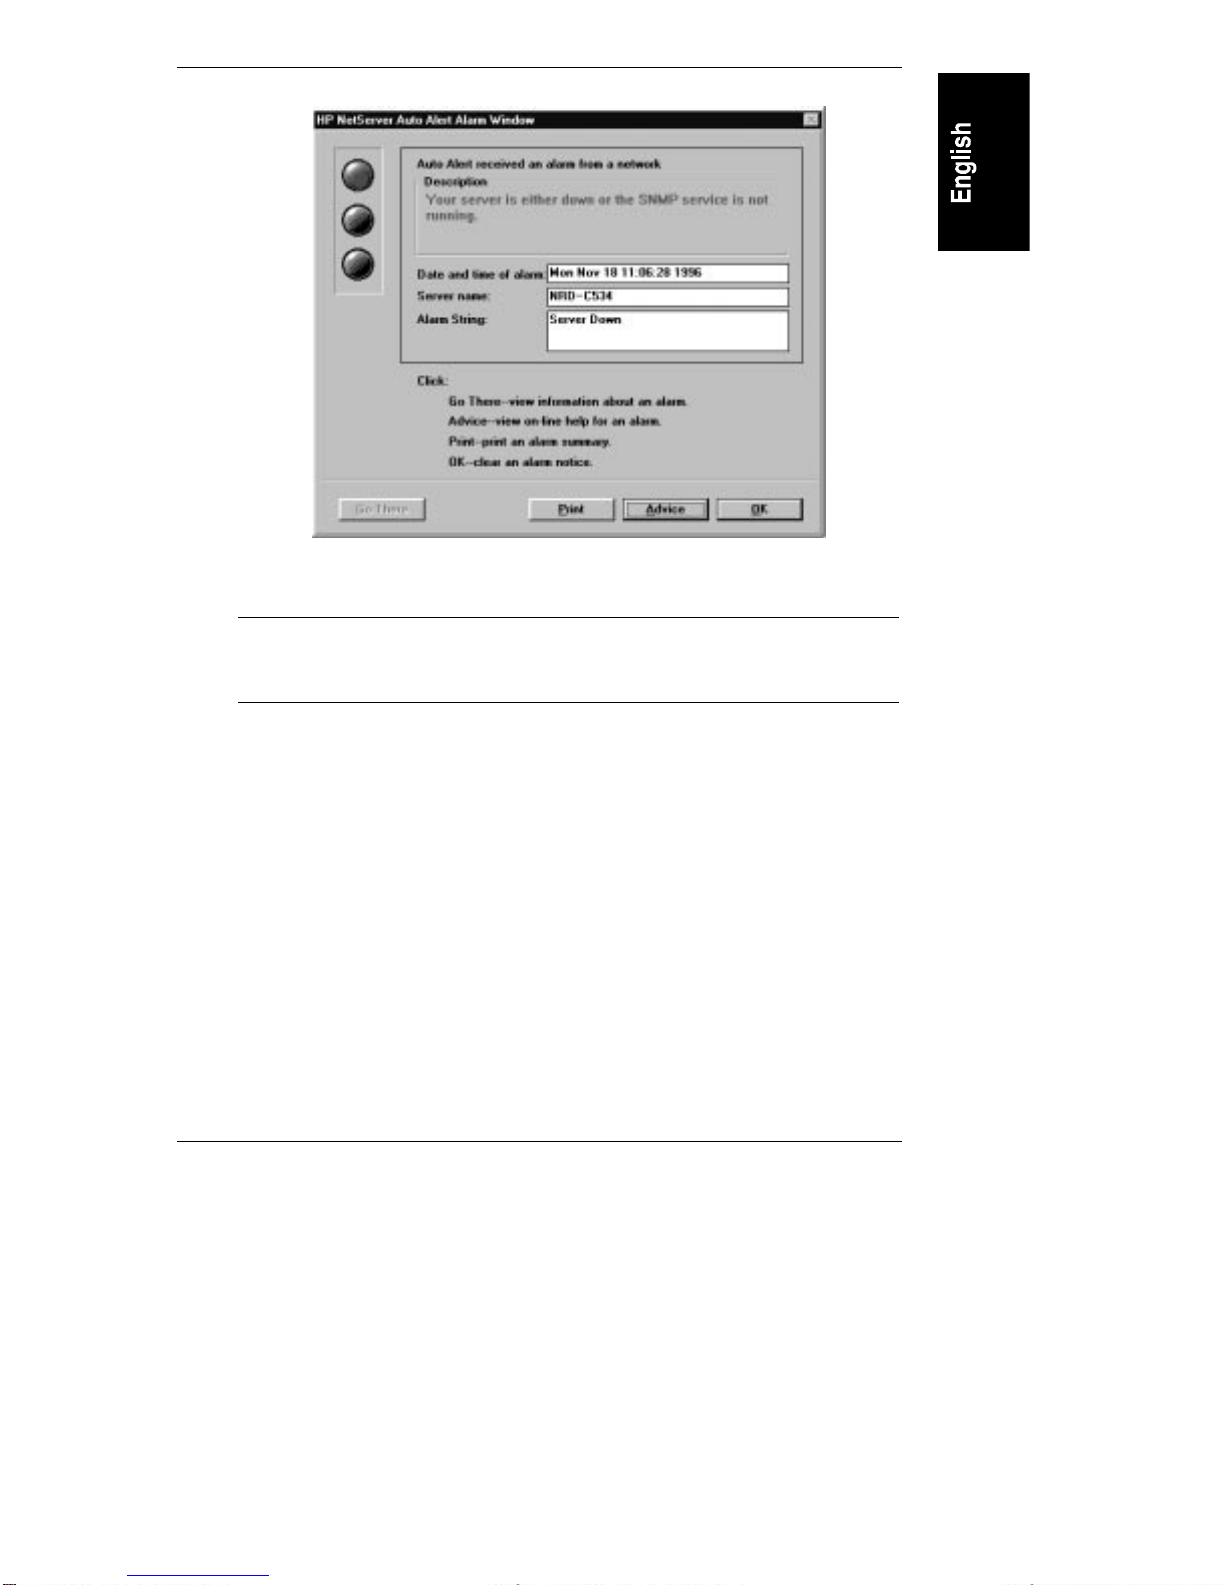
that the SNMP service at the server is not running.
The first Auto Alert notifications you receive are always Server Down messages
(see the following figure).
34
Page 39
Chapter 3 Installing the HP Support Anywhere Software
Figure 9: An Auto Alert Server Down Message
NOTE Auto Alert messages are stacked and displayed in the order
they are received (early messages supersede those received
more recently).
If NetServer installation is successful, as soon as you restart the NetServer, an
Auto Alert restart message is sent to your Support Anywhere Client. However,
remember that the Server Restart messages are stacked underneath the Server
Down messages.
Check the restart (Cold Start) messages against the servers you listed on the
Configuration Worksheet. If you did not receive a restart (Cold Start) message
from Auto Alert, then the server was not properly configured during Client Setup
(Part 1).
To view Auto Alert's restart (Cold Start) messages, you must first clear all the
Server Down messages.
35
Page 40

Chapter 3 Installing the HP Support Anywhere Software
Figure 10: Server Restart Message
At the client workstation, start with the top Auto Alert notification:
36
1. Using your Configuration worksheet, check off the Server Down
messages as you clear them. Continue until all Server Down messages
have been cleared.
2. Again using the Configuration Worksheet, check off each server's
Auto Alert restart (Cold Start) message in the appropriate column.
Page 41
Chapter 3 Installing the HP Support Anywhere Software
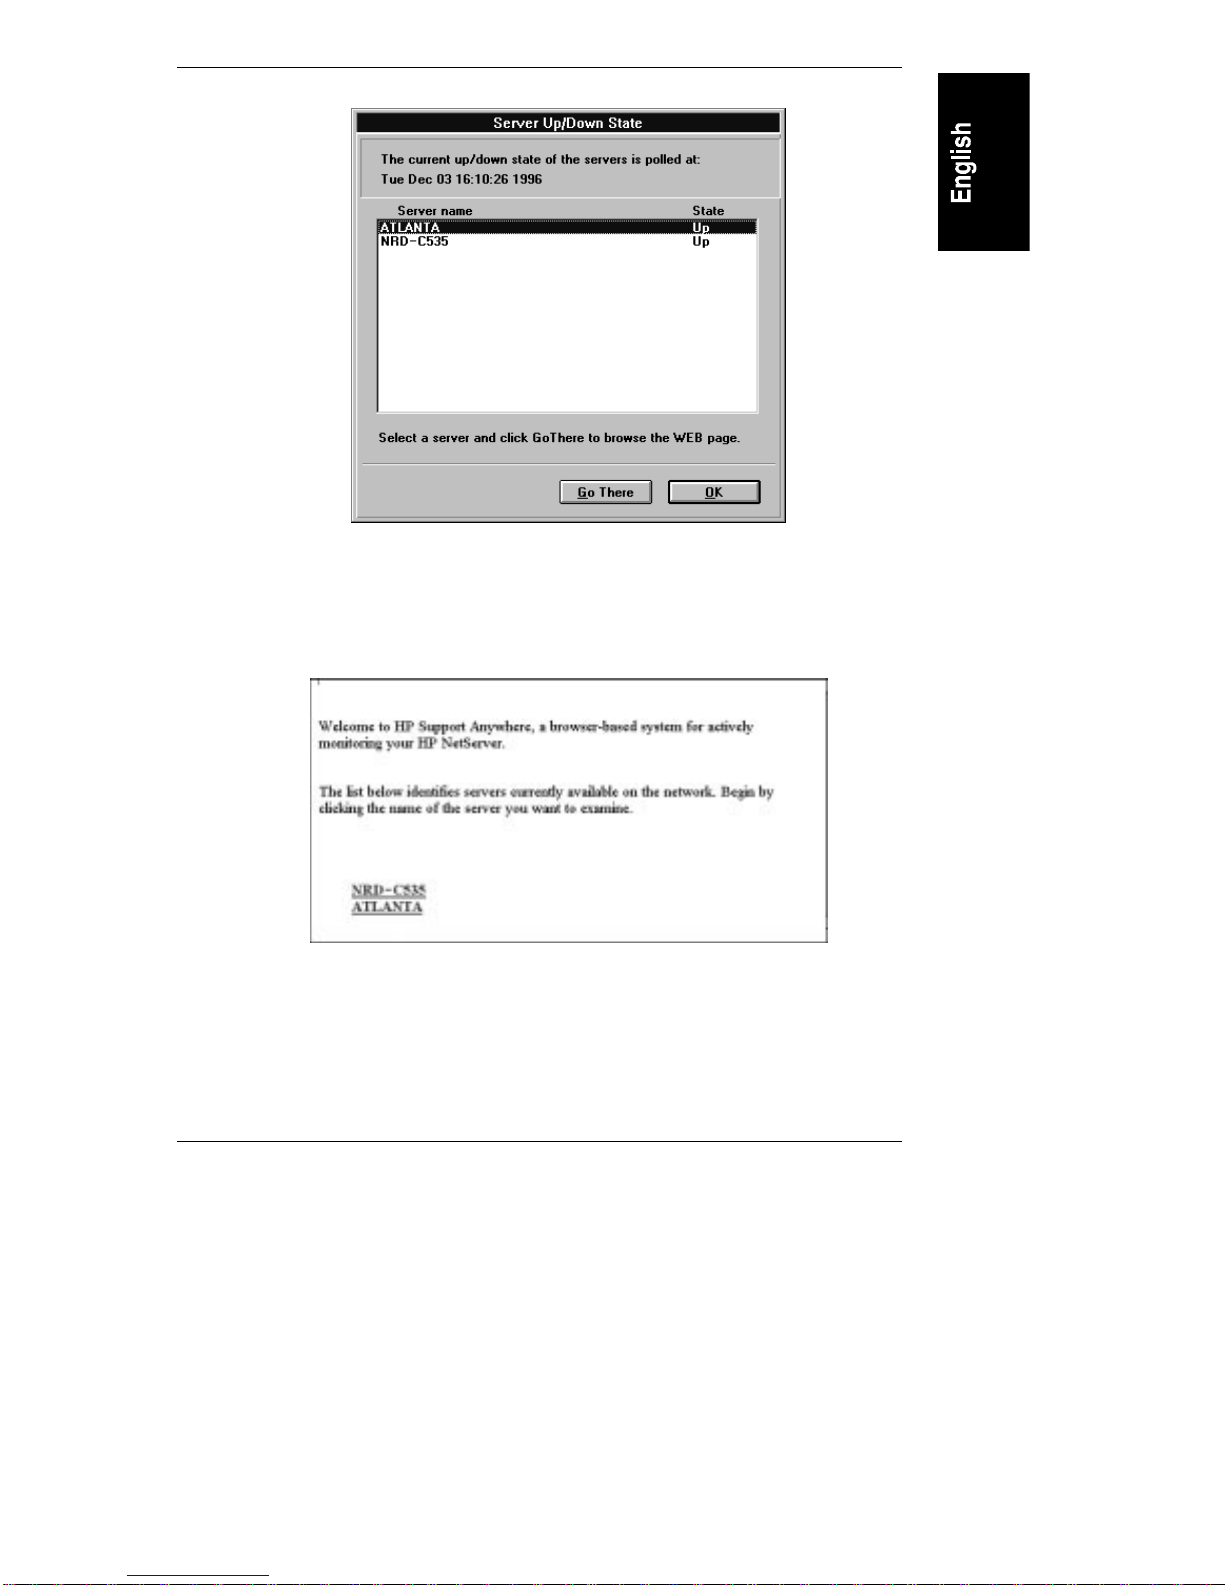
3. After all Auto Alert messages have been cleared, click the Support
Anywhere icon to activate your web browser. The following screen
appears listing all servers under web management.
4. Click a server on the list to "go there". When you are finished
examining the server's home page, click "Back" to return to Support
Anywhere's listing of servers managed via the web.
37
Page 42

Chapter 3 Installing the HP Support Anywhere Software
5. Continue this procedure, clicking each server until you have verified
that each server is accessible.
Troubleshootin g
The server components of Support Anywhere are designed to run only on HP
NetServers E Series. The server software will not function properly on any other
equipment. If you do not receive an Auto Alert restart message from one of the
HP NetServers E Series that was included in your installation, or you cannot
utilize the web interface feature, refer to the appropriate checklist.
If you did not receive a confirmation message from your server(s)
If you did not receive an Auto Alert restart message from a managed Windows
NT NetServer, check the following.
At the client workstation:
1. Is the client workstation running?
If the server sends an SNMP trap to the client and the client is not
running, you will never see the message.
2. Is Support Anywhere's Auto Alert feature running on the client?
If so, you will see the Auto Alert icon on the lower left of the screen, or on
the Windows task bar in Windows 95.
3. Are your managed servers configured with correct address information (IP
and/or IPX)?
At your HP NetServers running Microsoft Windows NT:
1. Is the SNMP service running on the NetServer in question?
For Windows NT, verify that the SNMP service has started on your client.
In the Windows Program Manager, double-click Control Panel, then
Services. Scroll through the list of services, and if the SNMP service is not
started, start it. If SNMP is not listed, you need to install it as described in
your Microsoft documentation.
2. Have you configured the trap destination address of your client?
If you don't do this, your server cannot send messages to your client. The
trap destination address is the address of your client (IP, IPX, or hostname
if your client uses DHCP). To check the trap destination address, from the
Windows Program Manager, double-click Control Panel, then Network.
Scroll through the list of software and look for SNMP service. Configure
38
Page 43

Chapter 3 Installing the HP Support Anywhere Software
the trap destination address here as described in your Microsoft
documentation.
3. Did you restart the server to load the Support Anywhere SNMP alarm
agents?
Check to ensure that the Support Anywhere alarm agent services have
been started on your server (see Step 1 above).
4. Send a test trap to the client. You can send additional test traps to your
client after checking the above items. There are two methods:
◊ Restart the server. When the server comes back online, an Auto Alert
restart message is automatically sent to the client.
◊ Stop the SNMP service, then restart it. This triggers a test trap without
shutting down the server or interrupting normal use. To stop (and
restart SNMP service), from the Windows Program Manager, doubleclick Control Panel, then Services. Scroll through the list of services
and select the SNMP service. Then click Stop.
At your HP NetServers running Novell NetWare/IntranetWare:
1. Is the SNMP service running on the NetServer in question?
At your NetWare console, to verify proper installation of SNMP.NLM and
the SNMP agents, type:
modules
2. Are the Support Anywhere SNMP agents properly loaded?
There are two methods to load the SNMP agents on NetWare servers:
◊ Restart the server. When the server comes back online, the SNMP
agents automatically load and an Auto Alert confirmation message is
sent to the client.
◊ Load the SNMP agents manually without shutting down the server, or
interrupting normal use. From the server console, execute the
following command:
nsaload
3. If the NetServer is a web server, unload http.nlm and then reload it so that
the changes will be activated.
39
Page 44

Chapter 3 Installing the HP Support Anywhere Software
If you cannot us e Suppor t A nywhere's web interface
To utilize Support Anywhere's web interface feature for your non-web servers,
you must add them to the support list of a Windows NT web server. If you have
not properly assigned your non-web servers, do so by re-running Client Setup
(Part 1). Choose the Configure Servers option.
NOTE To utilize Support Anywhere's web interface feature in an
exclusive Novell NetWare/IntranetWare environment, all HP
NetServers you wish to monitor via the web must be running
web-server software.
If a NetServer generates a Server Restart message, and has been configured for
web access and you are unable to access your server's web page (by clicking Go
There in Auto Alert), check the following:
1. Is a web browser installed on the client?
During the installation of Support Anywhere, setup looks for a web
browser on your client. If it doesn't find one, Auto Alert prompts you to
designate one the first time you attempt to use the program's web interface
feature.
The only supported web browsers for use with Support Anywhere are
Netscape Navigator (v2.0 and v3.0) and Microsoft Internet Explorer
(v3.0).
2. Does the HP NetServer that is not communicating have web server
software installed? If so, is it properly installed? Is your client browser
configured to communicate with it?
If all else fails, start over
If, after using the above procedures, you are still unable to generate a restart
message from the NetServer or utilize the web interface, reinstall Support
Anywhere. During setup, double-check the data entered on your Configuration
Worksheet (see Appendix D).
The Support Anywhere installation program cannot automatically detect all
necessary information about your servers, especially your Windows NT servers.
You must provide accurate information, input it correctly, and be sure it is
properly saved for each server you include in setup.
40
Page 45

Chapter 3 Installing the HP Support Anywhere Software
Part 4. Remote Console Options
The HP NetServer E 40 and E 45 offers a range of optional remote control
capabilities, which allow you off-site access to an E Series NetServer. With a
modem connection at one of the NetServer's serial ports, personnel at a distant
workstation or terminal can control server functions (including the boot process),
run diagnostic utilities, and manage and configure NOS-level NetServer
functions.
Support Anywhere includes three distinct methods you can use to access and
control an HP NetServer remotely. These are:
• HP Remote Console Redirection (E 40 and E 45 only)
OS level for viewing server boot events and running hardware diagnostics
• Graphics Console Redirection (Windows NT)
NOS level configuration and management
• RCONSOLE (Novell NetWare) support
NOS-level configuration and management
CAUTION All three forms of remote access endorsed by Support
Anywhere are password secured. However, the level of
protection is minimal and may therefore compromise security
on some networks. Carefully weigh the risks of exposure
when using remote access. Disable them when not needed.
Supported Mode ms
The following modems have been tested and are supported for use by HewlettPackard.
◊ Hayes ACCURA 28.8 External Modem
◊ US Robotics Sportster 28.8 External Modem
◊ Multitech Multimodem ZDX 28.8.External Modem
NOTE Hewlett-Packard recommends matching the modem
manufacturer/model at the HP NetServer and console for
optimum communications.
41
Page 46
Chapter 3 Installing the HP Support Anywhere Software
For supplemental information on setup and use of the Remote Console feature at
the server, see "Server Management Using HP Support Anywhere" in the HP
NetServer E Series User Guide.
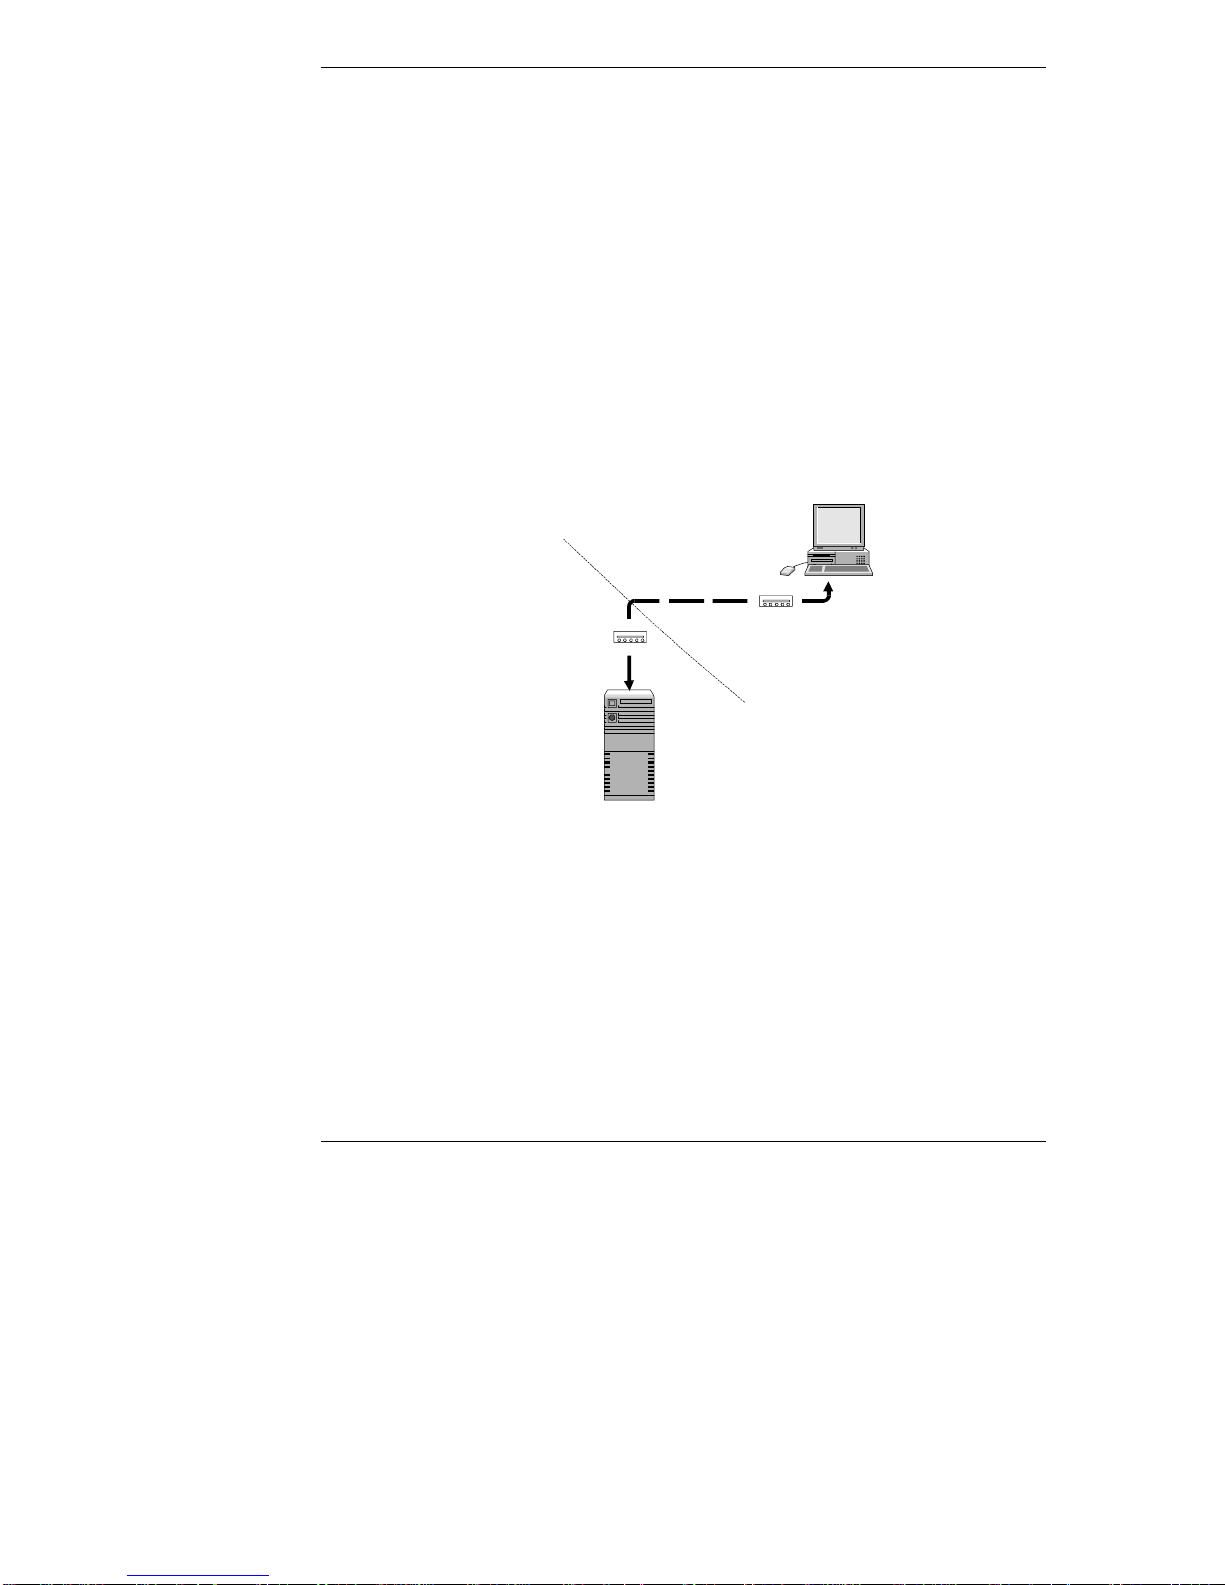
HP Remote Con sole Redirection (E 40 and E 45 only )
The HP NetServer E 40 and E 45's built-in Remote Console Redirection feature
can be used to provide troubleshooting and diagnostic services. Remote Console
Redirection allows you (or a VAR or system administrator) to manage, monitor
and configure a server without traveling to the NetServer site. Using Remote
Console Redirection, you can access and initiate all the configuration and
diagnostic features incorporated into the HP NetServer Utility Partition. The
following illustration shows how HP Remote Console Redirection works.
Remote
Console
Support Anywhere
Server
After setting the
server to receive
using the Utility
Partition Console
Redirection feature,
the server may be
taken over by the
remote console.
Modem
NetServer
Modem
Support Anywhere
Remote Console
Using a modem, the
offsite remote console
workstation, using
pcANYWHERE32, may
dial into and run
diagnostic utilities on
the HP NetServer.
Figure 11: HP Remote Console Setup
You (or your customer) may need assistance setting up a NetServer for HP
Console Redirection, particularly if you are unfamiliar with DOS prompt
computing. In such cases, HP recommends that you first establish phone contact
with an assistant and walk them through the setup defined in "Part 1 Setup at the
HP NetServer" of the installation steps that follow.
42
Page 47

Chapter 3 Installing the HP Support Anywhere Software
Minimum Server Requirements
In order to use HP Remote Console Redirection, your server needs:
• An installed HP Utility Partition
• An external modem or direct connection via one of the HP NetServer
E 40 or E 45's two serial ports
• An HP NetServer Navigator CD-ROM Version F.00.20 or later. (To find
the version number, look on the CD-ROM, opposite the HP logo.) The HP
NetServer Navigator CD-ROM includes the Utility Partition setup and
associated files, as well as pcANYWHERE32 communications software.
NOTE HP recommends that the customer (end user) retain possession
of the HP NetServer Navigator CD-ROM. In case of
emergency, the server can be rebooted directly via the
Navigator CD. Furthermore, Support Anywhere software
components are then available to the end user as needed.
Minimum Cons ole Re quirements
For the remote console, you can use any ANSI X3.64 compatible terminal or
terminal emulator with a modem or RS-232 connection. For best results, use an
ANSI color terminal that supports 25-line mode and IBM PC character set. In
addition, you will need:
• A 386-based (or faster) computer with 12 MB of available disk space
• A communications link to the server, either through a modem or a direct
serial connection
• Communications software. You can make master diskettes of the
pcANYWHERE32 software from the HP NetServer Navigator CD-ROM
that comes with the HP NetServer system.
• Microsoft Windows 95, or Windows NT Workstation 3.5, 3.51, or 4.0
Installation of HP R emote Cons ole Re direction
Installing HP Remote Console Redirection is a two-part process including setup
at the NetServer and at the workstation designated as the remote console.
43
Page 48

Chapter 3 Installing the HP Support Anywhere Software
You first setup and configure Remote Console Redirection at the NetServer.
Steps include assigning a serial (COM) port and password, and then initializing
the modem.
Once the modem at the NetServer has been initialized, you can use
pcANYWHERE32 (with either Windows NT or Win95), or any standard
communications program running on a console workstation to establish a simple,
character-based terminal connection.
Setup at the HP NetServer
At the NetServer, the installation of HP Console Redirection includes three steps:
1. BIOS-Level Setup
Enables console redirection at the BIOS level.
2. Modem Installation
Refers to physical installation of the external modem hardware.
3. Modem Initialization
Modem setup for communication with the remote console.
BIOS Level Setup
HP Console Redirection is built into the NetServer E 40 and E 45 system BIOS,
and enabled through a series of steps in the BIOS setup program.
NOTE The HP NetServer must be rebooted as part of the installation
for Remote Console Redirection at the server.
The HP NetServer E 40 and E 45 is equipped with two built-in serial ports
located on the back of the unit. They are designated Serial A (COM 1) and Serial
B (COM 2).
To enable and configure Remote Console Redirection at the server:
1. Power on (or reboot) the HP NetServer and, when prompted during bootup, press [F2] to run the Setup program.
2. On the BIOS Setup Main Menu, using the arrow keys, cursor to the
Configuration pull-down menu. Select "Integrated I/O Ports," and press
Enter.
The server displays a list of Integrated I/O Ports.
3. On the Integrated I/O Ports screen, cursor to "Console Redirect Port" and
select a serial port for console redirection Using [F7] and [F8] to toggle
44
Page 49

Chapter 3 Installing the HP Support Anywhere Software
through the options, match your port to the interrupt data provided in
Table 2.
Table 2: HP NetServer E 40 and E 45 Default Serial Port Interrupts
E 40 and E 45 Label
Serial A COM 1 3F8h IRQ 4
Serial B COM 2 2F8h IRQ 3
Port Interrupt
NOTE Your serial port IRQ and I/O address settings must match the
entry in the Console Redirect Port field. If you are unable to
match these settings, consult your system administrator or HP
technical representative.
4. When the entry in the Console Redirect Port field properly identifies your
port selection, press ESC.
The server saves your changes and returns to the Configuration menu.
5. On the Configuration menu, cursor to Exit and select "Save changes and
Exit."
The HP NetServer E 40 or E 45 reboots and incorporates the new
information in the NetServer's BIOS.
CAUTION As long as BIOS-level Remote Console Redirection is
enabled, your NetServer's security is easily breached.
Therefore, HP advises that you disable console redirection as
soon as you are finished using HP Remote Console
Redirection.
Modem Installatio n
To enable console redirection, you need to connect an external modem to the
NetServer port you assigned for use with console redirection. The ports are
designated on the back of the NetServer. Connect the modem to the port you have
chosen for console redirection, either Serial A or Serial B.
Modem Initializ a tio n
At the HP NetServer, the third step required to enable console redirection is
initializing the modem.
To initialize the modem and initiate a remote management session:
45
Page 50
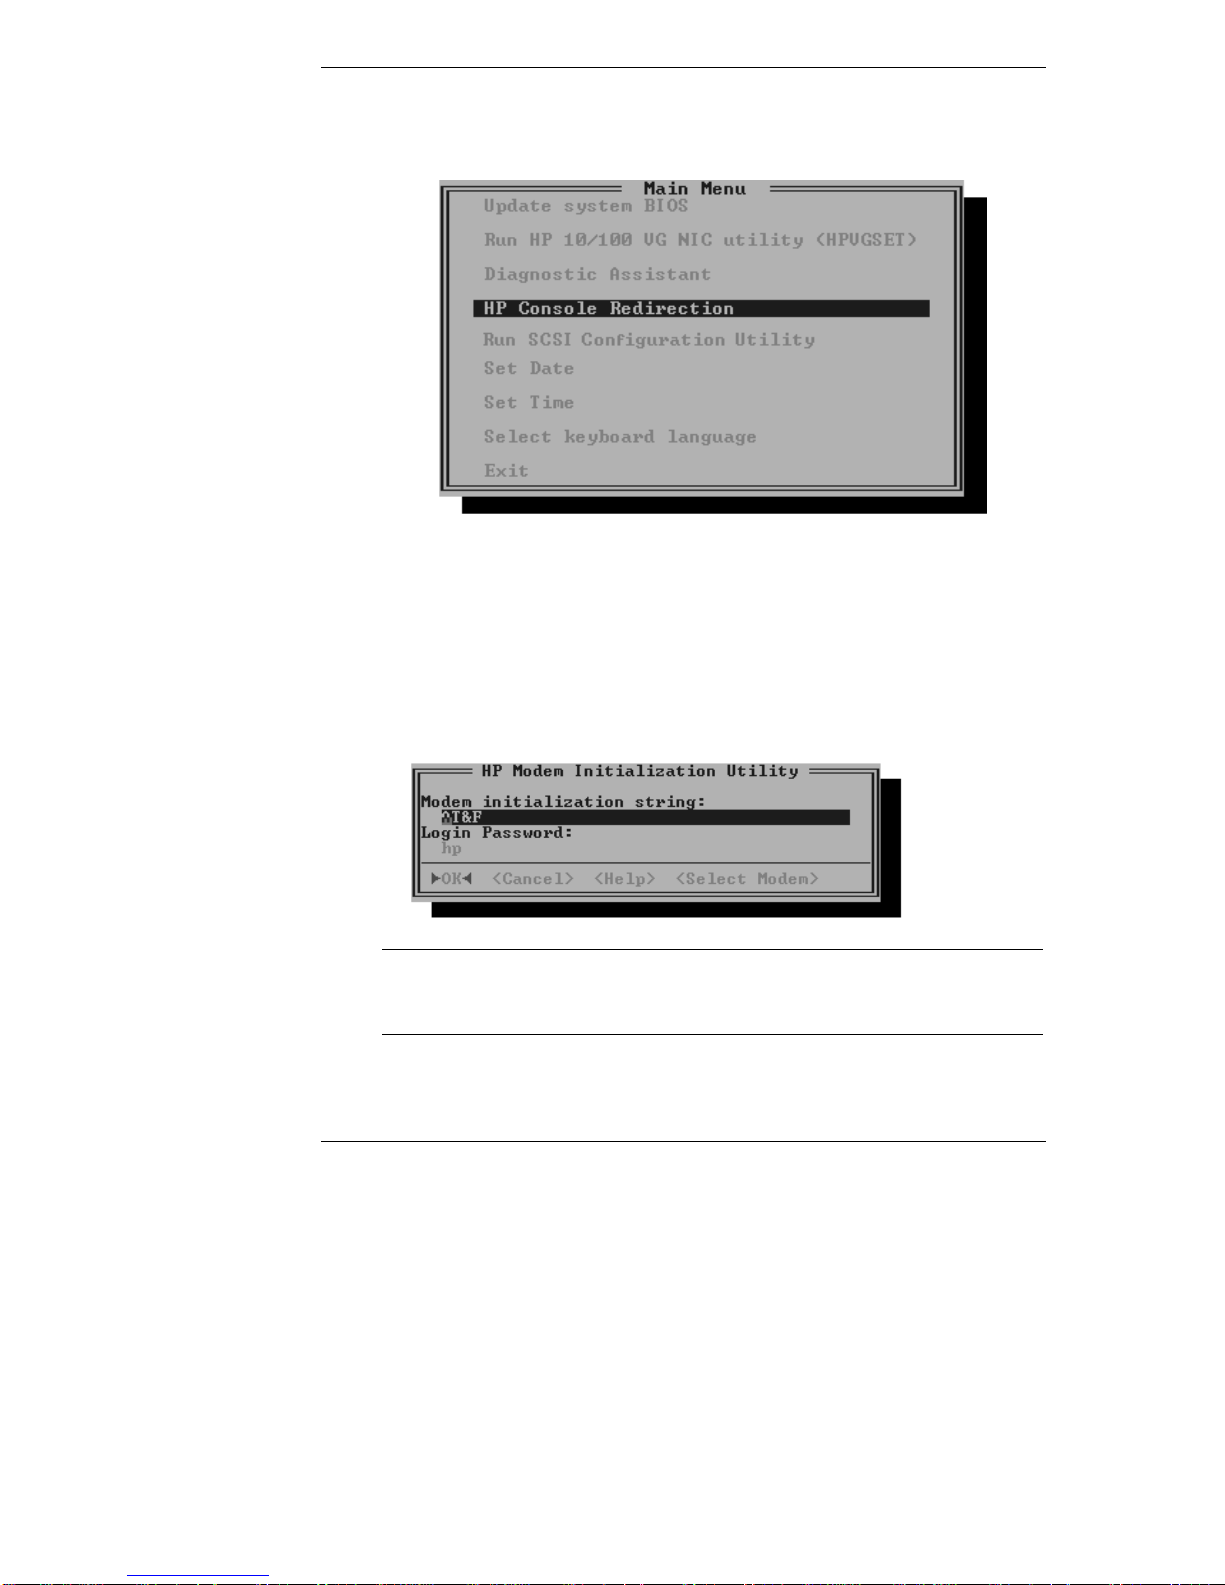
Chapter 3 Installing the HP Support Anywhere Software
1. Reboot the server and, when prompted, press [F12].
The server displays the Utility Partition Manager.
2. On the Utility Partition Main Menu, cursor to "HP Console Redirection."
The server displays the HP Console Redirection screen.
3. From the popup menu, select "Initialize the modem."
The program supplies a default initialization string (AT&F). This string
includes a group of characters sent to the modem that configure it for
routine operations. Use either the default string supplied by HP, or the
initialization string supplied by the manufacturer of the modem you
connected to the NetServer.
NOTE You can modify the modem initialization string as required.
This string may have been preset by the service personnel who
call in to diagnose problems with the server remotely.
4. The HP Modem Initialization Utility also allows for a case-sensitive
password.
46
Page 51

Chapter 3 Installing the HP Support Anywhere Software
You can enter any alphanumeric combination up to 20 characters in the
space provided. The password you enter here will be required for remote
access to the HP NetServer.
5. Tab to OK and press Enter.
The HP Modem Initialization Utility saves the modem initialization string
and password, and informs you that initialization is about to occur.
6. Select Yes to initialize the modem. (Cancel returns you to the HP Utility
Partition's Main Menu.)
The HP NetServer E 40 or E 45 awaits a call from the remote console and
is functionally disabled until a connection is made. To disable password
protection and return to normal NetServer operation, press the space bar.
NOTE Once the NetServer's modem has been initialized, your
customer's HP NetServer E 40 or E 45 awaits a call from the
remote console and is functionally disabled until a connection
is made.
Setup at the Re mote Console
You can use pcANYWHERE32 (shipped with each HP NetServer E 40 and E
45). Or, you may use any standard communications program to establish a
simple, character-based terminal connection from a console workstation to the
HP NetServer E 40 or E 45.
The advantage of using pcANYWHERE32 is that it is pre-configured for HP
Remote Console Redirection via the pre-install disk.
47
Page 52

Chapter 3 Installing the HP Support Anywhere Software
If you plan to manage your HP NetServer E 40 or E 45 using either a direct
terminal connection or via modem, and you have chosen not to use Symantec's
pcANYWHERE32, make sure your terminal emulation software:
• Provides remote dial-in and communications features
• Is correctly configured for console redirection
Regardless of which communications software you use, the following parameters
apply at the server's COM port
Table 3: Communications Parameters
Parameter
Baud Rate 19,200
Data Bits 8
Stop Bits 1
Parity None
Handshaking XON/XOFF
Connect Assert DCD
Disconnect Drop DTR
The remote console's display should closely resemble the characteristics of the
server's display if you use a PC-based, ANSI color terminal emulator that
supports 25-line mode and the IBM PC character set. The table below provides
the terminal settings to use when configuring your communications software for
use with HP Remote Console redirection.
Required
48
Page 53

Chapter 3 Installing the HP Support Anywhere Software
Table 4: Terminal Emulation Settings
Setting
Emulation ANSI Color Monochrome ANSI/VT-100
Character Set Extended PC/IBM PC ANSI
Screen Dimensions 80 x 25 80 x 24
Line Wrap OFF
Local Echo OFF
Scroll ON
Carriage Return
Translation
Backspace Translation None
Cursor Underline, blinking
Recommended Alternate
None
Installing and C onfiguring pc A NYW HER E32 at the Re mote Console
Although there are several connection options, typically you access the HP
NetServer via a modem. Unless you have decided to use another communications
package, you need to install the pcANYWHERE32 to enable character-based
console redirection at a remote workstation. Note that pcANYWHERE32 console
software is included with the HP NetServer E 40 and E 45.
To install pcANYWHERE32 at the remote console:
1. Insert the HP NetServer Navigator CD-ROM in the CD-ROM drive, or a
master copy of the pcANYWHERE32 "Pre-Install" diskette into drive A.
Choose Run from the File menu in Program Manager, or the Start menu
in Windows 95.
2. Enter one of the following commands:
◊ If you are installing from the CD, enter:
x:
\HPSA\US\PCA32\CONSOLE\PREINST\SETUP.EXE
where
x
: is the drive letter of the CD-ROM drive.
◊ If you are installing from a master diskette, enter:
a:setup
Follow the on-screen instructions to complete installation of
pcANYWHERE32.
3. After pcANYWHERE32 is installed, restart Windows NT or Windows 95.
49
Page 54

Chapter 3 Installing the HP Support Anywhere Software
4. To run pcANYWHERE32, double-click the pcANYWHERE32 program
icon in the pcANYWHERE32 program group, or choose it from the Start
menu.
5. The first time you start pcANYWHERE32, the Smart Setup Wizard helps
you configure your system by prompting you for basic information such as
COM port and modem specifications.
After the initial installation is complete, pcANYWHERE32 displays the
main program window.
pcANYWHERE32
menu bar
pcANYWHERE32
action bar
Once you have completed the initial pcANYWHERE32 installation, configure
the software for your system by selecting a modem model and identifying the
phone number for your HP NetServer(s).
To set the host phone number:
1. On the pcANYWHERE32 action bar, click Call Online Service.
pcANYWHERE32 displays an "Add Online Service Item."
2. Click Add Online Service Item to initiate pcANYWHERE32's Online
Service Wizard.
50
Page 55

Chapter 3 Installing the HP Support Anywhere Software
To rename the connection item you created, right-click the connection
item. From the popup menu, choose Rename. Type in the new name.
3. Enter the serial (COM) port assignment and telephone number of the
server you identified in the previous screen.
Be sure the Baud rate for communication between the HP NetServer and
the local modem is set at 19,200.
51
Page 56

Chapter 3 Installing the HP Support Anywhere Software
4. Click OK to return to the main program window.
pcANYWHERE32 displays a connection icon in the main program
window representing the HP NetServer you just configured.
NOTE You can copy and paste the connection icon multiple times to
create an icon for each HP NetServer you want to manage. Be
sure to modify the server name and phone number entries for
the individual entries.
Using HP C onsole R edirection
Originating a remote management session between an HP NetServer E 40 or E
45 and a remote console involves initialization at the server (to put the server in
standby mode) and an initiating call from the remote console. Because
Symantec's pcANYWHERE32 communications software is included with your
customer's HP NetServer, the following instructions assume use of this software
product at the remote console.
At the HP NetServer
Be sure the modem is properly initialized. (See Modem Initialization above.)
When you select OK, then Yes from the Modem Initialization Utility, server
52
Page 57

Chapter 3 Installing the HP Support Anywhere Software
function is suspended until a remote user successfully logs on. The server
remains in this standby state indefinitely until a connection is made, or until you
disable the remote login by pressing the space bar at the server.
At the Remote Console
To initiate a remote management session using pcANYWHERE32:
1. Run pcANYWHERE32 from the pcANYWHERE32 program group in
your Windows Program Manager.
2. Double-click the icon you created for your HP NetServer.
3. Enter the password you defined in the HP NetServer's modem
initialization program.
After the NetServer accepts the password, you have access to both the BIOS setup
routine and to the HP NetServer's Utility Partition.
Graphic Console R edirection (W indows NT)
If you want to access an HP NetServer running Windows NT and your remote
console is running either Windows NT or Windows 95, you can redirect all the
information displayed on the HP NetServer to your remote console using
pcANYWHERE32.
The following figure shows how the Console Redirection is setup.
53
Page 58

Chapter 3 Installing the HP Support Anywhere Software
Remote
Console
Support Anywhere
Server
After settingthe
server toreceive
using
pcANYWHERE32, the
server may be taken
over by the remote
console.
Modem
NetServer
Modem
Support Anywhere
Remote C onsole
Using a modem, the
offsite remote console
workstation, using
pcANYWHERE32, may
dial into and take full
graphic control of the
HP NetServer.
Figure 12: A Typical Installation of Graphics Console Redirection
A window on the console display exactly mimics the display at the NetServer. In
this way, you can take full control of your HP NetServer from the remote console.
However, to enable graphics redirection, pcANYWHERE32 software must be
installed on both the NetServer and the remote console.
NOTE pcANYWHERE32 graphics console redirection requires your
HP NetServer to be running Windows NT. In addition,
pcANYWHERE32 operates only on consoles running either
Windows 95 or Windows NT.
pcANYWHERE32 allows you to redirect what's graphically displayed on an HP
NetServer running Windows NT 3.51 or 4.0 to a remote Windows NT 3.51 or
Windows 95 PC console.
Installation of pcANYWHERE32 is a two-part process. Separate setup steps are
required for installation at the NetServer and at the workstation designated as the
remote console.
54
Page 59

Chapter 3 Installing the HP Support Anywhere Software
Minimum Server Requirements
In order to use Graphic Console Redirection, your server needs:
• An external modem or direct connection via one of the HP NetServer
E 40 or E 45's two serial ports
• pcANYWHERE32 communications software running on Windows NT
On the HP NetServer, pcANYWHERE32 host software is optionally installed as
part of the HP Support Anywhere installation.
Minimum Cons ole Re quirements
For the remote console, you can use any ANSI X3.64 compatible terminal or
terminal emulator with a modem or RS-232 connection. For best results, use an
ANSI color terminal that supports 25-line mode and IBM PC character set. In
addition, you will need:
• A 486-based (or faster) computer with 12 MB of available disk space
• A communications link to the server, either through a modem or a direct
serial connection.
• pcANYWHERE32 console software. You can make master diskettes of
pcANYWHERE32 software from the HP NetServer Navigator CD-ROM
that comes with each HP NetServer system.
• Microsoft Windows 95, or Windows NT Workstation v3.5, v3.51, or v4.0
Installing pcANY W HER E32 on the Remote Console
See the instructions in the preceding section to setup pcANYWHERE32 at the
remote console.
Installing pcA N YWH ERE3 2 on the Ne tServer
If the HP NetServer you are setting up for remote access does not have
pcANYWHERE32 Server software already installed, you (or your customer or
client) must install pcANYWHERE32 at the NetServer. Otherwise skip the
following installation steps and proceed to the following section detailing the
configuration of pcANYWHERE32 on the NetServer.
During the installation of HP Support Anywhere, the user is provided the option
to copy pcANYWHERE32 host software to the HP NetServer. However, if the
host software was not installed, follow these instructions to install
pcANYWHERE32 host software on the NetServer:
55
Page 60

Chapter 3 Installing the HP Support Anywhere Software
1. Insert the HP Navigator CD into the CD-ROM drive and, at the DOS
command prompt, type:
x
:\HPSA\US\SERVER\DISK1\WINNT\SETUP.EXE
where
x:
is the drive letter of the HP NetServer's CD-ROM drive.
Follow the instructions on the screen to install pcANYWHERE32.
2. Once pcANYWHERE32 is installed, restart the server and run
pcANYWHERE32 by double-clicking the pcANYWHERE32 program
icon in the pcANYWHERE32 program group.
Configuring pcA N YWH ERE3 2 on the Ne tServer
The first time you start pcANYWHERE32, the Smart Setup Wizard helps you
configure your system and prompts you for basic information including COM
port and modem type. Select the modem on the list that most closely matches the
one you intend to use.
In Windows NT, to set up Serial A (COM 1) or Serial B (COM 2) as the serial
port:
1. Click Ports in the Control Panel.
2. In the Ports dialog box, select COM 1 (or COM 2).
3. Click "Settings..." and then "Advanced...".
Configure using the following address and IRQ settings:
Table 5: HP NetServer E 40 and E 45 Default Serial Port Interrupts
E 40 and E 45 Label
Serial A COM 1 3F8h IRQ 4
Serial B COM 2 2F8h IRQ 3
Port Interrupt
For best performance, check the FIFO Enabled box.
Be sure to select the same COM port you identified when you configured the
NetServer during BIOS setup. Check by booting DOS and, when prompted
during boot-up, press [F2] to run the Setup program.
NOTE You must reinitialize the modem to enable Remote Console
Redirection.
On the BIOS Setup Main Menu, cursor to the Configuration menu and select
"Integrated I/O Ports." Check the display of Integrated I/O Ports.
56
Page 61

Chapter 3 Installing the HP Support Anywhere Software
After you have finished running the Smart Setup Wizard, the pcANYWHERE32
main program window appears.
pcANYWHERE32
menu bar
pcANYWHERE32
action button bar
To finish configuration, at the main program window:
1. Click "Be A Host PC."
2. Select the Modem connection item (see illustration below).
3. Right-click the Modem connection item to display the drop-down menu.
4. Choose "Properties…" from the drop-down menu in the Connection Info
section.
57
Page 62

Chapter 3 Installing the HP Support Anywhere Software
After verifying that the COM port and modem type are set correctly, click
OK to return to pcANYWHERE32's main program window.
5. Run the Modem connection item by double-clicking it. This initializes the
modem and establishes the Modem connection item you just set up as the
default.
NOTE The settings you have just selected become
pcANYWHERE32's defaults for the server-side installation. In
order for pcANYWHERE32 to communicate with a remote
console, the installation at the remote console must use these
same settings.
A pcANYWHERE32 icon appears to indicate the configuration process is
complete. Your server is now ready to support a remote connection. To customize
your host configuration for more options and greater security (such as creating a
specific list of allowed callers, or for using features such as call-back), refer to
pcANYWHERE32's online help.
pcAN YWH ERE 's Ke yboa rd Ma pping and Macro Features
Any communications software you use for console redirection must be able to
send special keystroke sequences, either via a "macro" key, or by sending
individual characters, that comprise an escape sequence.
HP has already set up a special macro file that includes keyboard combinations
and keystroke sequences for use by pcANYWHERE32. To make the macros
operational, you need to associate them with the icon you installed to call up the
NetServer.
To enable the macro file:
1. At the pcANYWHERE32 main screen, select the NetServer icon you
previously configured.
2. Right-click the icon and select Properties.
3. Click to select the session.
4. Click Use Macro Key, and identify the macro key with the text:
hpcr.mk7
If you choose not to use pcANYWHERE32, you will need to emulate the
keyboard functions even if your console is directly connected. For example, using
console redirection you must send a special sequence of keys to the NetServer in
58
Page 63

Chapter 3 Installing the HP Support Anywhere Software
order to initialize a warm server reboot. For a complete listing of emulation
sequences supported by the E 40 and E 45 BIOS, see Appendix B.
RCONSOLE (NetWare)
Novell NetWare's RCONSOLE feature works at the NOS level to provide full
remote access to a NetServer running NetWare 4.11. Installation of RCONSOLE
requires specific setup steps at both the console and NetServer before you can
establish an RCONSOLE communications link. Only the NetServer needs to be
running NetWare/IntranetWare; the RCONSOLE program can be run from a
DOS prompt. Thus, the only software requirement is that the client has access to
DOS
The following figure shows how RCONSOLE works on a NetServer running
NetWare.
Remote
Console
Modem
Support Anywhere
Server
Enable the server for
NetWare
RCONSOLE
connection.
NetServer
Modem
Support Anywhere
Remote Console
Using a modem, the
offsite remote console
workstation, using
RCONSOLE,may dial
into and take control of
the HP NetServer.
Figure 13: RCONSOLE Remotely Controlling an HP NetServer
Minimum Server Requirements
In order to use RCONSOLE, your server needs:
• An external modem or direct connection via one of the HP NetServer E 40
or E 45's two serial ports
59
Page 64

Chapter 3 Installing the HP Support Anywhere Software
• An HP NetServer running Novell NetWare (4.0 or 4.11) and including
RCONSOLE software and utilities
Minimum Cons ole Re quirements
For best results, use an ANSI color terminal that supports 25-line mode and IBM
PC character set. In addition, you will need:
• A 386-based (or faster) computer with 6 MB of available disk space
• A communications link to the server, either through a modem or a direct
serial connection
• Novell NetWare's RCONSOLE program
• MSDOS 3.0 or later
Setup at the NetWare NetServer
Enabling a NetWare RCONSOLE connection at your NetServer involves several
steps, including modifying the AUTOEXEC. NCF file and rebooting the server
in order to activate the changes.
To enable a NetWare RCONSOLE connection:
60
1. Run the NetWare server program and at the server prompt, type:
load install
2. At the NetServer installation utility, select "NCF files options," then
"Edit AUTOEXEC.NCF file".
3. Edit AUTOEXEC.NCF, by typing the following commands, each on a
separate line:
load remote <password> [Enter}
load aio {Enter}
load aiocomx{Enter}
load rs232 <com port> 19200{Enter}
4. Save and exit the edit by pressing [F10], then quit the install program.
5. Take the server off line. Type:
down
6. Quit the NOS. Exit the NetWare environment and enter DOS, type:
Page 65

Chapter 3 Installing the HP Support Anywhere Software
exit
7. Reboot, then run NetWare. Change to the NetWare server directory
and type:
server
At this point, your server is permanently enabled for RCONSOLE connection.
Setup at the NetWare Client
RCONSOLE software must also be installed and configured at the workstation
used as the remote console.
To install RCONSOLE software at the NetWare client workstation:
1. Copy the following files stored on the IntranetWare 4.11 CD to a
common directory:
rconsole.exe rconsole.hep rconsole.msg
textutil.hep textutil. idx textutil.msg
_run.ovl ibm_aio.ovl ibm_run.ovl
_aio.ovl
2. Switch to the directory that holds the files you just copied to the
console and run:
rconsole.exe
NOTE Novell recommends that the program rconsole.exe be run in
DOS (not in a DOS window inside Windows).
3. Select Asynchronous, then "Configuration".
Enter the settings appropriate to the modem installed at the console.
Enter any sequence of characters (limit 8) for User Connection ID.
You must make an entry for "Call-back number" even if you do not
intend to use this feature.
4. Press [Esc] to return to the previous menu, and select "Connect to
Remote Location".
5. Press [Ins] to enter data in the supplied fields. Provide the phone
number and location as prompted. Enter the name of the server you
want to manage and the server's phone number.
61
Page 66

Chapter 3 Installing the HP Support Anywhere Software
6. Press [Esc] to return to the previous screen. Highlight the phone
number of the server you want to call using RCONSOLE and press
[Enter].
RCONSOLE dials the selected server, establishes a connection and then supplies
you with a list of servers available via the selected phone access. As soon as you
select a server RCONSOLE initiates a remote console session. For further
information about RCONSOLE capabilities such as dial-back and inband remote,
refer to your Novell NetWare documentation.
62
Page 67

4 Using HP Support Anywhere
This chapter describes Support Anywhere services. It assumes that you are
familiar with the concepts and terminology introduced in Chapter 2, and that you
have already set up the Support Anywhere Client and installed Support
Anywhere on at least one HP NetServer E Series system.
Running HP Support A nywhere
Support Anywhere is a versatile management tool that combines LAN-based and
web-based software to monitor the performance and operating conditions of HP
NetServer E Series systems. Once installed, Support Anywhere's alarm message
service, Auto Alert, loads automatically whenever the Support Anywhere Client
is booted.
An icon appears to indicate that Support Anywhere's Auto Alert service is
operational:
• In Windows for Workgroups and Windows NT, the Auto Alert traffic
light icon appears in the lower-left corner of the Support Anywhere
Client's display (default position).
• In Windows 95, the icon appears on the task bar.
Click the Auto Alert icon (Windows NT or Windows for Workgroups) to open a
standard Windows dialog box. For Windows 95, right click the HP Auto Alert
icon in the task bar. You can then either:
◊ Stop Auto Alert service.
To restart Auto Alert, click the Auto Alert icon (or program name, in
Windows 95) in the Support Anywhere program group, or reboot the
Support Anywhere Client.
OR
◊ In Windows for Workgroups or Windows NT, reposition the icon.
63
Page 68

Chapter 4 Using HP Support Anywhere
Double-clicking the Auto Alert icon displays a panel with Support Anywhere
version information.
NOTE If you close the Auto Alert service at the Support Anywhere
Client, you will no longer be notified of alarms on your HP
NetServers.
HP Suppor t A ny wher e A uto A lert
Auto Alert is a service that monitors the operating environment of HP NetServers
and generates notifications and alarms based on factory-defined error thresholds.
The changes are identified by SNMP alarm agents which, during installation, are
installed on all participating HP NetServers.
In the course of normal operations, when a condition changes that might effect
server function, an Auto Alert notification is immediately sent over the network
to a designated client workstation.
Auto Alert alarms and notifications are triggered by changes in disk volume
(capacity), Network Interface Card (NIC) status, and predictive SCSI drive
failure.
Figure 14: Example of a Notification Sent to the Support Anywhere Client
64
Page 69

Chapter 4 Using HP Support Anywhere
The severity of the notification from the HP NetServer is color-coded in the
traffic light icon located in the upper-left corner of the screen:
• a red light signals that a critical event occurred; immediate action is
indicated
• a yellow light cautions that a minor-level problem exists; action should be
taken soon
• a green light indicates a return to normal operations
This symbol indicates an informational message; no action is necessary
Auto A lert R esponse Option s
Support Anywhere provides four user response options along with each Auto
Alert notification.
• Go There launches your web browser and accesses the web page of the
server that generated the alarm. At the NetServer's web page, you can
research error messages, review a log of alarms, or get configuration
information about the server. If you didn't install the web feature, the Go
There button will be grayed out.
• Print generates a hard-copy summary of the Auto Alert notification.
• Advice provides information about the error message and some possible
remedies.
• OK clears the alarm notice from your display.
When you close the notification display, Support Anywhere's icon remains in the
lower-left corner of the display (or in the Windows 95 program group) to remind
you that Support Anywhere service remains operational at the Support Anywhere
Client.
Auto A ler t Pr intouts
To get a hard-copy printout of an Auto Alert notice, click Print. A brief
description of the alarm, including a listing of the server name, alert ID string,
and the date and time of the notification, is sent to your designated printer.
This is an example of a typical printout generated by Support Anywhere.
- - HP Support Anywhere Alarm Information - Server name: [NRDC006]
Date and time of alarm: [Wed Aug 21 11:27:11 1996
Alarm string: [Capacity Warning Level]
65
Page 70
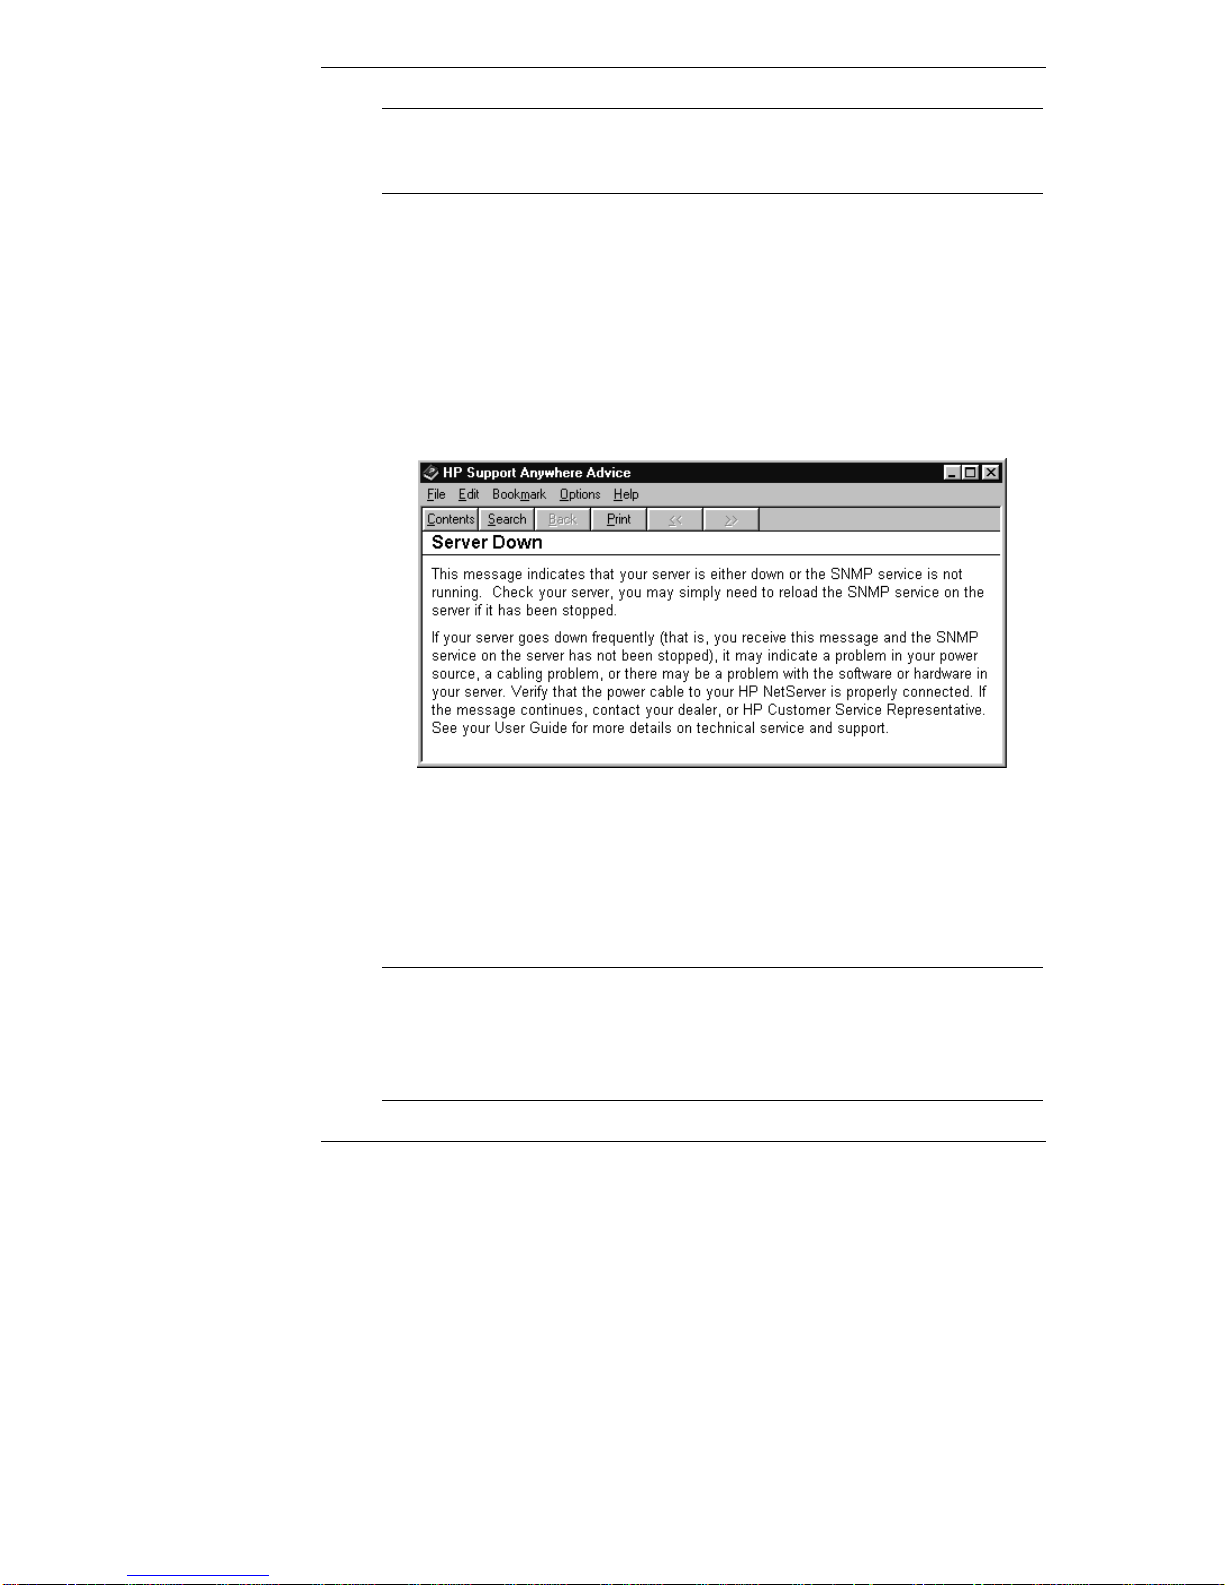
Chapter 4 Using HP Support Anywhere
NOTE If your Support Anywhere Client has fax capability, you can
redirect the printed summary to a service center, or other
facility by using the fax software's print-to-fax feature.
If you are not sure how to respond to an Auto Alert notification, print a copy of
the Support Anywhere notification for a reference, then call your dealer or
contact HP Customer Support.
Auto Alert Advice
To get more information about an Auto Alert notification, click Advice. A
standard Windows help screen appears with context-appropriate information
about the current Auto Alert notification. The following Advice screen explains
the red-light notification shown in the preceding figure.
Figure 15: Auto Alert Advice Screen
Auto Alert OK
After you have received an Auto Alert notification, you can clear the message at
any time by clicking OK. If an Advice screen is also displayed, you must first
close the Advice screen before you can clear the notification.
NOTE When you clear an Auto Alert message by clicking OK, the
Client does not retain a record of the cleared alarm. However,
Support Anywhere does log all alarms on the server's web
page. Click Go There to launch your client's web browser and
review the NetServer's alarm history.
66
Page 71

Chapter 4 Using HP Support Anywhere
Because each Auto Alert message is positioned in the same place on your Client's
display, if you receive multiple alarms, only the first alarm received will be
visible. Subsequent alarms are stacked in chronological order behind the
currently displayed Auto Alert notification, with the oldest displayed first.
After you have read and closed the currently displayed message (by clicking OK),
the message is immediately replaced by the next notification and so on.
Continue clicking OK until all notifications have been cleared.
When all notifications are cleared, Support Anywhere returns your Support
Anywhere Client to the application that was running prior to receipt of the first
alarm notification.
Using HP Support Anywhere's Web Interface
On sites with web servers, you have the option of monitoring your servers over
the web. Setup provides each server managed over the web with its own web
page. On each server's web page you can view detailed information about a
specific alarm, see a log of alarms, review performance statistics, or check
configuration information about your server.
To connect to a web server's home page:
• Click Go There from an Auto Alert notice.
OR
• Double-click the Support Anywhere icon in the Support Anywhere
Windows Program Group.
If you access Support Anywhere directly from the Program Manager, you see the
following welcome screen.
67
Page 72

Chapter 4 Using HP Support Anywhere
Figure 16: Support Anywhere Welcome Screen
Support Anywhere lists all managed NetServers currently configured for your
network. When you click on a server, your web browser connects you to that
server's home page.
68
Page 73

Chapter 4 Using HP Support Anywhere
Figure 17: Support Anywhere Home Page—Server Description
Server Description Page
This is the NetServer's home page, which provides you with an overview of the
NetServer's current operational status and configuration. The key elements
include:
• Server Name
This is the hostname you provided for the server during Support
Anywhere installation.
• Date and Time of Sample
All the information provided about the alarms is based on this time. To
update the information, click Refresh.
• Server Uptime (time since last shutdown)
This is the elapsed time between the occurrence of the most recent
shutdown and the "Date and Time of Sample".
• Network Operating System (NOS)
This identifies the NOS currently operational on the selected NetServer.
69
Page 74

Chapter 4 Using HP Support Anywhere
• Current Alarms
The number of current outstanding alarms generated by this NetServer is
displayed in bold red text. For more detailed information, click Alarms to
view an Alarm Summary and an Alarm History.
Server Configuration Pages
Clicking one of the Configuration Pages in the lower-right corner of the screen
displays detailed information about Server Configuration, including:
• Disk Storage
• Network Interface Card (NIC)
• SCSI Bus Information
• System Information
NOTE All the information presented about the configuration of the
NetServer is based on information gathered at the time
indicated for the Date and Time of Sample.
Disk Storage
The Disk Storage page displays the parameters for alarm thresholds. On this
page, you can modify the existing alarm thresholds. Notice that a default setting
is indicated for each parameter that is modifiable.
70
Page 75
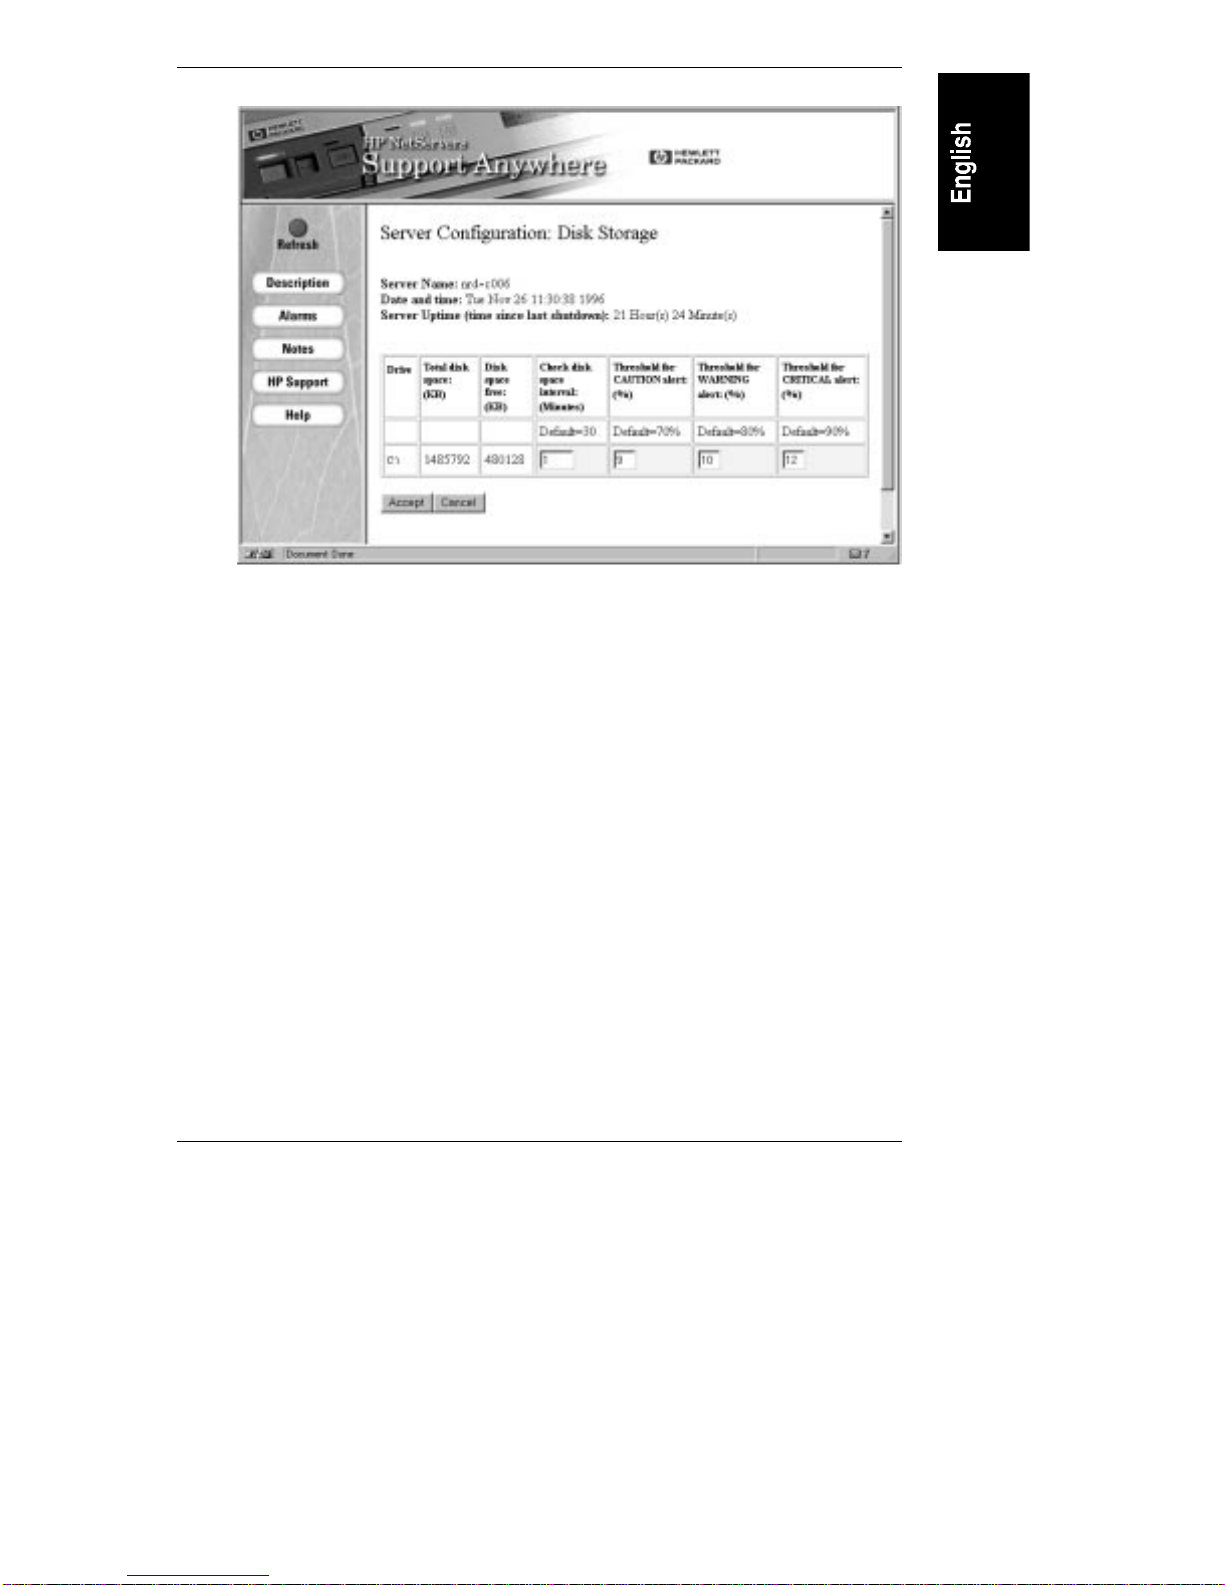
Chapter 4 Using HP Support Anywhere
Figure 18: Support Anywhere Configuration Page—Disk Storage
To change a threshold setting:
1. Click to highlight the box containing the value you want to modify.
2. Enter a new value.
3. At the bottom of the page, click Accept to install the new values for future
notifications.
OR
Click Cancel to retain the previously installed value.
Support Anywhere returns you to the Server Description home page.
Network Interface Card (NIC)
The Network Interface Card page provides the hardware interface connecting the
server to the network. In addition to general information, including server name,
date, time, and server uptime, this page provides important configuration details
about the NIC, including its location (slot) in the NetServer. No information on
this page may be modified.
71
Page 76

Chapter 4 Using HP Support Anywhere
Figure 19: Support Anywhere Configuration Page—Network Interface Card
The filename of the NIC driver is identified along with a description of the
driver, and the interrupt.
SCSI Bus Information
This page provides important information about your SCSI Bus configuration. In
addition to server name, date, time and server uptime, this page displays
important configuration details about the type of device, and its address and
capacity, along with vendor and identifying information. No information on this
page may be modified.
System Information
The System Information page provides an overview of key hardware and software
components installed on the NetServer. In addition to general information,
including server name, date, time and server uptime, this page provides
important details about the system including System Memory (RAM), current
BIOS version, distribution of slots, EISA, PCI, ISA, number of hard disk drives,
72
Page 77

Chapter 4 Using HP Support Anywhere
the operating system, version, and network name. No information on this page
may be modified.
Menu Buttons
In addition to the descriptive information about the NetServer, Support
Anywhere's sidebar menu provides six buttons to help you manage your
NetServer in the context of your network.
Refresh
Clicking Refresh updates all server information for the selected server.
Description
Clicking Description returns you to the NetServer's home page, which serves as a
gateway to Support Anywhere's Configuration pages. You can also return to the
Server Description page by clicking the link at the bottom of most Support
Anywhere pages.
Alarms
Click Alarms to view a table of recent alarms on the Alarms Summary page. A
descriptive list of all unacknowledged alarms is summarized in table format.
73
Page 78
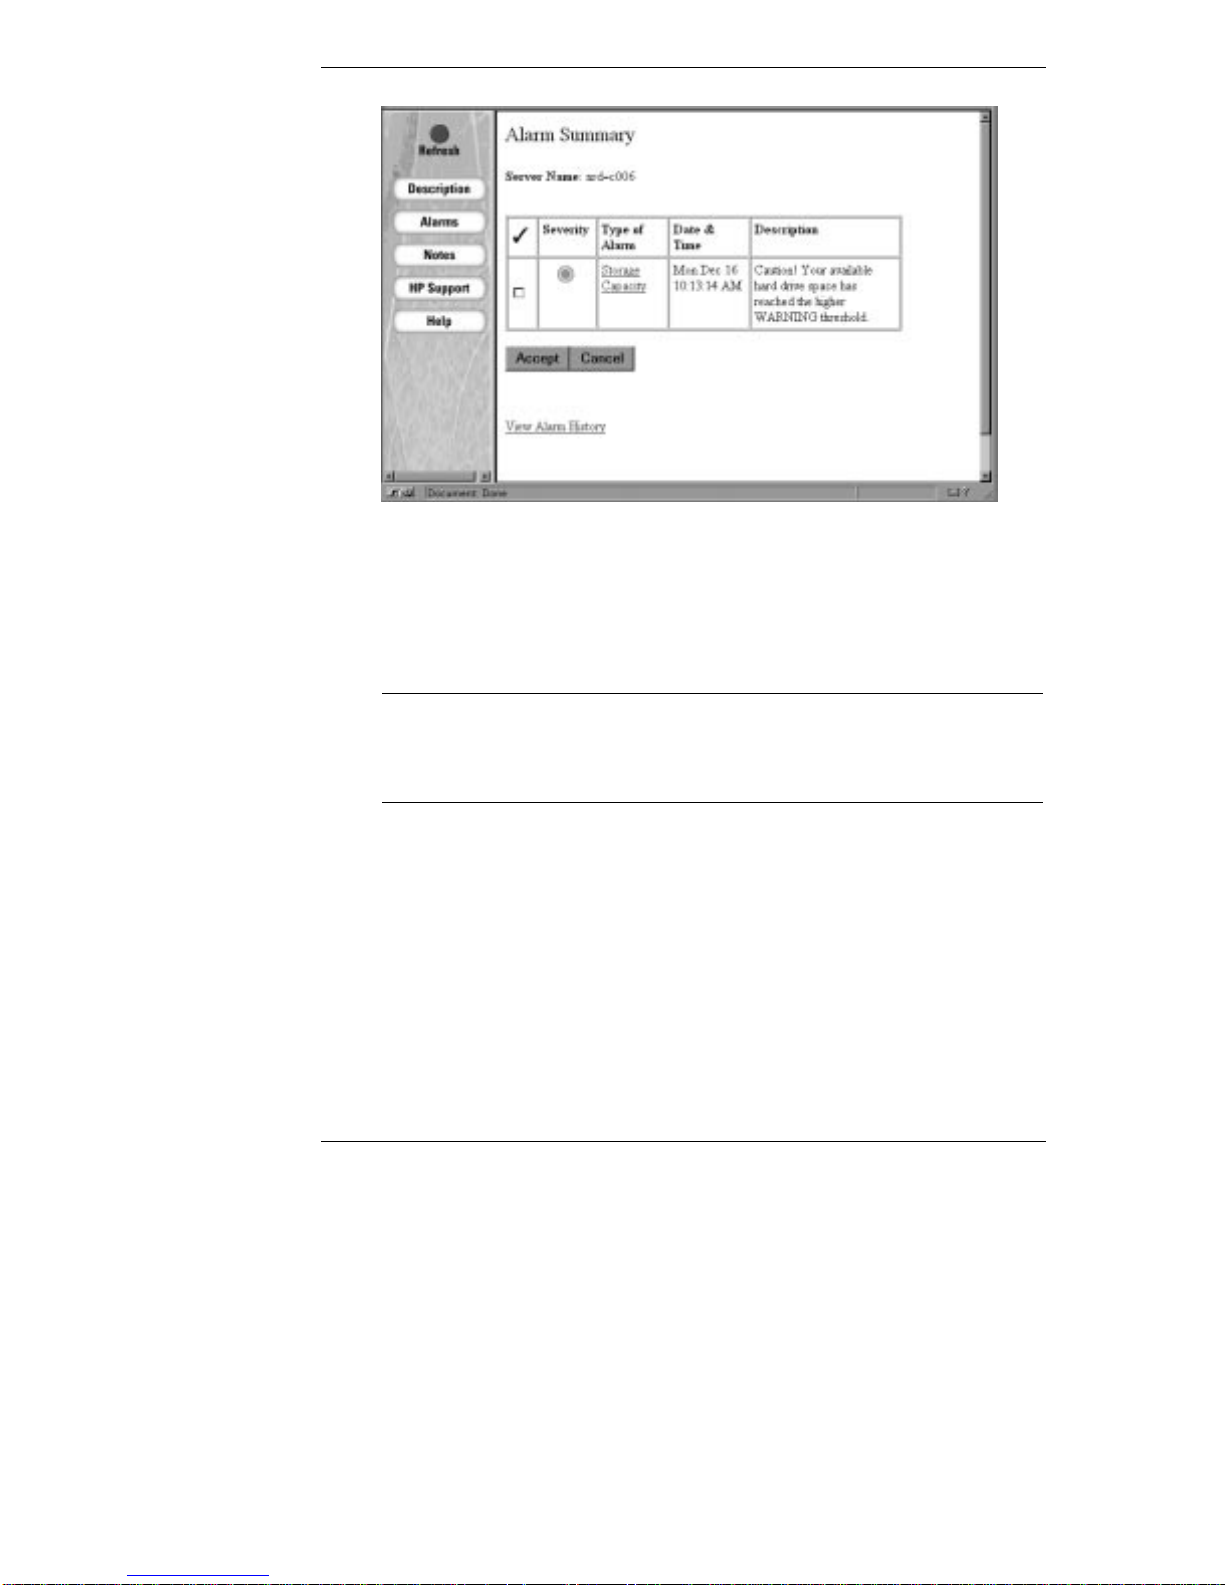
Chapter 4 Using HP Support Anywhere
To clear an alarm, click the checkbox in the first column for each alarm you no
longer want included in the summary. By clicking in the Check column you
"acknowledge" the alarm. Then when you click "Accept" at the bottom of the
page, Support Anywhere clears all checked alarms from the Alarms Summary,
stores a record of the acknowledged alarms on the Alarms History page, and
returns you to the Server Description home page.
NOTE Information about a cleared alarm is retained in the Alarm
History. To review information about a cleared alarm, click
View Alarm History at the bottom of the Alarm Summary
page.
In the Type of Alarm column, you can click any listed alarm to get detailed
information about that alarm. For example:
74
Page 79
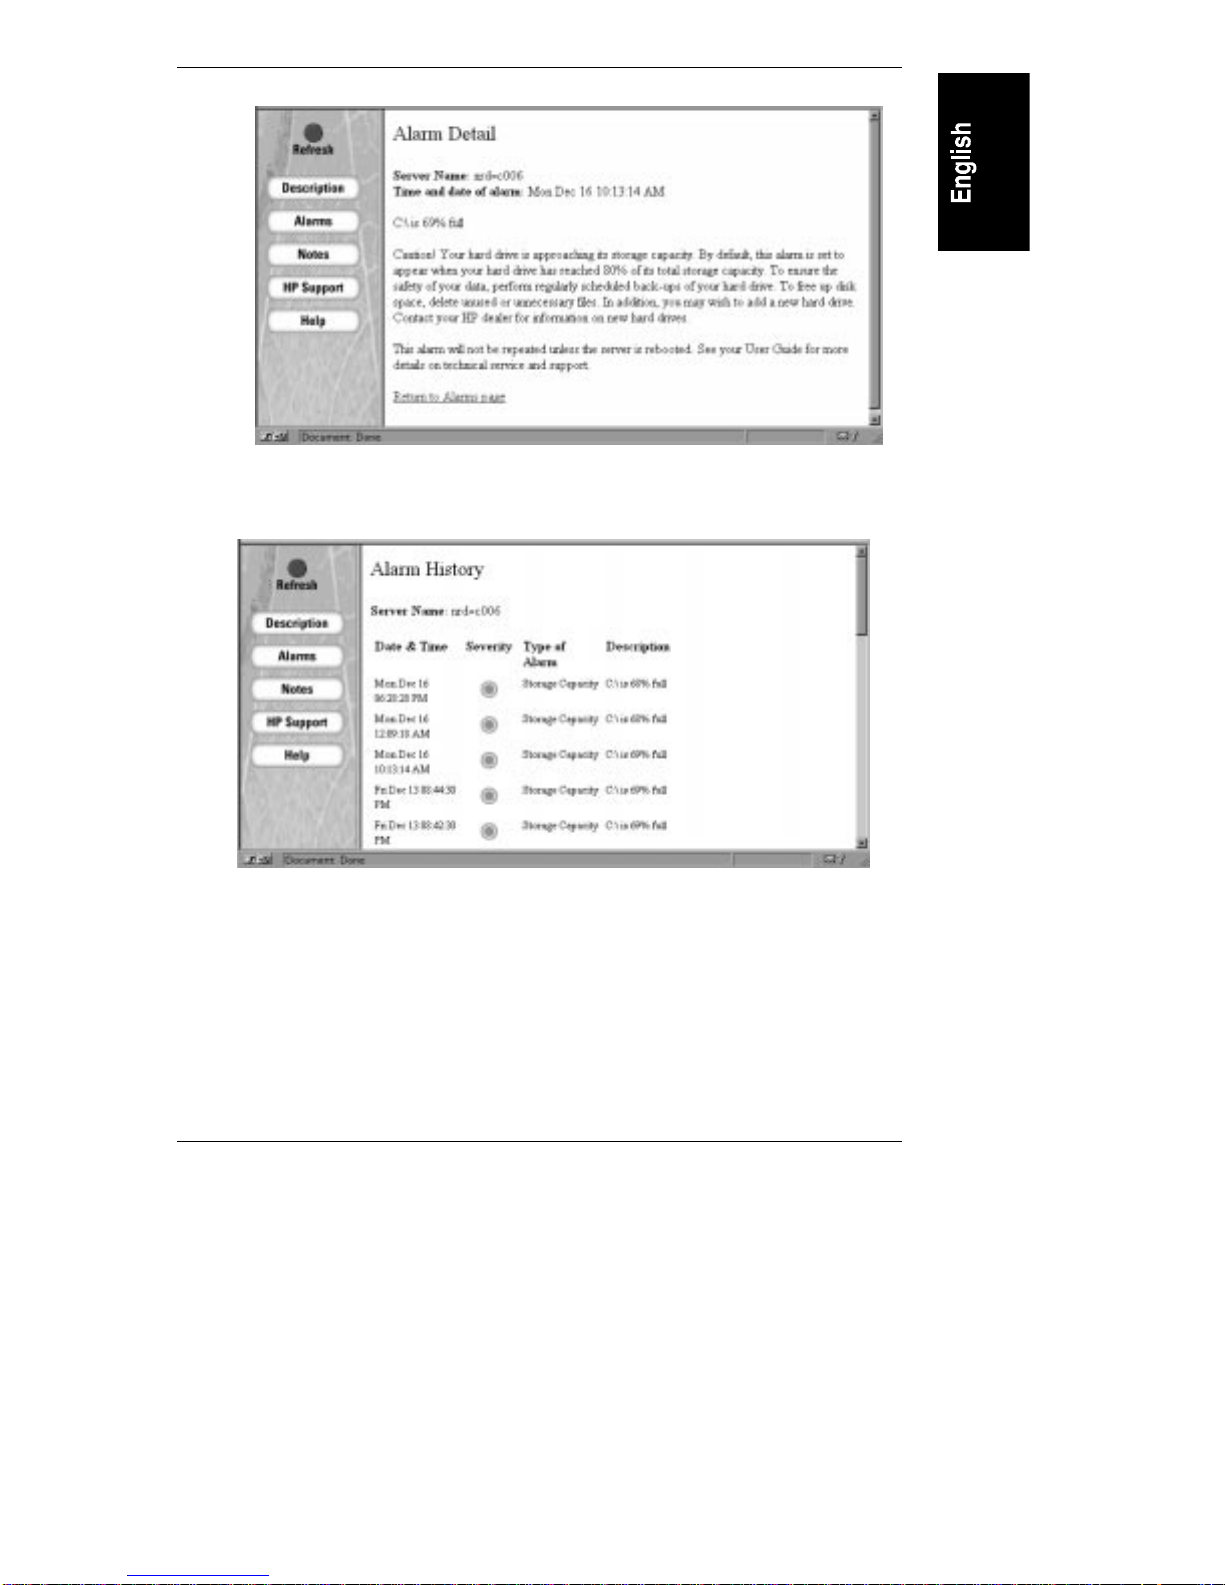
Chapter 4 Using HP Support Anywhere
To view an historical listing of all alarms generated by the NetServer, click the
Alarm History jump at the bottom of the Alarm Summary page.
The Alarms History page is a complete listing of all "Accepted" or acknowledged
alarms produced by the server.
HP Support
If your client is connected to the Internet, click HP Support for information about
NetServer maintenance, configuration, and repair.
When maintenance or configuration questions arise and you are connected to the
Internet, you can quickly get answers. Clicking HP Support connects you to HP's
75
Page 80

Chapter 4 Using HP Support Anywhere
World Wide Web page over the Internet. The HP web page lists support
resources, including Technical Support, and information about peripherals
available for your HP NetServer. In addition, you can download the most recent
version of software designed specifically for your NetServer from the HewlettPackard FTP site.
Notes
Click Notes for a log of user-entered information specific to the particular
NetServer. Support Anywhere provides this feature for Network Administrators
who manage numerous NetServers. Click Notes to see a quick overview of a
particular NetServer's performance and environment. By making NetServerspecific entries, you can review configuration and maintenance issues that have
arisen in the past.
To add a note to the Notes page:
• From the Add Notes page, click Submit to insert a note entered in the
space provided.
OR
• Click Cancel to discard the new text and return to the Notes page.
Support Anywhere adds text entered on the Add Notes page to the end of the text
block displayed on the Notes page. Notes are added sequentially; the last note
displayed as you scroll down is the most recent entry.
Web Security Considerations
Using the web to manage your servers may be challenging from a security
standpoint. By opening your network to web access, you may be concerned that
you're short-circuiting established security schemes.
Can anyone with a browser connect to your servers?
This is a realistic concern. That's why HP recommends that you have a security
strategy in place before connecting to the Internet. Such a strategy may include
the installation of one or more of the following security measures:
• User IDs and passwords
• IP address restriction
• Encryption
76
Page 81

Chapter 4 Using HP Support Anywhere
NOTE To find out more about whether a particular security option is
supported by your web server, check the documentation that
came with your web server software.
User IDs an d Passwords
An easy and inexpensive way to provide Internet security is to use passwords and
user IDs. This option is attractive not only because it is inexpensive and easy to
implement, but because it's a feature available with most web server software.
Documents or directories are protected by requiring a remote user to provide a
name and password in order to gain access.
By installing user ID and password protection, you can set security down to the
web page level. However, user IDs and passwords are a minimal security
solution. For increased effectiveness, you should consider combining passwords
and IDs with other strategies such as IP restriction and encryption.
IP A ddress Restr iction
Depending on your particular web server configuration, you may be able to use
an IP address scheme to tighten up security. More secure than simple password
locking, IP restriction allows you to secure access to individual web documents,
or to whole directories on a particular web server.
This scheme works by controlling browser access. Only browsers connecting
from certain designated IP (Internet) addresses, IP subnets, or domains are
allowed access. Used alone, this method has drawbacks and can be thwarted by
competent hackers using suitable equipment. Therefore, as a rule, IP address
restriction should be combined with user ID checking (passwords). In this way,
confirmation of a legal user's name and password can be clearly established first.
Encryption
As an Internet security solution, encryption provides the best overall web security
for the kind of information usually transmitted over the Internet. An encryption
method called "public key cryptography" is one such security option to consider.
In a public key system, you encode the text of a message with one key, and use a
separate key for decoding. In practice, the system is simple. You use one key, the
public key, for encoding, and another, the private key, for decoding.
77
Page 82

Chapter 4 Using HP Support Anywhere
Typically, the public key is widely distributed. The private key, however, is kept
secret, so that the message can only be decrypted by someone in possession of the
private key.
Using this method of encryption, both the request for a document and the
document itself are encrypted to ensure that a text message can be read only by
the intended recipient.
Netscape's SSL Encryption
Another effective encryption scheme is called Secure Socket Layer (SSL). SSL is
a technology developed by Netscape that encrypts transactions that use the webbased HTTP, NNTP, and FTP protocols. SSL allows server authentication
(verifying the server's identity to the client), encryption of data in transit, and
client authentication (verifying the client's identity to the server).
The following table lists security options supported by the three main web server
vendors.
Table 6: Security Options
Web Server
Software Vendor
User IDs &
Passwords
IP Restriction
Encryption
(SSL)
78
Netscape
Microsoft
Novell
XX X
XX X
XX *
X Supported feature * Feature supported on Novell Web Server 3.0
Page 83

A Customizing the Support A ny where
HP NetServer
This appendix covers the procedures for a customized installation of Support
Anywhere Server software. Do not attempt to customize Support Anywhere's
SNMP alarm agent software unless you are a confident network administrator
and understand the use of command line parameters.
Installing SN MP Software Agents Manually on
Novell NetWare Servers
As you add or reconfigure Novell NetWare servers, you may opt to install the
Support Anywhere server software on each server independently. If you want to
install or reinstall the software at a later date, you can use the Support Anywhere
Client installation program found on the HP Support Anywhere Client Diskette to
install the software without reinstalling the rest of the Support Anywhere
program files.
If your AUTOEXEC.NCF file does not include the HP NSALOAD command, the
Support Anywhere software (which is made up of several NLMs) will not load
automatically whenever the server is started. If so, you will then need to load the
software manually each time you start the server.
To load the Support Anywhere manually on your Novell NetWare servers, type
the following at your server's Support Anywhere Client:
NSALOAD
Loading the Au tomatic S erv er Restart S oftware for N ovell NetW are
If you installed the Support Anywhere software on your server through the
Support Anywhere installation program, the ASR NLMs were copied to that
server and enabled automatically. If you have done this, skip to step 4. Otherwise,
proceed to step 1. Note that this installation procedure assumes that a Novell
NetWare server and client have already been set up and are working correctly.
To manually install ASR for Novell NetWare:
1. Insert the HP NetServer Navigator CD-ROM in your server's CD-ROM
drive, or logon to a network accessible CD-ROM drive. If you prefer, you
79
Page 84

Appendix A Customizing the HP Support Anywhere Server Software
may make floppy diskette masters of the Server Software through the HP
Management Solutions menu of the HP NetServer Navigator.
2. Map a drive letter from the client to the server's SYS:\SYSTEM
directory.
3. Copy the files HPASR.NLM, HPRADRV.NLM, and HPLOGAPI.NLM
from
X
:\HPSA\US\SERVER\DISK1\NETWARE to the SYS:\SYSTEM
directory, where
X
is the drive letter for the CD-ROM drive that contains
the HP NetServer Navigator CD-ROM.
4. If you don't want ASR loaded automatically each time your server is
started, remove the statement LOAD HPASR from the server's
NSALOAD.NCF file.
Note that HPRADRV.NLM and HPLOGAPI.NLM must be present for
HPASR.NLM to function correctly. However, you do not need to
separately load them because HPASR.NLM loads them automatically
when it loads.
5. If you want to enable ASR manually, enter the following command from
the Support Anywhere Client prompt:
LOAD HPASR
ASR NLM Files and Parameters for Novell NetWare
The HPASR.NLM file provides ASR for NetWare. Loading this NLM on a
server enables ASR; unloading it disables ASR (without causing the system to
restart itself).
The default time after which the server will restart after a crash or hang is 10
minutes. The HPASR.NLM file can be dynamically modified with the following
command line parameter:
/t:<timeout> where <timeout> is a number in seconds
Minimum = 300 seconds (5 minutes)
Maximum = 1800 seconds (30 minutes)
Default = 600 seconds (10 minutes)
To change the timeout after loading the NLM, first unload it, and then reload it
with a new parameter.
ASR P rogr am Files an d Par ameter s for Wi ndows NT
The following program files provide ASR for Windows NT:
80
Page 85

Appendix A Customizing the HP Support Anywhere Server Software
NOTE By default, the ASR driver and ASR service programs are
configured in the registry to be started automatically. An
administrator may change this to manual control by using the
standard Windows NT Service / Driver configuration
programs reached through Program Manager: Control
Panel, then Service or Drivers.
• ASRDEV.SYS
This ASR driver mediates communication between the ASR service
program and the ASR hardware.
• ASRSRVC.EXE
This ASR service program resets the ASR hardware via calls to the ASR
driver. The polling period is 300 seconds (5 minutes) by default. It may be
reconfigured by the user via the ASRUSER program.
• ASRUSER.EXE
This program runs from a Windows command prompt. It is used to load
the ASR service program, change timeout parameters, and get ASR
statistics. It accepts the following command line parameters:
/g Loads the ASRSRVC service program and then starts it
/l Loads the ASRSRVC service program and the ASRDEV driver if
not already loaded. By default, the service program and the driver
load automatically. Use this option only if you change the registry
configuration to load ASR manually (on demand).
/u Disables ASR by unloading the ASRSRVC service program. The
ASR service may be stopped at any time by the administrator
running ASRUSER /u. Terminating the ASR service program in
this manner does not affect the registry configurations. For
instance, if the registry configurations are set to load the driver
and service programs automatically, these programs will still be
automatically loaded when the system is restarted.
/s Starts the ASRSRVC service program (loads it if not loaded)
/x Stops the ASRSRVC service program (without unloading it)
/t Changes the ASR hardware restart time. This is the time after
which the system will be automatically restarted if the ASR
hardware timer is not reset by the service program. This value is
preset to 600 seconds (10 minutes). In other words, if the service
program is not able to execute for 10 minutes (indicating a hung
system), the system will be automatically restarted by the ASR
81
Page 86

Appendix A Customizing the HP Support Anywhere Server Software
hardware.
You may reconfigure the restart time in the range 300 seconds (5
minutes) to 1800 seconds (30 minutes) by running ASRUSER /t.
The change will remain in effect even after restarting your
system.
/p Changes the ASR service program polling period. This is the
time interval at which the ASR service program resets the ASR
hardware timer. It must be less than the automatic hardware reset
time. This value is pre-configured to be 300 seconds (5 minutes).
In other words, the service program will reset the hardware timer
every 5 minutes. To change this time, run ASRUSER /p. The
value you choose must be less than the value entered for the
Automatic Hardware Restart time.
/o Gets the current ASR timeout and polling period
/v Gets the version number
/c Prints ASR counter statistics, for installation testing and
verification
82
Page 87

B Terminal Emulation Keys (E 40 and
E 45 only)
When keyboard commands are redirected to the NetServer's keyboard from a
remote console, keystrokes generated on a generic terminal keyboard may not be
able to control all the NetServer's keyboard keys. When there is no direct
mapping between the remote keyboard and the NetServer keyboard, special keys
on the NetServer keyboard are emulated using character strings.
This is why keys such as ESC and Home must be emulated in the form of ANSI
escape sequences to access HP NetServer E 40 and E 45 functions remotely. If
you choose not to use pcANYWHERE32 (which has pre-defined emulation keys),
you will need to program macro keys to correspond to the Remote Console
Redirection escape sequences.
PC keystrokes that have no ASCII/ANSI terminal equivalents, but are recognized
by the HP NetServer E 40 and E 45 BIOS, can only be used after you have logged
onto the NetServer. These BIOS specific commands are initiated by pressing Alt0 (zero) if the terminal has been set up correctly.
Most terminal emulation software permits the mapping of special keys to
character strings. If this is not true of the software you are using, you must send
strings manually. The tables below provide a guide to keyboard emulation, both
with keyboard combinations (where keys are held down together) and keystroke
sequences (where a string of keystrokes is entered).
Sequence Legend Sequence Legend
Esc 0 P Fl Esc [1 9 ~ F8
Esc 0 Q F2 Esc [2 0 ~ F9
Esc 0 R F3 Esc [2 1 ~ F10
Esc 0 S F4 Esc [2 3 ~ Fll
Esc [ @ Insert Esc [2 4 ~ F12
Esc [ A Up arrow Esc [6 4 ~ cFl
Esc [ B Down arrow Esc [6 5 ~ cF2
Esc [ C Right arrow Esc [6 6 ~ cF3
Esc [ D Left arrow Esc [6 7 ~ cF4
Esc [ H Home Esc [6 8 ~ cF5
83
Page 88

Appendix B Remote Console Redirection
Sequence Legend Sequence Legend
Esc [ K End Esc [6 9 ~ cF6
Esc [ M F5 Esc [7 0 ~ cF7
Esc [ U Page Down Esc [7 1 ~ cF8
Esc [ V Page Up Esc [7 2 ~ cF9
Esc [ Z Shift Tab Esc [7 3 ~ cFl0
Esc [ i Print Screen Esc [7 4 ~ cFll
Esc [ 2 i Shift Print Screen Esc [7 5 ~ cFl2
Esc [1 7 ~ F6 Esc Esc Esc
Esc [1 8 ~ F7 Esc Del Ctrl-Alt-Del
84
Page 89

C Glossary of Network Terminology
BPS An acronym for Bits Per Second. The term BPS is used on a network as a
measurement of speed or data throughput.
client A computer workstation connected to a Local Area Network (LAN) that
has access to resources located on another (usually more capable) computer
called a server, HP NetServer, or file server. A client can request some service to
be performed by another networked device.
CPU An acronym for Central Processing Unit (CPU). A complex set of
electrical circuits that executes stored program instructions. The CPU is the brain
of the computer.
device database This database stores a list of devices discovered the last time
the server was operational. The device database is used to detect changes to the
server. For example, if a hard drive is no longer operational after a power outage,
it will be discovered when the list of current devices is compared to the list stored
in the device database.
device driver A software utility which, when installed on a system, supports a
particular hardware component, such as a printer, disk drive, or interface card.
DHCP An acronym for Dynamic Host Configuration Protocol. DHCP was
designed to reduce the complexity of IP network administration by providing a
standard methodology for automatically configuring network hosts. A DHCP
server provides the client with a valid IP address, a subnet mask and a default
gateway. DHCP service is set up using the DHCPADMN program.
DMA An acronym for Direct Memory Access. The DMA channel is a
transaction policy in which data is transferred directly between a peripheral
device and the computer's main memory without CPU intervention.
driver Software or firmware between hardware devices (such as video boards,
printers, and keyboards) and the software application.
file server A computer equipped with relatively large amounts of mass storage
which provides file handling services to a network. A file server may impose
various levels of control as it regulates access to common data files and
applications available to the network.
host adapter There are numerous kinds of adapters--usually integrated into the
computer's main circuit board--that permit the computer to communicate with a
85
Page 90

Appendix C Glossary of Network Terminology
peripheral device (such as a modem, printer, or CD-ROM drive) for which the
computer itself doesn't have the proper connections.
HP Support Anywhere Client A workstation on a LAN designated to receive
information about operating conditions at networked HP NetServer E Series
servers.
HP NetServer Navigator CD-ROM A repository of software support products
including setup and installation programs for Support Anywhere.
I/O An acronym for Input/Output. I/O refers to the sending and receiving of data
in reference to a computer's Central Processing Unit (CPU). Peripheral devices
such as disk drives and keyboards are managed via the CPU's I/O channel.
IP address A unique string of characters assigned to networked devices to
facilitate communications. Generally, you use IP addresses if your network
protocol is TCP/IP, or if your NetServer includes operational web server software.
To find the IP address of a Windows NT server, use the "ipconfig" program.
LAN An acronym for Local Area Network. LANs interconnect servers, clients,
and other peripheral devices such as printers. The result is shared data
communications in which any computer can interact with any other
interconnected device in the group. LAN devices are distributed over a relatively
limited area--usually within the same building.
LAN adapter A hardware interface circuit board that either plugs into a slot, or
is built in to the computer's main circuit board (may also be called a "mother
board"). The LAN adapter provides hardware interfacing that allows a computer
to communicate to a Local Area Network. (See NIC and LAN)
LAN adapter driver Specialized software or firmware between a LAN adapter
and communications software that enables interfacing across a Local Area
Network.
NetWare Loadable Modules (NLM) Customized servers are built from pieces
or tools called NetWare Loadable Modules. An NLM is a program that can be
loaded or unloaded from the server while the server continues to run.
network A group of computers and other peripheral devices connected so that
they can communicate with one another. Most networks are setup to transmit
data, usually over telephone lines.
NIC An acronym for Network Interface Card. A NIC is a hardware interface
circuit board designed to plug into a slot usually provided on a computer's main
circuit board. The NIC provides a hardware interface that allows a computer to
communicate with other networked devices. (See LAN adapter)
86
Page 91

Appendix C Glossary of Network Terminology
node A computer, file server, or peripheral device connected to a LAN that is
used to create receive or repeat a message or stream of data. Generally, a node
refers to a client or workstation. (See client and workstation)
packet A unit of information typically sent across a network from one device to
another. Usually the packet has a pre-defined maximum and minimum size that
also includes an identification number as well as information about its origin and
destination.
peripheral A device, such as a printer or modem, attached to a computer. A
peripheral typically serves some input/output function.
port An access point for connection on a computer or peripheral device that is
used to send and/or receive data.
protocol A set of procedures or conventions defined to facilitate the exchange of
data between different kinds of computer systems, or devices.
RAM An acronym for Random Access Memory. RAM is computer hardware
used to temporarily store data. Computer RAM is usually composed of a number
of computer chips.
ROM An acronym for Read-Only Memory. ROM memory is used to store a
computer's general instructions for housekeeping operations. A user can access
and use data stored in ROM, but cannot alter the data. ROM is typically stored on
a nonvolatile memory chip.
SCSI The Small Computer System Interface is an industry-standard interface
which defines mechanical, electrical, and functional requirements for
connections and communication between small computers and disk drives and
other peripherals. Each disk drive is assigned a SCSI Address or SCSI ID (a
number from 0 to 7) that uniquely identifies the device on the SCSI channel.
SNMP An acronym for Simple Network Management Protocol. SNMP is an
industry standard protocol that communicates operational information from a
server to a designated client workstation. An SNMP agent installed on a server
can send information to the client without an explicit request from the client.
Such an operation is called a trap. Traps proactively alert the client of changes
that occur on a server, such as when a SCSI disk is down. The agent knows
which networked client to send traps to through a configurable trap destination..
server A computer, typically running administrative software and storing
resources which are available to other computers connected to a Local Area
Network (LAN). The server provides centralized multi-user access to system
resources such as databases. (See file server)
87
Page 92

Appendix C Glossary of Network Terminology
TCP/IP An acronym for Transmission Control Protocol/Internet Protocol.
TCP/IP defines specific networking rules for connecting different kinds of
computers and managing data errors, security issues, and line failures.
WAN An acronym for Wide Area Network. WAN is a communications network
similar in function to a Local Area Network (LAN) that can cover whole
geographical regions using telephone cables or microwave typically provided by a
common carrier. (See LAN)
workstation An individual computer connected to a network or LAN. Support
Anywhere uses the equivalent term "client". (See also client and server)
88
Page 93

D Configuration Worksheet
Make a copy of this configuration worksheet to fill out before you begin setting
up Support Anywhere on your network.
89
Page 94

Page 95

E Warranty, Software License, and
Support
Software Product Limited Warranty
The HP Software Product Limited Warranty will govern all Software which is
provided to you (including Microsoft software) as part of the HP computer
product. This HP Product Limited Warranty will supersede any non-HP software
warranty terms that may be found in any documentation or other materials
contained in the computer product packaging.
Ninety-Day Limited Software Warranty. HP warrants for a period of ninety
(90) days from the date of the purchase that the software product will execute its
programming instructions when all files are properly installed. HP does not
warrant that the operation of the software will be uninterrupted or error free. In
the event that this software product fails to execute its programming instructions
during the warranty period, Customer’s remedy shall be a refund or repair.
Should HP be unable to replace the media within a reasonable amount of time,
Customer’s alternate remedy shall be a refund of the purchase price upon return
of the product and all copies.
Removable Media. HP warrants the removable media, if supplied, upon which
this product is recorded to be free from defects in materials and workmanship
under normal use for a period of ninety (90) days from the date of purchase. In
the event the media proves to be defective during the warranty period,
Customer’s remedy shall be to return the media to HP for replacement. Should
HP be unable to replace the media within a reasonable amount of time,
Customer’s alternate remedy shall be a refund of the purchase price upon return
of the product and destruction of all other non-removable media copies of the
software product.
Notice of Warranty Claims. Customer must notify HP in writing of any
warranty claim not later than thirty (30) days after the expiration of the warranty
period.
Limitation of Warranty. HP makes no other express warranty, whether written
or oral, with respect to this product. Any implied warranty of merchantability or
fitness for a particular purpose is limited to the 90-day duration of this written
warranty. Some states or provinces do not allow limitations on how long an
implied warranty lasts, so the above limitation or exclusion may not apply to you.
91
Page 96

Appendix E Warranty, Software License and Support
This warranty gives specific legal rights, and you may also have other rights that
vary from state to state, or province to province.
Limitation of Liability and Remedies. THE REMEDIES PROVIDED ABOVE
ARE CUSTOMER’S SOLE AND EXCLUSIVE REMEDIES. IN NO EVENT
SHALL HP BE LIABLE FOR ANY DIRECT, INDIRECT, SPECIAL,
INCIDENTAL, OR CONSEQUENTIAL DAMAGES (INCLUDING LOST
PROFIT) WHETHER BASED ON WARRANTY, CONTRACT, TORT, OR
ANY OTHER LEGAL THEORY. Some states or provinces do not allow the
exclusion or limitation of incidental or consequential damages, so the above
limitation or exclusion may not apply to you.
Obtaining Warranty Service. You may obtain Warranty service from your
Authorized HP Reseller or HP Sales and Service Office.
Consumer transactions in Australia and the United Kingdom: The disclaimers
and limitations above shall not apply and shall not affect the statutory rights of
a Consumer.
HP Software License Agreement
ATTENTION: USE OF THE SOFTWARE IS SUBJECT TO THE HP
SOFTWARE LICENSE TERMS SET FORTH BELOW. USING THE
SOFTWARE INDICATES YOUR ACCEPTANCE OF THESE LICENSE
TERMS. IF YOU DO NOT ACCEPT THESE LICENSE TERMS, YOU MAY
RETURN THE SOFTWARE FOR A FULL REFUND. IF THE SOFTWARE IS
BUNDLED WITH ANOTHER PRODUCT, YOU MAY RETURN THE ENTIRE
UNUSED PRODUCT FOR A FULL REFUND.
HP Software License Terms
The following License Terms govern your use of the accompanying Software
unless you have a separate written agreement with HP.
License Grant. Hewlett-Packard grants the Customer a license in the software,
subject to the following:
Use. "Use" means storing, loading, installing, executing or displaying the
Software. You may not modify the Software or disable any licensing or control
features of the Software. The software resides on the HP NetServer Navigator
CD-ROM and consists of three pieces: the HP Support Anywhere Client
software, the Server software, and the Remote Console communications software.
92
Page 97

Appendix E Warranty, Software License and Support
• The HP Support Anywhere Client software may be used on one or more
client personal computer workstations connected to a network that
includes HP NetServer E Series systems.
• The Server software may be used on one or more HP NetServer E Series
systems.
• The Remote Console communications software (Symantec's
pcANYWHERE32 product supplied by HP) may be used on one remote
personal computer workstation and one HP NetServer E Series.
Ownership. The Software is owned and copyrighted by HP or its third party
suppliers. Your license confers no title or ownership in the Software and is not a
sale of any rights in the Software. HP's third party suppliers may protect their
rights in the event of any violation of these License Terms.
Copies and Adaptations. You may only make copies or adaptations of the
Software for archival purposes or when copying or adaptation is an essential step
in the authorized Use of the Software. You must reproduce all copyright notices
in the original Software on all copies or adaptations. You may not copy the
Software onto any public network.
No Disassembly or Decryption. You may not disassemble or decompile the
Software unless HP's prior written consent is obtained. In some jurisdictions,
HP's consent may not be required for limited disassembly or decompilation. Upon
request, you will provide HP with reasonably detailed information regarding any
disassembly or decompilation. You may not decrypt the Software unless
decryption is a necessary part of the operation of the Software.
Transfer. Your license will automatically terminate upon any transfer of the
Software. Upon transfer, you must deliver the Software, including any copies and
related documentation, to the transferee. The transferee must accept these
License Terms as a condition to the transfer.
Termination. HP may terminate your license upon notice for failure to comply
with any of these License Terms. Upon termination, you must immediately
destroy the Software, together with all copies, adaptations and merged portions in
any form.
Export Requirements. You may not export or re-export the Software or any
copy or adaptation in violation of any applicable laws or regulations.
U.S. Government Restricted Rights. The Software and any accompanying
documentation have been developed entirely at private expense. They are
delivered and licensed as "commercial computer software" as defined in DFARS
252.227-7013 (Oct 1988), DFARS 252.211-7015 (May 1991) or DFARS
93
Page 98

Appendix E Warranty, Software License and Support
252.227-7014 (Jun 1995), as a "commercial item" as defined in FAR 2.101(a), or
as "Restricted computer software" as defined in FAR 52.227-19 (Jun 1987) (or
any equivalent agency regulation or contract clause), whichever is applicable.
You have only those rights provided for such Software and any accompanying
documentation by the applicable FAR or DFARS clause or the HP standard
software agreement for the product involved.
Technical Support
Telephone Support
The HP-supplied hardware and software in HP servers are covered by no-charge
telephone assistance during the warranty period. In some geographic areas this
telephone support is provided by Hewlett-Packard; in other areas, telephone
support is provided by your reseller.
For non-HP-supplied products, support numbers are included in the product
documentation or are available from your reseller.
Hewlett-Packard provides telephone assistance in installing, configuring, and
diagnosing the server such that one local client PC is able to log into an HPsupported network operating system.
Assistance with additional functions, such as system design, operating system
upgrades, or performance optimization—and assistance with other technical
areas, such as cabling, non-HP hardware, or multiple operating system
environments—is available from Hewlett-Packard, resellers, or consultants at
additional charge. For example, HP offers Network Phone-In Support Service
with a 7-day, 24-hour option for network operating systems and multi-vendor
hardware. Contact your local HP office for details.
Obtaining HP Repair and Telephone Support
U.S. and Canada. For hardware service and telephone support, contact either:
• Participating Service Authorized HP Personal Computer Reseller
• HP Customer Support Center (Colorado) (1 970) 635-1000 from 6 AM to
8 PM Mountain Time on Monday through Friday, and from 9 AM to 3
PM Mountain Time on Saturday
Europe. For hardware service and telephone support, contact either:
• Participating Service Authorized HP Personal Computer Reseller
• HP Customer Support Center (Amsterdam):
94
Page 99

Appendix E Warranty, Software License and Support
Austria: 0660 6386
Belgium (Dutch): 02 626 8806
Belgium (French): 02 626 8807
Denmark: 3929 4099
Finland: 02 03 47 288
France: 01 43 62 3434
Germany: 0180 525 8143
Ireland: 01 662 5525
Italy: 02 2 641 0350
Netherlands: 020 6068751
Norway: 2 2 11 6299
Portugal: 01 441 7199
Spain: 902 321 123
Sweden: 08 619 2170
Switzerland: 084 880 1111
United Kingdom: 0171 512 5202
International
44 171 512 5202
(English):
Asia/Pacific. For hardware service and telephone support, contact either:
• A participating Reseller
or
• HP Customer Support Center:
Singapore 272-5300
Malaysia 295-2566
Hong Kong 800-7729
Indonesia 350-3408
Thailand 661-4011
China 010-62625666 ext. CSC
Other countries. For hardware service, contact your local HP office. For
telephone support, contact your authorized HP reseller.
95
Page 100

Appendix E Warranty, Software License and Support
Using Other Information Services
Worldwide, access the HP NetServer World Wide Web home page:
http://www.hp.com:80/netserver/support
For software patches and driver updates:
In the US, access the HP PC Support BBS: (208) 344-1691
Worldwide, access the HP FTP Server:
ftp://ftp.hp.com/pub/servers
You can also access the FTP directly, using the following instructions::
From the DOS prompt: ftp ftp.hp.com
LOGON: anonymous
PASSWORD: <your e-mail address>
For more information on the product:
HP Audio Tips & Fax Info (HPFirst):
(800) 333-1917 U.S. and Canada
(208) 344-4809 Outside U.S. and Canada
For information on CompuServe call
96
(800) 524-3388 U.S. and Canada
0130-37-32 Outside U.S. and Canada
After logging in to CompuServe, type GO HPSYS to get onto the HP
Forum.
 Loading...