

Page 1

User Guide
HP StorageWorks
Command Console V2.5
Product Version: 2.5
Tenth Edition (March 2005)
Part Number: AA–RV1UA–TE
This guide provides information about installing, configuring, and operating Command
Console software for the purpose of managing RAID array products.
Page 2

© Copyright 2002–2005 Hewlett-Packard Development Company, L.P.
Hewlett-Packard Company makes no warranty of any kind with regard to this material, including, but not limited to,
the implied warranties of merchantability and fitness for a particular purpose. Hewlett-Packard shall not be liable for
errors contained herein or for incidental or consequential damages in connection with the furnishing, performance,
or use of this material.
This document contains proprietary information, which is protected by copyright. No part of this document may be
photocopied, reproduced, or translated into another language without the prior written consent of Hewlett-Packard.
The information contained in this document is subject to change without notice. The only warranties for HP products
and services are set forth in the express warranty statements accompanying such products and services. Nothing
herein should be construed as constituting an additional warranty. HP shall not be liable for technical or editorial
errors or omissions contained herein.
Compaq Computer Corporation is a wholly-owned subsidiary of Hewlett-Packard Company.
Microsoft®, MS-DOS®, MS Windows®, Windows®, and Windows NT® are U.S. registered trademarks of
Microsoft Corporation.
UNIX® is a registered trademark of The Open Group.
Hewlett-Packard Company shall not be liable for technical or editorial errors or omissions contained herein. The
information is provided “as is” without warranty of any kind and is subject to change without notice. The warranties
for Hewlett-Packard Company products are set forth in the express limited warranty statements for such products.
Nothing herein should be construed as constituting an additional warranty.
Printed in the U.S.A.
Command Console V2.5 User Guide
Tenth Edition (March 2005)
Part Number: AA–RV1UA–TE
Page 3

contents
About this Guide. . . . . . . . . . . . . . . . . . . . . . . . . . . . . . . . . . . . . . . . . . . . . . . . . . . .9
Overview. . . . . . . . . . . . . . . . . . . . . . . . . . . . . . . . . . . . . . . . . . . . . . . . . . . . . . . . . . . . . . . . . 10
Intended Audience . . . . . . . . . . . . . . . . . . . . . . . . . . . . . . . . . . . . . . . . . . . . . . . . . . . . . . 10
Related Documentation . . . . . . . . . . . . . . . . . . . . . . . . . . . . . . . . . . . . . . . . . . . . . . . . . . 10
In This Guide . . . . . . . . . . . . . . . . . . . . . . . . . . . . . . . . . . . . . . . . . . . . . . . . . . . . . . . . . . . . . 11
Conventions . . . . . . . . . . . . . . . . . . . . . . . . . . . . . . . . . . . . . . . . . . . . . . . . . . . . . . . . . . . . . . 12
Document Conventions . . . . . . . . . . . . . . . . . . . . . . . . . . . . . . . . . . . . . . . . . . . . . . . . . . 12
Text Symbols . . . . . . . . . . . . . . . . . . . . . . . . . . . . . . . . . . . . . . . . . . . . . . . . . . . . . . . . . . 12
Equipment Symbols . . . . . . . . . . . . . . . . . . . . . . . . . . . . . . . . . . . . . . . . . . . . . . . . . . . . . 13
Rack Stability . . . . . . . . . . . . . . . . . . . . . . . . . . . . . . . . . . . . . . . . . . . . . . . . . . . . . . . . . . . . . 15
Getting Help . . . . . . . . . . . . . . . . . . . . . . . . . . . . . . . . . . . . . . . . . . . . . . . . . . . . . . . . . . . . . . 16
HP Technical Support . . . . . . . . . . . . . . . . . . . . . . . . . . . . . . . . . . . . . . . . . . . . . . . . . . . 16
HP Storage Web Site . . . . . . . . . . . . . . . . . . . . . . . . . . . . . . . . . . . . . . . . . . . . . . . . . . . . 16
HP Authorized Reseller . . . . . . . . . . . . . . . . . . . . . . . . . . . . . . . . . . . . . . . . . . . . . . . . . . 16
1 About SWCC . . . . . . . . . . . . . . . . . . . . . . . . . . . . . . . . . . . . . . . . . . . . . . . . . . . . .19
Product Overview. . . . . . . . . . . . . . . . . . . . . . . . . . . . . . . . . . . . . . . . . . . . . . . . . . . . . . . . . . 19
Features. . . . . . . . . . . . . . . . . . . . . . . . . . . . . . . . . . . . . . . . . . . . . . . . . . . . . . . . . . . . . . . . . . 20
Components of SWCC . . . . . . . . . . . . . . . . . . . . . . . . . . . . . . . . . . . . . . . . . . . . . . . . . . . . . . 21
Client and Agent Versions . . . . . . . . . . . . . . . . . . . . . . . . . . . . . . . . . . . . . . . . . . . . . . . . . . . 22
Command Console Client Minimum Hardware and Software Requirements . . . . . . . . . . . . 23
Network Specifications. . . . . . . . . . . . . . . . . . . . . . . . . . . . . . . . . . . . . . . . . . . . . . . . . . . . . . 24
Connections Supported by SWCC . . . . . . . . . . . . . . . . . . . . . . . . . . . . . . . . . . . . . . . . . . . . . 25
SAN and TCP/IP Network Connection . . . . . . . . . . . . . . . . . . . . . . . . . . . . . . . . . . . . . . 26
Local Serial Port Connection . . . . . . . . . . . . . . . . . . . . . . . . . . . . . . . . . . . . . . . . . . . . . . 28
SCSI Connection . . . . . . . . . . . . . . . . . . . . . . . . . . . . . . . . . . . . . . . . . . . . . . . . . . . . . . . 29
Accessing the Storage Window . . . . . . . . . . . . . . . . . . . . . . . . . . . . . . . . . . . . . . . . . . . . . . . 31
Serial Connections . . . . . . . . . . . . . . . . . . . . . . . . . . . . . . . . . . . . . . . . . . . . . . . . . . . . . . 31
SCSI Connections . . . . . . . . . . . . . . . . . . . . . . . . . . . . . . . . . . . . . . . . . . . . . . . . . . . . . . 33
Network Connections. . . . . . . . . . . . . . . . . . . . . . . . . . . . . . . . . . . . . . . . . . . . . . . . . . . . 34
Contents
3Command Console V2.5 User Guide
Page 4

Contents
Connection Features and Limitations. . . . . . . . . . . . . . . . . . . . . . . . . . . . . . . . . . . . . . . . 35
Local Client/Agent Network Connection. . . . . . . . . . . . . . . . . . . . . . . . . . . . . . . . . . . . . 37
2 Using Command Console . . . . . . . . . . . . . . . . . . . . . . . . . . . . . . . . . . . . . . . . . . . .39
Using the Navigation Tree . . . . . . . . . . . . . . . . . . . . . . . . . . . . . . . . . . . . . . . . . . . . . . . . . . . 39
Adding a Storage Subsystem to the Navigation Tree . . . . . . . . . . . . . . . . . . . . . . . . . . . 40
Managing Storage Subsystems from the Navigation Tree. . . . . . . . . . . . . . . . . . . . . . . . 40
Organizing Your Storage in the Navigation Tree . . . . . . . . . . . . . . . . . . . . . . . . . . . . . . 40
About the Navigation Tree Icons. . . . . . . . . . . . . . . . . . . . . . . . . . . . . . . . . . . . . . . . . . . 41
About the Asynchronous Event Service. . . . . . . . . . . . . . . . . . . . . . . . . . . . . . . . . . . . . . . . . 42
AES Functionality . . . . . . . . . . . . . . . . . . . . . . . . . . . . . . . . . . . . . . . . . . . . . . . . . . . . . . 42
To Stop or Start AES . . . . . . . . . . . . . . . . . . . . . . . . . . . . . . . . . . . . . . . . . . . . . . . . . . . . 42
From Windows NT . . . . . . . . . . . . . . . . . . . . . . . . . . . . . . . . . . . . . . . . . . . . . . . . . . 42
From Windows 2000 and Windows Server 2003 . . . . . . . . . . . . . . . . . . . . . . . . . . . 43
3 Setting Up Notification . . . . . . . . . . . . . . . . . . . . . . . . . . . . . . . . . . . . . . . . . . . . . .45
Required Components for Notification . . . . . . . . . . . . . . . . . . . . . . . . . . . . . . . . . . . . . . . . . 45
Setting Up Pager Notification. . . . . . . . . . . . . . . . . . . . . . . . . . . . . . . . . . . . . . . . . . . . . . . . . 46
Setting Up Pager Codes . . . . . . . . . . . . . . . . . . . . . . . . . . . . . . . . . . . . . . . . . . . . . . . . . . 47
To Assign a Pager Code to a Host System:. . . . . . . . . . . . . . . . . . . . . . . . . . . . . . . . 47
To Assign a Pager Code to a Subsystem: . . . . . . . . . . . . . . . . . . . . . . . . . . . . . . . . . 47
To View or Change a Pager Code for a Critical Event: . . . . . . . . . . . . . . . . . . . . . . 47
Setting Up User Profiles. . . . . . . . . . . . . . . . . . . . . . . . . . . . . . . . . . . . . . . . . . . . . . . . . . 48
Setting Up Notification Lists . . . . . . . . . . . . . . . . . . . . . . . . . . . . . . . . . . . . . . . . . . . . . . 51
Setting Up Modem and Polling Preferences . . . . . . . . . . . . . . . . . . . . . . . . . . . . . . . . . . 52
Associating My Enterprise, Systems, and Subsystems
with Notification Lists . . . . . . . . . . . . . . . . . . . . . . . . . . . . . . . . . . . . . . . . . . . . . . . . . . . 52
My Enterprise . . . . . . . . . . . . . . . . . . . . . . . . . . . . . . . . . . . . . . . . . . . . . . . . . . . . . . 52
System Level . . . . . . . . . . . . . . . . . . . . . . . . . . . . . . . . . . . . . . . . . . . . . . . . . . . . . . . 53
Subsystem Level . . . . . . . . . . . . . . . . . . . . . . . . . . . . . . . . . . . . . . . . . . . . . . . . . . . . 53
Using SWCC with a Third-Party Storage Management Program . . . . . . . . . . . . . . . . . . . . . 54
Using Event Logging on the Client System to Monitor Your Subsystem . . . . . . . . . . . . . . . 55
4 Interpreting Agent Email Messages . . . . . . . . . . . . . . . . . . . . . . . . . . . . . . . . . . . . .57
About Event Information Fields. . . . . . . . . . . . . . . . . . . . . . . . . . . . . . . . . . . . . . . . . . . . . . . 58
Mapping State Change Digits to RAID System Components . . . . . . . . . . . . . . . . . . . . . . . . 59
The First Digit of the State Change Field
(Overall RAID System) . . . . . . . . . . . . . . . . . . . . . . . . . . . . . . . . . . . . . . . . . . . . . . . . . . 59
The Second Digit of the State Change Field (Disks). . . . . . . . . . . . . . . . . . . . . . . . . . . . 60
4 Command Console V2.5 User Guide
Page 5

Contents
The Third Digit of the State Change Field (Power Supply). . . . . . . . . . . . . . . . . . . . . . . 60
The Fourth Digit of the State Change Field (Fans) . . . . . . . . . . . . . . . . . . . . . . . . . . . . . 61
The Fifth Digit of the State Change Field (Battery) . . . . . . . . . . . . . . . . . . . . . . . . . . . . 61
The Sixth Digit of the State Change Field (Temperature). . . . . . . . . . . . . . . . . . . . . . . . 62
The Seventh Digit of the State Change Field (This_Controller) . . . . . . . . . . . . . . . . . . . 63
The Eighth Digit of the State Change Field
(Communications LUN). . . . . . . . . . . . . . . . . . . . . . . . . . . . . . . . . . . . . . . . . . . . . . . . . . 63
The Ninth Digit of the State Change Field (Other_Controller) . . . . . . . . . . . . . . . . . . . . 63
The 10th Digit of the State Change Field (External Factors). . . . . . . . . . . . . . . . . . . . . . 64
The 11th Digit of the State Change Field (Logical Units). . . . . . . . . . . . . . . . . . . . . . . . 64
5 Using the Storage Window . . . . . . . . . . . . . . . . . . . . . . . . . . . . . . . . . . . . . . . . . . .67
Why Use the Storage Window? . . . . . . . . . . . . . . . . . . . . . . . . . . . . . . . . . . . . . . . . . . . . . . . 67
Storage Window Display . . . . . . . . . . . . . . . . . . . . . . . . . . . . . . . . . . . . . . . . . . . . . . . . . 67
Configuring a Controller. . . . . . . . . . . . . . . . . . . . . . . . . . . . . . . . . . . . . . . . . . . . . . . . . . . . . 68
Modifying the General Properties of the Controller . . . . . . . . . . . . . . . . . . . . . . . . . . . . 68
Viewing the Properties of the Host Port . . . . . . . . . . . . . . . . . . . . . . . . . . . . . . . . . . . . . 70
Modifying Properties of the Cache . . . . . . . . . . . . . . . . . . . . . . . . . . . . . . . . . . . . . . . . . 70
Viewing the Communications LUN. . . . . . . . . . . . . . . . . . . . . . . . . . . . . . . . . . . . . . . . . 70
Modifying the Connection Properties . . . . . . . . . . . . . . . . . . . . . . . . . . . . . . . . . . . . . . . 71
Viewing Properties of the Battery . . . . . . . . . . . . . . . . . . . . . . . . . . . . . . . . . . . . . . . . . . 72
Creating Virtual Disks . . . . . . . . . . . . . . . . . . . . . . . . . . . . . . . . . . . . . . . . . . . . . . . . . . . . . . 72
Deleting Virtual Disks . . . . . . . . . . . . . . . . . . . . . . . . . . . . . . . . . . . . . . . . . . . . . . . . . . . . . . 75
Modifying Virtual Disks. . . . . . . . . . . . . . . . . . . . . . . . . . . . . . . . . . . . . . . . . . . . . . . . . . . . . 76
Configuring the Operating System to Recognize Virtual Disk Changes . . . . . . . . . . . . . . . . 77
Windows NT/Windows 2000/Windows Server 2003 Configuration . . . . . . . . . . . . . . . 77
UNIX-Based Configuration . . . . . . . . . . . . . . . . . . . . . . . . . . . . . . . . . . . . . . . . . . . . . . . 78
Setting Passwords and Security Options (Network Only) . . . . . . . . . . . . . . . . . . . . . . . . . . . 79
Security Options. . . . . . . . . . . . . . . . . . . . . . . . . . . . . . . . . . . . . . . . . . . . . . . . . . . . . . . . 79
Password Security . . . . . . . . . . . . . . . . . . . . . . . . . . . . . . . . . . . . . . . . . . . . . . . . . . . . . . 79
Managing and Creating Spare Devices. . . . . . . . . . . . . . . . . . . . . . . . . . . . . . . . . . . . . . . . . . 80
Creating a Spare Device. . . . . . . . . . . . . . . . . . . . . . . . . . . . . . . . . . . . . . . . . . . . . . . . . . 80
Clearing Failed Devices . . . . . . . . . . . . . . . . . . . . . . . . . . . . . . . . . . . . . . . . . . . . . . . . . . 80
Using Configuration Files. . . . . . . . . . . . . . . . . . . . . . . . . . . . . . . . . . . . . . . . . . . . . . . . . . . . 81
Saving Configuration Settings to a File. . . . . . . . . . . . . . . . . . . . . . . . . . . . . . . . . . . . . . 81
Restoring Configuration Settings from a File . . . . . . . . . . . . . . . . . . . . . . . . . . . . . . . . . 81
Understanding the Icons . . . . . . . . . . . . . . . . . . . . . . . . . . . . . . . . . . . . . . . . . . . . . . . . . . . . . 83
CLI Window. . . . . . . . . . . . . . . . . . . . . . . . . . . . . . . . . . . . . . . . . . . . . . . . . . . . . . . . . . . . . . 84
CLI Functions. . . . . . . . . . . . . . . . . . . . . . . . . . . . . . . . . . . . . . . . . . . . . . . . . . . . . . . . . . 85
5Command Console V2.5 User Guide
Page 6

Contents
6 Integrating SWCC with Insight Manager . . . . . . . . . . . . . . . . . . . . . . . . . . . . . . . . .87
Installing the Integration Patch. . . . . . . . . . . . . . . . . . . . . . . . . . . . . . . . . . . . . . . . . . . . . . . . 88
Integrating the HSGxx Storage Window with Insight Manager . . . . . . . . . . . . . . . . . . . . . . 89
Insight Manager Unable to Find the HSGxx Storage Window . . . . . . . . . . . . . . . . . . . . . . . 90
Removing the Integration Patch Disables Storage Window. . . . . . . . . . . . . . . . . . . . . . . . . . 90
7 Troubleshooting . . . . . . . . . . . . . . . . . . . . . . . . . . . . . . . . . . . . . . . . . . . . . . . . . . .91
Troubleshooting Connection Problems . . . . . . . . . . . . . . . . . . . . . . . . . . . . . . . . . . . . . . . . . 91
Invalid Network Port Numbers During Installation. . . . . . . . . . . . . . . . . . . . . . . . . . . . . 91
Network Port Assignments for UNIX-Client/Server Systems. . . . . . . . . . . . . . . . . . . . . 92
DHCP and WINS . . . . . . . . . . . . . . . . . . . . . . . . . . . . . . . . . . . . . . . . . . . . . . . . . . . . . . . 92
Connecting Via the Host SCSI Port. . . . . . . . . . . . . . . . . . . . . . . . . . . . . . . . . . . . . . . . . 93
“Access Denied” Message . . . . . . . . . . . . . . . . . . . . . . . . . . . . . . . . . . . . . . . . . . . . . . . . 93
Aliases Not Checked . . . . . . . . . . . . . . . . . . . . . . . . . . . . . . . . . . . . . . . . . . . . . . . . . 93
Entry in the Client Authorization List Does Not Match . . . . . . . . . . . . . . . . . . . . . . 93
For other operating systems. . . . . . . . . . . . . . . . . . . . . . . . . . . . . . . . . . . . . . . . . . . . 95
Multiple Agents. . . . . . . . . . . . . . . . . . . . . . . . . . . . . . . . . . . . . . . . . . . . . . . . . . . . . 95
Adding New System by Using Internet Protocol Address May Cause Client to Stop
Responding. . . . . . . . . . . . . . . . . . . . . . . . . . . . . . . . . . . . . . . . . . . . . . . . . . . . . . . . . . . . 96
“No Agent Running” Message When Adding System to the Navigation Tree . . . . . . . . 96
Troubleshooting the Client . . . . . . . . . . . . . . . . . . . . . . . . . . . . . . . . . . . . . . . . . . . . . . . . . . . 98
Authorization Error When Adding an Agent System . . . . . . . . . . . . . . . . . . . . . . . . . . . 98
Cannot Open Storage Window. . . . . . . . . . . . . . . . . . . . . . . . . . . . . . . . . . . . . . . . . . . . . 98
Client Hangs When LUN Is Deleted . . . . . . . . . . . . . . . . . . . . . . . . . . . . . . . . . . . . . . . . 98
CLI RUN Commands. . . . . . . . . . . . . . . . . . . . . . . . . . . . . . . . . . . . . . . . . . . . . . . . . . . . 98
Event Notification for Subsystems Connected to a Client System . . . . . . . . . . . . . . . . . 98
Invalid or Missing Fault Displays and Event Logs . . . . . . . . . . . . . . . . . . . . . . . . . . . . . 99
Pager Notification Continues After Exiting the Command Console Client . . . . . . . . . . 99
Reconfiguration After Controller Replacement. . . . . . . . . . . . . . . . . . . . . . . . . . . . . . . 100
Some Graphics Do Not Scale Well with Large Fonts . . . . . . . . . . . . . . . . . . . . . . . . . . 100
Starting Client from the Command Prompt . . . . . . . . . . . . . . . . . . . . . . . . . . . . . . . . . . 100
Warning Message Windows . . . . . . . . . . . . . . . . . . . . . . . . . . . . . . . . . . . . . . . . . . . . . 100
Virtual Disk Recovery from a Configuration File . . . . . . . . . . . . . . . . . . . . . . . . . . . . . 100
Troubleshooting the HS-Series Agents . . . . . . . . . . . . . . . . . . . . . . . . . . . . . . . . . . . . . . . . 101
Agent Sensitive to Alphanumeric Names . . . . . . . . . . . . . . . . . . . . . . . . . . . . . . . . . . . 101
Invalid Cache Errors . . . . . . . . . . . . . . . . . . . . . . . . . . . . . . . . . . . . . . . . . . . . . . . . . . . 101
Cluster Integration for the HS-Series Agents . . . . . . . . . . . . . . . . . . . . . . . . . . . . . . . . . . . . 102
How to Integrate SWCC with Windows NT . . . . . . . . . . . . . . . . . . . . . . . . . . . . . . . . . 102
Multiple Communication Lost Messages. . . . . . . . . . . . . . . . . . . . . . . . . . . . . . . . . . . . 104
6 Command Console V2.5 User Guide
Page 7

Contents
Event Updates . . . . . . . . . . . . . . . . . . . . . . . . . . . . . . . . . . . . . . . . . . . . . . . . . . . . . . . . 104
Multiple Pages . . . . . . . . . . . . . . . . . . . . . . . . . . . . . . . . . . . . . . . . . . . . . . . . . . . . . . . . 104
A Using the Command Console LUN . . . . . . . . . . . . . . . . . . . . . . . . . . . . . . . . . . . . .105
About the Command Console LUN (CCL) . . . . . . . . . . . . . . . . . . . . . . . . . . . . . . . . . . . . . 106
Enabling and Disabling the CCL . . . . . . . . . . . . . . . . . . . . . . . . . . . . . . . . . . . . . . . . . . . . . 107
Using an Initial Configuration . . . . . . . . . . . . . . . . . . . . . . . . . . . . . . . . . . . . . . . . . . . . . . . 108
Preserving Virtual Disk IDs. . . . . . . . . . . . . . . . . . . . . . . . . . . . . . . . . . . . . . . . . . . . . . 108
Safely Disabling the CCL . . . . . . . . . . . . . . . . . . . . . . . . . . . . . . . . . . . . . . . . . . . . . . . 108
Setting the Fixed/Floating Option . . . . . . . . . . . . . . . . . . . . . . . . . . . . . . . . . . . . . . . . . . . . 109
Cautions When Using the CCL . . . . . . . . . . . . . . . . . . . . . . . . . . . . . . . . . . . . . . . . . . . . . . 110
B Interpreting SNMP Traps . . . . . . . . . . . . . . . . . . . . . . . . . . . . . . . . . . . . . . . . . . . .111
Object ID (OID) Variables . . . . . . . . . . . . . . . . . . . . . . . . . . . . . . . . . . . . . . . . . . . . . . . . . . 112
Octet String Values. . . . . . . . . . . . . . . . . . . . . . . . . . . . . . . . . . . . . . . . . . . . . . . . . . . . . . . . 113
ID and State Values . . . . . . . . . . . . . . . . . . . . . . . . . . . . . . . . . . . . . . . . . . . . . . . . . . . . . . . 114
Trap Example. . . . . . . . . . . . . . . . . . . . . . . . . . . . . . . . . . . . . . . . . . . . . . . . . . . . . . . . . . . . 116
Glossary. . . . . . . . . . . . . . . . . . . . . . . . . . . . . . . . . . . . . . . . . . . . . . . . . . . . . . . .127
Index . . . . . . . . . . . . . . . . . . . . . . . . . . . . . . . . . . . . . . . . . . . . . . . . . . . . . . . . . .145
Figures
1 SAN and TCP/IP network connection . . . . . . . . . . . . . . . . . . . . . . . . . . . . . . . . . . . . . . . 27
2 Local serial port connection. . . . . . . . . . . . . . . . . . . . . . . . . . . . . . . . . . . . . . . . . . . . . . . 28
3 SCSI connection using Fibre Channel cable . . . . . . . . . . . . . . . . . . . . . . . . . . . . . . . . . . 30
4 Connection Selection dialog box . . . . . . . . . . . . . . . . . . . . . . . . . . . . . . . . . . . . . . . . . . . 32
5 Connect Serial window . . . . . . . . . . . . . . . . . . . . . . . . . . . . . . . . . . . . . . . . . . . . . . . . . . 32
6 SCSI Setup window . . . . . . . . . . . . . . . . . . . . . . . . . . . . . . . . . . . . . . . . . . . . . . . . . . . . . 33
7 Connect Network (TCP/IP) window . . . . . . . . . . . . . . . . . . . . . . . . . . . . . . . . . . . . . . . . 35
8 An example of the Navigation tree . . . . . . . . . . . . . . . . . . . . . . . . . . . . . . . . . . . . . . . . . 39
9 Sample user profile – alphanumeric paging. . . . . . . . . . . . . . . . . . . . . . . . . . . . . . . . . . . 50
10 Sample user profile – numeric paging . . . . . . . . . . . . . . . . . . . . . . . . . . . . . . . . . . . . . . . 51
11 CLI Window. . . . . . . . . . . . . . . . . . . . . . . . . . . . . . . . . . . . . . . . . . . . . . . . . . . . . . . . . . . 84
Tables
1 Document Conventions . . . . . . . . . . . . . . . . . . . . . . . . . . . . . . . . . . . . . . . . . . . . . . . . . . 12
2 SWCC Features and Components . . . . . . . . . . . . . . . . . . . . . . . . . . . . . . . . . . . . . . . . . . 21
3 SWCC Component Versions . . . . . . . . . . . . . . . . . . . . . . . . . . . . . . . . . . . . . . . . . . . . . . 22
7Command Console V2.5 User Guide
Page 8

Contents
4 Minimum Hardware and Software Requirements . . . . . . . . . . . . . . . . . . . . . . . . . . . . . . 23
5 SWCC Connections for HS-Series Controllers . . . . . . . . . . . . . . . . . . . . . . . . . . . . . . . . 25
6 Feature Limitations . . . . . . . . . . . . . . . . . . . . . . . . . . . . . . . . . . . . . . . . . . . . . . . . . . . . . 36
7 Description of Icons in Navigation Window Status Bar . . . . . . . . . . . . . . . . . . . . . . . . . 41
8 Required Components for Notification . . . . . . . . . . . . . . . . . . . . . . . . . . . . . . . . . . . . . . 45
9 Setting Up Pager Notification . . . . . . . . . . . . . . . . . . . . . . . . . . . . . . . . . . . . . . . . . . . . . 46
10 Default Pager Codes. . . . . . . . . . . . . . . . . . . . . . . . . . . . . . . . . . . . . . . . . . . . . . . . . . . . . 48
11 State Change Digit Position and Corresponding RAID system Component. . . . . . . . . . 59
12 General Tab in the Controller Properties Window . . . . . . . . . . . . . . . . . . . . . . . . . . . . . 69
13 Connections Tab in the Controller Properties Window. . . . . . . . . . . . . . . . . . . . . . . . . . 71
14 Virtual Disk Properties Window . . . . . . . . . . . . . . . . . . . . . . . . . . . . . . . . . . . . . . . . . . . 76
15 Description of Icons in the Storage Window Status Bar . . . . . . . . . . . . . . . . . . . . . . . . . 83
8 Command Console V2.5 User Guide
Page 9

about this
guide
This guide contains step-by-step installation instructions and serves as a reference
for operation, troubleshooting, and future upgrades.
“About this Guide” topics include:
■ "Overview", page 10
■ "In This Guide", page 11
■ "Conventions", page 12
■ "Rack Stability", page 15
■ "Getting Help", page 16
About this Guide
About this Guide
9Command Console V2.5 User Guide
Page 10

About this Guide
Overview
This section covers the following topics:
■ Intended Audience
■ Related Documentation
Intended Audience
■ This guide is intended for storage administrators who have a basic
understanding of storage and networks.
Related Documentation
In addition to this guide, HP provides corresponding information:
■ Online help
■ HP StorageWorks Command Console V2.5 Release Notes
10 Command Console V2.5 User Guide
Page 11

In This Guide
This guide contains the following chapters and appendixes:
■ Chapter 1—”About SWCC” provides a description of the function and
■ Chapter 2—”Using SWCC” provides instructions on how to use SWCC.
■ Chapter 3—”Setting Up Notification” provides instructions on how to set up
■ Chapter 4—”Interpreting Agent Email Messages” provides a description of
■ Chapter 5—”Using the Storage Window” provides instructions on how to use
■ Chapter 6—”Integrating SWCC with Insight Manager” provides instructions
■ Chapter 7—”Troubleshooting” provides instructions on how to troubleshoot
■ Appendix A—”Using the Command Console LUN” provides instructions on
■ Appendix B—”Interpreting SNMP Traps” provides instructions on how to
About this Guide
capabilities of the SWCC application.
notifications on SWCC.
how to interpret Agent email messages.
Storage windows.
on how to integrate SWCC with the Insight Manager.
SWCC.
how to use the SWCC LUN.
interpret SNMP trap messages.
Command Console V2.5 User Guide
11
Page 12
About this Guide
Conventions
Conventions consist of the following:
■ Document Conventions
■ Text Symbols
■ Equipment Symbols
Document Conventions
This document follows the conventions in Tab le 1.
Table 1: Document Conventions
Blue text: Figure 1 Cross-reference links
Bold Menu items, buttons, and key, tab, and
Italics
Monospace font User input, commands, code, file and
Monospace, italic font Command-line and code variables
Blue underlined sans serif font text
(
http://www.hp.com
Convention Element
box names
Text emphasis and document titles in
body text
directory names, and system responses
(output and messages)
Web site addresses
)
Text Symbols
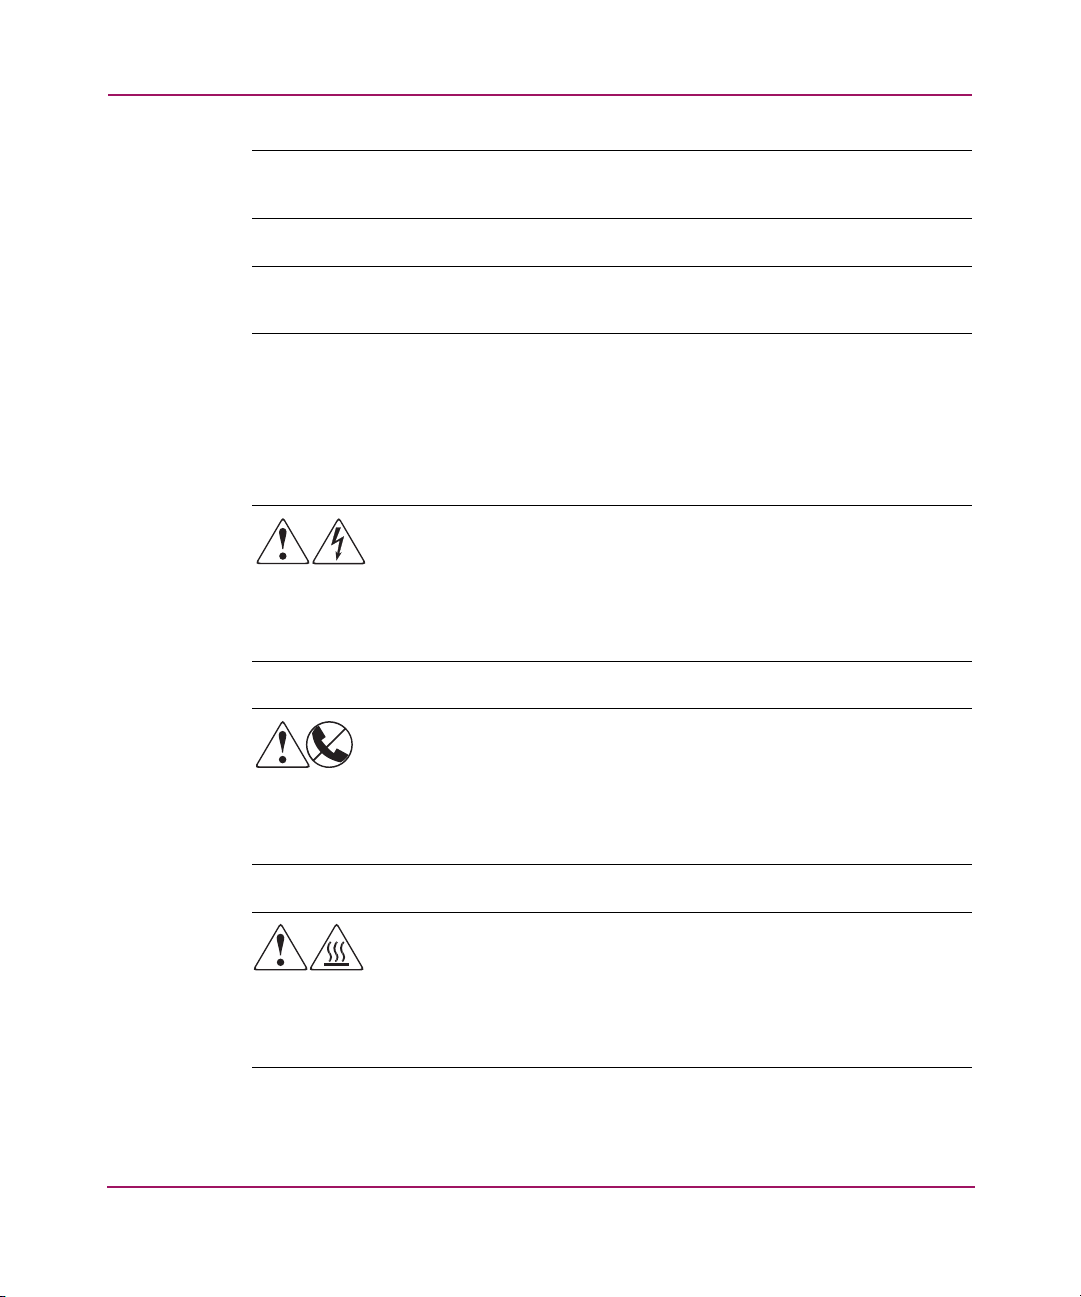
The following symbols may be found in the text of this guide. They have the
following meanings:
WARNING: Text set off in this manner indicates that failure to follow
directions in the warning could result in bodily harm or death.
Caution: Text set off in this manner indicates that failure to follow directions
could result in damage to equipment or data.
12 Command Console V2.5 User Guide
Page 13
Tip: Text in a tip provides additional help to readers by providing nonessential or
optional techniques, procedures, or shortcuts.
Note: Text set off in this manner presents commentary, sidelights, or interesting points
of information.
Equipment Symbols
The following equipment symbols may be found on hardware for which this guide
pertains. They have the following meanings:
About this Guide
Any enclosed surface or area of the equipment marked with these
symbols indicates the presence of electrical shock hazards. Enclosed
area contains no operator serviceable parts.
WARNING: To reduce the risk of personal injury from electrical shock
hazards, do not open this enclosure.
Command Console V2.5 User Guide
Any RJ-45 receptacle marked with these symbols indicates a network
interface connection.
WARNING: To reduce the risk of electrical shock, fire, or damage to
the equipment, do not plug telephone or telecommunications
connectors into this receptacle.
Any surface or area of the equipment marked with these symbols
indicates the presence of a hot surface or hot component. Contact with
this surface could result in injury.
WARNING: To reduce the risk of personal injury from a hot
component, allow the surface to cool before touching.
13
Page 14
About this Guide
Power supplies or systems marked with these symbols indicate
the presence of multiple sources of power.
WARNING: To reduce the risk of personal injury from electrical
shock, remove all power cords to completely disconnect power
from the power supplies and systems.
Any product or assembly marked with these symbols indicates that the
component exceeds the recommended weight for one individual to
handle safely.
WARNING: To reduce the risk of personal injury or damage to the
equipment, observe local occupational health and safety requirements
and guidelines for manually handling material.
14 Command Console V2.5 User Guide
Page 15
Rack Stability
Rack stability protects personnel and equipment.
About this Guide
WARNING: To reduce the risk of personal injury or damage to the
equipment, be sure that:
■ The leveling jacks are extended to the floor.
■ The full weight of the rack rests on the leveling jacks.
■ In single rack installations, the stabilizing feet are attached to the rack.
■ In multiple rack installations, the racks are coupled.
■ Only one rack component is extended at any time. A rack may become
unstable if more than one rack component is extended for any reason.
Command Console V2.5 User Guide
15
Page 16

About this Guide
Getting Help
If you still have a question after reading this guide, contact an HP authorized
service provider or access our web site
HP Technical Support
Telephone numbers for worldwide technical support are listed on the following
HP web site
of origin.
Note: For continuous quality improvement, calls may be recorded or monitored.
Be sure to have the following information available before calling:
■ Technical support registration number (if applicable)
■ Product serial numbers
■ Product model names and numbers
■ Applicable error messages
http://www.hp.com
http://www.hp.com/support/
.
. From this web site, select the country
■ Operating system type and revision level
■ Detailed, specific questions
HP Storage Web Site
The HP web site has the latest information on this product, as well as the latest
drivers. Access the storage web site at
http://www.hp.com/country/us/eng/prodserv/storage .html
and select the
appropriate product or solution.
HP Authorized Reseller
For the name of your nearest HP authorized reseller:
■ In the United States, call 1-800-345-1518
■ In Canada, call 1-800-263-5868
■ Elsewhere, see the HP web site for locations and telephone numbers
http://www.hp.com
16 Command Console V2.5 User Guide
.
Page 17

About this Guide
Command Console V2.5 User Guide
17
Page 18

About this Guide
18 Command Console V2.5 User Guide
Page 19

About SWCC
Product Overview
StorageWorks Command Console (SWCC) allows you to monitor and manage the
storage connected to your HS-Series controller. Command Console is a
management framework with a graphical user interface for managing HP
StorageWorks RAID array products. SWCC runs on Microsoft Windows NT 4.0,
Windows 2000, and Windows Server 2003 (32-bit). Refer to the SWCC
Quickspecs for the latest service pack requirements. The SWCC Quickspecs are
found at the web site. With SWCC, you can configure virtual disks, receive
notification of events, and monitor your storage systems.
SWCC works with Client and Agent components. The Client program is designed
for use on the Windows platform. It provides an easy method of configuring,
operating, monitoring, and troubleshooting a particular subsystem. An Agent is a
companion program that is installed on a host system running a supported
operating system. The host system is connected to the controllers managed by
SWCC. SWCC needs the Client and Agent to manage storage subsystems over a
network.
1
19Command Console V2.5 User Guide
Page 20

About SWCC
Features
SWCC offers the following features:
■ Manages HP StorageWorks RAID Arrays over a serial port, SCSI bus, or
TCP/IP network.
■ Configures RAID arrays using menus, icons, and system views.
■ Provides the Navigation window and the ability to right-click to view
properties.
■ Configures arrays from files. Array configurations can be saved as files and
used as a backup or to automatically configure other arrays.
■ Monitors subsystems.
■ Protects your access to subsystems and configuration with the password
protection option.
■ Interfaces with Windows NT, Windows 2000, or Windows Server 2003
logging capability on storage systems connected to Windows NT, Windows
2000, or Windows Server 2003 servers (not clients), and lists RAID array
events in the NT event log.
■ Notifies you of subsystem events via pager.
20 Command Console V2.5 User Guide
Page 21

Components of SWCC
SWCC includes:
■ Command Console—The Command Console consists of the Navigation tree,
Navigation window, Asynchronous Event Service, and Pager notification.
■ HS-Series Controller Client—The HS-Series Controller Client provides a
Storage window that displays detailed information about a specific
subsystem. From the Storage window, you can manage your subsystem, for
example, by creating virtual disks.
■ CLI Window—You can monitor and configure your subsystem by typing
commands into the Command Line Interpreter (CLI) window. The CLI offers
the same functionality as the Storage window. For more information, refer to
the HP StorageWorks HSG60 and HSG80 Array Controller and Array
Controller Command Line Interface Reference Guide.
■ HS-Series Agent performs the following:
— Obtains the status of the storage connected to the controller.
— Passes the status of the devices connected to the controller to the
Navigation tree, which passes the information to the Storage window.
— Passes the status of the devices connected to the controller to the Event
Viewer.
— Provides email notification. This feature is not available on Windows
2000, Windows NT, or Windows Server 2003.
Refer to Tabl e 2 for a summary of the SWCC features and required components.
About SWCC
Table 2: SWCC Features and Components
Agent
Features
Ability to create storagesets No Yes
Ability to monitor many subsystems at once Yes Yes
Event logging Yes No
Email notification (Does not apply to Agents
running on Windows NT 4.0, Windows 2000,
or Windows Server 2003)
Pager notification Yes Yes
Required?
Yes No
Client
Required?
21Command Console V2.5 User Guide
Page 22

About SWCC
Client and Agent Versions
SWCC uses different clients and agents to provide storage management over a
network. There is a single version of the Command Console that is used with all
device-specific clients. There is a unique client for each supported HS-Series
controller. There is an agent for each supported operating system though each
agent is compatible with all supported controllers.
See the current versions of the Command Console, Agent, CLI window, and
device-specific clients in Tab le 3.
Table 3: SWCC Component Versions
SWCC Component Version
Command Console V2.2.0
Agent V2.5.0
SWCC CLI Window V2.5.0
HSG80ACS85 Storage Window V2.5.0
HSG80 Storage Window V2.1.0
HSG60 Storage Window V2.5.0
22 Command Console V2.5 User Guide
Page 23

About SWCC
Command Console Client Minimum Hardware and Software Requirements
The minimum requirements to run the Command Console client properly are
listed in Tabl e 4.
Table 4: Minimum Hardware and Software Requirements
Item Requirements
Management Station Suggested minimum of a Pentium class system with 64
Operating System Microsoft Windows NT 4.0 Windows 2000, and
Monitor SVGA at 800x600 resolution, minimum*
Modem Hayes-compatible (for event notification)
Serial Port RS-232 (for local connection)
Network Adapter TCP/IP-compatible network card (for distributed systems
Controller
Compatibility
Host Software ASPI SCSI driver required for host port virtual terminal
MB of RAM.
Windows Server 2003 (32-bit). Please refer to the
SWCC Quickspecs for the latest service pack
requirements.
only)
HSG80, HSG60
connection (Windows NT only)
* Although it is possible to use the Client on a system with standard, VGA resolution, HP
recommends that you use SVGA. The Storage window requires a minimum amount of
screen space to properly display its contents. When you use VGA display resolution,
screen space becomes more limited. For more information, see "Storage Window
Display", page 67
23Command Console V2.5 User Guide
Page 24

About SWCC
Network Specifications
SWCC is a terabyte-class RAID Array manager. Fully scalable, SWCC can
manage a single, locally connected RAID array or RAID arrays in a multi-node,
TCP/IP network environment. SWCC can support a number of Clients and Agents
in a distributed environment.
24 Command Console V2.5 User Guide
Page 25

Connections Supported by SWCC
SWCC manages storage by using Storage windows. Storage windows are
device-specific clients that communicate with storage devices either directly or
through an agent. Storage windows are used to configure and monitor storage
arrays. An agent is connected to storage controllers, which the agent configures
and monitors.
There are several different types of connections used by the clients to
communicate with storage controllers and agents.
SWCC provides storage management over the following connections, as listed in
Tabl e 5:
■ Direct Serial connection
■ SCSI connection
■ Storage Area Network (SAN) and TCP/IP network
Table 5: SWCC Connections for HS-Series Controllers
Connection Agent Required?
SAN and TCP/IP network
connection
Direct serial connection No*
SCSI connection** No**
About SWCC
Yes
* If you do not install Agent, you cannot use the Navigation tree or Pager notification.
** SCSI over Fibre Channel is available with HSG60 and HSG80 controllers.
Note: SWCC does not support the Dynamic Host Configuration Protocol (DHCP) or
the Windows Internet Name Service (WINS).
To determine whether your system is using DHCP or WINS on Windows NT 4.0:
1. Right-click Network Neighborhood on the desktop.
2. Select Properties.
3. Click the Protocols tab.
4. Select TCP/IP, and then click Properties. The Microsoft TCP/IP Properties
window opens.
25Command Console V2.5 User Guide
Page 26

About SWCC
To determine whether your system is using DHCP or WINS on Windows 2000 or
Windows 2003:
1. Right-click My Network Places on your desktop.
2. Select Properties.
3. In the Network and Dial-up Connections window which opens, right-click
the connection to be used by SWCC.
4. Select Properties.
5. Select Internet Protocol (TCP/IP), then click Properties.
The Microsoft TCP/IP Properties window opens.
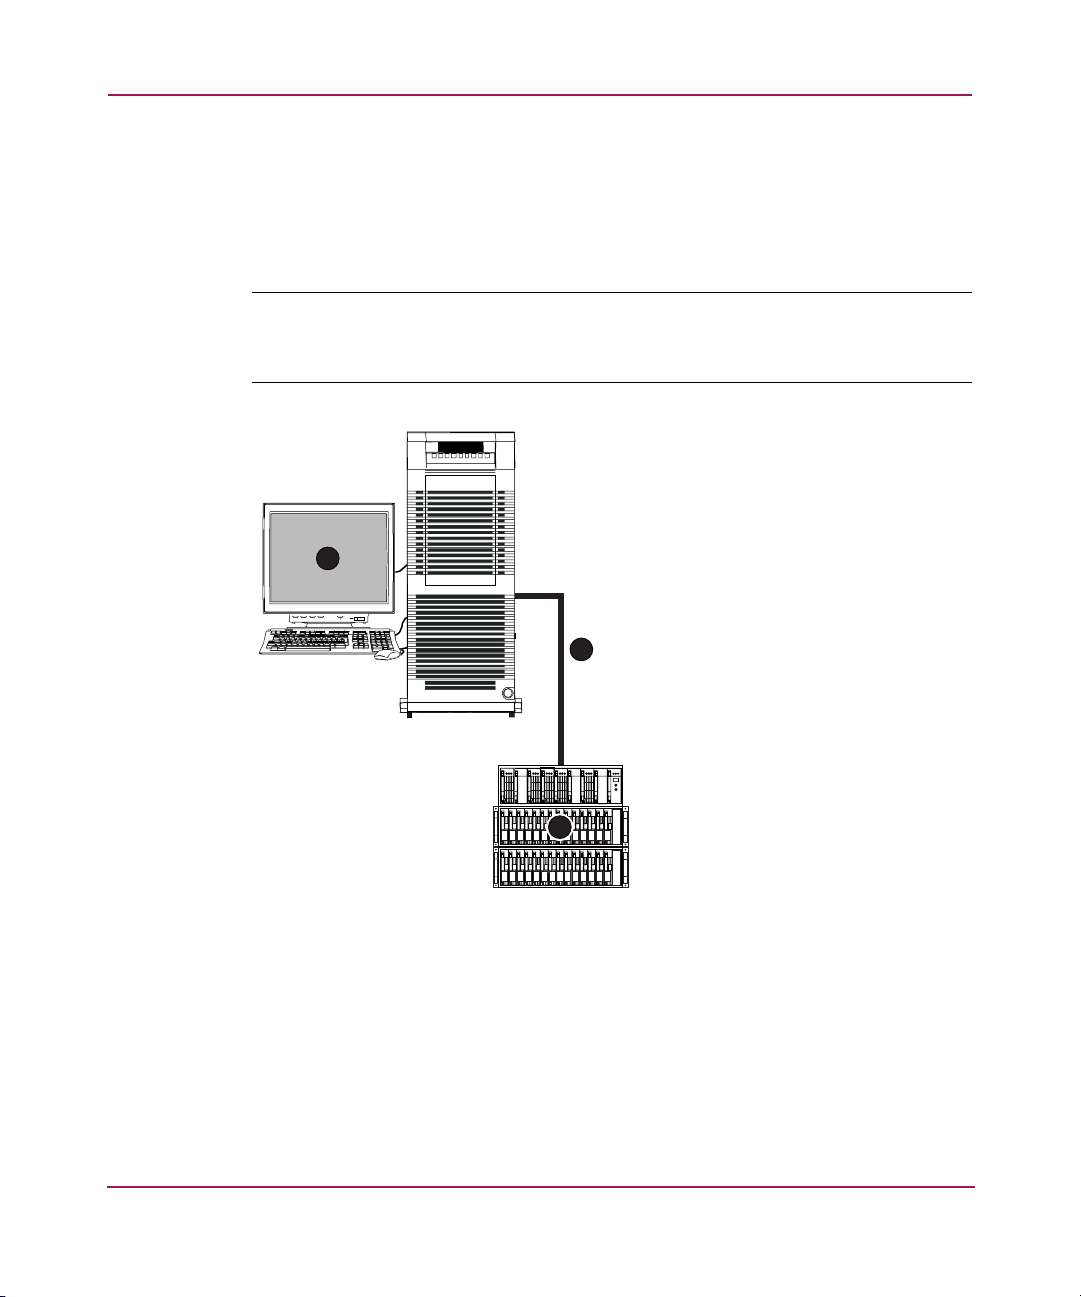
SAN and TCP/IP Network Connection
By using a network connection, as shown in Figure 1, you can configure and
monitor your storage subsystem from anywhere on your Local Area Network
(LAN). If you have a Wide Area Network (WAN) or a connection to the Internet,
you can monitor your subsystem with TCP/IP.
SWCC can include a number of Clients and Agents in a network. However, it is
suggested that you install only one HS-Series Agent on the computer that has a
connection to the HS-Series controller.
26 Command Console V2.5 User Guide
Page 27

About SWCC
7
VTAT
1
VTAT
O
H-STATVCENTO O
4 4
7
VTAT
H-STATVCENTO O
2
5
4
3
1 Agent system (has
Agent software)
2 TCP/IP net work
3 Client system (has Client
software)
4 Fibre Channel cable
5 Hub or switch
6
Figure 1: SAN and TCP/IP network connection
CXO7240A
6 Storage system
7 Servers
27Command Console V2.5 User Guide
Page 28
About SWCC
Local Serial Port Connection
A local serial port connection uses only the Storage window to manage your
storage subsystems. The client system is connected to the subsystem by a serial
connection, as shown in Figure 2.
Note: Local serial connections are available only with standalone Storage windows.
You cannot use the Command Console Navigation window to connect locally to a
subsystem.
1
VTAT
O
2
3
SHR-1598B
1 Client system
2 Serial connection
3 Storage system
Figure 2: Local serial port connection
28 Command Console V2.5 User Guide
Page 29

SCSI Connection
A SCSI connection over a SCSI bus or using the Fibre Channel bus, as shown in
Figure 3, uses only the Storage window to manage your storage system. The
HSG60 and HSG80 controllers support the SCSI over Fibre Channel bus
connection.
Note: Local SCSI connections are available only with standalone Storage windows.
You cannot use the Command Console Navigation window to connect locally to a
subsystem.
About SWCC
29Command Console V2.5 User Guide
Page 30
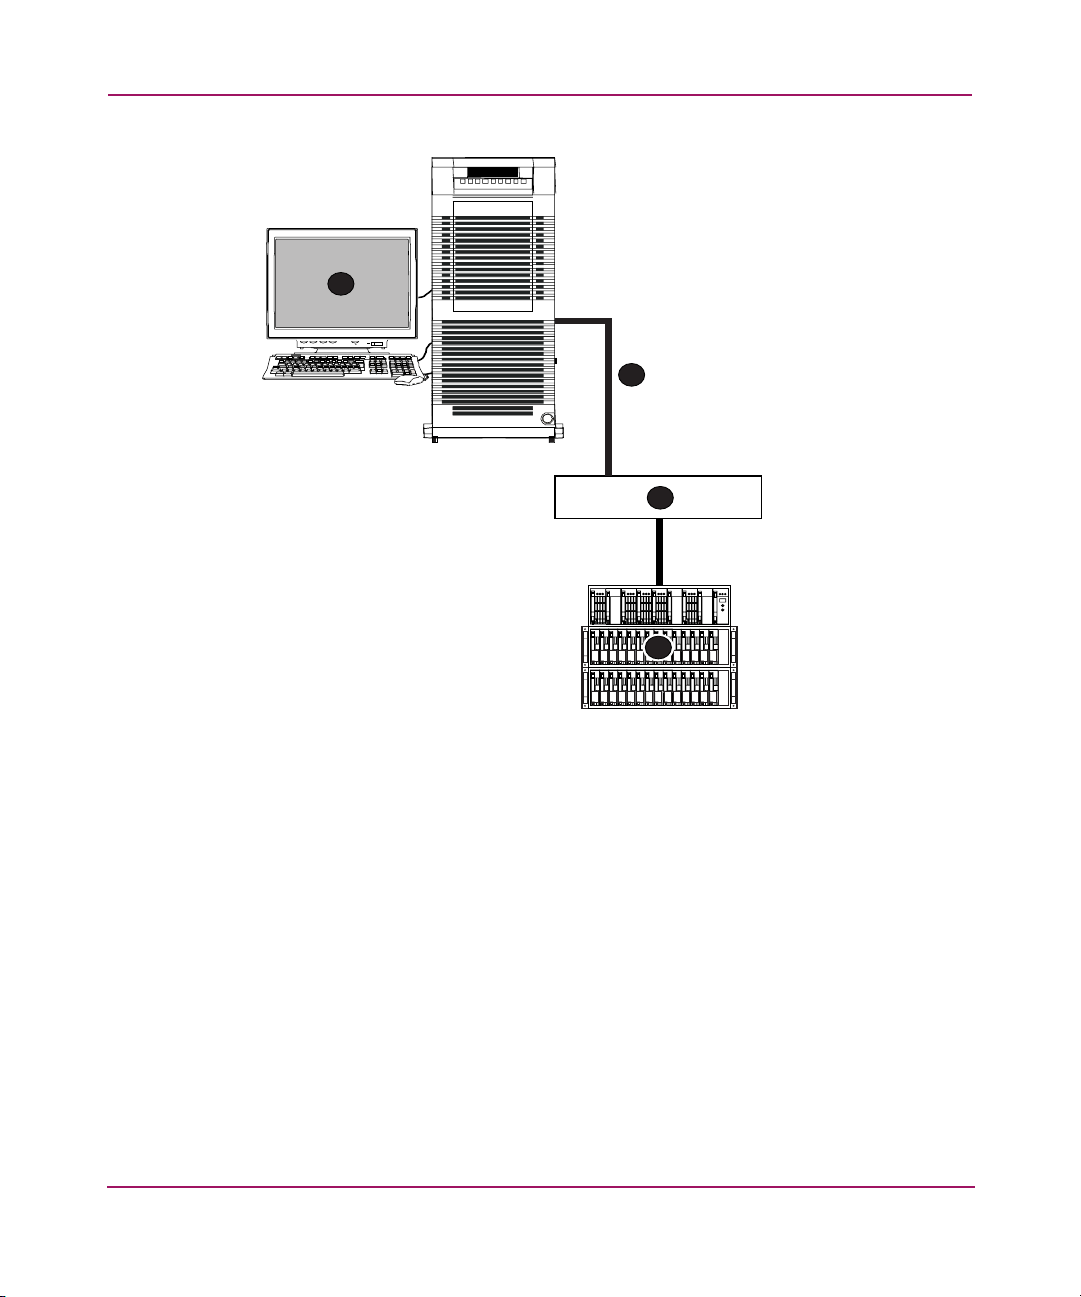
About SWCC
1
VTAT
O
2
3
4
SHR-1597B
1 Client system that has the Storage window
2 Fibre Channel cable (using SCSI connection)
3 Hub or switch
4 Storage system
Figure 3: SCSI connection using Fibre Channel cable
30 Command Console V2.5 User Guide
Page 31

Accessing the Storage Window
You can access the HS-Series Storage window from the Start menu. You can
connect the Storage window to storage over a serial connection, a SCSI
connection, or a TCP/IP network.
Before you can make either a SCSI or a network connection, you must have one
of the following:
■ A virtual disk created on the subsystem
■ Command Console LUN (CCL) enabled
For more information about:
■ Creating a virtual disk, see the section titled "Creating Virtual Disks", page 72
■ Enabling and disabling the CCL, see Appendix A,
■ Accessing the Storage window from the Navigation tree, see the section titled
"Managing Storage Subsystems from the Navigation Tree", page 40
Serial Connections
The simplest connection to a subsystem is a direct cable connection from the
Client’s host system to a serial port on the subsystem. The serial connection is
often used to set the initial configuration of a storage subsystem. This initial
configuration can then allow a SCSI or network connection to the subsystem.
A direct serial connection to a subsystem does not provide as much functionality
as a network connection. The agent is bypassed so that any agent-related function
is not available. These functions include event logging, email, and pager
notification. The Navigation tree is not available with a direct serial connection.
About SWCC
To set up a serial connection:
1. Click Start > Programs > Command Console > StorageWorks CC HSxxx.
The Connection Selection window opens, as shown in Figure 4.
31Command Console V2.5 User Guide
Page 32

About SWCC
Figure 4: Connection Selection dialog box
2. When the Connection Selection window opens, choose Serial and then click
OK. The Connect Serial window opens, as shown in Figure 5.
3. From the drop-down menu, choose the COM port connected to the RAID
HS-Series controller.
4. Choose a controller baud rate, a Subsystem Physical View, or a Subsystem
Grid View. Click Connect. When the Storage window opens, you are
connected to your subsystem.
Figure 5: Connect Serial window
32 Command Console V2.5 User Guide
Page 33

SCSI Connections
The SCSI connection uses the SCSI bus or Fibre Channel bus that is the primary
data channel for the storage subsystem. The amount of management information
that passes between the Storage window and the subsystem is small compared to
the amount of data moved by a typical storage request.
Like the direct serial connection, the SCSI connection does not use an agent. The
SCSI connection only supports a Storage window or CLI window without a
Navigation tree. There is no event logging, email, or pager notification with a
SCSI connection.
Establishing a SCSI connection requires that a Command Console LUN or a
virtual disk be configured on the storage subsystem.
1. Click Start > Programs > Command Console > StorageWorks CC HSxxx.
2. When the Connection Selection dialog box displays, select the SCSI option.
The SCSI Setup window opens, as shown in Figure 6.
3. Select a drive mapped to the subsystem or a CCL, and then click Connect.
Command Console connects to the storage subsystem and displays the
corresponding Storage window.
.
About SWCC
Figure 6: SCSI Setup window
33Command Console V2.5 User Guide
Page 34

About SWCC
Network Connections
Using SWCC with a network connection provides you with more features and
flexibility for managing storage subsystems than serial or SCSI connections. A
network connection between a client and agent supports the use of the Navigation
tree, allowing for the management of multiple subsystems from a single
application. The use of an agent enables event logging on the agent host and also
email and pager notification for subsystem events.
A network connection requires that an agent be installed on a host connected to
the storage subsystem. Establishing a network connection requires that a
Command Console LUN or a virtual disk be configured on the storage subsystem.
If the storage subsystem is not properly preconfigured, then a serial connection
must be used to enable the Command Console LUN or to create a virtual disk.
To use SWCC to manage the HS-Series controller over a network, install the
Command Console, the HS-Series device-specific Client (Storage window), and
the HS-Series Agent. The Command Console and the HS-Series Client are
installed together.
To set up SWCC to manage the HS-Series controller over a network:
1. Click Start > Programs > Command Console > StorageWorks CC HSxxx.
The Client displays the Connection Selection window.
2. Choose the Network (TCP/IP).
The Connect Network (TCP/IP) window opens, as shown in Figure 7.
34 Command Console V2.5 User Guide
Page 35

About SWCC
Figure 7: Connect Network (TCP/IP) window
3. Enter the host IP name or address in the text box, and then click Detect
Subsystems.
The Client locates the subsystem connected to the host.
4. Choose the subsystem, and then click Connect.
The Client displays the Storage window.
The controller maintains a table of host port connections that can contain up to 96
named connections. However only 8 of those connections can be active at any
time. The Client shows only those connections that the controller recognizes as
online.
Connection Features and Limitations
Because of the nature of the connections you can use between the Client and your
subsystems, the features available with each connection type vary slightly. Some
connection types impose limitations on the Client's features, as noted in Table 6.
35Command Console V2.5 User Guide
Page 36

About SWCC
Table 6: Feature Limitations
Feature
Connection
Type
Local Serial
Create
Virtual
Disk
Supported Supported Supported Not
Connect
(Storage
Window
Manager
and Agent
not used)
Local SCSI
Supported Supported Supported Not
Bus Connect
(Storage
Window
Manager
and Agent
not used)
Local
Supported Supported Supported Supported Supported Not
Network
Connect
(Client and
Agent
running on
the same
host)
Remote
Supported Supported Supported Supported Supported Supported
Network
Connect
(Client
running on
a PC remote
from Agent
on a host)
Delete
Virtual
Disk
Fault
Events:
Client
Visual
Notify
Fault
Events:
Paging
Notify
Supported
Supported
Windows
NT/
2000/
Server
2003
Fault
Events:
Event
Logging
Not
Supported
Not
Supported
Email
Notify
(UNIX/V
MS only)
Not
Supported
Not
Supported
Supported
36 Command Console V2.5 User Guide
Page 37

Table 6: Feature Limitations (Continued)
Feature
Connection
Type
RAS
Connect
(Client
running on
a remote PC
with a
dialup
network
connection)
Create
Virtual
Disk
Supported
but not
recom-
mended.
Follow-up
operating
system
configura-
tion cannot
be
performed
remotely.
Delete
Virtual
Disk
Supported
but not
recommended.
Follow-up
operating
system
configuration cannot
be
performed
remotely.
Fault
Events:
Client
Visual
Notify
Supported
reliably
only while
RAS intact.
Some
events may
be missed
while
dialup
connection is
broken.
Fault
Events:
Paging
Notify
Supported
reliably
only while
RAS intact.
Some
events may
be missed
while
dialup
connection is
broken.
Windows
NT/
2000/
Server
2003
Fault
Events:
Event
Logging
Supported
reliably at
host end
only. Some
events may
be missed
at Client
end while
dialup
connection is
broken.
About SWCC
Email
Notify
(UNIX/V
MS only)
Supported
Local Client/Agent Network Connection
You can run both the Client and Agent on the same Windows NT, Windows 2000,
or Windows Server 2003 host machine and connect them using a network
connection. By doing so, you can create a local connection to take advantage of
the Agent's event notification features. No special installation instructions are
necessary to implement this type of connection. Install each component as if the
Client were to run on a system remote from the host machine.
Because the Client runs only on Windows NT, Windows 2000, and Windows
Server 2003 systems, and the Agent runs on Windows NT, UNIX-based systems,
and OpenVMS, you can implement this type of connection only on a Windows
NT system. Also, you cannot use a Client with a local connection of either type
while an Agent is running on the local machine.
Note: SWCC is no longer supported on Novell NetWare systems with HBA
281540-B21 (3R-A3750-AA).
37Command Console V2.5 User Guide
Page 38

About SWCC
38 Command Console V2.5 User Guide
Page 39

Using Command Console
Using the Navigation Tree
The Navigation tree is displayed in the Navigation window. The Navigation tree
lets you view the status of all your storage at once, as shown in Figure 8. Note that
some items shown in this Navigation tree may not represent the software in your
release.
2
Figure 8: An example of the Navigation tree
39Command Console V2.5 User Guide
Page 40

Using Command Console
Adding a Storage Subsystem to the Navigation Tree
The Navigation tree allows you to manage your storage over the network from the
Storage window. If you plan to use pager notification, you must add the storage
subsystem to the Navigation tree.
To add the storage subsystem to the Navigation tree:
1. Verify that you have properly installed and configured the HS-Series Agent
on the storage subsystem host. For more information, refer to the installation
and configuration guide for your operating system.
2. To display the Navigation window, click Start > Programs > Command
Console > StorageWorks Command Console.
3. Click File > Add System.
The Add System window opens.
4. Type the host name or its TCP/IP address and click Apply.
5. Click Close.
6. Click the plus sign (+) to expand the host icon.
7. To access the Storage window for the subsystem, double-click the Storage
window icon.
Managing Storage Subsystems from the Navigation Tree
You can manage a storage subsystem from the Navigation tree by double-clicking
the Storage window or CLI window icon.
To access a subsystem window:
1. Double-click the folder for the storage subsystem.
Up to two icons may be displayed underneath the folder. This depends on
whether you have installed the Storage window and the CLI window.
2. Double-click the Storage window or CLI window icon for the subsystem.
Organizing Your Storage in the Navigation Tree
After you add systems to the Navigation tree, you can organize your storage in
folders:
■ You can place folders under the Command Console root or under another
general folder in the Navigation window.
40 Command Console V2.5 User Guide
Page 41

■ You can use folders to group systems and other general folders. Note that you
cannot use folders to group controllers.
For example, in Figure 8, the general folder Storage on the First floor was created
and two agent systems were placed in the folder. If a system in the folder is at a
critical state, the status of the folder displays the same critical state.
Note: For a description of the Command Console Navigation tree, refer to the “Quick
Tour” in the introduction of the Command Console Client online Help.
About the Navigation Tree Icons
The Navigation tree icons listed in Tab le 7 change to show system status. The
Navigation window status bar, located in the lower-left corner, summarizes the
host system connection status.
Table 7: Description of Icons in Navigation Window Status Bar
Icon Description
Using Command Console
Indicates the number of disconnected systems
Indicates the number of fully functional systems
Indicates the number of degraded systems
Indicates a critically failed system
41Command Console V2.5 User Guide
Page 42

Using Command Console
About the Asynchronous Event Service
The Asynchronous Event Service (AES) does the following:
■ Runs in the background as a service that provides status updates of the
subsystems to its client system. A client system must run AES to receive
updates.
■ Passes the trap (message) to the Navigation tree. The Navigation tree, in turn,
passes the trap to the appropriate Storage window. When a trap provides
information about a status change in a subsystem, one or more of the icons in
the Navigation tree change color or the symbol changes.
■ Send traps to pagers. To activate this feature, you must predefine each pager
number in the User Profile section of the Event Notification menu in the
Navigation window.
Note: Refer to Command Console’s online Help for the latest information about how
to diagnose problems that can occur when sending pages. Help provides instructions
on how to put AES into a debug mode.
AES Functionality
You can modify how AES starts. You can also manually stop or start AES.
However, you must run AES to receive pager notification of events and to provide
updates to the Navigation tree, Storage windows, and Event Viewer. If you stop
AES, the Client software stops the following functionality:
■ Updates to the Navigation tree and Storage windows
■ Updates from AES in the application log of the Event Viewer
■ Notifying pagers if a fault occurs
To Stop or Start AES
From Windows NT
To stop or start AES manually:
1. Double-click Services in Control Panel.
2. Click the AsyncEventSvc entry.
3. Click Stop or Start, and then click Close.
42 Command Console V2.5 User Guide
Page 43

To disable AES from starting automatically when your system boots, change the
startup option to manual in the Services window. Use the following steps:
1. Double-click Services in Control Panel.
2. Double-click the AsyncEventSvc entry.
The Services window opens.
3. Choose Manual under Startup Type, and click OK.
From Windows 2000 and Windows Server 2003
To stop or start AES manually:
1. Click Start > Settings > Control Panel > Administrative Tools >
Component Services.
2. Under Console Root, choose Services (Local).
3. Under Services (Local), right click AsyncEventSvc.
4. Click Stop or Start.
To disable the automatic start of AES, at system boot, change the startup option to
manual:
1. Click Start > Settings > Control Panel > Administrative Tools >
Component Services.
Using Command Console
2. Under Console Root, choose Services (Local).
3. Under Services (Local), right click AsyncEventSvc.
4. From the drop-down menu, choose Properties.
The AsyncEventSvc Properties (Local Computer) window opens.
5. Under the General tab, choose Manual from the Startup Type drop-down
menu.
6. Click OK.
43Command Console V2.5 User Guide
Page 44

Using Command Console
44 Command Console V2.5 User Guide
Page 45

Setting Up Notification
Required Components for Notification
Tabl e 8 lists the notification options available with SWCC and the components
required for each option.
Table 8: Required Components for Notification
Notification Option Required Components
Navigation tree Client and Agent
Pager Client and Agent
Email notification (applies to certain
agents)
Event logging Agent
SWCC with third-party storage
management program
3
Agent
Agent and third-party storage
management program
45Command Console V2.5 User Guide
Page 46

Setting Up Notification
Setting Up Pager Notification
You can set up Command Console to notify you by pager when a critical event
occurs. This feature works with alphanumeric and numeric pagers. You can
configure paging to notify multiple pagers for multiple storage subsystems within
different blocks of time. For example, if several people monitor your network in
shifts, you can configure paging so the software pages only those people working
the current shift. You can also temporarily disable any pager.
To receive pages, the following must occur:
■ The AES must be running on the client system on which you set up the pager
notification.
■ The Agent must be running.
■ The client system must be added to the Agent’s list of client system entries.
■ In the Agent’s list of client system entries, you must select the TCP/IP
notification scheme for your client system.
■ You must add the Agent system to the Navigation tree of the client system on
which you set up pager notification.
Note: Pager notification uses the Telocator Alphanumeric Protocol (TAP) adopted in
1988 by the Personal Communications Industry Association (PCIA). Verify that your
paging company uses this protocol.
Tabl e 9 lists and describes the steps to use to set up pager notification.
Table 9: Setting Up Pager Notification
Step Description Refer to Section
1 Numeric Pagers only - assign pager
codes to host systems and controllers.
2 Set up user profiles. Setting Up User Profiles.
3 Set up notification lists. Setting Up Notification Lists.
4 Set up modem and polling intervals. Setting Up Modem and
5 Associate systems and controllers with
notification list.
46 Command Console V2.5 User Guide
Setting Up Pager Codes.
Polling Preferences.
Associating My Enterprise,
Systems, and Subsystems with
Notification Lists.
Page 47

Setting Up Pager Codes
Numeric pager support lets you receive notification about critical events.
A numeric pager usually has three fields separated by hyphens. The first field
signifies the area code, the second field signifies the exchange, and the third field
signifies the four-digit extension.
A page from Command Console is structured as follows:
■ First field is a three-digit number for the host system.
■ Second field is a three-digit number for the subsystem.
■ Last field is a four-digit code for the critical event.
To set up pager codes, first assign a three-digit code for each host system, and
then assign another three-digit code for each subsystem controller connected to
that host. The last four digits are pre-assigned.
To Assign a Pager Code to a Host System:
1. Click a host system in the Navigation window.
2. Click File > Properties.
3. Click the Event Notification tab.
Setting Up Notification
4. Enter a three-digit number in Pager identification number. Avoid entering a
number that may be mistaken for an area code.
To Assign a Pager Code to a Subsystem:
1. Click a subsystem controller in the Navigation window.
2. Click File > Properties.
3. Click the Event Notification tab.
4. Enter a three-digit number in Pager identification number.
To View or Change a Pager Code for a Critical Event:
1. Click Options > Event Notification > Pager Codes.
2. Click the code you want to edit, and then click Edit.
3. Type the new pager code in the Edit field.
The default pager codes are listed in Tab le 10.
47Command Console V2.5 User Guide
Page 48

Setting Up Notification
Table 10: Default Pager Codes
Critical Event Code Notes
Disk Fault 1000 Physical device failure
Power Supply Fault 1002
Fan Fault 1003
Battery Fault 1004
Temperature Fault 1005
Controller Fault 1006 The controller detected an
internal fault
Communication Fault 1007 Agent cannot talk to the
subsystem.
Other controller fault 1008 One controller is
reporting a fault on the
other.
External fault 1009
LUN Fault 1010 Virtual disk failure
Note: All codes are numeric-only; alphanumeric pager codes are not supported.
Setting Up User Profiles
1. Click Options > Event Notification > User Profiles.
2. Click New.
3. Type a name. You can also enter a description.
4. Click the Pager tab.
5. Choose Enabled to enable paging to this person.
6. Enter the phone number for your pager in the Pager Number field, along
with any prefixes required to reach the outside phone system.
Optionally, you can use one or more commas to specify a wait intervals for
numeric pager numbers. Each comma causes the pager dialer to wait two
seconds before sending the PIN to the paging company. An example is: 8,,1,
800,5551212. In this example, there is a 4-second delay between the 8 and the
1.
48 Command Console V2.5 User Guide
Page 49

Setting Up Notification
7. Check Alphanumeric if the paging system supports alphanumeric paging.
Leaving the box blank results in numeric paging only.
8. Type the pager identification number (PIN). (This is required for
alphanumeric pagers). If your numeric pager does not require a PIN, leave the
field blank. For example, this field must be blank for numeric pagers that are
assigned a unique telephone number.
9. Type the start and end times that this person is available for paging, in the
format HH:MM using a 24-hour clock. If you want 24 hour coverage, enter a
start time of 00:00 and an end time of 24:00. You must enter a time period for
paging. If you leave the start and end times at 00:00, paging is cancelled for
this person.
10. Click OK to close the Edit Profile dialog box.
Keep the following in mind:
■ If you dial a code to access an outside number, the code must precede the
phone number in the pager number field.
■ Do not use commas with alphanumeric pagers, except to access an outside
line.
■ You may need to add more commas to make the Command Console pause
long enough for the pager company greeting to complete.
■ Alphanumeric pagers require you to supply the paging service provider’s
TAP service modem number in the pager number field.
■ Not every paging company requires a PIN. If your pager is assigned a unique
phone number for calling the paging company, do not enter a PIN.
■ Alphanumeric pagers require a PIN.
■ Refer to your pager documentation to determine which special characters are
supported.
Figure 9 shows a sample user profile for an alphanumeric pager, and Figure 10
shows a sample user profile for a numeric pager.
49Command Console V2.5 User Guide
Page 50

Setting Up Notification
Figure 9: Sample user profile – alphanumeric paging
50 Command Console V2.5 User Guide
Page 51

Setting Up Notification
Figure 10: Sample user profile – numeric paging
Note: The commas in the Identification Number field represent two-second wait
intervals.
Setting Up Notification Lists
Use notification lists to notify groups about critical events. Be sure to first create a
user profile for each user in the group. You cannot add users to the notification list
unless they have user profiles. Then, use the Properties pages to associate
notification lists with system and subsystem critical events.
1. Click Options > Event Notification > Notification List.
2. Click New and enter a name for the new notification list.
3. Write a brief description of the list (optional).
4. Add members to the list by clicking the check box next to each name.
51Command Console V2.5 User Guide
Page 52

Setting Up Notification
Setting Up Modem and Polling Preferences
The subsystem polling interval is the frequency at which the Client pings an
Agent to determine if it is running.
1. Click Options > Preferences.
2. Type the number of hours or minutes in the subsystem polling interval field.
The default-polling interval is 30 minutes.
3. Select the COM port in your computer that your modem uses.
4. For alphanumeric pagers, select the baud rate (typically, it is 1200) of your
paging service provider’s TAP modem.
Associating My Enterprise, Systems, and Subsystems with Notification Lists
You can associate host systems and subsystems with notification lists for the
purpose of paging a group if a critical event occurs. You can establish paging on
three separate levels:
■ My Enterprise
■ System Level
■ Subsystem Level
You can configure paging on all levels or any combination of levels.
Before you can associate a system or controller with a notification list, you must
first create a notification list. See "Setting Up Notification Lists", page 51.
My Enterprise
Use My Enterprise to notify all notifications lists listed here for problems on all
systems and subsystems.
1. Highlight My Enterprise in the Storage Window Manager and then choose
File > Properties > Event Notification from the menu.
2. Click the Notification List box to show all of the lists you have created.
3. Choose the list of persons who should be notified in case of a failure on any
system.
52 Command Console V2.5 User Guide
Page 53

System Level
Use the System Level to notify all notifications lists about problems on the
specific system and its selected subsystems.
1. Highlight the desired system name in the Storage Window Manager and then
2. Click the Notification List box to show all of the lists you have created.
3. Choose the list of persons, who should be notified in case of a failure on any
Subsystem Level
Use the Subsystem Level to notify all notifications lists listed here for problems
on the selected subsystem.
1. Highlight the desired system name in the Storage Window Manager and then
2. Click the Notification List box to show all of the lists you have created.
3. Choose the list for persons who should be notified in case of a failure on this
Setting Up Notification
choose Start > Programs > File > Properties > Event Notification.
subsystem of this specific system.
choose Start > Programs > File > Properties > Event Notification.
specific subsystem.
53Command Console V2.5 User Guide
Page 54

Setting Up Notification
Using SWCC with a Third-Party Storage Management Program
To use SWCC with a third-party storage management program:
1. Add the name of the computer on which the third-party storage management
program resides to the Agent’s list of client system entries. Select SNMP as
the notification scheme. The Agent sends SNMP traps to every client system
on its list.
For more information on how to add client systems, see the Installation and
Configuration Guide for your Agent.
2. Use the compiler that came with your third-party storage management
program to compile the Management Information Base (MIB) file,
hs-agent.mib in this kit.
Note: Depending on the third-party software, you may need to perform additional
steps. Refer to the third-party storage management program documentation.
54 Command Console V2.5 User Guide
Page 55

Setting Up Notification
Using Event Logging on the Client System to Monitor Your Subsystem
The Agent can place SNMP and TCP/IP traps in the Application Log of Event
Viewer, which is a part of Windows NT, Windows 2000, and Windows Server
2003. The HS-Series Agent collects events from the controllers and lists the
events under the source, AsyncEventSvc. If the Agent is installed on Windows
NT, Windows 2000, and Windows Server 2003, you can locate its entries in the
Application Log by looking for steam under the Source column.
For a client system to receive event logs from an HS-Series Agent on another
computer:
■ The client system must appear on the Agent’s list of client system entries and
TCP/IP must be selected as a notification scheme.
■ The AES must be running on the client system.
■ The Agent must be running.
To access Event Viewer:
■ Windows NT 4.0—Click Start > Programs > Administrative Tools >
Event Viewer to access the Application Log. Choose Application from the
Log menu.
■ Windows 2000 and Windows Server 2003—Click Start > Settings >
Control Panel > Administrative Tools > Event Viewer to access the
Application Log. Choose Application Log in the tree panel.
For more information about SNMP traps, see Chapter 5.
55Command Console V2.5 User Guide
Page 56

Setting Up Notification
56 Command Console V2.5 User Guide
Page 57

Interpreting Agent Email Messages
Note: This chapter does not apply to the HS-Series Agents running on
Windows NT 4.0, Windows 2000, or Windows Server 2003.
Most of the information in this chapter pertains to the event information email
messages that the RAID Manager agent sends when an event occurs. If the Agent
email notification feature is enabled when a RAID system event occurs, the Agent
sends notification to the specified email addresses. A storage system event can be
a change in the state of a physical storage device, a logical storage unit, or a
component of the physical enclosure.
The message specifies the name of the host to which the RAID array reporting the
event is connected. The message states the severity of the problem as one of these
three levels:
■ Critical
■ War ni ng
■ Informational
The email message is displayed in the following format:
----------------From RaidManager Tue Oct 6 15:59:59 1998
Date: Tue, 6 Oct 1998 15:59:58 -0500 (EST)
From: RaidManager
4
This is an automatic message from your StorageWorks
RAID Agent, steamd. The following message was just received.
Please check your syslog files and RAID box!
Hostname: Suncity
CRITICAL: Validation failed - Unauthorized client
(shr-dhcp-24-188.shr.dec.com, access level: -1); connection
refused (SP_TCP: ClientConnect)
End Of Automatic Message.
--------------------
57Command Console V2.5 User Guide
Page 58

Interpreting Agent Email Messages
About Event Information Fields
Event information messages report on the state of the RAID system. The event
information fields appear in the line following the problem severity level.
Example:
WARNING:Suncity HSG80 12000000000 HSG80 disks(disk21100:2) (SP_MONITOR:
MonitorSubsys)
\\ \
\\ \
(1) (2) (3)
Use the following information to help you to understand event information fields:
■ Host Name—The name of the host to which the RAID experiencing the event
is connected.
■ Storage System—Where the problem occurred.
■ State Change—The specified component of the storage system. This is an
11-digit field that provides important information about the status of your
RAID Array.
58 Command Console V2.5 User Guide
Page 59

Interpreting Agent Email Messages
Mapping State Change Digits to RAID System Components
Each of the 11 digits in the state change field can be mapped to a RAID system
component. Tabl e 11 lists the digits and their relationship.
Table 11: State Change Digit Position and Corresponding RAID System Component
Corresponding RAID System
State Change Digit Position
1 Overall RAID System
2Disks
3 Power Supply
4Fans
5Battery
6 Temperature
7This Controller
8Communications LUN
9 Other Controllers
10 External Factors
11 Logical Units
Component
The First Digit of the State Change Field (Overall RAID System)
The first digit in the state change field reports state changes in the overall RAID
system.
Example:
WARNING: Suncity HSG80 12000000000 HSG80 disks(disk21100:2)(SP_MONITOR:
MonitorSubsys)
The first digit can have one of two values:
0—Everything is fine.
1—Something has changed state.
59Command Console V2.5 User Guide
Page 60

Interpreting Agent Email Messages
The Second Digit of the State Change Field (Disks)
The second digit of the state change field reports state changes in disks.
Example:
WARNING: Suncity HSG80 12000000000 HSG80 disks(disk21100:2)(SP_MONITOR:
MonitorSubsys)
This digit can have one of three values:
0—Everything is fine.
1—Drive went from bad to good.
2—Drive went from good to bad.
In this example, a value of 2 is displayed in the disk digit position, indicating that
a drive went from good to bad.
The disk name (in parentheses) follows, in the format:
disk_name:state
where disk_name is the name of the disk and state can be either of the
following:
1—Disk went from bad to good.
2—Disk went from good to bad.
In this example, the failed drive is disk21100.
The Third Digit of the State Change Field (Power Supply)
The third digit of the state change field reports state changes in the power supply.
Example:
WARNING: Suncity HSG80 10200000000 HSG80 pwr(0:1:2) (SP_MONITOR:
MonitorSubsys)
The third digit can have one of three values:
0—Everything is fine.
1— Power supply went from bad to good.
2—Power supply went from good to bad.
The position (in parentheses) of the failed power supply usually follows. Three
numbers indicate the position in the format:
cabinet_number:power_position:state
60 Command Console V2.5 User Guide
Page 61

where cabinet_number is the cabinet ID from 0 to 1, the power-position is the
power supply location (1 or 2), and
state is one of the following:
1—Power supply went from bad to good.
2—Power supply went from good to bad.
3—Power supply is not present.
In this example, the power supply in position 1 of cabinet 0 (main cabinet) went
from good to bad.
The Fourth Digit of the State Change Field (Fans)
The fourth digit of the state change field reports state changes in fans.
Example:
WARNING: Suncity HSG80 10020000000 HSG80 fans(0:A:2) (SP_MONITOR:
MonitorSubsys)
The fourth digit can have one of three values:
0—Everything is fine.
1—Fan state went from bad to good.
2—Fan state went from good to bad.
The position (in parentheses) of the fan follows, in the format:
cabinet_number:fan_position:state
where cabinet_number is the cabinet ID from 0 to 1, fan_position is the
position of the fan, and
state is either of the following:
Interpreting Agent Email Messages
1—Fan went from bad to good.
2—Fan went from good to bad.
In this example, a fan failure occurred in cabinet 0, the main cabinet.
The Fifth Digit of the State Change Field (Battery)
The fifth digit reports battery state change.
Example:
WARNING: Suncity HSG80 10002000000 HSG80 batt(6:fail) (SP_MONITOR:
MonitorSubsys)
The fifth digit can have one of three values:
61Command Console V2.5 User Guide
Page 62

Interpreting Agent Email Messages
0—Everything is fine.
1—Battery state went from bad to good.
2—Battery state went from good to bad.
The details of the battery failure follow in parentheses, in the format:
controller_id:state
where controller_id is the SCSI ID of the reporting controller (in other words,
the cache battery failed for the other controller), and
state is one of the
following:
Good—Battery is good.
Low—Battery voltage is low.
Fail—Battery has failed.
In this example, the cache battery for the controller with SCSI ID 6 failed.
The Sixth Digit of the State Change Field (Temperature)
The sixth digit of the state change field reports temperature state changes.
Example:
WARNING: Suncity HSG80 10000200000 HSG80 temp(0:2:2) (SP_MONITOR:
Monitor_Subsys)
The sixth digit can have one of three values:
0—Everything is fine.
1—Temperature state went from bad to good.
2—Temperature state went from good to bad.
The details regarding the temperature change follow in parentheses, in the format:
cabinet_number:sensor_type:state
where cabinet_number is the cabinet ID from 0-1, sensor_type is the EMU
sensor (sensor 1 or sensor 2), and
state is either of the following:
1—Temperature went from bad to good.
2—Temperature went from good to bad.
In this example, an adverse temperature change is detected by sensor 2 of the
main cabinet.
62 Command Console V2.5 User Guide
Page 63

Interpreting Agent Email Messages
The Seventh Digit of the State Change Field (This_Controller)
The seventh digit reports state changes in This_Controller.
Note: This value is always 0 for a dual redundant configuration.
Example:
Suncity HSG80 10000002000 HSG80 (SP_MONITOR: MonitorSubsys)
This digit can have one of two values:
0—Everything is fine.
1—Failure of the controller in a single-controller configuration.
The Eighth Digit of the State Change Field (Communications LUN)
The eighth digit reports the state changes in the communications LUN.
Example:
CRITICAL: - Suncity HSG80 10000002000 HSG80 (SP_MONITOR:
MonitorSubsys)
CRITICAL: Unable to open device - hdisk1 (SP_MONITOR:
MonitorSubsys)
This digit can have one of three values:
0—Everything is fine.
1—Communications LUN is available to the host machine.
2—Communications LUN is not available to the host machine.
In this example, two email messages appear. The first message indicates that a
communications LUN changed state from good to bad. The second message
indicates that the Agent is unable to open the communications LUN for
monitoring the RAID system.
The Ninth Digit of the State Change Field (Other_Controller)
The ninth digit reports states changes in the Other_Controller.
63Command Console V2.5 User Guide
Page 64

Interpreting Agent Email Messages
Example:
WARNING: Suncity HSG80 10000000200 HSG80 (SP_MONITOR: MonitorSubsys)
This value never changes for a single controller configuration. It always changes
if either controller in a dual redundant configuration fails.
This digit can have one of three values:
0—Everything is fine.
1—Both controllers are functioning.
2—One of the two controllers failed.
Physically inspect the controllers to verify which one failed, as indicated by a
solid green indicator light (not blinking).
The 10th Digit of the State Change Field (External Factors)
The 10th digit indicates state changes caused by external factors.
Example:
WARNING: Suncity HSG80 10000000020 HSG80 (SP_MONITOR: MonitorSubsys)
This digit can have one of three values:
0—Everything is fine.
1—State changed from bad to good.
2—State changed from good to bad.
The 11th Digit of the State Change Field (Logical Units)
The 11th digit reports state changes in logical units.
Example:
WARNING: Suncity HSG80 10000000002 HSG80 lun(d100:3) (SP_MONITOR:
MonitorSubsys)
This digit can have one of three values:
0—Everything is fine.
1—A LUN state changed from bad to good.
2—A LUN state changed from good to bad.
64 Command Console V2.5 User Guide
Page 65

Interpreting Agent Email Messages
The details about the failure of the LUN follow in parentheses, in the format:
virtual_disk:state
where virtual_disk is the unit number of the virtual disk and state is any of the
following:
0—Good.
1—Reduced.
2—Reconstructing.
3—Failed.
In this example, logical unit D100 failed.
In most cases, the RaidManager sends at least two consecutive email messages.
The first message is always in the form:
--------------From RaidManager Tue Oct 6 16:09:37 1998
Date: Tue, 6 Oct 1998 16:09:37 -0500 (EST)
From: RaidManager
This is an automatic message from your StorageWorks
RAID Agent, steamd. The following message was just received.
Please check your syslog files and RAID box!
Hostname: Suncity
WARNING: - A RAID system change has been detected: Suncity HSG80
OVRL=1 (SP_MONITOR: MonitorSubsys)
End Of Automatic Message.
-------------
The text of the second message will be similar to the following (depending on the
error):
--------From RaidManager Tue Oct 6 16:09:37 1998
Date: Tue, 6 Oct 1998 16:09:37 -0500 (EST)
From: RaidManager
This is an automatic message from your StorageWorks
RAID Agent, steamd. The following message was just received.
Please check your syslog files and RAID box!
Hostname: Suncity
WARNING: - Suncity HSG80 12000000000 HSG80 disks(disk10200:1
disk10300:2) (SP_MONITOR: MonitorSubsys)
End Of Automatic Message.
-------------
65Command Console V2.5 User Guide
Page 66

Interpreting Agent Email Messages
Note: This example shows that disk10200 went from bad to good, and disk10300
went from good to bad.
66 Command Console V2.5 User Guide
Page 67

Using the Storage Window
Why Use the Storage Window?
The Storage window allows you to configure your storage subsystem. Use the
Storage window to do the following:
■ Configure the properties of the controller, host ports, and cache
■ Create the following RAID types:
— Striped device group (RAID 0)
— Mirrored device group (RAID 1)
— Striped mirrored device group (RAID 0+1)
— Striped parity device group (RAID 3/5)
— Individual device [JBOD (Just a Bunch of Disks)]
■ View the status of virtual disks, communications LUN, and battery
Storage Window Display
5
HP recommends that you use a minimum of SVGA (800x600) display resolution.
The Storage window requires a minimum amount of screen space to properly
display its contents. When you use VGA display resolution, screen space becomes
more limited.
If you must use VGA resolution, consider the following suggestions:
■ You may not be able to see the scroll bars on the bottom of the display. You
can use the Storage window's menu settings to remove the toolbar from the
display to make room for the bottom scroll bars.
■ If you are using the Client with a 24-device, high-availability enclosure, it
may be easier to configure the subsystem if you set the system type to Generic
for configuration purposes. Return the setting to High-Availability 24-Device
Pedestal for monitoring and viewing.
67Command Console V2.5 User Guide
Page 68

Using the Storage Window
Configuring a Controller
Your controller’s operating parameters are stored under six tabs in the Controller
Properties window, which you can access by one of two methods:
■ Double-clicking a controller icon in the Storage window
■ Right-clicking a controller icon in the Storage window and choosing
Properties.
A change in some controller settings requires that you restart. The program
prompts you to confirm the restart.
Modifying the General Properties of the Controller
The properties of the top and bottom controllers, such as type, serial number,
SCSI address, firmware revision, hardware revision, and common parameters are
stored under the General tab.
To configure the general properties of the controller, click the General tab. Refer
to step 12 for a description of each general property.
68 Command Console V2.5 User Guide
Page 69

Using the Storage Window
Table 12: General Tab in the Controller Properties Window
What You Can
Change
Enable Command
Console LUN alias
The Command Console LUN (CCL) appears as a virtual
device to your host. If your host allows device aliases, you
Description
can assign an alias to the CCL.
To use this feature, enable your CCL. Click the Enable box
and enter a name in the text box. Ensure the format of the
name follows the guidelines for your operating system.
Allocation class Use extreme caution when changing the setting of this field.
Caution: Changing the setting of the allocation
class of your controller may cause data corruption
and your host system may require restarting.
Enable autospare If a replacement policy is in place and autospare is enabled,
a failed drive will look for a spare drive. Check your legend
for icons that show the status of this process. To determine
whether a replacement policy is set, click the Settings tab in
the Virtual Disk Properties window.
Note that this option is not available on devices using RAID
0 or JBOD storage.
Time and date The controller uses the internal clock to time stamp event
logs and status messages.
Both the time and date fields must have values to change
either parameter. You cannot leave the date field blank.
Enable remote
copy mode
Enable remote copy mode activates remote copy for a
controller pair (subsystem). This feature requires you to first
enable remote copy mode for the controller.
To disable this feature, first remove all remote copy sets and
remote copy set connections from the Connections tab of the
Controller Properties window.
Remote copy mode The Remote copy mode field displays the name assigned to
the controller pair when remote copy was enabled. To
change the value for this field, you must first delete all
existing remote copy connections from the Connections tab
of the Controller Properties window.
69Command Console V2.5 User Guide
Page 70

Using the Storage Window
Viewing the Properties of the Host Port
The Host Ports tab displays the following information:
■ Port ID
■ Fibre Channel profile
■ Requested topology
■ Actual topology
■ Remote copy mode name that was assigned when remote copy was enabled
Modifying Properties of the Cache
The Cache tab provides the following information:
■ Write cache size
■ Cache version
■ Cache status
■ Unflushed data in cache
■ Cache flush time (seconds)
■ Cache uninterruptible power supply (UPS) settings
■ Enables mirrored cache
Confirm the following:
■ Cache flush_time: (seconds): is 10
■ No UPS is selected
Note: The controller requires that read-ahead cache mode is enabled before you can
enable write-back cache mode.
Viewing the Communications LUN
Click the Communications LUN tab to display the properties of the CCL. If the
CCL (SWCC virtual LUN) is disabled, the options under this tab are unavailable.
For more information about Floating and Fixed options and about the CCL, see
Appendix A.
70 Command Console V2.5 User Guide
Page 71

Modifying the Connection Properties
Click the Connections tab to modify the connection properties, shown in
Tabl e 13.
Table 13: Connections Tab in the Controller Properties Window
What You Can Change Description
Connection name The connection name is a unique string of
alphanumeric or punctuation characters that identifies
a connection between a host bus adapter and the
HSxxx controller. The host performs a Fibre Channel
bus scan when it receives notification of a change to
the fabric. As part of its device discovery process, the
host then identifies the HSxxx as a SCSI device and
login to the HSxxx controller. As the host performs the
logs into, the HSxxx controller allocates an entry in the
host connections table and assigns a connection name
to the new connection. Subsequent logins by the host
will use this same connection name and entry.
Controller-produced connection names take the form
“!NEWCONN
decimal integer. This string format is not allowed for
user-created connections.
Operating system You can set your controller to operate with a variety of
operating systems. Refer to the release notes for
operating systems compatibility.
Unit offset A decimal integer used to determine the LUN address
of a virtual disk on a specific connection. Offsets can
range from decimal 0-199.
Delete You can delete a connection by placing a check in the
delete box. After placing a check in one or more of the
boxes, click the Delete button. A confirmation dialog
window opens listing the connections to be deleted.
Click the OK button to delete. A confirmation message
is displayed when the deletion is complete.
Using the Storage Window
nn
”, w here nn is a two-character,
Note: Only connections on the current page can be
deleted (a maximum of 8).
71Command Console V2.5 User Guide
Page 72

Using the Storage Window
Viewing Properties of the Battery
The Battery tab provides the following information:
■ The state of the battery
■ The expiration date of the battery
Creating Virtual Disks
You can use the Virtual Disk Wizard to create different types of logical storage
units (called virtual disks) on your subsystem.
You can create the following types of virtual disks:
■ Single-device virtual disks (JBODs)
■ Striped virtual disks (RAID 0)
■ Mirrored virtual disks (RAID 1)
■ Striped mirrored virtual disks (RAID 0+1)
■ Striped parity virtual disks with parity across all drives (RAID 3/5)
Note that the capacity of the smallest member, not the largest, determines the
maximum capacity of RAID-based virtual disks.
■ The maximum capacity of RAID 0 virtual disks is equal to the number of
members times the capacity of the smallest member.
■ The maximum capacity of RAID 1 virtual disks is equal to the capacity of the
smallest member.
■ The maximum capacity of RAID 0+1 virtual disks is equal to the number of
members in one stripe times the capacity of the smallest mirrorset member.
■ The maximum capacity of RAID 3/5 virtual disks is equal to the number of
members minus one times the capacity of the smallest member.
Before you can create virtual disks from a physical device, your controller must
know of the device. You can add devices online without restarting the controller.
This procedure describes how to add a physical device before you create a virtual
disk.
To add a physical device and then create a virtual disk, follow these steps:
1. From the Navigation window, open a Storage window within a desired
subsystem.
2. Click Storage > Device > Add in the Navigation window.
72 Command Console V2.5 User Guide
Page 73

Using the Storage Window
3. If there is no user input in the Storage window within an hour, you are
prompted to enter a password. Type the SWCC password in the Security
Check window and click OK.
The SWCC password was created when you installed the Agent. To change
the password, open the Agent Configuration utility on the agent system (host).
4. Select the type of virtual disk that you want to create, and click Next in the
Add Virtual Disk Wizard – Step 1 of 5 window.
5. Select the physical devices to include in the virtual disk by clicking them in
the Available Storage field in Add Virtual Disk Wizard – Step 2 of 5
window.
As you click a physical device, it is added to the Selected Devices field. If
you selected JBOD in the previous step, you can select only one device.
6. Click Next.
You see th e Add Virtual Disk Wizard – Step 3 of 5 window.
7. Type the capacity of the virtual disk in the Capacity for Virtual Disk field,
and click Next in the Add Virtual Disk Wizard – Step 3 of 5 window. This
window provides you with the maximum and minimum megabytes that you
can choose for a capacity.
8. Type the unit number, operating parameters, and options for the virtual disk,
and then click Next. To save the controller configuration, choose the Save
controller configuration to virtual disk setting in the Add Virtual Disk
Wizard – Step 4 of 5 window.
Note: Saving the configuration to disk in a redundant controller configuration is not
supported and can cause unexpected controller behavior.
Virtual disks based on partitions on any container are all closely related because they
all share the same target and operating parameters of the container. If you change
any of this information for one partition on the container, all the partitions on that
container are changed.
9. The Add Virtual Disk Wizard – Step 5 of 5 window – displays the
selections that you made in steps 1-4.
10. If you are satisfied with your choices, click Finish to create the virtual disk.
73Command Console V2.5 User Guide
Page 74

Using the Storage Window
Note: The time required to initialize a virtual disk depends on the number of members
and its size. During initialization, the virtual disk is unavailable for I/O. You should
not use the virtual disks until initialization is complete.
After creating a virtual disk, you must perform additional steps to properly
configure your operating system. See "Configuring the Operating System to
Recognize Virtual Disk Changes", page 77, for more information.
74 Command Console V2.5 User Guide
Page 75

Deleting Virtual Disks
The virtual disks in your subsystem are logical units that contain your user data.
Although virtual disks do not exist in a physical sense, their logical structure ties
together the physical pieces of your data spread across the members. When
deleting a virtual disk, use extreme caution in order to prevent deleting valuable
user data.
To delete a virtual disk:
1. Do one of the following:
— From Windows NT 4.0, use Disk Administrator to delete the partition.
— From Windows 2000 and Windows Server 2003, use Disk Management
to delete the partition.
— From UNIX or OpenVMS, ensure that any file systems that were
mounted on the device are unmounted and removed. If the drive was part
of a logical volume, remove the device from the logical volume system.
2. Click the icon of the virtual disk that you want to delete.
3. Choose Storage > Virtual Disk > Delete in the Storage window.
4. If the Client prompts you for your password, enter it.
5. When the Client prompts to confirm the change, click Ye s to continue. The
Client deletes your virtual disk from your configuration and refreshes the
Storage window.
Using the Storage Window
After deleting a virtual disk, you must perform additional steps to properly
configure your operating system. See "Configuring the Operating System to
Recognize Virtual Disk Changes", page 77, for more information.
75Command Console V2.5 User Guide
Page 76

Using the Storage Window
Modifying Virtual Disks
You can modify the characteristics of your virtual disks in two ways:
■ Change their operating characteristics
■ Remove their members
Caution: Use extreme caution when modifying the characteristics of a virtual
disk. You may be putting valuable user data at risk.
You can change the characteristics of a virtual disk by accessing its property
sheets.
To access the property sheets of a virtual disk, refer to Tab le 14 and do one of the
following:
— Double-click the virtual disk icon .
— Right-click a virtual disk icon and choose Properties.
Table 14: Virtual Disk Properties Window
Tab Information
General Lists the characteristics of the virtual disk.
Settings You can change chunk size, reconstruction rate,
replacement policy, and maximum cached transfer blocks.
You can also enable or disable write-back cache by
clicking the checkbox. Click OK to save the changes and to
exit.
Note: The controller requires that read-ahead cache mode
is enabled before you can enable write-back cache mode.
Membership Displays the member devices.
Can view a device by name and its current state, channel,
target, and capacity.
76 Command Console V2.5 User Guide
Page 77

Using the Storage Window
Configuring the Operating System to Recognize Virtual Disk Changes
The Client does not perform all of the system configuration necessary to make
your subsystem's virtual disks visible to the user in the operating system.
When you create or delete virtual disks using either the Command Line Interface
(CLI) or Client, you are adding or removing “disks” in the subsystem in a manner
similar to plugging or unplugging physical disk drives on the host bus. In either
case, there are certain operating system configuration actions you must perform to
make these “disks” visible or invisible to the operating system's file system.
Windows NT/Windows 2000/Windows Server 2003 Configuration
On a Windows NT, Windows 2000, or Windows Server 2003 host, after you
create or delete a virtual disk, you must perform the following steps to properly
configure the file system to recognize your changes:
1. Start the host system. This action has the effect of forcing the Disk
Administrator or Disk Management to recognize added virtual disks as raw
disks, available for use. Deleted virtual disks are no longer present.
2. Create file system partitions on your disks. When you create a virtual disk in
the controller, you can partition it at the controller level in any way you wish
as long as you create at least one partition per disk. Each of the
controller-level partitions you create becomes a virtual disk, visible to the
host. In Disk Administrator, you must create partitions on these newly added
virtual disks at the Windows NT file system (NTFS) level.
3. After you create partitions on your drives in Windows NT, Windows 2000, or
Windows Server 2003, the file system assigns each drive a unique drive letter.
Make a note of the drive letters assigned.
4. Format your disks. You must format each newly added disk.
5. Start the Agent Configurator by double-clicking its icon in the Command
Console Start Menu group.
6. Navigate through the menus until a popup appears, prompting you to scan
your subsystems. Click Ye s to perform the scan and display a list of
subsystems.
7. Make sure that the access device you have been using for your subsystem still
exists. If you inadvertently deleted it, you must assign another device in its
place. If no access device exists, the Client cannot communicate with your
subsystem unless the CCL is used.
77Command Console V2.5 User Guide
Page 78

Using the Storage Window
8. Click Next until you can exit the configurator.
9. Choose the Services option in the Windows Control Panel for Windows NT,
or Computer Management in Administrative Tools for Windows 2000 and
Windows Server 2003.
10. Scroll down to highlight the Steam entry.
11. Click Stop and wait for a prompt indicating that the service is halted.
12. Click Start and wait for a prompt indicating that the service is started.
13. Exit Control Panel.
Windows NT, Windows 2000, and Windows Server 2003 now recognizes any
changes you made in your virtual disk configuration.
UNIX-Based Configuration
On a UNIX-based host, after you create or delete a virtual disk using the Client or
CLI, you must perform the following steps to properly configure the UNIX file
system to recognize your changes:
1. Restart the host system. This action has the effect of forcing the file system to
recognize added virtual disks as raw disks available for use. Deleted virtual
disks are no longer present.
2. (Optional) Create file system partitions on your disks. When you create a
virtual disk in the controller, you have the option to partition it at the
controller level in any way you wish. Each of the controller-level partitions
you create becomes a virtual disk, visible to the host.
3. Afterward, if you desire, you can partition these newly added virtual disks at
UNIX's file system level. Use the appropriate commands for your operating
system version to perform this task. Once you have partitioned your drives in
UNIX, the file system assigns each drive a unique drive identifier.
4. Stop and Restart the Agent. Using the Agent configuration script, you must
stop and restart the Agent running on your UNIX host, using the configuration
program. In the program, you must choose the option to create a new
storage.ini file. This action updates the Agent to recognize any virtual disk
changes you have made.
78 Command Console V2.5 User Guide
Page 79

Using the Storage Window
Setting Passwords and Security Options (Network Only)
Password security prevents unauthorized users from changing or removing
storage configurations. In SWCC, the following operations require a password:
■ Changing controller configuration
■ Changing virtual disk configuration
■ Changing device settings
Security Options
The two security options, View Only and Make Changes, are available from the
Storage Window Options menu.
Password Security
You create a password when you install the HS-Series Agent on a system. The
password is encrypted and stored in the file where the Command Console Agent
resides. To set or change a password, use the Agent Configuration menu.
Command Console allows a user with a valid password to make configuration
changes for one hour. If an hour elapses without user input, the Command
Console resets itself to View only. Any configuration change resets the timer and
keeps the current password active for one hour.
79Command Console V2.5 User Guide
Page 80

Using the Storage Window
Managing and Creating Spare Devices
Making a spare device part of a virtual disk lets you protect the integrity of the
RAID setup. A spare is especially important for virtual disks that have RAID
requirements of two or more devices. If one device fails, the virtual disk instantly
and automatically activates the spare device as a replacement.
A spare works as follows: if a device fails in a RAID 1, RAID 0+1, or RAID 3/5
virtual disk, the spare automatically replaces the failed device and the controller
reconstructs all virtual disks of which the failed device was a member.
After the controller writes data to a spare, the spare becomes part of the same
device group in which a device failed.
Creating a Spare Device
To create a spare device:
1. In the Storage window, click the device that you want to use as a spare. For an
automatic failed drive replacement, the device must be available and have a
capacity equal to or greater than the lowest capacity drive in the group.
2. From the Storage menu, choose Device, and then choose Make Spare.
Clearing Failed Devices
In the Storage window, the icon of a failed device is displayed with an X covering
it.
To clear the failed device:
1. From the Storage menu, choose Device.
2. Then choose Delete.
80 Command Console V2.5 User Guide
Page 81

Using Configuration Files
You can use a configuration file to save a subsystem configuration and view or
reconstruct it at another time. You can revert to a saved configuration at any time.
The Client reads the configuration file that you choose and sets up your subsystem
accordingly.
Saving Configuration Settings to a File
To save the configuration settings for a subsystem:
1. Click Storage > Controller Configuration > Save.
2. Follow the instructions on the screen.
The current configuration settings, including caches, LUNs, host port, and stripe
size, are saved to a file at the location that you specify.
Restoring Configuration Settings from a File
You can restore your entire subsystem from a saved configuration file. The Client
can restore your subsystem only if the configuration file corresponds to your
subsystem’s hardware configuration and if all of the controllers are attached to a
serial connection.
Using the Storage Window
Caution: Be aware of the configuration information in the configuration file
that you choose. If you choose a file that is incompatible with the current
configuration of data on your devices, you put your data at risk.
To restore your subsystem from a saved configuration file:
1. Choose one of the displayed options:
— If you need to reconfigure a failed controller that has existing virtual
disks, choose Load configuration only. The Client recreates your virtual
disks, but it does not initialize them. Your data is not overwritten.
— If you are configuring a new system, choose Load configuration and
initialize virtual disks.
2. Click OK.
3. When the Open dialog box displays, specify the location (path) and file name
in the text box, and then click Open.
81Command Console V2.5 User Guide
Page 82

Using the Storage Window
The configuration settings, such as caches, LUNs, host port, and stripe size,
are restored.
Caution: If the original hardware and connections are replaced or are not
saved before making new changes, you cannot restore the original
configuration settings.
82 Command Console V2.5 User Guide
Page 83

Understanding the Icons
You can obtain a definition of the icons by clicking View > Legend in the Storage
window.
The Storage window provides detailed information in both physical and logical
views of a subsystem in the Storage window. In each view, icons represent device
and virtual disk states. These icons change to indicate status. An X through a
device indicates device failure. The Storage window status bar indicates power,
fan, temperature, and battery states.
Table 15: Description of Icons in the Storage Window Status Bar
Icon Description
Indicates that the cabinet fans are all operating normally
Indicates that there is a problem with the cabinet fans
Indicates that the cabinet temperature is within its acceptable
range
Indicates that the cabinet temperature is out of its acceptable
range
Using the Storage Window
Indicates that all power supplies are operating normally
Indicates that the cache backup batteries are fully charged and
operating normally
Indicates that there is a low charge condition on the cache backup
batteries
Indicates that the cache backup batteries have failed or are
discharged
83Command Console V2.5 User Guide
Page 84

Using the Storage Window
CLI Window
The CLI is a text-based interface utility for monitoring and configuring your
storage subsystem. Because the configuration of the storage subsystem can be
changed using CLI commands, HP recommends that you allow CLI access only to
users who are familiar with CLI operation.
The CLI window, as shown in Figure 11 has a command-entry area and a
command-response area below it. You can enter commands in the command-entry
area, and the controller responds with the results of the entry in the response area.
Figure 11: CLI Window
84 Command Console V2.5 User Guide
Page 85

CLI Functions
Using the Storage Window
There are some functions available in the CLI that are not available in SWCC.
■ If you wish to use your controller's multiple-bus failover mode, you must
enable and control that function with the CLI.
■ If you wish to use virtual disk preferences in multiple-bus failover mode, you
must set your virtual disk preferences with the CLI when you set the failover
mode.
85Command Console V2.5 User Guide
Page 86

Using the Storage Window
86 Command Console V2.5 User Guide
Page 87

Integrating SWCC with Insight Manager
You can use the HSGxx Storage windows within Insight Manager V4.23 or later
to monitor and manage the controllers. If your HSGxx controller uses Array
Controller Software (ACS) V8.5 or later, you need to install the integration patch
(HSG80 Shim). HSG80 Storage Window V2.4 is required to run the integration
patch.
6
87Command Console V2.5 User Guide
Page 88

Integrating SWCC with Insight Manager
Installing the Integration Patch
To install the integration patch:
1. Verify that the HSGxx Storage Window for ACS V8.5 or later is installed by
looking in Add/Remove Programs. Click Start > Settings > Control Panel >
Add/Remove Programs.
2. Verify that the HSG80 Storage Window V2.4 is installed by looking in
Add/Remove Programs (HP StorageWorks HSG80 V2.4).
3. Verify that Insight Manager V4.23 or later is installed.
4. Install the integration patch from the Solution Software CD-ROM by
double-clicking setup.exe in the top-level directory. The SWCC Setup
window opens.
5. Choose HSG80 Controller Shim. If you do not have the HSG80 Storage
Window V2.4, also choose HSG80 Controller.
6. Click Next.
The patch is installed in the same location as the original SWCC installation.
88 Command Console V2.5 User Guide
Page 89

Integrating SWCC with Insight Manager
Integrating the HSGxx Storage Window with Insight Manager
To open an HSGxx Storage window:
1. Look in Add/Remove Programs in the Control Panel to verify that the
following are installed:
— The HSGxx Storage Window for ACS 8.5 or later (required to open the
correct Storage Window for your firmware).
— The HSG80 Storage Window 2.4 (HP StorageWorks HSG80 V2.4). The
integration patch uses files in this program.
— Insight Manager 4.23 or later.
— Insight Manager integration patch (HSG80 Insight Manager Shim).
2. Verify that you have installed the Insight Manager Agent and the
StorageWorks Command Console HS-Series Agent on the same computer.
3. Add the name of the client system running Insight Manager to the Agent’s list
of client system entries and choose SNMP as a notification scheme.
4. Open Insight Manager.
5. To open the Server window, click the device that you want to observe in the
Insight Manager Navigation window.
6. Click Mass Storage in the Server window. The Insight Manager Navigation
tree is displayed.
7. Expand the Navigation tree to display Storage System Information.
8. Double-click Storage System Information. You are given the status of the
system.
9. Click Launch. The Storage window opens.
89Command Console V2.5 User Guide
Page 90

Integrating SWCC with Insight Manager
Insight Manager Unable to Find the HSGxx Storage Window
If you install Insight Manager before you install SWCC, Insight Manager will not
be able to find the HSGxx Storage Window.
You can correct the problem by following these steps:
1. Click Start > Settings > Control Panel and then double-click the Insight
Agents icon.
A window opens showing you the active and inactive Agents under the
Services tab.
2. Highlight the entry for Fibre Array Information and click Add.
The Fibre Array Information entry is moved from Inactive Agents to Active
Agents.
Removing the Integration Patch Disables Storage Window
If you remove the integration patch, HSG80 Storage Window V2.4 will not work.
You will have to reinstall HSG80 Storage Window V2.4. The integration patch
uses some of the same files as the HSG80 Storage Window V2.4.
90 Command Console V2.5 User Guide
Page 91

Troubleshooting
Troubleshooting Connection Problems
SWCC is a TCP/IP socket-based application. As a result, SWCC requires that
each node running a SWCC Client or Agent has access to a valid hosts file or
Domain Name Service (DNS) server. Minimally, the valid hosts file must include
the system itself and all systems running the SWCC Client and Agent.
Invalid Network Port Numbers During Installation
During the Client or Agent installation, you may experience an error if the
installation program cannot find an acceptable pair of network port numbers.
Your Client uses Windows sockets (sometimes called “network ports”) to
communicate with its Agents. The socket numbers at the Client and Agent ends
must match for network communication to occur.
In Windows NT, Windows 2000, and Windows Server 2003, the socket numbers
are assigned in the services file in the
subdirectory. In UNIX-based systems, the socket numbers are assigned in the
services file in the
conflict with the socket numbers, you may edit the file manually.
/etc subdirectory. In the unlikely event that you experience a
\winnt\system32\drivers\etc
7
There are two default socket numbers, one for Command Console (4998) and the
other for the HS series Client and Agent (4999). If you are installing the Client or
Agent and these numbers are already taken by another application, the installation
program prompts to warn you that you must choose another pair.
To choose another pair for the Client, open the file containing the sockets in an
ASCII editor. Choose two numbers above 1023 that are not already used in the
file, and add the following two lines:
spgui number1/tcp # StorageWorks® Command Console
spagent number2/tcp # StorageWorks® Command Console
Note that the port numbers that you choose must match the port numbers used by
all of the Clients that connect to your Agent.
91Command Console V2.5 User Guide
Page 92

Troubleshooting
Network Port Assignments for UNIX-Client/Server Systems
A UNIX host may use Network Information Services (NIS) to serve the services
file containing its network port assignments.
The Agent must use the services file to determine which network ports to use.
Because of this requirement, you may need to configure your system so that the
Agent can access the proper services file.
You have two options to prevent a conflict between the two possible locations of
the services file. See your particular Agent guide for more information.
DHCP and WINS
SWCC does not support the DHCP or the WINS; however, you can still use these
protocols on systems that do not run the Command Console.
First, verify that your network is running:
■ For Windows NT, Windows 2000, or Windows Server 2003, run netstat at
the command prompt on the Agent and check the active TCP/IP connections.
■ For UNIX, run netstat with the correct options. Reference netstat man
pages in UNIX help information.
■ For other operating systems, refer to the operating system documentation.
To determine whether your system is using DHCP or WINS on Windows NT 4.0:
1. Right-click Network Neighborhood on the desktop.
2. Select Properties.
3. Click the Protocols tab.
4. Select TCP/IP, and then click Properties. The Microsoft TCP/IP Properties
window opens.
To determine whether your system is using DHCP or WINS on Windows 2000 or
Windows 2003:
1. Right-click My Network Places on your desktop.
2. Select Properties.
3. In the Network and Dial-up Connections window which opens, right-click
the connection to be used by SWCC.
4. Select Properties.
5. Select Internet Protocol (TCP/IP), then click Properties.
92 Command Console V2.5 User Guide
Page 93

The Microsoft TCP/IP Properties window opens.
Connecting Via the Host SCSI Port
The Client may indicate that it cannot find your subsystem if you attempt to
connect with the host SCSI port by using Windows NT, Windows 2000, or
Windows Server 2003 in either of the following situations:
■ An HP StorageWorks controller subsystem is not connected to the host.
■ An HP StorageWorks controller subsystem is connected to the host, but the
subsystem uses SCSI-2 mode and has no virtual disks configured on it with
CCL disabled.
If you are using SCSI-2 mode and Windows NT, Windows 2000, or Windows
Server 2003, you must disable the Command Console LUN and create a virtual
disk by using a serial connection. See "Enabling and Disabling the CCL",
page 107, for more information.
Because the Agent uses a SCSI host bus connection to its subsystems, the same
rules mentioned above also apply.
“Access Denied” Message
Troubleshooting
This section describes some common reasons for a Client to receive an “Access
Denied” message when you add an agent system to the Navigation tree.
Aliases Not Checked
Ensure that the Agent’s host system is configured to recognize the Client by its
assigned name rather than by an alias. If the host system has been configured to
recognize the Client by an alias, remove the alias from the system’s hosts file.
When SWCC Agents scan the Client authorization list, they do not check aliases.
SWCC will not scan the hosts alias list to verify if an alias matches the Client
authorization list.
Entry in the Client Authorization List Does Not Match
You may see an “Access Denied” message if the name of the client system that
you entered in the Agent configuration utility does not match the one for DNS or
the one in the agent system’s hosts file. The hosts file on Windows NT 4.0,
Windows 2000, and Windows Server 2003 is at
\winnt\system32\drivers\etc.
93Command Console V2.5 User Guide
Page 94

Troubleshooting
Your system may be configured to do one the following:
■ Check local hosts file first, and then go to DNS (most common setup for
Windows NT, Windows 2000, and Windows Server 2003).
■ Go to DNS first, and then check local hosts file.
■ Ignore DNS even if configured.
■ Ignore the local hosts file.
To determine your system configuration for Windows NT:
1. Right click Network Neighborhood (on the desktop).
2. Choose Properties.
3. Click the Protocols tab.
4. Choose TCP/IP, and then click Properties.
The Microsoft TCP/IP Properties window opens.
5. Click the WINS Address tab. If your computer uses DNS, the Enable DNS
for Windows resolution option is selected; you do not need to have Enable
LMHOSTS Lookup selected.
If WINS servers are available on the network, the
LMHOST file can be used.
SWCC does not support WINS.
6. To determine the IP address for the system, click the IP Address tab in the
Microsoft TCP/IP Properties window.
7. To determine the full name of the system, click the DNS tab.
To determine your system configuration for Windows 2000, and Windows Server
2003:
1. Right-click My Network Places on your desktop.
2. Select Properties.
3. In the Network and Dial-up Connections window which opens, right-click
the connection to be used by SWCC.
4. Select Properties.
5. Select Internet Protocol (TCP/IP), then click Properties.
The Internet Protocol (TCP/IP) Properties window opens.
6. Click Advanced.
The Advanced TCP/IP Settings window opens.
7. Click the WINS tab.
94 Command Console V2.5 User Guide
Page 95

8. Click the WINS Address tab. If your computer uses DNS, you do not need to
have Enable LMHOSTS Lookup selected.
Note: If WINS servers are available on the network, the LMHOST file can be used.
SWCC does not support WINS.
9. Check the General tab in the Internet Protocol (TCP/IP) Properties
window to determine the IP address for the system,.
10. Click the DNS tab in the Advanced TCP/IP Settings window to determine
the full name of the system.
For other operating systems
Generally, the entry for an Agent in the Client authorization list must match what
gethostbyaddr(<client IP address>) returns in the hosts agent h_name field if
gethostbyaddr(<client IP address>) is executed on the Agent system. If the hosts
files names on all systems are not identical, the
different Agent systems. For example,
xxx.xxx.xxx.xxx client.somewhere.com client
Troubleshooting
h_name returned may vary on
returns client.somewhere.com in the h_name field, but
returns client in the h_name field.
The best way to determine what to use for a Client name in the Client
authorization list is to write a program that runs on the Agent system and prints
the
Multiple Agents
If the Agent system is running multiple SWCC Agents (for example, to support
different controller types), the client system must be authorized for all Agents. If
the client system is missing from any authorized Client list of an Agent, that
Agent cannot be added to the Navigation tree.
xxx.xxx.xxx.xxx client client.somewhere.com
h_name field returned by gethostbyaddr(<client IP address>).
95Command Console V2.5 User Guide
Page 96

Troubleshooting
Adding New System by Using Internet Protocol Address May Cause Client to Stop Responding
The SWCC Client may stop responding if you attempt to add a system by using
the agent system’s IP address rather than its node name. This occurs when the
client system does not have a DNS server configured that knows the agent system,
and the agent system is not included in the client system’s hosts file. To correct
this situation, add the agent system to the hosts file on the client system.
If you receive an “Invalid host” or “Host not known” message when you attempt
to connect to an agent system, do not enter the IP address. Correct your DNS
server configuration. If it is correct, confirm that the DNS server knows the agent
system. If you are not using DNS, verify the agent system is in the client system’s
hosts file.
“No Agent Running” Message When Adding System to the Navigation Tree
While attempting to add a new system to the Navigation tree, you may see the
message “No Agent running on specified system.” This message may appear for
several reasons. The following are the most likely:
■ The wrong system name was entered.
■ The Agent was not installed on the entered system.
■ The Agent was installed on a system that stopped functioning.
■ Client and Agent port names and numbers in the services file may not match.
This may occur if the default value for an SWCC port was already in use. See
"Invalid Network Port Numbers During Installation", page 91, for more
information.
■ The specific Client required to support an Agent is not installed. For example,
if the Agent system has only a KZPCC Agent and the client system has only
an HSZ22 Client, the “No Agent Running” message is displayed.
To verify that there is Client support for an Agent, look at the following
registry key:
HKEY_LOCAL_MACHINE\Software\DigitalEquipmentCorporation\Command
Console\AppletManager
You should see a series of keys for supported products.
■ Make sure the system names used for the Client and the Agent match exactly.
As a general rule, use lowercase letters when entering names.
96 Command Console V2.5 User Guide
Page 97

Troubleshooting
■ You entered the host name in the \winnt\system32\drivers\etc\hosts
file. The host name is not required here, but TCP/IP looks at this file first to
resolve a host name.
97Command Console V2.5 User Guide
Page 98

Troubleshooting
Troubleshooting the Client
Authorization Error When Adding an Agent System
If you receive an authorization error when you add an agent system to the
Navigation tree, your client system may be missing from the Agent’s list of client
system entries. If you have more than one type of Agent installed on that agent
system, the name of your client system is displayed on each Agent’s list of client
system entries.
Cannot Open Storage Window
If you cannot open a Storage window from the Navigation tree or in standalone
mode, the client system access option for the subsystem to which you want to
connect is probably set to Overall Status (0), disabling access to the Storage
window.
Client Hangs When LUN Is Deleted
If you delete the LUN that is used by the communication drive, you cannot
communicate with the controller. You must assign another LUN to the monitored
subsystem before deleting the original LUN.
If you disable the Command Console LUN, the Client may lose its connection
with the subsystem. If you need to disable the communications LUN, first assign
another LUN as the communications LUN.
CLI RUN Commands
Do not issue RUN commands in the CLI window. Instead, issue RUN commands
from a maintenance terminal connection.
Event Notification for Subsystems Connected to a Client System
To use the event notification features, an Agent must be installed and running.
Create a local network connection by running the Client and Agent on the same
Windows NT/2000/Windows Server 2003 host computer. Install each component
as if the Client were running on a remote system.
98 Command Console V2.5 User Guide
Page 99

Invalid or Missing Fault Displays and Event Logs
Invalid or lost notifications may occur when the client system loses connection
with a subsystem. The client system receives notification about most of the
changing subsystem faults at monitored intervals. If the client system no longer
receives notification about subsystem faults, then changes to that subsystem will
not appear in the client system’s Navigation tree, Storage window (if applicable),
Fabric window (if applicable), and Event Viewer.
For example, while client system’s connection with a subsystem is broken, you
will not receive event logs about that subsystem, except the lost connection
notification.
The following list describes common causes for lost connections. After you fix
the physical and/or software problem that is listed below, you need to close and
reopen the Storage window for that subsystem to get its latest status.
■ RAS connections—Remote Access Service (RAS) connections are not
full-time. If no RAS connection exists, events are not logged to the Event
Viewer Application Log.
■ Serial controller connections—There may be a bad or missing serial cable. To
correct this situation, replace or plug in the cable.
■ Network connections—Agent may be missing or not running.
■ Network connections—There may be network discontinuity.
■ The Agent may not be properly configured for a client system.
Troubleshooting
■ If your setup includes a controller, the controller may have halted, reset, or
hung. To repair the situation, restart or replace the controller.
■ If your setup includes virtual disks, the virtual disk used for communicating
with the subsystem is no longer available.
Pager Notification Continues After Exiting the Command Console Client
You may have noticed continuous pager notification in response to subsystem
faults, even though you have exited the Command Console Client. This behavior
is normal.
AES runs as a service under Windows NT, Windows 2000, and Windows Server
2003. It continues to run after you exit the Command Console Client. AES
communicates with Agents and activates paging when a subsystem event occurs.
To stop pager notification, stop AES. For information about stopping AES, see
Chapter 2.
99Command Console V2.5 User Guide
Page 100

Troubleshooting
Reconfiguration After Controller Replacement
If you replace a controller in your subsystem, you must reconfigure your Agent’s
storage list to match the new hardware.
Some Graphics Do Not Scale Well with Large Fonts
Display small fonts when using the Client. Some graphics do not scale as well if
large fonts are used.
Starting Client from the Command Prompt
To start the Client with network connections from the command prompt, enter the
following at the command prompt on the Client system:
\path_to_client_directory\swcc.exe -d your_host_system
your_host_subsystem
where -d your_host_system your_host_subsystem is an optional set of
parameters that enables you to specify a system and a subsystem to start the
Client.
For example:
C:\>\Program Files\Compaq\SWCC\swcc.exe -d hostsystem subsystem
If you specify these parameters when the Client opens, the system is selected and
the subsystem is displayed in the Storage window. If the Client is not already
aware of the system and the subsystem, it adds them to the Navigation tree.
Warning Message Windows
You may see warning messages, such as “Command Execution Error” along with
detailed information. These messages indicate problems with the controller, rather
than with the software. The controller is responding to problems in parsing and
executing commands from the Client and Agent.
Virtual Disk Recovery from a Configuration File
If you delete a virtual disk, all the member drives are re-initialized and data is lost.
You cannot restore a virtual disk’s data by changing the configuration. A
configuration file contains information about only the structure of a virtual disk it does not store data.
100 Command Console V2.5 User Guide
 Loading...