

Page 1

hp StorageWorks
enterprise volume manager (multi-OS)
network administration guide
Part Number: AA–RR0VB–TE
Second Edition (August 2002)
Product Version:
Product Version: EVM Server V2.0D
Product Version:Product Version:
This document describes the planning and operations required to
establish, configure, update, and maintain an EVM network.
Page 2

© Hewlett-Packard Company, 2002. All rights reserved.
Hewlett-Packard Company makes no warranty of any kind with regard to this material, including, but
not limited to, the implied warranties of merchantability and fitness for a particular purpose.
Hewlett-Packard shall not be liable for errors contained herein or for incidental or consequential
damages in connection with the furnishing, performance, or use of this material.
This document contains proprietary information, which is protected by copyright. No part of this
document may be photocopied, reproduced, or translated into another language without the prior
written consent of Hewlett-Packard. The information contained in this document is subject to change
without notice.
HP, HP-UX, the Hewlett-Packard logo, OpenView, Compaq, the Compaq logo, SANworks,
StorageWorks, Secure Path, Tru64, TruCluster, and OpenVMS are trademarks of Hewlett-Packard
Company in the U.S. and/or other countries.
Microsoft, Windows, and Windows NT are trademarks of Microsoft Corporation in the U.S. and/or
other countries.
UNIX is a trademark of The Open Group in the U.S. and/or other countries.
All other product names mentioned herein may be trademarks of their respective companies.
Confidential computer software. Valid license from Hewlett-Packard required for possession, use or
copying. Consistent with FAR 12.211 and 12.212, Commercial Computer Software, Computer
Software Documentation, and Technical Data for Commercial Items are licensed to the U.S.
Government under vendor's standard commercial license.
Hewlett-Packard Company shall not be liable for technical or editorial errors or omissions contained
herein. The information is provided “as is” without warranty of any kind and is subject to change
without notice. The warranties for Hewlett-Packard Company products are set forth in the express
limited warranty statements accompanying such products. Nothing herein should be construed as
constituting an additional warranty.
Hewlett-Packard service tool software, including associated documentation, is the property of and
contains confidential technology of Hewlett-Packard Company or its affiliates. Service customer is
hereby licensed to use the software only for activities directly relating to the delivery of, and only
during the term of, the applicable services delivered by Hewlett-Packard or its authorized service
provider. Customer may not modify or reverse engineer, remove, or transfer the software or make the
software or any resultant diagnosis or system management data available to other parties without the
consent of Hewlett-Packard Company or its authorized service provider. Upon termination of the
services, customer will, at the option of Hewlett-Packard or its service provider, destroy or return the
software and associated documentation in its possession.
Printed in the U.S.A.
Enterprise Volume Manager (Multi-OS)
Network Administration Guide
Second Edition (August 2002)
Part Number: AA–RR0VB–TE
Page 3

Contents
About this Guide
Audience . . . . . . . . . . . . . . . . . . . . . . . . . . . . . . . . . . . . . . . . . . . . . . . . . . . . . . . . . . . . . xiii
Related Documentation . . . . . . . . . . . . . . . . . . . . . . . . . . . . . . . . . . . . . . . . . . . . . . . . . . xiv
Typographical Conventions. . . . . . . . . . . . . . . . . . . . . . . . . . . . . . . . . . . . . . . . . . . . . . . xiv
Symbols in Text . . . . . . . . . . . . . . . . . . . . . . . . . . . . . . . . . . . . . . . . . . . . . . . . . . . . . . . . xiv
Getting Help. . . . . . . . . . . . . . . . . . . . . . . . . . . . . . . . . . . . . . . . . . . . . . . . . . . . . . . . . . . xv
HP Technical Support . . . . . . . . . . . . . . . . . . . . . . . . . . . . . . . . . . . . . . . . . . . . . . . . xv
HP Website . . . . . . . . . . . . . . . . . . . . . . . . . . . . . . . . . . . . . . . . . . . . . . . . . . . . . . . . xv
HP Authorized Reseller . . . . . . . . . . . . . . . . . . . . . . . . . . . . . . . . . . . . . . . . . . . . . . . . . . xv
1 EVM Version 2.0D Software
New EVM Features . . . . . . . . . . . . . . . . . . . . . . . . . . . . . . . . . . . . . . . . . . . . . . . . . . . . 1–1
EVM Version 2.0D Changes . . . . . . . . . . . . . . . . . . . . . . . . . . . . . . . . . . . . . . . . . . . . . 1–1
EVM Software . . . . . . . . . . . . . . . . . . . . . . . . . . . . . . . . . . . . . . . . . . . . . . . . . . . . . . . . 1–2
EVM V2.0D Software Kit. . . . . . . . . . . . . . . . . . . . . . . . . . . . . . . . . . . . . . . . . . . . 1–2
EVM V2.0D Update Software. . . . . . . . . . . . . . . . . . . . . . . . . . . . . . . . . . . . . . . . . 1–3
EVM Release History . . . . . . . . . . . . . . . . . . . . . . . . . . . . . . . . . . . . . . . . . . . . . . . . . . 1–4
2 Introduction to EVM
What Is EVM? . . . . . . . . . . . . . . . . . . . . . . . . . . . . . . . . . . . . . . . . . . . . . . . . . . . . . . . . 2–1
What the Management Appliance Does . . . . . . . . . . . . . . . . . . . . . . . . . . . . . . 2–2
What the EVM Server Does . . . . . . . . . . . . . . . . . . . . . . . . . . . . . . . . . . . . . . . 2–3
What an EVM Host Agent Does. . . . . . . . . . . . . . . . . . . . . . . . . . . . . . . . . . . . 2–3
3 Planning a New EVM Network
Determining the Purpose of the EVM Network. . . . . . . . . . . . . . . . . . . . . . . . . . . . . . . 3–1
Licenses . . . . . . . . . . . . . . . . . . . . . . . . . . . . . . . . . . . . . . . . . . . . . . . . . . . . . . . . . . . . . 3–1
EVM Host Licenses. . . . . . . . . . . . . . . . . . . . . . . . . . . . . . . . . . . . . . . . . . . . . . . . . 3–2
VCS Snapshot Licenses. . . . . . . . . . . . . . . . . . . . . . . . . . . . . . . . . . . . . . . . . . . . . . 3–2
Storage Systems Planning . . . . . . . . . . . . . . . . . . . . . . . . . . . . . . . . . . . . . . . . . . . . . . . 3–2
Enterprise Volume Manager (Multi-OS) Network Administration Guide iii
Page 4

Contents
HSG-based Storage Systems . . . . . . . . . . . . . . . . . . . . . . . . . . . . . . . . . . . . . . . . . . 3–2
HSV-based Storage Systems . . . . . . . . . . . . . . . . . . . . . . . . . . . . . . . . . . . . . . . . . . 3–3
EVM Server Planning. . . . . . . . . . . . . . . . . . . . . . . . . . . . . . . . . . . . . . . . . . . . . . . . . . . 3–3
Management Appliance and OSM. . . . . . . . . . . . . . . . . . . . . . . . . . . . . . . . . . . . . . 3–3
HSG and HSV Element Managers. . . . . . . . . . . . . . . . . . . . . . . . . . . . . . . . . . . . . . 3–3
EVM Host Computer Planning. . . . . . . . . . . . . . . . . . . . . . . . . . . . . . . . . . . . . . . . . . . . 3–4
Host Operating System, FCA/HBA and LAN. . . . . . . . . . . . . . . . . . . . . . . . . . . . . 3–4
HSG or HSV Solution Software . . . . . . . . . . . . . . . . . . . . . . . . . . . . . . . . . . . . . . . 3–4
Secure Path. . . . . . . . . . . . . . . . . . . . . . . . . . . . . . . . . . . . . . . . . . . . . . . . . . . . . . . . 3–4
Sample Worksheets . . . . . . . . . . . . . . . . . . . . . . . . . . . . . . . . . . . . . . . . . . . . . . . . . . . . 3–5
4 Updating an EVM Network
Determining the Purpose of the Update . . . . . . . . . . . . . . . . . . . . . . . . . . . . . . . . . . . . . 4–1
Overview of Update Steps . . . . . . . . . . . . . . . . . . . . . . . . . . . . . . . . . . . . . . . . . . . . . . . 4–2
License Updates . . . . . . . . . . . . . . . . . . . . . . . . . . . . . . . . . . . . . . . . . . . . . . . . . . . . . . . 4–2
EVM Host Licenses . . . . . . . . . . . . . . . . . . . . . . . . . . . . . . . . . . . . . . . . . . . . . . . . . 4–2
VCS Snapshot Licenses . . . . . . . . . . . . . . . . . . . . . . . . . . . . . . . . . . . . . . . . . . . . . . 4–3
Storage Systems Updates . . . . . . . . . . . . . . . . . . . . . . . . . . . . . . . . . . . . . . . . . . . . . . . . 4–3
Storage Systems Update Overview . . . . . . . . . . . . . . . . . . . . . . . . . . . . . . . . . . . . . 4–3
HSG-based Storage Systems . . . . . . . . . . . . . . . . . . . . . . . . . . . . . . . . . . . . . . . . . . 4–3
HSV-based Storage Systems . . . . . . . . . . . . . . . . . . . . . . . . . . . . . . . . . . . . . . . . . . 4–4
EVM Server Update . . . . . . . . . . . . . . . . . . . . . . . . . . . . . . . . . . . . . . . . . . . . . . . . . . . . 4–4
EVM Server Update Overview . . . . . . . . . . . . . . . . . . . . . . . . . . . . . . . . . . . . . . . . 4–4
EVM Server Update. . . . . . . . . . . . . . . . . . . . . . . . . . . . . . . . . . . . . . . . . . . . . . . . . 4–5
EVM Host Computer Updates . . . . . . . . . . . . . . . . . . . . . . . . . . . . . . . . . . . . . . . . . . . . 4–5
EVM Hosts Update Overview . . . . . . . . . . . . . . . . . . . . . . . . . . . . . . . . . . . . . . . . . 4–5
HP-UX Update. . . . . . . . . . . . . . . . . . . . . . . . . . . . . . . . . . . . . . . . . . . . . . . . . . . . . 4–6
HP Tru64 UNIX Update . . . . . . . . . . . . . . . . . . . . . . . . . . . . . . . . . . . . . . . . . . . . . 4–6
IBM AIX Update . . . . . . . . . . . . . . . . . . . . . . . . . . . . . . . . . . . . . . . . . . . . . . . . . . . 4–6
Sun Solaris Update. . . . . . . . . . . . . . . . . . . . . . . . . . . . . . . . . . . . . . . . . . . . . . . . . . 4–7
Windows 2000/NT Update . . . . . . . . . . . . . . . . . . . . . . . . . . . . . . . . . . . . . . . . . . . 4–7
Sample Worksheets . . . . . . . . . . . . . . . . . . . . . . . . . . . . . . . . . . . . . . . . . . . . . . . . . . . . 4–7
5 Configuring the EVM Network
EVM Network Configuration Rules. . . . . . . . . . . . . . . . . . . . . . . . . . . . . . . . . . . . . . . . 5–2
Storage System Requirements and Support . . . . . . . . . . . . . . . . . . . . . . . . . . . . . . . . . . 5–2
EVM Server Requirements and Support . . . . . . . . . . . . . . . . . . . . . . . . . . . . . . . . . . . . 5–4
EVM Host Computer Requirements and Support . . . . . . . . . . . . . . . . . . . . . . . . . . . . . 5–5
iv Enterprise Volume Manager (Multi-OS) Network Administration Guide
Page 5

Contents
HP-UX Requirements and Support . . . . . . . . . . . . . . . . . . . . . . . . . . . . . . . . . . . . . 5–5
HP Tru64 UNIX Requirements and Support. . . . . . . . . . . . . . . . . . . . . . . . . . . . . . 5–6
IBM AIX Requirements and Support . . . . . . . . . . . . . . . . . . . . . . . . . . . . . . . . . . . 5–7
Sun Solaris Requirements and Support . . . . . . . . . . . . . . . . . . . . . . . . . . . . . . . . . . 5–8
Windows 2000 Requirements and Support . . . . . . . . . . . . . . . . . . . . . . . . . . . . . . 5–10
Windows NT Requirements and Support . . . . . . . . . . . . . . . . . . . . . . . . . . . . . . . 5–12
Browsing Computer Requirements . . . . . . . . . . . . . . . . . . . . . . . . . . . . . . . . . . . . . . . 5–13
Windows JRE Security Issue. . . . . . . . . . . . . . . . . . . . . . . . . . . . . . . . . . . . . . . . . 5–13
JRE Detection and Download from EVM. . . . . . . . . . . . . . . . . . . . . . . . . . . . . . . 5–13
Recommended Browser and JRE . . . . . . . . . . . . . . . . . . . . . . . . . . . . . . . . . . . . . 5–14
Browsing from HP-UX Computers. . . . . . . . . . . . . . . . . . . . . . . . . . . . . . . . . . . . 5–14
Selecting a Supported EVM-SAN Configuration . . . . . . . . . . . . . . . . . . . . . . . . . . . . 5–14
Example 1: EVM Host Agent on One Host Computer . . . . . . . . . . . . . . . . . . . . . 5–14
Example 2: EVM on Multiple Host Computers . . . . . . . . . . . . . . . . . . . . . . . . . . 5–15
Example 3: EVM on Multiple Hosts for High Availability . . . . . . . . . . . . . . . . . 5–16
Cluster Support. . . . . . . . . . . . . . . . . . . . . . . . . . . . . . . . . . . . . . . . . . . . . . . . . . . . . . . 5–16
HP Tru64 UNIX . . . . . . . . . . . . . . . . . . . . . . . . . . . . . . . . . . . . . . . . . . . . . . . 5–16
HP-UX . . . . . . . . . . . . . . . . . . . . . . . . . . . . . . . . . . . . . . . . . . . . . . . . . . . . . . 5–17
IBM AIX. . . . . . . . . . . . . . . . . . . . . . . . . . . . . . . . . . . . . . . . . . . . . . . . . . . . . 5–17
Sun Solaris . . . . . . . . . . . . . . . . . . . . . . . . . . . . . . . . . . . . . . . . . . . . . . . . . . . 5–17
Windows 2000 . . . . . . . . . . . . . . . . . . . . . . . . . . . . . . . . . . . . . . . . . . . . . . . . 5–17
Windows NT. . . . . . . . . . . . . . . . . . . . . . . . . . . . . . . . . . . . . . . . . . . . . . . . . . 5–18
EVM Network Configuration Rules . . . . . . . . . . . . . . . . . . . . . . . . . . . . . . . . . . . . . . 5–19
Minimum EVM 2.0D Network Requirements . . . . . . . . . . . . . . . . . . . . . . . . . . . 5–19
Node Visibility to the Management Appliance. . . . . . . . . . . . . . . . . . . . . . . . . . . 5–20
Storage System Limitation . . . . . . . . . . . . . . . . . . . . . . . . . . . . . . . . . . . . . . . . . . 5–20
Multiple Storage System Support . . . . . . . . . . . . . . . . . . . . . . . . . . . . . . . . . . . . . 5–20
Available Storage Systems . . . . . . . . . . . . . . . . . . . . . . . . . . . . . . . . . . . . . . . 5–21
Storage System Refresh Interval. . . . . . . . . . . . . . . . . . . . . . . . . . . . . . . . . . . 5–21
Detect Storage Properties . . . . . . . . . . . . . . . . . . . . . . . . . . . . . . . . . . . . . . . . 5–22
Element Manager Requirements . . . . . . . . . . . . . . . . . . . . . . . . . . . . . . . . . . . . . . 5–22
Management Appliance Service Resynchronization . . . . . . . . . . . . . . . . . . . 5–23
Using EVM in a DRM Configuration . . . . . . . . . . . . . . . . . . . . . . . . . . . . . . . . . . 5–24
HSG Container Name Limitations . . . . . . . . . . . . . . . . . . . . . . . . . . . . . . . . . . . . 5–24
Fault Tolerance and Disaster Recovery . . . . . . . . . . . . . . . . . . . . . . . . . . . . . . . . . . . . 5–24
Using the Save Configuration Feature. . . . . . . . . . . . . . . . . . . . . . . . . . . . . . . . . . 5–24
Using the Reload Configuration Feature. . . . . . . . . . . . . . . . . . . . . . . . . . . . . . . . 5–25
Save Procedure . . . . . . . . . . . . . . . . . . . . . . . . . . . . . . . . . . . . . . . . . . . . . . . . . . . 5–25
Enterprise Volume Manager (Multi-OS) Network Administration Guide v
Page 6

Contents
6 Troubleshooting
EVM Logs . . . . . . . . . . . . . . . . . . . . . . . . . . . . . . . . . . . . . . . . . . . . . . . . . . . . . . . . . . . 6–1
EVM Server Logs . . . . . . . . . . . . . . . . . . . . . . . . . . . . . . . . . . . . . . . . . . . . . . . . . . 6–2
EVM Job Logs . . . . . . . . . . . . . . . . . . . . . . . . . . . . . . . . . . . . . . . . . . . . . . . . . . . . . 6–2
EVM Switchboard Logs. . . . . . . . . . . . . . . . . . . . . . . . . . . . . . . . . . . . . . . . . . . . . . 6–2
Host Agent Configuration Logs. . . . . . . . . . . . . . . . . . . . . . . . . . . . . . . . . . . . . . . . 6–3
Limitations and Known Issues . . . . . . . . . . . . . . . . . . . . . . . . . . . . . . . . . . . . . . . . . . . . 6–3
Unable to Browse to the Management Appliance . . . . . . . . . . . . . . . . . . . . . . . . . . 6–3
Browsing Limitations. . . . . . . . . . . . . . . . . . . . . . . . . . . . . . . . . . . . . . . . . . . . . . . . 6–4
JRE Plug-in Problems on Browsing Computers . . . . . . . . . . . . . . . . . . . . . . . . . . . 6–4
Windows 2000/NT Browsing Computers . . . . . . . . . . . . . . . . . . . . . . . . . . . . . 6–5
Sun Solaris Browsing Computers . . . . . . . . . . . . . . . . . . . . . . . . . . . . . . . . . . . 6–6
Replacing or Renaming a Management Appliance . . . . . . . . . . . . . . . . . . . . . . . . . 6–6
Changing Storage Configurations While Jobs Are Running . . . . . . . . . . . . . . . . . . 6–6
EVM GUI Takes a Long Time to Load. . . . . . . . . . . . . . . . . . . . . . . . . . . . . . . . . . 6–7
30-Minute Spawn Process Timeout. . . . . . . . . . . . . . . . . . . . . . . . . . . . . . . . . . . . . 6–7
Accuracy of Step-Percent-Complete Bar. . . . . . . . . . . . . . . . . . . . . . . . . . . . . . . . . 6–7
EVM Host Agent Connectivity Troubleshooting . . . . . . . . . . . . . . . . . . . . . . . . . . 6–7
EVM Host Agent Computer Not on Resources Page . . . . . . . . . . . . . . . . . . . . 6–8
EVM Host Agent Computer Does Not Display Volume Information . . . . . . . 6–8
Snapshot Requirements and Limitations . . . . . . . . . . . . . . . . . . . . . . . . . . . . . . . . . 6–9
HSG-based Storage System Snapshot Requirements . . . . . . . . . . . . . . . . . . . . 6–9
HSG-based Storage System Snapshot Limitations . . . . . . . . . . . . . . . . . . . . . . 6–9
HSV-based Storage System Snapshot Requirements . . . . . . . . . . . . . . . . . . . . 6–9
HSV-based Storage System Snapshot Limitations . . . . . . . . . . . . . . . . . . . . . . 6–9
7 Starting EVM and Controlling Access
Starting the EVM Service or Daemon . . . . . . . . . . . . . . . . . . . . . . . . . . . . . . . . . . . . . . 7–1
Automatic Starting of the EVM Service or Daemon . . . . . . . . . . . . . . . . . . . . . . . . 7–1
Manually Stopping and Restarting the EVM Service or Daemon. . . . . . . . . . . . . . 7–2
Windows Procedure. . . . . . . . . . . . . . . . . . . . . . . . . . . . . . . . . . . . . . . . . . . . . . 7–2
UNIX Procedure . . . . . . . . . . . . . . . . . . . . . . . . . . . . . . . . . . . . . . . . . . . . . . . . 7–2
Keeping the EVM Server Running . . . . . . . . . . . . . . . . . . . . . . . . . . . . . . . . . . . . . 7–3
Keeping EVM Host Agents Running. . . . . . . . . . . . . . . . . . . . . . . . . . . . . . . . . . . . 7–4
Establishing Password Control. . . . . . . . . . . . . . . . . . . . . . . . . . . . . . . . . . . . . . . . . . . . 7–4
Logging In as Administrator . . . . . . . . . . . . . . . . . . . . . . . . . . . . . . . . . . . . . . . . . . 7–4
Establishing Account Passwords . . . . . . . . . . . . . . . . . . . . . . . . . . . . . . . . . . . . . . . 7–5
Browsing to EVM. . . . . . . . . . . . . . . . . . . . . . . . . . . . . . . . . . . . . . . . . . . . . . . . . . . . . . 7–7
vi Enterprise Volume Manager (Multi-OS) Network Administration Guide
Page 7

Starting a Web Browser. . . . . . . . . . . . . . . . . . . . . . . . . . . . . . . . . . . . . . . . . . . . . . 7–7
Setting the Browser to Automatically Check for Updated Pages. . . . . . . . . . . 7–7
Setting Up the Netscape Communicator Browser Font Size for UNIX . . . . . . 7–8
Browsing Limitations . . . . . . . . . . . . . . . . . . . . . . . . . . . . . . . . . . . . . . . . . . . . 7–8
Browsing to the EVM Network. . . . . . . . . . . . . . . . . . . . . . . . . . . . . . . . . . . . . . . . 7–9
Browsing to the EVM Home Page . . . . . . . . . . . . . . . . . . . . . . . . . . . . . . . . . . . . 7–12
Verifying EVM Network Version on a Management Appliance . . . . . . . . . . . . . 7–13
Obtaining the Required Web Browser Plug-In . . . . . . . . . . . . . . . . . . . . . . . . . . . 7–14
8 EVM Support for Volume Groups and
HP Tru64 UNIX AdvFS Domains
EVM Minimum Requirements for Volume Groups . . . . . . . . . . . . . . . . . . . . . . . . . . . 8–1
Volume Group and Domain Configurations . . . . . . . . . . . . . . . . . . . . . . . . . . . . . . . . . 8–2
Supported and Unsupported Volume Groups and Domains . . . . . . . . . . . . . . . . . . 8–2
Domain Best Practices for HP Tru64 UNIX. . . . . . . . . . . . . . . . . . . . . . . . . . . . . . 8–3
Volume Group Best Practices for IBM AIX. . . . . . . . . . . . . . . . . . . . . . . . . . . . . . 8–3
Volume Group Best Practices for HP-UX. . . . . . . . . . . . . . . . . . . . . . . . . . . . . . . . 8–3
Current Mapfile Requirement for HP-UX Volume Groups . . . . . . . . . . . . . . . 8–4
Creating and Updating a Mapfile for HP-UX Volume Groups . . . . . . . . . . . . 8–4
Command Options . . . . . . . . . . . . . . . . . . . . . . . . . . . . . . . . . . . . . . . . . . . 8–5
Menu-driven Procedure . . . . . . . . . . . . . . . . . . . . . . . . . . . . . . . . . . . . . . . 8–5
Command-line Procedure with a List of Volume Groups . . . . . . . . . . . . . 8–7
Command-line Procedure Specifying All Volume Groups . . . . . . . . . . . . 8–7
Volume Groups and Windows 2000 Dynamic Disks . . . . . . . . . . . . . . . . . . . . . . . . . . 8–8
EVM Limitations for HP Tru64 UNIX Domains . . . . . . . . . . . . . . . . . . . . . . . . . . . . . 8–8
EVM Limitations for HP-UX Logical Volume Manager . . . . . . . . . . . . . . . . . . . . . . . 8–8
EVM Limitations for IBM AIX Logical Volume Manager. . . . . . . . . . . . . . . . . . . . . . 8–9
Contents
9 EVM Jobs and Job Management
EVM Jobs. . . . . . . . . . . . . . . . . . . . . . . . . . . . . . . . . . . . . . . . . . . . . . . . . . . . . . . . . . . . 9–1
EVM Job Templates and Examples. . . . . . . . . . . . . . . . . . . . . . . . . . . . . . . . . . . . . 9–1
Volume and Unit Commands . . . . . . . . . . . . . . . . . . . . . . . . . . . . . . . . . . . . . . 9–2
Windows Clone Example . . . . . . . . . . . . . . . . . . . . . . . . . . . . . . . . . . . . . . . . . 9–2
UNIX Clone Example. . . . . . . . . . . . . . . . . . . . . . . . . . . . . . . . . . . . . . . . . . . . 9–3
Clone Operations. . . . . . . . . . . . . . . . . . . . . . . . . . . . . . . . . . . . . . . . . . . . . . . . 9–3
Clone Unit Operation . . . . . . . . . . . . . . . . . . . . . . . . . . . . . . . . . . . . . . . . . 9–3
Clone Volume Operation . . . . . . . . . . . . . . . . . . . . . . . . . . . . . . . . . . . . . . 9–3
Normalize Unit Operation . . . . . . . . . . . . . . . . . . . . . . . . . . . . . . . . . . . . . 9–3
Enterprise Volume Manager (Multi-OS) Network Administration Guide vii
Page 8

Contents
Normalize Volume Operation. . . . . . . . . . . . . . . . . . . . . . . . . . . . . . . . . . . 9–4
Suspend Operation . . . . . . . . . . . . . . . . . . . . . . . . . . . . . . . . . . . . . . . . . . . 9–4
Split Unit Operation . . . . . . . . . . . . . . . . . . . . . . . . . . . . . . . . . . . . . . . . . . 9–4
Split Volume Operation . . . . . . . . . . . . . . . . . . . . . . . . . . . . . . . . . . . . . . . 9–4
Resume Operation. . . . . . . . . . . . . . . . . . . . . . . . . . . . . . . . . . . . . . . . . . . . 9–4
Mount Unit Operation. . . . . . . . . . . . . . . . . . . . . . . . . . . . . . . . . . . . . . . . . 9–4
Mount Volume Operation. . . . . . . . . . . . . . . . . . . . . . . . . . . . . . . . . . . . . . 9–5
Launch Operation . . . . . . . . . . . . . . . . . . . . . . . . . . . . . . . . . . . . . . . . . . . . 9–5
Windows Snapshot Unit Example. . . . . . . . . . . . . . . . . . . . . . . . . . . . . . . . . . . 9–5
UNIX Snapshot Volume Example . . . . . . . . . . . . . . . . . . . . . . . . . . . . . . . . . . 9–5
Snapshot Operations . . . . . . . . . . . . . . . . . . . . . . . . . . . . . . . . . . . . . . . . . . . . . 9–6
Suspend Operation . . . . . . . . . . . . . . . . . . . . . . . . . . . . . . . . . . . . . . . . . . . 9–6
Snap Unit Operation . . . . . . . . . . . . . . . . . . . . . . . . . . . . . . . . . . . . . . . . . . 9–6
Snap Volume Operation . . . . . . . . . . . . . . . . . . . . . . . . . . . . . . . . . . . . . . . 9–6
Resume Operation. . . . . . . . . . . . . . . . . . . . . . . . . . . . . . . . . . . . . . . . . . . . 9–6
Mount Unit Operation. . . . . . . . . . . . . . . . . . . . . . . . . . . . . . . . . . . . . . . . . 9–6
Mount Volume Operation. . . . . . . . . . . . . . . . . . . . . . . . . . . . . . . . . . . . . . 9–7
Launch Operation . . . . . . . . . . . . . . . . . . . . . . . . . . . . . . . . . . . . . . . . . . . . 9–7
UNIX Volume Group Example—No Specific Mount Point or Fileset. . . . . . . 9–7
Using $<name> Variables . . . . . . . . . . . . . . . . . . . . . . . . . . . . . . . . . . . . . . . . . . 9–8
Running Multiple Jobs Simultaneously . . . . . . . . . . . . . . . . . . . . . . . . . . . . . . . . . . 9–8
Job Naming Conventions. . . . . . . . . . . . . . . . . . . . . . . . . . . . . . . . . . . . . . . . . . . . . 9–9
Aborting EVM Jobs . . . . . . . . . . . . . . . . . . . . . . . . . . . . . . . . . . . . . . . . . . . . . . . . . 9–9
Continuing EVM Jobs . . . . . . . . . . . . . . . . . . . . . . . . . . . . . . . . . . . . . . . . . . . . . . . 9–9
Validating EVM Jobs. . . . . . . . . . . . . . . . . . . . . . . . . . . . . . . . . . . . . . . . . . . . . . . . 9–9
EVM Job Operations . . . . . . . . . . . . . . . . . . . . . . . . . . . . . . . . . . . . . . . . . . . . . . . . . . 9–10
Windows 2000 EVM Jobs with SQL Server 2000. . . . . . . . . . . . . . . . . . . . . . . . . . . . 9–13
DButil Utility Commands . . . . . . . . . . . . . . . . . . . . . . . . . . . . . . . . . . . . . . . . . . . 9–13
Obtaining the DButil Utility. . . . . . . . . . . . . . . . . . . . . . . . . . . . . . . . . . . . . . . . . . 9–14
Storage Availability . . . . . . . . . . . . . . . . . . . . . . . . . . . . . . . . . . . . . . . . . . . . . . . . . . . 9–14
Presenting Raw Units . . . . . . . . . . . . . . . . . . . . . . . . . . . . . . . . . . . . . . . . . . . . . . . . . . 9–14
Performance Considerations. . . . . . . . . . . . . . . . . . . . . . . . . . . . . . . . . . . . . . . . . . . . . 9–15
10 Adding or Removing a Host Computer
Adding a Computer to an EVM Network. . . . . . . . . . . . . . . . . . . . . . . . . . . . . . . . . . . 10–1
Removing EVM from a Host Computer. . . . . . . . . . . . . . . . . . . . . . . . . . . . . . . . . . . . 10–1
Effects of Stopping EVM Activities . . . . . . . . . . . . . . . . . . . . . . . . . . . . . . . . . . . 10–2
Impacts on Affected EVM Jobs and Undo Jobs . . . . . . . . . . . . . . . . . . . . . . . . . . 10–2
viii Enterprise Volume Manager (Multi-OS) Network Administration Guide
Page 9

Preliminary Removal Steps. . . . . . . . . . . . . . . . . . . . . . . . . . . . . . . . . . . . . . . . . . 10–3
11 Removing an EVM Network
12 Migration Planning
EVM Network Migration Considerations . . . . . . . . . . . . . . . . . . . . . . . . . . . . . . . . . . 12–1
Effects of Stopping EVM Activities . . . . . . . . . . . . . . . . . . . . . . . . . . . . . . . . . . . 12–1
Preliminary Migration Steps . . . . . . . . . . . . . . . . . . . . . . . . . . . . . . . . . . . . . . . . . 12–2
Running Affected EVM Undo Jobs . . . . . . . . . . . . . . . . . . . . . . . . . . . . . . . . 12–2
Printing EVM Jobs Information for the Old EVM Network . . . . . . . . . . . . . 12–3
Migration Process Overview . . . . . . . . . . . . . . . . . . . . . . . . . . . . . . . . . . . . . . . . . . . . 12–3
Migrating EVM Server and EVM Client Computers . . . . . . . . . . . . . . . . . . . . . . 12–4
Re-creating EVM V1.x Jobs as EVM V2.0D Jobs . . . . . . . . . . . . . . . . . . . . . . . . 12–5
A EVM Network Planning Worksheets
Glossary
Index
Contents
Figures
2–1 EVM network configuration. . . . . . . . . . . . . . . . . . . . . . . . . . . . . . . . . . . . . . . 2–1
5–1 EVM-SAN configuration with one host computer . . . . . . . . . . . . . . . . . . . . . 5–15
5–2 EVM-SAN configuration with multiple host computers . . . . . . . . . . . . . . . . 5–15
5–3 EVM-SAN configuration with clustered host computers. . . . . . . . . . . . . . . . 5–16
5–4 EVM Configuration screen for save and reload . . . . . . . . . . . . . . . . . . . . . . . 5–26
7–1 Account Login form . . . . . . . . . . . . . . . . . . . . . . . . . . . . . . . . . . . . . . . . . . . . . 7–5
7–2 Password statement. . . . . . . . . . . . . . . . . . . . . . . . . . . . . . . . . . . . . . . . . . . . . . 7–6
7–3 Change form for an account password . . . . . . . . . . . . . . . . . . . . . . . . . . . . . . . 7–6
7–4 Management Appliance name and port number format . . . . . . . . . . . . . . . . . 7–10
7–5 Device Home Page (splash page) for the Management Appliance. . . . . . . . . 7–11
7–6 Navigating to the OSM Enterprise Volume Manager option . . . . . . . . . . . . . 7–12
7–7 EVM Launch Page sample . . . . . . . . . . . . . . . . . . . . . . . . . . . . . . . . . . . . . . . 7–13
7–8 Browsing display requesting required JRE (Java 2) plug-in. . . . . . . . . . . . . . 7–14
7–9 Installing the JRE (Java 2) plug-in display. . . . . . . . . . . . . . . . . . . . . . . . . . . 7–15
9–1 EVM Configuration screen for controlling storage system visibility. . . . . . . 9–16
Enterprise Volume Manager (Multi-OS) Network Administration Guide ix
Page 10

Contents
Tables
1 Typography . . . . . . . . . . . . . . . . . . . . . . . . . . . . . . . . . . . . . . . . . . . . . . . . . . . . . xii
1–1 EVM Kit Release History . . . . . . . . . . . . . . . . . . . . . . . . . . . . . . . . . . . . . . . . . 1–4
1–2 EVM 2.0X Update Release History . . . . . . . . . . . . . . . . . . . . . . . . . . . . . . . . . 1–5
3–1 Sample Worksheet: EVM Server and Management Appliance . . . . . . . . . . . . 3–5
3–2 Sample Worksheet: EVM Host Computers. . . . . . . . . . . . . . . . . . . . . . . . . . . . 3–6
3–3 Sample Worksheet: EVM Storage Systems . . . . . . . . . . . . . . . . . . . . . . . . . . . 3–7
4–1 Sample Update Worksheet: EVM Server and Management Appliance . . . . . . 4–7
4–2 Sample Update Worksheet: EVM Host Computers . . . . . . . . . . . . . . . . . . . . . 4–8
4–3 Sample Update Worksheet: EVM Storage Systems . . . . . . . . . . . . . . . . . . . . . 4–9
5–1 EVM Network Configuration Rules . . . . . . . . . . . . . . . . . . . . . . . . . . . . . . . . . 5–2
5–2 HSG-based Storage Systems. . . . . . . . . . . . . . . . . . . . . . . . . . . . . . . . . . . . . . . 5–3
5–3 HSG Snapshot Replication . . . . . . . . . . . . . . . . . . . . . . . . . . . . . . . . . . . . . . . . 5–4
5–4 HSV-based Storage Systems. . . . . . . . . . . . . . . . . . . . . . . . . . . . . . . . . . . . . . . 5–4
5–5 EVM Server Component Requirements . . . . . . . . . . . . . . . . . . . . . . . . . . . . . . 5–5
5–6 HP-UX Host Computers . . . . . . . . . . . . . . . . . . . . . . . . . . . . . . . . . . . . . . . . . . 5–6
5–7 HP Tru64 UNIX Host Computers. . . . . . . . . . . . . . . . . . . . . . . . . . . . . . . . . . . 5–7
5–8 IBM AIX Host Computers . . . . . . . . . . . . . . . . . . . . . . . . . . . . . . . . . . . . . . . . 5–8
5–9 Sun Solaris Host Computers . . . . . . . . . . . . . . . . . . . . . . . . . . . . . . . . . . . . . . . 5–9
5–10 Windows 2000 Host Computers . . . . . . . . . . . . . . . . . . . . . . . . . . . . . . . . . . . 5–11
5–11 Windows NT Host Computers . . . . . . . . . . . . . . . . . . . . . . . . . . . . . . . . . . . . 5–12
5–12 Browser Computer Requirements . . . . . . . . . . . . . . . . . . . . . . . . . . . . . . . . . . 5–13
9–1 EVM Job Operations . . . . . . . . . . . . . . . . . . . . . . . . . . . . . . . . . . . . . . . . . . . . 9–10
x Enterprise Volume Manager (Multi-OS) Network Administration Guide
Page 11

This guide provides information to help you:
• Plan and migrate an existing Enterprise Volume Manager (EVM) V1.x network to
an EVM V2.0D network
• Access and control an EVM V2.0D network
• Understand concepts regarding EVM V2.0D network volume grouping and job
management
• Add or remove the EVM host agent from a host computer
• Remove an EVM V2.0D network
• Configure and maintain an EVM network
Audience
This guide is intended for customers and Compaq authorized service providers.
Readers should be familiar with EVM itself and should be knowledgeable of the
following:
• EVM supported SAN fabric configurations
About this Guide
• EVM supported host operating system environments
• EVM supported storage systems
• EVM supported multibus configurations
Enterprise Volume Manager (Multi-OS) Network Administration Guide xi
Page 12

About this Guide
Related Documentation
For a complete list of EVM technical documentation, refer to the Enterprise Volume
Manager (Multi-OS) March 2002 Update Read Me First, AA-RQ70C-TE.
You may access technical documentation from the Compaq website:
http://thenew.hp.com
. Follow the links through Products and Services, Storage and
Compaq SANworks Software.
Typographical Conventions
Table 1 specifies the typographical conventions used in this document.
Table 1: Typography
Element Convention
Key names, menu items, buttons,
directory names, tab names, folder
names, and dialog box titles
File names Italics
User input, command names, system
responses (output and messages)
Variables Monospace, italic font
Website addresses Sans serif font (http://thenew.hp.com
Bold
Monospace font
)
Symbols in Text
The following symbols and formats may appear in the text of this document:
WARNING: Text set off in this manner indicates that failure to follow directions
in the warning could result in bodily harm or loss of life.
CAUTION: Text set off in this manner indicates that failure to follow directions could
result in damage to equipment or data.
IMPORTANT: Text set off in this manner presents clarifying information or specific instructions.
NOTE: Text set off in this manner presents commentary, sidelights, or interesting points of
information.
xii Enterprise Volume Manager (Multi-OS) Network Administration Guide
Page 13

Getting Help
If you have any questions after reading this guide, contact an HP authorized service
provider or visit our website: http://thenew.hp.com.
HP Technical Support
In North America, call technical support at 1-800-652-6672, available 24 hours a day,
7 days a week.
NOTE: For continuous quality improvement, calls may be recorded or monitored.
Outside North America, call technical support at the nearest location. Telephone
numbers for worldwide technical support are listed on the HP website under support:
http://thenew.hp.com/country/us/eng/contact_us.html.
Be sure to have the following information available before calling:
• Technical support registration number (if applicable)
• Product serial numbers
• Product model names and numbers
• Applicable error messages
About this Guide
• Operating system type and revision level
• Detailed, specific questions
HP Website
The HP website has the latest information on this product, as well as the latest
software updates. Access HP storage at:
http://thenew.hp.com/country/us/eng/prodserv/storage.html. From this website, select the
appropriate product or solution.
HP Authorized Reseller
For the name of your nearest HP Authorized Reseller:
• In the United States, call 1-800-345-1518
• In Canada, call 1-800-263-5868
• Elsewhere, see the HP website for locations and telephone numbers:
http://thenew.hp.com/country/us/eng/contact_us.html
Enterprise Volume Manager (Multi-OS) Network Administration Guide xiii
Page 14

Page 15

This chapter discusses features and capabilities introduced into EVM with the Version
2.0D release.
HP recommends reading this entire guide before you install the EVM V2.0D update
software. If you are migrating an EVM V1.x network containing Windows 2000,
Windows NT, or Sun Solaris hosts, pay special attention to Chapter 3 and Chapter 12
before you install the EVM V2.0D update software.
New EVM Features
EVM V2.0D includes support or for the following:
• HSV-based storage systems with Virtual Controller Software (VCS) version 2.0
• Array Controller Software (ACS) version 8.7
• Qlogic cPCI, PCI, and SBus adapters on Sun Solaris Platforms
1
EVM Version 2.0D Software
• HP StorageWorks Secure Path version 4.0 on Windows Host Agents
• HP Tru64 UNIX snapshots
• HP-UX 11i
Refer to the appropriate Host Agent Update Release Notes for descriptions of these
new features and any known issues.
EVM Version 2.0D Changes
The following changes have been made to EVM in the V2.0D release:
• EVM now supports demand allocated (space efficient), fully allocated (standard),
and snapclone snapshots on HSV-based storage systems. Refer to the online
Help/User Guide for details regarding these snap operations.
Enterprise Volume Manager (Multi-OS) Network Administration Guide 1–1
Page 16

EVM Version 2.0D Software
• The alias feature and windows are removed from EVM. The EVM information
windows are now called properties windows.
• Several types of job events that had been recorded in the EVM server log are now
recorded in EVM job logs.
• The pause operation and associated continue command are new.
• The launch, launchundo, resume, and suspend operations now include parameters
for capturing and checking return codes and messages that result from commands
issued by the operations.
• The EVM Job Add page is now called the EVM New Job page.
EVM Software
The EVM V2.0D release is available to new customers in kit form and to current
customers, who wish to update their existing EVM V2.0X network, as a Web-only
download.
EVM V2.0D Software Kit
The EVM V2.0D software kit contains, on two CD-ROMs, the software required to
install and use EVM V2.0D. This software consists of:
• EVM V2.0D Server. One CD-ROM for installing the EVM V2.0D Server on a
Management Appliance.
• EVM V2.0D Host Agents. One CD-ROM for installing the EVM host agents on
computers with the following supported host operating systems:
— HP Tru64 UNIX
— HP-UX
— IBM AIX
— Sun Solaris
— Windows 2000
— Windows NT.
The EVM V2.0D software kit identification number appears on a bar-coded label
affixed to the kit box. This code identifies the orderable software solution kit code as
“QB–6TAAA–SB,” EVM V2.0D for multiple operating systems.
1–2 Enterprise Volume Manager (Multi-OS) Network Administration Guide
Page 17

An EVM documentation kit accompanies the EVM software kit. The documentation
kit contains printed materials, including hardcopy documents, a CD-ROM with
technical documents as portable data format (PDF) files, and OS-specific online
Help/User Guide files. The EVM hardcopy documents consist of:
• EVM Read Me First
• EVM Network Administration Guide
• EVM Server V2.0D Installation Guide
• EVM Host Agent Installation Guides (by OS)
• EVM Server V2.0D Release Notes
• EVM Host Agent Release Notes (by OS)
• EVM Help/User Guide
• EVM OSM/MA Supplement
EVM V2.0D Update Software
The EVM V2.0D update software can be downloaded from the HP website at
http://thenew.hp.com/. Follow the links through Products & Services, Storage, and
Compaq SANworks Software. EVM V2.0D update software consists of:
• EVM V2.0D Server update. EVM server update software must be installed
before any supported EVM host agent software.
EVM Version 2.0D Software
• EVM Host Agent. The following operating systems are supported by the
EVM V2.0D release. See the appropriate EVM Host Agent Installation Guide for
the installation procedure.
— HP Tru64 UNIX
— HP-UX
— IBM AIX
— Sun Solaris
— Windows 2000
— Windows NT
Enterprise Volume Manager (Multi-OS) Network Administration Guide 1–3
Page 18

EVM Version 2.0D Software
EVM documentation that accompanies the EVM V2.0D update software consists of:
• EVM Update Read Me First
• EVM Update Network Administration Guide
• EVM Server V2.0D Update Installation Guide
• EVM Host Agent Update Installation Guides (by OS)
• EVM Server V2.0D Update Release Notes
• EVM Host Agent Update Release Notes (by OS)
• EVM Help/User Guide
EVM Release History
Two full releases of EVM software have been issued in kit form (see Table 1–1). Since
the initial EVM V2.0 kit release, three Web update releases have been issued (EVM
V2.0A, V2.0B, and V2.0C). Each update release added support for an additional
operating system and enhanced EVM server and host agent functionality.
Table 1–1: EVM Kit Release History
Release Date EVM Version Software Contents
October 2001 2.0 EVM Server V2.0
August 2002 2.0D EVM Server V2.0D
EVM Host Agent V2.0 for Windows 2000/NT
EVM Host Agent V2.0D for HP Tru64 UNIX
EVM Host Agent V2.0D for HP-UX
EVM Host Agent V2.0D for IBM AIX
EVM Host Agent V2.0D for Sun Solaris
EVM Host Agent V2.0D for Windows 2000/NT
Tab le 1–2 shows the history of EVM 2.0X Update releases.
1–4 Enterprise Volume Manager (Multi-OS) Network Administration Guide
Page 19

.
Table 1–2: EVM 2.0X Update Release History
EVM Version 2.0D Software
Update Release
Date
EVM Server
Version EVM Host Agents Included
December 2001 2.0A V2.0A for IBM AIX
January 2002 2.0B V2.0A for IBM AIX
V2.0B for Sun Solaris
April 2002 2.0C V2.0A for IBM AIX
V2.0B for Sun Solaris
V2.0C for Compaq Tru64 UNIX
V2.0C for Windows 2000/NT
August 2002 2.0D V2.0D for HP Tru64 UNIX
V2.0D for HP-UX
V2.0D for IBM AIX
V2.0D for Sun Solaris
V2.0D for Windows 2000/NT
Enterprise Volume Manager (Multi-OS) Network Administration Guide 1–5
Page 20

Page 21
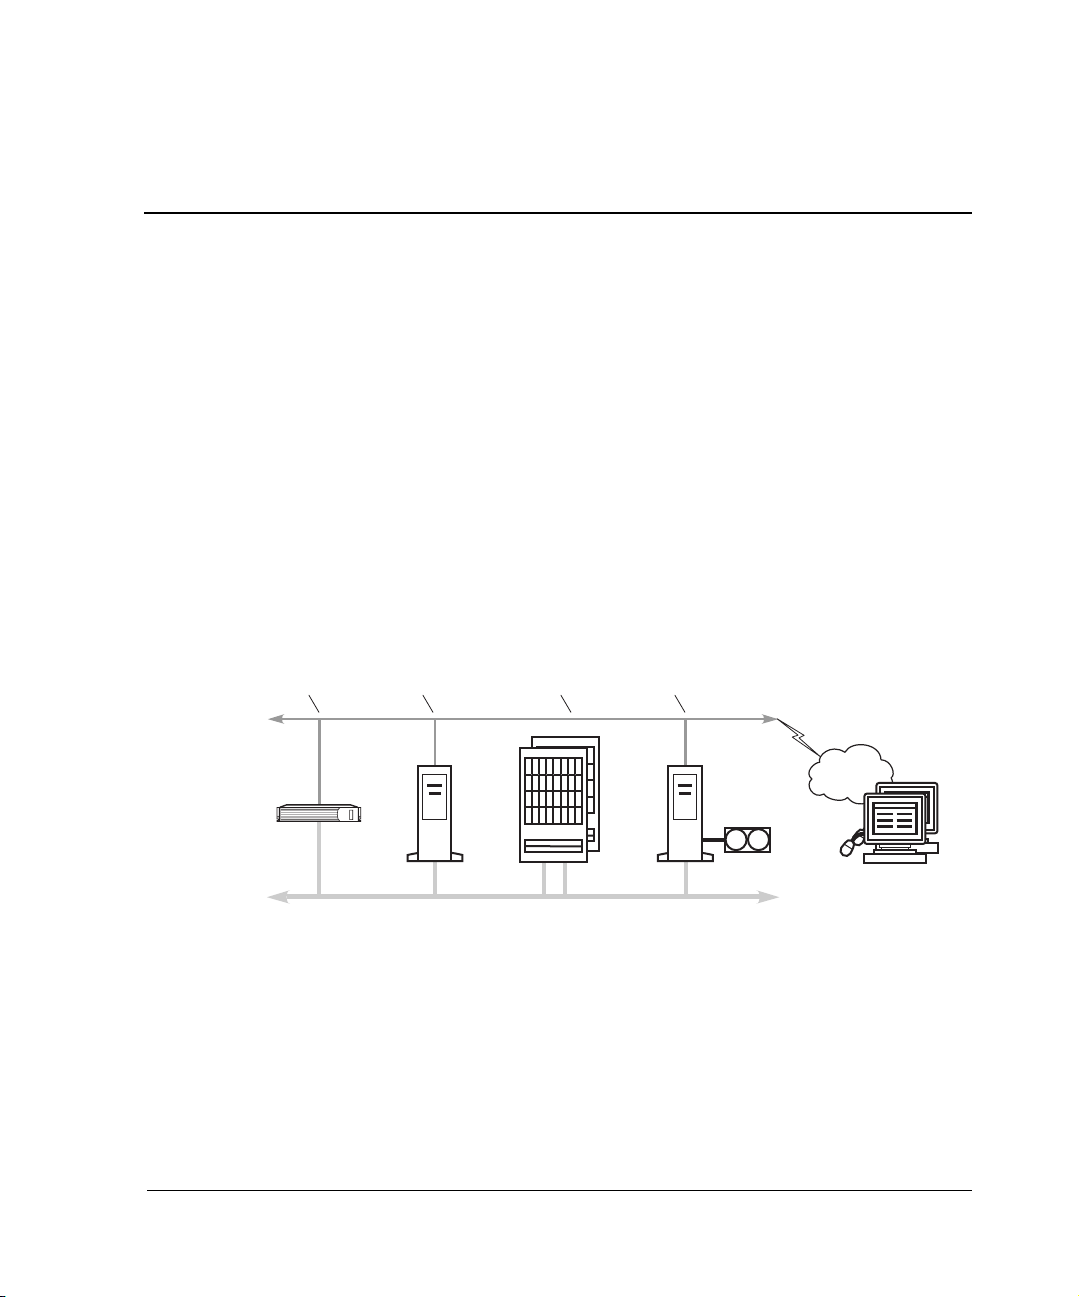
This chapter presents a basic introduction to the Enterprise Volume Manager,
discussing its purpose, its components, and its basic configuration.
What Is EVM?
EVM is an application program that makes point-in-time copies of storage volumes.
These copies, called Business Continuance Volumes (BCVs), can be mounted
dynamically on any other supported host in the EVM storage network. To replicate
storage volumes, EVM requires the establishment of an EVM network. Figure 2–1
shows a typical EVM network.
2
Introduction to EVM
EVM Server on
Management
Appliance
Figure 2–1: EVM network configuration
EVM
Host
Agent
StorageWorks
Storage Systems
EVM
Host
Agent
LAN
TCP/IP
Browsers
Fibre Channel SAN
CXO8019A
The EVM network consists of the following hardware and software components.
• One HP OpenView Management Appliance
• One or more host computers
• One or more HP StorageWorks storage systems
Enterprise Volume Manager (Multi-OS) Network Administration Guide 2–1
Page 22

Introduction to EVM
• EVM server software, which runs on the management appliance
• EVM host agent software runs on the user’s host computer systems that are part of
the EVM network.
• Storage Element Manager, which runs on the management appliance
The EVM server manages the EVM network, manages EVM jobs, and provides the
Web browser interface to users. The EVM server is installed on an HP OpenView
Management Appliance. Another EVM component, called the EVM host agent, is
installed on host computers and participates in the EVM jobs created for volume
management. StorageWorks storage systems provide the storage that is used in EVM
jobs.
An EVM network is often a subset of an existing Fibre Channel storage area network
(SAN). The SAN consists of host computers, StorageWorks storage systems, and
switches that are connected by fiber optic cabling. The Fibre Channel carries storage
data transmitted between StorageWorks storage systems and host computers.
The computers in an EVM network are also connected by a Local Area Network
(LAN) and communicate with each other by a TCP/IP connection. The LAN carries
command and status data transmitted between network components.
The EVM network and its associated StorageWorks storage systems can be managed
remotely using a Web browser. From the Web browser the user logs in to the
management appliance and the EVM server and then has access to the EVM graphical
user interface (GUI).
What the Management Appliance Does
EVM server software runs on the HP OpenView Management Appliance. The
Management Appliance provides a centralized facility for managing and monitoring
SAN elements, including storage arrays. Management Appliance software includes
element managers for both HSG-based and HSV-based storage systems. The element
managers allow users to manage storage through GUI interfaces, which are accessed
through a Web browser.
IMPORTANT: To use EVM with HSV-based storage systems, you must separately enter (on the
EVM Configuration page) the same user name and password that you entered in the OSM
(Open SAN Manager) Account Login page. See the online Help/User Guide for HSV password
details.
EVM networks are accessible from systems that have an Internet Explorer or Netscape
Web browser (see Table 5–12 on page 5–13 for browser compatibility with host
operating systems).
2–2 Enterprise Volume Manager (Multi-OS) Network Administration Guide
Page 23

What the EVM Server Does
The EVM server software controls all activities within the EVM network. The EVM
server software provides:
• An engine for running EVM storage replication jobs.
• EVM job creation and job management functions. These features allow the
creation, validation, and management of jobs. All EVM jobs are stored on the
Management Appliance.
• EVM Resources, Jobs, Logs, and Configuration pages. These displays provide
information that helps to identify available resources, create and manage jobs, log
EVM activities, and manage storage system visibility.
• An HTTP server for EVM. The HTTP server allows the use of a Web browser to
access all of the features of EVM.
What an EVM Host Agent Does
The EVM host agent software is installed on a host computer and performs all
activities associated with running EVM jobs within the EVM network, as directed by
the EVM server.
The host agent software provides an EVM Command Line and job engine. These two
elements provide the means for running EVM jobs. The host agent software also
provides communication between the host computer and the EVM server.
Introduction to EVM
Enterprise Volume Manager (Multi-OS) Network Administration Guide 2–3
Page 24

Page 25

3
Planning a New EVM Network
This chapter provides information on planning a new EVM network. Before installing
EVM software, HP recommends reading this planning chapter and Chapter 5,
“Configuring the EVM Network,” and completing the EVM network planning
worksheets in Appendix A.
This chapter discusses the following topics, which are the basic steps in planning an
EVM network:
• Determining the Purpose of the EVM Network on page 3–1
• Licenses on page 3–1
• Storage Systems Planning on page 3–2
• EVM Server Planning on page 3–3
• EVM Host Computer Planning on page 3–4
• Sample Worksheets on page 3–5
Determining the Purpose of the EVM Network
The first step in planning an EVM network is to specify its purpose. Determine, for
example, whether the network is intended for centralized backup, data warehousing,
or application testing.
After specifying the purpose of the EVM network, consider the EVM-SAN
configuration that best supports the operational requirements for that network. See
Chapter 5, “Configuring the EVM Network,” for sample configurations.
Licenses
In addition to the license that is required for the EVM server, other licenses are
required to view EVM network resources and include them in EVM jobs.
Enterprise Volume Manager (Multi-OS) Network Administration Guide 3–1
Page 26

Planning a New EVM Network
EVM Host Licenses
The EVM kit contains one EVM server license and a license for five EVM hosts. If
your planned EVM network includes more than five EVM-enabled hosts, you will
need to purchase a license for additional hosts. Host licenses are available in quantities
of 5, 10, or 25 hosts.
VCS Snapshot Licenses
If your planned EVM network includes HSV-based storage systems, you must have a
VCS snapshot license for each. EVM cannot access an HSV-based storage system
unless the storage system has a VCS snapshot license.
Storage Systems Planning
An EVM network must include at least one storage system and can include many
storage systems. However, for the best overall performance, an EVM network should
include only storage systems that you intend to include in EVM jobs.
If your SAN configuration (and planned EVM network) must include storage systems
that you do not intend to use with EVM, you can browse to the EVM Configuration
page and deselect them. This improves EVM performance but does not limit their use
outside of EVM.
Before installing EVM, ensure the following are addressed. For specific requirements
and versions, see Chapter 5, “Configuring the EVM Network.”
HSG-based Storage Systems
• You have identified the HSG-based storage systems that you want to use in the
EVM network, if any.
• The number of storage systems does not exceed the number that the Management
Appliance supports.
• Each HSG-based storage system is controlled by an element manager (and not by
a StorageWorks Command Console agent).
• Each HSG-based storage system has an EVM supported ACS and is configured
for multibus failover.
3–2 Enterprise Volume Manager (Multi-OS) Network Administration Guide
Page 27

HSV-based Storage Systems
• You have identified the HSV-based storage systems that you want to use in the
EVM network, if any.
• The number of storage systems does not exceed the number that the Management
Appliance supports.
• Each HSV-based storage system has an EVM supported VCS with snapshot
license.
EVM Server Planning
An EVM network must include one, and only one, EVM server running on a
Management Appliance. In addition, EVM can access only those storage systems that
are controlled by element managers that are on the same appliance as the EVM server
software.
If your SAN configuration (and planned EVM network) includes more than one
Management Appliance, you need to select the one on which to install the EVM server
software. Any other Management Appliances should be excluded from (zoned out of)
the EVM network.
Planning a New EVM Network
Before installing the EVM server software, ensure the following are addressed. For
specific requirements and versions, see Chapter 5, “Configuring the EVM Network.”
Management Appliance and OSM
• You have identified the Management Appliance that you want to use with EVM.
• Storage that you want to use with the EVM is controlled by that Management
Appliance.
• The Management Appliance is on the same LAN as the planned EVM host
computers.
• The Management Appliance is running an EVM supported version of OSM.
HSG and HSV Element Managers
• For HSG-based storage systems, the Management Appliance is running an EVM
supported version of the HSG Element Manager.
• For HSV-based storage systems, the Management Appliance is running an EVM
supported version of the HSV Element Manager.
Enterprise Volume Manager (Multi-OS) Network Administration Guide 3–3
Page 28

Planning a New EVM Network
EVM Host Computer Planning
An EVM network can include many EVM-enabled host computers. For a computer to
be EVM-enabled, you must install EVM host agent software on it.
In terms of EVM job operations, you need a computer to be EVM enabled to:
• Replicate storage volumes by specifying the host name.
• Suspend or resume host I/O (in conjunction with replication).
• Mount volumes on the host.
• Launch (start) an external job or issue a host command.
Selecting which computers are to be EVM enabled is largely a matter of reviewing
your operational needs. Typically, EVM host computers are database servers and tape
backup servers, although there is no EVM limitation on how a host is used.
Before installing EVM host agent software, ensure the following are addressed. For
specific requirements and versions, see Chapter 5, “Configuring the EVM Network.”
Host Operating System, FCA/HBA and LAN
• Each host is running an EVM supported operating system.
• Each host is connected to storage systems via EVM supported FCA/HBAs.
• Each host is on the same LAN as the Management Appliance (EVM server).
HSG or HSV Solution Software
• Each host is running EVM supported drivers from an HSG Solution Software kit.
• Or, the host is running EVM supported drivers from an HSV Operating System
kit.
Secure Path
• Each host is running an EVM supported version of StorageWorks Secure Path.
• Or, the host has EVM supported multipath support in the OS (for example, HP
Tru64 UNIX).
3–4 Enterprise Volume Manager (Multi-OS) Network Administration Guide
Page 29

Sample Worksheets
Tab le 3–1 through Table 3–3 show sample worksheets for a new EVM network being
planned.
Table 3–1: Sample Worksheet: EVM Server and Management Appliance
Component Version/Name Remarks
EVM Server Version
Appliance Name
OSM Version
HSG Element Manager Version
HSV Element Manager Version
2.0D EVM 2.0D plan (8/2002)
SWMAN123456 verified
1.0C SP3 verified
1.0D verified
2.0 verified
Planning a New EVM Network
Enterprise Volume Manager (Multi-OS) Network Administration Guide 3–5
Page 30

Planning a New EVM Network
Table 3–2: Sample Worksheet: EVM Host Computers
Host Computer
Name
Components
FCA
SolnSWSecr
HBA
Path
EVM
Ver RemarksOS
Colorado_1 Win2K
1
Colorado_2 Win2K
2
California_1 Tru64
3
California_2 Tru64
4
California_3 HP-UX
5
California_4 HP-UX
6
7
8
9
10
11
12
✔✔
✔✔
✔✔✔
✔✔✔
✔✔✔
✔✔✔
-- 2.0D need to update Secure Path
-- 2.0D need to update Secure Path
2.0D need patch BL3 for OS
2.0D need patch BL3 for OS
2.0D verified all
2.0D verified all
13
14
15
3–6 Enterprise Volume Manager (Multi-OS) Network Administration Guide
Page 31

Planning a New EVM Network
Table 3–3: Sample Worksheet: EVM Storage Systems
Components
Storage System Name
SUBSYS03 HSG 8.5 need to update ACS
1
2
SUBSYS04 HSG 8.6 need to reconfig to multibus failover
3
SUBSYS10 HSG 8.6 verified
4
system16 HSV 2.0 verified
5
system20 HSV 2.0 verified
6
7
RemarksContlr ACS VCS
8
9
10
11
12
13
14
15
Enterprise Volume Manager (Multi-OS) Network Administration Guide 3–7
Page 32

Page 33

4
Updating an EVM Network
This chapter provides information on updating an EVM network. Before installing
EVM software, HP recommends reading this planning chapter and Chapter 5,
“Configuring the EVM Network,” and completing the EVM network planning
worksheets in Appendix A.
This chapter discusses the following topics, which are the basic steps in planning an
EVM network:
• Determining the Purpose of the Update on page 4–1
• Overview of Update Steps on page 4–2
• License Updates on page 4–2
• Storage Systems Updates on page 4–3
• EVM Server Update on page 4–4
• EVM Host Computer Updates on page 4–5
• Sample Worksheets on page 4–7
Determining the Purpose of the Update
The first step in planning an update of the EVM network is to specify its purpose. For
example:
• Update the EVM server and host agents only for feature enhancements and bug
fixes.
• Add new OS support.
• Add HSV-based storage systems.
• Maintain interoperability with other StorageWorks products.
In all cases, you will need to update the EVM server and all EVM host agents in the
EVM network. In some cases, you may need to change or update storage and host
configurations before you update the EVM server or EVM host agents.
Enterprise Volume Manager (Multi-OS) Network Administration Guide 4–1
Page 34

Updating an EVM Network
If you are also adding new host computers during the update of the EVM network,
refer to Chapter 3 for host computer planning requirements on a “clean” computer.
Overview of Update Steps
1. Ensure that EVM update activities have been coordinated with users.
2. Ensure that no EVM jobs are running or “undoing” or are scheduled to run or
“undo” during the update.
3. Update the storage systems. For example, update an ACS version or add
HSV-based storage systems to the EVM network.
4. Update the Management Appliance, OSM, and HSG and HSV Element Managers
as necessary to support the storage. Do not update the EVM server yet.
5. Update Secure Path on the hosts.
6. Verify that the updated storage systems and hosts are working correctly.
7. Update the EVM server.
8. Browse to the EVM GUI. Verify that the expected storage systems appear on the
Resources page.
9. Update the EVM-enabled host computers.
10. Browse to the EVM GUI. Verify that the expected hosts and volumes appear on
the Resources page.
License Updates
In addition to the license that is required for the EVM server, other licenses are
required to view EVM network resources and include them in EVM jobs.
EVM Host Licenses
If your update adds EVM-enabled hosts, ensure that you have sufficient licenses for
the total number of hosts. If you need additional licenses, they are available in
quantities of 5, 10, or 25 hosts.
4–2 Enterprise Volume Manager (Multi-OS) Network Administration Guide
Page 35

VCS Snapshot Licenses
If your update adds HSV-based storage systems, you must have a VCS snapshot
license for each. EVM cannot access an HSV-based storage system unless the storage
system has a VCS snapshot license.
Storage Systems Updates
When you update an EVM network, you may also need to update some aspects of the
storage systems.
Storage Systems Update Overview
Identify the storage systems that require updating to interact with EVM.
1. Update the ACS on HSG-based storage systems (if applicable).
2. Reconfigure the failover mode to multibus on HSG-based storage systems (if
applicable).
3. Update the VCS on HSV-based storage systems (if applicable)
4. Verify that the Management Appliance is working correctly with the storage
systems.
Updating an EVM Network
In the following paragraphs, planning factors marked “new requirement” indicate a
configuration change must be made to work with EVM server V2.0D. Factors marked
“new support” indicate that a configuration change may be required.
HSG-based Storage Systems
Update planning factors include the following. For specific requirements and versions,
see Chapter 5, “Configuring the EVM Network.”
• ACS - new support
— ACS V8.5 - no longer supported (was supported by EVM server V2.0 and
V2.0A)
— ACS V8.6 - no change
— ACS V8.7 - new support
• Controller failover configuration
Enterprise Volume Manager (Multi-OS) Network Administration Guide 4–3
Page 36

Updating an EVM Network
— Multibus configuration - new requirement with EVM host agents for
IBM AIX and Sun Solaris and EVM Host Agent V2.0 for Windows2000/NT.
— Transparent configuration - no longer supported for IBM AIX, Sun Solaris,
and Windows 2000/NT.
NOTE: Changing from a transparent to multibus failover configuration is not just a matter of
issuing CLI commands, but also involves installing hardware and possibly software, such
as host bus adapters, cabling, switches, and HP Secure Path.
HSV-based Storage Systems
Update planning factors include the following. For specific requirements and versions,
see Chapter 5, “Configuring the EVM Network.”
• VCS - new support
— VCS 2.0 - required for use with EVM
• VCS Snapshot License - required for use with EVM
EVM Server Update
When you update the EVM server to V2.0D, you must update all EVM hosts to
V2.0D.
EVM Server Update Overview
Identify the Management Appliance on which the EVM server is running.
1. Update the OSM (if applicable)
2. Update the HSG and HSV Element Manager (if applicable)
3. Verify that the Management Appliance is working correctly with the storage
systems.
4. Update the EVM server software.
5. Browse to the EVM GUI Resources page.
6. Verify that the expected storage systems appear.
In the following paragraphs, planning factors marked “new requirement” indicate a
configuration change must be made before updating the EVM server. Factors marked
“new support” indicate that a configuration change may be required before updating.
4–4 Enterprise Volume Manager (Multi-OS) Network Administration Guide
Page 37

EVM Server Update
Update planning factors include the following. For specific requirements and versions,
see Chapter 5, “Configuring the EVM Network.”
• Previous EVM server - V2.0, V2.0A, V2.0B, V2.0C
• Management Appliance - no change
• OSM - new support
• HSG Element Manager - new requirement
• HSV Element Manager - new support
EVM Host Computer Updates
When you update one EVM host, you must update all EVM hosts. Before updating,
ensure that the EVM server is running V2.0D.
NOTE: HP allows you to install EVM host agent updates on computers that have not previously
been EVM enabled, provided you have sufficient EVM host licenses. When installing on a
“clean” computer, see Chapter 3, “Planning a New EVM Network” for host computer planning
requirements.
Updating an EVM Network
EVM Hosts Update Overview
Identify all EVM-enabled computers to be updated. On each:
1. Update the host OS version and FCA/HBA (if applicable).
2. Update the HSG or HSV Solution Software on the host (if applicable).
3. Update Secure Path on the host (if applicable).
4. Verify that the updated host is working correctly with the storage systems.
5. Update the EVM host agent.
6. Browse to the EVM GUI and verify that the expected host and volumes appear on
the Resources page.
Repeat until all hosts are updated.
The following paragraphs address EVM host agents for each supported OS. Planning
factors marked “new requirement” indicate a configuration change must be made
before updating the host agent. Factors marked “new support” indicate that a
configuration change may be required before updating.
Enterprise Volume Manager (Multi-OS) Network Administration Guide 4–5
Page 38

Updating an EVM Network
HP-UX Update
Update planning factors include the following. For specific requirements and versions,
see Chapter 5, “Configuring the EVM Network.”
• Previous host agents - V2.0C
• OS version - no change
• FCA/HBA - new support
• HSG and HSV Solution Software - new support
• Secure Path - new requirement
HP Tru64 UNIX Update
Update planning factors include the following. For specific requirements and versions,
see Chapter 5, “Configuring the EVM Network.”
• Previous host agents - V2.0C
• OS version - new requirement
• FCA/HBA - no change
• HSC or HSV Solution Software - new support
• Secure Path - not applicable
IBM AIX Update
Update planning factors include the following. For specific requirements and versions,
see Chapter 5, “Configuring the EVM Network.”
• Previous host agents - V2.0A
• OS version - no change
• FCA/HBA - no change
• HSG or HSV Solution Software - new support
• Secure Path - new requirement
4–6 Enterprise Volume Manager (Multi-OS) Network Administration Guide
Page 39

Sun Solaris Update
Update planning factors include the following. For specific requirements and versions,
see Chapter 5, “Configuring the EVM Network.”
• Previous host agents - V2.0B
• OS version - no change
• FCA/HBA - new support
• HSG or HSV Solution Software - new support
• Secure Path - new requirement
Windows 2000/NT Update
Update planning factors include the following. For specific requirements and versions,
see Chapter 5, “Configuring the EVM Network.”
• Previous host agents - V2.0, V2.0C
• OS version - new support (a different service pack may be required)
• FCA/HBA - no change
Updating an EVM Network
• HSG or HSV Solution Software - new support
• Secure Path - new requirement
Sample Worksheets
Tab le 4–1 through Table 4–3 show sample worksheets for an EVM network that is
being updated.
Table 4–1: Sample Update Worksheet: EVM Server and Management Appliance
Component Version/Name Remarks
EVM Server Version
Appliance Name
OSM Version
HSG Element Manager Version
HSV Element Manager Version
Enterprise Volume Manager (Multi-OS) Network Administration Guide 4–7
2.0D need to update server (now 2.0B)
SWMAN123456 verified
1.0C SP3 verified
1.0D update (now 1.0C)
2.0 update (now 1.0)
Page 40

Updating an EVM Network
Table 4–2: Sample Update Worksheet: EVM Host Computers
Host Computer
Name
Components
FCA
SolnSWSecr
HBA
Path
EVM
Ver RemarksOS
Oregon_1 Win2K
1
Oregon_2 Win2K
2
Kansas_1 Sun S
3
Kansas_2 Sun S
4
Texas_8 HP-UX
5
Texas_9 HP-UX
6
7
8
9
10
11
12
✔✔
✔✔
✔✔✔
✔✔✔
✔✔✔
✔✔✔
-- 2.0D now 2.0; need Secure Path
-- 2.0D now 2.0; need Secure Path
2.0D now 2.0B, verified all
2.0D now 2.0B, verified all
2.0D new host, verified all
2.0D new host, verified all
13
14
15
4–8 Enterprise Volume Manager (Multi-OS) Network Administration Guide
Page 41

Updating an EVM Network
Table 4–3: Sample Update Worksheet: EVM Storage Systems
Components
Storage System Name
SUBSYS05 HSG 8.5 need to update ACS
1
2
SUBSYS06 HSG 8.6 need to reconfig to multibus failover
3
SUBSYS11 HSG 8.6 verified
4
system18 HSV 2.0 verified
5
system22 HSV 2.0 verified
6
7
RemarksContlr ACS VCS
8
9
10
11
12
13
14
15
Enterprise Volume Manager (Multi-OS) Network Administration Guide 4–9
Page 42

Page 43

5
Configuring the EVM Network
This chapter provides rules and requirements for configuring an EVM network, the
EVM Server, HSG- and HSV-based storage systems, and EVM host agents. Tables
specify versions for each EVM hardware and software component. This chapter also
provides requirements for protecting the network in the event of a Management
Appliance failure.
This chapter discusses the following major topics:
• EVM Network Configuration Rules on page 5–2
• Storage System Requirements and Support on page 5–2
• EVM Server Requirements and Support on page 5–4
• EVM Host Computer Requirements and Support on page 5–5
• Browsing Computer Requirements on page 5–13
• Selecting a Supported EVM-SAN Configuration on page 5–14
• Cluster Support on page 5–16
• EVM Network Configuration Rules on page 5–19
• Fault Tolerance and Disaster Recovery on page 5–24
Enterprise Volume Manager (Multi-OS) Network Administration Guide 5–1
Page 44

Configuring the EVM Network
EVM Network Configuration Rules
Tab le 5–1 summarizes the component requirements for an EVM network. For
required and supported versions of these components see the sections below.
Table 5–1: EVM Network Configuration Rules
Component Required Remarks
Storage Systems At least one storage system
EVM Server One (and only one) Per EVM network
Management Appliance/
OSM
HSG Element Manager One If HSG-based storage is
HSV Element Manager One If HSV-based storage is
Access via browser At least one browsing
One
present
present
To access EVM GUI
computer
EVM hosts At least one host computer
Storage System Requirements and Support
Tab le 5–2, Table 5–3, and Table 5–4 specify the components required by HSG-based
storage systems, HSG snapshot replication, and HSV-based storage systems. See
“Snapshot Requirements and Limitations” on page 6–9 for snapshot usage rules.
5–2 Enterprise Volume Manager (Multi-OS) Network Administration Guide
Page 45

Configuring the EVM Network
Table 5–2: HSG-based Storage Systems
Component Required Remarks
Models: MA 8000 and RA 8000 or
EMA 12000 and ESA 12000 or
EMA 16000
ACS: 8.6F-4 and 8.7F or
8.6P-4 and 8.7P or
8.6S-4 and 8.7S
Controllers: Dual controllers configured for
multibus failover
SAN connections: To Management Appliance
F = clone application only
P and S = clone and snapshot
replication
Transparent failover is not
supported.
Fibre Channel
(EVM server) and all EVM
hosts
HSG Element Manager V1.0D On Management Appliance
SWCC: None—do not include SWCC managed storage
cannot be included in an EVM
network.
Component Supported Remarks
Maximum Storage
Systems:
25 EVM supports the maximum
that is allowed by the
combination of Management
Appliance, OSM, and
Element Manager.
Enterprise Volume Manager (Multi-OS) Network Administration Guide 5–3
Page 46

Configuring the EVM Network
Table 5–3: HSG Snapshot Replication
Component Required Remarks
Controllers Dual controllers configured for
multibus failover.
Cache Memory 512 MB per controller. Memory
must be mirrored.
ACS P or S Version. P and S = clone and snapshot
SAN Topology Fibre Channel switched fabric.
Table 5–4: HSV-based Storage Systems
Component Required Remarks
Models: All models For example, Enterprise
VCS: 2.0 with snapshot license
SAN Connections: To Management Appliance
(EVM server) and all EVM
hosts
HSV Element Manager V2.0 On Management Appliance
Component Supported Remarks
Maximum Storage
Systems
16 EVM supports the maximum
Transparent failover is not
supported.
replication.
Virtual Array models 2C6D,
2C12D, and 8C8D
Fibre Channel
that is allowed by the
combination of Management
Appliance, OSM, and
Element Manager.
EVM Server Requirements and Support
Tab le 5–5 specifies the requirements for each EVM server component.
5–4 Enterprise Volume Manager (Multi-OS) Network Administration Guide
Page 47

Configuring the EVM Network
Table 5–5: EVM Server Component Requirements
Component Required Remarks
EVM Server (software): One (and only one) Per EVM network
Management Appliance: Model I or Model II
OSM: January 2002 Update (V1.0C) Can include service packs
HSG Element Manager: V1.0D On Management Appliance
HSV Element Manager: V2.0 On Management Appliance
SAN Connection: To all EVM host computers Fibre Channel
LAN Connection: To all EVM host computers
Access via browser: At least one browsing computer To access EVM GUI
EVM Host Computer Requirements and Support
The following paragraphs specify required and supported EVM host agent
components for each supported operating system.
HP-UX Requirements and Support
Tab le 5–6 specifies the required and supported components for HP-UX host
computers.
Enterprise Volume Manager (Multi-OS) Network Administration Guide 5–5
Page 48

Configuring the EVM Network
Table 5–6: HP-UX Host Computers
Component Required Remarks
Operating system: HP-UX 11.0 and 11i
SAN connection
FCA/HBA:
LAN connection: Compatible LAN adapter
HSG Solution Software
kit:
HSV Solution Software
kit:
Secure Path: V3.0A for HP-UX
Component Supported Remarks
File System: HFS, VxFX
LV M: Yes
Cluster: No
Database: Oracle
Backup: Legato NetWorker
HP PCI Tachlite Adapters
A5158A or A6795A
V8.6B for HP-UX or
V8.7 for HP-UX
V2.0 for HP-UX
VERITAS NetBackup
FCA/HBAs must be running
with Secure Path
HP Tru64 UNIX Requirements and Support
Tab le 5–7 specifies the required and supported components for HP Tru64 UNIX host
computers.
5–6 Enterprise Volume Manager (Multi-OS) Network Administration Guide
Page 49

Configuring the EVM Network
Table 5–7: HP Tru64 UNIX Host Computers
Component Required Remarks
Operating system: 5.1A with patch kit 3 (BL3)
SAN connection
FCA/HBA:
LAN connection: Compatible LAN adapter
HSG Solution Software
kit:
HSV Solution Software
kit:
Secure Path: Not applicable
Component Supported Remarks
File System: advFS, UFS
LVM (LSM): No
Cluster: Yes, see remarks. EVM Host Agent V2.0D for
Database: Oracle
Backup: Legato NetWorker
Emulex LightPulse LP8000
adapters (176479-B21 /
DS-KGPSA-CB) or
Emulex LightPulse LP9002
adapters (FCA2354)
V8.6B for Tru64 UNIX or
V8.7 for Tru64 UNIX
V2.0 for Tru64 UNIX
HP Tru64 UNIX is
cluster-aware; however, Tru64
UNIX 5.1A patch BL3 does
not support the EVM host
cluster feature. See “Cluster
Support” on page 5–16 for
more information.
VERITAS NetBackup
IBM AIX Requirements and Support
Tab le 5–8 specifies the required and supported components for IBM AIX host
computers.
Enterprise Volume Manager (Multi-OS) Network Administration Guide 5–7
Page 50

Configuring the EVM Network
Table 5–8: IBM AIX Host Computers
Component Required Remarks
Operating system: 4.3.3
SAN connection
FCA/HBA:
LAN connection: Compatible LAN adapter
HSG Solution Software
kit:
HSV Solution Software
kit:
Secure Path: V2.0B for IBM AIX
Component Supported Remarks
File System: AIX JFS, UFS
LV M: Yes
Cluster: No
Database: Oracle
Backup: Legato NetWorker
Cambex FibreQuik PC1000
adapters (Compaq part number
197819-B21 / DS-SWIA1-PD)
V8.6B for IBM AIX or
V8.7 for IBM AIX
V2.0 for IBM AIX
VERITAS NetBackup
FCA/HBAs must be running
with Secure Path
Sun Solaris Requirements and Support
Tab le 5–9 specifies the required and supported components for Sun Solaris host
computers.
5–8 Enterprise Volume Manager (Multi-OS) Network Administration Guide
Page 51

Configuring the EVM Network
Table 5–9: Sun Solaris Host Computers
Component Required Remarks
Operating system: Sun Solaris 2.6 or
Sun Solaris 7 (32-bit or 64-bit) or
Sun Solaris 8 (32-bit or 64-bit)
SAN connection
FCA/HBA:
JNI FC-1063 (32-bit SBus)
adapters (Compaq part number
FCA/HBAs must be running
with Secure Path
380575-001 / SWSA4-SB) or
JNI FC-1063 (64-bit SBus)
adapters (Compaq part number
123503-001 / DS-SWSA4-SC) or
JNI FCI-1063 (32-bit PCI)
adapters (Compaq part number
SWSA4-PC) or
QLogic SANblade 2300 Series
(PCI) adapters (Compaq
FCA2257P, part number
254456-B21 / 3R-A3513-AA) or
QLogic SANblade 2300 Series
(cPCI) adapters (Compaq
FCA2257C, part number
254457-B21 / 3R-A3512-AA) or
QLogic SANblade 2300 Series
(SBus) adapters (Compaq
FCA2257S, part number
254458-B21 / 3R-A3514-AA)
LAN connection: Compatible LAN adapter
HSG Solution Software
kit:
HSV Solution Software
V8.6B for Sun Solaris or
V8.7 for Sun Solaris
V2.0 for Sun Solaris
kit:
Secure Path: V3.0A for Sun Solaris
Enterprise Volume Manager (Multi-OS) Network Administration Guide 5–9
Page 52

Configuring the EVM Network
Table 5-9: Sun Solaris Host Computers (continued)
Component Supported Remarks
File System: UFS
LV M: N o
Cluster: No
Database: Oracle
Backup: Legato NetWorker
VERITAS NetBackup
Windows 2000 Requirements and Support
Tab le 5–10 specifies the required and supported components for Windows 2000 host
computers.
5–10 Enterprise Volume Manager (Multi-OS) Network Administration Guide
Page 53

Configuring the EVM Network
Table 5–10: Windows 2000 Host Computers
Component Required Remarks
Operating system: Windows 2000 Server (SP2) or
Windows 2000 Advanced
Server (SP2) or
Windows 2000 Datacenter
Server (SP2)
SAN connection
FCA/HBA:
Emulex LightPulse LP8000
adapters (176479-B21 /
FCA/HBAs must be running
with Secure Path
DS-KGPSA-CB) or
Emulex LightPulse LP952L
adapters
LAN connection: Compatible LAN adapter
HSG Solution Software
kit:
HSV Solution Software
V8.6B for Windows 2000/NT or
V8.7 for Windows 2000/NT
V2.0 for Windows 2000/NT
kit:
Secure Path: V4.0 for Windows 2000/NT
Component Supported Remarks
File System: NTFS
LV M: N o
Cluster: Yes, limited
Database: Exchange 2000 Server
SQL 2000 Server
Oracle
SQL 2000 requires
StorageWorks DButil Script
Kit
Backup: CA ARCServeIT
Legato NetWorker
VERITAS Backup Exec
VERITAS NetBackup
Enterprise Volume Manager (Multi-OS) Network Administration Guide 5–11
Page 54

Configuring the EVM Network
Windows NT Requirements and Support
Tab le 5–11 specifies the required and supported components for Windows NT host
computers.
Table 5–11: Windows NT Host Computers
Component Required Remarks
Operating system: Windows NT Server 4.0 (SP6a) or
Windows NT Server 4.0
Enterprise Edition 1.0 (SP6a)
SAN connection
FCA/HBA:
LAN connection: Compatible LAN adapter
HSG Solution Software
kit:
HSV Solution Software
kit:
Secure Path: V4.0 for Windows 2000/NT
Component Supported Remarks
File System: NTFS
LV M: N o
Cluster: Yes, limited
Database: Exchange 2000 Server
Backup: CA ARCServeIT
Emulex LightPulse LP8000
adapters (176479-B21 /
DS-KGPSA-CB) or
Emulex LightPulse LP952L
adapters
V8.6B for Windows 2000/NT or
V8.7 for Windows 2000/NT
V2.0 for Windows 2000/NT
SQL 2000 Server
Oracle
Legato NetWorker
VERITAS Backup Exec
VERITAS NetBackup
FCA/HBAs must be running
with Secure Path
SQL 2000 requires
StorageWorks DButil Script
Kit
5–12 Enterprise Volume Manager (Multi-OS) Network Administration Guide
Page 55

Browsing Computer Requirements
You can browse to the EVM graphical user interface from any computer that has a
valid network connection. A computer does not need to have an EVM host agent
installed to be able to browse to EVM.
Because the EVM graphical user interface uses Java applets, the browsing computer
must have the required browser and Java Runtime Environment (JRE) plug-in.
Tab le 5–12 provides browser and JRE versions for each supported operating system.
Table 5–12: Browser Computer Requirements
Configuring the EVM Network
Operating
System
HP Tru64 UNIX Not supported 4.78 1.3.1_02
HP-UX Not supported 6.2.1 or 6.2.3 1.3.1_02
IBM AIX Not supported 4.79 1.3.1_00
Sun Solaris Not supported 4.78 or 4.79 1.3.1_03
Windows 2000 5.0, 5.5, or 6.00.26 Not supported 1.3.1_01
Windows NT 5.0, 5.5, or 6.00.26 Not supported 1.3.1_01
Internet
Explorer Netscape
Java2
(JRE) Remarks
Windows JRE Security Issue
The 1.3.1_01 version of the Windows JRE has a security vulnerability; customers may
elect to upgrade the JRE to avoid this security risk. For further information, refer to
Sun Microsystems’ Security Bulletin Archive, Bulletin 218 at the website
http://www.sunsolve.sun.com/pub-cgi/secBulletin.pl.
JRE Detection and Download from EVM
See “Browsing from
HP-UX Computers” on
page 5–14 for special
instructions.
Recommended browser
and JRE
Recommended browser
and JRE
When first browsing to EVM from a computer that does not have the required JRE
plug-in, EVM generates a warning message and prompts you to download the
required JRE directly from EVM. Once the JRE is successfully installed, EVM allows
browsing to the graphical user interface. JRE installation instructions are included in
the EVM Host Agent Installation Guides.
Enterprise Volume Manager (Multi-OS) Network Administration Guide 5–13
Page 56

Configuring the EVM Network
Recommended Browser and JRE
For best viewing results with EVM, HP recommends browsing from a supported
version of Internet Explorer and JRE plug-in.
Browsing from HP-UX Computers
To browse to EVM from an HP-UX computer, EVM requires a combination of
Netscape (6.2.1 or 6.2.3) and JRE 1.3.1_02. The Open SAN Manager, however,
requires Netscape 4.79. This requires the installation of two instances of Netscape.
Selecting a Supported EVM-SAN Configuration
The planning recommendations in this guide are intended as guidelines only. Refer to
the documentation that came with the StorageWorks storage system for detailed
information on supported SAN configurations.
A valid EVM-SAN configuration is one in which one or more host computers are
connected by Fibre Channel to StorageWorks storage systems. EVM is compatible
only with multibus failover SAN configurations and Switched Fabric Fibre Channel
environments.
Select an EVM-SAN configuration that best supports the purpose of your EVM
network. See “EVM Network Configuration Rules” on page 5–19 for a summary of
EVM network configuration rules.
The following examples show some possible configurations and their objectives.
Follow the rules in this chapter when you implement your configuration.
Example 1: EVM Host Agent on One Host Computer
The configuration in Figure 5–1 is good for providing nearline storage and tape
backups of volumes on StorageWorks storage systems. Only two installations of EVM
are required to create this configuration (EVM server on a Management Appliance
and EVM host agent on a host computer).
5–14 Enterprise Volume Manager (Multi-OS) Network Administration Guide
Page 57

LAN
2
1
EVM Server
EVM
Host
Agent
Tape
Drive
Switch
Fibre Channel SAN
Figure 5–1: EVM-SAN configuration with one host computer
Example 2: EVM on Multiple Host Computers
The configuration in Figure 5–2 provides for nearline storage and tape backups of
volumes on StorageWorks storage systems. EVM can also mount replicated volumes
on any of the three host computers. This configuration allows for several possible
uses.
Configuring the EVM Network
StorageWorks
Storage Systems
CXO8020A
For example, Computer 3 might be used to perform tests on copies of transaction
records produced by the application on Computer 2. Computer 4 could be a dedicated
tape backup server that backs up daily transactions from the application running on
Computer 2 and also backs up testing results from Computer 3.
LAN
1
EVM Server
23 4
EVM
Host
Agent
EVM
Host
Agent
EVM
Host
Agent
Tape
Drive
Switch
Figure 5–2: EVM-SAN configuration with multiple host computers
Enterprise Volume Manager (Multi-OS) Network Administration Guide 5–15
StorageWorks
Storage
Systems
Fibre Channel SAN
CXO8021A
Page 58

Configuring the EVM Network
Example 3: EVM on Multiple Hosts for High Availability
The configuration in Figure 5–3 adds clustering to the application server. The
configuration for Computers 2 and 3 includes dual-bus fault tolerance using HP
Secure Path. See “Selecting a Supported EVM-SAN Configuration” on page 5–14 for
a more detailed discussion.
1
23
EVM Server
Figure 5–3: EVM-SAN configuration with clustered host computers
Cluster Support
The following sections specify cluster support for each supported operating system.
HP Tru64 UNIX
The EVM Host Agent V2.0D for HP Tru64 UNIX is cluster-aware (however, Tru64
UNIX 5.1A patch BL3 does not support the EVM host cluster feature).
EVM
Host
Agent
EVM
Host
Agent
LAN
Tape
Drive
Switch
Switch
StorageWorks
Storage Systems
Fibre Channel SAN
CXO8022A
When the EVM host agent is present on a cluster, EVM provides the following:
• EVM jobs can mount BCVs on the cluster. The volumes are visible to all of the
hosts in the cluster.
• EVM displays one host icon that represents the cluster.
• EVM reports a cluster property of
Ye s for a host icon that represents a cluster.
• EVM displays icons of volumes that are associated with the cluster.
5–16 Enterprise Volume Manager (Multi-OS) Network Administration Guide
Page 59

The EVM Host Agent V2.0D for HP Tru64 UNIX is supported on host clusters that
use HP TruCluster, with the following limitations:
• If the node running the EVM host agent fails during the execution of a job, that
• A BCV presented by EVM is visible to all nodes in the cluster as long as one of
• Host agent software is installed to the cluster and resides on a share drive that is
HP-UX
The EVM Host Agent V2.0D for HP-UX is not cluster-aware and is not supported on
host clusters that use Hewlett-Packard MC/ServiceGuard.
IBM AIX
The EVM Host Agent V2.0D for IBM AIX is not cluster-aware and is not supported
on host clusters that use IBM HACMP (High Availability Cluster Multi-Processing).
Configuring the EVM Network
job will fail. Undoing and re-execution of the job should succeed.
the first two nodes (listed as active at the time the job was run) remains active.
visible to each node. The user has access to the first two active nodes listed. A job
will fail when the node running the EVM host agent fails during job execution.
Undoing and re-executing the job should succeed.
Sun Solaris
The EVM Host Agent V2.0D for Sun Solaris is not cluster-aware and is not supported
on host clusters that use Sun Cluster.
Windows 2000
The EVM Host Agent V2.0D for Windows 2000 is not cluster-aware, but is supported
on host clusters that use MSCS (Microsoft Cluster Service) for Windows 2000
Advanced Server and Windows 2000 Datacenter Server, with the following
limitations:
• A node becomes unavailable for job operations when the node running the EVM
host agent fails.
• If you are creating a BCV of the cluster quorum disk, do not mount the BCV on a
member of the same cluster.
• Host cluster support should be installed only on MSCS cluster nodes. Enabling
this feature on nonclustered systems causes undesirable side effects. Host cluster
support need be enabled on only one node of the cluster.
Enterprise Volume Manager (Multi-OS) Network Administration Guide 5–17
Page 60

Configuring the EVM Network
HP recommends that the host agent be installed on each node in the cluster. When the
EVM V2.0D host agent is present on a cluster, EVM provides the following:
• EVM jobs can mount BCVs of noncluster volumes to individual active hosts and
can mount BCVs of cluster volumes to a cluster. The cluster volumes are visible to
all hosts in the cluster.
• EVM displays a host icon for each active host in the cluster, plus one additional
icon, in capital letters, that represents the cluster itself.
• EVM reports a Cluster property of
the cluster and Yes for the icon that represents the cluster itself.
• EVM displays icons for noncluster volumes that are associated with individual
hosts in the cluster, plus icons for cluster volumes that are associated with the
cluster itself.
Windows NT
EVM host agent V2.0D for Windows NT is not cluster-aware, but is supported on host
clusters that use MSCS (Microsoft Cluster Service) for
Windows NT 4.0 Enterprise Edition, with the following limitations:
• A node becomes unavailable for job operations when the node running the EVM
host agent fails.
• If you are creating a BCV of the cluster quorum disk, do not mount the BCV on a
member of the same cluster.
• Host cluster support should be installed only on MSCS cluster nodes. Enabling
this feature on nonclustered systems causes undesirable side effects. Host cluster
support need be enabled on only one node of the cluster.
HP recommends that the host agent be installed on each node in the cluster. When the
EVM V2.0D host agent is present on a cluster, EVM provides the following:
• EVM jobs can mount BCVs of noncluster volumes to individual active hosts and
can mount BCVs of cluster volumes to a cluster. The cluster volumes are visible to
all hosts in the cluster.
No for icons that represent individual hosts in
• EVM displays a host icon for each active host in the cluster, plus one additional
icon, in capital letters, that represents the cluster itself.
• EVM reports a Cluster property of
No for icons that represent individual hosts in
the cluster and Yes for the icon that represents the cluster itself.
5–18 Enterprise Volume Manager (Multi-OS) Network Administration Guide
Page 61

• EVM displays icons for noncluster volumes that are associated with individual
hosts in the cluster, plus icons for cluster volumes that are associated with the
cluster itself.
EVM Network Configuration Rules
When planning an EVM V2.0D network, keep the following considerations in mind:
• Minimum EVM 2.0D Network Requirements
• Node Visibility to the Management Appliance
• Storage System Limitation
• Multiple Storage System Support
• Element Manager Requirements
• Using EVM in a DRM Configuration
• Using the Save Configuration Feature
• Using the Reload Configuration Feature
• Save Procedure
Configuring the EVM Network
Minimum EVM 2.0D Network Requirements
Each EVM V2.0D network requires the following:
• A Management Appliance with the Open SAN Manager (OSM) January 2002
Update.
• EVM V2.0D Server software installed on the Management Appliance.
• At least one EVM host agent node.
• At least one compatible storage system.
IMPORTANT: To use EVM with HSV-based storage systems, you must separately enter
the same user name and password that you entered in the OSM Account Login page. See
the Online Help/User Guide for HSV password details.
• A VCS snapshot license to use EVM with an HSV-based system.
• Access to a qualified Web browser (see Table 5–12 on page 5–13)
Enterprise Volume Manager (Multi-OS) Network Administration Guide 5–19
Page 62

Configuring the EVM Network
Node Visibility to the Management Appliance
Each EVM network is limited only by the Management Appliance visibility of SAN
nodes. If a host computer is visible to the Management Appliance, the host storage is
displayed on the EVM GUI and can be added to the EVM network.
Storage System Limitation
Keep these storage system limitations in mind when planning your EVM network:
• EVM V2.0D can simultaneously support up to 25 HSG-based storage systems and
up to 16 HSV-based storage systems. However, as the number of storage systems
increases, EVM job performance and user interface responsiveness can degrade.
Actual performance depends on several factors, including the number of jobs
running, the number of steps and complexity of the jobs, and I/O activity on the
storage systems and hosts.
• EVM is compatible only with multibus configurations.
NOTE: Changing from a transparent to multibus failover configuration is not just a matter of
issuing CLI commands, but also involves installing hardware and possibly software, such
as host bus adapters, cabling, switches, and HP Secure Path.
• EVM V2.0D must have the appropriate version of HP Secure Path software
installed on the host. Refer to Table 5–6 through Table 5–11, beginning on
page 5–6 for version information.
Multiple Storage System Support
Performance depends on several factors, including the number of jobs running, the
number of steps and complexity of the jobs, and I/O activity on the storage systems
and hosts.
EVM provides three user-selectable features to improve performance:
• Available Storage Systems
• Storage System Refresh Interval
• Detect Storage Properties
These features are covered below.
5–20 Enterprise Volume Manager (Multi-OS) Network Administration Guide
Page 63

Available Storage Systems
To compile a list of available resources, EVM queries every StorageWorks HSG- and
HSV-based storage system in the SAN during startup and again at each periodic
storage refresh. The more storage systems involved, the longer the refresh takes to
complete.
To make this process more efficient, EVM lets users selectively filter out those storage
systems not needed for EVM jobs. When storage systems are made unavailable to
EVM, the startup and storage refresh complete more quickly.
To deselect storage systems:
1. Browse to the EVM GUI.
2. From the Resources page, click the Configuration tab.
3. From the EVM Configuration display, select the Available Storage tab.
4. In the Storage Systems section, click (uncheck) the storage systems you want to
deselect.
5. Click Update to perform the deselection.
Storage System Refresh Interval
Configuring the EVM Network
Successful EVM job execution depends on EVM having up-to-date storage
information; periodic refreshes are critical. The following are factors to be considered
in establishing the refresh rate:
• If the storage configuration changes (for example, through the creation of a new
unit or the deletion of an existing unit), EVM will not know about the change until
a storage refresh occurs. Meanwhile, EVM jobs may fail as a result of using old
storage information.
• Refreshes are resource-intensive operations and, in extreme cases, can take as
long as five minutes per storage system to complete. So, choosing an appropriate
value for the refresh rate—one that balances performance with the need for
current information—is an important part of managing an EVM network.
• In stable environments where the storage configuration does not change
frequently, a longer refresh period ensures better performance. In environments
where storage changes frequently, a shorter refresh interval may be required.
Enterprise Volume Manager (Multi-OS) Network Administration Guide 5–21
Page 64

Configuring the EVM Network
• Refresh rate is also dependent on how busy the HSG and HSV element managers
are. If, for example, the element manager is in the process of doing a
resource-intensive function, it will be less responsive and EVM discovery will be
slower.
• By default, EVM refreshes the storage configuration information displayed by the
GUI on a periodic interval equal to 5 minutes times the number of storage
systems, or every 15 minutes, whichever is greater. For example, a configuration
with 10 storage systems has a default refresh rate of every 50 minutes. This
default value can be overridden through a user-defined, selectable refresh rate.
To establish a refresh rate manually, access the GUI Options page. From the EVM
Configuration page, choose the Available Storage tab and locate the Refresh Rate
section.
Detect Storage Properties
A manual refresh-on-demand allows a manual storage refresh to be performed at any
time. This feature is available only from the EVM Resources page. To initiate the
detect:
1. Right-click in any open area of the upper or lower pane and choose Refresh.
2. Right-click in any open area of the upper or lower left panes of the EVM
Resources page to display the Redraw Resource Diagrams and Detect Storage
Properties options.
Clicking Detect Storage Properties causes EVM to refresh storage system
information without waiting for the next automatic refresh.
NOTE: Clicking Redraw Resource Diagrams causes EVM to refresh the EVM Resources
page from cached information.
Element Manager Requirements
The EVM element manager provides access to the StorageWorks storage system and
is the interface to the HSG or HSV SAN network. The required element manager for
EVM is included in the Management Appliance with the OSM January 2002 Update.
To determine whether you already have the update, browse to the Management
Appliance and navigate to the OSM Home Page. If you do have the OSM January
2002 Update, the title bar in the Content pane contains the designation “Open SAN
Manager V1.0C.” If the title bar specifies any other version, you do not have the OSM
January 2002 Update.
5–22 Enterprise Volume Manager (Multi-OS) Network Administration Guide
Page 65

NOTE: To install the Management Appliance with the OSM January 2002 Update, refer to the
Management Appliance Update Installation Card, AA-RNE9D-TE.
EVM Server uses the HSG Element Manager or the HSV Element Manager to
communicate with HSG-based and HSV-based storage systems. These element
managers are preinstalled on the Management Appliance and are configured to start
automatically during the appliance startup. For EVM Server V2.0D operations, the
minimum required HSG Element Manager version is included in the Management
Appliance with the OSM January 2002 Update.
The element managers must remain running at all times to allow EVM communication
with HSG-based and HSV-based storage systems. EVM recognizes and communicates
only with storage systems that are presented by these element managers. If EVM does
not display a specific storage system on the EVM Resources page, check the Element
Manager display to verify that the storage system is being presented to EVM.
NOTE: If HSVs are not present on your SAN, EVM may take up to 10 minutes to load the user
interface.
Management Appliance Service Resynchronization
The Management Appliance is configured to automatically restart the core appliance
services (not including EVM) at 3:00 AM every Sunday. One of the services restarted
is the HSG Element Manager, which EVM depends on for communication access to
the storage hardware.
Configuring the EVM Network
When EVM detects a restart of the HSG Element Manager service, EVM
automatically enters an idle state until the HSG Element Manager service returns.
However, if an EVM job is running when this service restart occurs, this EVM job
may fail.
To prevent this type of failure, do one of the following:
• Schedule all EVM jobs so that they complete before 3:00 AM Sunday.
• Start all EVM jobs after 3:00 AM Sunday.
• Change the time of the Management Appliance resynchronization.
Consult the Management Appliance documentation for more information.
Enterprise Volume Manager (Multi-OS) Network Administration Guide 5–23
Page 66

Configuring the EVM Network
Using EVM in a DRM Configuration
EVM is compatible with Data Replication Manager (DRM) configurations. However,
management of a DRM environment may sometimes require that the Management
Appliance be excluded from the configuration (zoned out). Whenever the
Management Appliance is not part of the DRM configuration, the EVM server cannot
access storage systems within the DRM configuration.
HSG Container Name Limitations
The EVM network software places some limitations on changing the name of a
container. Keep these points in mind:
• Any HSG container name beginning with C! (capital “C” and an exclamation
point) and ending with !C (such as C!12345!C) is reserved for EVM program use.
The same restriction applies to any container name using this format with the
letter “S” (such as S!12345!S).
CAUTION: Do not use “C!” or “S!” at the beginning of a container name, and do not
use “!C” or “!S” at the end of one. Do not change the name of any container created by
the EVM network that begins or ends with these sequences.
Changing the name of a container created by EVM may affect the ability of EVM to
track that container. If a container name that uses the “C!...!C” or “S!...!S” format is
changed, EVM will not properly recognize that container. Since EVM safety rules
prohibit the EVM program from deleting anything that EVM storage did not create, the
container will not function properly.
• Do not include the words War ni ng, Critical, or Error, in any form, in any
container name. They are keywords used by EVM software for processing specific
functions.
Fault Tolerance and Disaster Recovery
This section contains procedures for protecting the EVM network configuration in the
event of a failure.
Using the Save Configuration Feature
EVM stores job files and critical configuration data on the Management Appliance.
HP recommends saving this information to a host computer on a regular basis. Being
able to reload the EVM configuration after a Management Appliance or EVM server
failure can prevent re-creating EVM jobs and reinstalling the EVM host agents.
5–24 Enterprise Volume Manager (Multi-OS) Network Administration Guide
Page 67

To save EVM jobs and configuration information, use the EVM Configuration Save
feature.
HP recommends saving the configuration information to a host computer within the
EVM network. To ensure that the backup files remain current, HP also recommends
saving this information on a continual basis, either periodically or whenever an EVM
job is created, modified, or deleted.
Typically, saving the configuration requires less than one megabyte of storage. In
extreme cases, the amount of storage required might exceed a few megabytes.
Using the Reload Configuration Feature
After a configuration is saved, the reload feature can be used to download this
information from the host computer to the Management Appliance.
Because a reload is primarily required following a failure, some manual cleanup is
expected. In particular, any EVM job that was running at the time of the failure must
be reviewed, cleaned up, and rerun.
Save Procedure
Complete the following procedure to save an EVM job and configuration data:
Configuring the EVM Network
1. Browse to the EVM GUI.
2. Click the Configuration tab.
The EVM Configuration page displays, with the Save/Reload menu selected
(see Figure 5–4).
3. On the Save/Reload menu, choose a host computer to save to.
HP recommends always using the same host computer for subsequent saves. This
ensures that only one set of EVM configuration files exists outside of the
Management Appliance, preventing the possibility of reloading an incorrect set.
Enterprise Volume Manager (Multi-OS) Network Administration Guide 5–25
Page 68

Configuring the EVM Network
Figure 5–4: EVM Configuration screen for save and reload
4. Click the Save button.
The EVM job files are Saved—copied from the Management Appliance to the
chosen host computer.
5. Click Exit.
Following a reload:
• Notice that the job status for all EVM jobs is set to “idle” and that the job validity
is set to “unknown.” These indications mean that all EVM jobs are in an unknown
state and must be revalidated before they can be used.
• When a saved EVM configuration is reloaded, the job state information is lost.
The job state defines the current operational status of the job (idle, running,
complete, undo complete, and so on). If state information is lost, the ability to
undo a complete or partially complete job is lost. If this occurs, manually remove
all mounted BCVs and modify the storage configuration to return this
configuration to its original state.
• In most cases, storage resources used by EVM can be identified by the container
names. Any container created or modified by EVM uses a name of the type
C!yyyyy!C, where “yyyyy” is any number from 0 to 99999. EVM uses this
special naming convention for all resources that EVM creates or modifies.
5–26 Enterprise Volume Manager (Multi-OS) Network Administration Guide
Page 69

Configuring the EVM Network
• Restoring the storage configuration to its original state can be accomplished either
manually, by using a configuration worksheet that described the details of each
unit on the storage system, or automatically with the features built into the HSG80
controller. ACS documentation includes a configuration worksheet that can be
used for manual restoration and also gives detailed information on how to use the
automatic restoration feature.
IMPORTANT: With either method, manual or automatic, updating the saved configuration
is critical following each change to the storage configuration.
Enterprise Volume Manager (Multi-OS) Network Administration Guide 5–27
Page 70

Page 71

This chapter describes known issues and suggested resolutions. It discusses the
following major topics:
• EVM Logs on page 6–1
• Limitations and Known Issues on page 6–3
IMPORTANT: Refer to the applicable EVM Host Agent Update Release Notes for the latest
issues.
EVM Logs
EVM logs are the primary source of diagnostic and troubleshooting information. The
EVM Log Reporting page in the EVM GUI provides access to all the log files that are
stored on the Management Appliance (EVM server).
The EVM Log Reporting page provides access to four basic types of logs:
• EVM Server Logs
6
Troubleshooting
• EVM Job Logs
• EVM Switchboard Logs
• Host Agent Configuration Logs
Each log type is discussed below.
EVM host agent logs are stored in the following directories for each host operating
system:
• HP Tru64 UNIX: \usr\opt\CPQevm\bin\logs
• HP-UX: \opt\CPQevm\bin\logs
• IBM AIX: \usr\opt\CPQevm\bin\logs
• Sun Solaris: \opt\CPQevm\bin\logs
• Windows: ..\Enterprise Volume Manager\bin\logs
Enterprise Volume Manager (Multi-OS) Network Administration Guide 6–1
Page 72

Troubleshooting
These files are not directly accessible from the EVM Log Reporting page.
EVM Server Logs
The EVM server log includes information about the following:
• Storage refreshes
• Job status changes
• EVM Command Line (EVMCL) and GUI update requests
• EVM host agent interaction
To prevent the EVM server log files from consuming too much disk space, EVM
automatically archives the existing log file and starts a new one. Archiving occurs
whenever the EVM server log file size reaches 10 megabytes or whenever the EVM
server is restarted.
Seven generations of EVM server log files are maintained. A file named evm1.txt is
the current log and evm7.txt is the oldest.
EVM Job Logs
Log files are kept for each EVM job. When a job runs for the first time, an EVM job
log file (such as job_name.txt) is created for this job and the individual operations that
comprise the job are recorded in the job log file. Detailed information about the job
state also is recorded in the job log file. Each time a job is executed, the current EVM
job log file for that job is archived and a new EVM job log file is created.
Seven generations of EVM job log files are maintained. The file-name format for an
EVM job log file uses the EVM job name and a sequential number. For example, an
EVM job log file named jobname_1.txt is the current log and jobname_7.txt is the
oldest.
EVM Switchboard Logs
The Switchboard process implements EVM functionality on each EVM host agent
computer. There is a Switchboard portion implemented on the host agents and another
Switchboard portion implemented on the Management Appliance (EVM server).
View the EVM Switchboard log files (sb.txt) on the EVM server in the Log Report
page. These logs contain primarily startup and initialization information about each
EVM host agent computer in the EVM network. This information is used to diagnose
host configuration, EVM host agent connectivity, and communication problems.
6–2 Enterprise Volume Manager (Multi-OS) Network Administration Guide
Page 73

Each EVM host agent computer also maintains a set of EVM Switchboard logs. These
logs contain detailed information about the interaction between the EVM host agent
and the EVM server. EVM Switchboard logs are useful for diagnosing mount,
suspend, resume, and launch operational issues.
To prevent EVM Switchboard log files from consuming too much disk space, EVM
automatically archives the existing EVM Switchboard log file and starts a new file.
Archiving occurs whenever the EVM Switchboard log file size reaches 10 megabytes
and whenever EVM is restarted.
Eight generations of EVM Switchboard log files are maintained. A file named sb.txt is
the current log and sb7.txt is the oldest.
Host Agent Configuration Logs
Host agent configuration logs contain current host, volume, and HBA information
about each EVM host agent computer. Two configuration logs exist for each host
agent:
• servername.host.txt log files that contain host and HBA information
• servername.volume.txt log files that contain volume information
These files contain low-level information in eXtensible Markup Language (XML)
format and are best understood by authorized service personnel.
Troubleshooting
Limitations and Known Issues
The information in this section can help avoid problems while using EVM.
Unable to Browse to the Management Appliance
If you are unable to browse to the Management Appliance Splash page or Account
Login page, the domain name server (DNS) might not be recognizing the
Management Appliance.
HP recommends rectifying this problem by inserting an “A” record (host record) and a
pointer record (also known as a PTR record or a reverse lookup record) on the DNS
server for the Management Appliance.
For dynamic host configuration protocol (DHCP) environments, set a permanent lease
and reservation for the Management Appliance.
Make sure the DNS is configured for DHCP.
Enterprise Volume Manager (Multi-OS) Network Administration Guide 6–3
Page 74

Troubleshooting
An alternative solution is to modify the “Hosts” file on each browsing computer, using
the following procedure:
1. Locate the “Hosts” file:
• For Windows operating systems, use Windows Explorer to locate directory
%systemroot%\System32\Drivers\Etc.
• For UNIX operating systems, go to the /etc directory.
2. Open the “Hosts” file using a text editor.
3. On the last line of the file, add the IP address and the fully-qualified domain name
for the Management Appliance.
For example, use the following format:
11.22.333.4444 swma1A2B3C.roadrunner.acme.net
4. Save the file.
5. Exit the editor.
6. Resume browsing to the Management Appliance.
Browsing Limitations
HP recommends the following:
• A minimum display resolution of 1024 x 768 pixels
• Browser displayed at full screen size
At resolutions lower than 1024 x 768 pixels, some portions of EVM menus may not be
viewable or accessible for input. At various resolutions, some portions of EVM menus
may not be viewable or accessible for input unless the browser is displayed at full
screen size.
JRE Plug-in Problems on Browsing Computers
Problems with JRE plug-ins on browsing computers can prevent use of the EVM GUI.
Typical symptoms include:
• The area for entering the user name and password is missing from the OSM
Account Login page, preventing login to OSM (and access to the EVM GUI).
• Java, Java Applet, or JavaScript errors appear, preventing display of the EVM
GUI.
6–4 Enterprise Volume Manager (Multi-OS) Network Administration Guide
Page 75

• Only the EVM session pane appears and there is no information in the EVM
pages.
• The error message “The Java2 Plug-In necessary to run this applet has not been
installed.” appears.
• The error message “The Java Runtime Environment cannot be loaded from
<path>.” appears.
The browser and JRE plug-in versions that are qualified for use with EVM are listed in
Tab le 5–12 on page 5–13. Ensure that you are using the correct versions. In addition,
you can download the correct JRE plug-in from the EVM server (see “Obtaining the
Required Web Browser Plug-In” on page 7–14).
Windows 2000/NT Browsing Computers
JRE Security Issue. See the paragraph “Windows JRE Security Issue” on page 5–13
for information on obtaining a newer version of the JRE.
Multiple JRE Installations. Multiple installations of a JRE on a browsing computer
may result in an incomplete configuration, despite uninstalling previous versions. To
correct this problem:
1. From Start > Settings, double-click the Java plug-in icon on the Control Panel.
Troubleshooting
2. On the Java plug-in Control Panel, select the Advanced tab.
3. Instead of “Use Java Plug-In Default,” select the correct plug-in and installation
directory from the menu.
Netscape regxpcom Bug. The regxpcom functionality of Netscape 6.1 and 6.2
browsers has a bug that affects the registering of the Java Plug-in. See Bugzilla bug
112201. Regxpcom may not finish until a reboot on version 6.1 browsers or it may
crash on version 6.2 browsers.
Users of Netscape 6.1 browsers who try to configure the Java Plug-in Control Panel to
use Netscape 6 will find that Netscape 6 is never registered. This may lead the users to
repeatedly select Netscape 6 in the Control Panel, which will only start multiple
regxpcom processes running endlessly in the background. The problem is fixed in
version 6.2.1 and version 6.2.3 of the Netscape browser.
Netscape and Uninstall-bug for J2SE. There is a bug in the uninstall process for the
J2SE 1.4 platform (JRE 1.4) on machines where version 1.3.1 is also installed. If
version 1.3.1 is installed, and then 1.4 is installed, and then 1.4 is uninstalled, the
uninstaller removes all Java Plug-in dll files from the netscape6/plugins directory.
This prevents the Netscape 6 browser from being able to run any applets with the 1.3.1
Java Plug-in product.
Enterprise Volume Manager (Multi-OS) Network Administration Guide 6–5
Page 76

Troubleshooting
To enable use of the 1.3.1 Java Plug-in after uninstalling 1.4, manually copy the
NPJava*.dll files from the 1.3.1 <jre directory>/bin directory to the
<Netscape6 install directory>/plugins/ directory.
Sun Solaris Browsing Computers
Patches and Kernel Update for Solaris. When installing the J2SE 1.4 platform
(JRE 1.4) for the Solaris operating environment, be sure that you have the proper
patches installed. To obtain patches, see the SunSolve support website.
Uninstall-bug on Solaris. A bug in the uninstall scripts for packages SUNWj3rt and
SUNWj3dev prevents those packages from being removed during a Disk Space
Reallocation (DSR) upgrade. With a DSR upgrade, these packages must first be
manually removed using the pkgrm command. See Solaris bug report 4635483 for
more information.
OpenWindows Bug. When running J2SE 1.4.0 on the Solaris operating environment,
behavior in conformance with the Java 2 Platform specification is not guaranteed
when using OpenWindows. In particular, some APIs related to handling focus, such as
the Component.requestFocus() method, fail when using OpenWindows. This problem
is due to a bug in OpenWindows. See the Solaris bug report 4505899 for more
information. The bug does not exist in the CDE window manager.
Replacing or Renaming a Management Appliance
Refer to the SANworks Enterprise Volume Manager Version 2.0 (Multi-OS)
Installation Guide for information and procedures to replace or rename a Management
Appliance during a network update.
Changing Storage Configurations While Jobs Are Running
If the configuration of a storage system is changed (externally to EVM) while jobs are
running, the changes may cause the jobs to fail. In some cases, the ability to undo jobs
that fail in this manner may be impaired and manual cleanup of the storage
configuration may be required.
To prevent such problems:
• Make sure that the storage configurations remain stable while running EVM jobs.
• Always perform a manual EVM storage detection after making changes to the
storage configuration (see “Detect Storage Properties” on page 5–22). The
detection makes EVM aware of the storage system changes.
6–6 Enterprise Volume Manager (Multi-OS) Network Administration Guide
Page 77

EVM GUI Takes a Long Time to Load
The EVM GUI makes extensive use of Java applets. When a new Web browser session
is established, applets may take a minute or more to download, depending on current
network conditions. After the applets are downloaded, they remain stored in the Web
browser cache until a new browser session is established.
30-Minute Spawn Process Timeout
By default, the EVM host agent is configured to time out and report an error if a
process spawned by a suspend, resume, or launch operation does not complete within
30 minutes. In some cases, the spawned process may require more than 30 minutes to
complete. For this situation, do the following:
1. Modify the PIPE_READ_TIMEOUT value in the sb.ini file, on the appropriate
EVM host agent computer, to reflect the desired value (in seconds).
2. Restart the EVM service on the EVM host agent computer to make the changes
take effect.
Accuracy of Step-Percent-Complete Bar
Troubleshooting
Sometimes the step-percent-complete bar on the Job Monitor page may drop from a
larger percentage to a smaller one. This does not necessarily indicate a problem.
For example, a clone normalization step may reach 100% and then drop down when
two jobs that normalize the same unit are both running. Because EVM displays the
average percent complete of all mirror members, the percent-complete bar in one job
may drop to a smaller percentage when the second job begins its normalization.
EVM Host Agent Connectivity Troubleshooting
The bidirectional communication between the EVM server and the individual EVM
host agent computers is accomplished through an encrypted TCP socket interface. For
this communication interface to work properly, the following must be true:
• Each EVM host agent computer must be able to resolve the network name of the
Management Appliance (EVM server).
• The Management Appliance (EVM server) must be able to resolve the network
names for each of the EVM host agent computers.
Enterprise Volume Manager (Multi-OS) Network Administration Guide 6–7
Page 78

Troubleshooting
Given the wide variety of possible network configurations, the default methods used
by EVM to establish this communications interface may not always work properly.
Assuming that the EVM host agent is installed and running properly, an EVM host
agent connectivity problem is likely if the EVM host agent computer:
• Does not show up in the EVM Resource page
• Shows up in the EVM Resource page, but does not display any volume
information
EVM Host Agent Computer Not on Resources Page
Most likely, the EVM host agent computer cannot communicate with the Management
Appliance (EVM server) using the network name entered during the EVM host agent
installation. Use the following general procedure to resolve this problem:
1. Using ping, nslookup, or another network utility, determine the name or Internet
Protocol (IP) address of the Management Appliance on which the EVM server is
installed.
2. Stop the EVM service on the EVM host agent.
3. Open the sb.ini file in the ..\Enterprise Volume Manager\bin directory.
4. Change the APPL_NAME field to the name determined in step 1.
5. Save the file.
6. Restart the EVM service.
EVM Host Agent Computer Does Not Display Volume Information
For this problem, the EVM host agent is able to communicate with the Management
Appliance (EVM server), but the EVM server is unable to communicate with the
EVM host agent. By default, the EVM server uses the NetBios name of the EVM host
agent computer. In some cases, the Management Appliance (EVM server) may be
unable to resolve the EVM host agent computer using this name.
EVM provides two alternate methods that should resolve the problem in nearly all
cases. In the sb.ini file on the EVM host agent computer, there are two optional fields:
NEWHOSTNAME and SHOWFQDN. By default, both are set to zero. The two methods
include the following:
1. Set the SHOWFQDN field to 1 to allow the EVM server to use the Fully Qualified
Domain Name of the EVM host agent computer. If the problem persists, try the
next method.
6–8 Enterprise Volume Manager (Multi-OS) Network Administration Guide
Page 79

2. Use the NEWHOSTNAME field to specify the EVM host agent computer IP address,
or any other name that might work.
Snapshot Requirements and Limitations
The following are snapshot requirements and limitations for HSG- and HSV-based
storage systems.
HSG-based Storage System Snapshot Requirements
• ACS version 8.6S, 8.6P, 8.7S, or 8.7P
• Dual HSG80 controllers
• 512 MB of cache per controller
• Mirrored cache
HSG-based Storage System Snapshot Limitations
• There can be no more than four snapshots per storage system.
• You cannot make a snapshot of a snapshot.
Troubleshooting
• You cannot make a snapshot of a unit that already has a snapshot.
• You cannot make a snapshot of a controller partition.
• You cannot make a snapshot of an initiator-side remote copy set.
• You cannot make a snapshot of a concatset.
• A snapshot and its source unit must both be in the same unit number range from 0
to 99 or from 100 to 199.
• Snapshots are not fault tolerant and will not survive a path or controller failover.
HSV-based Storage System Snapshot Requirements
• VCS version 2.0
• A valid snapshot license
HSV-based Storage System Snapshot Limitations
• There can be no more than seven simultaneous snapshots of a given virtual disk.
• You cannot mix fully allocated and demand allocated snapshot types on the same
virtual disk.
Enterprise Volume Manager (Multi-OS) Network Administration Guide 6–9
Page 80

Troubleshooting
• You cannot create a snapclone of a virtual disk that already has a snapshot.
• You cannot make a snapshot or a snapclone of a normalizing snapshot.
• You cannot make a snapshot or a snapclone of a virtual disk that has a normalizing
snapclone.
• You cannot make a snapshot or a snapclone of a snapshot.
• You cannot make a snapshot or a snapclone of a virtual disk that has a snapshot
that is deleting.
• Once a snapclone has fully normalized, deleting it has no impact on the source. If
the snapclone is deleted before it is fully normalized, the deletion must complete
before another snapclone or snapshot can be created of the source.
6–10 Enterprise Volume Manager (Multi-OS) Network Administration Guide
Page 81

Starting EVM and Controlling Access
This chapter provides information on starting and stopping the EVM server and EVM
host agents, browsing to the EVM network, and controlling access to the EVM
network. It discusses the following major topics:
• Starting the EVM Service or Daemon on page 7–1
• Establishing Password Control on page 7–4
• Browsing to EVM on page 7–7
Starting the EVM Service or Daemon
Restarting the host computer automatically starts the EVM service for Windows
operating systems or the EVM daemon for UNIX operating systems. Once started, the
service or daemon for an EVM host agent can be manually stopped and restarted on a
host computer, but the service for the EVM server cannot be stopped.
For UNIX computers, the EVM program and associated support scripts are installed
with root execute permission only. To run EVM, root permissions are required.
7
Automatic Starting of the EVM Service or Daemon
During installation, the EVM server is installed as a Windows service. EVM host
agents are installed as either a Windows service for Windows operating systems, or as
a daemon for UNIX operating systems. The EVM service or daemon can be started
during the installation, if desired. To manually activate this service or daemon
following the EVM host agent installation, refer to the next section.
Enterprise Volume Manager (Multi-OS) Network Administration Guide 7–1
Page 82

Starting EVM and Controlling Access
Manually Stopping and Restarting the EVM Service or Daemon
The procedure to manually stop and restart the EVM service or daemon varies,
depending on the operating system for the host computer. The EVM service cannot be
stopped at the EVM server level, but the service or daemon running on each individual
EVM host agent computer can be manually stopped and restarted. Use the appropriate
procedure, Windows- or UNIX-based, as required.
Windows Procedure
To manually stop or restart the EVM service on a Windows-based host computer:
1. Open the Windows Services window:
• For Windows 2000, choose Start > Settings > Control Panel >
Administrative Tools > Services.
• For Windows NT, choose Start > Settings > Control Panel > Services.
2. Choose Switchboard.
3. To stop the service, click Stop; to restart the service, click Start.
UNIX Procedure
After configuring the environment, perform the following steps to manually stop or
start the EVM daemon on a UNIX-based host computer:
1. Open a terminal window and log on as a superuser.
2. Change the working directory to:
• /usr/opt/CPQevm/bin for HP Tru64 UNIX
• /opt/CPQevm/bin for HP-UX
• /usr/opt/CPQevm/bin for IBM AIX
• /opt/CPQevm/bin for Sun Solaris
7–2 Enterprise Volume Manager (Multi-OS) Network Administration Guide
Page 83

3. Stop or start the EVM daemon.
• For HP Tru64 UNIX:
— Enter /sbin/rc2.d/K89entrprsvolmgr stop to halt the EVM
daemon.
— Enter /sbin/rc3.d/S89entrprsvolmgr start to start the
EVM daemon.
• For HP-UX:
— Enter /sbin/rc2.d/K890entrprsvolmgr stop to halt the
EVM daemon.
— Enter /sbin/rc2.d/S890entrprsvolmgr start to start the
EVM daemon.
• For IBM AIX:
— Enter /usr/opt/CPQevm/bin/evmshutdwn to stop the EVM
daemon.
— Enter /usr/opt/CPQevm/bin/entrprsvolmgr to start the EVM
daemon.
Starting EVM and Controlling Access
• For Sun Solaris:
— Enter /etc/rc2.d/K89entrprsvolmgr stop to halt the EVM
daemon.
— Enter /etc/rc3.d/S89entrprsvolmgr start to start the EVM
daemon.
Keeping the EVM Server Running
The EVM server must be kept running to create, run, monitor, or manage EVM jobs.
Do not stop the EVM server unless the EVM network is intentionally being shut
down.
CAUTION: Stopping the EVM server also shuts down the associated EVM network.
Any EVM job that is running on the EVM network will stop, and no EVM job can be run
until the EVM server is started again.
Enterprise Volume Manager (Multi-OS) Network Administration Guide 7–3
Page 84

Starting EVM and Controlling Access
Keeping EVM Host Agents Running
The EVM host agent must be running to allow a computer to participate in EVM jobs.
Do not stop an EVM host agent unless the computer will not participate in EVM jobs.
CAUTION: Stopping the EVM host agent service or daemon on a host computer
prevents that computer from participating in EVM jobs.
Establishing Password Control
Unless password control was previously established on the Management Appliance,
the OSM Login Account on the OSM Account Login Page is set to anonymous. This
setting means that no previous logon account is active within this browser session.
Default account names that provide specific permissions include administrator,
operator, and user. Administrator provides the highest level of access, operator is next,
and then user.
HP recommends changing the password for all default account names immediately
upon browsing to the Management Appliance for the first time.
Refer to the Management Appliance documentation for any updates to the logon
procedure within this section.
The basic steps for establishing password control are:
1. Logging in as the administrator.
2. Establishing passwords for the default accounts.
Logging In as Administrator
To log in as the administrator:
1. From the OSM Account Login Page, type administrator in the Name box
(see Figure 7–1).
7–4 Enterprise Volume Manager (Multi-OS) Network Administration Guide
Page 85

Figure 7–1: Account Login form
2. In the Password box, type administrator or the current administrator
password.
3. Click OK to log in; click Erase to clear all entries and return to step 1.
When login is complete, the OSM Home Page displays.
Establishing Account Passwords
Starting EVM and Controlling Access
Initially, each default account name is the same as its the default password. To control
access, these default passwords must be changed. While logged on as the
administrator, set new passwords for the default accounts (administrator, operator, and
user). The administrator can change these passwords at any time.
IMPORTANT: For security, HP recommends changing the password for all default accounts
immediately upon browsing to the Management Appliance for the first time.
To change an account name password, complete the following procedure:
1. Log in as the administrator (see the “Logging In as Administrator” section on
page 7–4).
The OSM Home Page displays.
2. Click the browser Back drop-down and choose Compaq WEB Login.
The OSM Account Login Page displays.
3. Click Refresh/Reload.
The “anonymous” login account name is replaced with “administrator.”
Enterprise Volume Manager (Multi-OS) Network Administration Guide 7–5
Page 86

Starting EVM and Controlling Access
4. Locate the password statement (see Figure 7–2).
Figure 7–2: Password statement
5. Click the changed link.
The Change Account form displays (see Figure 7–3).
Figure 7–3: Change form for an account password
6. Under Account Administrator
a. For Name, type administrator.
b. For Password, type the current administrator password.
7. Under Change Account
a. For Name, type a default account name (administrator, operator, or user).
b. For New Password, type a new password for the default account name.
c. For Confirm Password, type the new password again.
7–6 Enterprise Volume Manager (Multi-OS) Network Administration Guide
Page 87

8. Click OK to change the account password; click Erase to clear all entries and
return to step 6 to continue.
Clicking OK changes the old password for the default account name to the new
password.
9. Repeat this procedure, as required, for managing passwords on the other default
accounts.
10. Return to the OSM Account Login Page and log in again to access the OSM
Home Page.
Browsing to EVM
The EVM GUI can be accessed from computers that are not part of the EVM network.
Any computer connected to the Internet can browse to an EVM network, if the user
has the proper permissions (see “Establishing Password Control” on page 7–4).
When browsing to an EVM network, HP recommends using the following steps:
1. Start a browser (see “Starting a Web Browser” on page 7–7).
2. Verify browser settings, if applicable (see “Setting Up the Netscape
Communicator Browser Font Size for UNIX” on page 7–8).
Starting EVM and Controlling Access
3. Browse to the EVM network (see “Browsing to the EVM Network” on page 7–9).
4. Add the EVM network website as a favorite or bookmark for future reference.
Starting a Web Browser
From the desktop or Start menu, start a browser. Both Microsoft Internet Explorer and
Netscape Communicator browsers are supported.
See Table 5–12 on page 5–13 for supported browser versions.
Setting the Browser to Automatically Check for Updated Pages
After opening the browser, set the browser to automatically check for updated pages.
NOTE: Depending upon the browser version in use, the named text in the following procedures
may differ.
For Internet Explorer browsers, use the following procedure to establish this setting:
1. Choose Tools > Internet Options.
Enterprise Volume Manager (Multi-OS) Network Administration Guide 7–7
Page 88

Starting EVM and Controlling Access
2. From the General tab, under Temporary Internet files, click Settings.
3. Under Check for newer versions of stored pages, check Every visit to the page.
4. Click OK.
5. Click OK.
The setting is complete.
For Netscape browsers, use the following procedure to establish this setting:
1. Choose Edit > Preferences.
2. In the navigation pane, choose Advanced > Cache.
3. Under Document in cache is compared to document in network, check Every
time.
4. Click OK.
The setting is complete.
Setting Up the Netscape Communicator Browser Font Size for UNIX
For Netscape browsers, HP also recommends a font-size setting. The default font
settings for the Netscape browser running on a UNIX-based operating system can
cause some graphical elements to be displayed incorrectly.
For better viewing, choose a 12-point or larger font size for the fixed-width (or
monospace) and variable-width (or proportional) font selections. Direct the browser to
use application- or document specified fonts (including Dynamic Fonts); depending
upon version, you may need to direct the browser to “allow documents to use other
fonts.”
NOTE: Depending upon the browser version in use, the named text may differ.
To access the font settings, open the browser and choose Edit > Preferences >
Appearance > Fonts.
Browsing Limitations
HP recommends the following:
• A minimum display resolution of 1024 x 768 pixels
• Browser displayed at full screen size
7–8 Enterprise Volume Manager (Multi-OS) Network Administration Guide
Page 89

At resolutions lower than 1024 x 768 pixels, some portions of EVM menus may not be
viewable or accessible for input. At various resolutions, some portions of EVM menus
may not be viewable or accessible for input unless the browser is displayed at full
screen size.
Browsing to the EVM Network
To browse to an EVM network, the Management Appliance that supports the network
must be operating. Complete the following procedure from an open browser to browse
to an EVM network:
1. In the Address, Go to, or Location box, enter the Management Appliance name,
followed by port number :2301.
For example, if the Management Appliance is named “swma1A2B3C,” the proper
format to enter is http://swma1A2B3C:2301 (see Figure 7–4)
The Device Home Page for the Management Appliance displays (see Figure 7–5).
NOTE: If the Device Home Page does not display, see “EVM Logs” in Chapter 6.
Starting EVM and Controlling Access
Enterprise Volume Manager (Multi-OS) Network Administration Guide 7–9
Page 90

Starting EVM and Controlling Access
Figure 7–4: Management Appliance name and port number format
7–10 Enterprise Volume Manager (Multi-OS) Network Administration Guide
Page 91

Starting EVM and Controlling Access
Figure 7–5: Device Home Page (splash page) for the Management Appliance
2. Use the browser Favorites or Bookmarks feature to record the website URL.
NOTE: For convenience, use the Favorites or Bookmarks list the next time to browse to
this EVM network.
Proceed with “Browsing to the EVM Home Page” on page 7–12.
Enterprise Volume Manager (Multi-OS) Network Administration Guide 7–11
Page 92

Starting EVM and Controlling Access
Browsing to the EVM Home Page
Complete the following procedure to access the EVM Home Page.
1. Click anywhere on the Device Home Page.
NOTE: Typically, the OSM Account Login Page displays at this time. However, if a login has
occurred recently, the OSM Account Login Page may be bypassed. If this occurs and the
OSM Home Page displays, proceed to step 3.
2. Log in as required (see “Establishing Password Control”on page 7–4).
Proceed to step 3 after the OSM Home Page displays.
3. Navigate to Enterprise Volume Manager, as shown in Figure 7–6, by choosing
Applications > Volume Management > Enterprise Volume Manager.
The EVM Launch Page displays (see Figure 7–7).
Figure 7–6: Navigating to the OSM Enterprise Volume Manager option
7–12 Enterprise Volume Manager (Multi-OS) Network Administration Guide
Page 93

Starting EVM and Controlling Access
Figure 7–7: EVM Launch Page sample
4. Click Launch to activate the EVM application.
A new browser window opens with the EVM Home Page displayed, with the
EVM Resources tab open.
Verifying EVM Network Version on a Management Appliance
To verify the version of an EVM network:
1. Browse to the EVM Home Page, as described in the previous section.
Enterprise Volume Manager (Multi-OS) Network Administration Guide 7–13
Page 94

Starting EVM and Controlling Access
2. Click About.
A table showing the EVM version and build number displays in a separate
browser window.
Obtaining the Required Web Browser Plug-In
A JRE plug-in (a Java 2 plug-in) is required by the Web browser for viewing
EVM V2.0D network displays. If the system used to browse to the EVM network does
not have the appropriate JRE plug-in installed, a notification message, containing a
plug-in link, is displayed when EVM is launched (similar to that shown in
Figure 7–8).
Figure 7–8: Browsing display requesting required JRE (Java 2) plug-in
To install the required JRE plug-in:
1. Click the Here link to display another Web page (similar to that shown in
Figure 7–9) that provides instructions for installing the required plug-in.
7–14 Enterprise Volume Manager (Multi-OS) Network Administration Guide
Page 95

Starting EVM and Controlling Access
Figure 7–9: Installing the JRE (Java 2) plug-in display
2. From the drop-down menu, choose the appropriate host operating system type.
3. Click Instructions to view host-specific installation instructions.
4. If desired, print the installation instructions for use in installing the JRE plug-in.
5. Click the Back button the browser and then click JRE Download to begin the
download.
6. Save the JRE to a local drive.
7. Uninstall any previous JRE installation.
8. Install the JRE plug-in as required, per the installation instructions.
NOTE: After installing the required plug-in, HP recommends closing all open instances of
the browser to ensure that the plug-in loaded properly. Then, restart the browser to
continue.
Enterprise Volume Manager (Multi-OS) Network Administration Guide 7–15
Page 96

Page 97

8
EVM Support for Volume Groups and
HP Tru64 UNIX AdvFS Domains
A volume group (IBM AIX and HP-UX) or a domain (HP Tru64 UNIX) is a set of one
or more physical volumes from which space can be allocated to one or more logical
volumes or filesets. Volume groups and domains are the minimum containers that
EVM uses for replication.
EVM V2.0D supports the following uses of volume groups and domains:
• Use of Logical Volume Manager (LVM): IBM AIX and HP-UX
• Ability to replicate and mount logical volumes (IBM AIX and HP-UX) and
filesets (HP Tru64 UNIX)
This chapter discusses the following major topics:
• EVM Minimum Requirements for Volume Groups on page 8–1
• Volume Group and Domain Configurations on page 8–2
• Volume Groups and Windows 2000 Dynamic Disks on page 8–8
• EVM Limitations for HP Tru64 UNIX Domains page 8–8
• EVM Limitations for HP-UX Logical Volume Manager on page 8–8
• EVM Limitations for IBM AIX Logical Volume Manager on page 8–9
EVM Minimum Requirements for Volume Groups
The following are minimum requirements for the use of volume groups and domains
in an EVM network:
• All storage must be part of a StorageWorks HSG-based storage system or a
StorageWorks HSV-based storage system.
• HSG and HSV devices should not be mixed in a volume group, domain, or single
EVM job.
Enterprise Volume Manager (Multi-OS) Network Administration Guide 8–1
Page 98

EVM Support for Volume Groups and HP Tru64 UNIX AdvFS Domains
• All storage must be visible to the Management Appliance.
IMPORTANT: HP strongly recommends installing an identical ACS or VCS version level on
all HSG-based or HSV-based storage systems, respectively, in an EVM network that uses
volume grouping.
• A VCS snapshot license to use EVM with an HSV-based system.
• EVM must find free disks on the same storage system as the source disks (a
one-to-one match) for clone and snap operations of UNIX volume groups and
domains that span multiple storage systems.
• EVM must find adequate space in the HSV disk group when creating a BCV on an
HSV-based system. The type of BCV created (fully allocated snapshot, demand
allocated snapshot, or snapclone) determines the amount of free space needed.
Refer to the online Help/User Guide for detailed explanations of the HSV
replication operations.
NOTE: A demand allocated snapshot is also called a Vsnap.
Volume Group and Domain Configurations
The HP interpretation of volume groups and domains includes a configuration that can
consist of multiple HSG-based or HSV-based storage systems and multiple units. Each
volume group or domain is referenced by a single name and consists of physical
volumes. A logical volume or fileset is a subset of the volume group or domain and is
mountable.
NOTE: The fewer the physical volumes (units) that comprise a volume group or domain, the
faster and more efficient the EVM job becomes.
IMPORTANT: EVM V2.0D does not support volume grouping in Windows 2000 or Windows NT
environments.
Supported and Unsupported Volume Groups and Domains
EVM V2.0D supports any volume group or domain that has all physical volumes on
an HSG-based or HSV-based storage system that EVM can access (visible through the
Management Appliance).
EVM V2.0D does not support the following:
8–2 Enterprise Volume Manager (Multi-OS) Network Administration Guide
Page 99

EVM Support for Volume Groups and HP Tru64 UNIX AdvFS Domains
• Any volume group or domain comprised of physical volumes that are:
— Not exclusively using HSG-based or HSV-based storage systems
— On HSG-based or HSV-based storage systems that the EVM server cannot
access through the Management Appliance
— On another vendor’s storage system
• On IBM AIX, duplicate volume group names may cause problems. A BCV of a
source volume group cannot be mounted back to the same host; a second copy of
the same source cannot be mounted to the same destination.
NOTE: Duplicates are allowed on HP Tru64 UNIX.
Domain Best Practices for HP Tru64 UNIX
For HP Tru64 UNIX best practices, refer to the Update Release Notes - Enterprise
Volume Manager (Multi-OS) Host Agent for HP Tru64 UNIX.
Volume Group Best Practices for IBM AIX
HP strongly recommends creating a basic volume group configuration. A basic
configuration consists of only one logical volume that is connected to a single volume
group made up of one physical volume.
Some important considerations for using volume groups in EVM:
• For multiple hosts in the EVM network, use the basic configuration for each host.
• Each volume group name on source hosts must be unique.
NOTE: HP recommends using a volume group name that identifies the host on which the
group resides, for example Host1VG1.
• Before running an EVM job, make sure that sufficient resources exist on each
HSG-based or HSV-based storage system to simultaneously replicate all of the
physical volumes that comprise a volume group.
• Unlike Windows environments, IBM AIX cannot replicate a unit and then mount
that unit on the same host.
Volume Group Best Practices for HP-UX
HP strongly recommends creating a basic volume group configuration. A basic
configuration consists of only one logical volume that is connected to a single volume
group made up of one physical volume.
Enterprise Volume Manager (Multi-OS) Network Administration Guide 8–3
Page 100

EVM Support for Volume Groups and HP Tru64 UNIX AdvFS Domains
Some important considerations for using volume groups in EVM:
• For multiple hosts in the EVM network, use the basic configuration for each host.
• Each volume group name on source hosts must be unique.
NOTE: HP recommends using a volume group name that identifies the host on which the
group resides; for example Host1VG1.
• Before running an EVM job, make sure that sufficient resources exist on each
HSG-based or HSV-based storage system to simultaneously replicate all of the
physical volumes that comprise a volume group.
Current Mapfile Requirement for HP-UX Volume Groups
EVM uses a mapfile to import a replicated HP-UX volume group. The mapfile defines
the logical volume name-to-number association for all of the logical volumes in a
volume group. Without this information, the operating system assigns default names
to all of the logical volumes in the replicated volume group and the original names are
lost. Without the original name it is difficult to associate a source volume with its
replicated copy.
EVM includes a script named Generate_Mapfiles.ksh, which generates a mapfile for
each volume group. This script closes all the logical volumes (unmounts the
filesystems) and deactivates the volume group before creating the mapfile. After
creating the mapfile, EVM reactivates the volume group and reopens the logical
volumes. This process completes within two minutes for most volume groups. The
volume group and all logical volumes in it are unavailable during this period.
Schedule this process on an as needed basis to minimize its effect on normal
operations.
You must create a mapfile for each volume group that will be replicated using EVM. If
the logical volume configuration for a volume group changes through the addition or
deletion of a logical volume, you must generate an updated mapfile using the same
process. Volume groups with invalid mapfiles are not displayed on the EVM Resource
page and cannot be used in EVM jobs.
EVM does not automatically display HP-UX volume groups on the EVM Resources
page. To display an HP-UX volume group on the Resources page, you must create the
mapfile for the volume group after installing the EVM V2.0D host agent for HP-UX,
or you must update the mapfile after changing the volume group.
Creating and Updating a Mapfile for HP-UX Volume Groups
This section shows you how to create and update a mapfile after you have installed the
EVM V2.0D host agent for HP-UX, or after you have changed the volume group.
8–4 Enterprise Volume Manager (Multi-OS) Network Administration Guide
 Loading...